nodeum - free appliance solution discover an … tape libraries1 oracle sl150, sl3000, sl8500 dell...
TRANSCRIPT
Page 1 of 24 © Copyright MT-C 2017 – This document is the exclusive property of by MT-C and can neither be reproduced, nor communicated to a third party without preliminary written
authorization
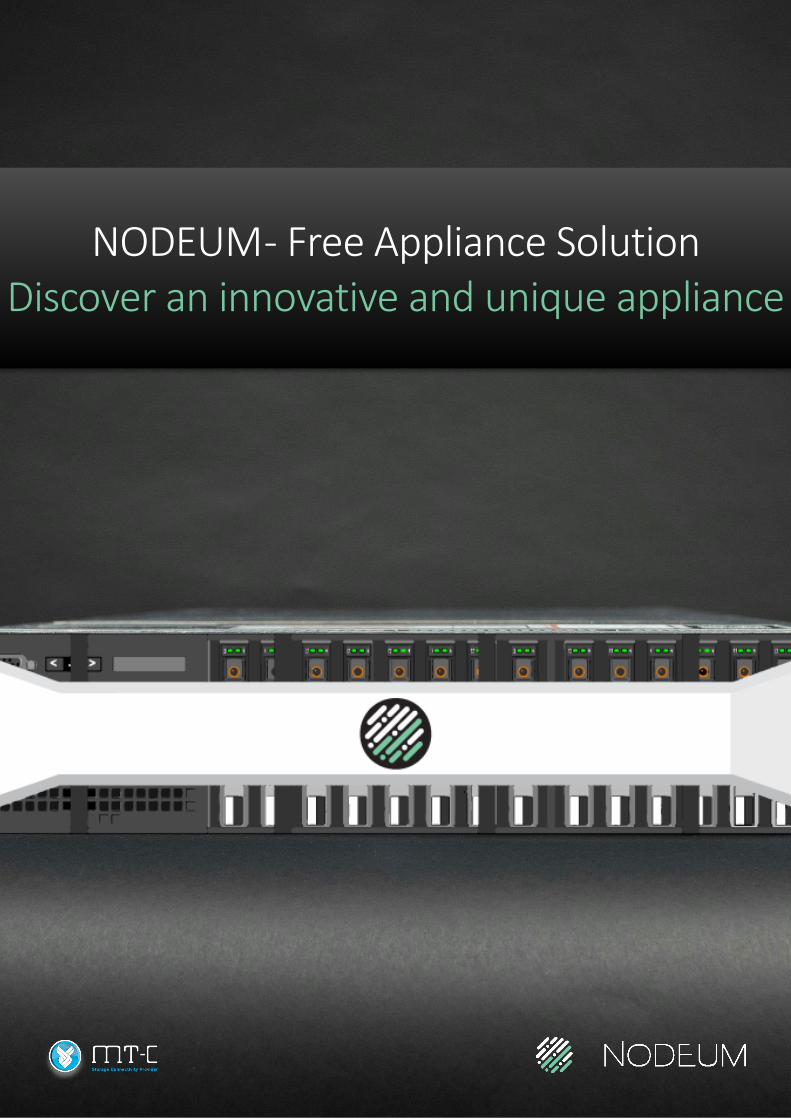
NODEUM - Free Appliance Solution Discover an innovative and unique appliance
Page 2 of 24 © Copyright MT-C 2017 – This document is the exclusive property of by MT-C and can neither be reproduced, nor communicated to a third party without preliminary written
authorization
Welcome to our Free NODEUM Appliance. Through this machine you will have the chance to
discover not only our exceptional and unique appliance, but also its new functionalities. In
fact, we have been studying the needs of our clients over the past 5 years in order to deliver
a solution that meets them perfectly. However, our research does not stop here. Indeed, MT-
C is always thinking out the box. So, we are looking forward in order to predict your future
needs by delivering you innovative functionalities.
Predict your future, your storage needs!
To be able to anticipate the growth of your data content, MT-C has designed and developed
NODEUM. It is an innovative and unique hybrid storage and active archive solution that allows,
through a native virtualization of the file system, to combine high capacity flash, disks or tape
units. This solution is the most adapted for industries such as: genomics & healthcare, spatial,
media & broadcasting, video surveillance and many more.
Page 3 of 24 © Copyright MT-C 2017 – This document is the exclusive property of by MT-C and can neither be reproduced, nor communicated to a third party without preliminary written
authorization
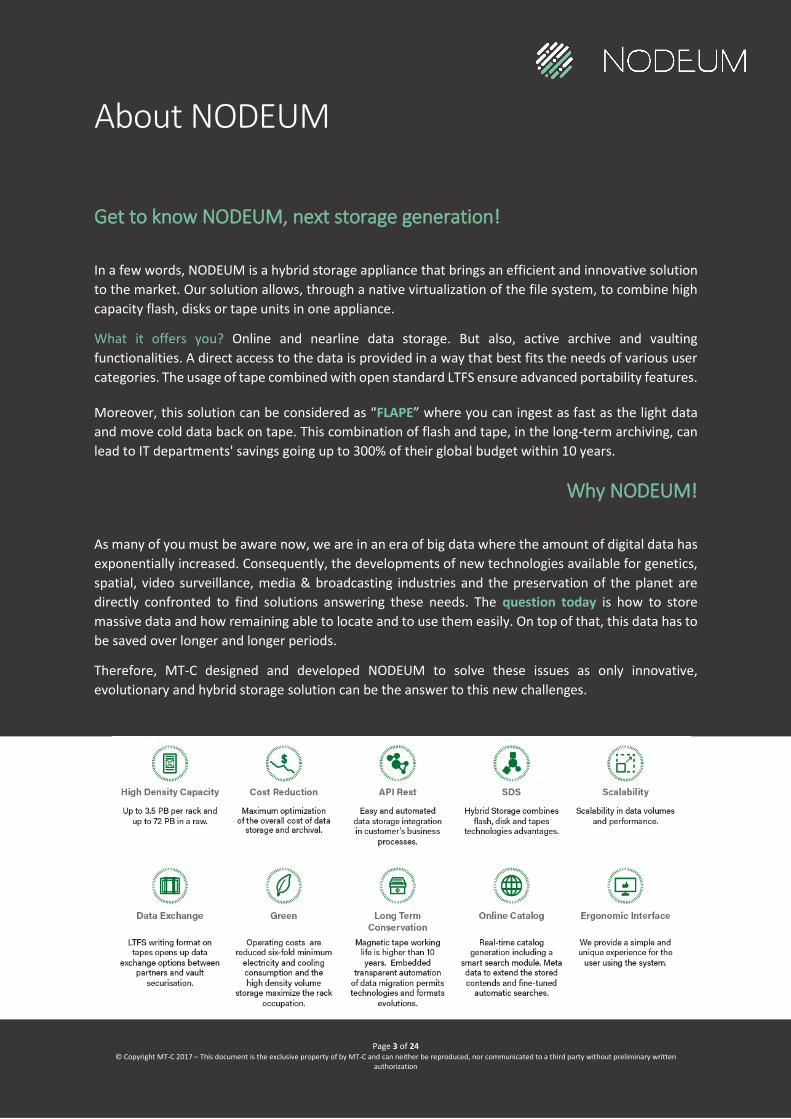
About NODEUM
Get to know NODEUM, next storage generation!
In a few words, NODEUM is a hybrid storage appliance that brings an efficient and innovative solution
to the market. Our solution allows, through a native virtualization of the file system, to combine high
capacity flash, disks or tape units in one appliance.
What it offers you? Online and nearline data storage. But also, active archive and vaulting
functionalities. A direct access to the data is provided in a way that best fits the needs of various user
categories. The usage of tape combined with open standard LTFS ensure advanced portability features.
Moreover, this solution can be considered as “FLAPE” where you can ingest as fast as the light data
and move cold data back on tape. This combination of flash and tape, in the long-term archiving, can
lead to IT departments' savings going up to 300% of their global budget within 10 years.
Why NODEUM!
As many of you must be aware now, we are in an era of big data where the amount of digital data has
exponentially increased. Consequently, the developments of new technologies available for genetics,
spatial, video surveillance, media & broadcasting industries and the preservation of the planet are
directly confronted to find solutions answering these needs. The question today is how to store
massive data and how remaining able to locate and to use them easily. On top of that, this data has to
be saved over longer and longer periods.
Therefore, MT-C designed and developed NODEUM to solve these issues as only innovative,
evolutionary and hybrid storage solution can be the answer to this new challenges.
Page 4 of 24 © Copyright MT-C 2017 – This document is the exclusive property of by MT-C and can neither be reproduced, nor communicated to a third party without preliminary written
authorization
Key Functionalities of NODEUM
STORAGE & ARCHIVING VIRTUALIZATION
Unique software defined solution that combines the benefits of the most advanced technologies like
flash, disks and tapes. What you really get! Universal access to your data. 80 to 90% of your data is
rarely consulted whereas 10 to 20% is regularly used. NODEUM enables the stocking of the relevant
data on the right support while being able to keep a universal access to all the information.
REST API AND FRAMEWORKS INTEGRATION
NODEUM provides an easy integration and automation of data storage management within customer-
specific processes. What you really get! Immediate update with the sequencer. NODEUM allows an
automatic update between the core application and the stocked data.
LEVERAGE THE LTFS OPEN STANDARD
NODEUM uses a universal and standardized open format LTFS. It can be supported by the most
significant libraries. What you really get! Storing your data in a Linear Tape File System (LTFS) open
standard. This is the best strategy for supporting data transportability and long-term data accessibility.
USER INTERFACE WITH BUILT-IN SEARCHABLE CATALOG
The management of the solution is done via an intuitive interface. The web interface has a built-in
catalog that remembers every file it has ever seen. From this interface, the user can access easily to
any data residing on cache or the archiving tapes. What you really get! The easiest way to store data
through a simplification and enrichment of the stocking process and the data research.
Page 5 of 24 © Copyright MT-C 2017 – This document is the exclusive property of by MT-C and can neither be reproduced, nor communicated to a third party without preliminary written
authorization
MANAGEMENT OF THE ARCHIVE PROCESS BY THE USERS
With the built-in catalogue, the users have the possibility to automate the flow of data from the cache
to the archiving tapes and vice versa. What you really get! Manual management. It will help you to
have an open access to the archive in simplicity.
MANAGEMENT OF THE PRIORITIES IN THE DATA FLOW
With the priority level defined for each movement of data to and from tapes, users are able to prioritize
and restore, for examples, or any other actions. What you really get! Simplicity in the priority switch.
It gives you the ability to change the dynamic of the priority with regard to the accessibility of the data.
EXPORT AND VAULTING OF DATA
By moving specifics tapes to external and secure vaults. Import tapes from external stakeholders and
integrate data in the catalog. Export tapes to external stakeholders. What you really get! Security, zero
risks. This allows a global security in protected areas with critical data.
REDUCED STORAGE COSTS
The solution has been designed to serve as a “green” storage and archive. It’s not only about reducing
electric bills but also about decreasing cooling requirements. In addition to being an “environmentally
friendly” solution, it provides extremely dense storage capability, reducing the carbon footprint and
minimizing the use of costly data center space. What you really get! OPEX and CAPEX costs reduction.
The energy costs is significantly lower than for a non-hybrid solution (e.g. full disk). Besides, this
technology is less expensive in comparison to the TB price of others solutions, while maintaining an
easy-to-use access for anybody.
Page 6 of 24 © Copyright MT-C 2017 – This document is the exclusive property of by MT-C and can neither be reproduced, nor communicated to a third party without preliminary written
authorization
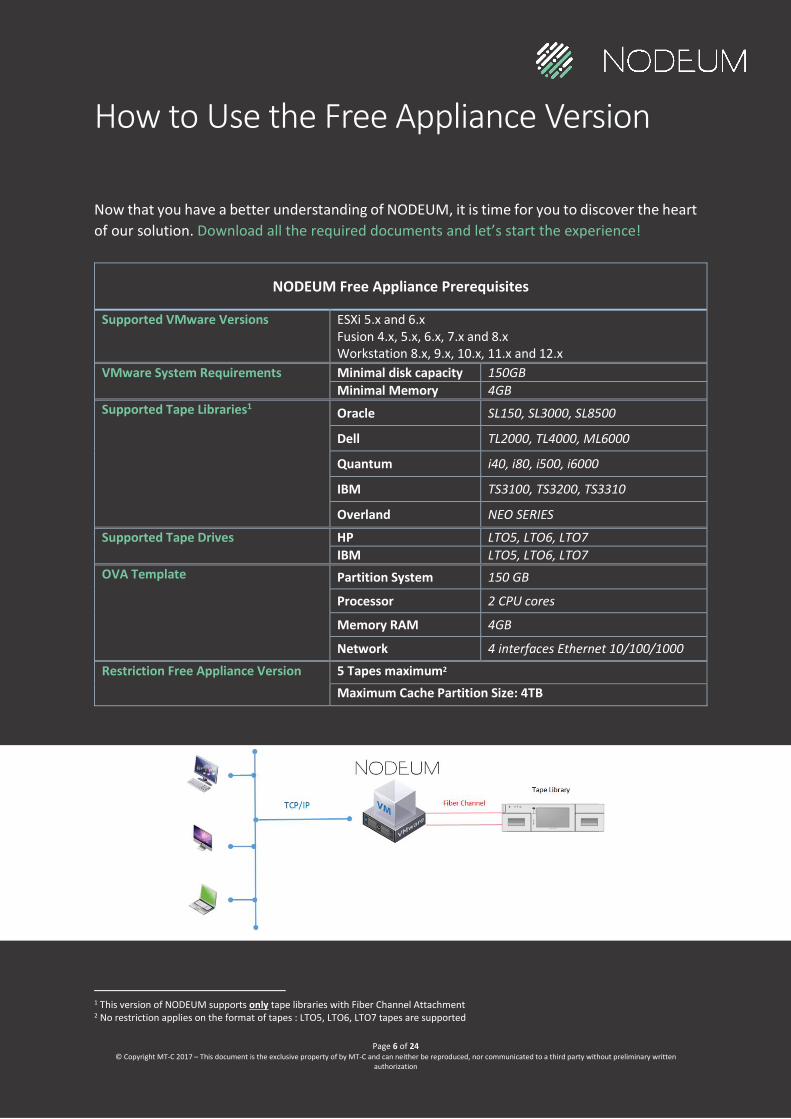
How to Use the Free Appliance Version
Now that you have a better understanding of NODEUM, it is time for you to discover the heart
of our solution. Download all the required documents and let’s start the experience!
NODEUM Free Appliance Prerequisites
Supported VMware Versions ESXi 5.x and 6.x Fusion 4.x, 5.x, 6.x, 7.x and 8.x Workstation 8.x, 9.x, 10.x, 11.x and 12.x
VMware System Requirements Minimal disk capacity 150GB
Minimal Memory 4GB
Supported Tape Libraries1 Oracle SL150, SL3000, SL8500
Dell TL2000, TL4000, ML6000
Quantum i40, i80, i500, i6000
IBM TS3100, TS3200, TS3310
Overland NEO SERIES
Supported Tape Drives HP LTO5, LTO6, LTO7
IBM LTO5, LTO6, LTO7
OVA Template Partition System 150 GB
Processor 2 CPU cores
Memory RAM 4GB
Network 4 interfaces Ethernet 10/100/1000
Restriction Free Appliance Version 5 Tapes maximum2
Maximum Cache Partition Size: 4TB
1 This version of NODEUM supports only tape libraries with Fiber Channel Attachment 2 No restriction applies on the format of tapes : LTO5, LTO6, LTO7 tapes are supported
Page 7 of 24 © Copyright MT-C 2017 – This document is the exclusive property of by MT-C and can neither be reproduced, nor communicated to a third party without preliminary written
authorization
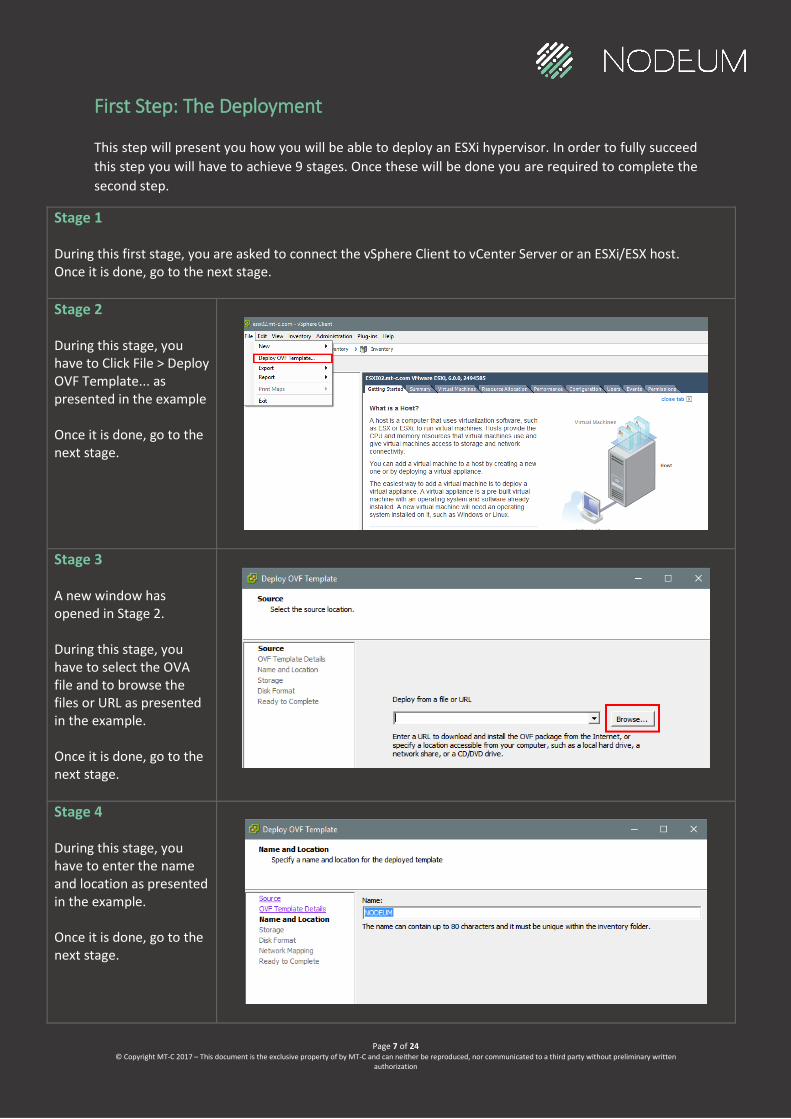
First Step: The Deployment
This step will present you how you will be able to deploy an ESXi hypervisor. In order to fully succeed
this step you will have to achieve 9 stages. Once these will be done you are required to complete the
second step.
Stage 1 During this first stage, you are asked to connect the vSphere Client to vCenter Server or an ESXi/ESX host. Once it is done, go to the next stage.
Stage 2 During this stage, you have to Click File > Deploy OVF Template... as presented in the example Once it is done, go to the next stage.
Stage 3 A new window has opened in Stage 2. During this stage, you have to select the OVA file and to browse the files or URL as presented in the example. Once it is done, go to the next stage.
Stage 4 During this stage, you have to enter the name and location as presented in the example. Once it is done, go to the next stage.
Page 8 of 24 © Copyright MT-C 2017 – This document is the exclusive property of by MT-C and can neither be reproduced, nor communicated to a third party without preliminary written
authorization
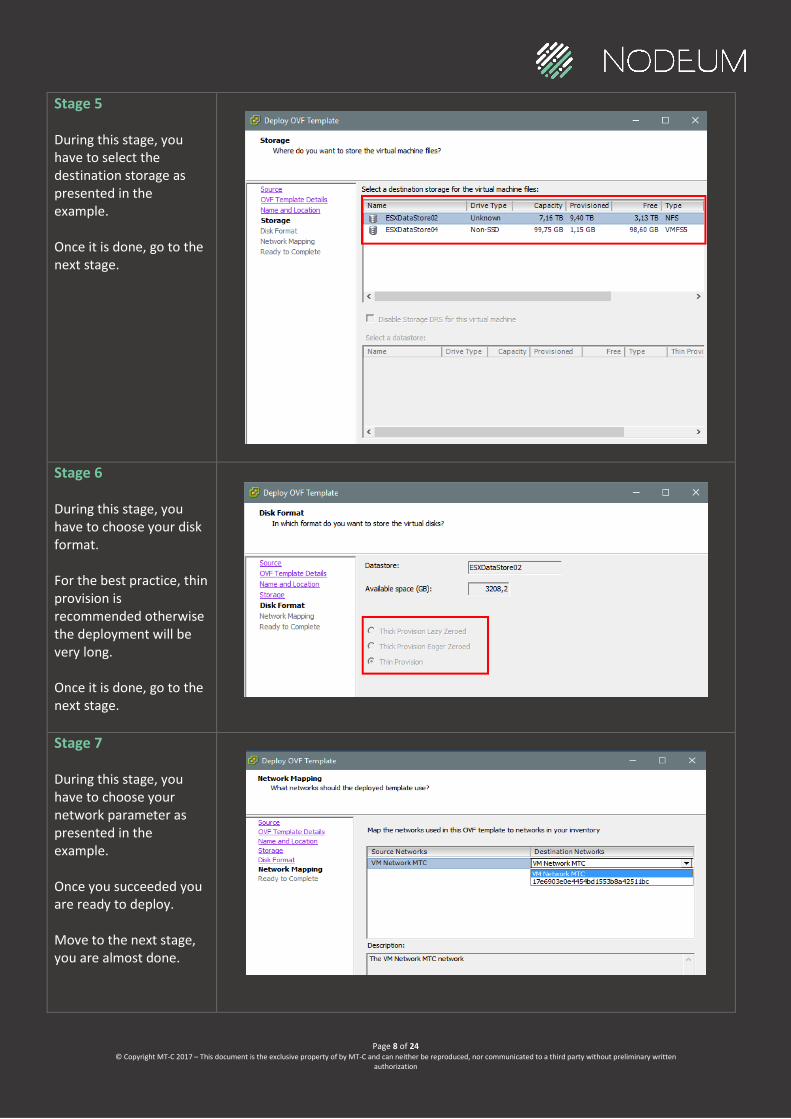
Stage 5 During this stage, you have to select the destination storage as presented in the example. Once it is done, go to the next stage.
Stage 6 During this stage, you have to choose your disk format. For the best practice, thin provision is recommended otherwise the deployment will be very long. Once it is done, go to the next stage.
Stage 7 During this stage, you have to choose your network parameter as presented in the example. Once you succeeded you are ready to deploy. Move to the next stage, you are almost done.

Page 9 of 24 © Copyright MT-C 2017 – This document is the exclusive property of by MT-C and can neither be reproduced, nor communicated to a third party without preliminary written
authorization
Stage 8 Confirm the options you want to use. Well done, the first step is now completed. Go discover the second step.
Page 10 of 24 © Copyright MT-C 2017 – This document is the exclusive property of by MT-C and can neither be reproduced, nor communicated to a third party without preliminary written
authorization
Second Step: The Installation of Fiber Channel Tape Library and Cache
Disk
To be honest, this step will take you a bit more time than the former one. But what mean 19 quick
stages when you can have access to a unique and innovative solution and remember, for FREE, right?
With this regard, you will now discover how to configure you hardware library. NODEUM requires a
Cache Disk, either local disk or remote disks. In the following stages you will have an example to
configure a local Cache Disk. In order to fully succeed this step, you are required to complete all the
stages.
Stage 1 During this first stage, you need to consult your backup hardware vendor to ensure that your tape device is supported to work with VMware ESXi/ESX 5.x and later upgrades. Once it is done, go to the next stage.
Stage 2 During this stage, you have to connect the vSphere Client to vCenter Server or an ESXi/ESX host. Once it is done, go to the next stage.
Stage 3 During this stage, you have to click the ESXi/ESX host to which the hardware is connected. Have a look to the example for further illustrations. Once it is done, go to the next stage.
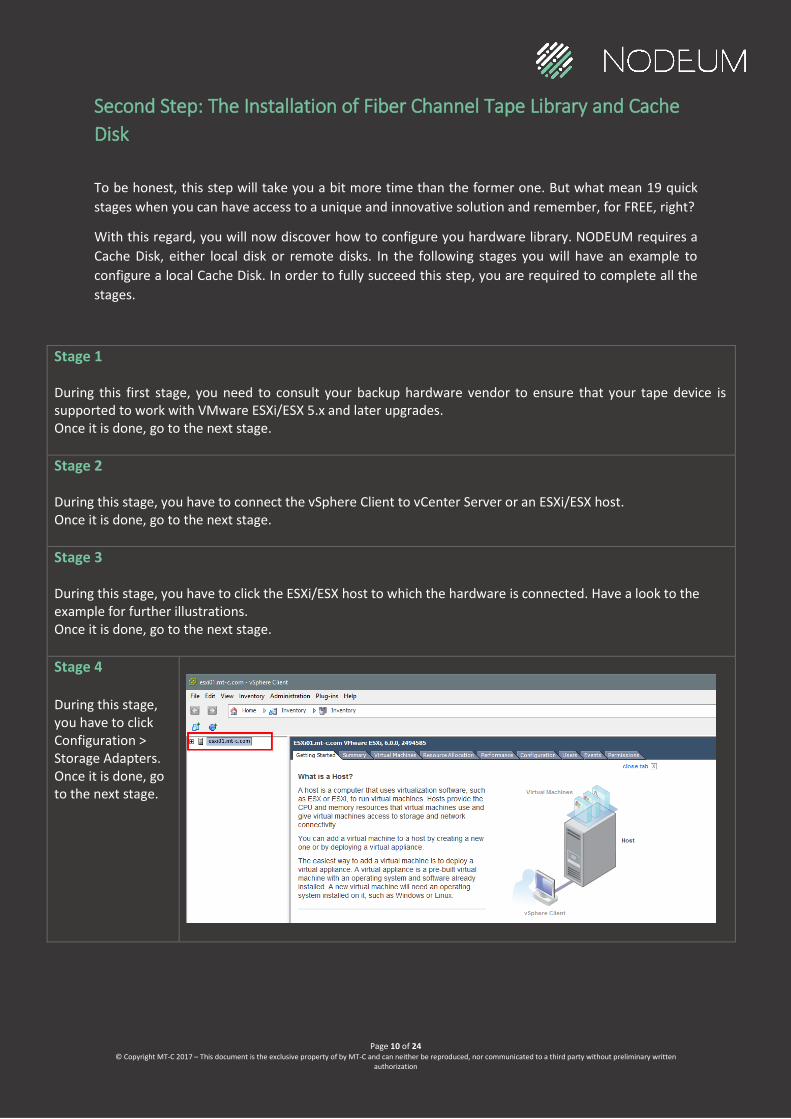
Stage 4 During this stage, you have to click Configuration > Storage Adapters. Once it is done, go to the next stage.
Page 11 of 24 © Copyright MT-C 2017 – This document is the exclusive property of by MT-C and can neither be reproduced, nor communicated to a third party without preliminary written
authorization
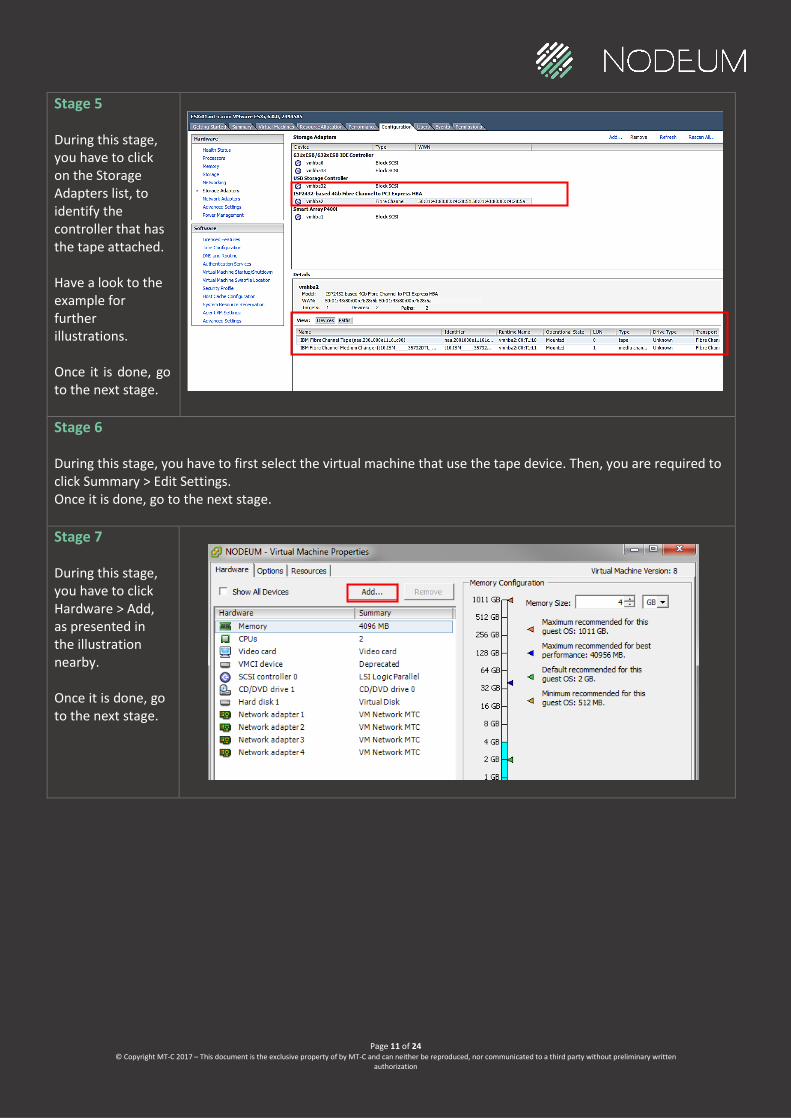
Stage 5 During this stage, you have to click on the Storage Adapters list, to identify the controller that has the tape attached. Have a look to the example for further illustrations. Once it is done, go to the next stage.
Stage 6 During this stage, you have to first select the virtual machine that use the tape device. Then, you are required to click Summary > Edit Settings. Once it is done, go to the next stage.
Stage 7 During this stage, you have to click Hardware > Add, as presented in the illustration nearby. Once it is done, go to the next stage.

Page 12 of 24 © Copyright MT-C 2017 – This document is the exclusive property of by MT-C and can neither be reproduced, nor communicated to a third party without preliminary written
authorization
Stage 8 During this stage, you have to select SCSI Device from the list of device types and click Next. Have a look to the example for further illustrations. Once it is done, go to the next stage.
Stage 9 During this stage, you have to select the appropriate device from the SCSI Device dropdown menu, as presented in the illustration nearby. Once it is done, go to the next stage.
Stage 10 During this stage, you have to apply the new configuration. Have a look to the example for further explanations. Once it is done, go to the next stage.
Page 13 of 24 © Copyright MT-C 2017 – This document is the exclusive property of by MT-C and can neither be reproduced, nor communicated to a third party without preliminary written
authorization
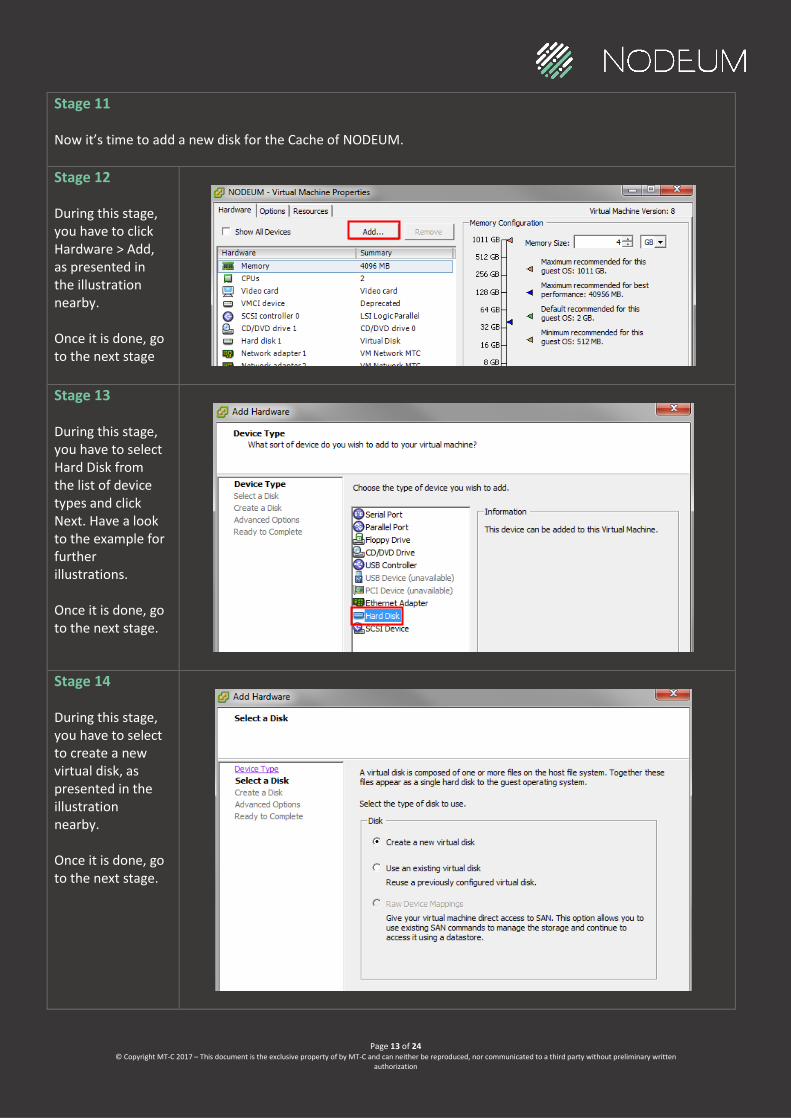
Stage 11 Now it’s time to add a new disk for the Cache of NODEUM.
Stage 12 During this stage, you have to click Hardware > Add, as presented in the illustration nearby. Once it is done, go to the next stage
Stage 13 During this stage, you have to select Hard Disk from the list of device types and click Next. Have a look to the example for further illustrations. Once it is done, go to the next stage.
Stage 14 During this stage, you have to select to create a new virtual disk, as presented in the illustration nearby. Once it is done, go to the next stage.
Page 14 of 24 © Copyright MT-C 2017 – This document is the exclusive property of by MT-C and can neither be reproduced, nor communicated to a third party without preliminary written
authorization
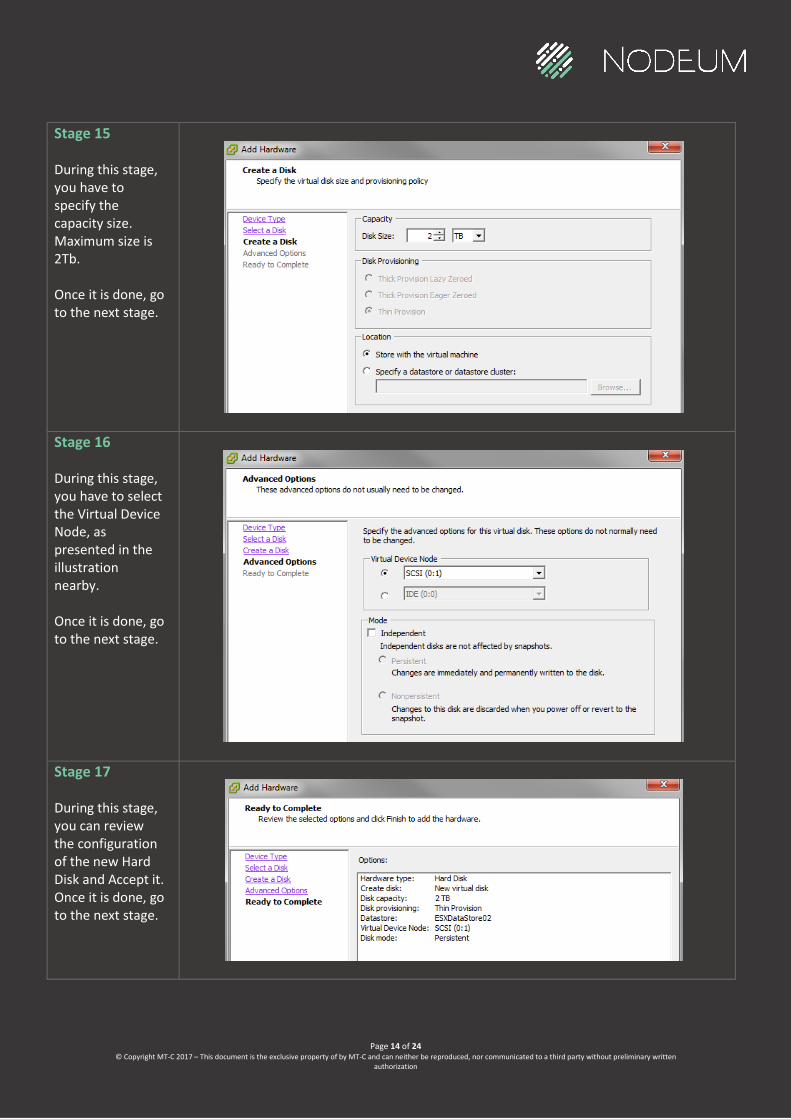
Stage 15 During this stage, you have to specify the capacity size. Maximum size is 2Tb. Once it is done, go to the next stage.
Stage 16 During this stage, you have to select the Virtual Device Node, as presented in the illustration nearby. Once it is done, go to the next stage.
Stage 17 During this stage, you can review the configuration of the new Hard Disk and Accept it. Once it is done, go to the next stage.
Page 15 of 24 © Copyright MT-C 2017 – This document is the exclusive property of by MT-C and can neither be reproduced, nor communicated to a third party without preliminary written
authorization
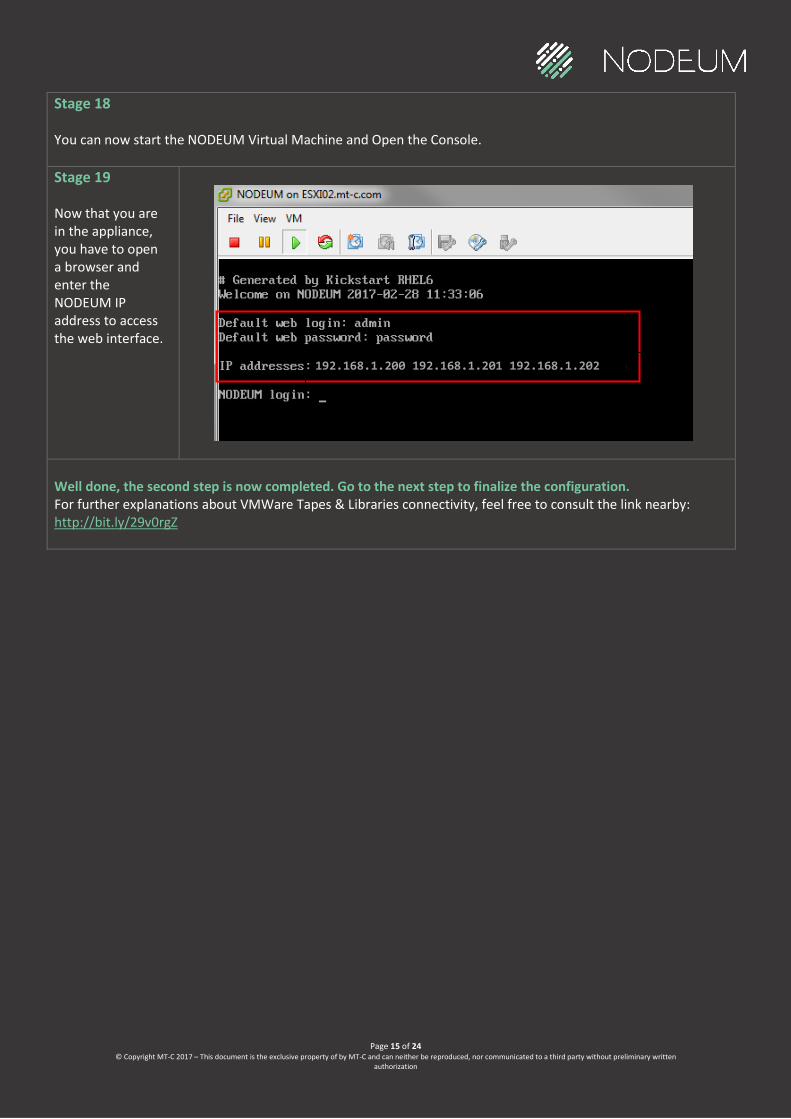
Stage 18 You can now start the NODEUM Virtual Machine and Open the Console.
Stage 19 Now that you are in the appliance, you have to open a browser and enter the NODEUM IP address to access the web interface.
Well done, the second step is now completed. Go to the next step to finalize the configuration. For further explanations about VMWare Tapes & Libraries connectivity, feel free to consult the link nearby: http://bit.ly/29v0rgZ
192.168.1.200 192.168.1.201 192.168.1.202
Page 16 of 24 © Copyright MT-C 2017 – This document is the exclusive property of by MT-C and can neither be reproduced, nor communicated to a third party without preliminary written
authorization
Third Step: The Configuration of Cache Disk and the Tape Library
You are almost done… just few more stages before enjoying the NODEUM!
With this regard, you will now discover how to configure a Cache Disk and a Tape Library within
NODEUM. In order to fully succeed this step, you are required to complete all the stages.
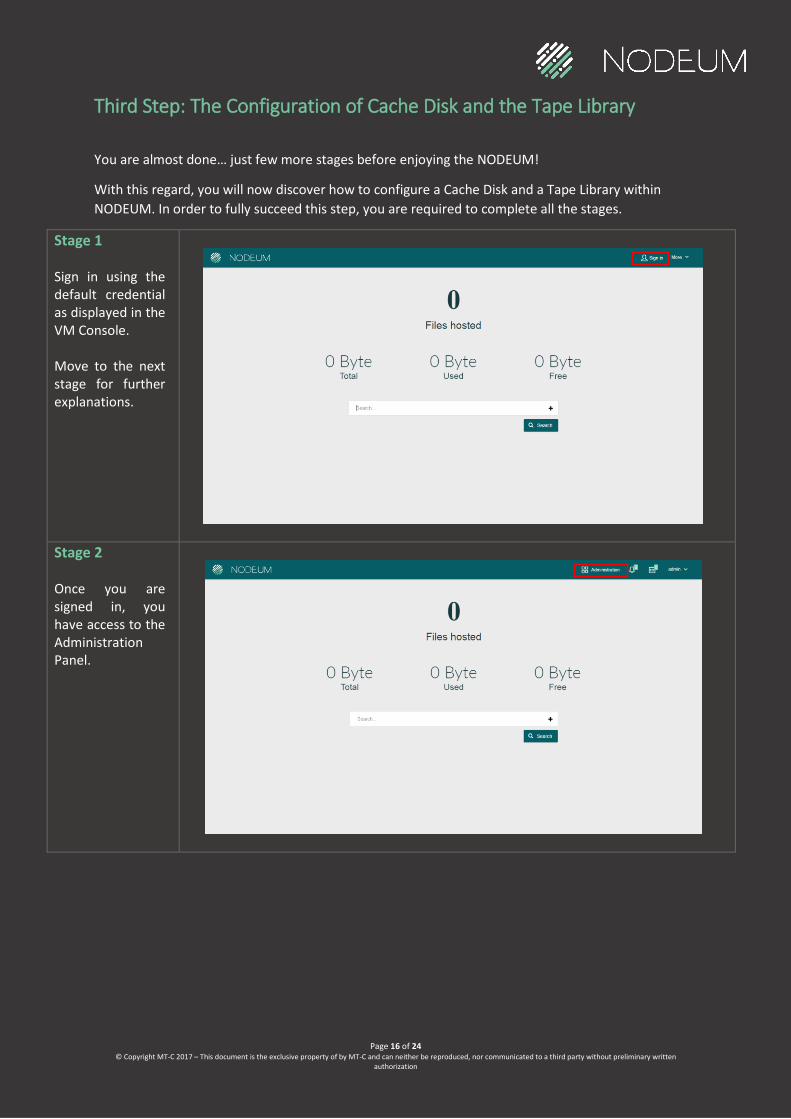
Stage 1 Sign in using the default credential as displayed in the VM Console. Move to the next stage for further explanations.
Stage 2 Once you are signed in, you have access to the Administration Panel.
Page 17 of 24 © Copyright MT-C 2017 – This document is the exclusive property of by MT-C and can neither be reproduced, nor communicated to a third party without preliminary written
authorization
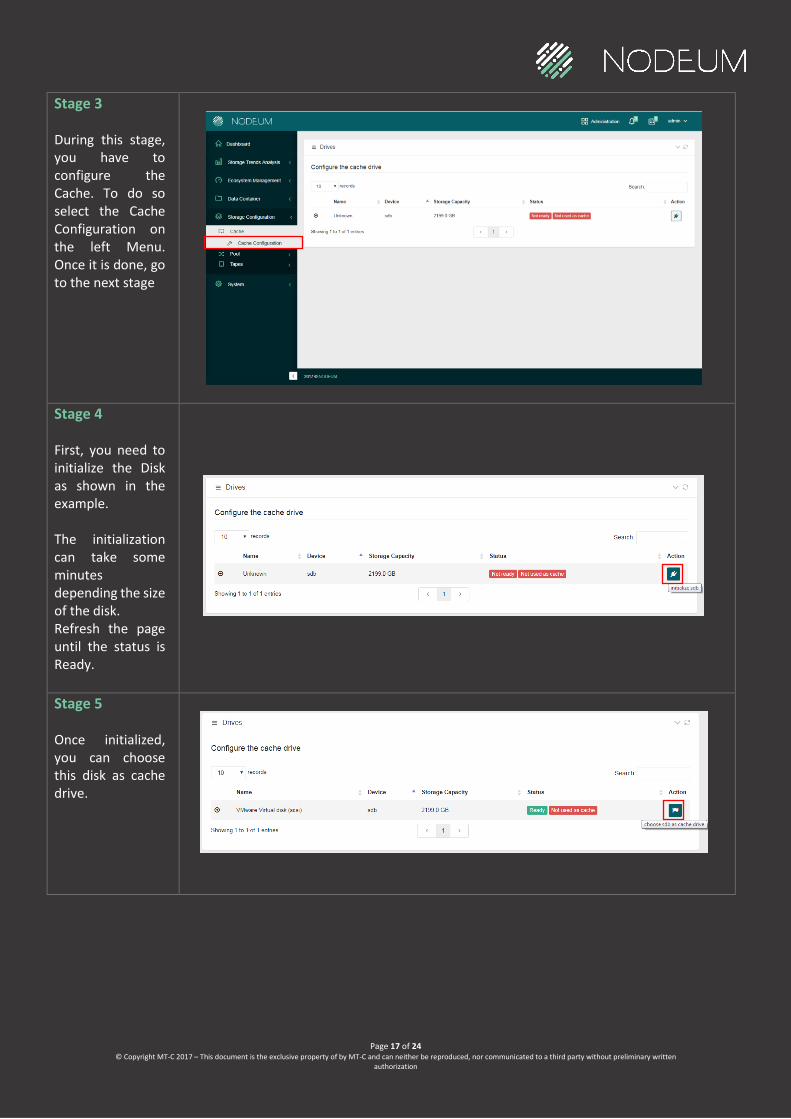
Stage 3 During this stage, you have to configure the Cache. To do so select the Cache Configuration on the left Menu. Once it is done, go to the next stage
Stage 4 First, you need to initialize the Disk as shown in the example. The initialization can take some minutes depending the size of the disk. Refresh the page until the status is Ready.
Stage 5 Once initialized, you can choose this disk as cache drive.
Page 18 of 24 © Copyright MT-C 2017 – This document is the exclusive property of by MT-C and can neither be reproduced, nor communicated to a third party without preliminary written
authorization
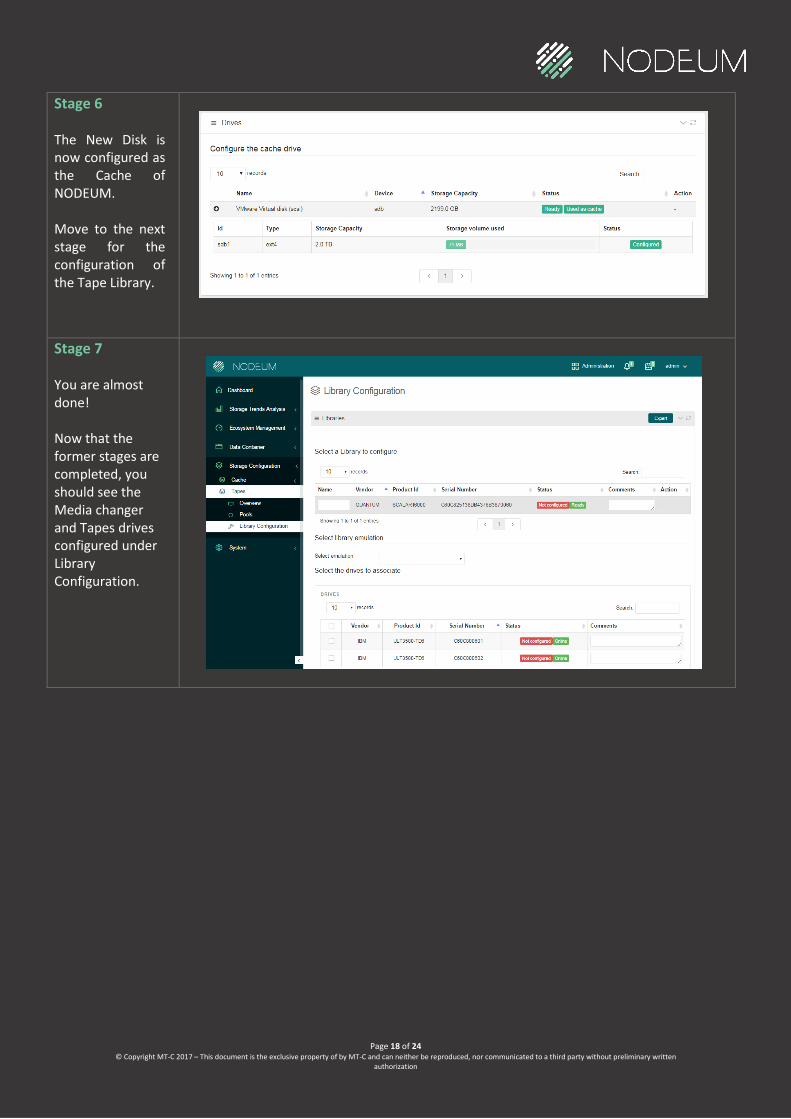
Stage 6 The New Disk is now configured as the Cache of NODEUM. Move to the next stage for the configuration of the Tape Library.
Stage 7 You are almost done! Now that the former stages are completed, you should see the Media changer and Tapes drives configured under Library Configuration.
Page 19 of 24 © Copyright MT-C 2017 – This document is the exclusive property of by MT-C and can neither be reproduced, nor communicated to a third party without preliminary written
authorization
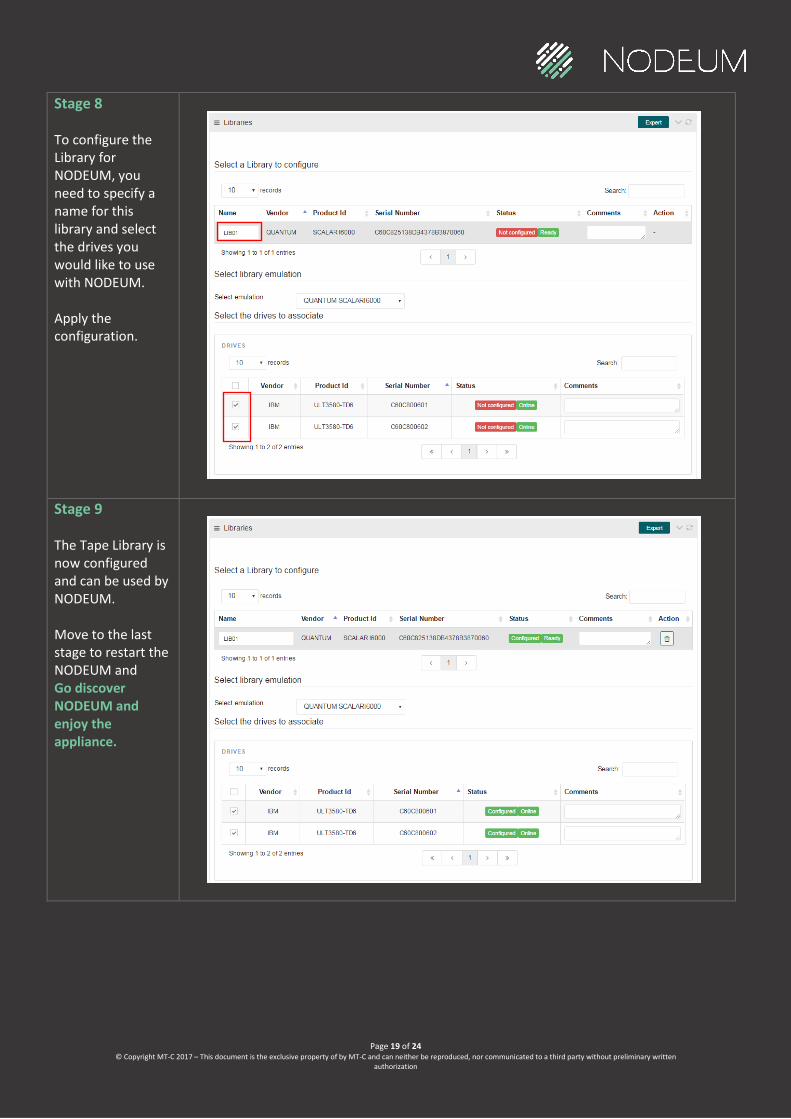
Stage 8 To configure the Library for NODEUM, you need to specify a name for this library and select the drives you would like to use with NODEUM. Apply the configuration.
Stage 9 The Tape Library is now configured and can be used by NODEUM. Move to the last stage to restart the NODEUM and Go discover NODEUM and enjoy the appliance.
Page 20 of 24 © Copyright MT-C 2017 – This document is the exclusive property of by MT-C and can neither be reproduced, nor communicated to a third party without preliminary written
authorization
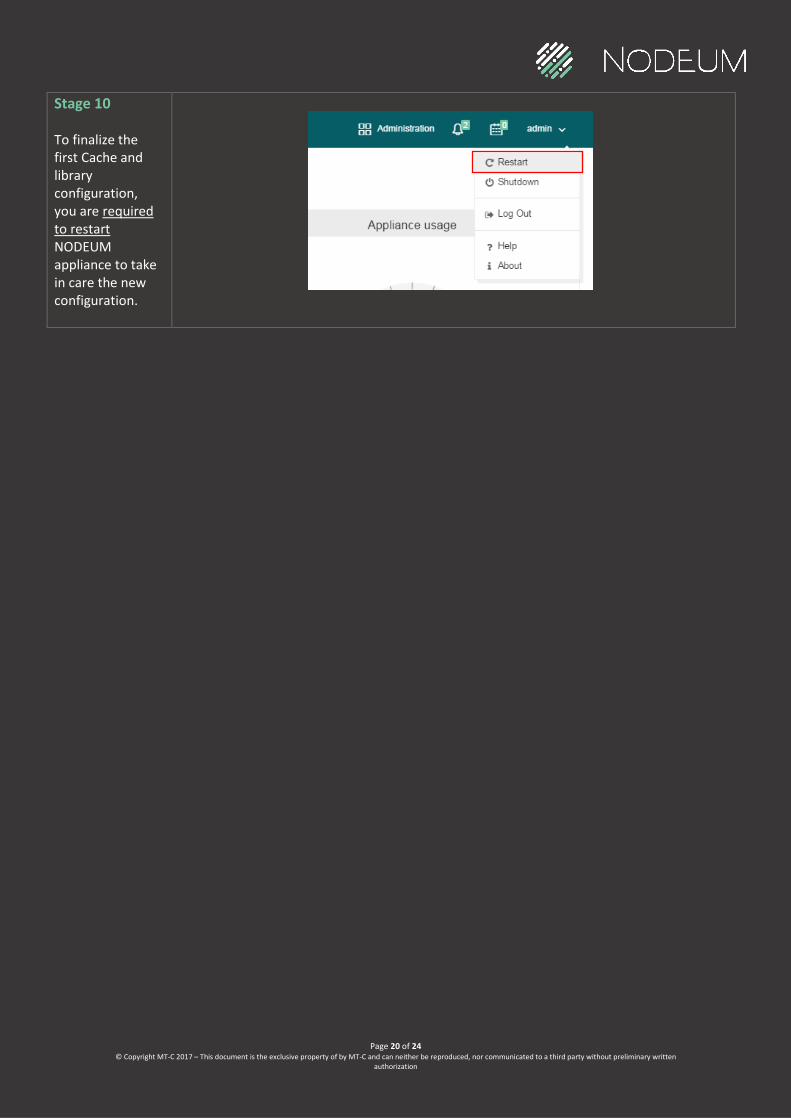
Stage 10 To finalize the first Cache and library configuration, you are required to restart NODEUM appliance to take in care the new configuration.
Page 21 of 24 © Copyright MT-C 2017 – This document is the exclusive property of by MT-C and can neither be reproduced, nor communicated to a third party without preliminary written
authorization
First connection
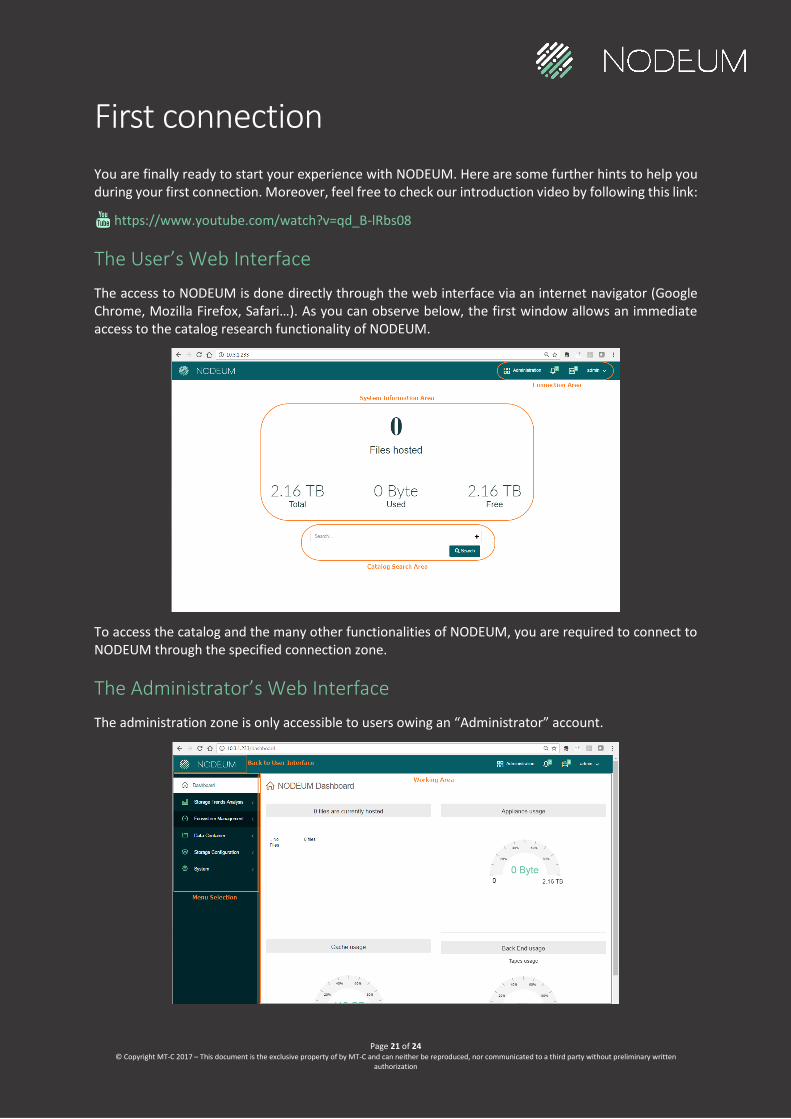
You are finally ready to start your experience with NODEUM. Here are some further hints to help you during your first connection. Moreover, feel free to check our introduction video by following this link:
https://www.youtube.com/watch?v=qd_B-lRbs08
The User’s Web Interface
The access to NODEUM is done directly through the web interface via an internet navigator (Google Chrome, Mozilla Firefox, Safari…). As you can observe below, the first window allows an immediate access to the catalog research functionality of NODEUM.
To access the catalog and the many other functionalities of NODEUM, you are required to connect to NODEUM through the specified connection zone.
The Administrator’s Web Interface
The administration zone is only accessible to users owing an “Administrator” account.
Page 22 of 24 © Copyright MT-C 2017 – This document is the exclusive property of by MT-C and can neither be reproduced, nor communicated to a third party without preliminary written
authorization
Connection and disconnection to the web interface
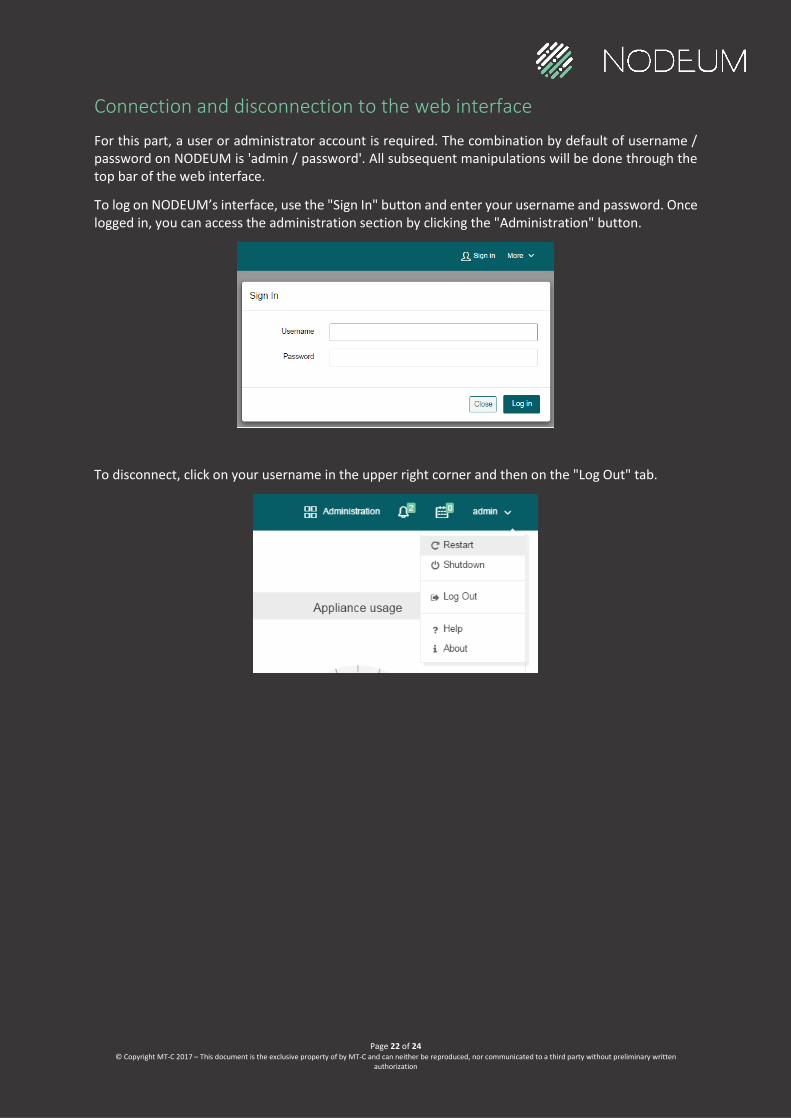
For this part, a user or administrator account is required. The combination by default of username / password on NODEUM is 'admin / password'. All subsequent manipulations will be done through the top bar of the web interface.
To log on NODEUM’s interface, use the "Sign In" button and enter your username and password. Once logged in, you can access the administration section by clicking the "Administration" button.
To disconnect, click on your username in the upper right corner and then on the "Log Out" tab.

Page 23 of 24 © Copyright MT-C 2017 – This document is the exclusive property of by MT-C and can neither be reproduced, nor communicated to a third party without preliminary written
authorization
Need help ?
Contact us via the MT-C online help center: helpcenter.mt-c.com, or via the central email address: [email protected]
What Next?
Now that you have all the cards in your hands, you can finally enjoy all the aspects of the appliance. In
fact, you are now able to store and to active archive all your digital data. In any case, do not hesitate
to contact our support team and ask your questions.
Contact Support
Email: [email protected]
Phone : +32 4 264 23 74
Contact Sales Let’s Be Innovative Together!
After having observed the potential of NODEUM and after having tested it by yourself. You are now
aware of the capacity of this solution. This appliance is the solution to all your storage and archival
issues. Do not omit that the big data era has started and that your company must be able to respond
to the required volumes in order to store and retrieve the data easily and at any time.
For further information, do not hesitate to contact our sales team.
Email: [email protected]
Direct Number: +32 4 264 37 81

Page 24 of 24 © Copyright MT-C 2017 – This document is the exclusive property of by MT-C and can neither be reproduced, nor communicated to a third party without preliminary written
authorization
USER LICENSE AGREEMENT
Downloading, installing or using the NODEUM Freemium Version, you conclude and agree to the terms
of the User License Agreement in a legally binding manner with NODEUM.
Please read and accept the User License Agreement available at the following address:
https://www.nodeum.io/hubfs/LEGAL/NODEUM - FREEMIUM Version License Agreement.pdf
ABOUT US
To know more about the advantages that your environment can gain from MT-C’s storage and archival
system, visit www.nodeum.io and send an e-mail to [email protected] to request a demonstration.
MT-C S.A.
Rue Ernest Solvay, 29A
B-4000 Liège, Belgium
P: +32 4 264 03 94