network receiver - dk.yamaha.com · wall ac outlet, the unit will not be disconnected from the...
TRANSCRIPT

G
Owner's Manual
EN
• The R-N803 and R-N803D network receivers allow you to play back sound in high-quality stereo at your own home.
• This manual explains preparations and operations for everyday users of the unit.
Network Receiver

English
PLEASE READ CAREFULLY BEFORE USE. BE SURE TO FOLLOW THESE INSTRUCTIONS.
The precautions listed below are to prevent risk of harm to the user and others, as well as to prevent property damage, and to help the user use this unit properly and safely. Be sure to follow these instructions.
After reading this manual, be sure to keep it in a safe place where it can be referenced at any time.
WARNINGThis content indicates “risk of serious injury or death.”
Power supply/power cord• Do not do anything that could damage the power cord.
- Do not place it near a heater.- Do not bend it excessively or alter it.- Do not scratch it.- Do not place it under a heavy object.Using the power cord with the core of the cord exposed could cause electric shocks or a fire.
• Do not touch the power plug or cord if there is a chance of lightning. Failure to observe this may cause electric shocks.
• Use this unit with the power supply voltage printed on it. Failure to connect to an appropriate AC outlet may cause a fire, electric shocks, or malfunctions.
• Be sure to use the supplied power cord. Also, do not use the supplied power cord for other units. Failure to observe the above may cause a fire, burns, or malfunctions.
• Check the electric plug periodically and remove any dirt or dust which may have accumulated on it. Failure to observe this may cause a fire or electric shocks.
• When setting up the unit, make sure that the AC outlet you are using is easily accessible. If some trouble or malfunction occurs, immediately turn off the power switch and disconnect the plug from the AC outlet. Even when the power switch is turned off, as long as the power cord is not unplugged from the wall AC outlet, the unit will not be disconnected from the power source.
• If you hear thunder or suspect approaching lightning, quickly turn off the power switch and pull the power plug from the AC outlet. Failure to observe this may cause a fire or malfunctions.
• If not using the unit for long periods of time, be sure to pull the power plug from the AC outlet. Failure to observe this may cause a fire or malfunctions.
Do not disassemble• Do not disassemble or modify this unit. Failure to observe this
may cause a fire, electric shocks, injury, or malfunctions. If you notice any irregularities, be sure to request an inspection or repair from the dealer where you purchased the unit or from qualified Yamaha service personnel.
Water warning• Do not expose the unit to rain, use it near water or in damp or
wet conditions, or place on it any containers (such as vases, bottles or glasses) containing liquids which might spill into any openings. A liquid such as water getting into the unit may cause a fire, electric shocks, or malfunctions. If any liquid such as water seeps into the device, turn off the power immediately and unplug the power cord from the AC outlet. Then, request an inspection from the dealer where you purchased the unit or from qualified Yamaha service personnel.
• Never insert or remove an electric plug with wet hands. Do not handle this unit with wet hands. Failure to observe this may cause electric shocks or malfunctions.
Fire warning• Do not place any burning items or open flames near the unit,
since they may cause a fire.
Maintenance and care• Do not use aerosols or spray-type chemicals that contain
combustible gas for cleaning or lubrication. The combustible gas will remain inside the unit, which may cause explosion or fire.
Battery use• Do not disassemble a battery. If the contents of the battery get
on your hands or in your eyes, it can cause blindness or chemical burns.
• Do not dispose of batteries in fire. Doing so may result in the battery bursting, causing a fire or injury.
• Do not expose a battery to high temperatures, such as direct sunlight or a fire. The battery may burst, causing a fire or injury.
• Do not attempt to recharge batteries that are not intended to be charged. Charging could cause the battery to burst or leak, which can cause blindness, chemical burns, or injury.
• If the batteries do leak, avoid contact with the leaked fluid.If the battery fluid should come in contact with your eyes, mouth, or skin, wash immediately with water and consult a doctor. Battery fluid is corrosive and may possibly cause loss of sight or chemical burns.
Wireless unit• Do not use this unit near medical devices or inside medical
facilities. Radio waves from this unit may affect electro-medical devices.
• Do not use this unit within 15 cm (6 in) of persons with a heart pacemaker implant or a defibrillator implant. Radio waves from this unit may affect electro-medical devices, such as a heart pacemaker implant or defibrillator implant.
If you notice any abnormality• If any of the following abnormalities occur, immediately turn
off the power and disconnect the power plug. If you are using batteries, remove the batteries from this unit.- The power cord/plug is damaged.- An unusual smell or smoke is emitted from the unit.- Foreign material gets into the interior of the unit.
PRECAUTIONS
• Be sure to request inspections or repairs from the dealer where you purchased the unit or from qualified Yamaha service personnel.
• Yamaha cannot be held responsible for damage caused by improper use or modifications to the unit.
• This product is for ordinary homes. Do not use for applications requiring high reliability, such as managing lives, health care or high-value assets.
i En

PRECAUTIONS
En
glis
h
- There is a loss of sound during use.- There is a crack or damage in the unit.Continued use could cause electric shocks, a fire, or malfunctions. Immediately request an inspection or repair from the dealer where you purchased the unit or from qualified Yamaha service personnel.
• Be careful not to drop or apply strong impact to this unit. If you suspect the unit may have been damaged due to dropping or impact, immediately turn off the power and pull the power plug from the AC outlet. Failure to observe this may cause electric shocks, a fire, or malfunctions. Immediately request an inspection from the dealer where you purchased the unit or from qualified Yamaha service personnel.
CAUTIONThis content indicates “risk of injury.”
Power supply/power cord• Do not use an AC outlet where the power plug fits loosely when
inserted. Failure to observe this may cause a fire, electric shocks, or burns.
• When removing the electric plug from the unit or an AC outlet, always hold the plug itself and not the cord. Pulling by the cord can damage it and cause electric shocks or a fire.
• Insert the power plug firmly all the way into the AC outlet. Using the unit when it is not plugged in sufficiently can cause dust to accumulate on the plug, causing a fire or burns.
Installation• Do not place the unit in an unstable position where it might
accidentally drop or fall over and cause injuries.• Do not block this unit's ventilation holes (cooling slits). This
unit has ventilation holes on the top/bottom to prevent the internal temperature from becoming too high. Failure to observe this may trap heat inside the unit, causing a fire or malfunctions.
• When installing this unit: - Do not cover it with any cloth.- Do not install it on a carpet or rug.- Make sure the top surface faces up; do not install on its sides
or upside down.- Do not use the device in a confined, poorly-ventilated
location.Failure to observe the above may trap heat inside the unit, causing a fire or malfunctions. Ensure that there is adequate space around the unit: at least 30 cm (11-3/4 in) on top, 20 cm (7-7/8 in) on the sides, and 20 cm (7-7/8 in) on the rear.
• Ensure that the top is facing upwards. Failure to observe this may cause malfunctions or for the unit to fall and cause injury.
• Do not place the unit in a location where it may come into contact with corrosive gases or salt air. Doing so may result in malfunction.
• Avoid being near the unit during a disaster, such as an earthquake. Since the unit may turn over or fall and cause injury, quickly move away from the unit and go to a safe place.
• Before moving this unit, be sure to turn off the power switch and disconnect all connection cables. Failure to observe this may damage the cables or cause you or someone else to trip and fall.
• When transporting or moving the unit always use two or more people. Attempting to lift the unit by yourself may damage your back, result in other injury, or cause damage to the unit itself.
Hearing loss• Do not use the unit/speakers or headphones for a long period of
time at a high or uncomfortable volume level, since this can cause permanent hearing loss. If you experience any hearing loss or ringing in the ears, consult a physician.
• Before connecting the unit to other devices, turn off the power for all devices. Also, before turning the power of all devices on or off, make sure that all volume levels are set to the minimum. Failing to do so may result in hearing loss, electric shock, or device damage.
• When turning on the AC power in your audio system, always turn on the unit LAST, to avoid hearing loss and speaker damage. When turning the power off the unit should be turned off FIRST for the same reason. Failure to observe the above may cause hearing impairment or speaker damage.
Maintenance• Remove the power plug from the AC outlet when cleaning the
unit. Failure to observe this may cause electric shocks.
Handling caution• Do not insert foreign materials such as metal or paper into the
ventilation holes of this unit. Failure to observe this may cause a fire, electric shocks, or malfunctions. If foreign material gets into the unit, immediately shut off the power and pull the power plug from the AC outlet / then turn off any amplifiers and receivers and request an inspection from the dealer where you purchased the unit or from qualified Yamaha service personnel.
• Do not rest your weight on the unit or place heavy objects on it. Avoid applying excessive force to the buttons, switches or connectors. Failure to observe the above may cause injury or unit damage.
• Avoid pulling the connected cables to prevent injuries or damage to the unit by causing it to fall.
Battery use• Always replace all batteries at the same time. Do not use new
batteries together with old ones. Using new ones with old ones could cause a fire, burns, or inflammation due to fluid leaks.
• Do not mix battery types, such as alkaline batteries with manganese batteries, or batteries from different makers, or different types of batteries from the same maker, since this can cause a fire, burns, or inflammation due to fluid leaks.
• Keep batteries away from children. A child could accidentally swallow a battery. Failure to observe this may also cause inflammation due to battery fluid leaks.
• Do not put in a pocket or bag, carry, or store batteries together with pieces of metal. The battery could short, burst, or leak, causing a fire or injury.
• Always make sure all batteries are inserted in conformity with the +/- polarity markings. Failure to do so might result in a fire, burns, or inflammation due to fluid leaks.
• When the batteries run out, or if the unit is not to be used for a long time remove the batteries from the remote control to prevent possible leakage of the battery fluid.
• When storing or discarding batteries, insulate the terminal area by applying tape, or some other protection. Mixing them with other batteries or metal objects can cause a fire, burns, or inflammation due to fluid.
CautionDo not touch the surface marked with this label.The surface may become hot during operation.
ii En

Notice
Indicates points that you must observe in order to prevent product failure, damage or malfunction and data loss, as well as to protect the environment.
Power• If not using the unit for a long period of time, be sure to pull the
power plug from the outlet. Even if the A (Standby/On) switch has been turned off, a minute current is still flowing.
Installation• Do not use this unit in the vicinity of other electronic
equipment, such as a TV, radio, AV unit, or mobile phone. Failure to observe this may cause this unit or the TV or radio to produce noise.
• Do not use this unit in a location that is exposed to direct sunlight (such as a vehicle interior), that becomes extremely hot, such as near a heater, or extremely cold, or that is subject to excessive dust or vibration. Failure to observe this may cause the unit's panel to become deformed, the internal components to malfunction, or for operation to become unstable.
• Install this unit as far away from other electronic equipment as possible. Digital signals from this unit may interfere with other electronic equipment.
• If using a wireless function, avoid installing this unit near metal walls or desks, microwave ovens, or other wireless devices.
Connections• If connecting external units, be sure to thoroughly read the
manual for each unit and connect them in accordance with the instructions. Failure to properly handle a unit in accordance with the instructions could cause malfunctions.
• Do not connect this unit to industrial units. Digital audio interface standards for consumer use and industrial use are different. This unit has been designed to connect to a consumer-use digital audio interface. Connections to an industrial-use digital audio interface could not only cause this unit to malfunction, but could also damage the speakers.
Handling• Do not place vinyl, plastic, or rubber products on this unit.
Failure to observe this may cause discoloration or deformation in the panel of this unit.
• If the ambient temperature changes drastically (such as during unit transportation or under rapid heating or cooling) and there is a chance condensation may have formed in the unit, leave the unit for several hours without turning on the power until it is completely dry before use. Using the unit while there is condensation can cause malfunctions.
Maintenance• When cleaning the unit, use a dry, soft cloth. Using chemicals
such as benzine or thinner, cleaning agents, or chemical scrubbing cloths can cause discoloration or deformation.
Batteries• Be sure to discard used batteries in accordance with local
regulations.
Information
Indicates information of note regarding this product.
About content in this manual• The illustrations and screens in this manual are for instructional
purposes only.• The company names and product names in this manual are the
trademarks or registered trademarks of their respective companies.
• Software may be revised and updated without prior notice.• Information marked by the “ WARNING” icon indicates
points that may lead to death or serious injury if not observed.• Information marked with the “ CAUTION” icon indicates
points that may lead to injury if not observed.• Information in the “Notice” sections indicates points that you
must observe to prevent product failure, damage or malfunction and data loss.
• Information listed in the “Note” sections indicates supplementary information.
• This manual describes the “iPhone”, “iPad” and “iPod touch” collectively as the “iPhone”. (“iPhone” refers to the “iPhone”, “iPad” and “iPod touch”, unless otherwise specified.)
• In this manual, illustrations of English menu screens are used as examples.
Notice and Information
iii En

Contents
1 En
En
glis
hP
RE
PAR
AT
ION
INT
RO
DU
CT
ION
BA
SIC
O
PE
RA
TIO
NA
DVA
NC
ED
O
PE
RA
TIO
NA
DD
ITIO
NA
L
INF
OR
MA
TIO
N
INTRODUCTION
What you can do with this unit ................................. 2Sources that can be played back on this unit ................. 2
Supplied accessories ................................................... 3Controls and functions ............................................... 4
Front panel ..................................................................... 4Front display .................................................................. 6Rear panel ...................................................................... 7Remote control............................................................... 8
PREPARATION
Connections ............................................................... 10Connecting audio devices ............................................ 10Connecting the speakers .............................................. 11Connecting the FM/AM antennas (R-N803) ............... 13Connecting the DAB/FM antenna (R-N803D)............ 13Connecting the network cable ..................................... 14Preparing a wireless antenna ....................................... 14Connecting the power cord.......................................... 14Turning on the unit ...................................................... 14
Connecting to network ............................................. 15Sharing the iOS device setting..................................... 16Configuring with the router's WPS push button.......... 17Set the wireless network connection manually............ 18Connecting a mobile device to the unit directly
(Wireless Direct) ..................................................... 19Verify the network connection status .......................... 20Configuring MusicCast................................................ 20
BASIC OPERATION
Playback .................................................................... 22Playing a source........................................................... 22Switching information on the front display ................. 22Front panel operations ................................................. 23Using the sleep timer ................................................... 24
Listening to FM/AM radio....................................... 25FM/AM tuning............................................................. 25Registering favorite radio stations (presets) ................ 25Radio Data System tuning
(U.K. and Europe models only)............................... 28Listening to DAB radio (R-N803D)......................... 29
Preparing the DAB tuning ........................................... 29Selecting a DAB radio station for reception................ 29Using preset function................................................... 30Displaying the DAB information................................. 31Checking reception strength of each DAB channel
label ......................................................................... 31Playing back music via Bluetooth............................ 32
Connecting a Bluetooth device (pairing) ..................... 32Playing back Bluetooth device contents ...................... 32Disconnecting a Bluetooth connection ........................ 33
Playing back music stored on media servers (PCs/NAS) ............................................................. 34Setting the media sharing of music files...................... 34Playback of PC music contents.................................... 35
Listening to Internet radio....................................... 37Playing back iPhone/iTunes music via a network
(AirPlay) ................................................................ 38Playback of iPhone/iTunes music contents ................. 38
Playing back music stored on a USB storage device ......................................................................39Connecting a USB storage device ............................... 39Playback of USB storage device contents ................... 39
Registering the current playback song/station (Preset function) ....................................................41Registering to a preset ................................................. 41Recalling a preset......................................................... 41Clearing a preset .......................................................... 41
ADVANCED OPERATION
Optimizing the speaker settings automatically (YPAO)...................................................................42Error messages............................................................. 44Warning messages ....................................................... 45
Configuring playback settings for different playback sources (Option menu) .........................46Option menu items....................................................... 46
Configuring various functions (Setup menu) .........47Setup menu items......................................................... 48Network ....................................................................... 48Bluetooth ..................................................................... 50YPAO .......................................................................... 50Volume ........................................................................ 50AutoPowerStdby (Auto Power Standby)..................... 51ECO Mode ................................................................... 51
Configuring the system settings (ADVANCED SETUP menu)...............................52ADVANCED SETUP menu items .............................. 52Checking the firmware version (VERSION)............... 52Changing the speaker impedance setting (SP IMP.) ... 52Selecting the remote control ID (REMOTE ID).......... 52Setting tuner frequency step (TU) ............................... 53Restoring the default settings (INIT)........................... 53Updating the firmware (UPDATE) ............................. 53
Updating the unit’s firmware via the network .......54
ADDITIONAL INFORMATION
Troubleshooting.........................................................55Error indications on the front display.....................61Supported devices and file formats .........................62
Supported devices........................................................ 62Supported file formats ................................................. 62
Trademarks ...............................................................63Specifications .............................................................64Index ...........................................................................66
Contents

INTRODUCTION
This unit is a network receiver compatible with a network source such as a media server and mobile device.It supports playback from not only audio sources such as a CD player or radio, but also from Bluetooth devices and network streaming services.
Sources that can be played back on this unit
* You need a commercially available wireless router (access point) when you use a mobile device.
1 Play back the Internet radio (p. 37)
2 Play back the streaming service (see the supplement for each service.)
3 Play back music files stored on your PC (p. 34)
4 Play back music files stored on your NAS (p. 34)
5 Play back music files stored on your iPod/iTunes with AirPlay (p. 38)
6 Play back audio content from Bluetooth devices (p. 32)
7 Play back music files stored on your USB device (p. 39)
8 Play back your external component (p. 10)
9 Listening to radio (p. 25, 29)
Note
For details on connecting the external devices, see “Connections” (p. 10).
What you can do with this unit
VOLUME
PURE DIRECT
RETURN
CONNECT
PUSH - ENTER
TUNINGPRESETBANDMEMORY CLEAR
BASSINPUT
5V 1A
BALANCE
L R
TREBLE LOUDNESS
FLAT
-30dB
DIMMER MODEDISPLAY
SELECT
PHONES
YPAO MIC
SPEAKERS USBA B
This unit
1 Internet
2 Streaming service
Modem
Router*
3 PC
5 AirPlay (iTunes)
4 NAS
5 AirPlay (iPhone/iPad/iPod touch)
6 Bluetooth
7 USB device 8 CD player, etc.
Mobiledevice
9 Radio
2 En

Supplied accessories
En
glis
hIN
TR
OD
UC
TIO
N
Check that the following accessories are supplied with the product.
Supplied accessories
Remote control FM antenna (R-N803)AM antenna (R-N803) DAB/FM antenna (R-N803D)
YPAO microphone Power cord
* The supplied power cord varies depending on the region of purchase.
Batteries (x2) (AA, R6, UM-3)
* One of the above is supplied depending on the region of purchase.
G
Network ReceiverRéseau Ampli-TunerСетевой ресивер
R-N803/R-N803D Owner’s Manual
CD-ROM (Europe model)
R-N803D Quick Start Guide
(Europe model)
G
Network Receiver
R-N803/R-N803D Owner’s Manual
(except Europe model)
3 En

Front panel
1 A (power)Turns on/off the unit.
2 Power indicatorBrightly lit: Power is onDimly lit: Standby modeTuned off: Power is off
Note
When not using this unit for an extended period of time, be sure to unplug it from the power outlet. This unit uses a minimal amount of power even in standby mode.
3 Remote control sensorReceives infrared signals from the remote control.
4 DIMMERChanges the brightness level of the front display. Choose brightness from 5 levels by pressing this button repeatedly.
5 DISPLAYSelects the information displayed on the front display (p. 22).
6 MODESets the FM band reception mode to automatic stereo or monaural (p. 25).
7 MEMORYRegisters the current radio station as a preset when TUNER is selected as the input source (p. 25, 30).Registers the current playback song or streaming station as a preset when NET or USB is selected as the input source (p. 41).
8 CLEARClears a preset radio station when TUNER is selected as the input source (p. 27, 30).Clears a preset song or a preset streaming station when NET or USB is selected as the input source (p. 41).
9 BANDSets the radio tuner band when TUNER is selected as the input source. (p. 25, 29)
0 Front displayShows information about the operational status of this unit (p. 6).
A PRESET j / iRecalls a preset radio station (p. 27, 30) or song/streaming station (p. 41).
B TUNING jj / iiSelects the tuning frequency (p. 25) or a DAB radio station (p. 29) when TUNER is selected as the input source.
C PURE DIRECT and indicatorAllows you to listen to a source in the purest possible sound (p. 23). The indicator above it lights up and the front display turns off when this function is turned on.
Controls and functions
VOLUME
PURE DIRECT
RETURN
CONNECT
PUSH - ENTER
TUNINGPRESETBANDMEMORY CLEAR
BASSINPUT
5V 1A
BALANCE
L R
TREBLE LOUDNESS
FLAT
-30dB
DIMMER MODEDISPLAY
SELECT
PHONES
YPAO MIC
SPEAKERS USBA B
12 3 4 5 6 7 8 9 : B CA
4 En

Controls and functions
En
glis
hIN
TR
OD
UC
TIO
N
D PHONES jackOutputs audio to your headphones for private listening.
E YPAO MIC jackFor connecting the supplied YPAO microphone (p. 42).
F SPEAKERS A/BTurns on or off the speaker set connected to the SPEAKERS A and/or SPEAKERS B terminals on the rear panel each time the corresponding button is pressed.
G USB jackFor connecting a USB storage device (p. 39).
H INPUT selectorSelects the input source you want to listen to.
I BASS controlIncreases or decreases the low frequency response. The center position produces a flat response (p. 23).
J TREBLE controlIncreases or decreases the high frequency response. The center position produces a flat response (p. 23).
K BALANCE controlAdjusts the sound output balance of the left and right speakers to compensate for sound imbalances caused by speaker locations or listening room conditions (p. 23).
L LOUDNESS controlRetains a full tonal range at any volume level (p. 24).
Note
The LOUDNESS control does not function when the YPAO Volume function (p. 50) is enabled.
M SELECT/ENTERTurn the dial to select a numeric value or setting, and press the dial to confirm.
N RETURNReturns to the previous indication of the front display.
CONNECTUse to register this unit to the MusicCast network (p. 20).
O VOLUME controlIncreases or decreases the sound output level.
VOLUME
PURE DIRECT
RETURN
CONNECT
PUSH - ENTER
TUNINGPRESETBANDMEMORY CLEAR
BASSINPUT
5V 1A
BALANCE
L R
TREBLE LOUDNESS
FLAT
-30dB
DIMMER MODEDISPLAY
SELECT
PHONES
YPAO MIC
SPEAKERS USBA B
OJIHFED K L M NG
5 En

Controls and functions
Front display
Note
• If you turn on the power to the unit right after you purchase or initialize it, the unit will display “WAC” (Wireless Accessory Configuration) on the front display and trigger an automatic iOS device search. See “Sharing the iOS device setting” (p. 16) for details on the iOS device and network connection.
• You can change the brightness level of the front display by pressing DIMMER on the front panel (p. 4).
1 Information displayDisplays the current status (such as input name).You can switch the information that is displayed when you press DISPLAY on the front panel (p. 22).
2 Bluetooth indicatorLights up when the unit is connecting to a Bluetooth device.
3 Signal strength indicatorLights up when the unit connects to a wireless network or operates as an access point. The strength of the wireless network signal can be verified by the indicator status.
4 SLEEP indicatorLights up when the sleep timer is on (p. 24).
5 STEREO indicatorLights up when the unit is receiving a stereo FM radio signal.
6 TUNED indicatorLights up when the unit is receiving an FM/AM radio station signal.
7 YPAO VOL. indicatorLights up when the YPAO volume (p. 50) function is enabled.The YPAO volume function is automatically enabled after YPAO is performed.
8 A/B indicators“A” lights up when the SPEAKERS A output is enabled and “B” lights up when the SPEAKERS B output is enabled.
9 Volume indicatorIndicates the current volume.
0 Cursor indicatorsIndicate the remote control cursor keys currently operational.
A Speaker indicatorsIndicate the speakers from which signals are output during YPAO.A Front speaker (L)S Front speaker (R)L Subwoofer
B MUTE indicatorBlinks when audio is muted.
VOL. MUTE
TUNEDSLEEP
YPAO VOL.
STEREO
SWL R
A B
1 9
: A: B
2 3 6 7 854
6 En

Controls and functions
En
glis
hIN
TR
OD
UC
TIO
N
Rear panel
1 LINE 1-3 jacksFor connecting to analog audio components (p. 10).
2 PHONO jacksFor connecting to a turntable (p. 10).
3 OPTICAL 1/2 jacksFor connecting to audio components equipped with optical digital output (p. 10).
4 COAXIAL 1/2 jacksFor connecting to audio components equipped with a coaxial digital output (p. 10).
5 NETWORK jackFor connecting to a network with a network cable (p. 14).
6 Wireless antennaFor connecting to a network device wirelessly (p. 14).
7 VOLTAGE SELECTOR (General models only)Selects the switch position according to your local voltage (p. 14).
8 AC IN jackFor connecting the supplied power cord (p. 14).
9 CD jacksFor connecting to a CD player, etc. (p. 10).
0 ANTENNA terminalsFor connecting to the radio antennas (p. 13).
A TRIGGER OUT jacksFor connecting to a subwoofer that supports the trigger function (p. 10).
B SUBWOOFER OUT jackFor connecting to a subwoofer with built-in amplifier (p. 10).
C SPEAKERS terminalsFor connecting to speakers (p. 10).
A
B
SPEAKERS
NETWORK
COAXIALOPTICAL
FM AM
75Ω
ANTENNA
SUBWOOFEROUT
TRIGGEROUT
IN
2
IN
1
IN
OUT
OUT
3
1 2 1 2
CD
PHONO
LINE
GND
12V 0.1A
AC IN
3 81 2 4 5 6
9
7
A B C: (R-N803)
7 En
Controls and functions
Remote control
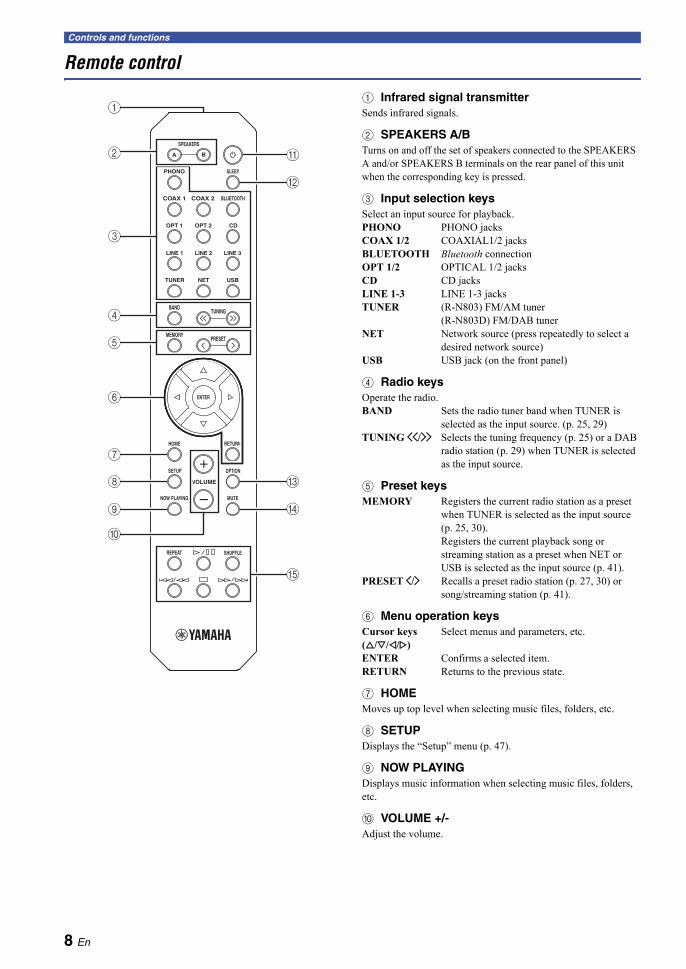
1 Infrared signal transmitterSends infrared signals.
2 SPEAKERS A/BTurns on and off the set of speakers connected to the SPEAKERS A and/or SPEAKERS B terminals on the rear panel of this unit when the corresponding key is pressed.
3 Input selection keysSelect an input source for playback.PHONO PHONO jacksCOAX 1/2 COAXIAL1/2 jacksBLUETOOTH Bluetooth connectionOPT 1/2 OPTICAL 1/2 jacksCD CD jacksLINE 1-3 LINE 1-3 jacksTUNER (R-N803) FM/AM tuner
(R-N803D) FM/DAB tunerNET Network source (press repeatedly to select a
desired network source)USB USB jack (on the front panel)
4 Radio keysOperate the radio.BAND Sets the radio tuner band when TUNER is
selected as the input source. (p. 25, 29)TUNING jj/ii Selects the tuning frequency (p. 25) or a DAB
radio station (p. 29) when TUNER is selected as the input source.
5 Preset keysMEMORY Registers the current radio station as a preset
when TUNER is selected as the input source (p. 25, 30).Registers the current playback song or streaming station as a preset when NET or USB is selected as the input source (p. 41).
PRESET j/i Recalls a preset radio station (p. 27, 30) or song/streaming station (p. 41).
6 Menu operation keysCursor keys Select menus and parameters, etc.(B/C/D/E)ENTER Confirms a selected item.RETURN Returns to the previous state.
7 HOMEMoves up top level when selecting music files, folders, etc.
8 SETUPDisplays the “Setup” menu (p. 47).
9 NOW PLAYINGDisplays music information when selecting music files, folders, etc.
0 VOLUME +/-Adjust the volume.
LINE 1
OPT 1 OPT 2 CD
COAX 1 COAX 2 BLUETOOTH
NET USB
LINE 2 LINE 3
TUNER
PRESET
TUNINGBAND
MEMORY
SETUP
HOME
MUTENOW PLAYING
VOLUME
RETURN
ENTER
REPEAT SHUFFLE
SLEEPPHONO
BA
SPEAKERS
OPTION
A
B
C
D
E
1
3
6
7
0
8
9
2
4
5
8 En

Controls and functions
En
glis
hIN
TR
OD
UC
TIO
N
A A (power)Turns on/off (standby) the unit.
Note
The A (power) key on the remote control works only when the A (power) on the front panel is on.
B SLEEPSets the sleep timer (p. 24).
C OPTIONDisplays the “Option” menu (p. 46).
D MUTEMutes the audio output.
E Playback keysLet you play back and perform other operations for network sources, Bluetooth devices and USB devices.
Note
The playback keys may not work depending on the Bluetooth device.
Installing batteries
Note
• Change all batteries if the operation range of the remote control narrows.
• Before inserting new batteries, wipe the compartment clean.
Operation rangeThe remote controls transmit a directional infrared beam.Be sure to aim the remote controls directly at the remote control sensor on the front panel of this unit.
30° 30°
Remote control
Approximately6 m (20 ft)
9 En
PREPARATION
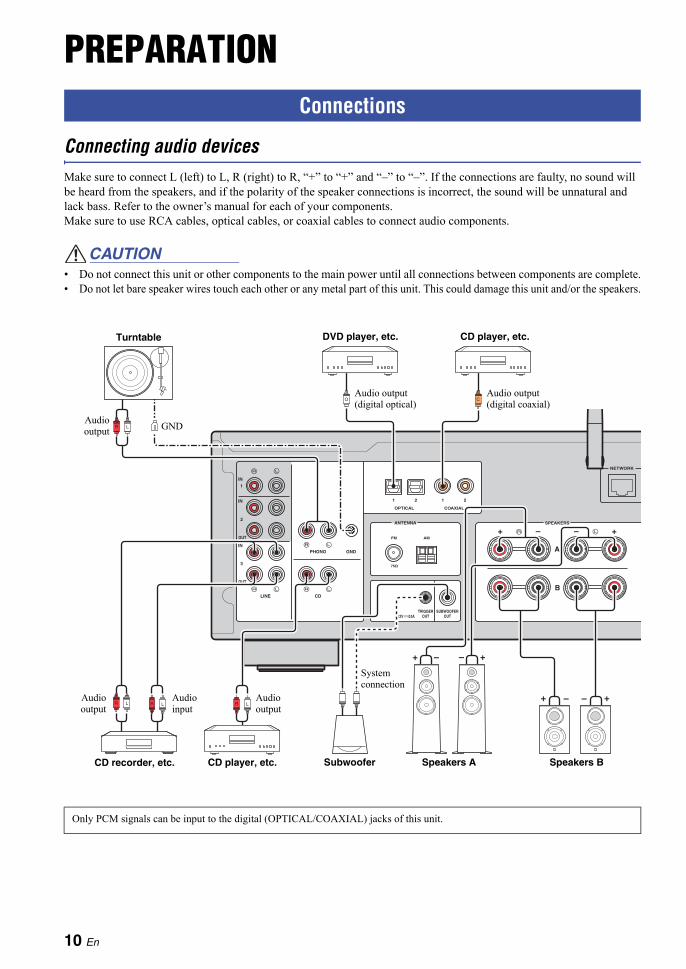
Connecting audio devicesMake sure to connect L (left) to L, R (right) to R, “+” to “+” and “–” to “–”. If the connections are faulty, no sound will be heard from the speakers, and if the polarity of the speaker connections is incorrect, the sound will be unnatural and lack bass. Refer to the owner’s manual for each of your components.Make sure to use RCA cables, optical cables, or coaxial cables to connect audio components.
CAUTION• Do not connect this unit or other components to the main power until all connections between components are complete.• Do not let bare speaker wires touch each other or any metal part of this unit. This could damage this unit and/or the speakers.
Connections
Only PCM signals can be input to the digital (OPTICAL/COAXIAL) jacks of this unit.
A
B
SPEAKERS
NETWORK
COAXIALOPTICAL
FM AM
75Ω
ANTENNA
SUBWOOFEROUT
TRIGGEROUT
IN
2
IN
1
IN
OUT
OUT
3
1 2 1 2
CD
PHONO
LINE
GND
12V 0.1A
O C
Audio input
Audiooutput
Speakers B
Turntable
Audiooutput
DVD player, etc.
GND
Audio output (digital coaxial)
Audio output (digital optical)
CD player, etc.
Audio output
CD player, etc. SubwooferCD recorder, etc. Speakers A
System connection
10 En

Connections
En
glis
hP
RE
PAR
AT
ION
Note
• Do not bundle audio cables and speaker cables together with the power cable. Doing so may generate noise.
• The PHONO jacks are designed for connecting a turntable with an MM cartridge.
• Connect your turntable to the GND terminal to reduce noise in the signal. However, for some turntables, you may hear less noise without the GND connection.
• If you have a Yamaha subwoofer that supports a system connection, you can switch the power of the subwoofer in conjunction with tuning on/off this unit by connecting the subwoofer to the TRIGGER OUT jack with a monaural mini-plug cable.
• In order to prevent the audio signal from looping when an audio recording device is connected, the audio signal is not output from the LINE 2 (OUT) jacks when LINE 2 is selected. Similarly, the audio signal is not output from the LINE 3 (OUT) jacks when LINE 3 is selected.
Connecting the speakers
CAUTIONConnect the speakers with impedance as shown below. If you connect speakers with an excessively low impedance, this unit may overheat. You can change the speaker impedance setting of this unit in “SP. IMP” (p. 52) in the ADVANCED SETUP menu.
Connecting speaker cablesSpeaker cables have two wires. One is for connecting the negative (–) terminal of the unit and the speaker, and the other is for the positive (+) terminal. If the wires are colored to prevent confusion, connect the black wire to the negative and the other wire to the positive terminal.a Remove approximately 10 mm (3/8”) of insulation from the ends of
the speaker cable and twist the bare wires of the cable firmly together.
b Loosen the speaker terminal.
c Insert the bare wires of the cable into the gap on the side (upper right or bottom left) of the terminal.
d Tighten the terminal.
Note
When inserting speaker cables into the speaker terminals, insert only the bare speaker wire. If insulated cable is inserted, the connection may be poor and sound may not be heard.
Connecting via banana plug(North America, Australia, General models only)
Tighten the knob and then insert the banana plug into the end of the corresponding terminal.
Speaker connection
Speaker impedance (SP IMP.)
4 MIN8 MIN (Default)
SPEAKERS A or SPEAKERS B
4 Ω or higher 8 Ω or higher
SPEAKERS A and SPEAKERS B
8 Ω or higher 16 Ω or higher
Bi-wire connection 4 Ω or higher 8 Ω or higher
aa
bb
dd
cc
10 mm (3/8")
Banana plug
11 En

Connections
Bi-wire connectionBi-wire connection separates the woofer from the combined midrange and tweeter section. A bi-wire compatible speaker has four binding post terminals. These two sets of terminals allow the speaker to be split into two independent sections. With these connections, the mid and high frequency drivers are connected to one set of terminals and the low frequency driver to another set of terminals.
Connect the other speaker to the other set of terminals in the same way.
Note
• When making bi-wire connections, remove the shorting bridges or cables on the speaker. Refer to the speakers’ instruction manuals for more information.
• To use the bi-wire connections, press SPEAKERS A and SPEAKERS B on the front panel or on the remote control so that both “A” and “B” indicators light up on the front display.
A
B
SPEAK
This unit
Speaker
VOLUME
PURE DIRECT
RETURN
CONNECT
PUSH - ENTER
TUNINGPRESETBANDMEMORY CLEAR
BASSINPUT
5V 1A
BALANCE
L R
TREBLE LOUDNESS
FLAT
-30dB
DIMMER MODEDISPLAY
SELECT
PHONES
YPAO MIC
SPEAKERS USBA B
SPEAKERS A/B
OPT 1 OPT 2 CD
COAX 1 COAX 2 BLUETOOTH
SLEEPPHONO
BA
SPEAKERS
SPEAKERS A/B
12 En

Connections
En
glis
hP
RE
PAR
AT
ION
Connecting the FM/AM antennas (R-N803)Connect the supplied FM/AM antenna to this unit.Fix the end of the FM antenna to a wall, and place the AM antenna.
Note
• If you experience poor reception quality, install an outdoor antenna.
• Unwind only the length of cable needed from the AM antenna unit.
• The wires of the AM antenna have no polarity.
Assembling the supplied AM antenna
Connecting the wires of the AM antenna
Connecting the DAB/FM antenna (R-N803D)Connect the supplied DAB/FM antenna to this unit and fix the antenna ends to a wall.
Note
• If you experience poor reception quality, install an outdoor antenna.
• The antenna should be stretched out horizontally.
COAXIALOPTICAL
FM AM
75Ω
ANTENNA
1 2 1 2
PHONO GND
FM antenna AM antenna
Insert2
Hold down1
COAXIALOPTICAL
FM AM
75Ω
ANTENNA
1 2 1 2
PHONO GND
FMDAB
DAB/FM antenna
13 En
Connections
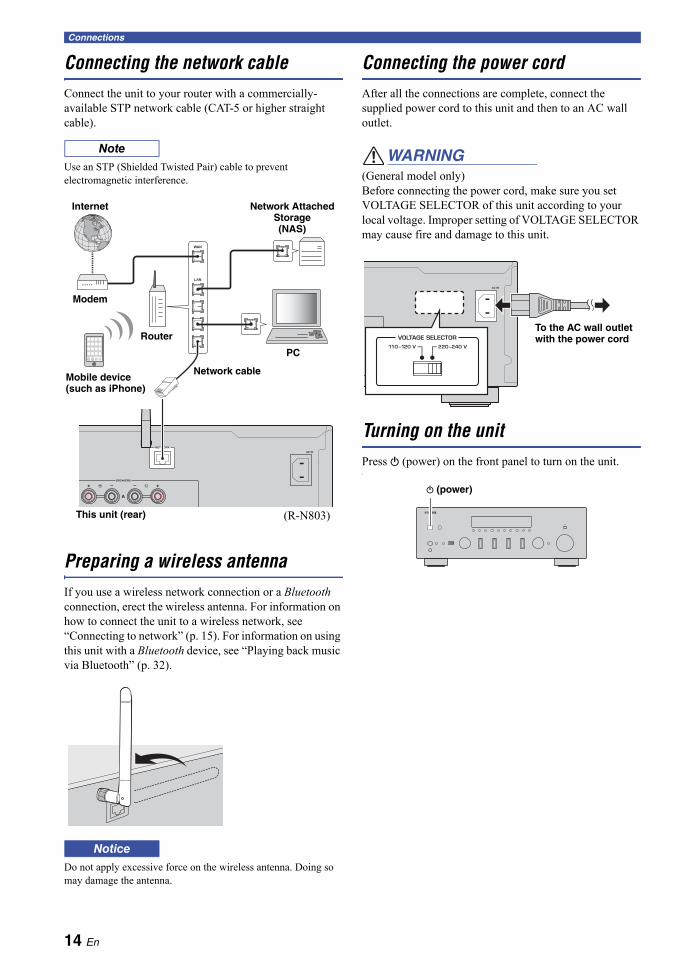
Connecting the network cableConnect the unit to your router with a commercially-available STP network cable (CAT-5 or higher straight cable).
Note
Use an STP (Shielded Twisted Pair) cable to prevent electromagnetic interference.
Preparing a wireless antennaIf you use a wireless network connection or a Bluetooth connection, erect the wireless antenna. For information on how to connect the unit to a wireless network, see “Connecting to network” (p. 15). For information on using this unit with a Bluetooth device, see “Playing back music via Bluetooth” (p. 32).
Notice
Do not apply excessive force on the wireless antenna. Doing so may damage the antenna.
Connecting the power cordAfter all the connections are complete, connect the supplied power cord to this unit and then to an AC wall outlet.
WARNING(General model only)Before connecting the power cord, make sure you set VOLTAGE SELECTOR of this unit according to your local voltage. Improper setting of VOLTAGE SELECTOR may cause fire and damage to this unit.
Turning on the unitPress A (power) on the front panel to turn on the unit.•
A
SPEAKERS
NETWORK
AC IN
LAN
WAN
Network Attached Storage (NAS)
Internet
Modem
Router
Network cable
PC
This unit (rear)
Mobile device (such as iPhone)
(R-N803)
NETWORK
AC IN
VOLTAGE SELECTOR
110–120 V 220–240 V
To the AC wall outlet with the power cord
A (power)
14 En

Connecting to network
En
glis
hP
RE
PAR
AT
ION
There are several methods to connect the unit to a network. Select a connection method according to your environment.
Note
• Some security software installed on your PC or the firewall settings of network devices (such as a router) may block the access of the unit to the network devices or the Internet. In these cases, configure the security software or firewall settings appropriately.
• Each server must be connected to the same subnet as the unit.• To use the service via the Internet, broadband connection is strongly recommended.• When playing a high-resolution audio source via the network, we recommend connecting with a wired router for stable playback.
Connecting with a wireless router (access point)Connect to the network with the method listed below that corresponds to your environment.
Connecting to network
WAC (Wireless Accessory Configuration)If you turn on the power to the unit right after you purchase or initialize it, the unit will automatically use the network settings of the iOS device (iPhone/iPad/iPod touch) and try to connect to a wireless LAN (unless the unit is already connected to a wired LAN).
If you have an iOS device, follow the procedure from Step 6 in “Sharing the iOS device setting” (p. 16).If you plan to connect the unit wirelessly by another method, press RETURN to exit the current screen, and then proceed to one of the sections below.
R-N803 XXXXXXWAC
Connecting using the Wi-Fi setting of the iOS device (iPhone/iPad/iPod touch)
Share the Wi-Fi setting of the iOS device (p. 16)
Connecting using WPS push button configuration on the wireless router (or access point)
Use the WPS push button configuration (p. 17)
Connecting with a wireless router (access point) without WPS push button configuration
Set the network connection manually (p. 18)
Connecting using “MusicCast CONTROLLER”Register this unit to the MusicCast network and make the wireless network connection at once (p. 20)
15 En

Connecting to network
Connecting with the wired router
Note
• You can configure the network parameters (such as IP address) in “IP Address” (p. 49) in the “Setup” menu.• If you want to use a wired LAN connection when a wireless connection has been made, set “Connection” (p. 48) in the “Setup” menu
to “Wired”.
Connecting without a wired router or wireless router (access point)
Note
When the unit is connected to the network with Wireless Direct, it cannot connect to any other wireless router (access point). To play back contents from the Internet or update the unit's firmware via the network, connect this unit to a network with a wired router or wireless router (access point).
Sharing the iOS device settingYou can easily setup a wireless connection by applying the connection settings on iOS devices (iPhone/iPad/iPod touch).Before proceeding, confirm that your iOS device is connected to a wireless router (access point).
Note
• If you set up a wireless connection with this method, all the network settings will be initialized.
• This configuration does not work if the security method of your wireless router (access point) is WEP. In this case, use other connection method.
1 Press SETUP.
2 Use the cursor keys (B / C) to select “Network” and press ENTER.
Note
To return to the previous state, press RETURN.
3 Use the cursor keys (B / C) to select “Connection” and press ENTER.
4 Use the cursor keys (B / C) to select “Wireless” and press ENTER.
5 Use the cursor keys (B / C) to select “Share Setting” and press ENTER twice.
Note
When connected to a wired network, “LAN CABLE” and “Pls disconnect” appears on the front display. In this case, disconnect the network cable from the unit, and press ENTER.
Connecting using the DHCP server function of the router
You can connect to the network by simply making a wired LAN connection (p. 14)
Connecting wirelessly to a mobile device (Wireless Direct)
Connect wirelessly with Wireless Direct (p. 19)
PRESETMEMORY
SETUP
HOME
MUTENOW PLAYING
VOLUME
RETURN
ENTER
OPTION
RETURN
SETUP
ENTERCursor keys B / C
Share SettingWIRELESS
Wireless(WAC)SHARE
16 En

Connecting to network
En
glis
hP
RE
PAR
AT
ION
6 On the iOS device, select the unit as the AirPlay speaker in the Wi-Fi screen.
7 Check the network currently selected and tap “Next”.
When the sharing process finishes, the unit is automatically connected to the selected network (access point).When the setting finishes, verify whether the unit is connected to a wireless network (p. 20).
Configuring with the router's WPS push buttonYou can easily set up a wireless connection with one push of the WPS button.
Note
This configuration does not work if the security method of your wireless router (access point) is WEP or WPA2-TKIP. In this case, use other connection method.
1 Press SETUP.
2 Use the cursor keys (B / C) to select “Network” and press ENTER.
Note
To return to the previous state, press RETURN.
3 Use the cursor keys (B / C) to select “Connection” and press ENTER.
4 Use the cursor keys (B / C) to select “Wireless” and press ENTER.
5 Press ENTER twice.“Connecting” appears on the front display.
6 Push the WPS button on the wireless router (access point).When the connection process finishes, “Completed” appears on the front display. When the setting finishes, verify whether the unit is connected to a wireless network (p. 20).If “Not connected” appears, repeat from Step 1 or try another connection method.
7 To exit from the menu, press SETUP.
The name of this unit
Example (iOS 10)
Tap here to start setup
The network currently selected
About WPSWPS (Wi-Fi Protected Setup) is a standard established by the Wi-Fi Alliance, which allows easy establishment of a wireless home network.
PRESETMEMORY
SETUP
HOME
MUTENOW PLAYING
VOLUME
RETURN
ENTER
OPTION
RETURN
SETUP
ENTERCursor keys B / C
WPSWIRELESS
17 En
Connecting to network
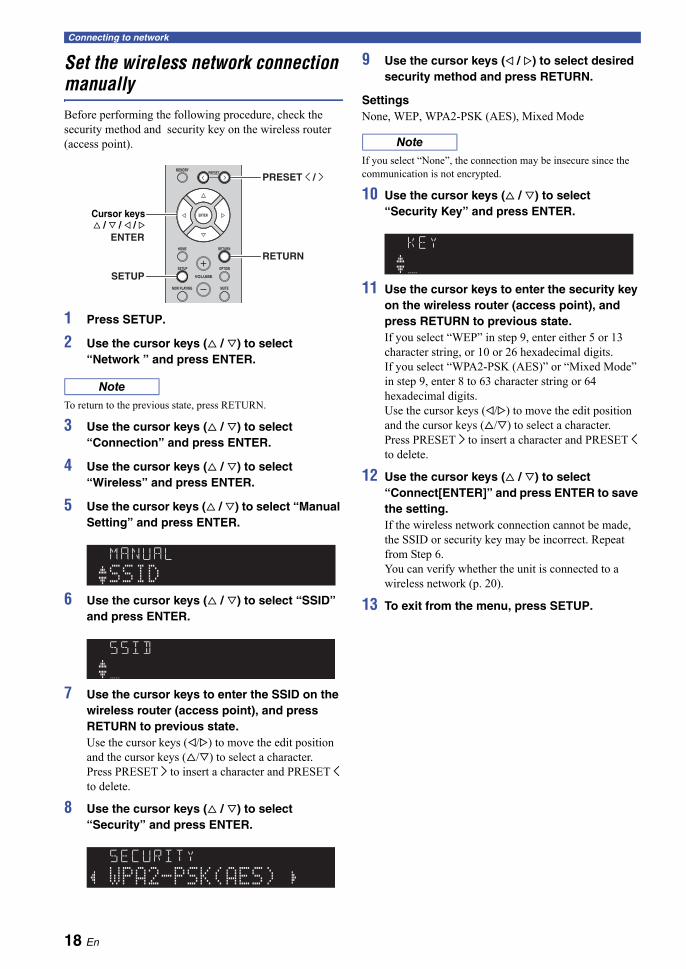
Set the wireless network connection manuallyBefore performing the following procedure, check the security method and security key on the wireless router (access point).
1 Press SETUP.
2 Use the cursor keys (B / C) to select “Network ” and press ENTER.
Note
To return to the previous state, press RETURN.
3 Use the cursor keys (B / C) to select “Connection” and press ENTER.
4 Use the cursor keys (B / C) to select “Wireless” and press ENTER.
5 Use the cursor keys (B / C) to select “Manual Setting” and press ENTER.
6 Use the cursor keys (B / C) to select “SSID” and press ENTER.
7 Use the cursor keys to enter the SSID on the wireless router (access point), and press RETURN to previous state.Use the cursor keys (D/E) to move the edit position and the cursor keys (B/C) to select a character.Press PRESET i to insert a character and PRESET j to delete.
8 Use the cursor keys (B / C) to select “Security” and press ENTER.
9 Use the cursor keys (D / E) to select desired security method and press RETURN.
SettingsNone, WEP, WPA2-PSK (AES), Mixed Mode
Note
If you select “None”, the connection may be insecure since the communication is not encrypted.
10 Use the cursor keys (B / C) to select “Security Key” and press ENTER.
11 Use the cursor keys to enter the security key on the wireless router (access point), and press RETURN to previous state.If you select “WEP” in step 9, enter either 5 or 13 character string, or 10 or 26 hexadecimal digits.If you select “WPA2-PSK (AES)” or “Mixed Mode” in step 9, enter 8 to 63 character string or 64 hexadecimal digits.Use the cursor keys (D/E) to move the edit position and the cursor keys (B/C) to select a character.Press PRESET i to insert a character and PRESET j to delete.
12 Use the cursor keys (B / C) to select “Connect[ENTER]” and press ENTER to save the setting.If the wireless network connection cannot be made, the SSID or security key may be incorrect. Repeat from Step 6.You can verify whether the unit is connected to a wireless network (p. 20).
13 To exit from the menu, press SETUP.
PRESETMEMORY
SETUP
HOME
MUTENOW PLAYING
VOLUME
RETURN
ENTER
OPTION
RETURN
PRESET j / i
SETUP
ENTER
Cursor keys B / C / D / E
SSIDMANUAL
SSID
WPA2-PSK(AES)SECURITY
KEY
18 En

Connecting to network
En
glis
hP
RE
PAR
AT
ION
Connecting a mobile device to the unit directly (Wireless Direct)Using Wireless Direct, this unit can operate as a wireless network access point that mobile devices can directly connect to.
Note
When making a Wireless Direct connection, you cannot connect this unit or the mobile device to the Internet, so Internet services such as Internet radio are not available.
1 Press SETUP.
2 Use the cursor keys (B / C) to select “Network” and press ENTER.
Note
To return to the previous state, press RETURN.
3 Use the cursor keys (B / C) to select “Connection” and press ENTER.
4 Use the cursor keys (B / C) to select “WirelesDirect” and press ENTER.
5 Press ENTER to check the SSID on this unit, and press RETURN to previous state.
6 Use the cursor keys (B / C) to select “Security” and press ENTER.
7 Use the cursor keys (D / E) to select desired security method and press RETURN.
SettingsNone, WPA2-PSK (AES)
Note
• If you select “None”, proceed to Step 10.• If you select “None”, the connection may be insecure since the
communication is not encrypted.
8 Use the cursor keys (B / C) to select “Security Key” and press ENTER.
9 Use the cursor keys to enter the security key on this unit, and press RETURN to previous state.Enter 8 to 63 character string or 64 hexadecimal digits.Use the cursor keys (D / E) to move the edit position and the cursor keys (B / C) to select a character.Press PRESET i to insert a character and PRESET j to delete.
10 Use the cursor keys (B / C) to select “Connect[Enter]” and press ENTER to save the setting.
11 Configure the Wi-Fi settings of a mobile device.For details on settings of your mobile device, refer to the instruction manual of the mobile device.
(1) Enable the Wi-Fi function on the mobile device.(2) Select the SSID of this unit from the list of
available access points.(3) When you are prompted for a password, enter the
security key displayed in Step 9.
If the Wireless Direct connection cannot be made, the security key may be incorrect. Configure the Wi-Fi settings of a mobile device again.
12 To exit from the menu, press SETUP.
PRESETMEMORY
SETUP
HOME
MUTENOW PLAYING
VOLUME
RETURN
ENTER
OPTION
RETURN
PRESET j / i
SETUP
ENTER
Cursor keys B / C / D / E
SSIDW DIRECT
WPA2-PSK(AES)SECURITY
KEY
19 En

Connecting to network
Verify the network connection statusPerform the following procedure to verify the unit’s connection to a network.
1 Press SETUP.
2 Use the cursor keys (B / C) to select “Network” and press ENTER.
Note
To return to the previous state, press RETURN.
3 Use the cursor keys (B / C) to select “Information” and press ENTER.
4 Use the cursor keys (B / C) to select “STATUS”.
When “Connect” appears, the unit is connected to a network. If “Disconnect” appears, reset connection.
5 To exit from the menu, press SETUP.
Configuring MusicCast
About MusicCastUse MusicCast to share music between MusicCast-compatible devices in multiple rooms.With the dedicated “MusicCast CONTROLLER” app, you can easily enjoy music from your smartphone, a media server (a personal computer or NAS) or Internet radio (streaming services) wherever you are in your home.• All MusicCast-compatible devices can be operated
from the dedicated “MusicCast CONTROLLER” app• Multiple devices that support MusicCast in separate
rooms can be linked to play music simultaneously• Supports music playback through Internet radio
(streaming services)• Network settings for devices that support MusicCast
Visit the following website for more information on MusicCast and on which devices are compatible.http://www.yamaha.com/musiccast/
Note
For details on MusicCast, download the MusicCast Setup Guide from the Yamaha Download website.http://download.yamaha.com/
MusicCast CONTROLLER
To use network functionality with a device that supports MusicCast, you need to use the “MusicCast CONTROLLER” dedicated app for mobile devices.Search for and install “MusicCast CONTROLLER” (free) in the App Store or on Google Play.
Registering to the MusicCast networkRegister this unit to the MusicCast network.At the same time, configure the wireless network connection settings for this unit.
Note
The SSID and security key for your wireless network will be needed.
1 On your mobile device, start “MusicCast CONTROLLER” and tap “Setup”.
Note
If you have already connected other MusicCast compatible devices to the network, tap “ ” (Settings) and then “Add New Device”.
PRESETMEMORY
SETUP
HOME
MUTENOW PLAYING
VOLUME
RETURN
ENTER
OPTION
RETURN
SETUP
ENTERCursor keys B / C
ConnectSTATUS
20 En

Connecting to network
En
glis
hP
RE
PAR
AT
ION
2 Operate “MusicCast CONTROLLER” following the on screen instructions, then hold down CONNECT on the front panel of this unit for 5 seconds.
3 Operate “MusicCast CONTROLLER” following the onscreen instructions to set up the network.
This completes the MusicCast network registration and wireless network connection settings.Use “MusicCast CONTROLLER” to play back music.
Note
• AirPlay and DSD sound cannot be transmitted. Music can be played back only from this unit.
• When Pure Direct (p. 23) is turned on, only the network sources (such as Internet radio), Bluetooth device sources and USB storage device sources can be played via the MusicCast network.
CONNECT
21 En

BASIC OPERATION
Playing a source
1 Press one of the input selection keys to select the input source you want to listen to.
2 Press SPEAKERS A and/or SPEAKERS B to select speakers A and/or speakers B.When speaker set A is turned on, “SPEAKERS A:On” appears on the front display.When speaker set B is turned on, “SPEAKERS B:On” appears on the front display.
Note
• When one set of speakers is connected using bi-wire connections, or when using two sets of speakers simultaneously (A and B), press SPEAKERS A and SPEAKERS B on the front panel or on the remote control so that both “A” and “B” indicators light up on the front display.
• When listening with headphones, turn off the speakers.
3 Play the source.
4 Press VOLUME +/– to adjust the sound output level.
Note
You can adjust the tonal quality by using the BASS, TREBLE, BALANCE and LOUDNESS controls or the PURE DIRECT switch on the front panel.
5 When you finish using, press A (power) on the front panel to turn off the power.When you press A (power) on the remote control, this unit set to standby mode.
Switching information on the front displayWhen you select a network source or USB as the input source, you can switch playback information on the front display.
1 Press DISPLAY.Each time you press the key, the displayed item changes.
About 3 seconds later, the corresponding information for the displayed item appears.
Note
“_” (underscore) will be displayed for characters not supported by the unit.
Playback
LINE 1
OPT 1 OPT 2 CD
COAX 1 COAX 2 BLUETOOTH
NET USB
LINE 2 LINE 3
TUNER
TUNINGBAND
SLEEPPHONO
BA
SPEAKERS
SETUP
HOME
MUTENOW PLAYING
VOLUME
RETURN
OPTION
Input selection keys
A (power)
VOLUME
SPEAKERS A/B
Input source Item
BluetoothTrack (song title), Artist (artist name), Album (album name)
ServerAirPlayUSB
Track (song title), Artist (artist name), Album (album name), Time
Net RadioTrack (song title), Album (album name), Time, Station (station name)
VOLUME
PURE DIRECT
RETURN
CONNECT
PUSH - ENTER
TUNINGPRESETBANDMEMORY CLEAR
BASSINPUT
5V 1A
BALANCE
L R
TREBLE LOUDNESS
FLAT
-30dB
DIMMER MODEDISPLAY
SELECT
PHONES
YPAO MIC
SPEAKERS USBA B
DISPLAY
TrackINFO A
Track #1SERVER A
22 En

Playback
En
glis
hB
AS
IC
OP
ER
AT
ION
Front panel operations
Enjoying pure high fidelity sound (Pure Direct)
When the PURE DIRECT switch is turned on, routes input signals from your audio sources so that the input signals bypass the BASS, TREBLE, BALANCE and LOUDNESS controls, thus eliminating any alterations to the audio signals and creating the purest possible sound. The PURE DIRECT indicator lights up and the front display turns off after a few seconds.
Note
• When the PURE DIRECT switch is turned on, the front display turns off.
• The BASS, TREBLE, BALANCE, and LOUDNESS controls do not function while PURE DIRECT is turned on.
Adjusting the BASS and TREBLE controls
The BASS and TREBLE controls adjust high and low frequency response.The center position produces a flat response.
BASS controlWhen you feel there is not enough bass (low frequency sound), rotate clockwise to boost. When you feel there is too much bass, rotate counterclockwise to suppress.Control range: –10 dB to +10 dB (20 Hz)
TREBLE controlWhen you feel there is not enough treble (high frequency sound), rotate clockwise to boost. When you feel there is too much treble, rotate counterclockwise to suppress. Control range: –10 dB to +10 dB (20 kHz)
Adjusting the BALANCE control
The BALANCE control adjusts the sound output balance of the left and right speakers to compensate for sound imbalance caused by speaker locations or listening room conditions.
Note
If you rotate the BALANCE control to the end of L (left) or R (right), the opposite side of channel is muted.
VOLUME
PURE DIRECT
RETURN
CONNECT
PUSH - ENTER
TUNINGPRESETBANDMEMORY CLEAR
BASSINPUT
5V 1A
BALANCE
L R
TREBLE LOUDNESS
FLAT
-30dB
DIMMER MODEDISPLAY
SELECT
PHONES
YPAO MIC
SPEAKERS USBA B
PURE DIRECT switch
VOLUME
PURE DIRECT
RETURN
CONNECT
PUSH - ENTER
TUNINGPRESETBANDMEMORY CLEAR
BASSINPUT
5V 1A
BALANCE
L R
TREBLE LOUDNESS
FLAT
-30dB
DIMMER MODEDISPLAY
SELECT
PHONES
YPAO MIC
SPEAKERS USBA B
BASS TREBLE
VOLUME
PURE DIRECT
RETURN
CONNECT
PUSH - ENTER
TUNINGPRESETBANDMEMORY CLEAR
BASSINPUT
5V 1A
BALANCE
L R
TREBLE LOUDNESS
FLAT
-30dB
DIMMER MODEDISPLAY
SELECT
PHONES
YPAO MIC
SPEAKERS USBA B
BALANCE
23 En

Playback
Adjusting the LOUDNESS control
Retain a full tonal range at any volume level, thus compensating for the human ears’ loss of sensitivity to high and low-frequency ranges at low volume.
Note
The LOUDNESS control does not function when the YPAO Volume function (p. 50) is enabled.
CAUTIONIf the PURE DIRECT switch is turned on with the LOUDNESS control set at a certain level, the input signals bypass the LOUDNESS control, resulting in a sudden increase in the sound output level. To prevent your ears or the speakers from being damaged, be sure to press the PURE DIRECT switch after lowering the sound output level or after checking that the LOUDNESS control is properly set.
1 Set the LOUDNESS control to the FLAT position.
2 Rotate the VOLUME control on the front panel (or press VOLUME +/– on the remote control) to set the sound output level to the loudest listening level that you would listen to.
3 Rotate the LOUDNESS control until the desired volume is obtained.
Note
After setting the LOUDNESS control, enjoy listening to music at your preferred volume level. If the effect of the LOUDNESS control setting is too strong or weak, readjust the LOUDNESS control.
Using the sleep timerUse this feature to automatically set this unit to standby mode after a certain amount of time. The sleep timer is useful when you are going to sleep while this unit is playing or recording a source.
Note
The sleep timer can only be set with the remote control.
1 Press SLEEP repeatedly to set the amount of time before this unit is set to standby mode.Each time you press SLEEP, the front display changes as shown below.
The SLEEP indicator blinks while setting the amount of time for the sleep timer.
If the sleep timer is set, the SLEEP indicator on the front display lights up.
Note
• To disable the sleep timer, select “Sleep Off”.• The sleep timer setting can also be canceled by pressing A (power) to set this unit to standby mode.
VOLUME
PURE DIRECT
RETURN
CONNECT
PUSH - ENTER
TUNINGPRESETBANDMEMORY CLEAR
BASSINPUT
5V 1A
BALANCE
L R
TREBLE LOUDNESS
FLAT
-30dB
DIMMER MODEDISPLAY
SELECT
PHONES
YPAO MIC
SPEAKERS USBA B
VOLUMELOUDNESS
LINE 1
OPT 1 OPT 2 CD
COAX 1 COAX 2 BLUETOOTH
LINE 2 LINE 3
SLEEPPHONO
BA
SPEAKERS
A
SLEEP
(power)
Sleep 120 min.
Sleep Off Sleep 30 min. Sleep 60 min.
Sleep 90 min.
Sleep 120min.SLEEP
VOL.
A
24 En

Listening to FM/AM radio
En
glis
hB
AS
IC
OP
ER
AT
ION
Note
R-N803D does not include an AM tuner.
FM/AM tuning
1 Press TUNER to select “TUNER” as the input source.
2 Press BAND repeatedly to select the reception band (FM or AM).
3 Press TUNING jj / ii to set a frequency.To search stations automatically, press and hold TUNING jj / ii for a second.
If a broadcast is being received, “TUNED” indicator on the front display will be lit. If a stereo broadcast is being received, the “STEREO” indicator will also lit.
Note
• If the station signals are weak, tuning search does not stop at the desired station.
• When FM radio reception is unstable, switching the FM mode to "Mono" may improve it.
Improving FM reception (FM mode)If the signal from the station is weak and the sound quality is not good, set the FM band reception mode to monaural mode to improve reception.
1 Press MODE repeatedly to select “Stereo” (automatic stereo mode) or “Mono” (monaural mode) when this unit is tuned in to an FM radio station.When “Mono” is selected, FM broadcasts will be heard in monaural sound.
Note
The STEREO indicator on the front panel lights up while listening to a station in stereo mode.
Registering favorite radio stations (presets)You can register up to 40 radio stations as presets. Once you have registered stations, you can easily tune into them by selecting their preset numbers.You can automatically register FM radio stations that have strong signals (auto preset). For AM radio stations or FM radio stations with weak signals, register them manually (p. 26).
Registering FM radio stations automatically (auto preset)
Note
• When you register radio stations automatically, radio stations currently registered to preset numbers may be overwritten.
• If the station you want to register is weak in signal strength, try using the manual preset tuning method.
• FM stations registered as presets using the automatic preset registration feature will be heard in stereo.
• (U.K. and Europe models only)Only Radio Data System broadcasting stations can be preset automatically.
Listening to FM/AM radio
TUNING jj / ii
TUNER
BAND
LINE 1
OPT 1 OPT 2 CD
COAX 1 COAX 2 BLUETOOTH
NET USB
LINE 2 LINE 3
TUNER
PRESET
TUNINGBAND
MEMORY
SLEEPPHONO
BA
SPEAKERS
FM 98.50MHzVOL.
TUNEDSTEREOA
Frequency
VOLUME
PURE DIRECT
RETURN
CONNECT
PUSH - ENTER
TUNINGPRESETBANDMEMORY CLEAR
BASSINPUT
5V 1A
BALANCE
L R
TREBLE LOUDNESS
FLAT
-30dB
DIMMER MODEDISPLAY
SELECT
PHONES
YPAO MIC
SPEAKERS USBA B
MODE
25 En
Listening to FM/AM radio
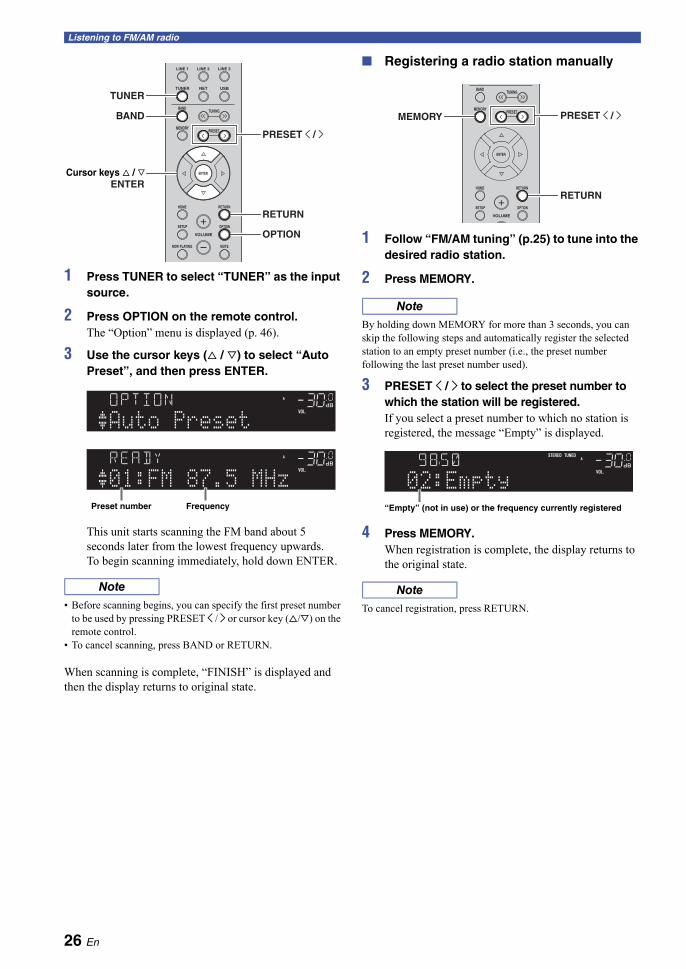
1 Press TUNER to select “TUNER” as the input source.
2 Press OPTION on the remote control.The “Option” menu is displayed (p. 46).
3 Use the cursor keys (B / C) to select “Auto Preset”, and then press ENTER.
This unit starts scanning the FM band about 5 seconds later from the lowest frequency upwards.To begin scanning immediately, hold down ENTER.
Note
• Before scanning begins, you can specify the first preset number to be used by pressing PRESET j / i or cursor key (B/C) on the remote control.
• To cancel scanning, press BAND or RETURN.
When scanning is complete, “FINISH” is displayed and then the display returns to original state.
Registering a radio station manually
1 Follow “FM/AM tuning” (p.25) to tune into the desired radio station.
2 Press MEMORY.
Note
By holding down MEMORY for more than 3 seconds, you can skip the following steps and automatically register the selected station to an empty preset number (i.e., the preset number following the last preset number used).
3 PRESET j / i to select the preset number to which the station will be registered.If you select a preset number to which no station is registered, the message “Empty” is displayed.
4 Press MEMORY.When registration is complete, the display returns to the original state.
Note
To cancel registration, press RETURN.
LINE 1
NET USB
LINE 2 LINE 3
TUNER
PRESET
TUNINGBAND
MEMORY
SETUP
HOME
MUTENOW PLAYING
VOLUME
RETURN
ENTER
OPTION
PRESET j / i
RETURN
OPTION
TUNER
BAND
ENTERCursor keys B / C
Auto PresetVOL.
OPTION A
01:FM 87.5 MHzVOL.
READY A
Preset number Frequency
PRESET
TUNINGBAND
MEMORY
SETUP
HOME
VOLUME
RETURN
ENTER
OPTION
PRESET j / i
RETURN
MEMORY
02:EmptyVOL.
9850TUNEDSTEREO
A
“Empty” (not in use) or the frequency currently registered
26 En

Listening to FM/AM radio
En
glis
hB
AS
IC
OP
ER
AT
ION
Recalling a preset stationYou can recall preset stations that were registered using automatic station preset or manual station preset.
1 Press TUNER to select “TUNER” as the input source.
2 Press PRESET j / i to select a preset number.
Note
• Preset numbers to which no stations are registered are skipped.• “No Presets” is displayed if no stations are registered.
Clearing a preset stationClear radio stations registered to the preset numbers.
On the remote control
1 Press TUNER to select “TUNER” as the input source.
2 Press OPTION.
3 Use the cursor keys to select “Clear Preset” and press ENTER.
4 Use the cursor keys (B / C) to select a preset station to be cleared and press ENTER.
If the preset station is cleared, “Cleared” appears and then the next in-use preset number is displayed.
5 Repeat step 4 until all desired preset stations are cleared.
6 To exit from the “Option” menu, press OPTION.
On the front panel
1 Rotate the INPUT selector to select “TUNER” as the input source.
2 Press CLEAR.
3 Press PRESET j / i to select a preset station to be cleared and press CLEAR.
If the preset station is cleared, “Cleared” appears.
LINE 1
OPT 1 OPT 2 CD
COAX 1 COAX 2 BLUETOOTH
NET USB
LINE 2 LINE 3
TUNER
PRESET
TUNINGBAND
MEMORY
SLEEPPHONO
BA
SPEAKERS
TUNER
PRESET j / i
LINE 1
NET USB
LINE 2 LINE 3
TUNER
PRESET
TUNINGBAND
MEMORY
SETUP
HOME
MUTENOW PLAYING
VOLUME
RETURN
ENTER
OPTION
OPTION
ENTER
TUNER
Cursor keys B / C
Clear PresetVOL.
OPTION A
01:FM 98.50MHzVOL.
CLEARTUNEDSTEREO
AA
Preset station to be cleared
01:CleardVOL.
CLEAR AA
INPUT CLEAR PRESET j / i SELECT/ENTER
01:FM 98.50MHzVOL.
CLEARTUNEDSTEREO
AA
Preset station to be cleared
01:CleardVOL.
CLEAR AA
27 En

Listening to FM/AM radio
Radio Data System tuning (U.K. and Europe models only)Radio Data System is a data transmission system used by FM stations in many countries. The unit can receive various types of Radio Data System data, such as “Program Service”, “Program Type,” “Radio Text” and “Clock Time”, when it is tuned into a Radio Data System broadcasting station.
Displaying the Radio Data System information
1 Tune into the desired Radio Data System broadcasting station.
Note
We recommend using “Auto Preset” to tune into the Radio Data System broadcasting stations (p. 25).
2 Press DISPLAY.Each time you press the key, the displayed item changes.
About 3 seconds later, the corresponding information for the displayed item appears.
Note
“Program Service”, “Program Type”, “Radio Text”, and “Clock Time” are not displayed if the radio station does not provide the Radio Data System service.
Program Service Program service name
Program Type Current program type
Radio Text Information on the current program
Clock Time Current time
Frequency Frequency
VOLUME
PURE DIRECT
RETURN
CONNECT
PUSH - ENTER
TUNINGPRESETBANDMEMORY CLEAR
BASSINPUT
5V 1A
BALANCE
L R
TREBLE LOUDNESS
FLAT
-30dB
DIMMER MODEDISPLAY
SELECT
PHONES
YPAO MIC
SPEAKERS USBA B
DISPLAY
Program TypeINFO
VOL.
TUNEDSTEREOA
Item name
CLASSICSVOL.
,9850TUNEDSTEREO
A
Information
28 En

Listening to DAB radio (R-N803D)
En
glis
hB
AS
IC
OP
ER
AT
ION
DAB (Digital Audio Broadcasting) uses digital signals for clearer sound and more stable reception compared to analog signals. This unit can also receive DAB+ (an upgraded version of DAB) that allows for more stations using MPEG-4 audio codec (AAC+), which has a more efficient transmission method.
Note
This unit supports Band III (174 to 240 MHz) only.
Preparing the DAB tuningBefore tuning in to DAB stations, an initial scan must be performed. When you select the DAB for the first time, the initial scan is performed automatically.To listen to a DAB station, connect the antenna as described in “Connecting the DAB/FM antenna (R-N803D)” (p.13).
1 Press TUNER to select “TUNER” as the input source.
2 Press BAND to select the DAB band.The initial scan starts. During the scan, the progress is displayed on the front display.When the scan is complete, the top of the list of the scanned stations appears on the front display.
Note
• If no DAB radio stations are found by an initial scan, “Not Found” appears on the front display, followed by “Off Air”. Press BAND twice to re-select the DAB band and scan again.
• You can check reception strength of each DAB channel label (p. 31).
• To perform an initial scan again after some DAB radio stations are stored, select “Initiate Scan” (p.46) in the “OPTION” menu. If you perform an initial scan again, the DAB radio stations currently registered to the preset numbers will be cleared.
Selecting a DAB radio station for receptionYou can select a DAB radio station from the stations stored by the initial scan.
1 Press TUNER to select “TUNER” as the input source.
2 Press BAND to select the DAB band.
3 Press TUNING jj / ii to select a DAB radio station.
Note
• “Off Air” appears when the selected DAB radio station is currently not available.
• When the unit is receiving a secondary station, “2” appears next to “DAB”.
Listening to DAB radio (R-N803D)
LINE 1
NET USB
LINE 2 LINE 3
TUNER
PRESET
TUNINGBAND
MEMORY
ENTER
TUNER
BAND
LINE 1
NET USB
LINE 2 LINE 3
TUNER
PRESET
TUNINGBAND
MEMORY
ENTER
TUNING jj / ii
TUNER
BAND
BBC Radio 4VOL.
DAB A
29 En

Listening to DAB radio (R-N803D)
Using preset functionYou can register up to 40 DAB radio stations as presets.Once you have registered stations, you can easily tune in to them by recalling the presets.
Note
You can register up to 40 favorite radio stations each for DAB and FM bands.
Registering a DAB radio stationSelect a DAB radio station and register it to a preset number.
1 Follow “Selecting a DAB radio station for reception” (p.29) to tune into the desired DAB radio station.
2 Press MEMORY.
Note
By holding down MEMORY for more than 3 seconds, you can skip the following steps and automatically register the selected station to an empty preset number (i.e., the preset number following the last preset number used).
3 Press PRESET j / i to select the preset number to which the station will be registered.If you select a preset number to which no station is registered, “Empty” is displayed.If you select a preset number to which a station has already been registered, “Overwrite?” is displayed.
4 Press MEMORY.When registration is complete, the display returns to the original state.
Note
To cancel registration, press RETURN or do not perform any operations for about 30 seconds.
Recalling a preset stationTune into a registered DAB radio station by selecting its preset number.
1 Press TUNER to select “TUNER” as the input source.
2 Press BAND to select the DAB band.
3 Press PRESET j / i to select the desired DAB radio station.
Note
• Preset numbers to which no stations are registered are skipped.• If this unit does not have any preset stations, “No Presets” is
displayed.
Clearing preset DAB radio stationsClear DAB radio stations registered to the preset numbers.
1 Press TUNER to select “TUNER” as the input source.
2 Press BAND to select the DAB band.
3 Press OPTION.
4 Use the cursor keys (B / C) to select “Clear Preset” and press ENTER.
5 Use the cursor keys (B / C) to select a preset DAB radio station to be cleared and press ENTER.If the preset DAB radio station is cleared “Cleared” appears and the next in-use preset number is displayed.
6 Repeat step 5 until all desired preset DAB radio stations are cleared.
7 To exit from the “OPTION” menu, press OPTION.
NET USBTUNER
PRESET
TUNINGBAND
MEMORY
SETUP
HOME
VOLUME
RETURN
ENTER
OPTION
PRESET j / i
OPTION
RETURN
TUNER
BAND
MEMORY
ENTERCursor keys B / C
02:EmptyVOL.
MEMORY A
“Empty” (not in use) or “Overwrite?” (in use)
PRESET:01VOL.
A
30 En

Listening to DAB radio (R-N803D)
En
glis
hB
AS
IC
OP
ER
AT
ION
Displaying the DAB informationThis unit can receive various types of DAB information when it is tuned in to a DAB radio station.
1 Select “TUNER” as the input source and tune into the desired DAB radio station.
2 Press DISPLAY on the front panel.Each time you press the key, the displayed item changes.
About 3 seconds later, the corresponding information appears.
Note
Some information may not be available depending on the selected DAB radio station.
Checking reception strength of each DAB channel labelYou can check reception strength of each DAB channel label (0 [none] to 100 [best]).
1 Press TUNER to select “TUNER” as the input source.
2 Press BAND to select the DAB band.
3 Press OPTION.
4 Use the cursor keys (B / C) to select “Tune Aid” and press ENTER.
5 Use the cursor keys (B / C) to select the desired DAB channel label.
6 To exit from the “OPTION” menu, press OPTION.
Item Information
Service Label Station name
DLS(Dynamic Label Segment)
Information on the station
Ensemble Label Ensemble name
Program Type Station genre
Date and Time Current date and time
Audio Mode Audio mode (monaural/stereo) and bit rate
CH Label/Freq Channel label and frequency
Signal Quality Signal reception quality (0 [none] to 100 [best])
VOLUME
PURE DIRECT
RETURN
CONNECT
PUSH - ENTER
TUNINGPRESETBANDMEMORY CLEAR
BASSINPUT
5V 1A
BALANCE
L R
TREBLE LOUDNESS
FLAT
-30dB
DIMMER MODEDISPLAY
SELECT
PHONES
YPAO MIC
SPEAKERS USBA B
DISPLAY
Program TypeDAB
Item name
SPORTDAB
Information
NET USBTUNER
PRESET
TUNINGBAND
MEMORY
SETUP
HOME
VOLUME
RETURN
ENTER
OPTION
OPTION
TUNER
BAND
ENTERCursor keys B / C
12B Level: 80TUNE AID
DAB channel label Reception strength
31 En
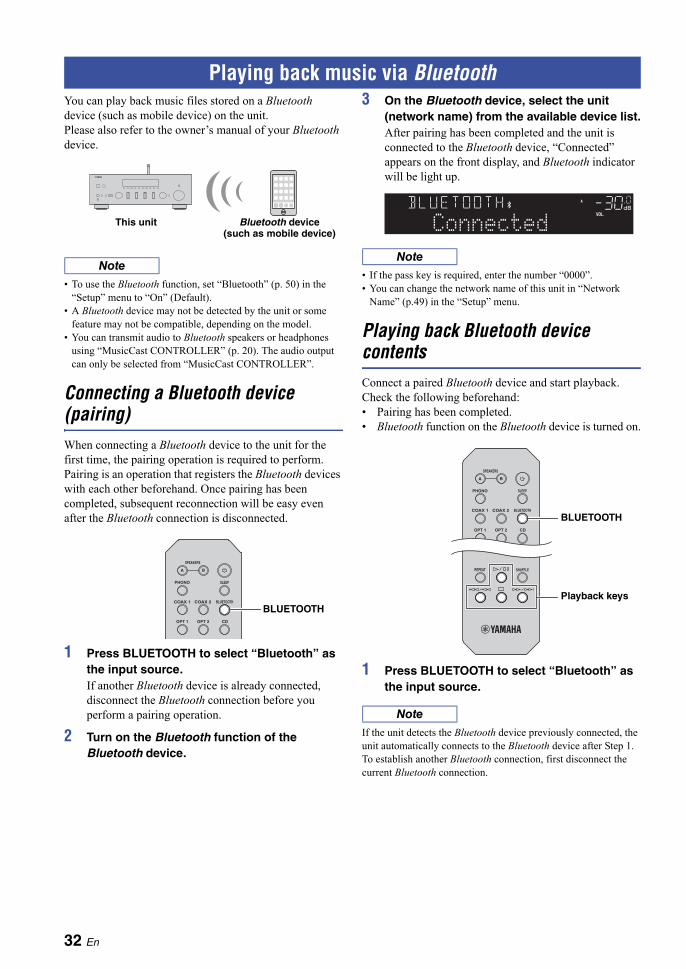
You can play back music files stored on a Bluetooth device (such as mobile device) on the unit.Please also refer to the owner’s manual of your Bluetooth device.
Note
• To use the Bluetooth function, set “Bluetooth” (p. 50) in the “Setup” menu to “On” (Default).
• A Bluetooth device may not be detected by the unit or some feature may not be compatible, depending on the model.
• You can transmit audio to Bluetooth speakers or headphones using “MusicCast CONTROLLER” (p. 20). The audio output can only be selected from “MusicCast CONTROLLER”.
Connecting a Bluetooth device (pairing)When connecting a Bluetooth device to the unit for the first time, the pairing operation is required to perform. Pairing is an operation that registers the Bluetooth devices with each other beforehand. Once pairing has been completed, subsequent reconnection will be easy even after the Bluetooth connection is disconnected.
1 Press BLUETOOTH to select “Bluetooth” as the input source.If another Bluetooth device is already connected, disconnect the Bluetooth connection before you perform a pairing operation.
2 Turn on the Bluetooth function of the Bluetooth device.
3 On the Bluetooth device, select the unit (network name) from the available device list.After pairing has been completed and the unit is connected to the Bluetooth device, “Connected” appears on the front display, and Bluetooth indicator will be light up.
Note
• If the pass key is required, enter the number “0000”.• You can change the network name of this unit in “Network
Name” (p.49) in the “Setup” menu.
Playing back Bluetooth device contentsConnect a paired Bluetooth device and start playback. Check the following beforehand:• Pairing has been completed.• Bluetooth function on the Bluetooth device is turned on.
1 Press BLUETOOTH to select “Bluetooth” as the input source.
Note
If the unit detects the Bluetooth device previously connected, the unit automatically connects to the Bluetooth device after Step 1. To establish another Bluetooth connection, first disconnect the current Bluetooth connection.
Playing back music via Bluetooth
This unit Bluetooth device (such as mobile device)
OPT 1 OPT 2 CD
COAX 1 COAX 2 BLUETOOTH
SLEEPPHONO
BA
SPEAKERS
BLUETOOTH
ConnectedVOL.
BLUETOOTH A
OPT 1 OPT 2 CD
COAX 1 COAX 2 BLUETOOTH
SLEEPPHONO
BA
SPEAKERS
REPEAT SHUFFLE
Playback keys
BLUETOOTH
32 En

Playing back music via Bluetooth
En
glis
hB
AS
IC
OP
ER
AT
ION
2 Operate the Bluetooth device to establish a Bluetooth connection.Select the unit’s model name from the Bluetooth device list on your device.When a connection is established, Bluetooth indicator on the front display will be light up.
Note
If you cannot connect the Bluetooth device, please perform pairing again.
3 Operate the Bluetooth device to play back music.
Note
You can use the playback keys on the remote control to control playback.
Disconnecting a Bluetooth connectionFollow one of the procedures below to disconnect a Bluetooth connection.• Turn off the Bluetooth function on the Bluetooth
device.• Hold down BLUETOOTH on the remote control for at
least 3 seconds.• Select an input source other than “Bluetooth” on the
unit.
Bluetooth• Bluetooth is a technology for wireless communication
between devices within an area of about 10 meters (33 ft) employing the 2.4 GHz frequency band, a band which can be used without a license.
Handling Bluetooth communications• The 2.4 GHz band used by Bluetooth compatible devices is
a radio band shared by many types of equipment. While Bluetooth compatible devices use a technology minimizing the influence of other components using the same radio band, such influence may reduce the speed or distance of communications and in some cases interrupt communications.
• The speed of signal transfer and the distance at which communication is possible differs according to the distance between the communicating devices, the presence of obstacles, radio wave conditions and the type of equipment.
• Yamaha does not guarantee all wireless connections between this unit and devices compatible with Bluetooth function.
33 En
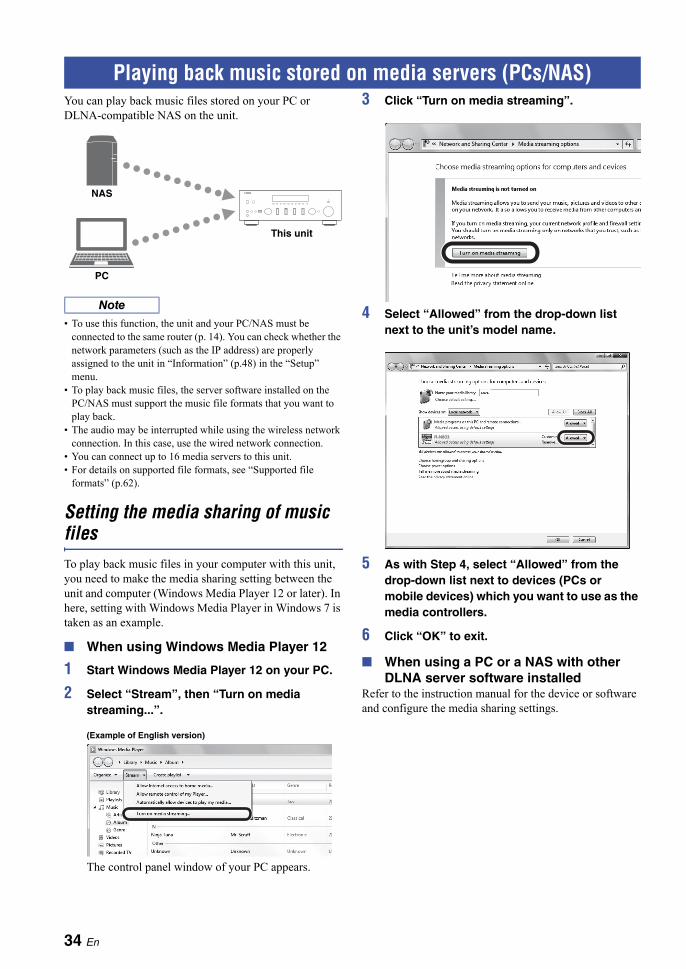
You can play back music files stored on your PC or DLNA-compatible NAS on the unit.
Note
• To use this function, the unit and your PC/NAS must be connected to the same router (p. 14). You can check whether the network parameters (such as the IP address) are properly assigned to the unit in “Information” (p.48) in the “Setup” menu.
• To play back music files, the server software installed on the PC/NAS must support the music file formats that you want to play back.
• The audio may be interrupted while using the wireless network connection. In this case, use the wired network connection.
• You can connect up to 16 media servers to this unit.• For details on supported file formats, see “Supported file
formats” (p.62).
Setting the media sharing of music filesTo play back music files in your computer with this unit, you need to make the media sharing setting between the unit and computer (Windows Media Player 12 or later). In here, setting with Windows Media Player in Windows 7 is taken as an example.
When using Windows Media Player 12
1 Start Windows Media Player 12 on your PC.
2 Select “Stream”, then “Turn on media streaming...”.
The control panel window of your PC appears.
3 Click “Turn on media streaming”.
4 Select “Allowed” from the drop-down list next to the unit’s model name.
5 As with Step 4, select “Allowed” from the drop-down list next to devices (PCs or mobile devices) which you want to use as the media controllers.
6 Click “OK” to exit.
When using a PC or a NAS with other DLNA server software installed
Refer to the instruction manual for the device or software and configure the media sharing settings.
Playing back music stored on media servers (PCs/NAS)
PC
NAS
This unit
(Example of English version)
R-N803
34 En

Playing back music stored on media servers (PCs/NAS)
En
glis
hB
AS
IC
OP
ER
AT
ION
Playback of PC music contentsFollow the procedure below to operate the PC music contents and start playback.
Note
“_” (underscore) will be displayed for characters not supported by the unit.
1 Press NET repeatedly to select “Server” as the input source.
2 Use the cursor keys (B / C) to select a music server and press ENTER.
3 Use the cursor keys to select an item and press ENTER.If a song is selected, playback starts and the playback information is displayed.
Note
• If playback of a music file selected from the unit is ongoing on your PC, the playback information is displayed.
• You can register the current playback song as a preset (p. 41).• If you press the DISPLAY on the front panel repeatedly, you
can switch the playback information on the front display (p. 22).
Use the following remote control keys to control playback.
Note
You can also use a DLNA-compatible Digital Media Controller (DMC) to control playback. For details, see “DMC Control” (p.49).
Repeat/shuffle settingsYou can configure the repeat/shuffle settings for the playback of PC music content.
1 When the input source is “Server,” press REPEAT or SHUFFLE on the playback key repeatedly to select the playback method.
NET USBTUNER
PRESET
TUNINGBAND
MEMORY
SETUP
HOME
MUTENOW PLAYING
VOLUME
RETURN
ENTER
REPEAT SHUFFLE
OPTION
RETURN
OPTION
NOW PLAYING
HOME
ENTER
NET
Playback keys
Cursor keysB / C / D / E
NAS ASERVER A
Song ASERVER A
Keys Function
Cursor keys Select a music file or folder.
ENTER
Starts playback if pressed while content is selected. Moves down one level if pressed while a folder is selected.
RETURN Moves up one level.
Playback keys
p/ e Pauses/resumes playback.
s Stops playback.
b / wSkips forward/backward.
f / a
HOME Displays the root directory of the music server.
NOW PLAYING Displays information about the song that’s playing.
Playback keys
Setting Function
REPEAT
Off Turns off the repeat function.
OnePlays back the current song repeatedly.
AllPlays back all songs in the current album (folder) repeatedly.
SHUFFLE
Off Turns off the shuffle function.
OnPlays back songs in the current album (folder) in random order.
35 En
Playing back music stored on media servers (PCs/NAS)
Automatic playback settingUse this setting to choose whether to automatically play back music from your PC or from the NAS when turning on the unit or when selecting “Server” as the input source.
1 When the input source is “Server”, press OPTION.
2 Use the cursor keys (B / C) to select “Auto Playback” and press ENTER.
3 Use the cursor keys (D / E) to select “On” (enable) or “Off” (disable).
4 To exit from the menu, press OPTION.
36 En

Listening to Internet radio
En
glis
hB
AS
IC
OP
ER
AT
ION
You can listen to Internet radio stations from all over the world.
Note
• To use this function, the unit must be connected to the Internet (p. 14). You can check whether the network parameters (such as the IP address) are properly assigned to the unit in “Information” (p.48) in the “Setup” menu.
• You may not be able to receive some Internet radio stations.• This unit uses the airable.Radio service. airable is a service of
Tune In GmbH.• This service may be discontinued without notice.
1 Press NET repeatedly to select “Net Radio” as the input source.The station list appears on the front display.
2 Use the cursor keys to select an item and press ENTER.If an Internet radio station is selected, playback starts and the playback information is displayed.
Use the following remote control keys to control playback.
Note
• You can register the current playback station as a preset (p. 41).• If you press the DISPLAY on the front panel repeatedly, you
can switch the playback information on the front display (p. 22).• Some information may not be available depending on the
station.
Listening to Internet radio
NET USBTUNER
PRESET
TUNINGBAND
MEMORY
SETUP
HOME
MUTENOW PLAYING
VOLUME
RETURN
ENTER
REPEAT SHUFFLE
OPTION
RETURN
NOW PLAYING
HOME
ENTER
NET
Cursor keysB / C / D / E
Playback keys
RadiosNET RADIO A
Keys Function
Cursor keys Select the Internet radio station or category such as the genre.
ENTER
Starts playback if pressed while an Internet radio station is selected. Moves down one level if pressed while a category is selected.
RETURN Moves up one level.
Playback keys s Stops playback.
HOME Displays the top categories if pressed during playback.
NOW PLAYINGDisplays the playback information for the Internet radio station.
JazzSTNET RADIO A
37 En

The AirPlay function allows you to play back iPhone/iTunes music on the unit via network.
Note
To use this function, the unit and your PC or iPhone must be connected to the same router (p. 14).
Playback of iPhone/iTunes music contentsFollow the procedure below to play back iPhone/iTunes music contents on the unit.
1 Turn on the unit, and start iTunes on the PC or display the playback screen on the iPhone.If the iPhone/iTunes recognizes the unit, the AirPlay icon appears.
Note
If the icon does not appear, check whether the unit and PC/iPhone are connected to the router properly.
2 On the iPhone/iTunes, click (tap) the AirPlay icon and select the unit (network name of the unit) as the audio output device.
3 Select a song and start playback.The unit automatically selects “AirPlay” as the input source and starts playback. The playback information is displayed on the front display.
Note
• If you press the DISPLAY on the front panel repeatedly, you can switch the playback information on the front display (p. 22).
• You can turn on the unit automatically when starting playback on iTunes or iPhone by setting “Standby (Network Standby)” (p.49) in the “Setup” menu to “On”.
• You can edit the network name (the unit’s name on the network) displayed on iPhone/iTunes in “Network Name” (p.49) in the “Setup” menu.
• You can adjust the unit’s volume from the iPhone/iTunes during playback.
CAUTIONAdjusting the volume on iTunes or iPhone may make the volume unexpectedly loud, which could result in damage to your hearing or to the device. If the playback volume is too loud, stop playback immediately on iTunes or iPhone. We recommend using “Volume interlock” (p. 46) in the “Option” menu to limit the changes in volume from iTunes or iPhone.
Use the following remote control keys to control playback.
Playing back iPhone/iTunes music via a network (AirPlay)
AirPlay works with iPhone, iPad, and iPod touch with iOS 4.3.3 or later, Mac with OS X Mountain Lion or later, and Mac and PC with iTunes 10.2.2 or later.(as of June 2017)
PC
iTunes
Router
Playback startsiPhone
Starts playback on iTunes or iPhone
This unit
iTunes (example)iOS10 (example)
Keys Functions
Playback keys
p/ e Pauses/resumes playback.
s Stops playback.
b / wSkips forward/backward.
f / a
REPEAT Changes the Repeat settings.
SHUFFLE Changes the Shuffle settings.
38 En
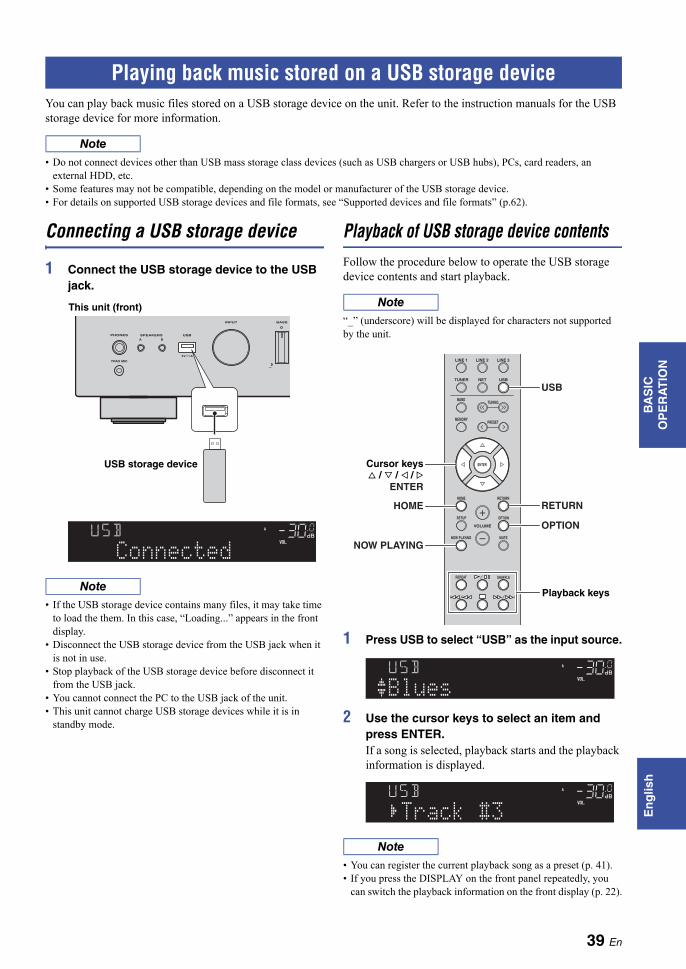
Playing back music stored on a USB storage device
En
glis
hB
AS
IC
OP
ER
AT
ION
You can play back music files stored on a USB storage device on the unit. Refer to the instruction manuals for the USB storage device for more information.
Note
• Do not connect devices other than USB mass storage class devices (such as USB chargers or USB hubs), PCs, card readers, an external HDD, etc.
• Some features may not be compatible, depending on the model or manufacturer of the USB storage device.• For details on supported USB storage devices and file formats, see “Supported devices and file formats” (p.62).
Connecting a USB storage device
1 Connect the USB storage device to the USB jack.
Note
• If the USB storage device contains many files, it may take time to load the them. In this case, “Loading...” appears in the front display.
• Disconnect the USB storage device from the USB jack when it is not in use.
• Stop playback of the USB storage device before disconnect it from the USB jack.
• You cannot connect the PC to the USB jack of the unit.• This unit cannot charge USB storage devices while it is in
standby mode.
Playback of USB storage device contentsFollow the procedure below to operate the USB storage device contents and start playback.
Note
“_” (underscore) will be displayed for characters not supported by the unit.
1 Press USB to select “USB” as the input source.
2 Use the cursor keys to select an item and press ENTER.If a song is selected, playback starts and the playback information is displayed.
Note
• You can register the current playback song as a preset (p. 41).• If you press the DISPLAY on the front panel repeatedly, you
can switch the playback information on the front display (p. 22).
Playing back music stored on a USB storage device
BASSINPUT
5V 1A
PHONES
YPAO MIC
SPEAKERS USBA B
This unit (front)
USB storage device
ConnectedUSB
VOL.
A
LINE 1
NET USB
LINE 2 LINE 3
TUNER
PRESET
TUNINGBAND
MEMORY
SETUP
HOME
MUTENOW PLAYING
VOLUME
RETURN
ENTER
REPEAT SHUFFLE
OPTION
RETURN
OPTION
USB
NOW PLAYING
HOME
ENTER
Playback keys
Cursor keysB / C / D / E
BluesUSB
VOL.
A
Track #3USB
VOL.
A
39 En

Playing back music stored on a USB storage device
Use the following remote control keys to control playback.
Repeat/shuffle settingsYou can configure the repeat/shuffle settings for playback of USB storage device contents.
1 If the input source is “USB,” press REPEAT or SHUFFLE on the playback keys repeatedly to select the playback method.
Automatic playback settingUse this setting to choose whether to automatically play back music from your USB storage device when turning on the unit or when selecting “USB” as the input source.
1 When the input source is “USB”, press OPTION.
2 Use the cursor keys (B / C) to select “Auto Playback” and press ENTER.
3 Use the cursor keys (D / E) to select “On” (enable) or “Off” (disable).
4 To exit from the menu, press OPTION.
Keys Function
Cursor keys Select a music file or folder.
ENTER
Starts playback if pressed while a music file is selected. Moves down one level if pressed while a folder is selected.
RETURN Moves up one level.
Playback keys
p/ e Pauses/resumes playback.
s Stops playback.
b / wSkips forward/backward.
f / a
HOME Displays the root directory of the USB device.
NOW PLAYING Displays information about the song that’s playing.
Playback keys
Setting Function
REPEAT
Off Turns off the repeat function.
OnePlays back the current song repeatedly.
AllPlays back all songs in the current album (folder) repeatedly.
SHUFFLE
Off Turns off the shuffle function.
OnPlays back songs in the current album (folder) in random order.
40 En
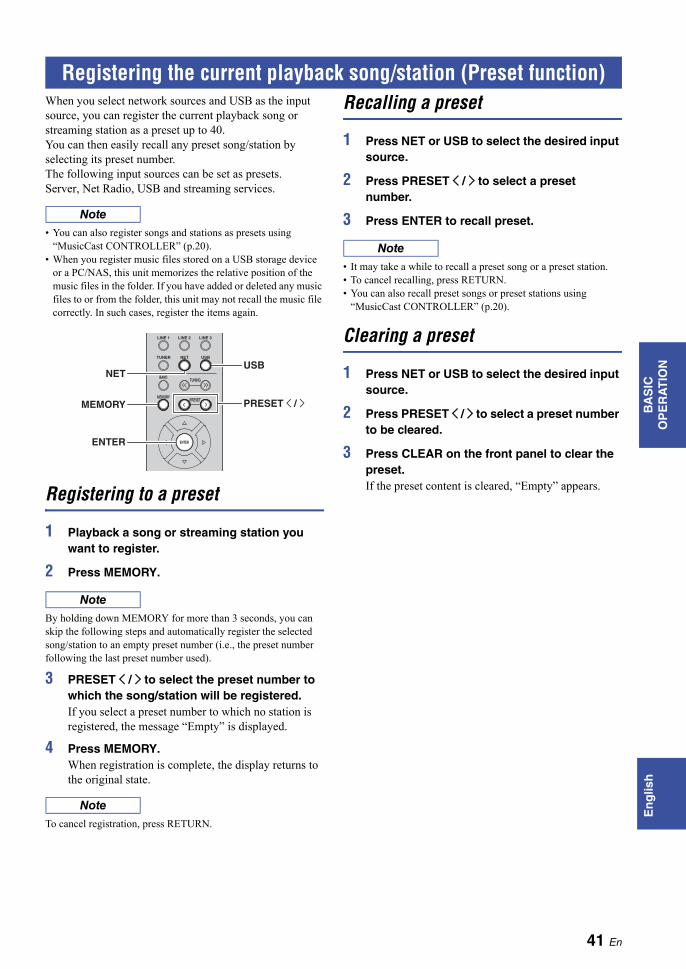
Registering the current playback song/station (Preset function)
En
glis
hB
AS
IC
OP
ER
AT
ION
When you select network sources and USB as the input source, you can register the current playback song or streaming station as a preset up to 40.You can then easily recall any preset song/station by selecting its preset number.The following input sources can be set as presets.Server, Net Radio, USB and streaming services.
Note
• You can also register songs and stations as presets using “MusicCast CONTROLLER” (p.20).
• When you register music files stored on a USB storage device or a PC/NAS, this unit memorizes the relative position of the music files in the folder. If you have added or deleted any music files to or from the folder, this unit may not recall the music file correctly. In such cases, register the items again.
Registering to a preset
1 Playback a song or streaming station you want to register.
2 Press MEMORY.
Note
By holding down MEMORY for more than 3 seconds, you can skip the following steps and automatically register the selected song/station to an empty preset number (i.e., the preset number following the last preset number used).
3 PRESET j / i to select the preset number to which the song/station will be registered.If you select a preset number to which no station is registered, the message “Empty” is displayed.
4 Press MEMORY.When registration is complete, the display returns to the original state.
Note
To cancel registration, press RETURN.
Recalling a preset
1 Press NET or USB to select the desired input source.
2 Press PRESET j / i to select a preset number.
3 Press ENTER to recall preset.
Note
• It may take a while to recall a preset song or a preset station.• To cancel recalling, press RETURN.• You can also recall preset songs or preset stations using
“MusicCast CONTROLLER” (p.20).
Clearing a preset
1 Press NET or USB to select the desired input source.
2 Press PRESET j / i to select a preset number to be cleared.
3 Press CLEAR on the front panel to clear the preset.If the preset content is cleared, “Empty” appears.
Registering the current playback song/station (Preset function)
LINE 1
NET USB
LINE 2 LINE 3
TUNER
PRESET
TUNINGBAND
MEMORY
ENTER
PRESET j / i
USBNET
MEMORY
ENTER
41 En

ADVANCED OPERATION
The Yamaha Parametric room Acoustic Optimizer (YPAO) function detects speaker connections, measures the distances from them to your listening position, and then automatically optimizes the speaker settings, such as volume balance and acoustic parameters, to suit your room.
Note
• The YPAO function of this unit adopts the YPAO-R.S.C. (Reflected Sound Control) technology that enables to create natural sound fields like a room specifically designed for acoustic perfection.
• Note the following regarding YPAO measurement.– Test tones are output at high volume and may surprise or
frighten small children.– Test tone volume cannot be adjusted.– Keep the room as quiet as possible.– Stay in a corner of the room behind the listening position so
that you do not become an obstacle between speakers and the YPAO microphone.
– Do not connect headphones.
1 Press A (power) on the front panel to turn on this unit.
2 Turn on the subwoofer and set the volume to half.If the crossover frequency is adjustable, set it to maximum.
3 Configure the following settings.• Press SPEAKERS A/B on the front panel or
remote control to select the speakers to be used.• Set the BASS control and TREBLE control on the
front panel to 0 (center position).• Set the BALANCE control on the front panel to the
center position.• Set the LOUDNESS control on the front panel to
FLAT (center position). • If Pure Direct is turned on, press PURE DIRECT
on the front panel to turn it off.•
Note
• The speaker settings are individually saved depending on the speaker system (A, B, A+B).
• When using YPAO, select the speaker system (A+B) only for the bi-wire connection. If you select the speaker system (A+B) when connecting other speakers to the SPEAKERS A/B terminals, the measurement will not be performed properly.
Optimizing the speaker settings automatically (YPAO)
LINE 1
OPT 1 OPT 2 CD
COAX 1 COAX 2 BLUETOOTH
NET USB
LINE 2 LINE 3
TUNER
PRESET
TUNINGBAND
MEMORY
SETUP
HOME
MUTENOW PLAYING
VOLUME
RETURN
ENTER
SLEEPPHONO
BA
SPEAKERS
OPTION
RETURN
ENTER
SPEAKERS A/B
Cursor keys B / C / D / E
VOLUME HIGH CUTCROSSOVER/
MIN MAXMIN MAX
SW
BASS TREBLE BALANCE LOUDNESS
PURE DIRECTSPEAKERS A/B
42 En

Optimizing the speaker settings automatically (YPAO)
En
glis
hA
DVA
NC
ED
O
PE
RA
TIO
N
4 Place the YPAO microphone at your listening position and connect it to the YPAO MIC jack on the front panel.
Note
Place the YPAO microphone at your listening position (same height as your ears). We recommend the use of a tripod as a microphone stand. You can use the tripod screws to stabilize the microphone.
The following message appears on the front display.
Note
To cancel the operation, disconnect the YPAO microphone before starting the measurement.
5 To start the measurement, press ENTER.The measurement will start in 10 seconds. It takes about 1 minute to perform the measurement.
Note
To cancel the measurement, press RETURN and then follow the procedure in “Error messages” (p. 44).
“Result Info.” appears on the front display when the measurement finishes.
Note
If “Error Info” appears, press the cursor key (E) to check the error message (p. 44).
6 To check the measurement result, press the cursor key (E).If “No Warning” appears on the front display, the measurement is properly completed.
Note
If any warning message (such as W-1) appears on the front display, see “Warning messages” (p. 45).
7 Press the cursor key (D) or RETURN.
8 To save the measurement results, use the cursor keys (B / C) to select “Save” and press ENTER.To finish the measurement without saving the result, use the cursor keys (B / C) to select “Cancel” and press ENTER.
Note
You can change the YPAO settings (YPAO On/Off and YPAO Volume) in the “Setup” menu (p. 50).
9 Disconnect the YPAO microphone from this unit.
Notice
The YPAO microphone is sensitive to heat, so should not be placed anywhere where it could be exposed to direct sunlight or high temperatures (such as on top of AV equipment).
YPAO MIC
YPAO MIC jack
YPAO microphone at listening position
Ear height
[ENTER]:StartYPAO
Result Info.YPAO( A
No WarningYPAO( A
[ENTER]:SaveYPAO( A
[ENTER]:CancelYPAO( A
Disconnect MICYPAO( A
43 En

Optimizing the speaker settings automatically (YPAO)
Error messagesIf any error message is displayed during the measurement, resolve the problem and perform YPAO again.
Note
After checking the error message, press the cursor key (D) to return to the previous state and follow the procedure below,– To start the measurement again:
Use the cursor keys (B / C) to select “Retry” and press ENTER. Proceed to Step 5 in page 43.– To exit YPAO:
Use the cursor keys (B / C) to select “Exit” and press ENTER.
Error message Cause Remedy
E-1 Noisy The noise is too loud.Keep the room quiet and start the measurement again.
E-2 No Signal The YPAO microphone cannot detect test tones.
Connect the YPAO microphone to the YPAO MIC jack firmly and start the measurement again. If this error occurs repeatedly, contact the nearest authorized Yamaha dealer or service center.
E-3 No MIC The YPAO microphone has been removed.Connect the YPAO microphone to the YPAO MIC jack firmly and start the measurement again.
E-4 User Cancel The measurement has been canceled. Start the measurement again as necessary.
E-5 PHONESThe headphones are connected to the PHONES jack of this unit.
Disconnect the headphones and start the measurement again.
E-10 Internal Error An internal error has occurred.Exit YPAO and then turn off and on this unit. If this error occurs repeatedly, contact the nearest authorized Yamaha dealer or service center.
E-20 No SPEAKERS Speakers are not detected.
Press SPEAKERS A/B to select the speakers to be used and start the measurement again.If this error occurs even when the speakers are properly selected, turn off this unit and check the speaker connections.
E-21 Control KnobThe BASS/TREBLE/BALANCE/LOUDNESS control positions are improper.
Set all the controls to the center position and start the measurement again.
E-22 Pure Direct Pure Direct is turned on.Press PURE DIRECT on the front panel to turn off Pure Direct and start the measurement again.
NoisyYPAO E-1
44 En
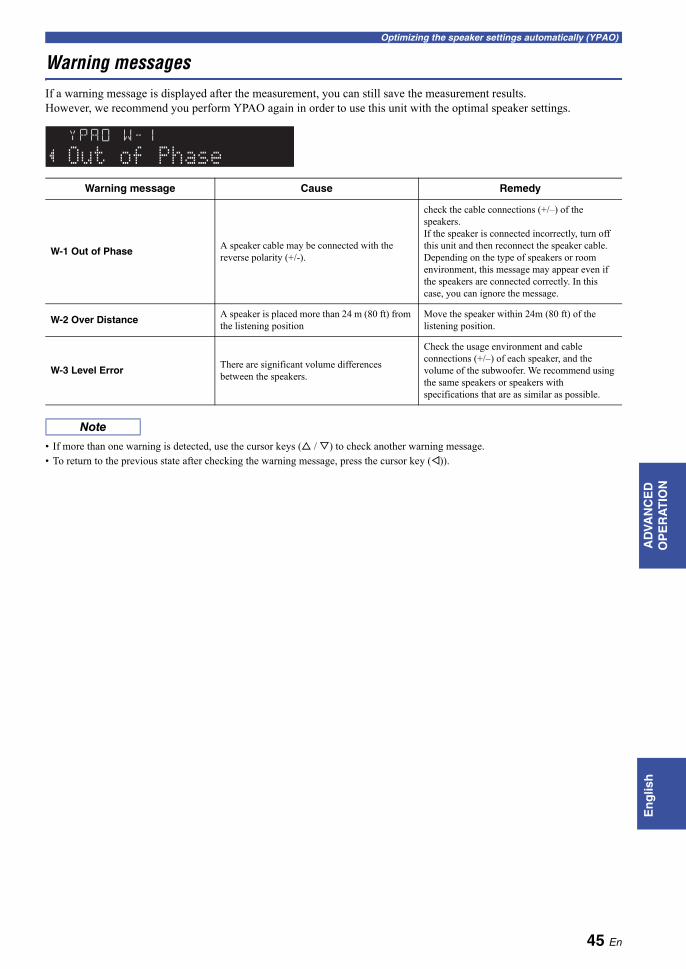
Optimizing the speaker settings automatically (YPAO)
En
glis
hA
DVA
NC
ED
O
PE
RA
TIO
N
Warning messagesIf a warning message is displayed after the measurement, you can still save the measurement results.However, we recommend you perform YPAO again in order to use this unit with the optimal speaker settings.
Note
• If more than one warning is detected, use the cursor keys (B / C) to check another warning message.• To return to the previous state after checking the warning message, press the cursor key (D)).
Warning message Cause Remedy
W-1 Out of PhaseA speaker cable may be connected with the reverse polarity (+/-).
check the cable connections (+/–) of the speakers.If the speaker is connected incorrectly, turn off this unit and then reconnect the speaker cable.Depending on the type of speakers or room environment, this message may appear even if the speakers are connected correctly. In this case, you can ignore the message.
W-2 Over DistanceA speaker is placed more than 24 m (80 ft) from the listening position
Move the speaker within 24m (80 ft) of the listening position.
W-3 Level ErrorThere are significant volume differences between the speakers.
Check the usage environment and cable connections (+/–) of each speaker, and the volume of the subwoofer. We recommend using the same speakers or speakers with specifications that are as similar as possible.
Out of PhaseYPAO W-1
45 En

You can configure separate playback settings for different playback sources. This menu allows you to easily configure settings during playback.
1 Press OPTION.
2 Use the cursor keys to select an item and press ENTER.
Note
To return to the previous state during menu operations, press RETURN.
3 Use the cursor keys (D / E) to select a setting.
4 To exit from the menu, press OPTION.
Option menu items
Note
Available items vary depending on the selected input source.
Volume TrimCorrects volume differences between input sources. If you are bothered by volume differences when switching between input sources, use this function to correct it.
Note
This setting is applied separately to each input source.
Setting range-10.0 dB to 0.0 dB to +10.0 dB (0.5 dB increments)
Default0.0 dB
Signal Info.Displays information about audio signal.
Choices
Note
To switch the information on the front display, press the cursor keys (B / C) repeatedly.
Vol.Interlock (Volume interlock)Enables/disables volume controls from iPhone/iTunes via AirPlay.
Settings
Configuring playback settings for different playback sources (Option menu)
Item Function Page
Volume TrimCorrects volume differences between input sources.
46
Signal Info.Displays information about the audio signal.
46
Auto PresetAutomatically registers FM radio stations with strong signals as presets.
25
Clear PresetClears radio stations registered to preset numbers.
27
Initiate Scan(R-N803D only)Performs an initial scan for DAB radio reception.
29
Tune Aid(R-N803D only)Checks reception strength of each DAB channel label.
31
PRESETMEMORY
SETUP
HOME
MUTENOW PLAYING
VOLUME
RETURN
ENTER
OPTION
RETURN
OPTION
ENTER
Cursor keysB / C / D / E
Volume TrimOPTION
VOL.
A
Vol.Interlock(Volume interlock)
Enables/Disables volume controls from iPhone/iTunes via AirPlay.
46
Auto Playback
Selects whether to automatically play back music from your PC/NAS or USB storage device when the unit is turned on or when the corresponding input source is selected.
36, 40
FORMAT Audio format of the input signal
SAMPLINGThe number of samples per second of the input digital signal
Off Disables volume controls from iPhone/iTunes.
Ltd (Default)
Enables volume controls from iPhone/iTunes within the limited range (-80.0 dB to -20.0 dB and mute).
FullEnables volume controls from iPhone/iTunes in the full range (-80.0 dB to +16.5 dB and mute).
Item Function Page
46 En

Configuring various functions (Setup menu)
En
glis
hA
DVA
NC
ED
O
PE
RA
TIO
N
You can configure the unit’s various functions.
1 Press SETUP.
2 Use the cursor keys (B / C) to select a menu item and press ENTER.
3 Use the cursor keys (D / E) to select a setting and press ENTER.
Note
To return to the previous state during menu operations, press RETURN.
4 To exit from the menu, press SETUP.
Configuring various functions (Setup menu)
PRESETMEMORY
SETUP
HOME
MUTENOW PLAYING
VOLUME
RETURN
ENTER
OPTION
RETURN
SETUP
ENTER
Cursor keysB / C / D / E
NetworkSETUP
VolumeSETUP
Max VolumeVOLUME
+16.5dBMAX VOL
47 En

Configuring various functions (Setup menu)
Setup menu items
NetworkConfigures the network settings.
ConnectionSelects the network connection method.
Note
When this unit is in the MusicCast extended mode, “Extend” is displayed. For details on the extended mode, refer to “MusicCast Setup Guide” on the Yamaha website.
InformationDisplays the network information on the unit.
Menu item Function Page
Network
Connection Selects the network connection method. 48
Information Displays the network information on the unit. 48
IP Address Configures the network parameters (such as IP address). 49
DMC ControlSelects whether to allow a DLNA-compatible Digital Media Controller (DMC) to control playback.
49
Standby(Network Standby)
Selects whether to enable/disable the function that turns on the unit from other network devices.
49
Network NameEdits the network name (the unit’s name on the network) displayed on other network devices.
49
Update (Network Update) Updates the firmware via the network. 50
Bluetooth
On/Off Enables/disables the Bluetooth functions. 50
Standby (Bluetooth Standby)
Selects whether to enable/disable the function that turns on the unit from Bluetooth devices (Bluetooth standby).
50
YPAO(Speaker A, Speaker B, Speaker A+B)
YPAO On/Off Enables/disables the reflection of the YPAO measurement. 50
VOL(YPAO Volume)
Enables/disables the YPAO volume function. 50
VolumeMax Volume Sets the maximum volume to prevent excessive loudness. 50
Initial Volume Sets the initial volume for when this receiver is turned on. 50
AutoPowerStdby(Auto Power Standby)
Sets the amount of time for the auto standby function. 51
ECO Mode Enables/disables the eco mode (power saving mode). 51
WiredSelect this option when you want to connect the unit to a network with a commercially-available network cable (p. 14).
WirelessSelect this option when you want to connect the unit to a network via the wireless router or access point (p. 16).
WirelessDirect
Select this option when you want to connect a mobile device to the unit directly. For details on settings, see “Connecting a mobile device to the unit directly (Wireless Direct)” (p. 19).
NEW FW Available
Appears if an update for this unit’s firmware is available (p. 54).
STATUS The connection status of the network.
MC NETStatus of the MusicCast Network. If “Ready” appears, you can use the MusicCast CONTROLLER app.
MAC
Displays MAC address of the unit. MAC address will vary depending on the connection method (wired LAN connection or wireless LAN / Wireless Direct connection).
SSID(When using wireless LAN connection or Wireless Direct) The SSID of this unit on the wireless network.
IP IP address
SUBNET Subnet mask
GATEWAY The IP address of the default gateway
DNS P The IP address of the primary DNS server
DNS S The IP address of the secondary DNS server
48 En

Configuring various functions (Setup menu)
En
glis
hA
DVA
NC
ED
O
PE
RA
TIO
N
IP AddressConfigures the network parameters (such as IP address).
DHCPSelect whether to use a DHCP server.
Manual network settings
1 Set “DHCP” to “Off”.
2 Use the cursor keys (B / C) to select a parameter type.
3 Use the cursor keys (D / E) to select the edit position.
(Example: IP address setting)
Use the cursor keys (D / E) to switch between segments (Address1, Address2...) of the address.
4 Use the Cursor keys (B / C) to change a value.
5 To exit from the menu, press SETUP.
DMC ControlSelects whether to allow DLNA-compatible Digital Media Controller (DMC) to control playback.
Note
A Digital Media Controller (DMC) is a device that can control other network devices through the network. When this function is enabled, you can control playback of the unit from DMCs (such as Windows Media Player 12) on the same network.
Standby (Network Standby)Selects whether the unit can be turned on from other network devices (network standby).
Network NameEdits the network name (the unit’s name on the network) displayed on other network devices.
1 Select “Network Name” and press ENTER.
2 Press ENTER twice to enter the name edit display.
3 Use the cursor keys (D / E) to move the edit position and the cursor keys (B / C) to select a character.
You can insert / delete a character, by pressing PRESET i (insert) or PRESET j (delete).
4 To confirm the new name, press ENTER.
5 To exit from the menu, press SETUP.
OffDoes not use a DHCP server. Configure the network parameters manually. For details, see “Manual network settings”.
On (Default)Uses a DHCP server to automatically obtain the unit’s network parameters (such as IP address).
IP Specifies an IP address.
SUBNET Specifies a subnet mask.
GATEWAY Specifies the IP address of the default gateway.
DNS PSpecifies the IP address of the primary DNS server.
DNS SSpecifies the IP address of the secondary DNS server.
Disable Does not allow DMCs to control playback.
Enable (Default)
Allows DMCs to control playback.
Address1•••192IP
Off Disables the network standby function.
OnEnables the network standby function. (The unit consumes more power than when “Off” is selected.)
Auto (Default)
Enables the network standby function. The unit is set to the power saving mode when the unit is disconnected from the network.
With an advanced energy saving design, this product achieves a low power consumption of not more than two watts when in Network Standby mode.
Network NameNETWORK
R-N803 XXXXXXNET NAME
R-N803 XXXXXXNET NAME
49 En

Configuring various functions (Setup menu)
Update (Network Update)Updates the firmware via the network.
BluetoothConfigures the Bluetooth settings.
On/OffEnables/disables the Bluetooth function (p. 32).
Standby (Bluetooth Standby)Selects whether to enable/disable the function that turns on the unit from Bluetooth devices (Bluetooth standby). If this function is set to “On”, the unit automatically turns on when a connect operation (p. 32) is performed on the Bluetooth device.
Note
This setting is not available when “Standby (Network Standby)” (p. 49) is set to “Off”.
YPAOConfigures the setting related to YPAO.The following settings are available for each speaker system (Speaker A, Speaker B, Speaker A+B).
Note
The corresponding speaker system and following settings will be selectable after the YPAO measurement result is saved.
YPAO On/OffEnables/disables the reflection of the YPAO measurement.
VOL (YPAO Volume)Enables/disables the YPAO volume function. When the YPAO Volume function is enabled, the high- and low-frequency levels are automatically adjusted according to the volume so that you can enjoy natural sounds even at low volume.
Note
• The YPAO Volume function is disabled when “YPAO On/Off” is set to “Off”.
• When the YPAO volume function is enabled, the YPAO VOL. indicator on the front display lights up.
• The LOUDNESS control (p. 24) does not function when the YPAO Volume function is enabled.
VolumeConfigures the volume-related settings.
Max VolumeSets the maximum volume to prevent excessive loudness.
Setting range-30 dB to +15.0 dB / +16.5 dB (5 dB step)
Default+16.5 dB
Initial VolumeSets the initial volume when the receiver is turned on.
Setting rangeOff, Mute, -80.0 dB to +16.5 dB (0.5 dB Step)
DefaultOff
Perform Update
Starts the process to update the unit’s firmware. For details, see “Updating the unit’s firmware via the network” (p. 54).
VersionDisplays the version of the firmware installed on the unit.
ID Displays the system ID number.
Off Disables the Bluetooth function.
On (Default)Enables the Bluetooth function. Immediately after selecting the “On”, output of the network source is paused.
Off Disables the Bluetooth standby function.
On (Default)Enables the Bluetooth standby function. (The unit consumes more power than when “Off” is selected.)
Off Disables the reflection of the YPAO measurement.
On (Default) Enables the reflection of the YPAO measurement.
Off Disables the YPAO Volume function.
On (Default) Enables the YPAO Volume function.
50 En

Configuring various functions (Setup menu)
En
glis
hA
DVA
NC
ED
O
PE
RA
TIO
N
AutoPowerStdby (Auto Power Standby)Enables/disables the auto-standby function. If you do not operate the unit for the specified time, the unit will automatically go into standby mode.
DefaultU.K. and Europe models: OnOther models: Off
Note
Just before the unit enters standby mode, “AutoPowerStdby” appears and then countdown starts in the front display.
ECO ModeEnables/disables the eco (power saving) mode. When the eco mode is enabled, you can reduce the unit’s power consumption.The new setting will take effect after the unit is restarted. Be sure to press ENTER to restart the unit after selecting a setting.
Note
When “ECO Mode” is set to “On”, the front display may become dark.
OffDoes not set the unit to standby mode automatically.
On
Sets the unit to standby mode automatically. While NET, BLUETOOTH or USB is selected as the input source, the unit will switch to standby mode if the selected source is not played back for 20 minutes.For all input sources, the unit will switch to standby mode if it is not operated for 8 hours.
Off (Default)
Disables the eco mode.
On Enables the eco mode.
51 En

Configure the system settings of the unit using the front panel controls.
1 Press A (power) to turn off the unit.
2 While holding down RETURN, press A (power).
3 Rotate SELECT/ENTER to select an item.
4 Press SELECT/ENTER to select a setting.
5 Press A (power) to set the unit to turn off and turn it on again.The new settings take effect.
ADVANCED SETUP menu items
Checking the firmware version (VERSION)
Check the version of firmware currently installed on the unit.
Note
• You can also check the firmware version in “Update (Network Update)” (p. 50) in the “Setup” menu.
• It may take a while until the firmware version is displayed.
Changing the speaker impedance setting (SP IMP.)
Change the unit’s speaker impedance settings depending on the impedance of the speakers connected.
Settings
Selecting the remote control ID (REMOTE ID)
Change the unit’s remote control ID so that it matches the remote control’s ID.Select “ID1” normally. Select “AUTO” only when you use the remote control supplied with some Yamaha player.
SettingsID1 (Default), AUTO
Configuring the system settings (ADVANCED SETUP menu)
Item Function Page
VERSIONChecks the version of firmware currently installed on the unit.
52
SP IMP.Changes the speaker impedance setting.
52
REMOTE ID Selects the unit’s remote control ID. 52
TU(Asia and General models only)Sets tuner frequency step.
53
INIT Restores the default settings. 53
UPDATE Updates the firmware. 53
VOLUME
PURE DIRECT
RETURN
CONNECT
PUSH - ENTER
TUNINGPRESETBANDMEMORY CLEAR
BASSINPUT
5V 1A
BALANCE
L R
TREBLE LOUDNESS
FLAT
-30dB
DIMMER MODEDISPLAY
SELECT
PHONES
YPAO MIC
SPEAKERS USBA B
A (power)
SELECT/ENTER
RETURN
DISPLAY
4 MINSelect this option when you connect speakers with an impedance of 4 ohms to less than 8 ohms to the unit.
8 MIN(Default)
Select this option when you connect speakers with an impedance of 8 ohms or more to the unit.
VERSION••xx.xx
SP IMP.••8¬MIN
REMOTE ID••ID1
52 En

Configuring the system settings (ADVANCED SETUP menu)
En
glis
hA
DVA
NC
ED
O
PE
RA
TIO
N
Setting tuner frequency step (TU)
(Asia and General models only)Selects the step size for locating tuner frequencies.
SettingsFM100/AM10, FM50/AM9 (Default)
Restoring the default settings (INIT)
Restores the default settings for the unit.
Choices
Updating the firmware (UPDATE)
New firmware that provides additional features or product improvements will be released as needed. If the unit is connected to the Internet, you can download the firmware via the network. For details, refer to the information supplied with updates.
Firmware update procedureDo not perform this procedure unless firmware update is necessary. Also, make sure you read the information supplied with updates before updating the firmware.
1 Press SELECT/ENTER repeatedly to select “USB” or “NETWORK” and press DISPLAY to start firmware update.
Choices
Note
If the unit detects newer firmware over the network, “NEW FW Available” appears as the “Information” menu item in “Network”. In this case, you can also update the unit’s firmware by following the procedure in “Updating the unit’s firmware via the network” (p. 54).
ALL Restores the default settings for the unit.
NETWORK
Initialize all of the network, Bluetooth and USB settings. When performing the initialization, the preset (p. 41) registered by NET/USB input will be cleared.
CANCEL Does not perform an initialization.
TU••••FM50/AM9
INIT••••CANCEL
USB Update the firmware using a USB memory device.
NETWORK Update the firmware via the network.
UPDATE•NETWORK
53 En

New firmware that provides additional features or product improvements will be released as needed. If the unit is connected to the Internet, you can download the firmware via the network and update it.
Note
You can also update the firmware using the USB memory device from the “ADVANCED SETUP” menu (p. 53).
1 Press SETUP.
2 Use the cursor keys (B / C) to select “Network” and press ENTER.
3 Use the cursor keys (B / C) to select “Information” and press ENTER.If new firmware is available, “NEW FW Available” appears on the front display.
4 Press RETURN to return the previous state.
5 Use the cursor keys (B / C) to select “Update” and press ENTER.
6 To start the firmware update, press ENTER.The unit to restart and the firmware update starts.
Note
To cancel the operation without updating the firmware, press SETUP.
7 If “UPDATE SUCCESS” appears on the front display, press A (power) on the front panel.
The firmware update is complete.
Notification of new firmware update
When new firmware is available on the network, “NEW FW” will be displayed on the front display for a short period of time when the unit is turned on.
To update the firmware, press ENTER (as described in Step 6) while the notification is displayed. If “UPDATE SUCCESS” appears on the front display, press A (power) on the front panel to turn off the unit.
Updating the unit’s firmware via the network
• Do not operate the unit or disconnect the power cable or network cable during firmware update. Firmware update takes about 5 minutes or more (depending on your Internet connection speed).
• If the unit is connected to the wireless network via a wireless network adapter, network update may not be possible depending on the condition of the wireless connection. In this case, update the firmware using the USB memory device (p. 53).
Notice
PRESETMEMORY
SETUP
HOME
MUTENOW PLAYING
VOLUME
RETURN
ENTER
OPTION
RETURN
SETUP
ENTER
Cursor keysB / C
AvailableNEW FW
Perform UpdateUPDATE
Update [ENTER]NEW FW
54 En

En
glis
hA
DD
ITIO
NA
L
INF
OR
MA
TIO
N
ADDITIONAL INFORMATION
Refer to the chart below if this unit does not function properly. If the problem you are experiencing is not listed below or if the instructions below do not help, set this unit to standby mode, disconnect the power cable, and contact the nearest authorized Yamaha dealer or service center.
General
Troubleshooting
Problem Possible cause RemedySee
page
The power does not turn on.
The protection circuitry has been activated three times consecutively. If the unit is in this condition, the power indicator on the front panel blinks when you try to turn on the power.
As a safety precaution, capability to turn on the power is disabled. Contact your nearest Yamaha dealer or service center to request repair. —
The power cord is not connected or the plug is not completely inserted.
Connect the power cord firmly.—
The protection circuitry has been activated because of a short circuit, etc.
Check that the speaker wires are not touching each other and then turn the power of this unit back on.
11
The internal microcomputer has frozen, due to an external electric shock (such as lightning or excessive static electricity) or to a drop in the power supply voltage.
Press A (power) on the front panel to turn off the unit and turn it on again after at least 15 seconds elapse. (If the problem persists, disconnect the power cable from the AC wall outlet and plug it again.)
—
The power does not turn off.
The internal microcomputer has frozen, due to an external electric shock (such as lightning or excessive static electricity) or to a drop in the power supply voltage.
Press A (power) on the front panel to turn off the unit and turn it on again after at least 15 seconds elapse. (If the problem persists, disconnect the power cable from the AC wall outlet and plug it again.)
—
No sound. Incorrect input or output cable connections.
Connect the cables properly. If the problem persists, the cables may be defective.
10
No appropriate input source has been selected.
Select an appropriate input source with the INPUT selector on the front panel (or one of the input selection key on the remote control).
22
The SPEAKERS A/B switches are not set properly.
Turn on the corresponding SPEAKERS A or SPEAKERS B.
22
Speaker connections are not secure. Secure the connections. 10
Output has been muted. Turn off the mute. 8
Headphones are connected to the PHONES jack.
Disconnect the headphones.5
The Max volume or Initial volume setting is set too low.
Check the settings for “Max Volume” and “Initial Volume” in the “Setup” menu.
50
The component corresponding to the selected input source is turned off or is not playing.
Turn the component on and make sure it is playing.—
The audio output of a device connected to a digital audio input (COAXIAL/OPTICAL jacks) is set to other than PCM.
Set the audio output of the connected device to PCM.—
55 En

Troubleshooting
Remote control
The sound suddenly goes off.
The protection circuitry has been activated because of a short circuit, etc.
Set the speaker impedance to match your speakers. 52
Check that the speaker wires are not touching each other and then turn the power of this unit back on.
11
This unit has become too hot. Make sure the openings on the top panel are not blocked.
—
The auto power standby function has turned this unit off.
Change the auto power standby (“AutoPowerStdby” in the “Setup” menu) to turn off.
51
Only the speaker on one side can be heard.
Incorrect cable connections. Connect the cables properly. If the problem persists, the cables may be defective.
10
Incorrect setting for the speaker balance. Set the BALANCE control to the appropriate position.
23
There is a lack of bass and no ambience.
The + and – wires are connected in reverse at the amplifier or the speakers.
Connect the speaker wires to the correct + and – phase.
11
A “humming” sound can be heard.
Incorrect cable connections. Connect the audio plugs firmly. If the problem persists, the cables may be defective.
10
No connection from the turntable to the GND terminal.
Make the GND connection between the turntable and this unit.
10
The volume level is low while playing a record.
The record is being played on a turntable with an MC cartridge.
The turntable should be connected to this unit through the MC head amplifier. —
The sound is degraded when listening with the headphones connected to the CD player or the tape deck connected to this unit.
The power of this unit is turned off, or this unit is set to standby mode.
Turn on the power of this unit.
—
The sound level is low.
The loudness control function is operating.
Turn down the volume, set the LOUDNESS control to the FLAT position, and then adjust the volume again.
24
Problem Possible cause RemedySee
page
The remote control does not work nor function properly.
Wrong distance or angle. The remote control will function within a maximum range of 6 m (20 ft) and no more than 30 degrees off-axis from the front panel.
9
Direct sunlight or lighting (from an inverter type of fluorescent lamp, etc.) is striking the remote control sensor of this unit.
Reposition this unit.
—
The batteries are weak. Replace all batteries. 9
Problem Possible cause RemedySee
page
56 En
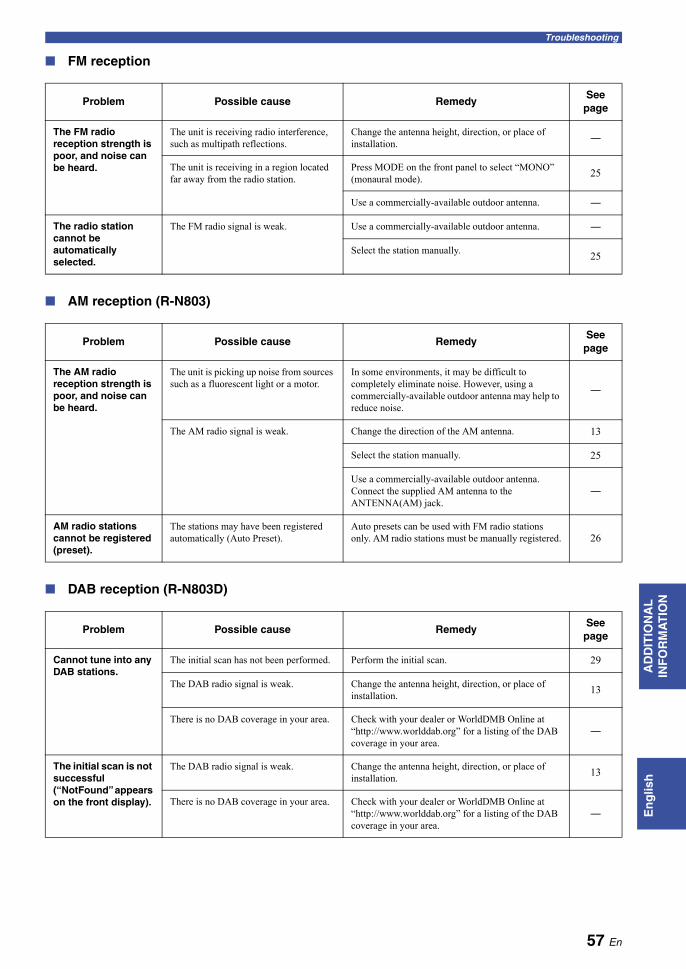
Troubleshooting
En
glis
hA
DD
ITIO
NA
L
INF
OR
MA
TIO
N
FM reception
AM reception (R-N803)
DAB reception (R-N803D)
Problem Possible cause RemedySee
page
The FM radio reception strength is poor, and noise can be heard.
The unit is receiving radio interference, such as multipath reflections.
Change the antenna height, direction, or place of installation.
―
The unit is receiving in a region located far away from the radio station.
Press MODE on the front panel to select “MONO” (monaural mode).
25
Use a commercially-available outdoor antenna. ―
The radio station cannot be automatically selected.
The FM radio signal is weak. Use a commercially-available outdoor antenna. ―
Select the station manually.25
Problem Possible cause RemedySee
page
The AM radio reception strength is poor, and noise can be heard.
The unit is picking up noise from sources such as a fluorescent light or a motor.
In some environments, it may be difficult to completely eliminate noise. However, using a commercially-available outdoor antenna may help to reduce noise.
―
The AM radio signal is weak. Change the direction of the AM antenna. 13
Select the station manually. 25
Use a commercially-available outdoor antenna. Connect the supplied AM antenna to the ANTENNA(AM) jack.
―
AM radio stations cannot be registered (preset).
The stations may have been registered automatically (Auto Preset).
Auto presets can be used with FM radio stations only. AM radio stations must be manually registered. 26
Problem Possible cause RemedySee
page
Cannot tune into any DAB stations.
The initial scan has not been performed. Perform the initial scan. 29
The DAB radio signal is weak. Change the antenna height, direction, or place of installation.
13
There is no DAB coverage in your area. Check with your dealer or WorldDMB Online at “http://www.worlddab.org” for a listing of the DAB coverage in your area.
―
The initial scan is not successful (“NotFound” appears on the front display).
The DAB radio signal is weak. Change the antenna height, direction, or place of installation.
13
There is no DAB coverage in your area. Check with your dealer or WorldDMB Online at “http://www.worlddab.org” for a listing of the DAB coverage in your area.
―
57 En

Troubleshooting
Bluetooth
The DAB radio reception strength is poor, and noise (such as hiss, crackle and jitter) can be heard.
The DAB radio signal is weak. Change the antenna height, direction, or place of installation.
13
The DAB information cannot be displayed or is inaccurate.
The DAB station may be temporarily out of service, or the DAB station information is not provided by the DAB broadcaster.
Contact the DAB broadcaster.
―
Problem Possible cause RemedySee
page
The unit cannot connect to a Bluetooth device.
The Bluetooth function is disabled. In the “Setup” menu, set “Bluetooth (On/Off)” to “On”.
50
The unit is connected to a different Bluetooth device.
Disconnect the current Bluetooth connection and connect with the desired Bluetooth device.
33
The unit is too far from the Bluetooth device.
Move the Bluetooth device closer to this unit.―
A device emitting electromagnetic waves (such as a microwave oven and a wireless device) may be located nearby.
Do not use this unit near devices that emit electromagnetic waves. ―
The Bluetooth device does not support the A2DP protocol.
Use a Bluetooth device that supports the A2DP protocol.
62
The connection profile registered in the Bluetooth device may not be functioning correctly for some reason.
Delete the connection profile in the Bluetooth device, and then connect the Bluetooth device to this unit.
32
The passkey on the Bluetooth adapter or other device may be set to a code besides “0000”.
Use a Bluetooth device on which the passkey is set to “0000”. ―
No sound can be heard, or the sound cuts off intermittently.
The volume on the Bluetooth device is too low.
Raise the volume on the Bluetooth device.―
The sound output on the Bluetooth device may not be set to this unit.
Select this unit as the output destination on the Bluetooth device.
32
The connection to the Bluetooth device is cut off.
Reconnect with the Bluetooth device.32
The unit is too far from the Bluetooth device.
Move the Bluetooth device closer to this unit.―
A device emitting electromagnetic waves (such as a microwave oven and a wireless device) may be located nearby.
Do not use this unit near devices that emit electromagnetic waves. ―
Problem Possible cause RemedySee
page
58 En

Troubleshooting
En
glis
hA
DD
ITIO
NA
L
INF
OR
MA
TIO
N
USB/network
Problem Possible cause RemedySee
page
The unit does not detect the USB storage device.
The USB storage device is not connected to the USB jack securely.
Turn off the unit, reconnect your USB device, and turn the unit on again.
39
The file system of the USB storage device is not FAT16 or FAT32.
Use a USB storage device with FAT16 or FAT32 format.
62
Folders and files in the USB device cannot be viewed.
The data in the USB storage device is protected by the encryption.
Use a USB storage device without an encryption function. 62
The network function cannot be used.
The network information (IP address) has not been properly acquired.
Enable the DHCP server function on your router and set “DHCP” in the “Setup” menu to “On” on the unit. If you want to configure the network parameters manually, make sure that the IP address of this unit is different from that of other devices on the network.
49
The unit cannot connect to the Internet via wireless LAN router (access point).
The wireless LAN router (access point) is turned off.
Turn on the wireless LAN router (access point).―
The unit is too far from the wireless LAN router (access point).
Set up this unit closer to the wireless LAN router (access point).
―
There is an object blocking the signal path between this unit and the wireless LAN router (access point).
Set up this unit so that there is a clear signal path between this unit and the wireless LAN router (access point).
―
A wireless network cannot be found.
A device emitting electromagnetic waves (such as a microwave oven and a wireless device) may be located nearby.
When connecting wirelessly, do not use this unit near devices that emit electromagnetic waves. ―
Access to the network is restricted, due to a firewall on the wireless LAN router (access point).
Check the firewall settings of the wireless LAN router (access point). ―
The PC (server) cannot be detected.
The media sharing settings on the PC (server) is incorrect.
Change the media sharing settings so that this unit can access the folder on the PC (server).
34
Access is restricted due to the security settings on the PC (server) or router.
Check the security settings on the computer (server) and wireless LAN router (access point).
―
This unit and the PC (server) are not connected to the same network.
Check the network and router settings, to make sure that they are connected to the same network.
―
The files on the PC (server) cannot be viewed (played back).
The file format may not be compatible with this unit or with the PC (server).
Use a file format that is compatible with this unit and with the PC. For details on supported file formats, see “Supported file formats”.
62
Internet radio cannot be played.
The selected Internet radio station is currently not available.
There may be a network problem at the radio station, or the service may have been stopped. Try the station later or select another station.
―
The selected Internet radio station is currently broadcasting silence.
Some Internet radio stations broadcast silence at certain of times of the day. Try the station later or select another station.
―
Access to the network is restricted due to the firewall settings on a network device, such as a wireless LAN router (access point).
Check the firewall settings of your network devices. The Internet radio can be played only when it passes through the port designated by each radio station. The port number varies depending on the radio station.
―
59 En

Troubleshooting
This unit cannot be detected when using AirPlay on an iPhone.
A wireless LAN router (access point) that supports multiple SSIDs is used.
The network separator function on the wireless LAN router (access point) may be preventing this unit from being accessed. When connecting to this unit with an iPhone, use an SSID on which this unit can be accessed (try connecting via the primary SSID).
―
The unit is not detected when using a dedicated application on a mobile device.
This unit and the mobile device are not connected to the same network.
Check the network and router settings, to make sure that they are connected to the same network.
―
A wireless LAN router (access point) that supports multiple SSIDs is used.
The network separator function on the wireless LAN router (access point) may be preventing this unit from being accessed. When connecting to this unit with a mobile device, use an SSID on which this unit can be accessed (try connecting via the primary SSID).
―
Firmware update via the network is failed.
The network connection is no good. Try connecting again after a while, or a USB storage device to update the firmware.
53
The unit cannot connect to the wireless LAN router (access point).
MAC address filtering is enabled on the wireless LAN router (access point).
This unit cannot connect to the wireless LAN router (access point) if its MAC address filtering is enabled. Change the settings on the wireless LAN router (access point) to allow this unit to connect.
―
Problem Possible cause RemedySee
page
60 En

Error indications on the front display
En
glis
hA
DD
ITIO
NA
L
INF
OR
MA
TIO
N
Error indications on the front display
Message Possible cause Remedy
Access denied Access to the PC is denied. Configure the sharing settings and select the unit as a device to which music contents are shared (p. 34).
Access error The unit cannot access the USB device. Turn off the unit and reconnect your USB device. If the problem persists, try another USB device.
The unit cannot access the iPod. Turn off the iPod and turn it on again.
The connected iPod is not supported by the unit.
Use an iPod supported by the unit (p. 62).
There is a problem with the signal path from the network to the unit.
Make sure your router and modem are turned on.
Check the connection between the unit and your router (or hub) (p. 14).
Check SP Wires The speaker cables short circuit. Twist the bare wires of the cables firmly and connect to the unit and speakers properly.
No content There are no playable files in the selected folder.
Select a folder that contains files supported by the unit.
Please wait The unit is preparing for connecting to the network.
Wait until the message disappears. If the message stays more than 3 minutes, turn off the unit and turn it on again.
Unable to play The unit cannot play back the songs stored on the iPod for some reason.
Check the song data. If it cannot be played on the iPod itself, the song data or storage area may be defective.
The unit cannot play back the songs stored on the PC for some reason.
Check if the format of files you are trying to play is supported by the unit. For information about the formats supported by the unit, see “Playing back music stored on media servers (PCs/NAS)” (p. 34). If the unit supports the file format, but still cannot play back any files, the network may be overloaded with heavy traffic.
Version error Firmware update is failed. Update the firmware again.
61 En

Supported devices
Bluetooth device• This unit supports Bluetooth devices that support
A2DP audio profile and AVRCP control profile.• Bluetooth device may not be detected by the unit or
some feature may not be compatible, depending on the model.
USB storage device• This unit supports USB mass storage class devices
(e.g., flash memories or portable audio players) using FAT16 or FAT32 format.
• USB storage devices with encryption cannot be used.• Some features may not be compatible, depending on
the model or manufacturer of the USB storage device.
AirPlay• AirPlay works with iPhone, iPad, and iPod touch with
iOS 4.3.3 or later, Mac with OS X Mountain Lion or later, and Mac and PC with iTunes 10.2.2 or later.
• Made for.iPhone 7 Plus, iPhone 7, iPhone SE, iPhone 6s Plus, iPhone 6s, iPhone 6 Plus, iPhone 6, iPhone 5s, iPhone 5c, iPhone 5, iPhone 4siPad Pro (9.7" and 12.9"), iPad mini 4, iPad Air 2, iPad mini 3, iPad Air, iPad mini 2, iPad mini, iPad (3rd and 4th generation), iPad 2iPod touch (5th and 6th generation)(as of June 2017)
Supported file formats
USB/PC (NAS)
* Linear PCM format only
Note
• To play back FLAC files stored on a PC or NAS, you need to install server software that supports sharing of FLAC files via DLNA on your PC or use a NAS that supports FLAC files.
• Digital Rights Management (DRM) contents cannot be played back.
Supported devices and file formats
File Sampling frequency (kHz)Quantization bitrate (bit)
Bitrate Gapless playback
WAV * 32/44.1/48/88.2/96/176.4/192 16/24 ―
MP3 32/44.1/48 ― 8 to 320 ―
WMA 32/44.1/48 ― 8 to 320 ―
MPEG-4 AAC 32/44.1/48 ― 8 to 320 ―
FLAC 32/44.1/48/88.2/96/176.4/192 16/24 ―
ALAC 32/44.1/48/88.2/96 16/24 ―
AIFF 32/44.1/48/88.2/96/176.4/192 16/24 ―
DSD 2.8MHz/5.6MHz 1 ― ―
62 En

Trademarks
En
glis
hA
DD
ITIO
NA
L
INF
OR
MA
TIO
N
Supports iOS 7 or later for setup using Wireless Accessory Configuration.“Made for iPod,” “Made for iPhone,” and “Made for iPad” mean that an electronic accessory has been designed to connect specifically to iPod, iPhone, or iPad, respectively, and has been certified by the developer to meet Apple performance standards.Apple is not responsible for the operation of this device or its compliance with safety and regulatory standards.Please note that the use of this accessory with iPod, iPhone, or iPad may affect wireless performance.iTunes, AirPlay, iPad, iPhone, iPod, and iPod touch are trademarks of Apple Inc., registered in the U.S. and other countries.iPad Air and iPad mini are trademarks of Apple Inc.App Store is a service mark of Apple Inc.
DLNA™ and DLNA CERTIFIED™ are trademarks or registered trademarks of Digital Living Network Alliance. All rights reserved.Unauthorized use is strictly prohibited.
Windows™Windows is a registered trademark of Microsoft Corporation in the United States and other countries.Internet Explorer, Windows Media Audio and Windows Media Player are either registered trademarks or trademarks of Microsoft Corporation in the United States and/or other countries.
Android™Google Play™Android and Google Play are trademarks of Google Inc.
The Wi-Fi CERTIFIED™ Logo is a certification mark of Wi-Fi Alliance®.The Wi-Fi Protected Setup™ Identifier Mark is a certification mark of Wi-Fi Alliance®.
The Bluetooth® word mark and logos are registered trademarks owned by Bluetooth SIG, Inc. and any use of such marks by Yamaha Corporation is under license.
Bluetooth protocol stack (Blue SDK)Copyright 1999-2014 OpenSynergy GmbHAll rights reserved. All unpublished rights reserved.
MusicCast is a trademark or registered trademark of Yamaha Corporation.
Yamaha Eco-Label is a mark that certifies products of high environmental performance.
(For R-N803D)The unit supports DAB/DAB+ tuning.
Trademarks
Explanations regarding GPLThis product utilizes GPL/LGPL open-source software in some sections. You have the right to obtain, duplicate, modify, and redistribute this open-source code only. For information on GPL/ LGPL open source software, how to obtain it, and the GPL/LGPL license, refer to the Yamaha Corporation website(http://download.yamaha.com/sourcecodes/musiccast/).
63 En

Network• Input jack: NETWORK x 1 (100Base-TX/10Base-T)• PC client function• Compatible with DLNA ver. 1.5• AirPlay supported• Internet radio• Streaming service• Wi-Fi function
Capable of direct connection with mobile deviceAvailable security method
....................................... WEP, WPA2-PSK(AES), Mixed ModeRadio frequency band .......................................................2.4 GHzRadio frequency (operational frequency)
..............................................................2412 MHz to 2472 MHzMaximum output power (E.I.R.P) ............... 17.5 dBm (56.2 mW)Wireless network standard ................................IEEE 802.11 b/g/nWi-Fi settingsWPS (Wi-Fi Protected Setup) ..............................Capable of WPSCapable of sharing with iOS devices by wireless connection.
Bluetooth related function• Version..............................................................Bluetooth 2.1 + EDR• Frequency.............................................................................2.4 GHz• Radio frequency (operational frequency)
....................................................................2402 MHz to 2480 MHz• Maximum output power (E.I.R.P)....................... 4.0 dBm (2.5 mW)• Wireless output...................................................... Bluetooth Class 2• Profiles
Source functionThe unit → sink device (ex. Bluetooth headphones)Profile: A2DP version 1.3, AVRCP version 1.6CODEC: SBC
Sink functionThe unit ← source device (ex. iPhone/Android)Profile: A2DP version 1.3, AVRCP version 1.6CODEC: SBC, AAC
USB• Input jack: USB x 1 (USB 2.0)• Capable of mass storage class USB memory• Current supply capacity: 1.0 A
Audio• Minimum RMS output power
(20 Hz to 20 kHz, 0.019% THD, 8Ω) .....................100 W+100 W• Dynamic power per channel (IHF) (8/6/4/2)
........................................................................... 140/170/220/290 W• Maximum power per channel (1 kHz, 0.7% THD, 4Ω)
[U.K. and Europe models] ...................................................160 W• IEC power (1 kHz, 0.04% THD, 8Ω)
[U.K. and Europe models] ...................................................115 W• Power band width (main L/R)
(0.06%THD 40.0 W, 8Ω) ..................................... 10 Hz to 50 kHz• Damping factor (SPEAKERS A)
1 kHz, 8 ....................................................................240 or more• Maximum effective output power (JEITA)
(1 kHz, 10% THD, 8)[Asia and General models]...................................................145 W
• Input sensitivity/input impedancePHONO (MM) ........................................................ 2.5 mV/47 kΩCD, etc. ................................................................. 200 mV/47 k
• Maximum input signalPHONO (MM) (1 kHz, 0.03% THD) ................................. 45 mVCD, etc. (1 kHz, 0.5% THD)..................................................2.2 V
• Output level/output impedanceCD, etc. (input 1 kHz, 200 mV)
OUT ................................................................... 200 mV/1.0 kSUBWOOFER OUT.............................................. 4.0 V/1.2 kΩ
(Cut off frequency) ........................................................... 90 HzPHONES (8 load) ..............................................470 mV/470
• Frequency responseCD, etc. (20 Hz to 20 kHz) ........................................... 0 ± 0.5 dBCD, etc. (10 Hz to 100 kHz, PURE DIRECT on) ........ 0 ± 1.0 dB
• RIAA equalization deviationPHONO (MM).................................................................. ± 0.5 dB
• Total harmonic distortionPHONO (MM) to OUT
(20 Hz to 20 kHz, 2.5 V) ....................................... 0.03% or lessCD, etc. to SPEAKERS
(20 Hz to 20 kHz, 50.0 W, 8)............................ 0.019% or less• Signal to noise ratio (IHF-A Network)
PHONO (MM) (input shorted, 5 mV)[U.S.A., Canada, Asia, General models] ..............82 dB or more[U.K., Europe, Korea, Australia models] .............75 dB or more
CD, etc. (input shorted, 200 mV) ..........................100 dB or more• Residual noise (IHF-A network) .............................................70 µV• Channel separation
CD, etc. (5.1 k input shorted, 1 kHz/10 kHz).........................................................................65/50 dB or more
• Tone control characteristicsBASS
Boost/cut (20 Hz) ........................................................... ± 10 dBTurnover frequency ......................................................... 300 Hz
TREBLEBoost/cut (20 kHz) ........................................................ ± 10 dBTurnover frequency ........................................................ 3.0 kHz
• Continuous loudness controlAttenuation 1 kHz................................................................ -30 dB
• Gain tracking error (+16.5 to -80 dB) ......................... 0.5 dB or less• Digital input (OPTICAL/COAXIAL)
Support audio sample rate ..........32/44.1/48/88.2/96/176.4/192 kHz
FM• Tuning range
[U.S.A. and Canada models] ...........................87.5 to 107.9 MHz[Asia and General models] ....... 87.5/87.50 to 108.0/108.00 MHz[U.K., Europe, Korea, Australia models] ....87.50 to 108.00 MHz
• 50 dB quieting sensitivity (IHF, 1 kHz, 100% MOD.)Mono ................................................................. 3.0 µV (20.8 dBf)
• Signal to noise ratio (IHF)Mono/stereo ...............................................................69 dB/67 dB
• Harmonic distortion (1 kHz)Mono/stereo ................................................................. 0.5%/0.6%
• Antenna input ..........................................................75Ω unbalanced
AM (R-N803)• Tuning range
[U.S.A. and Canada models] .............................. 530 to 1710 kHz[Asia and General models] ................. 530/531 to 1710/1611 kHz[Korea model]...................................................... 531 to 1611 kHz
DAB (R-N803D)• Tuning range...........................................174 to 240 MHz (Band III)• Support audio format
.............................MPEG 1 Layer II/MPEG 4 HE AAC v2 (AAC+)• Antenna input ..........................................................75Ω unbalanced
General• Power supply
[U.S.A. and Canada models] ............................. AC 120 V, 60 Hz[General model] .......................AC 110-120/220-240 V, 50/60 Hz[Korea model]..................................................... AC 220 V, 60 Hz[Australia model] ............................................... AC 240 V, 50 Hz[U.K. and Europe models] ................................. AC 230 V, 50 Hz[Asia model] ......................................... AC 220-240 V, 50/60 Hz
• Power consumption ................................................................ 250 W• Off mode.................................................................................. 0.1 W
Specifications
64 En

Specifications
En
glis
hA
DD
ITIO
NA
L
INF
OR
MA
TIO
N
• Standby power consumption (reference data) ......................... 0.1 W• Network Standby on
Wired .................................................................................... 1.7 WWireless (Wi-Fi/Wireless Direct/Bluetooth)......................... 1.8 W
• Maximum power consumption (1 kHz, 8Ω, 10% THD)[Asia and General models] .................................................. 450 W
• Dimensions (W H D) ................................ 435 151 392 mm(17-1/8" 6" 15-7/16")
* Including legs and protrusions
• Reference Dimensions (W H D) (with wireless antenna upright)......................................................................... 435 215 392 mm
(17-1/8" 8-1/2" 15-7/16")* Including legs and protrusions
• Weight..................................................................11.0 kg (24.25 lbs)
* The contents of this manual apply to the latest specifications as of the publishing date. To obtain the latest manual, access the Yamaha website then download the manual file.
65 En

AAC IN jack....................................................................... 7ADVANCED SETUP menu.......................................... 52AirPlay........................................................................... 38AM antenna ................................................................... 13AM radio ....................................................................... 25ANTENNA terminals...................................................... 7Auto Playback, option menu ......................................... 46Auto preset, FM radio stations ...................................... 25Auto Preset, option menu .............................................. 46Automatic playback, PC music content......................... 36Automatic playback, USB content ................................ 40Automatic speaker settings............................................ 42AutoPowerStdby (Auto Power Standby),
setup menu................................................................. 51
BBALANCE control........................................................ 23Banana plug, connection ............................................... 11BASS control................................................................. 23Batteries, remote control ................................................. 9Bi-wire connection ........................................................ 12Bluetooth device playback ............................................ 32Bluetooth indicator .......................................................... 6Bluetooth, setup menu ................................................... 50
CCD jacks .......................................................................... 7CD player, connection ................................................... 10Clear Preset, option menu.............................................. 46Clearing preset station ................................................... 27COAXIAL jacks.............................................................. 7Connection, Network, setup menu ................................ 48Control Knob, front display message ............................ 44
DDAB antenna ................................................................. 13DAB radio ..................................................................... 29DIMMER......................................................................... 4Disconnect MIC, front display message........................ 43Disconnection, Bluetooth connection............................ 33DLNA............................................................................ 34DMC Control, Network, setup menu ............................ 49DVD player, connection................................................ 10
EECO Mode, setup menu ................................................ 51[ENTER]:Start, front display message .......................... 43Error messages, YPAO.................................................. 44
FFirmware update via network........................................ 54Firmware update, ADVANCED SETUP menu ............ 53Firmware version, ADVANCED SETUP menu ........... 52FM antenna.................................................................... 13FM radio ........................................................................ 25
Front display ................................................................... 6Front display, switching information............................ 22
HHOME, remote control ................................................... 8
IInformation, Network, setup menu ............................... 48INIT, ADVANCED SETUP menu............................... 53Initialize, ADVANCED SETUP menu......................... 53Initiate Scan, option menu ............................................ 46Input selection keys, remote control ............................... 8INPUT selector ............................................................... 5Internal Error, front display message............................ 44Internet radio................................................................. 37iOS device setting sharing,
wireless network connection..................................... 16IP Address, Network, setup menu ................................ 49iPod content playback, AirPlay .................................... 38iTunes content playback, AirPlay................................. 38
LLevel Error, front display message ............................... 45LINE jacks ...................................................................... 7LOUDNESS control ..................................................... 24
MManual preset, FM/AM radio stations.......................... 26Manual setting, wireless network connection............... 18Media sharing setup ...................................................... 34Message, front display .................................................. 61MusicCast ..................................................................... 20MUTE ............................................................................. 6
NNAS content playback .................................................. 34Network cable, connection ........................................... 14Network connection...................................................... 15NETWORK jack............................................................. 7Network Name, Network, setup menu.......................... 49Network, setup menu .................................................... 48No MIC, front display message .................................... 44No Signal, front display message ................................. 44No SPEAKERS, front display message........................ 44No Warning, front display message.............................. 43Noisy, front display message ........................................ 44NOW PLAYING, remote control................................... 8
OOPTICAL jacks .............................................................. 7Option menu ................................................................. 46Out of Phase, front display message............................. 45Over Distance, front display message........................... 45
PPairing, Bluetooth device.............................................. 32PCs content playback.................................................... 34
Index
66 En

Index
En
glis
hA
DD
ITIO
NA
L
INF
OR
MA
TIO
N
PHONES jack ................................................................. 5PHONES, front display message.................................. 44PHONO jacks ................................................................. 7Playback keys ................................................................. 9Playback, Bluetooth device contents ............................ 32Playing back, PCs/NAS content ................................... 34Playing back, USB content ........................................... 39Power cord, connection ................................................ 14Power indicator ............................................................... 4Preset function, DAB.................................................... 30Preset, song/streaming station ...................................... 41PURE DIRECT switch ................................................. 23Pure Direct, front display message ............................... 44
RRadio Data System tuning ............................................ 28Remote control ID, ADVANCED SETUP menu......... 52Repeat playback, AirPlay ............................................. 38Repeat playback, PC music content.............................. 35Repeat playback, USB content ..................................... 40Result Info., front display message............................... 43RETURN ........................................................................ 5
SSELECT/ENTER............................................................ 5Setup menu ................................................................... 47Shuffle playback, AirPlay............................................. 38Shuffle playback, PC music content ............................. 35Shuffle playback, USB content..................................... 40Signal Info., option menu ............................................. 46Signal strength indicator ................................................. 6SLEEP............................................................................. 6Sleep timer .................................................................... 24SP IMP., ADVANCED SETUP menu ......................... 52Speaker impedance, ADVANCED SETUP menu........ 52Speaker, connection...................................................... 10SPEAKERS A/B............................................................. 5SPEAKERS terminals .................................................... 7Standby (Network Standby), Network, setup menu ..... 49STEREO ......................................................................... 6SUBWOOFER OUT jack............................................... 7Subwoofer, connection ................................................. 10
TTREBLE control ........................................................... 23TRIGGER OUT jacks..................................................... 7Tune Aid, option menu ................................................. 46TUNED........................................................................... 6Turntable, connection ................................................... 10
UUpdate (Network Update), Network, setup menu ........ 50UPDATE, ADVANCED SETUP menu ....................... 53USB content playback .................................................. 39User Cancel, front display message.............................. 44
VVerification, network connection ................................. 20VERSION, ADVANCED SETUP menu ..................... 52Vol.Interlock (Volume interlock), option menu ........... 46
VOLUME control ........................................................... 5Volume Trim, option menu........................................... 46Volume, setup menu ..................................................... 50
WWAC ............................................................................. 15Warning messages, YPAO............................................ 45Wireless antenna ........................................................... 14Wireless Direct.............................................................. 19WPS push button configuration,
wireless network connection ..................................... 17
YYPAO............................................................................ 42YPAO VOL..................................................................... 6YPAO, setup menu ....................................................... 50
67 En

(weee_battery_eu_en_02)
Information for users on collection and disposal of old equipment and used batteries:
These symbols on the products, packaging, and/or accompanying documents mean that used electrical and electronic products and batteries should not be mixed with general household waste.For proper treatment, recovery and recycling of old products and used batteries, please take them to applicable collection points, in accordance with your national legislation.By disposing of these products and batteries correctly, you will help to save valuable resources and prevent any potential negative effects on human health and the environment which could otherwise arise from inappropriate waste handling.For more information about collection and recycling of old products and batteries, please contact your local municipality, your waste disposal service or the point of sale where you purchased the items. For business users in the European Union:If you wish to discard electrical and electronic equipment, please contact your dealer or supplier for further information.Information on Disposal in other Countries outside the European Union:These symbols are only valid in the European Union. If you wish to discard these items, please contact your local authorities or dealer and ask for the correct method of disposal.Note for the battery symbol (bottom two symbol examples):This symbol might be used in combination with a chemical symbol. In this case it complies with the requirement set by the EU Battery Directive for the chemical involved.
68 En

EN English
SIMPLIFIED EU DECLARATION OF CONFORMITYHereby, Yamaha Music Europe GmbH declares that the radio equipment type [R-N803D] is in compliance with Directive 2014/53/EU. The full text of the EU declaration of conformity is available at the following internet address: https://europe.yamaha.com/en/support/compliance/doc.html
FR French
DECLARATION UE DE CONFORMITE SIMPLIFIEELe soussigné, Yamaha Music Europe GmbH, déclare que l'équipement radioélectrique du type [R-N803D] est conforme à la directive 2014/53/UE. Le texte complet de la déclaration UE de conformité est disponible à l'adresse internet suivante: https://europe.yamaha.com/en/support/compliance/doc.html
DE German
VEREINFACHTE EU-KONFORMITÄTSERKLÄRUNGHiermit erklärt Yamaha Music Europe GmbH, dass der Funkanlagentyp [R-N803D] der Richtlinie 2014/53/EU entspricht.Der vollständige Text der EU-Konformitätserklärung ist unter der folgenden Internetadresse verfügbar:https://europe.yamaha.com/en/support/compliance/doc.html
SV Swedish
FÖRENKLAD EU-FÖRSÄKRAN OM ÖVERENSSTÄMMELSEHärmed försäkrar Yamaha Music Europe GmbH att denna typ av radioutrustning [R-N803D] överensstämmer med direktiv 2014/53/EU. Den fullständiga texten till EU-försäkran om överensstämmelse finns på följande webbadress: https://europe.yamaha.com/en/support/compliance/doc.html
IT Italian
DICHIARAZIONE DI CONFORMITÀ UE SEMPLIFICATAIl fabbricante, Yamaha Music Europe GmbH, dichiara che il tipo di apparecchiatura radio [R-N803D] è conforme alla direttiva 2014/53/UE. Il testo completo della dichiarazione di conformità UE è disponibile al seguente indirizzo Internet: https://europe.yamaha.com/en/support/compliance/doc.html
ES Spanish
DECLARACIÓN UE DE CONFORMIDAD SIMPLIFICADAPor la presente, Yamaha Music Europe GmbH declara que el tipo de equipo radioeléctrico [R-N803D] es conforme con la Directiva 2014/53/UE. El texto completo de la declaración UE de conformidad está disponible en la dirección Internet siguiente: https://europe.yamaha.com/en/support/compliance/doc.html
NL Dutch
VEREENVOUDIGDE EU-CONFORMITEITSVERKLARINGHierbij verklaar ik, Yamaha Music Europe GmbH, dat het type radioapparatuur [R-N803D] conform is met Richtlijn 2014/53/EU. De volledige tekst van de EU-conformiteitsverklaring kan worden geraadpleegd op het volgende internetadres: https://europe.yamaha.com/en/support/compliance/doc.html
BG Bulgarian
ОПРОСТЕНА ЕС ДЕКЛАРАЦИЯ ЗА СЪОТВЕТСТВИЕС настоящото Yamaha Music Europe GmbH декларира, че този тип радиосъоръжение [R-N803D] е в съответствие с Директива 2014/53/ЕС. Цялостният текст на ЕС декларацията за съответствие може да се намери на следния интернет адрес: https://europe.yamaha.com/en/support/compliance/doc.html
CS Czech
ZJEDNODUŠENÉ EU PROHLÁŠENÍ O SHODĚTímto Yamaha Music Europe GmbH prohlašuje, že typ rádiového zařízení [R-N803D] je v souladu se směrnicí 2014/53/EU. Úplné znění EU prohlášení o shodě je k dispozici na této internetové adrese: https://europe.yamaha.com/en/support/compliance/doc.html
DA Danish
FORENKLET EU-OVERENSSTEMMELSESERKLÆRINGHermed erklærer Yamaha Music Europe GmbH, at radioudstyrstypen [R-N803D] er i overensstemmelse med direktiv 2014/53/EU. EU-overensstemmelseserklæringens fulde tekst kan findes på følgende internetadresse: https://europe.yamaha.com/en/support/compliance/doc.html
ET Estonian
LIHTSUSTATUD ELI VASTAVUSDEKLARATSIOONKäesolevaga deklareerib Yamaha Music Europe GmbH, et käesolev raadioseadme tüüp [R-N803D] vastab direktiivi 2014/53/EL nõuetele. ELi vastavusdeklaratsiooni täielik tekst on kättesaadav järgmisel internetiaadressil:https://europe.yamaha.com/en/support/compliance/doc.html
EL Greek
ΑΠΛΟΥΣΤΕΥΜΕΝΗ ΔΗΛΩΣΗ ΣΥΜΜΟΡΦΩΣΗΣ ΕΕΜε την παρούσα ο/η Yamaha Music Europe GmbH, δηλώνει ότι ο ραδιοεξοπλισμός [R-N803D] πληροί την οδηγία 2014/53/ΕΕ. Το πλήρες κείμενο της δήλωσης συμμόρφωσης ΕΕ διατίθεται στην ακόλουθη ιστοσελίδα στο διαδίκτυο: https://europe.yamaha.com/en/support/compliance/doc.html
HR Croatian
POJEDNOSTAVLJENA EU IZJAVA O SUKLADNOSTIYamaha Music Europe GmbH ovime izjavljuje da je radijska oprema tipa [R-N803D] u skladu s Direktivom 2014/53/EU.Cjeloviti tekst EU izjave o sukladnosti dostupan je na sljedećoj internetskoj adresi:https://europe.yamaha.com/en/support/compliance/doc.html
LV Latvian
VIENKĀRŠOTA ES ATBILSTĪBAS DEKLARĀCIJAAr šo Yamaha Music Europe GmbH deklarē, ka radioiekārta [R-N803D] atbilst Direktīvai 2014/53/ES. Pilns ES atbilstības deklarācijas teksts ir pieejams šādā interneta vietnē: https://europe.yamaha.com/en/support/compliance/doc.html
LT Lithuanian
SUPAPRASTINTA ES ATITIKTIES DEKLARACIJAAš, Yamaha Music Europe GmbH, patvirtinu, kad radijo įrenginių tipas [R-N803D] atitinka Direktyvą 2014/53/ES.Visas ES atitikties deklaracijos tekstas prieinamas šiuo interneto adresu: https://europe.yamaha.com/en/support/compliance/doc.html
HU Hungarian
EGYSZERŰSÍTETT EU-MEGFELELŐSÉGI NYILATKOZATYamaha Music Europe GmbH igazolja, hogy a [R-N803D] típusú rádióberendezés megfelel a 2014/53/EU irányelvnek.Az EU-megfelelőségi nyilatkozat teljes szövege elérhető a következő internetes címen: https://europe.yamaha.com/en/support/compliance/doc.html
69 En

PL Polish
UPROSZCZONA DEKLARACJA ZGODNOŚCI UEYamaha Music Europe GmbH niniejszym oświadcza, że typ urządzenia radiowego [R-N803D] jest zgodny z dyrektywą 2014/53/UE. Pełny tekst deklaracji zgodności UE jest dostępny pod następującym adresem internetowym: https://europe.yamaha.com/en/support/compliance/doc.html
PT Portuguese
DECLARAÇÃO UE DE CONFORMIDADE SIMPLIFICADAO(a) abaixo assinado(a) Yamaha Music Europe GmbH declara que o presente tipo de equipamento de rádio [R-N803D] está em conformidade com a Diretiva 2014/53/UE. O texto integral da declaração de conformidade está disponível no seguinte endereço de Internet: https://europe.yamaha.com/en/support/compliance/doc.html
RO Romanian
DECLARAȚIA UE DE CONFORMITATE SIMPLIFICATĂPrin prezenta, Yamaha Music Europe GmbH declară că tipul de echipamente radio [R-N803D] este în conformitate cu Directiva 2014/53/UE. Textul integral al declarației UE de conformitate este disponibil la următoarea adresă internet: https://europe.yamaha.com/en/support/compliance/doc.html
SK Slovak
ZJEDNODUŠENÉ EÚ VYHLÁSENIE O ZHODEYamaha Music Europe GmbH týmto vyhlasuje, že rádiové zariadenie typu [R-N803D] je v súlade so smernicou 2014/53/EÚ. Úplné EÚ vyhlásenie o zhode je k dispozícii na tejto internetovej adrese: https://europe.yamaha.com/en/support/compliance/doc.html
SL Slovenian
POENOSTAVLJENA IZJAVA EU O SKLADNOSTIYamaha Music Europe GmbH potrjuje, da je tip radijske opreme [R-N803D] skladen z Direktivo 2014/53/EU.Celotno besedilo izjave EU o skladnosti je na voljo na naslednjem spletnem naslovu: https://europe.yamaha.com/en/support/compliance/doc.html
FI Finnish
YKSINKERTAISTETTU EU-VAATIMUSTENMUKAISUUSVAKUUTUSYamaha Music Europe GmbH vakuuttaa, että radiolaitetyyppi [R-N803D] on direktiivin 2014/53/EU mukainen.EU-vaatimustenmukaisuusvakuutuksen täysimittainen teksti on saatavilla seuraavassa internetosoitteessa: https://europe.yamaha.com/en/support/compliance/doc.html
TR Turkey
BASİTLEŞTİRİLMİŞ AVRUPA BİRLİĞİ UYGUNLUK BİLDİRİMİİşbu belge ile, Yamaha Music Europe GmbH, radyo cihaz tipinin [R-N803D], Direktif 2014/53/AB'ye uygunluğunu beyan eder. AB uyumu beyanının tam metni aşağıdaki internet adresinden edinilebilir: https://europe.yamaha.com/en/support/compliance/doc.html
70 En

Published 06/2017 AM-A0
© 2017 Yamaha CorporationManual Development Group
Yamaha Downloadshttp://download.yamaha.com/
Yamaha Global Sitehttps://www.yamaha.com/
AV16-003910-1 Nakazawa-cho, Naka-ku, Hamamatsu, 430-8650 Japan