necropsy examination - hachaklait.org.il · necropsy examination necropsy techniques for feedlot...
TRANSCRIPT
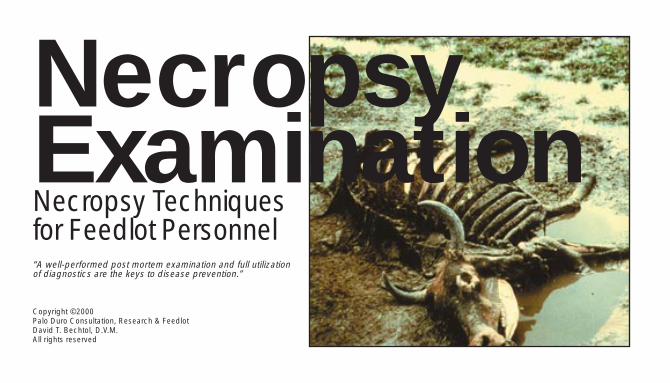
NecropsyExaminationNecropsy Techniquesfor Feedlot Personnel“A well-performed post mortem examination and full utilization of diagnostics are the keys to disease prevention.”
Copyright ©2000 Palo Duro Consultation, Research & FeedlotDavid T. Bechtol, D.V.M.All rights reserved
Table of Contents
Necropsy ExaminationNecropsy Techniques for Feedlot Personnel Page 5Necropsy Manual Page 8Necropsy Procedures Page 9Points to Remember Page 10Necropsy Equipment Page 14External Exam Page 15Procedure Page 17Left Side Down Preparation Page 19Right Side Down Preparation Page 21Preparation Page 23Examination of Hard & Soft Palate, Tongue,
Esophagus, Epiglottis and Trachea Page 24Examination of Thoracic and Abdominal Cavities Page 26Diagnostics Page 30Reflecting Thoracic Viscera Page 31Heart Examination Page 34Reflecting Abdominal Viscera Page 35Joint Examination Page 42Brain Removal and Examination Page 44
Table of Contents
Necropsy Manual ObservationsTrachea Page 48Larynx Page 49Lung Page 50Liver Page 51Kidney Page 52Esophagus Page 53Abdominal Cavity Page 55Rumen Page 56Abomasum Page 57Cecum Page 58Small Intestine Page 59Large Intestine Page 60Muscle Page 61Heart Page 62Brain Page 63Necropsy Observations References Page 64
4
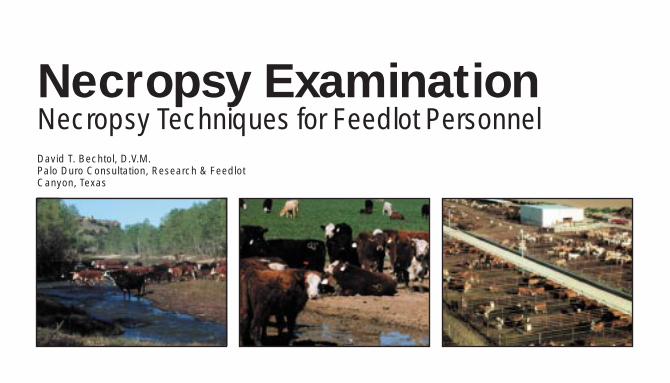
Necropsy ExaminationNecropsy Techniques for Feedlot PersonnelDavid T. Bechtol, D.V.M.Palo Duro Consultation, Research & FeedlotCanyon, Texas
5
Necropsy Techniques for Feedlot PersonnelThough dead cattle in a feedyard are a source of great
economic loss, they may still have some worth in the form ofvaluable diagnostic information. Necropsies are an excel-lent training tool to teach about anatomy, physiology andpathology. Evaluating obvious pathology associated withrespiratory, digestive, urogenital and/or reproductive tractswill enable you to rule out about 75% of the most commoncauses of feedlot diseases.
Feedyard personnel can be trained to perform simpleyet thorough and informative examinations.
First, a comprehensive history of the animal should begathered and recorded. This should include the age, sex,weight and breed of the animal. Type and duration ofsymptoms, and treatment are also important in interpretingfindings. The place of death and the position when foundshould be noted, as well as the number of animals in thegroup and others affected. A history of nutritional manage-ment, current ration, and days on feed may aid in the diag-nosis. Any piece of information relevant to the animal or itsenvironment may be the part that completes the puzzle.
Before examining the internal organs, an externalexamination should be performed.
Anything abnormal in appearance should be noted,such as:1. General appearance of carcass2. Thriftiness or apparent nutritional status3. Condition of hair coat and presence of external parasites4. Color and appearance of all visible mucous membranes5. Presence or absence of discharges from all body
openings and mammary glands6. Evidence of swellings, wounds, hernia and fractures.
The purpose of a necropsy is to expose tissues solesions can be seen and samples, if necessary, can be collected. By following certain procedures, an animal canbe examined and questions can be answered.
Points to remember are:1. A good necropsy is always cost effective.2. Personnel who perform necropsies not only become
more knowledgeable but also, most importantly, be-come an extension arm for the consulting veterinarian.
3. A properly performed necropsy allows laboratory pro-cedures to be performed to yield maximal diagnosticinformation.
4. Routine necropsies permit monitoring the herd healthstatus and managerial procedures.

6
5. Necropsies should be fully utilized as a means ofunderstanding disease pathogenesis and for distin-guishing one disease from another.
6. Allows to make assessments of vaccination and ther-apy programs based on knowledge and not uponcasual assumptions.
Necropsy equipment should include:1. Sharp knives2. Latex gloves3. Bucket4. Rib cutter5. Hatchett and/or saw6. Sharpening stone7. Sharpening steel8. Scissors9. Disinfectant10. Diagnostic sample collection. Supplies should include:
a. Test tubesb. Swabs with transport mediac. Baggies/tissue jard. Syringese. NeedlesAdherence to a definite necropsy protocol will result in
a uniform, systematic, consistent interpretation of lesionsand assures that each organ will be grossly observed.
Procedural steps include:1. Place animal on left or right side. Whichever side you
use, do it the same way every time. I normally placethe animal on the right side.
2. Start a midline incision at the sternum and extend it tothe lower jaw. Extend the incision from the sternumcaudally to the groin above the umbilicus, mammarygland or external male genitalia.
3. Reflect the front leg by lifting the leg and cutting themuscle attachments close to the thorax and lay theleg dorsally and flat.
4. Disarticulate the hind leg by grasping the upper partof the hind leg, incise the muscles and disarticulatethe coxofemoral joint and lay the leg dorsally and flat.
5. Reflect the skin ventrally along the midline incision.
6. Cut between the mandible (lower jaw), grasp thetongue and cut it loose from the medial surface of themandibles close to the bone. While grasping thetongue, cut behind the hard palate and around thepharynx to the level of the hyoid bones. Disarticulatethe hyoid bones and continue reflecting the tongue,pharynx, esophagus and trachea to the thoracic inlet.
7. Open esophagus and trachea.8. Remove the rib cage by cutting the ribs along the pro-
posed line of the thoracic inlet to the xiphoid cartilage
7
of the sternum. The next cut begins from the most dor-sal aspect of the first rib and extends caudally to thefirst lumbar vertebra. After the ribs are detached alongthese lines, the severed rib cage is removed by cut-ting it from the diaphragm.
9. Open the abdomen by cutting caudally along the mid-line to the brim of the pelvis.
10. After removing the upper rib cage and abdominalwall, examine the internal organs in situ.
11. Collection of specimens for bacteriologic examinationor direct culturing should be done at this time beforecontaminating any organ by manipulation or handlingof viscera.
12. Remove heart and lungs. Open the trachea andextend the incision into the bronchi and bronchioles.Palpate the lungs and give a lesion score:0 - Normal1 - Slight2 - Moderate (10-30% involvement)3 - Severe (>30% involvement)
13. Reflect abdominal viscera.14. Sever the dorsal attachment of the rumen from the
abdominal wall and pull the rumen counter-clockwise.
Sever the attachments between the liver and omasumventrally and pull the omasum, abomasum, reticullumand rumen clockwise until they are out of the abdomi-nal cavity. Cut the abomasum from the duodenum.
15. The spleen lies on top of the rumen and can be exam-ined at this time.
16. Remove the liver from its attachments to thediaphragm and remove from the abdominal cavity forexamination.
17. Grasp the intestines, pulling them taut from theirattachments, sever and remove from abdominal cav-ity. Cut the intestines close to their mesenteric attach-ments, freeing the attached border so that theintestines are easily straightened and opened forexamination.
18. Reflect the kidneys, adrenals, urinary bladder anduterus caudally and place them over the paralumbarfossa.
19. Joints normally examined are knee, shoulder, stifle,hip, hock and atlanto-occipital.
A well-performed post mortem examination and fullutilization of diagnostics are the keys to disease prevention.
8
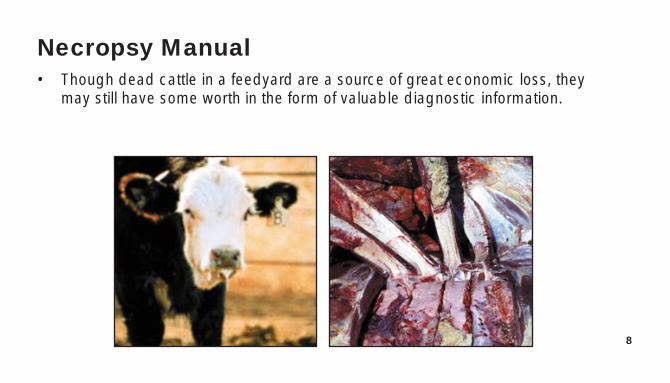
Necropsy Manual• Though dead cattle in a feedyard are a source of great economic loss, they
may still have some worth in the form of valuable diagnostic information.
9
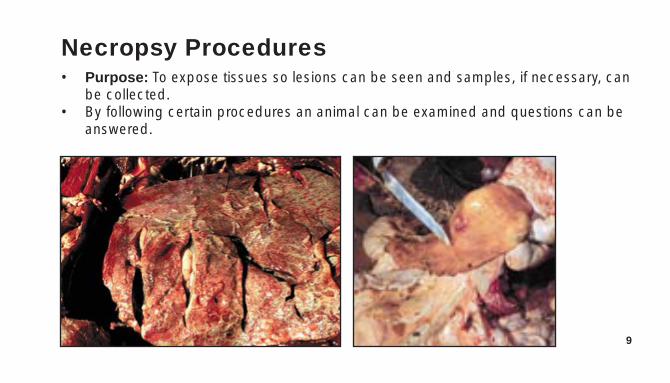
Necropsy Procedures• Purpose: To expose tissues so lesions can be seen and samples, if necessary, can
be collected.• By following certain procedures an animal can be examined and questions can be
answered.

10
Points to Remember• A good necropsy is always cost effective.• Personnel who perform necropsies not only become more knowledgeable
but also, most importantly, become an extension arm for the consulting veterinarian.
11
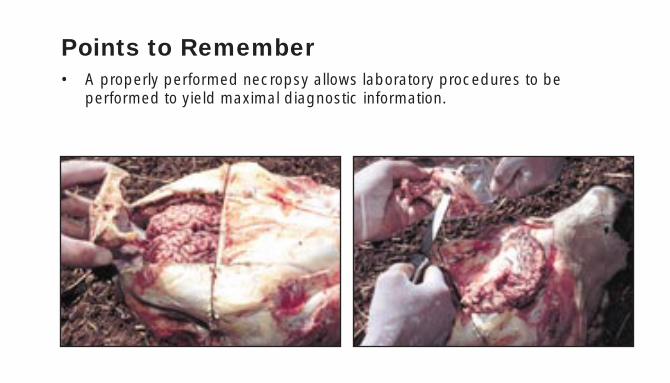
Points to Remember• A properly performed necropsy allows laboratory procedures to be
performed to yield maximal diagnostic information.
12
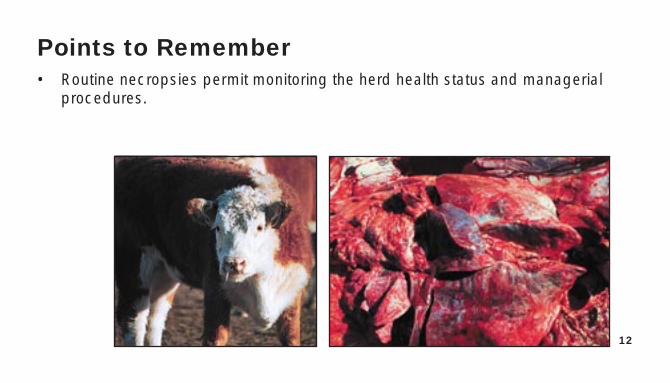
Points to Remember• Routine necropsies permit monitoring the herd health status and managerial
procedures.
13
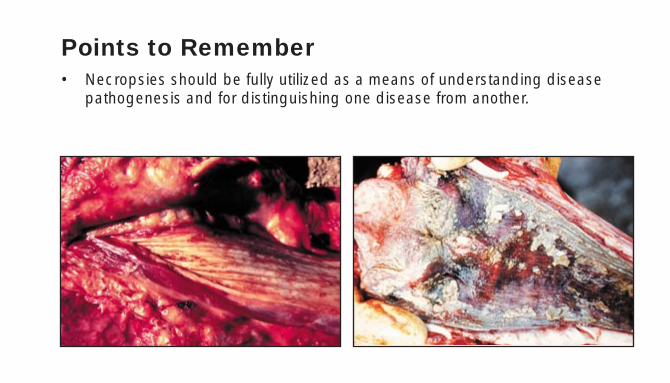
Points to Remember• Necropsies should be fully utilized as a means of understanding disease
pathogenesis and for distinguishing one disease from another.
14
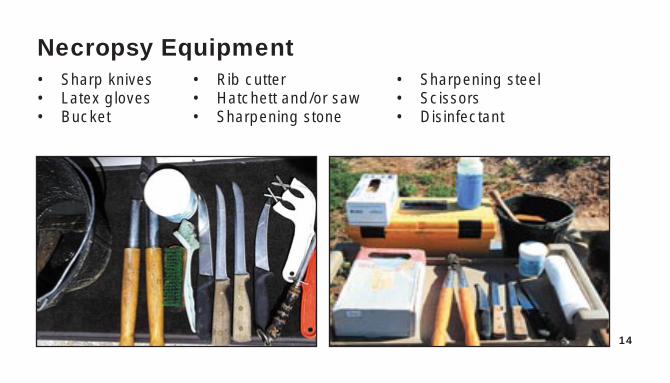
Necropsy Equipment• Sharp knives • Rib cutter • Sharpening steel• Latex gloves • Hatchett and/or saw • Scissors• Bucket • Sharpening stone • Disinfectant
15
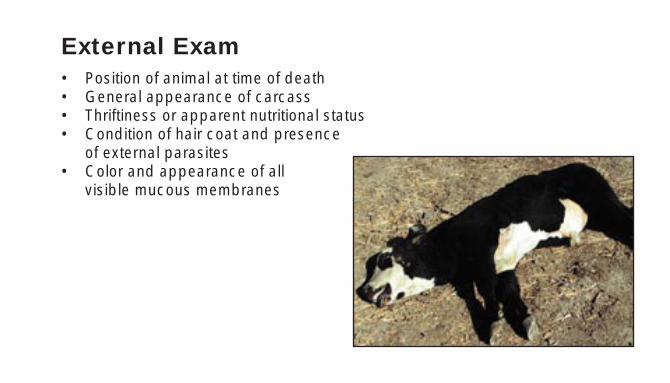
External Exam• Position of animal at time of death• General appearance of carcass• Thriftiness or apparent nutritional status• Condition of hair coat and presence
of external parasites• Color and appearance of all
visible mucous membranes
16
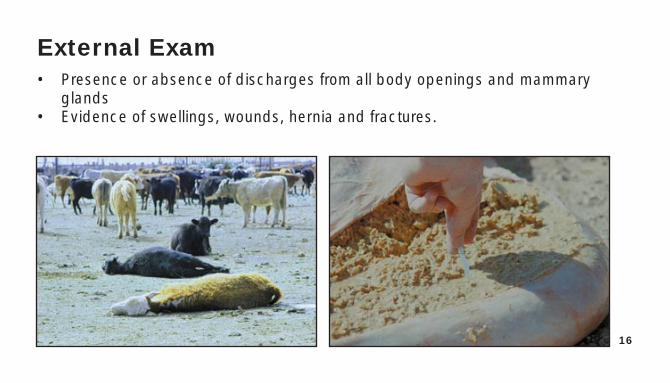
External Exam• Presence or absence of discharges from all body openings and mammary
glands• Evidence of swellings, wounds, hernia and fractures.
17
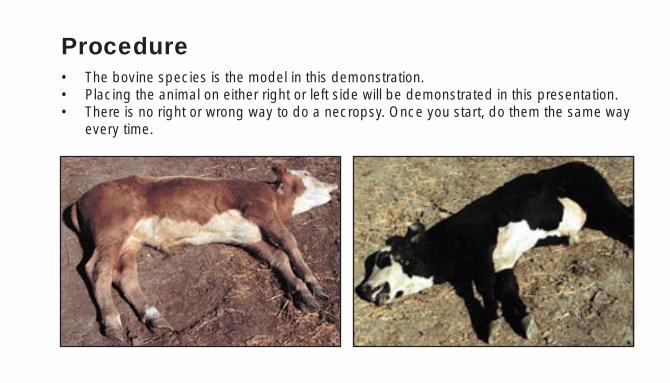
Procedure• The bovine species is the model in this demonstration.• Placing the animal on either right or left side will be demonstrated in this presentation.• There is no right or wrong way to do a necropsy. Once you start, do them the same way
every time.
18
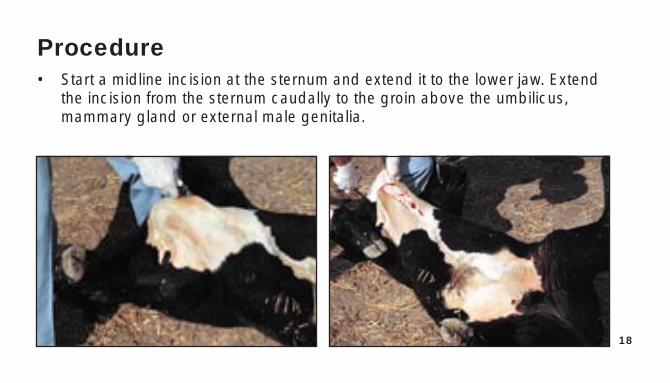
Procedure• Start a midline incision at the sternum and extend it to the lower jaw. Extend
the incision from the sternum caudally to the groin above the umbilicus,mammary gland or external male genitalia.
19
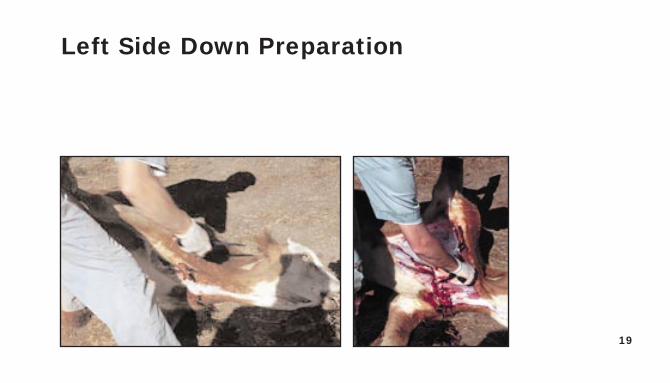
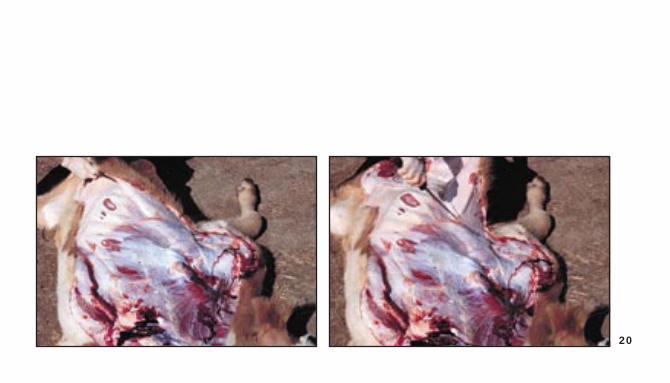
Left Side Down Preparation
20
21
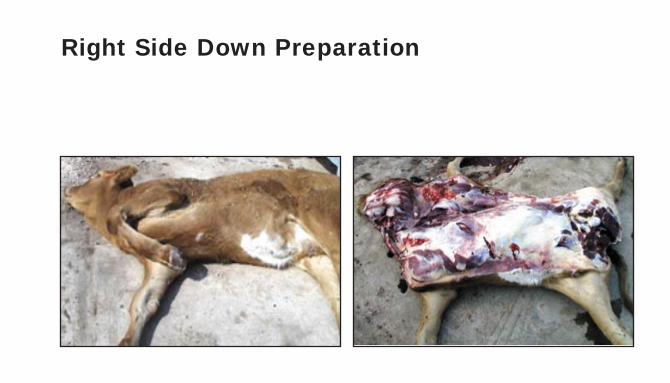
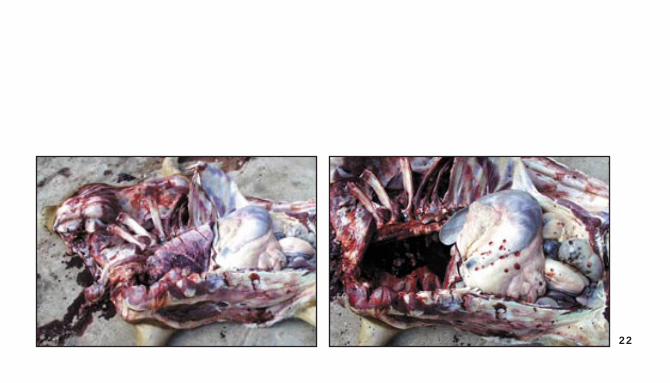
Right Side Down Preparation
22
23
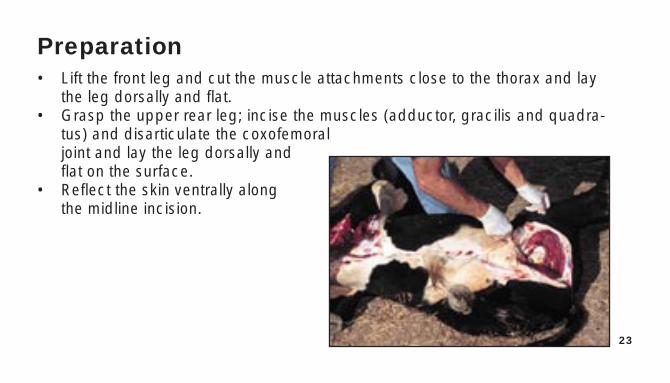
Preparation• Lift the front leg and cut the muscle attachments close to the thorax and lay
the leg dorsally and flat.• Grasp the upper rear leg; incise the muscles (adductor, gracilis and quadra-
tus) and disarticulate the coxofemoral joint and lay the leg dorsally and flat on the surface.
• Reflect the skin ventrally along the midline incision.
24
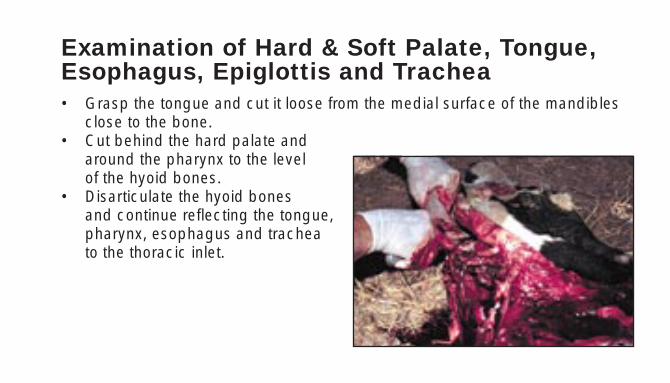
Examination of Hard & Soft Palate, Tongue,Esophagus, Epiglottis and Trachea• Grasp the tongue and cut it loose from the medial surface of the mandibles
close to the bone. • Cut behind the hard palate and
around the pharynx to the level of the hyoid bones.
• Disarticulate the hyoid bones and continue reflecting the tongue, pharynx, esophagus and trachea to the thoracic inlet.

25
Examination of Hard & Soft Palate, Tongue,Esophagus, Epiglottis and Trachea• Open esophagus and trachea.
26
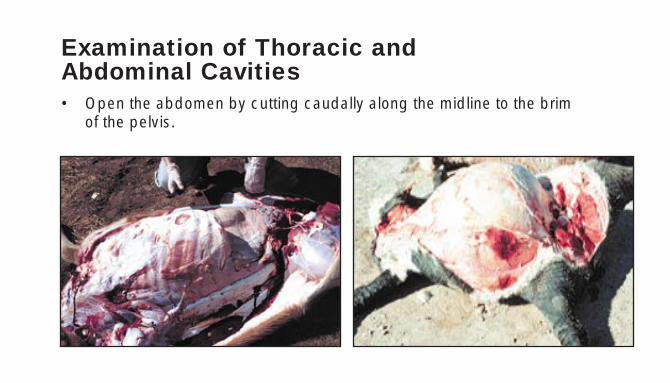
Examination of Thoracic and Abdominal Cavities• Open the abdomen by cutting caudally along the midline to the brim
of the pelvis.
27
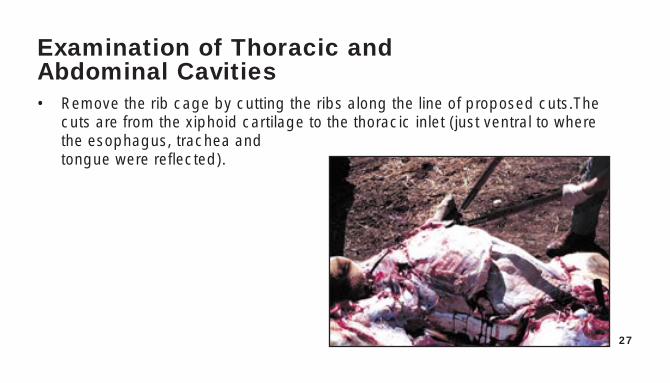
Examination of Thoracic and Abdominal Cavities• Remove the rib cage by cutting the ribs along the line of proposed cuts.The
cuts are from the xiphoid cartilage to the thoracic inlet (just ventral to wherethe esophagus, trachea and tongue were reflected).
28
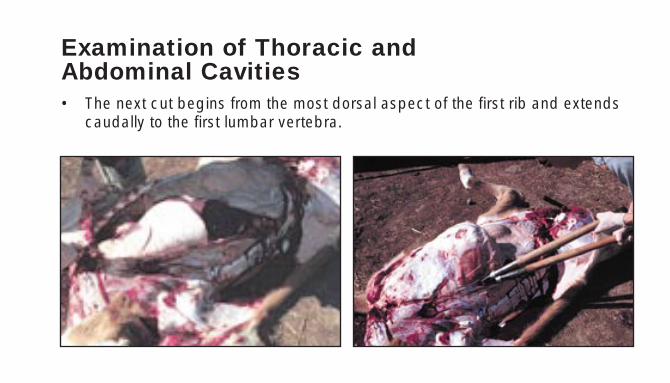
Examination of Thoracic and Abdominal Cavities• The next cut begins from the most dorsal aspect of the first rib and extends
caudally to the first lumbar vertebra.
29
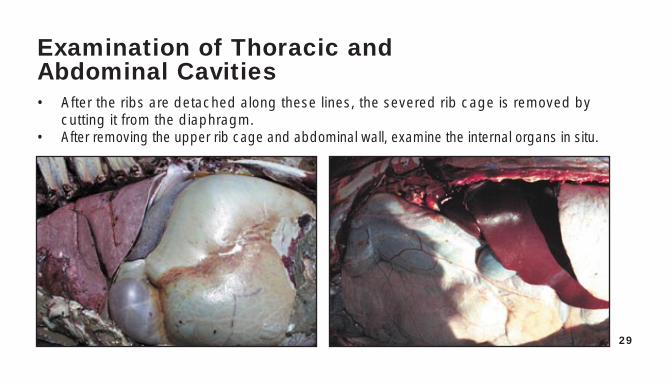
Examination of Thoracic and Abdominal Cavities• After the ribs are detached along these lines, the severed rib cage is removed by
cutting it from the diaphragm.• After removing the upper rib cage and abdominal wall, examine the internal organs in situ.
30
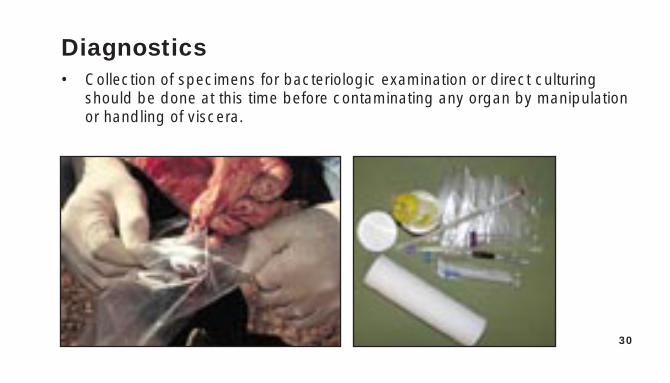
Diagnostics• Collection of specimens for bacteriologic examination or direct culturing
should be done at this time before contaminating any organ by manipulationor handling of viscera.
31
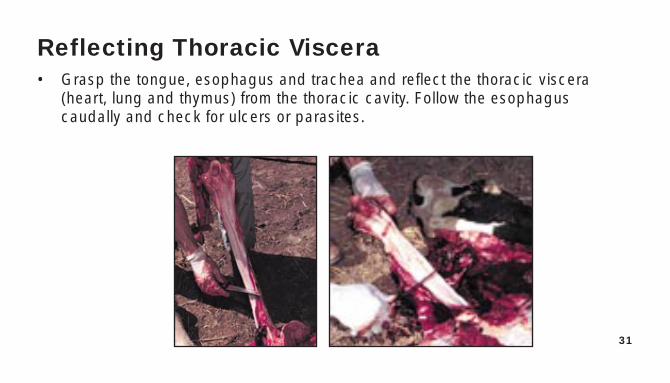
Reflecting Thoracic Viscera• Grasp the tongue, esophagus and trachea and reflect the thoracic viscera
(heart, lung and thymus) from the thoracic cavity. Follow the esophagus caudally and check for ulcers or parasites.
32
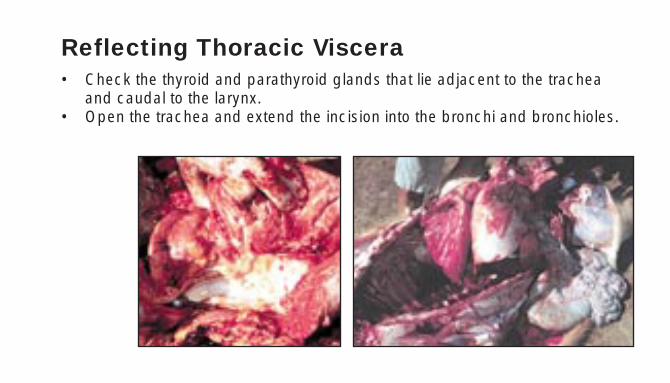
Reflecting Thoracic Viscera• Check the thyroid and parathyroid glands that lie adjacent to the trachea
and caudal to the larynx.• Open the trachea and extend the incision into the bronchi and bronchioles.
33
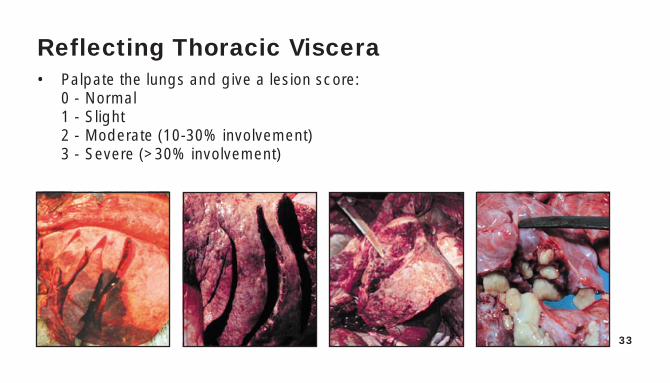
Reflecting Thoracic Viscera• Palpate the lungs and give a lesion score:
0 - Normal1 - Slight2 - Moderate (10-30% involvement)3 - Severe (>30% involvement)

34
Heart Examination• Examine the heart for myocardial hemorrhages, enlargement with rounded
apex and fibrin.• Open right ventricle and atrium.• Open left ventricle and atrium.
35
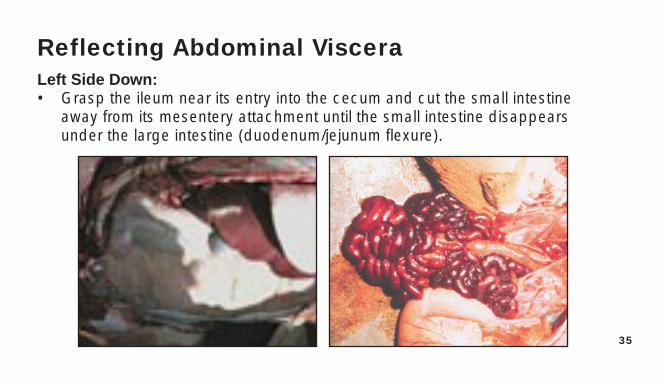
Reflecting Abdominal VisceraLeft Side Down:• Grasp the ileum near its entry into the cecum and cut the small intestine
away from its mesentery attachment until the small intestine disappearsunder the large intestine (duodenum/jejunum flexure).
36
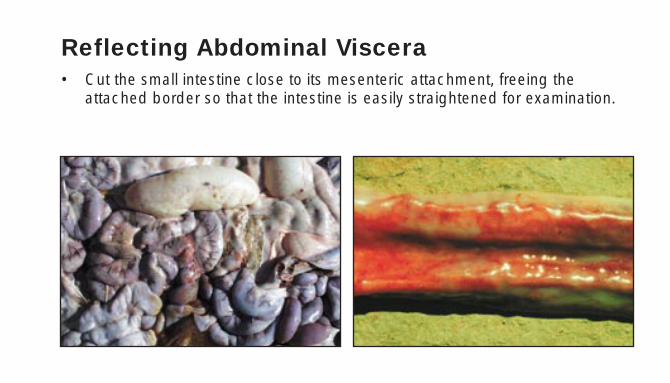
Reflecting Abdominal Viscera• Cut the small intestine close to its mesenteric attachment, freeing the
attached border so that the intestine is easily straightened for examination.
37
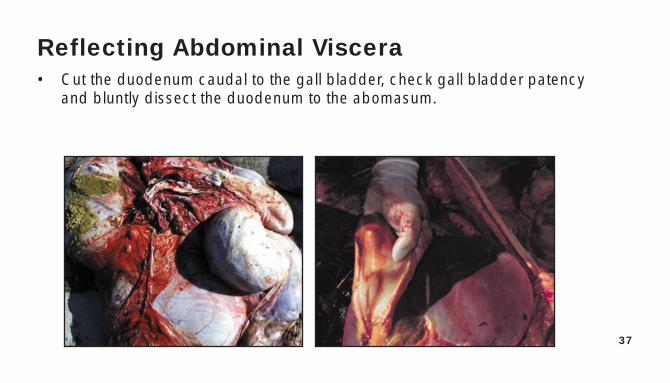
Reflecting Abdominal Viscera• Cut the duodenum caudal to the gall bladder, check gall bladder patency
and bluntly dissect the duodenum to the abomasum.
38
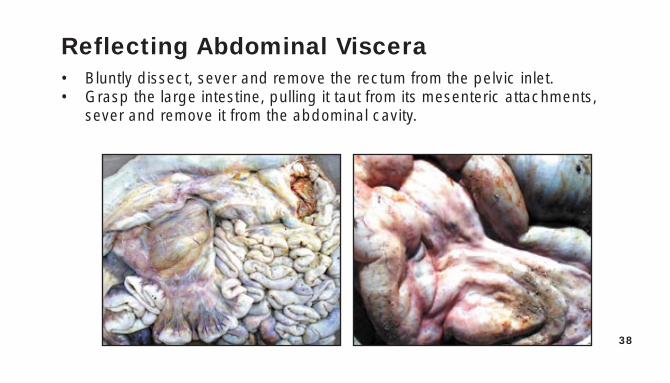
Reflecting Abdominal Viscera• Bluntly dissect, sever and remove the rectum from the pelvic inlet.• Grasp the large intestine, pulling it taut from its mesenteric attachments,
sever and remove it from the abdominal cavity.
39
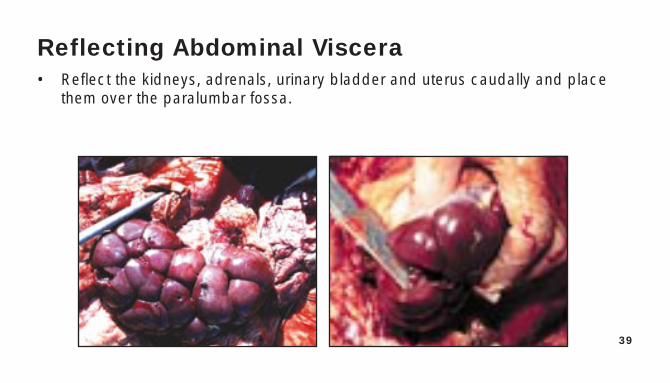
Reflecting Abdominal Viscera• Reflect the kidneys, adrenals, urinary bladder and uterus caudally and place
them over the paralumbar fossa.
40
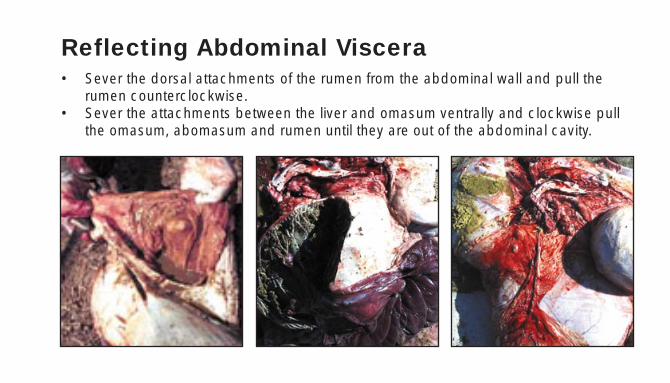
Reflecting Abdominal Viscera• Sever the dorsal attachments of the rumen from the abdominal wall and pull the
rumen counterclockwise.• Sever the attachments between the liver and omasum ventrally and clockwise pull
the omasum, abomasum and rumen until they are out of the abdominal cavity.
41
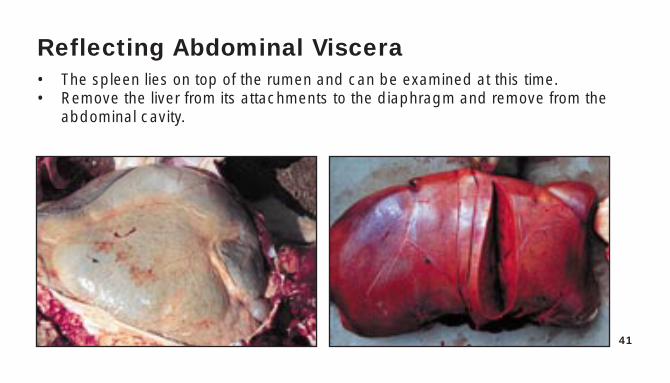
Reflecting Abdominal Viscera• The spleen lies on top of the rumen and can be examined at this time.• Remove the liver from its attachments to the diaphragm and remove from the
abdominal cavity.

42
Joint Examination• Joints examined:
– Coxofemoral – Right hip – Stifle– Hock – Shoulder – Atlanto-occipital
• To expose stifle, reflect skin, bend joint and cut patellar ligament.
43
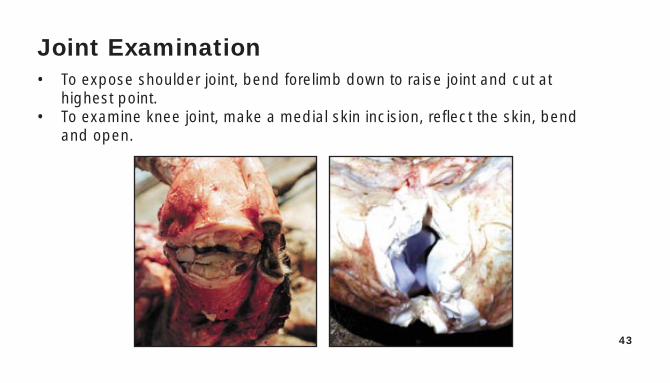
Joint Examination• To expose shoulder joint, bend forelimb down to raise joint and cut at
highest point.• To examine knee joint, make a medial skin incision, reflect the skin, bend
and open.
44
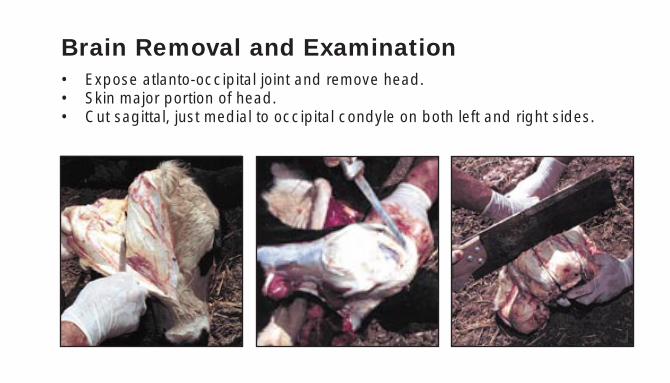
Brain Removal and Examination• Expose atlanto-occipital joint and remove head.• Skin major portion of head.• Cut sagittal, just medial to occipital condyle on both left and right sides.
45
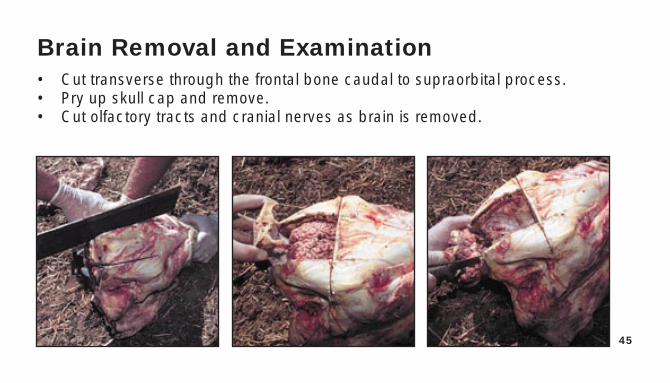
Brain Removal and Examination• Cut transverse through the frontal bone caudal to supraorbital process.• Pry up skull cap and remove.• Cut olfactory tracts and cranial nerves as brain is removed.
46
A well-performed post mortemexamination and full utilizationof diagnostics are the keys to
disease prevention.
47
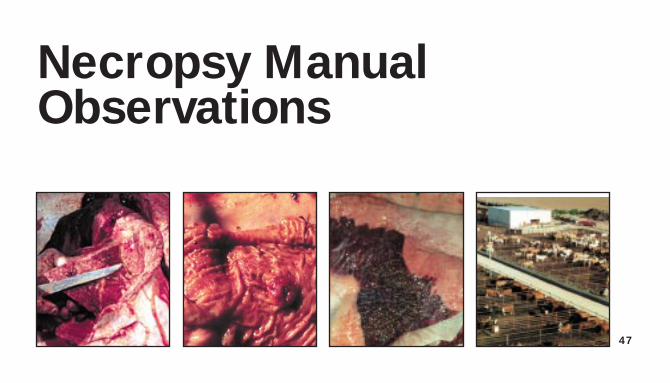
Necropsy ManualObservations
48
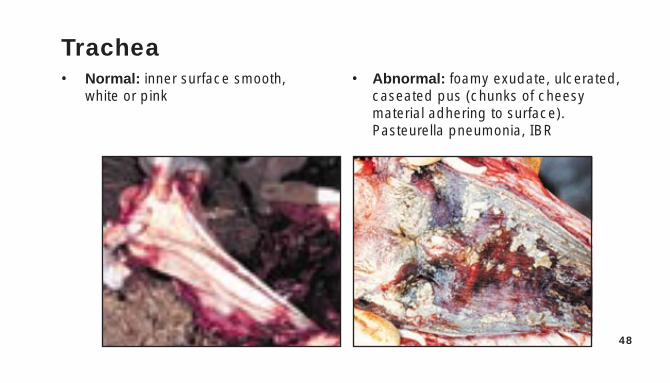
Trachea• Normal: inner surface smooth, • Abnormal: foamy exudate, ulcerated,
white or pink caseated pus (chunks of cheesy material adhering to surface).Pasteurella pneumonia, IBR
49
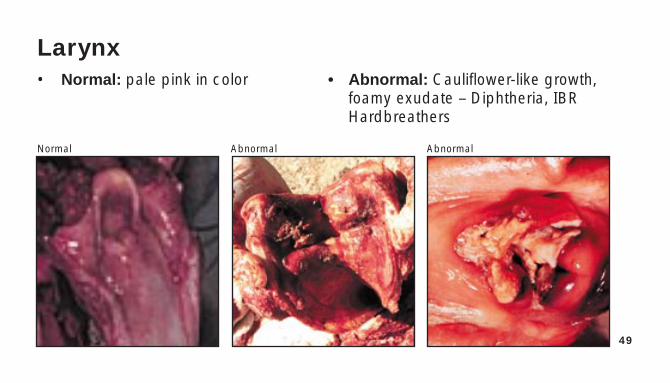
Larynx• Normal: pale pink in color • Abnormal: Cauliflower-like growth,
foamy exudate – Diphtheria, IBRHardbreathers
Normal Abnormal Abnormal
50
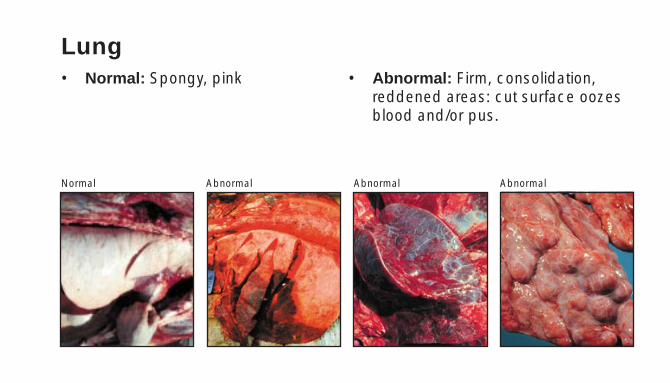
Lung• Normal: Spongy, pink • Abnormal: Firm, consolidation,
reddened areas: cut surface oozes blood and/or pus.
Normal Abnormal Abnormal Abnormal
51
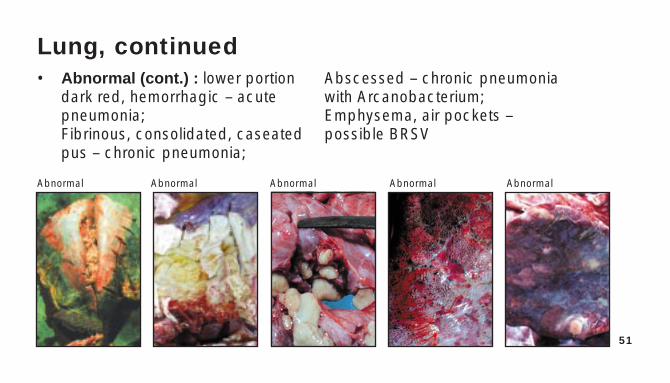
Lung, continued• Abnormal (cont.) : lower portion Abscessed – chronic pneumonia
dark red, hemorrhagic – acute with Arcanobacterium;pneumonia; Emphysema, air pockets –Fibrinous, consolidated, caseated possible BRSVpus – chronic pneumonia;
Abnormal Abnormal Abnormal Abnormal Abnormal
52
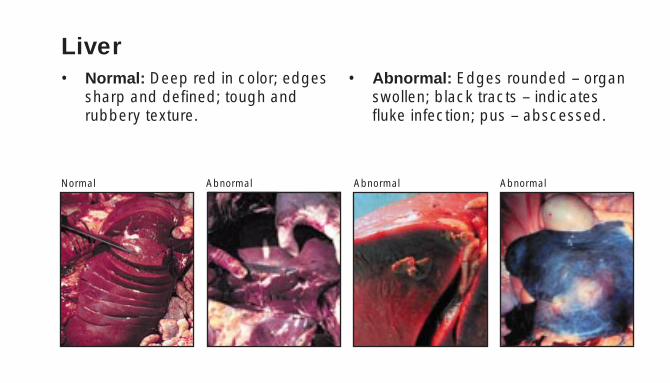
Liver• Normal: Deep red in color; edges • Abnormal: Edges rounded – organ
sharp and defined; tough and swollen; black tracts – indicatesrubbery texture. fluke infection; pus – abscessed.
Normal Abnormal Abnormal Abnormal
53
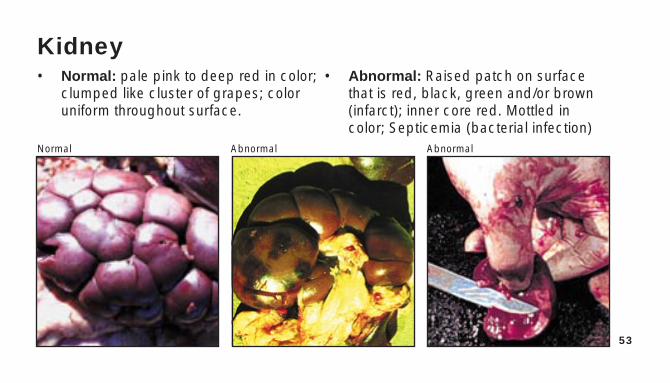
Kidney• Normal: pale pink to deep red in color; • Abnormal: Raised patch on surface
clumped like cluster of grapes; color that is red, black, green and/or brownuniform throughout surface. (infarct); inner core red. Mottled in
color; Septicemia (bacterial infection)Normal Abnormal Abnormal
54
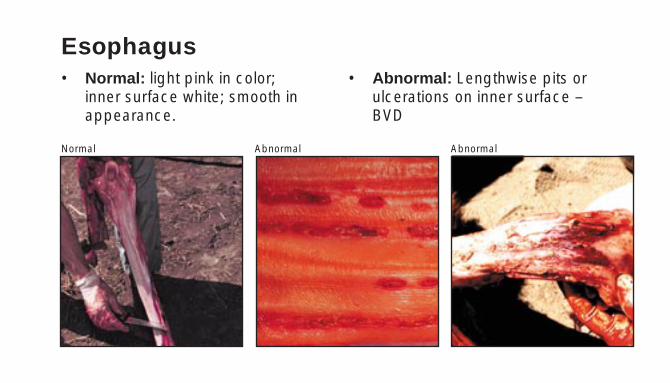
Esophagus• Normal: light pink in color; • Abnormal: Lengthwise pits or
inner surface white; smooth in ulcerations on inner surface –appearance. BVD
Normal Abnormal Abnormal

55
Rumen• Normal: Full of feed contents; wall • Abnormal: Bubbly contents –
has gray fingerlike projections. acidosis; wall under projectionshas red patches.
Normal Normal Abnormal Abnormal
56
Abdominal CavityOmentum
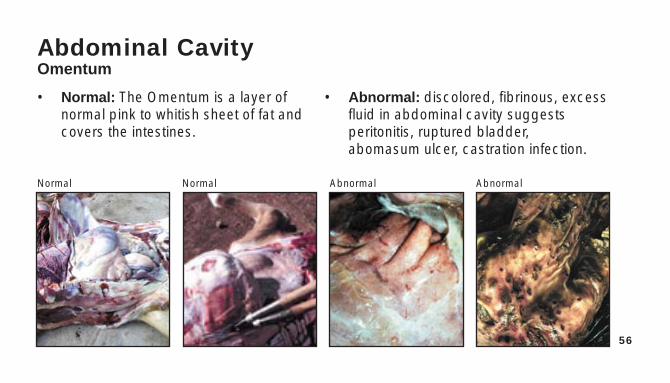
• Normal: The Omentum is a layer of • Abnormal: discolored, fibrinous, excessnormal pink to whitish sheet of fat and fluid in abdominal cavity suggestscovers the intestines. peritonitis, ruptured bladder,
abomasum ulcer, castration infection.
Normal Normal Abnormal Abnormal
57
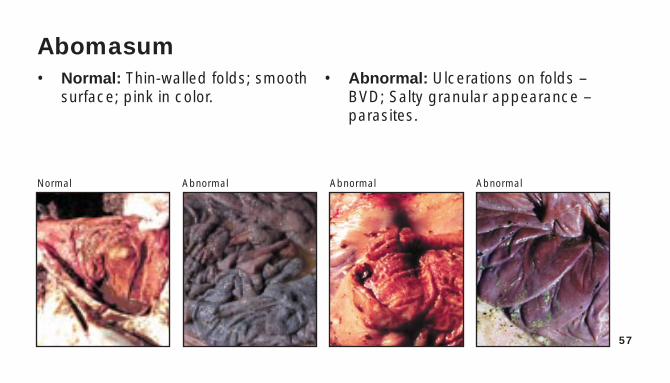
Abomasum• Normal: Thin-walled folds; smooth • Abnormal: Ulcerations on folds –
surface; pink in color. BVD; Salty granular appearance – parasites.
Normal Abnormal Abnormal Abnormal
58
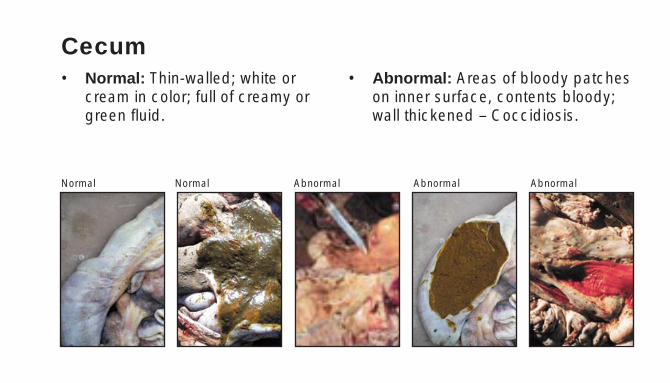
Cecum• Normal: Thin-walled; white or • Abnormal: Areas of bloody patches
cream in color; full of creamy or on inner surface, contents bloody;green fluid. wall thickened – Coccidiosis.
Normal Normal Abnormal Abnormal Abnormal
59
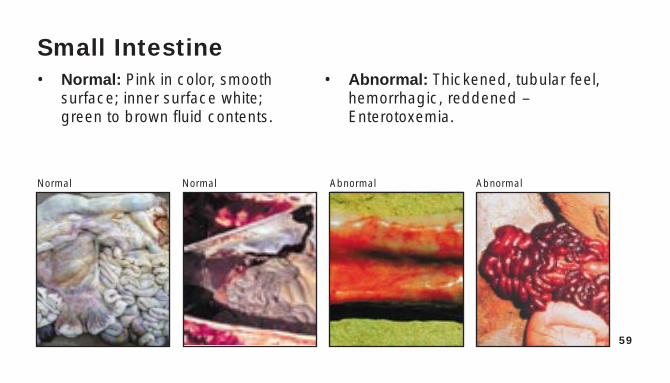
Small Intestine• Normal: Pink in color, smooth • Abnormal: Thickened, tubular feel,
surface; inner surface white; hemorrhagic, reddened – green to brown fluid contents. Enterotoxemia.
Normal Normal Abnormal Abnormal
60
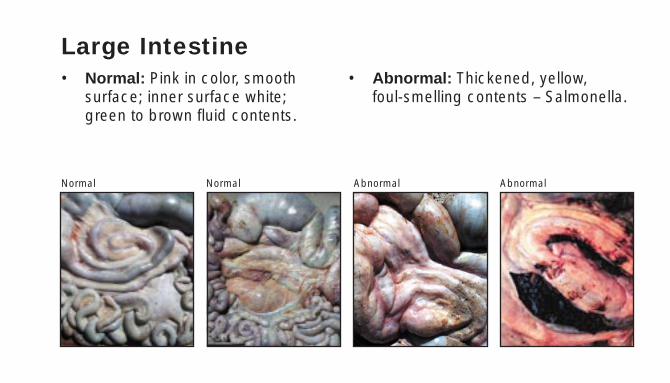
Large Intestine• Normal: Pink in color, smooth • Abnormal: Thickened, yellow,
surface; inner surface white; foul-smelling contents – Salmonella.green to brown fluid contents.
Normal Normal Abnormal Abnormal
61
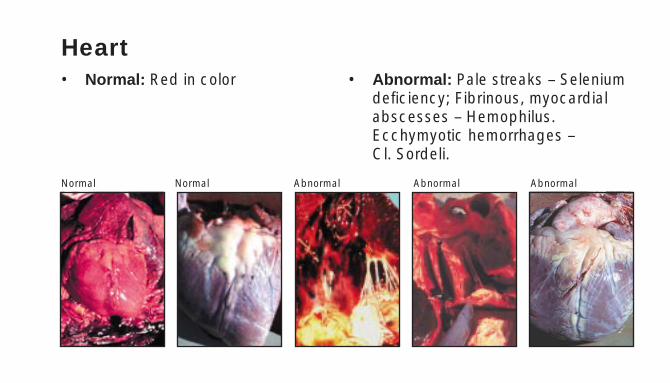
Heart• Normal: Red in color • Abnormal: Pale streaks – Selenium
deficiency; Fibrinous, myocardial abscesses – Hemophilus. Ecchymyotic hemorrhages – Cl. Sordeli.
Normal Normal Abnormal Abnormal Abnormal
62
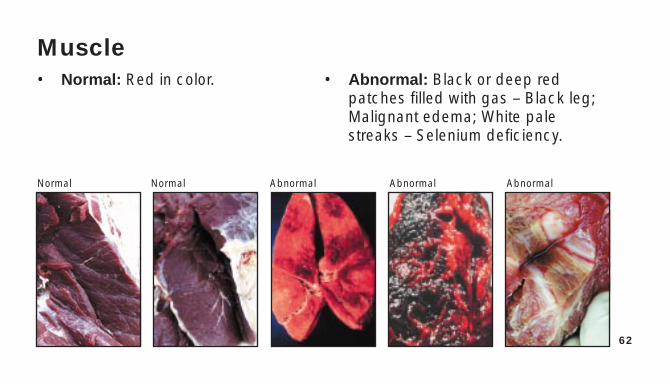
Muscle• Normal: Red in color. • Abnormal: Black or deep red
patches filled with gas – Black leg;Malignant edema; White pale streaks – Selenium deficiency.
Normal Normal Abnormal Abnormal Abnormal
63
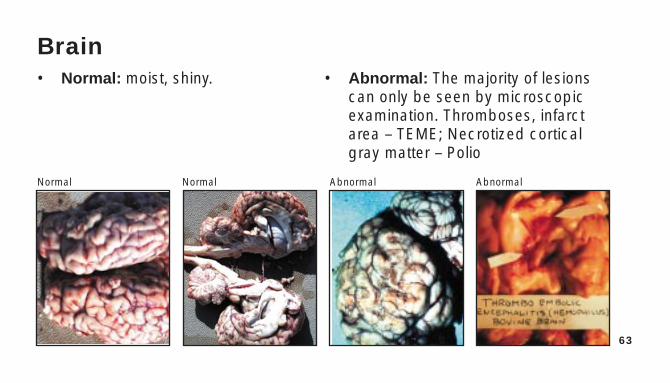
Brain• Normal: moist, shiny. • Abnormal: The majority of lesions
can only be seen by microscopic examination. Thromboses, infarct area – TEME; Necrotized cortical gray matter – Polio
Normal Normal Abnormal Abnormal
64
Necropsy Observations References• PDCR&F Pictorial Disease Guide Book• David T. Bechtol, D.V.M., personal slides obtained through
consultation and research practice.• Palo Duro Consultation, Research & Feedlot• Agri Research Center, Inc.
Rt. 1, Box 37 Canyon, TX 79015806-499-3304; 806-499-3392; FAX 806-499-3394web site www.paloduro-consulting.commail to [email protected]

Rt. 1, Box 37 Canyon,TX 79015806-499-3304; 806-499-3392; FAX 806-499-3394
web site www.paloduro-consulting.commail to [email protected]
Rt. 1, Box 37 Canyon,TX 79015806-499-3304; 806-499-3392; FAX 806-499-3394
web site www.paloduro-consulting.commail to [email protected]