navigating the documents tab - uniphi-software.com document... · web viewthe search function in...
TRANSCRIPT
UniPhi
Document Management
Manual
P a g e | 1

Table of ContentsLocating Documents................................................................................................................................... 4
Navigating the Documents Tab..............................................................................................................7
Advanced Search................................................................................................................................... 9
Working with Existing Documents.........................................................................................................12
Creating Documents................................................................................................................................. 14
Create a New Document...................................................................................................................... 16
Viewing a Document............................................................................................................................. 23
Stylesheets........................................................................................................................................... 25
Copy a Document................................................................................................................................. 27
Document Editing, and Version Control....................................................................................................28
Reverting Changes............................................................................................................................... 33
Document Transmittal............................................................................................................................... 34
Emailing a Document............................................................................................................................ 34
Document Sent Records....................................................................................................................... 38
Document Controls / Input Objects...........................................................................................................40
Rich Text Editor.................................................................................................................................... 41
Create a Certified Progress Claim........................................................................................................44
Documents and Issues Management.......................................................................................................49
Recording communications as project issues.......................................................................................50
Linking Response Documents..............................................................................................................56
Linked Contract Documentation............................................................................................................60
P a g e | 2

Manual OverviewThe aim of this manual is to provide instructions for using the Documents module in UniPhi. This manual
covers the majority of documents functions such as finding documents, creating and modifying
documents, and distributing documents both internally (e.g. colleagues), and externally
(clients/suppliers). You will also learn how to save content from your email directly into a UniPhi
document, and how to link a UniPhi document with a UniPhi issue.
All of the documents that you will be working with in UniPhi will have been created from templates as
defined by your System Administrator, or are the standard templates that come “out of the box”.
Concepts such as template design, your organisation style guides, and custom drop down lists are
configurable by your System Administrator, and the focus of this manual is therefore on guidance
through the document management aspects of UniPhi from an end user perspective.
How to use this ManualAs you read this manual you will notice the following icons recurring which will help to highlight and
enable you to quickly locate activities and summary areas, they will also assist with tips for keeping out of
trouble.
Puzzle Piece:The puzzle piece appears at the beginning of each session and any major section to
mark the overview of that item’s content or concept.
Cogs:The cogs denotes a step by step activity to be completed using UniPhi by the
participant relative to the section it is located in.
Light bulb:The light bulb denotes a helpful hint or tip you should be aware of.
Screenshots have been used throughout the manual to demonstrate what you should be viewing as you
move through the activities. They are for illustrative purposes only. Details such as dates, budget figures
and other entered text/data may vary.
P a g e | 3

Locating Documents
The first thing you will notice about UniPhi is the concept of context tabs. These tabs which appear along
the top row set the context of each of the tabs in the second row.
The first tab is My Work / Documents and will only display documents which you have authored,
and will include documents which are in private mode.
The second tab is My Portfolio / Documents where you will see a broader list of documents,
which now includes documents associated with each of the projects that you are working on.
Finally Portfolio / Documents displays the full list of all documents across your entire
organisation. Portfolio view is only available to Program Manager and Administrator licenced
users.
Once you have selected the appropriate context, you can quickly and easily locate a specific document,
or a group of documents according to your requirements. This ability to quickly search your entire project
or portfolio for specific documents is one of the key features of UniPhi, and one of the major benefits
when compared to using traditional network folder storage technologies.
Figure 1 Team Member licenced user view of UniPhi
Figure 2 Program and Project Manager licenced user view of UniPhi
P a g e | 4

With the correct context in mind, you can view the documents according to the filters that are relevant for
your search. For example you may choose to view all documents within a specific project; in which case
you would select the project from the drop down selection:
Figure 3 All documents within the selected project will be displayed
Once you have selected your project, you can then filter for a specific template:
Figure 4 Select the type of document you require by specifying the template that was used to create it
And finally you may wish to filter the list of documents by status.
Figure 5 The above search locates a particular document within a project and according to its status
P a g e | 5

UniPhi uses security permissions which are set at the document template level based on
user licence levels. These security settings are established and maintained by your
system administrator, and in effect mean that certain document will not be visible to
certain licenced users. As an example contract documents may be restricted to Program
Manager licence, meaning that Tem Members will not be able to see any contract
document.
P a g e | 6

Navigating the Documents Tab
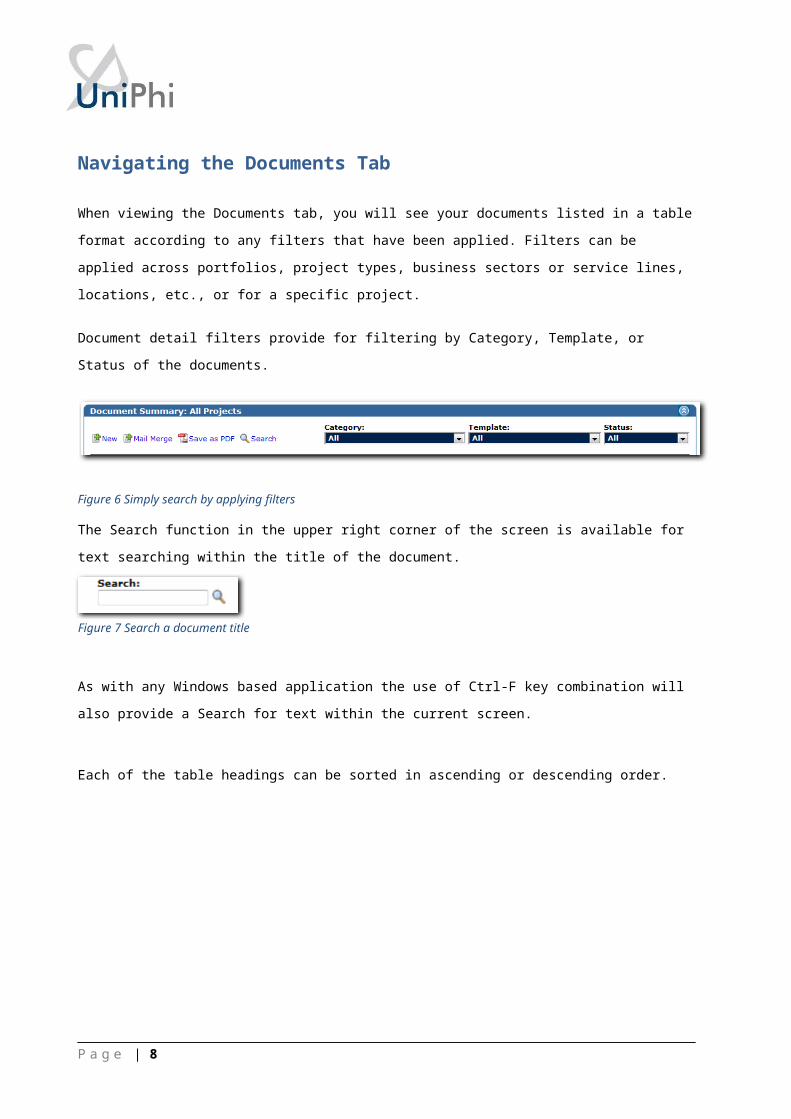
When viewing the Documents tab, you will see your documents listed in a table format according to any
filters that have been applied. Filters can be applied across portfolios, project types, business sectors or
service lines, locations, etc., or for a specific project.
Document detail filters provide for filtering by Category, Template, or Status of the documents.
Figure 6 Simply search by applying filters
The Search function in the upper right corner of the screen is available for text searching within the title
of the document.
As with any Windows based application the use of Ctrl-F key combination will also provide a Search for
text within the current screen.
Each of the table headings can be sorted in ascending or descending order.
Figure 8 Change the sort order by clicking the column heading
P a g e | 7
Figure 7 Search a document title
UniPhi presents all of the relevant information per document. In the example above you can identify the
Project name, the document name, the template that it was created from, the document version, the
document status, the date of last modification, and any due dates, and distribution sent date.
On the far right had column you will see two icons which are used for editing a document properties, and
for deleting a document. Pressing the edit icon allows you to change the document ID, the status, and
the due date of the document.
Pressing the delete icon will delete your icon. If you accidently delete a document, you will need to ask
your system administrator to recover it for you.
P a g e | 8

Advanced Search
In addition to being able to filter for documents according to the template that it was created from, and its
status, UniPhi also allows you to perform an advanced search. The advanced search button includes
additional search fields based on any of the document custom lists that have been created for your
organisations deployment of UniPhi.
Figure 9 Advanced search
Your UniPhi administrator is able to create custom checklists and drop down lists which can then be
applied to any relevant document of issue. Once a custom list has been applied to a document it will
appear as a searchable option within the Advanced Search function.
Advanced search allows you to search the actual contents of your UniPhi generated
documents. By typing a word or a phrase into the Keyword Search field, UniPhi will locate
any document that matches your phrase
As a simple example of how this feature works, let’s assume that your organisation stores design
drawings. Each of the design drawings will relate to a specific trade or discipline. Rather than having
multiple design drawings per project, and not knowing which trade or discipline they relate to, and
instead of creating a template per each trade discipline, you can select the specific trade discipline as the
document is created. By adding in a single step that prompts the document author to nominate the trade,
it is then possible to locate a design drawing according to the trade discipline that it relates to.
P a g e | 9

Figure 10 The advanced search screen will show all custom lists according to the selected template
Figure 11 Selecting the required discipline returns all documents matching your search
Depending on your organisation and the data that is being captured via your document templates, the
number of custom lists used can vary. Regardless of the number of lists, UniPhi will present each of
these lists within the advanced search function. A more complex example is included in the screen shot
below. Notice that UniPhi now allows you to search according to a multitude of criteria.
P a g e | 10

Figure 12 Where no template has been selected, all custom lists will be available for advanced search
In the screen shot above you will notice that the search results in the location of a document that is a
Civil discipline, and includes a Hold Point surveillance.
The Advanced Search feature allows for a wide range of search criteria to be applied,
including project start/end dates, document modified date range, and keyword search.
P a g e | 11

Working with Existing Documents
Viewing a Document
To view a document from the document tab, simply click on the document name.
UniPhi will open the selected document in a new tab and display the contents in a simple reviewable
HTML format. In order to view the document in the format that will be seen externally by your
supplier/clients, you can press the Save as PDF button.
Document StatusThere are seven document status types that are used in UniPhi. You can observe the status of all
document via the documents tab, and you can also use the filters to selectively locate documents based
on their status.
The document statuses in UniPhi are:
Private - This document status is for documents that are in a pre-draft early stage form, or those
currently being actively edited by their creator. While a document is in private status it can only be
viewed by those who have edit rights to that document.
Private documents can only be seen by the document author and are only visible in the
context of My Work / Documents. If you are unable to fine your own document, make
sure you are looking in the My Work tab.
Draft - This document status opens a document up to be read by any other project team member. A draft
status means that the document is still under development, it can be modified, and can have comments
added to it.
Open For Review - Like the draft status, this document status allows all other team members to view
and comment on the document. The difference is that in the eyes of the creator, the document is
completed and “open for review”.
Awaiting Sign Off – This document status allows people who need to sign off a document to sign it off.
Document sign off requirements are configured per template by the system administrator. Once a
P a g e | 12

document is moved to Awaiting Signoff it will appear in the My Work / Summary of the people/person
who are required to sign it off. If there is no specific sign off role for that template, then the document
creator can sign it off.
Signed Off - This document status completes a document’s life cycle. A signed off document cannot be
edited, though it can be copied or deleted.
Closed – This status can be selected for any document that does not require a sign-off process and is
considered as finalised.
Deleted – This option displays all documents that have been deleted.
Deleting Documents in UniPhi can be done, though technically a document is never
actually deleted from UniPhi. Rather, deleted documents are removed from view, and can
only be recovered by an Administrator licenced user.
P a g e | 13

Creating DocumentsDocuments can be created from various locations throughout UniPhi depending on the work that you are
performing at the time. Though the most common way to create a new document is to press the New
button from within the documents tab (as shown below), documents can also be created from within the
contracts tab related document, or directly from the Methodology tab.
Figure 13 Create a new document by pressing the New icon
Figure 14 Related documents are conveniently available within other tabs
P a g e | 14

Figure 15 All available templates can be viewed and launched from the Methodology tab
P a g e | 15

Create a New DocumentRegardless of how you create your new document, UniPhi will launch a new document pop up window,
which will guide you through the document creation process, according to the workflow and template that
you have selected.
Create a document
1. You will need to select the document template that you would like to use when creating your
document. If your UniPhi deployment has numerous templates, that may be grouped into logical
categories. This makes the template selection process simpler as the list of available templates is
reduced.
2. The Use Template selector will provide a list of templates available for selection based on the
template configurations and the users access level. Any template that is set to have an access level
higher than the logged in users level will not be displayed
If you attempt to create a new document and UniPhi appear to not respond, make sure you
have allowed pop-ups from UniPhi within your web browser
P a g e | 16

Figure 16 Pop up blockers need to allow UniPhi to launch new browsers/tabs
3. As projects are the central reference point for all information within UniPhi, you will next need to
specify the project that your new document relates to.
Figure 17 Nominate the project that your document belongs to
4. Next the New Document Name field will default to the name of the template that you have selected,
though this can be overwritten or appended with any further information that provides a suitable
document name.
P a g e | 17
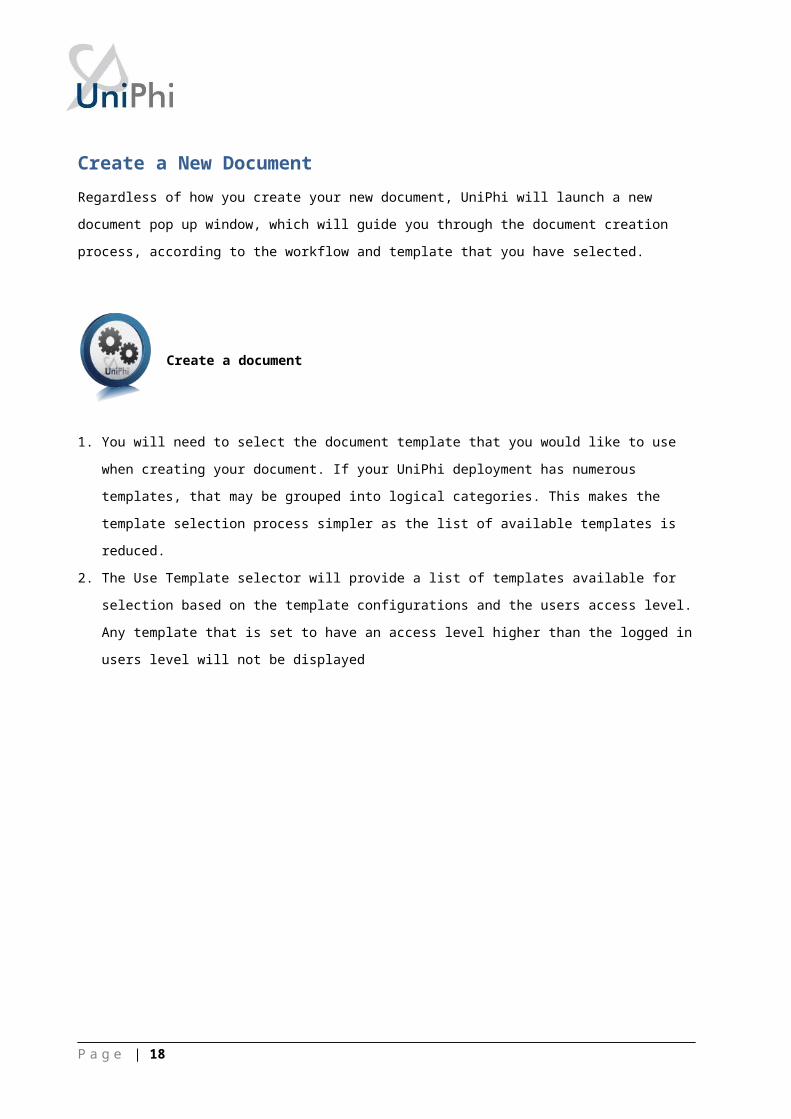
Figure 18 You may choose to rename or amend the title of your document
5. Once all of the details relating to your new document are correct, press the Create button.
The new document data entry screen consists of two sections: the primary section is on the left
which presents the current step or element of the document being prepared and the Checklist
section on the right which provides a summary list of each of the steps in the document.
P a g e | 18

Figure 19 The body of your document is on the left, while the navigation checklist is on the right
The current step in the screen show above is a Rich Text box which provides editing functions similar to
a word processing application.
Using the Checklist: The checklist is used as a way of navigating from one step to
another, and is useful if you need to move in a non sequential manner. If you are
progressing sequentially, you can also use the Save and Continue button at the bottom of
each step.
6. Select Save and Continue from the lower left of each page to proceed through each step in
sequence and arrive at the Finish step.
P a g e | 19

Figure 20 The Finish step allows you to review your document, and set its status
The Finish step shown above provides a number of options for how your newly created document will be
treated in UniPhi.
The options available at the Finish step are as follows:
Document Status: As mentioned previously, UniPhi has 7 document statuses to choose from, and it is
at this step that you can set the document status.
Due Date: Setting a due date will ensure that should a document require sign off, it will appear in the My
Work / Summary of the person requiring sign off. A due date set here will also appear in the Portfolio /
Documents tab view, and is a useful way to see upcoming document due dates, and those which are
overdue.
PDF Style: Your UniPhi deployment has been configured to have 2 or more organisation specific style
sheets to choose from. These style sheets will typically include your logo, address details, and other font
and formatting setting. Using the drop down menu here allows you to change the default style sheet set
by your system administrator.
Signatures: UniPhi can be configured to show signatures on documents which have been signed off.
Checking of unchecking this box will determine if signatures are shown or hidden.
Comments: UniPhi allows people reviewing and contributing to the document to make comments within
the document. Checking or unchecking this box will ensure that comments are shown or hidden
Transmittals: UniPhi can be used to transmit document via email both internally to your project team,
and externally to clients/suppliers. This checkbox allows you to either show or hid the transmittal details.
7. Review your document: At this stage it is beneficial to take a closer look at the contents of your
document. Your template may have been configured to draw on various pieces of information stored
in UniPhi and while still in Private status, you can review and make any required changes. The
simplest way to do this is to use the View Document, or Save as PDF buttons.
P a g e | 20

The View Document option will show you an html format of your document, while the Save as PDF
will present you with an exact version of the document as it will be produced and set to your
stakeholders. If you realise that a change is required you can simply click back into the necessary
step from the Checklist on the right hand side and make your changes.
8. Once any necessary change have been made and all configurations have been set, press the close
button to take you back to UniPhi’s documents tab, where your new document will be stored.
Figure 21 The close button will take you back to UniPhi
P a g e | 21

Document Status can be changed via inline by using the Edit icon to the right of the
document record:
Figure 22 Preform quick edits by modifying your document in-line
Filtering by Document Status when searching for documents provides some additional status options:
Figure 23 Filter by grouped status
The Status Filter provides for:
All – This selection is the default and displays All open documents excluding Deleted documents.
Non-signed Off – This filter groups all documents that are current in Draft, Open for Review or Awaiting
Sign-off statuses.
P a g e | 22

Viewing a DocumentWhen launching a document, UniPhi will open a new window or new tab on your browser.
Once your document has launched you will see a document toolbar which sits at the top of your
document. Depending on the status of your document, the toolbar will present you with various congtrols
and options.
As a standard, each document status will include the following
Edit: Unless a document has been signed off, it may be edited. Editing a document will create a
new version of the document.
Copy: Enables an existing document to be copied either as a duplicate within the same project,
or as a new document within a different project. Partial Copy: Used when a document contains content and similar template controls to another
UniPhi template. The Partial Copy feature looks up where the same template controls exist and
allows you to map the date from your current document into another document template.
Email: Allows a document to be transmitted via email.
Signatures, Comments, Transmittals: These may be hidden from view, or made visible
View Version: Where multiple versions of a document have been created, this drop down allows
you to view previous versions of a document.
Private Status documents will only display the Edit icon, and cannot be emailed:
Draft status document will also include the Watermark option:
Watermark: When you need to make sure that your stakeholders are aware that a document is
in draft mode (e.g. if it is printed out), then ticking the Watermark box will insert a DRAFT
watermark across your document.
Open for Review documents cannot show a Watermark
P a g e | 23

Awaiting Sign off, and Closed
Partial Copy not available. When a document is Awaiting Sign off, or Closed, it can no longer be
partially copied.
Signed Off documents cannot be edited
A document cannot be edited if it is being modified by another person. This is designed to
eliminate version conflict and data loss.
Document Toolbar Defaults: the Signature, Comments, Transmittal boxes are checked
by default, and the default style sheet is also nominated per template by your System
Administrator. You may change these setting for your document if necessary.
P a g e | 24

StylesheetsYour organisations corporate style guide will be configured into your UniPhi deployment, allowing a
standard look and feel to all document produced via UniPhi. Style is separated from the templates
allowing for changes to the corporate standards to be applied quickly and with minimal disruption.
Stylesheets are created by the UniPhi support team based on an organisations style guide.
Stylesheets are selected when preparing a document for output from the Edit toolbar.
The styles govern the font selection and standard text sizes in the PDF and any printed hard copies. The
stylesheet will manage things like font size, heading size and colours, which means you won’t need to
perform manual formatting within your document text – UniPhi will do it for you in the defined style.
If the corporate style is updated, or new versions are added, the list of available stylesheets can be
configured by UniPhi developers and made available to all users of your deployment.
Changes to your stylesheet will not impact the documents that have already been
created. All of the content will remain intact, but you will have the ability to generate your
documents (even the signed off ones) using whichever stylesheet you require.
P a g e | 25

Because documents are created in UniPhi within a new tab, or browser window you may
notice you’re your newly created document is not immediatley visible in your document
tab. Refreshing your browser will display your new document.
P a g e | 26

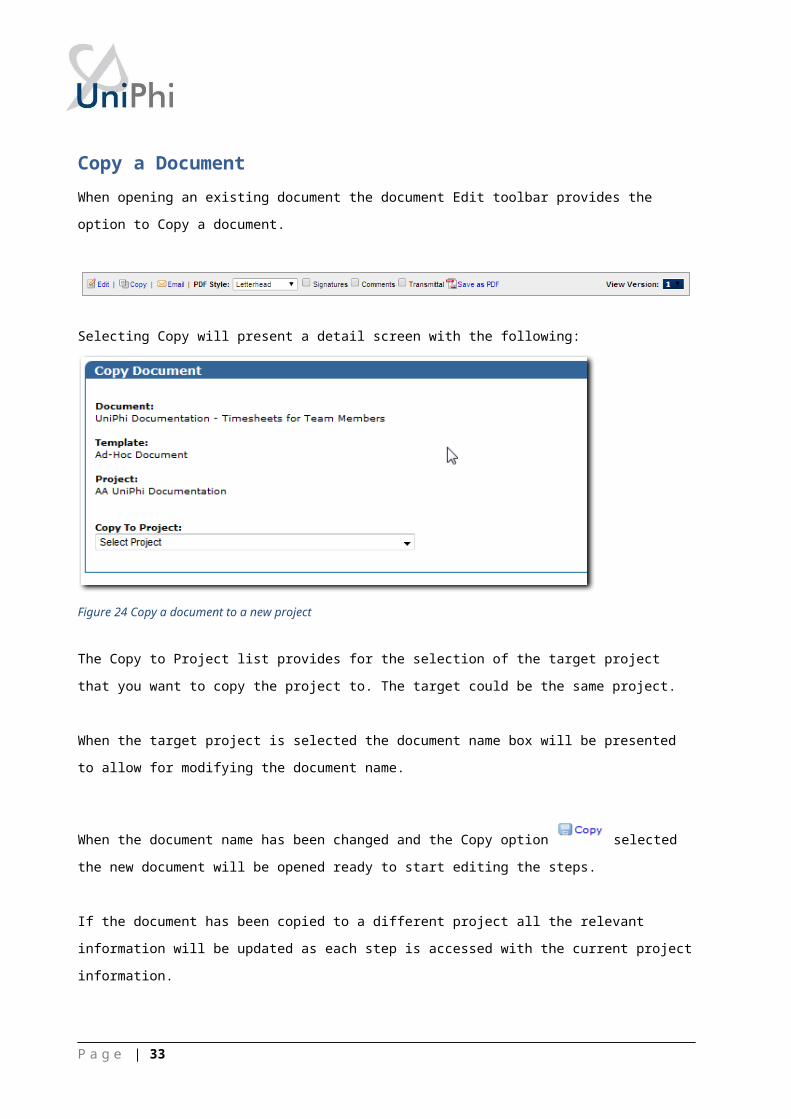
Copy a DocumentWhen opening an existing document the document Edit toolbar provides the option to Copy a document.
Selecting Copy will present a detail screen with the following:
Figure 24 Copy a document to a new project
The Copy to Project list provides for the selection of the target project that you want to copy the project
to. The target could be the same project.
When the target project is selected the document name box will be presented to allow for modifying the
document name.
When the document name has been changed and the Copy option selected the new document
will be opened ready to start editing the steps.
If the document has been copied to a different project all the relevant information will be updated as each
step is accessed with the current project information.
P a g e | 27

Document Editing, and Version Control
All documents can be edited by members of the project team. Each time the document is edited a new
version is created (for any status other than Private). Previous or Superseded versions can be accessed
and reviewed when viewing a document. Document reviewers and collaborators can observe changes
that have been made between versions, add comments within the document, and can revert back to
previous versions of a document.
Figure 25 Document version numbers
Document version control can also be utilised where a document is produced on a recurring basis. As an
example a monthly Minutes document can simply be produced each month as the same document. The
benefit in doing so is that UniPhi will not contain numerous copies of the Minutes, but rather will have one
document that contains multiple historic versions.
Figure 26 Select the version that you require
P a g e | 28

Document Version Control in Action
Version Control is a powerful method for both collaborating in the production of a document, and in
viewing historical changes to a document which have occurred. The following steps will guide you
through modifying a document, replacing attachments within the document, adding comments, and then
reverting back to a prior document version.
1. From the My Portfolio / Documents tab, select a document that you would like to edit.
2. The document will launch in a new tab. Press the button
3. Re-name your document, and press Continue
Figure 27 Rename your document
UniPhi will alert you that you are about to create a new version of your document. Click OK to
continue
P a g e | 29

4. Make some changes to your document.
The document being edited in the screen shot below has a new file attachment added at step 7
Figure 28 Add attachment descriptions if necessary
The document control type shown in the screen shot above allows the document author/editor to add a
description per file attachment, and to make general commentary relating to the step
5. Save any further changes and modifications and continue until you reach the Finish step.
6. Review your changes in either html format, or by saving at PDF
P a g e | 30

In the screen shot below, the document presents a change log view of all changes that have been made
with the file attachments. Notice files have been added and superseded. UniPhi lets you know when a
file was added, or changed.
Figure 29 Example output PDF document
Document attachments. UniPhi is able to save file attachments into documents. When
viewing this information in your UniPhi document you will see thumbnails of any image
files, and titles for any other files such as word document, spreadsheets, etc. You will find
the actual files saved within the PDF file attachment. In Adobe PDF reader this is located
via a paperclip icon in the top left corner of the PDF. Clicking on the files will launch them
on your computer.
P a g e | 31

Figure 30 The paperclip icon includes each of the attached files
P a g e | 32
Reverting ChangesIn the event that you are reviewing changes to a document and you do not agree with the changes that
have been made, you can revert the changes to a prior version.
To revert changes, simply launch your document and select the appropriate prior version from the list of
available versions and press the Revert button.
UniPhi will alert you that the process of reverting documents to a previous version is not
reversible, as you cannot undo the change or go back to the removed version of your
document.
Figure 31 Reverting to a previous version of a document cannot be undone.
P a g e | 33

Document Transmittal
Once your documents have been created, and reviewed, you may also be required to send them via
email. UniPhi has a document email functionality, which is designed to allow for doucment to be shared,
regardeless of your recipeint having a UniPhi licence or not. The functionality also stores a record of your
transmittals, which is a useful feature when anyone needs to know what was sent, to whom, and when.
Documents are emailed from UniPhi via the document toolbar. By simply opening your UniPhi document,
you will find the email button.
Figure 32 Select the recipients of your UniPhi document
P a g e | 34

Emailing a Document Selecting the Email option presents the UniPhi Email screen. A list of email addresses and resource will
appear. The resources displayed in this list are typically the Team List, which as its name suggests, are
those resources associated with the project that your document has been generated from.
The View option in the upper right corner allows for selecting 3 different views of the contact email
details.
Figure 33 Select the recipients according to the role
The View list options are:
Team List: All resources associated with the project.
Project Roles: All resources associated with the project grouped by Role.
Global Roles: All Resources from all projects in UniPhi grouped by Role.
The default list will be set within the document template but all three options are always available.
If an email address has not been entered via the resource tab, the contact the <> braces will be
displayed without an email address and will be greyed out so they cannot be selected.
P a g e | 35

Figure 34 Contacts without an email address appear with the < > characters
In the above example Bob does not have an email address. Bernard, Gerard, and Jane have been
selected as recipients of the email in the To: field. You may also add recipients to the CC: and BCC:
fields by clicking on the blue CC: or BCC: headers.
Figure 35 Click on the Cc: and Bcc: headings to send emails within those fields
Any intended recipient that does not appear can be manually added in the TO: CC: or BCC: fields.
P a g e | 36

Figure 36 You can also manually enter an email address if necessary
UniPhi automatically determines how to handle the email attachment format. If a recipient has a UniPhi
licence then the email will contain the body of the email and a link to the UniPhi system View Document
screen.
External Email Addresses will automatically trigger UniPhi to not include a link to the
UniPhi document replacing it with a PDF formatted attachment. The basis of this being
that the external user cannot access UniPhi to view the document. If any of the recipient
email addresses are external then ALL recipients will get a PDF attachment.
P a g e | 37

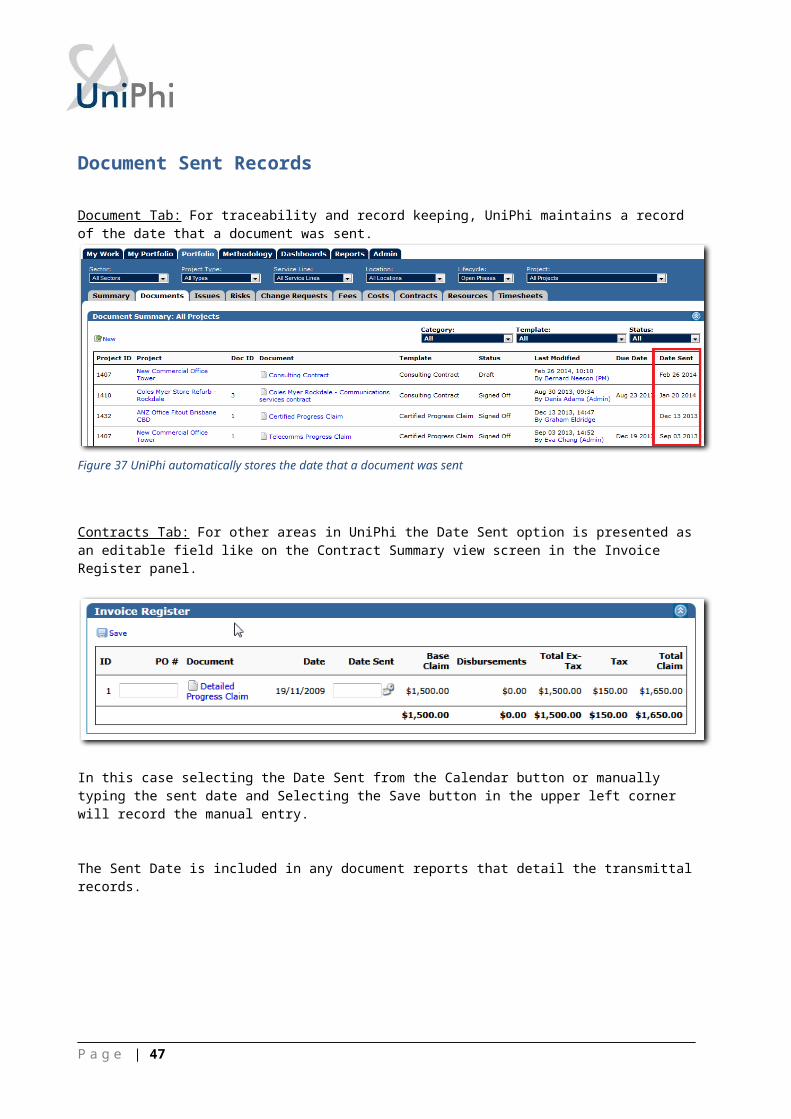
Document Sent Records
Document Tab: For traceability and record keeping, UniPhi maintains a record of the date that a document was sent.
Figure 37 UniPhi automatically stores the date that a document was sent
Contracts Tab: For other areas in UniPhi the Date Sent option is presented as an editable field like on the Contract Summary view screen in the Invoice Register panel.
In this case selecting the Date Sent from the Calendar button or manually typing the sent date and Selecting the Save button in the upper left corner will record the manual entry.
The Sent Date is included in any document reports that detail the transmittal records.
P a g e | 38

Recording Sent Date when Emailing a Document is not required as UniPhi automatically records the date and time of the outbound email in the transmittal records. If a document is sent multiple times the most recent sent date is displayed.
In this case Version 2 of the document has been sent twice, once without an email subject or body and
once as per the example above.
P a g e | 39

Document Controls / Input ObjectsDocument controls are an integral part of the document management system. They enable quick
creation of documents based on information that has already been entered into UniPhi for the relevant
project or portfolio.
They are used to display project data in pre-defined views some of which have controls that can modify
the content during document preparation.
The building of a template that can be used for document generation in UniPhi is the topic of a separate
manual. Please refer to the UniPhi 8.1 – Document Template Management.
The following pages present information relating to the preparation of a document based on a number of
different templates and how the author of the document can control the output of their document.
The following examples are not an exhaustive list but address the most commonly used input objects
and the source of the data.
For most of the input objects, if the document being prepared does not display the expected data, there
is either something incorrect in the selection (date, period, project, filter, etc.) or in the underlying data
itself. Commonly un-submitted timesheets, unsigned progress claims, documents started and left in
Private status, will impact on the validity of the document data. The remedy is to save the current
document and edit the underlying data. Returning to the document later and recommencing the edit
process will trigger an update of the existing document and present the current (and now correct) data.
Example Document Controls:
The Textbox (Rich) document control appears in most templates. Using this control the user can enter in
unlimited text, tables and graphics into their document. Default text can also be entered by the template
creator / administrator and will be displayed, and can be edited or deleted by the user.
A Contract Details control can be built into a template to let the user specify which contract the document
refers to as projects can have multiple contracts. This method is used to make information from the
selected contract available for use in the document you are creating.
P a g e | 40

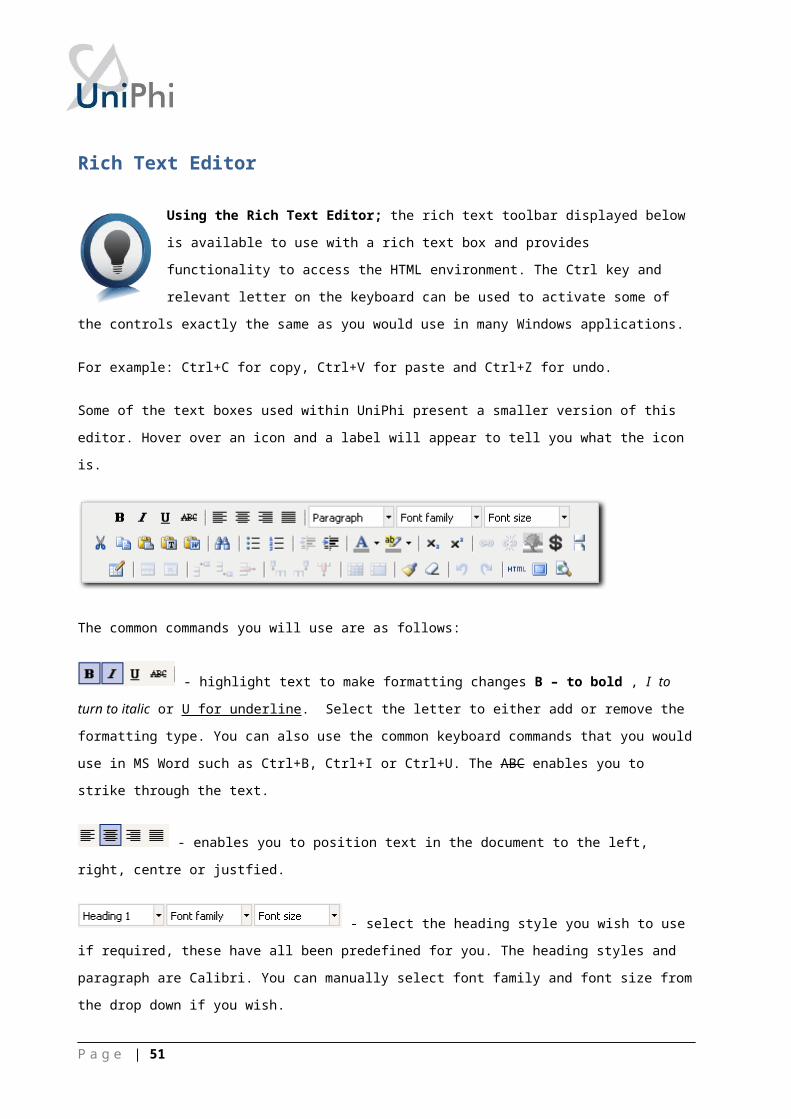
Rich Text Editor
Using the Rich Text Editor; the rich text toolbar displayed below is available to use with
a rich text box and provides functionality to access the HTML environment. The Ctrl key
and relevant letter on the keyboard can be used to activate some of the controls exactly
the same as you would use in many Windows applications.
For example: Ctrl+C for copy, Ctrl+V for paste and Ctrl+Z for undo.
Some of the text boxes used within UniPhi present a smaller version of this editor. Hover over an icon
and a label will appear to tell you what the icon is.
The common commands you will use are as follows:
- highlight text to make formatting changes B – to bold , I to turn to italic or U for
underline. Select the letter to either add or remove the formatting type. You can also use the common
keyboard commands that you would use in MS Word such as Ctrl+B, Ctrl+I or Ctrl+U. The ABC enables
you to strike through the text.
- enables you to position text in the document to the left, right, centre or justfied.
- select the heading style you wish to use if required, these
have all been predefined for you. The heading styles and paragraph are Calibri. You can manually select
font family and font size from the drop down if you wish.
- the cut, copy and paste icons enable you to add or remove text into the rich text box from
external documents or sources.
- the paste as plain text icon is used when copying text from MS Word. This is because MS Word
has its own markup language which does not match exactly with HTML. When copying text from MS
Word the rich text editor does its best to convert from word to HTML, however it is not perfect since the
two do not match up exactly. The paste as plain text option will remove the word formatting and allow the
user to have more control with formatting.
P a g e | 41

Information can be copied into UniPhi from MS Word by selecting the when pasting into UniPhi and
then editing as required. Alternatively, you can copy the HTML version of the document and paste this
into MS Word. If this method is used upload the document back into UniPhi.
- provides the options to create or remove a bulleted or numbered list. When you remove these a
space will be entered between each line of text . If you wish to remove these spaces place your cursor in
front of the first letter of the word you wish to move and select your backspace key. The word will be
inline with the word previously above, now select Shift+Enter. The word will be placed back on the line
immediatley below with no bullets and the space is removed.Alternatively, if you are familiar with HTML
you can view the code and make your changes there. (See HTML explanation further on in this section).
- enables you to change the colour of the font by highlighting the text and selecting the drop dowm
menu to pick your colour.
- enables you to highlight the background of the text, this is particulary useful if you want to note
where you have made changes in a document so the author or readers can see what you have amended
in the text. UniPhi does not have a track changes option.
- Used to insert a picture and enables you to select the image you want to insert. This can be used
for inserting a photo into CV or logos etc . The best method is to create a table and insert the graphic into
one cell, that way you can control the positioning.
- The first icon inserts a table into a rich text box and you can enter the number of rows
and columns required.
The middle icon displays the table properties and where you modify the amount of rows and columns
and set width and height properties.
Table width is suggested to be fixed to 650 pixels so when document is rendered to PDF it will fit on an
A4 page.
The last icon is the cell properties. It is suggested that you modify the cell/column using percentages with
a total of all columns across the table equalling 100%. For example a table with 5 columns may have a
width of 20% each, if you change one of the cells in a column you will need to update the remaining
columns to maintain 100%.
- Inserts a column in a table to the right or left or the last icon deletes a column. Place the
cursor in the column you wish to insert next to or delete and select the relevant icon.
P a g e | 42

- Inserts a row in a table below or above the row you are in. Place the the cursor in the row
you wish to insert a new row above or below or delete and select the relevent icon.
- redo or undo the last action(s) that you did . You can also use Ctrl+Z for undo or Ctrl+Y for
redo.
- select this icon to access the HTML code for the step. If you are familiar with HTML you may find it
easier to use the HTML view and make changes to the code to create your information, amend
formatting.
- enables you to view the full screen for the step you are in. Depending on your browser, you may
need to place your cursor in the rich text box or table for the step to appear. Clicking a second time will
return to the document mode.
. - enables you to indent text to the right or out-dent to the left. You can use this method as well
to remove bullets or numbers by selecting all the relevant text and then out-denting until removed.
The variable icon provides for pulling snippets of data from the system and inserting them into the
text ‘on the fly’.
The popup screen allows for selecting Project, Document, and Resource based information from the
system. The list of data is too extensive to be included here.
P a g e | 43

Create a Certified Progress Claim
Progress claims can be created as recommendations from a Quantity Surveyor, or a
Certification from a superintendent, or as an invoice from a contractor. This example
presents the basics of creating a progress payment certificate. Revenue and Cost
Contracts will present differently; the following is a Cost Contract example.
1. Select a contract from the project Contract system.
2. When viewing in the Contract summary view, note values in the Progress Claims and % Comp
columns:
Figure 38 Contracts summary view
3. Select the contract you need to create the progress claim (ensure you’re in the Claim view)
Figure 39 Update the % complete, or the This Claim value
4. Enter in either the % of work completed or the actual $ value being claimed.
Click .
P a g e | 44

5. The total value of the current claim is Saved and now ready for the document Progress Claim to
be prepared.
Document Sign-off is required. These values have not been committed so if you roll up
to the Contract Summary view, the values will not have changed.
To prepare the appropriate document to certify / commit the claimed values, click on the link to the
Certified Progress Claim template in the upper right corner “Related Templates” panel on the contract
screen.
P a g e | 45

This will launch the Create Document wizard
Modify the New Document Name to something appropriate and click to begin making/certifying
your progress claim
Move through the template steps (in the example demonstrated the template consists of the following
steps:
Related Workflow – here you can select the issue that the claim is related to so that the completed
document appears associated with that issue.
Certification – the document control that certifies the progress claim
Claim details – Contact and other details
P a g e | 46
Distribution – here you can select who is to receive the completed document
Attachment / UniPhi attachments – users can upload invoice and other relevant documents
At the Certification step, Enter in the certification date, ensuring the correct contract etc is selected:
This is the upper half of the screen displaying the Contract selection (which is by default the contract that
the template was triggered from). The view can be a Certification or a Recommendation depending on
P a g e | 47

the relevant role / timing of the document. The Contractors Claim date and Certification Date fields are
provided and must be filled in before continuing.
The lower section of the claim screen displays the actual Deliverable line items and any Variations that
have been entered to the contract. This is provided to expand on the summary data that is presented in
the upper portion of the claim.
If there is a disbursement claim value a cost code will need to be selected to allocate the cost. GST will
normally be calculated but if it is different to the invoice and this difference is valid (e.g. GST free
component of a building surveyors registration), the GST calculated can be manually changed. Click
to continue creating your progress claim.
Once the claim is completed, and signed the document off, go to the Contract Summary view to review
the contract values. Note the values have been committed and a total % complete for the project has
been calculated:
P a g e | 48

This is one example of a document input object and how they can be used. Every UniPhi installation will
have different template configurations and requirements. The Document Template Management manual
provides a more detailed view of all the document input objects.
P a g e | 49

Documents and Issues ManagementUniPhi uses the issues module for effective project collaboration. The issues module achieves that
through comments, and issue actions, which are accessible to the whole team. UniPhi also allows issues
to be integrated with UniPhi documents.
The relationship to the Documents module is in ensuring that as Issues are resolved there is
documentation to support the approved resolution.
In this section you will see how this is managed in UniPhi through the integration between:
Issues (RFI tracking)
Contracts
Documents (Surveillance Reports)
All information that is worth recording on a project relates to the resolution of an issue. If this statement is
true, then all communication is usually in resolution of an issue. This may be as simple as getting site
fencing erected to major change in scope or budget.
The following examples will demonstrate how UniPhi assists with recording initial communications /
issues and appending information responses to communications.
(See Appendix 1: Recording initial communications and Appendix 2: Appending information responses to
communications) for the appropriate workflows.
P a g e | 50
Recording communications as project issues
Project related communications often come via email, and it is important to ensure that this information
along with any file attachments are stored in UniPhi so as to allow for effective collaboration in
addressing the issues. UniPhi integrates with MS Outlook via a Save plug-in application that allows users
to quickly and easily save emails and attachments directly into UniPhi as either a document or an issue.
Save as Issue:
Once relevant communication has been received via MS Outlook, select the email and click on the plug-
in button.
This will launch the Save As UniPhi Issue form:
Figure 40 Save as issue form
P a g e | 51

Log the email into the issues register against the relevant project, either by creating a new issue that
needs to be resolved or appending the email to an existing issue. You can also choose to include
attachments and assign the issue to a specific resource, apply a due date or an issue template (refer to
the UniPhi Issues Management manual for more details).
The “Save & Drill” option will save the email and launch UniPhi in a browser window with the newly
updated issue ready for further editing or additional actions.
Enter all the relevant information or what is known at this stage and click on Save or Save & Drill to save
the issue and access it to enter more details.
The resulting Issue record can now accept additional
actions
further comments
email responses
additional file attachments
changes to due dates
etc.,
Incoming communications is only one of the ways that issues arise on a project. Team
members can record ideas and phone calls. If only to annotate the file to evidence that a
call was made or received. Note taking of ‘random thoughts’ like something that might be
needed in a few months can help with the quality management process of a project.
P a g e | 52

Save as Document:
In much the same way that UniPhi allows you to save an email as an issue, UniPhi also allows you to
save an email as a document. As with creating issues; when an email arrives with project related
content, simply press the “Save as Document” icon from Outlook menu ribbon.
1. The Save as Document pop up window will open, and present you with a number of selectable
options. These options include, the UniPhi deployment you wish to save your email against (you
may have access to more than one UniPhi deployment), the project that the email relates to, and
the Category, Template, and Status of the document you are about to save your document to
2. Select the relevant options form the drop down menus
P a g e | 53

Figure 41 Specify the correct criteria for your UniPhi document
The Category menu options are drawn from the settings as they have
been defined by your System Administrator, and the Templates that
appear in the drop down are those templates that have a File Upload step
within them
P a g e | 54
Figure 42 Template categories are a useful way of grouping your templates
3. When you then Save & Drill into your document, you will see that the contents of your email now
appears within the document you have either created or amended.
4. You may wish to continue working on the document that you have saved your email into. In this
case you will need to press the edit button to take you into the document edit mode.
P a g e | 55

5. Once you are in edit mode, each of the template steps will appear, thus allowing you to create
and update the necessary contents.
P a g e | 56

Linking Response Documents Responses are made using the documents system and they can be linked within UniPhi so that related
documents can be viewed in context.
Figure 43 A document linked with an issue
To link a document to an issue the relevant document template must have an Issue Selector input object
included in it. It is assumed that the creation of the templates that are relevant to Issue responses will
have this option available.
When creating the relevant document simply select the related issue with the Issue selector and as in the
example above the document will display as a Related Document in the Issue detail level. Note that the
Document status of Private will not display, any other status will display.
Document controls: Documents can be linked to issues, contracts and other documents
by using Documents Controls built in to UniPhi templates.
P a g e | 57

Below are a few examples demonstrating the different document controls and how they link to different
areas of UniPhi:
The Contract Details document control is used to link the document (e.g. a Project Manager
Instruction) to the selected contract (Architects Contract)
The Issue Selector document control is used to link the document / communication to the initial
issue:
This document will now appear in the Related Documents box when you have drilled into the selected
issue.
P a g e | 58

The Document Selector document control links all other communication related to the initial issue
into the response document
The File Upload (Multi) document control allows you to attach other external documents that can
then also be linked:
P a g e | 59

Figure 44 You can attach any file at this step.
UniPhi then acts as a document transmittal register for the documents
The client side project manager should be constantly monitoring and using the UniPhi
issues system making sure that all issues are recorded and actioned. Overdue issues
should be reviewed and followed up. The Issues Register report (located in the Reports
tab) can be used if this list needs to be issued to a contractor as part of the follow up.
The Issue sign-off or resolution process provides for Team Members to not “Close” an Issue but to set a
status of Awaiting Review. The process being to alert the Project Manager that they consider that their
actions have been completed. The Project Manager should review the actions and results and Close or
Re-open the Issue based on their findings.
P a g e | 60
Document upload link enables you to upload multiple files where.

Linked Contract Documentation
Each contract has two views, an edit view (used for creation of a contract, and
generating claims) and a document view (for contract summary information). You can
toggle between these views via the magnify glass and edit icons within the
contract. The document view displays all the documentation related to that contract (as
per below). These include Variations, Progress Claims, EOTs and other Related
Documents.
Note, the information itself has been hidden to display the range of documentation within the contract.
This was done by rolling up the information by clicking on the hide icon .
P a g e | 61