national fenestration rating council incorporated · b. installing cmast software and accessing the...
TRANSCRIPT

NationalFenestration
Rating CouncilIncorporated
SMART SYNC USER MANUAL [E0A1]
NFRC Component Modeling Approach Software Tool 1.2.17
© 2016 NATIONAL FENESTRATION RATING COUNCIL, INC.
PREPARED BY:National Fenestration Rating Council
6305 Ivy Lane, Suite 140Greenbelt, MD 20770
Voice: (301) 589-1776Fax: (301) 589-3884
Email: [email protected] Website: www.nfrc.org

NFRC SIRC CMAST 1.2.17 User Manual [E0A1] page i
FOREWORD
This NFRC Certified Products Database Simulation Lab User Manual provides guidelines and explains the procedure to NFRC Accredited Simulation Laboratories for uploading products information using NFRC online Certified Products Database (CPD 2.0).
Questions on the use of this procedure should be addressed to:
National Fenestration Rating Council 6305 Ivy Lane, Suite 140
Greenbelt, MD 20770 Voice: (301) 589-1776 Fax: (301) 589-3884 Email: [email protected]
Website: www.nfrc.org
NFRC SIRC CMAST 1.2.17 User Manual [E0A1] page ii
Table of Contents
Contents
Foreword ................................................................................................................................... i
Table of Contents .................................................................................................................. iiii
Understanding the Smart Sync Paradigm .......................................................................... 34
1. Understanding the Bi-Directional Methodology .................................................... 45
2. Installing the Software .............................................................................................. 67
A. INSTALLING .NET 4.5 FRAMEWORK ................................................................. 67
3. Maximizing the Efficiency of the Local Client Database ...................................... 78
4. Basic Instructions - Download ............................................................................... 910
5. Basic Instructions - Upload .................................................................................. 1213
6. Downloading Glazing Components ..................................................................... 1415
7. SIRC Instructions Only ........................................................................................ 1617
7.1 ENTITY DESCRIPTIONS AND UPLOAD ................................................................. 1617 7.4 OPERATING WITH AN OPTICS FILE WITHIN THE SMART SYNC CLIENT ......... 2627 7.5 OPERATING WITH A SPACER COMPONENT WITHIN THE SMART SYNC CLIENT .... 3031
8. ACE Instructions Only ......................................................................................... 3435
8.2 ENTITY DESCRIPTIONS AND UPLOAD ........................................................... 3435
9. IARC Instructions Only ....................................................................................... 4041
9.1 IMPORTING ENTITIES INTO THE CMAST APPLICATION USING THE SMART SYNC
CLIENT ......................................................................................................... 4041 9.2 ENTITY DESCRIPTIONS FOR IMPORTING ....................................................... 4041

NFRC Smart Sync CMAST 1.2.17 User Manual [E0A1] page 3
UNDERSTANDING THE SMART SYNC PARADIGM
There are two concepts involved with the Smart Sync client: bidirectional transfer and maximizing efficiency by limiting the size of the local client.
The current syncing model uploads and downloads all components to the local client, which often requires long sync times. The Smart Sync client provides the ability to upload and download select components, thereby reducing the time necessary for synchronization.
The CMAST Smart Sync Client facilitates data transfer of modeling components from the CMAST server to the CMAST local client database (download), and from the CMAST local client database to the CMAST server (upload).
There are two primary interfaces that allow the user to control this bidirectional transfer; upload and download.
The download interface provides the user the means to import/copy specific components to provide a starting place for new modeling based on existing components.
The user can download any component to which they have access rights. Only SIRCs and ACEs may upload components. Only ACEs and SIRCs may submit for review/validation. Glazing Components from the IGDB may not be uploaded, only downloaded.
CMAST users will experience a more efficient application when working with a smaller-sized client. The size of the client is managed by resetting the local client database after projects/jobs are complete or when experiencing reduced performance. It is not managed by deleting components from the local client database.

NFRC Smart Sync CMAST 1.2.17 User Manual [E0A1] page 4
1. UNDERSTANDING THE BI-DIRECTIONAL METHODOLOGY
The bidirectional transfer methodology contains download and upload processes that act independently of each other. In order for the Smart Sync client to associate the components to the server and local client database, a user will have to upload new components to the server, and then download the same components to the local client database in order to have the most current component with a server ID.
The following describes the expectations when users utilize the download and upload processes in the Smart Sync client; and the importing and deleting of components from the CMAST application.
Smart Sync Client: A. Downloading components:
i. The process of bringing a component with its current status and server ID to the local client database from the server.
ii. This process does not copy a component. B. Uploading Components:
i. Uploading a new component created in CMAST application to the server that does not have an associated server ID.
ii. Uploading a component with an associated server ID to the server to update the status and any changes or modifications to the component.
CMAST Application: A. Deleting components:
i. Occurs only in the CMAST application. ii. Deleting design or re-design status components will change the component’s
status to voluntary termination. iii. Important Note: Deleting components will not reduce the size of the local
database client. B. Copying components:
i. Occurs only in the CMAST application. ii. Copying a component will create a new component without a server ID.
C. NOTE: Must use the upload and download functions in the Smart Sync client to receive an associated server ID.
Error Message
If the Smart Sync client is not closed properly, the user will receive a message stating, “Application has encountered an error:”

NFRC Smart Sync CMAST 1.2.17 User Manual [E0A1] page 5
Generally, the user did wait until the screen refreshed when uploading or downloading entities or the red X was used to close the Smart Sync client. If this occurs, close the CMAST application and restart the software. If the error occurs repeatedly, the Smart Sync client connection is still active and the user must reboot the system.

NFRC Smart Sync CMAST 1.2.17 User Manual [E0A1] page 6
2. INSTALLING THE SOFTWARE
A. Installing .Net 4.5 Framework
If the local operating system does not include the .Net 4.5 framework: 1. Go to an approved Microsoft website to download the
framework: http://www.microsoft.com/en-us/download/details.aspx?id=30653 2. Download to computer 3. Sign user agreement 4. Install 5. Restart/reboot your computer
B. Installing CMAST Software and Accessing the Smart Sync Client 1. Installing CMAST Version 1.2.17
i. Before installing this new release, be sure to sync all components from the current local client database with the server.
ii. Uninstall any previous versions of the CMAST iii. Download the most current CMAST software from the CMAST website iv. Install the downloaded software v. Login into CMAST
2. Installing Smart Sync Client
i. Select the Sync button and the Smart Sync client will be installed. Based on operating system there may be an additional prompt. If prompted, select “More Info” and then “Run anyway.”
NOTE: Succeeding releases of the Smart Sync client will automatically update upon accessing Smart Sync.
Accessing the Smart Sync Client: a. After the initial install, to access the Smart Sync client, select the Sync button at the top left
of the CMAST application screen. b. The user will be logged out of the CMAST application and the Smart Sync client will be
displayed (the user’s login credentials will carry over to the Smart Sync client).

NFRC Smart Sync CMAST 1.2.17 User Manual [E0A1] page 7
3. MAXIMIZING THE EFFICIENCY OF THE LOCAL CLIENT DATABASE
A. Understanding the Local Client (CMAST Application) Database
This new CMAST release is designed with a blank database (CMDOP.CDF) that contains no components. In order for the CMAST application to work properly, the CMDOP.CDF database file shall always be present in CMAST’s application folder created during the install. The location of this folder is different for each of the various operating systems.
There is also a blank copy (CMDOP_Blank.CDF) of the local client database provided with the release. The instructions for resetting the local database back to an empty database are different depending on operating system. Instructions and customized batch files are available on the Smart Sync webpage.
B. Controlling the Size of the Local Client Database
The Smart Sync client allows the user the ability to control the size of the local client database by selecting only the components required to complete a project in the CMAST application. This allows the user to continue to work in a more efficient environment.
Here are two methods for maintaining the size of the local client database:
a. Method 1
i. The user works in the same local client database until CMAST begins to perform inefficiently (i.e. long waiting periods to select components, etc.). In order to reset the local client database, the user can follow the directions previously provided in this section. Upon resetting the database, the user can download the components required to work on the current job.
ii. This is not required action but may be useful, the user can rename the CMDOP.CDF file to another filename prior to resetting the local client database.
b. Method 2 (Preferred Method)
i. Use a blank CMDOP.CDF file for each client or project at the FPL, or Project / Label Certificate level.
ii. The user starts with an empty local client database and completes a project (XYZ Curtain Wall) and verifies that all of the components located in the local client database are uploaded to the server with the proper statues, etc.
iii. Store (copy) the CMDOP.CDF file that contains the XYZ Curtain Wall components in a specific folder for the job.
iv. Copy the CMDOP_Blank.CDF file; rename the copy to CMDOP.CDF, resulting in an empty local client database to begin a new job.

NFRC Smart Sync CMAST 1.2.17 User Manual [E0A1] page 8
v. To go back to the previous job (XYZ Curtain Wall), make sure the components in the current CMDOP.CDF are uploaded to the server and stored in a separate folder for retrieval.
vi. Locate and copy the previous job’s CDF file (XYZ Curtain Wall) into the proper CMAST folder (i.e. C:/Program Data/CMAST/).
NOTE: This method is very similar to the process that simulators use with storing Window.MDB files.

NFRC Smart Sync CMAST 1.2.17 User Manual [E0A1] page 9
4. BASIC INSTRUCTIONS - DOWNLOAD
The Download function is designed to download components (i.e., Projects; Spectral Data, etc.) from the CMAST server to the local client database. The following provides the basic instructions to successfully download components:
Information Displayed on Smart Sync Screen A. Download Button: At the top left of the screen, select the Download button. B. Welcome status: Displays the user name, the server, the application version, and the
location of the local client database. C. The Color Legend: Displays the status of the component when compared to the
components on the server and the user’s local client. a. Changed on Server (blue) – This can occur when multiple users are accessing the
same component. The component on the server is different than the component on the local server. In this case the component may need to be uploaded or downloaded based on the most current version of the component.
b. Available for Download (green) – The component on the server is the most current version.
c. Already Downloaded (gray) – The component on the server is identical to the component on the local client database. The user will not be able to download the component.
D. Pull Down Bar: The pull down bar filters the component’s status. E. Entity Listing: Use the slide bar to select the entity to download (i.e., Spacer Component) F. Visibility / Authority: These buttons filter who is authorized to download the component. G. Select Buttons: Use these buttons to select the components. H. Download Action Button: Use this button to download the selected components
I. Exit Button: Use this button , not the red X, to close the SmartSync client.

NFRC Smart Sync CMAST 1.2.17 User Manual [E0A1] page 10
Entity Descriptions and Download
CMAST application visibilities are based upon role and company determining how many components the user can view to download. It is important to understand that components with server IDs must be downloaded via the Smart Sync client before a SESA or COG assembly can be created.
The following provides details describing the expected outcome when downloading from a specific entity:
Projects: Download the project along with the following entities: FPL, approved spacer components, frame components from the FPL, glazing components, SESA, COGA, FA, and products
Products: Download the product along with the following entities: FPL, approved spacer components, frame components from the FPL, glazing components, SESA, COGA, FA,
Frame Assemblies: Download the frame assembly along with the following entities: FPL, frame components from the FPL
Center of Glazing Assembly (COGA): Download the COG assembly along with the glazing layers
Spacer Edge Seal Assembly (SESA): Download the SESA along with the spacer component
Framing Product Line (FPL): Download all components associated with the framing product line.
DB
A
I
E
F H
G

NFRC Smart Sync CMAST 1.2.17 User Manual [E0A1] page 11
Frame Components (By Product Family): View and select the applicable FPL by which to download either all or individual frame components
Frame Components: Download individual frame components. NOTE: This method cannot be used for projects requiring certification
Glazing Components (By Glazing Library): View and select the applicable IGDB release by which to download either all or individual glazing components in that specific release
Glazing Components: Download individual glazing components from the entire approve list
Companies: Download individual companies for use in assemblies, products, or projects.
Download (the default settings are Visibility = My Company & Status = All) a. Select the Entity type (e.g. Project, Product, Spacer, etc…) – Letter “E” b. Set your desired visibility / authority (Letter “F”) to view c. Select “Get List” and the application will load all entities that match the filtered
criteria – Letter “D” d. If there are no matches, the application will display “No Items Found”
e. Adjust the visibility / authority (Letter “F”) and select “Get List” f. Select one (via check box) or more component (the checkbox in the header will
select all) – Letter “G” i. Only entities that are blue or green may be downloaded
ii. Gray indicates either unavailable or already downloaded and matches the server copy
g. Select “Download” – Letter H i. Once completed, the entities that have been downloaded to the local client
database and will appear gray and will now be unavailable for download
NOTE: All download/import capabilities are based upon original client visibilities. The IARC only has the ability to Import entities from the server to review
components. When closing the Smart Sync Client, always use the “Exit” (Letter “I”) in order to
close the connection between Smart Sync Client and the local client rather than using the red X.
After closing the Smart Sync Client, the user can use the “One Touch Reconnect” button to log back into the CMAST application.

NFRC Smart Sync CMAST 1.2.17 User Manual [E0A1] page 12
5. BASIC INSTRUCTIONS - UPLOAD
The Upload function is designed to upload components (i.e., Projects; Spectral Data, etc.) from the local client database to the server. Functions to submit for review, submit for validation and submit for label certificate are explained in the appropriate user sections. The following provides the basic instructions to successfully upload components:
Information Displayed on Smart Sync Screen A. Upload Button: At the top left of the screen, select the Upload button. B. Welcome status: Displays the user name, the server, the application version, and the
location of the local client database. C. The Color Legend: Displays the status of the component when compared to the
components on the server and the user’s local client. a. New – May Be Uploaded (green) – The component does not exist on the server and
is new in the local client database. b. Updated – May Be Uploaded (blue) – The component on the server is different than
the component in the local client database. In this case, the component may need to be uploaded because the local client database has the most current version.
c. Unchanged from Server (gray) – The component on the server is identical to the component on the local client database. The user cannot upload the component.
D. Get List Button: This button is used to display the component list based on the applied filters.
E. Entity Listing: Use the slide bar to select the component to upload (i.e., Spacer Component)
F. Visibility / Authority: These buttons filter who is authorized to upload the component. G. Select Buttons: Use these buttons to select the components. H. Upload Action Button: Use this button to upload the selected components.
I. Exit Button: Use this button , not the red X, to close the Smart Sync client. J. Upload / Submit Frame Components (Toggle Buttons): These buttons designate whether
the user is uploading components to the server or submitting the components for review. K. Download After Upload Checkbox: This check box will allow for an immediate,
automatic download after successful upload. Server IDs or updated data will be automatically visible in the entity list and when re-signed into the CMAST application. To upload the selected entities only, leave the box unchecked.

NFRC Smart Sync CMAST 1.2.17 User Manual [E0A1] page 13
Uploading Entities to the Server (the default settings are Visibility = Mine/Status = All) a. Select the Entity type (e.g. Project, Product, Spacer, etc…) – Letter “E” b. Set your desired visibility / authority to view – Letter “F” c. Select “Get List” (Letter “D”) and the application will load all entities that match
the criteria d. If there are no matches, the application will display “No Items Found”
e. Adjust the visibility / authority and select “Get List” – Letter “F” f. Select one or more components (the checkbox in the header will select all) – Letter
“G” i. Only components that are blue or green may be uploaded
ii. Gray indicates either unavailable or already uploaded and matches the server copy
g. Select “Upload” (Letter “H”) - Once completed the components that have been uploaded to the server will appear gray.
h. Select “Upload” (Letter “H”) and “Download after upload” (Letter “K”) – Selecting this checkbox will have the selected uploaded items automatically downloaded. Server IDs or updated data will be automatically visible in the entity list and when re-signed into the CMAST application. The entities will appear blue after uploading indicating the server has issued server IDs. If Download after upload was selected, the entity will now appear grey and display the server IDs.
NOTE:
A
B J
I
D
E
HF
G
K

NFRC Smart Sync CMAST 1.2.17 User Manual [E0A1] page 14
When closing the Smart Client, always use the “Exit” (Letter “I”) in order to close the connection between Smart Client and the local client rather than using the red X.
After closing the Smart Sync Client, the user can use the “One Touch Reconnect” button to log back into the CMAST application.
6. DOWNLOADING GLAZING COMPONENTS
There are two different methods for downloading glazing data. Spectral data can be downloaded based on the general listing of the data or the version of the IGDB.
View Entire IGDB: In the download screen, select Glazing Components which will provide all of the glazing data that is approved for NFRC use. Once the screen is populated with glazing data, select the glazing layers and select download.
View User Selected Criteria: In the download screen, select Glazing Components (Search), this will allow user selected criteria to be displayed: IGDB release, manufacturer name, product name, or by NFRC ID. Once search criteria is entered by user, select “OK.” The glazing list is populated with the applicable glazing results, reference section 4 for further download instructions.
Filters:
Filters make it available to find glazing layers by specific criteria as entered by the user. If nothing is selected, the entire glazing database will be displayed. The filters may be used as follows (one or all may be selected):

NFRC Smart Sync CMAST 1.2.17 User Manual [E0A1] page 15
Glazing Library: When a specific glazing library is selected, only those glazing layers that are released in that version will be displayed. Leave the selection blank to search the entire IGDB.
Manufacturer Name: When a specific manufacturer name is selected, only those glazing layers that are associated to that manufacturer will be displayed. Leave the selection blank to search all manufacturers.
Product Name: When a specific product name is selected (i.e., “SB60” or “grey”), only those glazing layers that display those characters in their product name will be displayed. Leave the selection blank to search all glazing layers.
NFRC ID: When a specific NFRC ID is selected (i.e., “103”), only those glazing layers that display those characters in their product ID will be displayed. Leave the selection blank to search all NFRC IDs.
NFRC Smart Sync CMAST 1.2.17 User Manual [E0A1] page 16
7. SIRC INSTRUCTIONS ONLY
The Smart Sync client is designed to provide the SIRC the ability to download and upload specific components and to submit components in batches. By utilizing the processes to maximize the size of the local client database listed in Section 4, the SIRC will be able to create assemblies, download only the required glazing data, and upload components in batches to complete tasks efficiently.
The following are the instructions to create assemblies for validating framing product lines (FPL); submitting frames for review to an existing FPL; submitting an Optics file; and submitting a spacer component.
7.1 Entity Descriptions and Upload
The following provides details describing the expected outcome when uploading a specific entity (product, spacer component, etc.):
Center of Glazing Assembly (COGA): Only the COGA will be uploaded. Spacer Edge Seal Assembly (SESA): Only the SESA will be uploaded. Spacer Components: Only the new spacer component will be uploaded. Glazing Components: Only the Optics file will be uploaded. See Optics Section below for
further details. Framing Product Line (FPL): The FPL can only be uploaded as part of the initial frame
assembly and/or the validation product upload. Products: The product and the following entities will be uploaded: FPL, frame
components associated with the FPL, SESA, COGA, and FA. Frame Assemblies (FA): The FA and the following entities will be uploaded: FPL, and
frame components associated with the FPL. Frame Components:
o Scenario 1 – Frame components can be uploaded as a part of a frame assembly and/or the validation product upload.
o Scenario 2 –Individually selected new frame components created in the local client database associated with an already uploaded FPL.
7.2 Operating a Framing Product Line (FPL) for Validation within the Smart Sync Client
To understand the Smart Sync paradigm, submitting a product for validation will have an effect on frame components. All frame components associated with the FPL will be uploaded from the local client and may modify the frame component’s status. The following demonstrates the action based upon the frame component status.
NOTE: The SIRC does not upload the FPL. The FPL is uploaded when the validation
product or frame assembly is uploaded. When the validation product or frame assembly is uploaded every component
associated with the FPL currently on the local server will be uploaded.

NFRC Smart Sync CMAST 1.2.17 User Manual [E0A1] page 17
Components/assemblies/products created after the validation product or frame assembly has been uploaded, will not be uploaded when submitting for review/validation.
7.2.1 Within the CMAST application proceed with the following using normal practices:
Create the Framing Product Line (FPL) Create the Frame Components associated with the new Framing Product Line Create the Assemblies and the Validation Product Refer to Section 5 for Download instructions of entities (e.g. spacers, frames, etc.) Refer to Section 7 for Glazing download instructions.
7.2.2 Launch the Smart Sync client using the green Sync button 7.2.3 If you receive a prompt, select “more info,” and then select “Run anyway.”
7.2.4 Upload within the Smart Sync client
Select Upload (Letter “A”) from the Main Menu on the Smart Client Find “Products” in the selection window (Letter “B”) Set Visibility to “All Users” (Letter “C”) and Status to “All” (Letter “D”) Select “Get List” (Letter “E”) - The new Validation Product should appear in green Select the new product selection box. The user may select “Upload” (Letter “F”) to upload the entities selected only; the
user may also select the check box for “Download after Uploading” (Letter “G”) and have the selected uploaded items automatically downloaded. Server IDs or updated data will be automatically visible in the entity list and when re-signed into
NFRC Smart Sync CMAST 1.2.17 User Manual [E0A1] page 18
the CMAST application. - The Product will appear blue after uploading indicating the server has issued server IDs. If Download after upload was selected, the Product will appear grey and display the server IDs.
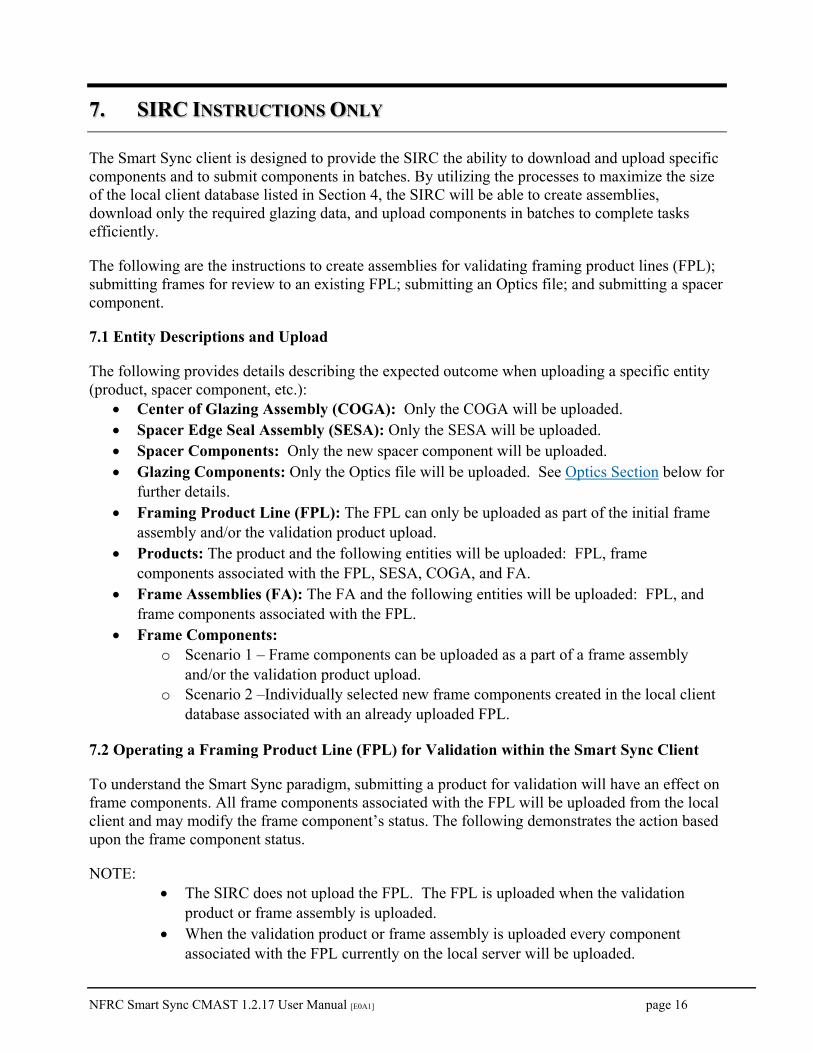
7.2.5 Select “Download” (Letter “A”) from the main menu
In the selection window, Products now has a (1) appearing behind it. The Smart Sync client determined that the server and the local client database have one different component. If there were five different components, a (5) would be placed after Products.
Select Product (Letter “B”) Set Visibility to “My Company” (Letter “C”) and Status “Design” (Letter “D”) Select “Get List” (Letter “E”)
NOTE: Sort by creation date, newest to oldest, and the one uploaded will be at the top.
A
B
DE
C FG

NFRC Smart Sync CMAST 1.2.17 User Manual [E0A1] page 19
Select the Product and select “Download,” (Letter “F”) this will retrieve the updated Product along with the updated components. The Product will turn gray once downloaded.
NOTE: When submitting a Validation Product for a Framing Product Line all components on the server with a design status will become locked when the product is submitted for validation. Therefore, submit the frame components for review prior to submitting the Product for Validation.
7.2.6 To submit for validation, select “Upload,” (Letter “A”), “Products,” (Letter “B”), and
“Submit Product for Validation.” (Letter “C”). This should show the components to be submitted for validation. Select the components to submit, and hit “Submit.” (Letter “D”)
A
B
DE
C FG

NFRC Smart Sync CMAST 1.2.17 User Manual [E0A1] page 20
NOTE: To view the most current status of your components (products, projects, etc.), download them after every upload/submit.
7.3 Submitting Frame Components for Review to an Existing FPL within Smart Sync Client
7.3.1. Login to the Original Client. Launch the Smart Sync Client using the green sync button. 7.3.2 Select “Download,” (Letter “A”), Select “Framing Product Lines,” (Letter “B”), “All
Users,” (Letter “C”), “Validated,” (Letter “D”), and “Get List.” (Letter “E”)
A
B
C D

NFRC Smart Sync CMAST 1.2.17 User Manual [E0A1] page 21
7.3.3 Select the Validated FPL to add new Frame Components to, select “Download.” (Letter “F”). After the components are successfully uploaded, use the Exit button Letter (G) to close the Smart Client.
7.3.4 Login to the CMAST application: a. Create Frame Components and associate them with the Validated FPL.
7.3.5 Launch the Smart Sync Client using the green sync button. 7.3.6 Select “Upload,” (Letter “A”), Select “Frame Components,” (Letter “B”), “Mine,”
(Letter “C”), “All,” (Letter “D”), and “Get List.” Letter (“E”)
A
B
D
G
E
C F

NFRC Smart Sync CMAST 1.2.17 User Manual [E0A1] page 22
7.3.7 Any new frame components will now be green. Select the Frame Components you want to upload and select “Upload.” (Letter “F”). The user may select “Upload” (Letter “F”) to upload the entities selected only; the user may also select the check box for “Download after Uploading” (Letter “G”) and have the selected uploaded items automatically downloaded. Server IDs or updated data will be automatically visible in the entity list and when re-signed into the CMAST application. - The Product will appear blue after uploading indicating the server has issued server IDs. If Download after upload was selected, the Product will appear grey and display the server IDs.
A
B
C
DE
FG

NFRC Smart Sync CMAST 1.2.17 User Manual [E0A1] page 23
7.3.8 Select “Download,” (Letter “A”), Select “Frame Components.” (Letter “B”). These
components will be green or blue.
7.3.9 Select the Frame Components to download and select “Download.” (Letter “C”). The
components on the local client now have the same status and server ID as the component on the server. These components should now be gray and can be submitted for review.
F
A
B
C
G

NFRC Smart Sync CMAST 1.2.17 User Manual [E0A1] page 24
7.3.10 Select “Upload,” (Letter “A”), “Frame Components,” (Letter “B”), and “Submit
Frame Components.” (Letter “C”) Any Frame Components that can be Submitted for Review will be in orange.
7.3.11 Select the Frame Components to be Submitted for Review and select “Submit”
(Letter “D”) 7.3.12 When the Frame components have been submitted you will receive this message:
A
B
CD

NFRC Smart Sync CMAST 1.2.17 User Manual [E0A1] page 25
7.3.13 It is recommended to bring the Frame Components into the CMAST application with
the correct status and server ID. Proceed to “Download,” (Letter “A”), “Framing Product Line,” (Letter “B”) and “Get List,” Letter (C), select the FPL to bring it back into the client, and select Download (Letter “D”). Go back to the CMAST application to view the individual frame components.
A
C
B
D

NFRC Smart Sync CMAST 1.2.17 User Manual [E0A1] page 26
NOTE: To view the most current status of your entities (components, products, projects, etc.), download your entities after every upload/submit.
7.4 Operating with an Optics File within the Smart Sync Client
7.4.1 Within the CMAST application, create an optics glazing component in accordance with normal operating procedures.
7.4.2 Launch the Smart Sync client using the green Sync button. With the Smart Sync client, select “Upload” (Letter “A”) from the Main Menu. Find “Glazing Components” (Letter “B”) in the selection window. Set Visibility to “Mine,” (Letter “C”) and Status to “All,” (Letter “D”) and Select “Get List.” Letter (“E”)
7.4.3 The user created Optic’s Glazing Components should appear in green or blue.
A
B
D
E
C FG
G F
NFRC Smart Sync CMAST 1.2.17 User Manual [E0A1] page 27
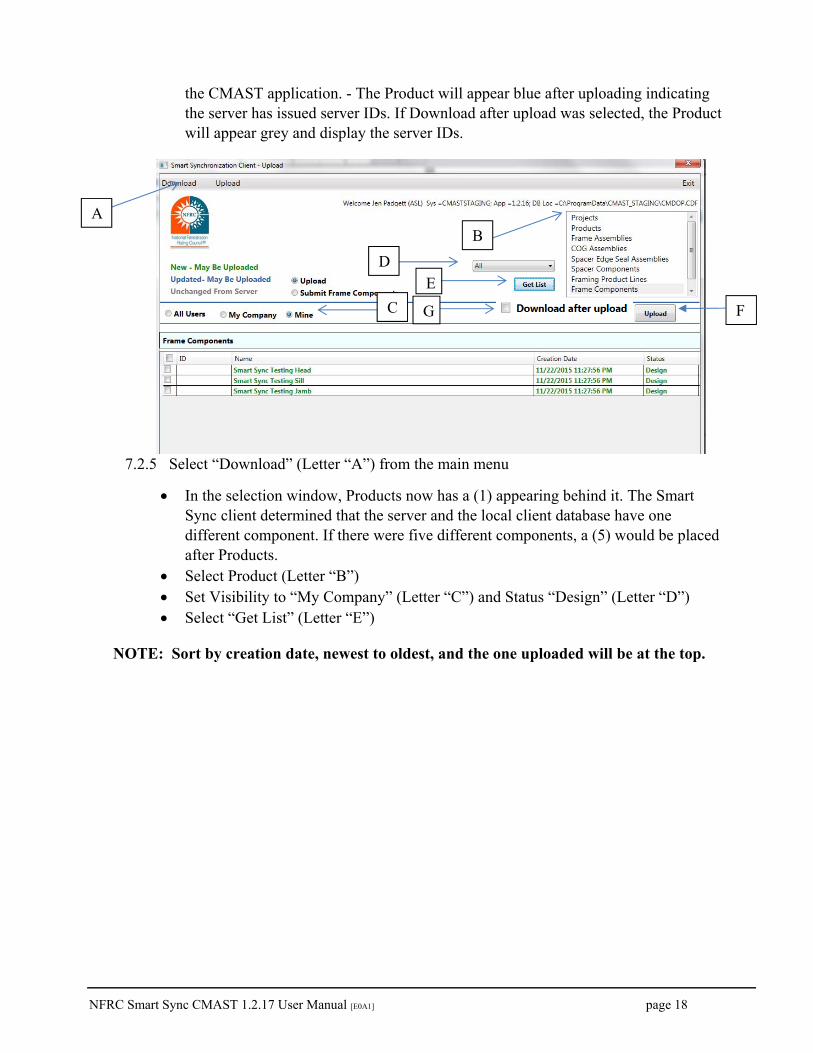
7.4.4 Select the new Optic’s Glazing Component and select “Upload” (Letter “F”); the user can select “Download after Upload” (Letter “G”) and have the selected uploaded items automatically downloaded.
7.4.5 The Optic’s Glazing Component should now appear blue; items automatically downloaded will be grey and display server IDs.
7.4.6 If Download after upload was not selected, obtain server IDs and same statuses by selecting “Download” (Letter “A”) from the main menu, “Glazing Components,” (Letter “B”), “My Company,” (Letter “C”), “Design” (Letter “D”), then “Get List.” (Letter “E”)
7.4.7 Select the Optic’s Glazing Component to be downloaded and select “Download.”
(Letter “F”)
7.4.8 The downloaded component will now turn gray and contain server IDs and statuses.
A
B
DE
C F

NFRC Smart Sync CMAST 1.2.17 User Manual [E0A1] page 28
7.4.9 To submit the Optic’s Glazing Component for review, select “Upload,” (Letter “A”) then “Submit Glazing Component.” (Letter “B”). The Optic’s Glazing Component should now be orange which means it’s available for submission.
7.4.10 Select the items you wish to submit and select “Submit.” (Letter “C”) 7.4.11 A notification will prompt that the item has been submitted.
7.4.12 The Optic’s Glazing Component will now appear grey.
A
B
C

NFRC Smart Sync CMAST 1.2.17 User Manual [E0A1] page 29
7.4.13 To bring the spacer into the Current Client with the same status and server ID, you can go back into “Download,” (Letter “A”), “Glazing,” (Letter “B”), and “Get List” (Letter “C”).
7.4.14 The item just submitted will appear blue. Select this component and select
“Download.” (Letter “D”). This will bring the most current status to your current local client.
7.4.15 The Glazing Component will now appear gray.
NOTE: To view the most current status of your entities (components, products, projects, etc.), download your entities after every upload/submit.
C
D
B
A

NFRC Smart Sync CMAST 1.2.17 User Manual [E0A1] page 30
7.5 Operating with a Spacer Component within the Smart Sync Client
7.5.1 With the original client, create a spacer component in accordance with normal practices. 7.5.2 Launch the Smart Sync Client using the Green Sync button. 7.5.3 With the Smart Client, select “Upload” (Letter “A”) from the Main Menu on the Smart
Client, Find “Spacer Components” (Letter “B”) in the selection window, Set Visibility to “Mine,” (Letter “C”), Status to “All,” (Letter “D”), and “Get List.” (Letter “E”)
7.5.4 The new Spacer Component should appear in green or blue. 7.5.5 Select the new Spacer Component and select “Upload.” (Letter “F”); the user can select
“Download after Upload” (Letter “G”) and have the selected uploaded items automatically downloaded. All automatically downloaded entities will be grey.
7.5.6 The Spacer Component should now appear blue.
7.5.7 Select “Download” (Letter “A”) from the main menu in order to update the status and obtain a server ID in the local client database.
7.5.8 In the selection window, Spacer now has an (#) appearing in the parentheses. (This will reflect the number of components that have changed.)
E
A
B
C
D
FG
G

NFRC Smart Sync CMAST 1.2.17 User Manual [E0A1] page 31
7.5.9 Select “Spacer Components,” (Letter “B”), “My Company,” (Letter “C”), “Design,” (Letter “D”), and “Get List,” (Letter “E”) sort by creation date, newest to oldest, and the component recently uploaded will be at the top.
7.5.10 Select Download (Letter “F”), the component downloaded will turn gray after downloading. The local client now has the same server ID and status.
7.5.11 Select “Upload” (Letter “A”) from the main menu, then “Submit Spacer Components.” (Letter “B”) The available components for submission will now be in orange.
A
B
C
D
E
F

NFRC Smart Sync CMAST 1.2.17 User Manual [E0A1] page 32
7.5.12 Select the component and hit “Submit” (Letter “C”) and the submitted component will
turn gray. The spacer on the local client will now have the same status and server ID as the spacer on the server. The spacer should now be gray.
7.5.13 To bring the spacer into the Current Client with the same status and server ID, go back
into “Download,” (Letter “A”), “Spacers,” (Letter “B”), “Get List,” (Letter “C”), and Download (Letter “D”) to bring the component back into the client.
A
B
C
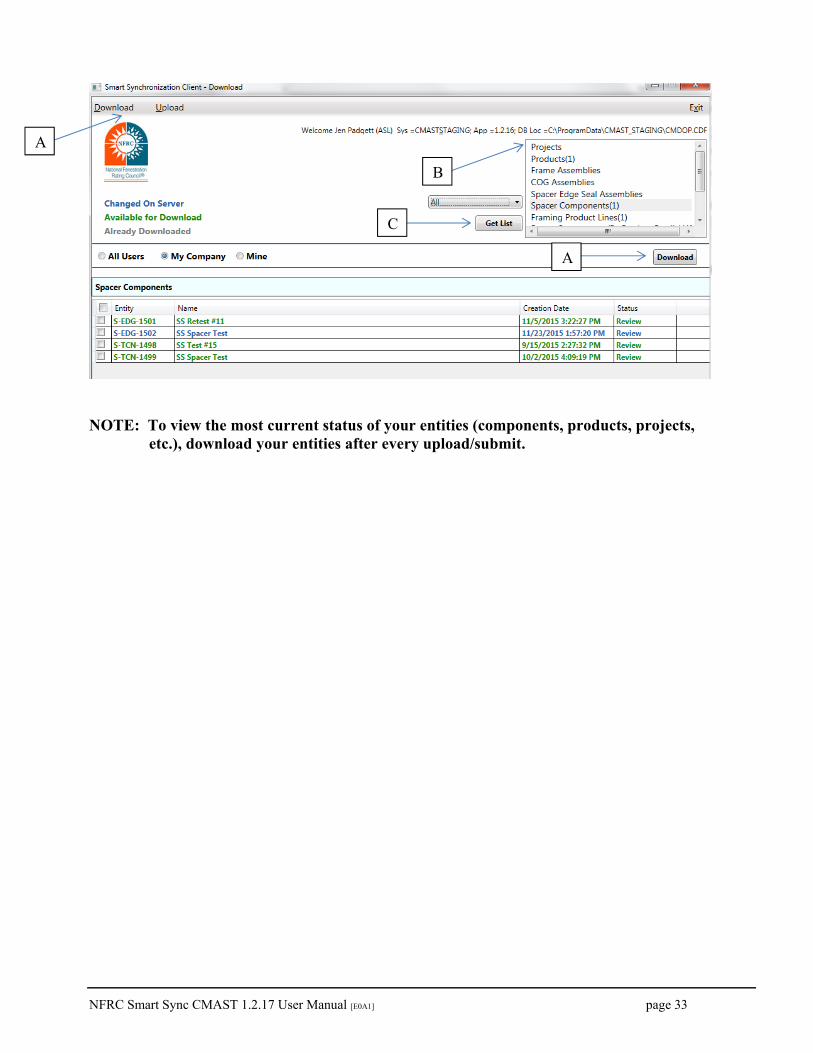
NFRC Smart Sync CMAST 1.2.17 User Manual [E0A1] page 33
NOTE: To view the most current status of your entities (components, products, projects,
etc.), download your entities after every upload/submit.
A
B
C
A

NFRC Smart Sync CMAST 1.2.17 User Manual [E0A1] page 34
8. ACE INSTRUCTIONS ONLY
8.1 Creating a Bid Report / Label Certificate with the Smart Sync Client
The Smart Sync client has changed the paradigm in which the ACE formerly operated within the CMAST application. Any time the ACE would expect to sync, there is now an upload/download function that has to occur in order for entities to obtain server IDs and bring them back down to the local client. Additionally, when an ACE submits a product for certification, it is done within the Smart Sync client and not in the CMAST application.
8.2 Entity Descriptions and Upload
The following provides details describing the expected outcome when uploading a specific entity (product, frame assembly, project, etc.):
Projects: Only the project will be uploaded Products: Only the SESA, COGA, and FA will be uploaded. Frame Assemblies (FA): Only the FA will be uploaded. Center of Glazing Assembly (COGA): Only the COGA will be uploaded. Spacer Edge Seal Assembly (SESA): Only the SESA will be uploaded.
8.2.1 Login to the CMAST application then launch the Smart Sync Client by pressing the
green sync button. 8.2.2 Download the approved components needed to create your assemblies
a. Refer to Section 7 to download glazing layers b. Refer to Section 5 to download approved spacer c. Downloading Frame Components:
There are two different methods for downloading frame components to be used in a project for certification. Select the method that works best for your project.
Method 1 - If FPL is selected for download, it will bring in all associated approved frame components. If the user will be using all the frame components in a FPL, the ACE should choose this method. They may take longer depending on the number of frame components associated with the FPL.

NFRC Smart Sync CMAST 1.2.17 User Manual [E0A1] page 35
Method 2 - If Framing Components (By Product Family) is selected, it will show a list of FPLs. Once a FPL is selected, it will bring in the components for download. Select only the components needed here as desired. If the user will only be using a select number of frame components in a FPL, the ACE should choose this method. This method should be used if you want only a few components downloaded instead of the all the approved framing associated with the FPL.
NOTE For use for certification, only approved components can be used.

NFRC Smart Sync CMAST 1.2.17 User Manual [E0A1] page 36
The “Framing Component” entity will not download approved Framing Components for the ACE role; therefore, only use Method 1 or Method 2 for certification.
8.2.3 Within the CMAST application, create a SESA, COGA, and FA using the component(s) that you previously downloaded. The ACE can upload and download at any time. It is recommended that this be done often to save work.
8.2.4 Create the products as needed in the original client. The ACE must always upload and download at this step.
8.2.5 In the CMAST application, select sync to launch the Smart Sync client. Select “Upload,” (Letter “A”, “Products,” (Letter “B”), “Mine,” (Letter “C”), “All,” (Letter “D”), “Get List” (Letter “E”). Select the products to be uploaded and select “Upload” (Letter “F”); the user may also select the check box for “Download after Uploading” (Letter “G”) and have the selected uploaded items automatically downloaded. Server IDs or updated data will be automatically visible in the entity list and when re-signed into the CMAST application. - The Product will appear blue after uploading indicating the server has issued server IDs. If Download after upload was selected, the Product will appear grey and display the server IDs
8.2.6 If only “Upload” was done, the product will turn blue because the server has issued a server id. The product on the local client database does not have server ID and must now be downloaded. If “Upload” and “Download after Upload” was selected, the product will turn grey as it has already been downloaded.
A
C
D
E
C FG

NFRC Smart Sync CMAST 1.2.17 User Manual [E0A1] page 37
8.2.7 Download the Product. Select “Download,” (Letter “A”), “Products,” (Letter “B”), “Mine,” (Letter “C”), “All,” (Letter “D”), “Get List” (Letter “E”). Select the products to be downloaded and select “Download” (Letter “F”).
8.2.8 The product should now turn gray. The product on the local client will now have the same status and server ID as the product on the server.
8.2.9 Exit the Smart Sync client by clicking on Exit and login to the CMAST application. 8.2.10 Create the Project. It is important to note that all products to be used on a project/label
certificate must have their server IDs prior to uploading the Project. At this point, a Bid Report can be generated.
8.2.11 Select the sync button to launch the Smart Sync client. 8.2.12 Upload the Project to obtain a server ID. 8.2.13 Download the Project to bring the Project with a server ID into the CMAST
application. 8.2.14 Once the Project has been uploaded and downloaded, the Project can be submitted for
Label Certificate.
A
B
CD
G
NFRC Smart Sync CMAST 1.2.17 User Manual [E0A1] page 38
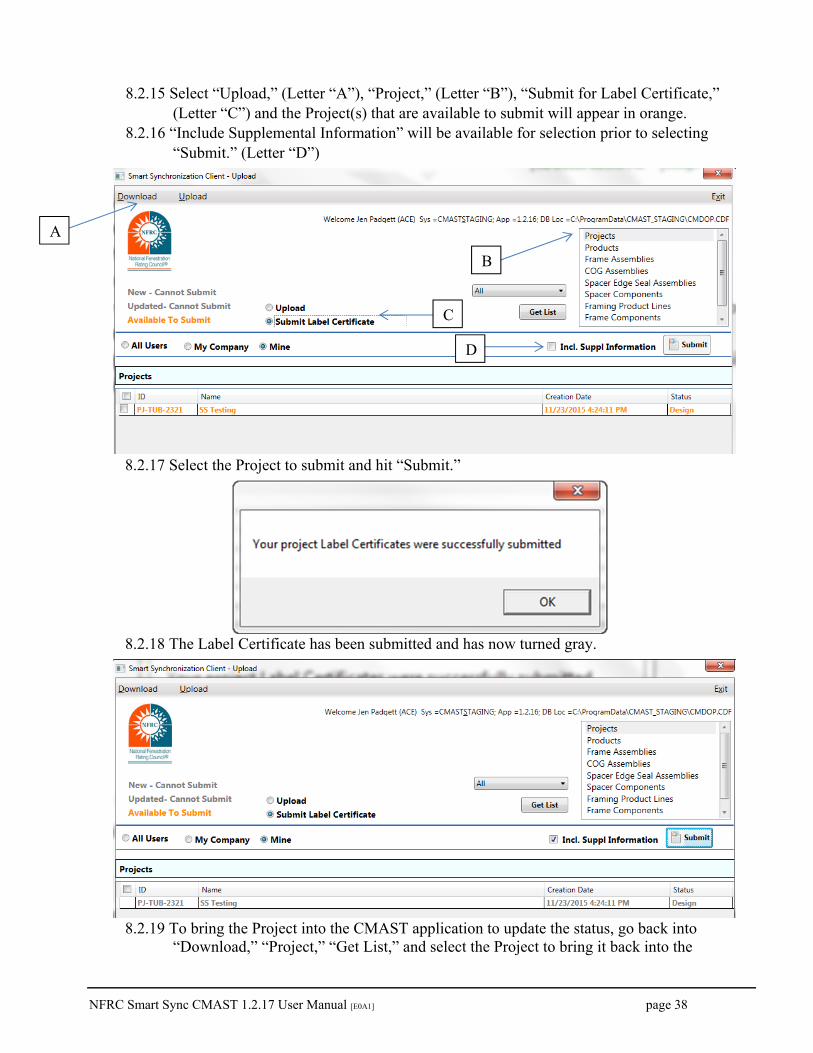
8.2.15 Select “Upload,” (Letter “A”), “Project,” (Letter “B”), “Submit for Label Certificate,” (Letter “C”) and the Project(s) that are available to submit will appear in orange.
8.2.16 “Include Supplemental Information” will be available for selection prior to selecting “Submit.” (Letter “D”)
8.2.17 Select the Project to submit and hit “Submit.”
8.2.18 The Label Certificate has been submitted and has now turned gray.
8.2.19 To bring the Project into the CMAST application to update the status, go back into
“Download,” “Project,” “Get List,” and select the Project to bring it back into the
A
B
C
D

NFRC Smart Sync CMAST 1.2.17 User Manual [E0A1] page 39
application. Go back to the CMAST application to see the project with its correct status.
NOTE: To view the most current status of your entities (components, products, projects, etc.), download your entities after every upload/submit.

NFRC Smart Sync CMAST 1.2.17 User Manual [E0A1] page 40
9. IARC INSTRUCTIONS ONLY
9.1 Importing Entities into the CMAST Application using the Smart Sync Client
The IARC will continue to approve entities on the CMAST webserver. To review the entities, such as a frame component or a project, the IARC can login to the CMAST client and import, via the Smart Sync client, the submitted entity for review. After logging in, refer to Section 5 on how to Import or Download entities for review.
In the CMAST application, the “Import from Server” button may appear “live”; however, it will simply cause the application to generate an error if used. All Import from Server must be done as “Download” in the Smart Sync client.
Information Displayed on Smart Sync Screen A. Download Radio Button (Letter “A”): Do not use if reviewing for certification.
Downloading entities with this radio button selected maintains all details (visibilities, status, etc.) the same as the server.
B. Import (Read Only) Radio Button (Letter “B”): Use this for reviewing for certification. The IARC is granted visibility and is able to review all related entities.
C. Download Action Button (Letter “C”): Use this button to download the selected entities.
9.2 Entity Descriptions for Importing
The following provides details describing the expected outcome when importing a specific entity (product, optics files, project, etc.):
1. To review an FPL for validation, import the validation product. 2. To review a Label Certificate, import the project. 3. To review a spacer for approval, import the spacer component. 4. To review an optics file for approval, import the glazing component.
AB
C

NFRC Smart Sync CMAST 1.2.17 User Manual [E0A1] page 41
NOTES: The upload function is not available for the IARC role. The approval process must be completed (via CMAST web) in the following order:
1. All components submitted for review associated with a validation product or framing product line must be approved or rejected
2. Then the Validation Test Review can be done and approved or rejected To maintain the local client database, please refer to Section 4, describing how best to
archive and reset the local client database.
12
3 4