moon roof assembly structure noise -...
TRANSCRIPT
T-SB-0088-12 June 13, 2012
Moon Roof Assembly Structure Noise
ServiceCategory Vehicle Exterior
Section Exterior Panels/Trim Market USA
Applicability
YEAR(S) MODEL(S) ADDITIONAL INFORMATION
2007 – 2011 Camry, Camry HV WMI(s): 4T1, 4T4
SUPERSESSION NOTICE
The information contained in this bulletin supersedes SB No. T-SB-0089-08.
• Applicability has been updated to include 2010 – 2011 model year vehicles.
• Repair Procedure has been updated.
Service Bulletin No. T-SB-0089-08 is Obsolete and any printed versions should be discarded. Besure to review the entire content of this service bulletin before proceeding.
Introduction
Some 2007 – 2011 North American produced (NAP) Camry and Camry HV vehicles may exhibita knocking, popping, ticking, or snapping noise from the moon roof area while driving. The repairprocedures below have been developed to address this condition.
NOTE• Repair Procedure 2 should not be completed unless Repair Procedure 1 does not correct
the condition.
• Repair Procedure 2 requires felt to be placed between the sheet-metal panels in the roof, NOTbetween the moon roof assembly and the roof.
• In order to properly perform this bulletin, the moon roof assembly MUST be COMPLETELYREMOVED from the roof.
• Do NOT place the felt on any part of the moon roof assembly.
• Repair Procedure 1: page 2
• Repair Procedure 2: page 8
© 2012 Toyota Motor Sales, USA Page 1 of 19

T-SB-0088-12 June 13, 2012 Page 2 of 19
Moon Roof Assembly Structure Noise
Parts Information
PREVIOUS PART NUMBER CURRENT PART NUMBER PART NAME QTY
08231-00801 Same Interior Noise Kit 1
Warranty Information
OP CODE DESCRIPTION TIME OFP T1 T2
NV1201 Headliner Removal & Moon Roof AssemblyAdjustment: Repair Procedure 1 1.6 63203-06030
NV1202 Remove Moon Roof Assembly & InsulateRoof Structure: Repair Procedure 2 1.3 63142-06040
91 57
APPLICABLE WARRANTY• This repair is covered under the Toyota Comprehensive Warranty. This warranty is in effect for
36 months or 36,000 miles, whichever occurs first, from the vehicle’s in-service date.
• Warranty application is limited to occurrence of the specified condition described in thisbulletin.
Repair Procedure 1
1. Confirm that the noise is coming from the moon roof area.
2. Record the radio station presets.
3. Remove the headliner assembly. Refer to the Technical Information System (TIS), applicablemodel and model year Repair Manual:
• 2007 / 2008 / 2009 / 2010 / 2011 Camry:Vehicle Interior – Interior Panels/Trim – “Interior: Roof Headlining: Removal”
• 2007 (to 10/2006) / 2007 (from 10/2006) / 2008 / 2009 / 2010 / 2011 Camry HV:Vehicle Interior – Interior Panels/Trim – “Interior: Roof Headlining: Removal”
© 2012 Toyota Motor Sales, USA
T-SB-0088-12 June 13, 2012 Page 3 of 19
Moon Roof Assembly Structure Noise
Repair Procedure 1 (Continued)
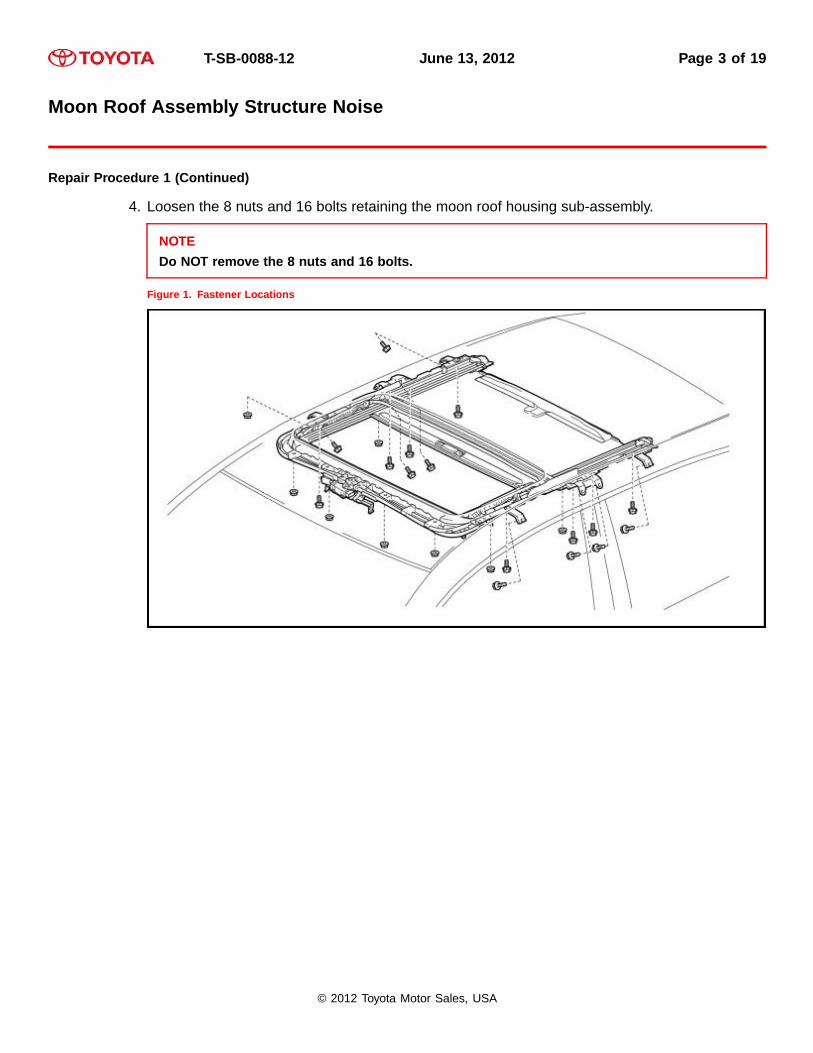
4. Loosen the 8 nuts and 16 bolts retaining the moon roof housing sub-assembly.
NOTEDo NOT remove the 8 nuts and 16 bolts.
Figure 1. Fastener Locations
© 2012 Toyota Motor Sales, USA

T-SB-0088-12 June 13, 2012 Page 4 of 19
Moon Roof Assembly Structure Noise
Repair Procedure 1 (Continued)
5. Tighten the rear most LH and RH nuts (as indicated in Figure 2).Torque: 5.5 N*m (56 kgf*cm, 49 in*lbf)
NOTELH & RH rear nuts must be tightened before any other moon roof assembly fasteners aretightened.
Figure 2.
© 2012 Toyota Motor Sales, USA

T-SB-0088-12 June 13, 2012 Page 5 of 19
Moon Roof Assembly Structure Noise
Repair Procedure 1 (Continued)
6. Tighten remaining 6 nuts (as indicated in Figure 3).Torque: 5.5 N*m (56 kgf*cm, 49 in*lbf)Figure 3.
© 2012 Toyota Motor Sales, USA

T-SB-0088-12 June 13, 2012 Page 6 of 19
Moon Roof Assembly Structure Noise
Repair Procedure 1 (Continued)
7. Tighten the 8 moon roof reinforcement to body structure bolts (as indicated in Figure 4).
A. Position each reinforcement bracket to sit squarely against both the body structure surfaceand the moon roof housing surface.
B. Tighten each bolt.Torque: 5.5 N*m (56 kgf*cm, 49 in*lbf)Figure 4.
© 2012 Toyota Motor Sales, USA

T-SB-0088-12 June 13, 2012 Page 7 of 19
Moon Roof Assembly Structure Noise
Repair Procedure 1 (Continued)
8. Tighten the 8 moon roof reinforcement to moon roof housing bolts (Figure 5).Torque: 5.5 N*m (56 kgf*cm, 49 in*lbf)Figure 5.
9. Secure any loose components and test drive vehicle to verify repair.
A. If noise is corrected, proceed to step 10 for reassembly of vehicle. Do NOT proceed toRepair Procedure 2.
B. If noise in not corrected, skip steps 10 and 11, proceed directly to Repair Procedure 2
10. Reinstall the headliner assembly. Refer to TIS, applicable model and model year Repair Manual:
• 2007 / 2008 / 2009 / 2010 / 2011 Camry:Vehicle Interior – Interior Panels/Trim – “Interior: Roof Headlining: Installation”
• 2007 (to 10/2006) / 2007 (from 10/2006) / 2008 / 2009 / 2010 / 2011 Camry HV:Vehicle Interior – Interior Panels/Trim – “Interior: Roof Headlining: Installation”
11. Reset the radio presets and clock.
© 2012 Toyota Motor Sales, USA

T-SB-0088-12 June 13, 2012 Page 8 of 19
Moon Roof Assembly Structure Noise
Repair Procedure 2
NOTE• Repair Procedure 2 should NOT be completed unless Repair Procedure 1 does not correct
the condition.
• This procedure requires felt to be placed between the sheet-metal panels in the roof, NOTbetween the moon roof assembly and the roof.
• In order to properly perform this procedure, the moon roof assembly MUST be COMPLETELYREMOVED from the roof.
• Do NOT place felt on any part of the moon roof assembly.
Figure 6. Artwork in Progress
1
2
1 Areas to Insulate
2 Front
1. Disengage the 2 claws and remove the front side rail spacer LH.
2. Disengage the 2 claws and remove the front side rail spacer RH.
3. Remove LH & RH curtain shield airbag assembly. Refer to TIS, applicable model and modelyear Repair Manual:
• 2007 / 2008 / 2009 / 2010 / 2011 Camry:Vehicle Interior – Supplemental Restraint Systems – “Curtain Shield Airbag Assembly:Removal”
• 2007 (to 10/2006) / 2007 (from 10/2006) / 2008 / 2009 / 2010 / 2011 Camry HV:Vehicle Interior – Supplemental Restraint Systems – “Curtain Shield Airbag Assembly:Removal”
4. Disconnect the 4 moon roof drain hoses.
© 2012 Toyota Motor Sales, USA
T-SB-0088-12 June 13, 2012 Page 9 of 19
Moon Roof Assembly Structure Noise
Repair Procedure 2 (Continued)
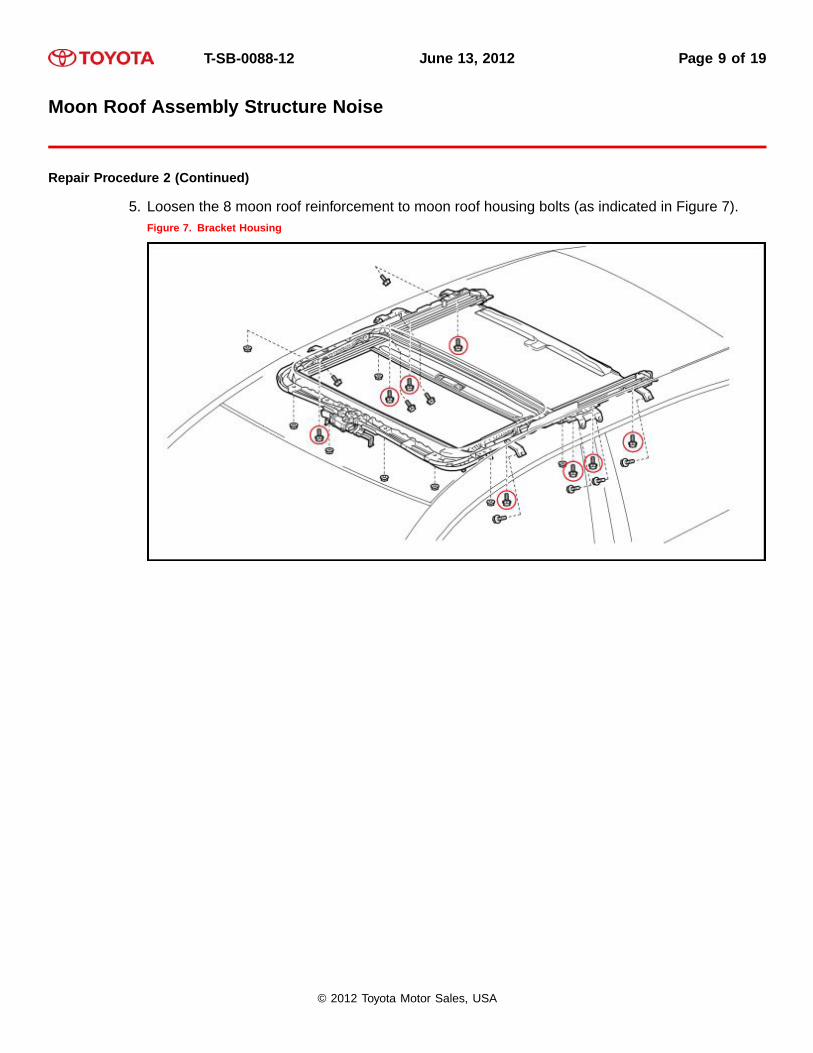
5. Loosen the 8 moon roof reinforcement to moon roof housing bolts (as indicated in Figure 7).Figure 7. Bracket Housing
© 2012 Toyota Motor Sales, USA
T-SB-0088-12 June 13, 2012 Page 10 of 19
Moon Roof Assembly Structure Noise
Repair Procedure 2 (Continued)
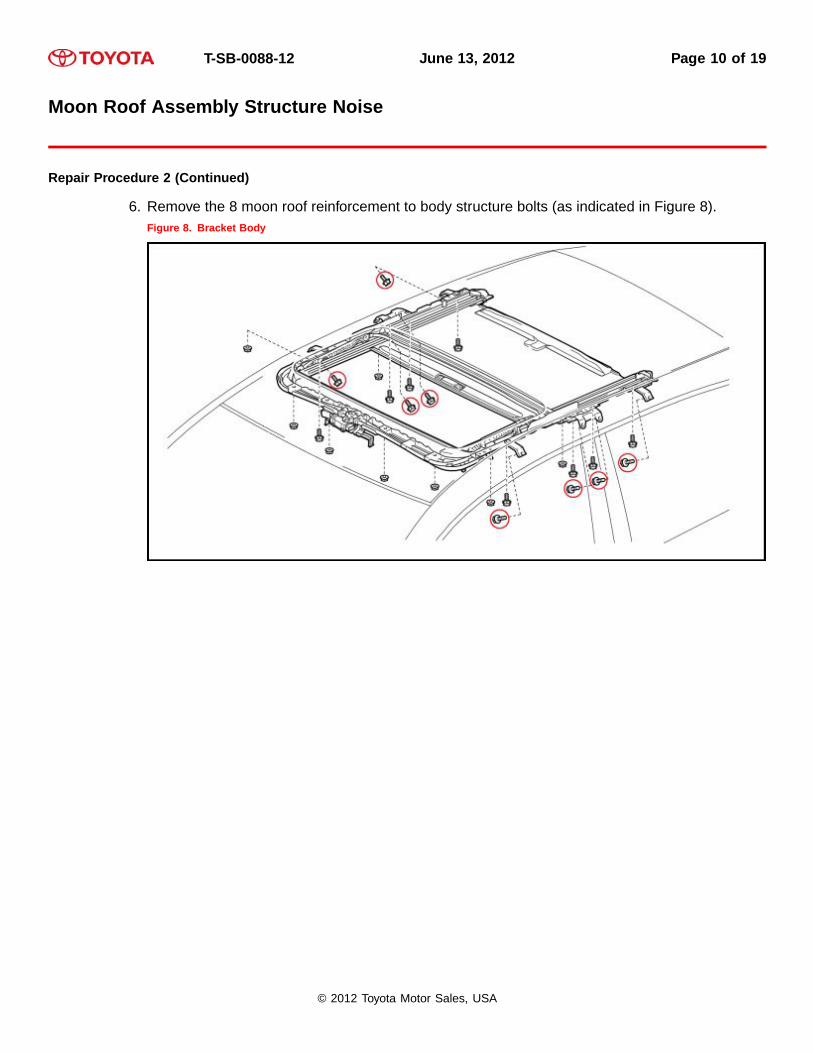
6. Remove the 8 moon roof reinforcement to body structure bolts (as indicated in Figure 8).Figure 8. Bracket Body
© 2012 Toyota Motor Sales, USA

T-SB-0088-12 June 13, 2012 Page 11 of 19
Moon Roof Assembly Structure Noise
Repair Procedure 2 (Continued)
7. Remove the 8 nuts and the moon roof housing sub-assembly. (as indicated in Figure 9).Figure 9. 8 Nuts
© 2012 Toyota Motor Sales, USA
T-SB-0088-12 June 13, 2012 Page 12 of 19
Moon Roof Assembly Structure Noise
Repair Procedure 2 (Continued)
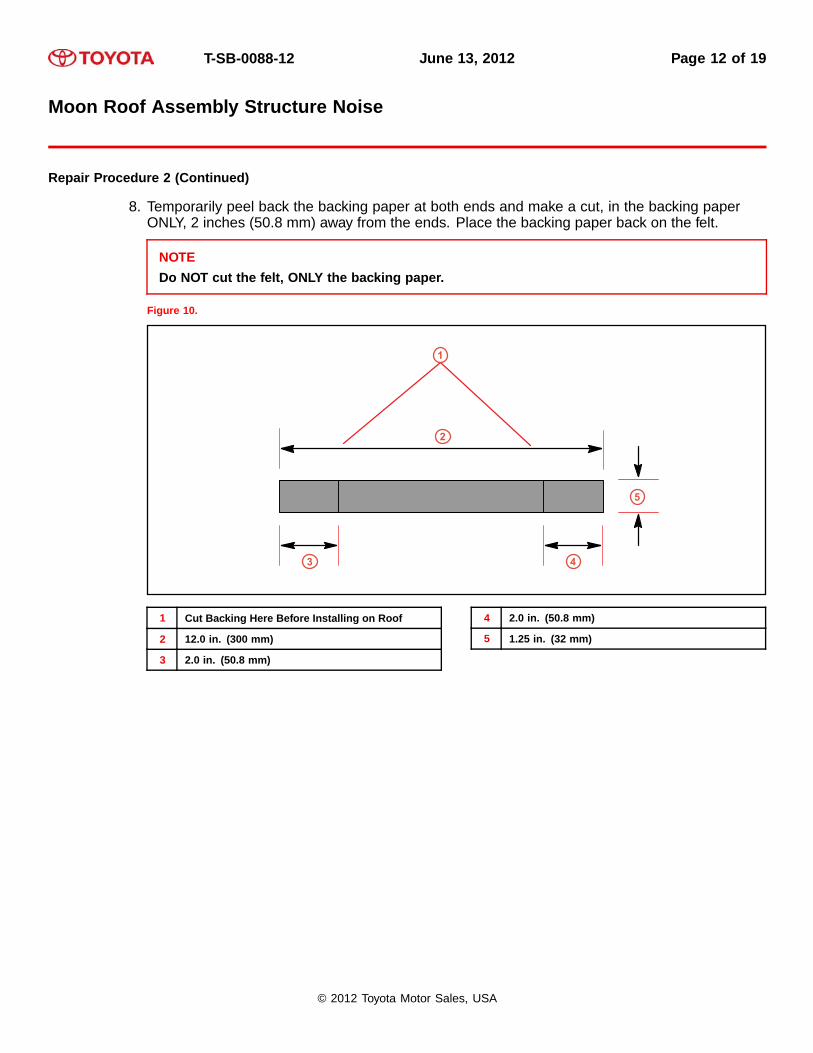
8. Temporarily peel back the backing paper at both ends and make a cut, in the backing paperONLY, 2 inches (50.8 mm) away from the ends. Place the backing paper back on the felt.
NOTEDo NOT cut the felt, ONLY the backing paper.
Figure 10.
1
2
3 4
5
1 Cut Backing Here Before Installing on Roof
2 12.0 in. (300 mm)
3 2.0 in. (50.8 mm)
4 2.0 in. (50.8 mm)
5 1.25 in. (32 mm)
© 2012 Toyota Motor Sales, USA
T-SB-0088-12 June 13, 2012 Page 13 of 19
Moon Roof Assembly Structure Noise
Repair Procedure 2 (Continued)
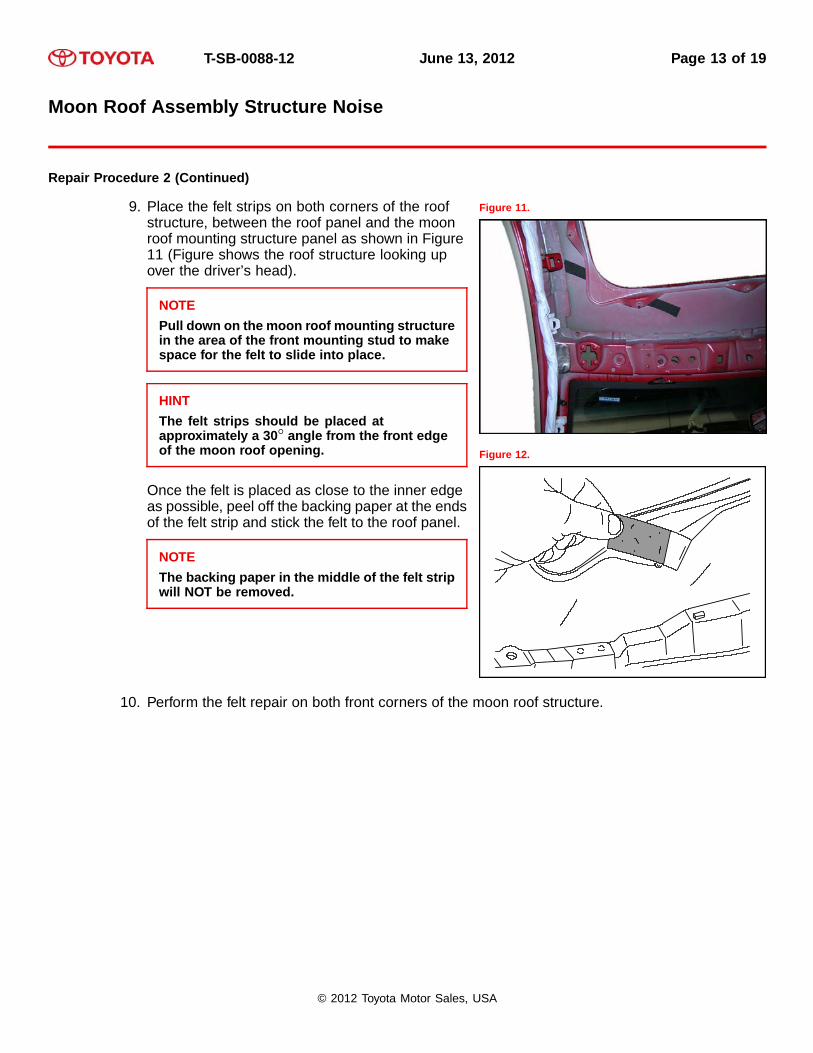
9. Place the felt strips on both corners of the roofstructure, between the roof panel and the moonroof mounting structure panel as shown in Figure11 (Figure shows the roof structure looking upover the driver’s head).
NOTEPull down on the moon roof mounting structurein the area of the front mounting stud to makespace for the felt to slide into place.
HINTThe felt strips should be placed atapproximately a 30◦ angle from the front edgeof the moon roof opening.
Once the felt is placed as close to the inner edgeas possible, peel off the backing paper at the endsof the felt strip and stick the felt to the roof panel.
NOTEThe backing paper in the middle of the felt stripwill NOT be removed.
Figure 11. .
Figure 12. .
10. Perform the felt repair on both front corners of the moon roof structure.
© 2012 Toyota Motor Sales, USA
T-SB-0088-12 June 13, 2012 Page 14 of 19
Moon Roof Assembly Structure Noise
Repair Procedure 2 (Continued)
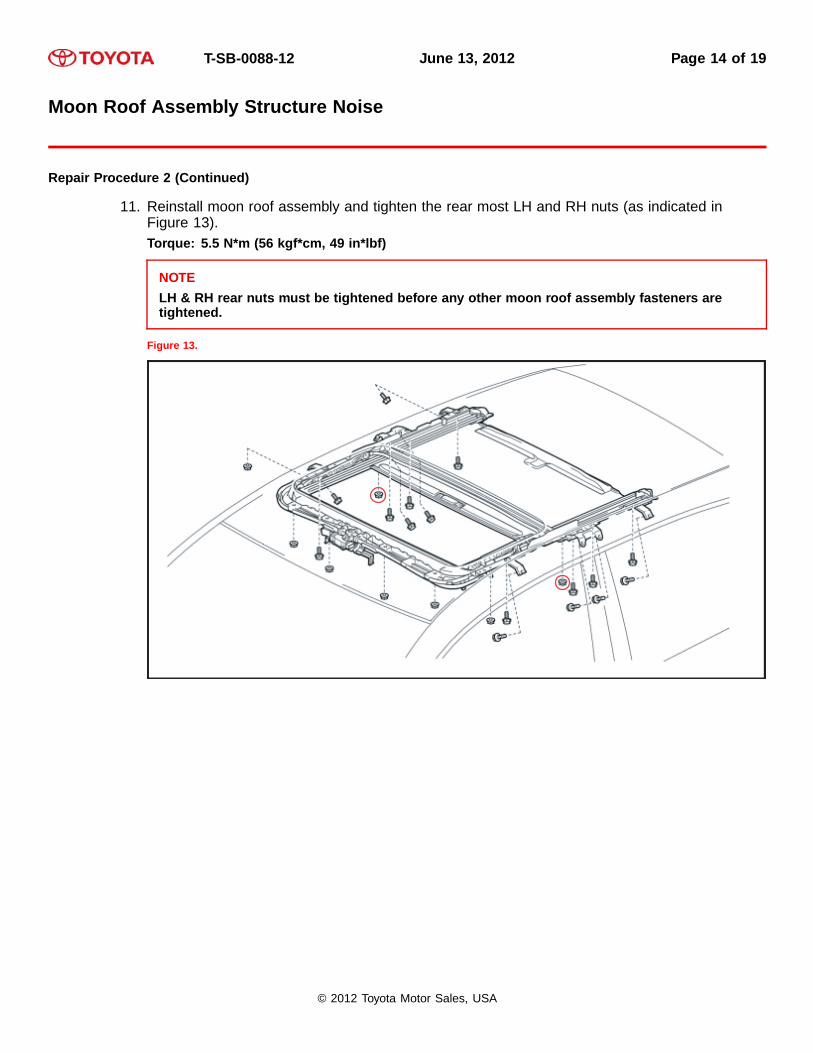
11. Reinstall moon roof assembly and tighten the rear most LH and RH nuts (as indicated inFigure 13).Torque: 5.5 N*m (56 kgf*cm, 49 in*lbf)
NOTELH & RH rear nuts must be tightened before any other moon roof assembly fasteners aretightened.
Figure 13.
© 2012 Toyota Motor Sales, USA
T-SB-0088-12 June 13, 2012 Page 15 of 19
Moon Roof Assembly Structure Noise
Repair Procedure 2 (Continued)
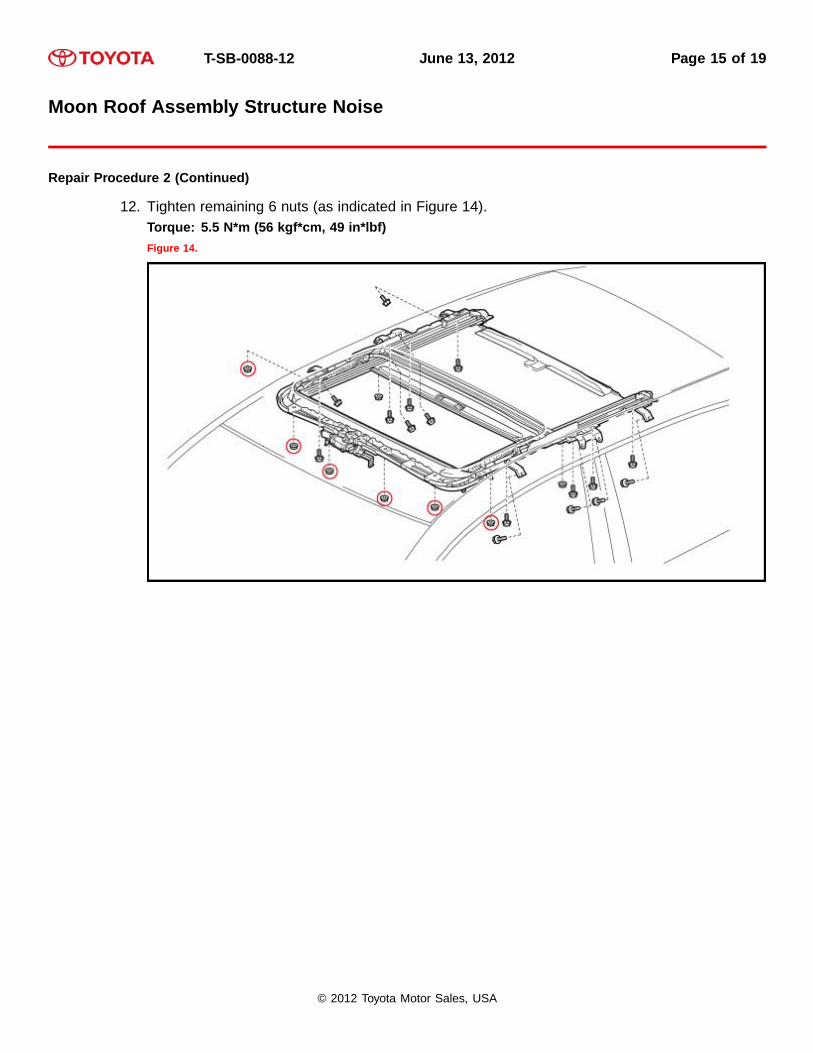
12. Tighten remaining 6 nuts (as indicated in Figure 14).Torque: 5.5 N*m (56 kgf*cm, 49 in*lbf)Figure 14.
© 2012 Toyota Motor Sales, USA

T-SB-0088-12 June 13, 2012 Page 16 of 19
Moon Roof Assembly Structure Noise
Repair Procedure 2 (Continued)
13. Tighten the 8 moon roof reinforcement to body structure bolts (as indicated in Figure 15).
A. Position each reinforcement bracket to sit squarely against both the body structure surfaceand the moon roof housing surface.
B. Tighten each bolt.Torque: 5.5 N*m (56 kgf*cm, 49 in*lbf)
Figure 15. Bracket Body
© 2012 Toyota Motor Sales, USA

T-SB-0088-12 June 13, 2012 Page 17 of 19
Moon Roof Assembly Structure Noise
Repair Procedure 2 (Continued)
14. Tighten the 8 moon roof reinforcement to moon roof housing bolts (as indicated in Figure 16).Torque: 5.5 N*m (56 kgf*cm, 49 in*lbf)Figure 16. Bracket Housing
15. Install the 4 moon roof drain hoses.
A. Slide the clip 30 mm (1.18 in.) or more fromthe end of the sliding roof drain hose.
Figure 17.
1 30 mm (1.18 in.) or more
© 2012 Toyota Motor Sales, USA
T-SB-0088-12 June 13, 2012 Page 18 of 19
Moon Roof Assembly Structure Noise
Repair Procedure 2 (Continued)
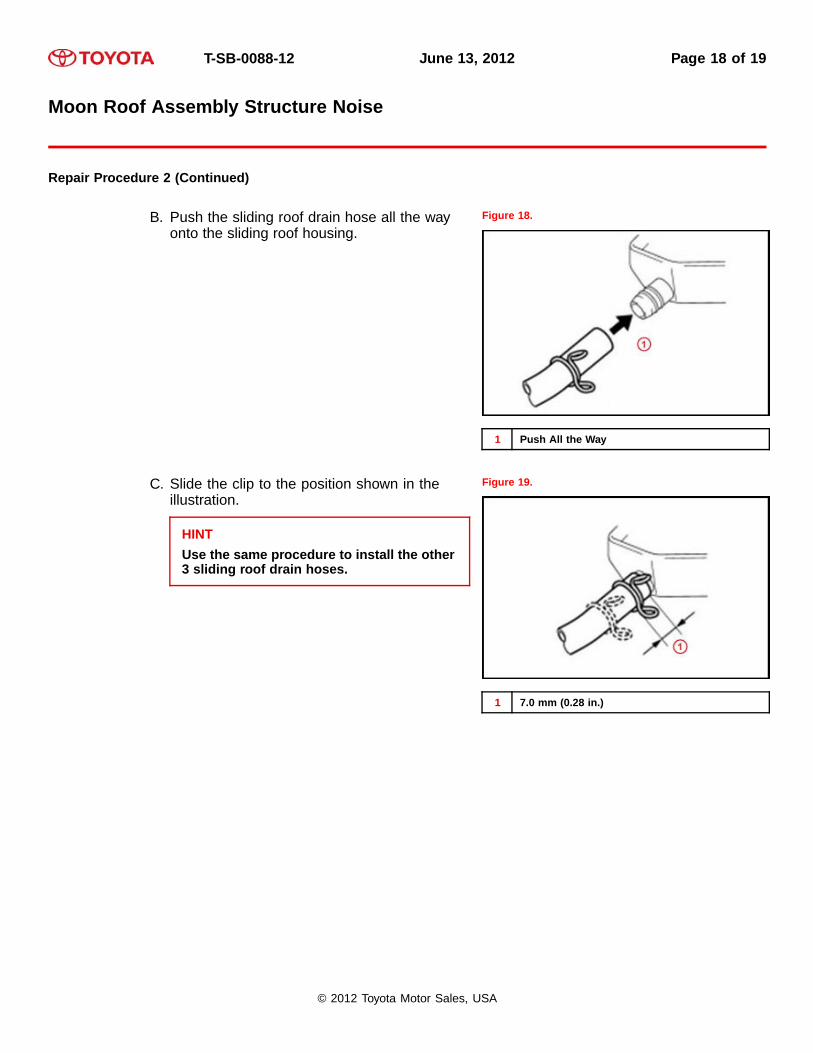
B. Push the sliding roof drain hose all the wayonto the sliding roof housing.
Figure 18.
1 Push All the Way
C. Slide the clip to the position shown in theillustration.
HINTUse the same procedure to install the other3 sliding roof drain hoses.
Figure 19.
1 7.0 mm (0.28 in.)
© 2012 Toyota Motor Sales, USA

T-SB-0088-12 June 13, 2012 Page 19 of 19
Moon Roof Assembly Structure Noise
Repair Procedure 2 (Continued)
D. Confirm that all the 4 sliding roof drain hosesare pushed all the way onto the sliding roofhousing and that the 4 clips are installed asshown in the illustration.
NOTICEThe clip must face toward the outside of thevehicle and also be above the lower surfaceof the sliding roof housing when installingthe drain hoses or damage to the headlinermay occur.
Figure 20.
1 7.0 mm (0.28 in.)
2 Clip
3 Upper Side
4 Outer Side
5 Front Side
16. Install roof headlining assembly. Refer to TIS, applicable model and model year Repair Manual:
• 2007 / 2008 / 2009 / 2010 / 2011 Camry:Vehicle Interior – Interior Panels/Trim – “Interior: Roof Headlining: Installation”
• 2007 / 2008 / 2009 / 2010 / 2011 Camry HV:Vehicle Interior – Interior Panels/Trim – “Interior: Roof Headlining: Installation”
17. Reset the radio presets and clock.
18. Test drive the vehicle to verify repair.
© 2012 Toyota Motor Sales, USA