montage-handbuch - woodag.com file2 3 zusätzlich für die montage mit einem tacker tacker,...
TRANSCRIPT
Montage-HandbuchManuel d’installation | Installation manual
DEFREN
INDO_HOM-O.indd 1 2016-09-06 13:55

2 3
EinführungHerzlichen Glückwunsch! Sie haben Ihren persönlichen Teil der INDO Kollektion erwor-ben. Einfach ausgedrückt bedeutet das, dass Sie Ihre Mauern mit den charaktervollsten Harthölzern veredeln werden, welche die Welt zu bieten hat. Sie zählen zu einer ausgewähl-ten Gruppe von Sammlern unserer Arbeit und Liebhabern unserer Designs, die nicht nur heutzutage sondern auch in Zukunft inspirie-ren werden.Die Schönheit unserer Paneele beschränkt sich nicht nur auf ihr Aussehen. Sie wurden durchdacht gestaltet, damit Raumausstatter aller Klassen professionelle Ergebnisse erzie-len können. Dieses Handbuch führt sie nun folgend in fünf einfachen Schritten durch den Montageprozess.
Zwei Goldene RegelnDie zwei goldenen Regeln für die besten Ergebnisse sind: 1. Streichen Sie die betreffende Wand vor der Montage schwarz 2. Platzieren Sie die Wandpaneele in einem zufälligen VerbundSie finden diese goldenen Regeln auch weiterführend eindeutig gekennzeichnet in Fettschrift in der Montageanleitung.
Besitzer- / MontageverantwortlichkeitAlle unsere Paneele werden sorgfältig geprüft, um zu garantieren, dass Sie nur die aus-gewähltesten Harthölzer erhalten, die die Natur zu bieten hat. Da alle von uns verwen-deten Materialien Naturprodukte sind, kann es zu gewissen Abweichungen in der Farbge-bung kommen. Es ist die Verantwortung des Monteurs, die Paneele vor der Montage auf deren Eignung zu prüfen. Für den unwahr-scheinlichen Fall, dass etwaige Defekte gefunden werden, sollten Sie sich umgehend an Ihren Lieferanten wenden. Montieren Sie keine Paneele die Sie gegebenenfalls als defekt ansehen, da wir keine Rücknahme für Teile anbieten können, die bereits montiert wurden.
Es liegt in der Verantwortlichkeit des Mont-eurs sicherzustellen, dass der Projektort
geeignet ist und die Paneele korrekt montiert werden (weitere Instruktionen auf den folgen-den Seiten). Der Hersteller akzeptiert keine Haftung für Mängel aufgrund von fehlerhafter oder ungeeigneter Montage.
Projektort - ÜberprüfungDie INDO Kollektion ist ausschliesslich für die Montage im Innenraum geeignet. Der Projekt-standort muss sich vollständig im Innenraum befinden und die Montagewände müssen gänzlich trocken sein. Bitte lesen Sie unser Dokument „Projektort und Montagewandan-forderungen“ für weitere Informationen über die Projektort-Überprüfung.
Die MontagewandUnsere Wandpaneele können auf verschiede-ne Wandoberflächen aufgebracht werden. Für beste Ergebnisse empfehlen wir die Montage auf einer ebenen Fläche. Flache Wände sind ideal, aber nicht lebhaft; kleine Unebenheiten sind akzeptabel und werden kein Problem darstellen.
Zustand der Montagewand – AllgemeinGenerell sollten die Oberflächen sauber und frei von losem Material oder Schmutz sein. Sie sollten vollständig trocken und strukturell fähig sein, das Paneelgewicht zusammen mit eventuellen Stützschichten (wenn zutreffend) zu tragen. Für das beste Ergebnis sollte die Montagewand schwarz gestrichen werden.
Checkliste Werkzeuge und benötigtes ZubehörDie folgende Aufstellung ist ein Überblick über die Werkzeuge, die Sie zur Montage benötigen werden.
Alle MontagenBesen und/oder Staubsauger, Wasserwaage und/oder Laser-Wasserwaage, Handsäge, Tischsäge und/oder Ablängsäge, Massband, Bleistift, Universalmesser, Verlängerungska-bel, Leiter und persönliche Schutzausrüstung.
Zusätzlich für die Montage mit KleberSilikonpistole und elastischer MS Polymerkle-ber High Tech.
DE
INDO_HOM-O.indd 2 2016-09-06 13:55

2 3
Zusätzlich für die Montage mit einem TackerTacker, Drahtstifte mit 1,2 mm Dicke und 30-50 mm Länge abhängig vom zu montierenden Paneeltyp.
Schritt 1
Handhabung und Akklimatisierung ihrer WandEntladen und handhaben Sie die Paneele mit Sorgfalt. Für beste Ergebnisse empfehlen wir Ihnen die einwöchige Lagerung der Paneele in der neuen klimatischen Umgebung vor der Installation. Holz ist ein natürliches Material das auf die Umgebung reagiert, weswegen minimales Zusammenziehen oder Ausdehnen in Abhängigkeit von der neuen Umgebung zu erwarten ist. Durch eine Akklimatisie-rung der Paneele vor der Installation ist die Stabilisierung des Materials vor der Fixierung gewährleistet. Daher kann gegebenenfalls ein besseres Ergebnis erzielt werden. Die Paneele sollten erst an den Montageort geliefert wer-den, wenn die Bauarbeiten soweit sind, dass der Raum vollständig geschlossen ist.
Schritt 2
Die erste PlatteZur effizienten Abdeckung der Fläche sollte bereits die erste Platte der Breite nach (mit ei-ner Tisch- oder Ablängsäge) halbiert werden. Nehmen Sie eine der entstehenden Halb-platten und platzieren Sie diese bündig an der linken Ecke der Wand und fixieren Sie sie anschliessend. Die zweite Hälfte können Sie dann für die erste Platte einer anderen Reihe wie in Schritt 5 beschrieben nutzen.
Schritt 3
Montage mit KleberDie Paneele können mit Hilfe des geeigneten Fixiermediums an eine Vielzahl von Ober-flächen fixiert werden. In den meisten Fällen empfehlen wir die Verwendung von starkem elastischem MS Polymerkleber High Tech. Sie werden ungefähr 290 ml Kleber pro 2 m2 Fläche benötigen.
Montage mit TackerWenn Paneele auf einen Holzuntergrund angebracht werden sollen, kann auch ein Tacker als Alternative (oder Ergänzung) zum Polymerkleber zur Befestigung genutzt
1 Woche
DE
INDO_HOM-O.indd 3 2016-09-06 13:55

4 5
werden. Für beste Ergebnisse bei der Verwen-dung eines Tackers sollten Sie darauf achten, dass die Drahtstifte so unauffällig wie möglich platziert werden. Wenn Sie Wandpaneele über Augenhöhe anbringen sollten die Stifte in ei-nem nach unten zeigenden Winkel angebracht werden. Paneele unter Augenhöhe sollten mit nach oben zeigendem Winkel angebracht werden. Drahtstifte auf Augenhöhe sollten in den Ecken der Paneele und zwischen den Elementen angebracht werden.
Schritt 4
Anordnung der ersten Reihe an der WandPositionieren Sie die ersten Paneele in einer geraden Reihe entlang der Wand. Wir emp-fehlen die Nutzung einer Wasserwaage oder Laser-Wasserwaage zur Ausrichtung einer geraden Reihe an der Wand vor der Befesti-gung der Paneele. Platzieren Sie das erste Halbpaneel links an der Wand wie in Schritt 2 beschrieben und folgen Sie der Ausrichtung. Mit der goldenen Regel #2 wird eine zufällige Anordnung erzielt, wodurch die Verbindungs-stellen unsichtbar werden.Fahren Sie mit den anderen Paneelen ebenso fort, bis sie das Ende der Reihe erreichen
und das letzte Paneel mit einer Tisch- oder Ablängsäge zurechtschneiden können. Das verbleibende Endstück kann verwendet wer-den, um die zweite Reihe zu starten. Für beste Ergebnisse sollten die Paneele ungleich ange-ordnet werden; d.h. Sie sollten die Anordnung der Paneele in den aufeinander folgenden Rei-hen nicht wiederholen. Nach der Montage der ersten 5 Reihen sollten Sie überprüfen, ob die Reihen noch immer gerade ausgerichtet sind und können diese gegebenenfalls korrigieren.
Schritt 5
Montage der WandPlatzieren Sie die Paneele in einem ungleich-mässigen (gemischten) Muster und arbeiten Sie sich in Reihen hoch, bis Sie das obere Ende der Wand erreichen. In jeder Reihe sollten die Endstücke des Endpaneels der Vorreihe verwendet werden, um die nächste Reihe zu starten. Beachten Sie, dass dies davon abhängt, ob die Unregelmässigkeit des Gesamtmusters dadurch beeinträchtigt wird; wenn notwendig kann das verbleibende Stück auch weiter gekürzt werden, um eine gewünschte andere Grösse zu erzielen. Wir empfehlen einen Dehnungsabstand von 10 mm unter und ober der Wand einzuhalten.
GROSSFLÄCHIGE BEREICHEDehnungsfugen in GebäudestrukturenSowohl für die Verwendung von Kleber als auch bei der Anwendung von Tacker bei Pro-jekten mit grossen Oberflächen ist es emp-fohlen die Dehnungsfugen der Gebäudestruk-tur auch für die Montage der Wandpaneele zu übernehmen. Dieser Zwischenraum kann mit einer flexiblen Versiegelung gefüllt werden.
DE
10 m
10 m
10 m
INDO_HOM-O.indd 4 2016-09-06 13:55
4 5
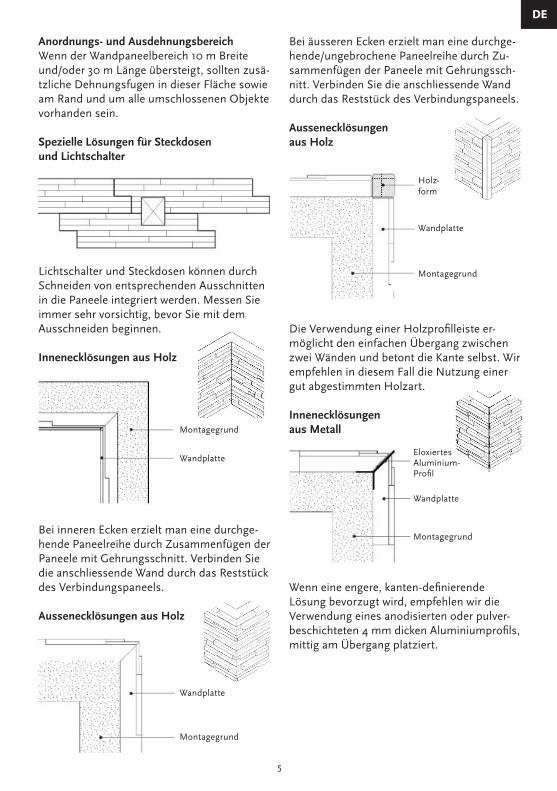
Anordnungs- und AusdehnungsbereichWenn der Wandpaneelbereich 10 m Breite und/oder 30 m Länge übersteigt, sollten zusä-tzliche Dehnungsfugen in dieser Fläche sowie am Rand und um alle umschlossenen Objekte vorhanden sein.
Spezielle Lösungen für Steckdosenund Lichtschalter
Lichtschalter und Steckdosen können durch Schneiden von entsprechenden Ausschnitten in die Paneele integriert werden. Messen Sie immer sehr vorsichtig, bevor Sie mit dem Ausschneiden beginnen.
Innenecklösungen aus Holz
Bei inneren Ecken erzielt man eine durchge-hende Paneelreihe durch Zusammenfügen der Paneele mit Gehrungsschnitt. Verbinden Sie die anschliessende Wand durch das Reststück des Verbindungspaneels.
Aussenecklösungen aus Holz
Bei äusseren Ecken erzielt man eine durchge-hende/ungebrochene Paneelreihe durch Zu-sammenfügen der Paneele mit Gehrungssch-nitt. Verbinden Sie die anschliessende Wand durch das Reststück des Verbindungspaneels.
Aussenecklösungenaus Holz
Die Verwendung einer Holzprofilleiste er-möglicht den einfachen Übergang zwischen zwei Wänden und betont die Kante selbst. Wir empfehlen in diesem Fall die Nutzung einer gut abgestimmten Holzart.
Innenecklösungenaus Metall
Wenn eine engere, kanten-definierende Lösung bevorzugt wird, empfehlen wir die Verwendung eines anodisierten oder pulver-beschichteten 4 mm dicken Aluminiumprofils, mittig am Übergang platziert.
DE
Wandplatte
Montagegrund
Montagegrund
Wandplatte
Wandplatte
Montagegrund
Holz-form
Wandplatte
Montagegrund
EloxiertesAluminium-Profil
INDO_HOM-O.indd 5 2016-09-06 13:55
6 7
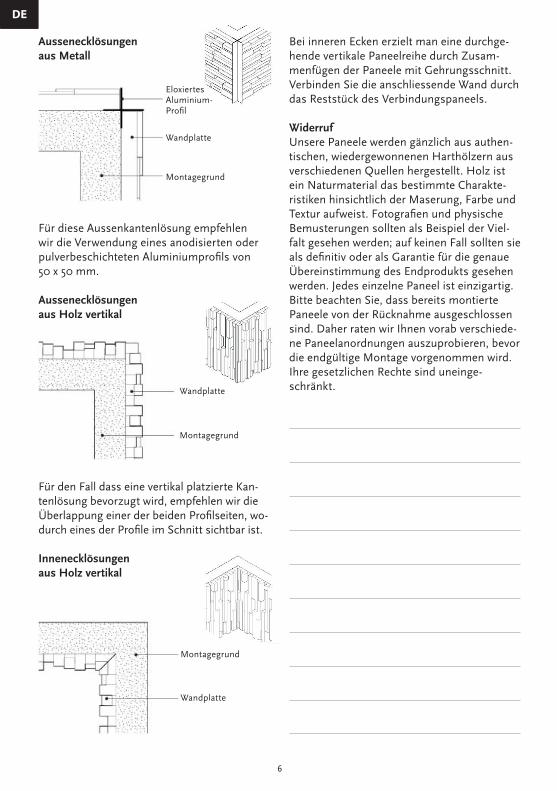
Aussenecklösungenaus Metall
Für diese Aussenkantenlösung empfehlen wir die Verwendung eines anodisierten oder pulverbeschichteten Aluminiumprofils von50 x 50 mm.
Aussenecklösungenaus Holz vertikal
Für den Fall dass eine vertikal platzierte Kan-tenlösung bevorzugt wird, empfehlen wir die Überlappung einer der beiden Profilseiten, wo-durch eines der Profile im Schnitt sichtbar ist.
Innenecklösungenaus Holz vertikal
Bei inneren Ecken erzielt man eine durchge-hende vertikale Paneelreihe durch Zusam-menfügen der Paneele mit Gehrungsschnitt. Verbinden Sie die anschliessende Wand durch das Reststück des Verbindungspaneels.
WiderrufUnsere Paneele werden gänzlich aus authen-tischen, wiedergewonnenen Harthölzern aus verschiedenen Quellen hergestellt. Holz ist ein Naturmaterial das bestimmte Charakte-ristiken hinsichtlich der Maserung, Farbe und Textur aufweist. Fotografien und physische Bemusterungen sollten als Beispiel der Viel-falt gesehen werden; auf keinen Fall sollten sie als definitiv oder als Garantie für die genaue Übereinstimmung des Endprodukts gesehen werden. Jedes einzelne Paneel ist einzigartig. Bitte beachten Sie, dass bereits montierte Paneele von der Rücknahme ausgeschlossen sind. Daher raten wir Ihnen vorab verschiede-ne Paneelanordnungen auszuprobieren, bevor die endgültige Montage vorgenommen wird. Ihre gesetzlichen Rechte sind uneinge-schränkt.
DE
Wandplatte
Wandplatte
Montagegrund
Montagegrund
Wandplatte
Montagegrund
EloxiertesAluminium-Profil
INDO_HOM-O.indd 6 2016-09-06 13:55

6 7
IntroductionFélicitations ! Vous avez acquis votre pro-pre pièce de la collection INDO. En deux mots, ceci signifie que vous êtes sur le point d’agrémenter vos murs avec des bois durs dotés de la plus forte identité que le monde ait à offrir. Vous rejoignez un groupe privilégié de collectionneurs avertis de nos œuvres et, comme elles sont de plus en plus reconnues, d’investisseurs dans un design qui inspirera dès maintenant et pendant les années à venir.La beauté de nos panneaux ne se limite pas à leur apparence. Ils ont été soigneusement conçus afin de parvenir à une finition profes-sionnelle à tous les niveaux de décoration. Ce manuel vous guidera tout au long du process-us d’installation en cinq étapes simples.
Deux règles d’orLes deux règles d’or pour obtenir le meilleur résultat sont: 1 Peignez le mur de support en noir avant l’installation 2 Placez les panneaux muraux au hasardVous retrouverez ces règles d’or clairement marquées en gras dans la suite de ce manuel d’installation.
Responsabilité du propriétaire/de l’installateurTous nos panneaux sont soigneusement inspectés afin de garantir que vous ne recevez que les plus beaux spécimens de bois durs que la nature ait à offrir. Cependant, tous nos matériaux étant naturels, des variations granulométriques naturelles sont possibles. Il incombe à l’installateur de s’assurer de l’adé-quation de tous les panneaux avant de procé-der à l’installation. Dans l’hypothèse très peu probable où des défauts seraient constatés, vous devez immédiatement contacter votre fournisseur. N’installez pas les panneaux qui vous semblent défectueux, car nous ne pou-vons pas accepter leur retour une fois que les panneaux ont été installés.
Il incombe à l’installateur de s’assurer que le site du projet est approprié et que les panneaux sont correctement installés (voir plus bas). La responsabilité du fabricant n’est pas engagée pour les défaillances dues à une
installation incorrecte ou inappropriée.
Site du projet - inspectionLa collection INDO est uniquement destinée à une installation intérieure. Le site du projet doit être entièrement protégé contre les éléments extérieurs et les murs de support doivent être totalement secs. Pour de plus amples détails sur l’inspection du site du projet, veuillez consulter notre document « Exigences applicables au site du projet et aux murs de support ».
Le mur de supportNos panneaux muraux peuvent être appli-qués sur une grande variété de surfaces de support. Pour obtenir les meilleurs résultats, nous conseillons de les fixer sur une surface plane. Les murs plats constituent le support idéal, mais ne sont en aucun cas indispensa-bles ; un faible degré d’inégalités est accepta-ble et ne causera pas de problèmes.
État du mur de support - généralitésEn général, les surfaces doivent être propres et exemptes de matières détachées ou de débris. Elles doivent être totalement sèches et structurellement capables de supporter le poids total des panneaux ainsi que celui de toute couche de renfort (si utilisée).Pour un résultat optimal, il est conseillé de peindre le mur de support en noir avant l’installation.
Liste des outils et accessoires requisCi-après un rapide aperçu des outils dont vous avez besoin pour effectuer le travail.
Toutes les installationsBalai et/ou aspirateur, niveau à bulle et/ou niveau laser, scie à main, scie sur table et/ou scie passe-partout, mètre ruban, crayon, couteau à lame rétractable, rallonge, échelle et équipement de protection individuelle.
En plus pour le montage avec une collePistolet à silicone et colle polymère MS élasti-que High Tech.
FR
INDO_HOM-O.indd 7 2016-09-06 13:55

8 9
En plus pour le montage avec une agrafeuseAgrafeuse, agrafes 1,2 mm d’épaisseur et 30-50 mm en fonction du type de panneaux muraux à installer
Étape 1
Traitement et acclimatation de votre murDéchargez et manipulez les panneaux avec soin. Pour des résultats optimaux, nous vous conseillons de stocker les panneaux dans leur nouvel environnement pendant une semaine avant de les installer. Le bois est un matériau naturel qui réagit à son environnement et un certain degré de rétrécissement ou de dilatation peut être attendu en fonction de la nature de la nouvelle maison des panneaux. Laisser les panneaux s’acclimater avant de les installer signifie que le bois se sera considéra-blement stabilisé avant d’être posé sur le mur, ce qui permettra d’obtenir une meilleure finition. Les panneaux ne doivent pas être amenés sur le site à moins que et jusqu’à ce que le bâtiment soit complètement protégé contre les éléments extérieurs.
Étape 2
Le premier carreauPour une couverture optimale, coupez le premier carreau en deux, dans le sens de la largeur (avec une scie sur table ou une scie passe-partout). En prenant l’une des deux moitiés de carreau, alignez le nouveau bord droit créé avec le bord gauche du mur et fixez-la. L’autre demi-carreau créé peut être utilisé pour démarrer les rangées suivantes comme décrit à l’étape 5.
ÉTAPE 3
Montage à l’aide d’une colleLes panneaux peuvent être montés sur une grande variété de surfaces à l’aide de l’agent de fixation approprié et, dans la plupart des cas, nous recommandons d’utiliser une colle forte élastique à base de polymères MS High Tech. À titre indicatif, vous aurez besoin d’en-viron 290 ml de colle pour 2m² de panneaux.
Assemblée avec agrafeuseSi les panneaux doivent être installés sur une surface de support en bois, une agrafeuse peut être utilisée comme alternative (ou en plus) d’une colle polymère. Pour des résultats
FR
1 Woche
INDO_HOM-O.indd 8 2016-09-06 13:55

8 9
optimaux avec une agrafeuse, veuillez vous assurer que les agrafes se voient au mini-mum. Lors de la fixation de panneaux muraux au-dessus du niveau des yeux, les agrafes doi-vent être mises en place à un angle descen-dant. Pour les panneaux au-dessous du ni-veau des yeux, les agrafes doivent être mises en place à un angle ascendant. Les agrafes à hauteur des yeux doivent être placées dans les coins des panneaux et entre les lattes.
Étape 4
Mise en place des premièresrangées sur votre murPositionnez les premiers panneaux en ligne droite le long du mur. Nous conseillons d’uti-liser un niveau à bulle ou un niveau laser pour tracer une ligne droite sur le mur qui servira de guide avant de positionner les panneaux. Placez le premier demi-panneau sur le côté gauche du mur selon les indications de l’étape 2 et suivez la ligne tracée avec le niveau à bul-le. Cette règle d’or n° 2 permet de créer une liaison aléatoire qui fait disparaître les joints.Continuez avec les autres panneaux jusqu’à ce que vous atteigniez la fin de la rangée, en utilisant une scie sur table ou une scie pas-
se-partout pour découper le dernier panneau à la taille voulue. Le morceau de panneau restant peut être utilisé pour démarrer la seconde rangée. Pour des résultats optimaux, nous recommandons de former des rangs de panneaux irréguliers ; à savoir que vous ne répétez pas exactement le rang des panneaux en rangées successives.Après avoir installé les cinq premières rangé-es, assurez-vous que les lignes droites sont conservées, corrigez-les si nécessaire.
Étape 5
Montage de votre murPlacez les panneaux selon une suite irrégu-lière (mélange) en commençant les rangées à partir bas jusqu’en haut du mur. Dans chaque rangée, la partie restante du panneau de l’extrémité d’une rangée peut être utilisée comme panneau pour démarrer la rangée suivante. N’oubliez pas qu’il s’agit de l’apti-tude à conserver l’aspect global irrégulier; si non approprié, faire les découpes dans une taille alternative devrait être suffisant pour y parvenir. Nous recommandons de laisser un espace pour l’expansion de 10 mm en bas et en haut du mur.
GRANDES SURFACESJoints d’expansion dans lastructure du bâtimentPour les deux montages à l’aide de colle ou d’une agrafeuse dans des projets de gran-de surface, il est toujours conseillé d’intég rer les joints d’expansion dans la structure du bâtiment en prévoyant le même espace d’expansion dans les panneaux muraux. Cet espace peut être comblé avec un matériau d’étanchéité flexible.
FR
10 m
10 m
10 m
INDO_HOM-O.indd 9 2016-09-06 13:55

10 11
Disposition et espace d’expansionLorsque la surface sur laquelle les panneaux muraux doivent être posés a une largeur supérieure à 10 m et/ou une longueur supérieure à 30 m, un espace d’expansion supplémentaire doit être intégré dans le terrain, ainsi qu’au niveau du périmètre et de toutes les obstructions.
Solutions spéciales pour prises decourant et interrupteurs électriques
Des interrupteurs électriques et des prises de courant peuvent être intégrés en découpant un trou dans le panneau. Effectuez toujours des mesures précises avant de découper le trou.
Solutions en bois pourangles intérieurs
Dans le cas d’un angle intérieur, il est possible de réaliser une rangée de panneaux interrom-pue sans joint en reliant les panneaux corres-pondants à l’aide d’un bord biseauté. Faites la jonction avec le mur de retour en utilisant la partie restante du panneau de jonction.
Solutions en bois pour angles extérieursUn angle sans joint / une rangée interrom-pue de panneaux sont réalisés en reliant les panneaux correspondants à l’aide d’un bord biseauté. Faites la jonction avec le mur de re-tour en utilisant la partie restante du panneau
de jonction.Solutions en bois pour
angles extérieursUne moulure carrée en bois permettra de délimiter les murs de jonction et de mettre en évidence l’angle lui-même. Nous vous conse-illons d’utiliser un type de bois bien assorti pour cette solution.
Solutions en métal pour
angles extérieursSi un angle plus étroit est souhaité, nous conseillons d’utiliser un profilé en aluminium anodisé ou revêtu par poudre d’une épaisseur de 4 mm, placé dans le joint biseauté.
Solutions en métal pourangles extérieurs
FR
Paroi de réception
Panneau mural
Panneau mural
Paroi de réception
Panneau mural
Moulageen bois
Paroi de réception
Panneau mural
Paroi de réception
Profilé enaluminium anodisé
INDO_HOM-O.indd 10 2016-09-06 13:55

10 11
Pour la solution à angle ouvert, nous conse-illons d’utiliser un profilé en aluminium ano-disé ou revêtu par poudre de 50 x 50 mm
Solutions en bois pour angles
extérieurs à la verticaleSi un angle vertical est préféré, nous re-commandons que des panneaux muraux se chevauchent afin qu’un côté des panneaux soit visible.
Solutions en bois pour angles
intérieurs à la verticaleDans le cas d’un angle intérieur, il est possible de réaliser une rangée de panneaux interrom-pue sans joint en reliant les panneaux corres-pondants à l’aide d’un bord biseauté. Faites la jonction avec le mur de retour en utilisant la partie restante du panneau de jonction
Clause de non-responsabilitéNos panneaux sont entièrement fabriqués en bois durs authentiques rénovés provenant d’une grande variété de sources. Le bois est un matériau naturel qui a des caractéristiques distinctives en matière de grain, couleur et texture. Les photographies et échantillons
physiques doivent être considérés comme illustratifs de la collection qu’ils représentent ; ils ne doivent en aucun cas être considérés comme définitifs ou garantissant une corres-pondance exacte. Chaque panneau individuel est unique. Veuillez noter qu’aucun retour ne sera accepté pour un produit ayant été installé. Dans cet esprit, nous vous conseil-lons toujours de saisir l’opportunité d’expéri-menter différentes dispositions des panneaux muraux avant l’installation finale. Vos droits légaux nesont pas affectés.
FR
Panneau mural
Panneau mural
Paroi de réception
Paroi de réception
Panneau mural
Paroi de réception
Profilé enaluminium anodisé
INDO_HOM-O.indd 11 2016-09-06 13:55

12 13
IntroductionCongratulations! You have acquired your very own piece from the collection of INDO. Put at it’s simplest, this means that you are about to adorn your walls with the most characterful hardwoods the world has to offer. You join a select group of discerning collectors of our work, and as is increasingly being recognised, investors in design that will inspire now and for years to come.The beauty of our panels is not confined to their appearance. They have been thoughtfully designed so that all levels of decorator can achieve a professional finish. This manual will now guide you through the installation process in five simple steps.
Two golden rulesThe two golden rules for the best result are: 1 Paint your receiving wall black prior to installation 2 Place the wall panels in a random bondYou will find these golden rules clearly marked in bold writing furtheron in this installation manual.
Owner / installer responsibilityAll of our panels are thoroughly inspected to ensure that you receive only the very finest specimen hardwoods nature has to bestow. As all of our materials are natural however some natural variations in grading may occur. It is the installer’s responsibility to check the suitability of all panels prior to installation. In the highly unlikely event that any defects are found to be present, you should contact your supplier immediately. Do not install panels you suspect to be defective as we cannot ac-cept returns once panels have been installed.
It is the installer’s responsibility to ensure that the project site is suitable and that the panels are correctly installed (for which see later). The manufacturer accepts no responsibility for failure due to incorrect ot inappropriate installation.
Project site – InspectionThe INDO collection is suitable solely for indoor installation. The project site should
be fully enclosed to the elements and all receiving walls should be completely dry. For further details on the project site inspection, please read our document “Project site and recieving wall requirements”.
The receiving wallOur wall panelling may be applied to a range of receiving surfaces. For the best results we recommend fixing to an even surface. Flat walls are ideal but by no means vital; a small degree of unevenness is acceptable and will not cause probelms.
Condition of receiving wall - generalIn general, surfaces should be clean and free from any loose material or debris. They should be completely dry and structurally capable of supporting the aggregate panel weight, together with that of any backing strata (where used).For the best result it is recommended to paint the receiving wall black before mounting.
Checklist tools and accesories neededHere is a quick look at the tools you will need for the job.
All installationsBroom and/or vacuum, spirit level and/or cross laser level, handsaw, table saw and/or crosscut saw, tape measure, pencil, utility knife, extension cord, ladder and personal protective equipment.
Add for mounting with adhesiveSilicon gun and elastic MS polymer High Tech.
Add for mounting with tackerTacker, brads 1.2 mm thickness and 30-50 mm depending on the wall panelling type being installed
EN
INDO_HOM-O.indd 12 2016-09-06 13:55

12 13
Handling and acclimatizing your wallUnload and handle panels with care. For best results, we recommend that you store panels in their new environment for a period of one week prior to installing them. Wood is a natu-ral material which reacts to it’s environment, therefore a degree of shrinkage or expansion may be expected depending on the nature of the panels’ new home. Allowing the panels to acclimatize in this way prior to installationmeans that the wood will have significantly stabilized before it is affixed to the wall. A better finish may therefore be achieved.Panels should not be delivered to site unless and until the building is completely closed to the elements.
Step 2 – The first tileFor the most efficient coverage, cut the first tile directly in half, widthways (with a tablesaw or a crosscut saw). Taking one of the resultant half tiles, align the newly created straight edge with the left edge of the wall and fix in place. The other newly created half tile may be used to start subsequent rows as described in step 5.
Mounting using adhesivePanels may be mounted to a range of surfaces using the correct fixing medium and in most cases we recommend using a strong elastic MS polymer adhesive High Tech. As a guide, you will require roughly 290 ml adhesive for every 2 sqm of panelling.
Mounting using tacker
EN
1 Woche
Step 1 Step 3
INDO_HOM-O.indd 13 2016-09-06 13:55

14 15
Where panels are to be installed onto a wooden backing surface, a tacker device may be used as an alternative (or in addition) to a polymer adhesive. For best results when using a tacker, take care to ensure that the appea-rance of the brads is minimised. When affixing wall panels above eye-level, brads should be ‘shot’ at a downwards angle. For panels below eye-level, shoot the brads at an upwards angle. Brads at eye-level should be shot into corners of the panel and between the lats.
Step 4
Placing the first rows of your wallPosition the first panels in a straight row along the wall. We recommend using a spirit level or cross laser to mark a straight line on the wall as a guide before positioning the pa-nels. Place the first halfpanel on the left side of the wall in the manner described in step 2 and follow the spirit line. With this golden rule #2 a random bond is created which makes the joints disappear.Continue with the other panels until you reach the end of the row, using a tablesaw or a cross-cut saw to cut the final panel to size. The leftover piece of panel may be used to start the second row. For best results, we recommend an irregular panel formation; that is to say that you do not exactly repeat the formation of the panels in successive rows.After installation of the first 5 rows check that straight lines have been maintained, correc-ting if necessary
Step 5
Mounting your wallPlace the panels in an irregular (mixed) forma-tion and work first upwardly in rows until you come to the top of the wall. In each row, the leftover portion of panel from the end of one row may be used as the starting panel for the following row. Remember that this is subject to it’s suitability to maintain the overall irregu-lar formation; where it is not suitable, cutting to an alternative size should make it so. Weadvise leaving a 10 mm expansion space both below and atop of the wall.
LARGE SURFACE AREASExpansion joints in building structureFor both mounting using adhesives or using a tacker in projects with large surface areas it is always advised to accommodate the expansion joints in the building structure by allowing the same expansion space in the wall panelling. This space may be filled with a flexible sealant.
Layout and expansion spaceWhen the wall panelling area exceeds 10 m in width and/or 30 m in length, additional expansion space must be incorporated into the field, as well as at the perimeter and all obstructions.
EN
10 m
10 m
10 m
INDO_HOM-O.indd 14 2016-09-06 13:55

14 15
Special solutions power-sockets and light switches
Light switches and power sockets can be inte-grated by cutting a hole within the panel. Al-ways measure carefully before cutting the hole.
Internal cornersolutions wood
In case of an internal corner a seamless unbroken row of panels is achieved by joining corresponding panels using a mitered edge. Connect the return wall using the leftover piece from the joining panel.
External cornersolutions wood
A seamless corner/unbroken row of panels is achieved by joining corresponding panels using a mitered edge. Connect the return wall using the leftover piece from the joining panel.
External cornersolutions wood
Using a square wooden moulding will delinea-te joining walls and put a strong emphasis on the corner itself. We recommend that you use a well matched wood type for this solution.
External cornersolutions metal
If a narrower, corner-defining solution is preferred we recommend using an anodised or powder coated aluminium profile of 4 mm thickness, positioned within the miter joint.
External cornersolutions metal
For this open corner solution we recommend using an anodised or powder coated alumini-um profile of 50 x 50 mm.
EN
Wall panel
Receiving wall
Receiving wall
Wall panel
Wall panel
Woodenmoulding
Receiving wall
Wall panel
Anodizedaluminiumprofile
Anodizedaluminiumprofile
Receiving wall
Wall panel
Receiving wall
INDO_HOM-O.indd 15 2016-09-06 13:55

16
External corner solutionswood vertical
If a vertically placed corner solution is prefer-red we recommend one row of the wall panel overlap so the side of one for the panels is visible.
Internal corner solutions wood verticalIn case of an internal corner a seamless unbroken row of vertical panels is achieved by joining corresponding panels using a mitered edge. Connect the return wall using the other half piece from the joining panel.
DisclaimerOur panels are made entirely of authentic, reclaimed hardwoods from a variety of sour-ces. Wood is a natural material that contains distinctive characteristics in grain, colour and texture. Photographs and physical samples should be viewed as illustrative of the collec-tion they represent; in no way should they be regarded as being definitive or of guarante-eing an exact match. Each individual panel is unique. Please note that no returns are offe-red for product that has been installed. With this in mind we always advise that you take the opportunity to experiment with different panel arrangements prior to final installation.Your statutory rights are not affected.
EN
Untere Gründlistrasse 23 | 6055 Alpnach Dorf | Switzerland
© H
WZ International A
G, 0
62016
Wall panel
Receiving wall
INDO_HOM-O.indd 16 2016-09-06 13:55