module 1 appendix 1 - bc · pdf filemodule 1 . appendix 1 . ... withdrawal from an intravenous...
TRANSCRIPT
Checklists
MODULE 1
APPENDIX 1
Includes Step-by-Step
Procedures and Techniques
for the Safe Handling and Preparation of Hazardous Drugs
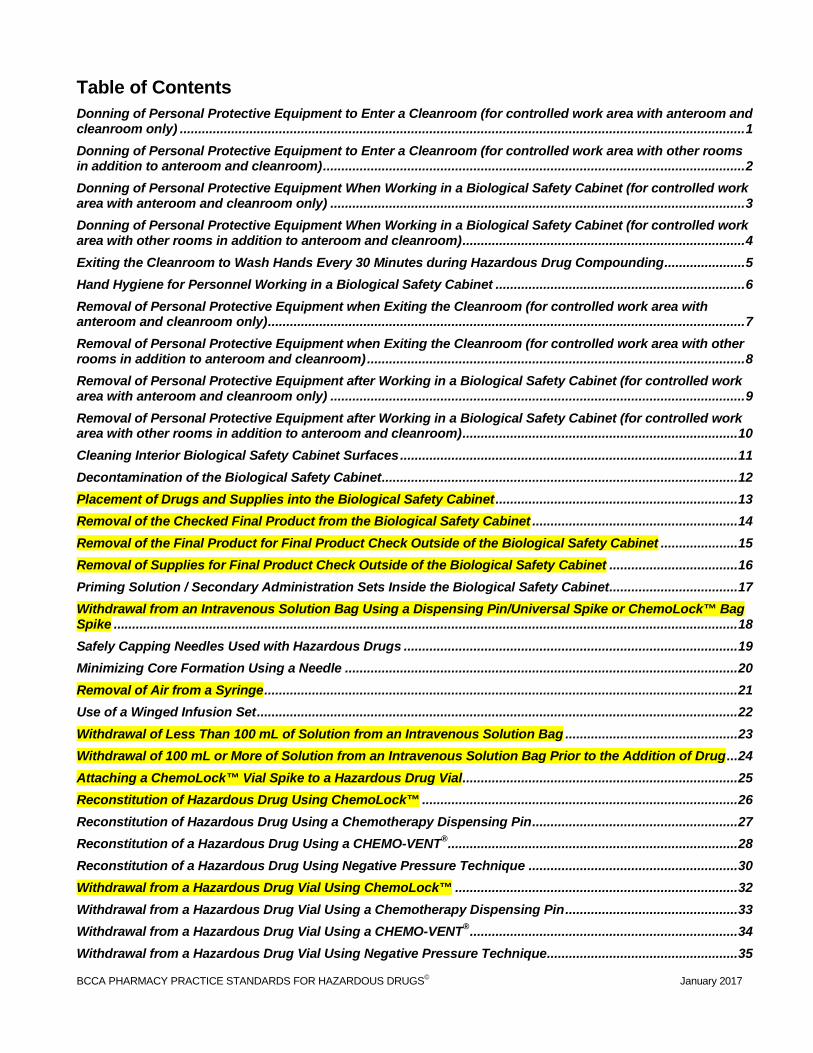
Table of Contents Donning of Personal Protective Equipment to Enter a Cleanroom (for controlled work area with anteroom and cleanroom only) .......................................................................................................................................................... 1 Donning of Personal Protective Equipment to Enter a Cleanroom (for controlled work area with other rooms in addition to anteroom and cleanroom) ................................................................................................................... 2 Donning of Personal Protective Equipment When Working in a Biological Safety Cabinet (for controlled work area with anteroom and cleanroom only) ................................................................................................................. 3 Donning of Personal Protective Equipment When Working in a Biological Safety Cabinet (for controlled work area with other rooms in addition to anteroom and cleanroom) ............................................................................. 4 Exiting the Cleanroom to Wash Hands Every 30 Minutes during Hazardous Drug Compounding ...................... 5 Hand Hygiene for Personnel Working in a Biological Safety Cabinet .................................................................... 6 Removal of Personal Protective Equipment when Exiting the Cleanroom (for controlled work area with anteroom and cleanroom only) .................................................................................................................................. 7 Removal of Personal Protective Equipment when Exiting the Cleanroom (for controlled work area with other rooms in addition to anteroom and cleanroom) ....................................................................................................... 8 Removal of Personal Protective Equipment after Working in a Biological Safety Cabinet (for controlled work area with anteroom and cleanroom only) ................................................................................................................. 9 Removal of Personal Protective Equipment after Working in a Biological Safety Cabinet (for controlled work area with other rooms in addition to anteroom and cleanroom) ........................................................................... 10 Cleaning Interior Biological Safety Cabinet Surfaces ............................................................................................ 11 Decontamination of the Biological Safety Cabinet ................................................................................................. 12 Placement of Drugs and Supplies into the Biological Safety Cabinet .................................................................. 13 Removal of the Checked Final Product from the Biological Safety Cabinet ........................................................ 14 Removal of the Final Product for Final Product Check Outside of the Biological Safety Cabinet ..................... 15 Removal of Supplies for Final Product Check Outside of the Biological Safety Cabinet ................................... 16 Priming Solution / Secondary Administration Sets Inside the Biological Safety Cabinet ................................... 17 Withdrawal from an Intravenous Solution Bag Using a Dispensing Pin/Universal Spike or ChemoLock™ Bag Spike .......................................................................................................................................................................... 18 Safely Capping Needles Used with Hazardous Drugs ........................................................................................... 19 Minimizing Core Formation Using a Needle ........................................................................................................... 20 Removal of Air from a Syringe ................................................................................................................................. 21 Use of a Winged Infusion Set ................................................................................................................................... 22 Withdrawal of Less Than 100 mL of Solution from an Intravenous Solution Bag ............................................... 23 Withdrawal of 100 mL or More of Solution from an Intravenous Solution Bag Prior to the Addition of Drug ... 24 Attaching a ChemoLock™ Vial Spike to a Hazardous Drug Vial ........................................................................... 25 Reconstitution of Hazardous Drug Using ChemoLock™ ...................................................................................... 26 Reconstitution of Hazardous Drug Using a Chemotherapy Dispensing Pin ........................................................ 27 Reconstitution of a Hazardous Drug Using a CHEMO-VENT® ............................................................................... 28 Reconstitution of a Hazardous Drug Using Negative Pressure Technique ......................................................... 30 Withdrawal from a Hazardous Drug Vial Using ChemoLock™ ............................................................................. 32 Withdrawal from a Hazardous Drug Vial Using a Chemotherapy Dispensing Pin ............................................... 33 Withdrawal from a Hazardous Drug Vial Using a CHEMO-VENT® ......................................................................... 34 Withdrawal from a Hazardous Drug Vial Using Negative Pressure Technique .................................................... 35
BCCA PHARMACY PRACTICE STANDARDS FOR HAZARDOUS DRUGS© January 2017
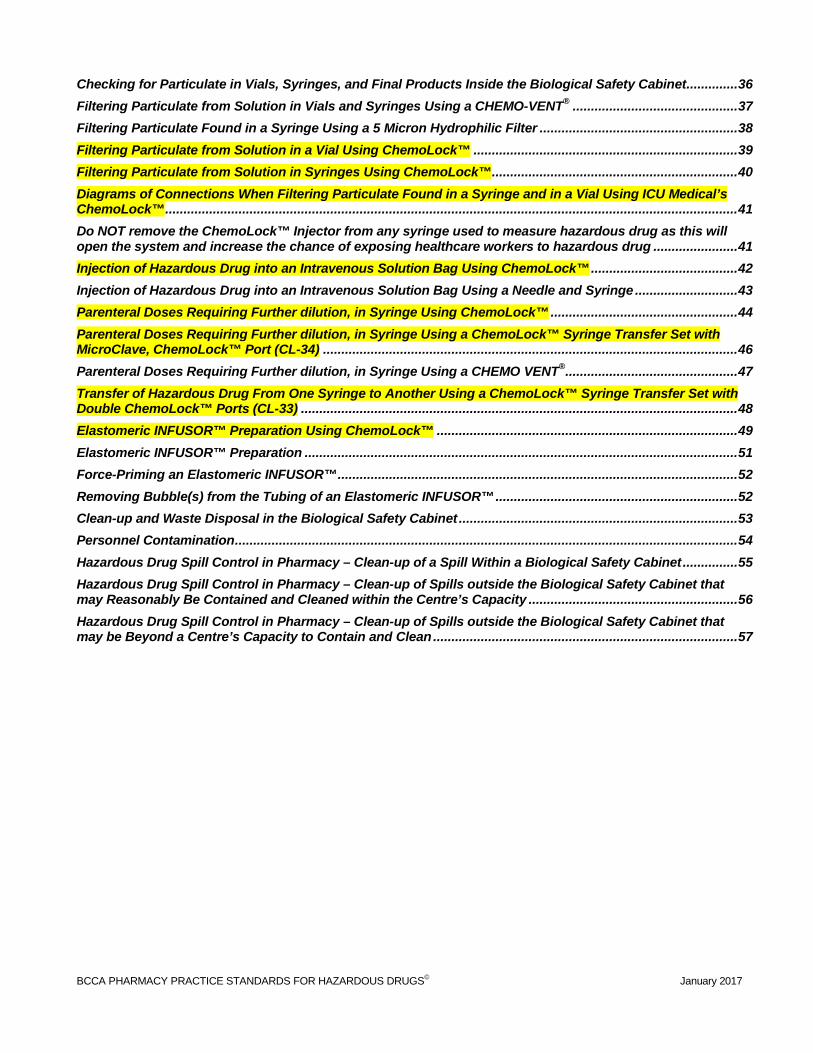
Checking for Particulate in Vials, Syringes, and Final Products Inside the Biological Safety Cabinet.............. 36 Filtering Particulate from Solution in Vials and Syringes Using a CHEMO-VENT® ............................................. 37 Filtering Particulate Found in a Syringe Using a 5 Micron Hydrophilic Filter ...................................................... 38 Filtering Particulate from Solution in a Vial Using ChemoLock™ ........................................................................ 39 Filtering Particulate from Solution in Syringes Using ChemoLock™ ................................................................... 40 Diagrams of Connections When Filtering Particulate Found in a Syringe and in a Vial Using ICU Medical’s ChemoLock™ ............................................................................................................................................................ 41 Do NOT remove the ChemoLock™ Injector from any syringe used to measure hazardous drug as this will open the system and increase the chance of exposing healthcare workers to hazardous drug ....................... 41 Injection of Hazardous Drug into an Intravenous Solution Bag Using ChemoLock™ ........................................ 42 Injection of Hazardous Drug into an Intravenous Solution Bag Using a Needle and Syringe ............................ 43 Parenteral Doses Requiring Further dilution, in Syringe Using ChemoLock™ ................................................... 44 Parenteral Doses Requiring Further dilution, in Syringe Using a ChemoLock™ Syringe Transfer Set with MicroClave, ChemoLock™ Port (CL-34) ................................................................................................................. 46 Parenteral Doses Requiring Further dilution, in Syringe Using a CHEMO VENT® ............................................... 47 Transfer of Hazardous Drug From One Syringe to Another Using a ChemoLock™ Syringe Transfer Set with Double ChemoLock™ Ports (CL-33) ....................................................................................................................... 48 Elastomeric INFUSOR™ Preparation Using ChemoLock™ .................................................................................. 49 Elastomeric INFUSOR™ Preparation ...................................................................................................................... 51 Force-Priming an Elastomeric INFUSOR™ ............................................................................................................. 52 Removing Bubble(s) from the Tubing of an Elastomeric INFUSOR™ .................................................................. 52 Clean-up and Waste Disposal in the Biological Safety Cabinet ............................................................................ 53 Personnel Contamination ......................................................................................................................................... 54 Hazardous Drug Spill Control in Pharmacy – Clean-up of a Spill Within a Biological Safety Cabinet ............... 55 Hazardous Drug Spill Control in Pharmacy – Clean-up of Spills outside the Biological Safety Cabinet that may Reasonably Be Contained and Cleaned within the Centre’s Capacity ......................................................... 56 Hazardous Drug Spill Control in Pharmacy – Clean-up of Spills outside the Biological Safety Cabinet that may be Beyond a Centre’s Capacity to Contain and Clean ................................................................................... 57
BCCA PHARMACY PRACTICE STANDARDS FOR HAZARDOUS DRUGS© January 2017
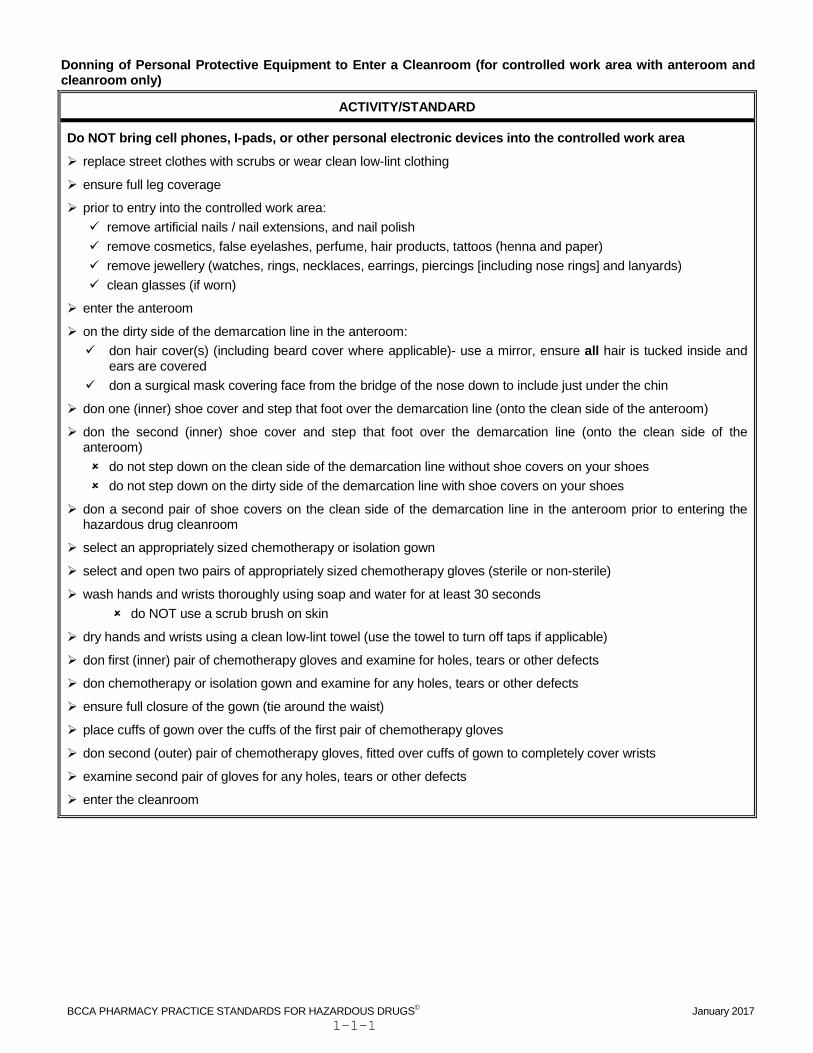
Donning of Personal Protective Equipment to Enter a Cleanroom (for controlled work area with anteroom and cleanroom only)
ACTIVITY/STANDARD
Do NOT bring cell phones, I-pads, or other personal electronic devices into the controlled work area
replace street clothes with scrubs or wear clean low-lint clothing
ensure full leg coverage
prior to entry into the controlled work area: remove artificial nails / nail extensions, and nail polish remove cosmetics, false eyelashes, perfume, hair products, tattoos (henna and paper) remove jewellery (watches, rings, necklaces, earrings, piercings [including nose rings] and lanyards) clean glasses (if worn)
enter the anteroom
on the dirty side of the demarcation line in the anteroom: don hair cover(s) (including beard cover where applicable)- use a mirror, ensure all hair is tucked inside and
ears are covered don a surgical mask covering face from the bridge of the nose down to include just under the chin
don one (inner) shoe cover and step that foot over the demarcation line (onto the clean side of the anteroom)
don the second (inner) shoe cover and step that foot over the demarcation line (onto the clean side of the anteroom) do not step down on the clean side of the demarcation line without shoe covers on your shoes do not step down on the dirty side of the demarcation line with shoe covers on your shoes
don a second pair of shoe covers on the clean side of the demarcation line in the anteroom prior to entering the hazardous drug cleanroom
select an appropriately sized chemotherapy or isolation gown
select and open two pairs of appropriately sized chemotherapy gloves (sterile or non-sterile)
wash hands and wrists thoroughly using soap and water for at least 30 seconds do NOT use a scrub brush on skin
dry hands and wrists using a clean low-lint towel (use the towel to turn off taps if applicable)
don first (inner) pair of chemotherapy gloves and examine for holes, tears or other defects
don chemotherapy or isolation gown and examine for any holes, tears or other defects
ensure full closure of the gown (tie around the waist)
place cuffs of gown over the cuffs of the first pair of chemotherapy gloves
don second (outer) pair of chemotherapy gloves, fitted over cuffs of gown to completely cover wrists
examine second pair of gloves for any holes, tears or other defects
enter the cleanroom
BCCA PHARMACY PRACTICE STANDARDS FOR HAZARDOUS DRUGS© January 2017 1-1-1
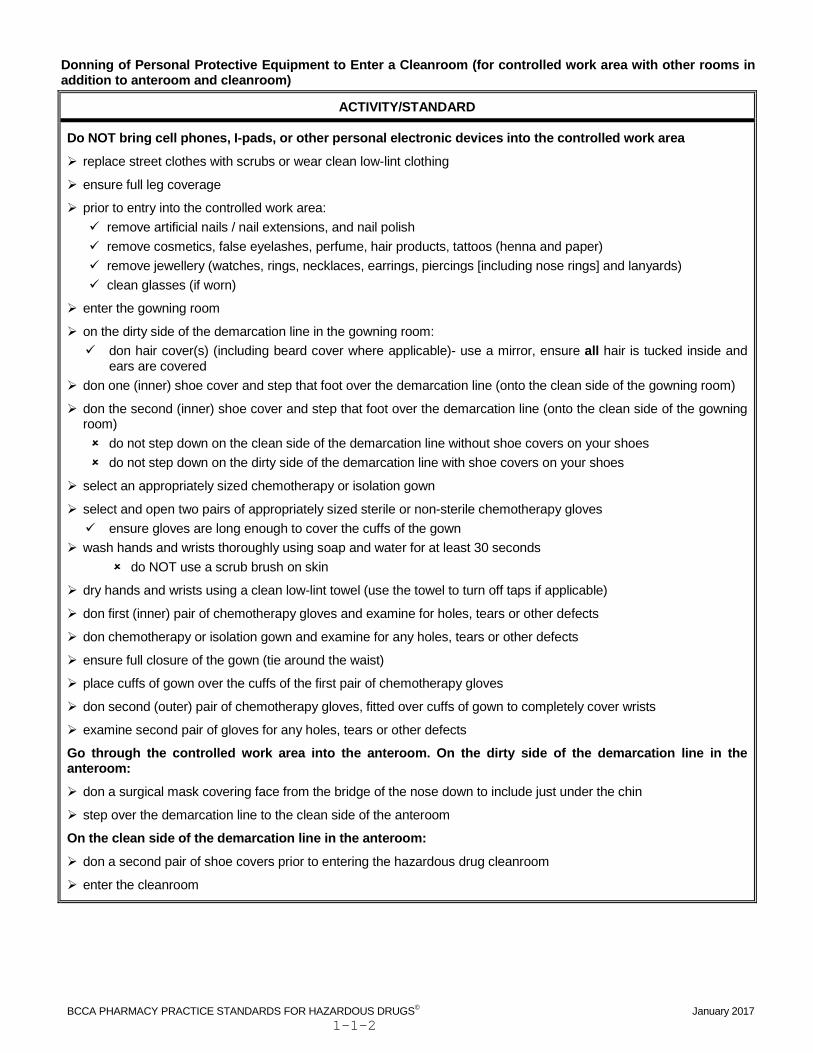
Donning of Personal Protective Equipment to Enter a Cleanroom (for controlled work area with other rooms in addition to anteroom and cleanroom)
ACTIVITY/STANDARD
Do NOT bring cell phones, I-pads, or other personal electronic devices into the controlled work area
replace street clothes with scrubs or wear clean low-lint clothing
ensure full leg coverage
prior to entry into the controlled work area: remove artificial nails / nail extensions, and nail polish remove cosmetics, false eyelashes, perfume, hair products, tattoos (henna and paper) remove jewellery (watches, rings, necklaces, earrings, piercings [including nose rings] and lanyards) clean glasses (if worn)
enter the gowning room
on the dirty side of the demarcation line in the gowning room: don hair cover(s) (including beard cover where applicable)- use a mirror, ensure all hair is tucked inside and
ears are covered don one (inner) shoe cover and step that foot over the demarcation line (onto the clean side of the gowning room)
don the second (inner) shoe cover and step that foot over the demarcation line (onto the clean side of the gowning room) do not step down on the clean side of the demarcation line without shoe covers on your shoes do not step down on the dirty side of the demarcation line with shoe covers on your shoes
select an appropriately sized chemotherapy or isolation gown
select and open two pairs of appropriately sized sterile or non-sterile chemotherapy gloves ensure gloves are long enough to cover the cuffs of the gown
wash hands and wrists thoroughly using soap and water for at least 30 seconds do NOT use a scrub brush on skin
dry hands and wrists using a clean low-lint towel (use the towel to turn off taps if applicable)
don first (inner) pair of chemotherapy gloves and examine for holes, tears or other defects
don chemotherapy or isolation gown and examine for any holes, tears or other defects
ensure full closure of the gown (tie around the waist)
place cuffs of gown over the cuffs of the first pair of chemotherapy gloves
don second (outer) pair of chemotherapy gloves, fitted over cuffs of gown to completely cover wrists
examine second pair of gloves for any holes, tears or other defects
Go through the controlled work area into the anteroom. On the dirty side of the demarcation line in the anteroom:
don a surgical mask covering face from the bridge of the nose down to include just under the chin
step over the demarcation line to the clean side of the anteroom
On the clean side of the demarcation line in the anteroom:
don a second pair of shoe covers prior to entering the hazardous drug cleanroom
enter the cleanroom
BCCA PHARMACY PRACTICE STANDARDS FOR HAZARDOUS DRUGS© January 2017 1-1-2

Donning of Personal Protective Equipment When Working in a Biological Safety Cabinet (for controlled work area with anteroom and cleanroom only)
ACTIVITY/STANDARD
Do NOT bring cell phones, I-pads, or other personal electronic devices into the controlled work area replace street clothes with scrubs or wear clean low-lint clothing ensure full leg coverage prior to entry into the controlled work area: remove artificial nails / nail extensions, and nail polish remove cosmetics, false eyelashes, perfume, hair products, tattoos (henna and paper) remove jewellery (watches, rings, necklaces, earrings, piercings [including nose rings] and lanyards) clean glasses (if worn)
enter the anteroom on the dirty side of the demarcation line in the anteroom: don hair cover(s) (including beard cover where applicable)- use a mirror, ensure all hair is tucked inside and
ears are covered don a surgical mask covering face from the bridge of the nose down to include just under the chin
or if cleaning or decontaminating the biological safety cabinet (BSC) with the viewing window raised:
• don a NIOSH-approved N95 or better respirator and safety goggles with side shields o ensure the correct respirator is worn (one that has been successfully fit-tested) o before each use of a respirator that requires an effective seal with the face for proper functioning,
perform a positive and negative pressure user seal check do NOT wear a surgical mask under a respirator
don one (inner) shoe cover and step that foot over the demarcation line (onto the clean side of the anteroom) don the second (inner) shoe cover and step that foot over the demarcation line (onto the clean side of the
anteroom) do not step down on the clean side of the demarcation line without shoe covers on your shoes do not step down on the dirty side of the demarcation line with shoe covers on your shoes
don a second pair of shoe covers on the clean side of the demarcation line in the anteroom select an appropriately sized chemotherapy gown select and open two pairs of appropriately sized sterile chemotherapy gloves wash hands and forearms thoroughly (see Hand Hygiene for Personnel Working in a Biological Safety Cabinet) dry hands and forearms using a clean, low lint towel (use the towel to turn off taps if applicable) don first (inner) pair of sterile chemotherapy gloves and examine for holes, tears or other defects don chemotherapy gown and examine for any holes, tears or other defects ensure full closure of the chemotherapy gown (tie around the waist) place cuffs of the gown over the cuffs of the first pair of chemotherapy gloves don second (outer) pair of sterile chemotherapy gloves, fitted over cuffs of gown to completely cover wrists examine second pair of gloves for any holes, tears or other defects don safety goggles (depending on the activities being performed in the cleanroom) enter the cleanroom
BCCA PHARMACY PRACTICE STANDARDS FOR HAZARDOUS DRUGS© January 2017 1-1-3

Donning of Personal Protective Equipment When Working in a Biological Safety Cabinet (for controlled work area with other rooms in addition to anteroom and cleanroom)
ACTIVITY/STANDARD
Do NOT bring cell phones, I-pads, or other personal electronic devices into the controlled work area replace street clothes with scrubs or wear clean low-lint clothing ensure full leg coverage prior to entry into the controlled work area: remove artificial nails / nail extensions, and nail polish remove cosmetics, false eyelashes, perfume, hair products, tattoos (henna and paper) remove jewellery (watches, rings, necklaces, earrings, piercings [including nose rings] and lanyards) clean glasses (if worn)
enter the gowning room on the dirty side of the demarcation line in the gowning room: don hair cover(s) (including beard cover where applicable)- use a mirror, ensure all hair is tucked inside and ears are
covered don one (inner) shoe cover and step that foot over the demarcation line (onto the clean side of the gowning room) don the second (inner) shoe cover and step that foot over the demarcation line (onto the clean side of the gowning room)
do not step down on the clean side of the demarcation line without shoe covers on your shoes do not step down on the dirty side of the demarcation line with shoe covers on your shoes
select an appropriately sized chemotherapy or isolation gown (note that this gown will NOT be the gown worn when working in the biological safety cabinet)
select and open one pair of appropriately sized non-sterile chemotherapy gloves (two pairs if not going straight through the controlled work area into the cleanroom to work in the biological safety cabinet) ensure gloves are long enough to cover the cuffs of the gown
wash hands and wrists thoroughly using soap and water for at least 30 seconds do NOT use a scrub brush on skin
dry hands and wrists using a clean low-lint towel (use the towel to turn off taps if applicable) don chemotherapy or isolation gown and examine for any holes, tears or other defects ensure full closure of the gown (tie around the waist) don chemotherapy gloves, fitted over cuffs of gown to completely cover wrists examine gloves for any holes, tears or other defects Go through the controlled work area into the anteroom. On the dirty side of the demarcation line in the anteroom: don a surgical mask covering face from the bridge of the nose down to include just under the chin step over the demarcation line to the clean side of the anteroom On the clean side of the demarcation line in the anteroom: remove gloves that were donned in the gowning room and discard into HD or regular waste remove the chemotherapy or isolation gown that was donned in the gowning room and hang up on the clean side of the
demarcation line for later use don a second pair of shoe covers select an appropriately sized chemotherapy gown select and open two pairs of appropriately sized sterile chemotherapy gloves wash hands and forearms thoroughly (see Hand Hygiene for Personnel Working in a Biological Safety Cabinet) dry hands and forearms using a clean, low lint towel (use the towel to turn off taps if applicable) don first (inner) pair of sterile chemotherapy gloves and examine for holes, tears or other defects don chemotherapy gown and examine for any holes, tears or other defects ensure full closure of the chemotherapy gown (tie around the waist) place cuffs of the gown over the cuffs of the first pair of chemotherapy gloves don second (outer) pair of sterile chemotherapy gloves, fitted over cuffs of gown to completely cover wrists examine second pair of gloves for any holes, tears or other defects don safety goggles (depending on the activities being performed in the cleanroom) enter the cleanroom
BCCA PHARMACY PRACTICE STANDARDS FOR HAZARDOUS DRUGS© January 2017 1-1-4
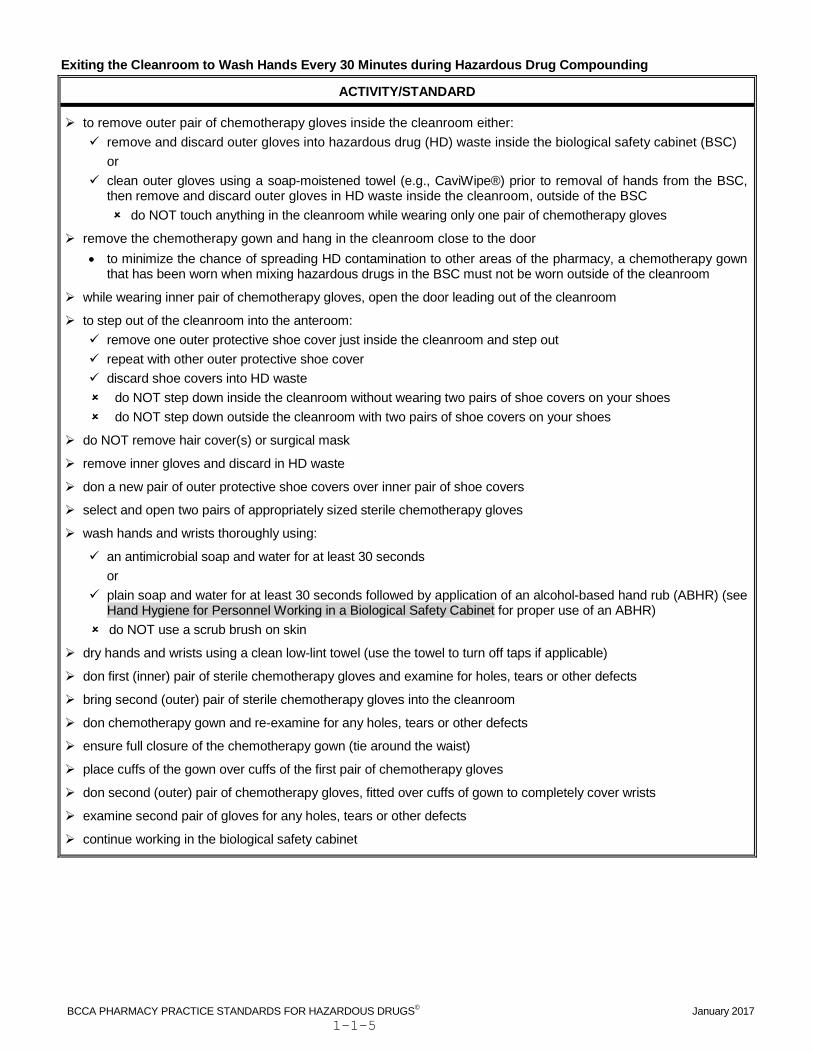
Exiting the Cleanroom to Wash Hands Every 30 Minutes during Hazardous Drug Compounding
ACTIVITY/STANDARD
to remove outer pair of chemotherapy gloves inside the cleanroom either: remove and discard outer gloves into hazardous drug (HD) waste inside the biological safety cabinet (BSC)
or clean outer gloves using a soap-moistened towel (e.g., CaviWipe®) prior to removal of hands from the BSC,
then remove and discard outer gloves in HD waste inside the cleanroom, outside of the BSC do NOT touch anything in the cleanroom while wearing only one pair of chemotherapy gloves
remove the chemotherapy gown and hang in the cleanroom close to the door • to minimize the chance of spreading HD contamination to other areas of the pharmacy, a chemotherapy gown
that has been worn when mixing hazardous drugs in the BSC must not be worn outside of the cleanroom
while wearing inner pair of chemotherapy gloves, open the door leading out of the cleanroom
to step out of the cleanroom into the anteroom: remove one outer protective shoe cover just inside the cleanroom and step out repeat with other outer protective shoe cover discard shoe covers into HD waste do NOT step down inside the cleanroom without wearing two pairs of shoe covers on your shoes do NOT step down outside the cleanroom with two pairs of shoe covers on your shoes
do NOT remove hair cover(s) or surgical mask
remove inner gloves and discard in HD waste
don a new pair of outer protective shoe covers over inner pair of shoe covers
select and open two pairs of appropriately sized sterile chemotherapy gloves
wash hands and wrists thoroughly using:
an antimicrobial soap and water for at least 30 seconds or
plain soap and water for at least 30 seconds followed by application of an alcohol-based hand rub (ABHR) (see Hand Hygiene for Personnel Working in a Biological Safety Cabinet for proper use of an ABHR)
do NOT use a scrub brush on skin
dry hands and wrists using a clean low-lint towel (use the towel to turn off taps if applicable)
don first (inner) pair of sterile chemotherapy gloves and examine for holes, tears or other defects
bring second (outer) pair of sterile chemotherapy gloves into the cleanroom
don chemotherapy gown and re-examine for any holes, tears or other defects
ensure full closure of the chemotherapy gown (tie around the waist)
place cuffs of the gown over cuffs of the first pair of chemotherapy gloves
don second (outer) pair of chemotherapy gloves, fitted over cuffs of gown to completely cover wrists
examine second pair of gloves for any holes, tears or other defects
continue working in the biological safety cabinet
BCCA PHARMACY PRACTICE STANDARDS FOR HAZARDOUS DRUGS© January 2017 1-1-5

Hand Hygiene for Personnel Working in a Biological Safety Cabinet
ACTIVITY/STANDARD
Plain or Antimicrobial Soap with Alcohol-Based Hand Rub (ABHR)
under running water: use a nail pick to remove debris from underneath fingernails wash hands and arms to elbows using plain soap or antimicrobial liquid soap for 30-60 seconds
do NOT use a scrub brush on skin rinse soap from hands and arms with the water flowing away from hands towards elbows
dry hands and arms using a clean low-lint towel allow hands and arms to dry completely use the towel to turn off the water taps (if applicable)
dispense a minimum of 2 full pumps of alcohol-based hand rub onto one palm
immerse fingertips of the opposite hand into the ABHR for several seconds
cover the hand and forearm (still of the opposite hand) with the ABHR and continue rubbing until it fully evaporates (at least 15 seconds)
repeat with other hand and forearm allowing the ABHR to fully evaporate
once hands are completely dry, don first (inner) pair of sterile chemotherapy gloves (see Donning of Personal Protective Equipment When Working in a Biological Safety Cabinet)
don chemotherapy gown
don second (outer) pair of sterile chemotherapy gloves
Antimicrobial Soap
under running water: use a nail pick to remove debris from underneath fingernails wash hands and arms to elbows using an antimicrobial liquid soap for 2 to 3 minutes
do NOT use a scrub brush on skin rinse soap from hands and arms with the water flowing away from hands towards elbows
dry hands and arms using a clean low-lint towel allow hands and arms to dry completely use the towel to turn off the water taps (if applicable)
once hands are completely dry, don first (inner) pair of sterile chemotherapy gloves (see Donning of Personal Protective Equipment When Working in a Biological Safety Cabinet)
don chemotherapy gown
don second (outer) pair of sterile chemotherapy gloves
BCCA PHARMACY PRACTICE STANDARDS FOR HAZARDOUS DRUGS© January 2017 1-1-6

Removal of Personal Protective Equipment when Exiting the Cleanroom (for controlled work area with anteroom and cleanroom only)
ACTIVITY/STANDARD
When work was NOT performed in the biological safety cabinet:
remove outer pair of chemotherapy gloves and discard into hazardous drug (HD) waste inside the cleanroom
while wearing inner pair of chemotherapy gloves, open the door leading out of the cleanroom
to step out of the cleanroom into the anteroom: remove one outer protective shoe cover just inside the cleanroom and step out repeat with other outer protective shoe cover discard shoe covers in HD waste
• do NOT step down inside the cleanroom without wearing two pairs of shoe covers • do NOT step down outside the cleanroom with two pairs of shoe covers on your shoes
remove inner chemotherapy gloves
wash hands with soap and water (NOT alcohol-based hand rub) immediately after removal of inner gloves and dry using a low-lint towel
to step over the demarcation line from the ‘clean’ side of the anteroom to the ‘dirty’ side: remove one inner protective shoe cover and step over the demarcation line repeat with other inner protective shoe cover discard shoe covers into HD waste
o do not step down on the clean side of the demarcation line without shoe covers on your shoes o do not step down on the dirty side of the demarcation line with shoe covers on your shoes
on the ‘dirty’ side of the demarcation line: remove hair cover(s) and surgical mask
After leaving the anteroom:
in the general pharmacy, wash hands again with soap and water (NOT alcohol-based hand rub)
change out of scrubs or put on a buttoned lab coat or tied isolation gown
BCCA PHARMACY PRACTICE STANDARDS FOR HAZARDOUS DRUGS© January 2017 1-1-7
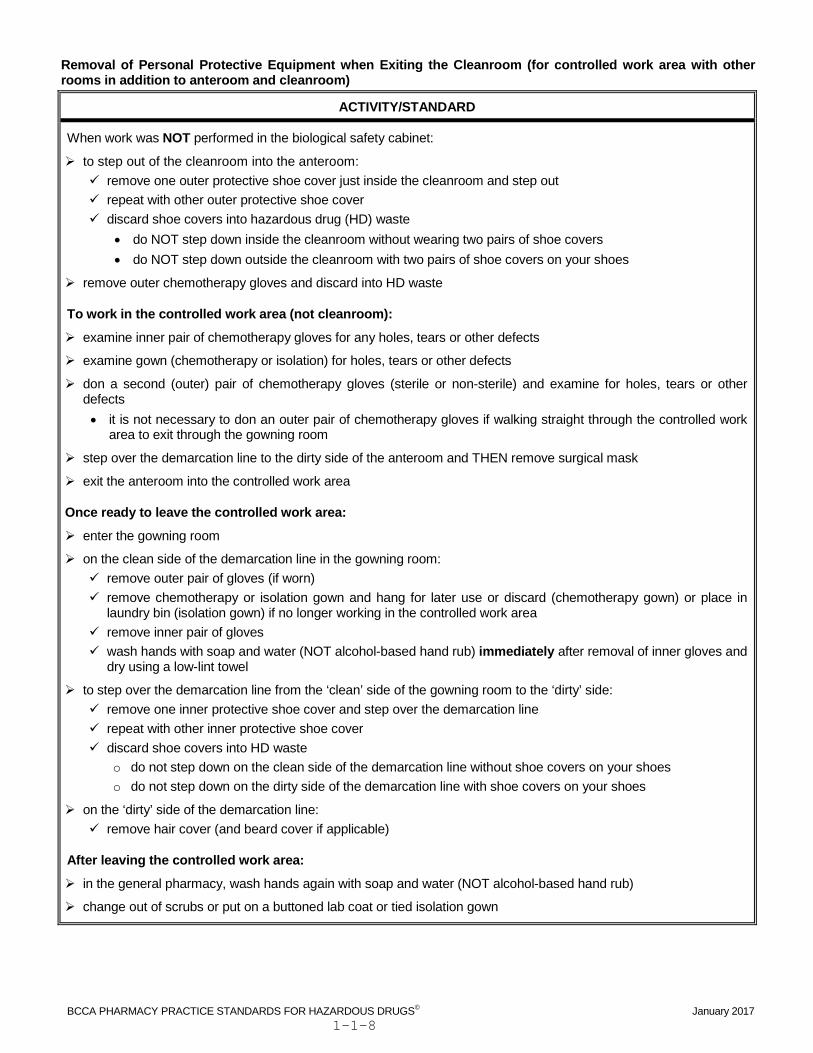
Removal of Personal Protective Equipment when Exiting the Cleanroom (for controlled work area with other rooms in addition to anteroom and cleanroom)
ACTIVITY/STANDARD
When work was NOT performed in the biological safety cabinet:
to step out of the cleanroom into the anteroom: remove one outer protective shoe cover just inside the cleanroom and step out repeat with other outer protective shoe cover discard shoe covers into hazardous drug (HD) waste
• do NOT step down inside the cleanroom without wearing two pairs of shoe covers • do NOT step down outside the cleanroom with two pairs of shoe covers on your shoes
remove outer chemotherapy gloves and discard into HD waste
To work in the controlled work area (not cleanroom):
examine inner pair of chemotherapy gloves for any holes, tears or other defects
examine gown (chemotherapy or isolation) for holes, tears or other defects
don a second (outer) pair of chemotherapy gloves (sterile or non-sterile) and examine for holes, tears or other defects • it is not necessary to don an outer pair of chemotherapy gloves if walking straight through the controlled work
area to exit through the gowning room
step over the demarcation line to the dirty side of the anteroom and THEN remove surgical mask
exit the anteroom into the controlled work area
Once ready to leave the controlled work area:
enter the gowning room
on the clean side of the demarcation line in the gowning room: remove outer pair of gloves (if worn) remove chemotherapy or isolation gown and hang for later use or discard (chemotherapy gown) or place in
laundry bin (isolation gown) if no longer working in the controlled work area remove inner pair of gloves wash hands with soap and water (NOT alcohol-based hand rub) immediately after removal of inner gloves and
dry using a low-lint towel
to step over the demarcation line from the ‘clean’ side of the gowning room to the ‘dirty’ side: remove one inner protective shoe cover and step over the demarcation line repeat with other inner protective shoe cover discard shoe covers into HD waste
o do not step down on the clean side of the demarcation line without shoe covers on your shoes o do not step down on the dirty side of the demarcation line with shoe covers on your shoes
on the ‘dirty’ side of the demarcation line: remove hair cover (and beard cover if applicable)
After leaving the controlled work area:
in the general pharmacy, wash hands again with soap and water (NOT alcohol-based hand rub)
change out of scrubs or put on a buttoned lab coat or tied isolation gown
BCCA PHARMACY PRACTICE STANDARDS FOR HAZARDOUS DRUGS© January 2017 1-1-8
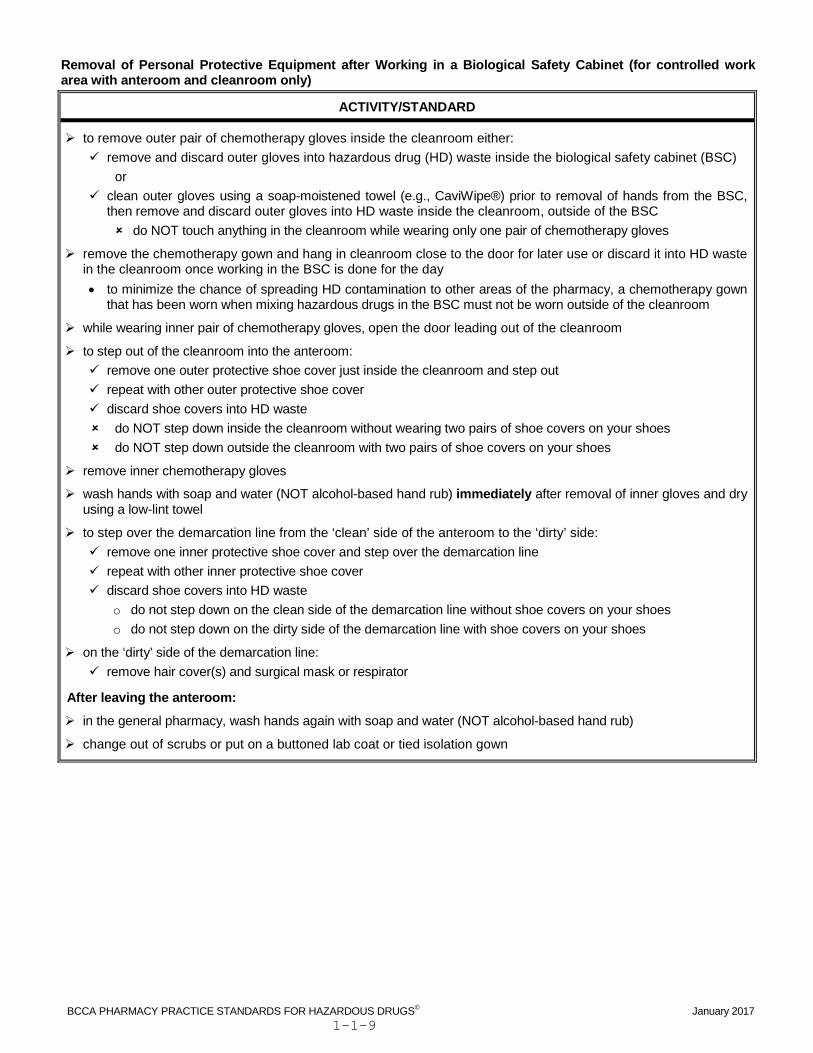
Removal of Personal Protective Equipment after Working in a Biological Safety Cabinet (for controlled work area with anteroom and cleanroom only)
ACTIVITY/STANDARD
to remove outer pair of chemotherapy gloves inside the cleanroom either: remove and discard outer gloves into hazardous drug (HD) waste inside the biological safety cabinet (BSC)
or clean outer gloves using a soap-moistened towel (e.g., CaviWipe®) prior to removal of hands from the BSC,
then remove and discard outer gloves into HD waste inside the cleanroom, outside of the BSC do NOT touch anything in the cleanroom while wearing only one pair of chemotherapy gloves
remove the chemotherapy gown and hang in cleanroom close to the door for later use or discard it into HD waste in the cleanroom once working in the BSC is done for the day • to minimize the chance of spreading HD contamination to other areas of the pharmacy, a chemotherapy gown
that has been worn when mixing hazardous drugs in the BSC must not be worn outside of the cleanroom
while wearing inner pair of chemotherapy gloves, open the door leading out of the cleanroom
to step out of the cleanroom into the anteroom: remove one outer protective shoe cover just inside the cleanroom and step out repeat with other outer protective shoe cover discard shoe covers into HD waste do NOT step down inside the cleanroom without wearing two pairs of shoe covers on your shoes do NOT step down outside the cleanroom with two pairs of shoe covers on your shoes
remove inner chemotherapy gloves
wash hands with soap and water (NOT alcohol-based hand rub) immediately after removal of inner gloves and dry using a low-lint towel
to step over the demarcation line from the ‘clean’ side of the anteroom to the ‘dirty’ side: remove one inner protective shoe cover and step over the demarcation line repeat with other inner protective shoe cover discard shoe covers into HD waste
o do not step down on the clean side of the demarcation line without shoe covers on your shoes o do not step down on the dirty side of the demarcation line with shoe covers on your shoes
on the ‘dirty’ side of the demarcation line: remove hair cover(s) and surgical mask or respirator
After leaving the anteroom:
in the general pharmacy, wash hands again with soap and water (NOT alcohol-based hand rub)
change out of scrubs or put on a buttoned lab coat or tied isolation gown
BCCA PHARMACY PRACTICE STANDARDS FOR HAZARDOUS DRUGS© January 2017 1-1-9
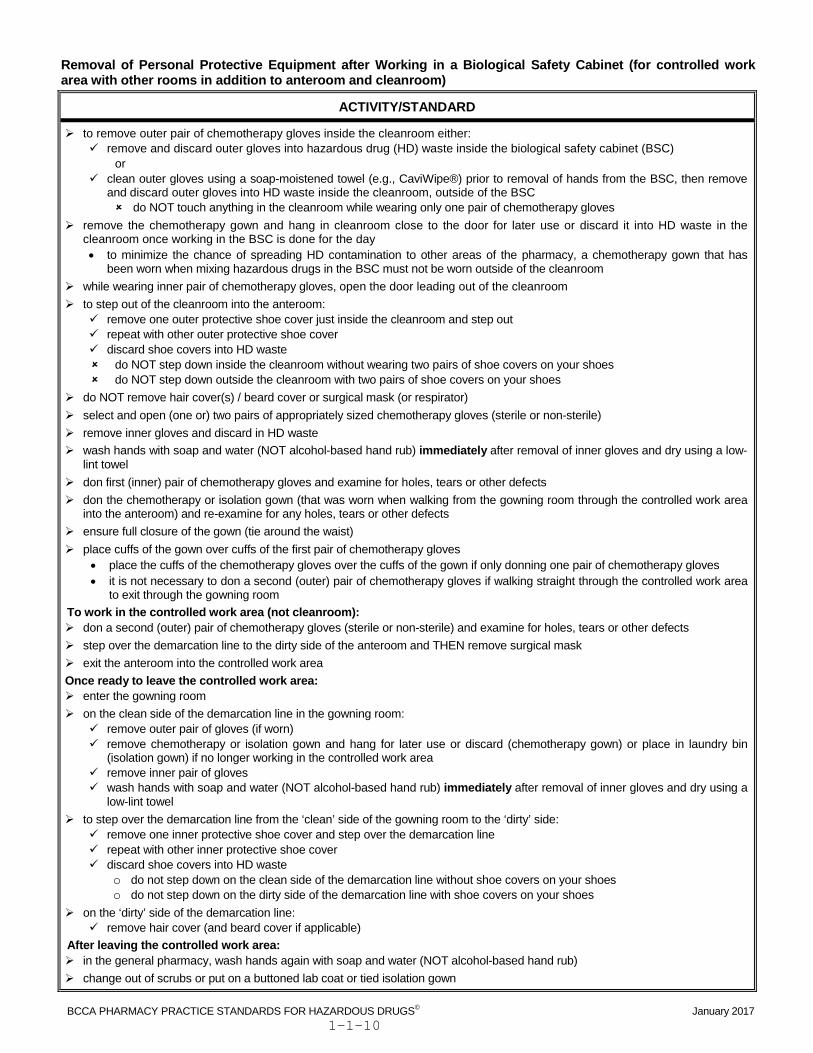
Removal of Personal Protective Equipment after Working in a Biological Safety Cabinet (for controlled work area with other rooms in addition to anteroom and cleanroom)
ACTIVITY/STANDARD
to remove outer pair of chemotherapy gloves inside the cleanroom either: remove and discard outer gloves into hazardous drug (HD) waste inside the biological safety cabinet (BSC)
or clean outer gloves using a soap-moistened towel (e.g., CaviWipe®) prior to removal of hands from the BSC, then remove
and discard outer gloves into HD waste inside the cleanroom, outside of the BSC do NOT touch anything in the cleanroom while wearing only one pair of chemotherapy gloves
remove the chemotherapy gown and hang in cleanroom close to the door for later use or discard it into HD waste in the cleanroom once working in the BSC is done for the day • to minimize the chance of spreading HD contamination to other areas of the pharmacy, a chemotherapy gown that has
been worn when mixing hazardous drugs in the BSC must not be worn outside of the cleanroom while wearing inner pair of chemotherapy gloves, open the door leading out of the cleanroom to step out of the cleanroom into the anteroom:
remove one outer protective shoe cover just inside the cleanroom and step out repeat with other outer protective shoe cover discard shoe covers into HD waste do NOT step down inside the cleanroom without wearing two pairs of shoe covers on your shoes do NOT step down outside the cleanroom with two pairs of shoe covers on your shoes
do NOT remove hair cover(s) / beard cover or surgical mask (or respirator) select and open (one or) two pairs of appropriately sized chemotherapy gloves (sterile or non-sterile) remove inner gloves and discard in HD waste wash hands with soap and water (NOT alcohol-based hand rub) immediately after removal of inner gloves and dry using a low-
lint towel don first (inner) pair of chemotherapy gloves and examine for holes, tears or other defects don the chemotherapy or isolation gown (that was worn when walking from the gowning room through the controlled work area
into the anteroom) and re-examine for any holes, tears or other defects ensure full closure of the gown (tie around the waist) place cuffs of the gown over cuffs of the first pair of chemotherapy gloves
• place the cuffs of the chemotherapy gloves over the cuffs of the gown if only donning one pair of chemotherapy gloves • it is not necessary to don a second (outer) pair of chemotherapy gloves if walking straight through the controlled work area
to exit through the gowning room To work in the controlled work area (not cleanroom): don a second (outer) pair of chemotherapy gloves (sterile or non-sterile) and examine for holes, tears or other defects step over the demarcation line to the dirty side of the anteroom and THEN remove surgical mask exit the anteroom into the controlled work area Once ready to leave the controlled work area: enter the gowning room on the clean side of the demarcation line in the gowning room:
remove outer pair of gloves (if worn) remove chemotherapy or isolation gown and hang for later use or discard (chemotherapy gown) or place in laundry bin
(isolation gown) if no longer working in the controlled work area remove inner pair of gloves wash hands with soap and water (NOT alcohol-based hand rub) immediately after removal of inner gloves and dry using a
low-lint towel to step over the demarcation line from the ‘clean’ side of the gowning room to the ‘dirty’ side:
remove one inner protective shoe cover and step over the demarcation line repeat with other inner protective shoe cover discard shoe covers into HD waste
o do not step down on the clean side of the demarcation line without shoe covers on your shoes o do not step down on the dirty side of the demarcation line with shoe covers on your shoes
on the ‘dirty’ side of the demarcation line: remove hair cover (and beard cover if applicable)
After leaving the controlled work area: in the general pharmacy, wash hands again with soap and water (NOT alcohol-based hand rub) change out of scrubs or put on a buttoned lab coat or tied isolation gown
BCCA PHARMACY PRACTICE STANDARDS FOR HAZARDOUS DRUGS© January 2017 1-1-10

Cleaning Interior Biological Safety Cabinet Surfaces
ACTIVITY/STANDARD
prior to cleaning the biological safety cabinet (BSC): purge the BSC for at least five minutes following the last hazardous drug (HD) preparation if performing end-of-
day cleaning place a sign on the outside of the cleanroom door indicating “DO NOT ENTER - Cleaning the BSC” wash hands and forearms (see Hand Hygiene for Personnel Working in a Biological Safety Cabinet) don full personal protective equipment (PPE) including a NIOSH-approved N95 or better respirator and safety
goggles with side shields (see Donning of Personal Protective Equipment when Working in a Biological Safety Cabinet) • ensure the correct respirator is worn (one that has been successfully fit-tested) • before each use of a respirator that requires an effective seal with the face for proper functioning, perform a
positive and negative pressure user seal check do NOT wear a surgical mask under a respirator
ensure the ultraviolet light in the BSC is off and the cabinet is in operational mode with both the internal & external fans turned on
gather the necessary cleaning and disinfecting agents (e.g., CaviWipe® and sterile 70% alcohol) and supplies raise the viewing window to allow full access to the interior surfaces of the BSC hang a sealable plastic bag on a hook inside the BSC to discard contaminated waste
ensure the hole in the plastic bag is above the zippered seal close the lid and clean and disinfect the outside of the sharps container place items from the supply tray (e.g., alcohol swabs) into a zip lock bag, seal and remove from the cabinet clean and disinfect the supply tray clean and disinfect any appliances in the BSC necessary for hazardous drug preparation (e.g., PhaSeal™ Vial
Assembly Fixture) moisten clean low-lint towels with aqueous antibacterial agent (or use CaviWipes®) – use at least one towel for
each surface clean surfaces inside the BSC in the following order:
ceiling grill (press gently to prevent damaging the high efficiency particulate air [HEPA] filter) back wall side walls and fixtures (gas or vacuum valves and bar and hooks if present) work surface front intake grill inside surface of the viewing window
o pull the viewing window down to clean the inside surface clean the outside surface of the viewing window
o pull the viewing window down all the way to clean the outside surface clean in the direction of airflow
clean from upstream, closest to the HEPA filter to downstream away from the HEPA filter slightly overlap the previous wipe to clean the work surface, work from the back of the BSC to the front
Use low-lint wipes pre-moistened with sterile 70% alcohol to disinfect all surfaces of the BSC in the same order and direction as cleaning – use at least one towel for each surface if the viewing window is made of plastic (e.g., PLEXIGLASS®), rinse with sterile water for irrigation (SWI) to
remove any residue from the cleaning agent, not alcohol discard used towels in the sealable zip lock bag inside the BSC seal, clean, and remove the zip lock bag from the BSC and discard in a hazardous waste container place the viewing window at the manufacturer’s recommended height for aseptic compounding once the viewing widow has been placed at the manufacturer’s recommended height for aseptic compounding,
purge the BSC for at least 15 minutes before any aseptic compounding takes place within the cabinet thoroughly wash non-disposable PPE (e.g., respirator / safety goggles) with soap and water before storing away for
future use don a new pair of outer chemotherapy gloves prior to preparation of parenteral hazardous drugs in the BSC document completed cleaning process
BCCA PHARMACY PRACTICE STANDARDS FOR HAZARDOUS DRUGS© January 2017 1-1-11
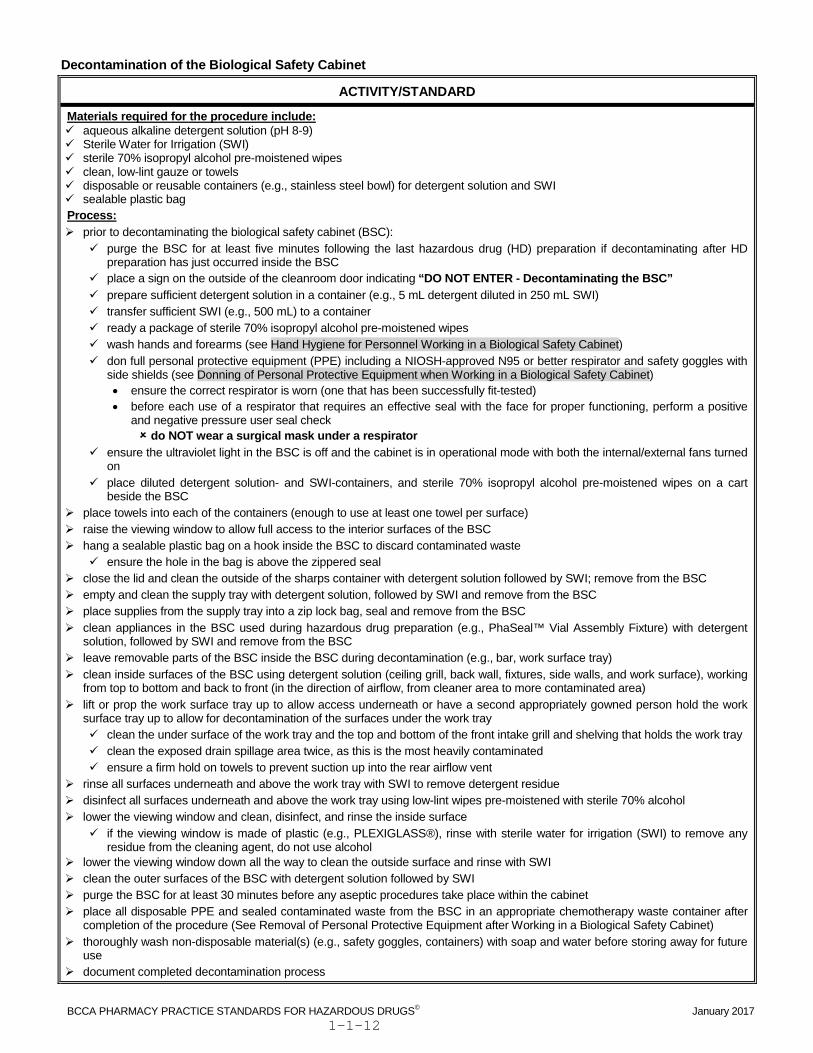
Decontamination of the Biological Safety Cabinet
ACTIVITY/STANDARD
Materials required for the procedure include: aqueous alkaline detergent solution (pH 8-9) Sterile Water for Irrigation (SWI) sterile 70% isopropyl alcohol pre-moistened wipes clean, low-lint gauze or towels disposable or reusable containers (e.g., stainless steel bowl) for detergent solution and SWI sealable plastic bag Process: prior to decontaminating the biological safety cabinet (BSC):
purge the BSC for at least five minutes following the last hazardous drug (HD) preparation if decontaminating after HD preparation has just occurred inside the BSC
place a sign on the outside of the cleanroom door indicating “DO NOT ENTER - Decontaminating the BSC” prepare sufficient detergent solution in a container (e.g., 5 mL detergent diluted in 250 mL SWI) transfer sufficient SWI (e.g., 500 mL) to a container ready a package of sterile 70% isopropyl alcohol pre-moistened wipes wash hands and forearms (see Hand Hygiene for Personnel Working in a Biological Safety Cabinet) don full personal protective equipment (PPE) including a NIOSH-approved N95 or better respirator and safety goggles with
side shields (see Donning of Personal Protective Equipment when Working in a Biological Safety Cabinet) • ensure the correct respirator is worn (one that has been successfully fit-tested) • before each use of a respirator that requires an effective seal with the face for proper functioning, perform a positive
and negative pressure user seal check do NOT wear a surgical mask under a respirator
ensure the ultraviolet light in the BSC is off and the cabinet is in operational mode with both the internal/external fans turned on
place diluted detergent solution- and SWI-containers, and sterile 70% isopropyl alcohol pre-moistened wipes on a cart beside the BSC
place towels into each of the containers (enough to use at least one towel per surface) raise the viewing window to allow full access to the interior surfaces of the BSC hang a sealable plastic bag on a hook inside the BSC to discard contaminated waste
ensure the hole in the bag is above the zippered seal close the lid and clean the outside of the sharps container with detergent solution followed by SWI; remove from the BSC empty and clean the supply tray with detergent solution, followed by SWI and remove from the BSC place supplies from the supply tray into a zip lock bag, seal and remove from the BSC clean appliances in the BSC used during hazardous drug preparation (e.g., PhaSeal™ Vial Assembly Fixture) with detergent
solution, followed by SWI and remove from the BSC leave removable parts of the BSC inside the BSC during decontamination (e.g., bar, work surface tray) clean inside surfaces of the BSC using detergent solution (ceiling grill, back wall, fixtures, side walls, and work surface), working
from top to bottom and back to front (in the direction of airflow, from cleaner area to more contaminated area) lift or prop the work surface tray up to allow access underneath or have a second appropriately gowned person hold the work
surface tray up to allow for decontamination of the surfaces under the work tray clean the under surface of the work tray and the top and bottom of the front intake grill and shelving that holds the work tray clean the exposed drain spillage area twice, as this is the most heavily contaminated ensure a firm hold on towels to prevent suction up into the rear airflow vent
rinse all surfaces underneath and above the work tray with SWI to remove detergent residue disinfect all surfaces underneath and above the work tray using low-lint wipes pre-moistened with sterile 70% alcohol lower the viewing window and clean, disinfect, and rinse the inside surface
if the viewing window is made of plastic (e.g., PLEXIGLASS®), rinse with sterile water for irrigation (SWI) to remove any residue from the cleaning agent, do not use alcohol
lower the viewing window down all the way to clean the outside surface and rinse with SWI clean the outer surfaces of the BSC with detergent solution followed by SWI purge the BSC for at least 30 minutes before any aseptic procedures take place within the cabinet place all disposable PPE and sealed contaminated waste from the BSC in an appropriate chemotherapy waste container after
completion of the procedure (See Removal of Personal Protective Equipment after Working in a Biological Safety Cabinet) thoroughly wash non-disposable material(s) (e.g., safety goggles, containers) with soap and water before storing away for future
use document completed decontamination process
BCCA PHARMACY PRACTICE STANDARDS FOR HAZARDOUS DRUGS© January 2017 1-1-12

Placement of Drugs and Supplies into the Biological Safety Cabinet
ACTIVITY/STANDARD
ensure the biological safety cabinet’s (BSC) viewing window is situated at the manufacturer’s recommended height for aseptic compounding
ensure the ultraviolet light in the BSC is off and the internal and external fans are on clean and disinfect the work surface of the BSC between every preparation using a soap-moistened towel (e.g.,
CaviWipe®) followed by a low lint wipe pre-moistened with sterile 70% alcohol between every preparation before leaving the BSC for an extended period of time (e.g., break) upon returning to work in the BSC after an extended period of time (e.g., break; after the BSC has purged for
at least 15 minutes post-full clean of all surfaces)- prior to mixing when covering for a staff member who was mixing
Supplies & Non-Hazardous Drug Vials disinfect non-hazardous drug vials and protective over-wrap on supplies using a low lint wipe pre-moistened with
sterile 70% alcohol and place directly onto the work surface of the BSC open protective over-wrap and place supplies that have protected or disinfectable critical sites (e.g.,
syringes with tip caps, chemotherapy dispensing pins, ChemoLock™ Bag Spikes) directly onto the work surface inside the BSC - not onto the front grill
do not remove the outer wrap of supplies prior to placement inside the BSC if critical sites that are not protected and are not disinfectable will be exposed (e.g., syringes supplied by the manufacturer without tip caps, needles on winged infusion sets)
remove intravenous (IV) solution bags from their outer packaging at the opening of the BSC and place onto the BSC’s work surface – place the outer packaging into the waste container outside of the BSC
if the IV solution bag is not in outer packaging or if the outer packaging was previously opened, disinfect the IV solution bag using a low lint wipe pre-moistened with sterile 70% alcohol prior to placing inside the BSC
disinfect outer gloves using a low lint wipe pre-moistened with sterile 70% alcohol prior to placing hands into the BSC to mix sterile preparations
Non-Accessed Hazardous Drug (HD) Vials check the expiry date of the drug if expired, do NOT use if not expired, disinfect by WIPING the vial(s) with a clean, low lint wipe pre-moistened with sterile 70% alcohol and
immediately place the HD vial(s) onto the work surface inside the BSC do not use the same sterile 70% alcohol wipe to disinfect multiple hazardous drugs do not use the same sterile 70% alcohol wipe to disinfect supplies after disinfecting a hazardous drug vial one sterile 70% alcohol wipe may be used on multiple vials of the same hazardous drug one sterile 70% alcohol wipe may be used to disinfect supplies first and THEN hazardous drug vials discard the used wipe(s) immediately after use into HD waste
Accessed HD Vials check the beyond-use (stability) date and time written directly on the accessed HD vial if past the beyond-use date, do NOT use if not past the beyond-use date, disinfect the outside of the sealed zip lock bag(s) containing the HD vial(s) using
a low lint wipe pre-moistened with sterile 70% alcohol and immediately place onto the work surface inside the BSC remove HD vial(s) from zip lock bag(s) inside the BSC do NOT reuse the zip lock bag- discard it into HD waste inside the BSC immediately upon removal of the vial
BCCA PHARMACY PRACTICE STANDARDS FOR HAZARDOUS DRUGS© January 2017 1-1-13

Removal of the Checked Final Product from the Biological Safety Cabinet
ACTIVITY/STANDARD
Drug vial(s) for checking and disposal INSIDE the biological safety cabinet (BSC) leave chemotherapy vents, dispensing pins and ChemoLock™ Vial Spikes in the vial stoppers – DO NOT REMOVE once the drug vial has been checked
discard the vial into the appropriate hazardous drug (HD) waste container inside the BSC (ALL vials with a chemotherapy vent inserted MUST be discarded into a sharps container; vials with a chemotherapy dispensing pin or a ChemoLock™ Vial Spike may be discarded into a non-sharp waste container)
Removing reusable checked drug vials from the BSC See Removal of the Product and Supplies for Final Product Check Outside of the Biological Safety Cabinet
Syringe(s) for checking and disposal inside the BSC if using ChemoLock™, leave the ChemoLock™ Injector attached to all hazardous drug syringes – DO NOT REMOVE if using a needle, leave the capped needle on the syringe for checking
or remove the capped needle from the syringe and discard into the sharps container immediately place a luer lock or a non-luer lock (slip) tip cap onto the syringe tip (if the syringe was used to withdraw HD)
do NOT remove the needle and place the syringe (with the syringe tip exposed) onto the work surface of the BSC if the syringe was used to withdraw hazardous drug
once the syringe(s) have been checked discard the syringe/needle into the HD sharps container or syringe/ChemoLock™ Injector into the non-sharp HD waste
container inside the BSC or
remove the capped needle(s) from the syringe(s), place a luer lock or non-luer lock (slip) tip cap onto the syringe, discard the needle(s) in the HD sharps container and the capped syringe(s) into the HD waste container inside the BSC or
discard the tip-capped syringe into the HD waste container inside the BSC
Intravenous (IV) solution bag – preparation for removal once all the drug has been added to the IV solution bag and the needle has been removed from the port:
disinfect the port of the IV solution bag with a 70% isopropyl alcohol (IPA) swab once the alcohol has dried, cover the port with a foil seal (recommendation)
or once all the drug has been added to the IV solution bag through the ChemoLock™ Bag Spike, remove the ChemoLock™
Injector from the ChemoLock™ Bag Spike squeeze the release clips on the ChemoLock™ Injector
o the ChemoLock™ Injector will automatically disconnect; do NOT pull apart when releasing
Final product removal gently invert the IV solution bag - check the final product for leaks and inspect the solution for particulate
if the administration port of the IV solution bag contains a ChemoLock™ bag spike, examine the connection between the bag spike and the administration port for leaks
clean gloves with a soap-moistened towel (e.g., CaviWipe®) and discard into HD waste inside the BSC using a new soap-moistened towel, wipe part of the final product to create a cleaned surface touch the cleaned surface with cleaned gloves to pick it up and then clean the rest of the final product (including the tubing if
applicable [e.g., when the final product is an INFUSOR™]) remove the final product from the BSC and place onto a cleanable or disposable surface affix the patient-specific label and all auxiliary labels to the final product once it has been removed from the BSC once labelled, place the final product into a zip lock bag and seal
Clean and disinfect the work surface using an aqueous antibacterial agent (e.g., CaviWipe®) followed by sterile 70% alcohol pre-moistened wipe between each preparation Note:
use one new soap-moistened towel for each item to be cleaned do NOT touch any surfaces inside the BSC after cleaning gloves prior to cleaning the final product - re-clean gloves if
possible HD contamination has occurred do not place cleaned final products onto the front grill or directly onto the work surface of the BSC
BCCA PHARMACY PRACTICE STANDARDS FOR HAZARDOUS DRUGS© January 2017 1-1-14

Removal of the Final Product for Final Product Check Outside of the Biological Safety Cabinet
ACTIVITY/STANDARD
Preparation of the final product for removal from the biological safety cabinet (BSC) Intravenous (IV) solution bag once all the drug has been added to the IV solution bag and the needle has been removed from the port:
disinfect the port of the IV solution bag with a 70% isopropyl alcohol (IPA) swab once the alcohol has dried, cover the port with a foil seal (recommendation)
or once all the drug has been added to the IV solution bag through the ChemoLock™ Bag Spike:
disconnect the ChemoLock™ Injector from the ChemoLock™ Bag Spike
gently invert the IV solution bag – check the final product for leaks and inspect the solution for particulate if the administration port of the IV solution bag contains a ChemoLock™ or other CSTD bag spike, examine
the connection between the bag spike and the administration port for leaks
INFUSOR™
once all the drug has been added to the INFUSOR™ and the syringe has been removed from the fill port, attach the fill port cap if using ChemoLock™ to inject hazardous drug, do NOT remove the ChemoLock™ Port from the INFUSOR™
fill port check the INFUSOR™ for leaks and inspect the solution for particulate
Syringe once all the drug has been withdrawn into the syringe:
tip cap the syringe with a luer lock tip cap (note: a pediatric dose in a slip tip syringe requires a non-luer lock [slip] tip cap) or
leave the ChemoLock™ Injector attached to the syringe check the syringe tip for leaks and inspect the solution for particulate
Removal of the final product clean gloves with a soap-moistened towel (e.g., CaviWipe®) and discard towel into hazardous drug (HD) waste
inside the BSC using a new soap-moistened towel, wipe part of the final product to create a cleaned surface touch the cleaned surface with cleaned gloves to pick it up and then clean the rest of the final product (including
tubing if applicable [e.g., when the final product is an INFUSOR™]) remove the final product from the BSC and place onto a cleanable or disposable surface for labelling
or once the final product has been cleaned, place it onto the soap-moistened towel on the work surface of the
BSC until ready to remove affix the patient-specific label and all auxiliary labels to the final product once it has been removed from the BSC once labelled, place into a zip lock bag and seal Clean and disinfect the work surface using an aqueous antibacterial agent (e.g., CaviWipe®) followed by a low lint wipe pre-moistened with sterile 70% alcohol between each preparation Note: use one new soap-moistened towel for each item to be cleaned do NOT touch any surfaces inside the BSC after cleaning gloves (except the container of soap-moistened
towels) prior to cleaning the final product - re-clean gloves if possible HD contamination has occurred do not place cleaned final products onto the front grill or directly onto the work surface of the BSC
BCCA PHARMACY PRACTICE STANDARDS FOR HAZARDOUS DRUGS© January 2017 1-1-15

Removal of Supplies for Final Product Check Outside of the Biological Safety Cabinet
ACTIVITY/STANDARD
Hazardous Drug (HD) Vial that WILL be reused if a hazardous drug vial stopper has a chemotherapy dispensing pin or a ChemoLock™ Vial Spike inserted – DO
NOT REMOVE from the vial (whether or not the remaining drug will be used) if a vial stopper has a chemotherapy vent inserted:
REMOVE the chemotherapy vent and discard it into the sharps container (do NOT recap the needle on the chemotherapy vent)
disinfect the vial stopper with a sterile 70% IPA swab and allow the alcohol to dry cover the stopper with a foil seal (recommendation)
write the beyond use date (stability date and time) directly on reusable vials • beyond use date (e.g., 48 hours) is an exact time - 48 hours ≠ end of the 2nd day • vials stable for “X” number of days are considered stable until the end of the applicable day
clean gloves with a soap-moistened towel (e.g., CaviWipe®) and discard towel into hazardous drug (HD) waste inside the BSC
using a new soap-moistened towel, wipe part of the reusable HD vial to create a cleaned surface touch the cleaned surface with cleaned gloves to pick it up and then clean the rest of the HD vial place the HD vial into a zip lock bag inside the BSC (e.g., above the work surface or front grill- NOT outside the
BSC), seal the bag and then remove from the BSC or
once the vial has been cleaned, place it onto the soap-moistened towel on the work surface of the BSC until ready to remove
Hazardous Drug (HD) Vial that will NOT be reused
it is not necessary to clean the vial place the HD vial into a zip lock bag above the work surface or front grill (NOT outside the BSC), seal the bag and
then remove from the BSC if a hazardous drug vial stopper has a chemotherapy dispensing pin or a ChemoLock™ Vial Spike inserted –
DO NOT REMOVE from the vial if a vial stopper has a chemotherapy vent inserted:
REMOVE the chemotherapy vent and discard it into the sharps container (do NOT recap the needle on the chemotherapy vent)
disinfect the vial stopper with a 70% IPA swab (to remove any possible HD residue that followed the chemotherapy vent needle out of the vial stopper)
HD Syringe(s) once all the drug has been injected into the final container:
carefully cap the needle (if applicable) remove the needle from the syringe cap the syringe tip with a tip cap (luer lock or non-luer lock)
or leave the ChemoLock™ Injector attached to the hazardous drug syringe for checking – DO NOT REMOVE place the syringe into a zip lock bag inside the BSC (e.g., above the work surface or front grill- NOT outside
the BSC), seal the bag and then remove from the BSC Clean and disinfect the work surface with aqueous antibacterial agent (e.g., CaviWipe®) followed by a low lint wipe pre-moistened with sterile 70% alcohol between each preparation. Note:
use one new soap-moistened towel for each item to be cleaned do NOT touch any surfaces inside the BSC after cleaning gloves except the container of soap-moistened
towels prior to cleaning the final product - re-clean gloves if possible HD contamination has occurred do not place cleaned final products directly onto the work surface or onto the front grill of the BSC
BCCA PHARMACY PRACTICE STANDARDS FOR HAZARDOUS DRUGS© January 2017 1-1-16

Priming Solution / Secondary Administration Sets Inside the Biological Safety Cabinet
ACTIVITY/STANDARD
Prior to adding hazardous drug to the intravenous (IV) solution bag:
ensure the correct solution / secondary administration set and IV solution bag for the drug being administered have been selected
squeeze the solution bag to check for leaks
close the roller clamp on the solution / secondary administration set
remove the protective cover from the administration port of the IV solution bag
remove the protective cover from the spike on the solution / secondary administration set
insert the spike of the solution / secondary administration set firmly into the administration port of the IV solution bag
hold the IV solution bag upright, or elevate the bag using a hook to allow the solution to flow freely from the bag into the tubing
squeeze the drip chamber of the solution / secondary administration set to fill the chamber about half full with solution
remove the protective cap from the distal end of the solution / secondary administration set tubing and save for later use or discard into HD waste inside the BSC (if attaching a ChemoLock™ Injector to the distal end of the tubing) do NOT allow the exposed end of the tubing (critical site) to touch any surface inside the biological safety
cabinet maintain first air to the distal end of the tubing until the tubing is primed with solution and the protective cap is
re-attached or a ChemoLock™ Injector is attached
slowly open the roller clamp of the solution / secondary administration set to allow the solution to completely fill the tubing
close the roller clamp as the solution reaches the distal end of the tubing do NOT allow the solution to drip into the sharps or non-sharps container in the BSC as this could cause the
hazardous drug in the container to aerosolize and/or vaporize into the BSC environment increasing the chance of exposure to hazardous drug
examine the tubing for air bubbles
remove air bubbles by tapping the sides of the tubing allowing them to move through the tubing to either end
USE ASEPTIC TECHNIQUE THROUGHOUT
BCCA PHARMACY PRACTICE STANDARDS FOR HAZARDOUS DRUGS© January 2017 1-1-17

Withdrawal from an Intravenous Solution Bag Using a Dispensing Pin/Universal Spike or ChemoLock™ Bag Spike
ACTIVITY/STANDARD
ensure the correct intravenous (IV) solution bag has been selected squeeze the solution bag to check for leaks remove the protective cover from the administration port of the IV solution bag remove the protective cover from the spike end of the dispensing pin / universal spike / ChemoLock™ Bag Spike insert the spike firmly into the administration port of the IV solution bag
when inserting a ChemoLock™ Bag Spike, insert up to the shoulder of the Bag Spike inspect the IV solution bag for particulate to attach the syringe to the IV solution bag:
• dispensing pin / universal spike: remove the protective cap (critical site) from the distal end of the dispensing pin / universal spike (critical
site) just prior to use and place on a sterile 70% IPA swab to the side of the work area attach an appropriately sized syringe onto the dispensing pin / universal spike
or • ChemoLock™ Bag Spike:
o luer a ChemoLock™ Injector to an appropriately sized syringe, rotating the Injector until an audible click is heard and it spins freely
o grasping the ChemoLock™ Port on the Bag Spike and the ChemoLock™ Injector attached to the syringe, push the two pieces straight together until an audible click is heard do NOT hold onto the release clips on the Injector when connecting the Injector to the Port on the Bag
Spike withdraw the correct volume of solution from the IV solution bag remove air bubbles from the syringe while it is still attached to the dispensing pin / universal spike / ChemoLock™
Bag Spike hold the syringe in a vertical position so the syringe tip is pointing upward (with the dispensing pin / universal
spike / ChemoLock™ Bag Spike positioned vertically higher than the syringe) tap the syringe barrel with fingers, knuckles or tweezers just below the air bubble(s) to bring them to the top of
the syringe tilt and rotate the syringe causing larger air bubbles to move through the solution collecting smaller air bubbles
at the top of the syringe slowly and carefully push on the plunger to expel the small amount of air back into the IV solution bag double check the final volume of solution in the syringe and adjust if necessary
to remove the syringe from the solution bag: • dispensing pin / universal spike:
remove the syringe from the dispensing pin / universal spike attach a capped needle or a tip cap (luer lock or non-luer lock) to the syringe tip repeat with additional syringe(s) or re-attach the protective cap to the distal end of the dispensing pin /
universal spike (critical site) or
• ChemoLock™ Bag Spike: squeeze the release clips on the ChemoLock™ Injector
o the ChemoLock™ Injector will automatically disconnect; do NOT pull apart when releasing inspect the solution in the syringe for particulate write the solution type and mark a line at the volume on the syringe barrel(s) with a thin tipped permanent marker
while the solution is IN the syringe use a NEW syringe for each volume of solution to be measured USE ASEPTIC TECHNIQUE THROUGHOUT
BCCA PHARMACY PRACTICE STANDARDS FOR HAZARDOUS DRUGS© January 2017 1-1-18

Safely Capping Needles Used with Hazardous Drugs
ACTIVITY/STANDARD
Needle Cap Holder Method
place the needle cap into the needle cap holder with the open end pointing up
holding the syringe barrel, slowly bring the tip of the needle close to the opening of the needle cap
place the tip of the needle inside the needle cap opening
slide the needle completely inside the needle cap, securing the cap onto the needle hub
if drug has splashed from the needle into the needle cap, replace the needle with a new one prior to injecting the drug into a container
Note: Use of a needle cap holder is the safest technique for recapping a needle used during hazardous drug
preparation
One-Handed (Swoop) Method
move the needle cap on an alcohol swab into the work area
holding the syringe barrel (with hand positioned above the barrel), slowly bring the tip of the needle close to the opening of the needle cap
place the tip of the needle inside the needle cap opening – do not touch the needle cap with the other hand
slide the needle inside the needle cap opening and follow through in an upward ‘swooping’ motion
once the needle/syringe attachment is in an upright position, use the other hand to grasp the needle cap near the middle and secure it onto the needle hub
Note: Do NOT push on the distal end (tip) of the needle cap with your finger or hand to secure it onto the needle. The
needle cap could break causing a needle stick injury
Do NOT use two hands to recap a needle used during hazardous drug preparation
USE ASEPTIC TECHNIQUE THROUGHOUT
BCCA PHARMACY PRACTICE STANDARDS FOR HAZARDOUS DRUGS© January 2017 1-1-19

Minimizing Core Formation Using a Needle
ACTIVITY/STANDARD
Vials:
ensure the correct vial has been selected
select a needle of appropriate gauge and attach to a syringe of appropriate size or
ready a chemotherapy vent
remove the protective cap from the vial stopper and discard into hazardous drug (HD) waste inside the biological safety cabinet (BSC)
with the vial in an upright position, disinfect the vial stopper using a sterile 70% isopropyl alcohol (IPA) swab wipe the vial stopper several (e.g., three) times in one direction use a new alcohol swab to disinfect each critical site
allow the alcohol to dry
remove the needle cap from the needle: attached to the syringe: place into a needle cap holder or on a sterile 70% IPA swab and store to the side of the
work area attached to the chemotherapy vent filter: discard the needle cap into hazardous waste inside the BSC
do NOT recap a chemotherapy vent needle, carefully remove the needle from the vial stopper and discard into the sharps container inside the BSC without recapping
place the needle tip on the vial stopper at a 45o angle with the bevel of the needle facing upwards
carefully exert downward pressure on the needle tip while positioning the needle into a vertical position
if multiple punctures to a single vial stopper are necessary, do NOT insert the needle into the vial stopper an access hole more than once
Intravenous (IV) Solution Bags
ensure the correct IV solution bag has been selected
lay the IV solution bag on the work surface of the BSC do NOT hang the IV solution bag from the bar in the BSC while injecting drug as this could cause the solution
to follow the needle out of the injection port resulting in a spill
disinfect the injection port of the IV solution bag using a sterile 70% isopropyl alcohol (IPA) swab
allow the alcohol to dry
remove the needle cap from the needle and place on a sterile 70% IPA swab or into a needle cap holder and store to the side of the work area
hold the injection port perpendicular to the airflow so first air is able to flow unobstructed over the point at which the needle will enter the port
place the needle tip onto the centre of the injection port
exert pressure on the needle tip while inserting the needle straight through both port membranes into the solution bag with the needle shaft parallel to the port walls
Note: inspect the solution in each accessed container for particulate (see Checking for Particulate in Vials,
Syringes, and Final Products)
USE ASEPTIC TECHNIQUE THROUGHOUT
BCCA PHARMACY PRACTICE STANDARDS FOR HAZARDOUS DRUGS© January 2017 1-1-20

Removal of Air from a Syringe
ACTIVITY/STANDARD
Using a Needle
remove air from a syringe while the syringe is still attached to the vial if possible if the syringe has been detached from the vial and syringe tip is exposed, attach a needle before removing air ensure the needle is capped (see Safely Capping Needles Used with Hazardous Drugs)
hold the syringe in a vertical position so the covered syringe tip is pointing upward (with the vial or capped needle positioned vertically higher than the syringe)
pull the plunger of the syringe down slightly first to remove any solution from the needle or syringe tip
tap the syringe barrel with fingers, knuckles or tweezers just below any air bubbles to bring them to the top of the syringe or
tilt and rotate the syringe causing larger air bubbles to move through the solution collecting smaller air bubbles at the top of the syringe
pull the plunger of the syringe down slightly again to remove any solution that may have splashed into the needle hub or syringe tip
slowly and carefully push up on the plunger to expel the small amount of air out NEVER eject hazardous drug (HD) solution into a needle cap
if hazardous drug solution has been accidentally expelled into the needle cap remove the capped needle discard the needle into the HD sharps container
• attach a new needle before injecting the solution or
• attach a luer lock syringe tip for dispensing
double check the final volume of solution in the syringe and adjust if necessary
Using ChemoLock™
When using ChemoLock™ to withdraw and/or inject hazardous drugs (HD), NEVER remove the ChemoLock™ Injector from the syringe, exposing the tip of a HD syringe
remove air from a syringe while the Injector/syringe is attached to the Vial Spike on the hazardous drug vial
hold the syringe/vial in a vertical position (with the vial positioned vertically higher than the syringe)
tap the syringe barrel with fingers, knuckles or tweezers just below any air bubbles to bring them to the top of the syringe or
tilt and rotate the syringe causing larger air bubbles to move through the solution collecting smaller air bubbles at the top of the syringe
slowly and carefully push up on the plunger to expel the small amount of air through the ChemoLock™ connection back into the hazardous drug vial
double check the final volume of solution in the syringe and adjust if necessary
USE ASEPTIC TECHNIQUE THROUGHOUT
BCCA PHARMACY PRACTICE STANDARDS FOR HAZARDOUS DRUGS© January 2017 1-1-21

Use of a Winged Infusion Set
ACTIVITY/STANDARD
If more than 2 punctures into an intravenous (IV) solution bag port are required when adding a hazardous drug (HD): ensure the correct IV solution bag has been selected squeeze the solution bag to check for leaks lay the IV solution bag on the work surface of the biological safety cabinet (BSC)
do NOT hang the IV solution bag from the bar in the BSC while injecting hazardous drug as this could cause the solution to follow the needle out of the injection port resulting in a spill
disinfect the injection port of the IV solution bag using a sterile 70% isopropyl alcohol (IPA) swab allow the alcohol to dry remove the winged infusion set from its protective over-wrap remove the needle cover of the winged infusion set and discard into HD waste inside the BSC (do NOT save for
recapping of the needle) hold the injection port perpendicular to the airflow so that first air is able to flow unobstructed over the point at which the
needle will enter the port place the needle tip onto the centre of the injection port exert pressure on the needle tip while inserting the needle of the winged infusion set straight through both port
membranes into the solution bag with the needle shaft parallel to the port walls remove the protective cap from the luer lock adaptor at the distal end of the winged infusion set and place on a sterile
70% IPA swab to the side of the work area if it is necessary to remove excess solution from the bag prior to the addition of drug (see Withdrawal of Less than 100 mL
of Solution from an Intravenous Solution Bag): luer lock a syringe to the end of the winged infusion set withdraw the required volume of solution from the IV solution bag write the solution type on the syringe barrel using a thin tipped permanent marker
verify the correct volume of drug for the dose is contained in the drug-filled syringes remove the solution-filled syringe from the winged infusion set and attach a non-luer lock or luer lock syringe tip cap attach a hazardous drug-filled syringe, beginning with the smallest volume, to the luer-lock end of the winged infusion set inject the drug remove the syringe from the winged infusion set and attach a non-luer lock or a luer lock syringe tip cap repeat with remaining syringe(s) until all drug has been injected into the IV solution bag to clear the tubing of drug (while the last emptied syringe is still attached to the winged infusion set):
hold the solution bag upright (injection port up) withdraw some air from the bag into the syringe inject the withdrawn solution and the air back into the solution bag
remove the needle of the winged infusion set from the injection port of the IV solution bag and carefully place into the sharps container in the BSC do NOT recap the needle of the winged infusion set unless using a safety winged infusion set with a safety
feature that allows for recapping of the needle in a manner that does not increase the chance of a HD spill or splash when recapping
do not recap a safety winged infusion set that is designed in such a manner that the safety shield flips and snaps into place as it can cause HD to splash from the needle tip upon securing
remove the luer lock syringe from the distal end of the tubing and place the rest of the winged infusion set tubing into the sharps container
disinfect the injection port of the IV solution bag using a 70% IPA swab and allow the alcohol to dry gently invert the bag to mix gently squeeze the bag to check for leaks and inspect the solution for particulate cover the port with a foil seal (recommendation)
USE ASEPTIC TECHNIQUE THROUGHOUT
BCCA PHARMACY PRACTICE STANDARDS FOR HAZARDOUS DRUGS© January 2017 1-1-22
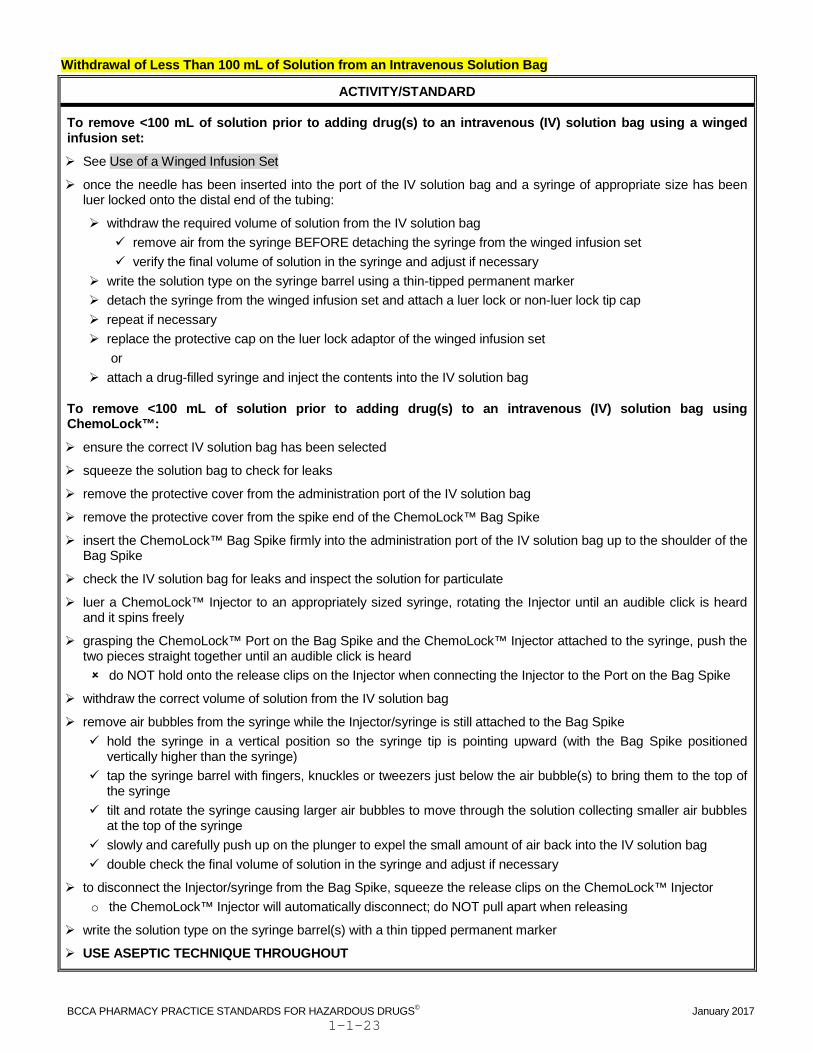
Withdrawal of Less Than 100 mL of Solution from an Intravenous Solution Bag
ACTIVITY/STANDARD
To remove <100 mL of solution prior to adding drug(s) to an intravenous (IV) solution bag using a winged infusion set:
See Use of a Winged Infusion Set
once the needle has been inserted into the port of the IV solution bag and a syringe of appropriate size has been luer locked onto the distal end of the tubing:
withdraw the required volume of solution from the IV solution bag remove air from the syringe BEFORE detaching the syringe from the winged infusion set verify the final volume of solution in the syringe and adjust if necessary
write the solution type on the syringe barrel using a thin-tipped permanent marker detach the syringe from the winged infusion set and attach a luer lock or non-luer lock tip cap repeat if necessary replace the protective cap on the luer lock adaptor of the winged infusion set
or attach a drug-filled syringe and inject the contents into the IV solution bag
To remove <100 mL of solution prior to adding drug(s) to an intravenous (IV) solution bag using ChemoLock™:
ensure the correct IV solution bag has been selected
squeeze the solution bag to check for leaks
remove the protective cover from the administration port of the IV solution bag
remove the protective cover from the spike end of the ChemoLock™ Bag Spike
insert the ChemoLock™ Bag Spike firmly into the administration port of the IV solution bag up to the shoulder of the Bag Spike
check the IV solution bag for leaks and inspect the solution for particulate
luer a ChemoLock™ Injector to an appropriately sized syringe, rotating the Injector until an audible click is heard and it spins freely
grasping the ChemoLock™ Port on the Bag Spike and the ChemoLock™ Injector attached to the syringe, push the two pieces straight together until an audible click is heard do NOT hold onto the release clips on the Injector when connecting the Injector to the Port on the Bag Spike
withdraw the correct volume of solution from the IV solution bag
remove air bubbles from the syringe while the Injector/syringe is still attached to the Bag Spike hold the syringe in a vertical position so the syringe tip is pointing upward (with the Bag Spike positioned
vertically higher than the syringe) tap the syringe barrel with fingers, knuckles or tweezers just below the air bubble(s) to bring them to the top of
the syringe tilt and rotate the syringe causing larger air bubbles to move through the solution collecting smaller air bubbles
at the top of the syringe slowly and carefully push up on the plunger to expel the small amount of air back into the IV solution bag double check the final volume of solution in the syringe and adjust if necessary
to disconnect the Injector/syringe from the Bag Spike, squeeze the release clips on the ChemoLock™ Injector o the ChemoLock™ Injector will automatically disconnect; do NOT pull apart when releasing
write the solution type on the syringe barrel(s) with a thin tipped permanent marker
USE ASEPTIC TECHNIQUE THROUGHOUT
BCCA PHARMACY PRACTICE STANDARDS FOR HAZARDOUS DRUGS© January 2017 1-1-23

Withdrawal of 100 mL or More of Solution from an Intravenous Solution Bag Prior to the Addition of Drug
ACTIVITY/STANDARD
To remove ≥100 mL of solution from an intravenous (IV) solution bag prior to adding drug(s) using a Solution / Secondary Administration Set (Secondary Set):
see Priming Solution / Secondary Administration Sets Inside the Biological Safety Cabinet
If adding hazardous drug, use a secondary set that has a ChemoLock™ Port above the drip chamber
once the secondary set has been inserted into the IV solution bag administration port: remove the protective cap from the distal end of the secondary set tubing and save for later use or discard into
hazardous drug (HD) waste inside the biological safety cabinet (BSC) (if replacing the protective cap with a ChemoLock™ Injector) do NOT allow the exposed end of the tubing (critical site) to touch any surface inside the BSC including the
graduated cylinder maintain first air to the distal end of the tubing until the required volume of solution has been drained from
the bag and the protective cap or a ChemoLock™ Injector is attached
place the end of the secondary set just inside the opening of a clean graduated cylinder
slowly open the roller clamp on the secondary set and drain the required volume of solution, measuring into the graduated cylinder
close the roller clamp on the secondary administration set
reattach the protective cap (non-hazardous drug) or luer a ChemoLock™ Injector (hazardous drug) onto the luer lock end of the secondary set tubing before adding drug to the IV solution bag o if attaching a ChemoLock™ Injector, rotate the Injector onto the tubing until an audible click is heard and it
spins freely
OR
remove the protective cap from the distal end of the secondary set and attach a needle
disinfect the vial stopper of an evacuated container using a sterile 70% isopropyl alcohol swab wipe the vial stopper several (e.g., three) times in one direction
allow the alcohol to dry
mark the volume to be removed from the IV solution bag on the evacuated container with a thin tipped permanent marker
insert the needle into the vial closure of the evacuated container (see Minimizing Core Formation Using a Needle) place the needle on the vial stopper at a 45o angle with the bevel of the needle facing upwards carefully exert downward pressure on the needle tip while positioning the needle into a vertical position
slowly open the roller clamp on the secondary set (the vacuum in the container will cause the solution to drain quickly)
drain the required volume of solution and close the roller clamp on the secondary set
carefully remove the needle from the evacuated container’s vial stopper recap
remove the capped needle from the luer lock end of the secondary set and discard into the sharps container inside the biological safety cabinet
reattach the protective cap (non-hazardous drug) or luer a ChemoLock™ Injector (hazardous drug) onto the luer lock end of the secondary administration set tubing before adding drug to the IV solution bag o if attaching a ChemoLock™ Injector, rotate the Injector onto the tubing until an audible click is heard and it
spins freely
leave the primed secondary set attached to the bag for administration to the patient
USE ASEPTIC TECHNIQUE THROUGHOUT
BCCA PHARMACY PRACTICE STANDARDS FOR HAZARDOUS DRUGS© January 2017 1-1-24
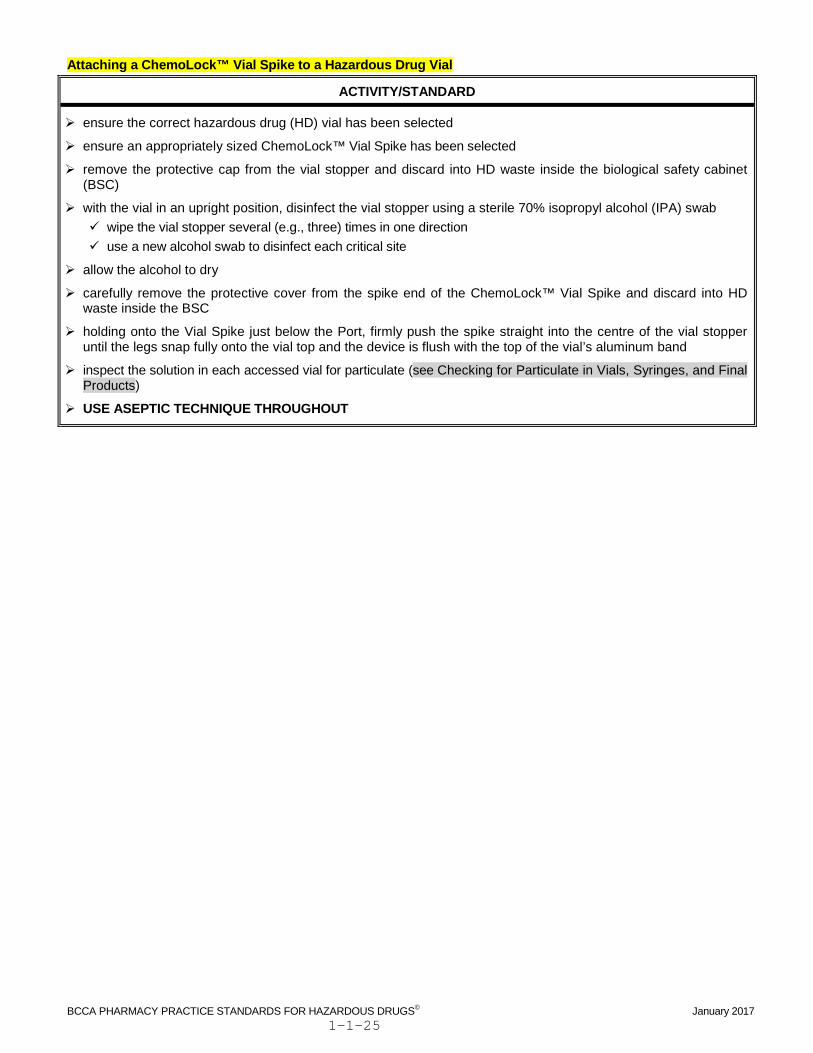
Attaching a ChemoLock™ Vial Spike to a Hazardous Drug Vial
ACTIVITY/STANDARD
ensure the correct hazardous drug (HD) vial has been selected
ensure an appropriately sized ChemoLock™ Vial Spike has been selected
remove the protective cap from the vial stopper and discard into HD waste inside the biological safety cabinet (BSC)
with the vial in an upright position, disinfect the vial stopper using a sterile 70% isopropyl alcohol (IPA) swab wipe the vial stopper several (e.g., three) times in one direction use a new alcohol swab to disinfect each critical site
allow the alcohol to dry
carefully remove the protective cover from the spike end of the ChemoLock™ Vial Spike and discard into HD waste inside the BSC
holding onto the Vial Spike just below the Port, firmly push the spike straight into the centre of the vial stopper until the legs snap fully onto the vial top and the device is flush with the top of the vial’s aluminum band
inspect the solution in each accessed vial for particulate (see Checking for Particulate in Vials, Syringes, and Final Products)
USE ASEPTIC TECHNIQUE THROUGHOUT
BCCA PHARMACY PRACTICE STANDARDS FOR HAZARDOUS DRUGS© January 2017 1-1-25
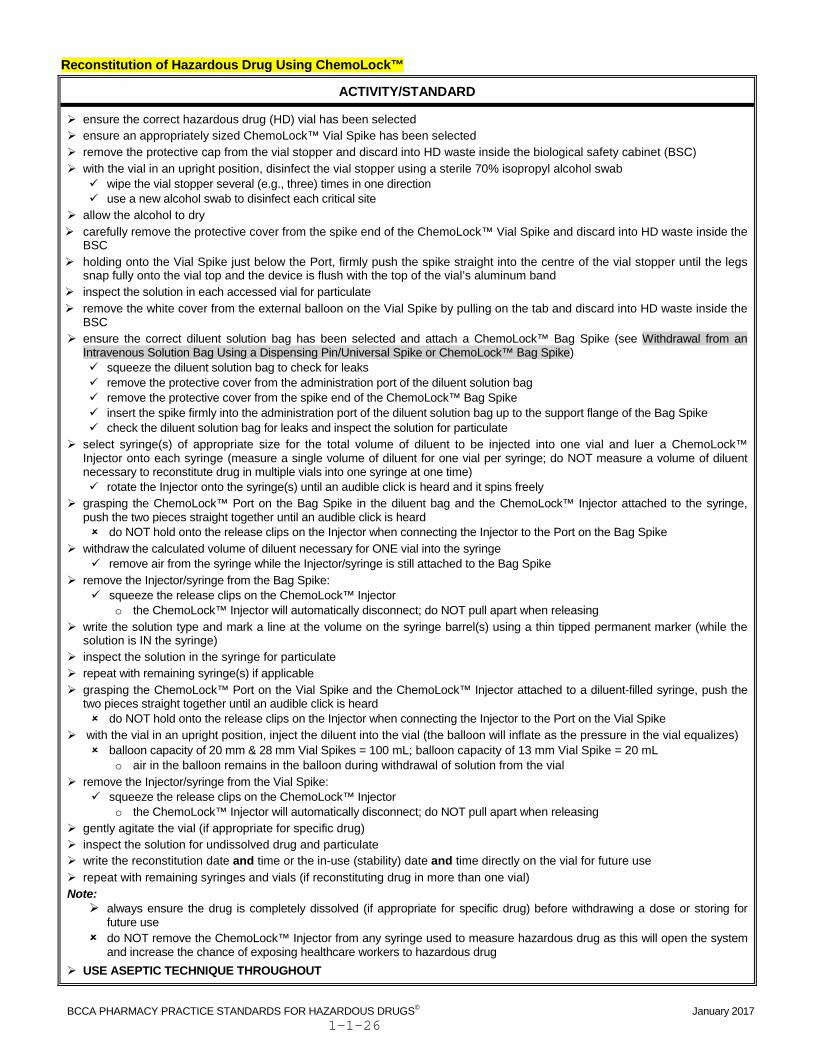
Reconstitution of Hazardous Drug Using ChemoLock™
ACTIVITY/STANDARD
ensure the correct hazardous drug (HD) vial has been selected ensure an appropriately sized ChemoLock™ Vial Spike has been selected remove the protective cap from the vial stopper and discard into HD waste inside the biological safety cabinet (BSC) with the vial in an upright position, disinfect the vial stopper using a sterile 70% isopropyl alcohol swab
wipe the vial stopper several (e.g., three) times in one direction use a new alcohol swab to disinfect each critical site
allow the alcohol to dry carefully remove the protective cover from the spike end of the ChemoLock™ Vial Spike and discard into HD waste inside the
BSC holding onto the Vial Spike just below the Port, firmly push the spike straight into the centre of the vial stopper until the legs
snap fully onto the vial top and the device is flush with the top of the vial’s aluminum band inspect the solution in each accessed vial for particulate remove the white cover from the external balloon on the Vial Spike by pulling on the tab and discard into HD waste inside the
BSC ensure the correct diluent solution bag has been selected and attach a ChemoLock™ Bag Spike (see Withdrawal from an
Intravenous Solution Bag Using a Dispensing Pin/Universal Spike or ChemoLock™ Bag Spike) squeeze the diluent solution bag to check for leaks remove the protective cover from the administration port of the diluent solution bag remove the protective cover from the spike end of the ChemoLock™ Bag Spike insert the spike firmly into the administration port of the diluent solution bag up to the support flange of the Bag Spike check the diluent solution bag for leaks and inspect the solution for particulate
select syringe(s) of appropriate size for the total volume of diluent to be injected into one vial and luer a ChemoLock™ Injector onto each syringe (measure a single volume of diluent for one vial per syringe; do NOT measure a volume of diluent necessary to reconstitute drug in multiple vials into one syringe at one time) rotate the Injector onto the syringe(s) until an audible click is heard and it spins freely
grasping the ChemoLock™ Port on the Bag Spike in the diluent bag and the ChemoLock™ Injector attached to the syringe, push the two pieces straight together until an audible click is heard do NOT hold onto the release clips on the Injector when connecting the Injector to the Port on the Bag Spike
withdraw the calculated volume of diluent necessary for ONE vial into the syringe remove air from the syringe while the Injector/syringe is still attached to the Bag Spike
remove the Injector/syringe from the Bag Spike: squeeze the release clips on the ChemoLock™ Injector
o the ChemoLock™ Injector will automatically disconnect; do NOT pull apart when releasing write the solution type and mark a line at the volume on the syringe barrel(s) using a thin tipped permanent marker (while the
solution is IN the syringe) inspect the solution in the syringe for particulate repeat with remaining syringe(s) if applicable grasping the ChemoLock™ Port on the Vial Spike and the ChemoLock™ Injector attached to a diluent-filled syringe, push the
two pieces straight together until an audible click is heard do NOT hold onto the release clips on the Injector when connecting the Injector to the Port on the Vial Spike
with the vial in an upright position, inject the diluent into the vial (the balloon will inflate as the pressure in the vial equalizes) balloon capacity of 20 mm & 28 mm Vial Spikes = 100 mL; balloon capacity of 13 mm Vial Spike = 20 mL
o air in the balloon remains in the balloon during withdrawal of solution from the vial remove the Injector/syringe from the Vial Spike:
squeeze the release clips on the ChemoLock™ Injector o the ChemoLock™ Injector will automatically disconnect; do NOT pull apart when releasing
gently agitate the vial (if appropriate for specific drug) inspect the solution for undissolved drug and particulate write the reconstitution date and time or the in-use (stability) date and time directly on the vial for future use repeat with remaining syringes and vials (if reconstituting drug in more than one vial) Note: always ensure the drug is completely dissolved (if appropriate for specific drug) before withdrawing a dose or storing for
future use do NOT remove the ChemoLock™ Injector from any syringe used to measure hazardous drug as this will open the system
and increase the chance of exposing healthcare workers to hazardous drug USE ASEPTIC TECHNIQUE THROUGHOUT
BCCA PHARMACY PRACTICE STANDARDS FOR HAZARDOUS DRUGS© January 2017 1-1-26
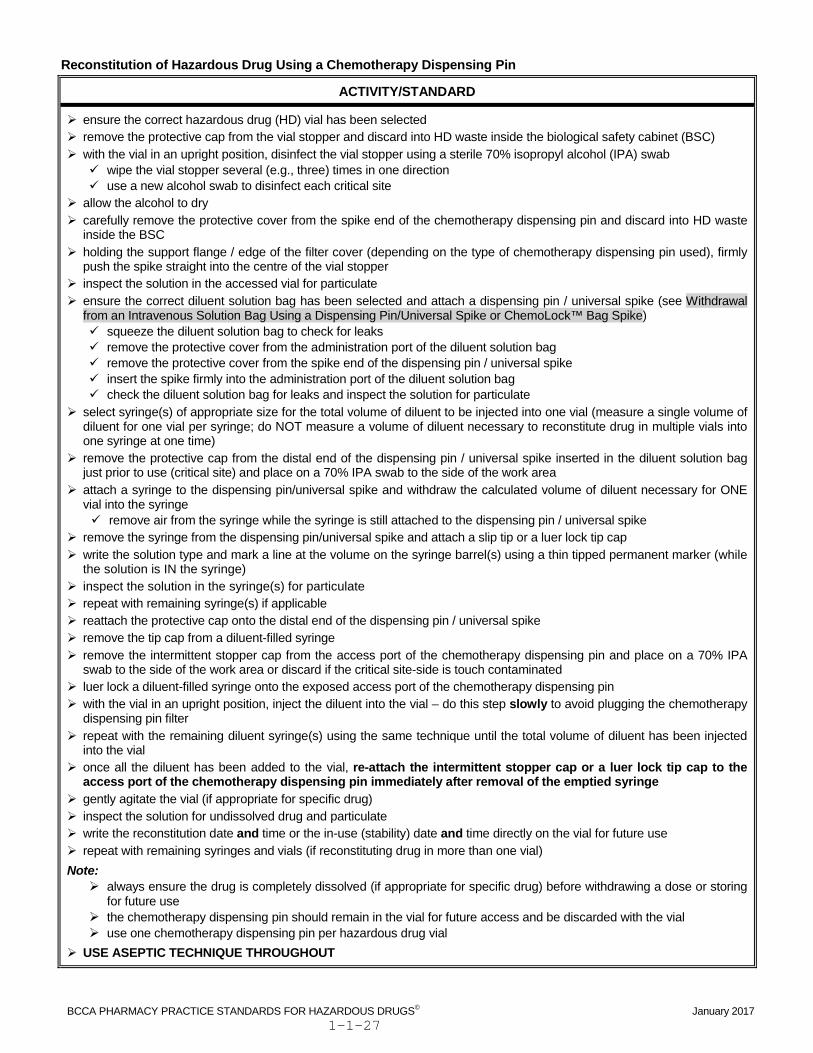
Reconstitution of Hazardous Drug Using a Chemotherapy Dispensing Pin
ACTIVITY/STANDARD
ensure the correct hazardous drug (HD) vial has been selected remove the protective cap from the vial stopper and discard into HD waste inside the biological safety cabinet (BSC) with the vial in an upright position, disinfect the vial stopper using a sterile 70% isopropyl alcohol (IPA) swab wipe the vial stopper several (e.g., three) times in one direction use a new alcohol swab to disinfect each critical site
allow the alcohol to dry carefully remove the protective cover from the spike end of the chemotherapy dispensing pin and discard into HD waste
inside the BSC holding the support flange / edge of the filter cover (depending on the type of chemotherapy dispensing pin used), firmly
push the spike straight into the centre of the vial stopper inspect the solution in the accessed vial for particulate ensure the correct diluent solution bag has been selected and attach a dispensing pin / universal spike (see Withdrawal
from an Intravenous Solution Bag Using a Dispensing Pin/Universal Spike or ChemoLock™ Bag Spike) squeeze the diluent solution bag to check for leaks remove the protective cover from the administration port of the diluent solution bag remove the protective cover from the spike end of the dispensing pin / universal spike insert the spike firmly into the administration port of the diluent solution bag check the diluent solution bag for leaks and inspect the solution for particulate
select syringe(s) of appropriate size for the total volume of diluent to be injected into one vial (measure a single volume of diluent for one vial per syringe; do NOT measure a volume of diluent necessary to reconstitute drug in multiple vials into one syringe at one time)
remove the protective cap from the distal end of the dispensing pin / universal spike inserted in the diluent solution bag just prior to use (critical site) and place on a 70% IPA swab to the side of the work area
attach a syringe to the dispensing pin/universal spike and withdraw the calculated volume of diluent necessary for ONE vial into the syringe remove air from the syringe while the syringe is still attached to the dispensing pin / universal spike
remove the syringe from the dispensing pin/universal spike and attach a slip tip or a luer lock tip cap write the solution type and mark a line at the volume on the syringe barrel(s) using a thin tipped permanent marker (while
the solution is IN the syringe) inspect the solution in the syringe(s) for particulate repeat with remaining syringe(s) if applicable reattach the protective cap onto the distal end of the dispensing pin / universal spike remove the tip cap from a diluent-filled syringe remove the intermittent stopper cap from the access port of the chemotherapy dispensing pin and place on a 70% IPA
swab to the side of the work area or discard if the critical site-side is touch contaminated luer lock a diluent-filled syringe onto the exposed access port of the chemotherapy dispensing pin with the vial in an upright position, inject the diluent into the vial – do this step slowly to avoid plugging the chemotherapy
dispensing pin filter repeat with the remaining diluent syringe(s) using the same technique until the total volume of diluent has been injected
into the vial once all the diluent has been added to the vial, re-attach the intermittent stopper cap or a luer lock tip cap to the
access port of the chemotherapy dispensing pin immediately after removal of the emptied syringe gently agitate the vial (if appropriate for specific drug) inspect the solution for undissolved drug and particulate write the reconstitution date and time or the in-use (stability) date and time directly on the vial for future use repeat with remaining syringes and vials (if reconstituting drug in more than one vial) Note: always ensure the drug is completely dissolved (if appropriate for specific drug) before withdrawing a dose or storing
for future use the chemotherapy dispensing pin should remain in the vial for future access and be discarded with the vial use one chemotherapy dispensing pin per hazardous drug vial
USE ASEPTIC TECHNIQUE THROUGHOUT
BCCA PHARMACY PRACTICE STANDARDS FOR HAZARDOUS DRUGS© January 2017 1-1-27
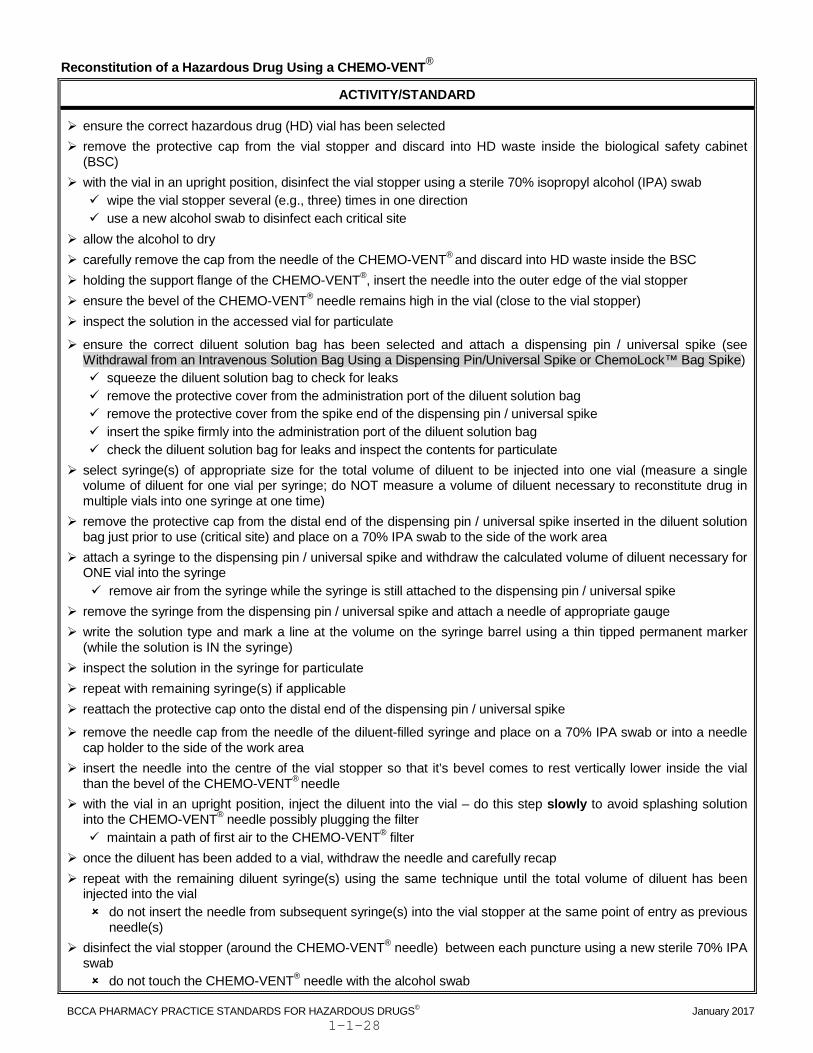
Reconstitution of a Hazardous Drug Using a CHEMO-VENT®
ACTIVITY/STANDARD
ensure the correct hazardous drug (HD) vial has been selected remove the protective cap from the vial stopper and discard into HD waste inside the biological safety cabinet
(BSC) with the vial in an upright position, disinfect the vial stopper using a sterile 70% isopropyl alcohol (IPA) swab wipe the vial stopper several (e.g., three) times in one direction use a new alcohol swab to disinfect each critical site
allow the alcohol to dry carefully remove the cap from the needle of the CHEMO-VENT® and discard into HD waste inside the BSC holding the support flange of the CHEMO-VENT®, insert the needle into the outer edge of the vial stopper ensure the bevel of the CHEMO-VENT® needle remains high in the vial (close to the vial stopper) inspect the solution in the accessed vial for particulate
ensure the correct diluent solution bag has been selected and attach a dispensing pin / universal spike (see Withdrawal from an Intravenous Solution Bag Using a Dispensing Pin/Universal Spike or ChemoLock™ Bag Spike) squeeze the diluent solution bag to check for leaks remove the protective cover from the administration port of the diluent solution bag remove the protective cover from the spike end of the dispensing pin / universal spike insert the spike firmly into the administration port of the diluent solution bag check the diluent solution bag for leaks and inspect the contents for particulate
select syringe(s) of appropriate size for the total volume of diluent to be injected into one vial (measure a single volume of diluent for one vial per syringe; do NOT measure a volume of diluent necessary to reconstitute drug in multiple vials into one syringe at one time)
remove the protective cap from the distal end of the dispensing pin / universal spike inserted in the diluent solution bag just prior to use (critical site) and place on a 70% IPA swab to the side of the work area
attach a syringe to the dispensing pin / universal spike and withdraw the calculated volume of diluent necessary for ONE vial into the syringe remove air from the syringe while the syringe is still attached to the dispensing pin / universal spike
remove the syringe from the dispensing pin / universal spike and attach a needle of appropriate gauge write the solution type and mark a line at the volume on the syringe barrel using a thin tipped permanent marker
(while the solution is IN the syringe) inspect the solution in the syringe for particulate repeat with remaining syringe(s) if applicable reattach the protective cap onto the distal end of the dispensing pin / universal spike
remove the needle cap from the needle of the diluent-filled syringe and place on a 70% IPA swab or into a needle cap holder to the side of the work area
insert the needle into the centre of the vial stopper so that it’s bevel comes to rest vertically lower inside the vial than the bevel of the CHEMO-VENT® needle
with the vial in an upright position, inject the diluent into the vial – do this step slowly to avoid splashing solution into the CHEMO-VENT® needle possibly plugging the filter maintain a path of first air to the CHEMO-VENT® filter
once the diluent has been added to a vial, withdraw the needle and carefully recap repeat with the remaining diluent syringe(s) using the same technique until the total volume of diluent has been
injected into the vial do not insert the needle from subsequent syringe(s) into the vial stopper at the same point of entry as previous
needle(s) disinfect the vial stopper (around the CHEMO-VENT® needle) between each puncture using a new sterile 70% IPA
swab do not touch the CHEMO-VENT® needle with the alcohol swab
BCCA PHARMACY PRACTICE STANDARDS FOR HAZARDOUS DRUGS© January 2017 1-1-28
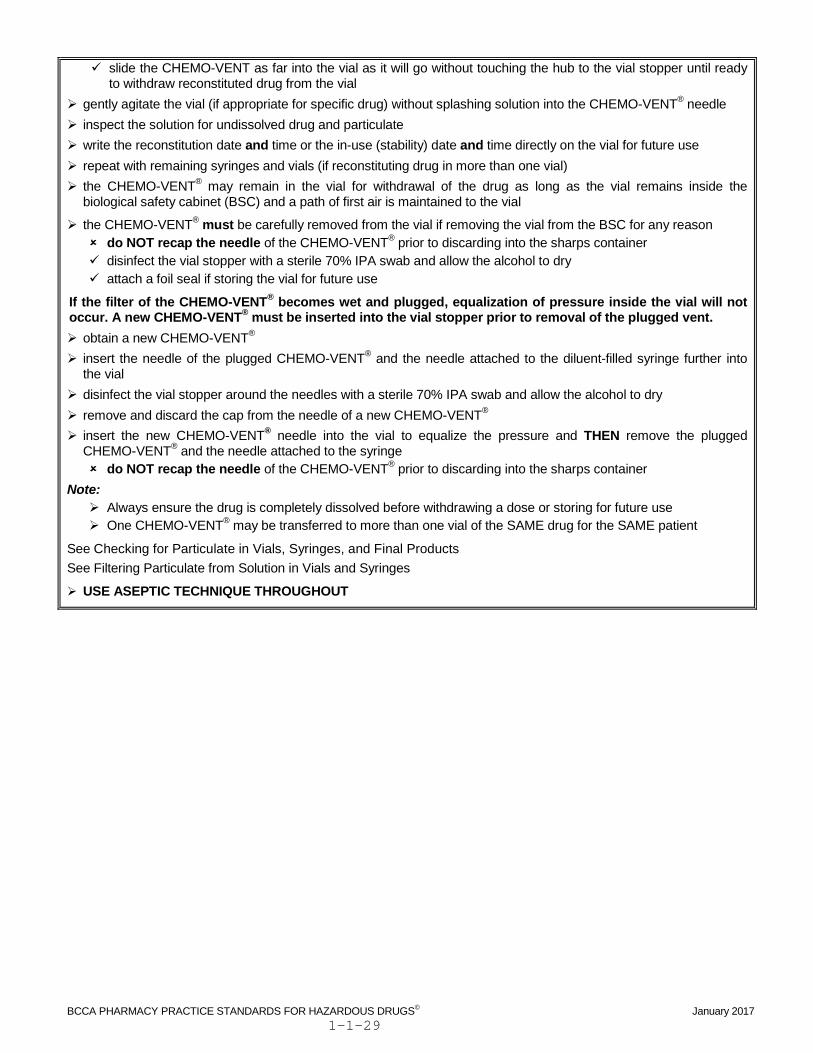
slide the CHEMO-VENT as far into the vial as it will go without touching the hub to the vial stopper until ready to withdraw reconstituted drug from the vial
gently agitate the vial (if appropriate for specific drug) without splashing solution into the CHEMO-VENT® needle inspect the solution for undissolved drug and particulate write the reconstitution date and time or the in-use (stability) date and time directly on the vial for future use repeat with remaining syringes and vials (if reconstituting drug in more than one vial) the CHEMO-VENT® may remain in the vial for withdrawal of the drug as long as the vial remains inside the
biological safety cabinet (BSC) and a path of first air is maintained to the vial
the CHEMO-VENT® must be carefully removed from the vial if removing the vial from the BSC for any reason do NOT recap the needle of the CHEMO-VENT® prior to discarding into the sharps container disinfect the vial stopper with a sterile 70% IPA swab and allow the alcohol to dry attach a foil seal if storing the vial for future use
If the filter of the CHEMO-VENT® becomes wet and plugged, equalization of pressure inside the vial will not occur. A new CHEMO-VENT® must be inserted into the vial stopper prior to removal of the plugged vent. obtain a new CHEMO-VENT® insert the needle of the plugged CHEMO-VENT® and the needle attached to the diluent-filled syringe further into
the vial disinfect the vial stopper around the needles with a sterile 70% IPA swab and allow the alcohol to dry remove and discard the cap from the needle of a new CHEMO-VENT® insert the new CHEMO-VENT® needle into the vial to equalize the pressure and THEN remove the plugged
CHEMO-VENT® and the needle attached to the syringe do NOT recap the needle of the CHEMO-VENT® prior to discarding into the sharps container
Note: Always ensure the drug is completely dissolved before withdrawing a dose or storing for future use One CHEMO-VENT® may be transferred to more than one vial of the SAME drug for the SAME patient
See Checking for Particulate in Vials, Syringes, and Final Products See Filtering Particulate from Solution in Vials and Syringes
USE ASEPTIC TECHNIQUE THROUGHOUT
BCCA PHARMACY PRACTICE STANDARDS FOR HAZARDOUS DRUGS© January 2017 1-1-29

Reconstitution of a Hazardous Drug Using Negative Pressure Technique
ACTIVITY/STANDARD
Negative pressure technique must NOT be used for hazardous drug (HD) reconstitution if filter venting or closed system drug transfer devices are available. If negative pressure must be used (e.g., when preparing a clinical trials drug), care must be taken. Build-up of positive pressure within the vial will cause back spray of HD solution when the needle is removed. Excess negative pressure will result in spillage from the bevel of the needle when it is removed from the HD vial. ensure the correct hazardous drug (HD) vial has been selected remove the protective cap from the vial stopper and discard into HD waste inside the biological safety cabinet
(BSC) with the vial in an upright position, disinfect the vial stopper using a sterile 70% isopropyl alcohol (IPA) swab wipe the vial stopper several (e.g., three) times in one direction use a new alcohol swab to disinfect each critical site
allow the alcohol to dry ensure the correct diluent solution bag has been selected and attach a dispensing pin / universal spike (see
Withdrawal from an Intravenous Solution Bag Using a dispensing Pin/Universal Spike or ChemoLock™ Bag Spike) squeeze the diluent solution bag to check for leaks remove the protective cover from the administration port of the diluent solution bag remove the protective cover from the spike end of the dispensing pin / universal spike insert the spike firmly into the administration port of the diluent solution bag check the diluent solution bag for leaks and inspect the solution for particulate
select syringe(s) of appropriate size for the total volume of diluent to be injected into one vial (measure a single volume of diluent for one vial per syringe; do NOT measure a volume of diluent necessary to reconstitute drug in multiple vials into one syringe at one time)
remove the protective cap from the distal end of the dispensing pin / universal spike inserted in the diluent solution bag just prior to use (critical site) and place on a 70% IPA swab to the side of the work area
attach a syringe to the dispensing pin / universal spike and withdraw the calculated volume of diluent necessary for ONE vial into the syringe remove air from the syringe while the syringe is still attached to the dispensing pin / universal spike
remove the syringe from the dispensing pin / universal spike and attach a needle of appropriate gauge write the solution type and mark a line at the volume on the syringe barrel using a thin tipped permanent marker
(while the solution is IN the syringe) inspect the solution in the syringe for particulate repeat with remaining syringe(s) if applicable reattach the protective cap onto the distal end of the dispensing pin / universal spike remove the needle cap from the needle of a diluent-filled syringe and place on a 70% IPA swab or into a needle
cap holder to the side of the work area insert the needle into the centre of the vial stopper with the vial in an upright position, first withdraw a small volume of air from the vial into the syringe to create a
slight negative pressure inside the vial slowly inject a small volume of diluent into the vial equal to the amount of air withdrawn from the vial do NOT inject all the diluent at once do NOT create positive pressure inside the vial
continue alternately withdrawing air and injecting diluent (milking technique) do NOT create excess negative pressure inside the vial throughout the reconstitution process
keep the bevel of the needle above the fluid level in the vial once all the diluent has been added, withdraw slightly more air into the syringe than the volume of diluent added to
create a slight negative pressure in the vial the HD contaminated air may be left in the syringe or injected into an empty sterile vial or an empty VIAFLEX® bag
BCCA PHARMACY PRACTICE STANDARDS FOR HAZARDOUS DRUGS© January 2017 1-1-30

remove the needle from the vial and safely recap do NOT eject the HD contaminated air into the needle cap as this causes HD aerosols / vapours to be released
into the biological safety cabinet environment repeat with the remaining diluent syringe(s) using the same technique until the total volume of diluent is injected
into the vial do not insert the needle from subsequent syringe(s) into the vial stopper at the same point of entry as previous
needles disinfect the vial stopper using a sterile 70% IPA swab gently agitate the vial (if appropriate for specific drug) and inspect the solution for undissolved drug and particulate write the reconstitution date and time or the in-use (stability) date and time directly on the vial for future use attach a foil seal if storing the vial for future use repeat with remaining syringes and vials (if reconstituting drug in more than one vial) Note: Always ensure the drug is completely dissolved and particle free before withdrawing a dose or storing for future
use See Checking for Particulate in Vials, Syringes, and Final Products See Filtering Particulate from Solution in Vials and Syringes USE ASEPTIC TECHNIQUE THROUGHOUT
BCCA PHARMACY PRACTICE STANDARDS FOR HAZARDOUS DRUGS© January 2017 1-1-31
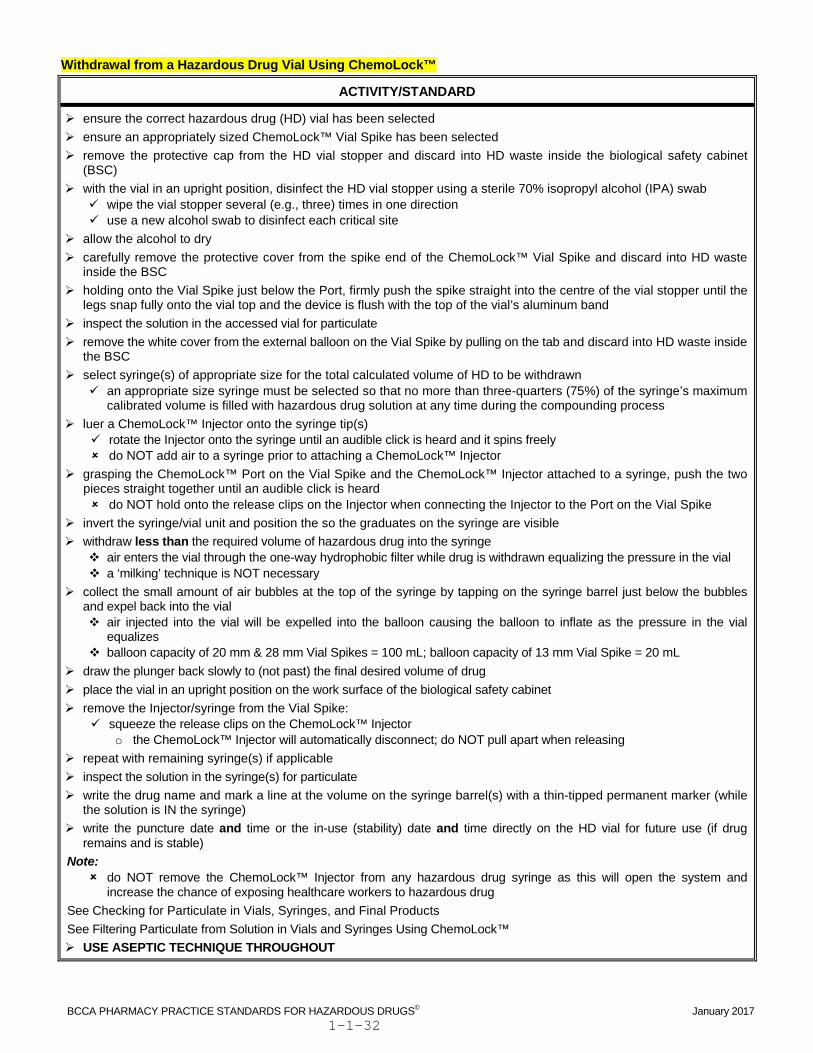
Withdrawal from a Hazardous Drug Vial Using ChemoLock™
ACTIVITY/STANDARD
ensure the correct hazardous drug (HD) vial has been selected ensure an appropriately sized ChemoLock™ Vial Spike has been selected remove the protective cap from the HD vial stopper and discard into HD waste inside the biological safety cabinet
(BSC) with the vial in an upright position, disinfect the HD vial stopper using a sterile 70% isopropyl alcohol (IPA) swab
wipe the vial stopper several (e.g., three) times in one direction use a new alcohol swab to disinfect each critical site
allow the alcohol to dry carefully remove the protective cover from the spike end of the ChemoLock™ Vial Spike and discard into HD waste
inside the BSC holding onto the Vial Spike just below the Port, firmly push the spike straight into the centre of the vial stopper until the
legs snap fully onto the vial top and the device is flush with the top of the vial’s aluminum band inspect the solution in the accessed vial for particulate remove the white cover from the external balloon on the Vial Spike by pulling on the tab and discard into HD waste inside
the BSC select syringe(s) of appropriate size for the total calculated volume of HD to be withdrawn
an appropriate size syringe must be selected so that no more than three-quarters (75%) of the syringe’s maximum calibrated volume is filled with hazardous drug solution at any time during the compounding process
luer a ChemoLock™ Injector onto the syringe tip(s) rotate the Injector onto the syringe until an audible click is heard and it spins freely do NOT add air to a syringe prior to attaching a ChemoLock™ Injector
grasping the ChemoLock™ Port on the Vial Spike and the ChemoLock™ Injector attached to a syringe, push the two pieces straight together until an audible click is heard do NOT hold onto the release clips on the Injector when connecting the Injector to the Port on the Vial Spike
invert the syringe/vial unit and position the so the graduates on the syringe are visible withdraw less than the required volume of hazardous drug into the syringe
air enters the vial through the one-way hydrophobic filter while drug is withdrawn equalizing the pressure in the vial a ‘milking’ technique is NOT necessary
collect the small amount of air bubbles at the top of the syringe by tapping on the syringe barrel just below the bubbles and expel back into the vial air injected into the vial will be expelled into the balloon causing the balloon to inflate as the pressure in the vial
equalizes balloon capacity of 20 mm & 28 mm Vial Spikes = 100 mL; balloon capacity of 13 mm Vial Spike = 20 mL
draw the plunger back slowly to (not past) the final desired volume of drug place the vial in an upright position on the work surface of the biological safety cabinet remove the Injector/syringe from the Vial Spike:
squeeze the release clips on the ChemoLock™ Injector o the ChemoLock™ Injector will automatically disconnect; do NOT pull apart when releasing
repeat with remaining syringe(s) if applicable inspect the solution in the syringe(s) for particulate write the drug name and mark a line at the volume on the syringe barrel(s) with a thin-tipped permanent marker (while
the solution is IN the syringe) write the puncture date and time or the in-use (stability) date and time directly on the HD vial for future use (if drug
remains and is stable) Note: do NOT remove the ChemoLock™ Injector from any hazardous drug syringe as this will open the system and
increase the chance of exposing healthcare workers to hazardous drug See Checking for Particulate in Vials, Syringes, and Final Products See Filtering Particulate from Solution in Vials and Syringes Using ChemoLock™ USE ASEPTIC TECHNIQUE THROUGHOUT
BCCA PHARMACY PRACTICE STANDARDS FOR HAZARDOUS DRUGS© January 2017 1-1-32

Withdrawal from a Hazardous Drug Vial Using a Chemotherapy Dispensing Pin
ACTIVITY/STANDARD
ensure the correct hazardous drug (HD) vial has been selected remove the protective cap from the HD vial stopper and discard into HD waste inside the biological safety cabinet (BSC) with the vial in an upright position, disinfect the HD vial stopper with a sterile 70% isopropyl alcohol (IPA) swab
wipe the vial stopper several (e.g., three) times in one direction use a new alcohol swab to disinfect each critical site
allow the alcohol to dry carefully remove the protective cover from the spike end of the chemotherapy dispensing pin and discard into HD waste
inside the BSC holding the support flange / edge of the filter cover (depending on the type of chemotherapy dispensing pin used), firmly
push the spike straight into the centre of the vial stopper inspect the solution in the accessed vial for particulate select syringe(s) of appropriate size for the total calculated volume of HD to be withdrawn
an appropriate size syringe must be selected so that no more than three-quarters (75%) of the syringe’s maximum calibrated volume is filled with hazardous drug solution at any time during the compounding process
remove the intermittent stopper cap from the access port of the chemotherapy dispensing pin and place on a 70% IPA swab to the side of the work area or discard if the critical site-side is touch contaminated
luer-lock the syringe onto the exposed access port of the chemotherapy dispensing pin invert the syringe/vial unit and position so the graduates on the syringe are visible
if using a BRAUN CHEMO DISPENSING PIN®: maintain a path of first air to the dispensing pin filter during withdrawal
withdraw less than the required volume of hazardous drug into the syringe air enters the vial through the hydrophobic filter while drug is withdrawn equalizing the pressure in the vial a ‘milking’ technique is NOT necessary
collect the small amount of air bubbles at the top of the syringe by tapping on the syringe barrel just below the bubbles and expel back into the vial pulling back on the syringe plunger to withdraw more drug will clear any fluid that may be on the filter surface after
expelling the air back into the HD vial failure to clear the fluid by aspiration may result in build-up of fluid on the filter surface, blocking the chemotherapy
dispensing pin filter and possibly creating a HD spill draw the plunger back slowly to (not past) the final desired volume of drug place the vial in an upright position on the work surface of the biological safety cabinet carefully detach the HD-filled syringe from the luer-lock access port of the chemotherapy dispensing pin and cover the
syringe tip by either: attaching a needle to inject the drug into an intravenous (IV) solution bag attaching the syringe to an infusion device attaching a syringe tip cap (luer lock or non-luer lock) until ready to inject the contents into a final container attaching a luer lock syringe tip for dispensing to the nursing unit
as soon as the syringe has been detached and the syringe tip covered, re-attach the intermittent stopper cap or a luer-lock tip cap to the access port of the chemotherapy dispensing pin (even if all hazardous drug was removed from the vial)
with the syringe tip covered, write the drug name and mark a line at the volume on the syringe barrel with a thin tipped permanent marker (while the solution is IN the syringe) if not dispensing to the nursing unit
write the puncture date and time or the in-use (stability) date and time directly on the HD vial for future use (if drug remains and is stable)
Note: the chemotherapy dispensing pin should remain in the vial for future access and be discarded with the vial use one chemotherapy dispensing pin per hazardous drug vial
See Checking for Particulate in Vials, Syringes, and Final Products See Filtering Particulate from Solution in Vials and Syringes
USE ASEPTIC TECHNIQUE THROUGHOUT
BCCA PHARMACY PRACTICE STANDARDS FOR HAZARDOUS DRUGS© January 2017 1-1-33

Withdrawal from a Hazardous Drug Vial Using a CHEMO-VENT®
ACTIVITY/STANDARD
ensure the correct hazardous drug (HD) vial has been selected remove the protective cap from the HD vial stopper and discard into HD waste inside the biological safety cabinet (BSC) with the vial in an upright position, disinfect the vial stopper using a sterile 70% isopropyl alcohol (IPA) swab
wipe the vial stopper several (e.g., three) times in one direction use a new alcohol swab to disinfect each critical site
allow the alcohol to dry carefully remove the cap from the needle of the CHEMO-VENT® and discard into HD waste inside the BSC holding the support flange of the CHEMO-VENT®, insert the needle into the outer edge of the vial stopper ensure the bevel of the CHEMO-VENT® needle remains low in the vial (closer to the bottom of the vial) inspect the solution in the accessed vial for particulate select syringe(s) of appropriate size for the total calculated volume of HD to be withdrawn and attach needle(s) of appropriate
gauge an appropriate size syringe must be selected so that no more than three-quarters (75%) of the syringe’s maximum
calibrated volume is filled with hazardous drug solution at any time during the compounding process remove the needle cap from the needle attached to a syringe and place on a 70% IPA swab or into a needle cap holder to the
side of the work area insert the needle into the centre of the vial stopper so that it’s bevel comes to rest vertically higher inside the vial than the bevel
of the CHEMO-VENT® (e.g., closer to the vial stopper) invert the syringe/vial unit and position so the graduates on the syringe are visible
maintain a path of first air to the CHEMO-VENT® filter during withdrawal withdraw less than the required volume of hazardous drug into the syringe
air enters the vial through the hydrophobic filter while drug is withdrawn equalizing pressure in the vial a ‘milking’ technique is NOT necessary
collect the small amount of air bubbles at the top of the syringe by tapping on the syringe barrel just below the bubbles and expel back into the vial ensure the bevel of the CHEMO-VENT® needle is NOT in solution prior to expelling air bubbles into the vial or solution will
be forced into the CHEMO-VENT® and possibly plug the filter draw the plunger back slowly to (not past) final desired volume of drug place the vial in an upright position on the work surface of the biological safety cabinet (BSC) remove the syringe’s needle from the vial and safely recap inspect the solution in the syringe for particulate write the drug name and mark a line at the volume on the syringe barrel with a thin tipped permanent marker (while the solution
is IN the syringe) the CHEMO-VENT® may remain in the vial for withdrawal of more drug as long as the vial remains in the BSC and a path of first
air is maintained to the vial, or the vent may be transferred to another vial of the SAME drug for the SAME patient for withdrawal write the puncture date and time or the in-use (stability) date and time directly on the accessed vial for future use (if drug
remains and is stable) the CHEMO-VENT® must be carefully removed from the vial if removing the vial from the BSC for any reason
do NOT recap the needle of the CHEMO-VENT® prior to discarding into the sharps container disinfect the vial stopper using a sterile 70% IPA swab and allow the alcohol to dry attach a foil seal if storing the vial for future use
If the filter of the CHEMO-VENT® becomes wet and plugged, equalization of pressure inside the vial will not occur. A new CHEMO-VENT® must be inserted into the vial stopper PRIOR to removal of the plugged vent. obtain a new CHEMO-VENT® insert the needle of the CHEMO-VENT® and the needle attached to the syringe further into the vial disinfect the vial stopper around the needles using a sterile 70% IPA swab and allow the alcohol to dry remove the cap from the needle of the new CHEMO-VENT® and discard into HD waste inside the BSC insert the new CHEMO-VENT® needle into the vial to equalize the pressure and THEN remove the plugged CHEMO-VENT® and
the needle attached to the syringe do NOT recap the needle of the CHEMO-VENT® prior to discarding into the sharps container
See Checking for Particulate in Vials, Syringes, and Final Products See Filtering Particulate from Solution in Vials and Syringes
USE ASEPTIC TECHNIQUE THROUGHOUT
BCCA PHARMACY PRACTICE STANDARDS FOR HAZARDOUS DRUGS© January 2017 1-1-34

Withdrawal from a Hazardous Drug Vial Using Negative Pressure Technique
ACTIVITY/STANDARD
Negative pressure technique must NOT be used for withdrawal of hazardous drug (HD) if filter venting or closed system drug transfer devices are available. If negative pressure must be used (e.g., when preparing a clinical trials drug), care must be taken. Build-up of positive pressure within the vial will cause back spray of HD solution when the needle is removed. Excess negative pressure will result in spillage from the bevel of the needle when it is removed from the HD vial. ensure the correct hazardous drug (HD) vial has been selected remove the protective cap from the HD vial stopper and discard into HD waste inside the biological safety cabinet
(BSC) with the vial in an upright position, disinfect the vial stopper using a sterile 70% isopropyl alcohol (IPA) swab
wipe the vial stopper several (e.g., three) times in one direction use a new alcohol swab to disinfect each critical site
allow the alcohol to dry select syringe(s) of appropriate size for the total calculated volume of HD to be withdrawn and attach needle(s) of
appropriate gauge an appropriate size syringe must be selected so that no more than three-quarters (75%) of the syringe’s
maximum calibrated volume is filled with hazardous drug solution at any time during the compounding process draw a volume of air into the syringe slightly less than the volume of HD solution to be withdrawn from the vial remove the needle cap from the needle attached to a syringe and place on a 70% IPA swab or into a needle cap
holder to the side of the work area insert the needle into the centre of the vial stopper invert the syringe/vial unit and position so the graduates on the syringe are visible first withdraw a small volume of HD into the syringe to create a slight negative pressure inside the vial slowly inject a small volume of air into the vial equal to the volume of drug withdrawn from the vial
do NOT inject all the air at once do NOT create positive pressure inside the vial
continue alternately withdrawing drug and injecting air (milking technique) do NOT create excess negative pressure inside the vial throughout the withdrawal process
collect the small amount of air bubbles at the top of the syringe by tapping on the syringe barrel just below the bubbles and expel back into the vial do not remove the needle from the vial to remove the air
draw the syringe plunger back slowly to (not past) the final desired volume of drug place the vial in an upright position on the work surface of the biological safety cabinet remove the needle from the vial and safely recap repeat with remaining syringe(s) if applicable inspect the solution in the syringe(s) for particulate write the drug name and mark a line at the volume on the syringe barrel(s) with a thin tipped permanent marker
(while the solution is IN the syringe) disinfect the vial stopper using a sterile 70% IPA swab and allow the alcohol to dry write the puncture date and time or the in-use (stability) date and time directly on the accessed vial for future use (if
drug remains and is stable) attach a foil seal if storing for future use See Checking for Particulate in Vials, Syringes, and Final Products See Filtering Particulate from Solution in Vials and Syringes See Capping Needles Safely USE ASEPTIC TECHNIQUE THROUGHOUT
BCCA PHARMACY PRACTICE STANDARDS FOR HAZARDOUS DRUGS© January 2017 1-1-35

Checking for Particulate in Vials, Syringes, and Final Products Inside the Biological Safety Cabinet
ACTIVITY/STANDARD
Vials: to inspect the contents of a vial for particulate:
position the vial upright and swirl the contents while looking for particulate rotate the vial upside down and swirl the contents while looking again for particulate bubbles will slowly float around and upwards; particulate will slowly float around and downwards inside the vial
if particulate is present in the vial: check the BCCA Drug Filtering Chart to see if the drug can be filtered
if the drug can be filtered, filter the solution during withdrawal from the vial (see Filtering Particulate from Solution in Vials and Syringes)
if residual drug is left in the vial once the total dose has been withdrawn: • use a thin-tipped permanent marker to write ‘FILTER’ directly on the vial
if the drug can NOT be filtered, the drug vial must be wasted and a new vial used to complete the preparation
Syringes: after withdrawal of solution from a vial, inspect the solution-filled syringe for particulate (even if the solution was
filtered during withdrawal from the vial) to inspect solution in a syringe for particulate:
slowly rotate the syringe upside down and then upright looking for particulate particulate will slowly float around in the solution in the syringe
if particulate is present in a syringe: check The BCCA Drug Filtering Chart to see if the drug can be filtered (see ‘Exception’ below) if the drug can be filtered:
filter the solution into a new syringe (see Filtering Particulate from Solution in Vials and Syringes) inspect the new syringe for particulate and re-filter if particulate is present
if the drug can NOT be filtered, the syringe and its contents must be wasted and a new syringe used to draw up the required volume of drug for the preparation
if particulate is not present in the syringe • if the syringe is the final product:
attach a luer lock tip cap for dispensing or
leave the syringe attached to the ChemoLock™ Injector for dispensing • if the syringe is not the final product:
inject solution in the syringe into a final container Final products (Intravenous solution bags, INFUSORS™, etc.) inspect final products for particulate prior to removal from the biological safety cabinet (if the drug will NOT be
filtered during administration) to inspect solution in a final product for particulate:
rotate the final product upside down and upright while looking for particulate bubbles will float slowly around and upwards; particulate will slowly float around and downwards inside the final
product if particulate is present (and the drug will NOT be filtered during administration), the final product will be wasted and
a new preparation made (see ‘Exception’ below) Exception: Certain drugs may contain a small amount of easily visible, white, amorphous particulates (e.g., cetuximab).
Refer to the Chemotherapy Preparation and Stability chart to determine if white particulate may be expected. If small white particulates are identified in these preparations, it may be dispensed and administered to the patient using a low protein binding 0.22 micron in-line filter.
USE ASEPTIC TECHNIQUE THROUGHOUT
BCCA PHARMACY PRACTICE STANDARDS FOR HAZARDOUS DRUGS© January 2017 1-1-36

Filtering Particulate from Solution in Vials and Syringes Using a CHEMO-VENT®
ACTIVITY/STANDARD
If particulate is present and not expected, check the BCCA Drug Filtering Chart to see if the drug can be filtered. If the drug can be filtered: Filtering particulate found in a vial using a 5 micron hydrophilic filter disc: luer lock a 5 micron hydrophilic filter disc to a syringe of appropriate size for the total calculated volume of
hazardous drug (HD) to be withdrawn luer lock an appropriately sized needle to the other side of the filter disc remove the cap from the needle of a CHEMO-VENT® and discard into HD waste inside the biological safety cabinet
(BSC) holding the support flange at the distal end of the CHEMO-VENT®, insert the needle into the outer edge of the vial
stopper insert the needle attached to the filter disc into the centre of the vial stopper so that it’s bevel comes to rest vertically
higher (closer to the vial stopper) than the CHEMO-VENT® bevel invert the vial/syringe/filter disc/needle assembly and withdraw the required volume of HD into the syringe place the vial back onto the work surface of the biological safety cabinet remove the needle (attached to the hydrophilic filter disc) from the vial and safely recap write the drug name and mark a line at the volume on the syringe barrel using a thin-tipped permanent marker inspect the drug in the syringe for particulate (see Checking for Particulate in Vials, Syringes, and Final Products) repeat with remaining syringe(s)
attach a NEW filter disc to each new syringe remove the needle/filter disc assembly from the syringe and discard into the sharps container inject the solution in the syringe(s) into a final container or ready the syringe(s) for dispensing to the nursing unit Filtering particulate found in a vial using a 5 micron hydrophilic filter needle: luer lock a 5 micron hydrophilic filter needle to a syringe of appropriate size for the total calculated volume of HD to
be withdrawn remove the cap from the needle of a CHEMO-VENT® and discard into HD waste inside the BSC holding the support flange at the distal end of the CHEMO-VENT®, insert the needle into the outer edge of the vial
stopper insert the filter needle into the centre of the vial stopper so that it’s bevel comes to rest vertically higher (closer to
the vial stopper) than the CHEMO-VENT® bevel invert the vial/syringe/filter needle assembly and withdraw the required volume of HD into the syringe place the vial back onto the work surface of the biological safety cabinet remove the hydrophilic filter needle from the vial and safely recap write the drug name and mark a line at the volume on the syringe barrel using a thin-tipped permanent marker inspect the drug in the syringe for particulate (see Checking for Particulate in Vials, Syringes, and Final Products) repeat with remaining syringe(s)
attach a NEW filter needle to each new syringe remove the filter needle from the syringe and discard into the sharps container inject the solution in the syringe(s) into a final container or ready the syringe(s) for dispensing to the nursing unit USE ASEPTIC TECHNIQUE THROUGHOUT
BCCA PHARMACY PRACTICE STANDARDS FOR HAZARDOUS DRUGS© January 2017 1-1-37

Filtering Particulate Found in a Syringe Using a 5 Micron Hydrophilic Filter
ACTIVITY/STANDARD
If particulate is present and not expected, check the BCCA Drug Filtering Chart to see if the drug can be filtered. If the drug can be filtered: luer lock a 5 micron hydrophilic filter needle to the hazardous drug-filled syringe containing particulate inject the drug solution into an intravenous (IV) solution bag (final container)
or luer lock a 5 micron hydrophilic filter disc to the hazardous drug-filled syringe containing particulate luer lock the hydrophilic filter disc to a final container (e.g., INFUSOR™) push the drug solution through the filter disc into the final container remove the filter disc from the final container
or luer lock a 5 micron hydrophilic filter disc to the hazardous drug-filled syringe containing particulate luer lock a syringe fluid dispensing connector/syringe tip connector to the distal end of the 5 micron hydrophilic filter
disc luer lock a new syringe to the distal end of the syringe fluid dispensing connector/syringe tip connector push the drug solution through the filter disc/syringe fluid dispensing connector/syringe tip connector into the new
syringe inspect the solution in the final container for particulate (see Checking for Particulate in Vials, Syringes, and Final
Products) USE ASEPTIC TECHNIQUE THROUGHOUT
BCCA PHARMACY PRACTICE STANDARDS FOR HAZARDOUS DRUGS© January 2017 1-1-38

Filtering Particulate from Solution in a Vial Using ChemoLock™
ACTIVITY/STANDARD
If particulate is present and not expected, check the BCCA Drug Filtering Chart to see if the drug can be filtered. If the drug can be filtered: Filtering solution found in a vial using a 5 micron hydrophilic filter disc: select syringe(s) of appropriate size for the total calculated volume of hazardous drug (HD) to be withdrawn from
the vial an appropriate size syringe must be selected so that no more than three-quarters (75%) of the syringe’s
maximum calibrated volume is filled with hazardous drug solution at any time during the compounding process luer a ChemoLock™ Injector onto the syringe tip(s)
rotate the Injector onto the syringe until an audible click is heard and it spins freely do NOT add air to the syringe prior to attaching a ChemoLock™ Injector
luer a ChemoLock™ Port to one end of a 5 micron hydrophilic filter disc luer a ChemoLock™ Injector to the other end of the same 5 micron hydrophilic filter disc
rotate the Injector onto the filter disc until an audible click is heard and it spins freely grasping the ChemoLock™ Port on the Vial Spike and the ChemoLock™ Injector attached to the filter disc, push
the two pieces straight together until an audible click is heard grasping the ChemoLock™ Port attached to the filter disc the ChemoLock™ Injector attached to a syringe, push
the two pieces straight together until an audible click is heard invert the syringe/vial unit and position so the graduates on the syringe are visible withdraw the calculated volume of hazardous drug into the syringe leave the Injector / filter / ChemoLock™ Port assembly attached to the Vial Spike on the vial for future use remove the Injector/syringe from the ChemoLock™ Port attached to the filter disc
squeeze the release clips on the ChemoLock™ Injector o the ChemoLock™ Injector will automatically disconnect; do NOT pull apart when releasing
repeat with remaining syringe(s) if applicable inspect the drug in the syringe(s) for particulate ready the syringe(s) for removal from the BSC (if the syringe is the final product) or inject the contents of the
syringe into a final container (e.g., intravenous (IV) solution bag / INFUSOR™) Note: do NOT remove the ChemoLock™ Injector from any syringe used to measure hazardous drug as this will open
the system and increase the chance of exposing healthcare workers to hazardous drug USE ASEPTIC TECHNIQUE THROUGHOUT
BCCA PHARMACY PRACTICE STANDARDS FOR HAZARDOUS DRUGS© January 2017 1-1-39
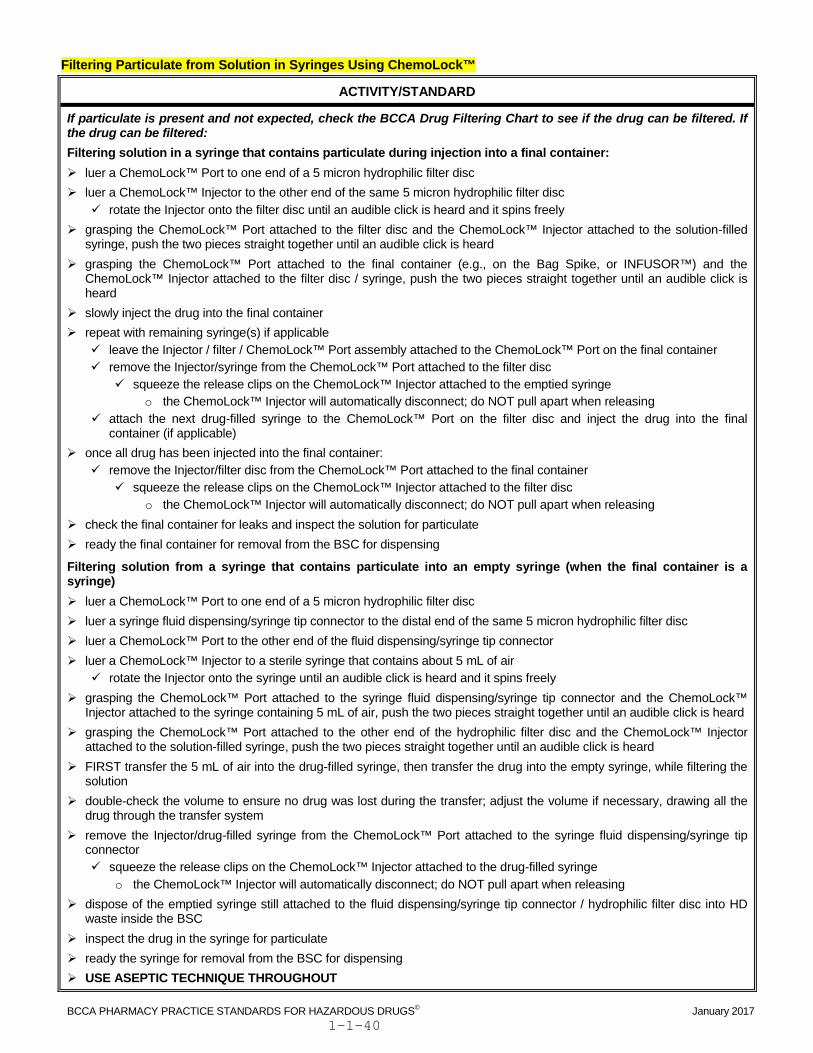
Filtering Particulate from Solution in Syringes Using ChemoLock™
ACTIVITY/STANDARD
If particulate is present and not expected, check the BCCA Drug Filtering Chart to see if the drug can be filtered. If the drug can be filtered: Filtering solution in a syringe that contains particulate during injection into a final container: luer a ChemoLock™ Port to one end of a 5 micron hydrophilic filter disc luer a ChemoLock™ Injector to the other end of the same 5 micron hydrophilic filter disc
rotate the Injector onto the filter disc until an audible click is heard and it spins freely grasping the ChemoLock™ Port attached to the filter disc and the ChemoLock™ Injector attached to the solution-filled
syringe, push the two pieces straight together until an audible click is heard grasping the ChemoLock™ Port attached to the final container (e.g., on the Bag Spike, or INFUSOR™) and the
ChemoLock™ Injector attached to the filter disc / syringe, push the two pieces straight together until an audible click is heard
slowly inject the drug into the final container repeat with remaining syringe(s) if applicable
leave the Injector / filter / ChemoLock™ Port assembly attached to the ChemoLock™ Port on the final container remove the Injector/syringe from the ChemoLock™ Port attached to the filter disc
squeeze the release clips on the ChemoLock™ Injector attached to the emptied syringe o the ChemoLock™ Injector will automatically disconnect; do NOT pull apart when releasing
attach the next drug-filled syringe to the ChemoLock™ Port on the filter disc and inject the drug into the final container (if applicable)
once all drug has been injected into the final container: remove the Injector/filter disc from the ChemoLock™ Port attached to the final container
squeeze the release clips on the ChemoLock™ Injector attached to the filter disc o the ChemoLock™ Injector will automatically disconnect; do NOT pull apart when releasing
check the final container for leaks and inspect the solution for particulate ready the final container for removal from the BSC for dispensing
Filtering solution from a syringe that contains particulate into an empty syringe (when the final container is a syringe) luer a ChemoLock™ Port to one end of a 5 micron hydrophilic filter disc luer a syringe fluid dispensing/syringe tip connector to the distal end of the same 5 micron hydrophilic filter disc luer a ChemoLock™ Port to the other end of the fluid dispensing/syringe tip connector luer a ChemoLock™ Injector to a sterile syringe that contains about 5 mL of air
rotate the Injector onto the syringe until an audible click is heard and it spins freely grasping the ChemoLock™ Port attached to the syringe fluid dispensing/syringe tip connector and the ChemoLock™
Injector attached to the syringe containing 5 mL of air, push the two pieces straight together until an audible click is heard grasping the ChemoLock™ Port attached to the other end of the hydrophilic filter disc and the ChemoLock™ Injector
attached to the solution-filled syringe, push the two pieces straight together until an audible click is heard FIRST transfer the 5 mL of air into the drug-filled syringe, then transfer the drug into the empty syringe, while filtering the
solution double-check the volume to ensure no drug was lost during the transfer; adjust the volume if necessary, drawing all the
drug through the transfer system remove the Injector/drug-filled syringe from the ChemoLock™ Port attached to the syringe fluid dispensing/syringe tip
connector squeeze the release clips on the ChemoLock™ Injector attached to the drug-filled syringe
o the ChemoLock™ Injector will automatically disconnect; do NOT pull apart when releasing dispose of the emptied syringe still attached to the fluid dispensing/syringe tip connector / hydrophilic filter disc into HD
waste inside the BSC inspect the drug in the syringe for particulate ready the syringe for removal from the BSC for dispensing USE ASEPTIC TECHNIQUE THROUGHOUT
BCCA PHARMACY PRACTICE STANDARDS FOR HAZARDOUS DRUGS© January 2017 1-1-40

Diagrams of Connections When Filtering Particulate Found in a Syringe and in a Vial Using ICU Medical’s ChemoLock™
Particulate may be found in either a syringe or a vial containing hazardous drug. To filter particulate while maintaining a closed system, follow the setup pictured below for filtration from a syringe or vial. Spinning Injector - Syringe Spinning Injector – Filter disc – Port
Port – Filter disc – Syringe connector – Port
Filter from a Vial: Vial – Spinning Injector – Filter disc – Port – Spinning Injector – Syringe
Filter during injection into an IV solution bag: IV Solution Bag – Spinning Injector – Filter disc – Port – Spinning Injector - Syringe
Filter from a drug-filled syringe into an empty syringe: Empty - Spinning - Port - Filter - Syringe - Port - Spinning - Drug-filled Syringe Injector disc Connector Injector syringe
Note: Do NOT remove the ChemoLock™ Injector from any syringe used to measure hazardous drug as this will open the system and increase the chance of exposing healthcare workers to hazardous drug
BCCA PHARMACY PRACTICE STANDARDS FOR HAZARDOUS DRUGS© January 2017 1-1-41

Injection of Hazardous Drug into an Intravenous Solution Bag Using ChemoLock™
ACTIVITY/STANDARD
ensure the correct intravenous (IV) solution bag has been selected squeeze the IV solution bag to check for leaks remove the protective cover from the administration port of the IV solution bag remove the protective cover from the spike end of the ChemoLock™ Bag Spike insert the spike firmly into the administration port of the IV solution bag up to the support flange of the Bag Spike check the IV solution bag for leaks and inspect the solution for particulate verify the correct volume of drug for the dose is contained in the syringe(s) and that the solution name and volume
are marked on the syringe barrel(s) using a thin-tipped permanent marker inspect the solution in the syringe(s) for particulate and filter the particulate out of the solution (if present) (see
Filtering Particulate from Solution in Syringes Using ChemoLock™) attach the Injector (attached to a hazardous drug-filled syringe) to the Port on the Bag Spike
grasping the Port on the ChemoLock™ Bag Spike and the ChemoLock™ Injector attached to the drug-filled syringe, push the two pieces straight together until an audible click is heard do NOT hold onto the release clips on the Injector when connecting the Injector to the Port on the Bag
Spike inject the drug remove the Injector/ syringe from the Port on the ChemoLock™ Bag Spike
squeeze the release clips on the ChemoLock™ Injector attached to the syringe o the ChemoLock™ Injector will automatically disconnect; do NOT pull apart when releasing
add drug from remaining syringe(s) if applicable check the IV solution bag for leaks and inspect the solution for particulate ready the IV solution bag for removal from the BSC for dispensing Note: do NOT remove the ChemoLock™ Injector from any syringe used to measure hazardous drug as this will open
the system and increase the chance of exposing healthcare workers to hazardous drug USE ASEPTIC TECHNIQUE THROUGHOUT
BCCA PHARMACY PRACTICE STANDARDS FOR HAZARDOUS DRUGS© January 2017 1-1-42

Injection of Hazardous Drug into an Intravenous Solution Bag Using a Needle and Syringe
ACTIVITY/STANDARD
Injection of Hazardous Drug into an intravenous (IV) Solution Bag Using a Needle and Syringe If ≤ 2 punctures into an IV solution bag port are required when adding hazardous drug (HD): select a needle(s) of appropriate gauge attach the needle(s) to a syringe(s) containing drug (if the syringe(s) does not already have a needle attached) ensure the correct IV solution bag has been selected squeeze the solution bag to check for leaks verify the correct volume of drug for the dose is contained in the syringe(s) and that the solution name and volume
are marked on the syringe barrel(s) with a thin-tipped permanent marker inspect the drug in the syringe(s) for particulate and filter if present (and the drug is filterable) lay the IV solution bag on the work surface of the biological safety cabinet (BSC)
o do NOT hang the IV solution bag from the bar in the BSC while injecting drug as this could cause a HD spill when removing the needle from the injection port
disinfect the injection port of the IV solution bag using a sterile 70% isopropyl alcohol (IPA) swab wipe the injection port several (e.g., three) times in one direction use a new alcohol swab to disinfect each critical site
allow the alcohol to dry hold the injection port perpendicular to the airflow so first air is able to flow unobstructed over the point at which the
needle will enter the port remove the needle cap from the needle and place on a sterile 70% IPA swab or into a needle cap holder to the side
of the work area place the needle tip onto the centre of the injection port exert pressure on the needle tip while rotating the needle straight through both membranes into the bag with the
needle shaft parallel to the port walls inject the drug remove the needle from the IV solution bag port and safely recap the needle remove the needle from the syringe, and discard the needle into the sharps container place a tip cap (luer lock or non-luer lock) onto the syringe tip to protect from leakage / aerosolization of any
hazardous drug droplets or aerosols repeat for remaining syringe if applicable after the syringe(s) have been injected, disinfect the injection port with a 70% IPA swab and allow the alcohol to dry gently invert the bag to mix squeeze the bag to check for leaks and inspect the solution for particulate cover the port with a foil seal (recommended) Note: If more than two punctures of the port are required see Use of a Winged Infusion Set
USE ASEPTIC TECHNIQUE THROUGHOUT
BCCA PHARMACY PRACTICE STANDARDS FOR HAZARDOUS DRUGS© January 2017 1-1-43

Parenteral Doses Requiring Further dilution, in Syringe Using ChemoLock™
ACTIVITY/STANDARD
Only use a fluid dispensing / syringe tip connector to transfer hazardous drug from one syringe to another IF there is NOT a ChemoLock™ Syringe Transfer Set with MicroClave or Double ChemoLock™ available attach a ChemoLock™ Vial Spike to the appropriate hazardous drug vial and a spinning ChemoLock™ Injector to a
syringe of appropriate size and withdraw the required volume of hazardous drug (see Withdrawal from a Hazardous Drug Vial Using ChemoLock™) an appropriate size syringe must be selected so that no more than three-quarters (75%) of the syringe’s
maximum calibrated volume is filled with hazardous drug solution at any time during the compounding process
select an appropriately sized syringe for the total calculated volume of hazardous drug plus diluent and attach a needle
draw up the calculated volume of diluent required mark the solution names and volumes on the syringes using a thin-tipped permanent marker (for final product
check) while the solutions are IN the syringes inspect the solution in the drug- and diluent-filled syringes for particulate if particulate is present, filter the solution in the syringe(s) (see Filtering Particulate from Solution in Syringes
Using ChemoLock™) remove the capped needle from the diluent syringe and discard into the sharps container luer a spinning ChemoLock™ Injector to the diluent-filled syringe
continue turning the Injector until an audible click is heard and the Injector spins freely attach one ChemoLock™ Port to each end of a fluid dispensing/syringe tip connector disinfect the Ports if first air was blocked during connection using a sterile 70% alcohol swab
wipe the Port several (e.g., three) times in one direction use a new alcohol swab to disinfect each critical site
grasping a ChemoLock™ Port on one end of the fluid dispensing/syringe tip connector and the ChemoLock™ Injector on the diluent-filled syringe, push the two pieces straight together until an audible click is heard do NOT hold onto the release clips on the Injector when connecting the Injector to the Port
after disinfecting the ChemoLock™ Port on the other end of the fluid dispensing/syringe tip connector: grasping the ChemoLock™ Port and the ChemoLock™ Injector on the hazardous drug-filled syringe, push
the two pieces straight together until an audible click is heard do NOT hold onto the release clips on the Injector when connecting the Injector to the Port
push on the plunger containing the hazardous drug until all the drug has been transferred into the diluent syringe
**Do not transfer residual drug from the Injector or hub of drug-filled syringe to the diluent syringe (syringes may have 0.037 mL-0.08 mL dead space in the hub; the Injector has 0.34 mL of drug). E.g., do not push/pull the syringes back and forth to mix the drug and diluent.
disconnect the Injector attached to the emptied drug syringe from the ChemoLock™ Port on the fluid dispensing/ syringe tip connector squeeze the release clips on the ChemoLock™ Injector attached to the emptied drug syringe
o the ChemoLock™ Injector will automatically disconnect; do NOT pull apart when releasing draw ~2 mL of air into a 3 mL syringe and luer a spinning ChemoLock™ Injector to the syringe
continue turning the Injector until an audible click is heard and the Injector spins freely grasping a ChemoLock™ Port on the end of the fluid dispensing/syringe tip connector and the ChemoLock™
Injector on the 3 mL syringe, push the two pieces straight together until an audible click is heard do NOT hold onto the release clips on the Injector when connecting the Injector to the Port
pull back on the plunger of the drug/diluent syringe to remove the residual hazardous drug from the fluid dispensing/syringe tip connector / Injectors
gather air bubbles at the tip of the syringe and slowly push the air into the Injector (do this step very carefully so as not to expel any drug)
disconnect the Injectors of each syringe from the ChemoLock™ Ports on the fluid dispensing/syringe tip
BCCA PHARMACY PRACTICE STANDARDS FOR HAZARDOUS DRUGS© January 2017 1-1-44
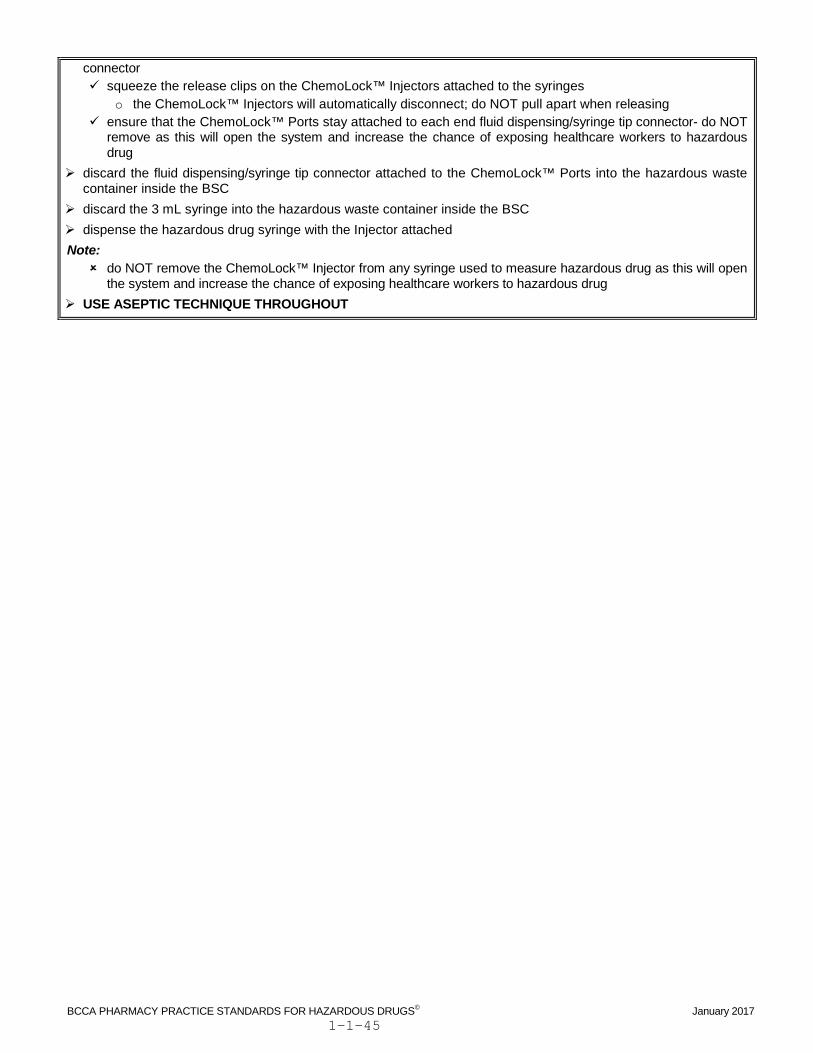
connector squeeze the release clips on the ChemoLock™ Injectors attached to the syringes
o the ChemoLock™ Injectors will automatically disconnect; do NOT pull apart when releasing ensure that the ChemoLock™ Ports stay attached to each end fluid dispensing/syringe tip connector- do NOT
remove as this will open the system and increase the chance of exposing healthcare workers to hazardous drug
discard the fluid dispensing/syringe tip connector attached to the ChemoLock™ Ports into the hazardous waste container inside the BSC
discard the 3 mL syringe into the hazardous waste container inside the BSC dispense the hazardous drug syringe with the Injector attached Note: do NOT remove the ChemoLock™ Injector from any syringe used to measure hazardous drug as this will open
the system and increase the chance of exposing healthcare workers to hazardous drug USE ASEPTIC TECHNIQUE THROUGHOUT
BCCA PHARMACY PRACTICE STANDARDS FOR HAZARDOUS DRUGS© January 2017 1-1-45

Parenteral Doses Requiring Further dilution, in Syringe Using a ChemoLock™ Syringe Transfer Set with MicroClave, ChemoLock™ Port (CL-34)
ACTIVITY/STANDARD
To prepare an Intrathecal (IT) Dose: Use preservative-free drug and diluent attach a ChemoLock™ Vial Spike to the appropriate hazardous drug vial and a spinning ChemoLock™ Injector to a
syringe of appropriate size and withdraw the required volume of hazardous drug (see Withdrawal from a Hazardous Drug Vial Using ChemoLock™) an appropriate size syringe must be selected so that no more than three-quarters (75%) of the syringe’s maximum
calibrated volume is filled with hazardous drug solution at any time during the compounding process select an appropriately sized syringe for the total calculated volume of hazardous drug plus diluent and attach a
needle draw up the calculated volume of diluent required mark the solution names and volumes on the syringes using a thin-tipped permanent marker (for final product check)
while the solutions are IN the syringes inspect the solution in the drug- and diluent-filled syringes for particulate if particulate is present, filter the solution in the syringe(s) (see Filtering Particulate from Solution in Syringes Using
ChemoLock™) remove the capped needle from the diluent syringe and discard into the sharps container luer the Clave-end of a ChemoLock™ Syringe Transfer Set with MicroClave and ChemoLock™ Port (Clave Transfer
Set) onto the diluent-filled syringe disinfect the Port on the other end of the ChemoLock™ Transfer Set if first air was blocked during connection using a
sterile 70% alcohol swab wipe the Port several (e.g., three) times in one direction use a new alcohol swab to disinfect each critical site
grasping the ChemoLock™ Port on the other end of the Clave Transfer Set and the ChemoLock™ Injector on the hazardous drug-filled syringe, push the two pieces straight together until an audible click is heard do NOT hold onto the release clips on the Injector when connecting the Injector to the Port
push on the plunger containing the hazardous drug until all the drug has been transferred into the diluent syringe **Do not transfer residual drug from the Injector or hub of drug-filled syringe to the diluent syringe (syringes may have 0.037mL-0.08mL dead space in the hub; the Injector has 0.34 mL of drug). E.g., do not push/pull the syringes back and forth to mix the drug and diluent. disconnect the Injector attached to the emptied drug syringe from the ChemoLock™ Port on the Clave Transfer Set
squeeze the release clips on the ChemoLock™ Injector attached to the emptied drug syringe o the ChemoLock™ Injector will automatically disconnect; do NOT pull apart when releasing
draw ~2 mL of air into a 3 mL syringe and luer a spinning ChemoLock™ Injector to the syringe continue turning the Injector until an audible click is heard and the Injector spins freely
grasping the ChemoLock™ Port on the end of the Clave Transfer Set and the ChemoLock™ Injector on the 3 mL syringe, push the two pieces straight together until an audible click is heard do NOT hold onto the release clips on the Injector when connecting the Injector to the Port
pull back on the plunger of the drug/diluent syringe to remove the residual hazardous drug from the Clave Transfer Set / Injector
gather air bubbles at the tip of the syringe and slowly push the air into the Clave on the transfer set (do this step very carefully so as not to expel any drug)
disconnect the Injector attached to the 3 mL syringe from the ChemoLock™ Port on the Clave Transfer Set squeeze the release clips on the ChemoLock™ Injector attached to the syringe
o the ChemoLock™ Injector will automatically disconnect; do NOT pull apart when releasing ensure that the Clave Transfer Set stays attached to the diluted hazardous drug-filled syringe- do NOT remove
discard the 3 mL syringe into the hazardous waste container inside the BSC dispense the hazardous drug-filled syringe containing the IT dose for administration by a physician
the physician will remove the Clave Transfer Set prior to administering the drug to the patient Note: do NOT remove the ChemoLock™ Injector from any syringe used to measure hazardous drug as this will open the
system and increase the chance of exposing healthcare workers to hazardous drug
USE ASEPTIC TECHNIQUE THROUGHOUT
BCCA PHARMACY PRACTICE STANDARDS FOR HAZARDOUS DRUGS© January 2017 1-1-46

Parenteral Doses Requiring Further dilution, in Syringe Using a CHEMO VENT®
ACTIVITY/STANDARD
See Withdrawal from a Hazardous Drug Vial using a CHEMO-VENT® once hazardous drug has been withdrawn from the vial and the needle has been recapped:
write the drug name and mark the volume on the syringe barrel with a thin tipped permanent marker attach a needle to an appropriately sized syringe for the calculated volume of drug plus diluent draw up the calculated volume of preservative-free diluent required recap the needle and write the diluent name and volume on the syringe barrel with a thin-tipped permanent
marker inspect the solution in the drug- and diluent-filled syringes for particulate (see Checking for Particulate in
Vials, Syringes, and Final Products) filter the solution in the syringe(s) if particulate is present remove the capped needle from the diluent syringe and discard into the sharps container luer lock the diluent syringe to one end of a fluid dispensing/syringe tip connector remove the capped needle from the hazardous drug-filled syringe and discard into the sharps container attach the drug-filled syringe to the other end of the fluid dispensing/syringe tip connector holding the syringes containing the drug and diluent, push on the plunger until all the drug is transferred into
the diluent syringe **Do not transfer residual drug from the hub of drug syringe to the diluent syringe (NB, Monoject Luer Lock syringes have 0.037mL-0.08mL dead space in hub). E.g., do not push/pull the syringes back and forth to mix the drug and diluent. disconnect the empty drug syringe from the fluid dispensing/syringe tip connector attach a non-luer lock or a luer lock syringe tip cap onto the empty hazardous drug syringe draw ~0.5 mL of air into a 3 mL syringe and attach to the fluid dispensing/syringe tip connector pull back on the plunger of the drug/diluent syringe to remove the residual hazardous drug from the transfer
set eliminate air bubbles and slowly push solution into the hub of the drug/diluent syringe, but not back into the
fluid dispensing/syringe tip connector (do this step very carefully so as not to expel any drug) disconnect each syringe from the fluid dispensing/syringe tip connector and discard the fluid
dispensing/syringe tip connector into the hazardous waste container inside the BSC attach a luer lock tip cap onto the drug/diluent-filled syringe for dispensing
USE ASEPTIC TECHNIQUE THROUGHOUT
BCCA PHARMACY PRACTICE STANDARDS FOR HAZARDOUS DRUGS© January 2017 1-1-47

Transfer of Hazardous Drug From One Syringe to Another Using a ChemoLock™ Syringe Transfer Set with Double ChemoLock™ Ports (CL-33)
ACTIVITY/STANDARD
luer a spinning ChemoLock™ Injector to an appropriately-sized syringe for the total volume of hazardous drug to be transferred from the drug-filled syringe into the new syringe continue turning the Injector until an audible click is heard and the Injector spins freely an appropriate size syringe must be selected so that no more than three-quarters (75%) of the syringe’s
maximum calibrated volume is filled with hazardous drug solution at any time during the compounding process
grasping the Port on one end of the ChemoLock™ Syringe Transfer Set with Double ChemoLock™ Ports (ChemoLock™ Transfer Set) and the ChemoLock™ Injector on the drug-filled syringe, push the two pieces straight together until an audible click is heard do NOT hold onto the release clips on the Injector when connecting the Injector to the Port
disinfect the Port on the other end of the ChemoLock™ Transfer Set if first air was blocked during connection using a sterile 70% alcohol swab wipe the Port several (e.g., three) times in one direction use a new alcohol swab to disinfect each critical site
grasping the disinfected Port on the ChemoLock™ Transfer Set and the ChemoLock™ Injector on the empty syringe, push the two pieces straight together until an audible click is heard do NOT hold onto the release clips on the Injector when connecting the Injector to the Port
transfer the required volume of hazardous drug into the empty syringe disconnect the Injectors of each syringe from the ChemoLock™ Ports on the ChemoLock™ Transfer Set
squeeze the release clips on the ChemoLock™ Injectors attached to the syringes o the ChemoLock™ Injectors will automatically disconnect; do NOT pull apart when releasing
discard the ChemoLock™ Transfer Set into the hazardous waste container inside the BSC save both syringes for the final product check as appropriate dispense the appropriate hazardous drug syringe with the Injector attached Note: do NOT remove the ChemoLock™ Injector from any syringe used to measure hazardous drug as this will open
the system and increase the chance of exposing healthcare workers to hazardous drug USE ASEPTIC TECHNIQUE THROUGHOUT
BCCA PHARMACY PRACTICE STANDARDS FOR HAZARDOUS DRUGS© January 2017 1-1-48
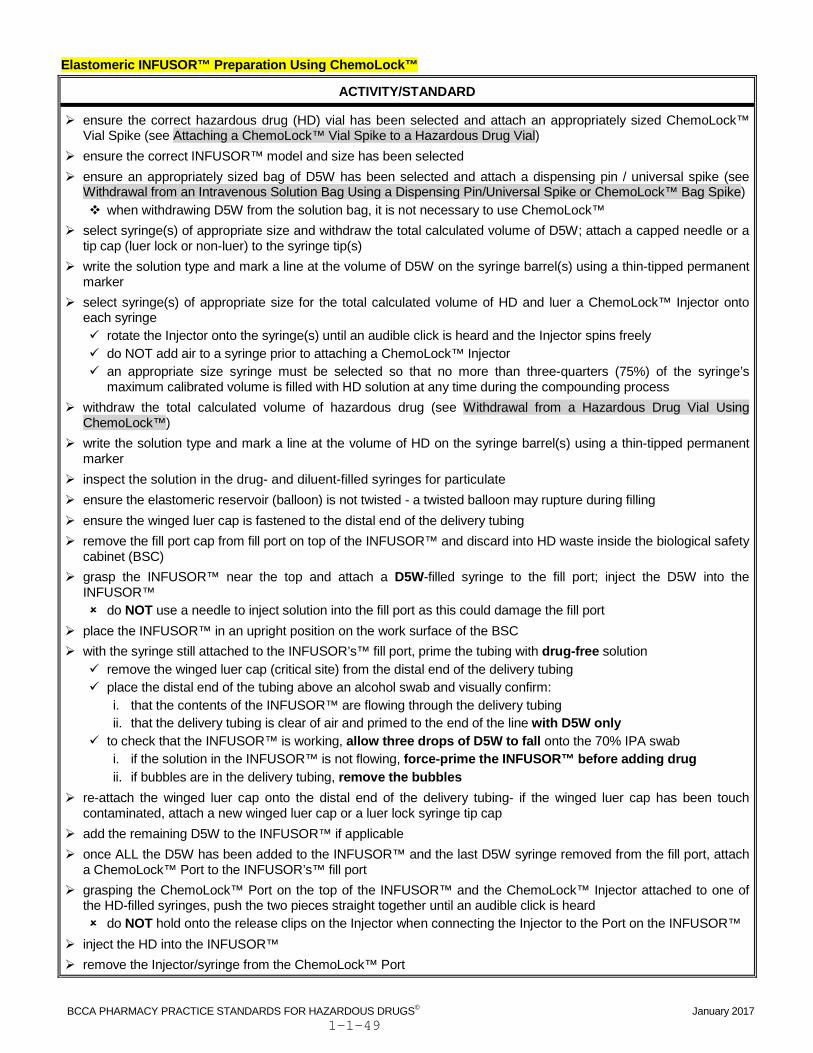
Elastomeric INFUSOR™ Preparation Using ChemoLock™
ACTIVITY/STANDARD
ensure the correct hazardous drug (HD) vial has been selected and attach an appropriately sized ChemoLock™ Vial Spike (see Attaching a ChemoLock™ Vial Spike to a Hazardous Drug Vial)
ensure the correct INFUSOR™ model and size has been selected ensure an appropriately sized bag of D5W has been selected and attach a dispensing pin / universal spike (see
Withdrawal from an Intravenous Solution Bag Using a Dispensing Pin/Universal Spike or ChemoLock™ Bag Spike) when withdrawing D5W from the solution bag, it is not necessary to use ChemoLock™
select syringe(s) of appropriate size and withdraw the total calculated volume of D5W; attach a capped needle or a tip cap (luer lock or non-luer) to the syringe tip(s)
write the solution type and mark a line at the volume of D5W on the syringe barrel(s) using a thin-tipped permanent marker
select syringe(s) of appropriate size for the total calculated volume of HD and luer a ChemoLock™ Injector onto each syringe rotate the Injector onto the syringe(s) until an audible click is heard and the Injector spins freely do NOT add air to a syringe prior to attaching a ChemoLock™ Injector an appropriate size syringe must be selected so that no more than three-quarters (75%) of the syringe’s
maximum calibrated volume is filled with HD solution at any time during the compounding process withdraw the total calculated volume of hazardous drug (see Withdrawal from a Hazardous Drug Vial Using
ChemoLock™) write the solution type and mark a line at the volume of HD on the syringe barrel(s) using a thin-tipped permanent
marker inspect the solution in the drug- and diluent-filled syringes for particulate ensure the elastomeric reservoir (balloon) is not twisted - a twisted balloon may rupture during filling ensure the winged luer cap is fastened to the distal end of the delivery tubing remove the fill port cap from fill port on top of the INFUSOR™ and discard into HD waste inside the biological safety
cabinet (BSC) grasp the INFUSOR™ near the top and attach a D5W-filled syringe to the fill port; inject the D5W into the
INFUSOR™ do NOT use a needle to inject solution into the fill port as this could damage the fill port
place the INFUSOR™ in an upright position on the work surface of the BSC with the syringe still attached to the INFUSOR’s™ fill port, prime the tubing with drug-free solution
remove the winged luer cap (critical site) from the distal end of the delivery tubing place the distal end of the tubing above an alcohol swab and visually confirm:
i. that the contents of the INFUSOR™ are flowing through the delivery tubing ii. that the delivery tubing is clear of air and primed to the end of the line with D5W only
to check that the INFUSOR™ is working, allow three drops of D5W to fall onto the 70% IPA swab i. if the solution in the INFUSOR™ is not flowing, force-prime the INFUSOR™ before adding drug ii. if bubbles are in the delivery tubing, remove the bubbles
re-attach the winged luer cap onto the distal end of the delivery tubing- if the winged luer cap has been touch contaminated, attach a new winged luer cap or a luer lock syringe tip cap
add the remaining D5W to the INFUSOR™ if applicable once ALL the D5W has been added to the INFUSOR™ and the last D5W syringe removed from the fill port, attach
a ChemoLock™ Port to the INFUSOR’s™ fill port grasping the ChemoLock™ Port on the top of the INFUSOR™ and the ChemoLock™ Injector attached to one of
the HD-filled syringes, push the two pieces straight together until an audible click is heard do NOT hold onto the release clips on the Injector when connecting the Injector to the Port on the INFUSOR™
inject the HD into the INFUSOR™ remove the Injector/syringe from the ChemoLock™ Port
BCCA PHARMACY PRACTICE STANDARDS FOR HAZARDOUS DRUGS© January 2017 1-1-49

squeeze the release clips on the ChemoLock™ Injector o the ChemoLock™ Injector will automatically disconnect, do NOT pull apart when releasing
repeat with remaining drug-filled syringes if applicable check the INFUSOR™ for leaks and inspect the solution for particulate leave the ChemoLock™ Port attached to the INFUSOR’s™ fill port for dispensing
Note: when adding D5W or HD to the INFUSOR™, use one of the following methods: (method ‘i’ is recommended)
i. invert the INFUSOR™ with the syringe attached, place the syringe plunger end flat on the work surface – grasp the syringe barrel with one hand, use slow, steady downward pressure to fill the balloon while steadying the INFUSOR™ with the other hand or
ii. with the INFUSOR™ in an upright position, use one hand to hold the syringe barrel while the other hand applies slow steady pressure to the syringe plunger do NOT apply pressure to the connection between the syringe or ChemoLock™ Port and the fill port on the
INFUSOR™ when injecting the D5W do not inject too vigorously creating turbulence in the solution as this may create bubbles
small bubbles in the balloon itself will not cause problems; they will gradually dissipate as they move through the filter
air in the tubing, while not a danger to the patient, may stop the flow of solution through the tubing, preventing drug from reaching the patient
Note: do NOT remove the ChemoLock™ Injector from any syringe used to measure hazardous drug as this will open the
system and increase the chance of exposing healthcare workers to hazardous drug USE ASEPTIC TECHNIQUE THROUGHOUT
BCCA PHARMACY PRACTICE STANDARDS FOR HAZARDOUS DRUGS© January 2017 1-1-50
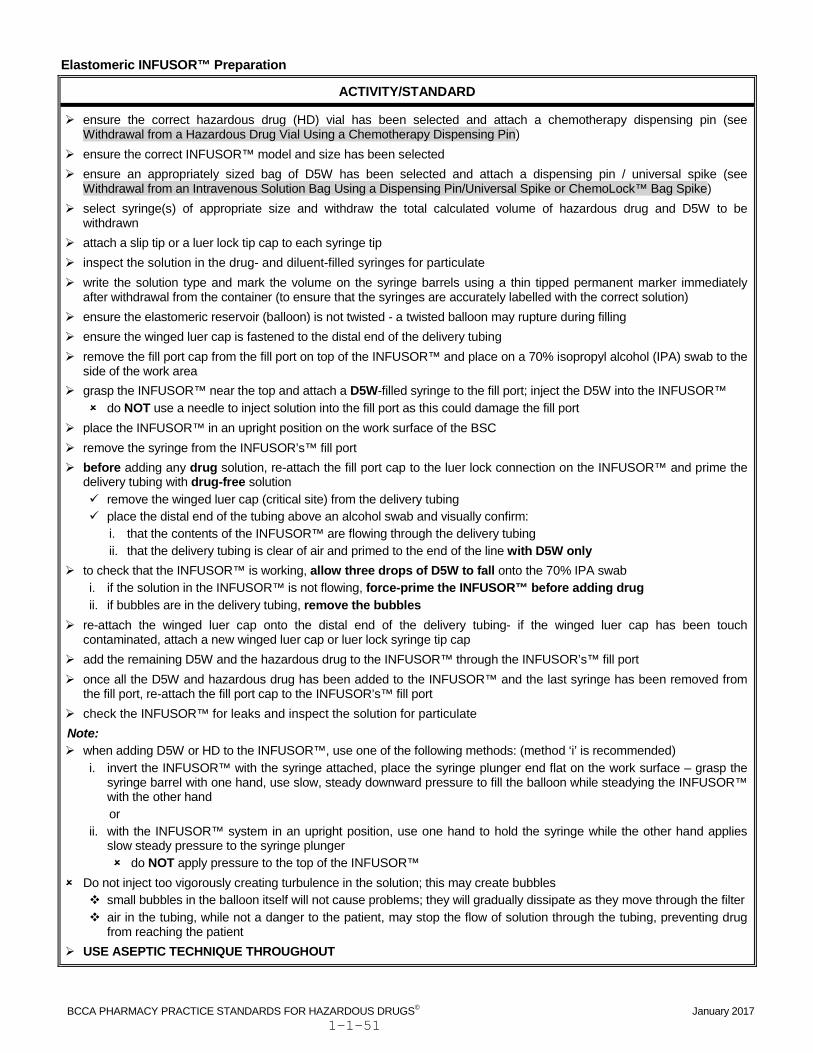
Elastomeric INFUSOR™ Preparation
ACTIVITY/STANDARD
ensure the correct hazardous drug (HD) vial has been selected and attach a chemotherapy dispensing pin (see Withdrawal from a Hazardous Drug Vial Using a Chemotherapy Dispensing Pin)
ensure the correct INFUSOR™ model and size has been selected ensure an appropriately sized bag of D5W has been selected and attach a dispensing pin / universal spike (see
Withdrawal from an Intravenous Solution Bag Using a Dispensing Pin/Universal Spike or ChemoLock™ Bag Spike) select syringe(s) of appropriate size and withdraw the total calculated volume of hazardous drug and D5W to be
withdrawn attach a slip tip or a luer lock tip cap to each syringe tip inspect the solution in the drug- and diluent-filled syringes for particulate write the solution type and mark the volume on the syringe barrels using a thin tipped permanent marker immediately
after withdrawal from the container (to ensure that the syringes are accurately labelled with the correct solution) ensure the elastomeric reservoir (balloon) is not twisted - a twisted balloon may rupture during filling ensure the winged luer cap is fastened to the distal end of the delivery tubing remove the fill port cap from the fill port on top of the INFUSOR™ and place on a 70% isopropyl alcohol (IPA) swab to the
side of the work area grasp the INFUSOR™ near the top and attach a D5W-filled syringe to the fill port; inject the D5W into the INFUSOR™
do NOT use a needle to inject solution into the fill port as this could damage the fill port place the INFUSOR™ in an upright position on the work surface of the BSC remove the syringe from the INFUSOR’s™ fill port before adding any drug solution, re-attach the fill port cap to the luer lock connection on the INFUSOR™ and prime the
delivery tubing with drug-free solution remove the winged luer cap (critical site) from the delivery tubing place the distal end of the tubing above an alcohol swab and visually confirm:
i. that the contents of the INFUSOR™ are flowing through the delivery tubing ii. that the delivery tubing is clear of air and primed to the end of the line with D5W only
to check that the INFUSOR™ is working, allow three drops of D5W to fall onto the 70% IPA swab i. if the solution in the INFUSOR™ is not flowing, force-prime the INFUSOR™ before adding drug ii. if bubbles are in the delivery tubing, remove the bubbles
re-attach the winged luer cap onto the distal end of the delivery tubing- if the winged luer cap has been touch contaminated, attach a new winged luer cap or luer lock syringe tip cap
add the remaining D5W and the hazardous drug to the INFUSOR™ through the INFUSOR’s™ fill port once all the D5W and hazardous drug has been added to the INFUSOR™ and the last syringe has been removed from
the fill port, re-attach the fill port cap to the INFUSOR’s™ fill port check the INFUSOR™ for leaks and inspect the solution for particulate Note: when adding D5W or HD to the INFUSOR™, use one of the following methods: (method ‘i’ is recommended)
i. invert the INFUSOR™ with the syringe attached, place the syringe plunger end flat on the work surface – grasp the syringe barrel with one hand, use slow, steady downward pressure to fill the balloon while steadying the INFUSOR™ with the other hand or
ii. with the INFUSOR™ system in an upright position, use one hand to hold the syringe while the other hand applies slow steady pressure to the syringe plunger do NOT apply pressure to the top of the INFUSOR™
Do not inject too vigorously creating turbulence in the solution; this may create bubbles small bubbles in the balloon itself will not cause problems; they will gradually dissipate as they move through the filter air in the tubing, while not a danger to the patient, may stop the flow of solution through the tubing, preventing drug
from reaching the patient USE ASEPTIC TECHNIQUE THROUGHOUT
BCCA PHARMACY PRACTICE STANDARDS FOR HAZARDOUS DRUGS© January 2017 1-1-51

Force-Priming an Elastomeric INFUSOR™
ACTIVITY/STANDARD
remove the winged luer cap from the distal end of the delivery tubing and place on a 70% isopropyl alcohol (IPA) swab away from the work area
attach a syringe tip connector to the distal end of the delivery tubing
attach a minimum 10mL syringe to the syringe tip connector
pull back the syringe plunger to create suction until fluid is observed in the syringe
visually confirm that the fluid in the tubing is flowing and that the tubing is clear of air before use - allow three drops of D5W to fall onto a 70% IPA swab
re-attach the winged luer cap to the distal end of the delivery tubing
continue adding the diluent (if applicable) and the drug
USE ASEPTIC TECHNIQUE THROUGHOUT
Removing Bubble(s) from the Tubing of an Elastomeric INFUSOR™
ACTIVITY/STANDARD
do NOT remove the winged luer cap from the distal end of the delivery tubing
hold the tubing between the pointer and middle fingers above the bubble(s) and between the thumb and ring finger below the bubble(s)
tap the tubing just below the bubble(s)
move the tubing through the fingers as the bubble(s) moves through the tubing until they reach the end
remove the winged luer cap from the distal end of the delivery tubing
visually confirm that the fluid in the tubing is flowing and no bubbles remain - allow three drops of D5W to fall onto a 70% isopropyl alcohol swab
re-attach the winged luer cap to the distal end of the delivery tubing
continue adding the diluent (if applicable) and the drug
USE ASEPTIC TECHNIQUE THROUGHOUT
BCCA PHARMACY PRACTICE STANDARDS FOR HAZARDOUS DRUGS© January 2017 1-1-52

Clean-up and Waste Disposal in the Biological Safety Cabinet
ACTIVITY/STANDARD
allow the biological safety cabinet (BSC) to purge for 5 minutes after the last compounding activity before beginning the cleaning or decontaminating process
if the sharps container is at the maximum fill line: securely close the lid inside the BSC clean the outside of the container with an aqueous antibacterial solution / soap-moistened towel
do NOT place the sharps container back on the work surface of the BSC once cleaned remove the sharps container and place into the larger hazardous waste container outside of the BSC
if the sharps container is not at the maximum fill line: loosely close the lid inside the BSC clean and disinfect the outside of the sharps container using an aqueous antibacterial agent / soap-moistened
towel (e.g., CaviWipe®) followed by a sterile 70% alcohol pre-moistened wipe either hang the container from the hooks inside the BSC or move it to the side of the work surface in the BSC
place items from the supply tray (e.g., alcohol swabs, needles) into a zip lock bag, seal and remove from the BSC do NOT allow the zip lock bag to touch any surface inside the BSC
clean and disinfect the supply tray in the BSC using an aqueous antibacterial agent (e.g., CaviWipe®) followed by a sterile 70% alcohol pre-moistened wipe
if removing the supply tray to clean or decontaminate the BSC, place in a zip lock bag and seal (above the front grill) once it has been cleaned and disinfected
seal the non-sharp waste bag inside the BSC, clean with an aqueous antibacterial solution / soap-moistened towel and place in an appropriate hazardous waste container outside of the BSC
clean and disinfect all other items in the BSC using an aqueous antibacterial agent followed by sterile 70% alcohol pre-moistened wipe (if applicable)
if removing other items to clean or decontaminate the BSC, place in a zip lock bag and seal once they have been cleaned and disinfected
Refer to BCCA Pharmacy Directive Number VI-20: Biological Safety Cabinet (BSC) Decontamination
BCCA PHARMACY PRACTICE STANDARDS FOR HAZARDOUS DRUGS© January 2017 1-1-53
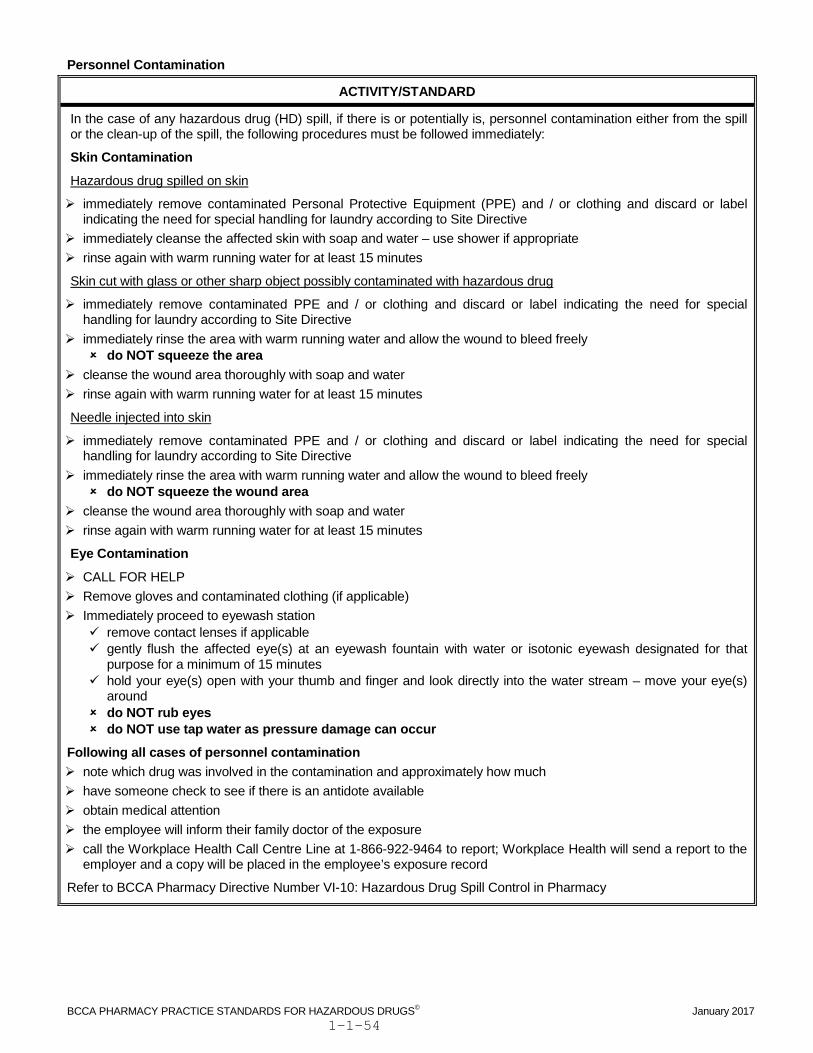
Personnel Contamination
ACTIVITY/STANDARD
In the case of any hazardous drug (HD) spill, if there is or potentially is, personnel contamination either from the spill or the clean-up of the spill, the following procedures must be followed immediately:
Skin Contamination
Hazardous drug spilled on skin
immediately remove contaminated Personal Protective Equipment (PPE) and / or clothing and discard or label indicating the need for special handling for laundry according to Site Directive
immediately cleanse the affected skin with soap and water – use shower if appropriate rinse again with warm running water for at least 15 minutes
Skin cut with glass or other sharp object possibly contaminated with hazardous drug
immediately remove contaminated PPE and / or clothing and discard or label indicating the need for special handling for laundry according to Site Directive
immediately rinse the area with warm running water and allow the wound to bleed freely do NOT squeeze the area
cleanse the wound area thoroughly with soap and water rinse again with warm running water for at least 15 minutes
Needle injected into skin
immediately remove contaminated PPE and / or clothing and discard or label indicating the need for special handling for laundry according to Site Directive
immediately rinse the area with warm running water and allow the wound to bleed freely do NOT squeeze the wound area
cleanse the wound area thoroughly with soap and water rinse again with warm running water for at least 15 minutes
Eye Contamination
CALL FOR HELP Remove gloves and contaminated clothing (if applicable) Immediately proceed to eyewash station
remove contact lenses if applicable gently flush the affected eye(s) at an eyewash fountain with water or isotonic eyewash designated for that
purpose for a minimum of 15 minutes hold your eye(s) open with your thumb and finger and look directly into the water stream – move your eye(s)
around do NOT rub eyes do NOT use tap water as pressure damage can occur
Following all cases of personnel contamination note which drug was involved in the contamination and approximately how much have someone check to see if there is an antidote available obtain medical attention the employee will inform their family doctor of the exposure call the Workplace Health Call Centre Line at 1-866-922-9464 to report; Workplace Health will send a report to the
employer and a copy will be placed in the employee’s exposure record
Refer to BCCA Pharmacy Directive Number VI-10: Hazardous Drug Spill Control in Pharmacy
BCCA PHARMACY PRACTICE STANDARDS FOR HAZARDOUS DRUGS© January 2017 1-1-54

Hazardous Drug Spill Control in Pharmacy – Clean-up of a Spill Within a Biological Safety Cabinet
ACTIVITY/STANDARD
as soon as a hazardous drug (HD) spill occurs - cease all compounding activity
have someone inform the supervisor that a spill has occurred
if personnel contamination has occurred or potentially occurred, see Personnel Contamination – this procedure takes precedence over clean-up of the spill itself
restrict movement of personnel near the biological safety cabinet (BSC) to optimize proper airflow of the BSC and minimize the risk of air spillage, e.g., moving HD-contaminated air out of the front of the BSC and into the room
if outer gloves have been contaminated, remove them immediately within the BSC and deposit them in the waste container within the BSC - remove hands from the BSC and don a new pair of outer gloves before proceeding further
place a sign on the door indicating “DO NOT ENTER - Cleaning/Decontaminating the BSC”
obtain a spill kit and don additional Personal Protective Equipment (PPE) (including safety goggles with side shields and a NIOSH-approved N95 or better respirator mask) remove surgical mask before donning respirator mask perform a positive or negative pressure seal test
use the contents of the spill kit, as appropriate, to clean the spill liquids are blotted with absorbent material (gauze pads, spill-control pads, etc) solids are wiped with wetted absorbent material in such a way as to limit their spread and minimize aerosol
generation
any broken glass fragments are picked up using a scoop (never the hands) and placed in a HD sharps container which goes into a larger HD disposal container along with all other contaminated waste
the spill area is decontaminated by cleaning three times using an alkaline (i.e. pH 8-9) aqueous detergent solution followed by water (detergent-water-detergent-water-detergent-water)
if the high efficiency particulate air (HEPA) filter has been contaminated, the internal and external exhaust fans of the BSC should be turned off and the front opening sealed off label the BSC as contaminated until the filter can be changed and disposed of properly by trained personnel
wearing appropriate PPE
dispose of all clean-up materials in containers, seal and clean the containers with an aqueous antibacterial solution prior to removal from the BSC
place the containers into a rigid HD waste container outside of the BSC and seal
dispose of PPE used during the spill clean-up in a rigid HD waste container and seal
decontaminate the entire BSC after spill clean up
allow the BSC to run (purge) for thirty (30) minutes after decontamination prior to any aseptic compounding
document incident in exposure records of employees involved in the spill and/or spill clean-up
call the Workplace Health Call Centre Line at 1-866-922-9464 to report; Workplace Health will send a report to the employer and a copy will be placed in the employee’s exposure record
replace all used items in the spill kit immediately following the clean-up
Refer to BCCA Pharmacy Directive VI-20: Biological Safety Cabinet (BSC) Decontamination
Refer to BCCA Pharmacy Directive Number VI-10: Hazardous Drug Spill Control in Pharmacy
BCCA PHARMACY PRACTICE STANDARDS FOR HAZARDOUS DRUGS© January 2017 1-1-55
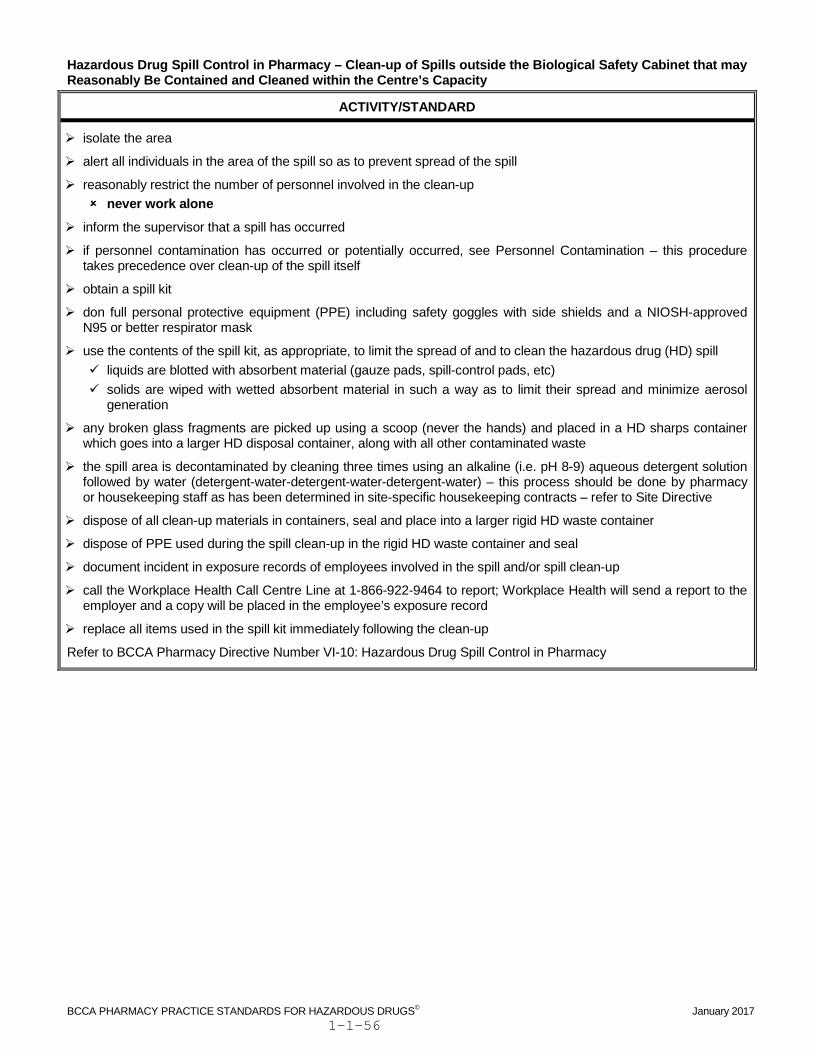
Hazardous Drug Spill Control in Pharmacy – Clean-up of Spills outside the Biological Safety Cabinet that may Reasonably Be Contained and Cleaned within the Centre’s Capacity
ACTIVITY/STANDARD
isolate the area
alert all individuals in the area of the spill so as to prevent spread of the spill
reasonably restrict the number of personnel involved in the clean-up never work alone
inform the supervisor that a spill has occurred
if personnel contamination has occurred or potentially occurred, see Personnel Contamination – this procedure takes precedence over clean-up of the spill itself
obtain a spill kit
don full personal protective equipment (PPE) including safety goggles with side shields and a NIOSH-approved N95 or better respirator mask
use the contents of the spill kit, as appropriate, to limit the spread of and to clean the hazardous drug (HD) spill liquids are blotted with absorbent material (gauze pads, spill-control pads, etc) solids are wiped with wetted absorbent material in such a way as to limit their spread and minimize aerosol
generation
any broken glass fragments are picked up using a scoop (never the hands) and placed in a HD sharps container which goes into a larger HD disposal container, along with all other contaminated waste
the spill area is decontaminated by cleaning three times using an alkaline (i.e. pH 8-9) aqueous detergent solution followed by water (detergent-water-detergent-water-detergent-water) – this process should be done by pharmacy or housekeeping staff as has been determined in site-specific housekeeping contracts – refer to Site Directive
dispose of all clean-up materials in containers, seal and place into a larger rigid HD waste container
dispose of PPE used during the spill clean-up in the rigid HD waste container and seal
document incident in exposure records of employees involved in the spill and/or spill clean-up
call the Workplace Health Call Centre Line at 1-866-922-9464 to report; Workplace Health will send a report to the employer and a copy will be placed in the employee’s exposure record
replace all items used in the spill kit immediately following the clean-up
Refer to BCCA Pharmacy Directive Number VI-10: Hazardous Drug Spill Control in Pharmacy
BCCA PHARMACY PRACTICE STANDARDS FOR HAZARDOUS DRUGS© January 2017 1-1-56
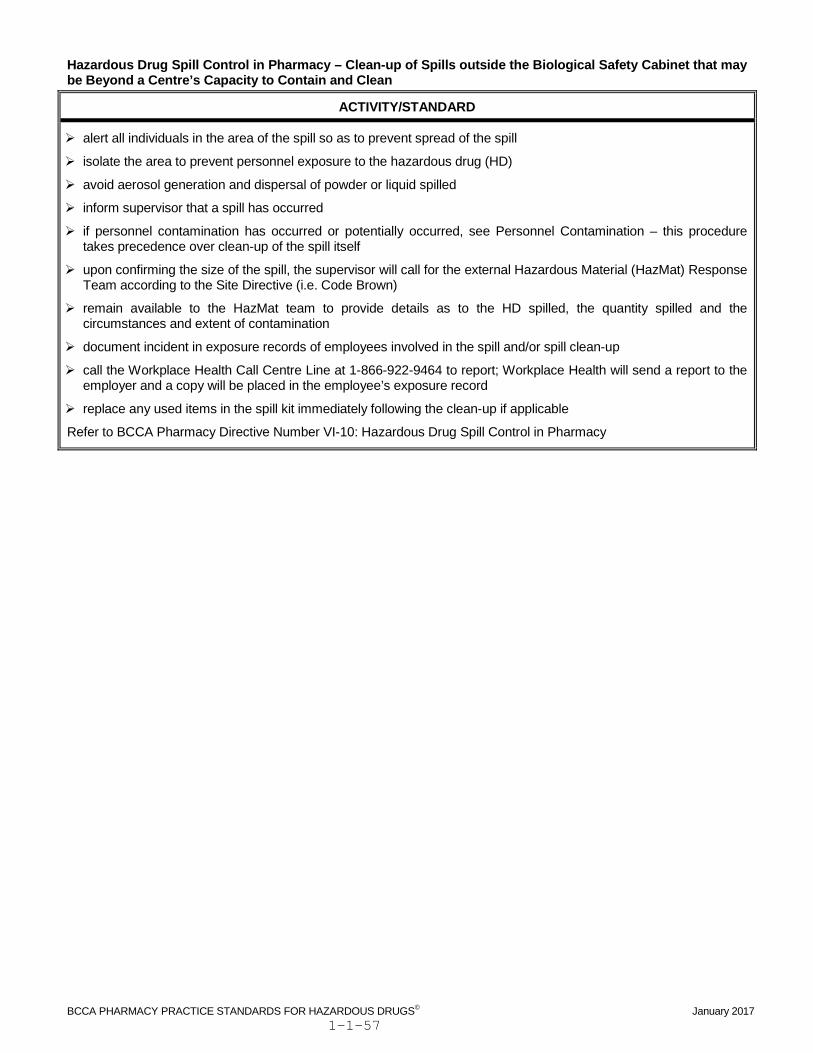
Hazardous Drug Spill Control in Pharmacy – Clean-up of Spills outside the Biological Safety Cabinet that may be Beyond a Centre’s Capacity to Contain and Clean
ACTIVITY/STANDARD
alert all individuals in the area of the spill so as to prevent spread of the spill
isolate the area to prevent personnel exposure to the hazardous drug (HD)
avoid aerosol generation and dispersal of powder or liquid spilled
inform supervisor that a spill has occurred
if personnel contamination has occurred or potentially occurred, see Personnel Contamination – this procedure takes precedence over clean-up of the spill itself
upon confirming the size of the spill, the supervisor will call for the external Hazardous Material (HazMat) Response Team according to the Site Directive (i.e. Code Brown)
remain available to the HazMat team to provide details as to the HD spilled, the quantity spilled and the circumstances and extent of contamination
document incident in exposure records of employees involved in the spill and/or spill clean-up
call the Workplace Health Call Centre Line at 1-866-922-9464 to report; Workplace Health will send a report to the employer and a copy will be placed in the employee’s exposure record
replace any used items in the spill kit immediately following the clean-up if applicable
Refer to BCCA Pharmacy Directive Number VI-10: Hazardous Drug Spill Control in Pharmacy
BCCA PHARMACY PRACTICE STANDARDS FOR HAZARDOUS DRUGS© January 2017 1-1-57