mit lincoln laboratory mini science kit
TRANSCRIPT
Page 1 of 34 T. H. Rider
9/18/11
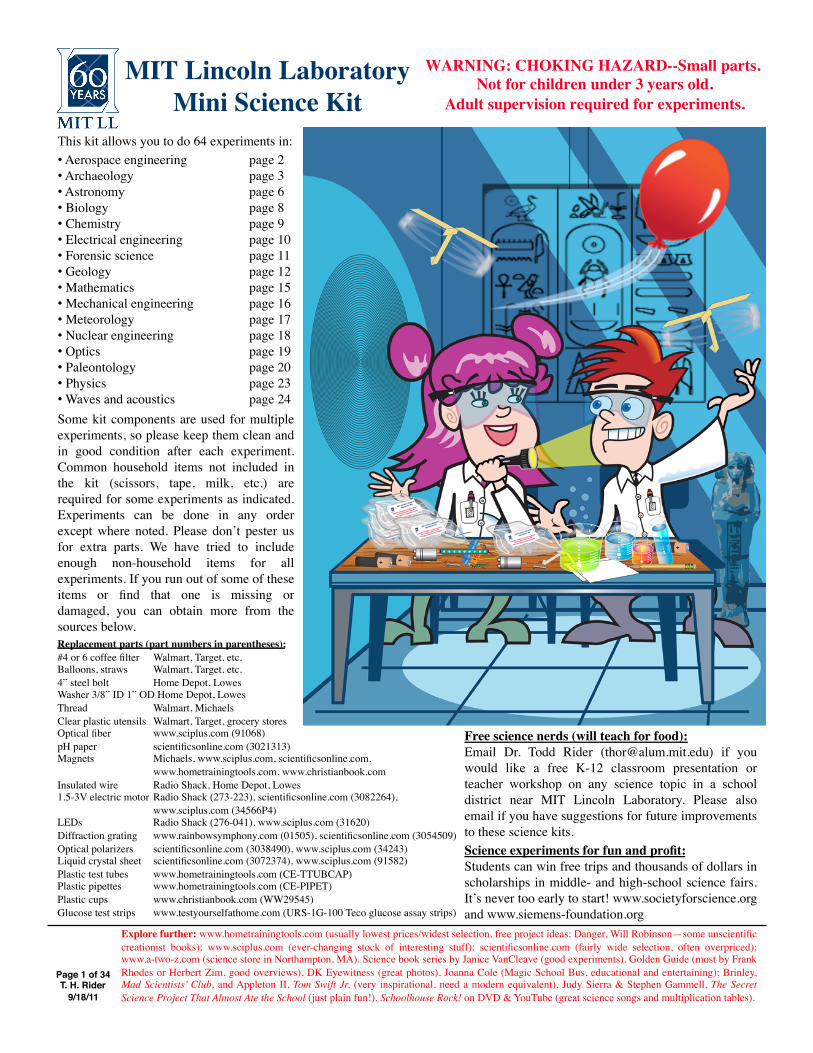
MIT Lincoln Laboratory�Mini Science Kit
This kit allows you to do 64 experiments in: • Aerospace engineering page 2 • Archaeology page 3 • Astronomy page 6 • Biology page 8 • Chemistry page 9 • Electrical engineering page 10 • Forensic science page 11 • Geology page 12 • Mathematics page 15 • Mechanical engineering page 16 • Meteorology page 17 • Nuclear engineering page 18 • Optics page 19 • Paleontology page 20 • Physics page 23 • Waves and acoustics page 24 Some kit components are used for multiple experiments, so please keep them clean and in good condition after each experiment. Common household items not included in the kit (scissors, tape, milk, etc.) are required for some experiments as indicated. Experiments can be done in any order except where noted. Please don’t pester us for extra parts. We have tried to include enough non-household items for all experiments. If you run out of some of these items or find that one is missing or damaged, you can obtain more from the sources below.
Explore further: www.hometrainingtools.com (usually lowest prices/widest selection, free project ideas; Danger, Will Robinson—some unscientific creationist books); www.sciplus.com (ever-changing stock of interesting stuff); scientificsonline.com (fairly wide selection, often overpriced); www.a-two-z.com (science store in Northampton, MA). Science book series by Janice VanCleave (good experiments), Golden Guide (most by Frank Rhodes or Herbert Zim, good overviews), DK Eyewitness (great photos), Joanna Cole (Magic School Bus, educational and entertaining); Brinley, Mad Scientists’ Club, and Appleton II, Tom Swift Jr. (very inspirational, need a modern equivalent), Judy Sierra & Stephen Gammell, The Secret Science Project That Almost Ate the School (just plain fun!). Schoolhouse Rock! on DVD & YouTube (great science songs and multiplication tables).
Replacement parts (part numbers in parentheses): #4 or 6 coffee filter Walmart, Target, etc. Balloons, straws Walmart, Target, etc. 4” steel bolt Home Depot, Lowes Washer 3/8” ID 1” OD Home Depot, Lowes Thread Walmart, Michaels Clear plastic utensils Walmart, Target, grocery stores Optical fiber www.sciplus.com (91068) pH paper scientificsonline.com (3021313) Magnets Michaels, www.sciplus.com, scientificsonline.com,
www.hometrainingtools.com, www.christianbook.com Insulated wire Radio Shack, Home Depot, Lowes 1.5-3V electric motor Radio Shack (273-223), scientificsonline.com (3082264),
www.sciplus.com (34566P4) LEDs Radio Shack (276-041), www.sciplus.com (31620) Diffraction grating www.rainbowsymphony.com (01505), scientificsonline.com (3054509) Optical polarizers scientificsonline.com (3038490), www.sciplus.com (34243) Liquid crystal sheet scientificsonline.com (3072374), www.sciplus.com (91582) Plastic test tubes www.hometrainingtools.com (CE-TTUBCAP) Plastic pipettes www.hometrainingtools.com (CE-PIPET) Plastic cups www.christianbook.com (WW29545) Glucose test strips www.testyourselfathome.com (URS-1G-100 Teco glucose assay strips)
Free science nerds (will teach for food): Email Dr. Todd Rider ([email protected]) if you would like a free K-12 classroom presentation or teacher workshop on any science topic in a school district near MIT Lincoln Laboratory. Please also email if you have suggestions for future improvements to these science kits. Science experiments for fun and profit: Students can win free trips and thousands of dollars in scholarships in middle- and high-school science fairs. It’s never too early to start! www.societyforscience.org and www.siemens-foundation.org
WARNING: CHOKING HAZARD--Small parts. �Not for children under 3 years old.�
Adult supervision required for experiments.
Page 2 of 34 T. H. Rider
9/18/11
Aerospace Engineering
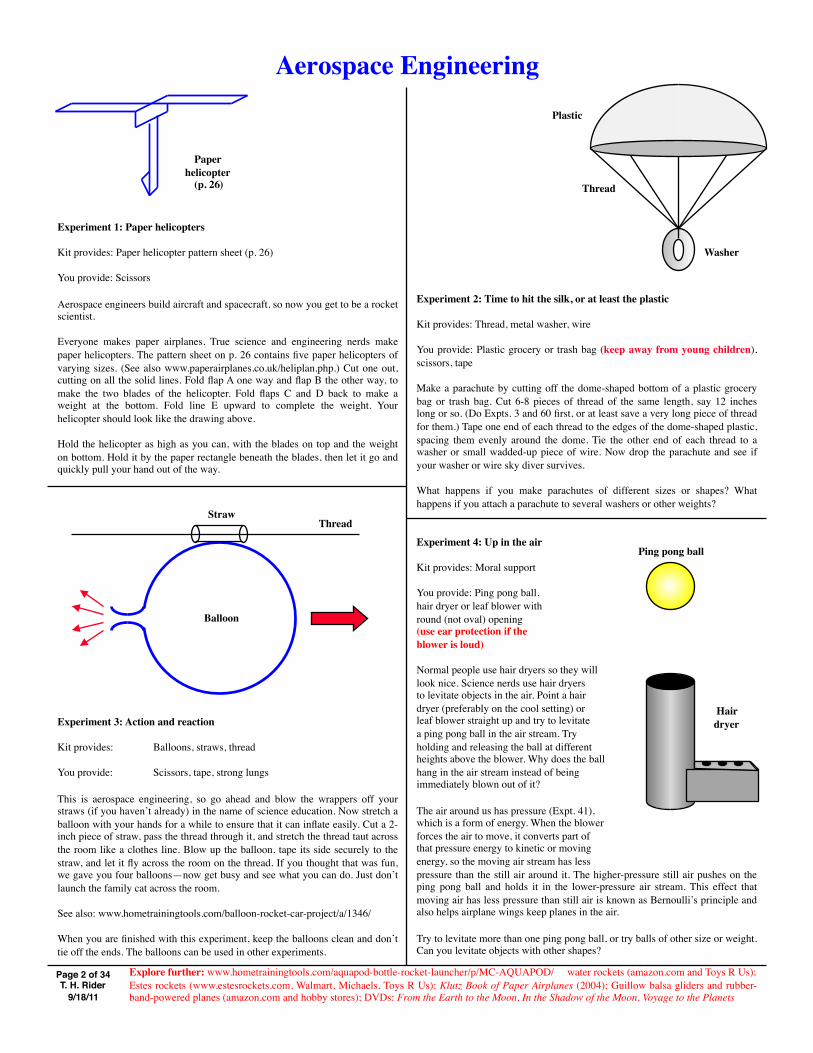
Experiment 4: Up in the air
Kit provides: Moral support
You provide: Ping pong ball, hair dryer or leaf blower with round (not oval) opening (use ear protection if the blower is loud)
Normal people use hair dryers so they will look nice. Science nerds use hair dryers to levitate objects in the air. Point a hair dryer (preferably on the cool setting) or leaf blower straight up and try to levitate a ping pong ball in the air stream. Try holding and releasing the ball at different heights above the blower. Why does the ball hang in the air stream instead of being immediately blown out of it?
The air around us has pressure (Expt. 41), which is a form of energy. When the blower forces the air to move, it converts part of that pressure energy to kinetic or moving energy, so the moving air stream has less pressure than the still air around it. The higher-pressure still air pushes on the ping pong ball and holds it in the lower-pressure air stream. This effect that moving air has less pressure than still air is known as Bernoulli’s principle and also helps airplane wings keep planes in the air.
Try to levitate more than one ping pong ball, or try balls of other size or weight. Can you levitate objects with other shapes?
Experiment 2: Time to hit the silk, or at least the plastic
Kit provides: Thread, metal washer, wire
You provide: Plastic grocery or trash bag (keep away from young children), scissors, tape
Make a parachute by cutting off the dome-shaped bottom of a plastic grocery bag or trash bag. Cut 6-8 pieces of thread of the same length, say 12 inches long or so. (Do Expts. 3 and 60 first, or at least save a very long piece of thread for them.) Tape one end of each thread to the edges of the dome-shaped plastic, spacing them evenly around the dome. Tie the other end of each thread to a washer or small wadded-up piece of wire. Now drop the parachute and see if your washer or wire sky diver survives.
What happens if you make parachutes of different sizes or shapes? What happens if you attach a parachute to several washers or other weights?
Experiment 1: Paper helicopters
Kit provides: Paper helicopter pattern sheet (p. 26)
You provide: Scissors
Aerospace engineers build aircraft and spacecraft, so now you get to be a rocket scientist.
Everyone makes paper airplanes. True science and engineering nerds make paper helicopters. The pattern sheet on p. 26 contains five paper helicopters of varying sizes. (See also www.paperairplanes.co.uk/heliplan.php.) Cut one out, cutting on all the solid lines. Fold flap A one way and flap B the other way, to make the two blades of the helicopter. Fold flaps C and D back to make a weight at the bottom. Fold line E upward to complete the weight. Your helicopter should look like the drawing above.
Hold the helicopter as high as you can, with the blades on top and the weight on bottom. Hold it by the paper rectangle beneath the blades, then let it go and quickly pull your hand out of the way.
Experiment 3: Action and reaction
Kit provides: Balloons, straws, thread
You provide: Scissors, tape, strong lungs
This is aerospace engineering, so go ahead and blow the wrappers off your straws (if you haven’t already) in the name of science education. Now stretch a balloon with your hands for a while to ensure that it can inflate easily. Cut a 2-inch piece of straw, pass the thread through it, and stretch the thread taut across the room like a clothes line. Blow up the balloon, tape its side securely to the straw, and let it fly across the room on the thread. If you thought that was fun, we gave you four balloons—now get busy and see what you can do. Just don’t launch the family cat across the room.
See also: www.hometrainingtools.com/balloon-rocket-car-project/a/1346/
When you are finished with this experiment, keep the balloons clean and don’t tie off the ends. The balloons can be used in other experiments.
Explore further: www.hometrainingtools.com/aquapod-bottle-rocket-launcher/p/MC-AQUAPOD/ water rockets (amazon.com and Toys R Us); Estes rockets (www.estesrockets.com, Walmart, Michaels, Toys R Us); Klutz Book of Paper Airplanes (2004); Guillow balsa gliders and rubber-band-powered planes (amazon.com and hobby stores); DVDs: From the Earth to the Moon, In the Shadow of the Moon, Voyage to the Planets
Paper helicopter
(p. 26)
Plastic
Thread
Washer
Ping pong ball
Hair dryer
Balloon
Straw Thread
Page 3 of 34 T. H. Rider
9/18/11
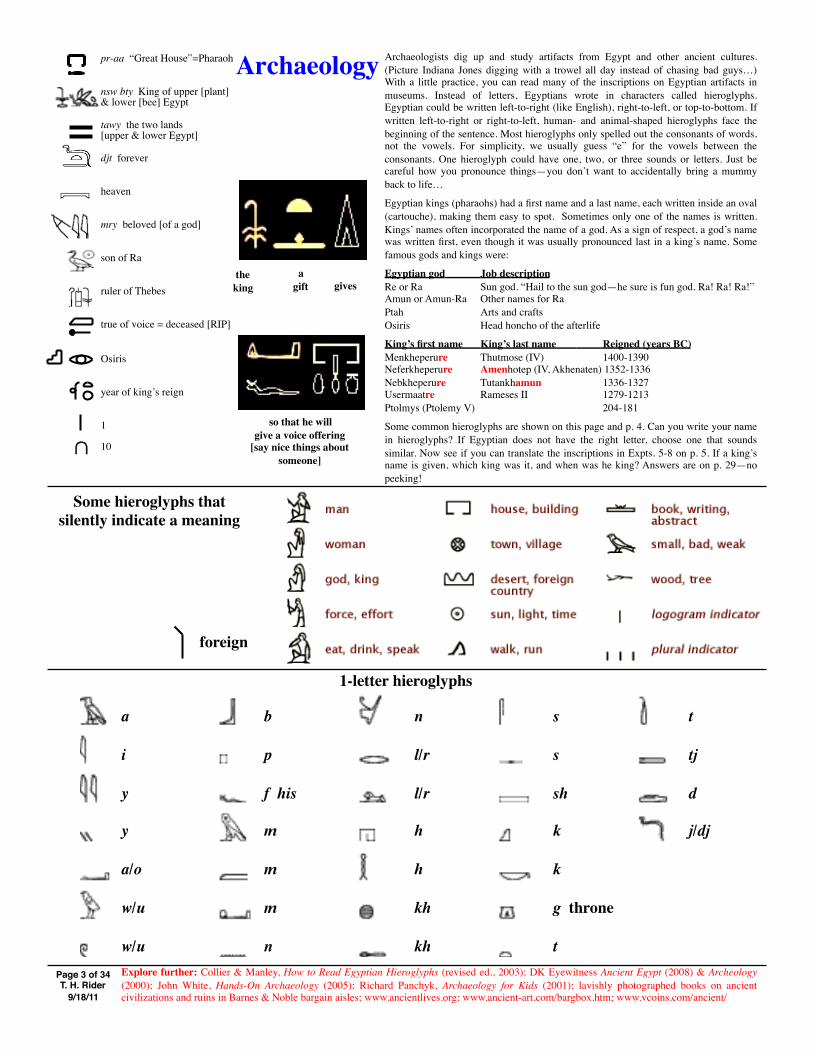
Archaeologists dig up and study artifacts from Egypt and other ancient cultures. (Picture Indiana Jones digging with a trowel all day instead of chasing bad guys…) With a little practice, you can read many of the inscriptions on Egyptian artifacts in museums. Instead of letters, Egyptians wrote in characters called hieroglyphs. Egyptian could be written left-to-right (like English), right-to-left, or top-to-bottom. If written left-to-right or right-to-left, human- and animal-shaped hieroglyphs face the beginning of the sentence. Most hieroglyphs only spelled out the consonants of words, not the vowels. For simplicity, we usually guess “e” for the vowels between the consonants. One hieroglyph could have one, two, or three sounds or letters. Just be careful how you pronounce things—you don’t want to accidentally bring a mummy back to life…
Egyptian kings (pharaohs) had a first name and a last name, each written inside an oval (cartouche), making them easy to spot. Sometimes only one of the names is written. Kings’ names often incorporated the name of a god. As a sign of respect, a god’s name was written first, even though it was usually pronounced last in a king’s name. Some famous gods and kings were:
Egyptian god Job description Re or Ra Sun god. “Hail to the sun god—he sure is fun god. Ra! Ra! Ra!” Amun or Amun-Ra Other names for Ra Ptah Arts and crafts Osiris Head honcho of the afterlife
King’s first name King’s last name Reigned (years BC) Menkheperure Thutmose (IV) 1400-1390 Neferkheperure Amenhotep (IV, Akhenaten) 1352-1336 Nebkheperure Tutankhamun 1336-1327 Usermaatre Rameses II 1279-1213 Ptolmys (Ptolemy V) 204-181
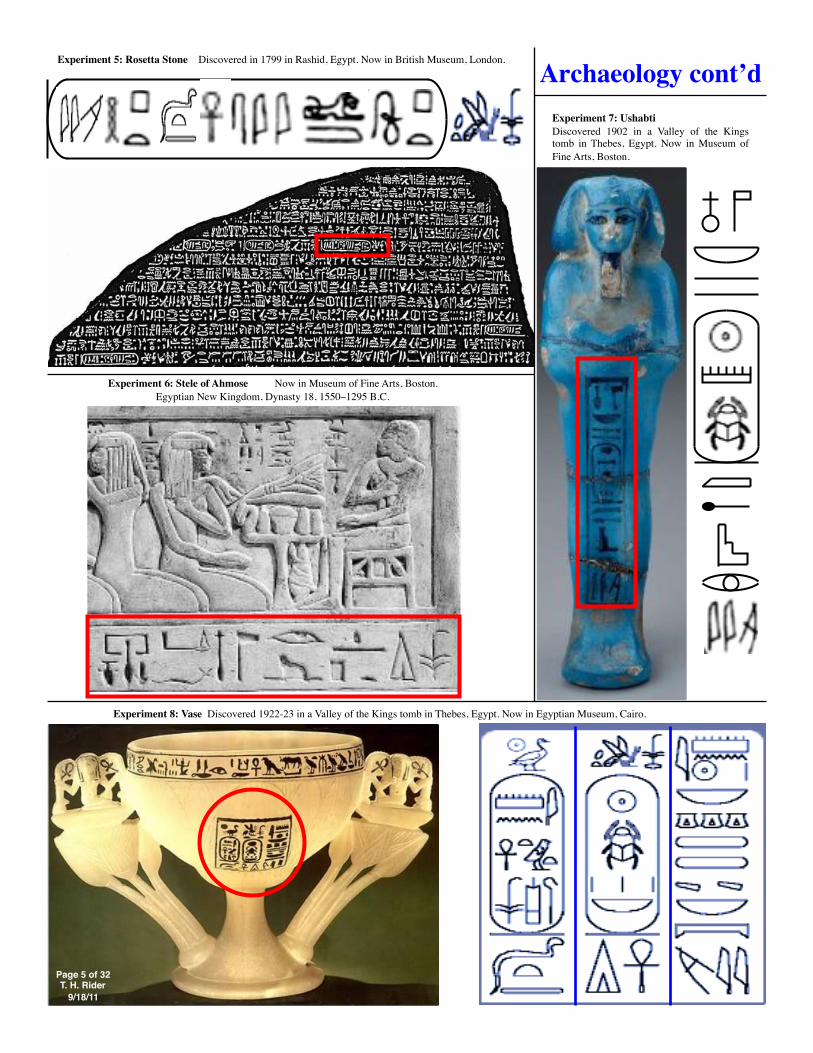
Some common hieroglyphs are shown on this page and p. 4. Can you write your name in hieroglyphs? If Egyptian does not have the right letter, choose one that sounds similar. Now see if you can translate the inscriptions in Expts. 5-8 on p. 5. If a king’s name is given, which king was it, and when was he king? Answers are on p. 29—no peeking!
Explore further: Collier & Manley, How to Read Egyptian Hieroglyphs (revised ed., 2003); DK Eyewitness Ancient Egypt (2008) & Archeology (2000); John White, Hands-On Archaeology (2005); Richard Panchyk, Archaeology for Kids (2001); lavishly photographed books on ancient civilizations and ruins in Barnes & Noble bargain aisles; www.ancientlives.org; www.ancient-art.com/bargbox.htm; www.vcoins.com/ancient/
pr-aa “Great House”=Pharaoh
nsw bty King of upper [plant] & lower [bee] Egypt
tawy the two lands [upper & lower Egypt]
djt forever
heaven
mry beloved [of a god]
son of Ra
ruler of Thebes
true of voice = deceased [RIP]
Osiris
year of king’s reign
1
10 ∩
the king
a gift gives
so that he will give a voice offering
[say nice things about someone]
Archaeology
1-letter hieroglyphs
a
i
y
y
a/o
w/u
w/u
b
p
f his
m
m
m
n
n
l/r
l/r
h
h
kh
kh
s
s
sh
k
k
g throne
t
t
tj
d
j/dj
foreign
Some hieroglyphs that silently indicate a meaning

Page 4 of 34 T. H. Rider
9/18/11
2-letter hieroglyphs
aw
ab
akh
iw
im
in
ir rites
is
aa great
ak
aj
o/wa
wa
wp
wn
iwn
wr
wd
wj
ba
bh
pa
pr house
ph
ma
mi like/as
mi
nb lord/all
nm
nh
nkh
ns
nj
rw
ra sun
di give
mw
mn
mr love
mh
ms
mt
mt
nw
nw
Some 3-letter hieroglyphs
iwn
ankh live/life
aha
wah
nfr good
ntr god
njm
rwj
htp offering
khpr being
khnt
khrw voice
shma
kap
tyw
djam/was power
maa true
Archaeology (continued)—Egyptian Hieroglyphs
ha
hw
hm
hm
hn
hr
hs
hj
kha 1000
kha
khw
kht
kha
khn
khn
khr
sa son
sa
sa
sw king
sn
sn
sk
st
sha
shw
shn
ti
tm
tja
dja
djw
djr
djd enduring
nekh
shs
shd
kd
ka spirit
kp
km
gm
gs
ta
Page 5 of 34 T. H. Rider
9/18/11
Experiment 7: Ushabti Discovered 1902 in a Valley of the Kings tomb in Thebes, Egypt. Now in Museum of Fine Arts, Boston.
Experiment 6: Stele of Ahmose Now in Museum of Fine Arts, Boston. Egyptian New Kingdom, Dynasty 18, 1550–1295 B.C.
Experiment 8: Vase Discovered 1922-23 in a Valley of the Kings tomb in Thebes, Egypt. Now in Egyptian Museum, Cairo.
Experiment 5: Rosetta Stone Discovered in 1799 in Rashid, Egypt. Now in British Museum, London.
Archaeology cont’d
Page 5 of 32 T. H. Rider
9/18/11

Page 6 of 34 T. H. Rider
9/18/11
Astronomy Experiment 9: Lunar geography Astronomers study planets, stars, and other space stuff and get rather cranky if you call them astrologers. To try out astronomy for yourself, go look at the moon. No, really. Binoculars are helpful but not required. The white areas are called the highlands; they are largely made of anorthosite, sort of like granite (p. 13). The dark areas are called seas (maria in Latin), but are really basalt, iron-rich lava that has spilled out from inside the moon and hardened. Six manned Apollo missions landed on the moon. Use the moon map on p. 7 to identify the landing sites. Note that the moon always keeps the same face to the earth as it orbits the earth. Watch the moon as it goes through its monthly phase--the shadows can make some features more visible at certain phases. Experiment 11: Meteor showers Comets have left trails of debris throughout the solar system. As earth orbits the sun each year, it passes through different debris trails. Some of the debris enters and burns up in our atmosphere, creating meteor showers at certain times of the year. Each meteor shower is named after the constellation in the direction from which the meteors appear to come (see blue list below). Check www.imo.net or www.space.com for more detailed information on upcoming meteor showers. Step outside way before dawn on the appropriate date, let your eyes adjust to the darkness, look toward the right constellation (see Expt. 12), and enjoy the show. You don’t need binoculars or a telescope--just your eyes. If you see a really big one coming, call Bruce Willis.
Experiment 12: To infinity and beyond! To identify stars in the night sky more easily, we arbitrarily group certain bright stars together as constellations. As the earth rotates each day and orbits the sun each year, different sets of constellations are visible from the northern and southern hemispheres. The star maps below are for the northern hemisphere; use whichever one is closest to the current month. How many constellations can you identify? With binoculars or a small telescope, you can see Jupiter and its four largest moons, other planets, the Andromeda galaxy, and nebulae. To know where to look, check the latest edition of one of these: Terence Dickinson, NightWatch Philip S. Harrington, Star Watch Guy Consolmagno & Dan M. Davis, Turn Left at Orion Also check www.skymaps.com to print a detailed map each month.
Experiment 10: Satellites Look at the sky for 30-60 minutes soon after sunset or before sunrise when only a few stars are out. During these times, sunlight shines on satellites but not on you. Binoculars are helpful but not required. Satellites will look like bright slowly moving stars. Most travel from west to east within minutes. Klaatu barada nikto! To identify what you have seen, or to find out when you can see really impressive satellites like the International Space Station, see: www.satobs.org www.heavens-above.com
January
July October
April
Meteor shower Approx. date Quadrantids/Bootes Jan 4 Lyrids April 22 Eta Aquarids May 5 Delta Aquarids July 27 Perseids Aug 12 Orionids Oct 21 Leonids Nov 18 Geminids Dec 14
Explore further: Latest editions of: Terence Dickinson, NightWatch and Backyard Astronomer’s Guide; Consolmagno & Davis, Turn Left at Orion; H.A. Rey, The Stars and Find the Constellations; telescopes at www.telescope.com & www.opticsplanet.com (avoid cheap telescopes in stores and catalogs—they are useless); www.hometrainingtools.com/space-astronomy/c/20/ & www.hometrainingtools.com/telescopes-accessories/c/128/
South South
See also: www.skymaps.com
www.kidscosmos.org/kid-stuff/star-maps.html

Page 7 of 34 T. H. Rider
9/18/11
Astronomy (continued)--Moon Map
Apollo 11
Crater Tycho 53 miles wide
100 million years old
Apollo 12 Apollo 14
Apollo 15
Apollo 16
Apollo 17
Crater Copernicus 58 miles wide
900 million years old
Sea of Tranquility
Sea of Serenity
Anorthosite from
light-colored highlands
4.4-4.5 billion years old
(Apollo 16)
Basalt from dark-colored
“seas” or maria
3.6-3.9 billion years old
(Apollo 11)
Sea of Rains
Sea of Clouds
See also: http://solarsystem.nasa.gov/multimedia/display.cfm?IM_ID=804

Page 8 of 34 T. H. Rider
9/18/11
Biology
Experiment 15: Enzymes Kit provides: 6 glucose test strips (narrow white plastic with light blue glucose test pad on one end), plastic test tubes, straw You provide: Regular milk (or Parmalat/Lil’ Milk for Expt. 16), Lactaid milk, lactase tablets (e.g., Lactaid), scissors, pliers, cups, foil
Enzymes are little molecular machines that do certain jobs inside you. Your body can easily use simple sugars like glucose as energy sources. However, milk mainly contains lactose, two simple sugars (glucose and galactose) glued together. Therefore, your body (especially when you are young) makes the enzyme lactase, which breaks lactose into its two parts. If people don’t have enough lactase, milk can upset their stomachs, but modern medicine has rushed to the rescue. Lactase tablets provide the enzyme for you, and Lactaid milk comes with all the lactose already broken down.
To watch enzymes in action, cut each glucose test strip lengthwise into two pieces. Now you can do up to 12 tests. Fill two test tubes 2/3 full with regular milk. Get an adult to crush a Lactaid tablet in pliers. Dump the pieces into one tube and mix carefully with a straw. Label which tube is which and cover both with foil. Keeping the tubes upright, hold their lower two-thirds in a cup of warm water for 5 minutes. Dip a half glucose test strip into one tube for a few seconds, then gently brush it against the inside rim of the tube to wipe off milk. Let the strip dry for 30 seconds, then compare the color with those above. How much glucose is in the milk? Test the other tube with a fresh half test strip. What happened? Be warned that most lactase tablets contain a small amount of glucose themselves. To be sure that isn’t confusing your results, wash out the test tubes and repeat the experiment with a tube of water and a tube of water plus crushed lactase tablet. Also repeat the experiment with Lactaid milk.
If you are in the mood to be gross, experiment with your own saliva! (Use only your own drool, and dispose of it properly when finished.) Saliva contains amylase, an enzyme that breaks down starch into glucose. Crumble a cracker in water in a cup. Chew another cracker for 30 seconds, then spit it into a second cup. Test both cups for glucose. Incidentally, even the test strips use enzymes, glucose oxidase and peroxidase. Enzymes run the world!
Experiment 16: Bacteria and antibiotics Kit provides: Plastic test tubes (must be clean), straws You provide: Yogurt, Parmalat or Lil’ Milk, triple antibiotic ointment, foil
Certain safe bacteria cause milk to solidify to become yogurt. Buy a small rectangular box of Parmalat or Lil’ Milk at the grocery store. Unlike normal milk, Parmalat/Lil’ Milk is ultra-high-temperature pasteurized to kill all bacteria in it, so it does not need refrigeration until it is opened. Insert its little plastic straw, use the milk box as a squeeze bottle, and fill two test tubes halfway with milk. Using a straw or long toothpick, add a healthy booger-sized blob of yogurt to each tube. Using a fresh straw or toothpick, add a similar blob of triple antibiotic ointment (e.g., Neosporin or similar generic version) to one tube, and label which tube is which. Cover the top of each tube with aluminum foil. Tape the tubes to the side of a box so they stay upright, and leave them in the warmest room in your house. After 2-3 days at 75oF (or overnight at 99oF), carefully tilt the tubes to the side. Why is there a difference? To be safe, don’t eat the yogurt you have made. In fact, knowing what you do now, you may decide never to eat yogurt again…
Optional: Make an inexpensive water bath incubator. Fill an ice chest with water, insert an aquarium heater and a thermometer in the water, and adjust until the water temperature holds constant at 99oF. Seal test tubes of milk + yogurt with plastic wrap and partially immerse them in the water overnight.
More glucose
0 mg/ml 1 mg/ml 2.5 mg/ml 5 mg/ml 10 mg/ml 20 mg/ml
Yogurt
Antibiotic ointm
ent
Test tubes
Explore further: Janice VanCleave, Biology for Every Kid, Human Body for Every Kid, A+ Projects in Biology; Sea Monkeys (Walmart); Luann Columbo, Uncover the Human Body; Human Body Inside Out Smart Lab; Joanna Cole, The Magic School Bus Inside the Human Body; www.ncbe.reading.ac.uk/NCBE/MATERIALS/DNA/menu.html; www.hometrainingtools.com/microscope-comparison-chart/a/1348/ (buy any of these, but avoid scopes in catalogs & stores—virtually all give badly distorted images); www.hometrainingtools.com/microscope-accessories/c/19/; www.hometrainingtools.com/microscope-slide-sets/c/151/; www.hometrainingtools.com/dissection-kit-advanced/p/DE-KIT02/
Experiment 13: Yeasty beasties Kit provides: Balloons, test tubes You provide: Bread yeast packets, sugar, water Biologists study how living organisms work, from bacteria to plants to people, and get to genetically engineer the occasional monster when research funding permits. To try your hand at biology, stretch the balloon so it can inflate easily. Pour a packet of bread yeast and one tablespoon of sugar into a clean test tube. Fill the tube with very warm (but not painfully hot) water, cover the top with your thumb, and shake the tube to mix it up. Stretch the deflated balloon over the top of the test tube. Over the course of several minutes or an hour, the balloon should inflate. Yeast cells are simple organisms that are in “suspended animation” in the packet. When water is added, they come back to life, eat the sugar, and burp out carbon dioxide (CO2) gas, which inflates the balloon. Repeat the experiment using other test tubes and balloons with hotter or colder water, or without yeast or without sugar. Why are yeast cells added to bread dough? If you have a microscope that magnifies at least 100x, you can see the individual yeast cells. Congratulations on being a new pet owner, and you don’t even have to take them out for a walk.
Dry active yeast packet
Experiment 14: The Joy of Vinegar
Kit provides: Test tubes, balloon, pipette (plastic eyedropper)
You provide: White vinegar, cooked chicken bone, hard-boiled egg in the shell, skim milk, clear glass or jar
Now let’s cook up some things that would horrify Julia Child. Ordinary white vinegar is a mild acid (dilute acetic acid) that can be used for several different biochemical reactions. It also smells bad, which is always a plus when you are doing mad science experiments:
(A) Fill a clean test tube nearly full with skim milk. Use the pipette to add several drops of vinegar to the tube. After several minutes to an hour, solid chunks should form in the milk. Casein is a polymer (long chemical molecule) and a protein (like meat) that is normally dissolved in milk, but the vinegar makes it precipitate or clump together to form solid chunks. Casein used to be widely used to make paints and glue.
(B) Take a cooked chicken bone, such as a wishbone, and clean it thoroughly. Notice that it is stiff and difficult to bend. Put the bone in a clear glass and add enough vinegar to cover the bone. Each day pour out the old vinegar and cover the bone with fresh vinegar. After a few days, the bone should be very rubbery and flexible. Bones are made of rubbery protein plus chalk-like calcium. The vinegar removed all the calcium from the bone, leaving only protein.
(C) Repeat the bone experiment, but use a hard-boiled egg instead of the chicken bone. The shell of an egg is also made of protein and calcium, and the vinegar will remove the calcium. See if you can squeeze the egg into a bottle without cracking the egg!
Clear glass or jar
Vinegar
Bone
Balloon
Test tube with warm water, yeast,
& sugar

Page 9 of 34 T. H. Rider
9/18/11
Chemistry
Experiment 18: Acids and bases Kit provides: 4 strips pH paper (narrow pinkish-orange paper strips), test tubes, balloon, mini plastic beakers You provide: Safe household acids and bases (lemon juice, vinegar, Tums, baking soda, Windex, etc.), scissors, tweezers
Acids are chemicals that have too many protons (hydrogens) and want to get rid of some of them. Bases, sometimes called alkali, have too few protons and want to steal some from other chemicals. Neutral chemicals are happy with their number of protons. pH is a number that measures how acidic or alkaline a chemical is. Neutral chemicals have pH 7, acids have pH values lower than 7, and bases have pH values higher than 7. pH paper starts off pinkish-orange, but changes color when dipped into a liquid chemical. The color scale above indicates approximately what color corresponds to each pH value.
To measure as many samples as possible, cut a strip of pH paper into several smaller pieces. Pour a little water into a mini plastic beaker. Grab a small piece of pH paper with tweezers, dip it into the water for a few seconds, and then pull it out. What is the pH of water? Get an adult to help you pour some safe household acids and bases into other mini beakers--try lemon juice, orange juice, vinegar, baking soda dissolved in water, Tums/Rolaids/etc. dissolved in water, and Windex. Test each one with a new small piece of pH paper. Wipe off the tweezers after each sample. Which ones are acids and which are bases? What is the strongest acid? What is the strongest base?
Fill a test tube almost full with vinegar or lemon juice. Break a Tums/Rolaids tablet in half and drop it in. Quickly seal the top of the test tube with a balloon. Notice the bubbles forming in the liquid. Within 10-20 minutes, the balloon should inflate with carbon dioxide (CO2) gas. Once the fizzing stops, test the pH of the liquid. What happened? Now you know how to spell relief. For extra messy fun, combine some bubble solution from Expt. 36 with a Tums + vinegar or baking soda + vinegar reaction.
To make your own pH indicator, cut a small, relatively dry piece of red cabbage. Soak it in Windex for a few minutes. What happens to the color? If you want to be fancier, get an adult to help chop red cabbage, boil it in water, and collect the colored water once it is cool. What happens if you mix the colored water with safe acids and bases such as those you tested above?
Experiment 19: Growing crystals Kit provides: Plastic spoon, wire You provide: Epsom salt, clear glass or jar, cotton string, water
Cut a ~2-inch piece of wire and ball it up to make a weight. Tie one end of cotton string or yarn to the wire weight. Cut the string so it is as tall as a clear glass or jar. Tape the other end of the string to a pencil.
Fill the glass halfway with very warm water. Slowly add Epsom salt while constantly stirring; keep adding it until no more salt will dissolve. Let the string hang down in the water and leave the glass for a week.
After a week, take the string out of the water. You should see Epsom salt crystals along the string. Use a Leeuwenhoek microscope (Expt. 52) to examine the crystals more closely. Repeat the experiment with table salt, sugar, or borax and then examine those crystals. Now it can look like Christmas year-round, no matter how much global warming may occur.
Experiment 20: Polymers Kit provides: Plastic spoon or other stirring utensil You provide: Elmer’s glue, box of borax powder (check laundry detergent aisle), water, measuring cups and spoons, disposable cups, food coloring
In one cup, mix ¼ cup water, 2 drops food coloring, and ¼ cup Elmer’s glue. Stir with a plastic spoon or other utensil. Wash off the spoon with water and dry it. In a second cup, mix 1/4 cup of water and 1 tablespoon of borax. Stir with the clean spoon. Wash off the spoon with water and dry it. Pour equal amounts of both mixtures into one large disposable plastic or paper cup. Stir with the plastic spoon for a minute. What does the mixture turn into? Can you fish it out of the cup? Can you gross out your favorite relative? Can you make a ball?
Glue contains polymers, which are very long yarn-like molecules that can slide past each other (see also Expt. 14A). Borax crosslinks the polymers, tying them to each other so that they can no longer move as easily, like a very tangled ball of yarn. Plastics and rubber are good examples of crosslinked polymers.
For more more slimy fun, get an adult to help you mix ¼ cup rubbing alcohol + ¼ cup dishwasher detergent containing sodium silicate (Costco Kirkland dishwasher detergent works well) and squeeze out the excess liquid, or see: www.hometrainingtools.com/slime-recipes-project/a/1660/
More acidic Neutral More alkaline/basic
pH 1
pH 2
pH 3
pH 4
pH 5
pH 6
pH 7
pH 8
pH 9
pH 1
0
pH 1
1
pH 1
2
? + Water with glue
Water with borax
Clear glass or jar
Water with dissolved
Epsom salt
String
Crystals
Wire weight
Explore further: Thames & Kosmos chemistry sets, especially C3000 (all other modern chemistry sets are useless; search for best price online); www.hometrainingtools.com/chemistry/c/3/; Magic Rocks (Toys R Us and other toy stores); Janice VanCleave, Chemistry for Every Kid (1989) and A+ Projects in Chemistry (1993); Robert Bruce Thompson, Illustrated Guide to Home Chemistry Experiments (2008)
Experiment 17: Models of chemical molecules Kit provides: Chemical model sheet (page 32) You provide: Scissors, glue stick and cardboard (optional)
Pure chemical elements like hydrogen, carbon, and oxygen are made of tiny pieces called atoms. Chemical compounds like water, sugar, and sand are made of molecules, or combinations of different atoms joined together. Chemists deal with elements, compounds of elements, and chemical reactions that change one compound into another. To make models of chemical molecules, cut out the model atoms on p. 32. Real atoms are too small to have colors, but our model atoms are white for hydrogen (H), black for carbon (C), red for oxygen (O), and blue for nitrogen (N). Electrons (shown as black lines) can form bonds between atoms to create molecules. Different types of atoms like to have different numbers of bonds: one bond for hydrogen, two for oxygen, three for nitrogen, four for carbon, etc. Most bonds are single bonds (one electron line between atoms), but some are double bonds (two electron lines) or even triple bonds (three lines). See how many different molecules you can create.
Methane (fart gas) CH4
Water H2O
Carbon dioxide CO2
Oxygen molecule O2
Ammonia NH3
Electron bond between atoms
Double electron bond between atoms
Triple electron bond between atoms
Hydrogen atom
Carbon atom
Nitrogen atom
Oxygen atom
Nitrogen molecule N2 Hydrogen molecule H2

Page 10 of 34 T. H. Rider
9/18/11
Electrical Engineering
Experiment 21: Electric motor Kit provides: Motor, wires You provide: 2 AA batteries, tape, scissors
Electrical engineers play with electric circuits, such as those here that use batteries, wire, motors, light bulbs, etc. Get an adult to cut three 6-12” pieces off the long wire included in the kit. The adult can strip 1/2” of insulation off each end of each wire. If a wire cutter/stripper is not available, scissors or even a nail clipper works well. To remove the insulation without cutting through the wire, don’t bring the blades all the way together; then use your fingernails to pull off the cut insulation. If necessary, you can even use strips of aluminum foil as wires.
Get two AA batteries. The end with the metal bump is positive (+), and the other end is negative (-). Put the batteries together, + end to - end as shown above, and tape them together. Tape two wires to the free ends of the batteries and touch them to both terminals on the motor. The motor should whir and its shaft should turn. To more easily see that the shaft is turning, you can put a broad piece of tape across the shaft. When the motor turns, it will spin the tape. What happens if you reverse which motor terminals the wires connect to? What happens if you only use one battery? Tune an AM radio to the static between stations. Bring the motor close to the radio. Connect and disconnect the motor. What happens and why? Wanna operate a pirate radio station?
With the motor disconnected from wires, bring the motor close to steel paperclips. What must be inside the motor? To make your own motor, see: www.hometrainingtools.com/build-motor-project/a/1605/
- + - + 2 batteries (1.5 V each)
Motor
Experiment 24: Electromagnet Kit provides: Wire, steel bolt, steel washers You provide: Steel paperclips, 2 AA batteries, tape, scissors
Bring the steel bolt close to steel paperclips. Is the bolt magnetic? Now strip ~1/2” of insulation off the ends of the remaining long wire. Make an electromagnet by wrapping the wire around the bolt as many times as possible (keep wrapping in the same direction around the bolt), only leaving fairly short ends that can be connected to the batteries as shown above. Use tape to connect the wire to the batteries and the batteries to each other. Is the bolt magnetic enough to pick up several paperclips at once? How many? Notice that the batteries get warm from this short circuit, so don’t keep the electromagnet on for very long. Disconnect one wire from the batteries before your parents complain that you are eating batteries. Now how many paperclips can the bolt pick up?
Electromagnets and permanent magnets (Expt. 58) can attract some metals (not all) by temporarily aligning the atoms in the metal to make the metal magnetic. In addition to paperclips, try to pick up the steel washers in this kit, as well as aluminum foil, various U.S. and foreign coins, or other metals you may have.
Use a compass (Expt. 31) to study the magnetic field of the electromagnet when it is on, off, and with or without the steel bolt inserted in the coil.
- + - + 2 batteries (1.5 V each)
Electromagnet
Experiment 22: Light emitting diodes (LEDs) Kit provides: 2 LEDs (small clear plastic parts with 2 wires each), wires You provide: 2 AA batteries, tape, scissors, paperclips, rubber bands
LEDs may get hot--please use caution. Tape two AA batteries together, then tape wires to each end as shown. Touch the wires to the two leads of an LED. If the LED doesn’t light up, reverse which LED leads the battery wires connect to. Yes, we know the LED is orange. Nobody loves orange, so we got these for a song. Note that one LED lead is shorter than the other. Which is positive and which is negative? What happens if you only use one battery?
Tape the two batteries together again. Connect two LEDs in parallel--one battery wire goes to the short lead of both LEDs, and the other battery wire goes to the long lead of both LEDs. Now connect the LEDs in series--the short lead of one LED contacts the long lead of the other LED, the free lead on one LED goes to the + battery wire, and the free lead on the other LED goes to the - battery wire. Are the LEDs brighter in series or in parallel?
For an improved battery holder, use a rubber band to hold a metal paperclip on each end of a battery, then attach your wires directly to the paperclips.
- + - + 2 batteries (1.5 V each)
LED
Parallel
Series
Explore further: Alligator clip leads and battery holders (Radio Shack, www.sciplus.com, or www.hometrainingtools.com) make Expts. 21-24 easier; Rudolf Graf, Safe and Simple Electrical Experiments (1973); Hexbug robots (amazon.com and Target); Lego Mindstorms (Toys R Us and online); Snap Circuits kits and 130 in 1 Electronic kit (search online for best prices); www.hometrainingtools.com/technology/c/9/
Experiment 23: Electrical conductivity Kit provides: LEDs or motor, wires, mini beaker (plastic cup) You provide: 2 AA batteries, tape, scissors, mechanical pencil lead, salt
Use two AA batteries to power an LED or electric motor as in Expts 21 and 22, but force the electricity to go through two test wires to get from the negative (-) battery terminal to the LED or motor. If the test wires are connected directly to each other, electricity is conducted through the wires to the LED or motor. If the test wires do not touch each other, there is no electrical conductivity—electricity cannot get to the LED or motor. Touch the test wires to different metals, plastic, glass, paper, etc. to test the electrical conductivity (how well electricity can flow through) of those substances. Electrical conductors have good conductivity, and electrical insulators do not conduct electricity.
Now test the conductivity of mechanical pencil lead (graphite) by putting the test wires close together or far apart on the pencil lead. Graphite conducts electricity, but not well, so the further the electricity has to travel through the graphite, the dimmer the light gets or the slower the motor runs. Light dimmers and volume knobs work this same way. Put the test wires in a mini beaker filled with water. Is water a conductor? What happens if you add salt to the water? How conductive is dry human skin? How about the skin of someone who is sweating? Now you might have to subject your parents to a lie detector test…
- + - + 2 batteries (1.5 V each)
LED Test wires
Mechanical pencil lead
Paperclip

Page 11 of 34 T. H. Rider
9/18/11
Forensic Science
Experiment 28: Fingerprints Kit provides: This sheet You provide: Pencil, blank paper, clear tape, cocoa or talcum powder, cosmetic brush, your parents’ permission for you to make a big dusty mess Everyone’s fingerprints are unique, but can generally be classified as arches, loops, or whorls. Go over and over the same square inch of paper with a pencil until the square is covered with graphite. Roll someone’s finger in it, stick clear tape on the finger, then put the tape on clean paper. Get prints from all 10 fingers, label the sheet with the person’s name, then move on to your next suspect. Touching a hard smooth surface leaves invisible skin oils in the form of fingerprints. To see the fingerprints, use a cosmetic brush to very softly dust light surfaces with cocoa powder or dark surfaces with talcum powder. Then “lift” fingerprints with tape, stick the tape to light or dark paper, and compare with your fingerprint files until you find the right suspect.
Small Features of Fingerprints
Major Types of Fingerprints
Plain arch Tented arch Right loop Left loop
Double loop whorl Plain whorl Central pocket loop whorl Accidental (misc.)
Experiment 27: Chromatography Kit provides: Coffee filter You provide: Scissors, clear glass or jar, tape, pencil, black washable marker (Vis-à-Vis wet erase pen works well)
Cut one coffee filter into ½–¾” wide strips with square ends. Tape one end of a long strip to a pencil. About 1” from the bottom of the strip, make a dot using a black washable marker. Suspend the paper strip in a clear glass or jar as shown. Add just enough water to the glass that the bottom ~1/2” of the strip will be in the water. The water level must be below the black dot. Watch the paper for 10-20 minutes, then take it out of the jar. Repeat the experiment with a new strip of paper and other types of ink.
As water spreads up the paper, it carries the ink with it. Many inks are composed of several different colored chemical molecules, some of which move more slowly through the paper than others. Chromatography, separating chemical molecules of different sizes by forcing them through paper or other materials, is a widely used lab technique for purifying or analyzing various chemicals. Granted that it seems more exciting with CSI music playing… See also: www.hometrainingtools.com/leaf-chromatography-science-project/a/1548
Clear glass or jar
Water
Filter paper
Experiment 25: DNA extraction Kit provides: Coffee filter cone, plastic test tubes You provide: Chopped onion, Woolite or other common detergent, table salt, meat tenderizer, drug store 91% isopropyl alcohol, measuring cups & spoons Forensic scientists use fingerprints, DNA, and other evidence to solve crimes. You can use household materials to remove the DNA from cells and gather enough to see with your own eyes. A hot detergent solution dissolves cell membranes as it would kitchen grease. Ions from table salt neutralize charged DNA molecules so they don’t repel each other. Meat tenderizer chews up enzymes that might break down the DNA. A coffee filter lets DNA and other molecules pass through but blocks all large debris. And alcohol is nonpolar, forcing the polar DNA and salt to form large clumps for self defense. Before beginning, put an unopened bottle of 91% isopropyl alcohol in a sealed Ziploc bag in the freezer for a few hours. Make an adult cry--get one to chop an onion into pieces and put it in a medium-sized Tupperware-style container. In a cup or bowl, put 3 oz water and add 2 teaspoons of detergent, 1/2 teaspoon of salt, and 1/2 teaspoon of meat tenderizer. Mix these together slowly with a spoon, then pour the mixture into the container with the chopped onion and reseal the container. Get an adult to put the container in a sink full of very hot water for 10-15 minutes, run cold water over it for a few minutes to cool it, and then give it back to you. Open the coffee filter into a cone shape and hold it point downward over a clean measuring cup. Slowly pour some of the onion mixture into the coffee filter, being careful not to let any onion mixture fall directly into the measuring cup. Only filtered onion mixture should go into the cup. Fill one test tube 1/3 full with filtered onion mixture. Get an adult to fill another test tube 1/3 full with cold alcohol. Now pour the contents of the onion tube into the alcohol tube. The alcohol is less dense and should stay in the upper half. Within the clear alcohol, you will see DNA clump together, going from looking like a milky cloud to spider web threads to a little DNA booger within minutes. Now frizz your hair and shout, “Give my creation life!”
Detergent Salt
Meat tenderizer Coffee filter
Ice-cold rubbing alcohol
Onion cell
DNA Free-
floating DNA
Clump of DNA
Experiment 26: DNA replication Kit provides: DNA models (pp. 32-34) You provide: scissors, cardboard & gluestick (optional)
Just as you can string together various combinations of letters to write an instruction book, a strand of DNA uses four chemical letters or nucleotides, designated A, C, G, and T, strung together in various combinations to spell out the instructions for making all the parts for viruses, bacteria, plants, and animals. DNA normally has two strands, with each A on one strand connected to a T on the other strand, and each C on one strand connected to a G on the other strand. Critters replicate or copy their DNA by separating the two strands and joining individual nucleotides to each to make new strands. Once scientists extract DNA from a crime scene (or dinosaur DNA from amber…), they have to artificially replicate the DNA to make enough to use or analyze. This process is called polymerase chain reaction (PCR), in which one DNA double strand becomes two, which then become four, then eight, etc. You can simulate PCR by cutting out the DNA strands and nucleotides on pp. 32-34. Put the two strands together on a flat table, then pull them apart and add nucleotides to make two identical double-stranded DNA sections.
A T C G T A G C C G A T
Explore further: www.hometrainingtools.com/search.asp?ss=forensic&x=0&y=0, forensic kits at www.amazon.com and Toys R Us

Page 12 of 34 T. H. Rider
9/18/11
Experiment 30: Collecting minerals Kit provides: Mineral identification sheet (p. 14) You provide: Minerals! Minerals are the pure ingredients that are mixed together to make rocks. You may be lucky enough to find a crop of pure minerals where you live or vacation. If you can only find rocks, you can order minerals from the suppliers listed below. Or go find some table salt—you have your first mineral! Some minerals can be identified simply based on how they look (see mineral sheet on p. 14). Others may require you to conduct tests such as those shown above in order to identify them. See the books below for more detailed information.
Kit provides: Test tubes, pipette You provide: Vegetable oil, food coloring, honey or corn syrup About 4.5 billion years ago, particles surrounding the newly formed sun condensed to form the earth and the other planets. Initially the earth was a hot molten mixture of rocks of different densities or heaviness. Iron had the highest density and sank to the center of the earth. Low-density silicates (rocks like granite containing silicon and oxygen) floated on top and solidified to form the continents. Medium-density iron silicates (basalt and peridotite) were in between.
To show how the layers of the earth separated, mix water and food coloring in one test tube. Fill another test tube ¼ full with honey or corn syrup. Gently add ¼ test tube of colored water on top of that. Then gently add ¼ test tube of vegetable oil on top of the water. Honey/corn syrup has the highest density, water has medium density, and oil has the lowest density, so they don’t mix. The density of a material relative to the density of water is called the specific gravity (SG) and is given for various minerals on p. 14.
Experiment 31: Making a magnetic compass Kit provides: Magnets You provide: Plastic bottle cap, glass of water, tape Fill a drinking glass full to overflowing with water and gently float an inverted plastic bottle cap in the water like a boat. Due to surface tension effects in the water, if the glass is not completely full, the cap will get stuck on the side of the glass, but if the glass is completely full, the cap will float somewhere in the center, which is what this experiment requires. Gently put one of the magnets in the center of the cap. The cap should be free to turn in any direction it would like. Bring one end of the other magnet near the glass, and see if the magnet and cap rotate to point toward the magnet. Flip the magnet you are holding to the other end, and see if the floating magnet rotates so that its other end faces your magnet. Now put the second magnet very far away from the glass. The floating magnet should settle down with one end pointing north and the other end south. Consult a map to figure out which is which, then use a small piece of tape to mark which end of your compass points north.
Due to a lot of iron at the center or core of the earth (Expt. 32), the earth acts like a giant magnet with poles at the north and south. Compasses such as the one you have made detect the earth’s magnetic field and indicate directions. Now that you have a good compass, you are ready to set off into the wilds to hunt and gather good fast food.
Mohs’ scale of hardness. A softer mineral can be
scratched by a harder one: 1: Talc 2: Gypsum 3: Calcite 4: Fluorite 5: Apatite 6: Feldspar 7: Quartz 8: Topaz, beryl 9: Corundum/ruby/sapphire 10: Diamond
Incr
easin
g ha
rdne
ss o
f min
eral
Unglazed ceramic tile (Lowes/Home Depot)
Streak test. Streak color may be different than surface of mineral and is a better identifier.
Mineral
2.5: Fingernail 3.5: Coins
5.5: Steel nail clipper
Explore further: www.geoed.com; www.djminerals.com; www.hometrainingtools.com/catalog/earth-space-science/cat_rocks-minerals.html; Shaffer & Zim, Rocks, Gems and Minerals & Frank Rhodes, Geology (Golden Guides); Chris Pellant, Smithsonian Handbooks: Rocks and Minerals; Prinz, Harlow, & Peters, Simon & Schuster’s Guide to Rocks and Minerals; Janice VanCleave, Earth Science books; Cole, Magic School Bus Inside the Earth
Some crystal shapes:
Cubic
Hexagonal
Rhombic
Octahedral
Geology
Experiment 29: “Life is like a box of rocks…” Kit provides: Rock identification sheet (p. 13) You provide: Rocks! Geology concerns what the earth is made of, which means rocks and minerals. Minerals are fairly pure chemical substances, like sulfur, gold, quartz (silicon dioxide), etc. (see Expt. 30). Rocks are mixtures of minerals (just as you mix pure ingredients together to bake a cake or cookies). For example, granite rock is made of three minerals mixed together: quartz, mica, and feldspar. Rocks can be divided into three categories: (A) Igneous rocks solidified from hot liquid materials (like volcanic lava) and may have flow marks, gas bubbles, or crystals (if they cooled slowly). (B) Sedimentary rocks were deposited as sediments at the bottom of rivers, lakes, or oceans and then hardened. They may crumble easily, have flat deposited layers, or contain visible chunks or fossils. (C) Metamorphic rocks began as igneous or sedimentary rocks but then were changed by extreme pressure and heat (but not melting) deep underground. They are stronger and denser (heavier) than sedimentary rocks and may have wavy layers from the pressure. Any of these three types of rock can be turned into either of the other types by the processes in the rock cycle shown above. Collect rocks from where you live or vacation, and use the rock sheet (p. 13) or the books below to identify them.
(A) Hot molten mixture of: • Low-density silicates (rocks like granite w/ silicon+oxygen) • Medium-density iron silicates (basalt and peridotite) • High-density iron
Iron sinks to center
(B) Silicates float to surface and
solidify to form continents
(C) Exposed basalt solidifies to
form ocean floor
Radioactive decay keeps basalt &
peridotite molten
(D) Water fills ocean basins
Experiment 32: Build your own planet
Igneous rocks
Metamorphic rocks
Sedimentary rocks
Magma (hot molten
rock)
Sediments (small pieces
of rocks) Rock cycle
Pressure & heat
Cooling
Melting
Melting
Pressure & heat
Erosion Deposition
Erosion
Erosion
Plastic bottle cap with
magnet inside
Drinking glass completely filled
with water

Page 13 of 34 T. H. Rider
9/18/11
Igne
ous r
ocks
Sedi
men
tary
rock
s
Gra
nite
Part
icle
s of b
lack
, whi
te, p
ink,
cle
ar
Har
d, fo
unda
tion
of c
ontin
ents
Use
d fo
r cou
nter
s, m
onum
ents
Cal
led
rhyo
lite
if un
iform
ly m
ixed
Pum
ice
Gra
y, fl
oats
in w
ater
(tra
pped
air
) H
arde
ned
volc
anic
foam
Use
d fo
r san
ding
Obs
idia
n Sh
iny
blac
k an
d sh
arp
(car
eful
!) Vo
lcan
ic g
lass
Use
d fo
r arr
owhe
ads
Basa
lt Bl
ack,
den
se, m
ay h
ave
bubb
les
Volc
anic
lava
that
coo
led
Form
s the
sea
floor
Cal
led
gabb
ro if
sepa
rate
cry
stal
s
Peri
dotit
e G
reen
ish, d
ense
Form
s man
tle o
f ear
th
Sour
ce o
f per
idot
(oliv
ine)
gem
s
Sand
ston
e G
rain
s of s
and
glue
d to
geth
er
Com
pone
nts 0
.1-2
mm
Lim
esto
ne
Rou
gh, fi
zzes
in v
ineg
ar
Com
pres
sed
little
seas
hells
Use
d fo
r cha
lk, b
uild
ings
Coa
l Bl
ack,
bur
ns—
used
for f
uel
Com
pres
sed
deca
yed
plan
ts
Bitu
min
ous c
oal i
s dul
l & c
rum
bly
Ant
hrac
ite c
oal i
s glo
ssy
& h
arde
r
Solid
ified
from
hot
liqu
id m
ater
ials.
May
hav
e flo
w m
arks
, gas
bub
bles
, or c
ryst
als (
if co
oled
slow
ly).
Dep
osite
d as
sedi
men
ts a
nd h
arde
ned.
May
cru
mbl
e ea
sily,
cont
ain
visib
le c
hunk
s or f
ossil
s, or
hav
e fla
t dep
osite
d la
yers
.
Met
amor
phic
rock
s
Con
glom
erat
e R
ound
peb
bles
glu
ed to
geth
er
Look
s lik
e co
ncre
te
Com
pone
nts >
2 m
m
Cal
led
brec
cia
if pe
bble
s are
shar
p
Oth
er ro
cks c
hang
ed b
y pr
essu
re o
r hea
t (bu
t not
mel
ting)
.
Stro
nger
& d
ense
r tha
n se
dim
enta
ry ro
cks;
may
hav
e w
avy
laye
rs fr
om p
ress
ure.
Gne
iss (“
Nic
e”)
Laye
rs o
f bla
ck,w
hite
, pin
k, c
lear
Form
ed fr
om g
rani
te
Use
d fo
r bui
ldin
gs
Qua
rtzi
te
Den
se g
lass
y sa
nd
Form
ed fr
om sa
ndst
one
Use
d fo
r bui
ldin
gs
Slat
e D
ense
bla
ck/g
ray/
gree
n, fi
ne la
yers
Form
ed fr
om sh
ale
Use
d fo
r bla
ckbo
ards
, tile
Schi
st
Gra
yish
with
glit
tery
, wav
y la
yers
Form
ed fr
om sl
ate
+ m
ore
pres
sure
Use
d fo
r bui
ldin
gs
Mar
ble
Den
se, p
olish
ed, fi
zzes
in v
ineg
ar
Form
ed fr
om li
mes
tone
Use
d fo
r cou
nter
tops
, tile
Shal
e M
ud th
at h
arde
ns to
rock
Com
pone
nts <
0.1
mm
May
con
tain
foss
ils
Mor
e or
gani
c m
atte
r d
arke
r
Dr. R
iderʼs
Gui
de to
Pet
Roc
ks
Page 13 of 32 T. H. Rider
9/18/11

Page 14 of 34 T. H. Rider
9/18/11
Minerals that are com
mon com
ponents of rocks:
Minerals that are m
ajor sources of metals:
Quartz
Clear/w
hite hard hexagonal crystals SiO
2 , hardness 7, SG 2.65
In sand, granite C
olor: amethyst/rose/sm
oky quartz M
icroscopic xtals: flint/agate/onyx
Feldspar W
hite/pink shiny hard “rock” (N
a,K,C
a)AlSi3 O
8 , hard: 6, SG ~2.6
Types: microcline, plagioclase, etc.
In granite
Mica
Flat, shiny, brittle, thin sheets Silicates, hard: 2.5-4, SG
~2.8 Biotite if black, m
uscovite if silver In granite, schist, etc.
Calcite
Causes double im
ages if clear M
ay be white or colored; not cubic
CaC
O3 , hardness 3, SG
2.71 In caves, lim
estone, marble
Augite
Black shiny crystals/layers (C
a,Mg,Fe)SiO
3 , hard: 5.5-6, SG ~3.4
In basalt H
ornblende is similar
Pyrite H
eavy golden cubes or clusters “Fool’s gold”—
not really gold FeS
2 , hardness 6-6.5, SG 5.0
Source of iron and sulfur
Malachite
Greenish cluster of round pieces
Cu
2 CO
3 (OH
)2 , hardness 3.5-4, SG 4.0
Source of copper for wires, pipes
Azurite is sim
ilar but bluish crystals
Bauxite G
ray/tan with round pieces inside
Breathe on it sm
ells like wet clay
Al(O
H)3 , etc., hardness 1-3, SG
~2.5
Alum
inum for foil, pots, etc.
Minerals that are m
ajor sources of non-metals:
Magnetite
Black, heavy, magnetic
Fe3 O4 , hardness 5.5-6.5, SG
5.2 Source of iron for m
agnets, steel H
ematite (Fe2 O
3 ) is similar but
reddish (rusted) and not magnetic
Graphite
Silvery black, soft, fine layers 2D
carbon atoms, hard: 1-2, SG
~2.2 U
sed in pencils, circuits, lubricant D
iamond is 3D
carbon atoms
Sulfur Yellow, soft, sm
ells bad S, hardness 1.5-2.5, SG
~2 U
sed in rubber, explosives, acid
Halite
Clear or w
hitish cubic crystals N
aCl, hardness 2, SG
~2.15 Left w
hen ancient oceans dried up U
sed for table salt, road salt
Fluorite 8-sided crystals, various colors
CaF
2 , hardness 4, SG 3.2
Fluorine for toothpaste, acid
Gypsum
W
hite/brown fragile crystals/“roses”
CaSO
4 2H2 O
, hardness 2, SG 2.32
Used for plaster, w
allboard
Bornite Shiny red/blue/purple m
etal “Peacock copper ore”
Cu
5 FeS4 , hardness 3, SG
5.0 M
ay have yellow/green chalcopyrite
Dr. Riderʼs Brief Bestiary of Minerals
Page 14 of 32 T. H. Rider
9/18/11

Page 15 of 34 T. H. Rider
9/18/11
Mathematics
Experiment 33: Walk through a sheet of paper Kit provides: Pattern sheet (p. 27) You provide: Scissors
Mathematics is much more than adding, subtracting, multiplying, and dividing numbers. Those numbers are just ways to describe sizes, shapes, probabilities, and physical laws, and we will explore some examples in Experiments 33-36.
Can you step through a standard-sized (8.5x11 inch) sheet of paper? Use the pattern sheet on p. 27 and cut along all the lines but nowhere else. (You may find it easier to fold the paper in half before you begin to cut.) You should be able to spread out the paper to form two loops, one the same size as the original sheet and one large enough you can walk through. The solid paper still has the same surface area it always did, but you have increased its perimeter by cutting so many lines. Area and perimeter or linear length are very important in mathematics. In principle, you could use the same paper to make a loop with a perimeter of several miles if you made the cut lines close enough together. Now you can make your allowance look bigger!
Experiment 34: Möbius strips Kit provides: Instructions You provide: Paper, scissors, tape, pencil
Cut a sheet of paper into long rectangular strips. Make a loop out of one strip, but twist one end by half a turn (flip it over) before you tape it to the other end. This creates a Möbius strip, named after the German mathematician August Möbius. You started with paper that had two sides, a front and a back. Use a pencil to draw a line around the Möbius strip until you come back to where you started. You just demonstrated that the Möbius strip only has one side! Try making more strips with no turns before you tape them together, one full turn, one and a half turns, two turns, two and a half turns, etc., and draw lines around each one. What determines how many sides each one has? Now draw a line down the end of each strip until you return to where you started. How many edges does each strip have?
Use a Möbius strip with one half turn, and cut it the long way down the middle all the way around but nowhere else. What happens? What happens if you cut again all the way around? Try cutting the long way down the middle all the way around strips with one full turn, one and a half turns, two turns, two and a half turns, etc. Do this with red tape and you could have a promising career in government.
See http://mathssquad.questacon.edu.au/mobius_strip.html for additional ideas. For even stranger mathematical shapes, see Klein bottles: http://plus.maths.org/content/os/issue26/features/mathart/index http://en.wikipedia.org/wiki/Klein_bottle
Experiment 35: E pluribus nerdum Kit provides: Instructions You provide: Coins
An important field of math is probability, or calculating the chances that various outcomes may happen. You can do experiments with probability using coins.
If a coin is evenly balanced and you flip it, on average it should come up heads half the time and tails half the time. Flip a coin 2 times and write down the result each time. Did it come up heads once and tails once? Flip it a couple more times to make 4 total flips, and write down the results. Was that two heads and two tails? How many heads and tails do you get if you do 8 flips total, or 16, or 32? Probability can only predict what the coin will do on average, not necessarily what it will actually do. However, the more flips you do, the closer the actual outcome should be to the expected average of heads half the time and tails half the time. If a coin has been coming up heads for several flips, does that mean the next flip is more likely to be tails to balance things out? (No, the coin doesn’t remember what it has done, so each new flip could go either way.)
Now flip two coins, preferably of two different types so you can tell them apart. How often should both come up heads at the same time? Flip both 32 times, write down the results, and check. How often should both come up tails? Check that too. How often should one (either coin) come up tails and the other come up heads? Test that.
Test for other possible outcomes, try larger numbers or runs, or try three coins.
If you get bored with coins, try predicting and testing probability with dice. If you get good at this, see how much money you can win from your parents.
Experiment 36: Soap bubble geometry Kit provides: Wire You provide: Dishwashing soap, glycerin (from drug store) or light corn syrup, bowl, your parents’ permission to make a big, wet, slippery, foamy mess
Make your own bubble solution using:
¼ cup dish soap 1 cup warm water 2 tablespoons glycerin or corn syrup
Stir it for several minutes to mix thoroughly. If the bubble solution doesn’t work well, try using different soap brands or water (tap, spring, or distilled), or try adjusting the amounts of each ingredient. Pour the bubble solution into a shallow bowl. If you would like to store the solution, use an airtight container.
Make a loop with the wire included in this kit, or with a metal coat hanger and an adult’s help. Dip the loop briefly into the bubble solution. Notice that the bubble solution clinging to the loop wants to minimize its surface area by forming a flat membrane across the loop, due to surface tension, or the way the rubbery soap membrane pulls on itself. Now blow gently through the loop. Initially the bubble solution stretches way out, but once it releases from the loop, it forms a ball or sphere, which again minimizes its surface area. Try making membranes and blowing bubbles with other wire shapes—triangles, squares, etc. If you are feeling ambitious, make a wire cube, dip it in the bubble solution, and see what happens! If you don’t need a pipette for other experiments, you can cut off half of the pipette bulb, dip that end briefly in bubble solution, then blow into the stem of the pipette to blow bubbles.
To make more bubbles than Lawrence Welk, combine some bubble solution with a Tums + vinegar or baking soda + vinegar reaction from Expt. 18. For additional ideas, see: http://mathssquad.questacon.edu.au/bubbles.html and www.hometrainingtools.com/super-soap-bubble-solution/a/1704/
Explore further: Overholt & Kincheloe, Math Wise! (2nd ed.); Muschla, Hands-On Math Projects with Real-Life Applications; Brunetto, MathART Projects and Activities; Janice VanCleave, Math for Every Kid, Play and Find Out About Math, and Teaching the Fun of Math; http://mathssquad.questacon.edu.au
Pattern sheet (p. 27) Cut along the lines
but nowhere else
Twist in paper
Paper rectangle
with ends taped
together to make a loop
Coins
Wire loop
Soap bubble
Page 16 of 34 T. H. Rider
9/18/11
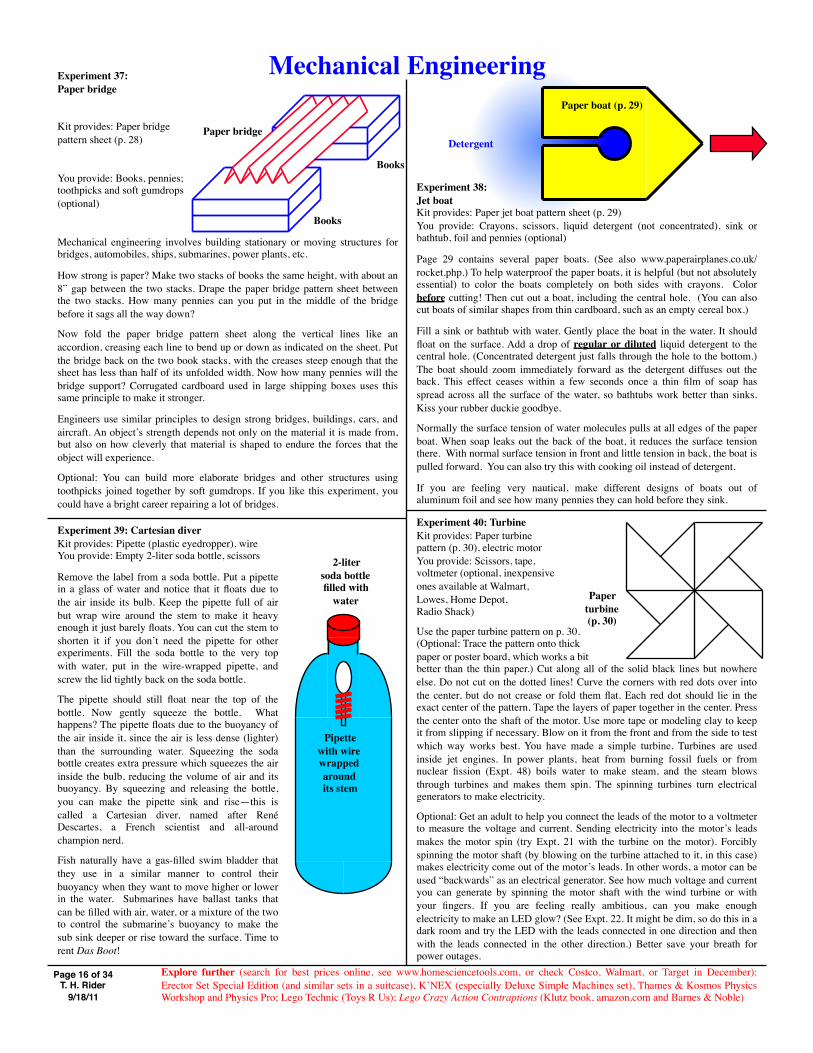
Experiment 37: Paper bridge
Kit provides: Paper bridge pattern sheet (p. 28)
You provide: Books, pennies; toothpicks and soft gumdrops (optional)
Mechanical engineering involves building stationary or moving structures for bridges, automobiles, ships, submarines, power plants, etc.
How strong is paper? Make two stacks of books the same height, with about an 8” gap between the two stacks. Drape the paper bridge pattern sheet between the two stacks. How many pennies can you put in the middle of the bridge before it sags all the way down?
Now fold the paper bridge pattern sheet along the vertical lines like an accordion, creasing each line to bend up or down as indicated on the sheet. Put the bridge back on the two book stacks, with the creases steep enough that the sheet has less than half of its unfolded width. Now how many pennies will the bridge support? Corrugated cardboard used in large shipping boxes uses this same principle to make it stronger.
Engineers use similar principles to design strong bridges, buildings, cars, and aircraft. An object’s strength depends not only on the material it is made from, but also on how cleverly that material is shaped to endure the forces that the object will experience.
Optional: You can build more elaborate bridges and other structures using toothpicks joined together by soft gumdrops. If you like this experiment, you could have a bright career repairing a lot of bridges.
Experiment 39: Cartesian diver Kit provides: Pipette (plastic eyedropper), wire You provide: Empty 2-liter soda bottle, scissors
Remove the label from a soda bottle. Put a pipette in a glass of water and notice that it floats due to the air inside its bulb. Keep the pipette full of air but wrap wire around the stem to make it heavy enough it just barely floats. You can cut the stem to shorten it if you don’t need the pipette for other experiments. Fill the soda bottle to the very top with water, put in the wire-wrapped pipette, and screw the lid tightly back on the soda bottle.
The pipette should still float near the top of the bottle. Now gently squeeze the bottle. What happens? The pipette floats due to the buoyancy of the air inside it, since the air is less dense (lighter) than the surrounding water. Squeezing the soda bottle creates extra pressure which squeezes the air inside the bulb, reducing the volume of air and its buoyancy. By squeezing and releasing the bottle, you can make the pipette sink and rise—this is called a Cartesian diver, named after René Descartes, a French scientist and all-around champion nerd.
Fish naturally have a gas-filled swim bladder that they use in a similar manner to control their buoyancy when they want to move higher or lower in the water. Submarines have ballast tanks that can be filled with air, water, or a mixture of the two to control the submarine’s buoyancy to make the sub sink deeper or rise toward the surface. Time to rent Das Boot!
Experiment 40: Turbine Kit provides: Paper turbine pattern (p. 30), electric motor You provide: Scissors, tape, voltmeter (optional, inexpensive ones available at Walmart, Lowes, Home Depot, Radio Shack)
Use the paper turbine pattern on p. 30. (Optional: Trace the pattern onto thick paper or poster board, which works a bit better than the thin paper.) Cut along all of the solid black lines but nowhere else. Do not cut on the dotted lines! Curve the corners with red dots over into the center, but do not crease or fold them flat. Each red dot should lie in the exact center of the pattern. Tape the layers of paper together in the center. Press the center onto the shaft of the motor. Use more tape or modeling clay to keep it from slipping if necessary. Blow on it from the front and from the side to test which way works best. You have made a simple turbine. Turbines are used inside jet engines. In power plants, heat from burning fossil fuels or from nuclear fission (Expt. 48) boils water to make steam, and the steam blows through turbines and makes them spin. The spinning turbines turn electrical generators to make electricity.
Optional: Get an adult to help you connect the leads of the motor to a voltmeter to measure the voltage and current. Sending electricity into the motor’s leads makes the motor spin (try Expt. 21 with the turbine on the motor). Forcibly spinning the motor shaft (by blowing on the turbine attached to it, in this case) makes electricity come out of the motor’s leads. In other words, a motor can be used “backwards” as an electrical generator. See how much voltage and current you can generate by spinning the motor shaft with the wind turbine or with your fingers. If you are feeling really ambitious, can you make enough electricity to make an LED glow? (See Expt. 22. It might be dim, so do this in a dark room and try the LED with the leads connected in one direction and then with the leads connected in the other direction.) Better save your breath for power outages.
Paper bridge
Books
Books
Explore further (search for best prices online, see www.homesciencetools.com, or check Costco, Walmart, or Target in December): Erector Set Special Edition (and similar sets in a suitcase), K’NEX (especially Deluxe Simple Machines set), Thames & Kosmos Physics Workshop and Physics Pro; Lego Technic (Toys R Us); Lego Crazy Action Contraptions (Klutz book, amazon.com and Barnes & Noble)
Experiment 38: Jet boat Kit provides: Paper jet boat pattern sheet (p. 29) You provide: Crayons, scissors, liquid detergent (not concentrated), sink or bathtub, foil and pennies (optional)
Page 29 contains several paper boats. (See also www.paperairplanes.co.uk/rocket.php.) To help waterproof the paper boats, it is helpful (but not absolutely essential) to color the boats completely on both sides with crayons. Color before cutting! Then cut out a boat, including the central hole. (You can also cut boats of similar shapes from thin cardboard, such as an empty cereal box.)
Fill a sink or bathtub with water. Gently place the boat in the water. It should float on the surface. Add a drop of regular or diluted liquid detergent to the central hole. (Concentrated detergent just falls through the hole to the bottom.) The boat should zoom immediately forward as the detergent diffuses out the back. This effect ceases within a few seconds once a thin film of soap has spread across all the surface of the water, so bathtubs work better than sinks. Kiss your rubber duckie goodbye.
Normally the surface tension of water molecules pulls at all edges of the paper boat. When soap leaks out the back of the boat, it reduces the surface tension there. With normal surface tension in front and little tension in back, the boat is pulled forward. You can also try this with cooking oil instead of detergent.
If you are feeling very nautical, make different designs of boats out of aluminum foil and see how many pennies they can hold before they sink.
Mechanical Engineering
Paper turbine (p. 30)
Pipette with wire wrapped around its stem
2-liter soda bottle filled with
water
Paper boat (p. 29)
Detergent

Page 17 of 34 T. H. Rider
9/18/11
Experiment 43: Tornado
Kit provides: Metal washer
You provide: Two empty 2-liter soda bottles, duct tape, flying cows or little dogs named Toto (optional)
Let’s do an experiment to see how tornadoes work. To continue with our theme of torturing soda bottles, peel the labels off two bottles and do this experiment in a large sink or bathtub. Fill one of the bottles 3/4 full with water. Dry off the top of the bottle and invert the other bottle above it with the washer sandwiched between the mouths of the two bottles to create a small hole between the two bottles. Join the bottles firmly together in this configuration using plenty of duct tape. (It’s okay if it leaks a bit.) Turn the bottles upside down, so that the one with the water is on top, and vigorously swirl them. The swirling motion should start a tornado in the water that is flowing from the upper bottle to the lower one. Stop moving the bottles, and the tornado will continue to swirl, since it very efficiently allows the water from the upper bottle to go down (around the edges) and the air from the lower bottle to go up (through the center) without letting them run into each other. To see how inefficient the process can be when the air and water do run into each other, repeat the experiment but without swirling the bottles to form a tornado.
Real tornadoes are similar. If heavier cool air coming from the north flows above lighter warm air coming from the south, the heavier cool air will want to go down, and the lighter warm air will want to go up. They can do that more efficiently if they begin a swirling motion. In most cases, this just leads to thunderstorms with winds blowing in various directions at different locations and altitudes, but occasionally the swirling motion becomes so severe that a tornado forms. The swirling wind in a tornado can blow at 100-200 miles per hour and can do a lot of damage if it reaches all the way to the ground.
Meteorology Experiment 41: Air pressure
Kit provides: These words of wisdom
You provide: Empty 2-liter soda bottle, sink, freezer
Meteorologists study the atmosphere (air) and weather, and some of them even get to point at things on TV. Although air is invisible, it is all around us and has pressure, meaning that it is constantly pushing on everything. To demonstrate this, remove the label from an empty 2-liter soda bottle and take the cap off (but save the cap). Have an adult run very hot water over the bottle in a large sink for a few minutes, in order to heat the air inside the bottle while getting as little water inside the bottle as possible. Keep the bottle upside down so the hot air doesn’t escape, then quickly put the cap back on the bottle, tighten it, and put the bottle in a freezer for a few minutes. What happens to the bottle?
Air expands and has more pressure when it is heated, and it contracts and has less pressure when it is cooled. The hot air perfectly fills the bottle initially, but after a few minutes in the freezer the air in the bottle has cooled and has much lower pressure—it doesn’t do a good job of filling the bottle anymore. The air outside the bottle is still at its normal full pressure, though, so it crushes the bottle. Air pressure plays an important role in meteorology, the science of weather, and it can be measured using an instrument called a barometer. Usually the air pressure decreases when a storm is on the way.
Experiment 42: Show a little convection
Kit provides: Mini beaker
You provide: Tall clear drinking glass, plastic wrap, red food coloring, salt, steak knife (with adult assistance, careful!)
Fill a mini beaker with hot water, add a couple drops of red food coloring, and cover it with plastic wrap. Set it inside an empty drinking glass, facing up. Fill the drinking glass with very cold water, then get an adult to use a steak knife to puncture the plastic wrap on the mini beaker. What happens?
Hot water is less dense (lighter) than cold water, so it wants to rise to the top. This is called convection. In meteorology, convection is important both in the ocean and in the atmosphere.
In the ocean, similar effects arise from differences in salt concentration as well as differences in temperature. You can demonstrate this by dissolving as much salt as possible in a drinking glass of tap water (normal temperature). Fill the mini beaker with red-colored tap water (same temperature) without salt, and cover it with plastic wrap. Put it at the bottom of the drinking glass and again have an adult puncture the plastic with a steak knife. Fresh water is less dense (lighter) than salt water, so it rises to the top.
Experiment 44: Gilligan’s Island weather station Kit provides: Straw, test tubes, pipette You provide: Empty 2-liter soda bottle, red food coloring, modeling clay, tape, marker
The Professor on Gilligan’s Island was a science nerd role model—he was able to build anything from an electrical generator to a radiation suit with bamboo, coconuts, and rope. (Too bad he didn’t know anything about boats…) You can use similar techniques to make your own instruments for measuring weather conditions.
To make a thermometer, use a clear two-liter soda bottle with no label, add a few drops of red food coloring, and fill it completely full with lukewarm water. Lower a clear drinking straw 1-2 inches into the bottle and thoroughly seal the top of the bottle around the straw with modeling clay. If necessary, use a pipette to add enough red water to come half way up the straw. Mark the current water level on the straw. Set the bottle in a sink full of hot water, wait a few minutes for the water to rise in the straw, and mark the new water level on the straw. Then put the bottle in a sink full of ice water, wait for the water level to stop going down, and mark the position on the straw. Your thermometer works because water expands as it becomes hotter and contracts as it cools. Real liquid thermometers work the same way, although instead of water they usually use nastier chemicals that expand and contract even more when they are heated and cooled. When you are done with the thermometer, this experiment also makes a great water gun (outdoors only, please!).
You can also use a test tube as a rain gauge. Attach it securely outside, then check it after each rain to see how much rainfall there was. If you would like to make or buy more sophisticated weather instruments, see the suggestions at the bottom of this page.
Explore further: Mary Kay Carson, Weather Projects for Young Scientists (2007); Janice VanCleave, Janice VanCleave’s Weather (1995); Brian Cosgrove, DK Eyewitness Weather (2007); Joanna Cole, The Magic School Bus Inside a Hurricane (1996); Storm Dunlop, Guide to Weather Forecasting (2008); www.hometrainingtools.com/weather-study-kit/p/KT-WESTUDY/
Was
her
2-liter soda bottle
Soda bottle
Soda bottle
Soda bottle
Water with red food
coloring
Clay
Straw
Mini beaker full of hot water with red food coloring,
covered with plastic wrap
Clear drinking glass full of cold water
Torn
ado
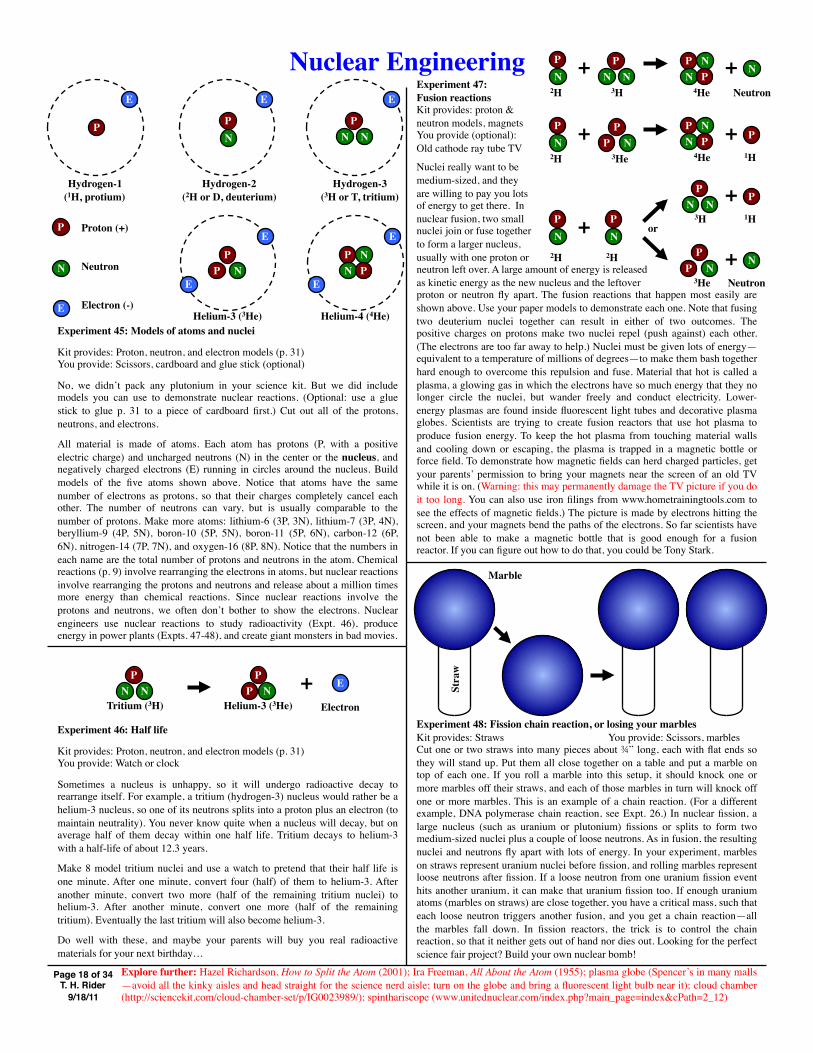
Page 18 of 34 T. H. Rider
9/18/11
Nuclear Engineering
Experiment 46: Half life
Kit provides: Proton, neutron, and electron models (p. 31) You provide: Watch or clock
Sometimes a nucleus is unhappy, so it will undergo radioactive decay to rearrange itself. For example, a tritium (hydrogen-3) nucleus would rather be a helium-3 nucleus, so one of its neutrons splits into a proton plus an electron (to maintain neutrality). You never know quite when a nucleus will decay, but on average half of them decay within one half life. Tritium decays to helium-3 with a half-life of about 12.3 years.
Make 8 model tritium nuclei and use a watch to pretend that their half life is one minute. After one minute, convert four (half) of them to helium-3. After another minute, convert two more (half of the remaining tritium nuclei) to helium-3. After another minute, convert one more (half of the remaining tritium). Eventually the last tritium will also become helium-3.
Do well with these, and maybe your parents will buy you real radioactive materials for your next birthday…
Experiment 45: Models of atoms and nuclei
Kit provides: Proton, neutron, and electron models (p. 31) You provide: Scissors, cardboard and glue stick (optional)
No, we didn’t pack any plutonium in your science kit. But we did include models you can use to demonstrate nuclear reactions. (Optional: use a glue stick to glue p. 31 to a piece of cardboard first.) Cut out all of the protons, neutrons, and electrons.
All material is made of atoms. Each atom has protons (P, with a positive electric charge) and uncharged neutrons (N) in the center or the nucleus, and negatively charged electrons (E) running in circles around the nucleus. Build models of the five atoms shown above. Notice that atoms have the same number of electrons as protons, so that their charges completely cancel each other. The number of neutrons can vary, but is usually comparable to the number of protons. Make more atoms: lithium-6 (3P, 3N), lithium-7 (3P, 4N), beryllium-9 (4P, 5N), boron-10 (5P, 5N), boron-11 (5P, 6N), carbon-12 (6P, 6N), nitrogen-14 (7P, 7N), and oxygen-16 (8P, 8N). Notice that the numbers in each name are the total number of protons and neutrons in the atom. Chemical reactions (p. 9) involve rearranging the electrons in atoms, but nuclear reactions involve rearranging the protons and neutrons and release about a million times more energy than chemical reactions. Since nuclear reactions involve the protons and neutrons, we often don’t bother to show the electrons. Nuclear engineers use nuclear reactions to study radioactivity (Expt. 46), produce energy in power plants (Expts. 47-48), and create giant monsters in bad movies.
Experiment 48: Fission chain reaction, or losing your marbles Kit provides: Straws You provide: Scissors, marbles Cut one or two straws into many pieces about ¾” long, each with flat ends so they will stand up. Put them all close together on a table and put a marble on top of each one. If you roll a marble into this setup, it should knock one or more marbles off their straws, and each of those marbles in turn will knock off one or more marbles. This is an example of a chain reaction. (For a different example, DNA polymerase chain reaction, see Expt. 26.) In nuclear fission, a large nucleus (such as uranium or plutonium) fissions or splits to form two medium-sized nuclei plus a couple of loose neutrons. As in fusion, the resulting nuclei and neutrons fly apart with lots of energy. In your experiment, marbles on straws represent uranium nuclei before fission, and rolling marbles represent loose neutrons after fission. If a loose neutron from one uranium fission event hits another uranium, it can make that uranium fission too. If enough uranium atoms (marbles on straws) are close together, you have a critical mass, such that each loose neutron triggers another fusion, and you get a chain reaction—all the marbles fall down. In fission reactors, the trick is to control the chain reaction, so that it neither gets out of hand nor dies out. Looking for the perfect science fair project? Build your own nuclear bomb!
Explore further: Hazel Richardson, How to Split the Atom (2001); Ira Freeman, All About the Atom (1955); plasma globe (Spencer’s in many malls—avoid all the kinky aisles and head straight for the science nerd aisle; turn on the globe and bring a fluorescent light bulb near it); cloud chamber (http://sciencekit.com/cloud-chamber-set/p/IG0023989/); spinthariscope (www.unitednuclear.com/index.php?main_page=index&cPath=2_12)
N
P
E
Proton (+)
Neutron
Electron (-)
P N N
P N P
E
Experiment 47: Fusion reactions Kit provides: proton & neutron models, magnets You provide (optional): Old cathode ray tube TV
Nuclei really want to be medium-sized, and they are willing to pay you lots of energy to get there. In nuclear fusion, two small nuclei join or fuse together to form a larger nucleus, usually with one proton or neutron left over. A large amount of energy is released as kinetic energy as the new nucleus and the leftover proton or neutron fly apart. The fusion reactions that happen most easily are shown above. Use your paper models to demonstrate each one. Note that fusing two deuterium nuclei together can result in either of two outcomes. The positive charges on protons make two nuclei repel (push against) each other. (The electrons are too far away to help.) Nuclei must be given lots of energy—equivalent to a temperature of millions of degrees—to make them bash together hard enough to overcome this repulsion and fuse. Material that hot is called a plasma, a glowing gas in which the electrons have so much energy that they no longer circle the nuclei, but wander freely and conduct electricity. Lower-energy plasmas are found inside fluorescent light tubes and decorative plasma globes. Scientists are trying to create fusion reactors that use hot plasma to produce fusion energy. To keep the hot plasma from touching material walls and cooling down or escaping, the plasma is trapped in a magnetic bottle or force field. To demonstrate how magnetic fields can herd charged particles, get your parents’ permission to bring your magnets near the screen of an old TV while it is on. (Warning: this may permanently damage the TV picture if you do it too long. You can also use iron filings from www.hometrainingtools.com to see the effects of magnetic fields.) The picture is made by electrons hitting the screen, and your magnets bend the paths of the electrons. So far scientists have not been able to make a magnetic bottle that is good enough for a fusion reactor. If you can figure out how to do that, you could be Tony Stark.
P N N
P N P
N P
N P
P N
N P
N
P P N
N P
+
+
+
+
2H
2H 3He 4He 1H
Neutron 4He 3H
N P
P
+ +
2H
1H N P
2H
P N N
3H
P N P
3He
N + Neutron
+
P N N N
P
P N
N P
Hydrogen-2 (2H or D, deuterium)
Helium-4 (4He)
Hydrogen-3 (3H or T, tritium)
P N P
Helium-3 (3He)
P
Hydrogen-1 (1H, protium)
E E E
E E
E E
or
Helium-3 (3He) Electron Tritium (3H)
Marble
Stra
w
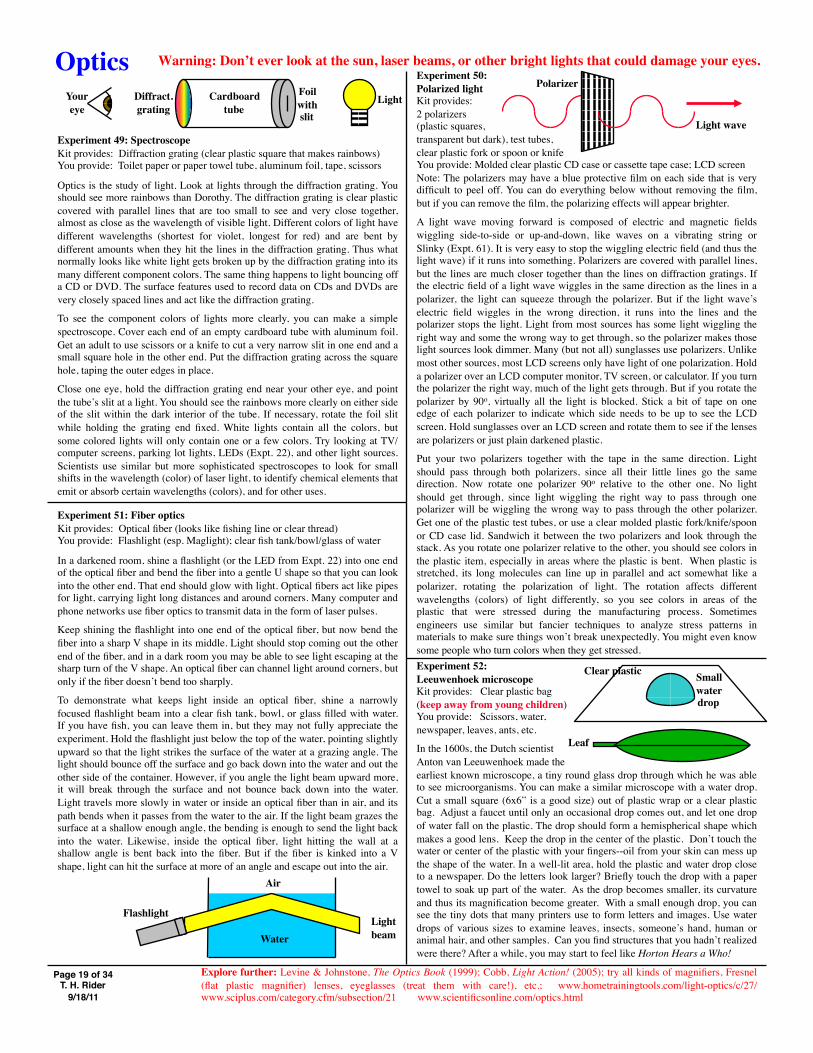
Page 19 of 34 T. H. Rider
9/18/11
Optics
Experiment 49: Spectroscope Kit provides: Diffraction grating (clear plastic square that makes rainbows) You provide: Toilet paper or paper towel tube, aluminum foil, tape, scissors
Optics is the study of light. Look at lights through the diffraction grating. You should see more rainbows than Dorothy. The diffraction grating is clear plastic covered with parallel lines that are too small to see and very close together, almost as close as the wavelength of visible light. Different colors of light have different wavelengths (shortest for violet, longest for red) and are bent by different amounts when they hit the lines in the diffraction grating. Thus what normally looks like white light gets broken up by the diffraction grating into its many different component colors. The same thing happens to light bouncing off a CD or DVD. The surface features used to record data on CDs and DVDs are very closely spaced lines and act like the diffraction grating.
To see the component colors of lights more clearly, you can make a simple spectroscope. Cover each end of an empty cardboard tube with aluminum foil. Get an adult to use scissors or a knife to cut a very narrow slit in one end and a small square hole in the other end. Put the diffraction grating across the square hole, taping the outer edges in place.
Close one eye, hold the diffraction grating end near your other eye, and point the tube’s slit at a light. You should see the rainbows more clearly on either side of the slit within the dark interior of the tube. If necessary, rotate the foil slit while holding the grating end fixed. White lights contain all the colors, but some colored lights will only contain one or a few colors. Try looking at TV/computer screens, parking lot lights, LEDs (Expt. 22), and other light sources. Scientists use similar but more sophisticated spectroscopes to look for small shifts in the wavelength (color) of laser light, to identify chemical elements that emit or absorb certain wavelengths (colors), and for other uses.
Experiment 50: Polarized light Kit provides: 2 polarizers (plastic squares, transparent but dark), test tubes, clear plastic fork or spoon or knife You provide: Molded clear plastic CD case or cassette tape case; LCD screen Note: The polarizers may have a blue protective film on each side that is very difficult to peel off. You can do everything below without removing the film, but if you can remove the film, the polarizing effects will appear brighter.
A light wave moving forward is composed of electric and magnetic fields wiggling side-to-side or up-and-down, like waves on a vibrating string or Slinky (Expt. 61). It is very easy to stop the wiggling electric field (and thus the light wave) if it runs into something. Polarizers are covered with parallel lines, but the lines are much closer together than the lines on diffraction gratings. If the electric field of a light wave wiggles in the same direction as the lines in a polarizer, the light can squeeze through the polarizer. But if the light wave’s electric field wiggles in the wrong direction, it runs into the lines and the polarizer stops the light. Light from most sources has some light wiggling the right way and some the wrong way to get through, so the polarizer makes those light sources look dimmer. Many (but not all) sunglasses use polarizers. Unlike most other sources, most LCD screens only have light of one polarization. Hold a polarizer over an LCD computer monitor, TV screen, or calculator. If you turn the polarizer the right way, much of the light gets through. But if you rotate the polarizer by 90o, virtually all the light is blocked. Stick a bit of tape on one edge of each polarizer to indicate which side needs to be up to see the LCD screen. Hold sunglasses over an LCD screen and rotate them to see if the lenses are polarizers or just plain darkened plastic.
Put your two polarizers together with the tape in the same direction. Light should pass through both polarizers, since all their little lines go the same direction. Now rotate one polarizer 90o relative to the other one. No light should get through, since light wiggling the right way to pass through one polarizer will be wiggling the wrong way to pass through the other polarizer. Get one of the plastic test tubes, or use a clear molded plastic fork/knife/spoon or CD case lid. Sandwich it between the two polarizers and look through the stack. As you rotate one polarizer relative to the other, you should see colors in the plastic item, especially in areas where the plastic is bent. When plastic is stretched, its long molecules can line up in parallel and act somewhat like a polarizer, rotating the polarization of light. The rotation affects different wavelengths (colors) of light differently, so you see colors in areas of the plastic that were stressed during the manufacturing process. Sometimes engineers use similar but fancier techniques to analyze stress patterns in materials to make sure things won’t break unexpectedly. You might even know some people who turn colors when they get stressed.
Experiment 51: Fiber optics Kit provides: Optical fiber (looks like fishing line or clear thread) You provide: Flashlight (esp. Maglight); clear fish tank/bowl/glass of water
In a darkened room, shine a flashlight (or the LED from Expt. 22) into one end of the optical fiber and bend the fiber into a gentle U shape so that you can look into the other end. That end should glow with light. Optical fibers act like pipes for light, carrying light long distances and around corners. Many computer and phone networks use fiber optics to transmit data in the form of laser pulses.
Keep shining the flashlight into one end of the optical fiber, but now bend the fiber into a sharp V shape in its middle. Light should stop coming out the other end of the fiber, and in a dark room you may be able to see light escaping at the sharp turn of the V shape. An optical fiber can channel light around corners, but only if the fiber doesn’t bend too sharply.
To demonstrate what keeps light inside an optical fiber, shine a narrowly focused flashlight beam into a clear fish tank, bowl, or glass filled with water. If you have fish, you can leave them in, but they may not fully appreciate the experiment. Hold the flashlight just below the top of the water, pointing slightly upward so that the light strikes the surface of the water at a grazing angle. The light should bounce off the surface and go back down into the water and out the other side of the container. However, if you angle the light beam upward more, it will break through the surface and not bounce back down into the water. Light travels more slowly in water or inside an optical fiber than in air, and its path bends when it passes from the water to the air. If the light beam grazes the surface at a shallow enough angle, the bending is enough to send the light back into the water. Likewise, inside the optical fiber, light hitting the wall at a shallow angle is bent back into the fiber. But if the fiber is kinked into a V shape, light can hit the surface at more of an angle and escape out into the air.
Light Your eye
Diffract. grating
Cardboard tube
Foil with slit
Air
Flashlight
Water Light beam
Polarizer
Light wave
Experiment 52: Leeuwenhoek microscope Kit provides: Clear plastic bag (keep away from young children) You provide: Scissors, water, newspaper, leaves, ants, etc.
In the 1600s, the Dutch scientist Anton van Leeuwenhoek made the earliest known microscope, a tiny round glass drop through which he was able to see microorganisms. You can make a similar microscope with a water drop. Cut a small square (6x6” is a good size) out of plastic wrap or a clear plastic bag. Adjust a faucet until only an occasional drop comes out, and let one drop of water fall on the plastic. The drop should form a hemispherical shape which makes a good lens. Keep the drop in the center of the plastic. Don’t touch the water or center of the plastic with your fingers--oil from your skin can mess up the shape of the water. In a well-lit area, hold the plastic and water drop close to a newspaper. Do the letters look larger? Briefly touch the drop with a paper towel to soak up part of the water. As the drop becomes smaller, its curvature and thus its magnification become greater. With a small enough drop, you can see the tiny dots that many printers use to form letters and images. Use water drops of various sizes to examine leaves, insects, someone’s hand, human or animal hair, and other samples. Can you find structures that you hadn’t realized were there? After a while, you may start to feel like Horton Hears a Who!
Small water drop
Clear plastic
Leaf
Explore further: Levine & Johnstone, The Optics Book (1999); Cobb, Light Action! (2005); try all kinds of magnifiers, Fresnel (flat plastic magnifier) lenses, eyeglasses (treat them with care!), etc.; www.hometrainingtools.com/light-optics/c/27/ www.sciplus.com/category.cfm/subsection/21 www.scientificsonline.com/optics.html
Warning: Don’t ever look at the sun, laser beams, or other bright lights that could damage your eyes.
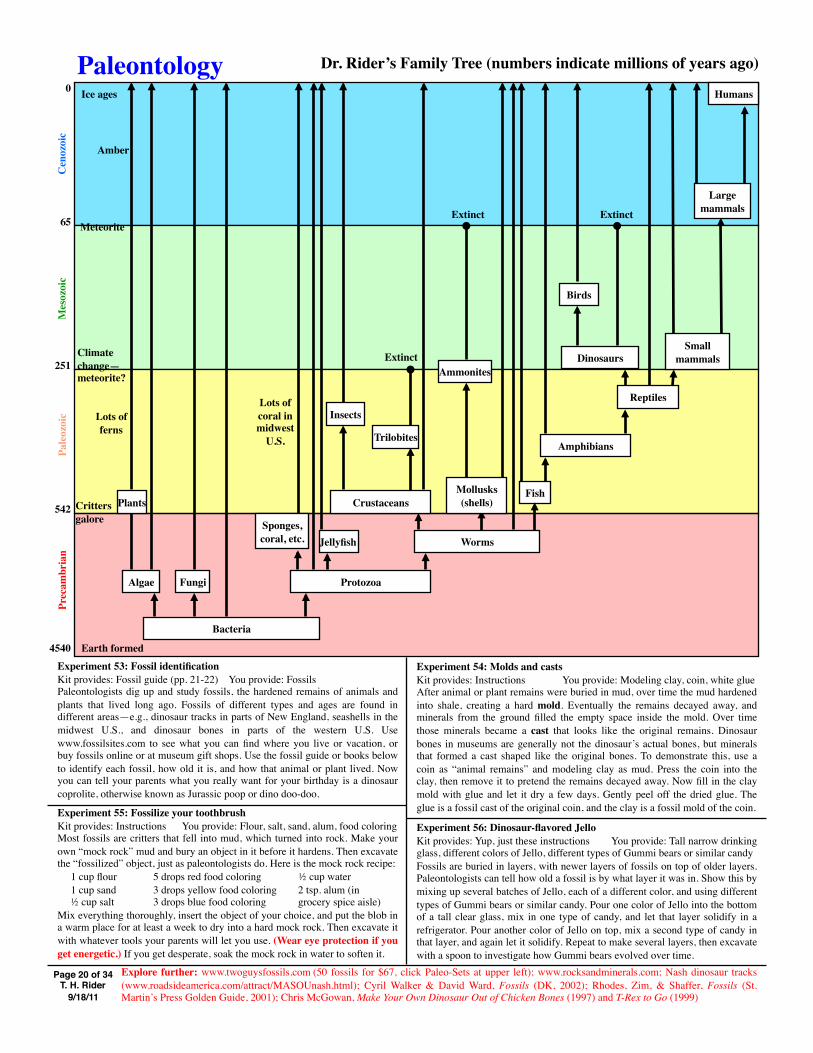
Page 20 of 34 T. H. Rider
9/18/11
Paleontology
Experiment 53: Fossil identification Kit provides: Fossil guide (pp. 21-22) You provide: Fossils Paleontologists dig up and study fossils, the hardened remains of animals and plants that lived long ago. Fossils of different types and ages are found in different areas—e.g., dinosaur tracks in parts of New England, seashells in the midwest U.S., and dinosaur bones in parts of the western U.S. Use www.fossilsites.com to see what you can find where you live or vacation, or buy fossils online or at museum gift shops. Use the fossil guide or books below to identify each fossil, how old it is, and how that animal or plant lived. Now you can tell your parents what you really want for your birthday is a dinosaur coprolite, otherwise known as Jurassic poop or dino doo-doo.
Experiment 55: Fossilize your toothbrush Kit provides: Instructions You provide: Flour, salt, sand, alum, food coloring Most fossils are critters that fell into mud, which turned into rock. Make your own “mock rock” mud and bury an object in it before it hardens. Then excavate the “fossilized” object, just as paleontologists do. Here is the mock rock recipe: 1 cup flour 5 drops red food coloring ½ cup water 1 cup sand 3 drops yellow food coloring 2 tsp. alum (in ½ cup salt 3 drops blue food coloring grocery spice aisle) Mix everything thoroughly, insert the object of your choice, and put the blob in a warm place for at least a week to dry into a hard mock rock. Then excavate it with whatever tools your parents will let you use. (Wear eye protection if you get energetic.) If you get desperate, soak the mock rock in water to soften it.
Experiment 56: Dinosaur-flavored Jello Kit provides: Yup, just these instructions You provide: Tall narrow drinking glass, different colors of Jello, different types of Gummi bears or similar candy Fossils are buried in layers, with newer layers of fossils on top of older layers. Paleontologists can tell how old a fossil is by what layer it was in. Show this by mixing up several batches of Jello, each of a different color, and using different types of Gummi bears or similar candy. Pour one color of Jello into the bottom of a tall clear glass, mix in one type of candy, and let that layer solidify in a refrigerator. Pour another color of Jello on top, mix a second type of candy in that layer, and again let it solidify. Repeat to make several layers, then excavate with a spoon to investigate how Gummi bears evolved over time.
Experiment 54: Molds and casts Kit provides: Instructions You provide: Modeling clay, coin, white glue After animal or plant remains were buried in mud, over time the mud hardened into shale, creating a hard mold. Eventually the remains decayed away, and minerals from the ground filled the empty space inside the mold. Over time those minerals became a cast that looks like the original remains. Dinosaur bones in museums are generally not the dinosaur’s actual bones, but minerals that formed a cast shaped like the original bones. To demonstrate this, use a coin as “animal remains” and modeling clay as mud. Press the coin into the clay, then remove it to pretend the remains decayed away. Now fill in the clay mold with glue and let it dry a few days. Gently peel off the dried glue. The glue is a fossil cast of the original coin, and the clay is a fossil mold of the coin.
Explore further: www.twoguysfossils.com (50 fossils for $67, click Paleo-Sets at upper left); www.rocksandminerals.com; Nash dinosaur tracks (www.roadsideamerica.com/attract/MASOUnash.html); Cyril Walker & David Ward, Fossils (DK, 2002); Rhodes, Zim, & Shaffer, Fossils (St. Martin’s Press Golden Guide, 2001); Chris McGowan, Make Your Own Dinosaur Out of Chicken Bones (1997) and T-Rex to Go (1999)
Dr. Rider’s Family Tree (numbers indicate millions of years ago) 0
65
251
542
4540
Prec
ambr
ian
Pale
ozoi
c M
esoz
oic
Cen
ozoi
c
Meteorite
Ice ages
Climate change— meteorite?
Critters galore
Earth formed
Humans
Dinosaurs
Birds
Reptiles
Amphibians
Fish
Fungi Algae
Sponges, coral, etc.
Bacteria
Protozoa
Trilobites
Insects Lots of coral in midwest
U.S.
Lots of ferns
Plants
Amber
Large mammals
Small mammals
Ammonites Extinct
Extinct Extinct
Mollusks (shells)
Worms
Crustaceans
Jellyfish

Page 21 of 34 T. H. Rider
9/18/11
Plan
ts:
Sim
ple
stat
iona
ry se
a an
imal
s tha
t loo
ked
like
plan
ts:
Alg
ae (S
trom
atol
ite)
Sing
le a
lgae
cel
ls pi
led
up to
form
stro
mat
olite
mou
nds i
n th
e oc
ean
Look
like
swir
ls/ri
ngs i
n ro
ck
3 bi
llion
yea
rs a
go to
pre
sent
Coa
l Fer
ns
Com
pres
sed
dead
fern
s for
med
coa
l 36
0-30
0 m
illio
n ye
ars a
go
Petr
ified
Woo
d Tr
ee tr
unks
or b
ranc
hes t
hat h
ave
been
repl
aced
by
min
eral
s 30
0 m
illio
n ye
ars a
go to
pre
sent
Leav
es
Leav
es fr
om tr
ees/b
ushe
s lef
t im
pres
sions
in m
ud th
at h
arde
ned
360
mill
ion
year
s ago
to p
rese
nt
Am
ber
Har
dene
d tr
ee sa
p (li
ke m
aple
syru
p)
May
con
tain
inse
cts,
leav
es, e
tc.
40 m
illio
n ye
ars a
go to
pre
sent
Col
onia
l Cor
al
Clu
ster
of c
oral
ani
mal
s th
at li
ved
toge
ther
542
mill
ion
year
s ago
to p
rese
nt
Blas
toid
Flow
er-li
ke se
a an
imal
Ofte
n on
ly th
e 5-
sided
bud
is fo
und
488-
251
mill
ion
year
s ago
Cri
noid
Flow
er-li
ke se
a an
imal
Ofte
n on
ly th
e st
em is
foun
d 48
8-25
1 m
illio
n ye
ars a
go
Bryz
oan
Stem
s/spi
rals
mad
e of
mill
ions
of m
icro
scop
ic se
a an
imal
s 48
8 m
illio
n ye
ars a
go to
pre
sent
Ani
mal
s tha
t liv
ed in
shel
ls:
Hor
n (R
ugos
e) C
oral
Sim
ple
anim
al; m
outh
at l
arge
end
Ofte
n m
istak
en fo
r a h
orn
or to
oth
488-
251
mill
ion
year
s ago
Brac
hiop
od
Cla
m-li
ke a
nim
al
Left
& r
ight
side
s of s
hell
look
sam
e 54
2 m
illio
n ye
ars a
go to
pre
sent
Pele
cypo
d C
lam
-like
ani
mal
Left/
righ
t sid
es o
f she
ll lo
ok d
iffer
ent
542
mill
ion
year
s ago
to p
rese
nt
Gas
trop
od
Snai
l tha
t liv
ed in
shel
l Sh
ell i
s usu
ally
con
e-sh
aped
spir
al
542
mill
ion
year
s ago
to p
rese
nt
Ort
hoce
ras
Squi
d-lik
e an
imal
Live
d in
con
e-sh
aped
shel
l 48
8-20
0 m
illio
n ye
ars a
go
Am
mon
ite
Squi
d-lik
e an
imal
Live
d in
spir
al sh
ell
425-
65 m
illio
n ye
ars a
go
Dr. R
iderʼs
Pre
hist
oric
Bes
tiary
(Par
t 1)
Page 21 of 32 T. H. Rider
9/18/11

Page 22 of 34 T. H. Rider
9/18/11
Arthropods:
Dinosaurs:
Trilobite U
nderwater crustacean related to
horseshoe crabs and lobsters 542-251 m
illion years ago
Craw
ling insect Beetles, etc.--R
elated to underwater
crustaceans like trilobites, but evolved to live on land
~416 million years ago to present
Shark tooth
Teeth were harder and preserved
much better than other shark parts
~420 million years ago to present
Flying insect M
any species from sm
all flies to giant dragonflies
Usually preserved in am
ber, or in m
ud that hardened to shale ~320 m
illion years ago to present
Com
plete fish D
ead fish sank into mud at bottom
of lake/ocean; m
ud hardened to shale ~510 m
illion years ago to present
Dinosaur tooth
Meat-eating dinosaurs had sharp pointed teeth; plant-eating dinosaurs had dull flat teeth
251-65 million years ago
Dinosaur eggshell
Eggshell pieces of hatched eggs, or w
hole unhatched eggs, could becom
e fossilized 251-65 m
illion years ago
Dinosaur gastrolith
“Gizzard stone” sw
allowed by
dinosaur to grind up food in stomach
Round and sm
ooth from grinding
251-65 million years ago
Dinosaur coprolite
Dino doo-doo,
or Jurassic poop 251-65 m
illion years ago
Mam
mals:
Dinosaur bone
May look like petrified w
ood, but dinosaur bone is porous inside
251-65 million years ago
Oreodont
Pig-like plant-eating mam
mal
Lived in North A
merica
48-4 million years ago
Mam
moth
Sometim
es frozen/preserved in ice H
air & tusk pieces w
idely available 5 m
illion – 10,000 years ago
Horse
Horses evolved in N
orth Am
erica, gradually getting bigger
Horse teeth are easy to recognize
40-50 million years ago to present
Whale
Gradually evolved from
land animals
Whale ear bones easy to recognize
~45 million years ago to present
Hum
ans Left fossil skeletons, as w
ell as stone tools and arrow
heads ~2.5 m
illion years ago to present
Fish: Dr. Riderʼs Prehistoric Bestiary (Part 2)
Page 22 of 32 T. H. Rider
9/18/11
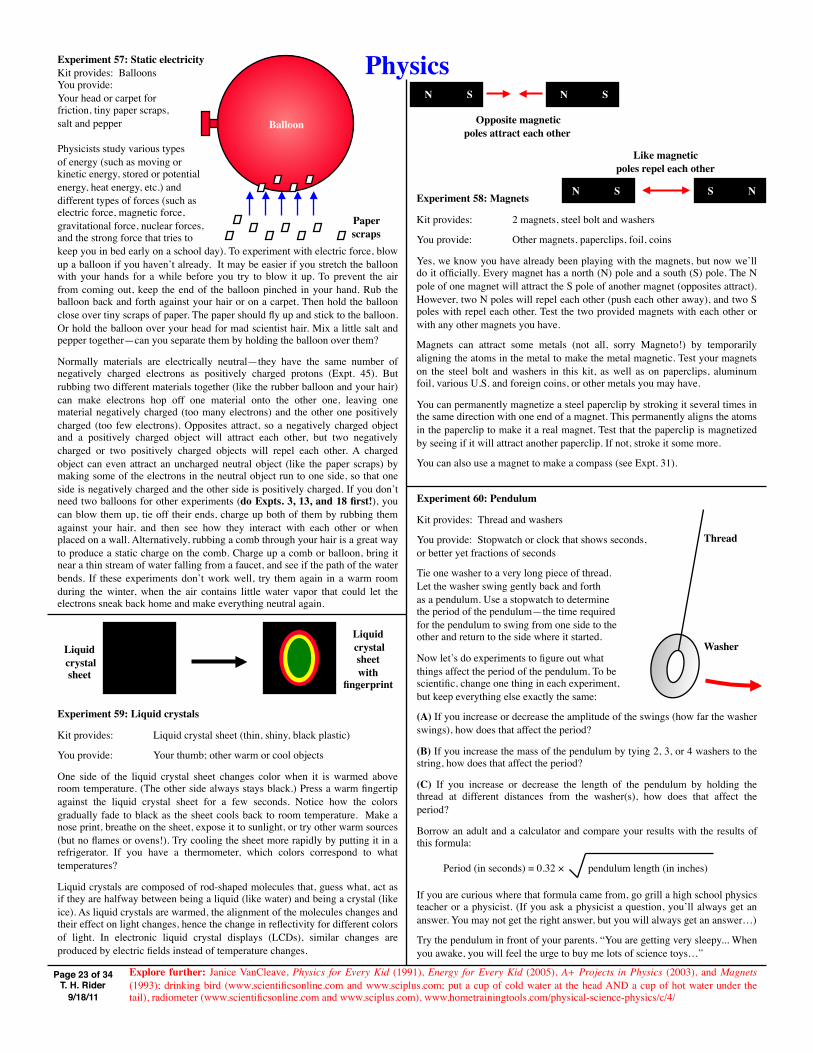
Page 23 of 34 T. H. Rider
9/18/11
Physics
Experiment 59: Liquid crystals
Kit provides: Liquid crystal sheet (thin, shiny, black plastic)
You provide: Your thumb; other warm or cool objects
One side of the liquid crystal sheet changes color when it is warmed above room temperature. (The other side always stays black.) Press a warm fingertip against the liquid crystal sheet for a few seconds. Notice how the colors gradually fade to black as the sheet cools back to room temperature. Make a nose print, breathe on the sheet, expose it to sunlight, or try other warm sources (but no flames or ovens!). Try cooling the sheet more rapidly by putting it in a refrigerator. If you have a thermometer, which colors correspond to what temperatures?
Liquid crystals are composed of rod-shaped molecules that, guess what, act as if they are halfway between being a liquid (like water) and being a crystal (like ice). As liquid crystals are warmed, the alignment of the molecules changes and their effect on light changes, hence the change in reflectivity for different colors of light. In electronic liquid crystal displays (LCDs), similar changes are produced by electric fields instead of temperature changes.
Experiment 57: Static electricity Kit provides: Balloons You provide: Your head or carpet for friction, tiny paper scraps, salt and pepper
Physicists study various types of energy (such as moving or kinetic energy, stored or potential energy, heat energy, etc.) and different types of forces (such as electric force, magnetic force, gravitational force, nuclear forces, and the strong force that tries to keep you in bed early on a school day). To experiment with electric force, blow up a balloon if you haven’t already. It may be easier if you stretch the balloon with your hands for a while before you try to blow it up. To prevent the air from coming out, keep the end of the balloon pinched in your hand. Rub the balloon back and forth against your hair or on a carpet. Then hold the balloon close over tiny scraps of paper. The paper should fly up and stick to the balloon. Or hold the balloon over your head for mad scientist hair. Mix a little salt and pepper together—can you separate them by holding the balloon over them?
Normally materials are electrically neutral—they have the same number of negatively charged electrons as positively charged protons (Expt. 45). But rubbing two different materials together (like the rubber balloon and your hair) can make electrons hop off one material onto the other one, leaving one material negatively charged (too many electrons) and the other one positively charged (too few electrons). Opposites attract, so a negatively charged object and a positively charged object will attract each other, but two negatively charged or two positively charged objects will repel each other. A charged object can even attract an uncharged neutral object (like the paper scraps) by making some of the electrons in the neutral object run to one side, so that one side is negatively charged and the other side is positively charged. If you don’t need two balloons for other experiments (do Expts. 3, 13, and 18 first!), you can blow them up, tie off their ends, charge up both of them by rubbing them against your hair, and then see how they interact with each other or when placed on a wall. Alternatively, rubbing a comb through your hair is a great way to produce a static charge on the comb. Charge up a comb or balloon, bring it near a thin stream of water falling from a faucet, and see if the path of the water bends. If these experiments don’t work well, try them again in a warm room during the winter, when the air contains little water vapor that could let the electrons sneak back home and make everything neutral again.
Balloon
Paper scraps
Explore further: Janice VanCleave, Physics for Every Kid (1991), Energy for Every Kid (2005), A+ Projects in Physics (2003), and Magnets (1993); drinking bird (www.scientificsonline.com and www.sciplus.com; put a cup of cold water at the head AND a cup of hot water under the tail), radiometer (www.scientificsonline.com and www.sciplus.com), www.hometrainingtools.com/physical-science-physics/c/4/
Experiment 58: Magnets
Kit provides: 2 magnets, steel bolt and washers
You provide: Other magnets, paperclips, foil, coins
Yes, we know you have already been playing with the magnets, but now we’ll do it officially. Every magnet has a north (N) pole and a south (S) pole. The N pole of one magnet will attract the S pole of another magnet (opposites attract). However, two N poles will repel each other (push each other away), and two S poles with repel each other. Test the two provided magnets with each other or with any other magnets you have.
Magnets can attract some metals (not all, sorry Magneto!) by temporarily aligning the atoms in the metal to make the metal magnetic. Test your magnets on the steel bolt and washers in this kit, as well as on paperclips, aluminum foil, various U.S. and foreign coins, or other metals you may have.
You can permanently magnetize a steel paperclip by stroking it several times in the same direction with one end of a magnet. This permanently aligns the atoms in the paperclip to make it a real magnet. Test that the paperclip is magnetized by seeing if it will attract another paperclip. If not, stroke it some more.
You can also use a magnet to make a compass (see Expt. 31).
N S N S
N S S N
Experiment 60: Pendulum
Kit provides: Thread and washers
You provide: Stopwatch or clock that shows seconds, or better yet fractions of seconds
Tie one washer to a very long piece of thread. Let the washer swing gently back and forth as a pendulum. Use a stopwatch to determine the period of the pendulum—the time required for the pendulum to swing from one side to the other and return to the side where it started.
Now let’s do experiments to figure out what things affect the period of the pendulum. To be scientific, change one thing in each experiment, but keep everything else exactly the same:
(A) If you increase or decrease the amplitude of the swings (how far the washer swings), how does that affect the period?
(B) If you increase the mass of the pendulum by tying 2, 3, or 4 washers to the string, how does that affect the period?
(C) If you increase or decrease the length of the pendulum by holding the thread at different distances from the washer(s), how does that affect the period?
Borrow an adult and a calculator and compare your results with the results of this formula:
Period (in seconds) = 0.32 × pendulum length (in inches)
If you are curious where that formula came from, go grill a high school physics teacher or a physicist. (If you ask a physicist a question, you’ll always get an answer. You may not get the right answer, but you will always get an answer…)
Try the pendulum in front of your parents. “You are getting very sleepy... When you awake, you will feel the urge to buy me lots of science toys…”
Liquid crystal sheet
Liquid crystal sheet with
fingerprint
Like magnetic poles repel each other
Opposite magnetic poles attract each other
Washer
Thread

Page 24 of 34 T. H. Rider
9/18/11
Waves and Acoustics
Experiment 64: Wave interference
Kit provides: Wave pattern sheet (p. 25)
You provide: Water, coins, photocopier, two clear overhead transparencies
Drop a small object such as a coin into a bowl, sink, or tub full of water (don’t let it go down the drain!). Notice that the object makes circular ripples or waves that spread outward. Now drop two coins at the same time but a few inches apart. Notice that the waves interfere with each other. Where the waves from both coins are going up at the same time and down at the same time, they add together to make bigger waves, which is called constructive interference. But where the waves from one coin are going up at the same time the waves from the other coin are going down, the waves cancel each other out, which is called destructive interference. Drop the coins at the same time again, but closer together or further apart, and see how that affects the interference patterns.
To do more experiments with interference patterns, have an adult make two identical photocopies of the wave pattern sheet (p. 25) on clear overhead projector transparencies. If the two transparencies are perfectly overlapped, you just see circles. But if you slowly slide one transparency over the other, you see constructive and destructive interference. This effect is called a Moiré pattern and would impress even Timothy Leary. Notice that in order to get good interference between two wave sources, the waves need to have the same wavelength or distance between successive waves. Constructive and destructive interference can be used to direct sound waves, laser beams, and radar beams in particular directions but not in others. Good to know if you are building a death ray for your science fair project!
Experiment 62: Silverware symphony
Kit provides: Thread
You provide: Metal spoons and pot lids of different sizes or metals (get your parents’ permission before you start banging on them)
Tie a piece of thread around a spoon and hold the spoon by the thread. Gently tap the spoon with another spoon. The hanging spoon vibrates, which vibrates the air around it and makes sound waves. Why is the thread important—what happens if you hold onto both spoons instead of hanging one by a thread? How does the sound change if you hit the same hanging spoon (carefully!) with different objects or materials? How does the sound change if you use a hanging spoon that is larger or smaller or made of a different metal? Metal pot lids work very well too. Musical instruments like triangles, cymbals, and xylophones work the same way. As with rubber bands and strings, larger objects can make longer waves, which correspond to sound waves with lower pitches.
Experiment 63: Straw kazoo Kit provides: Drinking straws You provide: Scissors, soda bottles of all sizes
Flatten one end of a straw and use clean scissors to cut the corners of that end to form a shape like a bird beak. Stick that end in your mouth (the flattened beak shape must be inside your mouth, not between your lips) and blow as hard as you can. You may need to adjust the shape and flatness of the cut end, how you blow, and how hard you blow, but sooner or later the straw should work as a kazoo. You’ll know you have succeeded when your parents are annoyed. What happens to the sound pitch (frequency) if you cut off part of the opposite end of the straw? The beak-shaped end of the straw acts like the reed in a woodwind instrument such as a clarinet or saxophone. A longer straw can make longer sound waves, which have lower pitches or frequencies.
You can also make sounds by blowing horizontally across the top of an empty soda bottle. (Try bottles of various sizes, from 8 or 12 ounces to two liters.) If you partially fill a bottle with water, there is less air inside for sound waves, and the waves should get shorter with higher pitches or frequencies when you blow. Musical instruments like flutes, trumpets, and trombones adjust the length of air-filled tubes to control what pitch they produce.
Experiment 61: Waves on a Slinky and on rubber bands Kit provides: These instructions You provide: Slinky (Walmart, Target, Toys R Us, etc.), rubber bands
Acoustics is the study of sound waves, which means you now get to make lots of noise for the sake of science. To see how waves work, stretch a Slinky out to several feet between you and another person. If you wiggle the Slinky up and down or side to side, you can make transverse waves. Light (p. 19) and radio waves are transverse waves made of wiggling electric fields (Expt. 57) and wiggling magnetic fields (Expt. 58).
If you hold the stretched Slinky straight and give one end a sudden shove, you can make longitudinal waves—parts of the Slinky are alternately compressed and stretched. Sound is longitudinal waves in air (or other materials); particles of air are alternately compressed and rarified as they bump into each other in a sound wave. Sometimes you see lightning several seconds before you hear the corresponding thunder, so you know that light waves travel much faster than sound waves.
Stretch a rubber band between your fingers and pluck it. Are the vibrations longitudinal or transverse waves? How does the length to which you stretch the rubber band affect the sound when it is plucked? Try different thicknesses of rubber bands if you have them. A vibrating rubber band vibrates the air around it and makes sound waves that come to your ears. Musical instruments such as guitars, violins, and pianos make sound using vibrating strings similar to the rubber band. A longer rubber band or string can make longer waves, which correspond to sound waves with lower pitches or frequencies.
Explore further: Levine & Johnstone, Science Experiments with Sound & Music (2002); Melissa and Doug Deluxe Band Set and Band in a Box (amazon.com and toy stores); www.hometrainingtools.com/sound-wave-motion/c/28/
Transverse wave
Longitudinal wave
Sound wave in air
This end inside your
mouth Drinking straw
Metal spoon
Thread
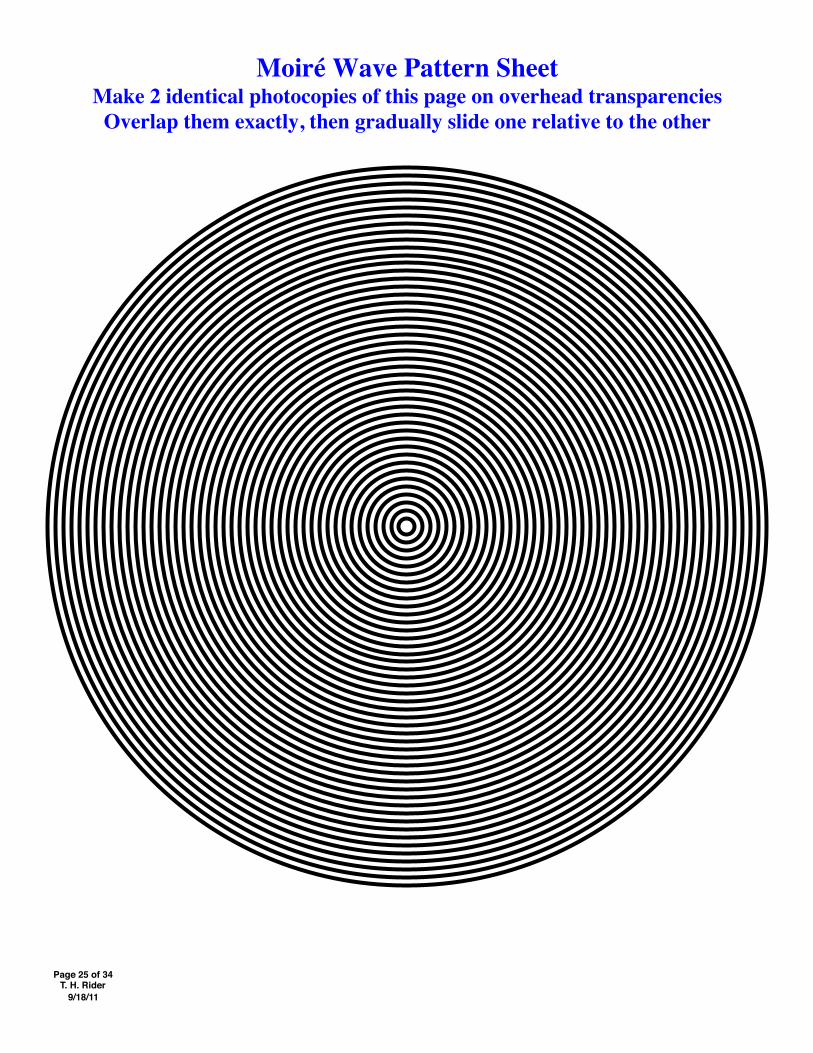
Page 25 of 34 T. H. Rider
9/18/11
Moiré Wave Pattern Sheet�Make 2 identical photocopies of this page on overhead transparencies�
Overlap them exactly, then gradually slide one relative to the other
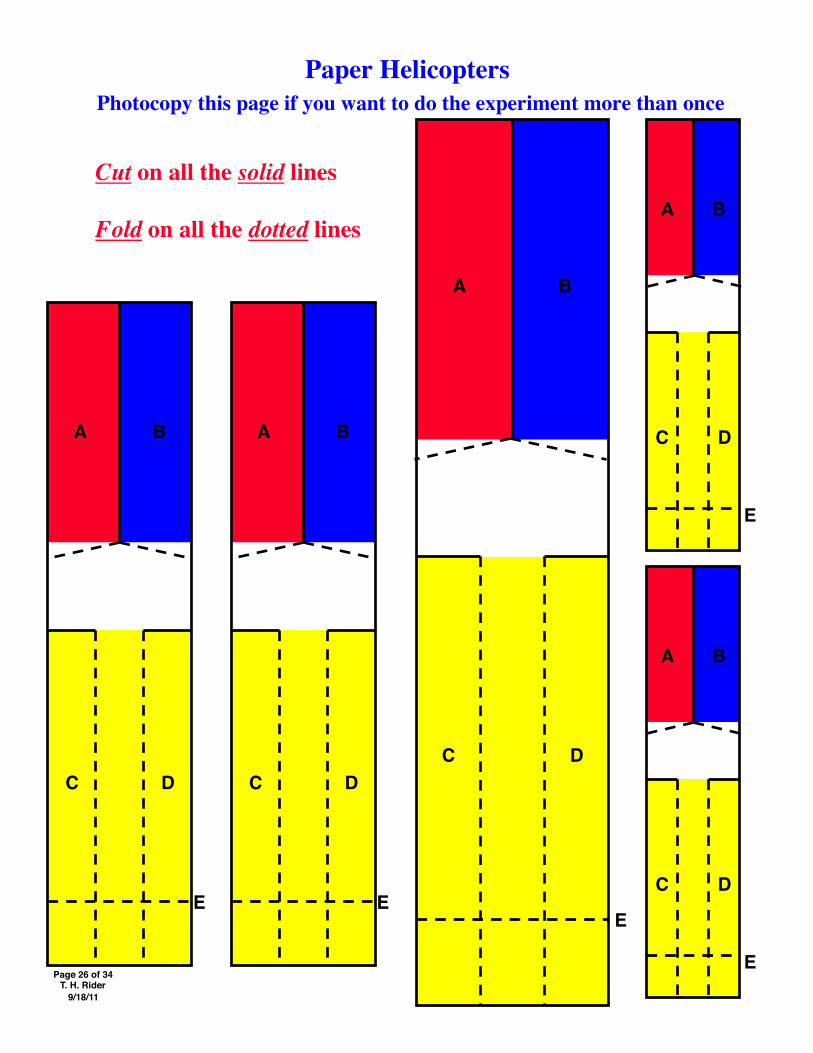
Page 26 of 34 T. H. Rider
9/18/11
Paper Helicopters� Photocopy this page if you want to do the experiment more than once
A B
C D
E
A B
C D
E
A B
C D
E
A B
C D
E
A B
C D
E
Cut on all the solid lines
Fold on all the dotted lines
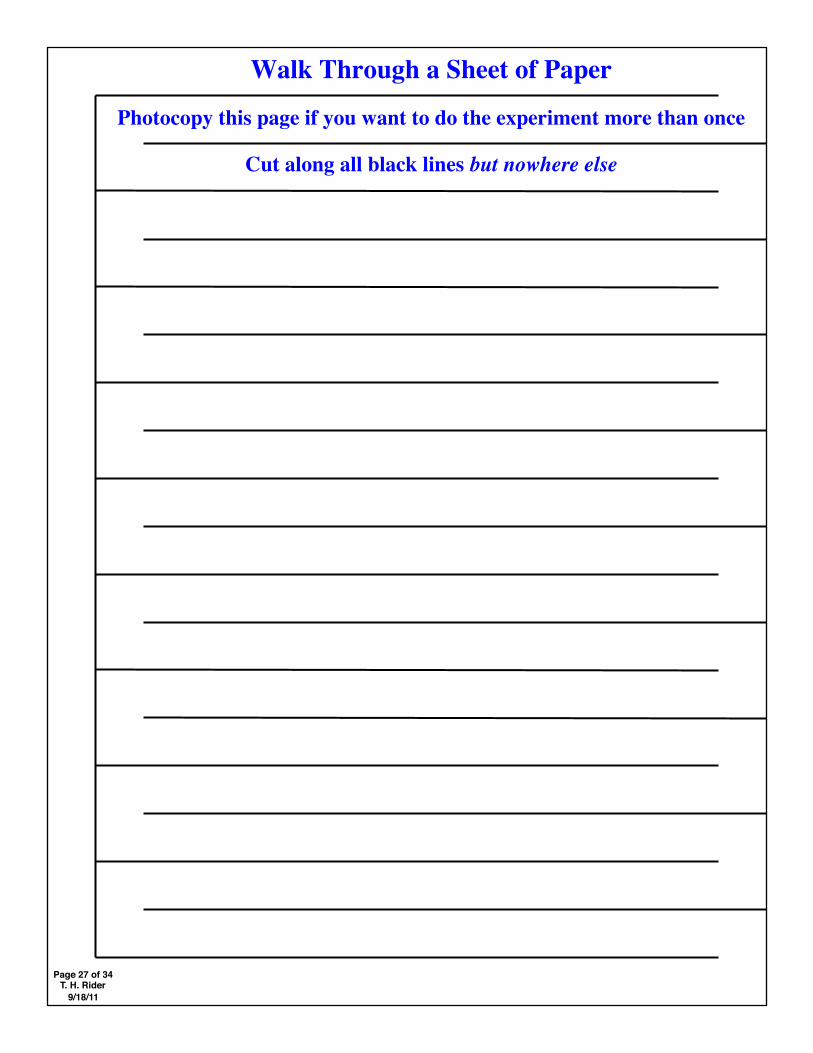
Page 27 of 34 T. H. Rider
9/18/11
Walk Through a Sheet of Paper�
Photocopy this page if you want to do the experiment more than once�
Cut along all black lines but nowhere else

Page 28 of 34 T. H. Rider
9/18/11
Paper Bridge�Photocopy this page if you want to do the experiment more than once
F o
l d
s o
t
h i
s
l i n
e
s t
i c k
s
u p
F o
l d
s o
t
h i
s
l i n
e
s t
i c k
s
d o
w n
F o
l d
s o
t
h i
s
l i n
e
s t
i c k
s
u p
F o
l d
s o
t
h i
s
l i n
e
s t
i c k
s
d o
w n
F o
l d
s o
t
h i
s
l i n
e
s t
i c k
s
u p
F o
l d
s o
t
h i
s
l i n
e
s t
i c k
s
d o
w n
F o
l d
s o
t
h i
s
l i n
e
s t
i c k
s
u p

Page 29 of 34 T. H. Rider
9/18/11
Paper Jet Boats� Photocopy this page if you want to do the experiment more than once
7: Made ca. 1390 BC for Thutmose IV
The good god, lord of the two lands, Men-kheper-ra [Thutmose IV], true of voice [deceased], Osiris’s beloved
Son of Ra Tutankhamun Ruler of Thebes Forever
Amun-Ra Lord of thrones & the two lands Lord of heaven Beloved [of Amun-Ra]
King of Upper & Lower Egypt Neb-Kheper-Ra Given life
8: Made ca. 1336-1327 BC for Tutankhamun
Kin
g of
upp
er
& lo
wer
Egy
pt
P T O
L M
Y
S live
fore
ver
Ptah
’s
belo
ved
5: Made ca. 196 BC for Ptolemy V (Ptolmys)
The
king
give
s an
offe
ring
to O
siris
the
good
god
so th
at h
e m
ay g
ive
a vo
ice
offe
ring
6: Made ca. 1550-1295 BC
Answers to Expts. 5-8

Page 30 of 34 T. H. Rider
9/18/11
Turbine Pattern� Photocopy this page if you want to do the experiment more than once.�
Cut along all of the solid black lines but nowhere else. (Do not cut on the dotted lines!) Fold the corners over so that the red dots are exactly in the
center. Tape the layers of paper together in the center. Press the center onto the shaft of the motor. Use more tape or modeling clay to keep it from
slipping if necessary.

Page 31 of 34 T. H. Rider
9/18/11
Proton, Neutron, and Electron Models
N Neutron
P (+) Proton
E (-) Electron
P (+) Proton
P (+) Proton
P (+) Proton
P (+) Proton
P (+) Proton
E (-) Electron
E (-) Electron
E (-) Electron
E (-) Electron
E (-) Electron
Photocopy this sheet if you want more. Optional: Use a glue stick to glue this sheet to cardboard before cutting out the models.
N Neutron
N Neutron
N Neutron
P (+) Proton
P (+) Proton
P (+) Proton
P (+) Proton
E (-) Electron
E (-) Electron
E (-) Electron
E (-) Electron
N Neutron
N Neutron
N Neutron
N Neutron
N Neutron
N Neutron
N Neutron
P (+) Proton
E (-) Electron
P (+) Proton
P (+) Proton
P (+) Proton
P (+) Proton
P (+) Proton
E (-) Electron
E (-) Electron
E (-) Electron
E (-) Electron
E (-) Electron
N Neutron
N Neutron
N Neutron
P (+) Proton
P (+) Proton
P (+) Proton
P (+) Proton
E (-) Electron
E (-) Electron
E (-) Electron
E (-) Electron
N Neutron
N Neutron
N Neutron
N Neutron
N Neutron
N Neutron
N Neutron
P (+) Proton
E (-) Electron
P (+) Proton
P (+) Proton
P (+) Proton
P (+) Proton
P (+) Proton
E (-) Electron
E (-) Electron
E (-) Electron
E (-) Electron
E (-) Electron
N Neutron
N Neutron
N Neutron
P (+) Proton
P (+) Proton
P (+) Proton
P (+) Proton
E (-) Electron
E (-) Electron
E (-) Electron
E (-) Electron
N Neutron
N Neutron
N Neutron
N Neutron
N Neutron
N Neutron
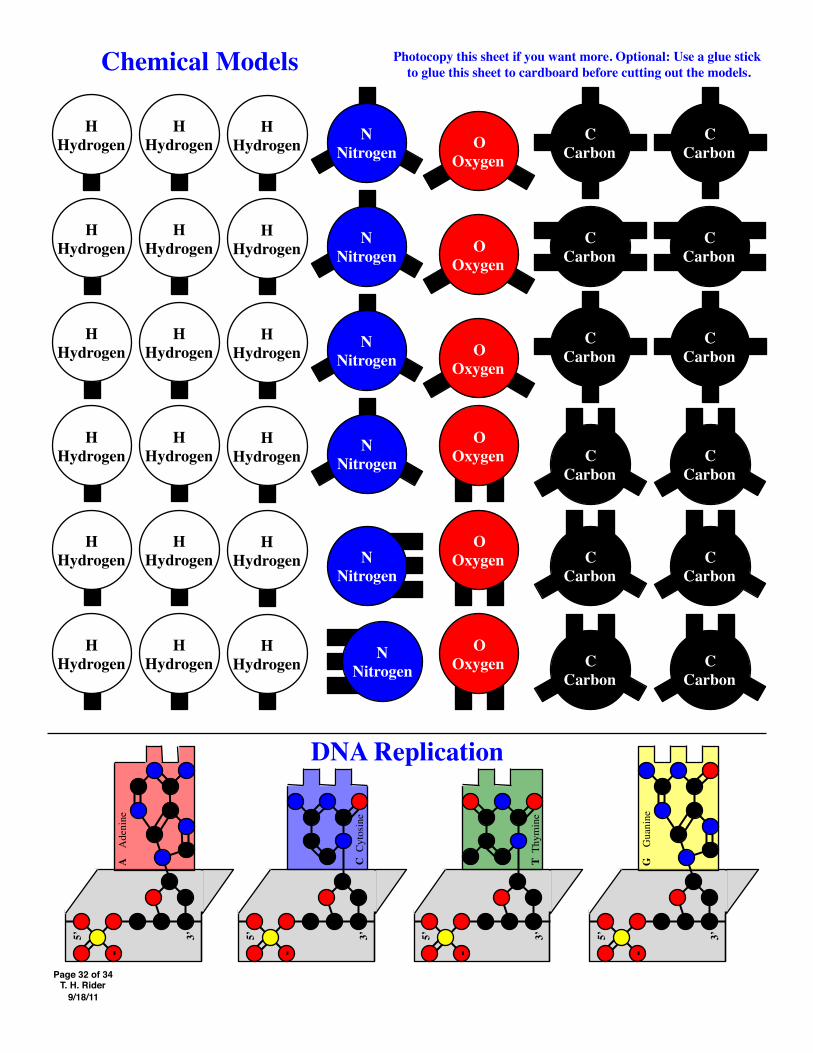
Page 32 of 34 T. H. Rider
9/18/11
Chemical Models
C Carbon
O Oxygen
N Nitrogen
H Hydrogen
C Carbon
H Hydrogen
H Hydrogen
H Hydrogen
H Hydrogen
H Hydrogen
N Nitrogen
N Nitrogen
O Oxygen
O Oxygen
N Nitrogen
H Hydrogen
H Hydrogen C
Carbon
C Carbon
C Carbon
C Carbon
C Carbon
C Carbon
C Carbon
H Hydrogen
H Hydrogen N
Nitrogen
O Oxygen C
Carbon
C Carbon
H Hydrogen
H Hydrogen
N Nitrogen
O Oxygen C
Carbon
O Oxygen
H Hydrogen
H Hydrogen
H Hydrogen
H Hydrogen
H Hydrogen
H Hydrogen
Photocopy this sheet if you want more. Optional: Use a glue stick to glue this sheet to cardboard before cutting out the models.
5’
3’
-
C C
ytos
ine
5’
3’
-
T T
hym
ine
5’
3’
- G
G
uani
ne
5’
3’
- A
A
deni
ne
DNA Replication
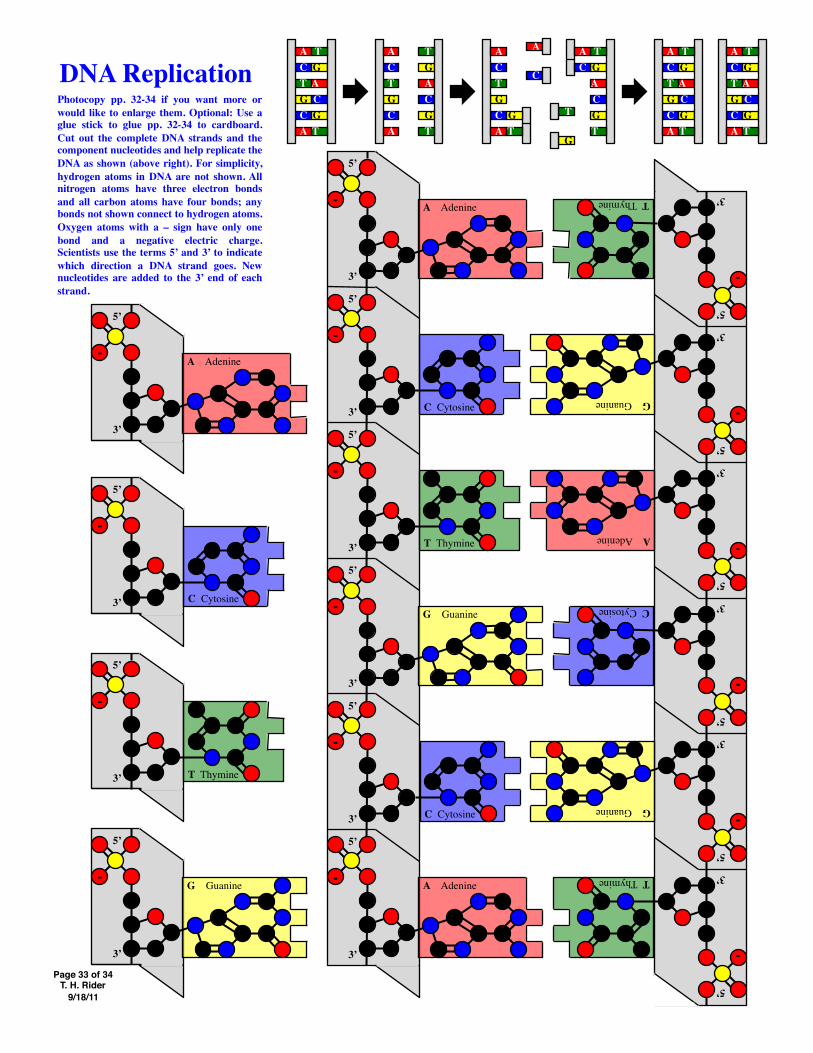
Page 33 of 34 T. H. Rider
9/18/11
5’
3’
3’
3’
3’
3’
3’
5’
5’
5’
5’
5’
-
-
-
-
-
-
G Guanine
T Thymine
C Cytosine
A Adenine
C Cytosine
A Adenine
5’
3’
3’
3’
3’
3’
3’
5’
5’
5’
5’
5’
-
-
-
-
-
-
G Guanine
T Thymine
C Cytosine
A Adenine
T Thymine
G Guanine
5’
3’
-
C Cytosine
5’
3’
-
T Thymine
5’
3’
- G Guanine
5’
3’
- A Adenine
A T C G T A G C C G A T
A C T G C A
T G A C G T
A T C G T A G C C G A T
A T C G T A G C C G A T
A
C
A T C G T A G C C G A T
A T C T G C G A T
T
G
DNA Replication Photocopy pp. 32-34 if you want more or would like to enlarge them. Optional: Use a glue stick to glue pp. 32-34 to cardboard. Cut out the complete DNA strands and the component nucleotides and help replicate the DNA as shown (above right). For simplicity, hydrogen atoms in DNA are not shown. All nitrogen atoms have three electron bonds and all carbon atoms have four bonds; any bonds not shown connect to hydrogen atoms. Oxygen atoms with a – sign have only one bond and a negative electric charge. Scientists use the terms 5’ and 3’ to indicate which direction a DNA strand goes. New nucleotides are added to the 3’ end of each strand.

Page 34 of 34 T. H. Rider
9/18/11
5’
3’
-
C C
ytos
ine
5’
3’
-
T T
hym
ine
5’
3’
- G
G
uani
ne
5’
3’
- A
A
deni
ne
5’
3’
-
C C
ytos
ine
5’
3’
-
T T
hym
ine
5’
3’
- G
G
uani
ne
5’
3’
- A
A
deni
ne
5’
3’
-
C C
ytos
ine
5’
3’
-
T T
hym
ine
5’
3’
- G
G
uani
ne
5’
3’
- A
A
deni
ne
5’
3’
-
C C
ytos
ine
5’
3’
-
T T
hym
ine
5’
3’
- G
G
uani
ne
5’
3’
- A
A
deni
ne
Phosphorus atom
Electron bond between atoms
Hydrogen atom (not shown)
Carbon atom
Nitrogen atom
Oxygen atom
DNA Replication (continued)

Page 35 of 34 T. H. Rider
9/18/11
This and the following pages are not part of the handout. This is a 2011 equipment list for reference for anyone mass-producing kits in the future. The next page is labels to print and affix to kit bags. The remaining pages are signs for setting up an assembly line to mass-produce kits. Ea
ch k
it ge
ts p
p. 1
-24
doub
le-s
ided
, pp.
25-
34 si
ngle
-sid
ed (d
o no
t ben
d or
stuf
f int
o ba
gs),
plus
the
follo
win
g:
Qua
ntity
Item
C
ost p
er k
it S
uppl
ier
1
Qua
rt Zi
ploc
bag
$0.
04 C
ostc
o ($
8.55
per
box
of 2
16)
1 C
lear
pla
stic
spoo
n, fo
rk, o
r kni
fe $
0.03
1 C
ostc
o ($
10.9
9 pe
r box
of 3
60)
4 C
lear
drin
king
stra
ws
$0.
016
Cos
tco
($11
.69
per b
ox o
f 300
0)
2 N
o. 4
con
e co
ffee
filte
rs
$0.
019
Cos
tco
($3.
79 p
er b
ag o
f 400
) 1
1/4
x3”
zinc
-pla
ted
bolt
$
0.08
Leh
igh-
Arm
stron
g (o
r see
Hom
e D
epot
/Low
es)
5 S
teel
was
hers
(3/8
” ID
, 1”
OD
) $
0.10
Leh
igh-
Arm
stron
g ($
0.02
eac
h, o
r see
Hom
e D
epot
/Low
es)
4 1
0” p
lain
bal
loon
s (as
s’t c
olor
s) $
0.19
6 b
allo
onim
prin
ters
.com
($7.
05 p
er b
ag o
f 144
) 20
ft C
otto
n th
read
Wal
mar
t ($5
.17
per s
pool
of 1
200
yard
s)
1 ft
Opt
ical
fibe
r
$0
Old
spoo
l don
ated
by
Linc
oln
Lab
grou
ps (o
r ww
w.sc
iplu
s.com
910
68)
10 ft
~24
-gau
ge w
ire
$0
Don
ated
by
MIT
LL g
roup
s (or
see
Hom
e D
epot
, Low
es, d
igik
ey.c
om, y
oudo
itele
ctro
nics
.com
) 2
Ora
nge
LED
s
$0.
06 w
ww.
scip
lus.c
om 3
1620
($.0
3 ea
ch if
bou
ght i
n bu
lk)
2 M
agne
ts
$0.
08 w
ww.
scip
lus.c
om 3
7407
($.0
4 ea
ch)
1.5x
1.5”
pie
ce D
iffra
ctio
n gr
atin
g
$0.
03 w
ww.
scip
lus.c
om sp
ecia
l ord
er ($
97.5
0 pe
r 200
’x3”
roll)
Get
skill
ed m
achi
nist
to c
ut ro
ll in
hal
f on
band
saw
(with
out m
eltin
g it)
Or w
ww.
rain
bow
sym
phon
y.co
m 0
1505
, sci
entifi
cson
line.
com
305
2116
2 2
x1.7
5” p
iece
s Pol
ariz
ers
$
0.14
7 w
ww.
scip
lus.c
om 4
0017
($1.
76 p
er 1
2x7”
shee
t)
C
ut in
to st
rips o
n ba
nd sa
w, th
en in
to sq
uare
s with
pap
er c
utte
r 1
3V
DC
mot
or
$0.
583
scie
ntifi
cson
line.
com
308
2264
($7.
00 p
er b
ag o
f 12)
, 2x
2” p
iece
Liq
uid
crys
tal s
heet
$
0.52
8 sc
ient
ifics
onlin
e.co
m 3
0723
74 ($
19.0
0/ft2 )
4 pi
eces
pH
pap
er
$0.
0544
ww
w.vw
r.com
620
00-4
02 ($
13.6
0 pe
r box
of 1
000)
3 P
lasti
c pi
pette
s
$0.
103
ww
w.vw
r.com
160
01-1
78 $
171.
83 p
er c
ase
of 5
000)
4 1
4-m
l pla
stic
test
tube
s $
0.25
ww
w.vw
r.com
608
18-6
18 ($
62.5
5 pe
r cas
e of
100
0)
4 S
mal
l cle
ar p
lasti
c cu
ps $
.04
ww
w.ch
ristia
nboo
k.co
m W
W29
545C
S ($
120
for 1
2,00
0)
6 G
luco
se te
st str
ips
$0.
18 w
w.te
codi
ag.c
om U
RS-1
G-1
00 g
luco
se st
rips (
$3.0
0 pe
r bot
tle o
f 100
) 1
2x4
” la
bel
$
0.01
8 C
orpo
rate
Exp
ress
: Ave
ry 5
963
($43
.82
per b
ox o
f 250
0)
22 sh
eets
pp.
1-3
4
$0.
166
Cor
pora
te E
xpre
ss ($
37.7
0 pe
r box
of 5
000
20-lb
8.5
x11”
shee
ts)
Plea
se n
ote
that
som
e of
thes
e pr
ices
refle
ct q
uant
ity d
iscou
nts
we
obta
ined
by
cont
actin
g th
e su
pplie
rs a
nd re
ques
ting
enou
gh m
ater
ials
to m
ake
2500
sc
ienc
e ki
ts. L
ist p
rices
or p
rices
for s
mal
ler o
rder
s may
be
high
er.

Page 36 of 34 T. H. Rider
9/18/11
WARNING: CHOKING HAZARD--Small parts. Not for children under 3 years old. �
Adult supervision required for experiments.
MIT Lincoln Laboratory�Mini Science Kit
WARNING: CHOKING HAZARD--Small parts. Not for children under 3 years old. �
Adult supervision required for experiments.
MIT Lincoln Laboratory�Mini Science Kit
WARNING: CHOKING HAZARD--Small parts. Not for children under 3 years old. �
Adult supervision required for experiments.
MIT Lincoln Laboratory�Mini Science Kit
WARNING: CHOKING HAZARD--Small parts. Not for children under 3 years old. �
Adult supervision required for experiments.
MIT Lincoln Laboratory�Mini Science Kit
WARNING: CHOKING HAZARD--Small parts. Not for children under 3 years old. �
Adult supervision required for experiments.
MIT Lincoln Laboratory�Mini Science Kit
WARNING: CHOKING HAZARD--Small parts. Not for children under 3 years old. �
Adult supervision required for experiments.
MIT Lincoln Laboratory�Mini Science Kit
WARNING: CHOKING HAZARD--Small parts. Not for children under 3 years old. �
Adult supervision required for experiments.
MIT Lincoln Laboratory�Mini Science Kit
WARNING: CHOKING HAZARD--Small parts. Not for children under 3 years old. �
Adult supervision required for experiments.
MIT Lincoln Laboratory�Mini Science Kit
WARNING: CHOKING HAZARD--Small parts. Not for children under 3 years old. �
Adult supervision required for experiments.
MIT Lincoln Laboratory�Mini Science Kit
WARNING: CHOKING HAZARD--Small parts. Not for children under 3 years old. �
Adult supervision required for experiments.
MIT Lincoln Laboratory�Mini Science Kit
Page 37 of 34 T. H. Rider
9/18/11
Each
kit
gets
1 pl
astic
bag
with
1 la
bel o
n it
Then
pas
s it
that
away

Page 38 of 34 T. H. Rider
9/18/11
Each
kit
gets
2 co
ffee
filte
r con
es
Then
pas
s it
that
away
Page 39 of 34 T. H. Rider
9/18/11
Each
kit
gets
3 pi
pette
s (ey
edro
pper
s)
Then
pas
s it
that
away

Page 40 of 34 T. H. Rider
9/18/11
Each
kit
gets
4 dr
inki
ng st
raw
s
Then
pas
s it
that
away

Page 41 of 34 T. H. Rider
9/18/11
Each
kit
gets
4 sm
all p
last
ic c
ups
Then
pas
s it
that
away

Page 42 of 34 T. H. Rider
9/18/11
Each
kit
gets
1 bo
lt
Then
pas
s it
that
away

Page 43 of 34 T. H. Rider
9/18/11
Each
kit
gets
5 w
ashe
rs
Then
pas
s it
that
away

Page 44 of 34 T. H. Rider
9/18/11
Each
kit
gets
1 m
otor
Then
pas
s it
that
away

Page 45 of 34 T. H. Rider
9/18/11
Each
kit
gets
1 cl
ear p
last
ic u
tens
il (s
poon
, for
k, o
r kni
fe—
just
one
, not
all
thre
e)
Then
pas
s it
that
away
Page 46 of 34 T. H. Rider
9/18/11
Each
kit
gets
first
pla
stic
test
tube
with
4 st
rips
of p
H p
aper
insid
e
Then
pas
s it
that
away

Page 47 of 34 T. H. Rider
9/18/11
Each
kit
gets
seco
nd p
last
ic te
st tu
be w
ith
6 gl
ucos
e te
st st
rips
insid
e
Then
pas
s it
that
away
Page 48 of 34 T. H. Rider
9/18/11
Each
kit
gets
thir
d pl
astic
test
tube
with
2 LE
Ds i
nsid
e
Then
pas
s it
that
away
Page 49 of 34 T. H. Rider
9/18/11
Each
kit
gets
four
th p
last
ic te
st tu
be w
ith
2 m
agne
ts in
side
Then
pas
s it
that
away
Page 50 of 34 T. H. Rider
9/18/11
Each
kit
gets
1 1
0-fo
ot p
iece
of w
ire
Then
pas
s it
that
away

Page 51 of 34 T. H. Rider
9/18/11
Each
kit
gets
1 2
0-fo
ot p
iece
of t
hrea
d
Then
pas
s it
that
away

Page 52 of 34 T. H. Rider
9/18/11
Each
kit
gets
4 ba
lloon
s
Then
pas
s it
that
away

Page 53 of 34 T. H. Rider
9/18/11
Each
kit
gets
2 po
lari
zers
Then
pas
s it
that
away

Page 54 of 34 T. H. Rider
9/18/11
Each
kit
gets
1 liq
uid
crys
tal p
iece
Then
pas
s it
that
away

Page 55 of 34 T. H. Rider
9/18/11
Each
kit
gets
1 di
ffrac
tion
grat
ing
Then
pas
s it
that
away

Page 56 of 34 T. H. Rider
9/18/11
Each
kit
gets
1 fo
ot-lo
ng
piec
e op
tical
fibe
r (ti
e in
a lo
op so
it
won
’t ke
ep e
scap
ing)
Then
pas
s it
that
away

Page 57 of 34 T. H. Rider
9/18/11
Stor
e se
aled
, pa
rtia
lly fi
nish
ed k
its
here
for n
ow

Page 58 of 34 T. H. Rider
9/18/11
Stor
e se
aled
, fin
ished
kits
here
for n
ow
Page 59 of 34 T. H. Rider
9/18/11
WARNING: CHOKING HAZARD--Small parts. Not for children under 3 years old. �
Adult supervision required for experiments.
MIT Lincoln Laboratory�Mini Science Kit
WARNING: CHOKING HAZARD--Small parts. Not for children under 3 years old. �
Adult supervision required for experiments.
MIT Lincoln Laboratory�Mini Science Kit
WARNING: CHOKING HAZARD--Small parts. Not for children under 3 years old. �
Adult supervision required for experiments.
MIT Lincoln Laboratory�Mini Science Kit
WARNING: CHOKING HAZARD--Small parts. Not for children under 3 years old. �
Adult supervision required for experiments.
MIT Lincoln Laboratory�Mini Science Kit
WARNING: CHOKING HAZARD--Small parts. Not for children under 3 years old. �
Adult supervision required for experiments.
MIT Lincoln Laboratory�Mini Science Kit
WARNING: CHOKING HAZARD--Small parts. Not for children under 3 years old. �
Adult supervision required for experiments.
MIT Lincoln Laboratory�Mini Science Kit
WARNING: CHOKING HAZARD--Small parts. Not for children under 3 years old. �
Adult supervision required for experiments.
MIT Lincoln Laboratory�Mini Science Kit
WARNING: CHOKING HAZARD--Small parts. Not for children under 3 years old. �
Adult supervision required for experiments.
MIT Lincoln Laboratory�Mini Science Kit
WARNING: CHOKING HAZARD--Small parts. Not for children under 3 years old. �
Adult supervision required for experiments.
MIT Lincoln Laboratory�Mini Science Kit
WARNING: CHOKING HAZARD--Small parts. Not for children under 3 years old. �
Adult supervision required for experiments.
MIT Lincoln Laboratory�Mini Science Kit