ministry of education - ontario · report the elementary and secondary educator data through the...
TRANSCRIPT

Ministry of Education
Information Management Branch
For Publicly-Funded and Inspected Private Schools
User Guide February 2007
School Data Submission: Educator

OnSIS User Guide OnSIS Release 3 School Data Submission - Educator February 2007
-2-
This page is left intentionally blank.

OnSIS User Guide OnSIS Release 3 School Data Submission - Educator February 2007
-3-
Table of Contents
INTRODUCTION ..................................................................................................5
Overview of School Data Submission – Educator.................................................7
List of Screens ......................................................................................................8
ELEMENTARY SCHOOLS SECTION ..................................................................9
Accessing School Data Submission - Educator Menu ........................................10
Adding Educators to the School Educator List (Verifying MEN)..........................12
School Educator Assignment Form.....................................................................15
Guide to Mandatory Fields – School Educator Assignment (Elementary)...........19
Guide to Non-Mandatory Fields – School Educator Assignment (Elementary) .......................................................................................................21
Editing or Updating Records ...............................................................................22
Adding Multiple Assignments..............................................................................24
Assigned Subject Information Form....................................................................28
Guide To Mandatory Fields for Assigned Subject Information Form...................32
Assigning An Educator(s) to a Class(es) ............................................................34
Temporary Letter of Approval (TLA) ...................................................................42
SECONDARY SCHOOL SECTION ....................................................................46
Accessing School Data Submission - Educator Menu ........................................47
Adding Educators to the School Educator List (Verifying MEN)..........................49
School Educator Assignment Form.....................................................................52
Guide to Mandatory Fields – School Educator Assignment (Secondary)............57
Guide to Non-Mandatory Fields – School Educator Assignment (Secondary) ........................................................................................................59

OnSIS User Guide OnSIS Release 3 School Data Submission - Educator February 2007
-4-
Editing or Updating Records ...............................................................................60
Adding Multiple Assignments..............................................................................62
Assigning An Educator(s) to a Class(es) ............................................................66
Course/Segment .................................................................................................74
Temporary Letter of Approval (TLA) ...................................................................76
FUNCTION MENU..............................................................................................80
Upload Educator Batch File ................................................................................80
Viewing/Downloading Batch Results...................................................................82
Deleting A Batch File ..........................................................................................86
Sign-off School Submission by the School .........................................................87
School-Level Submission Process......................................................................88
School Sign-Off Process.....................................................................................91
Running the Validation Report ............................................................................92
Running the Verification Reports ........................................................................95
Viewing the Reports............................................................................................98
School-Level Sign-Off .......................................................................................100
Data Correction Request ..................................................................................101
Purge and Pre-Populate ...................................................................................104
APPENDIX A – ELEMENTARY SCHOOL EDUCATOR SCENARIOS............107

OnSIS User Guide OnSIS Release 3 School Data Submission - Educator February 2007
-5-
Introduction OnSIS Application School Data Submission - Educator User Guide Purpose: This guide has been developed as a resource to help users understand the School Data Submission – Educator features of the Ontario School Information System (OnSIS). The guide combines step-by-step instructions along with a comprehensive look at each of the functions. This guide is supplemented by the following documents and resources that may be downloaded from the OnSIS site http://onsisinfo.edu.gov.on.ca in the “What’s New?” section. Here you will find links to the latest:
User Guides
Audio Presentations
E-learning Modules Users are strongly encouraged to read this user guide and all supplemental documents posted on the What’s New? section of the OnSIS application to ensure that they are aware of all aspects of OnSIS and related policies and procedures. Please note that some of the screens in this guide may not appear exactly as they do in the OnSIS application.

OnSIS User Guide OnSIS Release 3 School Data Submission - Educator February 2007
-6-
Ministry Support Inquiries regarding the Ontario School Information System and related policies and procedures should be directed to:
Ontario School Information System (OnSIS) Coordination Group Information Management Branch
Ministry of Education Suite 422, 777 Bay Street
Toronto, ON M5G 2E5
Telephone: 1-888-275-5934 or 416-212-6366 Monday to Friday (excluding holidays)
8:30 am to 4:30 pm Email: [email protected]
Fax: 416-212-2763 Extranet website: http://onsisinfo.edu.gov.on.ca

OnSIS User Guide OnSIS Release 3 School Data Submission - Educator February 2007
-7-
Overview of School Data Submission – Educator The School Data Submission application consists of at least three integrated sections: Educator, Class, and Student. Detailed information on procedures for completing the Class and Student forms is outlined in:
User Guide: School Data Submission, Publicly-Funded Elementary Schools.
User Guide: School Data Submission, Publicly-Funded Secondary Schools.
This user guide provides information for completing the forms in the Educator section of the School Data Submission, Publicly-Funded and Inspected Private Schools application. Note that Private schools with combined elementary and secondary panels must report the elementary and secondary educator data through the secondary data submission only. For information on completing the Elementary educator data portion, use:
User Guide: School Data Submission – Educator For Aggregate Student Data Reporting Schools (Care, Treatment and Correctional Facilities and Non-Inspected Private Schools)
For information on completing the Secondary educator data portion, use: User Guide: School Data Submission – Educator For Publicly-Funded
and Inspected Private Schools. To complete the educator section outlined in this guide, each educator will require a Ministry Educator Number (MEN). Obtaining an MEN for an educator may be done at any time. However, it is recommended that all MENs be requested and noted prior to beginning the work in this guide. Detailed information on the procedure for requesting an MEN and updating educator career experience is outlined in:
User Guide: Educator Administration.
In the School Data Submission – Educator section, outlined in this guide, users will use an educator’s MEN to assign the educator to a school(s), record each educator’s responsibilities, and assign the educator to a class(es). The Function Menu, which outlines the processes for signing-off a submission, is located at the end of this guide. These functions remain the same as earlier submissions.

OnSIS User Guide OnSIS Release 3 School Data Submission - Educator February 2007
-8-
List of Screens
SCREENS FOR ELEMENTARY SCHOOLS
SCREENS FOR SECONDARY
SCHOOLS
School Educator List
School Educator List
School Educator Assignment
School Educator Assignment
Assigned Subject Information
--- --- ---
List of Classes
List of Classes
Class Information
Class Information
TLA Information (public schools)
TLA Information (public schools)
--- --- ---
Course/Segment
NOTE: The screens in the SCHOOL EDUCATOR module are slightly different for elementary and secondary schools. Therefore, instructions for filling in the forms for elementary and secondary schools will be outlined in separate sections of this guide. The elementary section of this User Guide is NOT APPLICABLE to Elementary Private Schools. Elementary Private Schools should refer to: School Data Submission – Educator - For Aggregate Student Data Reporting Schools - Care, Treatment and Correctional Facilities (CTCF) and Non-Inspected Private Schools

OnSIS User Guide OnSIS Release 3 School Data Submission - Educator February 2007
-9-
Elementary Schools Section
The elementary section of this User Guide is applicable to
Elementary Public Schools only.
Elementary Private Schools should refer to: School Data Submission - Educator - For Aggregate Student Data Reporting Schools - Care, Treatment and Correctional Facilities (CTCF) and Non-Inspected Private Schools.
SCREENS FOR ELEMENTARY
SCHOOLS School Educator List School Educator Assignment Assigned Subject Information List of Classes Class Information TLA Information

OnSIS User Guide OnSIS Release 3 School Data Submission - Educator February 2007
-10-
Accessing School Data Submission - Educator Menu 1) To begin, enter the OnSIS URL:
https://www.gsa.gov.on.ca
2) Click English. 3) Enter your user name and password, click Login. 4) Under Education/Éducation, click OnSIS. 5) Click Enter. 6) Click Agree to the OnSIS Privacy Impact Assessment Page. 7) The OnSIS Home Page will be displayed, including a blue main menu
function bar. Click Data Collection to access the SCHOOL DATA SUBMISSION menu.
NOTE: A user with access to more than one school must select the appropriate school from the drop-down menu.
8) Click Add/Update School Submission.

OnSIS User Guide OnSIS Release 3 School Data Submission - Educator February 2007
-11-
9) From the SUBMISSION PERIOD LIST, click on the Submission Period
hyperlink with an “Open” Submission Status.
NOTE: You will not be able to open a submission period unless the previous submission period has been closed or signed off.
10) The SCHOOL DATA SUBMISSION menu displays. Click Educator to
access the SCHOOL EDUCATOR LIST.
OnSIS User Guide OnSIS Release 3 School Data Submission - Educator February 2007
-12-
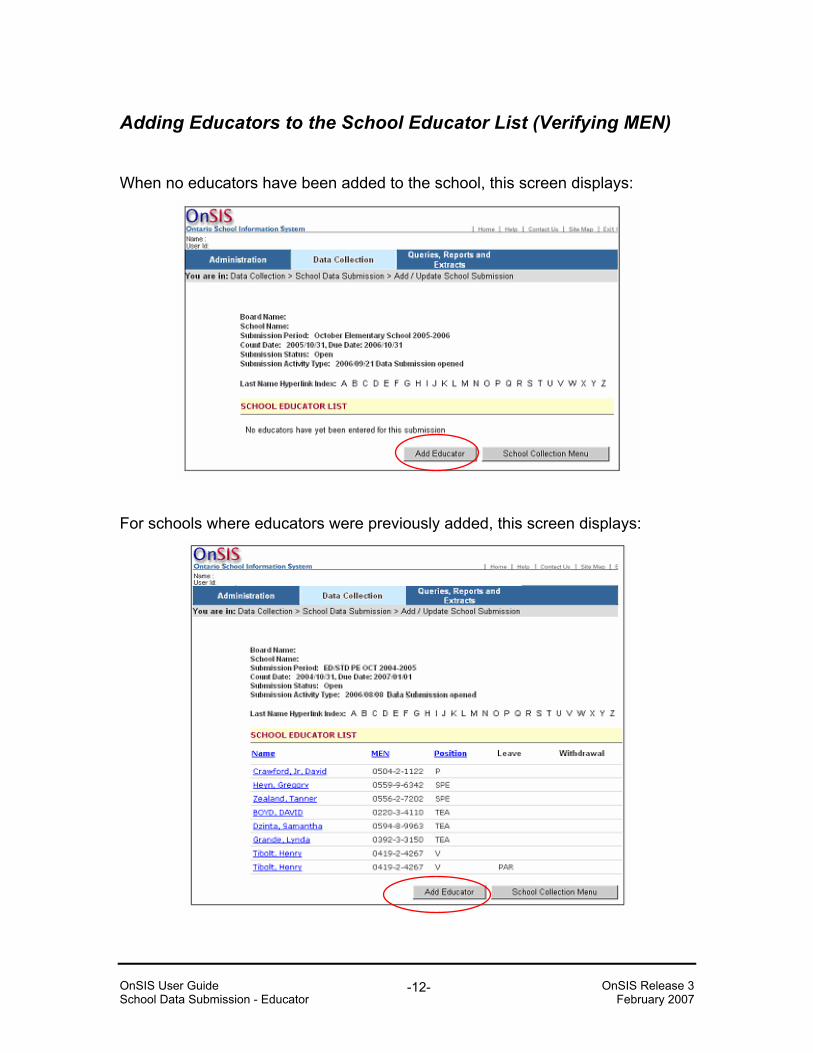
Adding Educators to the School Educator List (Verifying MEN) When no educators have been added to the school, this screen displays:
For schools where educators were previously added, this screen displays:

OnSIS User Guide OnSIS Release 3 School Data Submission - Educator February 2007
-13-
NOTES: The SCHOOL EDUCATOR LIST may be sorted by Last Name, MEN or Position by clicking on the hyperlinked headings. For example, if sorting by Position, click on the Position header. However, if an educator has more than one position, the records will no longer appear together for that educator. For quick access, use the Last Name Hyperlink Index (A-Z) to move directly to the list of educators whose last names begin with the letter selected. Selecting the hyperlink of an individual educator from the SCHOOL EDUCATOR LIST will allow the user to edit the record.
How to add educators to the SCHOOL EDUCATOR LIST: 1) From the SCHOOL EDUCATOR LIST, click Add Educator. This screen
displays:
2) Enter the Ministry Educator Number (MEN) and click on Verify.

OnSIS User Guide OnSIS Release 3 School Data Submission - Educator February 2007
-14-
NOTES: Obtaining an MEN for an educator may be done at any time. However, it is recommended that all MENs be requested and recorded prior to beginning the Educator section. If an educator has not been assigned an MEN, an MEN may be requested by selecting Administration on the blue main menu bar. Under EDUCATOR ADMINISTRATION, select Request Ministry Educator Number.
If the MEN is found in the OnSIS database, the MEN VERIFICATION pop-up screen displays:
If this is the educator you intended, click on Confirm.
NOTE: If an incorrect format or a non-existent MEN has been entered, an error message will display. Make the necessary corrections and click on Verify to try again.
3) Click on Cancel to return to the SCHOOL EDUCATOR ASSIGNMENT form
to re-enter and verify the MEN.
4) When you click on Confirm, the SCHOOL EDUCATOR ASSIGNMENT form will display with the Educator’s name.
NOTE: The educator will be added to the SCHOOL EDUCATOR LIST after the SCHOOL EDUCATOR ASSIGNMENT form is completed successfully.

OnSIS User Guide OnSIS Release 3 School Data Submission - Educator February 2007
-15-
School Educator Assignment Form After an educator’s MEN is verified, the SCHOOL EDUCATOR ASSIGNMENT form appears. Using this form, an educator’s position and his/her duties and/or teaching responsibilities at the school are recorded.
NOTES: Combined elementary and secondary schools (e.g. a grade 7–9 junior high school or a grade 7–12 school) require two separate submissions using the two Ministry designated school numbers, one for each school panel. In this guide, the screen shots are usually cropped and the forms are usually seen in sections. To view the entire SCHOOL EDUCATOR ASSIGNMENT form, scroll down.
Mandatory Fields:
Assignment Start Date
FTE (Full Time Equivalency)
Position
Teaching/Non-Teaching
Core Elementary Teacher (if applicable)

OnSIS User Guide OnSIS Release 3 School Data Submission - Educator February 2007
-16-
How to complete the SCHOOL EDUCATOR ASSIGNMENT form: 1) Check that the “Read Only” educator information at the top of the form is
accurate and scroll down to view the Career Experience List.
NOTE: If the educator’s information is incorrect, changes may be made through the blue main menu bar > Administration > EDUCATOR ADMINISTRATION > Update Educator Information.
2) Fill in all the mandatory fields indicated by a red asterisk (*). Some choices within the mandatory fields will require you to make choices in non-mandatory fields. Refer to the chart called Guide to Mandatory Fields – School Educator Assignment (Elementary).
Read Only

OnSIS User Guide OnSIS Release 3 School Data Submission - Educator February 2007
-17-
3) Scroll down and click Save. If you do not click Save, the data entered for this educator will be lost.
NOTE: If you select SCHOOL EDUCATOR LIST, you will return to the previous screen and the data will not be saved.
4) When you click Save, a Submit Successful screen displays. Check that the
data entered is correct.
5) Scroll down from the Submit Successful screen to view the five new
navigational buttons and the educator’s ASSIGNMENT LIST containing the data just entered and any other assignment(s) recorded for this educator at the school.

OnSIS User Guide OnSIS Release 3 School Data Submission - Educator February 2007
-18-
NOTES: An educator’s current career experience is listed under the CAREER EXPERIENCE LIST and is “Read Only” on this form. This data should be up-to-date. To update an educator’s biographical information or career experience, access the forms through the main blue menu bar: > Administration > EDUCATOR ADMINISTRATION > Update Educator Information. Update privileges for educator information are restricted to the home organization that originally requested the educator’s MEN or to any organization that previously submitted data for the educator to the Ministry. Receiving a Submit Successful screen signifies that the information entered thus far has been validated. Further validation occurs once the School Data Submission sign-off process begins. If the record has been entered in error, an option to delete the record is available at this time. The Delete function is used only when a new record has been created in error (e.g. duplicate). Pre-populated educator assignments (assignments that began in a previously reported submission period) may NOT be deleted. These may only be corrected through the Data Correction process. (See Table of Contents in this guide.)

OnSIS User Guide OnSIS Release 3 School Data Submission - Educator February 2007
-19-
Guide to Mandatory Fields – School Educator Assignment (Elementary) Assignment Start Date • Record the date that the educator’s assignment with the designated position
began at the school. • If this field is not pre-populated, the date selected must fall within the range of
the submission periods of the school year: Cycle Start Date and Count Date. Position • Select the position that best describes the educator’s role in the school. • If principal, vice-principal or supervisor is selected, Administration must
be selected in Instructional Type. Multiple values may be selected.
• If Department Head is selected, a Department value must be selected in Department. Otherwise, entering a Department is optional.
• Instructor is valid only for Private Schools. • Supervisor is valid only for Care, Treatment and Correctional Facilities. FTE (Full Time Equivalency) • Public school educators may have a maximum FTE of 1.00, either within a
school or across schools or a board. • FTE is entered as a percentage (e.g. 100% = 1.00 FTE, 50% = 0.50 FTE, 33%
= 0.33 FTE, etc.) Teaching/Non-Teaching Does the educator teach one or more regularly scheduled classes?
e.g. Core e.g. Self-Contained Special Education e.g. Specialty class such as music, art or physical education
a) If NO, select Non-Teaching.
Do not complete the ASSIGNED SUBJECT INFORMATION or CLASS INFORMATION forms for this educator. At least one option in

OnSIS User Guide OnSIS Release 3 School Data Submission - Educator February 2007
-20-
Instructional Type must also be selected.
b) If YES, select Teaching.
One or more ASSIGNED SUBJECT INFORMATION and/or CLASS INFORMATION forms must be completed. Do not select an Instructional Type.
c) If the educator has both regularly scheduled classes and other
responsibilities, select Both Teaching and Non-Teaching. One or more ASSIGNED SUBJECT INFORMATION and/or CLASS INFORMATION forms must be completed. At least one option in Instructional Type must be selected.
Notes: • Non-Teaching is valid only if any of the following Position Types are
selected: Principal, Vice-Principal, Department Head, Other, Principal - Acting, Principal - Visiting Exchange, Vice Principal - Acting, Vice Principal -Visiting Exchange, or Teacher - Specialty.
• An educator may have any combination of Teaching and Non-Teaching
responsibilities.
• If an option in the Leave Type or Withdrawal Type is selected, Not Applicable must be selected. Do not complete the ASSIGNED SUBJECT INFORMATION and/or CLASS INFORMATION forms for this educator.
• If Teaching or Not Applicable is selected, Instructional Type must be blank. Core Elementary Teacher • If the box is checked, complete a CLASS INFORMATION form for the
educator. • If the box is left unchecked, the educator will not appear on the Educator’s
Assigned to School list in the CLASS INFORMATION form. • Check the box if educators are assigned self-contained special education
classes. • If an educator teaches a subject, rather than a core class, is On Leave,
Withdrawn, or is Non-Teaching, the educator is considered a “non-core” teacher.

OnSIS User Guide OnSIS Release 3 School Data Submission - Educator February 2007
-21-
Guide to Non-Mandatory Fields – School Educator Assignment (Elementary)
Board Employee Number • This field may be used by Boards to assist in employee related activities. Department • This is an optional field, except when Department Head is selected in Position
Type, in which case a department must be selected under the Department field. • For elementary schools that use different titles for leadership positions within the
school, select Department Head to reflect these leadership responsibilities and under Department select the most appropriate description.
Leave Type • An educator On Leave is considered active in the school in which s/he is listed.
Do not record an Assignment End Date. • In the subsequent submission, the name of the educator On Leave will be
populated in the SCHOOL EDUCATOR LIST and the Leave Type field will be blank.
Withdrawal Type • If an educator’s assignment at the school has ended, a Withdrawal Type and an
Assignment End Date must be recorded. Letter of Permission • Will be addressed in a future release.
NOTE: For additional support in completing the SCHOOL EDUCATOR ASSIGNMENT form please refer to Appendix A – Elementary School Educator Assignment Scenarios at the end of this guide and to the School Data Submission – Educator, Audio Presentation for elementary schools.

OnSIS User Guide OnSIS Release 3 School Data Submission - Educator February 2007
-22-
Editing or Updating Records There are two ways to edit/update an educator’s assignment.
1) From the SCHOOL EDUCATOR LIST: a) Click the hyperlink of the name of the educator whose record you wish to
update. If the educator has multiple assignments, select the appropriate hyperlink.
b) The SCHOOL EDUCATOR ASSIGNMENT form displays.
c) Make the necessary changes/corrections. Click Save.
d) Submit Successful results screen displays.
2) From the SCHOOL EDUCATOR ASSIGNMENT form:
a) Scroll down to the Assignment List and click on any of the hyperlinks under Position or FTE to open the selected School Educator Assignment edit form.
b) Make the necessary changes/corrections. Click Save.
c) Submit Successful results screen displays.
Notes: • Assignment Start Date cannot be edited if prepopulated, however all other
fields can be edited. • Pre-populated educator assignments (assignments that began in a previously
reported submission period) may NOT be deleted. If the assignment was invalid for the previous submission period or if the Assignment Start Date was incorrect, the error can only be corrected through the Data Correction process.
• A prepopulated FTE must be accounted for in the current submission.
If the FTE was 1.00 in the previous submission, the total FTE must be 1.00 in the current submission.
For example, a vice principal on a half-time Secondment will be reported as having two assignments:
First Assignment Position = Vice Principal FTE = 0.50

OnSIS User Guide OnSIS Release 3 School Data Submission - Educator February 2007
-23-
Second Assignment Position = Vice Principal FTE = 0.50 Leave Type = Secondment
For steps to adding multiple assignments, see Adding Multiple Assignments.

OnSIS User Guide OnSIS Release 3 School Data Submission - Educator February 2007
-24-
Adding Multiple Assignments OnSIS allows for any combination of assignments to a maximum FTE of 1.00. Use the Add Another Assignment button to add assignments for educators who hold more than one position within the school. Duplicate position assignments cannot be created and will result in an error, unless part of the assignment is connected to a leave or part of the assignment is withdrawn. Many combinations of multiple assignments are possible. The following example illustrates only one possible scenario for reporting more than one assignment. For example, a vice-principal who is on a half time Leave will be reported as having two assignments:
First Assignment Position = Vice Principal FTE = 0.50 Second Assignment Position = Vice Principal FTE = 0.50, Leave Type - Secondment
Total FTE = 1.00 within the school
How to add a second assignment: 1) From the already existing SCHOOL EDUCATOR ASSIGNMENT form, scroll
to the bottom of the screen and click Add Another Assignment.

OnSIS User Guide OnSIS Release 3 School Data Submission - Educator February 2007
-25-
2) A blank SCHOOL EDUCATOR ASSIGNMENT form displays. Fill in all the mandatory fields indicated with a red asterisk(*) and any applicable optional fields.
3) Scroll down and click Save.

OnSIS User Guide OnSIS Release 3 School Data Submission - Educator February 2007
-26-
4) A Submit Successful screen displays. Scroll to the bottom of the screen. The additional assignment SCN (Leave Type = Secondment) is added under the ASSIGNMENT LIST.
To view the names of all educators added to a school, click SCHOOL EDUCATOR LIST.

OnSIS User Guide OnSIS Release 3 School Data Submission - Educator February 2007
-27-
5) The SCHOOL EDUCATOR LIST displays:
NOTE: The educator, Henry Tibolt, has two assignments, one with a leave; therefore, his name appears twice in the list.

OnSIS User Guide OnSIS Release 3 School Data Submission - Educator February 2007
-28-
Assigned Subject Information Form The ASSIGNED SUBJECT INFORMATION form is used for elementary educators whose teaching assignment includes a regularly scheduled class(es) in a subject other than core (e.g. computers, physical education, music, etc.). The ASSIGNED SUBJECT INFORMATION form is not completed for educators who teach only a core class(es). Some educators may teach both a core elementary class and a specialty subject, such as physical education, music or art class. In this case, both the CLASS INFORMATION AND ASSIGNED SUBJECT INFORMATION forms must be completed.
How to complete an ASSIGNED SUBJECT INFORMATION form: 1) From the SCHOOL EDUCATOR ASSIGNMENT form or the Submit
Successful results screen, click the Assign Subject button.

OnSIS User Guide OnSIS Release 3 School Data Submission - Educator February 2007
-29-
The ASSIGNED SUBJECT INFORMATION form displays. The first four fields are pre-populated from the previous screen.
2) Fill in all the mandatory fields indicated by a red asterisk(*). For a detailed
description of the choices available in these fields, refer to the chart Guide to Mandatory Fields for Assigned Subject Information Form.
Subject
Grade
Language of Instruction (LOI)
Number of Classes
3) Once all the mandatory fields have been entered, click Save.

OnSIS User Guide OnSIS Release 3 School Data Submission - Educator February 2007
-30-
A Submit Successful screen displays with the educator’s ASSIGNED SUBJECT INFORMATION populated as entered.
4) For educators who are assigned more than one subject, click Add Another
Subject. A new ASSIGNED SUBJECT INFORMATION input form will display.
5) Fill in all the mandatory fields indicated by a red asterisk(*). 6) Click Save once again.

OnSIS User Guide OnSIS Release 3 School Data Submission - Educator February 2007
-31-
7) The Submit Successful screen will display once again with the additional subjects assigned to the educator listed under the ASSIGNED SUBJECT LIST at the bottom of the screen.
Scroll Down
8) If an ASSIGNED SUBJECT INFORMATION record needs to be edited or
updated, click on the required hyperlink and the ASSIGNED SUBJECT INFORMATION edit form opens for input.
At the bottom of the SCHOOL EDUCATOR ASSIGNMENT form, any existing subject records applicable to the educator’s assignment are also listed in the ASSIGNMENT LIST. Clicking on the Subject hyperlink opens the ASSIGNED SUBJECT INFORMATION edit form for the selected subject.
Scroll Down

OnSIS User Guide OnSIS Release 3 School Data Submission - Educator February 2007
-32-
Guide to Mandatory Fields for Assigned Subject Information Form Subject
From the drop-down menu, select the subject that best describes the educator’s assignment.
Grade
If the educator teaches all elementary grades applicable to the school’s grade range, click on the All Elementary Grades radio button. If the educator teaches specific grades, click on the Specific Grades radio button. The Available Grade List is populated based on the school’s grade range (e.g. JK-6). Use the directional arrow button >> to select the grades for the selected subject. Use the shift or control (Ctrl) keys to select multiple grades.
Number of Classes
Number of classes refers to the number of classes assigned to the educator with the same combination of Subject, Grade(s), and Language of Instruction.
Language of Instruction (LOl)
Select either E - English or F - French from the drop-down menu.

OnSIS User Guide OnSIS Release 3 School Data Submission - Educator February 2007
-33-
Delete Assigned Subject Information Records If an educator is no longer assigned to a subject that was populated from a previous submission into the current submission period, or if the record was added by mistake, his/her record must be deleted. To delete a record: 1) The ASSIGNED SUBJECT LIST is located at the bottom of the ASSIGNED
SUBJECT INFORMATION form. Click on the blue hyperlink under Subject for the entry that you wish to delete, and then click Delete.
Scroll Down
2) You will be prompted with a confirmation message asking if you are sure that
you wish to delete the record. Click OK.
NOTES: The ASSIGNED SUBJECT INFORMATION form is pre-populated from the previous submission as long as that submission is in the same academic year. At the start of a new academic year, the ASSIGNED SUBJECT INFORMATION form will be blank. The ASSIGNED SUBJECT INFORMATION form does not need to be completed if the Core Elementary Teacher box has been checked and the educator does not teach any non-core or specialty subjects.
3) Click either the Educator Assignment or School Educator List
button at the bottom of the screen to return to that respective screen.

OnSIS User Guide OnSIS Release 3 School Data Submission - Educator February 2007
-34-
Assigning An Educator(s) to a Class(es) Once an educator has been assigned to a school, he or she may then be assigned to a class. The CLASS INFORMATION form allows an authorized user to view, add, edit and delete class information. A CLASS INFORMATION form must be completed for each core class or self-contained special education class in the school.
For detailed information on creating classes see the following user guide:
User Guide: School Data Submission, Publicly-Funded Elementary Schools.
How to assign an educator(s) to a class(es):
1) Access the LIST OF CLASSES in the school by clicking on the School Collection Menu button either at the bottom of the SCHOOL EDUCATOR LIST or the SCHOOL EDUCATOR ASSIGNMENT forms.
Alternatively, return to the blue main menu bar and select: Data Collection > Add/Update School Submission >
SCHOOL DATA SUBMISSION > Class.

OnSIS User Guide OnSIS Release 3 School Data Submission - Educator February 2007
-35-
2) Click Class and the LIST OF CLASSES screen displays. If no classes have
been added to the school, the screen displays as below:
To add a class, click Add Class.
3) If classes have been previously added, a hyperlinked list of classes displays:
NOTE: Class Codes are specific to the school. Each Class Code must be unique within a school and within a single submission period. An error message will be generated for duplicate class codes.
4) To assign an educator to a class, click on the Class Code hyperlink for the class.

OnSIS User Guide OnSIS Release 3 School Data Submission - Educator February 2007
-36-
If classes were previously entered, the following information about a class will display:
Class Information Fields: (* Indicates mandatory)
Class Code * (Read Only)
Class Start Date *
Class End Date *
Class Type *
Language of Instruction *
Classroom Type (optional)
NOTES: A class must be created in order to assign an educator to the class. The educator’s assignment to the class must be valid for the count date.
The Class Start Date will usually be the first day of school in September and the Class End Date will usually be the last day of school in June. Exceptions may exist. In cases where an additional class is created after the first day of school, the start date for the class would be the first day that the educator begins teaching the class.

OnSIS User Guide OnSIS Release 3 School Data Submission - Educator February 2007
-37-
The CLASS INFORMATION form displays as below:
5) Scroll down to view the EDUCATOR ASSIGNED TO CLASS section.
NOTES: An educator will only appear in the Educators Assigned to School list if the Core Elementary Teacher box on the SCHOOL EDUCATOR ASSIGNMENT form is checked. All educators with a Withdrawal or Leave Type value are excluded from the Educators Assigned to School list. If the educator is listed at the school under two positions (assignments), ensure that the correct position is assigned to the class.

OnSIS User Guide OnSIS Release 3 School Data Submission - Educator February 2007
-38-
6) The Educators Assigned to School box contains a scroll down field with a
list of educators assigned to the school. In the Educators Assigned to School box, highlight the name of the educator to assign to the class.
7) More than one educator may be assigned to a class by using the shift or
control (Ctrl) keys on your keyboard to highlight more than one name in the Educators Assigned to School box.
8) Use the upper >> directional arrows to move the highlighted name from the
Educators Assigned to School box to the Educator(s) Assigned to Class box. The names of all the educators assigned to the class will appear in the Educator(s) Assigned to Class box.
9) If an educator has been added to the Educator(s) Assigned to Class box by
mistake or is no longer assigned to the class, use the lower << arrows to remove an educator from the Educator(s) Assigned to Class box.
10) Click Save. If an error message displays, follow the instructions on the screen to correct the data and click Save again.
11) If a warning message displays, check that the data is correct. If it is not, click Cancel, make any necessary changes, and click Save again. If the information is correct, click Continue.
12) If successful, the message Submit Successful will appear at the top of the CLASS INFORMATION form. The Educator(s) Assigned to Class box will be populated appropriately.

OnSIS User Guide OnSIS Release 3 School Data Submission - Educator February 2007
-39-
13) Click Class List to continue. The LIST OF CLASSES screen displays. Notice that in the following example, a second educator was assigned to Class Code RM101.
14) Continue this process until all classes are assigned at least one educator,
unless the class ended before the Count Date.
NOTES: At least one educator must be assigned to each open class listed in the current submission period. The order in which the LIST OF CLASSES displays can be changed by clicking on the Class Code, Educator Name or MEN heading. If sorted by Class Code, all educators assigned to one class will be grouped together. If the sort order is changed to Educator Name or MEN, the same Class Code may appear twice if more than one educator was assigned to the class. At any time during this process, users may click on the Add Class function to add additional classes to the LIST OF CLASSES.

OnSIS User Guide OnSIS Release 3 School Data Submission - Educator February 2007
-40-
At the bottom of the SCHOOL EDUCATOR ASSIGNMENT form, any existing Class records applicable to the educator’s assignment are also listed in the ASSIGNMENT LIST.
Scroll Down
Clicking on the Class hyperlink opens the CLASS INFORMATION edit form for the selected class record.

OnSIS User Guide OnSIS Release 3 School Data Submission - Educator February 2007
-41-
Deleting a Class Information Record The Delete function is used if a class has been created by mistake within the current submission period.
NOTE: The Delete button will appear only if no students are assigned to the class.
1) Click Delete at the bottom of the screen. 2) You will be prompted with a confirmation message asking: “Are you sure you
wish to delete this class?” Click OK.

OnSIS User Guide OnSIS Release 3 School Data Submission - Educator February 2007
-42-
Temporary Letter of Approval (TLA) OCT-certified educators in Ontario who have been granted a Temporary Letter of Approval by the Ontario College of Teachers to teach outside of their area of qualification are reported using the TLA INFORMATION form. How to complete a TLA INFORMATION form: 1) Access the TLA INFORMATION form from one of these two screens:
Submit Successful SCHOOL EDUCATOR ASSIGNMENT results page, OR SCHOOL EDUCATOR LIST by clicking a hyperlinked educator’s name. The
SCHOOL EDUCATOR ASSIGNMENT form displays.
2) Click on the TLA button.

OnSIS User Guide OnSIS Release 3 School Data Submission - Educator February 2007
-43-
The first four fields are populated with data entered in the SCHOOL EDUCATOR ASSIGNMENT form.
3) Choose one of the following options on this form:
Check the Non-Teaching box, if applicable. For example, check this box if a TLA was granted for an educator acting as a vice-principal without appropriate certification.
For an educator who is teaching, select a Subject from the drop-down
menu that most closely matches the subject granted by the Temporary Letter of Approval.
4) Click Save. If you receive an error message, correct your submission and
click Save again. 5) If successful, the form will be refreshed with the updated information and the
message Submit Successful will appear at the top of the TLA INFORMATION screen.

OnSIS User Guide OnSIS Release 3 School Data Submission - Educator February 2007
-44-
6) Educators may have multiple TLA records as required. If the educator has more than one TLA subject, click Add Another TLA.
Notes:
• At the start of a new academic year, this form will be blank. • Data is pre-populated from the previous submission as long as
the submission was in the same academic year. • If the TLA is no longer applicable within an academic year, the
record(s) must be deleted.

OnSIS User Guide OnSIS Release 3 School Data Submission - Educator February 2007
-45-
Deleting a TLA Entry If an educator no longer has a TLA in the current submission period, his/her TLA record(s) must be deleted. 1) Scroll down to the bottom of the TLA INFORMATION form to view the TLA
LIST. Click the blue hyperlink for the TLA subject record that is to be deleted and click Delete.
2) You will be prompted by a confirmation message asking if you are sure that
you wish to delete. Click OK.
3) A message confirming that the TLA has been deleted will display.
4) Click Educator Assignment or School Educator List button at the bottom
of the screen to return to that respective form.

OnSIS User Guide OnSIS Release 3 School Data Submission - Educator February 2007
-46-
Secondary School Section
SCREENS FOR SECONDARY SCHOOLS
School Educator List School Educator Assignment List of Classes Class Information TLA Information Course/Segment

OnSIS User Guide OnSIS Release 3 School Data Submission - Educator February 2007
-47-
Accessing School Data Submission - Educator Menu 1) To begin, enter the OnSIS URL:
https://www.gsa.gov.on.ca
2) Click English. 3) Enter your user name and password, click Login. 4) Under Education/Éducation, click OnSIS. 5) Click Enter. 6) Click Agree to the OnSIS Privacy Impact Assessment Page. 7) The OnSIS Home Page will be displayed, including a blue main menu
function bar. Click Data Collection to access the SCHOOL DATA SUBMISSION menu.
NOTE: A user with access to more than one school must select the appropriate school from the drop-down menu.
8) Click, Add/Update School Submission.
OnSIS User Guide OnSIS Release 3 School Data Submission - Educator February 2007
-48-
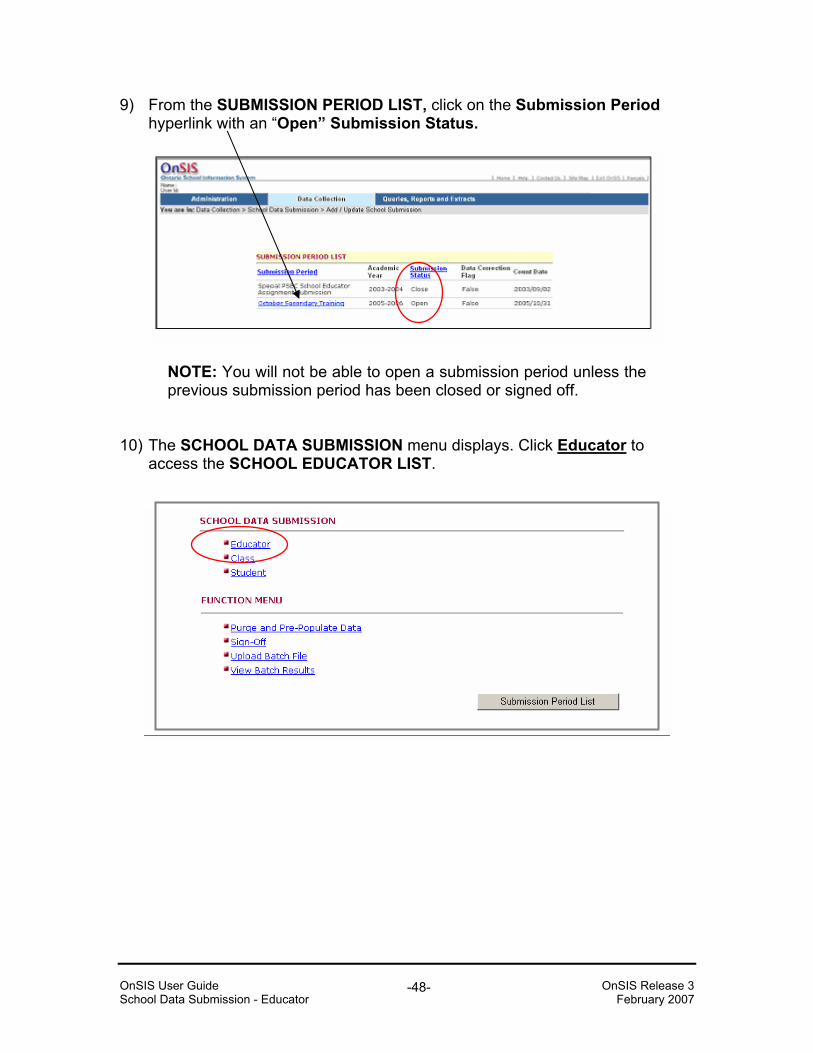
9) From the SUBMISSION PERIOD LIST, click on the Submission Period hyperlink with an “Open” Submission Status.
NOTE: You will not be able to open a submission period unless the previous submission period has been closed or signed off.
10) The SCHOOL DATA SUBMISSION menu displays. Click Educator to
access the SCHOOL EDUCATOR LIST.

OnSIS User Guide OnSIS Release 3 School Data Submission - Educator February 2007
-49-
Adding Educators to the School Educator List (Verifying MEN) When no educators have been added to the school, this screen displays:
For schools where educators were previously added, this screen displays:

OnSIS User Guide OnSIS Release 3 School Data Submission - Educator February 2007
-50-
NOTES: The SCHOOL EDUCATOR LIST may be sorted by Last Name, MEN or Position by clicking on the hyperlinked headings. For example, if sorting by Position, click on the Position header. However, if an educator has more than one position, the records will no longer appear together for that educator. For quick access, use the Last Name Hyperlink Index (A-Z) to move directly to the list of educators whose last names begin with the letter selected. Selecting the hyperlink of an individual educator from the SCHOOL EDUCATOR LIST will allow the user to edit the record.
How to add educators to the SCHOOL EDUCATOR LIST:
1) From the SCHOOL EDUCATOR LIST, click on Add Educator. This screen displays:
2) Enter the Ministry Educator Number (MEN) and click on Verify.

OnSIS User Guide OnSIS Release 3 School Data Submission - Educator February 2007
-51-
NOTES: Obtaining an MEN for an educator may be done at any time. However, it is recommended that all MENs be requested and recorded prior to beginning the Educator section. If an educator has not been assigned an MEN, an MEN may be requested by selecting Administration on the blue main menu bar. Under EDUCATOR ADMINISTRATION, select Request Ministry Educator Number.
If the MEN is found in the database, the MEN VERIFICATION pop-up screen displays:
3) If this is the educator you intended, click Confirm.
NOTE: If an incorrect format or a non-existent MEN has been entered, an error message displays. Make the necessary corrections and click on Verify to try again.
4) Click on Cancel to return to the SCHOOL EDUCATOR ASSIGNMENT form
to re-enter/verify the MEN. 5) When you click on Confirm the SCHOOL EDUCATOR ASSIGNMENT form
will display with the educator’s name.
NOTE: The educator will be added to the SCHOOL EDUCATOR LIST after the SCHOOL EDUCATOR ASSIGNMENT form is completed successfully.

OnSIS User Guide OnSIS Release 3 School Data Submission - Educator February 2007
-52-
School Educator Assignment Form After an educator’s MEN is verified, a SCHOOL EDUCATOR ASSIGNMENT form appears. Using this form, an educator’s position(s) and his/her duties and/or teaching responsibilities at the school are recorded.
NOTES: In this guide, the screen shots are usually cropped and the forms are usually seen in sections. To view the entire SCHOOL EDUCATOR ASSIGNMENT form, scroll down. Public Schools: Combined elementary and secondary schools (e.g. a grade 7–9 junior high school or a grade 7–12 school) require two separate submissions using the two Ministry designated school numbers, one for each school panel. Private Schools: Combined elementary and secondary panels in one school (e.g. a Kindergarten–12 school) require two separate student submissions, one for each school panel, but only one educator submission (for both elementary and secondary educators) through the secondary data submission.
• Secondary Inspected Private School Data Submission (includes Elemental Student Data and Educator Data)
• Elementary Non-Inspected Private School Data Submission (includes Aggregate Student Data)
Mandatory Fields:
Assignment Start Date
FTE (Full-Time Equivalency)
Position
Teaching/Non-Teaching

OnSIS User Guide OnSIS Release 3 School Data Submission - Educator February 2007
-53-
How to complete the SCHOOL EDUCATOR ASSIGNMENT form: 1) Check that the “Read Only” educator information at the top of the form is
accurate and scroll down to view the Career Experience List.
NOTE: If the educator’s information is incorrect, changes may be made through the blue main menu bar > Administration > EDUCATOR ADMINISTRATION > Update Educator Information.
2) Fill in all the mandatory fields indicated with a red asterisk(*). Some choices
within the mandatory fields will require you to make choices in non-mandatory
Read Only

OnSIS User Guide OnSIS Release 3 School Data Submission - Educator February 2007
-54-
fields. Refer to the chart called Guide to Mandatory Fields – School Educator Assignment (Secondary).

OnSIS User Guide OnSIS Release 3 School Data Submission - Educator February 2007
-55-
3) Scroll down and click Save. If you do not click Save, the data entered for this educator will be lost.
NOTE: If you select SCHOOL EDUCATOR LIST, you will return to the previous screen and the data will not be saved.
4) When you click Save, a Submit Successful screen is displayed. Check that the data entered is correct.
5) Scroll down to view the four new navigational buttons and the educator’s
ASSIGNMENT LIST containing the data just entered and any other assignment(s) recorded for this educator at the school.

OnSIS User Guide OnSIS Release 3 School Data Submission - Educator February 2007
-56-
NOTES: An educator’s current career experience is listed under the CAREER EXPERIENCE LIST and is “Read Only” on this form. This data should be up-to-date. To update an educator’s biographical information or career experience, access the forms through the main blue menu bar: > Administration > EDUCATOR ADMINISTRATION > Update Educator Information. Update privileges for educator information are restricted to the home organization that originally requested the educator’s MEN or to any organization who previously submitted data for the educator to the Ministry. Receiving a Submit Successful screen signifies that the information entered thus far has been validated. Further validation occurs once the School Data Submission sign-off process begins. If the record has been entered in error, an option to delete the record is available at this time. The Delete function is used only when a new record has been created in error (e.g. duplicate). Pre-populated educator assignments (assignments that began in a previously reported submission period) may NOT be deleted. These may only be corrected through the Data Correction process. (See Table of Contents in this guide.)

OnSIS User Guide OnSIS Release 3 School Data Submission - Educator February 2007
-57-
Guide to Mandatory Fields – School Educator Assignment (Secondary)
Assignment Start Date • Record the date that the educator’s assignment with the designated position
began at the school. • If this field is not pre-populated, the date selected must fall within the range of
the submission periods of the school year: Cycle Start Date and Count Date. Position Type • Select the position that best describes the educator’s role in the school. • If principal, vice-principal or supervisor is selected, Administration must
be selected in Instructional Type. Multiple values may be selected.
• If Department Head is selected, a Department value must be selected in Department. Otherwise, entering a Department is optional.
• Instructor is valid only for Private Schools. • Supervisor is valid only for Care, Treatment and Correctional Facilities. FTE (Full Time Equivalency) • Public school educators may have a maximum FTE of 1.00, either within a
school or across schools or boards. • FTE is entered as a percentage (e.g. 100% = 1.00 FTE, 50% = 0.50 FTE, 33%
= 0.33 FTE, etc.)

OnSIS User Guide OnSIS Release 3 School Data Submission - Educator February 2007
-58-
Guide to Mandatory Fields – School Educator Assignment (Secondary) - Continued Teaching/Non-Teaching Does the educator teach one or more regularly scheduled classes?
a) If NO, select Non-Teaching.
Do not complete a CLASS INFORMATION form. At least one option in Instructional Type must also be selected for this educator.
b) If YES, select Teaching.
One or more CLASS INFORMATION forms must be completed for this educator. Do not select an Instructional Type.
c) If the educator has both regularly scheduled classes and other
responsibilities, select Both Teaching and Non-Teaching.
One or more CLASS INFORMATION forms must be completed for this educator. At least one option in Instructional Type must be selected.
Notes: • Non-Teaching is valid only if any of the following Position Types are
selected: Principal, Vice-Principal, Department Head, Other, Principal - Acting, Principal -Visiting Exchange, Vice Principal – Acting, Vice Principal -Visiting Exchange, or Teacher – Specialty.
• An educator may have any combination of Teaching and Non-Teaching
responsibilities.
• If an option in the Leave Type or Withdrawal Type is selected, Not Applicable must be selected. Do not complete the CLASS INFORMATION form for this educator.
• If Teaching or Not Applicable is selected, Instructional Type must be blank.

OnSIS User Guide OnSIS Release 3 School Data Submission - Educator February 2007
-59-
Guide to Non-Mandatory Fields – School Educator Assignment (Secondary)
Board Employee Number • This field may be used by Boards to assist in employee related activities. Department • This is an optional field, except when Department Head is selected in Position
Type, in which case a department must be selected under the Department field. Leave Type • An educator On Leave is considered active in the school in which s/he is listed.
Do not record an Assignment End Date. • In the subsequent submission, the name of the educator On Leave will be
populated in the SCHOOL EDUCATOR LIST and the Leave Type field will be blank.
Withdrawal Type • If an educator’s assignment at the school has ended, a Withdrawal Type and an
Assignment End Date must be recorded. Letter of Permission • Will be addressed in a future release.
Note: For additional support in completing the SCHOOL EDUCATOR ASSIGNMENT form please refer to the School Data Submission – Educator, Audio Presentation (Secondary).

OnSIS User Guide OnSIS Release 3 School Data Submission - Educator February 2007
-60-
Editing or Updating Records There are two ways to edit an educator’s assignment. 1) From the SCHOOL EDUCATOR LIST:
a) Click the hyperlink of the name of the educator whose record you wish to
update. If the educator has multiple assignments, select the appropriate hyperlink.
b) The SCHOOL EDUCATOR ASSIGNMENT form displays.
c) Make the necessary changes/corrections. Click Save.
d) Submit Successful results screen displays.
2) From the SCHOOL EDUCATOR ASSIGNMENT form:
a) Scroll down to the Assignment List and click on any of the hyperlinks under Position or FTE to open the selected School Educator Assignment edit form.
b) Make the necessary changes/corrections. Click Save.
c) Submit Successful results screen displays.
Notes: • Assignment Start Date cannot be edited if prepopulated, however all other
fields can be edited. • Pre-populated educator assignments (assignments that began in a previously
reported submission period) may NOT be deleted. If the assignment was invalid for the previous submission period or if the Assignment Start Date was incorrect, this can only be corrected through the Data Correction process.
• A prepopulated FTE must be accounted for in the current submission.
If the FTE was 1.00 in the previous submission, the total FTE must be 1.00 in the current submission.
For example, a vice principal on a half-time Secondment will be reported as having two assignments:
First Assignment Position = Vice Principal FTE = 0.50

OnSIS User Guide OnSIS Release 3 School Data Submission - Educator February 2007
-61-
Second Assignment Position = Vice Principal FTE = 0.50 Leave Type = Secondment
For steps to adding multiple assignments, see Adding Multiple Assignments.

OnSIS User Guide OnSIS Release 3 School Data Submission - Educator February 2007
-62-
Adding Multiple Assignments OnSIS allows for any combination of assignments to a maximum of 1.00 FTE. Use the Add Another Assignment button to add assignments for educators who hold more than one position within the school. Duplicate position assignments cannot be created and will result in an error, unless part of the assignment is connected to a leave or part of the assignment is withdrawn. Many combinations of multiple assignments are possible. The following example illustrates only one possible scenario for reporting more than one assignment. For example, a vice-principal who is on a half-time leave will be reported as having two assignments: First Assignment Position = Vice Principal FTE = 0.50 Second Assignment Position = Vice Principal FTE = 0.50, Leave Type = Secondment Total FTE = 1.00 within the school
How to add a second assignment:
1) From the already existing SCHOOL EDUCATOR ASSIGNMENT form, scroll to the bottom of the screen and click Add Another Assignment.

OnSIS User Guide OnSIS Release 3 School Data Submission - Educator February 2007
-63-
2) A blank SCHOOL EDUCATOR ASSIGNMENT form displays. Fill in all the mandatory fields with a red asterisk(*) and any applicable optional fields.
3) Scroll down and click Save.

OnSIS User Guide OnSIS Release 3 School Data Submission - Educator February 2007
-64-
4) A Submit Successful screen displays. Scroll to the bottom of the screen. The additional assignment SCN (Leave Type = Secondment) is added under the ASSIGNMENT LIST.
To view the names of all educators added to a school, click SCHOOL EDUCATOR LIST.

OnSIS User Guide OnSIS Release 3 School Data Submission - Educator February 2007
-65-
5) The SCHOOL EDUCATOR LIST displays:
NOTE: The educator, Chantal Santin, has two assignments, one with a leave; therefore, her name appears twice in the list.

OnSIS User Guide OnSIS Release 3 School Data Submission - Educator February 2007
-66-
Assigning An Educator(s) to a Class(es) Once an educator has been assigned to a school, he or she may then be assigned to a class. The CLASS INFORMATION form allows an authorized user to view, add, edit and delete class information. A CLASS INFORMATION form must be completed for each class in the school.
Detailed instructions for creating a list of classes are outlined in a separate user guide. For detailed information on creating classes see:
User Guide: School Data Submission, Publicly-Funded Secondary Schools.
How to assign an educator(s) to a class(es):
1) Access the LIST OF CLASSES in the school by clicking on the School Collection Menu button either at bottom of the SCHOOL EDUCATOR LIST or on the SCHOOL EDUCATOR ASSIGNMENT form.
Alternatively, return to the blue main menu bar and select: Data Collection > Add/Update School Submission > SCHOOL DATA SUBMISSION > Class.

OnSIS User Guide OnSIS Release 3 School Data Submission - Educator February 2007
-67-
2) Click Class and the LIST OF CLASSES screen displays. If no classes have been added to the school, the screen displays as below:
3) To add a class, click Add Class. If classes have been previously added, a hyperlinked list of classes displays:
NOTE: Class Codes are specific to the school. Each Class Code must be unique within a school and within a single submission period. An error message will be generated for duplicate class codes.
4) To assign an educator to a class, click on the Class Code hyperlink for the class.

OnSIS User Guide OnSIS Release 3 School Data Submission - Educator February 2007
-68-
If classes were previously entered, the following information about a class is displayed:
Class Information (* indicates mandatory)
Class Code * (Read Only)
Class Start Date *
Class End Date *
Class Type *
Language of Instruction *
Classroom Type (optional)
NOTE: A Class must be created in order to assign an educator to the class. The educator assigned to the class must be valid for the count date. However, if an educator is on Leave or Withdrawn on the Count Date, but was teaching a class that began and ended between two submission period count dates, it is possible to assign this educator to a class.

OnSIS User Guide OnSIS Release 3 School Data Submission - Educator February 2007
-69-
The CLASS INFORMATION form displays as below:
5) Scroll down to view the EDUCATOR ASSIGNED TO CLASS section. 6) The Educators Assigned to School box contains a scroll down field with a
list of educators assigned to the school. In the Educators Assigned to School box, highlight the name of the educator to assign to the class.

OnSIS User Guide OnSIS Release 3 School Data Submission - Educator February 2007
-70-
NOTE: If the educator is listed at the school under two positions (assignments), ensure that the correct position is assigned to the class.
7) More than one educator may be assigned to a class by using the shift or control (Ctrl) keys on your keyboard to highlight more than one name in the Educators Assigned to School box.
8) Use the upper >> directional arrows to move the highlighted name from the
Educators Assigned to School box to the Educator(s) Assigned to Class box. The names of all the educators assigned to the class will appear in the Educator(s) Assigned to Class box.
9) If an educator has been added to the Educator(s) Assigned to Class box
by mistake or is no longer assigned to the class, use the lower << arrows to remove an educator from the Educator (s) Assigned to Class box.
10) Click Save. If an error message displays, follow the instructions on the
screen to correct the data and click Save again. 11) If a warning message displays, check that the data is correct. If it is not, click
Cancel, make any necessary changes, and click Save again. If the information is correct, click Continue.
12) If successful, the message Submit Successful will appear at the top of the
CLASS INFORMATION form. The EDUCATOR(S) ASSIGNED TO CLASS section of the form will be populated appropriately.

OnSIS User Guide OnSIS Release 3 School Data Submission - Educator February 2007
-71-
13) Click Class List. LIST OF CLASSES screen displays. Notice that in the following example, a second educator was assigned to Class Code 10AB.
14) Continue this process until all classes are assigned at least one educator,
unless the class ended before the Count Date.

OnSIS User Guide OnSIS Release 3 School Data Submission - Educator February 2007
-72-
NOTES: At least one educator must be assigned to each open class listed in the current submission period. The order in which the LIST OF CLASSES displays can be changed by clicking on the Class Code, Educator Name or MEN heading. If sorted by Class Code, all educators assigned to one class will be grouped together. If the sort order is changed to Educator Name or MEN, the same Class Code may appear twice if more than one educator was assigned to the class. At any time during this process, users may click on the Add Class function to add additional classes to the LIST OF CLASSES. An educator should only be assigned to a class, if the assignment is true on the Count Date.
Exception: An educator who is on Leave or Withdrawn on the Count Date but was teaching a class that began and ended between two submission period count dates can be assigned to a class.

OnSIS User Guide OnSIS Release 3 School Data Submission - Educator February 2007
-73-
At the bottom of the SCHOOL EDUCATOR ASSIGNMENT form, any existing Class records applicable to the educator’s assignment are also listed in the ASSIGNMENT LIST.
Scroll Down
Clicking on the Class hyperlink opens the CLASS INFORMATION edit form for the selected class record.

OnSIS User Guide OnSIS Release 3 School Data Submission - Educator February 2007
-74-
Deleting a Class Information Record The Delete function is used if a class has been created by mistake within the current submission period.
NOTE: The Delete button will appear only if no students are assigned to the class.
1) Click Delete at the bottom of the screen. 2) You will be prompted with a confirmation message asking: “Are you sure you
wish to delete this class?” Click OK.

OnSIS User Guide OnSIS Release 3 School Data Submission - Educator February 2007
-75-
Course/Segment
The Course/Segment button on the CLASS INFORMATION form is used to add a course or course segments to a class. It is assumed that classes were created and courses and course segments have already been added. Detailed information about this procedure is outlined in an earlier release:
User Guide: School Data Submission Publicly-Funded Secondary Schools.

OnSIS User Guide OnSIS Release 3 School Data Submission - Educator February 2007
-76-
Temporary Letter of Approval (TLA)
Applicable to Public Schools Only OCT-certified educators in Ontario who have been granted a Temporary Letter of Approval by the Ontario College of Teachers to teach outside of their area of qualification are reported using the TLA INFORMATION form.
How to complete a TLA INFORMATION form: 1) Access the TLA INFORMATION form from one of these two screens:
Submit Successful SCHOOL EDUCATOR ASSIGNMENT results page, OR
SCHOOL EDUCATOR LIST by clicking a hyperlinked educator’s name. The SCHOOL EDUCATOR ASSIGNMENT form displays.

OnSIS User Guide OnSIS Release 3 School Data Submission - Educator February 2007
-77-
2) Click on the TLA button. The first four fields are populated with data entered in the SCHOOL EDUCATOR ASSIGNMENT form.
3) Choose one of the following options on this form:
Check the Non-Teaching box, if applicable. For example, check this box if a TLA was granted for an educator acting as a vice-principal without appropriate certification.
For an educator who is teaching, select a Subject from the drop-down
menu that most closely matches the subject requested for a Temporary Letter of Approval.
4) Click Save. If you receive an error message, correct your submission and
click Save again. 5) If successful, the form will be refreshed with the updated information, and the
message Submit Successful will appear at the top of the TLA INFORMATION screen.

OnSIS User Guide OnSIS Release 3 School Data Submission - Educator February 2007
-78-
6) Educators may have multiple TLA records as required. If the educator has more than one TLA subject, click Add Another TLA.
Notes:
• Data is pre-populated from the previous submission as long as the submission was in the same academic year.
• At the start of a new academic year, this form will be blank. • If the TLA is no longer applicable within an academic year, the
record(s) must be deleted.

OnSIS User Guide OnSIS Release 3 School Data Submission - Educator February 2007
-79-
Deleting a TLA Entry If an educator no longer has a TLA in the current submission period, his/her TLA record(s) must be deleted. 1) Scroll down to the bottom of the TLA INFORMATION form to view the TLA
LIST. Click the blue hyperlink for the TLA subject record that is to be deleted and click Delete.
2) You will be prompted with a confirmation message asking if you are sure that
you wish to delete. Click OK.
3) A message confirming that the TLA has been deleted will display.
4) Click EDUCATOR ASSIGNMENT or SCHOOL EDUCATOR LIST button at
the bottom of the screen to return to that respective screen.

OnSIS User Guide OnSIS Release 3 School Data Submission - Educator February 2007
-80-
FUNCTION MENU
Upload Educator Batch File It is possible to upload a batch file for OnSIS Educator data, rather than inputting the data online. For the Batch File layout requirements, business rules and reference tables, see What’s New? after logging in to OnSIS. Batch File Upload Form The Batch File Upload form allows authorized users to select a School Data Submission batch file for uploading and subsequent processing within OnSIS. Accessing Upload Batch File 1) From the blue main menu bar, select Data Collection to access the School
Data Submission menu. 2) In the School Data Submission menu, select Upload Batch File.
The following form will appear:
3) Click the radio button for the file size that will be uploaded.

OnSIS User Guide OnSIS Release 3 School Data Submission - Educator February 2007
-81-
4) Click Browse to locate and select a file to upload. Once the file is selected, the Batch File Upload Form displays.
5) Click Submit File to upload the file. If the file upload is completed
successfully, the Batch File Upload Result is presented with the message, “File has been uploaded successfully.” If no file was selected, the Batch File Upload Form displays with an error message.
6) To upload another file, click Upload another File. To return to the Data Collection menu, select School Data Submission from the blue menu bar at the top of the screen.
OnSIS User Guide OnSIS Release 3 School Data Submission - Educator February 2007
-82-
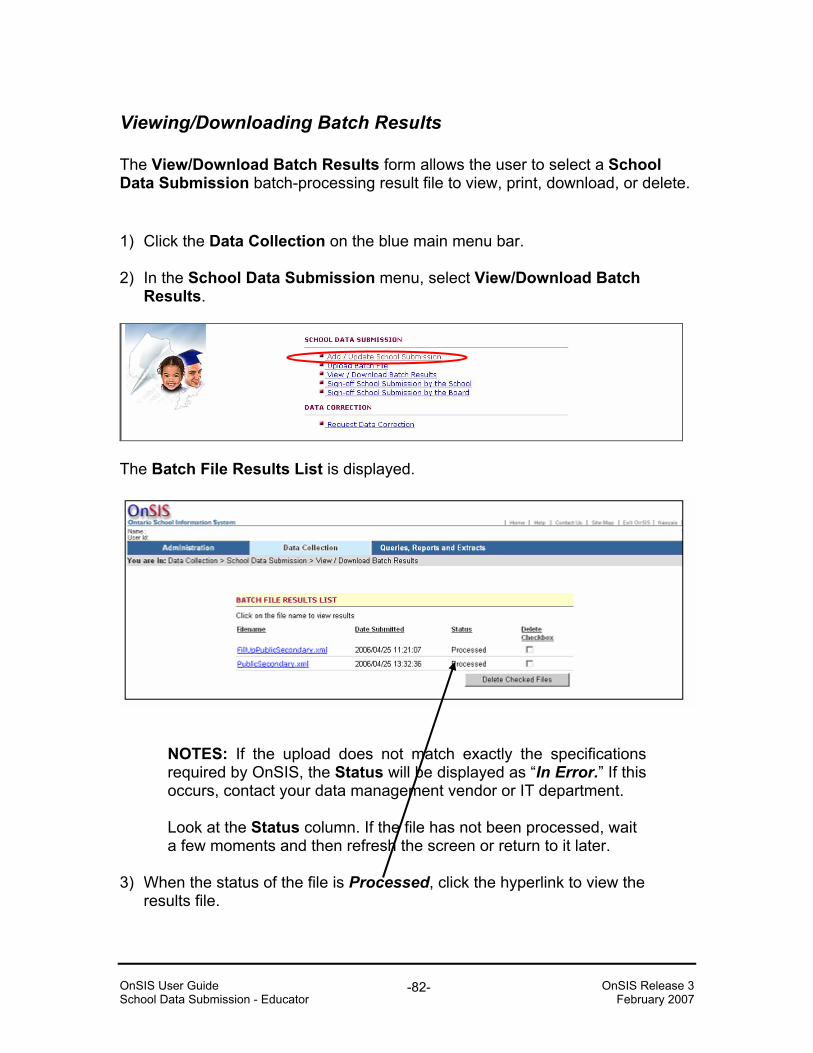
Viewing/Downloading Batch Results The View/Download Batch Results form allows the user to select a School Data Submission batch-processing result file to view, print, download, or delete.
1) Click the Data Collection on the blue main menu bar. 2) In the School Data Submission menu, select View/Download Batch
Results.
The Batch File Results List is displayed.
NOTES: If the upload does not match exactly the specifications required by OnSIS, the Status will be displayed as “In Error.” If this occurs, contact your data management vendor or IT department.
Look at the Status column. If the file has not been processed, wait a few moments and then refresh the screen or return to it later.
3) When the status of the file is Processed, click the hyperlink to view the
results file.

OnSIS User Guide OnSIS Release 3 School Data Submission - Educator February 2007
-83-
NOTE: The BATCH FILE RESULTS SUMMARY lists the records which were uploaded and identifies the number of records that were successfully loaded and the number of records that were rejected in error.
4) To see a list of errors in a file that has been successfully uploaded, click
Detail Report at the bottom of the screen.

OnSIS User Guide OnSIS Release 3 School Data Submission - Educator February 2007
-84-
NOTE: BATCH FILE RESULTS SUMMARY shows error messages that are generated and provides additional information about the errors.
5) To print the error report, click Print Report at the bottom of the page.
6) To download the results, click Download Report at the bottom of the page. The following pop-up will appear:
7) Click Save. Another pop-up screen will be displayed providing the option of
selecting where the file is to be saved. 8) Select where the file is to be saved and click Save. A message will be
displayed stating that the download is complete. Click Close to return to the Detail Report screen.
9) Click Previous Page at the bottom of the screen to return to the Batch File
Results Summary.

OnSIS User Guide OnSIS Release 3 School Data Submission - Educator February 2007
-85-
10) Click Download Results from this screen. A pop-up window will be displayed. Click Open
The following is an example of what will be displayed when the file is opened:
11) Make any necessary corrections in your data management system, recreate
the file, and upload it again.
OnSIS User Guide OnSIS Release 3 School Data Submission - Educator February 2007
-86-
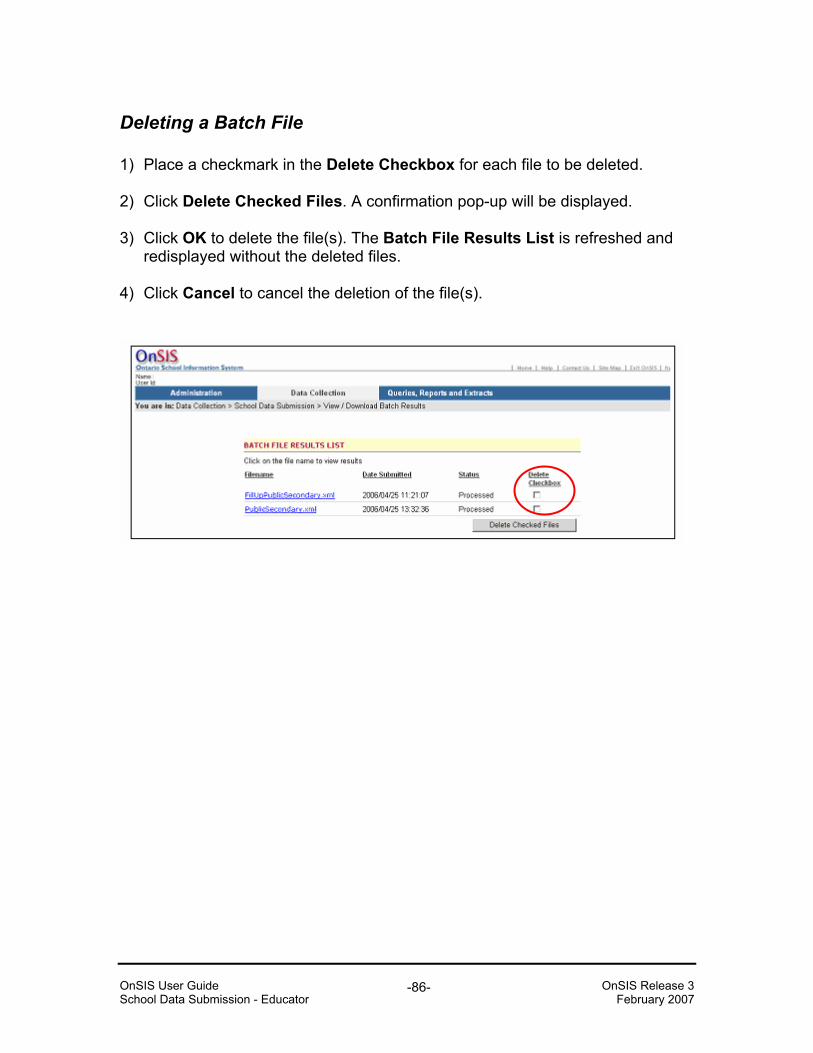
Deleting a Batch File 1) Place a checkmark in the Delete Checkbox for each file to be deleted. 2) Click Delete Checked Files. A confirmation pop-up will be displayed. 3) Click OK to delete the file(s). The Batch File Results List is refreshed and
redisplayed without the deleted files. 4) Click Cancel to cancel the deletion of the file(s).

OnSIS User Guide OnSIS Release 3 School Data Submission - Educator February 2007
-87-
Sign-off School Submission by the School Data collection submission periods are opened in order to allow boards and schools to submit data, either through direct input into OnSIS or by uploading a batch file from their data management system. The Ministry will open the submission period prior to the date by which boards and schools are required to submit the data. As part of the submission process, boards and schools will generate a validation report to ensure that what is being submitted is valid, and run verification reports. Boards and schools will be notified via email as to when they can begin submitting data, and when the data can be signed-off. When a submission period is opened, the submission status in the Submission Period List will be displayed as “Open”.
NOTE: Data can be submitted only for submission periods that are open.
OnSIS User Guide OnSIS Release 3 School Data Submission - Educator February 2007
-88-
School-Level Submission Process Data submission to OnSIS can occur via three methods – either online or through batch uploads or a combination of both methods. If the school is using a data management system, the files can be uploaded to ONSIS for validation/verification/sign-off. If the school is not using a data management system, all data must be entered online before going through the validation/verification/sign-off process. A board user can, at any time, perform tasks on behalf of the school.
NOTE: If critical errors are present when users initiate the sign-off procedures by clicking the Sign-off button, the system will not automatically generate verification reports. When sign-off is not successful, users must run verification reports separately or use a previous version of the reports, if available.
All previous submissions must be signed-off or closed. The flowchart on the following page documents the submission process.

OnSIS User Guide OnSIS Release 3 School Data Submission - Educator February 2007
-89-
A A
User enters data
(Uploads Batch or enters
data online)
The user will see a results page stating that the validation report has been generated. When the report is ready, the user will receive an e-mail with a hyperlink to the report. Or, the user can access the report directly via the View/Download Batch File Results menu. This report will list all errors and warnings that were encountered.
Errors?
User runs
validation report
Errors must be corrected
A
Warnings?
The user should check the data against the warning. If the data is OK, then the user should ignore the warning. If the data is not OK, then the user must correct it, and upload it again, in batch.
Is the data
OK?
No
No
Go back to A
Go to B on next page
No No

OnSIS User Guide OnSIS Release 3 School Data Submission - Educator February 2007
-90-
The verification reports must be run before sign-off can be initiated and should be re-run if any changes have been made as a result of errors in the data. Verification process (available from the sign-off form) will redirect the user to a report selection form (within the report module) that will allow the user to select/generate the set of verification reports or run individual verification reports for review to ensure numbers and totals
t
User runs
verification report
Numbers and totals accurate?
Correct errors
School Sign-Off button
displays and user initiates Sign-Off*
The school sign-off process performs the school sign-off. A result page will appear informing the user that the validation process has been initiated and the user will be informed via email when the validation report is available. The email includes a hyperlink to view the validation report.
Errors?
Sign-Off cancelled and
errors must be corrected A
User confirms
School Sign-Off Data is locked. No further changes can be made to the data by the school. The board is notified of sign-off by the school.
B
Yes
Go back to A (previous page).
Go back to A (previous page).
No

OnSIS User Guide OnSIS Release 3 School Data Submission - Educator February 2007
-91-
School Sign-Off Process When a school user logs into OnSIS, the following screen displays:
NOTE: A user with Board Administrator status can perform tasks on behalf of the school, at any time. A user with Co-ordinator status, for either a school or a board, will be able to run validation and verification reports but will not be able to sign-off.
1) Click the blue hyperlink for Sign-Off School Submission by the School. The Submission Period List is displayed.

OnSIS User Guide OnSIS Release 3 School Data Submission - Educator February 2007
-92-
2) Click the hyperlink for the submission period for which you wish to sign-off.
NOTE: The Submission Status must be set to “Open,” and all previous submission periods must be set to “Closed.”
The Sign-Off School Submission by School screen displays.
Running the Validation Report 1) Click Validation to initiate the validation process. A results page is displayed
with a notification that a validation request is initiated.

OnSIS User Guide OnSIS Release 3 School Data Submission - Educator February 2007
-93-
2) When the report is ready, an e-mail with a hyperlink to the report is sent to the
user’s e-mail address. The report can also be accessed directly via the View Reports option in the Queries, Reports and Extracts module. The report lists all errors and warnings encountered during the validation process.
3) Correct all errors. 4) Check warnings and make any necessary corrections. 5) If an entire batch file is submitted, it is necessary to purge and pre-populate
the data, and then upload it again. If only a few records require correction, an updated batch file can be submitted which includes only those records that were corrected. (All data can be purged and pre-populated if too many errors are encountered, or only selected sections can be purged and pre-populated and re-uploaded.) For instructions on purging and pre-populating, refer to the Table of Contents.
6) Re-run the validation report. If there are still critical errors and/or warnings,
follow steps 3 through 5 until the report has no errors and all warnings have been addressed.
NOTE: Validation during the school sign-off ensures that the data is complete. The entire OnSIS database is searched and inconsistencies are noted.

OnSIS User Guide OnSIS Release 3 School Data Submission - Educator February 2007
-94-
The following is a sample of a validation report. Note that it lists critical errors, which must be corrected, as well as warnings, which should be corrected if the data entered is incorrect.

OnSIS User Guide OnSIS Release 3 School Data Submission - Educator February 2007
-95-
Running the Verification Reports Verification reports have been created to make it easier for boards and schools to identify the source of errors. Once the user has identified the errors, the corrections may be made either online in OnSIS or in the school’s data management system followed by resubmitting a new batch file. The verification reports must be re-run before sign-off can be initiated and should be re-run if any errors are detected. Boards and schools should keep a complete copy of the final verification reports for their records. It will be beneficial to run the verification reports at the same time as the validation report in order to identify where the errors are and to be able to correct them. List of Elementary and Secondary Educator Verification Reports:

OnSIS User Guide OnSIS Release 3 School Data Submission - Educator February 2007
-96-
Running the Verification Reports 1) Click Verification. 2) A menu will appear listing all of the verification reports that can be requested.
(The example which follows is only a partial screen shot.)
3) At the top of the form, select the Academic Year and the Submission
Period Type. 4) Check off those reports that are to be verified or use the buttons at the bottom
of the form to select all reports, all summary reports, or all detail reports.

OnSIS User Guide OnSIS Release 3 School Data Submission - Educator February 2007
-97-
The bottom of the verification screen contains options regarding language, format, and running the report.
NOTE: The following information is also displayed:
• Estimated Run Time
• Days Kept On File When Viewed
• Days Kept On File When Not Viewed 5) Select the Report Language and Report Format. 6) Click Run Immediately or Run Later. 7) Click View Report List to view the report if you selected Run Immediately.
NOTES: It may be necessary to refresh the View Report List screen if the report has not been processed. PC users can use CTRL-R to do this. You can also access the report using the Queries, Reports and Extracts function on the OnSIS main menu.

OnSIS User Guide OnSIS Release 3 School Data Submission - Educator February 2007
-98-
Viewing the Reports Reports are presented in two sections: Reports not Generated, which displays their status, and Generated Reports. If you wish to see a list of previously generated reports, check the Previously Viewed Reports checkbox and then click Refresh.
To view a generated report, click its blue hyperlink.

OnSIS User Guide OnSIS Release 3 School Data Submission - Educator February 2007
-99-
The following pop-up will appear:
You can view the report online or Download it. When you are finished with the report, you can delete it or leave it. It will automatically be deleted when the number of days in the Days Kept on File option has elapsed.
NOTE: It is recommended that you Download the report first, then save it. Once a report has been viewed, it is moved to the Previously Viewed list.

OnSIS User Guide OnSIS Release 3 School Data Submission - Educator February 2007
-100-
School-Level Sign-Off
Once the validation report has been run and all critical errors fixed, a sign-off button will appear on the screen next to the validation and verification buttons.
Click Sign-Off to notify the board that you have signed-off and that they can perform the board sign-off (not applicable to private schools). You will receive the message: “Sign-Off Request has been initiated”.
NOTES: When Sign-Off is selected, a validation report and full verification reports will automatically be run. If no critical errors are found in the validation report, an e-mail will be sent informing the user that the sign-off was successful and a second e-mail will be sent to the board (not applicable to private schools). If any critical errors are found, the sign-off will automatically be cancelled. If the validation report has warnings, two additional buttons will appear. Click Confirm Sign-Off if the warnings are fine, and click Cancel Sign-Off if the data needs to be corrected.

OnSIS User Guide OnSIS Release 3 School Data Submission - Educator February 2007
-101-
Data Correction Request If the school or board finds an error after the data has been signed-off by the board, the board will have to make a formal request to the ministry to re-open the submission. This is done through a data correction. Private schools may also request a data correction, if an error has been discovered after the data was signed-off. The data correction form can be accessed by clicking Data Collection on the OnSIS main menu.
1) Click the blue hyperlink for Request Data Correction. The following screen will appear:
2) Click the blue hyperlink for School Data.

OnSIS User Guide OnSIS Release 3 School Data Submission - Educator February 2007
-102-
The Submission Period List will appear:
3) Click the appropriate submission period. A list of open schools will appear:
4) Check off the school(s) for which you wish to request a data correction and click Submit.
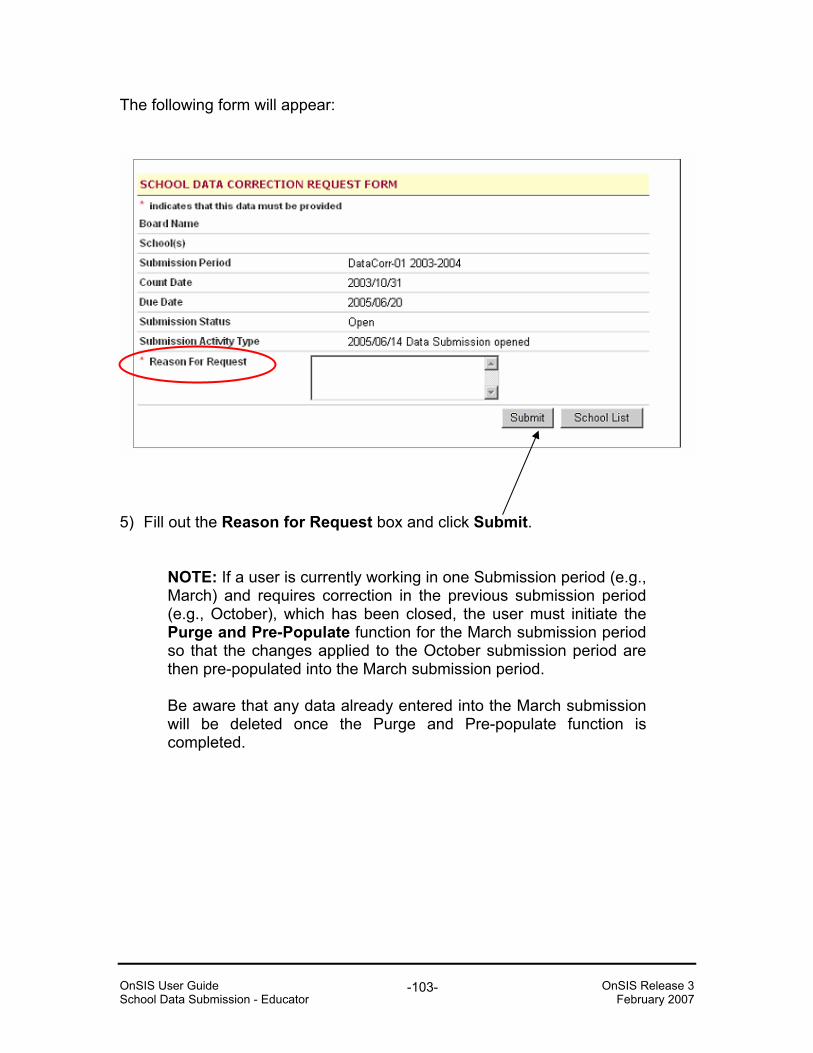
OnSIS User Guide OnSIS Release 3 School Data Submission - Educator February 2007
-103-
The following form will appear:
5) Fill out the Reason for Request box and click Submit.
NOTE: If a user is currently working in one Submission period (e.g., March) and requires correction in the previous submission period (e.g., October), which has been closed, the user must initiate the Purge and Pre-Populate function for the March submission period so that the changes applied to the October submission period are then pre-populated into the March submission period. Be aware that any data already entered into the March submission will be deleted once the Purge and Pre-populate function is completed.

OnSIS User Guide OnSIS Release 3 School Data Submission - Educator February 2007
-104-
Purge and Pre-Populate The Purge and Pre-populate function can be found on the Add/Update School Submission screen, in the Function Menu.
The Purge and Pre-populate function allows a selection of data areas to be purged and pre-populated. A user may selectively choose forms that he/she wishes to purge and pre-populate by clicking them or by selecting all of the forms. Using this function will return the data to the way it was when the submission period was initially opened. For example, if a user has consistently entered information incorrectly into one of the forms, he or she may find it easier to use the purge and pre-populate function and start over rather than go through and make the corrections manually. 1) Click Purge and Pre-Populate Data from the Function Menu.
The following form will appear:

OnSIS User Guide OnSIS Release 3 School Data Submission - Educator February 2007
-105-
2) Click the check boxes to indicate the forms that you wish to purge and pre- populate. 3) Click the Purge and Pre-Populate Data button. A pop-up will be displayed asking if you are sure that you want to purge and pre-populate.
4) Click OK to proceed or Cancel to return to the Function Menu. 5) If you click OK, a second confirm popup will be displayed asking if you really
want to purge and pre-populate. Click OK or Cancel.

OnSIS User Guide OnSIS Release 3 School Data Submission - Educator February 2007
-106-
6) If successful, a result form displays, along with a message confirming the list
of tables that have been purged and pre-populated.
7) Click Close to return to the Function Menu.

OnSIS User Guide OnSIS Release 3 School Data Submission - Educator February 2007
-107-
Appendix A
Elementary School Educator Assignment FAQ - SCENARIOS
• Can the Ministry give examples of when to set the Core Flag field on or
off? We need more clarification on this field. Core Flag is for Elementary schools only and is “on” if the educator teaches a “Core”/“Homeroom” or a Fully-Integrated Special Education class. • What is Non-Teaching? How can an educator be “Both”? Non-Teaching is required if the educator has an applicable value in Instructional Type, i.e. if the educator does not have an Assigned Subject or Class Assignment. “Both Teaching and Non-Teaching” is applicable if the educator has an applicable value in Instructional Type, but also has an Assigned Subject or Class Assignment. • How do you report educators assigned to a Junior High School or to
multiple schools? The FTE should be reported appropriately and separately for each school assignment, i.e., at each BSID Number/school panel. • How is Planning Prep Teacher time reported? This may involve a
specialty teacher. If a Specialty Teacher of a regularly scheduled non-core class:
E.g. School Educator Assignment Form
Position = Teacher, Specialty Teaching/Non-Teaching Flag = Teaching
Assigned Subject Information Form Record 1: Subject = AM - Music Grade(s) = 4, 5 Language of Instruction = English Number of Classes = 2

OnSIS User Guide OnSIS Release 3 School Data Submission - Educator February 2007
-108-
Record 2: Subject = AM - Music Grade(s) = 5 Language of Instruction = English Number of Classes = 1
NOTE: Multiple records of Assigned Subject are possible if the combination is unique.
If a Core Teacher (i.e. No Specialty), but covering the main Core Teacher for Planning Prep Time:
E.g. School Educator Assignment Form
Position = Teacher, Regular (or most appropriate) Teaching/Non-Teaching Flag = Teaching NOTE: Core Elementary Teacher Flag must be unchecked, unless the educator is also assigned to a Class (via Class Information).
Assigned Subject Information Form Record 1: Subject = XNS - No Specialty Grade(s) = 4, 5 Language of Instruction = English Number of Classes = 1 Record 2: Subject = XNS - No Specialty Grade(s) = 5 Language of Instruction = English Number of Classes = 1
NOTE: Multiple records of Assigned Subject are possible if the combination is unique.
If not a Specialty Teacher reported through Assigned Subject or a Core Teacher reported through Class Information, i.e. not the educator of a regularly scheduled class:
E.g. School Educator Assignment Form
Position = Other (or most appropriate) Teaching/Non-Teaching Flag = Non-Teaching Instructional Type = Resource Withdrawal (or most appropriate)
If a partial Specialty or Core Teacher/partial Non-Specialty or Non-Core Teacher:
Option 1:

OnSIS User Guide OnSIS Release 3 School Data Submission - Educator February 2007
-109-
If appropriate, report as two separate position assignments (positions must be unique) and allocate the FTE accordingly.
E.g. School Educator Assignment Form
Position = Teacher, Specialty FTE = 0.50 Teaching/Non-Teaching Flag = Teaching
Assigned Subject Information Form Subject = PA - Physical Activities Grade(s) = 4, 5 Language of Instruction = English Number of Classes = 2 NOTE: Multiple records of Assigned Subject are possible if the above combination is unique.
AND E.g. School Educator Assignment Form
Position = Vice Principal FTE = 0.50 Teaching/Non-Teaching Flag = Non-Teaching Instructional Type = Administration, Guidance
Option 2: School Educator Assignment Form
Position = Select the most appropriate Teaching/Non-Teaching Flag = Both Teaching and Non-Teaching Instructional Type = Select the appropriate type(s) (Multi-Select possible)
AND Assigned Subject Information Form
Select a Subject Select a Grade(s) Select a Language of Instruction Provide the Number of Classes that corresponds to the above
NOTE: Multiple records of Assigned Subject are possible if the above combination is unique.
AND/OR
Class Information Form Assign the educator to the Class (follow the Class Information instructions).
NOTE: Core Elementary Teacher Flag must be checked in School Educator Assignment Form to allow for this.

OnSIS User Guide OnSIS Release 3 School Data Submission - Educator February 2007
-110-
E.g. School Educator Assignment Form
Position = Teacher, Specialty FTE = 1.00 Teaching/Non-Teaching Flag = Both Teaching and Non-Teaching Instructional Type = Librarian
Assigned Subject Information Form Subject = AM - Music Grade(s) = 4, 5 Language of Instruction = English Number of Classes = 2
• How do you report a significant number of educators who do not teach classes (i.e. Assigned Subject or Core), but teach individual or small groups of students (e.g. ESL, Language resources, Reading Recovery, Student Success, Enrichment)
If not a Specialty Teacher reported through Assigned Subject or a Core Teacher reported through Class Information, i.e. not the educator of a regularly scheduled class: E.g. School Educator Assignment Form
Position = Other (or most appropriate) Teaching/Non-Teaching Flag = Non-Teaching Instructional Type = Select the most appropriate or select Resource Withdrawal (Multi-Select possible.)
o See the Instructional Type Reference Table for the latest values. NOTE:
The Instructional Type ESL should be used only for educators who do not have regularly scheduled classes. Educators who teach regularly scheduled ESL classes should report through the Assigned Subject screen and select ESL as the subject.

OnSIS User Guide OnSIS Release 3 School Data Submission - Educator February 2007
-111-
• Does a librarian teacher who instructs in the library have a position of specialty teacher or is s/he a regular teacher with Non-Teaching or Both Teaching and Non-Teaching? If it can be either, how do we know when to use each scenario?
If the educator is a librarian who instructs, but has no regularly scheduled classes:
E.g. School Educator Assignment Form
Position = Teacher, Specialty (or most appropriate) FTE = 1.00 Teaching/Non-Teaching Flag = Non-Teaching Instructional Type = Librarian
If the educator is a librarian with regularly scheduled classes: E.g. School Educator Assignment Form Position = Teacher, Specialty (or most appropriate) FTE = 1.00 Teaching/Non-Teaching Flag = Both Teaching and Non-Teaching Instructional Type = Librarian Assigned Subject Information Form Subject = AM - Music Grade(s) = 4, 5 Language of Instruction = English Number of Classes = 2
AND/OR Class Information Form
Assign the educator to the Class (follow the Class Information instructions).
NOTE: Core Elementary Teacher Flag must be checked in School Educator Assignment Form to allow for this.