migrating to dell emc unity with san copy · 7kh lqirupdwlrq lq wklv sxeolfdwlrq lv surylghg ³dv...
TRANSCRIPT
WHITE PAPER
MIGRATING TO DELL EMC UNITY WITH SAN COPY
ABSTRACT This white paper explains how to migrate Block data from a CLARiiON® CX™ or VNX™ Series system to Dell EMC Unity™. This paper outlines how to use Dell EMC SAN Copy™ to easily perform the migration of Block devices, and includes simple, step-by-step instructions for the migration. October, 2017

2
The information in this publication is provided “as is.” Dell Inc. makes no representations or warranties of any kind with respect to the information in this publication, and specifically disclaims implied warranties of merchantability or fitness for a particular purpose. Use, copying, and distribution of any software described in this publication requires an applicable software license. Copyright © 2016 Dell Inc. or its subsidiaries. All Rights Reserved. Dell, EMC, and other trademarks are trademarks of Dell Inc. or its subsidiaries. Other trademarks may be the property of their respective owners. Published in the USA [12/16] [White Paper] [H15164.2] Dell EMC believes the information in this document is accurate as of its publication date. The information is subject to change without notice.
3
TABLE OF CONTENTS EXECUTIVE SUMMARY ...........................................................................................................4
Audience ........................................................................................................................................... 4 USING SAN COPY TO MIGRATE TO DELL EMC UNITY .......................................................4
Native SAN Copy Import ................................................................................................................... 4 Background Information .................................................................................................................... 4 The Step-By-Step Procedure ............................................................................................................ 4
CONCLUSION ........................................................................................................................ 26 REFERENCES ........................................................................................................................ 27
4
EXECUTIVE SUMMARY Dell EMC Unity is Dell EMC’s latest midrange storage offering, which delivers a fully unified Block and File environment with flexible deployment options. Dell EMC Unity includes All Flash and Hybrid models, leverages the latest Flash technology, and starts in a 2U footprint. Dell EMC Unity also includes the Unity Virtual Storage Appliance, also known as the UnityVSA, which is a virtual instance of a Unity system. All Unity deployment options implement the Operating Environment. Managing a Unity system is simple and intuitive using Unisphere, which has a modern design and is built upon HTML-5. Dell EMC Unity provides all-inclusive software, such as data protection options like Snapshots and native Replication. This white paper is a migration guide to help you move Block storage from a CLARiiON CX or VNX Series storage system to a Dell EMC Unity system. It includes the steps needed to complete the migration in a simple, step-by-step process which leverages Dell EMC SAN Copy software installed on the source system. By utilizing Dell EMC SAN Copy, all data transfer operations are handled by the storage systems, which eliminates the need for a host level migration.
AUDIENCE This white paper is intended for Dell EMC customers, partners, and employees who are planning to migrate Block storage to Dell EMC Unity. It assumes familiarity with Dell EMC Unity and Dell EMC’s management software.
USING SAN COPY TO MIGRATE TO DELL EMC UNITY NATIVE SAN COPY IMPORT When migrating Block LUNs or Consistency Groups from a VNX system to Dell EMC Unity you can leverage the Native SAN Copy Import feature on Unity for a more integrated workflow. This procedure requires minimal configuration on the VNX side and can be initiated and monitored all through Unisphere, the UEMCLI, or the REST API on Unity. While this process utilizes SAN Copy it is only supported with source VNX systems in a push configuration. For more information on migrating Block LUNs with Native SAN Copy Import, please reference the Unity Migration Technologies whitepaper found on Dell EMC Online Support.
BACKGROUND INFORMATION The following guide provides a step-by-step procedure which can be followed to migrate Block LUNs from a VNX or CLARiiON CX Series system to Dell EMC Unity. The example used in the guide specifically migrates 5 Block LUNs from a VNX7600 (a VNX2 Series system) to a Unity 600 (a Dell EMC Unity system). All LUNs on the VNX7600 being migrated are from the same host and provide storage to a production application on the server. Both systems are running the latest target code, which is suggested while performing this procedure but not required. While this procedure and examples are specific to VNX2, steps on VNX1 Series and CLARiiON CX Series systems would be similar. For more information on Unisphere, Navisphere, or Dell EMC SAN Copy for the source system, please consult the white paper documentation found on Dell EMC Online Support. Note: When migrating LUNs which contain VMware VMFS Datastores, it is suggested to provide storage to the VMware environment from the target Unity system and leverage VMware based migration utilities. VMware Datastores can be created in Unisphere, which helps increase the level of integration between VMware and Dell EMC Unity.
THE STEP-BY-STEP PROCEDURE CONFIRM YOUR HOST AND OPERATING SYSTEM ARE SUPPORTED ON UNITY Before proceeding with the migration, you must first ensure that any Hosts and their Operating Systems being migrated are supported on Dell EMC Unity. In some instances, you may need to upgrade the host before migrating to Dell EMC Unity. For more information on supported configurations, consult the Dell EMC Unity Simple Support Matrix found on Dell EMC Online Support. BACK UP YOUR DATA Before performing any operations which involve manipulating data, Dell EMC highly recommends you perform a full backup of your data. While SAN Copy only performs reads on the source, protecting the source LUNs in case of an unforeseen issue is suggested.

5
STEP 1 To utilize Dell EMC SAN Copy for migrations, the SAN Copy enabler must be installed on the CLARiiON CX or VNX source system. For VNX systems, the Software tab within the Storage System Properties window shows which enablers are installed on the system. In Figure 1 below, the SAN Copy enabler has been installed, which is denoted by the –SANCopy entry in the Packages list. SAN Copy is available at no cost and can be installed using Unisphere Service Manager.
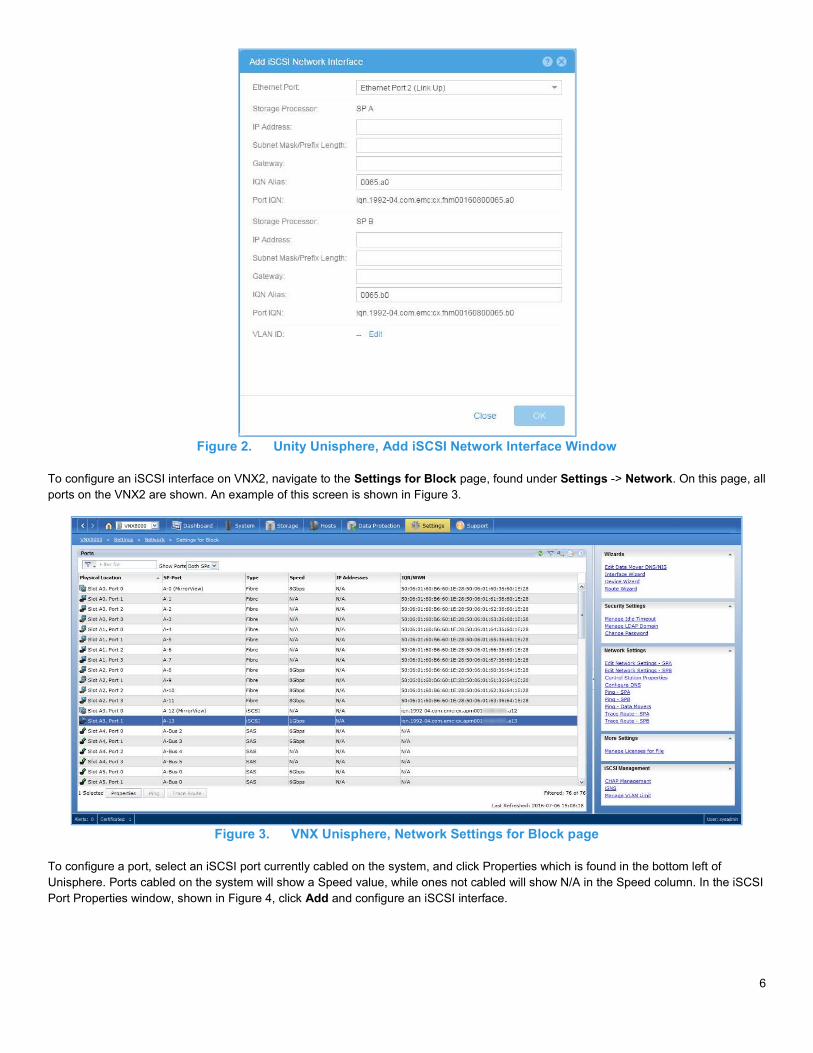
Figure 1. VNX Unisphere, VNX2 Storage System Properties Page In this step-by-step guide, incremental SAN Copy will be utilized. Incremental SAN Copy utilizes SnapView to create snapshots of the SAN Copy source LUNs. A SnapView snapshot is used as a consistent point in time source for each SAN Copy session. To use incremental SAN Copy, at least 1 LUN per source LUN must be allocated to the Reserved LUN Pool. These LUNs should be large enough to store the changed data during the time the SAN Copy session is configured. The Reserved LUN Pool is used to preserve the point in time image of the source LUN. In this example, the Reserved LUN Pool is already populated. For more information and Best Practices on populating the Reserved LUN Pool, consult SnapView and SAN Copy documentation for the source system. STEP 2 Next, connectivity between the source system and the Unity system must be configured. Connectivity between the systems can either be iSCSI or Fibre Channel. When both protocols are available on both systems, utilizing the fastest technology available is suggested. Only a single path between the source system and the Unity system is required, but multiple paths are suggested. When multiple paths are configured, SAN Copy will leverage the paths in an optimal manner and spread out concurrent SAN Copy operations among them. Having multiple paths may also increase the speed of the migration. If MirrorView is enabled on the source system, the MirrorView ports on the source VNX system cannot be utilized to transfer data to the Unity system. It is NOT recommended to utilize the Synchronous Replication Ports on the Unity system as the target of the migration. iSCSI When configuring iSCSI connections, you must configure iSCSI interfaces on the source system and Unity system. Configuring iSCSI interfaces on Unity is completed on the iSCSI Interfaces tab, found on the Block page under Storage. After selecting Add new iSCSI interface (denoted by the + symbol on the iSCSI Interfaces page), the Add iSCSI Network Interface window is launched, as shown in Figure 2.
6
Figure 2. Unity Unisphere, Add iSCSI Network Interface Window To configure an iSCSI interface on VNX2, navigate to the Settings for Block page, found under Settings -> Network. On this page, all ports on the VNX2 are shown. An example of this screen is shown in Figure 3.
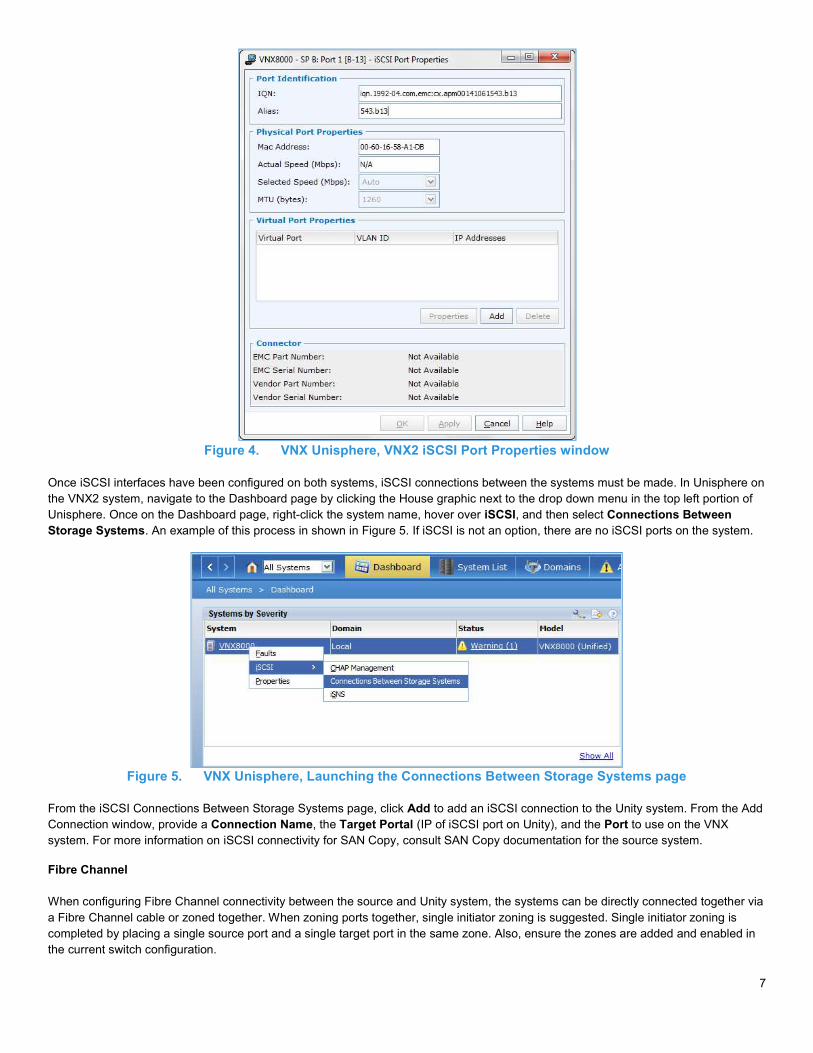
Figure 3. VNX Unisphere, Network Settings for Block page To configure a port, select an iSCSI port currently cabled on the system, and click Properties which is found in the bottom left of Unisphere. Ports cabled on the system will show a Speed value, while ones not cabled will show N/A in the Speed column. In the iSCSI Port Properties window, shown in Figure 4, click Add and configure an iSCSI interface.
7
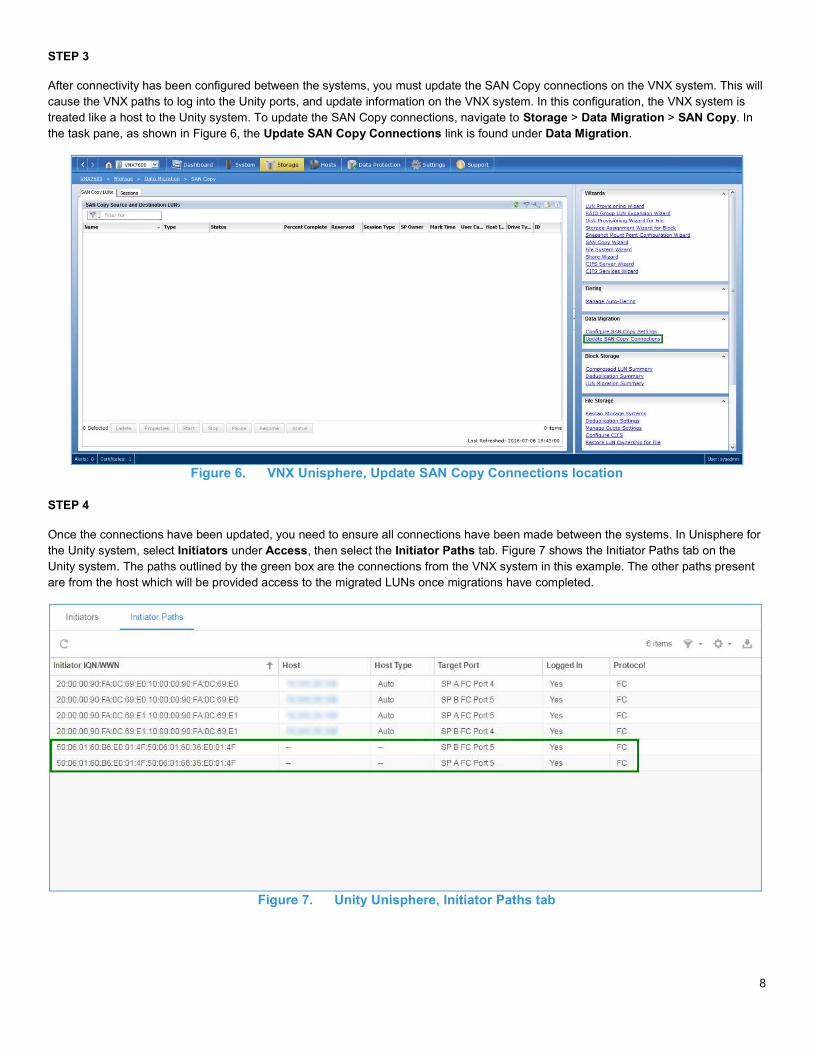
Figure 4. VNX Unisphere, VNX2 iSCSI Port Properties window Once iSCSI interfaces have been configured on both systems, iSCSI connections between the systems must be made. In Unisphere on the VNX2 system, navigate to the Dashboard page by clicking the House graphic next to the drop down menu in the top left portion of Unisphere. Once on the Dashboard page, right-click the system name, hover over iSCSI, and then select Connections Between Storage Systems. An example of this process in shown in Figure 5. If iSCSI is not an option, there are no iSCSI ports on the system.
Figure 5. VNX Unisphere, Launching the Connections Between Storage Systems page From the iSCSI Connections Between Storage Systems page, click Add to add an iSCSI connection to the Unity system. From the Add Connection window, provide a Connection Name, the Target Portal (IP of iSCSI port on Unity), and the Port to use on the VNX system. For more information on iSCSI connectivity for SAN Copy, consult SAN Copy documentation for the source system. Fibre Channel When configuring Fibre Channel connectivity between the source and Unity system, the systems can be directly connected together via a Fibre Channel cable or zoned together. When zoning ports together, single initiator zoning is suggested. Single initiator zoning is completed by placing a single source port and a single target port in the same zone. Also, ensure the zones are added and enabled in the current switch configuration.
8
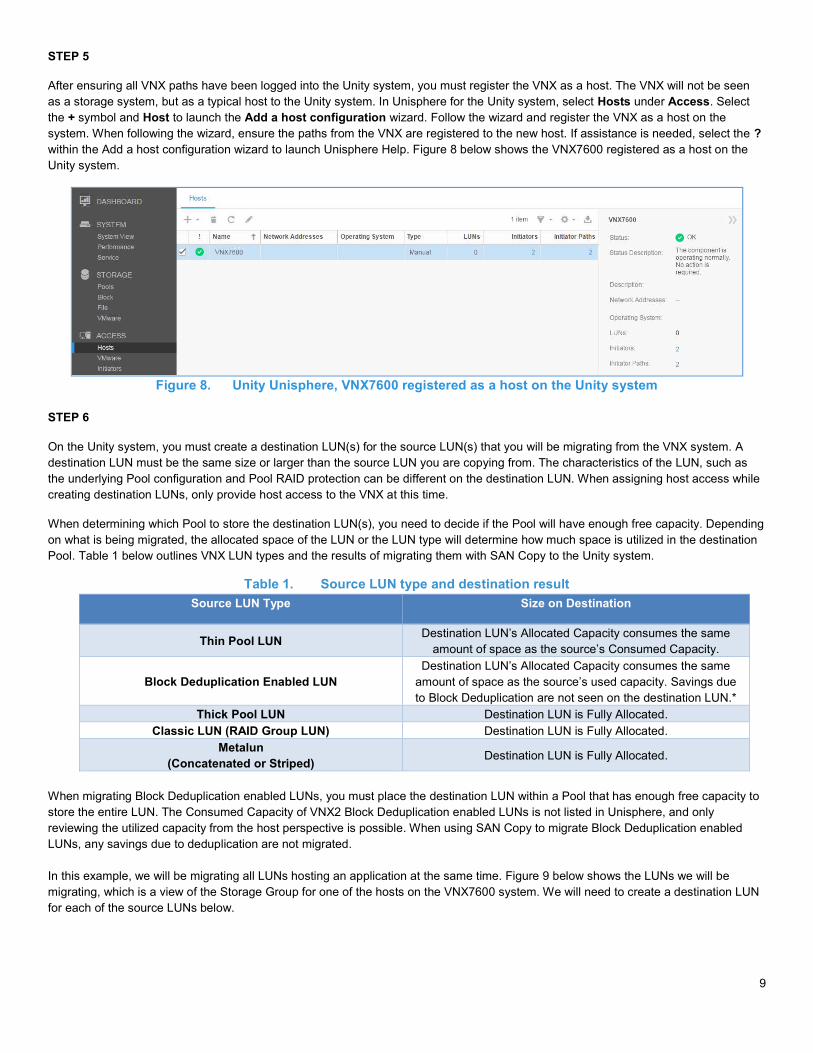
STEP 3 After connectivity has been configured between the systems, you must update the SAN Copy connections on the VNX system. This will cause the VNX paths to log into the Unity ports, and update information on the VNX system. In this configuration, the VNX system is treated like a host to the Unity system. To update the SAN Copy connections, navigate to Storage > Data Migration > SAN Copy. In the task pane, as shown in Figure 6, the Update SAN Copy Connections link is found under Data Migration.
Figure 6. VNX Unisphere, Update SAN Copy Connections location STEP 4 Once the connections have been updated, you need to ensure all connections have been made between the systems. In Unisphere for the Unity system, select Initiators under Access, then select the Initiator Paths tab. Figure 7 shows the Initiator Paths tab on the Unity system. The paths outlined by the green box are the connections from the VNX system in this example. The other paths present are from the host which will be provided access to the migrated LUNs once migrations have completed.
Figure 7. Unity Unisphere, Initiator Paths tab
9
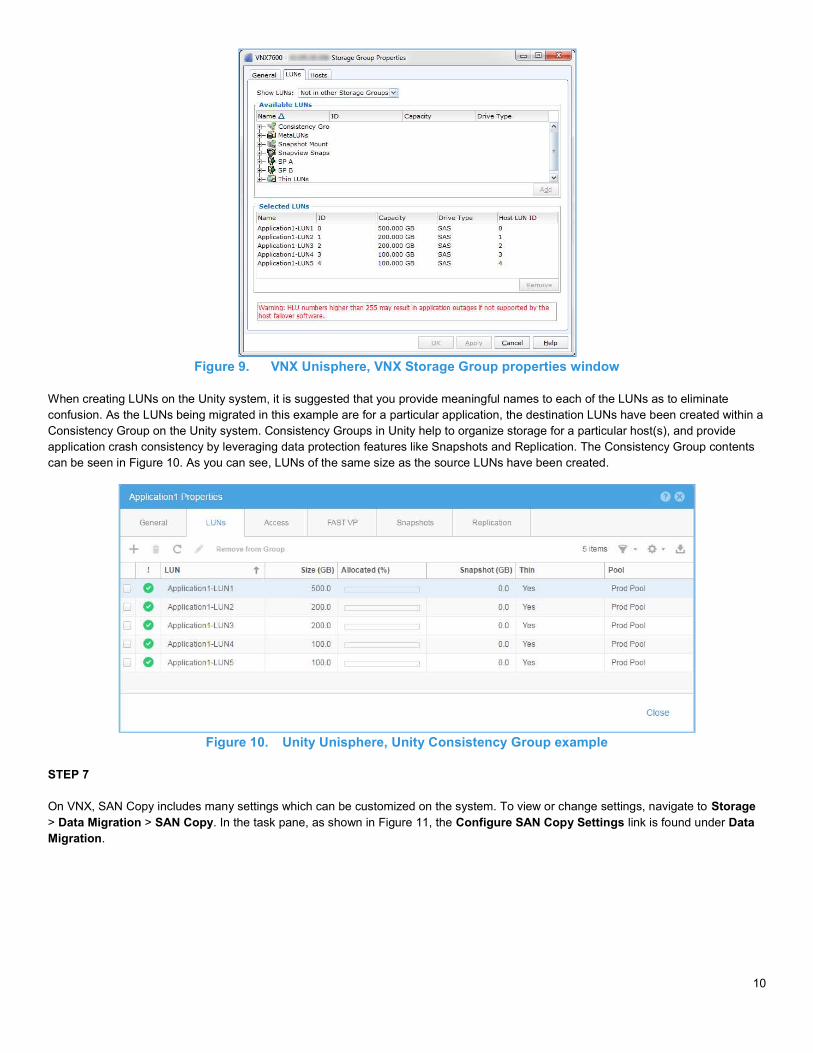
STEP 5 After ensuring all VNX paths have been logged into the Unity system, you must register the VNX as a host. The VNX will not be seen as a storage system, but as a typical host to the Unity system. In Unisphere for the Unity system, select Hosts under Access. Select the + symbol and Host to launch the Add a host configuration wizard. Follow the wizard and register the VNX as a host on the system. When following the wizard, ensure the paths from the VNX are registered to the new host. If assistance is needed, select the ? within the Add a host configuration wizard to launch Unisphere Help. Figure 8 below shows the VNX7600 registered as a host on the Unity system.
Figure 8. Unity Unisphere, VNX7600 registered as a host on the Unity system STEP 6 On the Unity system, you must create a destination LUN(s) for the source LUN(s) that you will be migrating from the VNX system. A destination LUN must be the same size or larger than the source LUN you are copying from. The characteristics of the LUN, such as the underlying Pool configuration and Pool RAID protection can be different on the destination LUN. When assigning host access while creating destination LUNs, only provide host access to the VNX at this time. When determining which Pool to store the destination LUN(s), you need to decide if the Pool will have enough free capacity. Depending on what is being migrated, the allocated space of the LUN or the LUN type will determine how much space is utilized in the destination Pool. Table 1 below outlines VNX LUN types and the results of migrating them with SAN Copy to the Unity system.
Table 1. Source LUN type and destination result Source LUN Type Size on Destination
Thin Pool LUN Destination LUN’s Allocated Capacity consumes the same amount of space as the source’s Consumed Capacity.
Block Deduplication Enabled LUN Destination LUN’s Allocated Capacity consumes the same
amount of space as the source’s used capacity. Savings due to Block Deduplication are not seen on the destination LUN.*
Thick Pool LUN Destination LUN is Fully Allocated. Classic LUN (RAID Group LUN) Destination LUN is Fully Allocated.
Metalun (Concatenated or Striped) Destination LUN is Fully Allocated.
When migrating Block Deduplication enabled LUNs, you must place the destination LUN within a Pool that has enough free capacity to store the entire LUN. The Consumed Capacity of VNX2 Block Deduplication enabled LUNs is not listed in Unisphere, and only reviewing the utilized capacity from the host perspective is possible. When using SAN Copy to migrate Block Deduplication enabled LUNs, any savings due to deduplication are not migrated. In this example, we will be migrating all LUNs hosting an application at the same time. Figure 9 below shows the LUNs we will be migrating, which is a view of the Storage Group for one of the hosts on the VNX7600 system. We will need to create a destination LUN for each of the source LUNs below.
10
Figure 9. VNX Unisphere, VNX Storage Group properties window When creating LUNs on the Unity system, it is suggested that you provide meaningful names to each of the LUNs as to eliminate confusion. As the LUNs being migrated in this example are for a particular application, the destination LUNs have been created within a Consistency Group on the Unity system. Consistency Groups in Unity help to organize storage for a particular host(s), and provide application crash consistency by leveraging data protection features like Snapshots and Replication. The Consistency Group contents can be seen in Figure 10. As you can see, LUNs of the same size as the source LUNs have been created.
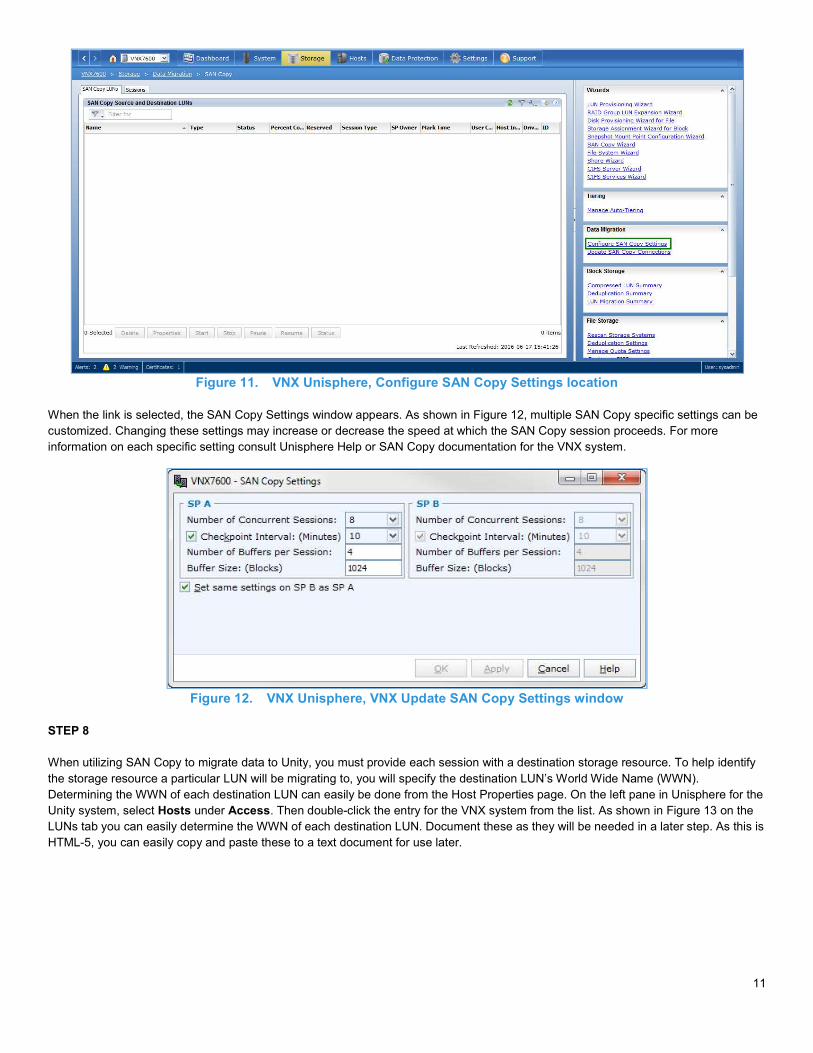
Figure 10. Unity Unisphere, Unity Consistency Group example STEP 7 On VNX, SAN Copy includes many settings which can be customized on the system. To view or change settings, navigate to Storage > Data Migration > SAN Copy. In the task pane, as shown in Figure 11, the Configure SAN Copy Settings link is found under Data Migration.
11
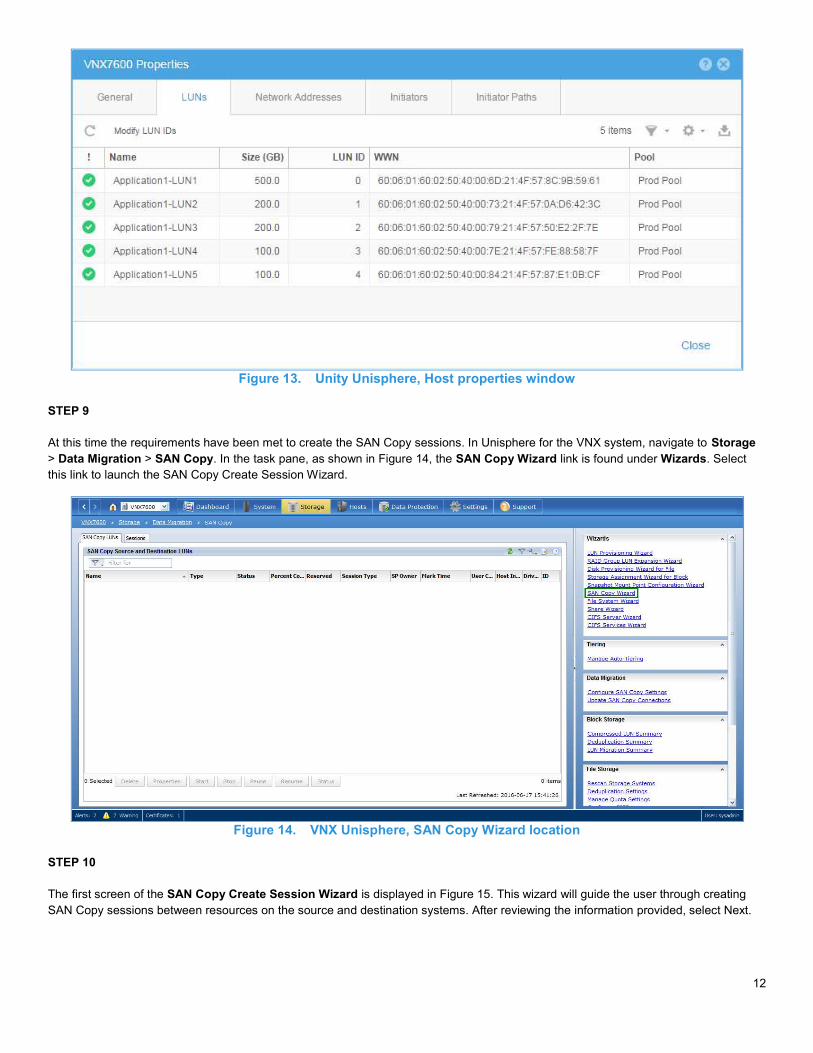
Figure 11. VNX Unisphere, Configure SAN Copy Settings location When the link is selected, the SAN Copy Settings window appears. As shown in Figure 12, multiple SAN Copy specific settings can be customized. Changing these settings may increase or decrease the speed at which the SAN Copy session proceeds. For more information on each specific setting consult Unisphere Help or SAN Copy documentation for the VNX system.
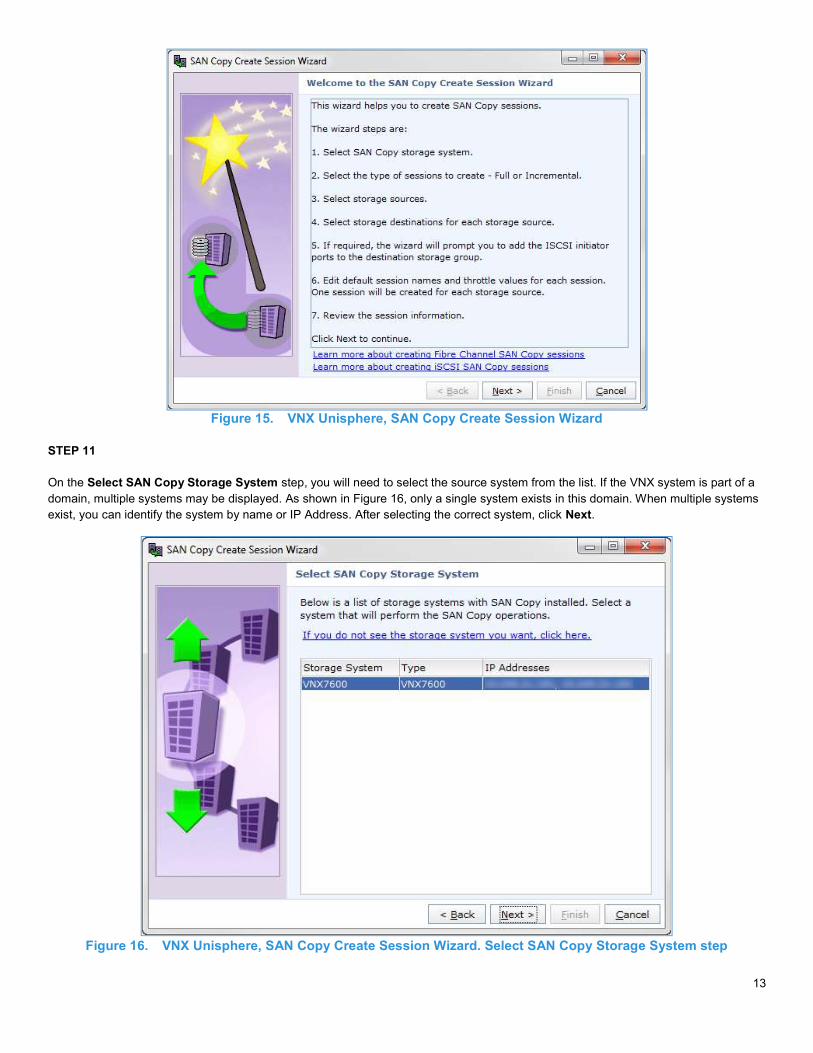
Figure 12. VNX Unisphere, VNX Update SAN Copy Settings window STEP 8 When utilizing SAN Copy to migrate data to Unity, you must provide each session with a destination storage resource. To help identify the storage resource a particular LUN will be migrating to, you will specify the destination LUN’s World Wide Name (WWN). Determining the WWN of each destination LUN can easily be done from the Host Properties page. On the left pane in Unisphere for the Unity system, select Hosts under Access. Then double-click the entry for the VNX system from the list. As shown in Figure 13 on the LUNs tab you can easily determine the WWN of each destination LUN. Document these as they will be needed in a later step. As this is HTML-5, you can easily copy and paste these to a text document for use later.
12
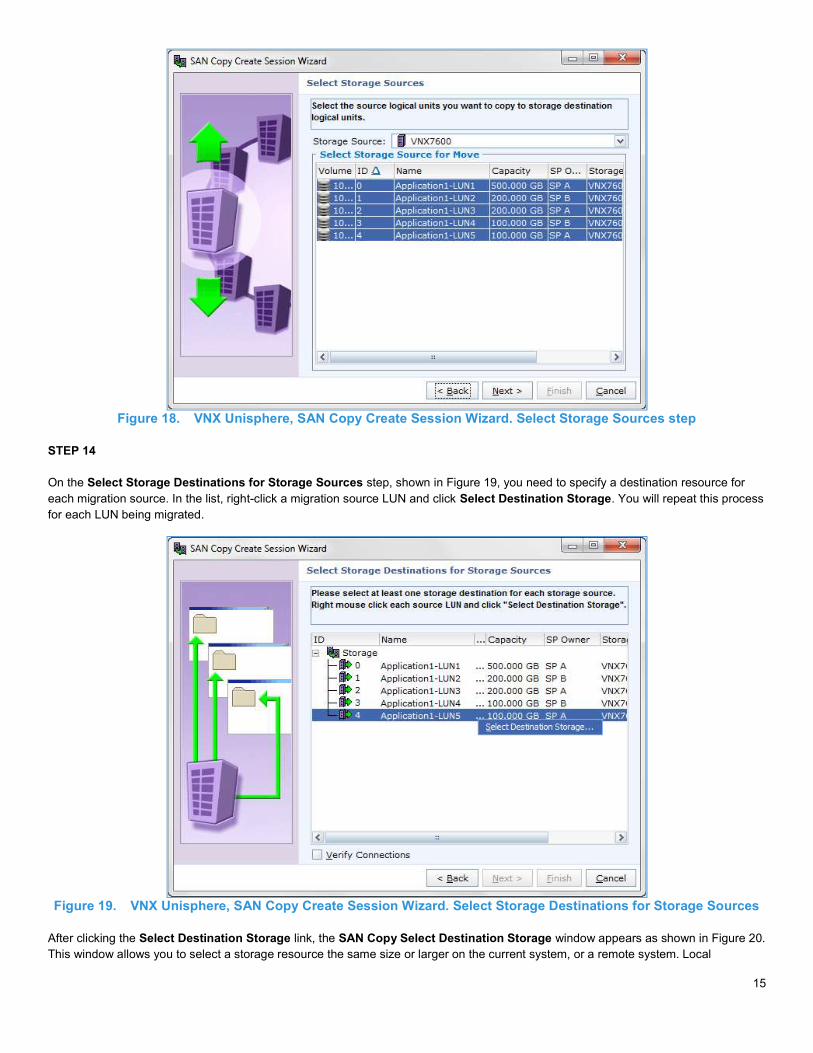
Figure 13. Unity Unisphere, Host properties window STEP 9 At this time the requirements have been met to create the SAN Copy sessions. In Unisphere for the VNX system, navigate to Storage > Data Migration > SAN Copy. In the task pane, as shown in Figure 14, the SAN Copy Wizard link is found under Wizards. Select this link to launch the SAN Copy Create Session Wizard.
Figure 14. VNX Unisphere, SAN Copy Wizard location STEP 10 The first screen of the SAN Copy Create Session Wizard is displayed in Figure 15. This wizard will guide the user through creating SAN Copy sessions between resources on the source and destination systems. After reviewing the information provided, select Next.
13
Figure 15. VNX Unisphere, SAN Copy Create Session Wizard STEP 11 On the Select SAN Copy Storage System step, you will need to select the source system from the list. If the VNX system is part of a domain, multiple systems may be displayed. As shown in Figure 16, only a single system exists in this domain. When multiple systems exist, you can identify the system by name or IP Address. After selecting the correct system, click Next.
Figure 16. VNX Unisphere, SAN Copy Create Session Wizard. Select SAN Copy Storage System step

14
STEP 12 Next is the Select Session Type step. At this point in time, you will choose between a Full or Incremental SAN Copy session. A Full session is used to copy the entire contents of a LUN each time the session is executed. During this time host access should be removed, as any changes to the source data will require another full copy to occur. An Incremental session leverages SnapView Snapshots, and after completing an initial synchronization between the source and destination images, only changes to the dataset since the last update will need to be copied. In this example we will utilize Incremental to minimize the downtime of the migration, and allow host I/O to occur to the source LUNs while the SAN Copy sessions are running. As shown in Figure 17, the radio icon next to Incremental is selected. Click Next.
Figure 17. VNX Unisphere, SAN Copy Create Session Wizard. Select SAN Copy Storage System step STEP 13 On the Select Storage Sources step you need to select the source LUNs for the migration. As shown in Figure 18, ensure the correct source system is selected from the Source System drop-down menu, and that all LUNs being migrated are selected. You can select multiple LUNs from this list by holding the Control key. In this example, all 5 LUNs on this system will be migrated. Click Next.
15
Figure 18. VNX Unisphere, SAN Copy Create Session Wizard. Select Storage Sources step STEP 14 On the Select Storage Destinations for Storage Sources step, shown in Figure 19, you need to specify a destination resource for each migration source. In the list, right-click a migration source LUN and click Select Destination Storage. You will repeat this process for each LUN being migrated.
Figure 19. VNX Unisphere, SAN Copy Create Session Wizard. Select Storage Destinations for Storage Sources After clicking the Select Destination Storage link, the SAN Copy Select Destination Storage window appears as shown in Figure 20. This window allows you to select a storage resource the same size or larger on the current system, or a remote system. Local
16
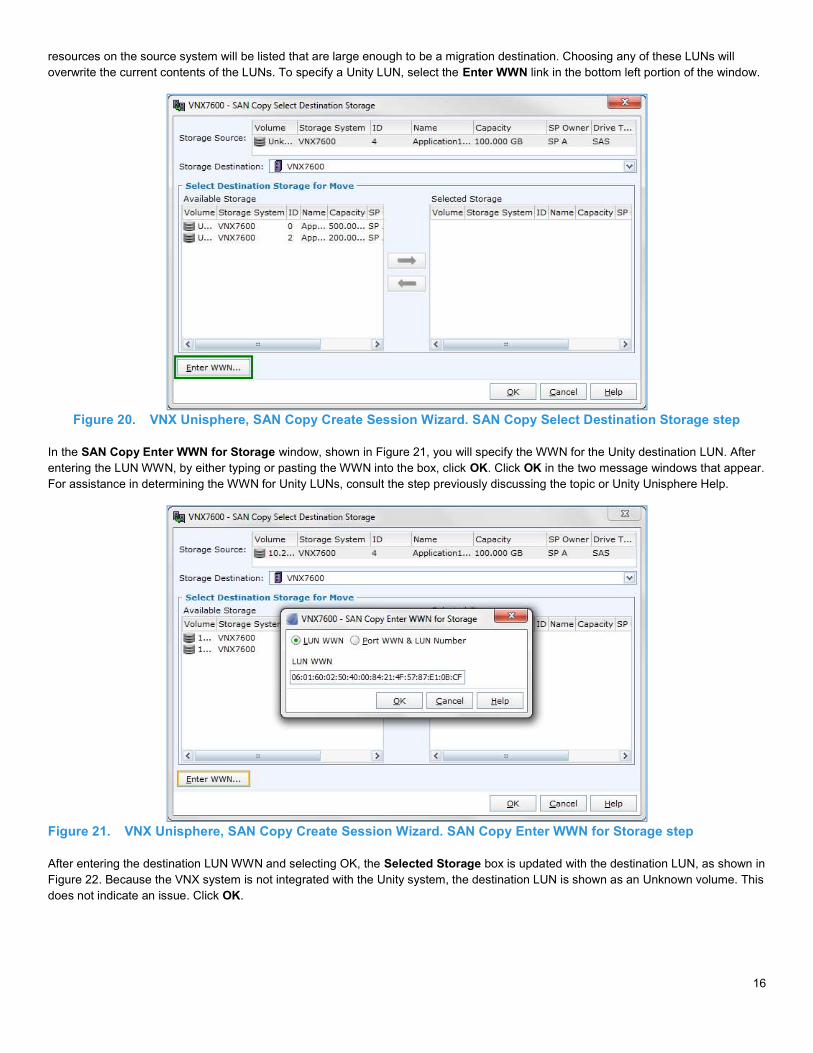
resources on the source system will be listed that are large enough to be a migration destination. Choosing any of these LUNs will overwrite the current contents of the LUNs. To specify a Unity LUN, select the Enter WWN link in the bottom left portion of the window.
Figure 20. VNX Unisphere, SAN Copy Create Session Wizard. SAN Copy Select Destination Storage step In the SAN Copy Enter WWN for Storage window, shown in Figure 21, you will specify the WWN for the Unity destination LUN. After entering the LUN WWN, by either typing or pasting the WWN into the box, click OK. Click OK in the two message windows that appear. For assistance in determining the WWN for Unity LUNs, consult the step previously discussing the topic or Unity Unisphere Help.
Figure 21. VNX Unisphere, SAN Copy Create Session Wizard. SAN Copy Enter WWN for Storage step After entering the destination LUN WWN and selecting OK, the Selected Storage box is updated with the destination LUN, as shown in Figure 22. Because the VNX system is not integrated with the Unity system, the destination LUN is shown as an Unknown volume. This does not indicate an issue. Click OK.

17
Figure 22. VNX Unisphere, SAN Copy Create Session Wizard. SAN Copy Select Destination Storage step After the destination storage resource is entered and selected, the Select Storage Destinations for Storage Sources window is updated. In the example, as shown in Figure 23, the selected destination resource is listed under the LUN it was selected for. For each of the remaining LUNs being migrated, select destination resources for each at this time.
Figure 23. VNX Unisphere, SAN Copy Create Session Wizard. Select Storage Destinations for Storage Sources A Verify Connections checkbox exists on the Select Storage Destinations for Storage Sources step. When the checkbox is selected and Next is clicked, SAN Copy will determine if access exists to all destination resources before proceeding. When connectivity is verified, the All the logical units are accessible message is displayed, as shown in Figure 24.
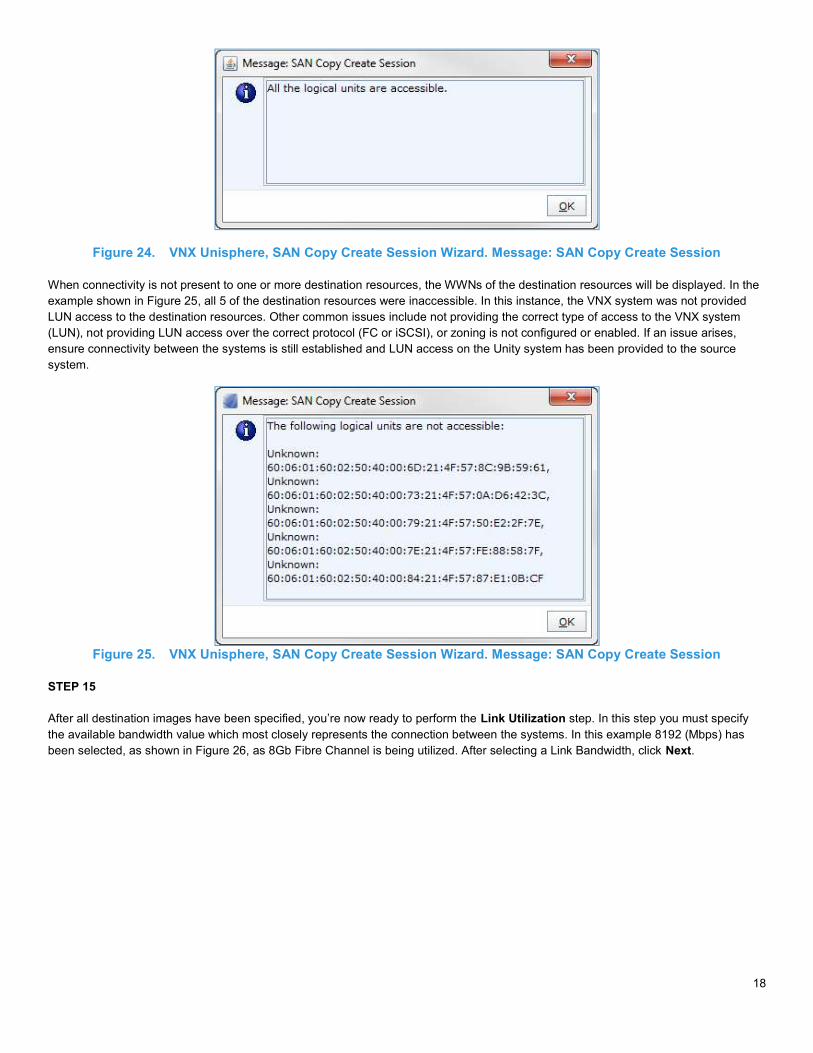
18
Figure 24. VNX Unisphere, SAN Copy Create Session Wizard. Message: SAN Copy Create Session When connectivity is not present to one or more destination resources, the WWNs of the destination resources will be displayed. In the example shown in Figure 25, all 5 of the destination resources were inaccessible. In this instance, the VNX system was not provided LUN access to the destination resources. Other common issues include not providing the correct type of access to the VNX system (LUN), not providing LUN access over the correct protocol (FC or iSCSI), or zoning is not configured or enabled. If an issue arises, ensure connectivity between the systems is still established and LUN access on the Unity system has been provided to the source system.
Figure 25. VNX Unisphere, SAN Copy Create Session Wizard. Message: SAN Copy Create Session STEP 15 After all destination images have been specified, you’re now ready to perform the Link Utilization step. In this step you must specify the available bandwidth value which most closely represents the connection between the systems. In this example 8192 (Mbps) has been selected, as shown in Figure 26, as 8Gb Fibre Channel is being utilized. After selecting a Link Bandwidth, click Next.

19
Figure 26. VNX Unisphere, SAN Copy Create Session Wizard. Link utilization step STEP 16 In the Session Names step each session being created is listed. The Session Name will be prefaced by the system IP address, then a number to identify the session on that system. In this step you have the choice to change the throttle settings for each of the SAN Copy sessions by selecting a Session and clicking Edit. These can be changed later. By default, all sessions have the same Throttle setting of 6. The Throttle can be set to a value between 1 and 10, where 10 provides the highest I/O rate possible and 1 the lowest. Specifying a high value utilizes more source resources and causes the SAN Copy operation to run faster. After specifying the Throttle settings, click Next.
Figure 27. VNX Unisphere, SAN Copy Create Session Wizard. Session Names step
20
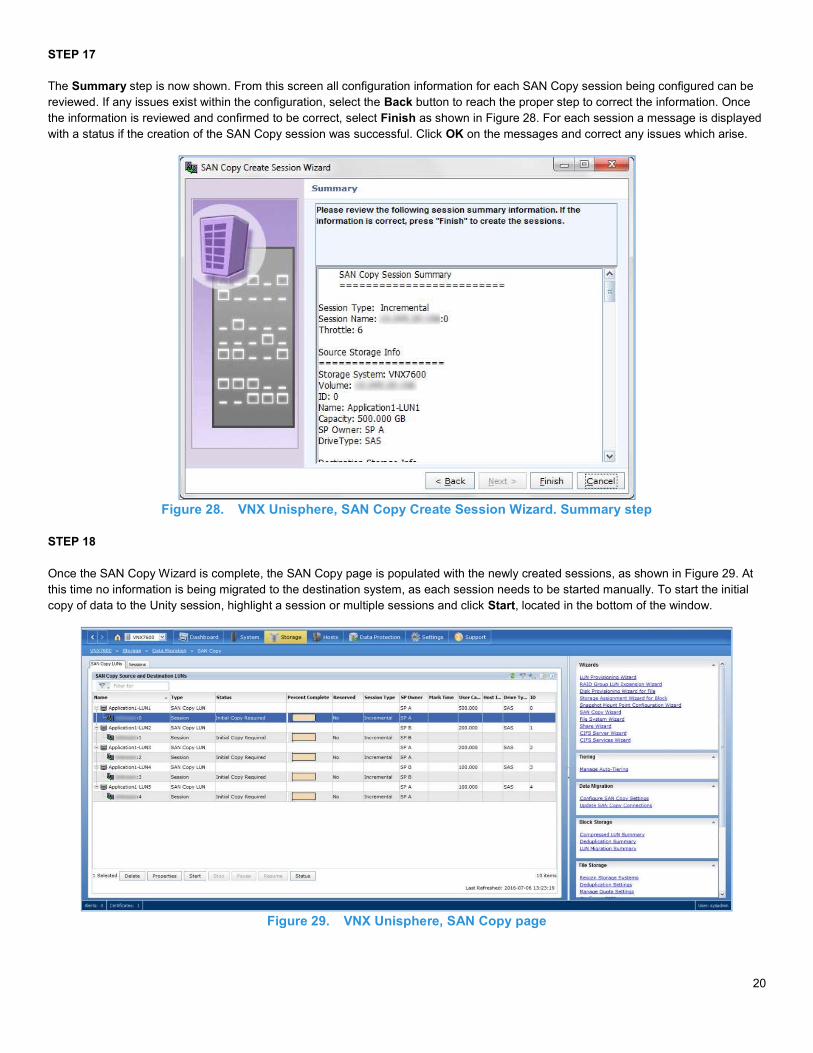
STEP 17 The Summary step is now shown. From this screen all configuration information for each SAN Copy session being configured can be reviewed. If any issues exist within the configuration, select the Back button to reach the proper step to correct the information. Once the information is reviewed and confirmed to be correct, select Finish as shown in Figure 28. For each session a message is displayed with a status if the creation of the SAN Copy session was successful. Click OK on the messages and correct any issues which arise.
Figure 28. VNX Unisphere, SAN Copy Create Session Wizard. Summary step STEP 18 Once the SAN Copy Wizard is complete, the SAN Copy page is populated with the newly created sessions, as shown in Figure 29. At this time no information is being migrated to the destination system, as each session needs to be started manually. To start the initial copy of data to the Unity session, highlight a session or multiple sessions and click Start, located in the bottom of the window.
Figure 29. VNX Unisphere, SAN Copy page
21
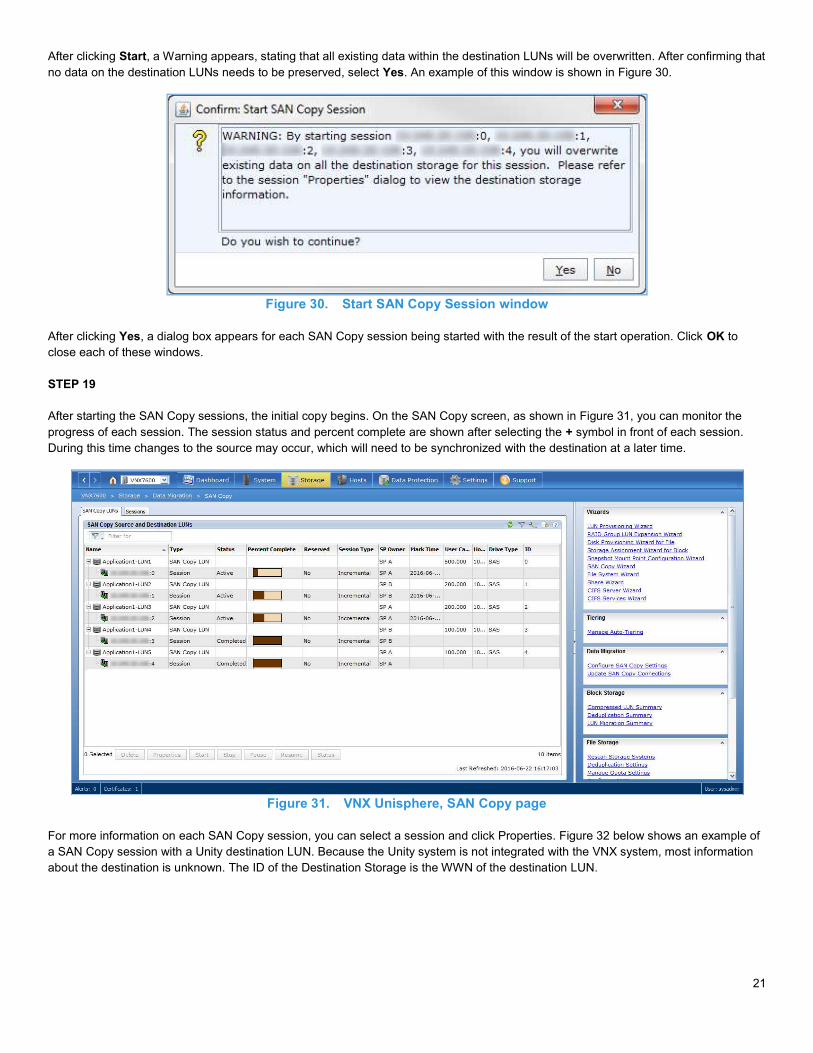
After clicking Start, a Warning appears, stating that all existing data within the destination LUNs will be overwritten. After confirming that no data on the destination LUNs needs to be preserved, select Yes. An example of this window is shown in Figure 30.
Figure 30. Start SAN Copy Session window After clicking Yes, a dialog box appears for each SAN Copy session being started with the result of the start operation. Click OK to close each of these windows. STEP 19 After starting the SAN Copy sessions, the initial copy begins. On the SAN Copy screen, as shown in Figure 31, you can monitor the progress of each session. The session status and percent complete are shown after selecting the + symbol in front of each session. During this time changes to the source may occur, which will need to be synchronized with the destination at a later time.
Figure 31. VNX Unisphere, SAN Copy page For more information on each SAN Copy session, you can select a session and click Properties. Figure 32 below shows an example of a SAN Copy session with a Unity destination LUN. Because the Unity system is not integrated with the VNX system, most information about the destination is unknown. The ID of the Destination Storage is the WWN of the destination LUN.
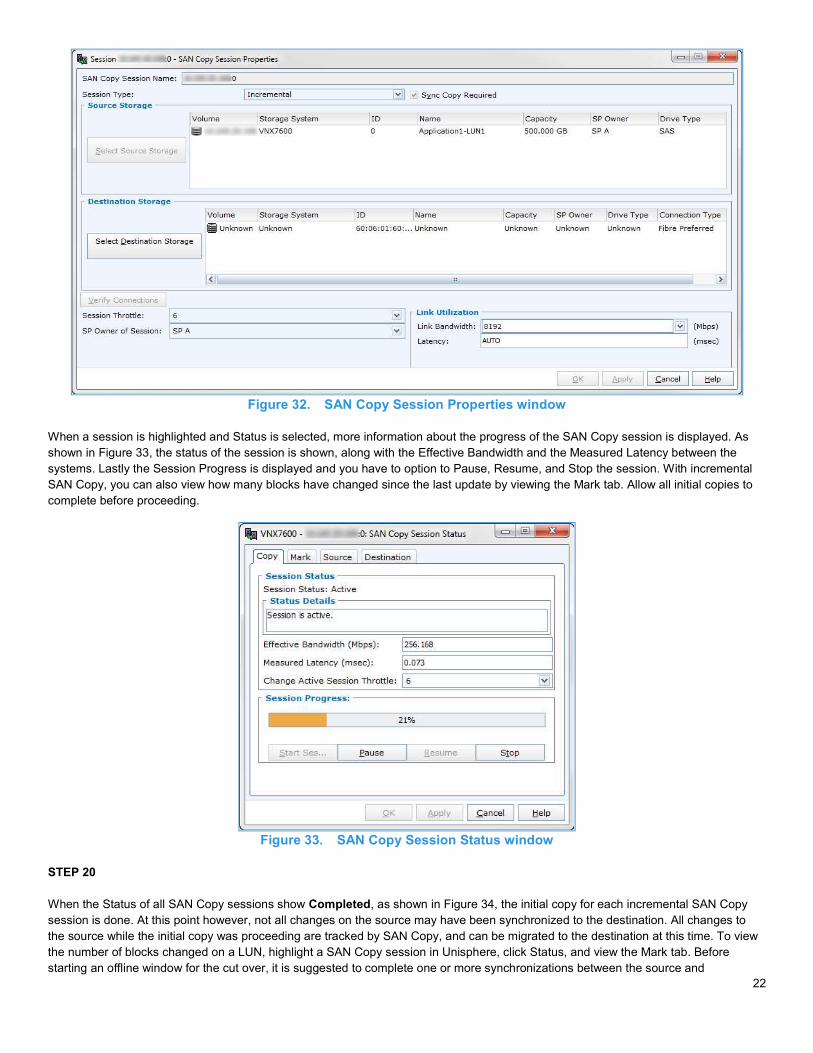
22
Figure 32. SAN Copy Session Properties window When a session is highlighted and Status is selected, more information about the progress of the SAN Copy session is displayed. As shown in Figure 33, the status of the session is shown, along with the Effective Bandwidth and the Measured Latency between the systems. Lastly the Session Progress is displayed and you have to option to Pause, Resume, and Stop the session. With incremental SAN Copy, you can also view how many blocks have changed since the last update by viewing the Mark tab. Allow all initial copies to complete before proceeding.
Figure 33. SAN Copy Session Status window STEP 20 When the Status of all SAN Copy sessions show Completed, as shown in Figure 34, the initial copy for each incremental SAN Copy session is done. At this point however, not all changes on the source may have been synchronized to the destination. All changes to the source while the initial copy was proceeding are tracked by SAN Copy, and can be migrated to the destination at this time. To view the number of blocks changed on a LUN, highlight a SAN Copy session in Unisphere, click Status, and view the Mark tab. Before starting an offline window for the cut over, it is suggested to complete one or more synchronizations between the source and
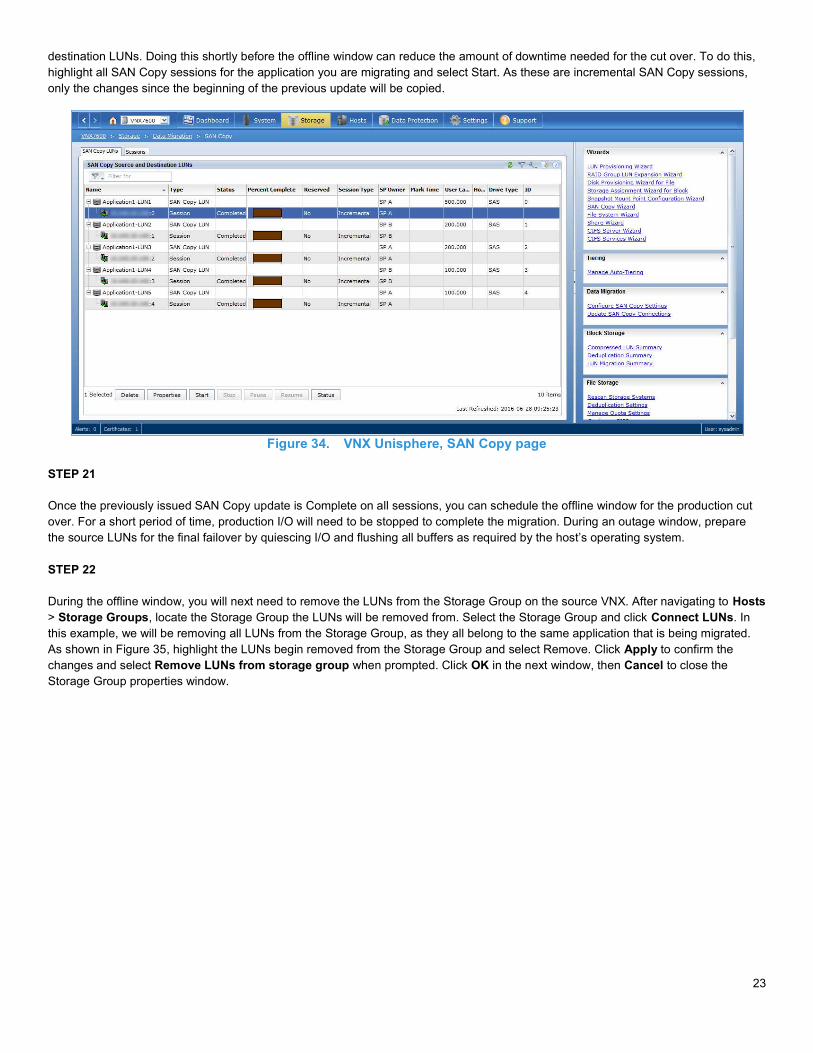
23
destination LUNs. Doing this shortly before the offline window can reduce the amount of downtime needed for the cut over. To do this, highlight all SAN Copy sessions for the application you are migrating and select Start. As these are incremental SAN Copy sessions, only the changes since the beginning of the previous update will be copied.
Figure 34. VNX Unisphere, SAN Copy page STEP 21 Once the previously issued SAN Copy update is Complete on all sessions, you can schedule the offline window for the production cut over. For a short period of time, production I/O will need to be stopped to complete the migration. During an outage window, prepare the source LUNs for the final failover by quiescing I/O and flushing all buffers as required by the host’s operating system. STEP 22 During the offline window, you will next need to remove the LUNs from the Storage Group on the source VNX. After navigating to Hosts > Storage Groups, locate the Storage Group the LUNs will be removed from. Select the Storage Group and click Connect LUNs. In this example, we will be removing all LUNs from the Storage Group, as they all belong to the same application that is being migrated. As shown in Figure 35, highlight the LUNs begin removed from the Storage Group and select Remove. Click Apply to confirm the changes and select Remove LUNs from storage group when prompted. Click OK in the next window, then Cancel to close the Storage Group properties window.
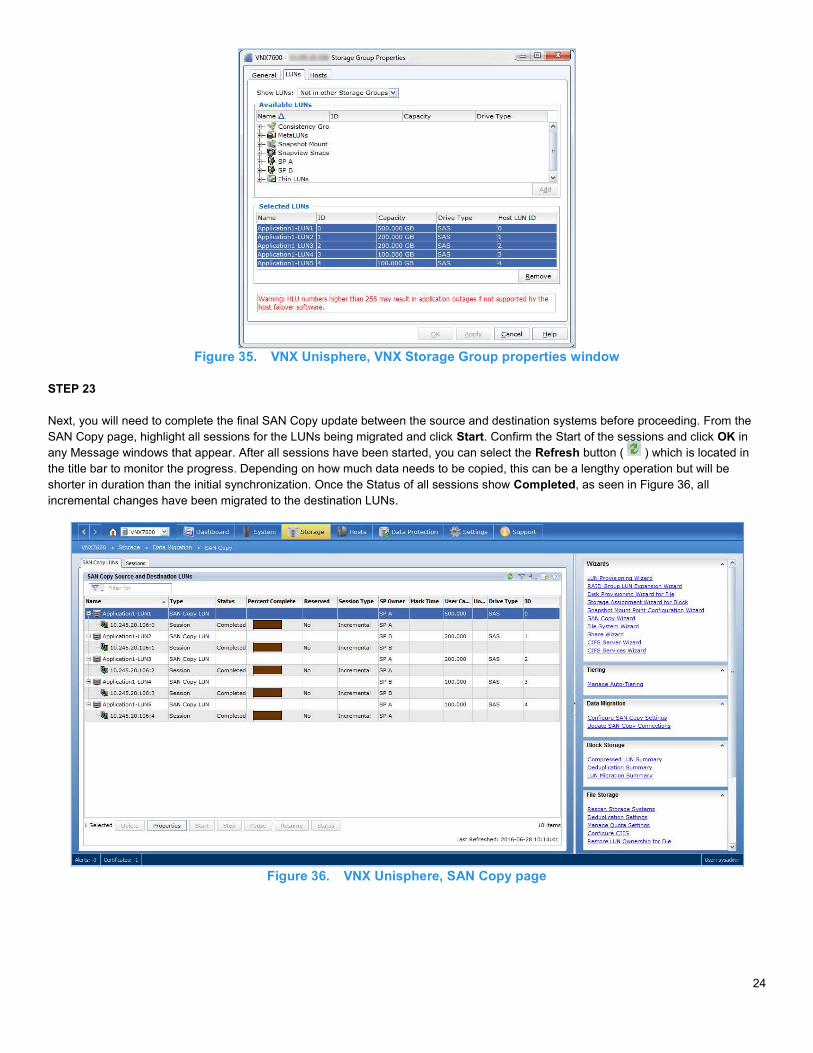
24
Figure 35. VNX Unisphere, VNX Storage Group properties window STEP 23 Next, you will need to complete the final SAN Copy update between the source and destination systems before proceeding. From the SAN Copy page, highlight all sessions for the LUNs being migrated and click Start. Confirm the Start of the sessions and click OK in any Message windows that appear. After all sessions have been started, you can select the Refresh button ( ) which is located in the title bar to monitor the progress. Depending on how much data needs to be copied, this can be a lengthy operation but will be shorter in duration than the initial synchronization. Once the Status of all sessions show Completed, as seen in Figure 36, all incremental changes have been migrated to the destination LUNs.
Figure 36. VNX Unisphere, SAN Copy page
25
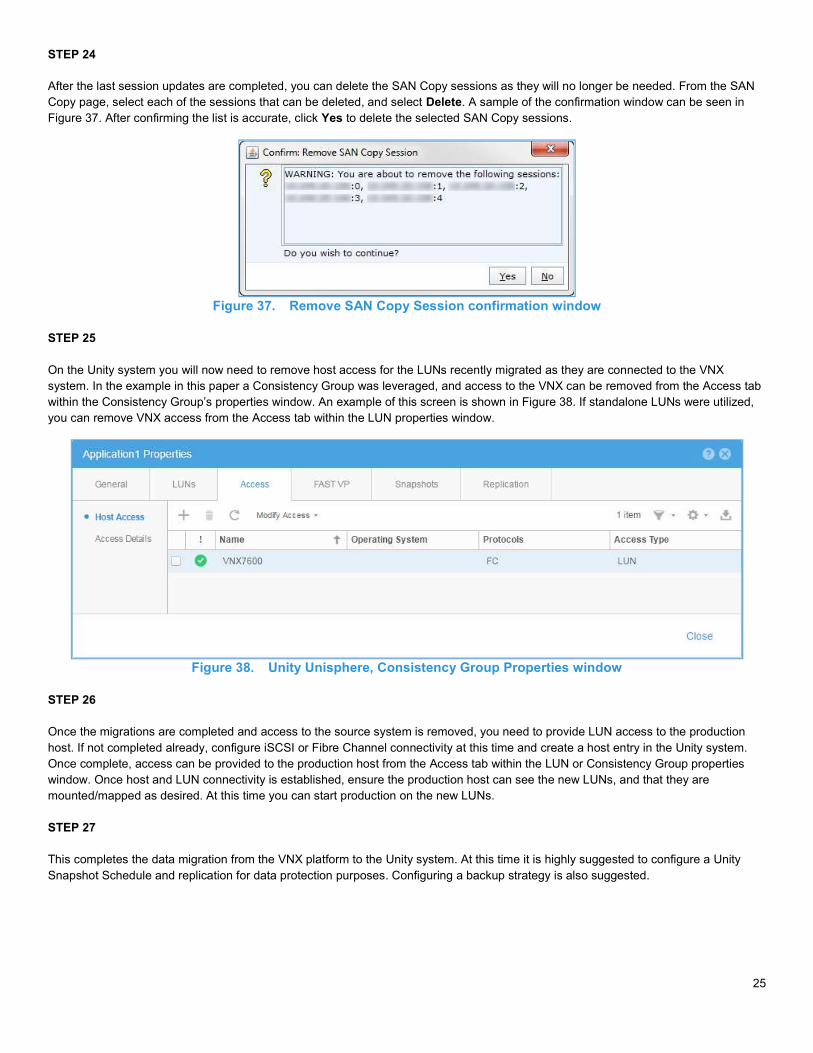
STEP 24 After the last session updates are completed, you can delete the SAN Copy sessions as they will no longer be needed. From the SAN Copy page, select each of the sessions that can be deleted, and select Delete. A sample of the confirmation window can be seen in Figure 37. After confirming the list is accurate, click Yes to delete the selected SAN Copy sessions.
Figure 37. Remove SAN Copy Session confirmation window STEP 25 On the Unity system you will now need to remove host access for the LUNs recently migrated as they are connected to the VNX system. In the example in this paper a Consistency Group was leveraged, and access to the VNX can be removed from the Access tab within the Consistency Group’s properties window. An example of this screen is shown in Figure 38. If standalone LUNs were utilized, you can remove VNX access from the Access tab within the LUN properties window.
Figure 38. Unity Unisphere, Consistency Group Properties window STEP 26 Once the migrations are completed and access to the source system is removed, you need to provide LUN access to the production host. If not completed already, configure iSCSI or Fibre Channel connectivity at this time and create a host entry in the Unity system. Once complete, access can be provided to the production host from the Access tab within the LUN or Consistency Group properties window. Once host and LUN connectivity is established, ensure the production host can see the new LUNs, and that they are mounted/mapped as desired. At this time you can start production on the new LUNs. STEP 27 This completes the data migration from the VNX platform to the Unity system. At this time it is highly suggested to configure a Unity Snapshot Schedule and replication for data protection purposes. Configuring a backup strategy is also suggested.
26
CONCLUSION When migrating block data from a VNX Series system to Unity, Dell EMC recommends using Dell EMC SAN Copy as the migration utility. This white paper has outlined a zero-cost, step-by-step procedure for customers to follow when migrating existing block storage to Dell EMC Unity using Incremental SAN Copy push operations. Incremental SAN Copy push was leveraged as it allows host I/O to occur during the migration process. Incremental SAN Copy push also limits the amount of downtime needed to transition production data from a Dell EMC CLARiiON CX or VNX Series system to a Dell EMC Unity system.
27
REFERENCES The following white papers can be found on Dell EMC Online Support:
Dell EMC Unity: Introduction to Unity Platform Dell EMC Unity: Unisphere Overview Dell EMC Unity: Replication Technologies Dell EMC Unity: Snapshots Dell EMC Unisphere: Unified Storage Management Solution for the VNX2 Series Dell EMC SAN Copy: A Detailed Review