microtek 5950pro supplement us
TRANSCRIPT
Getting to Know Your ScanMaker 5950 Pro
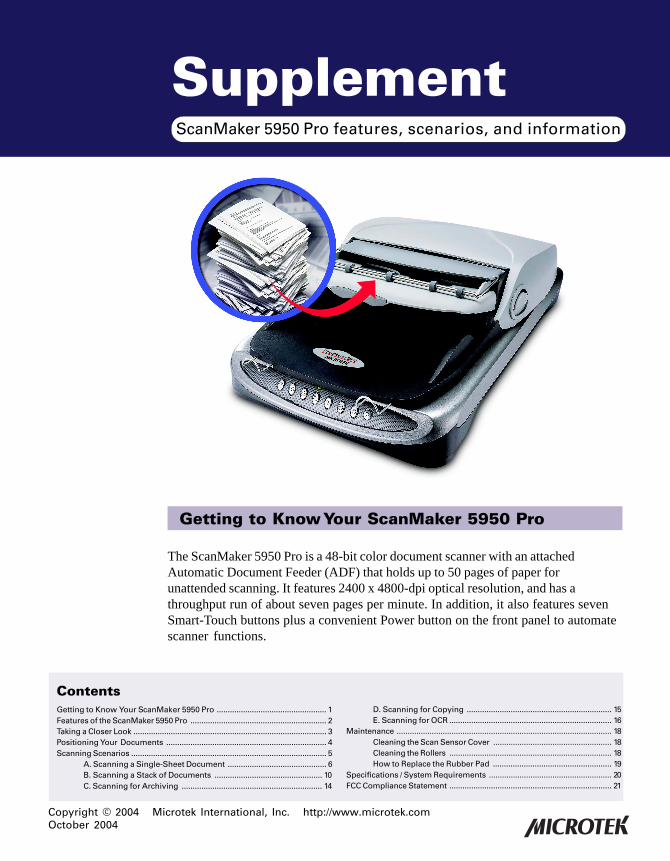
The ScanMaker 5950 Pro is a 48-bit color document scanner with an attachedAutomatic Document Feeder (ADF) that holds up to 50 pages of paper forunattended scanning. It features 2400 x 4800-dpi optical resolution, and has athroughput run of about seven pages per minute. In addition, it also features sevenSmart-Touch buttons plus a convenient Power button on the front panel to automatescanner functions.
Supplement
Copyright © 2004 Microtek International, Inc. http://www.microtek.comOctober 2004
ScanMaker 5950 Pro features, scenarios, and information
ContentsGetting to Know Your ScanMaker 5950 Pro .................................................. 1Features of the ScanMaker 5950 Pro .............................................................. 2Taking a Closer Look ........................................................................................ 3Positioning Your Documents ......................................................................... 4Scanning Scenarios ......................................................................................... 5
A. Scanning a Single-Sheet Document ............................................. 6B. Scanning a Stack of Documents ................................................. 10C. Scanning for Archiving ................................................................ 14
D. Scanning for Copying .................................................................. 15E. Scanning for OCR .......................................................................... 16
Maintenance .................................................................................................. 18Cleaning the Scan Sensor Cover ...................................................... 18Cleaning the Rollers .......................................................................... 18How to Replace the Rubber Pad ...................................................... 19
Specifications / System Requirements ........................................................ 20FCC Compliance Statement .......................................................................... 21

2 ScanMaker 5950 Pro Supplement
Features of the ScanMaker 5950 Pro
The ScanMaker 5950 Pro comes with several important features, including thefollowing:
• Included Automatic Document Feeder (ADF) — The high-capacity AutomaticDocument Feeder (ADF) for the ScanMaker 5950 Pro holds up to 50 sheets,supporting dimensions from A6 (4.14" x 5.83") up to legal size (8 1/2" x 14").
• Hi-Speed USB port — Hi-Speed USB is capable of data transfer rates of up to480MB/sec. Hi-Speed USB is backward compatible with the original USBstandard, providing the high/low data transfer rate via the included Hi-SpeedUSB cable.
• Seven Smart-Touch buttons — These seven buttons on the front panel of thescanner provide you with a quick and easy way to launch frequently usedscanner functions. All it takes is one touch of a button — and you can scan to afile, send an image to your printer, attach it to an email, etc. The seven Smart-Touch buttons include Cancel/Setup, Scan, Copy, E-mail, OCR, Scan-to-Web, andCustom.
• Microtek ScanWizard 5 scanning software — ScanWizard 5 features full scanningtools that both novice and experienced scanner users will find productive andeasy to use. The Standard Control Panel offers a simple and straightforward wayto complete a scanning session, and the Advanced Control Panel provides youwith additional controls to fine-tune your scans.

ScanMaker 5950 Pro Supplement 3
Taking a Closer Look
Scanner Lid (ADF)
ADF ConnectorHi-Speed USB (USB 2.0) port
Power button
Glass surface(for single-sheetdocument scanning)
Automatic Document Feeder(ADF)
Document Feed Tray(for high-volumedocument scanning)Paper Stabilizer
Horizontal ruler
Scan E-mailCopy OCR Scan-to-Web
Cancel/Setup
Custom
Document Tray
Tray Extender
Guide Arm
Earlobe Lever
Power Connector
4 ScanMaker 5950 Pro Supplement
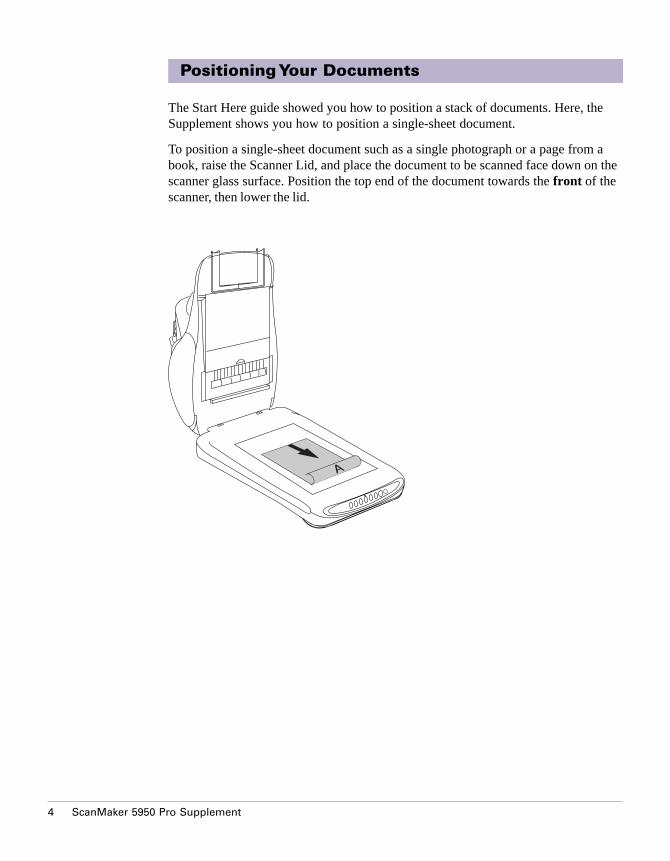
Positioning Your Documents
The Start Here guide showed you how to position a stack of documents. Here, theSupplement shows you how to position a single-sheet document.
To position a single-sheet document such as a single photograph or a page from abook, raise the Scanner Lid, and place the document to be scanned face down on thescanner glass surface. Position the top end of the document towards the front of thescanner, then lower the lid.
ScanMaker 5950 Pro Supplement 5
Scanning Scenarios
The following pages provide various scenarios for scanning with the ScanMaker5950 Pro, including the following:
• Scanning a single-sheet document: This scenario can also be your first scan inorder to familiarize yourself with scanning basics. It makes use of the StandardControl Panel for basic scanning, but provides additional information on how touse the Advanced Control Panel.
• Scanning a stack of documents: This scenario utilizes the ADF to scan a stackof documents. It makes use of the Standard Control Panel for basic scanning, butprovides additional information on how to use the Advanced Control Panel.
• Scanning for archiving: This scenario utilizes the ADF to scan documentsfor archiving.
• Scanning for copying: This scenario utilizes the ADF to send documents toyour printer.
• Scanning for OCR: This scenario utilizes the OCR function to scan a textdocument and convert it to a fully editable file.
6 ScanMaker 5950 Pro Supplement
A. Scanning a Single-sheet Document
1. Place the single-sheet document to be scanned on the glass scan bed or on theADF’s Document Feed Tray.
Warning: Do not place photo paper or fragile sheets of paper on the ADF’sDocument Feed Tray, as the frail material may be scratched during the feedingprocess. Always place frail originals on the scanner glass surface.
2. Double-click the ScanWizard 5 icon ( ) on your desktop to launch theScanWizard 5 Standard Control Panel.
3. Take note of the following:
• If the document to be scanned was placed on the glass scan bed: AfterScanWizard 5 launches, it performs an automatic preview of the document onthe scan bed. Go to step 4.
• If the document to be scanned was placed on the ADF’s Document Feed Tray:After ScanWizard 5 launches, click the Preview button in ScanWizard 5; apreliminary view of the document appears in the Preview window of thesoftware. At this time, the document is delivered to the ADF’s Document Trayfrom the ADF’s Document Feed Tray. Put the document back into theDocument Feed Tray to prepare for the actual scan (step 6).
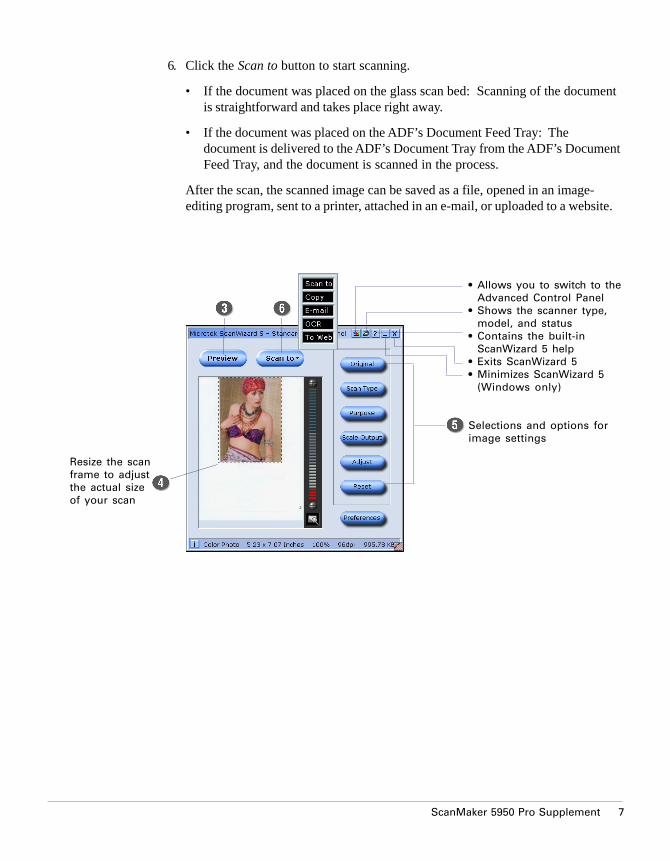
4. To resize the scan frame (floating dotted line around the preview image), drag onthe edge or corner of the scan frame, and resize to determine the final size of theactual scan.
5. Specify your scan settings by clicking the Tool buttons.
a) Click the Original button, then select the type of material to be scanned (e.g.,Photo, Text Document).
b) Click the Scan Type button, then select the output image type (e.g., True Color,Black & White).
c) Click the Purpose button, then select the intended usage or output; resolutionfor the selected purpose is shown at the bottom of the drop-down menu. TheCustom option lets you define your own resolution setting
d) Click the Scale Output button, then select the size/aspect ratio (e.g., 50%,100%) of the image when output.
e) Click the Adjust button, then adjust the image if needed with image correctiontools (Brightness, Contrast, Color, Sharpness, Saturation).
f) Click the Reset button to restore your settings to default values if needed.
ScanMaker 5950 Pro Supplement 7
6. Click the Scan to button to start scanning.
• If the document was placed on the glass scan bed: Scanning of the documentis straightforward and takes place right away.
• If the document was placed on the ADF’s Document Feed Tray: Thedocument is delivered to the ADF’s Document Tray from the ADF’s DocumentFeed Tray, and the document is scanned in the process.
After the scan, the scanned image can be saved as a file, opened in an image-editing program, sent to a printer, attached in an e-mail, or uploaded to a website.
Resize the scanframe to adjustthe actual sizeof your scan
• Allows you to switch to theAdvanced Control Panel
• Shows the scanner type,model, and status
• Contains the built-inScanWizard 5 help
• Exits ScanWizard 5• Minimizes ScanWizard 5
(Windows only)
Selections and options forimage settings
8 ScanMaker 5950 Pro Supplement
For Advanced Users
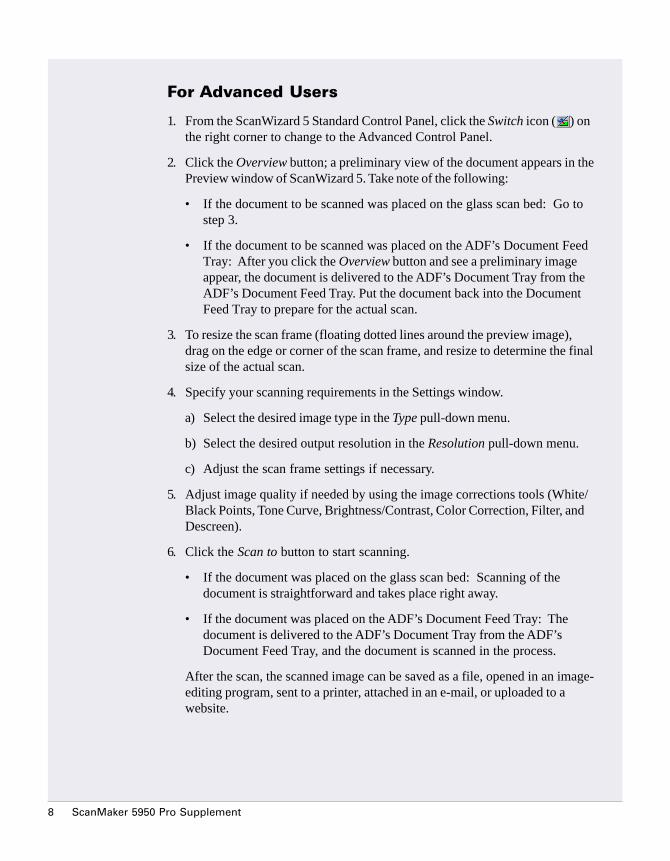
1. From the ScanWizard 5 Standard Control Panel, click the Switch icon ( ) onthe right corner to change to the Advanced Control Panel.
2. Click the Overview button; a preliminary view of the document appears in thePreview window of ScanWizard 5. Take note of the following:
• If the document to be scanned was placed on the glass scan bed: Go tostep 3.
• If the document to be scanned was placed on the ADF’s Document FeedTray: After you click the Overview button and see a preliminary imageappear, the document is delivered to the ADF’s Document Tray from theADF’s Document Feed Tray. Put the document back into the DocumentFeed Tray to prepare for the actual scan.
3. To resize the scan frame (floating dotted lines around the preview image),drag on the edge or corner of the scan frame, and resize to determine the finalsize of the actual scan.
4. Specify your scanning requirements in the Settings window.
a) Select the desired image type in the Type pull-down menu.
b) Select the desired output resolution in the Resolution pull-down menu.
c) Adjust the scan frame settings if necessary.
5. Adjust image quality if needed by using the image corrections tools (White/Black Points, Tone Curve, Brightness/Contrast, Color Correction, Filter, andDescreen).
6. Click the Scan to button to start scanning.
• If the document was placed on the glass scan bed: Scanning of thedocument is straightforward and takes place right away.
• If the document was placed on the ADF’s Document Feed Tray: Thedocument is delivered to the ADF’s Document Tray from the ADF’sDocument Feed Tray, and the document is scanned in the process.
After the scan, the scanned image can be saved as a file, opened in an image-editing program, sent to a printer, attached in an e-mail, or uploaded to awebsite.

ScanMaker 5950 Pro Supplement 9
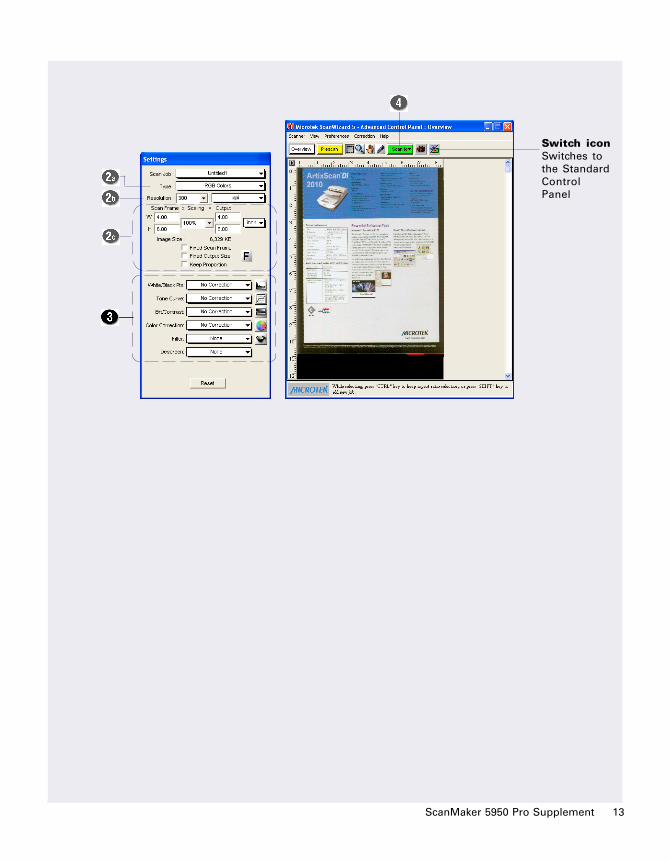
Switch iconSwitches tothe StandardControlPanel
10 ScanMaker 5950 Pro Supplement
B. Scanning a Stack of Documents
1. Place the stack of documents to be scanned on the ADF’s Document Feed Tray.
Warning: Do not place photo paper or fragile sheets of paper on the ADF'sDocument Feed Tray, as the frail material may be scratched during the feedingprocess. Always place frail originals on the scanner glass surface.
2. Double-click the ScanWizard 5 icon ( ) on your desktop to launch theScanWizard 5 Standard Control Panel.
Note: Before proceeding to use the ADF extensively, you may wish to use the“preview” feature. For more information, see the section “Using the Previewfeature”.
3. Specify your scan settings by clicking the Tool buttons.
a) Click the Original button, then select the type of material to be scanned (e.g.,Photo, Text Document).
b) Click the Scan Type button, then select the output image type (e.g., True Color,Black & White).
c) Click the Purpose button, then select the intended usage or output; resolutionfor the selected purpose is shown at the bottom of the drop-down menu. TheCustom option lets you define your own resolution setting
d) Click the Scale Output button, then select the size/aspect ratio (e.g., 50%,100%) of the image when output.
e) Click the Adjust button, then adjust the image if needed with image correctiontools (Brightness, Contrast, Color, Sharpness, Saturation).
f) Click the Reset button to restore your settings to default values if needed.
4. Click the Scan to button to start scanning.
At this time, the Save As dialog box appears, where you can specify folderlocation, file name, and format for the stack to be scanned. The stack can be savedas a single file comprising multiple pages, or the stack can be saved as individualfiles.
When all you finish specifying your preferences, click the Save button to closethe dialog box. Scanning then takes place, and the stack of documents issequentially scanned until the process is completed.

ScanMaker 5950 Pro Supplement 11
Using the Preview featureBefore you use the ADF extensively, you may wish to use the “preview” feature. Previewing can beuseful to see if the physical mechanism in your ADF is working properly in conjunction with theScanWizard 5 scanning software. Previewing requires only the use of a single sheet of paper (withsome text or material on it). Once the scanning mechanism is established and verified, you canproceed to use the ADF extensively with assurance.
To do the preview, follow the steps below:
1. Take a sample page from the paper stack that you wish to scan, and load it into the ADF’sDocument Feed Tray. You can use the first page of your paper stack, as long as it has some text ormaterial on it.
2. Click the Preview button (or the Overview button if you are working in the Advanced ControlPanel) in ScanWizard 5. A preview of the sample page will appear, indicating that the scanningmechanism is working.
At this moment, the sample page being previewed is delivered to the ADF’s Document Tray from theADF’s Document Feed Tray. Put the sample page back into the paper stack from where it was taken, andreload the entire paper stack into the ADF’s Document Feed Tray. Your preview has been successful, andyou are now ready to scan the stack.
Switch iconSwitches to theAdvanced Control Panel
12 ScanMaker 5950 Pro Supplement
For Advanced Users
1. From the ScanWizard 5 Standard Control Panel, click the Switch icon ( )onthe right corner to change to the Advanced Control Panel.
Note: Before proceeding to use the ADF extensively, you may wish to use the“preview” feature. For more information, see the section “Using the Previewfeature”.
2. Specify your scanning requirements in the Settings window.
a) Select the desired image type in the Type pull-down menu.
b) Select the desired output resolution in the Resolution pull-down menu.
c) Adjust the scan frame settings if necessary.
3. Adjust image quality if needed by using the image corrections tools (White/Black Points, Tone Curve, Brightness/Contrast, Color Correction, Filter, andDescreen).
4. Click the Scan to button to start scanning.
At this time, the Save As dialog box appears, where you can specify folderlocation, file name, and format for the stack to be scanned. The stack can besaved as a single file comprising multiple pages, or the stack can be saved asindividual files.
When you finish specifying your preferences, click the Save button to closethe dialog box. Scanning then takes place, and the stack of documents issequentially scanned until the process is completed.
ScanMaker 5950 Pro Supplement 13
Switch iconSwitches tothe StandardControlPanel
14 ScanMaker 5950 Pro Supplement
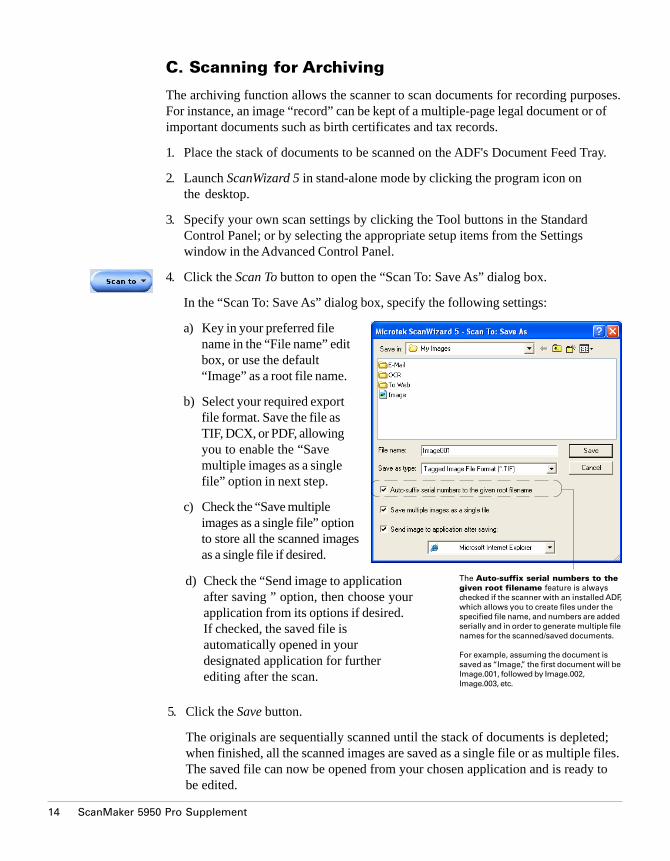
C. Scanning for Archiving
The archiving function allows the scanner to scan documents for recording purposes.For instance, an image “record” can be kept of a multiple-page legal document or ofimportant documents such as birth certificates and tax records.
1. Place the stack of documents to be scanned on the ADF's Document Feed Tray.
2. Launch ScanWizard 5 in stand-alone mode by clicking the program icon onthe desktop.
3. Specify your own scan settings by clicking the Tool buttons in the StandardControl Panel; or by selecting the appropriate setup items from the Settingswindow in the Advanced Control Panel.
4. Click the Scan To button to open the “Scan To: Save As” dialog box.
In the “Scan To: Save As” dialog box, specify the following settings:
a) Key in your preferred filename in the “File name” editbox, or use the default“Image” as a root file name.
b) Select your required exportfile format. Save the file asTIF, DCX, or PDF, allowingyou to enable the “Savemultiple images as a singlefile” option in next step.
c) Check the “Save multipleimages as a single file” optionto store all the scanned imagesas a single file if desired.
The Auto-suffix serial numbers to thegiven root filename feature is alwayschecked if the scanner with an installed ADF,which allows you to create files under thespecified file name, and numbers are addedserially and in order to generate multiple filenames for the scanned/saved documents.
For example, assuming the document issaved as “Image,” the first document will beImage.001, followed by Image.002,Image.003, etc.
d) Check the “Send image to applicationafter saving ” option, then choose yourapplication from its options if desired.If checked, the saved file isautomatically opened in yourdesignated application for furtherediting after the scan.
5. Click the Save button.
The originals are sequentially scanned until the stack of documents is depleted;when finished, all the scanned images are saved as a single file or as multiple files.The saved file can now be opened from your chosen application and is ready tobe edited.
ScanMaker 5950 Pro Supplement 15
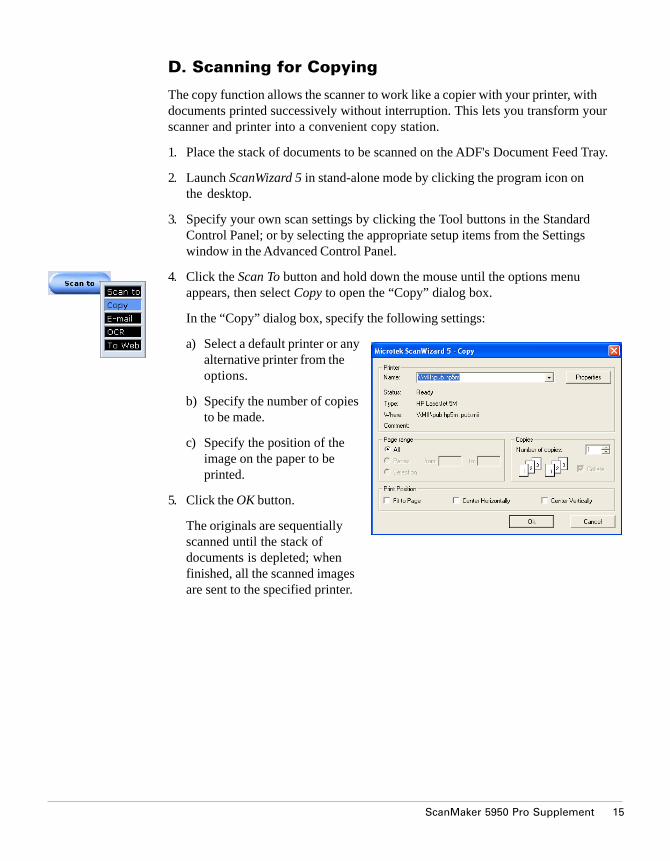
D. Scanning for Copying
The copy function allows the scanner to work like a copier with your printer, withdocuments printed successively without interruption. This lets you transform yourscanner and printer into a convenient copy station.
1. Place the stack of documents to be scanned on the ADF's Document Feed Tray.
2. Launch ScanWizard 5 in stand-alone mode by clicking the program icon onthe desktop.
3. Specify your own scan settings by clicking the Tool buttons in the StandardControl Panel; or by selecting the appropriate setup items from the Settingswindow in the Advanced Control Panel.
4. Click the Scan To button and hold down the mouse until the options menuappears, then select Copy to open the “Copy” dialog box.
In the “Copy” dialog box, specify the following settings:
a) Select a default printer or anyalternative printer from theoptions.
b) Specify the number of copiesto be made.
c) Specify the position of theimage on the paper to beprinted.
5. Click the OK button.
The originals are sequentiallyscanned until the stack ofdocuments is depleted; whenfinished, all the scanned imagesare sent to the specified printer.
16 ScanMaker 5950 Pro Supplement
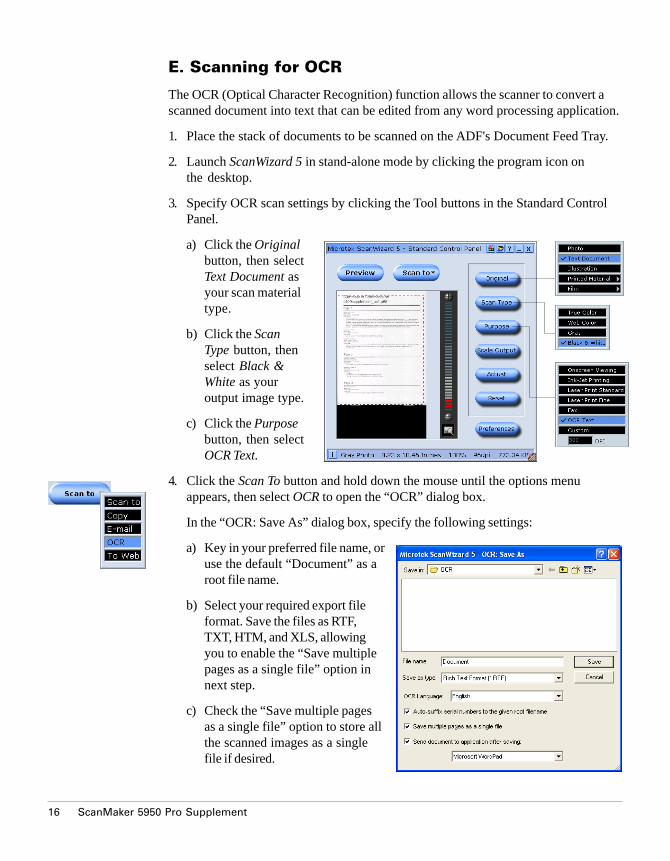
E. Scanning for OCR
The OCR (Optical Character Recognition) function allows the scanner to convert ascanned document into text that can be edited from any word processing application.
1. Place the stack of documents to be scanned on the ADF's Document Feed Tray.
2. Launch ScanWizard 5 in stand-alone mode by clicking the program icon onthe desktop.
3. Specify OCR scan settings by clicking the Tool buttons in the Standard ControlPanel.
a) Click the Originalbutton, then selectText Document asyour scan materialtype.
b) Click the ScanType button, thenselect Black &White as youroutput image type.
c) Click the Purposebutton, then selectOCR Text.
4. Click the Scan To button and hold down the mouse until the options menuappears, then select OCR to open the “OCR” dialog box.
In the “OCR: Save As” dialog box, specify the following settings:
a) Key in your preferred file name, oruse the default “Document” as aroot file name.
b) Select your required export fileformat. Save the files as RTF,TXT, HTM, and XLS, allowingyou to enable the “Save multiplepages as a single file” option innext step.
c) Check the “Save multiple pagesas a single file” option to store allthe scanned images as a singlefile if desired.
ScanMaker 5950 Pro Supplement 17
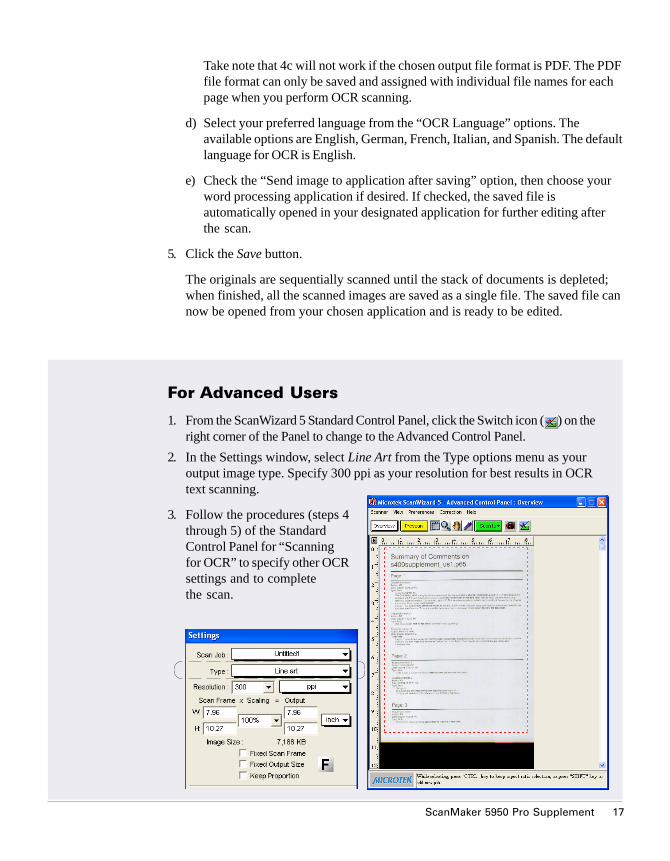
Take note that 4c will not work if the chosen output file format is PDF. The PDFfile format can only be saved and assigned with individual file names for eachpage when you perform OCR scanning.
d) Select your preferred language from the “OCR Language” options. Theavailable options are English, German, French, Italian, and Spanish. The defaultlanguage for OCR is English.
e) Check the “Send image to application after saving” option, then choose yourword processing application if desired. If checked, the saved file isautomatically opened in your designated application for further editing afterthe scan.
5. Click the Save button.
The originals are sequentially scanned until the stack of documents is depleted;when finished, all the scanned images are saved as a single file. The saved file cannow be opened from your chosen application and is ready to be edited.
For Advanced Users
1. From the ScanWizard 5 Standard Control Panel, click the Switch icon ( ) on theright corner of the Panel to change to the Advanced Control Panel.
2. In the Settings window, select Line Art from the Type options menu as youroutput image type. Specify 300 ppi as your resolution for best results in OCRtext scanning.
3. Follow the procedures (steps 4through 5) of the StandardControl Panel for “Scanningfor OCR” to specify other OCRsettings and to completethe scan.
18 ScanMaker 5950 Pro Supplement
Roller
Maintenance
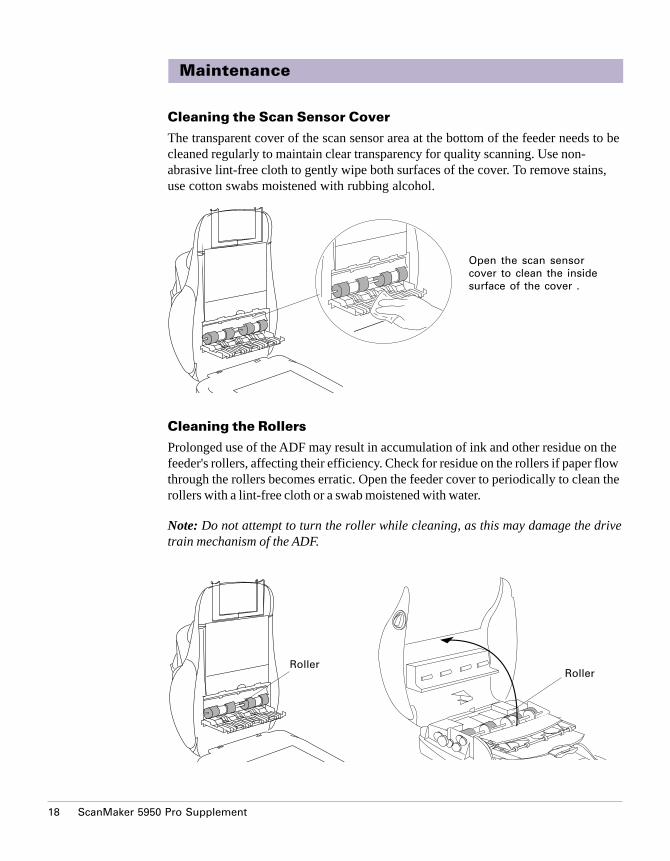
Cleaning the Scan Sensor Cover
The transparent cover of the scan sensor area at the bottom of the feeder needs to becleaned regularly to maintain clear transparency for quality scanning. Use non-abrasive lint-free cloth to gently wipe both surfaces of the cover. To remove stains,use cotton swabs moistened with rubbing alcohol.
Cleaning the Rollers
Prolonged use of the ADF may result in accumulation of ink and other residue on thefeeder's rollers, affecting their efficiency. Check for residue on the rollers if paper flowthrough the rollers becomes erratic. Open the feeder cover to periodically to clean therollers with a lint-free cloth or a swab moistened with water.
Note: Do not attempt to turn the roller while cleaning, as this may damage the drivetrain mechanism of the ADF.
Roller
Open the scan sensorcover to clean the insidesurface of the cover .

ScanMaker 5950 Pro Supplement 19
How to Replace the Rubber Pad
The rubber pad in your Automatic Document Feeder (ADF) is designed to makedocument feeding smooth. After scanning approximately 30,000 sheets through theADF, the rubber pad may become worn out, and problems such as document double-feeds may occur. In this case, check the rubber pad and replace it with a new one ifneeded; two rubber pads are included in your scanner package for this purpose.Follow the procedures below for replacing the rubber pad.
1. Open the feeder cover by lifting thetwo Earlobe Levers on each side ofthe cover.
Rubber Pad
2. With the cover fully opened, press thetwo arms of the rubber pad inward withyour fingers to pull out the rubber pad.
3. Insert and push the new rubber pad into thecompartment until it snaps into place.
4. Close the feeder cover.
Earlobe Levers
20 ScanMaker 5950 Pro Supplement
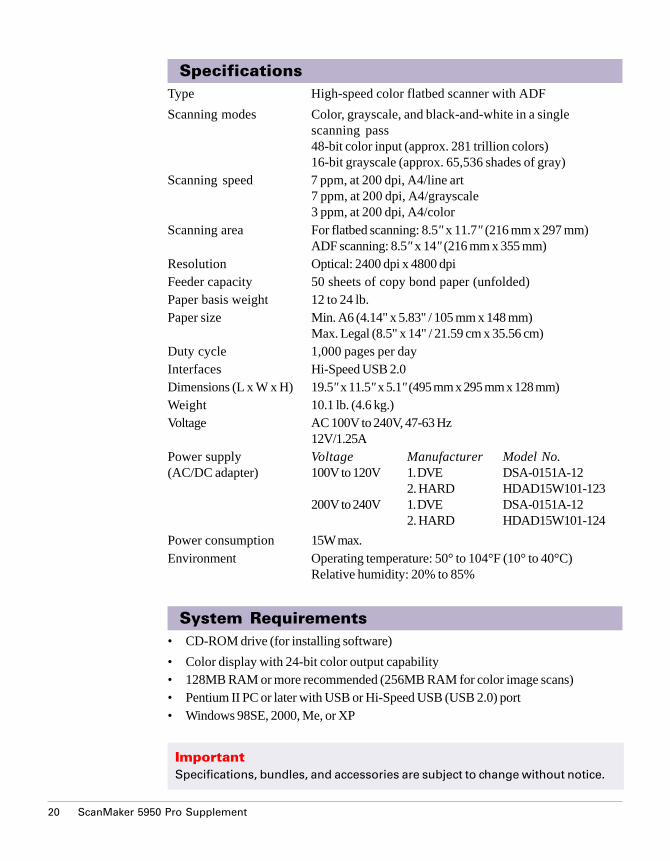
System Requirements• CD-ROM drive (for installing software)
• Color display with 24-bit color output capability• 128MB RAM or more recommended (256MB RAM for color image scans)• Pentium II PC or later with USB or Hi-Speed USB (USB 2.0) port• Windows 98SE, 2000, Me, or XP
SpecificationsType High-speed color flatbed scanner with ADF
Scanning modes Color, grayscale, and black-and-white in a singlescanning pass48-bit color input (approx. 281 trillion colors)16-bit grayscale (approx. 65,536 shades of gray)
Scanning speed 7 ppm, at 200 dpi, A4/line art7 ppm, at 200 dpi, A4/grayscale3 ppm, at 200 dpi, A4/color
Scanning area For flatbed scanning: 8.5" x 11.7" (216 mm x 297 mm)ADF scanning: 8.5" x 14" (216 mm x 355 mm)
Resolution Optical: 2400 dpi x 4800 dpiFeeder capacity 50 sheets of copy bond paper (unfolded)Paper basis weight 12 to 24 lb.Paper size Min. A6 (4.14" x 5.83" / 105 mm x 148 mm)
Max. Legal (8.5" x 14" / 21.59 cm x 35.56 cm)Duty cycle 1,000 pages per dayInterfaces Hi-Speed USB 2.0Dimensions (L x W x H) 19.5" x 11.5" x 5.1" (495 mm x 295 mm x 128 mm)Weight 10.1 lb. (4.6 kg.)Voltage AC 100V to 240V, 47-63 Hz
12V/1.25APower supply Voltage Manufacturer Model No.(AC/DC adapter) 100V to 120V 1. DVE DSA-0151A-12
2. HARD HDAD15W101-123200V to 240V 1. DVE DSA-0151A-12
2. HARD HDAD15W101-124
Power consumption 15W max.Environment Operating temperature: 50° to 104°F (10° to 40°C)
Relative humidity: 20% to 85%
ImportantSpecifications, bundles, and accessories are subject to change without notice.

ScanMaker 5950 Pro Supplement 21
FCC Compliance Statement
This equipment (Model: MRS-2400A48U) has been tested and found to comply withthe limits for a Class B digital device, pursuant to Part 15 of the FCC rules. Theselimits are designed to provide reasonable protection against harmful interference in aresidential installation. This equipment generates, uses and can radiate radiofrequency energy and, if not installed and used in accordance with the instructions,may cause harmful interference to radio communications. However, there is noguarantee that interference will not occur in a particular installation. If this equipmentdoes cause harmful interference to radio or television reception, which can bedetermined by turning the equipment off and on, the user is encouraged to try tocorrect the interference by one or more of the following measures:
• Reorient or relocate the receiving antenna.
• Increase the separation between the equipment and receiver.
• Connect the equipment into an outlet on a circuit different from that to which thereceiver is connected.
• Consult the dealer or an experienced radio/TV technician for help.
Note: A shielded Hi-Speed USB interface cable with ferrite core installed on thescanner connector end must be used with this equipment.
Caution: Changes or modifications not expressly approved by the manufacturerresponsible for compliance could void the user's authority to operate the equipment.
This device complies with Part 15 of the FCC Rules. Operation is subject to thefollowing two conditions: (1) This device may not cause harmful interference, and (2)this device must accept any interference received, including interference that maycause undesired operation.
Responsible Party: Loi HanMicrotek Lab, Inc.16941 Keegan AvenueCarson, CA 90746USAPhone: 310-687-5800Fax: 310-687-5950