metal shop measurement foundations · metal shop measurement foundations introduction to metal work...
TRANSCRIPT

This work is licensed under a Creative Commons Attribution-NonCommercial-ShareAlike 4.0 International License unless otherwise indicated.
Youth Explore Trades Skills Introduction to Metal Work
Metal Shop Measurement Foundations
DescriptionThis activity plan provides a basis for instruction of foundational measurement standards and procedures. It includes the use of imperial and metric measurement tools needed to work in the metal trades.
Lesson ObjectivesThe student will be able to:
• Work with both measurement systems used in metal trades in Canada
• Demonstrate an essential understanding of proficient measurement tool use
• Name and operate all basic measurement tools covered
AssumptionsThe teacher should:
• Be able to explain both the metric and SAE measurement systems
• Be able to identify and explain precision measurement tool use
The student should:
• Understand numbers systems
• Have a basic understanding of what a unit of measurement is
• Have experience using the metric system
TerminologyDecimal inch: an SAE measurement that is a part of a whole inch represented as a decimal value.
Fractional inch: an SAE measurement that is a part of a whole inch represented as a fraction.
Measurement: assigning a number to represent a length or amount of something based on a standardized system of units.
Measuring tape: a flexible ruler with linear measurement markings attached to a spring mechanism housed in a case. These may be in imperial or metric units or both.
Metric: a system of measurement based on a decimal standard, the global standard in measurement. Also known as the International System of Units, abbreviated as SI.

Metal Shop Measurement Foundations Introduction to Metal Work
2 Youth Explore Trades Skills
Micrometer: a gauge that measures small distances/thicknesses between its two faces, one of which is adjusted by a fine screw thread.
Ruler: a linear device that has graduations based on either the metric or SAE system intended for measuring distance.
Ruler graduations: the fixed interval markings along a ruler that represent a progressive increase in length measurement.
SAE: an acronym for the Society of Automotive Engineers, generally synonymous with the US standard for the traditional “imperial” measurement system.
Unit: a standard quantity in a specific system of measurement.
Vernier caliper: a precision measurement device that uses a caliper structure to measure fine measurements along a Vernier scale.
Estimated Time1.5–2 hours
Recommended Number of Students:20, based on the BC Technology Educators’ Best Practices Guide
Facilities Secondary school metal shop or equivalently equipped technology education shop
Tools• Whiteboard
• Overhead or data projector
• Computer
• Rulers
• Tape measures
• Micrometers
• Vernier calipers
Materials• Worksheets
• For optional activity: samples to measure (variety of sizes and shapes of general materials)
• Writing implement

Introduction to Metal Work Metal Shop Measurement Foundations
Youth Explore Trades Skills 3
ResourcesApprenticeship and Workplace Math 10 online: Open School BC, Open Course Resource.http://ocr.openschool.bc.ca/course/view.php?id=23
Teacher-led Activities1. Teacher will introduce each of the four main measurement tools:
a. Ruler
b. Tape measure
c. Micrometer
d. Vernier caliper
2. Teacher will demonstrate the use and accurate reading of each tool.
Student ActivitiesEach of these activities should take no more than 30 minutes.
Activity 1: Measuring in Metric Using a Measuring Tape
This is adapted from Open School BC’s Apprenticeship & Workplace Math 10 Module 1 Section 1 Assignment Part 1: Measuring in Metric.
Activity 2: Measuring in SAE/Imperial
This is adapted from Open School BC’s Apprenticeship & Workplace Math 10 Module 1 Section 2 Assignment Part 1: Imperial Units of Length.
Activity 3: Vernier Calipers and Micrometers
This is adapted from Open School BC’s Apprenticeship & Workplace Math 10 Module 2 Section 1 Lesson B: Measuring Diameters
Activity 4: Measuring Diameter
This is adapted from Open School BC’s Apprenticeship & Workplace Math 10 Module 2 Section 1 Assignment Part 2: Measuring Circumference and Diameter.
Optional Extension ActivityHave a variety of material blanks (common samples) and have students work through individual measurement stations. Each station would have a different measurement tool to use and a requirement to use both measurement systems throughout the activity.
AssessmentConsider co-creating the assessment criteria with your students at the beginning of the activity/project. You may want to include the following:
• All worksheet questions are answered correctly and completely.

Metal Shop Measurement Foundations Introduction to Metal Work
4 Youth Explore Trades Skills
Student Activity 1: Measuring in Metric Using a Measuring Tape
InstructionsFor this assignment, you will need a tape measure that shows millimetres, centimetres, and metres. You will also need two partners.
ProcedureStep 1: Measure your and your partners’ heights to the nearest millimetre. Record your
measured heights in the appropriate column of the table below.
Step 2: Measure your and your partners’ heights to the nearest tenth of a centimetre. Record your measured heights in the appropriate column of the table below.
Step 3: Measure your and your partners’ heights to the nearest thousandth of a metre. Record your measured heights in the appropriate column of the table below.
Height(mm) (cm) (m)
You
Partner 1
Partner 2
Have a look at your completed table. Do you notice any patterns? Answer the following questions based on the patterns you see. You may use the measurements you recorded as examples in your explanations.
1. Explain how you would change a measurement from millimetres to centimetres and give an example.
Example:

Introduction to Metal Work Metal Shop Measurement Foundations
Youth Explore Trades Skills 5
2. Explain how you would change a measurement from metres to centimetres and give an example.
Example:
3. Explain how you would change a measurement from millimetres to metres and give an example.
Example:

Metal Shop Measurement Foundations Introduction to Metal Work
6 Youth Explore Trades Skills
Student Activity 2: Measuring in SAE/Imperial
InstructionsPlease show all your work.
1. Name two objects about one inch in length.
2.
a. At what measures on the ruler are points A and B?
A:
B:
b. How far apart are A and B?
3. Nidal lives one block from his school. Nidal paced off the distance and estimates the distance to be 215 yd. What is this distance in feet?
A B

Introduction to Metal Work Metal Shop Measurement Foundations
Youth Explore Trades Skills 7
4. The centre lines of vertical framing studs are commonly 16" apart. How many studs would be required to fasten an 8' length of sheathing? Ignore the width of the studs themselves. (Hint: The left edge of the sheet falls along the centre line of the first stud.)
5. A 2 × 6 is 1½” in thick. How high would a stack of ten 2 × 6’s be?
Express your answer in feet and inches.
6. One circuit of the running track at Jon’s school is 440 yd. What fraction of a mile is that distance?

Metal Shop Measurement Foundations Introduction to Metal Work
8 Youth Explore Trades Skills
7. Norman, who lives in Fort St. John, is planning to visit his friend in Seattle. He will be travelling through Blaine, Washington. The distance from Fort St. John to Blaine is 1221 km. The distance from Blaine to Seattle is 109 mi. To the nearest kilometre, how far is it from Fort St. John to Seattle?
8. Monique was asked to quickly estimate the dimensions, in inches, of the cell phone shown below.
She estimates the cell phone measures approximately 5½” by 2½”.
a. How do you think Monique arrived at this estimate?

Introduction to Metal Work Metal Shop Measurement Foundations
Youth Explore Trades Skills 9
b. Do you think that Monique’s estimate was a good one? Why or why not?
c. What are the actual dimensions, in inches, of the phone? Round your answers to one decimal place. (Hint: Use the conversion rate of 2.54 cm per inch.)
d. Briefly describe a strategy you could use to quickly estimate the conversion between centimetres and inches.

Metal Shop Measurement Foundations Introduction to Metal Work
10 Youth Explore Trades Skills
Student Activity 3: Vernier Calipers and MicrometersRulers, metre sticks, and measuring tapes can give measurements to the nearest millimetre, or to the nearest 0.1 cm. Other measuring instruments can more accurately measure to the nearest tenth of a millimetre, or 0.01 cm, or even to the nearest one-thousandth of a millimetre, or 0.001 mm, depending on their scales.
The two measuring instruments you will learn about here are the caliper and the micrometer.
Vernier CalipersA Vernier caliper is an instrument used for making accurate linear measurements. It was invented by a French engineer named Pierre Vernier in 1613. It is a common tool used in laboratories and other industries that require precise measurements. Manufacturing of aircraft, buses, and scientific instruments are a few examples of industries in which precision measurements are essential.
Vernier Calipers
A Vernier caliper (often called a Vernier or caliper) is a convenient tool to use when measuring the length of a small object or the outer or inner diameter of a round object like a pipe or hole. A Vernier caliper can measure accurately to 0.01 cm, or 0.1 mm.
Reading a Vernier caliper is not difficult. Once the jaws of the Vernier are in place, the scales are set and the reading can be made.
There are two scales used for measuring with calipers: SI (metric) and imperial. These two scales can sometimes be found on the same caliper, one on the top and one on the bottom. When using each scale, the procedure for determining each measurement is slightly different. Only SI calipers will be discussed here.
Introduction to Metal Work Metal Shop Measurement Foundations
Youth Explore Trades Skills 11
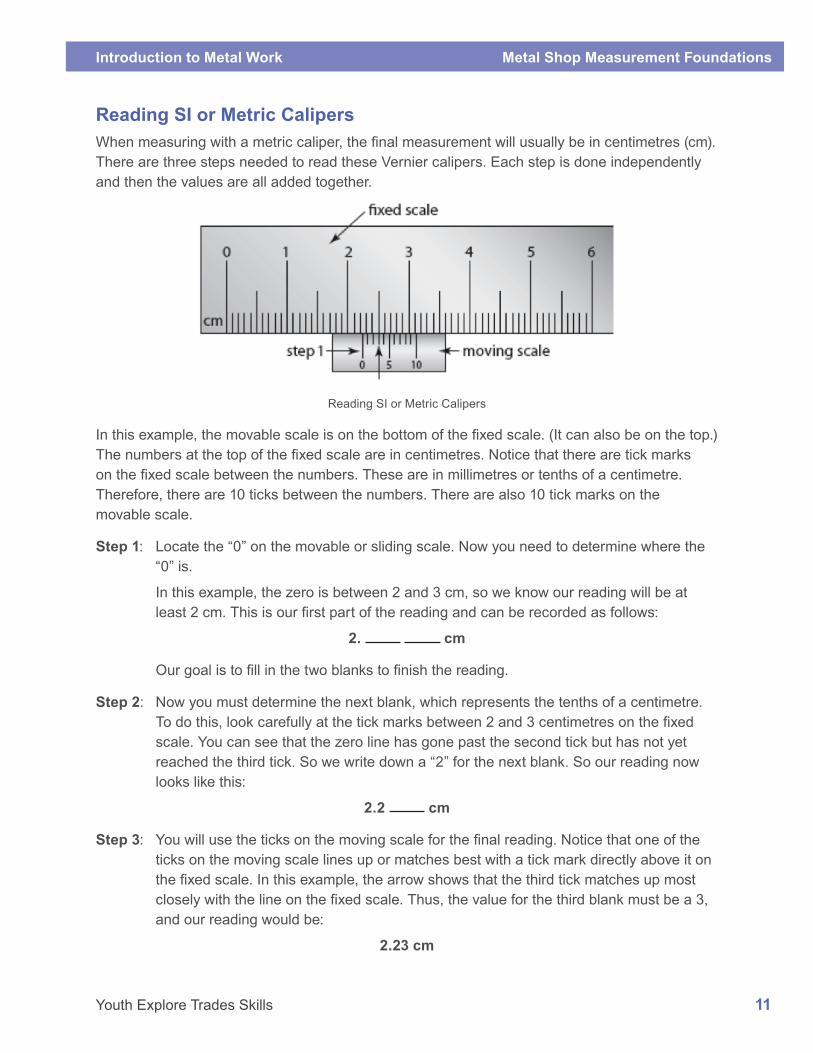
Reading SI or Metric CalipersWhen measuring with a metric caliper, the final measurement will usually be in centimetres (cm). There are three steps needed to read these Vernier calipers. Each step is done independently and then the values are all added together.
Reading SI or Metric Calipers
In this example, the movable scale is on the bottom of the fixed scale. (It can also be on the top.) The numbers at the top of the fixed scale are in centimetres. Notice that there are tick marks on the fixed scale between the numbers. These are in millimetres or tenths of a centimetre. Therefore, there are 10 ticks between the numbers. There are also 10 tick marks on the movable scale.
Step 1: Locate the “0” on the movable or sliding scale. Now you need to determine where the “0” is.
In this example, the zero is between 2 and 3 cm, so we know our reading will be at least 2 cm. This is our first part of the reading and can be recorded as follows:
2. cm
Our goal is to fill in the two blanks to finish the reading.
Step 2: Now you must determine the next blank, which represents the tenths of a centimetre. To do this, look carefully at the tick marks between 2 and 3 centimetres on the fixed scale. You can see that the zero line has gone past the second tick but has not yet reached the third tick. So we write down a “2” for the next blank. So our reading now looks like this:
2.2 cm
Step 3: You will use the ticks on the moving scale for the final reading. Notice that one of the ticks on the moving scale lines up or matches best with a tick mark directly above it on the fixed scale. In this example, the arrow shows that the third tick matches up most closely with the line on the fixed scale. Thus, the value for the third blank must be a 3, and our reading would be:
2.23 cm

Metal Shop Measurement Foundations Introduction to Metal Work
12 Youth Explore Trades Skills
Note: It doesn’t matter which line is matched on the fixed scale as we read from the movable scale.
Some sites that might help you are the following:
http://www.physics.smu.edu/~scalise/apparatus/caliper/
http://www.upscale.utoronto.ca/PVB/Harrison/Vernier/Vernier.html
http://hyperphysics.phy-astr.gsu.edu/hbase/class/phscilab/vernier.html

Introduction to Metal Work Metal Shop Measurement Foundations
Youth Explore Trades Skills 13
Vernier Calipers PracticeNow try these caliper readings and write down their measurements.
1. . cm
2. . cm
3. . cm
4. . cm
5. . cm

Metal Shop Measurement Foundations Introduction to Metal Work
14 Youth Explore Trades Skills
MicrometersMicrometers are another tool that can be used to precisely measure small lengths. In fact, micrometers can make even smaller and more precise measurements than a Vernier caliper can! Micrometers are often used to measure things like the thickness of round or flat items, engine parts, and items being made in a machine shop. While Vernier calipers can measure accurately to the nearest tenth of a millimetre (0.1 mm), a micrometer can measure to the nearest hundredth of a millimetre (0.01 mm).
The illustration shows the standard design of a micrometer. The areas that we will concentrate on are the sleeve (or barrel) and the thimble. The thimble is the moving scale on a micrometer.
In an imperial micrometer (top photo), as the jaws open and the space between the anvil and the spindle gets larger, the thimble turns and goes further down the sleeve. The parts in an SI or metric micrometer (bottom photo) are all the same, but the scales are different.
anvil
spindle lock
bevel
hub orbarrel
thimble
ratchet
Micrometer—Photo by Galushko Sergey © 2010
This photo shows an enlargement of the sleeve and thimble of the SI or metric micrometer. This is the type of photo or diagram that you will be reading the measurements from.
Metric micrometer’s sleeve and thimble

Introduction to Metal Work Metal Shop Measurement Foundations
Youth Explore Trades Skills 15
Reading SI or Metric MicrometersWhen an object is placed in the jaws of a micrometer between the anvil and the spindle, the thimble is turned in order to make both the anvil and the spindle touch the object. As the thimble is turned, it moves to the left (in the diagram below) and the length of the spindle decreases.
To read any length, first look at the top of the spindle reading. This scale is in millimetres. Simply count from the zero to where the thimble cuts across the spindle. In this example, the thimble crosses the spindle just past 8 mm.
Next read the thimble on the micrometer. The thimble reading is made where the line from the spindle crosses the thimble. In this diagram, the thimble reads 12. However, this is NOT 12 mm but 0.12 mm. Now the readings are added together to get the final reading:
8 mm + 0.12 mm = 8.12 mm
Notice that there are also divisions on the bottom of the scale in the barrel. These are half-millimetre divisions; they come into play when the thimble is partially turned between whole millimetre marks, as shown in the micrometer below:
While the top of the scale on the spindle is still showing 8 mm, there is a tick mark now showing on the bottom of the scale before the thimble. If this is the situation, you must add 0.5 mm to the top reading before reading the thimble. So this reading would be:
8 mm + 0.5 mm + 0.12 mm = 8.62 mm
When measuring with a Vernier caliper, there might be some room for error depending on which lines match the best. With the micrometer, however, there is only one right answer. Therefore, micrometers are much more precise and accurate than Vernier caliper are.

Metal Shop Measurement Foundations Introduction to Metal Work
16 Youth Explore Trades Skills
A site that might help you is the following:
Introduction to Metal Work: Measurement
Reading SI or Metric Micrometers (uses javascript so may not work on all devices)
http://www.upscale.utoronto.ca/PVB/Harrison/Micrometer/Flash/MicSimulation.html
Virtual Micrometer—Thousandth of Inch Simulator
http://www.stefanelli.eng.br/en/virtual-micrometer-thousandth-inch-simulator/
Apps are available. Search for “micrometer simulation”.
Now read these micrometers and write down their measurements.

Introduction to Metal Work Metal Shop Measurement Foundations
Youth Explore Trades Skills 17
Micrometers Practice 1.
2.
3.
4.
5.

Metal Shop Measurement Foundations Introduction to Metal Work
18 Youth Explore Trades Skills
6.

Introduction to Metal Work Metal Shop Measurement Foundations
Youth Explore Trades Skills 19
Student Activity 4: Reading Vernier Calipers and Micrometers
InstructionsPlease show all your work.
1. Describe a situation where you might use a Vernier caliper. Explain why you would use this measurement tool in the situation you described.
2. a. Read the following Vernier caliper measurement. The Vernier caliper is calibrated in metric units.
b. Read the following Vernier caliper measurement. The Vernier caliper is calibrated in metric units.
Metal Shop Measurement Foundations Introduction to Metal Work
20 Youth Explore Trades Skills
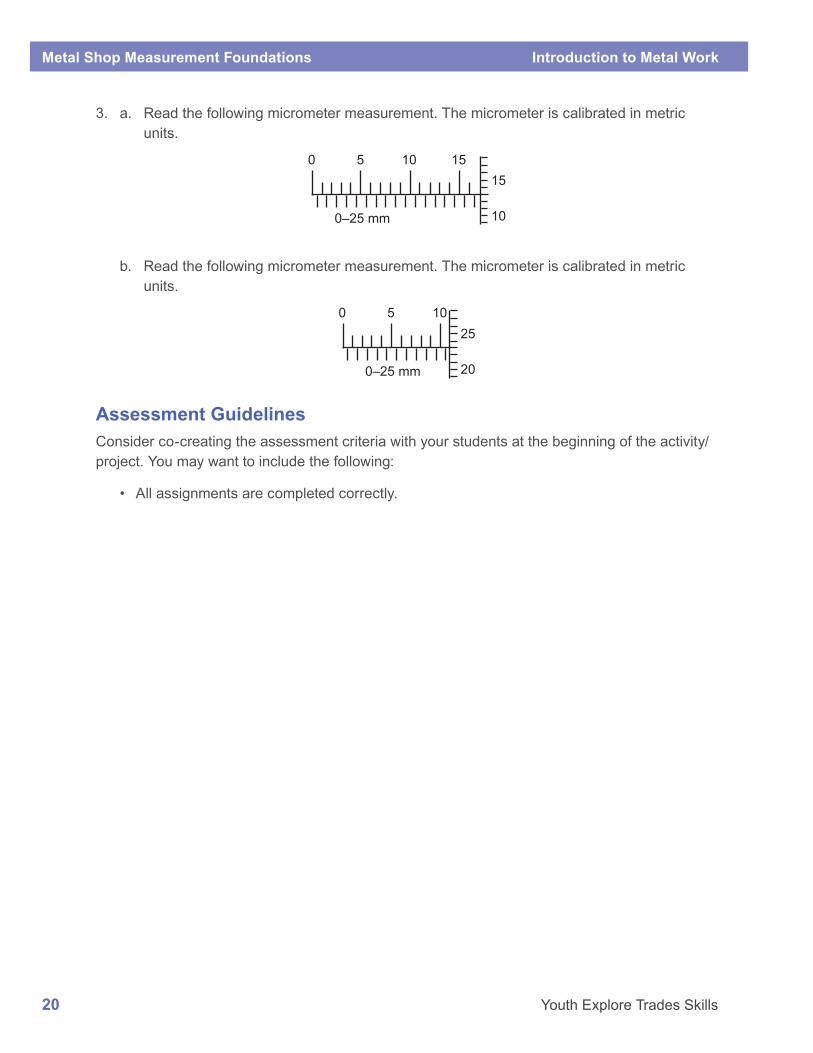
3. a. Read the following micrometer measurement. The micrometer is calibrated in metric units.
0 10515
100–25 mm
15
b. Read the following micrometer measurement. The micrometer is calibrated in metric units.
0 10525
200–25 mm
Assessment GuidelinesConsider co-creating the assessment criteria with your students at the beginning of the activity/project. You may want to include the following:
• All assignments are completed correctly.

Introduction to Metal Work Metal Shop Measurement Foundations
Youth Explore Trades Skills 21
Answer Key
Student Activity 1: Measuring in Metric Using a Measuring TapeHeight
(mm) (cm) (m)
You 1645 164.5 1.645
Partner 1 1702 170.2 1.702
Partner 2 1817 181.7 1.817
1. To change millimeters to centimetres, divide the measurement in centimetres by 10. For example,
2. To change a measurement from metres to centimetres, multiply by 100. For example,
3. To change a measurement from millimeters to metres, divide by 1000. For example,
Student Activity 2: Measuring in SAE/Imperial 1. Answers will vary. Some examples are the width of your thumb, the width of a postage
stamp, and the width of the control key on a computer keyboard.
2. a. A: 1½
B: 4¼
b. The points are 2¾" apart.

Metal Shop Measurement Foundations Introduction to Metal Work
22 Youth Explore Trades Skills
3. Lt x= the distance in feet.
x
x
x
2151
3645
ydft
3 yd(1 ft)(215 yd )
ydft
=
=
=
The distance between Nidal’s home and school is approximately 645 ft.
4. Student may include a diagram to support their solution or as an alternative to calculating it mathematically. The solution by calculation is shown below.
There are 6 studs after the first.
There are 7 studs behind the sheet.
5. The stack would be 1 ft 3 in high.
6. 1 mi = 1760 yd Let x = the distance in miles
So, 440 yd is one quarter of a mile.
7. First find the distance from Blaine to Seattle. Convert 109 mi to kilometres.
1 m i = 1.6 k m109 mi (109 1.6) km
174.4 k m175 km
×=≈
=

Introduction to Metal Work Metal Shop Measurement Foundations
Youth Explore Trades Skills 23
Now find the total distance from Fort St John to Seattle.
Total distance = (Fort St. John to Blaine) + (Blaine to Seattle)= 1221 km + 175 km= 1396 km
The approximate distance from Fort St. John to Seattle is 1396 km.
8. a. Answers will vary. Monique rounded the measurements to the nearest centimetre and then divided by 2.
b. Answers will vary. Monique rounded the measurements to the nearest centimetre and then divided by 2.
Do you think that Monique’s estimate was a good one? Why or why not? (1 mark)
Answers will vary. Student should express a reasonable explanation for their choice. Two sample responses are provided below.
Yes, Monique’s estimate was a good one. There are 2.54 cm in an inch. Monique rounded the dimensions up, so she rounded the conversion factor down to 2, which is an easy number to divide by.
No, Monique’s estimate was not a very good one. There are 2.54 cm in an inch. Monique should have rounded the conversion factor up to 3 before dividing. Then her estimate would have been about 3⅔ in by 2 in.
c. 1 in = 2.54 cm We can solve this by dividing by the conversion factor.
The cell phone measures 4.3 in by 2.3 in.
d. Answers will vary. Student may repeat the strategy that Monique used, or describe one of their own. As long as their explanation is clear and logical, they should receive the mark.

Metal Shop Measurement Foundations Introduction to Metal Work
24 Youth Explore Trades Skills
Student Activity 3: Vernier Calipers and Micrometers
Vernier Calipers Practice1. 3.64 cm
2. 2.37 cm
3. 4.76 cm
4. 1.93 cm
5. 3.32 cm
Micrometers Practice 1. 17.33
2. 4.24
3. 13.94
4. 12.99
5. 0.64
6. 21.05
Student Activity 4: Reading Vernier Calipers and Micrometers1. Answers will vary. Some situations include: measuring the inside or outside diameter of a
pipe, measuring the opening of a piece of pottery so you can make a lid that fits properly, measuring the small parts of engines. The students’ explanation will vary, but may include one or more of the following points:
• a Vernier calliper provides a more precise measurement than a ruler or tape measure
• a Vernier calliper has two sets of jaws and so can easily measure the inside diameter and the outside diameter of an object
• when measuring the diameter of a circular object, the calliper will “grab-on” to the widest part, so you know you’re measuring the diameter (whereas you would be guessing where the diameter was if you used a ruler)
2. a. 1.98 cm
b. 3.34 cm
3. a. 16.63 mm
b. 10.73 mm