measurement instructions ncs dosimetry audit v20100226
TRANSCRIPT
D o s i m e t r y a u d i t W o r k i n g i n s t r u c t i o n P a g e | 1 of 14
Measurement_instructions_NCS_dosimetry_audit_v20100226.doc
NOTES:
(The audit preparation is described on the final page of this document: actions 1 until 4) Audit visit
On arrival at the RT-institute Institute : _____________________________ Date : _____________________________ Accelerator ID : _____________________________ NCS auditor 1 : _____________________________ Institute representative 1 : _____________________________ NCS auditor 2 : _____________________________ Institute representative 2 : _____________________________ (NCS auditor 3 : _____________________________ Institute representative 3 : _____________________________) NOTE 1: It is advised to divide roles: one person takes the lead in setting up the equipment and fills in these sheets (the other person checks), the second person takes the lead in obtaining all data (the first person checks). NOTE 2: Please set-up the equipment AND DONOT start any measurement before you have lunch.
5. Unpack the equipment a. Bring all equipment case(s) to the treatment room b. Unpack equipment from the case(s) c. Place the equipment at the designated location: control- or treatment room) see checklist
6. Switch on the dosimeter and the barometer Make sure the dosimeter is connected to mains (i.e. 230 V, 50 Hz) and standby is OFF! a. Connect mains power cable b. Switch on the PTW Unidos Webline using the power switch on the back side c. Press the power button on the front panel Check if the following settings are applied: AUTO; Range: medium 30.1nA; Detector: Audit TPR/Dose; HV: +400CV; Statistics: Signal-controlled; Series: <commence>
7. Confirm that 40 liters of (de-mineralized) water is available for the NCS audit team Make sure the water is at room temperature ± 2 °C. DO NOT use cold water!
Preparation of the accelerator (assistance of local personnel needed)
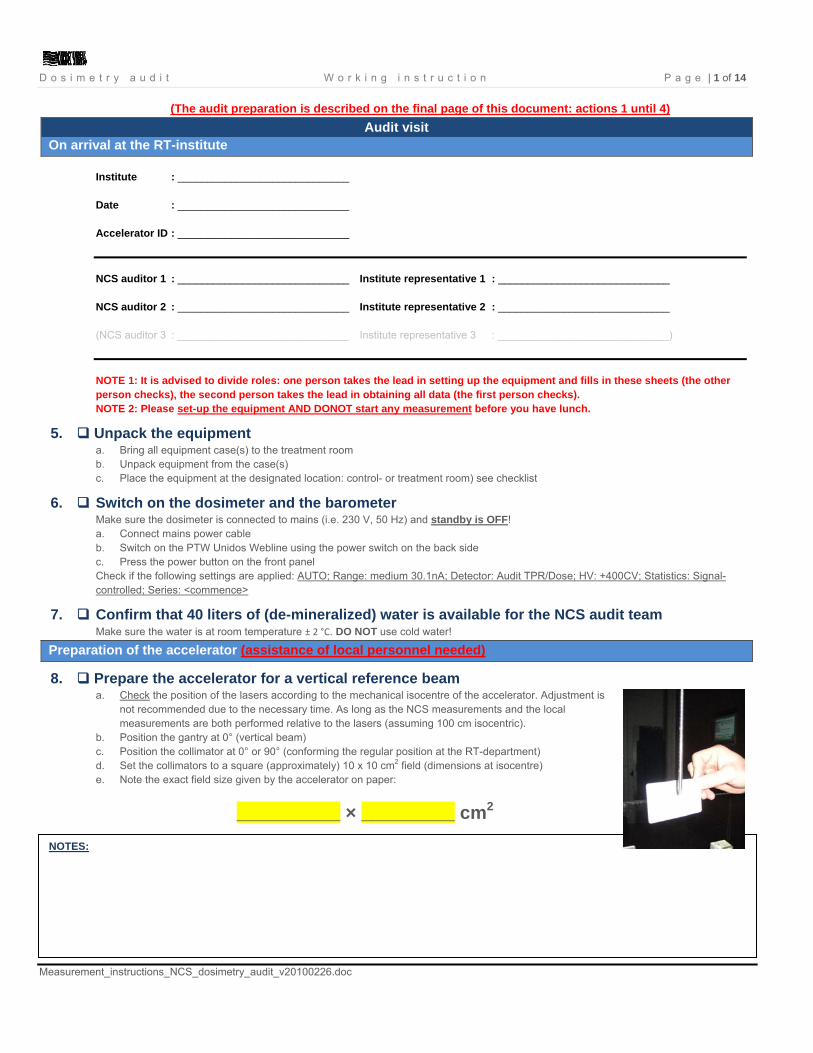
8. Prepare the accelerator for a vertical reference beam a. Check the position of the lasers according to the mechanical isocentre of the accelerator. Adjustment is
not recommended due to the necessary time. As long as the NCS measurements and the local measurements are both performed relative to the lasers (assuming 100 cm isocentric).
b. Position the gantry at 0° (vertical beam) c. Position the collimator at 0° or 90° (conforming the regular position at the RT-department) d. Set the collimators to a square (approximately) 10 x 10 cm2 field (dimensions at isocentre) e. Note the exact field size given by the accelerator on paper:
__________ × _________ cm2

D o s i m e t r y a u d i t W o r k i n g i n s t r u c t i o n P a g e | 2 of 14
Measurement_instructions_NCS_dosimetry_audit_v20100226.doc
NOTES:
Audit preparation and set-up Water phantom set-up
9. Position and align the water phantom on the treatment table (see photo)
a. Place the three black feet underneath the phantom b. Check if the (blue) valve is fitted to the phantom and make sure it is
closed clockwise (!!) (see photos on the right and below) c. Place the water phantom (approximately) aligned to the lasers on
the treatment table d. Make sure the projection of the light-ruler’s light beam doesn’t cross
the side of the phantom (i.e. the bar on which the depth indicator is placed)
e. Fill the phantom with water until no more than 2.5 cm from the top f. Place the white Trufix-tool in the phantom at the surface of the
phantom g. Level the water phantom using a small leveler h. Use the lasers and crosshairs to position the phantom in the centre
of the beam i. Check if the white Trufix alignment tool is in the centre of the beam
(see photo)
Preparation of the measurement distance and depth
10. Place the water level at the isocentre (SSD = 100 cm) a. Use a thin paper or white ‘credit card’ on top of the water b. Use both the lasers and the light ruler to place the phantom at the correct height Note 1: some institutes use the pointer to position the water level (SSD) at 100 cm. This method should be used if it is the institute’s method (water surface should be viewed from underneath the surface) combined with a check on laser and light ruler Note 2: When using the lasers, check the water level of the phantom with the reflections of the lasers coinciding with the incoming laser beams.
11. Use tape to place a desk ruler as a reference point at the water level (see photo at top of page)
a. Place the desk ruler vertically (minimum length measurement to be 20 cm) b. Use for example the 0 cm marker as a reference point (at the laser)
12. Move the white Trufix tool to the water surface exactly a. Keep the water surface as smooth as possible (by not leaning on the table) b. Check (using the lasers) if the white Trufix tool is in the centre of the beam c. Match the mirror image of the cone (when looking from underneath the water surface), see photo d. Make sure that the cone’s sides make a smooth cross in the mirror image of the cone
Desk-ruler attached with tape
Blue valve
White Trufix tool
Small water level
Valve closed

D o s i m e t r y a u d i t W o r k i n g i n s t r u c t i o n P a g e | 3 of 14
Measurement_instructions_NCS_dosimetry_audit_v20100226.doc
NOTES:
e. Move the axis to the surface
13. ‘Zero’ the depth indicator (see photo on the right) a. Use the ‘inbus’ screwdriver to release the wheel (see photo) b. Turn the wheel (without moving the Trufix tool) until the measurement value / counter is ‘zero’ c. Use the ‘inbus’ screwdriver to fix the wheel again
14. Move the Trufix tool down to a depth of 200 mm Note: the tip of the Trufix tool is now at a SCD of 120 cm
15. Move the table up by 200 mm. Do NOT use the table’s height indication! a. Place a thin paper or the white ‘credit card’ on the water surface b. Place the table up by 200 mm using the desk-ruler placed on the side of the phantom c. Check if the light ruler confirms that the surface of the water is now at 80 cm Note: If the light ruler and desk-ruler do not agree then make a note of this! BUT USE THE DESK-RULER! d. Remove the paper or the card from the water surface
16. Remove the white Trufix tool For removal of the Trufix tool, place it above the water surface
Preparation of the chamber
17. Place the NCS ionization chamber in its PMMA waterproof sleeve (1 mm thickness) a. Slide the dry (!!) silicon tube carefully over the ionization chamber and over its cable (rotate the ionization
chamber carefully while holding it downwards and keep the tube straight) b. Place the ionization chamber carefully inside its PMMA Trufix sleeve (wall thickness 1 mm) c. Fix the ionization chamber (stripe on the stem pointing upwards) using the little screw in the sleeve d. Slide the silicon tube over ionization chamber, over the PMMA sleeve. Cover the screw completely!!
18. Place the sleeve with chamber in the phantom and position it at a depth of 200 mm
a. Place the PMMA Trufix sleeve, containing the ionization chamber in the phantom b. Move the ionization chamber to a depth of 200 mm c. Check visually if the lasers cross the tip of the PMMA-sleeve (containing the ionization chamber)
NOTE: it is known that there is a water level variation as a result of Trufix versus chamber. During the analyses of the audit, this effect is taken into account.
19. Place the thermometer sensor in the water phantom a. Use the stainless steel tube to place the temperature probe in the water phantom b. Place the stainless steel tube in the phantom as close to the centre as possible (see photo) c. Fixate the stainless steel tube, containing the thermometer with tape d. After 5 minutes: Check the temperature difference between water and room. Note: the temperature difference (Twater – Troom) may not be larger than 2 °C (preferably not larger than 1 °C). If the temperature difference is too large, change the water temperature by adding hot or cold water
20. Connect the ionization chamber to the electrometer a. Connect the cable to the electrometer using the blue extension cable (TNC-triax) b. Fixate the measurement cables using (non-sticky!) tape on the table (not on the floor!)
inbus
D o s i m e t r y a u d i t W o r k i n g i n s t r u c t i o n P a g e | 4 of 14
Measurement_instructions_NCS_dosimetry_audit_v20100226.doc
NOTES:
Preparation of the electrometer (PTW Unidos Webline)
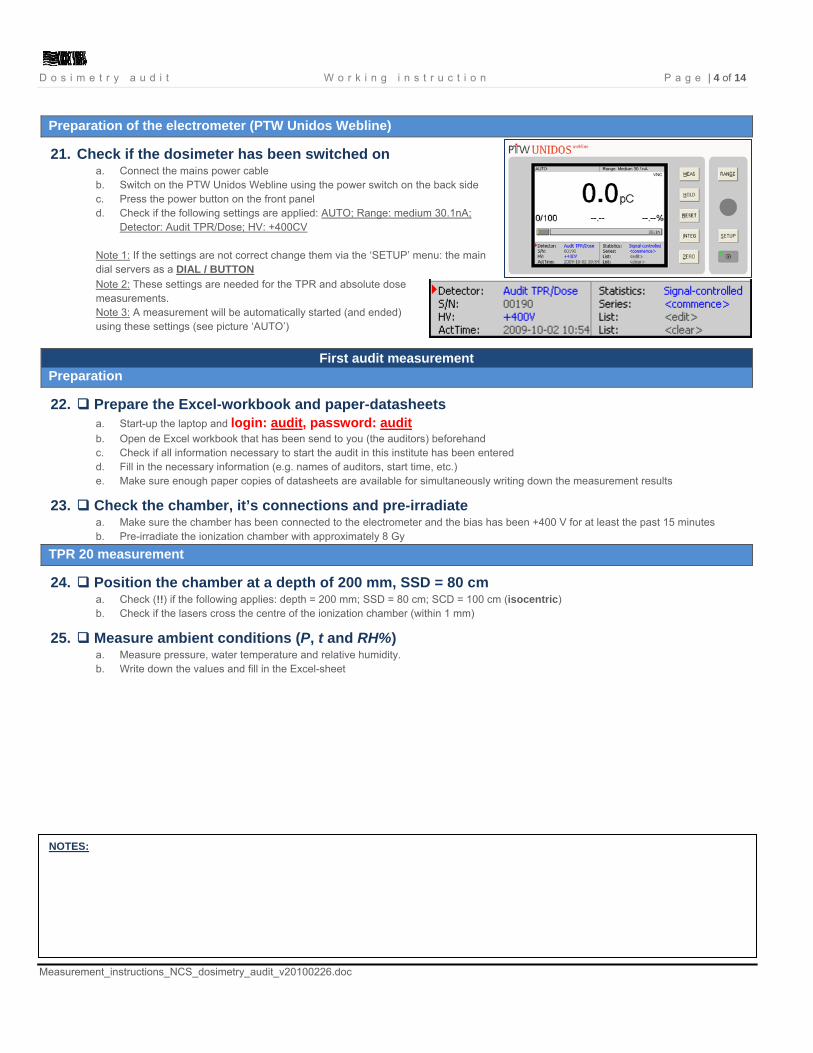
21. Check if the dosimeter has been switched on a. Connect the mains power cable b. Switch on the PTW Unidos Webline using the power switch on the back side c. Press the power button on the front panel d. Check if the following settings are applied: AUTO; Range: medium 30.1nA;
Detector: Audit TPR/Dose; HV: +400CV Note 1: If the settings are not correct change them via the ‘SETUP’ menu: the main dial servers as a DIAL / BUTTON Note 2: These settings are needed for the TPR and absolute dose measurements. Note 3: A measurement will be automatically started (and ended) using these settings (see picture ‘AUTO’)
First audit measurement Preparation
22. Prepare the Excel-workbook and paper-datasheets a. Start-up the laptop and login: audit, password: audit b. Open de Excel workbook that has been send to you (the auditors) beforehand c. Check if all information necessary to start the audit in this institute has been entered d. Fill in the necessary information (e.g. names of auditors, start time, etc.) e. Make sure enough paper copies of datasheets are available for simultaneously writing down the measurement results
23. Check the chamber, it’s connections and pre-irradiate a. Make sure the chamber has been connected to the electrometer and the bias has been +400 V for at least the past 15 minutes b. Pre-irradiate the ionization chamber with approximately 8 Gy
TPR 20 measurement
24. Position the chamber at a depth of 200 mm, SSD = 80 cm a. Check (!!) if the following applies: depth = 200 mm; SSD = 80 cm; SCD = 100 cm (isocentric) b. Check if the lasers cross the centre of the ionization chamber (within 1 mm)
25. Measure ambient conditions (P, t and RH%) a. Measure pressure, water temperature and relative humidity. b. Write down the values and fill in the Excel-sheet

D o s i m e t r y a u d i t W o r k i n g i n s t r u c t i o n P a g e | 5 of 14
Measurement_instructions_NCS_dosimetry_audit_v20100226.doc
NOTES:
26. Perform at least 5 charge measurements a. Zero the dosimeter b. Perform a leakage measurement for 120 seconds and record the value in the Excel-sheet with tab name “TPR I (20 cm)” c. Perform 5 charge measurements (200 M.U.), look for trends and, if necessary, perform more charge measurements d. Record the measurements in Excel-sheet with tab-name “TPR I (20 cm)”
tair = __________ °C twater = __________ °C P = __________ hPa RH = __________ %
Leakage Eph = ___ MV Eph = ___ MV Eph = ___ MV Reading pC Reading nC Reading nC Reading nC 1 __________ __________ __________ __________ 2 X __________ __________ __________ 3 X __________ __________ __________ 4 X __________ __________ __________ 5 X __________ __________ __________ 6 X __________ __________ __________ 7 X __________ __________ __________ 8 X __________ __________ __________ 9 X __________ __________ __________ tair = __________ °C twater = __________ °C P = __________ hPa RH = __________ %
27. Change energy and repeat measurements (for all required photon energies) Change the accelerator energy and repeat the charge measurements
28. Measure ambient conditions (P, t and RH%) a. Measure pressure, water temperature and relative humidity. b. Write down the values and fill in the Excel-sheet
TPR 10 measurement AND FIRST AUDIT MEASUREMENT IF SSD = 90 CM
29. Position the chamber and phantom at a depth of 100 mm, SSD = 90 cm a. Move the ionization chamber up by 100 mm to a depth of 100 mm b. Place the thin white paper or ‘credit card’ on the surface c. Move the SSD to 90 cm by lowering the table by 100 mm using the desk-ruler at the side of the phantom d. Check the displacement with the light-ruler e. Check (!!) if the following applies: depth = 100 mm; SSD = 90 cm; SCD = 100 cm (isocentric) f. Check if the lasers cross the centre of the ionization chamber (within 1 mm) g. Remove the paper or ‘credit card’ from the water surface
30. Measure ambient conditions (P, t and RH%) a. Measure pressure, water temperature and relative humidity. b. Write down the values and fill in the Excel-sheet

D o s i m e t r y a u d i t W o r k i n g i n s t r u c t i o n P a g e | 6 of 14
Measurement_instructions_NCS_dosimetry_audit_v20100226.doc
NOTES:
31. Perform at least 5 charge measurements Note: if THIS is a TPR10 AND a reference measurement (local reference SSD = 90 cm) then record values in Excel-sheet “Audit I” a. Zero the dosimeter b. Perform 5 charge measurements (200 M.U.), look for trends and, if necessary, perform more charge measurements c. Record the measurements in Excel-sheet with tab-name “TPR II (10 cm)” or “Audit I” (see note above)
tair = __________ °C twater = __________ °C P = __________ hPa RH = __________ %
Eph = ___ MV Eph = ___ MV Eph = ___ MV Reading nC Reading nC Reading nC 1 __________ __________ __________ 2 __________ __________ __________ 3 __________ __________ __________ 4 __________ __________ __________ 5 __________ __________ __________ 6 __________ __________ __________ 7 __________ __________ __________ 8 __________ __________ __________ 9 __________ __________ __________ tair = __________ °C twater = __________ °C P = __________ hPa RH = __________ %
32. Change energy and repeat measurements (for all required photon energies) Change the accelerator energy and repeat the charge measurements
33. Measure ambient conditions (P, t and RH%) a. Measure pressure, water temperature and relative humidity. b. Write down the values and fill in the Excel-sheet
34. Verify the calculated TPR20,10 in the Excel-sheet with the expected value a. The TPR20,10 has now been calculated in the Excel-sheet. b. Check if the value of TPR20,10 complies with the one given by the institute
First audit REFERENCE measurement ONLY IF LOCAL REFERENCE SSD = 100 CM
35. Verify if a reference measurement is needed a. If the usual reference SSD at the institute is 90 cm then NO reference measurement is needed. The TPR-10 measurement will serve
as a reference measurement (continue with the recombination measurements) b. If the usual reference SSD at the institute is 100 cm then (YES) a reference measurement is needed (continue here …)
36. Position the chamber and phantom at a depth of 100 mm, SSD = 100 cm a. Leave the ionization chamber at its depth of 100 mm b. Place the thin white paper or ‘credit card’ on the surface c. Move the SSD to 100 cm by lowering the table by 100 mm using the desk-ruler at the side of the phantom d. Check the displacement with the light-ruler e. Check (!!) if the following applies: depth = 100 mm; SSD = 100 cm; SCD = 110 cm (non-isocentric) f. Remove the paper or ‘credit card’ from the water surface

D o s i m e t r y a u d i t W o r k i n g i n s t r u c t i o n P a g e | 7 of 14
Measurement_instructions_NCS_dosimetry_audit_v20100226.doc
NOTES:
37. Measure ambient conditions (P, t and RH%) a. Measure pressure, water temperature and relative humidity. b. Write down the values and fill in the Excel-sheet
38. Perform at least 5 charge measurements a. Perform 5 charge measurements (200 M.U.), look for trends and, if necessary, perform more charge measurements b. Record the measurements in Excel-sheet with tab-name “Audit I”
tair = __________ °C twater = __________ °C P = __________ hPa RH = __________ %
Eph = ___ MV Eph = ___ MV Eph = ___ MV Reading nC Reading nC Reading nC 1 __________ __________ __________ 2 __________ __________ __________ 3 __________ __________ __________ 4 __________ __________ __________ 5 __________ __________ __________ 6 __________ __________ __________ 7 __________ __________ __________ 8 __________ __________ __________ 9 __________ __________ __________ tair = __________ °C twater = __________ °C P = __________ hPa RH = __________ %
39. Change energy and repeat measurements (for all required energies) Change the accelerator energy and repeat the charge measurements
40. Measure ambient conditions (P, t and RH%) c. Measure pressure, water temperature and relative humidity. d. Write down the values and fill in the Excel-sheet
RECOMBINATION measurement
41. Leave the ionization chamber (SCD) and phantom (SSD) as they are Note: the previous measurement serves as the initial measurement (bias +400 V) for the recombination measurement. Chamber and phantom should be left untouched to perform the 1/3 voltage measurement in order to determine the recombination correction.
42. Change electrometer bias setting to +133 V a. Change the bias of on the ionization chamber to (400/3 V =) +133 V by
selecting a ‘different’ detector from in at the PTW Unidos Webline interface b. Turn the dial and select ‘detector’ on the main screen then press the dial
(see picture on the right) c. Select detector ‘Audit Recomb’ and press ‘Close’ (by means of the Zero-
button) Note: the chamber bias voltage will be set to +133 V now. d. Pre-irradiate the ionization chamber with approximately 8 Gy
43. Measure ambient conditions (P, t and RH%) a. Measure pressure, water temperature and relative humidity.

D o s i m e t r y a u d i t W o r k i n g i n s t r u c t i o n P a g e | 8 of 14
Measurement_instructions_NCS_dosimetry_audit_v20100226.doc
NOTES:
b. Write down the values and fill in the Excel-sheet
44. Perform at least 5 charge measurements a. Zero the dosimeter b. Perform a leakage measurement for 120 seconds and record the value in the Excel-sheet with tab name “Ks 1” c. Perform 5 charge measurements (200 M.U.), look for trends and, if necessary, perform more charge measurements d. Record the measurements in Excel-sheet with tab-name “Ks 1”
tair = __________ °C twater = __________ °C P = __________ hPa RH = __________ %
Leakage Eph = ___ MV Eph = ___ MV Eph = ___ MV Reading pC Reading nC Reading nC Reading nC 1 __________ __________ __________ __________ 2 X __________ __________ __________ 3 X __________ __________ __________ 4 X __________ __________ __________ 5 X __________ __________ __________ 6 X __________ __________ __________ 7 X __________ __________ __________ 8 X __________ __________ __________ 9 X __________ __________ __________ tair = __________ °C twater = __________ °C P = __________ hPa RH = __________ %
45. Change energy and repeat measurements (for all required energies) Change the accelerator energy and repeat the charge measurements
46. Measure ambient conditions (P, t and RH%) a. Measure pressure, water temperature and relative humidity b. Write down the values and fill in the Excel-sheet
47. Remove the chamber from the phantom and remove the phantom from the table a. Change the bias of on the ionization chamber back to +400 V by selecting detector ‘Audit TPR/Dose at the PTW Unidos Webline
(see instruction 42 for explanation) b. Accept the warning of the electrometer when the voltage is switched to a higher level Note: chamber and phantom are removed in order to repeat an independent audit-measurement after the RT-department has finished it’s reference and routine dosimetry.
RT-department’s REFERENCE AND ROUTINE measurements
48. The institute will perform its reference and routine measurement (we will observe ...) a. During their measurements register their water temperature and enter it in the Excel-sheet b. Record the ambient and/or medium (e.g. water or PMMA, etc) temperature, pressure and relative humidity (NCS equipment)
tair = __________ °C tmedium = __________ °C P = __________ hPa RH = __________ %
c. Ask for electronic versions of their measurements (if available) and store them on the laptop d. Write down on the next page as many remarks and / or observations e. Fill in at bottom of sheet ‘Routine I’ cells concerning: given MU’s during routine measurement, expected dose at given
reference depth OR (directly) the ratio obtained from the routine measurement in ‘Ratio =’
D o s i m e t r y a u d i t W o r k i n g i n s t r u c t i o n P a g e | 9 of 14
Measurement_instructions_NCS_dosimetry_audit_v20100226.doc
NOTES:
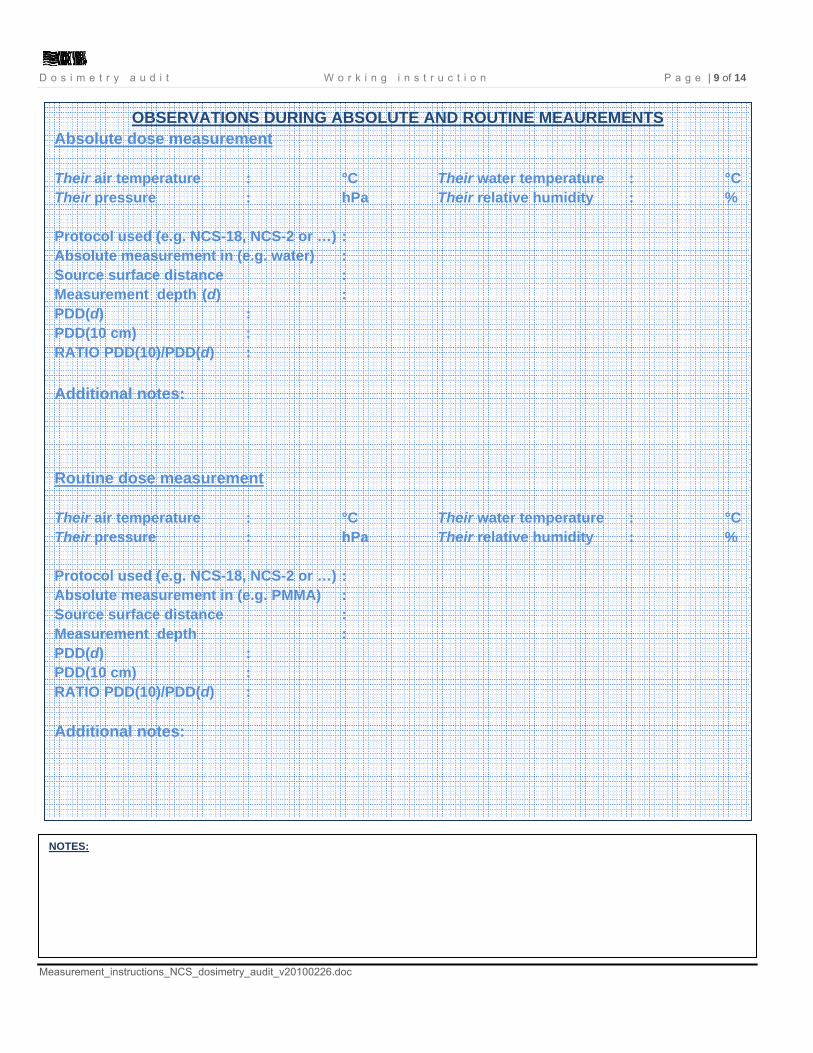
OBSERVATIONS DURING ABSOLUTE AND ROUTINE MEAUREMENTS
Absolute dose measurement Their air temperature : °C Their water temperature : °C Their pressure : hPa Their relative humidity : % Protocol used (e.g. NCS-18, NCS-2 or …) : Absolute measurement in (e.g. water) : Source surface distance : Measurement depth (d) : PDD(d) : PDD(10 cm) : RATIO PDD(10)/PDD(d) : Additional notes: Routine dose measurement Their air temperature : °C Their water temperature : °C Their pressure : hPa Their relative humidity : % Protocol used (e.g. NCS-18, NCS-2 or …) : Absolute measurement in (e.g. PMMA) : Source surface distance : Measurement depth : PDD(d) : PDD(10 cm) : RATIO PDD(10)/PDD(d) : Additional notes:
D o s i m e t r y a u d i t W o r k i n g i n s t r u c t i o n P a g e | 10 of 14
Measurement_instructions_NCS_dosimetry_audit_v20100226.doc
NOTES:
Continuation of the NCS-measurements Second audit measurement
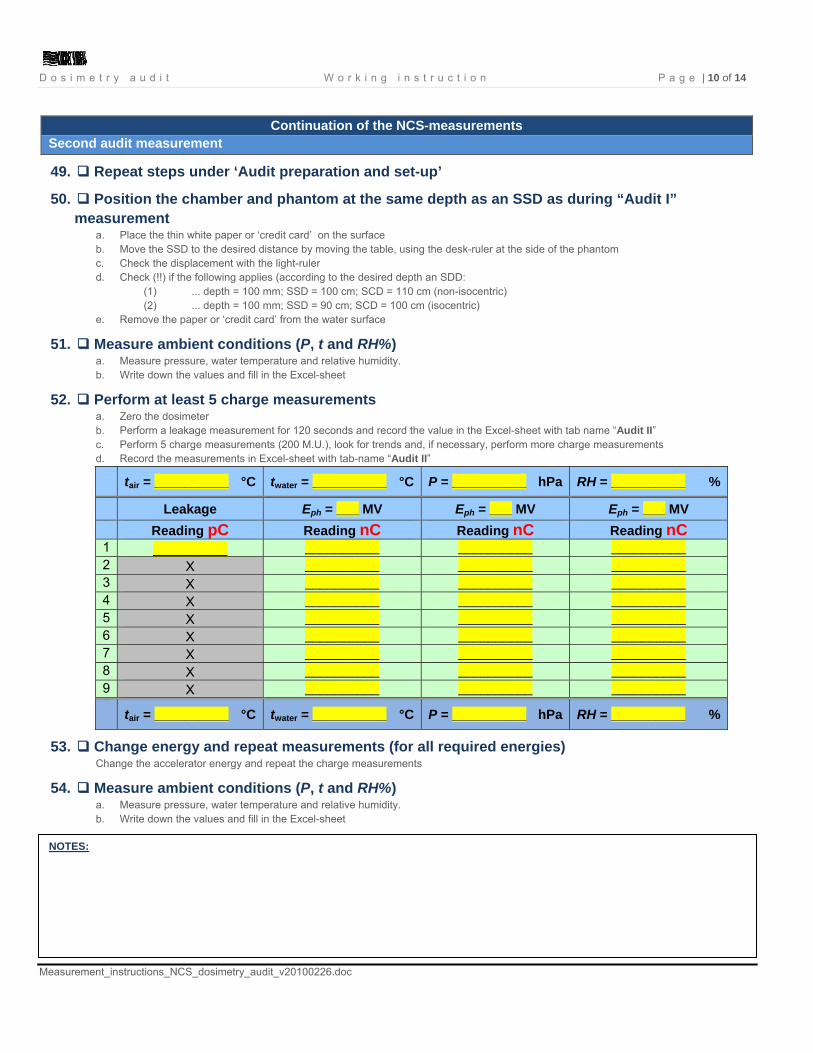
49. Repeat steps under ‘Audit preparation and set-up’
50. Position the chamber and phantom at the same depth as an SSD as during “Audit I” measurement
a. Place the thin white paper or ‘credit card’ on the surface b. Move the SSD to the desired distance by moving the table, using the desk-ruler at the side of the phantom c. Check the displacement with the light-ruler d. Check (!!) if the following applies (according to the desired depth an SDD:
(1) ... depth = 100 mm; SSD = 100 cm; SCD = 110 cm (non-isocentric) (2) ... depth = 100 mm; SSD = 90 cm; SCD = 100 cm (isocentric)
e. Remove the paper or ‘credit card’ from the water surface
51. Measure ambient conditions (P, t and RH%) a. Measure pressure, water temperature and relative humidity. b. Write down the values and fill in the Excel-sheet
52. Perform at least 5 charge measurements a. Zero the dosimeter b. Perform a leakage measurement for 120 seconds and record the value in the Excel-sheet with tab name “Audit II” c. Perform 5 charge measurements (200 M.U.), look for trends and, if necessary, perform more charge measurements d. Record the measurements in Excel-sheet with tab-name “Audit II”
tair = __________ °C twater = __________ °C P = __________ hPa RH = __________ %
Leakage Eph = ___ MV Eph = ___ MV Eph = ___ MV Reading pC Reading nC Reading nC Reading nC 1 __________ __________ __________ __________ 2 X __________ __________ __________ 3 X __________ __________ __________ 4 X __________ __________ __________ 5 X __________ __________ __________ 6 X __________ __________ __________ 7 X __________ __________ __________ 8 X __________ __________ __________ 9 X __________ __________ __________ tair = __________ °C twater = __________ °C P = __________ hPa RH = __________ %
53. Change energy and repeat measurements (for all required energies) Change the accelerator energy and repeat the charge measurements
54. Measure ambient conditions (P, t and RH%) a. Measure pressure, water temperature and relative humidity. b. Write down the values and fill in the Excel-sheet

D o s i m e t r y a u d i t W o r k i n g i n s t r u c t i o n P a g e | 11 of 14
Measurement_instructions_NCS_dosimetry_audit_v20100226.doc
NOTES:
Please don’t forget to read / perform the THIS page!
Analysis of preliminary results
55. Analyze the AUDIT MEASUREMENTS a. The measurement results are given in the Excel-sheet b. Decide if actions need to be taken:
• REF1 and REF2 should be within 0.5 %, however 1 % will be accepted • If the difference between REF1 and REF2 is larger than 1 %, an extra NCS-REF3 measurement needs to be performed and the
cause of the deviation needs to be investigated
56. Analyze the AUDIT-COMPARISON RESULTS a. The measurement result are given in the Excel-sheet b. Decide if actions need to be taken:
• The average of NCS REF1 and REF2 should be within 1.5 % of the reference and routine measurement result performed by the institute, however 2 % is accepted
• If the difference is larger than 2 %, the cause of the deviation needs to be investigated
Finalization of the audit visit At audit location
57. Confirm that all data is collected and backed up on the laptop a. Make sure that digital data (Excel-sheet) and measurements written down are present and complete b. Copy all measured date to the SD memory card c. Pack all equipment as when it arrived according to the photos. These instructions are included in the binder.
58. Make sure that THESE working instructions including written comments are packed also!!! a. Leave the ionization chamber in its sleeve and tubing. You can pack it in the larger PTW case. b. The Rotronic Hygroskop humidity meter is not packed in a case. Make sure it is kept in a safe place in the NCS-case,
packed with sufficient foam.

D o s i m e t r y a u d i t W o r k i n g i n s t r u c t i o n P a g e | 12 of 14
Measurement_instructions_NCS_dosimetry_audit_v20100226.doc
NOTES:
After the visit Directly after the visit (when the equipment has returned)
59. Confirm that the equipment has not been damaged during transportation a. Open the transport cases b. Check if the ionization chamber has not been damaged during transportation and is dry c. If any instrument is damaged during transportation, then contact the secretary of the NCS subcommittee ‘Dosimetry Audit’ d. Store the transport cases, containing the instruments in a dry and cool environment
60. Check and finalize the audit data files on the laptop and copies of paper-datasheets a. Check if the Excel-sheet of the audit is available on the laptop, named: ‘C:\NCS_dosimetry_audit
\YYYYMMDD_CITY_INSTITUTE_NCS_Audit_Measurement_Sheets_vX.xls’ b. Check if the Excel-sheet of the audit is available on the SD memory card, named: ‘C:\NCS_dosimetry_audit
\YYYYMMDD_CITY_INSTITUTE_NCS_Audit_Measurement_Sheets_vX.xls’ c. Compare the ‘Date modified’ and the contents of the two files on the laptop and on the SD memory card. If any deviation exists
between the files, contact the person who performed the audit to clarify what is the correct version d. Check of the file ‘YYYYMMDD_CITY_INSTITUTE_NCS_Audit_Measurement_Sheets_vX.xls’ is filled in completely. Consult the
person who performed the audit if data is missing or incomplete e. Back-up all previous audit measurement(s) to the local disk on the laptop, named: ‘C:\yyyymmdd_NCS_audit_backup.zip’. Where
yyyymmdd is replaced by the year (yyyy), month (mm) and day (dd) of the audit f. Send two files to the secretary of the NCS subcommittee ‘Dosimetry Audit’ by email (send a cc to yourself):
(1) YYYYMMDD_CITY_INSTITUTE_NCS_Audit_Measurement_Sheets_vX.xls (2) yyyymmdd_NCS_audit_backup.zip
g. Make sure that written data of the performed audit is available on paper
61. Check audit results and plan additional actions if necessary
D o s i m e t r y a u d i t W o r k i n g i n s t r u c t i o n P a g e | 13 of 14
Measurement_instructions_NCS_dosimetry_audit_v20100226.doc
NOTES:
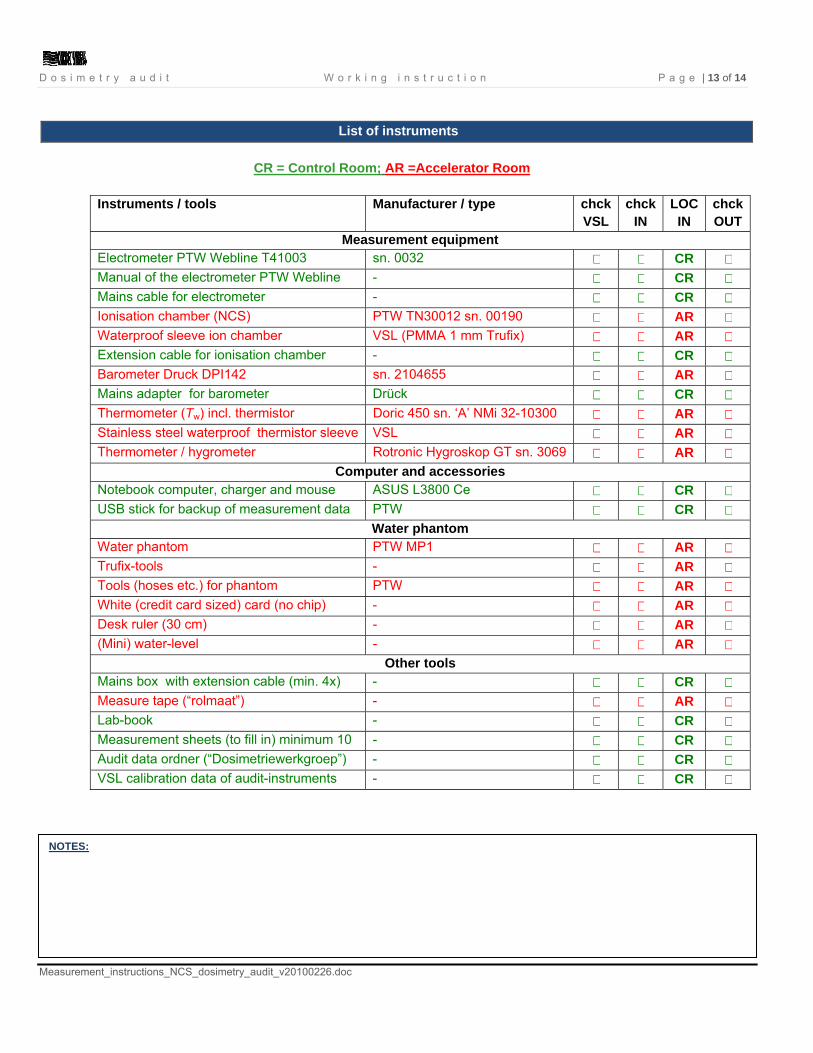
List of instruments
CR = Control Room; AR =Accelerator Room
Instruments / tools Manufacturer / type chck
VSL chck
IN LOCIN
chckOUT
Measurement equipment Electrometer PTW Webline T41003 sn. 0032 CR Manual of the electrometer PTW Webline - CR Mains cable for electrometer - CR Ionisation chamber (NCS) PTW TN30012 sn. 00190 AR Waterproof sleeve ion chamber VSL (PMMA 1 mm Trufix) AR Extension cable for ionisation chamber - CR Barometer Druck DPI142 sn. 2104655 AR Mains adapter for barometer Drück CR Thermometer (Tw) incl. thermistor Doric 450 sn. ‘A’ NMi 32-10300 AR Stainless steel waterproof thermistor sleeve VSL AR Thermometer / hygrometer Rotronic Hygroskop GT sn. 3069 AR
Computer and accessories Notebook computer, charger and mouse ASUS L3800 Ce CR USB stick for backup of measurement data PTW CR
Water phantom Water phantom PTW MP1 AR Trufix-tools - AR Tools (hoses etc.) for phantom PTW AR White (credit card sized) card (no chip) - AR Desk ruler (30 cm) - AR (Mini) water-level - AR
Other tools Mains box with extension cable (min. 4x) - CR Measure tape (“rolmaat”) - AR Lab-book - CR Measurement sheets (to fill in) minimum 10 - CR Audit data ordner (“Dosimetriewerkgroep”) - CR VSL calibration data of audit-instruments - CR
D o s i m e t r y a u d i t W o r k i n g i n s t r u c t i o n P a g e | 14 of 14
Measurement_instructions_NCS_dosimetry_audit_v20100226.doc
NOTES:
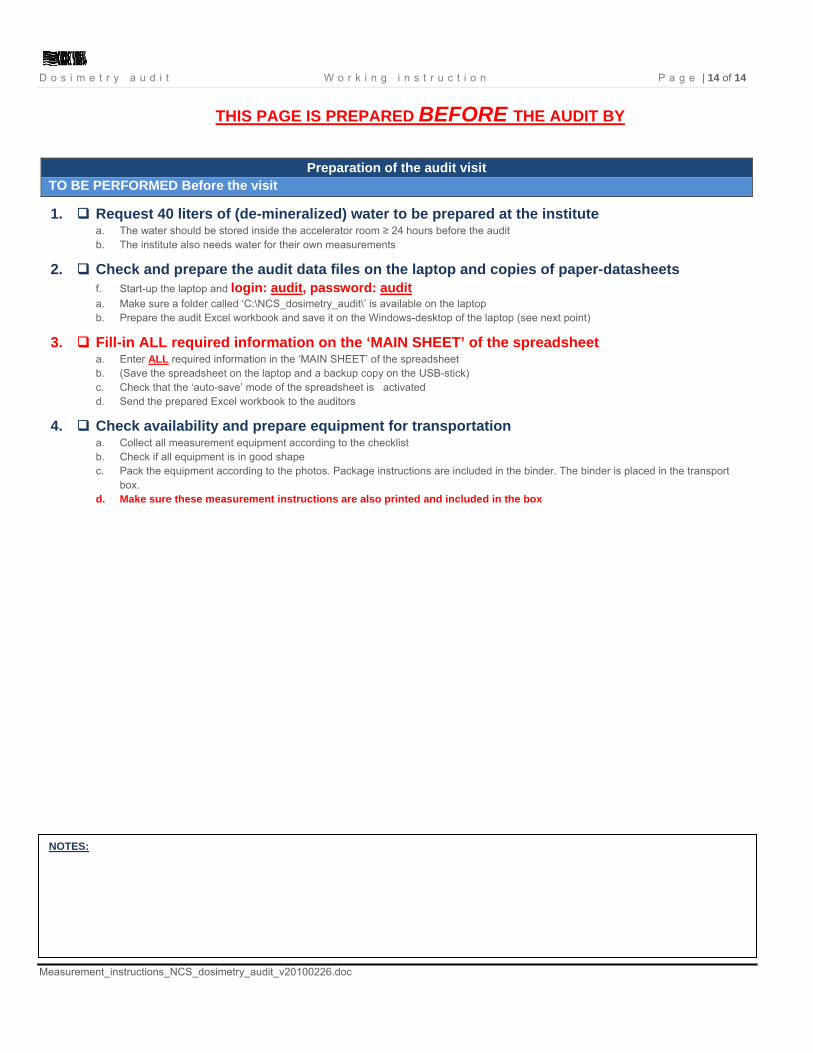
THIS PAGE IS PREPARED BEFORE THE AUDIT BY
Preparation of the audit visit TO BE PERFORMED Before the visit
1. Request 40 liters of (de-mineralized) water to be prepared at the institute a. The water should be stored inside the accelerator room ≥ 24 hours before the audit b. The institute also needs water for their own measurements
2. Check and prepare the audit data files on the laptop and copies of paper-datasheets f. Start-up the laptop and login: audit, password: audit a. Make sure a folder called ‘C:\NCS_dosimetry_audit\’ is available on the laptop b. Prepare the audit Excel workbook and save it on the Windows-desktop of the laptop (see next point)
3. Fill-in ALL required information on the ‘MAIN SHEET’ of the spreadsheet a. Enter ALL required information in the ‘MAIN SHEET’ of the spreadsheet b. (Save the spreadsheet on the laptop and a backup copy on the USB-stick) c. Check that the ‘auto-save’ mode of the spreadsheet is activated d. Send the prepared Excel workbook to the auditors
4. Check availability and prepare equipment for transportation a. Collect all measurement equipment according to the checklist b. Check if all equipment is in good shape c. Pack the equipment according to the photos. Package instructions are included in the binder. The binder is placed in the transport
box. d. Make sure these measurement instructions are also printed and included in the box