mase masemase ors t genera b - · pdf filethe generator you have purchased is the fruit of...
TRANSCRIPT

mase
mase
mase
mase
mase
GE
NE
RA
TO
RS
IS 2.7 B
Rev.3 A.A. 27/03/2014
cod.43256
Modello / Modelo
N° matricola / Matrìcula
Codice / Còdigo
USE, MAINTENANCE AND INSTALLATION MANUAL GB

IS 2.7 B
- 2
GB
GB

IS 2.7 B
- 3
GB
GB
This manual has to be preserved for all through life of the
gen set to which ago reference
Thank you for having chosen a product MASE.
As a leading generator manufacturer, Mase Generators offers a wide range of generators with an output from 1 KVA
portable generators to 1600 KVA units for special applications.
Founded in 1970, the Cesena-based company extends over a area of 16,000 square meters, including a 9,000 sq. mtr.
manufacturing facility.Mase Generators began as a company producing 500 Watt, light and compact portable generators. These generators
made the Mase Generators name well known throughout the world. Mase Generators is a leader in high
quality, reliable products, and innovative research performed by Research and Development Department.
The generator you have purchased is the fruit of years of experience in the sector and for the modern conception, the
strong sizing, the materials employees, the continuous updatings, constitutes an effective answer to the operators’
demands of the sector.
This Manual instructions will furnish you useful information and precious suggestions so you can fully exploit
all the possibilities that the generators offers you.
If any part of the manual resulted incomprehensible, please contact us.
In to renew our thanks we cordially greet you.
MASE GENERATORS S.p.A. Via Tortona, 345
47522 Cesena (FC) Italy
Tel.+39-0547-354311 Fax.+39-0547-317555
Technical data, informations, layouts of the texts and graphic preparations: edited by the Technical Office
Mase Generators
THE COMPANY MASE GENERATORS SPA RESERVES ALL RIGHTS TO IMPLEMENT MODIFICATIONS TO THIS PRESENT MANUAL WITHOUT
ADVANCE NOTICE OR NOTIFICATION, WHEN NECESSARY, IN ACCORDANCE WITH ITS POLICY OF CONTINUAL PRODUCT IMPROVEMENT.
THE MASE GENERATORS SPA, RESERVES ALL THE RIGHTS ON THE MANUAL PRESENT. ANY TOTAL OR PARTIAL REPRODUCTION IS
PERMITTED WITHOUT WRITTEN AUTHORIZATION OF THE MASE GENERATORS SPA.

IS 2.7 B
- 4
GB
GB
CONTENTS
DEFINITIONS USED ................................................. 5
PRELIMINARY PRESCRIPTIONS............................ 7
1 GENERAL INFORMATIONS ............................. 8
1.1 Conform use ..................................................... 8
1.2 Residual risks .................................................... 8
1.3 Safety symbols .................................................. 9
1.4 Symbols on the generator group ..................... 10
1.5 Safety label informations ................................. 11
1.6 Reference documents ..................................... 15
1.7 Reference regulations and legislative provisions .. 15
1.8 Marking ........................................................... 151.9 Identification of the generator unit ................... 15
2 GENERAL CHARACTERISTICS .................... 16
2.1 Composition of generator unit ......................... 16
2.2 Command and control panel ........................... 17
2.3 Table of technical characteristics .................... 18
3 INSTALLATION .............................................. 19
3.1 General housing characteristics ...................... 19
3.2 Lifting ............................................................... 19
3.3 Anchoring the generator .................................. 19
3.4 Ventilation ....................................................... 19
3.5 Cooling water circuit ........................................ 20
3.5.1Seawater feed system ..................................... 20
3.5.2Components .................................................... 21
3.5.3Typical installation with the generator above the
waterline ......................................................... 22
3.5.4Typical installation with the generator below thewaterline ......................................................... 22
3.5.5Exhaust system ................................................ 23
3.6 Fuel circuit ....................................................... 24
3.6.1Fuel filter .......................................................... 24
3.6.2Electric pump ................................................... 24
3.7 Electrical connections ...................................... 25
3.7.1Battery connection ........................................... 25
3.7.2Control panel connection ................................. 25
3.7.3A.C. connection. .............................................. 26
3.7.4Generator-network switching ............................ 273.7.5Emergency stop ............................................... 27
4 USING THE GENERATOR ............................. 28
4.1 Preliminary checks .......................................... 28
4.2 Fuelling ............................................................ 28
4.3 Starting the generator ...................................... 29
4.4 Stopping the generator .................................... 29
5 SAFETY SWITCHES AND WARNING
SIGNALS......................................................... 30
5.1 Protection against short circuits and overload .. 30
5.2 Protection against short-circuit of low
voltage electrical system .................................. 30
5.3 Control panel - Alarm codes ............................. 31
6 MAINTENANCE ............................................... 32
6.1 Preamble .......................................................... 32
6.2 Routine engine maintenance ............................ 32
6.3 Engine oil check .............................................. 32
6.4 Engine oil change ............................................ 336.5 Oil filter ............................................................ 33
6.6 Replacing / cleaning the fuel pump filter ........... 34
6.7 Replacing the line fuel filter .............................. 34
6.8 Bleeding the fuel system .................................. 35
6.9 Air filter ............................................................ 35
6.10 Draining the cooling system ............................. 35
6.11 Replacing the zinc anode ................................. 35
6.12 Seawater pump maintenance ........................... 36
6.13 Checking / replacing the v-belt ......................... 36
6.14 Alternator maintenance .................................... 376.15 Battery maintenance ........................................ 37
6.16 List of recommended spare parts ..................... 38
6.17 Periods of inactivity ......................................... 38
6.18 Period checks and maintenance ...................... 39
6.19 Anomalies, causes and remedies .................... 40
6.20 How to order the spare parts ............................ 40
7 TRASPORT, STORAGE, LIFTING,
HANDLING AND PACKAGING ....................... 41
7.1 Transport and storage ...................................... 41
7.2 Lifting and handling of the packed
generator unit .................................................. 41
8 GUARANTEE AND RESPONSABILITY .......... 42
8.1 Guarantee ........................................................ 42
8.2 Limits of responsability .................................... 42
9 DISPOSAL ...................................................... 42
9.1 Disposal of the waste materials deriving from
maintenance and scrapping ........................... 42
10 WIRING DIAGRAMS ....................................... 43

IS 2.7 B
- 5
GB
GB
DEFINITIONS USED
The terms used are current technical terms, and where considered necessary the meaning is described
below
- Generator
An assembly of an internal combustion piston engine and an alternate current, synchronous, 2-4 pole, self-
excited generator, joined together to create a station for self-production of electrical energy.
- User system
Composed of the power supply circuits of the user equipment, including the relevant sectioning, handling,
breaking, transformation, protection, etc. devices which do not form part of the production, transmission and
distribution systems.
- Category 1 electrical system
A system where the rated voltage is greater than 50 V and smaller than 1000 V including alternate current.
- Load
A set of numerical values of electrical and mechanical magnitudes which characterise the requirements
imposed on a rotary machine by an electrical circuit or by a mechanical device at a certain instant.
- Thermal switch
Main cut-out and breaking device made up of a switch which opens automatically by thermal effect.
- Differential switch
Main cut-out and breaking device made up of a switch which opens automatically by differential effect.
- Skilled person
A person with technical know-how or sufficient experience to allow him to avoid the dangers inherent in
electricity.
- MASE specialised personnel
A person able to evaluate the job assigned to him and recognise the possible dangers on the basis of training
at the MASE training centres, with professional experience and knowledge of the equipment in question and
of the possible dangers deriving in the event of negligent behaviour.
- Supplier
A body (e.g. manufacturer, agent, installer) which supplies the equipment or services relating to the machine.
- Control
Control action by which an output variable of the controlled system (controlled variable) is affected by an input
variable of the controlling system in order to achieve a certain goal.
- Manual control
Control where the change of a variable handled is produced by a person through manual intervention.
- Automatic control
Control where the change of a variable handled is produced by a controlling device (automatic controller) without
the intervention of a person.
- Danger
Source of possible harm or damage to health.
- Protection
Guard or protection device as safety measure to protect persons from a present or potential danger.
- Casing
Part intended to assure protection of the equipment against specific outside influences and protection in every
sense against contacts.

IS 2.7 B
- 6
GB
GB
- Connection in bad state
The live parts are not fully covered with insulation removable by destruction only, the connections are not securebecause of unstable tightening of the parts and a development of oxide between the parts.
- Direct contact
Contact of persons or animals with live parts.
- Control circuit
Circuit used to control machine operation.
- Equipment
General term which comprises materials, devices, equipment, accessories and similar used in conjunction withan electrical installation.

IS 2.7 B
- 7
GB
GB
PRELIMINARY PRESCRIPTIONS
FIELD OF EMPLOYMENT:
THE GENERATOR IS PROPER FOR TO PRODUCE IN WAY AUTONOMOUS ELECTRIC ENERGY IN THE
LIMITS OF TENSION AND WATT DECLARED BY THE BUILDER.
Consult this manual carefully before proceeding to the use and to any operation on the genset.
FAILURE TO RESPECT THE SPECIFICATIONS CONTAINED IN THIS USE AND MAINTENANCE MANUAL
WILL RESULT IN FORFEITURE OF THE GUARANTEE ON THE PRODUCT.
This manual was drawn up by the manufacturer and forms an integral part of the generator equipment, definition
used as indicated in Directive 98/37/EC; the information contained in the manual is addressed to all the persons
involved in the operating life cycle of the generator, and is necessary to inform both those who effectively carry
out the different operations and those who coordinate the activities, to arrange the necessary logistics and to
regulate access to the place where the generator will be installed and operated.
This manual was drawn up by the manufacturer with the purpose of providing essential information and
instructions for proper use and maintenance in conditions of safety. It constitutes an integral part of the generator
equipment and must carefully be protected from any agent which may damage it for the entire life cycle of the
generator. The manual must accompany the generator if transferred to another user or owner.
It is opportune to remember the supplied generator group needs installation.
The technician will release, at the end of the work, a declaration to the meaning of the normative applied.
The manual defines the purpose for which the generator was constructed and contains all the informationnecessary to guarantee safe and proper use.
Constant observance of the instructions contained in this manual guarantees the safety of the operator, protection
against damage to persons or things, operating economy and a longer life of the generator.
The drawings are provided by way of example. Even if the generator in your possession differs from the
illustrations contained in this manual in elements of little significance, for example the colour, the safety of the
generator and the information provided are nevertheless guaranteed.
To facilitate consultation, it has been divided into sections identifying the main concepts; for a quick look at the
topics, consult the index.
Ongoing improvement and development of the product may have led to modifications to the generator which are
not included in this publication.
Whenever a problem concerning the generator or this publication arises, consult with Mase Generators
SPA for the latest information available.

IS 2.7 B
- 8
GB
GB
1 GENERAL INFORMATIONS
1.1 CONFORM USE
The generator is suitable for independent production of electrical energy within the voltage and wattage limits
declared by the manufacturer.
Any other use outside the already stated field of use is prohibited: the generator is intended for marine use.
The generator has been designed to operate independently (without operator) if not for sporadic checks.The limits of use are:
- operating temperature: -10°C (14°F), +40°C (104°F)
- relative humidity: 30% - 90%
- the generator is suitable for marine operation.
Installations are subject to approval by mase or by an installer authorised by mase.
Arbitrary modifications to the machine are prohibited for safety reasons.
Original spare parts must be used on pain of losing machine conformity.
All the operations that require dismantling of special parts may only be carried out by technicians authorised by
the local dealer or the manufacturer.
Only mase technicians or personnel trained by mase have the necessary knowledge of the generator and
the special equipment as well as the experience to carry out any operation in the most economical and reliable
way.
1.2 RESIDUAL RISKS
The generator has been designed taking into account the safety regulations set out in the EC directives and
standards; nonetheless, the following residual risks remain:
- injury caused by contact with hot parts during maintenance.
- injury caused by electrocution during maintenance on the electric panel.
- risks connected with long periods of exposure to the noise of the generator (with open cowling).
- risks due to contact with the generator lubricants during maintenance.
- risks due to the fire hazard the fuel represents.
Because of the typical intrinsic danger of the Generators, you are reminded that, although the generator has
been designed, constructed and tested in accordance with the safety regulations, only proper and careful use
can guarantee full safety; to this end, the various precautions to be taken during use of the Generator are
listed below.

IS 2.7 B
- 9
GB
GB
SAFETY INSTRUCTIONS
The electromechanics equipments, included the generating sets, switch, command electric equipments and accessories,
can cause damages to people and,if they are installed, used or mainteined with not qualified operations, they can put
in serious danger the life of people. To avoid accidents is necessary to know the potential risks and operate withcaution.Read and follow all the precautions and the instructions for the safety. PRESERVE THESE INSTRUCTIONS.
The manual shows varied typologies of precautions and instructions for the safety: Danger, Warning, Caution.
1.3 SAFETY SIMBOLS
Indicates that particular attention must be paid in order to prevent serious risks which could lead to death or
possible harm to the health of personnel.
A condition which may occur during the lifetime of a product, system or plant considered at risk regarding damage
to persons, property, the environment or economic loss.
Indicates that particular attention must be paid in order to prevent serious consequences which could result
in damage to tangible goods, such as the resources or the product.
Other symbols on this manual
Particular important instructions
Indicates components and non inclusive parts with the base configuration.
Carefully consult this manual before using or carrying out any operation on the generator.
The routine maintenance operations, must be carried out by qualified personnel who have the appropriate
equipment and protections.

IS 2.7 B
- 10
GB
GB Cod.46286
Cod. 41527
Cod. 42264
Cod. 42329
Cod. 41650
Cod. 42136
Cod. 40179
Cod. 41961
Cod. 42900
Cod. 43244
Cod. 41961
Cod. 42586
Cod. 41763
Cod. 42868
Cod. 017224
Cod. 41650
Cod. 42329
1.4 SYMBOLS ON THE GENERATOR GROUP
Depends
on the
version

IS 2.7 B
- 11
GB
GB
1.5 SAFETY LABEL INFORMATIONS
• These labels warn the user of any danger which may cause serious injury.Carefully read the meaning and the precautions described in this manual.
• If the label detaches or becomes illegible, replace it with a new one which can be requested from an authorisedmase dealer.
Danger Symbols Meaning
HOT PARTS
Hot engine and exhaust system.
Can cause severe injury or death.
Do not work on generator set untill it is allowed to cool.
Servicing exhaust system.
Hot parts can cause severe injury or death.
Do not touch hot engine parts. An engine becomes hot while running and exhaust system
components become extremely hot.
ACCIDENTAL STARTING
Accidental starting. Can cause severe injury or death.
Disconnect battery cables before working on generator set. (Remove negative (-) lead
first when disconnecting battery. Reconnect negative (-) lead last when reconnectingbattery).
Disabling generator set. Accidental starting can cause severe injury or death.
Before working on the generator set or connected equipment, disable the generaset
as follows:
1)Disconnect power to battery charger, if equipped.
2)Remove battery cables (remove negative (-) lead first).
3)Reconnect negative (-) lead last when reconnecting battery.
Follow these precautions to prevent starting of generator set by the remote start/stop
switch.
Hazardous voltage. Moving rotor.
Can cause severe injury or death.
Operate generator set only with all guards and electrical enclosures in place.
MOVING PARTS
Rotating parts.
Can cause severe injury or death.
Do not operate generator set without all guards, screens, and covers in place.
PREVENTING FIRE
• Be sure to use the proper diesel fuel.
• Be sure to stop the engine before refueling.
• If you spill fuel, wipe off such spillage completely.• Never place oil or other flammable materials (such as straws, withered
grass) close to the engine during running or shortly after shutting it down.
• Check fuel oil and engine oil for leakage from their piping lines to cause
fires.

IS 2.7 B
- 12
GB
GB
PREVENTING FIRE
Can cause severe injury or death.
• Start
• Start the engine only from a starter switch without any load or in neutral posi-
tion of the clutch of machine unit.
The machine unit suddenly starts to move or generates power to cause seriouspersonal injury.
• Keep the machine unit sufficiently away from a building and flam-
mable materials during engine running. It may cause fires due to hot
exhaust gas and engine body.
• Keep sparks, open flames or any other form of ignition (match, cigarette,
etc.) away when fueling / refueling. Fire and or an explosion may result.
FIRE
Can cause severe injury or death.
In case of fire, do not open the chest
Extinguish the generator fire and immediately unload the whole content of the portable
extinguisher through the hole indicated by the label.
EXHAUST SYSTEM
Carbon monoxide.
Can cause severe injury or death.
The exhaust system must be leakproof and routinely inspected.
Carbon monoxide symptoms.
Carbon monoxide can cause severe nausea, fainting, or death.
Carbon monoxide is a poisonous gas witch is present in exhaust gases.
Inspecting exhaust system.
Carbon monoxide can cause severe nausea, fainting, or death.
In addiction to routine exhaust system inspection,install a carbon monoxide detector.Consult your boat builder or dealer for approved detector installation. Inspect your
detector before each generator set use. Test the carbon monoxide detector function
per the manufacter’s instructions and keep it operational at all times.
Installing exhaust system.
Carbon monoxide can cause severe nausea, fainting, or death.
In addiction to routine exhaust system inspection,install a carbon monoxide detector.
Use the following precautions when installing and operating generator set.
Do not install exhaust outlet where exhaust can be drawn in throught portholes,vents,orair conditioners.
If the generator set exhaust discarge outlet is near the waterline, water could enter
the exhaust discharge outlet and close or restrict the flow of exhaust.
Danger Symbols Meaning

IS 2.7 B
- 13
GB
GB
EXHAUST SYSTEM
Carbon monoxide.
Group generator use.
Carbon monoxide can cause severe nausea, fainting, or death.
Carbon monoxide is an odorless, colorless,tasteless, non irritating gas,able to, if inhaled
only also for brief time to provoke the death.
Be especially careful if operating the generator set when moored or anchored under
calm conditions as gases may accumulate.
If operating the generator set dockside, moor the ccraft so that the exhaust discharges
on the lee side (the side sheltered from the wind). Alway be aware of others-make sure
your exhaust is directed away from other boats and buildings.
HAZARDOUS VOLTAGE / ELECTRICAL SHOCK
Hazardous voltage. Moving motor.
Can cause severe injury or death.
Operate generator set only with all guards and electrical enclosures in place.
Grounding generator set. Hazardous voltage can cause severe injury or death.
Electroconduction is possible whnever electricity is present. Open main circuit
breakers of all power source before servicing equipment. Configure the installation to
electrically ground the generator set and alectrical circuits when in use.
Never contact electrical leads or appliances when standing in water or on wet ground,
as the chance of electroconduction increases under such conditions.
Disabling generator set.
Hazardous voltage can cause severe injury or death.
To disable the generating set from load, turn off the the automatic switch of the line or
disconnect the output cables from the commutation switch and block the final part of
cables. Hazardous voltage to load during an ispection cold cause severe damages to
people and to equipment. Do not use the emergency button instead the automatic switch
of the line.
Battery short circuit.
Explosion can cause severe injury or death. Short circuits can cause severe
damages to people and/or equipment. Disconnect the battery before doing installation
operations o generator set maintenances. Remove all jewels before doing maintenance
on the maintenance.
Remove negative (-) lead first when disconnecting battery. Reconnect negative (-) lead
last when reconnecting battery.
Never connect negative battery lead (-) to positive lead (+) of starting solenoid.
Danger Symbols Meaning

IS 2.7 B
- 14
GB
GB
Danger Symbols Meaning
BATTERY
Do not touch the electrolitic battery acid
Sufficient ventilation of the battery area.
• Keep the area around the battery well ventilated, paying attention to keepsparks, open flame and any other form of ignition away. During engine running or
charging battery, hydrogen gas is produced from the battery and
can be easily ignited.
Battery acid. Sulfuric acid in batteries can cause severe injury or death.
Sulfuric acid in battery ccan cause permanent damage to eyes, burn, skin, and hole
in clothing.
Always wear splash-proof safety googles when working near the battery. If battery
acid is splashed in the eyes or skin, wash immediately the affected area with largequantity of clean water. Seek immediate medical aid in case of eyes contact.
Do not intentionally make the battery spark by short-circuiting to check its
remaining charge. It will cause fires.
Make sure to use a gravimeter to check the remaining charge of the battery.
If the battery electrolyte frozen, recharge the battery after warming up to
thaw it.
SAFETY CLOTHING
Do not expose your skin to high pressure fuel spray
Be careful so as not to bring your skin in contact with high pressure fuel spray
from broken fuel injection pipe to penetrate your skin to cause inflamed.
If exposing to the spray should occur, obtain prompt medical treatment.
Beware of dirt from air blowing
Wear protective equipment such as goggles to protect your eyes when
blowing compressed air or steam. Dust or flying debris can hurt eyes.

IS 2.7 B
- 15
GB
GB
KVA
Hz
Cos.Ø
V V
A A
Degrees of protection IP
°C
m
Performance class
year of manifacture
Rated power factor
Rated voltage
declared frequency
Mass Kg
Class of insulation
Temp. max of use
Altitude max. of use
Rated current
Rated power 3F
Code Serial n°
1
2
5
4
14
6
7
8
9
10
11
12
13
15
16
3
1.6 REFERENCE DOCUMENTS
The instructions for use provided with each generatorare made up of a collection of documents of which this
manual represents the General Part. The following
documents are normally provided separate.
a CE declaration of conformity.
b Instruction manual for use and maintenance of
the generators,(this manual).
c Engine use and maintenance manual.
d List of mase Service Centres.
e mase Warranty certificate.
f Warranty card.
g EPA certificate (Engine manufacturing)
1.7 REFERENCE REGULATIONS AND LEGISLATIVE PROVISIONS
The generator groups, built by mase, destined to the
countries of the European Community, are conforming
to the applicable EC directives, and they are provided ofa EC Declaration of Conformity.
EN 12601: Reciprocating internal combustion engine
driven generating sets.
98/37/EC and subsequent amendments:
Essential machine requirements for safety and health
protection (“Machine” directive).
Directive 2006/95/EC (73/23/EC and subsequentamendments contained in the directive 93/68/EC):
Guarantee of safety of electrical material intended for use
within certain voltage limits, (“Low Voltage” Directives).
EN 60204.1: Electrical equipment of machines.
1.8 MARKING
The generator identification plate carries all theidentification data conforming to ISO 8528 and in
accordance with the provisions for EC marking for
those cases where required. Below is a facsimile of the
identification plate fixed on the hull of each generator.
1.9 IDENTIFICATION OF THE GENERATOR UNIT
1 - Machine name
2 - Machine code
3 - Serial number
4 - Rated power
5 - Declared frequency
6 - Rated power factor
7 - Rated voltage
8 - Rated current
9 - Degree of protection
10 - Class of isolation
11 - Temperature max. of use
12 - Altitude max. of use
13 - Performance class
14 - Year of construction
15 - Manufacturer - Adress
16 - Weight
The machine code number, the serial number
and the year of construction must always be
indicated when contacting the manufacturer
for information, order of spare parts, etc..

IS 2.7 B
- 16
GB
GB
1310
17
1115
16
12
14
18
81 2
3 4
5
5
5
6 7
9
2 GENERAL CHARACTERISTICS
The generators have been designed for use in the
marine field, using highly reliable 3000/3600 rpm air/
water-cooled diesel engines. Particular attention has
been paid to the degree of protection against external
agents, engine protection and protection of the electrical
parts against overload or overheating, adopting automaticsystems able to stop the generator in the event of
malfunctioning.
The generator is particularly quiet thanks to an internally
insulated soundproof casing and an advanced
soundproof system for combustion smoke exhaust.
The alternators used are the synchronous self-energized
type.
2.1 COMPOSITION OF GENERATOR UNIT
The generator unit is essentially composed by the
following components.
1 - Fixed frame
2 - Upper openable cowling
3 - Beside openable cowling
4 - Electric connection cowling
5 - Anchorage stirrup
6 - Emergency button
7 - Exhaust gas and cooling water connection
8 - Seawater intake connection
9 - Tank connections
10 - Engine air filter
11 - Check / refill oil cap
12 - Seawater pump
13 - Water/air radiator
14 - Starting motor
15 - rpm regulation screw
16 - Battery connection lead (+)
17 - Battery connection lead (-)
18 - Remote control panel connector
19 - Zinc anode
20 - Fuel pump filter
21 - Fuel pump

IS 2.7 B
- 17
GB
GB
20
13
19
21
6
1 3 5 4 2
2.2 REMOTE COMMAND AND CONTROL PANEL (STANDARD VERSION)
Each generator is fitted with an instrument panel for
commands and controls with the following components:
1) START BUTTON
2) STOP BUTTON
3) MENU NAVIGATION BUTTON
4) MENU NAVIGATION BUTTON
5) MENU SELECTION BUTTON
6) DISPLAY

IS 2.7 B
- 18
GB
GB
2.3 TECHNICAL CHARACTERISTICS TABLE
(1) Limited - time running power (LTP) ISO 8528-1It is the maximum power that, under the environment conditions established by the norm ISO 3046/1, the generator group it is able to disbursefor a maximum of 500 hours for year, of which a maximum of 300 hours among the interval of maintenance prescribed by the builder. It is acceptedthe operation to this power conditions the duration of the group.An overload of the 10% is admitted only for regulation.
(2) Prime power (PRP) ISO 8528-1It is the available maximum power for a variable power cycle that the generator group is able to disburse for a boundless number of hours for yearamong the interval of maintenance prescribed by the builder and under the environment conditions established by the norm ISO 3046/1. The middlepower during a period of 24 hours, doesn't have to exceed 80% of the PRP.An overload of the 10% is admitted only for regulation.
MAX POWER (LTP)1
2,2 kW
CONTINUOUS POWER (PRP) 2
1,9 kWPOWER FACTOR (Cos Φ) 1RATED VOLTAGE 120 VRATED FREQUENCY 60 HzGRADE OF PROTECTION IP 23MAX TEMP. OF USE 40 - 104 °C - °FMIN TEMP. OF USE -5 - 23 °C - °FMAX ALTITUDE OF USE 1000 - 3281 m - ft
MAX INCLINATION DURING
(PERIODICAL 3 min)30°
MAX INCLINATION DURING USE
(CONTINUOUS) 20°
PORTATA POMPA ACQUA MARE 20 - 5,3 L/min - gal/minL 510 - 20 mm - in.
DIMENSIONS W 403 - 15,8 mm - in.H 465 - 12,3 mm - in.
MASS 65 - 143 kg - lbs
TYPE 4 STROKEMANUFACTER YANMARMODEL LV48
DISPLACEMENT 211 - 12,9 cm3 - in
3
MAX POWER 4,7 - 3,46 HP - kWn° OF CYLINDERS 1CYLINDERS / HEAD MATERIAL ALLUMINIUMRATED SPEED 3600 rpmSPEED CONTROL CENTRIFUGAL / MECCANICALINDUCTION SYSTEM NATURALFUEL DIESELINJECTION SYSTEM DIRECTFUEL FEEDING PUMPS ELECTRICMAX PREVALENCE FUEL PUMP 700 - 27,5 mm - in.
FULL LOAD CONSUMPTION 0,8 - 0,21 L/h - gal/hCOOLING AIR / WATER
LUBRIFICATION SYSTEM FORCED
OIL SUMP CAPACITY 0,85 - 0,22 L - gal
COMBUSTION AIR VOLUME 0,34 - 12 m3/min - cfm
ELECTRIC PLANT 12 (negative pole to ground) VSTARTING ELECTRIC
STARTING MOTOR 12 - 0,8 V - kW
STARTING BATTERY 12 - 45 V - Ah
BATTERY CHARGER 12 - 10 V - A
STOPPING SYSTEM SOLENOID
TYPE SYNCHRONOUS, SELF-REGULATEDn° OF POLES 2MAX CURRENT 18,3 A
ISOLATION CLASS HVOLTAGE REGULATOR SELF-EXCITEDVOLTAGE STABILITY ±10%FREQUENCY STABILITY ±5%COOLING AIR / WATER
MODEL IS 2.7GENERAL FEATURES
ALTERNATOR
ENGINE

IS 2.7 B
- 19
GB
GB
3
mm
[in.]
2
1
3 INSTALLATION
The generator may only be installed by qualified
technicians. Malfunctioning due to improper
installation may cause injury or death.
3.1 GENERATOR HOUSING CHARACTERISTICS
- The generator must be installed in a sufficiently
ventilated room able to assure the amount of air required
for engine combustion.
- The room must be acoustically separated and isolated
from the living quarters.
- The generator must be positioned in such a way as tofacilitate normal maintenance operations.
- It is advisable to install the generator in the
propulsion engine room provided that it meets the
above conditions.
- The air must be clean.
- The air temperature in the place of installation must be
between -5°C (23°F) and +40°C (104°F).
- The relative humidity must not exceed 50% at a
maximum temperature of +40°C. Relative humidity of 90%
at +20°C (68°F) and 100% at +25°C (77°F) ispermissible.
3.2 LIFTING
Follow the procedure below to lift the generator:
- Place a homologated lifting strap of adequate capacity
(ref. 2) around the exhaust manifold (ref.1).
- Lift and handle with attention. See also chap. 7.2
3.3 ANCHORING THE GENERATOR
To anchor the generator, arrange a base to support theweight and vibrations.
Drill holes in the base as shown in fig.3.
3.4 VENTILATION
The generator is equipped with an internal forced cooling
system through a water/air exchanger.
The amount of air required for combustion is
aspirated through the intake located on the base (ref.4):
Therefore, always check that this intake is
free of any obstruction.

IS 2.7 B
- 20
GB
GB
1 2
3.5 COOLING WATER CIRCUIT
The generator engine is cooled by an open-circuitsystem in which seawater circulates.
At the time of installation, a seawater feed circuit
must be arranged for cooling, and an exhaust system
for the combustion gas and water mixture.
3.5.1 SEAWATER FEED SYSTEM
Two water intake systems are normally adopted on
boats:
-Direct intake system (ref.1).
-System with baffle (ref.2).
mase recommends using the direct intake system
(ref.1), since it prevents intake of pressurised water into
the intake ducts, instead generating a vacuum easily
overcome by the water pump head of the generator.
Do not fit any type of protection cap on the direct
intake system.
The system with baffle (ref.2), on the other hand, may
cause the following problems:
a- mounted with the slots facing the bow:
In this case, during navigation and with the generator
off, pressure is created in the water intake duct, which
may cause the system to fill up until reaching the exhaust
port, thus making it possible for water to enter the
cylinders.
b- mounted with the slots facing the stern:
In this case, during navigation a vacuum may be created
in the water intake duct such as to inhibit the water pumpto activate the cooling system or such as to limit the
flow rate with consequent overheating of the generator.

IS 2.7 B
- 21
GB
GB
6
6
5
2
1
3
4
6
3.5.2 COMPONENTS
If the generator is installed at a height over 1m (3,3ft)
above the waterline, a check valve (ref.2) must be
fitted after the seawater intake to prevent the water
circuit from emptying out when the engine is off. If
the circuit is empty, the water pump impeller may be
damaged during starting.
For the same reason, when starting the generator
for the first time, manually prime the intake pipe
leading from the valve to the pump.
- 1/2" direct seawater intake (ref.1).
- 1/2" ball cock (main system) (ref.3).
- 1/2" ball cock (system bleeding) (ref.4).
Serves to drain the cooling system of the generator
for general maintenance or for long periods of
inactivity.
- Water filter (inspectable) (ref.5).
It protects effectively the cooling circuit against intake
of mud, sand and seaweed.
The filter mesh must be the fine type, it is advisable
to use the type with 2-470µµµµµm (micron) pitch.
Different sizes would not allow good filter efficiency.
- Antisiphon valve (ref.6): this valve brings the cooling
circuit to atmospheric pressure when the engine is off,
preventing the siphonage phenomenon.
It must be used when the base of the generator is
under the water line, and must be positioned at least
500mm (1.6ft) above sea level.
The drain pipe of the antisiphon valve must be
positioned under the valve thus preventing water
from accumulating in the pipe which must always
remain empty to allow air to pass through it when
the generator is switched off.
It is advisable to run the drain pipe through the bilge,
as small amounts of water may flow from it during
normal operation.
Two holes have been made in the casing to connect
the antisiphon valve (ref.6).
Drain mixer
Anti-siphon valve
Water pump

IS 2.7 B
- 22
GB
GB
3.5.4 TYPICAL INSTALLATION WITH GENERATOR BELOW THE WATERLINE
3.5.3 TYPICAL INSTALLATION WITH GENERATOR ABOVE THE WATERLINE

IS 2.7 B
- 23
GB
GB
TYPICAL INSTALLATION WITH GENERATOR AND SEPARATOR BELOW THE WATERLINE
TYPICAL INSTALLATION WITH GENERATOR AND SEPARATOR ABOVE THE WATERLINE

IS 2.7 B
- 24
GB
GB
3.5.5 EXHAUST SYSTEM
The generator combustion gas/water exhaust system
must be independent of that of the main engines.
See installation diagrams.
The pipe length from the highest point of the
exhaust pipe to the exhaust must not exceed 2m (6.6
ft). This is to prevent that when the generator is
switched off, the water that is left in the exhaust pipe
flows back to the engine after having filled the barrel
exhaust.
Barrel exhaust (capacity 3.5 litres - 0.92 gal).
Attenuates the exhaust noise and prevents water
backflow to the engine. It is recommended to install
the exhaust not more than 1m (3.3ft) from the
generator and to position it at a height equal to or lower
than that of the generator base.
Silencer
Further reduces the noise. It is recommended to install
it at a distance of not more than 1m (3.3ft) from the
sea exhaust union.
Sea exhaust union.
It must be installed in such a position that it is always
above sea level.
Water/gas separator
Separates the water from the gas reducing the noise
at the exhaust and eliminating the typical pulsating
effect of water mixed with gas.
Carbon monoxide may cause strong nausea,
fainting or death. Do not use copper pipes in diesel
exhaust systems. The sulphur contained in diesel
exhausts causes deterioration of the system leading
to exhaust gas or water leaks.
For the safety of the boat occupants, install a carbon
monoxide detector.
When installing the generator or carrying out
maintenance operations, adopt the following
precautions:
Do not install the exhaust gas outlet pipes in places
where the gasses may be conveyed through the
portholes, vents or air conditioning system. If the exhaust
gas outlet is near the water level, water may enter the
exhaust gas outlet and block or limit the gas flow.
Muffler
Silencer + Sea exhaust union
Water/gas separator + Sea exhaust union

IS 2.7 B
- 25
GB
GB
3
1 2
3.6 FUEL CIRCUIT
The generator is diesel-powered by means of the
unions marked "DIESEL FUEL INLET" (rif.1) e "DIESEL
FUEL OUTLET" (rif.2). This one returns the exceded
fuel to tank.
The fuel pipes must be in hydrocarbon-resistant rubber
with an inside diameter of 8mm (0.31in).
For differences in level of more than 500mm (19.6in), fit
a single-acting check valve in order to prevent the fuel
system from emptying out.
Use a valve with 50mbar opening.
3.6.1 FUEL FILTER
The generator is NOT supplied with a fuel filter fitted
inside the casing.
Therefore, when connecting the fuel tank,
fit a fuel filter.
It is also advisable to fit a cock on the feed line
downstream of the tank.
3.6.2 ELECTRIC PUMP
The electric pump is equipped with a protective filter
(ref.3).
The electric pump is cooled and lubricated with the
fuel. Do not activate the pump without fuel in order
not to be damaged.
The generator is equipped with an automatic fuel
bleed valve.
Should manual bleeding be necessary, press the ON
button on the control panel and wait 30 seconds
before starting the generator.
- Inlet/outlet pipe diameter: 8 mm
- Filtering surface area: min. 500 cm2
- Degree of filtering: max. 10µµµµµm (micron)

IS 2.7 B
- 26
GB
GB
1
2
3
4
6
3.7 ELECTRICAL CONNECTIONS
3.7.1 BATTERY CONNECTION
Use a 12V stand-alone battery to start the generator.
Connect it to the generator terminals using cables of
25mm2 cross-section for a distance up to 5m (16.4ft)
or cables of 35mm2 cross-section for longer distances,
following this sequence of operations:
- First connect the positive pole (+) of the battery to
the terminal marked + on the generator (ref.1).
- Then connect the negative pole (-) of the battery to
the terminal marked - on the generator (ref.2).
- Spread some specific mineral grease on the
connectors in order to reduce oxidation or corrosion.
The generator is equipped with an automatic electronic
recharging device for the starter battery, able to deliver
10A at a voltage of 12V.
Install the battery in a ventilated housing separate
from the generator and any device which may cause
heat or sparks. Periodically check the state of the
terminal connections and the battery liquid level. If
necessary, disconnect the cables working in reverse
order from connection.
Do not invert the polarities of the connection cables,
as the generator and the battery may be seriously
damaged.
Do not connect any other loads to the battery.
In order to minimise galvanic currents, the (-) of the
generator battery must not be connected to the (-) of
the other batteries on board.
3.7.2 CONTROL PANEL CONNECTION
Connect the cable to connector (ref.3) using the cable
provided already connected to the control panel. Insert
the control panel cable through the hole (ref.4).
On control panel (ref.6) there is a display and buttons
for starting, stopping and menu navigation.
Control panel must be absolutely installed because
it’s essential for generator functioning. Do not use
different devices other that the supplied one, as they
can not be compatible with generator.
Remove battery connection before installing control
panel.
Control panel is supplied with a 10 meters length
cable. Do not modify this cable as it may cause
improper functioning of the panel circuit.
IS 2.7 B
- 27
GB
GB
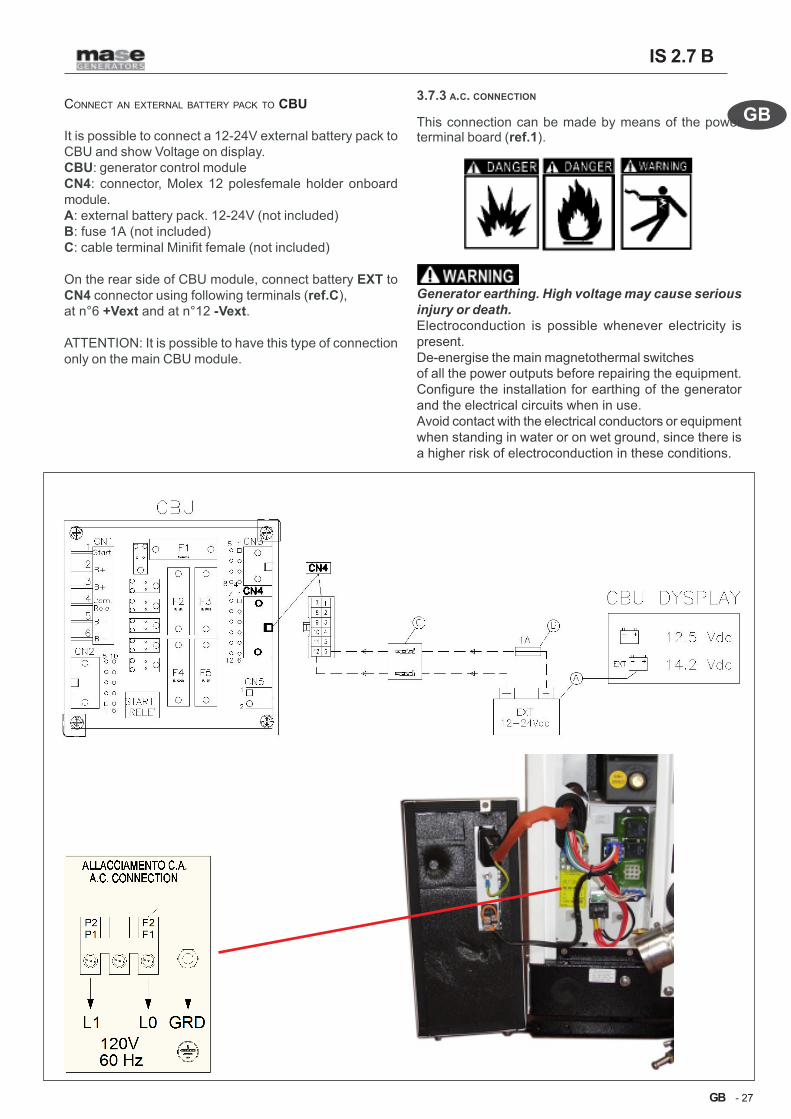
CONNECT AN EXTERNAL BATTERY PACK TO CBU
It is possible to connect a 12-24V external battery pack to
CBU and show Voltage on display.
CBU: generator control module
CN4: connector, Molex 12 polesfemale holder onboard
module.
A: external battery pack. 12-24V (not included)
B: fuse 1A (not included)
C: cable terminal Minifit female (not included)
On the rear side of CBU module, connect battery EXT to
CN4 connector using following terminals (ref.C),
at n°6 +Vext and at n°12 -Vext.
ATTENTION: It is possible to have this type of connection
only on the main CBU module.
3.7.3 A.C. CONNECTION
This connection can be made by means of the powerterminal board (ref.1).
Generator earthing. High voltage may cause serious
injury or death.
Electroconduction is possible whenever electricity is
present.
De-energise the main magnetothermal switches
of all the power outputs before repairing the equipment.
Configure the installation for earthing of the generator
and the electrical circuits when in use.
Avoid contact with the electrical conductors or equipment
when standing in water or on wet ground, since there is
a higher risk of electroconduction in these conditions.
IS 2.7 B
- 28
GB
GB
RETE
MAINS
RESEAU
CARICO
LOAD
CHARGE
2
3
1
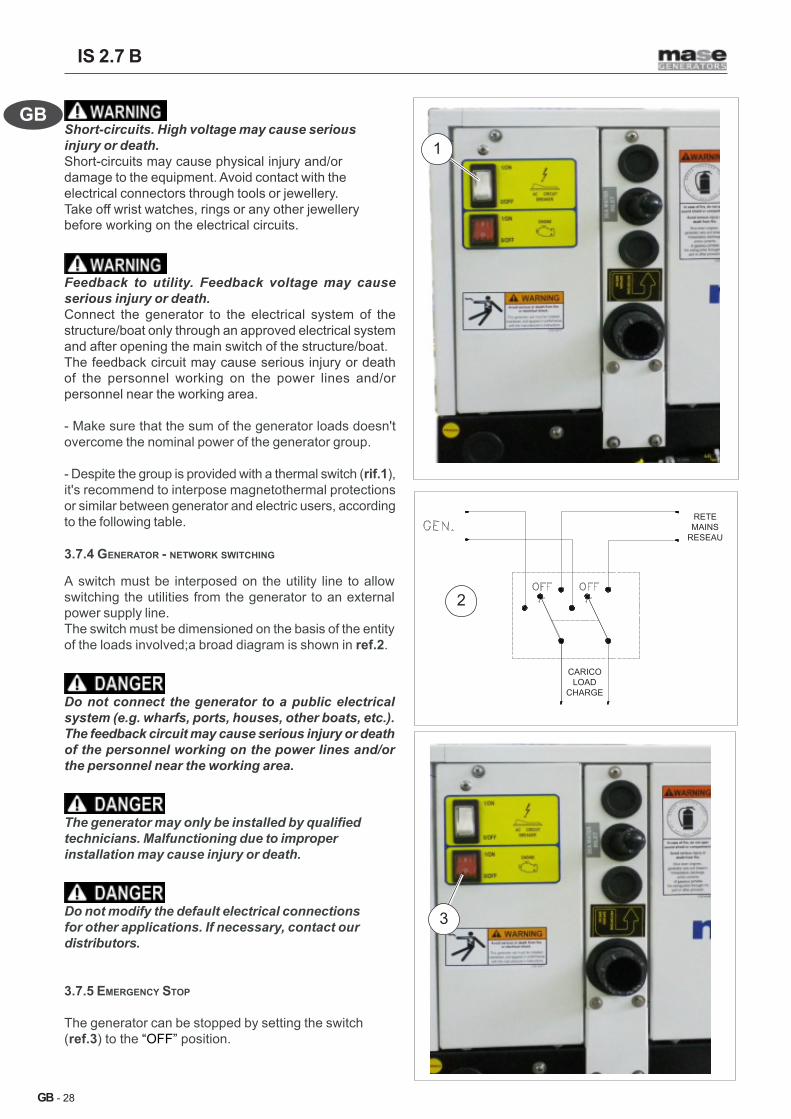
3.7.4 GENERATOR - NETWORK SWITCHING
A switch must be interposed on the utility line to allow
switching the utilities from the generator to an external
power supply line.
The switch must be dimensioned on the basis of the entity
of the loads involved;a broad diagram is shown in ref.2.
Do not connect the generator to a public electrical
system (e.g. wharfs, ports, houses, other boats, etc.).
The feedback circuit may cause serious injury or death
of the personnel working on the power lines and/or
the personnel near the working area.
The generator may only be installed by qualified
technicians. Malfunctioning due to improper
installation may cause injury or death.
Do not modify the default electrical connections
for other applications. If necessary, contact our
distributors.
3.7.5 EMERGENCY STOP
The generator can be stopped by setting the switch
(ref.3) to the “OFF” position.
Short-circuits. High voltage may cause serious
injury or death.
Short-circuits may cause physical injury and/or
damage to the equipment. Avoid contact with the
electrical connectors through tools or jewellery.
Take off wrist watches, rings or any other jewellery
before working on the electrical circuits.
Feedback to utility. Feedback voltage may cause
serious injury or death.
Connect the generator to the electrical system of the
structure/boat only through an approved electrical system
and after opening the main switch of the structure/boat.
The feedback circuit may cause serious injury or death
of the personnel working on the power lines and/or
personnel near the working area.
- Make sure that the sum of the generator loads doesn't
overcome the nominal power of the generator group.
- Despite the group is provided with a thermal switch (rif.1),
it's recommend to interpose magnetothermal protections
or similar between generator and electric users, according
to the following table.

IS 2.7 B
- 29
GB
GB
1
2
3
OPEN
4 USING THE GENERATOR
4.1 PRELIMINARY CHECKS
Before beginning with any starting procedures, it is
extremely important to “familiarise” yourself with the
generator and its controls.
Furthermore, visually inspect the generator and the
installation.
Any source of real or potential risk must be eliminated
before proceeding.
- Identify the position of the emergency stop buttons,
switches and other emergency systems on the
generator.
- Learn the specific emergency procedures pertaining
to the installation in question.
- Check the oil level by means of the dipstick (ref. 1).
See table for recommended oils (chap.6.5)
- Check that all the anchoring points of the generator
are properly tightened.
- Check that all the electrical utilities are off to prevent
starting the generator on load.
- Check that the water and fuel pipes are properly
connected
- Check that all the electrical connections have been
properly made and that no connections are in a bad
state.
- Check that the seawater cock is open (ref. 2)
- If a check valve has been fitted on the seawater intake
(as recommended in the installation manual), check that
the section of the water circuit leading from the pump to
the valve has been manually primed (ref.3).
4.2 FUELLING
The fuelling operations must be carried out extremely
carefully and the tank must not be filled over the
maximum level.
- Fuel is a toxic and flammable liquid, and must
therefore be kept in hermetically sealed containers
and stored in inaccessible places.
- Fuelling must always be carried out with the engine
off and the selector in the OFF position.
- Do not smoke and do not use naked flames during
fuelling.
- Fuel in well-ventilated places.
- Avoid contact of fuel with the skin and do not inhale
the fumes.

IS 2.7 B
- 30
GB
GB
4
3
12
OPEN
4.3 STARTING THE GENERATOR
Before starting the generator check that all the doors
is closed.
Before starting the generator ensure that all the
preliminary checks have been carried out.
StartPress the ON/OFF pushbutton (ref.1) to turn on the
module. It will show “mase” logo on display.
Press and hold pressed the START pushbutton (ref.2) in
order to preheat the glow plugs (pre-starting) and then
start the engine. Release only when the engine is started,
paying attention to not exceed 5 seconds for each starting
attempt and doing a pause of about 30 seconds between
them.
Repeated unsuccessful starting attempts may cause
excessive accumulation of water in the exhaust
system with possible serious damage
to the engine.
In case of have difficulty in starting the engine,
absolutely do not persist for a long time before first
having closed the seawater intake cock (Ref.3).
During the running-in period (the first 50 hours), do
not apply loads exceeding 70% of the rated power of
the generator.
For more detailed information, consult the manual
provided by the engine manufacturer, which
accompanies each generator.
4.4 STOPPING LHE GENERATOR
Stop the generator by pressing the STOP button onthe control panel (ref.1).The generator can be stopped also by setting the switch
(ref.4) to the “OFF” position.
Before stopping the generator, it is advisable to run it
for a few minutes without drawing current in order to
allow gradual cooling of the engine and the alternator.Pressing OFF on thi switch, the module
will completely turn off

IS 2.7 B
- 31
GB
GB
1
2
5 SAFETY SWITCHES AND WARNING SIGNALS
The generators are equipped with a set of safety switches
which protect it against improper use and
problems which may jeopardise its integrity.
5.1 PROTECTION AGAINST SHORT-CIRCUITS AND OVERLOAD
The generator is protected against short-circuits and
electrical overload.
A magnetothermal switch (ref.1) cuts the power when
a short-circuit occurs or when the power delivered
exceeds the rated value.
Before restoring the contact, remove the cause
of the cutout.
5.2 PROTECTION AGAINST SHORT-CIRCUITS OF LOW-VOLTAGE
ELECTRICAL SYSTEM.
In the event of a short-circuit of the low-voltage electrical
system, two fuses 3A - 30A (ref.2) break the circuit
stopping the generator. In this case the warning lights
of the engine protection module will all be off and it will
not be possible to reattempt starting.
If one of the above safety switches trip, find and
eliminate the cause and then press the STOP button
to reset the control panel (otherwise the signal would
remain in memory inhibiting engine starting).
Ala
rm c
od
e
Sim
bo
l
Alarm name Description
0 Emergency stop Means that the emergency pushbutton is pressed.
3 Missing engine stop Means that, after engine is stopped, the electronic board detects active parameters as the engine is still running.
4 Mechanical failure If generator is running, means that all detected parameters are simultaneously missing.
11 High engine digital temperature Means that the digital sensor detects high temperature
14 Digital low oil pressure Means that the digital sensor detects low oil pressure
15 Digital oil gauge failure Means that there is not wiring connection to digital gauge for oil pressure, with engine turned off.
16 High level battery Means that the battery voltage is too high.
17 Low level battery Means that the battery voltage is too low.
20 Generator: low frequency Means that the generator frequency is too low.
21 Generator: high frequency Means that the generator frequency is too high.
22 Generator: low voltage Means that the generator voltage is lower than the set alarm threshold.
23 Generator: high voltage Means that the generator voltage is higher than the set alarm threshold.
24 Alternator high temperature Means that the high engine temperature contact is open.
ALARM CHART FOR CBU MODULE

IS 2.7 B
- 32
GB
GB
ON / OFFSTART
SCROLL UP
- MENU
SCROLL
DOWN -
MENU
SELECT
F1
F2
F3
F4
F5
5.4 FUSES @@@@@
- Protection module fuses
On the printed circuit of the engine protection module
there are five fuses to protect the module. Remove the
frontal panel unscrewing the 4 screws to enter in it.
F1 : 5A 5x20mm for relay “ALARMS”
F2 : 5A 5x20mm for relay “IP” (insulated poles)
F3 : 5A 5x20mm for relay “RUNS”
F4 : 5A 5x20mm for relay “GLOWS”
F5 : 5A 5x20mm for relay “EV” (solenoid)
5.3 ENGINE PROTECTION MODULE
CBU device (Can-Bus transmission unit) controls
and driving the genset.
Large display and the control push-buttons allow an
easy use and monitoring of the CBU unit.
Displayed information
- Voltage Vac
- Frequency Hz
- Hourmeter
- Battery voltage of the genset
- Voltage of onboard batteries
- Low oil pressure alarm
- High engine temperature alarm
- High alternator temperature alarm
- Displayed stop alarms
- Storage and back-up of alarms
- Maintenance (first 50 hours)
Input / Output signals - Commands - Checks
- Connector mod. 485 for MODBUS protocol
(It allows monitoring and driving the genset by
the boat main control monitor)
- Output all included alarms (optional)
- Input voltage of onboard batteries (from 12V
up to 24V) (optional)
- Input battery voltage of the genset
- Input Start/Stop from remote panel
- Switch off button
- Scroll through display buttons
- Emergency pushbutton (predisposition)
The low oil pressure protection does not give an
indication of the oil level. The oil level must daily be
checked in order to prevent damage to the engine.
The engine correctly works if it doesn't exceed inclina-
tions max of 30° for up to 3 minutes and 25° without
limits of time, in comparison to both longitudinal and
transversal axles. If the engine works to greater incli-
nations, it risks an insufficient lubrication and/or aspi-
ration of oil from the filter air.
If one of the above safety switches trip, find and
eliminate the cause and then press the STOP button
to reset the control panel (otherwise the signal still in
memory inhibiting engine starting).

IS 2.7 B
- 33
GB
GB
1
6.3 ENGINE OIL CHECK
- Check the oil level by means of the cap/dipstick (ref.1).
The oil level must always be between the MAX and
MIN notches engraved on the dipstick.
- When checking the oil level, ensure that the generator
is positioned horizontally.
6 MAINTENANCE
6.1 PREAMBLE
It is recommended to strictly follow the instructions
in the manual provided by the engine manufacturer,
which accompanies each generator.
It is important to regularly check and carry out
maintenance on the generator. The operations to carry
out must be decided based on the hours of operation.
In order to carry out maintenance, the side doors and
top door must be removed.
The generator is started from a remote control panel.
In order to prevent accidental starting, set the
emergency switch to the (0/OFF) position.
Disconnect the negative pole from the starter battery.
Any maintenance operation on the generator must
be carried out with the engine off, after leaving it to
cool down sufficiently.
Carefully read paragraph 1.5 “General danger
information” in the manual.Periodically check the
electrical safety switches,such as the emergency
button, the earthing system, etc.
6.2 ROUTINE ENGINE MAINTENANCE
The periodic operations to be carried out on the engine
are indicated in the table “Service schedule” in
paragraph 6.18.
For more detailed information, consult the manual
provided by the engine manufacturer, which accompanies
each generator.

IS 2.7 B
- 34
GB
GB
S.A.E
Service
Grade
-30 -20 -10 0 10 20 30 40
Ambient temperature (oC)
5W
5W30
10W
10W30
40
20W
20W40
20
30
Grado
di
servizio
S.A.E.
Temperatura ambiente (°C)
2
1
3
3
S.A.E.
grade
service
Ambient temperature (°C)
6.4 ENGINE OIL CHANGE @
Use diesel engine oil
Top up the engine oil through the hole (ref.1). To change
the oil in the engine oil sump, take out the dipstick (ref.1).
Suct exhaust oil with a manual pump (ref.2).
It is advisable to drain the oil when it is still sufficiently
warm so that it flows easily.
- Dispose of the used oil in an appropriate manner,
since it is a polluting product.
- Take the used oil to special waste collection centres
for disposal.
- Wear gloves to protect the hands from contact with
oil. In case of accidental contact with engine oil,
thoroughly wash the affected part with soap and water.
- Do not top-up with oil or refuel above the maximum
level. An excessive quantity of oil may cause damage
to the engine.
Always check proper viscosity of the engine oil in
relation to the range of temperatures in which the
generator operates, as indicated in following chart.
6.5 OIL FILTER @
To replace the engine oil filter cartridge, follow the
procedure below:
- Remove and extract the filter (ref.3).
- Screw in the new filter after cleaning the rubber seal
and seating surface and ensure it is in perfect condition.
When the operation has been completed, thoroughly
clean all the parts of the generator soiled with oil and
fuel.
For engine safety reasons, use only original spare
parts.

IS 2.7 B
- 35
GB
GB
1
2
4
3
- Inlet/outlet pipe diameter: 8 mm
- Filtering surface area: min. 500 cm2
- Degree of filtering: max. 10µµµµµm (micron)
6.6 REPLACING / CLEANING THE FUEL PUMP FILTER @
This operation is carried out following the steps below:
- Remove the pipe (ref.1)
- Slide out the filter (ref.2)
- Clean or replace it
For reassembly repeat the operations in reverse order.
After replacing the filter, the fuel system has to be bled
by carrying out the operations described
in paragraph 6.8.
Do not let the fuel come into contact with the skin.
Wear gloves and protective goggles during
maintenance operations.
In the event of contact with fuel, immediately and
thoroughly wash the affected part with soap and water.
When the operation has been completed, thoroughly
clean off all traces of fuel and take the
cloths used to special waste collection centres.
6.7 REPLACING THE LINE FUEL FILTER
Follow the instructions given in the manual of the
type of fuel filter installed.
See also Chap. 3.6.1 “Fuel filter”.
6.8 BLEEDING THE FUEL SYSTEM
The fuel system is developed to eliminate air bubblespenetrated inside the system,automatically. Forautomatic bleeding, activate the fuel pump for fewminutes before starting the engine. To activate the fuelpump turn on the engine module and then press andkeep pressed START (ref.3) until “pre-heating glowplug” icon disappear from display.
If there are air bubbles in the fuel system, the engine willnot function regularly or will be unable to reach the ratedrpm. Air may penetrate the fuel circuit through a notperfectly sealed joint (pipe, filters, tank) or when the fuelin the tank is at minimum level.
6.9 AIR FILTER
The IS series generators are fitted with a dry air filter
(ref.4), which prevents foreign bodies from entering
the combustion chamber. It is sufficient to clean the filter
mass with diesel fuel once a year to remove any
impurities.
Take the liquids used to wash the filter
to special waste collection centres for disposal.

IS 2.7 B
- 36
GB
GB
3
4
6.10 DRAINING THE COOLING SYSTEM
In order to carry out maintenance on the water/air
exchanger or the cooling system, the seawater
intake circuit must be drained.
Carry out this operation as follows:
- Close the seawater intake cock (ref.1).
- Open the drain tap (ref.2) until all the water has
drained out.
- Close the drain tap.
Reopen the seawater intake cock before starting the
generator.
6.11 REPLACING THE ZINC ANODE
A sacrificial zinc anode (ref. 4) has been fitted in the
water/air heat exchanger (ref.3) to protect it against
galvanic currents.
Periodically check the wear out of zinc anode and
replace if necessary, in order to prevent that galvanic
currents corrodes exchanger irreparably.
It is recommended to check the zinc anode at least once
a month, when the generator is new, in order to check
how fast it wears, and then operate accordingly.
We suggest to replace the zinc anode at least once a
year anyway.
Genset
Discarge
Sea Water

IS 2.7 B
- 37
GB
GB
8Kg - 5mm
3
5
6
1
3
6.12 SEAWATER PUMP MAINTENANCE
At least once a year check the integrity of the rubber
seawater pump impeller.
Before opening the seawater pump to inspect the
impeller, drain the seawater from the cooling system
as described in paragraph 6.10.
To access the impeller, remove the cover (ref.5) and
use pliers to extract the impeller (ref.6), pulling it hard
towards the outside.
To refit a new impeller, repeat the operations
described above working in reverse order.
6.13 CHECKING / REPLACING THE V-BELT @
Do not open the doors or hold the hands close to the
V-belts and pulleys when the engine is running.
A V-belt is used to transmit the rotation motion from the
drive shaft pulley to the seawater pump pulley (ref.1).
A too tight belt accelerates wear, while a too slack belt
results in the pulleys running in idle and insufficient water
circulation.
Adjust the belt tension as follows:
Loosen the two adjusting screws (ref.2) and move the
seawater pump towards the outside to increase
tension or towards the inside to decrease it. Tighten the
screws and check the tension.
The belt tension is correct when it sags about 5mm
(ref.3) under a thrust force of 8kg (17,7lbs).
To prevent the belt from idling, do not spill any oil
on it. If oil is spilled, clean it off with petrol.

IS 2.7 B
- 38
GB
GB
6.14 ALTERNATOR MAINTENANCE
The alternator used on this model generator is type
synchronous, self-excited. This type of brushless
alternator without manifold does not require any particular
maintenance.
Periodic inspections and maintenance are limited to
eliminating any traces of moisture and oxidation
which may damage it.
6.15 BATTERY CHARGER
Before installing a new battery, it is important that it
first be fully chargedto charge it completely.
The battery must be activated by personnel who has
sulphuric acid for batteries and suitable equipment
available.
At least once a month check the level of the electrolyte
and, if necessary, top up with distilled water.If the
generator is not used for a long period of time, it is
advisable to disconnect it and store it in a dry place at a
temperature above 10°C (50°F), and to carry out a full
recharging cycle once a month.
When topping up the batteries with distilled water,
wear rubber gloves and protective goggles to prevent
accidental contact of sulphuric acid with the skin. In
the event of accidental contact, thoroughly wash the
affected part with soap and water and consult a
doctor.
If the battery is left completely flat for long periods of
time, it may be irreparably damaged.
Before proceeding with recharging the batteries,
check the level of electrolyte and, if necessary, top
up with distilled water. This operation must be
repeated when the charging cycle has been
completed.Cover the positive terminal with Vaseline
to protect it against corrosion and the formation of
oxide.

IS 2.7 B
- 39
GB
GB
6.16 LIST OF RECOMMEND SPARE PARTS
• Seawater pump impeller
• Seawater pump gasket
• Seawater pump belt
• Oil filter
• Fuel filter
• Zinc anode
• Fuses
A kit with recommended spare parts is available and
may be ordered from the Mase Service Network or
Technical Service.
6.17 PERIODS OF INACTIVITY @
Start up the generator at least once a month. If the
generator is not to be used for a long period of time,
carry out the following operations:
- Change the engine oil.
- Replace the oil filter cartridge (see par.6.5).
- Replace the fuel filter cartridge (see par.6.6, 6.7).
- Remove the injector and pour 2 cc of engine oil into
the cylinder and let the engine turn a few times by
manually operating the drive shaft pulley.
Refit the injector.
- Replace the zinc pads (see par.6.11)
- Aspirate some antifreeze into the seawater intake
pipe in order to protect the exchangers against low
temperatures, and lubricate the seawater pump
impeller and the metal parts in the cooling system.
- Disconnect the starter battery and store it in a dry
place (see par. 6.15)
- Disconnect the sea exhaust pipe from the engine
manifold.
- Clean the seawater filter.
- Close the seawater intake cock.
- Drain the seawater from the exhaust.
- Clean and lubricate the antisiphon valve (siphon
break), if installed.
- Clean the outside of the generator, removing all dust
and impurities.
- Cover the generator with a nylon sheet and store it
in horizontal position in a dry and ventilated place.

IS 2.7 B
- 40
GB
GB
6.18 PERIOD CHECKS AND MAINTENANCE
Perform service at intervals indicatedBefore
starting
Every 50
hrs.or 1
Month
Every 200
hrs.or 3
Month
Every 400
hrs.or 6
Month
Every 500
hrs.or Yearly
Every 1000
hrs.or Yearly
Fuel system
Replace the fuel filter element ○Check the fuel injection nozzle ●Check the fuel injection timing ●Check the fuel injection pump ●
Lubrification system
Check the oil level ○Replace the oil ○ 1
st time ○
Replace the oil filter element ○ 1st time ○
Cooling system
Inspect exhaust system components
for cracks and corrosion (exhaust line, hose
clamps, silencer and outlet flapper)
○
Check function of siphon break
(if equipped)○ 1
st time ○
Adjust seawater pump belt tension ○ 1st time ○
Replace seawater pump impeller ○Check condition of anticorrosion zinc ○ ○Check thermostat function ●Check correct airflow in the cooling system ●
Intake / Exhaust system
Check the air cleaner element ○Replace air cleaner element ○Check exhaust system ○Clean exhaust/water mixing elbow ○
Electrical system
Check and tighten electrical connections ○Clean battery cables ○Check the electrolyte level in the battery ○
Engine and mounting
Check for leakage af water and oil ○ ○Check tightness of mounting bolts/
vibromounts●
Check and adjusting intake / exhaust
valve clearance●
Check and adjust the injection fuel pump ●
Remote control system, etc.
Check remote control operation ○ ○Test run generator set ○
○ In presence of this symbol it is possible to effect the technical support autonomously .
● In presence of this symbol it is obligatory to effect the technical support in an authorized retailer /workshop

IS 2.7 B
- 41
GB
GB
6.19 ANOMALIES, CAUSES AND REMEDIES
The starter motor turns but the main engine does not start
- Check that there is fuel in the tank. (Fill up)
- Check if the stop solenoid is powered. (Consult Service Centre)
- Check that the emergency button is in ON position. (Turn ON position)
- Check that the DC thermal breakers are on. (Restore)
- Bleed the air bubbles from the fuel circuit.
- Check fuses. (Replace)
The engine protection module is not activated when the ON button is pressed
- Check fuses. (Replace)
- Check battery cables and clamps, and electrical connections. (Reconnect)
- Check integrity of the battery. (Recharge or replace)
- Check that the emergency button is in ON position. (Turn ON position)
The generator switches off during the operating period
- Check if a protection has been activated with symbol showed on display. (Remove the cause and retry starting)
- Check if there is fuel in the tank. (Fill up)
There is a high grade of smoke at the engine exhaust
- Check that the oil level in the sump does not exceed the MAX index. (Restore level)
- Check that the generator is not in overload. (Reduce the load)
- Check calibration of the injectors. (Consult Service Centre)
The engine runs irregularly
- Check fuel filters. (Replace)
- Bleed the air bubbles from the fuel circuit.
The alternator voltage is too low
- Check the engine rpm: 3750-3780 rpm, 62,5-63Hz, without utilities connected.
- Check if load is too high. (Reduce the load)
- Capacitor breakdown. (Contact Service Centre)
- Alternator failure. (Contact Service Centre)
- Check all electrical connections. (Contact Service Centre)
Starter battery flat
- Check the electrolyte level in the battery. (Restore the level)
- Check correct functioning of the DC alternator.
- Check integrity of the battery.
The generator does not deliver power
- Check that the magnetothermal switch is in the “ON” position. (Contact Service Centre)
- Capacitor breakdown. (Contact Service Centre)
- Alternator failure. (Contact Service Centre)
- Check all electrical connections. (Contact Service Centre)
6.20 HOW TO ORDER THE SPARE PARTS
In order to ensure a good functioning of the generator, we recommed to use original spare parts only.
The spares can be purchased from the mase authorized assistence network (consult the SERVICE manual
enclosed with the generator).
You can get any futher information contacting the mase central Service.

IS 2.7 B
- 42
GB
GB
7 TRANSPORT, STORAGE, LIFTING AND,
HANDLING AND PACKAGING
7.1 TRANSPORT AND STORAGE
Packaging: Supplied directly by Mase Generators.
The total weight of the packed generator is given in
Paragraph 2.3 “Table of technical characteristics”.
Transport: During transport the generator (with or
without packaging) must be protected against
atmospheric agents, it must not be turned upside down
and must be protected against knocks.
It is strictly prohibited to pollute the environment
with the packaging
Storage: The generator must be stored in horizontal
position and away from atmospheric agents and humidity.
7.2 LIFTING AND HANDLING OF THE PACKED GENERATOR UNIT
Always check that the capacity of the lifting means
and its accessories is greater than the weight of the
generator printed on the identification plate.
Use a lift truck to handle the generator (with capacity
greater than the weight of the generator indicated in the
table of technical characteristics (par. 2.3) of the Use
and Maintenance Manual), inserting the forks under the
base at the lower part of the generator.
For handling on level ground, a transpallet is sufficient
with a suitable capacity according to the table of technical
characteristics (par.2.3) of the Use and Maintenance
Manual.
The centre of gravity of the
generator corresponds to about the centre of its
geometrical volume.

IS 2.7 B
- 43
GB
GB
8 GUARANTEE AND RESPONSIBILITY
8.1 GUARANTEE
• The mase generators and all their components are guaranteed free of defects and are covered by the guarantee
for a period as required by current legislation from the date of installation.
• Not covered by the guarantee are: failed observance of the installation regulations, damage caused by natural
disasters, accidents, defects of the electrical system including the load to which the generator is connected,
negligence, improper use or abuse by the operator and damage caused by repairs carried out by unqualified
personnel.
• Repairs that cannot be carried out at the place of installation can be carried out at mase laboratories or at
authorised workshops. Transport expenses will be borne by the Customer.
• Under no circumstances does the Customer have the right to claim compensation for damages or side effects
caused by use of the machine in a manner not conform to what is described in this manual.
8.2 LIMITS OF RESPONSIBILITY
MASE GENERATORS s.p.a is responsible for anything regarding the safety, reliability and performance of the
Generator on the condition that:
• The generator is used by persons trained through the use and maintenance manual.
• The installation is carried out according to mase instructions.
• The service procedures are carried out exclusively by mase specialised technical personnel.
• The electrical system and the loads to which the generator is connected is in conformity with the applicable CEI
regulations.
• The generator is installed and used in accordance with the installations provided in this manual.
• Use original spare parts specific to each model.
• Use suitable fuel.
• Diesel fuel conforming to standards ASTM A975.
9 DISPOSAL
9.1 DISPOSAL OF THE WASTE MATERIALS DERIVING FROM MAINTENANCE AND SCRAPPING
• The packaging used for transport is biodegradable and thus easy to dispose of by companies authorised for paper
collection.
• The electrical components must be taken to companies authorised for the collection of electronic material.
• All the painted metal parts must be taken to companies authorised for the collection of metals.
Please note that the system and its components contain materials that, if dispersed in the environment,
may cause significant ecological damage.
The following materials must be delivered to specific collection centres authorised for their disposal:
- Starting battery
- Exhaust lubrication oils
- Mixtures of water and anti-freeze
- Filters
- Auxiliary cleaning material (e.g.: rags smeared or soaked with fuel and/or chemical cleaning products)
• Any other material not listed above must be taken to companies authorised for the collection of industrial waste.

IS 2.7 B
- 44
GB
GB
Cod.48606
10 WIRING DIAGRAM
1A
LTE
RN
ATO
R
2B
AT
TE
RY
3C
AP
AC
ITO
R
412 P
OLE
S C
ON
NE
CT
OR
5F
US
E
6F
US
E
7E
NG
INE
PR
OT
EC
TIO
N M
OD
ULE
8S
TA
RT
ER
MO
TO
R
9O
IL P
RE
SS
UR
E S
WIT
CH
10
EN
GIN
E T
HE
RM
OS
TA
T
11E
NG
INE
TH
ER
MO
STA
T
12
FU
EL C
UT-O
UT
SO
LE
NO
ID
13
EA
RT
H C
ON
NE
CT
ION
SC
RE
W
14
ALT
ER
NA
TO
R T
HE
RM
OS
TA
T
15
RE
LA
Y C
AR
D
16
PO
WE
R T
ER
MIN
AL B
OA
RD
17
FU
EL P
UM
P
18
0/1
SW
ITC
H
19
TH
ER
MA
L S
WIT
CH
20
9 P
OLE
S C
ON
NE
CT
OR