manual for installation, maintenance and use of lpg …
TRANSCRIPT

MANUAL FOR INSTALLATION, MAINTENANCE AND USE OF LPG INERT GAS
FIRE EXTINGUISHING SYSTEMS
LPG Técnicas en Extinción de Incendios, S.A. DOC. MUIG01IN01

TECHNICAL INFORMATION
LPG Técnicas en extinción de Incendios S.A. DOC: MU/IG/01/IN Rev: 1 Pag: 2/109
CHANGE CONTROL LIST.
Page Paragraph Modification Date Author

TECHNICAL INFORMATION
LPG Técnicas en extinción de Incendios S.A. DOC: MU/IG/01/IN Rev: 1 Pag: 3/109
INDEX
0 INTRODUCTION .............................................................................................. 6
1 BASIC ISSUES ................................................................................................ 7
2 INSTALLATION ............................................................................................... 9
2.1 Mechanical/ Pneumatic Installation ................................................................................................ 10 2.1.1 Support System ............................................................................................................................... 11 2.1.2 Storage System ............................................................................................................................... 18
2.1.2.1 LPG 128-60/65/80/85 (Data Sheet FT 148, FT 149, FT 147 and FT 125)............................. 19 2.1.2.2 Pressure switch....................................................................................................................... 22 2.1.2.3 Pressure Gauge....................................................................................................................... 23 2.1.2.4 Manifold discharge pipe......................................................................................................... 24 2.1.2.5 ¾" Check valve (Data Sheet FT 55)....................................................................................... 25 2.1.2.6 High pressure auxiliary cylinders........................................................................................... 26 2.1.2.7 Discharge hose 4S-H (Data Sheet FT 110) ............................................................................ 30 2.1.2.8 Pressure switch with locking device (Data Sheet FT 047) ..................................................... 31 2.1.2.9 Restrictor (Data Sheet FT 138) .............................................................................................. 32
2.1.3 Release System ............................................................................................................................... 34 2.1.3.1 Pressure pilot cylinder and pilot valve (Data Sheet FT 052-B).............................................. 35 2.1.3.2 LPG 128-40 Valve (refer to Data FT 141) ............................................................................. 37 2.1.3.3 Manual lever release (Data Sheet FT 051) ............................................................................. 38 2.1.3.4 Solenoid Valve (Data Sheet FT 017) ..................................................................................... 40 2.1.3.5 Pneumatic release cones (Data Sheet FT 058) ....................................................................... 43 2.1.3.6 Decompression screw (Data Sheet FT 070) ........................................................................... 45 2.1.3.7 Decompression Valve (Data Sheet FT 075) ........................................................................... 46 2.1.3.8 Release line Teflon flexible hoses (Data Sheet FT 040) ........................................................ 47 2.1.3.9 Pipe and fittings...................................................................................................................... 48 2.1.3.10 Supports ............................................................................................................................. 50 2.1.3.11 Nozzles (Data Sheet FT 135 / FT 136) .............................................................................. 53
2.2 Electrical Installation ........................................................................................................................ 55
2.3 Installation final requirements......................................................................................................... 58
3 COMMISSIONING AND MAINTENANCE...................................................... 59
3.1 System commissioning and reception .............................................................................................. 59 3.1.1 Component revision ........................................................................................................................ 60 3.1.2 Commissioning operations and operation tests. .............................................................................. 60
3.1.2.1 Blow out with nitrogen........................................................................................................... 61 3.1.2.2 Water tightness pneumatic test for open pipes. ...................................................................... 62 3.1.2.3 Operating Test for pressure switch with locking device. ....................................................... 63 3.1.2.4 Release circuit water tightness test......................................................................................... 64 3.1.2.5 Operating test for pilot cylinder release solenoid valves........................................................ 66
3.1.3 Inspection and test for protected enclosure integrity....................................................................... 69

TECHNICAL INFORMATION
LPG Técnicas en extinción de Incendios S.A. DOC: MU/IG/01/IN Rev: 1 Pag: 4/109
3.2 Maintenance....................................................................................................................................... 70
3.3 Manual use of devices........................................................................................................................ 72 3.3.1 Re-assembly of pressure switch with locking device...................................................................... 72 3.3.2 Actuation of manual lever release and manual pneumatic release.................................................. 73 3.3.3 Release line decompression ............................................................................................................ 73
3.4 Actuation in the event of failure of fire extinguishing system automatic activation.................... 74
3.5 Actuation after cylinder bank discharge ......................................................................................... 75 3.5.1 Maintenance program for fire fighting material means..................................................................104 3.5.2 Maintenance program for fire fighting material means..................................................................105

TECHNICAL INFORMATION
LPG Técnicas en extinción de Incendios S.A. DOC: MU/IG/01/IN Rev: 1 Pag: 5/109
CHANGE CONTROL LIST.
Page Paragraph Modification Date Author

TECHNICAL INFORMATION
LPG Técnicas en extinción de Incendios S.A. DOC: MU/IG/01/IN Rev: 1 Pag: 6/109
0 Introduction This manual is intended for fitters, maintainers and users of the INERT GAS fire extinguishing systems manufactured by LPG Técnicas en Extinción de Incendios, S.A.. It contains the instructions for the proper installation, use and maintenance of the systems.
IMPORTANT
All the information herein contained is property of LPG Técnicas en Extinción de Incendios, S.A. The company is entitled to introduce modifications without giving any prior notice. Reproduction, modification, partial or whole translation for other purposes than internal use is prohibited. All the efforts have been made to assure the exactness of the information herein included. However LPG does not assume any responsibility for its use. Anyone who uses this manual does it at at his/her own risk and assumes any consequence. Any questions regarding the information presented herein should be forwarded to:
LPG Técnicas en Extinción de Incendios, S.A. C/ Mestre Joan Corrales, 107-109
08950, ESPLUGUES DE LLOBREGAT Barcelona – ESPAÑA Fax: +34 93 473 74 92 Tel: +34 93 480 29 25
e-mail: [email protected]

TECHNICAL INFORMATION
LPG Técnicas en extinción de Incendios S.A. DOC: MU/IG/01/IN Rev: 1 Pag: 7/109
1 Basic Issues The systems manufactured and designed by LPG for fire extinction by means of INERT GAS are conceived to be solid, reliable and easy to assemble, thus allowing the checking of their operative status by means of easy check operations included in this manual. However LPG Técnicas en Extinción de Incendios, S.A. wishes to explain the following issues: Every single person who deals with the start-up, inspection, checking and maintenance of the systems
must be well trained in order to perform the different checks. LPG always recommends the adoption of safety work practices according to the legislation in force on health and safety procedural issues. It is also advisable for the personnel in charge of the installation and maintenance of the fire extinguishing system to receive some training on the safety area as well as to carry out both a complete and careful reading of this manual before engaging into any of the described operations.
Every single person who works in a monitored zone protected by INERT GAS must be informed of the fire
extinguishing agent properties and its possible effects both on people and protected goods. The personnel who work in the monitored zone must be instructed on how to proceed in the event of a possible alarm and in the different types of systems activation.
Throughout the installation and maintenance operations the workers must wear industrial clothing and
safety footwear. When necessary a helmet and gloves must also be worn. Whenever the workers are to drill holes for the pipe supports or for the positioning of the cylinder racking brackets, it is also compulsory the use of safety goggles or a mask. This protection is also applicable when some operations are to be carried out which may cause shedding of particles.
Due to possible false alarms of the detection system (if any) produced by the dust or the smoke caused by
installation works, the detection system of the area shall be either isolated or disconnected before and during the assembly operations.
The whole equipment and piping network must be installed according to the project design. Any
modification of the design must be approved in writing by the client and the responsible engineering company. The construction drawings must be corrected. The corrections to be submitted shall include the modifications in the project.

TECHNICAL INFORMATION
LPG Técnicas en extinción de Incendios S.A. DOC: MU/IG/01/IN Rev: 1 Pag: 8/109
When moving the cylinder make sure that the valve protection cap is always firmly and tightly
secured.
Use one or some of the following materials as thread sealing elements:
⎯ Thread sealing compound for 0.4 mm clearance. ⎯ Teflon tape. Regardless of the sealing element used do not ever cover the first two screw threads in order to assure the cleaning of the inside part of the piping network.
TECHNICAL INFORMATION
LPG Técnicas en extinción de Incendios S.A. DOC: MU/IG/01/IN Rev: 1 Pag: 9/109
2 Installation During the assembly of the system it is advisable to always use the installation drawings supplied with the delivery of components. As an example the plans of the following system types are included in the Appendix I: Battery type 80 I INERT GAS 7 cylinders base (plan number 520098AR) Battery type 140 I INERT GAS 3 cylinders base (plan number 520094AR)
All of these drawings describe the LPG INERT GAS standard rack system. In these plans it is possible to see the layout of the system cylinder rack, the connection of the simple release system and the layout of the standard support systems. The drawings are included only as an example, therefore those facilities to have specific drawings should be guided by their own ones. Proceed to check against the plans and the materials lists whether all of the components have been supplied. Check also whether any of the components are damaged. Any defective component must be replaced. Examine the position of the cylinders and the pipe sections in the drawings and check that no physical barriers are to be found which require some modification of the cylinders, the brackets or the pipe sections. The project engineer must be informed of any deviation with respect to the drawings. Previous to begin with the assembly of the installation verify the position of the battery (it is usually indicated in the plans). The most advisable position of the battery is the nearest room, although it should be away from the protected risk. It should also be large enough to house the equipment as well as to make possible the assembly and maintenance operations. The equipment must not be exposed to severe climatologically conditions, direct action of the flame or to a too humid environment. It must be located away from unauthorized handling and mechanical or chemical aggressions. Material to be required to install the equipment: ⎯Teflon tape, 0.4 mm joint sealing compound ⎯Set of ring spanners (6 to 22 mm) ⎯Adjustable spanner ⎯Hand electric hammer drill ⎯Hacksaw ⎯Drills (intended for work materials) ⎯Ladders, scaffolding ⎯Spirit Level ⎯Flexometer ⎯Philips and flat head screwdriver set ⎯Multimeter ⎯ Set of Allen keys ⎯Clamps, pliers ⎯Pipe cutters ⎯M.12 plugs appropriate for the fixing surface Note: In order to carry out the equipment assembly at least two workers will be necessary.

TECHNICAL INFORMATION
LPG Técnicas en extinción de Incendios S.A. DOC: MU/IG/01/IN Rev: 1 Pag: 10/109
2.1 Mechanical/ Pneumatic Installation The LPG INERT GAS centralized systems are divided into 4 systems: ⎯Support system ⎯Storage system ⎯Release system ⎯Distribution system In the following sections you shall find both a description of the components to each system and the explanation on how to perform their assembly. The order in which the components are described is also the order in which they must be installed.

TECHNICAL INFORMATION
LPG Técnicas en extinción de Incendios S.A. DOC: MU/IG/01/IN Rev: 1 Pag: 11/109
NUT
SUPPORT IRON PLATE
PARTITION WALL
M.12 SCREW
BRAKET
2.1.1 Support System Description: Metallic structure composed of a plateholder (bracket) to support the cylinders and the manifold block. The brackets for 80 litre cylinders have side columns. The brackets for 140 litre cylinders do not have columns, therefore their structure should be attached directly to the wall. Assembly: On carrying out the installation it is important to take the following issues into consideration: ⎯ Sweep the floor on which the battery will be assembled. Make sure by checking against the sizes
which appear on the drawing that the rack system fits perfectly in the chosen position. ⎯ The floor on which the bracket will be assembled must be as flat as possible. ⎯ The wall where the bracket will be fastened (in case it should be necessary) must be at right angles to
the floor and it will be solid (avoid partition walls, Pladur or similar ones). ⎯ In the event of having to fasten the bracket to a partition wall it will be necessary to prepare some iron
plates which shall allow fastening of the bracket from the other side of the wall as shown in the picture:
The assembly of the brackets and the position of the manifold depends upon the bracket having side columns and upon the connection to the piping network being horizontal or vertical. The steps to follow are the following:

TECHNICAL INFORMATION
LPG Técnicas en extinción de Incendios S.A. DOC: MU/IG/01/IN Rev: 1 Pag: 12/109
Assembly of brackets with a vertical support column: (see fig. 2.1.1.1. and 2.1.1.2) 1. Carry out a preassembly of the bracket by joining the back sleats (1) with the column (6). 2. When dealing with rack systems with more than 8 x 80 litre cylinders the central column (9) should
also be assembled. 3. The hexagonal brackets (4) are normally delivered assembled to the sleat. If this is not the case
assemble the hexagonal brackets to the sleat by using the iron gates (2) and the nuts (3) that have been supplied. Arrange the rubber guards (5) to protect the cylinders from any rubbing.
Fig. 2.1.1.1. 9 cylinders aligned with a straight 80 litre INERT GAS bracket
9
8
4
7
1
5 2
3
6

TECHNICAL INFORMATION
LPG Técnicas en extinción de Incendios S.A. DOC: MU/IG/01/IN Rev: 1 Pag: 13/109
Fig. 2.1.1.2. 4 cylinders aligned with a straight 80 litre INERT GAS bracket.
4. Bring the bracket joint close to the wall of the area that has been chosen. 5. Screw in the restrictor (10) of the figure 2.1.1.3. to the supply network inlet pipe. 6. Screw in a high-pressure elbow (not supplied by LPG) to the restrictor. The connection to the outlet
manifold (16) must be performed by means of a high-pressure flexible connector.
6
1
4

TECHNICAL INFORMATION
LPG Técnicas en extinción de Incendios S.A. DOC: MU/IG/01/IN Rev: 1 Pag: 14/109
7. Position bracket allowing adequate distance for connection of manifold (16) to elbow. The following
sketch (fig. 2.1.1.3) shows accurate distance between manifold and bracket:
Fig. 2.1.1.3 Sketch showing manifold mounted on bracket provided with
vertical support.
8. Mount manifold pipe (11) onto manifold seats (7). Do not tighten manifold, hold it by means of manifold "U" fixation (8), allowing freedom of movement.
9. Mount the two check valves (13) which occupy both ends of manifold. Apply thread sealing compound suitable for 0.4 mm gaps or Teflon tape to manifold pipe thread connection onto connection where the check valve is fitted , take care not to apply same to the two first threads. Place check valve onto manifold. Check valve arrow must point at manifold, never at cylinder. Tighten union firmly using a fixed wrench.

TECHNICAL INFORMATION
LPG Técnicas en extinción de Incendios S.A. DOC: MU/IG/01/IN Rev: 1 Pag: 15/109
10. Connect discharge hoses to check valves. Apply Teflon tape to union being careful not to apply same to the two first threads.
11. Place onto the brackets the two bank cylinders which are further apart from each other. To avoid damages in case cylinders are dropped by accident, place front hexagonal bracket,(4) prior to removing cylinder protection caps. Do not tighten so as to allow cylinder freedom of movement. Remove protection caps from both cylinders. Remove both cylinder head caps (15) for safety reasons to prevent accidental activation.
NOTE: VALVE PROTECTION CAP MUST ALWAYS BE INSTALLED WHENEVER A CYLINDER IS BEING TRANSPORTED.
12. Connect cylinder valves to discharge hoses. Connection between valve and hose does not require
any sealed element. Connection shall be carried out without forcing or twisting hose. Once connection is performed on both cylinders, accurate manifold position is obtained in relation to fixing brackets, so it is possible to proceed manifold final fixing onto its seats (7) by tightening manifold "U" fixation (8).
13. Connect manifold free end (16) to high pressure elbow (see fig. 2.1.1.3). Verify position of all parts installed on the bracket (cylinders, discharge hoses, manifold, bracket, elbow, restrictor and pipe system). Arrange position of parts as required prior to final fixation.
14. Mark anchored points on the floor and wall. It is possible to drill using as a guide bracket mechanised fixing drills. Fix bracket onto its final position. High-power chemical or metallic fixing plugs shall be used for floor and wall fixing. Do not use plastic plugs. If the wall is not strong enough, apply mounting in accordance with explanation in 2.1.1 Support System.
15. Tighten hexagonal brackets (4) pertaining to the two cylinders installed and check accurate component position.

TECHNICAL INFORMATION
LPG Técnicas en extinción de Incendios S.A. DOC: MU/IG/01/IN Rev: 1 Pag: 16/109
Mounting of brackets without vertical support: (see fig. 2.1.1.4 and 2.1.1.5) INERT GAS Bracket type 140 I.
Fig. 2.1.1.4 Bracket without columns suitable for 3 cylinders
1. Thread restrictor (7) in fig. 2.1.1.5 onto distribution system inlet pipeline. 2. Thread onto restrictor a high pressure elbow ( not supply by LPG). Connection at connector outlet (8) shall
be performed by means of high pressure free rotary coupling. 3. Place the two line of top and bottom brackets (1 & 2) on the floor, touching fixing wall, and in their working
position according to foreseen positions in fig. 2.1.1.5. In case of cylinder banks comprising 7 or more cylinders using several transverse brackets (1 & 2), join one after the other to determine distance between cylinders at end of cylinder bank and manifold:
54
1
2
3

TECHNICAL INFORMATION
LPG Técnicas en extinción de Incendios S.A. DOC: MU/IG/01/IN Rev: 1 Pag: 17/109
Fig. 2.1.1.5 Sketch showing mounting of manifold on brackets without vertical support
4. Place straps (3) on cylinders at ends of cylinder bank located onto the brackets (the shorter threaded end is mounted on the transverse bracket). In the case of cylinder banks comprising more than 7 cylinders and using several transverse brackets (1 & 2),also place at least rods of 1 cylinder for each set of transverse brackets.
5. Place cylinders located at manifold ends. In the case of cylinder bank of more than 7 cylinders (1 & 2) place at least 1 cylinder for each set of transverse brackets.
NOTE: VALVE PROTECTION CAP MUST ALWAYS BE INSTALLED WHENEVER A CYLINDER IS BEING TRANSPORTED.

TECHNICAL INFORMATION
LPG Técnicas en extinción de Incendios S.A. DOC: MU/IG/01/IN Rev: 1 Pag: 18/109
6. Raise transverse brackets up to the height indicated in sketch (fig. 2.1.1.5). 7. Tighten firmly straps (3) (fig. 2.1.1.4) in such a way that transverse brackets and cylinders make up a solid
assembly. 8. Lean assembly on wall, checking accurate position for connection to manifold outlet elbow. 9. Mount manifold (8), check valves (9) pertaining to cylinders placed on brackets. To mount, add sealing
compound or Teflon tape to manifold pipe thread connection where the check valve is fitted. Do not apply same to the two first threads. Place check valve onto manifold taking care that check valve arrow points at manifold, never at cylinder. Tighten union firmly using a fixed spanner.
10. Place discharge hose (10), pertaining to cylinders mentioned above, onto check valves mounted previously. Tighten with a fixed wrench. Connection between discharge hose and check valve requires Teflon tape.
11. In accordance to drawing data, fix manifold seats to wall (4) using metallic or chemical plugs. 12. Raise discharge manifold and place onto manifold seats (4). Fix using manifold “U” fixation (5). Do not
tighten. Allow manifold free movement. In the event of cylinder banks comprising a large number of cylinders and one single manifold, the latter shall be of a large diameter. Mechanical help shall be necessary for its mounting. Use pulleys or any other type of crane required by such operations.
13. Remove cylinder protection caps. 14. Connect discharge hoses to cylinder valve. Now manifold is accurately positioned in relation to cylinders. 15. Check position of all elements : cylinders, discharge hose, manifold, brackets, elbow, restrictor and
pipeline system. Arrange position of components prior to final bracket fixation. 16. Connect manifold (8) to restrictor elbow union. 17. Fix discharge manifold (6) onto its seats (4) and butt tighten manifold “U” fixation (5). 18. Mark transverse anchored points on the wall. It is possible to drill using as a guide mechanised fixing drills
on back transverse bracket. Fix bracket into its final position. High-power chemical or metallic fixing plugs shall be used for fixation. Do not use plastic plugs.
2.1.2 Storage System Composed of an assembly of steel cylinders containing extinguishing agent (called auxiliary cylinders), discharge valves and discharge manifold. Although they are not included in examples shown in Annex 1, there is a possibility of installing more than one discharge manifold and cylinder assemblies in groups of 12 or more cylinders in rows of 4 or 5 elements. The assembly is complemented with several control and auxiliary components. There are four LPG 128 valves depending on the working pressure and depending if they are supplied with or without solenoid thread port:
• LPG 128-80 with 240 bar working pressure (see Data Sheet #148) is supplied with solenoid thread port blinded with a cap to avoid leakage.
• LPG 128-60 with 240 bar working pressure (see Data Sheet #149) is supplied without solenoid thread port.
• LPG 128-85 with 370 bar working pressure (see Data Sheet #147) is supplied with solenoid thread port blinded with a cap to avoid leakage.
• LPG 128-65 with 370 bar working pressure (see Data Sheet #125) is supplied without solenoid thread port.
All LPG 128 valves are type 2 valves in accordance to EN 12094-4.

TECHNICAL INFORMATION
LPG Técnicas en extinción de Incendios S.A. DOC: MU/IG/01/IN Rev: 1 Pag: 19/109
Components comprising an INERT GAS storage system described below. The sequence to follow for mounting is the same as the order described below. 2.1.2.1 LPG 128-60/65/80/85 (Data Sheet FT 148, FT 149, FT 147 and FT 125) Description:
Figure 2.1.2.1 LPG Valve Model 128 Valve installed directly onto auxiliary bank cylinders. In the event of cylinder banks, activation may only be pneumatic requiring a source of external pressure (pilot cylinder).

TECHNICAL INFORMATION
LPG Técnicas en extinción de Incendios S.A. DOC: MU/IG/01/IN Rev: 1 Pag: 20/109
Differential opening valve. Mounted on cylinders of 80 or 140 l capacity. Pneumatic activation subject to pneumatic release cone connected to port (1). Supplied with pressure gauge that fulfils EN 837 (2) and calibrated pressure switch (3). A safety disk against over pressure rated at 270±10 bar / 415±15 bar (4) is incorporated. To prevent uncontrolled accidental discharges during installation or maintenance operations or handling of valve, remove head cap (5) and place plug on outlet port (7).This simple operation prevents risks, such as in case of accidental discharge, orifice (6) will drive gas from cylinder to environment in a controlled way, instead of through valve outlet (7). Safety disk cap (10) is also perforated thus allowing controlled gas discharge in case over pressure bursts safety disk. Mounting: Valve is delivered mounted onto auxiliary cylinder. Do not try to dismantle any of incorporated accessories. Mounting of elements associated (discharge hose (7) and release device (1) shall be installed later, following the order they are described. NOTE: VALVE UNION WITH PRESSURE GAUGE AND PRESSURE SWITCH IS FIXED. DISMANTLE IS NOT ALLOWED. NEVER TRY TO DISMANTLE SAME. NOTE: FOR ANY INSTALLATION OR MAINTENANCE OPERATION, VALVE HEAD CAP (5) MUST REMAIN DISMANTLED AS A SAFETY MEASURE. WHEN ANY MOUNTING, MAINTENANCE OR TEST OPERATION IS FINSIHED, DO NOT FORGET TO REPLACE HEAD CAP, HAND TIGHTEN, CHECK THAT HEAD CAP "O" RING IS MOUNTED IN ITS INTERIOR.

TECHNICAL INFORMATION
LPG Técnicas en extinción de Incendios S.A. DOC: MU/IG/01/IN Rev: 1 Pag: 21/109
LPG 128 Valve functional protocol. LPG 128 Valve makes use of cylinder internal pressure for opening .
The only way to activate valve is by making the Piston move downwards (11). When valve is at rest, pressure remains retained by closing element(12) and release disk (8) . Release pneumatic cone (13) incorporates in its interior a protactor piston (14). When pressure released by cylinder approaches back of protactor piston (14), same is displaced until release disk (8) bursts. At that moment pressure retained by release disk is released and driven over piston (11). Because surface relation between piston (11) and closing element (12) is 3:1, piston moves downwards thus, opening the valve. Dimensions: Valve gas inlet: ∅ext 1 “ ∅int ½” or 21 mm Valve gas outlet: ∅ext ¾ “ ∅int 18 mm Height: 155 mm Weight: 1.6 kg Pressure switch connection thread: ¼ “ ISO 228
CYLINDERPRESSURE
CYLINDER PRESSURE
DISCHARGE
PILOT PRESSU
Closed Opened

TECHNICAL INFORMATION
LPG Técnicas en extinción de Incendios S.A. DOC: MU/IG/01/IN Rev: 1 Pag: 22/109
Hand lever connection thread: M 30 x 1.5 Solenoid connection thread: M 36 x 1.5 Free Flow Cross Sectional Area: 128.5 mm2
Working Pressure: LPG 128-60 / LPG 128-80: Max. Working Pressure: 240 bar Functional Pressure: 60 bar LPG 128-65 / LPG 128-85: Max. Working Pressure: 370 bar Functional Pressure: 60 bar Containers: LPG 128 valve can be used in the following containers:
Container Volume [l] Fill ratio [kg/l] 80 200 bar at 15ºC / 300 bar at 15ºC
134 200 bar at 15ºC / 300 bar at 15ºC Other container sizes are allowed if following conditions are fulfilled:
o Maximum filling pressure 200 bar at 15ºC o Minimum charge 14 kg of agent
2.1.2.2 Pressure switch The Pressure switch are currently used as a control device. It can give or cut an electrical signal when pressure changes are detected into cylinders. This component will be delivered already mounted by LPG. In any case should these component be replaced or manipulated by other than LPG personnel. Pressure switch to be installed shall fulfill valve connection as shown on data sheet FT 145 (see Annex 1). Connection shall include a ¼” “Metal-Buna” joint. Working Pressure: Maximum working Pressure: 370 bar

TECHNICAL INFORMATION
LPG Técnicas en extinción de Incendios S.A. DOC: MU/IG/01/IN Rev: 1 Pag: 23/109
2.1.2.3 Pressure Gauge T/W pressure gauge is used for control the internal pressure of cylinders. It also acts as by-pass valve to allow connection of cylinder internal pressure to activation devices. In such cases where pressure gauge is not installed there should be a blind tape to fulfill the by-pass performance. In any case these components will be delivered already mounted by LPG. In any case should these components be replaced or manipulated by other than LPG personnel. Pressure gauge shall fulfils DIN EN 837 Class 1.6 minimum. Refer to Annex 1 for correct valve connection dimensions.

TECHNICAL INFORMATION
LPG Técnicas en extinción de Incendios S.A. DOC: MU/IG/01/IN Rev: 1 Pag: 24/109
2.1.2.4 Manifold discharge pipe Description: Pipe where contents of all bank cylinders is discharged and which directs extinguishing gas to appropriate pipe system. Made of black steel pipe in accordance with ASTM. Nominal diameter between ¾" and 2". SMAW welding process under approved procedure. Tested at 300/450 bar. Painted in black. Threaded outlets for connections to piping system (1), threaded inlets (2) for check valve connections and also for pressure switch with locking device (3).
Figure 2.1.2.4 Discharge manifold Mounting: Manifold pipe is located above cylinder bank, on fixed squares directly on the wall or on vertical supports. Assembly of manifold pipe is performed at the same time as bracket mounting. Avoid positioning manifold by initially connecting it to distribution system as such operation may modify elevation between manifold and discharge hose connections. See 2.1.1 bracket mounting for further information. All manifold threaded connections shall be sealed with Teflon tape.

TECHNICAL INFORMATION
LPG Técnicas en extinción de Incendios S.A. DOC: MU/IG/01/IN Rev: 1 Pag: 25/109
2.1.2.5 ¾" Check valve (Data Sheet FT 55) Description: Device which prevents gas returning from manifold pipe to cylinders, thus ensuring a complete discharge of all bank cylinders. Acts as a safety element by plugging the gas outlet to those cylinders which being disconnected may cause a manifold accidental discharge during maintenance operations.
Figure 2.1.2.5 ¾" Check Valve
Minimum cross sectional area: 314 mm2 Mounting: Once manifold is mounted onto brackets, mount all check valves. It is always located between discharge hose connected to cylinder and discharge manifold. To mount apply joint sealing compound or Teflon tape, to manifold pipe threaded connection where the check valve is fitted. Do not apply same to the two first rows of thread. Place check valve on manifold taking care that arrow points at manifold (upwards), never at cylinder. Tighten joint using a fixed wrench. Dimensions: External diameter: 52 mm Length: 84 mm Connection thread: G ¾” Working Pressure: 370 bar

TECHNICAL INFORMATION
LPG Técnicas en extinción de Incendios S.A. DOC: MU/IG/01/IN Rev: 1 Pag: 26/109
2.1.2.6 High pressure auxiliary cylinders
Figure 2.1.2.6 80 and 140 litre INERT GAS Cylinders.
Description: High pressure containers containing INERT GAS extinguishing agent charge. Cylinders of unwelded drawn steel in accordance with specifications 84/525/ECC. Heat treated. Hydraulic test pressure 450 bar. All models are approved according to European Regulations applicable ( ε mark ). Once valve is assembled onto cylinder collar (3) and protection flange(5), the equipment is protected by a safety cap for transportation (4). Cylinders are supplied packed. Each unit protected by octagonal cardboard. All cylinders are provided with identification labels indicating handling instructions. Mounting:
NOTE: DO NOT REMOVE PROTECTION CAPS FROM CYLINDERS UNTIL THEY ARE FIXED ONTO THEIR BRACKETS AND ONLY IMMEDIATELY PRIOR TO INSTALLATION OF DISCHARGE HOSE.
Assembly cylinder-valve is supplied fully mounted. Place all cylinder onto brackets. To prevent damages to cylinders by dropping them accidentally, locate front pieces of brackets prior to removing protection caps.

TECHNICAL INFORMATION
LPG Técnicas en extinción de Incendios S.A. DOC: MU/IG/01/IN Rev: 1 Pag: 27/109
Tighten front pieces allowing cylinder freedom of movement. Next, remove protection caps (4) Remove valve head cap. All cylinder valves shall be orientated in the same direction (Manifold and valve LPG stamp should be facing front). Do not forget, when release system mounting described in 2.1.3 is finished, to fix cylinders onto their brackets, tightening firmly. When complete system installation is finished (including release) mount and tighten manually all LPG 128.60/80 discharge valves head caps.
2.1.2.6.1 Cylinder inscriptions. Under legal requirement, all cylinders shall have a number of inscriptions attached to their ogives indicating name of manufacturer, quality trade names, hydraulic pressure test, gas contained and other data. Arrangement of LPG cylinder marks are specified as follows:

TECHNICAL INFORMATION
LPG Técnicas en extinción de Incendios S.A. DOC: MU/IG/01/IN Rev: 1 Pag: 28/109
2.1.2.6.2 INERT GAS Identifying Label (Ex. Argon) In each delivery, LPG supplies one adhesive identifying label for each cylinder supplied. To prevent damages during transport and cylinder installation, labels are delivered together with documentation accompanying delivery. This label identifies gas contained in cylinder, quantity of gas contained, cylinder weight when empty, working pressure, cylinder identification number and date of charge. INERT GAS extinguishing agent experiences substantial pressure deviations depending on ambient temperature. To avoid problems related with reading pressures on pressure gauges, LPG supplies an adhesive label containing a diagram for Pressure-Temperature for INERT GAS gaseous agent depending on cylinder filling density.
Figure 2.1.2.6.2 ARGON identifying label.

TECHNICAL INFORMATION
LPG Técnicas en extinción de Incendios S.A. DOC: MU/IG/01/IN Rev: 1 Pag: 29/109
As a legal requirement, it is compulsory for each cylinder to have its identifying label. Therefore, it is very important for the person performing the installation to have each label attached to its cylinder as soon as the installation is finished. To perform this operation, manufacturing lot number shall be compared with the number marked on each cylinder ogive (field 3 described in item 2.1.2.6.1) with identifying marks on labels supplied. Labels shall be attached directly onto cylinder body, in a visible location and in a normal reading position. To adhere labels easier, first wipe away dirt, dust, oil or grease from cylinder area where the label is going to be placed.

TECHNICAL INFORMATION
LPG Técnicas en extinción de Incendios S.A. DOC: MU/IG/01/IN Rev: 1 Pag: 30/109
2.1.2.7 Discharge hose 4S-H (Data Sheet FT 110) Description: Discharge pipe for INERT GAS agent from cylinders to manifold pipe. Nominal diameter ¾". Made of synthetic rubber. Working pressure of 420 bar and burst pressure 1680 bar. Length 421 mm.
Figure 2.1.2.7 4S-H discharge hose. Mounting: Connection (1) assembled swivel nut on LPG 128 valve outlet port (7) described in 2.1.2.1. The other end (2) connected to the non return valve. See example on drawings 520XXXAR in Appendix 1. Connection to check valve require Teflon tape, while connection to LPG 128 valve does not require and sealing element but it is recommended to add some Vaseline to union thread to facilitate fitting. First fix hose pertaining to check valve (2) taking care (1) that it faces valve outlet. Dimensions: Length: 421 mm Working Pressure: 420 bar Working Temperature: -40ºC to 120 ºC Bending radius: 280 mm
1 2

TECHNICAL INFORMATION
LPG Técnicas en extinción de Incendios S.A. DOC: MU/IG/01/IN Rev: 1 Pag: 31/109
2.1.2.8 Pressure switch with locking device (Data Sheet FT 047) Description: Pressure switch which closes or opens a circuit when a gas discharge is driven through the manifold pipe. The electric signal may be monitored on the panel board, or it may be used for stopping and /or starting up other electric devices. Once activated it can only be reassembled manually by pulling off the sphere incorporated in the locking system (1). Reassemble should be performed at storage location, on the pressure switch itself.
Figure 2.1.2.8. Pressure switch with locking device. Mounting: Mounted on manifold pipe (see figure 2.1.2.4 Discharge Manifold Pipe). Apply Teflon tape to threaded connection. Do not apply Teflon tape to the two first threads. Tighten union with a fixed wrench. Perform electric connection when installation mounting is finished in accordance with specifications in item 2.2 in this manual Electric Installation. Dimensions: High: 126 mm Wide: 30.3 mm Thermal gauge: 10 A Voltage gauge: 6 A – 250 V 4 A – 400 V Protection: IP 65 Working Temperature: 25ºC to 80 ºC Mechanical Life: 10 6 cycles Working pressure: 370 bar Minimum Working pressure: 10 bar
1
TECHNICAL INFORMATION
LPG Técnicas en extinción de Incendios S.A. DOC: MU/IG/01/IN Rev: 1 Pag: 32/109
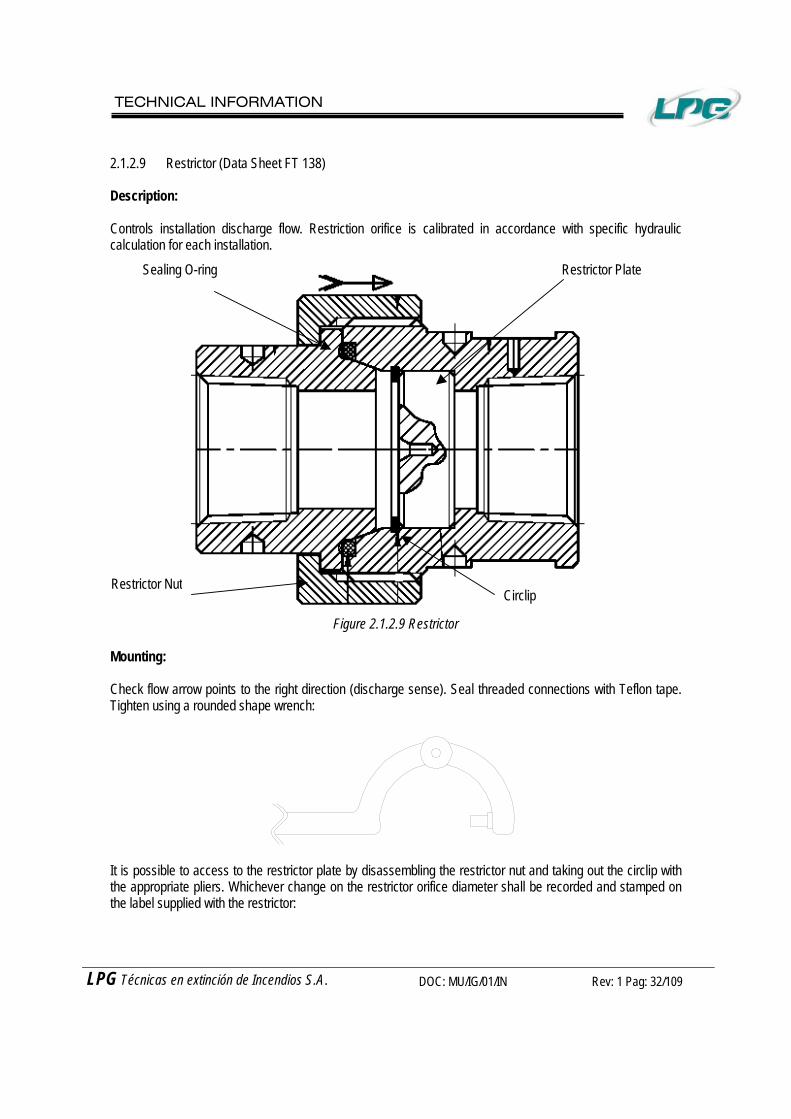
2.1.2.9 Restrictor (Data Sheet FT 138) Description: Controls installation discharge flow. Restriction orifice is calibrated in accordance with specific hydraulic calculation for each installation.
Figure 2.1.2.9 Restrictor
Mounting: Check flow arrow points to the right direction (discharge sense). Seal threaded connections with Teflon tape. Tighten using a rounded shape wrench:
It is possible to access to the restrictor plate by disassembling the restrictor nut and taking out the circlip with the appropriate pliers. Whichever change on the restrictor orifice diameter shall be recorded and stamped on the label supplied with the restrictor:
Sealing O-ring Restrictor Plate
Restrictor NutCirclip

TECHNICAL INFORMATION
LPG Técnicas en extinción de Incendios S.A. DOC: MU/IG/01/IN Rev: 1 Pag: 33/109
Flow characteristics: K1 = -0.13096 K2 = 0.00753 K3 = -0.00000 Other: Orifice in the diaphragm should be at least 3 mm. Orifice in the diaphragm should be at maximum 80% of upstream internal pipe diameter. Working pressure: 370 bar

TECHNICAL INFORMATION
LPG Técnicas en extinción de Incendios S.A. DOC: MU/IG/01/IN Rev: 1 Pag: 34/109
2.1.3 Release System This is the system which allows command of discharge of gas contained in cylinders. LPG-INERT GAS standard release system is pneumatic operated. Pneumatic release may incorporate associated solenoid valves into manual release device which select pneumatic opening for a selector valve. Located at outlet of pilot cylinders. Components which may be included into an INERT GAS release system and mounting of each one are described as follows. Mounting is performed in the order elements are described.

TECHNICAL INFORMATION
LPG Técnicas en extinción de Incendios S.A. DOC: MU/IG/01/IN Rev: 1 Pag: 35/109
2.1.3.1 Pressure pilot cylinder and pilot valve (Data Sheet FT 052) Description: Pilot cylinder of 3 l (5) capacity, equipped with discharge valve (1), charged with dry nitrogen at 100 bar. Manual actuation (2), electric actuation by solenoid valve (4). Once pilot cylinder discharge is activated, nitrogen flows through release line up to pneumatic release cones mounted on bank auxiliary cylinders. Once activated it is not possible to interrupt cylinder discharge (total discharge).
Number Description 1 Discharge valve 2 Manual release 3 Solenoid valve 4 Cylinder 5 Cone 6 Pressure gauge
Figure 2.1.3.1 Piloto cylinder+valve

TECHNICAL INFORMATION
LPG Técnicas en extinción de Incendios S.A. DOC: MU/IG/01/IN Rev: 1 Pag: 36/109
NOTE: EACH SINGLE PILOT CYLINDER CAN OPERATE UP TO 40 INERT GAS CYLINDER. Mounting: Fix pilot cylinder bracket to cylinder bank bracket in the position shown in installation drawings (see example included in Annex 1, drawings 520098AR,520094AR). Height of cylinder bracket shall be adequate for a possible manual operation. Unpack pilot cylinder. Fix same onto its bracket and remove protection cap. Tighten bracket leaving pressure gauge well visible and free access to the manual actuator (2). Unscrew pilot valve head cap to prevent accidental discharges during release system mounting. Mount the rest of release system. When completing all handling of release system, replace valve head cap.

TECHNICAL INFORMATION
LPG Técnicas en extinción de Incendios S.A. DOC: MU/IG/01/IN Rev: 1 Pag: 37/109
2.1.3.2 LPG 128-40 Valve (refer to Data FT 141) Dimensions: Valve gas inlet: ∅ext W 28.8 DIN 477 ∅int 3/8 “ Valve gas outlet: ∅ext 21.7 mm ∅int 12 mm Height: 155 mm Weight: 1.6 kg Solenoid connection thread: M 36 x 1.5 Pressure switch connection thread: M 10 x 1 Pressure gauge connection thread: M 10 x 1 Hand lever connection thread: M 30 x 1.5 Working Pressure: Max. Working Pressure: 166 bar Functional Pressure: 60 bar Containers: LPG 128 valve can be used in the following nitrogen containers:
Container Volume [l] Fill ratio [kg/l] 3 100 bar 15ºC

TECHNICAL INFORMATION
LPG Técnicas en extinción de Incendios S.A. DOC: MU/IG/01/IN Rev: 1 Pag: 38/109
2.1.3.3 Manual lever release (Data Sheet FT 051) Device which allows manual actuation of bank pilot cylinders. It comprises a lever (1) which manually operated backwards and downwards pushes a needle (2) against a release disk located on pilot valve body. Thus, release disk bursts and opens valve. Provided with seal (3) against accidental activations.
Figure 2.1.3.3.1 Manual lever release
Dimensions: Valve connection thread: M 30 x 1.5 Height: 82 mm Length: 68 mm Operation specifications: Working force applied to lever: 35 N Mounting: Check that seals (3) are not damaged. Check that "0"ring (5) is in its location. Release is placed on pilot valves on connection port indicated in 2.1.3.1. Use a rounded shape wrench for mounting. Do not apply sealing compound to threaded union (4) as sealing is achieved by "0" ring (5).
1
3
2
4
5

TECHNICAL INFORMATION
LPG Técnicas en extinción de Incendios S.A. DOC: MU/IG/01/IN Rev: 1 Pag: 39/109
Manual actuation devices shall be installed at normal operating height, at highly visible locations. They shall be protected against being tripped accidentally. Each lever manual release device shall be clearly marked indicating the protected zone it serves.
NOTE: PRIOR TO INSTALLING THE MANUAL RELEASE ONTO THE VALVE CHECK THAT PISTON IS DEEP SEATED INSIDE ITS HOUSING, BY PUSHING DOWN WITH A SCREWDRIVER.

TECHNICAL INFORMATION
LPG Técnicas en extinción de Incendios S.A. DOC: MU/IG/01/IN Rev: 1 Pag: 40/109
2.1.3.4 Solenoid Valve (Data Sheet FT 017) Description: Electric device which allows opening of LPG family valves. Connected (1) to pilot cylinder valve. Allows actuation of pilot cylinders by means of an electric signal emitted by a panel board or by a release push button. Comprising a coil (3) mounted on a stem. When coil excites internal core is drawn up, thus producing opening of the valve. The coil is fed electrically by means of the connector (4). There are two models available, one for normal operations and one for explosion proof operations. This device may be disassembled even when the pilot cylinder is charged.
Figure 2.1.3.4. Solenoid Valve
Dimensions: Valve connection thread: M 36 x 1.5 Electrical specifications: Minimum voltage: 22 V DC Nominal voltage: 24 V DC Maximum voltage: 27 V DC Minimum intensity: 0.50 A Nominal intensity: 0.55 A Maximum intensity: 0.60 A Consumption power: Low Temperature 13 W High Temperature 10 W Protection: IP-65 Solenoid coil: DIN 43650/A (2P+E)

TECHNICAL INFORMATION
LPG Técnicas en extinción de Incendios S.A. DOC: MU/IG/01/IN Rev: 1 Pag: 41/109
Working Pressure: Maximum Working Pressure: 170 bar Operation specifications: Working: Normally closed Reaction time: 6 miliseg. Mounting: Solenoid valve is delivered mounted on pilot cylinder valve. Do not perform electrical connection until pneumatic mounting for all the installation is completed (see 2.2: Electrical connection). In case of having to disassemble for operation test, remove connector (4), loosen nut (2) and remove coil (3) NOTE: LPG DOES NOT RECOMEND YOU TO REMOVE SOLENOID VALVE FROM PILOT CYLINDER, IN CASE OF MALFUNCTION, SEND VALVE + CYLINDER + SOLENOID VALVE TO LPG. If for any reason or breakdown, it is essential to remove solenoid valve from pilot cylinder valve, firstly, disconnect valve pressure gauge. When you disconnect the pressure gauge, pressure supply to solenoid valve is shut-off. This operation should be performed under great precaution and operate carefully to prevent false operations. Therefore, the operator shall stand sideways to prevent a pressure gauge violent explosion. Discharge of nitrogen cylinder may be produced and cause discharge of cylinder bank. To prevent this, dismantle head cap of pilot cylinder valve. Next, dismantle connector (4), nut (2) remove coil (3) and last loosen fixing nut (1) with a rounded shape wrench.
Now it is possible to remove the rest of the solenoid valve. Mounting is performed by reversing disassembly procedure.

TECHNICAL INFORMATION
LPG Técnicas en extinción de Incendios S.A. DOC: MU/IG/01/IN Rev: 1 Pag: 42/109
Prior to mounting a solenoid valve check that there is no leakage by applying soapy water to all solenoid valve body, previously removing connector and coil. Check likewise for leakage on valve head (head orifice).

TECHNICAL INFORMATION
LPG Técnicas en extinción de Incendios S.A. DOC: MU/IG/01/IN Rev: 1 Pag: 43/109
2.1.3.5 Pneumatic release cones (Data Sheet FT 058)
2
5 3
6
41
2
Figure 2.1.3.5 Pneumatic release cones Dimensions: Pneumatic pressurized gas inlet: ∅ ¼ “ Pneumatic pressurized gas outlet: ∅ ¼ “ (where applicable) Valve connection thread: M 30 x 1.5 Working Pressure: Max. Working Pressure (valve connection): 370 bar Max. Triggering Pressure: 140 bar Normal Triggering Pressure: 100 bar Min. Triggering Pressure: 60 bar (200 bar systems) 80 bar (300 bar systems) Description: The pneumatic cone (1) is provided with an internal piston (8) fitted with a protractor needle ( 2). When the piston is pneumatically activated on receiving the gas from the pilot cylinder, the needle bursts a disk housed on the valve body of the auxiliary cylinder. Thus discharging the pressurised extinguishing agent contained in the cylinder. This device is available provided with a coupling of 1, 2 or 3 working pneumatic tracks (3) + (6) or (7), depending on its location on the release line. On coupling (3) a fixing screw may be mounted (6) thus making a 2 track connection or a selector screw (7) which allows a third track for connection of release hoses coming from pilot cylinders or selector valves. On connection (4, 5) hoses are mounted on release line.

TECHNICAL INFORMATION
LPG Técnicas en extinción de Incendios S.A. DOC: MU/IG/01/IN Rev: 1 Pag: 44/109
Mounting: Piston-cone assembly is usually delivered mounted. Otherwise, insert the piston (8) into the cone body until it butts. Mount pneumatic coupling (3) and tighten the two track screw (6) or the three track one (7), according to drawings, without forgetting to insert the "0" rings (9, 10). NOTE: PRIOR TO MOUNTING THE CONE ON THE VALVE IT IS IMPORTANT TO CHECK THAT THE PISTON IS COMPLETELY RETRACTED INSIDE THE CONE, BY PUSHING DOWN WITH A SCREWDRIVER. PROTACTOR NEEDLE SHALL NEVER STICK OUT FROM CONE OR OTHERWISE A CYLINDER ACCIDENTAL DISCHARGE MAY BE PRODUCED.
Cone connection to bank cylinder valve is performed through release connection port (see figure in item 2.1.2.1 LPG 128 Valve), located on the opposite side to valve outlet. Use a rounded shape wrench for tightening. Do not apply sealing compounds to threaded union as sealing is by "0" ring. Repeat operation till all cylinders are fitted with a release cone.
Locate release cones on each cylinder in accordance with sketch for cylinder bank mounting and tighten. Next place screws (6 or 7) onto each cones in accordance with cylinder bank release drawing. Note: Burst disc, Burst disc fixer and Pneumatic Cone Needle SHALL be replace by new ones after each single actuation of the system.

TECHNICAL INFORMATION
LPG Técnicas en extinción de Incendios S.A. DOC: MU/IG/01/IN Rev: 1 Pag: 45/109
2.1.3.6 Decompression screw (Data Sheet FT 070) Description: Prior to a cylinder bank activation, the release circuit remains pressurized with nitrogen coming from pilot cylinder. To decompress the circuit in a safe and guided way, operate decompression screw (see 3.3.3 Release line decompression). There are two models available: C & L.
Screw model C
Screw model L
Figure 2.1.3.6 Decompression screw
Mounting: Model C is mounted directly on one of the pneumatic cone working tracks located onto the last cylinder on release line. Mount screw model L on any of the cones of intermediate cylinders, and connect it instead of the fixing screw. Thread element using a fixed wrench. Do not apply sealing compound to union as sealing is conical . Location determined in release system drawings. Dimensions: Connection threat: R ¼” Working pressure: 140 bar

TECHNICAL INFORMATION
LPG Técnicas en extinción de Incendios S.A. DOC: MU/IG/01/IN Rev: 1 Pag: 46/109
2.1.3.7 Decompression Valve (Data Sheet FT 075) Description: Decompression valves for pneumatic release systems prevent that excess pressure on release line produced by micro-leakage may accidentally activate release systems, leaving an external outlet which closes in case of real actuation of the pneumatic device.
Figure 2.1.3.7. Decompression valve
Mounting:
¼" Decompression valves shall be installed in accordance to drawings. They are generally mounted on an outlet "T" at nitrogen cylinder outlet valve and the first hose on release line (see examples in Annex 1: Drawings 520098AR, 520094AR). Union require to add PTFE tape to the thread taking care to don’t cover the first 2 threads. Dimensions: Connection threat: R ¼” Working pressure: 240 bar Minimum Working pressure: 20 bar

TECHNICAL INFORMATION
LPG Técnicas en extinción de Incendios S.A. DOC: MU/IG/01/IN Rev: 1 Pag: 47/109
2.1.3.8 Release line Teflon flexible hoses (Data Sheet FT 040) Description: ¼" Diameter Teflon hose fitted with brass ends used to direct release system gas from pilot cylinders to all auxiliary cylinders charged with Inert Gas. Flexible hoses are designed for a working pressure of 260 bar. Burst pressure 780 bar. Bending range 30 mm. Available in two lengths: 580 and 700 mm.
Figure 2.1.3.8 Teflon flexible hose. Mounting: Mount between release cone pneumatic couplings. Join chain of hoses together with pilot valve. Insert decompression screws or decompression valves according to drawing ( see examples in Annex 1, drawing 520098AR,520094AR). In the event of systems fitted with selector valves, follow connecting sketch pertaining to release drawings. Tighten threaded unions using a fixed wrench but do not apply sealing compound. Add Vaseline to unions to facilitate threaded union.
NOTE: AVOID TWISTING FLEXIBLE HOSES DURING MOUNTING OPERATIONS. THEREFORE, HOLD COUPLING CAP WITH A PAIR OF PLIERS WHILE JOINT IS TIGHTENED BY MEANS OF A FIXED WRENCH.

TECHNICAL INFORMATION
LPG Técnicas en extinción de Incendios S.A. DOC: MU/IG/01/IN Rev: 1 Pag: 48/109
Distribution System
Assembly of pipe and fittings which drive gas discharge from cylinders to protected zone. 2.1.3.9 Pipe and fittings
Pipes shall be installed in accordance with isometric drawing accompanying the project. Measures,
dimensions and pipe quality indicated in the drawing are to be comply with, as any modifications related to pipe dimensions or measures would impair system operation. In case of requiring any modification, the engineering department responsible for system design shall be notified as appropriate.
Pipe system shall comply with pressure requirements specified in table below. ASTM grade A-106 B unwelded steel pipes of the following classes (1) is recommended:
Connection by means of welded accessories:
(200 bar Systems) Prior restrictor After restrictor
Pipe size Working pressure
Pipe class Pipe size Working pressure
Pipe class
¾”
¾”
1
Sch 40 or larger Welded connection
1
1 ¼”
1 ¼”
1 ½”
1 ½”
2”
240 bar Sch 80 or larger Welded connection 2”
65 bar
Sch 40 or larger Welded connection
(300 bar Systems)
Prior restrictor After restrictor Pipe size Working
pressure Pipe class Pipe size Working
pressure Pipe class
¾”
¾”
1
1
1 ¼”
1 ¼”
1 ½”
1 ½”
2”
370 bar
Sch 160
2”
65 bar
Sch 40 or larger Welded connection
1 According to ANSI B-36-10

TECHNICAL INFORMATION
LPG Técnicas en extinción de Incendios S.A. DOC: MU/IG/01/IN Rev: 1 Pag: 49/109
Connecting fittings, whether threaded or welded, shall be 300 lb. prior to restrictor. On the rear of
restrictor accessories shall be 1000 lb. minimum. Pipes smaller or equal to 2" nominal diameter shall not be connected by welding on site. Connections
on site shall be threaded. Installation shall be earthed.
Pipe painting shall be red (RAL. 3002).

TECHNICAL INFORMATION
LPG Técnicas en extinción de Incendios S.A. DOC: MU/IG/01/IN Rev: 1 Pag: 50/109
2.1.3.10 Supports Every installation shall have a minimum of two supports to hold pipe system. Maximum distance between two supports along pipeline shall never exceed the following values:
Nominal Diameter (mm)
Nominal diameter (inches)
Maximum distance between supports (m)
10 3/8 1.0 15 ½ 1.5 20 ¾ 1.8 25 1 2.1 32 1 ¼ 2.4 40 1 ½ 2.7 50 2 3.4 70 2 ½ 3.5 80 3 3.7
100 4 4.3
Whenever pipeline is more than 2 inches (DN 50) and table distances cannot be adhered to because of building designs, these distances may be raised to 6 m between supports, if pipeline is provided with double supports.
Pipeline supports shall be located next to pipe unions, to elbows and pipeline reverse changes.
Supports shall connect pipe system directly to building structure and shall not be used to support
other objects. Parts of the building where supports are fixed shall be strong enough to take the load (see table for design charge). Otherwise, additional straps shall be fixed to other resistant elements. Only pipes with nominal diameters less than or equal to 50 mm may be attached to metallic structures in the shape of trusses or concrete slabs (design shall be approved by the authorities). Fastening plugs in concrete slabs shall be located at least 150 mm away from edge of slab.
Distance between nozzle and its support shall be the shortest possible:
- For pipelines with a smaller or equal diameter to 25 mm, maximum distance from support to
nozzle shall be 0.1 m. - For pipelines more than 25 mm diameter, maximum distance from support to nozzle shall be
0.25 m. Supports type hangers or manifold "U" fixation are recommended. Pipe brackets and other fittings for
holding pipes, shall completely surround the pipe and close. Supports shall comply with the following minimum requirements for sectional areas and depth
anchoring:

TECHNICAL INFORMATION
LPG Técnicas en extinción de Incendios S.A. DOC: MU/IG/01/IN Rev: 1 Pag: 51/109
Pipe nominal diameter Design charge (N)
Support minimum section (mm)
Thread size (metric)
Minimum depth of anchoring for
fastening plugs in concrete (mm)
until DN 50 (2”)
2000 30 8 30
between DN 50 (2”) and DN 100 (4”)
3500 50 10 40
between DN 100 (4”) and DN 150 (6”)
5000 70 12 40
between DN 150 (6”) and DN 200 (8”)
8500 125 16 50
- Minimum cross-sectional area of supports shall not be less than 30 mm2. - Support material shall be at least 3 mm thick. If galvanised, 2.5 mm thickness will be enough.
In the event of hot galvanised flanges, minimum dimensions shall be 2.5 mm x 1.5 mm for models not approved and 12 mm x 1.5 for approved models.
The following types of support are enclosed as examples:
FIXED SUPPORT: HORIZONTAL WALL
Z SUPPORT: FALSE FLOOR

TECHNICAL INFORMATION
LPG Técnicas en extinción de Incendios S.A. DOC: MU/IG/01/IN Rev: 1 Pag: 52/109
FIXED SUPPORT: FALSE FLOOR FALSE FLOOR SUPPORT
FLOOR FIXED SUPPORT
SUSPENDED CEILING SUPPORT SUSPENDED CEILING FIXED SUPPORT

TECHNICAL INFORMATION
LPG Técnicas en extinción de Incendios S.A. DOC: MU/IG/01/IN Rev: 1 Pag: 53/109
2.1.3.11 Nozzles (Data Sheet FT 135 / FT 136) Description: Nozzles which discharge extinguishing gas inside the protected enclosure. Comprising a discharge head containing a multiple number of orifices. A diaphragm fitted with one single calibrated orifice is to be mounted internally. To avoid orifice obstruction calibrated orifice shall be at least 3 mm diameter. Device designed to produce optimum gas distribution.
360º Nozzle 180º Nozzle
Figure 2.1.3.11 Nozzle Mounting: Apply thread sealing compound or Teflon tape to distribution pipeline thread. Connect nozzle and tighten using a fixed wrench. Flow characteristics: K1 = -0.18299 K2 = 0.03074 K3 = 0.00000 Other: Orifice in the diaphragm should be at least 3 mm. Orifice in the diaphragm should be at maximum 80% internal pipe diameter. Working pressure: 142 bar

TECHNICAL INFORMATION
LPG Técnicas en extinción de Incendios S.A. DOC: MU/IG/01/IN Rev: 1 Pag: 54/109
NOTE: FIXING OF NOZZLES IS VERY IMPORTANT. IT IS ALSO IMPORTANT THAT NOZZLE ORIENTATION SHALL NEVER POINT AT FALSE CEILINGS OR MOVILE PARTS AS GAS DISCHARGE COULD RAISE CELING SLABS OR DRAG OBJECTS. DISCHARGE NOZZLES SHALL NEVER BE LOCATED DIRECTLY ON VALVE DISCHARGE ORIFICE.
To prevent errors during installation, all nozzles shall incorporate legible and long lasting inscriptions indicating diaphragm calibrated diameter and identification of its location in the drawing with reference to project and system hydraulic calculations. Usually LPG performs a mechanic engraving (punched) of above mentioned inscriptions on nozzle bodies.
180º NOZZLE 360º NOZZLE FORBIDDEN

TECHNICAL INFORMATION
LPG Técnicas en extinción de Incendios S.A. DOC: MU/IG/01/IN Rev: 1 Pag: 55/109
2.2 Electrical Installation After performing installation pneumatic mounting and with pilot valve head caps dismantled, perform electrical connection of components requiring so. When these components are fed through a control station, it is recommended to read carefully the instructions for the station installation so as to prevent accidental tripping through which electrical devices may, in some cases, cause complete discharge of the whole cylinder bank. NOTE: LPG ELECTRICAL COMPONENTS DO NOT HAVE POLARITY. ALL ELECTRICAL CONNECTIONS SHALL BE PERFORMED IN SUCH A WAY THAT THE CABLES REACH RIGHT TO THE DEVICE TO PREVENT CABLE CONFUSION LATER FOR STARTING UP AND MAINTENANCE OPERATIONS. Pressure switch with locking device electrical connection:
For a normally closed circuit connect to 21 and 22 terminals. For a normally open circuit connect to 13 and 14 terminals.

TECHNICAL INFORMATION
LPG Técnicas en extinción de Incendios S.A. DOC: MU/IG/01/IN Rev: 1 Pag: 56/109
Solenoid valve electrical connection:
Assure that electrical power supply is disconnected during electrical connections and LPG 128 head cap is removed. Connect solenoid valve as shown below: After connection place LPG 128 head cap back again.
Pressure Gauge with contact:
In case that pressure gauges, with contact to monitor cylinder’s pressure, are to be used refer to following connection schema:
2
31
+
To Central Panel orINVERTER Circuit

TECHNICAL INFORMATION
LPG Técnicas en extinción de Incendios S.A. DOC: MU/IG/01/IN Rev: 1 Pag: 57/109
Specifications:
Voltage: 4.5 - 24V DC Current: 5 – 50 mA Max. Consumption: 3 W
LPG Pressure gauges are Normally Open. Final line resistance R1 shall be always installed. Please refer to Control Panel User’s Manual to get right resistance value for R1. If Normally Closed signal in the Control Panel is needed, system shall be completed with the INVERTER circuit supplied by LPG. In such case R1 resistance shall be 4K7 Ohms. Refer to following connection scheme:
Circuit shall be continuously supplied with 24 V c.c. When circuit is in service (connected to 24 V DC) Red Led remains ON. If it doesn’t light check connections and polarities. If problem persists contact LPG. Pressure gauges shall be connected in parallel to the INVERTER circuit through PRES port. Control Panel shall be connected to the INVERTER circuit through OUT relay. Once pressure gauges are connected to INVERTER circuit and R1 resistance is connected, Green Led will remain ON and OUT relay will remain closed. If it doesn’t light check connections and verify that cylinders have the right pressure. If problem persists contact LPG. In case of an open circuit (at 24 V DC power supply or through pressure gauges line) or in case of a short circuit in pressure gauges line (cylinder pressure lost detected) OUT relay will open to cause an alarm in the Control Panel. Green Led will be shut OFF.
1 2 3
Characteristics: Voltage: 24±20% V DC Consumption: < 1W Switch: 24 V DC max 1A

TECHNICAL INFORMATION
LPG Técnicas en extinción de Incendios S.A. DOC: MU/IG/01/IN Rev: 1 Pag: 58/109
2.3 Installation final requirements
- LPG Inert Gas Systems may be equipped with non-electrical disable devices. - All cylinders, including pilot cylinders, shall have an adhesive label attached indicating identification
number (coinciding with the one engraved on its ogive) gross weight , net weight and date of charge. Time delay cylinder does not incorporate an identification label.
- Paint of all components shall be in perfect condition. Repaint those areas where the paint has undergone
damages. In case of any oxide, prepare surface, apply a coat of priming for metal and finish by applying a coat of finishing paint. Colours for INERT GAS fire extinguishing systems are: black body and yellow ogive for cylinders, and (RAL 3002) red for pipe system.
- Each cylinder bank shall be identified by means of a notice indicating:
- Hazard protected - Warnings - Instructions for use and manual operation
Notices shall be firmly affixed and visible onto fixed elements, resistant to climatic and environmental conditions which they may be exposed to (dust, dirt, humidity, etc.).

TECHNICAL INFORMATION
LPG Técnicas en extinción de Incendios S.A. DOC: MU/IG/01/IN Rev: 1 Pag: 59/109
3 Commissioning and maintenance An INERT GAS extinguishing system shall be inspected and tested by competent personnel during system commissioning after its installation phase. Furthermore, a system inspection and maintenance calendar should be followed. The object of a periodical inspection is to ensure that the system is in perfect operating condition at all times. It is also useful for identification of problems due to age, accidental and environmental damages, unauthorised handling, changes in the contents of protected volume, uses, openings communicating with rooms and in general all those factors which may affect negatively foreseen extinguishing system output.
3.1 System commissioning and reception Extinguishing system commissioning consists of an installation inspection to evaluate installed system compliance with projected system and the execution of a series of tests which ensure proper operation of the extinguishing system. This document only deals with commissioning operations and inspections for cylinder banks and extinguishing systems. For detection system commissioning operations consult your supplier or detector manufacturer. Only personnel properly trained in fire extinguishing techniques shall perform system reception inspection and commissioning.
IT IS NECESSARY TO KNOW PROPERLY CYLINDER BANK CONNECTION AND IN PARTICULAR RELEASE SYSTEM.
as in some occasions only one release system is used to command discharge of several cylinder banks which may even be located on different distant locations. We recommend to study carefully installation drawings showing connection diagrams and LPG standard cylinder bank releases; in the case of commissioning of a non-standard cylinder bank it is necessary to consider the drawing supplied together with bank components. TESTS TO BE PERFORMED FOR SYSTEM COMMISSIONING SHALL FOLLOW THE STEPS DESCRIBED
IN THIS MANUAL, as a failure in execution could provoke a system accidental discharge. Extinguishing system tests for components which are not described in this manual shall not be performed. During the performance of tests all personnel not assigned to commissioning operations shall evacuate cylinder storage area and area or areas protected by the cylinder bank. Protection masks and gloves shall be worn for component handling subject to pressure.

TECHNICAL INFORMATION
LPG Técnicas en extinción de Incendios S.A. DOC: MU/IG/01/IN Rev: 1 Pag: 60/109
3.1.1 Component revision After installation of an INERT GAS system you should proceed with a system reception inspection. This consists of a component revision where condition, proper connection and installation of components in accordance with project are inspected. All component checking to be carried out are included on the checking list in Appendix III: Checking List for Installation Reception. 3.1.2 Commissioning operations and operation tests. For commissioning, it is recommended to perform all the tests described hereinafter. Some of these tests are also performed for maintenance operations (see calendar in item 3.2 Maintenance). Material supplied by LPG is subject to factory quality control, thus the following tests on installed system constitute a complement to ensure proper extinguishing system operation and to prevent possible damage resulting from mounting.

TECHNICAL INFORMATION
LPG Técnicas en extinción de Incendios S.A. DOC: MU/IG/01/IN Rev: 1 Pag: 61/109
3.1.2.1 Blow out with nitrogen Blowing out a pipe system with nitrogen (or any other suitable gas) ensures that the inside of the pipe is cleaned and denounces pipe or nozzle obstructions. Nitrogen flow shall be continuous. To perform the blow out, follow steps below: Remove auxiliary cylinder valve head caps. Remove pressure switch with locking device. Connect to manifold free port a dry nitrogen cylinder, fitted with regulated outlet of 50 bar pressure in
accordance with enclosed sketch:
Remove all nozzles comprising the system to be blown out. To perform nozzle reconnection, it is
very important to have available isometric drawings or project document where location of each nozzle is specified, as internal bores are different. Plug all free pipe ends/terminals, except one. Open nitrogen cylinder valve and keep blowing out for 15 seconds approximately.
NOTE: PRESSURE ESCAPE BY FREE END IS DANGEROUS. CHECK THAT THERE ARE NO PERSONS INSIDE THE ROOM AND EVACUATE OR FIX ELEMENTS WHICH COULD BE HURLED BY THE EFFECT OF THE PRESSURE.
PERFORMANCE OF THIS TEST MAY PRODUCE CLOUDS OF DUST.
THROUGH FREE OUTLET LIQUID AND SOLID RESIDUES MAY BE HURLED.
Repeat the operation freeing a different pipe end each time and plugging the rest of them until all pipe
ends are completed. Remove all plugs and replace nozzles INTO THEIR ORIGINAL POSITION. Disconnect nitrogen cylinder and reconnect pressure switch with locking device. Replace auxiliary cylinder valve head caps.
Pressure reducer
Relief valve

TECHNICAL INFORMATION
LPG Técnicas en extinción de Incendios S.A. DOC: MU/IG/01/IN Rev: 1 Pag: 62/109
3.1.2.2 Water tightness pneumatic test for open pipes. This test verifies water tightness for distribution system. Remove auxiliary cylinder valve head caps. Remove manifold pressure switch with locking device. On manifold, connect a nitrogen cylinder to pressure switch port (nitrogen or any other suitable gas) with
regulated outlet of 3 - 5 bar. Insert a "T" fitted with a sphere valve (relief) (½" or ¼" PN16 sphere valve).
Disconnect all nozzles comprising the system. To perform nozzle reconnection, it is very
important to have available isometric drawings for pipe system or project document where location of each nozzle is specified, as there are different models. Plug all free pipe ends, except one. Connect to free end a 0-10 bar pressure gauge or a pressure recorder device. Pressure recording may be
continuous or performed only at beginning or end of test. Pressurise pipe slowly at 3 - 5 bar. Wait for 10 minutes and register initial pressure value. Shut off
pressure supply, keeping pressurisation for 10 minutes. After 10 minutes, register pressure again. Depressurize system by means of the relief valve inserted into nitrogen the connection. Disconnect nitrogen supply and connect the new pressure switch with locking device. Disconnect pressure meter and unplug ends of free pipes. Place nozzles into their INITIAL POSITION. Tighten auxiliary cylinder valve head caps.
? When do you perform this test ? Always, except when:
- Other pipe tests have been performed which ensure its water tightness - Very simple distribution system, provided with only one accessory which
may change flow direction between manifold and nozzle. Limitations: If pipe temperaturre undergoes variations above 10 ºC during the 10 minute test, results of such test will not be reliable.
? Has the test been successful? Pressure registered at the end of the test shall be at least 80% of the pressure registered at the beginning of the test. Otherwise, look for system leakage: with pressurised pipe, check with soapy water pipe and accessory unions. If you do not find any leakage, depressurise and revise threaded unions. Repeat test .
Pressure reducer
Relief valve

TECHNICAL INFORMATION
LPG Técnicas en extinción de Incendios S.A. DOC: MU/IG/01/IN Rev: 1 Pag: 63/109
3.1.2.3 Operating Test for pressure switch with locking device. This test shall be perform when the pressure switch is already connected (to manifold and to alarm station) and it is not going to be disconnected again. Perform this test again in case of pressure switch disconnection for maintenance operations or for any other reason. Remove electric system box cap. Remove box electric body without disconnecting wiring. With the help of a ball pen or a rod, push lower
piston until box upper terminals are short circuited by means of the contact rod. Verify that control station receives corresponding alarm signal.
Re-insert pressure switch body into its box, replace box cap and reassemble pressure switch.
? Reassembly of LPG pressure switch with locking device. To reassemble this device it is only necessary to pull off the sphere incorporated in the locking device system.

TECHNICAL INFORMATION
LPG Técnicas en extinción de Incendios S.A. DOC: MU/IG/01/IN Rev: 1 Pag: 64/109
3.1.2.4 Release circuit water tightness test Remove caps from bank auxiliary cylinders. Disconnect the flexible hose (or copper pipe) which feeds release cone for first cylinder:
Disconnect discharge valve release cones. Holding the cone in your hand, remove the piston-
punch/needle assembly by pushing down with a screwdriver onto the narrower side of the cone.
Overturn the piston-needle assembly and reinsert it in the cone until it butts, punch pointing to the
narrower side of the cone. Reinstall cones on valves with piston overturned.
Apply a source of pressure of 8-10 bar onto free end of flexible hose line (<= in the figure). A nitrogen
cylinder is recommended, provided with a hand reducer, inserting a "T" fitted with a ( ½" or ¼" PN-16) relief valve.
Pressurise the line. Check with soapy water for flexible hose tightness. Check that there is no gas leakage through the head orifice of the valve without a head cap. Depressurize and replace each cone piston-punch assembly into initial position.
Pressure reducer
Relief valve

TECHNICAL INFORMATION
LPG Técnicas en extinción de Incendios S.A. DOC: MU/IG/01/IN Rev: 1 Pag: 65/109
NOTE: PRIOR TO MOUNTING CONE ON VALVE IT IS VERY IMPORTANT TO CHECK THAT THE PISTON IS COMPLETELY RETRACTED INSIDE THE CONE, BY PUSHING DOWN WITH A SCREWDRIVER. PROTACTOR NEDDLE SHALL NOT EXCEED THE NUT.
Reconnect the first bank cylinder to the line coming from the pilot bottle. Replace auxiliary cylinder valve caps.

TECHNICAL INFORMATION
LPG Técnicas en extinción de Incendios S.A. DOC: MU/IG/01/IN Rev: 1 Pag: 66/109
3.1.2.5 Operating test for pilot cylinder release solenoid valves. Consider thoroughly drawings or installation of electric circuit feeding pilot cylinder solenoid valves. INERT
GAS systems only incorporate solenoid valves in pilot cylinders as to feed selector valves. Solenoid valves are never mounted on INERT GAS auxiliary cylinder valves. Remove pilot cylinder valve head caps.
Remove solenoid coil nut and pull coil out of its housing on its centre stem. Remove all solenoid valve
coils pertaining to one release system. It is most important to ensure that they are all out of their housing so as to avoid an accidental discharge during the test.
Operate an electric release from fire station so as to excite coil. Once coil is excited, insert a suitable easily magnetised element (such as a light screwdriver) through its
centre orifice. Proper operation is confirmed if a magnetic field is produced retaining the metallic object

TECHNICAL INFORMATION
LPG Técnicas en extinción de Incendios S.A. DOC: MU/IG/01/IN Rev: 1 Pag: 67/109
inserted into the coil orifice. Minimum actuating time is 3 minutes during which a gradual heating of the coil may be observed.
Repeat operation with each of the solenoid valves in one release system.
To prevent accidents, prior to replacing each coil onto its stem, (it is vital not to muddle each coil
position) using same metallic object check for remains of magnetism through the coil orifice which may activate the valve.
Slowly place coil onto centre stem. If there is any magnetism left, controlled leakage will take place
through the top of pilot cylinder main valve. If so, remove coil quickly to interrupt leakage. Such leakage shows that solenoid valve is still being fed. Shut off that supply.
In the event of controlled leakage through the top of pilot cylinder main valve with the result that it will be
difficult to eliminate, to prevent slow discharge of cylinder, proceed to perform 2 or 3 rapid placements
IMPORTANT: It is advisable that the length of the cable for solenoid valves shall be such that it will not be possible to mix up their position (the long cable for the solenoid valve which is further away and the shorter cable for the one that is nearer).

TECHNICAL INFORMATION
LPG Técnicas en extinción de Incendios S.A. DOC: MU/IG/01/IN Rev: 1 Pag: 68/109
with the excited coil (pulses not to exceed 1 second ) on its stem to stop leakage. If leakage is uncontrolled, contact the Technical Service of LPG Técnicas en Extinction de Incendios, S.A.
Once coil is replaced onto its stem, replace the hexagonal nut which was removed in step 3.
NOTE: For whatever reason you decide to SEPARATE A PILOT VALVE BODY FROM A SOLENOID VALVE STEM it is imperative to disconnect pilot cylinder main valve gauge first. This operation shuts off pressure supply to solenoid valve. CAUTION: CYLINDER IS CHARGED AT 100 BAR. See 2.1.3.1 for further information. In case of malfunction, LPG recommends not to dismantle stem but submit pilot cylinder + solenoid + valve assembly to the technical service.

TECHNICAL INFORMATION
LPG Técnicas en extinción de Incendios S.A. DOC: MU/IG/01/IN Rev: 1 Pag: 69/109
3.1.3 Inspection and test for protected enclosure integrity. - Check enclosure measurements and its adaptability to design project specified measurements. Verify
that all structural components are in compliance with drawings. - Enclosure gas tightness may be checked by following one of these methods:
- Door Fan Test: This test comprises determining an enclosure leakage area by means of a pressurization and forced depressurization test. Operations for pressure changes are performed by means of a fan installed at enclosure door. From results obtained we draw up period of time agent maintained in the enclosure, that is, time design concentration is maintained at hazard located at maximum height.
- Flooding Test: Comprises a real discharge subject to continuous registering the evolution of
the oxygen concentration in the room at three points of different heights. From results obtained we may draw up period of time agent maintained in the enclosure.
Standards NFPA 2001 and ISO 14520 specify Door Fan Test as an enclosure integrity test (unless Authorities Having Jurisdiction say otherwise). CEA and Cepreven specify flooding test for rate of maintained time, except when any other procedure may be used. LPG has available means and qualified personnel to perform any of these two tests.

TECHNICAL INFORMATION
LPG Técnicas en extinción de Incendios S.A. DOC: MU/IG/01/IN Rev: 1 Pag: 70/109
3.2 Maintenance INERT GAS fire extinguishing systems shall be subject to a preventive maintenance program ensuring proper operation in case of fire. This program and maintenance operations shall comply with regulations applicable in the country or region where the system is installed. Herein Spanish Law applicable is taken as a base for installation maintenance. As manufacturer, LPG advises all system owners and final users to demand, as a minimum, execution of maintenance operations described in this manual. Safety manager as well as personnel in charge of maintenance shall be properly trained in system operation, required safety conditions for the maintenance and INERT GAS effects on persons and property. They shall also know and have access to system connection drawings, design project, maintenance and inspection files, including reception inspection. If INERT GAS system is projected to include a release abort system (LPG Maintenance Box) prior to each operation set such system in "MAINTENANCE" position. This valve position directs pilot cylinder discharge towards a system external escape. thus preventing cylinder bank actuation. Outlet for escape track shall be installed in a reliable zone outside storage area. When you finish maintenance operations, do not forget to reset release abort valve to its stand-by position. Regulatory requirements for maintenance of INERT GAS installation. As INERT GAS systems are fire fighting elements, at domestic level (Spain), they are covered in the Regulatory application frame for Installations and Fire Fighting Apparatus (R.D. 1942/1993). Appendix III comprises extracts from the most important Regulation points on system maintenance. In brief, this rule specifies the following: 1st) The last person responsible for installation maintenance is the final user or owner of same. 2nd) In all cases, installation maintainer as well as user or owner, shall keep written proof of compliance of preventive maintenance program, indicating, as a minimum, operations performed, results of verifications and tests and replacement of defective elements carried out. Annotations shall be up to date and shall be at the disposal of pertaining official inspection services.
3rd) Quarterly maintenance operations established under Regulations may be performed directly by installation user or owner without requiring assistance of any external official maintainers. LPG has performed a maintenance program in compliance with all Regulatory specifications for Fire Fighting Installations and Apparatus, including other maintenance operations recommended by LPG as manufacturer. This program specifies the following terms and operations: Quarterly:
TECHNICAL INFORMATION
LPG Técnicas en extinción de Incendios S.A. DOC: MU/IG/01/IN Rev: 1 Pag: 71/109
a) Check general condition of the installation using the list in Appendix III: Checking list for routine inspection for INERT GAS Fire Extinguishing Installations.
b) Check that installation identification notices, use and warning signs as well as cylinder adhesive labels are in their appropriate location.
c) Safety apparel for system handling and maintenance in perfect condition. Annually: a) Nozzles: in dusty atmospheres check that discharge orifices are not obstructed. b) Releases: Perform operating test for solenoid valves. Test described in item 3.1.2.5 in this manual. c) Alarms: check electric alarm devices for audible and visual operations. Give instructions from control
station. Check pressure switch with locking device for operation according to the test described in 3.1.2.3.
Every two years: a) In areas usually dirty and dusty distribution system shall be blown out with dry nitrogen, in accordance
with item 3.1.2.1. Every ten years: a) Proceed to re-stamping of bank cylinders (auxiliary cylinders and pilot cylinders), in accordance with
Regulations established by the Ministry of Industry and Energy for Pressure Apparatus, MIE AP-7 Complementary Technical Instruction.
b) Flexible hose and manifold hydraulic test for tightness. Flexible hoses and manifold are subjected to a hydraulic test, pressurized at a limit of 1.5 times component own working pressure.
Any repair or maintenance operation performed in addition to those mentioned above, shall be done with the approval of routine inspection in Appendix III.

TECHNICAL INFORMATION
LPG Técnicas en extinción de Incendios S.A. DOC: MU/IG/01/IN Rev: 1 Pag: 72/109
3.3 Manual use of devices Manual operations after an actuation The following operations shall always been performed manually after a discharge (see 3.5 Actuation after a cylinder bank discharge).
- Re-assembly of pressure switch with locking device - Decompression of release line
Manual operations in case of failure of automatic system: In the event of failure of automatic discharge system or malfunction of any of its components, LPG has made provision by designing components and systems in such a way as to allow manual actuation (see 3.4 Actuation in case of failure of fire extinguishing system automatic actuation). The following operations are included:
- Actuation of manual lever release 3.3.1 Re-assembly of pressure switch with locking device Unlatch the pressure switch by pulling off the lever (1).
Pressure switch is located on the storage area, mounted on discharge manifold pipe.
1

TECHNICAL INFORMATION
LPG Técnicas en extinción de Incendios S.A. DOC: MU/IG/01/IN Rev: 1 Pag: 73/109
3.3.2 Actuation of manual lever release and manual pneumatic release. Manual lever release is located on installation pilot cylinder valve.
To operate, pull hard to remove seal (3). Operate lever (1) by pulling hard backwards and downwards. Nitrogen cylinders are charged at a pressure of 100 bar. Thus, there is a certain lever retrocession. Perform same operations for use of manual pneumatic release described in section 2.1.3.3. 3.3.3 Release line decompression When a discharge takes place, release line remains pressurized with nitrogen all along its length, from pilot cylinder to the last release cone. INERT GAS systems have a decompression screw incorporated (generally located at pilot cylinder outlet or at last release cone) which allows controlled nitrogen evacuation. Operate decompression screw in accordance with the following procedure:
1
3

TECHNICAL INFORMATION
LPG Técnicas en extinción de Incendios S.A. DOC: MU/IG/01/IN Rev: 1 Pag: 74/109
1. Remove cap (7). 2. Using a flat screwdriver pull out internal cap (5). 3. Replace cap (5) on reverse position (hexagon on the outside). Tighten using a 6 mm Allen wrench. At
that moment internal pressure escape will be heard. 4. When all internal pressure has been vented, replace cap (5) as it was at the beginning (Grooved
surface facing exterior). 5. Place cap on its position (7) considering the "0" ring (6) is in its proper place. 3.4 Actuation in the event of failure of fire extinguishing system automatic
activation. When extinguishing discharge is not released within delay time specified by Central Station (see Control Station technical instructions) plus pneumatic delay (30 s) from fire alarm or if you can see a fire or alarm system has failed to operate, WAIT UNTIL AREA IS EVACUATED to manually activate extinguishment. The following operations shall be performed quickly and in order: 1. The person in charge of manual operation shall wear a helmet and gobbles which he will find on
storage area, next to cylinder bank and close to warning signs containing instructions for manual discharge.
2. Check visually condition of cylinder bank (flexible hoses, gauges on pilot cylinders show correct pressure).
3. Operate pilot cylinder release (see 3.3.2 Actuation of manual lever release and manual pneumatic release). This operation provokes opening of pilot cylinder valve and auxiliary cylinder valves.

TECHNICAL INFORMATION
LPG Técnicas en extinción de Incendios S.A. DOC: MU/IG/01/IN Rev: 1 Pag: 75/109
3.5 Actuation after cylinder bank discharge In the hazard: 1. Prior to opening the door or operate hazard ventilation where discharge has taken place, wait for the
arrival of the fire brigade. 2. Once the hazard is controlled clean the area . 3. Check visually condition of INERT GAS installation within the hazard (pipe general condition, nozzle
condition). It is recommended to follow pertaining items on "Checking list for routine inspections for INERT GAS fire extinguishing installation " (contained in Appendix III ).
Cylinder bank location: 4. Verify that all INERT GAS installation cylinders have been discharged ( check that all pressure
gauges indicate 0 bar). Otherwise, remove head caps manually. Notify LPG technical department. If it is not possible to remove head caps manually DO NOT FORCE THEM. Call LPG technical personnel.
5. Unlatch pressure switch (see 3.3.1 Reassemble pressure switch with locking device). 6. Cut electricity supply to pilot cylinder solenoid valve. 7. Decompress release line by means of the decompression screw. (see 3.3.3 Release line
decompression). In the event of cylinder banks with selector valves, for depressurisation operation of solenoid valves + manual release which control the opening of selector valves, the latter should be open.
8. Check visually INERT GAS installation condition within the hazard (component general condition). It is recommended to follow corresponding items on "Checking list for routine inspections for INERT GAS installation ".
9. Dismantle cylinders from their brackets and send them to LPG to be recharged as well as all damaged components for repair or replacement..
10. After replacing cylinders and their components, revise all system release systems and reassemble (e.g. Replace manual release seals, release discs used, etc.).
11. A new installation reception and commissioning of fire extinguishing system should be performed.

TECHNICAL INFORMATION
LPG Técnicas en extinción de Incendios S.A. DOC: MU/IG/01/IN Rev: 1 Pag: 76/109
ANNEXES ANNEX I Drawings for INERT GAS standard systems
ANNEX II Technical data for INERT GAS system components ANNEX III Clauses from Standards and Check List for Handover and Routine
Inspection for Fire Extinguishing Systems.

TECHNICAL INFORMATION
LPG Técnicas en extinción de Incendios S.A. DOC: MU/IG/01/IN Rev: 1 Pag: 77/109
ANNEX I
STANDARD DRAWINGS FOR INERT GAS SYSTEMS
DRAWING NUMBER DESCRIPTION 520098AR 80 l. INERT GAS STANDARD TYPE BANK SYSTEM 520094AR 140 l. INERT GAS STANDARD TYPE BANK SYSTEM FT-145 PRESSURE SWITCH CONNECTION

TECHNICAL INFORMATION
LPG Técnicas en extinción de Incendios S.A. DOC: MU/IG/01/IN Rev: 1 Pag: 78/109

TECHNICAL INFORMATION
LPG Técnicas en extinción de Incendios S.A. DOC: MU/IG/01/IN Rev: 1 Pag: 79/109

TECHNICAL INFORMATION
LPG Técnicas en extinción de Incendios S.A. DOC: MU/IG/01/IN Rev: 1 Pag: 80/109

TECHNICAL INFORMATION
LPG Técnicas en extinción de Incendios S.A. DOC: MU/IG/01/IN Rev: 1 Pag: 81/109

TECHNICAL INFORMATION
LPG Técnicas en extinción de Incendios S.A. DOC: MU/IG/01/IN Rev: 1 Pag: 82/109
ANNEX II
REPORT ON TECHNICAL DATA FOR INERT GAS SYSTEM COMPONENTS
DESCRIPTION Nº TECHNICAL DATA LPG 128-60 VALVE FT 149 LPG 128-80 VALVE FT 148 LPG 128-65 VALVE FT 125 LPG 128-85 VALVE FT 147 LPG 128-40 Valve FT 141 3 l Pilot cylinder FT 052 HIGH PRESSURE SOLENOID VALVE FT 017 HIGH PRESSURE HAND LEVER RELEASE FT 051 HIGH PRESSURE PNEUMATIC CONE FT 058 STANDARD NOZZLE 180º FT 135 STANDARD NOZZLE 360º FT 136 CHECK VALVE ¾” FT 055 RESTRICTOR FT 138 4S-H DISCHARGE HOSE FT 110 PTFE HOSE FT 040 PRESSURE SWITCH W/LOCKING DEVICE FT 047 DECOMPRESSION SCREW R ¼” FT 070 DEPRESSURIZATION VALVE R ¼” FT 075 NON-WELDED CYLINDERS FT 049,FT 013

TECHNICAL INFORMATION
LPG Técnicas en extinción de Incendios S.A. DOC: MU/IG/01/IN Rev: 1 Pag: 83/109

TECHNICAL INFORMATION
LPG Técnicas en extinción de Incendios S.A. DOC: MU/IG/01/IN Rev: 1 Pag: 84/109

TECHNICAL INFORMATION
LPG Técnicas en extinción de Incendios S.A. DOC: MU/IG/01/IN Rev: 1 Pag: 85/109

TECHNICAL INFORMATION
LPG Técnicas en extinción de Incendios S.A. DOC: MU/IG/01/IN Rev: 1 Pag: 86/109

TECHNICAL INFORMATION
LPG Técnicas en extinción de Incendios S.A. DOC: MU/IG/01/IN Rev: 1 Pag: 87/109

TECHNICAL INFORMATION
LPG Técnicas en extinción de Incendios S.A. DOC: MU/IG/01/IN Rev: 1 Pag: 88/109

TECHNICAL INFORMATION
LPG Técnicas en extinción de Incendios S.A. DOC: MU/IG/01/IN Rev: 1 Pag: 89/109
CARACTERÍSTICAS TÉCNICAS
FUNCIMIENTO
Normalmente cerrado
1
5
4
3
2
POSICIÓN
FUNCIMIENTO
P. MIN.
0 bar.
Ø ORIFICIO
0.8 mm.
FUNCIMIENTOP. MAX.
170 bar.
Muelles de recuperación
DENOMINACIÓN
Nitrilo / EPDM (UL)
Acero INOX AISI-303
Latón
MATERIAL
Acero INOX AISI-303
PRESENTACIÓN
2 3 4 1 10 9
NÚMERO F.TÉCNICA
RESPUESTAEN FRIO
CONSUMOTENSIÓN
NOMINAL EN CALIENTECONSUMO
DENOMINACIÓN
6
7
8
9
10
POSICIÓN
5 6
TIEMPOPROTECCIÓN
Acero INOX AISI-303
Acero INOX AISI-430 F
Teflón
MATERIAL
8
FECHA
REALIZADO
APROBADO
REVISADO
7
Nitrilo / EPDM (UL)

TECHNICAL INFORMATION
LPG Técnicas en extinción de Incendios S.A. DOC: MU/IG/01/IN Rev: 1 Pag: 90/109
BARCELONA
Mestre Joan Corrales,107-109
MATERIAL
PRESENTACIÓN
NOTA:
especificación reflejada en este documento con el propósito de realizar cambios o mejoras en los productos presentados.LPG Técnicas en Extinción de Incendios S.A., se reserva el derecho a modificar sin previo aviso cualquier dato o
ROSCAS SEGÚN DIN 13.
NÚMERO F.TÉCNICA
REALIZADO
REVISADO
APROBADOFECHA
DENOMINACIÓNPOSICIÓN
LATÓN
LATÓN
ACERO
LATÓN
EN12164:98tab2
EN12165:98tab4
EN12165:98tab4
NITRILO / EPDM (UL)
LATÓNEN12164:98tab2
ANILLO TIRADOR
PALANCA
CON PRECINTO
CUERPO
JUNTA TÓRICA
TUERCA
PASADOR DE SEGURIDAD
34 (9)3-4802925Fax. 34 (9)3-4737492
08950 Esplugues de Llobregat

TECHNICAL INFORMATION
LPG Técnicas en extinción de Incendios S.A. DOC: MU/IG/01/IN Rev: 1 Pag: 91/109

TECHNICAL INFORMATION
LPG Técnicas en extinción de Incendios S.A. DOC: MU/IG/01/IN Rev: 1 Pag: 92/109

TECHNICAL INFORMATION
LPG Técnicas en extinción de Incendios S.A. DOC: MU/IG/01/IN Rev: 1 Pag: 93/109
PRESENTACIÓN
NÚMERO F.TÉCNICA
REVISADO
APROBADOFECHA
REALIZADO

TECHNICAL INFORMATION
LPG Técnicas en extinción de Incendios S.A. DOC: MU/IG/01/IN Rev: 1 Pag: 94/109

TECHNICAL INFORMATION
LPG Técnicas en extinción de Incendios S.A. DOC: MU/IG/01/IN Rev: 1 Pag: 95/109

TECHNICAL INFORMATION
LPG Técnicas en extinción de Incendios S.A. DOC: MU/IG/01/IN Rev: 1 Pag: 96/109

TECHNICAL INFORMATION
LPG Técnicas en extinción de Incendios S.A. DOC: MU/IG/01/IN Rev: 1 Pag: 97/109
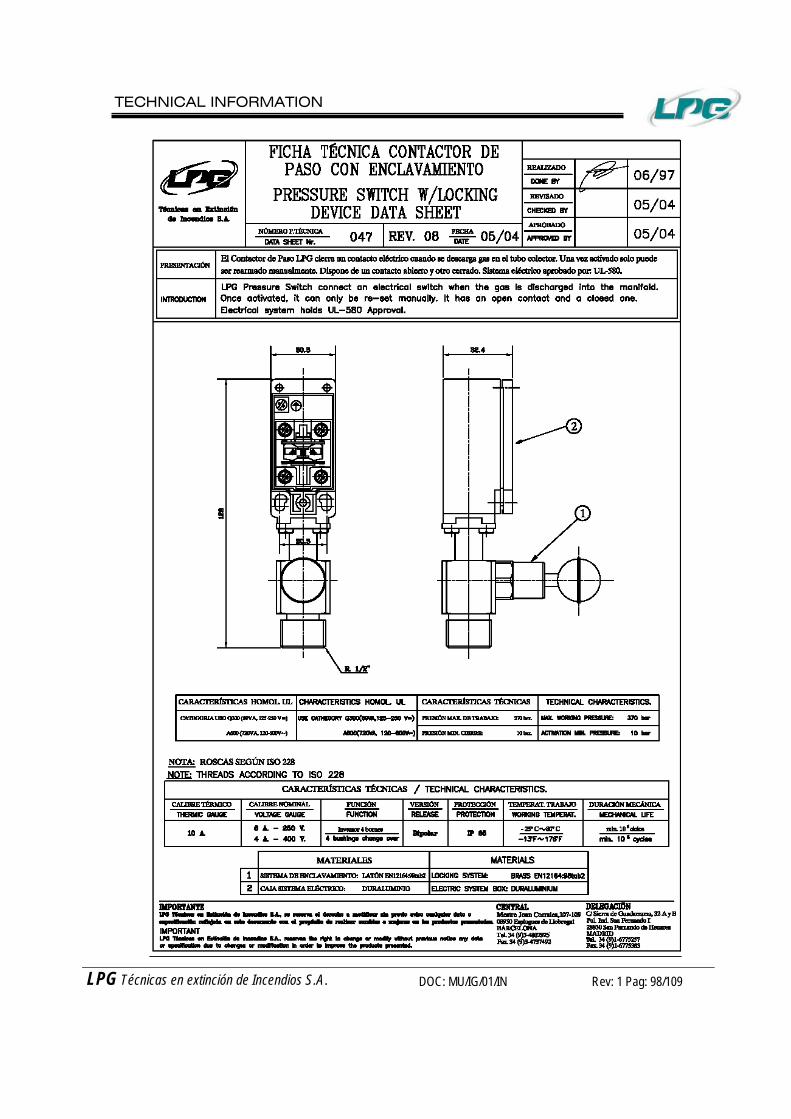
TECHNICAL INFORMATION
LPG Técnicas en extinción de Incendios S.A. DOC: MU/IG/01/IN Rev: 1 Pag: 98/109
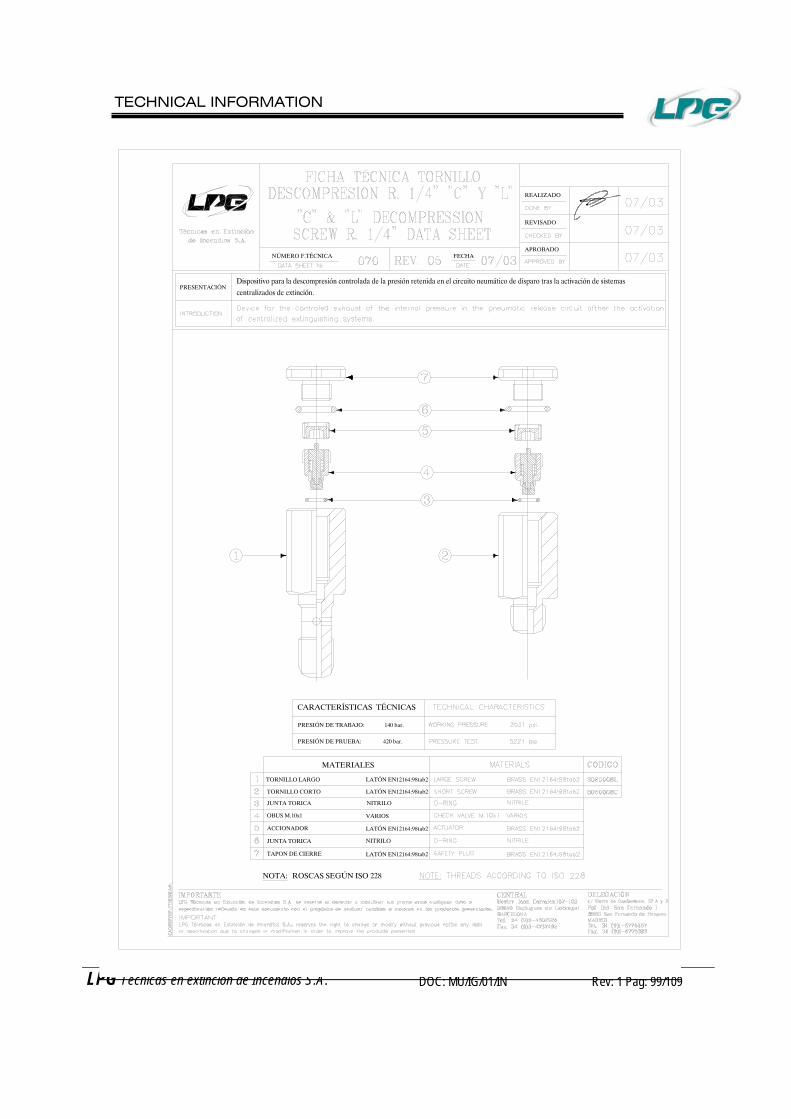
TECHNICAL INFORMATION
LPG Técnicas en extinción de Incendios S.A. DOC: MU/IG/01/IN Rev: 1 Pag: 99/109
NOTA:
NITRILOJUNTA TORICA
ROSCAS SEGÚN ISO 228
TAPON DE CIERRE LATÓN EN12164:98tab2
CARACTERÍSTICAS TÉCNICAS
LATÓN EN12164:98tab2TORNILLO LARGO
ACCIONADOR
OBUS M.10x1
JUNTA TORICA
TORNILLO CORTO
LATÓN EN12164:98tab2
VARIOS
LATÓN EN12164:98tab2
NITRILO
PRESIÓN DE TRABAJO:
PRESIÓN DE PRUEBA:
MATERIALES
420 bar.
140 bar.
PRESENTACIÓN
NÚMERO F.TÉCNICA APROBADO
FECHA
REALIZADO
REVISADO

TECHNICAL INFORMATION
LPG Técnicas en extinción de Incendios S.A. DOC: MU/IG/01/IN Rev: 1 Pag: 100/109
ROSCAS SEGÚN M.(DIN 13), R.(ISO 228)NOTA:
CUERPO INFERIOR LATÓN EN12164:98tab2
PISTON
JUNTA TORICA
JUNTA TORICA
MUELLE RECUPERACION
CUERPO SUPERIOR
DENOMINACION
Ac. INOX. AISI 302
LATÓN EN12164:98tab2
NITRILO
LATÓN EN12164:98tab2
NITRILO
MATERIAL
PRESIÓN MAX. DE TRABAJO:
PRESIÓN MIN. CIERRE:
CARACTERÍSTICAS TÉCNICAS
20 bar.
240 bar.
PRESENTACIÓN
NÚMERO F.TÉCNICA FECHAAPROBADO
REVISADO
REALIZADO

TECHNICAL INFORMATION
LPG Técnicas en extinción de Incendios S.A. DOC: MU/IG/01/IN Rev: 1 Pag: 101/109

TECHNICAL INFORMATION
LPG Técnicas en extinción de Incendios S.A. DOC: MU/IG/01/IN Rev: 1 Pag: 102/109

TECHNICAL INFORMATION
LPG Técnicas en extinción de Incendios S.A. DOC: MU/IG/01/IN Rev: 1 Pag: 103/109
ANNEX III
REGULATION EXTRACT AND CHECKING LIST FOR RECEPTION AND ROUTINE INSPECTION FOR FIRE
EXTINGUISHING INSTALLATIONS.

TECHNICAL INFORMATION
LPG Técnicas en extinción de Incendios S.A. DOC: MU/IG/01/IN Rev: 1 Pag: 104/109
APPENDIX 2 MINIMUM MAINTENANCE FOR FIRE PROTECTION INSTALLATIONS. 1. Fire Protection material means shall be subject to minimum maintenance program established in tables I
and II. 2. Maintenance operations indicated in table I shall be performed by personnel assigned by an approved
installer or maintainer, or by personnel assigned by installation user or property owner. 3. Maintenance operations indicated in table II shall be performed by personnel assigned by manufacturer,
installer or maintainer approved for the type of devices, equipment or systems in question or by personnel assigned by the user if he has obtained the condition of maintainer because he has proper technical means available, according to decision of the authority having jurisdiction in Industrial matters in the Autonomous Community.
4. In all cases, installation maintainer, user or property owner shall keep written proof of compliance of
preventive maintenance program, indicating, as a minimum, operations performed, results of inspections and tests and replacements of damaged elements. Annotations shall be kept up to date and shall be at the disposal of inspection services of pertaining Autonomous Community.
TABLE 1 3.5.1 Maintenance program for fire fighting material means
Operations to be performed by personnel assigned by property owner of equipment or system installation.
Equipment or system Every three months
Fire extinguishing fixed systems: Water sprinklers. Mist water. Powder. Foam. Gaseous extinguishing agents.
Check that extinguishing agent nozzles or sprinklers are in good conditions and free of obstructions for their proper operation. Check if system components are in good conditions, especially test valve for system sprinklers or manual control for powder systems or gaseous extinguishing agents. Check condition of charge for powder, carbon dioxide or halogenated hydrocarbon system installations and gas bottles, if any. Check pilot, signal circuits, etc, for systems fitted with control indicators. General cleaning of all components.
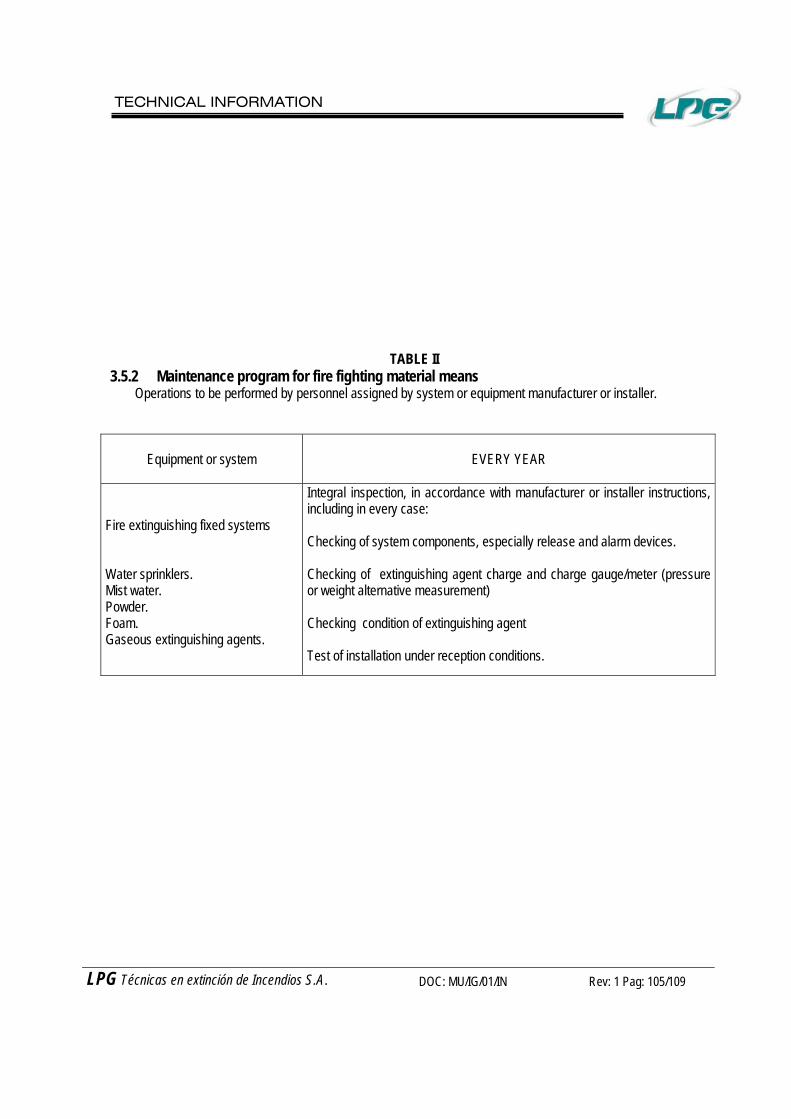
TECHNICAL INFORMATION
LPG Técnicas en extinción de Incendios S.A. DOC: MU/IG/01/IN Rev: 1 Pag: 105/109
TABLE II 3.5.2 Maintenance program for fire fighting material means
Operations to be performed by personnel assigned by system or equipment manufacturer or installer.
Equipment or system
EVERY YEAR
Fire extinguishing fixed systems Water sprinklers. Mist water. Powder. Foam. Gaseous extinguishing agents.
Integral inspection, in accordance with manufacturer or installer instructions, including in every case: Checking of system components, especially release and alarm devices. Checking of extinguishing agent charge and charge gauge/meter (pressure or weight alternative measurement) Checking condition of extinguishing agent Test of installation under reception conditions.

TECHNICAL INFORMATION
LPG Técnicas en extinción de Incendios S.A. DOC: MU/IG/01/IN Rev: 1 Pag: 106/109

TECHNICAL INFORMATION
LPG Técnicas en extinción de Incendios S.A. DOC: MU/IG/01/IN Rev: 1 Pag: 107/109
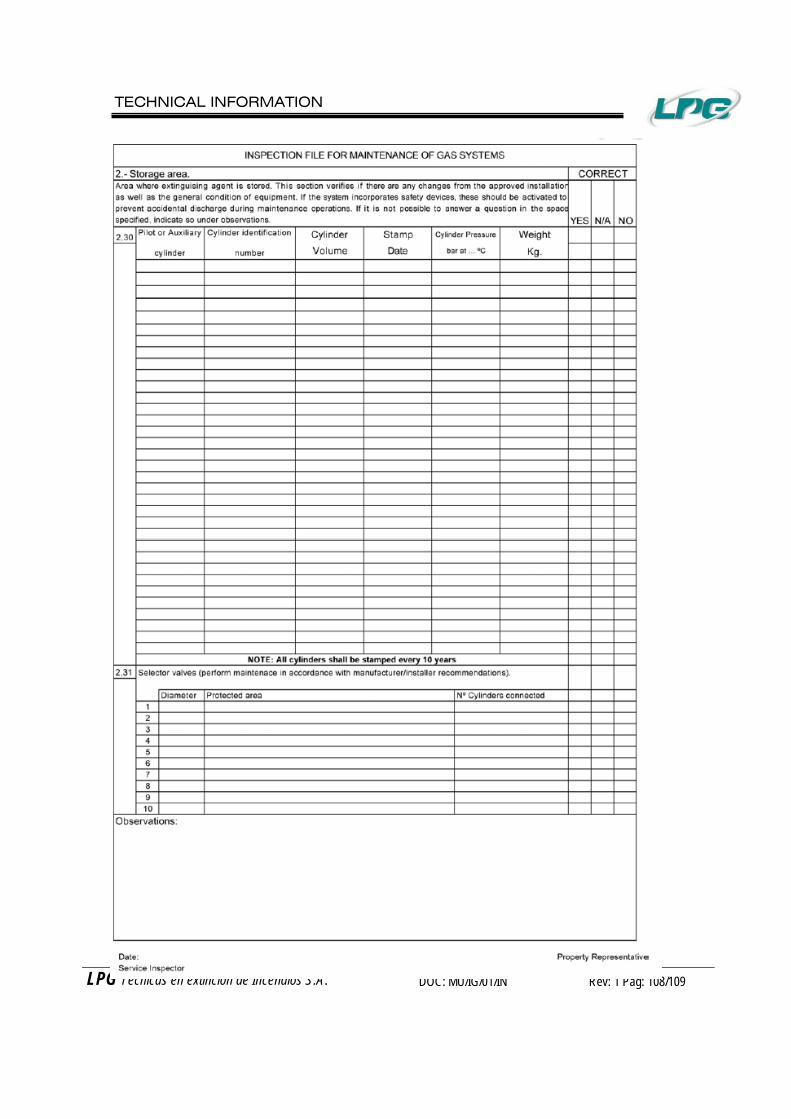
TECHNICAL INFORMATION
LPG Técnicas en extinción de Incendios S.A. DOC: MU/IG/01/IN Rev: 1 Pag: 108/109

TECHNICAL INFORMATION
LPG Técnicas en extinción de Incendios S.A. DOC: MU/IG/01/IN Rev: 1 Pag: 109/109

TECHNICAL INFORMATION
LPG Técnicas en extinción de Incendios S.A. DOC: MU/IG/01/IN Rev: 1 Pag: 110/109

TECHNICAL INFORMATION
LPG Técnicas en extinción de Incendios S.A. DOC: MU/IG/01/IN Rev: 1 Pag: 111/109