mailone for postbase user manual - fp mailing · pdf file · 2017-04-06mailone for...
TRANSCRIPT

SW Version 2.0.00.000 / Manual Release 10/22/2012
User Manual

MailOne for PostBase User Manual Contents
SW Version 2.0.00.000 2
Contents
1 Introduction ..................................................................................................... 5
2 Start / exit MailOne .......................................................................................... 7
2.1 Start MailOne and connect PostBase automatically .......................................................... 7 2.2 Connect MailOne and PostBase manually .......................................................................... 8 2.3 Disconnect PostBase ........................................................................................................... 8 2.4 Exit MailOne ........................................................................................................................ 8
3 The MailOne user interface ............................................................................... 9
3.1 The MailOne screen ............................................................................................................ 9 3.2 Menus and screen areas ................................................................................................... 10
3.2.1 The main menu ..................................................................................................... 10 3.2.2 The working area .................................................................................................. 10 3.2.3 The secondary menu ............................................................................................ 10 3.2.4 The status area ..................................................................................................... 10
3.3 Buttons and other elements in the working area ............................................................. 11 3.3.1 Buttons and input elements ................................................................................. 11 3.3.2 Status display for buttons ..................................................................................... 12 3.3.3 How to change the size of windows ..................................................................... 13
4 Overview of the main menu functions ............................................................ 14
4.1 Mailing .............................................................................................................................. 14 4.2 Text Messages ................................................................................................................... 14 4.3 Accounts ........................................................................................................................... 14 4.4 Addresses .......................................................................................................................... 14 4.5 Tracking ............................................................................................................................. 15 4.6 Transactions ...................................................................................................................... 15 4.7 Reports .............................................................................................................................. 15 4.8 Mailhandler ....................................................................................................................... 15 4.9 Settings ............................................................................................................................. 15 4.10 Help ................................................................................................................................... 16
5 Metering settings and metering ...................................................................... 16
5.1 Overview ........................................................................................................................... 16 5.2 Product Selection: Select services and set weight ............................................................ 17 5.3 Set weight ......................................................................................................................... 18 5.4 Add ZIP Code and details .................................................................................................. 19 5.5 Select advert ..................................................................................................................... 19 5.6 Select text message .......................................................................................................... 21 5.7 Assign to accounts ............................................................................................................ 22 5.8 Set date ............................................................................................................................. 23 5.9 Printing 4x6’’ Labels / Confirmation Labels ...................................................................... 23

MailOne for PostBase User Manual Contents
SW Version 2.0.00.000 3
5.10 Reprint function ................................................................................................................ 23 5.11 Rate Shopping ................................................................................................................... 24 5.12 Record feature .................................................................................................................. 24 5.13 Metering with PostBase mailing system ........................................................................... 25
6 Manage texts .................................................................................................. 26
6.1 Enter a new text ................................................................................................................ 26 6.2 Edit or delete a text .......................................................................................................... 26
7 Manage Accounts ........................................................................................... 27
7.1 Overview ........................................................................................................................... 27 7.2 Add a new account ........................................................................................................... 28 7.3 Search accounts ................................................................................................................ 30 7.4 Edit or delete accounts ..................................................................................................... 31 7.5 Setting up scancodes ........................................................................................................ 32
8 Manage Addresses .......................................................................................... 33
8.1 Overview ........................................................................................................................... 33 8.2 Add a new address ............................................................................................................ 34 8.3 Address search .................................................................................................................. 36 8.4 Edit or delete an address .................................................................................................. 37
9 Tracking .......................................................................................................... 38
9.1 Track & Trace .................................................................................................................... 38
10 Transaction administration ............................................................................. 41
10.1 Overview ........................................................................................................................... 41 10.2 Search and view transactions ........................................................................................... 42 10.3 Manual booking ................................................................................................................ 43 10.4 Export transactions ........................................................................................................... 44 10.5 Edit or delete transactions ................................................................................................ 45
11 Reports ........................................................................................................... 47
11.1 Types of reports ................................................................................................................ 47 11.2 Generating reports ........................................................................................................... 48
12 Mailhandler menu: PostBase setup and special functions ............................... 49
12.1 Overview ........................................................................................................................... 49 12.2 Postage download ............................................................................................................ 50 12.3 Auto Postage Download ................................................................................................... 50 12.4 Registers............................................................................................................................ 50 12.5 Piece counter .................................................................................................................... 50 12.6 Imprint Offset ................................................................................................................... 50 12.7 Standby Time .................................................................................................................... 51 12.8 Auto Off ............................................................................................................................ 51

MailOne for PostBase User Manual Contents
SW Version 2.0.00.000 4
12.9 Manage Connection .......................................................................................................... 52 12.10 Print Advert / Text Message Only ..................................................................................... 53 12.11 Print Numbers ................................................................................................................... 55 12.12 Feed Only / Count mail pieces .......................................................................................... 56 12.13 Seal Only ........................................................................................................................... 57
13 Troubleshooting ............................................................................................. 59
14 Appendix: MailOne software settings ............................................................. 64
14.1 Prerequisites ..................................................................................................................... 64 14.2 Download MailOne for PostBase and software installation ............................................. 64 14.3 Settings overview .............................................................................................................. 64 14.4 Settings: Application ......................................................................................................... 65 14.5 Settings: Imprints .............................................................................................................. 67 14.6 Settings: Defaults .............................................................................................................. 68 14.7 Settings: Accounts ............................................................................................................. 69 14.8 Settings: Addresses ........................................................................................................... 70 14.9 Settings: Setting up the label printer and perform a test imprint .................................... 71 14.10 Settings: Devices ............................................................................................................... 72 14.11 Settings: Transfer .............................................................................................................. 73 14.12 Settings: Database Backup ................................................................................................ 74 14.13 Settings: Administrator ..................................................................................................... 75

MailOne for PostBase User Manual Introduction
SW Version 1.9.12.383 5
1 Introduction
About this user manual This User Manual assumes that both PostBase and MailOne have already been installed and are now operational.
Target group This User Manual is aimed at users of MailOne for PostBase mailing systems. Users of MailOne should have basic knowledge of Windows. They do not need special computer skills.
Topics The present manual provides a comprehensive overview of the software and describes how to perform daily routine tasks.
[Mailing] Names of links and buttons are given in square brackets.
NOTE or TIP Notes for improving the operation or additional information appear in italics.
Product logo In this manual, the product names appear in their plain form ‘MailOne’.
NOTE: In the text below, in general ‘MailOne’ is used to refer to ‘MailOne for PostBase’.
What is PostBase MailOne? MailOne is a user-friendly software platform for your PostBase mailing system, e.g. for tracking your postage costs. It enables you to benefit from discounts offered with Commercial Base Pricing (CBP) products and use the mail tracking service provided by the US Post.
TIP: To download MailOne, please visit our web portal.
Application areas (examples)
− Print 4x6’’ labels (CBP / non CBP products) − Select mail products − Address administration − Print reports − Load postage − Track and Trace service − Transaction administration − Change system settings of PostBase − Use PostBase special functions (e.g. Print Numbers).
MailOne for PostBase User Manual Introduction
SW Version 1.9.12.383 6
Tracking postage costs
When dealing with a high volume of mail transactions; the individual costs can add up to a considerable amount over a period.
A high volume of postage makes tracking these costs difficult. MailOne allows you to easily track the amounts, and account for these costs from different perspectives. For example: The sending time, delivery status, sender, department or project.
MailOne captures and collects this information for all metered products. You can view mailing information in easily readable tables, graphs and charts or print reports.
Commercial Base Pricing Products
MailOne offers you the ability to use a number of USPS products with commercially-based pricing. These offer you various advantages such as a discount over retail prices, with delivery confirmation / tracking included (subject to prevailing USPS conditions).
TIP: Note that one of the conditions of using commercial-based pricing is the regular upload of product usage statistics to the USPS. The data is initially collected by a server operated by FP Mailing Solutions.
Only the MailOne software is able to print the 4x6’’ label required for CBP products (instead of four labels) via a printer connected to your PC. On this label, it prints an Intelligent Mail package barcode to send the CBP data to the US Post.
Mail tracking
Once your mail item has entered the USPS system, you can track its progress using the tracking facility. Through MailOne, you can see all mail having been successfully delivered.
Metering settings
MailOne enables you to make metering settings (product, weight, ZIP code, account etc.) directly on your computer and send these details to your PostBase mailings system. For non CBP products / retail products (except for 4x6’’ labels), you perform metering imprints with the PostBase mailings system.

MailOne for PostBase User Manual Start / exit MailOne
SW Version 1.9.12.383 7
2 Start / exit MailOne
2.1 Start MailOne and connect PostBase automatically
NOTE: If you work with MailOne for the first time, you first have to make some elementary settings. For further details refer to the Appendix.
Preconditions
First make sure that MailOne is installed and the PostBase is connected to your PC. PostBase must show the Home screen as shown in the example below.
Homescreen
Starting MailOne
Double click the ‘FP.MailOne.PostBase’ icon on your desktop to start MailOne. When opening, MailOne automatically establishes a connection to PostBase meter. MailOne shows the screen below after connecting.
When PostBase is connected to MailOne, it shows a screen like this.

MailOne for PostBase User Manual Start / exit MailOne
SW Version 1.9.12.383 8
2.2 Connect MailOne and PostBase manually
If connection does not work, MailOne shows the following screen.
Check if PostBase shows the Home screen. Then, click the [Connect] button in the working area.
Note: If MailOne does not show this screen, click the [Connect] button in the main menu.
2.3 Disconnect PostBase
Click [Disconnect] in the status area to terminate the connection with the mailing system.
2.4 Exit MailOne
If you want to exit the MailOne program, click [Exit] on the main menu or the [x]-Button on the top right corner.

MailOne for PostBase User Manual The MailOne user interface
SW Version 1.9.12.383 9
3 The MailOne user interface
You will first receive a short overview of your MailOne’s user interface. In the following chapters, the individual areas will be explained in detail.
3.1 The MailOne screen
NOTE: This screen appears after connecting MailOne to the PostBase mailing system.

MailOne for PostBase User Manual The MailOne user interface
SW Version 1.9.12.383 10
3.2 Menus and screen areas
NOTE: If you want to exit a menu, click on a button leading you to another menu. There is no ‘Back’ function.
3.2.1 The main menu
From the main menu, you get to the menus [Mailing], [Text messages], [Accounts], [Addresses], [Tracking], [Transactions], [Reports], [Mailhandler] and [Settings..] by clicking on the corresponding button. The selected menu will appear in the working area. In the main menu, you can also call the [Help] function. The [Exit] button closes the program.
3.2.2 The working area
The active menu appears in the MailOne working area.
3.2.3 The secondary menu
The secondary menu provides additional functions for the active menu in the working area. Click, for example, on [Save] in the Account Administration menu to store the settings of the current cost account.
The current user is displayed on the left side.
3.2.4 The status area
The status area provides, inter alia, information on the connected PostBase meter and on current processes.
MailOne for PostBase User Manual The MailOne user interface
SW Version 1.9.12.383 11
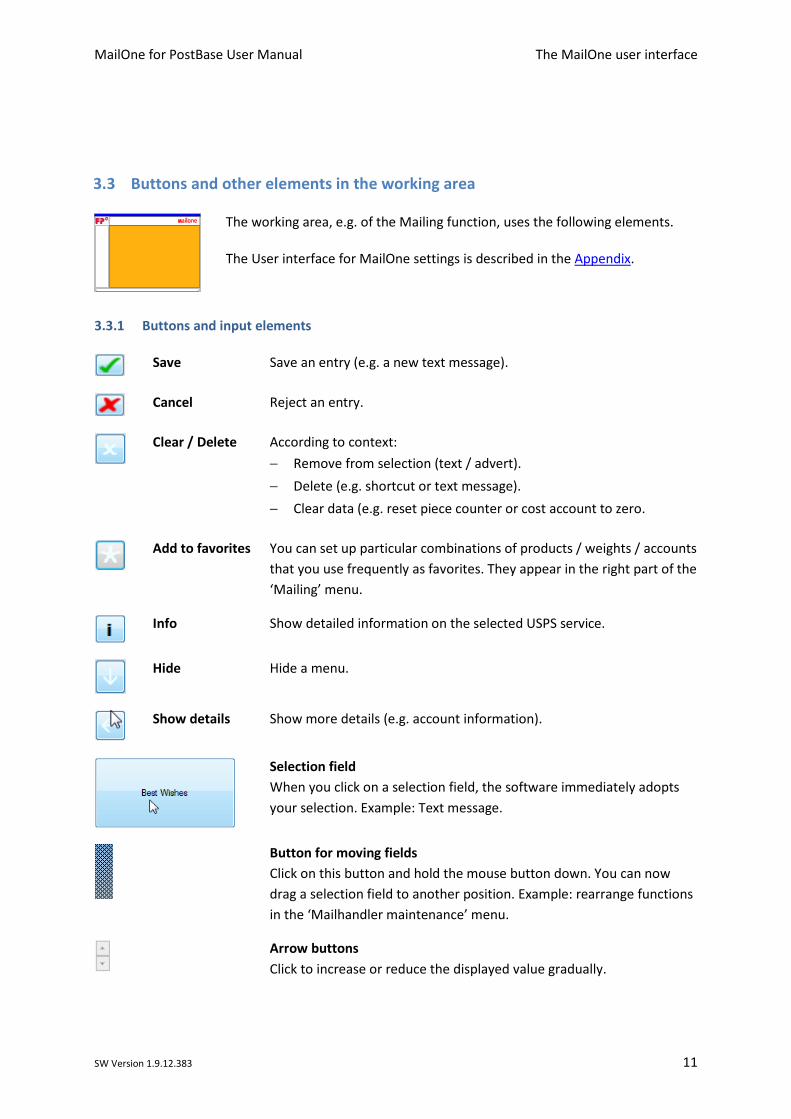
3.3 Buttons and other elements in the working area
The working area, e.g. of the Mailing function, uses the following elements.
The User interface for MailOne settings is described in the Appendix.
3.3.1 Buttons and input elements
Save Save an entry (e.g. a new text message).
Cancel Reject an entry.
Clear / Delete According to context:
− Remove from selection (text / advert). − Delete (e.g. shortcut or text message). − Clear data (e.g. reset piece counter or cost account to zero.
Add to favorites You can set up particular combinations of products / weights / accounts
that you use frequently as favorites. They appear in the right part of the ‘Mailing’ menu.
Info Show detailed information on the selected USPS service.
Hide Hide a menu.
Show details Show more details (e.g. account information).
Selection field When you click on a selection field, the software immediately adopts your selection. Example: Text message.
Button for moving fields Click on this button and hold the mouse button down. You can now drag a selection field to another position. Example: rearrange functions in the ‘Mailhandler maintenance’ menu.
Arrow buttons Click to increase or reduce the displayed value gradually.
MailOne for PostBase User Manual The MailOne user interface
SW Version 1.9.12.383 12
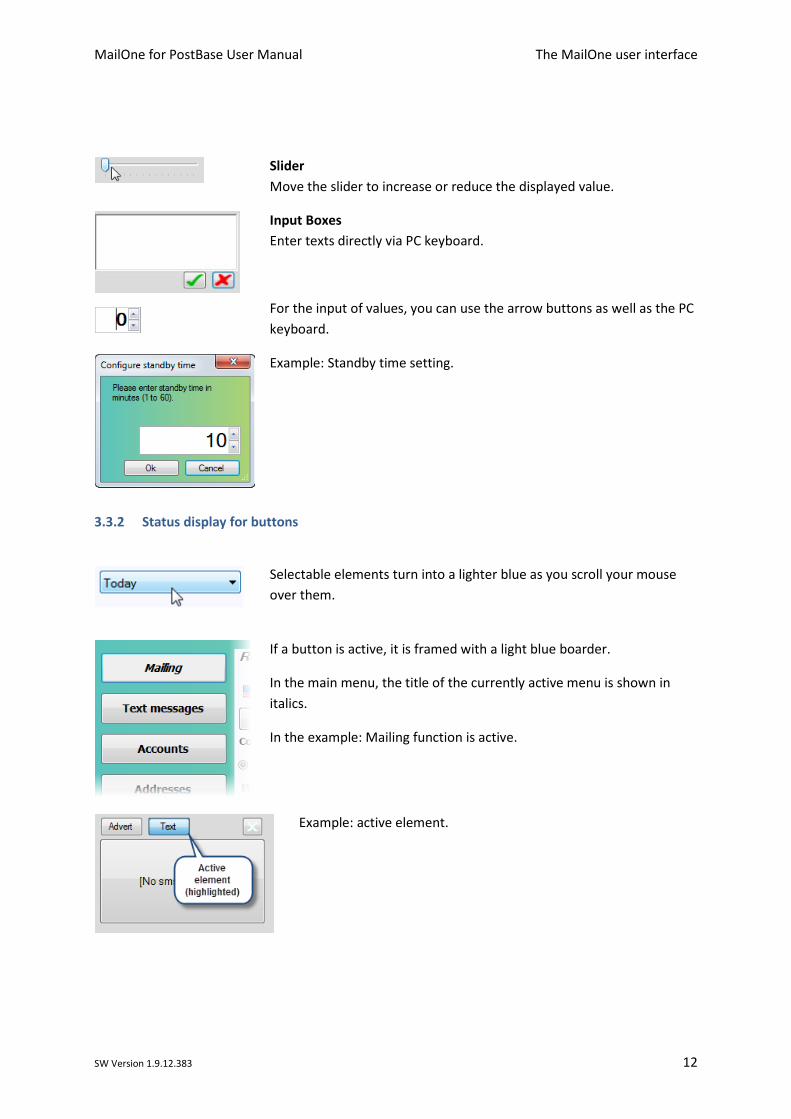
Slider Move the slider to increase or reduce the displayed value.
Input Boxes Enter texts directly via PC keyboard.
For the input of values, you can use the arrow buttons as well as the PC keyboard.
Example: Standby time setting.
3.3.2 Status display for buttons
Selectable elements turn into a lighter blue as you scroll your mouse over them.
If a button is active, it is framed with a light blue boarder.
In the main menu, the title of the currently active menu is shown in italics.
In the example: Mailing function is active.
Example: active element.

MailOne for PostBase User Manual The MailOne user interface
SW Version 1.9.12.383 13
3.3.3 How to change the size of windows
You might want to change the size of windows in MailOne, e.g. to show more entries in the ‘Extra Services’ list.
Hold the mouse over the border between the window areas. If resizing is allowed, it will change form to a border-drag function.
Click and hold the mouse button and drag the border to the desired position.
In this example: The scoll bar disappears and all entries in the ‘Extra Services’ list are shown.

MailOne for PostBase User Manual Overview of the main menu functions
SW Version 1.9.12.383 14
4 Overview of the main menu functions
In this section, you get to know the functions of your software at a glance. For more information follow the given hyperlink.
4.1 Mailing
Metering settings You can easily define metering settings from your PC. These include product settings (services and weight) as well as selecting a text message and / or an advert. Furthermore, you can select an account and adjust the date of postage.
For detailed information, please refer to chapter Metering settings and metering.
4.2 Text Messages
Manage text messages MailOne enables you to enter texts via PC keyboard and to store up to eight different text messages. You can access all stored texts from PostBase meter.
For detailed information, please refer to chapter Manage texts.
4.3 Accounts
Account Administration MailOne supports working with cost accounts and offers comfortable account administration features, like creating a new account, saving current account settings, and importing accounts from a .csv file. When using a barcode scanner, you can create, edit, and delete scancodes.
For detailed information, please refer to chapter Manage Accounts.
4.4 Addresses
Address Administration MailOne enables you to save addresses. You can enter addresses manually or import them from .csv file. You can edit or delete existing addresses.
For detailed information, please refer to chapter Manage Addresses.

MailOne for PostBase User Manual Overview of the main menu functions
SW Version 1.9.12.383 15
4.5 Tracking
Track and Trace Administration Check the status of all mail you have sent with confirmation extra services.
For detailed information, please refer to chapter Tracking.
4.6 Transactions
Transaction administration MailOne displays a list of all transaction information, e.g. date or product. You can book transactions manually, edit, void or delete them.
For detailed information, please refer to chapter Transaction administration.
4.7 Reports
Reports Reports in MailOne include Account Reports, Transaction Reports, Tracking Reports and USPS Reports. They will help you track your postage costs and optimize your postage usage.
For detailed information, please refer to chapter Reports.
4.8 Mailhandler
PostBase mailing system settings MailOne enables you to make settings on the PostBase mailing system. You can, for example, determine at which postage credit threshold your PostBase will alert you to load postage. Furthermore, there are several special functions.
For more detailed information, see chapter Mailhandler Menu: PostBase setup and special functions.
NOTE: All these features are available at the PostBase mailing system. Please refer to the PostBase Operator Manual.
4.9 Settings
MailOne Settings Define software settings, e.g. for addresses or printer.
For detailed information, please refer to the Appendix.
MailOne for PostBase User Manual Metering settings and metering
SW Version 1.9.12.383 16
4.10 Help
Help function If you run into problems while working with MailOne, click [Help] to review this User Manual. If our help function shouldn’t be sufficient to solve your problems, please consult the FP web page or contact Francotyp-Postalia.
5 Metering settings and metering
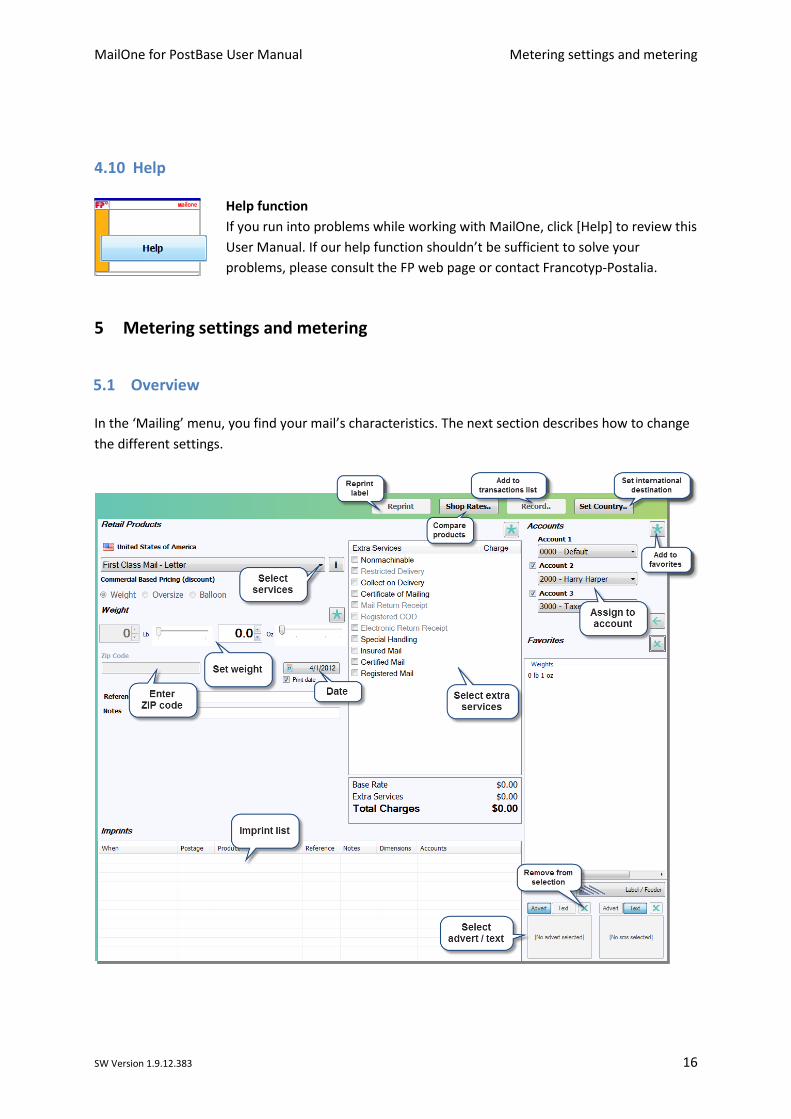
5.1 Overview
In the ‘Mailing’ menu, you find your mail’s characteristics. The next section describes how to change the different settings.

MailOne for PostBase User Manual Metering settings and metering
SW Version 1.9.12.383 17
5.2 Product Selection: Select services and set weight
Select Service
All available services are listed in the drop-down box at the top left. Click at the right hand side of the products box to open up the list.
Click on the desired postal product.
TIP: Click on the symbol to get details and options on the product you have selected.
Select Extra Services
The list to the right of the products box will show all extra services available for your product, together with the additional charge.
Click on the boxes for the desired extra services.
In some cases, you might have to enter additional information, e.g. if insurance is required. In this case, a pop-up box will appear to ask you for the insurance value.
The total amount of all extra services selected is shown in the ‘Extra Services’ total area
TIP: Click on the symbol to get details and options on an extra service.
MailOne for PostBase User Manual Metering settings and metering
SW Version 1.9.12.383 18
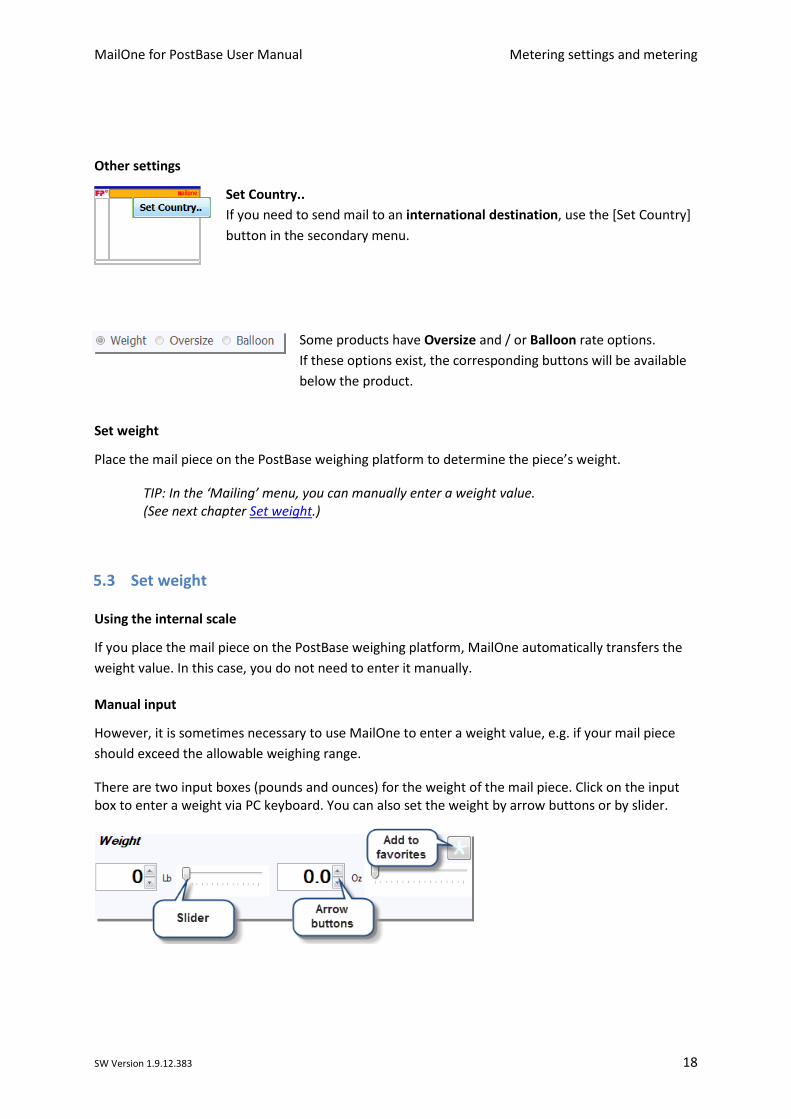
Other settings
Set Country.. If you need to send mail to an international destination, use the [Set Country] button in the secondary menu.
Some products have Oversize and / or Balloon rate options. If these options exist, the corresponding buttons will be available below the product.
Set weight
Place the mail piece on the PostBase weighing platform to determine the piece’s weight.
TIP: In the ‘Mailing’ menu, you can manually enter a weight value. (See next chapter Set weight.)
5.3 Set weight
Using the internal scale
If you place the mail piece on the PostBase weighing platform, MailOne automatically transfers the weight value. In this case, you do not need to enter it manually.
Manual input
However, it is sometimes necessary to use MailOne to enter a weight value, e.g. if your mail piece should exceed the allowable weighing range.
There are two input boxes (pounds and ounces) for the weight of the mail piece. Click on the input box to enter a weight via PC keyboard. You can also set the weight by arrow buttons or by slider.

MailOne for PostBase User Manual Metering settings and metering
SW Version 1.9.12.383 19
5.4 Add ZIP Code and details
Some products need you to give the destination’s ZIP code before the price can be calculated.
Enter the ZIP code in this area. The zone will be calculated automatically.
If there is no need to enter ZIP codes for your product, this box will be grayed out.
In this area, you also have the possibility to enter a reference code and a NOTE about the item.
5.5 Select advert
As soon as a valid product has been set, you can select adverts.
Click on the field for selecting adverts.
NOTE: For the administration of the advertisings, please refer to the FP portal. Here you find all Logos available for download.

MailOne for PostBase User Manual Metering settings and metering
SW Version 1.9.12.383 20
The ‘Adverts’ menu opens in the lower part of the working area. It displays all available advertisings.
Select the desired logo. MailOne adopts an advert closing the ‘Adverts’ menu.
PostBase applies your setting immediately showing the desired adverts.
TIP: If you click [Manage], you have the possibility to download adverts from the FP portal.

MailOne for PostBase User Manual Metering settings and metering
SW Version 1.9.12.383 21
5.6 Select text message
As soon as a valid product has been set, you can select sms texts.
Click on the field for selecting text messages.
The ‘Sms texts’ menu opens in the lower part of the working area. It displays all available text messages.
Select the desired text. MailOne adopts a text message closing the ‘Sms texts’ menu.
PostBase applies your setting immediately showing the desired text messages.

MailOne for PostBase User Manual Metering settings and metering
SW Version 1.9.12.383 22
5.7 Assign to accounts
You can assign any mail item to up to three accounts in the categories (or ‘levels’) as shown here.
TIP: If you have set up a barcode scanner, you might as well scan a barcode to set the accounts associated to this scancode. For more information, please refer to chapter Setting up scancodes.
Click on the drop-down box to see a list of all accounts applicable to that category.
Whilst the list is open, you can scroll through the entries or type the initial characters on your keyboard to jump through the list.
One account must always be present. However, even if you have configured MailOne to use three accounts, you can turn the last two on and off using the check-boxes.
You have to configure the number and titles of the categories shown in the ‘Accounts’ tab in the ‘Settings’ menu – the names set there will be the headings shown here on the mailing form. You can also choose to list the account number then name or vice versa (see chapter Settings: Accounts in the Appendix of this document).
TIP: If you have a very large number of accounts, you can open the Account-Search dialog clicking on the symbol. If you need information on how to manage cost accounts, please refer to chapter Manage Accounts.

MailOne for PostBase User Manual Metering settings and metering
SW Version 1.9.12.383 23
5.8 Set date
Click on the button displaying a date in the ‘Mailing’ menu.
MailOne opens a calender window. It displays the allowable predating range. At the bottom of the window, you see the actual date.
Click on the desired date.
The new date of postage appears in the ‘Product Selection’ menu.
5.9 Printing 4x6’’ Labels / Confirmation Labels
4x6’’ Labels
MailOne for PostBase enables you to print a 4x6” shipping label for the Commercial Base Pricing products (e.g. CBP Express Mail, CBP Priority Mail, …) as well as for the non-CBP shipping products (e.g. Priority Mail, Express Mail, First-Class Mail, Parcel Post, Media Mail…).
You can print 4x6” shipping labels using a label printer or an office printer.
MailOne only allows you to print one copy of each 4x6’’ label.
Confirmation Labels
If you have set MailOne to use USPS Confirmation Services (e.g. Delivery Confirmation), you can print the package tracking label, too. The label contains the unique Package Id for USPS tracking. However, it does not contain any postage information. That is, you must still meter the letter or package as normal and then attach the confirmation label.
5.10 Reprint function
Reprint If, for some reason a particular label does not print correctly, for example if your printer jams, you can reprint a label. Select it on the form below and press the [Reprint] button in the secondary menu. In this example, the [Reprint] button is disabled.

MailOne for PostBase User Manual Metering settings and metering
SW Version 1.9.12.383 24
5.11 Rate Shopping
Rate shopping Select the optimum mailing product by comparing postage and delivery times exactly for your mail items. Click on the [Shop Rates..] button in the secondary menu.
MailOne opens the Product Shopping dialog. Enter the destination ZIP code and the weight of your mail item. The available product list will be updated showing both postage and estimated delivery time.
5.12 Record feature
Record feature Record transactions so you can track them in the transaction list. Click on the [Record..] button in the secondary menu.
NOTE: This feature is not yet implemented.

MailOne for PostBase User Manual Metering settings and metering
SW Version 1.9.12.383 25
5.13 Metering with PostBase mailing system
For non CBP products / retail products (except for 4x6’’ labels), you perform the metering imprints with the PostBase mailings system.
MailOne enables you to start label printing and batch processing with the optional feeder directly from your computer. You can still also start metering as usual on the PostBase mailing system.
TIP: For information on handling the PostBase mailings system, please refer to the PostBase Operator Manual.
In the ‘Mailing’ menu, click on the [Label / Feeder] button.
The ‘Label and Feeder’ menu opens in the lower part of the working area. (The following example shows a menu for PostBase with label dispenser and feeder.)
Set the desired numbers of labels / the desired settings for batch processing with the feeder.
/
Click on [Start label] / [Start feeder] to start metering.

MailOne for PostBase User Manual Manage texts
SW Version 1.9.12.383 26
6 Manage texts
Clicking on [Text messages] in the main menu, you have the possibility to enter, edit or delete texts.
6.1 Enter a new text
Click on [Enter new text message].
You can now enter a text of your choice , of up to five lines of text.
Select the button to save your entry. In MailOne, you can store up to 12 different text messages.
In the ‘Manage Text messages’ menu, you can now select the new text.
6.2 Edit or delete a text
Edit a text
Click on the text you want to edit.
MailOne opens an input box for text. Enter a new text. Click to save.
Delete a text
Click button in the upper part right of the text.

MailOne for PostBase User Manual Manage Accounts
SW Version 1.9.12.383 27
7 Manage Accounts
7.1 Overview
Click on [Accounts] in the main menu to open the ‘Account Administration’ menu.
All changes to the accounts and their parameters can be carried out in the ‘Account administration’ menu.

MailOne for PostBase User Manual Manage Accounts
SW Version 1.9.12.383 28
7.2 Add a new account
Enter a new account
Click [New] in the secondary menu.
Attention: If you do not press [New] first, you may overwrite another selected account.
The entry of Name and Number is mandatory.
Click [Save] to store your new account. It appears in the account list.
− Charge: This fee will be charged to each transaction made for this account, in addition to the postage. It may be either an absolute, fixed value or a percentage of the postage value. You can also assign a negative charge, i.e. a rebate.
− Account level: Accounts are allocated to one of three levels, so that you can categorize them according to your business needs. Mail is recorded using one account from each level (For more information on account levels, i.e. on how to change their titles, please refer to Appendix - Settings: Accounts).
− Each account may be set active or inactive. Inactive accounts cannot be selected in the ‘Mailing’ menu and will not appear in reports.
NOTE: Making an account inactive may be preferable to deleting it, since you can restore an inactive account.
Import an account
If you do not want to enter accounts manually, you can load them from another computer system’s data. MailOne enables you to import data from a file in CSV format.
NOTE: CSV (‘Comma Separated Values’) is a simple format consisting of rows of data. Each row holds the various fields of data needed to define an account. The individual pieces of data (Name, Number etc.) in a row are separated by a particular character. A comma can be used for this as well as a semi-colon. If possible, do not choose a separator character occurring in any of the actual data values. Sometimes the file has a first row (‘header’ row) that defines the names of the following data fields, in the order they appear in the text.

MailOne for PostBase User Manual Manage Accounts
SW Version 1.9.12.383 29
Click [Import] in the secondary menu.
MailOne opens an Import Wizard. Enter the name of the data file and the character used to separate the data fields. If your file has a heading line, check ‘Ignore first line’. Continue with [Next].
Move the fields in the box using the arrow buttons to set the order in which the fields in your CSV file occur. If one of the fields should not exist in your file, uncheck the tick box. The display will show how the data will be interpreted. Continue with [Next]. MailOne imports the accounts.
MailOne for PostBase User Manual Manage Accounts
SW Version 1.9.12.383 30
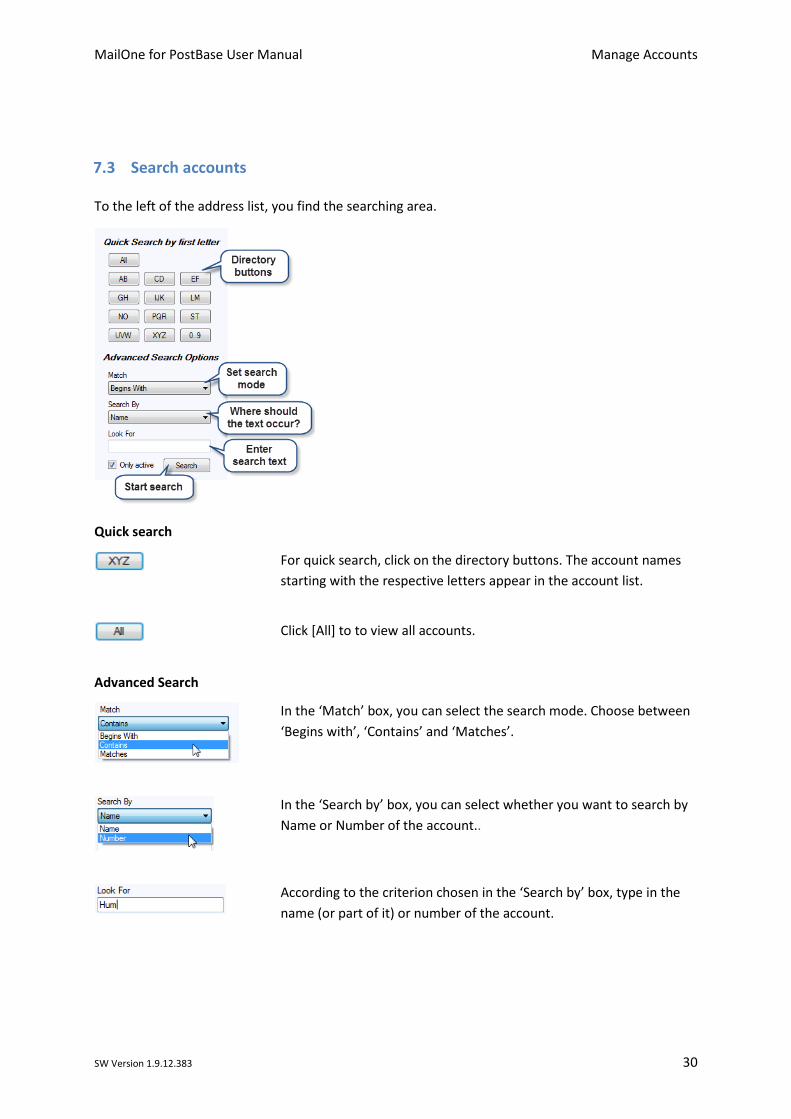
7.3 Search accounts
To the left of the address list, you find the searching area.
Quick search
For quick search, click on the directory buttons. The account names starting with the respective letters appear in the account list.
Click [All] to to view all accounts.
Advanced Search
In the ‘Match’ box, you can select the search mode. Choose between ‘Begins with’, ‘Contains’ and ‘Matches’.
In the ‘Search by’ box, you can select whether you want to search by Name or Number of the account..
According to the criterion chosen in the ‘Search by’ box, type in the name (or part of it) or number of the account.

MailOne for PostBase User Manual Manage Accounts
SW Version 1.9.12.383 31
7.4 Edit or delete accounts
Edit an account
Find the account (See above, chapter Search accounts). Click on the account you want to edit in the account list.
Edit the entry.
Click [Save] to save the entered changes.
Delete an account
Click on the account you want to delete in the account list.
Click [Delete].
If you want to delete all entries in the account list, click [Clear].
Attention: If you delete a level 1 account associated with one or more scancodes (see next chapter Setting up scancodes), the corresponding scancode will be deleted, too.

MailOne for PostBase User Manual Manage Accounts
SW Version 1.9.12.383 32
7.5 Setting up scancodes
You can use scancodes to simplify the entry of account details whilst mailing. A scancode is a barcode associated with a combination of accounts of level 1, 2 and 3 as needed. Once set up, scanning the barcode selects the corresponding accounts.
TIP: For information on how to set up a barcode scanner, please refer to chapter Settings: Devices in the Appendix of this document.
Click [Scancodes] in the secondary menu.
MailOne opens a ‘Scancodes’ dialog. Here you can create new scancodes clicking on the [New] button. The scancodes you have already created are shown on the list left. You can [Delete] scancodes or [Edit] the associated accounts.
− Name: You have to enter the scancode’s name in the box in the top right corner. The name must be in capitals. There is no limit to the number of characters, but it is advisable to use a medium length name to avoid scanning problems.
− Account selection: In the ‘Accounts’ section below, select the accounts you wish to associate with the scancode. You have to enter at least a level 1 account. If you have configured level 2 and 3 accounts, these may be associated with the scancode as well.
NOTE: If you scan a barcode whose contents are not recognized by the system, a ‘Scancode Management’ dialog will automatically appear. It allows you to define the unknown code and set up corresponding accounts.
In the ‘Reports’ menu, you can print the ‘Account Barcodes’ report with all barcodes on it (for more information on printing reports, please refer to chapter Generating reports). When working in the ‘Mailing’ or ‘Manual booking’ menus, the printed barcodes can simply be scanned using a standard barcode scanner.

MailOne for PostBase User Manual Manage Addresses
SW Version 1.9.12.383 33
8 Manage Addresses
8.1 Overview
Click on [Addresses] in the main menu to open the ‘Address Administration’ menu.

MailOne for PostBase User Manual Manage Addresses
SW Version 1.9.12.383 34
8.2 Add a new address
Enter a new address
Click [New] in the secondary menu.
Attention: If you do not press [New] first, you may overwrite another selected address entry.
The entry of Name, Postal Address or Post Office Box, City, State and ZIP code is mandatory. (See yellow boxes in the figure below.) Additionally, you can enter an address supplement (apartment etc.), company, email address, phone number and an additional ZIP code. The Preview area displays how the address will appear in the imprint.
Click [Save] to store your address entries. The new address appears in the address list.
Import addresses
If you do not want to enter addresses manually, you can load them from another computer system’s data. MailOne enables you to import data from a text file containing the addresses.
Export the desired data as a file in CSV format. Now you can import them to MailOne.
NOTE: CSV (‘Comma Separated Values’) is a simple format consisting of rows of data. Each row holds the various fields of data needed to define an address. The individual pieces of data (Name, ZIP code etc.) in a row are separated by a particular character. A comma can be used for this as well as a semi-colon. If possible, do not choose a separator character occurring in any of the actual data values. Sometimes the file has a first row (‘header’ row) that defines the names of the following data fields, in the order they appear in the text.

MailOne for PostBase User Manual Manage Addresses
SW Version 1.9.12.383 35
Click [Import] in the secondary menu.
MailOne opens an Import Wizard. Enter the name of the data file and the character used to separate the data fields. If your file has a heading line, check ‘Ignore first line’. Continue with [Next].
Move the fields in the box using the arrow buttons to set the order in which the fields in your CSV file occur. If one of the fields should not exist in your file, uncheck the tick box. The display will show how the data will be interpreted. Continue with [Next]. MailOne imports the addresses.

MailOne for PostBase User Manual Manage Addresses
SW Version 1.9.12.383 36
8.3 Address search
To the left of the address list, you find the searching area.
Quick search
For quick search, click on the directory buttons. The addressees starting with the respective letters appear in the address list.
Click [All] to to view all addresses.
Advanced Search
In the ‘Match’ box, you can select the search mode. Choose between ‘Begins with’, ‘Contains’ and ‘Matches’.
In the ‘Search by’ box, you can select whether you want to search by Name, Company, Attention lines, Address lines, Attention and Address lines or by City.
Type in the name (or part of it) of the criterion chosen in the ‘Search by’ box.

MailOne for PostBase User Manual Manage Addresses
SW Version 1.9.12.383 37
8.4 Edit or delete an address
Edit an address
Find the address (See above, chapter Address search). Click on the address you want to edit in the address list.
Edit the entry.
Click [Save] to save the entered changes.
Delete an address
Click on the address you want to delete in the address list.
Click [Delete].
If you want to delete all entries in the address list, click [Clear].

MailOne for PostBase User Manual Tracking
SW Version 1.9.12.383 38
9 Tracking
Click on [Tracking] in the main menu to open the menus ‘Track & Trace Administration’ and ‘FP Certified’.
9.1 Track & Trace
The Track & Trace function enables you to track your mail deliveries from MailOne.
NOTE: To use Track & Trace, you have to be registered for the respective online services with the USPS. Your USPS login ID and password must have been entered into the ‘Transfer settings’ dialog, see chapter Settings: Transfer in the Appendix of this document.

MailOne for PostBase User Manual Tracking
SW Version 1.9.12.383 39
Send the electronic manifest
If you have chosen a product with a Confirmation Service in the ‘Mailing’ menu, you can print a bar-coded label on the label printer. This bar-code label includes a Package ID to track the mail item.
MailOne collects the Package IDs into an electronic manifest which must be sent to the USPS first. Send this manifest file before tendering your mail to the USPS. MailOne must be connected to the Internet.
Click the [Send File] button in the secondary menu. MailOne sends the details of all mail processed since the last data transfer, irrespective of whether the mail is displayed in the screen or not.
Whilst the data is being sent, the Transfer progress panel appears.
Tracking your mail
In the ‘Track & Trace Administration’ menu, you can check the status of all mail you have sent with confirmation extra services. In the searching area on the left-hand side, you can enter criteria to find the mail whose delivery status you want to view.
Click [Update] in the secondary menu to requery the status information from the USPS. Now the program shows the latest delivery status.

MailOne for PostBase User Manual Tracking
SW Version 1.9.12.383 40
Delivery Status
The results list shows the status of all mail for which a confirmation label has been printed. The status is displayed by one of the following symbols.
REGISTERED: A label has been printed for this Package ID.
IN TRANSIT: The mail has been shipped to the USPS.
DELIVERED: The mail has been delivered by the USPS.
FAILED: Some sort of error or discrepancy has arisen. It needs further investigation.
Example label

MailOne for PostBase User Manual Transaction administration
SW Version 1.9.12.383 41
10 Transaction administration
Click on [Transactions] in the main menu to open the ‘Transaction Administration’ menu.
10.1 Overview
Every time you meter a piece of mail, a transaction will be logged by MailOne. The ‘Transaction Administration’ menu gives you a full picture of your mailing activity, e.g. when any particular letter was sent. Transactions are stored in the MailOne database and used to generate reports.
NOTE: Transactions do not appear on this page or in the reports until they have been recorded – see chapter Record feature.
MailOne for PostBase User Manual Transaction administration
SW Version 1.9.12.383 42
10.2 Search and view transactions
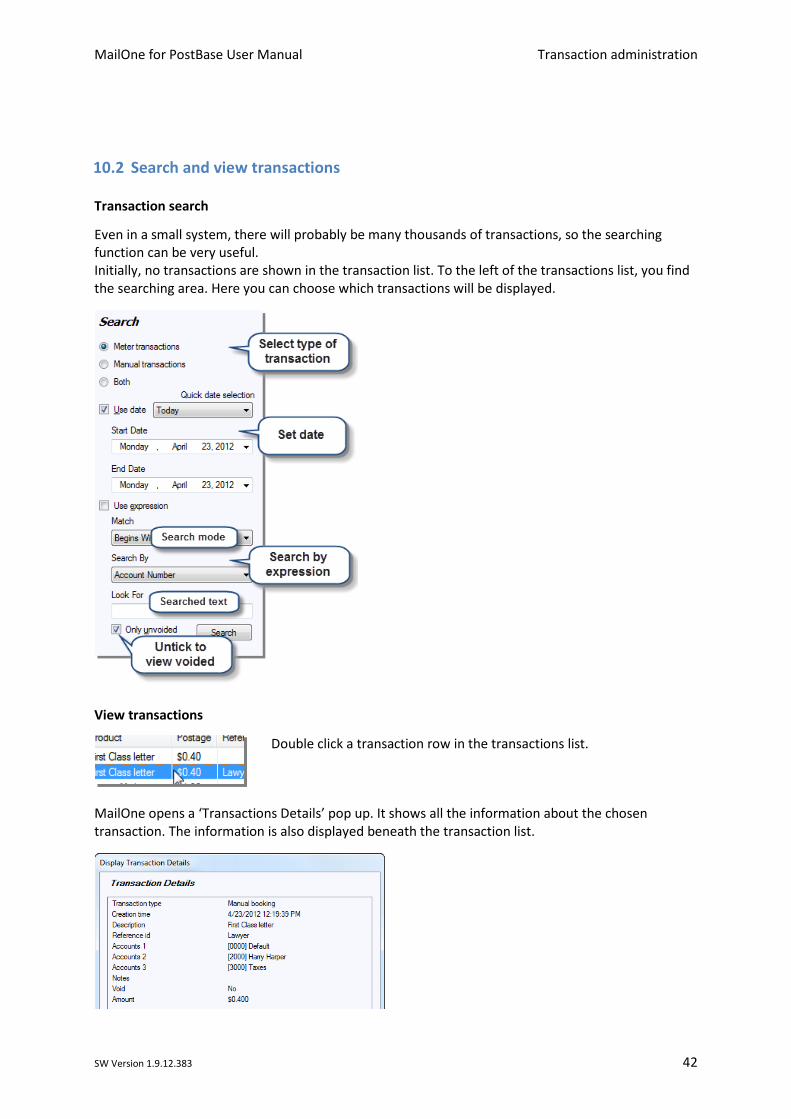
Transaction search
Even in a small system, there will probably be many thousands of transactions, so the searching function can be very useful. Initially, no transactions are shown in the transaction list. To the left of the transactions list, you find the searching area. Here you can choose which transactions will be displayed.
View transactions
Double click a transaction row in the transactions list.
MailOne opens a ‘Transactions Details’ pop up. It shows all the information about the chosen transaction. The information is also displayed beneath the transaction list.

MailOne for PostBase User Manual Transaction administration
SW Version 1.9.12.383 43
10.3 Manual booking
For different reasons, e.g. if there are software problems, you might use PostBase to meter mail independently of MailOne (known as offline postage). If you want to add these meterings to the MailOne reports, you can enter them in the MailOne ‘Transaction Administration’ menu.
To enter transactions manually, proceed as follows.
Click [Manual Booking..] in the secondary menu.
MailOne opens a ‘Manual booking’ Wizard. Here you can enter the transaction details.
MailOne for PostBase User Manual Transaction administration
SW Version 1.9.12.383 44
10.4 Export transactions
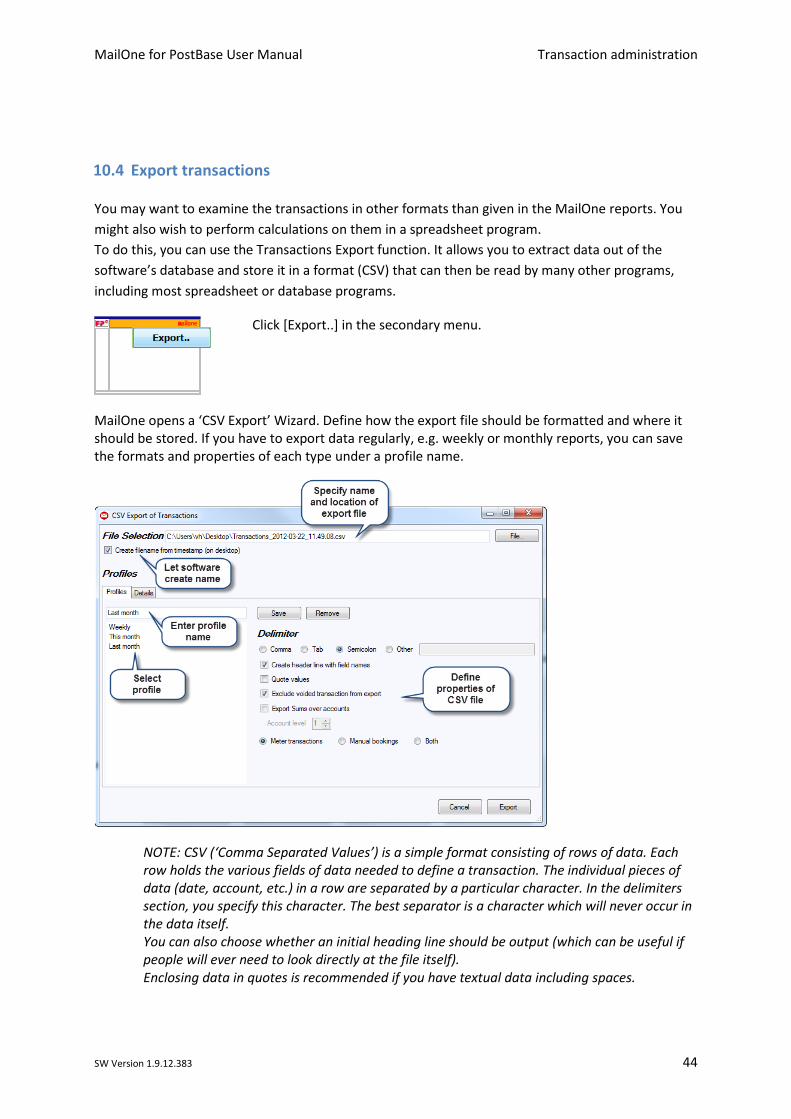
You may want to examine the transactions in other formats than given in the MailOne reports. You might also wish to perform calculations on them in a spreadsheet program. To do this, you can use the Transactions Export function. It allows you to extract data out of the software’s database and store it in a format (CSV) that can then be read by many other programs, including most spreadsheet or database programs.
Click [Export..] in the secondary menu.
MailOne opens a ‘CSV Export’ Wizard. Define how the export file should be formatted and where it should be stored. If you have to export data regularly, e.g. weekly or monthly reports, you can save the formats and properties of each type under a profile name.
NOTE: CSV (‘Comma Separated Values’) is a simple format consisting of rows of data. Each row holds the various fields of data needed to define a transaction. The individual pieces of data (date, account, etc.) in a row are separated by a particular character. In the delimiters section, you specify this character. The best separator is a character which will never occur in the data itself. You can also choose whether an initial heading line should be output (which can be useful if people will ever need to look directly at the file itself). Enclosing data in quotes is recommended if you have textual data including spaces.

MailOne for PostBase User Manual Transaction administration
SW Version 1.9.12.383 45
Select the [Details] tab to choose which data should be included in the export file, in which order these columns of data should appear and over which period of time.
10.5 Edit or delete transactions
Select the transactions you wish to edit
OR
Click [Select All] to select all transactions.
Click on [Edit].
NOTE: You cannot edit the amount or product selection once a transaction has been recorded in the database.

MailOne for PostBase User Manual Transaction administration
SW Version 1.9.12.383 46
MailOne opens an ‘Edit Transactions’ Wizard. Tick the box ‘Include accounts into updated’ to change the allocation of accounts. If the box is not ticked, the accounts will be left unaltered. This also applies to changing Notes or Reference.
Void, unvoid or delete transactions
Select the transactions you wish to void, unvoid or delete
OR
Click [Select All] to select all transactions.
Click [Void] to exclude transactions from the reports.
Click [Unvoid] to include voided transactions again in the reports.
Click [Delete] to remove a transaction from the system permanently.
Click [Clear] to remove all transactions.
TIP: It is strongly recommended that you use voiding rather than deleting, since you can later recover voided transactions by unvoiding.
MailOne for PostBase User Manual Reports
SW Version 1.9.12.383 47
11 Reports
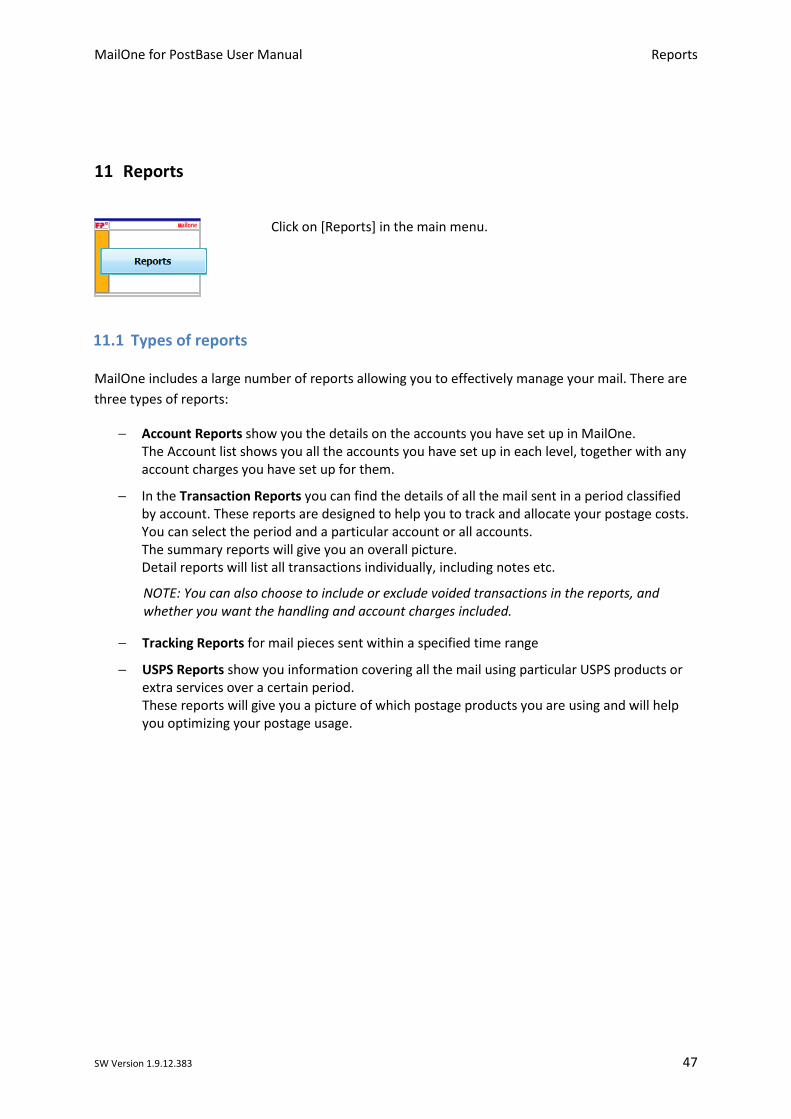
Click on [Reports] in the main menu.
11.1 Types of reports
MailOne includes a large number of reports allowing you to effectively manage your mail. There are three types of reports:
− Account Reports show you the details on the accounts you have set up in MailOne. The Account list shows you all the accounts you have set up in each level, together with any account charges you have set up for them.
− In the Transaction Reports you can find the details of all the mail sent in a period classified by account. These reports are designed to help you to track and allocate your postage costs. You can select the period and a particular account or all accounts. The summary reports will give you an overall picture. Detail reports will list all transactions individually, including notes etc.
NOTE: You can also choose to include or exclude voided transactions in the reports, and whether you want the handling and account charges included.
− Tracking Reports for mail pieces sent within a specified time range
− USPS Reports show you information covering all the mail using particular USPS products or extra services over a certain period. These reports will give you a picture of which postage products you are using and will help you optimizing your postage usage.

MailOne for PostBase User Manual Reports
SW Version 1.9.12.383 48
11.2 Generating reports
For most reports, you will need to give additional criteria, for example the timeframe the report should cover. These details are entered in the ‘Options’ area, and may vary according to the report you select.
Click on the [Preview] button in the secondary menu to see the report.
Click on the [Print] button in the secondary menu to print it out.
TIP: Clicking on [Print], a printer dialog box may appear first. You can turn this function off in the Print Settings.
Export reports In the options area, set the desired export options (file format and storage location). For information on the CSV format, please refer to chapter Export transactions.
Click on the [Export] button in the secondary menu to store the export file.

MailOne for PostBase User Manual Mailhandler menu: PostBase setup and special functions
SW Version 1.9.12.383 49
12 Mailhandler menu: PostBase setup and special functions
MailOne provides settings on the PostBase mailing system and several special functions.
NOTE: All these features are available at the PostBase mailing system. For more information, please refer to the PostBase Operator Manual.
In the main menu, click [Mailhandler].
12.1 Overview
The ‘Mailhandler maintenance’ menu is displayed in the working area
TIP: You can re-sort the functions according to your wishes.
MailOne for PostBase User Manual Mailhandler menu: PostBase setup and special functions
SW Version 1.9.12.383 50
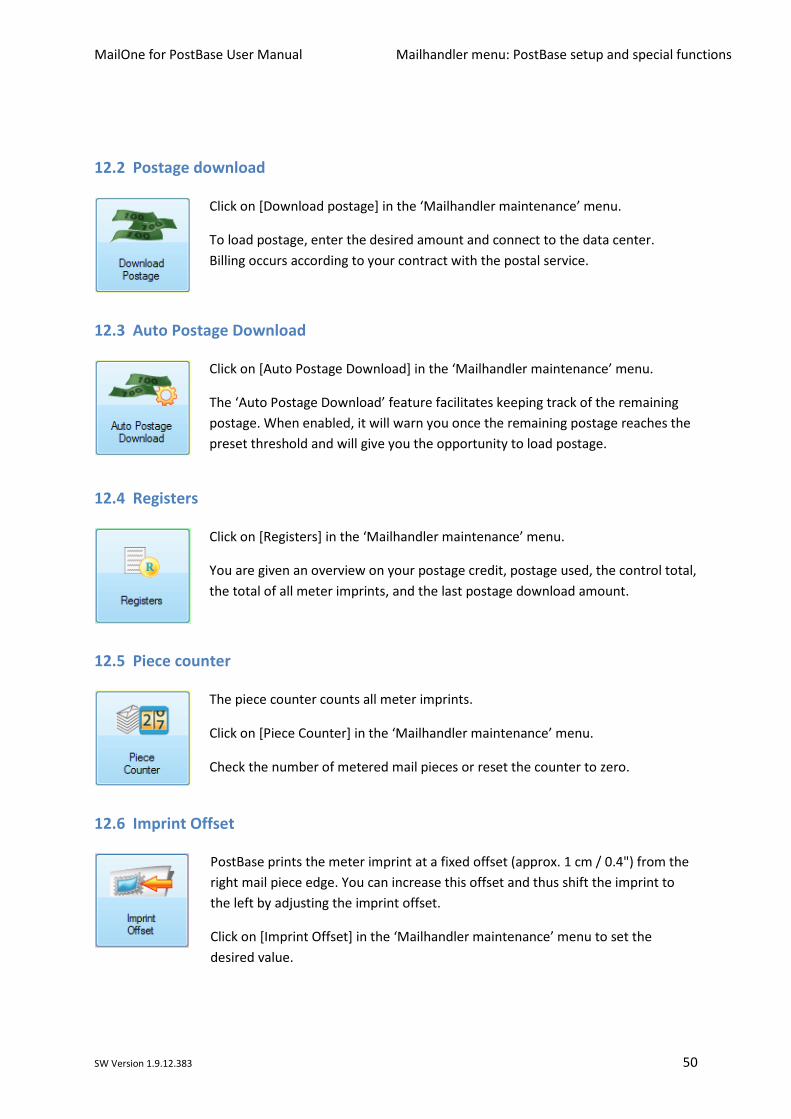
12.2 Postage download
Click on [Download postage] in the ‘Mailhandler maintenance’ menu.
To load postage, enter the desired amount and connect to the data center. Billing occurs according to your contract with the postal service.
12.3 Auto Postage Download
Click on [Auto Postage Download] in the ‘Mailhandler maintenance’ menu.
The ‘Auto Postage Download’ feature facilitates keeping track of the remaining postage. When enabled, it will warn you once the remaining postage reaches the preset threshold and will give you the opportunity to load postage.
12.4 Registers
Click on [Registers] in the ‘Mailhandler maintenance’ menu.
You are given an overview on your postage credit, postage used, the control total, the total of all meter imprints, and the last postage download amount.
12.5 Piece counter
The piece counter counts all meter imprints.
Click on [Piece Counter] in the ‘Mailhandler maintenance’ menu.
Check the number of metered mail pieces or reset the counter to zero.
12.6 Imprint Offset
PostBase prints the meter imprint at a fixed offset (approx. 1 cm / 0.4") from the right mail piece edge. You can increase this offset and thus shift the imprint to the left by adjusting the imprint offset.
Click on [Imprint Offset] in the ‘Mailhandler maintenance’ menu to set the desired value.

MailOne for PostBase User Manual Mailhandler menu: PostBase setup and special functions
SW Version 1.9.12.383 51
12.7 Standby Time
The PostBase mailing system will go to standby automatically if it is not used for a certain time.
To set this time, click on [Standby Time] in the ‘Mailhandler maintenance’ menu.
NOTE: When connected with MailOne, PostBase will neither turn itself off, nor enter standby mode.
12.8 Auto Off
The Auto Off time is the time between your last operation and the time PostBase automatically switches off.
If you want to set this time, click on [Auto Off] in the ‘Mailhandler maintenance’ menu.
NOTE: When connected with MailOne, PostBase will neither turn itself off, nor enter standby mode.
MailOne for PostBase User Manual Mailhandler menu: PostBase setup and special functions
SW Version 1.9.12.383 52
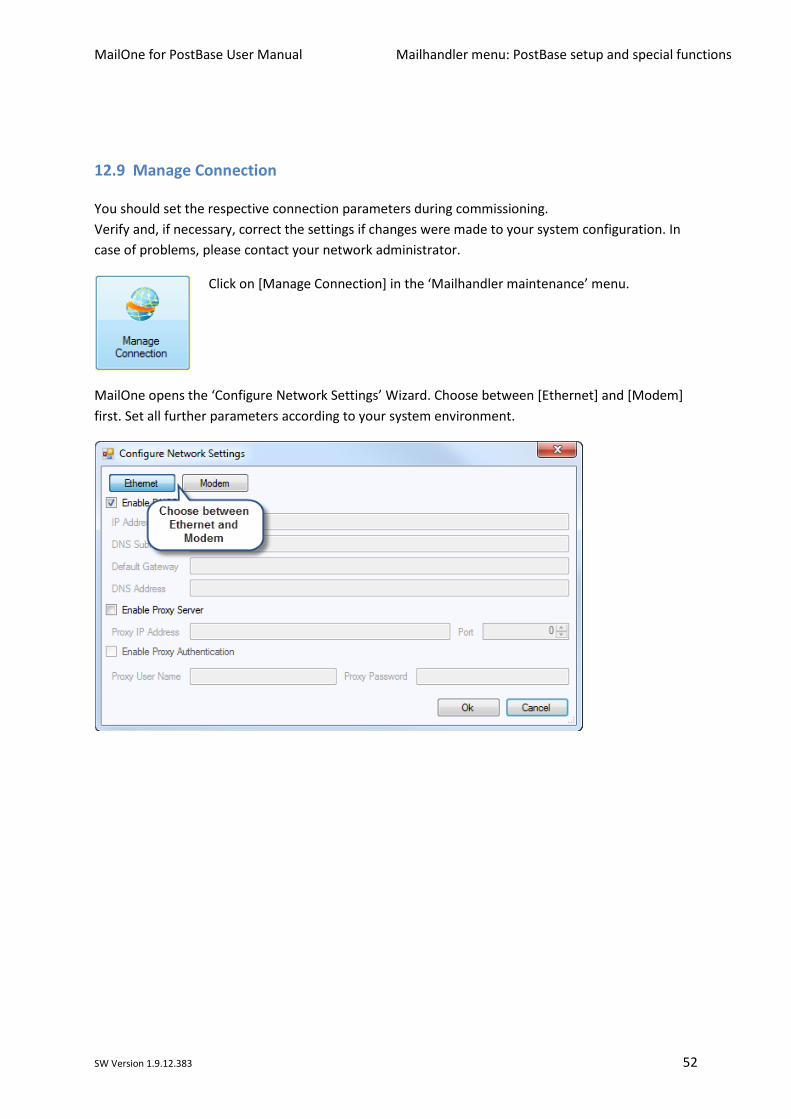
12.9 Manage Connection
You should set the respective connection parameters during commissioning. Verify and, if necessary, correct the settings if changes were made to your system configuration. In case of problems, please contact your network administrator.
Click on [Manage Connection] in the ‘Mailhandler maintenance’ menu.
MailOne opens the ‘Configure Network Settings’ Wizard. Choose between [Ethernet] and [Modem] first. Set all further parameters according to your system environment.

MailOne for PostBase User Manual Mailhandler menu: PostBase setup and special functions
SW Version 1.9.12.383 53
12.10 Print Advert / Text Message Only
With the ‘Print Advert Only’ function, you can print adverts and text messages.
Click on [Print Advert Only] in the ‘Mailhandler maintenance’ menu.
MailOne opens the ‘Print Advert Only’ window. The two selection fields on the upper left show the print image for this special function. You can assign each one of these fields either an advert or a text message.
Set an advert / a text message for printing
or
In the lower section of the ‘Print Advert Only’ window, select the kind of imprint you want to set: [Text Messages] or [Ads]. MailOne then displays all available adverts or text messages accordingly.

MailOne for PostBase User Manual Mailhandler menu: PostBase setup and special functions
SW Version 1.9.12.383 54
There are two ways to set the imprint:
− Click on the selection field in which the text message or advert should appear. Then, in the lower section of the window, click on the desired text message / advert.
− Simply ‘Drag and Drop’ the desired text message /advert into the desired selection field with the mouse.
When both selection fields show the desired imprints in the ‘Print Advert Only‘ window, you can start printing.
Start printing
Proceed exactly as when metering mail:
− Position a mail piece on the hand feed tray or
− Start label printing or
− Use the automatic feeder.
TIP: If you need help, please read the chapter Metering with PostBase mailing system and the PostBase Operator Manual.
The ‘Print Advert Only‘ special function has its own counter. MailOne shows the number of imprints on the right side of the window. When quitting the ‘Print Advert Only‘ window, the counter is reset to ‘0’.

MailOne for PostBase User Manual Mailhandler menu: PostBase setup and special functions
SW Version 1.9.12.383 55
12.11 Print Numbers
With the ‘Print Numbers’ function, you can print a 6-digit consecutive number vertically on your mail.
Click on [Print Numbers] in the ‘Mailhandler maintenance’ menu.
MailOne opens the ‘Print Numbers Only’ window. Here, you can define the settings for the ‘Print Numbers’ special function and start printing:
Define the start number and the direction of counting
Click on the button for the start number.
Enter the desired start number in the input field. You can choose any number between 1 and 999999.
Confirm your input.
Define the direction of counting: [Ascending] or [Descending].

MailOne for PostBase User Manual Mailhandler menu: PostBase setup and special functions
SW Version 1.9.12.383 56
Start printing
When the ‘Print Numbers Only’ window shows the desired settings, you can start printing. Proceed exactly as when metering mail:
− Position a mail piece on the hand feed tray or
− Start label printing or
− Use the automatic feeder.
TIP: If you need help, please read the chapter Metering with PostBase mailing system and the PostBase Operator Manual.
The ‘Print Numbers’ special function has its own counter. MailOne shows the number of imprints on the right side of the window. When quitting the ‘Print Numbers Only’ window, the counter is reset to ‘0’.
12.12 Feed Only / Count mail pieces
With the ‘Feed Only’ function, you can process mail without printing. In this way, you can count mail pieces and prepare your bulk mail for dispatch in counted stacks.
Click on [Feed Only] in the ‘Mailhandler maintenance’ menu.
MailOne opens the ‘Feed Letters Only’ window.

MailOne for PostBase User Manual Mailhandler menu: PostBase setup and special functions
SW Version 1.9.12.383 57
Start the letter transport
When batch processing with the automatic feeder for the ‘Feed Only’ special function, proceed exactly as when metering mail. If you need help, please read the chapter Metering with PostBase mailing system and the PostBase Operator Manual.
Note: The ‘Feed Only’ special function is also available when working without automatic feeder. You then have to position mail pieces individually on the hand feed tray.
MailOne shows the number of transported mail pieces on the right side of the window. When quitting the ‘Feed Letters Only’ window, the counter is reset to ‘0’.
12.13 Seal Only
With the ‘Seal Only’ function, you can seal and count letters without printing.
Click on [Seal Only] in the ‘Mailhandler maintenance’ menu.
Note: The ‘Seal Only’ special function is only available for PostBase mailing systems with automatic feeder.
MailOne opens the ‘Seal Letters Only’ window.
Switch on the seal function on the automatic feeder.
Note: For detailed information on the sealing function of the automatic feeder, please refer to the PostBase User Manual (Reference Guide). Please heed the envelope specifications for automatic sealing.

MailOne for PostBase User Manual Mailhandler menu: PostBase setup and special functions
SW Version 1.9.12.383 58
Start the letter transport.
When batch processing with the automatic feeder for the ‘Seal Only’ special function, proceed exactly as when metering mail. If you need help, please read the chapter Metering with PostBase mailing system and the PostBase Operator Manual.
The ‘Seal Only’ special function has its own counter. MailOne shows the number of processed letters on the right side of the window. When quitting the ‘Seal Letters Only’ window, the counter is reset to ‘0’.

MailOne for PostBase User Manual Troubleshooting
SW Version 1.9.12.383 59
13 Troubleshooting
Connect / Start software
Problem Area: The software cannot establish a connection with PostBase.
Rectification: − Check if PostBase is running. If the postage meter is turned off, the [Connect] button is grey.
− Check if PostBase displays the Homescreen (see chapter Start / exit MailOne).
− The USB cable must be properly connected. If there is no USB connection, the [Connect] button is grey.
In other cases…
− Turn off PostBase and close the program. Turn the postage meter on again. As soon as PostBase shows the Homescreen, open MailOne and click [Connect].
Problem Area: After clicking [Connect], MailOne displays a ‘Product Table Mismatch’ error. I cannot operate the software in connected mode.
Rectification: − This error might occur after updating the mailing system’s software. Perform a MailOne software update to align the product tables of the two systems.
Problem Area: After clicking [Connect], MailOne displays a license error.
Rectification: − Check if the right postage meter is connected with your PC.
FP Portal
Problem Area: The software cannot establish a connection with the FP Portal.
Rectification: − Check if your PC is connected to the Internet. − In the ‘Settings’ menu, check if the right Internet data has been entered (see
Appendix - Settings: Transfer).

MailOne for PostBase User Manual Troubleshooting
SW Version 1.9.12.383 60
Postage download
Problem Area: The software cannot perform postage download.
Rectification: − In the ‘Settings’ menu, check if the right Internet data has been entered (see Appendix - Settings: Transfer).
− Check if the network cable is properly connected.
Printing
Problem Area: I want to print a report, an error message appears.
Rectification: − Check if the printer is running and properly connected to your PC. − Check if the right printer has been set in the ‘Settings’ menu
(see Appendix - Settings: Setting up label printer and perform a test imprint).
Metering
Problem Area: PostBase does not start metering.
Rectification: − Check if a valid product / postage value is set. Also check if the PostBase touch screen displays anything.
− The currently set product can only be printed on 4x6” shipping labels.
Problem Area: Advert and/or text cannot be set (the buttons are grey).
Rectification: − First set a valid postal product before selecting advertising imprints. − The currently set product can only be printed on 4x6” shipping labels.
Advertising imprints are therefore not allowed.

MailOne for PostBase User Manual Troubleshooting
SW Version 1.9.12.383 61
Tracking
Problem Area: You are in Tracking and you press the Send File button. You get the message: “An error occurred connecting to USPS Server. Check servername, username and password.”
Rectification: − The server, username and/or password details for the USPS server may be incorrect. Check Appendix - Settings: Transfer).
− Also check your connection to the Internet.
Problem Area: Mail is sent with a Delivery Confirmation label using Confirmation Services. In the Tracking page the mail consistently stays at state New/Uploaded or shows a Delivery Problem.
Rectification: − Check the quality of the label (especially the bar code) being printed. Ensure that the bar code contrast is good.
− If you are using a dedicated Zebra Label Printer, make sure that the correct driver is being used (see Appendix - Settings: Setting up label printer and perform a test imprint).
Problem Area: In Tracking and you press the Send File Update buttons. You get the message: “Unexpected file length discovered parsing confirmation file. Expected 260 bytes, received {xxx} bytes.”
Rectification: − This depends on the format of the data transfer with the USPS. MailOne uses "CSV" format for all transfers. The USPS additionally supports other formats, and your account is probably configured to use a different format.
− You should call USPS Technical Support at 877-264-9693 and ensure that your account is configured for CSV file formats.

MailOne for PostBase User Manual Troubleshooting
SW Version 1.9.12.383 62
Print Advert Only
Problem Area: Printing will not start.
Rectification: − No advert / no text message has been set. Set at least one advert / one text message (see chapter Print Advert / Text Message Only).
Problem Area: The adverts / text messages are not printed on the expected position on the letter.
Rectification: − Imprint offset is active. Deactivate the imprint offset or set a suitable value (see chapter Imprint Offset).
Print Numbers
Problem Area: The number is not printed on the expected position on the letter.
Rectification: − Imprint offset is active. Deactivate the imprint offset or set a suitable value (see chapter Imprint Offset).
Seal Only
Problem Area: The envelopes are transported, but not sealed.
Rectification: − On the automatic feeder, check if the sealing function is switched on. Refer to the PostBase User Manual (Reference Guide).
Language
Problem area: I have changed the language in the ‘Settings’ menu. The MailOne interface still shows the previously set language.
Rectification: − Exit MailOne and restart it. The program will now adopt the new language.

MailOne for PostBase User Manual Troubleshooting
SW Version 1.9.12.383 63
Data transmission
Problem Area: In the status line at the bottom of the program, the following message appears: “Error: The product profile upload failed; please ensure proper Internet connectivity.”
Rectification: − MailOne needs to send statistical information to the USPS. It cannot do this, probably because the Internet connection is missing or broken. Check your connection to the Internet. In the mean time, the program will continue to function (see Appendix - Settings: Transfer).
Shut down
Problem Area:
Shutting down MailOne, you get the following message: “Pending confirmation records exist, that need to be sent to the USPS by Tracking / Send File. Do you want to cancel the shutdown process?”
Rectification: − Press [Yes]. Go into Tracking and use Send File to send the confirmation records to the USPS.
− If you press [No] MailOne will shut down, but the confirmation messages will not have been sent. MailOne will try to send these automatically the next time you run it.

MailOne for PostBase User Manual Appendix Installation and Settings
SW Version 1.9.12.383 64
14 Appendix: MailOne software settings
14.1 Prerequisites
System requirements
− Windows XP / Windows Vista / Windows 7 − Processor: Pentium min 1000 MHz − Screen resolution: min 800 x 1210 (height x width)
higher resolution is recommended − RAM: min 1 GB − Empty hard drive space: min 1.5 GB − Adobe Reader
14.2 Download MailOne for PostBase and software installation
Download 1. To download MailOne for PostBase, please visit our web portal.
Installation 2. Start the FP-MailOne-PostBase application on your PC to install MailOne with the help of the ClickOnce feature.
3. Connect PC to the PostBase meter as described in the PostBase Installation Manual.
Start MailOne
4. Double click the corresponding icon on your desktop to start.
At the first start (without connection to PostBase), only the [Settings], [Help] and [Exit] buttons are displayed in the main menu.
NOTE: If you work with MailOne for the first time, you first have to make some elementary settings.
14.3 Settings overview
Click on [Settings..] in the main menu. MailOne opens the ‘Settings’ dialog box.
Select the corresponding tab to make Application settings, Imprint settings etc.

MailOne for PostBase User Manual Appendix Installation and Settings
SW Version 1.9.12.383 65
14.4 Settings: Application
Click on the tab ‘Application’.
Application area (mandatory settings) Enter your FP Account number, CBP passphrase and your originating ZIP code. Activate or deactivate CBP and electronic confirmation services.
USPS area (settings for Confirmation Services) Enter information for the USPS at the bottom of the window:
− Mailing ID: Number received by the USPS for Confirmation Services.
− Mail Tender Time: Estimated time the Confirmation Services post is normally tendered by you with the USPS.
− Facility ZIP Code: ZIP Code of the USPS office at which this mail is tendered.
− Customer Reference: Reference to be included on the mail tracking data sent to and received from the USPS. However it is not used by the USPS - the field may be left blank.
− Package ID Start Value: If you have more than one instance of the program installed, each installation must have the Package Id Start Value set to a different version.

MailOne for PostBase User Manual Appendix Installation and Settings
SW Version 1.9.12.383 66
The start value is used in determining a package identification number used for every package sent using Confirmation Services. These numbers must be unique within any single organization for a period of six months. This uniqueness can only be guaranteed by setting each installed instance of MailOne with a different starting number. Clicking on the increment button will increment the value by 1,000,000.
Check for new Version / Update the MailOne software
By clicking on the [Check for new Version] button, you can check if a new MailOne version is available.

MailOne for PostBase User Manual Appendix Installation and Settings
SW Version 1.9.12.383 67
14.5 Settings: Imprints
Click on the tab ‘Imprints’.
Make settings on the Imprints table in the ‘Mailing’ menu and associated functions.
These settings configure:
− How the imprints are recorded (manually or automatically).
− How offline postage is handled – set a product name used for any offline postage. (For more information on offline postage, please refer to chapter Manual booking.)
− Whether a handling charge is applied generally.
− The display colors of the Imprints table. Set the colors used to indicate the states of the rows in the Imprints table.

MailOne for PostBase User Manual Appendix Installation and Settings
SW Version 1.9.12.383 68
14.6 Settings: Defaults
Click on the tab ‘Defaults’.
Adjust the default values appearing in the ‘Mailing’ menu when you first open it. These settings configure the default for product, country, reference text / notes, weight (useful if scale is not connected), accounts and destination ZIP code. The values will be set in the same way in the ‘Mailing’ menu. You can also configure the ‘Mailing’ menu to revert to these defaults after a certain period of non-use.
NOTE: You will be able to change any of these settings before metering a piece of mail. You can leave the Reference, Notes and Destination Zip Codes field blank if you wish - these must then be entered, as desired or necessary, for each piece of mail. You must enter the first Account. The entry of Account 2 and 3 is optional.

MailOne for PostBase User Manual Appendix Installation and Settings
SW Version 1.9.12.383 69
14.7 Settings: Accounts
Click on the tab ‘Accounts’.
− Titles for Account levels: Give names to the three levels used for tracking the mailing. These are the titles of the account selection boxes in the ‘Mailing’ menu.
TIP: You might use general titles such as ‘Addressee’, ‘Sender’, ‘Subject’. An attorney’s office might use titles such as: ‘Client’, ‘Lawyer’ and ‘Matter’.
− Number of Account levels: You can allocate mails to between one and three accounts. NOTE that Account level 1 account is always present.
− Display format: Accounts have both numbers and names. Choose whether the number or name part is displayed first.

MailOne for PostBase User Manual Appendix Installation and Settings
SW Version 1.9.12.383 70
14.8 Settings: Addresses
Click on the tab ‘Addresses’.
Select a default sender address.

MailOne for PostBase User Manual Appendix Installation and Settings
SW Version 1.9.12.383 71
14.9 Settings: Setting up the label printer and perform a test imprint
Select the ‘Print’ tab.
Select printer and Paper size. Click [Print test label] to start printing.
NOTE: When labels are printed on a standard printer, the normal Letter sized paper should be used. One label will be printed per page, with a border for cutting. This mode is not intended for printing pre-formatted labels on letter-sized paper.

MailOne for PostBase User Manual Appendix Installation and Settings
SW Version 1.9.12.383 72
14.10 Settings: Devices
Click on the tab ‘Devices’.
Configure the connections to external devices where applicable (external scale, e.g. Flexiscale, or barcode scanner).
External scale To simplify configuring an external scale, you can use the Auto-detect function. If you are using an external scale, it must also be connected to a serial port of your PC. In the 'Scale Port' field, you can set which serial port is being used (e.g. “COM3”).
Barcode scanner To simplify the selection of cost accounts as you capture mail data and during manual booking, you can set up a barcode scanner with each postage meter - the accounts are then selected by scanning the corresponding barcode. First, however, the bar code scanner must be configured. The scanners are attached to the PC through serial ports or, if it is a USB-based device, it should be configured through the driver that comes with it, so that it appears as if it is attached through a serial port. Barcode scanners must be set up manually in MailOne.

MailOne for PostBase User Manual Appendix Installation and Settings
SW Version 1.9.12.383 73
14.11 Settings: Transfer
Click on the tab ‘Transfer’.
Configure the Internet connection in order to be able to use the USPS Confirmation Services, track the mail you have sent, download postage, and use other services, e.g. software update.
MailOne for PostBase User Manual Appendix Installation and Settings
SW Version 1.9.12.383 74
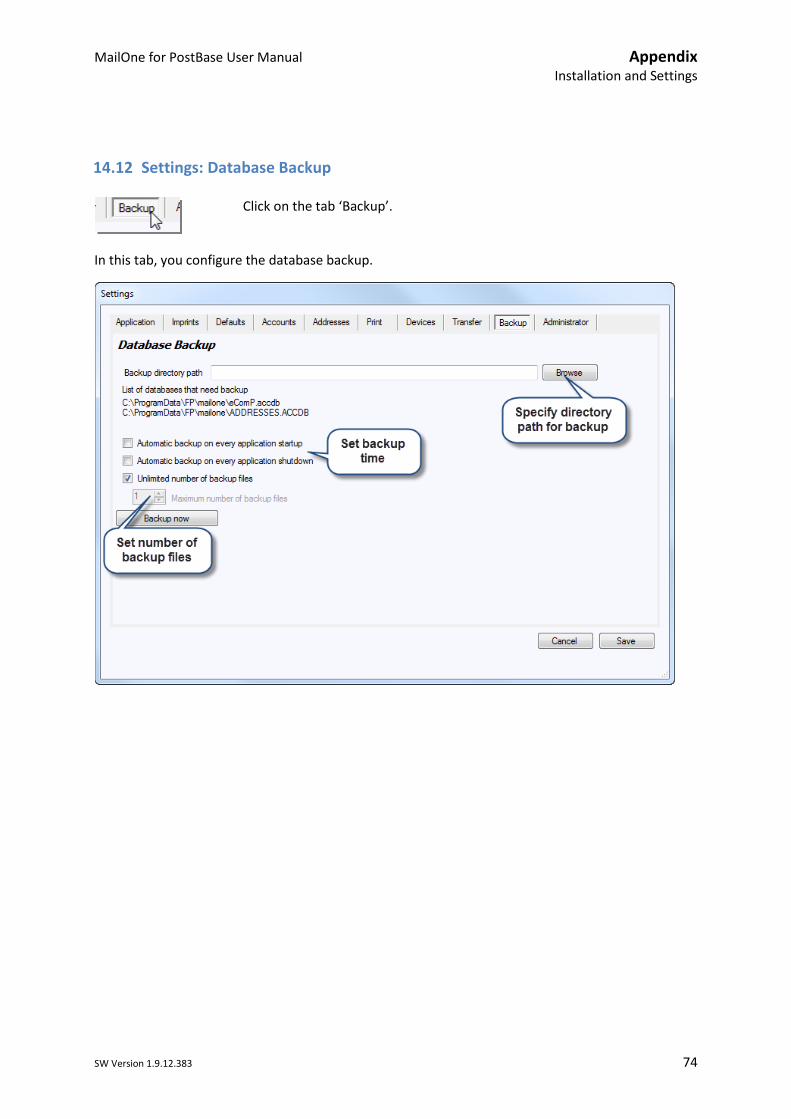
14.12 Settings: Database Backup
Click on the tab ‘Backup’.
In this tab, you configure the database backup.

MailOne for PostBase User Manual Appendix Installation and Settings
SW Version 1.9.12.383 75
14.13 Settings: Administrator
Click on the tab ‘Administrator’.
− Administrator settings: In the Administrator mode, some displays will only be available after entering the administrator password. Changes made by the administrator will be applied after restarting MailOne.
− Database Maintenance: You can repair / optimize the Main and Address databases. By running the [Repair Database] function, damaged data will be removed from the database, thus ensuring flawless operation. Regularly optimizing the database ensures a continuous high performance of the entire system.