m16dxws10—using the m-16dx with cubase - rolandcms.rolandus.com/assets/media/pdf/m16dxws10.pdfthen...
TRANSCRIPT

1
Workshop
M-16DX 16-Channel Digital Mixer
Using the M-16DX with Cubase™
© 2008 Roland Corporation U.S.All rights reserved. No part of this publication may be reproduced in any form without the
written permission of Roland Corporation U.S.Cubase™ is a trademark of Steinberg Media Technologies GmbH.
Steinberg Media Technologies GmbH. is not associated or affiliated with Roland in any manner.
M16DXWS10

2
About the Workshop Booklets
The EDIROL M-16DX 16-Channel Digital Mixer delivers the power of digital mixing to musicians at an incredibly affordable price. This crystal-clear 24-bit digital mixer supports sample rates up to 96 kHz, and it’s extremely flexible, with a wide range of analog and digital inputs and outputs, and effects. The M-16DX’s USB connectivity makes it an ideal partner for a computer-based digital audio workstation, and features such its pro EQ and the innovative Room Acoustic Control make it an excellent live mixer as well.
Each M-16DX Workshop Series booklet focuses on one M-16DX topic, and is intended as a companion to the M-16DX Owner’s Manual.
The M-16DX Workshop booklets require M-16DX O.S. Version 2.00 or higher. You can download the latest O.S. for free from www.RolandUS.com/EDIROL.
About This Booklet
The M-16DX makes an great companion to a digital audio workstation—or “DAW”—on a personal computer. To learn the basics of using the M-16DX with a DAW, see the Workshop booklet Using the M-16DX with a DAW. Then come back here for specific instructions on using the M-16DX with Cubase™.
We’ll assume you know how to operate Cubase—otherwise, consult Cubase’s built-in documentation in its Help menu. We’ll also assume the M-16DX is connected to your PC, and that they’re both powered-up.
Understanding the Symbols in This Booklet
Throughout this booklet, you’ll come across information that deserves special attention—that’s the reason it’s labeled with one of the following symbols.
A note is something that adds information about the topic at hand.
A tip offers suggestions for using the feature being discussed.
Warnings contain important information that can help you avoid possible damage to your equipment, your data, or yourself.
Configuring Cubase for Use with the M-16DX
In the Devices menu, select 1 Device Setup.... This opens the Device Setup window. MENU AT SIDE
If VST Audiobay in the Device Setup window 2 isn’t highlighted, click it, and then select EDIROL M-16DX from the Master ASIO Driver popup menu as shown here.
3
When Cubase asks, “Do you want to select another MASTER ASIO 3 driver?” click Switch.
If the system sample rate needs to change to match the M-16DX’s, click OK.
Make sure Direct Monitoring is checked4 since you’ll listen to the signals you’re recording through the M-16DX itself.
Click EDIROL M-16DX in the left-hand pane so the Device Setup 5 window shows the M-16DX’s settings.
Click6 VST Inputs to display the VST Inputs pane.
If you’ve made any changes, Cubase asks if you want to apply them—say yes.
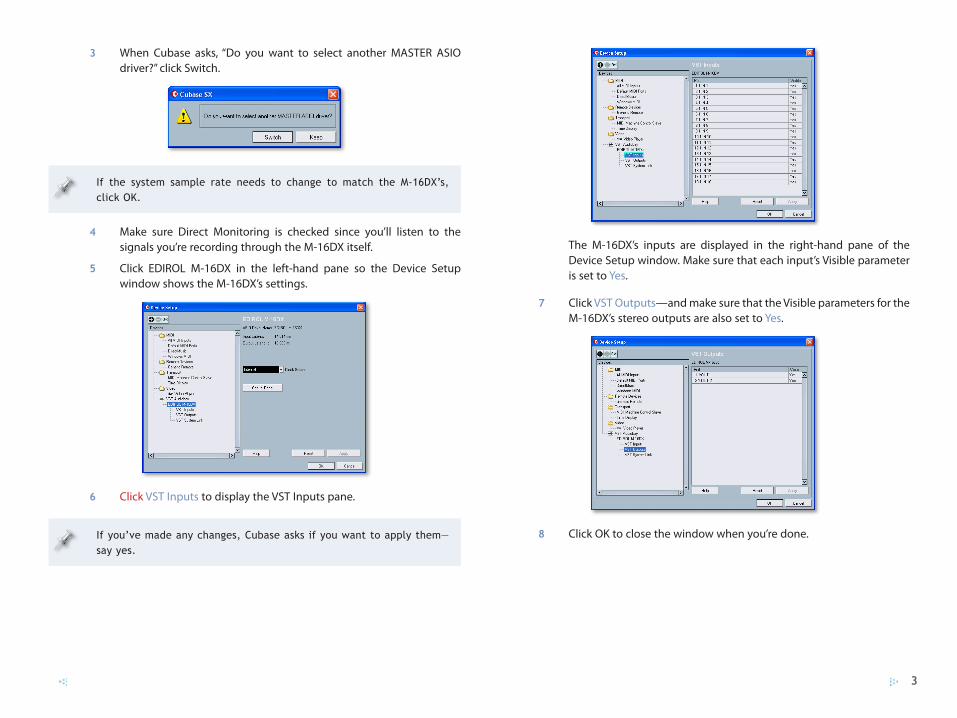
The M-16DX’s inputs are displayed in the right-hand pane of the Device Setup window. Make sure that each input’s Visible parameter is set to Yes.
Click 7 VST Outputs—and make sure that the Visible parameters for the M-16DX’s stereo outputs are also set to Yes.
Click OK to close the window when you’re done.8

4
Setting Up Recording Busses
In the Devices menu, select 1 VST Connections to open the VST Connections window.
Click the Inputs tab at the top of the VST connections window.2
Right-click on the default stereo input bus and select 3 Remove Bus from the popup menu as shown here.
We’re removing the default bus to ensure that your inputs wind up arranged in an easy-to-use way.
When Cubase asks if you really want to remove the bus, click Yes.4
We’re going to set up the M-16DX’s odd/even input channels as stereo pairs. This setup affords you the most flexibility, since it allows you to select any channel individually when you’re setting up a mono track, or to select stereo pairs when you’re setting up a stereo track.
Click Add Bus to open the Add Input Bus window.5
Set Configuration to Stereo, and set Count to 9, as shown above, and 6 click OK. You’ll see something like this:
Click the Outputs tab, and delete the default output bus by right-7 clicking it and selecting Remove Bus.
When Cubase asks if you really want to remove the bus, click Yes.8
Click Add Bus to open the Add Output Bus window.9
Set Configuration to Stereo, set Count to 1, and click OK. The new 10 stereo output bus appears.
Close the VST Connections window.11

5
Setting the Project’s Sample Rate
The project and the M-16DX must use the same sample rate. Here’s how to set a project’s sample rate.
If you want to work on a project in which audio’s already been recorded, or have a particular sample rate you want to use that’s different than the one the M-16DX is using, set the M-16DX’s sample rate to match the project’s, as described in the Using the M-16DX with a DAW Workshop booklet.
From the Project menu, select 1 Project Setup... to open the Project Setup window.
Select the same sample rate to which the M-16DX is set from the 2 Sample Rate popup menu, shown above, and click OK.
Setting Up a Track for Recording
Selecting Audio to Record
To set up a mono track for recording
1 Click the desired track to display its channel strip at the left of window as shown here.
Select the desired recording bus and left or right 2 input channel from the input popup menu, which is shown with a red arrow above above.
To select audio for a stereo track to record, select the desired stereo recording bus from the popup. (Only select Inputs 13/24 or 17/18 when the M-16DX’s USB button isn’t lit to avoid feedback.)
To learn how to set input levels for your recording bus, see the Cubase Operations Manual.
To learn how to set input levels for your recording bus, see the Cubase Operations Manual.

6
Setting the Track’s OutputSelect EDIROL M-16DX Stereo Out from the output 1 popup menu, shown above with a green arrow.
Turn Off Track Monitoring
Click the track you’ll be recording.1
Click the channel’s speaker button to turn it off if it’s 2 currently lit.
As we noted in the Using the M-16DX with a DAW Workshop booklet, you do have the option of listening through Cubase if you want to hear its effects as you record. However, since you’ll encounter latency if you do this, we recommend listening directly through the M-16DX.
Troubleshooting
If you have any problems playing or recording audio in Cubase, check its built-in online Help in the Help menu. As we noted in the Using the M-16DX with a DAW booklet, you can also find Windows XP troubleshooting tips at MusicXP.net at http://musicxp.net/tuning_tips.php.
You can also click the Control Panel... button in the Device Setup window—this opens the M-16DX’s control pane. Raising the Audio Buffer Size value can reduce pops and clicks, though it will also increase latency if you’re working with soft synths in Cubase. Likewise, you may want to try checking the Use Smaller ASIO Buffer Size ASIO Setting checkbox.
The End
We hope you’ve found this workshop helpful. You’ll find other M-16DX Workshop booklets available for downloading at www.RolandUS.com/EDIROL.