lsi™ 3ware® sata+sas raid software user guide addendum
TRANSCRIPT
LSI™ 3ware® SATA+SAS RAID Software User Guide Addendum
(VMware®, FreeBSD®, OpenSolaris™, and Mac® OS X)
Supports the 9750 RAID Controller Card Family9750-4i and 9750-8i
PN: 46605-00, Rev. AMarch 2010
46605- 00A

Document DescriptionDocument 46605-00, Rev. A, March 2010.This document will remain the official reference source for all revisions and releases of this product until rescinded by an update.
DisclaimerIt is the policy of LSI Corporation to improve products as new technology, components, software, and firmware become available. LSI reserves the right to make changes to any products herein at any time without notice. All features, functions, and operations described herein may not be marketed by LSI in all parts of the world. In some instances, photographs and figures are of equipment prototypes. Therefore, before using this document, consult your LSI representative for information that is applicable and current. LSI DOES NOT ASSUME ANY RESPONSIBILITY OR LIABILITY FOR THE USE OF ANY PRODUCTS DESCRIBED HEREIN EXCEPT AS EXPRESSLY AGREED TO IN WRITING BY LSI.
LSI products are not intended for use in life-support appliances, devices, or systems. Use of any LSI product in such applications without written consent of the appropriate LSI officer is prohibited.
License RestrictionThe purchase or use of an LSI Corporation product does not convey a license under any patent, copyright, trademark, or other intellectual property right of LSI or third parties.
Copyright Notice© 2010 LSI Corporation. All rights reserved.
Trademark AcknowledgmentsLSI, the LSI logo design, 3ware®, 3DM®, StorSwitch®, and TwinStor®, StorSave, and StreamFusion are trademarks or registered trademarks of LSI Corporation. All other brand and product names may be trademarks of their respective companies.

Table of ContentsAbout This Addendum . . . . . . . . . . . . . . . . . . . . . . . . . . . . . . . . . . . . . . . . vHow This Addendum is Organized . . . . . . . . . . . . . . . . . . . . . . . . . . . . . . . . . . . . . . . vRelated Documentation . . . . . . . . . . . . . . . . . . . . . . . . . . . . . . . . . . . . . . . . . . . . . . vi
Chapter 1. Introduction . . . . . . . . . . . . . . . . . . . . . . . . . . . . . . . . . . . . . . . . . . . . . . . . . .1What’s New for 10.1 . . . . . . . . . . . . . . . . . . . . . . . . . . . . . . . . . . . . . . . . . . . . . . . . . . 1Downloading 3ware Drivers and Software . . . . . . . . . . . . . . . . . . . . . . . . . . . . . . . . . 1
Chapter 2. VMware. . . . . . . . . . . . . . . . . . . . . . . . . . . . . . . . . . . . . . . . . . . . . . . . . . . . . .3Driver Installation Under VMware ESX/ESXi 4.x Server . . . . . . . . . . . . . . . . . . . . . . . . . . . . . . . . . . . . . . . . . . . . . . . . . 3
Installing the Driver when LSI 3ware RAID Controller is used as Primary Storage . . . . . . . . . . . . . . . . . . . . . . . . . . . . . . . . . . . . . . . . . . . . . . . . . . . . . . . 4
Installing the Driver when LSI 3ware RAID Controller is used as Secondary Storage . . . . . . . . . . . . . . . . . . . . . . . . . . . . . . . . . . . . . . . . . . . . . . . . . . . . . . . 5
Updating the Firmware Under VMware . . . . . . . . . . . . . . . . . . . . . . . . . . . . . . . . . . . 6Installing 3ware RAID Controller Management Software for VMware . . . . . . . . . . . . 7Managing the 3DM 2 Daemon under VMware . . . . . . . . . . . . . . . . . . . . . . . . . . . . . . 8Uninstalling 3ware Software on VMware . . . . . . . . . . . . . . . . . . . . . . . . . . . . . . . . . . 8Configuring the VMware Firewall to Allow Email Notification . . . . . . . . . . . . . . . . . . . 8
Chapter 3. OpenSolaris . . . . . . . . . . . . . . . . . . . . . . . . . . . . . . . . . . . . . . . . . . . . . . . . . .9Driver and Software Installation . . . . . . . . . . . . . . . . . . . . . . . . . . . . . . . . . . . . . . . . . 9
Installing the Driver and Software when LSI 3ware RAID Controller is used as Primary Storage . . . . . . . . . . . . . . . . . . . . . . . . . . . . . . . . . . . . . . . . . . . . . . 9
Installing the Driver and Software when LSI 3ware RAID Controller is used as Secondary Storage . . . . . . . . . . . . . . . . . . . . . . . . . . . . . . . . . . . . . . . . . . . 11
Installing the Driver and Software from the Command Line . . . . . . . . . . . . . . . 15Managing RAID Units Under OpenSolaris . . . . . . . . . . . . . . . . . . . . . . . . . . . . . . . . 16
Partitioning, Formatting and Mounting Units . . . . . . . . . . . . . . . . . . . . . . . . . . . 16RAID Unit Management Tasks . . . . . . . . . . . . . . . . . . . . . . . . . . . . . . . . . . . . . 16
Updating the Firmware . . . . . . . . . . . . . . . . . . . . . . . . . . . . . . . . . . . . . . . . . . . . . . . 17Uninstalling 3ware Software Under OpenSolaris . . . . . . . . . . . . . . . . . . . . . . . . . . . 17
Chapter 4. FreeBSD . . . . . . . . . . . . . . . . . . . . . . . . . . . . . . . . . . . . . . . . . . . . . . . . . . . .18Driver and Software Installation for FreeBSD . . . . . . . . . . . . . . . . . . . . . . . . . . . . . . 18
Obtaining 3ware FreeBSD Drivers . . . . . . . . . . . . . . . . . . . . . . . . . . . . . . . . . . 19Creating a FreeBSD Driver Diskette . . . . . . . . . . . . . . . . . . . . . . . . . . . . . . . . . 19Installing the Kernel Driver Module while you Install the FreeBSD on a Unit
Managed by a 3ware RAID Controller . . . . . . . . . . . . . . . . . . . . . . . . . . . . . . . 20Installing the 3ware Kernel Driver on a FreeBSD System that Boots from a
Different Device . . . . . . . . . . . . . . . . . . . . . . . . . . . . . . . . . . . . . . . . . . . . . . . . 21Updating Drivers under FreeBSD . . . . . . . . . . . . . . . . . . . . . . . . . . . . . . . . . . . . . . . 22
Updating the Kernel with the New Driver Source . . . . . . . . . . . . . . . . . . . . . . . 22Updating the 3ware Kernel Driver Module Under FreeBSD . . . . . . . . . . . . . . . 23Compiling and Loading the Driver as a Module using kldload . . . . . . . . . . . . . . 24
Management Software (3BM 2 and CLI) Installation from the Command Line . . . . . 25
Chapter 5. Mac OS X . . . . . . . . . . . . . . . . . . . . . . . . . . . . . . . . . . . . . . . . . . . . . . . . . . .26Driver and Software Installation . . . . . . . . . . . . . . . . . . . . . . . . . . . . . . . . . . . . . . . . 26Initialize (Format) and Partition a Unit . . . . . . . . . . . . . . . . . . . . . . . . . . . . . . . . . . . 30Update the Firmware . . . . . . . . . . . . . . . . . . . . . . . . . . . . . . . . . . . . . . . . . . . . . . . . 34Uninstall 3DM2, CLI, and Driver . . . . . . . . . . . . . . . . . . . . . . . . . . . . . . . . . . . . . . . 34Exceptions to Software User Guide, v10.0 . . . . . . . . . . . . . . . . . . . . . . . . . . . . . . . . 35Exceptions to 3ware 9750 SATA+SAS RAID Controller Card Installation Guide, v10.0 . . . . . . . . . . . . . . . . . . . . . . . . . . . . . . . . . . . . . . . . . . . . . . . . . . . . . . . 35
www.lsi.com/channel/products iii

Chapter 6. Installing/Uninstalling 3ware Management Software from the CommandLine under Linux and FreeBSD . . . . . . . . . . . . . . . . . . . . . . . . . . . . . . . . .37Installing 3ware Management Software . . . . . . . . . . . . . . . . . . . . . . . . . . . . . . . . . . 37Uninstalling 3ware Management Software . . . . . . . . . . . . . . . . . . . . . . . . . . . . . . . . 38
iv 3ware SATA+SAS RAID Controller Card Software User Guide, Version 10.1

About This Addendum
This document is an addendum to the LSI 3ware SATA+SAS RAID Controller Card Software User Guide, Version 10.0. This addendum provides information about the expanded operating system (OS) support for the LSI 3ware 9750 family (9750-4i and 9750-8i) of RAID controller cards, using firmware version 10.0 and software version 10.1.
This section includes the following:
• How This Addendum is Organized
• Related Documentation
How This Addendum is Organized Table 1 shows the organization and content included in this addendum.
Table 1: Chapters in this Addendum
Chapter Description
1. Introduction Provides an overview of what’s new for the 10.1 release.
2. VMware 4.x Provides detailed instructions for installing 3ware drivers and RAID management software under VMware 4.x.
3. OpenSolaris Provides detailed instructions for installing 3ware drivers and RAID management software under OpenSolaris.
4. FreeBSD 7.2 Provides detailed instructions for installing 3ware driver and RAID management software under FreeBSD 7.2.
5. Mac OS X Provides detailed instructions for installing 3ware drivers and RAID management software under Mac OS X.
6. Installing/Uninstalling 3ware Management Software from the Command Line under Linux and FreeBSD
Provides instructions for installing software management tools (3DM2 and CLI) using the install script for Linux and FreeBSD.
www.lsi.com/channel/products v

Related DocumentationThe following additional documentation is available:
• The installation guide that came with your 3ware RAID controller, the LSI 3ware 9750 SATA+SAS RAID Controller Card Installation Guide, Version 10.0 tells you how to physically install a 9750 controller.
• LSI 3ware SATA+SAS RAID Controller Card Software User Guide, Version 10.0 provides general information about using the 3ware RAID controller and the 3ware RAID management software utilities 3BM (3ware BIOS Manager) and 3DM2 (3ware Disk Manager).
• 3ware SATA+SAS RAID Controller Card CLI Guide, Version 10.0 provides information on using the 3ware Command Line Interface (CLI).
These guides are available in PDF format and can be downloaded individually from the LSI website at http://www.lsi.com/channel/ChannelDownloads.
vi LSI 3ware SATA+SAS RAID Controller Card Software User Guide Addendum

1
IntroductionThe 10.1 release is a web-only release of management software tools and drivers for the expanded OS support of the 9750 family of controller cards. This section includes:
• What’s New for 10.1
• Downloading 3ware Drivers and Software
What’s New for 10.1The following features are new for the 10.1 release:
• Expanded Driver support• OpenSolaris (x86 & amd64)• FreeBSD 7.2 (x86 & amd64)• VMware 4.x• Mac OS X
• New software installer for Linux and FreeBSD
Downloading 3ware Drivers and SoftwareTo install the driver and disk management tools you will need to download the components for the appropriate system to your computer from the LSI Channel website at http://www.lsi.com/channel/ChannelDownloads.
1 Select RAID Controllers as the Product Family from the drop-down list on the left.
Figure 1. Product Family Drop-Down List
2 Select 3ware SAS 9750-4i or 9750-8i as the Product from the drop-down list on the right, see Figure 2.
www.lsi.com/channel/products 1

Chapter 1: Introduction
Figure 2. Product Family Drop-Down List
3 Click the appropriate driver or software under the Support and Downloads tab, as shown in Figure 3. In the dialog box that appears, click Save to save the file to your storage media.
Figure 3. Support and Downloads Tab and Documentation Tab
4 If you downloaded the sofware as a compressed file (*.zip and *.tgz), extract the files and save them to your hard drive or other storage media.
5 If you downloaded an complete *.iso image, burn the image to a CD or DVD. You can also download separate components and do the installation that way if you choose.
6 If you downloaded a Mac image (*.cdr or *.dmg) file to your Mac you can do either one of the following:• Burn the *.cdr image to a CD or DVD.• When your ready to start the installation process, double-click on
either image to mount the image and open the image for browsing. Then double-click the icon StartInstall to begin the installation process.
2 LSI 3ware SATA+SAS RAID Controller Card Software User Guide Addendum

2
VMwareThis chapter provides detailed instructions for installing the 3ware driver and the RAID management software running under an VMware operating system.
This chapter includes the following sections:
• Driver Installation Under VMware ESX/ESXi 4.x Server
• Updating the Firmware Under VMware
• Installing 3ware RAID Controller Management Software for VMware
• Managing the 3DM 2 Daemon under VMware
• Uninstalling 3ware Software on VMware
• Configuring the VMware Firewall to Allow Email Notification
Driver Installation Under VMware ESX/ESXi 4.x Server
This section provides details about how to install the driver for your LSI 3ware RAID controller under VMware ESX/ESXi Server 4.x. It is organized into these sections:
• Installing the Driver when LSI 3ware RAID Controller is used as Primary Storage
• Installing the Driver when LSI 3ware RAID Controller is used as Secondary Storage• Installing the Driver using vihostupdate• Installing the Driver using esxupdate
www.lsi.com/channel/products 3

Chapter 2: VMware
Installing the Driver when LSI 3ware RAID Controller is used as Primary Storage
1 Install your 3ware RAID controller and drives. For details, see the installation guide for the controller.
2 Create the RAID units on the 3ware RAID controller using 3BM. You can access 3BM by pressing Alt-3 during system startup. For details on how to create and order units, refer to "Creating a Unit through 3BM " and "Ordering Units in 3BM" on pages 97 and 101 in the LSI 3ware SATA+SAS RAID Controller Card Software User Guide, Version 10.0.
3 Insert the applicable VMware ESX Installation CD into your CD-ROM or DVD drive and restart your system.
Your system should boot from the CD. (If it does not, change the BIOS settings to boot from the CD and then restart.)
4 At the VMware ESX Server 4.0 splash screen, press Enter to start the graphical installation method.
5 When prompted, choose your language and press Enter.
6 When prompted, choose your keyboard type and press Enter.
7 When prompted for additional driver support, provide the 3ware VMware driver CD. After the driver is loaded, you should follow on-screen instructions to complete VMware installation.
Prerequisite to Driver Installation: (Primary Storage)
You need a copy of:VMware ESX/ESXi Server 4.0, Update 1 (U1) installation CD orVMware ESX/ESXi Server 4.x/4.x GA (see patch below).
Due to a bug in the VMkernel you must run the following patch: VMware patch ESX400-200907001 for ESX 4.0 or VMware patch ESXi400-VEM-200907001 for ESXi 4.0
This issue is fixed in the ESX/ESXi 4.0, Update 1 (U1).
You need a copy of:LSI 3ware VMware 4.0 driver image (3w-sas.iso) on CD.You need to download the VMware 4.0 driver from the LSI website at:http://www.lsi.com/channel/ChannelDownloads.
Save the compressed file and extract the 3w-sas.iso file. Then burn the image to a iso CD.
See Chapter 1, “Downloading 3ware Drivers and Software” for downloading details from the LSI channel website.
4 LSI 3ware SATA+SAS RAID Controller Card Software User Guide Addendum

Driver Installation Under VMware ESX/ESXi 4.x Server
8 After you have finished your VMware ESX Server 4.x installation, reboot the server.
Installing the Driver when LSI 3ware RAID Controller is used as Secondary Storage
Depending upon your selection of ESX installation or ESXi installation, there are several options available for you to install and update the LSI 3ware VMware 4.x driver.
• If you are using ESX installation you need either: • vihostupdate to install the driver or• esxupdate to install the driver
• If you use ESXi installation you need to use: • vihostupdate to install the driver
Installing the Driver using vihostupdateTo update or add LSI 3ware drivers on existing ESX and ESXi installations using vihostupdate.
1 insert LSI 3ware VMware driver CDROM or medium that contains the driver file. Copy the file, offline-bundle.zip to the root of C: \e.g., C:\offline-bundle.zip.
2 Launch the vSphere Client providing the credentials for root.
3 Put the ESX/ESXi server into maintenance mode from vSphere Client.
(Double-click on Inventory >> click Summary tab >> click Enter Maintenance Mode)
4 Go to Programs >> VMware >> and launch the vSphere CLI.
Prerequisite to Driver Installation: (Secondary Storage)
You need a copy of:VMware vSphere 4.x Client on a windows machine.
You need to download the client from the VMware vSphere website at:http://www.vmware.com/support/product-support/vsphere
You need a copy of:The VMware VShere Command-Line Interface (CLI)
You need to download the CLI from the VMware communities website at:http://communities.vmware.com/community/developer/vsphere_cli
vihostupdate.pl is part of VMware vSphere CLI download.
www.lsi.com/channel/products 5

Chapter 2: VMware
5 You should have a command prompt showing the following path, C:\Program Files\VMware\VMware vSphere CLI
6 Change directory to bin e.g., cd bin
7 Now enter the following command via the VMware CLI perl vihostupdate.pl -server <x.x.x.x ip address> -username <root> -password "<>" -b c:\<offline-bundle.zip> -i
8 Once the driver load using vihostupdate is finished, close the VMware CLI.
9 Go back into the vSphere Client and take the ESX/ESXi server out of maintenance mode (click Summary tab >> click Exit Maintanence Mode.)
10 Reboot it. (click Summary tab >> click Reboot, then Yes to confirm)
11 As the ESX/ESXi server comes back up, you should see the 3ware-sas driver loading.
12 On vSphere you see the connection to the ESXi Server automatically reestablished through the vSphere Client, after the system has rebooted and all services have loaded.
13 Now you are ready to create VMs; storage pools, etc.
Installing the Driver using esxupdate To update or add LSI 3ware drivers on existing ESX installations using esxupdate.
1 Place the driver CD in the CD-ROM drive of the ESX host.
2 Mount the driver CD. mount -t iso9660 /dev/cdrom /mnt/cdrom
3 Navigate to the directory on the CD that contains the driver.Navigate to <cd mount point>/offline-bundle/ and locate the offline-bundle.zip file.
4 Run the esxupdate command to install drivers using the offline bundle.esxupdate --bundle= LSI_3.26.08.001vm40-offline_bundle xxxxxx.zip update
Updating the Firmware Under VMwareFirmware updates to the 3ware RAID controller can be done from 3DM 2 or CLI. For details, see “Updating the Firmware and Driver” on page 177 of the LSI 3ware SATA+SAS RAID Controller Card Software User Guide, Version 10.0. An electronic version is available at http://www.lsi.com/channel/ChannelDownloads.
6 LSI 3ware SATA+SAS RAID Controller Card Software User Guide Addendum

Installing 3ware RAID Controller Management Software for VMware
Installing 3ware RAID Controller Management Software for VMware
3ware RAID controller management software includes 3DM 2 and CLI. CLI can run locally on the VMware server in a console window.
By default, VMware ESX Server 4.0 does not have a GUI and therefore you cannot access 3DM 2 locally. You must use another system that has a GUI and a web browser to access 3DM 2.
After initial installation and setup, administration will typically be done remotely through CLI or 3DM 2.
If you have not yet installed 3DM and CLI, use the steps below to do so.
1 Mount the 3ware software image CD.mount -t iso9660 /dev/cdrom /mnt/cdrom
2 Navigate to the appropriate directory where the 3DM2 and CLI rpm files are located.cd /mnt/cdrom/packages/installers/tools/vmware/esx40/
3 Run the install commands for CLI and 3DM 2.rpm -ivh <LSI-3ware-CommandLine-Management-Utility-xxx.rpm>rpm -ivh <LSI-3ware-3dm2-Management-Utility-xxx.rpm>
4 Note the URL supplied by 3DM 2 at the end of installation, (for example, https://10.0.0.2:888), as it will be required in order to connect to 3DM 2 through a web browser.
Prerequisite to Software Installation:
You need a copy of:
Software utilities 3DM 2 and CLI are available on the management software CD.You need to download the LSI 3ware management software CD from the LSI website at: http://www.lsi.com/channel/ChannelDownloads and burn the image to a CD.
See Chapter 1, “Downloading 3ware Drivers and Software” for downloading details from the LSI channel website.
www.lsi.com/channel/products 7

Chapter 2: VMware
Managing the 3DM 2 Daemon under VMware3DM 2 should start automatically after installation and upon bootup. If it does not, use the steps below to manage it.
1 Login as root on the machine on which 3DM 2 is installed.
2 Use the following command and options./etc/init.d/tdm2 start|stop|restart
Uninstalling 3ware Software on VMwareYou can uninstall CLI, 3DM 2, and the 3ware RAID controller driver.
1 Login as root.
2 Check for installed packages.esxupdate query
You will see a list of the packages that have been installed on VMware.
3 Run the commandrpm -e <package_name>
on the package you wish to uninstall.
The software is removed.
Configuring the VMware Firewall to Allow Email Notification
You can select an option in 3DM 2 to allow email notification of alarms and other events reported by the 3ware RAID controller.
However, in order to receive email notification, you will need to configure the VMware firewall to allow outgoing email, as all ports are blocked by default.
1 Login to the server as root.
2 Configure the firewall to allow outgoing email.esxcfg-firewall -o 25,tcp,out,smtpesxcfg-firewall -o 587,tcp,out,smt
8 LSI 3ware SATA+SAS RAID Controller Card Software User Guide Addendum

3
OpenSolarisThis chapter provides detailed instructions for installing the 3ware driver and the RAID management software running under an OpenSolaris operating system.
This chapter includes the following sections:
• Driver and Software Installation
• Managing RAID Units Under OpenSolaris
• Updating the Firmware
• Uninstalling 3ware Software Under OpenSolaris
Driver and Software InstallationThis section provides detailed instructions for installing the 3ware driver and the RAID management software.
• Installing the Driver and Software when LSI 3ware RAID Controller is used as Primary Storage
• Installing the Driver and Software when LSI 3ware RAID Controller is used as Secondary Storage
• Installing the Driver and Software from the Command Line.
Installing the Driver and Software when LSI 3ware RAID Controller is used as Primary StorageThe steps below describe how to install the 3ware driver and RAID management software as the primary storage.
Note:
Installing the driver and software when the RAID controller is used as the primary storage only works on systems that support legacy BIOS.
www.lsi.com/channel/products 9

Chapter 3: OpenSolaris
1. Install your 3ware RAID controller. For details, see the installing guide for the controller.
2 Create the RAID units on the 3ware RAID controller using 3BM. For details on how to create and order units, refer to "Creating a Unit through 3BM " and "Ordering Units in 3BM" on pages 97 and 101. Refer to the LSI 3ware SATA+SAS RAID Controller Card Software User Guide, Version 10.0.
3 Download the LSI 3ware complete 10.1 ISO image fromhttp://www.lsi.com/channel/ChannelDownloads and burn it to a CD-ROM disc.
4 Copy the two driver folders from the CD that you just burned:
packages/drivers/opensolaris/amd64packages/drivers/opensolaris/i386
to a USB flash drive or other storage media.
5 Insert the OpenSolaris CD into your CD or DVD drive and boot from the CD.
6 When booting completes, you will be in the OpenSolaris desktop, open a terminal.
7 Insert the USB flash drive into your system. The drive should be mount automatically otherwise you can manually mount the drive.
8 From the terminal do the following:
a Login as root # suPasswd: opensolaris
b Run this command: # pfexec touch /ADD_DRV_IGNORE_ROOT_BASEDIR
c Copy 3ware drivers from the USB flash drive or other storage media# cp /<mount_point>/amd64/tw /kernel/drv/amd64 # cp /<mount_point>/i386/tw /kernel/drv/
d Load 3ware driver# add_drv –m “* 0666 root sys” –i '””pci13c1,1003”” ””pci13c1,1004”” ””pci13c1,1005”” ””pci13c1,1010””' –c scsi tw
e Double-click Install OpenSolaris icon on the OpenSolaris desktop to start the installation process. You should be able to select the array on the 3ware controller to install OpenSolaris on it. Follow through to complete the installation and reboot the system
10 LSI 3ware SATA+SAS RAID Controller Card Software User Guide Addendum

Driver and Software Installation
9 To install the management software insert the 3ware CD you burned in step 3, after OpenSolaris is rebooted, navigate to the directory on the CD that contains the installer.packages/installers/tools/opensolaris
10 Type:./setupSolaris_x86.binand press Enter.
Installing the Driver and Software when LSI 3ware RAID Controller is used as Secondary StorageThe steps below describe how to install the 3ware driver and RAID management software from a graphical window. You must be root to run the installer.
1 Download the LSI 3ware complete 10.1 ISO image fromhttp://www.lsi.com/channel/ChannelDownloads and burn it to a CD-ROM disc or mount the ISO image directly under OpenSolaris.
2 With your computer on, boot to OpenSolaris from another boot device. Then insert the CD you burned in step 1 and navigate to the folder on the CD that contains the installer.packages/installers/tools/opensolaris
3 Type:./setupSolaris_x86.bin
and press Enter.
4 After you press Enter, the application starts in graphical mode. On the Welcome screen, click Next.
www.lsi.com/channel/products 11

Chapter 3: OpenSolaris
Figure 4. Welcome Installation Screen
5 On the License Agreement page, accept the agreement and click Next.
Figure 5. License Agreement Screen
12 LSI 3ware SATA+SAS RAID Controller Card Software User Guide Addendum

Driver and Software Installation
6 If you want to change where the components will be installed, you can change the path and directory.
When you are ready, click Next.
Figure 6. Specify Directory Path Screen
7 Select the components you want to install and click Next.
Figure 7. Select Components to Install Screen
• The LSI 3ware OpenSolaris driver is required for the operating system to be able to interact with the 3ware RAID controller. (Installing the driver may require that you restart your computer.)
• CLI lets you set up and manage RAID units through a command line interface.
/opt/3ware
3ware Disk Manager (3DM 2)
www.lsi.com/channel/products 13

Chapter 3: OpenSolaris
8 On the summary screen, review the installation that is about to occur.
If you want to make changes, use the Back button to move back through the screens. When you are ready, click Install to continue.
Figure 8. Installation Summary Screen
9 When the final installation screen lets you know that installation is complete, click Finish.
Figure 9. Final Installation Screen
10 If you are prompted, restart your computer to load the driver.
You can now use the 3ware BIOS Manager (3BM), the 3ware Disk Manager (3DM2), or the 3ware Command Line Interface (CLI) to create and manage RAID units. Instructions for using 3BM are available in the
3ware Disk Manager (3DM 2)
/opt/3ware
14 LSI 3ware SATA+SAS RAID Controller Card Software User Guide Addendum

Driver and Software Installation
LSI 3ware SATA+SAS RAID Controller Card Software User Guide, Version 10.0. Instructions for using the CLI are available in 3ware SATA+SAS RAID Controller Card CLI Guide, Version 10.0.
Installing the Driver and Software from the Command LineThe following steps describe how to install software on OpenSolaris at a command line, using a console application. You must be root to run the installer.
To install the driver and software on OpenSolaris from the command line
1 Download the LSI 3ware OpenSolaris installation image fromhttp://www.lsi.com/channel/ChannelDownloads and mount the image or burn it to a CD-ROM disc.
2 Navigate to the folder on the mounted image or CD that contains the installer.packages/installers/tools/solaris/opensolaris
3 Type:./setupSolaris_x86.bin -console
and press Enter.
The application starts in text mode.
4 Respond to each screen as it walks you through the installation process.
The Console installation screens mirror those that display using the GUI installer. For specific information about the screens, see the previous section in this document.
To navigate in text mode, type:
1 for Next
2 for Previous
3 to Cancel
5 to Redisplay
0 to Continue Installing
5 After the installation is complete, check that the driver has loaded correctly. # modinfo | grep tw
www.lsi.com/channel/products 15

Chapter 3: OpenSolaris
Managing RAID Units Under OpenSolarisDetails about creating and managing RAID units are described in the LSI 3ware SATA+SAS RAID Controller Card Software User Guide, Version 10.0. This section includes some additional details required when working under OpenSolaris.
Under OpenSolaris, many unit management tasks require administrative privileges and manual configuration.
Partitioning, Formatting and Mounting UnitsAfter you create a RAID unit through 3BM or the 3ware CLI, you will need to format and partition the unit, create a file system, and mount it.
These types of system administration tasks are beyond the scope of this document. For information and procedures, see the OpenSolaris system documentation at http://opensolaris.org/os/community/documentation/doc_index/sysadmin/
RAID Unit Management TasksSome configuration changes made to a unit through CLI or 3BM will not be recognized by OpenSolaris until the system is made aware of the changes through system administration commands.
Enabling Multi-LUN SupportBy default, an OpenSolaris host is configured for one LUN per SCSI target. If you use Auto-Carving to create a unit with multiple LUNs, or if you create a boot unit, you will need to manually enable multiple LUN support in OpenSolaris before it can see more than the first LUN. See section D.2 Editing the sd.conf File in the OpenSolaris system documentation at:
http://dlc.sun.com/pdf/819-1274-14/819-1274-14.pdf
Link to 3ware KB 15509 regarding this issue:http://3ware.com/KB/article.aspx?id=15509
Removing a UnitIf you remove a unit through CLI, OpenSolaris will keep a record of the unit in the system cache until it is unconfigured through the devfsadm or cfgadm command.
16 LSI 3ware SATA+SAS RAID Controller Card Software User Guide Addendum
Updating the Firmware
See the devfsadm documentation at:
http://docs.sun.com/app/docs/doc/816-5166/devfsadm-1m?a=view
See the cfgadm documentation at:
http://docs.sun.com/app/docs/doc/816-5166/cfgadm-1m?l=en&a=view&q=cfgadm
Updating the FirmwareFirmware updates to the 3ware RAID controller can be done from 3DM 2 or CLI. For details, see “Updating the Firmware and Driver” on page 177 of the LSI 3ware SATA+SAS RAID Controller Card Software User Guide, Version 10.0. An electronic version is available at http://www.lsi.com/channel/ChannelDownloads.
Uninstalling 3ware Software Under OpenSolaris
The following steps describe how to uninstall software on OpenSolaris from the command line. If you do not use the -console option, the installer will assume you want GUI mode. You must be root to run the uninstaller.
1 Navigate to the directory where you installed the software. The default directory is /opt/3ware.
2 Change to the subdirectory “_uninst”.
3 To uninstall in text mode, type:./uninstall.bin -console and press Enter.
To uninstall in graphical mode, type:./uninstall.bin and press Enter.
Follow the prompts to remove the installed components.
www.lsi.com/channel/products 17

4
FreeBSDThis chapter provides detailed instructions for installing the 3ware driver and the RAID management software running under an FreeBSD operating system.
This chapter includes the following sections:
• Driver and Software Installation for FreeBSD
• Updating Drivers under FreeBSD
Driver and Software Installation for FreeBSD
This section provides details about how to install the driver for your 3ware RAID controller under FreeBSD.
• If the units you have created are your boot device, you install the driver for the controller as you install FreeBSD.
• If the operating system is already installed on a unit connected to another controller or to the motherboard, you start FreeBSD and then install the driver.
This section includes these topics:
• Obtaining 3ware FreeBSD Drivers
• Creating a FreeBSD Driver Diskette
• Installing the Kernel Driver Module while you Install the FreeBSD on a Unit Managed by a 3ware RAID Controller
• Installing the 3ware Kernel Driver on a FreeBSD System that Boots from a Different Device
Note: Before installing the 3ware driver, you must have already installed your 3ware RAID controller in the system. Consult the installation guide that came with your controller for how to do this. You can download the installation guide from: http://www.lsi.com/channel/ChannelDownloads.
18 LSI 3ware SATA+SAS RAID Controller Card Software User Guide Addendum

Driver and Software Installation for FreeBSD
After installing the driver, you can install the 3ware management tools 3DM 2 and CLI. For details, see “3ware Management Software under Linux and FreeBSD” on page 40.
Obtaining 3ware FreeBSD Drivers3ware drivers can be compiled from source files into the kernel as built-in drivers or can be modules that are loaded by the operating system. Both source files and modules are available from LSI 3ware, but modules with current controller drivers are only available for FreeBSD 7.2.
You can obtain the 3ware RAID controller driver for FreeBSD from one of these two sources:
• 3ware software CD-ROM (created in Chapter 1). This CD includes: Compiled and tested kernel driver modules for FreeBSD 7.2, located at:• 32-bit: packages/drivers/freebsd/7.2/x86• 64-bit: packages/drivers/freebsd/7.2/x86_64
Driver source files for FreeBSD 7.x, located at: • FreeBSD 7.x: packages/drivers/freebsd/src/7.x
• LSI web site. You can download the latest compiled and tested driver modules and driver source files for FreeBSD from the LSI web site at http://www.lsi.com/channel/ChannelDownloads.
Creating a FreeBSD Driver DisketteYou need a floppy drive if you are going to be installing FreeBSD on a unit or drive managed by a 3ware RAID controller card which becomes the boot unit for which your version of FreeBSD does not have a built-in driver.
To create a driver diskette
1 Insert a blank floppy and the 3ware software CD into a FreeBSD installed system.
2 Navigate to: packages\drivers\freebsd\7.2
3 Copy the appropriate driver to the floppy, i.e., driver from x86 folder if you are installing a 32-bit FreeBSD, x86_64 folder if you are installing 64-bit FreeBSD. You need the driver source from packages\drivers\freebsd\src\7.x if you are going to update the kernel with a new driver.
www.lsi.com/channel/products 19

Chapter 4: FreeBSD
Installing the Kernel Driver Module while you Install the FreeBSD on a Unit Managed by a 3ware RAID Controller
Use this procedure if your boot unit is going to be managed by the 3ware RAID controller.
It describes how to load the FreeBSD 7.2 kernel driver module to enable boot device support and how to then compile the current drivers into the kernel from source files.
1 Disconnect all SCSI, ATA, and SAS devices in the system, except the CD or DVD and hard drives connected to the 3ware RAID controller.
2 Create the RAID units on the 3ware RAID controller using 3BM. For details on how to create and order units, refer to "Creating a Unit through 3BM " and "Ordering Units in 3BM" on pages 97 and 101 in the 3ware SATA+SAS RAID Software User Guide, Version 10.0.
3 Insert the floppy disk containing tws.ko module into the floppy drive.
4 At the FreeBSD boot menu, select 6 "Escape to loader prompt."
5 At the loader prompt.
6 Load tws.ko from the floppy drive using.load disk0:tws.ko or disk1:tws.ko depending on how many drives you have connected to your system.
7 Continue with the installation by typing.boot
8 Install the FreeBSD OS, remove the FreeBSD installation CD, and reboot again.
Prerequisite:
You need a copy of:FreeBSD 7.2 (x86 or amd64) OS Installation CD
Note: This procedure is specific to FreeBSD 7.2 as it requires a compiled module. For versions of FreeBSD for which a compiled module is not supplied by 3ware it is necessary to compile your own module from source files. See “Compiling and Loading the Driver as a Module using kldload” on page 24.
20 LSI 3ware SATA+SAS RAID Controller Card Software User Guide Addendum

Driver and Software Installation for FreeBSD
Installing the 3ware Kernel Driver on a FreeBSD System that Boots from a Different DeviceUse the steps in this section if FreeBSD boots from a different device and you are using the unit on your 3ware RAID controller for secondary storage.
When you use the unit managed by the 3ware RAID controller for secondary storage, you do not need to use a driver diskette for driver installation.
1 Get the latest driver source files for your version of FreeBSD. See “Obtaining 3ware FreeBSD Drivers” on page 19.
2 Make sure the 3ware RAID controller is not yet installed in the system.
3 Install FreeBSD on a disk attached to the motherboard.
Be sure to install the full FreeBSD source.
4 Once FreeBSD is installed, power down the system and install the 3ware RAID controller. For assistance, see the installation guide that came with the controller.
5 Boot to FreeBSD.
6 Follow the instructions in “Updating the Kernel with the New Driver Source” on page 22 to update the kernel.
Tip: Install FreeBSD on the drive attached to the motherboard before installing the 3ware RAID controller. This avoids the possibility of installing to the wrong drive or unit.
www.lsi.com/channel/products 21

Chapter 4: FreeBSD
Updating Drivers under FreeBSDDrivers can be updated either from source files or with driver modules.
Using source files, you can compile drivers into the kernel or you can create modules for versions of FreeBSD for which LSI does not supply modules.
This section includes these topics:
• Updating the Kernel with the New Driver Source
• Updating the 3ware Kernel Driver Module Under FreeBSD
• Compiling and Loading the Driver as a Module using kldload
Updating the Kernel with the New Driver SourceUse this procedure if you wish to update your kernel from driver source files. To obtain source files, see “Obtaining 3ware FreeBSD Drivers” on page 19.
1 Unpack tws.tgz then copy the *.c and *.h files to /sys/dev/tws and the Makefile to /sys/modules/tws.
2 Go to /usr/src/sys/i386/conf or /usr/src/sys/amd64/conf depending on whether you have a 32-bit or 64-bit version of FreeBSD.
a Open your current configuration file: (GENERIC, SMP, or PAE or custom config), with vi or other editor.
Make sure “Device tws # 3ware 9750 series” is not commented out.
b Save changes.c In /usr/src/sys/conf/files add the following entries
between the entries for twa and twe:
dev/tws/tws.c optional tws \compile-with "${NORMAL_C} -I$S/dev/tws"
dev/tws/tws_cam.c optional tws \compile-with "${NORMAL_C} -I$S/dev/tws"
dev/tws/tws_hdm.c optional tws \compile-with "${NORMAL_C} -I$S/dev/tws"
dev/tws/tws_services.c optional tws \compile-with "${NORMAL_C} -I$S/dev/tws"
dev/tws/tws_user.c optional tws \compile-with "${NORMAL_C} -I$S/dev/tws"
22 LSI 3ware SATA+SAS RAID Controller Card Software User Guide Addendum

Updating Drivers under FreeBSD
d In /usr/src/sys/conf/kern.pre.mk
Add the following after the entry for tws# .. and the same for twsINCLUDES+= -I$S/dev/tws
e Run command config <config_name> specifying your configuration file: (GENERIC, SMP, PAE, or your custom config), followed by:
cd ../compile/<config_name>make cleanmake cleandepend make dependmake make install
3 Reboot your system. When the system reboots, the new kernel driver module will load automatically.
Updating the 3ware Kernel Driver Module Under FreeBSDThe following steps describe how to update the 3ware driver with a kernel driver module under FreeBSD.
1. Download and extract the driver, as described under “Downloading the Driver and Firmware” on page 178 refer to 3ware SATA+SAS RAID Software User Guide, Version 10.0.
2 Make a backup of any critical data prior to updating the 3ware driver.
3 Change the directory to the location with the extracted driver.Copy the driver into /boot/kernel.Make sure the module version matches the FreeBSD version. If theversions don’t match there could be a kernel panic.
4 Load the driver.kldload tws.koIf units are present, you should see unit information in the systemlog (usually, /var/log/messages).
5 If you wish to load the driver automatically every time the system is
Make a backup of your original driver before updating in case you need to revert back to it. However, you will not be able to revert back to the original driver if you are booting from that unit.
www.lsi.com/channel/products 23

Chapter 4: FreeBSD
rebooted, add the line 'tws_load="YES"' to the file/boot/loader.conf
Compiling and Loading the Driver as a Module using kldloadIf you want to use a driver module and 3ware does not supply one for your version of FreeBSD, use the following procedure. If you just want to install a 3ware-supplied module, see “Updating the 3ware Kernel Driver Module Under FreeBSD”.
To compile the driver as a module1. Boot to FreeBSD.
2 Download and extract the driver, as described under “Downloading the Driver and Firmware” on page 178 in the 3ware SATA+SAS RAID Software User Guide, Version 10.0.
3 Unpack tws.tgz. Then copy the *.c and *.h files to/sys/dev/tws and the Makefile to /sys/modules/tws
4 Build the tws.ko modulecd /sys/modules/twsmake
The tws.ko module is created in /sys/modules/tws.
To load the driver as a module1. In the current configuration file under /usr/src/sys/i386/
conf or /usr/src/sys/amd64/conf comment out the entry: "Device tws # 3ware 9750 series". This will unlink the old driver once you rebuild the kernel.
2 Rebuild the kernel.Run command config <config_name> specifying your configurationfile: (GENERIC, SMP, PAE, or your custom config), followed by:
cd ../compile/<config_name>
Note: You can only use kldload to load the driver as a module if your boot drive is attached to the mother board and is not managed by the 3ware RAID controller.
24 LSI 3ware SATA+SAS RAID Controller Card Software User Guide Addendum

Management Software (3BM 2 and CLI) Installation from the Command Line
make cleanmake cleandependmake dependmakemake install
3 Reboot to FreeBSD.
4 Load the kernel driver modulecd /sys/modules/twskldload ./tws.ko
5 If you wish to load the driver automatically every time the system boots:
a copy tws.ko into the boot foldercp /sys/modules/tws/tws.ko /boot/kernel/tws.ko(backup the old module if you wish to revert back)b add the line 'tws_load="YES"' to the file/boot/loader.conf
Management Software (3BM 2 and CLI) Installation from the Command Line
See “Installing 3ware Management Software” on page 37 for 3BM 2 and CLI installation instructions.
www.lsi.com/channel/products 25

5
Mac OS XThis Chapter provides detailed instructions for installing the 3ware driver and the RAID management software running under an Mac operating system.
This chapter includes the following sections:
• Driver and Software Installation.
• Initialize (Format) and Partition a Unit.
• Update the Firmware.
• Uninstall 3DM2, CLI, and Driver.
• Uninstall 3DM2, CLI, and Driver.
• Exceptions to Software User Guide, v10.0
Driver and Software InstallationThis section provides detailed instructions for installing the 3ware driver and software for the 9750-4i and 9750-8i on your Apple Mac Pro.
You can install all software at once, or you can use the installer to install specific components.
If you later want to uninstall the 3DM 2 software, see “Uninstall 3DM2, CLI, and Driver” on page 34.
To install the driver and disk management tools
1 Download the Mac 3ware installation CD from http://www.lsi.com/channel/ChannelDownloads.
2 LSI provides two different image type files (3wareCD.cdr or 3wareCD.dmg). Once downloaded to your Mac double-click on either image to mount the image and open the image for browsing.
3 Double-click the icon StartInstall to begin the software and driver installation process.
26 LSI 3ware SATA+SAS RAID Controller Card Software User Guide Addendum

Driver and Software Installation
When prompted, enter your Macintosh Admin user name and password and click OK.
Figure 10. Authenticate dialog requests user name and password
The installer starts and the welcome screen appears.
4 From the Welcome screen, click Next to start the installation process.
Figure 11. Welcome Installation Screen
5 On the License Agreement page, accept the agreement and click Next.
www.lsi.com/channel/products 27

Chapter 5: Mac OS X
Figure 12. License Agreement Screen
6 If you want to change where the 3ware Disk Management tools 3DM 2 and CLI will be installed, you can change the path and directory.
When you are ready, click Next.
Figure 13. Specify Directory Path Screen
/opt/3ware
28 LSI 3ware SATA+SAS RAID Controller Card Software User Guide Addendum
Driver and Software Installation
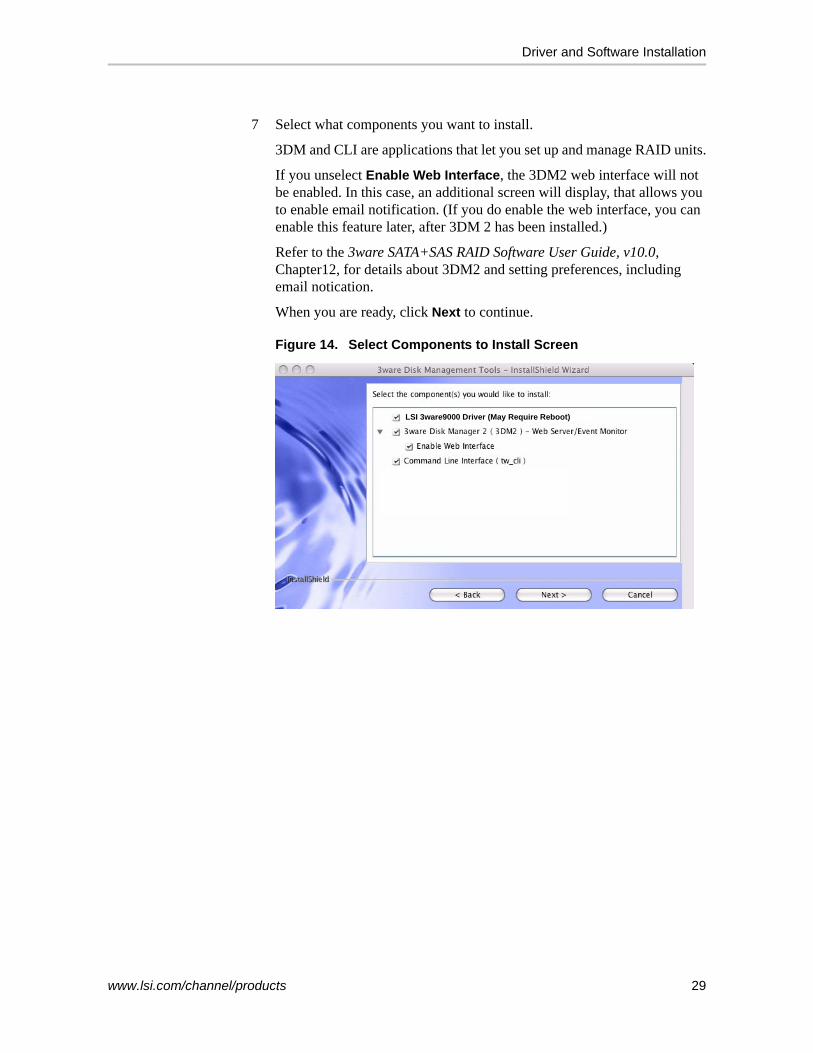
7 Select what components you want to install.
3DM and CLI are applications that let you set up and manage RAID units.
If you unselect Enable Web Interface, the 3DM2 web interface will not be enabled. In this case, an additional screen will display, that allows you to enable email notification. (If you do enable the web interface, you can enable this feature later, after 3DM 2 has been installed.)
Refer to the 3ware SATA+SAS RAID Software User Guide, v10.0, Chapter12, for details about 3DM2 and setting preferences, including email notication.
When you are ready, click Next to continue.
Figure 14. Select Components to Install Screen
LSI 3ware9000 Driver (May Require Reboot)
www.lsi.com/channel/products 29

Chapter 5: Mac OS X
8 When the final installation screen lets you know that installation is complete, click Finish.
Figure 15. Final Installation Screen
You will be prompted to restart your computer in order for the driver to be used with your 3ware RAID controller.
9 Restart your Mac.
If you have other tasks you wish to complete before restarting, you may do so. For example, if you need to update the firmware, through 3DM 2 or CLI, you may do before restarting. (For details about updating the firmware, see “Update the Firmware” on page 34.)
Initialize (Format) and Partition a UnitAfter you create a unit, it needs to be formatted, partitioned, and mounted by the operating system before it can be used.
When you create a unit through 3DM 2, the Mac OS X recognizes that a new disk is available, and displays a message asking what you want to do. (If this message does not appear, you can start the Disk Utility manually from the Finder and skip to step 2.)
Note: “Initialization” of the unit by your operating system is different from “initialization” of a unit by 3ware. Initialization under your operating system will format your disk, erasing any existing data in the process. Initialization under 3ware does not erase data; it puts redundant data on the drives of redundant units into a known state so that data can be recovered in the event of a disk failure.
30 LSI 3ware SATA+SAS RAID Controller Card Software User Guide Addendum

Initialize (Format) and Partition a Unit
1 In the Mac OS message, click Initialize.
Figure 16. Disk Insertion Message from the Mac OS
2 When the Macintosh Disk Utility window opens, find and select the drive that represents your RAID unit.
Figure 17. Macintosh Disk Utility Window with New RAID Unit
LSI 3ware 9750 Disk Media
www.lsi.com/channel/products 31

Chapter 5: Mac OS X
3 In the Disk Utility Window, select the Partition tab.
Figure 18. Macintosh Disk Utility Window, Partition Tab
4 In the Volume Scheme column, click Current to show the drop-down menu and select the number of partitions that you want your RAID unit to have.
Tip: If you only want one storage volume, select 1 Partition. (Each partition will appear as a separate drive on your computer.)
Figure 19. Selecting the Number of Volumes in Disk Utility
5 On the right, specify a volume name and then click Partition.
It is recommended to use a unique name, although Mac OS X will allow you to give the same name to more than one partition.
If you have questions about what Format to select, see the Apple documentation.
LSI 3ware 9750 Disk Media
X
X
3ware 9750 DISK Media
X
LSI 3ware 9750 Disk Media
X
XX
32 LSI 3ware SATA+SAS RAID Controller Card Software User Guide Addendum

Initialize (Format) and Partition a Unit
Figure 20. Defining the Volume in the Macintosh Disk Utility
6 When a message asks you to confirm you want to partition the disk, click Partition.
Figure 21. Confirmation Message to Create the Partition
You will see a series of messages appear toward the bottom of the Disk Utility window as the RAID unit is first partitioned and then formatted. This may take a couple of minutes, depending on the size of the drives in your RAID unit.
a) Enter a unique name
b) Click Partition
LSI 3ware 9750 Disk Media
XX
X
3ware 9750 DISK Media
“3ware 9750 DISK Media”
www.lsi.com/channel/products 33

Chapter 5: Mac OS X
Figure 22. Macintosh Disk Utility Showing Partitioning Progress
When the partitioning is complete, icons for each new volume appear on your desktop. They are now ready for use.
You can now close the Macintosh Disk Utility window. Your RAID unit is ready for use.
Update the FirmwareFirmware updates to the 3ware RAID controller can be done from 3DM 2 or CLI. For details, see “Updating the Firmware and Driver” on page 177 of the 3ware SATA+SAS RAID Software User Guide, v10.0. An electronic version is available at http://www.lsi.com/channel/ChannelDownloads.
Uninstall 3DM2, CLI, and Driver To uninstall 3DM2, CLI and driver, go to the following directory:
Macintosh HD/Applications/3ware
Then double-click on the StartUninstall icon, enter password when prompted, then you can select to uninstall everything or only certain component like 3DM2, CLI, or the driver.
Messages appear here as the unit is formatted.
LSI 3ware 9750 Disk Media
3ware 9750 DISK Media
X
XX
34 LSI 3ware SATA+SAS RAID Controller Card Software User Guide Addendum

Exceptions to Software User Guide, v10.0
Exceptions to Software User Guide, v10.0When refering to the 3ware SATA+SAS RAID Software User Guide, v10.0 mac users should be aware that the 3ware BIOS Manager (3BM) is mentioned in the majority of the chapters in the Software User Guide.
3BM is not supported for Mac OS, disregard any 3BM instructions. Chapter 2 and Chapter 5 are about 3BM completely, skip these chapters.
In Chapter 8, page 153 replace Note with the following Note: Units will be automatically initialized using background initialization when they are verified for the first time. (Verification requires that the units have been previously initialized.) This will not affect the data on the drives, and the units will perform normally, although performance will be slowed until the initialization and verification are completed.
In Chapter 9, page 157 in the last paragraph in the How Errors are Handled, add the following paragraph after the windows solution: On Mac OS X, you can do this using the First Aid tab in the Disk Utility—select the disk on the left and then click Verify Disk. If verification encounters problems, you can then use the Repair Disk option on the same screen.
In Chapter 9, page 161 add the following paragraph to the bottom of the note: On Mac OS X, you can do this using the First Aid tab in the Disk Utility—select the disk on the left and then click Verify Disk. If verification encounters problems, you can then use the Repair Disk option on the same screen.
Exceptions to 3ware 9750 SATA+SAS RAID Controller Card Installation Guide, v10.0
The following manual provide information about your 3ware RAID controller:
• 3ware 9750 SATA+SAS RAID Controller Card Installation Guide, v10.0
This guide is typically packaged with the controller, but can also be downloaded from the LSI website at:http://www.lsi.com/channel/ChannelDownloads.
The installation guide listed above for the 9750 controller cards provide detailed information about those controllers. The installation instructions, however, were written for use with a PC. While much of the information is also applicable for a Mac, some of the installation details are not. In place of the the instructions included in the section “Install the Controller in the Computer” on page 10 of the installation guide, follow the instructions in the user guide for your Mac Pro for opening your computer and installing a PCI Express card.
www.lsi.com/channel/products 35

Chapter 5: Mac OS X
If necessary, download the user guide for your Mac Pro from the Apple site and print out the chapter that includes information about opening the computer and adding PCI Express Cards.
36 LSI 3ware SATA+SAS RAID Controller Card Software User Guide Addendum

6
Installing/Uninstalling 3ware Management Software from the Command Line under Linux and FreeBSD3ware’s RAID management software, Version 10.1 includes a new command line installer that replaces the previous command line installer for Linux in the 3ware RAID Management Software User Guide, Version 10.0. The new command line installer is used with FreeBSD.
• Installing 3ware Management Software
• Uninstalling 3ware Management Software
Installing 3ware Management SoftwareThe following steps describe how to install software on Linux and FreeBSD at a command line, using a text-only interface. You must be root to run the installer.
1 Download the LSI 3ware Linux or FreeBSD installation image from LSI channel website at http://www.lsi.com/channel/ChannelDownloads.For details on how to download files from the LSI channel website see Chapter 1, “Downloading 3ware Drivers and Software”.
2 Mount the image or burn the image to a CD.
3 Navigate to the folder on the mounted image or CD that contains the installer.packages/installers/tools/linux
packages/installers/tools/freebsd
4 Type: ./install.sh -i
5 Respond to each screen as the script walks you through the installation process.
6 After the installation is complete, check that the software was installed correctly.
www.lsi.com/channel/products 37

Chapter 6: Installing/Uninstalling 3ware Management Software from the Command Line under Linux
Uninstalling 3ware Management SoftwareThe following steps describe how to uninstall software on Linux and FreeBSD at a command line, using a text-only interface. You must be root to run the installer.
1 Navigate to the folder on your computer where 3DM2/CLI are installed./opt/3ware/
Backup files, if needed. All files will be removed during uninstall from: /opt/3ware
This directory is only for use by the 3ware management software. No user data should be stored here.
2 Type: ./install.sh -u
3 Respond to each screen as the script walks you through the uninstall process.
4 After the uninstall is complete, check that the software is uninstalled.
38 LSI 3ware SATA+SAS RAID Controller Card Software User Guide Addendum