lotus notes client version 8.5 reference guide - marist
TRANSCRIPT

1
Lotus Notes Client
Version 8.5
Reference Guide
rev. 11/19/2009

2
Lotus Notes Client Version 8.5 Reference Guide
Accessing the Lotus Notes Client
From your desktop, double‐click the Lotus Notes icon.
Logging in to the Lotus Notes Client
The client is configured with your user name. Enter your password in the password field and click the Log In button.

3
Navigating the Lotus Notes Client
Menu Bar – tools for use with Lotus Notes
Window Tabs – switch between open windows
Toolbars – tools for documents and Applications
Bookmark Bar – contains bookmark icons / folders
Status Bar – info about the active window
The Lotus Notes Home Page
By Default, the Home Page is the first screen you see when you start Lotus Notes. It contains links to Lotus Notes
Applications. The Home Page can be accessed at any time by clicking the Home tab. Below is an example of the default
Home Page.

4
The Home Page can be customized using a pre‐designed Home Page or layout that you design yourself.
1. Click the top border of the Home Page that says Click Here for Home Page options.
2. Do one of the the following: a. To use a pre‐designed layout, click the down arrow in the Current Home Page selection list box and
select an option from the resulting menu. b. To create your own layout, click the Create a new Home Page button and follow the directions in the
New Page Wizard.
Security
Changing Your Password To change your Lotus Notes Client password, from the Menu Bar, choose File, Security, User Security. You will be
prompted for your current password. Enter the password and click Log In. The following window will open.
Click the Change Password button. You will again be prompted for your current password. Enter the password and click
Log In. The following window will open.
Enter your new password into both fields. Do not change the
Encryption Strength field or click Generate Password.
If your new password is not strong enough, the following box will
appear:
The pop‐up box below will notify you of successfully changing your
password. Click OK and OK to exit.

5
Locking Your Session
If you will be stepping away from your computer, pressing the Control (Ctrl) and F5 key together will lock your Lotus
Notes session. To unlock your session when you return, click on the splash screen. Enter your password when prompted
and click the Log In button.
Applications
Applications allow users to perform tasks pertaining to a specific area of interest. Mail, Calendar, and Contacts are all
examples of Applications.
Documents A document is any Application entry or record that contains information. For example, an email message is a document
in the Mail Application and a Calendar entry is a document in the Calendar Application. To open a document, double‐
click the document entry from any view in the open Application.
Managing Open Applications and Documents All Applications or documents that are open will be shown in the Window Tabs located above the View Pane.
To switch to an open Application or document, click on its Window Tab.
To cycle through all open items, press Ctrl + Tab.
To close an open Application or document, click the ‘X’ button on its Window Tab, press the Esc key, or select Close from the File menu.
Refresh To refresh the view of any section your are in, click on the blue arrow icon, which is located along the View Pane menu bar. The F9 key will also refresh the view you are in.
Preferences Preference for both Mail and Calendar can be found by choosing the More button, located along the View Pane menu bar.

6
Automatic Signatures To sign your name to outgoing e‐mail automatically, click on More, Preferences located along the View Pane menu bar.
A new window will appear; select the Mail tab and then select Signature. Check the box next to “Automatically append
a signature to the bottom of my outgoing mail messages” and then type a personal signature in the text box which will
automatically append to all of your outgoing messages. Click the OK button. Hint: Add 2 blank spaces before you begin
typing.
The Mail Application The Mail Application allows you to communicate with other Lotus Notes and Internet email‐users. To open the Mail
Application, click the Mail icon on the Bookmark Bar.
Panes
Panes are the different areas of the workspace that show a part of an open Application.
Navigation Pane – displays names of folders and views in an Application, such as Mail, Calendar, and Contacts.
View Pane – displays contents of current folder or view selected in the Navigation Pane.
Preview Pane – allows you to quickly preview the document selected in the View pane.
The Mail Navigation Pane
Inbox –messages that have been received.
Drafts – messages that have been saved, not sent.
Sent – messages that have been sent.
Follow up ‐ messages marked for follow‐up action.
Junk Mail ‐ junk mail from blocked senders.
‐ NOTE: SEE QUICK RULES
Trash – documents, with the exception of calendar entries, that have been sent to trash, but not yet deleted.
All Documents ‐ provides a view of all documents in the Mail Application.

7
Mail Threads ‐ provides a view of messages grouped with replies.
Folders ‐ contains user‐created/personal folders for storing documents.
Archive ‐ stores old or unused messages. Please contact the Help Desk for instructions in setting up an archive.
Rules ‐ contains rules for sorting or deleting incoming messages.
Stationary ‐ contains available stationary (message templates) for the Mail Application.
Viewing Mail 1. Click the Inbox icon in the Navigation Pane of the Mail Application. A list of messages you have received will
appear in the View Pane. 2. Click once on a message to view it in the Preview Pane or double click a message to open it in a new tab. 3. To Close an open Message, select Close from the File menu, press the Esc key, or click the Close button on the
Window Tab.
*Note: To view unread messages only, check the View Unread box at the top of the View Pane. To view all messages,
check the View All box at the top of the View Pane.
Opening the Preview Pane
There are two ways to display the Preview Pane:
1. Click on Preview at the bottom of the active window. 2. Click the Preview Pane button on the View toolbar.
Composing Mail To create a new message, Click the New Message button in the View Pane.

8
Addressing a Message 1. Manually type an address in the To field.
2. Use the Type Ahead feature: begin typing a person’s name in the To field. Pressing enter at any point while
typing will either: Insert the address of the person into the To field if the name is unique, or if there are multiple matches, a list of names will appear.
3. Another way to locate an address is to click the To: button; a window will appear from which you can
browse through contact books and search for contacts.
Options 2 and 3 can also be used to select contacts to be assigned to the CC(Carbon Copy) and BCC(Blind Carbon Copy) address fields.

9
Sending Mail with Attachments Place the mouse pointer in the Message body. The attachment will be placed exactly where your cursor lies. Click the
Attachment icon located along the View Pane menu bar. Select the files you want to attach. (To select multiple files, press the Ctrl key while you click on each file). Finally, click the Create Button.
Spell Check There are three options to spell check a message. 1. In‐Line spell checking places a red squiggle under any misspelled word. Right‐clicking the misspelled word displays a
list of possible corrections.
2. The spell check icon will open the Spell Check box. It will search both the Subject and Body of the message for any misspelled words. For each misspelled word you can choose to Skip, Replace, or Add to Dictionary.
3 Clicking Send will automatically display the Spell Check box. You can choose to use the Spell Check described in option 2, or choose to Send As Is.
Display Options There are three options available through the Display button. 1. BCC – displays the Blind Carbon Copy field when checked. 2. Additional Mail Options – displays the following options above address fields: High Importance, Return Receipt, Sign, Encrypt, and Mark Subject Confidential. 3. Sender Information – displays below the address fields, who the sender is and what time the message was sent. *Note: The Additional Mail Options listed at the top of each new message can also chosen by selecting Delivery Options.
Sending Mail Once the message (new, forwarded, or reply) has been composed, there is a choice between Send, Send and File, Save as Draft. The Send button sends the message out to all the addresses and saves a personal record in the Sent folder. The Send and File button sends out the message to all the addresses, saves a personal record in the Sent folder, and allows filing in a folder. The Save as Draft button saves the message in the Drafts folder and holds it there until a later time.
Receiving Mail To open a newly received message, double click on it. This will open the message in a new window tab.
Replying to Received Mail

10
When highlighting or reading a message, there is a button at the top of the screen labeled Reply. Clicking on the down
arrow next to Reply will provide several options, all of which will open a new message. The To: field will be filled in with
the original Sender’s address and the Subject field will contain the original subject pre‐pended with Re:.
Reply with History Only
This is the preferred option. Replies to the sender without any attachments that were included in the original message. It appends the body of the original message.
Reply with History & Attachments Replies to the sender and appends the body of the original message, including any attachments.
Reply Replies to the sender without appending the body of the original message.
Replying with Internet‐Style History This method of replying is useful for Marist listservs (MARSTAFF, MARFAC, course listservs).
Reply To All The Reply to All options are the same as Reply. The message will also be sent to all recipients of the original message and they will be placed in the CC: field. Warning: Do not reply to all for messages received from listservs unless you intend for all listserv recipients to receive your reply.
*Note: When you reply to a message, a Replied‐To icon appears next to the message.
Forward To forward a received message to another party, click on the button marked Forward, when highlighting or reading the message. Clicking on the down arrow next to Forward will provide several options, all of which will open a new message. The Subject field will contain the original subject pre‐pended with Fw:. The Forward options are similar to the Reply options.
*Note: When you forward a message, a Forwarded icon appears next to the message.
Receiving Mail with Attachments When you receive a message with an attachment it will be located in the body of the message at the point where the sender placed their cursor when they attached the file; simply double click and select Open to open it. You must have the application installed, in which the attachment was created. For example, if opening a .pdf file, you need Adobe Acrobat Reader installed.

11
Follow‐Up Message
From Mail view, select the message you want to flag.
Select the Follow Up icon. Select Add or Edit Flag from the resulting Menu. Check the Urgent Priority, Normal Priority, or Low Priority box. Specify the action in the Enter a Follow Up Action Box, this can be a brief description for the action you will take at the time specified for follow up. Enter a date and time in the When to Follow Up box. To set an alarm, check the Set an alarm on this message box and fill in the appropriate options. Click the OK button when you are finished. The Follow Up
icon will appear next to the message in the mail view and in the header of the message. *Note: To remove a flag from a message, select the
message, select Follow Up from the Actions menu, and
select Remove Flag from the resulting menu.
Saving Mail in Folders
The recommended way to save and organize messages is to file them in folders.
To save a message in a folder, click on the down arrow next to the button
and select Move to Folder where you can choose to Move or Copy to a particular
folder.
Select the desired folder and press the Move button.
Please refer to the ‘Folders’ section of this document to learn how
to create and delete folders.

12
Setting an Out of Office Message
You can set an out of office message to let others know when you are away from the office. From the mail View Pane,
select More, Out of Office.
The following window will appear; fill in the appropriate fields and press Enable and Close.
The Leaving and Returning fields should be set according to the day you want the Out of Office to begin and the day that
it should end.
By enabling the checkbox I am unavailable for meetings, the time you have scheduled to be out of the office, will be
marked as unavailable on your schedule.
The Standard Notification will be sent once to each address that emails you during the time that you are out of the
office. The fields for Subject, Body, and Additional body text will all appear in the out of office notification to each
address that emails you.
The Alternate Notification can be configured to alert specified recipients of a different out of office message. Complete
the Subject and Body fields as you have for the Standard Notification. Fill in the To: field just as you would for a new
message.

13
The Exclusions option can be configured to not send the out of office message to specified people or when the subject
line of an email contains a specified phrase.
Drafts When composing a message, it is possible to save the current message and send it out at a later date. In order to save
the message in Draft form, click the Save as Draft button. This automatically stores it in the Drafts folder. To retrieve an
unsent message, click on the selection for Drafts from within the Navigation Pane. Double click on the message to open,
edit, and send.
Sent This folder contains all of the messages that have been sent out (new, forwarded, and reply). As in all views and folders,
you have the ability to sort by the columns to help you locate a message: by clicking on any heading (Sender, Subject,
Date, or Size) this will cause the entire chain of mail to organize itself by the respective heading.
All Documents All Documents is a reference view. It contains links to all documents that are located in the mail database. This is a
useful view for searching purposes. To organize the list of items, you can click on Who, Subject, Date, or Size to
organize the column by each respective choice.
Trash When messages are deleted from any of the views or folders, they get stored in the Trash folder where they remain until
the Trash is manually emptied or after the default time of 48hours. To quickly free up space, you should empty your
Trash folder regularly. To delete a message, highlight the message and hit the delete button on the keyboard, right click
and select delete, or click on the trash icon. This will move the document into the Trash. To empty the trash, select
Trash from the navigation panel and click on the Empty Trash button.
Un‐deleting Documents While the message is still in the Trash folder, it can be restored to the location from which it was before deletion. Once
a document is deleted and before refreshing the database, a document that has been marked for deletion can be un‐
deleted by highlighting it within the Trash and clicking on the Restore button.
Note: Once the trash has been emptied, the message is permanently gone.
Folders To create a folder, from the Menu Bar, choose Create, Folder.
14
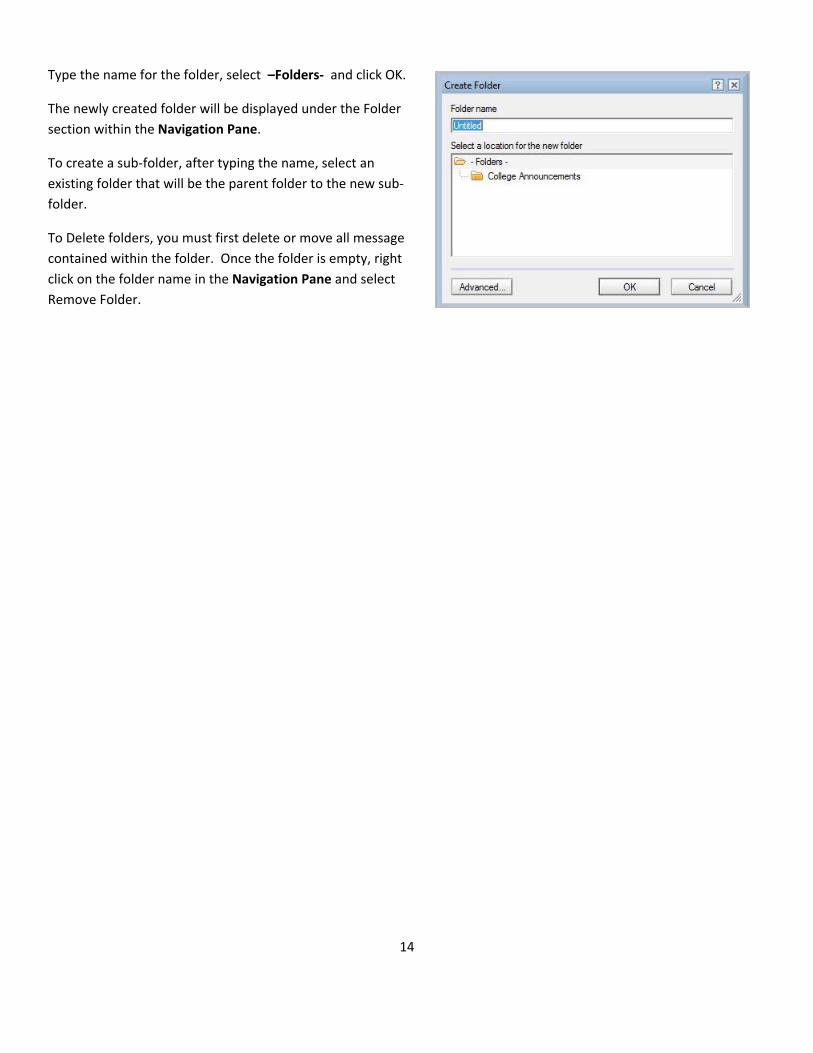
Type the name for the folder, select –Folders‐ and click OK.
The newly created folder will be displayed under the Folder
section within the Navigation Pane.
To create a sub‐folder, after typing the name, select an
existing folder that will be the parent folder to the new sub‐
folder.
To Delete folders, you must first delete or move all message
contained within the folder. Once the folder is empty, right
click on the folder name in the Navigation Pane and select
Remove Folder.

15
CALENDAR The calendar application allows you to organize appointments, events, meetings, reminders, and anniversaries.
Navigating the Calendar To open the Calendar, click the Calendar icon on the Bookmark Bar. Use the calendar format tabs at the top of the View Pane to change the number of days the calendar displays. Click the down arrow on the Format Tabs to display formatting options. Click the Back and Forward buttons next to the month in the Navigation Pane to cycle through the months. Use the slider bars on the right side and bottom of the View Pane to move through the Calendar. Click on Today in the Navigation Pane at any time to return to the current date.
Creating a Calendar Entry To create a calendar entry click on the down arrow next to the New button and a menu will appear. From here you can
choose what type of entry you would like to create; once an option is selected, a form will open. Fill out the appropriate
information and then click Save & Close at the top of the window; the entry will then be added to your calendar.
Calendar Entry Types
1. Appointment – to schedule time on your calendar. 2. Meeting – schedule time on your calendar and invite others. See Creating and Sending Meeting Invitations. 3. Anniversary ‐ to add an annual event to your calendar. 4. Reminder ‐ to remind yourself of something at a particular time. 5. All Day Event ‐ to schedule an entire day or block of days. 6. Event Announcement – invite others to an event, no invitee reply options.
Note: To change the color of a Calendar Entry, select More from the Actions menu, and select Preferences from the
resulting menu. Click on the Calendar & To Do tab and click on the Colors tab. Make color selections and click OK.
16
Dragging to Create A New Calendar Entry Drag a Mail message, Calendar entry, or To Do item onto the Calendar icon on the Bookmark Bar. Select a
Calendar entry type from the Copy Into dialog box that appears and click OK. The new calendar entry will appear. Fill in
the information and select options as desired. (If you create a meeting, the names of the people in the original item will
be copied into the new meeting as invitees.)
Meetings
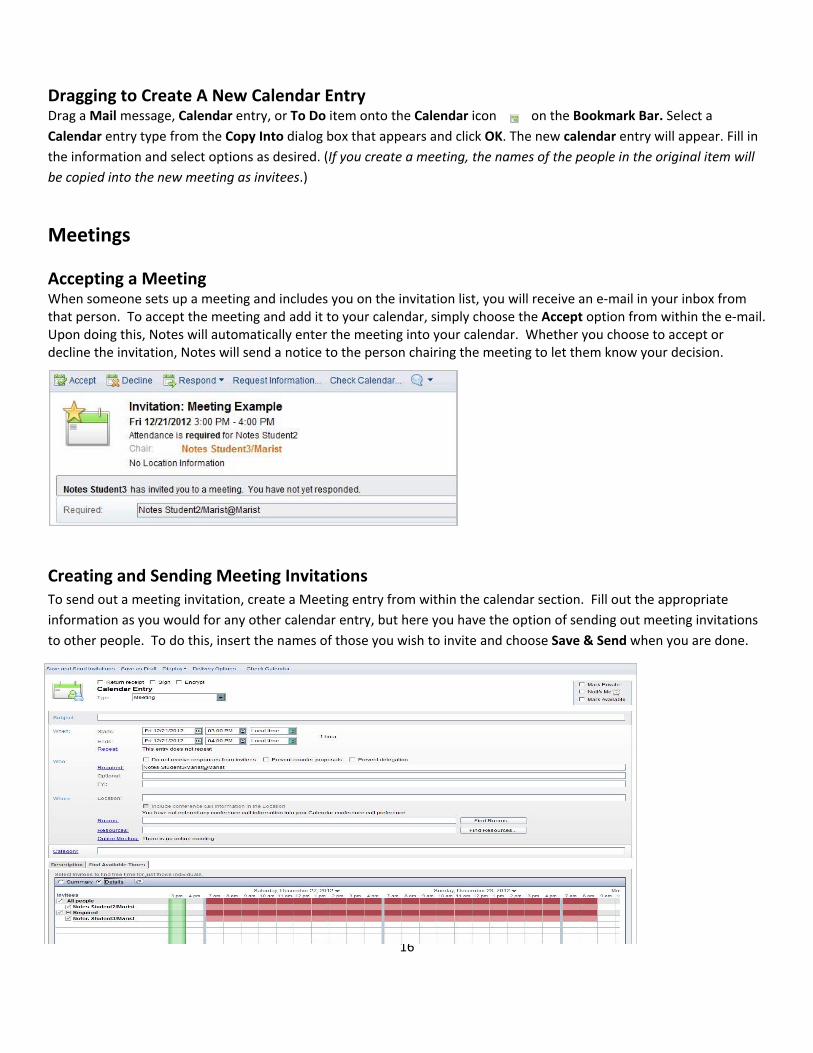
Accepting a Meeting When someone sets up a meeting and includes you on the invitation list, you will receive an e‐mail in your inbox from that person. To accept the meeting and add it to your calendar, simply choose the Accept option from within the e‐mail. Upon doing this, Notes will automatically enter the meeting into your calendar. Whether you choose to accept or decline the invitation, Notes will send a notice to the person chairing the meeting to let them know your decision.
Creating and Sending Meeting Invitations To send out a meeting invitation, create a Meeting entry from within the calendar section. Fill out the appropriate
information as you would for any other calendar entry, but here you have the option of sending out meeting invitations
to other people. To do this, insert the names of those you wish to invite and choose Save & Send when you are done.

17
Editing or Rescheduling a Meeting Entry Double‐click the entry you want to edit. Make changes to the entry. Click the Save and Send Invitations button for a meeting, or the Save and Close button for all other entries.
Printing a Calendar In Calendar, select Print from the File menu or click the Print button on the Universal toolbar. In the Print Calendar dialog box, check the Print Calendar box under What to Print. In the Calendar Style List box, select a style for your Calendar. Under the Print Range, select From and To Dates. Click the OK button to Print.

18
CONTACTS BOOK The Contacts Book is an application used to store information about people you communicate with. To open the
Contacts Book, click on the Contacts Book icon on the Bookmark Bar.
1. My Contacts – displays all contacts stored in your Contacts Book 2. By Category – displays contacts organized by category. 3. By Company – displays contacts organized by company. 4. Groups – displays a list of groups 5. Birthdays and Anniversaries – displays all Birthdays and
Anniversaries stored in your Contacts book 6. Advanced – contains access to Accounts, Certificates,
Connections, International MIMR, and locations.
Viewing Contacts in the Contacts book Click on My Contacts in the Navigation Pane of the Contacts Book application. A list of contacts store in your Contacts book will appear in the view pane. Double click a Contact to open it. *Note: To close a contact, select close from the File Menu, press the Esc key, or click the close button on the Window
tab.
Adding A Contact A new screen will pop‐up, the most important fields to fill in
are first and last name as well as e‐mail address. Be sure to
click Save & Close at the top of the window when you are
done.
*Note: To edit a contact, select the contact and click the Edit
button.
19
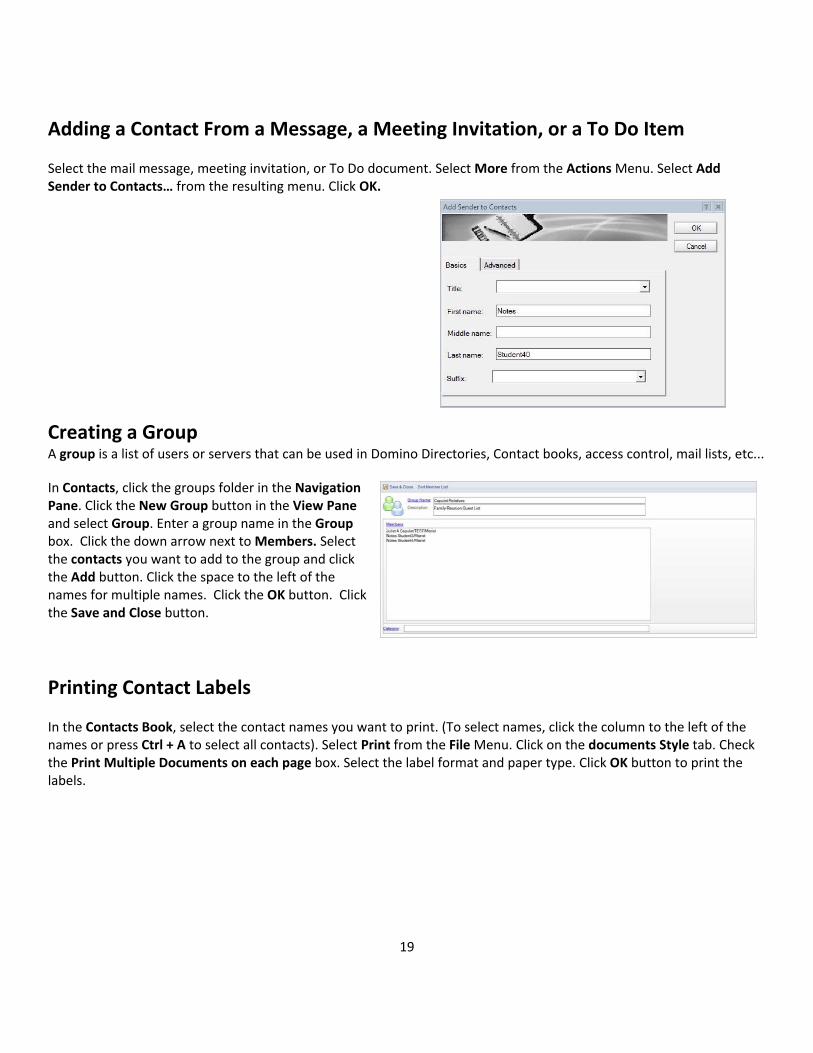
Adding a Contact From a Message, a Meeting Invitation, or a To Do Item Select the mail message, meeting invitation, or To Do document. Select More from the Actions Menu. Select Add Sender to Contacts… from the resulting menu. Click OK.
Creating a Group A group is a list of users or servers that can be used in Domino Directories, Contact books, access control, mail lists, etc...
In Contacts, click the groups folder in the Navigation Pane. Click the New Group button in the View Pane and select Group. Enter a group name in the Group box. Click the down arrow next to Members. Select the contacts you want to add to the group and click the Add button. Click the space to the left of the names for multiple names. Click the OK button. Click the Save and Close button.
Printing Contact Labels In the Contacts Book, select the contact names you want to print. (To select names, click the column to the left of the names or press Ctrl + A to select all contacts). Select Print from the File Menu. Click on the documents Style tab. Check the Print Multiple Documents on each page box. Select the label format and paper type. Click OK button to print the labels.

20
TO DO LIST
The To Do List Database The To Do List allows you to organize personal tasks and assign tasks to others. To open the To Do List, click the To Do
icon on the Bookmark Bar.
1. Incomplete – displays To Do items not completed by their due date 2. All To Do's – displays personal To Do items and items you have assigned to
others. 3. Personal – displays only personal To Do items. 4. Group – displays group To Do items. 5. By Category – displays To Do items by category 6. Complete – displays completed To Do items
Creating a Personal To Do Item Click the New To Do Item button at the top of the View Pane. Fill out the appropriate information and then click Save & Close at the top of the window.
Note: To quickly create a new To Do item, drag a Mail message, Calendar entry, or To Do item onto the To Do icon.
Marking a To Do Item Complete In the To Do List, select the To Do Item you want to mark as complete. Click the Mark Complete button
21
Assigning a To Do Item To Others Follow the steps for Creating A Personal To Do Item. In the Assign To field, check Others. In the Participants selection, fill in the Required, Optional, and FYI fields or click the Contacts Book button to select contacts from a Contacts Book. Click the Save and Send Assignments button

22
Other Features
More on Bookmarks
Bookmark Folders Bookmark Folders contain Bookmarks or other Bookmark folders. Several Bookmark Folders appear on the Bookmark
Bar by default.
1. Favorite Bookmarks – stores your most frequently used bookmarks 2. Applications – provide access to the Notes workspace and allows you to search or browse for
databases. 3. More Bookmarks – contains the Lotus Links folder, the Internet Search folder, a Create folder, the
Workplace Launcher folder, and the Startup folder. 4. History – contains a chronological listing of bookmarks for all items you visit. The History folder can
display items by date, site, or title. You can also use the History folder to find recently‐used documents or databases.
Note: To open a Bookmark Folder, click on its icon in the Bookmark Bar
Removing Bookmarks and Bookmark Folders 1. Right‐click the bookmark or folder you want to remove. 2. Select Remove Bookmark or Remove folder from the resulting menu. 3. Click the Yes button to confirm
Note: When you remove a bookmark folder, you remove all the bookmarks in that folder.
Managing Your Lotus Notes Mail Database Size Refer to the link http://www.marist.edu/it/pdfs/managingsize.pdf on the Marist College web site for more information
on managing your Lotus Notes mail database size.
Applications A Notes Application is a single file that contains multiple documents usually relating to a single area of interest. Mail,
Calendar, Contacts, Room Reservations, are all examples of applications. Your applications, such as Mail and Calendar
are already bookmarked for you. Other applications such as another person’s mail or calendar can be accessed if that
user has delegated access.

23
Opening an Application Select Application from File menu. Select Open from the resulting menu. Enter the name of the server the Application is stored on, or select a server from the Server list box. Select an Application from the Application box, or enter the path and file name of the Application in the Filename box. Click the Open button.
Logging Out of Lotus Notes
You can logout of the Lotus Notes Client by either; clicking the ‘X’ in the upper right‐hand corner of the client, or
choosing File, Exit from the menu bar.
SHORTCUTS
QUICK RULES Using Quick Rules is a simple and effective measure for combating junk mail. The following steps will guide you through setting up quick rules.
To Create A Quick Rule For A Message You Have Received:
1. Open your Inbox 2. Open the message you want to create a quick rule for 3. Click the More tab 4. Click Create Quick Rule
Shortcut Name Key Command Shortcut Action Shortcut Name Key Command Shortcut Action
Properties Alt + Enter Edit Properties Indent Paragraph F8 Text / Indent
Save Ctrl + S File / Save Outdent Paragraph Shift + F8 Text / Outdent
New None File / New Bullets None Text / List / Bullet
Edit Document Ctrl + E None Numbers none Text / List / Numbers
Forward as Mail
None None Align Paragraph none Text / Align / Paragraph
Print Ctrl + P File / Print Spacing none Text / Spacing
Cut Ctrl + X Edit / Cut Style none Text / Style
Copy Ctrl + C Edit / Copy Insert Table none Create / Table
Paste Ctrl + V Edit / Paste Attach none File / Attach
Copy as Link None Edit / Copy as Link Import none File / Import
Font Ctrl + K Text / Text Properties Find / Replace Ctrl + F Edit / Find/Replace
Font Size Ctrl + K Text / Text Properties Check Spelling none Edit / Check Spelling
Bold Ctrl + B Text / Bold Ruler Ctrl + R View / Ruler
Italic Ctrl + I Text / Italic Permanent Pen None Text / Permanent Pen

24
5. This will automatically fill in the Sender / Domain / Subject fields with the information from the open document 6. Check off which fields you want this Quick Rule to check for. 7. Check off when the rule should take action 8. Check off what the action should do under the above circumstances 9. Click OK 10. Click on Rules which is listed under Tools from the View Pane. 11. Here is a list of all the rules you have created, you may edit your Rule by clicking on the rule and selecting Edit.
To Create A Quick Rule From Scratch:
1. Open your Inbox 2. Open Rules which is listed under Tools from the View Pane. 3. Click New Rule 4. Complete the appropriate Fields 5. Click OK; Your new rule will now be listed.
How To Disable / Delete A Quick Rule:
1. Open Rules which is listed under Tools from the View Pane 2. Select the Rule you wish to Disable and/or Delete 3. You know have two choices
1. Disable Only; Click the Disable button; Rule will remain listed but not be active 2. Disable/Delete; Click the Disable button (MUST BE DONE FIRST); Click the Delete button.
***REMEMBER; WHEN DELETING A RULE; YOU MUST DISABLE THE RULE BEFORE CLICKING DELETE!!!
Delegating Access To Your Mail You can allow specified users to access your mail Application and set different levels of access. Others can simply check
your mail while you are away or send.
4. Select More from the Actions menu. 5. Select Preferences from the new
menu. 6. Click on the Access and Delegation
tab. 7. Click on the Access To Your Mail &
Calendar tab. 8. Do one of the following:
1. To add a person or group, click on Add Person or Group.

25
2. To modify access, select the name and click on Change Access. 9. Enter Access information. 10. Click the OK button.