lotus sametime version 8.5
TRANSCRIPT
Lotus® SametimeVersion 8.5
Lotus Sametime 8.5Installation and Administration Guide Part 1
Version 8.5.0
SC23-5987-04
���

Lotus® SametimeVersion 8.5
Lotus Sametime 8.5Installation and Administration Guide Part 1
Version 8.5.0
SC23-5987-04
���
NoteBefore using this information and the product it supports, read the information in “Notices” on page 637.
Edition notice
This edition applies to version 8.5 of IBM Lotus Sametime (program number 5724–J23) and to all subsequentreleases and modifications until otherwise indicated in new editions.
© Copyright International Business Machines Corporation 1996, 2009.US Government Users Restricted Rights – Use, duplication or disclosure restricted by GSA ADP Schedule Contractwith IBM Corp.
Contents
Chapter 1. Overview . . . . . . . . . 1Accessibility features for Lotus Sametime . . . . . 1What’s new in Lotus Sametime 8.5? . . . . . . 2What is Lotus Sametime? . . . . . . . . . . 3
Lotus Sametime server architecture . . . . . . 6Lotus Sametime System Console . . . . . . . 8Lotus Sametime Community Server . . . . . 8Lotus Sametime Proxy Server . . . . . . . . 9Lotus Sametime Media Manager. . . . . . . 9Lotus Sametime Meeting Server . . . . . . 10Lotus Sametime Gateway. . . . . . . . . 10Lotus Sametime clients . . . . . . . . . 11
Meeting features in Connect versus Web clients . . 13Glossary . . . . . . . . . . . . . . . 16
Chapter 2. Planning . . . . . . . . . 23Skills needed for Sametime administration . . . . 23System requirements . . . . . . . . . . . 24Downloading Lotus Sametime files for installation 24Supporting IPv6 addressing in a Lotus Sametimedeployment . . . . . . . . . . . . . . 25
Supporting IPv4, IPv6, or both protocols. . . . 26Enabling support for IPv6 . . . . . . . . 28
Planning deployment topologies . . . . . . . 33Deploying instant messaging and presence only 33Deploying instant messaging and meetings . . . 34Deploying instant messaging, meetings, and Webclients . . . . . . . . . . . . . . . 34Deploying instant messaging, meetings, Webclients, audio, and video . . . . . . . . . 34Deploying instant messaging to externalmessaging communities . . . . . . . . . 35
Planning for an LDAP directory . . . . . . . 40Planning a Community Server installation . . . . 41
Audio/video considerations . . . . . . . . 42Planning for the dedicated Domino server forLotus Sametime . . . . . . . . . . . . 43Deploying a stand-alone Community Server Mux 44
Planning a Lotus Sametime Media Managerinstallation . . . . . . . . . . . . . . 47
Audio and video considerations . . . . . . 48Planning a Lotus Sametime Gateway installation . . 50Planning for migration from an earlier release . . . 53Clustering Sametime servers for high availability . . 55Giving users a preview guide . . . . . . . . 56
Chapter 3. Installing . . . . . . . . . 57Installing on AIX, Linux, Solaris, and Windows . . 57
Installing DB2 on Linux and Windows . . . . 57Installing the Lotus Sametime System Console. . 59Connecting to an LDAP server . . . . . . . 64Installing a Lotus Sametime Community Serverand supporting software . . . . . . . . . 69Installing a Lotus Sametime Proxy Server . . . 101Installing a Lotus Sametime Media Manager . . 107Installing a Lotus Sametime Meeting Server . . 115Installing a Lotus Sametime Gateway server . . 122Installing the WebSphere Application ServerUpdate Installer . . . . . . . . . . . 196Deploying the Sametime client to users. . . . 199Starting and stopping servers in a LotusSametime deployment . . . . . . . . . 230Uninstalling . . . . . . . . . . . . . 240
Installing on IBM i . . . . . . . . . . . 248Preparing to install Lotus Sametime on IBM i 249Installing the Lotus Sametime System Console 250Connecting to an LDAP server . . . . . . 255Installing a Lotus Sametime Community Serverand supporting software . . . . . . . . 260Installing a Lotus Sametime Proxy Server . . . 312Installing a Lotus Sametime Meeting Server . . 318Installing a Lotus Sametime Gateway server . . 327Installing the WebSphere Application ServerUpdate Installer on IBM i . . . . . . . . 397Deploying the Sametime client to users. . . . 399Starting and stopping servers in a LotusSametime deployment . . . . . . . . . 417Uninstalling . . . . . . . . . . . . . 423
Chapter 4. Migrating and upgrading 431Upgrading Lotus Sametime. . . . . . . . . 431
Upgrading Lotus Sametime on AIX, Linux,Solaris, or Windows . . . . . . . . . . 431Upgrading Lotus Sametime on IBM i . . . . 502
Upgrading Lotus Sametime Gateway . . . . . 578Upgrading the DB2 server . . . . . . . . 579Upgrading Lotus Sametime Gateway servers 579
Upgrading Sametime clients . . . . . . . . 631Considerations for upgrading the SametimeConnect client . . . . . . . . . . . . 631Retiring older Sametime clients . . . . . . 632Installing the new Lotus Sametime client . . . 636
Notices . . . . . . . . . . . . . . 637Trademarks . . . . . . . . . . . . . . 639
© Copyright IBM Corp. 1996, 2009 iii

iv Lotus Sametime: Installation and Administration Guide Part 1

Chapter 1. Overview
Learn more about how to install and configure IBM Lotus Sametime for instantmessaging and Web conferences.
This section contains an overview of the components of IBM Lotus Sametime forinstallers and administrators.
Accessibility features for Lotus SametimeAccessibility features help users who have a disability, such as restricted mobilityor limited vision, to use information technology products successfully. IBM strivesto provide products with usable access for everyone, regardless of age or ability.
Accessibility features
The Lotus Sametime System Console is based on the IBM WebSphere ApplicationServer Integrated Console, and shares the same accessibility features, describedbelow.v The following features are for vision-impaired users:
– Can be operated by using only the keyboard– Communicates all information independent of color– Supports interfaces commonly used by screen readers and screen magnifiers– Supports the attachment of alternate output devices– Provides help information in an accessible format– Supports high contrast using a white background (some icons may not
display properly on a colored background)v The following features are for users who have mobility impairments or limited
use of their hands:– Allows the user to request more time to complete timed responses– Can be operated by using only the keyboard– Supports the attachment of alternative input and output devices
v The following features are for the deaf and hard of hearing users:– Supports alternatives to audio information– Supports adjustable volume control
v The console does not flash the screen at rates that could induce epileptic seizures
The help system for Integrated Solutions Console has the following accessibilityfeatures:v Uses the accessibility support enabled by the browser that is used to display the
helpv Enables navigation by using the keyboard
The Lotus Sametime Information Center is accessibility-enabled. The accessibilityfeatures of the information center are described at: publib.boulder.ibm.com/infocenter/sametime/v8r5/topic/com.ibm.help.ic.doc/using_system/accessibility_info.html.
© Copyright IBM Corp. 1996, 2009 1
Keyboard navigation
To move through the controls on a particular page, use the Tab key.
To click a link or control on a page using the keyboard, navigate to the link orcontrol and press Enter.
To change the navigation view using the keyboard, follow these steps:1. Navigate to the View selection list using the Tab key.2. Use the up and down arrows to change the value of the selection list.3. Press Enter.
The tasks displayed in the navigation are changed according to your selection.
Related accessibility information
When you administer WebSphere Application Server settings, you work in theIntegrated Solutions Console. Detailed information on console accessibility isprovided in the WebSphere Application Server information center.
IBM and accessibility
See the IBM Human Ability and Accessibility Center for more information aboutthe commitment that IBM has to accessibility:
What’s new in Lotus Sametime 8.5?Learn more about the new features in this release that allow Sametime® to makeunified communications in your organization simple and effective.
Unified communications consolidate various synchronous communicationschannels (voice, video, meetings) with asynchronous channels (e-mail, voicemail,social networks) on a common data network, thereby reducing communicationsand infrastructure costs. Unfortunately, however unified on the back end, unifiedcommunications solutions are rarely unified for the end user. It is not uncommonfor an ″integrated″ solution to require users to learn four or more software clients.And the clients rarely integrate with each other, forcing users to switch contexts astheir communication needs change, disrupting the task at hand. In the end, thiscomplexity slows adoption and the business fails to recognize the expected returnon investment.
The focus of Sametime 8.5 is to make unified communications seamless to the userby introducing a range of new capabilities and improvements:v A new online meeting experience is fully integrated into the Sametime Connect
client.v A new Sametime Meetings panel provides a consolidated view of a user’s
meetings and calendar and makes starting or joining a meeting a single-clickprocess. Users can easily invite others to meetings by dragging their names fromthe Contact list. They can accept meeting invitations with a single click, just likejoining a group chat. Users can move seamlessly from a text chat to a voice orvideo chat to a meeting. To upload meeting materials, they simply drag anddrop the items they need.
v New, zero-download, browser-based chat and meeting clients extend the desktopexperience to wherever the user is working.
2 Lotus Sametime: Installation and Administration Guide Part 1

v Improved audio and video capabilities make it easier to interoperate withexisting audio and video conferencing systems and increase their utilization.
v New audio and video codecs provide higher quality native voice and videoservices for a more compelling collaborative experience out of the box.
v New Web 2.0 APIs let developers embed Sametime capabilities into Web sitesand applications so users do not have to switch context as often.
v For mobile users, there is a new browser-based Apple iPhone chat client,support for the Blackberry Storm, and an improved mobile client for Microsoft®
Windows® Mobile devices.v New social views make it easier for users to find the people they collaborate
with the most.v You can now select an existing geographic location that you have previously
used and copy the location data to your current location.v Improved integration with Microsoft Outlook and Office puts more Sametime
capabilities at users’ fingertips.
This release also continues to focus on enhancing Sametime as a platform, makingit easier to manage and less expensive to operate.v A new Sametime System Console centralizes infrastructure configuration,
deployment, and management and centralizes policy management for allSametime services.
v A new Sametime Media Manager with SIP-based interfaces and APIsinteroperates with third-party video and audio conferencing systems. It alsooffers new video (H.264) and audio (G.722.1) codecs that deliver a better userexperience at a fraction of the bandwidth and provides administrative controlsover the video experience (size, bitrate, and so on).
v A new online meeting infrastructure no longer requires add-on servers for highavailability and improves firewall friendliness through the use of HTTP/S toconnect users.
v A new Sametime Proxy Server with Web 2.0 APIs simplifies integration into Websites and applications.
v New operating systems and platforms are supported for this release: IBM®
Lotus® Domino® 8.5, Microsoft Windows 2008 (32-bit and 64-bit editions) and64-bit Linux® operating systems.
What is Lotus Sametime?IBM Lotus Sametime consists of client and server applications that enable acommunity of users to collaborate through instant messaging and online meetingsover an intranet or the Internet. Lotus Sametime Entry is an offering targeted athelping organizations get started with instant messaging.
Members of the Lotus Sametime community use collaborative activities such asawareness, chat, screen sharing, and real-time audio/video capabilities to worktogether.
Awareness – Lotus Sametime awareness technology lets members who havelogged in to Lotus Sametime to see all other members who are logged in. Thenames of online users display in ″awareness lists″ in Lotus Sametime applications.From these awareness lists, members of the community can chat through instantmessaging sessions or start meetings that include chat, screen-sharing, polls, theability to send Web pages to other users, and audio/video capabilities.
Chapter 1. Overview 3
Meeting rooms – While awareness lists support instant collaboration with otheronline users, the Lotus Sametime Meeting Room Center provides a central meetingplace for members of the community. In the Meeting Room Center, users can createmeeting rooms and use them whenever they want to meet with their colleagues.Users access the Lotus Sametime Meeting Room Center with Web browsers orfrom the Meetings panel in the Lotus Sametime Connect client.
Instant messaging – The Lotus Sametime client is a Java™ application that uses theEclipse-based IBM Lotus Expeditor. The Lotus Sametime client leverages theEclipse plug-in framework to provide developers with extensibility features that gofar beyond those available in previous Lotus Sametime releases. Partners,independent software vendors (ISVs), customers, and internal developers use thesefeatures to integrate with the Lotus Sametime client to extend its capabilities.
Instant meetings – Instant meetings are meetings that Lotus Sametime Connectusers can create on the fly, and are perfect for quick meetings when you don’tneed to save the meeting room, its content, and related information.
Voice chat – The Lotus Sametime client allows users to talk to other LotusSametime users through their computer’s audio features and Voice-over-IP (VoIP)technology. VoIP is becoming increasingly popular, since it allows users anywherein the world to talk inexpensively. Voice-over-IP allows users to click themicrophone icon to call another user for instant voice chats over the intranet.
Telephony– Voice chat is one of two telephony capabilities in the Lotus SametimeIM client. The other is click-to-call (also called click-to-dial), which allows a user toinstantly create a telephone conference with one or more other users. In both cases,a user invites other users in a chat window or on the buddy list to join a call, andthe invitees are given the opportunity to either join or decline. Those users whochoose to join can connect to the call by clicking an icon. If voice chat is used toinitiate the call, all connected parties communicate using their computer’smicrophone and speakers. If click-to-call is used, a third-party telephony servicecalls each user at the appropriate number.
Video chat – Users who are equipped with video components can see each otheron their screens during a chat.
Location awareness – Lotus Sametime includes location awareness of the user, andan extensible resource area at the bottom of the left pane that can be customized toreflect different locations.
Connect to public IM networks – Lotus Sametime provides for connectivity tooutside instant messaging providers such as AOL’s AIM, Yahoo! Messenger,Microsoft Office Communications Server, and Google Talk communities throughIBM’s Lotus Sametime Gateway. Through the gateway, users can share presenceinformation and can participate in text-based IM conversations.
Contact information – The Business Card features provides the user withtelephone number, e-mail address, photo, name, title, and location displayed in theBusiness Card hover-over feature and in the chat window. Business cards can beprovided by the Lotus Sametime Community Server or a Lotus Connections server.
Emoticons – Lotus Sametime includes emotionally-expressive icons such as smileyfaces.
4 Lotus Sametime: Installation and Administration Guide Part 1

Customizing – Your company name can be added to the Instant Messagingwindow.
File transfer – Users can send files.
Quick find – Users can start typing name in the Quick Find box to find a personthey want to chat with, and then click the name to initiate a chat.
Time stamp – The time of day is provided in the Chat window along side the text.
Polling– A user can poll members of a group to provide brief feedback toquestions.
Policy– Users can be assigned access to different features in Instant Messaging,such as voice chat, creating meetings, transferring files, IP telephony. Policysettings govern their access.
The two primary Lotus Sametime client applications are the Lotus SametimeConnect client and the Lotus Sametime Meeting Room. The Lotus SametimeConnect client contains a presence list that displays selected members of thecommunity who are online. FromLotus Sametime Connect, a user can collaborateby sending instant messages or by starting an instant meeting with any otheronline member of the community.
The Lotus Sametime Meeting Room runs in a user’s Web browser whenever theuser attends a meeting. The Lotus Sametime Meeting Room contains componentsthat support the full range of Lotus Sametime collaborative activities, includinginteractive audio and video.
Lotus Sametime Standard and Lotus Sametime Entry
Lotus Sametime Standard is the full Lotus Sametime product offering, LotusSametime Standard provides awareness, instant messaging, and meeting roomfunctionality.
Lotus Sametime Entry is a limited offering, providing a core set of awareness andinstant messaging capabilities either from stand-alone Lotus Sametime clients orfrom within Lotus Notes®. Lotus Sametime Entry does not support meeting rooms.In addition, Lotus Sametime Entry is sometimes packaged with other IBMproducts.
You can expand your real-time collaboration capabilities in Lotus Sametime Entryby purchasing the Lotus Sametime Standard server to add meeting roomcapabilities and a richer instant messaging client to your environment.
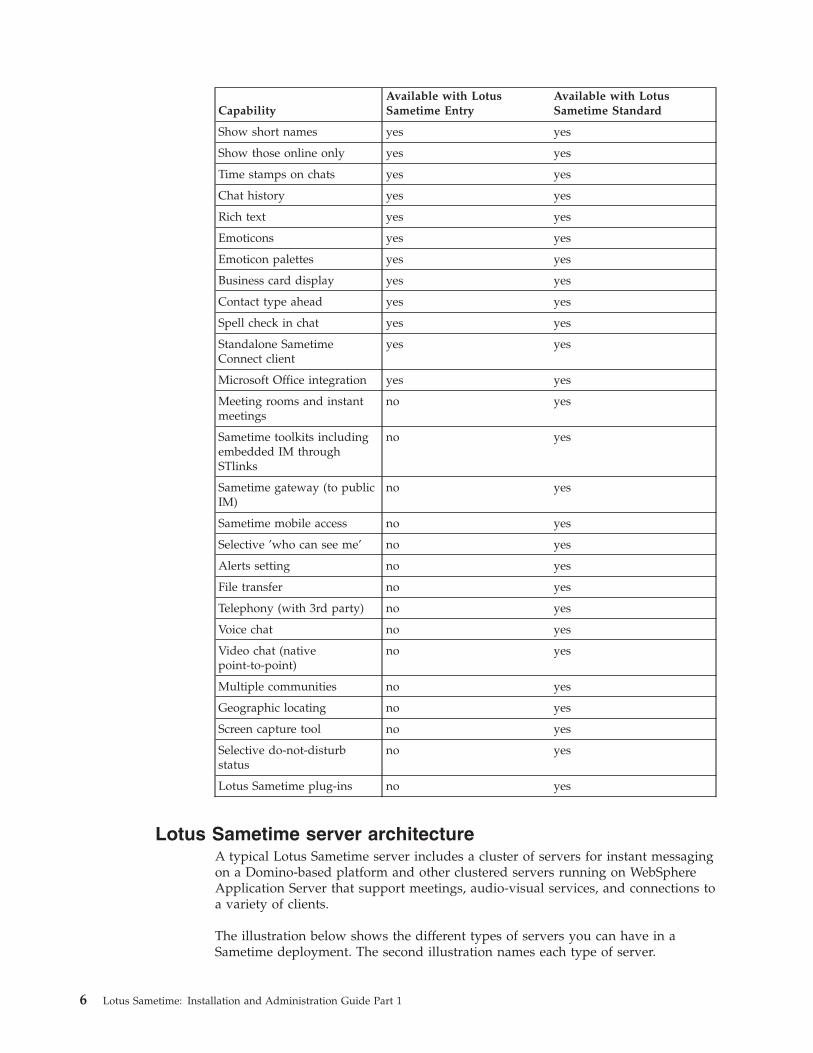
The following table compares the features of Lotus Sametime Entry and LotusSametime Standard.
CapabilityAvailable with LotusSametime Entry
Available with LotusSametime Standard
Presence yes yes
Instant Messaging chat yes yes
N-way (group) chat yes yes
Sort contact list yes yes
Chapter 1. Overview 5
CapabilityAvailable with LotusSametime Entry
Available with LotusSametime Standard
Show short names yes yes
Show those online only yes yes
Time stamps on chats yes yes
Chat history yes yes
Rich text yes yes
Emoticons yes yes
Emoticon palettes yes yes
Business card display yes yes
Contact type ahead yes yes
Spell check in chat yes yes
Standalone SametimeConnect client
yes yes
Microsoft Office integration yes yes
Meeting rooms and instantmeetings
no yes
Sametime toolkits includingembedded IM throughSTlinks
no yes
Sametime gateway (to publicIM)
no yes
Sametime mobile access no yes
Selective ’who can see me’ no yes
Alerts setting no yes
File transfer no yes
Telephony (with 3rd party) no yes
Voice chat no yes
Video chat (nativepoint-to-point)
no yes
Multiple communities no yes
Geographic locating no yes
Screen capture tool no yes
Selective do-not-disturbstatus
no yes
Lotus Sametime plug-ins no yes
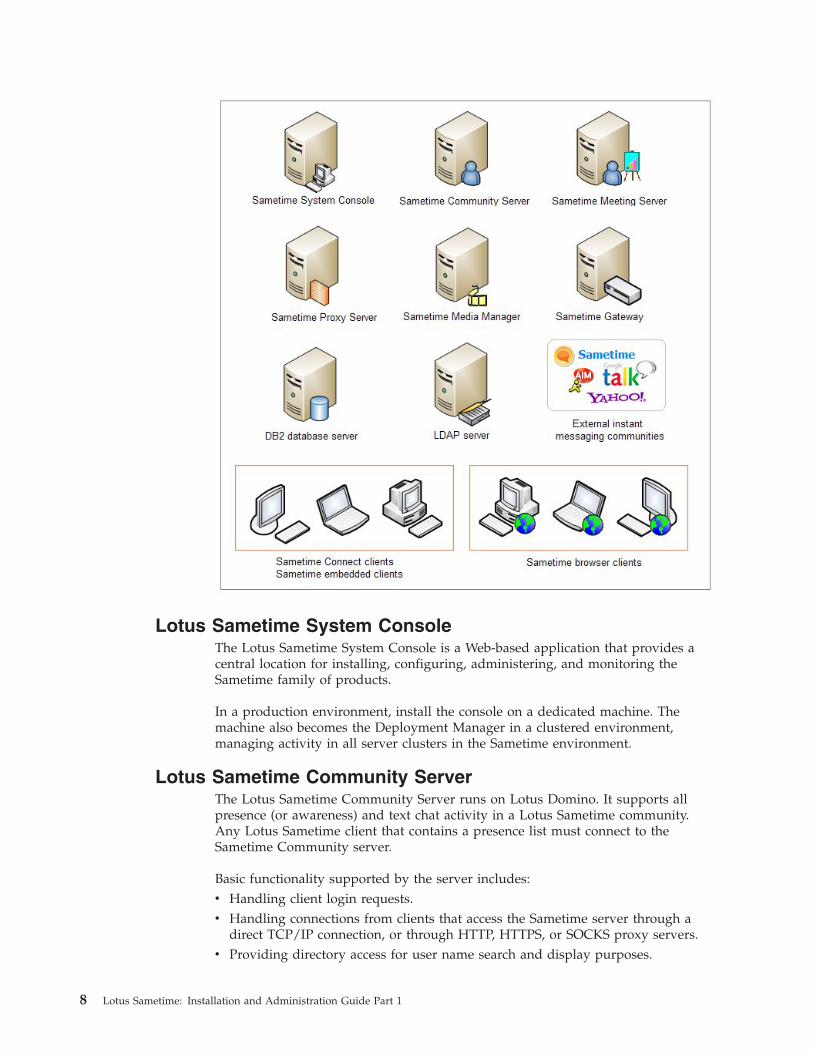
Lotus Sametime server architectureA typical Lotus Sametime server includes a cluster of servers for instant messagingon a Domino-based platform and other clustered servers running on WebSphereApplication Server that support meetings, audio-visual services, and connections toa variety of clients.
The illustration below shows the different types of servers you can have in aSametime deployment. The second illustration names each type of server.
6 Lotus Sametime: Installation and Administration Guide Part 1
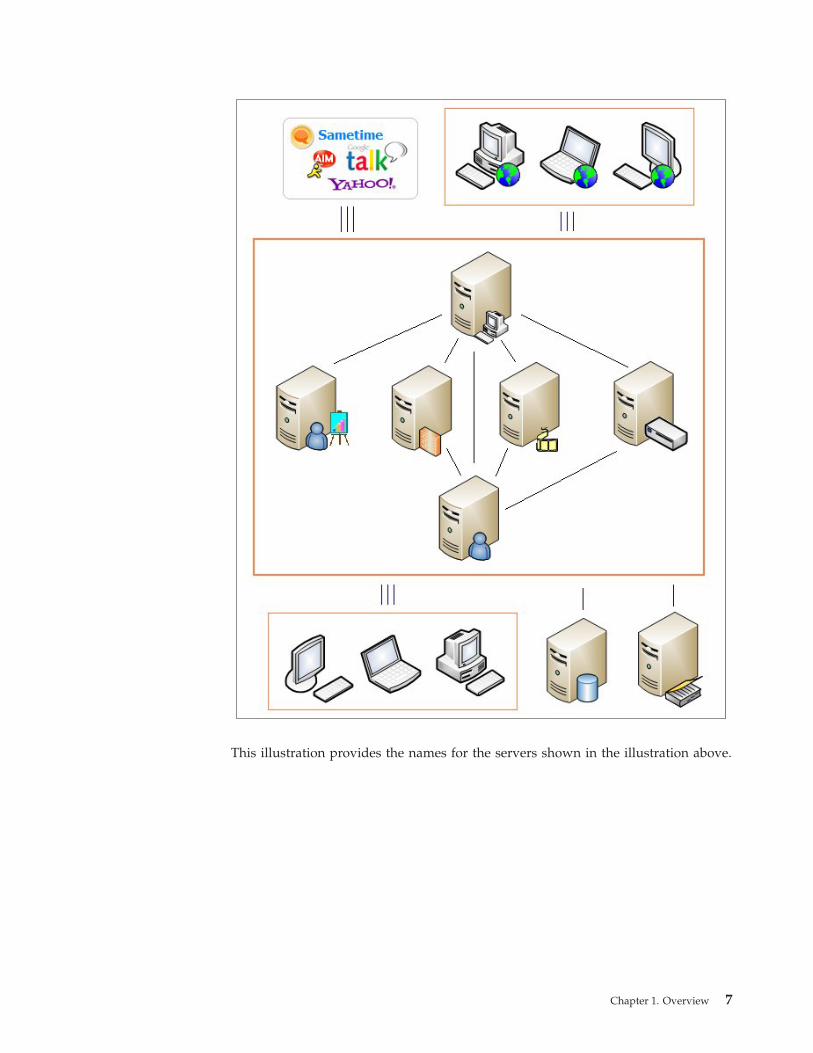
This illustration provides the names for the servers shown in the illustration above.
Chapter 1. Overview 7
Lotus Sametime System ConsoleThe Lotus Sametime System Console is a Web-based application that provides acentral location for installing, configuring, administering, and monitoring theSametime family of products.
In a production environment, install the console on a dedicated machine. Themachine also becomes the Deployment Manager in a clustered environment,managing activity in all server clusters in the Sametime environment.
Lotus Sametime Community ServerThe Lotus Sametime Community Server runs on Lotus Domino. It supports allpresence (or awareness) and text chat activity in a Lotus Sametime community.Any Lotus Sametime client that contains a presence list must connect to theSametime Community server.
Basic functionality supported by the server includes:v Handling client login requests.v Handling connections from clients that access the Sametime server through a
direct TCP/IP connection, or through HTTP, HTTPS, or SOCKS proxy servers.v Providing directory access for user name search and display purposes.
8 Lotus Sametime: Installation and Administration Guide Part 1
v Providing directory access to compile lists of all Sametime servers and users inthe community.
v Dissemination of presence and chat data to all users connected to CommunityServices.
v Maintenance and storage of privacy information, user preference settings, andpresence lists for online users.
v Handling connections from the Community Services on other Sametime serverswhen Using multiple non-clustered Lotus Sametime Community Servers.Server-to-server connections for the Lotus Sametime Community Server occur ondefault TCP/IP port 1516.
v Logging of server events to the General log settings (stlog.nsf).v Enabling a name entry prompt to appear when the ACL settings of a Domino
database enabled with IBM Lotus instant messaging technology allowsanonymous access. This name entry prompt ensures that the presence list in theSametime database can display a name for the user.
Lotus Sametime Proxy ServerThe IBM Lotus Sametime Proxy Server runs on WebSphere® Application Server. Itrequires a Lotus Sametime Community Server.
The Lotus Sametime Proxy Server communicates with the Lotus SametimeCommunity Server, Lotus Sametime Meeting server, Lotus Sametime ConnectionsServer, and Lotus Sametime Unified Telephony Server or TCSPI-enabled server.
The Proxy Server is responsible for the following activities:v It hosts the Sametime client for browsers.v It provides live names awareness for Sametime meetings, Business Cards, and
custom applications.v It replaces the Sametime Java Connect or Sametime Connect for Browsers client.v It can also replace the Sametime Links Toolkit.
Lotus Sametime Media ManagerThe IBM Lotus Sametime Media Manager runs on WebSphere Application Serverto provide audio visual services for chats and meetings. It requires a Lotusametime Community Server.
The Lotus Sametime Media Manager uses the Session Initiation Protocol (SIP) toprovide support for point-to-point and multipoint calls. It is designed to supportstandard audio and video codecs so that it works with other external audio andvideo vendors.
The Lotus Sametime Media Manager uses three components. In a pilotenvironment, the Lotus Sametime Media Manager components can all be installedon one server, but in a production environment, you should install each of thecomponents on its own server.v Conference server
The Conference server manages all conferences, including point-to-point andmultipoint. It works with the client to establish the SIP session for the call. Ithosts the internal TCSPI adapter and optionally an external TCSPI adapter.The Conference server requires access to LDAP, Meetings (optional), andProxy/Registrar (including transport protocol: UDP, TCP). The Conference serverwill handle workload management for conference sessions among the switchers.
Chapter 1. Overview 9
v Proxy and RegistrarThe Proxy and Registrar is responsible for location service and forwarding SIPmessages to a destination. It requires access to LDAP. You may also install andconfigure a database to be used with it.
v Packet switcherThe Packet switcher is responsible for receiving and sending media streams fromendpoints to other endpoints in a conference. The Switcher works on audiostreams to determine the active video stream to send to the participants, aprocess known as Voice-Activated Switching (VAS).The Packet switcher requires access to LDAP, Conference server, and mediaports (1 or a range of ports for audio, and 1 or a range of ports for video). If theswitchers are installed on the same machine, ensure that are no port conflicts.
If security is turned on, use SSL to allow servers to communicate.
Lotus Sametime Meeting ServerThe Lotus Sametime Meeting Server runs on WebSphere Application Server. Itrequires an IBM DB2 database and an LDAP server. The Meeting Server provides acentral meeting place for members of the community. When combined with theLotus Sametime Media Manager, meeting rooms can be enhanced withaudio-visual features.
Lotus Sametime GatewayIBM Lotus Sametime Gateway runs on WebSphere Application Server. It is aplatform for sharing presence and real-time collaboration with external instantmessaging communities.
Use Lotus Sametime Gateway to connect with any of the following gateways orcommunities:v Lotus Sametime communities deployed outside of your firewallv AOL Instant Messengerv Google Talkv Jabberv Yahoo Messenger
You can install one Lotus Sametime Gateway server or cluster of Lotus LotusSametime Gateway servers for a local Sametime community. A local communitycan be made up of one Sametime server, or a cluster of Sametime serversconnected by a common LDAP directory. Lotus Lotus Sametime Gateway does notsupport more than one local Sametime community and uses the same LDAPdirectory used by the local Sametime community.
Lotus Sametime Gateway is delivered with out-of-the-box functionality, such aspresence and instant messaging, filtering of blacklisted domains, user accesscontrol, and logging of user content, presence, and instant messaging events. Inaddition, all interactions with external domains are logged. Built upon a plug-intechnology, the Sametime Gateway allows IBM and third-party developers toenrich and customize message handlers for spam control and virus checking.
How Gateway connections work
Instant messaging and presence through the Lotus Sametime Gateway depend ondirect connections between companies. The following illustration shows a local
10 Lotus Sametime: Installation and Administration Guide Part 1
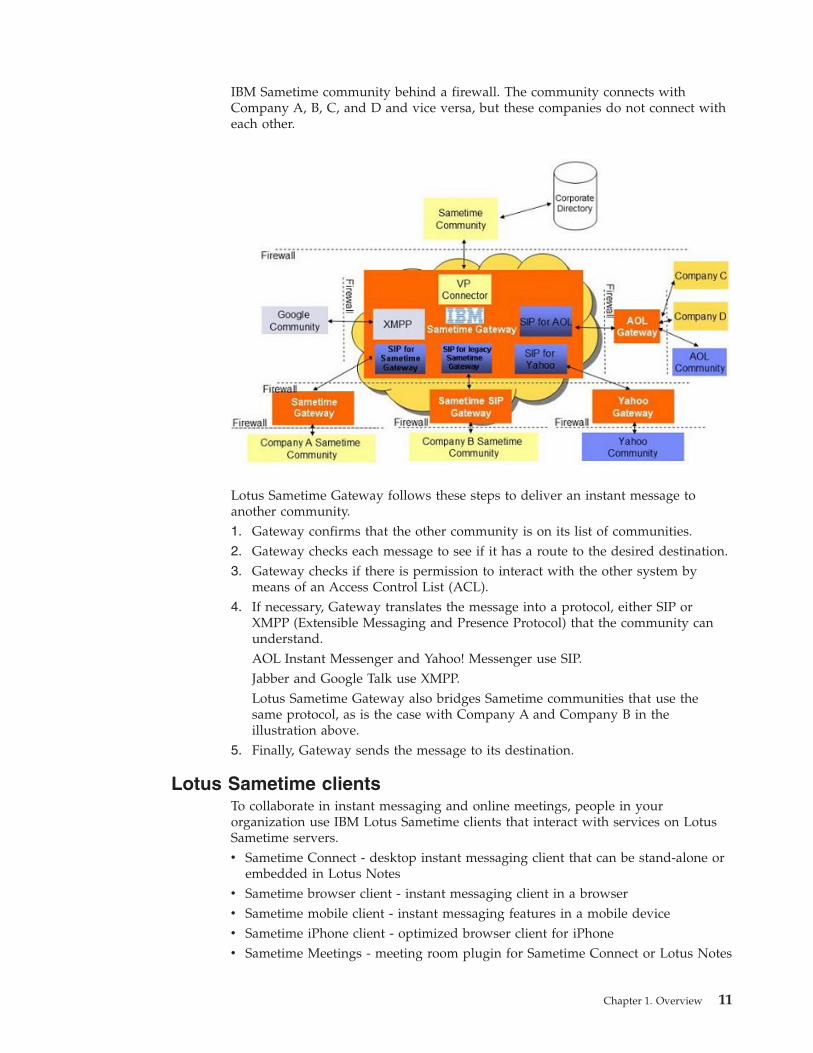
IBM Sametime community behind a firewall. The community connects withCompany A, B, C, and D and vice versa, but these companies do not connect witheach other.
Lotus Sametime Gateway follows these steps to deliver an instant message toanother community.1. Gateway confirms that the other community is on its list of communities.2. Gateway checks each message to see if it has a route to the desired destination.3. Gateway checks if there is permission to interact with the other system by
means of an Access Control List (ACL).4. If necessary, Gateway translates the message into a protocol, either SIP or
XMPP (Extensible Messaging and Presence Protocol) that the community canunderstand.AOL Instant Messenger and Yahoo! Messenger use SIP.Jabber and Google Talk use XMPP.Lotus Sametime Gateway also bridges Sametime communities that use thesame protocol, as is the case with Company A and Company B in theillustration above.
5. Finally, Gateway sends the message to its destination.
Lotus Sametime clientsTo collaborate in instant messaging and online meetings, people in yourorganization use IBM Lotus Sametime clients that interact with services on LotusSametime servers.v Sametime Connect - desktop instant messaging client that can be stand-alone or
embedded in Lotus Notesv Sametime browser client - instant messaging client in a browserv Sametime mobile client - instant messaging features in a mobile devicev Sametime iPhone client - optimized browser client for iPhonev Sametime Meetings - meeting room plugin for Sametime Connect or Lotus Notes
Chapter 1. Overview 11
v Sametime Meeting Room Center in a browser - online access to Sametimemeeting rooms
v Sametime Classic Meetings client - Java-based meeting room client interacts withthe Sametime Classic Meeting Server.
Integrating Lotus Sametime with Microsoft Office applicationsYou can integrate Lotus Sametime with Microsoft Office to enable Windows usersto talk and meet without leaving their Microsoft Office applications. You can alsointegrate Lotus Sametime with the Office SharePoint Server to enable LotusSametime users to communicate with Office SharePoint Server users from aSharePoint site.
The administrator decides which features to make available to clients. If youenable all features for clients, they have access to the following Sametime featuresfrom Microsoft Word, Microsoft PowerPoint, and Microsoft Excel.v Presence awareness
Names within Microsoft documents are instant-messaging-aware, which meansusers can see if a document author—or any name included in a document—isonline. This is helpful, for example, if a user is reviewing a client proposal andcannot proceed without verifying a project estimate with the writer. Presenceawareness allows the user to see immediately—directly from the proposal—thatthe writer is online and available to answer questions.
v Business-class instant messaging
Instant-messaging capabilities within Microsoft documents can help users getinformation and answers quickly, so they can work unimpeded. For example, toverify a data point in an Excel spreadsheet, a user can start a chat directly fromthe spreadsheet. There’s no need to leave the spreadsheet to start a chat or evena Voice over Internet Protocol (VoIP) call.
v Web conferencing
Users can also initiate Web conferences directly from Microsoft Officeapplications, for those projects that require collaboration to move them along. Auser working on a chart within a PowerPoint presentation, seeing that it needssome refining, can use Web conferencing to collaborate with team members.Sharing the presentation in real time, and even jointly editing it live, saves timethat would otherwise be spent sending e-mails or managing multiple versions ofthe content.
Related tasks
“Enabling installation of optional client features such as Microsoft OfficeIntegration” on page 200IBM Lotus Sametime ships with a number of optional client features that are notincluded in the default installation package. You can add features to theinstallation package for new client installs, as well as update already-installedclients.“Installing Sametime Integration for Microsoft Office” on page 217IBM Lotus Sametime integration with Microsoft Office allows you to collaborate,create meetings, and chat with coworkers through Microsoft Office applications.Lotus Sametime integration with the Microsoft Office SharePoint Server allowssimilar collaboration features with coworkers who use Office SharePoint Server astheir instant messaging application.
Lotus Sametime Advanced and Lotus Sametime UnifiedTelephony clientsThe users at your site must install the IBM Lotus Sametime Connect client andplug-ins that are compatible with your Lotus Sametime deployment.
12 Lotus Sametime: Installation and Administration Guide Part 1
Since the release cycles for Lotus Sametime, Lotus Sametime Advanced, and LotusSametime Unified Telephony vary, be sure that you deploy the correct version ofthe Lotus Sametime Connect client and plug-ins. This is especially important whenyou have a deployment that mixes different versions of these Lotus Sametimecomponents. You should deploy the version of the Lotus Sametime Connect clientthat is compatible with the versions of the Lotus Sametime Advanced and LotusSametime Unified Telephony servers deployed at your site. Once Lotus SametimeAdvanced 8.5 is released, your users can upgrade to the Lotus Sametime Connect8.5 client.
Lotus Sametime 8.5 supports the following clients on Windows XP and Vista:v Lotus Sametime Connect 8.5v Lotus Sametime Connect 8.5 embedded in Lotus Notes 8.5.1v Lotus Sametime Connect 8.0.2 embedded in Lotus Notes 8.5.1v Lotus Sametime Connect 8.0.2 with the Lotus Sametime Advanced plug-inv Lotus Sametime Connect 8.0.2 with the Lotus Sametime Unified Telephony
plug-insv Lotus Sametime Connect 8.0.2 with the Lotus Sametime Unified Telephony
plug-ins embedded in Notes® 8.5.1v Lotus Sametime Connect 8.0.2 with the Lotus Sametime Advanced and Lotus
Sametime Unified Telephony plug-ins.
Lotus Sametime Advanced update sites.
For Lotus Sametime Advanced, you can ensure that users get the correct plug-inby delivering the correct version of the Lotus Sametime Advanced update site forthe Sametime or Notes client that they are using. The Lotus Sametime Advancedupdate site for Lotus Sametime Connect 8.0.2 is available, now. Once the LotusSametime Advanced update sites for Lotus Sametime Connect 8.5 and Lotus Notes8.5.1 are available, then users can upgrade to the Lotus Sametime Connect 8.5 orLotus Notes 8.5.1 clients with the Lotus Sametime Advanced plug-ins.
For more information, see the system requirements for the Lotus Sametime familyof products at:http://www.ibm.com/support/docview.wss?rs=477&uid=swg27016451
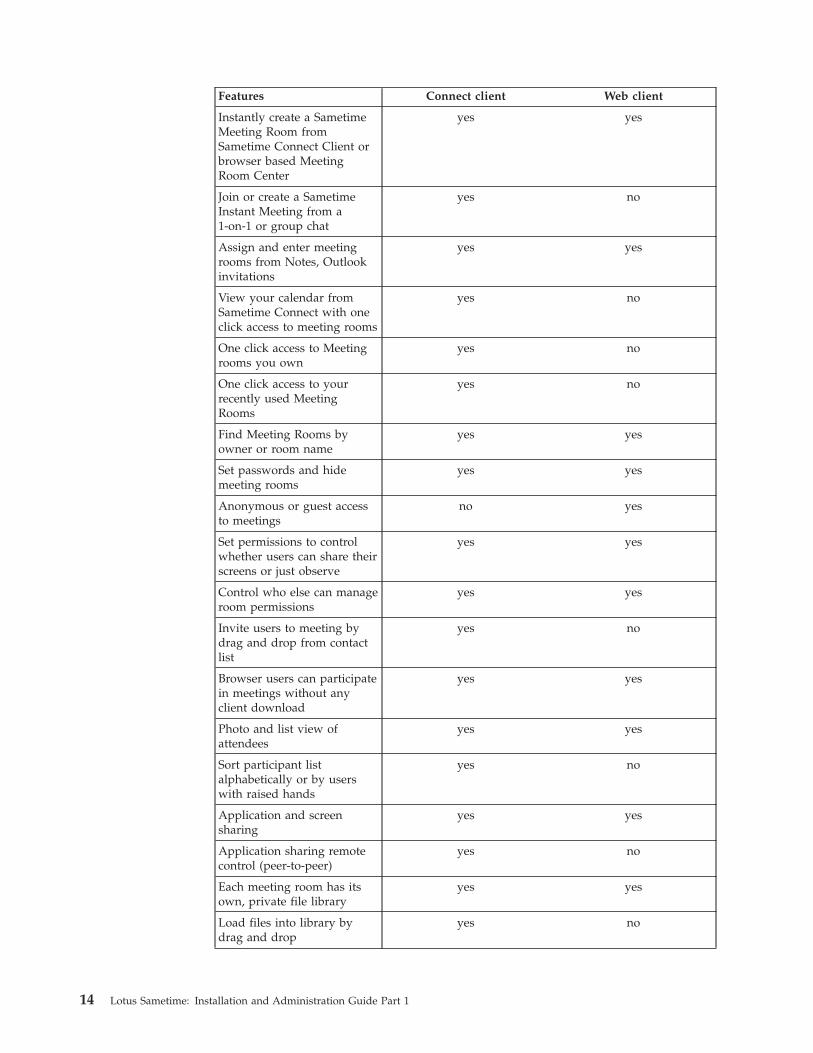
Meeting features in Connect versus Web clientsThe table below compares meeting features available to the Sametime Connectclient (rich client) and the Web client.
Features Connect client Web client
Reservationless, persistentmeeting rooms, available 24x 7 for participant use
yes yes
Instantly create a SametimeMeeting Room fromSametime Connect Client orbrowser based MeetingRoom Center
yes yes
Reservationless, persistentmeeting rooms, available 24x 7 for participant use
yes yes
Chapter 1. Overview 13
Features Connect client Web client
Instantly create a SametimeMeeting Room fromSametime Connect Client orbrowser based MeetingRoom Center
yes yes
Join or create a SametimeInstant Meeting from a1-on-1 or group chat
yes no
Assign and enter meetingrooms from Notes, Outlookinvitations
yes yes
View your calendar fromSametime Connect with oneclick access to meeting rooms
yes no
One click access to Meetingrooms you own
yes no
One click access to yourrecently used MeetingRooms
yes no
Find Meeting Rooms byowner or room name
yes yes
Set passwords and hidemeeting rooms
yes yes
Anonymous or guest accessto meetings
no yes
Set permissions to controlwhether users can share theirscreens or just observe
yes yes
Control who else can manageroom permissions
yes yes
Invite users to meeting bydrag and drop from contactlist
yes no
Browser users can participatein meetings without anyclient download
yes yes
Photo and list view ofattendees
yes yes
Sort participant listalphabetically or by userswith raised hands
yes no
Application and screensharing
yes yes
Application sharing remotecontrol (peer-to-peer)
yes no
Each meeting room has itsown, private file library
yes yes
Load files into library bydrag and drop
yes no
14 Lotus Sametime: Installation and Administration Guide Part 1
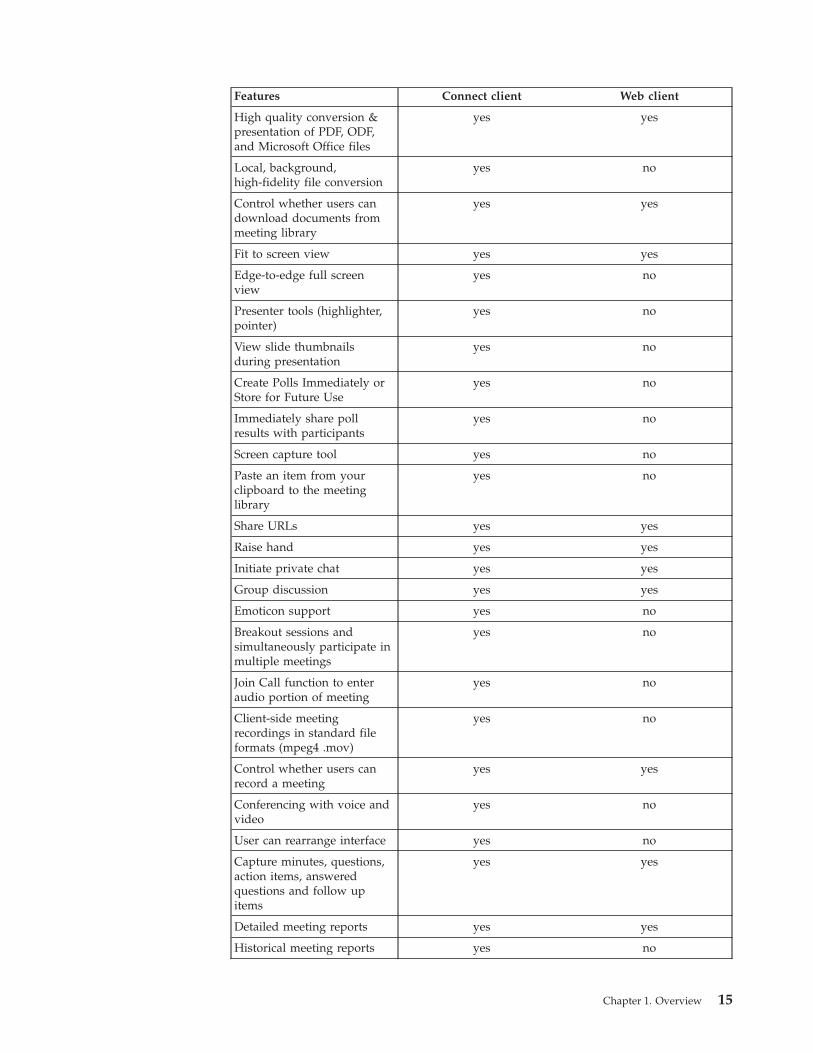
Features Connect client Web client
High quality conversion &presentation of PDF, ODF,and Microsoft Office files
yes yes
Local, background,high-fidelity file conversion
yes no
Control whether users candownload documents frommeeting library
yes yes
Fit to screen view yes yes
Edge-to-edge full screenview
yes no
Presenter tools (highlighter,pointer)
yes no
View slide thumbnailsduring presentation
yes no
Create Polls Immediately orStore for Future Use
yes no
Immediately share pollresults with participants
yes no
Screen capture tool yes no
Paste an item from yourclipboard to the meetinglibrary
yes no
Share URLs yes yes
Raise hand yes yes
Initiate private chat yes yes
Group discussion yes yes
Emoticon support yes no
Breakout sessions andsimultaneously participate inmultiple meetings
yes no
Join Call function to enteraudio portion of meeting
yes no
Client-side meetingrecordings in standard fileformats (mpeg4 .mov)
yes no
Control whether users canrecord a meeting
yes yes
Conferencing with voice andvideo
yes no
User can rearrange interface yes no
Capture minutes, questions,action items, answeredquestions and follow upitems
yes yes
Detailed meeting reports yes yes
Historical meeting reports yes no
Chapter 1. Overview 15
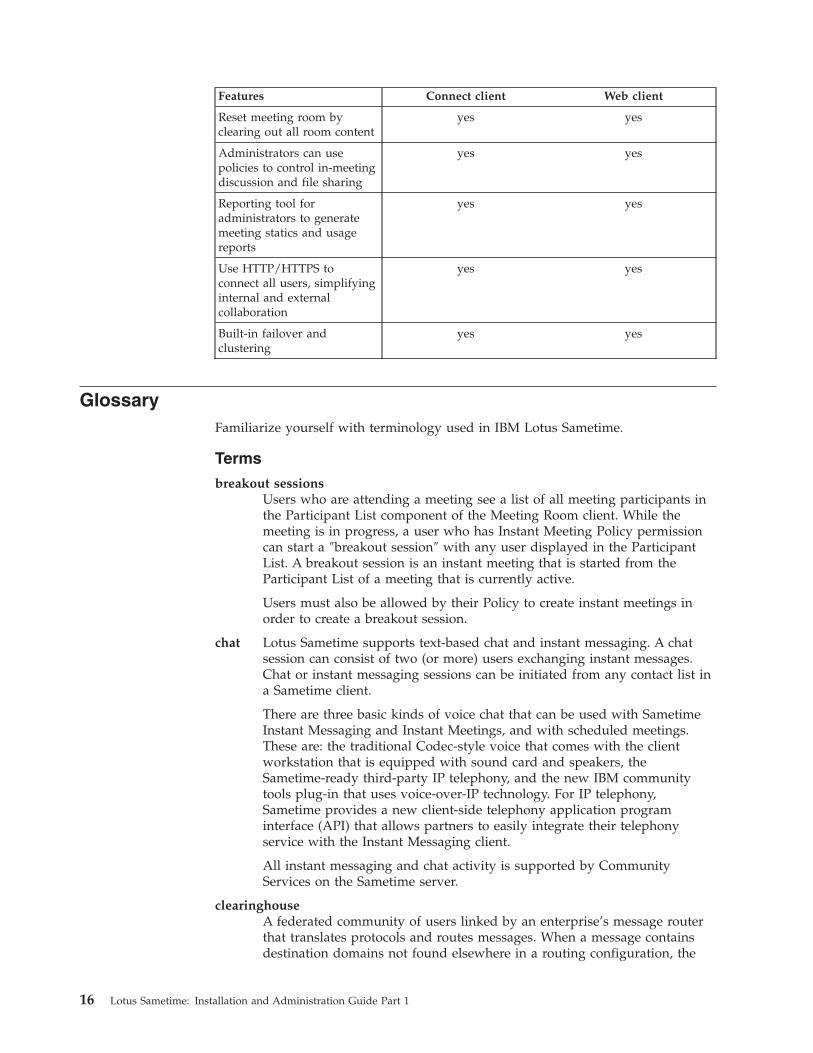
Features Connect client Web client
Reset meeting room byclearing out all room content
yes yes
Administrators can usepolicies to control in-meetingdiscussion and file sharing
yes yes
Reporting tool foradministrators to generatemeeting statics and usagereports
yes yes
Use HTTP/HTTPS toconnect all users, simplifyinginternal and externalcollaboration
yes yes
Built-in failover andclustering
yes yes
GlossaryFamiliarize yourself with terminology used in IBM Lotus Sametime.
Terms
breakout sessionsUsers who are attending a meeting see a list of all meeting participants inthe Participant List component of the Meeting Room client. While themeeting is in progress, a user who has Instant Meeting Policy permissioncan start a ″breakout session″ with any user displayed in the ParticipantList. A breakout session is an instant meeting that is started from theParticipant List of a meeting that is currently active.
Users must also be allowed by their Policy to create instant meetings inorder to create a breakout session.
chat Lotus Sametime supports text-based chat and instant messaging. A chatsession can consist of two (or more) users exchanging instant messages.Chat or instant messaging sessions can be initiated from any contact list ina Sametime client.
There are three basic kinds of voice chat that can be used with SametimeInstant Messaging and Instant Meetings, and with scheduled meetings.These are: the traditional Codec-style voice that comes with the clientworkstation that is equipped with sound card and speakers, theSametime-ready third-party IP telephony, and the new IBM communitytools plug-in that uses voice-over-IP technology. For IP telephony,Sametime provides a new client-side telephony application programinterface (API) that allows partners to easily integrate their telephonyservice with the Instant Messaging client.
All instant messaging and chat activity is supported by CommunityServices on the Sametime server.
clearinghouseA federated community of users linked by an enterprise’s message routerthat translates protocols and routes messages. When a message containsdestination domains not found elsewhere in a routing configuration, the
16 Lotus Sametime: Installation and Administration Guide Part 1
message is routed to a clearinghouse. A route to a clearinghouse enablesLotus Sametime Gateway users to connect to a much wider community.
communityThe Lotus Sametime community refers to all users that have Web browseraccess to a Sametime server (or servers) and all Sametime servers thatsupport those users. The Sametime community can be maintained in theDomino Directory on the Sametime Server or in an LDAP Directory on athird-party LDAP-compliant server. Specifically, the Sametime communitycan be described as a shared directory, or set of directories, that lists thepeople and groups of the community, and as one or more Sametimeservers that each have access to the shared directory or set of directories
connectivity (firewall and proxy support)To engage in collaborative activities, the Sametime clients must connect tovarious services on the Sametime server. The HTTP Services, CommunityServices, Meeting Services, Recorded Meeting Broadcast Services, andAudio/Video Services on the Sametime server listen for connections fromclients on different TCP/IP ports. Because of the number of ports requiredto support the full range of collaborative activities, Sametime includesspecially-designed connectivity features that enable Sametime clients toestablish connections through firewalls and proxy servers.
Domino DirectoryThe Lotus Sametime server uses the Domino Directory of the Dominoserver on which Sametime is installed. The Domino Directory is a databasethat serves as a central repository for information about Sametime users (ormembers of the Sametime community). The Domino Directory contains aseparate Person document for each Sametime user. The Person documentcontains the User Name and Internet password required for authenticationwith the Sametime server. The Person document also contains a ″Sametimeserver″ field that is used to specify a user’s home Sametime server. Thehome ″Sametime server″ is the Sametime server a user connects to whenlogging in to the Community Services for presence and chat activity. TheDomino Directory also contains Group documents that hold lists of usersthat perform similar tasks. Group documents also define the Public Groupsthat users can add to the Sametime Connect client presence list.
hand raiseHand raise is a collaborative activity that allows users to raise a hand atany time during a meeting. When users raise their hands, a hand iconappears next to their names in the Participant List.
IP audioInteractive IP Audio is a Lotus Sametime collaborative activity that enablesmultiple (two or more) users to transmit and receive audio over an IPnetwork. In a meeting that includes interactive IP audio, the audio canoperate in either the ″automatic microphone″ or the ″request microphone″mode. The request microphone mode is the more controlled mode. Onlyone user can speak at a time and a user must request the microphonebefore speaking. The automatic microphone mode enables two users tospeak simultaneously. In the automatic microphone mode, the personspeaking is automatically detected by the Audio/Video Services on theSametime server (it is not necessary to request the microphone beforespeaking). Automatic microphone mode offers a more natural form ofconversation but provides less control.
IP videoInteractive IP video is a Lotus Sametime collaborative activity that enables
Chapter 1. Overview 17
multiple users to transmit and receive video packets over an IP network. Ina meeting that includes interactive IP video, the video follows the audio.The video component of the Sametime Meeting Room client includes aRemote and Local video window. The Remote window displays imagesfrom the camera of the person who is speaking and the Local windowdisplays the image from a user’s local camera.
LDAP directoryThe administrator can configure the Lotus Sametime server to connect to aLightweight Directory Access Protocol (LDAP) server. This capabilityenables an administrator to integrate Sametime into an environment inwhich LDAP servers and LDAP directories are already deployed. WhenSametime is configured to connect to an LDAP server, the Sametime serversearches and authenticates user names against entries in the LDAPdirectory on the third-party LDAP server. The LDAP directory replaces theDomino Directory as the user repository in the community. The communityis defined by the users in the LDAP directory.
loggingThe Sametime server logging tools include the Sametime log and theDomino® log. The Sametime log records events in the Sametime logdatabase (stlog.nsf). The Sametime Administration Tool includes loggingsettings that enable you to control whether activities are logged to adatabase or to text files and to determine which activities are logged. Ifyou log Sametime information to a database, you can view the Sametimelog from the Sametime Administration Tool.
The Sametime Administration Tool also allows an administrator to launchthe Domino Web Administration Tool to view the Domino log. TheDomino log includes information about available memory and disk space,server performance, and databases that need maintenance.
meetingsLotus Sametime meetings are either ″instant″ or ″scheduled.″ An instantmeeting is started immediately from a presence list in any Sametime client.Whiteboard files cannot be saved during instant meetings. Instant meetingscannot be recorded. A scheduled meeting is scheduled to start at aparticular time and date. Scheduled meetings are created in advance in theSametime Meeting Center application (stconf.nsf) on the Sametime server.
The Meeting Services and the Community Services support the starting,stopping, and creation of meetings on the Sametime server. Components ofthe Sametime Meeting Room clients interact with the Meeting Services,Community Services, and Audio/Video Services when participating inSametime meetings. The Meeting Room Client provides telephony andvideo features for meetings (Web conferences). When attending a meeting,a participant can click the ’Join the call’ button on the Meeting page.Teleconferencing services are extensible through the use of TelephonyConferencing SPI (TCSPI) For Audio teleconferencing, telephone servicescan be made available for meetings and chats, allowing the user to initiatea call for selected users or for everyone in the meeting/chat, usingtelephone network or voice over IP (VoIP). Server establishes the phoneconference by calling each participant. Audio/video services include VoIPand video services for meetings, using G.711 and G.723 audio codecs, andH.263+,, and can be selected when a user schedules a meeting or launchesan instant meeting.
monitoringThe Sametime server includes charts that allow you to monitor current
18 Lotus Sametime: Installation and Administration Guide Part 1
Sametime server statistics. The monitoring charts, which are presented astables, provide up-to-the-second information about Community Services,Meeting Services, Recorded Meeting Broadcast Services, Audio/VideoServices, Web statistics, and free disk space on the server.
pollingPolling is a Sametime collaborative activity that enables a Room Owner orManager to use polls (or ask questions) to gather feedback from meetingparticipants. For example, the Moderator might ask meeting participants tovote to approve or reject a proposal. Any Sametime Connect users cansend polls. Users with share permission for the Sametime Connect cancreate polls.
The administrator controls whether this collaborative activity is availablefor meetings on the Sametime server from the Configuration - MeetingServices - General tab of the Sametime Administration Tool.
presencePresence refers to the ability of a user to detect when other users areonline. A user can view a presence list in a Lotus Sametime client orapplication that displays the names of other online users. Presence issometimes called ″awareness″ or ″online awareness.″
A presence list (or contact list) is a starting point for immediate or ″instant″collaboration. Presence lists in Sametime clients display the names ofonline users in bold green text. Instant messaging sessions and instantmeetings can be started immediately from a contact list. A user simplydouble-clicks or right-clicks an online user’s name to send an instantmessage or start an instant meeting.
Contact lists are found in all Sametime clients. The Sametime Connectclient includes a contact list that can display the names of all users in thecommunity who are online. The Sametime Meeting Room client contains aParticipant List that displays the names of all users attending a particularmeeting.
A user logs in to the Community Services on the Sametime server tobecome present in the community or an online place (such as a Sametimemeeting or Web site enabled with Sametime technology). The CommunityServices on the Sametime server support all presence functionality inSametime.
record and playback (recorded meetings)Lotus Sametime includes a Record and Playback feature that enables a userto record meetings. When scheduling a meeting, the user selects a checkbox labeled ″Record this meeting so that others can replay it later″ torecord the meeting.
Reverse proxy and portal server supportA Sametime server can be deployed behind a reverse proxy server or aportal server. When a Sametime server is deployed on an internal networkbehind a reverse proxy server, the reverse proxy server operates as anintermediary between the Sametime server and the Sametime clients. AllSametime data flowing between the Sametime server and its clients passesthrough the reverse proxy server. To accomplish its security objectives, areverse proxy server manipulates the data that passes through it. Themanipulation of Sametime data by the reverse proxy server imposesspecific requirements and limitations on the use of reverse proxy serverswith the Sametime server.
Chapter 1. Overview 19
Sametime Administration ToolThe Sametime®Administration Tool is an HTML and XML basedapplication that runs in a Web browser. You open the SametimeAdministration Tool by clicking ″Administer the Server″ on the Sametimeserver home page. The Sametime Administration Tool is the primaryadministration tool for the Sametime server.
Sametime GatewayIBM Lotus Sametime Gateway serves as the clearinghouse of presence,using Extensible Messaging and Presence Protocol (XMPP), Virtual Place(VP) protocol, and Session Initiation Protocol (SIP) to connect clients bothinside and outside your corporate environment. The Sametime Gatewayopens Sametime to external instant messaging access. You can enable thisfunctionality to allow users in your community to communicate with usersin another Sametime community that contains a Sametime server with theSametime Gateway functionality enabled. Enabling the Sametime Gatewayfunctionality requires the installation of separate components
Sametime Meeting Center (stconf.nsf)The Sametime Meeting Center is an application (a Lotus Notes® databasenamed stconf.nsf) on the Sametime server that is accessed by a Webbrowser. This application is a central meeting place for members of theSametime community. From the Sametime Meeting Center, you canschedule a meeting, start a meeting immediately, attend a meeting, andview information about scheduled and finished meetings. All scheduledmeetings in Sametime are created in the Sametime Meeting Center. A userwho starts an instant meeting from a contact list does not access theSametime Meeting Center. Anonymous access is allowed to the SametimeMeeting Center database by default. With anonymous access, users are notrequired to authenticate when accessing the Sametime Meeting Center.
Sametime serverThe term Sametime server is used throughout the documentation to referto a server that has both Lotus Sametime and Domino installed.
Sametime server clustersThe Sametime server supports Sametime server clustering. Sametimeserver clusters enhance server scalability and reliability to enable Sametimeto meet the demands of large user populations, and provide load balancingand failover capabilities for Sametime Community Services and MeetingServices.
Sametime server home page (stcenter.nsf)The Lotus Sametime server home page is an HTML page that exists in theSametime Center database (stcenter.nsf). The Sametime server home pagecan only be accessed by a Web browser and is the user entry point to theSametime server. After installing the Sametime server on the Dominoserver, you must set stcenter.nsf as the Home URL for the server. To dothis, open the Server document for the Domino server that includesSametime, select the Internet Protocols tab, select the HTTP tab, and enterstcenter.nsf in the Home URL field of the Mapping section of the Serverdocument.
screen sharingScreen sharing is a Lotus Sametime collaborative activity that enablesmultiple users to work within a single application on one user’s computer.Geographically dispersed users in remote locations can collaborate within asingle application to produce a document, spreadsheet, blueprint, or any
20 Lotus Sametime: Installation and Administration Guide Part 1
other file generated from a Windows application. Screen sharing issometimes also referred to as ″application sharing.″
In a meeting that includes screen sharing, one user uses the screen-sharingtool in the Sametime Meeting Room client to share a screen or applicationon the user’s local computer with other meeting participants in remotelocations. The other meeting participants also use the screen-sharing toolsof the Sametime Meeting Room client on their local computers to view andmake changes to the shared screen or application. It is not necessary forthe remote users to have the application that is being shared installed ontheir local systems. (The remote users share a single instance of theapplication that is running on only one meeting participant’s computer.)
Only one user at a time can be in control of the shared screen. Most userssee the initials of the user who controls the shared screen beside the cursor.The person who is sharing the screen does not see the initials whensomeone else controls the shared screen. The person who is sharing thescreen must view the Participant List details to confirm who controls theshared screen.
The administrator controls whether this collaborative activity is availablefor meetings on the Sametime server from the Configuration - MeetingServices - General tab of the Sametime Administration Tool.
The administrator controls whether screen sharing is available for meetingparticipants by setting the Policies - ″Allow screen sharing″ options of theSametime Administration Tool. Note that policy is group or user-specific
Screen sharing is supported by T.120 components of the Meeting Serviceson the Sametime server. For more information about using thiscollaborative activity in a meeting, see the Sametime user online help.
securityThe Sametime server uses the Internet and intranet security features thatare available on the Domino server on which it is installed. Generally, youuse the Access Control Lists (ACLs) of databases on the Sametime server toprovide users with anonymous access or basic password authentication toindividual databases on the server. In addition to the Domino Internet andintranet security features, the Sametime server requires ″authentication bytoken″ security mechanisms to ensure that Sametime clients that establishconnections to the Sametime services are authenticated. These securitymechanisms include the Sametime Secrets and Tokens authenticationdatabases and the Domino Single Sign-On (SSO) authentication feature.
self-registrationThe Lotus Sametime server includes a self-registration feature. This featureallows an user to create a Person document that contains a User Name andInternet password in the Domino Directory on the Sametime server. Theself-registration feature is available to users from the Register link of theSametime server home page. The administrator has the option of allowingor not allowing self-registration. Self-registration can reduce the workloadfor the administrator because it enables users to add themselves to theDomino Directory (create a Person document in the directory containing aUser Name and Internet password). Allowing self-registration can involvesecurity risks because it enables anonymous users to create records in theDomino Directory. These records permit anonymous users to authenticatewith databases on the server. Self-registration is not allowed by default.Also, self-registration cannot be used if Sametime is configured to operatewith an LDAP directory.
Chapter 1. Overview 21
send web pagesSend Web Pages is a Lotus Sametime collaborative activity that enables aMeeting Moderator to send a Web page URL to all participants in ameeting. When the Moderator sends a Web page URL to the meetingparticipants, a browser window opens on each participant’s screen anddisplays the Web page. If the Moderator sends an additional Web pageURL to the meeting participants, the new Web page replaces the previousWeb page in the Web browser window.
The administrator controls whether this collaborative activity is availablefor meetings on the Sametime server from the Configuration - MeetingServices - General settings of the Sametime Administration Tool.
shared whiteboard and slides toolsThe slides and shared whiteboard tools are Lotus Sametime collaborativeactivities. The slides tab in the meeting room supports uploadedpresentations and other documents, while the whiteboard tab provides awhite page on which meeting participants can draw. Both activitiesprovide annotation tools that can be used for drawing and highlighting.
In a slides presentation of a web conference or e-meeting, the meetingchair or other presenter displays a slide visible to participants on theircomputers. Remote meeting participants can view the images and annotatethe images using the annotation tools in the Sametime Meeting Room.Before slides can be presented in a meeting, a file containing the slide(s)must be attached to the meeting.
The meeting chair or creator can attach files before or during meetings,and any presenter can attach files during meetings.
StdebugTool.exe utilityYou can use the StdebugTool.exe utility to produce trace files and createnew trace file sets for troubleshooting purposes. These trace files containdebug messages that aid IBM Technical Support in troubleshootingSametime server problems. If you have never worked with Sametime tracefiles before, you should use the StdebugTool.exe utility only under theguidance of IBM Technical Support.
transfer filesTransferring files is a Lotus Sametime collaborative activity that enablesusers to send a file to another user via a contact list in the SametimeMeeting Room or the Sametime Connect client. Users must transfer one fileat a time to one person at a time. File transfers are automaticallyencrypted. The administrator can enable or disable this feature. When youenable this feature, both authenticated and anonymous users can transferfiles. The administrator can also disallow certain file types such as .exe filetypes.
The file transfer feature does not work with Sametime Links. For moreinformation about Sametime Links, see the Sametime Directory andDatabase Access Toolkit documentation available from IBMDeveloperWorks (http://www.ibm.com/developerworks/lotus/products/instantmessaging/.
22 Lotus Sametime: Installation and Administration Guide Part 1
Chapter 2. Planning
This section contains information about planning for information technologydepartments, including installers and administrators.
Skills needed for Sametime administrationAdministering a Lotus Sametime deployment calls for skills in several differenttechnologies. There are many IBM learning resources that can help you develop theskills you need.
WebSphere Application Server configuration and maintenance
View performance information about server and application components
WAS proxy, SIP, and HTTP servers
Use problem determination tools and log files to troubleshoot problems
Resources for information:
v System Administrator skills for IBM WebSphere Application Server 7v Education Assistant for WebSphere Application Server 7v WebSphere Application Server education
WebSphere Application Server application management
Use WebSphere Application Server administrative tools to configure and manageenterprise applications
Configure security for server-side application resources
WebSphere Application Server clustering
Deploy applications in clustered environments
Resources for information:
v IBM Certified System Administrator - WebSphere Application Server NetworkDeployment V7.0
LDAP directory management
Install and set up an LDAP directory
Manage users
DB2® database management
Creating and managing DB2 databases
Resources for information:
v DB2 education
© Copyright IBM Corp. 1996, 2009 23
v DB2 9.5 for Linux, UNIX®, and Windows Transition from DB2 9
Domino server administration
Domino is required for Sametime. The administrator should know:v Notes and Domino basics (what they are, how used)v Installation and setup of Notes and Domino.v How to monitor the Domino server tasks (logs, alerts)v Basic Domino networking (setup/configuration).v Security (levels, including how ACLs work, server security)v Server tasks (what are they, how to change, how used, access)v Administrator client (how to use, accessing from the web)v How to set up, configure, and manage users and groups in a Domino directory
Resources for information:
v Lotus Domino product home pagev Education Offerings on IBM Lotus Notes Domino 8/ 8.5
Secure Sockets Layer (SSL) configuration
Knowledge of certificate management
SSL management in Domino and WebSphere Application Server environments
Audio/Video technology
Audio/Video transmission protocols (STUN, TURN, ICE)
Audio/Video codecs (Media Manager)
System requirementsSystem requirements for installing IBM Lotus Sametime, including supportedoperating systems, databases, LDAP servers, Lotus Sametime servers, browsers,and JDKs.
System requirements for this release of the Lotus Sametime family of products ismaintained as an IBM Tech Note at the following Web address:http://www.ibm.com/support/docview.wss?rs=477&uid=swg27016451
Downloading Lotus Sametime files for installationIBM enables users to download IBM Lotus Sametime installation kits from thePassport Advantage® Web site.
About this task
Follow the steps for your operating system.1. AIX®, Linux, Solaris, Windows
a. To download installation packages, you must have an IBM PassportAdvantage account, which is described at the following Web address:www.ibm.com/software/howtobuy/passportadvantage/paocustomer/docs/en_US/ecare.html
24 Lotus Sametime: Installation and Administration Guide Part 1
b. Open this release’s Download document at the following Web address:http://www.ibm.com/support/docview.wss?rs=477&uid=24024322
Locate the components you need in the document’s listing, then downloadthe packages labelled with the corresponding part numbers to the systemon which you are installing.
c. Extract the files to a local directory.d. Verify that you have at least 1 GB of temporary space to run the installation
in your %TEMP% or /tmp directory.2. IBM i: (for Sametime Community Server installations from downloaded
images)a. To download installation packages, you must have an IBM Passport
Advantage account, which is described at the following Web address:www.ibm.com/software/howtobuy/passportadvantage/paocustomer/docs/en_US/ecare.html
b. Open this release’s Download document at the following Web address:http://www.ibm.com/support/docview.wss?rs=477&uid=24024322
Locate the components you need in the document’s listing, then downloadthe packages labelled with the corresponding part numbers.
c. On your workstation, run the downloaded .exe file to extract the followingfiles:v A short Readme documentv Q5724J23IM: IBM i binary save file containing the Sametime *BASE
optionv Q5724J23WC: IBM i binary save file containing Sametime option 1
(This file is included with Lotus Sametime Standard, but not with LotusSametime Entry.)
Complete the remaining steps to transfer the save files from yourworkstation to the system where you plan to install the SametimeCommunity server.
3. IBM i (for installations from downloaded images)a. To download installation packages, you must have an IBM Passport
Advantage account, which is described at the following Web address:www.ibm.com/software/howtobuy/passportadvantage/paocustomer/docs/en_US/ecare.html
b. Open this release’s Download document at the following Web address:http://www.ibm.com/support/docview.wss?rs=477&uid=24024322
Locate the components you need in the document’s listing, then downloadthe packages labelled with the corresponding part numbers.
c. Use ftp or another convenient method to transfer the installation package tothe system where you plan to install the product. Store the file in an IFSdirectory of your choosing; for example:/MySametimePackages
Supporting IPv6 addressing in a Lotus Sametime deploymentIPv6 addresses use a different format from IPv4 addresses to support a greaterrange of direct addresses to computers on the internet. Enabling IPv6 addressingreduces the need for Network Address Translators while improving the efficiencyof routing and providing for greater security. Beginning with release 8.0.2, IBMLotus Sametime servers and clients support the use of IPv6 addresses.
Chapter 2. Planning 25
Note: For more information on IPv6 addressing with Lotus Sametime, see thearticle Best practices for moving to IPv6.
In this release of Lotus Sametime, some components have some limitations whensupporting IPv6 addressing:v Lotus Sametime Gateway
You must install the Gateway with a special parameter to enable it for IPv6addressing; you cannot enable it for support after deployment. The instructionsfor installing a Lotus Sametime Gateway server include information on theparameter and how to use it.
v Lotus Sametime Media ManagerThe Media Manager does not support IPv6 addressing in this release. If yourLotus Sametime deployment includes a Media Manager server, you cannotenable IPv6 addressing at this time. IPv6 addressing will be supported in anupcoming release of Lotus Sametime Media Manager.
v Lotus Sametime Connect clientsIf you support only IPv6 addressing, clients from releases earlier than 8.0.2 willnot generate error messages but will appear ″broken″ to users because theycannot communicate with the IPv6–enabled servers. To avoid lengthyinvestigations of problems caused by attempts to use older clients with serverswhere only IPv6 addressing is enabled, you should only use clients from release8.0.2 or later. If you support both IPv4 and IPv6 addressing, all Lotus Sametimeclients can communicate all Lotus Sametime servers provided you configurethose servers to listen for IPv4–format addresses as well as IPv6–formataddresses.
v Lotus Sametime AdvancedLotus Sametime Advanced has not been updated to release 8.0.2 and does notyet support IPv6 addressing. If your Lotus Sametime deployment includes LotusSametime Advanced, you cannot enable IPv6 at this time. IPv6 addressing willbe supported in an upcoming release of Lotus Sametime Advanced.
v Lotus Sametime Unified TelephonyLotus Sametime Unified Telephony has not been updated to release 8.0.2 anddoes not yet support IPv6 addressing. If your Lotus Sametime deploymentincludes Lotus Sametime Unified Telephony, you cannot enable IPv6 at this time.IPv6 addressing will be supported in an upcoming release of Lotus SametimeUnified Telephony.
Enabling support for IPv6 addressing in Lotus Sametime products requiresconfiguration changes to various components of a deployment, as described in thefollowing topics:
Supporting IPv4, IPv6, or both protocolsYour IBM Lotus Sametime deployment can support IPv4 addressing, IPv6addressing, or both protocols. The option you choose will determine how youconfigure the servers in your deployment.
Existing Lotus Sametime deployments use IPv4 addressing only. Rather thancompletely switch over to IPv6 addressing, you will probably want to phase it inand support both protocols for some time until you are satisfied with your IPv6support. There are some requirements and limitations for each type of addressing,so review the sections below before implementing any changes.
26 Lotus Sametime: Installation and Administration Guide Part 1
IPv4 and IPv6 protocols
IPv4 (Internet Protocol version 4) and IPv6 (Internet Protocol version 6) are namesof protocols that define how you address computers on the Internet. The IPv6protocol was introduced to provide not only a larger number of addresses for theincreasing number of computers on the Internet, but also to enhance the security ofInternet communications.
When entering an IPv4 address, you format it using four sets of digits, separatedwith dots like this:205.188.21.22
IPv6 addresses use eight sets of hexadecimal digits separated with colons like this:2001:0db8:85a3:0000:0000:8a2e:0370:7334
You may see IPv6 addresses abbreviated, for example:v 2001:db8:85a3:0:0:8a2e:370:7334 where the leading zeros in each group are
omittedv 2001:db8:85a3::8a2e:370:7334 where two consecutive groups containing only
zeros are represented by a double colonv [2001:db8::]/64 where the suffix (/64) indicates the portion of the address that
represents the network (the remainder of the address represents computerswithin that network)
If the URL includes a port, add the :port value outside of the brackets like this:https://[2001:0db8:85a3:08d3:1319:8a2e:0370:7348]:443/
Supporting IPv4–only addressing
Prior to release 8.0.2, Lotus Sametime products supported only IPv4 addresses,listening only for connections from clients using the IPv4 protocol and ignoringconnections using the IPv6 protocol. An IPv4–only deployment requires no specialconfiguration and can combine Lotus Sametime components from release 8.0.2 andlater with those from prior releases.
Supporting both IPv4 and IPv6 addressing
Lotus Sametime release 8.0.2 introduced support for IPv6 addressing, butadditionally continued support for IPv4 addressing. This allows you to updateyour Lotus Sametime deployment gradually by combining servers that supportboth protocols.
Even if a particular Lotus Sametime component is enabled only for IPv4addressing, it can still communicate with IPv6–enabled servers within thedeployment provided those servers also support IPv4 addressing (known asdual-support).
Enabling support for IPv6 addressing requires some additional configuration inyour deployment. If you upgrade from an IPv6-enabled server in your LotusSametime deployment, you should verify that you IPv6 settings are still in placeand modify them if needed.
Chapter 2. Planning 27
Supporting IPv6–only addressing
If you choose to support only IPv6 addressing in your Lotus Sametimedeployment, use the instructions in this section to enable IPv6. You willadditionally need to disable support for IPv4 addressing by ensuring that yoursettings use values recommended for ″IPv6 only″ wherever that option is offered.
Enabling support for IPv6 addressing requires some additional configuration inyour deployment. If you upgrade from an IPv6-enabled server in your LotusSametime deployment, you should verify that you IPv6 settings are still in placeand modify them if needed.
Enabling support for IPv6Enabling IPv6 support in an IBM Lotus Sametime deployment involvesconfiguration changes to the operating system and networks as well as the LotusSametime components themselves.
About this task
Enable support for the IPv6 addressing protocol in your server and client operatingsystems before you install Lotus Sametime:
Enabling IPv6 on your operating systemsBefore enabling IPv6 support for IBM Lotus Sametime, you must enable it for yourserver and client operating systems.
About this task
The configuration changes needed for supporting IPv6 with Lotus Sametime varywith the operating system and whether you are using it as a server or a client:
Enabling IPv6 on a server operating system:
Consult your server operating system’s documentation for instructions onconfiguring support for IPv6 addressing. In addition, implement the specificchanges described here to ensure that your operating system can properlycommunicate with IBM Lotus Sametime while using IPv6 addressing.
About this task
The configuration changes needed for supporting IPv6 with Lotus Sametime varywith the server’s operating system:
Configuring an AIX server to support IPv6:
Configure support for IPv6 addressing on a computer running an IBM AIXoperating system.
About this task
To see which versions of AIX are supported by IBM Lotus Sametime, see theSametime Requirements Tech Note.
For complete instructions on configuring support for IPv6 addressing on acomputer running an IBM AIX operating system, see the Upgrading to IPv6 withIPv4 configured in the AIX information center:
28 Lotus Sametime: Installation and Administration Guide Part 1
Important: Some of the components of a Lotus Sametime server require the use ofan IPv4-formatted loopback address. To ensure that your Lotus Sametime serverfunctions properly, do not disable IPv4 support in your server operating system –instead, enable support for both IPv4 and IPv6 addressing.
Configuring an IBM i server for IPv6:
Configure support for IPv6 addressing on a computer running an IBM i operatingsystem.
Before you begin
You must be using IBM i V6R1 with Lotus Sametime if you want to support IPv6addressing; if you are using an older version of i5/OS®, upgrade to V6R1 beforeconfiguring the operating system to support IPv6 as described below. To see thecomplete list of IBM i and i5/OS versions supported by Lotus Sametime, see theSametime Requirements Tech Note.
For information on the IBM i operating system, visit the IBM System i informationcenter.
About this task
These instructions describe how to enable support for IPv6 addressing on afunctioning Sametime server that is currently using IPv4 addressing.
Follow the steps below to update the IBM i TCP/IP configuration for the IPv6address you will use for your Lotus Sametime server:
Important: Some of the components of a Lotus Sametime server require the use ofan IPv4-formatted loopback address. To ensure that your Lotus Sametime serverfunctions properly, do not disable IPv4 support in your server operating system –instead, enable support for both IPv4 and IPv6 addressing.1. Add the IPv6–formatted IP address that you will use for your Sametime server.
For more information, see Adding a TCP/IP address on IBM i.2. Add an entry in the local host table for the IPv6 IP address.
For more information, see Updating the host table on IBM i.Specify the same fully qualified host name that you used for the original IPv4address.
3. Update the Domain Name Server.The contents of the Domain Name Server should be similar to the local hosttable, with two DNS entries for the host name of your Sametime server: oneentry that maps the host name to the IPv4 address and another that maps it tothe IPv6 address.See Updating the Domain Name Server for IBM i for special considerationswhen TCP/IP is configured to check the DNS before the local host table.
Configuring a Linux server for IPv6:
By default, the versions of Linux SUSE and Linux RHEL required by IBM LotusSametime are enabled for IPv6 addressing; however, you should verify thatsupport is enabled before attempting to configure IPv6 support in Lotus Sametime.
Chapter 2. Planning 29

Before you begin
Some of the components of a Lotus Sametime server require the use of anIPv4-formatted loopback address. To ensure that your Lotus Sametime serverfunctions properly, do not disable IPv4 support in your server operating system –instead, enable support for both IPv4 and IPv6 addressing.
About this task
To see which versions of Linux are supported by Lotus Sametime, see theSametime Requirements Tech Note.v Red Hat Enterprise Linux
Red Hat Enterprise Linux supports IPv6 firewall rules using the Netfilter 6subsystem and the ip6tables command. In Red Hat Enterprise Linux 5, both IPv4and IPv6 services are enabled by default. For more information on IPv6 supportin Red Hat, visit the Red Hat Web site.
v SUSE LinuxSUSE Linux supports IPv6 addressing, which is enabled by default; for moreinformation on IPv6 support in Linux SUSE, see the SUSE Linux 10 ReferenceGuide.
A Linux SUSE operating system supports IPv6 addressing by default; however itsupport was disabled for some reason, you will need to enable it before installingLotus Sametime:
Configuring Linux SUSE to support IPv6:
Configure support for IPv6 addressing on a computer running a Linux SUSEoperating system.
About this task
IPv6 addressing is enabled by default on Linux SUSE servers, but may have beendisabled to improve performance while running applications that did not supportthis protocol.1. If you suspect that IPv6 addressing was disabled on your Linux SUSE server,
you can check by logging in as the root user and running the followingcommand:ifconfig
The system output will look like this:eth0 Link encap:Ethernet HWaddr 00:0F:1F:89:8F:D5
inet addr:192.168.1.100 Bcast:140.171.243.255 Mask:255.255.254.0inet6 addr: fe80::20f:1fff:fe89:8fd5/64 Scope:LinkUP BROADCAST RUNNING MULTICAST MTU:1500 Metric:1RX packets:33386388 errors:0 dropped:0 overruns:0 frame:0TX packets:2947979 errors:0 dropped:0 overruns:0 carrier:0collisions:0 txqueuelen:1000RX bytes:2211978470 (2109.5 Mb) TX bytes:380978644 (363.3 Mb)Base address:0xdf40 Memory:feae0000-feb00000
lo Link encap:Local Loopbackinet addr:127.0.0.1 Mask:255.0.0.0inet6 addr: ::1/128 Scope:HostUP LOOPBACK RUNNING MTU:16436 Metric:1RX packets:895 errors:0 dropped:0 overruns:0 frame:0
30 Lotus Sametime: Installation and Administration Guide Part 1
TX packets:895 errors:0 dropped:0 overruns:0 carrier:0collisions:0 txqueuelen:0RX bytes:76527 (74.7 Kb) TX bytes:76527 (74.7 Kb)
If the system output includes statements containing the string inet6 as shownabove, then IPv6 support is currently enabled and you can proceed directly tothe next topic.If the output does not contain this string, you must enable IPv6 support now asexplained in the next step.
2. Edit the configuration file of the kernel module loader and add the followingstatement:The configuration file is typically located in one of these locations:v /etc/modules.conf
v /etc/conf.modules
alias net-pf-10 ipv6 # automatically load IPv6 module on demand
3. Save and close the file.
Configuring a Solaris server for IPv6:
Configure support for IPv6 addressing on a computer running a Sun Solarisoperating system.
About this task
To see which versions of Solaris are supported by Lotus Sametime, see theSametime Requirements Tech Note.
Support for IPv6 addressing can be enabled during installation of a Solaris server.For information on enabling and verifying IPv6 support on Sun Solaris servers, seethe Sun IPv6 Administration Guide:
Important: Some of the components of a Lotus Sametime server require the use ofan IPv4-formatted loopback address. To ensure that your Lotus Sametime serverfunctions properly, do not disable IPv4 support in your server operating system –instead, enable support for both IPv4 and IPv6 addressing.
Configuring a Microsoft Windows server to support IPv6:
Configure support for IPv6 addressing on a computer running a MicrosoftWindows operating system.
Before you begin
Some of the components of a Lotus Sametime server require the use of anIPv4-formatted loopback address. To ensure that your Lotus Sametime serverfunctions properly, do not disable IPv4 support in your server operating system –instead, enable support for both IPv4 and IPv6 addressing.
About this task
To see which versions of Windows are supported by Lotus Sametime, see theSametime Requirements Tech Note.
The Microsoft TechNet Web site includes information on how IPv6 addressingaffects Microsoft operating systems.
Chapter 2. Planning 31
Enable IPv6 addressing for your Windows operating system by following the stepsbelow. Note that the names of commands and dialog boxes may be different foryour particular Windows operating system.1. Open the ″Network Connections″ dialog box; for example, by clicking Start →
Control Panel → Network Connections.2. In the ″Network Connections″ dialog box, right-click on Local Area
Connection, and click Properties.a. In the ″Local Area Connection Properties″ dialog box, make sure you are
viewing the ″General″ tab.b. On the ″General″ tab, click the Install button (below the list of connection
items).c. In the ″Select Network Component″ dialog box, click Protocol in the list of
network components, and then click the Add button.d. In the ″Select Network Protocol″ dialog box, click Microsoft TCP/IP version
6, and then click OK.Support for IPv6 is installed immediately, and the ″Network Component″and the ″Network Protocol″ dialog boxes close automatically.Back in the ″Local Area Connection Properties″ dialog box. you can enableor disable the IPv6 protocol on your computer using the checkbox thatappears next to Microsoft TCP/IP version 6.
e. Close the ″Local Area Connection Properties″ dialog box by clicking theClose button.
3. To assign an IP address to your computer, use the netsh command.The Microsoft TechNet Web site contains a Netsh Technical Reference sectionthat explains how to use the netsh command.
Enabling IPv6 on a client operating system:
Consult your server operating system’s documentation for instructions onconfiguring support for IPv6 addressing. In addition, implement the specificchanges described here to ensure that your operating system can properlycommunicate with IBM Lotus Sametime while using IPv6 addressing.
About this task
To see which operating systems are supported by Lotus Sametime Connect, see theSametime Requirements Tech Note.
The configuration changes needed for supporting IPv6 with Lotus Sametime varywith the client computer’s operating system:
Configuring a Windows client operating system for IPv6:
Configure a Microsoft Windows client operating system to support IPv6addressing.1. Open the ″Network Connections″ dialog box; for example, in Windows XP
Professional, by clicking Start → Control Panel → Network Connections.2. In the ″Network Connections″ dialog box, right-click on Local Area
Connection, and click Properties.a. In the ″Local Area Connection Properties″ dialog box, make sure you are
viewing the ″General″ tab.
32 Lotus Sametime: Installation and Administration Guide Part 1
b. On the ″General″ tab, click the Install button (below the list of connectionitems).
c. In the ″Select Network Component″ dialog box, click Protocol in the list ofnetwork components, and then click the Add button.
d. In the ″Select Network Protocol″ dialog box, click Microsoft TCP/IP version6, and then click OK.Support for IPv6 is installed immediately, and the ″Network Component″and the ″Network Protocol″ dialog boxes close automatically.Back in the ″Local Area Connection Properties″ dialog box. you can enableor disable the IPv6 protocol on your computer using the checkbox thatappears next to Microsoft TCP/IP version 6.
e. Close the ″Local Area Connection Properties″ dialog box by clicking theClose button.
3. If you later want to disable IPv6 support on the Windows client, reverse theabove settings as follows:a. Open the ″Network Connections″ dialog box; for example, in Windows XP
Professional, by clicking Start → Control Panel → Network Connections.b. In the ″Local Area Connection Properties″ dialog box, make sure you are
viewing the ″General″ tab.c. On the ″General″ tab, click Microsoft TCP/IP version 6.d. Click Uninstall.e. Close the ″Local Area Connection Properties″ dialog box by clicking the
Close button.
Planning deployment topologiesRead about the topology that includes the Lotus Sametime features you plan todeploy to users.
Deploying instant messaging and presence onlyTo provide instant messaging and presence only, use a Sametime CommunityServer or cluster of servers running on Domino.
The following components are deployed in a Sametime environment that containsinstant messaging and presence only:v Lotus Sametime System Console (used for managing and administering servers
from a central location)v DB2v LDAP directoryv Lotus Sametime Community Serverv Lotus Sametime Proxy Serverv Sametime Connect client, Sametime client embedded in Notes, or Sametime
browser client
To extend instant messaging to external communities, also deploy Lotus SametimeGateway. To provide audio-visual features in the Sametime client, also deployLotus Sametime Media Manager.
Chapter 2. Planning 33
Deploying instant messaging and meetingsTo provide instant messaging and presence, use a Sametime Community Server orcluster of servers running on Domino. To provide meeting rooms, use a SametimeMeeting Server or cluster of servers running on WebSphere Application Server.
The following components are deployed in a Sametime environment that combineinstant messaging and presence with meetingsv Lotus Sametime System Console (used for managing and administering servers
from a central location)v DB2v LDAP directoryv Lotus Sametime Community Serverv Lotus Sametime Proxy Serverv Lotus Sametime Meeting Serverv Sametime Connect client, Sametime client embedded in Notes, or Sametime
browser client
To extend instant messaging to external communities, also deploy Lotus SametimeGateway. To provide audio-visual features in the Sametime client and in meetings,also deploy Lotus Sametime Media Manager.
Deploying instant messaging, meetings, and Web clientsTo provide instant messaging and presence, use a Sametime Community Server orcluster of servers running on Domino. To provide meeting rooms, use a SametimeMeeting Server or cluster of servers running on WebSphere Application Server. Toprovide support for Web clients, use a Sametime Proxy Server.
The following components are deployed in a Sametime environment that combineinstant messaging and presence with meetingsv Lotus Sametime System Console (used for managing and administering servers
from a central location)v DB2v LDAP directoryv Lotus Sametime Community Serverv Lotus Sametime Proxy Serverv Lotus Sametime Meeting Serverv Sametime Connect client, Sametime client embedded in Notes, or Sametime
browser client
To extend instant messaging to external communities, also deploy Lotus SametimeGateway. To provide audio-visual features in the Sametime client and in meetings,also deploy Lotus Sametime Media Manager.
Deploying instant messaging, meetings, Web clients, audio,and video
To provide all client features to users, plan to deploy Sametime CommunityServers, Sametime Meeting Servers, Sametime Proxy Servers, and Lotus SametimeMedia Manager components.
The following components are deployed in a Sametime environment that combineinstant messaging and presence with meetings
34 Lotus Sametime: Installation and Administration Guide Part 1
v Lotus Sametime System Console (used for managing and administering serversfrom a central location)
v DB2v LDAP directoryv Lotus Sametime Community Serverv Lotus Sametime Proxy Serverv Lotus Sametime Meeting Serverv Sametime Connect client, Sametime client embedded in Notes, or Sametime
browser client
To extend instant messaging to external communities, also deploy Lotus SametimeGateway. To provide audio-visual features in the Sametime client and in meetings,also deploy Lotus Sametime Media Manager.
Audio-visual components provided with the Lotus SametimeMedia ManagerThe Lotus Sametime Media Manager comprises three components, which areinstalled on separate systems in a production environment.v Packet Switcher
Based on voice-activated switching, the Packet Switcher routes audio and videodata to participant endpoints. There can be one or more Packet Switchers in adeployment; it cannot be clustered. A Packet Switcher can only be registeredwith one Conference Manager. If you have a Conference Manager cluster thenthe Packet Switcher is registered with the cluster and each cluster member usesthe same Packet Switcher.
v Conference ManagerManages multipoint conferences by maintaining a dialog with each participant,and ensuring that all media flows between those participants. You can installmultiple Conference Manager components and cluster them for high availabilityand failover.
v SIP Proxy/RegistrarDirects conference participants to Conference Manager servers and provideshigh availability and failover functionality. You can install multiple SIPProxy/Registrar components and cluster them for high availability and failover.
Deploying instant messaging to external messagingcommunities
Use Lotus Sametime Gateway to connect Sametime clients with other instantmessaging clients. Several options are available for setting up a single server or acluster of Lotus Sametime Gateway servers in a network deployment. You caninstall Lotus Sametime Gateway securely in the network DMZ. In some cases,Network Address Translators (NAT) is supported.
In addition to the topologies described here, you can read about deploying LotusSametime Gateway on the wiki, available at the following Web address:http://www.ibm.com/developerworks/wikis/display/sametime/Sametime+Gateway+deployments
Deploy Lotus Sametime Gateway in the DMZ
Lotus Sametime Gateway is an enterprise solution that requires a clustereddeployment in the network DMZ. DMZ is a networking term that comes from themilitary term ″demilitarized zone.″ DMZ refers to an area of a network, usually
Chapter 2. Planning 35
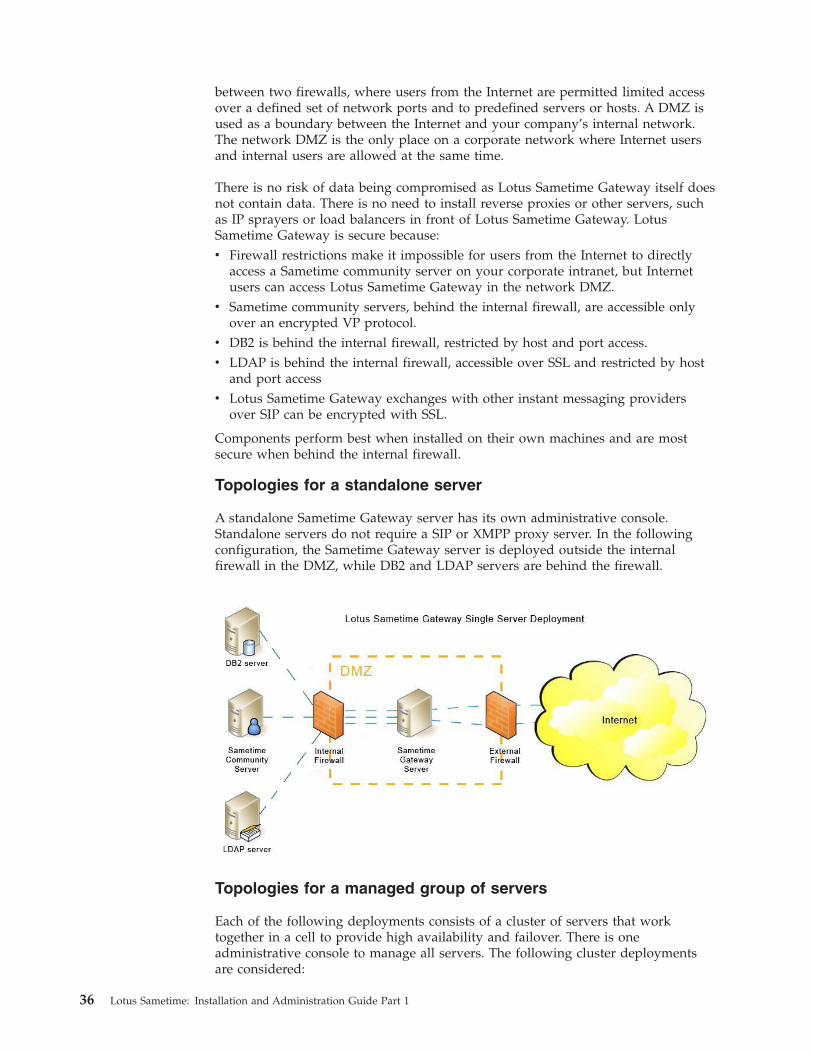
between two firewalls, where users from the Internet are permitted limited accessover a defined set of network ports and to predefined servers or hosts. A DMZ isused as a boundary between the Internet and your company’s internal network.The network DMZ is the only place on a corporate network where Internet usersand internal users are allowed at the same time.
There is no risk of data being compromised as Lotus Sametime Gateway itself doesnot contain data. There is no need to install reverse proxies or other servers, suchas IP sprayers or load balancers in front of Lotus Sametime Gateway. LotusSametime Gateway is secure because:v Firewall restrictions make it impossible for users from the Internet to directly
access a Sametime community server on your corporate intranet, but Internetusers can access Lotus Sametime Gateway in the network DMZ.
v Sametime community servers, behind the internal firewall, are accessible onlyover an encrypted VP protocol.
v DB2 is behind the internal firewall, restricted by host and port access.v LDAP is behind the internal firewall, accessible over SSL and restricted by host
and port accessv Lotus Sametime Gateway exchanges with other instant messaging providers
over SIP can be encrypted with SSL.
Components perform best when installed on their own machines and are mostsecure when behind the internal firewall.
Topologies for a standalone server
A standalone Sametime Gateway server has its own administrative console.Standalone servers do not require a SIP or XMPP proxy server. In the followingconfiguration, the Sametime Gateway server is deployed outside the internalfirewall in the DMZ, while DB2 and LDAP servers are behind the firewall.
Topologies for a managed group of servers
Each of the following deployments consists of a cluster of servers that worktogether in a cell to provide high availability and failover. There is oneadministrative console to manage all servers. The following cluster deploymentsare considered:
36 Lotus Sametime: Installation and Administration Guide Part 1
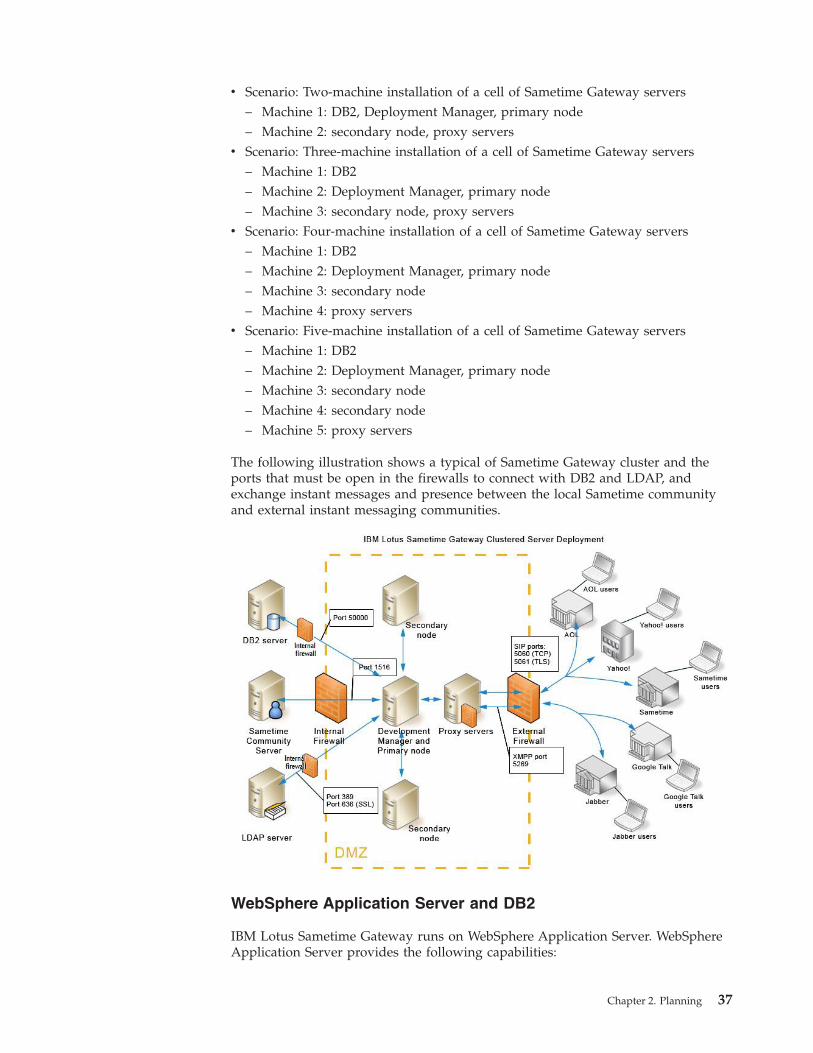
v Scenario: Two-machine installation of a cell of Sametime Gateway servers– Machine 1: DB2, Deployment Manager, primary node– Machine 2: secondary node, proxy servers
v Scenario: Three-machine installation of a cell of Sametime Gateway servers– Machine 1: DB2– Machine 2: Deployment Manager, primary node– Machine 3: secondary node, proxy servers
v Scenario: Four-machine installation of a cell of Sametime Gateway servers– Machine 1: DB2– Machine 2: Deployment Manager, primary node– Machine 3: secondary node– Machine 4: proxy servers
v Scenario: Five-machine installation of a cell of Sametime Gateway servers– Machine 1: DB2– Machine 2: Deployment Manager, primary node– Machine 3: secondary node– Machine 4: secondary node– Machine 5: proxy servers
The following illustration shows a typical of Sametime Gateway cluster and theports that must be open in the firewalls to connect with DB2 and LDAP, andexchange instant messages and presence between the local Sametime communityand external instant messaging communities.
WebSphere Application Server and DB2
IBM Lotus Sametime Gateway runs on WebSphere Application Server. WebSphereApplication Server provides the following capabilities:
Chapter 2. Planning 37

v Clustering support, robust failover capability using the High AvailabilityManager
v Session Initiation Protocol (SIP) Infrastructure, including stateless SIP Proxy andSIP IP sprayer provided by the platform
v Open, extensible platform support. Additional plug-in services can configured ina flexible manner
v A central place to administer system configuration and monitoring and securitypolicies through the Integrated Solutions Console and wsadmin scriptcommands.
DB2 is the storage for the Lotus Sametime Gateway policies and logging. DB2 canbe clustered for failover and load-balancing purposes. DB2 is part of the Lotuscommon storage strategy. Lotus Domino can use DB2 as an alternative repository,and Lotus Sametime Enterprise Meeting Server also uses DB2 for storing andsharing configuration data across servers. DB2 should be installed on a separatemachine behind the internal firewall.
Typical deployment when connecting to instant messagingcommunities
Lotus Sametime Gateway can connect to the following instant messagingcommunities:v AOL, Yahoo! Messenger, Google Talk, and XMPP communitiesv Other Lotus Sametime communitiesv Other Lotus Sametime companies using AOL clearinghouse
You can set up any or all configurations as needed. Lotus Sametime Gatewayallows selected individuals in your company to send instant messages to users onone or more public networks, giving your users immediate access to millions ofusers worldwide.
Note: When you set up a connection with AOL, you have the option of connectingwith AOL users only, or connecting with the AOL clearinghouse community thatincludes AOL, ICQ, iChat, and other users from AOL Enterprise Federation Partnercommunities, including external Sametime communities. IBM recommends thatyou do not configure both communities, as users served by the AOL clearinghouseare a superset of users served by the AOL community. If you set up AOL only, andlater decide to connect with the AOL clearinghouse community, delete the AOLcommunity first before adding the AOL clearinghouse community to LotusSametime Gateway.
When you connect to other Lotus Sametime companies, you can connect businessusers of different companies. This deployment is very useful in case of acquisitionswhen IT infrastructure is still separate, when you want to interconnect vendorsover the Internet. Connections are made secure by using an SSL certificateexchange.
38 Lotus Sametime: Installation and Administration Guide Part 1
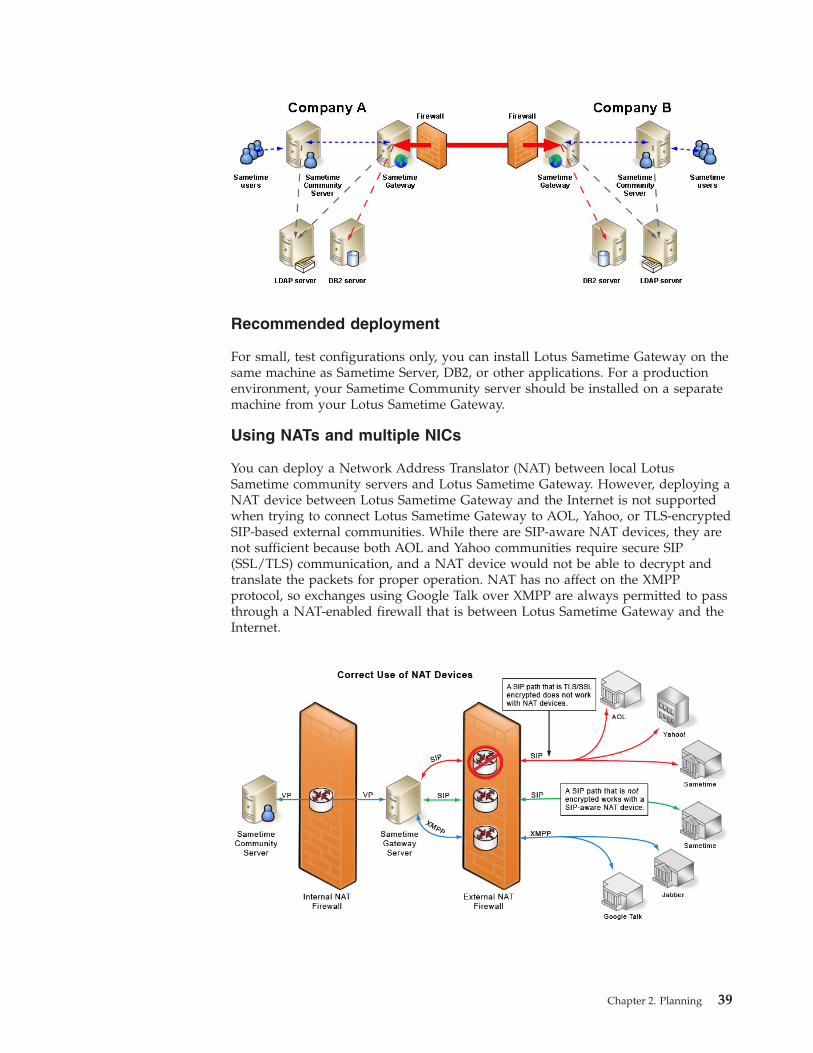
Recommended deployment
For small, test configurations only, you can install Lotus Sametime Gateway on thesame machine as Sametime Server, DB2, or other applications. For a productionenvironment, your Sametime Community server should be installed on a separatemachine from your Lotus Sametime Gateway.
Using NATs and multiple NICs
You can deploy a Network Address Translator (NAT) between local LotusSametime community servers and Lotus Sametime Gateway. However, deploying aNAT device between Lotus Sametime Gateway and the Internet is not supportedwhen trying to connect Lotus Sametime Gateway to AOL, Yahoo, or TLS-encryptedSIP-based external communities. While there are SIP-aware NAT devices, they arenot sufficient because both AOL and Yahoo communities require secure SIP(SSL/TLS) communication, and a NAT device would not be able to decrypt andtranslate the packets for proper operation. NAT has no affect on the XMPPprotocol, so exchanges using Google Talk over XMPP are always permitted to passthrough a NAT-enabled firewall that is between Lotus Sametime Gateway and theInternet.
Chapter 2. Planning 39
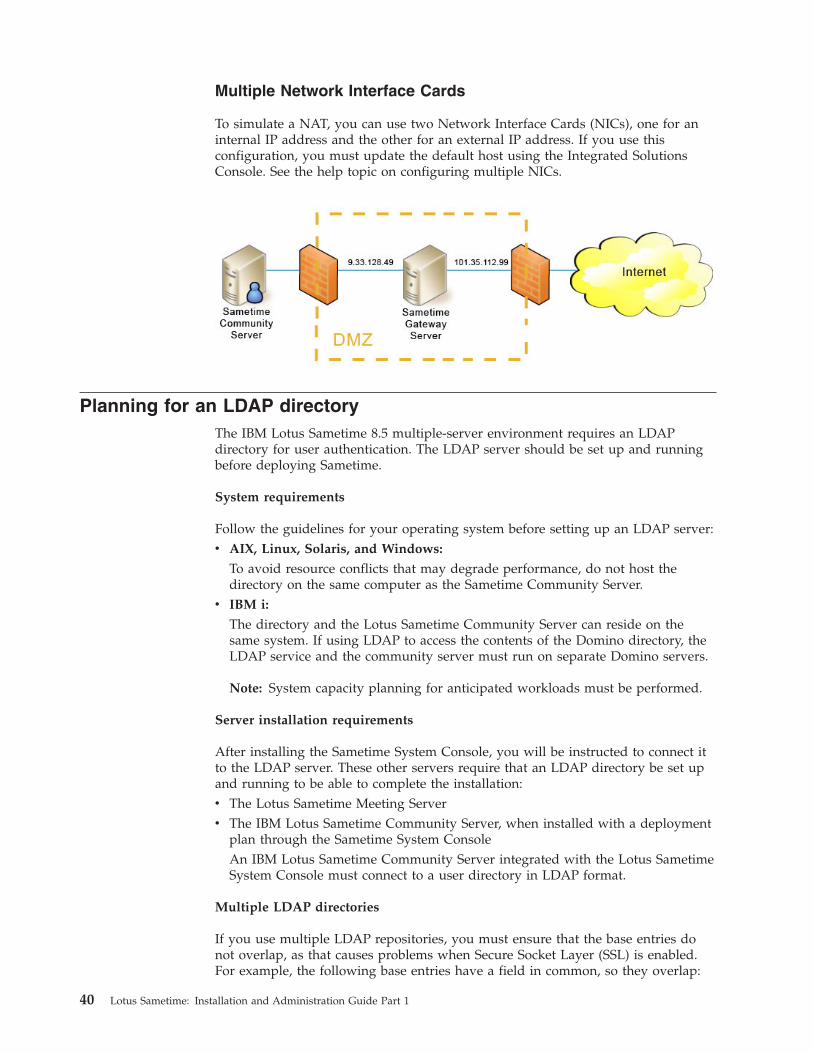
Multiple Network Interface Cards
To simulate a NAT, you can use two Network Interface Cards (NICs), one for aninternal IP address and the other for an external IP address. If you use thisconfiguration, you must update the default host using the Integrated SolutionsConsole. See the help topic on configuring multiple NICs.
Planning for an LDAP directoryThe IBM Lotus Sametime 8.5 multiple-server environment requires an LDAPdirectory for user authentication. The LDAP server should be set up and runningbefore deploying Sametime.
System requirements
Follow the guidelines for your operating system before setting up an LDAP server:v AIX, Linux, Solaris, and Windows:
To avoid resource conflicts that may degrade performance, do not host thedirectory on the same computer as the Sametime Community Server.
v IBM i:
The directory and the Lotus Sametime Community Server can reside on thesame system. If using LDAP to access the contents of the Domino directory, theLDAP service and the community server must run on separate Domino servers.
Note: System capacity planning for anticipated workloads must be performed.
Server installation requirements
After installing the Sametime System Console, you will be instructed to connect itto the LDAP server. These other servers require that an LDAP directory be set upand running to be able to complete the installation:v The Lotus Sametime Meeting Serverv The IBM Lotus Sametime Community Server, when installed with a deployment
plan through the Sametime System ConsoleAn IBM Lotus Sametime Community Server integrated with the Lotus SametimeSystem Console must connect to a user directory in LDAP format.
Multiple LDAP directories
If you use multiple LDAP repositories, you must ensure that the base entries donot overlap, as that causes problems when Secure Socket Layer (SSL) is enabled.For example, the following base entries have a field in common, so they overlap:
40 Lotus Sametime: Installation and Administration Guide Part 1

o=lotuso=sales,o=lotus
These base entries use different fields and are acceptable:o=ibm,c=uso=lotus
Lotus Sametime servers and the LDAP mail attribute
Lotus Sametime 8.5 requires authenticated users to have a mail attribute assignedin the LDAP directory. The mail attribute must be a unique string, whichpreferably follows the syntax and length restrictions of e-mail addresses.
This attribute is not used for e-mail purposes, and does not have to be assigned asa user name for logging into Lotus Sametime. Instead, the ″mail″ attribute servesas a common attribute between the various Lotus Sametime subsystems, such asCalendar Integration, Business Cards, LDAP, and REST APIs. This attribute is alsoused when generating a URL for a user’s persistent meeting room (for example,http://meetings.company.com/stmeetings/room/[email protected]/users-room). Inaddition, using the ″mail″ attribute provides certain performance advantages sincetranslation between attributes is not required; it also provides consistency andintegrity by using a common and well-understood attribute.
Note: Not all users need to be authenticated to use the server; the mail attribute isnot required for anonymous (guest) users.
Therefore, IBM recommends that the user repository (LDAP server) create a mailattribute for users who plan to authenticate with the Lotus Sametime servers. Themail attribute must be a unique string, which preferably follows the syntax andlength restrictions of e-mail addresses.
Upgrade considerations
If you used a Lotus Domino Directory in its native format with a previous releaseof Lotus Sametime, you have two options for setting up your user directory:v Convert the existing Lotus Domino Directory to LDAP format. The LDAP
service and the community server must run on separate Domino servers.v Set up a dedicated LDAP directory for use with Lotus Sametime
Best Practices
Best Practices for using LDAP with Lotus Sametime article on the Sametime wikicontains an overview of LDAP components and describes how the Lotus SametimeCommunity Server works with LDAP to provide authentication, name lookups,and name resolution. The article describes best practices for creating search filters,setting sametime.ini parameters, and enhancing Sametime and LDAPperformance.
Planning a Community Server installationYou should review the following considerations before installing an IBM LotusSametime Community Server.
Chapter 2. Planning 41
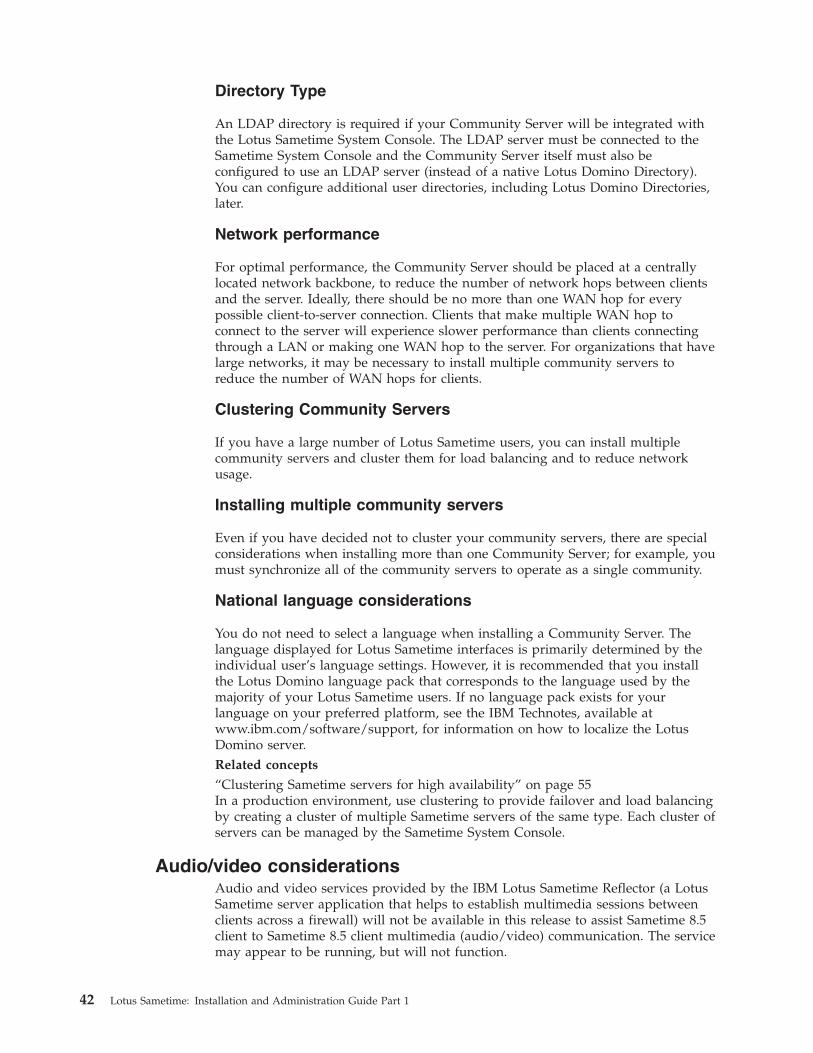
Directory Type
An LDAP directory is required if your Community Server will be integrated withthe Lotus Sametime System Console. The LDAP server must be connected to theSametime System Console and the Community Server itself must also beconfigured to use an LDAP server (instead of a native Lotus Domino Directory).You can configure additional user directories, including Lotus Domino Directories,later.
Network performance
For optimal performance, the Community Server should be placed at a centrallylocated network backbone, to reduce the number of network hops between clientsand the server. Ideally, there should be no more than one WAN hop for everypossible client-to-server connection. Clients that make multiple WAN hop toconnect to the server will experience slower performance than clients connectingthrough a LAN or making one WAN hop to the server. For organizations that havelarge networks, it may be necessary to install multiple community servers toreduce the number of WAN hops for clients.
Clustering Community Servers
If you have a large number of Lotus Sametime users, you can install multiplecommunity servers and cluster them for load balancing and to reduce networkusage.
Installing multiple community servers
Even if you have decided not to cluster your community servers, there are specialconsiderations when installing more than one Community Server; for example, youmust synchronize all of the community servers to operate as a single community.
National language considerations
You do not need to select a language when installing a Community Server. Thelanguage displayed for Lotus Sametime interfaces is primarily determined by theindividual user’s language settings. However, it is recommended that you installthe Lotus Domino language pack that corresponds to the language used by themajority of your Lotus Sametime users. If no language pack exists for yourlanguage on your preferred platform, see the IBM Technotes, available atwww.ibm.com/software/support, for information on how to localize the LotusDomino server.Related concepts
“Clustering Sametime servers for high availability” on page 55In a production environment, use clustering to provide failover and load balancingby creating a cluster of multiple Sametime servers of the same type. Each cluster ofservers can be managed by the Sametime System Console.
Audio/video considerationsAudio and video services provided by the IBM Lotus Sametime Reflector (a LotusSametime server application that helps to establish multimedia sessions betweenclients across a firewall) will not be available in this release to assist Sametime 8.5client to Sametime 8.5 client multimedia (audio/video) communication. The servicemay appear to be running, but will not function.
42 Lotus Sametime: Installation and Administration Guide Part 1
In the initial release of Lotus Sametime 8.5, the 8.5 client can only establish audioand video connections with other 8.5 clients. Release 8.5 audio/video services canco-exist with release 7.5.x and 8.0.x audio/video services, with the followingrestrictions:v The 8.5 client cannot establish an audio or video call with 7.5.x or 8.0.x clients.v The 7.5.x and 8.0.x clients cannot establish an audio or video call with the 8.5
client.v The 8.5 client cannot use the Lotus Sametime Reflector.
Planning for the dedicated Domino server for Lotus SametimeUnlike other IBM Lotus Sametime servers that run on WebSphere ApplicationServer, the Lotus Sametime Community Server runs on a Lotus Domino server.You must install the Domino server before you install the Lotus SametimeCommunity Server. The Domino Server that runs the Community Server should becompletely dedicated to supporting the real-time, interactive communicationservices of Lotus Sametime.
The Lotus Sametime Community Server uses the directory, security, and replicationfeatures of the Domino server. Do not use the Sametime Community Server forother high-demand Domino services such as mail storage and routing, applicationand database storage, or centralized directory and administration services.
IBM AIX, Linux, Sun Solaris and IBM i can run multiple partitioned Dominoservers on the same system. For these server platforms, you can create a newDomino server on the same system as your existing production server. Thisconfiguration is not supported in Microsoft Windows. Adding Lotus Sametime toan existing production server is not supported.
To add a server to an existing Domino domain for use as a Lotus SametimeCommunity Server, register the server to create a Server document before installingDomino. For more information, see ″Installing a Domino server″ for your operatingsystem.
To find out which Domino releases are supported for Lotus Sametime, see thefollowing document:http://www.ibm.com/support/docview.wss?rs=477&uid=swg27016451
Directory considerations
If your Community Server will be integrated with the Lotus Sametime SystemConsole, then you must initially configure the console with an LDAP server. TheCommunity Server must also use the LDAP server. If your user information isstored in a Lotus Domino Directory, you can configure Sametime to access theDomino Directory using LDAP. However, the LDAP service and the communityserver must run on separate Domino servers.
While an LDAP directory is highly recommended, you can configure the LotusSametime Community Server to directly access the Lotus Domino Directory if youdo not plan to use the Lotus Sametime System Console. Keep in mind thatchanging the Community Server to use an LDAP server at a later time is morecomplicated than initially configuring it to use LDAP.v If you install the Domino server in a new domain, no users are in the Domino
Directory at the time the server is created, other than the server administrator.Therefore, if you select the Domino Directory as the user repository for your
Chapter 2. Planning 43
Lotus Sametime Community Server, you will need to add all of your LotusSametime users to the Domino Directory. When you install the Domino serverinto an existing domain, you will not need to add these users to the directory.However, before a user can use Sametime, the user’s directory entry must beupdated with the name of a home Lotus Sametime server and an Internetpassword.
v To add a new Lotus Sametime user to the Domino Directory, create a Persondocument for the user in the directory that includes (at minimum) a Last Name,a User Name and an Internet password. The Person document must also includea home Sametime server. You can use any of the following tools to create aPerson document: an IBM Lotus Notes client, a Lotus Domino Administratorclient, or the Sametime server self-registration feature.
Deploying a stand-alone Community Server MuxOptionally install an IBM Lotus Sametime Community Server Mux (multiplexer)on a separate computer to remove the connection-handling load from the LotusSametime Community Server. Configuring a stand-alone multiplexer enables theCommunity Server to handle a larger number of users and improves its stability.
About this task
Every Lotus Sametime Community Server contains a multiplexer (″mux″)component that maintains connections from Lotus Sametime clients. TheCommunity Server Mux is installed automatically and comes configured forimmediate use. You can optionally deploy a stand-alone Community Mux byinstalling it on a separate computer, so that clients connect to the stand-alonemultiplexer instead of to the Community Server. This configuration frees theCommunity Server from the burden of managing the live client connections; thestand-alone multiplexer is dedicated to this task.
You can deploy a stand-alone Community Mux to operate with one or moreunclustered Community Servers, or to operate with a cluster. You can also deploymultiple stand-alone multiplexers and use a load-balancer to distribute clientconnections among them.
Deploying stand-alone multiplexers in front of a CommunityServer clusterIf you intend to deploy one or more stand-alone Community Server multiplexersin front of a cluster of Community Servers, there are some issues to consider.
The stand-alone multiplexer maintains a single IP connection to each CommunityServer in the cluster. The data for all Community Server clients is transmitted overthis single IP connection to the Community Server on the Sametime server. Theillustration below shows stand-alone Community Services multiplexers deployedin front of clustered Community Servers to reduce the client connection load onthe clustered servers.
44 Lotus Sametime: Installation and Administration Guide Part 1
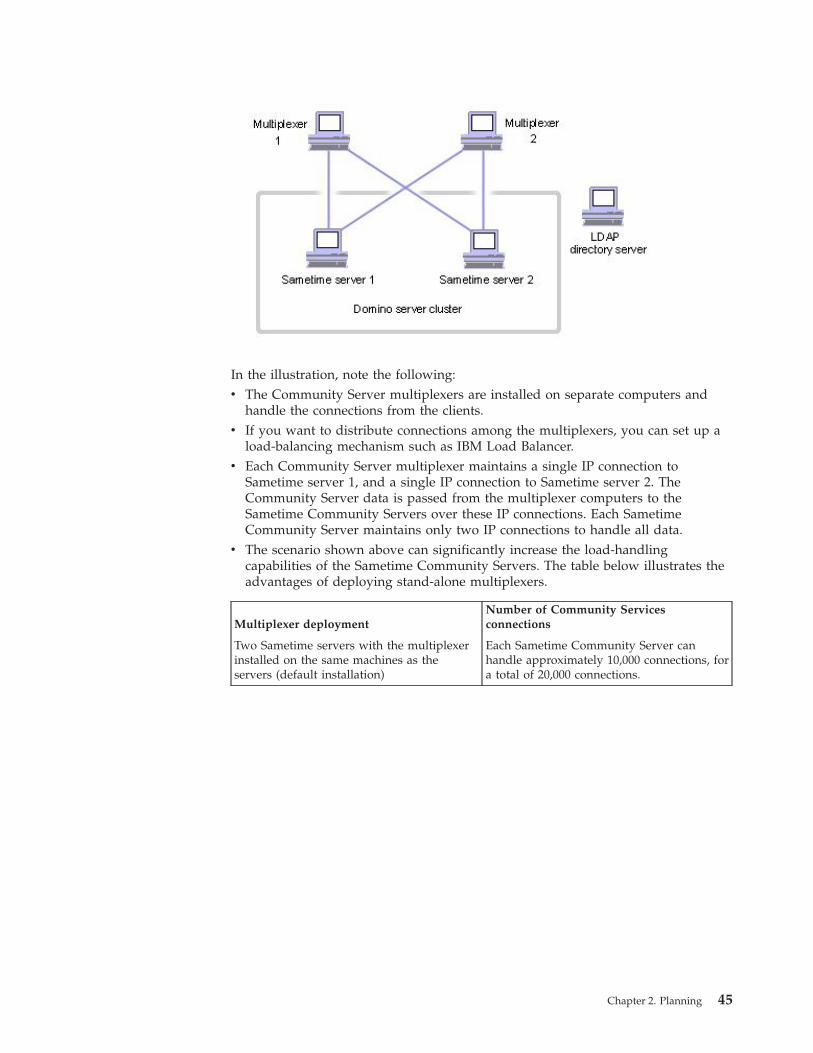
In the illustration, note the following:v The Community Server multiplexers are installed on separate computers and
handle the connections from the clients.v If you want to distribute connections among the multiplexers, you can set up a
load-balancing mechanism such as IBM Load Balancer.v Each Community Server multiplexer maintains a single IP connection to
Sametime server 1, and a single IP connection to Sametime server 2. TheCommunity Server data is passed from the multiplexer computers to theSametime Community Servers over these IP connections. Each SametimeCommunity Server maintains only two IP connections to handle all data.
v The scenario shown above can significantly increase the load-handlingcapabilities of the Sametime Community Servers. The table below illustrates theadvantages of deploying stand-alone multiplexers.
Multiplexer deploymentNumber of Community Servicesconnections
Two Sametime servers with the multiplexerinstalled on the same machines as theservers (default installation)
Each Sametime Community Server canhandle approximately 10,000 connections, fora total of 20,000 connections.
Chapter 2. Planning 45
Multiplexer deploymentNumber of Community Servicesconnections
Two Sametime servers with the multiplexersinstalled on different computes (as seen inthe illustration above)
v Each Sametime Community Server canservice approximately 100,000 activeconnections.
v Each Community Server multiplexermachine can handle as many as 20,000 to30,000 live IP port connections, for apossible total of 60,000 connections.
v The machines in the illustration abovemight be able to handle 160,000 activeconnections. You can increase the loadhandling capability further by addingadditional Community Servermultiplexers in front of the two SametimeCommunity Servers. For example, addingtwo more Community Server multiplexersto the cluster shown above mightaccommodate as many as 120,000 activeconnections (4 x 30,000 connections perCommunity Server multiplexer).
Note: The server capacity numbers used above are approximations meant toprovide a rough estimate of the possible load-handling improvement if you deployCommunity Server multiplexers on separate computers. The actual server capacityis affected by variables such as:v The average number of users in the contact lists of all Sametime clientsv The number of instant messages that users send
Deploying a stand-alone Community Mux for a single SametimeCommunity ServerThis section discusses the performance advantages and procedures associated withdeploying a separate multiplexer in front of a Sametime server machine (ormachines) that does not operate as part of a Community Server cluster.
Each Sametime server contains a Community Server multiplexer (or MUX)component. The function of the Community Server multiplexer is to handle andmaintain connections from Sametime clients to the Community Server.
During a normal Sametime server installation, the Community Server multiplexeris installed with all other Sametime components on the Sametime server machine.The Sametime server CD provides an option to install only the Community Servermultiplexer component. This option enables the administrator to install theCommunity Server multiplexer on a different machine than the Sametime server.
When the Sametime Community Server multiplexer is installed on a differentmachine than the Sametime server:v The Sametime Connect clients connect to the Community Server multiplexer
machine, not the Sametime server. This configuration frees the Sametime serverfrom the burden of managing the live client connections; the multiplexermachine is dedicated to this task.
v The Community Server multiplexer maintains a single IP connection to theSametime server. The data for all Community Server clients is transmitted overthis single IP connection to the Community Server.
46 Lotus Sametime: Installation and Administration Guide Part 1
In this scenario, the Community Server connection-handling load is removed fromthe Sametime server. The Sametime server does not need to employ systemresources to maintain thousands of client connections. Removing theconnection-handling load from the Sametime server ensures these system resourcescan be dedicated to other Community Server processing tasks.
The Community Server multiplexer machine dedicates its system resources tohandling client connections but does not perform other Community Serverprocessing. Distributing the Community Server workload between multiple serversin this way enables the Community Server to handle a larger number ofconnections (users) and to function more efficiently.
Performance improvements with a stand-alone multiplexer
If the Community Server multiplexer operates on the same machine as theSametime server, the Sametime server can handle approximately 8,000 to 10,000Community Server connections and also perform other Community Serverprocessing tasks adequately.
However, if the Sametime server is not required to expend system resources tomaintain client connections, the server can service approximately 100,000connections. (The Sametime server is capable of processing the Community Serverdata that is passed over 100,000 connections if it does not have to maintain theconnections themselves.)
When a Sametime Community Server multiplexer is installed on a separatemachine, the Community Server multiplexer can support approximately 20,000 liveIP port connections. You can also deploy multiple Community Server multiplexersin front of a Sametime server.
To summarize the performance benefits of a separate multiplexer deployment,consider the following example:v You can install three separate Community Server multiplexers in front of a
single Sametime server. If each Community Server multiplexer handles 20,000connections, as many as 60,000 users can be connected to a single Sametimeserver at one time.
v If the Sametime server is capable of servicing 100,000 connections, the serverperformance will not degrade under the load produced by 60,000 connections.
v If the multiplexer operates on the Sametime server instead of being deployedseparately, the Sametime server can service a maximum of 10,000 users. Bydeploying three separate multiplexers in front of a single Sametime server, youcan service 50,000 more users (assuming one connection per user) than if themultiplexer operates on the same machine as the Sametime server.
v If you deploy separate multiplexers in the manner described above, you can alsoimplement a rotating DNS system, or IBM WebSphere Edge Server, in front ofthe multiplexers to load balance connections to the separate multiplexers.
Planning a Lotus Sametime Media Manager installationYou should review the following considerations before installing components of anIBM Lotus Sametime Media Manager. In Sametime 8.5, audio and video aremanaged with the Lotus Sametime Media Manager server. Audio and videoservices provided by the Lotus Sametime Media Manager have been tested andoptimized for sessions with six participants. The actual number of participants persession will vary up or down based on network and environmental conditions.
Chapter 2. Planning 47
Important: In this release, a Lotus Sametime deployment can support only onestand-alone Media Manager server, or one cluster of Media Manager servers.
A Media Manager deployment consists of a Conference Manager, a SIP Proxy andRegistrar, and a Packet Switcher. The Conference Manager handles the workloaddistribution among the Packet Switchers. A standalone Media Managerdeployment can have multiple Packet Switchers to support a higher number ofsimultaneous audio and video conferences. Each Packet Switcher runs on aseparate WebSphere node and is not clustered. The Lotus Sametime SystemConsole can only administer one Media Manager instance. The individualcomponents of the Media Manager instance may be individually clustered toprovide failover and high availability, deployed as standalone servers, or installedon the same server – but only one Media Manager deployment can beadministered from a given Lotus Sametime System Console.
The Packet Switcher is not administered from the console, so it is not affected bythis limitation; however the Conference Manager and the SIP Proxy and Registrarcomponents are administered from the console, so your planning must take thislimitation into consideration.
Example 1: Two standalone Conference Manager servers cannot be administeredfrom the same Lotus Sametime System Console.
Example 2: A Conference Manager cluster and a SIP Proxy and Registrar clustercan both be administered from the same console. This is the recommendedtopology for enterprise customers.
Example 3: A Conference Manager cluster and a standalone SIP Proxy andRegistrar server can be administered from the same console.
This restriction is due to a limitation with the current version of the LotusSametime System Console.Related concepts
“Lotus Sametime Media Manager” on page 9The IBM Lotus Sametime Media Manager runs on WebSphere Application Serverto provide audio visual services for chats and meetings. It requires a Lotusametime Community Server.
Audio and video considerationsIf your IBM Lotus Sametime deployment will include one or more Lotus SametimeMedia Manager servers, you should review this information about audio/videofeatures.
Bandwidth considerations
Lotus Sametime Media Manager allows configuration of several parameters thateffect the bandwidth and performance of audio and video conferences. Theseparameters default to values which should work for most environments, but theycan be tuned to meet the specific needs of the organization deploying LotusSametime Media Manager.
In the Lotus Sametime System Console, the codecs used for audio and videotransfer can be tuned to the values required. The selected audio and video codecwill effect the bandwidth used and the processing power required to encode and
48 Lotus Sametime: Installation and Administration Guide Part 1
decode the information streams. Consult the specification of those codecs todetermine which one bests suits any specific needs of the deployment.
Within the specification of the video codec, it is also possible to adjust the videoresolution and bit-rate which will be used for video streams. Generally, the lowerthe resolution and the bit-rate, the lower the bandwidth used and the lower theprocessing power required to send and receive the video streams. However, thelower resolutions and bandwidth, the lower the quality of the video image.Likewise, the higher the bit-rate and resolution, the higher the required bandwidthand processing power, and the higher the quality of the video.
For example, if you are using low bandwidth networks and older machines withless processing power, it might be necessary to select a lower video bit rate. If thequality of the video image is important, and enough processing power andnetwork bandwidth is available, a higher video bit-rate can be used.
Sametime video codecs provide many resolution choices, from SQCIF to Wide FullHD (1080p). The higher the resolution, the more CPU, display memory, andgraphics card power are required. Machines equivalent to Lenovo T60 can handleCIF and VGA, but HD will require Intel® Core 2 Quad or better CPU and at least256 megabytes of display memory.
Another configuration parameter which can be adjusted is the number of switchedaudio streams. This is the total number of audio streams that will be sent from theserver to the client when participating in a audio conference call. The higher thenumber of audio streams to each client, then the higher the number of people onthe call who can speak at the same time and be heard by all participants. Thenumber of streams sent to each client also affects bandwidth and server load.
The total number of participants in audio and video conferences can also becapped, limiting the amount of bandwidth that any single call can use as a sum ofthe other parameters and the number of people participating in the conference.
Video Conferencing
As the number of participants in a video conference increases, so does the demandon the network. To ensure that a given network can support this new collaborativefeature, administrators have the ability to restrict the maximum number ofparticipants. Administrators should work directly with their network team toidentify the maximum number of participants that works best for theirorganization and their respective network policies. The default maximum numberof participants in a single audio-only or video conferences is set to six; however,this can be adjusted to accommodate specific network consumption requirements.
Audio and video services provided by the Sametime Media Manager have beentested and optimized for sessions with six participants. The actual number ofparticipants will vary up or down based on network and environmental conditions
Another consideration for networks is latency, which can cause undesirable results.Latency of less than 150ms end-to-end is normally acceptable in interactive real-timeaudio video conferencing.
Video driver
It is strongly recommended that you use the up-to-date driver that comes with thevideo camera, as some cameras do not work well with the generic video driver.
Chapter 2. Planning 49
Sametime Reflector
Audio and video services provided by the IBM Lotus Sametime Reflector (a LotusSametime server application that helps to establish multimedia sessions betweenclients across a firewall) will not be available in this release to assist Sametime 8.5client-to-client audio/video communication. The service may appear to be running,but will not function.
Client interoperability
In the initial release of Lotus Sametime 8.5, the 8.5 client can only establish audioand video connections with other 8.5 clients. Release 8.5 audio/video services canco-exist with release 7.5.x and 8.0.x audio/video services, with the followingrestrictions:v The 8.5 client cannot establish an audio or video call with 7.5.x or 8.0.x clients.v The 7.5.x and 8.0.x clients cannot establish an audio or video call with the 8.5
client.v The 8.5 client cannot use the Lotus Sametime Reflector.
Best Practices
For information on using the best practices for ensuring a good audio/visualexperience, see Audio/Visual Best Practices in the Sametime wiki.
Planning a Lotus Sametime Gateway installationBefore you begin your installation, consider the size of your deployment, the DB2database and LDAP server that you will connect to, ports in the firewalls that needto open, hardware requirements, and node names. Review this checklist to preparefor installation.
About this task
Collecting information about servers and ports now will make it easier to supplycorrect information during the Lotus Sametime Gateway installation.1. Review the deployment scenarios and refer to the software and hardware
requirements as you size your deployment. Determine if you are installing astandalone Sametime Gateway server, or a cluster of Sametime Gatewayservers. Clusters provide enhanced scalability and failover capabilities and arerecommended for large organizations and deployments with many users.Standalone deployments are recommended for small and mediumdeployments, or pilot deployments.
2. Talk with the systems administrators in your company who oversee DB2,LDAP, and DNS servers about Sametime Gateway requirements. Make sureeveryone in your organization knows that this product requires these services.A well-designed and well-thought out process makes the deployment of newsoftware systems roll out smoother and faster.
3. Consult the network firewall administrator about requirements to open portsin the firewalls. Sametime Gateway is installed in the DMZ between theinternal and external firewalls. See the deployment scenario diagrams tounderstand the ports that need to be open:
50 Lotus Sametime: Installation and Administration Guide Part 1
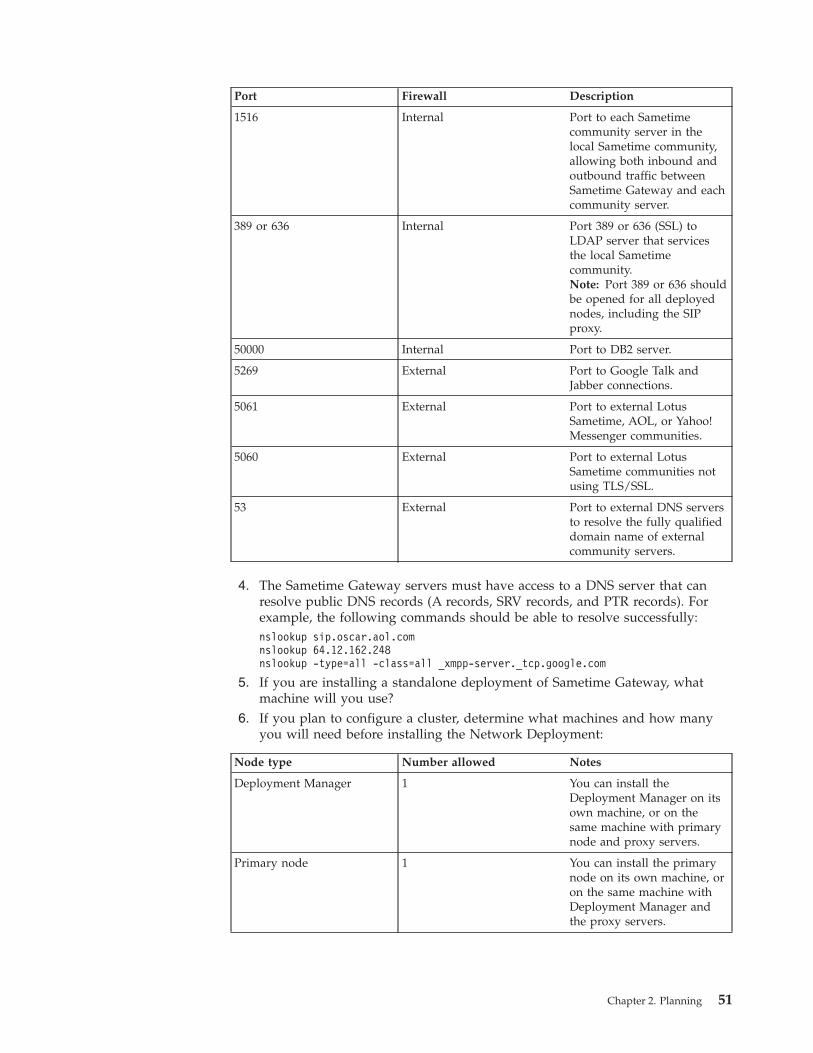
Port Firewall Description
1516 Internal Port to each Sametimecommunity server in thelocal Sametime community,allowing both inbound andoutbound traffic betweenSametime Gateway and eachcommunity server.
389 or 636 Internal Port 389 or 636 (SSL) toLDAP server that servicesthe local Sametimecommunity.Note: Port 389 or 636 shouldbe opened for all deployednodes, including the SIPproxy.
50000 Internal Port to DB2 server.
5269 External Port to Google Talk andJabber connections.
5061 External Port to external LotusSametime, AOL, or Yahoo!Messenger communities.
5060 External Port to external LotusSametime communities notusing TLS/SSL.
53 External Port to external DNS serversto resolve the fully qualifieddomain name of externalcommunity servers.
4. The Sametime Gateway servers must have access to a DNS server that canresolve public DNS records (A records, SRV records, and PTR records). Forexample, the following commands should be able to resolve successfully:nslookup sip.oscar.aol.comnslookup 64.12.162.248nslookup -type=all -class=all _xmpp-server._tcp.google.com
5. If you are installing a standalone deployment of Sametime Gateway, whatmachine will you use?
6. If you plan to configure a cluster, determine what machines and how manyyou will need before installing the Network Deployment:
Node type Number allowed Notes
Deployment Manager 1 You can install theDeployment Manager on itsown machine, or on thesame machine with primarynode and proxy servers.
Primary node 1 You can install the primarynode on its own machine, oron the same machine withDeployment Manager andthe proxy servers.
Chapter 2. Planning 51
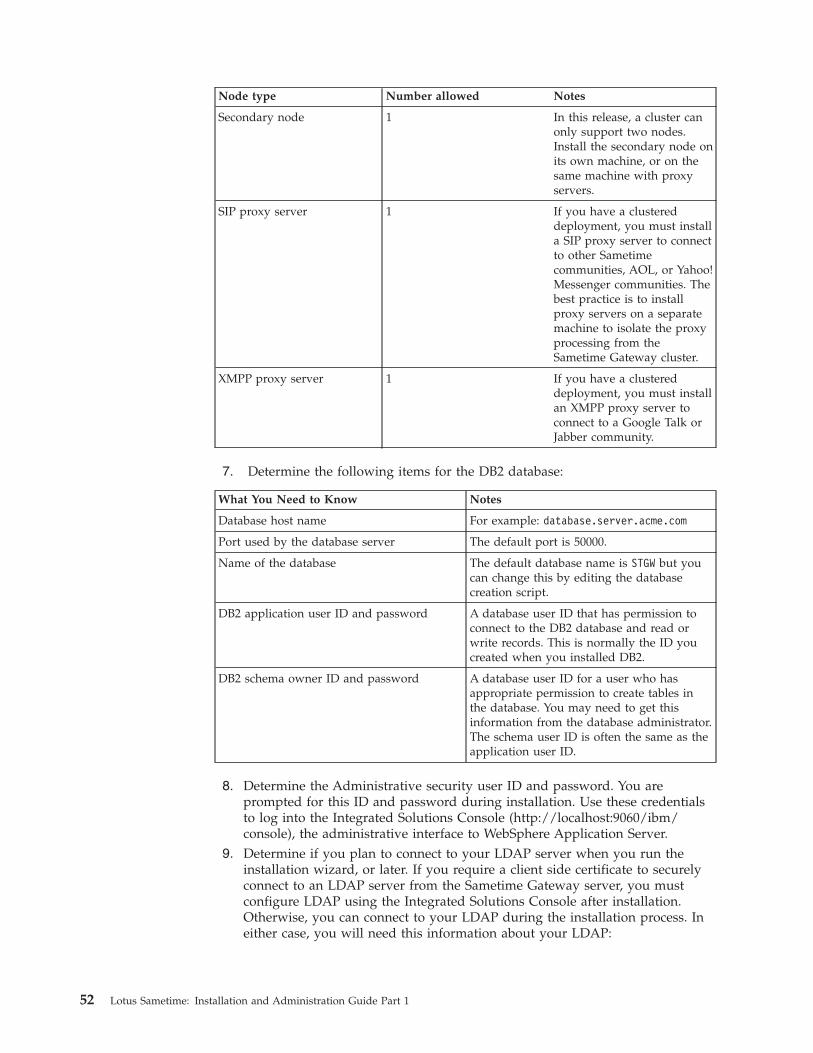
Node type Number allowed Notes
Secondary node 1 In this release, a cluster canonly support two nodes.Install the secondary node onits own machine, or on thesame machine with proxyservers.
SIP proxy server 1 If you have a clustereddeployment, you must installa SIP proxy server to connectto other Sametimecommunities, AOL, or Yahoo!Messenger communities. Thebest practice is to installproxy servers on a separatemachine to isolate the proxyprocessing from theSametime Gateway cluster.
XMPP proxy server 1 If you have a clustereddeployment, you must installan XMPP proxy server toconnect to a Google Talk orJabber community.
7. Determine the following items for the DB2 database:
What You Need to Know Notes
Database host name For example: database.server.acme.com
Port used by the database server The default port is 50000.
Name of the database The default database name is STGW but youcan change this by editing the databasecreation script.
DB2 application user ID and password A database user ID that has permission toconnect to the DB2 database and read orwrite records. This is normally the ID youcreated when you installed DB2.
DB2 schema owner ID and password A database user ID for a user who hasappropriate permission to create tables inthe database. You may need to get thisinformation from the database administrator.The schema user ID is often the same as theapplication user ID.
8. Determine the Administrative security user ID and password. You areprompted for this ID and password during installation. Use these credentialsto log into the Integrated Solutions Console (http://localhost:9060/ibm/console), the administrative interface to WebSphere Application Server.
9. Determine if you plan to connect to your LDAP server when you run theinstallation wizard, or later. If you require a client side certificate to securelyconnect to an LDAP server from the Sametime Gateway server, you mustconfigure LDAP using the Integrated Solutions Console after installation.Otherwise, you can connect to your LDAP during the installation process. Ineither case, you will need this information about your LDAP:
52 Lotus Sametime: Installation and Administration Guide Part 1
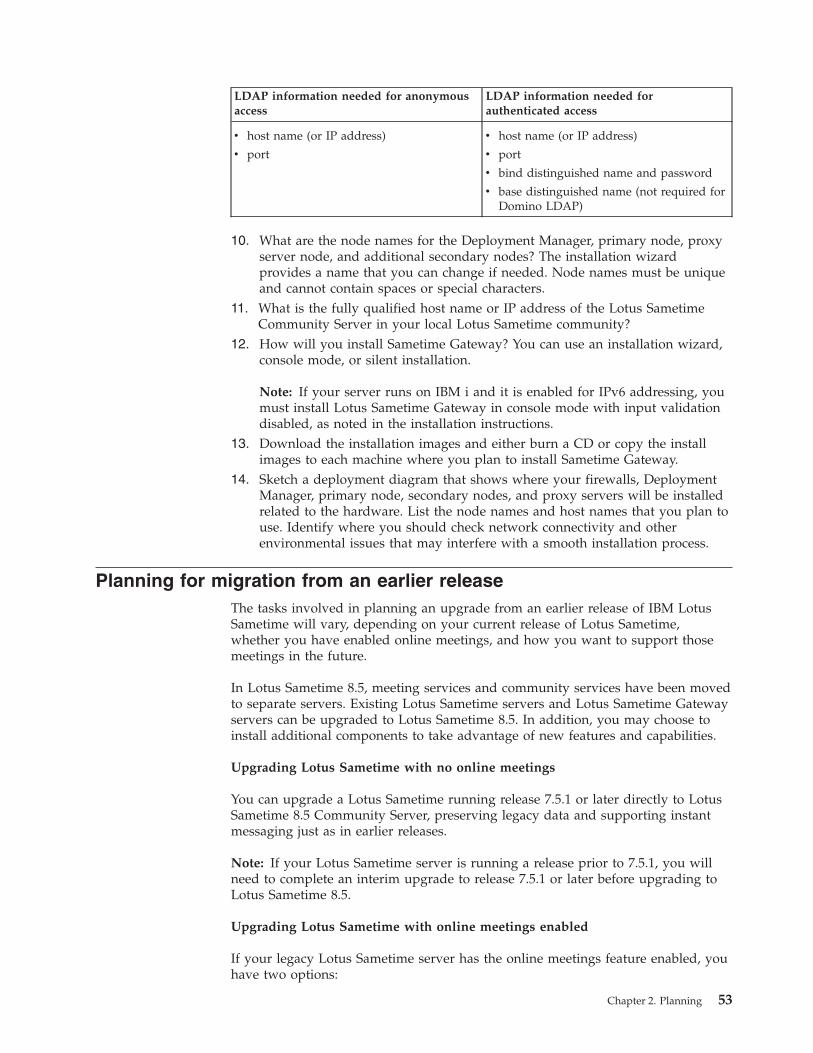
LDAP information needed for anonymousaccess
LDAP information needed forauthenticated access
v host name (or IP address)
v port
v host name (or IP address)
v port
v bind distinguished name and password
v base distinguished name (not required forDomino LDAP)
10. What are the node names for the Deployment Manager, primary node, proxyserver node, and additional secondary nodes? The installation wizardprovides a name that you can change if needed. Node names must be uniqueand cannot contain spaces or special characters.
11. What is the fully qualified host name or IP address of the Lotus SametimeCommunity Server in your local Lotus Sametime community?
12. How will you install Sametime Gateway? You can use an installation wizard,console mode, or silent installation.
Note: If your server runs on IBM i and it is enabled for IPv6 addressing, youmust install Lotus Sametime Gateway in console mode with input validationdisabled, as noted in the installation instructions.
13. Download the installation images and either burn a CD or copy the installimages to each machine where you plan to install Sametime Gateway.
14. Sketch a deployment diagram that shows where your firewalls, DeploymentManager, primary node, secondary nodes, and proxy servers will be installedrelated to the hardware. List the node names and host names that you plan touse. Identify where you should check network connectivity and otherenvironmental issues that may interfere with a smooth installation process.
Planning for migration from an earlier releaseThe tasks involved in planning an upgrade from an earlier release of IBM LotusSametime will vary, depending on your current release of Lotus Sametime,whether you have enabled online meetings, and how you want to support thosemeetings in the future.
In Lotus Sametime 8.5, meeting services and community services have been movedto separate servers. Existing Lotus Sametime servers and Lotus Sametime Gatewayservers can be upgraded to Lotus Sametime 8.5. In addition, you may choose toinstall additional components to take advantage of new features and capabilities.
Upgrading Lotus Sametime with no online meetings
You can upgrade a Lotus Sametime running release 7.5.1 or later directly to LotusSametime 8.5 Community Server, preserving legacy data and supporting instantmessaging just as in earlier releases.
Note: If your Lotus Sametime server is running a release prior to 7.5.1, you willneed to complete an interim upgrade to release 7.5.1 or later before upgrading toLotus Sametime 8.5.
Upgrading Lotus Sametime with online meetings enabled
If your legacy Lotus Sametime server has the online meetings feature enabled, youhave two options:
Chapter 2. Planning 53
v Continue creating and hosting online meetings on the upgraded serverIf the online meetings feature was enabled in your previous release of LotusSametime, it remains enabled when you upgrade and features work just as inthe earlier release.
Note: The Lotus Sametime Enterprise Meeting Server is not supported by LotusSametime release 8.5. If your meeting rooms are clustered with Lotus SametimeEnterprise Meeting Server, you will have to remove the servers from the cluster.
v Install additional Lotus Sametime 8.5 components to support the LotusSametime 8.5 Meeting ServerAll your legacy meeting data is still preserved, but rather than continue creatingand hosting meetings on the upgraded server, you can set up URL redirects toroute users to the Lotus Sametime 8.5 Meeting Server for creating and attendingmeetings. Expanding the deployment to include a stand-alone Meeting Serverrequires that you install these additional components:– LDAP user directory
Because the new components in Lotus Sametime 8.5 run on IBM WebSphereApplication Server, you must use an LDAP directory to ensure allcomponents can authenticate users. If your previous deployment used thenative Lotus Domino Directory for user management, you can convert it toLDAP format for use with the expanded deployment.
– IBM DB2 databaseThe database stores information used by several of the components in thedeployment.
– Lotus Sametime 8.5 System ConsoleThe Lotus Sametime System Console provides a central point foradministering all servers in the deployment. If you cluster any of theWebSphere-based servers, you can use the system console as the DeploymentManager; the console can serve as Deployment Manager for multiple clusters.
– Lotus Sametime 8.5 Proxy ServerThe Lotus Sametime Proxy Server enables browser-based clients to participatein Lotus Sametime instant messaging and online meetings. In addition, theLotus Sametime Proxy Server works with Lotus Sametime Community Serveror Lotus Connections to enable the business card feature in Lotus Sametime,and with Lotus Sametime Unified Telephony or other TCSPI-enabled productsto enable the Lotus Sametime click-to-call feature. The Lotus Sametime ProxyServer also provides live names awareness, and can replace the Links Toolkitused in earlier releases of Lotus Sametime.
– Lotus Sametime 8.5 Meeting ServerThe Lotus Sametime Meeting Server provides an online meeting feature in astand-alone server, rather than combining them with community services asin the past. Because it runs on WebSphere Application Server, the meetingserver can be clustered using a WebSphere network deployment.
If you choose to expand your deployment this way, you may additionally chooseinstall to these remaining components:v Lotus Sametime 8.5 Media Manager
The Lotus Sametime Media Manager provides audio and video features forinstant messaging and online meetings.
v Lotus Sametime 8.5 Gateway
54 Lotus Sametime: Installation and Administration Guide Part 1
The Lotus Sametime Gateway provides instant messaging with externalcommunities, including Lotus Sametime communities deployed outside of yourfirewall, AOL Instant Messenger, Google Talk, and Yahoo! Messenger.
Upgrading Lotus Sametime Gateway
You can upgrade Lotus Sametime Gateway 8.0.2 directly to release 8.5; if you havean earlier release you will need to complete an interim upgrade before you canupgrade to Lotus Sametime Gateway 8.5. Upgrading Lotus Sametime Gatewayincludes upgrading the WebSphere Application Server on which it runs fromversion 6 to version 7.
Although a new deployment of Lotus Sametime Gateway uses DB2 9.5 LimitedUse, an upgraded gateway will continue to use DB2 9.1 Enterprise Server Edition;the database schema will be updated automatically by scripts that run duringgateway product installation.
Before upgrading Lotus Sametime Gateway servers in a cluster, you will have toremove each node from the cluster. Once the server upgrades are complete, youcan add the nodes back into the cluster.
Note: In this release, a Lotus Sametime Gateway cluster can only have oneSecondary Node.
Upgrading Lotus Sametime clients
Lotus Sametime Connect and Lotus Sametime embedded clients running release7.5.1 or later can be upgraded directly to release 8.5. If your users are runningclients older than release 7.5.1, their workstations must be upgraded to release 7.5.1or later before you can upgrade them to release 8.5.
Clustering Sametime servers for high availabilityIn a production environment, use clustering to provide failover and load balancingby creating a cluster of multiple Sametime servers of the same type. Each cluster ofservers can be managed by the Sametime System Console.
Clusters are groups of servers that are managed together and participate inworkload management. A cluster can contain nodes or individual applicationservers. A node is usually a physical computer system with a distinct host IPaddress that is running one or more application servers. Clusters can be groupedunder the configuration of a cell, which logically associates many servers andclusters with different configurations and applications with one another dependingon the discretion of the administrator and what makes sense in their organizationalenvironments.
Clusters are responsible for balancing workload among servers. Servers that are apart of a cluster are called cluster members. When you install an application on acluster, the application is automatically installed on each cluster member. You canconfigure a cluster to provide workload balancing with service integration or withmessage driven beans in the application server.
Chapter 2. Planning 55
Related tasks
“Installing Gateway servers in a cluster” on page 138Complete these steps to install a cluster of Lotus Sametime Gateway servers in anetwork deployment. A cluster is a group of application servers that are managedtogether and participate in workload management. A network deployment is a groupof nodes administered by the same cell, and controlled by a Deployment Manager.Lotus Sametime Gateway supports cluster members on multiple nodes acrossmany nodes in a cell, with nodes either coexisting on the same hardware, orrunning on dedicated systems. At a minimum, a network deployment is made upof a Deployment Manager, which manages the cell, a primary node, a primaryserver (primary cluster member), and a secondary cluster member. You expand thecluster by adding additional cluster members either on existing nodes, or byadding a new secondary node and then adding the member to the new node.“Installing Gateway servers in a cluster” on page 340Complete these steps to install a cluster of Lotus Sametime Gateway servers in anetwork deployment. A cluster is a group of application servers that are managedtogether and participate in workload management. A network deployment is a groupof nodes administered by the same cell, and controlled by a Deployment Manager.Lotus Sametime Gateway supports cluster members on multiple nodes acrossmany nodes in a cell, with nodes either coexisting on the same hardware, orrunning on dedicated systems. At a minimum, a network deployment is made upof a Deployment Manager, which manages the cell, a primary node, a primaryserver (primary cluster member), and a secondary cluster member. You expand thecluster by adding additional cluster members either on existing nodes, or byadding a new secondary node and then adding the member to the new node.
Giving users a preview guideYou can help your IBM Lotus Sametime users get started quickly and easily usingthe informational and learning resources in the Lotus Sametime wiki. The LotusSametime product page links you to all of the informational and educationalmaterial you’ll need.
For starters, there are materials you can use to provide your users with a previewof the new features coming to their desktops: Administrators: Previewing LotusSametime for your users. The ready-to-distribute PDF file gives a quick overviewof what is new and changed in this release. The Lotus Symphony™ file includes thesame information as the PDF file, with instructions on how to customize the filewith information specific to your site and how to create your own PDF. Note: Besure to read the customization instructions in blue text.
The Lotus Sametime Getting started section of the wiki provides your users withlinks to Flash demonstrations, videos, reference cards, Web seminars, producttours, and other materials for learning more about Lotus Sametime: LotusSametime Media Gallery.
56 Lotus Sametime: Installation and Administration Guide Part 1
Chapter 3. Installing
Install and configure prerequisites, then install IBM Lotus Sametime servers andcomplete basic server configuration.
Installing on AIX, Linux, Solaris, and WindowsInstall and configure prerequisites, then install IBM Lotus Sametime servers andcomplete basic server configuration on AIX, Linux, Solaris, and Windows.
This section contains information about system requirements, Lotus Sametimeprerequisites, server installation and required configuration tasks to do afterinstallation.Related concepts
Chapter 4, “Migrating and upgrading,” on page 431Migrate data from a previous version of Lotus Sametime and upgrade one or moreservers to take advantage of the latest features.
Installing DB2 on Linux and WindowsIBM DB2 is a prerequisite for IBM Lotus Sametime and is included with theSametime installation package for Linux and Windows. The package does notinclude DB2 for AIX or Solaris.
Before you begin
The DB2 installation provided with Lotus Sametime supports Linux 32-bit systemsand Windows 32-bit or 64-bit systems. If you have a 64-bit Linux system, eitherinstall DB2 for Windows or install DB2 on a 32-bit Linux system instead. IBM iincludes DB2.
About this task
If you are running in a production environment, install DB2 on a separatemachine. In a pilot environment, you can install DB2 on the same machine onwhich you plan to install Lotus Sametime System Console.1. (Linux RHEL only) Disable SELinux on any RedHat operating system:
a. Log in as root on the Linux RedHat server where you will install DB2.b. Open the /etc/selinux/config file for editing.c. Locate the SELINUX setting. Change its value to either disable or
permissive.d. Save and close the file.e. Restart the Linux server.
2. Log in to your computer as the system administrator (Microsoft Windows) oras root (Linux).
3. Download the Sametime DB2 installation package if you have not alreadydone so.a. To download installation packages, you must have an IBM Passport
Advantage account, which is described at the following Web address:www.ibm.com/software/howtobuy/passportadvantage/paocustomer/docs/en_US/ecare.html
© Copyright IBM Corp. 1996, 2009 57
b. Open this release’s Download document at the following Web address:http://www.ibm.com/support/docview.wss?rs=477&uid=24024322
Locate the components you need in the document’s listing, then downloadthe packages labelled with the corresponding part numbers to the systemon which you are installing.
c. Extract the files to a local directory.d. Verify that you have at least 1 GB of temporary space to run the
installation in your %TEMP% or /tmp directory.4. Navigate to the folder where you extracted the files. Start the installation
program by running one of the following commands from the disk 1 folder:Linux
./launchpad.shWindows
launchpad.exe5. If necessary, select a language other than English from the ″Select a language″
dropdown list.6. Click Install IBM DB2 and click Install IBM DB2.7. Leave the defaults selected and click Next.
If Installation Manager is already installed, the selection is dimmed.8. At the Licenses screen, click the I accept the terms in the license agreements
option and click Next.9. At the next screen, accept the default locations.
Click Next.10. At the next screen, accept the default location for the package group.
Click Next.11. Select Create a new package group and accept the default location.
Click Next.12. Confirm that all available features are selected, then click Next.13. Create a new DB2 Application User ID that does not exist on the system. Then
supply a password that meets the operating system password policyrequirements as well as any additional requirements imposed by yourcompany. Confirm the password.For information about passwords, see the Password Rules topic in the DB2information center.
Important: This user cannot previously exist on the system. This user will becreated as a local operating system user during the DB2 installation process; ifyour organization does not allow creation of local operating system users forsecurity reasons, exit this installer and install DB2 v9.5 using a differentpackage. This installer will not check to see if the user already exists.Make a note of the DB2 Application User name and password. This user hasdatabase administration authority and you will supply the name andpassword when you install the Lotus Sametime System Console and whenyou connect to DB2 databases later.Then click Next.
14. At the summary panel, review the settings, then click Install to start theinstallation.The installation may take up to 20 minutes to install. You will receiveconfirmation when it is complete.
58 Lotus Sametime: Installation and Administration Guide Part 1
15. Click Finish to close the installation screen.16. Click Exit to close the Installation Manager.
Results
If the installation fails, click View Log File for more information. Logs are storedin the following locations.
Linux
/var/ibm/InstallationManager/logs
Windows 2008%ALLUSERSPROFILE%\IBM\Installation Manager\logs
Windows 2003%ALLUSERSPROFILE%\Application Data\IBM\Installation Manager\logs
What to do next
“Creating a database for the Lotus Sametime System Console on AIX, Linux,Solaris, and Windows”
Installing the Lotus Sametime System ConsoleThe Lotus Sametime System Console is your focal point for administering andconfiguring all Sametime servers.
About this task
Install and configure prerequisite applications, then install the IBM Lotus SametimeSystem Console, which you will use for preparing for server installations and formanaging your Lotus Sametime deployment.
Creating a database for the Lotus Sametime System Console onAIX, Linux, Solaris, and WindowsBefore installing the Lotus Sametime System Console, create a database to store itsdata.
Before you begin
Make sure you have installed DB2. If you previously created a System Consoledatabase and want to run the script again to create a database of the same name,use the DB2 DROP DATABASE command first to delete all user data and log files,as well as any back/restore history for the original database. Also note thatuninstalling DB2 does not remove the data and log files.
About this task
Run the scripts that come with Lotus Sametime in the DB2 installation package tocreate the database for the Lotus Sametime System Console.1. On the DB2 server, log in to the system as the DB2 administrator created
during DB2 installation if you are not already logged in.Linux and Windows: Now proceed to Step 3.AIX and Solaris: Now proceed to Step 2.
Chapter 3. Installing 59
2. Download the DB2 installation package if you have not already done so.a. To download installation packages, you must have an IBM Passport
Advantage account, which is described at the following Web address:www.ibm.com/software/howtobuy/passportadvantage/paocustomer/docs/en_US/ecare.html
b. Open this release’s Download document at the following Web address:http://www.ibm.com/support/docview.wss?rs=477&uid=24024322
Locate the components you need in the document’s listing, then downloadthe packages labelled with the corresponding part numbers to the systemon which you are installing.
c. Extract the files to a local directory.d. Verify that you have at least 1 GB of temporary space to run the installation
in your %TEMP% or /tmp directory.3. Open a command prompt and navigate to the folder where you extracted the
DB2 installation package.4. Create the database by running one of the following commands from the disk 1
folder:AIX, Linux, and Solaris
./createSCDb.sh STSC
Windows
createSCDb.bat STSC
Replace ″STSC″ in the command if you want to choose a different databasename. Names can be from 1 - 8 characters, but cannot contain special ormultibyte characters.Follow the rules for your operating system when naming DB2 objects.
5. Close the command window.6. Open the DB2 Control Center.
AIX, Linux, and Solaris
Open the IBM DB2 folder on the desktop and click Control Center.Windows
Click Start → Programs → IBM DB2 → installed_DB2_instance → GeneralAdministration Tools → Control Center.
7. Verify that the new database was created.Related tasks
“Installing DB2 on Linux and Windows” on page 57IBM DB2 is a prerequisite for IBM Lotus Sametime and is included with theSametime installation package for Linux and Windows. The package does notinclude DB2 for AIX or Solaris.
Installing the console on AIX, Linux, Solaris, and WindowsRun the install program to set up the Lotus Sametime System Console on AIX,Linux, Solaris, or Windows.
Before you begin
Ensure that your DB2 server is installed and running with the db2start command,and that the Lotus Sametime System Console database has been created.
AIX, Linux, and Solaris: The launchpad install program needs to be able to launcha Web browser to start. You will need to be on the console or have an X server and
60 Lotus Sametime: Installation and Administration Guide Part 1
a Web browser installed and configured. (VNC or a remote X term session willwork as well.)
About this task
Follow these steps to install the Lotus Sametime System Console.1. (Linux RHEL only) Disable SELinux on any RedHat operating system:
a. Log in as root on the Linux RedHat server where you will install theSametime System Console.
b. Open the /etc/selinux/config file for editing.c. Locate the SELINUX setting. Change its value to either disable or
permissive.d. Save and close the file.e. Restart the Linux server.
2. Log in to your computer as the system administrator (Microsoft Windows) oras root (IBM AIX, Linux, Solaris).Solaris only: Solaris installs must be performed by the root user using su or anormal login session. Third-party sudo packages are not supported on Solaris.
3. Download the Sametime System Console installation package if you have notalready done so.a. To download installation packages, you must have an IBM Passport
Advantage account, which is described at the following Web address:www.ibm.com/software/howtobuy/passportadvantage/paocustomer/docs/en_US/ecare.html
b. Open this release’s Download document at the following Web address:http://www.ibm.com/support/docview.wss?rs=477&uid=24024322
Locate the components you need in the document’s listing, then downloadthe packages labelled with the corresponding part numbers to the systemon which you are installing.
c. Extract the files to a local directory.d. Verify that you have at least 1 GB of temporary space to run the
installation in your %TEMP% or /tmp directory.4. Navigate to the folder where you stored the downloaded files for Lotus
Sametime and start the installation program by running one of the followingcommands from the disk 1 folder:AIX, Linux, Solaris
./launchpad.shWindows
launchpad.exe5. If necessary, select a language other than English from the ″Select a language″
dropdown list.6. Click Install IBM Lotus Sametime System Console and click Launch IBM
Lotus Sametime System Console 8.5 installation.7. Leave the defaults selected to install IBM Installation Manager, Version 1.3.x
and IBM Sametime System Console server, Version 8.5.x. Click Next.
Note: If IBM Installation Manager is already installed on the system, itsselection will be dimmed.
8. At the Licenses screen, click I accept the terms in the license agreements andclick Next.
9. Accept the location for shared installation files and click Next.
Chapter 3. Installing 61
10. Select Create a new package group. Accept the installation directory. Thenclick Next.
11. Verify that IBM Sametime System Console server 8.5.x is selected as thefeature to install and click Next.
12. At the Common Configurations screen, verify the cell, node, and host name.The Lotus Sametime System Console is a Deployment Manager andadministers a cell and any nodes federated into the cell for other Sametimeservers. In a production environment, the servers are in one geographic regionand in a pilot environment, the servers are all installed on one machine.v Cell: This is the name of the WebSphere cell that will be created for the
System Console, such as systemNameSSCCell.v Node: This is the name of the WebSphere node that will run the Sametime
applications in the Sametime System Console. It will be federated into thecell during the installation process.
v Host Name: Use the fully qualified DNS name of the server you areinstalling the Sametime System Console on. Make sure this DNS name isresolvable from other servers you will be installing products on. Do not usean IP address, a short host name, or localhost.
13. Create the WebSphere Application Server User ID user name and password,then confirm the password.This user will be created in a WebSphere local file system repository and doesnot exist on the operating system or in an LDAP directory. It will be used toadminister the Sametime System Console server.Make a note of the ID and password because you will need them later foradditional product installations and configuration. It will also be used toadminister the Sametime System Console server. Click Next.
14. At the Configure DB2 for the System Console screen, provide information forconnecting to the Sametime System Console database. Then click Next.v Host Name: Use the fully qualified domain name of the server where you
installed DB2. Do not use an IP address or a short host name.v The Port field shows the default port of 50000. Accept the default unless
you specified a different port during DB2 installation or your server isusing a different port.Linux: The default is typically 50000, but will vary based on portavailability. Check the /etc/services file on the DB2 server to verify the portnumber being used.
v Database Name for the System Console/Policy: Enter the name of thedatabase you want to connect to. If you used the recommended name whenyou created the Sametime System Console, the name is STSC.
v Application user ID: Enter the name of the database administrator youcreated when installing DB2. The default is db2admin.
v Application password: Supply the password that you created when youinstalled DB2, such as db2password.
15. Click Validate.16. When the button label changes to Validated, click Next.
If the database connection is not successful, use the dbverify.log to debug theproblem. The log can be found in the temp directory for your operatingsystem.AIX, Linux, and Solaris
/tmp
62 Lotus Sametime: Installation and Administration Guide Part 1
Windows
%TEMP%17. At the summary panel, review the settings, then click Install to start the
installation.18. Click Finish to close the installation screen.19. Click Exit to close the Installation Manager.
Results
After a successful installation, the three components that are needed to run theconsole start automatically: the Deployment Manager, the node agent, and theSametime System Console server. These must always be started before you can usethe system console.
If the installation was not successful, look at the installation logs for moreinformation about what occurred during the installation attempt. Fix any problems,then uninstall all components and reinstall. Find information in the logs directoryand the ant and native subdirectories.
AIX, Linux, or Solaris
/var/ibm/InstallationManager/logs
SSC connection log: /tmp/SSCLogs/ConsoleUtility.log.0
Windows 2008%ALLUSERSPROFILE%\IBM\Installation Manager\logs
Windows 2003%ALLUSERSPROFILE%\Application Data\IBM\Installation Manager\logs
SSC connection log:
Documents and Settings\username\Local Settings\Temp\SSCLogs\ConsoleUtility.log.0
What to do next
“Starting the Lotus Sametime System Console” on page 231Related tasks
“Uninstalling DB2 and Sametime software with the Installation Manager” on page243Use the Installation Manager to uninstall the following components that arepackaged with Lotus Sametime: IBM DB2 for Linux and Windows, Lotus SametimeSystem Console, Lotus Sametime Proxy Server, Lotus Sametime Meeting Server,and Lotus Sametime Media Manager.
Logging in to the Lotus Sametime System ConsoleUse the IBM Lotus Sametime System Console to prepare to install new servers,start Sametime servers that have been installed, use guided activities to performconfiguration tasks, and administer any Sametime servers managed by the console.
Chapter 3. Installing 63
About this task
With the Lotus Sametime System Console started, follow these steps to log in.1. From a browser, enter the following URL, replacing serverhostname.domain with
the fully qualified domain name of the Lotus Sametime System Console server.Specify port 8700 for all platforms except IBM i.http://serverhostname.domain:8700/ibm/console
IBM i: The port number may not be 8700. Use the port that was listed in theSametime System Console installation results summary. To check the port, openthe AboutThisProfile.txt file for the Sametime System Console DeploymentManager Profile and use the setting specified for the ″Administrative consoleport.″ For the default profile name (STSCDmgrProfile), the file is located here:/QIBM/UserData/Websphere/AppServer/V7/SametimeWAS/profiles/STSCDmgrProfile/logs/AboutThisProfile.txt
Note: During the install process, WebSphere security is enabled. SSL is enabledas part of the WebSphere security process and you will be directed to anotherport which listens for https connections.The WebSphere Application Server Integrated Solutions Console opens.
2. Enter the WebSphere Application Server User ID and password that youcreated when you installed Lotus Sametime System Console.The default name is wasadmin.
3. Click the Sametime System Console task to open it in the navigation tree.
What to do next
“Connecting to an LDAP server”Related tasks
“Starting the Lotus Sametime System Console” on page 231When started, the Lotus Sametime System Console runs as a task in the WebSphereApplication Server administrative console.
Connecting to an LDAP serverUse the Lotus Sametime System Console to connect IBM Lotus Sametime servers toan LDAP server that has already been installed and configured. An LDAP server isrequired for the Lotus Sametime System Console, Lotus Sametime CommunityServer, Lotus Sametime Meeting Server, Lotus Sametime Media Manager, andLotus Sametime Gateway Server .
Before you begin
Start the LDAP server and the Lotus Sametime System Console if they are notalready running.
About this task
If you have not already opened the Connect to LDAP Servers activity, follow thesesteps:1. From a browser, enter the following URL, replacing serverhostname.domain with
the fully qualified host name of the Lotus Sametime System Console server.http://serverhostname.domain:8700/ibm/console
64 Lotus Sametime: Installation and Administration Guide Part 1
If you are prompted with a security exception, accept the certificate, andcontinue.IBM i: The port number may not be 8700. Use the port that was listed in theSametime System Console installation results summary. To check the port, openthe AboutThisProfile.txt file for the Sametime System Console DeploymentManager Profile and use the setting specified for the ″Administrative consolesecure port.″ For the default profile name (STSCDMgrProfile), the file is locatedhere: /QIBM/UserData/Websphere/AppServer/V7/SametimeWAS/profiles/STSCDMgrProfile/logs/AboutThisProfile.txt
2. Enter the WebSphere Application Server User ID and password that youcreated when you installed the Lotus Sametime System Console.
3. Click the Sametime System Console task to open it in the navigation tree.4. Expand Sametime Prerequisites, and click Connect to LDAP Servers.Related concepts
“Planning for an LDAP directory” on page 40The IBM Lotus Sametime 8.5 multiple-server environment requires an LDAPdirectory for user authentication. The LDAP server should be set up and runningbefore deploying Sametime.Related tasks
“Starting the Lotus Sametime System Console” on page 231When started, the Lotus Sametime System Console runs as a task in the WebSphereApplication Server administrative console.
Sametime prerequisite: Connecting to an LDAP serverThis activity takes you through the steps for identifying users and groups in anLDAP directory that need access to IBM Lotus Sametime.
Before you begin
An LDAP server must be installed and configured.
About this task
Connect IBM Lotus Sametime servers to the LDAP server. Once your LotusSametime server connects to the LDAP server, it can search the LDAP directoryand authenticate Sametime users. If you have already connected Sametime to anLDAP server, but now you want to edit or delete a connection, use this activity.
Note: If you are using Active Directory as the LDAP, a common attribute to usefor authentication is the saMAccountName attribute. When an Active DirectoryLDAP is being used, WebSphere automatically maps uid to saMAccountName, sosaMACccountName should not be explicitly stated as an attribute. If you want touse saMAccountName for any LDAP attribute field, you must specify uid. SpecifyingsaMACccountName as a login or search property causes installation to fail. You canfind more information in this TechNote: http://www-01.ibm.com/support/docview.wss?uid=swg21253331.1. Connect to LDAP server.
In Connect to LDAP servers, click Add.If you want to edit or delete an LDAP connection instead, then click theappropriate button. You can only edit or delete an LDAP connection if it hasnot been used to install a product.
2. Bind to LDAP.a. Click either Anonymous access or Authenticated access.
Chapter 3. Installing 65
When a Lotus Sametime server connects to the LDAP server, this can bedone either anonymously or using credentials to authenticate with theLDAP server. If you select Authenticated access, you will be prompted withthe Bind distinguished name (DN) and Password fields to enter thisinformation. If you select Anonymous access, these fields will be hidden asthey are not required.
b. Enter a Deployment Name for this LDAP connection. This is name youprovide to this LDAP connection for easy reference. It does not need to mapto any existing server name or value and is intended as an easy way toidentify this object when you reference it in the future.
c. Enter the fully qualified domain name of the LDAP server you wish toconnect to in the Host name field. Do not use an IP address or a short hostname.
d. Enter the Port of the LDAP server. The default value is 389. If your LDAPserver is running on a different port, enter the correct port value here. Ifthis is an SSL connection, click Is secure LDAP connection?.
e. If you have selected Authenticated Access, enter the Bind distinguishedname (DN) and Password fields. These are the user credentials you will useto authenticate with your LDAP server. If you have selected AnonymousAccess, these fields will not be shown. For example:cn=John Smith,ou=managers,o=acme,st=Massachusetts,c=US
f. Verify that the check box for Is used by Sametime System Console? isselected. It is selected by default so that the LDAP server is used by theSametime System Console for authentication and policy management.
g. Click Next.When designating an authenticated user, IBM recommends that you create aunique directory entry that is used only for the purpose of authenticatingconnections from the Lotus Sametime server to the LDAP server. After creatingthe directory entry, you must ensure this directory entry has at least read accessto the attributes of the LDAP directory entries.
3. Base Distinguished Name and Filter for Searches.Enter the base distinguished name and filter for searches information.a. Select your base distinguished name and filter for searches from the
dropdown list, or if it was not found, enter it into the field. Selecting onethat was found from the dropdown list will populate the field for you. Youspecify the basic LDAP parameters required to conduct searches for people,and for groups, in an LDAP directory. Some of these parameters are alsonecessary for displaying the names of users in the IBM Lotus Sametimeuser interface.
Note: A dropdown list typically displays from which you select a base DNthat is detected by the guided activity; however, the list does not displaywhen Domino LDAP is being used. Additionally, Domino LDAP is the onlyLDAP that uses a blank base DN, while WebSphere requires a base DN forfederating repositories. Since WebSphere does not let you federate an LDAPdirectory with an empty base DN, it sets the base DN to C=US. The LDAPrepositories are listed by base DN after they are federated.
If your site uses single sign-on (SSO) for awareness, you must manuallymodify the base DN in both the Lotus Sametime Community Server andLotus Sametime Meeting Server so they match. Update the SametimeCommunity Server’s LDAP connections in the stconfig.nsf and da.nsf to
66 Lotus Sametime: Installation and Administration Guide Part 1
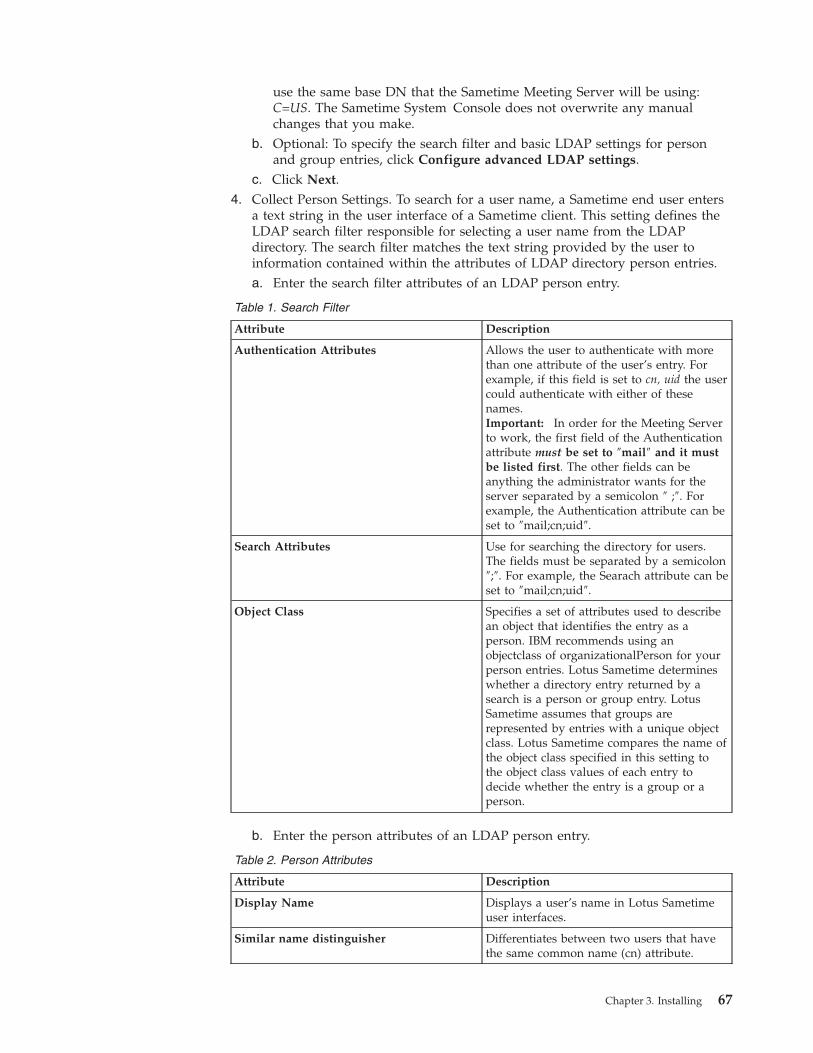
use the same base DN that the Sametime Meeting Server will be using:C=US. The Sametime System Console does not overwrite any manualchanges that you make.
b. Optional: To specify the search filter and basic LDAP settings for personand group entries, click Configure advanced LDAP settings.
c. Click Next.4. Collect Person Settings. To search for a user name, a Sametime end user enters
a text string in the user interface of a Sametime client. This setting defines theLDAP search filter responsible for selecting a user name from the LDAPdirectory. The search filter matches the text string provided by the user toinformation contained within the attributes of LDAP directory person entries.a. Enter the search filter attributes of an LDAP person entry.
Table 1. Search Filter
Attribute Description
Authentication Attributes Allows the user to authenticate with morethan one attribute of the user’s entry. Forexample, if this field is set to cn, uid the usercould authenticate with either of thesenames.Important: In order for the Meeting Serverto work, the first field of the Authenticationattribute must be set to ″mail″ and it mustbe listed first. The other fields can beanything the administrator wants for theserver separated by a semicolon ″ ;″. Forexample, the Authentication attribute can beset to ″mail;cn;uid″.
Search Attributes Use for searching the directory for users.The fields must be separated by a semicolon″;″. For example, the Searach attribute can beset to ″mail;cn;uid″.
Object Class Specifies a set of attributes used to describean object that identifies the entry as aperson. IBM recommends using anobjectclass of organizationalPerson for yourperson entries. Lotus Sametime determineswhether a directory entry returned by asearch is a person or group entry. LotusSametime assumes that groups arerepresented by entries with a unique objectclass. Lotus Sametime compares the name ofthe object class specified in this setting tothe object class values of each entry todecide whether the entry is a group or aperson.
b. Enter the person attributes of an LDAP person entry.
Table 2. Person Attributes
Attribute Description
Display Name Displays a user’s name in Lotus Sametimeuser interfaces.
Similar name distinguisher Differentiates between two users that havethe same common name (cn) attribute.
Chapter 3. Installing 67

Table 2. Person Attributes (continued)
Attribute Description
e-mail address Contains the user’s e-mail address in thefield.
Home Sametime Server Enter the fully qualified host name of thehome Sametime Community Server. If yourenvironment includes multiple LotusSametime Community Servers or you havedeployed other applications enabled withSametime technology, every user must beassigned to a home Sametime CommunityServer.
c. Click Next.5. Collect Group Settings. To search for a group name, a Sametime user enters a
text string in the user interface of a Sametime client. This setting defines theLDAP search filter responsible for selecting a group name from the LDAPdirectory. The search filter matches the text string provided by the user toinformation contained within the attributes of LDAP directory group entries.a. Enter the search filter attributes of an LDAP person entry.
Table 3. Search Filter
Attribute Description
Search Attributes Use for searching the directory for groups.
Object Class Specifies the attribute of a directory entrythat identifies the entry as a group. LotusSametime determines whether a directoryentry returned by a search is a person orgroup entry. Lotus Sametime assumes thatgroups are represented by entries with aunique object class. Lotus Sametimecompares the name of the object classspecified in this setting to the object classvalues of each entry to decide whether theentry is a group or a person.
b. Enter the person attributes of an LDAP person entry.
Table 4. Person Attributes
Attribute Description
Display Name Displays a group’s name in Lotus Sametimeuser interfaces.
Similar name distinguisher Differentiates between two groups that havethe same common name (cn) attribute.
Group membership attribute Specifies the name of the attribute in thegroup entry that contains that names ofindividual people or subgroups. If an useradds a group to a presence list, privacy list,or a list that restricts meeting attendance,Lotus Sametime must obtain the list ofmembers within the group so thatindividual members of the group can bedisplayed.
c. Click Next.
68 Lotus Sametime: Installation and Administration Guide Part 1
6. Task Completion Summary.Review the configuration details in the Task Completion Summary table, andclick Finish to connect to the LDAP server with this configuration, or clickCancel to abandon this configuration and start over.
7. Restart the System Console Deployment Manager if you selected the Is used bySametime System Console?. This is necessary to complete the LDAP federationprocess.
What to do next
Go to System Administration → Nodes. Select all the available nodes, and clickSynchronize. This ensures the LDAP changes are pushed to the nodes.Related tasks
“Starting the Lotus Sametime System Console” on page 231When started, the Lotus Sametime System Console runs as a task in the WebSphereApplication Server administrative console.“Starting and stopping the Deployment Manager” on page 417The Deployment Manager manages the Lotus Sametime System Console and allLotus Sametime Server cells.Related reference
“Command reference for starting and stopping servers” on page 232You may use a command window to start and stop Sametime components runningon WebSphere Application Server. To stop servers, you will supply the WebSphereApplication Server administrator password that was established when youinstalled the server. Important: Verify that the Deployment Manager for the cell isrunning before starting any server.
Installing a Lotus Sametime Community Server andsupporting software
First install a Lotus Sametime Community Server on a Domino platform. You musthave already connected the Sametime System Console to an LDAP server. Afterinstalling a Lotus Sametime Community Server, you can install and set up optionalcomponents, such as a multiplexer or integration with Microsoft Office.Related concepts
Chapter 4, “Migrating and upgrading,” on page 431Migrate data from a previous version of Lotus Sametime and upgrade one or moreservers to take advantage of the latest features.Related tasks
“Connecting to an LDAP server” on page 64Use the Lotus Sametime System Console to connect IBM Lotus Sametime servers toan LDAP server that has already been installed and configured. An LDAP server isrequired for the Lotus Sametime System Console, Lotus Sametime CommunityServer, Lotus Sametime Meeting Server, Lotus Sametime Media Manager, andLotus Sametime Gateway Server .
Installing a Domino serverInstall a Domino server and prepare the Domino environment before installing aLotus Sametime Community Server.
Chapter 3. Installing 69

Before you begin
If you have never installed and set up a Lotus Domino server, it is stronglyrecommended that you refer to the Lotus Domino documentation to get a fullunderstanding of how to install and set up a Domino server.
Installing a Domino server on Windows:
If you are installing a new IBM Lotus Domino server for your IBM LotusSametime server, use these general directions to remind you of the necessary stepsto install Lotus Domino; this procedure assumes that you have a workingknowledge of Domino administration.
Before you begin
If you are adding a server to an existing Lotus Domino domain, you need toregister the server before you can install Lotus Domino. The registration processcreates a Server document in the Domino Directory.
Specify the following settings during registration:1. Store the server ID file that is created during registration somewhere on the
system where you will configure the Sametime server. Record the path name;you will need to specify it when you configure the Sametime server.
2. Use the same network name as the first Lotus Domino server in the LotusDomino domain.
About this task
To install Lotus Domino on a Windows platform, follow these steps.1. Run the install program (setup.exe), which is on the Domino server
installation CD.2. Read the Welcome screen, and click Next. Then read the License Agreement
and click Yes.3. Enter the administrator’s name and the company name. Do not elect to install
Lotus Domino on partitioned servers.4. Choose the program and data directory in which to copy the software. Make
note of the locations you provide for the Domino program and datadirectories. You will need this information when you install Lotus Sametime.Click Next.
5. Select ″Domino Enterprise Server″ as the server type.6. Click Next to accept all components.7. Specify the program folder or accept Lotus Applications as the program folder
that will contain the software.8. Click Finish to complete the install program.9. (Domino 8.5 only) Create a file to modify XML transforms needed by
Sametime:a. Navigate to the Domino_program_directory\jvm\lib\jaxp.properties
directory.b. Create a file called jaxp.properties.c. Add the following line to the file:
javax.xml.transform.TransformerFactory=org.apache.xalan.processor.TransformerFactoryImpl
d. Save and close the file.
70 Lotus Sametime: Installation and Administration Guide Part 1

10. On the Windows Start menu, clickPrograms → Lotus Applications → LotusDomino Server to start the Server Setup program.
What to do next
Using the Domino Server Setup Program Locally: After installing Domino, thefirst time you start the server, the Domino Server Setup Program launches. TheServer Setup program asks a series of questions and guides you through the setupprocess.
Installing a Domino server on AIX, Linux, or Solaris:
If you are installing a new IBM Lotus Domino server, use these general directionsto remind you of the steps for installing Lotus Domino. This procedure assumesthat you have a working knowledge of Domino administration.
Before you begin
If you are adding a server to an existing Lotus Domino domain, you need toregister the server before you can install Lotus Domino. The registration processcreates a Server document in the Domino Directory.
Specify the following settings during registration:1. Store the server ID file that is created during registration somewhere on the
system where you will configure the Sametime server. Record the path name;you will need to specify it when you configure the Sametime server.
2. Use the same network name as the first Lotus Domino server in the LotusDomino domain.
About this task
The Lotus Domino installation programs for AIX, Linux, and Solaris use scriptsthat ask for configuration information and then install the software in theappropriate directories.1. Place the CD in the CD-ROM drive.2. Become the root user by logging in as the root user or using the ″su″ command.
Open Operations Navigator.3. Mount the Lotus Domino CD for your server platform (AIX, Solaris or Linux)
to make it available. You can mount the CD using the SMIT utility or theappropriate version of the following command:mount -r -v -cdrfs /dev/cd0 /cdrom
4. Using the above example, change to the /cdrom directory and start theinstallation script using the following command:./install
5. Follow the directions on each panel of the script, making sure to retain theinformation you provide for the location of the Domino executable directoryand the Domino data directory. You will need this information when you installthe Lotus Sametime Community Server.Installing Domino on partitioned servers:
a. When prompted to install more than one Lotus Domino server on thiscomputer, click Yes.
Chapter 3. Installing 71
b. When prompted for the location of the data directory and the Notes useraccount, be sure to specify a unique location for the data directory and theappropriate user name for each partitioned server.
6. (Domino 8.5 only) Create a file to modify XML transforms needed bySametime:a. Navigate to the Domino_program_directory/jvm/lib/jaxp.properties
directory.b. Create a file called jaxp.properties.c. Add the following line to the file:
javax.xml.transform.TransformerFactory=org.apache.xalan.processor.TransformerFactoryImpl
d. Save and close the file.e. If the Domino server is running, restart it so this change can take effect.
What to do next
After you have installed the Domino server, you must start and stop the Dominoserver at least once before installing the Sametime server. This allows certain filesto be created that Lotus Sametime needs in order to install correctly.Related tasks
“Starting and stopping servers in a Lotus Sametime deployment” on page 230An IBM Lotus Sametime deployment is made of up several component servers thatcan be started and stopped independently.
Preparing the AIX, Linux, or Solaris environment for Domino:
Set up the environment on a computer running IBM AIX, Linux, or Sun Solarisbefore installing IBM Lotus Domino.1. You must log in as the root user to install the Lotus Domino and Lotus
Sametime server.2. You must have a designated operating system user who can start the Lotus
Sametime server, and this user must be a part of a designated operating systemgroup.The default user is ″notes″ and the default group is also ″notes,″ but anynon-root username and group can be used. To verify that the designatedoperating system user is part of the operating system group, type thefollowing, where dominoUserName is the name of the Notes user.groups dominoUserName
For example, if you type groups notes and get the return value of notes, thisindicates that the user name ″notes″ is a part of the group ″notes″.
3. Verify the amount of disk space you have. Make sure that the file system has atleast 1GB of disk space. Type the following command: type ″df -k″
Note: If you are installing from a downloaded image rather than a CD, youmust also consider the disk space required for the *.tar install files and theunpacked install files, which require approximately 2GB of disk space.
4. (AIX only) The Input Output Completion Protocol (IOCP) must be installedand configured.If not, it will not allow the Lotus Domino setup to begin, and you will get thefollowing error:
72 Lotus Sametime: Installation and Administration Guide Part 1
Your system is not configured with I/O Completion Ports. I/O Completion Portsmust be installed in order to run the Domino 7 Server. Install and makeavailable I/O Completion Ports and restart your system.� Refer to LotusKnowledgebase Technote 1086556 for detailed instructions on how toinstall/configure IOCP.
5. (Linux RHEL only) Disable SELinux on any RedHat operating system:a. Open the /etc/selinux/config file for editing.b. Locate the SELINUX setting.c. Change its value to either disabled or permissive.d. Save and close the file.e. Restart the Linux server.
6. (For partitioned servers only) Additional preparation is necessary if you planto install Lotus Sametime on a partitioned Lotus Domino server:a. Ensure that each partitioned server has a unique IP address.
You can map multiple IP addresses to one network card using the ifconfigcommand:ifconfig device alias new_IP_address netmask subnet
For example:ifconfig en0 alias 9.3.187.209 netmask 255.255.255.128
b. Ensure that each partitioned server has a DNS name that maps to its uniqueIP address.If a DNS name can be resolved to multiple IP addresses, be sure to read the″multi-homed″ notes in Installing partitioned Domino servers on AIX,Linux, or Solaris.
c. It is recommended (but not required) that each partitioned server be run bya unique user account.Create a new UNIX Notes user for each partitioned server that you plan toinstall. You can use a single Notes group for all partitions
Configuring partitioned Domino servers on AIX, Linux, or Solaris:
Prepare IBM Lotus Domino partitioned servers before installing the LotusSametime Community Server on AIX, Linux, or Solaris. Partitioned Domino serversare not supported on Microsoft Windows.
About this task
Follow these steps to configure each server. Use the appropriate Notes useraccount for each server you want to configure. For example, log in as notes andconfigure the first server. Then log out, log in as notes2 and configure the secondserver, and so on.1. Log in with the first Notes user account and run the following command:
/opt/lotus/bin/server
2. During configuration, make sure that any field referring to the server’s name orIP address is set up properly. By default, the IP address and server name fieldsfor each configuration contain the IP address and server name of the firstserver. For each additional server, you must update these fields so that they areappropriate for that partition.
3. After configuration for each server is complete, provide the host name for eachpartitioned Lotus Domino server:a. Start the Lotus Domino server.
Chapter 3. Installing 73
b. Open a browser and go to the server’s Lotus Domino Directory (usuallynames.nsf).
c. Open the Server document for this particular Lotus Domino server.d. Choose Internet Protocols / HTTP tab and fill in the Host name with the
fully qualified name of the server, and then enable Bind to host name. ForMulti-homed, do not enter the Host name; instead enter all IP addressesinto the Host name field.
e. Save and close the server document.f. Open the notes.ini file and add the following field:
TCPIP_TcpIpAddress=0,(server_ip):1352
4. Log out.5. Access the Community Services Network settings from the Sametime
Administration Tool by selecting Configuration > Connectivity > Networks andPorts. You must change the Event Server port and the Token Server port foreach additional partition you install. Ensure that the values are unique and thatthey are not in use by another Sametime server or process. Recommendation:Use ports above 9098.
6. Repeat the process until you have configured all the partitioned Notes servers.
What to do next
1. Start each partitioned Lotus Domino server, one at a time.2. Verify each server has successfully started.3. Verify no errors are reported.4. Stop each Lotus Domino server.
Installing the Notes client and Domino administrative client:
To administer the Lotus Domino server, you must install and configure at least oneMicrosoft Windows PC as the administration workstation.
Before you begin
Before you can install the Lotus Domino and Lotus Notes clients, you must haveinstalled and set up the Lotus Domino server.
About this task
Use the IBM Lotus Domino software that shipped with IBM Lotus Sametime toinstall and configure the Lotus Domino Administrator and IBM Lotus Notes clientson the administration workstation.1. If you are installing from physical media, insert the Lotus Notes Client CD into
the PC you plan to use as the administrator’s workstation.2. Start the installation wizard.3. Follow the instructions on each panel of the Lotus Notes installation wizard,
selecting to install both the Lotus Domino Administrator and Lotus Notesclients.
4. Copy the certifier ID and administrator ID files from the Domino data directoryof your Lotus Domino server to the Lotus Notes data directory of theAdministrator workstation. You can use File Transfer Protocol (FTP) or anothermethod, or you can let the initial communications between the server andadministration workstation copy the files for you automatically.
5. If necessary, start the Lotus Domino Server.
74 Lotus Sametime: Installation and Administration Guide Part 1
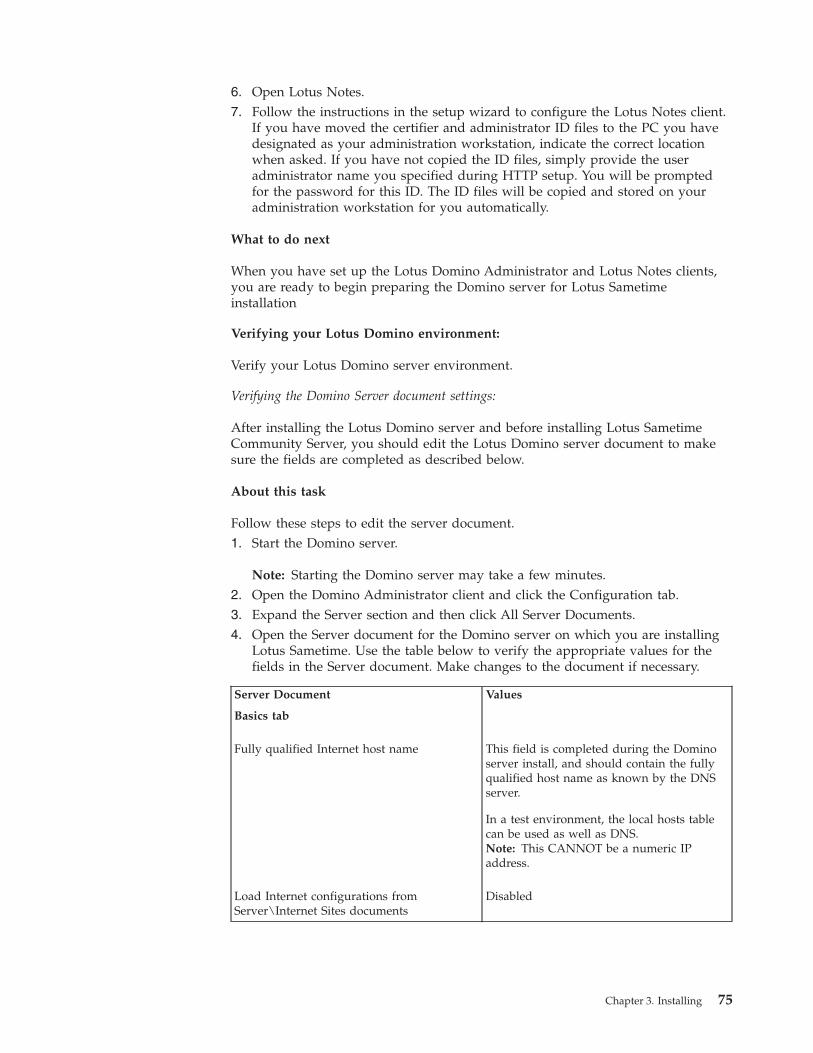
6. Open Lotus Notes.7. Follow the instructions in the setup wizard to configure the Lotus Notes client.
If you have moved the certifier and administrator ID files to the PC you havedesignated as your administration workstation, indicate the correct locationwhen asked. If you have not copied the ID files, simply provide the useradministrator name you specified during HTTP setup. You will be promptedfor the password for this ID. The ID files will be copied and stored on youradministration workstation for you automatically.
What to do next
When you have set up the Lotus Domino Administrator and Lotus Notes clients,you are ready to begin preparing the Domino server for Lotus Sametimeinstallation
Verifying your Lotus Domino environment:
Verify your Lotus Domino server environment.
Verifying the Domino Server document settings:
After installing the Lotus Domino server and before installing Lotus SametimeCommunity Server, you should edit the Lotus Domino server document to makesure the fields are completed as described below.
About this task
Follow these steps to edit the server document.1. Start the Domino server.
Note: Starting the Domino server may take a few minutes.2. Open the Domino Administrator client and click the Configuration tab.3. Expand the Server section and then click All Server Documents.4. Open the Server document for the Domino server on which you are installing
Lotus Sametime. Use the table below to verify the appropriate values for thefields in the Server document. Make changes to the document if necessary.
Server Document Values
Basics tab
Fully qualified Internet host name This field is completed during the Dominoserver install, and should contain the fullyqualified host name as known by the DNSserver.
In a test environment, the local hosts tablecan be used as well as DNS.Note: This CANNOT be a numeric IPaddress.
Load Internet configurations fromServer\Internet Sites documents
Disabled
Chapter 3. Installing 75
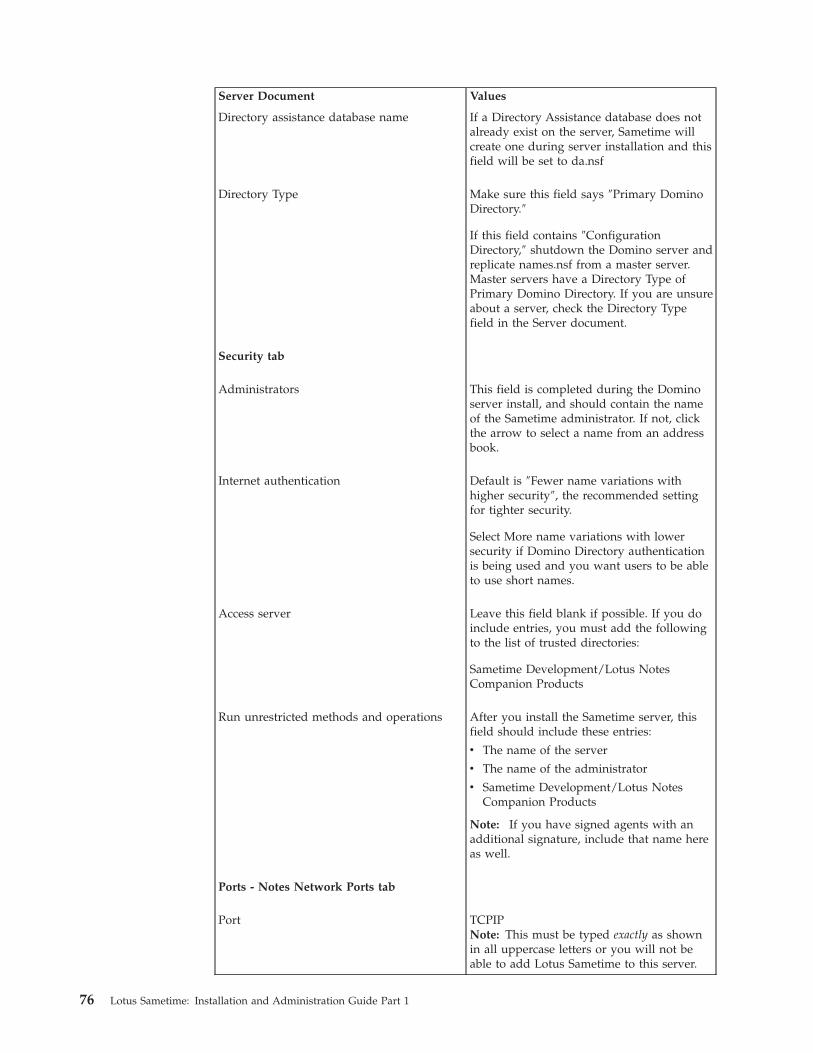
Server Document Values
Directory assistance database name If a Directory Assistance database does notalready exist on the server, Sametime willcreate one during server installation and thisfield will be set to da.nsf
Directory Type Make sure this field says ″Primary DominoDirectory.″
If this field contains ″ConfigurationDirectory,″ shutdown the Domino server andreplicate names.nsf from a master server.Master servers have a Directory Type ofPrimary Domino Directory. If you are unsureabout a server, check the Directory Typefield in the Server document.
Security tab
Administrators This field is completed during the Dominoserver install, and should contain the nameof the Sametime administrator. If not, clickthe arrow to select a name from an addressbook.
Internet authentication Default is ″Fewer name variations withhigher security″, the recommended settingfor tighter security.
Select More name variations with lowersecurity if Domino Directory authenticationis being used and you want users to be ableto use short names.
Access server Leave this field blank if possible. If you doinclude entries, you must add the followingto the list of trusted directories:
Sametime Development/Lotus NotesCompanion Products
Run unrestricted methods and operations After you install the Sametime server, thisfield should include these entries:
v The name of the server
v The name of the administrator
v Sametime Development/Lotus NotesCompanion Products
Note: If you have signed agents with anadditional signature, include that name hereas well.
Ports - Notes Network Ports tab
Port TCPIPNote: This must be typed exactly as shownin all uppercase letters or you will not beable to add Lotus Sametime to this server.
76 Lotus Sametime: Installation and Administration Guide Part 1
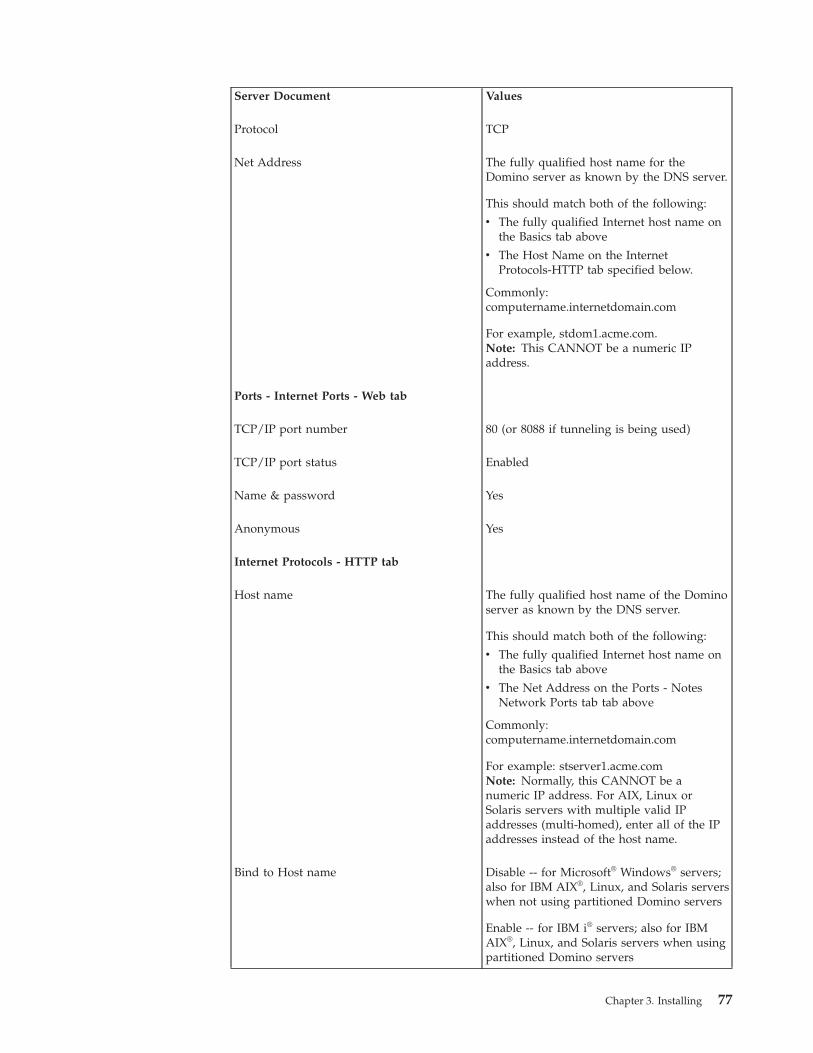
Server Document Values
Protocol TCP
Net Address The fully qualified host name for theDomino server as known by the DNS server.
This should match both of the following:
v The fully qualified Internet host name onthe Basics tab above
v The Host Name on the InternetProtocols-HTTP tab specified below.
Commonly:computername.internetdomain.com
For example, stdom1.acme.com.Note: This CANNOT be a numeric IPaddress.
Ports - Internet Ports - Web tab
TCP/IP port number 80 (or 8088 if tunneling is being used)
TCP/IP port status Enabled
Name & password Yes
Anonymous Yes
Internet Protocols - HTTP tab
Host name The fully qualified host name of the Dominoserver as known by the DNS server.
This should match both of the following:
v The fully qualified Internet host name onthe Basics tab above
v The Net Address on the Ports - NotesNetwork Ports tab tab above
Commonly:computername.internetdomain.com
For example: stserver1.acme.comNote: Normally, this CANNOT be anumeric IP address. For AIX, Linux orSolaris servers with multiple valid IPaddresses (multi-homed), enter all of the IPaddresses instead of the host name.
Bind to Host name Disable -- for Microsoft® Windows® servers;also for IBM AIX®, Linux, and Solaris serverswhen not using partitioned Domino servers
Enable -- for IBM i® servers; also for IBMAIX®, Linux, and Solaris servers when usingpartitioned Domino servers
Chapter 3. Installing 77

Server Document Values
Allow HTTP clients to browse databases Yes (enable) for portals, otherwise, notnecessary
Home URL This field is set to ″stcenter.nsf″ duringLotus Sametime installation.
DSAPI filter file names If this field is set to NDOLEXTN (DominoOffline Services), remove the value andleave this field blank.
Internet Protocols - Domino Web Enginetab
Session Authentication This field is set to Multiple Servers (SSO)during Sametime installation.
If single sign on (SSO) is not being used,you can change this to single-server.
Web SSO Configuration This field is set to LtpaToken duringSametime installation.
Java servlet support Domino Servlet Manager
5. Click Save and Close, if you made changes.6. Stop and restart the Domino server for the changes to take effect.Related tasks
“Starting and stopping servers in a Lotus Sametime deployment” on page 230An IBM Lotus Sametime deployment is made of up several component servers thatcan be started and stopped independently.
Verifying the Domino server is accessible:
Before installing IBM Lotus Sametime, verify that the IBM Lotus Domino server isaccessible from client workstations.
About this task
Test client access (using HTTP) to a Lotus Notes database hosted on your LotusDomino server.
Start a Web browser on the workstation and attempt to access names.nsf (or someother convenient database) by entering the following address into the location bar:If you have set names.nsf to be inaccessible from clients, test with a database thatclients can access.http://hostname.yourco.com/names.nsf
If you can sign on using the server administrator ID and internet password toview the contents of names.nsf, the Domino server is accessible and ready forinstallation of Sametime.
Installing a community server on AIX, Linux, Solaris, or WindowsFollow the instructions for your operating system to install a Lotus SametimeCommunity Server on AIX, Linux, Solaris, or Windows.
78 Lotus Sametime: Installation and Administration Guide Part 1
Preparing to install a Lotus Sametime Community Server:
Use the Lotus Sametime System Console to prepare to install a Lotus SametimeCommunity Server by pre-populating values required for installation.
Before you begin
Start the Lotus Sametime System Console if it is not already running. Start theDomino server to allow validation of the Domino administrator during theinstallation.
About this task
If you have not already opened the Install Lotus Sametime Community Serverguided activity, follow these steps:1. From a browser, enter the following URL, replacing serverhostname.domain with
the fully qualified domain name of the Lotus Sametime System Console server.http://serverhostname.domain:8700/ibm/console
2. Enter the WebSphere Application Server User ID and password that youcreated when you installed the Lotus Sametime System Console.
3. Click the Sametime System Console task to open it in the navigation tree.4. Click Sametime Guided Activities → Install Sametime Community Server.Related tasks
“Starting the Lotus Sametime System Console” on page 231When started, the Lotus Sametime System Console runs as a task in the WebSphereApplication Server administrative console.
Guided activity: Preparing to install a Lotus Sametime Community Server:
This guided activity takes you through the steps of creating a deployment plan,which collects information that pre-populates installation screens.
Before you begin
You have installed and prepared the IBM Lotus Domino server environment on theserver where you plan to install the Lotus Sametime Community Server andstarted the Domino server. If you plan to connect to a separate slide conversionserver, you have configured the server and know its name and port number.
About this task
Follow these steps to store a deployment plan on the Lotus Sametime SystemConsole to be used when you run the installation program for Lotus SametimeCommunity Server.1. Plan a product installation.
In the Install Sametime Community Server portlet, click Create a NewDeployment Plan, and then click Next.
2. Deployment Name.Give the deployment plan a unique, recognizable name, which will be shownonly in the Sametime System Console, and then click Next.The name should include the installation and node type, such as stComm. Youcan include multibyte characters, symbols, and spaces in the name. The namecan be up to 256 characters and is not case sensitive.
Chapter 3. Installing 79
3. Server Host Name.Provide the fully qualified host name for this Lotus Sametime CommunityServer. Do not use an IP address or the host’s short name.
4. Connect to Domino Server.Enter the existing Domino administrator’s user ID and password, and thenclick Next.Use the common-name portion of the ID (not the hierarchical name thatincludes slashes). The Sametime System Console validates the administratorcredentials on the Domino server.
5. Slide Conversion.Do one of the following:Select Use the Sametime server to host the slide conversion feature on thecurrent server, and then click Next.Select Use Sametime slide conversion server to host the slide conversionfeature on a different Community Server, provide the host name and port toconnect to that server, and then click Next.
6. Connect to an LDAP Server.Click the LDAP directory that you configured with the Lotus Sametime SystemConsole guided activity, and then click Next.
7. HTTP Tunneling.To allow Sametime clients to make HTTP-tunneled connections on port 80 to aserver with a single IP address, click Enable HTTP Tunneling, and then clickNext.Selecting this feature increases the possibility that users in restrictive networkenvironments can exchange data in chats on a Sametime Community Serverthat is extended to the Internet.
8. Deployment Summary.Review the summary screen, and then click Finish.The deployment plan is ready to be used for the server installation. If you needto make any changes, click Modify an Existing Deployment Plan and updatethe plan. All changes must be made prior to running installation.
What to do next
“Installing a Lotus Sametime Community Server and supporting software” on page69
Installing with a deployment plan when IPv6 addressing is enabled:
If you are installing an IBM Lotus Sametime Community Server using adeployment plan and your Lotus Sametime System Console supports IPv6addressing, you may need to map the Lotus Sametime System Console’s IPaddress to its host name to ensure that the deployment plan can be retrievedduring installation.
About this task
You create a deployment plan on the Lotus Sametime System Console. When youinstall the Lotus Sametime Community Server and indicate that you want to usethe deployment plan, the Lotus Sametime Community Server’s installationprogram retrieves the deployment plan from the Lotus Sametime System Console.The installation program does not support IPv6 addressing; however, if your
80 Lotus Sametime: Installation and Administration Guide Part 1
deployment uses both IPv4 and IPv6 addressing, you can map both addresses tothe same host name as a workaround. When presented with the IPv6 address, theinstallation program uses this mapping to determine the corresponding host name,and then retrieves the deployment plan using the associated IPv4 address.
This task is only necessary when all of the following conditions are true:v You are installing the Lotus Sametime Community Server using a deployment
plan (already created and stored on the Lotus Sametime System Console).If you will not be using a deployment plan, then there is no reason to completethis task.
v You are installing the Lotus Sametime Community Server on either IBM AIX,Linux, Solaris, or Microsoft Windows.If you are installing the Lotus Sametime Community Server on IBM i, youcannot use a deployment plan, so there is no reason to complete this task.
v The Lotus Sametime System Console supports both IPv4 and IPv6 protocols.If the Lotus Sametime System Console supports only IPv4, this task is notneeded. If the Lotus Sametime System Console supports only IPv6, there is noIPv4 address to map to the host name and there is no reason to complete thistask.
Important: For an IPv6-only deployment, you cannot use a deployment plan forthe Lotus Sametime Community Server. Instead, install the server by runningthe installation program without connecting to the Lotus Sametime SystemConsole, and then register the Lotus Sametime Community Server with theconsole afterward.
1. Log on to the computer where you will install the Lotus Sametime CommunityServer as a user with root (AIX, Linux, Solaris), or administrator (Windows)privileges.
2. Navigate to the directory containing the /etc/hosts file:v AIX, Linux: /etc/hostsv Solaris: /etc/inet/hostsv Windows: C:/WINDOWS/system32/drivers/etc/hosts
3. Add the following statements to the hosts file to map the Lotus SametimeSystem Console’s IPv4 address and its IPv6 address to the same host:Explicit_IPv6_address Fully_qualified_host_name Short_nameExplicit_IPv4_address Fully_qualified_host_name Short_name
Where:v Explicit_IPv6_address specifies the IPv6-formatted address for the Lotus
Sametime System Console.v Explicit_IPv4_address specifies the IPv4-formatted address for the Lotus
Sametime System Console.v Fully_qualified_host_name specifies the fully qualified host name
(server.domain) for the Lotus Sametime System Console. This value is thesame for both statements.
v Short_name specifies the short host name for the Lotus Sametime SystemConsole. This value is the same for both statements.
Example:2002:97d:eec3:623:9:123:118:101 stsyscon.acme.com stsyscon9.123.118.101 stsyscon.acme.com stsyscon
4. Save and close the file.
Chapter 3. Installing 81
5. Restart the server before attempting to run the Lotus Sametime CommunityServer installation program.
Running the community server installation program on AIX, Linux, Solaris, orWindows:
Run the installation program on the machine where you plan to install a LotusSametime Community Server. It must be on its own machine.
Before you begin
You should have already created a deployment plan for the Lotus SametimeCommunity Server and started the Lotus Sametime System Console server. If youhave opened the Sametime System Console in a browser, close it before continuing.Also close any open Sametime clients.
Complete any pending reboot actions you may have from installing otherapplications. Make sure that all applications on the server computer (including theDomino Server Administrator and the Web browser) are closed. All Dominoservices must be stopped. Otherwise, you might corrupt any shared files and theinstallation program might not run properly.
About this task
By using the deployment plan you created earlier, you have fewer selections tomake when you run the installation program.1. (Linux RHEL only) Disable SELinux on any RedHat operating system:
a. Log in as root on the Linux RedHat server where you will install the LotusSametime server.
b. Open the /etc/selinux/config file for editing.c. Locate the SELINUX setting. Change its value to either disable or
permissive.d. Save and close the file.e. Restart the Linux server.
2. Log in to your computer as the system administrator (Microsoft Windows) oras root (IBM AIX, Linux, Solaris).Solaris only: Solaris installs must be performed by the root user using su or anormal login session. Third-party sudo packages are not supported on Solaris.
3. Download the Sametime Community Server installation package if you havenot already done so.a. To download installation packages, you must have an IBM Passport
Advantage account, which is described at the following Web address:www.ibm.com/software/howtobuy/passportadvantage/paocustomer/docs/en_US/ecare.html
b. Open this release’s Download document at the following Web address:http://www.ibm.com/support/docview.wss?rs=477&uid=24024322
Locate the components you need in the document’s listing, then downloadthe packages labelled with the corresponding part numbers to the systemon which you are installing.
c. Extract the files to a local directory.d. Verify that you have at least 1 GB of temporary space to run the
installation in your %TEMP% or /tmp directory.
82 Lotus Sametime: Installation and Administration Guide Part 1
4. Navigate to the folder where you stored the downloaded files for LotusSametime and open the Server folder. Start the installation program byrunning one of the following commands:AIX
./setupaix.binLinux
./setuplinux.binSolaris
./setupsolaris.binWindows
setupwin32.exe5. Select the language to use for the installation and click OK.6. At the Welcome screen, click Next.7. At the Licenses screen, click the I accept both the IBM and the non-IBM
terms option and click Next.8. Click Yes to install from the Lotus Sametime System Console. Click Next.9. Supply values for connecting to the Lotus Sametime System Console, then
click Next.v Sametime System Console hostname: Provide the Host Name for the Lotus
Sametime System Console. The host name was determined when youinstalled the Lotus Sametime System Console.
v Use SSL: Leave this option selected to run the server over a secureconnection.
v Sametime System Console port: Leave 9443 as the default value.v Sametime System Console administrator: Provide the WebSphere
Application Server User ID and password that you created when youinstalled the Lotus Sametime System Console.
v Fully qualified hostname for this Sametime server: Provide the fullyqualified host name for the machine you are currently using, which is thesame name you used when you created the deployment plan for thisinstallation.Do not use an IP address or short host name.
10. Select the Lotus Sametime Community Server deployment plan you createdearlier with the Lotus Sametime System Console guided activity. Then clickNext.
11. At the summary panel, review the settings, then click Install to start theinstallation.
12. Click Finish to close the installation screen.13. If prompted, click Finish to reboot the system.
Results
The Domino_data_directory\stsetup_exit_status.txt file contains a zero (″0″) ifthe installation is successful. If the installation was not successful, look at theinstallation logs for more information about what occurred during the installationattempt. Fix the problem, then try installing again. The installation logs are storedin the following locations.
Domino data directory: SametimeInstall.log, stsetup.log, stsetup_exit_status.txt,notes.ini, sametime.ini, and meetingserver.ini
Chapter 3. Installing 83
SametimeIniParser.log: This log may be in /tmp or in the Domino data directory.
SSC connection log: /tmp/SSCLogs/ConsoleUtility.log.0
The default Domino data directory is /local/notesdata/.
Windows
Domino data directory: SametimeInstall.log, stsetup.log, and stsetup_exit_status.txt
Domino program directory: notes.ini, sametime.ini, andstsetup_exit_code_windows.txt
SametimeIniParser.log: This log may be in %TEMP% or in the Domino datadirectory.
SSC connection log: Documents and Settings\username\LocalSettings\Temp\SSCLogs\ConsoleUtility.log.0
The default Domino data directory is c:\program files\ibm\lotus\domino\data\and the Domino program directory is c:\program files\ibm\lotus\domino.Related tasks
“Guided activity: Preparing to install a Lotus Sametime Community Server” onpage 79This guided activity takes you through the steps of creating a deployment plan,which collects information that pre-populates installation screens.“Starting the Lotus Sametime System Console” on page 231When started, the Lotus Sametime System Console runs as a task in the WebSphereApplication Server administrative console.
Enabling the Sametime Administrator to manage the Community Server:
Add the IBM Lotus Sametime Administrator account to the stconfig.nsf database toenable the administrator to manage the Lotus Sametime Community Server.
Before you begin
Install a Lotus Sametime Community Server using a deployment plan created onthe Lotus Sametime System Console.
About this task
When you use a deployment plan to install the Lotus Sametime CommunityServer, the Lotus Sametime Administrator listed in the LDAP directory does notautomatically have access to manage the server. Add the Sametime Administratorto the server’s Access Control List to ensure that user account has the appropriateaccess.
Note: This task is not necessary if you installed the Community Server withoutusing a deployment plan, or if you upgraded the Community Server from anearlier release.1. If the Lotus Sametime Community Server is running, stop it now:
Only stop the Lotus Sametime server; you will need to have the Lotus Dominoserver running to complete this task.a. Open a command window.
84 Lotus Sametime: Installation and Administration Guide Part 1
b. Navigate to the Lotus Domino installation directory.c. Start the Lotus Domino server console by typing jconsole and then
pressing Enter.d. In the Lotus Domino server console, stop the Lotus Sametime server by
typing Tell STADDIN Quit and then pressing Enter.2. Open the Lotus Notes client on this server.3. Open the ″Sametime Configuration″ (stconfig.nsf) database:
a. Click File → Lotus Notes Application → Open.b. In the Look in field, select the server where the Lotus Sametime
Community Server is installed.If you are using a Lotus Notes client on the same server, the location is″Local″.
c. In the Open Application dialog box, click the ″Data″ folder and then clickOpen.
d. In that folder, locate the ″Sametime Configuration″(stconfig.nsf) databaseand click Open.
4. Add the Lotus Sametime Administrator to the Access Control List for thisdatabase:a. Click File → Application → Access Control.b. In the Access Control List dialog box, locate the following name:
(&(objectclass=groupOfNames)(member=%s)).This user is included by default but is not needed; rather than creating anew user, you can simply change this user’s name.
c. Click the name, and then click the Rename button below the list.d. Type the name of the Lotus Sametime Administrator account that is listed in
your LDAP directory, and then click OK.e. Click OK to close the Access Control List dialog box.
5. Close the Lotus Notes client.
Configuring Sametime for partitioned Domino servers on AIX, Linux, or Solaris:
After installing the Lotus Sametime Community server in a IBM Lotus Dominopartitioned server environment on AIX, Linux, or Solaris, configure the partitionedservers to avoid IP conflicts.
Avoiding IP conflicts in a multi-homed configuration:
If your computer hosts multiple IBM Lotus Sametime servers (a ″multi-homed″configuration), you must define settings to ensure that the IP addresses for eachSametime server do not conflict. This topic applies only to IBM AIX, Linux, andSun Solaris servers.
Define trusted IP addresses:
About this task
If your server has multiple IP addresses but they do not all translate to single DNSnames, then you will need to configure Sametime and indicate which IP addressesto trust:1. Open the sametime.ini file and make the following change before saving the
file: Under [Config], add:
Chapter 3. Installing 85
VPS_TRUSTED_IPS=comma_separated_list_of_IPv4_addresses_for_all_network_interfaces_on_server
For example:VPS_TRUSTED_IPS=9.51.251.231,9.51.251.232,9.51.251.233,9.51.251.234,9.51.251.238
2. Using the IBM Lotus Notes Client, open the stconfig.nsf database, which islocated on the Sametime server.
3. Modify the Community Trusted IPs setting to equal the list of IPv4 addressesthat you specified in step 1.
Bind the Broadcast Server to all IP addresses:
About this task
By default, Broadcast Server will only bind to a single IP address and port. Ifmultiple IP addresses resolve to the same DNS name, then you will need to bindall of them to the Broadcast Server by completing the following steps:1. Start the Sametime server.2. Log in as Administrator, and open the Sametime Administration Tool by
clicking Administer the Server.3. Click Configuration → Connectivity → Broadcast gateway address for client
connections.4. Do one of the following:
v Enter the specific IP Address you wish to use for Broadcast connections.v Specify that the Broadcast Server should bind to ALL IP addresses on the
server.5. Close the Sametime Administration Tool.6. Open the meetingserver.ini file and make the following change before saving
the file: Under [SOFTWARE\Lotus\Sametime\BroadcastGateway\DBNL],locate the entry:IPBindAll=0
and change it toIPBindAll=1
Specify a dotted IPv4 Address:
About this task
If you are specifying a DNS name for the Address for client connections → Hostname and Address for HTTP tunneled client connections → Host name fields,then you must specify a dotted IPv4 Address that your Fully Qualified DomainName resolves to:1. Start the Sametime server.2. Log in as Administrator, and open the Sametime Administration Tool by
clicking Administer the Server.3. Click Configuration → Connectivity.4. Enter the dotted IPv4 Address in the following fields:
v Address for client connections → Host name
v Address for HTTP tunneled client connections → Host name
Verifying a community server installation on AIX, Linux, Solaris, or Windows:
86 Lotus Sametime: Installation and Administration Guide Part 1
After installing the Lotus Sametime Community Server, start the server and verifythat the installation was successful.
About this task
Follow these steps to confirm that you can connect to the community server.1. On the Domino server, start the Domino server and Sametime Community
Server.2. On the Sametime System Console system, start the Lotus Sametime System
Console.3. Start the Deployment Manager for the cell.4. From a browser, log in to the Integrated Solutions Console:
a. Enter the following URL, replacing serverhostname.domain with the fullyqualified domain name of the Lotus Sametime System Console server.http://serverhostname.domain:8700/ibm/console
b. Enter the WebSphere Application Server User ID and password that youcreated when you installed Lotus Sametime System Console.
5. Click Sametime System Console → Sametime Servers → Sametime CommunityServers.
6. In the Sametime Community Servers list, click the deployment name of theserver you installed.
7. Click any of the tabs to see the types of settings you can change. You will makemost configuration changes from these tabs.
8. Log in to the Sametime Administration Tool.a. Using a browser, enter the URL http://serverhostname.domain:port/
stcenter.nsf
Replace serverhostname.domain with your Community Server name and addthe port number if you determined it is not the default port number 80. Forexample: http://st85comm1.acme.com/stcenter.nsf
b. Log in with the Domino administrator’s name and password.c. On the Sametime Welcome page, under Administrator Tools, click
Administer the server. You use the Sametime Administration Tool for someserver administration tasks.
Related concepts
“Starting and stopping servers running on Lotus Domino” on page 235The IBM Lotus Sametime Community Server is configured as a set of services thatstart and stop automatically when the Domino server is stopped or started.Related tasks
“Guided activity: Preparing to install a Lotus Sametime Community Server” onpage 79This guided activity takes you through the steps of creating a deployment plan,which collects information that pre-populates installation screens.
Enabling IPv6 support on a Lotus Sametime Community ServerEnabling support for IPv6 addressing on an IBM Lotus Sametime server involvesconfiguring settings for both Lotus Domino and Lotus Sametime.
Chapter 3. Installing 87
Before you begin
Install Lotus Domino and a Lotus Sametime Community Server as describedearlier; these products must be installed before you can modify their configurationsettings.
Important: Due to the way the Lotus Sametime Community Server functions, youmust not disable IPv4 addressing in the server’s operating system. Even if you willuse IPv6-only addressing with the Lotus Sametime Community Server and withyour network, internal server components use IPv4 addresses (for example, inloopback addresses) and will fail if the operating system does not support IPv4addressing.
About this task
To enable support for IPv6 addressing on the Lotus Sametime Community Server,modify the configuration settings for Lotus Domino and for Lotus Sametime asexplained in the following topics:
Configuring Lotus Domino to support IPv6 addressing:
The IBM Lotus Sametime Community Server is hosted on Lotus Domino. Whenyou enable support for IPv6 addressing on the Community Server, you mustadditionally ensure that the underlying Lotus Domino server also supports IPv6.
Before you begin
Lotus Sametime supports IPv6 addressing only with Lotus Domino 8.0 or later. Ifyou use an earlier release of Lotus Domino, you must upgrade it to release 8.xbefore you can configure it for IPv6 addressing.
About this task
The steps to enabling IPv6 support in Lotus Domino vary with the operatingsystem:
Configuring Lotus Domino for IPv6 addressing on AIX, Linux, or Solaris:
Before an IBM Lotus Sametime server can support IPv6 addressing on IBM AIX,Linux, or Solaris, you must configure IPv6 support for the Lotus Domino server onwhich it is hosted.
Before you begin
Lotus Domino and the Lotus Sametime Community server must be installed; theLotus Domino server must be running (it does not matter whether the CommunityServer is also running at this point).
About this task
In Lotus Domino, only IPv4 addressing is enabled by default. Configuring LotusDomino to support IPv6 involves modifying the Lotus Sametime CommunityServer’s ″Server″ document within the Lotus Domino Administrator interface, aswell as adding configuration settings to the notes.ini file used by Lotus Domino.
88 Lotus Sametime: Installation and Administration Guide Part 1

For information on supporting IPv6 with Lotus Domino, see ″IPv6 and LotusDomino″ in the Lotus Domino Administration information center at:Lotus Domino Administration information center
1. To support both IPv4 and IPv6 addressing, update the ″Server″ document forthe Community Server so that both formats will be accepted:
Note: If you will only support IPv6 addressing, skip this step.a. On the Lotus Domino/Lotus Sametime Community Server, start the
Domino Administrator client.b. In the Domino Administrator, navigate to the Server pane and double-click
your Community Server’s name to select it.This opens the corresponding ″Server″ document.
c. In the ″Server″ document, navigate to the Internet Protocols → HTTP tab.d. Update the HTTP hostname field by entering the Community Server’s fully
qualified host name, followed by the explicit IPv4 and IPv6 IP addresses forthis server.Attention: When you fill out this field, you must enter the values usingthe following format:v The first value in the field must a fully qualified host name (for example:
commsvr1.acme.com).v The second and third values must be the explicit IP addresses (using IPv4
dot notation or IPv6 colon notation) that correspond to that host name;the order of these two IP addresses does not matter.
v Separate values with a carriage return by pressing the ENTER key beforeadding another value.
e. Save and close the ″Server″ document.f. Restart the HTTP service on the Lotus Domino server by running the
following command in the console:tell http restart
2. Enable support for IPv6 addresses by adding the following setting to thenotes.ini file, located in the Lotus Domino server data directory:tcp_enableipv6=1DONT_USE_REMEMBERED_ADDRESSES=1
Leave this file open for the next step.3. (AIX and Solaris only) Add the following setting to the notes.ini file to define
the default zone for your server:tcp_defaultzone=zone
In this statement, zone is the default zone; this information can be obtained byrunning the ifconfig -a command.
4. Restart the Lotus Domino server so your changes can take effect.
Configuring Lotus Domino for IPv6 on Windows:
Before an IBM Lotus Sametime Community Server can support IPv6 addressing onMicrosoft Windows, you must configure IPv6 support for the IBM Lotus Dominoserver on which it is hosted.
Chapter 3. Installing 89
Before you begin
Lotus Domino and the Lotus Sametime Community server must be installed; theLotus Domino server must be running (it does not matter whether the CommunityServer is also running at this point).
About this task
In Lotus Domino, only IPv4 addressing is enabled by default. Configuring LotusDomino to support IPv6 involves modifying the Lotus Sametime CommunityServer’s ″Server″ document within the Lotus Domino Administrator interface, aswell as adding configuration settings to the notes.ini file used by Lotus Domino.
For information on supporting IPv6 with Lotus Domino, see ″IPv6 and LotusDomino″ in the Lotus Domino Administration information center at:Lotus Domino Administration information center
1. To support both IPv4 and IPv6 addressing, update the ″Server″ document forthe Community Server so that both formats will be accepted:
Note: If you will only support IPv6 addressing, skip this step.a. On the Lotus Domino/Lotus Sametime Community Server, start the
Domino Administrator client.b. In the Domino Administrator, navigate to the Server pane and double-click
your Community Server’s name to select it.This opens the corresponding ″Server″ document.
c. In the ″Server″ document, navigate to the Internet Protocols → HTTP tab.d. Update the HTTP hostname field by entering the fully qualified host name,
followed by the explicit IPv4 and IPv6 IP addresses for this server.Attention: When you fill out this field, you must enter the values usingthe following format:v The first value in the field must a fully qualified DNS (for example:
commsvr1.acme.com).v The second and third values must be the explicit IP addresses (using IPv4
dot notation or IPv6 colon notation) that correspond to that host name;the order of these two IP addresses does not matter.
v Separate values with a carriage return by pressing the ENTER key beforeadding another value.
e. Save and close the ″Server″ document.f. Restart the HTTP service on the Lotus Domino server by running the
following command in the console:tell http restart
2. Enable support for IPv6 addresses by adding the following settings to thenotes.ini file, located in the Lotus Domino server data directory:tcp_enableipv6=1DONT_USE_REMEMBERED_ADDRESSES=1
In the next statement, zone is the default zone; this information can be obtainedby running the ipconfig /all command.tcp_defaultzone=zone
This set of statements creates one port for IPv4 addressing (TCPIP) and anotherport for IPv6 addressing (TCPIPV6):
90 Lotus Sametime: Installation and Administration Guide Part 1

TCPIP=tcp,0,15,0TCPIPV6=tcp,0,15,0tcpip_tcpipaddress=0,Domino_server's_IPv4_addressTCPIPV6_tcpipaddress=0,Domino_server's_IPv6_addressports=tcpip,tcpipv6
3. Restart the Lotus Domino server so your changes can take effect.
Configuring the Lotus Sametime Community Server to support IPv6addressing:
Configure settings to establish connectivity and resolve addresses when using IPv6addressing on the IBM Lotus Sametime Community Server.
Before you begin
Enable support for IPv6 addresses on the Lotus Domino server hosting this LotusSametime Community Server.
Important: Due to the way the Lotus Sametime Community Server functions, youmust not disable IPv4 addressing in the server’s operating system. Even if you willuse IPv6-only addressing with the Lotus Sametime Community Server and withyour network, internal server components use IPv4 addresses (for example, inloopback addresses) and will fail if the operating system does not support IPv4addressing.
About this task
Follow the steps below to configure IPv6 support on the Lotus SametimeCommunity Server:1. Stop the Community Server.2. Locate the sametime.ini file in the Lotus Sametime Community Server’s data
directory, and open the file so you can edit it.3. In the [Connectivity] section, add (or modify) the following statements:
UCM_RESOLVE_PREFERRED_IP_VER=IPv4_or_IPv6_selectionVPS_HOST=Explicit_IP_address_of_this_serverUCM_LOCAL_IP=Explicit_IP_address_of_this_serverVPHMX_HTTP_SERVER_IP=IP_address_of_Domino_HTTP_serverVPHMX_HTTP_SERVER_PORT=Domino_HTTP_port
where:v UCM_RESOLVE_PREFERRED_IP_VER specifies which type of addresses should be
preferred when a domain name resolves to multiple addresses of bothprotocols:– If you support only IPv6 addressing, set this to ″6″ to disallow
IPv4–formatted addresses.– If you support both IPv4 and IPv6 addressing, set this to ″4″ to allow both
protocols but attempt to resolve addresses, using IPv4 protocol first.v VPS_HOST specifies the explicit IP address of this Lotus Sametime Community
Server. Use the IP address that matches the setting inUCM_RESOLVE_PREFERRED_IP_VER. For example, if you set that value to ″4″ thenspecify an IPv4–format address, but if you set that value to ″6″ then specifyan IPv6–format address.
v UCM_LOCAL_IP specifies the explicit IP address of this Lotus SametimeCommunity Server. Use the IP address that matches the setting in
Chapter 3. Installing 91
UCM_RESOLVE_PREFERRED_IP_VER. For example, if you set that value to ″4″ thenspecify an IPv4–format address, but if you set that value to ″6″ then specifyan IPv6–format address.
v VPHMX_HTTP_SERVER_IP specifies the IP address of the Lotus Domino HTTPserver running on this computer.
v VPHMX_HTTP_SERVER_PORT specifies the port used by the Lotus Domino HTTPserver running on this computer; normally this is port 80.
4. In the [Config] section, add (or modify) the following statement:STLINKS_HOST=Explicit_IP_address_of_this_server
where STLINKS_HOST specifies the explicit IP address of this Lotus SametimeCommunity Server. Use the IP address that matches the setting inUCM_RESOLVE_PREFERRED_IP_VER. For example, if you set that value to ″4″ thenspecify an IPv4–format address, but if you set that value to ″6″ then specify anIPv6–format address.
Table 5. Accepted values for STLINKS_HOST
Type of address Example
IPv4 explicit address (dot notation) 9.42.127.134
IPv6 explicit address using colon notation 2002:92a:8f7a:200:9:42:127:134
IPv6 explicit address using double-colonnotation
3ef0::bee7:994:2e66
IPv6 explicit address using IPv4–suffixnotation
3ef0::bee7:9.148.46.102
IPv4 ″any″ (four zeroes) 0.0.0.0
IPv6 ″any″ (a double colon) ::
5. Add (or modify) the following statements in the [Debug] section within thesametime.ini file:v If this Lotus Sametime Community Server will support both IPv4 and IPv6
addressing:VPMX_DISABLE_CONFIGURATION_UPDATE=1VPMX_HOSTNAME=::,0.0.0.0VPMX_PORT=1533VPHMX_HOSTNAME=::,0.0.0.0VPHMX_PORT=8082
Where:– VPMX_DISABLE_CONFIGURATION_UPDATE=1 requires all four of the statements
that follow it.– VPMX_HOSTNAME specifies the addresses where the multiplexer residing on
this server handles Lotus Sametime client communications. (Themultiplexer was installed automatically as a part of the Lotus SametimeCommunity Server; if you will additionally install a stand-aloneCommunity Mux, you will need to enable support for IPv6 addressing onthat server as well).
Table 6. Accepted values for VPMX_HOSTNAME
Type of address Example
IPv4 explicit address (dot notation) 9.42.127.134
IPv6 explicit address using colon notation 2002:92a:8f7a:200:9:42:127:134
IPv6 explicit address using double-colonnotation
3ef0::bee7:994:2e66
92 Lotus Sametime: Installation and Administration Guide Part 1
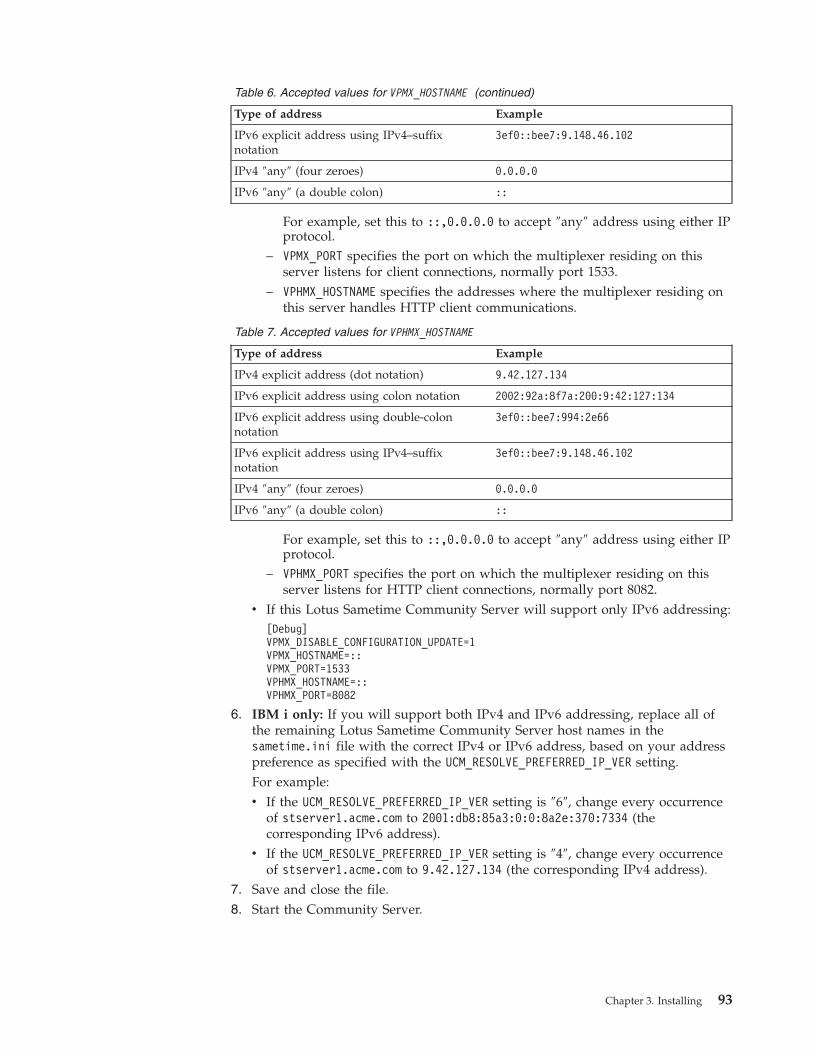
Table 6. Accepted values for VPMX_HOSTNAME (continued)
Type of address Example
IPv6 explicit address using IPv4–suffixnotation
3ef0::bee7:9.148.46.102
IPv4 ″any″ (four zeroes) 0.0.0.0
IPv6 ″any″ (a double colon) ::
For example, set this to ::,0.0.0.0 to accept ″any″ address using either IPprotocol.
– VPMX_PORT specifies the port on which the multiplexer residing on thisserver listens for client connections, normally port 1533.
– VPHMX_HOSTNAME specifies the addresses where the multiplexer residing onthis server handles HTTP client communications.
Table 7. Accepted values for VPHMX_HOSTNAME
Type of address Example
IPv4 explicit address (dot notation) 9.42.127.134
IPv6 explicit address using colon notation 2002:92a:8f7a:200:9:42:127:134
IPv6 explicit address using double-colonnotation
3ef0::bee7:994:2e66
IPv6 explicit address using IPv4–suffixnotation
3ef0::bee7:9.148.46.102
IPv4 ″any″ (four zeroes) 0.0.0.0
IPv6 ″any″ (a double colon) ::
For example, set this to ::,0.0.0.0 to accept ″any″ address using either IPprotocol.
– VPHMX_PORT specifies the port on which the multiplexer residing on thisserver listens for HTTP client connections, normally port 8082.
v If this Lotus Sametime Community Server will support only IPv6 addressing:[Debug]VPMX_DISABLE_CONFIGURATION_UPDATE=1VPMX_HOSTNAME=::VPMX_PORT=1533VPHMX_HOSTNAME=::VPHMX_PORT=8082
6. IBM i only: If you will support both IPv4 and IPv6 addressing, replace all ofthe remaining Lotus Sametime Community Server host names in thesametime.ini file with the correct IPv4 or IPv6 address, based on your addresspreference as specified with the UCM_RESOLVE_PREFERRED_IP_VER setting.For example:v If the UCM_RESOLVE_PREFERRED_IP_VER setting is ″6″, change every occurrence
of stserver1.acme.com to 2001:db8:85a3:0:0:8a2e:370:7334 (thecorresponding IPv6 address).
v If the UCM_RESOLVE_PREFERRED_IP_VER setting is ″4″, change every occurrenceof stserver1.acme.com to 9.42.127.134 (the corresponding IPv4 address).
7. Save and close the file.8. Start the Community Server.
Chapter 3. Installing 93
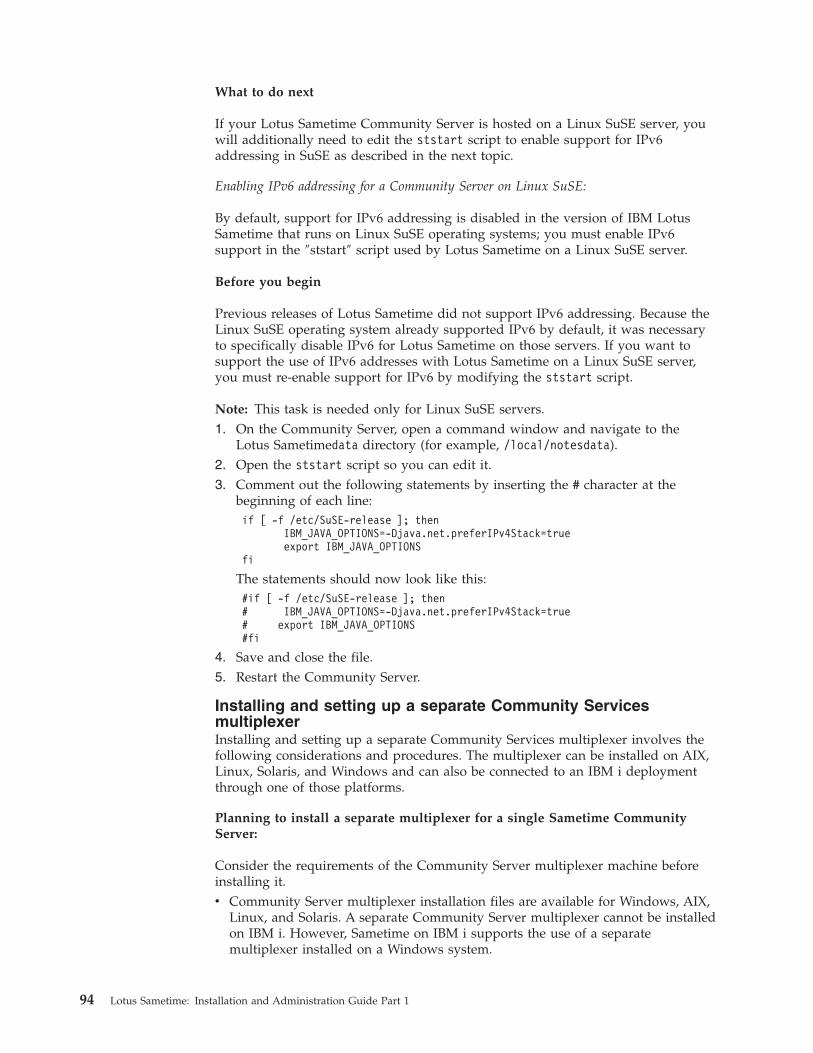
What to do next
If your Lotus Sametime Community Server is hosted on a Linux SuSE server, youwill additionally need to edit the ststart script to enable support for IPv6addressing in SuSE as described in the next topic.
Enabling IPv6 addressing for a Community Server on Linux SuSE:
By default, support for IPv6 addressing is disabled in the version of IBM LotusSametime that runs on Linux SuSE operating systems; you must enable IPv6support in the ″ststart″ script used by Lotus Sametime on a Linux SuSE server.
Before you begin
Previous releases of Lotus Sametime did not support IPv6 addressing. Because theLinux SuSE operating system already supported IPv6 by default, it was necessaryto specifically disable IPv6 for Lotus Sametime on those servers. If you want tosupport the use of IPv6 addresses with Lotus Sametime on a Linux SuSE server,you must re-enable support for IPv6 by modifying the ststart script.
Note: This task is needed only for Linux SuSE servers.1. On the Community Server, open a command window and navigate to the
Lotus Sametimedata directory (for example, /local/notesdata).2. Open the ststart script so you can edit it.3. Comment out the following statements by inserting the # character at the
beginning of each line:if [ -f /etc/SuSE-release ]; then
IBM_JAVA_OPTIONS=-Djava.net.preferIPv4Stack=trueexport IBM_JAVA_OPTIONS
fi
The statements should now look like this:#if [ -f /etc/SuSE-release ]; then# IBM_JAVA_OPTIONS=-Djava.net.preferIPv4Stack=true# export IBM_JAVA_OPTIONS#fi
4. Save and close the file.5. Restart the Community Server.
Installing and setting up a separate Community ServicesmultiplexerInstalling and setting up a separate Community Services multiplexer involves thefollowing considerations and procedures. The multiplexer can be installed on AIX,Linux, Solaris, and Windows and can also be connected to an IBM i deploymentthrough one of those platforms.
Planning to install a separate multiplexer for a single Sametime CommunityServer:
Consider the requirements of the Community Server multiplexer machine beforeinstalling it.v Community Server multiplexer installation files are available for Windows, AIX,
Linux, and Solaris. A separate Community Server multiplexer cannot be installedon IBM i. However, Sametime on IBM i supports the use of a separatemultiplexer installed on a Windows system.
94 Lotus Sametime: Installation and Administration Guide Part 1
v The minimum system requirements for the Community Server multiplexermachine are the same as the system requirements for the core SametimeCommunity Server.
v A machine that meets the minimum system requirements should be able tohandle approximately 20,000 simultaneous client connections.
v Testing indicates that machines with dual 1133 MHz CPUs and 2 GB of RAMcan handle approximately 30,000 simultaneous client connections.
v TCP/IP connectivity must be available between the Community Servermultiplexer machine and the Sametime Community Server. Port 1516 is thedefault port for the connection from the Community Server multiplexer machineto the Sametime Community Server.
Installing the Community Services multiplexer:
To deploy a stand-alone Community Services multiplexer, install it on a separatecomputer.
About this task
Follow these steps to install the Community Services multiplexer:1. Insert the Lotus Sametime CD into the Community Services multiplexer
machine, start the installation program, and choose the option to install theCommunity Services Mux.
2. At the ″Select a language″ screen, select a language for the installer, and thenclick OK.
3. At the ″Welcome″ screen, click Next.4. At the license agreement screen, click I accept both the IBM and the non-IBM
terms, and then click Next.5. At the ″Directory name″ screen, browse to a the directory where you want to
install the Community Mux (or accept the default), and then click .Next
6. At the ″Host name or IP address″ screen, enter the fully qualified host name ofthe Lotus Sametime Community Server that this Community Mux will serve.For best results, do not use an IP address.
7. At the summary screen, click Install.8. At the ″successfully installed″ screen, click Finish.
Connecting to a Sametime Community Mux server:
Use the IBM Lotus Sametime System Console to connect to a Lotus SametimeCommunity Mux and validate its settings.
Before you begin
Start the Lotus Sametime Community Mux if it is not already running.
About this task
If you have not already opened the Connect to Sametime Community Mux Serversactivity, follow these steps:1. From a browser, enter the following URL, replacing serverhostname.domain with
the fully qualified host name of the Lotus Sametime System Console server (forexample stconsole.acme.com).http://serverhostname.domain:8700/ibm/console
Chapter 3. Installing 95
If you are prompted with a security exception, accept the certificate, andcontinue.
2. Enter the WebSphere Application Server User ID and password that youcreated when you installed the Lotus Sametime System Console.
3. Click the Sametime System Console task to open it in the navigation tree.4. Expand Sametime Prerequisites, and click Connect to Sametime Community
Mux Servers.Related concepts
“Planning for an LDAP directory” on page 40The IBM Lotus Sametime 8.5 multiple-server environment requires an LDAPdirectory for user authentication. The LDAP server should be set up and runningbefore deploying Sametime.Related tasks
“Starting the Lotus Sametime System Console” on page 231When started, the Lotus Sametime System Console runs as a task in the WebSphereApplication Server administrative console.
Sametime prerequisite: Connecting to a Sametime Community Mux Server:
Validate the host name and ports specified for a new IBM Lotus SametimeCommunity Mux server.
Before you begin
Use this page to validate the host name of a new Community Mux, along with theports on which it will listen for client connections. This ensures you have aworking multiplexer before you attempt to connect it to a Lotus SametimeCommunity Server or cluster.1. Connect to Sametime Community Mux Servers.
Click Add to begin the guided activity, which lets you validate your installedLotus Sametime Community Mux servers before connecting them toCommunity Servers.You can optionally edit or delete connections to Community Mux servers. ClickRefresh to view your most recent changes.
2. Add Sametime Community Mux Servers.a. In ″Connect to Sametime Community Mux Servers″, click Add.b. In the Host Name field, type the fully qualified host name of the new
Sametime Community Mux (for example: mux1.acme.com).c. Accept the default settings for the Client Port and Client HTTP Port fields.
These settings indicate the ports that the multiplexer will listen on forconnections from Lotus Sametime Connect clients and from Web clients,respectively.
d. Click Save.The connection to the Lotus Sametime Community Mux is validated whenyou save the settings.
Configuring security for the multiplexer:
Update the CommunityConnectivity document in the stconfig.nsf database toenable the Sametime Community Server to accept connections from theCommunity Server multiplexer.
96 Lotus Sametime: Installation and Administration Guide Part 1
About this task
A Sametime Community Server only accepts connections from a CommunityServices multiplexer that is listed in the ″CommunityTrustedIps″ field of a″CommunityConnectivity″ document to prevent an unauthorized machine fromconnecting to the Sametime Community Server.1. Use a Lotus Notes client to open the stconfig.nsf database on the Sametime
Community Server.2. Open the CommunityConnectivity document in the stconfig.nsf database by
double-clicking on the date associated with the document.If the CommunityConnectivity document does not exist in the stconfig.nsfdatabase, you must create it. To create the CommunityConnectivity document,choose Create → CommunityConnectivity from the menu bar in the stconfig.nsfdatabase.
3. In the ″CommunityTrustedIps″ field, enter the IP addresses of the CommunityServices multiplexer machine(s). If you enter multiple addresses, separate eachaddress with a comma.The IP addresses of SIP Connector machines associated with a Sametimecommunity are also entered in this field.
4. Save and close the CommunityConnectivity document.
Configuring the sametime.ini file for the multiplexer:
When the multiplexer is installed on a separate machine, the configuration of themultiplexer is controlled by the settings in the sametime.ini file on the multiplexermachine. Review the settings in the Sametime.ini file on the multiplexer machineto confirm that they are appropriate for your site.
About this task
Notes about maximum user and server connections with a multiplexer:
v When the Community Services multiplexer is installed on a separate machine,Community Services users do not connect to the Sametime server. Therefore, theMaximum user and server connections to the Community Server setting in theSametime Administration Tool for the Sametime Community Server does notapply. Use the VPMX_CAPACITY= parameter in the multiplexer’s sametime.inifile to control the maximum number of connections.
v Multiplexer machines that meet the minimum system requirements cansuccessfully handle 20,000 connections. This value may vary depending on theprocessing capabilities of the multiplexer machine. Multiplexer machines thathave dual 1133 MHz CPUs and 2GB of RAM can successfully handle as many as30000 connections.
Follow these steps to confirm or change the settings for VPS_HOST, VPS_PORT,and VPMX_CAPACITY, open the sametime.ini file on the Community Servermultiplexer machine.1. Open a text editor on the Community Server multiplexer machine.2. Open the Sametime.ini file located in the Sametime server installation directory
(the default directory in Windows is C:\program files\lotus\domino).3. Confirm the host name (VPS_HOST) of the Sametime server to which the
Community Services multiplexer connects (specified during the CommunityServices multiplexer installation and in the stconfig.nsf database.
Chapter 3. Installing 97
4. Confirm the port (VPS_PORT) the Community Services multiplexer uses toestablish the connection with the Sametime server (default port 1516).
5. Confirm or change the maximum number of simultaneous connections allowedto the multiplexer (VPMX_CAPACITY).The default value is 20,000 connections:VPMX_CAPACITY=20000
6. Save the sametime.ini file.
Configuring a stand-alone Community Mux for IPv6:
Configure settings to establish connectivity between an IBM Lotus Sametime serverand a stand-alone Lotus Sametime Community Mux when using IPv6 addressing.
About this task
Each Lotus Sametime server contains a local Community Services multiplexercomponent. The multiplexer handles and maintain connections from LotusSametime clients to the Community Services on the Lotus Sametime server. If yourmultiplexer is hosted on the same server as Community Services, it was alreadyenabled for IPv6 support when you configured the Community Services.
If you installed a stand-alone Community Mux (hosted on a separate server), youcan enable IPv6 support as described below.1. Stop the multiplexer.2. Locate the sametime.ini file in the Sametime Community Mux installation
directory, and open the file so you can edit it.3. Add (or modify) the following statements to the [Connectivity] section within
the file:
Note: The first three settings must match the values used for the LotusSametime server where Community Services are hosted; these values must usethe same IP protocol as well.UCM_RESOLVE_PREFERRED_IP_VER=IPv4_or_IPv6_selectionVPS_HOST=Explicit_IP_address_of_Sametime_serverUCM_LOCAL_IP=Explicit_IP_address_of_Community_MuxVPHMX_HTTP_SERVER_IP=IP_address_of_Domino_HTTP_serverVPHMX_HTTP_SERVER_PORT=Domino_HTTP_port
where:v UCM_RESOLVE_PREFERRED_IP_VER specifies which type of addresses should be
preferred when a domain name resolves to multiple addresses of bothprotocols:– If you support both IPv4 and IPv6 addressing, set this to ″4″ to allow both
protocols but attempt to resolve addresses using IPv4 protocol first.– If you support only IPv6 addressing, set this to ″6″ -- this will still allow
both protocols, but will attempt to resolve addresses using IPv6 protocolfirst in case your operating system is enabled for both IP protocols.
v VPS_HOST specifies the explicit IP address of the Lotus Sametime server towhich this Community Services multiplexer connects. This value must usethe format specified in UCM_RESOLVE_PREFERRED_IP_VER; for example if youentered a ″4″ for that setting, then you must provide an IPv4–format IPaddress here.
v UCM_LOCAL_IP specifies the explicit IP address of the Community Muxmachine (using dot notation for IPv4 protocol or colon notation for IPv6
98 Lotus Sametime: Installation and Administration Guide Part 1

protocol). This value must use the format specified inUCM_RESOLVE_PREFERRED_IP_VER; for example if you entered a ″4″ for thatsetting, then you must provide an IPv4–format IP address here.
v VPHMX_HTTP_SERVER_IP specifies the IP address of the Lotus Domino HTTPserver where Lotus Sametime is running.
v VPHMX_HTTP_SERVER_PORT specifies the port used by the Lotus Domino HTTPserver where Lotus Sametime is running; normally port 80.
4. Add (or modify) the following statements in the [Debug] section within thesametime.ini file:v If this Lotus Sametime server will support both IPv4 and IPv6 addressing:
VPMX_DISABLE_CONFIGURATION_UPDATE=1VPMX_HOSTNAME=::,0.0.0.0VPMX_PORT=1533VPHMX_HOSTNAME=::,0.0.0.0VPHMX_PORT=8082
Where:– VPMX_DISABLE_CONFIGURATION_UPDATE=1 requires all four of the statements
that follow it.– VPMX_HOSTNAME specifies the addresses where this multiplexer serves Lotus
Sametime client communications.
Table 8. Accepted values for VPMX_HOSTNAME
Type of address Example
IPv4 explicit address (dot notation) 9.42.127.134
IPv6 explicit address using colon notation 2002:92a:8f7a:200:9:42:127:134
IPv6 explicit address using double-colonnotation
3ef0::bee7:994:2e66
IPv6 explicit address using IPv4–suffixnotation
3ef0::bee7:9.148.46.102
IPv4 ″any″ (four zeroes) 0.0.0.0
IPv6 ″any″ (a double colon) ::
For example, set this to ::,0.0.0.0 to accept ″any″ address using either IPprotocol.
– VPMX_PORT specifies the port on which this multiplexer listens for clientconnections, normally port 1533.
– VPHMX_HOSTNAME specifies the addresses where this multiplexer servesHTTP client communications.
Table 9. Accepted values for VPHMX_HOSTNAME
Type of address Example
IPv4 explicit address (dot notation) 9.42.127.134
IPv6 explicit address using colon notation 2002:92a:8f7a:200:9:42:127:134
IPv6 explicit address using double-colonnotation
3ef0::bee7:994:2e66
IPv6 explicit address using IPv4–suffixnotation
3ef0::bee7:9.148.46.102
IPv4 ″any″ (four zeroes) 0.0.0.0
IPv6 ″any″ (a double colon) ::
Chapter 3. Installing 99
For example, set this to ::,0.0.0.0 to accept ″any″ address using either IPprotocol.
– VPHMX_PORT specifies the port on which the stand-alone Community Muxlistens for HTTP client connections, normally port 8082.
v If this Lotus Sametime server will support only IPv6 addressing:[Debug]VPMX_DISABLE_CONFIGURATION_UPDATE=1VPMX_HOSTNAME=::VPMX_PORT=1533VPHMX_HOSTNAME=::VPHMX_PORT=8082
5. Save and close the file.6. Restart the Community Mux so your changes can take effect.
Configuring client connectivity to the multiplexer:
After you have configured the Community Server multiplexer, give users the DNSname of the multiplexer and instruct them to set up their Sametime Connectpreferences to connect to the multiplexer instead of the Sametime CommunityServer.
About this task
Each user must update the Sametime Connect client with the DNS name of themultiplexer. If you have deployed multiple Community Server multiplexers,distribute users evenly among the machines. For example, with two multiplexers,direct half of your users to use multiplexer 1 and the other half to use multiplexer2.1. Open Sametime Connect.2. Choose File → Preferences → Server Communities.3. In the Server Community field, type the DNS name of the Community Server
multiplexer machine, such as messaging.acme.com, as instructed by theadministrator.
Load-balancing client connections to multiplexers (optional):
Dynamically load-balancing connections to multiple Community Servicesmultiplexers is an optional procedure.
Set up load balancing in one of these ways:v Set up a rotating DNS system to accomplish load balancing. Use rotating DNS to
associate the IP addresses of the Community Services multiplexer machines to asingle DNS name.For example, associate the IP address of Community Services multiplexermachine 1 (11.22.33.44) and Community Server multiplexer machine 2(11.22.33.55) to the DNS name cscluster.sametime.com.
v Set up an IBM WebSphere Edge Server (Network Dispatcher) in front of theSametime servers that you intend to cluster. Use the WebSphere Edge ServerNetwork Dispatcher to distribute connections to the Community Servicesmultiplexer machines. See the documentation for the IBM WebSphere EdgeServer for more information.
100 Lotus Sametime: Installation and Administration Guide Part 1
Installing a Lotus Sametime Proxy ServerThe IBM Lotus Sametime Proxy Server enables browser-based clients to participatein Lotus Sametime instant messaging and online meetings. In addition, the LotusSametime Proxy Server works with Lotus Sametime Community Server or LotusConnections to enable the business card feature in Lotus Sametime, and with LotusSametime Unified Telephony or other TCSPI-enabled products to enable the LotusSametime click-to-call feature. The Lotus Sametime Proxy Server also provides livenames awareness, and can replace the Links Toolkit used in earlier releases of LotusSametime.
Preparing to install a Lotus Sametime Proxy ServerUse the Lotus Sametime System Console to prepare to install a Lotus SametimeProxy Server by pre-populating values required for installation.
Before you begin
Start the Lotus Sametime System Console if it is not already running.
About this task
If you have not already opened the Install Lotus Sametime Proxy Server guidedactivity, follow these steps:1. From a browser, enter the following URL, replacing serverhostname.domain with
the fully qualified domain name of the Lotus Sametime System Console server.http://serverhostname.domain:8700/ibm/console
2. Enter the WebSphere Application Server User ID and password that youcreated when you installed the Lotus Sametime System Console.
3. Click the Sametime System Console task to open it in the navigation tree.4. Click Sametime Guided Activities → Install Sametime Proxy Server.Related tasks
“Starting the Lotus Sametime System Console” on page 231When started, the Lotus Sametime System Console runs as a task in the WebSphereApplication Server administrative console.
Guided activity: Preparing to install a Lotus Sametime Proxy Server:
This guided activity takes you through the steps of creating a deployment plan,which collects information that pre-populates installation screens.
Before you begin
The following servers must be installed and running:v LDAP serverv Lotus Sametime System Consolev Lotus Sametime Community Server, installed using a deployment plan created
on the System Console
About this task
Follow these steps to store a deployment plan on the Sametime System Console tobe used when you run the installation program for Lotus Sametime Proxy Server.1. Plan a product installation.
Chapter 3. Installing 101
In the Install Sametime Proxy Server portlet, click Create a New DeploymentPlan, and then click Next.
2. Deployment Name.a. Give the deployment plan a unique, recognizable name, which will be
shown only in the Sametime System Console, and then click Next.The name should include the installation and node type, such asstProxy_primary. You can include multibyte characters, symbols, and spacesin the name. The name can be up to 256 characters and is not case sensitive.
b. Click Existing Sametime Community Server, select the Lotus SametimeCommunity Server to which you want to connect the Lotus Sametime ProxyServer, and then click Next.
3. Choose the configuration type.Select the profile type for this installation, and then click Next:Pilot use: Select Cell Profile.Production use:
Add this server to the Sametime System Console cell by selecting theappropriate Network Deployment option.v First server of this type: Select Network Deployment - Primary Node.v Additional server of this type: Select Network Deployment - Secondary Node.
If you will use the Lotus Sametime System Console as the DeploymentManager for a Lotus Sametime Proxy Server cluster, there is no need to install aLotus Sametime Proxy Server with the Deployment Manager option.
4. WebSphere Profile Settings.a. Type the fully qualified host name of the server where you will be installing
the Lotus Sametime Proxy Server.b. Enter the user name and password to be used as the WebSphere
Application Server administrator on the Sametime Proxy Server, and thenclick Next.
Important: This must be a unique user ID that does not exist in the LDAPdirectory.
5. Deployment Summary.Review the summary screen, and then click Finish.The deployment plan is ready to be used for the server installation. If you needto make any changes, click Modify an Existing Deployment Plan and updatethe plan. All changes must be made prior to running installation.
What to do next
“Installing a proxy server on AIX, Linux, Solaris, or Windows”
Installing a proxy server on AIX, Linux, Solaris, or WindowsRun the installation program on the machine where you plan to install a LotusSametime Proxy Server.
Before you begin
You should have already created a deployment plan for the Lotus Sametime ProxyServer and started the Lotus Sametime System Console server. If you are loggedinto the Sametime System Console, log out and close the browser beforecontinuing.
102 Lotus Sametime: Installation and Administration Guide Part 1
AIX, Linux, and Solaris: The launchpad install program needs to be able to launcha Web browser to start. You will need to be on the console or have an X server anda Web browser installed and configured. (VNC or a remote X term session willwork as well).
About this task
By using the deployment plan you created earlier, you have fewer selections tomake when you run the installation program.1. (Linux RHEL only) Disable SELinux on any RedHat operating system:
a. Log in as root on the Linux RedHat server where you will install the LotusSametime server.
b. Open the /etc/selinux/config file for editing.c. Locate the SELINUX setting. Change its value to either disable or
permissive.d. Save and close the file.e. Restart the Linux server.
2. Log in to your computer as the system administrator (Microsoft Windows) oras root (IBM AIX, Linux, Solaris).Solaris only: Solaris installs must be performed by the root user using su or anormal login session. Third-party sudo packages are not supported on Solaris.
3. Download the installation package if you have not already done so. Thisinstallation uses SametimeProxyServer.zip.a. To download installation packages, you must have an IBM Passport
Advantage account, which is described at the following Web address:www.ibm.com/software/howtobuy/passportadvantage/paocustomer/docs/en_US/ecare.html
b. Open this release’s Download document at the following Web address:http://www.ibm.com/support/docview.wss?rs=477&uid=24024322
Locate the components you need in the document’s listing, then downloadthe packages labelled with the corresponding part numbers to the systemon which you are installing.
c. Extract the files to a local directory.d. Verify that you have at least 1 GB of temporary space to run the
installation in your %TEMP% or /tmp directory.4. Navigate to the folder where you stored the downloaded files for Lotus
Sametime and start the installation program by running one of the followingcommands from the disk 1 folder:AIX, Linux, Solaris
./launchpad.shWindows
launchpad.exe5. If necessary, select a language other than English from the ″Select a language″
dropdown list.6. Click Install IBM Lotus Sametime Proxy Server and click Launch IBM Lotus
Sametime Proxy Server 8.5 installation.7. Select the packages you want to install and click Next.8. At the Licenses screen, click the I accept the terms in the license agreements
option and click Next.9. Select a package group option and accept the installation directory. Then click
Next.
Chapter 3. Installing 103
Select Create a new package group if you have not installed any otherSametime software on this machine.Leave Use the existing package group selected if you are installing severalSametime servers on the same machine.
10. Select IBM Lotus Sametime Proxy Server as the feature to install and selectUse Lotus Sametime System Console to install. Click Next.
11. At the WebSphere Profile settings screen, supply values for connecting to theLotus Sametime System Console.v Host Name: Provide the Host Name for the Lotus Sametime System
Console. The Host Name was determined when you installed the LotusSametime System Console.
v Use SSL: Leave this option selected to run the server over a secureconnection.
v HTTPs Port: Leave 9443 as the default value.v User ID and password: Provide the WebSphere Application Server User ID
and password that you created when you installed the Lotus SametimeSystem Console.
12. Provide the host name for the machine you are currently using, which is thesame name you used when you created the deployment plan for thisinstallation.Do not use an IP address or short host name.
13. Click Validate to log in to the Lotus Sametime System Console.The button name changes to Validated after you log in.
14. When you are logged in, click Next.15. Select the Lotus Sametime Proxy Server deployment plan you created earlier
with the Lotus Sametime System Console guided activity. Then click Next.16. Review the deployment settings, then click Next.17. At the summary panel, review the settings, then click Install to start the
installation.18. Click Finish to close the installation screen.19. Click Exit to close the Installation Manager.
Results
If the installation was not successful, look at the installation logs for moreinformation about what occurred during the installation attempt. Fix any problems,then uninstall all components and reinstall. Find information in the logs directoryand the ant and native subdirectories.
AIX, Linux, or Solaris
/var/ibm/InstallationManager/logs
SSC connection log: /tmp/SSCLogs/ConsoleUtility.log.0
Windows 2008%ALLUSERSPROFILE%\IBM\Installation Manager\logs
Windows 2003%ALLUSERSPROFILE%\Application Data\IBM\Installation Manager\logs
104 Lotus Sametime: Installation and Administration Guide Part 1
SSC connection log:
Documents and Settings\username\Local Settings\Temp\SSCLogs\ConsoleUtility.log.0
What to do next
Managing trusted IP addressesRelated tasks
“Guided activity: Preparing to install a Lotus Sametime Proxy Server” on page 101This guided activity takes you through the steps of creating a deployment plan,which collects information that pre-populates installation screens.“Starting the Lotus Sametime System Console” on page 231When started, the Lotus Sametime System Console runs as a task in the WebSphereApplication Server administrative console.“Uninstalling DB2 and Sametime software with the Installation Manager” on page243Use the Installation Manager to uninstall the following components that arepackaged with Lotus Sametime: IBM DB2 for Linux and Windows, Lotus SametimeSystem Console, Lotus Sametime Proxy Server, Lotus Sametime Meeting Server,and Lotus Sametime Media Manager.
Verifying a proxy server installation on AIX, Linux, Solaris, or Windows:
Open the Sametime Web client to verify that the installation was successful.
About this task
Follow these steps to verify the installation.1. Using a browser, log in to the Lotus Sametime Proxy Server application with
the following command: http://serverhostname.domain:port/stwebclient/index.jsp
Replace serverhostname.domain with your server name and add the port number.
Tip: To verify the port number being used by the Lotus Sametime ProxyServer, log in the Lotus Sametime System Console. In the WebSphereApplication Server administrative console, click Servers → WebSphereapplication servers → STProxyServer → ports → WC_defaulthost to find the portnumber.For example: http://st85proxy1.acme.com:9081/stwebclient/index.jsp
2. Verify that you can create or view contacts.Related tasks
“Logging in to the Lotus Sametime System Console” on page 63Use the IBM Lotus Sametime System Console to prepare to install new servers,start Sametime servers that have been installed, use guided activities to performconfiguration tasks, and administer any Sametime servers managed by the console.
Managing trusted IP addressesWhenever you install a server that communicates with an IBM Lotus SametimeCommunity Server, you must add the new server’s IP address to the CommunityServer’s settings.
Chapter 3. Installing 105
About this task
The Lotus Sametime Community Server accepts connections from the LotusSametime Media Manager, the Lotus Sametime Gateway, the Lotus SametimeCommunity Mux, and the Lotus Sametime Proxy Server, as well as other serversthat are listed in the Community Services page. To ensure that the Lotus SametimeCommunity Server trusts these components when they establish a connection, youmust add the trusted server’s IP address to the Lotus Sametime CommunityServer.
You do not need to add the Lotus Sametime System Console’s IP address becauseit is added automatically when you install the Lotus Sametime Community Serverusing a deployment plan or register the Lotus Sametime Community Server withthe console after installation.
This task must be completed separately for each server within a Lotus SametimeCommunity Server cluster, as well as for multiple non-clustered CommunityServers.1. Log in to the Integrated Solutions Console.2. Click Sametime System Console → Sametime Servers → Sametime Community
Servers.3. In the Sametime Community Servers list, click the deployment name of the
server with the list of trusted IP addresses that you want to change.4. Click the Connectivity tab.5. Under Trusted Servers, enter the IP address of the server that must connect to
the Lotus Sametime Community Server in the New IP Address field, and clickAdd.
Note: For the Lotus Sametime Media Manager, enter the Conference Managerserver IP address. Each instance of a Conference Manager cluster must beentered.To delete an IP address from the list, select it and click Delete Selected.
6. Click OK.7. Restart the Lotus Sametime Community Server for the change to take effect.
Installing the FIPS ServerIBM Lotus Sametime supports the U.S. government-defined security requirementsfor cryptographic modules known as FIPS 140-2 (Federal Information ProcessingStandard 140-2). Installing the FIPS Server is only necessary if your LotusSametime deployment must be FIPS-compliant; otherwise, it is optional.
Before you begin
You should have already installed the IBM Lotus Sametime Server Console and theLotus Sametime Proxy Server.
About this task
To maintain FIPS 140-compliance for all data exchanged between clients and LotusSametime Community Servers, you must install the FIPS Server on the LotusSametime Proxy Server to accept data on behalf of Lotus Sametime CommunityServers.
106 Lotus Sametime: Installation and Administration Guide Part 1
If you want to administer the FIPS Server from the Sametime Systems Console,you must install the FIPS administration portlet before you install the FIPS Server.The FIPS administration portlet can connect to the FIPS Server only if the it hasbeen installed on the Lotus Sametime Proxy Server, and you must always restartthe Lotus Sametime Proxy Server if you make any configuration changes using theadministration portlet. You cannot have multiple FIPS Servers running on the samemachine.
If you do not install the FIPS administration portlet, you can manage the FIPSServer using information in FIPS Support for IBM Lotus Sametime 8.1. Install the FIPS administration portlet into the Sametime System Console of
the Integrated Solutions Console. Go to WebSphere\STSCServerCell\optionalConsoleApps\fips.proxyadmin and install the portlet using theinstructions in the readme.txt.
2. Copy sametimefipsproxy.war from setup\STIPLaunchpad\disk1\FIPSProxy onthe image disk to your local drive.
3. Log in to the Integrated Solutions Console on the machine where you areinstalling the FIPS Server.
4. Click Applications → Application Types → Websphere EnterpriseApplications.
5. On the Enterprise Applications page, click Install. .6. Under Path to the new application, browse to the sametimefipsproxy.war file.
Keep the default settings to install the server, and then click Next
7. Enter the context root that you want for the FIPS Server.8. Click Finish and save the configuration.9. Restart the Lotus Sametime Proxy Server to automatically start the FIPS
Server.10. Log in to the Integrated Solutions Console.11. Click Sametime System Console → Sametime Servers → FIPS Proxy Servers.
You can only edit data for FIPS if the FIPS war is running on the installedserver. Make sure that your FIPS Server is running in order to administer it.
Note: Currently, You cannot administer the per-node configuration or verticalclustering of FIPS on the Sametime System Console.
12. Click the FIPS Server that you installed.13. Enter a fully qualified inbound host name and port and an outbound host
name and port to which FIPS connects, and then click OK.14. Restart the Lotus Sametime Proxy Server again to automatically start the FIPS
Server.
Installing a Lotus Sametime Media ManagerFollow the instructions for your operating system to install a Lotus SametimeMedia Manager.
Preparing to install a Lotus Sametime Media ManagerUse the Lotus Sametime System Console to prepare to install a Lotus SametimeMedia Manager by pre-populating values required for installation. The mediamanager runs on Linux and Windows only.
Before you begin
Start the Lotus Sametime System Console if it is not already running.
Chapter 3. Installing 107
About this task
If you have not already opened the Install Lotus Sametime Media Manager guidedactivity, follow these steps:1. From a browser, enter the following URL, replacing serverhostname.domain with
the fully qualified domain name of the Lotus Sametime System Console server.http://serverhostname.domain:8700/ibm/console
2. Enter the WebSphere Application Server User ID and password that youcreated when you installed the Lotus Sametime System Console.
3. Click the Sametime System Console task to open it in the navigation tree.4. Click Sametime Guided Activities → Install Sametime Media Manager.Related tasks
“Starting the Lotus Sametime System Console” on page 231When started, the Lotus Sametime System Console runs as a task in the WebSphereApplication Server administrative console.
Guided activity: Preparing to install a Lotus Sametime Media Manager:
This guided activity takes you through the steps of creating a deployment plan,which collects information that pre-populates installation screens. The IBM LotusSametime Media Manager runs on Linux and Microsoft Windows only. The mediamanager is comprised of three components: Proxy/Registrar, Conference Manager,and Packet Switcher. In a production environment, you should install these MediaManager components on separate machines for better performance.
Before you begin
The instructions below assume you have decided what type of deployment planyou are setting up for the Media Manager. A pilot deployment uses one machineand one deployment plan. A production deployment typically distributes eachMedia Manager component on a separate machine and therefore uses multipledeployment plans. In addition, you can cluster the Proxy/Registrar and ConferenceManager components, which requires a deployment plan for the component’sprimary node and another deployment plan for secondary nodes. Clustering is notavailable for the Packet Switcher; it is also not available for an ″All Components″installation of the Media Manager, which includes the Packet Switcher.v Pilot deployment prerequisite
You must have installed a Lotus Sametime Community server using adeployment plan.
v Production deployment prerequisites
The SIP Proxy and Registrar requires that you have installed a Lotus SametimeCommunity server using a deployment plan.The Conference Manager requires that you have installed a Lotus SametimeCommunity server and a SIP Proxy and Registrar using deployment plans.The Packet Switcher requires that you have installed a Lotus SametimeCommunity server and a Conference Manager using deployment plans.
Create deployment plans and install each component in this order to meetprerequisites:1. SIP Proxy and Registrar2. Conference Manager3. Packet Switcher
108 Lotus Sametime: Installation and Administration Guide Part 1
About this task
Follow these steps to store a deployment plan on the Sametime System Console tobe used when you run the installation program for Lotus Sametime MediaManager or one of its components.1. Plan a product installation.
In the Install Sametime Media Manager portlet, click Create a NewDeployment Plan, and then click Next.
2. Deployment Name.Give the deployment plan a unique, recognizable name, which will be shownonly in the Sametime System Console, and then click Next.The name should include the installation and node type, such asstMedia_primary or stMediaProxReg_primary. You can include multibytecharacters, symbols, and spaces in the name. The name can be up to 256characters and is not case sensitive.
3. Media Manager Feature Installation.Select which components to install, and then click Next:Pilot use: Click Install All Components to install all media managercomponents on the same computer.Production use: Select the component to install on the current computer.v Install Proxy/Registrarv Install Conference Managerv Install Packet Switcher
Attention: The Packet Switcher can only be deployed with ConferenceManagers that have already been installed and registered with the LotusSametime System Console.
4. Choose the configuration type.Select the profile type for this installation, and then click Next
Pilot use: Select Cell Profile.Production use:
Add this server to the Sametime System Console cell by selecting theappropriate Network Deployment option.v First server of this type: Select Network Deployment - Primary Node. (The
Packet Switcher must be installed using the Primary Node option).v Additional SIP Proxy and Registrar or Conference Manager: Select Network
Deployment - Secondary Node. (The secondary node option does not applyto a Packet Switcher installation because Packet Switchers cannot beclustered.)
If you will use the Lotus Sametime System Console as the DeploymentManager for a SIP Proxy and Registrar cluster, there is no need to install a SIPProxy and Registrar with the Deployment Manager option. If you will use theLotus Sametime System Console as the Deployment Manager for a ConferenceManager cluster, there is no need to install a Conference Manager with theDeployment Manager option.
5. WebSphere Profile Settings.a. Type the fully qualified host name of the server where you will be installing
the media manager component.
Chapter 3. Installing 109
b. Enter the user name and password to be used as the WebSphereApplication Server administrator on the Sametime Media Manager server,and then click Next.
Important: This must be a unique user ID that does not exist in the LDAPdirectory.
6. Connect to Community Server.Select the deployment plan that represents the Community Server to which thisMedia Manager component (or components) connect, and then click Next.For a Conference Manager deployment plan, also select the existingProxy/Registrar deployment plan. For a Packet Switcher deployment plan, alsoselect the existing Conference Manager deployment plan.
7. Deployment Summary.Review the summary screen, and then click Finish.The deployment plan is ready to be used for the server installation. If you needto make any changes, click Modify an Existing Deployment Plan and updatethe plan. All changes must be made prior to running installation.Repeat this guided activity for each media manager component you plan toinstall on a separate computer.
What to do next
“Installing a media manager on Linux or Windows”
Installing a media manager on Linux or WindowsRun the installation program on the machine where you plan to install LotusSametime Media Manager. The media manager runs only on Linux or Windows.
Before you begin
You should have already created a deployment plan for the Lotus Sametime MediaManager and started the Lotus Sametime System Console server. If you are loggedinto the Sametime System Console, log out and close the browser beforecontinuing.
Linux: The launchpad install program needs to be able to launch a Web browser tostart. You will need to be on the console or have an X server and a Web browserinstalled and configured. (VNC or a remote X term session will work as well).
About this task
By using the deployment plan you created earlier, you have fewer selections tomake when you run the installation program.1. (Linux RHEL only) Disable SELinux on any RedHat operating system:
a. Log in as root on the Linux RedHat server where you will install the LotusSametime server.
b. Open the /etc/selinux/config file for editing.c. Locate the SELINUX setting. Change its value to either disable or
permissive.d. Save and close the file.e. Restart the Linux server.
2. Log in to your computer as the system administrator (Microsoft Windows) oras root (Linux).
110 Lotus Sametime: Installation and Administration Guide Part 1

3. Download the installation package for the Sametime Media Manager if youhave not already done so.a. To download installation packages, you must have an IBM Passport
Advantage account, which is described at the following Web address:www.ibm.com/software/howtobuy/passportadvantage/paocustomer/docs/en_US/ecare.html
b. Open this release’s Download document at the following Web address:http://www.ibm.com/support/docview.wss?rs=477&uid=24024322
Locate the components you need in the document’s listing, then downloadthe packages labelled with the corresponding part numbers to the systemon which you are installing.
c. Extract the files to a local directory.d. Verify that you have at least 1 GB of temporary space to run the
installation in your %TEMP% or /tmp directory.4. Navigate to the folder where you stored the downloaded files for Lotus
Sametime and start the installation program by running one of the followingcommands from the disk 1 folder:Linux
./launchpad.shWindows
launchpad.exe5. If necessary, select a language other than English from the ″Select a language″
dropdown list.6. Click Install IBM Lotus Sametime Media Manager and click Launch IBM
Lotus Sametime Media Manager 8.5 installation.7. Select the version you want to install and click Next.8. At the Licenses screen, click the I accept the terms in the license agreements
option and click Next.9. Select a package group option and accept the installation directory. Then click
Next.Select Create a new package group if you have not installed any otherSametime software on this machine.Leave Use the existing package group selected if you are installing severalSametime servers on the same machine.
10. Select IBM Sametime Media Manager as the feature to install and select UseLotus Sametime System Console to install. Click Next.
11. At the SSC Login screen, supply values for connecting to the Lotus SametimeSystem Console.v Host name: Provide the fully qualified domain name in the Host Name
field for the Lotus Sametime System Console. The host name wasdetermined when you installed the Lotus Sametime System Console.
v Use SSL: Leave this option selected to run the server over a secureconnection.
v HTTPs port: Leave 9443 as the default value.v User ID and password: Provide the WebSphere Application Server User ID
and password that you created when you installed the Lotus SametimeSystem Console.
12. Provide the host name for the machine you are currently using, which is thesame name you used when you created the deployment plan for thisinstallation.
Chapter 3. Installing 111
Do not use an IP address or short host name.13. Click Validate to log in to the Lotus Sametime System Console.
The button name changes to Validated after you log in.14. When you are logged in, click Next.15. Select the Lotus Sametime Media Manager deployment plan you created
earlier with the Lotus Sametime System Console guided activity. Then clickNext.
16. Review the deployment settings, then click Next.17. At the summary panel, review the settings, then click Install to start the
installation.18. Click Finish to close the installation screen.19. Click Exit to close the Installation Manager.
Results
If the installation was not successful, look at the installation logs for moreinformation about what occurred during the installation attempt. Fix any problems,then uninstall all components and reinstall. Find information in the logs directoryand the ant and native subdirectories.
Linux
/var/ibm/InstallationManager/logs
SSC connection log: /tmp/SSCLogs/ConsoleUtility.log.0
Windows 2008%ALLUSERSPROFILE%\IBM\Installation Manager\logs
Windows 2003%ALLUSERSPROFILE%\Application Data\IBM\Installation Manager\logs
SSC connection log:
Documents and Settings\username\Local Settings\Temp\SSCLogs\ConsoleUtility.log.0
What to do nextRelated tasks
“Guided activity: Preparing to install a Lotus Sametime Media Manager” on page108This guided activity takes you through the steps of creating a deployment plan,which collects information that pre-populates installation screens. The IBM LotusSametime Media Manager runs on Linux and Microsoft Windows only. The mediamanager is comprised of three components: Proxy/Registrar, Conference Manager,and Packet Switcher. In a production environment, you should install these MediaManager components on separate machines for better performance.“Starting the Lotus Sametime System Console” on page 231When started, the Lotus Sametime System Console runs as a task in the WebSphereApplication Server administrative console.
Managing trusted IP addresses:
112 Lotus Sametime: Installation and Administration Guide Part 1
Whenever you install a server that communicates with an IBM Lotus SametimeCommunity Server, you must add the new server’s IP address to the CommunityServer’s settings.
About this task
The Lotus Sametime Community Server accepts connections from the LotusSametime Media Manager, the Lotus Sametime Gateway, the Lotus SametimeCommunity Mux, and the Lotus Sametime Proxy Server, as well as other serversthat are listed in the Community Services page. To ensure that the Lotus SametimeCommunity Server trusts these components when they establish a connection, youmust add the trusted server’s IP address to the Lotus Sametime CommunityServer.
You do not need to add the Lotus Sametime System Console’s IP address becauseit is added automatically when you install the Lotus Sametime Community Serverusing a deployment plan or register the Lotus Sametime Community Server withthe console after installation.
This task must be completed separately for each server within a Lotus SametimeCommunity Server cluster, as well as for multiple non-clustered CommunityServers.1. Log in to the Integrated Solutions Console.2. Click Sametime System Console → Sametime Servers → Sametime Community
Servers.3. In the Sametime Community Servers list, click the deployment name of the
server with the list of trusted IP addresses that you want to change.4. Click the Connectivity tab.5. Under Trusted Servers, enter the IP address of the server that must connect to
the Lotus Sametime Community Server in the New IP Address field, and clickAdd.
Note: For the Lotus Sametime Media Manager, enter the Conference Managerserver IP address. Each instance of a Conference Manager cluster must beentered.To delete an IP address from the list, select it and click Delete Selected.
6. Click OK.7. Restart the Lotus Sametime Community Server for the change to take effect.
Increasing the heap size for a non-clustered SIP Proxy and Registrarcomponent:
If you installed the IBM Lotus Sametime Media Manager using the Cell profileoption to create a non-clustered server, increase the maximum heap size for the SIPProxy and Registrar component. Complete this task regardless of whether the SIPProxy and Registrar component is hosted on a computer with other mediamanager components, or is hosted separately.
Before you begin
Install the Lotus Sametime Media Manager using the Cell profile to create anon-clustered server. If you installed the SIP Proxy and Registrar on a separatecomputer, complete this task on that server.
Chapter 3. Installing 113
Note: If you installed the SIP Proxy and Registrar component using the PrimaryNode or Secondary Node option so you can create a cluster, skip this task.Federating a server into a cluster overwrites the heap settings, so you willcomplete this task after creating the cluster.
About this task
Typically, the total value of all server instance JVM heap sizes on a specific nodemust be less than half of the total RAM of that computer.1. Log in to the SIP Proxy and Registrar’s Integrated Solutions Console as the
WebSphere administrator.2. Click Servers → Server Types → WebSphere application servers → .3. Click a server name to display the ″Configuration″ page for the server.4. In the Server Infrastructure section, click Java and process management, and
then click Process definition.5. Under ″Additional Properties″ click Java virtual machine.6. Under ″General Properties″ specify the heap size settings as follows:
Table 10. Heap settings for the SIP Proxy and Registrar
Initial heap size 256
Maximum heap size 1024
7. In the Generic JVM arguments field, type the following information exactly asshown:-Xverbosegclog:${SERVER_LOG_ROOT}/gc.log,1,14000
This will create an approximately 20MB rolling verbose GC log file, stored inthe server logs directory.
8. Click OK.9. Save your changes by clicking the Save link in the ″Messages″ box at the top of
the page.
Verifying a media manager installation on Linux or Windows:
After installing the Lotus Sametime Media Manager, verify that you can useaudio-visual services.
About this task
Follow these steps to verify that the server started automatically after installationand that you can use audio-visual services from the Sametime Connect client.1. Check the WebSphere Application Server systemout.log and systemerr.log for
any exceptions.2. From a browser, log in to the Lotus Sametime System Console:
a. Enter the following URL, replacing serverhostname.domain with the fullyqualified domain name of the Lotus Sametime System Console server.http://serverhostname.domain:8700/ibm/console
b. Enter the WebSphere Application Server User ID and password that youcreated when you installed Lotus Sametime System Console.
c. Click the Sametime System Console task to open it in the navigation tree.3. Click Servers → Server types → WebSphere application servers.
114 Lotus Sametime: Installation and Administration Guide Part 1
4. Find the Media Manager server in the list and verify that the status columnshows that the server is running.
5. Log in to the Lotus Sametime Client and verify that you can use audio-visualservices in a meeting or a chat.
Installing a Lotus Sametime Meeting ServerFollow the instructions for your operating system to install a Lotus SametimeMeeting Server.
Creating a database for the Lotus Sametime Meeting Server onAIX, Linux, Solaris, and WindowsBefore installing the Lotus Sametime Meeting Server on AIX, Linux, Solaris, andWindows, create a database to store its data.
Before you begin
If you previously created a Meeting Server database and want to run the scriptagain to create a database of the same name, use the DB2 DROP DATABASEcommand to delete all user data and log files, as well as any back/restore historyfor the original database. Also note that uninstalling DB2 does not remove the dataand log files.
About this task
Run the scripts that come with Lotus Sametime in the DB2 installation package tocreate the database for the Lotus Sametime Meeting Server.1. On the DB2 server, log in to the system as the DB2 administrator created
during DB2 installation.2. Open a command prompt and navigate to the folder where you extracted the
DB2 installation package.3. Create the database by running one of the following commands from the disk 1
folder:AIX, Linux, and Solaris
./createMeetingDb.sh STMS
Windows
createMeetingDb.bat STMS
Replace ″STMS″ in the command if you want to choose a different databasename. Names can be from 1 - 8 characters, but cannot contain special ormultibyte characters.Follow the rules for your operating system when naming DB2 objects.
4. Close the DB2 command window.5. Open the DB2 Control Center.
AIX, Linux, and Solaris:
Open the IBM DB2 folder on the desktop and click Control Center.Windows:
Click Start → Programs → IBM DB2 → General Administration Tools → ControlCenter.
6. Verify that the new database was created.
Chapter 3. Installing 115

Related tasks
“Installing DB2 on Linux and Windows” on page 57IBM DB2 is a prerequisite for IBM Lotus Sametime and is included with theSametime installation package for Linux and Windows. The package does notinclude DB2 for AIX or Solaris.
Connecting to a DB2 databaseUse the Lotus Sametime System Console to connect to the Lotus Sametime MeetingServer or Lotus Sametime Gateway database before installing the server from theSystem Console. If you installed the server without using the System Console (as isthe case with the Sametime Meeting Server on IBM i and Sametime Gateway onany platform), do this step before registering the server with the System Console.
Before you begin
Start the Lotus Sametime System Console if it is not already running.
About this task
If you have not already opened the Connect to DB2 Databases activity, follow thesesteps:1. From a browser, enter the following URL, replacing serverhostname.domain with
the fully qualified domain name of the Lotus Sametime System Console server.http://serverhostname.domain:8700/ibm/console
IBM i: The port number may not be 8700. Use the port that was listed in theSametime System Console installation results summary or use the settingspecified for the Administrative console secure port in the AboutThisProfile.txtfile. For the Sametime System Console Deployment Manager Profile(STSCDmgrProfile), the file is located in the following path:/QIBM/UserData/Websphere/AppServer/V7/SametimeWAS/profiles/STSCDmgrProfile/logs/AboutThisProfile.txt
2. Enter the WebSphere Application Server User ID and password that youcreated when you installed the Lotus Sametime System Console.
3. Click the Sametime System Console task to open it in the navigation tree.4. Click Sametime Prerequisites → Connect to DB2 Databases.Related tasks
“Starting the Lotus Sametime System Console” on page 231When started, the Lotus Sametime System Console runs as a task in the WebSphereApplication Server administrative console.
Sametime prerequisite: Connecting to a DB2 database:
This activity takes you through the steps for connecting to the Meeting Server orGateway database you created.
Before you begin
AIX, Linux, Solaris, Windows: Ensure that IBM DB2 has been installed and thatyou have created the Sametime Meeting Server or Gateway database.
IBM i: Ensure that you have created the required database schemas and tables.
In the Connect to DB2 Databases portlet, verify that the Lotus Sametime SystemConsole database you created earlier is already displayed in the list of databases.
116 Lotus Sametime: Installation and Administration Guide Part 1
About this task
Follow these steps to connect to the Meeting Server or Gateway database. Youmust do this before you can install the Meeting Server using the Sametime SystemConsole. If you installed the server without using the System Console (as is thecase with the Sametime Meeting Server on IBM i and Sametime Gateway on anyplatform), do this step before registering the server with the System Console.1. DB2 Configuration Guided Activity.
Click Add to begin the guided activity that will connect your server to the DB2database. If a connection already exists, you can optionally edit or delete it.
2. Add a new database.a. In the Connect to DB2 Databases portlet, click Add.
If you want to edit or delete a database instead, then select one, and clickthe appropriate button.
b. Enter the fully qualified host name of the DB2 server in the Host namefield.Do not enter an IP address or a short host name.
c. The Port field shows the default port of 50000. Accept the default unlessyou specified a different port during DB2 installation or your server is usinga different port.Linux: The default is typically 50001, but will vary based on portavailability. Check the /etc/services file on the DB2 server to verify theport number being used.
d. In the Database name, field, enter the name of the database you want toconnect to.Meeting Server database
On AIX, Linux, Solaris, and Windows, the database name is STMS unlessyou changed it.On IBM i, the name is always STMS.Gateway database
For AIX, Linux, Solaris, and Windows, the database name is STGWDBunless you changed it.For IBM i, use the name you specified when creating the database schemas.
e. In the Application user ID field, supply the DB2 application’sadministrative user name that you created when you installed DB2, such asdb2admin. This user has database administration authority and you will usethis user ID and password whenever you work with DB2 databases forLotus Sametime. On IBM i, this is the user profile you specified as theowner of the Meeting Server database schemas in your copy of thestms.default.response.properties file or the user profile you logged in withwhen you created the Gateway database schemas.
f. In the Application password field, enter the password for the DB2administrative user ID.
g. If you are connecting to a database on an IBM i server, click Hosted onIBM i.
h. Click Finish.
Preparing to install a Lotus Sametime Meeting ServerUse the Lotus Sametime System Console to prepare to install a Lotus SametimeMeeting Server by pre-populating values required for installation.
Chapter 3. Installing 117
Before you begin
Start the Lotus Sametime System Console if it is not already running.
About this task
If you have not already opened the Install Lotus Sametime Meeting Server guidedactivity, follow these steps:1. From a browser, enter the following URL, replacing serverhostname.domain with
the fully qualified domain name of the Lotus Sametime System Console server.http://serverhostname.domain:8700/ibm/console
2. Enter the WebSphere Application Server User ID and password that youcreated when you installed the Lotus Sametime System Console.
3. Click the Sametime System Console task to open it in the navigation tree.4. Click Sametime Guided Activities → Install Sametime Meeting Server.Related tasks
“Starting the Lotus Sametime System Console” on page 231When started, the Lotus Sametime System Console runs as a task in the WebSphereApplication Server administrative console.
Guided activity: Preparing to install a Lotus Sametime Meeting Server:
This guided activity takes you through the steps of creating a deployment plan,which collects information that pre-populates installation screens.
Before you begin
You have set up an IBM DB2 database and an LDAP server, and have run theguided activities for connecting to the DB2 database and to the LDAP server.
About this task
Follow these steps to store a deployment plan on the Lotus Sametime SystemConsole to be used when you run the installation program for Lotus SametimeMeeting Server.1. Plan a product installation.
In the Install Sametime Meeting Server portlet, click Create a NewDeployment Plan, and then click Next.
2. Deployment Name.Give the deployment plan a unique, recognizable name, which will be shownonly in the Sametime System Console, and then click Next.The name should include the installation and node type, such asstMeeting_primary. You can include multibyte characters, symbols, and spacesin the name. The name can be up to 256 characters and is not case sensitive.
3. Choose the configuration type.Select the profile type for this installation, and then click Next:Pilot use: Select Cell Profile.Production use:
Add this server to the Sametime System Console cell by selecting theappropriate Network Deployment option.v First server of this type: Select Network Deployment - Primary Node.
118 Lotus Sametime: Installation and Administration Guide Part 1
v Additional server of this type: Select Network Deployment - Secondary Node.
If you will use the Lotus Sametime System Console as the DeploymentManager for a Lotus Sametime Meeting Server cluster, there is no need toinstall a Lotus Sametime Meeting Server with the Deployment Manager option.
4. WebSphere Profile Settings.a. Type the fully qualified host name of the server where you will be installing
the Lotus Sametime Meeting Server.b. Enter the user name and password to be used as the WebSphere
Application Server administrator on the Sametime Meeting Server, and thenclick Next.
Important: This must be a unique user ID that does not exist in the LDAPdirectory.
5. Choose a database for this deployment.Select the Lotus Sametime Meeting Server database that you configured withthe Lotus Sametime System Console activity, and then click Next.If you used the recommended name when you created the Sametime MeetingServer database, the name is STMS.
6. Connect to an LDAP Server.Select the LDAP directory that you configured with the Lotus Sametime SystemConsole guided activity, and then click Next.
7. Deployment Summary.Review the summary screen, and then click Finish.The deployment plan is ready to be used for the server installation. If you needto make any changes, click Modify an Existing Deployment Plan and updatethe plan. All changes must be made prior to running installation.
What to do next
“Installing a meeting server on AIX, Linux, Solaris, or Windows”
Installing a meeting server on AIX, Linux, Solaris, or WindowsRun the installation program on the machine where you plan to install a LotusSametime Meeting Server.
Before you begin
You should have already created a deployment plan for the Lotus SametimeMeeting Server and started the Lotus Sametime System Console server. If you arelogged into the Sametime System Console, log out and close the browser beforecontinuing.
AIX, Linux, and Solaris: The launchpad install program needs to be able to launcha Web browser to start. You will need to be on the console or have an X server anda Web browser installed and configured. (VNC or a remote X term session willwork as well).
About this task
By using the deployment plan you created earlier, you have fewer selections tomake when you run the installation program.1. (Linux RHEL only) Disable SELinux on any RedHat operating system:
Chapter 3. Installing 119
a. Log in as root on the Linux RedHat server where you will install the LotusSametime server.
b. Open the /etc/selinux/config file for editing.c. Locate the SELINUX setting. Change its value to either disable or
permissive.d. Save and close the file.e. Restart the Linux server.
2. Log in to your computer as the system administrator (Microsoft Windows) oras root (IBM AIX, Linux, Solaris).Solaris only: Solaris installs must be performed by the root user using su or anormal login session. Third-party sudo packages are not supported on Solaris.
3. Download the Meeting Server installation package if you have not alreadydone so.a. To download installation packages, you must have an IBM Passport
Advantage account, which is described at the following Web address:www.ibm.com/software/howtobuy/passportadvantage/paocustomer/docs/en_US/ecare.html
b. Open this release’s Download document at the following Web address:http://www.ibm.com/support/docview.wss?rs=477&uid=24024322
Locate the components you need in the document’s listing, then downloadthe packages labelled with the corresponding part numbers to the systemon which you are installing.
c. Extract the files to a local directory.d. Verify that you have at least 1 GB of temporary space to run the
installation in your %TEMP% or /tmp directory.4. Navigate to the folder where you stored the downloaded files for Lotus
Sametime and start the installation program by running one of the followingcommands from the disk 1 folder:AIX, Linux, Solaris
./launchpad.shWindows
launchpad.exe5. If necessary, select a language other than English from the ″Select a language″
dropdown list.6. Click Install IBM Lotus Sametime Meeting Server and click Launch IBM
Lotus Sametime Meeting Server 8.5 installation.7. Select the version you want to install and click Next.8. At the Licenses screen, click the I accept the terms in the license agreements
option and click Next.9. Select a package group option and accept the installation directory. Then click
Next.Select Create a new package group if you have not installed any otherSametime software on this machine.Leave Use the existing package group selected if you are installing severalSametime servers on the same machine.
10. Select IBM Lotus Sametime Meeting Server 8.5.0 as the feature to install andselect Use Lotus Sametime System Console to install. Click Next.
11. At the Common Configurations screen, supply values for connecting to theLotus Sametime System Console.
120 Lotus Sametime: Installation and Administration Guide Part 1
v Host Name: Provide the fully qualified domain name in the Host Namefield for the Lotus Sametime System Console. The host name wasdetermined when you installed the Lotus Sametime System Console.
v Use SSL: Leave this option selected to run the server over a secureconnection.
v HTTPs Port: Leave 9443 as the default value.v User ID and password: Provide the WebSphere Application Server User ID
and password that you created when you installed the Lotus SametimeSystem Console.
12. Provide the host name for the machine you are currently using, which is thesame name you used when you created the deployment plan for thisinstallation.Do not use an IP address or short host name.
13. Click Validate to log in to the Lotus Sametime System Console.The button name changes to Validated after you log in.
14. When you are logged in, click Next.15. Select the Lotus Sametime Meeting Server deployment plan you created
earlier with the Lotus Sametime System Console guided activity. Then clickNext.
16. Review the deployment settings, then click Next.17. At the summary panel, review the settings, then click Install to start the
installation.18. Click Finish when the installation process is complete.19. Click Exit to close the Installation Manager.
Results
If the installation was not successful, look at the installation logs for moreinformation about what occurred during the installation attempt. Fix any problems,then uninstall all components and reinstall. Find information in the logs directoryand the ant and native subdirectories.
AIX, Linux, or Solaris
/var/ibm/InstallationManager/logs
SSC connection log: /tmp/SSCLogs/ConsoleUtility.log.0
Windows 2008%ALLUSERSPROFILE%\IBM\Installation Manager\logs
Windows 2003%ALLUSERSPROFILE%\Application Data\IBM\Installation Manager\logs
SSC connection log:
Documents and Settings\username\Local Settings\Temp\SSCLogs\ConsoleUtility.log.0
Chapter 3. Installing 121
What to do nextRelated tasks
“Starting and stopping servers running on WebSphere Application Server” on page230Starting and stopping IBM Lotus Sametime servers that run on WebSphereApplication Server involves other server components such as the DeploymentManager and the node agent.“Uninstalling DB2 and Sametime software with the Installation Manager” on page243Use the Installation Manager to uninstall the following components that arepackaged with Lotus Sametime: IBM DB2 for Linux and Windows, Lotus SametimeSystem Console, Lotus Sametime Proxy Server, Lotus Sametime Meeting Server,and Lotus Sametime Media Manager.
Verifying a meeting server installation:
Log in to the Lotus Sametime Meeting Server to verify that the installation wassuccessful.
About this task
Verify the installation by logging in to the server and creating a new meetingroom.1. From a Web browser, navigate to the Meeting Room Center by entering the
following URL:http://serverhostname.domain:port/stmeetings
Replace serverhostname.domain with the fully qualified domain name of theMeeting server; for example:
Tip: To verify the HTTP port number being used by the Lotus SametimeMeeting Server, open the AboutThisProfile.txt file for the Sametime MeetingApplication Server Profile and use the setting specified for the HTTP transportport. The default profile name is STMAppProfile. On IBM i, look for theAboutThisProfile.txt file in the following location: /QIBM/UserData/Websphere/AppServer/V7/SametimeWAS/profiles/STMAppProfile/logs/AboutThisProfile.txt
http://st85ms1.acme.com:9080/stmeetings
Note: By default, the WebSphere proxy listens on port 80, and forwards to theLotus Sametime Meeting Server on port 9080.
2. Click Log In and then enter your User name and Password to log in to theMeeting Center.
3. Click New Meeting Room, then fill in the fields and click Save.4. The new meeting appears in the list of meetings that you own. Click Enter
Meeting Room below the name of the new meeting to join the meeting.
Installing a Lotus Sametime Gateway serverPlan a deployment and install IBM DB2 and then one or more Lotus SametimeGateway servers.
Creating a DB2 database for Windows, Linux, AIX, and SolarisCreate the database tables and schema needed by Lotus Sametime Gateway. Thesesteps assume that you already have installed DB2 on the same machine on which
122 Lotus Sametime: Installation and Administration Guide Part 1
you are now creating the database. If the machine on which you installed DB2 isnamed STGW, follow the steps in this procedure to change the name of the databasein the database creation script. The default database name, STGW, cannot be themachine name.
Before you begin
The Lotus Sametime Gateway installation package includes a database creationscript, which creates the database. Follow the steps below to unpack theinstallation compressed file and extract the contents before you run the script.
Expected state: DB2 is installed and running.1. From the installation media, copy the Lotus Sametime Gateway installation
image for your operating system to a temporary directory on the DB2 servernode:The part numbers for each product are available in the Lotus SametimeDownload document.v Windows:
\TMP\SametimeGateway\part_number.exe
v Linux, AIX, or Solaris:/TMP/SametimeGateway/part_number.tar
2. Open a command window and navigate to the temporary directory.3. Unzip the installation image to the /TMP/SametimeGateway folder.4. Log in to the operating system using the DB2 administrator account created
when you installed DB2.5. On the node where you will be creating the database Lotus Sametime Gateway,
open a command window and type one of the following commands:v Windows:
db2cmd
v Linux or AIX:. /db2adminHomeDir/sqllib/db2profile
Note the period (.) and space before /db2adminHomeDir/sqllib/db2profile.v Solaris:
. /db2adminHomeDir/sqllib/db2profile
6. If the host name on which you installed DB2 is named STGW, or if you need tochange the database name to something other than STGW, or if your databaseadministrator wishes to specify tablespace options, complete the following substeps, otherwise skip this step.a. Using a text editor, open createDb.sql.b. Replace every instance of stGW with a new database name that is eight
characters or less.c. If desired, you may edit the tablespace file locations for your specific
environment to be somewhere other than the default location.d. Save the file.
7. In the DB2 window, navigate to this directory:\TMP\SametimeGateway\database\db2
8. Type the following command to create the database:db2 -tvf createDb.sql > createDbOut.txt
Chapter 3. Installing 123
If you edited the createDb.sql file, inspect the createDbOut.txt file to be surethat all commands executed correctly.
9. Stop and then restart the database using the following commands:a. db2stopb. db2start
Installing Sametime GatewayInstall an IBM Lotus Sametime Gateway server. This section provides proceduresfor installing a single server and installing a cluster of servers. When installing acluster, you install a primary server, a Deployment Manager server, and at leastone additional server on its own machine. You can install the primary server andDeployment Manager on the same machine, or each on its own machine.
Before you begin
The fully qualified domain name of the Lotus Sametime Gateway server must beexternally resolvable by the domain name server, and must not be set in the″hosts″ file. Verify that this is true before installing the Lotus Sametime Gateway.
About this task
Unlike other Lotus Sametime components, the Lotus Sametime Gateway does notinstall with a deployment plan created on the Lotus Sametime System Console.Instead, you enter required information as you proceed through the installationprogram. Once the installation is complete, you will register the Gateway with theLotus Sametime System Console; from then on, you will administer the Gatewayserver from the System Console, just like all the other Lotus Sametimecomponents.
Installing a single Gateway server:
Choose to install a single Sametime Gateway server on Windows, AIX, Linux,Solaris, or IBM i.
Installing a single server on Windows:
Complete these steps to install Lotus Sametime Gateway as a single server onWindows, to create an administrative user ID for WebSphere Application Server,and to connect to an LDAP server. This installation program installs WebSphereApplication Server and Lotus Sametime Gateway. If you need to install anadditional Lotus Sametime Gateway server later, follow the procedure for installingservers in a cluster.
Before you begin
Expected state: DB2 is installed. The DB2 database is created and DB2 is running.
Information on downloading packages for Lotus Sametime is located at:www.ibm.com/support/docview.wss?rs=477&uid=swg24024322
1. Log in as the Windows administrator on the server where you will installLotus Sametime Gateway.
2. Create the temporary file folder \TMP\WASCD.3. From the installation media, copy the WebSphere Application Server
installation image part_number.exe to the folder \TMP\WASCD.
124 Lotus Sametime: Installation and Administration Guide Part 1
4. Open a command window and navigate to the folder \TMP\WASCD.5. Extract all files to the temporary directory \TMP\WASCD. When you are done
extracting the files, you should have a \TMP\WASCD\ifpackage folder with WASand JDK folders inside the ifpackage folder.
6. From the installation media, copy the Sametime Gateway installation imagepart_number.exe to the \TMP folder.
7. Extract the files in part_number.exe. This step creates the folder\TMP\SametimeGateway.
8. Navigate to the \TMP\SametimeGateway folder containing the extracted files.9. Open a command window and type the following command:
v For wizard mode: install.batv For console mode: install.bat -console
Attention: If one or more of the DNS addresses in your environment (forexample: WebSphere Application Server installation host name, DB2 hostname, or LDAP host name) refers to an IPv6–format address, add thefollowing option to your install command to work around an IPv6–relatedissue with the installer:install.bat -V BypassWasInfoCheck=true
Because your input will not be verified during installation, you should takeextra care when typing values.
10. Select the language for the installation wizard and click OK. The LotusSametime Gateway Welcome screen is displayed. You can launch theSametime information center from this panel.
11. Click Next to continue with the installation. The Software License Agreementdialog is displayed. Read the license agreement carefully. Select theappropriate radio button option to accept the terms if you agree with thestatement and click Next to proceed with the installation.
12. Select Standalone server and then click Next.13. Type or click Browse to select the path to where you extracted the WebSphere
Application Server installation files from the CD. Do not use quotation marks.This directory should contain the WAS and JDK subdirectories. It is veryimportant that you select the parent directory and not the subdirectory. Forexample: use C:\TMP\WASCD\ifpackage but do not use C:\TMP\WASCD\ifpackage\WAS or C:\TMP\WASCD\ifpackage\JDK.
14. Click Next to see the default directory path where WebSphere ApplicationServer will be installed is displayed. To change the installation location ofWebSphere Application Server, click Browse and select a desired location, ortype a new path.
15. Click Next to see node, cell, and host name profile information provided bythe installer. If the supplied information is correct, click Next.
Option Description
Node Logical name for the node. For example,acmeNode.
Cell Name for the cell. Every WebSphereApplication Server is created on a nodeinside a cell. A cell is a collection of nodesfor administration and workloadmanagement. For example, acmeCell.
Chapter 3. Installing 125
Option Description
Host name Fully qualified domain name of the machineon which you are installing WebSphereApplication Server. For example:server1.acme.comNote: If the server where you are installinghas multiple NICs/IPs/DNS names, or formore information about considerations inchoosing a host name, read the section ″Hostname considerations″ in the WebSphereApplication Server information center topic,Creating an application server profile.
16. Create a user ID and password to log in to the Integrated Solutions Console,the administrative interface for managing Lotus Sametime Gateway. The userID must not exist in the LDAP directory. Passwords must not contain accentedcharacters or any of the following characters:;*!?"/<>|+&'`[]%^
17. Click Next to see the default directory path where Lotus Sametime Gatewaywill be installed. To change the location, click Browse and select a desiredlocation, or type a new path.
18. Click Next to enter database properties.
Option Description
Host name Fully qualified host name or TCP/IPaddress of the database server.
Port Port number on the database server.
Database name The name of the database that you created.If you used the default database name, typeSTGW. Case does not matter.
Application user ID A database user ID that has permission toconnect to the database and read or writerecords. The application user ID is often thesame as the schema owner user ID.
Application password The password for the application user. Theapplication password is often the same asthe schema owner password.
Schema user ID The ID for the user that has appropriatepermissions to create tables in the database.You may need to get this information fromthe database administrator. The schema userID is often the same as the application userID.
Schema password The password for the schema owner. Youmay need to get this information from thedatabase administrator. The schemapassword is often the same as theapplication password.
19. Click Next to connect to an LDAP server at this time. The LDAP server mustbe the same LDAP used by Lotus Sametime.
126 Lotus Sametime: Installation and Administration Guide Part 1
Option Description
Configure LDAP now Select if you want to set up a connectionbetween Sametime Gateway and LDAP thatdoes not need an SSL connection. You willneed to know the host name and port of theLDAP server.
Configure LDAP after the installation Select this option if you need to set up anSSL connection with LDAP, or if you do notknow the host name and port number usedby LDAP. If you are installing LotusSametime Gateway outside the firewall andthe LDAP directory is located inside thefirewall, choose this option and skip to step23.
20. Select an LDAP host name from list of Registered host names and ports inyour domain, or select Other and enter a host name or IP address in the Hostname field. The default port number is 389. Click Next.
21. If anonymous access is successful to the LDAP host name, you may have theoption of continuing with anonymous access or changing the access toauthenticated access. If anonymous access is not permitted, you will not havethis option because you must supply a bind distinguished name andpassword.
Option Description
Anonymous access Select this option if you don’t needauthenticated access to the LDAP server.Lotus Sametime Gateway only requiresanonymous access to an LDAP server.
Authenticated access Select this option if your LDAP serverrequires authenticated access. You mustprovide an authentication identity, includinga bind distinguished name and passwordfrom the LDAP administrator.
22. Enter the Bind distinguished name (DN) and Bind password. The binddistinguished name can be any user with read permission for the directoryserver. The bind DN need not be the LDAP administrator. For example:v Bind distinguished name:
uid=ldapadmin,cn=users,l=shipley,st=kansas,c=us,ou=acme,o=medical,DC=ACME,DC=COM
v Bind password:C@pital1
23. Click Next. Choose a base distinguished name from the list of Suggested basedistinguished names in your LDAP or enter a base DN in the Basedistinguished name field. The base distinguished name indicates the startingpoint for LDAP searches of the directory service. For example, for the binddistinguished name given as an example in the previous step, you can specifythe base DN as: DC=ACME,DC=COM. For authorization purposes, this field is casesensitive. This panel is not shown if you are connecting to Domino LDAP.
24. Click Next to see the Lotus Sametime Gateway installation summary. You canreview the installation summary settings and, if necessary, click Back to makechanges.
25. Click Install to begin copying files. A progress bar is displayed and theactivity is logged to the Lotus Sametime Gateway log file. This installation
Chapter 3. Installing 127
takes about 10 minutes to complete. When the installation is complete, thewizard displays a message indicating a successful installation.
26. Read the summary and click Finish. To view the installation log, click Viewlog file or open the log file at stgw_server_root\logs\installlog.txt.
Installing a single server on AIX, Linux, or Solaris:
Complete these steps to install a single Lotus Sametime Gateway server on an AIX,Linux, or a Solaris machine, to create an administrative user ID for WebSphereApplication Server, and to connect to an LDAP server. This installation requiresinstalling the WebSphere Application Server Network Deployment edition, even ifyou are installing a single server. If you need to create a cluster of Lotus SametimeGateway servers later, follow the procedure for installing a cluster of servers usingthe wizard.
Before you begin
Expected state: DB2 or the DBMS Administration Client is installed. The DB2database is created and DB2 is running.
Information on downloading packages for Lotus Sametime is located at thefollowing Web address:http://www.ibm.com/support/docview.wss?rs=477&uid=swg24024322
About this task
The Lotus Sametime Gateway install wizard deploys both the WebSphereApplication Server and the Lotus Sametime Gateway server application in oneinstallation.1. Log in as root on the server where you will install Lotus Sametime Gateway.2. (Linux RHEL only) Disable SELinux on any RedHat operating system:
a. Open the /etc/selinux/config file for editing.b. Locate the SELINUX setting.c. Change its value to either disable or permissive.d. Save and close the file.e. Restart the Linux server.
3. Create the temporary file folder /TMP/WASCD.4. From the installation media, copy the WebSphere Application Server
installation image for your operating system to /TMP/WASCD.5. Open a command window and navigate to the directory /TMP/WASCD.6. Run the following command to uncompress the files:
gunzip -c part_number.tar.gz | tar -xvf -
When you are done extracting the files, you should have the following folder:/TMP/WASCD/ifpackage
Verify that you have WAS and JDK folders inside the ifpackage folder.7. From the installation media, copy the Lotus Sametime Gateway installation
image part_number.tar to the temporary directory /TMP.8. Navigate to the /TMP directory and uncompress the following file:
unzip part_number.tar
128 Lotus Sametime: Installation and Administration Guide Part 1
When you are done, you have the folder /TMP/SametimeGateway
9. You can run the installer in wizard mode or in console mode. Use the wizardmode if you are installing from a PC to the IBM i system.v To run the installer in wizard mode, type the following command:
installi5OS.bat
Attention: If one or more of the DNS addresses in your environment (forexample: WebSphere Application Server installation host name, DB2 hostname, or LDAP host name) refers to an IPv6–format address, add thefollowing option to your install command to work around an IPv6–relatedissue with the installer:installi5OS.bat -V BypassWasInfoCheck=true
Because your input will not be verified during installation, you should takeextra care when typing values.
v To run the installer in console mode, perform these steps:a. Copy the directory /TMP/SametimeGateway to the IFS of the IBM i system.b. Start a QSHELL session.c. Navigate to the /TMP/SametimeGateway directory and type the following
command:install.sh -console
Attention: If one or more of the DNS addresses in your environment(for example: WebSphere Application Server installation host name, DB2host name, or LDAP host name) refers to an IPv6–format address, addthe following option to your install command to work around anIPv6–related issue with the installer:install.sh -console -V BypassWasInfoCheck=true
Because your input will not be verified during installation, you shouldtake extra care when typing values.
10. Select the language to be used for the installation and click OK. The LotusSametime Gateway Welcome screen is displayed.
11. Click Next to continue with the installation. The Software License Agreementdialog is displayed. Read the license agreement carefully. Select theappropriate radio button option to accept the terms if you agree with thestatement and click Next to proceed with the installation.
12. Select Standalone server, and then click Next.13. Type or click Browse to select the path to where you extracted the WebSphere
Application Server installation files from the CD. This directory shouldcontain the WAS and JDK subdirectories. It is very important that you selectthe parent directory and not the subdirectory. For example: use/TMP/WASCD/ifpackage but do not use /TMP/WASCD/ifpackage/WAS or/TMP/WASCD/ifpackage/JDK.
14. Click Next to see the default directory path where WebSphere ApplicationServer will be installed is displayed. To change the installation location ofWebSphere Application Server, click Browse and select a desired location, ortype a new path.
15. Click Next to see node, cell, and host name profile information provided bythe installer. If the supplied information is correct, click Next.
Chapter 3. Installing 129
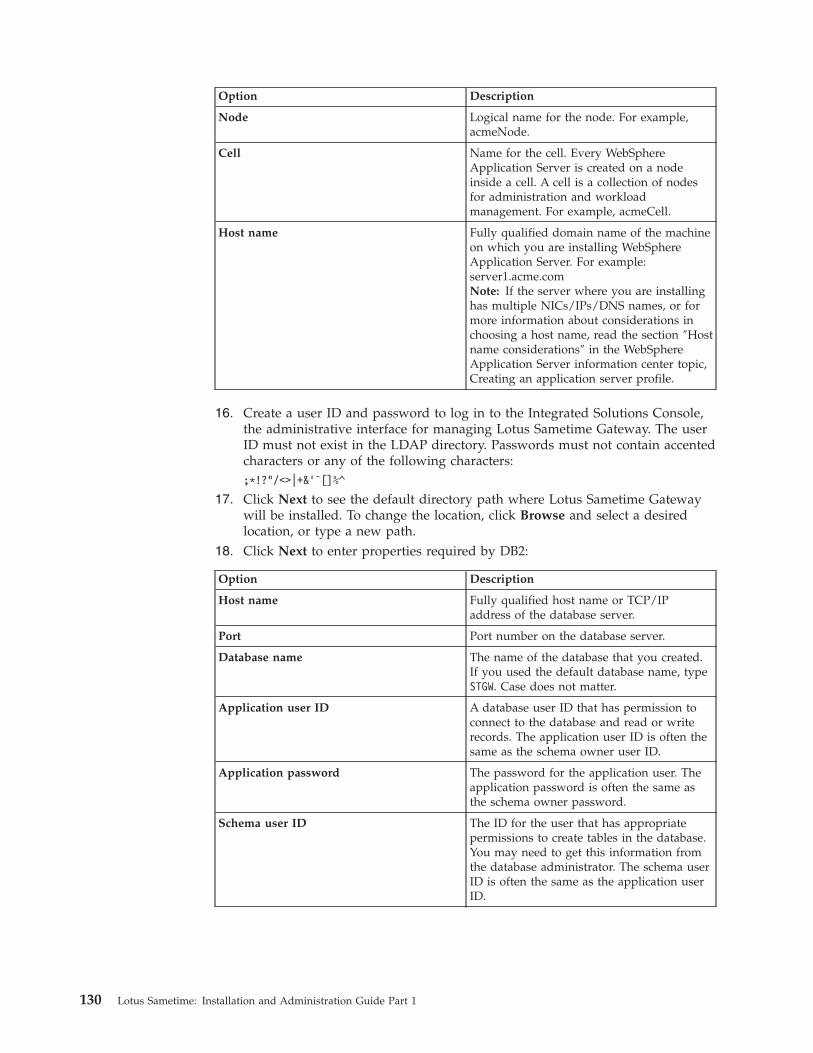
Option Description
Node Logical name for the node. For example,acmeNode.
Cell Name for the cell. Every WebSphereApplication Server is created on a nodeinside a cell. A cell is a collection of nodesfor administration and workloadmanagement. For example, acmeCell.
Host name Fully qualified domain name of the machineon which you are installing WebSphereApplication Server. For example:server1.acme.comNote: If the server where you are installinghas multiple NICs/IPs/DNS names, or formore information about considerations inchoosing a host name, read the section ″Hostname considerations″ in the WebSphereApplication Server information center topic,Creating an application server profile.
16. Create a user ID and password to log in to the Integrated Solutions Console,the administrative interface for managing Lotus Sametime Gateway. The userID must not exist in the LDAP directory. Passwords must not contain accentedcharacters or any of the following characters:;*!?"/<>|+&'`[]%^
17. Click Next to see the default directory path where Lotus Sametime Gatewaywill be installed. To change the location, click Browse and select a desiredlocation, or type a new path.
18. Click Next to enter properties required by DB2:
Option Description
Host name Fully qualified host name or TCP/IPaddress of the database server.
Port Port number on the database server.
Database name The name of the database that you created.If you used the default database name, typeSTGW. Case does not matter.
Application user ID A database user ID that has permission toconnect to the database and read or writerecords. The application user ID is often thesame as the schema owner user ID.
Application password The password for the application user. Theapplication password is often the same asthe schema owner password.
Schema user ID The ID for the user that has appropriatepermissions to create tables in the database.You may need to get this information fromthe database administrator. The schema userID is often the same as the application userID.
130 Lotus Sametime: Installation and Administration Guide Part 1
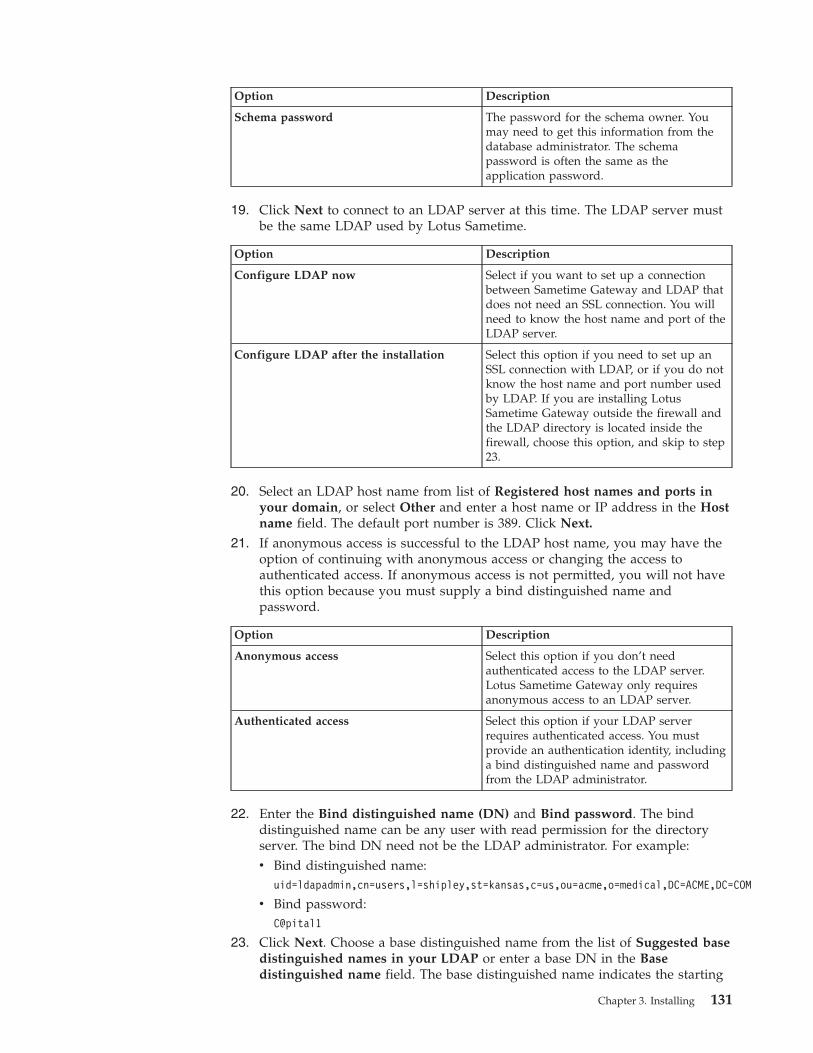
Option Description
Schema password The password for the schema owner. Youmay need to get this information from thedatabase administrator. The schemapassword is often the same as theapplication password.
19. Click Next to connect to an LDAP server at this time. The LDAP server mustbe the same LDAP used by Lotus Sametime.
Option Description
Configure LDAP now Select if you want to set up a connectionbetween Sametime Gateway and LDAP thatdoes not need an SSL connection. You willneed to know the host name and port of theLDAP server.
Configure LDAP after the installation Select this option if you need to set up anSSL connection with LDAP, or if you do notknow the host name and port number usedby LDAP. If you are installing LotusSametime Gateway outside the firewall andthe LDAP directory is located inside thefirewall, choose this option, and skip to step23.
20. Select an LDAP host name from list of Registered host names and ports inyour domain, or select Other and enter a host name or IP address in the Hostname field. The default port number is 389. Click Next.
21. If anonymous access is successful to the LDAP host name, you may have theoption of continuing with anonymous access or changing the access toauthenticated access. If anonymous access is not permitted, you will not havethis option because you must supply a bind distinguished name andpassword.
Option Description
Anonymous access Select this option if you don’t needauthenticated access to the LDAP server.Lotus Sametime Gateway only requiresanonymous access to an LDAP server.
Authenticated access Select this option if your LDAP serverrequires authenticated access. You mustprovide an authentication identity, includinga bind distinguished name and passwordfrom the LDAP administrator.
22. Enter the Bind distinguished name (DN) and Bind password. The binddistinguished name can be any user with read permission for the directoryserver. The bind DN need not be the LDAP administrator. For example:v Bind distinguished name:
uid=ldapadmin,cn=users,l=shipley,st=kansas,c=us,ou=acme,o=medical,DC=ACME,DC=COM
v Bind password:C@pital1
23. Click Next. Choose a base distinguished name from the list of Suggested basedistinguished names in your LDAP or enter a base DN in the Basedistinguished name field. The base distinguished name indicates the starting
Chapter 3. Installing 131
point for LDAP searches of the directory service. For example, for the binddistinguished name given as an example in the previous step, you can specifythe base DN as: DC=ACME,DC=COM. For authorization purposes, this field is casesensitive. This panel is not shown if you are connecting to Domino LDAP.
24. Click Next to see the Lotus Sametime Gateway installation summary. You canreview the installation summary settings and, if necessary, click Back to makechanges.
25. Click Install to begin copying files. A progress bar is displayed and theactivity is logged to the Lotus Sametime Gateway log file. This installationtakes about 10 minutes to complete. When the installation is complete, thewizard displays a message indicating a successful installation.
26. Read the summary and click Finish. To view the installation log, click Viewlog file or open the log file at stgw_server_root/logs/installlog.txt
Managing trusted IP addresses:
Whenever you install a server that communicates with an IBM Lotus SametimeCommunity Server, you must add the new server’s IP address to the CommunityServer’s settings.
About this task
The Lotus Sametime Community Server accepts connections from the LotusSametime Media Manager, the Lotus Sametime Gateway, the Lotus SametimeCommunity Mux, and the Lotus Sametime Proxy Server, as well as other serversthat are listed in the Community Services page. To ensure that the Lotus SametimeCommunity Server trusts these components when they establish a connection, youmust add the trusted server’s IP address to the Lotus Sametime CommunityServer.
You do not need to add the Lotus Sametime System Console’s IP address becauseit is added automatically when you install the Lotus Sametime Community Serverusing a deployment plan or register the Lotus Sametime Community Server withthe console after installation.
This task must be completed separately for each server within a Lotus SametimeCommunity Server cluster, as well as for multiple non-clustered CommunityServers.1. Log in to the Integrated Solutions Console.2. Click Sametime System Console → Sametime Servers → Sametime Community
Servers.3. In the Sametime Community Servers list, click the deployment name of the
server with the list of trusted IP addresses that you want to change.4. Click the Connectivity tab.5. Under Trusted Servers, enter the IP address of the server that must connect to
the Lotus Sametime Community Server in the New IP Address field, and clickAdd.
Note: For the Lotus Sametime Media Manager, enter the Conference Managerserver IP address. Each instance of a Conference Manager cluster must beentered.To delete an IP address from the list, select it and click Delete Selected.
6. Click OK.
132 Lotus Sametime: Installation and Administration Guide Part 1
7. Restart the Lotus Sametime Community Server for the change to take effect.
Starting a single server:
This section explains how to start a standalone Lotus Sametime Gateway server.Skip these steps if you are setting up a cluster.
About this task
Single server configurations must have the Lotus Sametime Gateway serverrunning to access the Integrated Solutions Console, while a Lotus SametimeGateway cluster must have the Deployment Manager running to access theIntegrated Solutions Console. Do not start Lotus Sametime Gateway at this time ifyou are creating a cluster of Lotus Sametime Gateway servers.1. Log in to the server machine as a user with administrative privileges.2. Navigate to the Lotus Sametime Gateway profile directory that contains
binaries: stgw_profile_root\bin3. Type the following command to start Lotus Sametime Gateway. Note that
RTCGWServer is case-sensitive.AIX, Linux, and Solaris./startServer.sh RTCGWServer
WindowsstartServer.bat RTCGWServer
IBM istartServer RTCGWServer
Connecting to a DB2 database:
Use the Lotus Sametime System Console to connect to the Lotus Sametime MeetingServer or Lotus Sametime Gateway database before installing the server from theSystem Console. If you installed the server without using the System Console (as isthe case with the Sametime Meeting Server on IBM i and Sametime Gateway onany platform), do this step before registering the server with the System Console.
Before you begin
Start the Lotus Sametime System Console if it is not already running.
About this task
If you have not already opened the Connect to DB2 Databases activity, follow thesesteps:1. From a browser, enter the following URL, replacing serverhostname.domain with
the fully qualified domain name of the Lotus Sametime System Console server.http://serverhostname.domain:8700/ibm/console
IBM i: The port number may not be 8700. Use the port that was listed in theSametime System Console installation results summary or use the settingspecified for the Administrative console secure port in the AboutThisProfile.txtfile. For the Sametime System Console Deployment Manager Profile(STSCDmgrProfile), the file is located in the following path:/QIBM/UserData/Websphere/AppServer/V7/SametimeWAS/profiles/STSCDmgrProfile/logs/AboutThisProfile.txt
Chapter 3. Installing 133
2. Enter the WebSphere Application Server User ID and password that youcreated when you installed the Lotus Sametime System Console.
3. Click the Sametime System Console task to open it in the navigation tree.4. Click Sametime Prerequisites → Connect to DB2 Databases.Related tasks
“Starting the Lotus Sametime System Console” on page 231When started, the Lotus Sametime System Console runs as a task in the WebSphereApplication Server administrative console.
Sametime prerequisite: Connecting to a DB2 database:
This activity takes you through the steps for connecting to the Meeting Server orGateway database you created.
Before you begin
AIX, Linux, Solaris, Windows: Ensure that IBM DB2 has been installed and thatyou have created the Sametime Meeting Server or Gateway database.
IBM i: Ensure that you have created the required database schemas and tables.
In the Connect to DB2 Databases portlet, verify that the Lotus Sametime SystemConsole database you created earlier is already displayed in the list of databases.
About this task
Follow these steps to connect to the Meeting Server or Gateway database. Youmust do this before you can install the Meeting Server using the Sametime SystemConsole. If you installed the server without using the System Console (as is thecase with the Sametime Meeting Server on IBM i and Sametime Gateway on anyplatform), do this step before registering the server with the System Console.1. DB2 Configuration Guided Activity.
Click Add to begin the guided activity that will connect your server to the DB2database. If a connection already exists, you can optionally edit or delete it.
2. Add a new database.a. In the Connect to DB2 Databases portlet, click Add.
If you want to edit or delete a database instead, then select one, and clickthe appropriate button.
b. Enter the fully qualified host name of the DB2 server in the Host namefield.Do not enter an IP address or a short host name.
c. The Port field shows the default port of 50000. Accept the default unlessyou specified a different port during DB2 installation or your server is usinga different port.Linux: The default is typically 50001, but will vary based on portavailability. Check the /etc/services file on the DB2 server to verify theport number being used.
d. In the Database name, field, enter the name of the database you want toconnect to.Meeting Server database
On AIX, Linux, Solaris, and Windows, the database name is STMS unlessyou changed it.
134 Lotus Sametime: Installation and Administration Guide Part 1
On IBM i, the name is always STMS.Gateway database
For AIX, Linux, Solaris, and Windows, the database name is STGWDBunless you changed it.For IBM i, use the name you specified when creating the database schemas.
e. In the Application user ID field, supply the DB2 application’sadministrative user name that you created when you installed DB2, such asdb2admin. This user has database administration authority and you will usethis user ID and password whenever you work with DB2 databases forLotus Sametime. On IBM i, this is the user profile you specified as theowner of the Meeting Server database schemas in your copy of thestms.default.response.properties file or the user profile you logged in withwhen you created the Gateway database schemas.
f. In the Application password field, enter the password for the DB2administrative user ID.
g. If you are connecting to a database on an IBM i server, click Hosted onIBM i.
h. Click Finish.
Registering a new Gateway server with the System Console:
After installing an IBM Lotus Sametime Gateway server on IBM AIX, Linux, SunSolaris, or Microsoft Windows, register it with the Lotus Sametime System Console,so you can manage all of the Lotus Sametime servers from a central location.
Before you begin
Before you register the server, verify that you have completed the following tasks,which are described in the Installing on AIX, Linux, Solaris, and Windows sectionof this information center.v The Lotus Sametime System Console must be started.v The LDAP server must be connected to the System Console and must be started.v The Gateway database must be connected to the System Console and must be
started.v The Community Server that the Gateway server connects to must already be
registered with the Console and must be started.
About this task
Working from the server that you want to connect to the console, follow thesesteps to update properties files and run the registration utility.
During this task you will edit the following files; click the topic titles below to seedetails on each file. Use Ctrl+Click to open the topic in a new browser tab orwindow so you can keep it open for reference:v console.properties
v productConfig.properties
1. On the Lotus Sametime Gateway server, navigate to the stgw_server_root/IBM/WebSphere/STgateway/console directory.
2. Make backup copies (using different names) of the console.properties andproductConfig.properties files.
Chapter 3. Installing 135
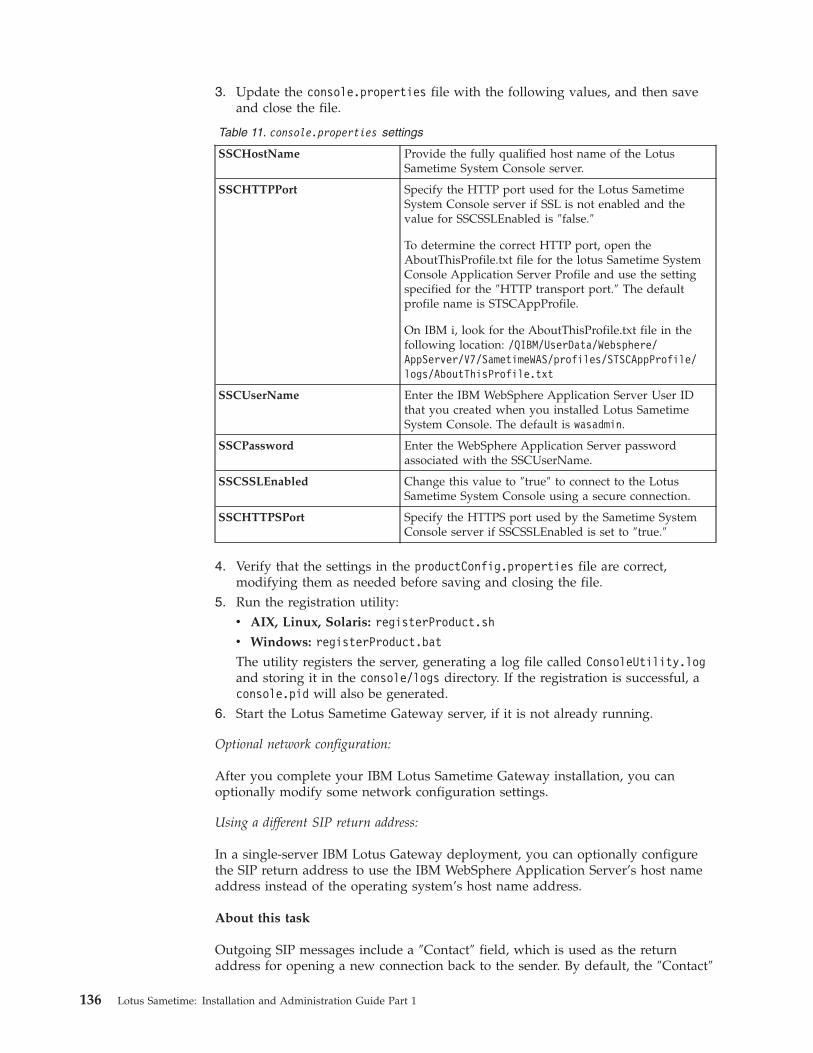
3. Update the console.properties file with the following values, and then saveand close the file.
Table 11. console.properties settings
SSCHostName Provide the fully qualified host name of the LotusSametime System Console server.
SSCHTTPPort Specify the HTTP port used for the Lotus SametimeSystem Console server if SSL is not enabled and thevalue for SSCSSLEnabled is ″false.″
To determine the correct HTTP port, open theAboutThisProfile.txt file for the lotus Sametime SystemConsole Application Server Profile and use the settingspecified for the ″HTTP transport port.″ The defaultprofile name is STSCAppProfile.
On IBM i, look for the AboutThisProfile.txt file in thefollowing location: /QIBM/UserData/Websphere/AppServer/V7/SametimeWAS/profiles/STSCAppProfile/logs/AboutThisProfile.txt
SSCUserName Enter the IBM WebSphere Application Server User IDthat you created when you installed Lotus SametimeSystem Console. The default is wasadmin.
SSCPassword Enter the WebSphere Application Server passwordassociated with the SSCUserName.
SSCSSLEnabled Change this value to ″true″ to connect to the LotusSametime System Console using a secure connection.
SSCHTTPSPort Specify the HTTPS port used by the Sametime SystemConsole server if SSCSSLEnabled is set to ″true.″
4. Verify that the settings in the productConfig.properties file are correct,modifying them as needed before saving and closing the file.
5. Run the registration utility:v AIX, Linux, Solaris: registerProduct.sh
v Windows: registerProduct.bat
The utility registers the server, generating a log file called ConsoleUtility.logand storing it in the console/logs directory. If the registration is successful, aconsole.pid will also be generated.
6. Start the Lotus Sametime Gateway server, if it is not already running.
Optional network configuration:
After you complete your IBM Lotus Sametime Gateway installation, you canoptionally modify some network configuration settings.
Using a different SIP return address:
In a single-server IBM Lotus Gateway deployment, you can optionally configurethe SIP return address to use the IBM WebSphere Application Server’s host nameaddress instead of the operating system’s host name address.
About this task
Outgoing SIP messages include a ″Contact″ field, which is used as the returnaddress for opening a new connection back to the sender. By default, the ″Contact″
136 Lotus Sametime: Installation and Administration Guide Part 1
value uses the operating system’s own host name address. If you wish, you canassign the WebSphere Application Server’s host name address to this value instead.If you do this, WebSphere Application Server stops listening for SIP messages onall of the available operating system interfaces, and instead listens only on theinterface described by the new return address (its own host name address).
Specifying a different SIP return address is an optional procedure, and applies toonly single-server installations (clustered installations already use the WebSphereApplication Server’s host name address as the SIP return address).1. Log into Integrated Solutions Console.2. Click Servers → Application servers.3. Click RTGWServer.4. Under ″Communications″, click Ports.5. Click SIP_DEFAULTHOST.6. In the Host field, type the WebSphere Application Server installation’s host
name address, and then click OK.Specify a fully qualified domain name in this field; for example:server1.acme.com
Use the name you specified as the host name when you installed this LotusSametime Gateway server.
7. Click SIP_DEFAULTHOST_SECURE.8. In the Host field, type the WebSphere Application Server installation’s host
name address, and then click OK.Specify a fully qualified domain name in this field; for example:server1.acme.com
Use the name you specified as the host name when you installed this LotusSametime Gateway server.
9. Restart the Lotus Sametime Gateway server.
Configuring network interface cards to simulate a NAT:
This optional procedure describes how to you can simulate a Network AddressTranslator (NAT) to provide additional security by using two Network InterfaceCards (NICs), one for an internal IP address facing the Sametime communityserver, and the other for an external IP address facing the Internet. This procedureapplies to standalone Sametime Gateway deployments only. If you use thisconfiguration, you must update the default host using the Integrated SolutionsConsole.
Before you begin
The procedure applies to single server installations only. If you have a cluster ofSametime Gateway servers, and you want to set up two Network Interface Cards,install the NICs on the proxy server node in the cluster. The proxy server node issmart enough to handle incoming and outgoing addresses on two different IPaddresses without additional configuration.
About this task
Perform these steps to configure multiple NIC support in a single serverinstallation. When Sametime Gateway has two IP addresses, one external facing
Chapter 3. Installing 137
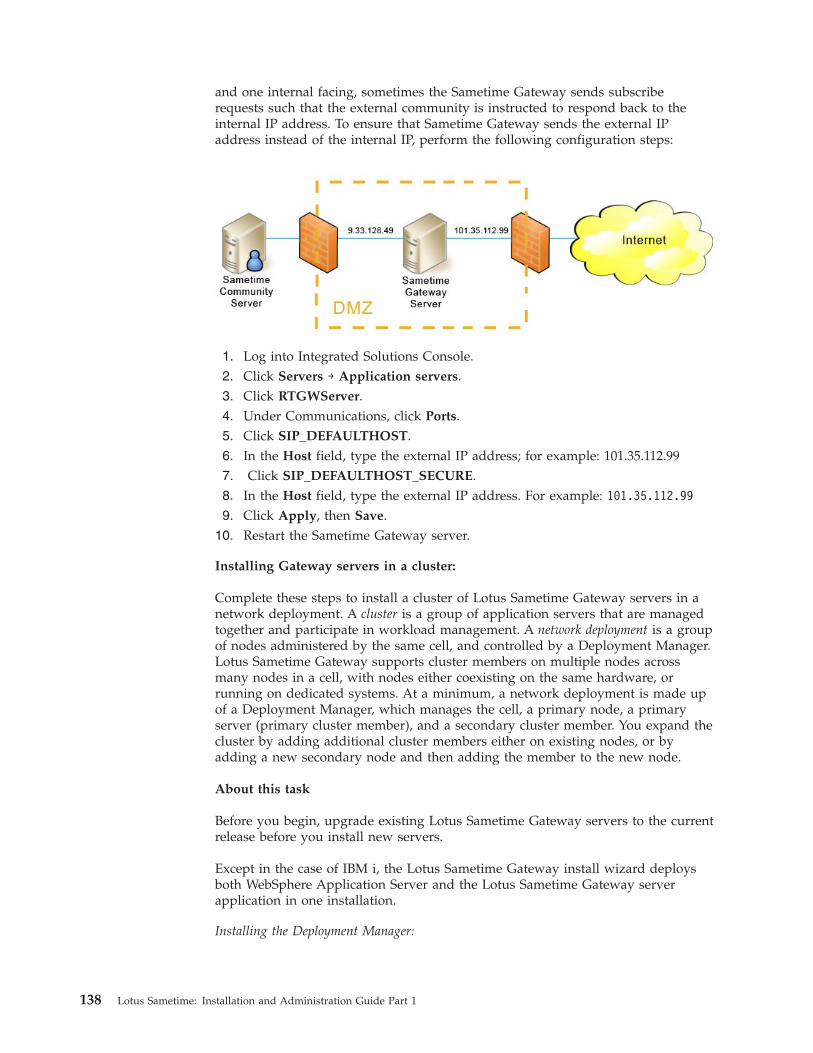
and one internal facing, sometimes the Sametime Gateway sends subscriberequests such that the external community is instructed to respond back to theinternal IP address. To ensure that Sametime Gateway sends the external IPaddress instead of the internal IP, perform the following configuration steps:
1. Log into Integrated Solutions Console.2. Click Servers → Application servers.3. Click RTGWServer.4. Under Communications, click Ports.5. Click SIP_DEFAULTHOST.6. In the Host field, type the external IP address; for example: 101.35.112.997. Click SIP_DEFAULTHOST_SECURE.8. In the Host field, type the external IP address. For example: 101.35.112.999. Click Apply, then Save.
10. Restart the Sametime Gateway server.
Installing Gateway servers in a cluster:
Complete these steps to install a cluster of Lotus Sametime Gateway servers in anetwork deployment. A cluster is a group of application servers that are managedtogether and participate in workload management. A network deployment is a groupof nodes administered by the same cell, and controlled by a Deployment Manager.Lotus Sametime Gateway supports cluster members on multiple nodes acrossmany nodes in a cell, with nodes either coexisting on the same hardware, orrunning on dedicated systems. At a minimum, a network deployment is made upof a Deployment Manager, which manages the cell, a primary node, a primaryserver (primary cluster member), and a secondary cluster member. You expand thecluster by adding additional cluster members either on existing nodes, or byadding a new secondary node and then adding the member to the new node.
About this task
Before you begin, upgrade existing Lotus Sametime Gateway servers to the currentrelease before you install new servers.
Except in the case of IBM i, the Lotus Sametime Gateway install wizard deploysboth WebSphere Application Server and the Lotus Sametime Gateway serverapplication in one installation.
Installing the Deployment Manager:
138 Lotus Sametime: Installation and Administration Guide Part 1
Install the Deployment Manager on its own machine, or on the same machine asthe primary node. Installing the Deployment Manager on the same machine as theprimary node provides the efficiency of multiple Java Virtual Machines and takesadvantage of a fast CPU. If you are installing the Deployment Manager on thesame machine with an existing primary node from a previous release, upgrade theprimary node to the present release before installing the Deployment Manager.
Installing the Deployment Manager on Windows:
Install the Deployment Manager on the same machine as the primary server, or ona separate machine. The installation program also creates a non-SSL connection toLDAP.
Before you begin
Expected state: The DB2 server is installed, the DB2 database has been created, andDB2 is running.
Information on downloading packages for Lotus Sametime is located at thefollowing Web address:www.ibm.com/support/docview.wss?rs=477&uid=swg24024322
About this task
You can install the Deployment Manager and the primary server on the samemachine, or each on its own machine. Additional nodes must be installed on theirown machines.1. Log in as the Windows administrator on the server where you will install
Lotus Sametime Gateway.2. Create two temporary file folders: \TMP\WASCD and \TMP\SametimeGateway.3. From the installation media, copy the WebSphere Application Server
installation image part_number.exe to the folder \TMP\WASCD.4. Open a command window and navigate to the folder \TMP\WASCD.5. Extract all files to the temporary directory \TMP\WASCD. When you are done
extracting the files, you should have a \TMP\WASCD\ifpackage folder with WASand JDK folders inside the ifpackage folder.
6. Extract the files in Sametime Gateway installation image part_number.exe tothe \TMP\SametimeGateway folder.
7. Open a command window and type the following command:v For wizard mode: install.batv For console mode: install.bat -console
Attention: If one or more of the DNS addresses in your environment (forexample: WebSphere Application Server installation host name, DB2 hostname, or LDAP host name) refers to an IPv6–format address, add thefollowing option to your install command to work around an IPv6–relatedissue with the installer:install.bat -V BypassWasInfoCheck=true
Because your input will not be verified during installation, you should takeextra care when typing values.
Chapter 3. Installing 139
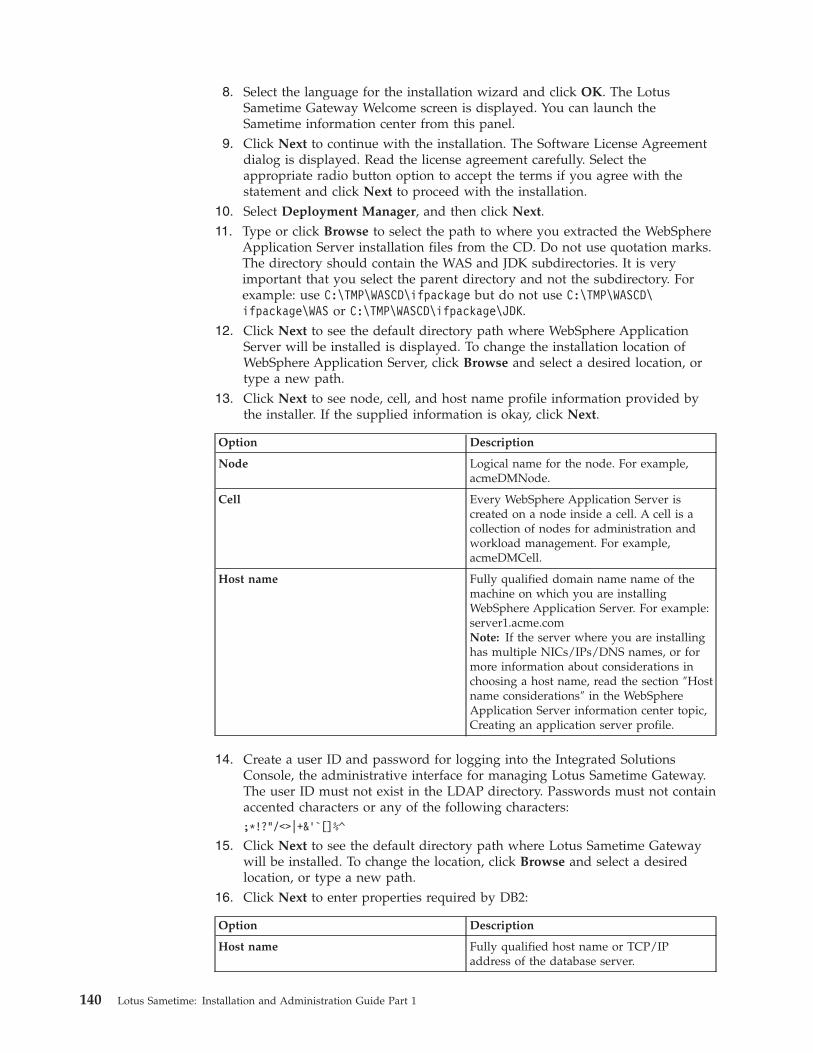
8. Select the language for the installation wizard and click OK. The LotusSametime Gateway Welcome screen is displayed. You can launch theSametime information center from this panel.
9. Click Next to continue with the installation. The Software License Agreementdialog is displayed. Read the license agreement carefully. Select theappropriate radio button option to accept the terms if you agree with thestatement and click Next to proceed with the installation.
10. Select Deployment Manager, and then click Next.11. Type or click Browse to select the path to where you extracted the WebSphere
Application Server installation files from the CD. Do not use quotation marks.The directory should contain the WAS and JDK subdirectories. It is veryimportant that you select the parent directory and not the subdirectory. Forexample: use C:\TMP\WASCD\ifpackage but do not use C:\TMP\WASCD\ifpackage\WAS or C:\TMP\WASCD\ifpackage\JDK.
12. Click Next to see the default directory path where WebSphere ApplicationServer will be installed is displayed. To change the installation location ofWebSphere Application Server, click Browse and select a desired location, ortype a new path.
13. Click Next to see node, cell, and host name profile information provided bythe installer. If the supplied information is okay, click Next.
Option Description
Node Logical name for the node. For example,acmeDMNode.
Cell Every WebSphere Application Server iscreated on a node inside a cell. A cell is acollection of nodes for administration andworkload management. For example,acmeDMCell.
Host name Fully qualified domain name name of themachine on which you are installingWebSphere Application Server. For example:server1.acme.comNote: If the server where you are installinghas multiple NICs/IPs/DNS names, or formore information about considerations inchoosing a host name, read the section ″Hostname considerations″ in the WebSphereApplication Server information center topic,Creating an application server profile.
14. Create a user ID and password for logging into the Integrated SolutionsConsole, the administrative interface for managing Lotus Sametime Gateway.The user ID must not exist in the LDAP directory. Passwords must not containaccented characters or any of the following characters:;*!?"/<>|+&'`[]%^
15. Click Next to see the default directory path where Lotus Sametime Gatewaywill be installed. To change the location, click Browse and select a desiredlocation, or type a new path.
16. Click Next to enter properties required by DB2:
Option Description
Host name Fully qualified host name or TCP/IPaddress of the database server.
140 Lotus Sametime: Installation and Administration Guide Part 1
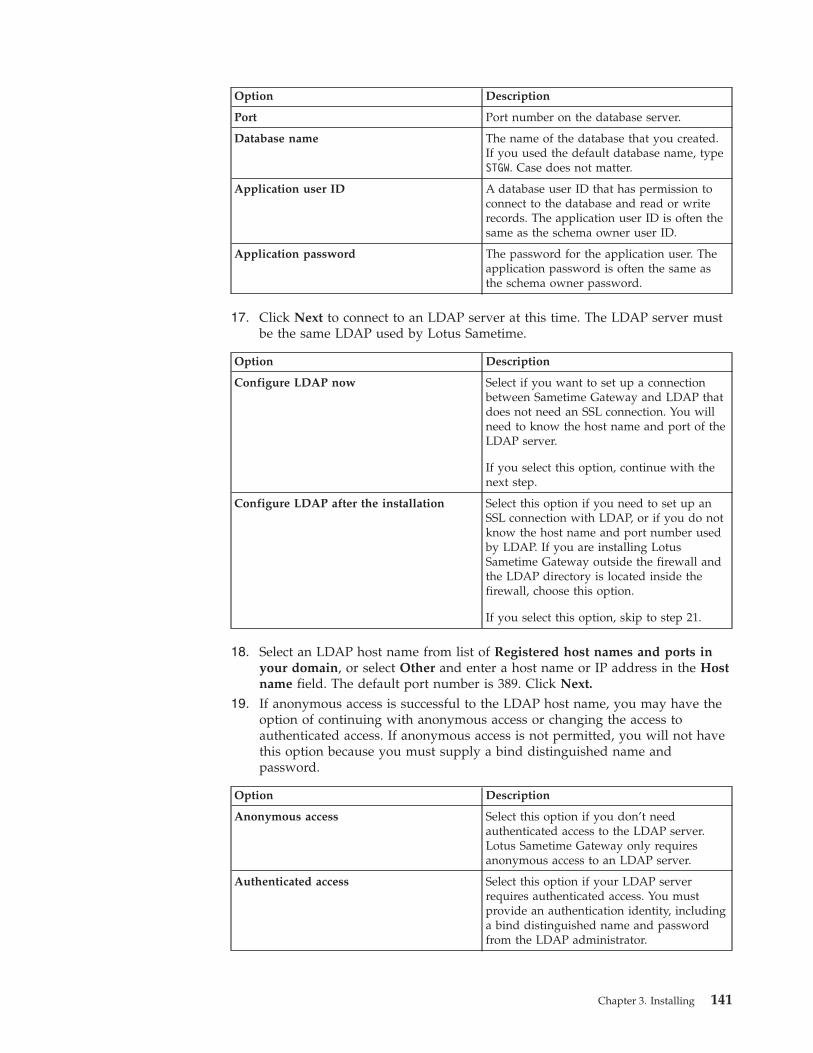
Option Description
Port Port number on the database server.
Database name The name of the database that you created.If you used the default database name, typeSTGW. Case does not matter.
Application user ID A database user ID that has permission toconnect to the database and read or writerecords. The application user ID is often thesame as the schema owner user ID.
Application password The password for the application user. Theapplication password is often the same asthe schema owner password.
17. Click Next to connect to an LDAP server at this time. The LDAP server mustbe the same LDAP used by Lotus Sametime.
Option Description
Configure LDAP now Select if you want to set up a connectionbetween Sametime Gateway and LDAP thatdoes not need an SSL connection. You willneed to know the host name and port of theLDAP server.
If you select this option, continue with thenext step.
Configure LDAP after the installation Select this option if you need to set up anSSL connection with LDAP, or if you do notknow the host name and port number usedby LDAP. If you are installing LotusSametime Gateway outside the firewall andthe LDAP directory is located inside thefirewall, choose this option.
If you select this option, skip to step 21.
18. Select an LDAP host name from list of Registered host names and ports inyour domain, or select Other and enter a host name or IP address in the Hostname field. The default port number is 389. Click Next.
19. If anonymous access is successful to the LDAP host name, you may have theoption of continuing with anonymous access or changing the access toauthenticated access. If anonymous access is not permitted, you will not havethis option because you must supply a bind distinguished name andpassword.
Option Description
Anonymous access Select this option if you don’t needauthenticated access to the LDAP server.Lotus Sametime Gateway only requiresanonymous access to an LDAP server.
Authenticated access Select this option if your LDAP serverrequires authenticated access. You mustprovide an authentication identity, includinga bind distinguished name and passwordfrom the LDAP administrator.
Chapter 3. Installing 141

20. Enter the Bind distinguished name (DN) and Bind password. The binddistinguished name can be any user with read permission for the directoryserver. The bind DN need not be the LDAP administrator. For example:v Bind distinguished name:
uid=ldapadmin,cn=users,l=shipley,st=kansas,c=us,ou=acme,o=medical,DC=ACME,DC=COM
v Bind password:C@pital1
21. Click Next. Choose a base distinguished name from the list of Suggested basedistinguished names in your LDAP or enter a base DN in the Basedistinguished name field. The base distinguished name indicates the startingpoint for LDAP searches of the directory service. For example, for the binddistinguished name given as an example in the previous step, you can specifythe base DN as: DC=ACME,DC=COM. For authorization purposes, this field is casesensitive. This panel is not shown if you are connecting to Domino LDAP.
22. Click Next to see the Lotus Sametime Gateway installation summary. You canreview the installation summary settings and, if necessary, click Back to makechanges.
23. Click Install to begin copying files. A progress screen is displayed and theactivity is logged to the Lotus Sametime Gateway log file. This installationtakes about 10 minutes to complete. When the installation is complete, thewizard displays a message indicating a successful installation.
24. Read the summary and click Finish. To view the installation log, click Viewlog file or open the log file at stgw_server_root\logs\installlog.txt
25. To test the Deployment Manager installation and ensure that LDAP settingsare correct, log into the Deployment Manager node as a user withadministrative privileges.
26. Navigate to the stgw_profile_root\bin directory.27. Start the Deployment Manager with the following command:
startManager.bat
28. Log in into the Integrated Solutions Console using the administrative user IDand password that you created.
29. Test the LDAP connectivity. Click Users and Groups → Manage users.30. Verify that you can search and retrieve users in your LDAP directory.31. Leave the Deployment Manager node running as you install other nodes in
the cluster.
Managing trusted IP addresses:
Whenever you install a server that communicates with an IBM Lotus SametimeCommunity Server, you must add the new server’s IP address to the CommunityServer’s settings.
About this task
The Lotus Sametime Community Server accepts connections from the LotusSametime Media Manager, the Lotus Sametime Gateway, the Lotus SametimeCommunity Mux, and the Lotus Sametime Proxy Server, as well as other serversthat are listed in the Community Services page. To ensure that the Lotus SametimeCommunity Server trusts these components when they establish a connection, youmust add the trusted server’s IP address to the Lotus Sametime CommunityServer.
142 Lotus Sametime: Installation and Administration Guide Part 1
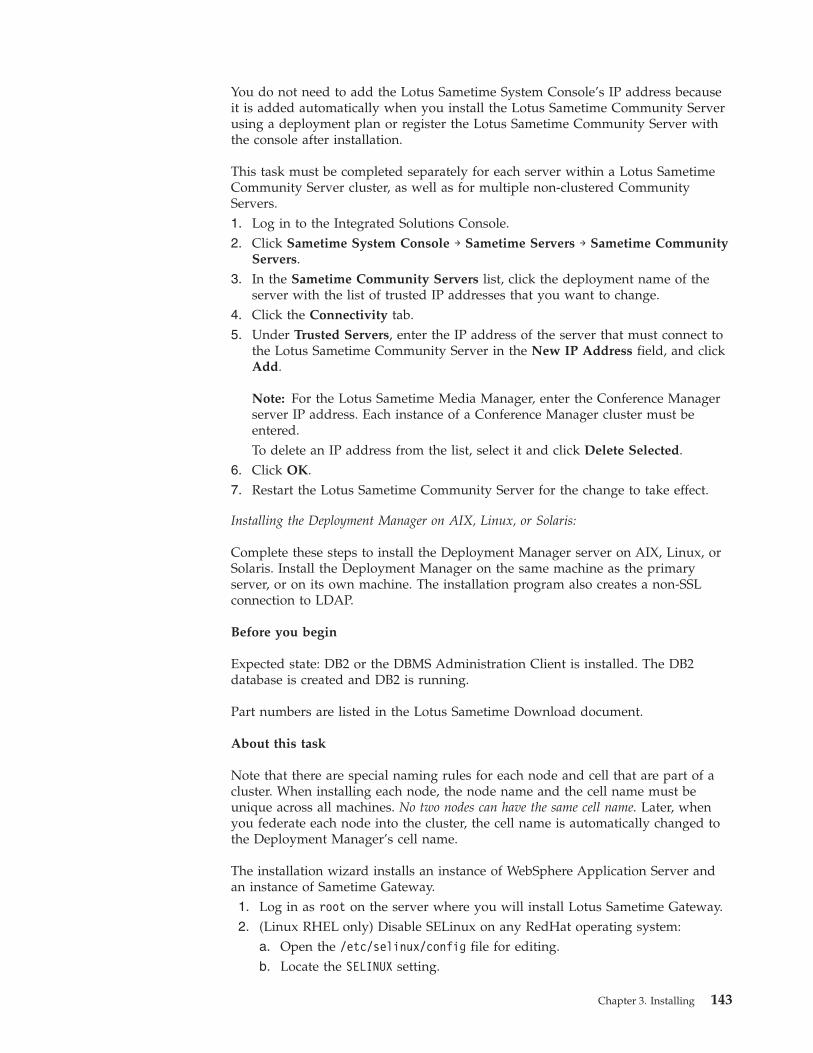
You do not need to add the Lotus Sametime System Console’s IP address becauseit is added automatically when you install the Lotus Sametime Community Serverusing a deployment plan or register the Lotus Sametime Community Server withthe console after installation.
This task must be completed separately for each server within a Lotus SametimeCommunity Server cluster, as well as for multiple non-clustered CommunityServers.1. Log in to the Integrated Solutions Console.2. Click Sametime System Console → Sametime Servers → Sametime Community
Servers.3. In the Sametime Community Servers list, click the deployment name of the
server with the list of trusted IP addresses that you want to change.4. Click the Connectivity tab.5. Under Trusted Servers, enter the IP address of the server that must connect to
the Lotus Sametime Community Server in the New IP Address field, and clickAdd.
Note: For the Lotus Sametime Media Manager, enter the Conference Managerserver IP address. Each instance of a Conference Manager cluster must beentered.To delete an IP address from the list, select it and click Delete Selected.
6. Click OK.7. Restart the Lotus Sametime Community Server for the change to take effect.
Installing the Deployment Manager on AIX, Linux, or Solaris:
Complete these steps to install the Deployment Manager server on AIX, Linux, orSolaris. Install the Deployment Manager on the same machine as the primaryserver, or on its own machine. The installation program also creates a non-SSLconnection to LDAP.
Before you begin
Expected state: DB2 or the DBMS Administration Client is installed. The DB2database is created and DB2 is running.
Part numbers are listed in the Lotus Sametime Download document.
About this task
Note that there are special naming rules for each node and cell that are part of acluster. When installing each node, the node name and the cell name must beunique across all machines. No two nodes can have the same cell name. Later, whenyou federate each node into the cluster, the cell name is automatically changed tothe Deployment Manager’s cell name.
The installation wizard installs an instance of WebSphere Application Server andan instance of Sametime Gateway.1. Log in as root on the server where you will install Lotus Sametime Gateway.2. (Linux RHEL only) Disable SELinux on any RedHat operating system:
a. Open the /etc/selinux/config file for editing.b. Locate the SELINUX setting.
Chapter 3. Installing 143
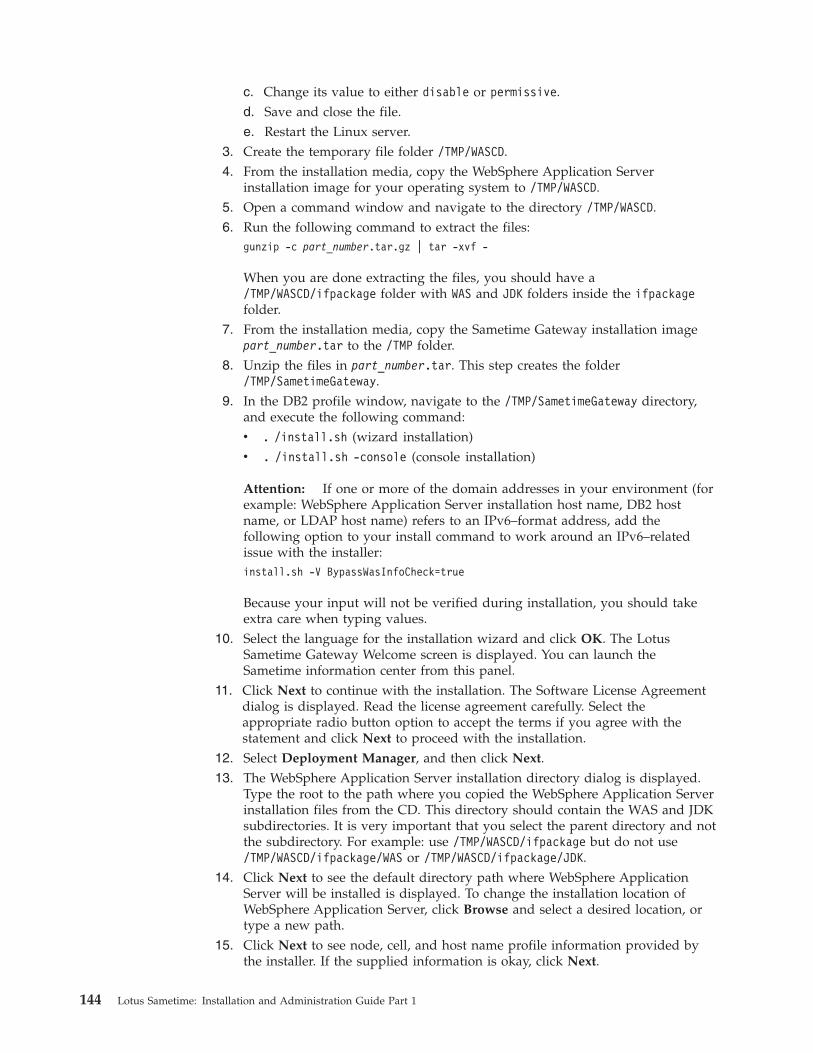
c. Change its value to either disable or permissive.d. Save and close the file.e. Restart the Linux server.
3. Create the temporary file folder /TMP/WASCD.4. From the installation media, copy the WebSphere Application Server
installation image for your operating system to /TMP/WASCD.5. Open a command window and navigate to the directory /TMP/WASCD.6. Run the following command to extract the files:
gunzip -c part_number.tar.gz | tar -xvf -
When you are done extracting the files, you should have a/TMP/WASCD/ifpackage folder with WAS and JDK folders inside the ifpackagefolder.
7. From the installation media, copy the Sametime Gateway installation imagepart_number.tar to the /TMP folder.
8. Unzip the files in part_number.tar. This step creates the folder/TMP/SametimeGateway.
9. In the DB2 profile window, navigate to the /TMP/SametimeGateway directory,and execute the following command:v . /install.sh (wizard installation)v . /install.sh -console (console installation)
Attention: If one or more of the domain addresses in your environment (forexample: WebSphere Application Server installation host name, DB2 hostname, or LDAP host name) refers to an IPv6–format address, add thefollowing option to your install command to work around an IPv6–relatedissue with the installer:install.sh -V BypassWasInfoCheck=true
Because your input will not be verified during installation, you should takeextra care when typing values.
10. Select the language for the installation wizard and click OK. The LotusSametime Gateway Welcome screen is displayed. You can launch theSametime information center from this panel.
11. Click Next to continue with the installation. The Software License Agreementdialog is displayed. Read the license agreement carefully. Select theappropriate radio button option to accept the terms if you agree with thestatement and click Next to proceed with the installation.
12. Select Deployment Manager, and then click Next.13. The WebSphere Application Server installation directory dialog is displayed.
Type the root to the path where you copied the WebSphere Application Serverinstallation files from the CD. This directory should contain the WAS and JDKsubdirectories. It is very important that you select the parent directory and notthe subdirectory. For example: use /TMP/WASCD/ifpackage but do not use/TMP/WASCD/ifpackage/WAS or /TMP/WASCD/ifpackage/JDK.
14. Click Next to see the default directory path where WebSphere ApplicationServer will be installed is displayed. To change the installation location ofWebSphere Application Server, click Browse and select a desired location, ortype a new path.
15. Click Next to see node, cell, and host name profile information provided bythe installer. If the supplied information is okay, click Next.
144 Lotus Sametime: Installation and Administration Guide Part 1
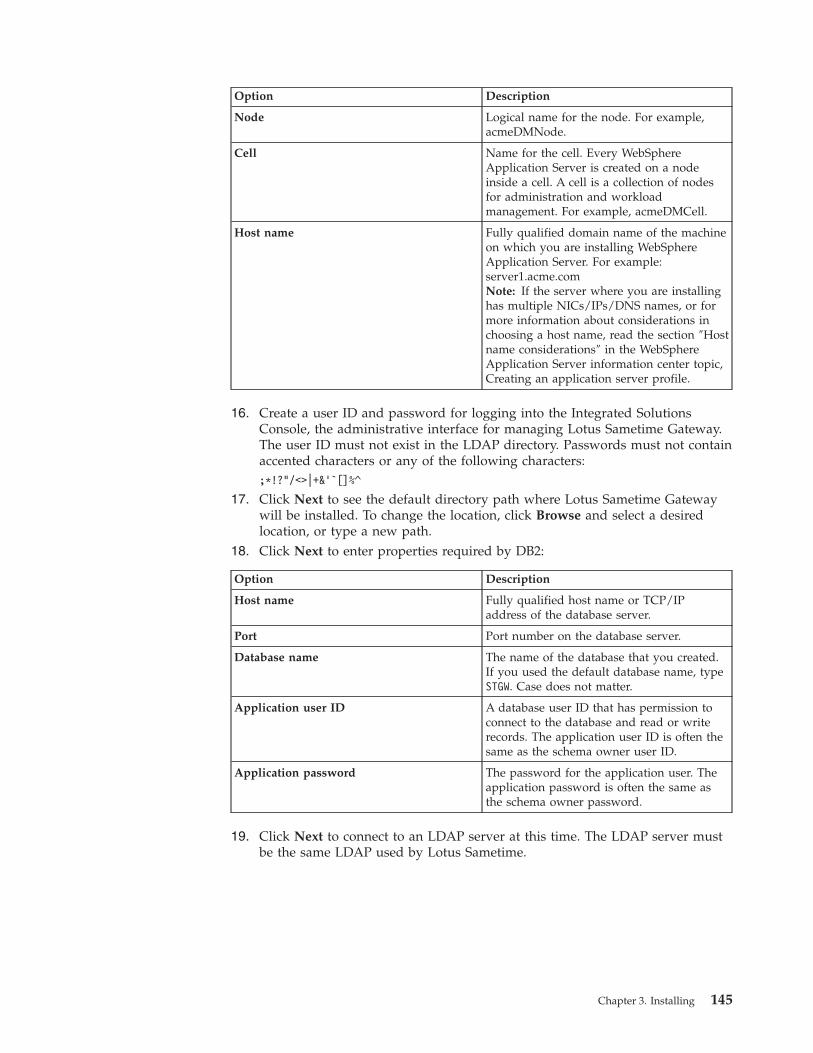
Option Description
Node Logical name for the node. For example,acmeDMNode.
Cell Name for the cell. Every WebSphereApplication Server is created on a nodeinside a cell. A cell is a collection of nodesfor administration and workloadmanagement. For example, acmeDMCell.
Host name Fully qualified domain name of the machineon which you are installing WebSphereApplication Server. For example:server1.acme.comNote: If the server where you are installinghas multiple NICs/IPs/DNS names, or formore information about considerations inchoosing a host name, read the section ″Hostname considerations″ in the WebSphereApplication Server information center topic,Creating an application server profile.
16. Create a user ID and password for logging into the Integrated SolutionsConsole, the administrative interface for managing Lotus Sametime Gateway.The user ID must not exist in the LDAP directory. Passwords must not containaccented characters or any of the following characters:;*!?"/<>|+&'`[]%^
17. Click Next to see the default directory path where Lotus Sametime Gatewaywill be installed. To change the location, click Browse and select a desiredlocation, or type a new path.
18. Click Next to enter properties required by DB2:
Option Description
Host name Fully qualified host name or TCP/IPaddress of the database server.
Port Port number on the database server.
Database name The name of the database that you created.If you used the default database name, typeSTGW. Case does not matter.
Application user ID A database user ID that has permission toconnect to the database and read or writerecords. The application user ID is often thesame as the schema owner user ID.
Application password The password for the application user. Theapplication password is often the same asthe schema owner password.
19. Click Next to connect to an LDAP server at this time. The LDAP server mustbe the same LDAP used by Lotus Sametime.
Chapter 3. Installing 145
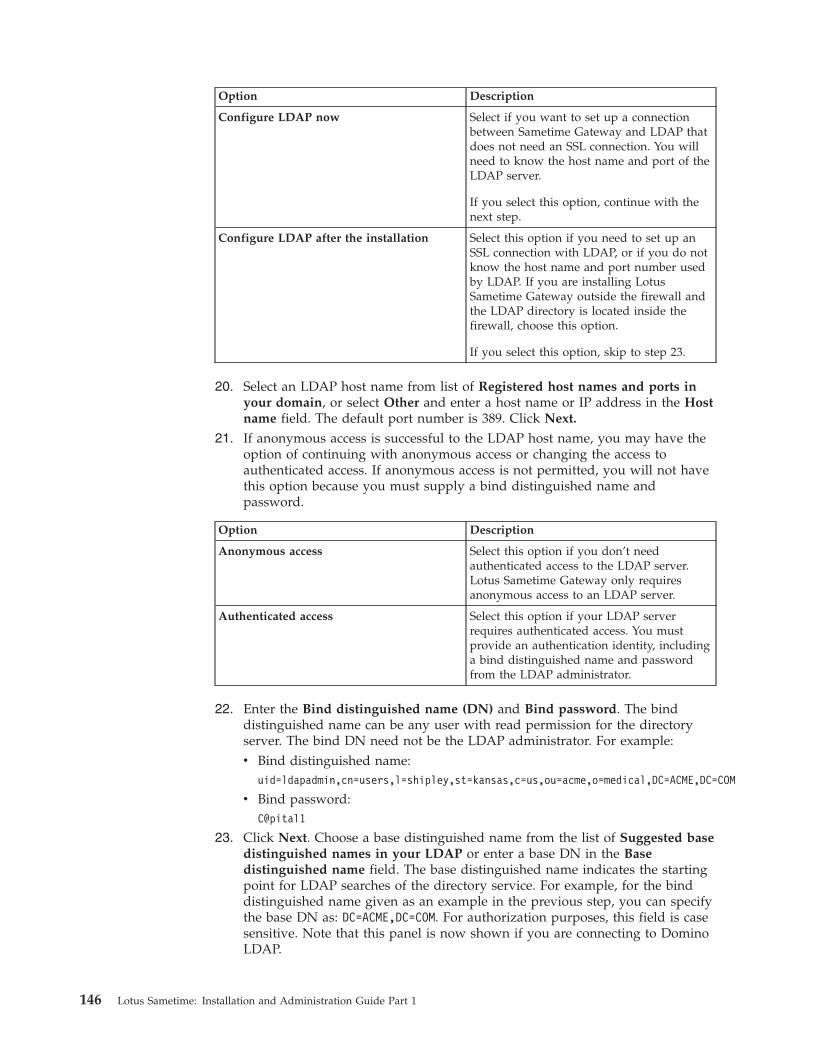
Option Description
Configure LDAP now Select if you want to set up a connectionbetween Sametime Gateway and LDAP thatdoes not need an SSL connection. You willneed to know the host name and port of theLDAP server.
If you select this option, continue with thenext step.
Configure LDAP after the installation Select this option if you need to set up anSSL connection with LDAP, or if you do notknow the host name and port number usedby LDAP. If you are installing LotusSametime Gateway outside the firewall andthe LDAP directory is located inside thefirewall, choose this option.
If you select this option, skip to step 23.
20. Select an LDAP host name from list of Registered host names and ports inyour domain, or select Other and enter a host name or IP address in the Hostname field. The default port number is 389. Click Next.
21. If anonymous access is successful to the LDAP host name, you may have theoption of continuing with anonymous access or changing the access toauthenticated access. If anonymous access is not permitted, you will not havethis option because you must supply a bind distinguished name andpassword.
Option Description
Anonymous access Select this option if you don’t needauthenticated access to the LDAP server.Lotus Sametime Gateway only requiresanonymous access to an LDAP server.
Authenticated access Select this option if your LDAP serverrequires authenticated access. You mustprovide an authentication identity, includinga bind distinguished name and passwordfrom the LDAP administrator.
22. Enter the Bind distinguished name (DN) and Bind password. The binddistinguished name can be any user with read permission for the directoryserver. The bind DN need not be the LDAP administrator. For example:v Bind distinguished name:
uid=ldapadmin,cn=users,l=shipley,st=kansas,c=us,ou=acme,o=medical,DC=ACME,DC=COM
v Bind password:C@pital1
23. Click Next. Choose a base distinguished name from the list of Suggested basedistinguished names in your LDAP or enter a base DN in the Basedistinguished name field. The base distinguished name indicates the startingpoint for LDAP searches of the directory service. For example, for the binddistinguished name given as an example in the previous step, you can specifythe base DN as: DC=ACME,DC=COM. For authorization purposes, this field is casesensitive. Note that this panel is now shown if you are connecting to DominoLDAP.
146 Lotus Sametime: Installation and Administration Guide Part 1
24. Click Next to see the Lotus Sametime Gateway installation summary. You canreview the installation summary settings and, if necessary, click Back to makechanges.
25. Click Install to begin copying files. A progress screen is displayed and theactivity is logged to the Lotus Sametime Gateway log file. This installationtakes about 10 minutes to complete. When the installation is complete, thewizard displays a message indicating a successful installation.
26. Read the summary and click Finish. To view the installation log, click Viewlog file or open the log file at stgw_server_root/logs/installlog.txt
27. To test the Deployment Manager installation and ensure that LDAP settingsare correct, log into the Deployment Manager node as a user withadministrative privileges.
28. Navigate to the stgw_profile_root/bin directory.29. Start the Deployment Manager with the following command:
./startManager.sh
30. Log in into the Integrated Solutions Console using the administrative user IDand password that you created.
31. Test the LDAP connectivity. Click Users and Groups → Manage users.32. Verify that you can search and retrieve users in your LDAP directory.33. Leave the Deployment Manager node running as you install other nodes in
the cluster.
What to do next
You have installed the Deployment Manager server.
Note: Do not start the server at this time (skip step 3 – restart the server – in thesteps below).
Managing trusted IP addresses:
Whenever you install a server that communicates with an IBM Lotus SametimeCommunity Server, you must add the new server’s IP address to the CommunityServer’s settings.
About this task
The Lotus Sametime Community Server accepts connections from the LotusSametime Media Manager, the Lotus Sametime Gateway, the Lotus SametimeCommunity Mux, and the Lotus Sametime Proxy Server, as well as other serversthat are listed in the Community Services page. To ensure that the Lotus SametimeCommunity Server trusts these components when they establish a connection, youmust add the trusted server’s IP address to the Lotus Sametime CommunityServer.
You do not need to add the Lotus Sametime System Console’s IP address becauseit is added automatically when you install the Lotus Sametime Community Serverusing a deployment plan or register the Lotus Sametime Community Server withthe console after installation.
This task must be completed separately for each server within a Lotus SametimeCommunity Server cluster, as well as for multiple non-clustered CommunityServers.
Chapter 3. Installing 147
1. Log in to the Integrated Solutions Console.2. Click Sametime System Console → Sametime Servers → Sametime Community
Servers.3. In the Sametime Community Servers list, click the deployment name of the
server with the list of trusted IP addresses that you want to change.4. Click the Connectivity tab.5. Under Trusted Servers, enter the IP address of the server that must connect to
the Lotus Sametime Community Server in the New IP Address field, and clickAdd.
Note: For the Lotus Sametime Media Manager, enter the Conference Managerserver IP address. Each instance of a Conference Manager cluster must beentered.To delete an IP address from the list, select it and click Delete Selected.
6. Click OK.7. Restart the Lotus Sametime Community Server for the change to take effect.
Installing the primary node:
Install a primary node for a cluster. You can install the primary node and theDeployment Manager on the same machine. Installing the primary node on thesame machine as the Deployment Manager provides the efficiency of multiple JavaVirtual Machines and takes advantage of a fast CPU. If you are installing theprimary node on the same machine with an existing Deployment Manager from aprevious release, upgrade the Deployment Manager to the present release beforeinstalling the primary node.
Installing the primary node on Windows:
Complete these steps to install the primary node of a Lotus Sametime Gatewaycluster on Windows. You can install both the primary node and DeploymentManager on the same machine.
Before you begin
Expected state: DB2 or the DBMS Administration Client is installed. The DB2database is created and DB2 is running. The Deployment Manager is installed andrunning.
Information on downloading packages for Lotus Sametime Gateway is located inthe Lotus Sametime Download document.
About this task
The following steps show the installation of a primary node on a separate machinefrom the Deployment Manager. If you are installing the primary node on the samesystem as the Deployment Manager, you do not have to copy the WebSphereApplication Server media to the server. Instead, the install program reuses theshared binaries that are installed with the Deployment Manager.1. Log in as the Windows administrator on the server where you will install
Lotus Sametime Gateway.2. Complete the following substeps only if you are installing the primary node
on its own machine. If you plan to install the primary node on the samemachine as the Deployment manager, skip to step 3.
148 Lotus Sametime: Installation and Administration Guide Part 1
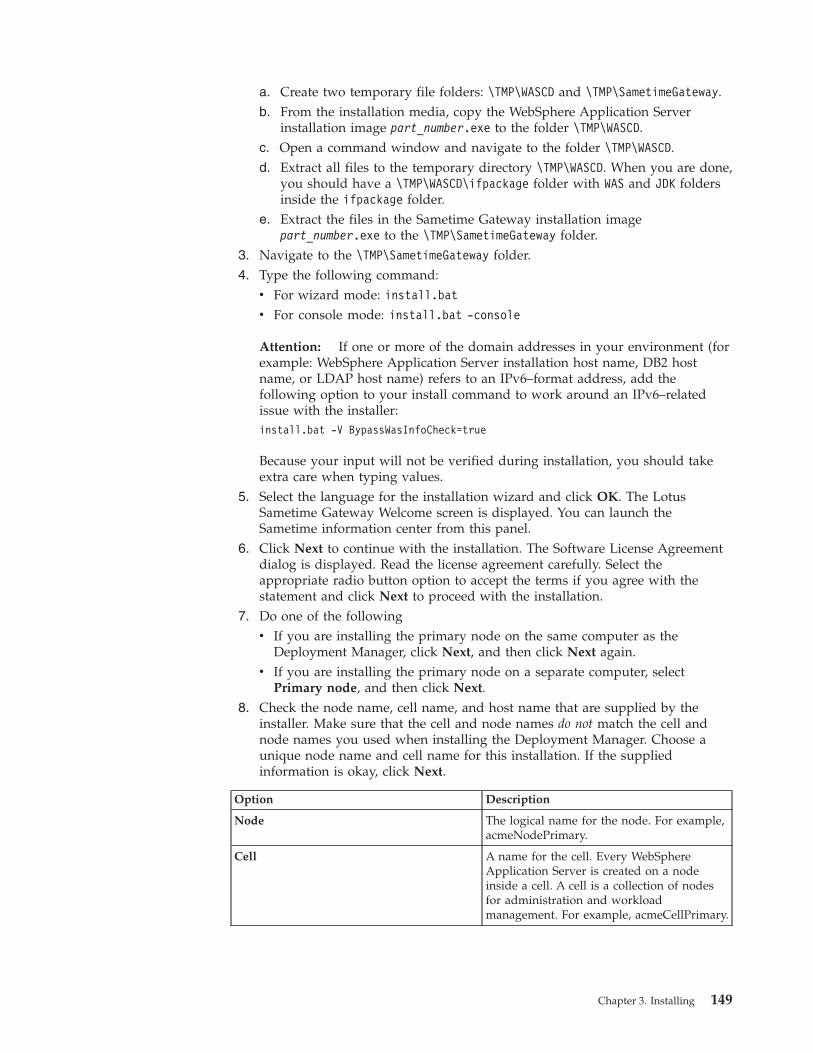
a. Create two temporary file folders: \TMP\WASCD and \TMP\SametimeGateway.b. From the installation media, copy the WebSphere Application Server
installation image part_number.exe to the folder \TMP\WASCD.c. Open a command window and navigate to the folder \TMP\WASCD.d. Extract all files to the temporary directory \TMP\WASCD. When you are done,
you should have a \TMP\WASCD\ifpackage folder with WAS and JDK foldersinside the ifpackage folder.
e. Extract the files in the Sametime Gateway installation imagepart_number.exe to the \TMP\SametimeGateway folder.
3. Navigate to the \TMP\SametimeGateway folder.4. Type the following command:
v For wizard mode: install.batv For console mode: install.bat -console
Attention: If one or more of the domain addresses in your environment (forexample: WebSphere Application Server installation host name, DB2 hostname, or LDAP host name) refers to an IPv6–format address, add thefollowing option to your install command to work around an IPv6–relatedissue with the installer:install.bat -V BypassWasInfoCheck=true
Because your input will not be verified during installation, you should takeextra care when typing values.
5. Select the language for the installation wizard and click OK. The LotusSametime Gateway Welcome screen is displayed. You can launch theSametime information center from this panel.
6. Click Next to continue with the installation. The Software License Agreementdialog is displayed. Read the license agreement carefully. Select theappropriate radio button option to accept the terms if you agree with thestatement and click Next to proceed with the installation.
7. Do one of the followingv If you are installing the primary node on the same computer as the
Deployment Manager, click Next, and then click Next again.v If you are installing the primary node on a separate computer, select
Primary node, and then click Next.8. Check the node name, cell name, and host name that are supplied by the
installer. Make sure that the cell and node names do not match the cell andnode names you used when installing the Deployment Manager. Choose aunique node name and cell name for this installation. If the suppliedinformation is okay, click Next.
Option Description
Node The logical name for the node. For example,acmeNodePrimary.
Cell A name for the cell. Every WebSphereApplication Server is created on a nodeinside a cell. A cell is a collection of nodesfor administration and workloadmanagement. For example, acmeCellPrimary.
Chapter 3. Installing 149
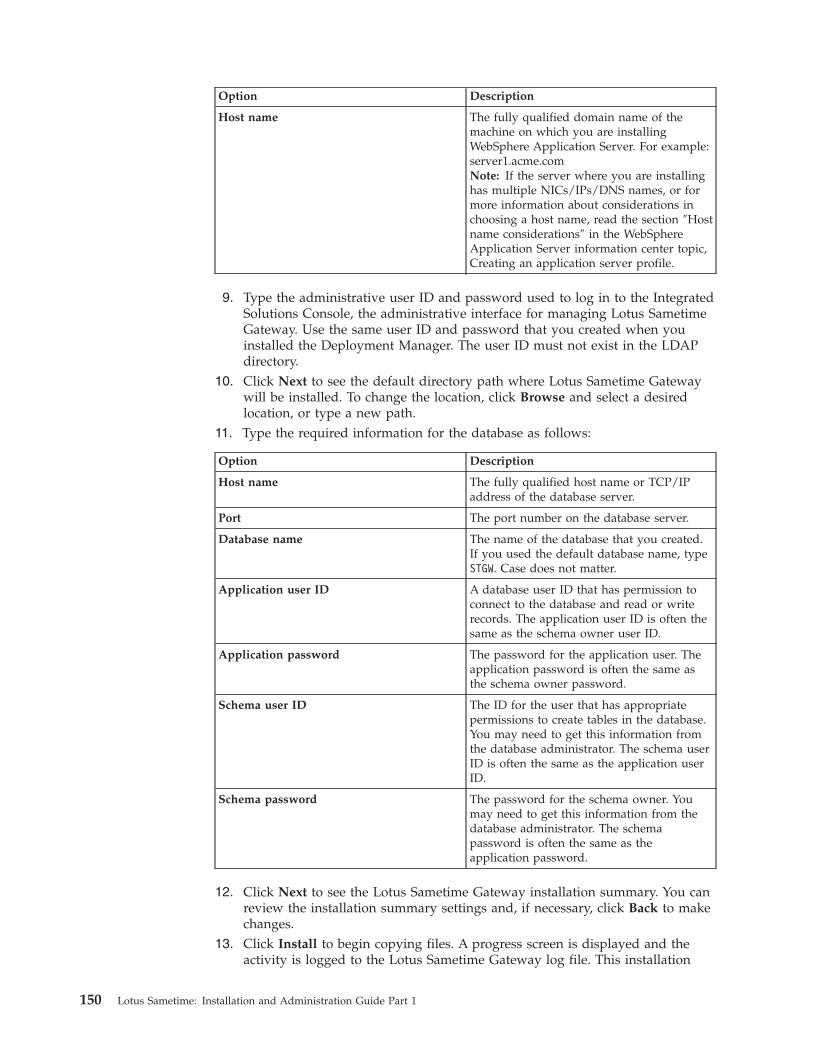
Option Description
Host name The fully qualified domain name of themachine on which you are installingWebSphere Application Server. For example:server1.acme.comNote: If the server where you are installinghas multiple NICs/IPs/DNS names, or formore information about considerations inchoosing a host name, read the section ″Hostname considerations″ in the WebSphereApplication Server information center topic,Creating an application server profile.
9. Type the administrative user ID and password used to log in to the IntegratedSolutions Console, the administrative interface for managing Lotus SametimeGateway. Use the same user ID and password that you created when youinstalled the Deployment Manager. The user ID must not exist in the LDAPdirectory.
10. Click Next to see the default directory path where Lotus Sametime Gatewaywill be installed. To change the location, click Browse and select a desiredlocation, or type a new path.
11. Type the required information for the database as follows:
Option Description
Host name The fully qualified host name or TCP/IPaddress of the database server.
Port The port number on the database server.
Database name The name of the database that you created.If you used the default database name, typeSTGW. Case does not matter.
Application user ID A database user ID that has permission toconnect to the database and read or writerecords. The application user ID is often thesame as the schema owner user ID.
Application password The password for the application user. Theapplication password is often the same asthe schema owner password.
Schema user ID The ID for the user that has appropriatepermissions to create tables in the database.You may need to get this information fromthe database administrator. The schema userID is often the same as the application userID.
Schema password The password for the schema owner. Youmay need to get this information from thedatabase administrator. The schemapassword is often the same as theapplication password.
12. Click Next to see the Lotus Sametime Gateway installation summary. You canreview the installation summary settings and, if necessary, click Back to makechanges.
13. Click Install to begin copying files. A progress screen is displayed and theactivity is logged to the Lotus Sametime Gateway log file. This installation
150 Lotus Sametime: Installation and Administration Guide Part 1
takes about 10 to 20 minutes to complete. When the installation is complete,the wizard displays a message indicating a successful installation.
14. Read the summary and click Finish. To view the installation log, click Viewlog file or open the log file at stgw_server_root\logs\installlog.txt
Managing trusted IP addresses:
Whenever you install a server that communicates with an IBM Lotus SametimeCommunity Server, you must add the new server’s IP address to the CommunityServer’s settings.
About this task
The Lotus Sametime Community Server accepts connections from the LotusSametime Media Manager, the Lotus Sametime Gateway, the Lotus SametimeCommunity Mux, and the Lotus Sametime Proxy Server, as well as other serversthat are listed in the Community Services page. To ensure that the Lotus SametimeCommunity Server trusts these components when they establish a connection, youmust add the trusted server’s IP address to the Lotus Sametime CommunityServer.
You do not need to add the Lotus Sametime System Console’s IP address becauseit is added automatically when you install the Lotus Sametime Community Serverusing a deployment plan or register the Lotus Sametime Community Server withthe console after installation.
This task must be completed separately for each server within a Lotus SametimeCommunity Server cluster, as well as for multiple non-clustered CommunityServers.1. Log in to the Integrated Solutions Console.2. Click Sametime System Console → Sametime Servers → Sametime Community
Servers.3. In the Sametime Community Servers list, click the deployment name of the
server with the list of trusted IP addresses that you want to change.4. Click the Connectivity tab.5. Under Trusted Servers, enter the IP address of the server that must connect to
the Lotus Sametime Community Server in the New IP Address field, and clickAdd.
Note: For the Lotus Sametime Media Manager, enter the Conference Managerserver IP address. Each instance of a Conference Manager cluster must beentered.To delete an IP address from the list, select it and click Delete Selected.
6. Click OK.7. Restart the Lotus Sametime Community Server for the change to take effect.
Installing the primary node on AIX, Linux, or Solaris:
Install the primary node of a Lotus Sametime Gateway cluster on Windows. Youcan install both the primary node and Deployment Manager on the same machine.
Chapter 3. Installing 151
Before you begin
Expected state: DB2 or the DBMS Administration Client is installed. The DB2database is created and DB2 is running. The Deployment Manager is installed andrunning.
Information on downloading packages for Lotus Sametime Gateway is located inthe Lotus Sametime Download document.
About this task
The Lotus Sametime Gateway install wizard deploys both the WebSphereApplication Server and the Lotus Sametime Gateway server application in oneinstallation.1. Log in as root on the server where you will install Lotus Sametime Gateway.2. (Linux RHEL only) Disable SELinux on any RedHat operating system:
a. Open the /etc/selinux/config file for editing.b. Locate the SELINUX setting.c. Change its value to either disable or permissive.d. Save and close the file.e. Restart the Linux server.
3. If you are not installing the primary node on the Deployment Managermachine, complete the following sub steps:a. Create the temporary file folder /TMP/WASCD .b. Open a command window and navigate to the folder /TMP/WASCD.c. Extract all files to the temporary directory /TMP/WASCD. When you are done
extracting the files, you should have a /TMP/WASCD/ifpackage folder withWAS and JDK folders inside the ifpackage folder.
d. Run the following command to extract the files:gunzip -c part_number.tar.gz | tar -xvf -
When you are done extracting the files, you should have a/TMP/WASCD/ifpackage folder with WAS and JDK folders inside the ifpackagefolder.
4. From the installation media, copy the Lotus Sametime Gateway installationimage part_number.tar to the temporary directory /TMP/SametimeGateway.
5. Extract the following file to the /TMP/SametimeGateway folder:tar -xvf part_number.tar
6. Navigate to the temporary directory /TMP/SametimeGateway and type one ofthe following commands:v For wizard mode: ./install.shv For console mode: ./install.sh -console
Attention: If one or more of the DNS addresses in your environment (forexample: WebSphere Application Server installation host name, DB2 hostname, or LDAP host name) refers to an IPv6–format address, add thefollowing option to your install command to work around an IPv6–relatedissue with the installer:./install.sh -V BypassWasInfoCheck=true
Because your input will not be verified during installation, you should takeextra care when typing values.
152 Lotus Sametime: Installation and Administration Guide Part 1
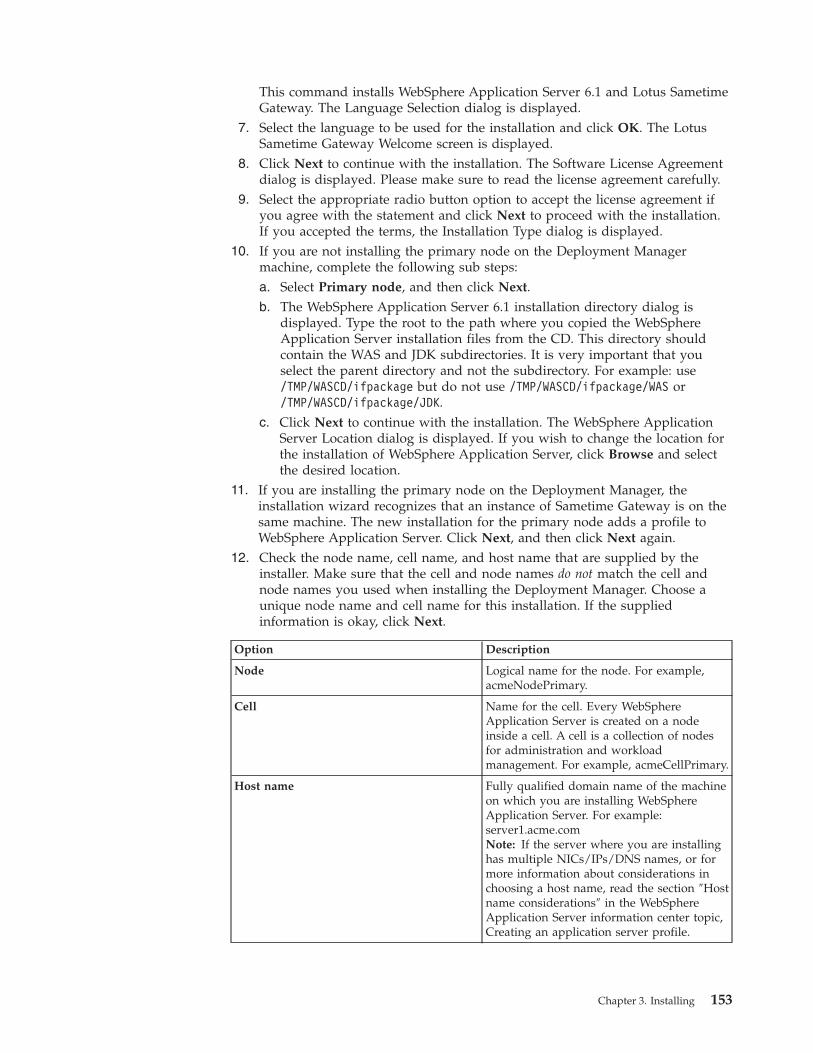
This command installs WebSphere Application Server 6.1 and Lotus SametimeGateway. The Language Selection dialog is displayed.
7. Select the language to be used for the installation and click OK. The LotusSametime Gateway Welcome screen is displayed.
8. Click Next to continue with the installation. The Software License Agreementdialog is displayed. Please make sure to read the license agreement carefully.
9. Select the appropriate radio button option to accept the license agreement ifyou agree with the statement and click Next to proceed with the installation.If you accepted the terms, the Installation Type dialog is displayed.
10. If you are not installing the primary node on the Deployment Managermachine, complete the following sub steps:a. Select Primary node, and then click Next.b. The WebSphere Application Server 6.1 installation directory dialog is
displayed. Type the root to the path where you copied the WebSphereApplication Server installation files from the CD. This directory shouldcontain the WAS and JDK subdirectories. It is very important that youselect the parent directory and not the subdirectory. For example: use/TMP/WASCD/ifpackage but do not use /TMP/WASCD/ifpackage/WAS or/TMP/WASCD/ifpackage/JDK.
c. Click Next to continue with the installation. The WebSphere ApplicationServer Location dialog is displayed. If you wish to change the location forthe installation of WebSphere Application Server, click Browse and selectthe desired location.
11. If you are installing the primary node on the Deployment Manager, theinstallation wizard recognizes that an instance of Sametime Gateway is on thesame machine. The new installation for the primary node adds a profile toWebSphere Application Server. Click Next, and then click Next again.
12. Check the node name, cell name, and host name that are supplied by theinstaller. Make sure that the cell and node names do not match the cell andnode names you used when installing the Deployment Manager. Choose aunique node name and cell name for this installation. If the suppliedinformation is okay, click Next.
Option Description
Node Logical name for the node. For example,acmeNodePrimary.
Cell Name for the cell. Every WebSphereApplication Server is created on a nodeinside a cell. A cell is a collection of nodesfor administration and workloadmanagement. For example, acmeCellPrimary.
Host name Fully qualified domain name of the machineon which you are installing WebSphereApplication Server. For example:server1.acme.comNote: If the server where you are installinghas multiple NICs/IPs/DNS names, or formore information about considerations inchoosing a host name, read the section ″Hostname considerations″ in the WebSphereApplication Server information center topic,Creating an application server profile.
Chapter 3. Installing 153
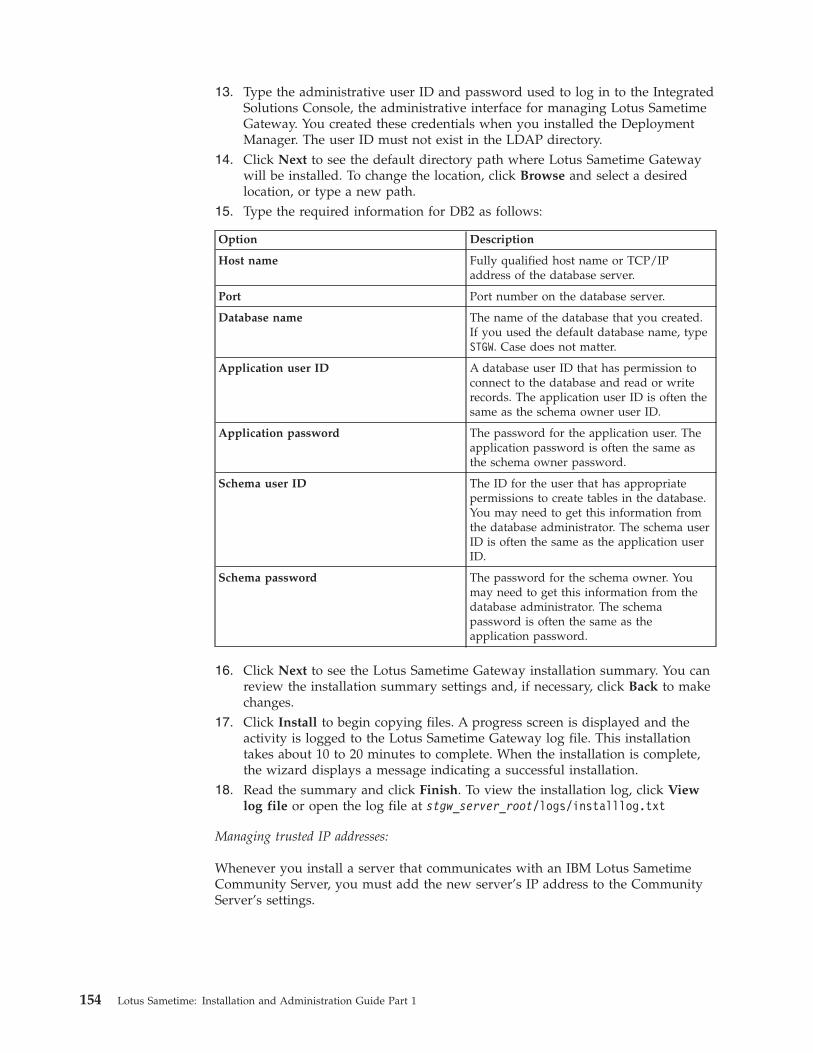
13. Type the administrative user ID and password used to log in to the IntegratedSolutions Console, the administrative interface for managing Lotus SametimeGateway. You created these credentials when you installed the DeploymentManager. The user ID must not exist in the LDAP directory.
14. Click Next to see the default directory path where Lotus Sametime Gatewaywill be installed. To change the location, click Browse and select a desiredlocation, or type a new path.
15. Type the required information for DB2 as follows:
Option Description
Host name Fully qualified host name or TCP/IPaddress of the database server.
Port Port number on the database server.
Database name The name of the database that you created.If you used the default database name, typeSTGW. Case does not matter.
Application user ID A database user ID that has permission toconnect to the database and read or writerecords. The application user ID is often thesame as the schema owner user ID.
Application password The password for the application user. Theapplication password is often the same asthe schema owner password.
Schema user ID The ID for the user that has appropriatepermissions to create tables in the database.You may need to get this information fromthe database administrator. The schema userID is often the same as the application userID.
Schema password The password for the schema owner. Youmay need to get this information from thedatabase administrator. The schemapassword is often the same as theapplication password.
16. Click Next to see the Lotus Sametime Gateway installation summary. You canreview the installation summary settings and, if necessary, click Back to makechanges.
17. Click Install to begin copying files. A progress screen is displayed and theactivity is logged to the Lotus Sametime Gateway log file. This installationtakes about 10 to 20 minutes to complete. When the installation is complete,the wizard displays a message indicating a successful installation.
18. Read the summary and click Finish. To view the installation log, click Viewlog file or open the log file at stgw_server_root/logs/installlog.txt
Managing trusted IP addresses:
Whenever you install a server that communicates with an IBM Lotus SametimeCommunity Server, you must add the new server’s IP address to the CommunityServer’s settings.
154 Lotus Sametime: Installation and Administration Guide Part 1
About this task
The Lotus Sametime Community Server accepts connections from the LotusSametime Media Manager, the Lotus Sametime Gateway, the Lotus SametimeCommunity Mux, and the Lotus Sametime Proxy Server, as well as other serversthat are listed in the Community Services page. To ensure that the Lotus SametimeCommunity Server trusts these components when they establish a connection, youmust add the trusted server’s IP address to the Lotus Sametime CommunityServer.
You do not need to add the Lotus Sametime System Console’s IP address becauseit is added automatically when you install the Lotus Sametime Community Serverusing a deployment plan or register the Lotus Sametime Community Server withthe console after installation.
This task must be completed separately for each server within a Lotus SametimeCommunity Server cluster, as well as for multiple non-clustered CommunityServers.1. Log in to the Integrated Solutions Console.2. Click Sametime System Console → Sametime Servers → Sametime Community
Servers.3. In the Sametime Community Servers list, click the deployment name of the
server with the list of trusted IP addresses that you want to change.4. Click the Connectivity tab.5. Under Trusted Servers, enter the IP address of the server that must connect to
the Lotus Sametime Community Server in the New IP Address field, and clickAdd.
Note: For the Lotus Sametime Media Manager, enter the Conference Managerserver IP address. Each instance of a Conference Manager cluster must beentered.To delete an IP address from the list, select it and click Delete Selected.
6. Click OK.7. Restart the Lotus Sametime Community Server for the change to take effect.
Federating the primary node into the cell:
After you create the primary node you must add the primary node to theDeployment Manager’s cell.
Federating the primary node into the cell on Windows:
Add the primary node to the Deployment Manager’s cell. Adding the primarynode to the cell allows a central point of administration for the networkdeployment by using the Deployment Manager’s Integrated Solutions Console. Youwill not be able log into the primary node’s Integrated Solutions Console after thisstep.
Before you begin
Expected state: the Deployment Manager is running.
Chapter 3. Installing 155

About this task
1. Make sure that the system clocks on the Deployment Manager and the primarynode are within five minutes of each other and set for the same timezone.Federation fails if the clocks are not synchronized within five minutes.
2. Ping the Deployment Manager node from the primary node to make sure thehost name is resolvable.
3. On the primary node, open a command window and navigate to thestgw_profile_root\bin directory. If the Deployment Manager and the primarynode are installed on the same machine, the default profile directory isRTCGW_Profile1 (not RTCGW_Profile).
4. Run the following command to add the primary node to the DeploymentManager’s cell:addNode.bat DM_hostname DM_port_number -includeapps
Where DM_hostname is the host name of the Deployment Manager server. Forexample:addNode.bat gateway_dm.acme.com 8879 -includeapps
Port 8879 is the default port on which the Deployment Manager listens.5. When prompted, provide the Deployment Manager’s administrative user ID
and password.Wait for the operation to complete before proceeding. Look for a successmessage similar to the following when complete:Node MyserverNodePrimary has been successfully federated.
6. To verify that the primary node has joined the Deployment Manager’s cell, loginto the Integrated Solutions Console (http://localhost:9060/ibm/console)using your administrative user ID and password and click Servers →Application servers. Make sure you can see the primary node’s information.If you already logged in, you must log out and then log in again before youcan see changes.
Federating the primary node into the cell on AIX, Linux, and Solaris:
Add the primary node to the Deployment Manager’s cell on AIX, Linux, or Solarisplatforms. Adding the primary node to the cell allows a central point ofadministration for the network deployment by using the Deployment Manager’sIntegrated Solutions Console. You will not be able log into the primary node’sIntegrated Solutions Console after this step.
Before you begin
Expected state: the Deployment Manager is running.1. Make sure that the system clocks on the Deployment Manager and the primary
node are within five minutes of each other and set for the same timezone.Federation fails if the clocks are not synchronized within five minutes.
2. Ping the Deployment Manager node from the primary node to make sure theDeployment Manager host name is resolvable.
3. On the primary node, open a command window and navigate to thestgw_profile_root/bin directory.
4. Run the following command to add the primary node to the DeploymentManager’s cell:./addNode.sh DM_hostname DM_port_number -includeapps
156 Lotus Sametime: Installation and Administration Guide Part 1
Where DM_hostname is the host name of the Deployment Manager server. Forexample:./addNode.sh gateway_dm.acme.com 8879 -includeapps
5. When prompted, provide the Deployment Manager’s administrative user IDand password. Wait for the operation to complete before proceeding. Look for asuccess message similar to the following when complete:Node MyserverNodePrimary has been successfully federated.
Port 8879 is the default port on which the Deployment Manager listens.6. To verify that the primary node has joined the Deployment Manager’s cell, log
into the Integrated Solutions Console (http://localhost:9060/ibm/console)using your administrative user ID and password and click Servers →Application servers. Make sure you can see the primary node’s information.If you already logged in, you must log out and then log in again before youcan see changes.
What happens when you federate the primary node into the cell?:
When you federate the primary node into the Deployment Manager’s cell, theprimary node’s original configuration is backed up. This means that you canremove the primary node from the Deployment Manager at a later time, and youcan restore the profile configuration to the state it was in before federation.
The primary node’s scope changes to include the Deployment Manager’s cell.Before federation, the scope of the RTCGWServer was:cell:<PrimaryCell>/node:<PrimaryNode>/server:RTCGWServer
After federation, the scope of the server is the following:cell:<Deployment Manager Cell>/node:/<PrimaryNode>/server:RTCGWServer
When you federate, the Integrated Solutions Console of the primary node isdisabled because you will be using the Integrated Solutions Console from theDeployment Manager. The primary node inherits all the cell level configurationdata from the Deployment Manager. Any information you can see through theDeployment Manager’s Integrated Solutions Console is now stored in XML on theprimary node, so it is accessible from any application. The applications that wereinstalled to RTCGWServer are now included on the RTCGWServer in theDeployment Manager’s cell. If you attempt to federate another node that containsthese same applications, they are excluded.
Because the LDAP configuration and your credentials as the WebSphereApplication Server administrative user in the Deployment Manager are defined atthe cell level, this data overwrites the security settings of the primary node. TheDeployment Manager’s settings apply to the primary node. If you remove theprimary node from the cell, the primary node’s original security configuration arerestored.
When you federate the primary server into the cell, a single server of SametimeGateway can be managed by a Deployment Manager. You can actually run a realenvironment and configure your Sametime communities just as you would in astandalone server environment. What is lacking is failover and load balancingcapabilities. In order to add those features, you need to add a secondary node andcreate a cluster in the later steps.
Installing an additional server in a cluster:
Chapter 3. Installing 157
Install a secondary node for the cluster. A cluster at a minimum contains a primaryserver, a Deployment Manager, and at least one secondary node. Depending uponyour capacity requirements, install secondary nodes as needed.
About this task
Note: In this release, a Lotus Sametime Gateway cluster can support only twonodes.
Installing a secondary node on Windows:
Complete these steps to install a secondary node on Windows that will be part of acluster of Sametime Gateway servers.
About this task
A secondary node for the cluster must be installed on its own machine. Asecondary cannot be installed on the same machine as the primary server or theDeployment Manager.
Information on downloading packages for Lotus Sametime is located at thefollowing Web address:http://www.ibm.com/support/docview.wss?rs=477&uid=swg24024322
1. Log in as the Windows administrator on the server where you will installLotus Sametime Gateway.
2. Create two temporary file folders: \TMP\WASCD and \TMP\SametimeGateway.3. From the installation media, copy the WebSphere Application Server
installation image part_number.exe to the folder \TMP\WASCD.4. Open a command window and navigate to the folder \TMP\WASCD.5. Extract all files to the temporary directory \TMP\WASCD. When you are done
extracting the files, you should have a \TMP\WASCD\ifpackage folder with WASand JDK folders inside the ifpackage folder.
6. Extract the files in the Sametime Gateway installation image part_number.exeto the \TMP\SametimeGateway folder.
7. Open a command window and type the following command:v For wizard mode: install.batv For console mode: install.bat -console
Attention: If one or more of the domain addresses in your environment (forexample: WebSphere Application Server installation host name, DB2 hostname, or LDAP host name) refers to an IPv6–format address, add thefollowing option to your install command to work around an IPv6–relatedissue with the installer:install.bat -V BypassWasInfoCheck=true
Because your input will not be verified during installation, you should takeextra care when typing values.
8. Select the language for the installation wizard and click OK. The LotusSametime Gateway Welcome screen is displayed. You can launch theSametime information center from this panel.
9. Click Next to continue with the installation. The Software License Agreementdialog is displayed. Read the license agreement carefully. Select the
158 Lotus Sametime: Installation and Administration Guide Part 1
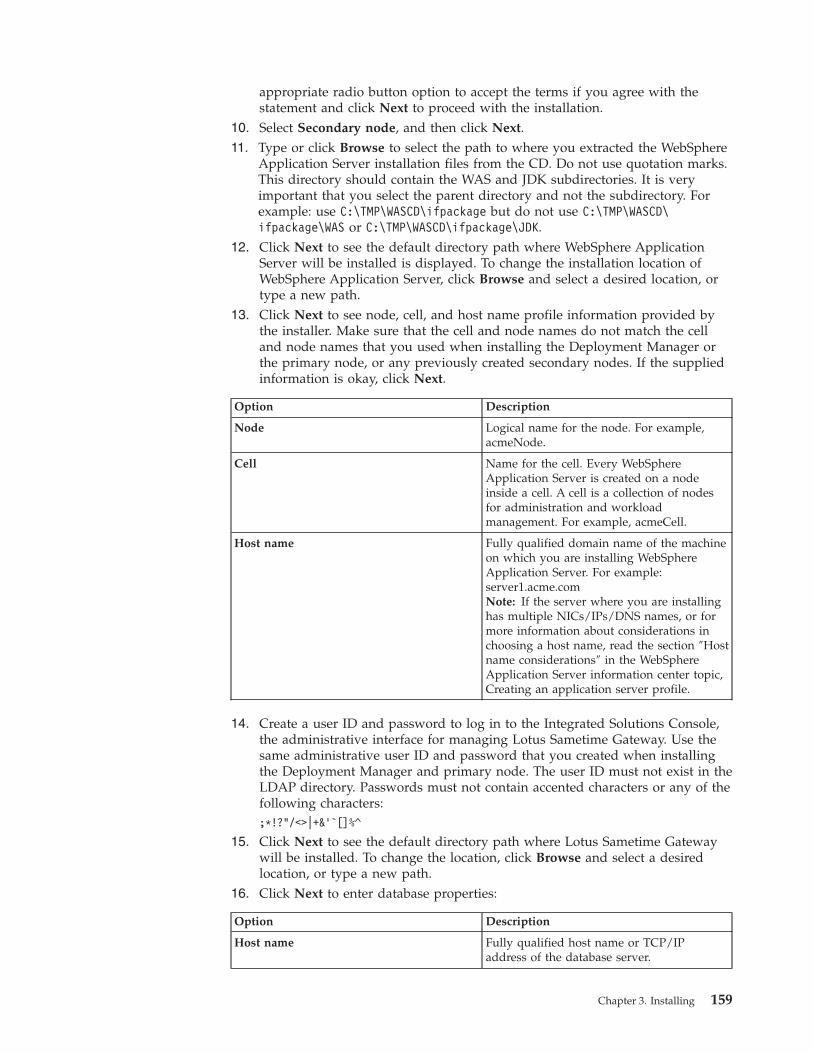
appropriate radio button option to accept the terms if you agree with thestatement and click Next to proceed with the installation.
10. Select Secondary node, and then click Next.11. Type or click Browse to select the path to where you extracted the WebSphere
Application Server installation files from the CD. Do not use quotation marks.This directory should contain the WAS and JDK subdirectories. It is veryimportant that you select the parent directory and not the subdirectory. Forexample: use C:\TMP\WASCD\ifpackage but do not use C:\TMP\WASCD\ifpackage\WAS or C:\TMP\WASCD\ifpackage\JDK.
12. Click Next to see the default directory path where WebSphere ApplicationServer will be installed is displayed. To change the installation location ofWebSphere Application Server, click Browse and select a desired location, ortype a new path.
13. Click Next to see node, cell, and host name profile information provided bythe installer. Make sure that the cell and node names do not match the celland node names that you used when installing the Deployment Manager orthe primary node, or any previously created secondary nodes. If the suppliedinformation is okay, click Next.
Option Description
Node Logical name for the node. For example,acmeNode.
Cell Name for the cell. Every WebSphereApplication Server is created on a nodeinside a cell. A cell is a collection of nodesfor administration and workloadmanagement. For example, acmeCell.
Host name Fully qualified domain name of the machineon which you are installing WebSphereApplication Server. For example:server1.acme.comNote: If the server where you are installinghas multiple NICs/IPs/DNS names, or formore information about considerations inchoosing a host name, read the section ″Hostname considerations″ in the WebSphereApplication Server information center topic,Creating an application server profile.
14. Create a user ID and password to log in to the Integrated Solutions Console,the administrative interface for managing Lotus Sametime Gateway. Use thesame administrative user ID and password that you created when installingthe Deployment Manager and primary node. The user ID must not exist in theLDAP directory. Passwords must not contain accented characters or any of thefollowing characters:;*!?"/<>|+&'`[]%^
15. Click Next to see the default directory path where Lotus Sametime Gatewaywill be installed. To change the location, click Browse and select a desiredlocation, or type a new path.
16. Click Next to enter database properties:
Option Description
Host name Fully qualified host name or TCP/IPaddress of the database server.
Chapter 3. Installing 159
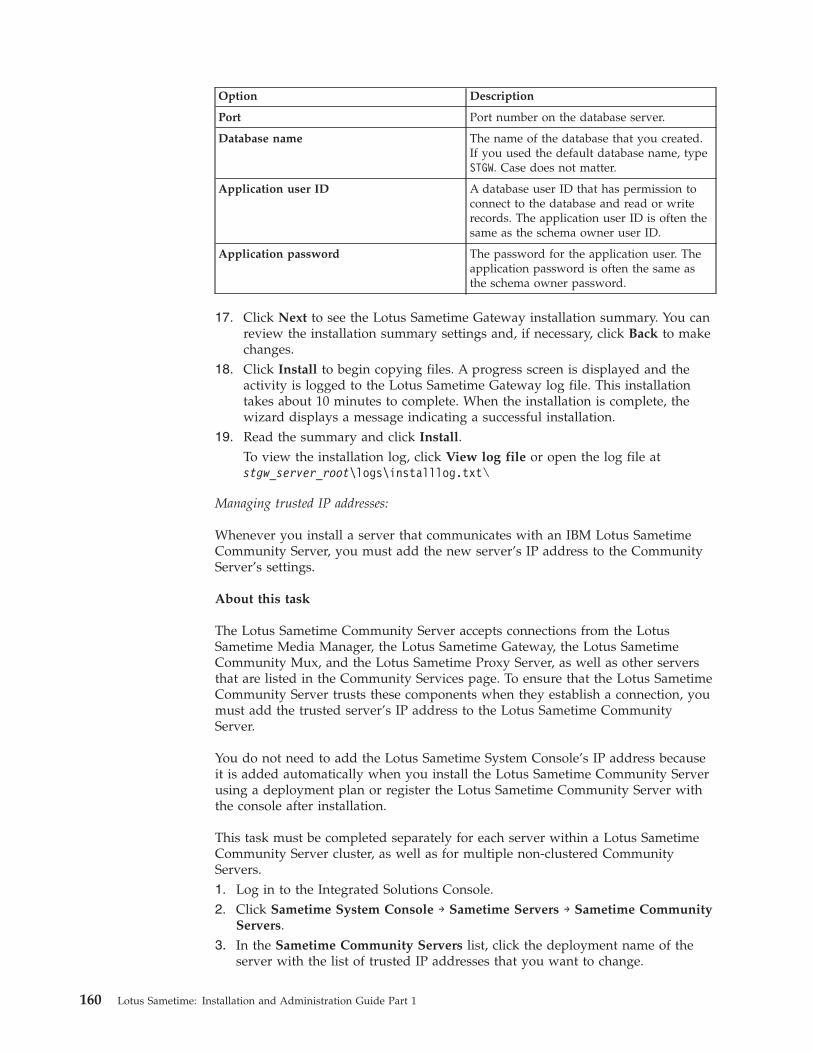
Option Description
Port Port number on the database server.
Database name The name of the database that you created.If you used the default database name, typeSTGW. Case does not matter.
Application user ID A database user ID that has permission toconnect to the database and read or writerecords. The application user ID is often thesame as the schema owner user ID.
Application password The password for the application user. Theapplication password is often the same asthe schema owner password.
17. Click Next to see the Lotus Sametime Gateway installation summary. You canreview the installation summary settings and, if necessary, click Back to makechanges.
18. Click Install to begin copying files. A progress screen is displayed and theactivity is logged to the Lotus Sametime Gateway log file. This installationtakes about 10 minutes to complete. When the installation is complete, thewizard displays a message indicating a successful installation.
19. Read the summary and click Install.To view the installation log, click View log file or open the log file atstgw_server_root\logs\installlog.txt\
Managing trusted IP addresses:
Whenever you install a server that communicates with an IBM Lotus SametimeCommunity Server, you must add the new server’s IP address to the CommunityServer’s settings.
About this task
The Lotus Sametime Community Server accepts connections from the LotusSametime Media Manager, the Lotus Sametime Gateway, the Lotus SametimeCommunity Mux, and the Lotus Sametime Proxy Server, as well as other serversthat are listed in the Community Services page. To ensure that the Lotus SametimeCommunity Server trusts these components when they establish a connection, youmust add the trusted server’s IP address to the Lotus Sametime CommunityServer.
You do not need to add the Lotus Sametime System Console’s IP address becauseit is added automatically when you install the Lotus Sametime Community Serverusing a deployment plan or register the Lotus Sametime Community Server withthe console after installation.
This task must be completed separately for each server within a Lotus SametimeCommunity Server cluster, as well as for multiple non-clustered CommunityServers.1. Log in to the Integrated Solutions Console.2. Click Sametime System Console → Sametime Servers → Sametime Community
Servers.3. In the Sametime Community Servers list, click the deployment name of the
server with the list of trusted IP addresses that you want to change.
160 Lotus Sametime: Installation and Administration Guide Part 1
4. Click the Connectivity tab.5. Under Trusted Servers, enter the IP address of the server that must connect to
the Lotus Sametime Community Server in the New IP Address field, and clickAdd.
Note: For the Lotus Sametime Media Manager, enter the Conference Managerserver IP address. Each instance of a Conference Manager cluster must beentered.To delete an IP address from the list, select it and click Delete Selected.
6. Click OK.7. Restart the Lotus Sametime Community Server for the change to take effect.
Installing a secondary node on AIX, Linux, or Solaris:
Complete these steps to install a secondary node on AIX, Linux, or Solaris that willbe part of a cluster of Sametime Gateway servers.
About this task
A secondary node for the cluster must be installed on its own machine and cannotbe installed on the same machine as the primary server or the DeploymentManager.
Part numbers are listed in the Lotus Sametime Download document.1. Log in as root on the server where you will install Lotus Sametime Gateway.2. (Linux RHEL only) Disable SELinux on any RedHat operating system:
a. Open the /etc/selinux/config file for editing.b. Locate the SELINUX setting.c. Change its value to either disable or permissive.d. Save and close the file.e. Restart the Linux server.
3. Create the temporary file folder /TMP/WASCD.4. From the installation media, copy the WebSphere Application Server
installation image for your operating system to /TMP/WASCD.5. Open a command window and navigate to the directory /TMP/WASCD.6. Run the following command to uncompress the files:
gunzip -c part_number.tar.gz | tar -xvf -
When you are finished extracting the files, you should have a/TMP/WASCD/ifpackage folder with WAS and JDK folders inside the ifpackagefolder.
7. From the installation media, copy the Lotus Sametime Gateway installationimage part_number.tar to the temporary directory /TMP/SametimeGateway.
8. In the DB2 profile window, navigate to the temporary directory /TMP.9. Unzip the following file to the /TMP/SametimeGateway folder:
unzip part_number.tar
10. Navigate to the folder /TMP/SametimeGateway and type one of the followingcommands:v For wizard mode: . /install.sh
v For console mode: . /install.sh -console
Chapter 3. Installing 161
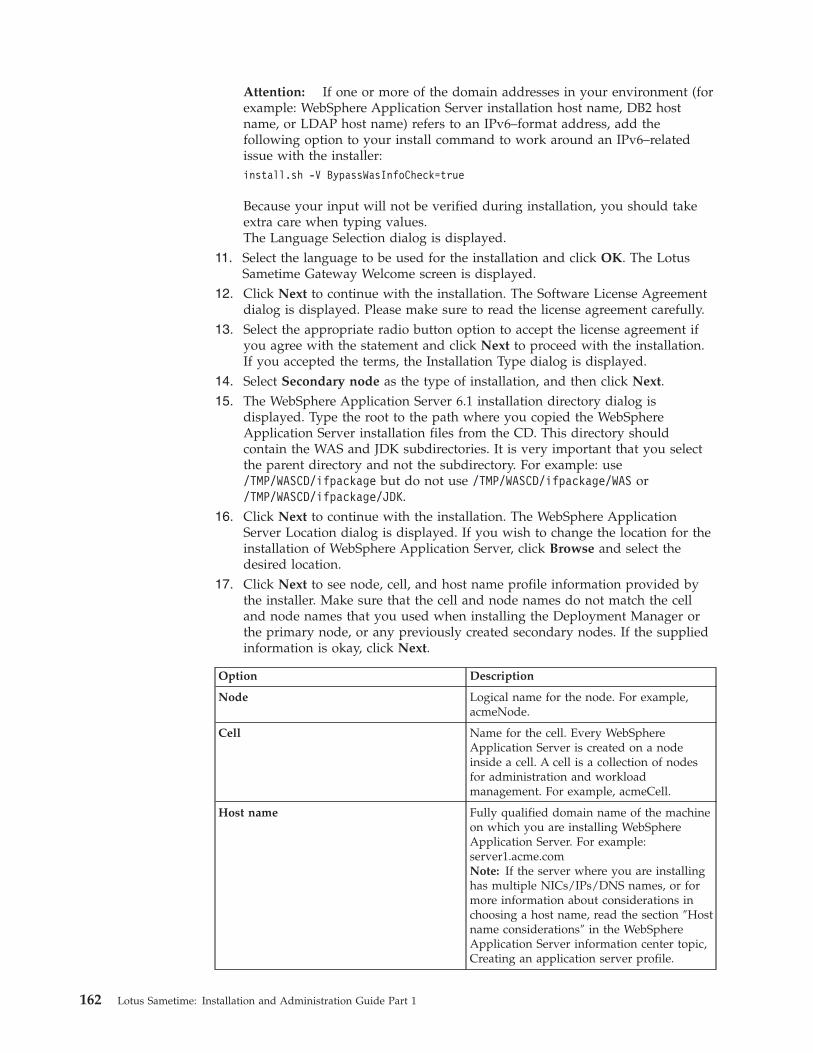
Attention: If one or more of the domain addresses in your environment (forexample: WebSphere Application Server installation host name, DB2 hostname, or LDAP host name) refers to an IPv6–format address, add thefollowing option to your install command to work around an IPv6–relatedissue with the installer:install.sh -V BypassWasInfoCheck=true
Because your input will not be verified during installation, you should takeextra care when typing values.The Language Selection dialog is displayed.
11. Select the language to be used for the installation and click OK. The LotusSametime Gateway Welcome screen is displayed.
12. Click Next to continue with the installation. The Software License Agreementdialog is displayed. Please make sure to read the license agreement carefully.
13. Select the appropriate radio button option to accept the license agreement ifyou agree with the statement and click Next to proceed with the installation.If you accepted the terms, the Installation Type dialog is displayed.
14. Select Secondary node as the type of installation, and then click Next.15. The WebSphere Application Server 6.1 installation directory dialog is
displayed. Type the root to the path where you copied the WebSphereApplication Server installation files from the CD. This directory shouldcontain the WAS and JDK subdirectories. It is very important that you selectthe parent directory and not the subdirectory. For example: use/TMP/WASCD/ifpackage but do not use /TMP/WASCD/ifpackage/WAS or/TMP/WASCD/ifpackage/JDK.
16. Click Next to continue with the installation. The WebSphere ApplicationServer Location dialog is displayed. If you wish to change the location for theinstallation of WebSphere Application Server, click Browse and select thedesired location.
17. Click Next to see node, cell, and host name profile information provided bythe installer. Make sure that the cell and node names do not match the celland node names that you used when installing the Deployment Manager orthe primary node, or any previously created secondary nodes. If the suppliedinformation is okay, click Next.
Option Description
Node Logical name for the node. For example,acmeNode.
Cell Name for the cell. Every WebSphereApplication Server is created on a nodeinside a cell. A cell is a collection of nodesfor administration and workloadmanagement. For example, acmeCell.
Host name Fully qualified domain name of the machineon which you are installing WebSphereApplication Server. For example:server1.acme.comNote: If the server where you are installinghas multiple NICs/IPs/DNS names, or formore information about considerations inchoosing a host name, read the section ″Hostname considerations″ in the WebSphereApplication Server information center topic,Creating an application server profile.
162 Lotus Sametime: Installation and Administration Guide Part 1
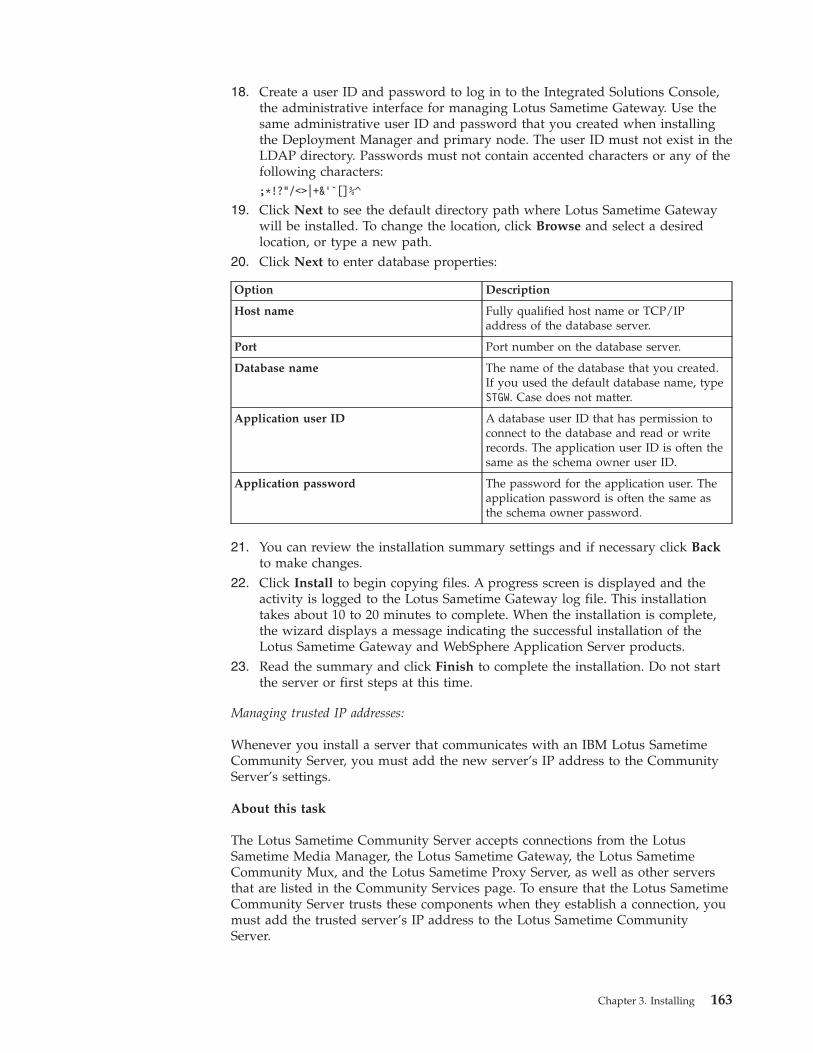
18. Create a user ID and password to log in to the Integrated Solutions Console,the administrative interface for managing Lotus Sametime Gateway. Use thesame administrative user ID and password that you created when installingthe Deployment Manager and primary node. The user ID must not exist in theLDAP directory. Passwords must not contain accented characters or any of thefollowing characters:;*!?"/<>|+&'`[]%^
19. Click Next to see the default directory path where Lotus Sametime Gatewaywill be installed. To change the location, click Browse and select a desiredlocation, or type a new path.
20. Click Next to enter database properties:
Option Description
Host name Fully qualified host name or TCP/IPaddress of the database server.
Port Port number on the database server.
Database name The name of the database that you created.If you used the default database name, typeSTGW. Case does not matter.
Application user ID A database user ID that has permission toconnect to the database and read or writerecords. The application user ID is often thesame as the schema owner user ID.
Application password The password for the application user. Theapplication password is often the same asthe schema owner password.
21. You can review the installation summary settings and if necessary click Backto make changes.
22. Click Install to begin copying files. A progress screen is displayed and theactivity is logged to the Lotus Sametime Gateway log file. This installationtakes about 10 to 20 minutes to complete. When the installation is complete,the wizard displays a message indicating the successful installation of theLotus Sametime Gateway and WebSphere Application Server products.
23. Read the summary and click Finish to complete the installation. Do not startthe server or first steps at this time.
Managing trusted IP addresses:
Whenever you install a server that communicates with an IBM Lotus SametimeCommunity Server, you must add the new server’s IP address to the CommunityServer’s settings.
About this task
The Lotus Sametime Community Server accepts connections from the LotusSametime Media Manager, the Lotus Sametime Gateway, the Lotus SametimeCommunity Mux, and the Lotus Sametime Proxy Server, as well as other serversthat are listed in the Community Services page. To ensure that the Lotus SametimeCommunity Server trusts these components when they establish a connection, youmust add the trusted server’s IP address to the Lotus Sametime CommunityServer.
Chapter 3. Installing 163
You do not need to add the Lotus Sametime System Console’s IP address becauseit is added automatically when you install the Lotus Sametime Community Serverusing a deployment plan or register the Lotus Sametime Community Server withthe console after installation.
This task must be completed separately for each server within a Lotus SametimeCommunity Server cluster, as well as for multiple non-clustered CommunityServers.1. Log in to the Integrated Solutions Console.2. Click Sametime System Console → Sametime Servers → Sametime Community
Servers.3. In the Sametime Community Servers list, click the deployment name of the
server with the list of trusted IP addresses that you want to change.4. Click the Connectivity tab.5. Under Trusted Servers, enter the IP address of the server that must connect to
the Lotus Sametime Community Server in the New IP Address field, and clickAdd.
Note: For the Lotus Sametime Media Manager, enter the Conference Managerserver IP address. Each instance of a Conference Manager cluster must beentered.To delete an IP address from the list, select it and click Delete Selected.
6. Click OK.7. Restart the Lotus Sametime Community Server for the change to take effect.
Federating secondary nodes into the cell:
Add secondary nodes to the Deployment Manager’s cell to create a networkdeployment of Sametime Gateway servers.
About this task
In this release, a Lotus Sametime Gateway cluster can support only two nodes: onePrimary Node and one Secondary Node.
Federating a secondary node on Windows into the cell:
Add a secondary node to the Deployment Manager’s cell. Adding secondary nodesto the cell allows a central point of administration for the network deployment byusing the Deployment Manager’s Integrated Solutions Console.
Before you begin
Expected state: the Deployment Manager is running.1. Make sure that the system clocks on the Deployment Manager and the
secondary node are within five minutes of each other and set for the sametimezone. Federation fails if the clocks are not synchronized within fiveminutes.
2. Ping the Deployment Manager node from the secondary node to make sure theDeployment Manager host name is resolvable.
3. On the secondary node, open a command window and navigate to thestgw_profile_root\bin directory.
164 Lotus Sametime: Installation and Administration Guide Part 1
4. Run the following command to add a secondary node to the DeploymentManager’s cell. Note the omission of the -includeapps qualifier.addNode.bat DM_hostname DM_port_number
Where DM_hostname is the host name of the Deployment Manager server. Forexample:addNode.bat gateway_dm.acme.com 8879
5. When prompted, provide the Deployment Manager’s administrative user IDand password. Wait for the operation to complete before proceeding. Look for asuccess message similar to the following when complete:Node Machine22NodeSecondary has been successfully federated.
Port 8879 is the default port on which the Deployment Manager listens.6. For each additional secondary node, repeat the preceding steps.7. Restart the Deployment Manager by typing the following commands. Wait for
the first command to finish before starting the Deployment Manager:stopManagerstartManager
What to do next
When you have finished installing and federating secondary nodes into theDeployment manager, continue with the cluster configuration as instructed in thetopic, “Creating a cluster and proxy servers” on page 167.
Federating a secondary node on AIX, Linux, and Solaris into the cell:
Add a secondary node to the Deployment Manager’s cell. Adding a secondarynode to the cell allows a central point of administration for the networkdeployment by using the Deployment Manager’s Integrated Solutions Console.
Before you begin
Expected state: the Deployment Manager is running.1. Make sure that the system clocks on the Deployment Manager and the
secondary node are within five minutes of each other and set for the sametimezone. Federation fails if the clocks are not synchronized within fiveminutes.
2. Ping the Deployment Manager node from the secondary node to make sure theDeployment Manager host name is resolvable.
3. On secondary node, open a command window and navigate to thestgw_profile_root\bin directory.
4. Run the following command to add a secondary node to the DeploymentManager’s cell. Note the omission of the -includeapps qualifier../addNode.sh DM_hostname DM_port_number
Where DM_hostname is the host name of the Deployment Manager server. Forexample:./addNode.sh gateway_dm.acme.com 8879
5. When prompted, provide the Deployment Manager’s administrative user IDand password. Wait for the operation to complete before proceeding. Look for asuccess message similar to the following when complete:Node Machine22NodeSecondary has been successfully federated.
Chapter 3. Installing 165
6. For each additional AIX, Linux, or Solaris secondary node, repeat the precedingsteps.
7. Restart the Deployment Manager by typing the following commands on theDeployment Manager machine. Wait for the first command to finish beforestarting the Deployment Manager:./stopManager.sh./startManager.sh
What to do next
When you have finished installing and federating secondary nodes into theDeployment manager, continue with the cluster configuration as instructed in thetopic, “Creating a cluster and proxy servers” on page 167.
What is a network deployment?:
A network deployment is a distributed WebSphere environment. Unlike astand-alone environment that contains only one application server node, a networkdeployment contains many application server nodes that can distribute theworkload of Lotus Sametime Gateway applications across several physical systems.The purpose of a network deployment is to provide a topology that is scalable andhas load balancing and failover capabilities.
Typically, a network deployment contains one node per physical computer. This isnot a requirement. Nodes are logical groupings of application servers, so you canhave more than one node installed on a physical system. For performance reasons,most installations have only one cluster member per node, since each clustermember creates its own JVM footprint.
In a network deployment, all nodes are federated into the deployment manager’scell. This allows the deployment manager to do its purpose in life- Manage theDeployment. A Deployment Manager is nothing more than a node that isresponsible for administering a cell. In Lotus Sametime Gateway, the only thingsconfigured on the Deployment Manager node are a few minor cell level attributes,and the Lotus Sametime Gateway administrative portlet plugin extensions. LotusSametime Gateway application files all run on the cluster member applicationservers.
The primary node is basically the same thing as a standalone node installation,minus a few cell level configurations that will be trumped by the DeploymentManager’s configuration. The primary node contains all the applications andWebSphere Application Server components that are required to run LotusSametime Gateway. When you install a primary node, you create a server instancecalled RTCGWServer. This server instance is cloned for use with all secondarynodes across the cluster. There can only be one primary Lotus Sametime Gatewaynode installed in any network deployment, because applications can only be addedto the cell from one node. In the Lotus Sametime Gateway network deployment,the primary node also configures the database server.
The secondary nodes are WebSphere Application Server placeholders that can runadditional cluster members (servers created as clones of the primary server). Whenyou install a secondary node for Lotus Sametime Gateway, the installation creates anode and default server instance, as well as some node level WebSphereApplication Server attributes such as data sources, WebSphere variables, andshared library definitions. A network deployment of Lotus Sametime Gateway cancontain as many secondary nodes as your environment needs.
166 Lotus Sametime: Installation and Administration Guide Part 1
Creating a cluster and proxy servers:
Create a Sametime Gateway cluster, install proxy servers, and then configure theproxy servers to use the cluster. Set up node replication only if you need highavailability and failover, and then start the cluster.
About this task
Starting a cluster involves starting the Deployment Manager, starting the nodeagents on all the nodes, and then starting the servers, including the proxy servers,on each node.
Creating the cluster:
Create a new cluster of IBM Lotus Lotus Sametime Gateway servers by runningthe Cluster Configuration Wizard. If you are upgrading an existing LotusSametime Gateway cluster, you must still complete this task because you removedthe cluster before upgrading the nodes.
Before you begin
Expected state: the Deployment Manager is running and nodes are stopped.
About this task
The instructions that follow describe steps for setting up a horizontal cluster, themost common cluster configuration. The Primary Node already has the primaryserver installed, so no additional server is needed on that computer. To add serversto the horizontal cluster, create one cluster member for each secondary node(computer).
Note: This release supports only one Secondary Node on a cluster.1. On the Deployment Manager, open a command window, navigate to the
stgw_server_root\config directory, and run the following command:AIX, Linux, and Solaris./configwizard.sh
Windowsconfigwizard.bat
IBM i./configwizard.sh
Note: To run this program in console mode (instead of using the graphicalinterface), add the -console argument to the command line; for example:configwizard.bat -console
2. View the Welcome page and click Next.3. For a Secondary Node, do the following:
a. Select the Secondary Node from the Node drop down list and type aunique name in the Server Name field.
b. Click Add Member.4. When you have finished adding the Secondary Nodes, click Next.5. Type the Schema user ID and Schema password for the database
Chapter 3. Installing 167

. These credentials have appropriate permissions to create tables in thedatabase. You may need to get this information from the databaseadministrator. The schema user ID is often the same as the application user IDfor the database.
6. Read the summary and click Configure. When finished, you can view theconfiguration log at You can review the configuration wizard log atstgw_server_root\logs\configwizard.log.
7. Restart the Deployment Manager with the following commands:./stopServer.sh dmgr -username username -password password./startServer.sh dmgr
WindowsstopServer.bat dmgr -username username -password passwordstartServer.bat dmgr
IBM i./stopServer.sh dmgr -username username -password passwordstartServer.sh dmgr
8. Complete the following steps on every node in the cluster, including thePrimary Node:a. Log in to the node’s operating system.b. Navigate to the stgw_profile_root\bin directory.c. Start the node agent on the node with the following command:
AIX, Linux, and Solaris./startNode.sh
WindowsstartNode.bat
IBM istartNode
Note: During installations, the Node agent on primary and secondaryservers may be loaded, and issuing a startnode command may result in theerror: ″Conflict detected on port 8878. Likely causes: a) An instance of theserver nodeagent is already running b) some other process is using port8878.″ If this occurs you can confirm the nodeagent status by running thecommand serverstatus nodeagent from the stgw_profile_root\bindirectory. When prompted, supply the Lotus Sametime Gatewayadministrator credentials. Verify that the nodeagent is running (the statuswill read, ″The Node Agent ″nodeagent″ is STARTED). If the agent isrunning, continue to the next step.
9. When all the node agents are started, verify that the cluster configuredproperly by performing the following steps:a. Log into the Integrated Solutions Console (http://localhost:9060/ibm/
console) using your administrative user ID and password on theDeployment Manager machine.
b. Click Servers → Clusters, and verify that SametimeGatewayCluster appearsin the table.
c. Click SametimeGatewayCluster, and then under Additional properties,click Cluster members to view the cluster members that you created.
Connecting to a DB2 database:
Use the Lotus Sametime System Console to connect to the Lotus Sametime MeetingServer or Lotus Sametime Gateway database before installing the server from the
168 Lotus Sametime: Installation and Administration Guide Part 1
System Console. If you installed the server without using the System Console (as isthe case with the Sametime Meeting Server on IBM i and Sametime Gateway onany platform), do this step before registering the server with the System Console.
Before you begin
Start the Lotus Sametime System Console if it is not already running.
About this task
If you have not already opened the Connect to DB2 Databases activity, follow thesesteps:1. From a browser, enter the following URL, replacing serverhostname.domain with
the fully qualified domain name of the Lotus Sametime System Console server.http://serverhostname.domain:8700/ibm/console
IBM i: The port number may not be 8700. Use the port that was listed in theSametime System Console installation results summary or use the settingspecified for the Administrative console secure port in the AboutThisProfile.txtfile. For the Sametime System Console Deployment Manager Profile(STSCDmgrProfile), the file is located in the following path:/QIBM/UserData/Websphere/AppServer/V7/SametimeWAS/profiles/STSCDmgrProfile/logs/AboutThisProfile.txt
2. Enter the WebSphere Application Server User ID and password that youcreated when you installed the Lotus Sametime System Console.
3. Click the Sametime System Console task to open it in the navigation tree.4. Click Sametime Prerequisites → Connect to DB2 Databases.Related tasks
“Starting the Lotus Sametime System Console” on page 231When started, the Lotus Sametime System Console runs as a task in the WebSphereApplication Server administrative console.
Sametime prerequisite: Connecting to a DB2 database:
This activity takes you through the steps for connecting to the Meeting Server orGateway database you created.
Before you begin
AIX, Linux, Solaris, Windows: Ensure that IBM DB2 has been installed and thatyou have created the Sametime Meeting Server or Gateway database.
IBM i: Ensure that you have created the required database schemas and tables.
In the Connect to DB2 Databases portlet, verify that the Lotus Sametime SystemConsole database you created earlier is already displayed in the list of databases.
About this task
Follow these steps to connect to the Meeting Server or Gateway database. Youmust do this before you can install the Meeting Server using the Sametime SystemConsole. If you installed the server without using the System Console (as is thecase with the Sametime Meeting Server on IBM i and Sametime Gateway on anyplatform), do this step before registering the server with the System Console.1. DB2 Configuration Guided Activity.
Chapter 3. Installing 169
Click Add to begin the guided activity that will connect your server to the DB2database. If a connection already exists, you can optionally edit or delete it.
2. Add a new database.a. In the Connect to DB2 Databases portlet, click Add.
If you want to edit or delete a database instead, then select one, and clickthe appropriate button.
b. Enter the fully qualified host name of the DB2 server in the Host namefield.Do not enter an IP address or a short host name.
c. The Port field shows the default port of 50000. Accept the default unlessyou specified a different port during DB2 installation or your server is usinga different port.Linux: The default is typically 50001, but will vary based on portavailability. Check the /etc/services file on the DB2 server to verify theport number being used.
d. In the Database name, field, enter the name of the database you want toconnect to.Meeting Server database
On AIX, Linux, Solaris, and Windows, the database name is STMS unlessyou changed it.On IBM i, the name is always STMS.Gateway database
For AIX, Linux, Solaris, and Windows, the database name is STGWDBunless you changed it.For IBM i, use the name you specified when creating the database schemas.
e. In the Application user ID field, supply the DB2 application’sadministrative user name that you created when you installed DB2, such asdb2admin. This user has database administration authority and you will usethis user ID and password whenever you work with DB2 databases forLotus Sametime. On IBM i, this is the user profile you specified as theowner of the Meeting Server database schemas in your copy of thestms.default.response.properties file or the user profile you logged in withwhen you created the Gateway database schemas.
f. In the Application password field, enter the password for the DB2administrative user ID.
g. If you are connecting to a database on an IBM i server, click Hosted onIBM i.
h. Click Finish.
Installing SIP and XMPP proxy servers:
SIP and XMPP proxy servers act as the initial point of entry for messages that flowinto and out of the enterprise. While you can install these proxy servers on an IBMLotus Sametime Gateway node, it is recommended that you install them on aseparate machine to isolate the proxy processing from the Lotus SametimeGateway cluster.
Before you begin
Expected state: DB2, LDAP, and Sametime Gateway servers are installed.
170 Lotus Sametime: Installation and Administration Guide Part 1

About this task
For network security, IBM recommends that you install the XMPP and SIP proxyserver node and the Sametime Gateway cluster in the network DMZ. Installing theSIP proxy in the DMZ by itself is not a supported configuration because it places afirewall device between that server and the Sametime Gateway cluster. All of thesecomponents should be able to communicate freely which each other withouttraversing through a firewall device.
Note: If you are upgrading from a previous version of Lotus Sametime Gateway,you already have a SIP proxy server. If the SIP proxy server is on an existingprimary or secondary node, there is no need to upgrade the SIP proxy server.However, if your SIP proxy server is installed on its own node, you must upgradeWebSphere Application Server on that node to version 6.1.0.11. If you want yourcluster to be able to access Google Talk or other XMPP users, you must install anXMPP proxy server.
Installing a SIP and XMPP proxy server on Windows:
The SIP and XMPP proxy servers are the first point of contact, after the firewall,for messages that flow into and out your enterprise. Install the proxy servers forboth standalone or network deployment installations of Sametime Gateway. IBMrecommends that you install a SIP and XMPP proxy server on its own node.
About this task
The XMPP and SIP proxy server node installation creates a WebSphere ApplicationServer node with two application servers installed. One server is a generic SIPproxy server provided by WebSphere Application Server, and the other is astandard application server onto which is installed the XMPP proxy application.The node does not function until it is federated into a Sametime Gateway cell.Information on downloading packages for Lotus Sametime Gateway is located inthe Lotus Sametime Download document.1. Create two temporary file folders: \TMP\WASCD and \TMP\SametimeGateway.2. From the installation media, copy the WebSphere Application Server
installation image part_number.exe to the folder \TMP\WASCD.3. Open a command window and navigate to the folder \TMP\WASCD.4. Extract all files to the temporary directory \TMP\WASCD. When you are done
extracting the files, you should have a \TMP\WASCD\ifpackage folder with WASand JDK folders inside the ifpackage folder.
5. From the installation media, copy the Sametime Gateway installation imagepart_number.exe to the \TMP folder.
6. Extract the files in part_number.exe to the \TMP\SametimeGateway folder.7. Navigate to the\TMP\SametimeGateway folder.8. Type the following command:
v For wizard mode: install.batv For console mode: install.bat -console
Chapter 3. Installing 171

Attention: If one or more of the DNS addresses in your environment (forexample: WebSphere Application Server installation host name, DB2 hostname, or LDAP host name) refers to an IPv6–format address, add thefollowing option to your install command to work around an IPv6–relatedissue with the installer:install.bat -V BypassWasInfoCheck=true
Because your input will not be verified during installation, you should takeextra care when typing values.
9. Select the language for the installation wizard and click OK. The LotusSametime Gateway Welcome screen is displayed. You can launch theSametime information center from this panel.
10. Click Next to continue with the installation. The Software License Agreementdialog is displayed. Read the license agreement carefully. Select theappropriate radio button option to accept the terms if you agree with thestatement and click Next to proceed with the installation.
11. If you are installing the proxy server on its own computer instead of on anexisting Sametime Gateway node, complete the following sub steps:a. Select SIP and XMPP proxy servers, and then click Next.b. The WebSphere Application Server 6.1 installation directory dialog is
displayed. Type the root to the path where you copied the WebSphereApplication Server installation files from the CD. This directory shouldcontain the WAS and JDK subdirectories. It is very important that youselect the parent directory and not the subdirectory. For example: use\TMP\WASCD\ifpackage but do not use \TMP\WASCD\ifpackage\WAS or\TMP\WASCD\ifpackage\JDK.
c. Click Next to continue with the installation. The WebSphere ApplicationServer Location dialog is displayed. If you wish to change the location forthe installation of WebSphere Application Server, click Browse and selectthe desired location.
12. If you are installing the proxy servers on an existing Sametime Gateway node,the installation wizard recognizes that an instance of Sametime Gateway is onthe same machine. The new installation for the proxy servers adds a profile toWebSphere Application Server. Click Next.
13. Check the node name, cell name, and host name that are supplied by theinstaller. Make sure that the cell and node names do not match the cell andnode names you used when installing the Deployment Manager. Choose aunique node name and cell name for this installation. If the suppliedinformation is okay, click Next.
Option Description
Node Logical name for the node. For example,acmeNodeProxy.
Cell Name for the cell. Every WebSphereApplication Server is created on a nodeinside a cell. A cell is a collection of nodesfor administration and workloadmanagement. For example, acmeCellProxy.
172 Lotus Sametime: Installation and Administration Guide Part 1
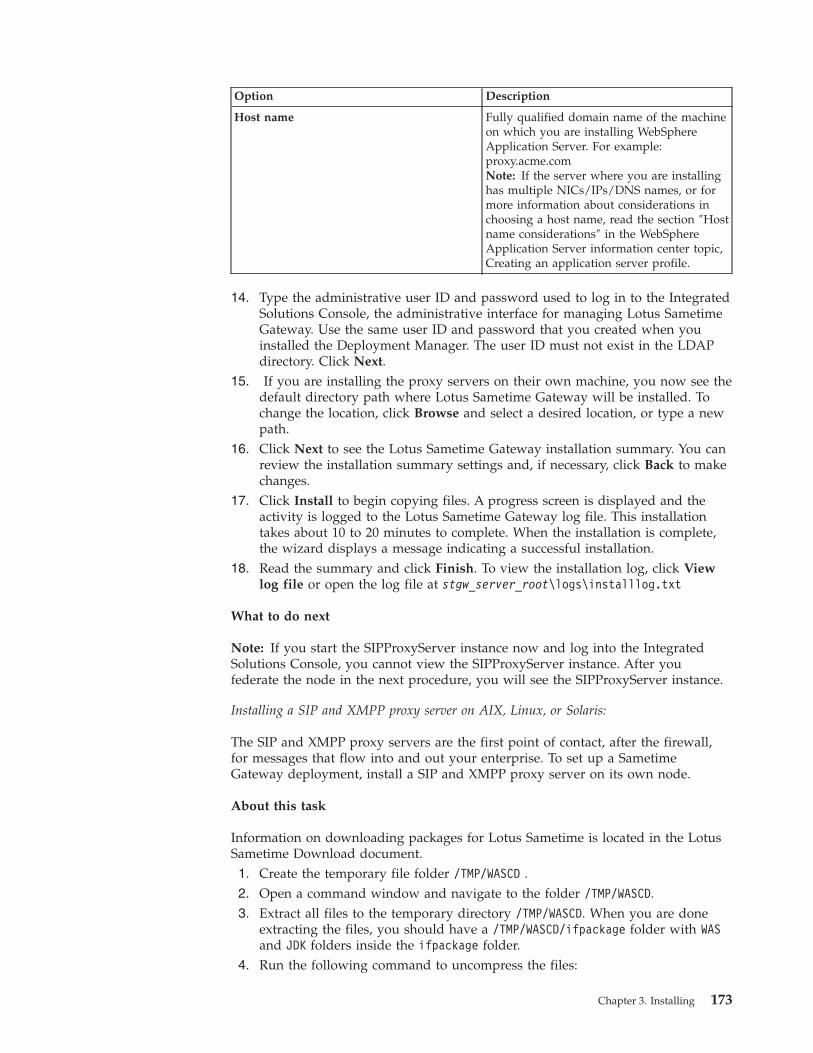
Option Description
Host name Fully qualified domain name of the machineon which you are installing WebSphereApplication Server. For example:proxy.acme.comNote: If the server where you are installinghas multiple NICs/IPs/DNS names, or formore information about considerations inchoosing a host name, read the section ″Hostname considerations″ in the WebSphereApplication Server information center topic,Creating an application server profile.
14. Type the administrative user ID and password used to log in to the IntegratedSolutions Console, the administrative interface for managing Lotus SametimeGateway. Use the same user ID and password that you created when youinstalled the Deployment Manager. The user ID must not exist in the LDAPdirectory. Click Next.
15. If you are installing the proxy servers on their own machine, you now see thedefault directory path where Lotus Sametime Gateway will be installed. Tochange the location, click Browse and select a desired location, or type a newpath.
16. Click Next to see the Lotus Sametime Gateway installation summary. You canreview the installation summary settings and, if necessary, click Back to makechanges.
17. Click Install to begin copying files. A progress screen is displayed and theactivity is logged to the Lotus Sametime Gateway log file. This installationtakes about 10 to 20 minutes to complete. When the installation is complete,the wizard displays a message indicating a successful installation.
18. Read the summary and click Finish. To view the installation log, click Viewlog file or open the log file at stgw_server_root\logs\installlog.txt
What to do next
Note: If you start the SIPProxyServer instance now and log into the IntegratedSolutions Console, you cannot view the SIPProxyServer instance. After youfederate the node in the next procedure, you will see the SIPProxyServer instance.
Installing a SIP and XMPP proxy server on AIX, Linux, or Solaris:
The SIP and XMPP proxy servers are the first point of contact, after the firewall,for messages that flow into and out your enterprise. To set up a SametimeGateway deployment, install a SIP and XMPP proxy server on its own node.
About this task
Information on downloading packages for Lotus Sametime is located in the LotusSametime Download document.1. Create the temporary file folder /TMP/WASCD .2. Open a command window and navigate to the folder /TMP/WASCD.3. Extract all files to the temporary directory /TMP/WASCD. When you are done
extracting the files, you should have a /TMP/WASCD/ifpackage folder with WASand JDK folders inside the ifpackage folder.
4. Run the following command to uncompress the files:
Chapter 3. Installing 173
gunzip -c part_number.tar.gz | tar -xvf -
When you are done extracting the files, you should have a/TMP/WASCD/ifpackage folder with WAS and JDK folders inside the ifpackagefolder.
5. From the installation media, copy the Lotus Sametime Gateway installationimage part_number.tar to the temporary directory /TMP.
6. Unzip the following file:unzip part_number.tar
This step creates the folder /TMP/SametimeGateway.7.
8. Navigate to the temporary directory /TMP/SametimeGateway and type one ofthe following commands:v For wizard mode: . /install.sh
v For console mode: . /install.sh -console
This command installs WebSphere Application Server 6.1 and Lotus SametimeGateway. The Language Selection dialog is displayed.
9. Select the language to be used for the installation and click OK. The LotusSametime Gateway Welcome screen is displayed.
10. Click Next to continue with the installation. The Software License Agreementdialog is displayed. Please make sure to read the license agreement carefully.
11. Select the appropriate radio button option to accept the license agreement ifyou agree with the statement and click Next to proceed with the installation.If you accepted the terms, the Installation Type dialog is displayed.
12. Select SIP and XMPP proxy servers, and then click Next.13. If you are installing the proxy servers on their own machine, complete the
following sub steps:a. The WebSphere Application Server installation directory dialog is
displayed. Type the root to the path where you copied the WebSphereApplication Server installation files from the CD. This directory shouldcontain the WAS and JDK subdirectories. It is very important that youselect the parent directory and not the subdirectory. For example: use/TMP/WASCD/ifpackage but do not use /TMP/WASCD/ifpackage/WAS or/TMP/WASCD/ifpackage/JDK.
b. Click Next to continue with the installation. The WebSphere ApplicationServer Location dialog is displayed. If you wish to change the location forthe installation of WebSphere Application Server, click Browse and selectthe desired location.
14. If you are not installing the proxy servers on their own machine, theinstallation wizard recognizes that an instance of Sametime Gateway is on thesame machine. The new installation for the SIP and XMPP proxy servers addsa profile to WebSphere Application Server. Click Next, and then click Nextagain.
15. Check the node name, cell name, and host name that are supplied by theinstaller. Make sure that the cell and node names do not match the cell andnode names you used when installing other Sametime Gateway servers.Choose a unique node name and cell name for this installation. If the suppliedinformation is okay, click Next.
174 Lotus Sametime: Installation and Administration Guide Part 1
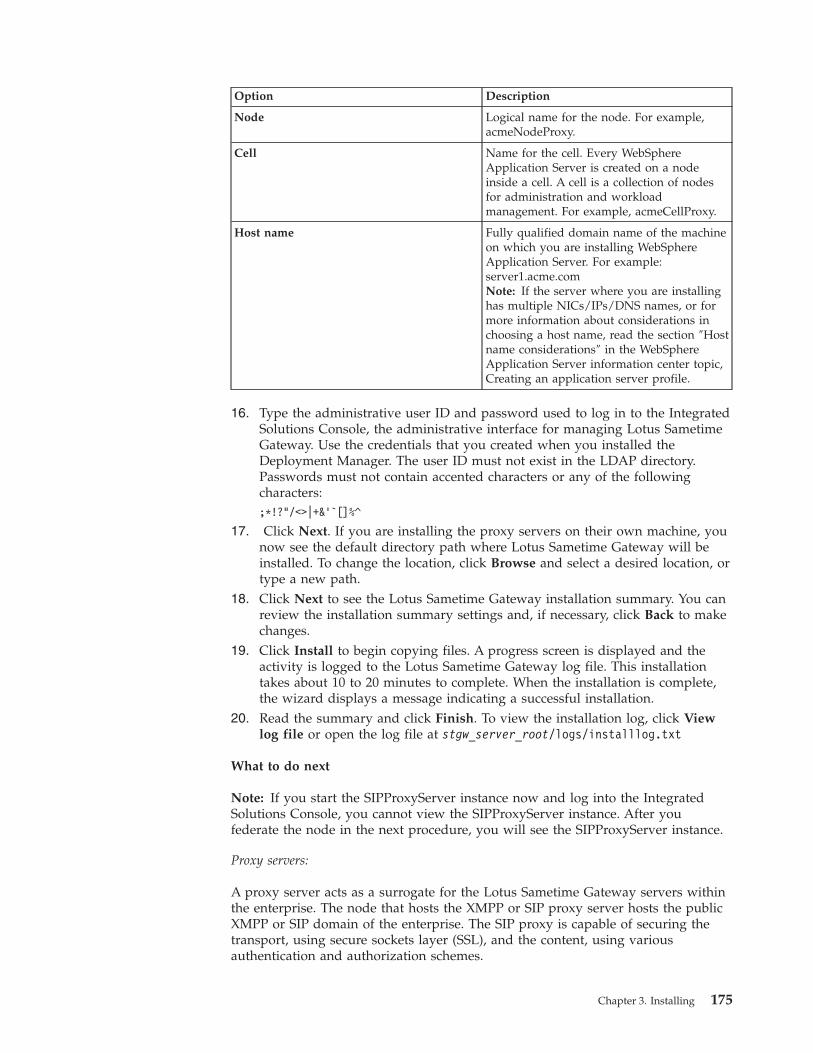
Option Description
Node Logical name for the node. For example,acmeNodeProxy.
Cell Name for the cell. Every WebSphereApplication Server is created on a nodeinside a cell. A cell is a collection of nodesfor administration and workloadmanagement. For example, acmeCellProxy.
Host name Fully qualified domain name of the machineon which you are installing WebSphereApplication Server. For example:server1.acme.comNote: If the server where you are installinghas multiple NICs/IPs/DNS names, or formore information about considerations inchoosing a host name, read the section ″Hostname considerations″ in the WebSphereApplication Server information center topic,Creating an application server profile.
16. Type the administrative user ID and password used to log in to the IntegratedSolutions Console, the administrative interface for managing Lotus SametimeGateway. Use the credentials that you created when you installed theDeployment Manager. The user ID must not exist in the LDAP directory.Passwords must not contain accented characters or any of the followingcharacters:;*!?"/<>|+&'`[]%^
17. Click Next. If you are installing the proxy servers on their own machine, younow see the default directory path where Lotus Sametime Gateway will beinstalled. To change the location, click Browse and select a desired location, ortype a new path.
18. Click Next to see the Lotus Sametime Gateway installation summary. You canreview the installation summary settings and, if necessary, click Back to makechanges.
19. Click Install to begin copying files. A progress screen is displayed and theactivity is logged to the Lotus Sametime Gateway log file. This installationtakes about 10 to 20 minutes to complete. When the installation is complete,the wizard displays a message indicating a successful installation.
20. Read the summary and click Finish. To view the installation log, click Viewlog file or open the log file at stgw_server_root/logs/installlog.txt
What to do next
Note: If you start the SIPProxyServer instance now and log into the IntegratedSolutions Console, you cannot view the SIPProxyServer instance. After youfederate the node in the next procedure, you will see the SIPProxyServer instance.
Proxy servers:
A proxy server acts as a surrogate for the Lotus Sametime Gateway servers withinthe enterprise. The node that hosts the XMPP or SIP proxy server hosts the publicXMPP or SIP domain of the enterprise. The SIP proxy is capable of securing thetransport, using secure sockets layer (SSL), and the content, using variousauthentication and authorization schemes.
Chapter 3. Installing 175

A SIP proxy server facilitates automatic load balancing, affinity matching, andfailover for a cluster of Lotus Sametime Gateway servers. It’s also the preferredplace to configure the connection settings for external domains, since it directlymanages all such connections when in use. You must set up a cluster with at leastone node before creating a SIP proxy server. You can run a SIP proxy server on anLotus Sametime Gateway server node, or create a separate node, on which LotusSametime Gateway is not installed, to be the SIP proxy server node.
After you set up a Lotus Sametime Gateway cluster and a SIP proxy server, youcan add external communities to Lotus Sametime Gateway. Lotus SametimeGateway prompts you for the relevant connection settings (host name, portnumber, transport protocol), and then creates the SIP Uniform Resource Indicator(URI). The SIP URI is sent to the SIP container in WebSphere Application Serverwhich sends it to the SIP proxy server to route the request to the appropriatedestination. There is no need to set the domain, host, port, or transport protocol inthe SIP proxy server as all this information is set in Lotus Sametime Gateway.
Multiple proxy servers
You can set up multiple proxy servers for load balancing, better Web response, andhigh availability. WebSphere Application Server does not support the clustering ofSIP or XMPP proxy servers, but you can set up more than one proxy server infront of an Lotus Sametime Gateway cluster. This configuration provides multipleentry points into the Lotus Sametime Gateway cluster while providing workloadbalancing. Multiple proxy server can be fronted by a simple IP sprayer, such as theSIP Load Balancer component included in WebSphere Application Server thathandles IP spraying to multiple proxy servers. If a proxy server fails, the affinity isto the container and not to the proxy itself so there is one less potential failurealong the message flow.
Federating the proxy server node into the cell:
After you install the SIP and XMPP proxy server node, you must federate the nodeinto the Deployment Manager’s cell so that the proxy server becomes part of thecluster.
Before you begin
Expected state: The Deployment Manager is running.
About this task
To federate or add the proxy server node into the cell, you run the addnodecommand on the proxy server node and specify the hostname of the DeploymentManager.1. Log into the proxy server node’s operating system.2. IBM i only: On the command line, run the STRQSH (Start Qshell) command.3. Synchronize the system clocks on the Deployment Manager and the proxy node
so that they are within five minutes of one another and are set for the sametime zone.Federation fails if the clocks are not synchronized within five minutes of eachother.
4. On the proxy server node, open a command window and navigate to thestgw_profile_root\bin directory.
176 Lotus Sametime: Installation and Administration Guide Part 1
5. IBM i only: Run the following command to obtain theSOAP_CONNECTOR_ADDRESS port number. Make a note of the port numberas you will need it to add nodes to the cluster:dspwasinst
6. Run the following command to add the proxy server node to the DeploymentManager’s cell:AIX, Linux, and Solaris:./addNode.sh DM_server_host_name DM_port_number -includeapps
WindowsaddNode.bat DM_hostname DM_port_number -includeapps
IBM i:addNode DM_server_host_name DM_SOAP_port -username WAS_Admin_user_name_on_DM-password WAS_Admin_password_on_DM
where:v DM_server_host_name is the resolvable host name of the Deployment
Manager.v DM_SOAP_portis the port that the Deployment Manager’s SOAP port is
listening on.v WAS_Admin_user_name_on_DM is the user ID of the WebSphere Application
Server administrator account on the Deployment Manager.v WAS_Admin_password_on_DM is the password associated with the
WebSphere Application Server administrator account.
For example:addNode gateway_dm.acme.com 8879 -includeapps -username wasadmin -password waspassword
7. When prompted, provide the Deployment Manager’s administrative user IDand password. Wait for the operation to complete before proceeding. Look for asuccess message similar to the following when complete:Node MyProxyNode has been successfully federated.
8. Verify that the proxy servers are installed correctly:a. Log into the Integrated Solutions Console (http://localhost:9060/ibm/
console).If you already logged in, you must log out and then log in again before youcan see changes.
b. Click Servers → Proxy servers. You should see the SIP proxy server.c. Click Servers → Application Servers. You should see the XMPP proxy
server.
Configuring a SIP proxy server:
Configure the Session Initiation Protocol (SIP) proxy server for a cluster of IBMLotus Sametime Gateway servers. There is no need to configure external domainsin the SIP proxy server; this is done through the Lotus Sametime Gatewayconfiguration.
Before you begin
Set up a cluster with at least one secondary node and install the SIP and XMPPproxy servers on the same physical hardware as a Deployment Manager, primarynode, or secondary node, or install the proxy servers on separate hardware. TheSIP and XMPP installation creates a new profile for the SIP and XMPP proxyservers.
Chapter 3. Installing 177
About this task
After you finish setting up a SIP proxy server, you’ll have a port number. Youprovide the port number in combination with the domain name of the node onwhich the SIP proxy server runs to external servers to connect to your LotusSametime Gateway.
Assigning the SIP proxy to work with the Lotus Sametime Gateway cluster:
Assign the SIP proxy server to function with the IBM Lotus Sametime Gatewaycluster.1. In the Integrated Solutions Console, click Server Types → WebSphere proxy
servers.2. In the ″WebSphere proxy servers″ page, click the SIPProxyServer link
corresponding to the proxy server you want to update.3. Click SIP Proxy server settings → SIP Proxy settings.4. From the drop down list, select the Lotus Lotus Sametime Gateway cluster.5. Click OK then click Save, and then click OK again.
Configuring the SIP Proxy server to listen on ports 5060 and 5061:
Configure the IBM Lotus Sametime Gateway cluster’s SIP Proxy server to listen onports 5060 and 5061.
Before you begin
Configure a cluster of Lotus Sametime Gateway servers.
About this task
Public instant messaging providers require you to accept connections on ports 5060and 5061, so you will need to confirm that the SIP Proxy server’s host name isresolvable and is listening on these ports. If the cluster’s SIP Proxy server isinstalled on a node that is already hosting Lotus Sametime Gateway, and the SIPProxy server is not already listening on ports 5060 and 5061, reconfigure the portsettings as follows:1. Determine which ports the SIP Proxy server is currently listening on:
a. On the cluster’s Deployment Manager, log in to the Integrated SolutionsConsole as the WebSphere administrator.
b. Click WebSphere proxy servers → SIPProxyServer → Ports.c. Check the listening ports for the following names:
v PROXY_SIP_ADDRESSv PROXY_SIPS_ADDRESSIf PROXY_SIP_ADDRESS listens on port 5060 and PROXY_SIPS_ADDRESSlistens on port 5061, you can skip the rest of this task. Otherwise, proceed tothe next step to change the port settings.
2. Determine whether any nodes share the IP address and host name with the SIPProxy server.If another node shares the IP address and host name, change the default hostport settings for that node to avoid a conflict with the SIP Proxy server.a. Still on the Deployment Manager, click System Administration → Nodes.
178 Lotus Sametime: Installation and Administration Guide Part 1

b. Check whether any nodes use the same IP address and host name as theSIP Proxy server.
c. If a node does share the IP address and host name, check its port settingsfor the following names:v SIP_DEFAULTHOSTv SIP_DEFAULTHOST_SECURE
d. If SIP_DEFAULTHOST is not set to 5060 and SIP_DEFAULTHOST_SECUREis not set to 5061, skip to step 3.
e. If ports 5060 and 5061 are already in use, change those settings now bysetting:v SIP_DEFAULTHOST to port 5080v SIP_DEFAULTHOST_SECURE to port 5081
f. Save your changes to the master configuration by clicking Save whenprompted.
3. Now reset the SIP ports on the SIP Proxy server to use ports 5060 and 5061:a. On the Deployment Manager, click WebSphere proxy servers →
SIPProxyServer → Ports.b. Change the port settings for the following names:
v PROXY_SIP_ADDRESS to port 5060v PROXY_SIPS_ADDRESS to port 5061
c. Save your changes to the master configuration and synchronize the nodes inthe cluster:WebSphere Application Server displays a message prompting you to savechanges to the master configuration. Select the Synchronize nodes optionbefore clicking the Save button.
Creating a virtual host for the SIP proxy:
Create virtual host definitions for ports 5060 and 5061.1. To identify the SIP proxy port number in the proxy server table, click the name
of the SIP proxy server that you created.2. Under Proxy Settings, select SIP proxy server settings → SIP Proxy server
transports.3. Make a note of the port number defined for SIPS_PROXY_CHAIN. The port
number in combination with the domain name of the node on which the SIPproxy server runs is needed for configuring external servers to connect to yourLotus Lotus Sametime Gateway server.
4. Now move to the Environment section if the Integrated Solutions Console.5. Click Virtual Hosts → default_host → Host Aliases → New.6. Verify the virtual host definitions for 5060/5061. If the virtual host is not
defined, define the new alias as follows:a. Add * to the Host Name field.b. Add 5060 to the Port field.c. Click OK.d. Click Save.The additional Virtual Host entry is needed if the default ports are not addedduring installation. Port 5060, however, only covers non-TLS installs. For securesetups, the following entry may also need to be added: *:5061
Create custom properties for the SIP proxy server:
Chapter 3. Installing 179
Define custom properties that will instruct the SIP proxy server to return ″503Service Unavailable″ when the server is down, rather than the default error ″404Page not found.″
Create two custom properties for the new SIP Proxy server as follows:The new properties will instruct the SIP Proxy server to return ″503 ServiceUnavailable″ when the server is down, rather than the default error ″404 Page notfound.″1. In the Integrated Solutions Console, click Servers → Proxy Servers →
your_new_SIP_proxy.2. Click SIP Proxy server settings → SIP Proxy settings → Custom properties.3. Click New, enter the following information, and then click OK.
Name lsnLookupFailureReasonPhrase
Value Service Unavailable
4. Click New, enter the following information, and then click OK.
Name lsnLookupFailureResponseCode
Value 503
5. Click Save.
Tuning the SIP proxy:
This sections describes the steps for tuning a SIP proxy.
About this task
Tune the JVM garbage collection policy for the SIP proxy server as follows:1. In the Integrated Solutions Console, click Servers → Proxy Servers →
SIPProxyServer.2. Perform the following instructions for each of the sip proxies in the list:
a. Select a proxy server by clicking it in the list.b. Under Server Infrastructure, click Java and Process management → Process
Definition.c. Under Additional Properties, click Java Virtual Machine.d. In the Initial Heap Size field, enter 600.e. In the Maximum Heap Size field, enter 600.f. In the Generic JVM arguments field, enter the following value as one
continuous line :-Xmo60m -Xgcpolicy:gencon -Xgc:noAdaptiveTenure,tenureAge=8,stdGlobalCompactToSatisfyAllocate -Xtgc:parallel
g. Click OK, and click Save to save changes to the master configuration.
Configuring the Gateway cluster and SIP proxy for a NAT environment:
Configure a cluster of IBM Lotus Sametime Gateway servers to operate in a NAT(Network Address Translation) environment.
180 Lotus Sametime: Installation and Administration Guide Part 1
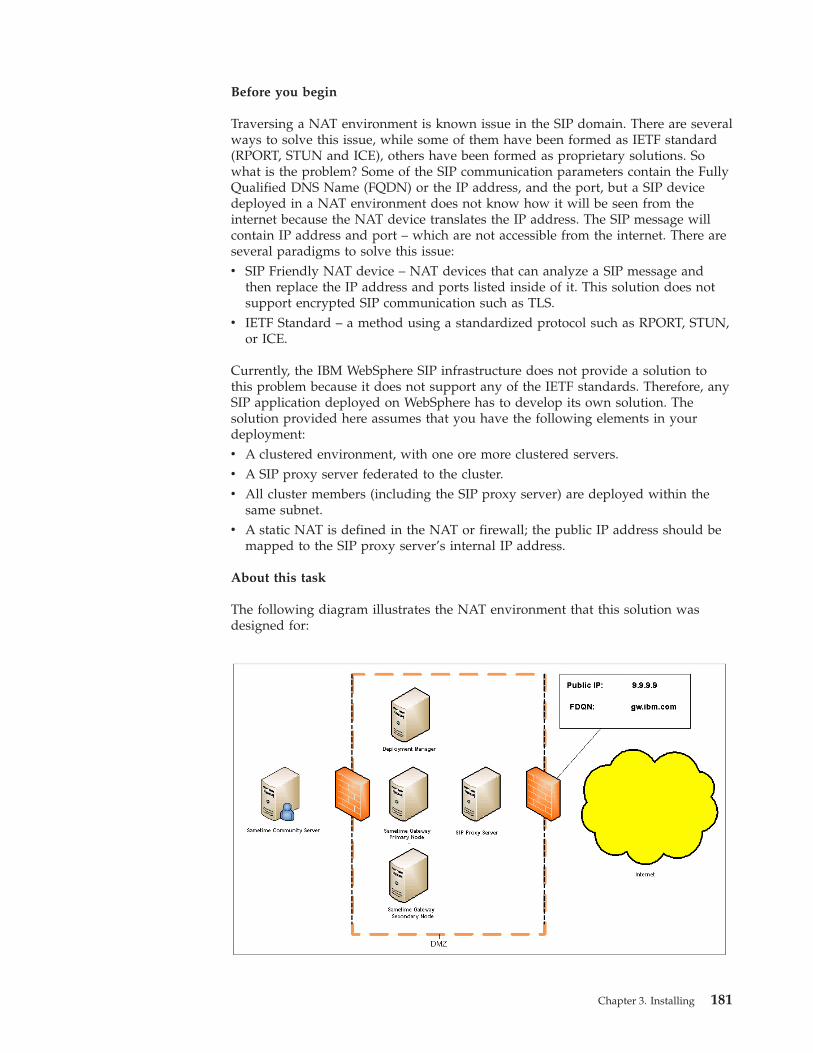
Before you begin
Traversing a NAT environment is known issue in the SIP domain. There are severalways to solve this issue, while some of them have been formed as IETF standard(RPORT, STUN and ICE), others have been formed as proprietary solutions. Sowhat is the problem? Some of the SIP communication parameters contain the FullyQualified DNS Name (FQDN) or the IP address, and the port, but a SIP devicedeployed in a NAT environment does not know how it will be seen from theinternet because the NAT device translates the IP address. The SIP message willcontain IP address and port – which are not accessible from the internet. There areseveral paradigms to solve this issue:v SIP Friendly NAT device – NAT devices that can analyze a SIP message and
then replace the IP address and ports listed inside of it. This solution does notsupport encrypted SIP communication such as TLS.
v IETF Standard – a method using a standardized protocol such as RPORT, STUN,or ICE.
Currently, the IBM WebSphere SIP infrastructure does not provide a solution tothis problem because it does not support any of the IETF standards. Therefore, anySIP application deployed on WebSphere has to develop its own solution. Thesolution provided here assumes that you have the following elements in yourdeployment:v A clustered environment, with one ore more clustered servers.v A SIP proxy server federated to the cluster.v All cluster members (including the SIP proxy server) are deployed within the
same subnet.v A static NAT is defined in the NAT or firewall; the public IP address should be
mapped to the SIP proxy server’s internal IP address.
About this task
The following diagram illustrates the NAT environment that this solution wasdesigned for:
Chapter 3. Installing 181
Limitations:v Only static NAT is supportedv A single SIP proxy deployment was tested; a multiple-SIP proxy deployment
was never tested but can be applied with the same setting.v Single-server deployment is not supported, but a clustered deployment which
contains only one server is supported.1. Map a fully qualified domain name to the public IP address serving the Lotus
Sametime Gateway.This FDQN will be used when registering the Gateway for provisioning withYahoo! and AOL, as well as in the SRV record used for communicating withGoogle.
2. Install the SSL certificate.The CN name for the certificate should be the one defined as FQDN mapped tothe public IP in step 2. For example, the diagram above uses the FQDNgw.ibm.com. For information on requesting the certificate, see Creating acertificate request.
3. Define a custom property to map the cluster FQDN for traversing the NAT:Define a custom property to enable communications in a NAT (NetworkAddress Translation) environment. Traversing NAT is known issue for the SIPdomain; defining the ″FQDN″ custom property for Lotus Sametime Gateway isa workaround for this issue. Before beginning, make sure the followingrequirements have been satisfied:v A static NAT should be defined in the NAT or Firewall (only static NATs are
supported).v The public IP address should be mapped to the SIP proxy internal IP
address.v A fully qualified domain name must be mapped to the public IP address
serving the Lotus Sametime Gateway.This FDQN will be used when registering the Lotus Sametime Gateway forprovisioning with Yahoo! & AOL, as well as the SRV record used forcommunicating with Google .a. Log in to the Integrated Services Console as a Lotus Sametime Gateway
administrator.b. Click System administration → Cell → Custom Properties.c. Click New and enter information for the new custom property:
Name Type com.ibm.sametime.gateway.fqdn as the name ofthe new property.
Value Type your fully qualified domain name.
Description Type a description of the new property.
d. Click Apply, and then click OK.e. Perform a full synchronize with the nodes:
1) In the Deployment Manager’s Integrated Solutions Console, clickSystem administration → Nodes.
2) Click Full Resynchronize.f. Restart all Lotus Sametime Gateway nodes.For example, If you set the custom property to gw.ibm.com (and the port is setto 5070), the INVITE SDP would look like this:
182 Lotus Sametime: Installation and Administration Guide Part 1
v=0o=- 0 0 IN IP4 gw.ibm.coms=sessionc=IN IP4 gw.ibm.comt=0 0m=message 5070 sip null
4. Enable the SIP Proxy IP Sprayer:a. In the Integrated Solutions Console, click Servers → Proxy Servers.b. Select the SIP proxy server from the list.c. Click SIP Proxy Server Settings → Enable SSL sprayer.d. Apply the following settings:
v Enable SSL sprayerv Set the SSL host to the FQDN (in our diagram gw.ibm.com)v Set the port to 5061.
e. Restart the proxy and the Lotus Sametime Gateway server.
Configuring the XMPP proxy server:
Configure the XMPP proxy server to allow Google Talk, and other XMPP-basedinstant messaging systems to flow to and from the Sametime Gateway.
Before you begin
Expected state: the SIP and XMPP proxy server node is installed and federated intothe cell. A Sametime cluster has been installed. The Deployment Manager isstarted.1. On the Deployment Manager node, log into the Integrated Solutions Console.2. Click Servers → Application Servers and select the XMPPProxyServer from
the list.3. Click Ports.4. Click New to add a port.5. Select User-defined Port .6. Type XMPP_INTERNAL_PORT in the Specify port name field.7. In the Host name field, type the IP address of the machine on which
XMPPProxyServer is installed.8. In the Port field, type 5271.
A note about ports:v XMPP_INTERNAL_PORT is used for listening to traffic from the proxy
server.If the XMPPProxy and XMPPServer are running on the same physicalcomputer, they will attempt to listen to the same default value ofXMPP_INTERNAL_PORT which is 5271. As a result, the proxy will listen tothe incoming connections from the server, and the server will listen to theproxy. In order to break this endless loop, set XMPP_INTERNAL_PORT toanother value for the proxy (for example, 5272).
v XMPP_SERVER_ADDRESS port is used on the proxy server itself to listento traffic from an external community.The XMPP_SERVER_ADDRESS port (5269) is unrelated to the ″port 5269″value that appeared on the XMPP community page when you created the
Chapter 3. Installing 183
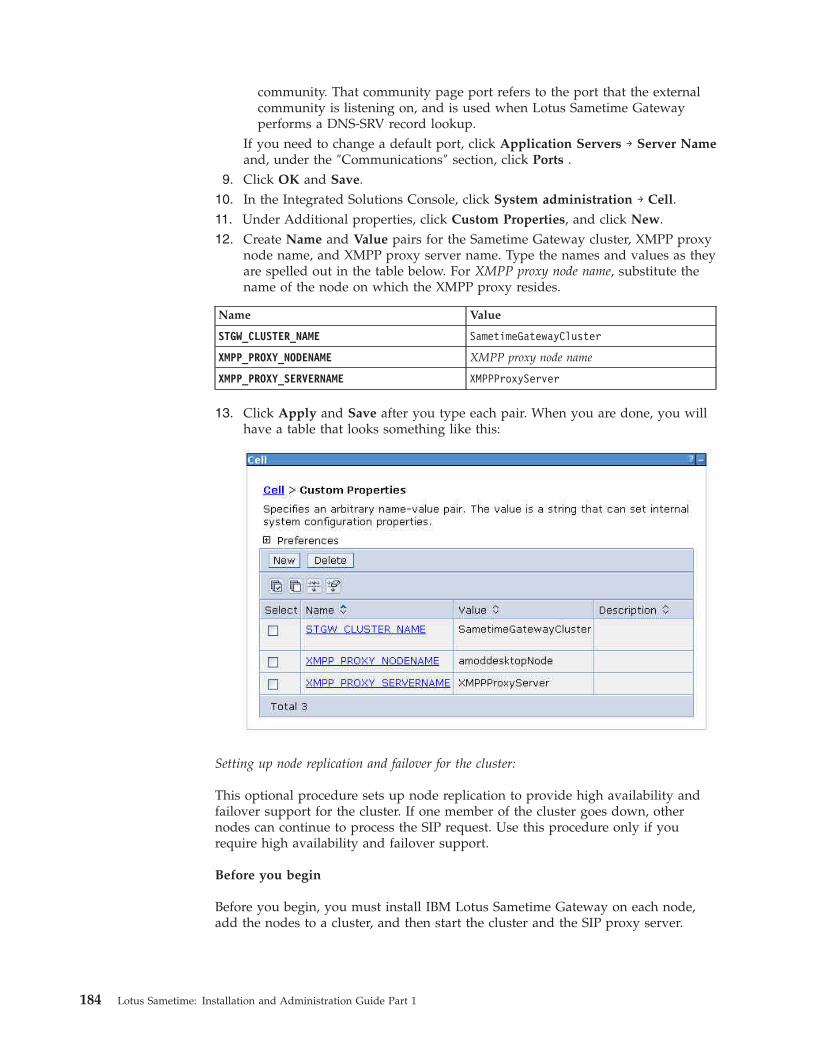
community. That community page port refers to the port that the externalcommunity is listening on, and is used when Lotus Sametime Gatewayperforms a DNS-SRV record lookup.
If you need to change a default port, click Application Servers → Server Nameand, under the ″Communications″ section, click Ports .
9. Click OK and Save.10. In the Integrated Solutions Console, click System administration → Cell.11. Under Additional properties, click Custom Properties, and click New.12. Create Name and Value pairs for the Sametime Gateway cluster, XMPP proxy
node name, and XMPP proxy server name. Type the names and values as theyare spelled out in the table below. For XMPP proxy node name, substitute thename of the node on which the XMPP proxy resides.
Name Value
STGW_CLUSTER_NAME SametimeGatewayCluster
XMPP_PROXY_NODENAME XMPP proxy node name
XMPP_PROXY_SERVERNAME XMPPProxyServer
13. Click Apply and Save after you type each pair. When you are done, you willhave a table that looks something like this:
Setting up node replication and failover for the cluster:
This optional procedure sets up node replication to provide high availability andfailover support for the cluster. If one member of the cluster goes down, othernodes can continue to process the SIP request. Use this procedure only if yourequire high availability and failover support.
Before you begin
Before you begin, you must install IBM Lotus Sametime Gateway on each node,add the nodes to a cluster, and then start the cluster and the SIP proxy server.
184 Lotus Sametime: Installation and Administration Guide Part 1
About this task
Lotus Sametime Gateway offers a comprehensive high availability (HA) solution.High availability means an environment that doesn’t have a single point of failure.A SIP cluster that requires replication and failover can consist of many replicationdomains, each of which contain a set of two servers. There is no limit set on thenumber of servers in a cluster. For performance reasons, each replication domainshould contain two servers only. The replication domain should be set to the entiredomain, which means state is replicated to all servers in the replication domain.The replication mode must be Both client and server. The distributed session for acontainer must be set to Memory-to-memory replication.1. Click Servers → clusters and verify that the Sametime Gateway cluster is started
and the status is green.2. Click Servers → Proxy Servers and verify that the SIP proxy is started and the
status is green.3. Click SIP proxy → SIP Proxy Server Settings → SIP proxy settings and verify
that the cluster in the drop down box is the same Sametime Gateway clusterdefined in the previous step.
4. Click Environment → Replication Domains , and then click New. Do not pickthe GatewayCache. This is the DynaCache used to propagate the configurationacross the cluster, and is not used for SIP session replication.
5. Type a name for the new replication domain.6. Under Number of Replicas, select Entire Domain so that the SIP session is
replicated to all members in the domain, and click OK.7. Click Servers → Application Servers, and then select a member of the cluster.
a. Under Container Settings, clickSession management.b. Under Additional Properties, click Distributed environment settings.c. Under Distributed sessions, click Memory-to-memory replication. The
distributed session option will become enabled once configured.d. Under Replication domain, select the replication domain that you created in
previous steps.e. In the Replication mode field, select Both client and server, then click OK,
and then clickSave. Memory to memory replication is now enabled for thismember of the cluster.
8. Repeat the previous step for each member of the cluster.
Starting a cluster:
When starting a cluster for the first time, you must start the Deployment Manager,node agents, and then all Lotus Sametime Gateway servers in the cluster.
Before you begin
Before begin these steps, you must install Lotus Sametime Gateway on each node,federate the nodes into the cell, run the Cluster Configuration Wizard, and then setup SIP and XMPP proxy servers for your cluster.
About this task
In the steps that follow, you start the Deployment Manager in a command windowso that you can log in to the Integrated Solutions Console and complete theremaining steps. After the Deployment Manager is started, you can view theIntegrated Solutions Console pages. However, you cannot view the Lotus
Chapter 3. Installing 185
Sametime Gateway administration pages until you start at least one node agentand the Lotus Sametime Gateway server on that node.1. Log in to the Deployment Manager node as a user with administrative
privileges.2. Open a command window (QShell session on IBM i) and navigate to the
stgw_profile_root\bin directory3. If not already started, start the Deployment Manager with the following
command:AIX, Linux, and Solaris./startManager.sh
WindowsstartManager.bat
IBM istartManager
4. Log in to one of the Lotus Sametime Gateway nodes.5. Open a command window (QShell session on IBM i) and navigate to the
stgw_profile_root\bin directory.6. Start the node agent with the following command.
AIX, Linux, and Solaris./startNode.sh
WindowsstartNode.bat
IBM istartNode
7. Log in to the other nodes, except the Deployment Manager node, and repeatthe previous steps to start the node agent on each node.
Stopping and starting the Deployment Manager:
This topic describes how to stop and start the Deployment Manager.1. Log in to the Deployment Manager node as a user with administrative
privileges.2. Open a command window (QShell session on IBM i) and navigate to the
stgw_profile_root\bin directory3. Stop the Deployment Manager. Use the administrative user ID and password
that you created when you installed the Deployment Manager. Note that youdo not have to provide the username and password qualifiers in the command;you can wait to be prompted and then enter your credentials. Type thefollowing commands:AIX, Linux, and Solaris./stopManager.sh -username username -password password./startManager.sh
WindowsstopManager.bat -username username -password passwordstartManager.bat
IBM istopManager -username username -password passwordstartManager
Stopping and starting the node agents:
186 Lotus Sametime: Installation and Administration Guide Part 1

This topic describes how to stop and start the node agents. Typically, you stop andstart node a node agent by logging onto a node and running the stop node or startnode command. However, for convenience, you can restart all node agents fromthe Deployment Manager node by using the Integrated Solutions Console only ifthe node agents are running. If they are stopped, you must start the node agentsfrom nodes themselves.1. Log in to one of the Lotus Sametime Gateway nodes.2. Open a command window (QShell session on IBM i) and navigate to the
stgw_profile_root\bin directory.3. Stop the node agent with the following command:
AIX, Linux, and Solaris./stopNode.sh
WindowsstopNode.bat
IBM istopNode
4. Start the node agent with the following command.AIX, Linux, and Solaris./startNode.sh
WindowsstartNode.bat
IBM istartNode
5. Log in to the other nodes, except the Deployment Manager node, and repeatthe previous steps to stop and start the node agent on each node.
6. To restart node agents that are already running:a. Make sure the Deployment Manager is running and log into the Integrated
Solutions Console on the Deployment Manager node.b. Click System Administration → Node agents .c. Select all node agents, and then click Restart.
Stopping and starting a cluster:
Complete these steps to stop and start a cluster of Sametime Gateway servers fromthe Integrated Solutions Console.
Before you begin
Expected state: the Deployment Manager, node agents, and all servers in thecluster are started.
About this task
You must restart the cluster when you add, delete, or change a community.1. Log into the Integrated Solutions Console (http://localhost:9060/ibm/console)
on the Deployment Manager server as a user with administrative privileges.2. Click Servers → Clusters.3. Select the Lotus Sametime Gateway cluster, and click Stop, and wait for the
cluster to stop.4. Click Servers → Clusters.
Chapter 3. Installing 187
5. Select the Lotus Sametime Gateway cluster, and click Start.6. Click Servers → Proxy servers.7. Select the SIP proxy server and click Start if it is not already started.8. Click Servers → Application servers.9. Select the XMPP proxy server and click Start if it is not already started.
Stopping and starting servers in a cluster:
This topic describes how to stop or start individual servers or nodes in a cluster.1. Log into the Integrated Solutions Console (http://localhost:9060/ibm/console)
on the Deployment Manager server as a user with administrative privileges.2. Click Servers → Application Servers .3. If you want to stop a server, select the application server’s check box and click
Stop.4. If you want to start a server, select the application server’s check box and click
Start.
Stopping and starting a single server:
Complete these steps to stop and start a single Sametime Gateway server in asingle server environment.1. Log in to the server machine as a user with administrative privileges.2. Open a command window and navigate to the Lotus Sametime Gateway
profile directory that contains binaries: stgw_profile_root\bin3. Type the following command to stop the Sametime Gateway server. Note that
RTCGWServer is case-sensitive, and that on all the stopserver commands, you areprompted to enter your administrative user ID and password that you created.v Windows:
stopserver.bat RTCGWServer
v Linux, AIX, or Solaris:./stopserver.sh RTCGWServer
v IBM i:stopServer RTCGWServer
4. Type the following command to start Lotus Sametime Gateway.v Windows:
startserver.bat RTCGWServer
v Linux, AIX, or Solaris:./startserver.sh RTCGWServer
v IBM i:startServer RTCGWServer
Starting the SIP and XMPP proxy servers:
The XMPP and SIP proxy server node is different from other Sametime Gatewaynode installation types in that it contains more than one server. Based on the typeof traffic you expect to have in your environment (SIP or XMPP), you can start orstop the appropriate proxy server instance on the node. This removes the need todefine a proxy server for each type of protocol. If you require the XMPP proxyfunctionality only, then start the XMPPProxyServer only. If you need SIP proxyfunctionality only, then start the SIPProxyServer only. If you need both, start both.
188 Lotus Sametime: Installation and Administration Guide Part 1
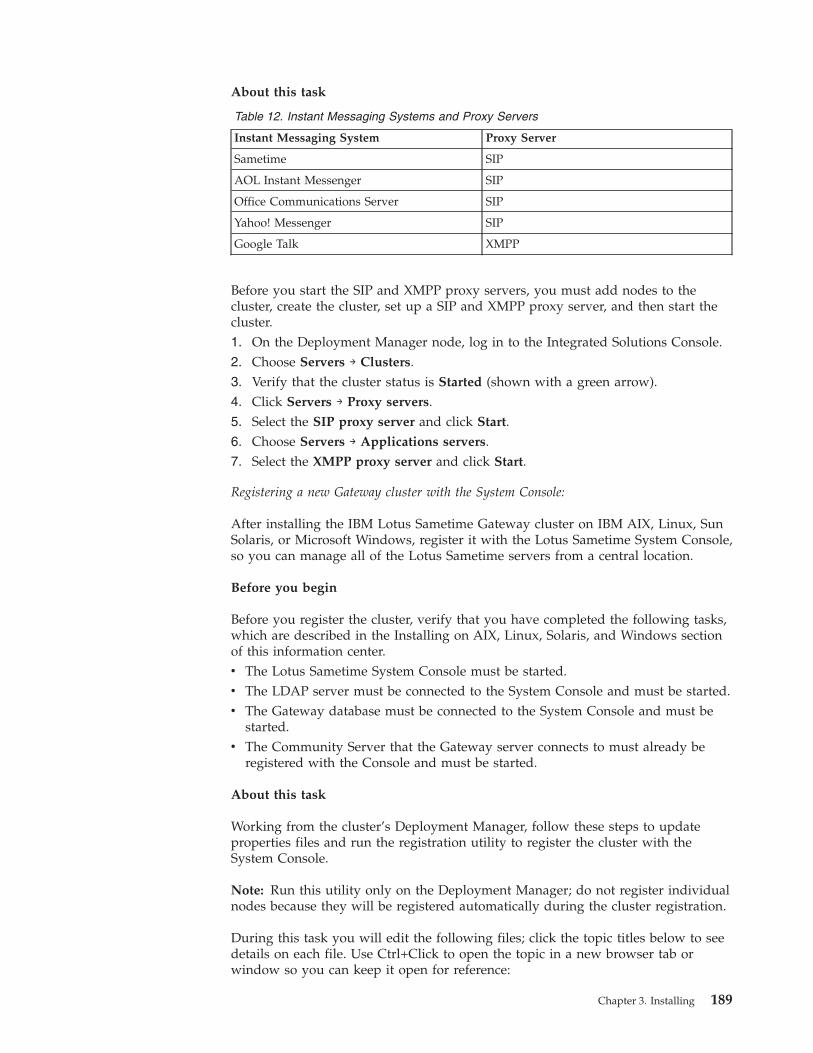
About this task
Table 12. Instant Messaging Systems and Proxy Servers
Instant Messaging System Proxy Server
Sametime SIP
AOL Instant Messenger SIP
Office Communications Server SIP
Yahoo! Messenger SIP
Google Talk XMPP
Before you start the SIP and XMPP proxy servers, you must add nodes to thecluster, create the cluster, set up a SIP and XMPP proxy server, and then start thecluster.1. On the Deployment Manager node, log in to the Integrated Solutions Console.2. Choose Servers → Clusters.3. Verify that the cluster status is Started (shown with a green arrow).4. Click Servers → Proxy servers.5. Select the SIP proxy server and click Start.6. Choose Servers → Applications servers.7. Select the XMPP proxy server and click Start.
Registering a new Gateway cluster with the System Console:
After installing the IBM Lotus Sametime Gateway cluster on IBM AIX, Linux, SunSolaris, or Microsoft Windows, register it with the Lotus Sametime System Console,so you can manage all of the Lotus Sametime servers from a central location.
Before you begin
Before you register the cluster, verify that you have completed the following tasks,which are described in the Installing on AIX, Linux, Solaris, and Windows sectionof this information center.v The Lotus Sametime System Console must be started.v The LDAP server must be connected to the System Console and must be started.v The Gateway database must be connected to the System Console and must be
started.v The Community Server that the Gateway server connects to must already be
registered with the Console and must be started.
About this task
Working from the cluster’s Deployment Manager, follow these steps to updateproperties files and run the registration utility to register the cluster with theSystem Console.
Note: Run this utility only on the Deployment Manager; do not register individualnodes because they will be registered automatically during the cluster registration.
During this task you will edit the following files; click the topic titles below to seedetails on each file. Use Ctrl+Click to open the topic in a new browser tab orwindow so you can keep it open for reference:
Chapter 3. Installing 189
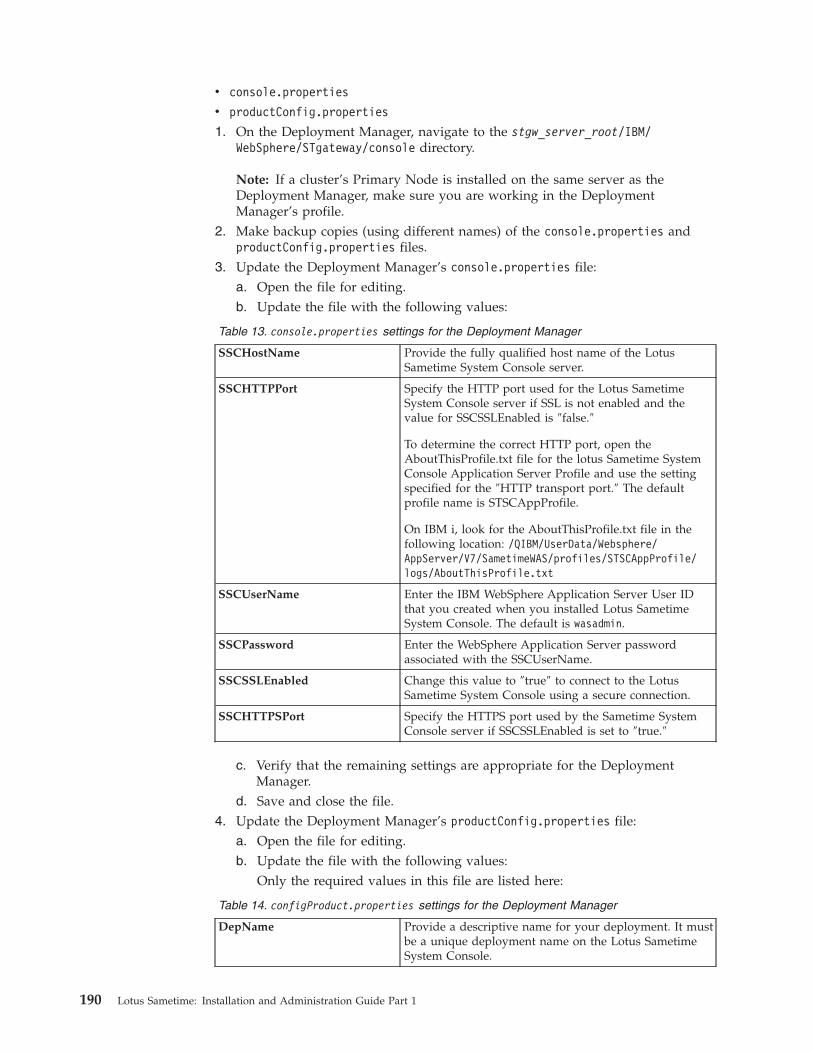
v console.properties
v productConfig.properties
1. On the Deployment Manager, navigate to the stgw_server_root/IBM/WebSphere/STgateway/console directory.
Note: If a cluster’s Primary Node is installed on the same server as theDeployment Manager, make sure you are working in the DeploymentManager’s profile.
2. Make backup copies (using different names) of the console.properties andproductConfig.properties files.
3. Update the Deployment Manager’s console.properties file:a. Open the file for editing.b. Update the file with the following values:
Table 13. console.properties settings for the Deployment Manager
SSCHostName Provide the fully qualified host name of the LotusSametime System Console server.
SSCHTTPPort Specify the HTTP port used for the Lotus SametimeSystem Console server if SSL is not enabled and thevalue for SSCSSLEnabled is ″false.″
To determine the correct HTTP port, open theAboutThisProfile.txt file for the lotus Sametime SystemConsole Application Server Profile and use the settingspecified for the ″HTTP transport port.″ The defaultprofile name is STSCAppProfile.
On IBM i, look for the AboutThisProfile.txt file in thefollowing location: /QIBM/UserData/Websphere/AppServer/V7/SametimeWAS/profiles/STSCAppProfile/logs/AboutThisProfile.txt
SSCUserName Enter the IBM WebSphere Application Server User IDthat you created when you installed Lotus SametimeSystem Console. The default is wasadmin.
SSCPassword Enter the WebSphere Application Server passwordassociated with the SSCUserName.
SSCSSLEnabled Change this value to ″true″ to connect to the LotusSametime System Console using a secure connection.
SSCHTTPSPort Specify the HTTPS port used by the Sametime SystemConsole server if SSCSSLEnabled is set to ″true.″
c. Verify that the remaining settings are appropriate for the DeploymentManager.
d. Save and close the file.4. Update the Deployment Manager’s productConfig.properties file:
a. Open the file for editing.b. Update the file with the following values:
Only the required values in this file are listed here:
Table 14. configProduct.properties settings for the Deployment Manager
DepName Provide a descriptive name for your deployment. It mustbe a unique deployment name on the Lotus SametimeSystem Console.
190 Lotus Sametime: Installation and Administration Guide Part 1
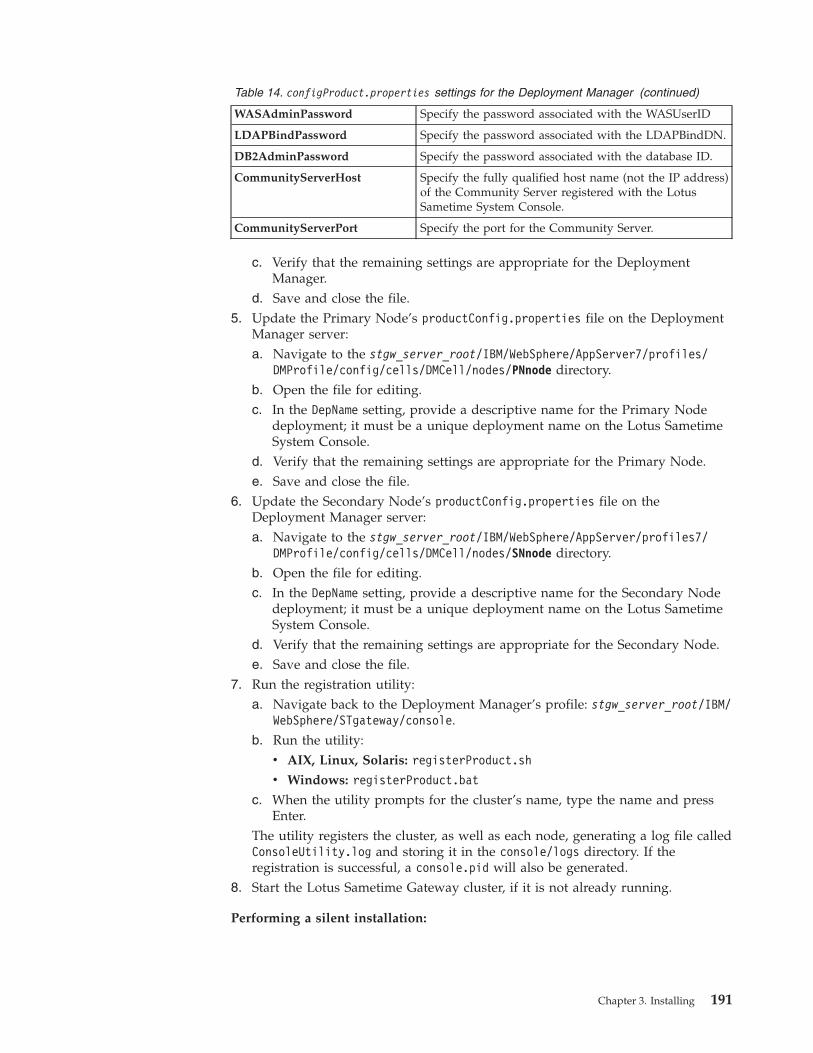
Table 14. configProduct.properties settings for the Deployment Manager (continued)
WASAdminPassword Specify the password associated with the WASUserID
LDAPBindPassword Specify the password associated with the LDAPBindDN.
DB2AdminPassword Specify the password associated with the database ID.
CommunityServerHost Specify the fully qualified host name (not the IP address)of the Community Server registered with the LotusSametime System Console.
CommunityServerPort Specify the port for the Community Server.
c. Verify that the remaining settings are appropriate for the DeploymentManager.
d. Save and close the file.5. Update the Primary Node’s productConfig.properties file on the Deployment
Manager server:a. Navigate to the stgw_server_root/IBM/WebSphere/AppServer7/profiles/
DMProfile/config/cells/DMCell/nodes/PNnode directory.b. Open the file for editing.c. In the DepName setting, provide a descriptive name for the Primary Node
deployment; it must be a unique deployment name on the Lotus SametimeSystem Console.
d. Verify that the remaining settings are appropriate for the Primary Node.e. Save and close the file.
6. Update the Secondary Node’s productConfig.properties file on theDeployment Manager server:a. Navigate to the stgw_server_root/IBM/WebSphere/AppServer/profiles7/
DMProfile/config/cells/DMCell/nodes/SNnode directory.b. Open the file for editing.c. In the DepName setting, provide a descriptive name for the Secondary Node
deployment; it must be a unique deployment name on the Lotus SametimeSystem Console.
d. Verify that the remaining settings are appropriate for the Secondary Node.e. Save and close the file.
7. Run the registration utility:a. Navigate back to the Deployment Manager’s profile: stgw_server_root/IBM/
WebSphere/STgateway/console.b. Run the utility:
v AIX, Linux, Solaris: registerProduct.sh
v Windows: registerProduct.bat
c. When the utility prompts for the cluster’s name, type the name and pressEnter.
The utility registers the cluster, as well as each node, generating a log file calledConsoleUtility.log and storing it in the console/logs directory. If theregistration is successful, a console.pid will also be generated.
8. Start the Lotus Sametime Gateway cluster, if it is not already running.
Performing a silent installation:
Chapter 3. Installing 191
IBM Lotus Sametime Gateway can be installed silently using a response file. Youcan either generate your own response file by installing using the install wizard, orby editing the default response file that is provided.
Performing a silent installation on Windows:
IBM Lotus Sametime Gateway can be installed silently using a response file. Youcan either generate your own response file by installing using the install wizard, orby editing the default response file that is provided.
Before you begin
Information on downloading packages for Lotus Sametime is located at thefollowing Web address:www.ibm.com/support/docview.wss?rs=477&uid=swg24024322
About this task
A response file is a text file that contains all the options that would normally bespecified in the installation dialogs. Silent installation is useful in situations whereautomation is desired.
To perform a silent installation, you have to create a new response file or edit theexisting response file that is included with the product. On the root of the LotusSametime Gateway installation CD is a fully-documented responsefile: installresponse.txt. Copy this file to the machine and edit it with valuesappropriate for your environment, or complete the following steps to create aresponse file based on a real installation.1. From the installation media, copy and extract the files from the following Lotus
Sametime Gateway installation image to a temporary directory \TMP on themachine where you will be installing Lotus Sametime Gateway:C17KCML.exe
2. Open a command window.3. Navigate to the directory where you copied and extracted the installation files:
\TMP\SametimeGateway
4. Record a response file by typing the following command. This will perform aninstallation and generate a response file:install.bat -options-record response_file
where response_file is an absolute path to the response file to be generated. Forexample:install.bat -options-record C:\TMP\SametimeGateway\gatewayOptions.txt
5. Once a response file is created, either by modifying the installresponse.txtfile included with the installer, or by generating your own response file, open acommand window.
6. Type the following command to use the response file that you created:install.bat -options response_file -silent
What to do next
Upon completion of the installation, control will return to the command window.Validation or installation errors are logged to the installation log file.
192 Lotus Sametime: Installation and Administration Guide Part 1

Note: Generating response files using the -options-record option puts clear textpasswords in the response file.
Managing trusted IP addresses:
Whenever you install a server that communicates with an IBM Lotus SametimeCommunity Server, you must add the new server’s IP address to the CommunityServer’s settings.
About this task
The Lotus Sametime Community Server accepts connections from the LotusSametime Media Manager, the Lotus Sametime Gateway, the Lotus SametimeCommunity Mux, and the Lotus Sametime Proxy Server, as well as other serversthat are listed in the Community Services page. To ensure that the Lotus SametimeCommunity Server trusts these components when they establish a connection, youmust add the trusted server’s IP address to the Lotus Sametime CommunityServer.
You do not need to add the Lotus Sametime System Console’s IP address becauseit is added automatically when you install the Lotus Sametime Community Serverusing a deployment plan or register the Lotus Sametime Community Server withthe console after installation.
This task must be completed separately for each server within a Lotus SametimeCommunity Server cluster, as well as for multiple non-clustered CommunityServers.1. Log in to the Integrated Solutions Console.2. Click Sametime System Console → Sametime Servers → Sametime Community
Servers.3. In the Sametime Community Servers list, click the deployment name of the
server with the list of trusted IP addresses that you want to change.4. Click the Connectivity tab.5. Under Trusted Servers, enter the IP address of the server that must connect to
the Lotus Sametime Community Server in the New IP Address field, and clickAdd.
Note: For the Lotus Sametime Media Manager, enter the Conference Managerserver IP address. Each instance of a Conference Manager cluster must beentered.To delete an IP address from the list, select it and click Delete Selected.
6. Click OK.7. Restart the Lotus Sametime Community Server for the change to take effect.
Performing a silent installation on AIX, Linux, or Solaris:
IBM Lotus Sametime Gateway can be installed silently using a response file. Youcan either generate your own response file by installing using the install wizard, orby editing the default response file that is provided.
Before you begin
Information on downloading packages for Lotus Sametime is located at thefollowing Web address:
Chapter 3. Installing 193
www.ibm.com/support/docview.wss?rs=477&uid=swg24024322
About this task
A response file is a text file that contains all the options that would normally bespecified in the installation dialogs. Silent installation is useful in situations whereautomation is desired.
To perform a silent installation, you have to create a new response file or edit theexisting response file that is included with the product. On the root of the LotusSametime Gateway installation CD is a fully-documented response file:installresponse.txt. Copy this file to the machine and edit it with valuesappropriate for your environment, or complete the following steps to create aresponse file based on a real installation.
Note: The installation program installs both WebSphere Application Server andSametime Gateway.1. From the installation media, copy and uncompress the following Lotus
Sametime Gateway installation image to a temporary directory /TMP on themachine where you will be installing Lotus Sametime Gateway:C17KBML.tar
2. Open a command window and type the following command to source the DB2profile:. /db2adminHomeDir/sqllib/db2profile
Note the period (.) and space before /db2adminHomeDir/sqllib/db2profile.3. Navigate to the directory where you copied and extracted the installation files:
/TMP/SametimeGateway
4. Record a response file by typing the following command. This will perform aninstallation and generate a response file:./ install.sh -options-record response_file
where response_file is an absolute path to the response file to be generated. Forexample, in Windows:./ install.sh -options-record TMP/SametimeGateway/gatewayOptions.txt
5. Once a response file is created, either by modifying the installresponse.txtfile included with the installer, or by generating your own response file, open acommand window.
6. Type the following command to install using the response file:. /install.sh -options response_file -silent
What to do next
Upon completion of the installation, control will return to the command window.Validation or installation errors are logged to the installation log file.
Note: Generating response files using the -options-record option puts clear textpasswords in the response file.
Managing trusted IP addresses:
Whenever you install a server that communicates with an IBM Lotus SametimeCommunity Server, you must add the new server’s IP address to the CommunityServer’s settings.
194 Lotus Sametime: Installation and Administration Guide Part 1
About this task
The Lotus Sametime Community Server accepts connections from the LotusSametime Media Manager, the Lotus Sametime Gateway, the Lotus SametimeCommunity Mux, and the Lotus Sametime Proxy Server, as well as other serversthat are listed in the Community Services page. To ensure that the Lotus SametimeCommunity Server trusts these components when they establish a connection, youmust add the trusted server’s IP address to the Lotus Sametime CommunityServer.
You do not need to add the Lotus Sametime System Console’s IP address becauseit is added automatically when you install the Lotus Sametime Community Serverusing a deployment plan or register the Lotus Sametime Community Server withthe console after installation.
This task must be completed separately for each server within a Lotus SametimeCommunity Server cluster, as well as for multiple non-clustered CommunityServers.1. Log in to the Integrated Solutions Console.2. Click Sametime System Console → Sametime Servers → Sametime Community
Servers.3. In the Sametime Community Servers list, click the deployment name of the
server with the list of trusted IP addresses that you want to change.4. Click the Connectivity tab.5. Under Trusted Servers, enter the IP address of the server that must connect to
the Lotus Sametime Community Server in the New IP Address field, and clickAdd.
Note: For the Lotus Sametime Media Manager, enter the Conference Managerserver IP address. Each instance of a Conference Manager cluster must beentered.To delete an IP address from the list, select it and click Delete Selected.
6. Click OK.7. Restart the Lotus Sametime Community Server for the change to take effect.
Troubleshooting installation:
These steps help you troubleshoot installation problems by describing how you canuse a different tables pace name for the database and how you can clean yoursystem of previous installations.
About this task
Many installation problems are caused when the installer cannot locate thedatabase or when installing a new instance of Sametime Gateway and a previousinstallation has not been completely removed from the system. The following stepsdescribe how to use a different table space in the database or clean your system ofprevious installations.1. Open the installation log file at stgw_server_root\logs\installlog.txt2. If log reports an error in finding the DB2 database, check to make sure you are
using the table space name USERSPACE1. Sametime Gateway expects USERSPACE1by default. To install using a different table space name, use the followingcommand when you run the installer:
Chapter 3. Installing 195
install.bat -VTableSpaceName="tableSpaceName"
Where tableSpaceName is the name of the table space that you want the installerto use.
3. To clean your system of previous installations, use the log to find the locationof the Install Shield Multiplatform (ISMP) database called the Vital ProductDatabase (VPD). For example, examine this log entry from Windows (formattedto fit on the page):(Nov 24, 2007 2:22:22 PM), stGwInstall,com.ibm.rtc.gateway.install.CheckVPDRegistry, msg1,using VPD registry at C:\Program Files\CommonFiles\InstallShield\Universal\common\Gen2\_vpddb\vpd
The location of this registry varies from system to system. On windows, VPD isusually found in the \Program Files\Common Files\InstallShield\Universal\common\Gen2 folder. If a Sametime Gateway server is uninstalled, but an erroroccurs and the product is not unregistered, the VPD shows that SametimeGateway is installed on the system. When a new installation is initiated, and apreviously installed Sametime Gateway server is detected, the installer promptsyou to upgrade or install a new version, or the installer forces you to install aDeployment Manager server or a Primary Server on the same system. None ofthese scenarios are desired because there are no Sametime Gateway serversinstalled on the system.
4. Back up the Gen2 folder. Note that the VPD registry may be used by otherprograms that are installed with InstallShield, so removing this registry mayinterfere with other programs. It’s recommended that you do not remove theGen2 folder unless absolutely necessary.
5. Remove the original Gen2 folder.6. If installing on Windows, delete the following left over files:
C:\Windows\.nifregistryC:\Windows\vpd.properties
7. Start the installation again.
Installing the WebSphere Application Server Update InstallerUse the WebSphere Application Server Update Installer to add required softwareupdates.
About this task
Follow these steps to download the update package and install the IBM UpdateInstaller, which is needed for installed software updates for WebSphere ApplicationServer.1. Log in with the same user account used to install the Sametime software.2. On the local system, create a directory to store the update files, such as
stwas_fixes.3. Download the IBM Update Installer package if you have not already done so.
a. To download installation packages, you must have an IBM PassportAdvantage account, which is described at the following Web address:www.ibm.com/software/howtobuy/passportadvantage/paocustomer/docs/en_US/ecare.html
b. Open this release’s Download document at the following Web address:http://www.ibm.com/support/docview.wss?rs=477&uid=24024322
196 Lotus Sametime: Installation and Administration Guide Part 1
Locate the components you need in the document’s listing, then downloadthe packages labelled with the corresponding part numbers to the systemon which you are installing.
c. Extract the files to a local directory.d. Verify that you have at least 1 GB of temporary space to run the
installation in your %TEMP% or /tmp directory.4. Extract the package to the local fixes directory you created.5. In the UpdateInstallers subdirectory of the package you extracted, extract the
updateInstaller package for your platform.6. Navigate to the directory where you extracted the Update Installer and run
the install program.AIX, Linux, and Solaris
./installWindows
install.exe7. The installation wizard initializes and displays the Welcome screen.
a. Linux Red Hat and Linux zSeries® users: if you select the documentationlinks in the installation program for the Update Installer, your Webbrowser might not launch. The path to the Web browser is not included inyour PATH environment variable. To resolve this problem, you can addthe Web browser path to your PATH environment variable, and rerun theinstallation program.
b. Click Next to continue.8. The License agreement screen is displayed. Read the license agreement and
accept its terms. After you accept the licensing terms, the installation wizardchecks for a supported operating system and prerequisite patches. If youencounter a problem such as not having the right prerequisite updates onyour system, cancel the installation, make the required changes, and restartthe installation.
9. The Installation directory screen is displayed. Specify the destination of theinstallation root directory.
10. Select the Create a start menu icon to create a shortcut for the UpdateInstaller. Deselect this checkbox if you do not need a shortcut for the UpdateInstaller in your start menu. Click Next to continue.
11. The Installation summary panel appears. Review the summary. Click Next tobegin the installation or click Back to make changes to previous panels.
12. The Installation results panel is displayed. Verify the success of the installerprogram by examining the completion panel.a. If you want to launch the Update Installer upon completion of the
installation, select Launch Update Installer for WebSphere Software onexit.
b. Click Finish to exit the installer.
Installing WebSphere Application Server updatesIf you must install additional WebSphere Application Server software updates,perform this step on each of the servers in your deployment running onWebSphere Application Server.
Chapter 3. Installing 197
Before you begin
To perform these steps, you must have already installed the WebSphereApplication Server Update Installer.
About this task
Follow these steps to install the WebSphere Application Server software updatesrequired for Sametime 8.5 servers as outlined in the Technote on the IBM SupportSite.
http://www.ibm.com/support/docview.wss?rs=477&uid=swg21415822
System requirements for this release of the Lotus Sametime family of products ismaintained as an IBM Technote at the following Web address:http://www.ibm.com/support/docview.wss?rs=477&uid=swg27016451
1. Download the WebSphere Application Server updates package if you have notalready done so.a. To download installation packages, you must have an IBM Passport
Advantage account, which is described at the following Web address:www.ibm.com/software/howtobuy/passportadvantage/paocustomer/docs/en_US/ecare.html
b. Open this release’s Download document at the following Web address:http://www.ibm.com/support/docview.wss?rs=477&uid=24024322
Locate the components you need in the document’s listing, then downloadthe packages labelled with the corresponding part numbers to the systemon which you are installing.
c. Extract the files to a local directory.d. Verify that you have at least 1 GB of temporary space to run the
installation in your %TEMP% or /tmp directory.2. Extract the updates to a local directory such as stwas_fixes.3. Ensure that you stop all running processes as described in “Command
reference for starting and stopping servers” on page 232.4. If you have not already launched the WebSphere Application Server Update
Installer, log in with the same user account used to install the Sametimesoftware, then navigate to the directory where you installed the UpdateInstaller and run the update program.AIX, Linux, and Solaris
./update.shWindows
update.bat5. The Welcome screen is displayed. Click Next.6. Specify the location of the product that you want updated.7. Accept the default to Install maintenance. Click Next.8. At the prompt, enter the directory name containing the Sametime update
packages (for example, stwas_fixes). Click Next.9. The system will automatically determine the appropriate maintenance
packages based on the version of the product that is installed. Click Next.10. Before the installation, the Confirmation panel confirms which packages will
be installed. Click Next.
198 Lotus Sametime: Installation and Administration Guide Part 1
11. After you install the update package, check the installation log to verify thatthe install is successful. The log can be found at app_server_root/logs/update/maintenance_package.install.
12. Start the servers as described in “Command reference for starting andstopping servers” on page 232.
Results
To verify which updates have been installed, run the versionInfo command fromthe app_server_root/bin directory.
Linux
./versionInfo.sh -maintenancePackages > version.txt
Windows
versionInfo -maintenancePackages > version.txt
The command creates a text file that lists all the WebSphere Application Serverupdates that have been installed on the system.Related tasks
“Installing the WebSphere Application Server Update Installer” on page 196Use the WebSphere Application Server Update Installer to add required softwareupdates.
Deploying the Sametime client to usersThe IBM Lotus Sametime Connect client or Lotus Sametime client embedded inNotes have to be installed on users’ machines to use instant messaging andmeetings. This section gives you information about ways to install these clients.
Sametime Connect client considerationsThere are several things you need to know before deploying the IBM LotusSametime Connect client to your users.
About this task
The Lotus Sametime Connect client must be installed on a user’s workstation bysomeone with administrative privileges on that computer. Before installing theclient, review the following changes for this release:v Using Lotus Expeditor to install the Sametime client
If you will use Lotus Expeditor to push the client onto user workstations, beaware of the following restrictions:– Do not use non-ASCII characters in the name of the installation directory.– Do not use long paths (instead create a profile that uses short paths).– Do not use paths containing non-ISO-8859-1 characters.
These restrictions are discussed in the Lotus Expeditor information center.v Internet passwords required
Internet passwords are required to log on to IBM Lotus Sametime connect.Before using Lotus Sametime Connect, each user must have an Internetpassword in their Person Document in the Domino Directory or stored in theLDAP Directory. You may need to inform users of their Internet passwords.
Chapter 3. Installing 199
v Supporting IPv6 addressing with the Connect client
Supporting the IPv6 protocol in a Lotus Sametime deployment requires you toupgrade Lotus Sametime Connect clients to release 8.5 to ensure they cancommunicate with Lotus Sametime servers that use IPv6 addresses.If you support only IPv6 addressing, older clients will not generate errormessages but will appear ″broken″ to users because they cannot communicatewith the IPv6–enabled servers. To avoid lengthy investigations of problemscaused by attempts to use older clients with servers where only IPv6 addressingis enabled, you should only use clients from release 8.0.2 or later.If you support both IPv4 and IPv6 addressing, all Lotus Sametime clients cancommunicate with the IPv6–enabled servers; just be sure to configure the serversto listen for IPv4–format addresses as well as IPv6–format addresses.
v Spell checker dictionaries
The U.S. English spell check dictionary is installed automatically, but you caninstall spell checker dictionaries for additional languages. The additionaldictionaries are provided as an update site on the client CD and downloadedimage in the optional-components/optional-components-update.zip file. See“Adding optional features to already-installed clients” on page 209.
Enabling installation of optional client features such as MicrosoftOffice IntegrationIBM Lotus Sametime ships with a number of optional client features that are notincluded in the default installation package. You can add features to theinstallation package for new client installs, as well as update already-installedclients.
Before you begin
For example, these optional features are not installed by default; to make themavailable to your users, you must either update existing clients or customize theinstallation package for new clients.v Microsoft Office Integration featuresv E-mail Integration featuresv Spell checker dictionaries
Note: Microsoft Office Integration features are available only for clients running onWindows.
The administrator decides which features to make available to clients, and whichmethod to use for installing the client. The following sections explain the availableoptions in more detail.
Editing the client installation file for a CD or download image:
IBM Lotus Sametime ships with optional client features that you can add to thedefault client installations, including Microsoft Office Integration features onMicrosoft Windows clients, E-mail Integration Features, and Spell CheckerDictionaries.
About this task
Follow these steps to use a customized install.xml file to include optionalfeatures in installations from a CD or download image.
200 Lotus Sametime: Installation and Administration Guide Part 1
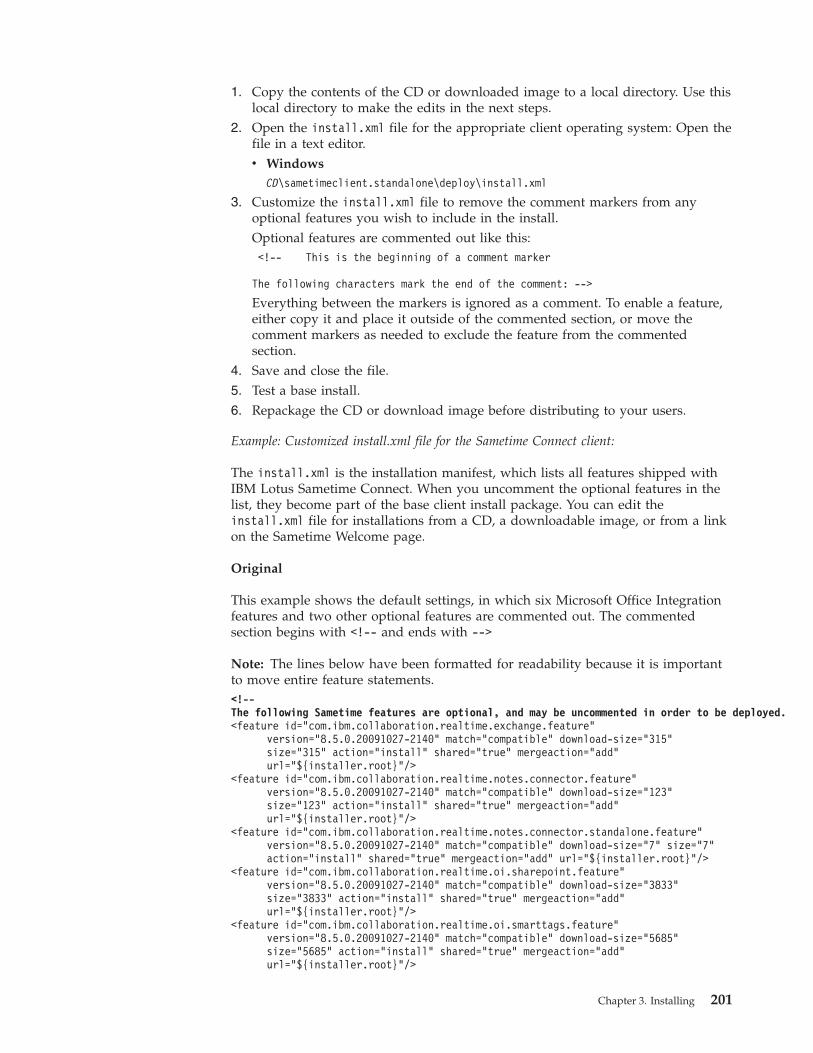
1. Copy the contents of the CD or downloaded image to a local directory. Use thislocal directory to make the edits in the next steps.
2. Open the install.xml file for the appropriate client operating system: Open thefile in a text editor.v Windows
CD\sametimeclient.standalone\deploy\install.xml
3. Customize the install.xml file to remove the comment markers from anyoptional features you wish to include in the install.Optional features are commented out like this:<!-- This is the beginning of a comment marker
The following characters mark the end of the comment: -->
Everything between the markers is ignored as a comment. To enable a feature,either copy it and place it outside of the commented section, or move thecomment markers as needed to exclude the feature from the commentedsection.
4. Save and close the file.5. Test a base install.6. Repackage the CD or download image before distributing to your users.
Example: Customized install.xml file for the Sametime Connect client:
The install.xml is the installation manifest, which lists all features shipped withIBM Lotus Sametime Connect. When you uncomment the optional features in thelist, they become part of the base client install package. You can edit theinstall.xml file for installations from a CD, a downloadable image, or from a linkon the Sametime Welcome page.
Original
This example shows the default settings, in which six Microsoft Office Integrationfeatures and two other optional features are commented out. The commentedsection begins with <!-- and ends with -->
Note: The lines below have been formatted for readability because it is importantto move entire feature statements.<!--The following Sametime features are optional, and may be uncommented in order to be deployed.<feature id="com.ibm.collaboration.realtime.exchange.feature"
version="8.5.0.20091027-2140" match="compatible" download-size="315"size="315" action="install" shared="true" mergeaction="add"url="${installer.root}"/>
<feature id="com.ibm.collaboration.realtime.notes.connector.feature"version="8.5.0.20091027-2140" match="compatible" download-size="123"size="123" action="install" shared="true" mergeaction="add"url="${installer.root}"/>
<feature id="com.ibm.collaboration.realtime.notes.connector.standalone.feature"version="8.5.0.20091027-2140" match="compatible" download-size="7" size="7"action="install" shared="true" mergeaction="add" url="${installer.root}"/>
<feature id="com.ibm.collaboration.realtime.oi.sharepoint.feature"version="8.5.0.20091027-2140" match="compatible" download-size="3833"size="3833" action="install" shared="true" mergeaction="add"url="${installer.root}"/>
<feature id="com.ibm.collaboration.realtime.oi.smarttags.feature"version="8.5.0.20091027-2140" match="compatible" download-size="5685"size="5685" action="install" shared="true" mergeaction="add"url="${installer.root}"/>
Chapter 3. Installing 201
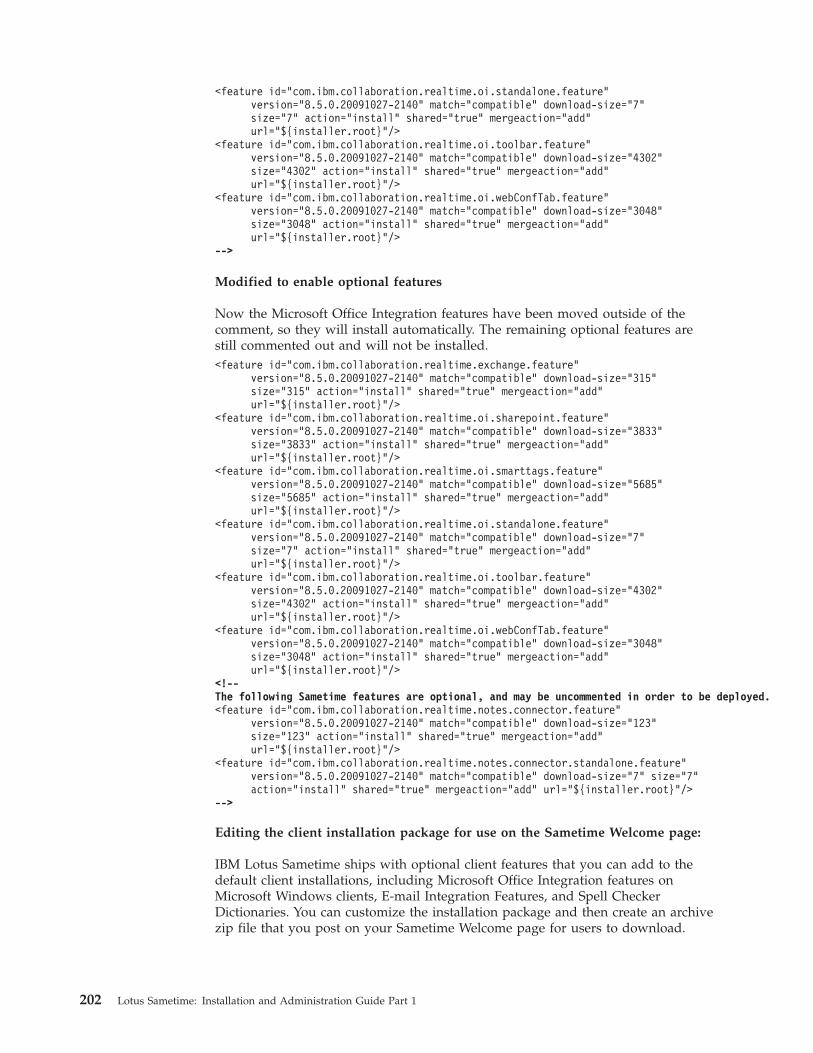
<feature id="com.ibm.collaboration.realtime.oi.standalone.feature"version="8.5.0.20091027-2140" match="compatible" download-size="7"size="7" action="install" shared="true" mergeaction="add"url="${installer.root}"/>
<feature id="com.ibm.collaboration.realtime.oi.toolbar.feature"version="8.5.0.20091027-2140" match="compatible" download-size="4302"size="4302" action="install" shared="true" mergeaction="add"url="${installer.root}"/>
<feature id="com.ibm.collaboration.realtime.oi.webConfTab.feature"version="8.5.0.20091027-2140" match="compatible" download-size="3048"size="3048" action="install" shared="true" mergeaction="add"url="${installer.root}"/>
-->
Modified to enable optional features
Now the Microsoft Office Integration features have been moved outside of thecomment, so they will install automatically. The remaining optional features arestill commented out and will not be installed.<feature id="com.ibm.collaboration.realtime.exchange.feature"
version="8.5.0.20091027-2140" match="compatible" download-size="315"size="315" action="install" shared="true" mergeaction="add"url="${installer.root}"/>
<feature id="com.ibm.collaboration.realtime.oi.sharepoint.feature"version="8.5.0.20091027-2140" match="compatible" download-size="3833"size="3833" action="install" shared="true" mergeaction="add"url="${installer.root}"/>
<feature id="com.ibm.collaboration.realtime.oi.smarttags.feature"version="8.5.0.20091027-2140" match="compatible" download-size="5685"size="5685" action="install" shared="true" mergeaction="add"url="${installer.root}"/>
<feature id="com.ibm.collaboration.realtime.oi.standalone.feature"version="8.5.0.20091027-2140" match="compatible" download-size="7"size="7" action="install" shared="true" mergeaction="add"url="${installer.root}"/>
<feature id="com.ibm.collaboration.realtime.oi.toolbar.feature"version="8.5.0.20091027-2140" match="compatible" download-size="4302"size="4302" action="install" shared="true" mergeaction="add"url="${installer.root}"/>
<feature id="com.ibm.collaboration.realtime.oi.webConfTab.feature"version="8.5.0.20091027-2140" match="compatible" download-size="3048"size="3048" action="install" shared="true" mergeaction="add"url="${installer.root}"/>
<!--The following Sametime features are optional, and may be uncommented in order to be deployed.<feature id="com.ibm.collaboration.realtime.notes.connector.feature"
version="8.5.0.20091027-2140" match="compatible" download-size="123"size="123" action="install" shared="true" mergeaction="add"url="${installer.root}"/>
<feature id="com.ibm.collaboration.realtime.notes.connector.standalone.feature"version="8.5.0.20091027-2140" match="compatible" download-size="7" size="7"action="install" shared="true" mergeaction="add" url="${installer.root}"/>
-->
Editing the client installation package for use on the Sametime Welcome page:
IBM Lotus Sametime ships with optional client features that you can add to thedefault client installations, including Microsoft Office Integration features onMicrosoft Windows clients, E-mail Integration Features, and Spell CheckerDictionaries. You can customize the installation package and then create an archivezip file that you post on your Sametime Welcome page for users to download.
202 Lotus Sametime: Installation and Administration Guide Part 1
About this task
Complete these tasks to create a customized install.xml file and post it for usersto download using a link on the Sametime Welcome page:
Editing the client install file:
IBM Lotus Sametime ships with optional client features that you can add to thedefault client installations, including Microsoft Office Integration features onMicrosoft Windows clients, E-mail Integration Features, and Spell CheckerDictionaries. You can customize the installation package and then create an archivezip file that you post on your Sametime Welcome page for users to download.
About this task
Follow these steps to use a customized install.xml file to include optionalfeatures in installations from the network.1. Open the install manifest (the install.xml file) stored in the network-install
directory on the Sametime server:v Windows server
– Windows client: C:\Program Files\lotus\domino\data\domino\html\sametime\network-install\install\deploy\install.xml
v AIX, Linux, and Solaris servers
– Windows client: /local/notesdata/domino/html/sametime/network-install/install/deploy/install.xml
v IBM i server
There is no default data directory but the name may be similar to this:– Windows client: /STserver/domino/html/sametime/network-install/
install/deploy/install.xml2. Edit both versions of install.xml to uncomment any optional features you
wish to include in the install.Optional features are commented out like this:<!-- This is the beginning of a comment marker
The following characters mark the end of the comment: -->
Everything between the markers is ignored as a comment. To enable a feature,either copy it and place it outside of the commented section, or move thecomment markers as needed to exclude the feature from the commentedsection.
3. Save and close the files.
Example: Customized install.xml file for the Sametime Connect client:
The install.xml is the installation manifest, which lists all features shipped withIBM Lotus Sametime Connect. When you uncomment the optional features in thelist, they become part of the base client install package. You can edit theinstall.xml file for installations from a CD, a downloadable image, or from a linkon the Sametime Welcome page.
Chapter 3. Installing 203

Original
This example shows the default settings, in which six Microsoft Office Integrationfeatures and two other optional features are commented out. The commentedsection begins with <!-- and ends with -->
Note: The lines below have been formatted for readability because it is importantto move entire feature statements.<!--The following Sametime features are optional, and may be uncommented in order to be deployed.<feature id="com.ibm.collaboration.realtime.exchange.feature"
version="8.5.0.20091027-2140" match="compatible" download-size="315"size="315" action="install" shared="true" mergeaction="add"url="${installer.root}"/>
<feature id="com.ibm.collaboration.realtime.notes.connector.feature"version="8.5.0.20091027-2140" match="compatible" download-size="123"size="123" action="install" shared="true" mergeaction="add"url="${installer.root}"/>
<feature id="com.ibm.collaboration.realtime.notes.connector.standalone.feature"version="8.5.0.20091027-2140" match="compatible" download-size="7" size="7"action="install" shared="true" mergeaction="add" url="${installer.root}"/>
<feature id="com.ibm.collaboration.realtime.oi.sharepoint.feature"version="8.5.0.20091027-2140" match="compatible" download-size="3833"size="3833" action="install" shared="true" mergeaction="add"url="${installer.root}"/>
<feature id="com.ibm.collaboration.realtime.oi.smarttags.feature"version="8.5.0.20091027-2140" match="compatible" download-size="5685"size="5685" action="install" shared="true" mergeaction="add"url="${installer.root}"/>
<feature id="com.ibm.collaboration.realtime.oi.standalone.feature"version="8.5.0.20091027-2140" match="compatible" download-size="7"size="7" action="install" shared="true" mergeaction="add"url="${installer.root}"/>
<feature id="com.ibm.collaboration.realtime.oi.toolbar.feature"version="8.5.0.20091027-2140" match="compatible" download-size="4302"size="4302" action="install" shared="true" mergeaction="add"url="${installer.root}"/>
<feature id="com.ibm.collaboration.realtime.oi.webConfTab.feature"version="8.5.0.20091027-2140" match="compatible" download-size="3048"size="3048" action="install" shared="true" mergeaction="add"url="${installer.root}"/>
-->
Modified to enable optional features
Now the Microsoft Office Integration features have been moved outside of thecomment, so they will install automatically. The remaining optional features arestill commented out and will not be installed.<feature id="com.ibm.collaboration.realtime.exchange.feature"
version="8.5.0.20091027-2140" match="compatible" download-size="315"size="315" action="install" shared="true" mergeaction="add"url="${installer.root}"/>
<feature id="com.ibm.collaboration.realtime.oi.sharepoint.feature"version="8.5.0.20091027-2140" match="compatible" download-size="3833"size="3833" action="install" shared="true" mergeaction="add"url="${installer.root}"/>
<feature id="com.ibm.collaboration.realtime.oi.smarttags.feature"version="8.5.0.20091027-2140" match="compatible" download-size="5685"size="5685" action="install" shared="true" mergeaction="add"url="${installer.root}"/>
<feature id="com.ibm.collaboration.realtime.oi.standalone.feature"version="8.5.0.20091027-2140" match="compatible" download-size="7"size="7" action="install" shared="true" mergeaction="add"url="${installer.root}"/>
204 Lotus Sametime: Installation and Administration Guide Part 1
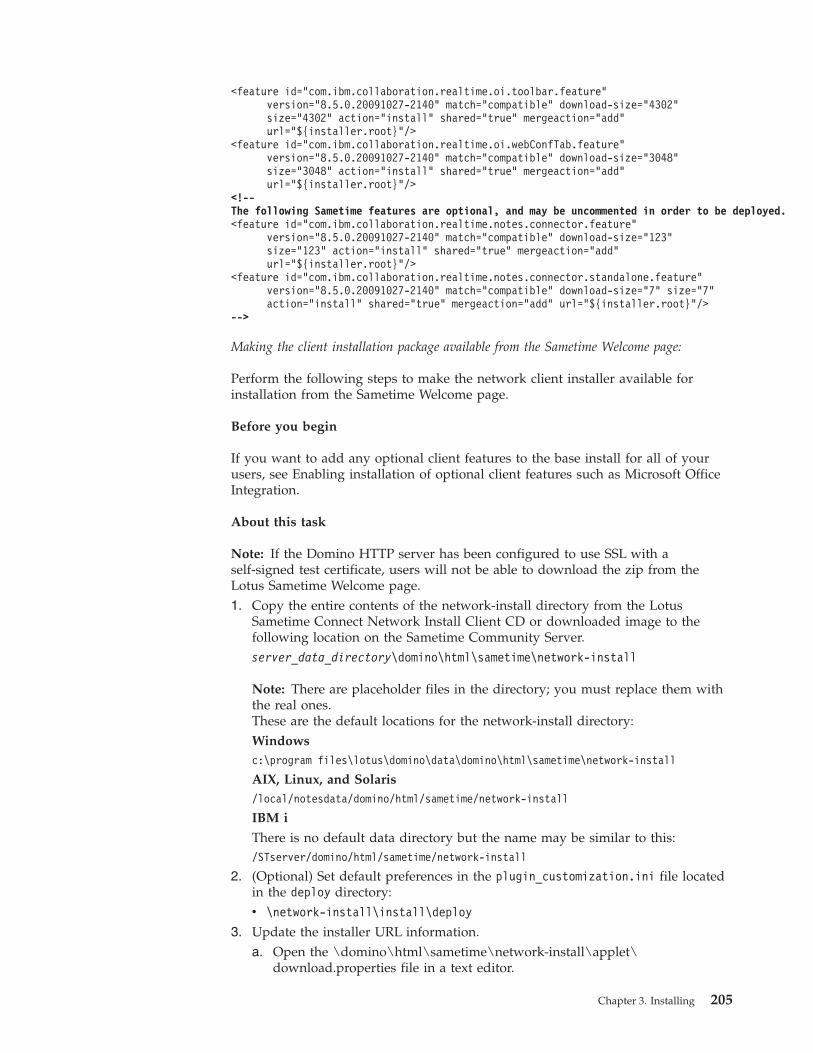
<feature id="com.ibm.collaboration.realtime.oi.toolbar.feature"version="8.5.0.20091027-2140" match="compatible" download-size="4302"size="4302" action="install" shared="true" mergeaction="add"url="${installer.root}"/>
<feature id="com.ibm.collaboration.realtime.oi.webConfTab.feature"version="8.5.0.20091027-2140" match="compatible" download-size="3048"size="3048" action="install" shared="true" mergeaction="add"url="${installer.root}"/>
<!--The following Sametime features are optional, and may be uncommented in order to be deployed.<feature id="com.ibm.collaboration.realtime.notes.connector.feature"
version="8.5.0.20091027-2140" match="compatible" download-size="123"size="123" action="install" shared="true" mergeaction="add"url="${installer.root}"/>
<feature id="com.ibm.collaboration.realtime.notes.connector.standalone.feature"version="8.5.0.20091027-2140" match="compatible" download-size="7" size="7"action="install" shared="true" mergeaction="add" url="${installer.root}"/>
-->
Making the client installation package available from the Sametime Welcome page:
Perform the following steps to make the network client installer available forinstallation from the Sametime Welcome page.
Before you begin
If you want to add any optional client features to the base install for all of yourusers, see Enabling installation of optional client features such as Microsoft OfficeIntegration.
About this task
Note: If the Domino HTTP server has been configured to use SSL with aself-signed test certificate, users will not be able to download the zip from theLotus Sametime Welcome page.1. Copy the entire contents of the network-install directory from the Lotus
Sametime Connect Network Install Client CD or downloaded image to thefollowing location on the Sametime Community Server.server_data_directory\domino\html\sametime\network-install
Note: There are placeholder files in the directory; you must replace them withthe real ones.These are the default locations for the network-install directory:Windowsc:\program files\lotus\domino\data\domino\html\sametime\network-install
AIX, Linux, and Solaris/local/notesdata/domino/html/sametime/network-install
IBM i
There is no default data directory but the name may be similar to this:/STserver/domino/html/sametime/network-install
2. (Optional) Set default preferences in the plugin_customization.ini file locatedin the deploy directory:v \network-install\install\deploy
3. Update the installer URL information.a. Open the \domino\html\sametime\network-install\applet\
download.properties file in a text editor.
Chapter 3. Installing 205
b. Set the value of the installer.root.base property to match the correct URL forthe network-install directory on your Sametime server.For example, if your Sametime server host name is stserver.com:installer.root.base=http://stserver.com/sametime/network-install
c. Save your changes.4. Use the ArchiveCreator tool to generate the installer archive zips for each
platform.These zip files only include the base installer with the Expeditor/Eclipseplatform and the install manifest which can be customized for yourenvironment. This allows the user to download the zip file, extract it, and runthe installer, which provisions the Lotus Sametime features from the update siteincluded with the network-install directory.Windows
a. Open a console window to the \domino\html\sametime\network-install\bin directory
b. Run the ArchiveCreator tool (ArchiveCreator.bat).AIX, Linux, and Solaris
a. Open a console window to the \domino\html\sametime\network-install\bin directory
b. Run the ArchiveCreator tool (ArchiveCreator.sh).IBM i
a. Run the following commands:QSH
cd /server_data_directory/domino/html/sametime/network-install/bin
ArchiveCreator_i5OS.sh
b. Press F3 to Exit QSH.
Editing the installation package for the Lotus Notes embedded client:
IBM Lotus Sametime ships with optional client features that you can add to thedefault client installations, including Microsoft Office Integration features onMicrosoft Windows clients, E-mail Integration Features, and Spell CheckerDictionaries. You can customize the installation package for the Lotus Sametimeclient that is embedded in Lotus Notes on Microsoft Windows.
About this task
Follow these steps to use a customized install.addon.xml file that includesoptional features in the Lotus Notes embedded client installation package.1. Copy the contents of the CD or downloaded image to a local directory. Use this
local directory to make the edits in the next steps.2. Extract the sametime.embedded.add-on.OS.yyyymmdd-hhss.zip archive file for
the appropriate client operating system.v Windows
sametime.embedded.add-on.win.yyyymmdd-hhss.zip
where yyyymmdd-hhss displays a date and time; for example: 20091027-2140.3. Open the deploy\install.addon.xml file for editing (this is one of the extracted
files).4. Locate the section that starts with the following statement (near the end of the
file):
206 Lotus Sametime: Installation and Administration Guide Part 1

The following Sametime features are optional, and may be uncommented in order to be deployed.
5. Remove the comment markers to enable desired features:v By default, all of the features in this section are disabled because they are
commented out.v You can enable any combination of features.v You can enable any, or all, of these features by moving the comment markers
to the appropriate position.v Make sure to comment entire features (from the opening <feature marker
through the closing /> marker.v Begin a comment with this marker: <!--v End a comment with this marker: --><!-- This is a sample comment;it can run across multiple lines in the file --><!--The marker can be on the same line as other text, or on its own line.-->
For example, you may want to enable one or more Microsoft Office Integrationfeatures for clients running on Windows:
Table 15. Microsoft Office Integration features available on Windows
Feature Description
com.ibm.collaboration.realtime.exchangeProvides automatic availability status updates inSametime livenames based on Microsoft Outlookcalendar entries.
com.ibm.collaboration.realtime.oi.sharepoint.featureProvides awareness and instant messaging amongLotus Sametime users who are using an OfficeSharePoint site.
com.ibm.collaboration.realtime.oi.toolbarProvides an action toolbar in Microsoft Outlookcontaining Lotus Sametime instant messaging actions,including access to the contact list, status, and locationinformation.
com.ibm.collaboration.realtime.oi.webConfTabProvides the ability to reserve Sametime meetings fromthe Sametime tab in Microsoft Outlook meetings.
com.ibm.collaboration.realtime.oi.smarttagsProvides Sametime instant messaging actions in theMicrosoft Office document Smart Tags menu and thetoolbar for Word, Excel, and PowerPoint.
6. Save and close the deploy\install.addon.xml file.7. Repackage the CD or download image before distributing to your users.
Example: Customized client install.addon.xml file for embedded client:
The install.addon.xml file is the installation manifest, which lists all featuresshipped with the IBM Lotus Sametime embedded client for Lotus Notes. Whenyou uncomment the optional features in the list, they become part of the baseclient install package.
Original
The set of optional features is enclosed in comment markers (all of the features arewithin a single comment):
Chapter 3. Installing 207
Note: Lines have been formatted here for readability because it is important tomake sure you move entire feature statements.<feature id="com.ibm.rtc.meetings.embedded.feature"
version="8.5.0.20091027-1957" match="compatible" download-size="5"size="5" action="install" shared="true" mergeaction="add"url="jar:${installer.root}/sametime.embedded.update.site.20091027-2140.zip!/"/>
<feature id="com.ibm.rtc.meetings.feature" version="8.5.0.20091027-1957"match="compatible" download-size="23446" size="23446" action="install"shared="true" mergeaction="add"url="jar:${installer.root}/sametime.embedded.update.site.20091027-2140.zip!/"/>
<feature id="com.ibm.rtc.web.utils.feature"version="8.5.0.20091027-2140" match="compatible" download-size="139"size="139" action="install" shared="true" mergeaction="add"url="jar:${installer.root}/sametime.embedded.update.site.20091027-2140.zip!/"/>
<feature id="com.ibm.collaboration.realtime.sslite.feature"version="1.0.0" match="greaterOrEqual" download-size="0" size="0"action="uninstall" shared="true"url="jar:${installer.root}/sametime.embedded.update.site.20091027-2140.zip!/"/>
<!--The following Sametime features are optional, and may be uncommented in order to be deployed.<feature id="com.ibm.collaboration.realtime.exchange.feature"
version="8.5.0.20091027-2140" match="compatible" download-size="315"size="315" action="install" shared="true" mergeaction="add"url="jar:${installer.root}/sametime.embedded.update.site.20091027-2140.zip!/"/>
<feature id="com.ibm.collaboration.realtime.oi.embedded.feature"version="8.5.0.20091027-2140" match="compatible" download-size="7"size="7" action="install" shared="true" mergeaction="add"url="jar:${installer.root}/sametime.embedded.update.site.20091027-2140.zip!/"/>
<feature id="com.ibm.collaboration.realtime.oi.sharepoint.feature"version="8.5.0.20091027-2140" match="compatible" download-size="3833"size="3833" action="install" shared="true" mergeaction="add"url="jar:${installer.root}/sametime.embedded.update.site.20091027-2140.zip!/"/>
<feature id="com.ibm.collaboration.realtime.oi.smarttags.feature"version="8.5.0.20091027-2140" match="compatible" download-size="5685"size="5685" action="install" shared="true" mergeaction="add"url="jar:${installer.root}/sametime.embedded.update.site.20091027-2140.zip!/"/>
<feature id="com.ibm.collaboration.realtime.oi.toolbar.feature"version="8.5.0.20091027-2140" match="compatible" download-size="4302"size="4302" action="install" shared="true" mergeaction="add"url="jar:${installer.root}/sametime.embedded.update.site.20091027-2140.zip!/"/>
<feature id="com.ibm.collaboration.realtime.oi.webConfTab.feature"version="8.5.0.20091027-2140" match="compatible" download-size="3048"size="3048" action="install" shared="true" mergeaction="add"url="jar:${installer.root}/sametime.embedded.update.site.20091027-2140.zip!/"/>
-->
Modified to enable optional features
The first three optional features have been moved outside of the comment markersand are now enabled for installation:<feature id="com.ibm.rtc.meetings.embedded.feature"
version="8.5.0.20091027-1957" match="compatible" download-size="5"size="5" action="install" shared="true" mergeaction="add"url="jar:${installer.root}/sametime.embedded.update.site.20091027-2140.zip!/"/>
<feature id="com.ibm.rtc.meetings.feature"version="8.5.0.20091027-1957" match="compatible" download-size="23446"size="23446" action="install" shared="true" mergeaction="add"url="jar:${installer.root}/sametime.embedded.update.site.20091027-2140.zip!/"/>
<feature id="com.ibm.rtc.web.utils.feature"version="8.5.0.20091027-2140" match="compatible" download-size="139"size="139" action="install" shared="true" mergeaction="add"url="jar:${installer.root}/sametime.embedded.update.site.20091027-2140.zip!/"/>
<feature id="com.ibm.collaboration.realtime.sslite.feature"version="1.0.0" match="greaterOrEqual" download-size="0"size="0" action="uninstall" shared="true"
208 Lotus Sametime: Installation and Administration Guide Part 1
url="jar:${installer.root}/sametime.embedded.update.site.20091027-2140.zip!/"/><!-- These three features have been enabled by moving them outside of the comment: --><feature id="com.ibm.collaboration.realtime.exchange.feature"
version="8.5.0.20091027-2140" match="compatible" download-size="315"size="315" action="install" shared="true" mergeaction="add"url="jar:${installer.root}/sametime.embedded.update.site.20091027-2140.zip!/"/>
<feature id="com.ibm.collaboration.realtime.oi.embedded.feature"version="8.5.0.20091027-2140" match="compatible" download-size="7"size="7" action="install" shared="true" mergeaction="add"url="jar:${installer.root}/sametime.embedded.update.site.20091027-2140.zip!/"/>
<feature id="com.ibm.collaboration.realtime.oi.sharepoint.feature"version="8.5.0.20091027-2140" match="compatible" download-size="3833"size="3833" action="install" shared="true" mergeaction="add"url="jar:${installer.root}/sametime.embedded.update.site.20091027-2140.zip!/"/>
<!--The following Sametime features are optional, and may be uncommented in order to be deployed.<feature id="com.ibm.collaboration.realtime.oi.smarttags.feature"
version="8.5.0.20091027-2140" match="compatible" download-size="5685"size="5685" action="install" shared="true" mergeaction="add"url="jar:${installer.root}/sametime.embedded.update.site.20091027-2140.zip!/"/>
<feature id="com.ibm.collaboration.realtime.oi.toolbar.feature"version="8.5.0.20091027-2140" match="compatible" download-size="4302"size="4302" action="install" shared="true" mergeaction="add"url="jar:${installer.root}/sametime.embedded.update.site.20091027-2140.zip!/"/>
<feature id="com.ibm.collaboration.realtime.oi.webConfTab.feature"version="8.5.0.20091027-2140" match="compatible" download-size="3048"size="3048" action="install" shared="true" mergeaction="add"url="jar:${installer.root}/sametime.embedded.update.site.20091027-2140.zip!/"/>
-->
Adding optional features to already-installed clients:
The IBM Lotus Sametime client can be easily updated at any time after the initialinstallation.
Before you begin
There are several reasons to install an update, including:v To install optional features. Sametime ships with several optional features - these
are provided with the release but are not automatically installed.v To install a new feature that you have purchased from a 3rd party or developed
yourself using the Sametime SDK.v To install an update that Lotus has provided to fix an existing client feature.
A basic Eclipse update site is provided in the optional-components directory of thestandalone client install CD and downloaded image. It includes all of the optionalfeatures distributed with Sametime, including Microsoft integration features andspell checker dictionaries for various languages. You can make updates to this siteyourself to remove features you do not plan to distribute, to add your ownfeatures, or to add fixes.
Three options are available for delivering updates to Sametime Connect clientusers:v Automatic Updates: Administrators can provision new or updated Sametime
features to their clients in a ″push″ mode so that all clients use the same set offeatures. The push method enables the client to receive updates automaticallywhenever he or she logs in to Sametime.
Chapter 3. Installing 209
v Optional Updates: Administrators can also provide new Sametime features totheir clients as an option. With the optional method, the user is notified thatoptional updates are available when logging in to Sametime. The user selectswhich updates to install, if any.
Note: The optional update feature is the recommended approach for anyupdates that are not required. If the optional site is configured before the initialclient install, it provides a seamless initial install experience. A user installs theclient, and is presented with a prompt to select optional features at first log in. Itrequires less communication and manual interaction than the manual updatemethod.
v Manual Updates: Administrators either distribute update sites (zip or jar files)or post them to a Web server, and provide the users with instructions formanually installing the updates using the tools in the connect client.
About this task
Setting up automatic updates
To set up your server so that client updates are installed automatically, specify the″Sametime update site URL″ on each of your Sametime servers.
From the Lotus Sametime System Console, open the policies page and update eachof the appropriate policies:1. Log in to the Sametime System Console, open that server’s Integrated Solutions
Console, select Sametime System Console, and then click Manage Policies →Instant Messaging.
2. Locate the ″Sametime update site URL″ setting in the Instant Messaging sectionof the policy.
3. Specify the URL for the update site where you will post required updates.Updates of features from this site are required and will be installedautomatically; the client is not provided a choice. For Lotus Sametime 8.0connect clients, you can specify more than one URL by separating them withsemi-colons or commas.When the user logs in from the client, the client checks the �Sametime updatesite URL� setting for the appropriate policy on the default Sametime server.
Note: If the URL has not been specified or the setting is not found, the clientwill search the preferences.ini file located in the update plugin(com.ibm.collaboration.realtime.update\preferences.ini) root directory for theadminUpdatePolicyURL value. (The policy setting was not available prior toSametime 7.5.1.)When the client logs in and connects to the specified update site, it silentlydownloads all updated features it finds and installs them. Once installation iscomplete, the user receives a textbox announcing that new updates have beeninstalled and that the user should restart the Sametime client. The user canclick the restart button or press a five-minute delay button. If the user isinvolved in chats with other users, he or she can continue to delay restart for aslong as he wishes by continuing to press the restart button at five-minuteintervals. After the restart, the client checks again to see if there are moreupdates, and if it finds none, the user is not interrupted again. This updateprocess takes place each time the user restarts his client and logs in.
Setting up optional updates
210 Lotus Sametime: Installation and Administration Guide Part 1
To set up your server so that your users are presented with a selection of optionalupdates, specify the ″Sametime optional add-on site URLs″ on each of yourSametime servers.
From the Lotus Sametime System Console, open the policies page and update eachof the appropriate policies:1. Log in to the Sametime System Console, open that server’s Integrated Solutions
Console, select Sametime System Console, and then click Manage Policies →Instant Messaging.
2. Locate the ″Sametime optional add-on site URLs″ setting in the InstantMessaging section of the policy.
3. Specify one or more URLs for update sites where you will post optionalupdates.When the user logs in from the client, the client checks the ″Sametime optionaladd-on site URLs″ policy on the default Sametime server.When the user logs in from the client, the client checks the ″Sametime optionaladd-on site URLs″ policy on the default Sametime server.
Note: If the URL has not been specified or the setting is not found, the clientwill search the preferences.ini file located in the update plugin(com.ibm.collaboration.realtime.update\preferences.ini) root directory for theoptionalUpdatePolicyURL value. (The policy setting was not available prior toSametime 8.0.)When the client logs in, it scans all of the optional update sites listed to findany available updates that match the client configuration. If any updates arefound, the client displays a message alerting the user that updates are availablewith an option to open the Update Manager (which is pre-populated with thelist of sites defined in the policy). The alert also allows the user to disablefurther checking on startup. (This preference can also be set in the Contact Listpreferences). From the Update Manager, the user can select which updates (ifany) they would like to install, then follow the instructions in the updatepanels to accept the license(s) and complete the install. If any updates areinstalled, the client will prompt the user to restart.
Manually installing updates
In Sametime Connect, the user can manually install updates by choosing Tools >Plug-ins > Install plug-ins. The user can then:1. Select Search for new features to install, and then click Next.2. Add an update site:
v If remote, select Add Remote Location..., specify a name for the update siteand provide the URL for the site.
v If a local directory, select Add Folder Location..., and select the directorywhere the update site exists.
v If a local archive, select Add Zip / Jar Location... and select the update sitearchive.For example, if you have access to the Standalone client install CD ordownloaded image, you can click New Archive Site.... Then navigate to theoptional-components directory and select optional-components-update-site.zip.
3. Click OK to add the new update site, and then click Finish. After a short time,the Update window appears
Chapter 3. Installing 211
4. Expand the update site and select the updates you wish to install from theavailable list. Then click Next.
5. You must agree to the license terms to continue.6. In the next window, click Finish to install. Verify by clicking Install.7. Restart the Client.
Installing the Sametime Connect client from a CDUsers can install the IBM Lotus Sametime Connect client from the standalone clientinstaller CD or corresponding downloaded image.
Installing the Sametime Connect client from CD on Windows:
Users can install the IBM Lotus Sametime Connect client from the standalone clientinstaller CD or corresponding downloaded image on a Microsoft Windows client.
Before you begin
If the installation has been customized to install Microsoft Office Integrationfeatures, you must ensure that no Office or Outlook processes are running at thetime of the install. For more information, see the IBM Tech Note 1307607 at:www.ibm.com/support/docview.wss?rs=477&uid=swg21307607
About this task
Follow these steps to install the Sametime Connect client on a Windows client.1. If the Sametime Connect client is running, shut it down before attempting to
install the newer version.2. Important: Make a back-up copy of the directory where the earlier version of
the client is installed, in case you need to revert to it.3. Navigate to the root of the CD or downloaded image.4. Double-click setup.exe to begin the installation.
If you have previous releases of the Connect client installed:v Sametime Connect 7.5.x:
The default operation is to uninstall an existing client, but because the 8.5client installs to a different directory, you can choose to retain the 7.5.x clientby running the new installation with a special flag, as follows:setup.exe /v"STUNINSTALL75=0"
v Sametime Connect 8.0.x:The 8.5 client installs to the same path as the 8.0.x client, you cannot retainthe older client when you install the 8.5 client; the new client will replace theold client.
5. Enter the required information when prompted.6. When the installation completes, launch the Sametime Connect client; by
default Sametime Connect is installed to C:\Program Files\IBM\Lotus\SametimeConnect.
Configuring the silent install for Connect client:
You can enable the silent installation of the IBM Lotus Sametime Connect Client onWindows using two files that are provided on the client standalone installer CDand the associated downloaded image.
212 Lotus Sametime: Installation and Administration Guide Part 1
About this task
Copy the setup.bat and the silentinstall.ini files from the root of the CD ordownload, and then update them to tailor the installer to your requirements.
Updating the setup.bat file
The batch file (setup.bat) contains several different commands that can be used toperform different installation functions. Some of the commands are commented outby default but can be uncommented and updated if the function is needed.Detailed explanations are included in the setup.bat file.v Uninstalling older, pre-7.5.x Sametime Connect clients
Three commands are provided to shutdown, uninstall, and cleanup an older,pre-7.5.x installation of the connect client. These commands are commented-outby default. If this functionality is needed, uncomment these lines and configurethe paths to the old Sametime install directory as needed for your environment.
v Several sample commands are provided for different methods of executing thesilent install.– The first option executes the installer silently and uses a silentinstall.ini file to
preconfigure connection settings.This is the default. If you choose to use one of the other methods, commentout this command.
– The second option executes the installer silently and migrates the connectionsettings from an existing, earlier (pre-7.5) version of Sametime.This option does not use the silentinstall.ini file. If you choose to use thismethod, uncomment this command.
– The third option executes the MSI version of the installer silently, using asilentinstall.ini to preconfigure the connection settings. If you choose to usethis method, uncomment this command.
The commands in the setup.bat file contain several configuration parameters:
Table 16. Sametime Connect command line parameters
parameter description
install.log The name of the log file created by theinstaller. The file is created in the samedirectory as the installer.
INSTALLDIR={path} Full path to the desired installation directory
STSILENTINIFILE={name} Name of the silentinstall.ini file
STSILENTINSTALL=TRUE Must be TRUE for silent execution
STMIGRATESETTINGSPRE75CHK Instructs the installer to migrate connectionsettings from an existing pre-7.5 version ofSametime.
LAPAGREE= Set to YES to indicate acceptance of thelicense agreement. This must be specified onthe command-line when the silentinstall.inifile is not used. When silentinstall.ini isused, LAPAGREE is set in that file.
Updating the silentinstall.ini file
Chapter 3. Installing 213
The silentinstall.ini file contains configuration parameters for the Lotus SametimeConnect client. The settings are used to pre-populate the community-config.xml filewith server connection information and other parameters required by the installerfor silent execution.
Table 17. silentinstall.ini file
parameter description/value
LAPAGREE=NO You must change this parameter to YES toindicate acceptance of the license agreement.
STSERVERNAME=stservername.domain.com Fully qualified host name of the Sametimeserver. Normally this should be the same asthe home Sametime server specified in theperson document.
STCOMMUNITYNAME=YourCommunityName
Community name
STSERVERPORT=1533 Sametime Server IP Port number
STSENDKEEPALIVE=true Flag for sending keep alive signal.
STKEEPALIVETIME=60 Default is 60 seconds. Indicates how often tocheck the connectivity between the clientand server, allowing timely notification ifdisconnected.
STCONNECTIONTYPE75=direct Connection type
STPROXYHOST=Proxy port number (leaveblank if not used)
Proxy host name (leave blank if not used)
STPROXYPORT= Proxy port number (leave blank if not used)
STRESOLVELOCALY75= Proxy resolves local flag (TRUE/FALSE)
STPROXYUSERNAME= Proxy user name (leave blank if not used)
STPROXYPASSWORD= Proxy password (leave blank if not used)
214 Lotus Sametime: Installation and Administration Guide Part 1
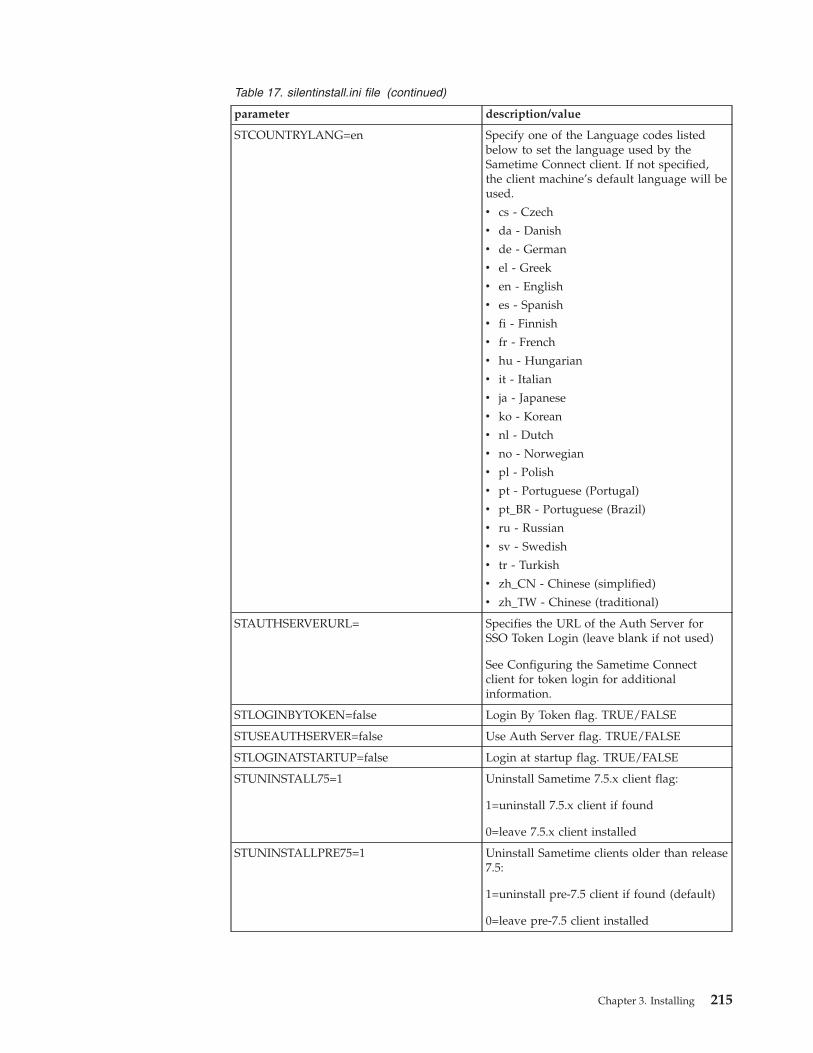
Table 17. silentinstall.ini file (continued)
parameter description/value
STCOUNTRYLANG=en Specify one of the Language codes listedbelow to set the language used by theSametime Connect client. If not specified,the client machine’s default language will beused.
v cs - Czech
v da - Danish
v de - German
v el - Greek
v en - English
v es - Spanish
v fi - Finnish
v fr - French
v hu - Hungarian
v it - Italian
v ja - Japanese
v ko - Korean
v nl - Dutch
v no - Norwegian
v pl - Polish
v pt - Portuguese (Portugal)
v pt_BR - Portuguese (Brazil)
v ru - Russian
v sv - Swedish
v tr - Turkish
v zh_CN - Chinese (simplified)
v zh_TW - Chinese (traditional)
STAUTHSERVERURL= Specifies the URL of the Auth Server forSSO Token Login (leave blank if not used)
See Configuring the Sametime Connectclient for token login for additionalinformation.
STLOGINBYTOKEN=false Login By Token flag. TRUE/FALSE
STUSEAUTHSERVER=false Use Auth Server flag. TRUE/FALSE
STLOGINATSTARTUP=false Login at startup flag. TRUE/FALSE
STUNINSTALL75=1 Uninstall Sametime 7.5.x client flag:
1=uninstall 7.5.x client if found
0=leave 7.5.x client installed
STUNINSTALLPRE75=1 Uninstall Sametime clients older than release7.5:
1=uninstall pre-7.5 client if found (default)
0=leave pre-7.5 client installed
Chapter 3. Installing 215

Installing the Sametime Connect client from the networkProviding installation files on the network allows users to download the LotusSametime Connect Client without CDs or download images.
Installing the Sametime Connect client from the network on Windows:
When network installation files are available, users can install Lotus SametimeConnect from a Web browser on Windows.1. (Optional) Set default preferences in the plugin_customization.ini file located
in the \network-install\install\deploy directory:2. Using a Web browser, open the Sametime Welcome page on your Sametime
server.For example, if the fully qualified host name of your Sametime server isstserver.com, you open http://stserver.com/stcenter.nsf.
3. Click Download Lotus Sametime Connect 8.5 Client to display the ″Welcometo the IBM Lotus Sametime Connect 8.5 Client Download Site″ page.
4. Click Install Now to begin the download and installation process.Once all files have been downloaded, the actual client installer will start.Follow the instructions in the installer and enter the required information tocomplete the installation.
Tip: If there are problems running the network client installer applet, or if youwant to install at a later time, you can select Save from the Welcome pageinstead. This shows you a downloads page where you can select the operatingsystem of the installer you wish to save and follow the instructions fordownloading the installer for later use.
Installing the Sametime embedded client for Lotus NotesInstall the IBM Lotus Sametime embedded client to a Lotus Notes client.
Installing the embedded client on Windows:
Install the IBM Lotus Sametime embedded clients on a Lotus Notes client runningon Microsoft Windows.
About this task
The Lotus Sametime embedded client installs directly into the Lotus Notesdirectory. If you have already installed a previous version of the embedded client,it is upgraded to this new version.1. Download the installation package for the Lotus Sametime embedded client if
you have not already done so.a. To download installation packages, you must have an IBM Passport
Advantage account, which is described at the following Web address:www.ibm.com/software/howtobuy/passportadvantage/paocustomer/docs/en_US/ecare.html
b. Open this release’s Download document at the following Web address:http://www.ibm.com/support/docview.wss?rs=477&uid=24024322
Locate the components you need in the document’s listing, then downloadthe packages labelled with the corresponding part numbers to the systemon which you are installing.
c. Extract the files to a local directory.d. Verify that you have at least 1 GB of temporary space to run the installation
in your %TEMP% or /tmp directory.
216 Lotus Sametime: Installation and Administration Guide Part 1
2. Stop the Lotus Notes client.3. Double-click the setup.exe file to begin installation:
a. Select a language and click Next.b. Click Next as needed to proceed through the installation screen.
4. Verify the installation:a. Help → About IBM Lotus Notes
b. Click Feature Details.c. Verify that ″Sametime Application″ appears in the list of features with
″8.5.0″ at the beginning of its version information.d. Close the dialog box.
Installing Sametime Integration for Microsoft OfficeIBM Lotus Sametime integration with Microsoft Office allows you to collaborate,create meetings, and chat with coworkers through Microsoft Office applications.Lotus Sametime integration with the Microsoft Office SharePoint Server allowssimilar collaboration features with coworkers who use Office SharePoint Server astheir instant messaging application.
About this task
You can integrate Lotus Sametime with Microsoft Office to enable users tocollaborate directly within Office applications. You can additionally integrate LotusSametime with the Office SharePoint Server to enable Lotus Sametime users tocommunicate with Office SharePoint Server users from a SharePoint site.
Office integration
Integrating Lotus Sametime with Microsoft Office allows Lotus Sametime users tocollaborate directly within Office products by providing awareness and messagingcapabilities within each application. All users must be hosted on Lotus Sametimeservers.
Lotus Sametime Office Integration features require the following applications:v Microsoft Office version XP, 2003, or 2007v Microsoft Windows version XP or Vista
Office SharePoint Server integration
Integrating Lotus Sametime with Microsoft Office SharePoint Server extendscollaboration capabilities by providing awareness and instant messaging amongusers whose names appear on a SharePoint site. Any Office SharePoint Serveruser’s live name that can be resolved using the standard e-mail address field willbe recognized and will display its presence status to a user who is logged intoLotus Sametime. Clicking on an active SharePoint user displays a contextual LotusSametime menu. During a chat, the Lotus Sametime user is presented with thecomplete feature set of Lotus Sametime and its third-party plug ins, includingemoticons, file sharing, image captures, multiway chats, audio, video, telephony,screen sharing, and chat history.
Integration with Office SharePoint Server is achieved using documented interfacesfrom Microsoft Corporation. Deploying this feature requires modifying twotemplate files on the Office SharePoint Server. In addition, Lotus SametimeConnect users will need to upgrade their installed client software.
Chapter 3. Installing 217
Lotus Sametime integration with the Microsoft Office SharePoint Server requiresthe following applications:v Microsoft Office versions XP, 2003, 2007v Microsoft Internet Explorer browser, version 6 or higherv Microsoft Office SharePoint Server service version 2 or version 3, Microsoft
Office SharePoint Portal Server 2003, or Microsoft Office SharePoint Server 2007v Lotus Sametime 8.5 client with the Lotus Sametime Connect Integrator for
Microsoft Officev Lotus Sametime server, release 8.5 or higher
The Office SharePoint feature requires only a Lotus Sametime client; other OfficeIntegration features need not be installed at all, or may be present in anycombination. Complete the tasks below according to the features you wish toinstall. The client installation files or update site also need to be enabled to includethe Office Integration features.Related tasks
“Enabling installation of optional client features such as Microsoft OfficeIntegration” on page 200IBM Lotus Sametime ships with a number of optional client features that are notincluded in the default installation package. You can add features to theinstallation package for new client installs, as well as update already-installedclients.
Installing Office Integration:
IBM Lotus Sametime with Microsoft Office allows you to collaborate, createmeetings, and chat with co-workers from Microsoft Office.
Before you begin
Complete the installation of Lotus Sametime servers and clients and installMicrosoft Office before beginning the Microsoft Office integration.
About this task
Lotus Sametime Integration with Microsoft Office offers the following features:v Sametime Connect integrator for Microsoft Officev Microsoft Outlook calendar availabilityv Sametime Connect integrator for Microsoft Outlookv Sametime meeting integrator for Microsoft Outlookv Sametime Connect integrator for SharePoint
Note: When you install Office Integration, you do not have to close any Office,Outlook, or Internet Explorer process, but Office Integration become available onlyafter you restart those programs.
Installing the Office Integration features
The following should be performed after the installation of (or upgrade to) LotusSametime Connect client on each machine.
Enabling SmartTags
218 Lotus Sametime: Installation and Administration Guide Part 1
The Sametime Office Integration feature set adds the SmartTag recognizer whichwill start on either the names from the user’s local buddy list or from internet-stylee-mail addresses, for example ″[email protected]″.
Note: These are in addition to the Lotus Sametime menu items contributed toPerson Name (English) from Lotus Sametime 7.5.1.v To enable SmartTags, select the Person (Lotus Sametime Recognizer) entry from
the AutoCorrect SmartTag dialog.v The use of automatic hyperlinks in Office documents will interfere with the new
SmartTag’s ability to recognize e-mail addresses -- you can regain the SmartTagfunction by disabling hyperlinks: Clear the ″Internet and network paths withhyperlinks″ option in ″AutoFormat As You Type″ tab from theTools->Auto-Correct Options menu.
Known issues
v The Meeting Integrator feature can support Sametime meeting servers thatrequire SSL by modifying the syntax of the server name specified in theSametime Meeting properties: if SSL is required, include the protocol portion ofthe server URL, for example ″https://sametime.mycompany.com″. The syntaxshown in the dialog example, ″sametime.mycompany.com″, is correct for serversthat are accessible by ordinary, non-SSL http.
v If the default e-mail fields read by the Outlook Toolbar are not the appropriatefields for a customer’s enterprise, the Toolbar can be redirected to use otherfields instead by modifying the file CustomProperties.ini in the Sametime installfolder. The intent is that such modifications would be made by IT experts andthe ini file (text) be distributed to users. If this optional file is not present,Toolbar uses its default field settings.
Limitations
v The local Outlook user e-mail address must be resolvable in Sametime for theMyStatus button to properly display status.
v The Meeting Integrator feature is not included in a meeting request that beginsfrom Outlook’s ″Plan A Meeting″ dialog.
v In a meeting which includes a Sametime meeting, if the Sametime meetingpassword is changed after the initial invitation is sent, then the message bodywill show more than one password -- the most recent password assignment isdisplayed last.
Third Party Limitations
v Microsoft Outlook will cache and retain forms despite the uninstall if the form isdesignated to be used.To fully uninstall and eliminate the ST OnlineMeeting, ST OnlineMeetingRTL,and STContact custom forms, the user must be sure to set Calendar and Contact″When posting...″ properties back to IPM.Appointment and IPM.Contactrespectively.
v Microsoft Outlook permits multiple user profiles but is designed to operateunder one profile at a time, which must be selected at Outlook’s launch. SomeLotus Sametime features must keep the Outlook process running for theiroperation, which has implications when a user wants to select or switch profiles.Outlook can be configured to always use one default profile, or to prompt atstart-up; if you later want to use Outlook with a different profile, you must exitOutlook, launch it again, and then select the new profile.
Chapter 3. Installing 219
If the Lotus Sametime client has been configured to use Outlook for either theCalendar AutoStatus feature or as the storage location for Chat History, andOutlook is not already running, Lotus Sametime will silently launch Outlook toaccess those features, and then keep it running as a background process with nouser interface. If the user has multiple profiles with no default selected andLotus Sametime executes this silent launch, a ″Use Profile″ dialog box will beprovided by Outlook and will be used by the background process. When theuser later starts Outlook, the profile chosen earlier during the Lotus Sametimestart-up will automatically be used; if the user wants to change the profile, he orshe must exit both Outlook and the Lotus Sametime client (which in turn stopsthe Outlook process running in the background).
Installing the Meeting Integrator:
IBM Lotus Sametime Meeting Integrator allows you to use the Calendar featurewithin Microsoft Office even though you do not have the Sametime Clientinstalled.
About this task
Note: When you install Office Integration, you do not need to close MicrosoftOutlook, but the Meeting Integrator becomes available only after you restartOutlook.
To install IBM Lotus Sametime Meeting Integrator (sametime-outlook-integrator-8.5.exe), launch the installer and work through the screens from install to license. Ifyou have closed all the Outlook Processes Running during installing, the fix isinstalled successfully onto Outlook. If you have not closed all the OutlookProcesses Running during installing, the fix is installed completely only after yourestart Outlook.
Known issues
The Meeting Integrator feature can support Sametime meeting servers that requireSSL by modifying the syntax of the server name specified in the Sametime Meetingproperties: if SSL is required, include the protocol portion of the server URL, forexample ″https://sametime.mycompany.com″. The syntax shown in the dialogexample, ″sametime.mycompany.com″, is correct for servers that are accessible byordinary, non-SSL http.
Limitations
The Meeting Integrator feature is not included in a meeting request that beginsfrom Outlook’s ″Plan A Meeting″ dialog. In a meeting which includes a Sametimemeeting, if the Sametime meeting password is changed after the initial invitation issent, then the message body will show more than one password -- the most recentpassword assignment is displayed last.
Setting up the Meeting Integrator for a secure connection:
Install the SSL certificate on the client to use the Meeting Integrator successfully onSametime servers running on a secure connection. The Sametime Meeting Serverruns on a secure HTTPS connection by default.
220 Lotus Sametime: Installation and Administration Guide Part 1
About this task
Follow these steps to install the certificate.1. Open Internet Explorer to connect to the Sametime server over HTTPS.2. At the Security Alert dialog box, click View Certificate.
If you do not see a dialog box, double-click the lock icon located in the bottomright corner of the window.
3. The Certificate dialog box shows the certificate properties. Open theCertification Path tab.The root certificate shows a red X because it is not yet trusted.
4. Select the root certificate and click View Certificate.A dialog box shows the properties of the root certificate.
5. Click Install Certificate.6. When the wizard starts, click Next.7. On the next screen, select Automatically select the certificate store based on
the type of certificate and click Next.8. Click Finish.
At the prompt, click Yes to trust the root certificate.9. After receiving a confirmation that the certificate was correctly installed, close
and reopen Internet Explorer and connect to the Sametime server again.If the certificate was installed properly, the Security Alert no longer appears.
Troubleshooting Microsoft Office integration:
If the Microsoft Office integration does not work properly in your IBM LotusSametime deployment, you may need to adjust the Lotus Sametime serverconfiguration.
Troubleshooting the Lotus Sametime Integrator for Microsoft Outlook
The Lotus Sametime Integrator for Microsoft Outlook (or “Outlook toolbar”) worksby asking Lotus Sametime to process an identifier phrase – in the Outlook case, thephrase is an e-mail address. The key to getting full functionality from the Outlooktoolbar is to configure the Lotus Sametime server to resolve the e-mail ″phrases″found by the toolbar.
The most common symptom of resolution problems is that the Target Contactbutton is not updated to show the Lotus Sametime display name and status, butinstead continues to show an e-mail address, such as “[email protected]” or“JSMITH” (a CN portion of an X.400 address). There will always be e-mails fromexternal parties that will remain unresolved, but addresses for Lotus Sametimeuser should resolve.
Troubleshooting has four steps, described in more detail below: enable logging,find the resolution request, check the phrase, and, if necessary, adjust the LotusSametime server configuration.
Enabling Logging
Begin troubleshooting this problem by enabling the log files in the Lotus Sametimeclient. As any new e-mail address is encountered, an XML message is sent from theOutlook toolbar to the Lotus Sametime client for lookup processing. Thesemessages can be echoed into the client logs. The configuration information for a
Chapter 3. Installing 221
user is stored in a workspace under the user’s Documents and Settings folder,under the path Documents and Settings\User\Application Data\Lotus\Sametime\.config. The rcpinstall.properties file located here is processed on each launchof the client.
Open this and add the following line to the end of the file:com.ibm.collaboration.realtime.brokerbridge.level=FINE
On all subsequent launches, the XML traffic between the Lotus Sametime clientand the Office Integration features will be logged to the trace-log-N.xml files inthe Application Data\Lotus\Sametime\logs folder.
A few tips will simplify using these logs:v Focus the troubleshooting effort on just one Office application – so avoid
opening other Office applications or SharePoint pages, because their messagetraffic will overlap the Outlook messages and make the logs larger.
v The Lotus Sametime client usually needs to be exited to complete the writing ofthe logs – the easiest approach is to start Lotus Sametime, click a few probleme-mails, then exit the client and examine the logs.
v The logs are designed to be opened in a browser from the ApplicationData\Lotus\Sametime\logs folder, which contains formatting files to create tablesof output.
Finding the Resolution Request
Once the trace log is opened, use the browser’s function to search for text in thepage and search for the phrase “liveNameResolve”. This XML message is the typeused by Outlook toolbar to request resolutions – because e-mail addresses mapuniquely to one person, the toolbar is using the lookup service which returns onlyunique matches. Once the table row containing a liveNameResolve is found, thetarget phrase is located in the lookupName section – this in turn is an array of oneor more phrases, in stringArray\data nodes. As a concrete example, an e-mailwithin the STOIDEV enterprise from user John Doe might cause aliveNameResolve like this one:<?xml version="1.0" encoding="utf-8" ?><messageSet version="1.0" signed="false">
<liveNameResolve typeVersion="1.0"><lookupNames valueType="stringArray"><stringArray length="1"><data><!<CDATA<CN=John Doe,CN=Users,DC=stoidev,DC=com>>></data>
</stringArray> </lookupNames></liveNameResolve><signature /> </messageSet>
This example has been formatted for this page – it may appear as a single line inthe logs. So the e-mail address phrase here is CN=JohnDoe,CN=Users,DC=stoidev,DC=com.
Note that in this example (from a real Exchange test set-up) this particular formatof the e-mail address is NOT ordinarily displayed to the Outlook user – instead,the user sees “John Doe” or “[email protected]” displayed in Outlook documentsand dialogs.
Checking the Phrase
A quick check for resolution results can be accomplished by starting the LotusSametime client and clicking Add Contact. Then, paste the phrase from theliveNameRequest (CN=John Doe,CN=Users,DC=stoidev,DC=com in this example) intothe User name field of the ″New Contact″ dialog box, and click Lookup. If the
222 Lotus Sametime: Installation and Administration Guide Part 1
phrase returns a unique result, then the toolbar should likewise get that result andoperate fully for that target contact. If there are no results, or if there are multipleresults, then the toolbar resolution will not be able to display a Lotus Sametimeuser for that address.
Adjusting the Server Configuration
Both the Lotus Sametime client and the Outlook toolbar (working within the LotusSametime client), rely on the Lotus Sametime server to associate a particularphrase with a user. No other communications to directories are in use – if theLotus Sametime server cannot establish the association, the Outlook toolbar canonly assume that none exists. However, the Lotus Sametime server has greatflexibility and can be directed to use any of the directory fields at its disposalwhen doing this processing.
Authentication settings in the LDAP directory ensure that Sametime users can beauthenticated against entries. The first table entry, called ″Search filter to use whenresolving a user name to a distinguished name″, dictates the query that is used.Notice that ″mail=%s″ is a recommended setting, and will be successful when theID phrase is the SMTP e-mail address ″[email protected]″. For cases like theexample above, the default settings for many Exchange deployments will have thisaddress phrase, in its entirety, within an attribute called “legacyExchangeDN” – soa query term “(legacyExchangeDN=%s)” would typically be added as an additionto the “(mail=%s)” and others present in the filter string. Other cases could requireinspecting available directory attributes to find a suitable match.
One final detail is that the Lotus Sametime server, by default, will skip overattribute values that are in LDAP canonical format as a single field, but it offers anoverride – this override would be required in the legacyExchangeDN case, forexample. To establish the override behavior, edit the Lotus Sametime server’ssametime.ini configuration file and add this line:ST_DB_LDAP_ALLOW_SEARCH_ON_DN=1
to the section labeled [Directory]. If there is no such section already, create one byappending the two lines at the end of the sametime.ini file:[Directory]ST_DB_LDAP_ALLOW_SEARCH_ON_DN=1
Setting up Office SharePoint integration:
Integrating IBM Lotus Sametime with Microsoft Office SharePoint Server extendscollaboration capabilities by providing awareness and instant messaging betweenLotus Sametime users who are using an Office SharePoint site. Systemadministrators set up this feature by modifying template files on the MicrosoftOffice SharePoint Server as described below. Users add these new capabilities byusing a customized install file to install the optional client feature called ″SametimeConnect integrator for SharePoint.″
About this task
Complete the tasks below to set up Office SharePoint integration:
Chapter 3. Installing 223
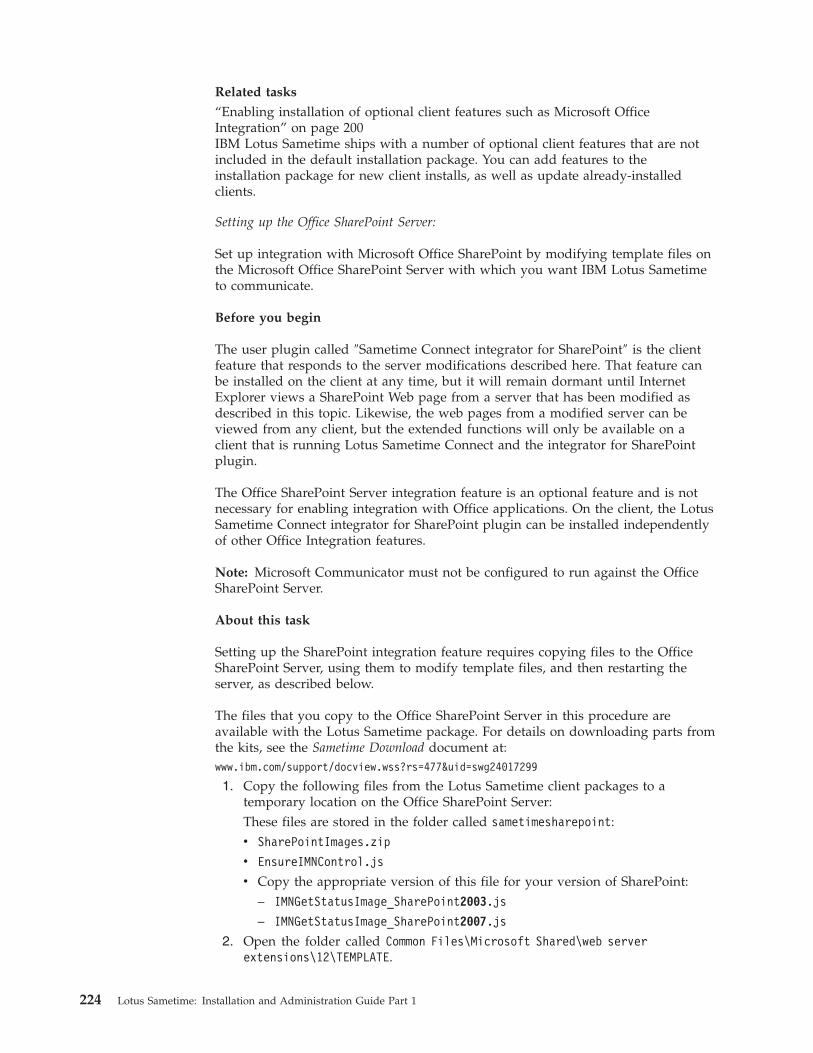
Related tasks
“Enabling installation of optional client features such as Microsoft OfficeIntegration” on page 200IBM Lotus Sametime ships with a number of optional client features that are notincluded in the default installation package. You can add features to theinstallation package for new client installs, as well as update already-installedclients.
Setting up the Office SharePoint Server:
Set up integration with Microsoft Office SharePoint by modifying template files onthe Microsoft Office SharePoint Server with which you want IBM Lotus Sametimeto communicate.
Before you begin
The user plugin called ″Sametime Connect integrator for SharePoint″ is the clientfeature that responds to the server modifications described here. That feature canbe installed on the client at any time, but it will remain dormant until InternetExplorer views a SharePoint Web page from a server that has been modified asdescribed in this topic. Likewise, the web pages from a modified server can beviewed from any client, but the extended functions will only be available on aclient that is running Lotus Sametime Connect and the integrator for SharePointplugin.
The Office SharePoint Server integration feature is an optional feature and is notnecessary for enabling integration with Office applications. On the client, the LotusSametime Connect integrator for SharePoint plugin can be installed independentlyof other Office Integration features.
Note: Microsoft Communicator must not be configured to run against the OfficeSharePoint Server.
About this task
Setting up the SharePoint integration feature requires copying files to the OfficeSharePoint Server, using them to modify template files, and then restarting theserver, as described below.
The files that you copy to the Office SharePoint Server in this procedure areavailable with the Lotus Sametime package. For details on downloading parts fromthe kits, see the Sametime Download document at:www.ibm.com/support/docview.wss?rs=477&uid=swg24017299
1. Copy the following files from the Lotus Sametime client packages to atemporary location on the Office SharePoint Server:These files are stored in the folder called sametimesharepoint:v SharePointImages.zip
v EnsureIMNControl.js
v Copy the appropriate version of this file for your version of SharePoint:– IMNGetStatusImage_SharePoint2003.js
– IMNGetStatusImage_SharePoint2007.js
2. Open the folder called Common Files\Microsoft Shared\web serverextensions\12\TEMPLATE.
224 Lotus Sametime: Installation and Administration Guide Part 1
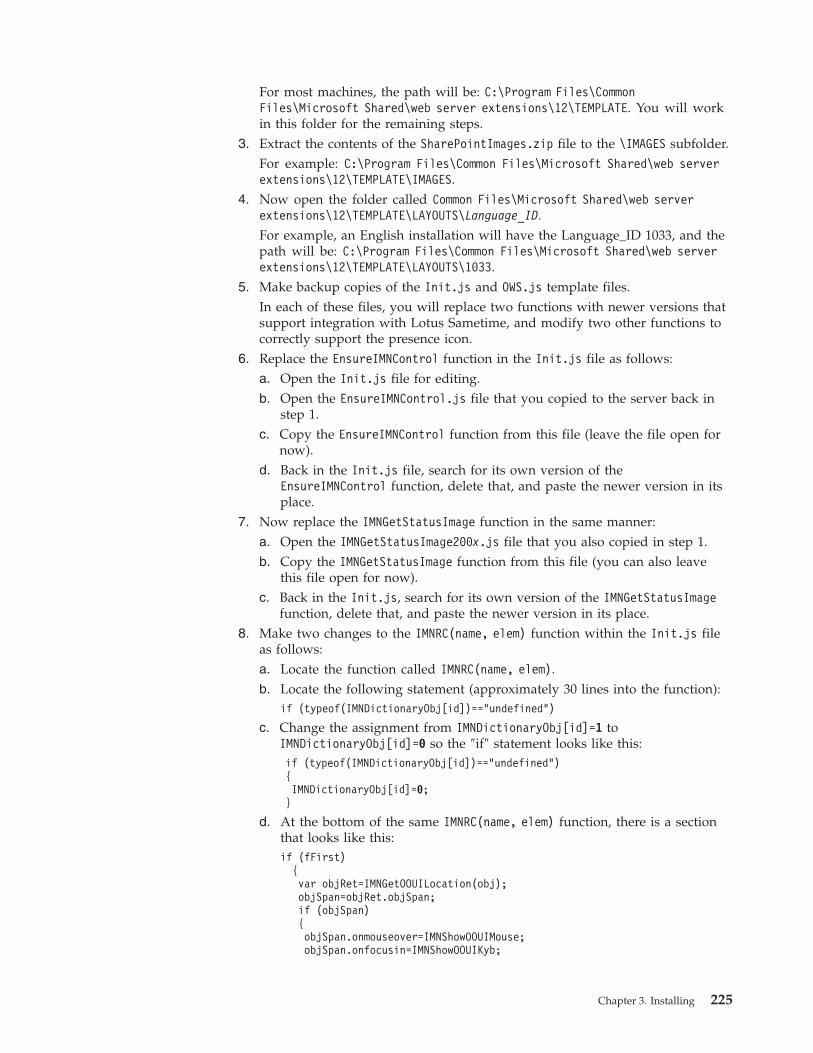
For most machines, the path will be: C:\Program Files\CommonFiles\Microsoft Shared\web server extensions\12\TEMPLATE. You will workin this folder for the remaining steps.
3. Extract the contents of the SharePointImages.zip file to the \IMAGES subfolder.For example: C:\Program Files\Common Files\Microsoft Shared\web serverextensions\12\TEMPLATE\IMAGES.
4. Now open the folder called Common Files\Microsoft Shared\web serverextensions\12\TEMPLATE\LAYOUTS\Language_ID.For example, an English installation will have the Language_ID 1033, and thepath will be: C:\Program Files\Common Files\Microsoft Shared\web serverextensions\12\TEMPLATE\LAYOUTS\1033.
5. Make backup copies of the Init.js and OWS.js template files.In each of these files, you will replace two functions with newer versions thatsupport integration with Lotus Sametime, and modify two other functions tocorrectly support the presence icon.
6. Replace the EnsureIMNControl function in the Init.js file as follows:a. Open the Init.js file for editing.b. Open the EnsureIMNControl.js file that you copied to the server back in
step 1.c. Copy the EnsureIMNControl function from this file (leave the file open for
now).d. Back in the Init.js file, search for its own version of the
EnsureIMNControl function, delete that, and paste the newer version in itsplace.
7. Now replace the IMNGetStatusImage function in the same manner:a. Open the IMNGetStatusImage200x.js file that you also copied in step 1.b. Copy the IMNGetStatusImage function from this file (you can also leave
this file open for now).c. Back in the Init.js, search for its own version of the IMNGetStatusImage
function, delete that, and paste the newer version in its place.8. Make two changes to the IMNRC(name, elem) function within the Init.js file
as follows:a. Locate the function called IMNRC(name, elem).b. Locate the following statement (approximately 30 lines into the function):
if (typeof(IMNDictionaryObj[id])=="undefined")
c. Change the assignment from IMNDictionaryObj[id]=1 toIMNDictionaryObj[id]=0 so the ″if″ statement looks like this:if (typeof(IMNDictionaryObj[id])=="undefined"){IMNDictionaryObj[id]=0;}
d. At the bottom of the same IMNRC(name, elem) function, there is a sectionthat looks like this:if (fFirst)
{var objRet=IMNGetOOUILocation(obj);objSpan=objRet.objSpan;if (objSpan){objSpan.onmouseover=IMNShowOOUIMouse;objSpan.onfocusin=IMNShowOOUIKyb;
Chapter 3. Installing 225
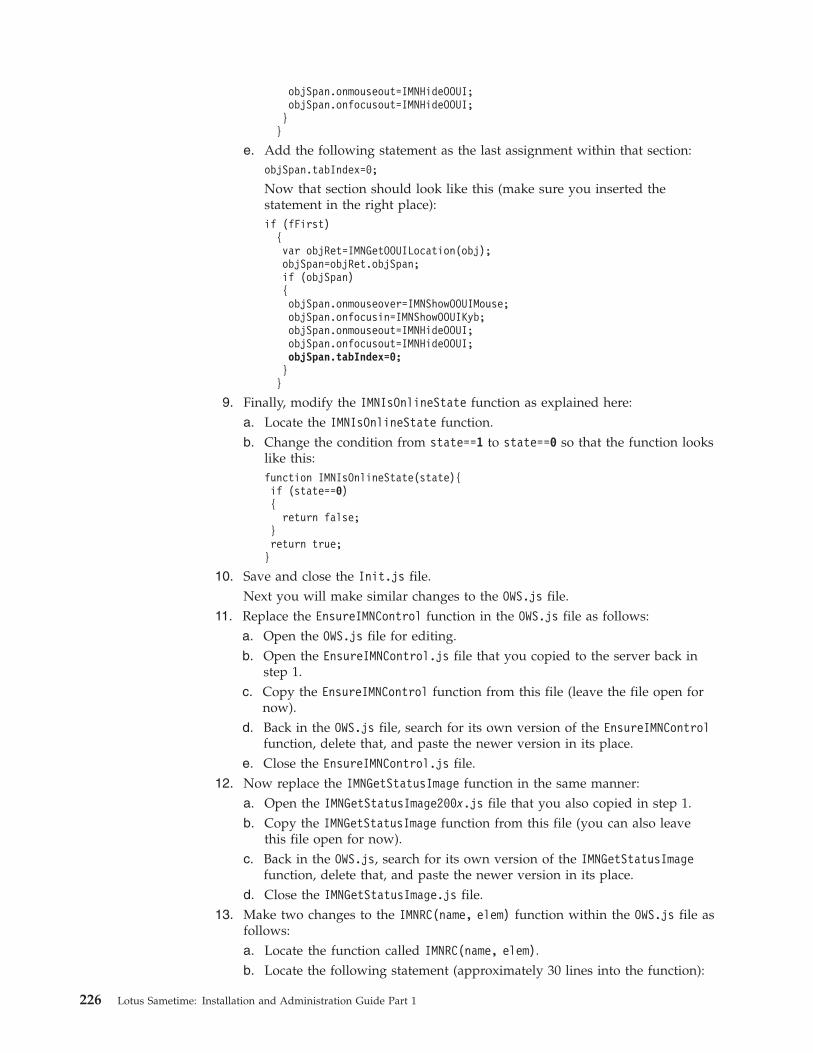
objSpan.onmouseout=IMNHideOOUI;objSpan.onfocusout=IMNHideOOUI;}}
e. Add the following statement as the last assignment within that section:objSpan.tabIndex=0;
Now that section should look like this (make sure you inserted thestatement in the right place):if (fFirst)
{var objRet=IMNGetOOUILocation(obj);objSpan=objRet.objSpan;if (objSpan){objSpan.onmouseover=IMNShowOOUIMouse;objSpan.onfocusin=IMNShowOOUIKyb;objSpan.onmouseout=IMNHideOOUI;objSpan.onfocusout=IMNHideOOUI;objSpan.tabIndex=0;}}
9. Finally, modify the IMNIsOnlineState function as explained here:a. Locate the IMNIsOnlineState function.b. Change the condition from state==1 to state==0 so that the function looks
like this:function IMNIsOnlineState(state){if (state==0){
return false;}return true;}
10. Save and close the Init.js file.Next you will make similar changes to the OWS.js file.
11. Replace the EnsureIMNControl function in the OWS.js file as follows:a. Open the OWS.js file for editing.b. Open the EnsureIMNControl.js file that you copied to the server back in
step 1.c. Copy the EnsureIMNControl function from this file (leave the file open for
now).d. Back in the OWS.js file, search for its own version of the EnsureIMNControl
function, delete that, and paste the newer version in its place.e. Close the EnsureIMNControl.js file.
12. Now replace the IMNGetStatusImage function in the same manner:a. Open the IMNGetStatusImage200x.js file that you also copied in step 1.b. Copy the IMNGetStatusImage function from this file (you can also leave
this file open for now).c. Back in the OWS.js, search for its own version of the IMNGetStatusImage
function, delete that, and paste the newer version in its place.d. Close the IMNGetStatusImage.js file.
13. Make two changes to the IMNRC(name, elem) function within the OWS.js file asfollows:a. Locate the function called IMNRC(name, elem).b. Locate the following statement (approximately 30 lines into the function):
226 Lotus Sametime: Installation and Administration Guide Part 1
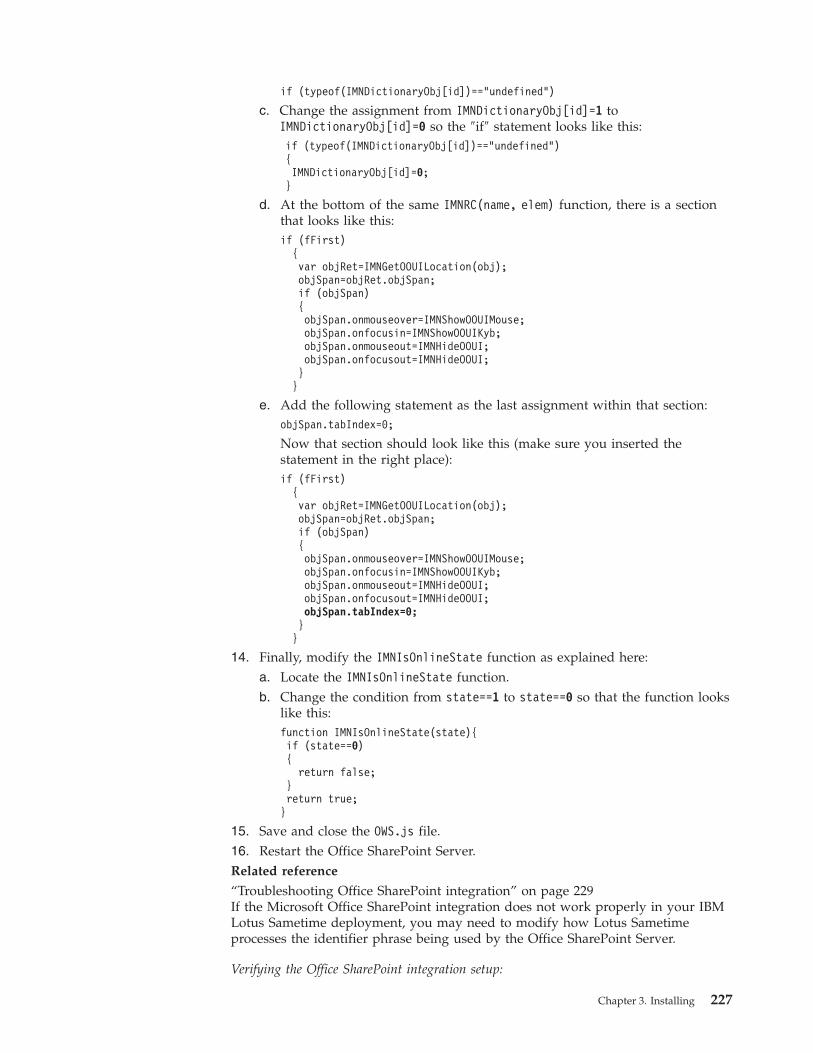
if (typeof(IMNDictionaryObj[id])=="undefined")
c. Change the assignment from IMNDictionaryObj[id]=1 toIMNDictionaryObj[id]=0 so the ″if″ statement looks like this:if (typeof(IMNDictionaryObj[id])=="undefined"){IMNDictionaryObj[id]=0;}
d. At the bottom of the same IMNRC(name, elem) function, there is a sectionthat looks like this:if (fFirst)
{var objRet=IMNGetOOUILocation(obj);objSpan=objRet.objSpan;if (objSpan){objSpan.onmouseover=IMNShowOOUIMouse;objSpan.onfocusin=IMNShowOOUIKyb;objSpan.onmouseout=IMNHideOOUI;objSpan.onfocusout=IMNHideOOUI;}}
e. Add the following statement as the last assignment within that section:objSpan.tabIndex=0;
Now that section should look like this (make sure you inserted thestatement in the right place):if (fFirst)
{var objRet=IMNGetOOUILocation(obj);objSpan=objRet.objSpan;if (objSpan){objSpan.onmouseover=IMNShowOOUIMouse;objSpan.onfocusin=IMNShowOOUIKyb;objSpan.onmouseout=IMNHideOOUI;objSpan.onfocusout=IMNHideOOUI;objSpan.tabIndex=0;}}
14. Finally, modify the IMNIsOnlineState function as explained here:a. Locate the IMNIsOnlineState function.b. Change the condition from state==1 to state==0 so that the function looks
like this:function IMNIsOnlineState(state){if (state==0){
return false;}return true;}
15. Save and close the OWS.js file.16. Restart the Office SharePoint Server.Related reference
“Troubleshooting Office SharePoint integration” on page 229If the Microsoft Office SharePoint integration does not work properly in your IBMLotus Sametime deployment, you may need to modify how Lotus Sametimeprocesses the identifier phrase being used by the Office SharePoint Server.
Verifying the Office SharePoint integration setup:
Chapter 3. Installing 227
Use the IBM Lotus Sametime Connect client with the Lotus Sametime Connectintegrator for SharePoint to verify that the Microsoft Office SharePoint integrationfeature is working correctly.
Before you begin
Set up the Office SharePoint Server by modifying template files as described in″Setting up the Office SharePoint server.″ On the client machine, install LotusSametime Connect with the optional feature called ″Sametime Connect integratorfor SharePoint.″
About this task
When a Web page like the My Site page is loaded, the Lotus Sametime SharePointcontrol will display a presence icon for names on the page that represent onlineLotus Sametime users (for example, a green square indicates a online user whosestatus is Available). No icon appears when a name is unresolved or a user isoffline. Log in to the Sametime Connect client and navigate to a SharePoint site toensure that the presence icons are displaying correctly.1. If online users are displaying appropriate Lotus Sametime presence icons,
integration is correctly configured and you have finished. Skip the remainder ofthis topic.
2. If icons are missing, check for the following situations:v Names on this page are missing icons entirely.You know that a particular
name should have a presence icon but only displays it when you mouse-overthe name.In this case, the client control is loading and resolving the name, but the iconupdate within the page is not complete. The most likely cause is incorrectediting of the template files on the server; return to the previous topic andverify that you made the changes properly.
v Names are missing icons and a mouse-over shows the control as a gray″X″.
In this case, the client control is loading but is not receiving positiveresolutions for the person data being set by the page. Verify that the LotusSametime Connect client is running and logged into the Lotus Sametimeserver. If the problem persists, check the following topic, ″TroubleshootingOffice SharePoint integration″.
v A mouse-over does not show any change in the presence icon and does nothave a gray ″X″.
In this case, either:– The optional Lotus Sametime Connect integrator for SharePoint feature
was not installed on the client. Install it now and repeat this procedure toverify that integration is working correctly.
– the JavaScript™ library edits have not been applied on the server hostingthis Web page. Return to the previous topic and apply the templatechanges directly on the Office SharePoint Server where the page beingtested is hosted.
228 Lotus Sametime: Installation and Administration Guide Part 1
Related tasks
“Enabling installation of optional client features such as Microsoft OfficeIntegration” on page 200IBM Lotus Sametime ships with a number of optional client features that are notincluded in the default installation package. You can add features to theinstallation package for new client installs, as well as update already-installedclients.Related reference
“Troubleshooting Office SharePoint integration”If the Microsoft Office SharePoint integration does not work properly in your IBMLotus Sametime deployment, you may need to modify how Lotus Sametimeprocesses the identifier phrase being used by the Office SharePoint Server.“Troubleshooting Office SharePoint integration”If the Microsoft Office SharePoint integration does not work properly in your IBMLotus Sametime deployment, you may need to modify how Lotus Sametimeprocesses the identifier phrase being used by the Office SharePoint Server.
Troubleshooting Office SharePoint integration:
If the Microsoft Office SharePoint integration does not work properly in your IBMLotus Sametime deployment, you may need to modify how Lotus Sametimeprocesses the identifier phrase being used by the Office SharePoint Server.
Lotus Sametime and Office SharePoint user directories
In some enterprises, the Office SharePoint integration may function immediatelywith no additional configuration updates besides the JavaScript library changesdescribed in ″Setting up Office SharePoint Server integration″. The most likelyscenario to encounter this immediate functionality is one where Lotus Sametimeand Office SharePoint have both been configured to use the same Active Directory,sharing this one LDAP for their backend directory. However, sharing a commonLDAP is not a prerequisite for success with the Lotus Sametime SharePointintegration.
Enterprises where the Lotus Sametime server uses a different directory server areworkable, even in cases where Lotus Sametime is configured to use IBM LotusDomino and Office SharePoint is configured to use Active Directory. The key to thefunctionality is the concept of Lotus Sametime ″resolving″ a phrase to match aLotus Sametime user. The Office SharePoint Server creates and delivers Web pagesto the local browser, and the live names on the page include JavaScript code thatinitializes names with presence controls.
Ensuring that Lotus Sametime can resolve an Office SharePoint server phrase
In Office SharePoint 2007, the function that provides a Lotus Sametime user namewith a presence icon is called IMNRC. This function will appear in the page sourcewherever Office SharePoint intends to place a presence icon. The IMNRC functionis passed an identifier phrase, typically an SMTP-format e-mail address for theuser; so alongside the name ″Alice Jones″ will be a presence initializer likeIMNRC( ″[email protected]″). The Lotus Sametime control that is loaded into thebrowser will be passed this ID (the ″[email protected]″ string).
The primary requirement for successful use of the Lotus Sametime SharePointintegration is that the ID phrase be uniquely resolvable by the Lotus Sametimeserver. Lotus Sametime does not require the Office SharePoint Server to use a
Chapter 3. Installing 229
particular data field as its ID for users, but you must configure the Lotus Sametimeserver to recognize the field you choose. The exact setting used by the LotusSametime server is described in the ″Table 6, Authentication settings for the LDAPdirectory″ in the LDAP directory settings topic within this information center.
The first table entry, called ″Search filter to use when resolving a user name to adistinguished name″, dictates the query that is used. Notice that ″mail=%s″ is arecommended setting, and will be successful when the ID phrase is the SMTPe-mail address ″[email protected]″.
To summarize, the user data that is configured as an ID for presence by OfficeSharePoint Server must be made available to the Lotus Sametime server (even if ina second directory), and then specified in the ″Search filter... when resolving a username″ field. A quick troubleshooting check is to take the ID phrase found in thepresence initializing function, and paste it into the Lookup text field of the ″AddContact″ dialog in the Lotus Sametime Connect Client. If it is a unique match, theID phrase will resolve in the proper Office SharePoint integration.Related tasks
“Setting up the Office SharePoint Server” on page 224Set up integration with Microsoft Office SharePoint by modifying template files onthe Microsoft Office SharePoint Server with which you want IBM Lotus Sametimeto communicate.“Verifying the Office SharePoint integration setup” on page 227Use the IBM Lotus Sametime Connect client with the Lotus Sametime Connectintegrator for SharePoint to verify that the Microsoft Office SharePoint integrationfeature is working correctly.
Starting and stopping servers in a Lotus Sametimedeployment
An IBM Lotus Sametime deployment is made of up several component servers thatcan be started and stopped independently.
Starting and stopping servers running on WebSphere ApplicationServerStarting and stopping IBM Lotus Sametime servers that run on WebSphereApplication Server involves other server components such as the DeploymentManager and the node agent.
Starting and stopping the Deployment Manager:
The Deployment Manager manages the Lotus Sametime System Console and allLotus Sametime Server cells.
About this task
Before starting Lotus Sametime Servers, the Deployment Manager must be runningfor each cell.
Windows only: You can also use the Start - Programs menu to use the Start andStop menu commands.1. In a command window, navigate to the app_server_root/profiles/
DeploymentManagerName/bin directory for the Deployment Manager you wantto start:
2. Run the following command to start and stop the Deployment Manager:
230 Lotus Sametime: Installation and Administration Guide Part 1
AIX, Linux, or Solaris
./startManager.sh
./stopManager.sh dmgr -username admin_user -password admin_password
Windows
startManager.batstopManager.bat dmgr -username admin_user -passwordadmin_password
IBM i
startManager dmgr
stopManager dmgr -username admin_user -password admin_password.Related tasks
“Starting and stopping WebSphere Application Servers on Windows” on page 232Use the Start Programs menu in Microsoft Windows to start or stop any Sametimeservers running on WebSphere Application Server.Related reference
“Command reference for starting and stopping servers” on page 232You may use a command window to start and stop Sametime components runningon WebSphere Application Server. To stop servers, you will supply the WebSphereApplication Server administrator password that was established when youinstalled the server. Important: Verify that the Deployment Manager for the cell isrunning before starting any server.
Starting the Lotus Sametime System Console:
When started, the Lotus Sametime System Console runs as a task in the WebSphereApplication Server administrative console.
Before you begin
Verify that the Deployment Manager is running for the cell.1. In a command window, navigate to the local app_server_root/profiles/
STSCAppProfile profile directory and change to the bin directory:2. Run the following commands:
AIX, Linux, or Solaris
./startNode.sh
./startServer.sh STConsoleServer
Windows
startNode.bat
startServer.bat STConsoleServer
IBM i
startNode
startServer STConsoleServer
What to do next
“Logging in to the Lotus Sametime System Console” on page 63
Chapter 3. Installing 231

Related tasks
“Starting and stopping the Deployment Manager” on page 230The Deployment Manager manages the Lotus Sametime System Console and allLotus Sametime Server cells.Related reference
“Command reference for starting and stopping servers”You may use a command window to start and stop Sametime components runningon WebSphere Application Server. To stop servers, you will supply the WebSphereApplication Server administrator password that was established when youinstalled the server. Important: Verify that the Deployment Manager for the cell isrunning before starting any server.
Starting and stopping WebSphere Application Servers on Windows:
Use the Start Programs menu in Microsoft Windows to start or stop any Sametimeservers running on WebSphere Application Server.
About this task
From the IBM WebSphere menu off the Start Programs menu, you can navigate tothe Start and Stop menu choices for a server.1. Working on the server you want to start or stop, click Start → All Programs.2. Click IBM WebSphere Application Server → Network Deployment V7.0 →
Profiles.3. Select the profile for the server and click the appropriate Start or Stop menu
command.Related tasks
“Automating Sametime Community Server shutdown on Windows” on page 240Follow these instructions for the proper sequence of events for an automatedshutdown of a IBM Lotus Sametime Community Server on Windows.Related reference
“Command reference for starting and stopping servers”You may use a command window to start and stop Sametime components runningon WebSphere Application Server. To stop servers, you will supply the WebSphereApplication Server administrator password that was established when youinstalled the server. Important: Verify that the Deployment Manager for the cell isrunning before starting any server.
Command reference for starting and stopping servers:
You may use a command window to start and stop Sametime components runningon WebSphere Application Server. To stop servers, you will supply the WebSphereApplication Server administrator password that was established when youinstalled the server. Important: Verify that the Deployment Manager for the cell isrunning before starting any server.
Table 18. Server command directories
Type Primary node Secondary node
Sametime System Console STSCAppProfile/bin STSCSNAppProfile/bin
Meeting Server STMAppProfile/bin STMSNAppProfile/bin
Proxy Server STPAppProfile/bin STPSNAppProfile/bin
Media Manager STMSAppProfile/bin STMSSNAppProfile/bin
232 Lotus Sametime: Installation and Administration Guide Part 1
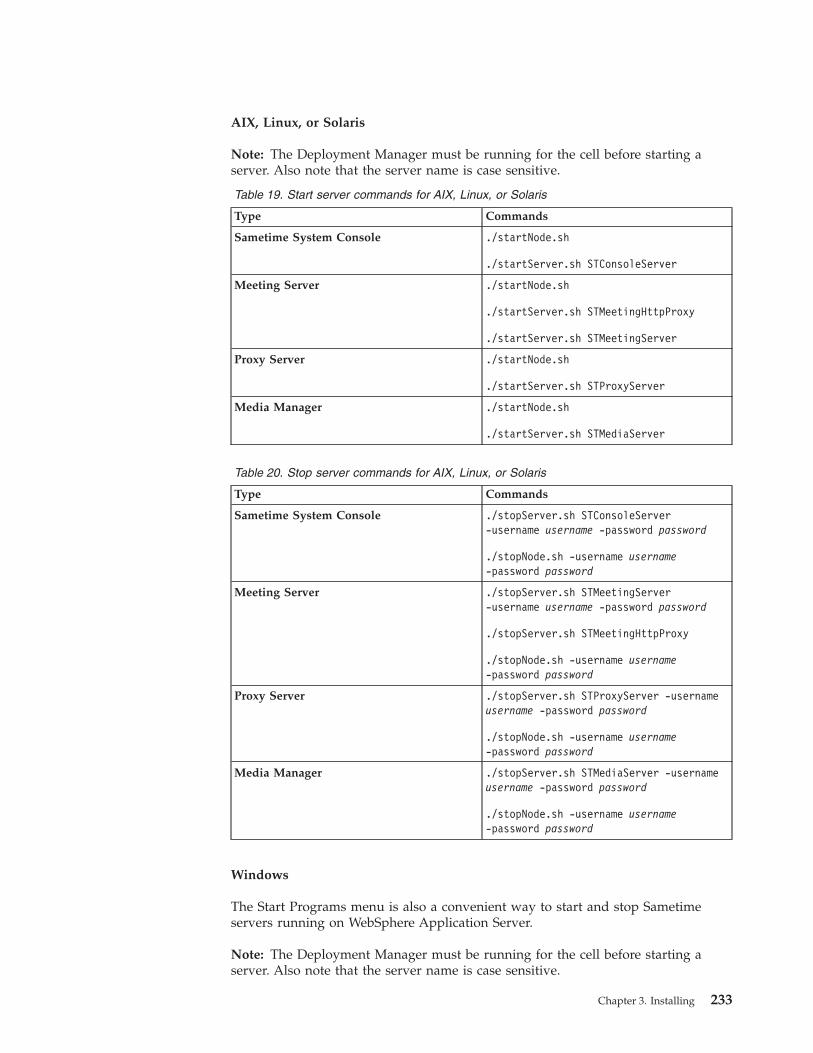
AIX, Linux, or Solaris
Note: The Deployment Manager must be running for the cell before starting aserver. Also note that the server name is case sensitive.
Table 19. Start server commands for AIX, Linux, or Solaris
Type Commands
Sametime System Console ./startNode.sh
./startServer.sh STConsoleServer
Meeting Server ./startNode.sh
./startServer.sh STMeetingHttpProxy
./startServer.sh STMeetingServer
Proxy Server ./startNode.sh
./startServer.sh STProxyServer
Media Manager ./startNode.sh
./startServer.sh STMediaServer
Table 20. Stop server commands for AIX, Linux, or Solaris
Type Commands
Sametime System Console ./stopServer.sh STConsoleServer-username username -password password
./stopNode.sh -username username-password password
Meeting Server ./stopServer.sh STMeetingServer-username username -password password
./stopServer.sh STMeetingHttpProxy
./stopNode.sh -username username-password password
Proxy Server ./stopServer.sh STProxyServer -usernameusername -password password
./stopNode.sh -username username-password password
Media Manager ./stopServer.sh STMediaServer -usernameusername -password password
./stopNode.sh -username username-password password
Windows
The Start Programs menu is also a convenient way to start and stop Sametimeservers running on WebSphere Application Server.
Note: The Deployment Manager must be running for the cell before starting aserver. Also note that the server name is case sensitive.
Chapter 3. Installing 233
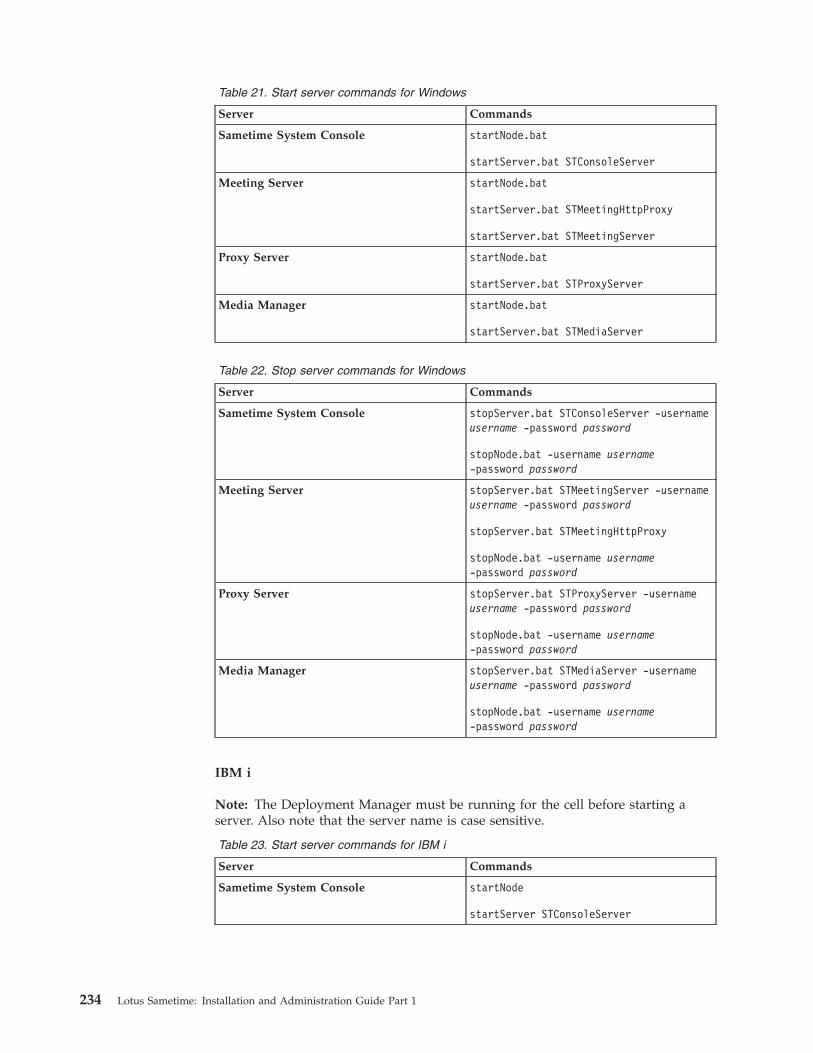
Table 21. Start server commands for Windows
Server Commands
Sametime System Console startNode.bat
startServer.bat STConsoleServer
Meeting Server startNode.bat
startServer.bat STMeetingHttpProxy
startServer.bat STMeetingServer
Proxy Server startNode.bat
startServer.bat STProxyServer
Media Manager startNode.bat
startServer.bat STMediaServer
Table 22. Stop server commands for Windows
Server Commands
Sametime System Console stopServer.bat STConsoleServer -usernameusername -password password
stopNode.bat -username username-password password
Meeting Server stopServer.bat STMeetingServer -usernameusername -password password
stopServer.bat STMeetingHttpProxy
stopNode.bat -username username-password password
Proxy Server stopServer.bat STProxyServer -usernameusername -password password
stopNode.bat -username username-password password
Media Manager stopServer.bat STMediaServer -usernameusername -password password
stopNode.bat -username username-password password
IBM i
Note: The Deployment Manager must be running for the cell before starting aserver. Also note that the server name is case sensitive.
Table 23. Start server commands for IBM i
Server Commands
Sametime System Console startNode
startServer STConsoleServer
234 Lotus Sametime: Installation and Administration Guide Part 1
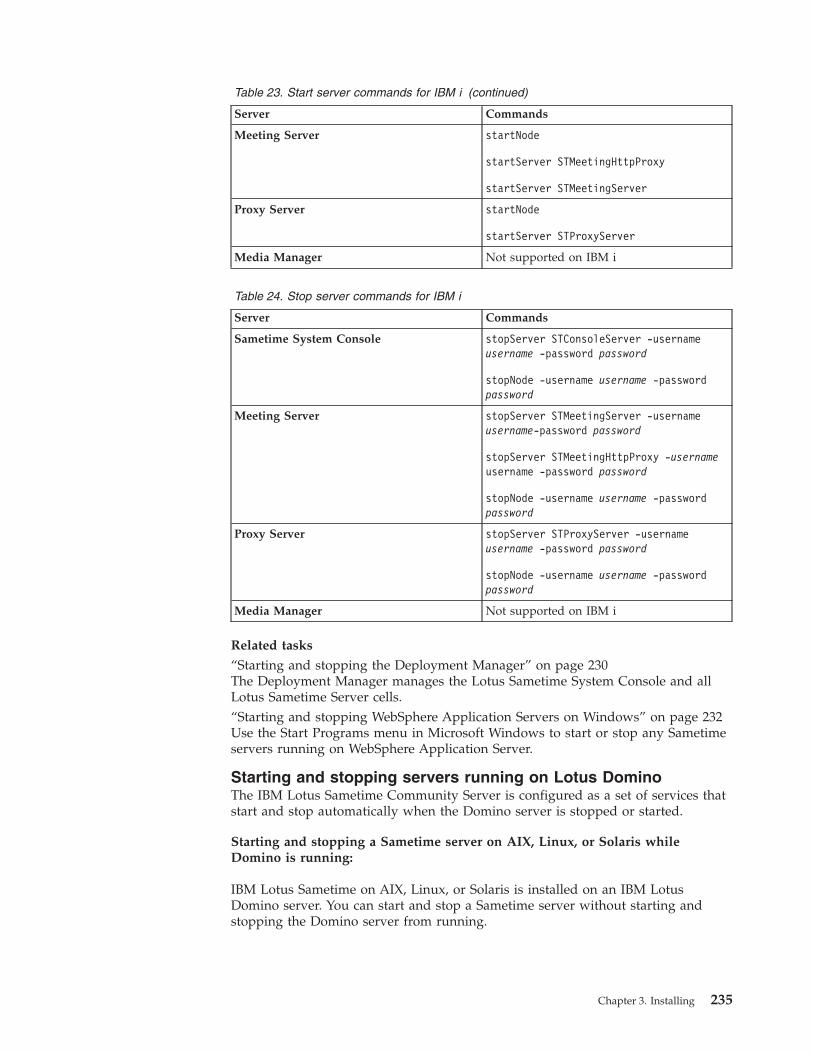
Table 23. Start server commands for IBM i (continued)
Server Commands
Meeting Server startNode
startServer STMeetingHttpProxy
startServer STMeetingServer
Proxy Server startNode
startServer STProxyServer
Media Manager Not supported on IBM i
Table 24. Stop server commands for IBM i
Server Commands
Sametime System Console stopServer STConsoleServer -usernameusername -password password
stopNode -username username -passwordpassword
Meeting Server stopServer STMeetingServer -usernameusername-password password
stopServer STMeetingHttpProxy -usernameusername -password password
stopNode -username username -passwordpassword
Proxy Server stopServer STProxyServer -usernameusername -password password
stopNode -username username -passwordpassword
Media Manager Not supported on IBM i
Related tasks
“Starting and stopping the Deployment Manager” on page 230The Deployment Manager manages the Lotus Sametime System Console and allLotus Sametime Server cells.“Starting and stopping WebSphere Application Servers on Windows” on page 232Use the Start Programs menu in Microsoft Windows to start or stop any Sametimeservers running on WebSphere Application Server.
Starting and stopping servers running on Lotus DominoThe IBM Lotus Sametime Community Server is configured as a set of services thatstart and stop automatically when the Domino server is stopped or started.
Starting and stopping a Sametime server on AIX, Linux, or Solaris whileDomino is running:
IBM Lotus Sametime on AIX, Linux, or Solaris is installed on an IBM LotusDomino server. You can start and stop a Sametime server without starting andstopping the Domino server from running.
Chapter 3. Installing 235
About this task
There are times when you will need to keep the Domino server running whiledoing Sametime maintenance tasks. For example, you might need to shut downSametime services while you make configuration changes on the Sametime server,but you need to leave the Domino server running so you can access Dominodatabases on the server.1. Open the Domino server console on the Sametime/Domino server.2. In the Domino server console, choose one of the following actions:
To start the Sametime server from a Domino server that is already running,type this command:Load STADDIN
To stop the Sametime server without stopping the Domino server, type thiscommand:Tell STADDIN Quit
Related concepts
“Considerations for AIX, Linux, and Solaris” on page 239If you install IBM Lotus Sametime on an IBM AIX, Linux, or Sun Solaris server,you should be aware of some special behaviors.
Starting and stopping a Sametime server on Windows while Domino isrunning:
IBM Lotus Sametime on Windows is installed on an IBM Lotus Domino server.You can start and stop a Sametime server without starting and stopping theDomino server from running.
About this task
There are times when you will need to keep the Domino server running whiledoing Sametime maintenance tasks. For example, you might need to shut downSametime services while you make configuration changes on the Sametime server,but you need to leave the Domino server running so you can access Dominodatabases on the server.1. Open the Domino server console on the Sametime/Domino server.2. In the Domino server console, choose one of the following actions:
To start the Sametime server from a Domino server that is already running,type this command:Load STADDIN
To stop the Sametime server without stopping the Domino server, type thiscommand:Tell STADDIN Quit
Starting and stopping Domino and a Sametime Community Server on AIX,Linux, or Solaris:
Learn how to start and stop a Sametime Community Server running on AIX,Linux, or Solaris.
Starting Domino and a Sametime Community Server on AIX, Linux, or Solaris:
Follow these instructions to start a Sametime Community Server on AIX, Linux, orSolaris.
236 Lotus Sametime: Installation and Administration Guide Part 1
About this task
IBM Lotus Sametime is installed on an IBM Lotus Domino server. Once you set upthe Lotus Domino server to launch Lotus Sametime automatically, then wheneveryou start or stop the Domino server, you are starting and stopping the LotusSametime server as well.1. Log in to the system as the default Domino user. Make sure the default path
and environment are set correctly.2. Start the Sametime server by issuing the following server command. Note that
starting the Sametime server might take a few minutes../ststart
3. The ″ststart″ script file sets some important environment variables beforelaunching the server executable (/opt/ibm/lotus/bin/server).
What to do next
Starting and stopping the Sametime server without starting and stoppingDomino
You can start and stop the Sametime server and keep the Domino server running.For example, you might need to shut down Sametime services while you makeconfiguration changes on the Sametime server, but you need to leave the Dominoserver running so you can access Domino databases on the server.1. Open the Domino server console on the Sametime/Domino server.2. In the Domino server console, choose one of the following actions:
a. To start the Sametime server from a Domino server that is already runningtype this command:Load STADDIN
b. To stop the Sametime server without stopping the Domino server type thiscommand:Tell STADDIN Quit
Related concepts
“Considerations for AIX, Linux, and Solaris” on page 239If you install IBM Lotus Sametime on an IBM AIX, Linux, or Sun Solaris server,you should be aware of some special behaviors.
Running a Sametime server as a background process on AIX:
You can run Lotus Sametime as a background process on an IBM AIX server.
Before you begin
The operating system’s IBM Lotus Domino user actually runs the backgroundprocess, and must have permission to run the script and write files to the DominoData Directory.
About this task
To run the Sametime server as a background process, complete the following steps:1. Open the ststart script located in the data directory, and copy the two sections
below into the .profile of the Domino user that will run Sametime as abackground process:
Chapter 3. Installing 237
# Define variablesBINDIR=/opt/lotus/notes/latest/ibmpow/LOTUSDIR=/opt/lotus/bin
# Export paths for notes userLIBPATH=${LIBPATH}:$BINDIRexport LIBPATHPATH=${PATH}:$BINDIRexport PATH
Note: The PATH environment variable cannot contain the /lotus/bin directory,which defaults to /opt/lotus/bin.
2. Set up the Virtual Frame Buffer, and verify that it is running.3. Set the DISPLAY environment variable to the host name:
DISPLAY=machine:1export DISPLAY
4. From the command prompt, run the following command, which enables you tomanage the server only through the IBM Lotus Notes Administration Client:nohup /opt/lotus/bin/server < /dev/null > /dev/null 2>&1 &
5. If you want to use text files for stin and stout, use the following:a. Create the following script on the server:
#!/usr/bin/shDOMINO_PROGRAM_DIR=/opt/lotusDOMINO_DATA_DIR=/local/notesdataexport DOMINO_PROGRAM_DIRexport DOMINO_DATA_DIRcd $DOMINO_DATA_DIRif [ -f st.in ] ; then
rm st.infiif [ -f st.out ] ; then
mv st.out st.out.bakfitouch st.in$DOMINO_PROGRAM_DIR/bin/server <st.in >st.out 2>&1 &cd -
Note:
If /usr/bin/sh does not exist, change the path for sh at the top of the script.If the default installation settings are not used, modify theDOMINO_DATA_DIR and DOMINO_PROGRAM_DIR environmentvariables at the top of the script.
b. Save the script on the AIX server.c. Use the cd command to navigate to the folder where the script was saved.d. Launch the script by typing:
./script_name
where script_name is the file name of the script.
Results
Once the server is running, you can interact with the server console by using theAdministrator Client Server console. Alternatively, you can view the console in atelnet session by issuing the following commands:> cd DOMINO_DATA_DIR> tail -f st.out
238 Lotus Sametime: Installation and Administration Guide Part 1
To enter commands at the server console, do the following:> cd DOMINO_DATA_DIR> echo {command} >>st.in
where
DOMINO_DATA_DIR is be the value for the Domino Data directory; for example,/local/notesdata,
and
{command} is a Domino Server console command such as ″Show Tasks″; forexample:> echo show tasks >>st.in
Stopping Domino and a Sametime Community Server on AIX, Linux, or Solaris:
Follow these instructions to stop a Sametime Community Server on AIX, Linux, orSolaris.1. Return to the terminal session where Domino was started.2. If the prompt character > is not present, press the Enter key once to be
presented with a prompt character. Then type either exit or quit and press theEnter key.
Considerations for AIX, Linux, and Solaris:
If you install IBM Lotus Sametime on an IBM AIX, Linux, or Sun Solaris server,you should be aware of some special behaviors.v You must not have /opt/ibm/lotus/bin in your PATH, otherwise Sametime will
not function correctly.v If you do not start Sametime from an XWindows environment, Save Annotations
will not function unless you set up a Virtual frame buffer.v If you start Sametime from a telnet session, exiting the telnet session also
terminates the Domino Console and Sametime.
Starting and stopping Domino and a Sametime Community Server onWindows:
Learn how to start and stop a Sametime Community Server on Windows.
Starting Domino and a Sametime server on Windows:
Follow these instructions to start a Sametime server on Windows.1. Select Start → Administrative Tools → Component Services.2. In the Services dialog box, select Services (Local).3. Right-click ″Sametime server″ and select Start.
Stopping Domino and a Sametime Community Server on Windows:
Follow these instructions to stop a Lotus Sametime Community Server onWindows.1. Select Start → Administrative Tools → Component Services.2. In the Services dialog box, select Services (Local).
Chapter 3. Installing 239
3. Right-click ″Sametime server″ and select Stop.
Automating Sametime Community Server shutdown on Windows:
Follow these instructions for the proper sequence of events for an automatedshutdown of a IBM Lotus Sametime Community Server on Windows.
About this task
If you try to automate the shutdown of Lotus Sametime Community Servers inbatch files by using the Windows net stop command against Lotus Dominowithout first shutting down Sametime services, then crash-on-shutdown eventsand long restart times can result. This sort of shutdown can also trigger crashes ofother servers within a Community Services Cluster. These problems occur becausethe ST Community Launch service relaunches Lotus Sametime applications asneeded. If Domino is stopped, then ST Community Launch works as designed andtries to relaunch the now-failing applications, with unpredictable results.
You can prevent these problems by creating your batch file with the propersequence of events for an automated shutdown of the Lotus Community SametimeServer.
Follow this order when you create your batch file:net stop "ST Community Launch"
<wait for service shutdown>
net stop "Sametime Server"
<wait for service shutdown>
net stop "Lotus Domino Server"
<wait for service shutdown>
Note: If your site has changed the service names then adjust the commandsaccordingly. These individual services might require several minutes to shut downproperly; this time is longer for high-volume servers. IBM recommends performingthese steps manually first to observe the time required for each shutdown. Insertthe appropriate wait sleep commands between the net stop commands when youcreate your batch files.
UninstallingBefore you can install a newer version of IBM Lotus Sametime, you must uninstallthe currently deployed version.
About this task
Complete these tasks to uninstall Lotus Sametime components.
Removing a node from a clusterBefore uninstalling a Sametime server that is part of a cluster, use the cluster utilityto remove the server from the cluster.
Removing a Sametime Community Server from a cluster:
240 Lotus Sametime: Installation and Administration Guide Part 1
Before uninstalling a Sametime Community Server that is part of a cluster, use theupdateSTCluster utility to remove the server from the cluster.
Before you begin
About this task
Follow these steps to remove the Sametime Community Server from the clusteradministered with the Sametime System Console.1. Working on the server you want to remove from the cluster, navigate to the
InstallLocation/console directory for the Deployment Manager profile.2. If this is the first time you have run a utility on this server, open
console.properties file and provide the System Console Host name, port, UserName and Password. Also, you can specify the log level, which is notmandatory.
3. Verify that the values in the productConfig.properties file are correct.4. Run the utility from the console directory you used in Step 1.
AIX, Linux, Solaris
updateSTCluster.sh -remove
Windows
updateSTCluster.bat -remove
5. When you are prompted, enter the name of the cluster you are updating.The utility removes the Sametime Community Server from the cluster andgenerates the ConsoleUtility.log file. It also deletes the console.pid file from theconsole directory.
Removing a WebSphere Application Server node from a cluster:
Before uninstalling an IBM Lotus Sametime server that was clustered with an IBMWebSphere Application Server network deployment, use the updateWASClusterutility to remove the node from the cluster.
About this task
Removing a node from a cluster involves manually removing the nodes in theDeployment Manager’s Integrated Solutions Console settings, verifyingconfiguration settings for the cluster, and then running a utility that updatesadditional cluster settings to reflect the removal of the node.1. Remove the node from the Deployment Manager:
Note: For additional information on removing a node from the DeploymentManager, see the removeNode command in the WebSphere Application Server7 information center. See Deleting specific cluster members for information onremoving a cluster member.a. In the Deployment Manager’s Integrated Solutions Console, click System
administration → Nodes.b. On the ″Nodes″ page, select the check box beside each node that you want
to remove.c. At the topic of the table, click the Remove Node button.
If you cannot remove the node by clicking Remove Node, remove the nodefrom the configuration by clicking Force Delete.
d. Click OK.
Chapter 3. Installing 241
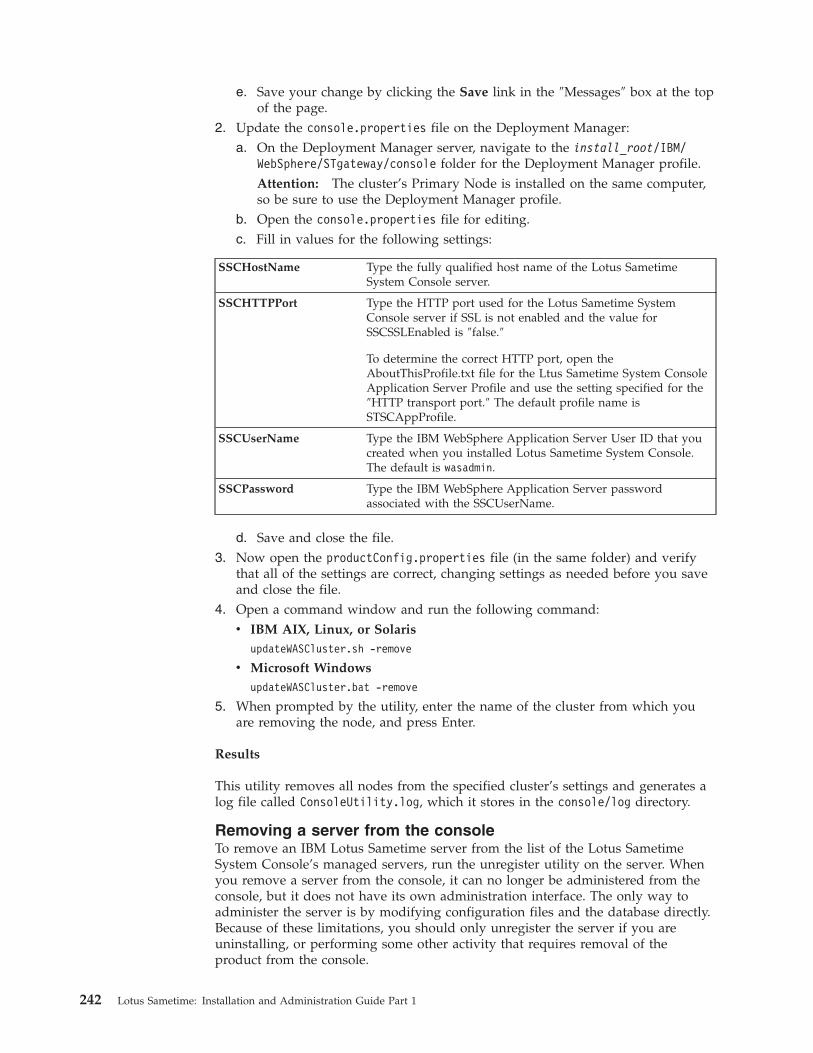
e. Save your change by clicking the Save link in the ″Messages″ box at the topof the page.
2. Update the console.properties file on the Deployment Manager:a. On the Deployment Manager server, navigate to the install_root/IBM/
WebSphere/STgateway/console folder for the Deployment Manager profile.Attention: The cluster’s Primary Node is installed on the same computer,so be sure to use the Deployment Manager profile.
b. Open the console.properties file for editing.c. Fill in values for the following settings:
SSCHostName Type the fully qualified host name of the Lotus SametimeSystem Console server.
SSCHTTPPort Type the HTTP port used for the Lotus Sametime SystemConsole server if SSL is not enabled and the value forSSCSSLEnabled is ″false.″
To determine the correct HTTP port, open theAboutThisProfile.txt file for the Ltus Sametime System ConsoleApplication Server Profile and use the setting specified for the″HTTP transport port.″ The default profile name isSTSCAppProfile.
SSCUserName Type the IBM WebSphere Application Server User ID that youcreated when you installed Lotus Sametime System Console.The default is wasadmin.
SSCPassword Type the IBM WebSphere Application Server passwordassociated with the SSCUserName.
d. Save and close the file.3. Now open the productConfig.properties file (in the same folder) and verify
that all of the settings are correct, changing settings as needed before you saveand close the file.
4. Open a command window and run the following command:v IBM AIX, Linux, or Solaris
updateWASCluster.sh -remove
v Microsoft WindowsupdateWASCluster.bat -remove
5. When prompted by the utility, enter the name of the cluster from which youare removing the node, and press Enter.
Results
This utility removes all nodes from the specified cluster’s settings and generates alog file called ConsoleUtility.log, which it stores in the console/log directory.
Removing a server from the consoleTo remove an IBM Lotus Sametime server from the list of the Lotus SametimeSystem Console’s managed servers, run the unregister utility on the server. Whenyou remove a server from the console, it can no longer be administered from theconsole, but it does not have its own administration interface. The only way toadminister the server is by modifying configuration files and the database directly.Because of these limitations, you should only unregister the server if you areuninstalling, or performing some other activity that requires removal of theproduct from the console.
242 Lotus Sametime: Installation and Administration Guide Part 1
About this task
This procedure works for the following Lotus Sametime servers: CommunityServer, Proxy Server, and Meeting Server. A Sametime Community Server revertsback to using legacy policies if you remove it from the console.
Note: To unregister a Lotus Sametime Gateway server, see Removing a LotusSametime Gateway server from the console.1. Working on the server you want to remove, navigate to the
InstallLocation/console directory.2. If this is the first time you have run a utility on this server, open
console.properties file and provide the System Console Host name, port, UserName and Password. Also you can specify the log level, which is notmandatory.
3. Verify that the values in the productConfig.properties file are correct.4. If you are unregistering a Sametime Community Server or Meeting Server, start
the server. Otherwise, proceed to the next step.5. Run the unregister utility:
v Sametime Community Server
AIX, Linux, Solaris
unregisterProductNode.sh
Windows
unregisterProductNode.bat
v Other servers
AIX, Linux, Solaris
unregisterWASProduct.sh
Windows
unregisterWASProduct.bat
The utility unregisters the server and generates the ConsoleUtility.log file,storing it in the console/logs. If the unregistration is successful, the utilitydeletes the console.pid file from the console directory.
Uninstalling DB2 and Sametime software with the InstallationManagerUse the Installation Manager to uninstall the following components that arepackaged with Lotus Sametime: IBM DB2 for Linux and Windows, Lotus SametimeSystem Console, Lotus Sametime Proxy Server, Lotus Sametime Meeting Server,and Lotus Sametime Media Manager.
Before you begin
Leave the DB2 server running, but stop any Sametime servers that you plan touninstall. For instructions, see “Command reference for starting and stoppingservers” on page 232.
About this task
Run the installer on the Sametime server to see the Uninstall option.1. Run the Installation Manager.
AIX, Linux, and Solaris
/opt/IBM/InstallationManager/eclipse/IBMIM
Chapter 3. Installing 243
Windows
Select Start → Programs → IBM Installation Manager → IBM InstallationManager.
2. Choose the components to remove from the server. Click Next.3. Click Uninstall.4. (DB2) Remove all files in the /tmp or temp directory.
Results
When the uninstallation process is complete, the users and groups created duringinstall will be removed from the machine, but the home directories of the userswill remain. For more information about uninstalling DB2, see these topics in theDB2 9.5 Information Center:
Uninstalling your DB2 product (Windows)
Uninstalling your DB2 product (Linux and UNIX)Related tasks
“Manually removing WebSphere Application Server on AIX, Linux, Solaris, andWindows” on page 248You may need to remove WebSphere Application Server manually if it remains onthe system after Lotus Sametime fails to install or uninstall completely.
Manually removing DB2 and Sametime on AIX, Linux, Solaris, and Windows:
You can manually remove DB2 and Sametime components if either installation oruninstallation processes do not complete successfully.
Before you begin
Stop the servers that you plan to uninstall. For instructions, see “Commandreference for starting and stopping servers” on page 232.
About this task
Follow these steps to remove DB2, Sametime, DB2 users, and data directories.Follow all steps that apply to the software you installed on the machine.1. Remove WebSphere Application Server services you created using the
wasservice command with the -remove switch.2. Manually remove DB2 and the Install Manager from the operating system.
For example, on Windows, use the Control Panel, Add/Remove Programspanel.
3. DB2 only: Manually remove db2users and groups created on the local server.4. Remove these directories for DB2 and Installation Manager.
The directories below show the Windows path. They will differ on AIX, Linux,and Solaris.v c:\documents and settings\all users\application data\ibm\installation
managerv c:\documents and settings\all users\application data\ibm\db2v c:\documents and settings\all users\application data\ibm\db2historyv c:\documents and settings\db2adminv c:\documents and settings\install user\application data\ibm\vshet
244 Lotus Sametime: Installation and Administration Guide Part 1
v c:\documents and settings\install user\application data\ibm\db25. Delete the remaining WebSphere Application Server and DB2 directories.
What to do next
For more information about uninstalling DB2, see these topics in the DB2 9.5Information Center:
Uninstalling your DB2 product (Windows)
Uninstalling your DB2 product (Linux and UNIX)
Uninstalling a Lotus Sametime Community ServerFollow the instructions for your operating system to uninstall the Lotus SametimeCommunity Server.
Uninstalling the Lotus Sametime Community Server on Windows:
To uninstall IBM Lotus Sametime Community Server from an IBM Lotus Dominoserver using the Sametime Community Server uninstall program, all LotusSametime Community Server files that were added to the Lotus Dominoinstallation are removed with the exception of files that were created while runningLotus Sametime Community Server. Updates that were made to the address books(including person documents, server documents, and changes to the AccessControl List) are not removed.
Before you begin
Before you uninstall the Lotus Sametime Community Server, it is always goodpractice to back up any important files.
About this task
To completely remove Lotus Sametime Community Server, you must uninstallLotus Domino as well, and also both the Lotus directory and the Notes datadirectories.1. Stop the Domino (Sametime) server.2. From the Microsoft Windows Start menu, select Settings > Control Panel >
Add/Remove Programs.3. Select IBM Lotus Sametime 8.x from the list and click Add/Remove. Click Yes
when prompted to remove the Sametime server.4. When the Windows uninstall program completes, click OK to exit the uninstall
program.
Uninstalling the Lotus Sametime Community Server on AIX, Linux, or Solaris:
To uninstall IBM Lotus Sametime Community Server from an IBM Lotus Dominoserver using the Sametime Community Server uninstall program, all LotusSametime Community Server files that were added to the Lotus Dominoinstallation are removed with the exception of files that were created while runningLotus Sametime Community Server. Updates that were made to the address books(including person documents, server documents, and changes to the AccessControl List) are not removed.1. Stop the Domino (Sametime) server.
Chapter 3. Installing 245
2. Switch to the root user.3. Change to the following directory:
datadir/_uninstst
4. Start the uninstall using the following command:./uninstaller.bin
Uninstalling Sametime GatewayThis topic covers instructions on how to uninstall the Lotus Sametime Gateway ondifferent operating systems. All files that were installed are removed, as well asany shortcuts and registry entries.
About this task
Note: WebSphere Application Server, Sametime Gateway Profile, and SametimeGateway must be uninstalled before installing anew. If all components are notremoved, the VPD registry may determine that Sametime Gateway is still installedand believe that you are trying to install a second instance of Sametime Gateway.
Removing a Lotus Sametime Gateway server from the console:
To remove an IBM Lotus Sametime Gateway server from the list of the LotusSametime System Console’s managed servers, run the unregister utility on theserver. When you remove a server from the console, it can no longer beadministered from the console, but it does not have its own administrationinterface. The only way to administer the server is by modifying configuration filesand the database directly. Because of these limitations, you should only unregisterthe server if you are uninstalling, or performing some other activity that requiresremoval of the product from the console.1. Working on the server you want to remove, navigate to the
InstallLocation/console directory.2. If this is the first time you have run a utility on this server, open
theconsole.properties file and provide the System Console Host name, port,User Name and Password. Also you can specify the log level, which is notmandatory.
3. Verify that the values in the productConfig.properties file are correct.4. Unregister the server by running the following command:
v AIX, Linux, Solaris: unregisterWASProduct.sh
v Windows: unregisterWASProduct.bat
5. If you want to uninstall Lotus Sametime Gateway from the server, run thefollowing command:v AIX, Linux, Solaris: unregisterWASProduct.sh -uninstall
v Windows: unregisterWASProduct.bat -uninstall
Results
The utility unregisters the server and generates the ConsoleUtility.log file,storing it in the console/logs. If the unregistration is successful, the utility deletesthe console.pid file from the console directory.
Uninstalling Sametime Gateway on Windows:
This topic explains how to uninstall Lotus Sametime Gateway on Windows for asingle server or cluster.
246 Lotus Sametime: Installation and Administration Guide Part 1
Before you begin
Uninstalling Lotus Sametime Gateway automatically removes WebSphereApplication Server as well. If you are reinstalling Lotus Sametime Gateway, there’sno need to uninstall DB2 first. If you need to uninstall DB2, uninstall it separatelyaccording instructions in the DB2 Information Center at http://publib.boulder.ibm.com/infocenter/db2luw/v8/index.jsp.
Note: WebSphere Application Server, the Sametime Gateway Profile, and SametimeGateway must be uninstalled before installing anew. If all components are notremoved, the VPD registry may determine that Sametime Gateway is still installedand believe that you are trying to install a second instance of Sametime Gateway.1. Shut down any servers that are running, including the Deployment Manager
and node agents if you have a cluster.2. Open a command window and navigate to the following directory:
stgw_server_root/_uninst3. Type the appropriate command to start the uninstall program:
v For GUI mode, type uninstaller.exe
v For console mode, type uninstaller.exe -console
4. Select the language you wish to use for the uninstall procedure and click OK.The Welcome screen is displayed.
5. Click Next to proceed. The Lotus Sametime Gateway features screen isdisplayed.
6. Select the check box for all available components/features and click Next. TheUninstall summary screen is displayed.
7. Click Uninstall to begin the procedure. The progress is displayed on thescreen.
8. When the uninstall is complete, read the summary information and clickFinish to exit the wizard.
9. Remove all Lotus Sametime Gateway install folders from your computer.10. If you are uninstalling a cluster of servers, repeat the preceding steps on each
node, running the uninstall utility as you would on a single serverdeployment.
Uninstalling Sametime Gateway on AIX, Linux, and Solaris:
This topic explains how to uninstall a single server or cluster of IBM LotusSametime Gateway servers on AIX, Linux, and Solaris operating systems.
Before you begin
Uninstalling Lotus Sametime Gateway automatically removes WebSphereApplication Server as well. If you are reinstalling Lotus Sametime Gateway, there’sno need to uninstall DB2 first. If you need to uninstall DB2, uninstall it separatelyaccording instructions in the DB2 Information Center at http://publib.boulder.ibm.com/infocenter/db2luw/v9/index.jsp.
Note: WebSphere Application Server, the Sametime Gateway Profile, and SametimeGateway must be uninstalled before installing anew. If all components are notremoved, the VPD registry may determine that Sametime Gateway is still installedand believe that you are trying to install a second instance of Sametime Gateway.1. Shut down any servers that are running, including the Deployment Manager
and node agents on each node.
Chapter 3. Installing 247

2. Open a command window and navigate to the following directory:stgw_server_root/_uninst
3. Execute the appropriate command:v For GUI mode type./uninstaller.binv For Console mode type ./uninstaller.bin -console
4. Select the language you wish to use for the uninstall procedure and click OK.The Welcome screen is displayed.
5. Click Next to proceed. The Lotus Sametime Gateway features screen isdisplayed.
6. Select the check box for all available components/features and click Next. TheUninstall summary screen is displayed.
7. Click Uninstall to begin the procedure. The progress is displayed on thescreen.
8. When the uninstall is complete, read the summary information and clickFinish to exit the wizard.
9. Remove all Lotus Sametime Gateway install folders from your computer.10. If you are uninstalling a cluster of servers, repeat the preceding steps on each
node, running the uninstall utility as you would on a single serverdeployment.
Manually removing WebSphere Application Server on AIX, Linux,Solaris, and WindowsYou may need to remove WebSphere Application Server manually if it remains onthe system after Lotus Sametime fails to install or uninstall completely.
Before you begin
If after an attempted Sametime install or uninstall, you have many files and foldersleft in app_server_root/profiles/profile_name or app_server_root/bin, run theWebSphere Application Server uninstall program to remove the rest of the files.Remove WebSphere Application Server only if it is not in use by any other serveron the system.
About this task
Stop all java processes. Then follow the steps in the WebSphere Application Server7 Information Center for your platform to remove unneeded WebSphereApplication Server software from the system.
Uninstalling the WebSphere Application Server product
Installing on IBM iInstall and configure prerequisites, then install IBM Lotus Sametime servers andcomplete basic server configuration.
This section contains information about system requirements, Lotus Sametimeprerequisites, server installation and required configuration tasks to do afterinstallation.
248 Lotus Sametime: Installation and Administration Guide Part 1
Related concepts
Chapter 4, “Migrating and upgrading,” on page 431Migrate data from a previous version of Lotus Sametime and upgrade one or moreservers to take advantage of the latest features.
Preparing to install Lotus Sametime on IBM iFollow these steps to prepare IBM i for Lotus Sametime server installations.
Preparing to create the Sametime database schemas and tableson IBM iThe IBM Lotus Sametime System Console, Sametime Meeting Server, and theSametime Gateway Server use databases to store data. Verify that the schemas donot already exist.
Before you begin
Decide on which system you will install the Sametime System Console, theSametime Meeting Server, the Sametime Gateway Server, and their databases. OnIBM i, they can all be on the same system or different systems. However, if youplan to install either the Sametime System Console or the Meeting Server on IBM i,both servers and the databases must be on IBM i.
About this task
The Sametime System Console requires two database schemas with these specificnames: SSC and POLICY. The Meeting server requires these two database schemas:MTG and POLICY. The servers share the POLICY schema. Typically, you willcreate all of the schemas on the same system.
A schema cannot be created on a particular system LPAR if an IBM i libraryalready exists with that name. Use these WRKLIB commands to determine if alibrary already exists with these names.
WRKLIB SSC
WRKLIB POLICY
WRKLIB MTG
If there is such a library and it was not created by Sametime, you must resolve theconflict by removing or renaming the libraries. Alternatively, the schemas can becreated on a different IBM i system LPAR.
Creating a user profile to own the database schemas on IBM iFollow these steps to create a user profile to own the database schemas for theSametime System Console and the Sametime Meeting Server.
About this task
On the system where you plan to create the database schemas, create a user profileto be the database owner. The profile that you create can have a user class of*USER and does not require any special authorities
If you plan to create the schemas for the System Console and the Meeting Serveron the same system, use the same user profile for all of the schemas.
Chapter 3. Installing 249
Verifying authority to install and set up Sametime on IBM iThe administrator who installs and sets up IBM Lotus Sametime must sign on tothe system with a user profile that has the required authorities. Before installing,verify that the user profile you plan to use has the required special authorities.
About this task
The IBM i security officer has the required authorities to install and set up LotusSametime. If you are not the security officer, use the Display User Profile(DSPUSRPRF) command to determine if your user profile has the requiredauthorities by following these steps.1. Type the following IBM i command:
DSPUSRPRF user_id
2. Press the PAGE DOWN key and look for the special authority field to displaythe special authorities for the user profile. Verify that you have the necessaryauthorities for installing the Sametime software.v All object access (*ALLOBJ)v Security administration (*SECADM)
3. Verify that you have the necessary authorities to add the Sametime CommunityServer to an IBM i Domino Server.v All object access (*ALLOBJ)v System configuration (*IOSYSCFG)v Job control (*JOBCTL)
Results
If your user profile does not have the required authorities, either ask the securityofficer to install and set up the Lotus Sametime server or add the requiredauthorities to your user profile.
Installing the Lotus Sametime System ConsoleThe Lotus Sametime System Console is your focal point for administering andconfiguring all Sametime servers.
About this task
Install and configure prerequisite applications, then install the IBM Lotus SametimeSystem Console, which you will use for preparing for server installations and formanaging your Lotus Sametime deployment.
Preparing the console installation file on IBM iFollow these steps to customize the response.properties file to prepare for installingthe Lotus Sametime System Console on IBM i.
Before you begin
You should have completed the preparation steps in ″Preparing to install LotusSametime on IBM i.″
About this task
Skip the first two steps if you are installing from physical media.1. Download the installation package if you have not already done so.
250 Lotus Sametime: Installation and Administration Guide Part 1

a. To download installation packages, you must have an IBM PassportAdvantage account, which is described at the following Web address:www.ibm.com/software/howtobuy/passportadvantage/paocustomer/docs/en_US/ecare.html
b. Open this release’s Download document at the following Web address:http://www.ibm.com/support/docview.wss?rs=477&uid=24024322
Locate the components you need in the document’s listing, then downloadthe packages labelled with the corresponding part numbers.
c. Use ftp or another convenient method to transfer the installation package tothe system where you plan to install the product. Store the file in an IFSdirectory of your choosing; for example:/MySametimePackages
2. Extract the installation files to the directory where you stored the installationpackage.a. From an IBM i command line, run the following command to start the
QShell Interpreter:QSH
b. Run the cd shell command, specifying the fully qualified path to theinstallation package directory; for example:cd /MySametimePackages
c. Run the following cd shell command, specifying the name of the .tar file:pax -r -C 819 -f name_of_installation_package
d. Press F3 to exit QSH.3. Review the IBM International Program License Agreement and ensure that you
agree to its terms before proceeding. The agreement is stored in the licensessubdirectory of the program image; for example:/MySametimePackages/SametimeSystemConsole/IBMi/stii_ssc/licenses
For DVD:/qopt/volume_ID/IBMi/stii_ssc/licenses
4. Navigate to the program image directory; for example:/MySametimePackages/SametimeSystemConsole/IBMi/stii_ssc
For DVD:/qopt/volume_ID/IBMi/stii_ssc
5. Make a copy of the ssc.default.response.properties file, using a name of yourchoosing. Store the copy in a location on the system that the installationprogram can access.
6. Customize your copy of the response.properties file with the settingsappropriate for your specific installation.For the database.db.user.id and database.db.user.password settings in the propertiesfile, specify the user profile and password you created to be the owner of theSystem Console database schemas.
Related tasks
“Preparing to install Lotus Sametime on IBM i” on page 249Follow these steps to prepare IBM i for Lotus Sametime server installations.
Creating the System Console database schemas and tables onIBM iRun the script to create the database schema for the IBM Lotus Sametime SystemConsole on IBM i.
Chapter 3. Installing 251
Before you begin
You should have prepared the console installation file as described in ″Preparingthe console installation file on IBM i.″
About this task
On the IBM i system where you will install the Sametime System Console, followthese steps to create the database schema and tables:1. Log in with a user profile that has *ALLOBJ and *SECADM special authorities.
These authorities are required to create the database schemas. The databaseschemas will be created on the system specified in your copy of thessc.default.response.properties file and owned by the user profile specified inthe file.
2. From an IBM i command line, run the following command to start the QShellInterpreter:QSH
3. Run the cd shell command, specifying the fully qualified path to the installationkit directory; for example:cd /MySametimePackages/SametimeSystemConsole/IBMi/stii_ssc
For DVD:cd /qopt/STCONSOLE/IBMi/stii_ssc/licenses
4. If the SSC schema does not already exist on the system, run the following shellcommand to create the required database schemas and tables. The commandalso creates the POLICY schema if it does not exist.setupDB_ssc.sh -Dinstall.response.file=path_and_name_of_customized_response.properties_file
5. When the script completes, press F3 to exit QSH.
Results
If the database schema creation was not successful, look at the script log for moreinformation about what occurred during the attempt. Fix the problem, then tryrunning the script again. The script log is stored in the following location.
/QIBM/UserData/Lotus/stii/logs
The log name contains the date and time in this form:
ssc_dbsetupyyyymmdd_hhmm.log
For example, this log was created at 3:07 A.M. on December 15, 2009:
ssc_dbsetup_20091215_0307.log
Related tasks
“Preparing to install Lotus Sametime on IBM i” on page 249Follow these steps to prepare IBM i for Lotus Sametime server installations.
Installing the console on IBM iRun the install script to set up the IBM Lotus Sametime System Console on IBM i.
252 Lotus Sametime: Installation and Administration Guide Part 1
Before you begin
If you intend to install from a downloaded image, you should have downloadedthe console server installation package. For all installations, you should havecompleted the preparation steps. The database schemas required for the SystemConsole (SSC and POLICY) should already exist.
About this task
Follow these steps to install the Sametime System Console and WebSphereApplication Server.1. Log in using a profile with *ALLOBJ and *SECADM special authorities.2. Use the WRKSYSVAL command to check the setting for the QVFYOBJRST system
value and change it if necessary. The setting must be 3 or lower to install theSametime software.
3. From an IBM i command line, run the following command to start the QShellInterpreter:QSH
4. Run the cd shell command, specifying the fully qualified path to the installationkit directory; for example:/MySametimePackages/SametimeSystemConsole/IBMi/stii_ssc
For installing from DVD:cd /qopt/volume_ID/IBMi/stii_ssc
5. Start the Sametime System Console installation with the following shellcommand:install_ssc.sh -Dinstall.response.file=path_and_name_of_customized_response.properties_file
When the script completes, a summary of the results is displayed. Make a noteof the URL for connecting to the Integrated Solutions Console. The ″Adminport″ displayed is the port you must use when logging in to the systemconsole.
6. Press F3 to exit QSH.
Results
If the installation was not successful, look at the installation logs for moreinformation about what occurred during the installation attempt. Fix the problem,then try installing again. The installation logs are stored in the following location.
/QIBM/UserData/Lotus/stii/logs
The log name contains the date and time in this form:
install_STCONSOLE_yyyymmdd_hhmm.log
For example, this log was created at 3:07 A.M. on December 15, 2009:
install_STCONSOLE_20091215_0307.log
Chapter 3. Installing 253

Related tasks
“Preparing to install Lotus Sametime on IBM i” on page 249Follow these steps to prepare IBM i for Lotus Sametime server installations.
Increasing the WebSphere Application Server usage limit forrunning Sametime on IBM iUse the Change License Information command to allow an unlimited number ofusers for the WebSphere Application Server installation. Changing the usage limitin this manner is acceptable provided you are in compliance with the terms ofyour Sametime license and are only using WebSphere Application Server forrunning Sametime.
About this task
If you install more than one Sametime server that uses WebSphere ApplicationServer on the same system, this task only needs to be done once. Following therecommended installation sequence, the first server that uses WebSphereApplication Server is the Sametime System Console. Other servers that useWebSphere Application Server are the Sametime Meeting Server, Sametime ProxyServer, and Sametime Gateway.1. Sign on to the system with a user profile that has *ALLOBJ special authority.2. From any IBM i command line, run the following command (on one line):
CHGLICINF PRDID(5733W70) LICTRM(V7) FEATURE(5102) USGLMT(*NOMAX) THRESHOLD(*USGLMT)
Results
The usage limit is changed to *NOMAX.
If the following message is displayed, type G.CPA9E1B: Usage limit increase must be authorized.
Press help before replying (C G)
After you respond to the CPA9E1B message, you must respond to the samemessage on the QSYSOPR message queue:1. Run the DSPMSG QSYSOPR command to see the message in the QSYSOPR
message queue.2. When the message is displayed, type G.
Logging in to the Lotus Sametime System ConsoleUse the IBM Lotus Sametime System Console to prepare to install new servers,start Sametime servers that have been installed, use guided activities to performconfiguration tasks, and administer any Sametime servers managed by the console.
About this task
With the Lotus Sametime System Console started, follow these steps to log in.1. From a browser, enter the following URL, replacing serverhostname.domain with
the fully qualified domain name of the Lotus Sametime System Console server.Specify port 8700 for all platforms except IBM i.http://serverhostname.domain:8700/ibm/console
IBM i: The port number may not be 8700. Use the port that was listed in theSametime System Console installation results summary. To check the port, openthe AboutThisProfile.txt file for the Sametime System Console Deployment
254 Lotus Sametime: Installation and Administration Guide Part 1
Manager Profile and use the setting specified for the ″Administrative consoleport.″ For the default profile name (STSCDmgrProfile), the file is located here:/QIBM/UserData/Websphere/AppServer/V7/SametimeWAS/profiles/STSCDmgrProfile/logs/AboutThisProfile.txt
Note: During the install process, WebSphere security is enabled. SSL is enabledas part of the WebSphere security process and you will be directed to anotherport which listens for https connections.The WebSphere Application Server Integrated Solutions Console opens.
2. Enter the WebSphere Application Server User ID and password that youcreated when you installed Lotus Sametime System Console.The default name is wasadmin.
3. Click the Sametime System Console task to open it in the navigation tree.
What to do next
“Connecting to an LDAP server” on page 64Related tasks
“Starting the Lotus Sametime System Console” on page 231When started, the Lotus Sametime System Console runs as a task in the WebSphereApplication Server administrative console.
Connecting to an LDAP serverUse the Lotus Sametime System Console to connect IBM Lotus Sametime servers toan LDAP server that has already been installed and configured. An LDAP server isrequired for the Lotus Sametime System Console, Lotus Sametime CommunityServer, Lotus Sametime Meeting Server, Lotus Sametime Media Manager, andLotus Sametime Gateway Server .
Before you begin
Start the LDAP server and the Lotus Sametime System Console if they are notalready running.
About this task
If you have not already opened the Connect to LDAP Servers activity, follow thesesteps:1. From a browser, enter the following URL, replacing serverhostname.domain with
the fully qualified host name of the Lotus Sametime System Console server.http://serverhostname.domain:8700/ibm/console
If you are prompted with a security exception, accept the certificate, andcontinue.IBM i: The port number may not be 8700. Use the port that was listed in theSametime System Console installation results summary. To check the port, openthe AboutThisProfile.txt file for the Sametime System Console DeploymentManager Profile and use the setting specified for the ″Administrative consolesecure port.″ For the default profile name (STSCDMgrProfile), the file is locatedhere: /QIBM/UserData/Websphere/AppServer/V7/SametimeWAS/profiles/STSCDMgrProfile/logs/AboutThisProfile.txt
2. Enter the WebSphere Application Server User ID and password that youcreated when you installed the Lotus Sametime System Console.
Chapter 3. Installing 255
3. Click the Sametime System Console task to open it in the navigation tree.4. Expand Sametime Prerequisites, and click Connect to LDAP Servers.Related concepts
“Planning for an LDAP directory” on page 40The IBM Lotus Sametime 8.5 multiple-server environment requires an LDAPdirectory for user authentication. The LDAP server should be set up and runningbefore deploying Sametime.Related tasks
“Starting the Lotus Sametime System Console” on page 231When started, the Lotus Sametime System Console runs as a task in the WebSphereApplication Server administrative console.
Sametime prerequisite: Connecting to an LDAP serverThis activity takes you through the steps for identifying users and groups in anLDAP directory that need access to IBM Lotus Sametime.
Before you begin
An LDAP server must be installed and configured.
About this task
Connect IBM Lotus Sametime servers to the LDAP server. Once your LotusSametime server connects to the LDAP server, it can search the LDAP directoryand authenticate Sametime users. If you have already connected Sametime to anLDAP server, but now you want to edit or delete a connection, use this activity.
Note: If you are using Active Directory as the LDAP, a common attribute to usefor authentication is the saMAccountName attribute. When an Active DirectoryLDAP is being used, WebSphere automatically maps uid to saMAccountName, sosaMACccountName should not be explicitly stated as an attribute. If you want touse saMAccountName for any LDAP attribute field, you must specify uid. SpecifyingsaMACccountName as a login or search property causes installation to fail. You canfind more information in this TechNote: http://www-01.ibm.com/support/docview.wss?uid=swg21253331.1. Connect to LDAP server.
In Connect to LDAP servers, click Add.If you want to edit or delete an LDAP connection instead, then click theappropriate button. You can only edit or delete an LDAP connection if it hasnot been used to install a product.
2. Bind to LDAP.a. Click either Anonymous access or Authenticated access.
When a Lotus Sametime server connects to the LDAP server, this can bedone either anonymously or using credentials to authenticate with theLDAP server. If you select Authenticated access, you will be prompted withthe Bind distinguished name (DN) and Password fields to enter thisinformation. If you select Anonymous access, these fields will be hidden asthey are not required.
b. Enter a Deployment Name for this LDAP connection. This is name youprovide to this LDAP connection for easy reference. It does not need to mapto any existing server name or value and is intended as an easy way toidentify this object when you reference it in the future.
256 Lotus Sametime: Installation and Administration Guide Part 1

c. Enter the fully qualified domain name of the LDAP server you wish toconnect to in the Host name field. Do not use an IP address or a short hostname.
d. Enter the Port of the LDAP server. The default value is 389. If your LDAPserver is running on a different port, enter the correct port value here. Ifthis is an SSL connection, click Is secure LDAP connection?.
e. If you have selected Authenticated Access, enter the Bind distinguishedname (DN) and Password fields. These are the user credentials you will useto authenticate with your LDAP server. If you have selected AnonymousAccess, these fields will not be shown. For example:cn=John Smith,ou=managers,o=acme,st=Massachusetts,c=US
f. Verify that the check box for Is used by Sametime System Console? isselected. It is selected by default so that the LDAP server is used by theSametime System Console for authentication and policy management.
g. Click Next.When designating an authenticated user, IBM recommends that you create aunique directory entry that is used only for the purpose of authenticatingconnections from the Lotus Sametime server to the LDAP server. After creatingthe directory entry, you must ensure this directory entry has at least read accessto the attributes of the LDAP directory entries.
3. Base Distinguished Name and Filter for Searches.Enter the base distinguished name and filter for searches information.a. Select your base distinguished name and filter for searches from the
dropdown list, or if it was not found, enter it into the field. Selecting onethat was found from the dropdown list will populate the field for you. Youspecify the basic LDAP parameters required to conduct searches for people,and for groups, in an LDAP directory. Some of these parameters are alsonecessary for displaying the names of users in the IBM Lotus Sametimeuser interface.
Note: A dropdown list typically displays from which you select a base DNthat is detected by the guided activity; however, the list does not displaywhen Domino LDAP is being used. Additionally, Domino LDAP is the onlyLDAP that uses a blank base DN, while WebSphere requires a base DN forfederating repositories. Since WebSphere does not let you federate an LDAPdirectory with an empty base DN, it sets the base DN to C=US. The LDAPrepositories are listed by base DN after they are federated.
If your site uses single sign-on (SSO) for awareness, you must manuallymodify the base DN in both the Lotus Sametime Community Server andLotus Sametime Meeting Server so they match. Update the SametimeCommunity Server’s LDAP connections in the stconfig.nsf and da.nsf touse the same base DN that the Sametime Meeting Server will be using:C=US. The Sametime System Console does not overwrite any manualchanges that you make.
b. Optional: To specify the search filter and basic LDAP settings for personand group entries, click Configure advanced LDAP settings.
c. Click Next.4. Collect Person Settings. To search for a user name, a Sametime end user enters
a text string in the user interface of a Sametime client. This setting defines theLDAP search filter responsible for selecting a user name from the LDAPdirectory. The search filter matches the text string provided by the user toinformation contained within the attributes of LDAP directory person entries.
Chapter 3. Installing 257
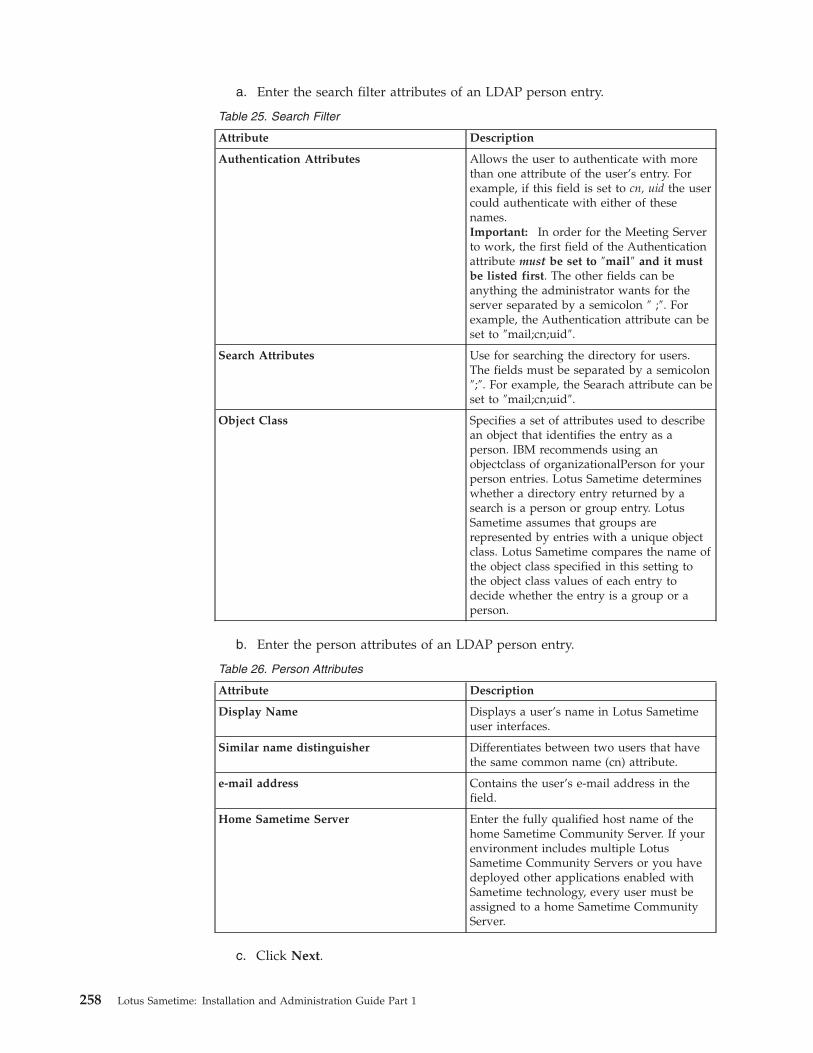
a. Enter the search filter attributes of an LDAP person entry.
Table 25. Search Filter
Attribute Description
Authentication Attributes Allows the user to authenticate with morethan one attribute of the user’s entry. Forexample, if this field is set to cn, uid the usercould authenticate with either of thesenames.Important: In order for the Meeting Serverto work, the first field of the Authenticationattribute must be set to ″mail″ and it mustbe listed first. The other fields can beanything the administrator wants for theserver separated by a semicolon ″ ;″. Forexample, the Authentication attribute can beset to ″mail;cn;uid″.
Search Attributes Use for searching the directory for users.The fields must be separated by a semicolon″;″. For example, the Searach attribute can beset to ″mail;cn;uid″.
Object Class Specifies a set of attributes used to describean object that identifies the entry as aperson. IBM recommends using anobjectclass of organizationalPerson for yourperson entries. Lotus Sametime determineswhether a directory entry returned by asearch is a person or group entry. LotusSametime assumes that groups arerepresented by entries with a unique objectclass. Lotus Sametime compares the name ofthe object class specified in this setting tothe object class values of each entry todecide whether the entry is a group or aperson.
b. Enter the person attributes of an LDAP person entry.
Table 26. Person Attributes
Attribute Description
Display Name Displays a user’s name in Lotus Sametimeuser interfaces.
Similar name distinguisher Differentiates between two users that havethe same common name (cn) attribute.
e-mail address Contains the user’s e-mail address in thefield.
Home Sametime Server Enter the fully qualified host name of thehome Sametime Community Server. If yourenvironment includes multiple LotusSametime Community Servers or you havedeployed other applications enabled withSametime technology, every user must beassigned to a home Sametime CommunityServer.
c. Click Next.
258 Lotus Sametime: Installation and Administration Guide Part 1
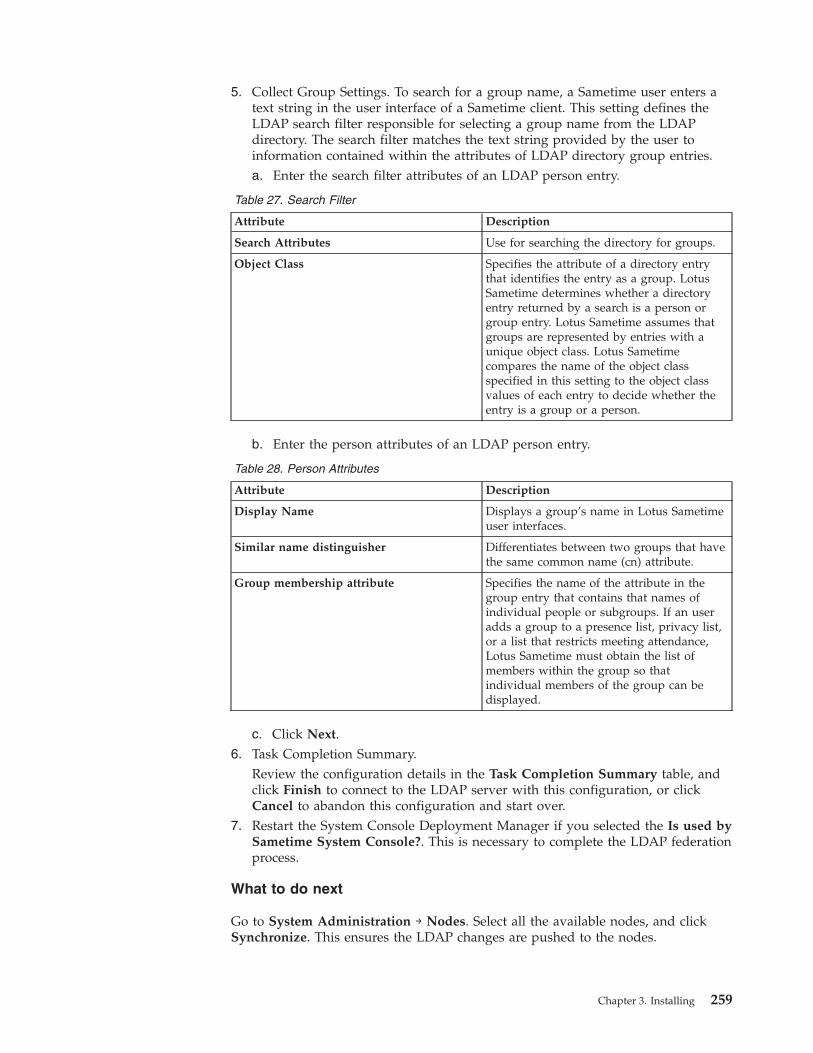
5. Collect Group Settings. To search for a group name, a Sametime user enters atext string in the user interface of a Sametime client. This setting defines theLDAP search filter responsible for selecting a group name from the LDAPdirectory. The search filter matches the text string provided by the user toinformation contained within the attributes of LDAP directory group entries.a. Enter the search filter attributes of an LDAP person entry.
Table 27. Search Filter
Attribute Description
Search Attributes Use for searching the directory for groups.
Object Class Specifies the attribute of a directory entrythat identifies the entry as a group. LotusSametime determines whether a directoryentry returned by a search is a person orgroup entry. Lotus Sametime assumes thatgroups are represented by entries with aunique object class. Lotus Sametimecompares the name of the object classspecified in this setting to the object classvalues of each entry to decide whether theentry is a group or a person.
b. Enter the person attributes of an LDAP person entry.
Table 28. Person Attributes
Attribute Description
Display Name Displays a group’s name in Lotus Sametimeuser interfaces.
Similar name distinguisher Differentiates between two groups that havethe same common name (cn) attribute.
Group membership attribute Specifies the name of the attribute in thegroup entry that contains that names ofindividual people or subgroups. If an useradds a group to a presence list, privacy list,or a list that restricts meeting attendance,Lotus Sametime must obtain the list ofmembers within the group so thatindividual members of the group can bedisplayed.
c. Click Next.6. Task Completion Summary.
Review the configuration details in the Task Completion Summary table, andclick Finish to connect to the LDAP server with this configuration, or clickCancel to abandon this configuration and start over.
7. Restart the System Console Deployment Manager if you selected the Is used bySametime System Console?. This is necessary to complete the LDAP federationprocess.
What to do next
Go to System Administration → Nodes. Select all the available nodes, and clickSynchronize. This ensures the LDAP changes are pushed to the nodes.
Chapter 3. Installing 259
Related tasks
“Starting the Lotus Sametime System Console” on page 231When started, the Lotus Sametime System Console runs as a task in the WebSphereApplication Server administrative console.“Starting and stopping the Deployment Manager” on page 417The Deployment Manager manages the Lotus Sametime System Console and allLotus Sametime Server cells.Related reference
“Command reference for starting and stopping servers” on page 232You may use a command window to start and stop Sametime components runningon WebSphere Application Server. To stop servers, you will supply the WebSphereApplication Server administrator password that was established when youinstalled the server. Important: Verify that the Deployment Manager for the cell isrunning before starting any server.
Installing a Lotus Sametime Community Server andsupporting software
First install a Lotus Sametime Community Server on a Domino platform. You musthave already connected the Sametime System Console to an LDAP server. Afterinstalling a Lotus Sametime Community Server, you can install and set up optionalcomponents, such as a multiplexer or integration with Microsoft Office.Related concepts
Chapter 4, “Migrating and upgrading,” on page 431Migrate data from a previous version of Lotus Sametime and upgrade one or moreservers to take advantage of the latest features.Related tasks
“Connecting to an LDAP server” on page 64Use the Lotus Sametime System Console to connect IBM Lotus Sametime servers toan LDAP server that has already been installed and configured. An LDAP server isrequired for the Lotus Sametime System Console, Lotus Sametime CommunityServer, Lotus Sametime Meeting Server, Lotus Sametime Media Manager, andLotus Sametime Gateway Server .
Installing a Domino serverInstall a Domino server and prepare the Domino environment before installing aLotus Sametime Community Server.
Before you begin
If you have never installed and set up a Lotus Domino server, it is stronglyrecommended that you refer to the Lotus Domino documentation to get a fullunderstanding of how to install and set up a Domino server.
Preparing the TCP/IP Environment on IBM i:
Your Lotus Sametime Community Server must be configured to use one or morespecific TCP/IP addresses so that it will not attempt to share TCP/IP ports withany other HTTP servers on your system.
About this task
This section guides you through the process of verifying your TCP/IPconfiguration, making changes if necessary to resolve conflicts between servers,
260 Lotus Sametime: Installation and Administration Guide Part 1
and gathering the TCP/IP information that you will need to configure yourSametime server.
Verifying host table entries for IBM i:
IBM Lotus Sametime provides a list of host table entries that are already definedon your server.
About this task
To verify your host table entries, follow these steps:1. From any IBM i command line, type the following command and press Enter:
CFGTCP
2. On the Configure TCP/IP display, select option 10 to work with TCP/IP HostTable entries.
3. Record each host name and the corresponding TCP/IP address, as you mayneed this information later.
4. If your Lotus Sametime deployment will support IPv6 addressing, make surethat the IPv6 address is mapped to the server’s host name in this table. If youwill support both IPv4 and IPv6 addressing, then each format should bemapped to the host name to ensure that connections of both types are enabled.
Verifying configuration of existing IBM i Domino servers:
IBM Lotus Sametime provides which TCP/IP addresses are currently being usedby your Domino servers.
About this task
Note: If you do not have any Domino servers configured on your system, you canskip this section.
To determine which TCP/IP addresses are currently being used by your Dominoservers, follow these steps after verifying that you have started your Dominoservers.1. From an IBM i command interface, sign on to your server.2. Verify the current TCP/IP addresses for each Domino server by entering the
following command:WRKDOMCSL servername
3. From the Domino Console display, type the following command and pressEnter:sh port tcpip
4. Press F5 to refresh the screen.v If the server is using only one TCP/IP address, you will see a specific
TCP/IP Local Address listed using port 1352. For example, 10.1.2.3:1352.v If the server is using all active TCP/IP addresses, you will see *:1352
displayed as the Local Address rather than a particular TCP/IP address.5. Record the results for each Domino server, as you will use this information
later.
Selecting a TCP/IP address for your IBM i Sametime server:
Chapter 3. Installing 261
Determine which TCP/IP addresses are already defined on your system anddecide which address you will use for your IBM Lotus Sametime server. You willalso need to determine whether you need to define additional TCP/IP addresses toavoid conflicts between servers.
About this task
Follow these steps to select a TCP/IP address for the server.1. First determine which TCP/IP addresses are currently defined for your system.
v From any IBM i command line, type the following command and pressEnter:CFGTCP
v On the Configure TCP/IP display, select option 1 to Work with TCP/IPinterfaces and display a list of the currently defined TCP/IP interfaces.
2. Verify that each of the TCP/IP addresses you recorded when you looked at theHost Table or ran the ’sh port tcpip’ command is currently defined.
3. Verify that the system has enough TCP/IP addresses defined so that you canassign at least one for the exclusive use of each of the following:v Your Sametime serverv Each existing Domino serverv Each instance of the IBM HTTP server running on your system
4. Contact your network administrator to assign additional TCP/IP addresses andhost names if needed.
5. Ensure that the new host names are also added to your Domain Name Server(DNS).
6. Select the TCP/IP address you will assign to your Sametime server.7. Decide which TCP/IP addresses should be assigned to each existing Domino
server and each instance of the IBM HTTP server.Record this information, as you will use it later to ensure that existing serversare properly bound to specific IP addresses so that their port usage does notconflict with your Sametime server.
Adding a TCP/IP address on IBM i:
To configure an additional TCP/IP address for IBM i, complete this task.
About this task
If you did not need to assign additional TCP/IP addresses, you can skip this topic.1. From any IBM i command line, type the following command and press Enter:
CFGTCP
2. Select option 1 to work with TCP/IP interfaces.3. On the Work with TCP/IP Interfaces display, type a 1 in the Opt column and
press Enter to add a TCP/IP interface.4. On the Add TCP/IP Interface display, enter the following information:
Field Description
Internet Address Specify the TCP/IP address you want toadd. For example, enter 10.1.2.4.
262 Lotus Sametime: Installation and Administration Guide Part 1
Field Description
Line Description Specify the name of the line description foryour LAN adapter. For example, enterTRNLINE.
Subnet Mask Specify the subnet mask that is appropriatefor your interface. For example, enter255.255.255.0.
5. Press Enter to add the new interface and return to the Work with TCP/IPInterfaces display.
6. To start an interface, type a 9 beside it and press Enter.
Updating the host table on IBM i:
Add an entry in the IBM i host table for your IBM Lotus Sametime server.
About this task
To add a host table entry for your Sametime server, follow these steps:1. From any IBM i command line, type the following command and press Enter:
CFGTCP
2. Type 10 and press Enter to work with TCP/IP host table entries.3. If one of the TCP/IP addresses that you selected is not listed in the Host Table,
follow these steps to add a new entry:v Type a 1 in the Opt column next to the blank Internet Address and press
Enter to add a Host Table Entry.v When the Add TCP/IP Host Table Entry display appears, enter the following
information:
Field Description
Internet Address Enter the TCP/IP address that you assignedto the Domino server. For example, enter10.1.2.4.
Host name Enter the fully qualified name of theDomino server as the host name. Forexample, enter stdom1.acme.com.
Note: Although you can add multiple host names for the same IP address,make sure you list the fully qualified name for your Domino server first,before any alternative short names.
v Press Enter to create the Host Table Entry.4. Follow these steps to update an existing Host Table Entry:
Note: If the TCP/IP address you want to use is listed in the table, but thecorresponding Domino server is not listed as one of the possible host names forthat address, you must update the existing host table entry to include theadditional host name.v Type a 2 in the Opt column next to the Internet Address and press Enter to
change the Host Table Entry.
Chapter 3. Installing 263
v When the Change TCP/IP Host Table Entry display appears, you may needto Page Down to view the currently defined list of host names.
v When you have displayed the last host name, enter a ’+’ in the ’+ for morevalues’ prompt and press Enter.
v When the Specify More Values for Parameter HOSTNAME display appears,replace an existing host name or one of the *SAME entries with the fullyqualified name of your Domino server (for example, stdom1.acme.com).
Note: The fully qualified name of your Domino server must be listed first inthis table.
v Press Enter to update the host name. Press Enter again to change the HostTable Entry.
Note: You can remove a host name for an Internet Address by following theabove steps to update the Host Table Entry and replacing the host name with*BLANK.
Updating the Domain Name Server for IBM i:
If you defined any additional host names, work with your TCP/IP administrator toensure that the new host names are added to your Lotus Domain Name Server(DNS).
About this task
If you have configured TCP/IP to search the DNS before searching the host table,you may need to make additional changes in your configuration. Follow thesesteps to check your TCP/IP Configuration Properties:1. From any IBM i command line, type the following command and press Enter:
CFGTCP
2. On the Configure TCP/IP display, type 12 and press Enter to change theTCP/IP domain information.
3. On the Change TCP/IP Domain (CHGTCPDMN) display, look for the ″Hostname search priority″ setting.If the value is *REMOTE, either change this value to *LOCAL or verify withyour network administrator that the fully qualified host name is the first valuelisted in the DNS for the IP address associated with your Sametime server. Thefully qualified host name must be listed before any short names in order foryour Sametime server to function correctly.If the value of this field is *LOCAL, you do not need to take any further action.You already ensured that the fully qualified host name was listed first in yourlocal host table in an earlier step.CAUTION:If you change the ″Search order″ you must stop and restart TCP/IP for thechange to take effect.
4. If your Lotus Sametime deployment will support IPv6 addressing, make surethat the IPv6 address is mapped to the server’s host name. If you will supportboth IPv4 and IPv6 addressing, then each format should be mapped to the hostname to ensure that connections of both types are enabled.
5. Press F3 to exit.
Updating the configuration of existing IBM i Domino servers:
264 Lotus Sametime: Installation and Administration Guide Part 1
Ensure your existing Lotus Domino servers are correctly bound to the specific fullyqualified host names that you have assigned to them. This will prevent them fromconflicting with your Lotus Sametime Community Server. If necessary, you willmodify the existing Lotus Domino server settings to enable partitioning andspecify a unique fully qualified host name.
About this task
Even if you changed your server’s fully qualified host name by modifying theserver’s notes.ini file, the change may not have occurred in the server document.This procedure updates both the server document and the notes.ini file.1. Using a profile with the authorities listed in Chapter 1, end the Domino server,
if it is active, by typing the following command and pressing Enter:ENDDOMSVR DOM1
where DOM1 is the name of the Domino server.
Note: Ending the Domino server may take a few minutes.2. Change the Domino server settings by typing the following command and
pressing F4:CHGDOMSVR DOM1
where DOM1 is the name of the Domino server.3. In the Advanced services field, you should see *PARTITION or *ALL. If neither
value is specified, then specify *PARTITION.4. In the Internet Address field, enter the fully qualified host name for this
Domino server.5. Press Enter.
If the changes to the server settings were successful, the following message isdisplayed:Command CHGDOMSVR ended successfully.
6. Restart the Domino server by typing the following commands and pressingEnter:STRDOMSVR DOM1
Where DOM1 is the name of the Domino server.
Note: Starting the Domino server may take a few minutes.7. Using a Domino Administrator Client, edit the server settings in the Server
Document so that the Domino HTTP server binds to the specific host name.v Select the Configuration tab.v In the left pane, click Server and select All Server Documents.v Open the server document for the Domino server and click the Edit Server
button.v Select the Internet Protocols tab, and then select the HTTP tab.v In the Host name(s) field, verify the DNS name for the TCP/IP address that
you specified in the Change Domino Server command.v In the Bind to host name field, select Enabled.v Select the Ports tab, then select the Internet Ports tab, then select the Web
tab.v Verify in the HTTP settings that the TCP/IP port has a port number
specified. The default port number is 80.v Click Save and Close.
Chapter 3. Installing 265
8. Stop and restart the Domino server.9. When the Domino server has restarted, access it through a Notes client or a
Web browser to make sure it is still accessible using TCP/IP.
Updating the HTTP server configuration on IBM i:
Your Lotus Sametime Community Server will use the Lotus Domino HTTP server.It is possible that you may have already configured IBM HTTP Server for IBM i onyour system for other applications. If so, then you must verify that each instance ofthe HTTP server is bound to a specific TCP/IP address. This will prevent it fromconflicting with your Lotus Sametime server.
About this task
To change the HTTP server settings using commands, follow these steps:1. If the HTTP server is currently running, type the following command on any
IBM i command line and press Enter to end it:ENDTCPSVR SERVER(*HTTP)
2. Start the HTTP Administration server by typing the following command andpressing Enter:STRTCPSVR SERVER(*HTTP) HTTPSVR(*ADMIN)
3. Open the IBM HTTP server configurations page.v Start your Web browser.v Enter the following URL:
http://mysystem:2001where mysystem is the name of your system.
v Click IBM Web Administration for IBM i.v Select the Manage tab.v Select the HTTP Servers tab.
4. Select a configuration from the menu at the top of the screen, and complete thefollowing items for each configured instance of the HTTP server:v From the list on the left pane, select General Server Configuration.v In the right pane, find the IP address and port table in the section called
Server IP address and ports to listen on.v If one of the rows in the table has an asterisk (*) in the IP Address column,
then the server is listening on all IP addresses. Select that row. Replace theasterisk (*) with the IP address for this server and click Continue.
v When finished updating the server IP address table, click Apply to save yourchanges.
5. When each instance of the HTTP server is configured to use a specific IPaddress, restart the HTTP servers by typing the following command andpressing Enter:STRTCPSVR SERVER(*HTTP)
Installing a Domino server:
Before you can install the Lotus Sametime Community Server, you must havealready installed an IBM Lotus Domino server.
Installing a Domino server in a new domain on IBM i:
266 Lotus Sametime: Installation and Administration Guide Part 1
Follow these steps to set up a Lotus Domino server in a new Lotus Dominodomain.1. Launch the appropriate Domino wizard, depending on whether or not you
have already installed Domino:v If you have not already installed Domino, launch the Domino InstallShield
Wizard from a Windows workstation by running the setup.exe file locatedon the Domino product CD-ROM. Once you complete the installation, youare given the option to launch the Domino Server Setup Wizard to configurea Domino server.
v If you have already installed Domino, launch the Domino Server SetupWizard from a Windows workstation by running the domwzd.exe file locatedon the Domino product CD-ROM.
2. Follow the instructions on each wizard display to configure the new Dominoserver. Be sure to specify that you are configuring a Domino server in a newdomain. If you need help with a particular setting, click Help.
3. Configure the Domino server with the following settings specific to a Sametimeinstallation. Enter other values as needed.
Display Description
Server Name Enter the name of the new Domino serverwhere you will add Sametime. For example,specify STDOM1.
Advanced server settings Specify Yes for Enable server partitioning toallow multiple Domino servers to run on thesame system.
Domain Name Enter the name of the Domino domain. Forexample, enter Acme.
Administrator’s Name and Password Specify the Domino administrator’s name.This administrator will also be the Sametimeserver administrator.
Specify a password for the DominoAdministrator.
Internet Services Select Web Browsers (HTTP services).
Sametime requires that you use the DominoHTTP server.
Deselect Directory Services (LDAPservices).
Even if you plan to use an LDAP directory,you should not run it on the same serverwhere you run Sametime.
Domino Network Settings Click Customize to view the AdvancedNetwork Settings.
Chapter 3. Installing 267
Display Description
Advanced Network Settings Click the check box associated with the IPaddress for this server. Ensure that only onecheck box is selected.
You must edit the Host Name field andreplace the IP address with the fullyqualified Internet host name for this server.Type over the IP address displayed in theHost Name column and replace it with thefully qualified host name for the server. Forexample, STDOM1.ACME.COM. You mustpress Enter for the change to take effect.
Also, type the fully qualified host name inthe field at the bottom of the display.
When finished, click OK and continue untilDomino server setup is complete.
Related tasks
“Adding a Domino server to an existing Domino domain on IBM i”You can install or add a Lotus Domino server into an existing Lotus Dominodomain.
Adding a Domino server to an existing Domino domain on IBM i:
You can install or add a Lotus Domino server into an existing Lotus Dominodomain.1. Register the additional server for your normal operating environment. You
must specify the following settings during registration:v Store the server ID file that is created during registration somewhere on the
system where you will configure the Sametime server. Record the path name;you will need to specify it when you configure the Sametime server.
v Change the owner of the ID file to Qnotes by right-clicking the file iniSeries® Navigator and selecting Permissions.
v Use the same network name as the first Lotus Domino server in the LotusDomino domain.
2. Launch the appropriate Domino wizard, depending on whether or not youhave already installed Domino:v If you have not already installed Domino, launch the Domino InstallShield
Wizard from a Windows workstation by running the setup.exe file locatedon the Domino product CD-ROM. Once you complete the installation, youare given the option to launch the Domino Server Setup Wizard to configurea Domino server.
v If you have already installed Domino, launch the Domino Server SetupWizard from a Windows workstation by running the domwzd.exe file locatedon the Domino product CD-ROM.
3. Follow the instructions on each wizard display to complete the addition of thenew Domino server. Be sure to specify that you are configuring an additionalDomino server in an existing domain. If you need help with a particularsetting, click Help.
4. Configure the Domino server with the following settings:
268 Lotus Sametime: Installation and Administration Guide Part 1

Note: This table only documents settings that directly apply to this Sametimeinstallation. For settings that are not documented below, you can enter yourown values.
Display Description
Registered Name Provide the registered name of theadditional Domino server where you willadd Sametime. For example, specifySales1/Acme.
Advanced server settings Specify Yes for Enable server partitioning toallow multiple Domino servers to run on thesame system.
Internet Services Select Web Browsers (HTTP services).
Sametime requires that you use the DominoHTTP server.
Deselect Directory Services (LDAPservices).
Even if you plan to use an LDAP directory,you should not run it on the same serverwhere you run Sametime.
Domino Network Settings Click Customize to view the AdvancedNetwork Settings.
Advanced Network Settings Click the check box associated with the IPaddress for this server. Ensure that only onecheck box is selected.
You must edit the Host Name field andreplace the IP address with the fullyqualified Internet host name for this server.Type over the IP address displayed in theHost Name column and replace it with thefully qualified host name for the server. Forexample, STDOM1.ACME.COM. You mustpress Enter for the change to take effect.
Also, type the fully qualified host name inthe field at the bottom of the display.
When finished, click OK and continue untilDomino server setup is complete.
Related tasks
“Installing a Domino server in a new domain on IBM i” on page 266Follow these steps to set up a Lotus Domino server in a new Lotus Dominodomain.
Installing the Notes client and Domino administrative client:
To administer the Lotus Domino server, you must install and configure at least oneMicrosoft Windows PC as the administration workstation.
Chapter 3. Installing 269
Before you begin
Before you can install the Lotus Domino and Lotus Notes clients, you must haveinstalled and set up the Lotus Domino server.
About this task
Use the IBM Lotus Domino software that shipped with IBM Lotus Sametime toinstall and configure the Lotus Domino Administrator and IBM Lotus Notes clientson the administration workstation.1. If you are installing from physical media, insert the Lotus Notes Client CD into
the PC you plan to use as the administrator’s workstation.2. Start the installation wizard.3. Follow the instructions on each panel of the Lotus Notes installation wizard,
selecting to install both the Lotus Domino Administrator and Lotus Notesclients.
4. Copy the certifier ID and administrator ID files from the Domino data directoryof your Lotus Domino server to the Lotus Notes data directory of theAdministrator workstation. You can use File Transfer Protocol (FTP) or anothermethod, or you can let the initial communications between the server andadministration workstation copy the files for you automatically.
5. If necessary, start the Lotus Domino Server.6. Open Lotus Notes.7. Follow the instructions in the setup wizard to configure the Lotus Notes client.
If you have moved the certifier and administrator ID files to the PC you havedesignated as your administration workstation, indicate the correct locationwhen asked. If you have not copied the ID files, simply provide the useradministrator name you specified during HTTP setup. You will be promptedfor the password for this ID. The ID files will be copied and stored on youradministration workstation for you automatically.
What to do next
When you have set up the Lotus Domino Administrator and Lotus Notes clients,you are ready to begin preparing the Domino server for Lotus Sametimeinstallation
Verifying your Lotus Domino environment:
Verify your Lotus Domino server environment.
Verifying the Domino Server document settings:
After installing the Lotus Domino server and before installing Lotus SametimeCommunity Server, you should edit the Lotus Domino server document to makesure the fields are completed as described below.
About this task
Follow these steps to edit the server document.1. Start the Domino server.
Note: Starting the Domino server may take a few minutes.2. Open the Domino Administrator client and click the Configuration tab.
270 Lotus Sametime: Installation and Administration Guide Part 1
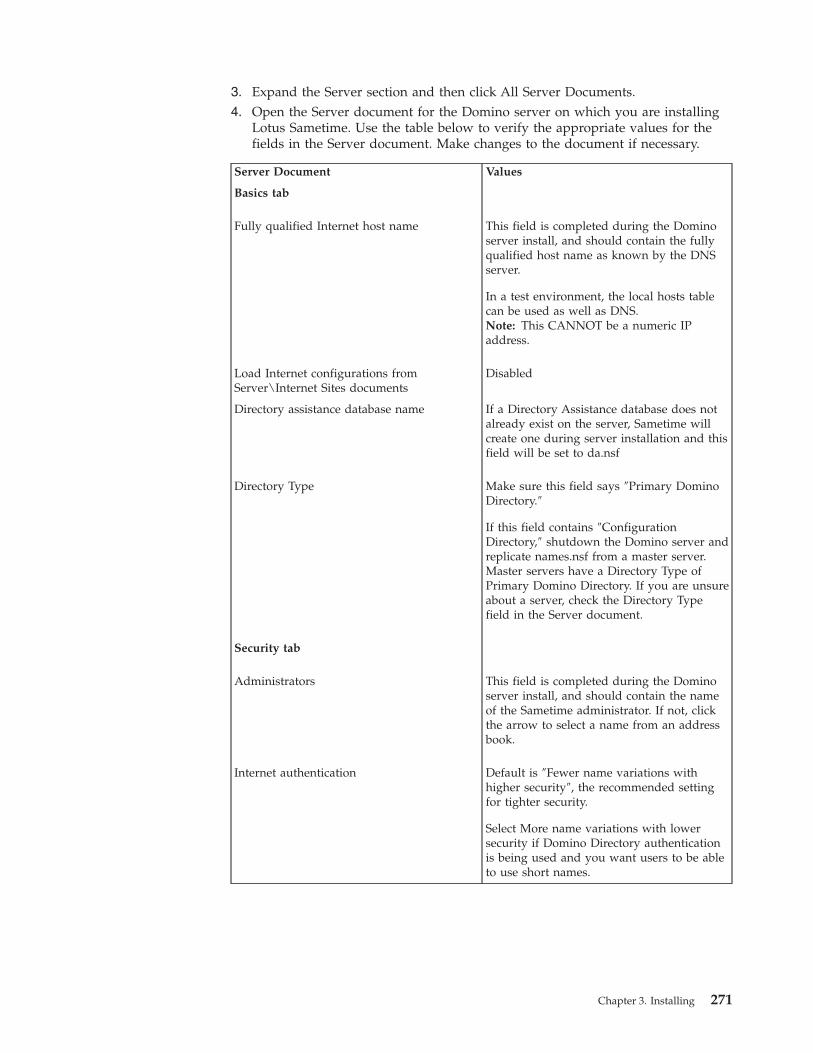
3. Expand the Server section and then click All Server Documents.4. Open the Server document for the Domino server on which you are installing
Lotus Sametime. Use the table below to verify the appropriate values for thefields in the Server document. Make changes to the document if necessary.
Server Document Values
Basics tab
Fully qualified Internet host name This field is completed during the Dominoserver install, and should contain the fullyqualified host name as known by the DNSserver.
In a test environment, the local hosts tablecan be used as well as DNS.Note: This CANNOT be a numeric IPaddress.
Load Internet configurations fromServer\Internet Sites documents
Disabled
Directory assistance database name If a Directory Assistance database does notalready exist on the server, Sametime willcreate one during server installation and thisfield will be set to da.nsf
Directory Type Make sure this field says ″Primary DominoDirectory.″
If this field contains ″ConfigurationDirectory,″ shutdown the Domino server andreplicate names.nsf from a master server.Master servers have a Directory Type ofPrimary Domino Directory. If you are unsureabout a server, check the Directory Typefield in the Server document.
Security tab
Administrators This field is completed during the Dominoserver install, and should contain the nameof the Sametime administrator. If not, clickthe arrow to select a name from an addressbook.
Internet authentication Default is ″Fewer name variations withhigher security″, the recommended settingfor tighter security.
Select More name variations with lowersecurity if Domino Directory authenticationis being used and you want users to be ableto use short names.
Chapter 3. Installing 271

Server Document Values
Access server Leave this field blank if possible. If you doinclude entries, you must add the followingto the list of trusted directories:
Sametime Development/Lotus NotesCompanion Products
Run unrestricted methods and operations After you install the Sametime server, thisfield should include these entries:
v The name of the server
v The name of the administrator
v Sametime Development/Lotus NotesCompanion Products
Note: If you have signed agents with anadditional signature, include that name hereas well.
Ports - Notes Network Ports tab
Port TCPIPNote: This must be typed exactly as shownin all uppercase letters or you will not beable to add Lotus Sametime to this server.
Protocol TCP
Net Address The fully qualified host name for theDomino server as known by the DNS server.
This should match both of the following:
v The fully qualified Internet host name onthe Basics tab above
v The Host Name on the InternetProtocols-HTTP tab specified below.
Commonly:computername.internetdomain.com
For example, stdom1.acme.com.Note: This CANNOT be a numeric IPaddress.
Ports - Internet Ports - Web tab
TCP/IP port number 80 (or 8088 if tunneling is being used)
TCP/IP port status Enabled
Name & password Yes
Anonymous Yes
Internet Protocols - HTTP tab
272 Lotus Sametime: Installation and Administration Guide Part 1
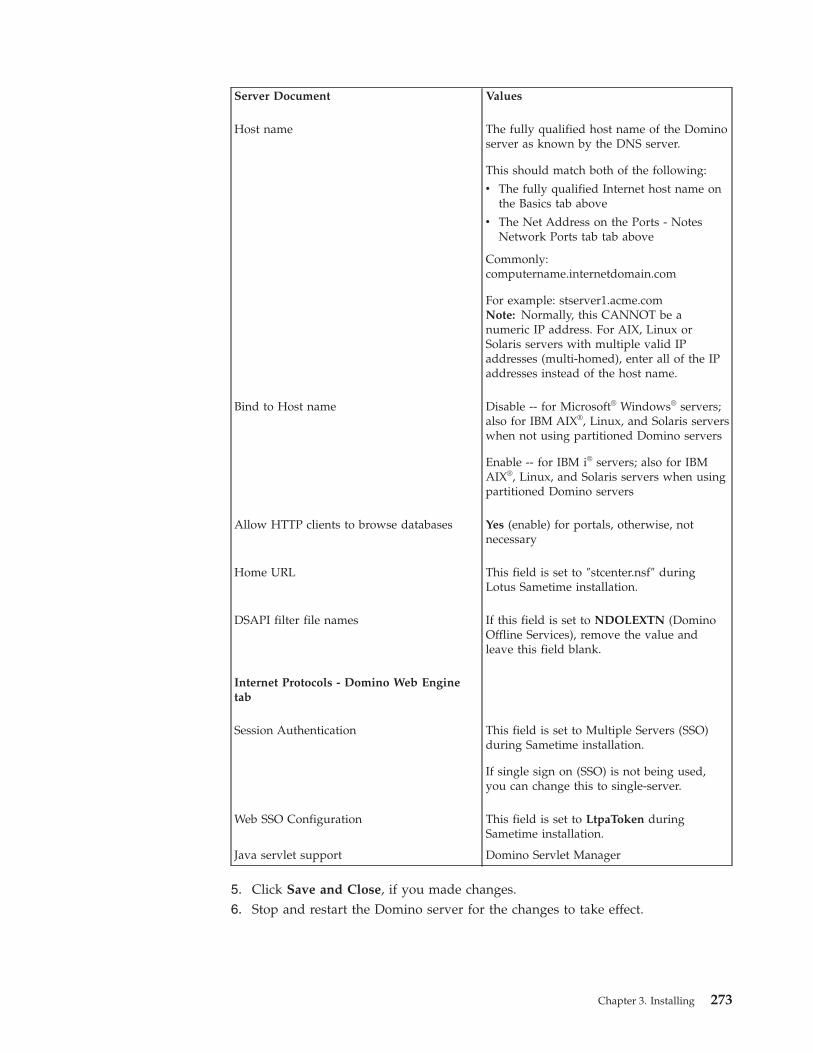
Server Document Values
Host name The fully qualified host name of the Dominoserver as known by the DNS server.
This should match both of the following:
v The fully qualified Internet host name onthe Basics tab above
v The Net Address on the Ports - NotesNetwork Ports tab tab above
Commonly:computername.internetdomain.com
For example: stserver1.acme.comNote: Normally, this CANNOT be anumeric IP address. For AIX, Linux orSolaris servers with multiple valid IPaddresses (multi-homed), enter all of the IPaddresses instead of the host name.
Bind to Host name Disable -- for Microsoft® Windows® servers;also for IBM AIX®, Linux, and Solaris serverswhen not using partitioned Domino servers
Enable -- for IBM i® servers; also for IBMAIX®, Linux, and Solaris servers when usingpartitioned Domino servers
Allow HTTP clients to browse databases Yes (enable) for portals, otherwise, notnecessary
Home URL This field is set to ″stcenter.nsf″ duringLotus Sametime installation.
DSAPI filter file names If this field is set to NDOLEXTN (DominoOffline Services), remove the value andleave this field blank.
Internet Protocols - Domino Web Enginetab
Session Authentication This field is set to Multiple Servers (SSO)during Sametime installation.
If single sign on (SSO) is not being used,you can change this to single-server.
Web SSO Configuration This field is set to LtpaToken duringSametime installation.
Java servlet support Domino Servlet Manager
5. Click Save and Close, if you made changes.6. Stop and restart the Domino server for the changes to take effect.
Chapter 3. Installing 273
Related tasks
“Starting and stopping servers in a Lotus Sametime deployment” on page 230An IBM Lotus Sametime deployment is made of up several component servers thatcan be started and stopped independently.
Verifying the Domino server is accessible:
Before installing IBM Lotus Sametime, verify that the IBM Lotus Domino server isaccessible from client workstations.
About this task
Test client access (using HTTP) to a Lotus Notes database hosted on your LotusDomino server.
Start a Web browser on the workstation and attempt to access names.nsf (or someother convenient database) by entering the following address into the location bar:If you have set names.nsf to be inaccessible from clients, test with a database thatclients can access.http://hostname.yourco.com/names.nsf
If you can sign on using the server administrator ID and internet password toview the contents of names.nsf, the Domino server is accessible and ready forinstallation of Sametime.
Installing a community server on IBM iFollow these instructions to install a new Lotus Sametime Community Server onIBM i.
Preparing to install the community server from a downloaded image on IBM i:
Follow these steps to download the installation package for the Lotus SametimeCommunity Server for IBM i. If you are installing from physical media, skip thisstep.
Before you begin
You should have already installed Domino.
About this task
Follow these steps to download the installation package and create save files.1. Download the installation package for the Sametime Community Server if you
have not already done so.a. To download installation packages, you must have an IBM Passport
Advantage account, which is described at the following Web address:www.ibm.com/software/howtobuy/passportadvantage/paocustomer/docs/en_US/ecare.html
b. Open this release’s Download document at the following Web address:http://www.ibm.com/support/docview.wss?rs=477&uid=24024322
Locate the components you need in the document’s listing, then downloadthe packages labelled with the corresponding part numbers.
c. On your workstation, run the downloaded .exe file to extract the followingfiles:v A short Readme document
274 Lotus Sametime: Installation and Administration Guide Part 1
v Q5724J23IM: IBM i binary save file containing the Sametime *BASEoption
v Q5724J23WC: IBM i binary save file containing Sametime option 1(This file is included with Lotus Sametime Standard, but not with LotusSametime Entry.)
Complete the remaining steps to transfer the save files from yourworkstation to the system where you plan to install the SametimeCommunity server.
2. Sign on to the system with a user profile that has *ALLOBJ and *SECADMspecial authorities.
3. On any IBM i command line, run the following commands to create a libraryand the required empty save files for the Sametime software. The second savefile, MYLIB/Q5724J23WC, is not needed for Sametime Entry.CRTLIB MYLIBCRTSAVF MYLIB/Q5724J23IMCRTSAVF MYLIB/Q5724J23WC
4. Open a Windows Command Prompt session on your workstation and changeto the directory that contains the downloaded files. For example:cd c:\mydir
5. Start an FTP session with your system and transfer the downloaded files to thesave files you created earlier. The second put command is not needed forSametime Entry. Use the same user profile that you used in step 2.ftp [your IBM i server name or IP address]usernamepasswordbinput Q5724J23IM MYLIB/Q5724J23IM (replaceput Q5724J23WC MYLIB/Q5724J23WC (replacequit
The save files on your system now contain the Sametime Community Serversoftware.
Related tasks
“Starting the Lotus Sametime System Console” on page 231When started, the Lotus Sametime System Console runs as a task in the WebSphereApplication Server administrative console.
Pre-accepting the Lotus Sametime software agreements on IBM i:
If you are installing IBM Lotus Sametime from physical media, it is highlyrecommended that you display and accept the Lotus Sametime softwareagreements before starting the installation.
About this task
If you do not pre-accept the software agreements, the installation process willrestore the product to the system, but then stop and wait for you to accept theagreements before completing the installation. Skip this step if installing from adownloaded image.1. Insert the Lotus Sametime DVD into the optical drive of your system.2. Enter the following command on an IBM i command line:
GO LICPGM
The Work with Licensed Programs display appears.
Chapter 3. Installing 275
3. From the Work with Licensed Programs (LICPGM) menu, select option 5(Prepare for install) and press Enter. The Prepare for Install display appears.
4. Type 1 in the option field next to Work with software agreements. Press Enter.When the Work with Software Agreements display appears, you see all IBMlicensed programs that require software agreement acceptance and whether theagreement has been accepted. Only licensed programs that are not yet installedappear on this display. The software agreements for Lotus Sametime will notappear in the list until you restore them from the DVD in a later step.
5. Press F22 (shift-F10) to restore the Software Agreements from the LotusSametime DVD.For the Device parameter, specify the name of your optical drive (For example,OPT01). Press Enter to restore the Sametime software agreements to the system.
6. Once the Software agreements are restored, the following message is displayed:Waiting for reply to message on message queue QSYSOPR.
You can sign on to another session to respond to the message or ask the systemoperator to respond.To view and respond to the message from another session:v Enter the following command on an IBM i command line:
WRKMSGQ QSYSOPRv Select option 5 to display the messages in the QSYSOPR message queue.v Locate the following message in the queue:
Load the next volume in optical device OPT01. (X G)v The Lotus Sametime software agreements have already been restored. If you
want to restore more software agreements from another DVD, insert the nextDVD and respond with G. When the software agreements have beenrestored, the message is issued again. When you are done, respond to themessage with X.
7. The Work with software agreements display should now show the restoredlicenses for products that are not yet installed.v If you are using the DVD for the Entry version of Lotus Sametime, you will
see an entry for Licensed Program 5724J23, option *BASE.v If you are using the DVD for Lotus Sametime Standard, you will see two
entries for Licensed Program 5724J23: one entry for *BASE and another entryfor Option 1.
8. For each entry for Licensed Program 5724J23, type 5 in the option field andpress Enter to display the Software Agreement. Then press F14 (Accept) toaccept the terms of the software agreement.
Note: In some unusual situations, the following message may be issued whenyou attempt to display the Software Agreement:
CPDB6D6 - Software agreement documents are missing. If this occurs, repeatstep 5 to restore the Software Agreements again and continue with theremaining steps in this procedure.
Running the community server installation program on IBM i:
Run the installation program on the machine where you plan to install a LotusSametime Community Server.
276 Lotus Sametime: Installation and Administration Guide Part 1
Before you begin
You should have already installed Domino. If you intend to install from adownloaded image, you should have downloaded the community serverinstallation package and created save files.
About this task
Use the IBM i command line to install the community server programs.1. Log in using a profile with *ALLOBJ and *SECADM special authorities.2. From the IBM i command line, run the appropriate command for installing
from a downloaded image or physical media.Installing from a downloaded image
a. Use the RSTLICPGM command to install from the save files you created whenyou downloaded the installation package.This example uses the save files MYLIB/Q5724J23IM and MYLIB/Q5724J23WC.(For Sametime Entry, the second RSTLICPGM command is not needed.)RSTLICPGM LICPGM(5724J23) DEV(*SAVF) OPTION(*BASE) LNG(2924) SAVF(MYLIB/Q5724J23IM)RSTLICPGM LICPGM(5724J23) DEV(*SAVF) OPTION(1) SAVF(MYLIB/Q5724J23WC)
b. When you are prompted to accept the Sametime software agreement, youmust accept it in order to continue.
Installing from physical media
Insert the Lotus Sametime disk in your system optical drive and use the LODRUNcommand:LODRUN DEV(*OPT) DIR('/os400')
The system loads the Lotus Sametime programs to the appropriate libraries and/QIBM directories. You will see status messages as the system installs thesoftware.
Related tasks
“Installing a Domino server in a new domain on IBM i” on page 266Follow these steps to set up a Lotus Domino server in a new Lotus Dominodomain.“Pre-accepting the Lotus Sametime software agreements on IBM i” on page 275If you are installing IBM Lotus Sametime from physical media, it is highlyrecommended that you display and accept the Lotus Sametime softwareagreements before starting the installation.“Verifying authority to install and set up Sametime on IBM i” on page 250The administrator who installs and sets up IBM Lotus Sametime must sign on tothe system with a user profile that has the required authorities. Before installing,verify that the user profile you plan to use has the required special authorities.“Downloading Lotus Sametime files for installation” on page 24IBM enables users to download IBM Lotus Sametime installation kits from thePassport Advantage Web site.
Verifying your IBM i library list:
While a single version of IBM Lotus Sametime supports multiple languages, theLotus Sametime language feature for the Sametime licensed program is packagedusing the English language feature code.
About this task
If the primary language of your system is not English, follow these steps to verifythat QSYS2924 is in your library list:
Chapter 3. Installing 277
Note: If the primary language of your system is English, you do not need tomodify your library list.1. From an IBM i command line, type the following command and press Enter:
WRKSYSVAL QSYSLIBL
2. On the Work with System Values display, type a 2 next to QSYSLIBL and pressEnter.
3. On the Change System Value display, check whether QSYS2924 is included inthe list. If it is listed, press F3 to exit. If it is not listed, proceed to step 4.
4. Type QSYS2924 next to Sequence Number 0 and press Enter.5. Press F3 to exit.6. If you changed the library list, sign off the system and sign back on to activate
the new library list.
Adding the Sametime Community Server to an IBM i Domino Server:
To set up a Lotus Sametime Community Server running on IBM i, provide thenecessary information, such as the directory type and ports.
About this task
Follow these steps to set up the Sametime Community Server.1. Sign on to the system with a user profile that has *ALLOBJ, *IOSYSCFG, and
*JOBCTL special authorities.2. Stop the Lotus Domino server.3. On any IBM i command line, type the command ADDLSTDOM and press F4:4. In the Domino server name field, type the name of the Domino server where
you will add Sametime.5. In the Directory type field, select which type of directory Sametime will use.
You must select *LDAP if you want to use the Sametime System Console toadminister this server.v If you chose *DOMINO, skip to the next step.v If you chose *LDAP, the following fields are displayed so you can provide
the basic information that enables Sametime to connect to the LDAP server:
Table 29. LDAP fields
Field Description
Name Enter the name of the LDAP server thatSametime will use.Note: It is also possible to specify theTCP/IP address, but this is notrecommended.
Port Enter the IP port that Sametime will use.The default IP port for LDAP connections is389.
278 Lotus Sametime: Installation and Administration Guide Part 1
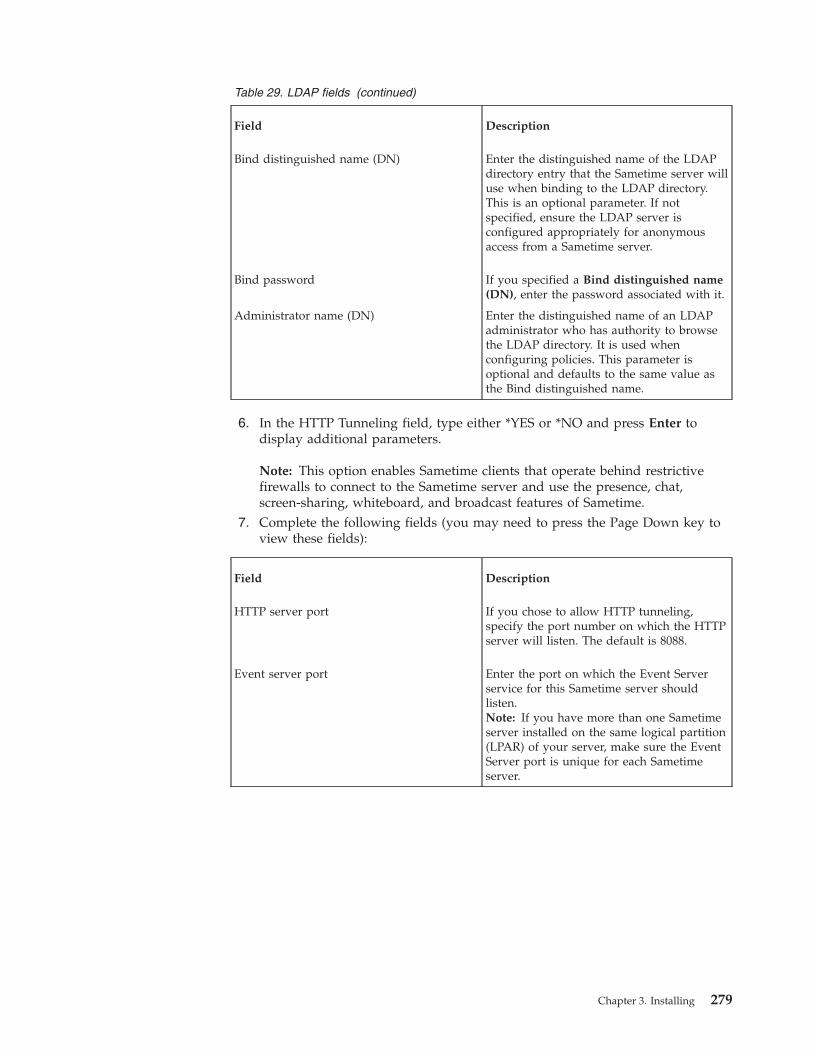
Table 29. LDAP fields (continued)
Field Description
Bind distinguished name (DN) Enter the distinguished name of the LDAPdirectory entry that the Sametime server willuse when binding to the LDAP directory.This is an optional parameter. If notspecified, ensure the LDAP server isconfigured appropriately for anonymousaccess from a Sametime server.
Bind password If you specified a Bind distinguished name(DN), enter the password associated with it.
Administrator name (DN) Enter the distinguished name of an LDAPadministrator who has authority to browsethe LDAP directory. It is used whenconfiguring policies. This parameter isoptional and defaults to the same value asthe Bind distinguished name.
6. In the HTTP Tunneling field, type either *YES or *NO and press Enter todisplay additional parameters.
Note: This option enables Sametime clients that operate behind restrictivefirewalls to connect to the Sametime server and use the presence, chat,screen-sharing, whiteboard, and broadcast features of Sametime.
7. Complete the following fields (you may need to press the Page Down key toview these fields):
Field Description
HTTP server port If you chose to allow HTTP tunneling,specify the port number on which the HTTPserver will listen. The default is 8088.
Event server port Enter the port on which the Event Serverservice for this Sametime server shouldlisten.Note: If you have more than one Sametimeserver installed on the same logical partition(LPAR) of your server, make sure the EventServer port is unique for each Sametimeserver.
Chapter 3. Installing 279
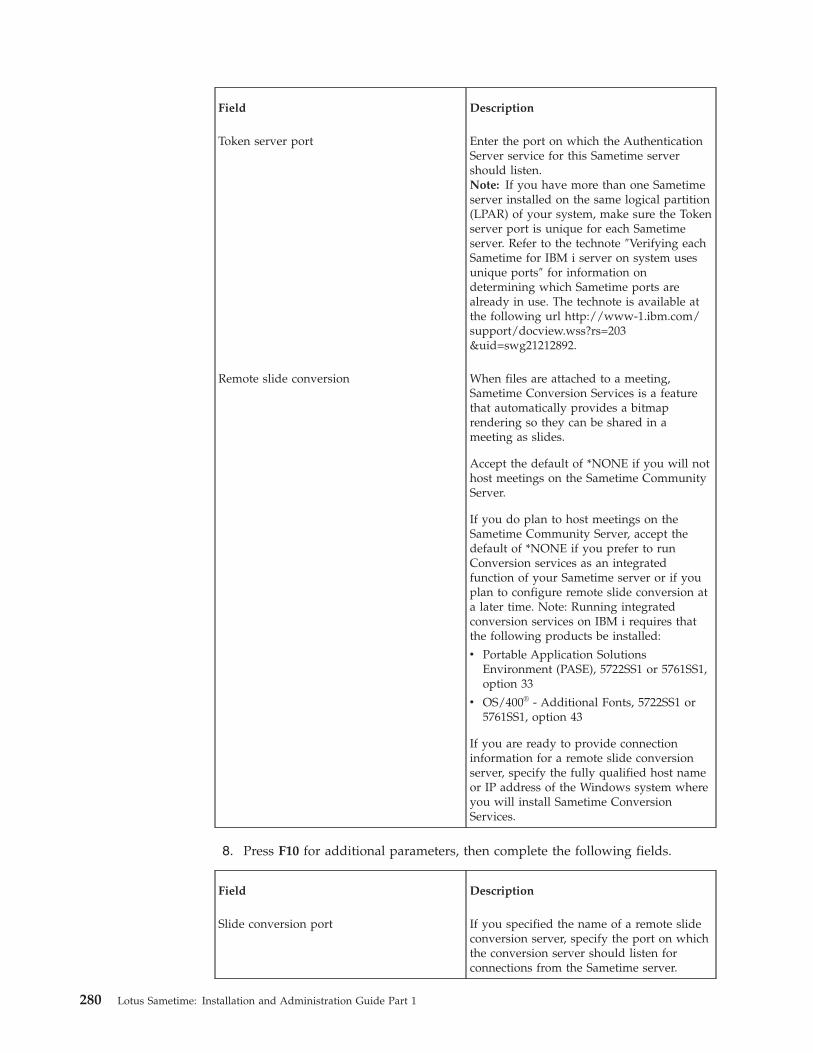
Field Description
Token server port Enter the port on which the AuthenticationServer service for this Sametime servershould listen.Note: If you have more than one Sametimeserver installed on the same logical partition(LPAR) of your system, make sure the Tokenserver port is unique for each Sametimeserver. Refer to the technote ″Verifying eachSametime for IBM i server on system usesunique ports″ for information ondetermining which Sametime ports arealready in use. The technote is available atthe following url http://www-1.ibm.com/support/docview.wss?rs=203&uid=swg21212892.
Remote slide conversion When files are attached to a meeting,Sametime Conversion Services is a featurethat automatically provides a bitmaprendering so they can be shared in ameeting as slides.
Accept the default of *NONE if you will nothost meetings on the Sametime CommunityServer.
If you do plan to host meetings on theSametime Community Server, accept thedefault of *NONE if you prefer to runConversion services as an integratedfunction of your Sametime server or if youplan to configure remote slide conversion ata later time. Note: Running integratedconversion services on IBM i requires thatthe following products be installed:
v Portable Application SolutionsEnvironment (PASE), 5722SS1 or 5761SS1,option 33
v OS/400® - Additional Fonts, 5722SS1 or5761SS1, option 43
If you are ready to provide connectioninformation for a remote slide conversionserver, specify the fully qualified host nameor IP address of the Windows system whereyou will install Sametime ConversionServices.
8. Press F10 for additional parameters, then complete the following fields.
Field Description
Slide conversion port If you specified the name of a remote slideconversion server, specify the port on whichthe conversion server should listen forconnections from the Sametime server.
280 Lotus Sametime: Installation and Administration Guide Part 1
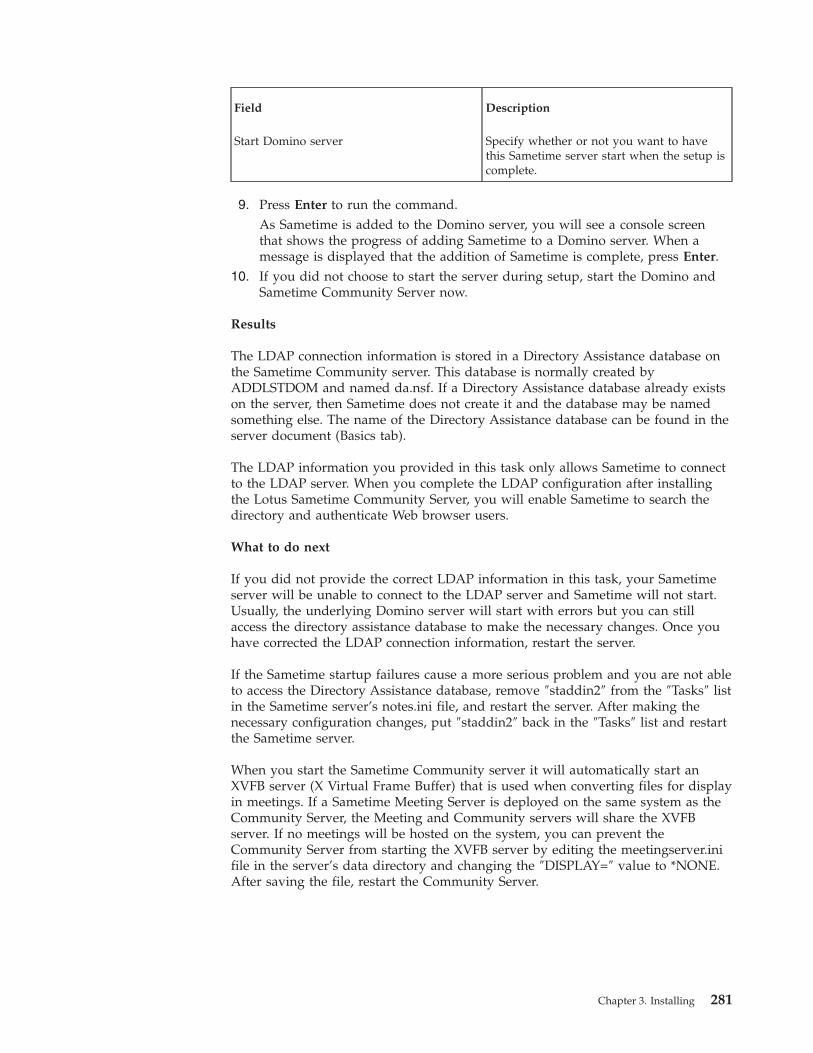
Field Description
Start Domino server Specify whether or not you want to havethis Sametime server start when the setup iscomplete.
9. Press Enter to run the command.As Sametime is added to the Domino server, you will see a console screenthat shows the progress of adding Sametime to a Domino server. When amessage is displayed that the addition of Sametime is complete, press Enter.
10. If you did not choose to start the server during setup, start the Domino andSametime Community Server now.
Results
The LDAP connection information is stored in a Directory Assistance database onthe Sametime Community server. This database is normally created byADDLSTDOM and named da.nsf. If a Directory Assistance database already existson the server, then Sametime does not create it and the database may be namedsomething else. The name of the Directory Assistance database can be found in theserver document (Basics tab).
The LDAP information you provided in this task only allows Sametime to connectto the LDAP server. When you complete the LDAP configuration after installingthe Lotus Sametime Community Server, you will enable Sametime to search thedirectory and authenticate Web browser users.
What to do next
If you did not provide the correct LDAP information in this task, your Sametimeserver will be unable to connect to the LDAP server and Sametime will not start.Usually, the underlying Domino server will start with errors but you can stillaccess the directory assistance database to make the necessary changes. Once youhave corrected the LDAP connection information, restart the server.
If the Sametime startup failures cause a more serious problem and you are not ableto access the Directory Assistance database, remove ″staddin2″ from the ″Tasks″ listin the Sametime server’s notes.ini file, and restart the server. After making thenecessary configuration changes, put ″staddin2″ back in the ″Tasks″ list and restartthe Sametime server.
When you start the Sametime Community server it will automatically start anXVFB server (X Virtual Frame Buffer) that is used when converting files for displayin meetings. If a Sametime Meeting Server is deployed on the same system as theCommunity Server, the Meeting and Community servers will share the XVFBserver. If no meetings will be hosted on the system, you can prevent theCommunity Server from starting the XVFB server by editing the meetingserver.inifile in the server’s data directory and changing the ″DISPLAY=″ value to *NONE.After saving the file, restart the Community Server.
Chapter 3. Installing 281
Related tasks
“Starting Domino and a Sametime Community Server on IBM i” on page 422Follow these instructions to start a Sametime Community Server on IBM i from anIBM i command line.
Completing the LDAP configuration on IBM iAfter installing the Lotus Sametime Community Server on IBM i, use the SametimeAdministration tool to provide the information that Sametime needs to search theLDAP directory and authenticate Sametime users against entries in the LDAPdirectory.
Before you begin
Start the Lotus Sametime Community Server.
Note: If you did not specify the correct LDAP connection information when youconfigured the Sametime server, the server will not start. See “Adding theSametime Community Server to an IBM i Domino Server” on page 278 to correctthis before proceeding.
About this task
Follow these steps to complete the LDAP directory configuration for Domino.1. Access the Sametime server by starting your Web browser and entering the
following URL:http://serverhostname.domain:port/stcenter.nsf
Replace serverhostname.domain with your fully qualified server name and addthe port number if you determined it is not the default port number 80. Youmust specify the server’s fully qualified host name; if you do not, you will beable to access the Sametime Welcome Page, but you will not be able to log in.For example: http://st85comm1.acme.com/stcenter.nsf
2. From the Sametime Welcome page, click Administer the Server.3. At the login prompt, and specify the Domino server administrator ID and
password and click Enter.4. In the Sametime Administration Tool, click LDAP Directory.5. Enter the settings to enable your Sametime server to access the LDAP directory.
The settings should match the information you provided when you connectedthe Sametime System Console to the LDAP server.
6. Click Save & Close.7. Restart the Sametime server to enable your settings.
What to do next
From a Web browser, access the Sametime Welcome Page using the fully qualifiedhost name of the Sametime server. Verify that you can log in with a User ID andpassword from the LDAP directory.
282 Lotus Sametime: Installation and Administration Guide Part 1
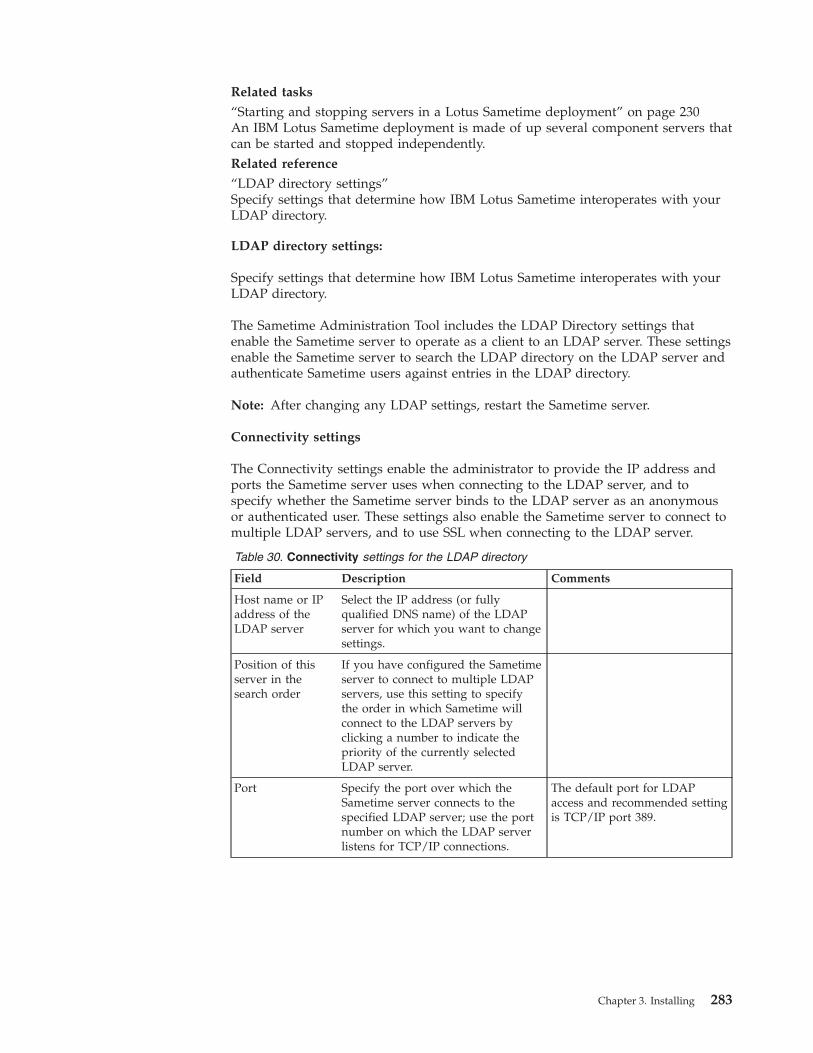
Related tasks
“Starting and stopping servers in a Lotus Sametime deployment” on page 230An IBM Lotus Sametime deployment is made of up several component servers thatcan be started and stopped independently.Related reference
“LDAP directory settings”Specify settings that determine how IBM Lotus Sametime interoperates with yourLDAP directory.
LDAP directory settings:
Specify settings that determine how IBM Lotus Sametime interoperates with yourLDAP directory.
The Sametime Administration Tool includes the LDAP Directory settings thatenable the Sametime server to operate as a client to an LDAP server. These settingsenable the Sametime server to search the LDAP directory on the LDAP server andauthenticate Sametime users against entries in the LDAP directory.
Note: After changing any LDAP settings, restart the Sametime server.
Connectivity settings
The Connectivity settings enable the administrator to provide the IP address andports the Sametime server uses when connecting to the LDAP server, and tospecify whether the Sametime server binds to the LDAP server as an anonymousor authenticated user. These settings also enable the Sametime server to connect tomultiple LDAP servers, and to use SSL when connecting to the LDAP server.
Table 30. Connectivity settings for the LDAP directory
Field Description Comments
Host name or IPaddress of theLDAP server
Select the IP address (or fullyqualified DNS name) of the LDAPserver for which you want to changesettings.
Position of thisserver in thesearch order
If you have configured the Sametimeserver to connect to multiple LDAPservers, use this setting to specifythe order in which Sametime willconnect to the LDAP servers byclicking a number to indicate thepriority of the currently selectedLDAP server.
Port Specify the port over which theSametime server connects to thespecified LDAP server; use the portnumber on which the LDAP serverlistens for TCP/IP connections.
The default port for LDAPaccess and recommended settingis TCP/IP port 389.
Chapter 3. Installing 283
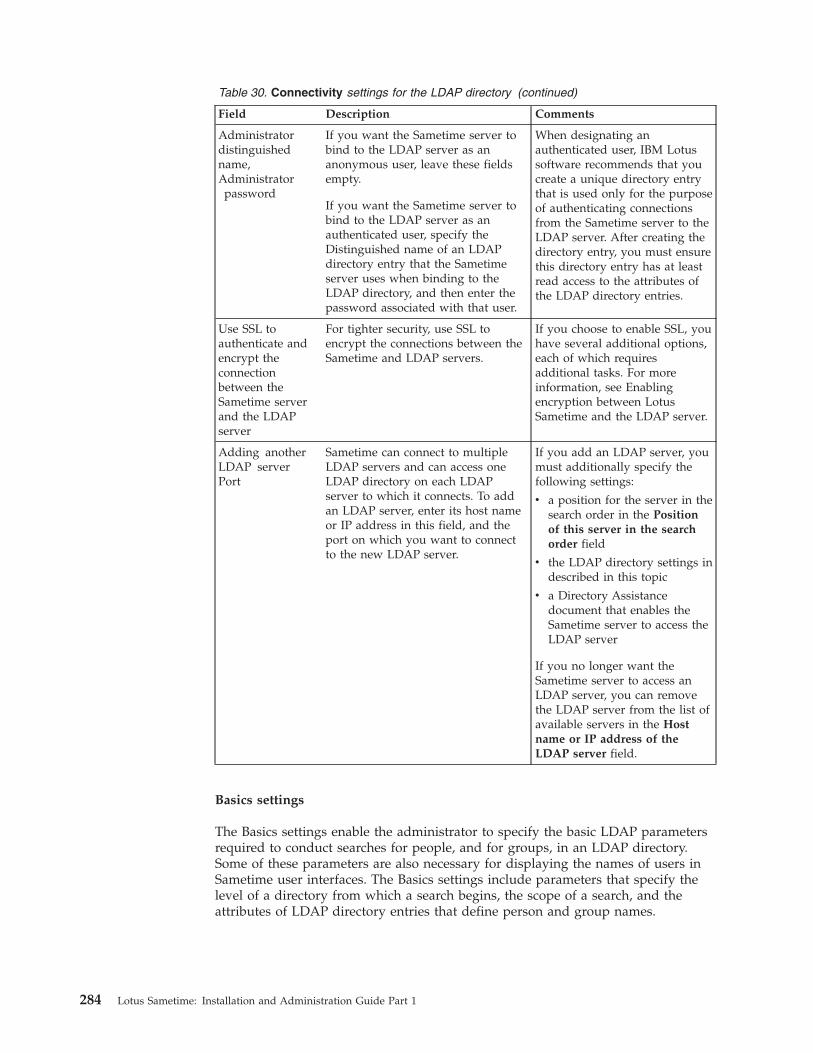
Table 30. Connectivity settings for the LDAP directory (continued)
Field Description Comments
Administratordistinguishedname,Administrator
password
If you want the Sametime server tobind to the LDAP server as ananonymous user, leave these fieldsempty.
If you want the Sametime server tobind to the LDAP server as anauthenticated user, specify theDistinguished name of an LDAPdirectory entry that the Sametimeserver uses when binding to theLDAP directory, and then enter thepassword associated with that user.
When designating anauthenticated user, IBM Lotussoftware recommends that youcreate a unique directory entrythat is used only for the purposeof authenticating connectionsfrom the Sametime server to theLDAP server. After creating thedirectory entry, you must ensurethis directory entry has at leastread access to the attributes ofthe LDAP directory entries.
Use SSL toauthenticate andencrypt theconnectionbetween theSametime serverand the LDAPserver
For tighter security, use SSL toencrypt the connections between theSametime and LDAP servers.
If you choose to enable SSL, youhave several additional options,each of which requiresadditional tasks. For moreinformation, see Enablingencryption between LotusSametime and the LDAP server.
Adding anotherLDAP serverPort
Sametime can connect to multipleLDAP servers and can access oneLDAP directory on each LDAPserver to which it connects. To addan LDAP server, enter its host nameor IP address in this field, and theport on which you want to connectto the new LDAP server.
If you add an LDAP server, youmust additionally specify thefollowing settings:
v a position for the server in thesearch order in the Positionof this server in the searchorder field
v the LDAP directory settings indescribed in this topic
v a Directory Assistancedocument that enables theSametime server to access theLDAP server
If you no longer want theSametime server to access anLDAP server, you can removethe LDAP server from the list ofavailable servers in the Hostname or IP address of theLDAP server field.
Basics settings
The Basics settings enable the administrator to specify the basic LDAP parametersrequired to conduct searches for people, and for groups, in an LDAP directory.Some of these parameters are also necessary for displaying the names of users inSametime user interfaces. The Basics settings include parameters that specify thelevel of a directory from which a search begins, the scope of a search, and theattributes of LDAP directory entries that define person and group names.
284 Lotus Sametime: Installation and Administration Guide Part 1
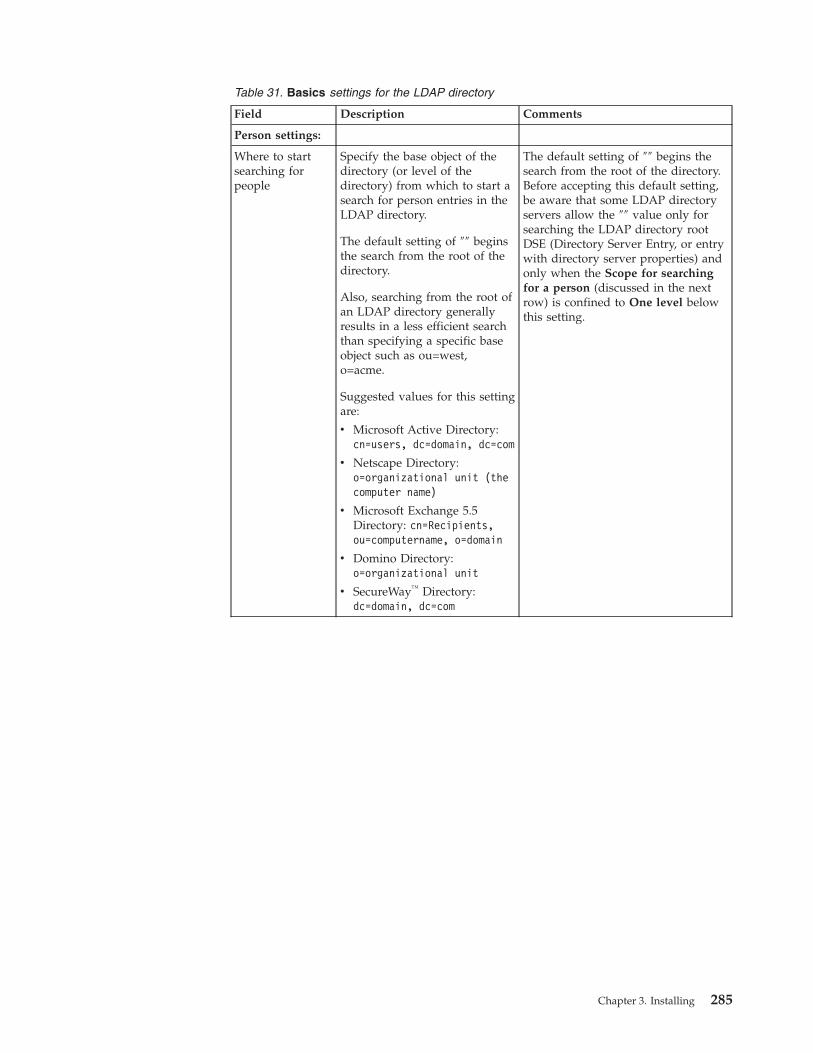
Table 31. Basics settings for the LDAP directory
Field Description Comments
Person settings:
Where to startsearching forpeople
Specify the base object of thedirectory (or level of thedirectory) from which to start asearch for person entries in theLDAP directory.
The default setting of ″″ beginsthe search from the root of thedirectory.
Also, searching from the root ofan LDAP directory generallyresults in a less efficient searchthan specifying a specific baseobject such as ou=west,o=acme.
Suggested values for this settingare:
v Microsoft Active Directory:cn=users, dc=domain, dc=com
v Netscape Directory:o=organizational unit (thecomputer name)
v Microsoft Exchange 5.5Directory: cn=Recipients,ou=computername, o=domain
v Domino Directory:o=organizational unit
v SecureWay™ Directory:dc=domain, dc=com
The default setting of ″″ begins thesearch from the root of the directory.Before accepting this default setting,be aware that some LDAP directoryservers allow the ″″ value only forsearching the LDAP directory rootDSE (Directory Server Entry, or entrywith directory server properties) andonly when the Scope for searchingfor a person (discussed in the nextrow) is confined to One level belowthis setting.
Chapter 3. Installing 285
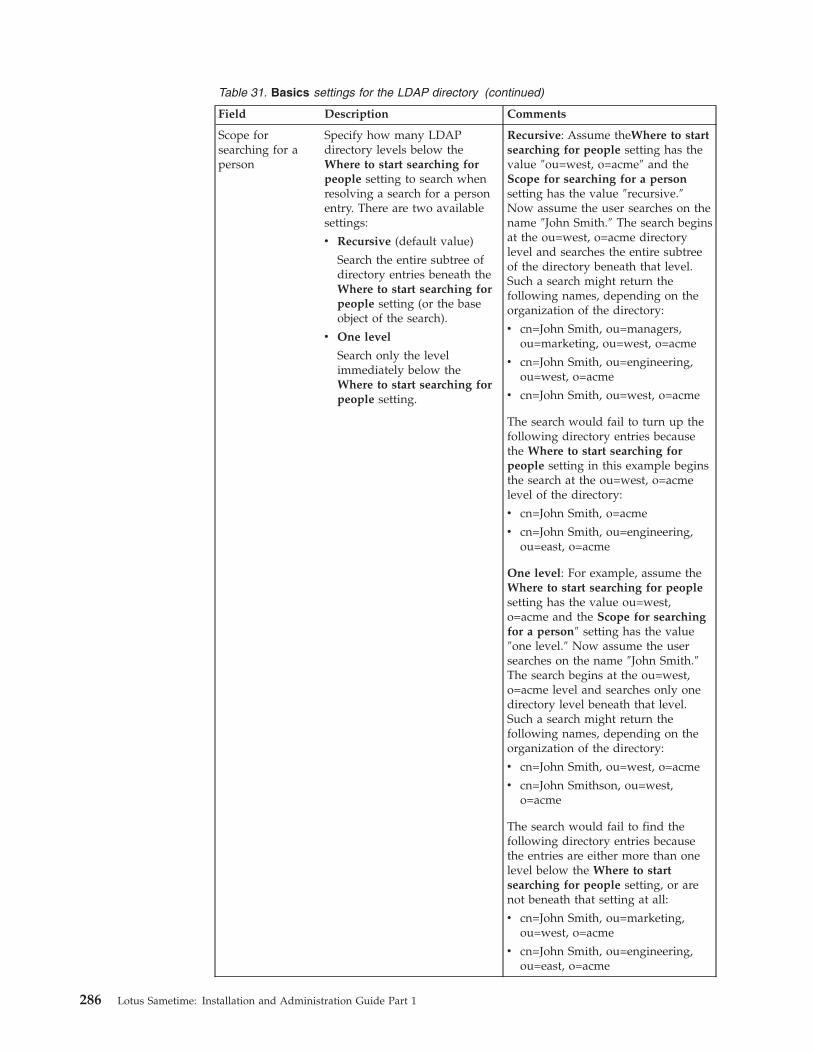
Table 31. Basics settings for the LDAP directory (continued)
Field Description Comments
Scope forsearching for aperson
Specify how many LDAPdirectory levels below theWhere to start searching forpeople setting to search whenresolving a search for a personentry. There are two availablesettings:
v Recursive (default value)
Search the entire subtree ofdirectory entries beneath theWhere to start searching forpeople setting (or the baseobject of the search).
v One level
Search only the levelimmediately below theWhere to start searching forpeople setting.
Recursive: Assume theWhere to startsearching for people setting has thevalue ″ou=west, o=acme″ and theScope for searching for a personsetting has the value ″recursive.″Now assume the user searches on thename ″John Smith.″ The search beginsat the ou=west, o=acme directorylevel and searches the entire subtreeof the directory beneath that level.Such a search might return thefollowing names, depending on theorganization of the directory:
v cn=John Smith, ou=managers,ou=marketing, ou=west, o=acme
v cn=John Smith, ou=engineering,ou=west, o=acme
v cn=John Smith, ou=west, o=acme
The search would fail to turn up thefollowing directory entries becausethe Where to start searching forpeople setting in this example beginsthe search at the ou=west, o=acmelevel of the directory:
v cn=John Smith, o=acme
v cn=John Smith, ou=engineering,ou=east, o=acme
One level: For example, assume theWhere to start searching for peoplesetting has the value ou=west,o=acme and the Scope for searchingfor a person″ setting has the value″one level.″ Now assume the usersearches on the name ″John Smith.″The search begins at the ou=west,o=acme level and searches only onedirectory level beneath that level.Such a search might return thefollowing names, depending on theorganization of the directory:
v cn=John Smith, ou=west, o=acme
v cn=John Smithson, ou=west,o=acme
The search would fail to find thefollowing directory entries becausethe entries are either more than onelevel below the Where to startsearching for people setting, or arenot beneath that setting at all:
v cn=John Smith, ou=marketing,ou=west, o=acme
v cn=John Smith, ou=engineering,ou=east, o=acme
286 Lotus Sametime: Installation and Administration Guide Part 1

Table 31. Basics settings for the LDAP directory (continued)
Field Description Comments
The attribute ofthe person entrythat defines theperson’s name
Specify the attribute of anLDAP directory person entrythat is used to display a user’sname in the Sametime end-userinterfaces (as the result of asearch or in a privacy orpresence list). The value of thissetting can be any attribute ofthe LDAP directory personentry, such as cn (commonname), sn (surname),givenname, or mail (e-mailaddress).
The suggested value forMicrosoft Exchange 5.5Directory, Microsoft ActiveDirectory, Netscape Directory,Domino Directory servers, andSecureWay servers is cn.
Consider an LDAP person entrycontaining the following attributes:
v cn: James Lock
v givenname: James
v sn: Lock
v mail: [email protected]
In this example, if the The attributeof the person entry that defines theperson’s name setting is ″cn,″ thesearch result displays the user’s nameas James Lock. If the setting is ″mail″,the user’s name displays [email protected]: You can also write a Java classto control the format of user namesreturned from LDAP directorysearches. This capability is useful ifyou want user names to display in aformat that is not specified by anLDAP directory entry attribute. Formore information, see Using Javaclasses to customize LDAP directorysearches.
Attribute used todistinguishbetween twosimilar personnames
Sspecify the attribute of aperson entry that is used todifferentiate between two usersthat have the same commonname (cn) attribute.
Suggested values for this settingare:
v Microsoft Exchange 5.5Directory, Netscape Directory,Domino Directory, SecureWayDirectory: mail
v Microsoft Active Directory:user principal name
This setting can specify any attributeof a person entry that candifferentiate one person from anotherperson with the same name. Anexample value for this setting is themail attribute, which contains thee-mail address of an LDAP directoryperson entry.
To illustrate, assume that a search onthe name John Smith returns twoperson entries with the commonname (cn) John Smith. Since the twoJohn Smiths will have different e-mailaddresses, the mail attribute can bedisplayed to enable the user todetermine which John Smith is thecorrect one.
The object classused to determineif an entry is aperson
Specify the attribute of adirectory entry that identifiesthe entry as a person.
The suggested value forMicrosoft Exchange 5.5Directory, Microsoft ActiveDirectory, Netscape Directory,Domino Directory, andSecureWay Directory isorganizationalPerson.
Sametime assumes that individualusers are represented by entries witha unique object class. Sametimecompares the name of the object classspecified in this setting to the objectclass values of each entry to decidewhether the entry is a person or agroup. Enter the object class attributeused for people in the LDAP schemaof the LDAP directory in yourenvironment.
Chapter 3. Installing 287

Table 31. Basics settings for the LDAP directory (continued)
Field Description Comments
Attribute of aperson entry thatdefines a person’se-mail address
Specify the attribute of a personentry that contains the user’se-mail address.
Suggested values for this settingare:
v Microsoft Exchange 5.5Directory, Netscape Directory,Domino Directory, SecureWayDirectory: mail
v Microsoft Active Directory:user principal name
This setting is required bycomponents of the Sametime serverthat use the Session InitiationProtocol (SIP), such as the SametimeGateway to connect to other instantmessaging services. SIP entities areidentified by their e-mail addresses.
Group settings:
Where to startsearching forgroups
Specify the base object of thedirectory (or level of thedirectory) from which to start asearch for group entries in theLDAP directory.
The default setting of ″″ beginsthe search from the root of thedirectory.
Suggested values for this settingare:
v Microsoft Active Directory :cn=users, dc=domain, dc=com
v Netscape Directory:o=organizational unit (thecomputer name)
v Microsoft Exchange 5.5Directory: cn=Recipients,ou=computername, o=domain
v Domino Directory:o=organizational unit
v SecureWay Directory:dc=domain, dc=com
Before accepting the default setting(″″), be aware that some LDAPDirectory servers allow the ″″ valueonly for searching the LDAPdirectory root DSE (Directory ServerEntry, or entry with directory serverproperties) and only when the searchscope is confined to One level belowthe Where to start searching forgroups setting. Also, searching fromthe root of an LDAP directorygenerally results in a less efficientsearch than setting a specific baseobject (such as ou=west, o=acme) forthe search.
The extent of the search for groupentries is further controlled by theScope for searching for groupssetting, described in the next row.
288 Lotus Sametime: Installation and Administration Guide Part 1
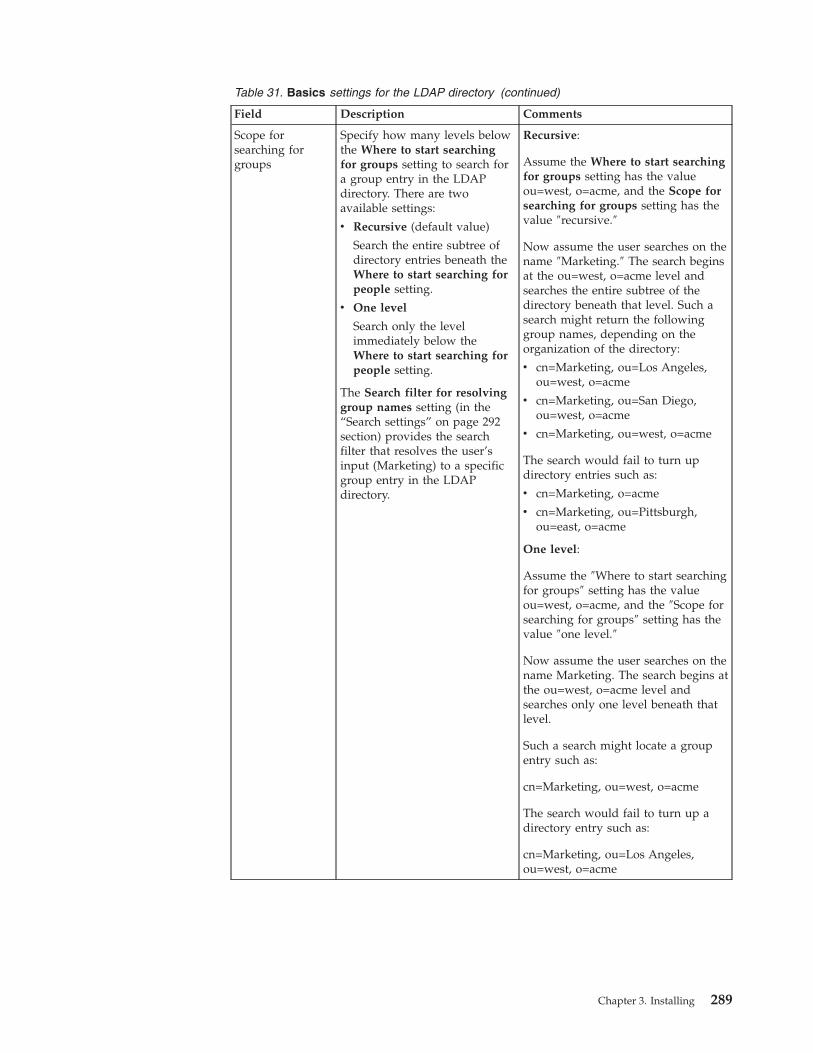
Table 31. Basics settings for the LDAP directory (continued)
Field Description Comments
Scope forsearching forgroups
Specify how many levels belowthe Where to start searchingfor groups setting to search fora group entry in the LDAPdirectory. There are twoavailable settings:
v Recursive (default value)
Search the entire subtree ofdirectory entries beneath theWhere to start searching forpeople setting.
v One level
Search only the levelimmediately below theWhere to start searching forpeople setting.
The Search filter for resolvinggroup names setting (in the“Search settings” on page 292section) provides the searchfilter that resolves the user’sinput (Marketing) to a specificgroup entry in the LDAPdirectory.
Recursive:
Assume the Where to start searchingfor groups setting has the valueou=west, o=acme, and the Scope forsearching for groups setting has thevalue ″recursive.″
Now assume the user searches on thename ″Marketing.″ The search beginsat the ou=west, o=acme level andsearches the entire subtree of thedirectory beneath that level. Such asearch might return the followinggroup names, depending on theorganization of the directory:
v cn=Marketing, ou=Los Angeles,ou=west, o=acme
v cn=Marketing, ou=San Diego,ou=west, o=acme
v cn=Marketing, ou=west, o=acme
The search would fail to turn updirectory entries such as:
v cn=Marketing, o=acme
v cn=Marketing, ou=Pittsburgh,ou=east, o=acme
One level:
Assume the ″Where to start searchingfor groups″ setting has the valueou=west, o=acme, and the ″Scope forsearching for groups″ setting has thevalue ″one level.″
Now assume the user searches on thename Marketing. The search begins atthe ou=west, o=acme level andsearches only one level beneath thatlevel.
Such a search might locate a groupentry such as:
cn=Marketing, ou=west, o=acme
The search would fail to turn up adirectory entry such as:
cn=Marketing, ou=Los Angeles,ou=west, o=acme
Chapter 3. Installing 289
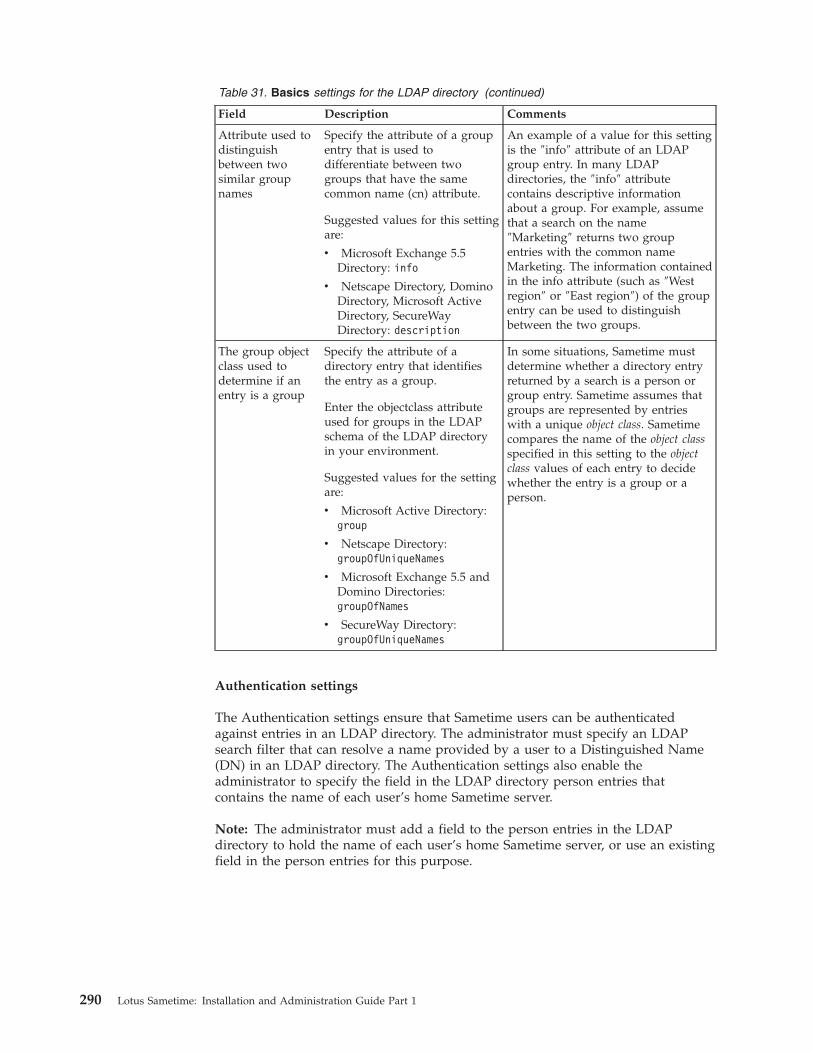
Table 31. Basics settings for the LDAP directory (continued)
Field Description Comments
Attribute used todistinguishbetween twosimilar groupnames
Specify the attribute of a groupentry that is used todifferentiate between twogroups that have the samecommon name (cn) attribute.
Suggested values for this settingare:
v Microsoft Exchange 5.5Directory: info
v Netscape Directory, DominoDirectory, Microsoft ActiveDirectory, SecureWayDirectory: description
An example of a value for this settingis the ″info″ attribute of an LDAPgroup entry. In many LDAPdirectories, the ″info″ attributecontains descriptive informationabout a group. For example, assumethat a search on the name″Marketing″ returns two groupentries with the common nameMarketing. The information containedin the info attribute (such as ″Westregion″ or ″East region″) of the groupentry can be used to distinguishbetween the two groups.
The group objectclass used todetermine if anentry is a group
Specify the attribute of adirectory entry that identifiesthe entry as a group.
Enter the objectclass attributeused for groups in the LDAPschema of the LDAP directoryin your environment.
Suggested values for the settingare:
v Microsoft Active Directory:group
v Netscape Directory:groupOfUniqueNames
v Microsoft Exchange 5.5 andDomino Directories:groupOfNames
v SecureWay Directory:groupOfUniqueNames
In some situations, Sametime mustdetermine whether a directory entryreturned by a search is a person orgroup entry. Sametime assumes thatgroups are represented by entrieswith a unique object class. Sametimecompares the name of the object classspecified in this setting to the objectclass values of each entry to decidewhether the entry is a group or aperson.
Authentication settings
The Authentication settings ensure that Sametime users can be authenticatedagainst entries in an LDAP directory. The administrator must specify an LDAPsearch filter that can resolve a name provided by a user to a Distinguished Name(DN) in an LDAP directory. The Authentication settings also enable theadministrator to specify the field in the LDAP directory person entries thatcontains the name of each user’s home Sametime server.
Note: The administrator must add a field to the person entries in the LDAPdirectory to hold the name of each user’s home Sametime server, or use an existingfield in the person entries for this purpose.
290 Lotus Sametime: Installation and Administration Guide Part 1
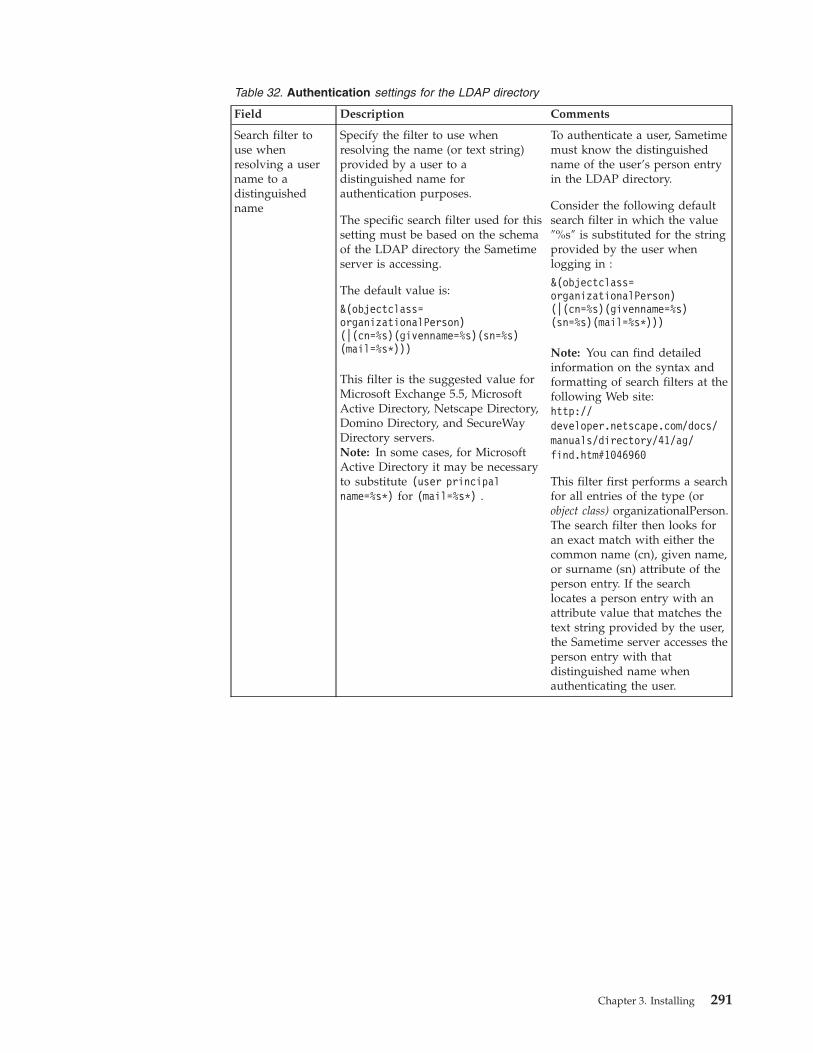
Table 32. Authentication settings for the LDAP directory
Field Description Comments
Search filter touse whenresolving a username to adistinguishedname
Specify the filter to use whenresolving the name (or text string)provided by a user to adistinguished name forauthentication purposes.
The specific search filter used for thissetting must be based on the schemaof the LDAP directory the Sametimeserver is accessing.
The default value is:
&(objectclass=organizationalPerson)(|(cn=%s)(givenname=%s)(sn=%s)(mail=%s*)))
This filter is the suggested value forMicrosoft Exchange 5.5, MicrosoftActive Directory, Netscape Directory,Domino Directory, and SecureWayDirectory servers.Note: In some cases, for MicrosoftActive Directory it may be necessaryto substitute (user principalname=%s*) for (mail=%s*) .
To authenticate a user, Sametimemust know the distinguishedname of the user’s person entryin the LDAP directory.
Consider the following defaultsearch filter in which the value″%s″ is substituted for the stringprovided by the user whenlogging in :
&(objectclass=organizationalPerson)(|(cn=%s)(givenname=%s)(sn=%s)(mail=%s*)))
Note: You can find detailedinformation on the syntax andformatting of search filters at thefollowing Web site:http://developer.netscape.com/docs/manuals/directory/41/ag/find.htm#1046960
This filter first performs a searchfor all entries of the type (orobject class) organizationalPerson.The search filter then looks foran exact match with either thecommon name (cn), given name,or surname (sn) attribute of theperson entry. If the searchlocates a person entry with anattribute value that matches thetext string provided by the user,the Sametime server accesses theperson entry with thatdistinguished name whenauthenticating the user.
Chapter 3. Installing 291
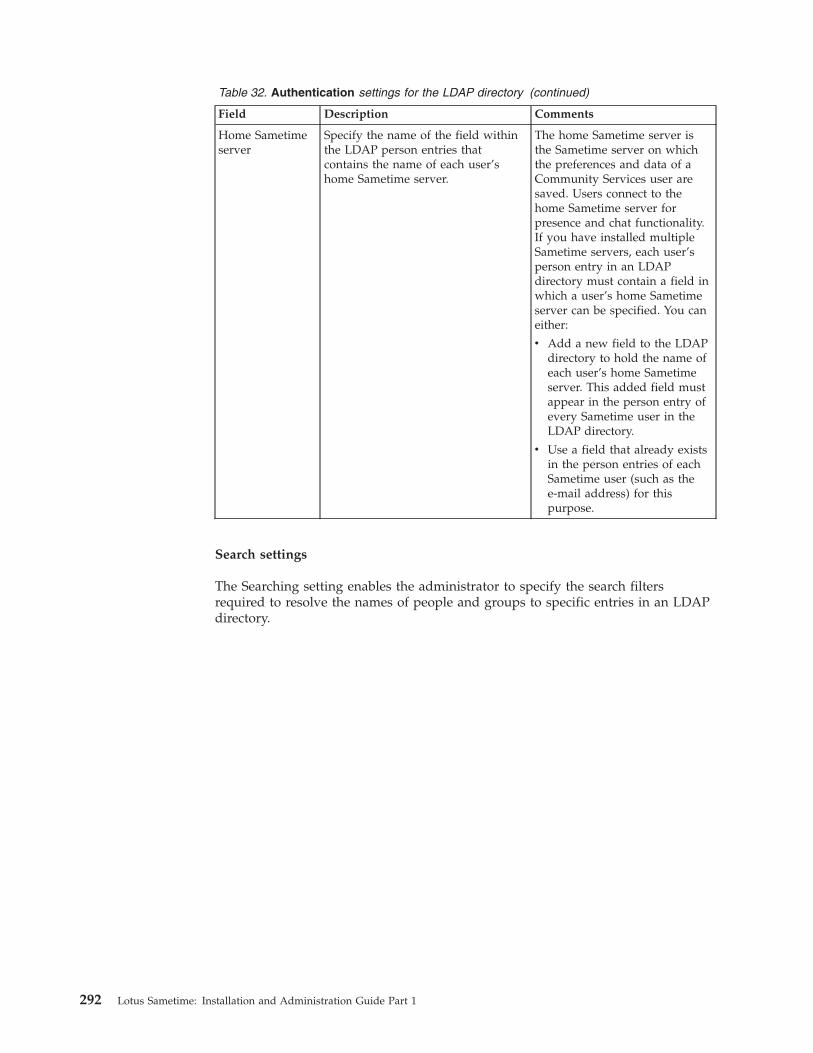
Table 32. Authentication settings for the LDAP directory (continued)
Field Description Comments
Home Sametimeserver
Specify the name of the field withinthe LDAP person entries thatcontains the name of each user’shome Sametime server.
The home Sametime server isthe Sametime server on whichthe preferences and data of aCommunity Services user aresaved. Users connect to thehome Sametime server forpresence and chat functionality.If you have installed multipleSametime servers, each user’sperson entry in an LDAPdirectory must contain a field inwhich a user’s home Sametimeserver can be specified. You caneither:
v Add a new field to the LDAPdirectory to hold the name ofeach user’s home Sametimeserver. This added field mustappear in the person entry ofevery Sametime user in theLDAP directory.
v Use a field that already existsin the person entries of eachSametime user (such as thee-mail address) for thispurpose.
Search settings
The Searching setting enables the administrator to specify the search filtersrequired to resolve the names of people and groups to specific entries in an LDAPdirectory.
292 Lotus Sametime: Installation and Administration Guide Part 1
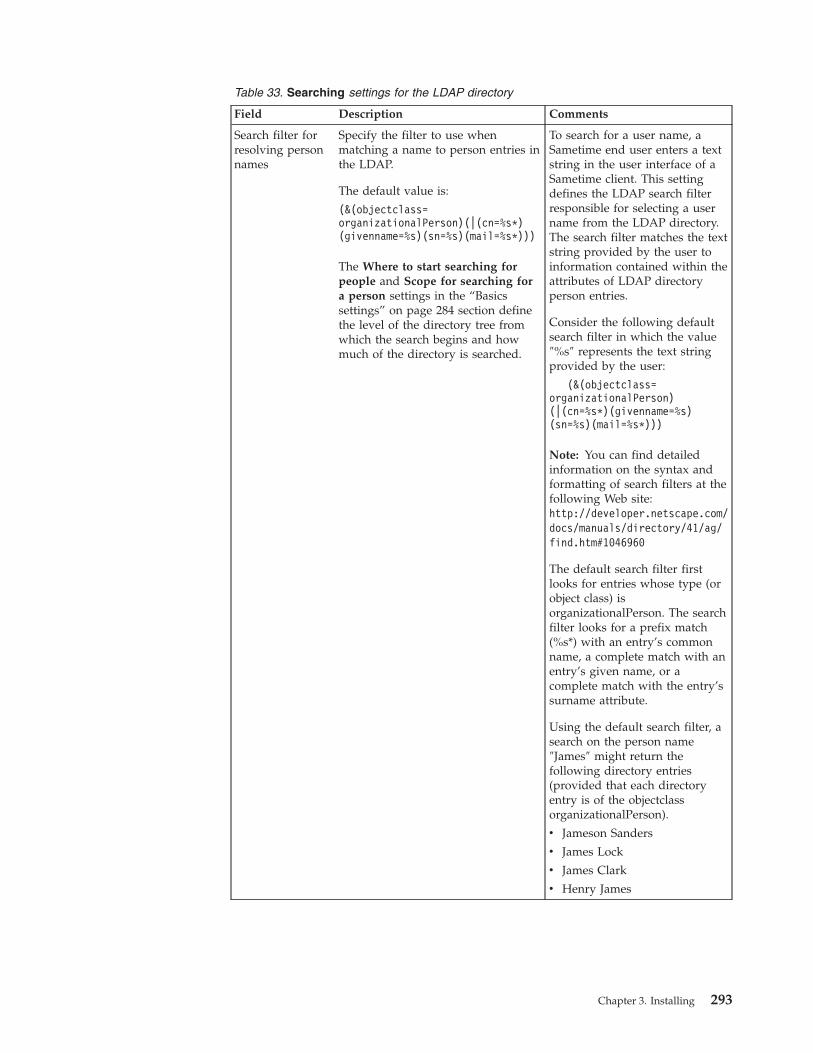
Table 33. Searching settings for the LDAP directory
Field Description Comments
Search filter forresolving personnames
Specify the filter to use whenmatching a name to person entries inthe LDAP.
The default value is:
(&(objectclass=organizationalPerson)(|(cn=%s*)(givenname=%s)(sn=%s)(mail=%s*)))
The Where to start searching forpeople and Scope for searching fora person settings in the “Basicssettings” on page 284 section definethe level of the directory tree fromwhich the search begins and howmuch of the directory is searched.
To search for a user name, aSametime end user enters a textstring in the user interface of aSametime client. This settingdefines the LDAP search filterresponsible for selecting a username from the LDAP directory.The search filter matches the textstring provided by the user toinformation contained within theattributes of LDAP directoryperson entries.
Consider the following defaultsearch filter in which the value″%s″ represents the text stringprovided by the user:
(&(objectclass=organizationalPerson)(|(cn=%s*)(givenname=%s)(sn=%s)(mail=%s*)))
Note: You can find detailedinformation on the syntax andformatting of search filters at thefollowing Web site:http://developer.netscape.com/docs/manuals/directory/41/ag/find.htm#1046960
The default search filter firstlooks for entries whose type (orobject class) isorganizationalPerson. The searchfilter looks for a prefix match(%s*) with an entry’s commonname, a complete match with anentry’s given name, or acomplete match with the entry’ssurname attribute.
Using the default search filter, asearch on the person name″James″ might return thefollowing directory entries(provided that each directoryentry is of the objectclassorganizationalPerson).
v Jameson Sanders
v James Lock
v James Clark
v Henry James
Chapter 3. Installing 293
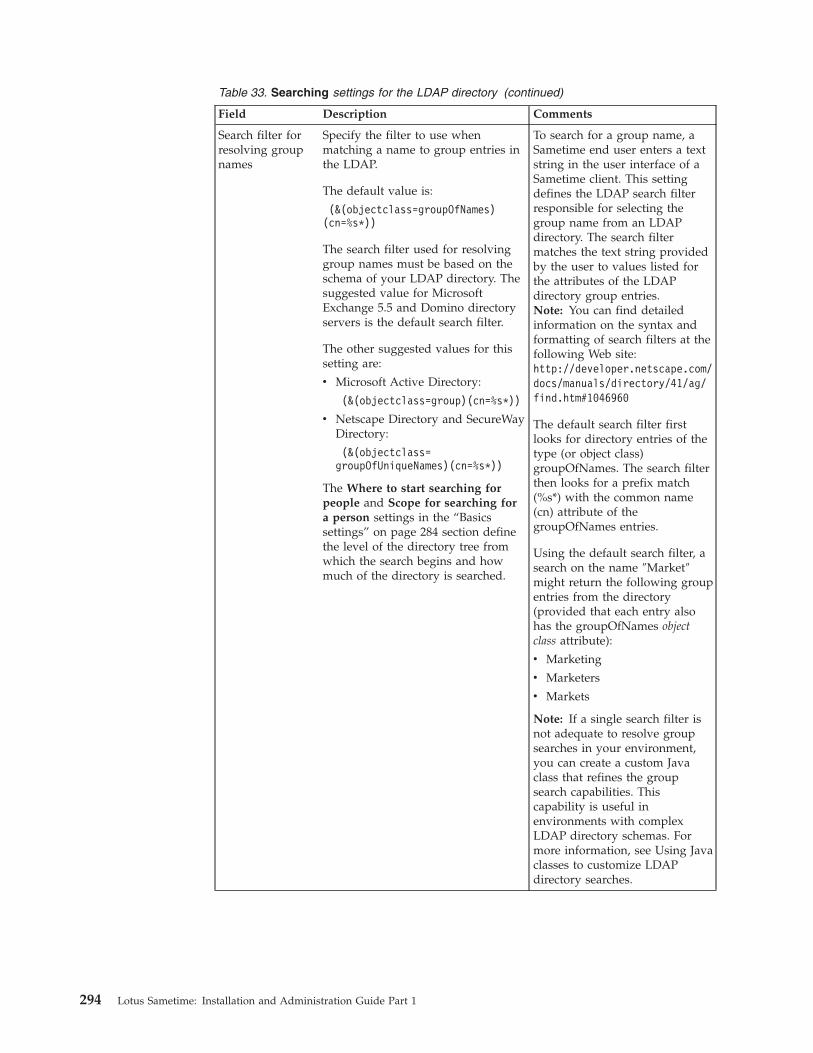
Table 33. Searching settings for the LDAP directory (continued)
Field Description Comments
Search filter forresolving groupnames
Specify the filter to use whenmatching a name to group entries inthe LDAP.
The default value is:
(&(objectclass=groupOfNames)(cn=%s*))
The search filter used for resolvinggroup names must be based on theschema of your LDAP directory. Thesuggested value for MicrosoftExchange 5.5 and Domino directoryservers is the default search filter.
The other suggested values for thissetting are:
v Microsoft Active Directory:
(&(objectclass=group)(cn=%s*))
v Netscape Directory and SecureWayDirectory:
(&(objectclass=groupOfUniqueNames)(cn=%s*))
The Where to start searching forpeople and Scope for searching fora person settings in the “Basicssettings” on page 284 section definethe level of the directory tree fromwhich the search begins and howmuch of the directory is searched.
To search for a group name, aSametime end user enters a textstring in the user interface of aSametime client. This settingdefines the LDAP search filterresponsible for selecting thegroup name from an LDAPdirectory. The search filtermatches the text string providedby the user to values listed forthe attributes of the LDAPdirectory group entries.Note: You can find detailedinformation on the syntax andformatting of search filters at thefollowing Web site:http://developer.netscape.com/docs/manuals/directory/41/ag/find.htm#1046960
The default search filter firstlooks for directory entries of thetype (or object class)groupOfNames. The search filterthen looks for a prefix match(%s*) with the common name(cn) attribute of thegroupOfNames entries.
Using the default search filter, asearch on the name ″Market″might return the following groupentries from the directory(provided that each entry alsohas the groupOfNames objectclass attribute):
v Marketing
v Marketers
v Markets
Note: If a single search filter isnot adequate to resolve groupsearches in your environment,you can create a custom Javaclass that refines the groupsearch capabilities. Thiscapability is useful inenvironments with complexLDAP directory schemas. Formore information, see Using Javaclasses to customize LDAPdirectory searches.
294 Lotus Sametime: Installation and Administration Guide Part 1

Table 33. Searching settings for the LDAP directory (continued)
Field Description Comments
Policy searchfilters
Specify a search filter to use whenresolving a user’s or group’smembership in a policy, to determineaccess right during authentication.
For Domino, you can use an emptystring (″″) if you don’t want to createa filter. The IBM Directory Serverrequires a non-empty value here; forexample: dc=teamspace,dc=com
A policy allows you to restrictaccess to certain features ofSametime when you use eitherthe Domino LDAP or IBMDirectory Server for usermanagement. The filters forsearching for people and groupsin Policy are similar to thoseused for searching for peopleand groups in LDAP but aredesigned to draw on informationstored in Domino or IBMDirectory Server.
Group Content settings
The Group Contents setting enable the administrator to specify the attribute of agroup entry that contains the names of group members.
Table 34. Group Contents settings for the LDAP directory
Field Description
Attribute in thegroup objectclass that has thenames of thegroup members
Specify the name of the attribute inthe group entry that contains thatnames of invidual people orsubgroups.
Suggested values for this setting are:
v Microsoft Active Directory,Microsoft Exchange 5.5 Directory,and Domino Directory: member
v Netscape Directory and IBMSecureway Directory:UniqueMember
If an end user adds a group to apresence list, privacy list, or a listthat restricts meeting attendance,Sametime must obtain the list ofmembers within the group sothat individual members of thegroup can be displayed. The″Attribute in the group objectclass that has the names of thegroup members″ setting definesthe attribute within an LDAPdirectory group entry that holdsthe names of all members of thegroup.
This setting assumes that theLDAP directory schema uses asingle directory entry torepresent a group, and thatnames of group members areheld in one attribute thatcontains multiple values. Thisassumption is true for MicrosoftExchange 5.5, Microsoft ActiveDirectory, Netscape Directory,and Domino environments.
Add Administrator settings
The Add Administrator settings are used to enable additional administrators toaccess the Sametime Administration Tool.
Chapter 3. Installing 295
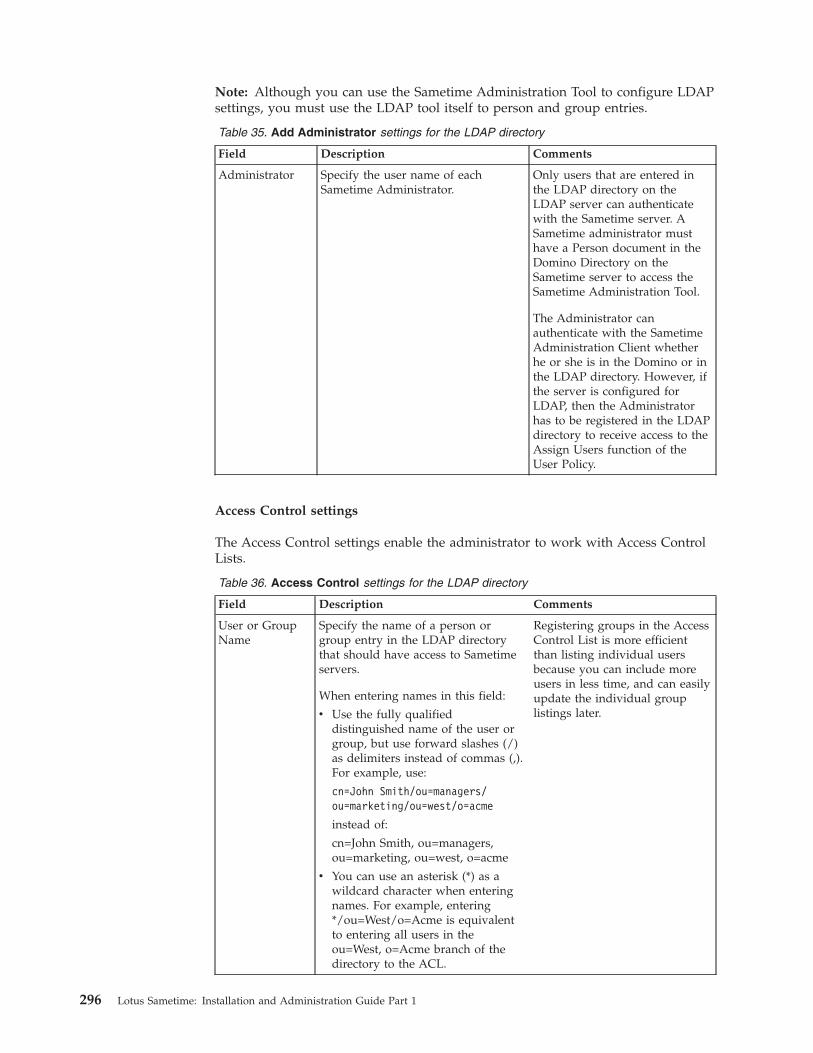
Note: Although you can use the Sametime Administration Tool to configure LDAPsettings, you must use the LDAP tool itself to person and group entries.
Table 35. Add Administrator settings for the LDAP directory
Field Description Comments
Administrator Specify the user name of eachSametime Administrator.
Only users that are entered inthe LDAP directory on theLDAP server can authenticatewith the Sametime server. ASametime administrator musthave a Person document in theDomino Directory on theSametime server to access theSametime Administration Tool.
The Administrator canauthenticate with the SametimeAdministration Client whetherhe or she is in the Domino or inthe LDAP directory. However, ifthe server is configured forLDAP, then the Administratorhas to be registered in the LDAPdirectory to receive access to theAssign Users function of theUser Policy.
Access Control settings
The Access Control settings enable the administrator to work with Access ControlLists.
Table 36. Access Control settings for the LDAP directory
Field Description Comments
User or GroupName
Specify the name of a person orgroup entry in the LDAP directorythat should have access to Sametimeservers.
When entering names in this field:
v Use the fully qualifieddistinguished name of the user orgroup, but use forward slashes (/)as delimiters instead of commas (,).For example, use:
cn=John Smith/ou=managers/ou=marketing/ou=west/o=acme
instead of:
cn=John Smith, ou=managers,ou=marketing, ou=west, o=acme
v You can use an asterisk (*) as awildcard character when enteringnames. For example, entering*/ou=West/o=Acme is equivalentto entering all users in theou=West, o=Acme branch of thedirectory to the ACL.
Registering groups in the AccessControl List is more efficientthan listing individual usersbecause you can include moreusers in less time, and can easilyupdate the individual grouplistings later.
296 Lotus Sametime: Installation and Administration Guide Part 1
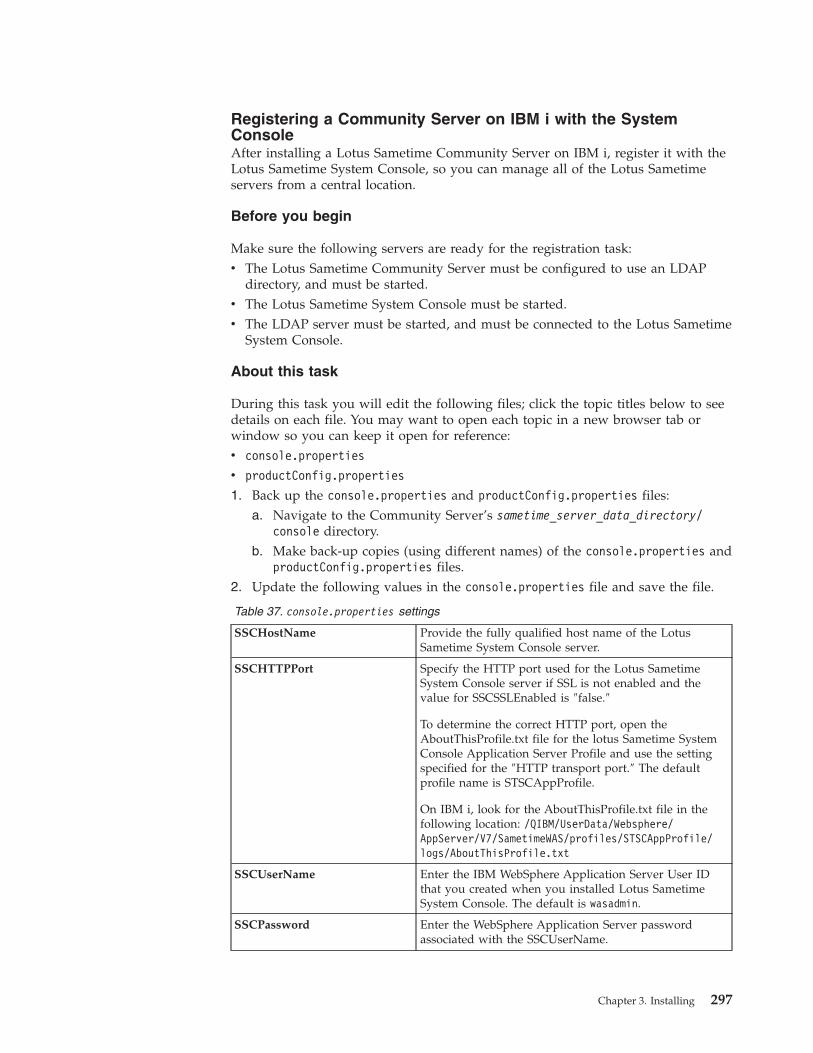
Registering a Community Server on IBM i with the SystemConsoleAfter installing a Lotus Sametime Community Server on IBM i, register it with theLotus Sametime System Console, so you can manage all of the Lotus Sametimeservers from a central location.
Before you begin
Make sure the following servers are ready for the registration task:v The Lotus Sametime Community Server must be configured to use an LDAP
directory, and must be started.v The Lotus Sametime System Console must be started.v The LDAP server must be started, and must be connected to the Lotus Sametime
System Console.
About this task
During this task you will edit the following files; click the topic titles below to seedetails on each file. You may want to open each topic in a new browser tab orwindow so you can keep it open for reference:v console.properties
v productConfig.properties
1. Back up the console.properties and productConfig.properties files:a. Navigate to the Community Server’s sametime_server_data_directory/
console directory.b. Make back-up copies (using different names) of the console.properties and
productConfig.properties files.2. Update the following values in the console.properties file and save the file.
Table 37. console.properties settings
SSCHostName Provide the fully qualified host name of the LotusSametime System Console server.
SSCHTTPPort Specify the HTTP port used for the Lotus SametimeSystem Console server if SSL is not enabled and thevalue for SSCSSLEnabled is ″false.″
To determine the correct HTTP port, open theAboutThisProfile.txt file for the lotus Sametime SystemConsole Application Server Profile and use the settingspecified for the ″HTTP transport port.″ The defaultprofile name is STSCAppProfile.
On IBM i, look for the AboutThisProfile.txt file in thefollowing location: /QIBM/UserData/Websphere/AppServer/V7/SametimeWAS/profiles/STSCAppProfile/logs/AboutThisProfile.txt
SSCUserName Enter the IBM WebSphere Application Server User IDthat you created when you installed Lotus SametimeSystem Console. The default is wasadmin.
SSCPassword Enter the WebSphere Application Server passwordassociated with the SSCUserName.
Chapter 3. Installing 297
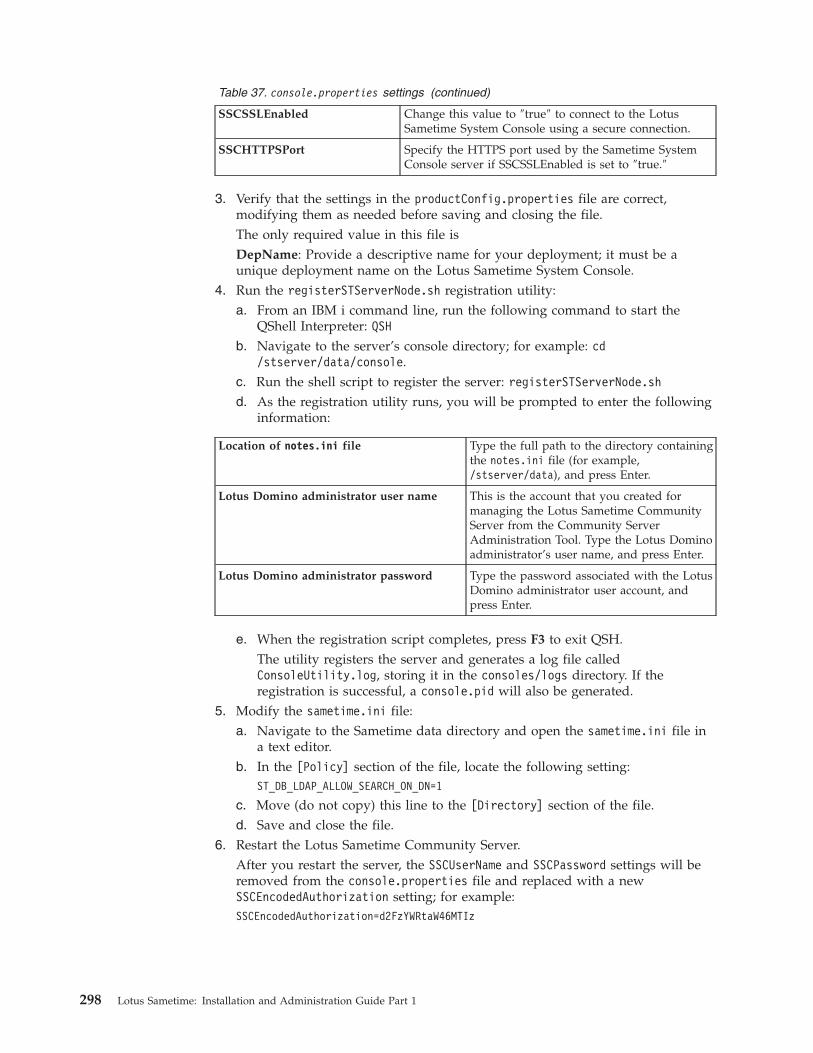
Table 37. console.properties settings (continued)
SSCSSLEnabled Change this value to ″true″ to connect to the LotusSametime System Console using a secure connection.
SSCHTTPSPort Specify the HTTPS port used by the Sametime SystemConsole server if SSCSSLEnabled is set to ″true.″
3. Verify that the settings in the productConfig.properties file are correct,modifying them as needed before saving and closing the file.The only required value in this file isDepName: Provide a descriptive name for your deployment; it must be aunique deployment name on the Lotus Sametime System Console.
4. Run the registerSTServerNode.sh registration utility:a. From an IBM i command line, run the following command to start the
QShell Interpreter: QSHb. Navigate to the server’s console directory; for example: cd
/stserver/data/console.c. Run the shell script to register the server: registerSTServerNode.shd. As the registration utility runs, you will be prompted to enter the following
information:
Location of notes.ini file Type the full path to the directory containingthe notes.ini file (for example,/stserver/data), and press Enter.
Lotus Domino administrator user name This is the account that you created formanaging the Lotus Sametime CommunityServer from the Community ServerAdministration Tool. Type the Lotus Dominoadministrator’s user name, and press Enter.
Lotus Domino administrator password Type the password associated with the LotusDomino administrator user account, andpress Enter.
e. When the registration script completes, press F3 to exit QSH.The utility registers the server and generates a log file calledConsoleUtility.log, storing it in the consoles/logs directory. If theregistration is successful, a console.pid will also be generated.
5. Modify the sametime.ini file:a. Navigate to the Sametime data directory and open the sametime.ini file in
a text editor.b. In the [Policy] section of the file, locate the following setting:
ST_DB_LDAP_ALLOW_SEARCH_ON_DN=1
c. Move (do not copy) this line to the [Directory] section of the file.d. Save and close the file.
6. Restart the Lotus Sametime Community Server.After you restart the server, the SSCUserName and SSCPassword settings will beremoved from the console.properties file and replaced with a newSSCEncodedAuthorization setting; for example:SSCEncodedAuthorization=d2FzYWRtaW46MTIz
298 Lotus Sametime: Installation and Administration Guide Part 1
Enabling IPv6 support on a Lotus Sametime Community ServerEnabling support for IPv6 addressing on an IBM Lotus Sametime server involvesconfiguring settings for both Lotus Domino and Lotus Sametime.
Before you begin
Install Lotus Domino and a Lotus Sametime Community Server as describedearlier; these products must be installed before you can modify their configurationsettings.
Important: Due to the way the Lotus Sametime Community Server functions, youmust not disable IPv4 addressing in the server’s operating system. Even if you willuse IPv6-only addressing with the Lotus Sametime Community Server and withyour network, internal server components use IPv4 addresses (for example, inloopback addresses) and will fail if the operating system does not support IPv4addressing.
About this task
To enable support for IPv6 addressing on the Lotus Sametime Community Server,modify the configuration settings for Lotus Domino and for Lotus Sametime asexplained in the following topics:
Configuring Lotus Domino to support IPv6 addressing:
The IBM Lotus Sametime Community Server is hosted on Lotus Domino. Whenyou enable support for IPv6 addressing on the Community Server, you mustadditionally ensure that the underlying Lotus Domino server also supports IPv6.
Before you begin
Lotus Sametime supports IPv6 addressing only with Lotus Domino 8.0 or later. Ifyou use an earlier release of Lotus Domino, you must upgrade it to release 8.xbefore you can configure it for IPv6 addressing.
About this task
The steps to enabling IPv6 support in Lotus Domino vary with the operatingsystem:
Configuring Lotus Domino for IPv6 addressing on IBM i:
Before an IBM Lotus Sametime server can support IPv6 addressing on IBM i, youmust configure IPv6 support for the Lotus Domino server on which it is hosted.
About this task
In Lotus Domino, only IPv4 addressing is enabled by default. Configuring LotusDomino to support IPv6 involves several steps, including adding configurationsettings to the notes.ini file for the Lotus Domino server. The steps for enablingonly IPv6 support are different from the steps for enabling support for both IPv4and IPv6; follow the instructions in the appropriate topic:
Configuring Lotus Domino to support both IPv4 and IPv6 addressing on IBM i:
Chapter 3. Installing 299
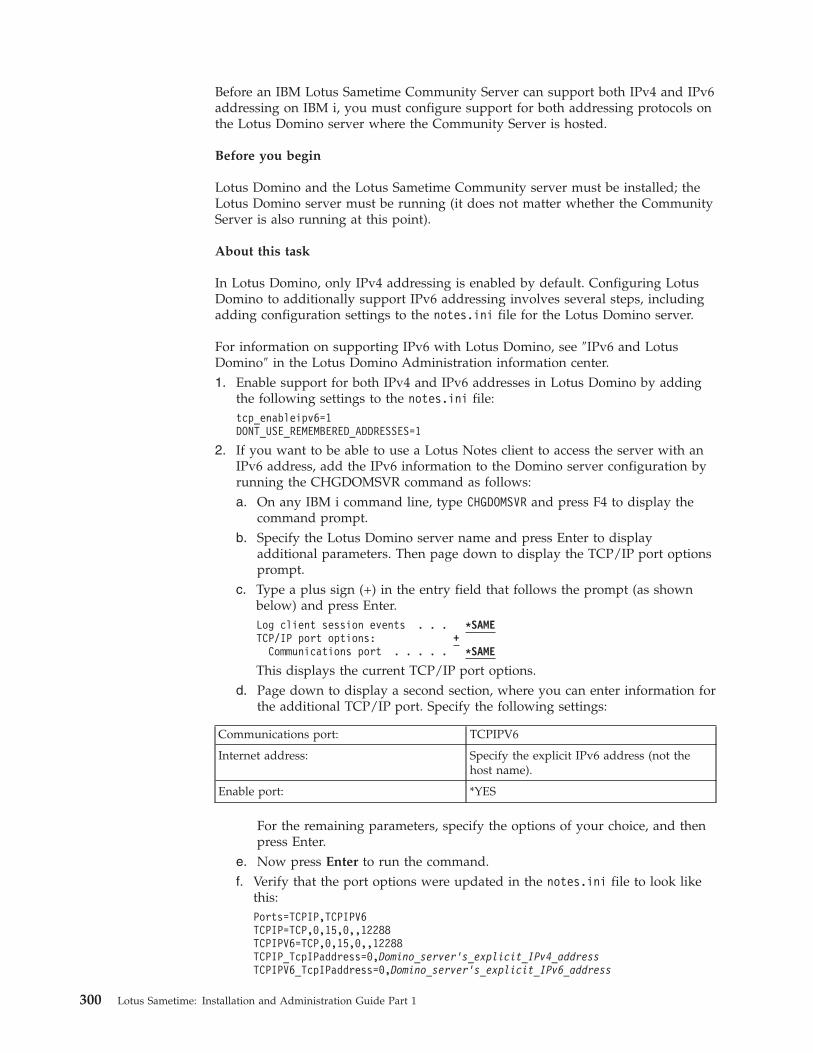
Before an IBM Lotus Sametime Community Server can support both IPv4 and IPv6addressing on IBM i, you must configure support for both addressing protocols onthe Lotus Domino server where the Community Server is hosted.
Before you begin
Lotus Domino and the Lotus Sametime Community server must be installed; theLotus Domino server must be running (it does not matter whether the CommunityServer is also running at this point).
About this task
In Lotus Domino, only IPv4 addressing is enabled by default. Configuring LotusDomino to additionally support IPv6 addressing involves several steps, includingadding configuration settings to the notes.ini file for the Lotus Domino server.
For information on supporting IPv6 with Lotus Domino, see ″IPv6 and LotusDomino″ in the Lotus Domino Administration information center.1. Enable support for both IPv4 and IPv6 addresses in Lotus Domino by adding
the following settings to the notes.ini file:tcp_enableipv6=1DONT_USE_REMEMBERED_ADDRESSES=1
2. If you want to be able to use a Lotus Notes client to access the server with anIPv6 address, add the IPv6 information to the Domino server configuration byrunning the CHGDOMSVR command as follows:a. On any IBM i command line, type CHGDOMSVR and press F4 to display the
command prompt.b. Specify the Lotus Domino server name and press Enter to display
additional parameters. Then page down to display the TCP/IP port optionsprompt.
c. Type a plus sign (+) in the entry field that follows the prompt (as shownbelow) and press Enter.Log client session events . . . *SAMETCP/IP port options: +
Communications port . . . . . *SAME
This displays the current TCP/IP port options.d. Page down to display a second section, where you can enter information for
the additional TCP/IP port. Specify the following settings:
Communications port: TCPIPV6
Internet address: Specify the explicit IPv6 address (not thehost name).
Enable port: *YES
For the remaining parameters, specify the options of your choice, and thenpress Enter.
e. Now press Enter to run the command.f. Verify that the port options were updated in the notes.ini file to look like
this:Ports=TCPIP,TCPIPV6TCPIP=TCP,0,15,0,,12288TCPIPV6=TCP,0,15,0,,12288TCPIP_TcpIPaddress=0,Domino_server's_explicit_IPv4_addressTCPIPV6_TcpIPaddress=0,Domino_server's_explicit_IPv6_address
300 Lotus Sametime: Installation and Administration Guide Part 1
3. Verify that the server host table and the Domain Name Server use the server’sIPv6 address. Both the IPv4 and IPv6 address should map to the same hostname.You should have set these values when setting up your IBM i server beforeinstalling Lotus Domino; for information, see the section Preparing the TCP/IPenvironment on IBM i.The contents of the Domain Name Server should be two DNS entries for thehost name of your Sametime server: one entry that maps the host name to theIPv4 address and another that maps it to the IPv6 address.
4. Restart the Lotus Domino server so your changes can take effect.5. Determine which IP address must be added to the HTTP hostname field in the
server document:The choice of IP address depends on how the Domain Name Server resolvesthe host name. To determine which IP address to add to the server document,attempt to access the Lotus Sametime Community Server from a Web browserusing an IPv4 client:http://Community_Server_host_name
v If you can access the server with the IPv4 client, update the CommunityServer’s ″Server″ document in Lotus Domino by adding the IPv6 address (seenext step).
v If you cannot access the server with the IPv4 client, then update theCommunity Server’s ″Server″ document in Lotus Domino by adding the IPv4address (see next step).
6. Update the HTTP hostname field in the Community Server’s ″Server″document:a. On the Lotus Domino/Lotus Sametime server, start the Domino
Administrator client.b. In the Domino Administrator, navigate to the Server pane and double-click
your Community Server’s name to open the corresponding ″Server″document.
c. In the ″Server″ document, navigate to the Internet Protocols → HTTP tab.The fully qualified host name of the Community Server should alreadyappear in the HTTP hostname field.
d. Update the HTTP hostname field by pressing Enter (used as a delimiter)and then adding the appropriate IP address as determined in the previousstep.v If you were able to access the server with the IPv4 client, add the IPv6
address now.v If you were not able to access the server with the IPv4 client, add the
IPv4 address now.
Attention: Do not add both the IPv6 and the IPv4 addresses.e. Save and close the ″Server″ document.
7. Restart the HTTP service on the Lotus Domino server by running the followingcommand in the console:tell http restart
8. Verify that you can access the Community Server using either an IPv4 or anIPv6 client with the following URL:http://Community_Server_host_name
Configuring Lotus Domino to support only IPv6 addressing on IBM i:
Chapter 3. Installing 301
Before an IBM Lotus Sametime Community Server can support IPv6 addressing onIBM i, you must configure IPv6 support for the Lotus Domino server on which it ishosted.
Before you begin
Lotus Domino and the Lotus Sametime Community server must be installed; theLotus Domino server must be running (it does not matter whether the CommunityServer is also running at this point).
About this task
In Lotus Domino, only IPv4 addressing is enabled by default. Configuring LotusDomino to support IPv6 addressing involves several steps, including addingconfiguration settings to the notes.ini file for the Lotus Domino server.
For information on supporting IPv6 with Lotus Domino, see ″IPv6 and LotusDomino″ in the Lotus Domino Administration information center.1. Enable support for IPv6 addresses in Lotus Domino by adding the following
settings to the notes.ini file:tcp_enableipv6=1DONT_USE_REMEMBERED_ADDRESSES=1
2. Update the Domino TCP/IP port settings in the notes.ini file so they onlyspecify the IPv6 address, like this:Ports=TCPIPV6TCPIPV6=TCP,0,15,0,,12288TCPIPV6_TcpIPaddress=0,Domino_server's_explicit_IPv6_address
3. Update the stcommsrvrtk.jar file in the Lotus Domino installation directory:To support IPv6–only addressing for a Lotus Sametime Community Serverrunning on IBM i, you must replace the stcommsrvrtk.jar file with a newerversion. Run the following command, where ″8xx″ is the version of LotusDomino that you are using for your Community Server:CPY OBJ('/QIBM/ProdData/LOTUS/sametime/stcommsrvrtk.jar')
TODIR('/QIBM/ProdData/LOTUS/domino8xx') REPLACE(*YES) OWNER(*KEEP)
For example, if your Community Server is running on a Domino 8.0.2 server,run this command:CPY OBJ('/QIBM/ProdData/LOTUS/sametime/stcommsrvrtk.jar')
TODIR('/QIBM/ProdData/LOTUS/domino802') REPLACE(*YES) OWNER(*KEEP)
4. Verify that the server host table and the Domain Name Server use the server’sIPv6 address, which is mapped to the host name.You should have set these values when setting up your IBM i server beforeinstalling Lotus Domino; for information, see the section Preparing the TCP/IPenvironment on IBM i.
5. Restart the Lotus Domino server so your changes can take effect.6. Determine whether you need to add the IPv6 address to the HTTP hostname
field in the Community Server’s ″Server″ document in Lotus Domino:This depends on how the Domain Name Server resolves the host name. Todetermine whether you need to add the IPv6 address to the ″Server″ document,attempt to access the Community Server from a Web browser using an IPv6client:http://Community_Server's_host_name
v If you do need to add the IPv6 address, continue with step 7; otherwise, skipto step 8.
302 Lotus Sametime: Installation and Administration Guide Part 1
7. To add the IPv6 address to the HTTP hostname field in the server document,complete the following substeps:a. On the Lotus Domino/Lotus Sametime Community Server, start the
Domino Administrator client.b. In the Domino Administrator, navigate to the Server pane and double-click
your Community Server’s name to open the corresponding ″Server″document.
c. In the ″Server″ document, click Internet Protocols → HTTP.The fully qualified host name of the Community Server should alreadyappear in the HTTP hostname field.
d. Update the HTTP hostname field by pressing Enter (used as a delimiter)and then adding the IPv6 address to the field.
e. Save and close the ″Server″ document.f. Restart the HTTP service on the Lotus Domino server by running the
following command in the console:tell http restart
8. Verify that you can access the Community Server from a Web browser using anIPv6 client:http://Community_Server's_host_name
Configuring the Lotus Sametime Community Server to support IPv6addressing:
Configure settings to establish connectivity and resolve addresses when using IPv6addressing on the IBM Lotus Sametime Community Server.
Before you begin
Enable support for IPv6 addresses on the Lotus Domino server hosting this LotusSametime Community Server.
Important: Due to the way the Lotus Sametime Community Server functions, youmust not disable IPv4 addressing in the server’s operating system. Even if you willuse IPv6-only addressing with the Lotus Sametime Community Server and withyour network, internal server components use IPv4 addresses (for example, inloopback addresses) and will fail if the operating system does not support IPv4addressing.
About this task
Follow the steps below to configure IPv6 support on the Lotus SametimeCommunity Server:1. Stop the Community Server.2. Locate the sametime.ini file in the Lotus Sametime Community Server’s data
directory, and open the file so you can edit it.3. In the [Connectivity] section, add (or modify) the following statements:
UCM_RESOLVE_PREFERRED_IP_VER=IPv4_or_IPv6_selectionVPS_HOST=Explicit_IP_address_of_this_serverUCM_LOCAL_IP=Explicit_IP_address_of_this_serverVPHMX_HTTP_SERVER_IP=IP_address_of_Domino_HTTP_serverVPHMX_HTTP_SERVER_PORT=Domino_HTTP_port
where:
Chapter 3. Installing 303
v UCM_RESOLVE_PREFERRED_IP_VER specifies which type of addresses should bepreferred when a domain name resolves to multiple addresses of bothprotocols:– If you support only IPv6 addressing, set this to ″6″ to disallow
IPv4–formatted addresses.– If you support both IPv4 and IPv6 addressing, set this to ″4″ to allow both
protocols but attempt to resolve addresses, using IPv4 protocol first.v VPS_HOST specifies the explicit IP address of this Lotus Sametime Community
Server. Use the IP address that matches the setting inUCM_RESOLVE_PREFERRED_IP_VER. For example, if you set that value to ″4″ thenspecify an IPv4–format address, but if you set that value to ″6″ then specifyan IPv6–format address.
v UCM_LOCAL_IP specifies the explicit IP address of this Lotus SametimeCommunity Server. Use the IP address that matches the setting inUCM_RESOLVE_PREFERRED_IP_VER. For example, if you set that value to ″4″ thenspecify an IPv4–format address, but if you set that value to ″6″ then specifyan IPv6–format address.
v VPHMX_HTTP_SERVER_IP specifies the IP address of the Lotus Domino HTTPserver running on this computer.
v VPHMX_HTTP_SERVER_PORT specifies the port used by the Lotus Domino HTTPserver running on this computer; normally this is port 80.
4. In the [Config] section, add (or modify) the following statement:STLINKS_HOST=Explicit_IP_address_of_this_server
where STLINKS_HOST specifies the explicit IP address of this Lotus SametimeCommunity Server. Use the IP address that matches the setting inUCM_RESOLVE_PREFERRED_IP_VER. For example, if you set that value to ″4″ thenspecify an IPv4–format address, but if you set that value to ″6″ then specify anIPv6–format address.
Table 38. Accepted values for STLINKS_HOST
Type of address Example
IPv4 explicit address (dot notation) 9.42.127.134
IPv6 explicit address using colon notation 2002:92a:8f7a:200:9:42:127:134
IPv6 explicit address using double-colonnotation
3ef0::bee7:994:2e66
IPv6 explicit address using IPv4–suffixnotation
3ef0::bee7:9.148.46.102
IPv4 ″any″ (four zeroes) 0.0.0.0
IPv6 ″any″ (a double colon) ::
5. Add (or modify) the following statements in the [Debug] section within thesametime.ini file:v If this Lotus Sametime Community Server will support both IPv4 and IPv6
addressing:VPMX_DISABLE_CONFIGURATION_UPDATE=1VPMX_HOSTNAME=::,0.0.0.0VPMX_PORT=1533VPHMX_HOSTNAME=::,0.0.0.0VPHMX_PORT=8082
Where:– VPMX_DISABLE_CONFIGURATION_UPDATE=1 requires all four of the statements
that follow it.
304 Lotus Sametime: Installation and Administration Guide Part 1
– VPMX_HOSTNAME specifies the addresses where the multiplexer residing onthis server handles Lotus Sametime client communications. (Themultiplexer was installed automatically as a part of the Lotus SametimeCommunity Server; if you will additionally install a stand-aloneCommunity Mux, you will need to enable support for IPv6 addressing onthat server as well).
Table 39. Accepted values for VPMX_HOSTNAME
Type of address Example
IPv4 explicit address (dot notation) 9.42.127.134
IPv6 explicit address using colon notation 2002:92a:8f7a:200:9:42:127:134
IPv6 explicit address using double-colonnotation
3ef0::bee7:994:2e66
IPv6 explicit address using IPv4–suffixnotation
3ef0::bee7:9.148.46.102
IPv4 ″any″ (four zeroes) 0.0.0.0
IPv6 ″any″ (a double colon) ::
For example, set this to ::,0.0.0.0 to accept ″any″ address using either IPprotocol.
– VPMX_PORT specifies the port on which the multiplexer residing on thisserver listens for client connections, normally port 1533.
– VPHMX_HOSTNAME specifies the addresses where the multiplexer residing onthis server handles HTTP client communications.
Table 40. Accepted values for VPHMX_HOSTNAME
Type of address Example
IPv4 explicit address (dot notation) 9.42.127.134
IPv6 explicit address using colon notation 2002:92a:8f7a:200:9:42:127:134
IPv6 explicit address using double-colonnotation
3ef0::bee7:994:2e66
IPv6 explicit address using IPv4–suffixnotation
3ef0::bee7:9.148.46.102
IPv4 ″any″ (four zeroes) 0.0.0.0
IPv6 ″any″ (a double colon) ::
For example, set this to ::,0.0.0.0 to accept ″any″ address using either IPprotocol.
– VPHMX_PORT specifies the port on which the multiplexer residing on thisserver listens for HTTP client connections, normally port 8082.
v If this Lotus Sametime Community Server will support only IPv6 addressing:[Debug]VPMX_DISABLE_CONFIGURATION_UPDATE=1VPMX_HOSTNAME=::VPMX_PORT=1533VPHMX_HOSTNAME=::VPHMX_PORT=8082
6. IBM i only: If you will support both IPv4 and IPv6 addressing, replace all ofthe remaining Lotus Sametime Community Server host names in thesametime.ini file with the correct IPv4 or IPv6 address, based on your addresspreference as specified with the UCM_RESOLVE_PREFERRED_IP_VER setting.For example:
Chapter 3. Installing 305
v If the UCM_RESOLVE_PREFERRED_IP_VER setting is ″6″, change every occurrenceof stserver1.acme.com to 2001:db8:85a3:0:0:8a2e:370:7334 (thecorresponding IPv6 address).
v If the UCM_RESOLVE_PREFERRED_IP_VER setting is ″4″, change every occurrenceof stserver1.acme.com to 9.42.127.134 (the corresponding IPv4 address).
7. Save and close the file.8. Start the Community Server.
What to do next
If your Lotus Sametime Community Server is hosted on a Linux SuSE server, youwill additionally need to edit the ststart script to enable support for IPv6addressing in SuSE as described in the next topic.
Installing and setting up a separate Community ServicesmultiplexerInstalling and setting up a separate Community Services multiplexer involves thefollowing considerations and procedures. The multiplexer can be installed on AIX,Linux, Solaris, and Windows and can also be connected to an IBM i deploymentthrough one of those platforms.
Planning to install a separate multiplexer for a single Sametime CommunityServer:
Consider the requirements of the Community Server multiplexer machine beforeinstalling it.v Community Server multiplexer installation files are available for Windows, AIX,
Linux, and Solaris. A separate Community Server multiplexer cannot be installedon IBM i. However, Sametime on IBM i supports the use of a separatemultiplexer installed on a Windows system.
v The minimum system requirements for the Community Server multiplexermachine are the same as the system requirements for the core SametimeCommunity Server.
v A machine that meets the minimum system requirements should be able tohandle approximately 20,000 simultaneous client connections.
v Testing indicates that machines with dual 1133 MHz CPUs and 2 GB of RAMcan handle approximately 30,000 simultaneous client connections.
v TCP/IP connectivity must be available between the Community Servermultiplexer machine and the Sametime Community Server. Port 1516 is thedefault port for the connection from the Community Server multiplexer machineto the Sametime Community Server.
Installing the Community Services multiplexer:
To deploy a stand-alone Community Services multiplexer, install it on a separatecomputer.
About this task
Follow these steps to install the Community Services multiplexer:1. Insert the Lotus Sametime CD into the Community Services multiplexer
machine, start the installation program, and choose the option to install theCommunity Services Mux.
306 Lotus Sametime: Installation and Administration Guide Part 1
2. At the ″Select a language″ screen, select a language for the installer, and thenclick OK.
3. At the ″Welcome″ screen, click Next.4. At the license agreement screen, click I accept both the IBM and the non-IBM
terms, and then click Next.5. At the ″Directory name″ screen, browse to a the directory where you want to
install the Community Mux (or accept the default), and then click .Next
6. At the ″Host name or IP address″ screen, enter the fully qualified host name ofthe Lotus Sametime Community Server that this Community Mux will serve.For best results, do not use an IP address.
7. At the summary screen, click Install.8. At the ″successfully installed″ screen, click Finish.
Connecting to a Sametime Community Mux server:
Use the IBM Lotus Sametime System Console to connect to a Lotus SametimeCommunity Mux and validate its settings.
Before you begin
Start the Lotus Sametime Community Mux if it is not already running.
About this task
If you have not already opened the Connect to Sametime Community Mux Serversactivity, follow these steps:1. From a browser, enter the following URL, replacing serverhostname.domain with
the fully qualified host name of the Lotus Sametime System Console server (forexample stconsole.acme.com).http://serverhostname.domain:8700/ibm/console
If you are prompted with a security exception, accept the certificate, andcontinue.
2. Enter the WebSphere Application Server User ID and password that youcreated when you installed the Lotus Sametime System Console.
3. Click the Sametime System Console task to open it in the navigation tree.4. Expand Sametime Prerequisites, and click Connect to Sametime Community
Mux Servers.Related concepts
“Planning for an LDAP directory” on page 40The IBM Lotus Sametime 8.5 multiple-server environment requires an LDAPdirectory for user authentication. The LDAP server should be set up and runningbefore deploying Sametime.Related tasks
“Starting the Lotus Sametime System Console” on page 231When started, the Lotus Sametime System Console runs as a task in the WebSphereApplication Server administrative console.
Sametime prerequisite: Connecting to a Sametime Community Mux Server:
Validate the host name and ports specified for a new IBM Lotus SametimeCommunity Mux server.
Chapter 3. Installing 307

Before you begin
Use this page to validate the host name of a new Community Mux, along with theports on which it will listen for client connections. This ensures you have aworking multiplexer before you attempt to connect it to a Lotus SametimeCommunity Server or cluster.1. Connect to Sametime Community Mux Servers.
Click Add to begin the guided activity, which lets you validate your installedLotus Sametime Community Mux servers before connecting them toCommunity Servers.You can optionally edit or delete connections to Community Mux servers. ClickRefresh to view your most recent changes.
2. Add Sametime Community Mux Servers.a. In ″Connect to Sametime Community Mux Servers″, click Add.b. In the Host Name field, type the fully qualified host name of the new
Sametime Community Mux (for example: mux1.acme.com).c. Accept the default settings for the Client Port and Client HTTP Port fields.
These settings indicate the ports that the multiplexer will listen on forconnections from Lotus Sametime Connect clients and from Web clients,respectively.
d. Click Save.The connection to the Lotus Sametime Community Mux is validated whenyou save the settings.
Configuring security for the multiplexer:
Update the CommunityConnectivity document in the stconfig.nsf database toenable the Sametime Community Server to accept connections from theCommunity Server multiplexer.
About this task
A Sametime Community Server only accepts connections from a CommunityServices multiplexer that is listed in the ″CommunityTrustedIps″ field of a″CommunityConnectivity″ document to prevent an unauthorized machine fromconnecting to the Sametime Community Server.1. Use a Lotus Notes client to open the stconfig.nsf database on the Sametime
Community Server.2. Open the CommunityConnectivity document in the stconfig.nsf database by
double-clicking on the date associated with the document.If the CommunityConnectivity document does not exist in the stconfig.nsfdatabase, you must create it. To create the CommunityConnectivity document,choose Create → CommunityConnectivity from the menu bar in the stconfig.nsfdatabase.
3. In the ″CommunityTrustedIps″ field, enter the IP addresses of the CommunityServices multiplexer machine(s). If you enter multiple addresses, separate eachaddress with a comma.The IP addresses of SIP Connector machines associated with a Sametimecommunity are also entered in this field.
4. Save and close the CommunityConnectivity document.
Configuring the sametime.ini file for the multiplexer:
308 Lotus Sametime: Installation and Administration Guide Part 1
When the multiplexer is installed on a separate machine, the configuration of themultiplexer is controlled by the settings in the sametime.ini file on the multiplexermachine. Review the settings in the Sametime.ini file on the multiplexer machineto confirm that they are appropriate for your site.
About this task
Notes about maximum user and server connections with a multiplexer:
v When the Community Services multiplexer is installed on a separate machine,Community Services users do not connect to the Sametime server. Therefore, theMaximum user and server connections to the Community Server setting in theSametime Administration Tool for the Sametime Community Server does notapply. Use the VPMX_CAPACITY= parameter in the multiplexer’s sametime.inifile to control the maximum number of connections.
v Multiplexer machines that meet the minimum system requirements cansuccessfully handle 20,000 connections. This value may vary depending on theprocessing capabilities of the multiplexer machine. Multiplexer machines thathave dual 1133 MHz CPUs and 2GB of RAM can successfully handle as many as30000 connections.
Follow these steps to confirm or change the settings for VPS_HOST, VPS_PORT,and VPMX_CAPACITY, open the sametime.ini file on the Community Servermultiplexer machine.1. Open a text editor on the Community Server multiplexer machine.2. Open the Sametime.ini file located in the Sametime server installation directory
(the default directory in Windows is C:\program files\lotus\domino).3. Confirm the host name (VPS_HOST) of the Sametime server to which the
Community Services multiplexer connects (specified during the CommunityServices multiplexer installation and in the stconfig.nsf database.
4. Confirm the port (VPS_PORT) the Community Services multiplexer uses toestablish the connection with the Sametime server (default port 1516).
5. Confirm or change the maximum number of simultaneous connections allowedto the multiplexer (VPMX_CAPACITY).The default value is 20,000 connections:VPMX_CAPACITY=20000
6. Save the sametime.ini file.
Configuring a stand-alone Community Mux for IPv6:
Configure settings to establish connectivity between an IBM Lotus Sametime serverand a stand-alone Lotus Sametime Community Mux when using IPv6 addressing.
About this task
Each Lotus Sametime server contains a local Community Services multiplexercomponent. The multiplexer handles and maintain connections from LotusSametime clients to the Community Services on the Lotus Sametime server. If yourmultiplexer is hosted on the same server as Community Services, it was alreadyenabled for IPv6 support when you configured the Community Services.
If you installed a stand-alone Community Mux (hosted on a separate server), youcan enable IPv6 support as described below.1. Stop the multiplexer.
Chapter 3. Installing 309
2. Locate the sametime.ini file in the Sametime Community Mux installationdirectory, and open the file so you can edit it.
3. Add (or modify) the following statements to the [Connectivity] section withinthe file:
Note: The first three settings must match the values used for the LotusSametime server where Community Services are hosted; these values must usethe same IP protocol as well.UCM_RESOLVE_PREFERRED_IP_VER=IPv4_or_IPv6_selectionVPS_HOST=Explicit_IP_address_of_Sametime_serverUCM_LOCAL_IP=Explicit_IP_address_of_Community_MuxVPHMX_HTTP_SERVER_IP=IP_address_of_Domino_HTTP_serverVPHMX_HTTP_SERVER_PORT=Domino_HTTP_port
where:v UCM_RESOLVE_PREFERRED_IP_VER specifies which type of addresses should be
preferred when a domain name resolves to multiple addresses of bothprotocols:– If you support both IPv4 and IPv6 addressing, set this to ″4″ to allow both
protocols but attempt to resolve addresses using IPv4 protocol first.– If you support only IPv6 addressing, set this to ″6″ -- this will still allow
both protocols, but will attempt to resolve addresses using IPv6 protocolfirst in case your operating system is enabled for both IP protocols.
v VPS_HOST specifies the explicit IP address of the Lotus Sametime server towhich this Community Services multiplexer connects. This value must usethe format specified in UCM_RESOLVE_PREFERRED_IP_VER; for example if youentered a ″4″ for that setting, then you must provide an IPv4–format IPaddress here.
v UCM_LOCAL_IP specifies the explicit IP address of the Community Muxmachine (using dot notation for IPv4 protocol or colon notation for IPv6protocol). This value must use the format specified inUCM_RESOLVE_PREFERRED_IP_VER; for example if you entered a ″4″ for thatsetting, then you must provide an IPv4–format IP address here.
v VPHMX_HTTP_SERVER_IP specifies the IP address of the Lotus Domino HTTPserver where Lotus Sametime is running.
v VPHMX_HTTP_SERVER_PORT specifies the port used by the Lotus Domino HTTPserver where Lotus Sametime is running; normally port 80.
4. Add (or modify) the following statements in the [Debug] section within thesametime.ini file:v If this Lotus Sametime server will support both IPv4 and IPv6 addressing:
VPMX_DISABLE_CONFIGURATION_UPDATE=1VPMX_HOSTNAME=::,0.0.0.0VPMX_PORT=1533VPHMX_HOSTNAME=::,0.0.0.0VPHMX_PORT=8082
Where:– VPMX_DISABLE_CONFIGURATION_UPDATE=1 requires all four of the statements
that follow it.– VPMX_HOSTNAME specifies the addresses where this multiplexer serves Lotus
Sametime client communications.
Table 41. Accepted values for VPMX_HOSTNAME
Type of address Example
IPv4 explicit address (dot notation) 9.42.127.134
310 Lotus Sametime: Installation and Administration Guide Part 1
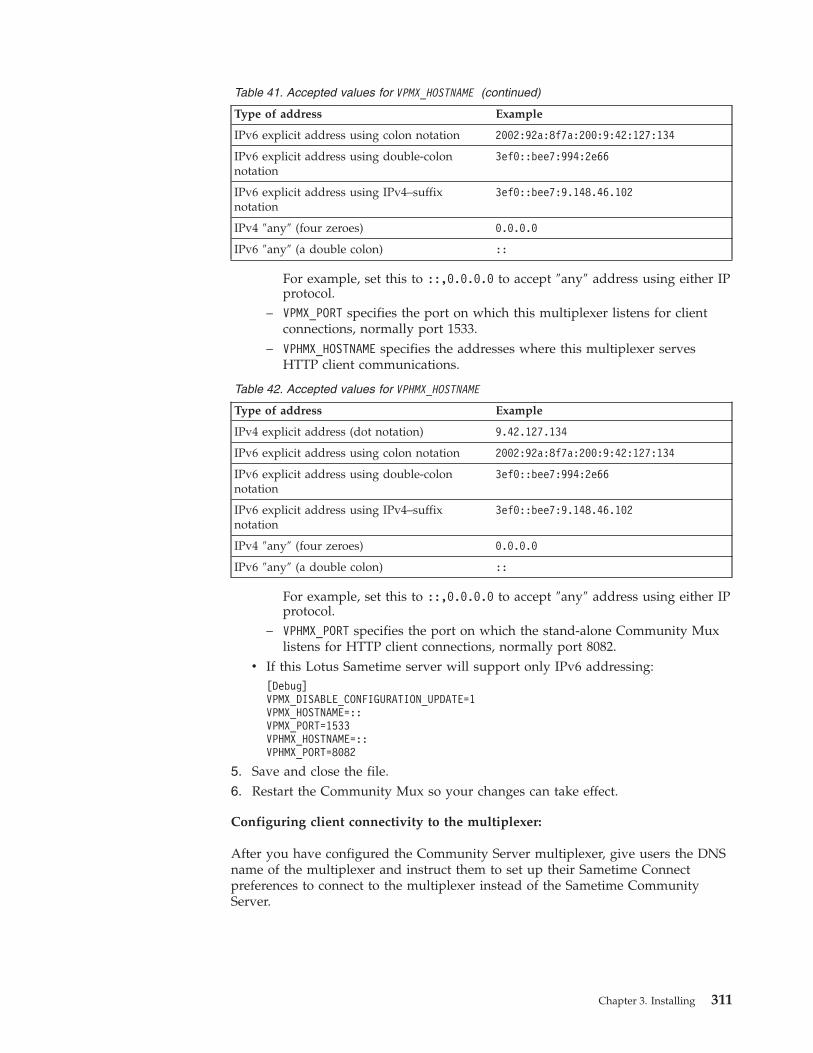
Table 41. Accepted values for VPMX_HOSTNAME (continued)
Type of address Example
IPv6 explicit address using colon notation 2002:92a:8f7a:200:9:42:127:134
IPv6 explicit address using double-colonnotation
3ef0::bee7:994:2e66
IPv6 explicit address using IPv4–suffixnotation
3ef0::bee7:9.148.46.102
IPv4 ″any″ (four zeroes) 0.0.0.0
IPv6 ″any″ (a double colon) ::
For example, set this to ::,0.0.0.0 to accept ″any″ address using either IPprotocol.
– VPMX_PORT specifies the port on which this multiplexer listens for clientconnections, normally port 1533.
– VPHMX_HOSTNAME specifies the addresses where this multiplexer servesHTTP client communications.
Table 42. Accepted values for VPHMX_HOSTNAME
Type of address Example
IPv4 explicit address (dot notation) 9.42.127.134
IPv6 explicit address using colon notation 2002:92a:8f7a:200:9:42:127:134
IPv6 explicit address using double-colonnotation
3ef0::bee7:994:2e66
IPv6 explicit address using IPv4–suffixnotation
3ef0::bee7:9.148.46.102
IPv4 ″any″ (four zeroes) 0.0.0.0
IPv6 ″any″ (a double colon) ::
For example, set this to ::,0.0.0.0 to accept ″any″ address using either IPprotocol.
– VPHMX_PORT specifies the port on which the stand-alone Community Muxlistens for HTTP client connections, normally port 8082.
v If this Lotus Sametime server will support only IPv6 addressing:[Debug]VPMX_DISABLE_CONFIGURATION_UPDATE=1VPMX_HOSTNAME=::VPMX_PORT=1533VPHMX_HOSTNAME=::VPHMX_PORT=8082
5. Save and close the file.6. Restart the Community Mux so your changes can take effect.
Configuring client connectivity to the multiplexer:
After you have configured the Community Server multiplexer, give users the DNSname of the multiplexer and instruct them to set up their Sametime Connectpreferences to connect to the multiplexer instead of the Sametime CommunityServer.
Chapter 3. Installing 311
About this task
Each user must update the Sametime Connect client with the DNS name of themultiplexer. If you have deployed multiple Community Server multiplexers,distribute users evenly among the machines. For example, with two multiplexers,direct half of your users to use multiplexer 1 and the other half to use multiplexer2.1. Open Sametime Connect.2. Choose File → Preferences → Server Communities.3. In the Server Community field, type the DNS name of the Community Server
multiplexer machine, such as messaging.acme.com, as instructed by theadministrator.
Load-balancing client connections to multiplexers (optional):
Dynamically load-balancing connections to multiple Community Servicesmultiplexers is an optional procedure.
Set up load balancing in one of these ways:v Set up a rotating DNS system to accomplish load balancing. Use rotating DNS to
associate the IP addresses of the Community Services multiplexer machines to asingle DNS name.For example, associate the IP address of Community Services multiplexermachine 1 (11.22.33.44) and Community Server multiplexer machine 2(11.22.33.55) to the DNS name cscluster.sametime.com.
v Set up an IBM WebSphere Edge Server (Network Dispatcher) in front of theSametime servers that you intend to cluster. Use the WebSphere Edge ServerNetwork Dispatcher to distribute connections to the Community Servicesmultiplexer machines. See the documentation for the IBM WebSphere EdgeServer for more information.
Installing a Lotus Sametime Proxy ServerThe IBM Lotus Sametime Proxy Server enables browser-based clients to participatein Lotus Sametime instant messaging and online meetings. In addition, the LotusSametime Proxy Server works with Lotus Sametime Community Server or LotusConnections to enable the business card feature in Lotus Sametime, and with LotusSametime Unified Telephony or other TCSPI-enabled products to enable the LotusSametime click-to-call feature. The Lotus Sametime Proxy Server also provides livenames awareness, and can replace the Links Toolkit used in earlier releases of LotusSametime.
Preparing the proxy server installation file on IBM iFollow these steps to customize the response.properties file to prepare for installingthe Lotus Sametime Proxy Server on IBM i.
About this task
Skip the first two steps if you are installing from physical media.1. Download the installation package if you have not already done so.
a. To download installation packages, you must have an IBM PassportAdvantage account, which is described at the following Web address:www.ibm.com/software/howtobuy/passportadvantage/paocustomer/docs/en_US/ecare.html
b. Open this release’s Download document at the following Web address:
312 Lotus Sametime: Installation and Administration Guide Part 1
http://www.ibm.com/support/docview.wss?rs=477&uid=24024322
Locate the components you need in the document’s listing, then downloadthe packages labelled with the corresponding part numbers.
c. Use ftp or another convenient method to transfer the installation package tothe system where you plan to install the product. Store the file in an IFSdirectory of your choosing; for example:/MySametimePackages
2. Extract the installation files to the directory where you stored the installationpackage.a. From an IBM i command line, run the following command to start the
QShell Interpreter:QSH
b. Run the cd shell command, specifying the fully qualified path to theinstallation package directory; for example:cd /MySametimePackages
c. Run the following cd shell command, specifying the name of the .tar file:pax -r -C 819 -f name_of_installation_package
d. Press F3 to exit QSH.3. Review the IBM International Program License Agreement and ensure that you
agree to its terms before proceeding. The agreement is stored in the licensessubdirectory of the program image:/MySametimePackages/SametimeProxyServer/IBMi/stii_stp/licenses
For DVD:/qopt/volume_id/IBMi/stii_stp/licenses
4. Navigate to the program image directory; for example:/MySametimePackages/SametimeProxyServer/IBMi/stii_stp
For DVD:/qopt/volume_id/IBMi/stii_stp
5. Make a copy of the stp.default.response.properties file, using a name of yourchoosing. Store the copy in a location on the system that the installationprogram can access.
6. Customize your copy of the response.properties file with the settingsappropriate for your specific installation.There are special considerations if you are planning to install both theSametime Meeting Server and the Sametime Proxy Server on the same system.You will need to define a separate host name and IP address in addition to thedefault system host name and IP address. After both servers have beeninstalled, you will be directed to update the Host Alias table for the SametimeProxy Server so that it does not use the same host name and IP address as theMeeting Server. This is necessary for live names to work correctly in meetingrooms.
Installing a proxy server on IBM iRun the install script to set up the Lotus Sametime Proxy Server on IBM i.
Before you begin
If you intend to install from a downloaded image, you should have downloadedthe proxy server installation package. For all installations, you should havecompleted the preparation steps.
Chapter 3. Installing 313
About this task
Follow these steps to install the Lotus Sametime Proxy Server and WebSphereApplication Server.1. Log in using a profile with *ALLOBJ and *SECADM special authorities.2. Use the WRKSYSVAL command to check the setting for the QVFYOBJRST system
value and change it if necessary. The setting must be 3 or lower to install theSametime software.
3. From an IBM i command line, run the following command to start the QShellInterpreter:QSH
4. Run the cd shell command, specifying the fully qualified path to theinstallation kit directory; for example:/MySametimePackages/SametimeProxyServer/IBMi/stii_stp
For DVD:cd /qopt/volume_ID/IBMi/stii_stp
5. Start the installation with the following shell command:install_stp.sh-Dinstall.response.file=path_and_name_of_customized_response.properties_file
6. When the installation completes, press F3 to exit QSH.
Results
If the installation was not successful, look at the installation logs for moreinformation about what occurred during the installation attempt. Fix the problem,then try installing again. The installation logs are stored in the following location.
/QIBM/UserData/Lotus/stii/logs
The log name contains the date and time in this form:
install_STPROXY_yyyymmdd_hhmm.log
For example, this log was created at 3:07 A.M. on December 15, 2009:
install_STPROXY_20091215_0307.log
What to do next
If this is the first installation of WebSphere Application Server on this system,follow steps for increasing the WebSphere Application Server usage limit. This taskneeds to be done only once on a system.
If you have installed both the Sametime Meeting Server and the Sametime ProxyServer on the same system, you must update the table of Host Aliases associatedwith the Sametime Proxy Server’s default_host virtual host so that it does not usethe same host name and IP address as the Sametime Meeting Server. Follow thesteps in Deploying Sametime Proxy Server and Sametime Meeting Server on thesame machine.
314 Lotus Sametime: Installation and Administration Guide Part 1
Related tasks
“Preparing to install Lotus Sametime on IBM i” on page 249Follow these steps to prepare IBM i for Lotus Sametime server installations.
Registering a non-clustered IBM i Sametime server with theLotus Sametime System ConsoleAfter installing a Lotus Sametime Community Server, Sametime Proxy Server, orSametime Meeting server on IBM i, register it with the Sametime System Consoleto allow you to manage all Sametime servers from a central location.
Before you begin
Before you register the server, verify that you have completed the following tasks.
Sametime Community Server
v The community server must be configured to use an LDAP directory.v The community server must be started.v The Lotus Sametime System Console must be started.v The LDAP server must be started.v The LDAP server must be connected to the Sametime System Console.
Sametime Proxy Server
v The Lotus Sametime System Console must be started.v The Community Server that the Proxy Server connects to must be registered
with the Sametime System Console.
Sametime Meeting Server
v The meeting server must be started.v The Lotus Sametime System Console must be started.v The LDAP server must be started.v The LDAP server must be connected to the Sametime System Console.v The Meeting Server database (STMS) must be connected to the Sametime System
Console.
About this task
Working from the Sametime server that you want to connect with the console,follow these steps to update properties files and run the registration utility toregister the server with the console.
During this task you will edit the following files; click the topic titles below to seedetails on each file. Use Ctrl+Click to open the topic in a new browser tab orwindow so you can keep it open for reference:v console.properties
v productConfig.properties
1. On the Sametime server you plan to register, navigate to the console directory.v Community Server
The console directory is a subdirectory of the Sametime Community serverdata directory.
v Proxy Server/QIBM/UserData/Lotus/stii/STPROXY/STPROXY_date_time/console
Chapter 3. Installing 315
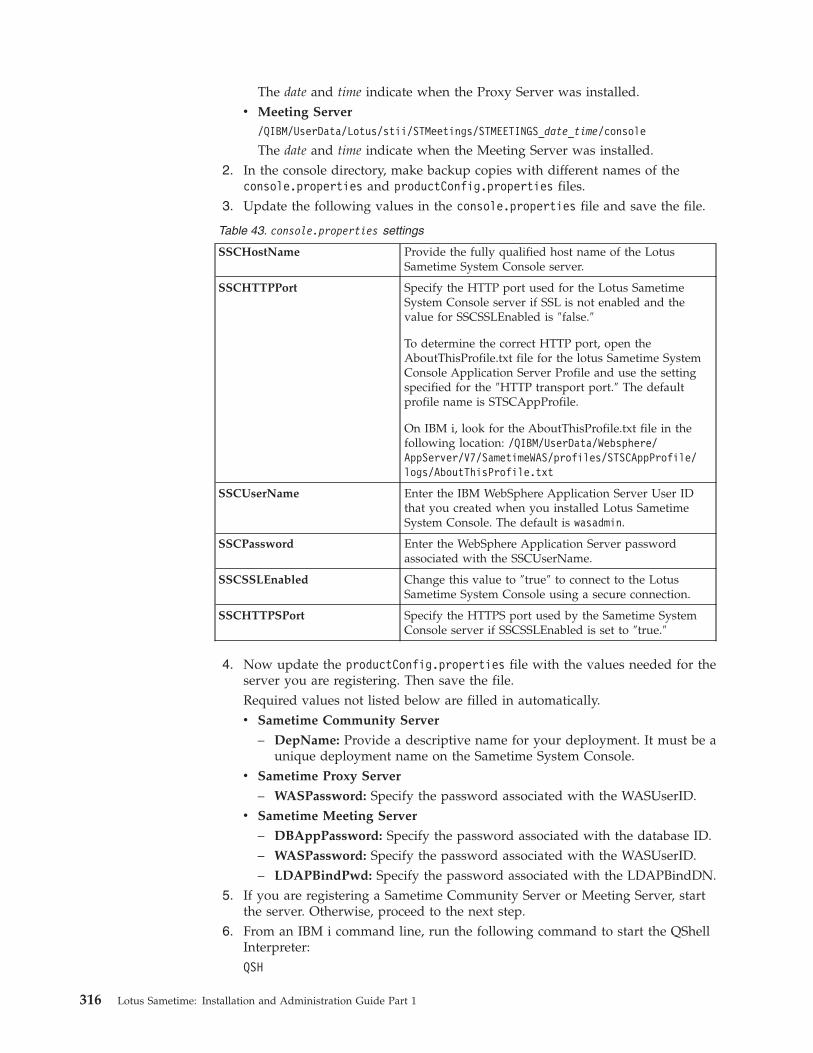
The date and time indicate when the Proxy Server was installed.v Meeting Server
/QIBM/UserData/Lotus/stii/STMeetings/STMEETINGS_date_time/console
The date and time indicate when the Meeting Server was installed.2. In the console directory, make backup copies with different names of the
console.properties and productConfig.properties files.3. Update the following values in the console.properties file and save the file.
Table 43. console.properties settings
SSCHostName Provide the fully qualified host name of the LotusSametime System Console server.
SSCHTTPPort Specify the HTTP port used for the Lotus SametimeSystem Console server if SSL is not enabled and thevalue for SSCSSLEnabled is ″false.″
To determine the correct HTTP port, open theAboutThisProfile.txt file for the lotus Sametime SystemConsole Application Server Profile and use the settingspecified for the ″HTTP transport port.″ The defaultprofile name is STSCAppProfile.
On IBM i, look for the AboutThisProfile.txt file in thefollowing location: /QIBM/UserData/Websphere/AppServer/V7/SametimeWAS/profiles/STSCAppProfile/logs/AboutThisProfile.txt
SSCUserName Enter the IBM WebSphere Application Server User IDthat you created when you installed Lotus SametimeSystem Console. The default is wasadmin.
SSCPassword Enter the WebSphere Application Server passwordassociated with the SSCUserName.
SSCSSLEnabled Change this value to ″true″ to connect to the LotusSametime System Console using a secure connection.
SSCHTTPSPort Specify the HTTPS port used by the Sametime SystemConsole server if SSCSSLEnabled is set to ″true.″
4. Now update the productConfig.properties file with the values needed for theserver you are registering. Then save the file.Required values not listed below are filled in automatically.v Sametime Community Server
– DepName: Provide a descriptive name for your deployment. It must be aunique deployment name on the Sametime System Console.
v Sametime Proxy Server
– WASPassword: Specify the password associated with the WASUserID.v Sametime Meeting Server
– DBAppPassword: Specify the password associated with the database ID.– WASPassword: Specify the password associated with the WASUserID.– LDAPBindPwd: Specify the password associated with the LDAPBindDN.
5. If you are registering a Sametime Community Server or Meeting Server, startthe server. Otherwise, proceed to the next step.
6. From an IBM i command line, run the following command to start the QShellInterpreter:QSH
316 Lotus Sametime: Installation and Administration Guide Part 1
7. Run the cd shell command, specifying the fully qualified path to the consoledirectory you used in Step 1.
8. Run the appropriate shell script to register the server:v Sametime Community Server
registerSTServerNode.sh
When prompted, specify the following information:– Full path to the Sametime Community server data directory where the
notes.ini file is located.– The Community Server Administrator ID and password.
v Other servers
registerProduct.sh
9. When the registration script completes, press F3 to exit QSH.10. On the Lotus Sametime Community Server, modify the sametime.ini file:
a. Navigate to the Sametime data directory and open the sametime.ini file ina text editor.
b. Find the [Policy] section of the file.c. Move (do not copy) the line ST_DB_LDAP_ALLOW_SEARCH_ON_DN=1 to the
[Directory] section of the file.d. Close and save the file.e. Restart the server.
Verifying a proxy server installation on IBM iOpen the Sametime Web client to verify that the installation was successful.
About this task
Follow these steps to verify the installation.1. Using a browser, log in to the Lotus Sametime Proxy Server application with
the following command: http://serverhostname.domain:port/stwebclient/index.jsp
Replace serverhostname.domain with your server name and add the port number.
Tip: To verify the HTTP port number being used by the Lotus Sametime ProxyServer, open the AboutThisProfile.txt file for the Sametime Proxy ApplicationServer Profile and use the setting specified for the HTTP transport port. Thedefault profile name is STPAppProfile. On IBM i, look for theAboutThisProfile.txt file in the following location /QIBM/UserData/Websphere/AppServer/V7/SametimeWAS/profiles/STPAppProfile/logs/AboutThisProfile.txt:
For example: http://st85proxy1.acme.com:9081/stwebclient/index.jsp2. Log in to the Lotus Sametime Client and verify that you can create or view
contacts.
Chapter 3. Installing 317
Related tasks
“Logging in to the Lotus Sametime System Console” on page 63Use the IBM Lotus Sametime System Console to prepare to install new servers,start Sametime servers that have been installed, use guided activities to performconfiguration tasks, and administer any Sametime servers managed by the console.
Managing trusted IP addressesWhenever you install a server that communicates with an IBM Lotus SametimeCommunity Server, you must add the new server’s IP address to the CommunityServer’s settings.
About this task
The Lotus Sametime Community Server accepts connections from the LotusSametime Media Manager, the Lotus Sametime Gateway, the Lotus SametimeCommunity Mux, and the Lotus Sametime Proxy Server, as well as other serversthat are listed in the Community Services page. To ensure that the Lotus SametimeCommunity Server trusts these components when they establish a connection, youmust add the trusted server’s IP address to the Lotus Sametime CommunityServer.
You do not need to add the Lotus Sametime System Console’s IP address becauseit is added automatically when you install the Lotus Sametime Community Serverusing a deployment plan or register the Lotus Sametime Community Server withthe console after installation.
This task must be completed separately for each server within a Lotus SametimeCommunity Server cluster, as well as for multiple non-clustered CommunityServers.1. Log in to the Integrated Solutions Console.2. Click Sametime System Console → Sametime Servers → Sametime Community
Servers.3. In the Sametime Community Servers list, click the deployment name of the
server with the list of trusted IP addresses that you want to change.4. Click the Connectivity tab.5. Under Trusted Servers, enter the IP address of the server that must connect to
the Lotus Sametime Community Server in the New IP Address field, and clickAdd.
Note: For the Lotus Sametime Media Manager, enter the Conference Managerserver IP address. Each instance of a Conference Manager cluster must beentered.To delete an IP address from the list, select it and click Delete Selected.
6. Click OK.7. Restart the Lotus Sametime Community Server for the change to take effect.
Installing a Lotus Sametime Meeting ServerFollow the instructions for your operating system to install a Lotus SametimeMeeting Server.
Preparing the meeting server installation file on IBM iFollow these steps to customize the response.properties file to prepare for installingthe Lotus Sametime Meeting Server on IBM i.
318 Lotus Sametime: Installation and Administration Guide Part 1
Before you begin
You should have completed the preparation steps in ″Preparing to install LotusSametime on IBM i.″
About this task
Skip the first two steps if you are installing from physical media.1. Download the installation package if you have not already done so.
a. To download installation packages, you must have an IBM PassportAdvantage account, which is described at the following Web address:www.ibm.com/software/howtobuy/passportadvantage/paocustomer/docs/en_US/ecare.html
b. Open this release’s Download document at the following Web address:http://www.ibm.com/support/docview.wss?rs=477&uid=24024322
Locate the components you need in the document’s listing, then downloadthe packages labelled with the corresponding part numbers.
c. Use ftp or another convenient method to transfer the installation package tothe system where you plan to install the product. Store the file in an IFSdirectory of your choosing; for example:/MySametimePackages
2. Extract the installation files to the directory where you stored the installationpackage.a. From an IBM i command line, run the following command to start the
QShell Interpreter:QSH
b. Run the cd shell command, specifying the fully qualified path to theinstallation package directory; for example:cd /MySametimePackages
c. Run the following cd shell command, specifying the name of the .tar file:pax -r -C 819 -f name_of_installation_package
d. Press F3 to exit QSH.3. Review the IBM International Program License Agreement and ensure that you
agree to its terms before proceeding. The agreement is stored in the licensessubdirectory of the program image:/MySametimePackages/SametimeMeetingServer/IBMi/stii_stms/licenses
For DVD:/qopt/volume_ID/IBMi/stii_stms/licenses
4. Navigate to the program image directory, for example:/MySametimePackages/SametimeMeetingServer/IBMi/stii_stms
For DVD:/qopt/volume_ID/IBMi/stii_stms
5. Make a copy of the stms.default.response.properties file, using a name of yourchoosing. Store the copy in a location on the system that the installationprogram can access.
6. Customize your copy of the response.properties file with the settingsappropriate for your specific installation.For the database.db.user.id and database.db.user.password settings in the propertiesfile, specify the user profile and password you created to be the owner of theMeeting Server database schemas.
Chapter 3. Installing 319
There are special considerations if you are planning to install both theSametime Meeting Server and the Sametime Proxy Server on the same system.You will need to define a separate host name and IP address in addition to thedefault system host name and IP address. After both servers have beeninstalled, you will be directed to update the Host Alias table for the SametimeProxy Server so that it does not use the same host name and IP address as theSametime Meeting Server. This is necessary for live names to work correctly inmeeting rooms.
Related tasks
“Preparing to install Lotus Sametime on IBM i” on page 249Follow these steps to prepare IBM i for Lotus Sametime server installations.
Creating the Meeting Server database schemas and tables onIBM iRun the script to create the database schemas for the IBM Lotus Sametime MeetingServer on IBM i.
Before you begin
You should have prepared the Meeting Server installation file as described in″Preparing the Meeting Server installation file on IBM i.″
About this task
On the IBM i system that will install the Sametime Meeting Server, follow thesesteps to create the database schema and tables:1. Log in with a user profile that has *ALLOBJ and *SECADM special authorities.
These authorities are required to create the database schemas. The databaseschemas will be created on the system specified in your copy of thestms.default.response.properties file and owned by the user profile specified inthe file.
2. From an IBM i command line, run the following command to start the QShellInterpreter:QSH
3. Run the cd shell command, specifying the fully qualified path to theinstallation kit directory; for example/MySametimePackages/SametimeMeetingServer/IBMi/stii_stms
For DVD:/qopt/volume_ID/IBMi/stii_stms
4. The POLICY schema is shared by the Meeting Server and the System Console.If the POLICY schema already exists, the Meeting Server database setup scriptwill only create the MTG schema.setupDB_stms.sh -Dinstall.response.file=path_and_name_of_customized_response.properties_file
5. When the script completes, press F3 to exit QSH.
Results
If the database schema creation was not successful, look at the script log for moreinformation about what occurred during the attempt. Fix the problem, then tryrunning the script again. The script log is stored in the following location.
/QIBM/UserData/Lotus/stii/logs
320 Lotus Sametime: Installation and Administration Guide Part 1
The log name contains the date and time in this form:
stms_dbsetup_yyyymmdd_hhmm.log
For example, this log was created at 3:07 A.M. on December 15, 2009:
stms_dbsetup_20091215_0307.log
Related tasks
“Preparing to install Lotus Sametime on IBM i” on page 249Follow these steps to prepare IBM i for Lotus Sametime server installations.
Installing a meeting server on IBM iRun the database schema and install scripts to set up the Lotus Sametime MeetingServer on IBM i.
Before you begin
If you intend to install from a downloaded image, you should have downloadedthe meeting server installation package. For all installations, you should havecompleted the preparation steps. The database schemas required for the MeetingServer (MTG and POLICY) should already exist.
About this task
Follow these steps to install the Lotus Sametime Meeting Server and WebSphereApplication Server.1. Log in using a profile with *ALLOBJ and *SECADM special authorities.2. Use the WRKSYSVAL command to check the setting for the QVFYOBJRST system
value and change it if necessary. The setting must be 3 or lower to install theSametime software.
3. From an IBM i command line, run the following command to start the QShellInterpreter:QSH
4. Run the cd shell command, specifying the fully qualified path to theinstallation kit directory; for example:/MySametimePackages/SametimeMeetingServer/IBMi/stii_stms
For DVD:cd /qopt/volume_ID/IBMi/stii_stms
5. Start the Meeting Server installation with the following shell command:install_stms.sh -Dinstall.response.file=path_and_name_of_customized_response.properties_file
6. When the script completes, press F3 to exit QSH.
Results
If the installation was not successful, look at the installation logs for moreinformation about what occurred during the installation attempt. Fix the problem,then try installing again. The installation logs are stored in the following location.
/QIBM/UserData/Lotus/stii/logs
The log name contains the date and time in this form:
install_STMEETINGS_yyyymmdd_hhmm.log
Chapter 3. Installing 321
For example, this log was created at 3:07 A.M. on December 15, 2009:
install_STMEETINGS_20091215_0307.log
What to do next
If this is the first installation of WebSphere Application Server on this system,follow steps for increasing the WebSphere Application Server usage limit. This taskneeds to be done only once on a system.
If you have installed both the Sametime Meeting Server and the Sametime ProxyServer on the same system, you must update the table of Host Aliases associatedwith the Sametime Proxy Server’s default_host virtual host so that it does not usethe same host name and IP address as the Sametime Meeting Server. Follow thesteps in Deploying Sametime Proxy Server and Sametime Meeting Server on thesame machine.Related tasks
“Preparing to install Lotus Sametime on IBM i” on page 249Follow these steps to prepare IBM i for Lotus Sametime server installations.
Connecting to a DB2 databaseUse the Lotus Sametime System Console to connect to the Lotus Sametime MeetingServer or Lotus Sametime Gateway database before installing the server from theSystem Console. If you installed the server without using the System Console (as isthe case with the Sametime Meeting Server on IBM i and Sametime Gateway onany platform), do this step before registering the server with the System Console.
Before you begin
Start the Lotus Sametime System Console if it is not already running.
About this task
If you have not already opened the Connect to DB2 Databases activity, follow thesesteps:1. From a browser, enter the following URL, replacing serverhostname.domain with
the fully qualified domain name of the Lotus Sametime System Console server.http://serverhostname.domain:8700/ibm/console
IBM i: The port number may not be 8700. Use the port that was listed in theSametime System Console installation results summary or use the settingspecified for the Administrative console secure port in the AboutThisProfile.txtfile. For the Sametime System Console Deployment Manager Profile(STSCDmgrProfile), the file is located in the following path:/QIBM/UserData/Websphere/AppServer/V7/SametimeWAS/profiles/STSCDmgrProfile/logs/AboutThisProfile.txt
2. Enter the WebSphere Application Server User ID and password that youcreated when you installed the Lotus Sametime System Console.
3. Click the Sametime System Console task to open it in the navigation tree.4. Click Sametime Prerequisites → Connect to DB2 Databases.
322 Lotus Sametime: Installation and Administration Guide Part 1
Related tasks
“Starting the Lotus Sametime System Console” on page 231When started, the Lotus Sametime System Console runs as a task in the WebSphereApplication Server administrative console.
Sametime prerequisite: Connecting to a DB2 database:
This activity takes you through the steps for connecting to the Meeting Server orGateway database you created.
Before you begin
AIX, Linux, Solaris, Windows: Ensure that IBM DB2 has been installed and thatyou have created the Sametime Meeting Server or Gateway database.
IBM i: Ensure that you have created the required database schemas and tables.
In the Connect to DB2 Databases portlet, verify that the Lotus Sametime SystemConsole database you created earlier is already displayed in the list of databases.
About this task
Follow these steps to connect to the Meeting Server or Gateway database. Youmust do this before you can install the Meeting Server using the Sametime SystemConsole. If you installed the server without using the System Console (as is thecase with the Sametime Meeting Server on IBM i and Sametime Gateway on anyplatform), do this step before registering the server with the System Console.1. DB2 Configuration Guided Activity.
Click Add to begin the guided activity that will connect your server to the DB2database. If a connection already exists, you can optionally edit or delete it.
2. Add a new database.a. In the Connect to DB2 Databases portlet, click Add.
If you want to edit or delete a database instead, then select one, and clickthe appropriate button.
b. Enter the fully qualified host name of the DB2 server in the Host namefield.Do not enter an IP address or a short host name.
c. The Port field shows the default port of 50000. Accept the default unlessyou specified a different port during DB2 installation or your server is usinga different port.Linux: The default is typically 50001, but will vary based on portavailability. Check the /etc/services file on the DB2 server to verify theport number being used.
d. In the Database name, field, enter the name of the database you want toconnect to.Meeting Server database
On AIX, Linux, Solaris, and Windows, the database name is STMS unlessyou changed it.On IBM i, the name is always STMS.Gateway database
For AIX, Linux, Solaris, and Windows, the database name is STGWDBunless you changed it.
Chapter 3. Installing 323
For IBM i, use the name you specified when creating the database schemas.e. In the Application user ID field, supply the DB2 application’s
administrative user name that you created when you installed DB2, such asdb2admin. This user has database administration authority and you will usethis user ID and password whenever you work with DB2 databases forLotus Sametime. On IBM i, this is the user profile you specified as theowner of the Meeting Server database schemas in your copy of thestms.default.response.properties file or the user profile you logged in withwhen you created the Gateway database schemas.
f. In the Application password field, enter the password for the DB2administrative user ID.
g. If you are connecting to a database on an IBM i server, click Hosted onIBM i.
h. Click Finish.
Registering a non-clustered IBM i Sametime server with theLotus Sametime System ConsoleAfter installing a Lotus Sametime Community Server, Sametime Proxy Server, orSametime Meeting server on IBM i, register it with the Sametime System Consoleto allow you to manage all Sametime servers from a central location.
Before you begin
Before you register the server, verify that you have completed the following tasks.
Sametime Community Server
v The community server must be configured to use an LDAP directory.v The community server must be started.v The Lotus Sametime System Console must be started.v The LDAP server must be started.v The LDAP server must be connected to the Sametime System Console.
Sametime Proxy Server
v The Lotus Sametime System Console must be started.v The Community Server that the Proxy Server connects to must be registered
with the Sametime System Console.
Sametime Meeting Server
v The meeting server must be started.v The Lotus Sametime System Console must be started.v The LDAP server must be started.v The LDAP server must be connected to the Sametime System Console.v The Meeting Server database (STMS) must be connected to the Sametime System
Console.
About this task
Working from the Sametime server that you want to connect with the console,follow these steps to update properties files and run the registration utility toregister the server with the console.
324 Lotus Sametime: Installation and Administration Guide Part 1
During this task you will edit the following files; click the topic titles below to seedetails on each file. Use Ctrl+Click to open the topic in a new browser tab orwindow so you can keep it open for reference:v console.properties
v productConfig.properties
1. On the Sametime server you plan to register, navigate to the console directory.v Community Server
The console directory is a subdirectory of the Sametime Community serverdata directory.
v Proxy Server/QIBM/UserData/Lotus/stii/STPROXY/STPROXY_date_time/console
The date and time indicate when the Proxy Server was installed.v Meeting Server
/QIBM/UserData/Lotus/stii/STMeetings/STMEETINGS_date_time/console
The date and time indicate when the Meeting Server was installed.2. In the console directory, make backup copies with different names of the
console.properties and productConfig.properties files.3. Update the following values in the console.properties file and save the file.
Table 44. console.properties settings
SSCHostName Provide the fully qualified host name of the LotusSametime System Console server.
SSCHTTPPort Specify the HTTP port used for the Lotus SametimeSystem Console server if SSL is not enabled and thevalue for SSCSSLEnabled is ″false.″
To determine the correct HTTP port, open theAboutThisProfile.txt file for the lotus Sametime SystemConsole Application Server Profile and use the settingspecified for the ″HTTP transport port.″ The defaultprofile name is STSCAppProfile.
On IBM i, look for the AboutThisProfile.txt file in thefollowing location: /QIBM/UserData/Websphere/AppServer/V7/SametimeWAS/profiles/STSCAppProfile/logs/AboutThisProfile.txt
SSCUserName Enter the IBM WebSphere Application Server User IDthat you created when you installed Lotus SametimeSystem Console. The default is wasadmin.
SSCPassword Enter the WebSphere Application Server passwordassociated with the SSCUserName.
SSCSSLEnabled Change this value to ″true″ to connect to the LotusSametime System Console using a secure connection.
SSCHTTPSPort Specify the HTTPS port used by the Sametime SystemConsole server if SSCSSLEnabled is set to ″true.″
4. Now update the productConfig.properties file with the values needed for theserver you are registering. Then save the file.Required values not listed below are filled in automatically.v Sametime Community Server
– DepName: Provide a descriptive name for your deployment. It must be aunique deployment name on the Sametime System Console.
Chapter 3. Installing 325
v Sametime Proxy Server
– WASPassword: Specify the password associated with the WASUserID.v Sametime Meeting Server
– DBAppPassword: Specify the password associated with the database ID.– WASPassword: Specify the password associated with the WASUserID.– LDAPBindPwd: Specify the password associated with the LDAPBindDN.
5. If you are registering a Sametime Community Server or Meeting Server, startthe server. Otherwise, proceed to the next step.
6. From an IBM i command line, run the following command to start the QShellInterpreter:QSH
7. Run the cd shell command, specifying the fully qualified path to the consoledirectory you used in Step 1.
8. Run the appropriate shell script to register the server:v Sametime Community Server
registerSTServerNode.sh
When prompted, specify the following information:– Full path to the Sametime Community server data directory where the
notes.ini file is located.– The Community Server Administrator ID and password.
v Other servers
registerProduct.sh
9. When the registration script completes, press F3 to exit QSH.10. On the Lotus Sametime Community Server, modify the sametime.ini file:
a. Navigate to the Sametime data directory and open the sametime.ini file ina text editor.
b. Find the [Policy] section of the file.c. Move (do not copy) the line ST_DB_LDAP_ALLOW_SEARCH_ON_DN=1 to the
[Directory] section of the file.d. Close and save the file.e. Restart the server.
Verifying a meeting server installationLog in to the Lotus Sametime Meeting Server to verify that the installation wassuccessful.
About this task
Verify the installation by logging in to the server and creating a new meetingroom.1. From a Web browser, navigate to the Meeting Room Center by entering the
following URL:http://serverhostname.domain:port/stmeetings
Replace serverhostname.domain with the fully qualified domain name of theMeeting server; for example:
Tip: To verify the HTTP port number being used by the Lotus SametimeMeeting Server, open the AboutThisProfile.txt file for the Sametime MeetingApplication Server Profile and use the setting specified for the HTTP transport
326 Lotus Sametime: Installation and Administration Guide Part 1
port. The default profile name is STMAppProfile. On IBM i, look for theAboutThisProfile.txt file in the following location: /QIBM/UserData/Websphere/AppServer/V7/SametimeWAS/profiles/STMAppProfile/logs/AboutThisProfile.txt
http://st85ms1.acme.com:9080/stmeetings
Note: By default, the WebSphere proxy listens on port 80, and forwards to theLotus Sametime Meeting Server on port 9080.
2. Click Log In and then enter your User name and Password to log in to theMeeting Center.
3. Click New Meeting Room, then fill in the fields and click Save.4. The new meeting appears in the list of meetings that you own. Click Enter
Meeting Room below the name of the new meeting to join the meeting.
Installing a Lotus Sametime Gateway serverPlan a deployment and install IBM DB2 and then one or more Lotus SametimeGateway servers.
Creating the Gateway database schemas and tables on IBM iBefore you install Lotus Sametime Gateway, you must create the DB2 database,including tables and bufferpools, needed by Lotus Sametime Gateway. SametimeGateway stores community settings and custom properties in the database.
About this task
For a multi-server installation, you should perform the steps once on the IBM iserver where you want to host the data for Lotus Sametime Gateway. Afterwards,when you install Lotus Sametime Gateway, you use the host name of that IBM iserver when specifying the server name on the database information panel of thewizard.
On the IBM i system that will host your database, proceed as follows:1. Create a user profile on the system that will be the owner of the schema
created for the Lotus Sametime Gateway data. The profile that you create canhave a user class of *USER, and will not require special authorities.
2. Log in as the profile that will be the owner of the schema.3. From the installation media, copy the Lotus Sametime Gateway installation
image to a temporary directory \TMP\SametimeGateway and unzip the contents.4. Locate a copy of \TMP\SametimeGateway\database\db2_iseries\createDbi5OS
and copy it to a temp directory in the IFS of the database server.5. On the IBM i system, start a QSHELL session. From an IBM i command line,
type the command:QSH
6. Change to the temp directory where you copied the file createDbi5OS and typethe following command:createDbi5OS <schema name>
Where <schema name> is the name of the schema you would like LotusSametime Gateway to use. The name must meet the requirements for a libraryname in IBM i, and must not already be used. For example, STGW.
Chapter 3. Installing 327
What to do next
You can now proceed with the Lotus Sametime Gateway installation.
Installing Sametime GatewayInstall an IBM Lotus Sametime Gateway server. This section provides proceduresfor installing a single server and installing a cluster of servers. When installing acluster, you install a primary server, a Deployment Manager server, and at leastone additional server on its own machine. You can install the primary server andDeployment Manager on the same machine, or each on its own machine.
Before you begin
The fully qualified domain name of the Lotus Sametime Gateway server must beexternally resolvable by the domain name server, and must not be set in the″hosts″ file. Verify that this is true before installing the Lotus Sametime Gateway.
About this task
Unlike other Lotus Sametime components, the Lotus Sametime Gateway does notinstall with a deployment plan created on the Lotus Sametime System Console.Instead, you enter required information as you proceed through the installationprogram. Once the installation is complete, you will register the Gateway with theLotus Sametime System Console; from then on, you will administer the Gatewayserver from the System Console, just like all the other Lotus Sametimecomponents.
Installing a single Gateway server:
Choose to install a single Sametime Gateway server on Windows, AIX, Linux,Solaris, or IBM i.
Installing a single server on IBM i:
To install Lotus Sametime Gateway on IBM i, you must first install WebSphereApplication Server. You can install more than one instance of Lotus SametimeGateway on a single IBM i system.
Installing WebSphere Application Server on IBM i:
Install WebSphere Application Server before you install Lotus Sametime Gateway.After you install WebSphere Application Server, you can install more than oneinstance of Lotus Sametime Gateway on a single IBM i system.
Before you begin
If WebSphere Application Server Network Deployment has been installed byanother Sametime product from the current release, you may use that WebSphereApplication Server installation for Sametime Gateway. You need *ALLOBJ and*SECADM authorities to successfully complete the WebSphere Application ServerNetwork Deployment installation.
About this task
Information on downloading packages for Lotus Sametime is located at thefollowing Web address:
328 Lotus Sametime: Installation and Administration Guide Part 1
www.ibm.com/support/docview.wss?rs=477&uid=swg24024322
1. Create the temporary file folder /TMP/WASCD on a PC that can connect to theIBM i system.
2. Copy the file part_number.zip to the temporary folder /TMP/WASCD
3. Open a command window and navigate to the folder /TMP/WASCD.4. Extract all files to the temporary directory/TMP/WASCD. When you are done
extracting the files, you should have a /TMP/WASCD/ifpackage folder with WASand JDK folders inside the ifpackage folder.
5. Copy the ifpackage folder to the IFS of the IBM i system.6. In the folder you copied to the IFS of the IBM i system, edit the file
ifpackage/WAS/responsefile.nd.txt
7. Accept the license to install. Read the comments in the file regarding LicenseAcceptance and then set the value of silentInstallLicenseAcceptance to true.For example:-OPT silentInstallLicenseAcceptance="true"
8. Change the following options in the file:-OPT profileType="none"-OPT installLocation="/QIBM/ProdData/WebSphere/AppServer/V7/SametimeWAS"-OPT defaultProfileLocation="/QIBM/UserData/WebSphere/AppServer/V7/SametimeWAS"
9. Save the file. The rest of the install options in the file are correct for a defaultinstallation.
10. To run the install, start a QSHELL session.11. Navigate to the ifpackage/WAS directory.12. Run the following command:
install -options responsefile.nd.txt
13. When the installation is successful, you will see a message such as this:(Nov 29, 2007 5:19:59 AM), Process, com.ibm.ws.install.ni.ismp.actions.ISMPLogSuccessMessageAction, msg1, INSTCONFSUCCESS.install.ni.ismp.actions.ISMPLogSuccessMessageAction,msg1, INSTCONFSUCCESS
What to do next
If this is the first installation of WebSphere Application Server on this system,follow steps for increasing the WebSphere Application Server usage limit. This taskneeds to be done only once on a system.
Installing a single Sametime Gateway server on IBM i:
Complete these steps to install a single Lotus Sametime Gateway server on IBM i.If you need to create a cluster of Lotus Sametime Gateway servers later, follow theprocedure for installing a cluster of servers.
Before you begin
Before you begin, WebSphere Application Server must be installed. You need*ALLOBJ and *SECADM authorities to successfully complete the Lotus SametimeGateway installation.
Information on downloading packages for Lotus Sametime is located at thefollowing Web address:http://www.ibm.com/support/docview.wss?rs=477&uid=swg24024322
Chapter 3. Installing 329
About this task
IBM i allows multiple instances of Lotus Sametime Gateway to be installed on asingle IBM i system. If a Lotus Sametime Gateway server is running while youinstall a new Lotus Sametime Gateway server, the running server must be restartedbefore you can use the Integrated Solutions Console to administer Lotus SametimeGateway.1. From the installation media, copy the Lotus Sametime Gateway installation
image (part_number.exe) to a temporary directory such as c:\TMP.2. Extract the contents of part_number.exe to the temporary directory c:\TMP.3. Navigate to the folder: c:\TMP\SametimeGateway.4. You can run the installer in wizard mode or in console mode. Use the wizard
mode if you are installing from a PC to the IBM i system.
Important: If you are installing on an IPv6–enabled server, you must use thesecond option below to install using the console.v To run the installer in wizard mode, type the following command:
installi5OS.bat
v To run the installer in console mode, perform these steps:a. Copy the directory /TMP/SametimeGateway to the IFS of the IBM i system.b. Start a QSHELL session.c. Navigate to the /TMP/SametimeGateway directory and type the following
command:install.sh -console
Attention: If one or more of the DNS addresses in your environment(for example: WebSphere Application Server installation host name, DB2host name, or LDAP host name) refers to an IPv6–format address, addthe following option to your install command to work around anIPv6–related issue with the installer:install.sh -console -V BypassWasInfoCheck=true
Because your input will not be verified during installation, you shouldtake extra care when typing values.
5. Select the language to be used for the installation and click OK. The LotusSametime Gateway Welcome screen is displayed.
6. Click Next to continue with the installation. The Software License Agreementdialog is displayed. Please make sure to read the license agreement carefully.
7. Select the appropriate radio button option to accept the license agreement ifyou agree with the statement and click Next to proceed with the installation.If you accepted the terms, the Installation Type dialog is displayed.
8. Select Standalone server, and then click Next.9. See node, cell, and host name profile information provided by the installer. If
the supplied information is okay, click Next.
Option Description
Node Logical name for the node. For example,acmeNode.
330 Lotus Sametime: Installation and Administration Guide Part 1
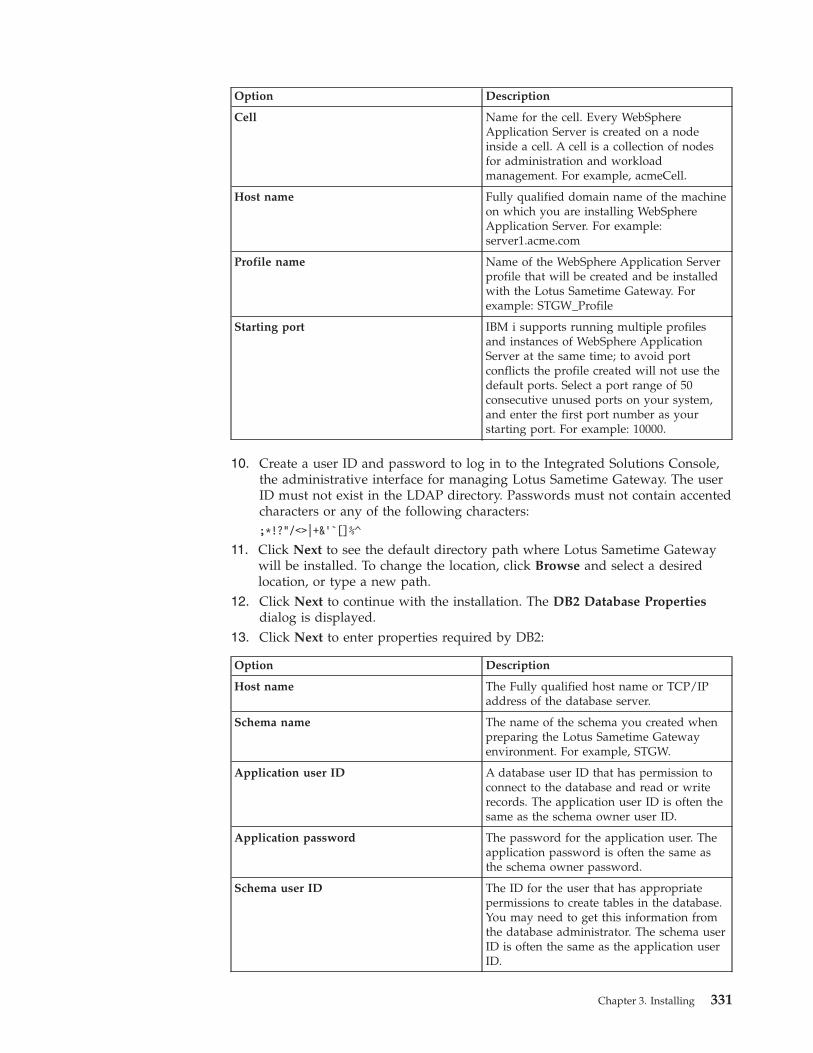
Option Description
Cell Name for the cell. Every WebSphereApplication Server is created on a nodeinside a cell. A cell is a collection of nodesfor administration and workloadmanagement. For example, acmeCell.
Host name Fully qualified domain name of the machineon which you are installing WebSphereApplication Server. For example:server1.acme.com
Profile name Name of the WebSphere Application Serverprofile that will be created and be installedwith the Lotus Sametime Gateway. Forexample: STGW_Profile
Starting port IBM i supports running multiple profilesand instances of WebSphere ApplicationServer at the same time; to avoid portconflicts the profile created will not use thedefault ports. Select a port range of 50consecutive unused ports on your system,and enter the first port number as yourstarting port. For example: 10000.
10. Create a user ID and password to log in to the Integrated Solutions Console,the administrative interface for managing Lotus Sametime Gateway. The userID must not exist in the LDAP directory. Passwords must not contain accentedcharacters or any of the following characters:;*!?"/<>|+&'`[]%^
11. Click Next to see the default directory path where Lotus Sametime Gatewaywill be installed. To change the location, click Browse and select a desiredlocation, or type a new path.
12. Click Next to continue with the installation. The DB2 Database Propertiesdialog is displayed.
13. Click Next to enter properties required by DB2:
Option Description
Host name The Fully qualified host name or TCP/IPaddress of the database server.
Schema name The name of the schema you created whenpreparing the Lotus Sametime Gatewayenvironment. For example, STGW.
Application user ID A database user ID that has permission toconnect to the database and read or writerecords. The application user ID is often thesame as the schema owner user ID.
Application password The password for the application user. Theapplication password is often the same asthe schema owner password.
Schema user ID The ID for the user that has appropriatepermissions to create tables in the database.You may need to get this information fromthe database administrator. The schema userID is often the same as the application userID.
Chapter 3. Installing 331
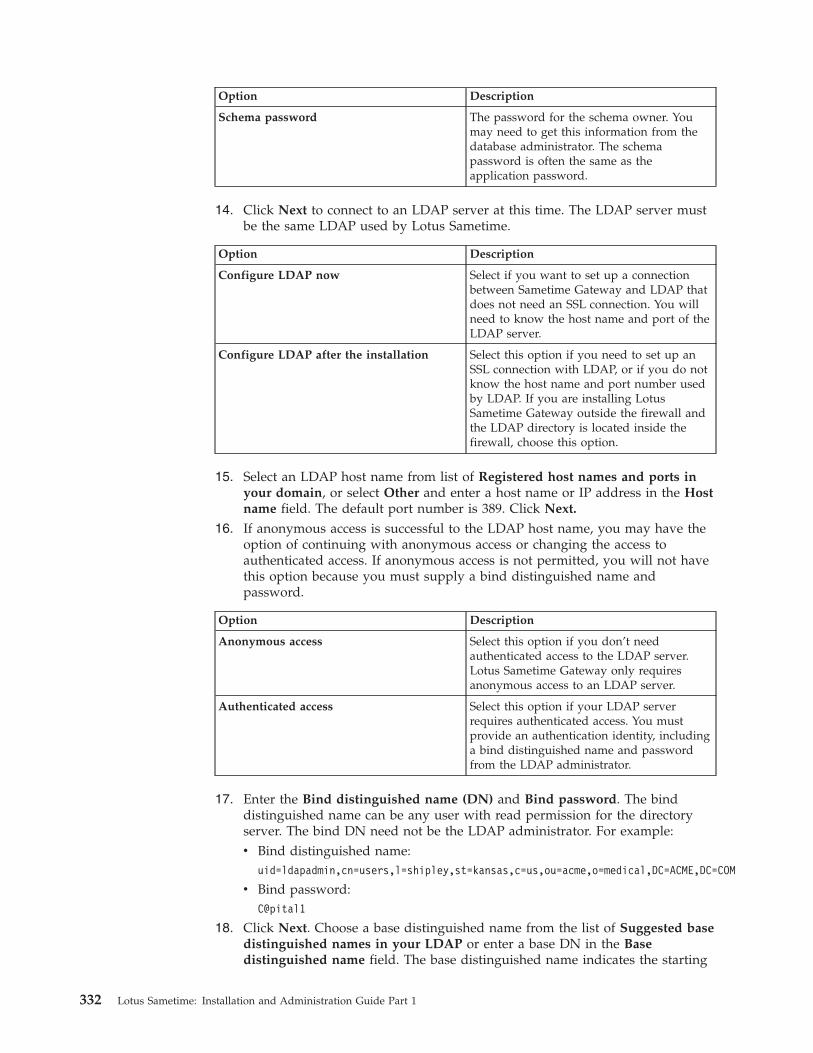
Option Description
Schema password The password for the schema owner. Youmay need to get this information from thedatabase administrator. The schemapassword is often the same as theapplication password.
14. Click Next to connect to an LDAP server at this time. The LDAP server mustbe the same LDAP used by Lotus Sametime.
Option Description
Configure LDAP now Select if you want to set up a connectionbetween Sametime Gateway and LDAP thatdoes not need an SSL connection. You willneed to know the host name and port of theLDAP server.
Configure LDAP after the installation Select this option if you need to set up anSSL connection with LDAP, or if you do notknow the host name and port number usedby LDAP. If you are installing LotusSametime Gateway outside the firewall andthe LDAP directory is located inside thefirewall, choose this option.
15. Select an LDAP host name from list of Registered host names and ports inyour domain, or select Other and enter a host name or IP address in the Hostname field. The default port number is 389. Click Next.
16. If anonymous access is successful to the LDAP host name, you may have theoption of continuing with anonymous access or changing the access toauthenticated access. If anonymous access is not permitted, you will not havethis option because you must supply a bind distinguished name andpassword.
Option Description
Anonymous access Select this option if you don’t needauthenticated access to the LDAP server.Lotus Sametime Gateway only requiresanonymous access to an LDAP server.
Authenticated access Select this option if your LDAP serverrequires authenticated access. You mustprovide an authentication identity, includinga bind distinguished name and passwordfrom the LDAP administrator.
17. Enter the Bind distinguished name (DN) and Bind password. The binddistinguished name can be any user with read permission for the directoryserver. The bind DN need not be the LDAP administrator. For example:v Bind distinguished name:
uid=ldapadmin,cn=users,l=shipley,st=kansas,c=us,ou=acme,o=medical,DC=ACME,DC=COM
v Bind password:C@pital1
18. Click Next. Choose a base distinguished name from the list of Suggested basedistinguished names in your LDAP or enter a base DN in the Basedistinguished name field. The base distinguished name indicates the starting
332 Lotus Sametime: Installation and Administration Guide Part 1
point for LDAP searches of the directory service. For example, for the binddistinguished name given as an example in the previous step, you can specifythe base DN as: DC=ACME,DC=COM. For authorization purposes, this field is casesensitive. This panel is not shown if you are connecting to Domino LDAP.
19. Click Next to see the Lotus Sametime Gateway installation summary. You canreview the installation summary settings and, if necessary, click Back to makechanges.
20. Click Install to begin copying files. A progress screen is displayed and theactivity is logged to the Lotus Sametime Gateway log file. This installationtakes about 10 minutes to complete. When the installation is complete, thewizard displays a message indicating a successful installation.
21. Read the summary and click Finish. To view the installation log, open the logfile at stgw_server_root\logs\installlog.txt
What to do next
You now have installed the server.
Managing trusted IP addresses:
Whenever you install a server that communicates with an IBM Lotus SametimeCommunity Server, you must add the new server’s IP address to the CommunityServer’s settings.
About this task
The Lotus Sametime Community Server accepts connections from the LotusSametime Media Manager, the Lotus Sametime Gateway, the Lotus SametimeCommunity Mux, and the Lotus Sametime Proxy Server, as well as other serversthat are listed in the Community Services page. To ensure that the Lotus SametimeCommunity Server trusts these components when they establish a connection, youmust add the trusted server’s IP address to the Lotus Sametime CommunityServer.
You do not need to add the Lotus Sametime System Console’s IP address becauseit is added automatically when you install the Lotus Sametime Community Serverusing a deployment plan or register the Lotus Sametime Community Server withthe console after installation.
This task must be completed separately for each server within a Lotus SametimeCommunity Server cluster, as well as for multiple non-clustered CommunityServers.1. Log in to the Integrated Solutions Console.2. Click Sametime System Console → Sametime Servers → Sametime Community
Servers.3. In the Sametime Community Servers list, click the deployment name of the
server with the list of trusted IP addresses that you want to change.4. Click the Connectivity tab.5. Under Trusted Servers, enter the IP address of the server that must connect to
the Lotus Sametime Community Server in the New IP Address field, and clickAdd.
Chapter 3. Installing 333
Note: For the Lotus Sametime Media Manager, enter the Conference Managerserver IP address. Each instance of a Conference Manager cluster must beentered.To delete an IP address from the list, select it and click Delete Selected.
6. Click OK.7. Restart the Lotus Sametime Community Server for the change to take effect.
Starting a single server:
This section explains how to start a standalone Lotus Sametime Gateway server.Skip these steps if you are setting up a cluster.
About this task
Single server configurations must have the Lotus Sametime Gateway serverrunning to access the Integrated Solutions Console, while a Lotus SametimeGateway cluster must have the Deployment Manager running to access theIntegrated Solutions Console. Do not start Lotus Sametime Gateway at this time ifyou are creating a cluster of Lotus Sametime Gateway servers.1. Log in to the server machine as a user with administrative privileges.2. Navigate to the Lotus Sametime Gateway profile directory that contains
binaries: stgw_profile_root\bin3. Type the following command to start Lotus Sametime Gateway. Note that
RTCGWServer is case-sensitive.AIX, Linux, and Solaris./startServer.sh RTCGWServer
WindowsstartServer.bat RTCGWServer
IBM istartServer RTCGWServer
Connecting to a DB2 database:
Use the Lotus Sametime System Console to connect to the Lotus Sametime MeetingServer or Lotus Sametime Gateway database before installing the server from theSystem Console. If you installed the server without using the System Console (as isthe case with the Sametime Meeting Server on IBM i and Sametime Gateway onany platform), do this step before registering the server with the System Console.
Before you begin
Start the Lotus Sametime System Console if it is not already running.
About this task
If you have not already opened the Connect to DB2 Databases activity, follow thesesteps:1. From a browser, enter the following URL, replacing serverhostname.domain with
the fully qualified domain name of the Lotus Sametime System Console server.http://serverhostname.domain:8700/ibm/console
IBM i: The port number may not be 8700. Use the port that was listed in theSametime System Console installation results summary or use the settingspecified for the Administrative console secure port in the AboutThisProfile.txt
334 Lotus Sametime: Installation and Administration Guide Part 1
file. For the Sametime System Console Deployment Manager Profile(STSCDmgrProfile), the file is located in the following path:/QIBM/UserData/Websphere/AppServer/V7/SametimeWAS/profiles/STSCDmgrProfile/logs/AboutThisProfile.txt
2. Enter the WebSphere Application Server User ID and password that youcreated when you installed the Lotus Sametime System Console.
3. Click the Sametime System Console task to open it in the navigation tree.4. Click Sametime Prerequisites → Connect to DB2 Databases.Related tasks
“Starting the Lotus Sametime System Console” on page 231When started, the Lotus Sametime System Console runs as a task in the WebSphereApplication Server administrative console.
Sametime prerequisite: Connecting to a DB2 database:
This activity takes you through the steps for connecting to the Meeting Server orGateway database you created.
Before you begin
AIX, Linux, Solaris, Windows: Ensure that IBM DB2 has been installed and thatyou have created the Sametime Meeting Server or Gateway database.
IBM i: Ensure that you have created the required database schemas and tables.
In the Connect to DB2 Databases portlet, verify that the Lotus Sametime SystemConsole database you created earlier is already displayed in the list of databases.
About this task
Follow these steps to connect to the Meeting Server or Gateway database. Youmust do this before you can install the Meeting Server using the Sametime SystemConsole. If you installed the server without using the System Console (as is thecase with the Sametime Meeting Server on IBM i and Sametime Gateway on anyplatform), do this step before registering the server with the System Console.1. DB2 Configuration Guided Activity.
Click Add to begin the guided activity that will connect your server to the DB2database. If a connection already exists, you can optionally edit or delete it.
2. Add a new database.a. In the Connect to DB2 Databases portlet, click Add.
If you want to edit or delete a database instead, then select one, and clickthe appropriate button.
b. Enter the fully qualified host name of the DB2 server in the Host namefield.Do not enter an IP address or a short host name.
c. The Port field shows the default port of 50000. Accept the default unlessyou specified a different port during DB2 installation or your server is usinga different port.Linux: The default is typically 50001, but will vary based on portavailability. Check the /etc/services file on the DB2 server to verify theport number being used.
Chapter 3. Installing 335
d. In the Database name, field, enter the name of the database you want toconnect to.Meeting Server database
On AIX, Linux, Solaris, and Windows, the database name is STMS unlessyou changed it.On IBM i, the name is always STMS.Gateway database
For AIX, Linux, Solaris, and Windows, the database name is STGWDBunless you changed it.For IBM i, use the name you specified when creating the database schemas.
e. In the Application user ID field, supply the DB2 application’sadministrative user name that you created when you installed DB2, such asdb2admin. This user has database administration authority and you will usethis user ID and password whenever you work with DB2 databases forLotus Sametime. On IBM i, this is the user profile you specified as theowner of the Meeting Server database schemas in your copy of thestms.default.response.properties file or the user profile you logged in withwhen you created the Gateway database schemas.
f. In the Application password field, enter the password for the DB2administrative user ID.
g. If you are connecting to a database on an IBM i server, click Hosted onIBM i.
h. Click Finish.
Registering a new Gateway server on IBM i with the System Console:
After installing an IBM Lotus Sametime Gateway server on IBM i, register it withthe Lotus Sametime System Console, which allows you to manage all LotusSametime servers from a central location.
Before you begin
Before you register the server, verify that you have completed the following tasks,which are described in the Installing on IBM i section of this information center.v The Lotus Sametime System Console must be started.v The LDAP server must be connected to the System Console and must be started.v The Gateway database must be connected to the System Console and must be
started.v The Community Server that the Gateway server connects to must already be
registered with the Console and must be started.
About this task
Working from the server that you want to connect with the console, follow thesesteps to update properties files and run the registration utility.
During this task you will edit the following files; click the topic titles below to seedetails on each file. Use Ctrl+Click to open the topic in a new browser tab orwindow so you can keep it open for reference:v console.properties
v productConfig.properties
336 Lotus Sametime: Installation and Administration Guide Part 1
1. Working on the Lotus Sametime Gateway server, navigate to the/qibm/userdata/STGateway/ProfileName/console directory.The ProfileName is the one you specified when you installed the Gateway.
2. Make backup copies (using different names) of the console.properties andproductConfig.properties files.
3. Update the console.properties file with the following values, and then saveand close the file.
Table 45. console.properties settings
SSCHostName Provide the fully qualified host name of the LotusSametime System Console server.
SSCHTTPPort Specify the HTTP port used for the Lotus SametimeSystem Console server if SSL is not enabled and thevalue for SSCSSLEnabled is ″false.″
To determine the correct HTTP port, open theAboutThisProfile.txt file for the lotus Sametime SystemConsole Application Server Profile and use the settingspecified for the ″HTTP transport port.″ The defaultprofile name is STSCAppProfile.
On IBM i, look for the AboutThisProfile.txt file in thefollowing location: /QIBM/UserData/Websphere/AppServer/V7/SametimeWAS/profiles/STSCAppProfile/logs/AboutThisProfile.txt
SSCUserName Enter the IBM WebSphere Application Server User IDthat you created when you installed Lotus SametimeSystem Console. The default is wasadmin.
SSCPassword Enter the WebSphere Application Server passwordassociated with the SSCUserName.
SSCSSLEnabled Change this value to ″true″ to connect to the LotusSametime System Console using a secure connection.
SSCHTTPSPort Specify the HTTPS port used by the Sametime SystemConsole server if SSCSSLEnabled is set to ″true.″
4. Update the productConfig.properties file with the following values, and thensave and close the file.Only the required values in this file are listed here:
Table 46. productConfig.properties settings
InstallType Specify ″Cell″ as the installation type since this is anon-clustered server.
DepName Provide a descriptive name for your deployment. It mustbe a unique deployment name on the Lotus SametimeSystem Console.
NodeIP Specify the IP address of the server being registered.
WASAdminPassword Specify the password associated with the WASUserID
LDAPBindPassword Specify the password associated with the LDAPBindDN.
DB2AdminPassword Specify the password associated with the database ID.
CommunityServerHost Specify the fully qualified host name (not the IP address)of the Community Server registered with the LotusSametime System Console.
CommunityServerPort Specify the port for the Community Server.
Chapter 3. Installing 337
Table 46. productConfig.properties settings (continued)
LDAPHost Specify the fully qualified host name (not the IP address)of the LDAP server that was registered with the LotusSametime System Console.
LDAPPort Specify the port of the LDAP server that was registeredwith the Lotus Sametime System Console.
LDAPBindDN Specify the Bind Distinguished Name of the LDAPserver that was registered with the Lotus SametimeSystem Console.
LDAPBindPwd Specify the password associated with the LDAPBindDNvalue.
LDAPBaseDN Specify the search base of the LDAP server that wasregistered with the Lotus Sametime System Console.
5. Run the registration utility:a. From an IBM i command line, run the following command to start the
QShell Interpreter: QSHb. Run the cd shell command, specifying the fully qualified path to the console
directory you used in Step 1.c. Run the shell script to register the server: registerProduct.shd. When the registration script completes, press F3 to exit QSH.
The utility registers the cluster, as well as each node, generating a log filecalled ConsoleUtility.log and storing it in the consoles/logs directory. Ifthe registration is successful, a console.pid will also be generated.
6. Start Lotus Sametime Gateway server, if it is not already running.
Optional network configuration:
After you complete your IBM Lotus Sametime Gateway installation, you canoptionally modify some network configuration settings.
Using a different SIP return address:
In a single-server IBM Lotus Gateway deployment, you can optionally configurethe SIP return address to use the IBM WebSphere Application Server’s host nameaddress instead of the operating system’s host name address.
About this task
Outgoing SIP messages include a ″Contact″ field, which is used as the returnaddress for opening a new connection back to the sender. By default, the ″Contact″value uses the operating system’s own host name address. If you wish, you canassign the WebSphere Application Server’s host name address to this value instead.If you do this, WebSphere Application Server stops listening for SIP messages onall of the available operating system interfaces, and instead listens only on theinterface described by the new return address (its own host name address).
Specifying a different SIP return address is an optional procedure, and applies toonly single-server installations (clustered installations already use the WebSphereApplication Server’s host name address as the SIP return address).1. Log into Integrated Solutions Console.2. Click Servers → Application servers.3. Click RTGWServer.
338 Lotus Sametime: Installation and Administration Guide Part 1
4. Under ″Communications″, click Ports.5. Click SIP_DEFAULTHOST.6. In the Host field, type the WebSphere Application Server installation’s host
name address, and then click OK.Specify a fully qualified domain name in this field; for example:server1.acme.com
Use the name you specified as the host name when you installed this LotusSametime Gateway server.
7. Click SIP_DEFAULTHOST_SECURE.8. In the Host field, type the WebSphere Application Server installation’s host
name address, and then click OK.Specify a fully qualified domain name in this field; for example:server1.acme.com
Use the name you specified as the host name when you installed this LotusSametime Gateway server.
9. Restart the Lotus Sametime Gateway server.
Configuring network interface cards to simulate a NAT:
This optional procedure describes how to you can simulate a Network AddressTranslator (NAT) to provide additional security by using two Network InterfaceCards (NICs), one for an internal IP address facing the Sametime communityserver, and the other for an external IP address facing the Internet. This procedureapplies to standalone Sametime Gateway deployments only. If you use thisconfiguration, you must update the default host using the Integrated SolutionsConsole.
Before you begin
The procedure applies to single server installations only. If you have a cluster ofSametime Gateway servers, and you want to set up two Network Interface Cards,install the NICs on the proxy server node in the cluster. The proxy server node issmart enough to handle incoming and outgoing addresses on two different IPaddresses without additional configuration.
About this task
Perform these steps to configure multiple NIC support in a single serverinstallation. When Sametime Gateway has two IP addresses, one external facingand one internal facing, sometimes the Sametime Gateway sends subscriberequests such that the external community is instructed to respond back to theinternal IP address. To ensure that Sametime Gateway sends the external IPaddress instead of the internal IP, perform the following configuration steps:
Chapter 3. Installing 339
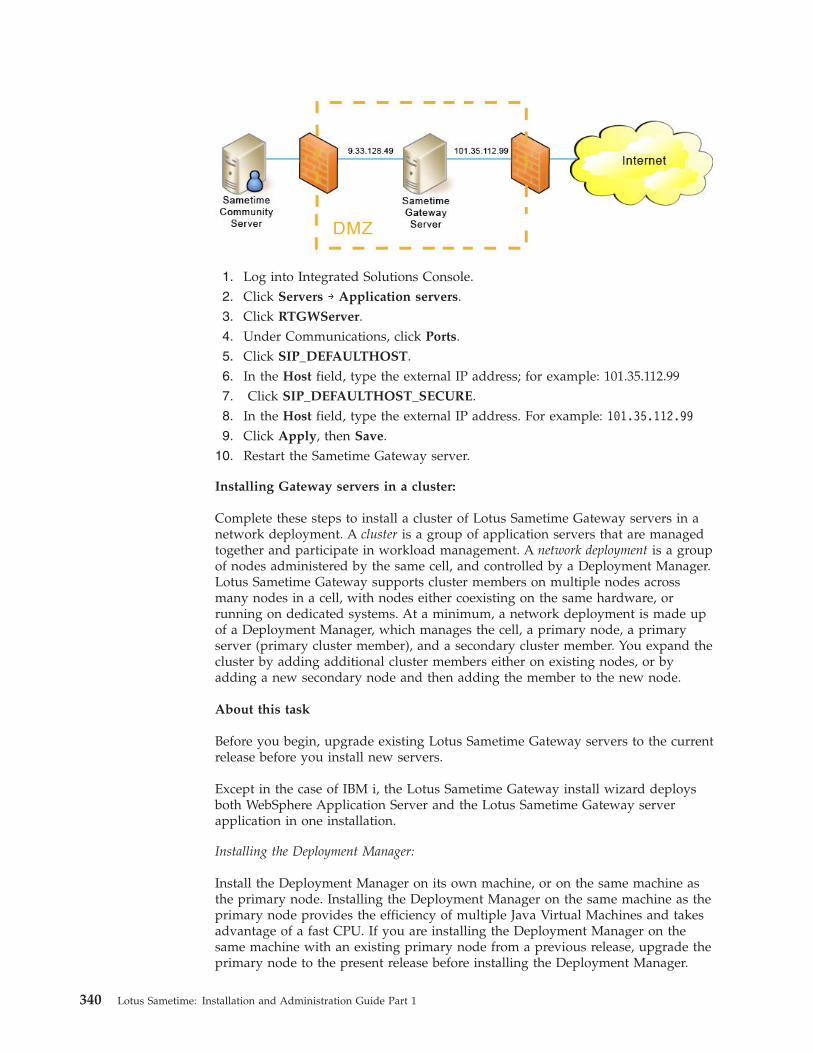
1. Log into Integrated Solutions Console.2. Click Servers → Application servers.3. Click RTGWServer.4. Under Communications, click Ports.5. Click SIP_DEFAULTHOST.6. In the Host field, type the external IP address; for example: 101.35.112.997. Click SIP_DEFAULTHOST_SECURE.8. In the Host field, type the external IP address. For example: 101.35.112.999. Click Apply, then Save.
10. Restart the Sametime Gateway server.
Installing Gateway servers in a cluster:
Complete these steps to install a cluster of Lotus Sametime Gateway servers in anetwork deployment. A cluster is a group of application servers that are managedtogether and participate in workload management. A network deployment is a groupof nodes administered by the same cell, and controlled by a Deployment Manager.Lotus Sametime Gateway supports cluster members on multiple nodes acrossmany nodes in a cell, with nodes either coexisting on the same hardware, orrunning on dedicated systems. At a minimum, a network deployment is made upof a Deployment Manager, which manages the cell, a primary node, a primaryserver (primary cluster member), and a secondary cluster member. You expand thecluster by adding additional cluster members either on existing nodes, or byadding a new secondary node and then adding the member to the new node.
About this task
Before you begin, upgrade existing Lotus Sametime Gateway servers to the currentrelease before you install new servers.
Except in the case of IBM i, the Lotus Sametime Gateway install wizard deploysboth WebSphere Application Server and the Lotus Sametime Gateway serverapplication in one installation.
Installing the Deployment Manager:
Install the Deployment Manager on its own machine, or on the same machine asthe primary node. Installing the Deployment Manager on the same machine as theprimary node provides the efficiency of multiple Java Virtual Machines and takesadvantage of a fast CPU. If you are installing the Deployment Manager on thesame machine with an existing primary node from a previous release, upgrade theprimary node to the present release before installing the Deployment Manager.
340 Lotus Sametime: Installation and Administration Guide Part 1
Installing the Deployment Manager on IBM i:
Install the Deployment Manager on IBM i by first installing WebSphere ApplicationServer on IBM i. After WebSphere Application Server is installed, you can installmultiple instances of Sametime Gateway on the same machine.
Installing WebSphere Application Server on IBM i:
Install WebSphere Application Server before you install Lotus Sametime Gateway.After you install WebSphere Application Server, you can install more than oneinstance of Lotus Sametime Gateway on a single IBM i system.
Before you begin
If WebSphere Application Server V6.1 Network Deployment has been installed foruse by a previous version of Lotus Sametime Gateway, use the procedure forupdating your installation of WebSphere Application Server V6.1 rather than thesteps for a new installation. You need *ALLOBJ and *SECADM authorities tosuccessfully complete the WebSphere Application Server Network Deploymentinstallation.
About this task
Information on downloading packages for Lotus Sametime is located at thefollowing Web address:www.ibm.com/support/docview.wss?rs=477&uid=swg24024322
Note: Complete details on requirements for WebSphere Application ServerNetwork Deployment are available from: http://publib.boulder.ibm.com/infocenter/wasinfo/v7r0/index.jsp1. Create the temporary file folder /TMP/WASCD on a PC that can connect to the
IBM i system.2. Copy the file part_number.zip to the /TMP/WASCD folder.3. Open a command window and navigate to the folder /TMP/WASCD.4. Extract all files to the temporary directory \TMP\WASCD. When you are done
extracting the files, you should have a /TMP/WASCD/ifpackage folder with WASand JDK folders inside the ifpackage folder.
5. Copy the ifpackage folder to the IFS of the IBM i system.6. In the folder you copied to the IFS of the IBM i system, edit the file
ifpackage/WAS/responsefile.nd.txt
7. Accept the licence to install. Read the comments in the file regarding LicenceAcceptance and then set the value of silentInstallLicenseAcceptance to true.For example:-OPT silentInstallLicenseAcceptance="true"
8. Save the file. The rest of the install options in the file are correct for a defaultinstallation.
9. To run the install, start a QSHELL session.10. Navigate to the ifpackage/WAS directory.11. Run the following command:
install -options responsefile.nd.txt
12. When the installation is successful, you will see a message such as this:
Chapter 3. Installing 341
(Nov 29, 2007 5:19:59 AM), Process, com.ibm.ws.install.ni.ismp.actions.ISMPLogSuccessMessageAction, msg1, INSTCONFSUCCESS.install.ni.ismp.actions.ISMPLogSuccessMessageAction,msg1, INSTCONFSUCCESS
What to do next
If this is the first installation of WebSphere Application Server on this system,follow steps for increasing the WebSphere Application Server usage limit. This taskneeds to be done only once on a system.
Installing the Deployment Manager for Sametime Gateway on IBM i:
Complete these steps to install the Deployment Manager server on IBM i. Installthe Deployment Manager on the same machine as the primary server, or on itsown machine.
Before you begin
Before you begin, create the database schema for Sametime Gateway and theninstall the primary node.
Information on downloading packages for Lotus Sametime is located at thefollowing Web address:http://www.ibm.com/support/docview.wss?rs=477&uid=swg24024322
About this task
Note that there are special naming rules for each node and cell that are part of acluster. When installing each node, the node name and the cell name must beunique across all machines. No two nodes can have the same cell name. Later, whenyou federate each node into the cluster, the cell name is automatically changed tothe Deployment Manager’s cell name.1. From the installation media, copy the Lotus Sametime Gateway installation
image (part_number.exe) to a temporary directory such as /TMP.2. Extract the contents of part_number.exe to the temporary directory /TMP.3. Navigate to the folder: /TMP/SametimeGateway.4. You can run the installer in wizard mode or in console mode. Use the wizard
mode if you are installing from a PC to the IBM i system.
Important: If you are installing on an IPv6–enabled server, you must use thesecond option below to install using the console.v To run the installer in wizard mode, type the following command:
installi5OS.bat
v To run the installer in console mode, perform these steps:a. Copy the directory /TMP/SametimeGateway to the IFS of the IBM i system.b. Start a QSHELL session.c. Navigate to the /TMP/SametimeGateway directory and type the following
command:install.sh -console
342 Lotus Sametime: Installation and Administration Guide Part 1
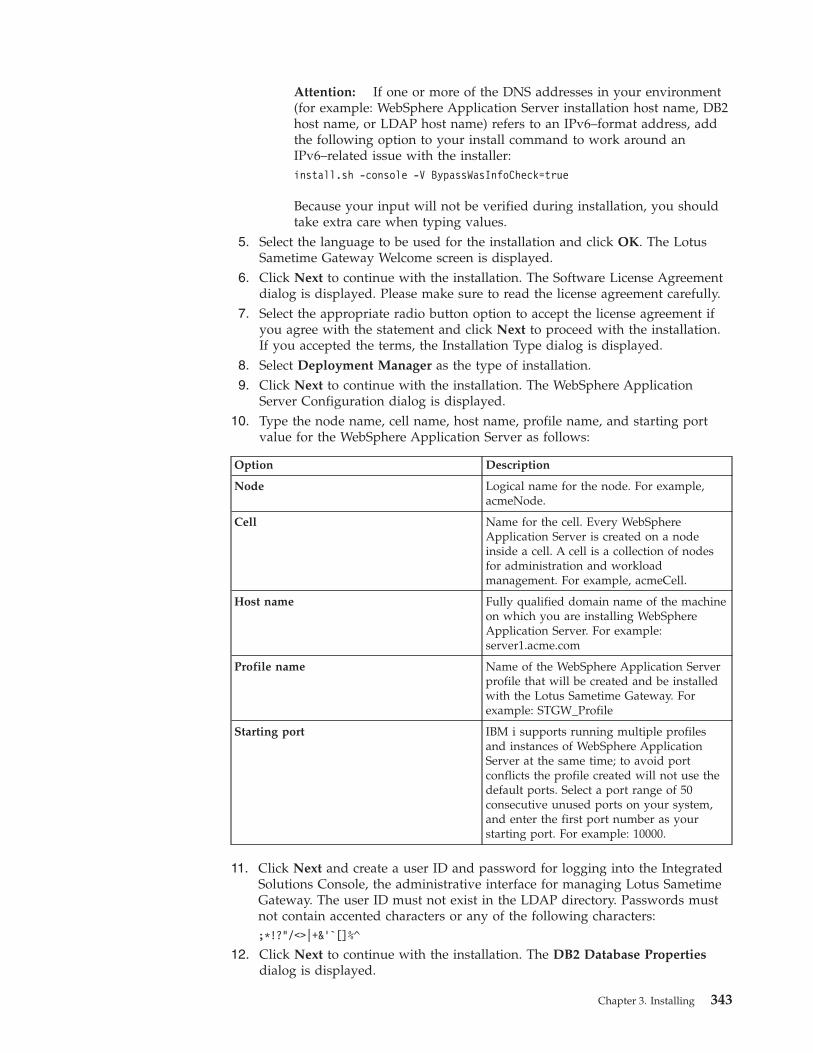
Attention: If one or more of the DNS addresses in your environment(for example: WebSphere Application Server installation host name, DB2host name, or LDAP host name) refers to an IPv6–format address, addthe following option to your install command to work around anIPv6–related issue with the installer:install.sh -console -V BypassWasInfoCheck=true
Because your input will not be verified during installation, you shouldtake extra care when typing values.
5. Select the language to be used for the installation and click OK. The LotusSametime Gateway Welcome screen is displayed.
6. Click Next to continue with the installation. The Software License Agreementdialog is displayed. Please make sure to read the license agreement carefully.
7. Select the appropriate radio button option to accept the license agreement ifyou agree with the statement and click Next to proceed with the installation.If you accepted the terms, the Installation Type dialog is displayed.
8. Select Deployment Manager as the type of installation.9. Click Next to continue with the installation. The WebSphere Application
Server Configuration dialog is displayed.10. Type the node name, cell name, host name, profile name, and starting port
value for the WebSphere Application Server as follows:
Option Description
Node Logical name for the node. For example,acmeNode.
Cell Name for the cell. Every WebSphereApplication Server is created on a nodeinside a cell. A cell is a collection of nodesfor administration and workloadmanagement. For example, acmeCell.
Host name Fully qualified domain name of the machineon which you are installing WebSphereApplication Server. For example:server1.acme.com
Profile name Name of the WebSphere Application Serverprofile that will be created and be installedwith the Lotus Sametime Gateway. Forexample: STGW_Profile
Starting port IBM i supports running multiple profilesand instances of WebSphere ApplicationServer at the same time; to avoid portconflicts the profile created will not use thedefault ports. Select a port range of 50consecutive unused ports on your system,and enter the first port number as yourstarting port. For example: 10000.
11. Click Next and create a user ID and password for logging into the IntegratedSolutions Console, the administrative interface for managing Lotus SametimeGateway. The user ID must not exist in the LDAP directory. Passwords mustnot contain accented characters or any of the following characters:;*!?"/<>|+&'`[]%^
12. Click Next to continue with the installation. The DB2 Database Propertiesdialog is displayed.
Chapter 3. Installing 343

13. Type the required information for DB2 for IBM i as follows:
Option Description
Host name Fully qualified domain name of the machineon which you are installing WebSphereApplication Server. For example:server1.acme.com
Schema name The name of the schema you created whenpreparing the Lotus Sametime Gatewayenvironment. For example, STGW.
Application user ID A database user ID that has permission toconnect to the database and read or writerecords. The application user ID is often thesame as the schema owner user ID.
Application password The password for the application user. Theapplication password is often the same asthe schema owner password.
14. Click Next to connect to an LDAP server at this time. The LDAP server mustbe the same LDAP used by Lotus Sametime.
Option Description
Configure LDAP now Select if you want to set up a connectionbetween Sametime Gateway and LDAP thatdoes not need an SSL connection. You willneed to know the host name and port of theLDAP server.
Configure LDAP after the installation Select this option if you need to set up anSSL connection with LDAP, or if you do notknow the host name and port number usedby LDAP. If you are installing LotusSametime Gateway outside the firewall andthe LDAP directory is located inside thefirewall, choose this option.
15. Select an LDAP host name from list of Registered host names and ports inyour domain, or select Other and enter a host name or IP address in the Hostname field. The default port number is 389. Click Next.
16. If anonymous access is successful to the LDAP host name, you may have theoption of continuing with anonymous access or changing the access toauthenticated access. If anonymous access is not permitted, you will not havethis option because you must supply a bind distinguished name andpassword.
Option Description
Anonymous access Select this option if you don’t needauthenticated access to the LDAP server.Lotus Sametime Gateway only requiresanonymous access to an LDAP server.
Authenticated access Select this option if your LDAP serverrequires authenticated access. You mustprovide an authentication identity, includinga bind distinguished name and passwordfrom the LDAP administrator.
344 Lotus Sametime: Installation and Administration Guide Part 1
17. Enter the Bind distinguished name (DN) and Bind password. The binddistinguished name can be any user with read permission for the directoryserver. The bind DN need not be the LDAP administrator. For example:v Bind distinguished name:
uid=ldapadmin,cn=users,l=shipley,st=kansas,c=us,ou=acme,o=medical,DC=ACME,DC=COM
v Bind password:C@pital1
18. Click Next. Choose a base distinguished name from the list of Suggested basedistinguished names in your LDAP or enter a base DN in the Basedistinguished name field. The base distinguished name indicates the startingpoint for LDAP searches of the directory service. For example, for the binddistinguished name given as an example in the previous step, you can specifythe base DN as: DC=ACME,DC=COM. For authorization purposes, this field is casesensitive. This panel is not shown if you are connecting to Domino LDAP.
19. Click Next to see the Lotus Sametime Gateway installation summary. You canreview the installation summary settings and, if necessary, click Back to makechanges.
20. Click Install to begin copying files. A progress screen is displayed and theactivity is logged to the Lotus Sametime Gateway log file. This installationtakes about 10 minutes to complete. When the installation is complete, thewizard displays a message indicating a successful installation.
21. Read the summary and click Finish to complete the installation. To view theinstallation log, click View log file or open the log file atstgw_server_root\logs\installlog.txt
22. To test the Deployment Manager installation and ensure that LDAP settingsare correct, log into the Deployment Manager node as a user withadministrative privileges.
23. Navigate to the stgw_profile_root/bin directory.24. Start the Deployment Manager with the following command:
./startManager dmgr
25. Log in into the Integrated Solutions Console using the administrative user IDand password that you created.
26. Test the LDAP connectivity. Click Users and Groups → Manage users.27. Verify that you can search and retrieve users in your LDAP directory.28. Leave the Deployment Manager node running as you install other nodes in
the cluster.
Managing trusted IP addresses:
Whenever you install a server that communicates with an IBM Lotus SametimeCommunity Server, you must add the new server’s IP address to the CommunityServer’s settings.
About this task
The Lotus Sametime Community Server accepts connections from the LotusSametime Media Manager, the Lotus Sametime Gateway, the Lotus SametimeCommunity Mux, and the Lotus Sametime Proxy Server, as well as other serversthat are listed in the Community Services page. To ensure that the Lotus SametimeCommunity Server trusts these components when they establish a connection, youmust add the trusted server’s IP address to the Lotus Sametime CommunityServer.
Chapter 3. Installing 345
You do not need to add the Lotus Sametime System Console’s IP address becauseit is added automatically when you install the Lotus Sametime Community Serverusing a deployment plan or register the Lotus Sametime Community Server withthe console after installation.
This task must be completed separately for each server within a Lotus SametimeCommunity Server cluster, as well as for multiple non-clustered CommunityServers.1. Log in to the Integrated Solutions Console.2. Click Sametime System Console → Sametime Servers → Sametime Community
Servers.3. In the Sametime Community Servers list, click the deployment name of the
server with the list of trusted IP addresses that you want to change.4. Click the Connectivity tab.5. Under Trusted Servers, enter the IP address of the server that must connect to
the Lotus Sametime Community Server in the New IP Address field, and clickAdd.
Note: For the Lotus Sametime Media Manager, enter the Conference Managerserver IP address. Each instance of a Conference Manager cluster must beentered.To delete an IP address from the list, select it and click Delete Selected.
6. Click OK.7. Restart the Lotus Sametime Community Server for the change to take effect.
Installing the primary node:
Install a primary node for a cluster. You can install the primary node and theDeployment Manager on the same machine. Installing the primary node on thesame machine as the Deployment Manager provides the efficiency of multiple JavaVirtual Machines and takes advantage of a fast CPU. If you are installing theprimary node on the same machine with an existing Deployment Manager from aprevious release, upgrade the Deployment Manager to the present release beforeinstalling the primary node.
Installing the primary server on IBM i:
To install the primary server on IBM i, you must install WebSphere ApplicationServer first. After WebSphere Application Server is installed, you can installmultiple instances of Sametime Gateway on the same machine.
Installing WebSphere Application Server on IBM i:
Install WebSphere Application Server before you install Lotus Sametime Gateway.After you install WebSphere Application Server, you can install more than oneinstance of Lotus Sametime Gateway on a single IBM i system.
Before you begin
If WebSphere Application Server V6.1 Network Deployment has been installed foruse by a previous version of Lotus Sametime Gateway, use the procedure forupdating your installation of WebSphere Application Server V6.1 rather than thesteps for a new installation. You need *ALLOBJ and *SECADM authorities to
346 Lotus Sametime: Installation and Administration Guide Part 1
successfully complete the WebSphere Application Server Network Deploymentinstallation.
About this task
Information on downloading packages for Lotus Sametime Gateway is located atthe following Web address:http://www.ibm.com/support/docview.wss?rs=477&uid=24024322
Note: Complete details on requirements for WebSphere Application ServerNetwork Deployment are available from: http://publib.boulder.ibm.com/infocenter/wasinfo/v7r0/index.jsp1. Create the temporary file folder /TMP/WASCD on a PC that can connect to the
IBM i system.2. Copy the file part_number.zip to the temporary folder /TMP/WASCD
3. Open a command window and navigate to the folder /TMP/WASCD.4. Extract all files to the temporary directory /TMP/WASCD. When you are done
extracting the files, you should have a /TMP/WASCD/ifpackage folder with WASand JDK folders inside the ifpackage folder.
5. Copy the ifpackage folder to the IFS of the IBM i system.6. In the folder you copied to the IFS of the IBM i system, edit the file
ifpackage/WAS/responsefile.nd.txt
7. Accept the licence to install. Read the comments in the file regarding LicenceAcceptance and then set the value of silentInstallLicenseAcceptance to true.For example:-OPT silentInstallLicenseAcceptance="true"
8. Save the file. The rest of the install options in the file are correct for a defaultinstallation.
9. To run the install, start a QSHELL session.10. Navigate to the ifpackage/WAS directory.11. Run the following command:
install -options responsefile.nd.txt
12. When the installation is successful, you will see a message such as this:(Nov 29, 2007 5:19:59 AM), Process, com.ibm.ws.install.ni.ismp.actions.ISMPLogSuccessMessageAction, msg1, INSTCONFSUCCESS.install.ni.ismp.actions.ISMPLogSuccessMessageAction,msg1, INSTCONFSUCCESS
What to do next
If this is the first installation of WebSphere Application Server on this system,follow steps for increasing the WebSphere Application Server usage limit. This taskneeds to be done only once on a system.
Installing the primary node for Sametime Gateway on IBM i:
Complete these steps to install the primary Sametime Gateway node in a cluster onIBM i.
Chapter 3. Installing 347
Before you begin
Before you begin, install WebSphere Application Server. You need *ALLOBJ and*SECADM authorities to successfully complete the Lotus Sametime Gatewayinstallation.
Information on downloading packages for Lotus Sametime Gateway is located inthe Lotus Sametime Download document.
About this task
IBM i allows multiple instances of Lotus Sametime Gateway to be installed on asingle IBM i system. If a Lotus Sametime Gateway server is running while youinstall a new Lotus Sametime Gateway server, the running server must be restartedbefore you can use the Integrated Solutions Console to administer Lotus SametimeGateway.
Note that there are special naming rules for each node and cell that are part of acluster. When installing each node, the node name and the cell name must beunique across all machines. No two nodes can have the same cell name. Later, whenyou federate each node into the cluster, the cell name is automatically changed tothe Deployment Manager’s cell name.1. From the installation media, copy the Lotus Sametime Gateway installation
image (part_number.exe) to a temporary directory such asc:\TMP\SametimeGateway.
2. Extract the contents of part_number.exe to the temporary directoryc:\TMP\SametimeGateway.
3. Navigate to the folder: c:\TMP\SametimeGateway.4. You can run the installer in wizard mode or in console mode. Use the wizard
mode if you are installing from a PC to the IBM i system.
Important: If you are installing on an IPv6–enabled server, you must use thesecond option below to install using the console.v To run the installer in wizard mode, type the following command:
installi5OS.bat
v To run the installer in console mode, perform these steps:a. Copy the directory /TMP/SametimeGateway to the IFS of the IBM i system.b. Start a QSHELL session.c. Navigate to the /TMP/SametimeGateway directory and type the following
command:install.sh -console
Attention: If one or more of the DNS addresses in your environment(for example: WebSphere Application Server installation host name, DB2host name, or LDAP host name) refers to an IPv6–format address, addthe following option to your install command to work around anIPv6–related issue with the installer:install.sh -console -V BypassWasInfoCheck=true
Because your input will not be verified during installation, you shouldtake extra care when typing values.
5. Select the language to be used for the installation and click OK. The LotusSametime Gateway Welcome screen is displayed.
348 Lotus Sametime: Installation and Administration Guide Part 1

6. Click Next to continue with the installation. The Software License Agreementdialog is displayed. Please make sure to read the license agreement carefully.
7. Select the appropriate radio button option to accept the license agreement ifyou agree with the statement and click Next to proceed with the installation.If you accepted the terms, the Installation Type dialog is displayed.
8. Select Primary node as the type of installation.9. Click Next to continue with the installation. The WebSphere Application
Server Configuration dialog is displayed.10. Type the node name, cell name, host name, profile name, and starting port
value for the WebSphere Application Server as follows:
Option Description
Node Logical name for the node. For example,acmeNode.
Cell Name for the cell. Every WebSphereApplication Server is created on a nodeinside a cell. A cell is a collection of nodesfor administration and workloadmanagement. For example, acmeCell.
Host name Fully qualified domain name of the machineon which you are installing WebSphereApplication Server. For example:server1.acme.com
Profile name Name of the WebSphere Application Serverprofile that will be created and be installedwith the Lotus Sametime Gateway. Forexample: STGW_Profile
Starting port IBM i supports running multiple profilesand instances of WebSphere ApplicationServer at the same time; to avoid portconflicts the profile created will not use thedefault ports. Select a port range of 50consecutive unused ports on your system,and enter the first port number as yourstarting port. For example: 10000.
11. Create a user ID and password to log in to the Integrated Solutions Console,the administrative interface for managing Lotus Sametime Gateway. Use thesame administrative user ID and password that you created when installingthe Deployment Manager. The user ID must not exist in the LDAP directory.Passwords must not contain accented characters or any of the followingcharacters:;*!?"/<>|+&'`[]%^
12. Click Next to continue with the installation. The DB2 Database Propertiesdialog is displayed.
13. Type the required information for DB2 for IBM i as follows:
Option Description
Host name Fully qualified domain name of the machineon which you are installing WebSphereApplication Server. For example:server1.acme.com
Chapter 3. Installing 349
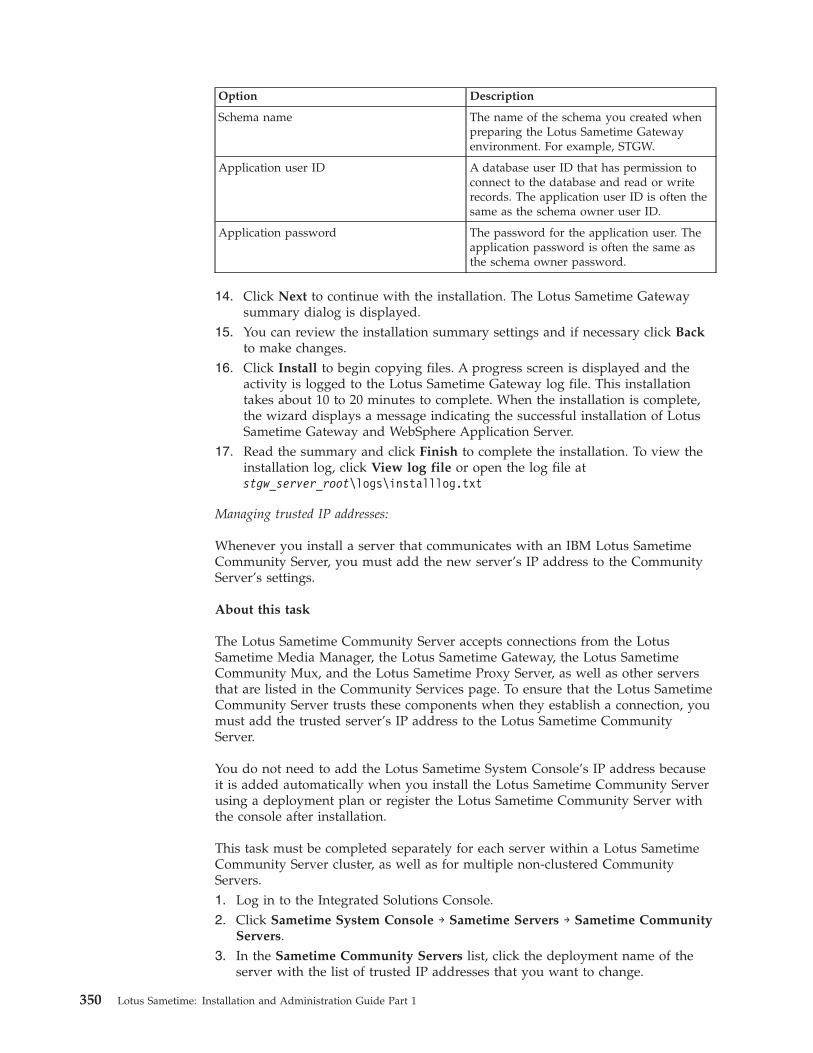
Option Description
Schema name The name of the schema you created whenpreparing the Lotus Sametime Gatewayenvironment. For example, STGW.
Application user ID A database user ID that has permission toconnect to the database and read or writerecords. The application user ID is often thesame as the schema owner user ID.
Application password The password for the application user. Theapplication password is often the same asthe schema owner password.
14. Click Next to continue with the installation. The Lotus Sametime Gatewaysummary dialog is displayed.
15. You can review the installation summary settings and if necessary click Backto make changes.
16. Click Install to begin copying files. A progress screen is displayed and theactivity is logged to the Lotus Sametime Gateway log file. This installationtakes about 10 to 20 minutes to complete. When the installation is complete,the wizard displays a message indicating the successful installation of LotusSametime Gateway and WebSphere Application Server.
17. Read the summary and click Finish to complete the installation. To view theinstallation log, click View log file or open the log file atstgw_server_root\logs\installlog.txt
Managing trusted IP addresses:
Whenever you install a server that communicates with an IBM Lotus SametimeCommunity Server, you must add the new server’s IP address to the CommunityServer’s settings.
About this task
The Lotus Sametime Community Server accepts connections from the LotusSametime Media Manager, the Lotus Sametime Gateway, the Lotus SametimeCommunity Mux, and the Lotus Sametime Proxy Server, as well as other serversthat are listed in the Community Services page. To ensure that the Lotus SametimeCommunity Server trusts these components when they establish a connection, youmust add the trusted server’s IP address to the Lotus Sametime CommunityServer.
You do not need to add the Lotus Sametime System Console’s IP address becauseit is added automatically when you install the Lotus Sametime Community Serverusing a deployment plan or register the Lotus Sametime Community Server withthe console after installation.
This task must be completed separately for each server within a Lotus SametimeCommunity Server cluster, as well as for multiple non-clustered CommunityServers.1. Log in to the Integrated Solutions Console.2. Click Sametime System Console → Sametime Servers → Sametime Community
Servers.3. In the Sametime Community Servers list, click the deployment name of the
server with the list of trusted IP addresses that you want to change.
350 Lotus Sametime: Installation and Administration Guide Part 1
4. Click the Connectivity tab.5. Under Trusted Servers, enter the IP address of the server that must connect to
the Lotus Sametime Community Server in the New IP Address field, and clickAdd.
Note: For the Lotus Sametime Media Manager, enter the Conference Managerserver IP address. Each instance of a Conference Manager cluster must beentered.To delete an IP address from the list, select it and click Delete Selected.
6. Click OK.7. Restart the Lotus Sametime Community Server for the change to take effect.
Federating the primary node into the cell:
After you create the primary node you must add the primary node to theDeployment Manager’s cell.
Federating the primary node into the cell on IBM i:
Add the primary node to the Deployment Manager’s cell on IBM i. Adding theprimary node to the cell allows a central point of administration for the networkdeployment by using the Deployment Manager’s Integrated Solutions Console. Youwill not be able log into the primary node’s Integrated Solutions Console after thisstep.
Before you begin
Expected state: the Deployment Manager is running.1. Make sure that the system clocks on the Deployment Manager and the
primary node are within five minutes of each other and set for the sametimezone. Federation fails if the clocks are not synchronized within fiveminutes.
2. Ping the Deployment Manager node from the primary node to make sure thehost name is resolvable.
3. Log in to the IBM i system where the Deployment Manager node is installedas a user with administrative privileges.
4. On the IBM i command line, run the STRQSH (Start Qshell) command.5. Navigate to the stgw_profile_root\bin directory for the Deployment Manager
profile.6. Run the following command to obtain the SOAP_CONNECTOR_ADDRESS
port number. Make a note of the port number as you will need it to addnodes to the cluster:dspwasinst
7. Log in to the IBM i system, where the primary node is installed, withadministrative privileges.
8. On the IBM i command line, run the STRQSH (Start Qshell) command.9. Navigate to the stgw_profile_root\bin directory for the primary node profile.
10. Run the following command to add the primary node to the DeploymentManager’s cell:addNode DM_server_host_name DM_SOAP_port -includeapps-username WAS_Admin_user_name_on_DM_on_DM -password WAS_Admin_password_on_DM
Where:
Chapter 3. Installing 351
v DM_server_host_name is the resolvable host name of the DeploymentManager.
v DM_SOAP_port is the port that the Deployment Manager’s SOAP port islistening on.
v WAS_Admin_username_on_DM is the user ID of the WebSphere ApplicationServer administrator account on the Deployment Manager.
v WAS_Admin_password_on_DM is the password associated with thatWebSphere Application Server administrator account on the DeploymentManager.
For example:addNode gateway_dm.acme.com 8880 -includeapps -username wasadmin -password waspassword
11. When prompted, provide the Deployment Manager’s administrative user IDand password. Wait for the operation to complete before proceeding. Look fora success message similar to the following when complete:Node MyserverNodePrimary has been successfully federated.
12. To verify that the primary node has joined the Deployment Manager’s cell, loginto the Integrated Solutions Console (http://localhost:9060/ibm/console)using your administrative user ID and password and click Servers →Application servers. Make sure you can see the primary node’s information.If you already logged in, you must log out and then log in again before youcan see changes.
What happens when you federate the primary node into the cell?:
When you federate the primary node into the Deployment Manager’s cell, theprimary node’s original configuration is backed up. This means that you canremove the primary node from the Deployment Manager at a later time, and youcan restore the profile configuration to the state it was in before federation.
The primary node’s scope changes to include the Deployment Manager’s cell.Before federation, the scope of the RTCGWServer was:cell:<PrimaryCell>/node:<PrimaryNode>/server:RTCGWServer
After federation, the scope of the server is the following:cell:<Deployment Manager Cell>/node:/<PrimaryNode>/server:RTCGWServer
When you federate, the Integrated Solutions Console of the primary node isdisabled because you will be using the Integrated Solutions Console from theDeployment Manager. The primary node inherits all the cell level configurationdata from the Deployment Manager. Any information you can see through theDeployment Manager’s Integrated Solutions Console is now stored in XML on theprimary node, so it is accessible from any application. The applications that wereinstalled to RTCGWServer are now included on the RTCGWServer in theDeployment Manager’s cell. If you attempt to federate another node that containsthese same applications, they are excluded.
Because the LDAP configuration and your credentials as the WebSphereApplication Server administrative user in the Deployment Manager are defined atthe cell level, this data overwrites the security settings of the primary node. TheDeployment Manager’s settings apply to the primary node. If you remove theprimary node from the cell, the primary node’s original security configuration arerestored.
352 Lotus Sametime: Installation and Administration Guide Part 1
When you federate the primary server into the cell, a single server of SametimeGateway can be managed by a Deployment Manager. You can actually run a realenvironment and configure your Sametime communities just as you would in astandalone server environment. What is lacking is failover and load balancingcapabilities. In order to add those features, you need to add a secondary node andcreate a cluster in the later steps.
Installing an additional server in a cluster:
Install a secondary node for the cluster. A cluster at a minimum contains a primaryserver, a Deployment Manager, and at least one secondary node. Depending uponyour capacity requirements, install secondary nodes as needed.
About this task
Note: In this release, a Lotus Sametime Gateway cluster can support only twonodes.
Installing an additional server on IBM i:
Install an additional server on IBM i by first installing WebSphere ApplicationServer on IBM i. After WebSphere Application Server is installed, you can installmultiple instances of Sametime Gateway on the same machine.
Installing WebSphere Application Server on IBM i:
Install WebSphere Application Server before you install Lotus Sametime Gateway.After you install WebSphere Application Server, you can install more than oneinstance of Lotus Sametime Gateway on a single IBM i system.
Before you begin
If WebSphere Application Server V6.1 Network Deployment has been installed foruse by a previous version of Lotus Sametime Gateway, use the procedure forupdating your installation of WebSphere Application Server V6.1 rather than thesteps for a new installation. You need *ALLOBJ and *SECADM authorities tosuccessfully complete the WebSphere Application Server Network Deploymentinstallation.
About this task
Information on downloading packages for Lotus Sametime is located at thefollowing Web address:www.ibm.com/support/docview.wss?rs=477&uid=swg24024322
Note: Complete details on requirements for WebSphere Application ServerNetwork Deployment are available from: http://publib.boulder.ibm.com/infocenter/wasinfo/v7r0/index.jsp1. Create the temporary file folder /TMP/WASCD on a PC that can connect to the
IBM i system.2. Copy the file part_number.zip to the /TMP/WASCD folder.3. Open a command window and navigate to the folder /TMP/WASCD.4. Extract all files to the temporary directory /TMP/WASCD. When you are done
extracting the files, you should have a /TMP/WASCD/ifpackage folder with WASand JDK folders inside the ifpackage folder.
Chapter 3. Installing 353
5. Copy the ifpackage folder to the IFS of the IBM i system.6. In the folder you copied to the IFS of the IBM i system, edit the file
ifpackage/WAS/responsefile.nd.txt
7. Accept the licence to install. Read the comments in the file regarding LicenceAcceptance and then set the value of silentInstallLicenseAcceptance to true.For example:-OPT silentInstallLicenseAcceptance="true"
8. Save the file. The rest of the install options in the file are correct for a defaultinstallation.
9. To run the install, start a QSHELL session.10. Navigate to the ifpackage/WAS directory.11. Run the following command:
install -options responsefile.nd.txt
12. When the installation is successful, you will see a message such as this:(Nov 29, 2007 5:19:59 AM), Process, com.ibm.ws.install.ni.ismp.actions.ISMPLogSuccessMessageAction, msg1, INSTCONFSUCCESS.install.ni.ismp.actions.ISMPLogSuccessMessageAction,msg1, INSTCONFSUCCESS
What to do next
If this is the first installation of WebSphere Application Server on this system,follow steps for increasing the WebSphere Application Server usage limit. This taskneeds to be done only once on a system.
Installing an additional server for Sametime Gateway on IBM i:
Install an additional server or secondary server on IBM i that will be part of acluster of Lotus Sametime Gateway servers.
Before you begin
Before you begin, install WebSphere Application Server on the machine. You need*ALLOBJ and *SECADM authorities to successfully complete the Lotus SametimeGateway installation.
Information on downloading packages for Lotus Sametime is located at thefollowing Web address:http://www.ibm.com/support/docview.wss?rs=477&uid=swg24024322
About this task
IBM i allows multiple instances of Lotus Sametime Gateway to be installed on asingle IBM i system. If a Lotus Sametime Gateway server is running while youinstall a new Lotus Sametime Gateway server, the running server must be restartedbefore you can use the Integrated Solutions Console to administer Lotus SametimeGateway.
Note that there are special naming rules for each node and cell that are part of acluster. When installing each node, the node name and the cell name must beunique across all machines. No two nodes can have the same cell name. Later, whenyou federate each node into the cluster, the cell name is automatically changed tothe Deployment Manager’s cell name.
354 Lotus Sametime: Installation and Administration Guide Part 1
1. From the installation media, copy the Lotus Sametime Gateway installationimage (part_number.exe) to a temporary directory such as/TMP/SametimeGateway.
2. Extract the contents of part_number.exe to the temporary directory/TMP/SametimeGateway.
3. Navigate to the folder: /TMP/SametimeGateway.4. You can run the installer in wizard mode or in console mode. Use the wizard
mode if you are installing from a PC to the IBM i system.
Important: If you are installing on an IPv6–enabled server, you must use thesecond option below to install using the console.v To run the installer in wizard mode, type the following command:
installi5OS.bat
v To run the installer in console mode, perform these steps:a. Copy the directory /TMP/SametimeGateway to the IFS of the IBM i system.b. Start a QSHELL session.c. Navigate to the /TMP/SametimeGateway directory and type the following
command:install.sh -console
Attention: If one or more of the domain addresses in yourenvironment (for example: WebSphere Application Server installationhost name, DB2 host name, or LDAP host name) refers to anIPv6–format address, add the following option to your install commandto work around an IPv6–related issue with the installer:install.sh -console -V BypassWasInfoCheck=true
Because your input will not be verified during installation, you shouldtake extra care when typing values.
5. Select the language to be used for the installation and click OK. The LotusSametime Gateway Welcome screen is displayed.
6. Click Next to continue with the installation. The Software License Agreementdialog is displayed. Please make sure to read the license agreement carefully.
7. Select the appropriate radio button option to accept the license agreement ifyou agree with the statement and click Next to proceed with the installation.If you accepted the terms, the Installation Type dialog is displayed.
8. Select Secondary node as the type of installation.9. Click Next to continue with the installation. The WebSphere Application
Server Configuration dialog is displayed.10. Type the node name, cell name, host name, profile name, and starting port
value for the WebSphere Application Server as follows:
Option Description
Node Logical name for the node. For example,acmeNode.
Cell Name for the cell. Every WebSphereApplication Server is created on a nodeinside a cell. A cell is a collection of nodesfor administration and workloadmanagement. For example, acmeCell.
Chapter 3. Installing 355
Option Description
Host name Fully qualified domain name of the machineon which you are installing WebSphereApplication Server. For example:server1.acme.com
Profile name Name of the WebSphere Application Serverprofile that will be created and be installedwith the Lotus Sametime Gateway. Forexample: STGW_Profile
Starting port IBM i supports running multiple profilesand instances of WebSphere ApplicationServer at the same time; to avoid portconflicts the profile created will not use thedefault ports. Select a port range of 50consecutive unused ports on your system,and enter the first port number as yourstarting port. For example: 10000.
11. Create a user ID and password to log in to the Integrated Solutions Console,the administrative interface for managing Lotus Sametime Gateway. Use thesame administrative user ID and password that you created when installingthe Deployment Manager and primary node. The user ID must not exist in theLDAP directory. Passwords must not contain accented characters or any of thefollowing characters:;*!?"/<>|+&'`[]%^
12. Click Next to continue with the installation. The DB2 Database Propertiesdialog is displayed.
13. Type the required information for DB2 for IBM i as follows:
Option Description
Host name Fully qualified domain name of the machineon which you are installing WebSphereApplication Server. For example:server1.acme.com
Schema name The name of the schema you created whenpreparing the Lotus Sametime Gatewayenvironment. For example, STGW.
Application user ID A database user ID that has permission toconnect to the database and read or writerecords. The application user ID is often thesame as the schema owner user ID.
Application password The password for the application user. Theapplication password is often the same asthe schema owner password.
14. Click Next to continue with the installation. The Lotus Sametime Gatewaysummary dialog is displayed.
15. You can review the installation summary settings and if necessary click Backto make changes.
16. Click Install to begin copying files. A progress screen is displayed and theactivity is logged to the Lotus Sametime Gateway log file. This installationtakes about 10 to 20 minutes to complete. When the installation is complete,the wizard displays a message indicating the successful installation of LotusSametime Gateway and WebSphere Application Server.
356 Lotus Sametime: Installation and Administration Guide Part 1
17. Read the summary and click Finish to complete the installation. To view theinstallation log, open the log file at stgw_server_root\logs\installlog.txt
Managing trusted IP addresses:
Whenever you install a server that communicates with an IBM Lotus SametimeCommunity Server, you must add the new server’s IP address to the CommunityServer’s settings.
About this task
The Lotus Sametime Community Server accepts connections from the LotusSametime Media Manager, the Lotus Sametime Gateway, the Lotus SametimeCommunity Mux, and the Lotus Sametime Proxy Server, as well as other serversthat are listed in the Community Services page. To ensure that the Lotus SametimeCommunity Server trusts these components when they establish a connection, youmust add the trusted server’s IP address to the Lotus Sametime CommunityServer.
You do not need to add the Lotus Sametime System Console’s IP address becauseit is added automatically when you install the Lotus Sametime Community Serverusing a deployment plan or register the Lotus Sametime Community Server withthe console after installation.
This task must be completed separately for each server within a Lotus SametimeCommunity Server cluster, as well as for multiple non-clustered CommunityServers.1. Log in to the Integrated Solutions Console.2. Click Sametime System Console → Sametime Servers → Sametime Community
Servers.3. In the Sametime Community Servers list, click the deployment name of the
server with the list of trusted IP addresses that you want to change.4. Click the Connectivity tab.5. Under Trusted Servers, enter the IP address of the server that must connect to
the Lotus Sametime Community Server in the New IP Address field, and clickAdd.
Note: For the Lotus Sametime Media Manager, enter the Conference Managerserver IP address. Each instance of a Conference Manager cluster must beentered.To delete an IP address from the list, select it and click Delete Selected.
6. Click OK.7. Restart the Lotus Sametime Community Server for the change to take effect.
Federating secondary nodes into the cell:
Add secondary nodes to the Deployment Manager’s cell to create a networkdeployment of Sametime Gateway servers.
About this task
In this release, a Lotus Sametime Gateway cluster can support only two nodes: onePrimary Node and one Secondary Node.
Chapter 3. Installing 357
Federating a secondary node on IBM i into the cell:
Add the secondary node to the Deployment Manager’s cell on IBM i. Adding thesecondary node to the cell allows a central point of administration for the networkdeployment by using the Deployment Manager’s Integrated Solutions Console.
Before you begin
Expected state: the Deployment Manager is running.1. Make sure that the system clocks on the Deployment Manager and the
secondary node are within five minutes of each other and set for the sametimezone. Federation fails if the clocks are not synchronized within fiveminutes.
2. Ping the Deployment Manager node from the secondary node to make surethe Deployment Manager host name is resolvable.
3. Log in to the IBM i system where the Deployment Manager node is installedwith administrative privileges.
4. On the IBM i command line, run the STRQSH (Start Qshell) command.5. Navigate to the stgw_profile_root\bin directory for the Deployment Manager
profile.6. Run the following command to obtain the SOAP_CONNECTOR_ADDRESS
port number. Make a note of the port number as you will need it to addnodes to the cluster:dspwasinst
7. Log into the secondary node.8. On the IBM i command line, run the STRQSH (Start Qshell) command.9. Navigate to the stgw_profile_root\bin directory for the secondary node
profile.10. Run the following command to add the secondary node to the Deployment
Manager’s cell. Note the omission of the -includeapps qualifier.addNode DM_server_host_name DM_SOAP_port -username WAS_Admin_user_name_on_DM-password WAS_Admin_password_on_DM
where:v DM_server_host_name is the resolvable host name of the Deployment
Manager.v DM_SOAP_portis the port that the Deployment Manager’s SOAP port is
listening on.v WAS_Admin_user_name_on_DM is the user ID of the WebSphere Application
Server administrator account on the Deployment Manager.v WAS_Admin_password_on_DM is the password associated with the
WebSphere Application Server administrator account.For example:addNode gateway_dm.acme.com 8880 -username wasadmin -password waspassword
11. When prompted, provide the Deployment Manager’s administrative user IDand password. Wait for the operation to complete before proceeding. Look fora success message similar to the following when complete:Node Machine22NodeSecondary has been successfully federated.
12. For each additional IBM i secondary node, repeat the preceding steps.13. Navigate to the stgw_profile_root\bin directory for the Deployment Manager
profile.
358 Lotus Sametime: Installation and Administration Guide Part 1
14. Restart the Deployment Manager by typing the following commands. Wait forthe first command to finish before starting the Deployment Manager:./stopServer.sh dmgr -username username -password password./startServer.sh dmgr
WindowsstopServer.bat dmgr -username username -password passwordstartServer.bat dmgr
IBM i./stopServer.sh dmgr -username username -password passwordstartServer.sh dmgr
What to do next
When you have finished installing and federating secondary nodes into theDeployment manager, continue with the cluster configuration as instructed in thetopic, “Creating a cluster and proxy servers” on page 167.
What is a network deployment?:
A network deployment is a distributed WebSphere environment. Unlike astand-alone environment that contains only one application server node, a networkdeployment contains many application server nodes that can distribute theworkload of Lotus Sametime Gateway applications across several physical systems.The purpose of a network deployment is to provide a topology that is scalable andhas load balancing and failover capabilities.
Typically, a network deployment contains one node per physical computer. This isnot a requirement. Nodes are logical groupings of application servers, so you canhave more than one node installed on a physical system. For performance reasons,most installations have only one cluster member per node, since each clustermember creates its own JVM footprint.
In a network deployment, all nodes are federated into the deployment manager’scell. This allows the deployment manager to do its purpose in life- Manage theDeployment. A Deployment Manager is nothing more than a node that isresponsible for administering a cell. In Lotus Sametime Gateway, the only thingsconfigured on the Deployment Manager node are a few minor cell level attributes,and the Lotus Sametime Gateway administrative portlet plugin extensions. LotusSametime Gateway application files all run on the cluster member applicationservers.
The primary node is basically the same thing as a standalone node installation,minus a few cell level configurations that will be trumped by the DeploymentManager’s configuration. The primary node contains all the applications andWebSphere Application Server components that are required to run LotusSametime Gateway. When you install a primary node, you create a server instancecalled RTCGWServer. This server instance is cloned for use with all secondarynodes across the cluster. There can only be one primary Lotus Sametime Gatewaynode installed in any network deployment, because applications can only be addedto the cell from one node. In the Lotus Sametime Gateway network deployment,the primary node also configures the database server.
The secondary nodes are WebSphere Application Server placeholders that can runadditional cluster members (servers created as clones of the primary server). Whenyou install a secondary node for Lotus Sametime Gateway, the installation creates anode and default server instance, as well as some node level WebSphere
Chapter 3. Installing 359
Application Server attributes such as data sources, WebSphere variables, andshared library definitions. A network deployment of Lotus Sametime Gateway cancontain as many secondary nodes as your environment needs.
Creating a cluster and proxy servers:
Create a Sametime Gateway cluster, install proxy servers, and then configure theproxy servers to use the cluster. Set up node replication only if you need highavailability and failover, and then start the cluster.
About this task
Starting a cluster involves starting the Deployment Manager, starting the nodeagents on all the nodes, and then starting the servers, including the proxy servers,on each node.
Creating the cluster:
Create a new cluster of IBM Lotus Lotus Sametime Gateway servers by runningthe Cluster Configuration Wizard. If you are upgrading an existing LotusSametime Gateway cluster, you must still complete this task because you removedthe cluster before upgrading the nodes.
Before you begin
Expected state: the Deployment Manager is running and nodes are stopped.
About this task
The instructions that follow describe steps for setting up a horizontal cluster, themost common cluster configuration. The Primary Node already has the primaryserver installed, so no additional server is needed on that computer. To add serversto the horizontal cluster, create one cluster member for each secondary node(computer).
Note: This release supports only one Secondary Node on a cluster.1. On the Deployment Manager, open a command window, navigate to the
stgw_server_root\config directory, and run the following command:AIX, Linux, and Solaris./configwizard.sh
Windowsconfigwizard.bat
IBM i./configwizard.sh
Note: To run this program in console mode (instead of using the graphicalinterface), add the -console argument to the command line; for example:configwizard.bat -console
2. View the Welcome page and click Next.3. For a Secondary Node, do the following:
a. Select the Secondary Node from the Node drop down list and type aunique name in the Server Name field.
b. Click Add Member.
360 Lotus Sametime: Installation and Administration Guide Part 1
4. When you have finished adding the Secondary Nodes, click Next.5. Type the Schema user ID and Schema password for the database
. These credentials have appropriate permissions to create tables in thedatabase. You may need to get this information from the databaseadministrator. The schema user ID is often the same as the application user IDfor the database.
6. Read the summary and click Configure. When finished, you can view theconfiguration log at You can review the configuration wizard log atstgw_server_root\logs\configwizard.log.
7. Restart the Deployment Manager with the following commands:./stopServer.sh dmgr -username username -password password./startServer.sh dmgr
WindowsstopServer.bat dmgr -username username -password passwordstartServer.bat dmgr
IBM i./stopServer.sh dmgr -username username -password passwordstartServer.sh dmgr
8. Complete the following steps on every node in the cluster, including thePrimary Node:a. Log in to the node’s operating system.b. Navigate to the stgw_profile_root\bin directory.c. Start the node agent on the node with the following command:
AIX, Linux, and Solaris./startNode.sh
WindowsstartNode.bat
IBM istartNode
Note: During installations, the Node agent on primary and secondaryservers may be loaded, and issuing a startnode command may result in theerror: ″Conflict detected on port 8878. Likely causes: a) An instance of theserver nodeagent is already running b) some other process is using port8878.″ If this occurs you can confirm the nodeagent status by running thecommand serverstatus nodeagent from the stgw_profile_root\bindirectory. When prompted, supply the Lotus Sametime Gatewayadministrator credentials. Verify that the nodeagent is running (the statuswill read, ″The Node Agent ″nodeagent″ is STARTED). If the agent isrunning, continue to the next step.
9. When all the node agents are started, verify that the cluster configuredproperly by performing the following steps:a. Log into the Integrated Solutions Console (http://localhost:9060/ibm/
console) using your administrative user ID and password on theDeployment Manager machine.
b. Click Servers → Clusters, and verify that SametimeGatewayCluster appearsin the table.
c. Click SametimeGatewayCluster, and then under Additional properties,click Cluster members to view the cluster members that you created.
Connecting to a DB2 database:
Chapter 3. Installing 361

Use the Lotus Sametime System Console to connect to the Lotus Sametime MeetingServer or Lotus Sametime Gateway database before installing the server from theSystem Console. If you installed the server without using the System Console (as isthe case with the Sametime Meeting Server on IBM i and Sametime Gateway onany platform), do this step before registering the server with the System Console.
Before you begin
Start the Lotus Sametime System Console if it is not already running.
About this task
If you have not already opened the Connect to DB2 Databases activity, follow thesesteps:1. From a browser, enter the following URL, replacing serverhostname.domain with
the fully qualified domain name of the Lotus Sametime System Console server.http://serverhostname.domain:8700/ibm/console
IBM i: The port number may not be 8700. Use the port that was listed in theSametime System Console installation results summary or use the settingspecified for the Administrative console secure port in the AboutThisProfile.txtfile. For the Sametime System Console Deployment Manager Profile(STSCDmgrProfile), the file is located in the following path:/QIBM/UserData/Websphere/AppServer/V7/SametimeWAS/profiles/STSCDmgrProfile/logs/AboutThisProfile.txt
2. Enter the WebSphere Application Server User ID and password that youcreated when you installed the Lotus Sametime System Console.
3. Click the Sametime System Console task to open it in the navigation tree.4. Click Sametime Prerequisites → Connect to DB2 Databases.Related tasks
“Starting the Lotus Sametime System Console” on page 231When started, the Lotus Sametime System Console runs as a task in the WebSphereApplication Server administrative console.
Sametime prerequisite: Connecting to a DB2 database:
This activity takes you through the steps for connecting to the Meeting Server orGateway database you created.
Before you begin
AIX, Linux, Solaris, Windows: Ensure that IBM DB2 has been installed and thatyou have created the Sametime Meeting Server or Gateway database.
IBM i: Ensure that you have created the required database schemas and tables.
In the Connect to DB2 Databases portlet, verify that the Lotus Sametime SystemConsole database you created earlier is already displayed in the list of databases.
About this task
Follow these steps to connect to the Meeting Server or Gateway database. Youmust do this before you can install the Meeting Server using the Sametime SystemConsole. If you installed the server without using the System Console (as is thecase with the Sametime Meeting Server on IBM i and Sametime Gateway on any
362 Lotus Sametime: Installation and Administration Guide Part 1
platform), do this step before registering the server with the System Console.1. DB2 Configuration Guided Activity.
Click Add to begin the guided activity that will connect your server to the DB2database. If a connection already exists, you can optionally edit or delete it.
2. Add a new database.a. In the Connect to DB2 Databases portlet, click Add.
If you want to edit or delete a database instead, then select one, and clickthe appropriate button.
b. Enter the fully qualified host name of the DB2 server in the Host namefield.Do not enter an IP address or a short host name.
c. The Port field shows the default port of 50000. Accept the default unlessyou specified a different port during DB2 installation or your server is usinga different port.Linux: The default is typically 50001, but will vary based on portavailability. Check the /etc/services file on the DB2 server to verify theport number being used.
d. In the Database name, field, enter the name of the database you want toconnect to.Meeting Server database
On AIX, Linux, Solaris, and Windows, the database name is STMS unlessyou changed it.On IBM i, the name is always STMS.Gateway database
For AIX, Linux, Solaris, and Windows, the database name is STGWDBunless you changed it.For IBM i, use the name you specified when creating the database schemas.
e. In the Application user ID field, supply the DB2 application’sadministrative user name that you created when you installed DB2, such asdb2admin. This user has database administration authority and you will usethis user ID and password whenever you work with DB2 databases forLotus Sametime. On IBM i, this is the user profile you specified as theowner of the Meeting Server database schemas in your copy of thestms.default.response.properties file or the user profile you logged in withwhen you created the Gateway database schemas.
f. In the Application password field, enter the password for the DB2administrative user ID.
g. If you are connecting to a database on an IBM i server, click Hosted onIBM i.
h. Click Finish.
Creating Common Event Infrastructure data source for IBM i:
The Common Event Infrastructure data source must be manually created on IBM iafter running the configuration wizard to create a Sametime Gateway cluster. Thesesteps apply to clustered deployments only.
Before you begin
Expected state: the Deployment Manager is running and nodes are stopped.
Chapter 3. Installing 363
1. Log into the Integrated Solutions Console (http://localhost:9060/ibm/console) and select Resources → JDBC → Data sources.
2. Set the scope to Cluster=SametimeGatewayCluster
3. Click New.4. Type the data source name:
CommonEventInfrastructure_Bus
5. Type the JNDI name:jdbc/com.ibm.ws.sib/SametimeGatewayCluster-CEI.DM_cell_name.BUS
Where DM_cell_name is the cell name of the Deployment Manager which isinput in the installation of the Deployment Manager.
6. Select the existing Event_DB2iSeries_JDBC_Provider and click Next.7. Type the server name. This is the hostname of the IBM i system where your
database schema is located.8. For the Component-managed auth alias, select:
DM_cell_name/SametimeGatewayCluster/EventAuthDataAliasDB2iSeries
and then click Next.9. Deselect CMP
10. Click Next.11. Click Finish.12. Click the data source you just created, CommonEventInfrastructure_Bus, to
see its properties.13. Under Additional Properties, select Custom Properties.14. Select the property named Libraries.15. Set the Value to the name of the schema you are using for the Sametime
Gateway cluster.16. Select OK.17. Save your changes to the configuration.18. Select Resources → JDBC → JDBCProviders .19. Select the Event_DB2iSeries_JDBC_Provider.20. Change the Class path to:
/QIBM/ProdData/OS400/jt400/lib/jt400Native.jar
21. Click OK and then Save to save your changes to the configuration.
Installing SIP and XMPP proxy servers:
SIP and XMPP proxy servers act as the initial point of entry for messages that flowinto and out of the enterprise. While you can install these proxy servers on an IBMLotus Sametime Gateway node, it is recommended that you install them on aseparate machine to isolate the proxy processing from the Lotus SametimeGateway cluster.
Before you begin
Expected state: DB2, LDAP, and Sametime Gateway servers are installed.
364 Lotus Sametime: Installation and Administration Guide Part 1
About this task
For network security, IBM recommends that you install the XMPP and SIP proxyserver node and the Sametime Gateway cluster in the network DMZ. Installing theSIP proxy in the DMZ by itself is not a supported configuration because it places afirewall device between that server and the Sametime Gateway cluster. All of thesecomponents should be able to communicate freely which each other withouttraversing through a firewall device.
Note: If you are upgrading from a previous version of Lotus Sametime Gateway,you already have a SIP proxy server. If the SIP proxy server is on an existingprimary or secondary node, there is no need to upgrade the SIP proxy server.However, if your SIP proxy server is installed on its own node, you must upgradeWebSphere Application Server on that node to version 6.1.0.11. If you want yourcluster to be able to access Google Talk or other XMPP users, you must install anXMPP proxy server.
Installing a SIP and XMPP proxy server on IBM i:
The SIP and XMPP proxy servers are the first point of contact, after the firewall,for messages that flow into and out your enterprise. To set up a SametimeGateway deployment, install a SIP and XMPP proxy server on its own node.
Before you begin
Before you begin, WebSphere Application Server must be installed. You need*ALLOBJ and *SECADM authorities to successfully complete the WebSphereApplication Server Network Deployment installation.
Information on downloading packages for Lotus Sametime is located in the LotusSametime Download document.1. From the installation media, copy the Lotus Sametime Gateway installation
image (C17KCML.exe) to a temporary directory such as /TMP.2. Extract the contents of part_number.exe to the temporary directory /TMP.3. Navigate to the folder: /TMP/SametimeGateway.4. You can run the installer in wizard mode or in console mode. Use the wizard
mode if you are installing from a PC to the IBM i system.v To run the installer in wizard mode, type the following command:
installi5OS.bat
v To run the installer in console mode, perform these steps:a. Copy the directory /TMP/SametimeGateway to the IFS of the IBM i system.b. Start a QSHELL session.c. Navigate to the /TMP/SametimeGateway directory and type the following
command:install.sh -console
5. Select the language to be used for the installation and click OK. The LotusSametime Gateway Welcome screen is displayed.
6. Click Next to continue with the installation. The Software License Agreementdialog is displayed. Please make sure to read the license agreement carefully.
7. Select the appropriate radio button option to accept the license agreement ifyou agree with the statement and click Next to proceed with the installation.If you accepted the terms, the Installation Type dialog is displayed.
Chapter 3. Installing 365
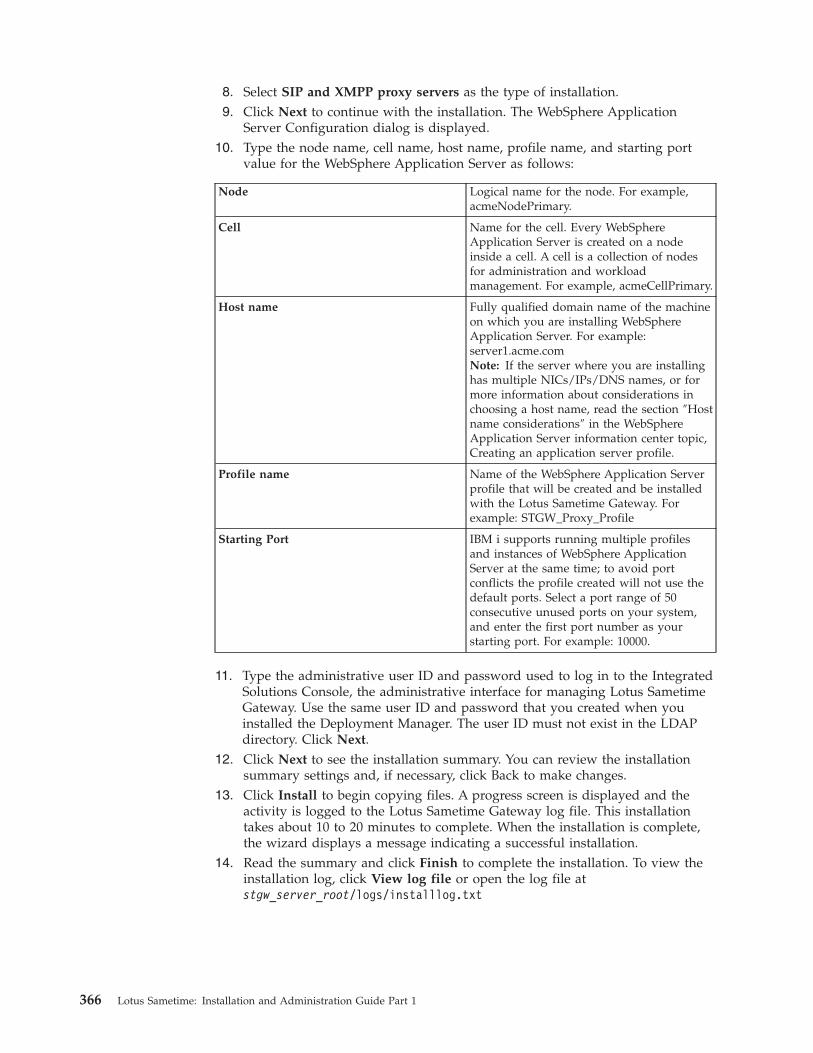
8. Select SIP and XMPP proxy servers as the type of installation.9. Click Next to continue with the installation. The WebSphere Application
Server Configuration dialog is displayed.10. Type the node name, cell name, host name, profile name, and starting port
value for the WebSphere Application Server as follows:
Node Logical name for the node. For example,acmeNodePrimary.
Cell Name for the cell. Every WebSphereApplication Server is created on a nodeinside a cell. A cell is a collection of nodesfor administration and workloadmanagement. For example, acmeCellPrimary.
Host name Fully qualified domain name of the machineon which you are installing WebSphereApplication Server. For example:server1.acme.comNote: If the server where you are installinghas multiple NICs/IPs/DNS names, or formore information about considerations inchoosing a host name, read the section ″Hostname considerations″ in the WebSphereApplication Server information center topic,Creating an application server profile.
Profile name Name of the WebSphere Application Serverprofile that will be created and be installedwith the Lotus Sametime Gateway. Forexample: STGW_Proxy_Profile
Starting Port IBM i supports running multiple profilesand instances of WebSphere ApplicationServer at the same time; to avoid portconflicts the profile created will not use thedefault ports. Select a port range of 50consecutive unused ports on your system,and enter the first port number as yourstarting port. For example: 10000.
11. Type the administrative user ID and password used to log in to the IntegratedSolutions Console, the administrative interface for managing Lotus SametimeGateway. Use the same user ID and password that you created when youinstalled the Deployment Manager. The user ID must not exist in the LDAPdirectory. Click Next.
12. Click Next to see the installation summary. You can review the installationsummary settings and, if necessary, click Back to make changes.
13. Click Install to begin copying files. A progress screen is displayed and theactivity is logged to the Lotus Sametime Gateway log file. This installationtakes about 10 to 20 minutes to complete. When the installation is complete,the wizard displays a message indicating a successful installation.
14. Read the summary and click Finish to complete the installation. To view theinstallation log, click View log file or open the log file atstgw_server_root/logs/installlog.txt
366 Lotus Sametime: Installation and Administration Guide Part 1
What to do next
Note: If you start the SIPProxyServer instance now and log into the IntegratedSolutions Console, you cannot view the SIPProxyServer instance. After youfederate the node in the next procedure, you then see the SIPProxyServer instance.
Proxy servers:
A proxy server acts as a surrogate for the Lotus Sametime Gateway servers withinthe enterprise. The node that hosts the XMPP or SIP proxy server hosts the publicXMPP or SIP domain of the enterprise. The SIP proxy is capable of securing thetransport, using secure sockets layer (SSL), and the content, using variousauthentication and authorization schemes.
A SIP proxy server facilitates automatic load balancing, affinity matching, andfailover for a cluster of Lotus Sametime Gateway servers. It’s also the preferredplace to configure the connection settings for external domains, since it directlymanages all such connections when in use. You must set up a cluster with at leastone node before creating a SIP proxy server. You can run a SIP proxy server on anLotus Sametime Gateway server node, or create a separate node, on which LotusSametime Gateway is not installed, to be the SIP proxy server node.
After you set up a Lotus Sametime Gateway cluster and a SIP proxy server, youcan add external communities to Lotus Sametime Gateway. Lotus SametimeGateway prompts you for the relevant connection settings (host name, portnumber, transport protocol), and then creates the SIP Uniform Resource Indicator(URI). The SIP URI is sent to the SIP container in WebSphere Application Serverwhich sends it to the SIP proxy server to route the request to the appropriatedestination. There is no need to set the domain, host, port, or transport protocol inthe SIP proxy server as all this information is set in Lotus Sametime Gateway.
Multiple proxy servers
You can set up multiple proxy servers for load balancing, better Web response, andhigh availability. WebSphere Application Server does not support the clustering ofSIP or XMPP proxy servers, but you can set up more than one proxy server infront of an Lotus Sametime Gateway cluster. This configuration provides multipleentry points into the Lotus Sametime Gateway cluster while providing workloadbalancing. Multiple proxy server can be fronted by a simple IP sprayer, such as theSIP Load Balancer component included in WebSphere Application Server thathandles IP spraying to multiple proxy servers. If a proxy server fails, the affinity isto the container and not to the proxy itself so there is one less potential failurealong the message flow.
Federating the proxy server node into the cell:
After you install the SIP and XMPP proxy server node, you must federate the nodeinto the Deployment Manager’s cell so that the proxy server becomes part of thecluster.
Before you begin
Expected state: The Deployment Manager is running.
Chapter 3. Installing 367

About this task
To federate or add the proxy server node into the cell, you run the addnodecommand on the proxy server node and specify the hostname of the DeploymentManager.1. Log into the proxy server node’s operating system.2. IBM i only: On the command line, run the STRQSH (Start Qshell) command.3. Synchronize the system clocks on the Deployment Manager and the proxy node
so that they are within five minutes of one another and are set for the sametime zone.Federation fails if the clocks are not synchronized within five minutes of eachother.
4. On the proxy server node, open a command window and navigate to thestgw_profile_root\bin directory.
5. IBM i only: Run the following command to obtain theSOAP_CONNECTOR_ADDRESS port number. Make a note of the port numberas you will need it to add nodes to the cluster:dspwasinst
6. Run the following command to add the proxy server node to the DeploymentManager’s cell:AIX, Linux, and Solaris:./addNode.sh DM_server_host_name DM_port_number -includeapps
WindowsaddNode.bat DM_hostname DM_port_number -includeapps
IBM i:addNode DM_server_host_name DM_SOAP_port -username WAS_Admin_user_name_on_DM-password WAS_Admin_password_on_DM
where:v DM_server_host_name is the resolvable host name of the Deployment
Manager.v DM_SOAP_portis the port that the Deployment Manager’s SOAP port is
listening on.v WAS_Admin_user_name_on_DM is the user ID of the WebSphere Application
Server administrator account on the Deployment Manager.v WAS_Admin_password_on_DM is the password associated with the
WebSphere Application Server administrator account.
For example:addNode gateway_dm.acme.com 8879 -includeapps -username wasadmin -password waspassword
7. When prompted, provide the Deployment Manager’s administrative user IDand password. Wait for the operation to complete before proceeding. Look for asuccess message similar to the following when complete:Node MyProxyNode has been successfully federated.
8. Verify that the proxy servers are installed correctly:a. Log into the Integrated Solutions Console (http://localhost:9060/ibm/
console).If you already logged in, you must log out and then log in again before youcan see changes.
b. Click Servers → Proxy servers. You should see the SIP proxy server.
368 Lotus Sametime: Installation and Administration Guide Part 1
c. Click Servers → Application Servers. You should see the XMPP proxyserver.
Configuring a SIP proxy server:
Configure the Session Initiation Protocol (SIP) proxy server for a cluster of IBMLotus Sametime Gateway servers. There is no need to configure external domainsin the SIP proxy server; this is done through the Lotus Sametime Gatewayconfiguration.
Before you begin
Set up a cluster with at least one secondary node and install the SIP and XMPPproxy servers on the same physical hardware as a Deployment Manager, primarynode, or secondary node, or install the proxy servers on separate hardware. TheSIP and XMPP installation creates a new profile for the SIP and XMPP proxyservers.
About this task
After you finish setting up a SIP proxy server, you’ll have a port number. Youprovide the port number in combination with the domain name of the node onwhich the SIP proxy server runs to external servers to connect to your LotusSametime Gateway.
Assigning the SIP proxy to work with the Lotus Sametime Gateway cluster:
Assign the SIP proxy server to function with the IBM Lotus Sametime Gatewaycluster.1. In the Integrated Solutions Console, click Server Types → WebSphere proxy
servers.2. In the ″WebSphere proxy servers″ page, click the SIPProxyServer link
corresponding to the proxy server you want to update.3. Click SIP Proxy server settings → SIP Proxy settings.4. From the drop down list, select the Lotus Lotus Sametime Gateway cluster.5. Click OK then click Save, and then click OK again.
Configuring the SIP Proxy server to listen on ports 5060 and 5061:
Configure the IBM Lotus Sametime Gateway cluster’s SIP Proxy server to listen onports 5060 and 5061.
Before you begin
Configure a cluster of Lotus Sametime Gateway servers.
About this task
Public instant messaging providers require you to accept connections on ports 5060and 5061, so you will need to confirm that the SIP Proxy server’s host name isresolvable and is listening on these ports. If the cluster’s SIP Proxy server isinstalled on a node that is already hosting Lotus Sametime Gateway, and the SIPProxy server is not already listening on ports 5060 and 5061, reconfigure the portsettings as follows:1. Determine which ports the SIP Proxy server is currently listening on:
Chapter 3. Installing 369
a. On the cluster’s Deployment Manager, log in to the Integrated SolutionsConsole as the WebSphere administrator.
b. Click WebSphere proxy servers → SIPProxyServer → Ports.c. Check the listening ports for the following names:
v PROXY_SIP_ADDRESSv PROXY_SIPS_ADDRESSIf PROXY_SIP_ADDRESS listens on port 5060 and PROXY_SIPS_ADDRESSlistens on port 5061, you can skip the rest of this task. Otherwise, proceed tothe next step to change the port settings.
2. Determine whether any nodes share the IP address and host name with the SIPProxy server.If another node shares the IP address and host name, change the default hostport settings for that node to avoid a conflict with the SIP Proxy server.a. Still on the Deployment Manager, click System Administration → Nodes.b. Check whether any nodes use the same IP address and host name as the
SIP Proxy server.c. If a node does share the IP address and host name, check its port settings
for the following names:v SIP_DEFAULTHOSTv SIP_DEFAULTHOST_SECURE
d. If SIP_DEFAULTHOST is not set to 5060 and SIP_DEFAULTHOST_SECUREis not set to 5061, skip to step 3.
e. If ports 5060 and 5061 are already in use, change those settings now bysetting:v SIP_DEFAULTHOST to port 5080v SIP_DEFAULTHOST_SECURE to port 5081
f. Save your changes to the master configuration by clicking Save whenprompted.
3. Now reset the SIP ports on the SIP Proxy server to use ports 5060 and 5061:a. On the Deployment Manager, click WebSphere proxy servers →
SIPProxyServer → Ports.b. Change the port settings for the following names:
v PROXY_SIP_ADDRESS to port 5060v PROXY_SIPS_ADDRESS to port 5061
c. Save your changes to the master configuration and synchronize the nodes inthe cluster:WebSphere Application Server displays a message prompting you to savechanges to the master configuration. Select the Synchronize nodes optionbefore clicking the Save button.
Creating a virtual host for the SIP proxy:
Create virtual host definitions for ports 5060 and 5061.1. To identify the SIP proxy port number in the proxy server table, click the name
of the SIP proxy server that you created.2. Under Proxy Settings, select SIP proxy server settings → SIP Proxy server
transports.
370 Lotus Sametime: Installation and Administration Guide Part 1
3. Make a note of the port number defined for SIPS_PROXY_CHAIN. The portnumber in combination with the domain name of the node on which the SIPproxy server runs is needed for configuring external servers to connect to yourLotus Lotus Sametime Gateway server.
4. Now move to the Environment section if the Integrated Solutions Console.5. Click Virtual Hosts → default_host → Host Aliases → New.6. Verify the virtual host definitions for 5060/5061. If the virtual host is not
defined, define the new alias as follows:a. Add * to the Host Name field.b. Add 5060 to the Port field.c. Click OK.d. Click Save.The additional Virtual Host entry is needed if the default ports are not addedduring installation. Port 5060, however, only covers non-TLS installs. For securesetups, the following entry may also need to be added: *:5061
Create custom properties for the SIP proxy server:
Define custom properties that will instruct the SIP proxy server to return ″503Service Unavailable″ when the server is down, rather than the default error ″404Page not found.″
Create two custom properties for the new SIP Proxy server as follows:The new properties will instruct the SIP Proxy server to return ″503 ServiceUnavailable″ when the server is down, rather than the default error ″404 Page notfound.″1. In the Integrated Solutions Console, click Servers → Proxy Servers →
your_new_SIP_proxy.2. Click SIP Proxy server settings → SIP Proxy settings → Custom properties.3. Click New, enter the following information, and then click OK.
Name lsnLookupFailureReasonPhrase
Value Service Unavailable
4. Click New, enter the following information, and then click OK.
Name lsnLookupFailureResponseCode
Value 503
5. Click Save.
Tuning the SIP proxy:
This sections describes the steps for tuning a SIP proxy.
About this task
Tune the JVM garbage collection policy for the SIP proxy server as follows:1. In the Integrated Solutions Console, click Servers → Proxy Servers →
SIPProxyServer.2. Perform the following instructions for each of the sip proxies in the list:
a. Select a proxy server by clicking it in the list.
Chapter 3. Installing 371
b. Under Server Infrastructure, click Java and Process management → ProcessDefinition.
c. Under Additional Properties, click Java Virtual Machine.d. In the Initial Heap Size field, enter 600.e. In the Maximum Heap Size field, enter 600.f. In the Generic JVM arguments field, enter the following value as one
continuous line :-Xmo60m -Xgcpolicy:gencon -Xgc:noAdaptiveTenure,tenureAge=8,stdGlobalCompactToSatisfyAllocate -Xtgc:parallel
g. Click OK, and click Save to save changes to the master configuration.
Configuring the Gateway cluster and SIP proxy for a NAT environment:
Configure a cluster of IBM Lotus Sametime Gateway servers to operate in a NAT(Network Address Translation) environment.
Before you begin
Traversing a NAT environment is known issue in the SIP domain. There are severalways to solve this issue, while some of them have been formed as IETF standard(RPORT, STUN and ICE), others have been formed as proprietary solutions. Sowhat is the problem? Some of the SIP communication parameters contain the FullyQualified DNS Name (FQDN) or the IP address, and the port, but a SIP devicedeployed in a NAT environment does not know how it will be seen from theinternet because the NAT device translates the IP address. The SIP message willcontain IP address and port – which are not accessible from the internet. There areseveral paradigms to solve this issue:v SIP Friendly NAT device – NAT devices that can analyze a SIP message and
then replace the IP address and ports listed inside of it. This solution does notsupport encrypted SIP communication such as TLS.
v IETF Standard – a method using a standardized protocol such as RPORT, STUN,or ICE.
Currently, the IBM WebSphere SIP infrastructure does not provide a solution tothis problem because it does not support any of the IETF standards. Therefore, anySIP application deployed on WebSphere has to develop its own solution. Thesolution provided here assumes that you have the following elements in yourdeployment:v A clustered environment, with one ore more clustered servers.v A SIP proxy server federated to the cluster.v All cluster members (including the SIP proxy server) are deployed within the
same subnet.v A static NAT is defined in the NAT or firewall; the public IP address should be
mapped to the SIP proxy server’s internal IP address.
About this task
The following diagram illustrates the NAT environment that this solution wasdesigned for:
372 Lotus Sametime: Installation and Administration Guide Part 1
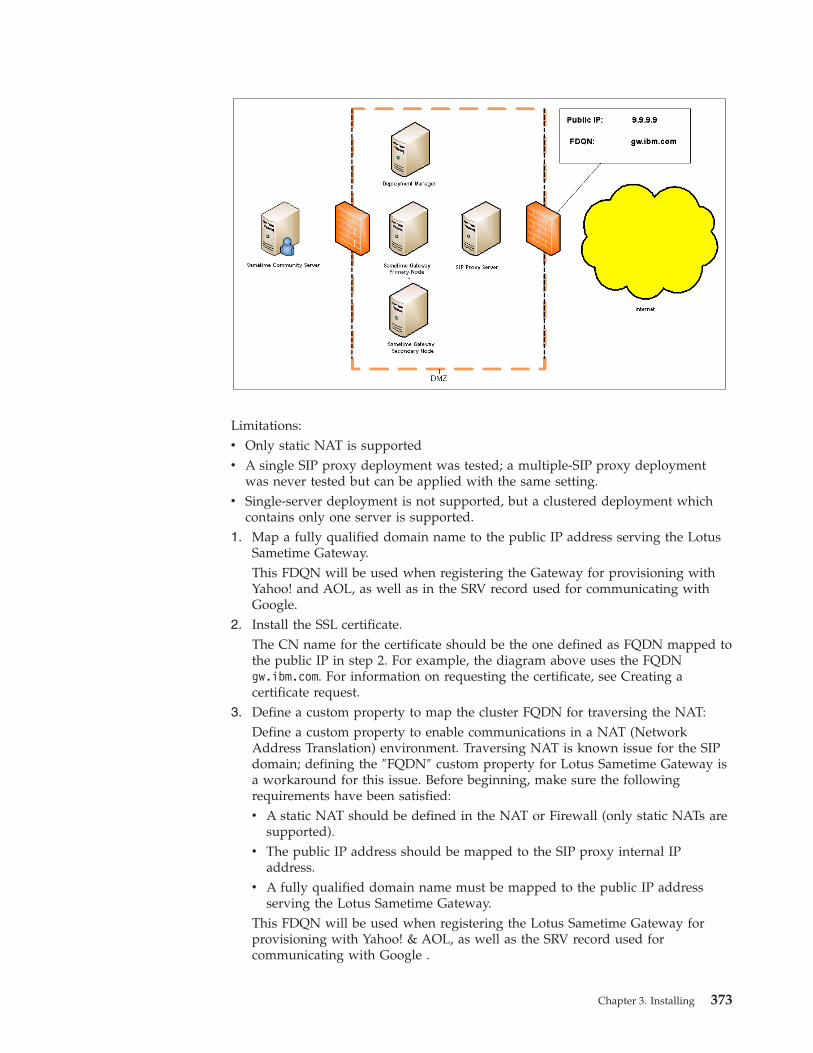
Limitations:v Only static NAT is supportedv A single SIP proxy deployment was tested; a multiple-SIP proxy deployment
was never tested but can be applied with the same setting.v Single-server deployment is not supported, but a clustered deployment which
contains only one server is supported.1. Map a fully qualified domain name to the public IP address serving the Lotus
Sametime Gateway.This FDQN will be used when registering the Gateway for provisioning withYahoo! and AOL, as well as in the SRV record used for communicating withGoogle.
2. Install the SSL certificate.The CN name for the certificate should be the one defined as FQDN mapped tothe public IP in step 2. For example, the diagram above uses the FQDNgw.ibm.com. For information on requesting the certificate, see Creating acertificate request.
3. Define a custom property to map the cluster FQDN for traversing the NAT:Define a custom property to enable communications in a NAT (NetworkAddress Translation) environment. Traversing NAT is known issue for the SIPdomain; defining the ″FQDN″ custom property for Lotus Sametime Gateway isa workaround for this issue. Before beginning, make sure the followingrequirements have been satisfied:v A static NAT should be defined in the NAT or Firewall (only static NATs are
supported).v The public IP address should be mapped to the SIP proxy internal IP
address.v A fully qualified domain name must be mapped to the public IP address
serving the Lotus Sametime Gateway.This FDQN will be used when registering the Lotus Sametime Gateway forprovisioning with Yahoo! & AOL, as well as the SRV record used forcommunicating with Google .
Chapter 3. Installing 373
a. Log in to the Integrated Services Console as a Lotus Sametime Gatewayadministrator.
b. Click System administration → Cell → Custom Properties.c. Click New and enter information for the new custom property:
Name Type com.ibm.sametime.gateway.fqdn as the name ofthe new property.
Value Type your fully qualified domain name.
Description Type a description of the new property.
d. Click Apply, and then click OK.e. Perform a full synchronize with the nodes:
1) In the Deployment Manager’s Integrated Solutions Console, clickSystem administration → Nodes.
2) Click Full Resynchronize.f. Restart all Lotus Sametime Gateway nodes.For example, If you set the custom property to gw.ibm.com (and the port is setto 5070), the INVITE SDP would look like this:v=0o=- 0 0 IN IP4 gw.ibm.coms=sessionc=IN IP4 gw.ibm.comt=0 0m=message 5070 sip null
4. Enable the SIP Proxy IP Sprayer:a. In the Integrated Solutions Console, click Servers → Proxy Servers.b. Select the SIP proxy server from the list.c. Click SIP Proxy Server Settings → Enable SSL sprayer.d. Apply the following settings:
v Enable SSL sprayerv Set the SSL host to the FQDN (in our diagram gw.ibm.com)v Set the port to 5061.
e. Restart the proxy and the Lotus Sametime Gateway server.
Configuring the XMPP proxy server:
Configure the XMPP proxy server to allow Google Talk, and other XMPP-basedinstant messaging systems to flow to and from the Sametime Gateway.
Before you begin
Expected state: the SIP and XMPP proxy server node is installed and federated intothe cell. A Sametime cluster has been installed. The Deployment Manager isstarted.1. On the Deployment Manager node, log into the Integrated Solutions Console.2. Click Servers → Application Servers and select the XMPPProxyServer from
the list.3. Click Ports.4. Click New to add a port.5. Select User-defined Port .6. Type XMPP_INTERNAL_PORT in the Specify port name field.
374 Lotus Sametime: Installation and Administration Guide Part 1
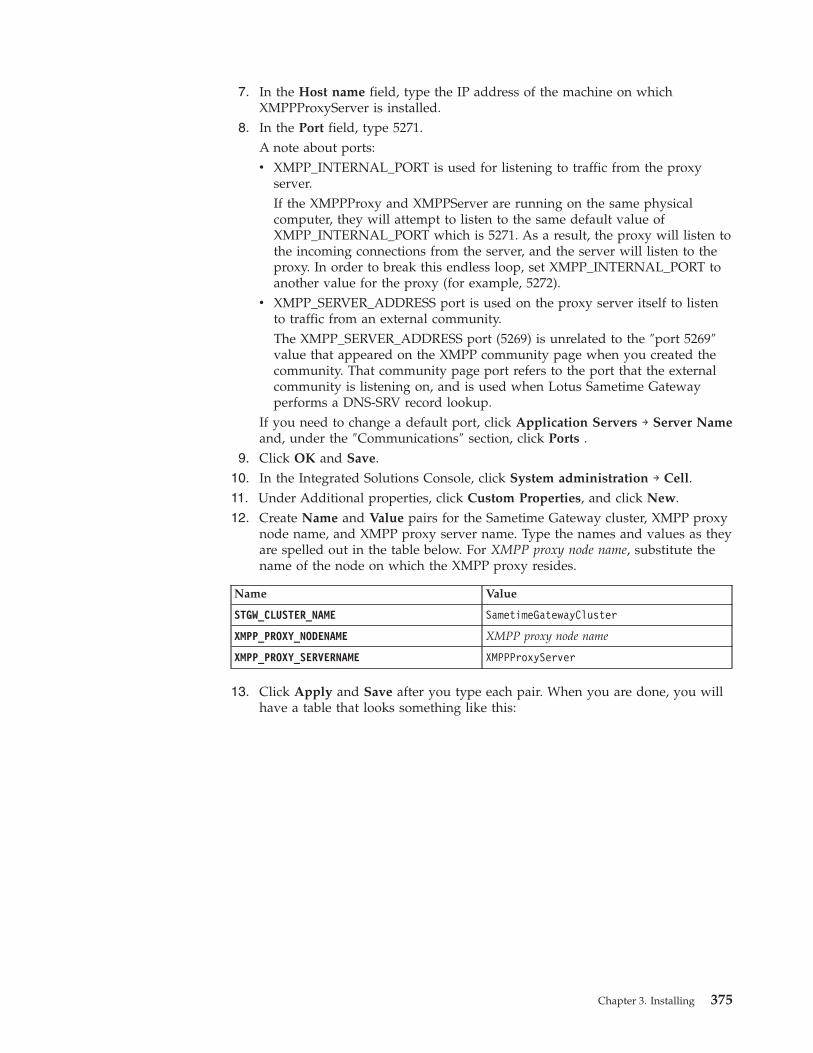
7. In the Host name field, type the IP address of the machine on whichXMPPProxyServer is installed.
8. In the Port field, type 5271.A note about ports:v XMPP_INTERNAL_PORT is used for listening to traffic from the proxy
server.If the XMPPProxy and XMPPServer are running on the same physicalcomputer, they will attempt to listen to the same default value ofXMPP_INTERNAL_PORT which is 5271. As a result, the proxy will listen tothe incoming connections from the server, and the server will listen to theproxy. In order to break this endless loop, set XMPP_INTERNAL_PORT toanother value for the proxy (for example, 5272).
v XMPP_SERVER_ADDRESS port is used on the proxy server itself to listento traffic from an external community.The XMPP_SERVER_ADDRESS port (5269) is unrelated to the ″port 5269″value that appeared on the XMPP community page when you created thecommunity. That community page port refers to the port that the externalcommunity is listening on, and is used when Lotus Sametime Gatewayperforms a DNS-SRV record lookup.
If you need to change a default port, click Application Servers → Server Nameand, under the ″Communications″ section, click Ports .
9. Click OK and Save.10. In the Integrated Solutions Console, click System administration → Cell.11. Under Additional properties, click Custom Properties, and click New.12. Create Name and Value pairs for the Sametime Gateway cluster, XMPP proxy
node name, and XMPP proxy server name. Type the names and values as theyare spelled out in the table below. For XMPP proxy node name, substitute thename of the node on which the XMPP proxy resides.
Name Value
STGW_CLUSTER_NAME SametimeGatewayCluster
XMPP_PROXY_NODENAME XMPP proxy node name
XMPP_PROXY_SERVERNAME XMPPProxyServer
13. Click Apply and Save after you type each pair. When you are done, you willhave a table that looks something like this:
Chapter 3. Installing 375
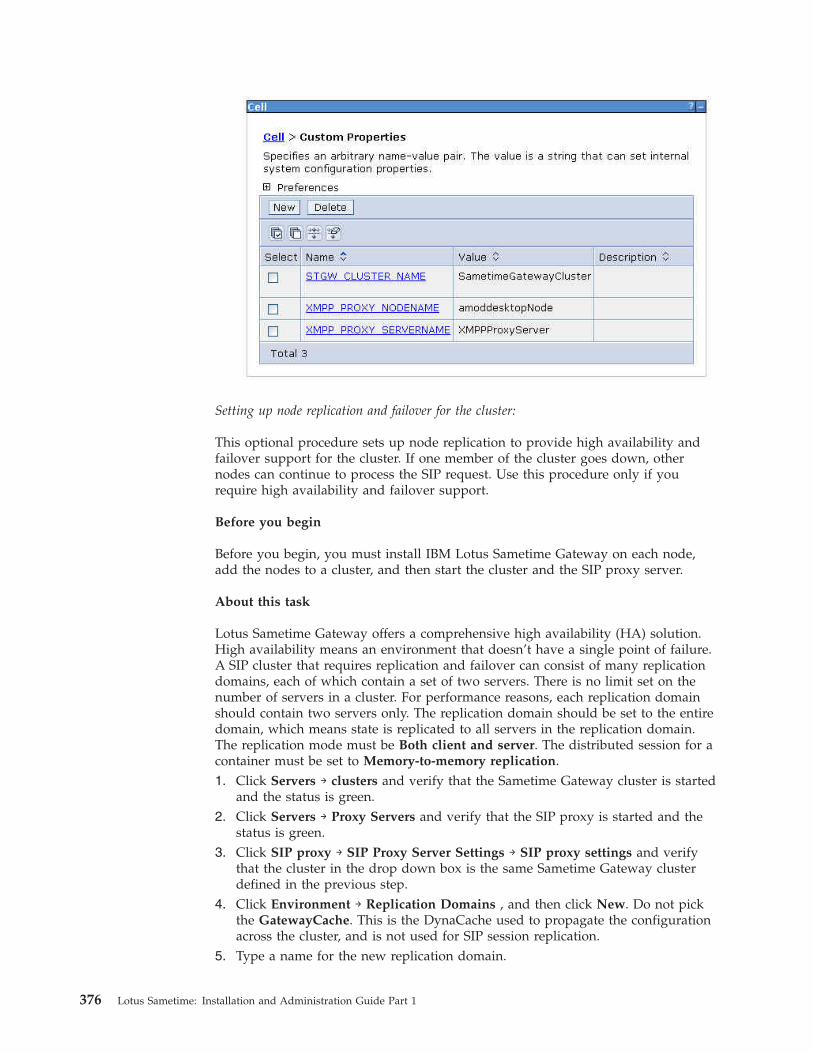
Setting up node replication and failover for the cluster:
This optional procedure sets up node replication to provide high availability andfailover support for the cluster. If one member of the cluster goes down, othernodes can continue to process the SIP request. Use this procedure only if yourequire high availability and failover support.
Before you begin
Before you begin, you must install IBM Lotus Sametime Gateway on each node,add the nodes to a cluster, and then start the cluster and the SIP proxy server.
About this task
Lotus Sametime Gateway offers a comprehensive high availability (HA) solution.High availability means an environment that doesn’t have a single point of failure.A SIP cluster that requires replication and failover can consist of many replicationdomains, each of which contain a set of two servers. There is no limit set on thenumber of servers in a cluster. For performance reasons, each replication domainshould contain two servers only. The replication domain should be set to the entiredomain, which means state is replicated to all servers in the replication domain.The replication mode must be Both client and server. The distributed session for acontainer must be set to Memory-to-memory replication.1. Click Servers → clusters and verify that the Sametime Gateway cluster is started
and the status is green.2. Click Servers → Proxy Servers and verify that the SIP proxy is started and the
status is green.3. Click SIP proxy → SIP Proxy Server Settings → SIP proxy settings and verify
that the cluster in the drop down box is the same Sametime Gateway clusterdefined in the previous step.
4. Click Environment → Replication Domains , and then click New. Do not pickthe GatewayCache. This is the DynaCache used to propagate the configurationacross the cluster, and is not used for SIP session replication.
5. Type a name for the new replication domain.
376 Lotus Sametime: Installation and Administration Guide Part 1
6. Under Number of Replicas, select Entire Domain so that the SIP session isreplicated to all members in the domain, and click OK.
7. Click Servers → Application Servers, and then select a member of the cluster.a. Under Container Settings, clickSession management.b. Under Additional Properties, click Distributed environment settings.c. Under Distributed sessions, click Memory-to-memory replication. The
distributed session option will become enabled once configured.d. Under Replication domain, select the replication domain that you created in
previous steps.e. In the Replication mode field, select Both client and server, then click OK,
and then clickSave. Memory to memory replication is now enabled for thismember of the cluster.
8. Repeat the previous step for each member of the cluster.
Starting a cluster:
When starting a cluster for the first time, you must start the Deployment Manager,node agents, and then all Lotus Sametime Gateway servers in the cluster.
Before you begin
Before begin these steps, you must install Lotus Sametime Gateway on each node,federate the nodes into the cell, run the Cluster Configuration Wizard, and then setup SIP and XMPP proxy servers for your cluster.
About this task
In the steps that follow, you start the Deployment Manager in a command windowso that you can log in to the Integrated Solutions Console and complete theremaining steps. After the Deployment Manager is started, you can view theIntegrated Solutions Console pages. However, you cannot view the LotusSametime Gateway administration pages until you start at least one node agentand the Lotus Sametime Gateway server on that node.1. Log in to the Deployment Manager node as a user with administrative
privileges.2. Open a command window (QShell session on IBM i) and navigate to the
stgw_profile_root\bin directory3. If not already started, start the Deployment Manager with the following
command:AIX, Linux, and Solaris./startManager.sh
WindowsstartManager.bat
IBM istartManager
4. Log in to one of the Lotus Sametime Gateway nodes.5. Open a command window (QShell session on IBM i) and navigate to the
stgw_profile_root\bin directory.6. Start the node agent with the following command.
AIX, Linux, and Solaris./startNode.sh
Chapter 3. Installing 377
WindowsstartNode.bat
IBM istartNode
7. Log in to the other nodes, except the Deployment Manager node, and repeatthe previous steps to start the node agent on each node.
Stopping and starting the Deployment Manager:
This topic describes how to stop and start the Deployment Manager.1. Log in to the Deployment Manager node as a user with administrative
privileges.2. Open a command window (QShell session on IBM i) and navigate to the
stgw_profile_root\bin directory3. Stop the Deployment Manager. Use the administrative user ID and password
that you created when you installed the Deployment Manager. Note that youdo not have to provide the username and password qualifiers in the command;you can wait to be prompted and then enter your credentials. Type thefollowing commands:AIX, Linux, and Solaris./stopManager.sh -username username -password password./startManager.sh
WindowsstopManager.bat -username username -password passwordstartManager.bat
IBM istopManager -username username -password passwordstartManager
Stopping and starting the node agents:
This topic describes how to stop and start the node agents. Typically, you stop andstart node a node agent by logging onto a node and running the stop node or startnode command. However, for convenience, you can restart all node agents fromthe Deployment Manager node by using the Integrated Solutions Console only ifthe node agents are running. If they are stopped, you must start the node agentsfrom nodes themselves.1. Log in to one of the Lotus Sametime Gateway nodes.2. Open a command window (QShell session on IBM i) and navigate to the
stgw_profile_root\bin directory.3. Stop the node agent with the following command:
AIX, Linux, and Solaris./stopNode.sh
WindowsstopNode.bat
IBM istopNode
4. Start the node agent with the following command.AIX, Linux, and Solaris./startNode.sh
Windows
378 Lotus Sametime: Installation and Administration Guide Part 1
startNode.bat
IBM istartNode
5. Log in to the other nodes, except the Deployment Manager node, and repeatthe previous steps to stop and start the node agent on each node.
6. To restart node agents that are already running:a. Make sure the Deployment Manager is running and log into the Integrated
Solutions Console on the Deployment Manager node.b. Click System Administration → Node agents .c. Select all node agents, and then click Restart.
Stopping and starting a cluster:
Complete these steps to stop and start a cluster of Sametime Gateway servers fromthe Integrated Solutions Console.
Before you begin
Expected state: the Deployment Manager, node agents, and all servers in thecluster are started.
About this task
You must restart the cluster when you add, delete, or change a community.1. Log into the Integrated Solutions Console (http://localhost:9060/ibm/console)
on the Deployment Manager server as a user with administrative privileges.2. Click Servers → Clusters.3. Select the Lotus Sametime Gateway cluster, and click Stop, and wait for the
cluster to stop.4. Click Servers → Clusters.5. Select the Lotus Sametime Gateway cluster, and click Start.6. Click Servers → Proxy servers.7. Select the SIP proxy server and click Start if it is not already started.8. Click Servers → Application servers.9. Select the XMPP proxy server and click Start if it is not already started.
Stopping and starting servers in a cluster:
This topic describes how to stop or start individual servers or nodes in a cluster.1. Log into the Integrated Solutions Console (http://localhost:9060/ibm/console)
on the Deployment Manager server as a user with administrative privileges.2. Click Servers → Application Servers .3. If you want to stop a server, select the application server’s check box and click
Stop.4. If you want to start a server, select the application server’s check box and click
Start.
Stopping and starting a single server:
Complete these steps to stop and start a single Sametime Gateway server in asingle server environment.
Chapter 3. Installing 379
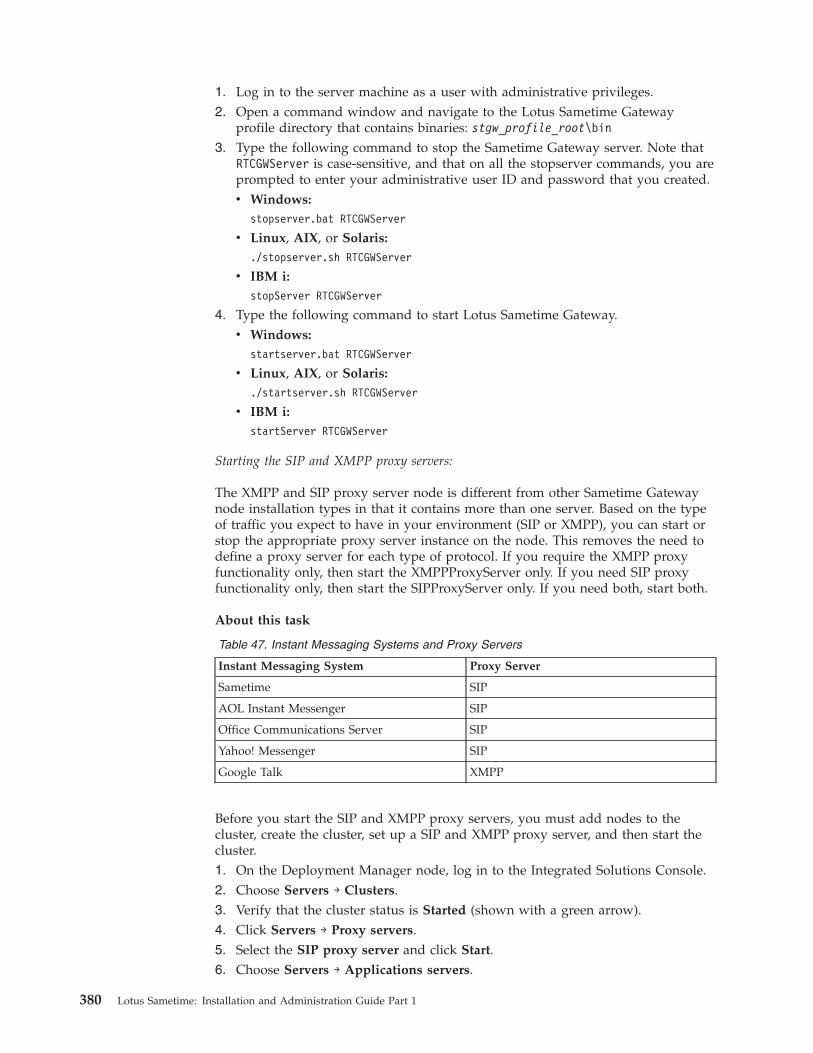
1. Log in to the server machine as a user with administrative privileges.2. Open a command window and navigate to the Lotus Sametime Gateway
profile directory that contains binaries: stgw_profile_root\bin3. Type the following command to stop the Sametime Gateway server. Note that
RTCGWServer is case-sensitive, and that on all the stopserver commands, you areprompted to enter your administrative user ID and password that you created.v Windows:
stopserver.bat RTCGWServer
v Linux, AIX, or Solaris:./stopserver.sh RTCGWServer
v IBM i:stopServer RTCGWServer
4. Type the following command to start Lotus Sametime Gateway.v Windows:
startserver.bat RTCGWServer
v Linux, AIX, or Solaris:./startserver.sh RTCGWServer
v IBM i:startServer RTCGWServer
Starting the SIP and XMPP proxy servers:
The XMPP and SIP proxy server node is different from other Sametime Gatewaynode installation types in that it contains more than one server. Based on the typeof traffic you expect to have in your environment (SIP or XMPP), you can start orstop the appropriate proxy server instance on the node. This removes the need todefine a proxy server for each type of protocol. If you require the XMPP proxyfunctionality only, then start the XMPPProxyServer only. If you need SIP proxyfunctionality only, then start the SIPProxyServer only. If you need both, start both.
About this task
Table 47. Instant Messaging Systems and Proxy Servers
Instant Messaging System Proxy Server
Sametime SIP
AOL Instant Messenger SIP
Office Communications Server SIP
Yahoo! Messenger SIP
Google Talk XMPP
Before you start the SIP and XMPP proxy servers, you must add nodes to thecluster, create the cluster, set up a SIP and XMPP proxy server, and then start thecluster.1. On the Deployment Manager node, log in to the Integrated Solutions Console.2. Choose Servers → Clusters.3. Verify that the cluster status is Started (shown with a green arrow).4. Click Servers → Proxy servers.5. Select the SIP proxy server and click Start.6. Choose Servers → Applications servers.
380 Lotus Sametime: Installation and Administration Guide Part 1
7. Select the XMPP proxy server and click Start.
Registering a new Gateway cluster on IBM i with the System Console:
After installing the IBM Lotus Sametime Gateway cluster on IBM i, register it withthe Lotus Sametime System Console, which allows you to manage all LotusSametime servers from a central location.
Before you begin
Before you register the cluster, verify that you have completed the following tasks,which are described in the Installing on IBM i section of this information center.v The Lotus Sametime System Console must be started.v The LDAP server must be connected to the System Console and must be started.v The Gateway database must be connected to the System Console and must be
started.v The Community Server that the Gateway server connects to must already be
registered with the Console and must be started.
About this task
Working from the Deployment Manager, follow these steps to update propertiesfiles and run the registration utility to register the cluster with the console.
Note: Run this utility only on the Deployment Manager; do not register individualnodes because they will be registered automatically during the cluster registration.
During this task you will edit the following files; click the file names below to seedetails. You may want to open the topic in a new browser tab or window so youcan keep it open for reference:v console.properties
v productConfig.properties
1. Working on the Deployment Manager, navigate to the console directory:/qibm/userdata/STGateway/ProfileName/console
Where the ProfileName is the one you specified when you installed the Gateway.
Note: If the Primary Node is installed on the same server as the DeploymentManager, make sure you are working in the Deployment Manager’s profile.
2. Make backup copies (using different names) of the console.properties andproductConfig.properties files.
3. Update the Deployment Manager’s console.properties file:a. Open the file for editing.b. Update the file with the following values:
Table 48. console.properties settings for the Deployment Manager
SSCHostName Provide the fully qualified host name of the LotusSametime System Console server.
Chapter 3. Installing 381
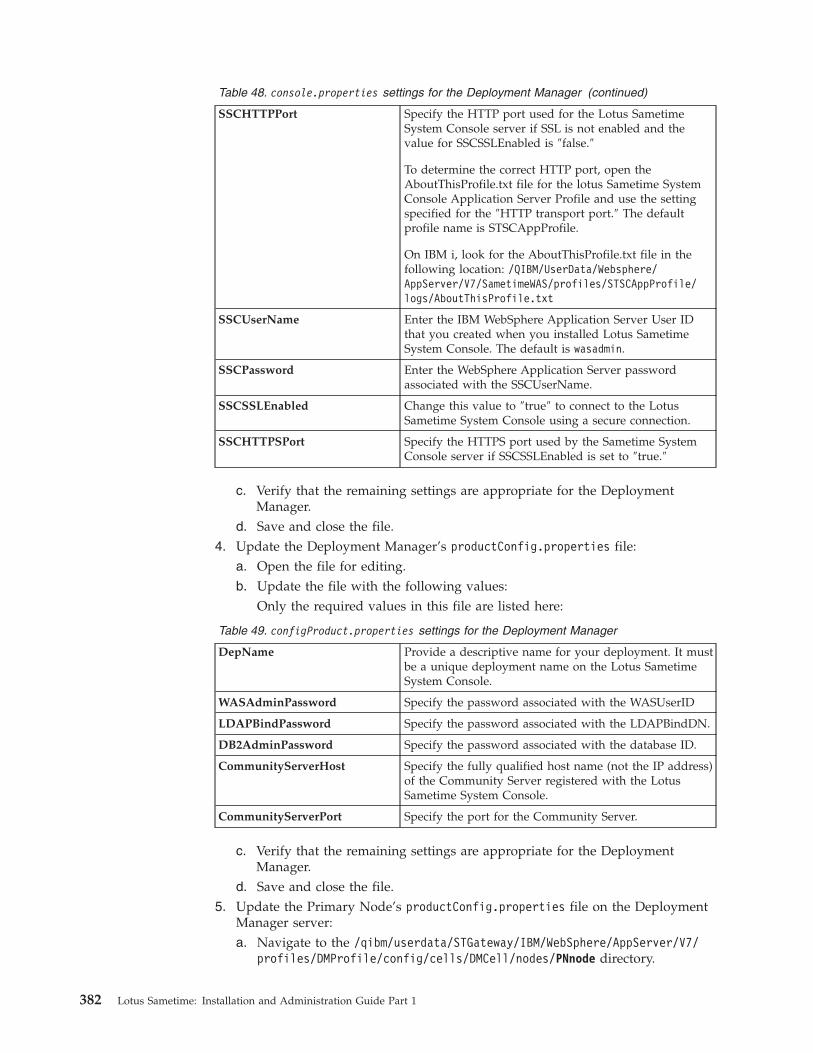
Table 48. console.properties settings for the Deployment Manager (continued)
SSCHTTPPort Specify the HTTP port used for the Lotus SametimeSystem Console server if SSL is not enabled and thevalue for SSCSSLEnabled is ″false.″
To determine the correct HTTP port, open theAboutThisProfile.txt file for the lotus Sametime SystemConsole Application Server Profile and use the settingspecified for the ″HTTP transport port.″ The defaultprofile name is STSCAppProfile.
On IBM i, look for the AboutThisProfile.txt file in thefollowing location: /QIBM/UserData/Websphere/AppServer/V7/SametimeWAS/profiles/STSCAppProfile/logs/AboutThisProfile.txt
SSCUserName Enter the IBM WebSphere Application Server User IDthat you created when you installed Lotus SametimeSystem Console. The default is wasadmin.
SSCPassword Enter the WebSphere Application Server passwordassociated with the SSCUserName.
SSCSSLEnabled Change this value to ″true″ to connect to the LotusSametime System Console using a secure connection.
SSCHTTPSPort Specify the HTTPS port used by the Sametime SystemConsole server if SSCSSLEnabled is set to ″true.″
c. Verify that the remaining settings are appropriate for the DeploymentManager.
d. Save and close the file.4. Update the Deployment Manager’s productConfig.properties file:
a. Open the file for editing.b. Update the file with the following values:
Only the required values in this file are listed here:
Table 49. configProduct.properties settings for the Deployment Manager
DepName Provide a descriptive name for your deployment. It mustbe a unique deployment name on the Lotus SametimeSystem Console.
WASAdminPassword Specify the password associated with the WASUserID
LDAPBindPassword Specify the password associated with the LDAPBindDN.
DB2AdminPassword Specify the password associated with the database ID.
CommunityServerHost Specify the fully qualified host name (not the IP address)of the Community Server registered with the LotusSametime System Console.
CommunityServerPort Specify the port for the Community Server.
c. Verify that the remaining settings are appropriate for the DeploymentManager.
d. Save and close the file.5. Update the Primary Node’s productConfig.properties file on the Deployment
Manager server:a. Navigate to the /qibm/userdata/STGateway/IBM/WebSphere/AppServer/V7/
profiles/DMProfile/config/cells/DMCell/nodes/PNnode directory.
382 Lotus Sametime: Installation and Administration Guide Part 1
b. Open the file for editing.c. In the DepName setting, provide a descriptive name for Primary Node
deployment; it must be a unique deployment name on the Lotus SametimeSystem Console.
d. Verify that the remaining settings are appropriate for the Primary Node.e. Save and close the file.
6. Update the Secondary Node’s productConfig.properties file on theDeployment Manager server:a. Navigate to the /qibm/userdata/STGateway/IBM/WebSphere/AppServer7/
profiles/DMProfile/config/cells/DMCell/nodes/SNnode directory.b. Open the file for editing.c. In the DepName setting, provide a descriptive name for the Secondary Node
deployment; it must be a unique deployment name on the Lotus SametimeSystem Console.
d. Verify that the remaining settings are appropriate for the Secondary Node.e. Save and close the file.
7. Run the registration utility:a. Return to the Deployment Manager’s profile (the directory you used in Step
1).b. From an IBM i command line, run the following command to start the
QShell Interpreter: QSHc. Run the cd shell command, specifying the fully qualified path to the console
directory you used in Step 1.d. Run the shell script to register the server: registerProduct.she. When the utility prompts for the cluster’s name, type the name and press
Enter.f. When the registration script completes, press F3 to exit QSH.
The utility registers the cluster, as well as each node, generating a log filecalled ConsoleUtility.log and storing it in the consoles/logs directory. Ifthe registration is successful, a console.pid will also be generated.
8. Start the Lotus Sametime Gateway cluster, if it is not already running.
Performing a silent installation:
IBM Lotus Sametime Gateway can be installed silently using a response file. Youcan either generate your own response file by installing using the install wizard, orby editing the default response file that is provided.
Performing a silent installation on IBM i:
IBM Lotus Sametime Gateway can be installed silently using a response file. Youcan either generate your own response file by installing using the install wizard, orby editing the default response file that is provided.
Before you begin
You must install WebSphere Application Server separately before performing asilent installation. The silent installation program must be run in QSH mode.
Information on downloading packages for Lotus Sametime is located at thefollowing Web address:
Chapter 3. Installing 383
www.ibm.com/support/docview.wss?rs=477&uid=swg24024322
About this task
A response file is a text file that contains all the options that would normally bespecified in the installation dialogs. Silent installation is useful in situations whereautomation is desired.
To perform a silent installation, you have to create a new response file or edit theexisting response file that is included with the product. On the root of the LotusSametime Gateway installation CD is a fully-documented responsefile: installresponse.txt. Copy this file to the machine and edit it with valuesappropriate for your environment, or complete the following steps to create aresponse file based on a real installation.1. From the installation media, copy and unzip the following Lotus Sametime
Gateway installation image to a temporary directory /TMP on the machinewhere you will be installing Lotus Sametime Gateway:C17KCML.exe
This step creates a folder: /TMP/SametimeGateway.2. Copy the folder /TMP/SametimeGateway to the IFS of the IBM i system.3. Start a QSHELL session.4. Navigate to the /TMP/SametimeGateway folder.5. Record a response file by typing the following command. This will perform an
installation and generate a response file:install.sh -options-record response_file
where response_file is an absolute path to the response file to be generated.install.sh -options-record /TMP/SametimeGateway/gatewayOptions.txt
6. If another Sametime Gateway installation exists on the system, you must allowfor the existence of more than one Sametime Gateway server by completing thesub steps that follow:a. Using a text editor, open the response file.b. Search for the line starting with -V Coexist=.c. If the line exists set the value to be -V Coexist="true". If the line does not
exist, add -V Coexist="true" to the bottom of the file.d. Save and close the response file.
7. Once a response file is created, either by modifying the installresponse.txtfile included with the installer, or by generating your own response file, open acommand window.
8. Type the following command to use the response file that you created:install.sh -options response_file -silent
Results
Upon completion of the installation, control will return to the command window.Validation or installation errors are logged to the installation log file.
Note: Generating response files using the -options-record option puts clear textpasswords in the response file.
Managing trusted IP addresses:
384 Lotus Sametime: Installation and Administration Guide Part 1
Whenever you install a server that communicates with an IBM Lotus SametimeCommunity Server, you must add the new server’s IP address to the CommunityServer’s settings.
About this task
The Lotus Sametime Community Server accepts connections from the LotusSametime Media Manager, the Lotus Sametime Gateway, the Lotus SametimeCommunity Mux, and the Lotus Sametime Proxy Server, as well as other serversthat are listed in the Community Services page. To ensure that the Lotus SametimeCommunity Server trusts these components when they establish a connection, youmust add the trusted server’s IP address to the Lotus Sametime CommunityServer.
You do not need to add the Lotus Sametime System Console’s IP address becauseit is added automatically when you install the Lotus Sametime Community Serverusing a deployment plan or register the Lotus Sametime Community Server withthe console after installation.
This task must be completed separately for each server within a Lotus SametimeCommunity Server cluster, as well as for multiple non-clustered CommunityServers.1. Log in to the Integrated Solutions Console.2. Click Sametime System Console → Sametime Servers → Sametime Community
Servers.3. In the Sametime Community Servers list, click the deployment name of the
server with the list of trusted IP addresses that you want to change.4. Click the Connectivity tab.5. Under Trusted Servers, enter the IP address of the server that must connect to
the Lotus Sametime Community Server in the New IP Address field, and clickAdd.
Note: For the Lotus Sametime Media Manager, enter the Conference Managerserver IP address. Each instance of a Conference Manager cluster must beentered.To delete an IP address from the list, select it and click Delete Selected.
6. Click OK.7. Restart the Lotus Sametime Community Server for the change to take effect.
Troubleshooting installation:
These steps help you troubleshoot installation problems by describing how you canuse a different tables pace name for the database and how you can clean yoursystem of previous installations.
About this task
Many installation problems are caused when the installer cannot locate thedatabase or when installing a new instance of Sametime Gateway and a previousinstallation has not been completely removed from the system. The following stepsdescribe how to use a different table space in the database or clean your system ofprevious installations.1. Open the installation log file at stgw_server_root\logs\installlog.txt
Chapter 3. Installing 385
2. If log reports an error in finding the DB2 database, check to make sure you areusing the table space name USERSPACE1. Sametime Gateway expects USERSPACE1by default. To install using a different table space name, use the followingcommand when you run the installer:install.bat -VTableSpaceName="tableSpaceName"
Where tableSpaceName is the name of the table space that you want the installerto use.
3. To clean your system of previous installations, use the log to find the locationof the Install Shield Multiplatform (ISMP) database called the Vital ProductDatabase (VPD). For example, examine this log entry from Windows (formattedto fit on the page):(Nov 24, 2007 2:22:22 PM), stGwInstall,com.ibm.rtc.gateway.install.CheckVPDRegistry, msg1,using VPD registry at C:\Program Files\CommonFiles\InstallShield\Universal\common\Gen2\_vpddb\vpd
The location of this registry varies from system to system. On windows, VPD isusually found in the \Program Files\Common Files\InstallShield\Universal\common\Gen2 folder. If a Sametime Gateway server is uninstalled, but an erroroccurs and the product is not unregistered, the VPD shows that SametimeGateway is installed on the system. When a new installation is initiated, and apreviously installed Sametime Gateway server is detected, the installer promptsyou to upgrade or install a new version, or the installer forces you to install aDeployment Manager server or a Primary Server on the same system. None ofthese scenarios are desired because there are no Sametime Gateway serversinstalled on the system.
4. Back up the Gen2 folder. Note that the VPD registry may be used by otherprograms that are installed with InstallShield, so removing this registry mayinterfere with other programs. It’s recommended that you do not remove theGen2 folder unless absolutely necessary.
5. Remove the original Gen2 folder.6. If installing on Windows, delete the following left over files:
C:\Windows\.nifregistryC:\Windows\vpd.properties
7. Start the installation again.
Configuring LDAPConfigure Sametime Gateway to use the LDAP directory used by the localSametime environment. If you did not connect to LDAP when you installedSametime Gateway, or you did connect to LDAP but now want to create a secureconnection, use these procedures. Sametime Gateway must look up names andgroups in the LDAP directory to grant users and groups access to externalcommunities.
About this task
Use Lotus Sametime Gateway with virtually any LDAP directory that is supportedby Lotus Sametime and the WebSphere Application Server environment. LotusSametime Gateway deployment does not require changes to existing directorystructures. It’s recommended that you configure the same LDAP directory that isused by the Sametime community server. You can use a separate LDAP directory,but information between the two LDAP directories must be replicated andidentical.
386 Lotus Sametime: Installation and Administration Guide Part 1
Note: The use of an LDAP directory is not required for Lotus Sametime Gateway,but it lets you implement an access control list (ACL) that controls which usersand groups can access, and be accessed from, external communities. If you do notwant to configure the use of an LDAP directory at this time, you can skip theprocedure. If you later decide to start using an LDAP directory for Lotus SametimeGateway, you can configure the interaction at that time.
Be sure to read the first topic below before setting up your LDAP directory:
LDAP and access to external and internal users:
Lotus Sametime Gateway works with the LDAP user registry used by your localSametime community so that you can assign local users permission to accessmembers in external and clearinghouse communities. For local users to chat withand share presence with a member of an external community, two events musthappen: you must assign the local user to the external community and the externalcommunity administrator must assign the external community member access toyour Sametime community.
You can use Lotus Sametime Gateway with virtually any LDAP directory that issupported by Lotus Sametime or the WebSphere Application Server environment.Lotus Sametime Gateway deployment does not require changes to existingdirectory structures. When you configure WebSphere Application Server to use anLDAP user registry, you are identifying to Lotus Sametime Gateway the LDAPdirectory that houses members of the local Sametime community. As anadministrator, you look up names and groups in the LDAP directory and assignthem capabilities when accessing an external community.
Using LDAP, you can assign users and group to capabilities such as instantmessaging or presence or both when assigning users and groups access to anexternal community. Lotus Sametime Gateway displays group names, user names(short names), and user e-mail addresses. Groups do not have e-mail addresses.
Access to internal and external communities
When you assign a local user from your LDAP directory access to an externalcommunity, you provide, at the local level, permission for that local user toexchange instant messages with potentially all members of an external community.You cannot give the user permission to subscribe to some members of the externalcommunity because you cannot control who in the external community has accessto the local user. If the administrator in an external community assigns allmembers in the external directory access to your local community, your localSametime user can subscribe to all members of the external community and allexternal community members can subscribe to your user.
As an administrator, you cannot set access for external users because there is noway for you to configure access in external directories. External users can onlyhave instant messaging and presence with the members of your local communityfor whom you have assigned access. The only people who can be subscribed to byexternal users are the users and groups who have been granted access by you.
For example, if local user John has not been granted access to external community,and external user Mary subscribes to John’s presence, Mary will never receive aresponse because local user John does not have the rights to send a response. Anysubscription requests from an external user is blocked by the Lotus Sametime
Chapter 3. Installing 387
Gateway because the local user is not granted access to subscribe to the externalcommunity.
Configuring LDAP for a single server:
IBM Lotus Sametime Gateway requires that IBM WebSphere Application Server beconfigured to use a Lightweight Directory Access Protocol (LDAP) user registrythat contains members of the local Sametime community. Complete the followingsteps if you did not create a connection to LDAP at installation, or you completeda connection to LDAP but want to secure that connection over SSL.
Before you begin
Expected state: Administrative security is enabled. The Deployment Manager isrunning.1. If not already started, start Lotus Sametime Gateway:
a. Open a command window (QShell session on IBM i).b. Navigate to the Lotus Sametime Gateway profile directory that contains
binaries: rtcgw_profile_root\binc. Type the following command. Note that RTCGWServer is case-sensitive.
AIX, Linux, and Solaris./startServer.sh RTCGWServer
WindowsstartServer.bat RTCGWServer
IBM istartServer RTCGWServer
2. Ensure that the enterprise LDAP server is running.3. Complete the following sub steps to connect to connect to LDAP over SSL,
otherwise skip this step. If the LDAP server is using a public certificate, thenyou need to obtain the public root CA and import it. If your LDAP server isusing a self-signed certificate, then you simply import the self-signedcertificate.a. From the Integrated Solutions Console, select Security → SSL Certificates
and key management, then select Key stores and certificates.b. Click NodeDefaultTrustStore.c. Click Signer certificates.d. Click Add.e. In the Alias field, type a description for the certificate, whether it’s
self-signed or a public CA.f. In the File name field, type the path to the certificate file. For example,
c:\certname.cer.g. Click Apply and then Save.
4. From the Integrated Solutions Console, select Security → Global Security.5. Make sure the Enable administrative security and Enable application
security options are selected.6. In the Available realm definitions, select Federated repositories.7. Click Set as current.8. Click Configure.9. Click Add base entry to the Realm.
10. On the next screen, click Add Repository...
388 Lotus Sametime: Installation and Administration Guide Part 1
11. Type a logical name for the repository in the Repository Identifier field. Theidentifer can be any value, as long as it’s unique within the cell.
12. Select the type of LDAP server to use from the Type list. If you have an IBMLotus Domino Version 7.0 server, select IBM Lotus Domino Version 6.5 asyour LDAP type.
13. Enter the fully qualified host name of the LDAP server in the Primary hostname field. You can enter either the IP address or domain name system (DNS)name.
14. Enter the LDAP server port number in the Port field. The host name and theport number represent the realm for this LDAP server in the WebSphereApplication Server cell. The default value is 389.
15. Optionally, enter the bind DN name in the Bind distinguished name field.The bind distinguished name can be any user with read permission for thedirectory server. The bind DN need not be the LDAP administrator. Leave thisfield blank to connect to the LDAP server anonymously.
16. Optionally enter the password corresponding to the bind DN in the Bindpassword field. Leave this field blank to connect to the LDAP serveranonymously.
17. Specify the Login properties when setting up the repository. The cn, uid, andmail are common login property values. If your LDAP server uses a loginproperty other than uid, you must change the value to match your user prefix.
18. Click Apply, and then click Save.19. In the Distinguished name of a base entry that uniquely identifies this set
of entries in the realm field, type the base DN of your choice such as″o=myLDAPRealm″ or ″o=defaultWIMLDAPBasedRealm″. This DN is forinternal Websphere Application Server use only and is used to identify a set ofentries when returning search results.
20. In the Distinguished name of a base entry in this repository field, type theDN of the base entry within the directory to begin searches. Leave this fieldblank to start LDAP searches at the root of your LDAP repository, or if youhave a Domino LDAP, which always begins searches at the root of thedirectory. An example of a DN for the base entry in a repository:dc=IBM,dc=COM
21. Click Apply, and then click Save.22. Use a text editor and open wimconfig.xml. The directory path that follows is
all on one line but represented here on two lines for printing:app_server_root\profiles\RTCGW_Profile\config\cells\<cell_name>\wim\config\wimconfig.xml
The <cell_name> is the name of your cell.23. Search for the following text:
<config:attributeConfiguration>
24. Below this line of text, add the following line if it does not exist:<config:externalIdAttributes name="dominounid"/> , specifying the correctvalue for your directory from the following list:Domino LDAP: dominounidIDS: ibm-entryuuidActive Directory: objectguidNovell eDirectory: guid
Sun ONE: nsuniqueid For example, if you have a Domino LDAP, your textmay look like this. Note that your text may be different.
Chapter 3. Installing 389
<config:attributeConfiguration><config:externalIdAttributes name="dominounid" /><config:attributes name="userPassword" propertyName="password" /><config:entityTypes>Group</config:entityTypes></config:attributes>
- <config:attributes name="cn" propertyName="cn"><config:entityTypes>Group</config:entityTypes></config:attributes>
<config:propertiesNotSupported name="businessAddress" /></config:attributeConfiguration>
25. Now find the <config:repositories> element and add the following line tothe <config:attributeConfiguration> element block:<config:externalIdAttributes name="<unique_attribute>"syntax="<attribute_syntax>"/>
where <unique_attribute> is the unique LDAP attribute that you want to useand <attribute_syntax> identifies the syntax. Include the syntax attributeonly if the syntax is something other than a type of string.For example, to use a string called dominounid, edit the wimconfig.xml file toinclude the following element:<config:externalIdAttributes name="dominounid"/>
If the attribute was not a string, you would identify its syntax as well. Forexample:<config:externalIdAttributes name="GUID" syntax="octetString"/>
The following are some examples of commonly used unique attributes fordifferent some flavors of LDAP:v Domino LDAP: dominounidv IDS: ibm-entryuuidv Active Directory: objectguidv Novell eDirectory: guidv Sun ONE: nsuniqueid
26. Save the file. Note: the dominounid attribute was introduced in LotusDomino 6.5.4 and 7.0. In some cases this attribute may not appear in theschema database or on the Server Configuration document (LDAP tab). Thiscan occur when the administration server for the Domino domain is version6.5.3 or lower. The Administration server controls the creation of the Schemadatabase, as well as which attributes are available for anonymous queriesthrough the Configuration document. To resolve the issue, the Administrationserver should be upgraded to Domino version 6.5.4 or above. In addition,while a particular Domino LDAP may not require to bind, binding isnecessary to retrieve the dominounid attribute. Any bind user would beacceptable, read only is fine.
27. Stop and then restart the Lotus Sametime Gateway server:a. Navigate to the directory that contains binaries: rtcgw_profile_root\binb. Type the following commands, depending on your operating system, to
stop and then start Lotus Sametime Gateway. You must use the user nameand password that you provided when you enabled administrativesecurity to stop the server. Wait for the stopserver command to finishbefore executing the startserver command. Note that RTCGWServer iscase-sensitive.AIX, Linux, and Solaris./stopServer.sh RTCGWServer -username username -password password./startServer.sh RTCGWServer
Windows
390 Lotus Sametime: Installation and Administration Guide Part 1
stopServer.bat RTCGWServer -username username -password passwordstartServer.bat RTCGWServer
IBM istopServer RTCGWServer -username username -password passwordstartServer RTCGWServer
28. log into the Integrated Solutions Console (http://localhost:9060/ibm/console).29. Select Users and Groups → Manage Users.30. Click Search to verify that you can search your LDAP directory. If your LDAP
functionality is enabled, you should see a list of users on the screen.31. Click a user name and make sure you can see the user’s content. You can
verify group names as well.32. Copy the script: stgw_server_root/config/adminscripts/rtcgw_vmm.jacl to
app_server_root/bin .33. Open a separate command window and navigate to app_server_root/bin .34. Run the following command:
wsadmin -username username -password password -f rtcgw_vmm.jacl
Where username is the administrative user ID that you use to log into theIntegrated Solutions Console. You created this user ID when you installedLotus Sametime Gateway. For example:wsadmin -username wasadmin -password gateway4u -f rtcgw_vmm.jacl
35. Stop and then restart the Lotus Sametime Gateway server:a. Navigate to the directory that contains binaries: rtcgw_profile_root\binb. Type the following commands, depending on your operating system, to
stop and then start Lotus Sametime Gateway. You must use the user nameand password that you provided when you enabled administrativesecurity to stop the server. Wait for the stopserver command to finishbefore executing the startserver command. Note that RTCGWServer iscase-sensitive.AIX, Linux, and Solaris./stopServer.sh RTCGWServer -username username -password password./startServer.sh RTCGWServer
WindowsstopServer.bat RTCGWServer -username username -password passwordstartServer.bat RTCGWServer
IBM istopServer RTCGWServer -username username -password passwordstartServer RTCGWServer
36. The remaining optional steps apply to an LDAP server that is not a DominoLDAP directory. By default, Sametime uses mail as the attribute in an LDAPrecord to search for users. If your LDAP directory uses a different attribute,you can change Sametime to use that attribute instead. For example, if youwant to change Sametime to instead use the attribute displayName, completethe following steps:a. Use a Lotus Notes client on the Sametime server to open the Sametime
Configuration database (stconfig.nsf).b. Click File → Database → Open and select the Local server.c. Select the Sametime Configuration database (stconfig.nsf).d. Click Open.e. In the right pane of the Configuration database, locate the LDAP server
entry in the Form Name column of the Configuration.
Chapter 3. Installing 391
f. Each LDAP Server document is listed to the right and beneath the LDAPServer entry under the Last Modified Date column. The date representsthe last time the LDAP server document was modified.
g. To open an LDAP Server document, double-click the date in the LastModified Date column that represents the document.
h. When the LDAP Server document opens, double-click the document to putit in edit mode.
i. Search and replace mail with displayname.
Search filter for resolving person names:(&(objectclass=organizationalPerson)(|(uid=%s*)(givenname=%s*)(sn=%s*)(mail=%s*)))Search filter to use when resolving a user name to a distinguished name:(&(objectclass=organizationalPerson)(|(uid=%s)(givenname=%s)(sn=%s)(mail=%s)))
"Attribute of the person entry that defines the person's e-mail address" mail
j. Save your changes and then restart the Domino server.k. On the Lotus Sametime Gateway server that is connected to LDAP, use a
text editor and open the following file:
rtcgw_profile_root\config\cells\<cell_name>\wim\config\wimconfig.xml
l. Add the following line under the other configuration attributes:<config:attributes name="displayName" propertyName="mail"/> Forexample:<config:attributeConfiguration>
<config:externalIdAttributes name="dominounid" /><config:attributes name="userPassword" propertyName="password" />
- <config:attributes name="cn" propertyName="displayName"><config:attributes name="displayName" propertyName="mail"/><config:entityTypes>Group</config:entityTypes></config:attributes>
- <config:attributes name="cn" propertyName="cn"><config:entityTypes>Group</config:entityTypes></config:attributes>
<config:propertiesNotSupported name="businessAddress" /></config:attributeConfiguration>
m. Save the file.n. Stop and restart the Lotus Sametime Gateway server.
Configuring LDAP for a cluster:
The IBM Lotus Sametime Gateway requires that IBM WebSphere ApplicationServer be configured to use the Lightweight Director Access Protocol (LDAP) userregistry that contains members of the local Sametime community. These stepsinclude information for setting up a connection to LDAP using a self-signedcertificate. Complete the following steps if you did not create a connection toLDAP at installation, or you completed a connection to LDAP but want to securethat connection over SSL.
Before you begin
Expected state: the Deployment Manager and node agents are started. The serversare stopped. Administrative security is enabled.1. Log in to the Deployment Manager node as a user with administrative
privileges. Make sure you have an enterprise LDAP server that containsmembers of the local Sametime community and the LDAP server is running.
392 Lotus Sametime: Installation and Administration Guide Part 1
2. Complete the following sub steps to connect to LDAP over SSL, otherwiseskip this step. If your LDAP server is using a public CA, then you need toobtain the public root CA and import it. If your LDAP server is using aself-signed certificate, then you simply import the self-signed certificate.a. From the Integrated Solutions Console, select Security → SSL Certificates
and key management, then select Key stores and certificates.b. Click CellDefaultTrustStore.c. Click Signer certificates.d. Click Add.e. In the Alias field, type a description for the certificate, whether it’s
self-signed or a public CA.f. In the File name field, type the path to the certificate file. For example,
c:\certname.cer.g. Click Apply and then Save.
3. Select Security → Secure administration, applications, and infrastructure.4. Make sure the Enable administrative security and Enable application
security options are selected.5. In the Available realm definitions, select Federated repositories.6. Click Set as current.7. Click Configure.8. Click Add base entry to the Realm...
9. On the next screen, click Add Repository...
10. Type a logical name for the repository in the Repository Identifier field. Theidentifier can be any value, as long as it’s unique within the cell.
11. Select the type of LDAP server to use from the Type list. If you have a IBMLotus Domino Version 7.0 server, select IBM Lotus Domino Version 6.5 as yourLDAP type.
12. Enter the fully qualified host name of the LDAP server in the Primary Hostfield. You can enter either the IP address or domain name system (DNS)name.
13. Enter the LDAP server port number in the Port field. The host name and theport number represent the realm for this LDAP server in the WebSphereApplication Server cell. The default value is 389.
14. Optionally, enter the bind DN name in the Bind distinguished name field.The bind distinguished name can be any user with read permission for thedirectory server. The bind DN need not be the LDAP administrator. Leave thisfield blank to connect to the LDAP server anonymously.
15. Optionally, enter the password corresponding to the bind DN in the Bindpassword field. Leave this field blank to connect to the LDAP serveranonymously.
16. Specify the Login properties when setting up the repository. The cn, uid, andmail are common login property values. If your LDAP server uses a loginproperty other than uid, you must change the value to match your user prefix.
17. Click Apply, and then click Save.18. In the Distinguished name of a base entry that uniquely identifies this set
of entries in the realm field, type the base DN of your choice such as″o=myLDAPRealm″ or ″o=defaultWIMLDAPBasedRealm″. This DN is forinternal Websphere Application Server use only and is used to identify a set ofentries when returning search results.
Chapter 3. Installing 393
19. In the Distinguished name of a base entry in this repository field, type theDN of the base entry within the directory to begin searches. Leave this fieldblank to start LDAP searches at the root of your LDAP repository, or if youhave a Domino LDAP, which always begins searches at the root of thedirectory. An example of a DN for the base entry in a repository:dc=IBM,dc=COM
20. Click Apply, and then click Save.21. Log out of the Integrated Solutions Console.22. On the Lotus Sametime Gateway server that is connected to LDAP, use a text
editor and open wimconfig.xml. The directory path that follows is all on oneline but represented here on two lines for printing:app_server_root\profiles\RTCGW_Profile\config\cells\<cell_name>\wim\config\wimconfig.xml
The <cell_name> is the name of your cell.23. Search for the following text:
<config:attributeConfiguration>
24. Below this line of text, add the following line if it does not exist:<config:externalIdAttributes name="dominounid"/> , specifying the correctvalue for your directory from the following list:Domino LDAP: dominounidIDS: ibm-entryuuidActive Directory: objectguidNovell eDirectory: guid
Sun ONE: nsuniqueid For example, if you have a Domino LDAP, your textmay look like this. Note that your text may be different.<config:attributeConfiguration>
<config:externalIdAttributes name="dominounid" /><config:attributes name="userPassword" propertyName="password" /><config:entityTypes>Group</config:entityTypes></config:attributes>
- <config:attributes name="cn" propertyName="cn"><config:entityTypes>Group</config:entityTypes></config:attributes>
<config:propertiesNotSupported name="businessAddress" /></config:attributeConfiguration>
25. Now find the <con fig:repositories> element and add the following line tothe <config:attributeConfiguration> element block:<config:externalIdAttributes name="<unique_attribute>"syntax="<attribute_syntax>"/>
where <unique_attribute> is the unique LDAP attribute that you want to useand <attribute_syntax> identifies the syntax. Include the syntax attributeonly if the syntax is something other than a type of string.For example, to use a string called dominounid, edit the wimconfig.xml file toinclude the following element:<config:externalIdAttributes name="dominounid"/>
If the attribute was not a string, you would identify its syntax as well. Forexample:<config:externalIdAttributes name="GUID" syntax="octetString"/>
The following are some examples of commonly used unique attributes fordifferent some flavors of LDAP:v Domino LDAP: dominounid
394 Lotus Sametime: Installation and Administration Guide Part 1
v IDS: ibm-entryuuidv Active Directory: objectguidv Novell eDirectory: guidv Sun ONE: nsuniqueid
26. Save the file.27. Navigate to the rtcgw_profile_root\bin directory.28. Stop the Deployment Manager and wait for the command to finish, and then
restart the Deployment Manager. Use the user name and password that youcreated when you enabled administrative security. Type the followingcommands:AIX, Linux, and Solaris./stopServer.sh dmgr -username username -password password./startServer.sh dmgr
WindowsstopServer.bat dmgr -username username -password passwordstartServer.bat dmgr
IBM i./stopServer.sh dmgr -username username -password passwordstartServer.sh dmgr
29. Synchronize your changes to all nodes in the cluster. Click SystemAdministration → Nodes
30. Select all nodes in the cluster, then click Full Resynchronize.31. Restart the node agents.
a. Log into the Integrated Solutions Console (http://localhost:9060/ibm/console) on the Deployment Manager node.
b. Click System Administration → Node agents .c. Select all node agents, and then click Restart.
32. Choose Servers → Clusters
33. Select the Lotus Sametime Gateway cluster and click Start. Verify that thecluster status is started. (shown with a green arrow).
34. Select Users and Groups → Manage Users.35. Click Search to verify that you can search your LDAP directory. If your LDAP
functionality is enabled, you should see a list of users on the screen.36. Click a user name and make sure you can see the user’s content. You can
verify group names as well.37. Copy the following script:
from:stgw_server_root/config/adminscripts/rtcgw_vmm.jaclto the Deployment Manager node:app_server_root/bin
38. Open a command window and navigate to app_server_root/bin .39. Run the following command:
wsadmin -username username -password password -f rtcgw_vmm.jacl
Where username is the administrative user ID that you use to log into theIntegrated Solutions Console. You created this user ID when you installedLotus Sametime Gateway. For example:wsadmin -username wasadmin -password gateway4u -f rtcgw_vmm.jacl
40. In the DB2 window on the Deployment Manager node, stop the DeploymentManager and wait for the command to finish, and then restart the
Chapter 3. Installing 395
Deployment Manager. Use the user name and password that you providedwhen you enabled administrative security. Type the following commands:AIX, Linux, and Solaris./stopManager.sh -username username -password password./startManager.sh
WindowsstopManager.bat -username username -password passwordstartManager.bat
IBM istopManager -username username -password passwordstartManager
41. Restart the node agents.a. log into the Integrated Solutions Console (http://localhost:9060/ibm/
console) on the Deployment Manager node.b. Click System Administration → Node agents .c. Select all node agents, and then click Restart.
42. Choose Servers → Clusters
43. Select the Lotus Sametime Gateway cluster and click Start. Verify that thecluster status is started. (shown with a green arrow).
44. The remaining optional steps apply to an LDAP server that is not a nativeinternal Domino directory. Complete these steps to change the defaultattribute of the person entry that defines the person’s e-mail address inapp_server_root\profiles\RTCGW_Profile \config\cells\<cell_name>\wim\config\wimconfig.xml. The default attribute is mail. If you want to change thedefault attribute to displayName, complete the following steps:a. Use a Lotus Notes client on the Sametime server to open the Sametime
Configuration database (stconfig.nsf).b. Click File → Database → Open and select the Local server.c. Select the Sametime Configuration database (stconfig.nsf).d. Click Open.e. In the right pane of the Configuration database, locate the LDAP server
entry in the Form Name column of the Configuration.f. Each LDAP Server document is listed to the right and beneath the LDAP
Server entry under the Last Modified Date column. The date representsthe last time the LDAP server document was modified.
g. To open an LDAP Server document, double-click the date in the LastModified Date column that represents the document.
h. When the LDAP Server document opens, double-click the document to putit in edit mode.
i. Search and replace mail with displayname.Search filter for resolving person names:(&(objectclass=organizationalPerson)(|(uid=%s*)(givenname=%s*)(sn=%s*)(mail=%s*)))Search filter to use when resolving a user name to a distinguished name:(&(objectclass=organizationalPerson)(|(uid=%s)(givenname=%s)(sn=%s)(mail=%s)))
"Attribute of the person entry that defines the person's e-mail address" mail
j. Save your changes and then restart the Domino server.k. On the Lotus Sametime Gateway server that is connected to LDAP, use a
text editor and open the following file:app_server_root\profiles\RTCGW_Profile\config\cells\<cell_name>\wim\config\wimconfig.xml
396 Lotus Sametime: Installation and Administration Guide Part 1
l. Add the following line under the other configuration attributes:<config:attributes name="displayName" propertyName="mail"/> Forexample:<config:attributeConfiguration><config:externalIdAttributes name="dominounid" /><config:attributes name="userPassword" propertyName="password" /><config:attributes name="cn" propertyName="displayName"><config:attributes name="displayName" propertyName="mail"/><config:entityTypes>Group</config:entityTypes></config:attributes><config:attributes name="cn" propertyName="cn"><config:entityTypes>Group</config:entityTypes></config:attributes><config:propertiesNotSupported name="businessAddress" /></config:attributeConfiguration>
m. Save the file. Note: the dominounid attribute was introduced in LotusDomino 6.5.4 and 7.0. In some cases this attribute may not appear in theschema database or on the Server Configuration document (LDAP tab).This can occur when the administration server for the Domino domain isversion 6.5.3 or lower. The Administration server controls the creation ofthe Schema database, as well as which attributes are available foranonymous queries through the Configuration document. To resolve theissue, the Administration server should be upgraded to Domino version6.5.4 or above. In addition, while a particular Domino LDAP may notrequire to bind, binding is necessary to retrieve the dominounid attribute.Any bind user would be acceptable, read only is fine.
n. Stop and restart the Deployment Manager, the node agents and LotusSametime Gateway servers.
Results
You are now ready to set up SSL on a cluster.
Installing the WebSphere Application Server Update Installeron IBM i
Use the WebSphere Application Server Update Installer to add required softwareupdates.
About this task
Follow these steps to download the update package and install the IBM UpdateInstaller, which is needed for installed software updates for WebSphere ApplicationServer. Extract the packages and run the Update Installer install program from theworkstation that you download the update package to. The Update Installer willbe remotely installed to your IBM i system.1. Log in with the same user account used to install the Sametime software.2. On the local system, create a directory to store the update files, such as
stwas_fixes.3. Download the IBM Update Installer package if you have not already done so.
a. To download installation packages, you must have an IBM PassportAdvantage account, which is described at the following Web address:www.ibm.com/software/howtobuy/passportadvantage/paocustomer/docs/en_US/ecare.html
b. Open this release’s Download document at the following Web address:http://www.ibm.com/support/docview.wss?rs=477&uid=24024322
Chapter 3. Installing 397
Locate the components you need in the document’s listing, then downloadthe packages labelled with the corresponding part numbers.
4. Extract the package to the local fixes directory you created.5. In the UpdateInstallers subdirectory of the package you extracted, extract the
updateInstaller package for your platform.6. Navigate to the directory where you extracted the Update Installer and run
the install program.install.exe
7. The installation wizard initializes and displays the Welcome screen. Click Nextto continue.
8. The License agreement screen is displayed. Read the license agreement andaccept its terms. After you accept the licensing terms, the installation wizardchecks for a supported operating system and prerequisite patches. If youencounter a problem such as not having the right prerequisite updates onyour system, cancel the installation, make the required changes, and restartthe installation.
9. The Installation directory screen is displayed. Specify the destination of theinstallation root directory.
10. The Installation summary panel appears. Review the summary. Click Next tobegin the installation or click Back to make changes to previous panels.
11. The Installation results panel is displayed. Verify the success of the installerprogram by examining the completion panel.
Installing WebSphere Application Server updates on IBM iIf you must install additional WebSphere Application Server software updates,perform this step on each of the servers in your deployment running onWebSphere Application Server.
Before you begin
To perform these steps, you must have already installed the WebSphereApplication Server Update Installer.
About this task
Follow these steps to install the WebSphere Application Server software updatesrequired for Sametime 8.5 servers as outlined in the Technote on the IBM SupportSite.
http://www.ibm.com/support/docview.wss?rs=477&uid=swg21415822
System requirements for this release of the Lotus Sametime family of products ismaintained as an IBM Technote at the following Web address:http://www.ibm.com/support/docview.wss?rs=477&uid=swg27016451
1. Download the WebSphere Application Server updates package if you have notalready done so.a. To download installation packages, you must have an IBM Passport
Advantage account, which is described at the following Web address:www.ibm.com/software/howtobuy/passportadvantage/paocustomer/docs/en_US/ecare.html
b. Open this release’s Download document at the following Web address:http://www.ibm.com/support/docview.wss?rs=477&uid=24024322
398 Lotus Sametime: Installation and Administration Guide Part 1
Locate the components you need in the document’s listing, then downloadthe packages labelled with the corresponding part numbers.
2. Extract the updates to a local directory such as stwas_fixes.3. Use ftp or another convenient method to transfer the installation package to the
system where you plan to install the product. Store the file in an IFS directoryof your choosing; for example:updateInstall_Home/maintenance
By default updateInstall_Home is the root directory of the Update Installer,/QIBM/ProdData/WebSphere/UpdateInstaller/V7/UPDI.
4. Ensure that you stop all running processes as described in “Commandreference for starting and stopping servers” on page 232.
5. Open the document calledupdateInstall_Home/os400_readme_updateinstaller.html.Follow the instructions in ″Installing multiple maintenance packs with silentinstall″ to install the update package.
6. After you install the update package, check the installation log to verify thatthe install is successful. The log can be found at app_server_root/logs/update/install/updatelog.txt.
7. Start the servers as described in “Command reference for starting and stoppingservers” on page 232.
Results
To verify which updates have been installed, run the versionInfo command fromthe app_server_root/bin directory.
./versionInfo -maintenancePackages > version.txt
The command creates a text file that lists all the WebSphere Application Serverupdates that have been installed on the system.Related tasks
“Installing the WebSphere Application Server Update Installer on IBM i” on page397Use the WebSphere Application Server Update Installer to add required softwareupdates.
Deploying the Sametime client to usersThe IBM Lotus Sametime Connect client or Lotus Sametime client embedded inNotes have to be installed on users’ machines to use instant messaging andmeetings. This section gives you information about ways to install these clients.
Sametime Connect client considerationsThere are several things you need to know before deploying the IBM LotusSametime Connect client to your users.
About this task
The Lotus Sametime Connect client must be installed on a user’s workstation bysomeone with administrative privileges on that computer. Before installing theclient, review the following changes for this release:v Using Lotus Expeditor to install the Sametime client
Chapter 3. Installing 399
If you will use Lotus Expeditor to push the client onto user workstations, beaware of the following restrictions:– Do not use non-ASCII characters in the name of the installation directory.– Do not use long paths (instead create a profile that uses short paths).– Do not use paths containing non-ISO-8859-1 characters.
These restrictions are discussed in the Lotus Expeditor information center.v Internet passwords required
Internet passwords are required to log on to IBM Lotus Sametime connect.Before using Lotus Sametime Connect, each user must have an Internetpassword in their Person Document in the Domino Directory or stored in theLDAP Directory. You may need to inform users of their Internet passwords.
v Supporting IPv6 addressing with the Connect client
Supporting the IPv6 protocol in a Lotus Sametime deployment requires you toupgrade Lotus Sametime Connect clients to release 8.5 to ensure they cancommunicate with Lotus Sametime servers that use IPv6 addresses.If you support only IPv6 addressing, older clients will not generate errormessages but will appear ″broken″ to users because they cannot communicatewith the IPv6–enabled servers. To avoid lengthy investigations of problemscaused by attempts to use older clients with servers where only IPv6 addressingis enabled, you should only use clients from release 8.0.2 or later.If you support both IPv4 and IPv6 addressing, all Lotus Sametime clients cancommunicate with the IPv6–enabled servers; just be sure to configure the serversto listen for IPv4–format addresses as well as IPv6–format addresses.
v Spell checker dictionaries
The U.S. English spell check dictionary is installed automatically, but you caninstall spell checker dictionaries for additional languages. The additionaldictionaries are provided as an update site on the client CD and downloadedimage in the optional-components/optional-components-update.zip file. See“Adding optional features to already-installed clients” on page 209.
Enabling installation of optional client features such as MicrosoftOffice IntegrationIBM Lotus Sametime ships with a number of optional client features that are notincluded in the default installation package. You can add features to theinstallation package for new client installs, as well as update already-installedclients.
Before you begin
For example, these optional features are not installed by default; to make themavailable to your users, you must either update existing clients or customize theinstallation package for new clients.v Microsoft Office Integration featuresv E-mail Integration featuresv Spell checker dictionaries
Note: Microsoft Office Integration features are available only for clients running onWindows.
The administrator decides which features to make available to clients, and whichmethod to use for installing the client. The following sections explain the availableoptions in more detail.
400 Lotus Sametime: Installation and Administration Guide Part 1
Editing the client installation file for a CD or download image:
IBM Lotus Sametime ships with optional client features that you can add to thedefault client installations, including Microsoft Office Integration features onMicrosoft Windows clients, E-mail Integration Features, and Spell CheckerDictionaries.
About this task
Follow these steps to use a customized install.xml file to include optionalfeatures in installations from a CD or download image.1. Copy the contents of the CD or downloaded image to a local directory. Use this
local directory to make the edits in the next steps.2. Open the install.xml file for the appropriate client operating system: Open the
file in a text editor.v Windows
CD\sametimeclient.standalone\deploy\install.xml
3. Customize the install.xml file to remove the comment markers from anyoptional features you wish to include in the install.Optional features are commented out like this:<!-- This is the beginning of a comment marker
The following characters mark the end of the comment: -->
Everything between the markers is ignored as a comment. To enable a feature,either copy it and place it outside of the commented section, or move thecomment markers as needed to exclude the feature from the commentedsection.
4. Save and close the file.5. Test a base install.6. Repackage the CD or download image before distributing to your users.
Example: Customized install.xml file for the Sametime Connect client:
The install.xml is the installation manifest, which lists all features shipped withIBM Lotus Sametime Connect. When you uncomment the optional features in thelist, they become part of the base client install package. You can edit theinstall.xml file for installations from a CD, a downloadable image, or from a linkon the Sametime Welcome page.
Original
This example shows the default settings, in which six Microsoft Office Integrationfeatures and two other optional features are commented out. The commentedsection begins with <!-- and ends with -->
Note: The lines below have been formatted for readability because it is importantto move entire feature statements.<!--The following Sametime features are optional, and may be uncommented in order to be deployed.<feature id="com.ibm.collaboration.realtime.exchange.feature"
version="8.5.0.20091027-2140" match="compatible" download-size="315"size="315" action="install" shared="true" mergeaction="add"url="${installer.root}"/>
<feature id="com.ibm.collaboration.realtime.notes.connector.feature"version="8.5.0.20091027-2140" match="compatible" download-size="123"
Chapter 3. Installing 401
size="123" action="install" shared="true" mergeaction="add"url="${installer.root}"/>
<feature id="com.ibm.collaboration.realtime.notes.connector.standalone.feature"version="8.5.0.20091027-2140" match="compatible" download-size="7" size="7"action="install" shared="true" mergeaction="add" url="${installer.root}"/>
<feature id="com.ibm.collaboration.realtime.oi.sharepoint.feature"version="8.5.0.20091027-2140" match="compatible" download-size="3833"size="3833" action="install" shared="true" mergeaction="add"url="${installer.root}"/>
<feature id="com.ibm.collaboration.realtime.oi.smarttags.feature"version="8.5.0.20091027-2140" match="compatible" download-size="5685"size="5685" action="install" shared="true" mergeaction="add"url="${installer.root}"/>
<feature id="com.ibm.collaboration.realtime.oi.standalone.feature"version="8.5.0.20091027-2140" match="compatible" download-size="7"size="7" action="install" shared="true" mergeaction="add"url="${installer.root}"/>
<feature id="com.ibm.collaboration.realtime.oi.toolbar.feature"version="8.5.0.20091027-2140" match="compatible" download-size="4302"size="4302" action="install" shared="true" mergeaction="add"url="${installer.root}"/>
<feature id="com.ibm.collaboration.realtime.oi.webConfTab.feature"version="8.5.0.20091027-2140" match="compatible" download-size="3048"size="3048" action="install" shared="true" mergeaction="add"url="${installer.root}"/>
-->
Modified to enable optional features
Now the Microsoft Office Integration features have been moved outside of thecomment, so they will install automatically. The remaining optional features arestill commented out and will not be installed.<feature id="com.ibm.collaboration.realtime.exchange.feature"
version="8.5.0.20091027-2140" match="compatible" download-size="315"size="315" action="install" shared="true" mergeaction="add"url="${installer.root}"/>
<feature id="com.ibm.collaboration.realtime.oi.sharepoint.feature"version="8.5.0.20091027-2140" match="compatible" download-size="3833"size="3833" action="install" shared="true" mergeaction="add"url="${installer.root}"/>
<feature id="com.ibm.collaboration.realtime.oi.smarttags.feature"version="8.5.0.20091027-2140" match="compatible" download-size="5685"size="5685" action="install" shared="true" mergeaction="add"url="${installer.root}"/>
<feature id="com.ibm.collaboration.realtime.oi.standalone.feature"version="8.5.0.20091027-2140" match="compatible" download-size="7"size="7" action="install" shared="true" mergeaction="add"url="${installer.root}"/>
<feature id="com.ibm.collaboration.realtime.oi.toolbar.feature"version="8.5.0.20091027-2140" match="compatible" download-size="4302"size="4302" action="install" shared="true" mergeaction="add"url="${installer.root}"/>
<feature id="com.ibm.collaboration.realtime.oi.webConfTab.feature"version="8.5.0.20091027-2140" match="compatible" download-size="3048"size="3048" action="install" shared="true" mergeaction="add"url="${installer.root}"/>
<!--The following Sametime features are optional, and may be uncommented in order to be deployed.<feature id="com.ibm.collaboration.realtime.notes.connector.feature"
version="8.5.0.20091027-2140" match="compatible" download-size="123"size="123" action="install" shared="true" mergeaction="add"url="${installer.root}"/>
<feature id="com.ibm.collaboration.realtime.notes.connector.standalone.feature"version="8.5.0.20091027-2140" match="compatible" download-size="7" size="7"action="install" shared="true" mergeaction="add" url="${installer.root}"/>
-->
402 Lotus Sametime: Installation and Administration Guide Part 1
Editing the client installation package for use on the Sametime Welcome page:
IBM Lotus Sametime ships with optional client features that you can add to thedefault client installations, including Microsoft Office Integration features onMicrosoft Windows clients, E-mail Integration Features, and Spell CheckerDictionaries. You can customize the installation package and then create an archivezip file that you post on your Sametime Welcome page for users to download.
About this task
Complete these tasks to create a customized install.xml file and post it for usersto download using a link on the Sametime Welcome page:
Editing the client install file:
IBM Lotus Sametime ships with optional client features that you can add to thedefault client installations, including Microsoft Office Integration features onMicrosoft Windows clients, E-mail Integration Features, and Spell CheckerDictionaries. You can customize the installation package and then create an archivezip file that you post on your Sametime Welcome page for users to download.
About this task
Follow these steps to use a customized install.xml file to include optionalfeatures in installations from the network.1. Open the install manifest (the install.xml file) stored in the network-install
directory on the Sametime server:v Windows server
– Windows client: C:\Program Files\lotus\domino\data\domino\html\sametime\network-install\install\deploy\install.xml
v AIX, Linux, and Solaris servers
– Windows client: /local/notesdata/domino/html/sametime/network-install/install/deploy/install.xml
v IBM i server
There is no default data directory but the name may be similar to this:– Windows client: /STserver/domino/html/sametime/network-install/
install/deploy/install.xml2. Edit both versions of install.xml to uncomment any optional features you
wish to include in the install.Optional features are commented out like this:<!-- This is the beginning of a comment marker
The following characters mark the end of the comment: -->
Everything between the markers is ignored as a comment. To enable a feature,either copy it and place it outside of the commented section, or move thecomment markers as needed to exclude the feature from the commentedsection.
3. Save and close the files.
Example: Customized install.xml file for the Sametime Connect client:
The install.xml is the installation manifest, which lists all features shipped withIBM Lotus Sametime Connect. When you uncomment the optional features in the
Chapter 3. Installing 403

list, they become part of the base client install package. You can edit theinstall.xml file for installations from a CD, a downloadable image, or from a linkon the Sametime Welcome page.
Original
This example shows the default settings, in which six Microsoft Office Integrationfeatures and two other optional features are commented out. The commentedsection begins with <!-- and ends with -->
Note: The lines below have been formatted for readability because it is importantto move entire feature statements.<!--The following Sametime features are optional, and may be uncommented in order to be deployed.<feature id="com.ibm.collaboration.realtime.exchange.feature"
version="8.5.0.20091027-2140" match="compatible" download-size="315"size="315" action="install" shared="true" mergeaction="add"url="${installer.root}"/>
<feature id="com.ibm.collaboration.realtime.notes.connector.feature"version="8.5.0.20091027-2140" match="compatible" download-size="123"size="123" action="install" shared="true" mergeaction="add"url="${installer.root}"/>
<feature id="com.ibm.collaboration.realtime.notes.connector.standalone.feature"version="8.5.0.20091027-2140" match="compatible" download-size="7" size="7"action="install" shared="true" mergeaction="add" url="${installer.root}"/>
<feature id="com.ibm.collaboration.realtime.oi.sharepoint.feature"version="8.5.0.20091027-2140" match="compatible" download-size="3833"size="3833" action="install" shared="true" mergeaction="add"url="${installer.root}"/>
<feature id="com.ibm.collaboration.realtime.oi.smarttags.feature"version="8.5.0.20091027-2140" match="compatible" download-size="5685"size="5685" action="install" shared="true" mergeaction="add"url="${installer.root}"/>
<feature id="com.ibm.collaboration.realtime.oi.standalone.feature"version="8.5.0.20091027-2140" match="compatible" download-size="7"size="7" action="install" shared="true" mergeaction="add"url="${installer.root}"/>
<feature id="com.ibm.collaboration.realtime.oi.toolbar.feature"version="8.5.0.20091027-2140" match="compatible" download-size="4302"size="4302" action="install" shared="true" mergeaction="add"url="${installer.root}"/>
<feature id="com.ibm.collaboration.realtime.oi.webConfTab.feature"version="8.5.0.20091027-2140" match="compatible" download-size="3048"size="3048" action="install" shared="true" mergeaction="add"url="${installer.root}"/>
-->
Modified to enable optional features
Now the Microsoft Office Integration features have been moved outside of thecomment, so they will install automatically. The remaining optional features arestill commented out and will not be installed.<feature id="com.ibm.collaboration.realtime.exchange.feature"
version="8.5.0.20091027-2140" match="compatible" download-size="315"size="315" action="install" shared="true" mergeaction="add"url="${installer.root}"/>
<feature id="com.ibm.collaboration.realtime.oi.sharepoint.feature"version="8.5.0.20091027-2140" match="compatible" download-size="3833"size="3833" action="install" shared="true" mergeaction="add"url="${installer.root}"/>
<feature id="com.ibm.collaboration.realtime.oi.smarttags.feature"version="8.5.0.20091027-2140" match="compatible" download-size="5685"size="5685" action="install" shared="true" mergeaction="add"
404 Lotus Sametime: Installation and Administration Guide Part 1
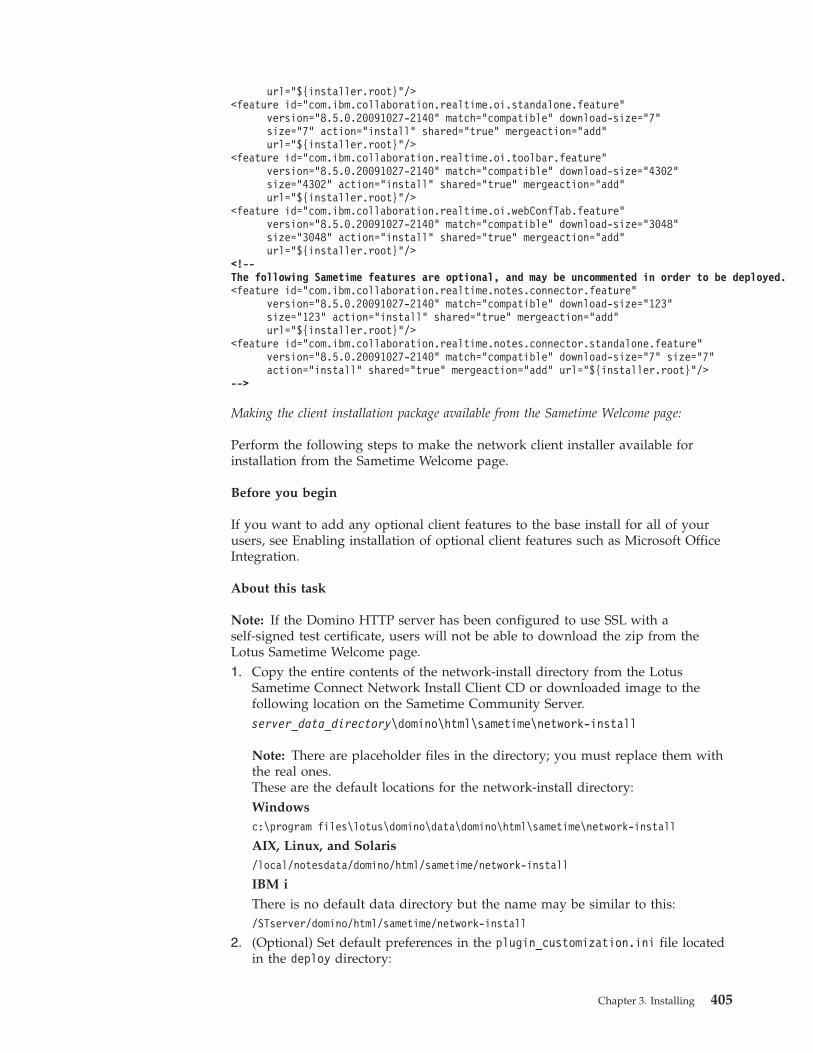
url="${installer.root}"/><feature id="com.ibm.collaboration.realtime.oi.standalone.feature"
version="8.5.0.20091027-2140" match="compatible" download-size="7"size="7" action="install" shared="true" mergeaction="add"url="${installer.root}"/>
<feature id="com.ibm.collaboration.realtime.oi.toolbar.feature"version="8.5.0.20091027-2140" match="compatible" download-size="4302"size="4302" action="install" shared="true" mergeaction="add"url="${installer.root}"/>
<feature id="com.ibm.collaboration.realtime.oi.webConfTab.feature"version="8.5.0.20091027-2140" match="compatible" download-size="3048"size="3048" action="install" shared="true" mergeaction="add"url="${installer.root}"/>
<!--The following Sametime features are optional, and may be uncommented in order to be deployed.<feature id="com.ibm.collaboration.realtime.notes.connector.feature"
version="8.5.0.20091027-2140" match="compatible" download-size="123"size="123" action="install" shared="true" mergeaction="add"url="${installer.root}"/>
<feature id="com.ibm.collaboration.realtime.notes.connector.standalone.feature"version="8.5.0.20091027-2140" match="compatible" download-size="7" size="7"action="install" shared="true" mergeaction="add" url="${installer.root}"/>
-->
Making the client installation package available from the Sametime Welcome page:
Perform the following steps to make the network client installer available forinstallation from the Sametime Welcome page.
Before you begin
If you want to add any optional client features to the base install for all of yourusers, see Enabling installation of optional client features such as Microsoft OfficeIntegration.
About this task
Note: If the Domino HTTP server has been configured to use SSL with aself-signed test certificate, users will not be able to download the zip from theLotus Sametime Welcome page.1. Copy the entire contents of the network-install directory from the Lotus
Sametime Connect Network Install Client CD or downloaded image to thefollowing location on the Sametime Community Server.server_data_directory\domino\html\sametime\network-install
Note: There are placeholder files in the directory; you must replace them withthe real ones.These are the default locations for the network-install directory:Windowsc:\program files\lotus\domino\data\domino\html\sametime\network-install
AIX, Linux, and Solaris/local/notesdata/domino/html/sametime/network-install
IBM i
There is no default data directory but the name may be similar to this:/STserver/domino/html/sametime/network-install
2. (Optional) Set default preferences in the plugin_customization.ini file locatedin the deploy directory:
Chapter 3. Installing 405
v \network-install\install\deploy
3. Update the installer URL information.a. Open the \domino\html\sametime\network-install\applet\
download.properties file in a text editor.b. Set the value of the installer.root.base property to match the correct URL for
the network-install directory on your Sametime server.For example, if your Sametime server host name is stserver.com:installer.root.base=http://stserver.com/sametime/network-install
c. Save your changes.4. Use the ArchiveCreator tool to generate the installer archive zips for each
platform.These zip files only include the base installer with the Expeditor/Eclipseplatform and the install manifest which can be customized for yourenvironment. This allows the user to download the zip file, extract it, and runthe installer, which provisions the Lotus Sametime features from the update siteincluded with the network-install directory.Windows
a. Open a console window to the \domino\html\sametime\network-install\bin directory
b. Run the ArchiveCreator tool (ArchiveCreator.bat).AIX, Linux, and Solaris
a. Open a console window to the \domino\html\sametime\network-install\bin directory
b. Run the ArchiveCreator tool (ArchiveCreator.sh).IBM i
a. Run the following commands:QSH
cd /server_data_directory/domino/html/sametime/network-install/bin
ArchiveCreator_i5OS.sh
b. Press F3 to Exit QSH.
Editing the installation package for the Lotus Notes embedded client:
IBM Lotus Sametime ships with optional client features that you can add to thedefault client installations, including Microsoft Office Integration features onMicrosoft Windows clients, E-mail Integration Features, and Spell CheckerDictionaries. You can customize the installation package for the Lotus Sametimeclient that is embedded in Lotus Notes on Microsoft Windows.
About this task
Follow these steps to use a customized install.addon.xml file that includesoptional features in the Lotus Notes embedded client installation package.1. Copy the contents of the CD or downloaded image to a local directory. Use this
local directory to make the edits in the next steps.2. Extract the sametime.embedded.add-on.OS.yyyymmdd-hhss.zip archive file for
the appropriate client operating system.v Windows
sametime.embedded.add-on.win.yyyymmdd-hhss.zip
where yyyymmdd-hhss displays a date and time; for example: 20091027-2140.
406 Lotus Sametime: Installation and Administration Guide Part 1
3. Open the deploy\install.addon.xml file for editing (this is one of the extractedfiles).
4. Locate the section that starts with the following statement (near the end of thefile):The following Sametime features are optional, and may be uncommented in order to be deployed.
5. Remove the comment markers to enable desired features:v By default, all of the features in this section are disabled because they are
commented out.v You can enable any combination of features.v You can enable any, or all, of these features by moving the comment markers
to the appropriate position.v Make sure to comment entire features (from the opening <feature marker
through the closing /> marker.v Begin a comment with this marker: <!--v End a comment with this marker: --><!-- This is a sample comment;it can run across multiple lines in the file --><!--The marker can be on the same line as other text, or on its own line.-->
For example, you may want to enable one or more Microsoft Office Integrationfeatures for clients running on Windows:
Table 50. Microsoft Office Integration features available on Windows
Feature Description
com.ibm.collaboration.realtime.exchangeProvides automatic availability status updates inSametime livenames based on Microsoft Outlookcalendar entries.
com.ibm.collaboration.realtime.oi.sharepoint.featureProvides awareness and instant messaging amongLotus Sametime users who are using an OfficeSharePoint site.
com.ibm.collaboration.realtime.oi.toolbarProvides an action toolbar in Microsoft Outlookcontaining Lotus Sametime instant messaging actions,including access to the contact list, status, and locationinformation.
com.ibm.collaboration.realtime.oi.webConfTabProvides the ability to reserve Sametime meetings fromthe Sametime tab in Microsoft Outlook meetings.
com.ibm.collaboration.realtime.oi.smarttagsProvides Sametime instant messaging actions in theMicrosoft Office document Smart Tags menu and thetoolbar for Word, Excel, and PowerPoint.
6. Save and close the deploy\install.addon.xml file.7. Repackage the CD or download image before distributing to your users.
Example: Customized client install.addon.xml file for embedded client:
The install.addon.xml file is the installation manifest, which lists all featuresshipped with the IBM Lotus Sametime embedded client for Lotus Notes. Whenyou uncomment the optional features in the list, they become part of the baseclient install package.
Chapter 3. Installing 407
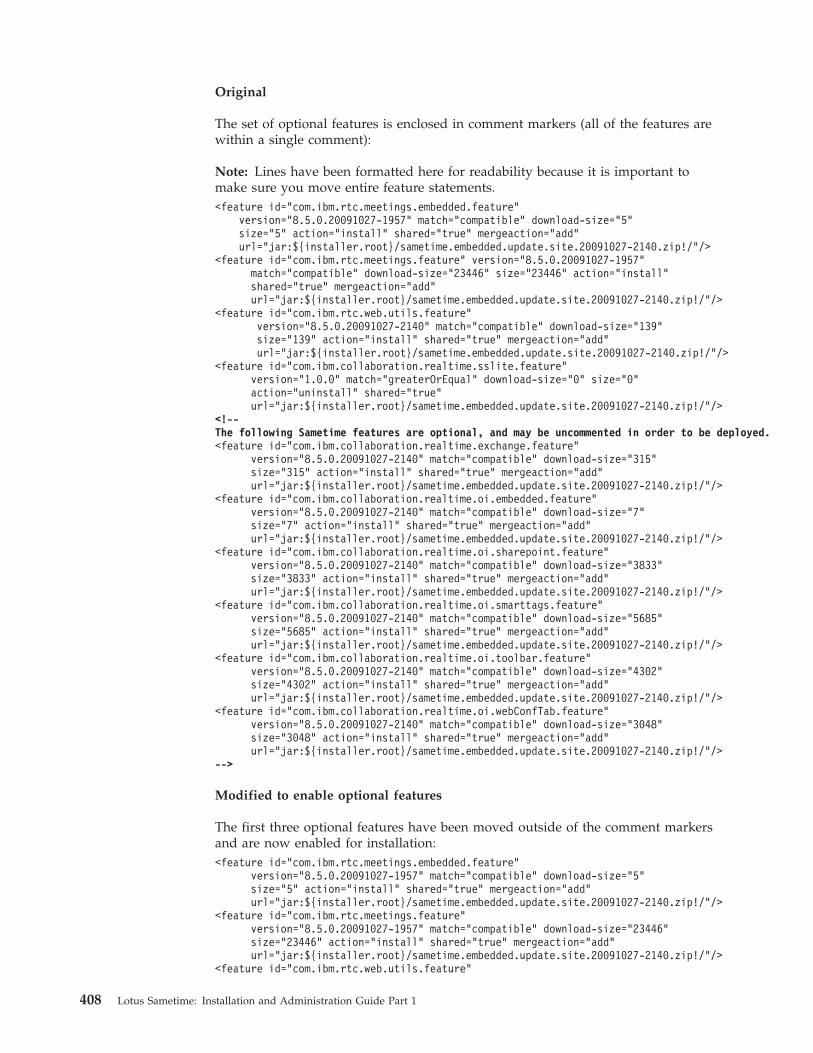
Original
The set of optional features is enclosed in comment markers (all of the features arewithin a single comment):
Note: Lines have been formatted here for readability because it is important tomake sure you move entire feature statements.<feature id="com.ibm.rtc.meetings.embedded.feature"
version="8.5.0.20091027-1957" match="compatible" download-size="5"size="5" action="install" shared="true" mergeaction="add"url="jar:${installer.root}/sametime.embedded.update.site.20091027-2140.zip!/"/>
<feature id="com.ibm.rtc.meetings.feature" version="8.5.0.20091027-1957"match="compatible" download-size="23446" size="23446" action="install"shared="true" mergeaction="add"url="jar:${installer.root}/sametime.embedded.update.site.20091027-2140.zip!/"/>
<feature id="com.ibm.rtc.web.utils.feature"version="8.5.0.20091027-2140" match="compatible" download-size="139"size="139" action="install" shared="true" mergeaction="add"url="jar:${installer.root}/sametime.embedded.update.site.20091027-2140.zip!/"/>
<feature id="com.ibm.collaboration.realtime.sslite.feature"version="1.0.0" match="greaterOrEqual" download-size="0" size="0"action="uninstall" shared="true"url="jar:${installer.root}/sametime.embedded.update.site.20091027-2140.zip!/"/>
<!--The following Sametime features are optional, and may be uncommented in order to be deployed.<feature id="com.ibm.collaboration.realtime.exchange.feature"
version="8.5.0.20091027-2140" match="compatible" download-size="315"size="315" action="install" shared="true" mergeaction="add"url="jar:${installer.root}/sametime.embedded.update.site.20091027-2140.zip!/"/>
<feature id="com.ibm.collaboration.realtime.oi.embedded.feature"version="8.5.0.20091027-2140" match="compatible" download-size="7"size="7" action="install" shared="true" mergeaction="add"url="jar:${installer.root}/sametime.embedded.update.site.20091027-2140.zip!/"/>
<feature id="com.ibm.collaboration.realtime.oi.sharepoint.feature"version="8.5.0.20091027-2140" match="compatible" download-size="3833"size="3833" action="install" shared="true" mergeaction="add"url="jar:${installer.root}/sametime.embedded.update.site.20091027-2140.zip!/"/>
<feature id="com.ibm.collaboration.realtime.oi.smarttags.feature"version="8.5.0.20091027-2140" match="compatible" download-size="5685"size="5685" action="install" shared="true" mergeaction="add"url="jar:${installer.root}/sametime.embedded.update.site.20091027-2140.zip!/"/>
<feature id="com.ibm.collaboration.realtime.oi.toolbar.feature"version="8.5.0.20091027-2140" match="compatible" download-size="4302"size="4302" action="install" shared="true" mergeaction="add"url="jar:${installer.root}/sametime.embedded.update.site.20091027-2140.zip!/"/>
<feature id="com.ibm.collaboration.realtime.oi.webConfTab.feature"version="8.5.0.20091027-2140" match="compatible" download-size="3048"size="3048" action="install" shared="true" mergeaction="add"url="jar:${installer.root}/sametime.embedded.update.site.20091027-2140.zip!/"/>
-->
Modified to enable optional features
The first three optional features have been moved outside of the comment markersand are now enabled for installation:<feature id="com.ibm.rtc.meetings.embedded.feature"
version="8.5.0.20091027-1957" match="compatible" download-size="5"size="5" action="install" shared="true" mergeaction="add"url="jar:${installer.root}/sametime.embedded.update.site.20091027-2140.zip!/"/>
<feature id="com.ibm.rtc.meetings.feature"version="8.5.0.20091027-1957" match="compatible" download-size="23446"size="23446" action="install" shared="true" mergeaction="add"url="jar:${installer.root}/sametime.embedded.update.site.20091027-2140.zip!/"/>
<feature id="com.ibm.rtc.web.utils.feature"
408 Lotus Sametime: Installation and Administration Guide Part 1
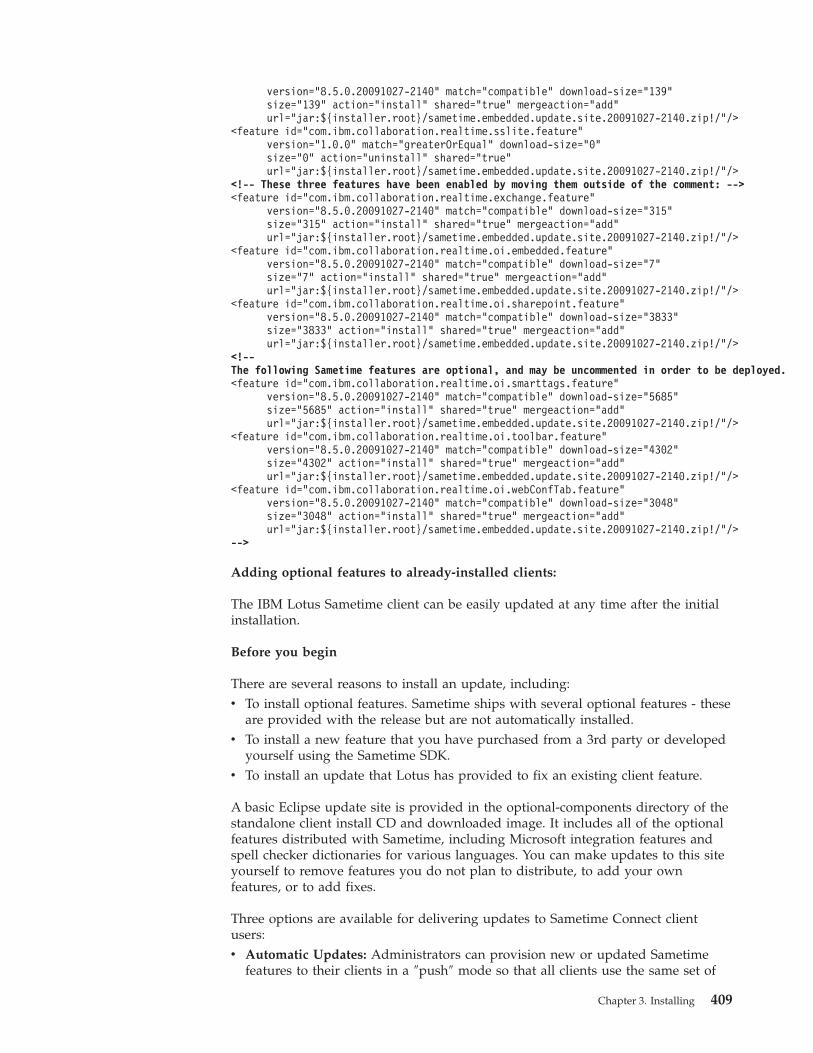
version="8.5.0.20091027-2140" match="compatible" download-size="139"size="139" action="install" shared="true" mergeaction="add"url="jar:${installer.root}/sametime.embedded.update.site.20091027-2140.zip!/"/>
<feature id="com.ibm.collaboration.realtime.sslite.feature"version="1.0.0" match="greaterOrEqual" download-size="0"size="0" action="uninstall" shared="true"url="jar:${installer.root}/sametime.embedded.update.site.20091027-2140.zip!/"/>
<!-- These three features have been enabled by moving them outside of the comment: --><feature id="com.ibm.collaboration.realtime.exchange.feature"
version="8.5.0.20091027-2140" match="compatible" download-size="315"size="315" action="install" shared="true" mergeaction="add"url="jar:${installer.root}/sametime.embedded.update.site.20091027-2140.zip!/"/>
<feature id="com.ibm.collaboration.realtime.oi.embedded.feature"version="8.5.0.20091027-2140" match="compatible" download-size="7"size="7" action="install" shared="true" mergeaction="add"url="jar:${installer.root}/sametime.embedded.update.site.20091027-2140.zip!/"/>
<feature id="com.ibm.collaboration.realtime.oi.sharepoint.feature"version="8.5.0.20091027-2140" match="compatible" download-size="3833"size="3833" action="install" shared="true" mergeaction="add"url="jar:${installer.root}/sametime.embedded.update.site.20091027-2140.zip!/"/>
<!--The following Sametime features are optional, and may be uncommented in order to be deployed.<feature id="com.ibm.collaboration.realtime.oi.smarttags.feature"
version="8.5.0.20091027-2140" match="compatible" download-size="5685"size="5685" action="install" shared="true" mergeaction="add"url="jar:${installer.root}/sametime.embedded.update.site.20091027-2140.zip!/"/>
<feature id="com.ibm.collaboration.realtime.oi.toolbar.feature"version="8.5.0.20091027-2140" match="compatible" download-size="4302"size="4302" action="install" shared="true" mergeaction="add"url="jar:${installer.root}/sametime.embedded.update.site.20091027-2140.zip!/"/>
<feature id="com.ibm.collaboration.realtime.oi.webConfTab.feature"version="8.5.0.20091027-2140" match="compatible" download-size="3048"size="3048" action="install" shared="true" mergeaction="add"url="jar:${installer.root}/sametime.embedded.update.site.20091027-2140.zip!/"/>
-->
Adding optional features to already-installed clients:
The IBM Lotus Sametime client can be easily updated at any time after the initialinstallation.
Before you begin
There are several reasons to install an update, including:v To install optional features. Sametime ships with several optional features - these
are provided with the release but are not automatically installed.v To install a new feature that you have purchased from a 3rd party or developed
yourself using the Sametime SDK.v To install an update that Lotus has provided to fix an existing client feature.
A basic Eclipse update site is provided in the optional-components directory of thestandalone client install CD and downloaded image. It includes all of the optionalfeatures distributed with Sametime, including Microsoft integration features andspell checker dictionaries for various languages. You can make updates to this siteyourself to remove features you do not plan to distribute, to add your ownfeatures, or to add fixes.
Three options are available for delivering updates to Sametime Connect clientusers:v Automatic Updates: Administrators can provision new or updated Sametime
features to their clients in a ″push″ mode so that all clients use the same set of
Chapter 3. Installing 409
features. The push method enables the client to receive updates automaticallywhenever he or she logs in to Sametime.
v Optional Updates: Administrators can also provide new Sametime features totheir clients as an option. With the optional method, the user is notified thatoptional updates are available when logging in to Sametime. The user selectswhich updates to install, if any.
Note: The optional update feature is the recommended approach for anyupdates that are not required. If the optional site is configured before the initialclient install, it provides a seamless initial install experience. A user installs theclient, and is presented with a prompt to select optional features at first log in. Itrequires less communication and manual interaction than the manual updatemethod.
v Manual Updates: Administrators either distribute update sites (zip or jar files)or post them to a Web server, and provide the users with instructions formanually installing the updates using the tools in the connect client.
About this task
Setting up automatic updates
To set up your server so that client updates are installed automatically, specify the″Sametime update site URL″ on each of your Sametime servers.
From the Lotus Sametime System Console, open the policies page and update eachof the appropriate policies:1. Log in to the Sametime System Console, open that server’s Integrated Solutions
Console, select Sametime System Console, and then click Manage Policies →Instant Messaging.
2. Locate the ″Sametime update site URL″ setting in the Instant Messaging sectionof the policy.
3. Specify the URL for the update site where you will post required updates.Updates of features from this site are required and will be installedautomatically; the client is not provided a choice. For Lotus Sametime 8.0connect clients, you can specify more than one URL by separating them withsemi-colons or commas.When the user logs in from the client, the client checks the �Sametime updatesite URL� setting for the appropriate policy on the default Sametime server.
Note: If the URL has not been specified or the setting is not found, the clientwill search the preferences.ini file located in the update plugin(com.ibm.collaboration.realtime.update\preferences.ini) root directory for theadminUpdatePolicyURL value. (The policy setting was not available prior toSametime 7.5.1.)When the client logs in and connects to the specified update site, it silentlydownloads all updated features it finds and installs them. Once installation iscomplete, the user receives a textbox announcing that new updates have beeninstalled and that the user should restart the Sametime client. The user canclick the restart button or press a five-minute delay button. If the user isinvolved in chats with other users, he or she can continue to delay restart for aslong as he wishes by continuing to press the restart button at five-minuteintervals. After the restart, the client checks again to see if there are moreupdates, and if it finds none, the user is not interrupted again. This updateprocess takes place each time the user restarts his client and logs in.
410 Lotus Sametime: Installation and Administration Guide Part 1
Setting up optional updates
To set up your server so that your users are presented with a selection of optionalupdates, specify the ″Sametime optional add-on site URLs″ on each of yourSametime servers.
From the Lotus Sametime System Console, open the policies page and update eachof the appropriate policies:1. Log in to the Sametime System Console, open that server’s Integrated Solutions
Console, select Sametime System Console, and then click Manage Policies →Instant Messaging.
2. Locate the ″Sametime optional add-on site URLs″ setting in the InstantMessaging section of the policy.
3. Specify one or more URLs for update sites where you will post optionalupdates.When the user logs in from the client, the client checks the ″Sametime optionaladd-on site URLs″ policy on the default Sametime server.When the user logs in from the client, the client checks the ″Sametime optionaladd-on site URLs″ policy on the default Sametime server.
Note: If the URL has not been specified or the setting is not found, the clientwill search the preferences.ini file located in the update plugin(com.ibm.collaboration.realtime.update\preferences.ini) root directory for theoptionalUpdatePolicyURL value. (The policy setting was not available prior toSametime 8.0.)When the client logs in, it scans all of the optional update sites listed to findany available updates that match the client configuration. If any updates arefound, the client displays a message alerting the user that updates are availablewith an option to open the Update Manager (which is pre-populated with thelist of sites defined in the policy). The alert also allows the user to disablefurther checking on startup. (This preference can also be set in the Contact Listpreferences). From the Update Manager, the user can select which updates (ifany) they would like to install, then follow the instructions in the updatepanels to accept the license(s) and complete the install. If any updates areinstalled, the client will prompt the user to restart.
Manually installing updates
In Sametime Connect, the user can manually install updates by choosing Tools >Plug-ins > Install plug-ins. The user can then:1. Select Search for new features to install, and then click Next.2. Add an update site:
v If remote, select Add Remote Location..., specify a name for the update siteand provide the URL for the site.
v If a local directory, select Add Folder Location..., and select the directorywhere the update site exists.
v If a local archive, select Add Zip / Jar Location... and select the update sitearchive.For example, if you have access to the Standalone client install CD ordownloaded image, you can click New Archive Site.... Then navigate to theoptional-components directory and select optional-components-update-site.zip.
Chapter 3. Installing 411
3. Click OK to add the new update site, and then click Finish. After a short time,the Update window appears
4. Expand the update site and select the updates you wish to install from theavailable list. Then click Next.
5. You must agree to the license terms to continue.6. In the next window, click Finish to install. Verify by clicking Install.7. Restart the Client.
Installing the Sametime Connect client from a CDUsers can install the IBM Lotus Sametime Connect client from the standalone clientinstaller CD or corresponding downloaded image.
Installing the Sametime Connect client from CD on Windows:
Users can install the IBM Lotus Sametime Connect client from the standalone clientinstaller CD or corresponding downloaded image on a Microsoft Windows client.
Before you begin
If the installation has been customized to install Microsoft Office Integrationfeatures, you must ensure that no Office or Outlook processes are running at thetime of the install. For more information, see the IBM Tech Note 1307607 at:www.ibm.com/support/docview.wss?rs=477&uid=swg21307607
About this task
Follow these steps to install the Sametime Connect client on a Windows client.1. If the Sametime Connect client is running, shut it down before attempting to
install the newer version.2. Important: Make a back-up copy of the directory where the earlier version of
the client is installed, in case you need to revert to it.3. Navigate to the root of the CD or downloaded image.4. Double-click setup.exe to begin the installation.
If you have previous releases of the Connect client installed:v Sametime Connect 7.5.x:
The default operation is to uninstall an existing client, but because the 8.5client installs to a different directory, you can choose to retain the 7.5.x clientby running the new installation with a special flag, as follows:setup.exe /v"STUNINSTALL75=0"
v Sametime Connect 8.0.x:The 8.5 client installs to the same path as the 8.0.x client, you cannot retainthe older client when you install the 8.5 client; the new client will replace theold client.
5. Enter the required information when prompted.6. When the installation completes, launch the Sametime Connect client; by
default Sametime Connect is installed to C:\Program Files\IBM\Lotus\SametimeConnect.
Configuring the silent install for Connect client:
412 Lotus Sametime: Installation and Administration Guide Part 1
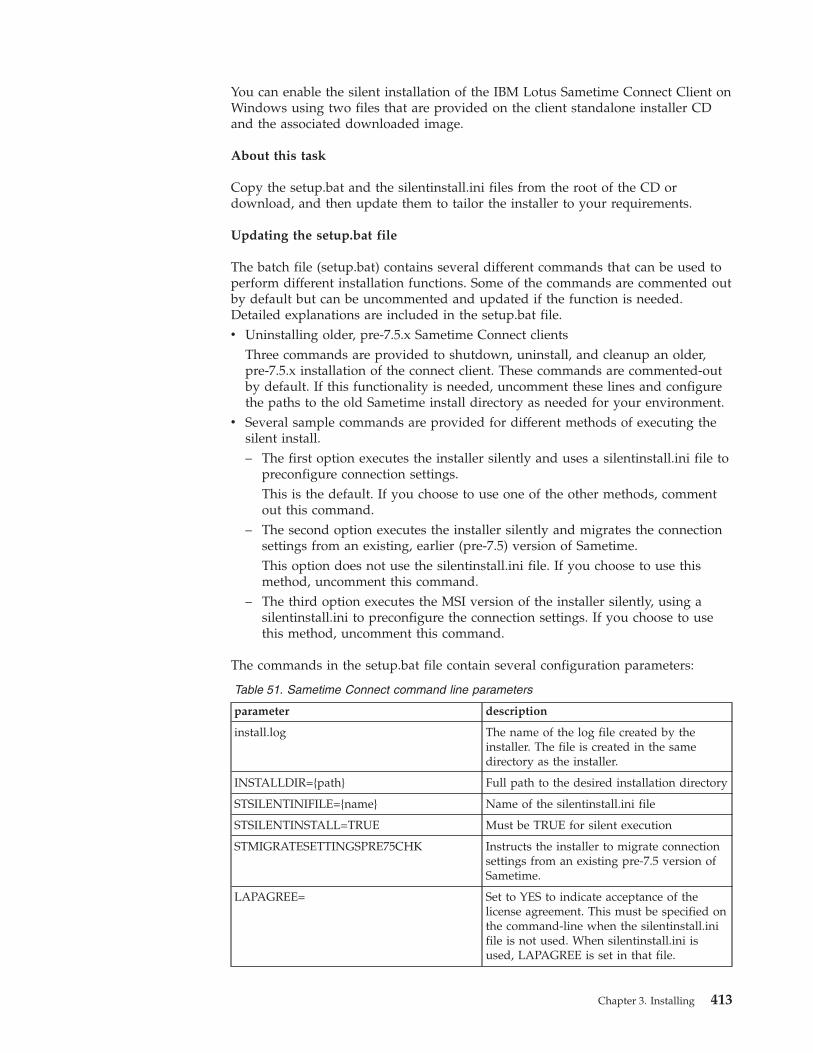
You can enable the silent installation of the IBM Lotus Sametime Connect Client onWindows using two files that are provided on the client standalone installer CDand the associated downloaded image.
About this task
Copy the setup.bat and the silentinstall.ini files from the root of the CD ordownload, and then update them to tailor the installer to your requirements.
Updating the setup.bat file
The batch file (setup.bat) contains several different commands that can be used toperform different installation functions. Some of the commands are commented outby default but can be uncommented and updated if the function is needed.Detailed explanations are included in the setup.bat file.v Uninstalling older, pre-7.5.x Sametime Connect clients
Three commands are provided to shutdown, uninstall, and cleanup an older,pre-7.5.x installation of the connect client. These commands are commented-outby default. If this functionality is needed, uncomment these lines and configurethe paths to the old Sametime install directory as needed for your environment.
v Several sample commands are provided for different methods of executing thesilent install.– The first option executes the installer silently and uses a silentinstall.ini file to
preconfigure connection settings.This is the default. If you choose to use one of the other methods, commentout this command.
– The second option executes the installer silently and migrates the connectionsettings from an existing, earlier (pre-7.5) version of Sametime.This option does not use the silentinstall.ini file. If you choose to use thismethod, uncomment this command.
– The third option executes the MSI version of the installer silently, using asilentinstall.ini to preconfigure the connection settings. If you choose to usethis method, uncomment this command.
The commands in the setup.bat file contain several configuration parameters:
Table 51. Sametime Connect command line parameters
parameter description
install.log The name of the log file created by theinstaller. The file is created in the samedirectory as the installer.
INSTALLDIR={path} Full path to the desired installation directory
STSILENTINIFILE={name} Name of the silentinstall.ini file
STSILENTINSTALL=TRUE Must be TRUE for silent execution
STMIGRATESETTINGSPRE75CHK Instructs the installer to migrate connectionsettings from an existing pre-7.5 version ofSametime.
LAPAGREE= Set to YES to indicate acceptance of thelicense agreement. This must be specified onthe command-line when the silentinstall.inifile is not used. When silentinstall.ini isused, LAPAGREE is set in that file.
Chapter 3. Installing 413
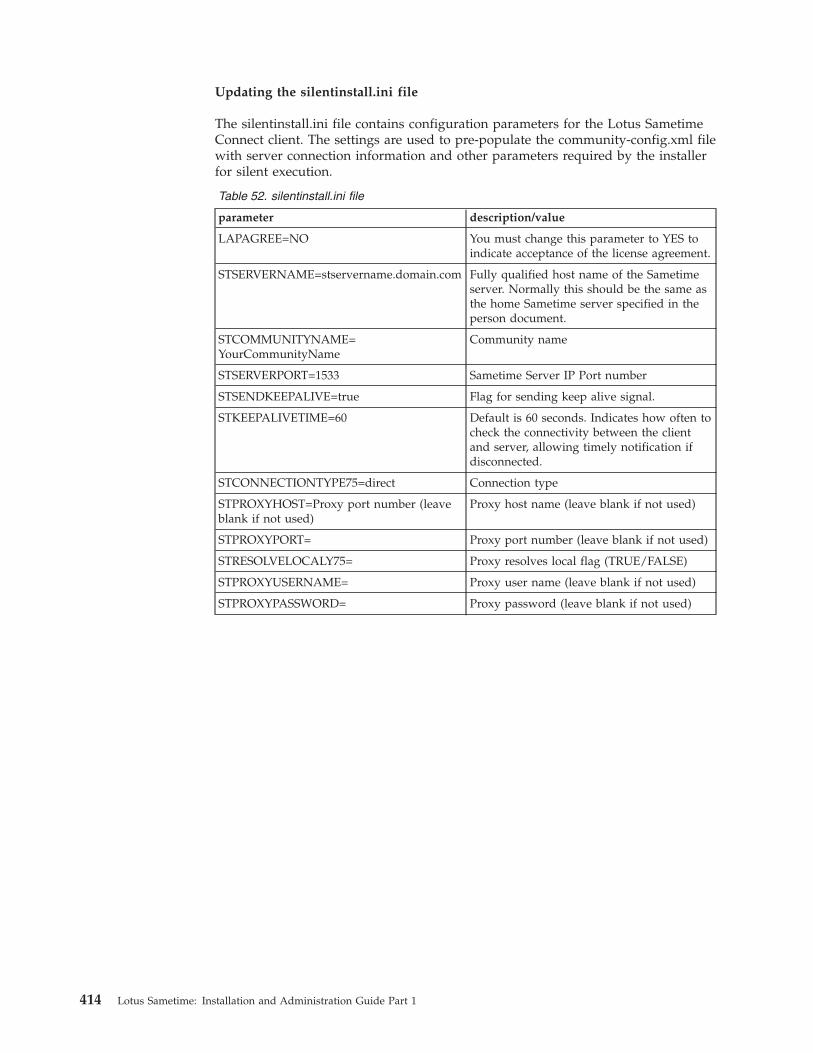
Updating the silentinstall.ini file
The silentinstall.ini file contains configuration parameters for the Lotus SametimeConnect client. The settings are used to pre-populate the community-config.xml filewith server connection information and other parameters required by the installerfor silent execution.
Table 52. silentinstall.ini file
parameter description/value
LAPAGREE=NO You must change this parameter to YES toindicate acceptance of the license agreement.
STSERVERNAME=stservername.domain.com Fully qualified host name of the Sametimeserver. Normally this should be the same asthe home Sametime server specified in theperson document.
STCOMMUNITYNAME=YourCommunityName
Community name
STSERVERPORT=1533 Sametime Server IP Port number
STSENDKEEPALIVE=true Flag for sending keep alive signal.
STKEEPALIVETIME=60 Default is 60 seconds. Indicates how often tocheck the connectivity between the clientand server, allowing timely notification ifdisconnected.
STCONNECTIONTYPE75=direct Connection type
STPROXYHOST=Proxy port number (leaveblank if not used)
Proxy host name (leave blank if not used)
STPROXYPORT= Proxy port number (leave blank if not used)
STRESOLVELOCALY75= Proxy resolves local flag (TRUE/FALSE)
STPROXYUSERNAME= Proxy user name (leave blank if not used)
STPROXYPASSWORD= Proxy password (leave blank if not used)
414 Lotus Sametime: Installation and Administration Guide Part 1

Table 52. silentinstall.ini file (continued)
parameter description/value
STCOUNTRYLANG=en Specify one of the Language codes listedbelow to set the language used by theSametime Connect client. If not specified,the client machine’s default language will beused.
v cs - Czech
v da - Danish
v de - German
v el - Greek
v en - English
v es - Spanish
v fi - Finnish
v fr - French
v hu - Hungarian
v it - Italian
v ja - Japanese
v ko - Korean
v nl - Dutch
v no - Norwegian
v pl - Polish
v pt - Portuguese (Portugal)
v pt_BR - Portuguese (Brazil)
v ru - Russian
v sv - Swedish
v tr - Turkish
v zh_CN - Chinese (simplified)
v zh_TW - Chinese (traditional)
STAUTHSERVERURL= Specifies the URL of the Auth Server forSSO Token Login (leave blank if not used)
See Configuring the Sametime Connectclient for token login for additionalinformation.
STLOGINBYTOKEN=false Login By Token flag. TRUE/FALSE
STUSEAUTHSERVER=false Use Auth Server flag. TRUE/FALSE
STLOGINATSTARTUP=false Login at startup flag. TRUE/FALSE
STUNINSTALL75=1 Uninstall Sametime 7.5.x client flag:
1=uninstall 7.5.x client if found
0=leave 7.5.x client installed
STUNINSTALLPRE75=1 Uninstall Sametime clients older than release7.5:
1=uninstall pre-7.5 client if found (default)
0=leave pre-7.5 client installed
Chapter 3. Installing 415
Installing the Sametime Connect client from the networkProviding installation files on the network allows users to download the LotusSametime Connect Client without CDs or download images.
Installing the Sametime Connect client from the network on Windows:
When network installation files are available, users can install Lotus SametimeConnect from a Web browser on Windows.1. (Optional) Set default preferences in the plugin_customization.ini file located
in the \network-install\install\deploy directory:2. Using a Web browser, open the Sametime Welcome page on your Sametime
server.For example, if the fully qualified host name of your Sametime server isstserver.com, you open http://stserver.com/stcenter.nsf.
3. Click Download Lotus Sametime Connect 8.5 Client to display the ″Welcometo the IBM Lotus Sametime Connect 8.5 Client Download Site″ page.
4. Click Install Now to begin the download and installation process.Once all files have been downloaded, the actual client installer will start.Follow the instructions in the installer and enter the required information tocomplete the installation.
Tip: If there are problems running the network client installer applet, or if youwant to install at a later time, you can select Save from the Welcome pageinstead. This shows you a downloads page where you can select the operatingsystem of the installer you wish to save and follow the instructions fordownloading the installer for later use.
Installing the Sametime embedded client for Lotus NotesInstall the IBM Lotus Sametime embedded client to a Lotus Notes client.
Installing the embedded client on Windows:
Install the IBM Lotus Sametime embedded clients on a Lotus Notes client runningon Microsoft Windows.
About this task
The Lotus Sametime embedded client installs directly into the Lotus Notesdirectory. If you have already installed a previous version of the embedded client,it is upgraded to this new version.1. Download the installation package for the Lotus Sametime embedded client if
you have not already done so.a. To download installation packages, you must have an IBM Passport
Advantage account, which is described at the following Web address:www.ibm.com/software/howtobuy/passportadvantage/paocustomer/docs/en_US/ecare.html
b. Open this release’s Download document at the following Web address:http://www.ibm.com/support/docview.wss?rs=477&uid=24024322
Locate the components you need in the document’s listing, then downloadthe packages labelled with the corresponding part numbers to the systemon which you are installing.
c. Extract the files to a local directory.d. Verify that you have at least 1 GB of temporary space to run the installation
in your %TEMP% or /tmp directory.
416 Lotus Sametime: Installation and Administration Guide Part 1
2. Stop the Lotus Notes client.3. Double-click the setup.exe file to begin installation:
a. Select a language and click Next.b. Click Next as needed to proceed through the installation screen.
4. Verify the installation:a. Help → About IBM Lotus Notes
b. Click Feature Details.c. Verify that ″Sametime Application″ appears in the list of features with
″8.5.0″ at the beginning of its version information.d. Close the dialog box.
Starting and stopping servers in a Lotus Sametimedeployment
An IBM Lotus Sametime deployment is made of up several component servers thatcan be started and stopped independently.
Starting and stopping servers running on WebSphere ApplicationServerStarting and stopping IBM Lotus Sametime servers that run on WebSphereApplication Server involves other server components such as the DeploymentManager and the node agent.
Starting and stopping the Deployment Manager:
The Deployment Manager manages the Lotus Sametime System Console and allLotus Sametime Server cells.
About this task
Before starting Lotus Sametime Servers, the Deployment Manager must be runningfor each cell.
Windows only: You can also use the Start - Programs menu to use the Start andStop menu commands.1. In a command window, navigate to the app_server_root/profiles/
DeploymentManagerName/bin directory for the Deployment Manager you wantto start:
2. Run the following command to start and stop the Deployment Manager:AIX, Linux, or Solaris
./startManager.sh
./stopManager.sh dmgr -username admin_user -password admin_password
Windows
startManager.batstopManager.bat dmgr -username admin_user -passwordadmin_password
IBM i
startManager dmgr
stopManager dmgr -username admin_user -password admin_password.
Chapter 3. Installing 417
Related tasks
“Starting and stopping WebSphere Application Servers on Windows” on page 232Use the Start Programs menu in Microsoft Windows to start or stop any Sametimeservers running on WebSphere Application Server.Related reference
“Command reference for starting and stopping servers” on page 232You may use a command window to start and stop Sametime components runningon WebSphere Application Server. To stop servers, you will supply the WebSphereApplication Server administrator password that was established when youinstalled the server. Important: Verify that the Deployment Manager for the cell isrunning before starting any server.
Starting the Lotus Sametime System Console:
When started, the Lotus Sametime System Console runs as a task in the WebSphereApplication Server administrative console.
Before you begin
Verify that the Deployment Manager is running for the cell.1. In a command window, navigate to the local app_server_root/profiles/
STSCAppProfile profile directory and change to the bin directory:2. Run the following commands:
AIX, Linux, or Solaris
./startNode.sh
./startServer.sh STConsoleServer
Windows
startNode.bat
startServer.bat STConsoleServer
IBM i
startNode
startServer STConsoleServer
What to do next
“Logging in to the Lotus Sametime System Console” on page 63Related tasks
“Starting and stopping the Deployment Manager” on page 230The Deployment Manager manages the Lotus Sametime System Console and allLotus Sametime Server cells.Related reference
“Command reference for starting and stopping servers” on page 232You may use a command window to start and stop Sametime components runningon WebSphere Application Server. To stop servers, you will supply the WebSphereApplication Server administrator password that was established when youinstalled the server. Important: Verify that the Deployment Manager for the cell isrunning before starting any server.
Command reference for starting and stopping servers:
You may use a command window to start and stop Sametime components runningon WebSphere Application Server. To stop servers, you will supply the WebSphere
418 Lotus Sametime: Installation and Administration Guide Part 1
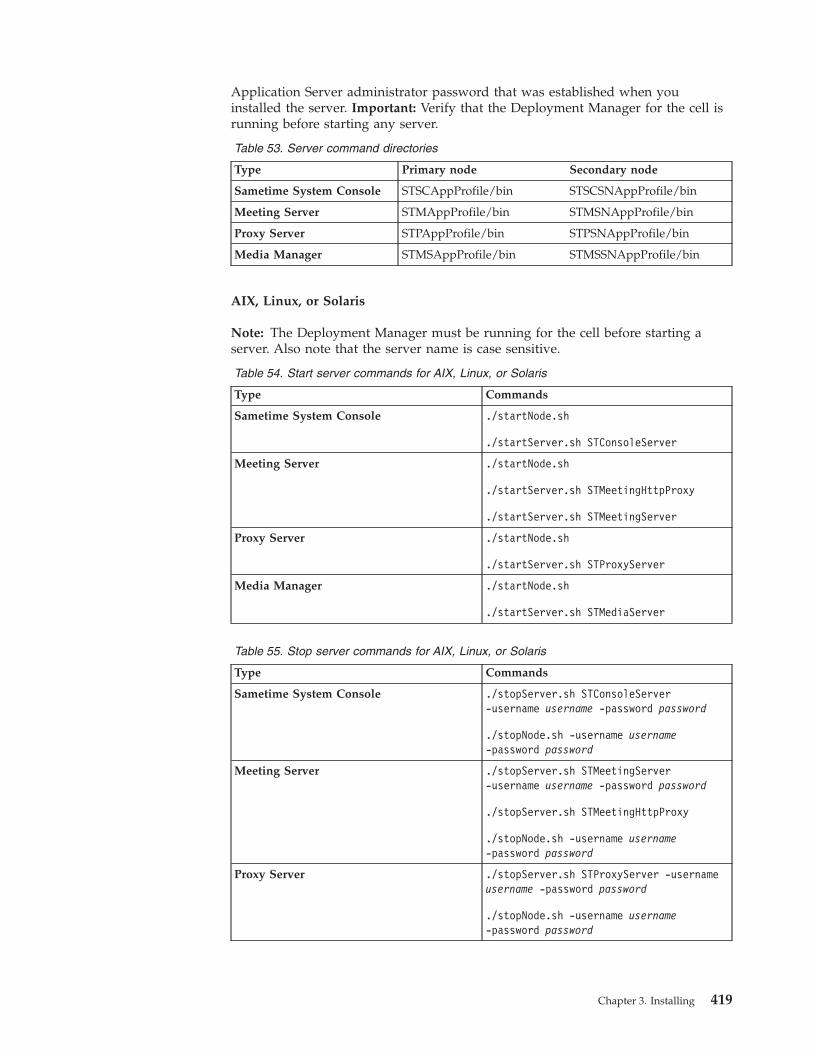
Application Server administrator password that was established when youinstalled the server. Important: Verify that the Deployment Manager for the cell isrunning before starting any server.
Table 53. Server command directories
Type Primary node Secondary node
Sametime System Console STSCAppProfile/bin STSCSNAppProfile/bin
Meeting Server STMAppProfile/bin STMSNAppProfile/bin
Proxy Server STPAppProfile/bin STPSNAppProfile/bin
Media Manager STMSAppProfile/bin STMSSNAppProfile/bin
AIX, Linux, or Solaris
Note: The Deployment Manager must be running for the cell before starting aserver. Also note that the server name is case sensitive.
Table 54. Start server commands for AIX, Linux, or Solaris
Type Commands
Sametime System Console ./startNode.sh
./startServer.sh STConsoleServer
Meeting Server ./startNode.sh
./startServer.sh STMeetingHttpProxy
./startServer.sh STMeetingServer
Proxy Server ./startNode.sh
./startServer.sh STProxyServer
Media Manager ./startNode.sh
./startServer.sh STMediaServer
Table 55. Stop server commands for AIX, Linux, or Solaris
Type Commands
Sametime System Console ./stopServer.sh STConsoleServer-username username -password password
./stopNode.sh -username username-password password
Meeting Server ./stopServer.sh STMeetingServer-username username -password password
./stopServer.sh STMeetingHttpProxy
./stopNode.sh -username username-password password
Proxy Server ./stopServer.sh STProxyServer -usernameusername -password password
./stopNode.sh -username username-password password
Chapter 3. Installing 419
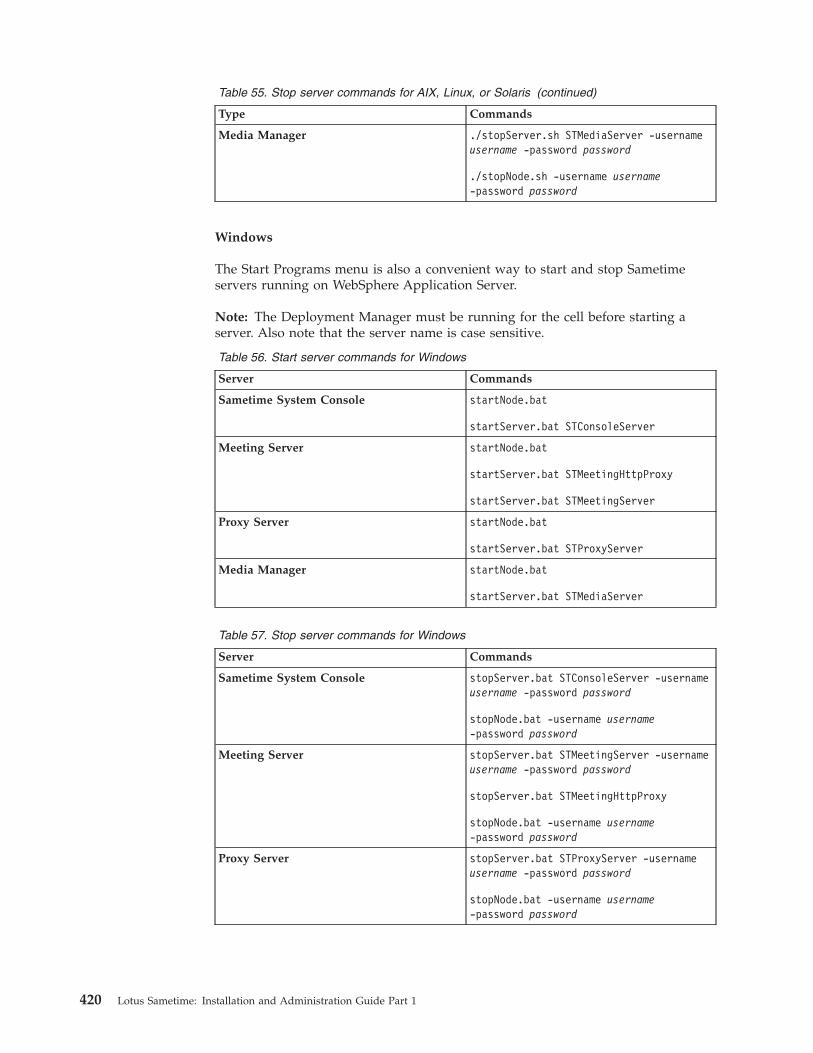
Table 55. Stop server commands for AIX, Linux, or Solaris (continued)
Type Commands
Media Manager ./stopServer.sh STMediaServer -usernameusername -password password
./stopNode.sh -username username-password password
Windows
The Start Programs menu is also a convenient way to start and stop Sametimeservers running on WebSphere Application Server.
Note: The Deployment Manager must be running for the cell before starting aserver. Also note that the server name is case sensitive.
Table 56. Start server commands for Windows
Server Commands
Sametime System Console startNode.bat
startServer.bat STConsoleServer
Meeting Server startNode.bat
startServer.bat STMeetingHttpProxy
startServer.bat STMeetingServer
Proxy Server startNode.bat
startServer.bat STProxyServer
Media Manager startNode.bat
startServer.bat STMediaServer
Table 57. Stop server commands for Windows
Server Commands
Sametime System Console stopServer.bat STConsoleServer -usernameusername -password password
stopNode.bat -username username-password password
Meeting Server stopServer.bat STMeetingServer -usernameusername -password password
stopServer.bat STMeetingHttpProxy
stopNode.bat -username username-password password
Proxy Server stopServer.bat STProxyServer -usernameusername -password password
stopNode.bat -username username-password password
420 Lotus Sametime: Installation and Administration Guide Part 1

Table 57. Stop server commands for Windows (continued)
Server Commands
Media Manager stopServer.bat STMediaServer -usernameusername -password password
stopNode.bat -username username-password password
IBM i
Note: The Deployment Manager must be running for the cell before starting aserver. Also note that the server name is case sensitive.
Table 58. Start server commands for IBM i
Server Commands
Sametime System Console startNode
startServer STConsoleServer
Meeting Server startNode
startServer STMeetingHttpProxy
startServer STMeetingServer
Proxy Server startNode
startServer STProxyServer
Media Manager Not supported on IBM i
Table 59. Stop server commands for IBM i
Server Commands
Sametime System Console stopServer STConsoleServer -usernameusername -password password
stopNode -username username -passwordpassword
Meeting Server stopServer STMeetingServer -usernameusername-password password
stopServer STMeetingHttpProxy -usernameusername -password password
stopNode -username username -passwordpassword
Proxy Server stopServer STProxyServer -usernameusername -password password
stopNode -username username -passwordpassword
Media Manager Not supported on IBM i
Chapter 3. Installing 421
Related tasks
“Starting and stopping the Deployment Manager” on page 230The Deployment Manager manages the Lotus Sametime System Console and allLotus Sametime Server cells.“Starting and stopping WebSphere Application Servers on Windows” on page 232Use the Start Programs menu in Microsoft Windows to start or stop any Sametimeservers running on WebSphere Application Server.
Starting and stopping servers running on Lotus DominoThe IBM Lotus Sametime Community Server is configured as a set of services thatstart and stop automatically when the Domino server is stopped or started.
Starting and stopping a Sametime server on IBM i while Domino is running:
IBM Lotus Sametime on IBM i is installed on an IBM Lotus Domino server. Youcan start and stop a Sametime server without starting and stopping the Dominoserver from running.
About this task
There are times when you will need to keep the Domino server running whiledoing Sametime maintenance tasks. For example, you might need to shut downSametime services while you make configuration changes on the Sametime server,but you need to leave the Domino server running so you can access Dominodatabases on the server.1. On any IBM i, command line, enter the Work with Domino Console command
and press F4:WRKDOMCSL
2. Enter the server name and press Enter.3. In the Domino server console, choose one of the following actions:
v To start the Sametime service on a Domino server that is already running,type this command:load STADDIN2
v To stop the Sametime services without stopping the Domino server, type thiscommand:tell STADDIN2 Quit
4. Periodically press F5 to refresh your screen and look for a message to confirmthat Sametime has started or stopped.
Starting and stopping Domino and a Sametime Community Server on IBM i:
Learn how to start and stop a Sametime Community Server running on IBM i.
Starting Domino and a Sametime Community Server on IBM i:
Follow these instructions to start a Sametime Community Server on IBM i from anIBM i command line.
About this task
Follow these steps to start both Domino and a Sametime Community Server.1. From any IBM i command line, run the following command:
WRKDOMSVR
422 Lotus Sametime: Installation and Administration Guide Part 1
2. On the Work with Domino Servers display, start the server by typing 1 in theOpt column next to the Domino server where you added Sametime and pressEnter.
3. Press Enter to confirm your server selection.4. Periodically press F5 to refresh your screen and wait for the Domino server
status to be *STARTED.To confirm that all Sametime components have started, type 5 in the Optcolumn next to the server and press Enter to display the Domino console. Onthe Display Domino Console display, look for the message ″Sametime: Serverstartup successful″ which indicates that all Sametime components have started.You may need to press F5 periodically to refresh the screen until this messageis displayed.
Tip: You can also use IBM i Navigator to start the Sametime server by selectingNetwork → Servers → Domino. Right-click on the Domino server where youadded Sametime and select Start.
Stopping Domino and a Sametime Community Server on IBM i:
Follow these instructions to stop a Lotus Sametime server on IBM i from an IBM icommand line.
About this task
Follow these steps to stop both Domino and a Sametime Community Server froman IBM i command line.1. From any IBM i command line, run the following command:
WRKDOMSVR
2. On the Work with Domino Servers display, stop the server by typing 6 in theOpt column next to the Domino server where you added Sametime and pressEnter.
3. Press Enter to confirm your server selection.4. Periodically press F5 to refresh your screen and wait for the Domino server
status to be *ENDED.
Tip: You can also use IBM i Navigator to stop the Sametime server by selectingNetwork → Servers → Domino. Right-click on the Domino server where youadded Sametime and select Stop.
UninstallingBefore you can install a newer version of IBM Lotus Sametime, you must uninstallthe currently deployed version.
About this task
Complete these tasks to uninstall Lotus Sametime components.
Removing a server from the console on IBM iTo remove an IBM Lotus Sametime server from the list of the Lotus SametimeSystem Console’s managed servers, run the unregister utility on the server. Whenyou remove a server from the console, it can no longer be administered from theconsole, but it does not have its own administration interface. The only way toadminister the server is by modifying configuration files and the database directly.
Chapter 3. Installing 423
Because of these limitations, you should only unregister the server if you areuninstalling, or performing some other activity that requires removal of theproduct from the console.
About this task
This procedure works for the following Lotus Sametime servers: CommunityServer, Proxy Server, and Meeting Server. A Sametime Community Server revertsback to using legacy policies if you remove it from the console.
Note: To unregister a Lotus Sametime Gateway server, see Removing a LotusSametime Gateway server on IBM i from the console from the console.1. Working on the server you want to remove, navigate to the console directory.
v Community Server
The console directory is a subdirectory of the Sametime Community serverdata directory.
v Proxy Server/QIBM/UserData/Lotus/stii/STPROXY/STPROXY_date_time/console
The date and time indicate when the Proxy Server was installed.v Meeting Server
/QIBM/UserData/Lotus/stii/STMeetings/STMEETINGS_date_time/console
The date and time indicate when the Meeting Server was installed.2. Verify that the values in the productConfig.properties file are correct.3. If you are unregistering a Sametime Community Server or Meeting Server, start
the server. Otherwise, proceed to the next step.4. From an IBM i command line, run the following command to start the QShell
Interpreter:QSH
5. Run the cd shell command, specifying the fully qualified path to the consoledirectory you used in Step 1.
6. Run the appropriate shell script to register the server:v Sametime Community Server
unregisterProductNode.sh
v Other servers
unregisterWASProduct.sh
The utility unregisters the server and generates the ConsoleUtility.log file,storing it in the console/logs. If the unregistration is successful, the utilitydeletes the console.pid file from the console directory.
7. When the script completes, press F3 to exit QSH.
Removing the Sametime Community Server from an IBM iDomino ServerYou can remove Lotus Sametime files from a Lotus Domino server withoutdeleting the Lotus Sametime Community Server software from your system. Usethe RMVLSTDOM command to reverse the changes made when you ran theADDLSTDOM command after installing the Sametime Community Server.
About this task
When you remove Sametime Community Server from a Domino server, all filesrelated to Sametime that were added to the Domino server data directory or were
424 Lotus Sametime: Installation and Administration Guide Part 1
created while running Sametime components are removed. Updates that weremade to the Domino Directory, including person documents, server documents andchanges to the ACL are not removed. To remove Sametime from a Domino server,follow these steps:1. End the Domino server where you plan to remove Sametime.2. On any IBM i command line, type the following command and press F4:
RMVLSTDOM
3. Enter the name of the Domino server where you want to remove Sametime andpress Enter.
4. When prompted, type a ″g″ to complete the Remove Sametime from a Dominoserver command.A message will appear indicating that Sametime has been removed.
5. Using the Domino Administrator Application, modify the Domino serverdocument by changing the Is this a Sametime server? field to No.
6. Delete any Sametime Connection documents between this Sametime server andother Sametime servers.
7. Optional: If the Sametime Community Server used an LDAP directory, anLDAP document for that server exists in the Directory Assistance database. Youmay want to remove this and any other unnecessary documents from theDirectory Assistance database.
Results
The server is once again a Domino server.
If you want to delete the Sametime Community Server software from the system,remove Sametime from your servers and then run the DLTLICPGM (DeleteLicensed Program) command.v For Sametime Standard, delete 5724J23 option 1 and then delete 5724J23 *BASE.v For Sametime Entry, delete 5724J23 *BASE.
Uninstalling IBM i Sametime servers running on WebSphereApplication ServerRun the uninstall scripts to uninstall the following components that are packagedwith Lotus Sametime: Lotus Sametime System Console, Lotus Sametime ProxyServer, and Lotus Sametime Meeting Server.
Before you begin
Use the unregister utility to remove servers from the Sametime System Consolebefore uninstalling the Sametime software.v Before uninstalling the Sametime System Console, unregister all servers
registered with the console, including the Community Server, Proxy Server,Meeting Server, and Gateway.
v Before uninstalling a Meeting Server or Proxy Server, unregister the server fromthe Sametime System Console.
About this task
Follow these steps to shut down the servers and run the uninstall scripts.1. For the type of server you plan to uninstall, shut down the servers listed
below:
Chapter 3. Installing 425
v Sametime System Console
Shut down the System Console Deployment Manager, the System Consoleapplication server, and the associated node agent.
v Proxy Server
Shut down the Proxy Deployment Manager, the Sametime Proxy applicationserver, and the associated node agent.
v Meeting Server
Shut down the Meeting Deployment Manager, the Sametime Meetingapplication server, and the associated node agent.
2. From an IBM i command line, run the following command to start the QShellInterpreter:QSH
3. Run the cd shell command, specifying the fully qualified path to the uninstalldirectory for the server.v Sametime System Console
cd /QIBM/UserData/Lotus/stii/STCONSOLE/STCONSOLE_date_time/uninstallwhere date and time indicate when the system console wasinstalled.
v Proxy Servercd /QIBM/UserData/Lotus/stii/STPROXY/STPROXY_date_time/uninstall
where date and time indicate when the proxy server was installed.v Meeting Server
cd /QIBM/UserData/Lotus/stii/STMeetings/STMEETINGS_date_time/uninstall
where date and time indicate when the meeting server was installed.4. Run the following shell command:
uninstall.sh
When the script completes, a summary of the results is displayed.5. Press F3 to exit QSH.
Results
If the uninstall was not successful, look at the log for more information. Fix theproblem, then try uninstalling again. The uninstall logs are stored in the followinglocation.
QIBM/UserData/Lotus/stii/logs
The log name contains the date and time in this form:
uninstall_ServerType_yyyymmdd_hhmm.log
For example, this log for uninstalling a meeting server was created at 3:07 A.M. onDecember 15, 2009:
uninstall_STMEETINGS_20091215_0307.log
What to do next
When you have successfully uninstalled a server, there are other items associatedwith Sametime that you may want to remove from the system.
426 Lotus Sametime: Installation and Administration Guide Part 1
v WebSphere Application Server installation
The WebSphere Application Server installation directory is typically shared byall of the Sametime servers running on WebSphere Application Server. Do notremove the WebSphere Application Server installation if there are any otherSametime servers on the system that are still using it. The sample commandsbelow use the default installation directory.To uninstall WebSphere Application Server, run the following QSH command:/qibm/proddata/websphere/appserver/v7/sametimewas/uninstall/uninstall -silent
To remove the WebSphere Application Server data from the system, run thefollowing QSH commands:rm -R /qibm/proddata/websphere/appserver/v7/sametimewasrm -R /qibm/userdata/websphere/appserver/v7/sametimewas
v Sametime installation information
Remove installation information associated with the server you uninstalled inone of these ways:If you still have other Sametime servers on the system, you can remove theinstallation information associated with the server that you uninstalled. Run thefollowing QSH command, specifying the appropriate date and time:–– Sametime System Console
rm -R /qibm/userdata/lotus/stii/STConsole/STConsole_date_time
– Proxy Serverrm -R /qibm/userdata/lotus/stii/STProxy/STProxy_date_time
– Meeting Serverrm -R /qibm/userdata/lotus/stii/STMeetings/STMEETINGS_date_time
If there are no other Sametime servers installed on the system, you can removeall Sametime installation information, by running the following QSH command.rm -R /qibm/userdata/lotus/stii
v Sametime databases
If you are certain that no other Sametime servers are still using the databasesused by the Meeting Server (MTG and POLICY) or the Sametime SystemConsole (STSC and POLICY), you can delete them. Remember that the POLICYdatabase is shared between the Meeting Server and the Sametime SystemConsole.
Related tasks
“Removing a server from the console on IBM i” on page 423To remove an IBM Lotus Sametime server from the list of the Lotus SametimeSystem Console’s managed servers, run the unregister utility on the server. Whenyou remove a server from the console, it can no longer be administered from theconsole, but it does not have its own administration interface. The only way toadminister the server is by modifying configuration files and the database directly.Because of these limitations, you should only unregister the server if you areuninstalling, or performing some other activity that requires removal of theproduct from the console.
Uninstalling Sametime Gateway on IBM iThis topic explains how to uninstall a single server or cluster of IBM LotusSametime Gateway servers running on IBM i.
Chapter 3. Installing 427
About this task
On IBM i, the install and uninstall of WebSphere Application Server are separatefrom Lotus Sametime Gateway. Uninstalling Lotus Sametime Gateway does notaffect the WebSphere Application Server installation. Complete details onuninstalling WebSphere Application Server are available from the WebSphereApplication Server information center.1. Shut down any servers that are running, including the Deployment Manager
and node agents if you are uninstalling a cluster.2. Start a QShell session.3. Navigate to the following folder: stgw_server_root/_uninst4. Type uninstalli5OS.sh
5. Select the language you wish to use for the uninstall procedure and click OK.The Welcome screen is displayed.
6. Click Next to proceed. The Lotus Sametime Gateway features screen isdisplayed.
7. Click Uninstall to begin the procedure. The progress is displayed on the screen.8. When the uninstall is complete, read the summary information and click Finish
to exit the wizard.9. If you are uninstalling a cluster of servers, repeat the preceding steps on each
node, running the uninstall utility as you would on a single server deployment.
Removing a Lotus Sametime Gateway server on IBM i from the console:
To remove an IBM Lotus Sametime Gateway server from the list of the LotusSametime System Console’s managed servers, run the unregister utility on theserver. When you remove a server from the console, it can no longer beadministered from the console, but it does not have its own administrationinterface. The only way to administer the server is by modifying configuration filesand the database directly. Because of these limitations, you should only unregisterthe server if you are uninstalling, or performing some other activity that requiresremoval of the product from the console.1. Working on the server you want to remove, navigate to the
/qibm/userdata/STGateway/ProfileName directory where ProfileName is the oneyou specified when you installed the Gateway.
2. If this is the first time you have run a utility on this server, open theconsole.properties file and provide the System Console Host name, port, UserName and Password. Also you can specify the log level, which is notmandatory.
3. Verify that the values in the productConfig.properties file are correct.4. Unregister the server by running the following command:
unregisterWASProduct.sh
5. If you want to uninstall Lotus Sametime Gateway from the server, run thefollowing command: unregisterWASProduct.sh -uninstall
Results
The utility unregisters the server and generates the ConsoleUtility.log file,storing it in the console/logs. If the unregistration is successful, the utility deletesthe console.pid file from the console directory.
428 Lotus Sametime: Installation and Administration Guide Part 1
Manually removing WebSphere Application Server on IBM iYou may need to remove WebSphere Application Server manually if it remains onthe system after Lotus Sametime fails to install or uninstall completely.
Before you begin
If after an attempted Sametime install or uninstall, you have many files and foldersleft in app_server_root/profiles/profile_name or app_server_root/bin, run theWebSphere Application Server uninstall program to remove the rest of the files.Remove WebSphere Application Server only if it is not in use by any other serveron the system.
About this task
Stop all java processes. Then follow the steps in the WebSphere Application Server7 Information Center to remove unneeded WebSphere Application Server softwarefrom the system.
Uninstalling the product on IBM i
Chapter 3. Installing 429

430 Lotus Sametime: Installation and Administration Guide Part 1

Chapter 4. Migrating and upgrading
Migrate data from a previous version of Lotus Sametime and upgrade one or moreservers to take advantage of the latest features.
This section contains information about installing and configuring IBM LotusSametime, while maintaining as much legacy data as possible, if you have usedprevious versions of the product.
Upgrading Lotus SametimeIBM Lotus Sametime 8.5 introduces many new features and components. You canupgrade your existing Lotus Sametime servers in place; if you have meetingsenabled you can optionally add new components to your deployment.
Upgrading Lotus Sametime on AIX, Linux, Solaris, or WindowsUpgrade from previous releases of IBM Lotus Sametime on the IBM AIX, Linux,Sun Solaris, or Microsoft Windows operating system.
About this task
You can upgrade from the following types of Lotus Sametime deployments:v Lotus Sametime (release 7.5.1)v Lotus Sametime Instant Messaging Limited Use (release 8.0, 8.0.1, and 8.0.2)v Lotus Sametime Entry (release 8.0, 8.0.1, and 8.0.2)v Lotus Sametime Standard (release 8.0, 8.0.1, and 8.0.2)
The upgrade process is the same for all servers up to a point; if you have meetingsenabled on your server there will be additional tasks to complete if you want tomigrate existing meetings to a new Lotus Sametime 8.5 Meeting Server.
Note: If you have a cluster of Lotus Sametime servers, you must upgrade allservers in the cluster. A cluster cannot support servers running different releases ofLotus Sametime.
Upgrading Lotus Sametime servers on AIX, Linux, Solaris, andWindowsUpgrade one or more IBM Lotus Sametime servers running on IBM AIX, Linux,Sun Solaris, or Microsoft Windows.
Disabling cluster replication:
Before you begin to an IBM Lotus Sametime server, you must disable clusterreplication to avoid sending or receiving configuration changes while preparing forthe upgrade.
About this task
If you have a cluster of servers, you must upgrade every server in the cluster. Toavoid sending or receiving configuration changes while you are preparing toupgrade, disable cluster replication for all servers in the cluster. For more
© Copyright IBM Corp. 1996, 2009 431
information, see Disabling cluster replication for an entire server in the LotusDomino and Notes information center.
Removing meeting rooms from Enterprise Meeting Server:
If you have meeting services enabled on your IBM Lotus Sametime server and youclustered the meeting rooms with Lotus Sametime Enterprise Meeting Server, youmust remove those servers from Enterprise Meeting Server before upgrading them.
About this task
Lotus Sametime 8.5 does not support the use of Lotus Sametime EnterpriseMeeting Server. Instead, you deploy one or more Lotus Sametime 8.5 MeetingServers and optionally cluster them using an IBM WebSphere network deployment.Then you can set up URL redirects from your upgraded Lotus Sametime servers tothe new Meeting Servers so that when a user clicks a link to create or attend ameeting on an upgraded server, the link is automatically redirected to the newMeeting Server.
If you do not wish to install the Lotus Sametime 8.5 Meeting Server yet, you canstill create and host meetings on the upgraded server, but you cannot cluster themeeting rooms.
Upgrading the Lotus Sametime server on AIX, Linux, Solaris, or Windows:
After you have completed the preliminary steps to prepare the environment,upgrade each of your IBM Lotus Sametime servers.
About this task
If you are upgrading a cluster, be sure to upgrade each of the servers in the cluster(and register each server with the Lotus Sametime System Console) before youconfigure the cluster and register the cluster itself.
Checking for supported releases for Lotus Domino and Lotus Sametime:
Before upgrading to IBM Lotus Sametime 8.5, determine whether you first need toupgrade your Lotus Domino and your operating system releases. You also need todetermine whether your current level of Lotus Sametime is supported by the LotusSametime 8.5 upgrade process.
About this task
Follow these steps to ensure that the server you intend to upgrade is running on asupported level of the operating system and that the current releases of LotusDomino and Lotus Sametime are supported by the upgrade process. If the serverincludes an unsupported release of any product, you must complete an interimupgrade to a supported product.1. Check the operating system level on the computer where Lotus Sametime is
installed.Make sure that your currently installed server releases, and product releases,are all supported on the new operating system level. For information on systemrequirements, see the Detailed System Requirements.
2. Check the Lotus Domino release on the server to be upgraded.
432 Lotus Sametime: Installation and Administration Guide Part 1
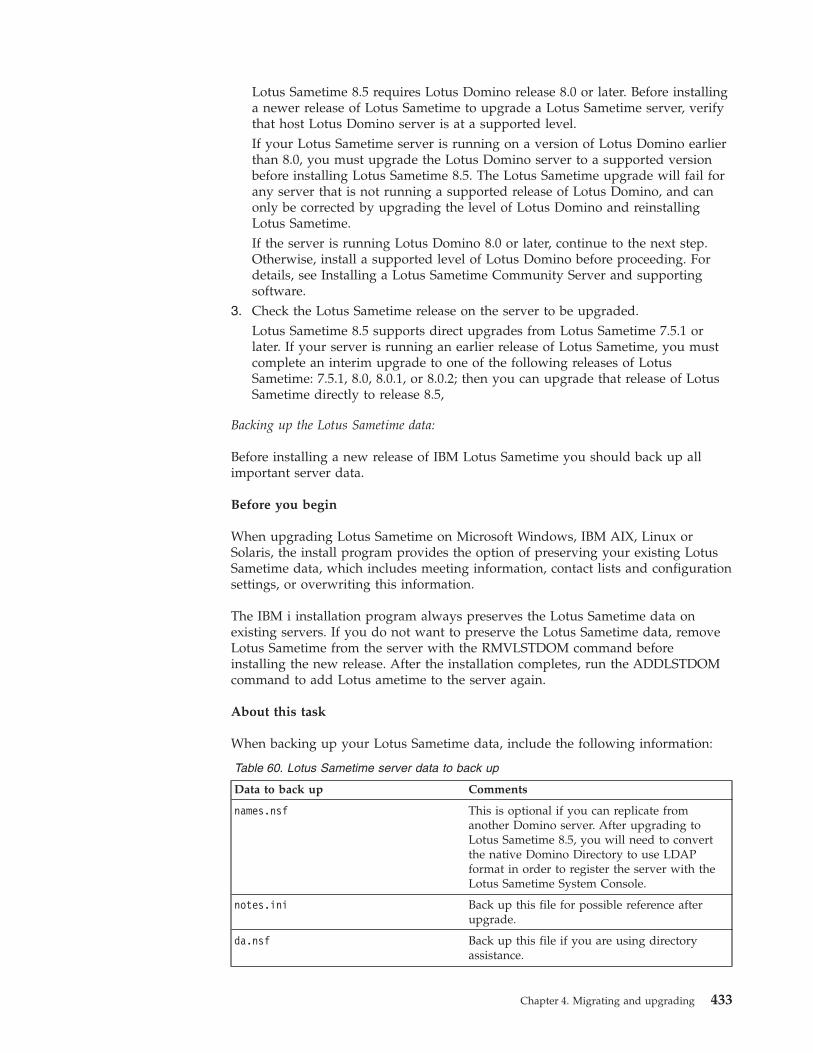
Lotus Sametime 8.5 requires Lotus Domino release 8.0 or later. Before installinga newer release of Lotus Sametime to upgrade a Lotus Sametime server, verifythat host Lotus Domino server is at a supported level.If your Lotus Sametime server is running on a version of Lotus Domino earlierthan 8.0, you must upgrade the Lotus Domino server to a supported versionbefore installing Lotus Sametime 8.5. The Lotus Sametime upgrade will fail forany server that is not running a supported release of Lotus Domino, and canonly be corrected by upgrading the level of Lotus Domino and reinstallingLotus Sametime.If the server is running Lotus Domino 8.0 or later, continue to the next step.Otherwise, install a supported level of Lotus Domino before proceeding. Fordetails, see Installing a Lotus Sametime Community Server and supportingsoftware.
3. Check the Lotus Sametime release on the server to be upgraded.Lotus Sametime 8.5 supports direct upgrades from Lotus Sametime 7.5.1 orlater. If your server is running an earlier release of Lotus Sametime, you mustcomplete an interim upgrade to one of the following releases of LotusSametime: 7.5.1, 8.0, 8.0.1, or 8.0.2; then you can upgrade that release of LotusSametime directly to release 8.5,
Backing up the Lotus Sametime data:
Before installing a new release of IBM Lotus Sametime you should back up allimportant server data.
Before you begin
When upgrading Lotus Sametime on Microsoft Windows, IBM AIX, Linux orSolaris, the install program provides the option of preserving your existing LotusSametime data, which includes meeting information, contact lists and configurationsettings, or overwriting this information.
The IBM i installation program always preserves the Lotus Sametime data onexisting servers. If you do not want to preserve the Lotus Sametime data, removeLotus Sametime from the server with the RMVLSTDOM command beforeinstalling the new release. After the installation completes, run the ADDLSTDOMcommand to add Lotus ametime to the server again.
About this task
When backing up your Lotus Sametime data, include the following information:
Table 60. Lotus Sametime server data to back up
Data to back up Comments
names.nsf This is optional if you can replicate fromanother Domino server. After upgrading toLotus Sametime 8.5, you will need to convertthe native Domino Directory to use LDAPformat in order to register the server with theLotus Sametime System Console.
notes.ini Back up this file for possible reference afterupgrade.
da.nsf Back up this file if you are using directoryassistance.
Chapter 4. Migrating and upgrading 433
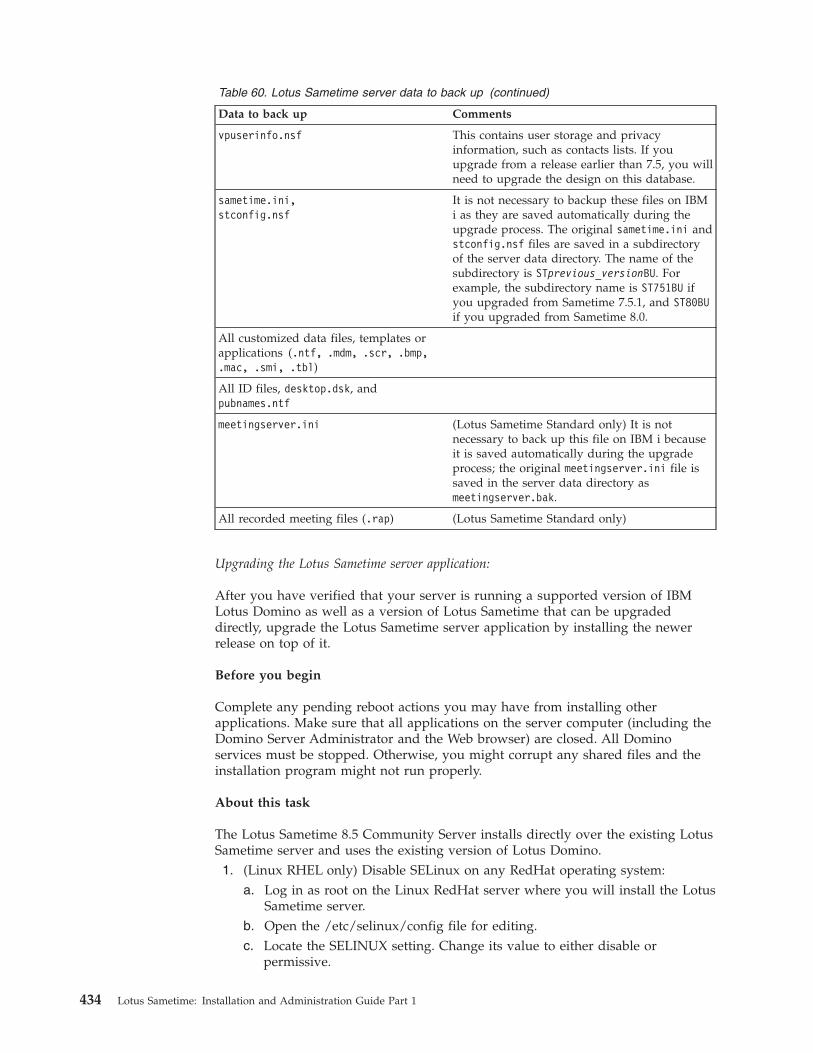
Table 60. Lotus Sametime server data to back up (continued)
Data to back up Comments
vpuserinfo.nsf This contains user storage and privacyinformation, such as contacts lists. If youupgrade from a release earlier than 7.5, you willneed to upgrade the design on this database.
sametime.ini,stconfig.nsf
It is not necessary to backup these files on IBMi as they are saved automatically during theupgrade process. The original sametime.ini andstconfig.nsf files are saved in a subdirectoryof the server data directory. The name of thesubdirectory is STprevious_versionBU. Forexample, the subdirectory name is ST751BU ifyou upgraded from Sametime 7.5.1, and ST80BUif you upgraded from Sametime 8.0.
All customized data files, templates orapplications (.ntf, .mdm, .scr, .bmp,.mac, .smi, .tbl)
All ID files, desktop.dsk, andpubnames.ntf
meetingserver.ini (Lotus Sametime Standard only) It is notnecessary to back up this file on IBM i becauseit is saved automatically during the upgradeprocess; the original meetingserver.ini file issaved in the server data directory asmeetingserver.bak.
All recorded meeting files (.rap) (Lotus Sametime Standard only)
Upgrading the Lotus Sametime server application:
After you have verified that your server is running a supported version of IBMLotus Domino as well as a version of Lotus Sametime that can be upgradeddirectly, upgrade the Lotus Sametime server application by installing the newerrelease on top of it.
Before you begin
Complete any pending reboot actions you may have from installing otherapplications. Make sure that all applications on the server computer (including theDomino Server Administrator and the Web browser) are closed. All Dominoservices must be stopped. Otherwise, you might corrupt any shared files and theinstallation program might not run properly.
About this task
The Lotus Sametime 8.5 Community Server installs directly over the existing LotusSametime server and uses the existing version of Lotus Domino.1. (Linux RHEL only) Disable SELinux on any RedHat operating system:
a. Log in as root on the Linux RedHat server where you will install the LotusSametime server.
b. Open the /etc/selinux/config file for editing.c. Locate the SELINUX setting. Change its value to either disable or
permissive.
434 Lotus Sametime: Installation and Administration Guide Part 1
d. Save and close the file.e. Restart the Linux server.
2. Log in to your computer as the system administrator (Microsoft Windows) oras root (IBM AIX, Linux, Solaris).Solaris only: Solaris installs must be performed by the root user using su or anormal login session. Third-party sudo packages are not supported on Solaris.
3. Download the Sametime Community Server installation package if you havenot already done so.a. To download installation packages, you must have an IBM Passport
Advantage account, which is described at the following Web address:www.ibm.com/software/howtobuy/passportadvantage/paocustomer/docs/en_US/ecare.html
b. Open this release’s Download document at the following Web address:http://www.ibm.com/support/docview.wss?rs=477&uid=24024322
Locate the components you need in the document’s listing, then downloadthe packages labelled with the corresponding part numbers to the systemon which you are installing.
c. Extract the files to a local directory.d. Verify that you have at least 1 GB of temporary space to run the
installation in your %TEMP% or /tmp directory.4. Navigate to the folder where you stored the downloaded files for Lotus
Sametime and open the Server folder. Start the installation program byrunning one of the following commands:AIX
./setupaix.binLinux
./setuplinux.binSolaris
./setupsolaris.binWindows
setupwin32.exe5. Select the language to use for the installation and click OK.6. At the Welcome screen, click Next.7. At the Licenses screen, click the I accept both the IBM and the non-IBM
terms option and click Next.8. Select the option to install without the Lotus Sametime System Console. Click
Next.9. Server Host Name.
Provide the fully qualified host name for this Lotus Sametime CommunityServer. Do not use an IP address or the host’s short name.
10. Connect to Domino Server.Enter the existing Domino administrator’s user ID and password, and thenclick Next.Use the common-name portion of the ID (not the hierarchical name thatincludes slashes). The Sametime System Console validates the administratorcredentials on the Domino server.
11. Slide Conversion.Do one of the following:
Chapter 4. Migrating and upgrading 435

Select Use the Sametime server to host the slide conversion feature on thecurrent server, and then click Next.Select Use Sametime slide conversion server to host the slide conversionfeature on a different Community Server, provide the host name and port toconnect to that server, and then click Next.
12. Connect to an LDAP Server.Select the user directory to be used with the Sametime Community Server,and then click Next.
13. HTTP Tunneling.To allow Sametime clients to make HTTP-tunneled connections on port 80 to aserver with a single IP address, click Enable HTTP Tunneling, and then clickNext.Selecting this feature increases the possibility that users in restrictive networkenvironments can exchange data in chats on a Sametime Community Serverthat is extended to the Internet.
14. At the summary panel, review the settings, then click Install to start theinstallation.
15. Click Finish to close the installation screen.16. If prompted, click Finish to reboot the system.
Migrating data from pre-7.5 releases of Lotus Sametime:
The format for storing IBM Lotus Sametime user privacy information changed inrelease 7.5. If you are upgrading from a release prior to 7.5, complete these tasks tomigrate user privacy information to the new format.
Upgrading the vpuserinfo.nsf template:
As part of upgrading IBM Lotus Sametime, you will need to replace the design ofthe vpuserinfo.nsf database.
About this task
As part of a product upgrade, you will need to replace the design of thevpuserinfo.nsf database with the stuserin.ntf template:1. Start the Lotus Notes client.2. Click File → Application → Open.3. Select the Community Server you upgraded (select ″Local″ for the current
server).4. Select the Configuration folder.5. In the file name field, type vpuserinfo.nsf and then click Open.6. Once the database is open, click File → Application → Replace Design.7. Select the newly installed Lotus Sametime Community Server as the template
server, and then click the Show advanced templates option to locate the″Sametime User Information″ (stuserin.ntf) template.
8. Click the stuserin.ntf template to select it, and then click Replace to updatethe database’s design to match the template.
9. When you have finished, you can exit the Lotus Notes client.
Migrating user privacy information:
436 Lotus Sametime: Installation and Administration Guide Part 1
If you are upgrading from a version of IBM Lotus Sametime earlier than release7.5, you will need to migrate privacy information to the newer format.
Before you begin
The format for storing privacy information changed in Lotus Sametime 7.5. If youare upgrading from a release prior to 7.5, and your users have stored privacyinformation (″Who can see me″) from the earlier release, then you need to migratethis information by running a utility after upgrading. If the information is notmigrated, privacy information from the earlier release appears to be lost afterupgrading.
Note: There is no need to run this utility unless you have upgraded from a releaseprior to 7.5 and your users have stored privacy data from the earlier release.
Considerations:v If you delay running the utility, users may create additional privacy data on the
upgraded server. In this situation, the new data is stored in addition to theexisting data and it is not predictable which privacy record will be used.Running the upgrade utility will not solve the problem. If necessary, theadministrator can manually delete one of the privacy records fromvpuserinfo.nsf.
v If you have multiple Lotus Sametime servers within a single community (buthave not configured them as a Community Services cluster), each of the serversmaintains a separate version of vpuserinfo.nsf. It is highly recommended thatyou run the upgrade utility on each of the servers in the communityimmediately after upgrading it to the new Lotus Sametime Community Server.
v If you have clustered the Lotus Sametime servers to support server failover andload balancing, it is best to upgrade all of the servers at the same time, ifpossible. Immediately run the upgrade utility on just one of the Lotus Sametimeservers in the cluster and allow the vpuserinfo.nsf updates to replicate to theother servers.
v If it is not possible to upgrade all of the servers in the cluster at the same time,consider advising your users to avoid creating additional privacy data until allof the servers have been upgraded. If users who are connected to a serverrunning a release prior to 7.5 create new privacy data, it will be stored in theolder format. This may conflict with privacy data that has already been migratedto the newer format. More than one privacy record for a user and conflictsbetween the records can cause unexpected results. Running the upgrade utilityagain will not solve the problem. If necessary, the administrator can manuallydelete one of the privacy records from vpuserinfo.nsf.
v The time required to run the utility depends on the size of vpuserinfo.nsf . Forexample, running the utility for a 2 GB vpuserinfo.nsf file may take 30 minutes.
v When the utility runs, two files are created in the Sametime server datadirectory:– vpuserinfo.nsf (time stamp): backup copy of vpuserinfo.nsf before it was
modified by the utility– vpuserinfo.nsf.log (time stamp): log of activity which occurred when the
utility ran
Running the privacy migration utility on Windows:
Chapter 4. Migrating and upgrading 437
Run the privacy migration utility to migrate user privacy information that wasstored prior to IBM Lotus Sametime 7.5 to the new format. An optional parameterallows you to migrate privacy data for only a specified subset of your LotusSametime users.
Before you begin
This example assumes the default Domino installation directory (c:\ProgramFiles\Lotus\Domino).
Example
1. If you intend to migrate privacy information for only a specified subset of yourSametime users, create a text file containing the names of the users. Forexample, create a text file called upgrade_util_filter.txt and save it in theDomino installation directory or another accessible location. The file shouldhave each user specified on a separate line in the following format:CN=John Smith/O=AcmeCN=Jane Doe/O=AcmeCN=Sally Brown/O=Acme
2. Stop the Sametime server3. Open a Windows command prompt4. Run the following commands:
c:\program files\lotus\Domino> upgrade_util.cmd<sametime_server_data_directory> [<upgrade_util_filter_file>] (where″c:\program files\lotus\Domino″ is the directory where the Domino server isinstalled).v If you do not specify the server data directory (the first parameter shown
above), the SametimeDirectory entry in the sametime.ini file is used.v If you do not specify the upgrade util filter file (the second parameter shown
above), the UpgradeUtilFilter entry in the sametime.ini file is used.v If there is no such entry in the sametime.ini, no filter will be used, meaning
migrating privacy information of all Sametime users.
Note: If you intend to use the <upgrade_util_filter_file> parameter, it shouldbe the second parameter, meaning you should also specify the<sametime_server_data_directory> parameter.
5. Check the vpuserinfo.nsf.log file which has the latest time stamp to verifythat the utility ran successfully.
Running the privacy migration utility on AIX, Linux or Solaris:
Run the privacy migration utility to migrate user privacy information that wasstored prior to IBM Lotus Sametime 7.5 to the new format. to migrate privacyinformation from AIX, Solaris, or Linux to the new format. An optional parameterallows you to migrate privacy data for only a specified subset of your LotusSametime users.
Example
To run the utility after upgrading to Sametime 8, follow these steps:1. If you intend to migrate privacy information for only a specified subset of your
Sametime users, create a text file containing the names of the users. Forexample, create a text file called upgrade_util_filter.txt and save it in the server
438 Lotus Sametime: Installation and Administration Guide Part 1
data directory or another accessible location. The file should have each userspecified on a separate line in the following format:CN=John Smith/O=AcmeCN=Jane Doe/O=AcmeCN=Sally Brown/O=Acme
2. Change directory to the data directory.3. Make the script executable by running the following command.
- chmod u+x upgrade_util.sh
4. Stop the Sametime server.5. Run the upgrade utility as the user defined for your Domino and Sametime
deployment, typically ″notes″:upgrade_util.sh <domino_program_directory><sametime_server_data_directory> [ <upgrade_util_filter_file> ]v The first two parameters should be specified, and the last parameter is
optional.v If you do not specify the upgrade util filter file (the third parameter shown
above), the UpgradeUtilFilter entry in the sametime.ini file is used.v If there is no such entry in the sametime.ini, no filter will be used, meaning
migrating privacy information of all Sametime users.6. Check the vpuserinfo.nsf.log file which has the latest time stamp to verify that
the utility ran successfully.
Enabling cluster replication:
After all of the servers in the IBM Lotus Sametime cluster have been upgraded,you can enable cluster replication once again to ensure that the servers are sharingconfiguration information.
About this task
If you saved each server’s data during the upgrade, your previous cluster settingsstill exist and you just need to enable replication among the servers. For moreinformation, see Replicating with all servers in a cluster in the Lotus Domino andNotes information center.
If you did not save server data during the upgrade, you may need to recreate thecluster as described in Clustering Lotus Sametime Community Servers in thisinformation center. You will need to return to this upgrade section after completingthe cluster configuration, so you may want to open the link in a separate browsertab or window so you do not lose your place.
Upgrading a stand-alone Community Mux:
If your previous IBM Lotus Sametime deployment included a stand-aloneCommunity Mux, you can upgrade the multiplexer to release 8.5.
Before you begin
This task only applies to a stand-alone Community Mux; the multiplexer thatinstalls directly on the Lotus Sametime server was upgraded automatically whenyou upgraded that server.
Chapter 4. Migrating and upgrading 439
About this task
Lotus Sametime 8.5 supports a stand-alone Community Mux installed with anearlier version of the product; however if you plan to support IPv6 addressing inyour deployment, you must upgrade the Community Mux (IPv6 addressing wasintroduced in Lotus Sametime 8.0.2).
If you have more than one stand-alone Community Mux, upgrade all of them:1. Insert the Lotus Sametime CD into the Community Services multiplexer
machine, start the installation program, and choose the option to install theCommunity Services Mux.
2. At the ″Select a language″ screen, select a language for the installer, and thenclick OK.
3. At the ″Welcome″ screen, click Next.4. At the license agreement screen, click I accept both the IBM and the non-IBM
terms, and then click Next.5. At the ″Directory name″ screen, browse to a the directory where you want to
install the Community Mux (or accept the default), and then click .Next
6. At the ″Host name or IP address″ screen, enter the fully qualified host name ofthe Lotus Sametime Community Server that this Community Mux will serve.For best results, do not use an IP address.
7. At the summary screen, click Install.8. At the ″successfully installed″ screen, click Finish.
Upgrading a remote Conversion Server:
If your IBM Lotus Sametime deployment includes a remote conversion server andyou will continue to host meetings on one or more upgraded Lotus Sametimeservers, you should upgrade the conversion server as well.
About this task
Your Sametime server may already be configured to use a particular conversionserver and port number. If you used a remote conversion server in a previousrelease of Sametime, the configuration was migrated during the upgrade. You mayhave specified the configuration when you installed Sametime or when you addedSametime to a Domino server (i5/OS). Verify that the information is correct, orupdate the server configuration.1. On the upgraded Lotus Sametime server, verify the conversion server
configuration:a. Open the stconvservices.properties file, which is located in the Sametime
server data stconversion subdirectory.b. Check the value for RemoteConversionURL setting:
v If no remote conversion server has been configured, the setting looks like:#RemoteConversionURL=http://conversions1.ibm.com:8081;http://conversions2.ibm.com:8081/servlet/stconversion
v When one remote conversion server is configured, the # is absent at thestart of the line, the server name is correct, and everything between thesemicolon and the end of the line is deleted. For example:RemoteConversionURL=http://stconv.acme.com:19610/servlet/stconversion
Note the port number (19610 in the example) to use when you run theinstallation program.
440 Lotus Sametime: Installation and Administration Guide Part 1
v If more than one conversion server is configured, there is no # sign, anddata for each server is separated by a semicolon. For example:RemoteConversionURL=http://stconv1.acme.com:19610/servlet/stconversion;http://stconv2.acme.com:8081/servlet/stconversion
Find the entry for the conversion server that you plan to install, and notethe port number.
c. Save and close the file.d. If you updated the file, restart the Lotus Sametime server now.
2. Upgrade the remote conversion server:The Lotus Sametime Conversion Services installation program is located in theLotus Sametime 8.5 Community Server package.a. Move to the computer hosting the remote conversion server that you will
upgrade.b. Download the conversion server installation program or insert the CD
containing it, and start the installation.c. Select a language for the installer, and click Next.d. Select the option to install Sametime Conversion Services, and click Next.e. Follow the prompts presented to complete the installation.f. When you are prompted for the port on which the conversion service will
listen, specify the port number you noted when you verified the Sametimeserver configuration in Step 1.
g. If you installed Conversion Services on Microsoft Windows 2000, restart theserver.
h. If your users will be posting documents that contain text for languagesother than English, verify that the locale for your Conversion Server is setappropriately.
Results
The conversion services component starts automatically when you restart theserver. To start the conversion services manually, click Start > Administrative tools> Services.
Upgrading a stand-alone Reflector:
Audio and video services provided by the IBM Lotus Sametime Reflector will notbe available in this release to assist client-to-Sametime client audio/videocommunication.
About this task
The Lotus Sametime Reflector is a server application that helps to establishaudio/video sessions between Lotus Sametime clients across a firewall. This initialrelease of Lotus Sametime 8.5 does not include a Reflector component; the servicemay appear to be running, but will not function. In this release, the LotusSametime 8.5 client can only establish audio and video connections with otherLotus Sametime 8.5 clients.
Release 8.5 audio/video services can co-exist with release 7.5.x and 8.0.xaudio/video services, with the following restrictions:v The 8.5 client cannot establish an audio or video call with 7.5.x or 8.0.x clients
Chapter 4. Migrating and upgrading 441
v The 7.5.x and 8.0.x clients cannot establish an audio or video call with the 8.5client
v The 8.5 client cannot use the Lotus Sametime Reflector
Next steps:
After you have completed an upgrade of one or more IBM Lotus Sametimeservers, the instant messaging, awareness, and presence features are ready to use.If your previous deployment included the online meetings feature, you can eitheruse them on the upgraded server (as in previous releases) or migrate meetings tothe Lotus Sametime 8.5 Meeting Server.
About this task
If your Lotus Sametime server does not have the online meetings feature enabled,or meetings are enabled but you intend to continue creating and hosting them onthe upgraded servers, then your upgrade is complete and you are ready to beginusing Lotus Sametime 8.5.
You only need to continue to next upgrade section if your Lotus Sametime serverhas the online meetings feature enabled and you want to migrate them to the newLotus Sametime 8.5 Meeting Server. To migrate meetings, you will need to set upan LDAP directory (if you are currently using native Domino authentication),install new Lotus Sametime 8.5 components, and then set up URL redirects fromthe upgraded servers to one or more newly installed Meeting Servers. All of thesetasks are discussed in detail in the next section.
Expanding the deployment to host meetings on a LotusSametime 8.5 Meeting ServerIf you have upgraded one or more IBM Lotus Sametime servers and have themeetings feature enabled, you can choose to migrate the meetings to a LotusSametime 8.5 Meeting Server and take advantage of new features such aspersistent meeting rooms.
About this task
This section applies only to deployments where the upgraded servers have onlinemeetings enabled and you want to migrate them to the new Lotus Sametime 8.5Meeting Server. To migrate meetings, you will need to set up an LDAP directory,install new Lotus Sametime 8.5 components, and then set up URL redirects fromthe upgraded servers to one or more newly installed Meeting Servers. All of thesetasks are discussed in detail in this section.
Note: This section discusses installing new Lotus Sametime 8.5 components.Information on topics such as configuration, administration, tuning, andtroubleshooting appears elsewhere in this information center.
Replacing the Domino Directory with an LDAP directory:
If you configured IBM Lotus Sametime to use a native IBM Lotus Dominoddirectory for user authentication in a previous release, you must convert thedirectory to LDAP format for use with Lotus Sametime 8.5.
442 Lotus Sametime: Installation and Administration Guide Part 1
About this task
Lotus Sametime 8.5 requires the use of an LDAP directory for user authentication.Rather than installing a new LDAP directory, you can convert your existing LotusDomino Directory to LDAP format. Complete this task before installing the LotusSametime System Console for the new deployment.
Shutting down the Sametime services while keeping the Domino services active:
To replace the Domino directory with an LDAP directory, shut down the Sametimeservices while you make configuration changes on the Sametime server.
About this task
You must leave the Domino server running so you can access Domino databaseson the server.1. Open the Domino server console on the Sametime/Domino server.2. In the Domino server console, type the following command:
For Windows, AIX, Linus, and Solaris servers:Tell STADDIN Quit
For IBM i servers:Tell STADDIN2 Quit
Creating a Directory Assistance database:
Setting up Directory Assistance enables Web browser users to authenticate againstentries in the LDAP directory when accessing databases on the Lotus Sametimeserver that require basic password authentication. Sametime Connect clients do notrequire Directory Assistance.
About this task
Because Lotus Sametime uses Directory Assistance to access an LDAP server, youmust ensure that a Directory Assistance database exists on the Sametime servereither by creating a new database or replicating an existing one. Use the sameprocess to set up Directory Assistance for a Sametime server as you would for aDomino server without Sametime.
Follow these steps to create a new Directory Assistance database.1. Open a Lotus Notes client.2. Choose File → Database → New.3. Select the Sametime server (or select the Local server if you are running
Sametime on a Windows server and you opened the Notes client on theserver).
4. Create the Directory Assistance database on the server using the templateDA50.NTF. Provide a database name and file name (for example, da.nsf) for theDirectory Assistance database.
What to do next
To replicate a database instead of creating a new one, create a new replica of theDirectory Assistance database on the Sametime server. Then create a Connectiondocument to schedule replication of the database. See your Domino serveradministration documentation for information on replication.
Chapter 4. Migrating and upgrading 443
Identifying the Directory Assistance database on the Sametime server:
After you have ensured that a Directory Assistance database exists on theSametime server, you must identify the Directory Assistance database on theSametime server.
About this task
Enter the database filename in the ″Directory Assistance database name″ field inthe Basics section of the Sametime server’s Server document.1. From a Notes client, choose File → Database → Open.2. Select the Sametime server (or select the Local server if you are running
Sametime on a Windows server and you opened the Notes client on theserver).
3. Select the Domino directory (names.nsf) and click Open.4. Select Server → Servers to open the Servers view.5. Double-click the name of the Sametime server to open the Server document.6. If necessary, select the Basics tab of the Server document.7. Click Edit Server.8. In the ″Directory Assistance database name″ field, enter the filename (for
example, da.nsf) of the Directory Assistance database.9. Click Save & Close.
Creating a Directory Assistance document:
The Directory Assistance database on the Sametime server must contain aDirectory Assistance document that enables the Sametime server to access theLDAP server.
About this task
Follow these steps to create the Directory Assistance document for the LDAPserver. You can change the suggested values shown below as required by yourenvironment.1. From the Notes client, open the Directory Assistance database (usually named
da.nsf) on the Sametime server.2. Click Add Directory Assistance.3. In the Basics tab, make these settings:
Setting Value
Domain type Select LDAP.
Domain name Enter any descriptive name; the name must bedifferent from any other in Directory Assistance.Do not use the Domino domain name.
Company name Enter the name of your company.
Search order The suggested value is 1. The search order specifiesthe order this directory is searched relative to otherdirectories in Directory Assistance.
444 Lotus Sametime: Installation and Administration Guide Part 1
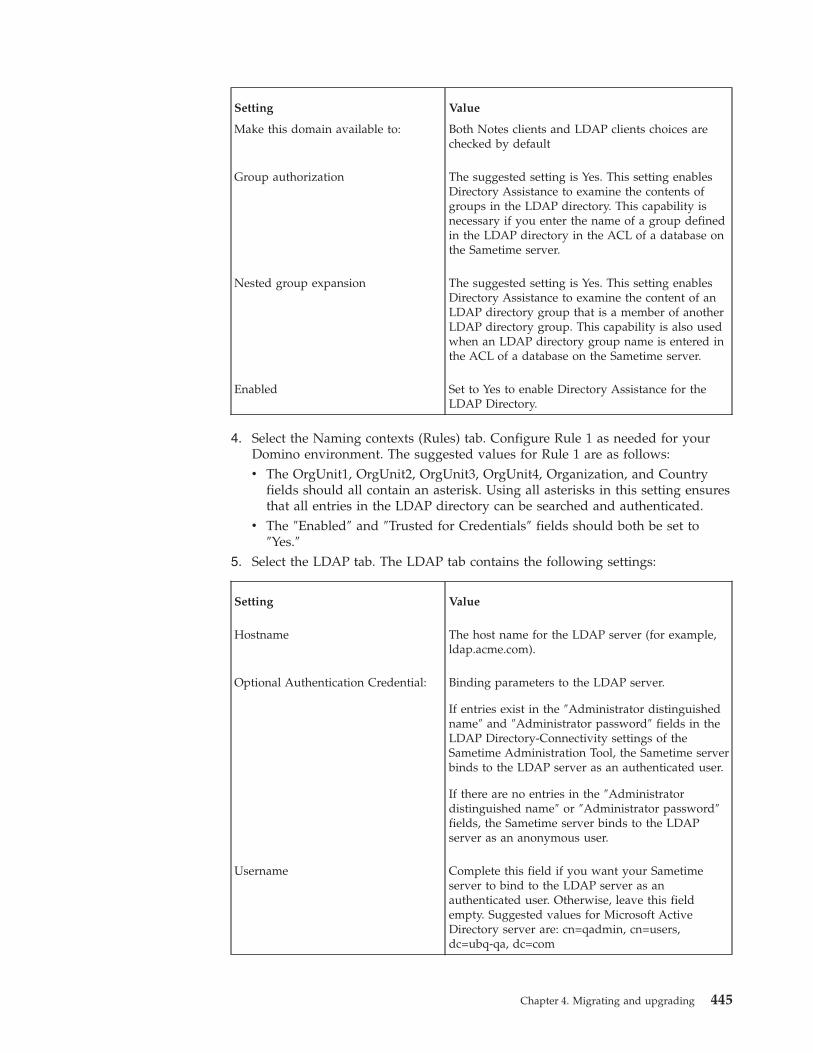
Setting Value
Make this domain available to: Both Notes clients and LDAP clients choices arechecked by default
Group authorization The suggested setting is Yes. This setting enablesDirectory Assistance to examine the contents ofgroups in the LDAP directory. This capability isnecessary if you enter the name of a group definedin the LDAP directory in the ACL of a database onthe Sametime server.
Nested group expansion The suggested setting is Yes. This setting enablesDirectory Assistance to examine the content of anLDAP directory group that is a member of anotherLDAP directory group. This capability is also usedwhen an LDAP directory group name is entered inthe ACL of a database on the Sametime server.
Enabled Set to Yes to enable Directory Assistance for theLDAP Directory.
4. Select the Naming contexts (Rules) tab. Configure Rule 1 as needed for yourDomino environment. The suggested values for Rule 1 are as follows:v The OrgUnit1, OrgUnit2, OrgUnit3, OrgUnit4, Organization, and Country
fields should all contain an asterisk. Using all asterisks in this setting ensuresthat all entries in the LDAP directory can be searched and authenticated.
v The ″Enabled″ and ″Trusted for Credentials″ fields should both be set to″Yes.″
5. Select the LDAP tab. The LDAP tab contains the following settings:
Setting Value
Hostname The host name for the LDAP server (for example,ldap.acme.com).
Optional Authentication Credential: Binding parameters to the LDAP server.
If entries exist in the ″Administrator distinguishedname″ and ″Administrator password″ fields in theLDAP Directory-Connectivity settings of theSametime Administration Tool, the Sametime serverbinds to the LDAP server as an authenticated user.
If there are no entries in the ″Administratordistinguished name″ or ″Administrator password″fields, the Sametime server binds to the LDAPserver as an anonymous user.
Username Complete this field if you want your Sametimeserver to bind to the LDAP server as anauthenticated user. Otherwise, leave this fieldempty. Suggested values for Microsoft ActiveDirectory server are: cn=qadmin, cn=users,dc=ubq-qa, dc=com
Chapter 4. Migrating and upgrading 445
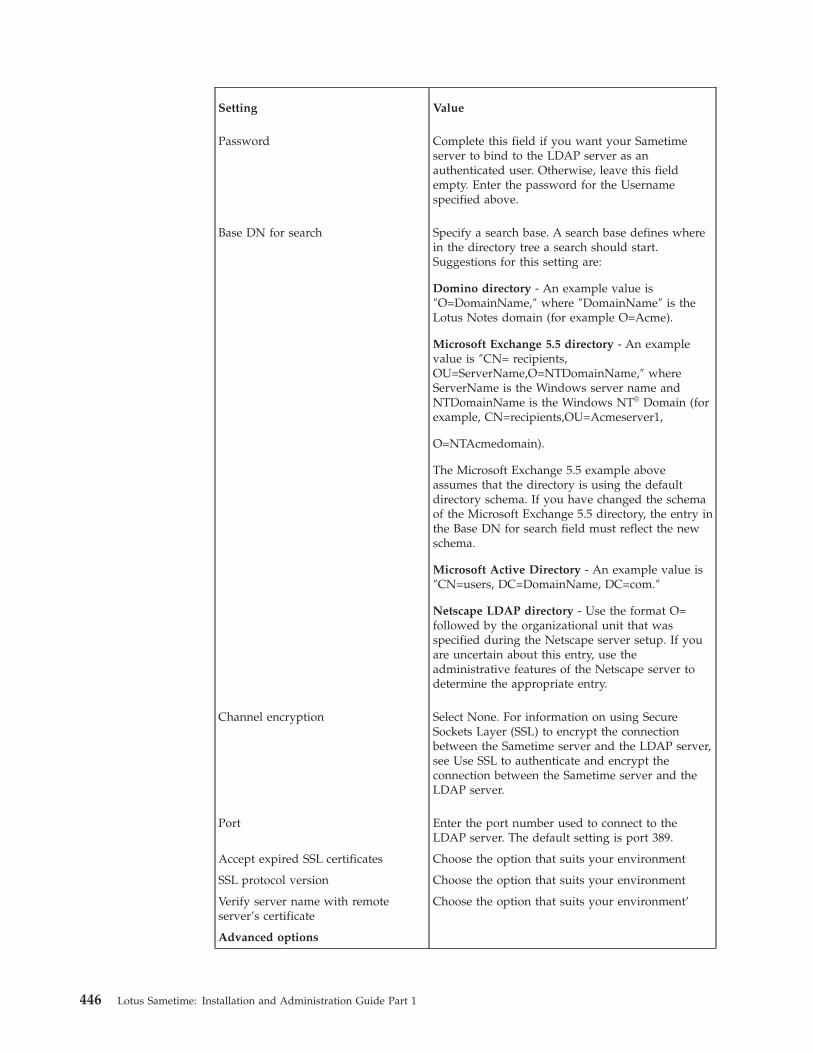
Setting Value
Password Complete this field if you want your Sametimeserver to bind to the LDAP server as anauthenticated user. Otherwise, leave this fieldempty. Enter the password for the Usernamespecified above.
Base DN for search Specify a search base. A search base defines wherein the directory tree a search should start.Suggestions for this setting are:
Domino directory - An example value is″O=DomainName,″ where ″DomainName″ is theLotus Notes domain (for example O=Acme).
Microsoft Exchange 5.5 directory - An examplevalue is ″CN= recipients,OU=ServerName,O=NTDomainName,″ whereServerName is the Windows server name andNTDomainName is the Windows NT® Domain (forexample, CN=recipients,OU=Acmeserver1,
O=NTAcmedomain).
The Microsoft Exchange 5.5 example aboveassumes that the directory is using the defaultdirectory schema. If you have changed the schemaof the Microsoft Exchange 5.5 directory, the entry inthe Base DN for search field must reflect the newschema.
Microsoft Active Directory - An example value is″CN=users, DC=DomainName, DC=com.″
Netscape LDAP directory - Use the format O=followed by the organizational unit that wasspecified during the Netscape server setup. If youare uncertain about this entry, use theadministrative features of the Netscape server todetermine the appropriate entry.
Channel encryption Select None. For information on using SecureSockets Layer (SSL) to encrypt the connectionbetween the Sametime server and the LDAP server,see Use SSL to authenticate and encrypt theconnection between the Sametime server and theLDAP server.
Port Enter the port number used to connect to theLDAP server. The default setting is port 389.
Accept expired SSL certificates Choose the option that suits your environment
SSL protocol version Choose the option that suits your environment
Verify server name with remoteserver’s certificate
Choose the option that suits your environment’
Advanced options
446 Lotus Sametime: Installation and Administration Guide Part 1
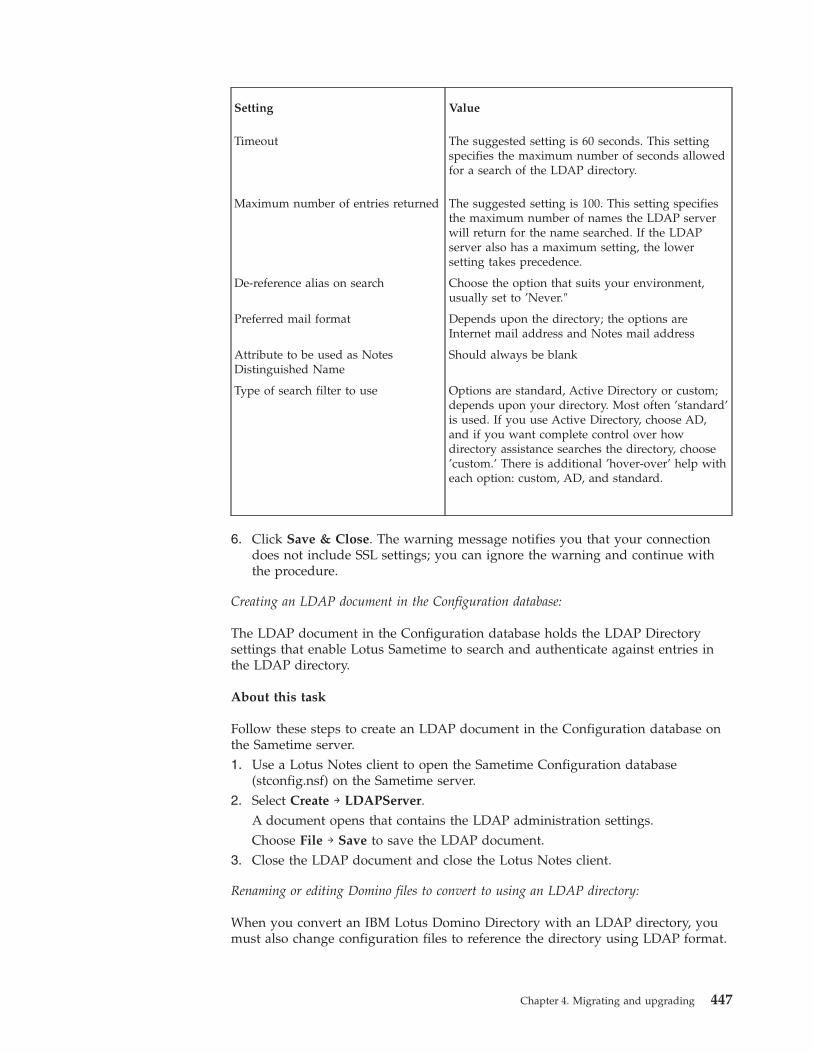
Setting Value
Timeout The suggested setting is 60 seconds. This settingspecifies the maximum number of seconds allowedfor a search of the LDAP directory.
Maximum number of entries returned The suggested setting is 100. This setting specifiesthe maximum number of names the LDAP serverwill return for the name searched. If the LDAPserver also has a maximum setting, the lowersetting takes precedence.
De-reference alias on search Choose the option that suits your environment,usually set to ’Never.″
Preferred mail format Depends upon the directory; the options areInternet mail address and Notes mail address
Attribute to be used as NotesDistinguished Name
Should always be blank
Type of search filter to use Options are standard, Active Directory or custom;depends upon your directory. Most often ’standard’is used. If you use Active Directory, choose AD,and if you want complete control over howdirectory assistance searches the directory, choose’custom.’ There is additional ’hover-over’ help witheach option: custom, AD, and standard.
6. Click Save & Close. The warning message notifies you that your connectiondoes not include SSL settings; you can ignore the warning and continue withthe procedure.
Creating an LDAP document in the Configuration database:
The LDAP document in the Configuration database holds the LDAP Directorysettings that enable Lotus Sametime to search and authenticate against entries inthe LDAP directory.
About this task
Follow these steps to create an LDAP document in the Configuration database onthe Sametime server.1. Use a Lotus Notes client to open the Sametime Configuration database
(stconfig.nsf) on the Sametime server.2. Select Create → LDAPServer.
A document opens that contains the LDAP administration settings.Choose File → Save to save the LDAP document.
3. Close the LDAP document and close the Lotus Notes client.
Renaming or editing Domino files to convert to using an LDAP directory:
When you convert an IBM Lotus Domino Directory with an LDAP directory, youmust also change configuration files to reference the directory using LDAP format.
Chapter 4. Migrating and upgrading 447
About this task
Perform the procedure that corresponds to the operating system on which theLotus Sametime server is running.
Copying and renaming .DLL files on Windows:
When you convert the IBM Lotu sDomino Directory to LDAP format, you mustalso copy and rename .DLL files for use with the LDAP directory.
About this task
If your Lotus Sametime server runs on the Microsoft Windows operating system,perform this procedure:1. On the Lotus Sametime server, create a working directory to copy files to so
that you can rename them.2. Copy the ″STAuthenticationLdap.dll″ from the directory C:\Program
Files\Lotus\Domino\Directory BB\Ldap to the working directory.3. In the working directory, rename the ″STAuthenticationLdap.dll″ file to
″STAuthentication.dll.″4. Copy the renamed ″STAuthentication.dll″ file to the C:\Program
Files\Lotus\Domino or $installeddir\Lotus\Domino.Note Copying the ″STAuthentication.dll″ file to the C:\ProgramFiles\Lotus\Domino or $installeddir\Lotus\Domino will overwrite anexisting file of the same name.
5. Copy the file ″STGroupsLdap.dll″ from the directory C:\ProgramFiles\Lotus\Domino\Directory BB\Ldap to the working directory.
6. Rename the ″STGroupsLdap.dll″ file to ″STGroups.dll.″7. Copy the renamed STGroups.dll file to the C:\Sametime directory.
Note Copying the ″STGroups.dll″ file to the C:\Sametime directory willoverwrite an existing file of the same name.
8. Copy the file ″STResolveLdap.dll″ from the directory C:\ProgramFiles\Lotus\Domino\Directory BB\Ldap to the working directory.
9. Rename the ″STResolveLdap.dll″ file to ″STResolve.dll.″10. Copy the renamed ″STResolve.dll″ file to the C:\Program
Files\Lotus\Domino or $installeddir\Lotus\Domino.Note Copying the ″STResolve.dll″ file to the C:\Sametime directory willoverwrite an existing file of the same name.
11. Copy the ″StBrowseLdap.dll″ file from the directory C:\ProgramFiles\Lotus\Domino\Directory BB\Ldap to the working directory.
12. Rename the ″StBrowseLdap.dll″ file to ″StBrowse.dll.″13. Copy the renamed STBrowse.dll file to the C:\Program Files\Lotus\Domino
or $installeddir\Lotus\Domino.14. Copy the ″StDirectoryListLDAP.sym″ file from the directory C:\Program
Files\Lotus\Domino\Directory BB\Ldap to the working directory.15. Rename the ″StDirectoryListLDAP.sym″ file to ″StDirectoryList.sym.″16. Copy the renamed StDirectoryList.sym file to the C:\Program
Files\Lotus\Domino or $installeddir\Lotus\Domino.17. Copy the ″StLdap.dll″ file from the directory C:\Program
Files\Lotus\Domino\Directory BB\Ldap to C:\Program Files\Lotus\Dominoor $installeddir\Lotus\Domino.
448 Lotus Sametime: Installation and Administration Guide Part 1
18. Copy the ″stLdap.ini″ file from the directory C:\ProgramFiles\Lotus\Domino\Directory BB\Ldap to C:\Program Files\Lotus\Dominoor $installeddir\Lotus\Domino.
Editing the sametime.ini file on AIX, Linux, and Solaris:
When you convert the IBM Lotus Domino Directory to LDAP format, you mustedit the sametime.ini file to indicate that an LDAP directory will now be used.
About this task
If your Lotus Sametime server runs on IBM AIX, Linux, or Solaris, perform thisprocedure to edit the sametime.ini file in the Sametime server installationdirectory. You must change the DirectoryType parameter from ″Domino″ to″LDAP″ in the sametime.ini file.1. Use a text editor to open the sametime.ini file located in the Sametime server
installation directory (for example, root/lotus/domino).2. In the [CONFIG] section of the sametime.ini file edit the DirectoryType=
parameter so that it specifies LDAP as shown below:DirectoryType=LDAP
3. Save and close the sametime.ini file.
Specifying LDAP as the directory type in the Sametime.ini file:
Edit the sametime.ini file to replace the Domino Directory with an LDAP directory.1. Use a text editor to open the sametime.ini file located in the Sametime server
data directory.2. In the [Directory] section of the sametime.ini file, edit the DirectoryType=
parameter so that it specifies LDAP as shown below:DirectoryType=LDAP
3. Save and close the file.
Changing names to an LDAP format:
Run the Name Change task to ensure that the user and group names that arestored in the vpuserinfo.nsf database on the Sametime server are converted fromthe native Domino directory name format to an LDAP directory format.
About this task
Running the name conversion utility updates Lotus Sametime Community Serveruser or group names with the latest directory changes. The name conversion utilityuses a comma-separated value list that you compile to change names, deletenames, or convert all names from Domino to Domino LDAP formatted names.
Users create a contact list, a privacy list, and an alert-me-when list in the IBMLotus Sametime Connect client by selecting user names or group names from theDomino or Domino LDAP directory that is used with the IBM Lotus SametimeCommunity server. These contact, privacy, alert-me-when lists are stored in theuser information database (vpuserinfo.nsf) on Lotus Sametime Community servers.When a user starts the Lotus Sametime Connect client, the lists are downloadedfrom the database to update the lists stored on the client’s local computer
Chapter 4. Migrating and upgrading 449
You do not need to run the name conversion utility when you add new users orgroups to the Domino or LDAP directory.
Run the name conversion utility manually on a stand-alone Lotus SametimeCommunity server, or on a server in a cluster which will replicate the changethroughout the cluster.
Note: Be sure to stop the Domino server before you run the name conversionutility.
Configuring LDAP:
Specify the LDAP Directory settings that enable the Sametime server to search theLDAP directory on the LDAP server and authenticate Sametime users againstentries in the LDAP directory.
About this task
Configuring the LDAP Directory settings requires previous experience with LDAP;in particular you will need to know the following information:v The structure (directory tree) of the LDAP directory the Sametime server will
accessv The schema of Person and Group entries in the LDAP directoryv How to construct LDAP search filters to access the attributes of Person and
Group entries in the LDAP directory1. In the Sametime server home page, click Administer the Server.2. Click LDAP Directory.3. Enter the settings to enable your LDAP directory to access Sametime servers.4. Click Save.5. Restart the Sametime server to enable your settings.
Updating search settings for policies:
Replace the Notes policy key in sametime.ini with a key for the LDAP directoryand verify that the search filter settings are correct for the LDAP server.
About this task
To switch from the Domino directory to an LDAP configuration, make thefollowing changes:1. Stop the Sametime Policy service.2. In the Policy section of the Sametime.ini file, replace the key:
POLICY_DIRECTORY_BB_IMPL=com.ibm.sametime.policy.directorybb.notes.DirNotesBlackBox
with this key:POLICY_DIRECTORY_BB_IMPL=com.ibm.sametime.policy.directorybb.ldap.DirLdapBlackBox
3. Save the Sametime.ini file.4. Click Administer the Server.5. In the navigation pane, click LDAP Directory → Searching.
The top two search filter settings are for LDAP, and the lower two search filtersettings are for Policy.
6. Verify that the LDAP Server document holds the proper values for theBaseMembership and GroupMembership fields.
450 Lotus Sametime: Installation and Administration Guide Part 1

The most effective policy search through the LDAP Directory may be using amemberOf attribute. In this case, the Policy filter field contains this attributename, so if your LDAP Server provides the memberOf attribute, you shouldknow how to configure the use of this feature.
7. Save stconfig.nsf.8. Using the ″tell http restart″ command in the Domino console, restart the
Domino HTTP server.9. Restart the Sametime Policy service.
Reconfiguring the UserInfo servlet after switching from Domino to LDAP:
The UserInfo servlet must be reconfigured after switching from Domino to LDAPto enable the Business Card to work.
About this task
To reconfigure the UserInfo servlet, follow these steps:1. Open UserInfoConfig.xml in a text editor and replace all its contents with the
following, then save the file:<UserInformation><ReadStConfigUpdates value="true"/><Resources><Storage type="LDAP"><StorageDetails HostName="hera.haifa.ibm.com" Port="389" UserName=""Password="" SslEnabled="false" SslPort="636" BaseDN="" Scope="2"SearchFilter="(&(objectclass=organizationalPerson)(|(cn=%s)(givenname=%s)(sn=%s)(mail=%s)))"/><!-- Add another StorageDetails tag to support another ldap server.The listing order implies the searching order --><!-- Scope: 0=OBJECT_SCOPE 1=ONELEVEL_SCOPE 2=SUBTREE_SCOPE--><SslProperties KeyStorePath="" KeyStorePassword=""/><Details>
<Detail Id="MailAddress" FieldName="mail" Type="text/plain"/><Detail Id="Name" FieldName="cn" Type="text/plain"/><Detail Id="Title" FieldName="title" Type="text/plain"/><Detail Id="Location" FieldName="postalAddress" Type="text/plain"/><Detail Id="Telephone" FieldName="telephoneNumber" Type="text/plain"/><Detail Id="Company" FieldName="ou" Type="text/plain" /><Detail Id="Photo" FieldName="jpegPhoto" Type="image/jpeg" />
</Details></Storage></Resources><ParamsSets><Set SetId="0" params="MailAddress,Name,Title,Location,Telephone,Photo,Company"/><Set SetId="1" params="MailAddress,Name,Title,Location,Telephone,Photo,Company"/></ParamsSets><BlackBoxConfiguration><BlackBox type="LDAP" name="com.ibm.sametime.userinfo.userinfobb.UserInfoLdapBB"MaxInstances="5" /></BlackBoxConfiguration></UserInformation>
2. Open the Sametime server home page and log in as an administrator.3. Click Administer the server.4. Click Configuration → Business Card.5. Choose the attributes to display in user business cards:
v Photov Namev Companyv E-mail addressv Telephonev Address or locationv Title
Chapter 4. Migrating and upgrading 451
6. Click Update.7. Stop and restart Domino and Lotus Sametime.
Installing DB2 on Linux and Windows:
IBM DB2 is a prerequisite for IBM Lotus Sametime and is included with theSametime installation package for Linux and Windows. The package does notinclude DB2 for AIX or Solaris.
Before you begin
The DB2 installation provided with Lotus Sametime supports Linux 32-bit systemsand Windows 32-bit or 64-bit systems. If you have a 64-bit Linux system, eitherinstall DB2 for Windows or install DB2 on a 32-bit Linux system instead. IBM iincludes DB2.
About this task
If you are running in a production environment, install DB2 on a separatemachine. In a pilot environment, you can install DB2 on the same machine onwhich you plan to install Lotus Sametime System Console.1. (Linux RHEL only) Disable SELinux on any RedHat operating system:
a. Log in as root on the Linux RedHat server where you will install DB2.b. Open the /etc/selinux/config file for editing.c. Locate the SELINUX setting. Change its value to either disable or
permissive.d. Save and close the file.e. Restart the Linux server.
2. Log in to your computer as the system administrator (Microsoft Windows) oras root (Linux).
3. Download the Sametime DB2 installation package if you have not alreadydone so.a. To download installation packages, you must have an IBM Passport
Advantage account, which is described at the following Web address:www.ibm.com/software/howtobuy/passportadvantage/paocustomer/docs/en_US/ecare.html
b. Open this release’s Download document at the following Web address:http://www.ibm.com/support/docview.wss?rs=477&uid=24024322
Locate the components you need in the document’s listing, then downloadthe packages labelled with the corresponding part numbers to the systemon which you are installing.
c. Extract the files to a local directory.d. Verify that you have at least 1 GB of temporary space to run the
installation in your %TEMP% or /tmp directory.4. Navigate to the folder where you extracted the files. Start the installation
program by running one of the following commands from the disk 1 folder:Linux
./launchpad.shWindows
launchpad.exe5. If necessary, select a language other than English from the ″Select a language″
dropdown list.
452 Lotus Sametime: Installation and Administration Guide Part 1
6. Click Install IBM DB2 and click Install IBM DB2.7. Leave the defaults selected and click Next.
If Installation Manager is already installed, the selection is dimmed.8. At the Licenses screen, click the I accept the terms in the license agreements
option and click Next.9. At the next screen, accept the default locations.
Click Next.10. At the next screen, accept the default location for the package group.
Click Next.11. Select Create a new package group and accept the default location.
Click Next.12. Confirm that all available features are selected, then click Next.13. Create a new DB2 Application User ID that does not exist on the system. Then
supply a password that meets the operating system password policyrequirements as well as any additional requirements imposed by yourcompany. Confirm the password.For information about passwords, see the Password Rules topic in the DB2information center.
Important: This user cannot previously exist on the system. This user will becreated as a local operating system user during the DB2 installation process; ifyour organization does not allow creation of local operating system users forsecurity reasons, exit this installer and install DB2 v9.5 using a differentpackage. This installer will not check to see if the user already exists.Make a note of the DB2 Application User name and password. This user hasdatabase administration authority and you will supply the name andpassword when you install the Lotus Sametime System Console and whenyou connect to DB2 databases later.Then click Next.
14. At the summary panel, review the settings, then click Install to start theinstallation.The installation may take up to 20 minutes to install. You will receiveconfirmation when it is complete.
15. Click Finish to close the installation screen.16. Click Exit to close the Installation Manager.
Results
If the installation fails, click View Log File for more information. Logs are storedin the following locations.
Linux
/var/ibm/InstallationManager/logs
Windows 2008%ALLUSERSPROFILE%\IBM\Installation Manager\logs
Windows 2003%ALLUSERSPROFILE%\Application Data\IBM\Installation Manager\logs
Chapter 4. Migrating and upgrading 453
What to do next
“Creating a database for the Lotus Sametime System Console on AIX, Linux,Solaris, and Windows” on page 59
Setting up the Lotus Sametime System Console:
A new IBM Lotus Sametime 8.5 deployment uses a system console as the centralpoint for administering servers; all new Lotus Sametime 8.5 components mustconnect to the console. Set up the Lotus Sametime System Console and itsprerequisite components before you install a Lotus Sametime 8.5 Meeting Server.
About this task
Setting up the Lotus Sametime System Console involves creating a database tostore console data, connecting the console to existing servers, and creating policysettings on the console.
Installing the Lotus Sametime System Console:
The Lotus Sametime System Console is your focal point for administering andconfiguring all Sametime servers.
About this task
Install and configure prerequisite applications, then install the IBM Lotus SametimeSystem Console, which you will use for preparing for server installations and formanaging your Lotus Sametime deployment.
Creating a database for the Lotus Sametime System Console on AIX, Linux, Solaris, andWindows:
Before installing the Lotus Sametime System Console, create a database to store itsdata.
Before you begin
Make sure you have installed DB2. If you previously created a System Consoledatabase and want to run the script again to create a database of the same name,use the DB2 DROP DATABASE command first to delete all user data and log files,as well as any back/restore history for the original database. Also note thatuninstalling DB2 does not remove the data and log files.
About this task
Run the scripts that come with Lotus Sametime in the DB2 installation package tocreate the database for the Lotus Sametime System Console.1. On the DB2 server, log in to the system as the DB2 administrator created
during DB2 installation if you are not already logged in.Linux and Windows: Now proceed to Step 3.AIX and Solaris: Now proceed to Step 2.
2. Download the DB2 installation package if you have not already done so.a. To download installation packages, you must have an IBM Passport
Advantage account, which is described at the following Web address:www.ibm.com/software/howtobuy/passportadvantage/paocustomer/docs/en_US/ecare.html
454 Lotus Sametime: Installation and Administration Guide Part 1
b. Open this release’s Download document at the following Web address:http://www.ibm.com/support/docview.wss?rs=477&uid=24024322
Locate the components you need in the document’s listing, then downloadthe packages labelled with the corresponding part numbers to the systemon which you are installing.
c. Extract the files to a local directory.d. Verify that you have at least 1 GB of temporary space to run the installation
in your %TEMP% or /tmp directory.3. Open a command prompt and navigate to the folder where you extracted the
DB2 installation package.4. Create the database by running one of the following commands from the disk 1
folder:AIX, Linux, and Solaris
./createSCDb.sh STSC
Windows
createSCDb.bat STSC
Replace ″STSC″ in the command if you want to choose a different databasename. Names can be from 1 - 8 characters, but cannot contain special ormultibyte characters.Follow the rules for your operating system when naming DB2 objects.
5. Close the command window.6. Open the DB2 Control Center.
AIX, Linux, and Solaris
Open the IBM DB2 folder on the desktop and click Control Center.Windows
Click Start → Programs → IBM DB2 → installed_DB2_instance → GeneralAdministration Tools → Control Center.
7. Verify that the new database was created.Related tasks
“Installing DB2 on Linux and Windows” on page 57IBM DB2 is a prerequisite for IBM Lotus Sametime and is included with theSametime installation package for Linux and Windows. The package does notinclude DB2 for AIX or Solaris.
Installing the console on AIX, Linux, Solaris, and Windows:
Run the install program to set up the Lotus Sametime System Console on AIX,Linux, Solaris, or Windows.
Before you begin
Ensure that your DB2 server is installed and running with the db2start command,and that the Lotus Sametime System Console database has been created.
AIX, Linux, and Solaris: The launchpad install program needs to be able to launcha Web browser to start. You will need to be on the console or have an X server anda Web browser installed and configured. (VNC or a remote X term session willwork as well.)
Chapter 4. Migrating and upgrading 455
About this task
Follow these steps to install the Lotus Sametime System Console.1. (Linux RHEL only) Disable SELinux on any RedHat operating system:
a. Log in as root on the Linux RedHat server where you will install theSametime System Console.
b. Open the /etc/selinux/config file for editing.c. Locate the SELINUX setting. Change its value to either disable or
permissive.d. Save and close the file.e. Restart the Linux server.
2. Log in to your computer as the system administrator (Microsoft Windows) oras root (IBM AIX, Linux, Solaris).Solaris only: Solaris installs must be performed by the root user using su or anormal login session. Third-party sudo packages are not supported on Solaris.
3. Download the Sametime System Console installation package if you have notalready done so.a. To download installation packages, you must have an IBM Passport
Advantage account, which is described at the following Web address:www.ibm.com/software/howtobuy/passportadvantage/paocustomer/docs/en_US/ecare.html
b. Open this release’s Download document at the following Web address:http://www.ibm.com/support/docview.wss?rs=477&uid=24024322
Locate the components you need in the document’s listing, then downloadthe packages labelled with the corresponding part numbers to the systemon which you are installing.
c. Extract the files to a local directory.d. Verify that you have at least 1 GB of temporary space to run the
installation in your %TEMP% or /tmp directory.4. Navigate to the folder where you stored the downloaded files for Lotus
Sametime and start the installation program by running one of the followingcommands from the disk 1 folder:AIX, Linux, Solaris
./launchpad.shWindows
launchpad.exe5. If necessary, select a language other than English from the ″Select a language″
dropdown list.6. Click Install IBM Lotus Sametime System Console and click Launch IBM
Lotus Sametime System Console 8.5 installation.7. Leave the defaults selected to install IBM Installation Manager, Version 1.3.x
and IBM Sametime System Console server, Version 8.5.x. Click Next.
Note: If IBM Installation Manager is already installed on the system, itsselection will be dimmed.
8. At the Licenses screen, click I accept the terms in the license agreements andclick Next.
9. Accept the location for shared installation files and click Next.10. Select Create a new package group. Accept the installation directory. Then
click Next.
456 Lotus Sametime: Installation and Administration Guide Part 1

11. Verify that IBM Sametime System Console server 8.5.x is selected as thefeature to install and click Next.
12. At the Common Configurations screen, verify the cell, node, and host name.The Lotus Sametime System Console is a Deployment Manager andadministers a cell and any nodes federated into the cell for other Sametimeservers. In a production environment, the servers are in one geographic regionand in a pilot environment, the servers are all installed on one machine.v Cell: This is the name of the WebSphere cell that will be created for the
System Console, such as systemNameSSCCell.v Node: This is the name of the WebSphere node that will run the Sametime
applications in the Sametime System Console. It will be federated into thecell during the installation process.
v Host Name: Use the fully qualified DNS name of the server you areinstalling the Sametime System Console on. Make sure this DNS name isresolvable from other servers you will be installing products on. Do not usean IP address, a short host name, or localhost.
13. Create the WebSphere Application Server User ID user name and password,then confirm the password.This user will be created in a WebSphere local file system repository and doesnot exist on the operating system or in an LDAP directory. It will be used toadminister the Sametime System Console server.Make a note of the ID and password because you will need them later foradditional product installations and configuration. It will also be used toadminister the Sametime System Console server. Click Next.
14. At the Configure DB2 for the System Console screen, provide information forconnecting to the Sametime System Console database. Then click Next.v Host Name: Use the fully qualified domain name of the server where you
installed DB2. Do not use an IP address or a short host name.v The Port field shows the default port of 50000. Accept the default unless
you specified a different port during DB2 installation or your server isusing a different port.Linux: The default is typically 50000, but will vary based on portavailability. Check the /etc/services file on the DB2 server to verify the portnumber being used.
v Database Name for the System Console/Policy: Enter the name of thedatabase you want to connect to. If you used the recommended name whenyou created the Sametime System Console, the name is STSC.
v Application user ID: Enter the name of the database administrator youcreated when installing DB2. The default is db2admin.
v Application password: Supply the password that you created when youinstalled DB2, such as db2password.
15. Click Validate.16. When the button label changes to Validated, click Next.
If the database connection is not successful, use the dbverify.log to debug theproblem. The log can be found in the temp directory for your operatingsystem.AIX, Linux, and Solaris
/tmpWindows
%TEMP%
Chapter 4. Migrating and upgrading 457
17. At the summary panel, review the settings, then click Install to start theinstallation.
18. Click Finish to close the installation screen.19. Click Exit to close the Installation Manager.
Results
After a successful installation, the three components that are needed to run theconsole start automatically: the Deployment Manager, the node agent, and theSametime System Console server. These must always be started before you can usethe system console.
If the installation was not successful, look at the installation logs for moreinformation about what occurred during the installation attempt. Fix any problems,then uninstall all components and reinstall. Find information in the logs directoryand the ant and native subdirectories.
AIX, Linux, or Solaris
/var/ibm/InstallationManager/logs
SSC connection log: /tmp/SSCLogs/ConsoleUtility.log.0
Windows 2008%ALLUSERSPROFILE%\IBM\Installation Manager\logs
Windows 2003%ALLUSERSPROFILE%\Application Data\IBM\Installation Manager\logs
SSC connection log:
Documents and Settings\username\Local Settings\Temp\SSCLogs\ConsoleUtility.log.0
What to do next
“Starting the Lotus Sametime System Console” on page 231Related tasks
“Uninstalling DB2 and Sametime software with the Installation Manager” on page243Use the Installation Manager to uninstall the following components that arepackaged with Lotus Sametime: IBM DB2 for Linux and Windows, Lotus SametimeSystem Console, Lotus Sametime Proxy Server, Lotus Sametime Meeting Server,and Lotus Sametime Media Manager.
Logging in to the Lotus Sametime System Console:
Use the IBM Lotus Sametime System Console to prepare to install new servers,start Sametime servers that have been installed, use guided activities to performconfiguration tasks, and administer any Sametime servers managed by the console.
About this task
With the Lotus Sametime System Console started, follow these steps to log in.
458 Lotus Sametime: Installation and Administration Guide Part 1

1. From a browser, enter the following URL, replacing serverhostname.domain withthe fully qualified domain name of the Lotus Sametime System Console server.Specify port 8700 for all platforms except IBM i.http://serverhostname.domain:8700/ibm/console
IBM i: The port number may not be 8700. Use the port that was listed in theSametime System Console installation results summary. To check the port, openthe AboutThisProfile.txt file for the Sametime System Console DeploymentManager Profile and use the setting specified for the ″Administrative consoleport.″ For the default profile name (STSCDmgrProfile), the file is located here:/QIBM/UserData/Websphere/AppServer/V7/SametimeWAS/profiles/STSCDmgrProfile/logs/AboutThisProfile.txt
Note: During the install process, WebSphere security is enabled. SSL is enabledas part of the WebSphere security process and you will be directed to anotherport which listens for https connections.The WebSphere Application Server Integrated Solutions Console opens.
2. Enter the WebSphere Application Server User ID and password that youcreated when you installed Lotus Sametime System Console.The default name is wasadmin.
3. Click the Sametime System Console task to open it in the navigation tree.
What to do next
“Connecting to an LDAP server” on page 64Related tasks
“Starting the Lotus Sametime System Console” on page 231When started, the Lotus Sametime System Console runs as a task in the WebSphereApplication Server administrative console.
Connecting to an LDAP server:
Use the Lotus Sametime System Console to connect IBM Lotus Sametime servers toan LDAP server that has already been installed and configured. An LDAP server isrequired for the Lotus Sametime System Console, Lotus Sametime CommunityServer, Lotus Sametime Meeting Server, Lotus Sametime Media Manager, andLotus Sametime Gateway Server .
Before you begin
Start the LDAP server and the Lotus Sametime System Console if they are notalready running.
About this task
If you have not already opened the Connect to LDAP Servers activity, follow thesesteps:1. From a browser, enter the following URL, replacing serverhostname.domain with
the fully qualified host name of the Lotus Sametime System Console server.http://serverhostname.domain:8700/ibm/console
If you are prompted with a security exception, accept the certificate, andcontinue.IBM i: The port number may not be 8700. Use the port that was listed in theSametime System Console installation results summary. To check the port, open
Chapter 4. Migrating and upgrading 459
the AboutThisProfile.txt file for the Sametime System Console DeploymentManager Profile and use the setting specified for the ″Administrative consolesecure port.″ For the default profile name (STSCDMgrProfile), the file is locatedhere: /QIBM/UserData/Websphere/AppServer/V7/SametimeWAS/profiles/STSCDMgrProfile/logs/AboutThisProfile.txt
2. Enter the WebSphere Application Server User ID and password that youcreated when you installed the Lotus Sametime System Console.
3. Click the Sametime System Console task to open it in the navigation tree.4. Expand Sametime Prerequisites, and click Connect to LDAP Servers.Related concepts
“Planning for an LDAP directory” on page 40The IBM Lotus Sametime 8.5 multiple-server environment requires an LDAPdirectory for user authentication. The LDAP server should be set up and runningbefore deploying Sametime.Related tasks
“Starting the Lotus Sametime System Console” on page 231When started, the Lotus Sametime System Console runs as a task in the WebSphereApplication Server administrative console.
Sametime prerequisite: Connecting to an LDAP server:
This activity takes you through the steps for identifying users and groups in anLDAP directory that need access to IBM Lotus Sametime.
Before you begin
An LDAP server must be installed and configured.
About this task
Connect IBM Lotus Sametime servers to the LDAP server. Once your LotusSametime server connects to the LDAP server, it can search the LDAP directoryand authenticate Sametime users. If you have already connected Sametime to anLDAP server, but now you want to edit or delete a connection, use this activity.
Note: If you are using Active Directory as the LDAP, a common attribute to usefor authentication is the saMAccountName attribute. When an Active DirectoryLDAP is being used, WebSphere automatically maps uid to saMAccountName, sosaMACccountName should not be explicitly stated as an attribute. If you want touse saMAccountName for any LDAP attribute field, you must specify uid. SpecifyingsaMACccountName as a login or search property causes installation to fail. You canfind more information in this TechNote: http://www-01.ibm.com/support/docview.wss?uid=swg21253331.1. Connect to LDAP server.
In Connect to LDAP servers, click Add.If you want to edit or delete an LDAP connection instead, then click theappropriate button. You can only edit or delete an LDAP connection if it hasnot been used to install a product.
2. Bind to LDAP.a. Click either Anonymous access or Authenticated access.
When a Lotus Sametime server connects to the LDAP server, this can bedone either anonymously or using credentials to authenticate with theLDAP server. If you select Authenticated access, you will be prompted with
460 Lotus Sametime: Installation and Administration Guide Part 1
the Bind distinguished name (DN) and Password fields to enter thisinformation. If you select Anonymous access, these fields will be hidden asthey are not required.
b. Enter a Deployment Name for this LDAP connection. This is name youprovide to this LDAP connection for easy reference. It does not need to mapto any existing server name or value and is intended as an easy way toidentify this object when you reference it in the future.
c. Enter the fully qualified domain name of the LDAP server you wish toconnect to in the Host name field. Do not use an IP address or a short hostname.
d. Enter the Port of the LDAP server. The default value is 389. If your LDAPserver is running on a different port, enter the correct port value here. Ifthis is an SSL connection, click Is secure LDAP connection?.
e. If you have selected Authenticated Access, enter the Bind distinguishedname (DN) and Password fields. These are the user credentials you will useto authenticate with your LDAP server. If you have selected AnonymousAccess, these fields will not be shown. For example:cn=John Smith,ou=managers,o=acme,st=Massachusetts,c=US
f. Verify that the check box for Is used by Sametime System Console? isselected. It is selected by default so that the LDAP server is used by theSametime System Console for authentication and policy management.
g. Click Next.When designating an authenticated user, IBM recommends that you create aunique directory entry that is used only for the purpose of authenticatingconnections from the Lotus Sametime server to the LDAP server. After creatingthe directory entry, you must ensure this directory entry has at least read accessto the attributes of the LDAP directory entries.
3. Base Distinguished Name and Filter for Searches.Enter the base distinguished name and filter for searches information.a. Select your base distinguished name and filter for searches from the
dropdown list, or if it was not found, enter it into the field. Selecting onethat was found from the dropdown list will populate the field for you. Youspecify the basic LDAP parameters required to conduct searches for people,and for groups, in an LDAP directory. Some of these parameters are alsonecessary for displaying the names of users in the IBM Lotus Sametimeuser interface.
Note: A dropdown list typically displays from which you select a base DNthat is detected by the guided activity; however, the list does not displaywhen Domino LDAP is being used. Additionally, Domino LDAP is the onlyLDAP that uses a blank base DN, while WebSphere requires a base DN forfederating repositories. Since WebSphere does not let you federate an LDAPdirectory with an empty base DN, it sets the base DN to C=US. The LDAPrepositories are listed by base DN after they are federated.
If your site uses single sign-on (SSO) for awareness, you must manuallymodify the base DN in both the Lotus Sametime Community Server andLotus Sametime Meeting Server so they match. Update the SametimeCommunity Server’s LDAP connections in the stconfig.nsf and da.nsf touse the same base DN that the Sametime Meeting Server will be using:C=US. The Sametime System Console does not overwrite any manualchanges that you make.
Chapter 4. Migrating and upgrading 461
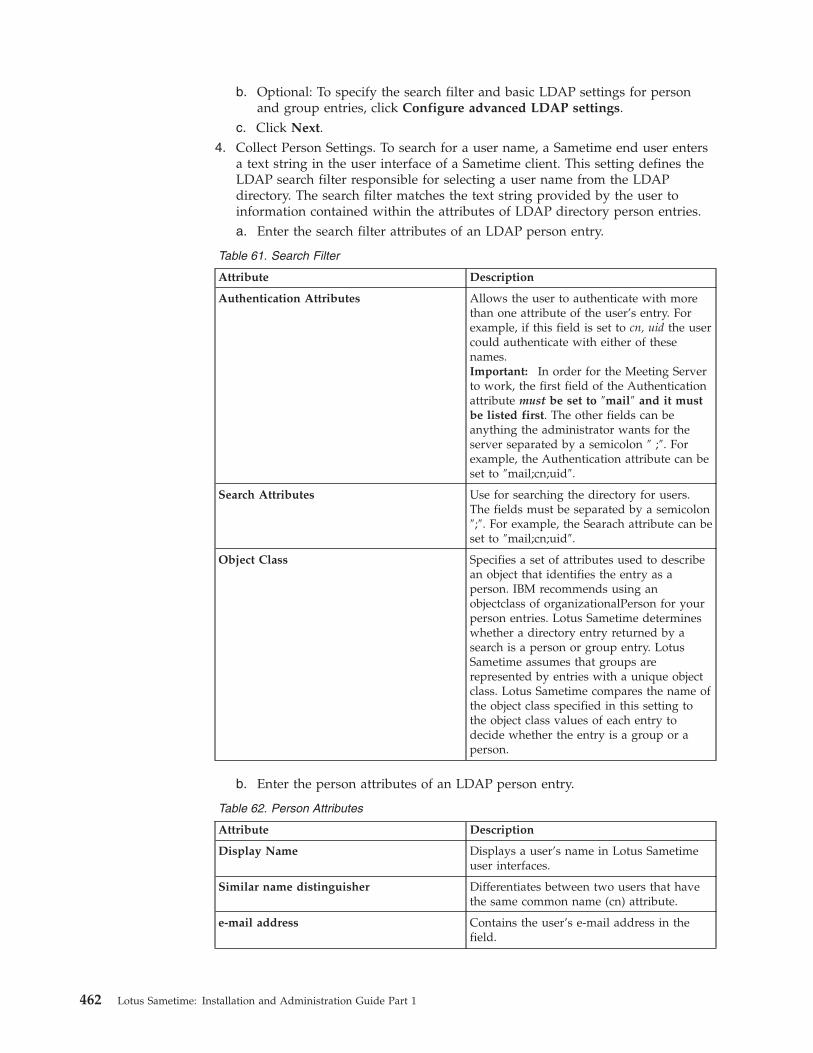
b. Optional: To specify the search filter and basic LDAP settings for personand group entries, click Configure advanced LDAP settings.
c. Click Next.4. Collect Person Settings. To search for a user name, a Sametime end user enters
a text string in the user interface of a Sametime client. This setting defines theLDAP search filter responsible for selecting a user name from the LDAPdirectory. The search filter matches the text string provided by the user toinformation contained within the attributes of LDAP directory person entries.a. Enter the search filter attributes of an LDAP person entry.
Table 61. Search Filter
Attribute Description
Authentication Attributes Allows the user to authenticate with morethan one attribute of the user’s entry. Forexample, if this field is set to cn, uid the usercould authenticate with either of thesenames.Important: In order for the Meeting Serverto work, the first field of the Authenticationattribute must be set to ″mail″ and it mustbe listed first. The other fields can beanything the administrator wants for theserver separated by a semicolon ″ ;″. Forexample, the Authentication attribute can beset to ″mail;cn;uid″.
Search Attributes Use for searching the directory for users.The fields must be separated by a semicolon″;″. For example, the Searach attribute can beset to ″mail;cn;uid″.
Object Class Specifies a set of attributes used to describean object that identifies the entry as aperson. IBM recommends using anobjectclass of organizationalPerson for yourperson entries. Lotus Sametime determineswhether a directory entry returned by asearch is a person or group entry. LotusSametime assumes that groups arerepresented by entries with a unique objectclass. Lotus Sametime compares the name ofthe object class specified in this setting tothe object class values of each entry todecide whether the entry is a group or aperson.
b. Enter the person attributes of an LDAP person entry.
Table 62. Person Attributes
Attribute Description
Display Name Displays a user’s name in Lotus Sametimeuser interfaces.
Similar name distinguisher Differentiates between two users that havethe same common name (cn) attribute.
e-mail address Contains the user’s e-mail address in thefield.
462 Lotus Sametime: Installation and Administration Guide Part 1
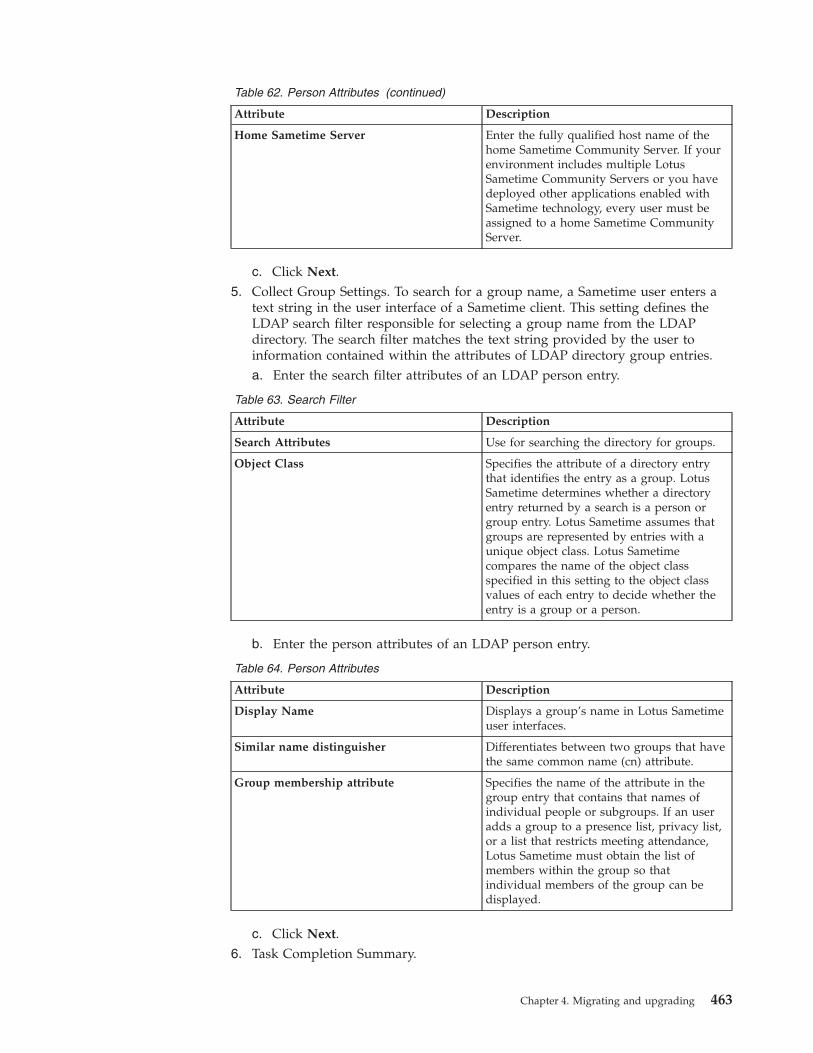
Table 62. Person Attributes (continued)
Attribute Description
Home Sametime Server Enter the fully qualified host name of thehome Sametime Community Server. If yourenvironment includes multiple LotusSametime Community Servers or you havedeployed other applications enabled withSametime technology, every user must beassigned to a home Sametime CommunityServer.
c. Click Next.5. Collect Group Settings. To search for a group name, a Sametime user enters a
text string in the user interface of a Sametime client. This setting defines theLDAP search filter responsible for selecting a group name from the LDAPdirectory. The search filter matches the text string provided by the user toinformation contained within the attributes of LDAP directory group entries.a. Enter the search filter attributes of an LDAP person entry.
Table 63. Search Filter
Attribute Description
Search Attributes Use for searching the directory for groups.
Object Class Specifies the attribute of a directory entrythat identifies the entry as a group. LotusSametime determines whether a directoryentry returned by a search is a person orgroup entry. Lotus Sametime assumes thatgroups are represented by entries with aunique object class. Lotus Sametimecompares the name of the object classspecified in this setting to the object classvalues of each entry to decide whether theentry is a group or a person.
b. Enter the person attributes of an LDAP person entry.
Table 64. Person Attributes
Attribute Description
Display Name Displays a group’s name in Lotus Sametimeuser interfaces.
Similar name distinguisher Differentiates between two groups that havethe same common name (cn) attribute.
Group membership attribute Specifies the name of the attribute in thegroup entry that contains that names ofindividual people or subgroups. If an useradds a group to a presence list, privacy list,or a list that restricts meeting attendance,Lotus Sametime must obtain the list ofmembers within the group so thatindividual members of the group can bedisplayed.
c. Click Next.6. Task Completion Summary.
Chapter 4. Migrating and upgrading 463
Review the configuration details in the Task Completion Summary table, andclick Finish to connect to the LDAP server with this configuration, or clickCancel to abandon this configuration and start over.
7. Restart the System Console Deployment Manager if you selected the Is used bySametime System Console?. This is necessary to complete the LDAP federationprocess.
What to do next
Go to System Administration → Nodes. Select all the available nodes, and clickSynchronize. This ensures the LDAP changes are pushed to the nodes.Related tasks
“Starting the Lotus Sametime System Console” on page 231When started, the Lotus Sametime System Console runs as a task in the WebSphereApplication Server administrative console.“Starting and stopping the Deployment Manager” on page 417The Deployment Manager manages the Lotus Sametime System Console and allLotus Sametime Server cells.Related reference
“Command reference for starting and stopping servers” on page 232You may use a command window to start and stop Sametime components runningon WebSphere Application Server. To stop servers, you will supply the WebSphereApplication Server administrator password that was established when youinstalled the server. Important: Verify that the Deployment Manager for the cell isrunning before starting any server.
Connecting to a Sametime Community Mux server:
Use the IBM Lotus Sametime System Console to connect to a Lotus SametimeCommunity Mux and validate its settings.
Before you begin
Start the Lotus Sametime Community Mux if it is not already running.
About this task
If you have not already opened the Connect to Sametime Community Mux Serversactivity, follow these steps:1. From a browser, enter the following URL, replacing serverhostname.domain with
the fully qualified host name of the Lotus Sametime System Console server (forexample stconsole.acme.com).http://serverhostname.domain:8700/ibm/console
If you are prompted with a security exception, accept the certificate, andcontinue.
2. Enter the WebSphere Application Server User ID and password that youcreated when you installed the Lotus Sametime System Console.
3. Click the Sametime System Console task to open it in the navigation tree.4. Expand Sametime Prerequisites, and click Connect to Sametime Community
Mux Servers.
464 Lotus Sametime: Installation and Administration Guide Part 1
Related concepts
“Planning for an LDAP directory” on page 40The IBM Lotus Sametime 8.5 multiple-server environment requires an LDAPdirectory for user authentication. The LDAP server should be set up and runningbefore deploying Sametime.Related tasks
“Starting the Lotus Sametime System Console” on page 231When started, the Lotus Sametime System Console runs as a task in the WebSphereApplication Server administrative console.
Sametime prerequisite: Connecting to a Sametime Community Mux Server:
Validate the host name and ports specified for a new IBM Lotus SametimeCommunity Mux server.
Before you begin
Use this page to validate the host name of a new Community Mux, along with theports on which it will listen for client connections. This ensures you have aworking multiplexer before you attempt to connect it to a Lotus SametimeCommunity Server or cluster.1. Connect to Sametime Community Mux Servers.
Click Add to begin the guided activity, which lets you validate your installedLotus Sametime Community Mux servers before connecting them toCommunity Servers.You can optionally edit or delete connections to Community Mux servers. ClickRefresh to view your most recent changes.
2. Add Sametime Community Mux Servers.a. In ″Connect to Sametime Community Mux Servers″, click Add.b. In the Host Name field, type the fully qualified host name of the new
Sametime Community Mux (for example: mux1.acme.com).c. Accept the default settings for the Client Port and Client HTTP Port fields.
These settings indicate the ports that the multiplexer will listen on forconnections from Lotus Sametime Connect clients and from Web clients,respectively.
d. Click Save.The connection to the Lotus Sametime Community Mux is validated whenyou save the settings.
Registering an upgraded Community Server with the System Console:
After upgrading an IBM Lotus Sametime server to a Lotus Sametime CommunityServer on IBM AIX, Linux, Sun Solaris, or Microsoft Windows, register it with theLotus Sametime System Console, so you can manage all of the Lotus Sametimeservers from a central location. If you upgraded a cluster, you must register eachindividual server before registering the cluster.
Before you begin
Make sure the following servers are ready for the registration task:v The upgraded Lotus Sametime Community Server must be configured to use an
LDAP directory, and must be started.
Chapter 4. Migrating and upgrading 465
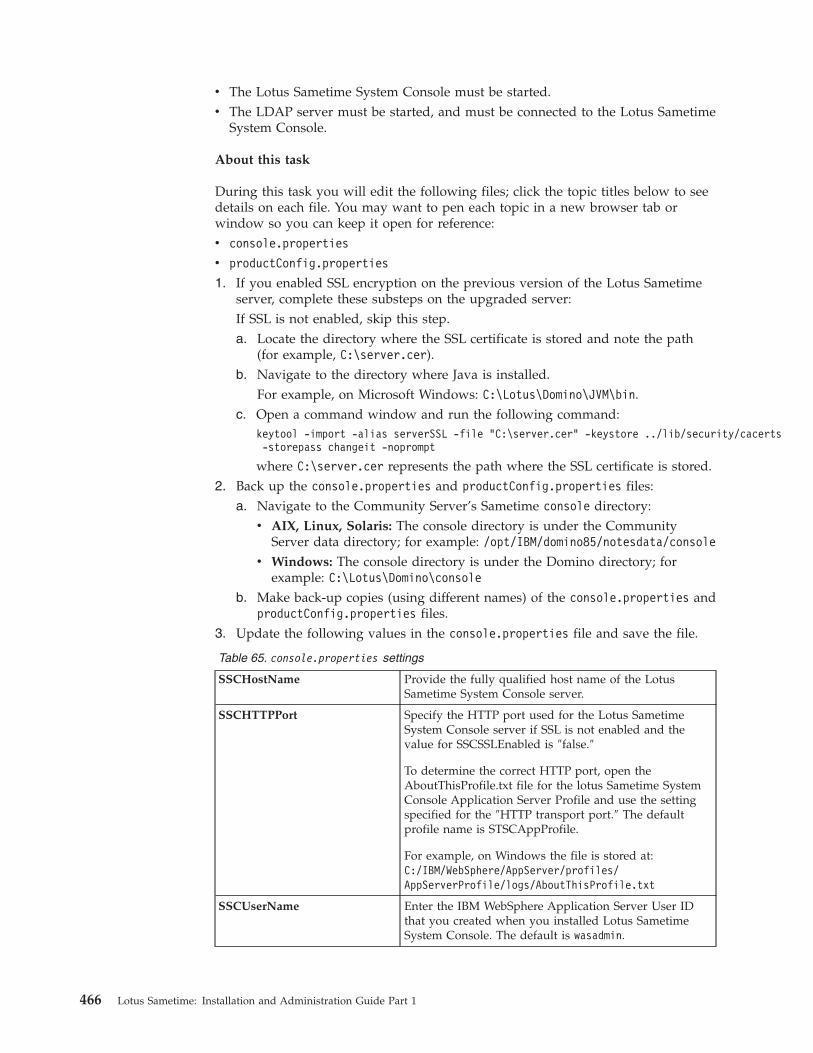
v The Lotus Sametime System Console must be started.v The LDAP server must be started, and must be connected to the Lotus Sametime
System Console.
About this task
During this task you will edit the following files; click the topic titles below to seedetails on each file. You may want to pen each topic in a new browser tab orwindow so you can keep it open for reference:v console.properties
v productConfig.properties
1. If you enabled SSL encryption on the previous version of the Lotus Sametimeserver, complete these substeps on the upgraded server:If SSL is not enabled, skip this step.a. Locate the directory where the SSL certificate is stored and note the path
(for example, C:\server.cer).b. Navigate to the directory where Java is installed.
For example, on Microsoft Windows: C:\Lotus\Domino\JVM\bin.c. Open a command window and run the following command:
keytool -import -alias serverSSL -file "C:\server.cer" -keystore ../lib/security/cacerts-storepass changeit -noprompt
where C:\server.cer represents the path where the SSL certificate is stored.2. Back up the console.properties and productConfig.properties files:
a. Navigate to the Community Server’s Sametime console directory:v AIX, Linux, Solaris: The console directory is under the Community
Server data directory; for example: /opt/IBM/domino85/notesdata/consolev Windows: The console directory is under the Domino directory; for
example: C:\Lotus\Domino\consoleb. Make back-up copies (using different names) of the console.properties and
productConfig.properties files.3. Update the following values in the console.properties file and save the file.
Table 65. console.properties settings
SSCHostName Provide the fully qualified host name of the LotusSametime System Console server.
SSCHTTPPort Specify the HTTP port used for the Lotus SametimeSystem Console server if SSL is not enabled and thevalue for SSCSSLEnabled is ″false.″
To determine the correct HTTP port, open theAboutThisProfile.txt file for the lotus Sametime SystemConsole Application Server Profile and use the settingspecified for the ″HTTP transport port.″ The defaultprofile name is STSCAppProfile.
For example, on Windows the file is stored at:C:/IBM/WebSphere/AppServer/profiles/AppServerProfile/logs/AboutThisProfile.txt
SSCUserName Enter the IBM WebSphere Application Server User IDthat you created when you installed Lotus SametimeSystem Console. The default is wasadmin.
466 Lotus Sametime: Installation and Administration Guide Part 1
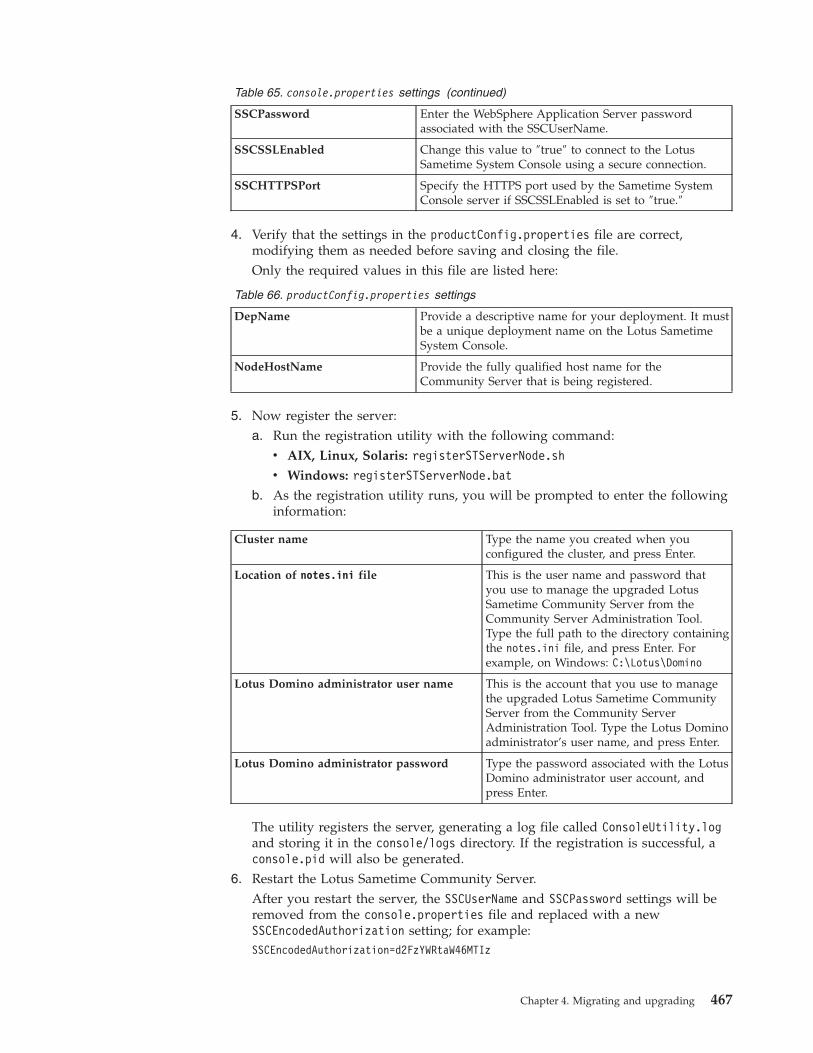
Table 65. console.properties settings (continued)
SSCPassword Enter the WebSphere Application Server passwordassociated with the SSCUserName.
SSCSSLEnabled Change this value to ″true″ to connect to the LotusSametime System Console using a secure connection.
SSCHTTPSPort Specify the HTTPS port used by the Sametime SystemConsole server if SSCSSLEnabled is set to ″true.″
4. Verify that the settings in the productConfig.properties file are correct,modifying them as needed before saving and closing the file.Only the required values in this file are listed here:
Table 66. productConfig.properties settings
DepName Provide a descriptive name for your deployment. It mustbe a unique deployment name on the Lotus SametimeSystem Console.
NodeHostName Provide the fully qualified host name for theCommunity Server that is being registered.
5. Now register the server:a. Run the registration utility with the following command:
v AIX, Linux, Solaris: registerSTServerNode.sh
v Windows: registerSTServerNode.bat
b. As the registration utility runs, you will be prompted to enter the followinginformation:
Cluster name Type the name you created when youconfigured the cluster, and press Enter.
Location of notes.ini file This is the user name and password thatyou use to manage the upgraded LotusSametime Community Server from theCommunity Server Administration Tool.Type the full path to the directory containingthe notes.ini file, and press Enter. Forexample, on Windows: C:\Lotus\Domino
Lotus Domino administrator user name This is the account that you use to managethe upgraded Lotus Sametime CommunityServer from the Community ServerAdministration Tool. Type the Lotus Dominoadministrator’s user name, and press Enter.
Lotus Domino administrator password Type the password associated with the LotusDomino administrator user account, andpress Enter.
The utility registers the server, generating a log file called ConsoleUtility.logand storing it in the console/logs directory. If the registration is successful, aconsole.pid will also be generated.
6. Restart the Lotus Sametime Community Server.After you restart the server, the SSCUserName and SSCPassword settings will beremoved from the console.properties file and replaced with a newSSCEncodedAuthorization setting; for example:SSCEncodedAuthorization=d2FzYWRtaW46MTIz
Chapter 4. Migrating and upgrading 467
Registering an upgraded Community Servers cluster with the System Console:
After upgrading an IBM Lotus Sametime cluster to a Lotus Sametime CommunityServer cluster on IBM AIX, Linux, Sun Solaris, or Microsoft Windows, register thecluster with the Lotus Sametime System Console, so you can manage all of theLotus Sametime servers from a central location.
Before you begin
Make sure of each these servers is ready for the cluster registration task:v Each of the upgraded Lotus Sametime Community Servers in the cluster must
be registered with the Lotus Sametime System Console, and must be started.v The Lotus Sametime System Console must be started.v The LDAP server must be started, and must be connected to the Lotus Sametime
System Console.1. Verify that each of the servers in the cluster has been registered with the Lotus
Sametime System Console.2. Run the registration utility using the command in the scenario below that best
applies to your deployment:v The deployment includes a stand-alone Community Mux that was not added
to the cluster as a member, but works with the cluster (so the clustermembers refer to this server’s host name):– AIX, Linux, Solaris: registerSTCluster.sh -external
– Windows: registerSTCluster.bat -external
v The deployment includes a stand-alone rotating DNS server that was notadded to the cluster as a member, but works with the cluster (so the clustermembers refer to this server’s host name):– AIX, Linux, Solaris: registerSTCluster.sh -external
– Windows: registerSTCluster.bat -external
v The deployment includes a stand-alone load balancer that was not added tothe cluster as a member, but works with the cluster (so the cluster membersrefer to this server’s host name):– AIX, Linux, Solaris: registerSTCluster.sh -external
– Windows: registerSTCluster.bat -external
v None of the above:– AIX, Linux, Solaris: registerSTCluster.sh
– Windows: registerSTCluster.bat
3. As the registration utility runs, you will be prompted to enter the followinginformation:
Cluster name Type the name you created when youconfigured the cluster, and press Enter.
Location of notes.ini file This is the user name and password thatyou use to manage the upgraded LotusSametime Community Server from theCommunity Server Administration Tool.Type the full path to the directory containingthe notes.ini file, and press Enter. Forexample, on Windows: C:\Lotus\Domino
468 Lotus Sametime: Installation and Administration Guide Part 1
Lotus Domino administrator user name This is the account that you use to managethe upgraded Lotus Sametime CommunityServer from the Community ServerAdministration Tool. Type the Lotus Dominoadministrator’s user name, and press Enter.
Lotus Domino administrator password Type the password associated with the LotusDomino administrator user account, andpress Enter.
The utility registers the server, generating a log file called ConsoleUtility.logand storing it in the console/logs directory.
4. Restart the Lotus Sametime Community Server.
Migrating user policies:
In IBM Lotus Sametime 8.5, user policies are administrated through the LotusSametime System Console. After you have upgraded Lotus Sametime servers froma previous release and set up a new Lotus Sametime 8.5 System Console, migrateuser policies from the Community Server to the System Console.
About this task
The methods for creating and storing policies in previous releases of LotusSametime are very different from the methods used in release 8.5, and there are noutilities available to migrate the data automatically. If you want to transfer existinguser policies to the new releases, you need to review them on the Lotus SametimeCommunity Server, note them down, and then recreate them on the LotusSametime System Console as described in the following topics:
Copying policies from the Lotus Sametime Community Server:
On the upgraded IBM Lotus Sametime Community Server, review existing policysettings and copy them down so you can recreate them in the Lotus SametimeSystem Console. If you upgraded multiple non-clustered servers, copy the settingsfrom each if they are different. If you upgraded a cluster, you only need thesettings from one of the cluster members.
About this task
If you want to recreate your current set of policies on the system console in theLotus Sametime 8.5 deployment, copy the settings from the upgraded server:1. Open a browser and navigate to the Lotus Sametime Community Server
containing the policies you need to record:Type the following address:http://host_name/servlet/auth/admin
where host_name is the fully qualified host name of the server; for example:http://commsvr1.acme.com/servlet/auth/admin
2. From the Lotus Sametime home page, click Administer the Server.3. Log in as the Lotus Sametime administrator.4. In the navigation pane, click Policies.5. Copy all your existing policy settings.
Recreating legacy policies on the Lotus Sametime System Console:
Chapter 4. Migrating and upgrading 469
Create new policy settings on the IBM Lotus Sametime System Console to reflectthe settings in your previous deployment.
About this task
There is no automatic migration of policies from the Sametime Administration Toolto the Lotus Sametime System Console. You must create new policy settingsmanually because Sametime Administration Tool policies do not map one-to-one topolicies in the Lotus Sametime System Console.
Managing users with policies:
All IBM Lotus Sametime users are automatically assigned to default policies.Sametime Instant Messaging, Meetings, and Media Services each has a defaultpolicy to be applied to users. You can create additional user policies, and assignusers and groups to these policies.
About this task
When a user authenticates, Lotus Sametime applies a default policy if no otherpolicy can be found for that user. You can create new policies that grant or limitaccess to features, and assign users to these policies. Users can be assigned to morethan one policy. If a user belongs to more than one policy, then Lotus Sametimeuses the policy weight to determine policy precedence. Custom policies can bedesigned for specific groups in the company, and the default policy can beinherited or assigned. Meetings policy changes take effect immediately, whileInstant Messaging and Media Services policy changes take effect within an hour.
There is also an anonymous policy that is assigned by default to users who havenot authenticated, and unauthenticated users always receive this policy.
Note: If your deployment includes the Lotus Sametime System Console, you mustmanage policies there because all settings made in the legacy SametimeAdministration Tool (STCenter.nsf) are ignored. This includes the override allfeature, as well. Moreover, there is no automatic migration of policies from theSametime Administration Tool to the Lotus Sametime System Console. You mustdo this manually because Sametime Administration Tool policies do not mapone-to-one to policies in the Lotus Sametime System Console.
Finding policies associated with a user:
You can find all the policies associated with a user for all the IBM Lotus Sametimeproducts to which the user has access.1. Log in to the Integrated Solutions Console.2. Click Sametime System Console.3. Click Manage Policies.4. Click any user Lotus Sametime component. It does not matter which
component that you select, because your search results display all the policiesfor all the Sametime components to which the user has access.v Instant Messagingv Meetingsv Media Manager
5. Click Find Active Policies.
470 Lotus Sametime: Installation and Administration Guide Part 1
6. Select the criterion for the user for which you want to find the associatedpolicies in the Search by field.v User IDv Namev E-mail address
7. Enter the entire or partial user ID, e-mail address, or name of the user orgroup in the Search for field If you enter partial information, use an asteriskas a wild card character for missing or incomplete information. For example,type sm* for all names starting with sm.
8. Select the number of listings in the search results in the Maximum resultsfield.
9. Click Search. The results display the users that match your search criteria.10. Select a name in the results table, and then click Find Active Policies to show
the policies for that user.11. Click Done.
Creating new user policies:
You can create user policies, and assign users and groups to these policies.
About this task
You can set policy for users to have access to specific IBM Lotus Sametimefeatures, depending upon their level of need. For example, the maximum size for afile being transferred is set by default at 1 megabyte to help manage traffic overthe server(s); however, if you have a group that routinely transfers large files forbusiness reasons, you can create a new policy specifically for those users and setthe maximum size of files that they can send to a much higher number.1. Log in to the Integrated Solutions Console.2. Click Sametime System Console.3. Click Manage Policies.4. Click the Lotus Sametime product for which you want to create a policy.
v Instant Messagingv Meetingsv Media Manager
5. Click New.6. Enter a name to use to identify the policy in the Policy Name field.7. Specify the features that you want to enable or disable for the users or groups
that you will assign to this policy. Some instant messaging features are flaggedwith IC characters after the field label. This flag indicates that a feature is onlyavailable for installed clients. The feature is not available to browser clients.
8. Click OK.
Results
Tip: You can follow these same basic steps to delete or edit a policy. Delete apolicy by selecting the policy and then click the Delete button. Edit a policy byclicking the policy name. You cannot delete the anonymous or default policies, butyou can edit them. If you edit a policy, you cannot change the policy ID. To dothis, you must make a copy of the policy by selecting it and clicking Duplicate,
Chapter 4. Migrating and upgrading 471

then you can enter a new ID in the copy. Before you delete the original, be sure toreassign the users and groups to the copy and give it the proper policy weight.
What to do next
You can now assign users and groups to this policy.
Assign users and groups to policies:
You can assign users and groups to specific user polices to grant or limit access tofeatures in IBM Lotus Sametime.
About this task
You cannot assign users to the default or anonymous policies. Authenticated usersare automatically assigned to the default policies. Unauthenticated users areassigned to anonymous policies.1. Log in to the Integrated Solutions Console.2. Click Sametime System Console.3. Click Manage Policies.4. Click the Lotus Sametime component with the policy to which you want to
assign a user or a group.v Instant Messagingv Meetingsv Media Manager
5. Select a policy name from the list, and click Assign.6. Click Add Users or Add Groups.
At this point you could remove a user from a policy, by selecting the user inthe list and then clicking Remove.
7. Select the criterion for searching for the user or group that you want to add tothe policy in the Search by field.v User IDv Namev E-mail address
8. Enter user ID, e-mail address, or name or partial name with wildcardcharacters (asterisks) of the user or group in the Search for field
9. Select the number of listings on each search results page in the Maximumresults field.
10. Click Search. The results display the DN, display name, and e-mail address ofthe users that matched your search.
11. Select a user and click Assign.12. Click Done.
Sametime Instant Messaging user policy settings:
You can grant or limit access to features in IBM Lotus Sametime Instant Messagingby enabling or disabling various policies for users. Policy changes take effectimmediately.
All unauthenticated users have the anonymous policy, Sametime Instant MessagingAnonymous Policy, applied to them. For authenticated users, the Lotus Sametime
472 Lotus Sametime: Installation and Administration Guide Part 1
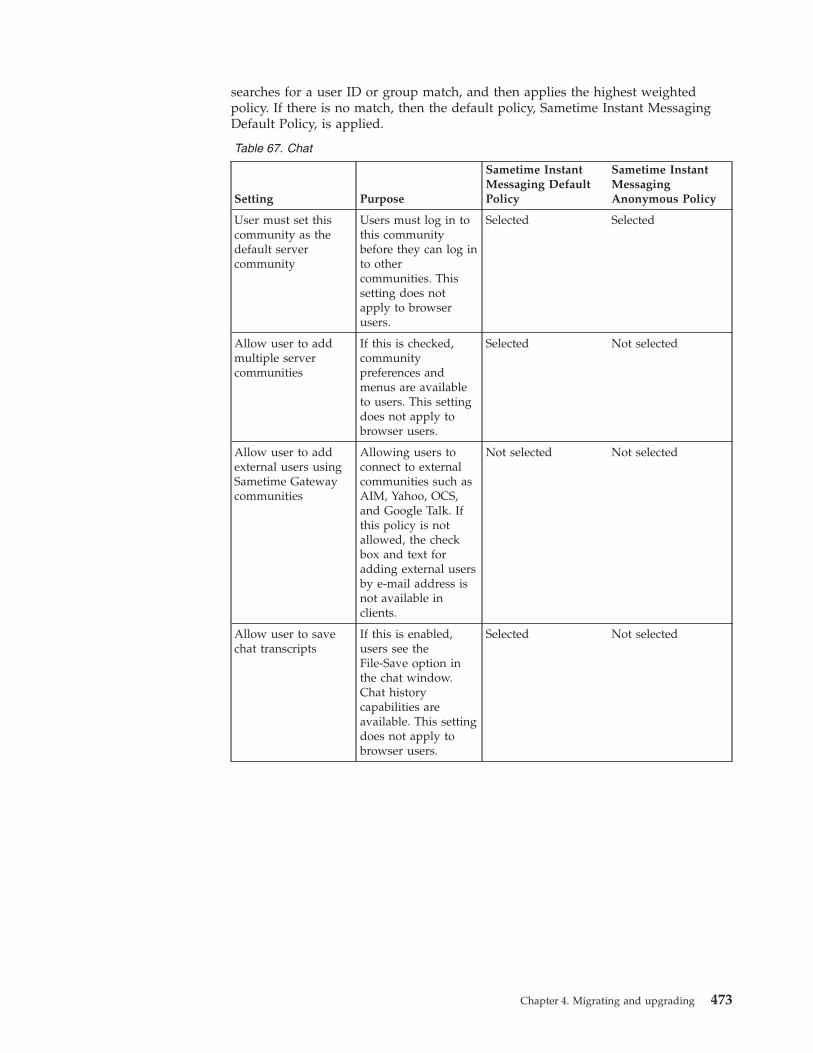
searches for a user ID or group match, and then applies the highest weightedpolicy. If there is no match, then the default policy, Sametime Instant MessagingDefault Policy, is applied.
Table 67. Chat
Setting Purpose
Sametime InstantMessaging DefaultPolicy
Sametime InstantMessagingAnonymous Policy
User must set thiscommunity as thedefault servercommunity
Users must log in tothis communitybefore they can log into othercommunities. Thissetting does notapply to browserusers.
Selected Selected
Allow user to addmultiple servercommunities
If this is checked,communitypreferences andmenus are availableto users. This settingdoes not apply tobrowser users.
Selected Not selected
Allow user to addexternal users usingSametime Gatewaycommunities
Allowing users toconnect to externalcommunities such asAIM, Yahoo, OCS,and Google Talk. Ifthis policy is notallowed, the checkbox and text foradding external usersby e-mail address isnot available inclients.
Not selected Not selected
Allow user to savechat transcripts
If this is enabled,users see theFile-Save option inthe chat window.Chat historycapabilities areavailable. This settingdoes not apply tobrowser users.
Selected Not selected
Chapter 4. Migrating and upgrading 473
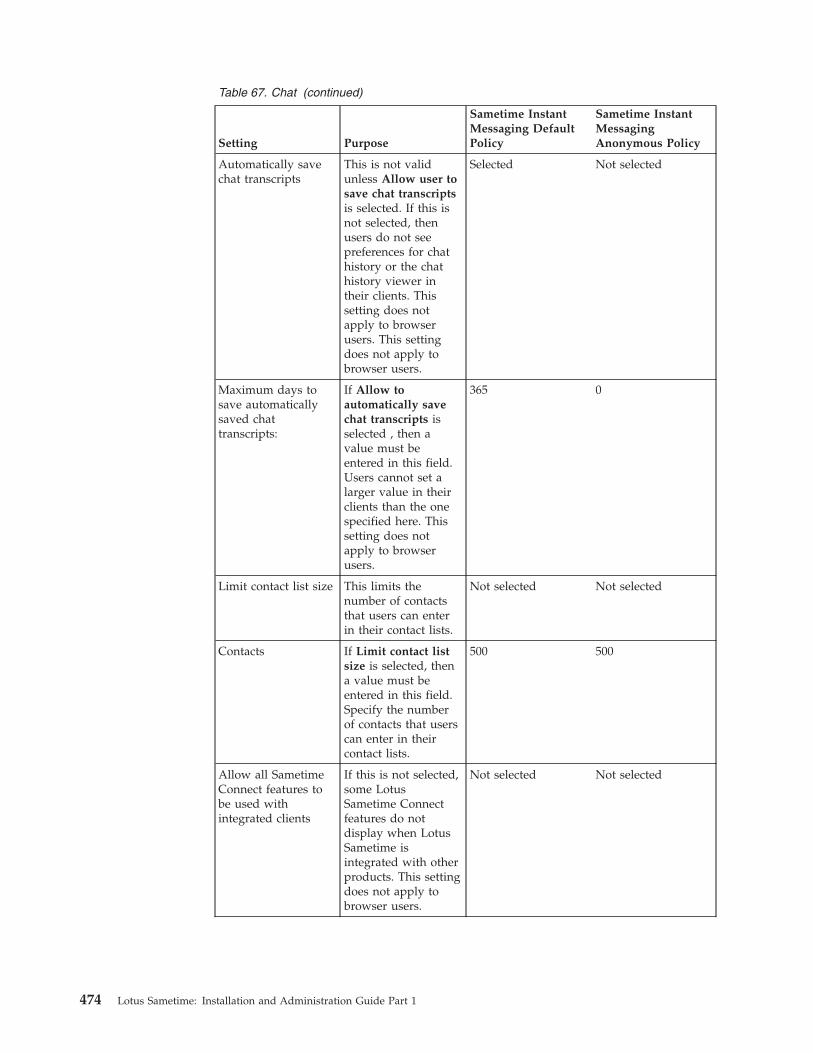
Table 67. Chat (continued)
Setting Purpose
Sametime InstantMessaging DefaultPolicy
Sametime InstantMessagingAnonymous Policy
Automatically savechat transcripts
This is not validunless Allow user tosave chat transcriptsis selected. If this isnot selected, thenusers do not seepreferences for chathistory or the chathistory viewer intheir clients. Thissetting does notapply to browserusers. This settingdoes not apply tobrowser users.
Selected Not selected
Maximum days tosave automaticallysaved chattranscripts:
If Allow toautomatically savechat transcripts isselected , then avalue must beentered in this field.Users cannot set alarger value in theirclients than the onespecified here. Thissetting does notapply to browserusers.
365 0
Limit contact list size This limits thenumber of contactsthat users can enterin their contact lists.
Not selected Not selected
Contacts If Limit contact listsize is selected, thena value must beentered in this field.Specify the numberof contacts that userscan enter in theircontact lists.
500 500
Allow all SametimeConnect features tobe used withintegrated clients
If this is not selected,some LotusSametime Connectfeatures do notdisplay when LotusSametime isintegrated with otherproducts. This settingdoes not apply tobrowser users.
Not selected Not selected
474 Lotus Sametime: Installation and Administration Guide Part 1
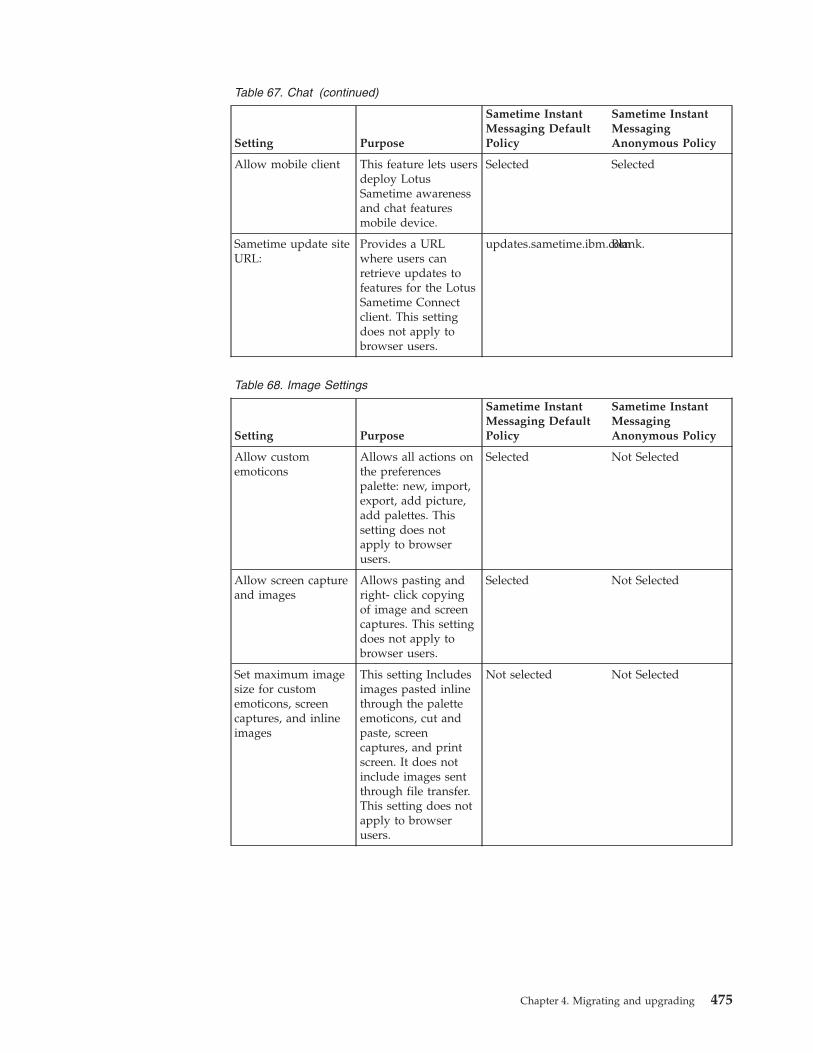
Table 67. Chat (continued)
Setting Purpose
Sametime InstantMessaging DefaultPolicy
Sametime InstantMessagingAnonymous Policy
Allow mobile client This feature lets usersdeploy LotusSametime awarenessand chat featuresmobile device.
Selected Selected
Sametime update siteURL:
Provides a URLwhere users canretrieve updates tofeatures for the LotusSametime Connectclient. This settingdoes not apply tobrowser users.
updates.sametime.ibm.comBlank.
Table 68. Image Settings
Setting Purpose
Sametime InstantMessaging DefaultPolicy
Sametime InstantMessagingAnonymous Policy
Allow customemoticons
Allows all actions onthe preferencespalette: new, import,export, add picture,add palettes. Thissetting does notapply to browserusers.
Selected Not Selected
Allow screen captureand images
Allows pasting andright- click copyingof image and screencaptures. This settingdoes not apply tobrowser users.
Selected Not Selected
Set maximum imagesize for customemoticons, screencaptures, and inlineimages
This setting Includesimages pasted inlinethrough the paletteemoticons, cut andpaste, screencaptures, and printscreen. It does notinclude images sentthrough file transfer.This setting does notapply to browserusers.
Not selected Not Selected
Chapter 4. Migrating and upgrading 475
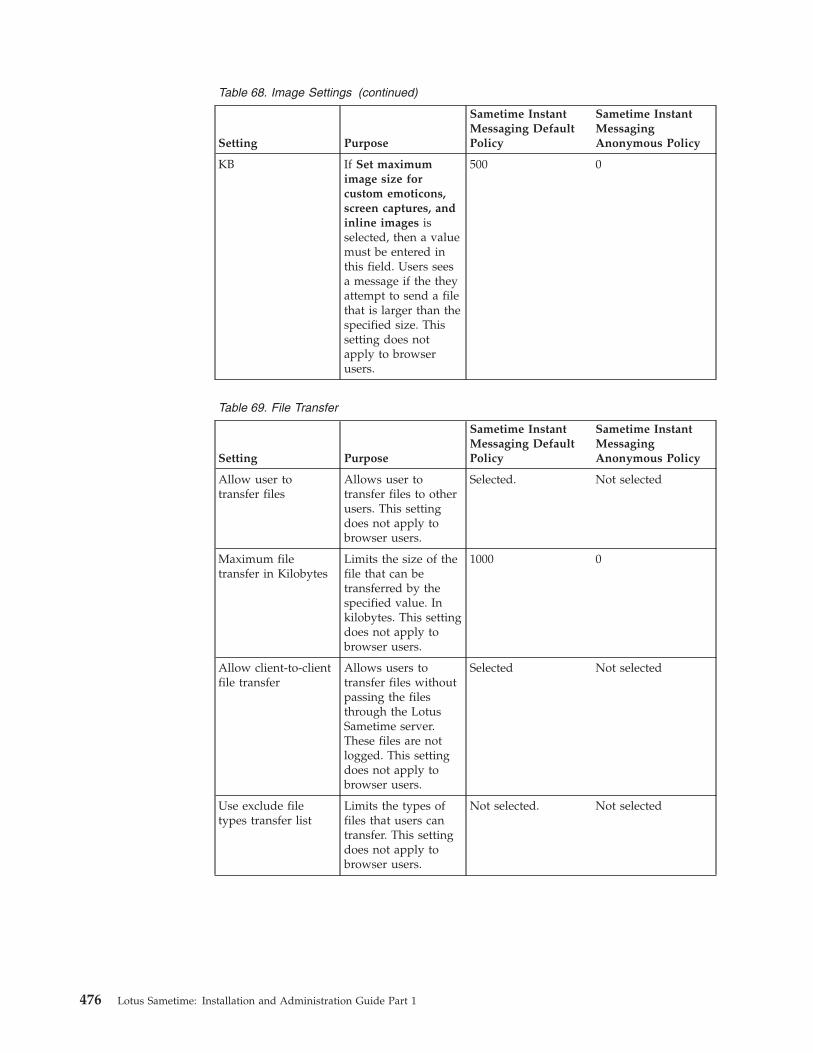
Table 68. Image Settings (continued)
Setting Purpose
Sametime InstantMessaging DefaultPolicy
Sametime InstantMessagingAnonymous Policy
KB If Set maximumimage size forcustom emoticons,screen captures, andinline images isselected, then a valuemust be entered inthis field. Users seesa message if the theyattempt to send a filethat is larger than thespecified size. Thissetting does notapply to browserusers.
500 0
Table 69. File Transfer
Setting Purpose
Sametime InstantMessaging DefaultPolicy
Sametime InstantMessagingAnonymous Policy
Allow user totransfer files
Allows user totransfer files to otherusers. This settingdoes not apply tobrowser users.
Selected. Not selected
Maximum filetransfer in Kilobytes
Limits the size of thefile that can betransferred by thespecified value. Inkilobytes. This settingdoes not apply tobrowser users.
1000 0
Allow client-to-clientfile transfer
Allows users totransfer files withoutpassing the filesthrough the LotusSametime server.These files are notlogged. This settingdoes not apply tobrowser users.
Selected Not selected
Use exclude filetypes transfer list
Limits the types offiles that users cantransfer. This settingdoes not apply tobrowser users.
Not selected. Not selected
476 Lotus Sametime: Installation and Administration Guide Part 1
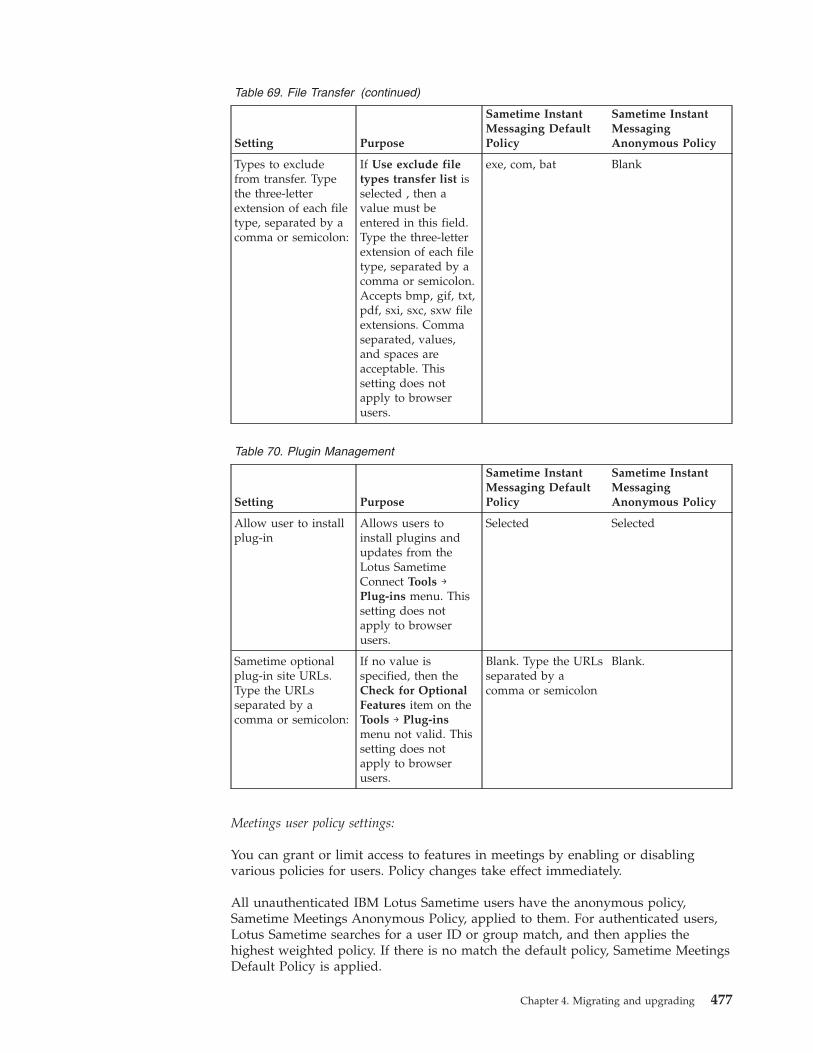
Table 69. File Transfer (continued)
Setting Purpose
Sametime InstantMessaging DefaultPolicy
Sametime InstantMessagingAnonymous Policy
Types to excludefrom transfer. Typethe three-letterextension of each filetype, separated by acomma or semicolon:
If Use exclude filetypes transfer list isselected , then avalue must beentered in this field.Type the three-letterextension of each filetype, separated by acomma or semicolon.Accepts bmp, gif, txt,pdf, sxi, sxc, sxw fileextensions. Commaseparated, values,and spaces areacceptable. Thissetting does notapply to browserusers.
exe, com, bat Blank
Table 70. Plugin Management
Setting Purpose
Sametime InstantMessaging DefaultPolicy
Sametime InstantMessagingAnonymous Policy
Allow user to installplug-in
Allows users toinstall plugins andupdates from theLotus SametimeConnect Tools →Plug-ins menu. Thissetting does notapply to browserusers.
Selected Selected
Sametime optionalplug-in site URLs.Type the URLsseparated by acomma or semicolon:
If no value isspecified, then theCheck for OptionalFeatures item on theTools → Plug-insmenu not valid. Thissetting does notapply to browserusers.
Blank. Type the URLsseparated by acomma or semicolon
Blank.
Meetings user policy settings:
You can grant or limit access to features in meetings by enabling or disablingvarious policies for users. Policy changes take effect immediately.
All unauthenticated IBM Lotus Sametime users have the anonymous policy,Sametime Meetings Anonymous Policy, applied to them. For authenticated users,Lotus Sametime searches for a user ID or group match, and then applies thehighest weighted policy. If there is no match the default policy, Sametime MeetingsDefault Policy is applied.
Chapter 4. Migrating and upgrading 477
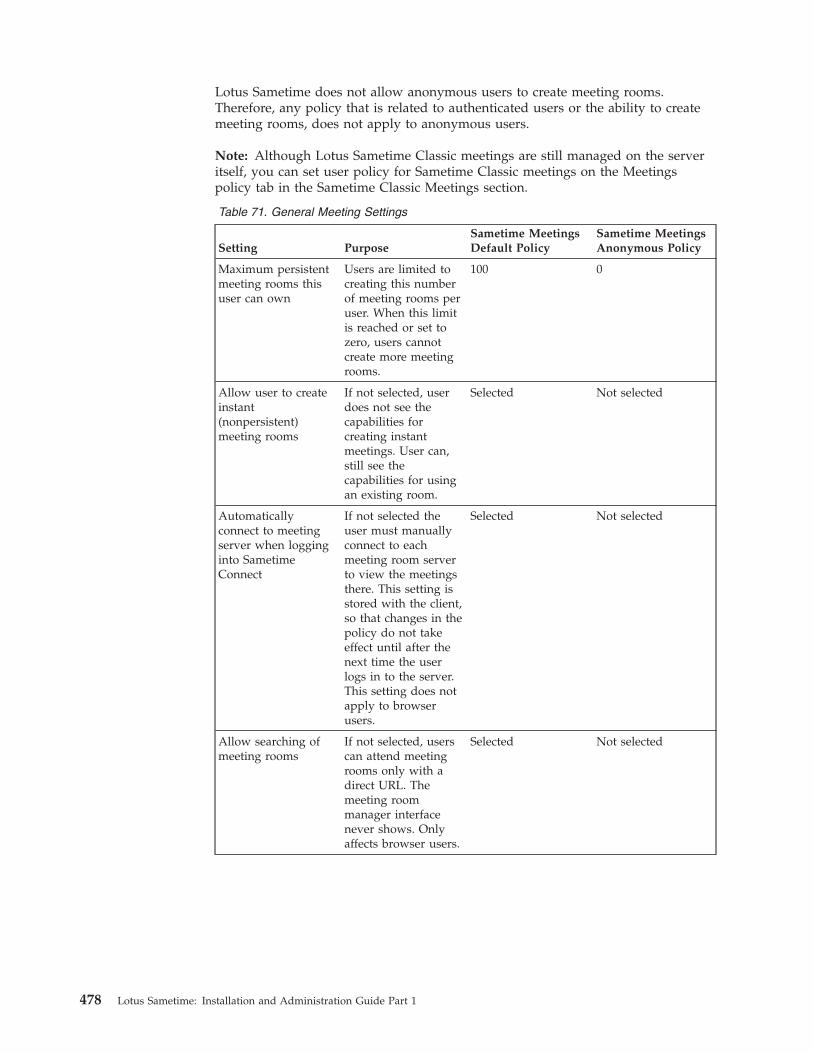
Lotus Sametime does not allow anonymous users to create meeting rooms.Therefore, any policy that is related to authenticated users or the ability to createmeeting rooms, does not apply to anonymous users.
Note: Although Lotus Sametime Classic meetings are still managed on the serveritself, you can set user policy for Sametime Classic meetings on the Meetingspolicy tab in the Sametime Classic Meetings section.
Table 71. General Meeting Settings
Setting PurposeSametime MeetingsDefault Policy
Sametime MeetingsAnonymous Policy
Maximum persistentmeeting rooms thisuser can own
Users are limited tocreating this numberof meeting rooms peruser. When this limitis reached or set tozero, users cannotcreate more meetingrooms.
100 0
Allow user to createinstant(nonpersistent)meeting rooms
If not selected, userdoes not see thecapabilities forcreating instantmeetings. User can,still see thecapabilities for usingan existing room.
Selected Not selected
Automaticallyconnect to meetingserver when logginginto SametimeConnect
If not selected theuser must manuallyconnect to eachmeeting room serverto view the meetingsthere. This setting isstored with the client,so that changes in thepolicy do not takeeffect until after thenext time the userlogs in to the server.This setting does notapply to browserusers.
Selected Not selected
Allow searching ofmeeting rooms
If not selected, userscan attend meetingrooms only with adirect URL. Themeeting roommanager interfacenever shows. Onlyaffects browser users.
Selected Not selected
478 Lotus Sametime: Installation and Administration Guide Part 1
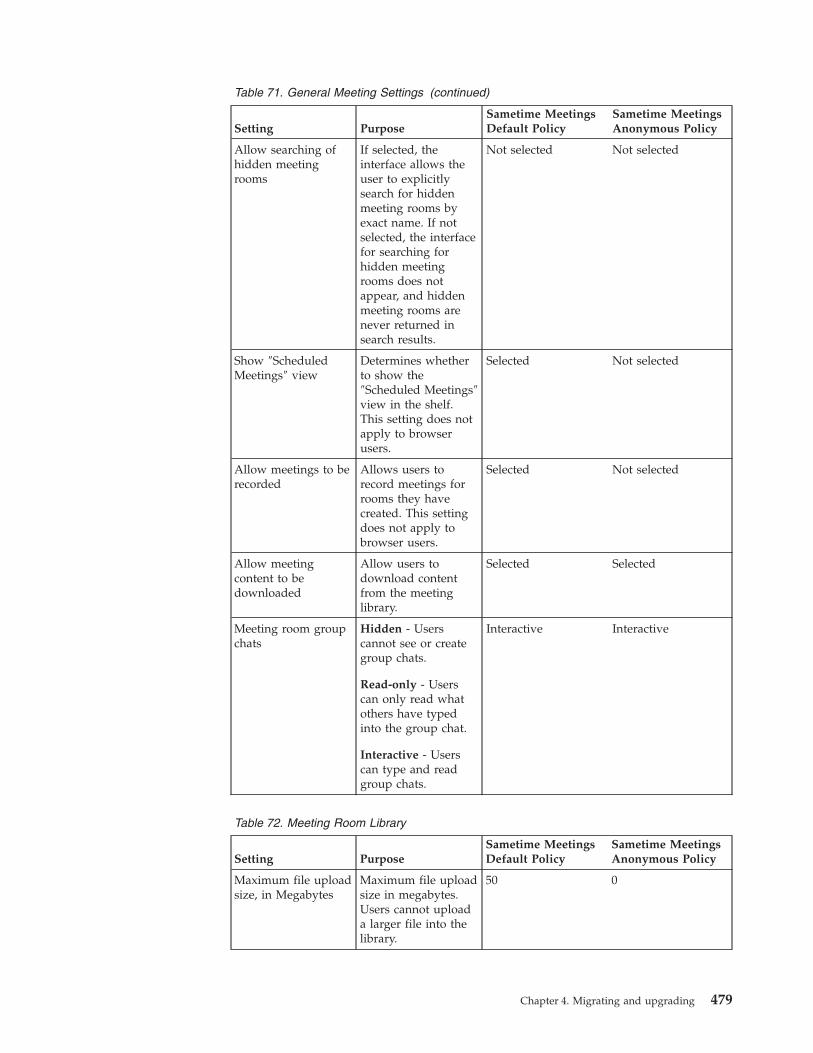
Table 71. General Meeting Settings (continued)
Setting PurposeSametime MeetingsDefault Policy
Sametime MeetingsAnonymous Policy
Allow searching ofhidden meetingrooms
If selected, theinterface allows theuser to explicitlysearch for hiddenmeeting rooms byexact name. If notselected, the interfacefor searching forhidden meetingrooms does notappear, and hiddenmeeting rooms arenever returned insearch results.
Not selected Not selected
Show ″ScheduledMeetings″ view
Determines whetherto show the″Scheduled Meetings″view in the shelf.This setting does notapply to browserusers.
Selected Not selected
Allow meetings to berecorded
Allows users torecord meetings forrooms they havecreated. This settingdoes not apply tobrowser users.
Selected Not selected
Allow meetingcontent to bedownloaded
Allow users todownload contentfrom the meetinglibrary.
Selected Selected
Meeting room groupchats
Hidden - Userscannot see or creategroup chats.
Read-only - Userscan only read whatothers have typedinto the group chat.
Interactive - Userscan type and readgroup chats.
Interactive Interactive
Table 72. Meeting Room Library
Setting PurposeSametime MeetingsDefault Policy
Sametime MeetingsAnonymous Policy
Maximum file uploadsize, in Megabytes
Maximum file uploadsize in megabytes.Users cannot uploada larger file into thelibrary.
50 0
Chapter 4. Migrating and upgrading 479
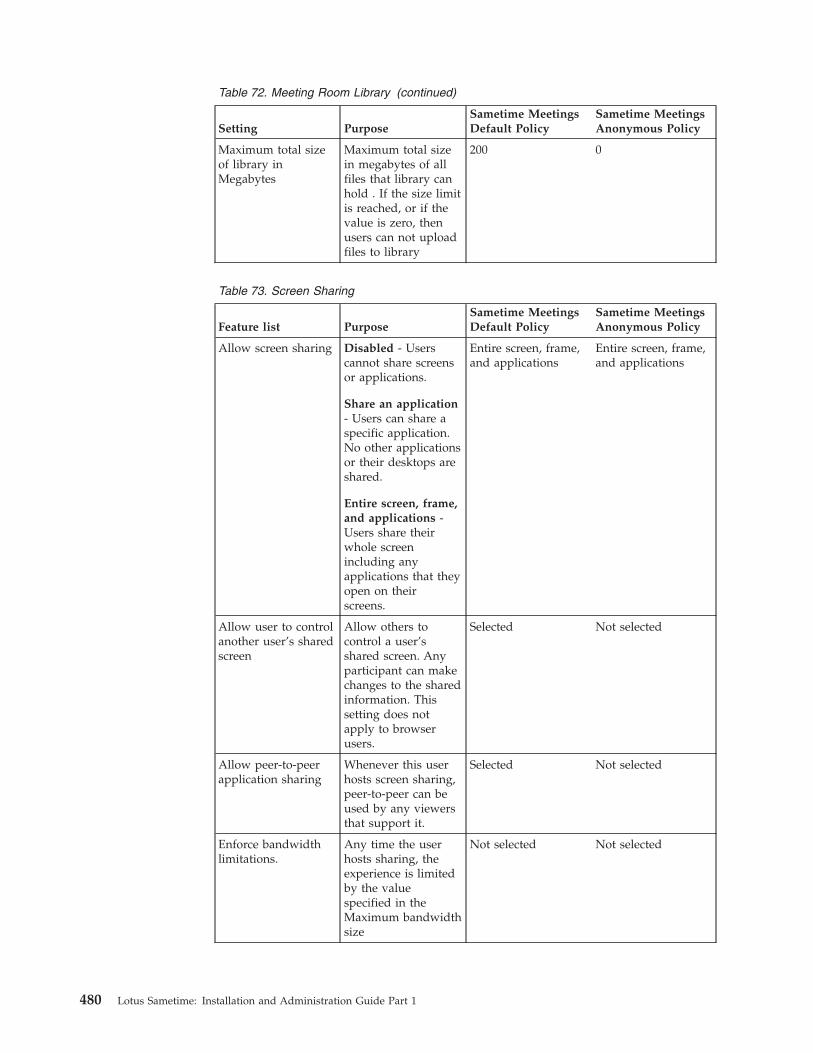
Table 72. Meeting Room Library (continued)
Setting PurposeSametime MeetingsDefault Policy
Sametime MeetingsAnonymous Policy
Maximum total sizeof library inMegabytes
Maximum total sizein megabytes of allfiles that library canhold . If the size limitis reached, or if thevalue is zero, thenusers can not uploadfiles to library
200 0
Table 73. Screen Sharing
Feature list PurposeSametime MeetingsDefault Policy
Sametime MeetingsAnonymous Policy
Allow screen sharing Disabled - Userscannot share screensor applications.
Share an application- Users can share aspecific application.No other applicationsor their desktops areshared.
Entire screen, frame,and applications -Users share theirwhole screenincluding anyapplications that theyopen on theirscreens.
Entire screen, frame,and applications
Entire screen, frame,and applications
Allow user to controlanother user’s sharedscreen
Allow others tocontrol a user’sshared screen. Anyparticipant can makechanges to the sharedinformation. Thissetting does notapply to browserusers.
Selected Not selected
Allow peer-to-peerapplication sharing
Whenever this userhosts screen sharing,peer-to-peer can beused by any viewersthat support it.
Selected Not selected
Enforce bandwidthlimitations.
Any time the userhosts sharing, theexperience is limitedby the valuespecified in theMaximum bandwidthsize
Not selected Not selected
480 Lotus Sametime: Installation and Administration Guide Part 1

Table 73. Screen Sharing (continued)
Feature list PurposeSametime MeetingsDefault Policy
Sametime MeetingsAnonymous Policy
Maximum bandwidthsize, in Kilobytes persecond:
This is not usedunless ″Enforcebandwidthlimitations″ isselected.
500 500
Table 74. Sametime Classic Meetings.
Feature list PurposeSametime MeetingsDefault Policy
Sametime MeetingsAnonymous Policy
Allow users to createinstant meetings andbreakout sessions.
Lets users start ameeting from thecontact list, from anexisting chat, andfrom within ameeting (breakoutsession).
Selected Not selected
Allow Sametime IPaudio and video ininstant meetings andbreakout sessions.
No Does not allowuse of SametimeInternet Protocolaudio and video ininstant meetings andbreakout sessions.
IP audio only Allowuse of SametimeInternet Protocolaudio but not videoin instant meetingsand breakoutsessions.
IP video only Allowsuse of SametimeInternet Protocolvideo but not audioin instant meetingsand breakoutsessions.
No No
Allow participationin meeting roomchats.
Allows participantsin the meeting to usethe chat window tocommunicate withany other participantin the meeting.
Selected Not selected
Chapter 4. Migrating and upgrading 481
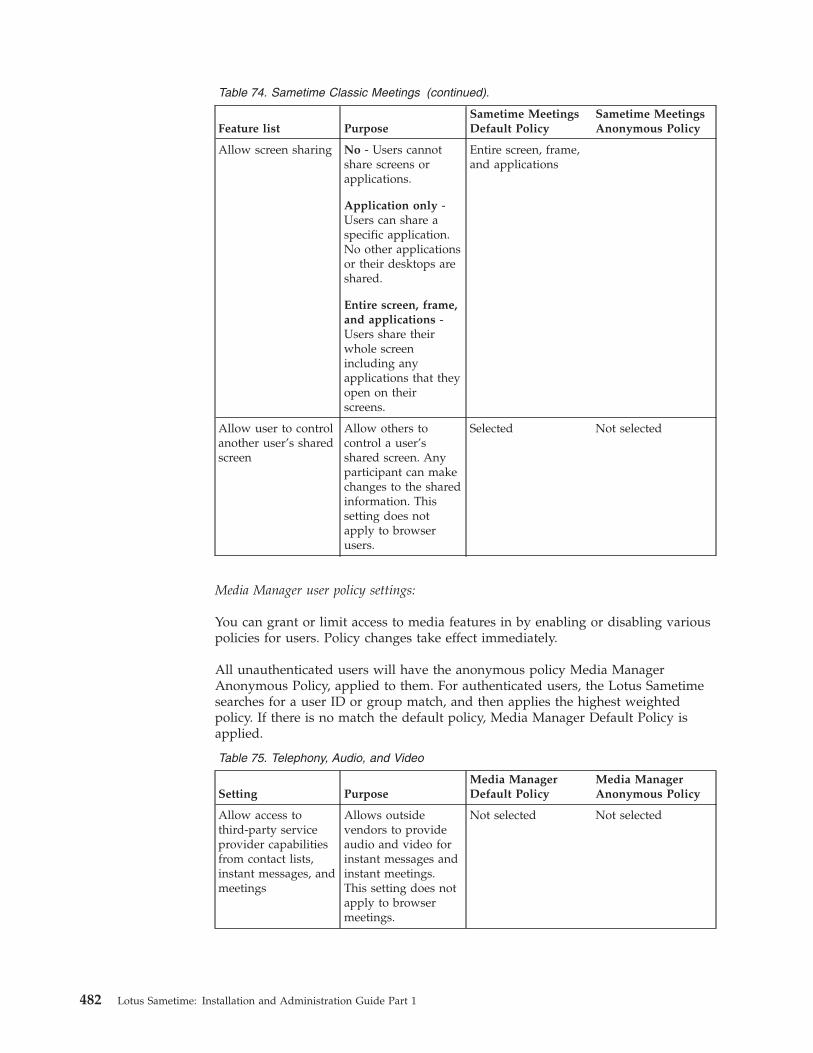
Table 74. Sametime Classic Meetings (continued).
Feature list PurposeSametime MeetingsDefault Policy
Sametime MeetingsAnonymous Policy
Allow screen sharing No - Users cannotshare screens orapplications.
Application only -Users can share aspecific application.No other applicationsor their desktops areshared.
Entire screen, frame,and applications -Users share theirwhole screenincluding anyapplications that theyopen on theirscreens.
Entire screen, frame,and applications
Allow user to controlanother user’s sharedscreen
Allow others tocontrol a user’sshared screen. Anyparticipant can makechanges to the sharedinformation. Thissetting does notapply to browserusers.
Selected Not selected
Media Manager user policy settings:
You can grant or limit access to media features in by enabling or disabling variouspolicies for users. Policy changes take effect immediately.
All unauthenticated users will have the anonymous policy Media ManagerAnonymous Policy, applied to them. For authenticated users, the Lotus Sametimesearches for a user ID or group match, and then applies the highest weightedpolicy. If there is no match the default policy, Media Manager Default Policy isapplied.
Table 75. Telephony, Audio, and Video
Setting PurposeMedia ManagerDefault Policy
Media ManagerAnonymous Policy
Allow access tothird-party serviceprovider capabilitiesfrom contact lists,instant messages, andmeetings
Allows outsidevendors to provideaudio and video forinstant messages andinstant meetings.This setting does notapply to browsermeetings.
Not selected Not selected
482 Lotus Sametime: Installation and Administration Guide Part 1
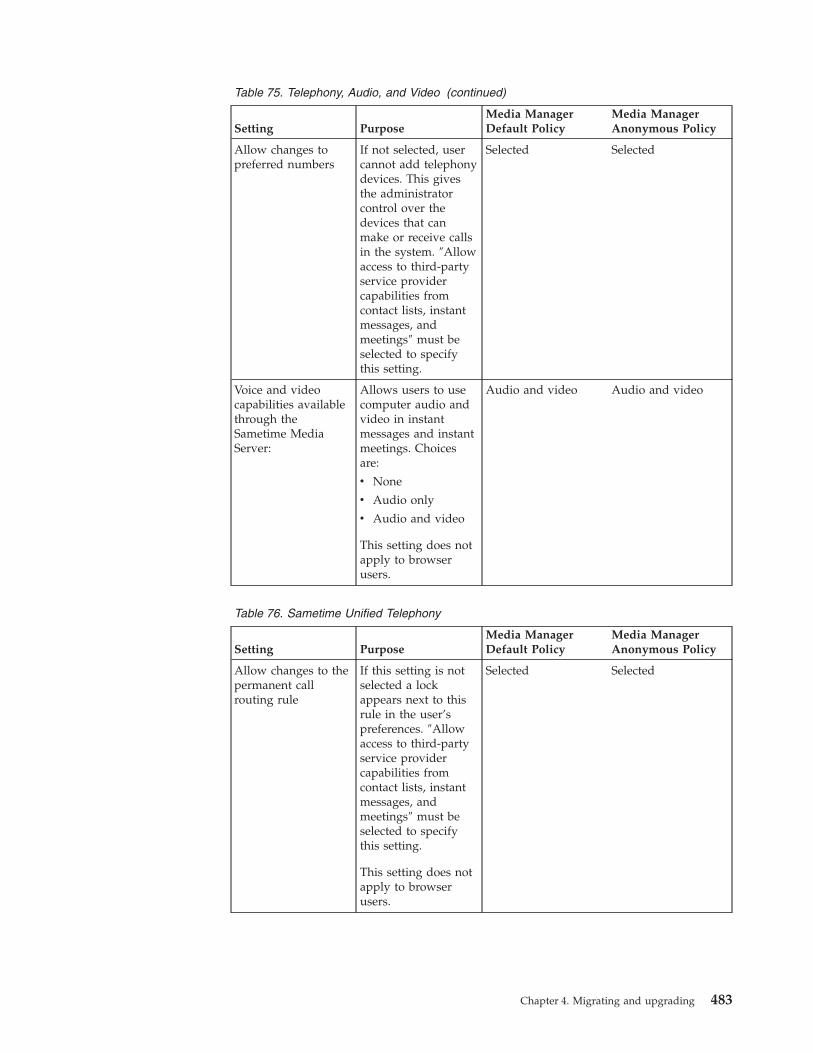
Table 75. Telephony, Audio, and Video (continued)
Setting PurposeMedia ManagerDefault Policy
Media ManagerAnonymous Policy
Allow changes topreferred numbers
If not selected, usercannot add telephonydevices. This givesthe administratorcontrol over thedevices that canmake or receive callsin the system. ″Allowaccess to third-partyservice providercapabilities fromcontact lists, instantmessages, andmeetings″ must beselected to specifythis setting.
Selected Selected
Voice and videocapabilities availablethrough theSametime MediaServer:
Allows users to usecomputer audio andvideo in instantmessages and instantmeetings. Choicesare:
v None
v Audio only
v Audio and video
This setting does notapply to browserusers.
Audio and video Audio and video
Table 76. Sametime Unified Telephony
Setting PurposeMedia ManagerDefault Policy
Media ManagerAnonymous Policy
Allow changes to thepermanent callrouting rule
If this setting is notselected a lockappears next to thisrule in the user’spreferences. ″Allowaccess to third-partyservice providercapabilities fromcontact lists, instantmessages, andmeetings″ must beselected to specifythis setting.
This setting does notapply to browserusers.
Selected Selected
Chapter 4. Migrating and upgrading 483
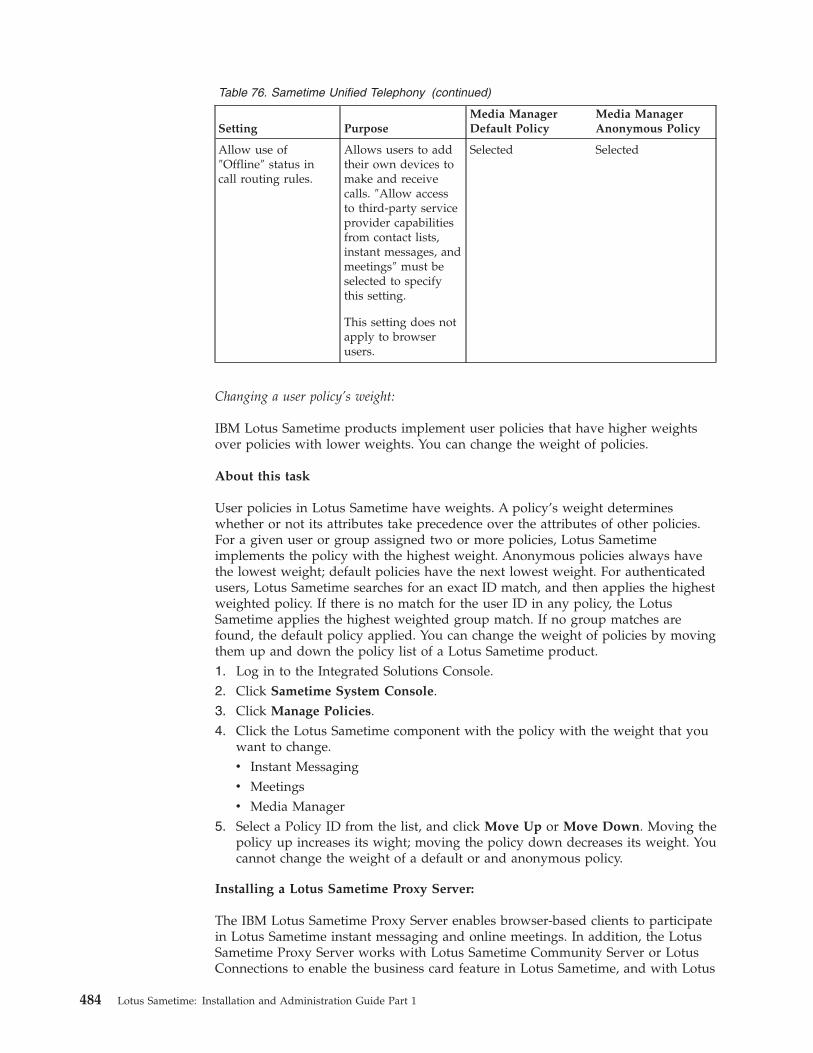
Table 76. Sametime Unified Telephony (continued)
Setting PurposeMedia ManagerDefault Policy
Media ManagerAnonymous Policy
Allow use of″Offline″ status incall routing rules.
Allows users to addtheir own devices tomake and receivecalls. ″Allow accessto third-party serviceprovider capabilitiesfrom contact lists,instant messages, andmeetings″ must beselected to specifythis setting.
This setting does notapply to browserusers.
Selected Selected
Changing a user policy’s weight:
IBM Lotus Sametime products implement user policies that have higher weightsover policies with lower weights. You can change the weight of policies.
About this task
User policies in Lotus Sametime have weights. A policy’s weight determineswhether or not its attributes take precedence over the attributes of other policies.For a given user or group assigned two or more policies, Lotus Sametimeimplements the policy with the highest weight. Anonymous policies always havethe lowest weight; default policies have the next lowest weight. For authenticatedusers, Lotus Sametime searches for an exact ID match, and then applies the highestweighted policy. If there is no match for the user ID in any policy, the LotusSametime applies the highest weighted group match. If no group matches arefound, the default policy applied. You can change the weight of policies by movingthem up and down the policy list of a Lotus Sametime product.1. Log in to the Integrated Solutions Console.2. Click Sametime System Console.3. Click Manage Policies.4. Click the Lotus Sametime component with the policy with the weight that you
want to change.v Instant Messagingv Meetingsv Media Manager
5. Select a Policy ID from the list, and click Move Up or Move Down. Moving thepolicy up increases its wight; moving the policy down decreases its weight. Youcannot change the weight of a default or and anonymous policy.
Installing a Lotus Sametime Proxy Server:
The IBM Lotus Sametime Proxy Server enables browser-based clients to participatein Lotus Sametime instant messaging and online meetings. In addition, the LotusSametime Proxy Server works with Lotus Sametime Community Server or LotusConnections to enable the business card feature in Lotus Sametime, and with Lotus
484 Lotus Sametime: Installation and Administration Guide Part 1

Sametime Unified Telephony or other TCSPI-enabled products to enable the LotusSametime click-to-call feature. The Lotus Sametime Proxy Server also provides livenames awareness, and can replace the Links Toolkit used in earlier releases of LotusSametime.
Preparing to install a Lotus Sametime Proxy Server:
Use the Lotus Sametime System Console to prepare to install a Lotus SametimeProxy Server by pre-populating values required for installation.
Before you begin
Start the Lotus Sametime System Console if it is not already running.
About this task
If you have not already opened the Install Lotus Sametime Proxy Server guidedactivity, follow these steps:1. From a browser, enter the following URL, replacing serverhostname.domain with
the fully qualified domain name of the Lotus Sametime System Console server.http://serverhostname.domain:8700/ibm/console
2. Enter the WebSphere Application Server User ID and password that youcreated when you installed the Lotus Sametime System Console.
3. Click the Sametime System Console task to open it in the navigation tree.4. Click Sametime Guided Activities → Install Sametime Proxy Server.Related tasks
“Starting the Lotus Sametime System Console” on page 231When started, the Lotus Sametime System Console runs as a task in the WebSphereApplication Server administrative console.
Guided activity: Preparing to install a Lotus Sametime Proxy Server:
This guided activity takes you through the steps of creating a deployment plan,which collects information that pre-populates installation screens.
Before you begin
The following servers must be installed and running:v LDAP serverv Lotus Sametime System Consolev Lotus Sametime Community Server, installed using a deployment plan created
on the System Console
About this task
Follow these steps to store a deployment plan on the Sametime System Console tobe used when you run the installation program for Lotus Sametime Proxy Server.1. Plan a product installation.
In the Install Sametime Proxy Server portlet, click Create a New DeploymentPlan, and then click Next.
2. Deployment Name.a. Give the deployment plan a unique, recognizable name, which will be
shown only in the Sametime System Console, and then click Next.
Chapter 4. Migrating and upgrading 485
The name should include the installation and node type, such asstProxy_primary. You can include multibyte characters, symbols, and spacesin the name. The name can be up to 256 characters and is not case sensitive.
b. Click Existing Sametime Community Server, select the Lotus SametimeCommunity Server to which you want to connect the Lotus Sametime ProxyServer, and then click Next.
3. Choose the configuration type.Select the profile type for this installation, and then click Next:Pilot use: Select Cell Profile.Production use:
Add this server to the Sametime System Console cell by selecting theappropriate Network Deployment option.v First server of this type: Select Network Deployment - Primary Node.v Additional server of this type: Select Network Deployment - Secondary Node.
If you will use the Lotus Sametime System Console as the DeploymentManager for a Lotus Sametime Proxy Server cluster, there is no need to install aLotus Sametime Proxy Server with the Deployment Manager option.
4. WebSphere Profile Settings.a. Type the fully qualified host name of the server where you will be installing
the Lotus Sametime Proxy Server.b. Enter the user name and password to be used as the WebSphere
Application Server administrator on the Sametime Proxy Server, and thenclick Next.
Important: This must be a unique user ID that does not exist in the LDAPdirectory.
5. Deployment Summary.Review the summary screen, and then click Finish.The deployment plan is ready to be used for the server installation. If you needto make any changes, click Modify an Existing Deployment Plan and updatethe plan. All changes must be made prior to running installation.
What to do next
“Installing a proxy server on AIX, Linux, Solaris, or Windows” on page 102
Installing a proxy server on AIX, Linux, Solaris, or Windows:
Run the installation program on the machine where you plan to install a LotusSametime Proxy Server.
Before you begin
You should have already created a deployment plan for the Lotus Sametime ProxyServer and started the Lotus Sametime System Console server. If you are loggedinto the Sametime System Console, log out and close the browser beforecontinuing.
AIX, Linux, and Solaris: The launchpad install program needs to be able to launcha Web browser to start. You will need to be on the console or have an X server anda Web browser installed and configured. (VNC or a remote X term session willwork as well).
486 Lotus Sametime: Installation and Administration Guide Part 1
About this task
By using the deployment plan you created earlier, you have fewer selections tomake when you run the installation program.1. (Linux RHEL only) Disable SELinux on any RedHat operating system:
a. Log in as root on the Linux RedHat server where you will install the LotusSametime server.
b. Open the /etc/selinux/config file for editing.c. Locate the SELINUX setting. Change its value to either disable or
permissive.d. Save and close the file.e. Restart the Linux server.
2. Log in to your computer as the system administrator (Microsoft Windows) oras root (IBM AIX, Linux, Solaris).Solaris only: Solaris installs must be performed by the root user using su or anormal login session. Third-party sudo packages are not supported on Solaris.
3. Download the installation package if you have not already done so. Thisinstallation uses SametimeProxyServer.zip.a. To download installation packages, you must have an IBM Passport
Advantage account, which is described at the following Web address:www.ibm.com/software/howtobuy/passportadvantage/paocustomer/docs/en_US/ecare.html
b. Open this release’s Download document at the following Web address:http://www.ibm.com/support/docview.wss?rs=477&uid=24024322
Locate the components you need in the document’s listing, then downloadthe packages labelled with the corresponding part numbers to the systemon which you are installing.
c. Extract the files to a local directory.d. Verify that you have at least 1 GB of temporary space to run the
installation in your %TEMP% or /tmp directory.4. Navigate to the folder where you stored the downloaded files for Lotus
Sametime and start the installation program by running one of the followingcommands from the disk 1 folder:AIX, Linux, Solaris
./launchpad.shWindows
launchpad.exe5. If necessary, select a language other than English from the ″Select a language″
dropdown list.6. Click Install IBM Lotus Sametime Proxy Server and click Launch IBM Lotus
Sametime Proxy Server 8.5 installation.7. Select the packages you want to install and click Next.8. At the Licenses screen, click the I accept the terms in the license agreements
option and click Next.9. Select a package group option and accept the installation directory. Then click
Next.Select Create a new package group if you have not installed any otherSametime software on this machine.Leave Use the existing package group selected if you are installing severalSametime servers on the same machine.
Chapter 4. Migrating and upgrading 487
10. Select IBM Lotus Sametime Proxy Server as the feature to install and selectUse Lotus Sametime System Console to install. Click Next.
11. At the WebSphere Profile settings screen, supply values for connecting to theLotus Sametime System Console.v Host Name: Provide the Host Name for the Lotus Sametime System
Console. The Host Name was determined when you installed the LotusSametime System Console.
v Use SSL: Leave this option selected to run the server over a secureconnection.
v HTTPs Port: Leave 9443 as the default value.v User ID and password: Provide the WebSphere Application Server User ID
and password that you created when you installed the Lotus SametimeSystem Console.
12. Provide the host name for the machine you are currently using, which is thesame name you used when you created the deployment plan for thisinstallation.Do not use an IP address or short host name.
13. Click Validate to log in to the Lotus Sametime System Console.The button name changes to Validated after you log in.
14. When you are logged in, click Next.15. Select the Lotus Sametime Proxy Server deployment plan you created earlier
with the Lotus Sametime System Console guided activity. Then click Next.16. Review the deployment settings, then click Next.17. At the summary panel, review the settings, then click Install to start the
installation.18. Click Finish to close the installation screen.19. Click Exit to close the Installation Manager.
Results
If the installation was not successful, look at the installation logs for moreinformation about what occurred during the installation attempt. Fix any problems,then uninstall all components and reinstall. Find information in the logs directoryand the ant and native subdirectories.
AIX, Linux, or Solaris
/var/ibm/InstallationManager/logs
SSC connection log: /tmp/SSCLogs/ConsoleUtility.log.0
Windows 2008%ALLUSERSPROFILE%\IBM\Installation Manager\logs
Windows 2003%ALLUSERSPROFILE%\Application Data\IBM\Installation Manager\logs
SSC connection log:
Documents and Settings\username\Local Settings\Temp\SSCLogs\ConsoleUtility.log.0
488 Lotus Sametime: Installation and Administration Guide Part 1
What to do next
Managing trusted IP addressesRelated tasks
“Guided activity: Preparing to install a Lotus Sametime Proxy Server” on page 101This guided activity takes you through the steps of creating a deployment plan,which collects information that pre-populates installation screens.“Starting the Lotus Sametime System Console” on page 231When started, the Lotus Sametime System Console runs as a task in the WebSphereApplication Server administrative console.“Uninstalling DB2 and Sametime software with the Installation Manager” on page243Use the Installation Manager to uninstall the following components that arepackaged with Lotus Sametime: IBM DB2 for Linux and Windows, Lotus SametimeSystem Console, Lotus Sametime Proxy Server, Lotus Sametime Meeting Server,and Lotus Sametime Media Manager.
Verifying a proxy server installation on AIX, Linux, Solaris, or Windows:
Open the Sametime Web client to verify that the installation was successful.
About this task
Follow these steps to verify the installation.1. Using a browser, log in to the Lotus Sametime Proxy Server application with
the following command: http://serverhostname.domain:port/stwebclient/index.jsp
Replace serverhostname.domain with your server name and add the port number.
Tip: To verify the port number being used by the Lotus Sametime ProxyServer, log in the Lotus Sametime System Console. In the WebSphereApplication Server administrative console, click Servers → WebSphereapplication servers → STProxyServer → ports → WC_defaulthost to find the portnumber.For example: http://st85proxy1.acme.com:9081/stwebclient/index.jsp
2. Verify that you can create or view contacts.Related tasks
“Logging in to the Lotus Sametime System Console” on page 63Use the IBM Lotus Sametime System Console to prepare to install new servers,start Sametime servers that have been installed, use guided activities to performconfiguration tasks, and administer any Sametime servers managed by the console.
Managing trusted IP addresses:
Whenever you install a server that communicates with an IBM Lotus SametimeCommunity Server, you must add the new server’s IP address to the CommunityServer’s settings.
About this task
The Lotus Sametime Community Server accepts connections from the LotusSametime Media Manager, the Lotus Sametime Gateway, the Lotus SametimeCommunity Mux, and the Lotus Sametime Proxy Server, as well as other serversthat are listed in the Community Services page. To ensure that the Lotus Sametime
Chapter 4. Migrating and upgrading 489
Community Server trusts these components when they establish a connection, youmust add the trusted server’s IP address to the Lotus Sametime CommunityServer.
You do not need to add the Lotus Sametime System Console’s IP address becauseit is added automatically when you install the Lotus Sametime Community Serverusing a deployment plan or register the Lotus Sametime Community Server withthe console after installation.
This task must be completed separately for each server within a Lotus SametimeCommunity Server cluster, as well as for multiple non-clustered CommunityServers.1. Log in to the Integrated Solutions Console.2. Click Sametime System Console → Sametime Servers → Sametime Community
Servers.3. In the Sametime Community Servers list, click the deployment name of the
server with the list of trusted IP addresses that you want to change.4. Click the Connectivity tab.5. Under Trusted Servers, enter the IP address of the server that must connect to
the Lotus Sametime Community Server in the New IP Address field, and clickAdd.
Note: For the Lotus Sametime Media Manager, enter the Conference Managerserver IP address. Each instance of a Conference Manager cluster must beentered.To delete an IP address from the list, select it and click Delete Selected.
6. Click OK.7. Restart the Lotus Sametime Community Server for the change to take effect.
Installing the FIPS Server:
IBM Lotus Sametime supports the U.S. government-defined security requirementsfor cryptographic modules known as FIPS 140-2 (Federal Information ProcessingStandard 140-2). Installing the FIPS Server is only necessary if your LotusSametime deployment must be FIPS-compliant; otherwise, it is optional.
Before you begin
You should have already installed the IBM Lotus Sametime Server Console and theLotus Sametime Proxy Server.
About this task
To maintain FIPS 140-compliance for all data exchanged between clients and LotusSametime Community Servers, you must install the FIPS Server on the LotusSametime Proxy Server to accept data on behalf of Lotus Sametime CommunityServers.
If you want to administer the FIPS Server from the Sametime Systems Console,you must install the FIPS administration portlet before you install the FIPS Server.The FIPS administration portlet can connect to the FIPS Server only if the it hasbeen installed on the Lotus Sametime Proxy Server, and you must always restart
490 Lotus Sametime: Installation and Administration Guide Part 1
the Lotus Sametime Proxy Server if you make any configuration changes using theadministration portlet. You cannot have multiple FIPS Servers running on the samemachine.
If you do not install the FIPS administration portlet, you can manage the FIPSServer using information in FIPS Support for IBM Lotus Sametime 8.1. Install the FIPS administration portlet into the Sametime System Console of
the Integrated Solutions Console. Go to WebSphere\STSCServerCell\optionalConsoleApps\fips.proxyadmin and install the portlet using theinstructions in the readme.txt.
2. Copy sametimefipsproxy.war from setup\STIPLaunchpad\disk1\FIPSProxy onthe image disk to your local drive.
3. Log in to the Integrated Solutions Console on the machine where you areinstalling the FIPS Server.
4. Click Applications → Application Types → Websphere EnterpriseApplications.
5. On the Enterprise Applications page, click Install. .6. Under Path to the new application, browse to the sametimefipsproxy.war file.
Keep the default settings to install the server, and then click Next
7. Enter the context root that you want for the FIPS Server.8. Click Finish and save the configuration.9. Restart the Lotus Sametime Proxy Server to automatically start the FIPS
Server.10. Log in to the Integrated Solutions Console.11. Click Sametime System Console → Sametime Servers → FIPS Proxy Servers.
You can only edit data for FIPS if the FIPS war is running on the installedserver. Make sure that your FIPS Server is running in order to administer it.
Note: Currently, You cannot administer the per-node configuration or verticalclustering of FIPS on the Sametime System Console.
12. Click the FIPS Server that you installed.13. Enter a fully qualified inbound host name and port and an outbound host
name and port to which FIPS connects, and then click OK.14. Restart the Lotus Sametime Proxy Server again to automatically start the FIPS
Server.
Setting up a Lotus Sametime Meeting Server:
Before you can migrate meetings from an upgraded IBM Lotus Sametime server,you must install a Lotus Sametime Meeting Server and then set up URL redirectsfrom the upgraded server to the Lotus Sametime Meeting Server.
Installing a Lotus Sametime Meeting Server:
Follow the instructions for your operating system to install a Lotus SametimeMeeting Server.
Creating a database for the Lotus Sametime Meeting Server on AIX, Linux, Solaris, andWindows:
Before installing the Lotus Sametime Meeting Server on AIX, Linux, Solaris, andWindows, create a database to store its data.
Chapter 4. Migrating and upgrading 491
Before you begin
If you previously created a Meeting Server database and want to run the scriptagain to create a database of the same name, use the DB2 DROP DATABASEcommand to delete all user data and log files, as well as any back/restore historyfor the original database. Also note that uninstalling DB2 does not remove the dataand log files.
About this task
Run the scripts that come with Lotus Sametime in the DB2 installation package tocreate the database for the Lotus Sametime Meeting Server.1. On the DB2 server, log in to the system as the DB2 administrator created
during DB2 installation.2. Open a command prompt and navigate to the folder where you extracted the
DB2 installation package.3. Create the database by running one of the following commands from the disk 1
folder:AIX, Linux, and Solaris
./createMeetingDb.sh STMS
Windows
createMeetingDb.bat STMS
Replace ″STMS″ in the command if you want to choose a different databasename. Names can be from 1 - 8 characters, but cannot contain special ormultibyte characters.Follow the rules for your operating system when naming DB2 objects.
4. Close the DB2 command window.5. Open the DB2 Control Center.
AIX, Linux, and Solaris:
Open the IBM DB2 folder on the desktop and click Control Center.Windows:
Click Start → Programs → IBM DB2 → General Administration Tools → ControlCenter.
6. Verify that the new database was created.Related tasks
“Installing DB2 on Linux and Windows” on page 57IBM DB2 is a prerequisite for IBM Lotus Sametime and is included with theSametime installation package for Linux and Windows. The package does notinclude DB2 for AIX or Solaris.
Connecting to a DB2 database:
Use the Lotus Sametime System Console to connect to the Lotus Sametime MeetingServer or Lotus Sametime Gateway database before installing the server from theSystem Console. If you installed the server without using the System Console (as isthe case with the Sametime Meeting Server on IBM i and Sametime Gateway onany platform), do this step before registering the server with the System Console.
Before you begin
Start the Lotus Sametime System Console if it is not already running.
492 Lotus Sametime: Installation and Administration Guide Part 1
About this task
If you have not already opened the Connect to DB2 Databases activity, follow thesesteps:1. From a browser, enter the following URL, replacing serverhostname.domain with
the fully qualified domain name of the Lotus Sametime System Console server.http://serverhostname.domain:8700/ibm/console
IBM i: The port number may not be 8700. Use the port that was listed in theSametime System Console installation results summary or use the settingspecified for the Administrative console secure port in the AboutThisProfile.txtfile. For the Sametime System Console Deployment Manager Profile(STSCDmgrProfile), the file is located in the following path:/QIBM/UserData/Websphere/AppServer/V7/SametimeWAS/profiles/STSCDmgrProfile/logs/AboutThisProfile.txt
2. Enter the WebSphere Application Server User ID and password that youcreated when you installed the Lotus Sametime System Console.
3. Click the Sametime System Console task to open it in the navigation tree.4. Click Sametime Prerequisites → Connect to DB2 Databases.Related tasks
“Starting the Lotus Sametime System Console” on page 231When started, the Lotus Sametime System Console runs as a task in the WebSphereApplication Server administrative console.
Sametime prerequisite: Connecting to a DB2 database:
This activity takes you through the steps for connecting to the Meeting Server orGateway database you created.
Before you begin
AIX, Linux, Solaris, Windows: Ensure that IBM DB2 has been installed and thatyou have created the Sametime Meeting Server or Gateway database.
IBM i: Ensure that you have created the required database schemas and tables.
In the Connect to DB2 Databases portlet, verify that the Lotus Sametime SystemConsole database you created earlier is already displayed in the list of databases.
About this task
Follow these steps to connect to the Meeting Server or Gateway database. Youmust do this before you can install the Meeting Server using the Sametime SystemConsole. If you installed the server without using the System Console (as is thecase with the Sametime Meeting Server on IBM i and Sametime Gateway on anyplatform), do this step before registering the server with the System Console.1. DB2 Configuration Guided Activity.
Click Add to begin the guided activity that will connect your server to the DB2database. If a connection already exists, you can optionally edit or delete it.
2. Add a new database.a. In the Connect to DB2 Databases portlet, click Add.
If you want to edit or delete a database instead, then select one, and clickthe appropriate button.
Chapter 4. Migrating and upgrading 493

b. Enter the fully qualified host name of the DB2 server in the Host namefield.Do not enter an IP address or a short host name.
c. The Port field shows the default port of 50000. Accept the default unlessyou specified a different port during DB2 installation or your server is usinga different port.Linux: The default is typically 50001, but will vary based on portavailability. Check the /etc/services file on the DB2 server to verify theport number being used.
d. In the Database name, field, enter the name of the database you want toconnect to.Meeting Server database
On AIX, Linux, Solaris, and Windows, the database name is STMS unlessyou changed it.On IBM i, the name is always STMS.Gateway database
For AIX, Linux, Solaris, and Windows, the database name is STGWDBunless you changed it.For IBM i, use the name you specified when creating the database schemas.
e. In the Application user ID field, supply the DB2 application’sadministrative user name that you created when you installed DB2, such asdb2admin. This user has database administration authority and you will usethis user ID and password whenever you work with DB2 databases forLotus Sametime. On IBM i, this is the user profile you specified as theowner of the Meeting Server database schemas in your copy of thestms.default.response.properties file or the user profile you logged in withwhen you created the Gateway database schemas.
f. In the Application password field, enter the password for the DB2administrative user ID.
g. If you are connecting to a database on an IBM i server, click Hosted onIBM i.
h. Click Finish.
Preparing to install a Lotus Sametime Meeting Server:
Use the Lotus Sametime System Console to prepare to install a Lotus SametimeMeeting Server by pre-populating values required for installation.
Before you begin
Start the Lotus Sametime System Console if it is not already running.
About this task
If you have not already opened the Install Lotus Sametime Meeting Server guidedactivity, follow these steps:1. From a browser, enter the following URL, replacing serverhostname.domain with
the fully qualified domain name of the Lotus Sametime System Console server.http://serverhostname.domain:8700/ibm/console
2. Enter the WebSphere Application Server User ID and password that youcreated when you installed the Lotus Sametime System Console.
3. Click the Sametime System Console task to open it in the navigation tree.
494 Lotus Sametime: Installation and Administration Guide Part 1
4. Click Sametime Guided Activities → Install Sametime Meeting Server.Related tasks
“Starting the Lotus Sametime System Console” on page 231When started, the Lotus Sametime System Console runs as a task in the WebSphereApplication Server administrative console.
Guided activity: Preparing to install a Lotus Sametime Meeting Server:
This guided activity takes you through the steps of creating a deployment plan,which collects information that pre-populates installation screens.
Before you begin
You have set up an IBM DB2 database and an LDAP server, and have run theguided activities for connecting to the DB2 database and to the LDAP server.
About this task
Follow these steps to store a deployment plan on the Lotus Sametime SystemConsole to be used when you run the installation program for Lotus SametimeMeeting Server.1. Plan a product installation.
In the Install Sametime Meeting Server portlet, click Create a NewDeployment Plan, and then click Next.
2. Deployment Name.Give the deployment plan a unique, recognizable name, which will be shownonly in the Sametime System Console, and then click Next.The name should include the installation and node type, such asstMeeting_primary. You can include multibyte characters, symbols, and spacesin the name. The name can be up to 256 characters and is not case sensitive.
3. Choose the configuration type.Select the profile type for this installation, and then click Next:Pilot use: Select Cell Profile.Production use:
Add this server to the Sametime System Console cell by selecting theappropriate Network Deployment option.v First server of this type: Select Network Deployment - Primary Node.v Additional server of this type: Select Network Deployment - Secondary Node.
If you will use the Lotus Sametime System Console as the DeploymentManager for a Lotus Sametime Meeting Server cluster, there is no need toinstall a Lotus Sametime Meeting Server with the Deployment Manager option.
4. WebSphere Profile Settings.a. Type the fully qualified host name of the server where you will be installing
the Lotus Sametime Meeting Server.b. Enter the user name and password to be used as the WebSphere
Application Server administrator on the Sametime Meeting Server, and thenclick Next.
Important: This must be a unique user ID that does not exist in the LDAPdirectory.
5. Choose a database for this deployment.
Chapter 4. Migrating and upgrading 495

Select the Lotus Sametime Meeting Server database that you configured withthe Lotus Sametime System Console activity, and then click Next.If you used the recommended name when you created the Sametime MeetingServer database, the name is STMS.
6. Connect to an LDAP Server.Select the LDAP directory that you configured with the Lotus Sametime SystemConsole guided activity, and then click Next.
7. Deployment Summary.Review the summary screen, and then click Finish.The deployment plan is ready to be used for the server installation. If you needto make any changes, click Modify an Existing Deployment Plan and updatethe plan. All changes must be made prior to running installation.
What to do next
“Installing a meeting server on AIX, Linux, Solaris, or Windows” on page 119
Installing a meeting server on AIX, Linux, Solaris, or Windows:
Run the installation program on the machine where you plan to install a LotusSametime Meeting Server.
Before you begin
You should have already created a deployment plan for the Lotus SametimeMeeting Server and started the Lotus Sametime System Console server. If you arelogged into the Sametime System Console, log out and close the browser beforecontinuing.
AIX, Linux, and Solaris: The launchpad install program needs to be able to launcha Web browser to start. You will need to be on the console or have an X server anda Web browser installed and configured. (VNC or a remote X term session willwork as well).
About this task
By using the deployment plan you created earlier, you have fewer selections tomake when you run the installation program.1. (Linux RHEL only) Disable SELinux on any RedHat operating system:
a. Log in as root on the Linux RedHat server where you will install the LotusSametime server.
b. Open the /etc/selinux/config file for editing.c. Locate the SELINUX setting. Change its value to either disable or
permissive.d. Save and close the file.e. Restart the Linux server.
2. Log in to your computer as the system administrator (Microsoft Windows) oras root (IBM AIX, Linux, Solaris).Solaris only: Solaris installs must be performed by the root user using su or anormal login session. Third-party sudo packages are not supported on Solaris.
3. Download the Meeting Server installation package if you have not alreadydone so.
496 Lotus Sametime: Installation and Administration Guide Part 1

a. To download installation packages, you must have an IBM PassportAdvantage account, which is described at the following Web address:www.ibm.com/software/howtobuy/passportadvantage/paocustomer/docs/en_US/ecare.html
b. Open this release’s Download document at the following Web address:http://www.ibm.com/support/docview.wss?rs=477&uid=24024322
Locate the components you need in the document’s listing, then downloadthe packages labelled with the corresponding part numbers to the systemon which you are installing.
c. Extract the files to a local directory.d. Verify that you have at least 1 GB of temporary space to run the
installation in your %TEMP% or /tmp directory.4. Navigate to the folder where you stored the downloaded files for Lotus
Sametime and start the installation program by running one of the followingcommands from the disk 1 folder:AIX, Linux, Solaris
./launchpad.shWindows
launchpad.exe5. If necessary, select a language other than English from the ″Select a language″
dropdown list.6. Click Install IBM Lotus Sametime Meeting Server and click Launch IBM
Lotus Sametime Meeting Server 8.5 installation.7. Select the version you want to install and click Next.8. At the Licenses screen, click the I accept the terms in the license agreements
option and click Next.9. Select a package group option and accept the installation directory. Then click
Next.Select Create a new package group if you have not installed any otherSametime software on this machine.Leave Use the existing package group selected if you are installing severalSametime servers on the same machine.
10. Select IBM Lotus Sametime Meeting Server 8.5.0 as the feature to install andselect Use Lotus Sametime System Console to install. Click Next.
11. At the Common Configurations screen, supply values for connecting to theLotus Sametime System Console.v Host Name: Provide the fully qualified domain name in the Host Name
field for the Lotus Sametime System Console. The host name wasdetermined when you installed the Lotus Sametime System Console.
v Use SSL: Leave this option selected to run the server over a secureconnection.
v HTTPs Port: Leave 9443 as the default value.v User ID and password: Provide the WebSphere Application Server User ID
and password that you created when you installed the Lotus SametimeSystem Console.
12. Provide the host name for the machine you are currently using, which is thesame name you used when you created the deployment plan for thisinstallation.Do not use an IP address or short host name.
13. Click Validate to log in to the Lotus Sametime System Console.
Chapter 4. Migrating and upgrading 497
The button name changes to Validated after you log in.14. When you are logged in, click Next.15. Select the Lotus Sametime Meeting Server deployment plan you created
earlier with the Lotus Sametime System Console guided activity. Then clickNext.
16. Review the deployment settings, then click Next.17. At the summary panel, review the settings, then click Install to start the
installation.18. Click Finish when the installation process is complete.19. Click Exit to close the Installation Manager.
Results
If the installation was not successful, look at the installation logs for moreinformation about what occurred during the installation attempt. Fix any problems,then uninstall all components and reinstall. Find information in the logs directoryand the ant and native subdirectories.
AIX, Linux, or Solaris
/var/ibm/InstallationManager/logs
SSC connection log: /tmp/SSCLogs/ConsoleUtility.log.0
Windows 2008%ALLUSERSPROFILE%\IBM\Installation Manager\logs
Windows 2003%ALLUSERSPROFILE%\Application Data\IBM\Installation Manager\logs
SSC connection log:
Documents and Settings\username\Local Settings\Temp\SSCLogs\ConsoleUtility.log.0
What to do next
Related tasks
“Starting and stopping servers running on WebSphere Application Server” on page230Starting and stopping IBM Lotus Sametime servers that run on WebSphereApplication Server involves other server components such as the DeploymentManager and the node agent.“Uninstalling DB2 and Sametime software with the Installation Manager” on page243Use the Installation Manager to uninstall the following components that arepackaged with Lotus Sametime: IBM DB2 for Linux and Windows, Lotus SametimeSystem Console, Lotus Sametime Proxy Server, Lotus Sametime Meeting Server,and Lotus Sametime Media Manager.
Verifying a meeting server installation:
Log in to the Lotus Sametime Meeting Server to verify that the installation wassuccessful.
498 Lotus Sametime: Installation and Administration Guide Part 1
About this task
Verify the installation by logging in to the server and creating a new meetingroom.1. From a Web browser, navigate to the Meeting Room Center by entering the
following URL:http://serverhostname.domain:port/stmeetings
Replace serverhostname.domain with the fully qualified domain name of theMeeting server; for example:
Tip: To verify the HTTP port number being used by the Lotus SametimeMeeting Server, open the AboutThisProfile.txt file for the Sametime MeetingApplication Server Profile and use the setting specified for the HTTP transportport. The default profile name is STMAppProfile. On IBM i, look for theAboutThisProfile.txt file in the following location: /QIBM/UserData/Websphere/AppServer/V7/SametimeWAS/profiles/STMAppProfile/logs/AboutThisProfile.txt
http://st85ms1.acme.com:9080/stmeetings
Note: By default, the WebSphere proxy listens on port 80, and forwards to theLotus Sametime Meeting Server on port 9080.
2. Click Log In and then enter your User name and Password to log in to theMeeting Center.
3. Click New Meeting Room, then fill in the fields and click Save.4. The new meeting appears in the list of meetings that you own. Click Enter
Meeting Room below the name of the new meeting to join the meeting.
Setting up URL redirects to migrate meetings:
After you install the new IBM Lotus Sametime 8.5 Meeting Server, you are readyto migrate meetings. Rather than transfer meeting schedules and associated datafrom the legacy server to the new server, you will set up URL redirects thatautomatically link users to the appropriate meeting room on the new server.
Configuring the upgraded server to issue redirects to a Meeting Server:
Configure an upgraded IBM Lotus Sametime server to issue a redirect to a URLhosted on the new Lotus Sametime 8.5 Meeting Server.
About this task
You can complete this task on the following servers:v One or more upgraded Lotus Sametime 8.5 servers with meetingsv One or more pre-8.5 Lotus Sametime server with meetings enabledv Multiple pre-8.5 Lotus Sametime servers (with meetings enabled) that are
clustered with the Lotus Sametime Enterprise Meeting Server
Lotus Sametime 8.5 does not directly support the Lotus Sametime EnterpriseMeeting Server, so you cannot cluster upgraded Lotus Sametime 8.5 meeting roomsas in previous releases. However, you can set up URL redirects from pre-8.5servers that are clustered with the Lotus Sametime Enterprise Meeting Server.1. Enable redirects on the Lotus Sametime Community Mux:
a. Open the sametime.ini file on the server where the Community Mux ishosted.
Chapter 4. Migrating and upgrading 499
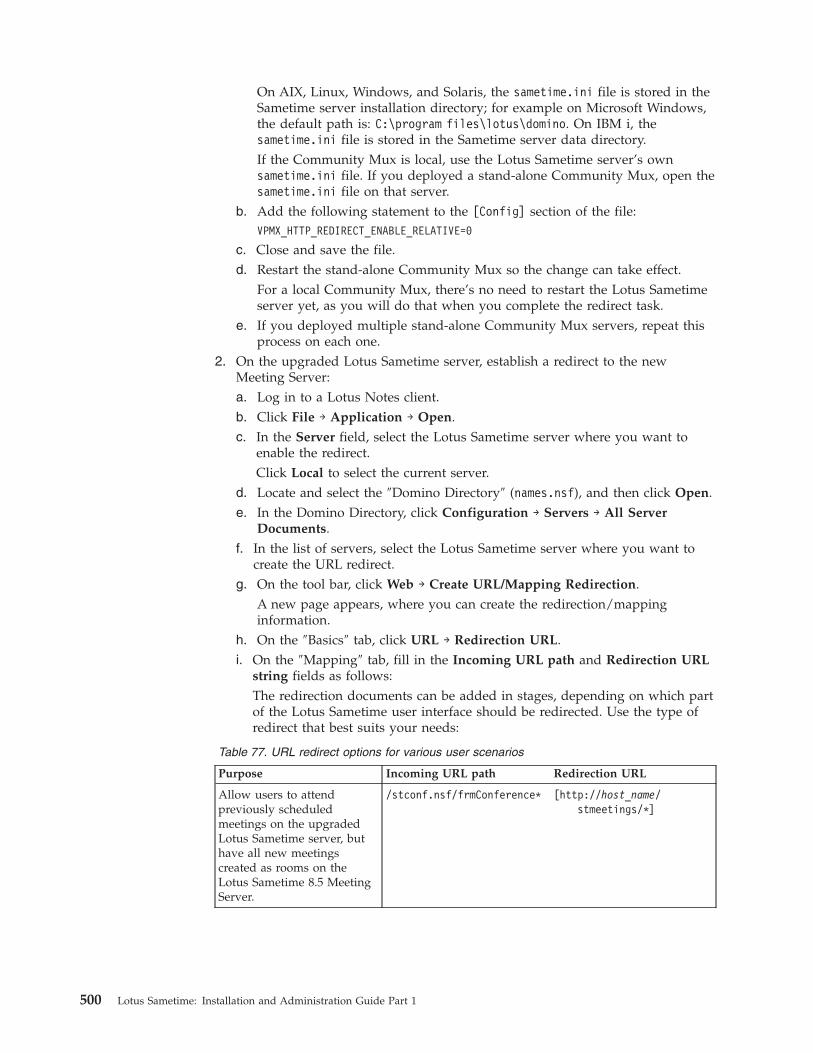
On AIX, Linux, Windows, and Solaris, the sametime.ini file is stored in theSametime server installation directory; for example on Microsoft Windows,the default path is: C:\program files\lotus\domino. On IBM i, thesametime.ini file is stored in the Sametime server data directory.If the Community Mux is local, use the Lotus Sametime server’s ownsametime.ini file. If you deployed a stand-alone Community Mux, open thesametime.ini file on that server.
b. Add the following statement to the [Config] section of the file:VPMX_HTTP_REDIRECT_ENABLE_RELATIVE=0
c. Close and save the file.d. Restart the stand-alone Community Mux so the change can take effect.
For a local Community Mux, there’s no need to restart the Lotus Sametimeserver yet, as you will do that when you complete the redirect task.
e. If you deployed multiple stand-alone Community Mux servers, repeat thisprocess on each one.
2. On the upgraded Lotus Sametime server, establish a redirect to the newMeeting Server:a. Log in to a Lotus Notes client.b. Click File → Application → Open.c. In the Server field, select the Lotus Sametime server where you want to
enable the redirect.Click Local to select the current server.
d. Locate and select the ″Domino Directory″ (names.nsf), and then click Open.e. In the Domino Directory, click Configuration → Servers → All Server
Documents.f. In the list of servers, select the Lotus Sametime server where you want to
create the URL redirect.g. On the tool bar, click Web → Create URL/Mapping Redirection.
A new page appears, where you can create the redirection/mappinginformation.
h. On the ″Basics″ tab, click URL → Redirection URL.i. On the ″Mapping″ tab, fill in the Incoming URL path and Redirection URL
string fields as follows:The redirection documents can be added in stages, depending on which partof the Lotus Sametime user interface should be redirected. Use the type ofredirect that best suits your needs:
Table 77. URL redirect options for various user scenarios
Purpose Incoming URL path Redirection URL
Allow users to attendpreviously scheduledmeetings on the upgradedLotus Sametime server, buthave all new meetingscreated as rooms on theLotus Sametime 8.5 MeetingServer.
/stconf.nsf/frmConference* [http://host_name/stmeetings/*]
500 Lotus Sametime: Installation and Administration Guide Part 1
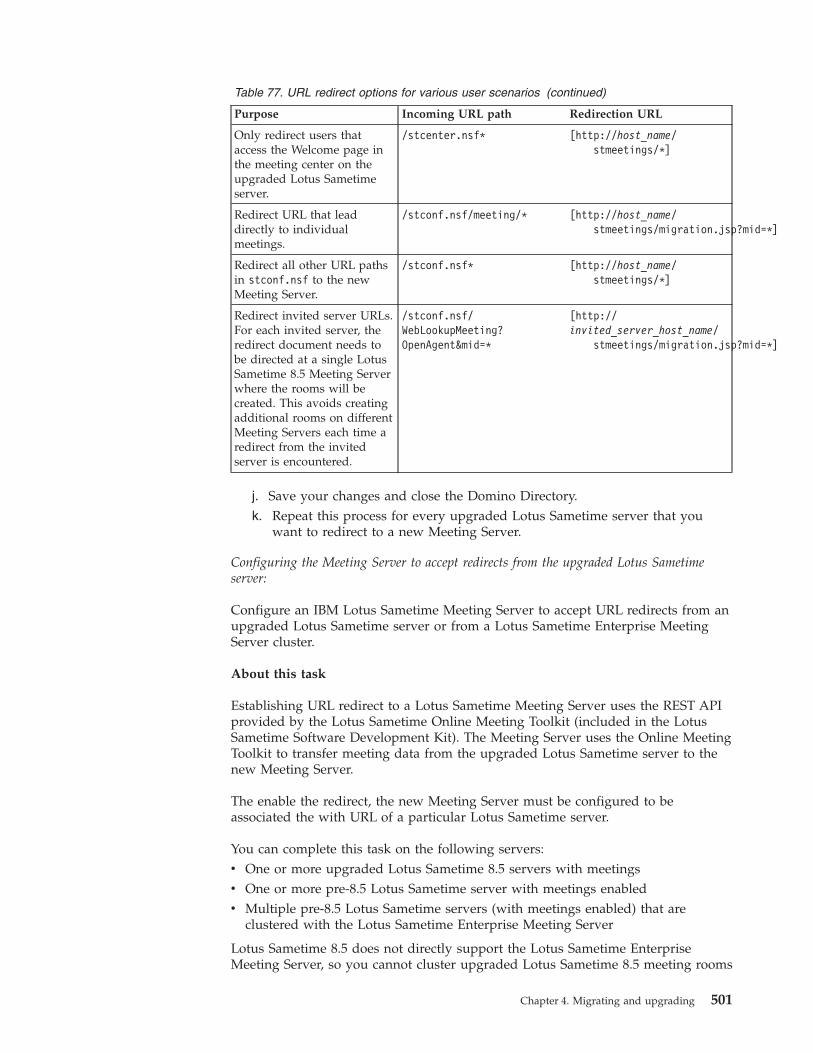
Table 77. URL redirect options for various user scenarios (continued)
Purpose Incoming URL path Redirection URL
Only redirect users thataccess the Welcome page inthe meeting center on theupgraded Lotus Sametimeserver.
/stcenter.nsf* [http://host_name/stmeetings/*]
Redirect URL that leaddirectly to individualmeetings.
/stconf.nsf/meeting/* [http://host_name/stmeetings/migration.jsp?mid=*]
Redirect all other URL pathsin stconf.nsf to the newMeeting Server.
/stconf.nsf* [http://host_name/stmeetings/*]
Redirect invited server URLs.For each invited server, theredirect document needs tobe directed at a single LotusSametime 8.5 Meeting Serverwhere the rooms will becreated. This avoids creatingadditional rooms on differentMeeting Servers each time aredirect from the invitedserver is encountered.
/stconf.nsf/WebLookupMeeting?OpenAgent&mid=*
[http://invited_server_host_name/
stmeetings/migration.jsp?mid=*]
j. Save your changes and close the Domino Directory.k. Repeat this process for every upgraded Lotus Sametime server that you
want to redirect to a new Meeting Server.
Configuring the Meeting Server to accept redirects from the upgraded Lotus Sametimeserver:
Configure an IBM Lotus Sametime Meeting Server to accept URL redirects from anupgraded Lotus Sametime server or from a Lotus Sametime Enterprise MeetingServer cluster.
About this task
Establishing URL redirect to a Lotus Sametime Meeting Server uses the REST APIprovided by the Lotus Sametime Online Meeting Toolkit (included in the LotusSametime Software Development Kit). The Meeting Server uses the Online MeetingToolkit to transfer meeting data from the upgraded Lotus Sametime server to thenew Meeting Server.
The enable the redirect, the new Meeting Server must be configured to beassociated the with URL of a particular Lotus Sametime server.
You can complete this task on the following servers:v One or more upgraded Lotus Sametime 8.5 servers with meetingsv One or more pre-8.5 Lotus Sametime server with meetings enabledv Multiple pre-8.5 Lotus Sametime servers (with meetings enabled) that are
clustered with the Lotus Sametime Enterprise Meeting Server
Lotus Sametime 8.5 does not directly support the Lotus Sametime EnterpriseMeeting Server, so you cannot cluster upgraded Lotus Sametime 8.5 meeting rooms
Chapter 4. Migrating and upgrading 501
as in previous releases. However, you can set up URL redirects from pre-8.5servers that are clustered with the Lotus Sametime Enterprise Meeting Server.1. Log in to the Lotus Sametime System Console as the Sametime administrator.2. Click Sametime Servers → Sametime Meeting Servers.3. In the ″Meeting Servers″ list, click the name of the server that will accept
redirects from a particular Lotus Sametime server.4. Click the Server Configuration tab.5. Click Edit.6. Type restapi.migrationUrl as the name of the new configuration key.7. Now assign one of the following values to the key, depending on whether the
Lotus Sametime server is clustered with Lotus Sametime Enterprise MeetingServer:v Lotus Sametime server (non-clustered): http://host_name/servlet/meeting/
v Lotus Sametime Enterprise Meeting Server (cluster): http://host_name/iwc/sametime/meeting/
For host_name, supply the Lotus Sametime server’s fully qualified host name;for example: ststd1.acme.com
8. Click OK.
Expanding the deployment with optional 8.5 components:
After you have upgraded your IBM Lotus Sametime deployment and migratedmeetings to the new Lotus Sametime Meeting Server, you may want to integrateadditional components into your deployment.
About this task
The following components are not required for upgrading a Lotus Sametime serverand migrating meetings, but provide additional capabilities to a Lotus Sametimedeployment:v Lotus Sametime Media Manager: Provides audio and video features for instant
messaging and online meetings.For more information, see Planning a Lotus Sametime Media Managerinstallation.
v Lotus Sametime Gateway: Provides instant messaging with externalcommunities, including:– Lotus Sametime communities deployed outside of your firewall– AOL Instant Messenger– Google Talk– Yahoo MessengerFor more information, see Planning a Lotus Sametime Gateway installation.
Upgrading Lotus Sametime on IBM iUpgrade from previous releases of IBM Lotus Sametime on the IBM i operatingsystem.
About this task
You can upgrade from the following types of Lotus Sametime deployments:v Lotus Sametime (release 7.5.1)
502 Lotus Sametime: Installation and Administration Guide Part 1

v Lotus Sametime Instant Messaging Limited Use (release 8.0, 8.0.1, and 8.0.2)v Lotus Sametime Entry (release 8.0, 8.0.1, and 8.0.2)v Lotus Sametime Standard (release 8.0, 8.0.1, and 8.0.2)
The upgrade process is the same for all servers up to a point; if you have meetingsenabled on your server there will be additional tasks to complete if you want tomigrate existing meetings to a new Lotus Sametime 8.5 Meeting Server.
Note: If you have a cluster of Lotus Sametime servers, you must upgrade allservers in the cluster. A cluster cannot support servers running different releases ofLotus Sametime.
Upgrading Lotus Sametime servers on IBM iUpgrade one or more IBM Lotus Sametime servers running on IBM i.
Upgrading Lotus Sametime on IBM i:
Upgrade from previous releases of IBM Lotus Sametime on the IBM i operatingsystem.
About this task
You can upgrade from the following types of Lotus Sametime deployments:v Lotus Sametime (release 7.5.1)v Lotus Sametime Instant Messaging Limited Use (release 8.0, 8.0.1, and 8.0.2)v Lotus Sametime Entry (release 8.0, 8.0.1, and 8.0.2)v Lotus Sametime Standard (release 8.0, 8.0.1, and 8.0.2)
The upgrade process is the same for all servers up to a point; if you have meetingsenabled on your server there will be additional tasks to complete if you want tomigrate existing meetings to a new Lotus Sametime 8.5 Meeting Server.
Note: If you have a cluster of Lotus Sametime servers, you must upgrade allservers in the cluster. A cluster cannot support servers running different releases ofLotus Sametime.
Disabling cluster replication:
Before you begin to an IBM Lotus Sametime server, you must disable clusterreplication to avoid sending or receiving configuration changes while preparing forthe upgrade.
About this task
If you have a cluster of servers, you must upgrade every server in the cluster. Toavoid sending or receiving configuration changes while you are preparing toupgrade, disable cluster replication for all servers in the cluster. For moreinformation, see Disabling cluster replication for an entire server in the LotusDomino and Notes information center.
Removing meeting rooms from Enterprise Meeting Server:
If you have meeting services enabled on your IBM Lotus Sametime server and youclustered the meeting rooms with Lotus Sametime Enterprise Meeting Server, youmust remove those servers from Enterprise Meeting Server before upgrading them.
Chapter 4. Migrating and upgrading 503

About this task
Lotus Sametime 8.5 does not support the use of Lotus Sametime EnterpriseMeeting Server. Instead, you deploy one or more Lotus Sametime 8.5 MeetingServers and optionally cluster them using an IBM WebSphere network deployment.Then you can set up URL redirects from your upgraded Lotus Sametime servers tothe new Meeting Servers so that when a user clicks a link to create or attend ameeting on an upgraded server, the link is automatically redirected to the newMeeting Server.
If you do not wish to install the Lotus Sametime 8.5 Meeting Server yet, you canstill create and host meetings on the upgraded server, but you cannot cluster themeeting rooms.
Upgrading the Lotus Sametime server on IBM i:
After you have completed the preliminary steps to prepare the environment,upgrade each of your IBM Lotus Sametime servers.
About this task
If you are upgrading a cluster, be sure to upgrade each of the servers in the cluster(and register each server with the Lotus Sametime System Console) before youconfigure the cluster and register the cluster itself.
Checking for supported releases for Lotus Domino and Lotus Sametime on IBM i:
Before upgrading to IBM Lotus Sametime 8.5, determine whether you first need toupgrade your Lotus Domino and your operating system releases. You also need todetermine whether your current level of Lotus Sametime is supported by the LotusSametime 8.5 upgrade process.
About this task
Follow these steps to ensure that the server you intend to upgrade is running on asupported level of the operating system and that the current releases of LotusDomino and Lotus Sametime are supported by the upgrade process. If the serverincludes an unsupported release of any product, you must complete an interimupgrade to a supported product.1. Check the operating system level on the computer where Lotus Sametime is
installed.You must upgrade to at least IBM i 5.4 before installing Lotus Sametime 8.5.IBM i 5.4 or later is required for Lotus Sametime 8.5 and IBM i 6.1 is requiredfor supporting IPv6 addressing.Consider other Lotus Domino servers and related Lotus products that may berunning on the same system in your upgrade plans. Make sure that yourcurrently installed server releases, and product releases, are all supported onthe new operating system level. For up-to-date details about whichcombinations of Domino, Sametime, and other Lotus Domino related productreleases are supported on current IBM i releases, see the Lotus Software forIBM i Compatibility Guide.For information on Lotus Sametime 8.5 system requirements, see the DetailedSystem Requirements.
2. Check the Lotus Domino release on the server to be upgraded.
504 Lotus Sametime: Installation and Administration Guide Part 1
Lotus Sametime 8.5 requires Lotus Domino release 8.0 or later. Before installinga newer release of Lotus Sametime to upgrade a Lotus Sametime server, verifythat each Lotus Domino server hosting Lotus Sametime is at a supported level.If your Lotus Sametime server is running on a version of Lotus Domino earlierthan 8.0, you must upgrade the Lotus Domino server to a supported versionbefore installing Lotus Sametime 8.5. The Lotus Sametime upgrade will fail forany server that is not running a supported release of Lotus Domino, and canonly be corrected by upgrading the level of Lotus Domino and reinstallingLotus Sametime.If the server is running Lotus Domino 8 or later, continue to the next step.Otherwise, install a supported level of Lotus Domino and run the UPDDOMSVRcommand to update each Lotus Domino server hosting Lotus Sametime beforeproceeding.
3. Check the Lotus Sametime release on the server to be upgraded.Lotus Sametime 8.5 supports direct upgrades from Lotus Sametime 7.5.1 orlater. If your server is running an earlier release of Lotus Sametime, you mustcomplete an interim upgrade to one of the following releases of LotusSametime: 7.5.1, 8.0, 8.0.1, or 8.0.2; then you can upgrade that release of LotusSametime directly to release 8.5,
Backing up the Lotus Sametime data:
Before installing a new release of IBM Lotus Sametime you should back up allimportant server data.
Before you begin
When upgrading Lotus Sametime on Microsoft Windows, IBM AIX, Linux orSolaris, the install program provides the option of preserving your existing LotusSametime data, which includes meeting information, contact lists and configurationsettings, or overwriting this information.
The IBM i installation program always preserves the Lotus Sametime data onexisting servers. If you do not want to preserve the Lotus Sametime data, removeLotus Sametime from the server with the RMVLSTDOM command beforeinstalling the new release. After the installation completes, run the ADDLSTDOMcommand to add Lotus ametime to the server again.
About this task
When backing up your Lotus Sametime data, include the following information:
Table 78. Lotus Sametime server data to back up
Data to back up Comments
names.nsf This is optional if you can replicate fromanother Domino server. After upgrading toLotus Sametime 8.5, you will need to convertthe native Domino Directory to use LDAPformat in order to register the server with theLotus Sametime System Console.
notes.ini Back up this file for possible reference afterupgrade.
da.nsf Back up this file if you are using directoryassistance.
Chapter 4. Migrating and upgrading 505
Table 78. Lotus Sametime server data to back up (continued)
Data to back up Comments
vpuserinfo.nsf This contains user storage and privacyinformation, such as contacts lists. If youupgrade from a release earlier than 7.5, you willneed to upgrade the design on this database.
sametime.ini,stconfig.nsf
It is not necessary to backup these files on IBMi as they are saved automatically during theupgrade process. The original sametime.ini andstconfig.nsf files are saved in a subdirectoryof the server data directory. The name of thesubdirectory is STprevious_versionBU. Forexample, the subdirectory name is ST751BU ifyou upgraded from Sametime 7.5.1, and ST80BUif you upgraded from Sametime 8.0.
All customized data files, templates orapplications (.ntf, .mdm, .scr, .bmp,.mac, .smi, .tbl)
All ID files, desktop.dsk, andpubnames.ntf
meetingserver.ini (Lotus Sametime Standard only) It is notnecessary to back up this file on IBM i becauseit is saved automatically during the upgradeprocess; the original meetingserver.ini file issaved in the server data directory asmeetingserver.bak.
All recorded meeting files (.rap) (Lotus Sametime Standard only)
Pre-accepting the Lotus Sametime software agreements on IBM i:
If you are installing IBM Lotus Sametime from physical media, it is highlyrecommended that you display and accept the Lotus Sametime softwareagreements before starting the installation.
About this task
If you do not pre-accept the software agreements, the installation process willrestore the product to the system, but then stop and wait for you to accept theagreements before completing the installation. Skip this step if installing from adownloaded image.1. Insert the Lotus Sametime DVD into the optical drive of your system.2. Enter the following command on an IBM i command line:
GO LICPGM
The Work with Licensed Programs display appears.3. From the Work with Licensed Programs (LICPGM) menu, select option 5
(Prepare for install) and press Enter. The Prepare for Install display appears.4. Type 1 in the option field next to Work with software agreements. Press Enter.
When the Work with Software Agreements display appears, you see all IBMlicensed programs that require software agreement acceptance and whether theagreement has been accepted. Only licensed programs that are not yet installedappear on this display. The software agreements for Lotus Sametime will notappear in the list until you restore them from the DVD in a later step.
506 Lotus Sametime: Installation and Administration Guide Part 1
5. Press F22 (shift-F10) to restore the Software Agreements from the LotusSametime DVD.For the Device parameter, specify the name of your optical drive (For example,OPT01). Press Enter to restore the Sametime software agreements to the system.
6. Once the Software agreements are restored, the following message is displayed:Waiting for reply to message on message queue QSYSOPR.
You can sign on to another session to respond to the message or ask the systemoperator to respond.To view and respond to the message from another session:v Enter the following command on an IBM i command line:
WRKMSGQ QSYSOPRv Select option 5 to display the messages in the QSYSOPR message queue.v Locate the following message in the queue:
Load the next volume in optical device OPT01. (X G)v The Lotus Sametime software agreements have already been restored. If you
want to restore more software agreements from another DVD, insert the nextDVD and respond with G. When the software agreements have beenrestored, the message is issued again. When you are done, respond to themessage with X.
7. The Work with software agreements display should now show the restoredlicenses for products that are not yet installed.v If you are using the DVD for the Entry version of Lotus Sametime, you will
see an entry for Licensed Program 5724J23, option *BASE.v If you are using the DVD for Lotus Sametime Standard, you will see two
entries for Licensed Program 5724J23: one entry for *BASE and another entryfor Option 1.
8. For each entry for Licensed Program 5724J23, type 5 in the option field andpress Enter to display the Software Agreement. Then press F14 (Accept) toaccept the terms of the software agreement.
Note: In some unusual situations, the following message may be issued whenyou attempt to display the Software Agreement:
CPDB6D6 - Software agreement documents are missing. If this occurs, repeatstep 5 to restore the Software Agreements again and continue with theremaining steps in this procedure.
Upgrading the Lotus Sametime server application on IBM i:
Run the installation program on the computer where you plan to upgrade an IBMLotus Sametime server.
About this task
Use the IBM i command line to install the Lotus Sametime Community Server.1. Make sure you have backed up the recommended files to a directory outside of
your Sametime directory structure or to physical media before proceeding.2. Sign on to your server with a user profile that has the *ALLOBJ and *SECADM
special authorities3. Stop the IBM Lotus Domino server that will run Sametime. Stop all existing
Lotus Sametime servers.
Chapter 4. Migrating and upgrading 507
4. From the IBM i command line, run the appropriate command for installingfrom a downloaded image or physical media.Installing from a downloaded image
a. Make sure that you have downloaded the community server installationpackage and created save files.
b. Use the RSTLICPGM command to install from the save files you created whenyou downloaded the installation package.This example uses the save files MYLIB/Q5724J23IM and MYLIB/Q5724J23WC.RSTLICPGM LICPGM(5724J23) DEV(*SAVF) OPTION(*BASE) LNG(2924) SAVF(MYLIB/Q5724J23IM)RSTLICPGM LICPGM(5724J23) DEV(*SAVF) OPTION(1) SAVF(MYLIB/Q5724J23WC)
c. When you are prompted to accept the Sametime software agreement, youmust accept it in order to continue.
Installing from physical media
a. Make sure you have pre-accepted the license agreement as explained in theprevious task.
b. Insert the Lotus Sametime disk in your system optical drive and use theLODRUN command:LODRUN DEV(*OPT) DIR('/os400')
The system loads the Lotus Sametime programs to the appropriate libraries and/QIBM directories. You will see status messages as the system installs thesoftware.
Results
All of your existing Lotus Sametime servers are upgraded during the installprocess. Check the job log to verify that all of your Lotus Sametime servers wereupgraded successfully. You should see the following message for each LotusSametime server that was successfully upgraded on your system:Upgrade successful for Lotus Sametime server server_name
What to do next
Refresh the design of your Lotus Sametime databases by either waiting for thenightly Design server task to run or by forcing an immediate refresh with the LOADDESIGN command, as described in the following steps.1. On any IBM i command line, type the following command and press Enter:
WRKDOMCSL
2. On the ″Work with Domino Console″ display, type the name of your LotusSametime server and press Enter.
3. At the command prompt, type the following Lotus Domino subcommand andpress Enter:LOAD DESIGN
Related tasks
“Starting and stopping Domino and a Sametime Community Server on IBM i” onpage 422Learn how to start and stop a Sametime Community Server running on IBM i.“Installing a Domino server in a new domain on IBM i” on page 266Follow these steps to set up a Lotus Domino server in a new Lotus Dominodomain.
Migrating data from pre-7.5 releases of Lotus Sametime:
508 Lotus Sametime: Installation and Administration Guide Part 1
The format for storing IBM Lotus Sametime user privacy information changed inrelease 7.5. If you are upgrading from a release prior to 7.5, complete these tasks tomigrate user privacy information to the new format.
Upgrading the vpuserinfo.nsf template:
As part of upgrading IBM Lotus Sametime, you will need to replace the design ofthe vpuserinfo.nsf database.
About this task
As part of a product upgrade, you will need to replace the design of thevpuserinfo.nsf database with the stuserin.ntf template:1. Start the Lotus Notes client.2. Click File → Application → Open.3. Select the Community Server you upgraded (select ″Local″ for the current
server).4. Select the Configuration folder.5. In the file name field, type vpuserinfo.nsf and then click Open.6. Once the database is open, click File → Application → Replace Design.7. Select the newly installed Lotus Sametime Community Server as the template
server, and then click the Show advanced templates option to locate the″Sametime User Information″ (stuserin.ntf) template.
8. Click the stuserin.ntf template to select it, and then click Replace to updatethe database’s design to match the template.
9. When you have finished, you can exit the Lotus Notes client.
Running the privacy migration utility on IBM i:
Run the privacy migration utility to migrate user privacy information that wasstored prior to IBM Lotus Sametime 7.5 to the new format. An optional parameterallows you to migrate privacy data for only a specified subset of your LotusSametime users.
About this task
To run the privacy information migration utility after upgrading Lotus Sametime,follow these steps:1. If you intend to migrate privacy information for only a specified subset of your
Sametime users, create a text file containing the names of the users. Forexample, create a text file called upgrade_util_filter.txt and save it in yourSametime server data directory or another accessible location. The file shouldhave each user specified on a separate line in the following format:CN=John Smith/O=AcmeCN=Jane Doe/O=AcmeCN=Sally Brown/O=Acme
2. Stop the Sametime server.3. From any IBM i command line, start the QShell Interpreter:
QSH
4. Run the following shell command:cd <sametime_server_data_directory>
Chapter 4. Migrating and upgrading 509
5. To migrate privacy information for all of your Sametime users, run thefollowing shell command:upgrade_privacy <sametime_server_data_directory>
To migrate privacy information for a specified subset of your Sametime users,run the following shell command:upgrade_privacy <sametime_server_data_directory> <upgrade_util_filter_file>
6. Check the vpuserinfo.nsf<time_stamp>.log file that has the latest time stamp toverify that the utility ran successfully. You can exit the QShell session andbrowse for the file, or run the following shell command to display the contents:cat vpuserinfo*.log
Enabling cluster replication:
After all of the servers in the IBM Lotus Sametime cluster have been upgraded,you can enable cluster replication once again to ensure that the servers are sharingconfiguration information.
About this task
If you saved each server’s data during the upgrade, your previous cluster settingsstill exist and you just need to enable replication among the servers. For moreinformation, see Replicating with all servers in a cluster in the Lotus Domino andNotes information center.
If you did not save server data during the upgrade, you may need to recreate thecluster as described in Clustering Lotus Sametime Community Servers in thisinformation center. You will need to return to this upgrade section after completingthe cluster configuration, so you may want to open the link in a separate browsertab or window so you do not lose your place.
Upgrading a stand-alone Community Mux:
If your previous IBM Lotus Sametime deployment included a stand-aloneCommunity Mux, you can upgrade the multiplexer to release 8.5.
Before you begin
This task only applies to a stand-alone Community Mux; the multiplexer thatinstalls directly on the Lotus Sametime server was upgraded automatically whenyou upgraded that server.
About this task
Lotus Sametime 8.5 supports a stand-alone Community Mux installed with anearlier version of the product; however if you plan to support IPv6 addressing inyour deployment, you must upgrade the Community Mux (IPv6 addressing wasintroduced in Lotus Sametime 8.0.2).
If you have more than one stand-alone Community Mux, upgrade all of them:1. Insert the Lotus Sametime CD into the Community Services multiplexer
machine, start the installation program, and choose the option to install theCommunity Services Mux.
2. At the ″Select a language″ screen, select a language for the installer, and thenclick OK.
510 Lotus Sametime: Installation and Administration Guide Part 1
3. At the ″Welcome″ screen, click Next.4. At the license agreement screen, click I accept both the IBM and the non-IBM
terms, and then click Next.5. At the ″Directory name″ screen, browse to a the directory where you want to
install the Community Mux (or accept the default), and then click .Next
6. At the ″Host name or IP address″ screen, enter the fully qualified host name ofthe Lotus Sametime Community Server that this Community Mux will serve.For best results, do not use an IP address.
7. At the summary screen, click Install.8. At the ″successfully installed″ screen, click Finish.
Upgrading a remote Conversion Server:
If your IBM Lotus Sametime deployment includes a remote conversion server andyou will continue to host meetings on one or more upgraded Lotus Sametimeservers, you should upgrade the conversion server as well.
About this task
Your Sametime server may already be configured to use a particular conversionserver and port number. If you used a remote conversion server in a previousrelease of Sametime, the configuration was migrated during the upgrade. You mayhave specified the configuration when you installed Sametime or when you addedSametime to a Domino server (i5/OS). Verify that the information is correct, orupdate the server configuration.1. On the upgraded Lotus Sametime server, verify the conversion server
configuration:a. Open the stconvservices.properties file, which is located in the Sametime
server data stconversion subdirectory.b. Check the value for RemoteConversionURL setting:
v If no remote conversion server has been configured, the setting looks like:#RemoteConversionURL=http://conversions1.ibm.com:8081;http://conversions2.ibm.com:8081/servlet/stconversion
v When one remote conversion server is configured, the # is absent at thestart of the line, the server name is correct, and everything between thesemicolon and the end of the line is deleted. For example:RemoteConversionURL=http://stconv.acme.com:19610/servlet/stconversion
Note the port number (19610 in the example) to use when you run theinstallation program.
v If more than one conversion server is configured, there is no # sign, anddata for each server is separated by a semicolon. For example:RemoteConversionURL=http://stconv1.acme.com:19610/servlet/stconversion;http://stconv2.acme.com:8081/servlet/stconversion
Find the entry for the conversion server that you plan to install, and notethe port number.
c. Save and close the file.d. If you updated the file, restart the Lotus Sametime server now.
2. Upgrade the remote conversion server:The Lotus Sametime Conversion Services installation program is located in theLotus Sametime 8.5 Community Server package.
Chapter 4. Migrating and upgrading 511
a. Move to the computer hosting the remote conversion server that you willupgrade.
b. Download the conversion server installation program or insert the CDcontaining it, and start the installation.
c. Select a language for the installer, and click Next.d. Select the option to install Sametime Conversion Services, and click Next.e. Follow the prompts presented to complete the installation.f. When you are prompted for the port on which the conversion service will
listen, specify the port number you noted when you verified the Sametimeserver configuration in Step 1.
g. If you installed Conversion Services on Microsoft Windows 2000, restart theserver.
h. If your users will be posting documents that contain text for languagesother than English, verify that the locale for your Conversion Server is setappropriately.
Results
The conversion services component starts automatically when you restart theserver. To start the conversion services manually, click Start > Administrative tools> Services.
Upgrading a stand-alone Reflector:
Audio and video services provided by the IBM Lotus Sametime Reflector will notbe available in this release to assist client-to-Sametime client audio/videocommunication.
About this task
The Lotus Sametime Reflector is a server application that helps to establishaudio/video sessions between Lotus Sametime clients across a firewall. This initialrelease of Lotus Sametime 8.5 does not include a Reflector component; the servicemay appear to be running, but will not function. In this release, the LotusSametime 8.5 client can only establish audio and video connections with otherLotus Sametime 8.5 clients.
Release 8.5 audio/video services can co-exist with release 7.5.x and 8.0.xaudio/video services, with the following restrictions:v The 8.5 client cannot establish an audio or video call with 7.5.x or 8.0.x clientsv The 7.5.x and 8.0.x clients cannot establish an audio or video call with the 8.5
clientv The 8.5 client cannot use the Lotus Sametime Reflector
Next steps:
After you have completed an upgrade of one or more IBM Lotus Sametimeservers, the instant messaging, awareness, and presence features are ready to use.If your previous deployment included the online meetings feature, you can eitheruse them on the upgraded server (as in previous releases) or migrate meetings tothe Lotus Sametime 8.5 Meeting Server.
512 Lotus Sametime: Installation and Administration Guide Part 1
About this task
If your Lotus Sametime server does not have the online meetings feature enabled,or meetings are enabled but you intend to continue creating and hosting them onthe upgraded servers, then your upgrade is complete and you are ready to beginusing Lotus Sametime 8.5.
You only need to continue to next upgrade section if your Lotus Sametime serverhas the online meetings feature enabled and you want to migrate them to the newLotus Sametime 8.5 Meeting Server. To migrate meetings, you will need to set upan LDAP directory (if you are currently using native Domino authentication),install new Lotus Sametime 8.5 components, and then set up URL redirects fromthe upgraded servers to one or more newly installed Meeting Servers. All of thesetasks are discussed in detail in the next section.
Expanding the deployment to host meetings on a LotusSametime 8.5 Meeting ServerIf you have upgraded one or more IBM Lotus Sametime servers and have themeetings feature enabled, you can choose to migrate the meetings to a LotusSametime 8.5 Meeting Server and take advantage of new features such aspersistent meeting rooms.
About this task
This section applies only to deployments where the upgraded servers have onlinemeetings enabled and you want to migrate them to the new Lotus Sametime 8.5Meeting Server. To migrate meetings, you will need to set up an LDAP directory,install new Lotus Sametime 8.5 components, and then set up URL redirects fromthe upgraded servers to one or more newly installed Meeting Servers. All of thesetasks are discussed in detail in this section.
Note: This section discusses installing new Lotus Sametime 8.5 components.Information on topics such as configuration, administration, tuning, andtroubleshooting appears elsewhere in this information center.
Migrating a Domino Directory to LDAP format on IBM i:
If your existing Sametime server is using a native IBM Lotus Domino Directory foruser authentication, you will need to convert it to use LDAP protocol so that it canbe registered with the Lotus Sametime System Console.
Before you begin
Previous releases of Lotus Sametime allowed the use of the native Lotus DominoDirectory for user authentication. In release 8.5, the Lotus Sametime SystemConsole requires access to an LDAP directory, so if you want to register yourCommunity Server with the System Console, you must migrate the Lotus DominoDirectory to LDAP format. For more information, see Planning for an LDAPdirectory and the ″Directory considerations″ section of Planning a CommunityServer installation for more information.
Note: If you migrate convert the existing Lotus Domino Directory to LDAP format,the directory can no longer be hosted on the same Lotus Domino server as theCommunity Server.
Chapter 4. Migrating and upgrading 513
About this task
Follow these steps to migrate the Lotus Domino directory to LDAP format.1. Shut down the Lotus Sametime services but keep the Lotus Domino services
active as described in Starting and stopping a Sametime server on IBM i whileDomino is running.
2. Specify LDAP connection information on IBM i.3. Start the Lotus Sametime server.4. Run the name change task.5. Configure the LDAP Directory settings in the LDAP document using a Lotus
Notes client or the Sametime Administration Tool.
Note: The Connectivity section should already be completed. Verify that theinformation in the other sections is correct: Basics, Authentication, Searching,and Group Contents. If necessary, update them for your LDAP directory.
6. Restart the Lotus Sametime server.
What to do next
Next, you may need to complete these additional tasks to complete theconfiguration of your converted LDAP directory:
Changing LDAP connection information for servers on IBM i:About this task
Follow these steps to re-configure an IBM i Sametime server to connect to anLDAP directory instead of a Domino directory:1. On any IBM i command line, type the following and press F4:
CHGLSTDOM
2. On the ″Change Sametime on Domino″ display, set Directory Type to *LDAPand press Enter.
3. Complete the following fields describing your LDAP server:
Option Description
Name Enter the name or TCP/IP address of theLDAP server that Sametime will use. It isalso possible to specify the TCP/IP address,but this is not recommended.
Port Enter the IP port that Sametime will use.The default IP port for LDAP connections is389.
Bind distinguished name (DN) Enter the distinguished name of the LDAPdirectory entry that the Sametime server willuse when binding to the LDAP directory.This is an optional parameter. If notspecified, you must ensure the LDAP serveris configured appropriately for anonymousaccess from a Sametime server.
Bind password If you specified a Bind distinguished name(DN), enter the password associated with it.
514 Lotus Sametime: Installation and Administration Guide Part 1
Option Description
Administrator name (DN) Enter the distinguished name of an LDAPadministrator who has authority to browsethe LDAP directory. It is used whenconfiguring policies. This parameter isoptional and defaults to the same value asthe Bind distinguished name.
4. Press Enter to run the command.
Note: If your server is enabled for both IPv4 and IPv6 addressing, you mustmanually update the sametime.ini file so that ″VPS HOST=″ is set to anexplicit IP address, rather than the host name, after running the CHGLSTDOMcommand.
Related tasks
“Configuring the Lotus Sametime Community Server to support IPv6 addressing”on page 303Configure settings to establish connectivity and resolve addresses when using IPv6addressing on the IBM Lotus Sametime Community Server.
Configuring the LDAP Directory settings:
Specify the LDAP Directory settings that enable the Sametime server to search theLDAP directory on the LDAP server and authenticate Sametime users againstentries in the LDAP directory.
Before you begin
Configuring the LDAP Directory settings requires previous experience with LDAP;in particular you will need to know the following information:v The structure (directory tree) of the LDAP directory the Sametime server will
accessv The schema of Person and Group entries in the LDAP directoryv How to construct LDAP search filters to access the attributes of Person and
Group entries in the LDAP directory
About this task
You must configure the LDAP Directory settings on the LDAP document in theConfiguration database to ensure that the Sametime server can search andauthenticate against entries in the LDAP directory. Use the SametimeAdministration Tool to enter LDAP Directory settings; the tool then writes thevalues to the LDAP document in the Sametime Configuration database(stconfig.nsf) and updates the Directory Assistance database.
To configure the LDAP settings using the Sametime Administration Tool:1. In the Sametime server home page, click Administer the server.2. Click LDAP Directory.3. Enter the settings to enable your LDAP directory to access Sametime servers.
For descriptions of the settings, see LDAP directory settings4. Click Save & Close.5. Restart the Sametime server to enable your settings.
Chapter 4. Migrating and upgrading 515
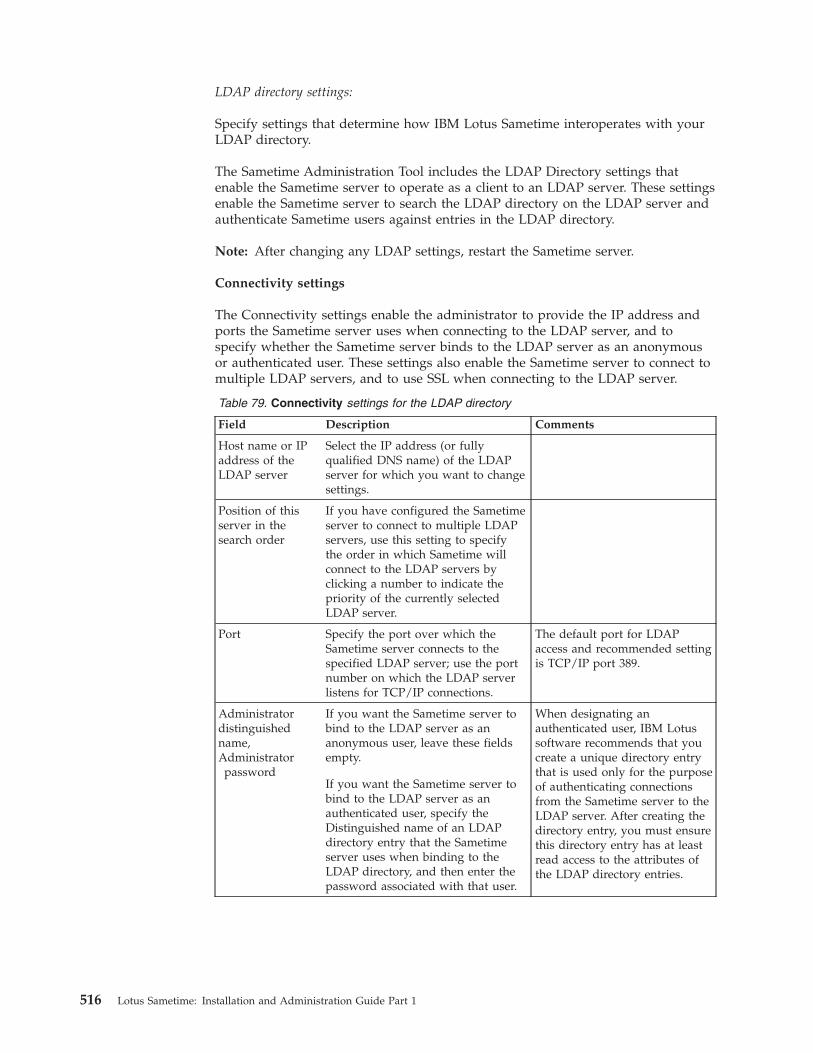
LDAP directory settings:
Specify settings that determine how IBM Lotus Sametime interoperates with yourLDAP directory.
The Sametime Administration Tool includes the LDAP Directory settings thatenable the Sametime server to operate as a client to an LDAP server. These settingsenable the Sametime server to search the LDAP directory on the LDAP server andauthenticate Sametime users against entries in the LDAP directory.
Note: After changing any LDAP settings, restart the Sametime server.
Connectivity settings
The Connectivity settings enable the administrator to provide the IP address andports the Sametime server uses when connecting to the LDAP server, and tospecify whether the Sametime server binds to the LDAP server as an anonymousor authenticated user. These settings also enable the Sametime server to connect tomultiple LDAP servers, and to use SSL when connecting to the LDAP server.
Table 79. Connectivity settings for the LDAP directory
Field Description Comments
Host name or IPaddress of theLDAP server
Select the IP address (or fullyqualified DNS name) of the LDAPserver for which you want to changesettings.
Position of thisserver in thesearch order
If you have configured the Sametimeserver to connect to multiple LDAPservers, use this setting to specifythe order in which Sametime willconnect to the LDAP servers byclicking a number to indicate thepriority of the currently selectedLDAP server.
Port Specify the port over which theSametime server connects to thespecified LDAP server; use the portnumber on which the LDAP serverlistens for TCP/IP connections.
The default port for LDAPaccess and recommended settingis TCP/IP port 389.
Administratordistinguishedname,Administrator
password
If you want the Sametime server tobind to the LDAP server as ananonymous user, leave these fieldsempty.
If you want the Sametime server tobind to the LDAP server as anauthenticated user, specify theDistinguished name of an LDAPdirectory entry that the Sametimeserver uses when binding to theLDAP directory, and then enter thepassword associated with that user.
When designating anauthenticated user, IBM Lotussoftware recommends that youcreate a unique directory entrythat is used only for the purposeof authenticating connectionsfrom the Sametime server to theLDAP server. After creating thedirectory entry, you must ensurethis directory entry has at leastread access to the attributes ofthe LDAP directory entries.
516 Lotus Sametime: Installation and Administration Guide Part 1
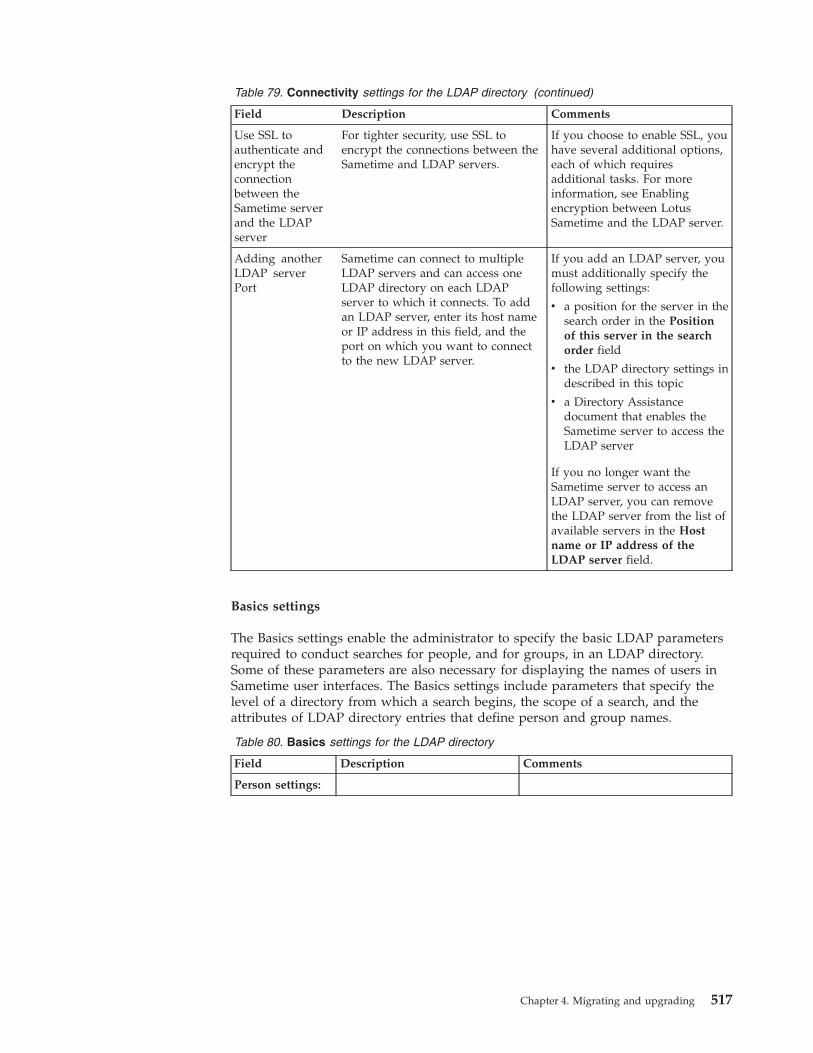
Table 79. Connectivity settings for the LDAP directory (continued)
Field Description Comments
Use SSL toauthenticate andencrypt theconnectionbetween theSametime serverand the LDAPserver
For tighter security, use SSL toencrypt the connections between theSametime and LDAP servers.
If you choose to enable SSL, youhave several additional options,each of which requiresadditional tasks. For moreinformation, see Enablingencryption between LotusSametime and the LDAP server.
Adding anotherLDAP serverPort
Sametime can connect to multipleLDAP servers and can access oneLDAP directory on each LDAPserver to which it connects. To addan LDAP server, enter its host nameor IP address in this field, and theport on which you want to connectto the new LDAP server.
If you add an LDAP server, youmust additionally specify thefollowing settings:
v a position for the server in thesearch order in the Positionof this server in the searchorder field
v the LDAP directory settings indescribed in this topic
v a Directory Assistancedocument that enables theSametime server to access theLDAP server
If you no longer want theSametime server to access anLDAP server, you can removethe LDAP server from the list ofavailable servers in the Hostname or IP address of theLDAP server field.
Basics settings
The Basics settings enable the administrator to specify the basic LDAP parametersrequired to conduct searches for people, and for groups, in an LDAP directory.Some of these parameters are also necessary for displaying the names of users inSametime user interfaces. The Basics settings include parameters that specify thelevel of a directory from which a search begins, the scope of a search, and theattributes of LDAP directory entries that define person and group names.
Table 80. Basics settings for the LDAP directory
Field Description Comments
Person settings:
Chapter 4. Migrating and upgrading 517

Table 80. Basics settings for the LDAP directory (continued)
Field Description Comments
Where to startsearching forpeople
Specify the base object of thedirectory (or level of thedirectory) from which to start asearch for person entries in theLDAP directory.
The default setting of ″″ beginsthe search from the root of thedirectory.
Also, searching from the root ofan LDAP directory generallyresults in a less efficient searchthan specifying a specific baseobject such as ou=west,o=acme.
Suggested values for this settingare:
v Microsoft Active Directory:cn=users, dc=domain, dc=com
v Netscape Directory:o=organizational unit (thecomputer name)
v Microsoft Exchange 5.5Directory: cn=Recipients,ou=computername, o=domain
v Domino Directory:o=organizational unit
v SecureWay Directory:dc=domain, dc=com
The default setting of ″″ begins thesearch from the root of the directory.Before accepting this default setting,be aware that some LDAP directoryservers allow the ″″ value only forsearching the LDAP directory rootDSE (Directory Server Entry, or entrywith directory server properties) andonly when the Scope for searchingfor a person (discussed in the nextrow) is confined to One level belowthis setting.
518 Lotus Sametime: Installation and Administration Guide Part 1
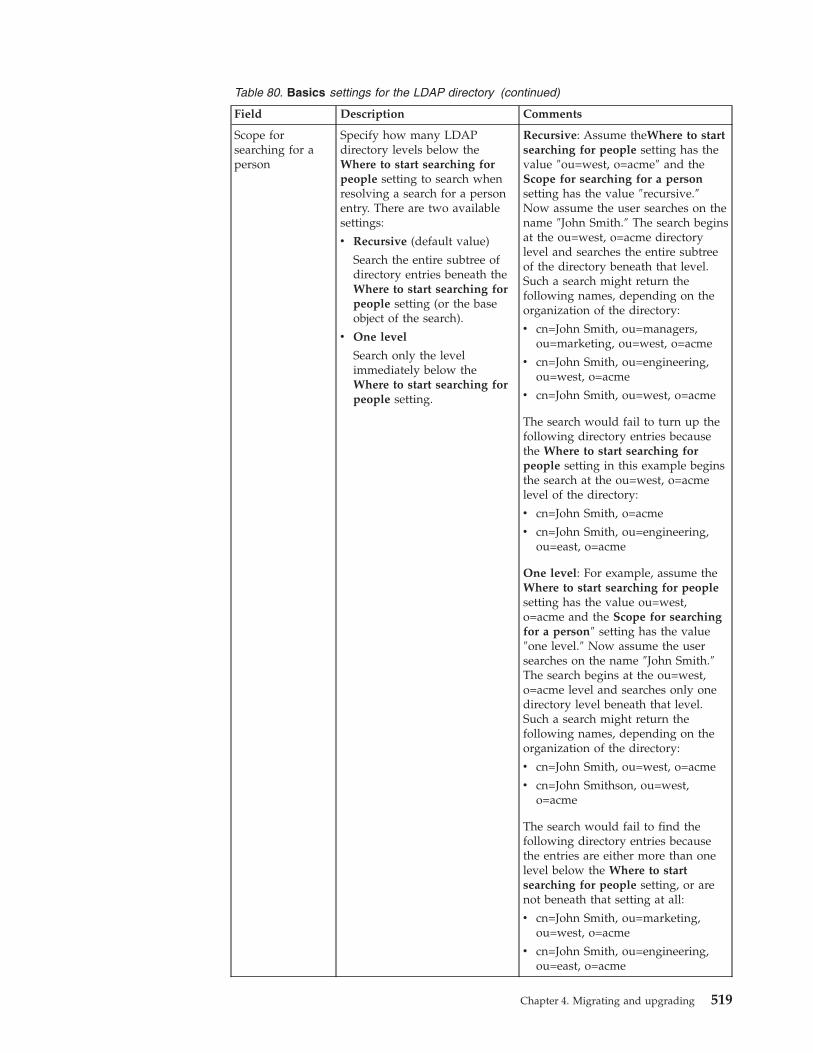
Table 80. Basics settings for the LDAP directory (continued)
Field Description Comments
Scope forsearching for aperson
Specify how many LDAPdirectory levels below theWhere to start searching forpeople setting to search whenresolving a search for a personentry. There are two availablesettings:
v Recursive (default value)
Search the entire subtree ofdirectory entries beneath theWhere to start searching forpeople setting (or the baseobject of the search).
v One level
Search only the levelimmediately below theWhere to start searching forpeople setting.
Recursive: Assume theWhere to startsearching for people setting has thevalue ″ou=west, o=acme″ and theScope for searching for a personsetting has the value ″recursive.″Now assume the user searches on thename ″John Smith.″ The search beginsat the ou=west, o=acme directorylevel and searches the entire subtreeof the directory beneath that level.Such a search might return thefollowing names, depending on theorganization of the directory:
v cn=John Smith, ou=managers,ou=marketing, ou=west, o=acme
v cn=John Smith, ou=engineering,ou=west, o=acme
v cn=John Smith, ou=west, o=acme
The search would fail to turn up thefollowing directory entries becausethe Where to start searching forpeople setting in this example beginsthe search at the ou=west, o=acmelevel of the directory:
v cn=John Smith, o=acme
v cn=John Smith, ou=engineering,ou=east, o=acme
One level: For example, assume theWhere to start searching for peoplesetting has the value ou=west,o=acme and the Scope for searchingfor a person″ setting has the value″one level.″ Now assume the usersearches on the name ″John Smith.″The search begins at the ou=west,o=acme level and searches only onedirectory level beneath that level.Such a search might return thefollowing names, depending on theorganization of the directory:
v cn=John Smith, ou=west, o=acme
v cn=John Smithson, ou=west,o=acme
The search would fail to find thefollowing directory entries becausethe entries are either more than onelevel below the Where to startsearching for people setting, or arenot beneath that setting at all:
v cn=John Smith, ou=marketing,ou=west, o=acme
v cn=John Smith, ou=engineering,ou=east, o=acme
Chapter 4. Migrating and upgrading 519
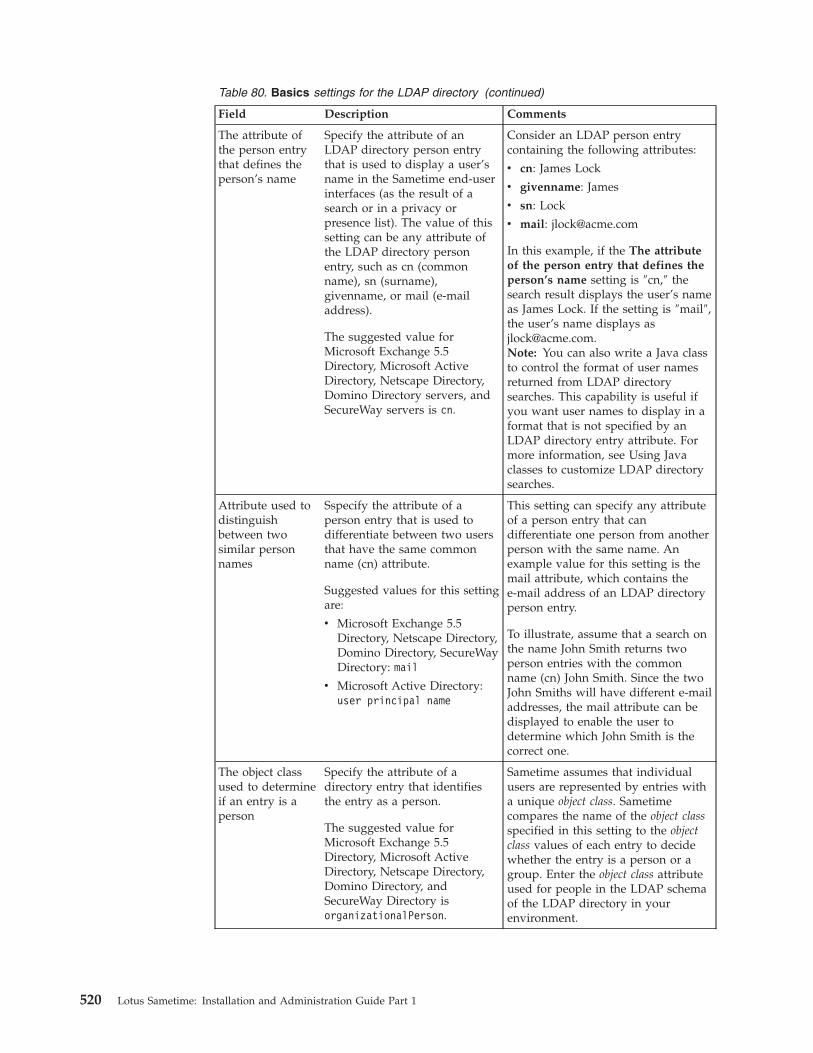
Table 80. Basics settings for the LDAP directory (continued)
Field Description Comments
The attribute ofthe person entrythat defines theperson’s name
Specify the attribute of anLDAP directory person entrythat is used to display a user’sname in the Sametime end-userinterfaces (as the result of asearch or in a privacy orpresence list). The value of thissetting can be any attribute ofthe LDAP directory personentry, such as cn (commonname), sn (surname),givenname, or mail (e-mailaddress).
The suggested value forMicrosoft Exchange 5.5Directory, Microsoft ActiveDirectory, Netscape Directory,Domino Directory servers, andSecureWay servers is cn.
Consider an LDAP person entrycontaining the following attributes:
v cn: James Lock
v givenname: James
v sn: Lock
v mail: [email protected]
In this example, if the The attributeof the person entry that defines theperson’s name setting is ″cn,″ thesearch result displays the user’s nameas James Lock. If the setting is ″mail″,the user’s name displays [email protected]: You can also write a Java classto control the format of user namesreturned from LDAP directorysearches. This capability is useful ifyou want user names to display in aformat that is not specified by anLDAP directory entry attribute. Formore information, see Using Javaclasses to customize LDAP directorysearches.
Attribute used todistinguishbetween twosimilar personnames
Sspecify the attribute of aperson entry that is used todifferentiate between two usersthat have the same commonname (cn) attribute.
Suggested values for this settingare:
v Microsoft Exchange 5.5Directory, Netscape Directory,Domino Directory, SecureWayDirectory: mail
v Microsoft Active Directory:user principal name
This setting can specify any attributeof a person entry that candifferentiate one person from anotherperson with the same name. Anexample value for this setting is themail attribute, which contains thee-mail address of an LDAP directoryperson entry.
To illustrate, assume that a search onthe name John Smith returns twoperson entries with the commonname (cn) John Smith. Since the twoJohn Smiths will have different e-mailaddresses, the mail attribute can bedisplayed to enable the user todetermine which John Smith is thecorrect one.
The object classused to determineif an entry is aperson
Specify the attribute of adirectory entry that identifiesthe entry as a person.
The suggested value forMicrosoft Exchange 5.5Directory, Microsoft ActiveDirectory, Netscape Directory,Domino Directory, andSecureWay Directory isorganizationalPerson.
Sametime assumes that individualusers are represented by entries witha unique object class. Sametimecompares the name of the object classspecified in this setting to the objectclass values of each entry to decidewhether the entry is a person or agroup. Enter the object class attributeused for people in the LDAP schemaof the LDAP directory in yourenvironment.
520 Lotus Sametime: Installation and Administration Guide Part 1
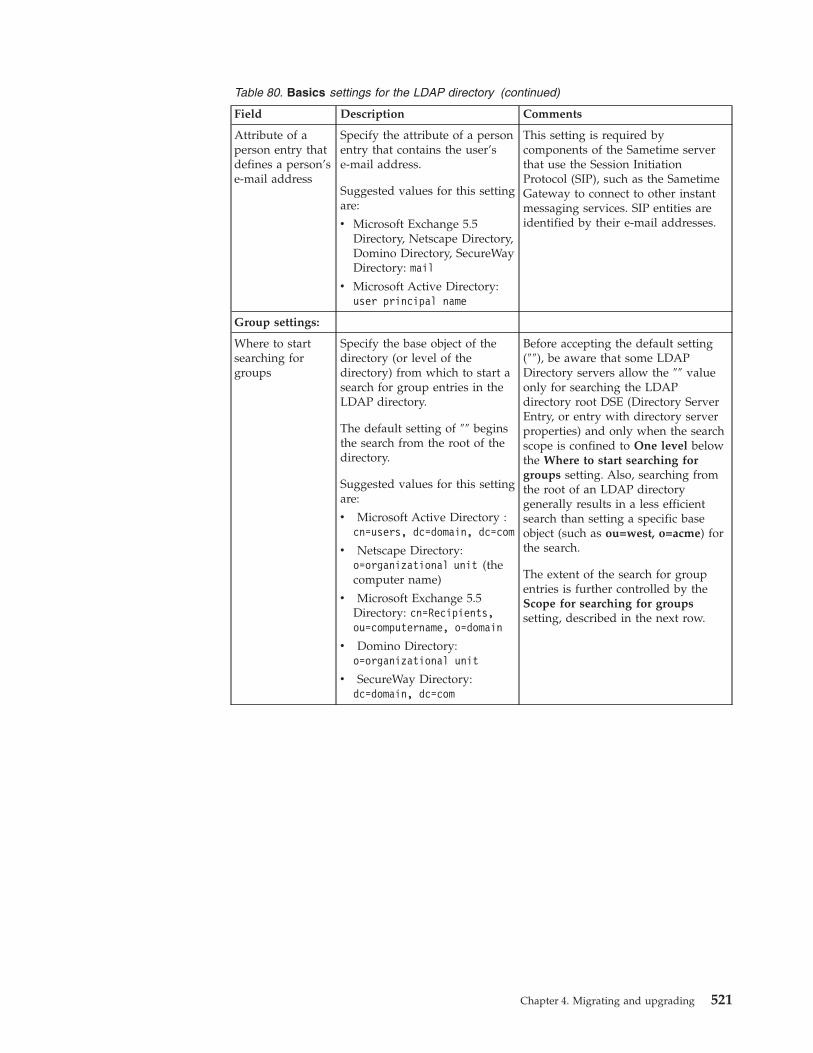
Table 80. Basics settings for the LDAP directory (continued)
Field Description Comments
Attribute of aperson entry thatdefines a person’se-mail address
Specify the attribute of a personentry that contains the user’se-mail address.
Suggested values for this settingare:
v Microsoft Exchange 5.5Directory, Netscape Directory,Domino Directory, SecureWayDirectory: mail
v Microsoft Active Directory:user principal name
This setting is required bycomponents of the Sametime serverthat use the Session InitiationProtocol (SIP), such as the SametimeGateway to connect to other instantmessaging services. SIP entities areidentified by their e-mail addresses.
Group settings:
Where to startsearching forgroups
Specify the base object of thedirectory (or level of thedirectory) from which to start asearch for group entries in theLDAP directory.
The default setting of ″″ beginsthe search from the root of thedirectory.
Suggested values for this settingare:
v Microsoft Active Directory :cn=users, dc=domain, dc=com
v Netscape Directory:o=organizational unit (thecomputer name)
v Microsoft Exchange 5.5Directory: cn=Recipients,ou=computername, o=domain
v Domino Directory:o=organizational unit
v SecureWay Directory:dc=domain, dc=com
Before accepting the default setting(″″), be aware that some LDAPDirectory servers allow the ″″ valueonly for searching the LDAPdirectory root DSE (Directory ServerEntry, or entry with directory serverproperties) and only when the searchscope is confined to One level belowthe Where to start searching forgroups setting. Also, searching fromthe root of an LDAP directorygenerally results in a less efficientsearch than setting a specific baseobject (such as ou=west, o=acme) forthe search.
The extent of the search for groupentries is further controlled by theScope for searching for groupssetting, described in the next row.
Chapter 4. Migrating and upgrading 521

Table 80. Basics settings for the LDAP directory (continued)
Field Description Comments
Scope forsearching forgroups
Specify how many levels belowthe Where to start searchingfor groups setting to search fora group entry in the LDAPdirectory. There are twoavailable settings:
v Recursive (default value)
Search the entire subtree ofdirectory entries beneath theWhere to start searching forpeople setting.
v One level
Search only the levelimmediately below theWhere to start searching forpeople setting.
The Search filter for resolvinggroup names setting (in the“Search settings” on page 525section) provides the searchfilter that resolves the user’sinput (Marketing) to a specificgroup entry in the LDAPdirectory.
Recursive:
Assume the Where to start searchingfor groups setting has the valueou=west, o=acme, and the Scope forsearching for groups setting has thevalue ″recursive.″
Now assume the user searches on thename ″Marketing.″ The search beginsat the ou=west, o=acme level andsearches the entire subtree of thedirectory beneath that level. Such asearch might return the followinggroup names, depending on theorganization of the directory:
v cn=Marketing, ou=Los Angeles,ou=west, o=acme
v cn=Marketing, ou=San Diego,ou=west, o=acme
v cn=Marketing, ou=west, o=acme
The search would fail to turn updirectory entries such as:
v cn=Marketing, o=acme
v cn=Marketing, ou=Pittsburgh,ou=east, o=acme
One level:
Assume the ″Where to start searchingfor groups″ setting has the valueou=west, o=acme, and the ″Scope forsearching for groups″ setting has thevalue ″one level.″
Now assume the user searches on thename Marketing. The search begins atthe ou=west, o=acme level andsearches only one level beneath thatlevel.
Such a search might locate a groupentry such as:
cn=Marketing, ou=west, o=acme
The search would fail to turn up adirectory entry such as:
cn=Marketing, ou=Los Angeles,ou=west, o=acme
522 Lotus Sametime: Installation and Administration Guide Part 1

Table 80. Basics settings for the LDAP directory (continued)
Field Description Comments
Attribute used todistinguishbetween twosimilar groupnames
Specify the attribute of a groupentry that is used todifferentiate between twogroups that have the samecommon name (cn) attribute.
Suggested values for this settingare:
v Microsoft Exchange 5.5Directory: info
v Netscape Directory, DominoDirectory, Microsoft ActiveDirectory, SecureWayDirectory: description
An example of a value for this settingis the ″info″ attribute of an LDAPgroup entry. In many LDAPdirectories, the ″info″ attributecontains descriptive informationabout a group. For example, assumethat a search on the name″Marketing″ returns two groupentries with the common nameMarketing. The information containedin the info attribute (such as ″Westregion″ or ″East region″) of the groupentry can be used to distinguishbetween the two groups.
The group objectclass used todetermine if anentry is a group
Specify the attribute of adirectory entry that identifiesthe entry as a group.
Enter the objectclass attributeused for groups in the LDAPschema of the LDAP directoryin your environment.
Suggested values for the settingare:
v Microsoft Active Directory:group
v Netscape Directory:groupOfUniqueNames
v Microsoft Exchange 5.5 andDomino Directories:groupOfNames
v SecureWay Directory:groupOfUniqueNames
In some situations, Sametime mustdetermine whether a directory entryreturned by a search is a person orgroup entry. Sametime assumes thatgroups are represented by entrieswith a unique object class. Sametimecompares the name of the object classspecified in this setting to the objectclass values of each entry to decidewhether the entry is a group or aperson.
Authentication settings
The Authentication settings ensure that Sametime users can be authenticatedagainst entries in an LDAP directory. The administrator must specify an LDAPsearch filter that can resolve a name provided by a user to a Distinguished Name(DN) in an LDAP directory. The Authentication settings also enable theadministrator to specify the field in the LDAP directory person entries thatcontains the name of each user’s home Sametime server.
Note: The administrator must add a field to the person entries in the LDAPdirectory to hold the name of each user’s home Sametime server, or use an existingfield in the person entries for this purpose.
Chapter 4. Migrating and upgrading 523
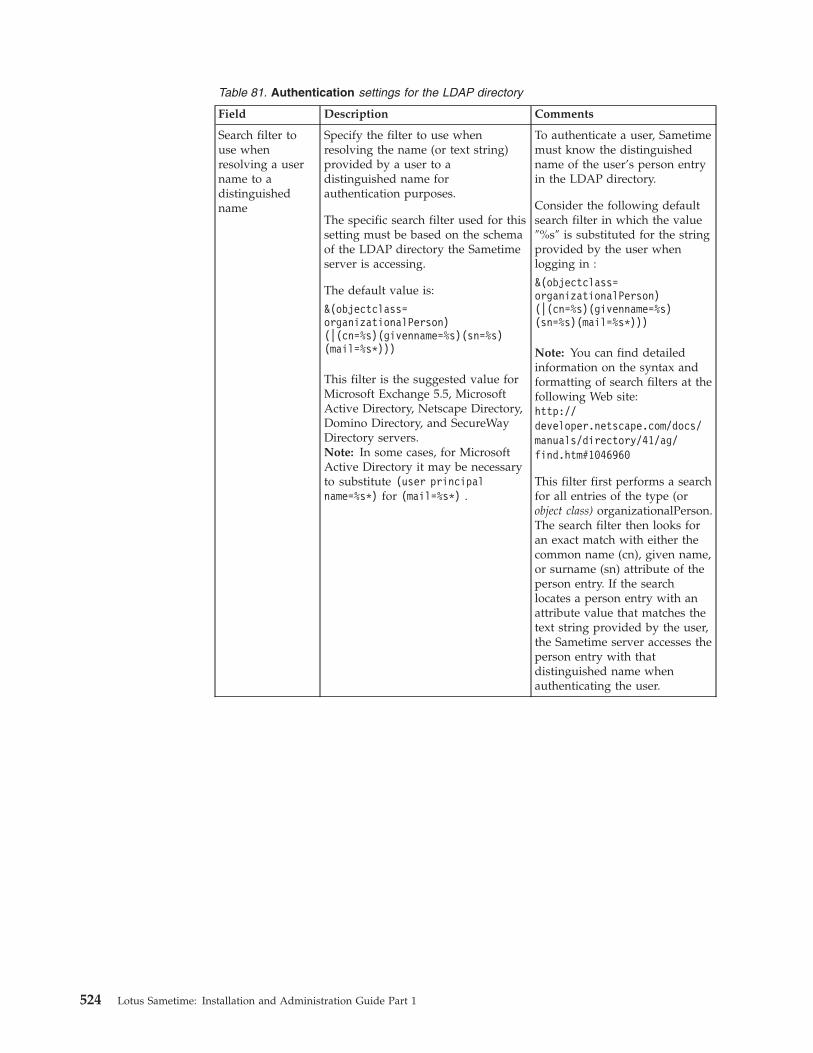
Table 81. Authentication settings for the LDAP directory
Field Description Comments
Search filter touse whenresolving a username to adistinguishedname
Specify the filter to use whenresolving the name (or text string)provided by a user to adistinguished name forauthentication purposes.
The specific search filter used for thissetting must be based on the schemaof the LDAP directory the Sametimeserver is accessing.
The default value is:
&(objectclass=organizationalPerson)(|(cn=%s)(givenname=%s)(sn=%s)(mail=%s*)))
This filter is the suggested value forMicrosoft Exchange 5.5, MicrosoftActive Directory, Netscape Directory,Domino Directory, and SecureWayDirectory servers.Note: In some cases, for MicrosoftActive Directory it may be necessaryto substitute (user principalname=%s*) for (mail=%s*) .
To authenticate a user, Sametimemust know the distinguishedname of the user’s person entryin the LDAP directory.
Consider the following defaultsearch filter in which the value″%s″ is substituted for the stringprovided by the user whenlogging in :
&(objectclass=organizationalPerson)(|(cn=%s)(givenname=%s)(sn=%s)(mail=%s*)))
Note: You can find detailedinformation on the syntax andformatting of search filters at thefollowing Web site:http://developer.netscape.com/docs/manuals/directory/41/ag/find.htm#1046960
This filter first performs a searchfor all entries of the type (orobject class) organizationalPerson.The search filter then looks foran exact match with either thecommon name (cn), given name,or surname (sn) attribute of theperson entry. If the searchlocates a person entry with anattribute value that matches thetext string provided by the user,the Sametime server accesses theperson entry with thatdistinguished name whenauthenticating the user.
524 Lotus Sametime: Installation and Administration Guide Part 1
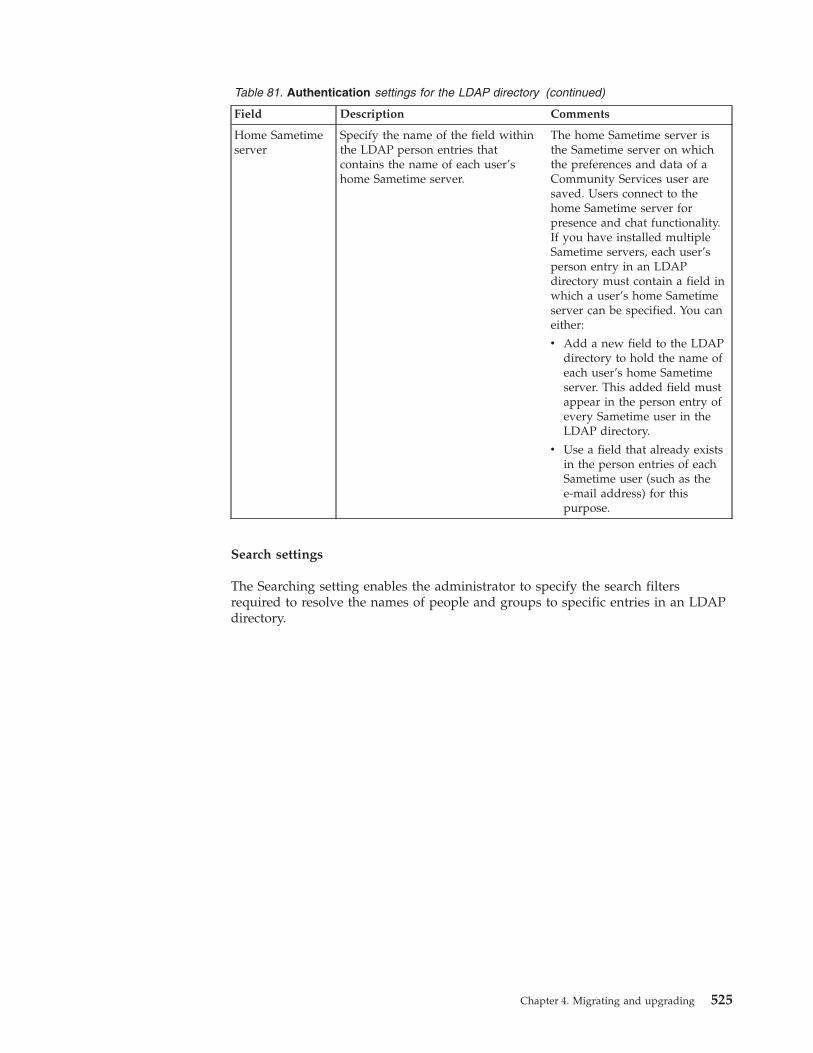
Table 81. Authentication settings for the LDAP directory (continued)
Field Description Comments
Home Sametimeserver
Specify the name of the field withinthe LDAP person entries thatcontains the name of each user’shome Sametime server.
The home Sametime server isthe Sametime server on whichthe preferences and data of aCommunity Services user aresaved. Users connect to thehome Sametime server forpresence and chat functionality.If you have installed multipleSametime servers, each user’sperson entry in an LDAPdirectory must contain a field inwhich a user’s home Sametimeserver can be specified. You caneither:
v Add a new field to the LDAPdirectory to hold the name ofeach user’s home Sametimeserver. This added field mustappear in the person entry ofevery Sametime user in theLDAP directory.
v Use a field that already existsin the person entries of eachSametime user (such as thee-mail address) for thispurpose.
Search settings
The Searching setting enables the administrator to specify the search filtersrequired to resolve the names of people and groups to specific entries in an LDAPdirectory.
Chapter 4. Migrating and upgrading 525
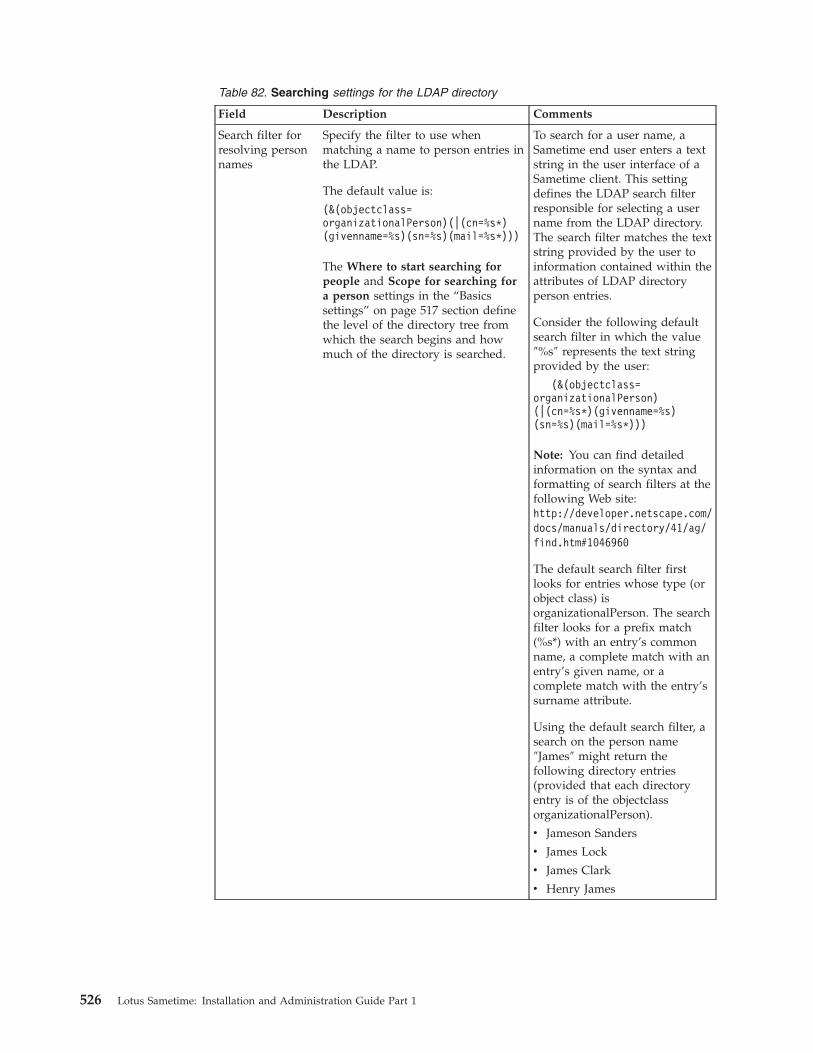
Table 82. Searching settings for the LDAP directory
Field Description Comments
Search filter forresolving personnames
Specify the filter to use whenmatching a name to person entries inthe LDAP.
The default value is:
(&(objectclass=organizationalPerson)(|(cn=%s*)(givenname=%s)(sn=%s)(mail=%s*)))
The Where to start searching forpeople and Scope for searching fora person settings in the “Basicssettings” on page 517 section definethe level of the directory tree fromwhich the search begins and howmuch of the directory is searched.
To search for a user name, aSametime end user enters a textstring in the user interface of aSametime client. This settingdefines the LDAP search filterresponsible for selecting a username from the LDAP directory.The search filter matches the textstring provided by the user toinformation contained within theattributes of LDAP directoryperson entries.
Consider the following defaultsearch filter in which the value″%s″ represents the text stringprovided by the user:
(&(objectclass=organizationalPerson)(|(cn=%s*)(givenname=%s)(sn=%s)(mail=%s*)))
Note: You can find detailedinformation on the syntax andformatting of search filters at thefollowing Web site:http://developer.netscape.com/docs/manuals/directory/41/ag/find.htm#1046960
The default search filter firstlooks for entries whose type (orobject class) isorganizationalPerson. The searchfilter looks for a prefix match(%s*) with an entry’s commonname, a complete match with anentry’s given name, or acomplete match with the entry’ssurname attribute.
Using the default search filter, asearch on the person name″James″ might return thefollowing directory entries(provided that each directoryentry is of the objectclassorganizationalPerson).
v Jameson Sanders
v James Lock
v James Clark
v Henry James
526 Lotus Sametime: Installation and Administration Guide Part 1
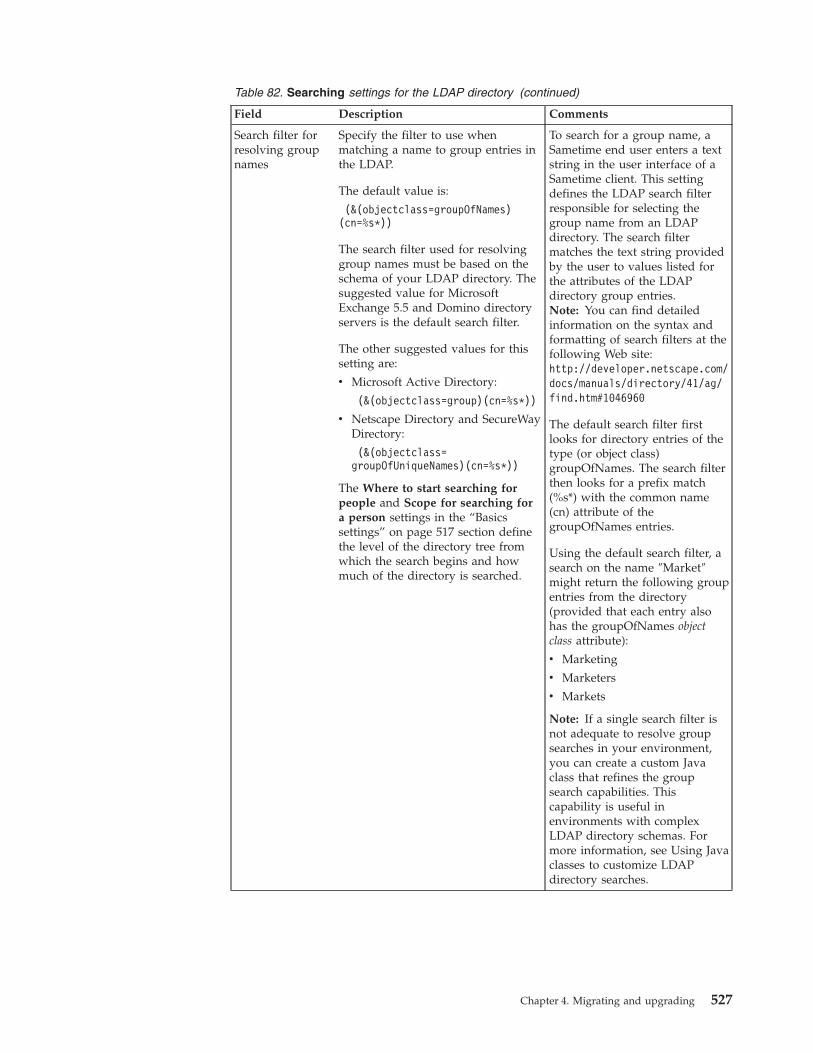
Table 82. Searching settings for the LDAP directory (continued)
Field Description Comments
Search filter forresolving groupnames
Specify the filter to use whenmatching a name to group entries inthe LDAP.
The default value is:
(&(objectclass=groupOfNames)(cn=%s*))
The search filter used for resolvinggroup names must be based on theschema of your LDAP directory. Thesuggested value for MicrosoftExchange 5.5 and Domino directoryservers is the default search filter.
The other suggested values for thissetting are:
v Microsoft Active Directory:
(&(objectclass=group)(cn=%s*))
v Netscape Directory and SecureWayDirectory:
(&(objectclass=groupOfUniqueNames)(cn=%s*))
The Where to start searching forpeople and Scope for searching fora person settings in the “Basicssettings” on page 517 section definethe level of the directory tree fromwhich the search begins and howmuch of the directory is searched.
To search for a group name, aSametime end user enters a textstring in the user interface of aSametime client. This settingdefines the LDAP search filterresponsible for selecting thegroup name from an LDAPdirectory. The search filtermatches the text string providedby the user to values listed forthe attributes of the LDAPdirectory group entries.Note: You can find detailedinformation on the syntax andformatting of search filters at thefollowing Web site:http://developer.netscape.com/docs/manuals/directory/41/ag/find.htm#1046960
The default search filter firstlooks for directory entries of thetype (or object class)groupOfNames. The search filterthen looks for a prefix match(%s*) with the common name(cn) attribute of thegroupOfNames entries.
Using the default search filter, asearch on the name ″Market″might return the following groupentries from the directory(provided that each entry alsohas the groupOfNames objectclass attribute):
v Marketing
v Marketers
v Markets
Note: If a single search filter isnot adequate to resolve groupsearches in your environment,you can create a custom Javaclass that refines the groupsearch capabilities. Thiscapability is useful inenvironments with complexLDAP directory schemas. Formore information, see Using Javaclasses to customize LDAPdirectory searches.
Chapter 4. Migrating and upgrading 527
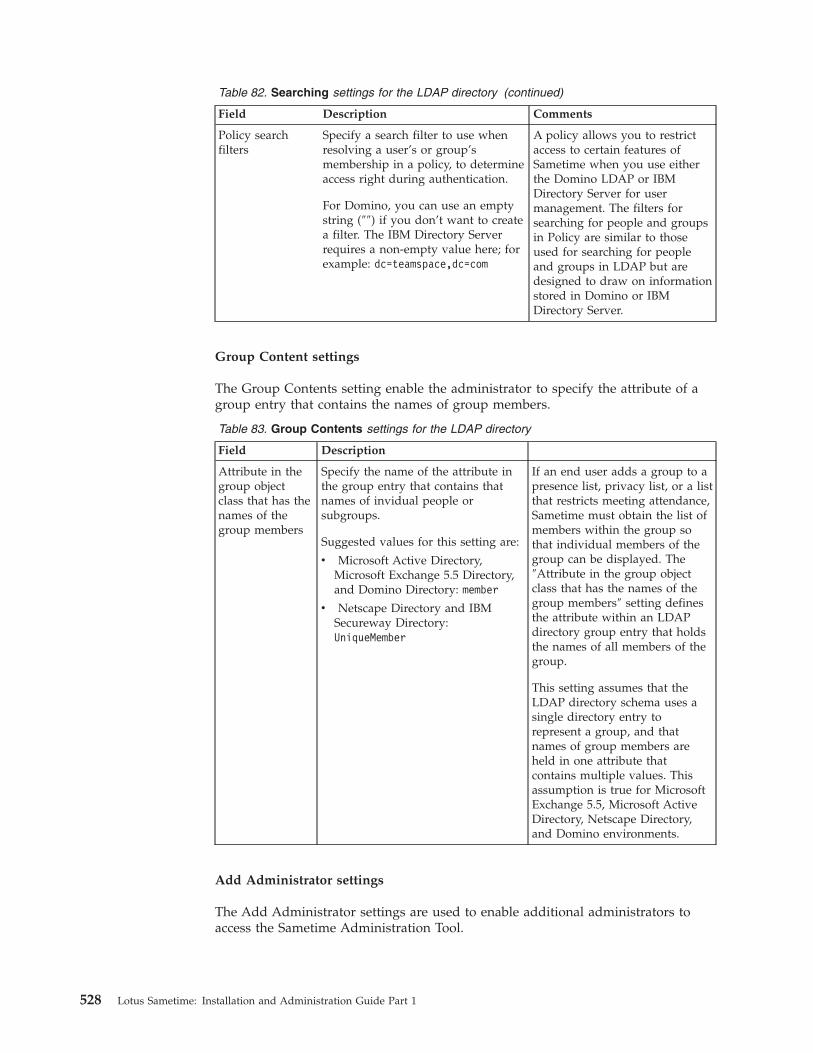
Table 82. Searching settings for the LDAP directory (continued)
Field Description Comments
Policy searchfilters
Specify a search filter to use whenresolving a user’s or group’smembership in a policy, to determineaccess right during authentication.
For Domino, you can use an emptystring (″″) if you don’t want to createa filter. The IBM Directory Serverrequires a non-empty value here; forexample: dc=teamspace,dc=com
A policy allows you to restrictaccess to certain features ofSametime when you use eitherthe Domino LDAP or IBMDirectory Server for usermanagement. The filters forsearching for people and groupsin Policy are similar to thoseused for searching for peopleand groups in LDAP but aredesigned to draw on informationstored in Domino or IBMDirectory Server.
Group Content settings
The Group Contents setting enable the administrator to specify the attribute of agroup entry that contains the names of group members.
Table 83. Group Contents settings for the LDAP directory
Field Description
Attribute in thegroup objectclass that has thenames of thegroup members
Specify the name of the attribute inthe group entry that contains thatnames of invidual people orsubgroups.
Suggested values for this setting are:
v Microsoft Active Directory,Microsoft Exchange 5.5 Directory,and Domino Directory: member
v Netscape Directory and IBMSecureway Directory:UniqueMember
If an end user adds a group to apresence list, privacy list, or a listthat restricts meeting attendance,Sametime must obtain the list ofmembers within the group sothat individual members of thegroup can be displayed. The″Attribute in the group objectclass that has the names of thegroup members″ setting definesthe attribute within an LDAPdirectory group entry that holdsthe names of all members of thegroup.
This setting assumes that theLDAP directory schema uses asingle directory entry torepresent a group, and thatnames of group members areheld in one attribute thatcontains multiple values. Thisassumption is true for MicrosoftExchange 5.5, Microsoft ActiveDirectory, Netscape Directory,and Domino environments.
Add Administrator settings
The Add Administrator settings are used to enable additional administrators toaccess the Sametime Administration Tool.
528 Lotus Sametime: Installation and Administration Guide Part 1
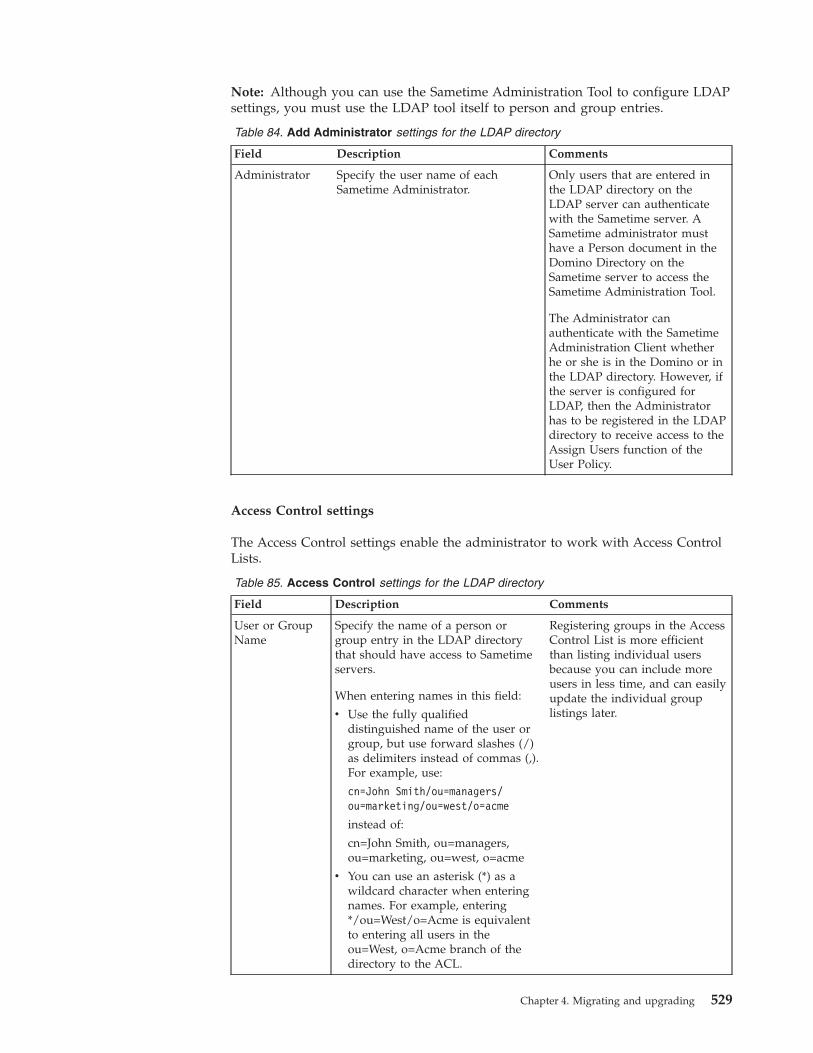
Note: Although you can use the Sametime Administration Tool to configure LDAPsettings, you must use the LDAP tool itself to person and group entries.
Table 84. Add Administrator settings for the LDAP directory
Field Description Comments
Administrator Specify the user name of eachSametime Administrator.
Only users that are entered inthe LDAP directory on theLDAP server can authenticatewith the Sametime server. ASametime administrator musthave a Person document in theDomino Directory on theSametime server to access theSametime Administration Tool.
The Administrator canauthenticate with the SametimeAdministration Client whetherhe or she is in the Domino or inthe LDAP directory. However, ifthe server is configured forLDAP, then the Administratorhas to be registered in the LDAPdirectory to receive access to theAssign Users function of theUser Policy.
Access Control settings
The Access Control settings enable the administrator to work with Access ControlLists.
Table 85. Access Control settings for the LDAP directory
Field Description Comments
User or GroupName
Specify the name of a person orgroup entry in the LDAP directorythat should have access to Sametimeservers.
When entering names in this field:
v Use the fully qualifieddistinguished name of the user orgroup, but use forward slashes (/)as delimiters instead of commas (,).For example, use:
cn=John Smith/ou=managers/ou=marketing/ou=west/o=acme
instead of:
cn=John Smith, ou=managers,ou=marketing, ou=west, o=acme
v You can use an asterisk (*) as awildcard character when enteringnames. For example, entering*/ou=West/o=Acme is equivalentto entering all users in theou=West, o=Acme branch of thedirectory to the ACL.
Registering groups in the AccessControl List is more efficientthan listing individual usersbecause you can include moreusers in less time, and can easilyupdate the individual grouplistings later.
Chapter 4. Migrating and upgrading 529
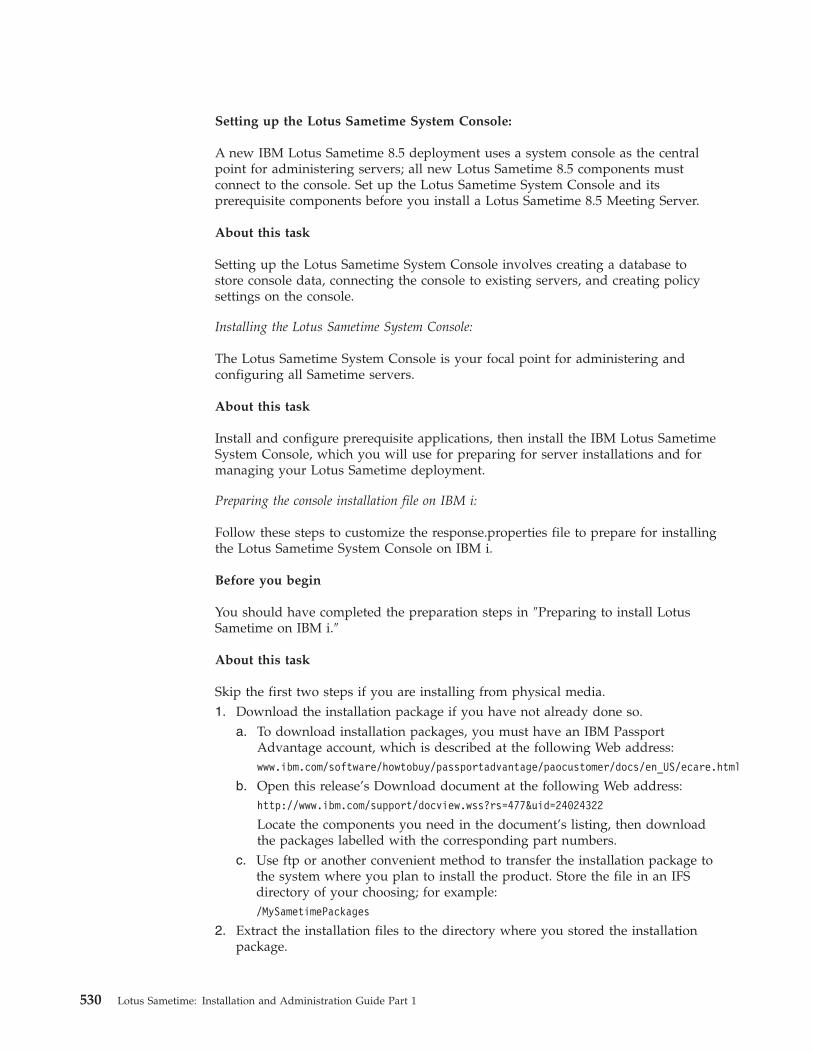
Setting up the Lotus Sametime System Console:
A new IBM Lotus Sametime 8.5 deployment uses a system console as the centralpoint for administering servers; all new Lotus Sametime 8.5 components mustconnect to the console. Set up the Lotus Sametime System Console and itsprerequisite components before you install a Lotus Sametime 8.5 Meeting Server.
About this task
Setting up the Lotus Sametime System Console involves creating a database tostore console data, connecting the console to existing servers, and creating policysettings on the console.
Installing the Lotus Sametime System Console:
The Lotus Sametime System Console is your focal point for administering andconfiguring all Sametime servers.
About this task
Install and configure prerequisite applications, then install the IBM Lotus SametimeSystem Console, which you will use for preparing for server installations and formanaging your Lotus Sametime deployment.
Preparing the console installation file on IBM i:
Follow these steps to customize the response.properties file to prepare for installingthe Lotus Sametime System Console on IBM i.
Before you begin
You should have completed the preparation steps in ″Preparing to install LotusSametime on IBM i.″
About this task
Skip the first two steps if you are installing from physical media.1. Download the installation package if you have not already done so.
a. To download installation packages, you must have an IBM PassportAdvantage account, which is described at the following Web address:www.ibm.com/software/howtobuy/passportadvantage/paocustomer/docs/en_US/ecare.html
b. Open this release’s Download document at the following Web address:http://www.ibm.com/support/docview.wss?rs=477&uid=24024322
Locate the components you need in the document’s listing, then downloadthe packages labelled with the corresponding part numbers.
c. Use ftp or another convenient method to transfer the installation package tothe system where you plan to install the product. Store the file in an IFSdirectory of your choosing; for example:/MySametimePackages
2. Extract the installation files to the directory where you stored the installationpackage.
530 Lotus Sametime: Installation and Administration Guide Part 1
a. From an IBM i command line, run the following command to start theQShell Interpreter:QSH
b. Run the cd shell command, specifying the fully qualified path to theinstallation package directory; for example:cd /MySametimePackages
c. Run the following cd shell command, specifying the name of the .tar file:pax -r -C 819 -f name_of_installation_package
d. Press F3 to exit QSH.3. Review the IBM International Program License Agreement and ensure that you
agree to its terms before proceeding. The agreement is stored in the licensessubdirectory of the program image; for example:/MySametimePackages/SametimeSystemConsole/IBMi/stii_ssc/licenses
For DVD:/qopt/volume_ID/IBMi/stii_ssc/licenses
4. Navigate to the program image directory; for example:/MySametimePackages/SametimeSystemConsole/IBMi/stii_ssc
For DVD:/qopt/volume_ID/IBMi/stii_ssc
5. Make a copy of the ssc.default.response.properties file, using a name of yourchoosing. Store the copy in a location on the system that the installationprogram can access.
6. Customize your copy of the response.properties file with the settingsappropriate for your specific installation.For the database.db.user.id and database.db.user.password settings in the propertiesfile, specify the user profile and password you created to be the owner of theSystem Console database schemas.
Related tasks
“Preparing to install Lotus Sametime on IBM i” on page 249Follow these steps to prepare IBM i for Lotus Sametime server installations.
Creating the System Console database schemas and tables on IBM i:
Run the script to create the database schema for the IBM Lotus Sametime SystemConsole on IBM i.
Before you begin
You should have prepared the console installation file as described in ″Preparingthe console installation file on IBM i.″
About this task
On the IBM i system where you will install the Sametime System Console, followthese steps to create the database schema and tables:1. Log in with a user profile that has *ALLOBJ and *SECADM special authorities.
These authorities are required to create the database schemas. The databaseschemas will be created on the system specified in your copy of thessc.default.response.properties file and owned by the user profile specified inthe file.
Chapter 4. Migrating and upgrading 531
2. From an IBM i command line, run the following command to start the QShellInterpreter:QSH
3. Run the cd shell command, specifying the fully qualified path to the installationkit directory; for example:cd /MySametimePackages/SametimeSystemConsole/IBMi/stii_ssc
For DVD:cd /qopt/STCONSOLE/IBMi/stii_ssc/licenses
4. If the SSC schema does not already exist on the system, run the following shellcommand to create the required database schemas and tables. The commandalso creates the POLICY schema if it does not exist.setupDB_ssc.sh -Dinstall.response.file=path_and_name_of_customized_response.properties_file
5. When the script completes, press F3 to exit QSH.
Results
If the database schema creation was not successful, look at the script log for moreinformation about what occurred during the attempt. Fix the problem, then tryrunning the script again. The script log is stored in the following location.
/QIBM/UserData/Lotus/stii/logs
The log name contains the date and time in this form:
ssc_dbsetupyyyymmdd_hhmm.log
For example, this log was created at 3:07 A.M. on December 15, 2009:
ssc_dbsetup_20091215_0307.log
Related tasks
“Preparing to install Lotus Sametime on IBM i” on page 249Follow these steps to prepare IBM i for Lotus Sametime server installations.
Installing the console on IBM i:
Run the install script to set up the IBM Lotus Sametime System Console on IBM i.
Before you begin
If you intend to install from a downloaded image, you should have downloadedthe console server installation package. For all installations, you should havecompleted the preparation steps. The database schemas required for the SystemConsole (SSC and POLICY) should already exist.
About this task
Follow these steps to install the Sametime System Console and WebSphereApplication Server.1. Log in using a profile with *ALLOBJ and *SECADM special authorities.2. Use the WRKSYSVAL command to check the setting for the QVFYOBJRST system
value and change it if necessary. The setting must be 3 or lower to install theSametime software.
532 Lotus Sametime: Installation and Administration Guide Part 1
3. From an IBM i command line, run the following command to start the QShellInterpreter:QSH
4. Run the cd shell command, specifying the fully qualified path to the installationkit directory; for example:/MySametimePackages/SametimeSystemConsole/IBMi/stii_ssc
For installing from DVD:cd /qopt/volume_ID/IBMi/stii_ssc
5. Start the Sametime System Console installation with the following shellcommand:install_ssc.sh -Dinstall.response.file=path_and_name_of_customized_response.properties_file
When the script completes, a summary of the results is displayed. Make a noteof the URL for connecting to the Integrated Solutions Console. The ″Adminport″ displayed is the port you must use when logging in to the systemconsole.
6. Press F3 to exit QSH.
Results
If the installation was not successful, look at the installation logs for moreinformation about what occurred during the installation attempt. Fix the problem,then try installing again. The installation logs are stored in the following location.
/QIBM/UserData/Lotus/stii/logs
The log name contains the date and time in this form:
install_STCONSOLE_yyyymmdd_hhmm.log
For example, this log was created at 3:07 A.M. on December 15, 2009:
install_STCONSOLE_20091215_0307.log
Related tasks
“Preparing to install Lotus Sametime on IBM i” on page 249Follow these steps to prepare IBM i for Lotus Sametime server installations.
Increasing the WebSphere Application Server usage limit for running Sametime on IBMi:
Use the Change License Information command to allow an unlimited number ofusers for the WebSphere Application Server installation. Changing the usage limitin this manner is acceptable provided you are in compliance with the terms ofyour Sametime license and are only using WebSphere Application Server forrunning Sametime.
About this task
If you install more than one Sametime server that uses WebSphere ApplicationServer on the same system, this task only needs to be done once. Following therecommended installation sequence, the first server that uses WebSphereApplication Server is the Sametime System Console. Other servers that useWebSphere Application Server are the Sametime Meeting Server, Sametime ProxyServer, and Sametime Gateway.
Chapter 4. Migrating and upgrading 533
1. Sign on to the system with a user profile that has *ALLOBJ special authority.2. From any IBM i command line, run the following command (on one line):
CHGLICINF PRDID(5733W70) LICTRM(V7) FEATURE(5102) USGLMT(*NOMAX) THRESHOLD(*USGLMT)
Results
The usage limit is changed to *NOMAX.
If the following message is displayed, type G.CPA9E1B: Usage limit increase must be authorized.
Press help before replying (C G)
After you respond to the CPA9E1B message, you must respond to the samemessage on the QSYSOPR message queue:1. Run the DSPMSG QSYSOPR command to see the message in the QSYSOPR
message queue.2. When the message is displayed, type G.
Logging in to the Lotus Sametime System Console:
Use the IBM Lotus Sametime System Console to prepare to install new servers,start Sametime servers that have been installed, use guided activities to performconfiguration tasks, and administer any Sametime servers managed by the console.
About this task
With the Lotus Sametime System Console started, follow these steps to log in.1. From a browser, enter the following URL, replacing serverhostname.domain with
the fully qualified domain name of the Lotus Sametime System Console server.Specify port 8700 for all platforms except IBM i.http://serverhostname.domain:8700/ibm/console
IBM i: The port number may not be 8700. Use the port that was listed in theSametime System Console installation results summary. To check the port, openthe AboutThisProfile.txt file for the Sametime System Console DeploymentManager Profile and use the setting specified for the ″Administrative consoleport.″ For the default profile name (STSCDmgrProfile), the file is located here:/QIBM/UserData/Websphere/AppServer/V7/SametimeWAS/profiles/STSCDmgrProfile/logs/AboutThisProfile.txt
Note: During the install process, WebSphere security is enabled. SSL is enabledas part of the WebSphere security process and you will be directed to anotherport which listens for https connections.The WebSphere Application Server Integrated Solutions Console opens.
2. Enter the WebSphere Application Server User ID and password that youcreated when you installed Lotus Sametime System Console.The default name is wasadmin.
3. Click the Sametime System Console task to open it in the navigation tree.
What to do next
“Connecting to an LDAP server” on page 64
534 Lotus Sametime: Installation and Administration Guide Part 1
Related tasks
“Starting the Lotus Sametime System Console” on page 231When started, the Lotus Sametime System Console runs as a task in the WebSphereApplication Server administrative console.
Connecting to an LDAP server:
Use the Lotus Sametime System Console to connect IBM Lotus Sametime servers toan LDAP server that has already been installed and configured. An LDAP server isrequired for the Lotus Sametime System Console, Lotus Sametime CommunityServer, Lotus Sametime Meeting Server, Lotus Sametime Media Manager, andLotus Sametime Gateway Server .
Before you begin
Start the LDAP server and the Lotus Sametime System Console if they are notalready running.
About this task
If you have not already opened the Connect to LDAP Servers activity, follow thesesteps:1. From a browser, enter the following URL, replacing serverhostname.domain with
the fully qualified host name of the Lotus Sametime System Console server.http://serverhostname.domain:8700/ibm/console
If you are prompted with a security exception, accept the certificate, andcontinue.IBM i: The port number may not be 8700. Use the port that was listed in theSametime System Console installation results summary. To check the port, openthe AboutThisProfile.txt file for the Sametime System Console DeploymentManager Profile and use the setting specified for the ″Administrative consolesecure port.″ For the default profile name (STSCDMgrProfile), the file is locatedhere: /QIBM/UserData/Websphere/AppServer/V7/SametimeWAS/profiles/STSCDMgrProfile/logs/AboutThisProfile.txt
2. Enter the WebSphere Application Server User ID and password that youcreated when you installed the Lotus Sametime System Console.
3. Click the Sametime System Console task to open it in the navigation tree.4. Expand Sametime Prerequisites, and click Connect to LDAP Servers.Related concepts
“Planning for an LDAP directory” on page 40The IBM Lotus Sametime 8.5 multiple-server environment requires an LDAPdirectory for user authentication. The LDAP server should be set up and runningbefore deploying Sametime.Related tasks
“Starting the Lotus Sametime System Console” on page 231When started, the Lotus Sametime System Console runs as a task in the WebSphereApplication Server administrative console.
Sametime prerequisite: Connecting to an LDAP server:
This activity takes you through the steps for identifying users and groups in anLDAP directory that need access to IBM Lotus Sametime.
Chapter 4. Migrating and upgrading 535
Before you begin
An LDAP server must be installed and configured.
About this task
Connect IBM Lotus Sametime servers to the LDAP server. Once your LotusSametime server connects to the LDAP server, it can search the LDAP directoryand authenticate Sametime users. If you have already connected Sametime to anLDAP server, but now you want to edit or delete a connection, use this activity.
Note: If you are using Active Directory as the LDAP, a common attribute to usefor authentication is the saMAccountName attribute. When an Active DirectoryLDAP is being used, WebSphere automatically maps uid to saMAccountName, sosaMACccountName should not be explicitly stated as an attribute. If you want touse saMAccountName for any LDAP attribute field, you must specify uid. SpecifyingsaMACccountName as a login or search property causes installation to fail. You canfind more information in this TechNote: http://www-01.ibm.com/support/docview.wss?uid=swg21253331.1. Connect to LDAP server.
In Connect to LDAP servers, click Add.If you want to edit or delete an LDAP connection instead, then click theappropriate button. You can only edit or delete an LDAP connection if it hasnot been used to install a product.
2. Bind to LDAP.a. Click either Anonymous access or Authenticated access.
When a Lotus Sametime server connects to the LDAP server, this can bedone either anonymously or using credentials to authenticate with theLDAP server. If you select Authenticated access, you will be prompted withthe Bind distinguished name (DN) and Password fields to enter thisinformation. If you select Anonymous access, these fields will be hidden asthey are not required.
b. Enter a Deployment Name for this LDAP connection. This is name youprovide to this LDAP connection for easy reference. It does not need to mapto any existing server name or value and is intended as an easy way toidentify this object when you reference it in the future.
c. Enter the fully qualified domain name of the LDAP server you wish toconnect to in the Host name field. Do not use an IP address or a short hostname.
d. Enter the Port of the LDAP server. The default value is 389. If your LDAPserver is running on a different port, enter the correct port value here. Ifthis is an SSL connection, click Is secure LDAP connection?.
e. If you have selected Authenticated Access, enter the Bind distinguishedname (DN) and Password fields. These are the user credentials you will useto authenticate with your LDAP server. If you have selected AnonymousAccess, these fields will not be shown. For example:cn=John Smith,ou=managers,o=acme,st=Massachusetts,c=US
f. Verify that the check box for Is used by Sametime System Console? isselected. It is selected by default so that the LDAP server is used by theSametime System Console for authentication and policy management.
g. Click Next.When designating an authenticated user, IBM recommends that you create aunique directory entry that is used only for the purpose of authenticating
536 Lotus Sametime: Installation and Administration Guide Part 1
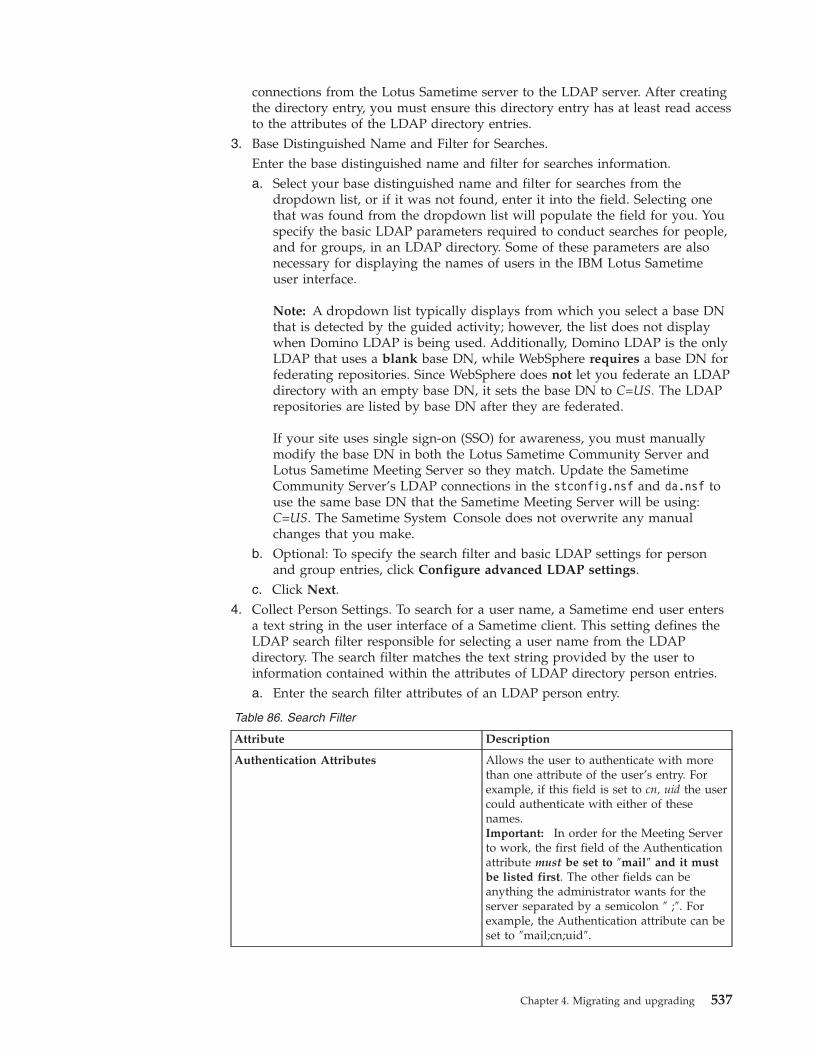
connections from the Lotus Sametime server to the LDAP server. After creatingthe directory entry, you must ensure this directory entry has at least read accessto the attributes of the LDAP directory entries.
3. Base Distinguished Name and Filter for Searches.Enter the base distinguished name and filter for searches information.a. Select your base distinguished name and filter for searches from the
dropdown list, or if it was not found, enter it into the field. Selecting onethat was found from the dropdown list will populate the field for you. Youspecify the basic LDAP parameters required to conduct searches for people,and for groups, in an LDAP directory. Some of these parameters are alsonecessary for displaying the names of users in the IBM Lotus Sametimeuser interface.
Note: A dropdown list typically displays from which you select a base DNthat is detected by the guided activity; however, the list does not displaywhen Domino LDAP is being used. Additionally, Domino LDAP is the onlyLDAP that uses a blank base DN, while WebSphere requires a base DN forfederating repositories. Since WebSphere does not let you federate an LDAPdirectory with an empty base DN, it sets the base DN to C=US. The LDAPrepositories are listed by base DN after they are federated.
If your site uses single sign-on (SSO) for awareness, you must manuallymodify the base DN in both the Lotus Sametime Community Server andLotus Sametime Meeting Server so they match. Update the SametimeCommunity Server’s LDAP connections in the stconfig.nsf and da.nsf touse the same base DN that the Sametime Meeting Server will be using:C=US. The Sametime System Console does not overwrite any manualchanges that you make.
b. Optional: To specify the search filter and basic LDAP settings for personand group entries, click Configure advanced LDAP settings.
c. Click Next.4. Collect Person Settings. To search for a user name, a Sametime end user enters
a text string in the user interface of a Sametime client. This setting defines theLDAP search filter responsible for selecting a user name from the LDAPdirectory. The search filter matches the text string provided by the user toinformation contained within the attributes of LDAP directory person entries.a. Enter the search filter attributes of an LDAP person entry.
Table 86. Search Filter
Attribute Description
Authentication Attributes Allows the user to authenticate with morethan one attribute of the user’s entry. Forexample, if this field is set to cn, uid the usercould authenticate with either of thesenames.Important: In order for the Meeting Serverto work, the first field of the Authenticationattribute must be set to ″mail″ and it mustbe listed first. The other fields can beanything the administrator wants for theserver separated by a semicolon ″ ;″. Forexample, the Authentication attribute can beset to ″mail;cn;uid″.
Chapter 4. Migrating and upgrading 537
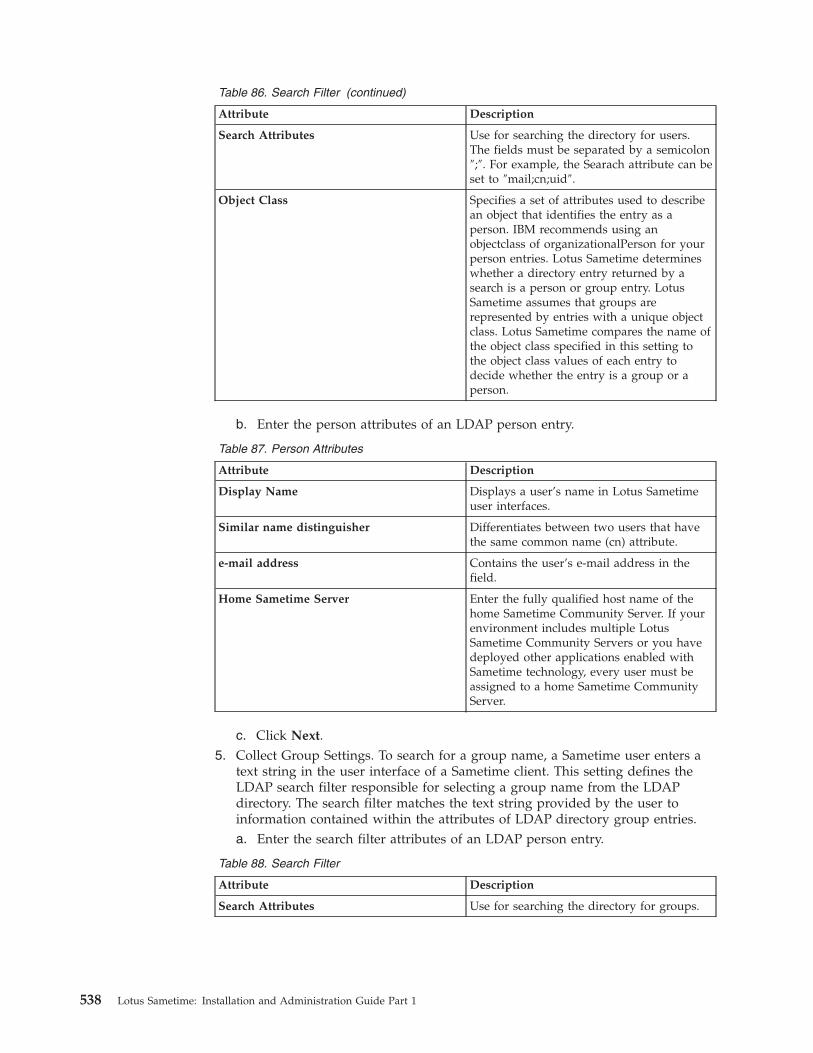
Table 86. Search Filter (continued)
Attribute Description
Search Attributes Use for searching the directory for users.The fields must be separated by a semicolon″;″. For example, the Searach attribute can beset to ″mail;cn;uid″.
Object Class Specifies a set of attributes used to describean object that identifies the entry as aperson. IBM recommends using anobjectclass of organizationalPerson for yourperson entries. Lotus Sametime determineswhether a directory entry returned by asearch is a person or group entry. LotusSametime assumes that groups arerepresented by entries with a unique objectclass. Lotus Sametime compares the name ofthe object class specified in this setting tothe object class values of each entry todecide whether the entry is a group or aperson.
b. Enter the person attributes of an LDAP person entry.
Table 87. Person Attributes
Attribute Description
Display Name Displays a user’s name in Lotus Sametimeuser interfaces.
Similar name distinguisher Differentiates between two users that havethe same common name (cn) attribute.
e-mail address Contains the user’s e-mail address in thefield.
Home Sametime Server Enter the fully qualified host name of thehome Sametime Community Server. If yourenvironment includes multiple LotusSametime Community Servers or you havedeployed other applications enabled withSametime technology, every user must beassigned to a home Sametime CommunityServer.
c. Click Next.5. Collect Group Settings. To search for a group name, a Sametime user enters a
text string in the user interface of a Sametime client. This setting defines theLDAP search filter responsible for selecting a group name from the LDAPdirectory. The search filter matches the text string provided by the user toinformation contained within the attributes of LDAP directory group entries.a. Enter the search filter attributes of an LDAP person entry.
Table 88. Search Filter
Attribute Description
Search Attributes Use for searching the directory for groups.
538 Lotus Sametime: Installation and Administration Guide Part 1
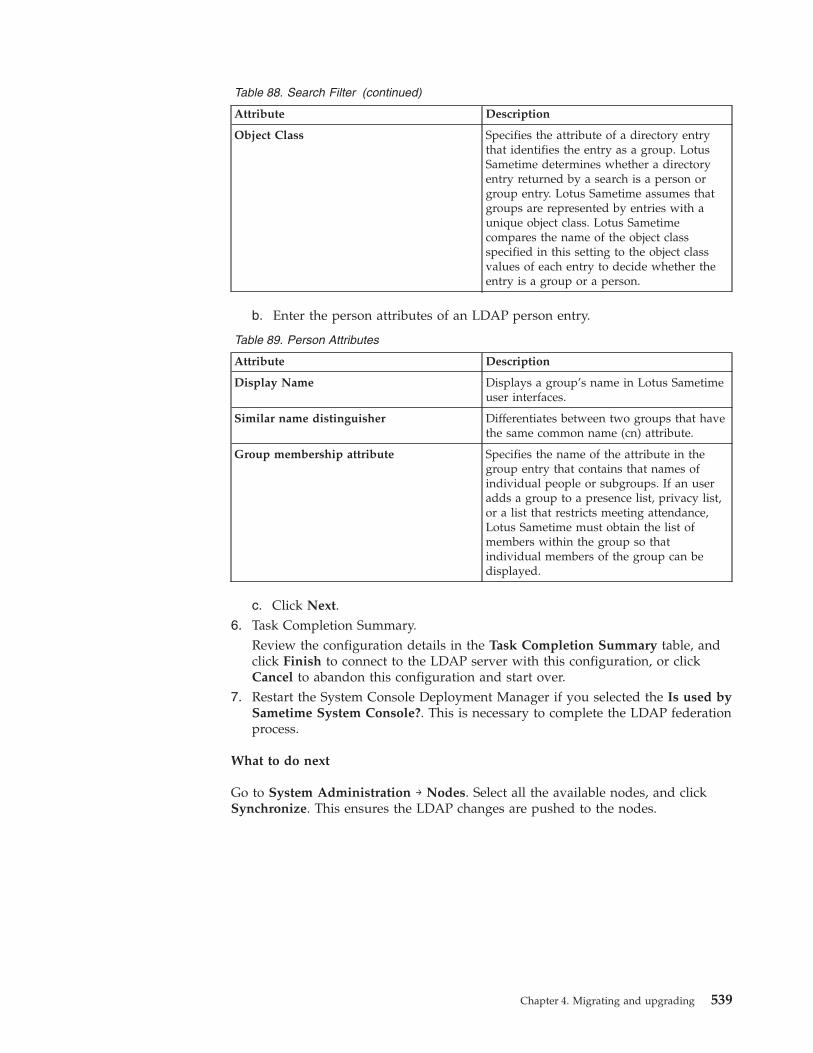
Table 88. Search Filter (continued)
Attribute Description
Object Class Specifies the attribute of a directory entrythat identifies the entry as a group. LotusSametime determines whether a directoryentry returned by a search is a person orgroup entry. Lotus Sametime assumes thatgroups are represented by entries with aunique object class. Lotus Sametimecompares the name of the object classspecified in this setting to the object classvalues of each entry to decide whether theentry is a group or a person.
b. Enter the person attributes of an LDAP person entry.
Table 89. Person Attributes
Attribute Description
Display Name Displays a group’s name in Lotus Sametimeuser interfaces.
Similar name distinguisher Differentiates between two groups that havethe same common name (cn) attribute.
Group membership attribute Specifies the name of the attribute in thegroup entry that contains that names ofindividual people or subgroups. If an useradds a group to a presence list, privacy list,or a list that restricts meeting attendance,Lotus Sametime must obtain the list ofmembers within the group so thatindividual members of the group can bedisplayed.
c. Click Next.6. Task Completion Summary.
Review the configuration details in the Task Completion Summary table, andclick Finish to connect to the LDAP server with this configuration, or clickCancel to abandon this configuration and start over.
7. Restart the System Console Deployment Manager if you selected the Is used bySametime System Console?. This is necessary to complete the LDAP federationprocess.
What to do next
Go to System Administration → Nodes. Select all the available nodes, and clickSynchronize. This ensures the LDAP changes are pushed to the nodes.
Chapter 4. Migrating and upgrading 539
Related tasks
“Starting the Lotus Sametime System Console” on page 231When started, the Lotus Sametime System Console runs as a task in the WebSphereApplication Server administrative console.“Starting and stopping the Deployment Manager” on page 417The Deployment Manager manages the Lotus Sametime System Console and allLotus Sametime Server cells.Related reference
“Command reference for starting and stopping servers” on page 232You may use a command window to start and stop Sametime components runningon WebSphere Application Server. To stop servers, you will supply the WebSphereApplication Server administrator password that was established when youinstalled the server. Important: Verify that the Deployment Manager for the cell isrunning before starting any server.
Connecting to a Sametime Community Mux server:
Use the IBM Lotus Sametime System Console to connect to a Lotus SametimeCommunity Mux and validate its settings.
Before you begin
Start the Lotus Sametime Community Mux if it is not already running.
About this task
If you have not already opened the Connect to Sametime Community Mux Serversactivity, follow these steps:1. From a browser, enter the following URL, replacing serverhostname.domain with
the fully qualified host name of the Lotus Sametime System Console server (forexample stconsole.acme.com).http://serverhostname.domain:8700/ibm/console
If you are prompted with a security exception, accept the certificate, andcontinue.
2. Enter the WebSphere Application Server User ID and password that youcreated when you installed the Lotus Sametime System Console.
3. Click the Sametime System Console task to open it in the navigation tree.4. Expand Sametime Prerequisites, and click Connect to Sametime Community
Mux Servers.Related concepts
“Planning for an LDAP directory” on page 40The IBM Lotus Sametime 8.5 multiple-server environment requires an LDAPdirectory for user authentication. The LDAP server should be set up and runningbefore deploying Sametime.Related tasks
“Starting the Lotus Sametime System Console” on page 231When started, the Lotus Sametime System Console runs as a task in the WebSphereApplication Server administrative console.
Sametime prerequisite: Connecting to a Sametime Community Mux Server:
Validate the host name and ports specified for a new IBM Lotus SametimeCommunity Mux server.
540 Lotus Sametime: Installation and Administration Guide Part 1

Before you begin
Use this page to validate the host name of a new Community Mux, along with theports on which it will listen for client connections. This ensures you have aworking multiplexer before you attempt to connect it to a Lotus SametimeCommunity Server or cluster.1. Connect to Sametime Community Mux Servers.
Click Add to begin the guided activity, which lets you validate your installedLotus Sametime Community Mux servers before connecting them toCommunity Servers.You can optionally edit or delete connections to Community Mux servers. ClickRefresh to view your most recent changes.
2. Add Sametime Community Mux Servers.a. In ″Connect to Sametime Community Mux Servers″, click Add.b. In the Host Name field, type the fully qualified host name of the new
Sametime Community Mux (for example: mux1.acme.com).c. Accept the default settings for the Client Port and Client HTTP Port fields.
These settings indicate the ports that the multiplexer will listen on forconnections from Lotus Sametime Connect clients and from Web clients,respectively.
d. Click Save.The connection to the Lotus Sametime Community Mux is validated whenyou save the settings.
Registering an upgraded Community Server on IBM i with the System Console:
After upgrading an IBM Lotus Sametime server to a Lotus Sametime CommunityServer on IBM i, register it with the Lotus Sametime System Console, so you canmanage all of the Lotus Sametime servers from a central location. If you upgradeda cluster, you must register each individual server before registering the cluster.
Before you begin
Make sure the following servers are ready for the registration task:v The upgraded Lotus Sametime Community Server must be configured to use an
LDAP directory, and must be started.v The Lotus Sametime System Console must be started.v The LDAP server must be started, and must be connected to the Lotus Sametime
System Console.
About this task
During this task you will edit the following files; click the topic titles below to seedetails on each file. You may want to open each topic in a new browser tab orwindow so you can keep it open for reference:v console.properties
v productConfig.properties
1. If you enabled SSL encryption on the previous version of the Lotus Sametimeserver, complete these substeps on the upgraded server:If SSL is not enabled, skip this step.a. Locate the directory where the SSL certificate is stored and note the path
(for example, /stserver/server.cer).
Chapter 4. Migrating and upgrading 541

b. From an IBM i command line, run the following command to start theQShell Interpreter: QSH.
c. Run the following shell command to navigate to the directory where Java isinstalled:cd /QOpenSys/QIBM/ProdData/JavaVM/jdk50/32bit/jre/bin
d. Now run the following command (on a single line) to import the SSLcertificate:keytool -import -alias certificate_name -file file_containing_certificate
-storepass changeit -keystore ../lib/security/cacerts
e. Press F3 to exit QShell.2. Back up the console.properties and productConfig.properties files:
a. Navigate to the Community Server’s sametime_server_data_directory/console directory.
b. Make back-up copies (using different names) of the console.properties andproductConfig.properties files.
3. Update the following values in the console.properties file and save the file.
Table 90. console.properties settings
SSCHostName Provide the fully qualified host name of the LotusSametime System Console server.
SSCHTTPPort Specify the HTTP port used for the Lotus SametimeSystem Console server if SSL is not enabled and thevalue for SSCSSLEnabled is ″false.″
To determine the correct HTTP port, open theAboutThisProfile.txt file for the lotus Sametime SystemConsole Application Server Profile and use the settingspecified for the ″HTTP transport port.″ The defaultprofile name is STSCAppProfile.
On IBM i, look for the AboutThisProfile.txt file in thefollowing location: /QIBM/UserData/Websphere/AppServer/V7/SametimeWAS/profiles/STSCAppProfile/logs/AboutThisProfile.txt
SSCUserName Enter the IBM WebSphere Application Server User IDthat you created when you installed Lotus SametimeSystem Console. The default is wasadmin.
SSCPassword Enter the WebSphere Application Server passwordassociated with the SSCUserName.
SSCSSLEnabled Change this value to ″true″ to connect to the LotusSametime System Console using a secure connection.
SSCHTTPSPort Specify the HTTPS port used by the Sametime SystemConsole server if SSCSSLEnabled is set to ″true.″
4. Verify that the settings in the productConfig.properties file are correct,modifying them as needed before saving and closing the file.The only required value in this file isDepName: Provide a descriptive name for your deployment; it must be aunique deployment name on the Lotus Sametime System Console.
5. Run the registerSTServerNode.sh registration utility:a. From an IBM i command line, run the following command to start the
QShell Interpreter: QSH
542 Lotus Sametime: Installation and Administration Guide Part 1
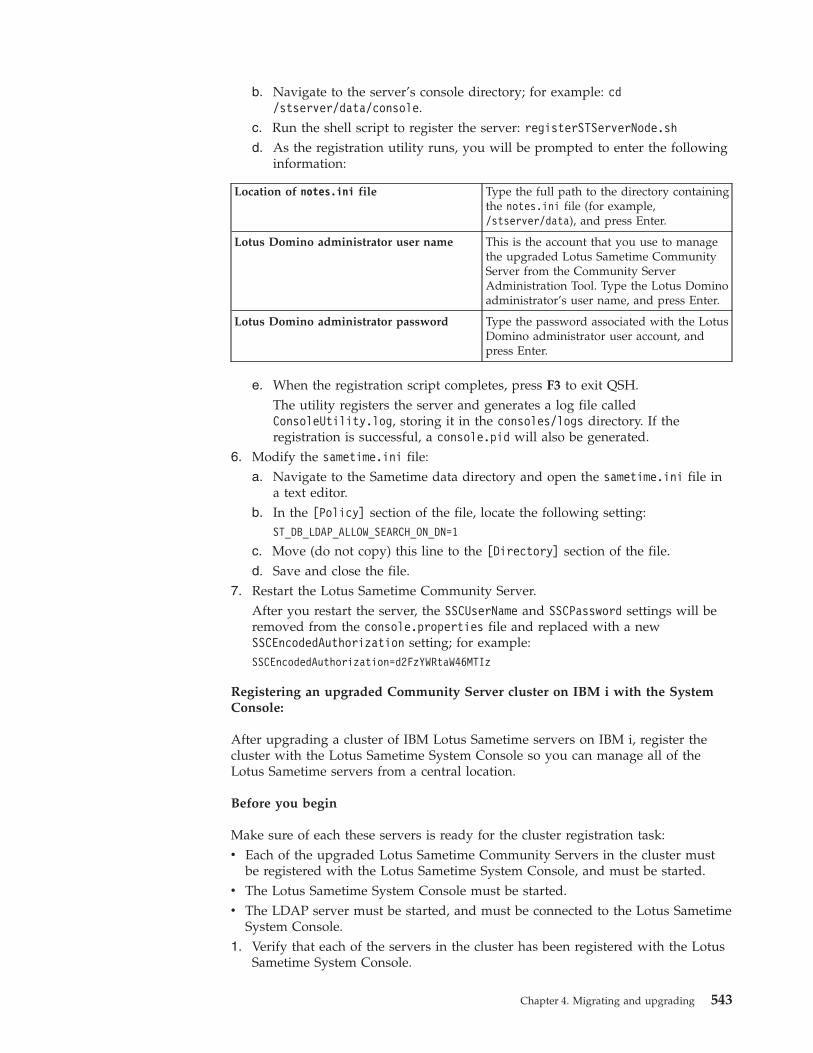
b. Navigate to the server’s console directory; for example: cd/stserver/data/console.
c. Run the shell script to register the server: registerSTServerNode.shd. As the registration utility runs, you will be prompted to enter the following
information:
Location of notes.ini file Type the full path to the directory containingthe notes.ini file (for example,/stserver/data), and press Enter.
Lotus Domino administrator user name This is the account that you use to managethe upgraded Lotus Sametime CommunityServer from the Community ServerAdministration Tool. Type the Lotus Dominoadministrator’s user name, and press Enter.
Lotus Domino administrator password Type the password associated with the LotusDomino administrator user account, andpress Enter.
e. When the registration script completes, press F3 to exit QSH.The utility registers the server and generates a log file calledConsoleUtility.log, storing it in the consoles/logs directory. If theregistration is successful, a console.pid will also be generated.
6. Modify the sametime.ini file:a. Navigate to the Sametime data directory and open the sametime.ini file in
a text editor.b. In the [Policy] section of the file, locate the following setting:
ST_DB_LDAP_ALLOW_SEARCH_ON_DN=1
c. Move (do not copy) this line to the [Directory] section of the file.d. Save and close the file.
7. Restart the Lotus Sametime Community Server.After you restart the server, the SSCUserName and SSCPassword settings will beremoved from the console.properties file and replaced with a newSSCEncodedAuthorization setting; for example:SSCEncodedAuthorization=d2FzYWRtaW46MTIz
Registering an upgraded Community Server cluster on IBM i with the SystemConsole:
After upgrading a cluster of IBM Lotus Sametime servers on IBM i, register thecluster with the Lotus Sametime System Console so you can manage all of theLotus Sametime servers from a central location.
Before you begin
Make sure of each these servers is ready for the cluster registration task:v Each of the upgraded Lotus Sametime Community Servers in the cluster must
be registered with the Lotus Sametime System Console, and must be started.v The Lotus Sametime System Console must be started.v The LDAP server must be started, and must be connected to the Lotus Sametime
System Console.1. Verify that each of the servers in the cluster has been registered with the Lotus
Sametime System Console.
Chapter 4. Migrating and upgrading 543

2. Complete the following steps for each server in the cluster to verify each serverdocument’s Net Address field:a. From a Lotus Notes client, open the Server document for the Lotus
Sametime Community Server you are working on.b. Click the Ports tab.c. Click the Notes Network Ports tab and check the Net Address field:
This field should contain the fully qualified host name of the current LotusSametime Community Server. If the field contains an IP address change itnow.
d. Click Save if you made a change, and then click Close to close the Serverdocument.
e. If you changed the Server document, restart the server.f. Remember to repeat this task for every server in the cluster.
3. Now run the registerSTCluster.sh registration utility from one of the serversin the cluster:a. From an IBM i command line, run the following command to start the
QShell Interpreter: QSHb. Navigate to the server’s sametime_server_data_directory/console
directory; for example: cd /stserver/data/console.c. Run the shell script using the command in the scenario below that best
applies to your deployment:v The deployment includes a stand-alone Community Mux that was not
added to the cluster as a member, but works with the cluster (so thecluster members refer to this server’s host name):registerSTCluster.sh -external
v The deployment includes a stand-alone rotating DNS server that was notadded to the cluster as a member, but works with the cluster (so thecluster members refer to this server’s host name):registerSTCluster.sh -external
v The deployment includes a stand-alone load balancer that was not addedto the cluster as a member, but works with the cluster (so the clustermembers refer to this server’s host name):registerSTCluster.sh -external
v None of the above:registerSTCluster.sh
d. As the registration utility runs, you will be prompted to enter the followinginformation:
Cluster name Type the name you created when youconfigured the cluster, and press Enter.
Location of notes.ini file Type the full path to the SametimeCommunity Server data directory containingnotes.ini file (for example,/stserver/data), and press Enter.
Lotus Domino administrator user name This is the account that you use to managethe upgraded Lotus Sametime CommunityServer from the Community ServerAdministration Tool. Type the Lotus Dominoadministrator’s user name, and press Enter.
544 Lotus Sametime: Installation and Administration Guide Part 1

Lotus Domino administrator password Type the password associated with the LotusDomino administrator user account, andpress Enter.
e. When the registration script completes, press F3 to exit QSH.The utility registers the cluster, generating a log file calledConsoleUtility.log and storing it in the consoles/logs directory.
4. Restart the Lotus Sametime Community Server where you ran the registrationutility.
Migrating user policies:
In IBM Lotus Sametime 8.5, user policies are administrated through the LotusSametime System Console. After you have upgraded Lotus Sametime servers froma previous release and set up a new Lotus Sametime 8.5 System Console, migrateuser policies from the Community Server to the System Console.
About this task
The methods for creating and storing policies in previous releases of LotusSametime are very different from the methods used in release 8.5, and there are noutilities available to migrate the data automatically. If you want to transfer existinguser policies to the new releases, you need to review them on the Lotus SametimeCommunity Server, note them down, and then recreate them on the LotusSametime System Console as described in the following topics:
Copying policies from the Lotus Sametime Community Server:
On the upgraded IBM Lotus Sametime Community Server, review existing policysettings and copy them down so you can recreate them in the Lotus SametimeSystem Console. If you upgraded multiple non-clustered servers, copy the settingsfrom each if they are different. If you upgraded a cluster, you only need thesettings from one of the cluster members.
About this task
If you want to recreate your current set of policies on the system console in theLotus Sametime 8.5 deployment, copy the settings from the upgraded server:1. Open a browser and navigate to the Lotus Sametime Community Server
containing the policies you need to record:Type the following address:http://host_name/servlet/auth/admin
where host_name is the fully qualified host name of the server; for example:http://commsvr1.acme.com/servlet/auth/admin
2. From the Lotus Sametime home page, click Administer the Server.3. Log in as the Lotus Sametime administrator.4. In the navigation pane, click Policies.5. Copy all your existing policy settings.
Recreating legacy policies on the Lotus Sametime System Console:
Create new policy settings on the IBM Lotus Sametime System Console to reflectthe settings in your previous deployment.
Chapter 4. Migrating and upgrading 545
About this task
There is no automatic migration of policies from the Sametime Administration Toolto the Lotus Sametime System Console. You must create new policy settingsmanually because Sametime Administration Tool policies do not map one-to-one topolicies in the Lotus Sametime System Console.
Managing users with policies:
All IBM Lotus Sametime users are automatically assigned to default policies.Sametime Instant Messaging, Meetings, and Media Services each has a defaultpolicy to be applied to users. You can create additional user policies, and assignusers and groups to these policies.
About this task
When a user authenticates, Lotus Sametime applies a default policy if no otherpolicy can be found for that user. You can create new policies that grant or limitaccess to features, and assign users to these policies. Users can be assigned to morethan one policy. If a user belongs to more than one policy, then Lotus Sametimeuses the policy weight to determine policy precedence. Custom policies can bedesigned for specific groups in the company, and the default policy can beinherited or assigned. Meetings policy changes take effect immediately, whileInstant Messaging and Media Services policy changes take effect within an hour.
There is also an anonymous policy that is assigned by default to users who havenot authenticated, and unauthenticated users always receive this policy.
Note: If your deployment includes the Lotus Sametime System Console, you mustmanage policies there because all settings made in the legacy SametimeAdministration Tool (STCenter.nsf) are ignored. This includes the override allfeature, as well. Moreover, there is no automatic migration of policies from theSametime Administration Tool to the Lotus Sametime System Console. You mustdo this manually because Sametime Administration Tool policies do not mapone-to-one to policies in the Lotus Sametime System Console.
Finding policies associated with a user:
You can find all the policies associated with a user for all the IBM Lotus Sametimeproducts to which the user has access.1. Log in to the Integrated Solutions Console.2. Click Sametime System Console.3. Click Manage Policies.4. Click any user Lotus Sametime component. It does not matter which
component that you select, because your search results display all the policiesfor all the Sametime components to which the user has access.v Instant Messagingv Meetingsv Media Manager
5. Click Find Active Policies.6. Select the criterion for the user for which you want to find the associated
policies in the Search by field.v User ID
546 Lotus Sametime: Installation and Administration Guide Part 1
v Namev E-mail address
7. Enter the entire or partial user ID, e-mail address, or name of the user orgroup in the Search for field If you enter partial information, use an asteriskas a wild card character for missing or incomplete information. For example,type sm* for all names starting with sm.
8. Select the number of listings in the search results in the Maximum resultsfield.
9. Click Search. The results display the users that match your search criteria.10. Select a name in the results table, and then click Find Active Policies to show
the policies for that user.11. Click Done.
Creating new user policies:
You can create user policies, and assign users and groups to these policies.
About this task
You can set policy for users to have access to specific IBM Lotus Sametimefeatures, depending upon their level of need. For example, the maximum size for afile being transferred is set by default at 1 megabyte to help manage traffic overthe server(s); however, if you have a group that routinely transfers large files forbusiness reasons, you can create a new policy specifically for those users and setthe maximum size of files that they can send to a much higher number.1. Log in to the Integrated Solutions Console.2. Click Sametime System Console.3. Click Manage Policies.4. Click the Lotus Sametime product for which you want to create a policy.
v Instant Messagingv Meetingsv Media Manager
5. Click New.6. Enter a name to use to identify the policy in the Policy Name field.7. Specify the features that you want to enable or disable for the users or groups
that you will assign to this policy. Some instant messaging features are flaggedwith IC characters after the field label. This flag indicates that a feature is onlyavailable for installed clients. The feature is not available to browser clients.
8. Click OK.
Results
Tip: You can follow these same basic steps to delete or edit a policy. Delete apolicy by selecting the policy and then click the Delete button. Edit a policy byclicking the policy name. You cannot delete the anonymous or default policies, butyou can edit them. If you edit a policy, you cannot change the policy ID. To dothis, you must make a copy of the policy by selecting it and clicking Duplicate,then you can enter a new ID in the copy. Before you delete the original, be sure toreassign the users and groups to the copy and give it the proper policy weight.
Chapter 4. Migrating and upgrading 547

What to do next
You can now assign users and groups to this policy.
Assign users and groups to policies:
You can assign users and groups to specific user polices to grant or limit access tofeatures in IBM Lotus Sametime.
About this task
You cannot assign users to the default or anonymous policies. Authenticated usersare automatically assigned to the default policies. Unauthenticated users areassigned to anonymous policies.1. Log in to the Integrated Solutions Console.2. Click Sametime System Console.3. Click Manage Policies.4. Click the Lotus Sametime component with the policy to which you want to
assign a user or a group.v Instant Messagingv Meetingsv Media Manager
5. Select a policy name from the list, and click Assign.6. Click Add Users or Add Groups.
At this point you could remove a user from a policy, by selecting the user inthe list and then clicking Remove.
7. Select the criterion for searching for the user or group that you want to add tothe policy in the Search by field.v User IDv Namev E-mail address
8. Enter user ID, e-mail address, or name or partial name with wildcardcharacters (asterisks) of the user or group in the Search for field
9. Select the number of listings on each search results page in the Maximumresults field.
10. Click Search. The results display the DN, display name, and e-mail address ofthe users that matched your search.
11. Select a user and click Assign.12. Click Done.
Sametime Instant Messaging user policy settings:
You can grant or limit access to features in IBM Lotus Sametime Instant Messagingby enabling or disabling various policies for users. Policy changes take effectimmediately.
All unauthenticated users have the anonymous policy, Sametime Instant MessagingAnonymous Policy, applied to them. For authenticated users, the Lotus Sametimesearches for a user ID or group match, and then applies the highest weightedpolicy. If there is no match, then the default policy, Sametime Instant MessagingDefault Policy, is applied.
548 Lotus Sametime: Installation and Administration Guide Part 1
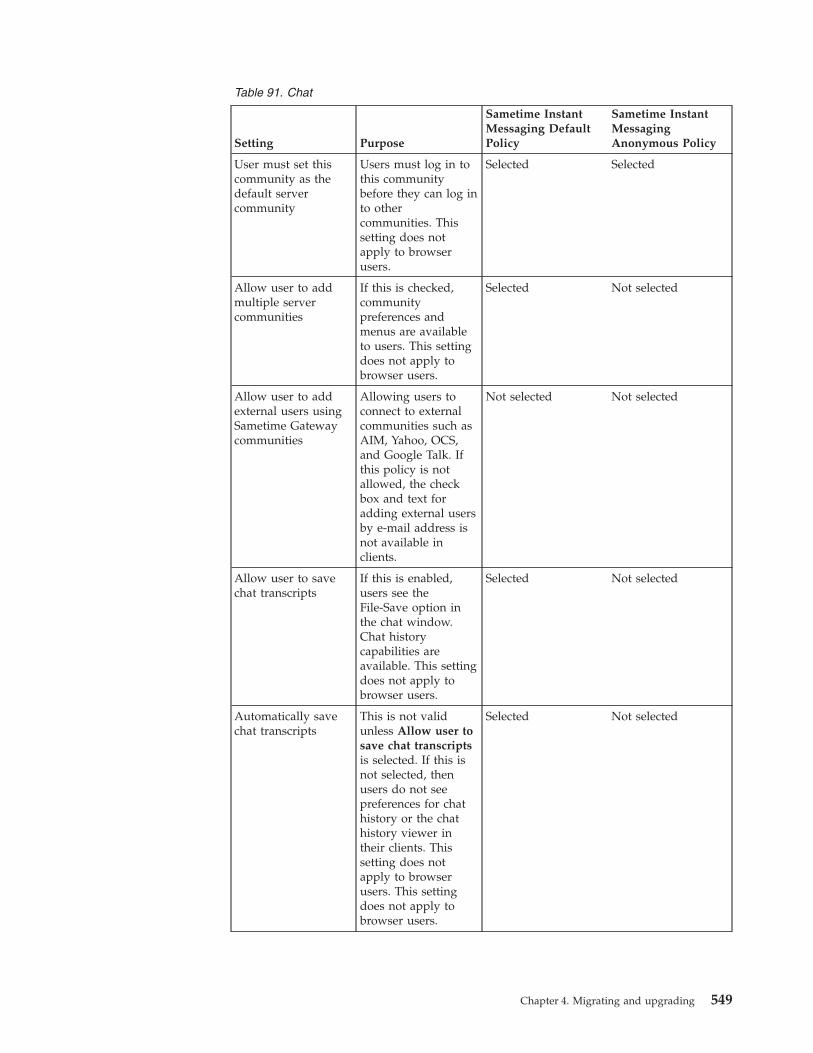
Table 91. Chat
Setting Purpose
Sametime InstantMessaging DefaultPolicy
Sametime InstantMessagingAnonymous Policy
User must set thiscommunity as thedefault servercommunity
Users must log in tothis communitybefore they can log into othercommunities. Thissetting does notapply to browserusers.
Selected Selected
Allow user to addmultiple servercommunities
If this is checked,communitypreferences andmenus are availableto users. This settingdoes not apply tobrowser users.
Selected Not selected
Allow user to addexternal users usingSametime Gatewaycommunities
Allowing users toconnect to externalcommunities such asAIM, Yahoo, OCS,and Google Talk. Ifthis policy is notallowed, the checkbox and text foradding external usersby e-mail address isnot available inclients.
Not selected Not selected
Allow user to savechat transcripts
If this is enabled,users see theFile-Save option inthe chat window.Chat historycapabilities areavailable. This settingdoes not apply tobrowser users.
Selected Not selected
Automatically savechat transcripts
This is not validunless Allow user tosave chat transcriptsis selected. If this isnot selected, thenusers do not seepreferences for chathistory or the chathistory viewer intheir clients. Thissetting does notapply to browserusers. This settingdoes not apply tobrowser users.
Selected Not selected
Chapter 4. Migrating and upgrading 549
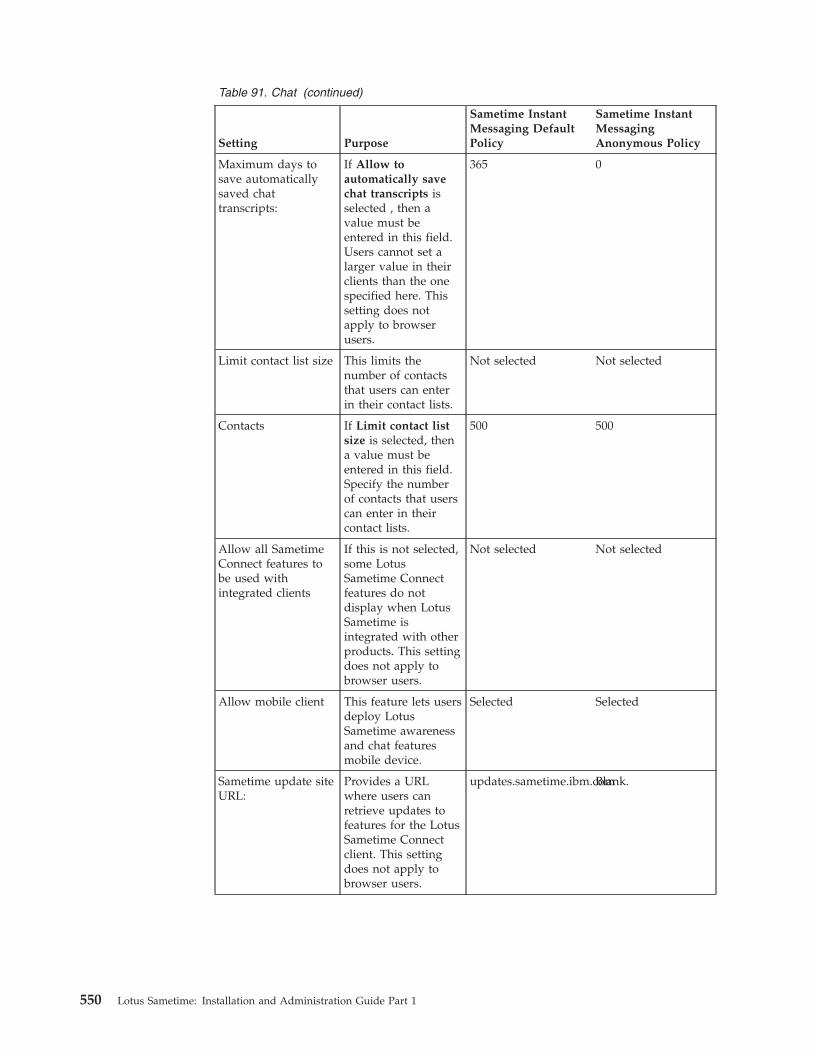
Table 91. Chat (continued)
Setting Purpose
Sametime InstantMessaging DefaultPolicy
Sametime InstantMessagingAnonymous Policy
Maximum days tosave automaticallysaved chattranscripts:
If Allow toautomatically savechat transcripts isselected , then avalue must beentered in this field.Users cannot set alarger value in theirclients than the onespecified here. Thissetting does notapply to browserusers.
365 0
Limit contact list size This limits thenumber of contactsthat users can enterin their contact lists.
Not selected Not selected
Contacts If Limit contact listsize is selected, thena value must beentered in this field.Specify the numberof contacts that userscan enter in theircontact lists.
500 500
Allow all SametimeConnect features tobe used withintegrated clients
If this is not selected,some LotusSametime Connectfeatures do notdisplay when LotusSametime isintegrated with otherproducts. This settingdoes not apply tobrowser users.
Not selected Not selected
Allow mobile client This feature lets usersdeploy LotusSametime awarenessand chat featuresmobile device.
Selected Selected
Sametime update siteURL:
Provides a URLwhere users canretrieve updates tofeatures for the LotusSametime Connectclient. This settingdoes not apply tobrowser users.
updates.sametime.ibm.comBlank.
550 Lotus Sametime: Installation and Administration Guide Part 1
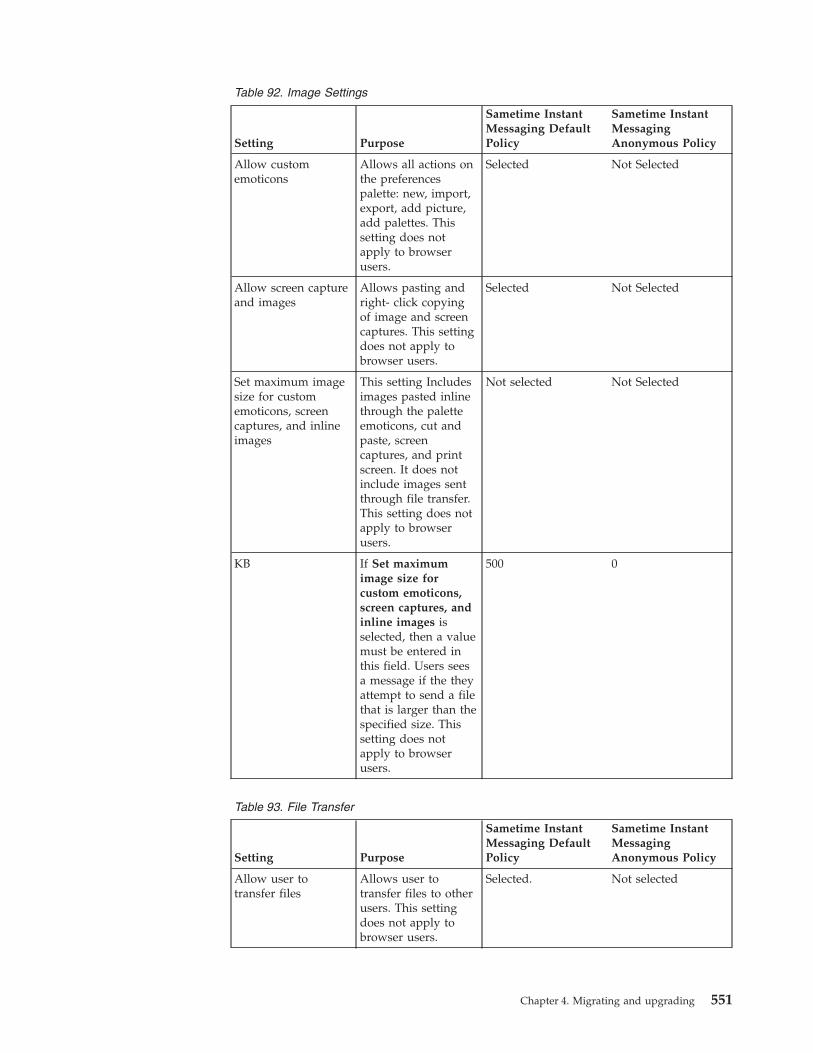
Table 92. Image Settings
Setting Purpose
Sametime InstantMessaging DefaultPolicy
Sametime InstantMessagingAnonymous Policy
Allow customemoticons
Allows all actions onthe preferencespalette: new, import,export, add picture,add palettes. Thissetting does notapply to browserusers.
Selected Not Selected
Allow screen captureand images
Allows pasting andright- click copyingof image and screencaptures. This settingdoes not apply tobrowser users.
Selected Not Selected
Set maximum imagesize for customemoticons, screencaptures, and inlineimages
This setting Includesimages pasted inlinethrough the paletteemoticons, cut andpaste, screencaptures, and printscreen. It does notinclude images sentthrough file transfer.This setting does notapply to browserusers.
Not selected Not Selected
KB If Set maximumimage size forcustom emoticons,screen captures, andinline images isselected, then a valuemust be entered inthis field. Users seesa message if the theyattempt to send a filethat is larger than thespecified size. Thissetting does notapply to browserusers.
500 0
Table 93. File Transfer
Setting Purpose
Sametime InstantMessaging DefaultPolicy
Sametime InstantMessagingAnonymous Policy
Allow user totransfer files
Allows user totransfer files to otherusers. This settingdoes not apply tobrowser users.
Selected. Not selected
Chapter 4. Migrating and upgrading 551
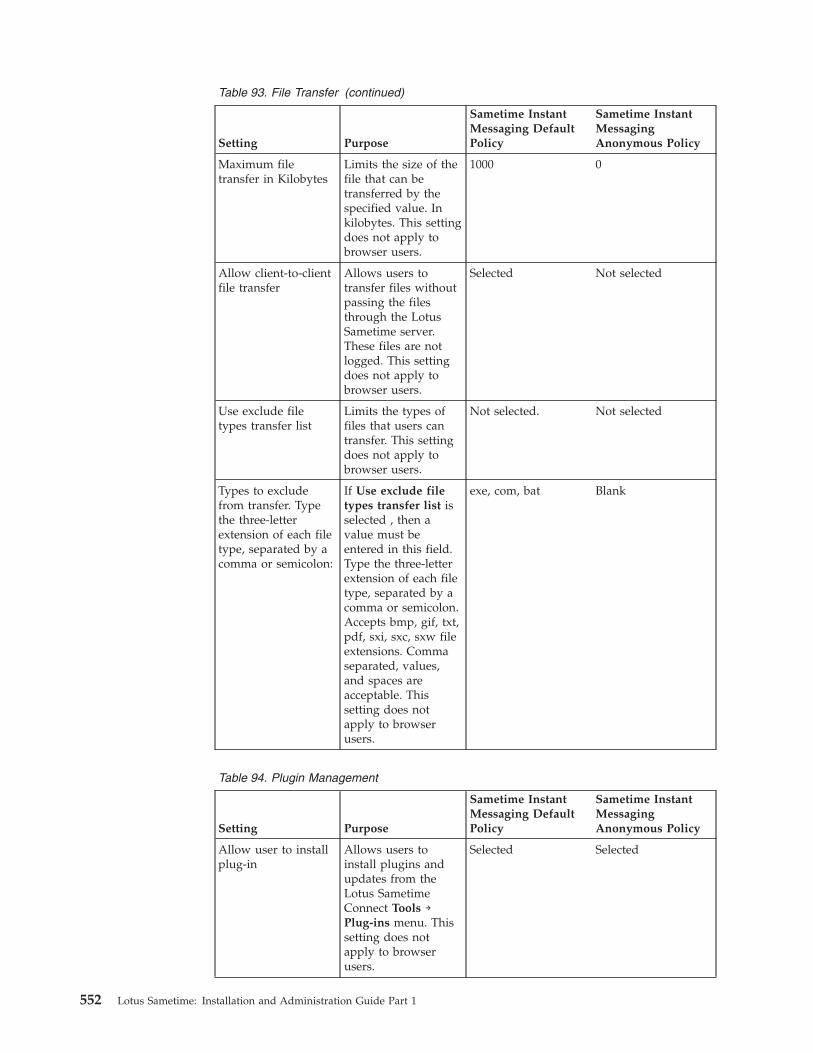
Table 93. File Transfer (continued)
Setting Purpose
Sametime InstantMessaging DefaultPolicy
Sametime InstantMessagingAnonymous Policy
Maximum filetransfer in Kilobytes
Limits the size of thefile that can betransferred by thespecified value. Inkilobytes. This settingdoes not apply tobrowser users.
1000 0
Allow client-to-clientfile transfer
Allows users totransfer files withoutpassing the filesthrough the LotusSametime server.These files are notlogged. This settingdoes not apply tobrowser users.
Selected Not selected
Use exclude filetypes transfer list
Limits the types offiles that users cantransfer. This settingdoes not apply tobrowser users.
Not selected. Not selected
Types to excludefrom transfer. Typethe three-letterextension of each filetype, separated by acomma or semicolon:
If Use exclude filetypes transfer list isselected , then avalue must beentered in this field.Type the three-letterextension of each filetype, separated by acomma or semicolon.Accepts bmp, gif, txt,pdf, sxi, sxc, sxw fileextensions. Commaseparated, values,and spaces areacceptable. Thissetting does notapply to browserusers.
exe, com, bat Blank
Table 94. Plugin Management
Setting Purpose
Sametime InstantMessaging DefaultPolicy
Sametime InstantMessagingAnonymous Policy
Allow user to installplug-in
Allows users toinstall plugins andupdates from theLotus SametimeConnect Tools →Plug-ins menu. Thissetting does notapply to browserusers.
Selected Selected
552 Lotus Sametime: Installation and Administration Guide Part 1
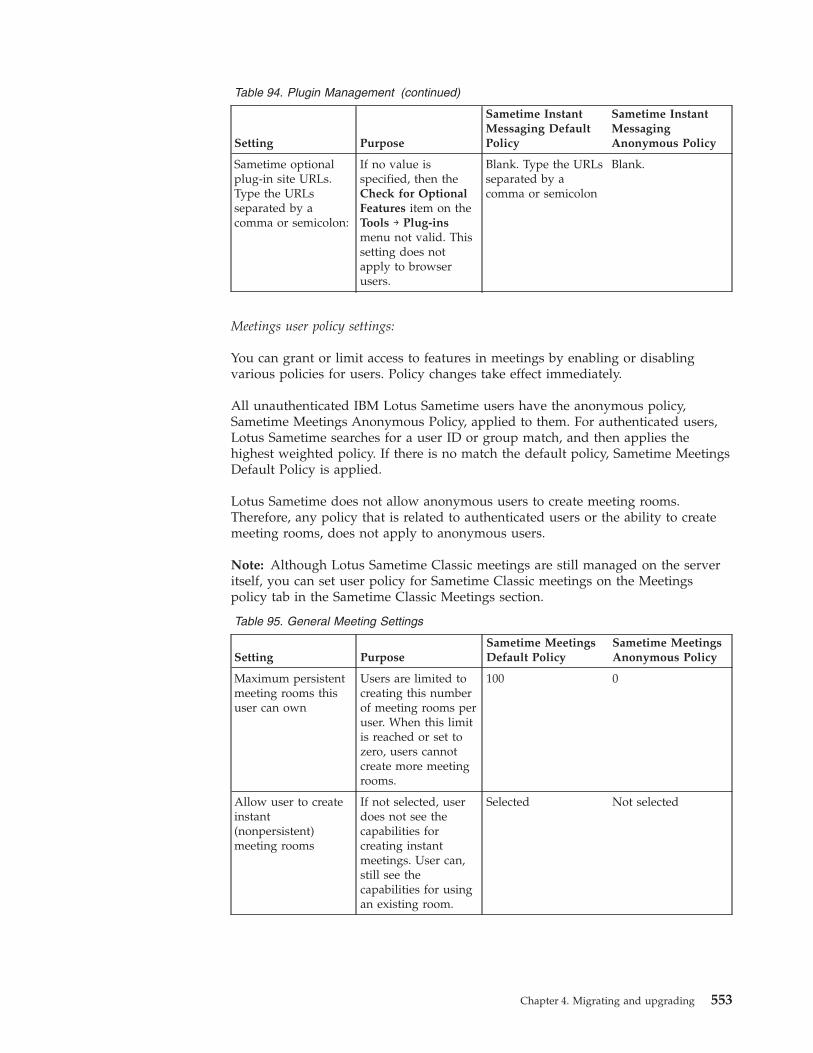
Table 94. Plugin Management (continued)
Setting Purpose
Sametime InstantMessaging DefaultPolicy
Sametime InstantMessagingAnonymous Policy
Sametime optionalplug-in site URLs.Type the URLsseparated by acomma or semicolon:
If no value isspecified, then theCheck for OptionalFeatures item on theTools → Plug-insmenu not valid. Thissetting does notapply to browserusers.
Blank. Type the URLsseparated by acomma or semicolon
Blank.
Meetings user policy settings:
You can grant or limit access to features in meetings by enabling or disablingvarious policies for users. Policy changes take effect immediately.
All unauthenticated IBM Lotus Sametime users have the anonymous policy,Sametime Meetings Anonymous Policy, applied to them. For authenticated users,Lotus Sametime searches for a user ID or group match, and then applies thehighest weighted policy. If there is no match the default policy, Sametime MeetingsDefault Policy is applied.
Lotus Sametime does not allow anonymous users to create meeting rooms.Therefore, any policy that is related to authenticated users or the ability to createmeeting rooms, does not apply to anonymous users.
Note: Although Lotus Sametime Classic meetings are still managed on the serveritself, you can set user policy for Sametime Classic meetings on the Meetingspolicy tab in the Sametime Classic Meetings section.
Table 95. General Meeting Settings
Setting PurposeSametime MeetingsDefault Policy
Sametime MeetingsAnonymous Policy
Maximum persistentmeeting rooms thisuser can own
Users are limited tocreating this numberof meeting rooms peruser. When this limitis reached or set tozero, users cannotcreate more meetingrooms.
100 0
Allow user to createinstant(nonpersistent)meeting rooms
If not selected, userdoes not see thecapabilities forcreating instantmeetings. User can,still see thecapabilities for usingan existing room.
Selected Not selected
Chapter 4. Migrating and upgrading 553
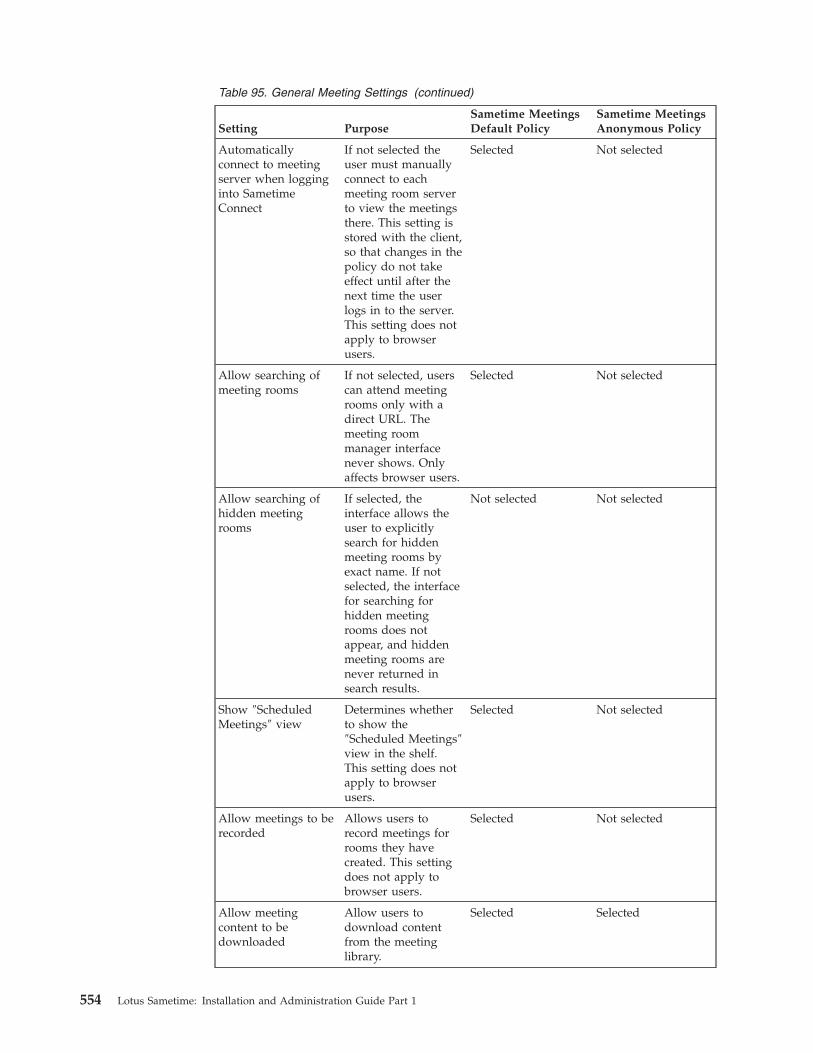
Table 95. General Meeting Settings (continued)
Setting PurposeSametime MeetingsDefault Policy
Sametime MeetingsAnonymous Policy
Automaticallyconnect to meetingserver when logginginto SametimeConnect
If not selected theuser must manuallyconnect to eachmeeting room serverto view the meetingsthere. This setting isstored with the client,so that changes in thepolicy do not takeeffect until after thenext time the userlogs in to the server.This setting does notapply to browserusers.
Selected Not selected
Allow searching ofmeeting rooms
If not selected, userscan attend meetingrooms only with adirect URL. Themeeting roommanager interfacenever shows. Onlyaffects browser users.
Selected Not selected
Allow searching ofhidden meetingrooms
If selected, theinterface allows theuser to explicitlysearch for hiddenmeeting rooms byexact name. If notselected, the interfacefor searching forhidden meetingrooms does notappear, and hiddenmeeting rooms arenever returned insearch results.
Not selected Not selected
Show ″ScheduledMeetings″ view
Determines whetherto show the″Scheduled Meetings″view in the shelf.This setting does notapply to browserusers.
Selected Not selected
Allow meetings to berecorded
Allows users torecord meetings forrooms they havecreated. This settingdoes not apply tobrowser users.
Selected Not selected
Allow meetingcontent to bedownloaded
Allow users todownload contentfrom the meetinglibrary.
Selected Selected
554 Lotus Sametime: Installation and Administration Guide Part 1
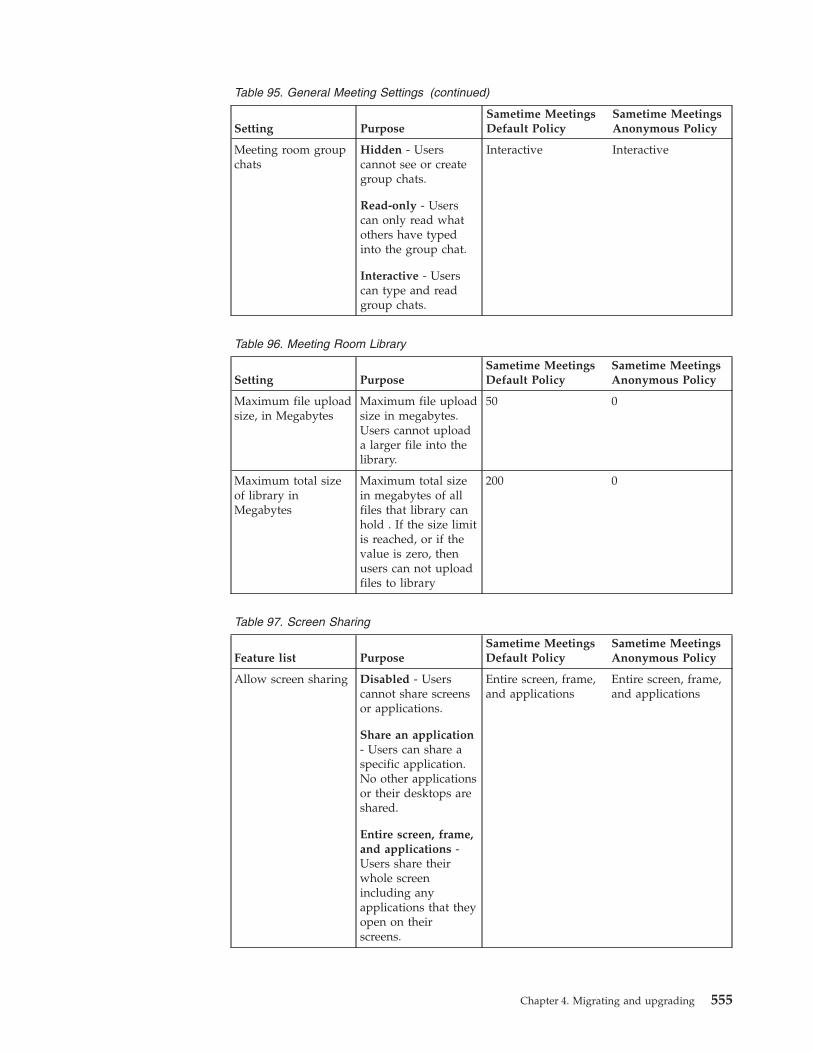
Table 95. General Meeting Settings (continued)
Setting PurposeSametime MeetingsDefault Policy
Sametime MeetingsAnonymous Policy
Meeting room groupchats
Hidden - Userscannot see or creategroup chats.
Read-only - Userscan only read whatothers have typedinto the group chat.
Interactive - Userscan type and readgroup chats.
Interactive Interactive
Table 96. Meeting Room Library
Setting PurposeSametime MeetingsDefault Policy
Sametime MeetingsAnonymous Policy
Maximum file uploadsize, in Megabytes
Maximum file uploadsize in megabytes.Users cannot uploada larger file into thelibrary.
50 0
Maximum total sizeof library inMegabytes
Maximum total sizein megabytes of allfiles that library canhold . If the size limitis reached, or if thevalue is zero, thenusers can not uploadfiles to library
200 0
Table 97. Screen Sharing
Feature list PurposeSametime MeetingsDefault Policy
Sametime MeetingsAnonymous Policy
Allow screen sharing Disabled - Userscannot share screensor applications.
Share an application- Users can share aspecific application.No other applicationsor their desktops areshared.
Entire screen, frame,and applications -Users share theirwhole screenincluding anyapplications that theyopen on theirscreens.
Entire screen, frame,and applications
Entire screen, frame,and applications
Chapter 4. Migrating and upgrading 555
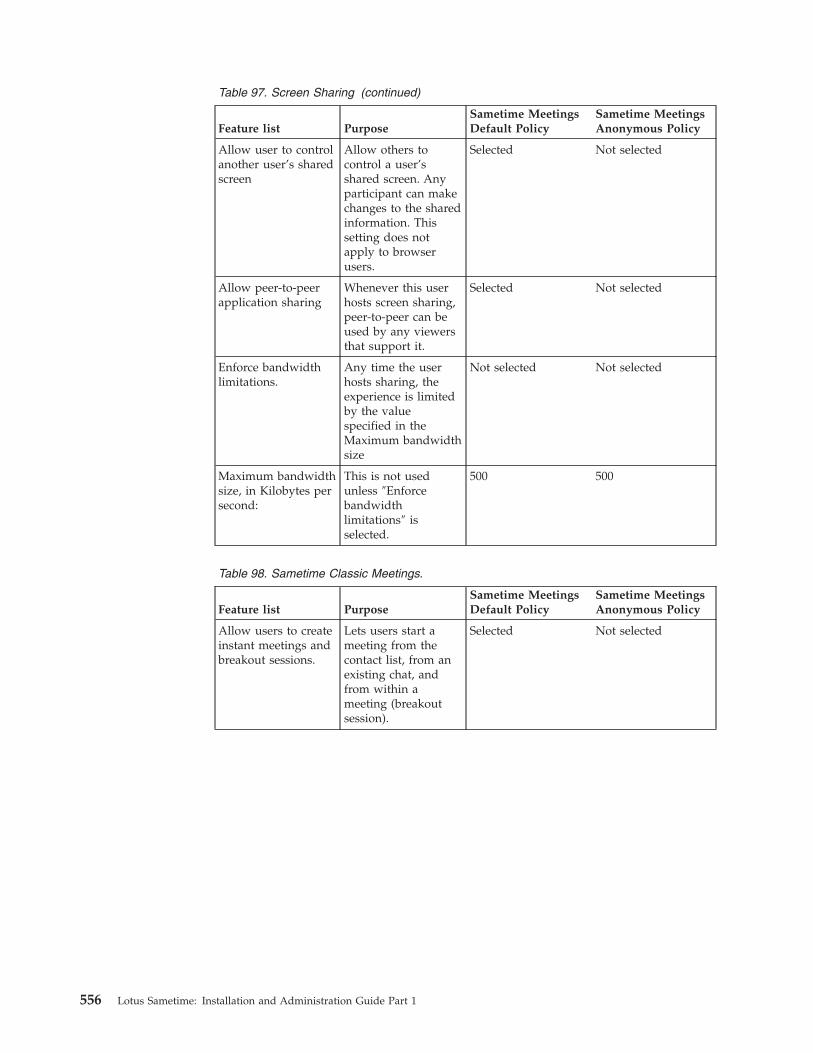
Table 97. Screen Sharing (continued)
Feature list PurposeSametime MeetingsDefault Policy
Sametime MeetingsAnonymous Policy
Allow user to controlanother user’s sharedscreen
Allow others tocontrol a user’sshared screen. Anyparticipant can makechanges to the sharedinformation. Thissetting does notapply to browserusers.
Selected Not selected
Allow peer-to-peerapplication sharing
Whenever this userhosts screen sharing,peer-to-peer can beused by any viewersthat support it.
Selected Not selected
Enforce bandwidthlimitations.
Any time the userhosts sharing, theexperience is limitedby the valuespecified in theMaximum bandwidthsize
Not selected Not selected
Maximum bandwidthsize, in Kilobytes persecond:
This is not usedunless ″Enforcebandwidthlimitations″ isselected.
500 500
Table 98. Sametime Classic Meetings.
Feature list PurposeSametime MeetingsDefault Policy
Sametime MeetingsAnonymous Policy
Allow users to createinstant meetings andbreakout sessions.
Lets users start ameeting from thecontact list, from anexisting chat, andfrom within ameeting (breakoutsession).
Selected Not selected
556 Lotus Sametime: Installation and Administration Guide Part 1
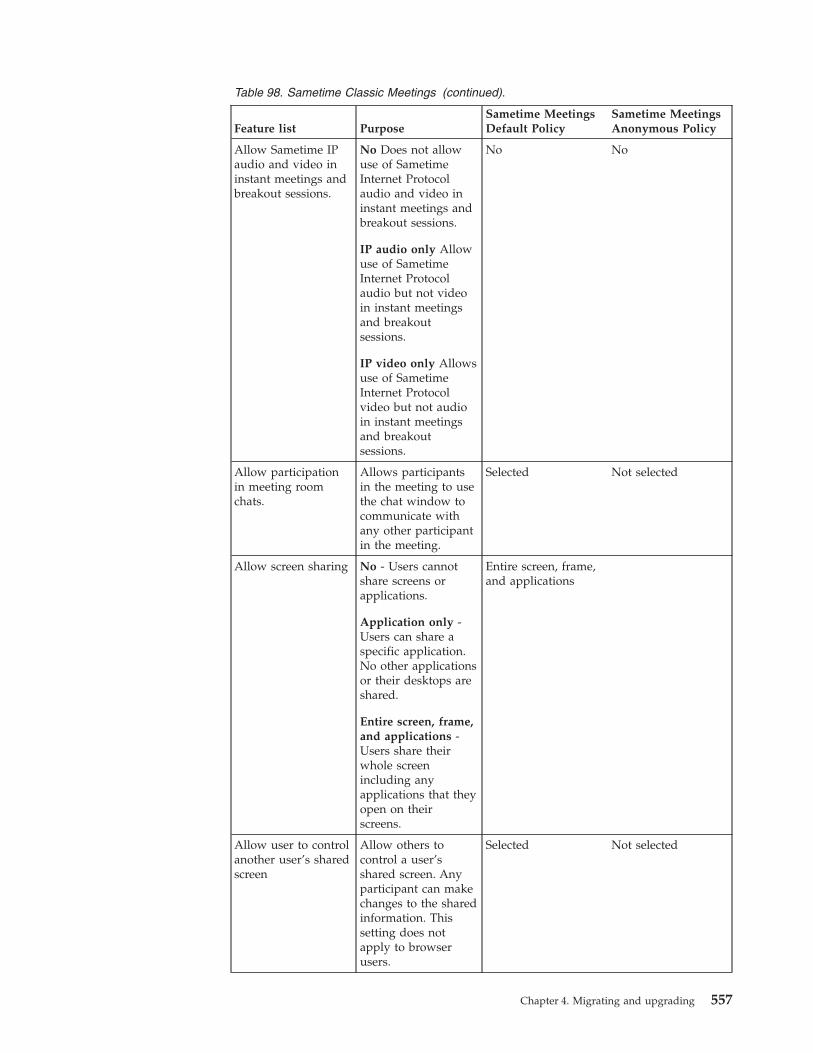
Table 98. Sametime Classic Meetings (continued).
Feature list PurposeSametime MeetingsDefault Policy
Sametime MeetingsAnonymous Policy
Allow Sametime IPaudio and video ininstant meetings andbreakout sessions.
No Does not allowuse of SametimeInternet Protocolaudio and video ininstant meetings andbreakout sessions.
IP audio only Allowuse of SametimeInternet Protocolaudio but not videoin instant meetingsand breakoutsessions.
IP video only Allowsuse of SametimeInternet Protocolvideo but not audioin instant meetingsand breakoutsessions.
No No
Allow participationin meeting roomchats.
Allows participantsin the meeting to usethe chat window tocommunicate withany other participantin the meeting.
Selected Not selected
Allow screen sharing No - Users cannotshare screens orapplications.
Application only -Users can share aspecific application.No other applicationsor their desktops areshared.
Entire screen, frame,and applications -Users share theirwhole screenincluding anyapplications that theyopen on theirscreens.
Entire screen, frame,and applications
Allow user to controlanother user’s sharedscreen
Allow others tocontrol a user’sshared screen. Anyparticipant can makechanges to the sharedinformation. Thissetting does notapply to browserusers.
Selected Not selected
Chapter 4. Migrating and upgrading 557
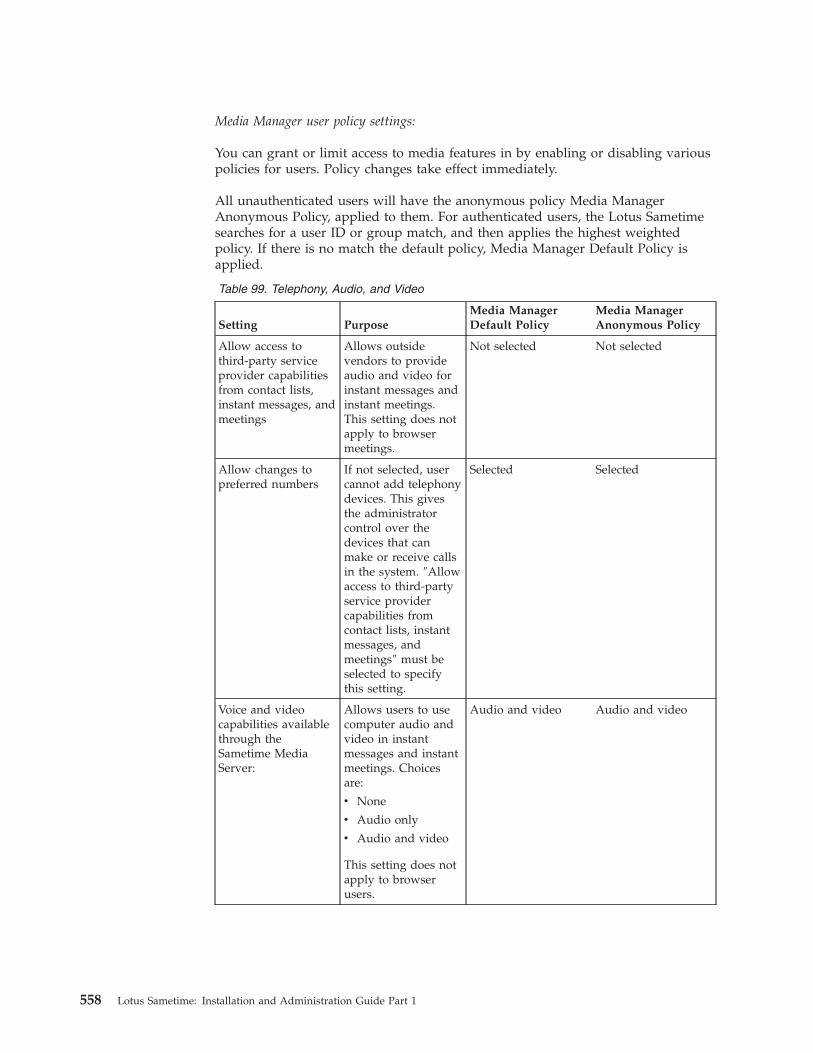
Media Manager user policy settings:
You can grant or limit access to media features in by enabling or disabling variouspolicies for users. Policy changes take effect immediately.
All unauthenticated users will have the anonymous policy Media ManagerAnonymous Policy, applied to them. For authenticated users, the Lotus Sametimesearches for a user ID or group match, and then applies the highest weightedpolicy. If there is no match the default policy, Media Manager Default Policy isapplied.
Table 99. Telephony, Audio, and Video
Setting PurposeMedia ManagerDefault Policy
Media ManagerAnonymous Policy
Allow access tothird-party serviceprovider capabilitiesfrom contact lists,instant messages, andmeetings
Allows outsidevendors to provideaudio and video forinstant messages andinstant meetings.This setting does notapply to browsermeetings.
Not selected Not selected
Allow changes topreferred numbers
If not selected, usercannot add telephonydevices. This givesthe administratorcontrol over thedevices that canmake or receive callsin the system. ″Allowaccess to third-partyservice providercapabilities fromcontact lists, instantmessages, andmeetings″ must beselected to specifythis setting.
Selected Selected
Voice and videocapabilities availablethrough theSametime MediaServer:
Allows users to usecomputer audio andvideo in instantmessages and instantmeetings. Choicesare:
v None
v Audio only
v Audio and video
This setting does notapply to browserusers.
Audio and video Audio and video
558 Lotus Sametime: Installation and Administration Guide Part 1
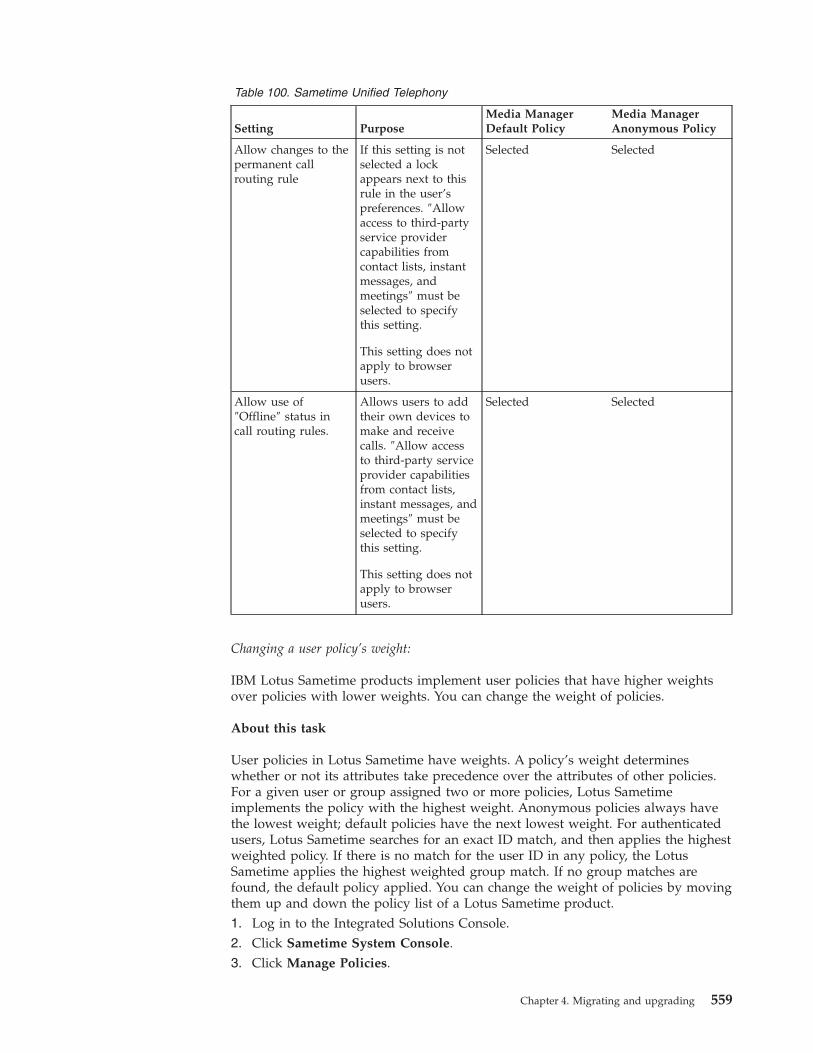
Table 100. Sametime Unified Telephony
Setting PurposeMedia ManagerDefault Policy
Media ManagerAnonymous Policy
Allow changes to thepermanent callrouting rule
If this setting is notselected a lockappears next to thisrule in the user’spreferences. ″Allowaccess to third-partyservice providercapabilities fromcontact lists, instantmessages, andmeetings″ must beselected to specifythis setting.
This setting does notapply to browserusers.
Selected Selected
Allow use of″Offline″ status incall routing rules.
Allows users to addtheir own devices tomake and receivecalls. ″Allow accessto third-party serviceprovider capabilitiesfrom contact lists,instant messages, andmeetings″ must beselected to specifythis setting.
This setting does notapply to browserusers.
Selected Selected
Changing a user policy’s weight:
IBM Lotus Sametime products implement user policies that have higher weightsover policies with lower weights. You can change the weight of policies.
About this task
User policies in Lotus Sametime have weights. A policy’s weight determineswhether or not its attributes take precedence over the attributes of other policies.For a given user or group assigned two or more policies, Lotus Sametimeimplements the policy with the highest weight. Anonymous policies always havethe lowest weight; default policies have the next lowest weight. For authenticatedusers, Lotus Sametime searches for an exact ID match, and then applies the highestweighted policy. If there is no match for the user ID in any policy, the LotusSametime applies the highest weighted group match. If no group matches arefound, the default policy applied. You can change the weight of policies by movingthem up and down the policy list of a Lotus Sametime product.1. Log in to the Integrated Solutions Console.2. Click Sametime System Console.3. Click Manage Policies.
Chapter 4. Migrating and upgrading 559
4. Click the Lotus Sametime component with the policy with the weight that youwant to change.v Instant Messagingv Meetingsv Media Manager
5. Select a Policy ID from the list, and click Move Up or Move Down. Moving thepolicy up increases its wight; moving the policy down decreases its weight. Youcannot change the weight of a default or and anonymous policy.
Installing a Lotus Sametime Proxy Server:
The IBM Lotus Sametime Proxy Server enables browser-based clients to participatein Lotus Sametime instant messaging and online meetings. In addition, the LotusSametime Proxy Server works with Lotus Sametime Community Server or LotusConnections to enable the business card feature in Lotus Sametime, and with LotusSametime Unified Telephony or other TCSPI-enabled products to enable the LotusSametime click-to-call feature. The Lotus Sametime Proxy Server also provides livenames awareness, and can replace the Links Toolkit used in earlier releases of LotusSametime.
Preparing the proxy server installation file on IBM i:
Follow these steps to customize the response.properties file to prepare for installingthe Lotus Sametime Proxy Server on IBM i.
About this task
Skip the first two steps if you are installing from physical media.1. Download the installation package if you have not already done so.
a. To download installation packages, you must have an IBM PassportAdvantage account, which is described at the following Web address:www.ibm.com/software/howtobuy/passportadvantage/paocustomer/docs/en_US/ecare.html
b. Open this release’s Download document at the following Web address:http://www.ibm.com/support/docview.wss?rs=477&uid=24024322
Locate the components you need in the document’s listing, then downloadthe packages labelled with the corresponding part numbers.
c. Use ftp or another convenient method to transfer the installation package tothe system where you plan to install the product. Store the file in an IFSdirectory of your choosing; for example:/MySametimePackages
2. Extract the installation files to the directory where you stored the installationpackage.a. From an IBM i command line, run the following command to start the
QShell Interpreter:QSH
b. Run the cd shell command, specifying the fully qualified path to theinstallation package directory; for example:cd /MySametimePackages
c. Run the following cd shell command, specifying the name of the .tar file:pax -r -C 819 -f name_of_installation_package
d. Press F3 to exit QSH.
560 Lotus Sametime: Installation and Administration Guide Part 1
3. Review the IBM International Program License Agreement and ensure that youagree to its terms before proceeding. The agreement is stored in the licensessubdirectory of the program image:/MySametimePackages/SametimeProxyServer/IBMi/stii_stp/licenses
For DVD:/qopt/volume_id/IBMi/stii_stp/licenses
4. Navigate to the program image directory; for example:/MySametimePackages/SametimeProxyServer/IBMi/stii_stp
For DVD:/qopt/volume_id/IBMi/stii_stp
5. Make a copy of the stp.default.response.properties file, using a name of yourchoosing. Store the copy in a location on the system that the installationprogram can access.
6. Customize your copy of the response.properties file with the settingsappropriate for your specific installation.There are special considerations if you are planning to install both theSametime Meeting Server and the Sametime Proxy Server on the same system.You will need to define a separate host name and IP address in addition to thedefault system host name and IP address. After both servers have beeninstalled, you will be directed to update the Host Alias table for the SametimeProxy Server so that it does not use the same host name and IP address as theMeeting Server. This is necessary for live names to work correctly in meetingrooms.
Installing a proxy server on IBM i:
Run the install script to set up the Lotus Sametime Proxy Server on IBM i.
Before you begin
If you intend to install from a downloaded image, you should have downloadedthe proxy server installation package. For all installations, you should havecompleted the preparation steps.
About this task
Follow these steps to install the Lotus Sametime Proxy Server and WebSphereApplication Server.1. Log in using a profile with *ALLOBJ and *SECADM special authorities.2. Use the WRKSYSVAL command to check the setting for the QVFYOBJRST system
value and change it if necessary. The setting must be 3 or lower to install theSametime software.
3. From an IBM i command line, run the following command to start the QShellInterpreter:QSH
4. Run the cd shell command, specifying the fully qualified path to theinstallation kit directory; for example:/MySametimePackages/SametimeProxyServer/IBMi/stii_stp
For DVD:cd /qopt/volume_ID/IBMi/stii_stp
5. Start the installation with the following shell command:
Chapter 4. Migrating and upgrading 561
install_stp.sh-Dinstall.response.file=path_and_name_of_customized_response.properties_file
6. When the installation completes, press F3 to exit QSH.
Results
If the installation was not successful, look at the installation logs for moreinformation about what occurred during the installation attempt. Fix the problem,then try installing again. The installation logs are stored in the following location.
/QIBM/UserData/Lotus/stii/logs
The log name contains the date and time in this form:
install_STPROXY_yyyymmdd_hhmm.log
For example, this log was created at 3:07 A.M. on December 15, 2009:
install_STPROXY_20091215_0307.log
What to do next
If this is the first installation of WebSphere Application Server on this system,follow steps for increasing the WebSphere Application Server usage limit. This taskneeds to be done only once on a system.
If you have installed both the Sametime Meeting Server and the Sametime ProxyServer on the same system, you must update the table of Host Aliases associatedwith the Sametime Proxy Server’s default_host virtual host so that it does not usethe same host name and IP address as the Sametime Meeting Server. Follow thesteps in Deploying Sametime Proxy Server and Sametime Meeting Server on thesame machine.Related tasks
“Preparing to install Lotus Sametime on IBM i” on page 249Follow these steps to prepare IBM i for Lotus Sametime server installations.
Registering a non-clustered IBM i Sametime server with the Lotus Sametime SystemConsole:
After installing a Lotus Sametime Community Server, Sametime Proxy Server, orSametime Meeting server on IBM i, register it with the Sametime System Consoleto allow you to manage all Sametime servers from a central location.
Before you begin
Before you register the server, verify that you have completed the following tasks.
Sametime Community Server
v The community server must be configured to use an LDAP directory.v The community server must be started.v The Lotus Sametime System Console must be started.v The LDAP server must be started.v The LDAP server must be connected to the Sametime System Console.
562 Lotus Sametime: Installation and Administration Guide Part 1
Sametime Proxy Server
v The Lotus Sametime System Console must be started.v The Community Server that the Proxy Server connects to must be registered
with the Sametime System Console.
Sametime Meeting Server
v The meeting server must be started.v The Lotus Sametime System Console must be started.v The LDAP server must be started.v The LDAP server must be connected to the Sametime System Console.v The Meeting Server database (STMS) must be connected to the Sametime System
Console.
About this task
Working from the Sametime server that you want to connect with the console,follow these steps to update properties files and run the registration utility toregister the server with the console.
During this task you will edit the following files; click the topic titles below to seedetails on each file. Use Ctrl+Click to open the topic in a new browser tab orwindow so you can keep it open for reference:v console.properties
v productConfig.properties
1. On the Sametime server you plan to register, navigate to the console directory.v Community Server
The console directory is a subdirectory of the Sametime Community serverdata directory.
v Proxy Server/QIBM/UserData/Lotus/stii/STPROXY/STPROXY_date_time/console
The date and time indicate when the Proxy Server was installed.v Meeting Server
/QIBM/UserData/Lotus/stii/STMeetings/STMEETINGS_date_time/console
The date and time indicate when the Meeting Server was installed.2. In the console directory, make backup copies with different names of the
console.properties and productConfig.properties files.3. Update the following values in the console.properties file and save the file.
Table 101. console.properties settings
SSCHostName Provide the fully qualified host name of the LotusSametime System Console server.
Chapter 4. Migrating and upgrading 563
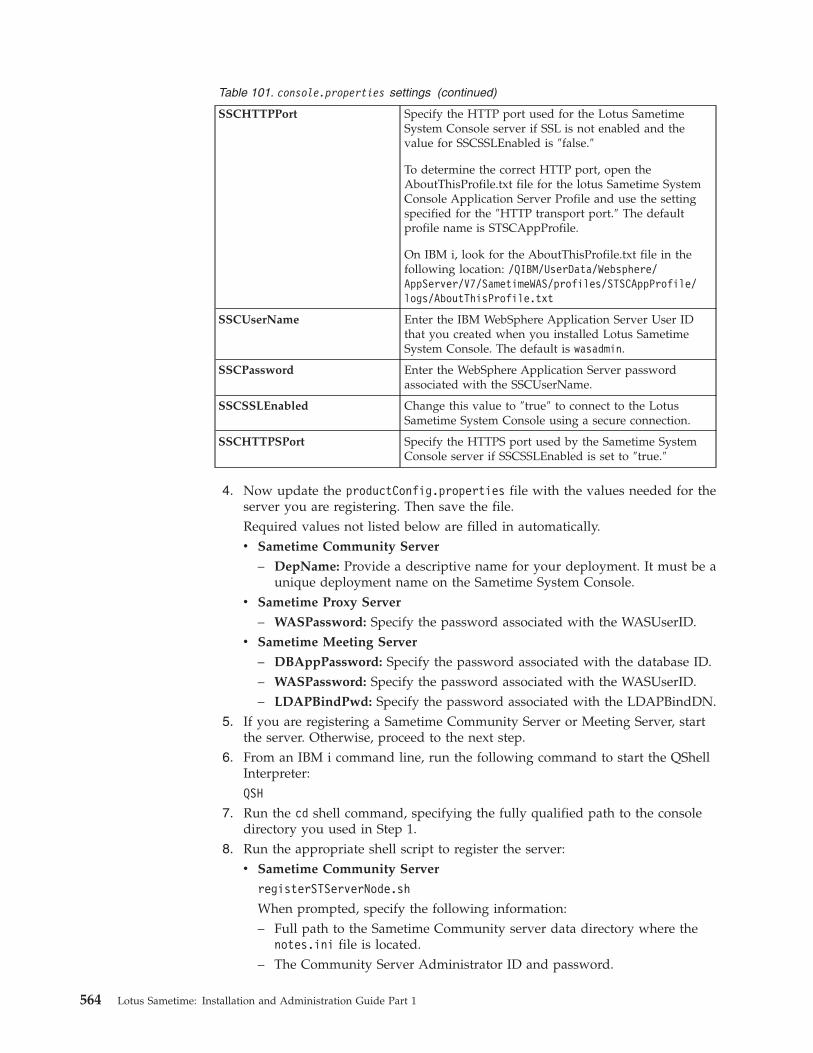
Table 101. console.properties settings (continued)
SSCHTTPPort Specify the HTTP port used for the Lotus SametimeSystem Console server if SSL is not enabled and thevalue for SSCSSLEnabled is ″false.″
To determine the correct HTTP port, open theAboutThisProfile.txt file for the lotus Sametime SystemConsole Application Server Profile and use the settingspecified for the ″HTTP transport port.″ The defaultprofile name is STSCAppProfile.
On IBM i, look for the AboutThisProfile.txt file in thefollowing location: /QIBM/UserData/Websphere/AppServer/V7/SametimeWAS/profiles/STSCAppProfile/logs/AboutThisProfile.txt
SSCUserName Enter the IBM WebSphere Application Server User IDthat you created when you installed Lotus SametimeSystem Console. The default is wasadmin.
SSCPassword Enter the WebSphere Application Server passwordassociated with the SSCUserName.
SSCSSLEnabled Change this value to ″true″ to connect to the LotusSametime System Console using a secure connection.
SSCHTTPSPort Specify the HTTPS port used by the Sametime SystemConsole server if SSCSSLEnabled is set to ″true.″
4. Now update the productConfig.properties file with the values needed for theserver you are registering. Then save the file.Required values not listed below are filled in automatically.v Sametime Community Server
– DepName: Provide a descriptive name for your deployment. It must be aunique deployment name on the Sametime System Console.
v Sametime Proxy Server
– WASPassword: Specify the password associated with the WASUserID.v Sametime Meeting Server
– DBAppPassword: Specify the password associated with the database ID.– WASPassword: Specify the password associated with the WASUserID.– LDAPBindPwd: Specify the password associated with the LDAPBindDN.
5. If you are registering a Sametime Community Server or Meeting Server, startthe server. Otherwise, proceed to the next step.
6. From an IBM i command line, run the following command to start the QShellInterpreter:QSH
7. Run the cd shell command, specifying the fully qualified path to the consoledirectory you used in Step 1.
8. Run the appropriate shell script to register the server:v Sametime Community Server
registerSTServerNode.sh
When prompted, specify the following information:– Full path to the Sametime Community server data directory where the
notes.ini file is located.– The Community Server Administrator ID and password.
564 Lotus Sametime: Installation and Administration Guide Part 1
v Other servers
registerProduct.sh
9. When the registration script completes, press F3 to exit QSH.10. On the Lotus Sametime Community Server, modify the sametime.ini file:
a. Navigate to the Sametime data directory and open the sametime.ini file ina text editor.
b. Find the [Policy] section of the file.c. Move (do not copy) the line ST_DB_LDAP_ALLOW_SEARCH_ON_DN=1 to the
[Directory] section of the file.d. Close and save the file.e. Restart the server.
Verifying a proxy server installation on IBM i:
Open the Sametime Web client to verify that the installation was successful.
About this task
Follow these steps to verify the installation.1. Using a browser, log in to the Lotus Sametime Proxy Server application with
the following command: http://serverhostname.domain:port/stwebclient/index.jsp
Replace serverhostname.domain with your server name and add the port number.
Tip: To verify the HTTP port number being used by the Lotus Sametime ProxyServer, open the AboutThisProfile.txt file for the Sametime Proxy ApplicationServer Profile and use the setting specified for the HTTP transport port. Thedefault profile name is STPAppProfile. On IBM i, look for theAboutThisProfile.txt file in the following location /QIBM/UserData/Websphere/AppServer/V7/SametimeWAS/profiles/STPAppProfile/logs/AboutThisProfile.txt:
For example: http://st85proxy1.acme.com:9081/stwebclient/index.jsp2. Log in to the Lotus Sametime Client and verify that you can create or view
contacts.Related tasks
“Logging in to the Lotus Sametime System Console” on page 63Use the IBM Lotus Sametime System Console to prepare to install new servers,start Sametime servers that have been installed, use guided activities to performconfiguration tasks, and administer any Sametime servers managed by the console.
Managing trusted IP addresses:
Whenever you install a server that communicates with an IBM Lotus SametimeCommunity Server, you must add the new server’s IP address to the CommunityServer’s settings.
About this task
The Lotus Sametime Community Server accepts connections from the LotusSametime Media Manager, the Lotus Sametime Gateway, the Lotus SametimeCommunity Mux, and the Lotus Sametime Proxy Server, as well as other serversthat are listed in the Community Services page. To ensure that the Lotus Sametime
Chapter 4. Migrating and upgrading 565
Community Server trusts these components when they establish a connection, youmust add the trusted server’s IP address to the Lotus Sametime CommunityServer.
You do not need to add the Lotus Sametime System Console’s IP address becauseit is added automatically when you install the Lotus Sametime Community Serverusing a deployment plan or register the Lotus Sametime Community Server withthe console after installation.
This task must be completed separately for each server within a Lotus SametimeCommunity Server cluster, as well as for multiple non-clustered CommunityServers.1. Log in to the Integrated Solutions Console.2. Click Sametime System Console → Sametime Servers → Sametime Community
Servers.3. In the Sametime Community Servers list, click the deployment name of the
server with the list of trusted IP addresses that you want to change.4. Click the Connectivity tab.5. Under Trusted Servers, enter the IP address of the server that must connect to
the Lotus Sametime Community Server in the New IP Address field, and clickAdd.
Note: For the Lotus Sametime Media Manager, enter the Conference Managerserver IP address. Each instance of a Conference Manager cluster must beentered.To delete an IP address from the list, select it and click Delete Selected.
6. Click OK.7. Restart the Lotus Sametime Community Server for the change to take effect.
Setting up a Lotus Sametime Meeting Server:
Before you can migrate meetings from an upgraded IBM Lotus Sametime server,you must install a Lotus Sametime Meeting Server and then set up URL redirectsfrom the upgraded server to the Lotus Sametime Meeting Server.
Installing a Lotus Sametime Meeting Server:
Follow the instructions for your operating system to install a Lotus SametimeMeeting Server.
Preparing the meeting server installation file on IBM i:
Follow these steps to customize the response.properties file to prepare for installingthe Lotus Sametime Meeting Server on IBM i.
Before you begin
You should have completed the preparation steps in ″Preparing to install LotusSametime on IBM i.″
About this task
Skip the first two steps if you are installing from physical media.1. Download the installation package if you have not already done so.
566 Lotus Sametime: Installation and Administration Guide Part 1
a. To download installation packages, you must have an IBM PassportAdvantage account, which is described at the following Web address:www.ibm.com/software/howtobuy/passportadvantage/paocustomer/docs/en_US/ecare.html
b. Open this release’s Download document at the following Web address:http://www.ibm.com/support/docview.wss?rs=477&uid=24024322
Locate the components you need in the document’s listing, then downloadthe packages labelled with the corresponding part numbers.
c. Use ftp or another convenient method to transfer the installation package tothe system where you plan to install the product. Store the file in an IFSdirectory of your choosing; for example:/MySametimePackages
2. Extract the installation files to the directory where you stored the installationpackage.a. From an IBM i command line, run the following command to start the
QShell Interpreter:QSH
b. Run the cd shell command, specifying the fully qualified path to theinstallation package directory; for example:cd /MySametimePackages
c. Run the following cd shell command, specifying the name of the .tar file:pax -r -C 819 -f name_of_installation_package
d. Press F3 to exit QSH.3. Review the IBM International Program License Agreement and ensure that you
agree to its terms before proceeding. The agreement is stored in the licensessubdirectory of the program image:/MySametimePackages/SametimeMeetingServer/IBMi/stii_stms/licenses
For DVD:/qopt/volume_ID/IBMi/stii_stms/licenses
4. Navigate to the program image directory, for example:/MySametimePackages/SametimeMeetingServer/IBMi/stii_stms
For DVD:/qopt/volume_ID/IBMi/stii_stms
5. Make a copy of the stms.default.response.properties file, using a name of yourchoosing. Store the copy in a location on the system that the installationprogram can access.
6. Customize your copy of the response.properties file with the settingsappropriate for your specific installation.For the database.db.user.id and database.db.user.password settings in the propertiesfile, specify the user profile and password you created to be the owner of theMeeting Server database schemas.There are special considerations if you are planning to install both theSametime Meeting Server and the Sametime Proxy Server on the same system.You will need to define a separate host name and IP address in addition to thedefault system host name and IP address. After both servers have beeninstalled, you will be directed to update the Host Alias table for the SametimeProxy Server so that it does not use the same host name and IP address as theSametime Meeting Server. This is necessary for live names to work correctly inmeeting rooms.
Chapter 4. Migrating and upgrading 567
Related tasks
“Preparing to install Lotus Sametime on IBM i” on page 249Follow these steps to prepare IBM i for Lotus Sametime server installations.
Creating the Meeting Server database schemas and tables on IBM i:
Run the script to create the database schemas for the IBM Lotus Sametime MeetingServer on IBM i.
Before you begin
You should have prepared the Meeting Server installation file as described in″Preparing the Meeting Server installation file on IBM i.″
About this task
On the IBM i system that will install the Sametime Meeting Server, follow thesesteps to create the database schema and tables:1. Log in with a user profile that has *ALLOBJ and *SECADM special authorities.
These authorities are required to create the database schemas. The databaseschemas will be created on the system specified in your copy of thestms.default.response.properties file and owned by the user profile specified inthe file.
2. From an IBM i command line, run the following command to start the QShellInterpreter:QSH
3. Run the cd shell command, specifying the fully qualified path to theinstallation kit directory; for example/MySametimePackages/SametimeMeetingServer/IBMi/stii_stms
For DVD:/qopt/volume_ID/IBMi/stii_stms
4. The POLICY schema is shared by the Meeting Server and the System Console.If the POLICY schema already exists, the Meeting Server database setup scriptwill only create the MTG schema.setupDB_stms.sh -Dinstall.response.file=path_and_name_of_customized_response.properties_file
5. When the script completes, press F3 to exit QSH.
Results
If the database schema creation was not successful, look at the script log for moreinformation about what occurred during the attempt. Fix the problem, then tryrunning the script again. The script log is stored in the following location.
/QIBM/UserData/Lotus/stii/logs
The log name contains the date and time in this form:
stms_dbsetup_yyyymmdd_hhmm.log
For example, this log was created at 3:07 A.M. on December 15, 2009:
stms_dbsetup_20091215_0307.log
568 Lotus Sametime: Installation and Administration Guide Part 1
Related tasks
“Preparing to install Lotus Sametime on IBM i” on page 249Follow these steps to prepare IBM i for Lotus Sametime server installations.
Installing a meeting server on IBM i:
Run the database schema and install scripts to set up the Lotus Sametime MeetingServer on IBM i.
Before you begin
If you intend to install from a downloaded image, you should have downloadedthe meeting server installation package. For all installations, you should havecompleted the preparation steps. The database schemas required for the MeetingServer (MTG and POLICY) should already exist.
About this task
Follow these steps to install the Lotus Sametime Meeting Server and WebSphereApplication Server.1. Log in using a profile with *ALLOBJ and *SECADM special authorities.2. Use the WRKSYSVAL command to check the setting for the QVFYOBJRST system
value and change it if necessary. The setting must be 3 or lower to install theSametime software.
3. From an IBM i command line, run the following command to start the QShellInterpreter:QSH
4. Run the cd shell command, specifying the fully qualified path to theinstallation kit directory; for example:/MySametimePackages/SametimeMeetingServer/IBMi/stii_stms
For DVD:cd /qopt/volume_ID/IBMi/stii_stms
5. Start the Meeting Server installation with the following shell command:install_stms.sh -Dinstall.response.file=path_and_name_of_customized_response.properties_file
6. When the script completes, press F3 to exit QSH.
Results
If the installation was not successful, look at the installation logs for moreinformation about what occurred during the installation attempt. Fix the problem,then try installing again. The installation logs are stored in the following location.
/QIBM/UserData/Lotus/stii/logs
The log name contains the date and time in this form:
install_STMEETINGS_yyyymmdd_hhmm.log
For example, this log was created at 3:07 A.M. on December 15, 2009:
install_STMEETINGS_20091215_0307.log
Chapter 4. Migrating and upgrading 569
What to do next
If this is the first installation of WebSphere Application Server on this system,follow steps for increasing the WebSphere Application Server usage limit. This taskneeds to be done only once on a system.
If you have installed both the Sametime Meeting Server and the Sametime ProxyServer on the same system, you must update the table of Host Aliases associatedwith the Sametime Proxy Server’s default_host virtual host so that it does not usethe same host name and IP address as the Sametime Meeting Server. Follow thesteps in Deploying Sametime Proxy Server and Sametime Meeting Server on thesame machine.Related tasks
“Preparing to install Lotus Sametime on IBM i” on page 249Follow these steps to prepare IBM i for Lotus Sametime server installations.
Connecting to a DB2 database:
Use the Lotus Sametime System Console to connect to the Lotus Sametime MeetingServer or Lotus Sametime Gateway database before installing the server from theSystem Console. If you installed the server without using the System Console (as isthe case with the Sametime Meeting Server on IBM i and Sametime Gateway onany platform), do this step before registering the server with the System Console.
Before you begin
Start the Lotus Sametime System Console if it is not already running.
About this task
If you have not already opened the Connect to DB2 Databases activity, follow thesesteps:1. From a browser, enter the following URL, replacing serverhostname.domain with
the fully qualified domain name of the Lotus Sametime System Console server.http://serverhostname.domain:8700/ibm/console
IBM i: The port number may not be 8700. Use the port that was listed in theSametime System Console installation results summary or use the settingspecified for the Administrative console secure port in the AboutThisProfile.txtfile. For the Sametime System Console Deployment Manager Profile(STSCDmgrProfile), the file is located in the following path:/QIBM/UserData/Websphere/AppServer/V7/SametimeWAS/profiles/STSCDmgrProfile/logs/AboutThisProfile.txt
2. Enter the WebSphere Application Server User ID and password that youcreated when you installed the Lotus Sametime System Console.
3. Click the Sametime System Console task to open it in the navigation tree.4. Click Sametime Prerequisites → Connect to DB2 Databases.Related tasks
“Starting the Lotus Sametime System Console” on page 231When started, the Lotus Sametime System Console runs as a task in the WebSphereApplication Server administrative console.
Sametime prerequisite: Connecting to a DB2 database:
570 Lotus Sametime: Installation and Administration Guide Part 1
This activity takes you through the steps for connecting to the Meeting Server orGateway database you created.
Before you begin
AIX, Linux, Solaris, Windows: Ensure that IBM DB2 has been installed and thatyou have created the Sametime Meeting Server or Gateway database.
IBM i: Ensure that you have created the required database schemas and tables.
In the Connect to DB2 Databases portlet, verify that the Lotus Sametime SystemConsole database you created earlier is already displayed in the list of databases.
About this task
Follow these steps to connect to the Meeting Server or Gateway database. Youmust do this before you can install the Meeting Server using the Sametime SystemConsole. If you installed the server without using the System Console (as is thecase with the Sametime Meeting Server on IBM i and Sametime Gateway on anyplatform), do this step before registering the server with the System Console.1. DB2 Configuration Guided Activity.
Click Add to begin the guided activity that will connect your server to the DB2database. If a connection already exists, you can optionally edit or delete it.
2. Add a new database.a. In the Connect to DB2 Databases portlet, click Add.
If you want to edit or delete a database instead, then select one, and clickthe appropriate button.
b. Enter the fully qualified host name of the DB2 server in the Host namefield.Do not enter an IP address or a short host name.
c. The Port field shows the default port of 50000. Accept the default unlessyou specified a different port during DB2 installation or your server is usinga different port.Linux: The default is typically 50001, but will vary based on portavailability. Check the /etc/services file on the DB2 server to verify theport number being used.
d. In the Database name, field, enter the name of the database you want toconnect to.Meeting Server database
On AIX, Linux, Solaris, and Windows, the database name is STMS unlessyou changed it.On IBM i, the name is always STMS.Gateway database
For AIX, Linux, Solaris, and Windows, the database name is STGWDBunless you changed it.For IBM i, use the name you specified when creating the database schemas.
e. In the Application user ID field, supply the DB2 application’sadministrative user name that you created when you installed DB2, such asdb2admin. This user has database administration authority and you will usethis user ID and password whenever you work with DB2 databases forLotus Sametime. On IBM i, this is the user profile you specified as theowner of the Meeting Server database schemas in your copy of the
Chapter 4. Migrating and upgrading 571
stms.default.response.properties file or the user profile you logged in withwhen you created the Gateway database schemas.
f. In the Application password field, enter the password for the DB2administrative user ID.
g. If you are connecting to a database on an IBM i server, click Hosted onIBM i.
h. Click Finish.
Registering a non-clustered IBM i Sametime server with the Lotus Sametime SystemConsole:
After installing a Lotus Sametime Community Server, Sametime Proxy Server, orSametime Meeting server on IBM i, register it with the Sametime System Consoleto allow you to manage all Sametime servers from a central location.
Before you begin
Before you register the server, verify that you have completed the following tasks.
Sametime Community Server
v The community server must be configured to use an LDAP directory.v The community server must be started.v The Lotus Sametime System Console must be started.v The LDAP server must be started.v The LDAP server must be connected to the Sametime System Console.
Sametime Proxy Server
v The Lotus Sametime System Console must be started.v The Community Server that the Proxy Server connects to must be registered
with the Sametime System Console.
Sametime Meeting Server
v The meeting server must be started.v The Lotus Sametime System Console must be started.v The LDAP server must be started.v The LDAP server must be connected to the Sametime System Console.v The Meeting Server database (STMS) must be connected to the Sametime System
Console.
About this task
Working from the Sametime server that you want to connect with the console,follow these steps to update properties files and run the registration utility toregister the server with the console.
During this task you will edit the following files; click the topic titles below to seedetails on each file. Use Ctrl+Click to open the topic in a new browser tab orwindow so you can keep it open for reference:v console.properties
v productConfig.properties
1. On the Sametime server you plan to register, navigate to the console directory.
572 Lotus Sametime: Installation and Administration Guide Part 1
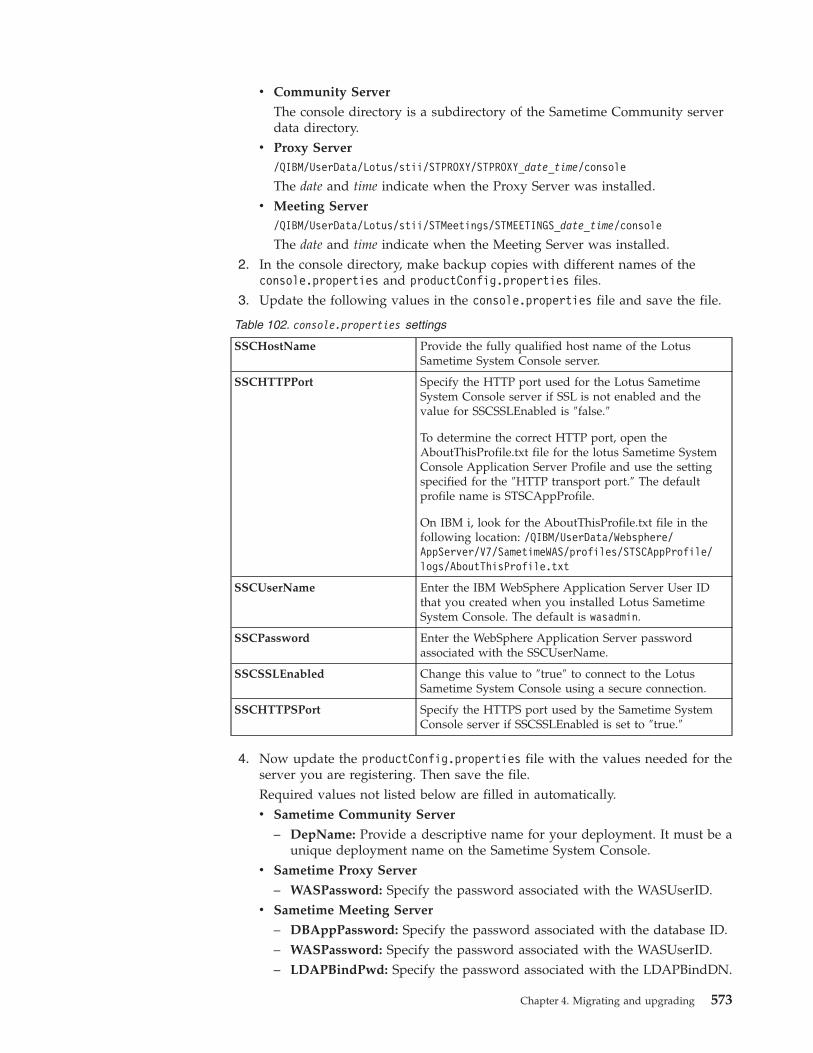
v Community Server
The console directory is a subdirectory of the Sametime Community serverdata directory.
v Proxy Server/QIBM/UserData/Lotus/stii/STPROXY/STPROXY_date_time/console
The date and time indicate when the Proxy Server was installed.v Meeting Server
/QIBM/UserData/Lotus/stii/STMeetings/STMEETINGS_date_time/console
The date and time indicate when the Meeting Server was installed.2. In the console directory, make backup copies with different names of the
console.properties and productConfig.properties files.3. Update the following values in the console.properties file and save the file.
Table 102. console.properties settings
SSCHostName Provide the fully qualified host name of the LotusSametime System Console server.
SSCHTTPPort Specify the HTTP port used for the Lotus SametimeSystem Console server if SSL is not enabled and thevalue for SSCSSLEnabled is ″false.″
To determine the correct HTTP port, open theAboutThisProfile.txt file for the lotus Sametime SystemConsole Application Server Profile and use the settingspecified for the ″HTTP transport port.″ The defaultprofile name is STSCAppProfile.
On IBM i, look for the AboutThisProfile.txt file in thefollowing location: /QIBM/UserData/Websphere/AppServer/V7/SametimeWAS/profiles/STSCAppProfile/logs/AboutThisProfile.txt
SSCUserName Enter the IBM WebSphere Application Server User IDthat you created when you installed Lotus SametimeSystem Console. The default is wasadmin.
SSCPassword Enter the WebSphere Application Server passwordassociated with the SSCUserName.
SSCSSLEnabled Change this value to ″true″ to connect to the LotusSametime System Console using a secure connection.
SSCHTTPSPort Specify the HTTPS port used by the Sametime SystemConsole server if SSCSSLEnabled is set to ″true.″
4. Now update the productConfig.properties file with the values needed for theserver you are registering. Then save the file.Required values not listed below are filled in automatically.v Sametime Community Server
– DepName: Provide a descriptive name for your deployment. It must be aunique deployment name on the Sametime System Console.
v Sametime Proxy Server
– WASPassword: Specify the password associated with the WASUserID.v Sametime Meeting Server
– DBAppPassword: Specify the password associated with the database ID.– WASPassword: Specify the password associated with the WASUserID.– LDAPBindPwd: Specify the password associated with the LDAPBindDN.
Chapter 4. Migrating and upgrading 573
5. If you are registering a Sametime Community Server or Meeting Server, startthe server. Otherwise, proceed to the next step.
6. From an IBM i command line, run the following command to start the QShellInterpreter:QSH
7. Run the cd shell command, specifying the fully qualified path to the consoledirectory you used in Step 1.
8. Run the appropriate shell script to register the server:v Sametime Community Server
registerSTServerNode.sh
When prompted, specify the following information:– Full path to the Sametime Community server data directory where the
notes.ini file is located.– The Community Server Administrator ID and password.
v Other servers
registerProduct.sh
9. When the registration script completes, press F3 to exit QSH.10. On the Lotus Sametime Community Server, modify the sametime.ini file:
a. Navigate to the Sametime data directory and open the sametime.ini file ina text editor.
b. Find the [Policy] section of the file.c. Move (do not copy) the line ST_DB_LDAP_ALLOW_SEARCH_ON_DN=1 to the
[Directory] section of the file.d. Close and save the file.e. Restart the server.
Verifying a meeting server installation:
Log in to the Lotus Sametime Meeting Server to verify that the installation wassuccessful.
About this task
Verify the installation by logging in to the server and creating a new meetingroom.1. From a Web browser, navigate to the Meeting Room Center by entering the
following URL:http://serverhostname.domain:port/stmeetings
Replace serverhostname.domain with the fully qualified domain name of theMeeting server; for example:
Tip: To verify the HTTP port number being used by the Lotus SametimeMeeting Server, open the AboutThisProfile.txt file for the Sametime MeetingApplication Server Profile and use the setting specified for the HTTP transportport. The default profile name is STMAppProfile. On IBM i, look for theAboutThisProfile.txt file in the following location: /QIBM/UserData/Websphere/AppServer/V7/SametimeWAS/profiles/STMAppProfile/logs/AboutThisProfile.txt
http://st85ms1.acme.com:9080/stmeetings
574 Lotus Sametime: Installation and Administration Guide Part 1
Note: By default, the WebSphere proxy listens on port 80, and forwards to theLotus Sametime Meeting Server on port 9080.
2. Click Log In and then enter your User name and Password to log in to theMeeting Center.
3. Click New Meeting Room, then fill in the fields and click Save.4. The new meeting appears in the list of meetings that you own. Click Enter
Meeting Room below the name of the new meeting to join the meeting.
Setting up URL redirects to migrate meetings:
After you install the new IBM Lotus Sametime 8.5 Meeting Server, you are readyto migrate meetings. Rather than transfer meeting schedules and associated datafrom the legacy server to the new server, you will set up URL redirects thatautomatically link users to the appropriate meeting room on the new server.
Configuring the upgraded server to issue redirects to a Meeting Server:
Configure an upgraded IBM Lotus Sametime server to issue a redirect to a URLhosted on the new Lotus Sametime 8.5 Meeting Server.
About this task
You can complete this task on the following servers:v One or more upgraded Lotus Sametime 8.5 servers with meetingsv One or more pre-8.5 Lotus Sametime server with meetings enabledv Multiple pre-8.5 Lotus Sametime servers (with meetings enabled) that are
clustered with the Lotus Sametime Enterprise Meeting Server
Lotus Sametime 8.5 does not directly support the Lotus Sametime EnterpriseMeeting Server, so you cannot cluster upgraded Lotus Sametime 8.5 meeting roomsas in previous releases. However, you can set up URL redirects from pre-8.5servers that are clustered with the Lotus Sametime Enterprise Meeting Server.1. Enable redirects on the Lotus Sametime Community Mux:
a. Open the sametime.ini file on the server where the Community Mux ishosted.On AIX, Linux, Windows, and Solaris, the sametime.ini file is stored in theSametime server installation directory; for example on Microsoft Windows,the default path is: C:\program files\lotus\domino. On IBM i, thesametime.ini file is stored in the Sametime server data directory.If the Community Mux is local, use the Lotus Sametime server’s ownsametime.ini file. If you deployed a stand-alone Community Mux, open thesametime.ini file on that server.
b. Add the following statement to the [Config] section of the file:VPMX_HTTP_REDIRECT_ENABLE_RELATIVE=0
c. Close and save the file.d. Restart the stand-alone Community Mux so the change can take effect.
For a local Community Mux, there’s no need to restart the Lotus Sametimeserver yet, as you will do that when you complete the redirect task.
e. If you deployed multiple stand-alone Community Mux servers, repeat thisprocess on each one.
2. On the upgraded Lotus Sametime server, establish a redirect to the newMeeting Server:
Chapter 4. Migrating and upgrading 575
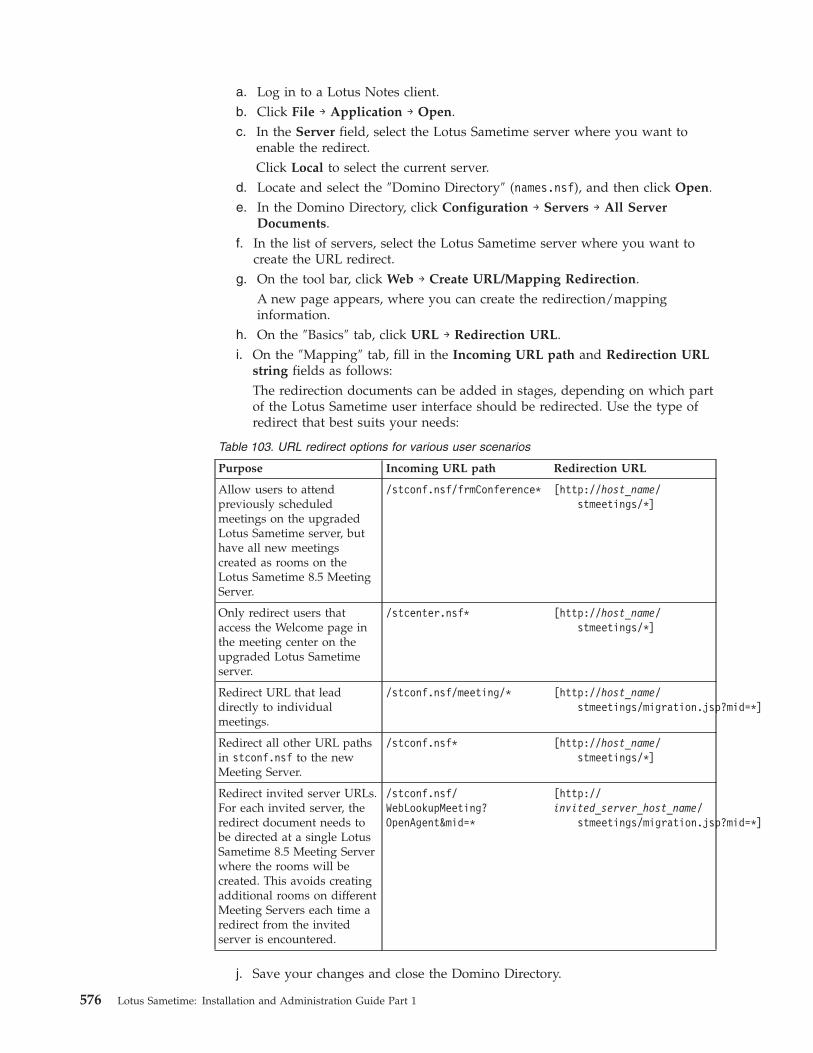
a. Log in to a Lotus Notes client.b. Click File → Application → Open.c. In the Server field, select the Lotus Sametime server where you want to
enable the redirect.Click Local to select the current server.
d. Locate and select the ″Domino Directory″ (names.nsf), and then click Open.e. In the Domino Directory, click Configuration → Servers → All Server
Documents.f. In the list of servers, select the Lotus Sametime server where you want to
create the URL redirect.g. On the tool bar, click Web → Create URL/Mapping Redirection.
A new page appears, where you can create the redirection/mappinginformation.
h. On the ″Basics″ tab, click URL → Redirection URL.i. On the ″Mapping″ tab, fill in the Incoming URL path and Redirection URL
string fields as follows:The redirection documents can be added in stages, depending on which partof the Lotus Sametime user interface should be redirected. Use the type ofredirect that best suits your needs:
Table 103. URL redirect options for various user scenarios
Purpose Incoming URL path Redirection URL
Allow users to attendpreviously scheduledmeetings on the upgradedLotus Sametime server, buthave all new meetingscreated as rooms on theLotus Sametime 8.5 MeetingServer.
/stconf.nsf/frmConference* [http://host_name/stmeetings/*]
Only redirect users thataccess the Welcome page inthe meeting center on theupgraded Lotus Sametimeserver.
/stcenter.nsf* [http://host_name/stmeetings/*]
Redirect URL that leaddirectly to individualmeetings.
/stconf.nsf/meeting/* [http://host_name/stmeetings/migration.jsp?mid=*]
Redirect all other URL pathsin stconf.nsf to the newMeeting Server.
/stconf.nsf* [http://host_name/stmeetings/*]
Redirect invited server URLs.For each invited server, theredirect document needs tobe directed at a single LotusSametime 8.5 Meeting Serverwhere the rooms will becreated. This avoids creatingadditional rooms on differentMeeting Servers each time aredirect from the invitedserver is encountered.
/stconf.nsf/WebLookupMeeting?OpenAgent&mid=*
[http://invited_server_host_name/
stmeetings/migration.jsp?mid=*]
j. Save your changes and close the Domino Directory.
576 Lotus Sametime: Installation and Administration Guide Part 1

k. Repeat this process for every upgraded Lotus Sametime server that youwant to redirect to a new Meeting Server.
Configuring the Meeting Server to accept redirects from the upgraded Lotus Sametimeserver:
Configure an IBM Lotus Sametime Meeting Server to accept URL redirects from anupgraded Lotus Sametime server or from a Lotus Sametime Enterprise MeetingServer cluster.
About this task
Establishing URL redirect to a Lotus Sametime Meeting Server uses the REST APIprovided by the Lotus Sametime Online Meeting Toolkit (included in the LotusSametime Software Development Kit). The Meeting Server uses the Online MeetingToolkit to transfer meeting data from the upgraded Lotus Sametime server to thenew Meeting Server.
The enable the redirect, the new Meeting Server must be configured to beassociated the with URL of a particular Lotus Sametime server.
You can complete this task on the following servers:v One or more upgraded Lotus Sametime 8.5 servers with meetingsv One or more pre-8.5 Lotus Sametime server with meetings enabledv Multiple pre-8.5 Lotus Sametime servers (with meetings enabled) that are
clustered with the Lotus Sametime Enterprise Meeting Server
Lotus Sametime 8.5 does not directly support the Lotus Sametime EnterpriseMeeting Server, so you cannot cluster upgraded Lotus Sametime 8.5 meeting roomsas in previous releases. However, you can set up URL redirects from pre-8.5servers that are clustered with the Lotus Sametime Enterprise Meeting Server.1. Log in to the Lotus Sametime System Console as the Sametime administrator.2. Click Sametime Servers → Sametime Meeting Servers.3. In the ″Meeting Servers″ list, click the name of the server that will accept
redirects from a particular Lotus Sametime server.4. Click the Server Configuration tab.5. Click Edit.6. Type restapi.migrationUrl as the name of the new configuration key.7. Now assign one of the following values to the key, depending on whether the
Lotus Sametime server is clustered with Lotus Sametime Enterprise MeetingServer:v Lotus Sametime server (non-clustered): http://host_name/servlet/meeting/
v Lotus Sametime Enterprise Meeting Server (cluster): http://host_name/iwc/sametime/meeting/
For host_name, supply the Lotus Sametime server’s fully qualified host name;for example: ststd1.acme.com
8. Click OK.
Expanding the deployment with optional 8.5 components:
After you have upgraded your IBM Lotus Sametime deployment and migratedmeetings to the new Lotus Sametime Meeting Server, you may want to integrateadditional components into your deployment.
Chapter 4. Migrating and upgrading 577
About this task
The following components are not required for upgrading a Lotus Sametime serverand migrating meetings, but provide additional capabilities to a Lotus Sametimedeployment:v Lotus Sametime Media Manager: Provides audio and video features for instant
messaging and online meetings.For more information, see Planning a Lotus Sametime Media Managerinstallation.
v Lotus Sametime Gateway: Provides instant messaging with externalcommunities, including:– Lotus Sametime communities deployed outside of your firewall– AOL Instant Messenger– Google Talk– Yahoo MessengerFor more information, see Planning a Lotus Sametime Gateway installation.
Upgrading Lotus Sametime GatewayUpgrade IBM Lotus Sametime Gateway and IBM WebSphere Application Serverfrom any previous release.
Before you begin
When upgrading to release 8.5, you must upgrade the WebSphere ApplicationServer as well as the Lotus Sametime Gateway software. IBM DB2 does not requireupgrading, but you will need to run scripts that update the database schema.
Upgrade WebSphere Application server and Lotus Sametime Gateway to release8.5 by installing them directly over your earlier version. If you have multipleinstances of Lotus Sametime Gateway installed on a single computer, you mustupgrade each instance in turn.
About this task
Lotus Sametime 8.5 Gateway can upgrade directly only from release 8.0.2; if youare using an earlier release of the Gateway, you must either upgrade to release8.0.2 or install release 8.5 as a new deployment.
Backing up data: It is recommended that you take a complete snapshot of theenvironment prior to upgrading (for example, create a ghost image, pull out amirrored disk (RAID-1) before starting, or creating a VMWare snapshot). If a fullbackup of this sort is not available, then a rollback from an upgrade failure mightnot be possible. To help expedite a new fresh install (in case of an unrecoverableupgrade failure) backup the following directories, prior to the upgrade:v Linux:
/opt/IBM/WebSphere/opt/.ibm/
v Windows:\Program Files\IBM\WebSphere\
578 Lotus Sametime: Installation and Administration Guide Part 1
Preserving certificates: You can preserve your CA certificates that you had signedand used on the old installation as long as you are using the same host name.When upgrading the server, certificates are automatically preserved for you.
Upgrading clusters: When upgrading a cluster, you must know the cluster namewhen you upgrade the Deployment Manager server. To view the cluster name inthe Integrated Solutions Console, click Servers → Clusters . The default clustername in Sametime Gateway is RTCGW_Cluster.
Before you upgrade the product software, you will need to remove the cluster andthen remove all nodes from the Deployment Manager. After you have upgraded allinstances of the product, you will recreate the cluster.
Upgrading the DB2 serverThe edition of IBM DB2 that is used in this release IBM Lotus Sametime is notcompatible with the edition used in earlier releases, so you should not upgrade theDB2 server used by your Lotus Sametime Gateway deployment.
About this task
Previous releases of Lotus Sametime Gateway used the Enterprise edition of theDB2 database server. This release of Lotus Sametime uses the Limited Use edition;you cannot migrate from the Enterprise edition to the Limited Use edition.
If you are upgrading your Lotus Sametime Gateway deployment, you shouldretain your existing DB2 installation for it. The new installation program willupgrade the database schema automatically; when the upgrade is complete, thedatabase will be ready for use.
Note: You will still need to install DB2 9.5 Limited Use edition for the LotusSametime System Console and the Lotus Sametime Meeting Server, but anupgraded Lotus Sametime Gateway server cannot use it.
Upgrading Lotus Sametime Gateway serversUpgrade an existing IBM Lotus Sametime Gateway stand-alone or clustered server.
Backing up the Sametime Gateway environmentIBM recommends that you back up your IBM Lotus Sametime Gatewayenvironment before you start the upgrade process.
About this task
For each Lotus Sametime Gateway server, run a server file system cold backup, sothat the whole file system can be rolled back in case the upgrade fails. There is nooption to backup and rollback specific directories; the whole file system should bebacked up. If Lotus Sametime Gateway is installed on a Virtual Machine, you cantake a snapshot before continuing any farther.
Upgrading a stand-alone Lotus Sametime Gateway serverUpgrading a stand-alone IBM Lotus Sametime Gateway server requires upgradingthe IBM WebSphere Application Server application as well as the Lotus SametimeGateway application. The installation program upgrades both applications to thenewest version. After you have finished upgrading the server, you will need toregister it with the Lotus Sametime System Console so it can be administered fromthat central location.
Chapter 4. Migrating and upgrading 579
About this task
When the installation program installs the newer version of WebSphereApplication Server on a computer, it overwrites most of the previous version;however, it leaves the AppServer directory intact and creates a new AppServer7directory. This is because the original AppServer directory is still needed on anupgraded server, for the following reasons:v Not all profiles on a server will necessarily be upgraded to Lotus Sametime
release 8.5, and the AppServer directory is still needed for those profiles that arenot being upgraded.
v Of the profiles that are upgraded, the active profile will exist under AppServer7but there will still be a backup profile under the original AppServer directory.
v Once a server is upgrade to release 8.5, all server administration operations mustbe performed underneath the AppServer7/profiles/Profile_Name tree.
Upgrading all profiles on a Lotus Sametime Gateway server:
Upgrading an existing Lotus Sametime Gateway server involves upgrading theIBM WebSphere Application Server as well as the IBM Lotus Sametime Gatewayserver for every instance of the product that is installed on the computer.
Upgrading a Windows server:
Upgrade IBM Lotus Sametime Gateway on Microsoft Windows server. Theinstallation wizard upgrades both Lotus Sametime Gateway and IBM WebSphereApplication Server to the latest versions.
Before you begin
Stop all instances of Lotus Sametime Gateway and WebSphere Application Serveron the current computer.
About this task
Upgrade all Lotus Sametime Gateway instances in your deployment. If a serverhas multiple instances of the Gateway, you must upgrade every instance separately(this is likely to be the case when you upgrade a cluster). Each upgrade willrequire you to run the Gateway installation program again, specifying the targetinstance to be upgraded during each run. Note that the server hosting a cluster’sDeployment Manager also hosts the Primary Node; it is important to make sureyou upgrade the Deployment Manager first; then when you upgrade the PrimaryNode, you specify that profile’s install path instead.
When you are finished upgrading, your server will contain WebSphere ApplicationServer Network Deployment 7 and Lotus Sametime Gateway 8.5.1. Create the temporary file folder \TMP\WASCD.2. From the installation media, copy the WebSphere Application Server
installation image part_number.exe to the folder \TMP\WASCD.The Lotus Sametime Download document lists the part numbers for eachsoftware component and explains how to download them.
3. Open a command window and navigate to the folder \TMP\WASCD.4. Extract all files to the temporary directory \TMP\WASCD. When you are done
extracting the files, you should have a \TMP\WASCD\ifpackage folder with WASand JDK folders inside the ifpackage folder.
580 Lotus Sametime: Installation and Administration Guide Part 1
5. From the installation media, copy the Sametime Gateway installation imagepart_number.exe to the \TMP folder.
6. In the \TMP folder, create a subfolder called SametimeGateway.7. Extract the files in part_number.exe into the \TMP\SametimeGateway folder.8. Open a command window and type the following command:
v For wizard mode: install.batv For console mode: install.bat -console
Attention: If one or more of the DNS addresses in your environment (forexample: WebSphere Application Server installation host name, DB2 hostname, or LDAP host name) refers to an IPv6–format address, add thefollowing option to your install command to work around an IPv6–relatedissue with the installer:install.bat -V BypassWasInfoCheck=true
Because your input will not be verified during installation, you should takeextra care when typing values.
9. Select the language for the installation wizard and click OK. The LotusSametime Gateway Welcome screen is displayed. You can launch theSametime information center from this panel.
10. Click Next to continue with the installation. The Software License Agreementdialog is displayed. Read the license agreement carefully. Select theappropriate radio button option to accept the terms if you agree with thestatement and click Next to proceed with the installation.
11. Select Upgrade an existing instance of Sametime Gateway.12. On the same panel, review the location of the Sametime Gateway instance to
upgrade. If the location is okay, click Next.13. Type or click Browse to select the path to where you extracted the WebSphere
Application Server installation files from the CD, and click Next.Do not use quotation marks. This directory should contain the WAS and JDKsubdirectories. It is very important that you select the parent directory and notthe subdirectory. For example: use C:\TMP\WASCD\ifpackage but do not useC:\TMP\WASCD\ifpackage\WAS or C:\TMP\WASCD\ifpackage\JDK.
Important: If you are upgrading the server that contains the DeploymentManager and the Primary Node for a cluster, you must upgrade theDeployment Manager first to ensure proper functionality.
14. If you are upgrading the Deployment Manager server, type the name of theexisting cluster. Tip: To obtain the cluster name from the Integrated SolutionsConsole, click Servers → Clusters. The default cluster name is RTCGW_Cluster.
15. Click Next to enter database properties.
Option Description
Host name The fully qualified host name or TCP/IPaddress of the database server.
Port Port number on the database server(typically 50000).
Database name The name of the database that you created.If you used the default database name, typeSTGW. Case does not matter.
Chapter 4. Migrating and upgrading 581

Option Description
Application user ID A database user ID that has permission toconnect to the database and read or writerecords. The application user ID is often thesame as the schema owner user ID.
Application password The password for the application user. Theapplication password is often the same asthe schema owner password.
Schema user ID The ID for the user that has appropriatepermissions to create tables in the database.You may need to get this information fromthe database administrator. The schema userID is often the same as the application userID.
Schema password The password for the schema owner. Youmay need to get this information from thedatabase administrator. The schemapassword is often the same as theapplication password.
16. Review the installation summary settings and, if necessary, click Back to makechanges.
17. Click Install to begin copying files.A progress screen is displayed and the activity is logged to the LotusSametime Gateway log file. The upgrade process is in two stages. The firststage upgrades Sametime Gateway and takes 5 to 20 minutes. The secondstage upgrades WebSphere Application Server and takes another 15 to 20minutes to complete.When the upgrades are complete, the wizard displays a message indicating asuccessful installation.
18. Read the summary and click Finish.To view the installation log, click View log file or open the log file atstgw_server_root\logs\installlog.txt.
Upgrading an AIX, Linux, or Solaris server:
Upgrade IBM Lotus Sametime Gateway on IBM AIX, Linux, or Sun SolarisWindows server. The installation wizard upgrades both Lotus Sametime Gatewayand IBM WebSphere Application Server to the latest versions.
Before you begin
Stop all instances of Lotus Sametime Gateway and WebSphere Application Serveron the current computer.
About this task
Upgrade all Lotus Sametime Gateway instances in your deployment. If a serverhas multiple instances of the Gateway, you must upgrade every instance separately(this is likely to be the case when you upgrade a cluster). Each upgrade willrequire you to run the Gateway installation program again, specifying the targetinstance to be upgraded during each run. Note that the server hosting a cluster’sDeployment Manager also hosts the Primary Node; it is important to make sure
582 Lotus Sametime: Installation and Administration Guide Part 1
you upgrade the Deployment Manager first; then when you upgrade the PrimaryNode, you specify that profile’s install path instead.
When you are finished upgrading, your server will contain WebSphere ApplicationServer Network Deployment 7 and Lotus Sametime Gateway 8.5.1. Create the temporary file folder /TMP/WASCD.2. From the installation media, copy the WebSphere Application Server
installation image for your operating system to /TMP/WASCD.The Lotus Sametime Download document lists the part numbers for eachsoftware component and explains how to download them.
3. Open a command window and navigate to the directory /TMP/WASCD.4. Run the following command to uncompress the files:
gunzip -c part_number.tar.gz | tar -xvf -
When you are done extracting the files, you should have the following folder:/TMP/WASCD/ifpackage
Verify that you have WAS and JDK folders inside the ifpackage folder.5. From the installation media, copy the Lotus Sametime Gateway installation
image part_number.tar to the temporary directory /TMP.6. In the /TMP directory, create a subdirectory called SametimeGateway.7. Uncompress the following file into the /TMP/SametimeGateway directory:
unzip part_number.tar
8. Navigate to the folder /TMP/SametimeGateway and type one of the followingcommands:v For wizard mode: ./install.shv For console mode: ./install.sh -console
Attention: If one or more of the DNS addresses in your environment (forexample: WebSphere Application Server installation host name, DB2 hostname, or LDAP host name) refers to an IPv6–format address, add thefollowing option to your install command to work around an IPv6–relatedissue with the installer:./install.sh -V BypassWasInfoCheck=true
Because your input will not be verified during installation, you should takeextra care when typing values.
9. Select the language for the installation wizard and click OK. The LotusSametime Gateway Welcome screen is displayed. You can launch theSametime information center from this panel.
10. Click Next to continue with the installation. The Software License Agreementdialog is displayed. Read the license agreement carefully. Select theappropriate radio button option to accept the terms if you agree with thestatement and click Next to proceed with the installation.
11. Select Upgrade an existing instance of Sametime Gateway.12. On the same panel, review the location of the Sametime Gateway instance to
upgrade. If the location is okay, click Next.13. Type or click Browse to select the path to where you extracted the WebSphere
Application Server installation files from the CD.
Chapter 4. Migrating and upgrading 583
This directory should contain the WAS and JDK subdirectories. It is veryimportant that you select the parent directory and not the subdirectory. Forexample: use /TMP/WASCD/ifpackage but do not use /TMP/WASCD/ifpackage/WASor /TMP/WASCD/ifpackage/JDK.
Important: If you are upgrading the server that contains the DeploymentManager and the Primary Node for a cluster, you must upgrade theDeployment Manager first to ensure proper functionality.
14. If you are upgrading the Deployment Manager server, type the name of theexisting cluster. Tip: To obtain the cluster name from the Integrated SolutionsConsole, click Servers → Clusters. The default cluster name is RTCGW_Cluster.
15. Click Next to enter database properties.
Option Description
Host name The Fully qualified host name or TCP/IPaddress of the database server.
Port Port number on the database server(typically 50001).
Database name The name of the database that you created.If you used the default database name, typeSTGW. Case does not matter.
Application user ID A database user ID that has permission toconnect to the database and read or writerecords. The application user ID is often thesame as the schema owner user ID.
Application password The password for the application user. Theapplication password is often the same asthe schema owner password.
Schema user ID The ID for the user that has appropriatepermissions to create tables in the database.You may need to get this information fromthe database administrator. The schema userID is often the same as the application userID.
Schema password The password for the schema owner. Youmay need to get this information from thedatabase administrator. The schemapassword is often the same as theapplication password.
16. Review the installation summary settings and, if necessary, click Back to makechanges.
17. Click Install to begin copying files.A progress screen is displayed and the activity is logged to the LotusSametime Gateway log file. The upgrade process is in two stages. The firststage upgrades Sametime Gateway and takes 5 to 20 minutes. The secondstage upgrades WebSphere Application Server and takes another 15 to 20minutes to complete.When the upgrades are complete, the wizard displays a message indicating asuccessful installation.
18. Read the summary and click Finish.To view the installation log, click View log file or open the log file atstgw_server_root/logs/installlog.txt.
584 Lotus Sametime: Installation and Administration Guide Part 1
Upgrading a Lotus Sametime Gateway server on IBM i:
Upgrading an IBM Lotus Sametime Gateway server on IBM i is a two-step process.First you must upgrade the previous version of IBM WebSphere ApplicationServer, and then you upgrade Lotus Sametime Gateway on the same computer.
Upgrading WebSphere Application Server on IBM i:
Upgrade IBM WebSphere Application Server on IBM i before you upgrade IBMLotus Sametime Gateway. The installation wizard upgrades WebSphere ApplicationServer to the latest version.
Before you begin
Stop all instances of Lotus Sametime Gateway and WebSphere Application Serveron the current computer.
You must have *ALLOBJ and *SECADM authorities to successfully complete theupgrade.
About this task
Upgrade all Lotus Sametime Gateway instances in your deployment. If a serverhas multiple instances of the Gateway, you must upgrade every instance separately(this is likely to be the case when you upgrade a cluster). Each upgrade willrequire you to run the Gateway installation program again, specifying the targetinstance to be upgraded during each run. Note that the server hosting a cluster’sDeployment Manager also hosts the Primary Node; it is important to make sureyou upgrade the Deployment Manager first; then when you upgrade the PrimaryNode, you specify that profile’s install path instead.
When you are finished upgrading, your server will contain WebSphere ApplicationServer Network Deployment 7 and Lotus Sametime Gateway 8.5.1. Create the temporary file folder /TMP/WASCD on a computer that can connect to
the IBM i system.2. Copy the file part_number.zip to the temporary folder /TMP/WASCD.
The Lotus Sametime Download document lists the part numbers for eachsoftware component and explains how to download them.
3. Open a command window and navigate to the folder /TMP/WASCD.4. Extract all files to the temporary directory /TMP/WASCD. When you are done
extracting the files, you should have a /TMP/WASCD/ifpackage folder with WASand JDK folders inside the ifpackage folder.
5. Copy the ifpackage folder to the IFS of the IBM i system.6. In the folder you copied to the IFS of the IBM i system, edit the file
ifpackage/WAS/responsefile.nd.txt
7. Accept the license to install. Read the comments in the file regarding LicenseAcceptance and then set the value of silentInstallLicenseAcceptance to true.For example:-OPT silentInstallLicenseAcceptance="true"
8. Set the option installType to installAndPatch. For example:-OPT installType="installAndPatch"
9. Set the option installLocation to the location of the WebSphere ApplicationServer to be updated. For example:
Chapter 4. Migrating and upgrading 585
-OPT installLocation="/QIBM/ProdData/WebSphere/AppServer/V61/ND"
10. Save the file.11. Start a QSHELL session.12. Before running the install to update the product, the classes directory from the
installation location must be removed. You can do this by issuing a move (mv)command./QIBM/ProdData/WebSphere/AppServer/V61/ND/classes /tmp/was_classes
13. Navigate to the ifpackage/WAS directory.14. Run the following command:
install -options responsefile.nd.txt
15. When the installation is successful, you will see a message such as this:(Nov 29, 2009 5:19:59 AM), Process, com.ibm.ws.install.ni.ismp.actions.ISMPLogSuccessMessageAction, msg1, INSTCONFSUCCESS.install.ni.ismp.actions.ISMPLogSuccessMessageAction,msg1, INSTCONFSUCCESS
Upgrading Lotus Sametime Gateway on IBM i:
Upgrade IBM Lotus Sametime Gateway on an IBM i server. The installation wizardupgrades Lotus Sametime Gateway to the latest version.
Before you begin
Upgrade IBM WebSphere Application Server on this computer before attempting toupgrade Lotus Sametime Gateway.
Stop all instances of Lotus Sametime Gateway on the current computer.
You must have *ALLOBJ and *SECADM authorities to successfully complete theupgrade.
About this task
IBM i allows multiple instances of Lotus Sametime Gateway to be installed on asingle IBM i system. If a Lotus Sametime Gateway server is running while youinstall a new Lotus Sametime Gateway server, the running server must be restartedbefore you can use the Integrated Solutions Console to administer Lotus SametimeGateway.
Upgrade all Lotus Sametime Gateway instances in your deployment. If a serverhas multiple instances of the Gateway, you must upgrade every instance separately(this is likely to be the case when you upgrade a cluster). Each upgrade willrequire you to run the Gateway installation program again, specifying the targetinstance to be upgraded during each run. Note that the server hosting a cluster’sDeployment Manager also hosts the Primary Node; it is important to make sureyou upgrade the Deployment Manager first; then when you upgrade the PrimaryNode, you specify that profile’s install path instead.
When you are finished upgrading, your server will contain WebSphere ApplicationServer Network Deployment 7 and Lotus Sametime Gateway 8.5.1. From the installation media, copy the Lotus Sametime Gateway installation
image (part_number.exe) to a temporary directory such as /TMP.The Lotus Sametime Download document lists the part numbers for eachsoftware component and explains how to download them.
586 Lotus Sametime: Installation and Administration Guide Part 1

2. In the /TMP directory, create a subdirectory called SametimeGateway.3. Extract the contents of part_number.exe to the /TMP/SametimeGateway
directory.4. Navigate to the folder: /TMP/SametimeGateway.5. You can run the installer in wizard mode or in console mode. Use the wizard
mode if you are installing from a PC to the IBM i system.
Important: If you are installing on an IPv6–enabled server, you must use thesecond option below to install using the console.v To run the installer in wizard mode, type the following command:
installi5OS.bat
v To run the installer in console mode, perform these steps:a. Copy the directory /TMP/SametimeGateway to the IFS of the IBM i system.b. Start a QSHELL session.c. Navigate to the /TMP/SametimeGateway directory and type the following
command:install.sh -console
Attention: If one or more of the DNS addresses in your environment (forexample: WebSphere Application Server installation host name, DB2 hostname, or LDAP host name) refers to an IPv6–format address, add thefollowing option to your install command to work around an IPv6–relatedissue with the installer:install.sh -V BypassWasInfoCheck=true
Because your input will not be verified during installation, you should takeextra care when typing values.
6. Select the language for the installation and click OK. The Lotus SametimeGateway Welcome screen is displayed. If you are installing in wizard mode,you can launch the Lotus Sametime Information Center from this panel. ClickNext to continue with the installation.
7. Click Next to continue with the installation. The Software License Agreementdialog is displayed. Please make sure to read the license agreement carefully.Select the appropriate radio button option to accept the license agreement ifyou agree with the statement and click Next to proceed with the installation.
8. Select Upgrade an existing instance of Sametime Gateway. The installationwizard displays the location of the installed Sametime Gateway server on thismachine. Change the location of the existing Sametime Gateway server to thestgw_server_root of the server you’d like to upgrade, if necessary, then clickNext.
Important: If you are upgrading the server that contains the DeploymentManager and the Primary Node for a cluster, you must upgrade theDeployment Manager first to ensure proper functionality.
9. If you are upgrading the Deployment Manager server, type the name of thecluster to which Lotus Sametime Gateway belongs.
Tip: To obtain the cluster name from the Integrated Solutions Console, clickServers → Clusters . The default cluster name is RTCGW_Cluster.
Chapter 4. Migrating and upgrading 587
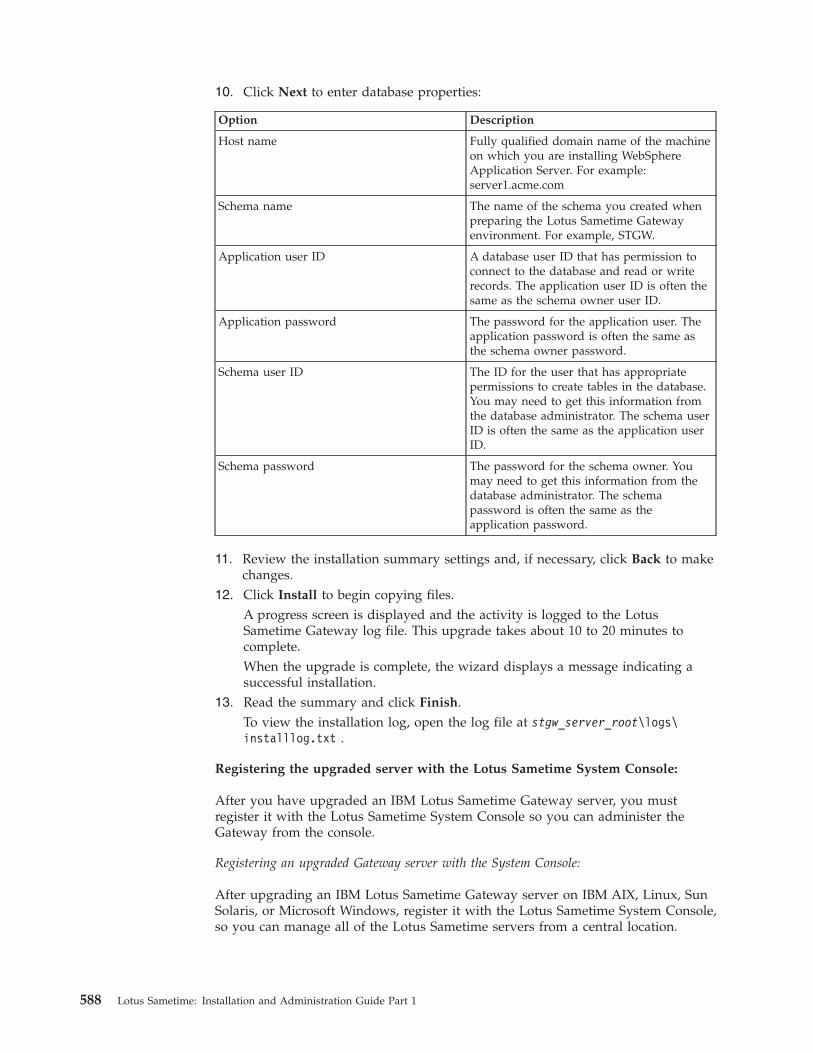
10. Click Next to enter database properties:
Option Description
Host name Fully qualified domain name of the machineon which you are installing WebSphereApplication Server. For example:server1.acme.com
Schema name The name of the schema you created whenpreparing the Lotus Sametime Gatewayenvironment. For example, STGW.
Application user ID A database user ID that has permission toconnect to the database and read or writerecords. The application user ID is often thesame as the schema owner user ID.
Application password The password for the application user. Theapplication password is often the same asthe schema owner password.
Schema user ID The ID for the user that has appropriatepermissions to create tables in the database.You may need to get this information fromthe database administrator. The schema userID is often the same as the application userID.
Schema password The password for the schema owner. Youmay need to get this information from thedatabase administrator. The schemapassword is often the same as theapplication password.
11. Review the installation summary settings and, if necessary, click Back to makechanges.
12. Click Install to begin copying files.A progress screen is displayed and the activity is logged to the LotusSametime Gateway log file. This upgrade takes about 10 to 20 minutes tocomplete.When the upgrade is complete, the wizard displays a message indicating asuccessful installation.
13. Read the summary and click Finish.To view the installation log, open the log file at stgw_server_root\logs\installlog.txt .
Registering the upgraded server with the Lotus Sametime System Console:
After you have upgraded an IBM Lotus Sametime Gateway server, you mustregister it with the Lotus Sametime System Console so you can administer theGateway from the console.
Registering an upgraded Gateway server with the System Console:
After upgrading an IBM Lotus Sametime Gateway server on IBM AIX, Linux, SunSolaris, or Microsoft Windows, register it with the Lotus Sametime System Console,so you can manage all of the Lotus Sametime servers from a central location.
588 Lotus Sametime: Installation and Administration Guide Part 1
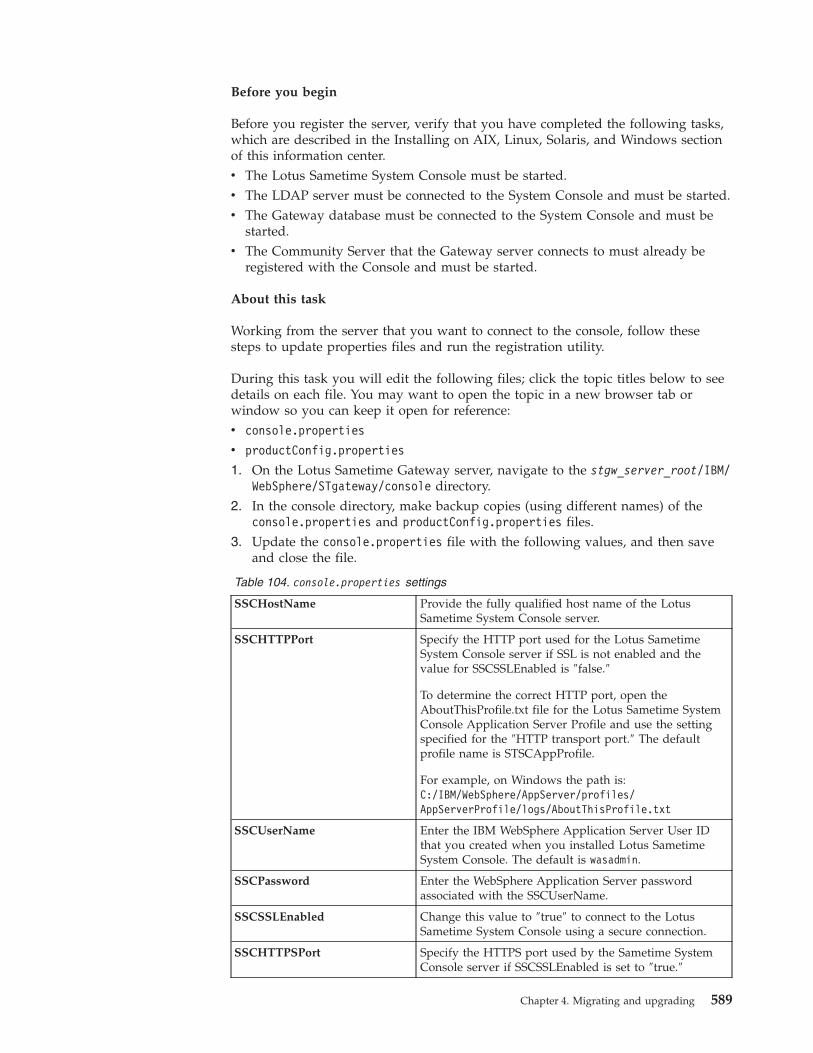
Before you begin
Before you register the server, verify that you have completed the following tasks,which are described in the Installing on AIX, Linux, Solaris, and Windows sectionof this information center.v The Lotus Sametime System Console must be started.v The LDAP server must be connected to the System Console and must be started.v The Gateway database must be connected to the System Console and must be
started.v The Community Server that the Gateway server connects to must already be
registered with the Console and must be started.
About this task
Working from the server that you want to connect to the console, follow thesesteps to update properties files and run the registration utility.
During this task you will edit the following files; click the topic titles below to seedetails on each file. You may want to open the topic in a new browser tab orwindow so you can keep it open for reference:v console.properties
v productConfig.properties
1. On the Lotus Sametime Gateway server, navigate to the stgw_server_root/IBM/WebSphere/STgateway/console directory.
2. In the console directory, make backup copies (using different names) of theconsole.properties and productConfig.properties files.
3. Update the console.properties file with the following values, and then saveand close the file.
Table 104. console.properties settings
SSCHostName Provide the fully qualified host name of the LotusSametime System Console server.
SSCHTTPPort Specify the HTTP port used for the Lotus SametimeSystem Console server if SSL is not enabled and thevalue for SSCSSLEnabled is ″false.″
To determine the correct HTTP port, open theAboutThisProfile.txt file for the Lotus Sametime SystemConsole Application Server Profile and use the settingspecified for the ″HTTP transport port.″ The defaultprofile name is STSCAppProfile.
For example, on Windows the path is:C:/IBM/WebSphere/AppServer/profiles/AppServerProfile/logs/AboutThisProfile.txt
SSCUserName Enter the IBM WebSphere Application Server User IDthat you created when you installed Lotus SametimeSystem Console. The default is wasadmin.
SSCPassword Enter the WebSphere Application Server passwordassociated with the SSCUserName.
SSCSSLEnabled Change this value to ″true″ to connect to the LotusSametime System Console using a secure connection.
SSCHTTPSPort Specify the HTTPS port used by the Sametime SystemConsole server if SSCSSLEnabled is set to ″true.″
Chapter 4. Migrating and upgrading 589
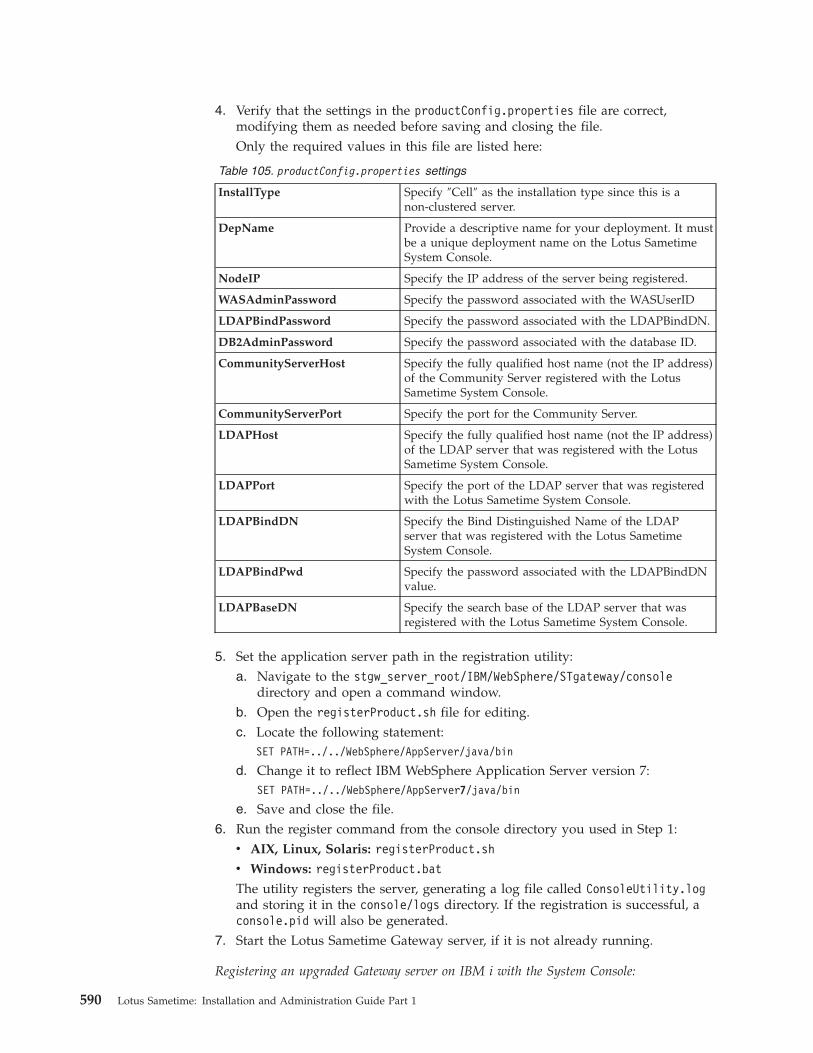
4. Verify that the settings in the productConfig.properties file are correct,modifying them as needed before saving and closing the file.Only the required values in this file are listed here:
Table 105. productConfig.properties settings
InstallType Specify ″Cell″ as the installation type since this is anon-clustered server.
DepName Provide a descriptive name for your deployment. It mustbe a unique deployment name on the Lotus SametimeSystem Console.
NodeIP Specify the IP address of the server being registered.
WASAdminPassword Specify the password associated with the WASUserID
LDAPBindPassword Specify the password associated with the LDAPBindDN.
DB2AdminPassword Specify the password associated with the database ID.
CommunityServerHost Specify the fully qualified host name (not the IP address)of the Community Server registered with the LotusSametime System Console.
CommunityServerPort Specify the port for the Community Server.
LDAPHost Specify the fully qualified host name (not the IP address)of the LDAP server that was registered with the LotusSametime System Console.
LDAPPort Specify the port of the LDAP server that was registeredwith the Lotus Sametime System Console.
LDAPBindDN Specify the Bind Distinguished Name of the LDAPserver that was registered with the Lotus SametimeSystem Console.
LDAPBindPwd Specify the password associated with the LDAPBindDNvalue.
LDAPBaseDN Specify the search base of the LDAP server that wasregistered with the Lotus Sametime System Console.
5. Set the application server path in the registration utility:a. Navigate to the stgw_server_root/IBM/WebSphere/STgateway/console
directory and open a command window.b. Open the registerProduct.sh file for editing.c. Locate the following statement:
SET PATH=../../WebSphere/AppServer/java/bin
d. Change it to reflect IBM WebSphere Application Server version 7:SET PATH=../../WebSphere/AppServer7/java/bin
e. Save and close the file.6. Run the register command from the console directory you used in Step 1:
v AIX, Linux, Solaris: registerProduct.sh
v Windows: registerProduct.bat
The utility registers the server, generating a log file called ConsoleUtility.logand storing it in the console/logs directory. If the registration is successful, aconsole.pid will also be generated.
7. Start the Lotus Sametime Gateway server, if it is not already running.
Registering an upgraded Gateway server on IBM i with the System Console:
590 Lotus Sametime: Installation and Administration Guide Part 1
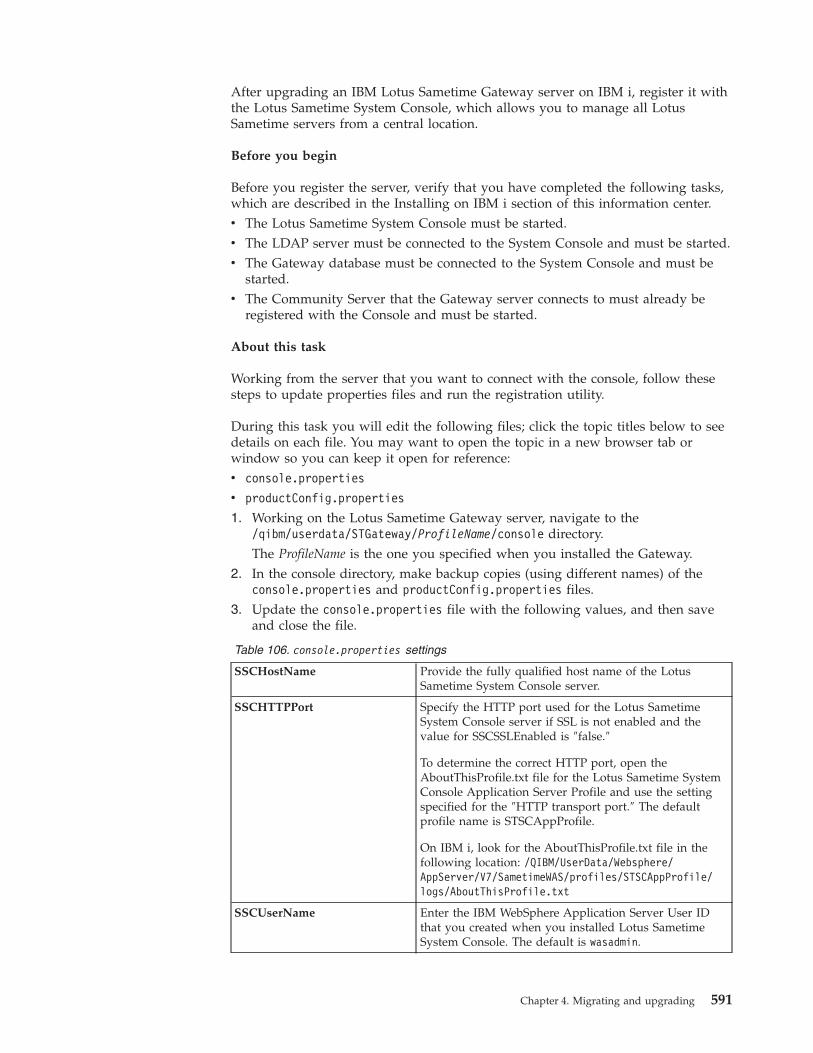
After upgrading an IBM Lotus Sametime Gateway server on IBM i, register it withthe Lotus Sametime System Console, which allows you to manage all LotusSametime servers from a central location.
Before you begin
Before you register the server, verify that you have completed the following tasks,which are described in the Installing on IBM i section of this information center.v The Lotus Sametime System Console must be started.v The LDAP server must be connected to the System Console and must be started.v The Gateway database must be connected to the System Console and must be
started.v The Community Server that the Gateway server connects to must already be
registered with the Console and must be started.
About this task
Working from the server that you want to connect with the console, follow thesesteps to update properties files and run the registration utility.
During this task you will edit the following files; click the topic titles below to seedetails on each file. You may want to open the topic in a new browser tab orwindow so you can keep it open for reference:v console.properties
v productConfig.properties
1. Working on the Lotus Sametime Gateway server, navigate to the/qibm/userdata/STGateway/ProfileName/console directory.The ProfileName is the one you specified when you installed the Gateway.
2. In the console directory, make backup copies (using different names) of theconsole.properties and productConfig.properties files.
3. Update the console.properties file with the following values, and then saveand close the file.
Table 106. console.properties settings
SSCHostName Provide the fully qualified host name of the LotusSametime System Console server.
SSCHTTPPort Specify the HTTP port used for the Lotus SametimeSystem Console server if SSL is not enabled and thevalue for SSCSSLEnabled is ″false.″
To determine the correct HTTP port, open theAboutThisProfile.txt file for the Lotus Sametime SystemConsole Application Server Profile and use the settingspecified for the ″HTTP transport port.″ The defaultprofile name is STSCAppProfile.
On IBM i, look for the AboutThisProfile.txt file in thefollowing location: /QIBM/UserData/Websphere/AppServer/V7/SametimeWAS/profiles/STSCAppProfile/logs/AboutThisProfile.txt
SSCUserName Enter the IBM WebSphere Application Server User IDthat you created when you installed Lotus SametimeSystem Console. The default is wasadmin.
Chapter 4. Migrating and upgrading 591
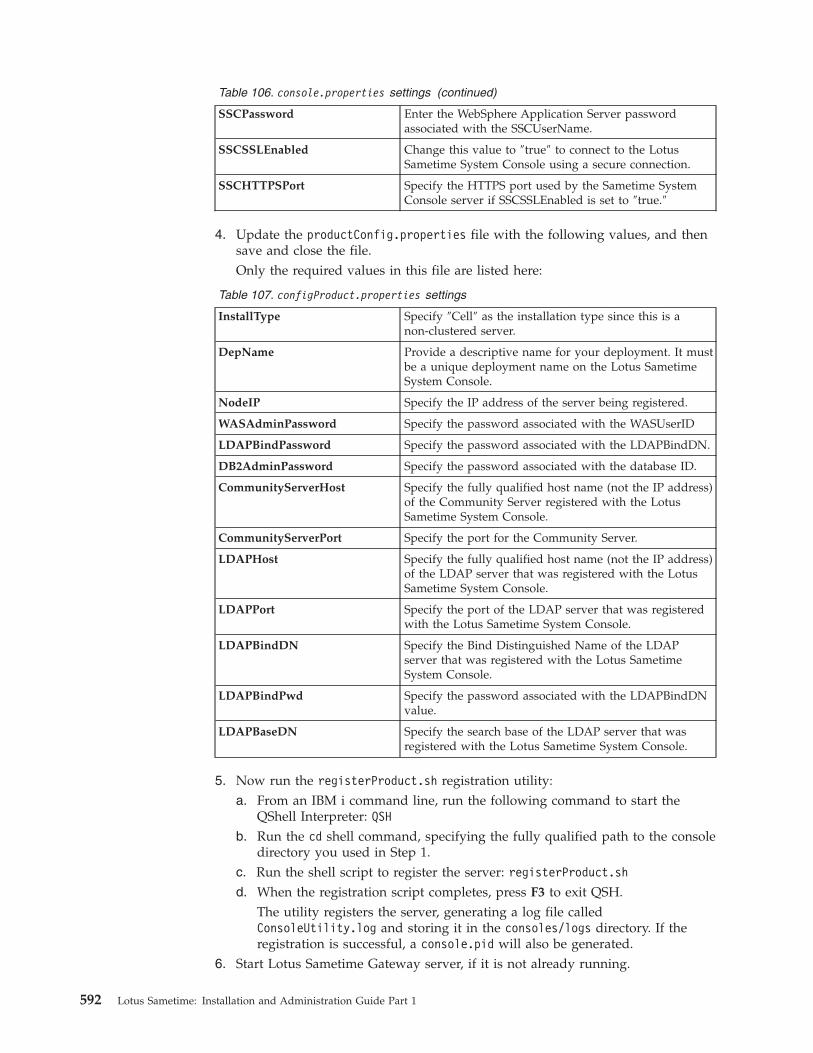
Table 106. console.properties settings (continued)
SSCPassword Enter the WebSphere Application Server passwordassociated with the SSCUserName.
SSCSSLEnabled Change this value to ″true″ to connect to the LotusSametime System Console using a secure connection.
SSCHTTPSPort Specify the HTTPS port used by the Sametime SystemConsole server if SSCSSLEnabled is set to ″true.″
4. Update the productConfig.properties file with the following values, and thensave and close the file.Only the required values in this file are listed here:
Table 107. configProduct.properties settings
InstallType Specify ″Cell″ as the installation type since this is anon-clustered server.
DepName Provide a descriptive name for your deployment. It mustbe a unique deployment name on the Lotus SametimeSystem Console.
NodeIP Specify the IP address of the server being registered.
WASAdminPassword Specify the password associated with the WASUserID
LDAPBindPassword Specify the password associated with the LDAPBindDN.
DB2AdminPassword Specify the password associated with the database ID.
CommunityServerHost Specify the fully qualified host name (not the IP address)of the Community Server registered with the LotusSametime System Console.
CommunityServerPort Specify the port for the Community Server.
LDAPHost Specify the fully qualified host name (not the IP address)of the LDAP server that was registered with the LotusSametime System Console.
LDAPPort Specify the port of the LDAP server that was registeredwith the Lotus Sametime System Console.
LDAPBindDN Specify the Bind Distinguished Name of the LDAPserver that was registered with the Lotus SametimeSystem Console.
LDAPBindPwd Specify the password associated with the LDAPBindDNvalue.
LDAPBaseDN Specify the search base of the LDAP server that wasregistered with the Lotus Sametime System Console.
5. Now run the registerProduct.sh registration utility:a. From an IBM i command line, run the following command to start the
QShell Interpreter: QSHb. Run the cd shell command, specifying the fully qualified path to the console
directory you used in Step 1.c. Run the shell script to register the server: registerProduct.shd. When the registration script completes, press F3 to exit QSH.
The utility registers the server, generating a log file calledConsoleUtility.log and storing it in the consoles/logs directory. If theregistration is successful, a console.pid will also be generated.
6. Start Lotus Sametime Gateway server, if it is not already running.
592 Lotus Sametime: Installation and Administration Guide Part 1
Upgrading a cluster of Lotus Sametime Gateway serversUpgrading a cluster of IBM Lotus Sametime Gateway server requires you toremove all nodes from the cluster before upgrading each instance of the LotusSametime Gateway server on every node. The installation program upgrades theIBM WebSphere Application Server and the Lotus Sametime Gateway applicationsto the newest version. After you have finished upgrading the nodes, you will needto recreate the cluster by federating the nodes to the Deployment Manager. Finally,you will register the cluster with the Lotus Sametime System Console so it can beadministered from that central location.
About this task
When the installation program installs the newer version of WebSphereApplication Server on a node, it overwrites most of the previous version; however,it leaves the AppServer directory intact and creates a new AppServer7 directory.This is because the original AppServer directory is still needed on an upgradedserver, for the following reasons:v Not all profiles on a server will necessarily be upgraded to Lotus Sametime
release 8.5, and the AppServer directory is still needed for those profiles that arenot being upgraded.
v Of the profiles that are upgraded, the active profile will exist under AppServer7(on IBM i, AppServer/V7), but there will still be a backup profile under theoriginal AppServer directory.
v Once a server is upgrade to release 8.5, all server administration operations mustbe performed underneath the AppServer7/profiles/Profile_Name tree (on IBM i,the AppServer/V7/profiles/Profile_Name tree).
Make sure you upgrade the following servers in your cluster:v Deployment Managerv Primary Nodev Secondary Node (release 8.5 supports only one Secondary Node in a Lotus
Sametime Gateway cluster)v SIP proxy serverv XMPP proxy server
Removing the Lotus Sametime Gateway nodes from the cluster:
Before you can upgrade the instances of IBM Lotus Sametime Gateway in aclustered deployment, you must remove the nodes from the cluster. IBMWebSphere is installed during the product upgrade, but it cannot be upgraded ona node that is federated to the cluster’s Deployment Manager. After you completethe upgrade for every node in the cluster, you will by federate the nodes to theDeployment Manager.
About this task
Removing nodes from the Lotus Sametime Gateway cluster involves manuallyremoving the nodes in the Deployment Manager’s Integrated Solutions Consolesettings, and then running a utility that updates additional settings for you.1. Log in to the Deployment Manager’s Integrated Solutions Console as the IBM
WebSphere administrator.2. Stop the cluster that you want to upgrade:
Chapter 4. Migrating and upgrading 593
Because the SIP proxy server and the XMPP proxy server function as part ofthe cluster, you need to stop them as well.a. Click Servers → Clusters.b. In the clusters table, click the check box next to the cluster’s name, and
then click the Stop button at the top of the table.Wait for the cluster’s status to update before proceeding.
c. Now click Servers → Proxy servers.d. In the proxy servers table, click the check box next to the SIP proxy server
associated with the cluster, and then click the Stop button at the top of thetable.
e. Finally, click Servers → Application servers.f. In the application servers table, click the check box next to the XMPP proxy
server associated with the cluster, and then click the Stop button at the topof the table.
3. Delete that old cluster:a. Click Servers → Clusters → WebSphere Application Server Clusters.b. In the clusters table, click the check box in front of the old cluster, and
then click the Delete button at the top of the table.c. Click OK.d. Save the change by clicking Save in the ″Messages″ box at the top of the
page.4. Now delete all ″Sametime Gateway″ WebSphere Enterprise Applications:
a. Click Applications → Application Types → WebSphere enterpriseapplications.
b. In the applications table, click the check box for every Sametime Gatewayapplication.
Important: Do not delete the ivtApp and query applications.c. Click OK.d. Save the change by clicking Save in the ″Messages″ box at the top of the
page.5. Now remove nodes:6. Still working on the Deployment Manager, click System administration →
Nodes.7. On the ″Nodes″ page, select the check box beside each node that you want to
remove.If you are upgrading, remove all nodes.
8. At the topic of the table, click the Remove Node button.If you cannot remove the nodes by clicking Remove Node, remove the nodefrom the configuration by clicking Force Delete.
9. Click OK.10. Save your change by clicking the Save link in the ″Messages″ box at the top of
the page.
Upgrading all profiles on a Lotus Sametime Gateway server:
Upgrading an existing Lotus Sametime Gateway server involves upgrading theIBM WebSphere Application Server as well as the IBM Lotus Sametime Gatewayserver for every instance of the product that is installed on the computer.
594 Lotus Sametime: Installation and Administration Guide Part 1
Upgrading a Windows server:
Upgrade IBM Lotus Sametime Gateway on Microsoft Windows server. Theinstallation wizard upgrades both Lotus Sametime Gateway and IBM WebSphereApplication Server to the latest versions.
Before you begin
Stop all instances of Lotus Sametime Gateway and WebSphere Application Serveron the current computer.
About this task
Upgrade all Lotus Sametime Gateway instances in your deployment. If a serverhas multiple instances of the Gateway, you must upgrade every instance separately(this is likely to be the case when you upgrade a cluster). Each upgrade willrequire you to run the Gateway installation program again, specifying the targetinstance to be upgraded during each run. Note that the server hosting a cluster’sDeployment Manager also hosts the Primary Node; it is important to make sureyou upgrade the Deployment Manager first; then when you upgrade the PrimaryNode, you specify that profile’s install path instead.
When you are finished upgrading, your server will contain WebSphere ApplicationServer Network Deployment 7 and Lotus Sametime Gateway 8.5.1. Create the temporary file folder \TMP\WASCD.2. From the installation media, copy the WebSphere Application Server
installation image part_number.exe to the folder \TMP\WASCD.The Lotus Sametime Download document lists the part numbers for eachsoftware component and explains how to download them.
3. Open a command window and navigate to the folder \TMP\WASCD.4. Extract all files to the temporary directory \TMP\WASCD. When you are done
extracting the files, you should have a \TMP\WASCD\ifpackage folder with WASand JDK folders inside the ifpackage folder.
5. From the installation media, copy the Sametime Gateway installation imagepart_number.exe to the \TMP folder.
6. In the \TMP folder, create a subfolder called SametimeGateway.7. Extract the files in part_number.exe into the \TMP\SametimeGateway folder.8. Open a command window and type the following command:
v For wizard mode: install.batv For console mode: install.bat -console
Attention: If one or more of the DNS addresses in your environment (forexample: WebSphere Application Server installation host name, DB2 hostname, or LDAP host name) refers to an IPv6–format address, add thefollowing option to your install command to work around an IPv6–relatedissue with the installer:install.bat -V BypassWasInfoCheck=true
Because your input will not be verified during installation, you should takeextra care when typing values.
9. Select the language for the installation wizard and click OK. The LotusSametime Gateway Welcome screen is displayed. You can launch theSametime information center from this panel.
Chapter 4. Migrating and upgrading 595

10. Click Next to continue with the installation. The Software License Agreementdialog is displayed. Read the license agreement carefully. Select theappropriate radio button option to accept the terms if you agree with thestatement and click Next to proceed with the installation.
11. Select Upgrade an existing instance of Sametime Gateway.12. On the same panel, review the location of the Sametime Gateway instance to
upgrade. If the location is okay, click Next.13. Type or click Browse to select the path to where you extracted the WebSphere
Application Server installation files from the CD, and click Next.Do not use quotation marks. This directory should contain the WAS and JDKsubdirectories. It is very important that you select the parent directory and notthe subdirectory. For example: use C:\TMP\WASCD\ifpackage but do not useC:\TMP\WASCD\ifpackage\WAS or C:\TMP\WASCD\ifpackage\JDK.
Important: If you are upgrading the server that contains the DeploymentManager and the Primary Node for a cluster, you must upgrade theDeployment Manager first to ensure proper functionality.
14. If you are upgrading the Deployment Manager server, type the name of theexisting cluster. Tip: To obtain the cluster name from the Integrated SolutionsConsole, click Servers → Clusters. The default cluster name is RTCGW_Cluster.
15. Click Next to enter database properties.
Option Description
Host name The fully qualified host name or TCP/IPaddress of the database server.
Port Port number on the database server(typically 50000).
Database name The name of the database that you created.If you used the default database name, typeSTGW. Case does not matter.
Application user ID A database user ID that has permission toconnect to the database and read or writerecords. The application user ID is often thesame as the schema owner user ID.
Application password The password for the application user. Theapplication password is often the same asthe schema owner password.
Schema user ID The ID for the user that has appropriatepermissions to create tables in the database.You may need to get this information fromthe database administrator. The schema userID is often the same as the application userID.
Schema password The password for the schema owner. Youmay need to get this information from thedatabase administrator. The schemapassword is often the same as theapplication password.
16. Review the installation summary settings and, if necessary, click Back to makechanges.
17. Click Install to begin copying files.
596 Lotus Sametime: Installation and Administration Guide Part 1
A progress screen is displayed and the activity is logged to the LotusSametime Gateway log file. The upgrade process is in two stages. The firststage upgrades Sametime Gateway and takes 5 to 20 minutes. The secondstage upgrades WebSphere Application Server and takes another 15 to 20minutes to complete.When the upgrades are complete, the wizard displays a message indicating asuccessful installation.
18. Read the summary and click Finish.To view the installation log, click View log file or open the log file atstgw_server_root\logs\installlog.txt.
Upgrading an AIX, Linux, or Solaris server:
Upgrade IBM Lotus Sametime Gateway on IBM AIX, Linux, or Sun SolarisWindows server. The installation wizard upgrades both Lotus Sametime Gatewayand IBM WebSphere Application Server to the latest versions.
Before you begin
Stop all instances of Lotus Sametime Gateway and WebSphere Application Serveron the current computer.
About this task
Upgrade all Lotus Sametime Gateway instances in your deployment. If a serverhas multiple instances of the Gateway, you must upgrade every instance separately(this is likely to be the case when you upgrade a cluster). Each upgrade willrequire you to run the Gateway installation program again, specifying the targetinstance to be upgraded during each run. Note that the server hosting a cluster’sDeployment Manager also hosts the Primary Node; it is important to make sureyou upgrade the Deployment Manager first; then when you upgrade the PrimaryNode, you specify that profile’s install path instead.
When you are finished upgrading, your server will contain WebSphere ApplicationServer Network Deployment 7 and Lotus Sametime Gateway 8.5.1. Create the temporary file folder /TMP/WASCD.2. From the installation media, copy the WebSphere Application Server
installation image for your operating system to /TMP/WASCD.The Lotus Sametime Download document lists the part numbers for eachsoftware component and explains how to download them.
3. Open a command window and navigate to the directory /TMP/WASCD.4. Run the following command to uncompress the files:
gunzip -c part_number.tar.gz | tar -xvf -
When you are done extracting the files, you should have the following folder:/TMP/WASCD/ifpackage
Verify that you have WAS and JDK folders inside the ifpackage folder.5. From the installation media, copy the Lotus Sametime Gateway installation
image part_number.tar to the temporary directory /TMP.6. In the /TMP directory, create a subdirectory called SametimeGateway.7. Uncompress the following file into the /TMP/SametimeGateway directory:
unzip part_number.tar
Chapter 4. Migrating and upgrading 597
8. Navigate to the folder /TMP/SametimeGateway and type one of the followingcommands:v For wizard mode: ./install.shv For console mode: ./install.sh -console
Attention: If one or more of the DNS addresses in your environment (forexample: WebSphere Application Server installation host name, DB2 hostname, or LDAP host name) refers to an IPv6–format address, add thefollowing option to your install command to work around an IPv6–relatedissue with the installer:./install.sh -V BypassWasInfoCheck=true
Because your input will not be verified during installation, you should takeextra care when typing values.
9. Select the language for the installation wizard and click OK. The LotusSametime Gateway Welcome screen is displayed. You can launch theSametime information center from this panel.
10. Click Next to continue with the installation. The Software License Agreementdialog is displayed. Read the license agreement carefully. Select theappropriate radio button option to accept the terms if you agree with thestatement and click Next to proceed with the installation.
11. Select Upgrade an existing instance of Sametime Gateway.12. On the same panel, review the location of the Sametime Gateway instance to
upgrade. If the location is okay, click Next.13. Type or click Browse to select the path to where you extracted the WebSphere
Application Server installation files from the CD.This directory should contain the WAS and JDK subdirectories. It is veryimportant that you select the parent directory and not the subdirectory. Forexample: use /TMP/WASCD/ifpackage but do not use /TMP/WASCD/ifpackage/WASor /TMP/WASCD/ifpackage/JDK.
Important: If you are upgrading the server that contains the DeploymentManager and the Primary Node for a cluster, you must upgrade theDeployment Manager first to ensure proper functionality.
14. If you are upgrading the Deployment Manager server, type the name of theexisting cluster. Tip: To obtain the cluster name from the Integrated SolutionsConsole, click Servers → Clusters. The default cluster name is RTCGW_Cluster.
15. Click Next to enter database properties.
Option Description
Host name The Fully qualified host name or TCP/IPaddress of the database server.
Port Port number on the database server(typically 50001).
Database name The name of the database that you created.If you used the default database name, typeSTGW. Case does not matter.
Application user ID A database user ID that has permission toconnect to the database and read or writerecords. The application user ID is often thesame as the schema owner user ID.
598 Lotus Sametime: Installation and Administration Guide Part 1
Option Description
Application password The password for the application user. Theapplication password is often the same asthe schema owner password.
Schema user ID The ID for the user that has appropriatepermissions to create tables in the database.You may need to get this information fromthe database administrator. The schema userID is often the same as the application userID.
Schema password The password for the schema owner. Youmay need to get this information from thedatabase administrator. The schemapassword is often the same as theapplication password.
16. Review the installation summary settings and, if necessary, click Back to makechanges.
17. Click Install to begin copying files.A progress screen is displayed and the activity is logged to the LotusSametime Gateway log file. The upgrade process is in two stages. The firststage upgrades Sametime Gateway and takes 5 to 20 minutes. The secondstage upgrades WebSphere Application Server and takes another 15 to 20minutes to complete.When the upgrades are complete, the wizard displays a message indicating asuccessful installation.
18. Read the summary and click Finish.To view the installation log, click View log file or open the log file atstgw_server_root/logs/installlog.txt.
Upgrading a Lotus Sametime Gateway server on IBM i:
Upgrading an IBM Lotus Sametime Gateway server on IBM i is a two-step process.First you must upgrade the previous version of IBM WebSphere ApplicationServer, and then you upgrade Lotus Sametime Gateway on the same computer.
Upgrading WebSphere Application Server on IBM i:
Upgrade IBM WebSphere Application Server on IBM i before you upgrade IBMLotus Sametime Gateway. The installation wizard upgrades WebSphere ApplicationServer to the latest version.
Before you begin
Stop all instances of Lotus Sametime Gateway and WebSphere Application Serveron the current computer.
You must have *ALLOBJ and *SECADM authorities to successfully complete theupgrade.
About this task
Upgrade all Lotus Sametime Gateway instances in your deployment. If a serverhas multiple instances of the Gateway, you must upgrade every instance separately
Chapter 4. Migrating and upgrading 599
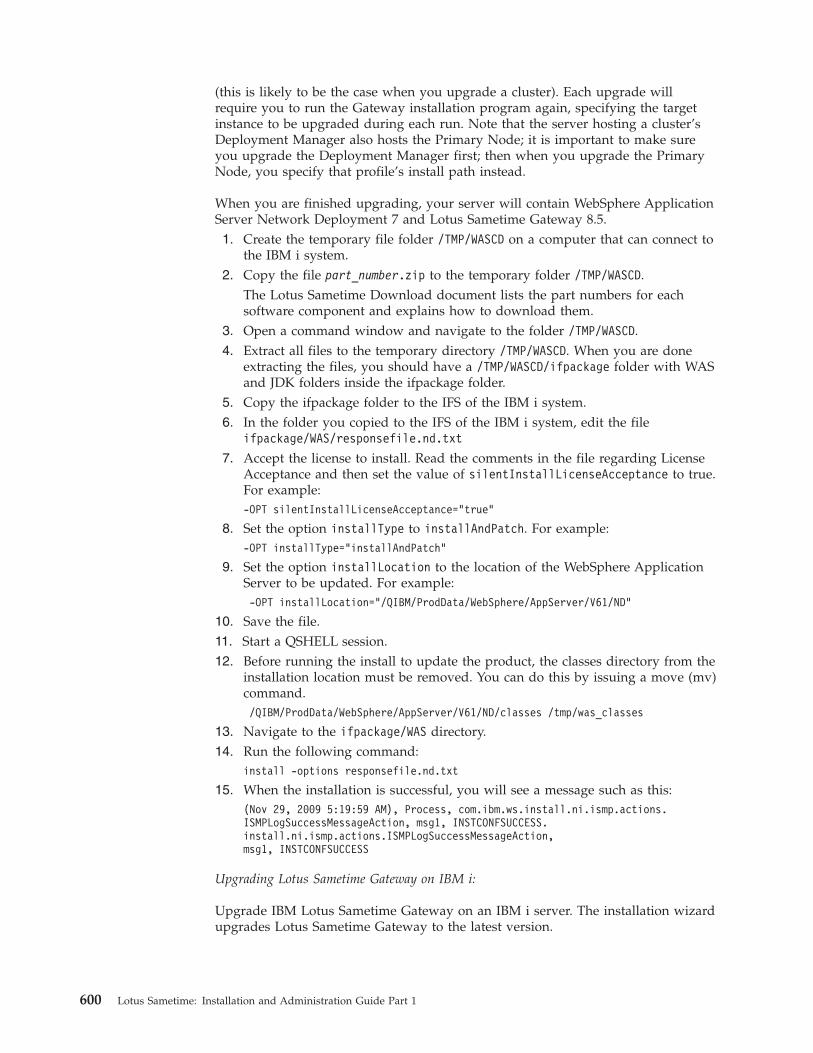
(this is likely to be the case when you upgrade a cluster). Each upgrade willrequire you to run the Gateway installation program again, specifying the targetinstance to be upgraded during each run. Note that the server hosting a cluster’sDeployment Manager also hosts the Primary Node; it is important to make sureyou upgrade the Deployment Manager first; then when you upgrade the PrimaryNode, you specify that profile’s install path instead.
When you are finished upgrading, your server will contain WebSphere ApplicationServer Network Deployment 7 and Lotus Sametime Gateway 8.5.1. Create the temporary file folder /TMP/WASCD on a computer that can connect to
the IBM i system.2. Copy the file part_number.zip to the temporary folder /TMP/WASCD.
The Lotus Sametime Download document lists the part numbers for eachsoftware component and explains how to download them.
3. Open a command window and navigate to the folder /TMP/WASCD.4. Extract all files to the temporary directory /TMP/WASCD. When you are done
extracting the files, you should have a /TMP/WASCD/ifpackage folder with WASand JDK folders inside the ifpackage folder.
5. Copy the ifpackage folder to the IFS of the IBM i system.6. In the folder you copied to the IFS of the IBM i system, edit the file
ifpackage/WAS/responsefile.nd.txt
7. Accept the license to install. Read the comments in the file regarding LicenseAcceptance and then set the value of silentInstallLicenseAcceptance to true.For example:-OPT silentInstallLicenseAcceptance="true"
8. Set the option installType to installAndPatch. For example:-OPT installType="installAndPatch"
9. Set the option installLocation to the location of the WebSphere ApplicationServer to be updated. For example:-OPT installLocation="/QIBM/ProdData/WebSphere/AppServer/V61/ND"
10. Save the file.11. Start a QSHELL session.12. Before running the install to update the product, the classes directory from the
installation location must be removed. You can do this by issuing a move (mv)command./QIBM/ProdData/WebSphere/AppServer/V61/ND/classes /tmp/was_classes
13. Navigate to the ifpackage/WAS directory.14. Run the following command:
install -options responsefile.nd.txt
15. When the installation is successful, you will see a message such as this:(Nov 29, 2009 5:19:59 AM), Process, com.ibm.ws.install.ni.ismp.actions.ISMPLogSuccessMessageAction, msg1, INSTCONFSUCCESS.install.ni.ismp.actions.ISMPLogSuccessMessageAction,msg1, INSTCONFSUCCESS
Upgrading Lotus Sametime Gateway on IBM i:
Upgrade IBM Lotus Sametime Gateway on an IBM i server. The installation wizardupgrades Lotus Sametime Gateway to the latest version.
600 Lotus Sametime: Installation and Administration Guide Part 1
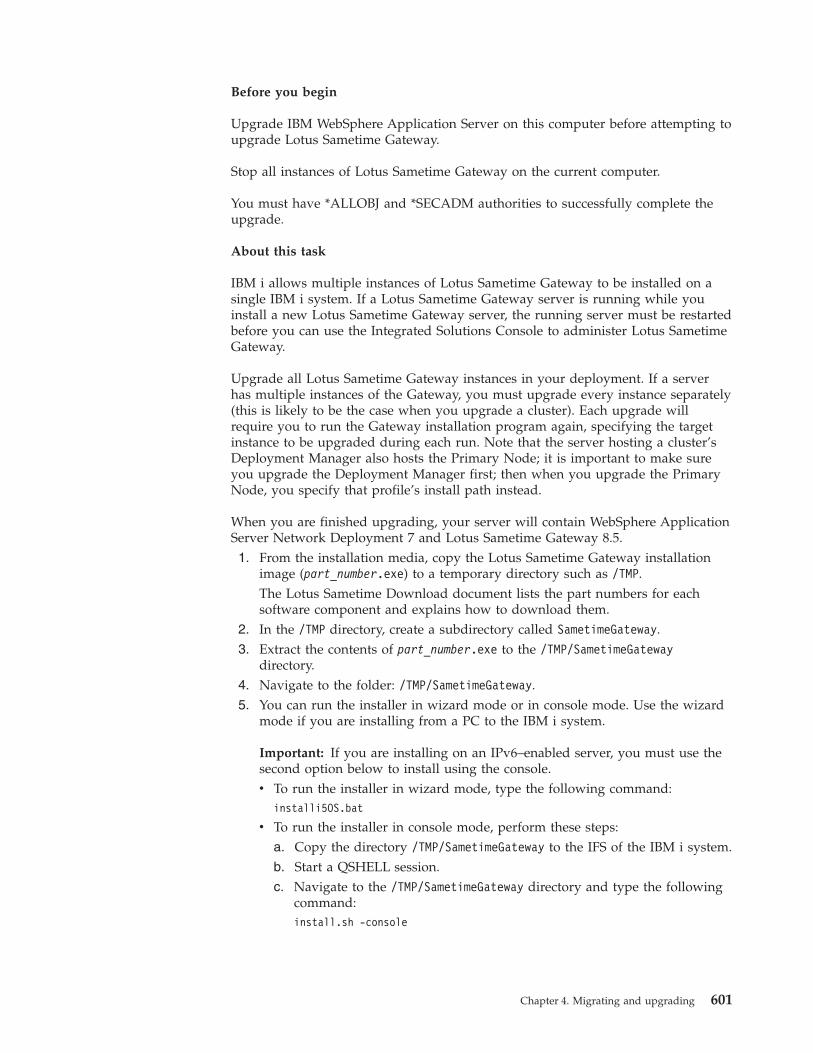
Before you begin
Upgrade IBM WebSphere Application Server on this computer before attempting toupgrade Lotus Sametime Gateway.
Stop all instances of Lotus Sametime Gateway on the current computer.
You must have *ALLOBJ and *SECADM authorities to successfully complete theupgrade.
About this task
IBM i allows multiple instances of Lotus Sametime Gateway to be installed on asingle IBM i system. If a Lotus Sametime Gateway server is running while youinstall a new Lotus Sametime Gateway server, the running server must be restartedbefore you can use the Integrated Solutions Console to administer Lotus SametimeGateway.
Upgrade all Lotus Sametime Gateway instances in your deployment. If a serverhas multiple instances of the Gateway, you must upgrade every instance separately(this is likely to be the case when you upgrade a cluster). Each upgrade willrequire you to run the Gateway installation program again, specifying the targetinstance to be upgraded during each run. Note that the server hosting a cluster’sDeployment Manager also hosts the Primary Node; it is important to make sureyou upgrade the Deployment Manager first; then when you upgrade the PrimaryNode, you specify that profile’s install path instead.
When you are finished upgrading, your server will contain WebSphere ApplicationServer Network Deployment 7 and Lotus Sametime Gateway 8.5.1. From the installation media, copy the Lotus Sametime Gateway installation
image (part_number.exe) to a temporary directory such as /TMP.The Lotus Sametime Download document lists the part numbers for eachsoftware component and explains how to download them.
2. In the /TMP directory, create a subdirectory called SametimeGateway.3. Extract the contents of part_number.exe to the /TMP/SametimeGateway
directory.4. Navigate to the folder: /TMP/SametimeGateway.5. You can run the installer in wizard mode or in console mode. Use the wizard
mode if you are installing from a PC to the IBM i system.
Important: If you are installing on an IPv6–enabled server, you must use thesecond option below to install using the console.v To run the installer in wizard mode, type the following command:
installi5OS.bat
v To run the installer in console mode, perform these steps:a. Copy the directory /TMP/SametimeGateway to the IFS of the IBM i system.b. Start a QSHELL session.c. Navigate to the /TMP/SametimeGateway directory and type the following
command:install.sh -console
Chapter 4. Migrating and upgrading 601
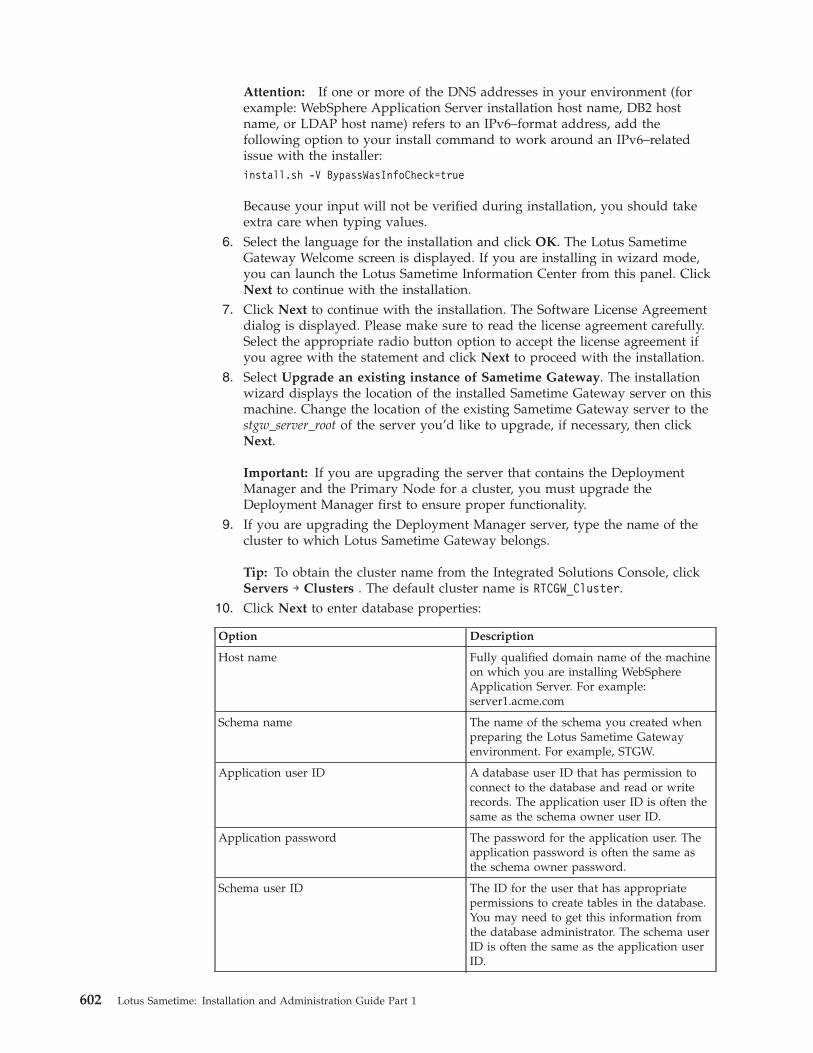
Attention: If one or more of the DNS addresses in your environment (forexample: WebSphere Application Server installation host name, DB2 hostname, or LDAP host name) refers to an IPv6–format address, add thefollowing option to your install command to work around an IPv6–relatedissue with the installer:install.sh -V BypassWasInfoCheck=true
Because your input will not be verified during installation, you should takeextra care when typing values.
6. Select the language for the installation and click OK. The Lotus SametimeGateway Welcome screen is displayed. If you are installing in wizard mode,you can launch the Lotus Sametime Information Center from this panel. ClickNext to continue with the installation.
7. Click Next to continue with the installation. The Software License Agreementdialog is displayed. Please make sure to read the license agreement carefully.Select the appropriate radio button option to accept the license agreement ifyou agree with the statement and click Next to proceed with the installation.
8. Select Upgrade an existing instance of Sametime Gateway. The installationwizard displays the location of the installed Sametime Gateway server on thismachine. Change the location of the existing Sametime Gateway server to thestgw_server_root of the server you’d like to upgrade, if necessary, then clickNext.
Important: If you are upgrading the server that contains the DeploymentManager and the Primary Node for a cluster, you must upgrade theDeployment Manager first to ensure proper functionality.
9. If you are upgrading the Deployment Manager server, type the name of thecluster to which Lotus Sametime Gateway belongs.
Tip: To obtain the cluster name from the Integrated Solutions Console, clickServers → Clusters . The default cluster name is RTCGW_Cluster.
10. Click Next to enter database properties:
Option Description
Host name Fully qualified domain name of the machineon which you are installing WebSphereApplication Server. For example:server1.acme.com
Schema name The name of the schema you created whenpreparing the Lotus Sametime Gatewayenvironment. For example, STGW.
Application user ID A database user ID that has permission toconnect to the database and read or writerecords. The application user ID is often thesame as the schema owner user ID.
Application password The password for the application user. Theapplication password is often the same asthe schema owner password.
Schema user ID The ID for the user that has appropriatepermissions to create tables in the database.You may need to get this information fromthe database administrator. The schema userID is often the same as the application userID.
602 Lotus Sametime: Installation and Administration Guide Part 1
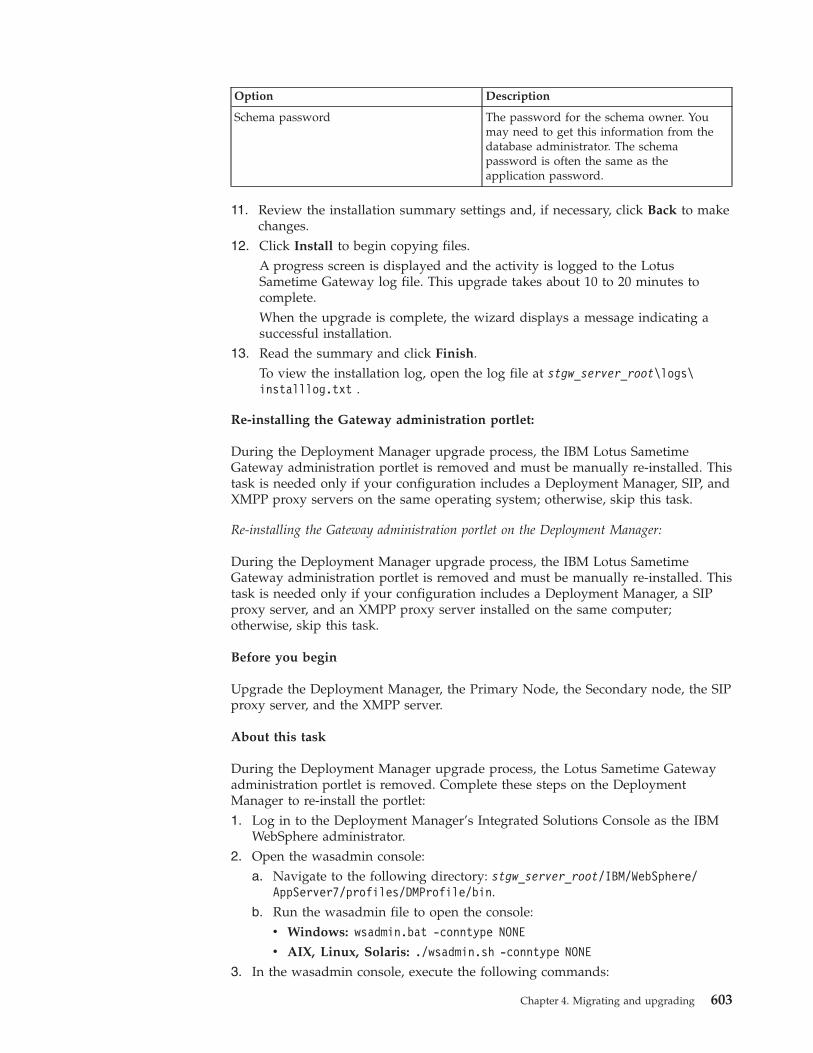
Option Description
Schema password The password for the schema owner. Youmay need to get this information from thedatabase administrator. The schemapassword is often the same as theapplication password.
11. Review the installation summary settings and, if necessary, click Back to makechanges.
12. Click Install to begin copying files.A progress screen is displayed and the activity is logged to the LotusSametime Gateway log file. This upgrade takes about 10 to 20 minutes tocomplete.When the upgrade is complete, the wizard displays a message indicating asuccessful installation.
13. Read the summary and click Finish.To view the installation log, open the log file at stgw_server_root\logs\installlog.txt .
Re-installing the Gateway administration portlet:
During the Deployment Manager upgrade process, the IBM Lotus SametimeGateway administration portlet is removed and must be manually re-installed. Thistask is needed only if your configuration includes a Deployment Manager, SIP, andXMPP proxy servers on the same operating system; otherwise, skip this task.
Re-installing the Gateway administration portlet on the Deployment Manager:
During the Deployment Manager upgrade process, the IBM Lotus SametimeGateway administration portlet is removed and must be manually re-installed. Thistask is needed only if your configuration includes a Deployment Manager, a SIPproxy server, and an XMPP proxy server installed on the same computer;otherwise, skip this task.
Before you begin
Upgrade the Deployment Manager, the Primary Node, the Secondary node, the SIPproxy server, and the XMPP server.
About this task
During the Deployment Manager upgrade process, the Lotus Sametime Gatewayadministration portlet is removed. Complete these steps on the DeploymentManager to re-install the portlet:1. Log in to the Deployment Manager’s Integrated Solutions Console as the IBM
WebSphere administrator.2. Open the wasadmin console:
a. Navigate to the following directory: stgw_server_root/IBM/WebSphere/AppServer7/profiles/DMProfile/bin.
b. Run the wasadmin file to open the console:v Windows: wsadmin.bat -conntype NONE
v AIX, Linux, Solaris: ./wsadmin.sh -conntype NONE
3. In the wasadmin console, execute the following commands:
Chapter 4. Migrating and upgrading 603
$AdminApp update isclite modulefile {-operation delete -contenturi RTCAdminPortlet.war}
$AdminConfig save
quit
4. Now delete the following file: AppServer7/systemApps/isclite.ear/RTCAdminPortlet.war
5. Now copy a file to replace the one you just deleted:Copy this file:AppServer7/profiles/RTCGW_Profile/installableApps/RTCAdminPortlet.war
and paste it in:AppServer7/systemApps/isclite.ear/
6. Open the wasadmin console again:a. Navigate to the following directory: stgw_server_root/IBM/WebSphere/
AppServer7/profiles/DMProfile/bin.b. Run the wasadmin file to open the console:
v Windows: wsadmin.bat -conntype NONE
v AIX, Linux, Solaris: ./wsadmin.sh -conntype NONE
7. In the wsadmin console, execute the following commands:$AdminApp update isclite modulefile {-operation add -contents "WAS_home/systemApps/isclite.ear/RTCAdminPortlet.war" -contenturi RTCAdminPortlet.war -usedefaultbindings-server dmgr -preCompileJSPs -contextroot /ibm/RTCGW -MapWebModToVH {{.* .* admin_host}}}
$AdminConfig save
quit
where WAS_home is the absolute path to the WebSphere Application Serverinstall directory.
8. Restart the Deployment Manager.
Re-installing the Gateway administration portlet on the Deployment Manager on IBM i:
During the Deployment Manager upgrade process, the IBM Lotus SametimeGateway administration portlet is removed and must be manually re-installed. Thistask is needed only if your configuration includes a Deployment Manager, a SIPproxy server, and an XMPP proxy server installed on the same computer;otherwise, skip this task.
Before you begin
Upgrade the Deployment Manager, the Primary Node, the Secondary node, the SIPproxy server, and the XMPP server.
About this task
During the Deployment Manager upgrade process, the Lotus Sametime Gatewayadministration portlet is removed. Complete these steps on the DeploymentManager to re-install the portlet:1. Log in to the Deployment Manager’s Integrated Solutions Console as the IBM
WebSphere administrator.2. Open the wasadmin console:
a. Navigate to the following directory: /qibm/userdata/STGateway/IBM/WebSphere/AppServer/V7/profiles/DMProfile.
604 Lotus Sametime: Installation and Administration Guide Part 1
b. Run the wasadmin file to open the console: wsadmin.sh -conntype NONE
3. In the wasadmin console, execute the following commands:$AdminApp update isclite modulefile {-operation delete -contenturi RTCAdminPortlet.war}
$AdminConfig savequit
4. Now delete the following file: AppServer/V7/systemApps/isclite.ear/RTCAdminPortlet.war
5. Now copy a file to replace the one you just deleted:Copy this file:AppServer/V7/profiles/RTCGW_Profile/installableApps/RTCAdminPortlet.war
and paste it in:AppServer/V7/systemApps/isclite.ear/
6. Open the wasadmin console again:a. Navigate to the following directory: /qibm/userdata/STGateway/IBM/
WebSphere/AppServer/V7/profiles/DMProfile.b. Run the wasadmin file to open the console: wsadmin.sh -conntype NONE
7. In the wsadmin console, execute the following commands ($AdminApp shouldbe on one line. It has been formatted to fit this page.):$AdminApp update isclite modulefile {-operation add -contents
"WAS_home/systemApps/isclite.ear/RTCAdminPortlet.war"-contenturi RTCAdminPortlet.war -usedefaultbindings -server dmgr-preCompileJSPs -contextroot /ibm/RTCGW -MapWebModToVH {{.* .* admin_host}}}
$AdminConfig save
quit
where WAS_home is the absolute path to the WebSphere Application Serverinstall directory.
8. Restart the Deployment Manager.
Federating the primary node into the cell:
After you create the primary node you must add the primary node to theDeployment Manager’s cell.
Federating the primary node into the cell on Windows:
Add the primary node to the Deployment Manager’s cell. Adding the primarynode to the cell allows a central point of administration for the networkdeployment by using the Deployment Manager’s Integrated Solutions Console. Youwill not be able log into the primary node’s Integrated Solutions Console after thisstep.
Before you begin
Expected state: the Deployment Manager is running.
About this task
1. Make sure that the system clocks on the Deployment Manager and the primarynode are within five minutes of each other and set for the same timezone.Federation fails if the clocks are not synchronized within five minutes.
Chapter 4. Migrating and upgrading 605
2. Ping the Deployment Manager node from the primary node to make sure thehost name is resolvable.
3. On the primary node, open a command window and navigate to thestgw_profile_root\bin directory. If the Deployment Manager and the primarynode are installed on the same machine, the default profile directory isRTCGW_Profile1 (not RTCGW_Profile).
4. Run the following command to add the primary node to the DeploymentManager’s cell:addNode.bat DM_hostname DM_port_number -includeapps
Where DM_hostname is the host name of the Deployment Manager server. Forexample:addNode.bat gateway_dm.acme.com 8879 -includeapps
Port 8879 is the default port on which the Deployment Manager listens.5. When prompted, provide the Deployment Manager’s administrative user ID
and password.Wait for the operation to complete before proceeding. Look for a successmessage similar to the following when complete:Node MyserverNodePrimary has been successfully federated.
6. To verify that the primary node has joined the Deployment Manager’s cell, loginto the Integrated Solutions Console (http://localhost:9060/ibm/console)using your administrative user ID and password and click Servers →Application servers. Make sure you can see the primary node’s information.If you already logged in, you must log out and then log in again before youcan see changes.
Federating the primary node into the cell on AIX, Linux, and Solaris:
Add the primary node to the Deployment Manager’s cell on AIX, Linux, or Solarisplatforms. Adding the primary node to the cell allows a central point ofadministration for the network deployment by using the Deployment Manager’sIntegrated Solutions Console. You will not be able log into the primary node’sIntegrated Solutions Console after this step.
Before you begin
Expected state: the Deployment Manager is running.1. Make sure that the system clocks on the Deployment Manager and the primary
node are within five minutes of each other and set for the same timezone.Federation fails if the clocks are not synchronized within five minutes.
2. Ping the Deployment Manager node from the primary node to make sure theDeployment Manager host name is resolvable.
3. On the primary node, open a command window and navigate to thestgw_profile_root/bin directory.
4. Run the following command to add the primary node to the DeploymentManager’s cell:./addNode.sh DM_hostname DM_port_number -includeapps
Where DM_hostname is the host name of the Deployment Manager server. Forexample:./addNode.sh gateway_dm.acme.com 8879 -includeapps
606 Lotus Sametime: Installation and Administration Guide Part 1
5. When prompted, provide the Deployment Manager’s administrative user IDand password. Wait for the operation to complete before proceeding. Look for asuccess message similar to the following when complete:Node MyserverNodePrimary has been successfully federated.
Port 8879 is the default port on which the Deployment Manager listens.6. To verify that the primary node has joined the Deployment Manager’s cell, log
into the Integrated Solutions Console (http://localhost:9060/ibm/console)using your administrative user ID and password and click Servers →Application servers. Make sure you can see the primary node’s information.If you already logged in, you must log out and then log in again before youcan see changes.
Federating the primary node into the cell on IBM i:
Add the primary node to the Deployment Manager’s cell on IBM i. Adding theprimary node to the cell allows a central point of administration for the networkdeployment by using the Deployment Manager’s Integrated Solutions Console. Youwill not be able log into the primary node’s Integrated Solutions Console after thisstep.
Before you begin
Expected state: the Deployment Manager is running.1. Make sure that the system clocks on the Deployment Manager and the
primary node are within five minutes of each other and set for the sametimezone. Federation fails if the clocks are not synchronized within fiveminutes.
2. Ping the Deployment Manager node from the primary node to make sure thehost name is resolvable.
3. Log in to the IBM i system where the Deployment Manager node is installedas a user with administrative privileges.
4. On the IBM i command line, run the STRQSH (Start Qshell) command.5. Navigate to the stgw_profile_root\bin directory for the Deployment Manager
profile.6. Run the following command to obtain the SOAP_CONNECTOR_ADDRESS
port number. Make a note of the port number as you will need it to addnodes to the cluster:dspwasinst
7. Log in to the IBM i system, where the primary node is installed, withadministrative privileges.
8. On the IBM i command line, run the STRQSH (Start Qshell) command.9. Navigate to the stgw_profile_root\bin directory for the primary node profile.
10. Run the following command to add the primary node to the DeploymentManager’s cell:addNode DM_server_host_name DM_SOAP_port -includeapps-username WAS_Admin_user_name_on_DM_on_DM -password WAS_Admin_password_on_DM
Where:v DM_server_host_name is the resolvable host name of the Deployment
Manager.v DM_SOAP_port is the port that the Deployment Manager’s SOAP port is
listening on.
Chapter 4. Migrating and upgrading 607
v WAS_Admin_username_on_DM is the user ID of the WebSphere ApplicationServer administrator account on the Deployment Manager.
v WAS_Admin_password_on_DM is the password associated with thatWebSphere Application Server administrator account on the DeploymentManager.
For example:addNode gateway_dm.acme.com 8880 -includeapps -username wasadmin -password waspassword
11. When prompted, provide the Deployment Manager’s administrative user IDand password. Wait for the operation to complete before proceeding. Look fora success message similar to the following when complete:Node MyserverNodePrimary has been successfully federated.
12. To verify that the primary node has joined the Deployment Manager’s cell, loginto the Integrated Solutions Console (http://localhost:9060/ibm/console)using your administrative user ID and password and click Servers →Application servers. Make sure you can see the primary node’s information.If you already logged in, you must log out and then log in again before youcan see changes.
Federating secondary nodes into the cell:
Add secondary nodes to the Deployment Manager’s cell to create a networkdeployment of Sametime Gateway servers.
About this task
In this release, a Lotus Sametime Gateway cluster can support only two nodes: onePrimary Node and one Secondary Node.
Federating a secondary node on Windows into the cell:
Add a secondary node to the Deployment Manager’s cell. Adding secondary nodesto the cell allows a central point of administration for the network deployment byusing the Deployment Manager’s Integrated Solutions Console.
Before you begin
Expected state: the Deployment Manager is running.1. Make sure that the system clocks on the Deployment Manager and the
secondary node are within five minutes of each other and set for the sametimezone. Federation fails if the clocks are not synchronized within fiveminutes.
2. Ping the Deployment Manager node from the secondary node to make sure theDeployment Manager host name is resolvable.
3. On the secondary node, open a command window and navigate to thestgw_profile_root\bin directory.
4. Run the following command to add a secondary node to the DeploymentManager’s cell. Note the omission of the -includeapps qualifier.addNode.bat DM_hostname DM_port_number
Where DM_hostname is the host name of the Deployment Manager server. Forexample:addNode.bat gateway_dm.acme.com 8879
608 Lotus Sametime: Installation and Administration Guide Part 1
5. When prompted, provide the Deployment Manager’s administrative user IDand password. Wait for the operation to complete before proceeding. Look for asuccess message similar to the following when complete:Node Machine22NodeSecondary has been successfully federated.
Port 8879 is the default port on which the Deployment Manager listens.6. For each additional secondary node, repeat the preceding steps.7. Restart the Deployment Manager by typing the following commands. Wait for
the first command to finish before starting the Deployment Manager:stopManagerstartManager
What to do next
When you have finished installing and federating secondary nodes into theDeployment manager, continue with the cluster configuration as instructed in thetopic, “Creating a cluster and proxy servers” on page 167.
Federating a secondary node on AIX, Linux, and Solaris into the cell:
Add a secondary node to the Deployment Manager’s cell. Adding a secondarynode to the cell allows a central point of administration for the networkdeployment by using the Deployment Manager’s Integrated Solutions Console.
Before you begin
Expected state: the Deployment Manager is running.1. Make sure that the system clocks on the Deployment Manager and the
secondary node are within five minutes of each other and set for the sametimezone. Federation fails if the clocks are not synchronized within fiveminutes.
2. Ping the Deployment Manager node from the secondary node to make sure theDeployment Manager host name is resolvable.
3. On secondary node, open a command window and navigate to thestgw_profile_root\bin directory.
4. Run the following command to add a secondary node to the DeploymentManager’s cell. Note the omission of the -includeapps qualifier../addNode.sh DM_hostname DM_port_number
Where DM_hostname is the host name of the Deployment Manager server. Forexample:./addNode.sh gateway_dm.acme.com 8879
5. When prompted, provide the Deployment Manager’s administrative user IDand password. Wait for the operation to complete before proceeding. Look for asuccess message similar to the following when complete:Node Machine22NodeSecondary has been successfully federated.
6. For each additional AIX, Linux, or Solaris secondary node, repeat the precedingsteps.
7. Restart the Deployment Manager by typing the following commands on theDeployment Manager machine. Wait for the first command to finish beforestarting the Deployment Manager:./stopManager.sh./startManager.sh
Chapter 4. Migrating and upgrading 609
What to do next
When you have finished installing and federating secondary nodes into theDeployment manager, continue with the cluster configuration as instructed in thetopic, “Creating a cluster and proxy servers” on page 167.
Federating a secondary node on IBM i into the cell:
Add the secondary node to the Deployment Manager’s cell on IBM i. Adding thesecondary node to the cell allows a central point of administration for the networkdeployment by using the Deployment Manager’s Integrated Solutions Console.
Before you begin
Expected state: the Deployment Manager is running.1. Make sure that the system clocks on the Deployment Manager and the
secondary node are within five minutes of each other and set for the sametimezone. Federation fails if the clocks are not synchronized within fiveminutes.
2. Ping the Deployment Manager node from the secondary node to make surethe Deployment Manager host name is resolvable.
3. Log in to the IBM i system where the Deployment Manager node is installedwith administrative privileges.
4. On the IBM i command line, run the STRQSH (Start Qshell) command.5. Navigate to the stgw_profile_root\bin directory for the Deployment Manager
profile.6. Run the following command to obtain the SOAP_CONNECTOR_ADDRESS
port number. Make a note of the port number as you will need it to addnodes to the cluster:dspwasinst
7. Log into the secondary node.8. On the IBM i command line, run the STRQSH (Start Qshell) command.9. Navigate to the stgw_profile_root\bin directory for the secondary node
profile.10. Run the following command to add the secondary node to the Deployment
Manager’s cell. Note the omission of the -includeapps qualifier.addNode DM_server_host_name DM_SOAP_port -username WAS_Admin_user_name_on_DM-password WAS_Admin_password_on_DM
where:v DM_server_host_name is the resolvable host name of the Deployment
Manager.v DM_SOAP_portis the port that the Deployment Manager’s SOAP port is
listening on.v WAS_Admin_user_name_on_DM is the user ID of the WebSphere Application
Server administrator account on the Deployment Manager.v WAS_Admin_password_on_DM is the password associated with the
WebSphere Application Server administrator account.For example:addNode gateway_dm.acme.com 8880 -username wasadmin -password waspassword
610 Lotus Sametime: Installation and Administration Guide Part 1

11. When prompted, provide the Deployment Manager’s administrative user IDand password. Wait for the operation to complete before proceeding. Look fora success message similar to the following when complete:Node Machine22NodeSecondary has been successfully federated.
12. For each additional IBM i secondary node, repeat the preceding steps.13. Navigate to the stgw_profile_root\bin directory for the Deployment Manager
profile.14. Restart the Deployment Manager by typing the following commands. Wait for
the first command to finish before starting the Deployment Manager:./stopServer.sh dmgr -username username -password password./startServer.sh dmgr
WindowsstopServer.bat dmgr -username username -password passwordstartServer.bat dmgr
IBM i./stopServer.sh dmgr -username username -password passwordstartServer.sh dmgr
What to do next
When you have finished installing and federating secondary nodes into theDeployment manager, continue with the cluster configuration as instructed in thetopic, “Creating a cluster and proxy servers” on page 167.
Creating the cluster:
Create a new cluster of IBM Lotus Lotus Sametime Gateway servers by runningthe Cluster Configuration Wizard. If you are upgrading an existing LotusSametime Gateway cluster, you must still complete this task because you removedthe cluster before upgrading the nodes.
Before you begin
Expected state: the Deployment Manager is running and nodes are stopped.
About this task
The instructions that follow describe steps for setting up a horizontal cluster, themost common cluster configuration. The Primary Node already has the primaryserver installed, so no additional server is needed on that computer. To add serversto the horizontal cluster, create one cluster member for each secondary node(computer).
Note: This release supports only one Secondary Node on a cluster.1. On the Deployment Manager, open a command window, navigate to the
stgw_server_root\config directory, and run the following command:AIX, Linux, and Solaris./configwizard.sh
Windowsconfigwizard.bat
IBM i./configwizard.sh
Chapter 4. Migrating and upgrading 611
Note: To run this program in console mode (instead of using the graphicalinterface), add the -console argument to the command line; for example:configwizard.bat -console
2. View the Welcome page and click Next.3. For a Secondary Node, do the following:
a. Select the Secondary Node from the Node drop down list and type aunique name in the Server Name field.
b. Click Add Member.4. When you have finished adding the Secondary Nodes, click Next.5. Type the Schema user ID and Schema password for the database
. These credentials have appropriate permissions to create tables in thedatabase. You may need to get this information from the databaseadministrator. The schema user ID is often the same as the application user IDfor the database.
6. Read the summary and click Configure. When finished, you can view theconfiguration log at You can review the configuration wizard log atstgw_server_root\logs\configwizard.log.
7. Restart the Deployment Manager with the following commands:./stopServer.sh dmgr -username username -password password./startServer.sh dmgr
WindowsstopServer.bat dmgr -username username -password passwordstartServer.bat dmgr
IBM i./stopServer.sh dmgr -username username -password passwordstartServer.sh dmgr
8. Complete the following steps on every node in the cluster, including thePrimary Node:a. Log in to the node’s operating system.b. Navigate to the stgw_profile_root\bin directory.c. Start the node agent on the node with the following command:
AIX, Linux, and Solaris./startNode.sh
WindowsstartNode.bat
IBM istartNode
Note: During installations, the Node agent on primary and secondaryservers may be loaded, and issuing a startnode command may result in theerror: ″Conflict detected on port 8878. Likely causes: a) An instance of theserver nodeagent is already running b) some other process is using port8878.″ If this occurs you can confirm the nodeagent status by running thecommand serverstatus nodeagent from the stgw_profile_root\bindirectory. When prompted, supply the Lotus Sametime Gatewayadministrator credentials. Verify that the nodeagent is running (the statuswill read, ″The Node Agent ″nodeagent″ is STARTED). If the agent isrunning, continue to the next step.
9. When all the node agents are started, verify that the cluster configuredproperly by performing the following steps:
612 Lotus Sametime: Installation and Administration Guide Part 1

a. Log into the Integrated Solutions Console (http://localhost:9060/ibm/console) using your administrative user ID and password on theDeployment Manager machine.
b. Click Servers → Clusters, and verify that SametimeGatewayCluster appearsin the table.
c. Click SametimeGatewayCluster, and then under Additional properties,click Cluster members to view the cluster members that you created.
Creating an environment variable with the installation path on each node:
After you run the upgrade wizard on members of a Lotus Sametime Gatewaycluster, you must create an environment variable on each node that references theLotus Sametime Gateway installation path on that node.
Before you begin
Expected state: The Deployment Manager and nodes are upgraded. All LotusLotus Sametime Gateway servers are stopped, all node agents are stopped, and theDeployment Manager is stopped.
About this task
This procedure is required for upgraded nodes in a cluster only.1. Log into the Deployment Manager node as a user with administrative
privileges.2. Open a command window (QShell session on IBM i) and navigate to the
stgw_profile_root\bin directory3. Start the Deployment Manager by typing the following command:
AIX, Linux, and Solaris./startManager.sh
WindowsstartManager.bat
IBM istartManager
4. Start the nodeagents by logging in to one of the Lotus Sametime Gatewaynodes.
5. Open a command window (QShell session on IBM i) and navigate to thestgw_profile_root\bin directory.
6. Start the node agent with the following command.IBM AIX, Linux, and Solaris./startNode.sh
Microsoft WindowsstartNode.bat
IBM istartNode
7. Log in to the other nodes, except the Deployment Manager node, and repeatthe previous steps to start the node agent on each node.
8. On the Deployment Manager, log in to the Integrated Solutions Console.9. Click Environment → WebSphere Variables.
10. Under Scope, choose the primary node in the cluster from the list. In thefollowing example, the primary node is the first node circled in red, and the
Chapter 4. Migrating and upgrading 613
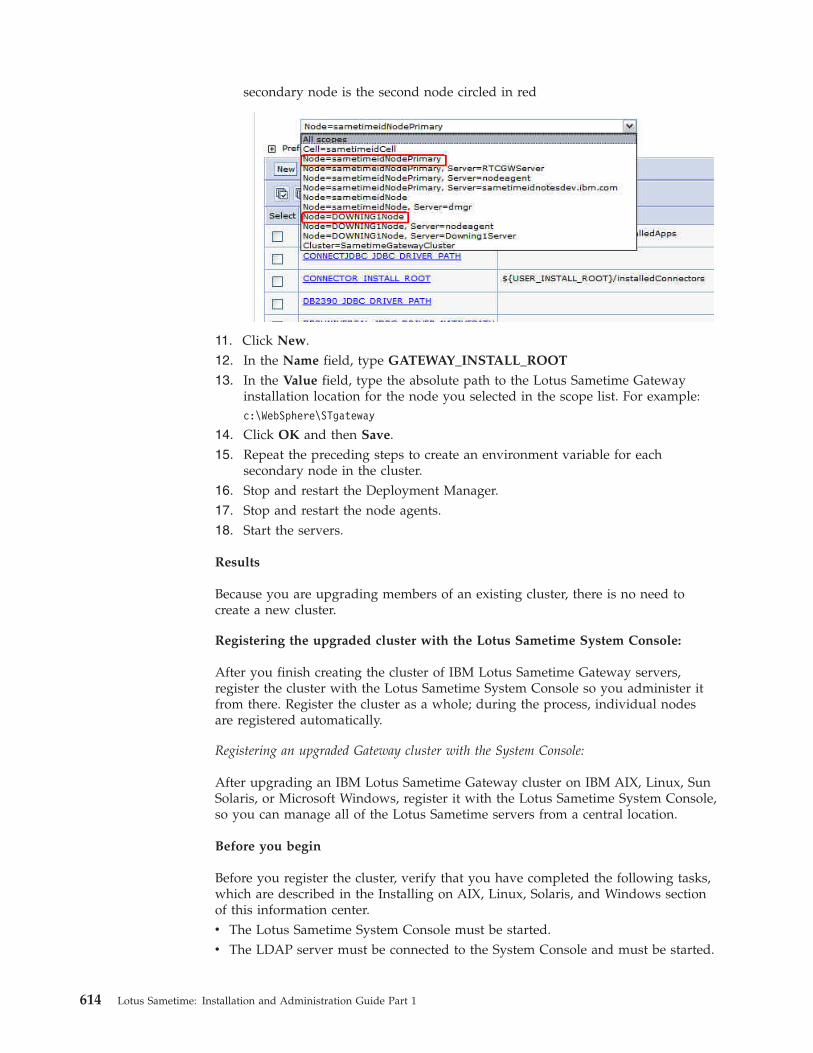
secondary node is the second node circled in red
11. Click New.12. In the Name field, type GATEWAY_INSTALL_ROOT
13. In the Value field, type the absolute path to the Lotus Sametime Gatewayinstallation location for the node you selected in the scope list. For example:c:\WebSphere\STgateway
14. Click OK and then Save.15. Repeat the preceding steps to create an environment variable for each
secondary node in the cluster.16. Stop and restart the Deployment Manager.17. Stop and restart the node agents.18. Start the servers.
Results
Because you are upgrading members of an existing cluster, there is no need tocreate a new cluster.
Registering the upgraded cluster with the Lotus Sametime System Console:
After you finish creating the cluster of IBM Lotus Sametime Gateway servers,register the cluster with the Lotus Sametime System Console so you administer itfrom there. Register the cluster as a whole; during the process, individual nodesare registered automatically.
Registering an upgraded Gateway cluster with the System Console:
After upgrading an IBM Lotus Sametime Gateway cluster on IBM AIX, Linux, SunSolaris, or Microsoft Windows, register it with the Lotus Sametime System Console,so you can manage all of the Lotus Sametime servers from a central location.
Before you begin
Before you register the cluster, verify that you have completed the following tasks,which are described in the Installing on AIX, Linux, Solaris, and Windows sectionof this information center.v The Lotus Sametime System Console must be started.v The LDAP server must be connected to the System Console and must be started.
614 Lotus Sametime: Installation and Administration Guide Part 1
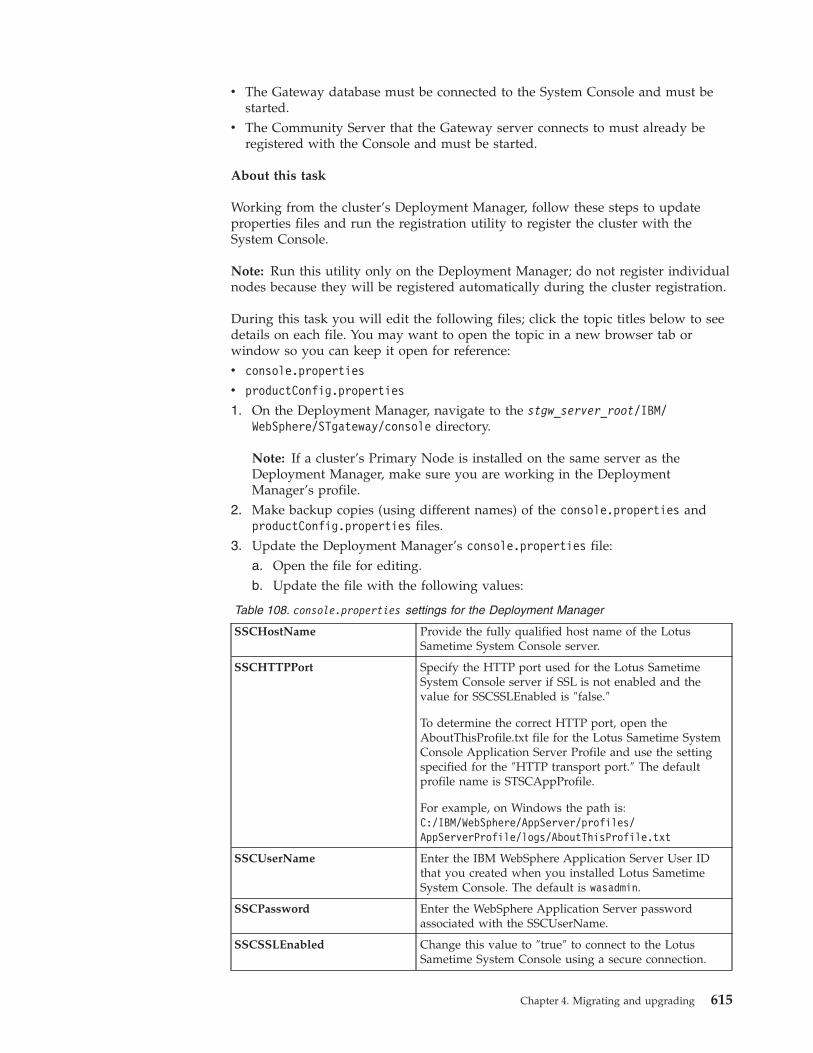
v The Gateway database must be connected to the System Console and must bestarted.
v The Community Server that the Gateway server connects to must already beregistered with the Console and must be started.
About this task
Working from the cluster’s Deployment Manager, follow these steps to updateproperties files and run the registration utility to register the cluster with theSystem Console.
Note: Run this utility only on the Deployment Manager; do not register individualnodes because they will be registered automatically during the cluster registration.
During this task you will edit the following files; click the topic titles below to seedetails on each file. You may want to open the topic in a new browser tab orwindow so you can keep it open for reference:v console.properties
v productConfig.properties
1. On the Deployment Manager, navigate to the stgw_server_root/IBM/WebSphere/STgateway/console directory.
Note: If a cluster’s Primary Node is installed on the same server as theDeployment Manager, make sure you are working in the DeploymentManager’s profile.
2. Make backup copies (using different names) of the console.properties andproductConfig.properties files.
3. Update the Deployment Manager’s console.properties file:a. Open the file for editing.b. Update the file with the following values:
Table 108. console.properties settings for the Deployment Manager
SSCHostName Provide the fully qualified host name of the LotusSametime System Console server.
SSCHTTPPort Specify the HTTP port used for the Lotus SametimeSystem Console server if SSL is not enabled and thevalue for SSCSSLEnabled is ″false.″
To determine the correct HTTP port, open theAboutThisProfile.txt file for the Lotus Sametime SystemConsole Application Server Profile and use the settingspecified for the ″HTTP transport port.″ The defaultprofile name is STSCAppProfile.
For example, on Windows the path is:C:/IBM/WebSphere/AppServer/profiles/AppServerProfile/logs/AboutThisProfile.txt
SSCUserName Enter the IBM WebSphere Application Server User IDthat you created when you installed Lotus SametimeSystem Console. The default is wasadmin.
SSCPassword Enter the WebSphere Application Server passwordassociated with the SSCUserName.
SSCSSLEnabled Change this value to ″true″ to connect to the LotusSametime System Console using a secure connection.
Chapter 4. Migrating and upgrading 615
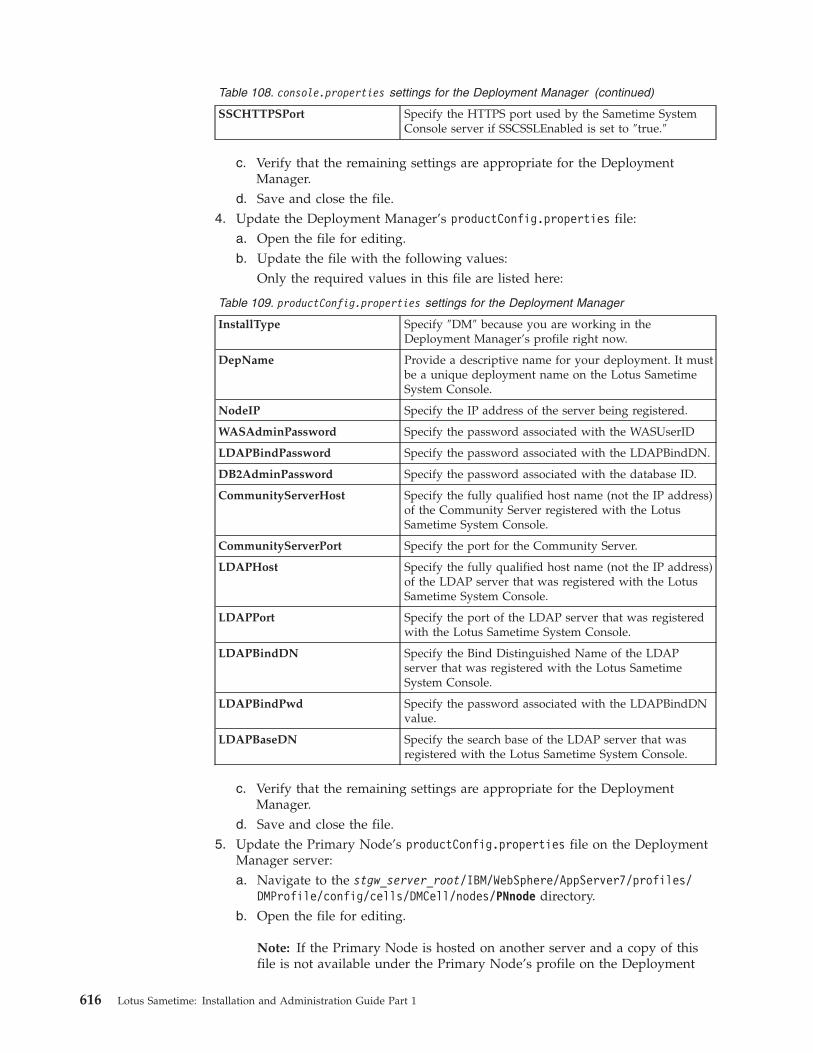
Table 108. console.properties settings for the Deployment Manager (continued)
SSCHTTPSPort Specify the HTTPS port used by the Sametime SystemConsole server if SSCSSLEnabled is set to ″true.″
c. Verify that the remaining settings are appropriate for the DeploymentManager.
d. Save and close the file.4. Update the Deployment Manager’s productConfig.properties file:
a. Open the file for editing.b. Update the file with the following values:
Only the required values in this file are listed here:
Table 109. productConfig.properties settings for the Deployment Manager
InstallType Specify ″DM″ because you are working in theDeployment Manager’s profile right now.
DepName Provide a descriptive name for your deployment. It mustbe a unique deployment name on the Lotus SametimeSystem Console.
NodeIP Specify the IP address of the server being registered.
WASAdminPassword Specify the password associated with the WASUserID
LDAPBindPassword Specify the password associated with the LDAPBindDN.
DB2AdminPassword Specify the password associated with the database ID.
CommunityServerHost Specify the fully qualified host name (not the IP address)of the Community Server registered with the LotusSametime System Console.
CommunityServerPort Specify the port for the Community Server.
LDAPHost Specify the fully qualified host name (not the IP address)of the LDAP server that was registered with the LotusSametime System Console.
LDAPPort Specify the port of the LDAP server that was registeredwith the Lotus Sametime System Console.
LDAPBindDN Specify the Bind Distinguished Name of the LDAPserver that was registered with the Lotus SametimeSystem Console.
LDAPBindPwd Specify the password associated with the LDAPBindDNvalue.
LDAPBaseDN Specify the search base of the LDAP server that wasregistered with the Lotus Sametime System Console.
c. Verify that the remaining settings are appropriate for the DeploymentManager.
d. Save and close the file.5. Update the Primary Node’s productConfig.properties file on the Deployment
Manager server:a. Navigate to the stgw_server_root/IBM/WebSphere/AppServer7/profiles/
DMProfile/config/cells/DMCell/nodes/PNnode directory.b. Open the file for editing.
Note: If the Primary Node is hosted on another server and a copy of thisfile is not available under the Primary Node’s profile on the Deployment
616 Lotus Sametime: Installation and Administration Guide Part 1
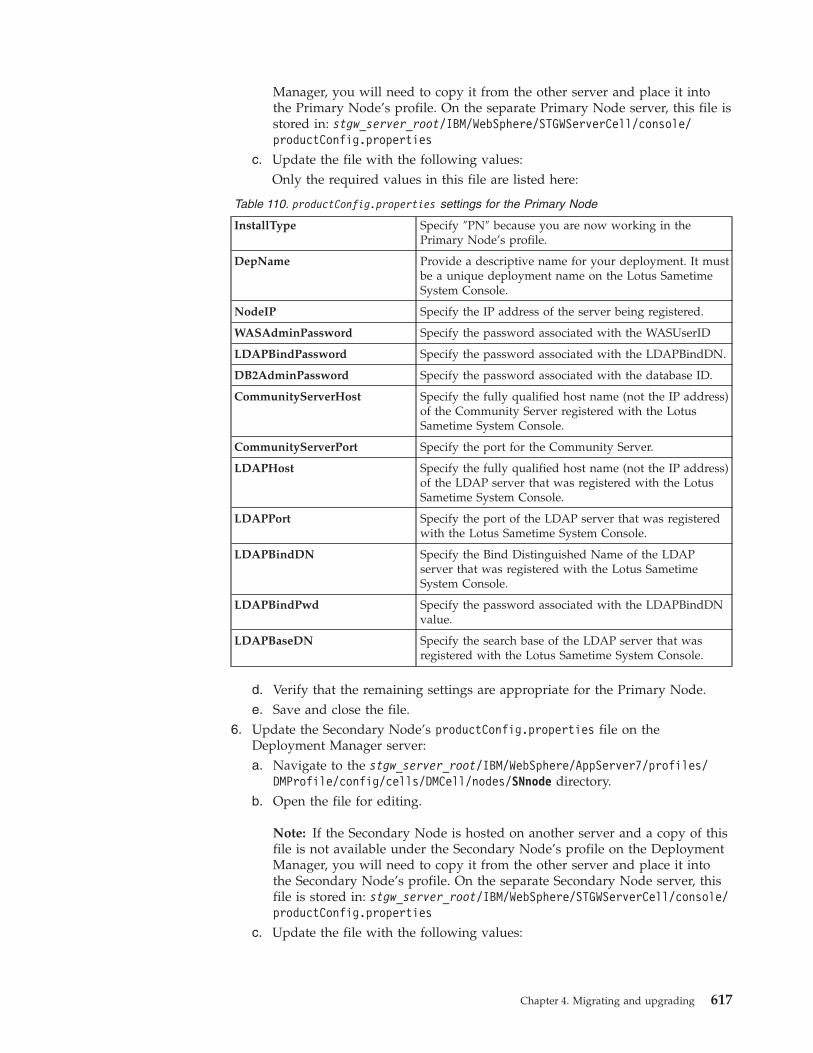
Manager, you will need to copy it from the other server and place it intothe Primary Node’s profile. On the separate Primary Node server, this file isstored in: stgw_server_root/IBM/WebSphere/STGWServerCell/console/productConfig.properties
c. Update the file with the following values:Only the required values in this file are listed here:
Table 110. productConfig.properties settings for the Primary Node
InstallType Specify ″PN″ because you are now working in thePrimary Node’s profile.
DepName Provide a descriptive name for your deployment. It mustbe a unique deployment name on the Lotus SametimeSystem Console.
NodeIP Specify the IP address of the server being registered.
WASAdminPassword Specify the password associated with the WASUserID
LDAPBindPassword Specify the password associated with the LDAPBindDN.
DB2AdminPassword Specify the password associated with the database ID.
CommunityServerHost Specify the fully qualified host name (not the IP address)of the Community Server registered with the LotusSametime System Console.
CommunityServerPort Specify the port for the Community Server.
LDAPHost Specify the fully qualified host name (not the IP address)of the LDAP server that was registered with the LotusSametime System Console.
LDAPPort Specify the port of the LDAP server that was registeredwith the Lotus Sametime System Console.
LDAPBindDN Specify the Bind Distinguished Name of the LDAPserver that was registered with the Lotus SametimeSystem Console.
LDAPBindPwd Specify the password associated with the LDAPBindDNvalue.
LDAPBaseDN Specify the search base of the LDAP server that wasregistered with the Lotus Sametime System Console.
d. Verify that the remaining settings are appropriate for the Primary Node.e. Save and close the file.
6. Update the Secondary Node’s productConfig.properties file on theDeployment Manager server:a. Navigate to the stgw_server_root/IBM/WebSphere/AppServer7/profiles/
DMProfile/config/cells/DMCell/nodes/SNnode directory.b. Open the file for editing.
Note: If the Secondary Node is hosted on another server and a copy of thisfile is not available under the Secondary Node’s profile on the DeploymentManager, you will need to copy it from the other server and place it intothe Secondary Node’s profile. On the separate Secondary Node server, thisfile is stored in: stgw_server_root/IBM/WebSphere/STGWServerCell/console/productConfig.properties
c. Update the file with the following values:
Chapter 4. Migrating and upgrading 617
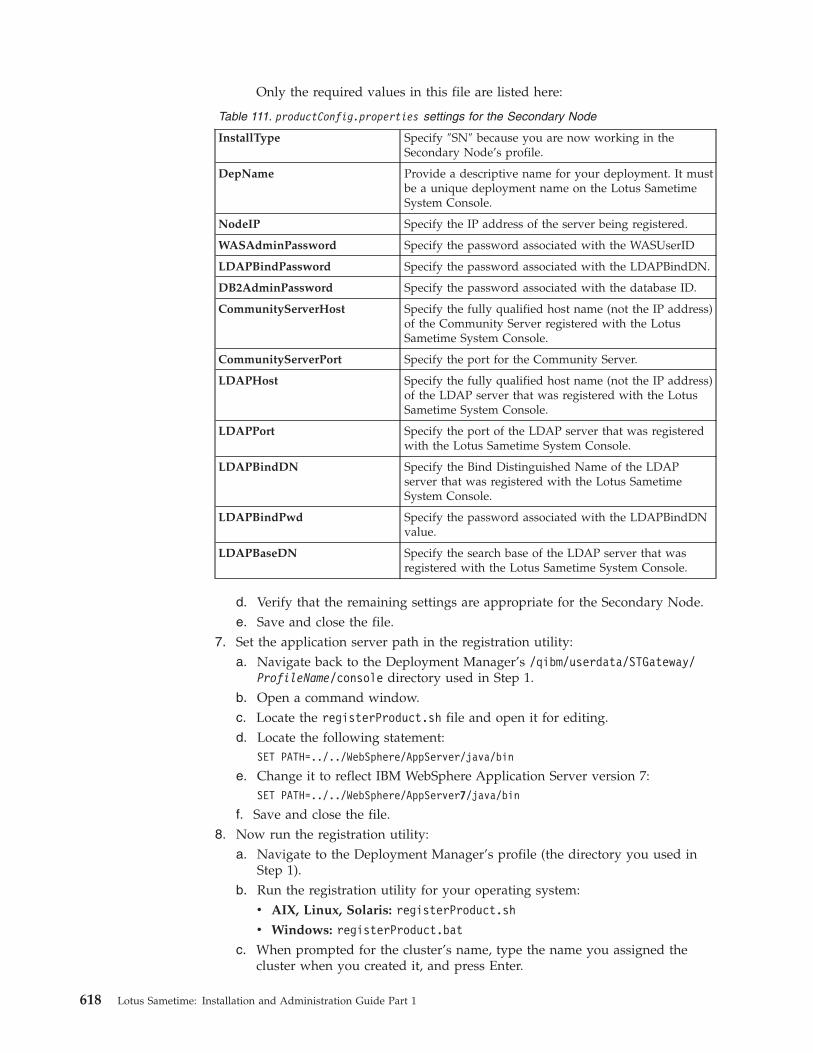
Only the required values in this file are listed here:
Table 111. productConfig.properties settings for the Secondary Node
InstallType Specify ″SN″ because you are now working in theSecondary Node’s profile.
DepName Provide a descriptive name for your deployment. It mustbe a unique deployment name on the Lotus SametimeSystem Console.
NodeIP Specify the IP address of the server being registered.
WASAdminPassword Specify the password associated with the WASUserID
LDAPBindPassword Specify the password associated with the LDAPBindDN.
DB2AdminPassword Specify the password associated with the database ID.
CommunityServerHost Specify the fully qualified host name (not the IP address)of the Community Server registered with the LotusSametime System Console.
CommunityServerPort Specify the port for the Community Server.
LDAPHost Specify the fully qualified host name (not the IP address)of the LDAP server that was registered with the LotusSametime System Console.
LDAPPort Specify the port of the LDAP server that was registeredwith the Lotus Sametime System Console.
LDAPBindDN Specify the Bind Distinguished Name of the LDAPserver that was registered with the Lotus SametimeSystem Console.
LDAPBindPwd Specify the password associated with the LDAPBindDNvalue.
LDAPBaseDN Specify the search base of the LDAP server that wasregistered with the Lotus Sametime System Console.
d. Verify that the remaining settings are appropriate for the Secondary Node.e. Save and close the file.
7. Set the application server path in the registration utility:a. Navigate back to the Deployment Manager’s /qibm/userdata/STGateway/
ProfileName/console directory used in Step 1.b. Open a command window.c. Locate the registerProduct.sh file and open it for editing.d. Locate the following statement:
SET PATH=../../WebSphere/AppServer/java/bin
e. Change it to reflect IBM WebSphere Application Server version 7:SET PATH=../../WebSphere/AppServer7/java/bin
f. Save and close the file.8. Now run the registration utility:
a. Navigate to the Deployment Manager’s profile (the directory you used inStep 1).
b. Run the registration utility for your operating system:v AIX, Linux, Solaris: registerProduct.sh
v Windows: registerProduct.bat
c. When prompted for the cluster’s name, type the name you assigned thecluster when you created it, and press Enter.
618 Lotus Sametime: Installation and Administration Guide Part 1

The utility registers the cluster, as well as each node, generating a log file calledConsoleUtility.log and storing it in the console/logs directory. If theregistration is successful, a console.pid will also be generated.
9. Start the Lotus Sametime Gateway cluster, if it is not already running.
Registering an upgraded Gateway cluster on IBM i with the System Console:
After upgrading an IBM Lotus Sametime Gateway cluster on IBM i, register it withthe Lotus Sametime System Console, which allows you to manage all LotusSametime servers from a central location.
Before you begin
Before you register the cluster, verify that you have completed the following tasks,which are described in the Installing on IBM i section of this information center.v The Lotus Sametime System Console must be started.v The LDAP server must be connected to the System Console and must be started.v The Gateway database must be connected to the System Console and must be
started.v The Community Server that the Gateway server connects to must already be
registered with the Console and must be started.
About this task
Working from the Deployment Manager, follow these steps to update propertiesfiles and run the registration utility to register the cluster with the console.
Note: Run this utility only on the Deployment Manager; do not register individualnodes because they will be registered automatically during the cluster registration.
During this task you will edit the following files; click the topic titles below to seedetails on each file. You may want to open the topic in a new browser tab orwindow so you can keep it open for reference:v console.properties
v productConfig.properties
1. Working on the Deployment Manager, navigate to the console directory:/qibm/userdata/STGateway/ProfileName/console
Where the ProfileName is the one you specified when you installed theGateway.
Note: If the Primary Node is installed on the same server as the DeploymentManager, make sure you are working in the Deployment Manager’s profile.
2. Make backup copies (using different names) of the console.properties andproductConfig.properties files.
3. Update the Deployment Manager’s console.properties file:a. Open the file for editing.b. Update the file with the following values:
Table 112. console.properties settings for the Deployment Manager
SSCHostName Provide the fully qualified host name of the LotusSametime System Console server.
Chapter 4. Migrating and upgrading 619
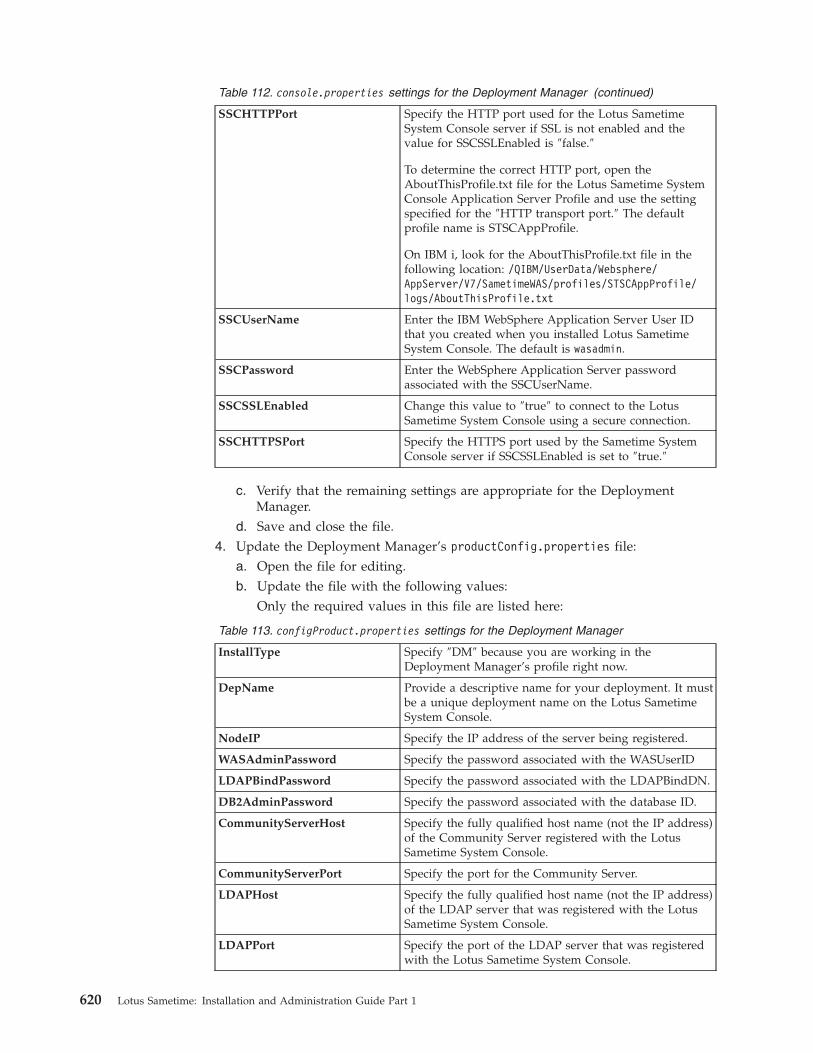
Table 112. console.properties settings for the Deployment Manager (continued)
SSCHTTPPort Specify the HTTP port used for the Lotus SametimeSystem Console server if SSL is not enabled and thevalue for SSCSSLEnabled is ″false.″
To determine the correct HTTP port, open theAboutThisProfile.txt file for the Lotus Sametime SystemConsole Application Server Profile and use the settingspecified for the ″HTTP transport port.″ The defaultprofile name is STSCAppProfile.
On IBM i, look for the AboutThisProfile.txt file in thefollowing location: /QIBM/UserData/Websphere/AppServer/V7/SametimeWAS/profiles/STSCAppProfile/logs/AboutThisProfile.txt
SSCUserName Enter the IBM WebSphere Application Server User IDthat you created when you installed Lotus SametimeSystem Console. The default is wasadmin.
SSCPassword Enter the WebSphere Application Server passwordassociated with the SSCUserName.
SSCSSLEnabled Change this value to ″true″ to connect to the LotusSametime System Console using a secure connection.
SSCHTTPSPort Specify the HTTPS port used by the Sametime SystemConsole server if SSCSSLEnabled is set to ″true.″
c. Verify that the remaining settings are appropriate for the DeploymentManager.
d. Save and close the file.4. Update the Deployment Manager’s productConfig.properties file:
a. Open the file for editing.b. Update the file with the following values:
Only the required values in this file are listed here:
Table 113. configProduct.properties settings for the Deployment Manager
InstallType Specify ″DM″ because you are working in theDeployment Manager’s profile right now.
DepName Provide a descriptive name for your deployment. It mustbe a unique deployment name on the Lotus SametimeSystem Console.
NodeIP Specify the IP address of the server being registered.
WASAdminPassword Specify the password associated with the WASUserID
LDAPBindPassword Specify the password associated with the LDAPBindDN.
DB2AdminPassword Specify the password associated with the database ID.
CommunityServerHost Specify the fully qualified host name (not the IP address)of the Community Server registered with the LotusSametime System Console.
CommunityServerPort Specify the port for the Community Server.
LDAPHost Specify the fully qualified host name (not the IP address)of the LDAP server that was registered with the LotusSametime System Console.
LDAPPort Specify the port of the LDAP server that was registeredwith the Lotus Sametime System Console.
620 Lotus Sametime: Installation and Administration Guide Part 1

Table 113. configProduct.properties settings for the Deployment Manager (continued)
LDAPBindDN Specify the Bind Distinguished Name of the LDAPserver that was registered with the Lotus SametimeSystem Console.
LDAPBindPwd Specify the password associated with the LDAPBindDNvalue.
LDAPBaseDN Specify the search base of the LDAP server that wasregistered with the Lotus Sametime System Console.
c. Verify that the remaining settings are appropriate for the DeploymentManager.
d. Save and close the file.5. Update the Primary Node’s productConfig.properties file on the Deployment
Manager server:a. Navigate to the /qibm/userdata/STGateway/IBM/WebSphere/AppServer/V7/
profiles/DMProfile/config/cells/DMCell/nodes/PNnode directory.b. Open the file for editing.
Note: If the Primary Node is hosted on another server and a copy of thisfile is not available under the Primary Node’s profile on the DeploymentManager, you will need to copy it from the other server and place it intothe Primary Node’s profile. On the separate Primary Node server, this file isstored in: /qibm/userdata/STGateway/IBM/WebSphere/STGWServerCell/console/productConfig.properties
c. Update the file with the following values:Only the required values in this file are listed here:
Table 114. configProduct.properties settings for the Primary Node
InstallType Specify ″PN″ because you are now working in thePrimary Node’s profile.
DepName Provide a descriptive name for your deployment. It mustbe a unique deployment name on the Lotus SametimeSystem Console.
NodeIP Specify the IP address of the server being registered.
WASAdminPassword Specify the password associated with the WASUserID
LDAPBindPassword Specify the password associated with the LDAPBindDN.
DB2AdminPassword Specify the password associated with the database ID.
CommunityServerHost Specify the fully qualified host name (not the IP address)of the Community Server registered with the LotusSametime System Console.
CommunityServerPort Specify the port for the Community Server.
LDAPHost Specify the fully qualified host name (not the IP address)of the LDAP server that was registered with the LotusSametime System Console.
LDAPPort Specify the port of the LDAP server that was registeredwith the Lotus Sametime System Console.
LDAPBindDN Specify the Bind Distinguished Name of the LDAPserver that was registered with the Lotus SametimeSystem Console.
LDAPBindPwd Specify the password associated with the LDAPBindDNvalue.
Chapter 4. Migrating and upgrading 621
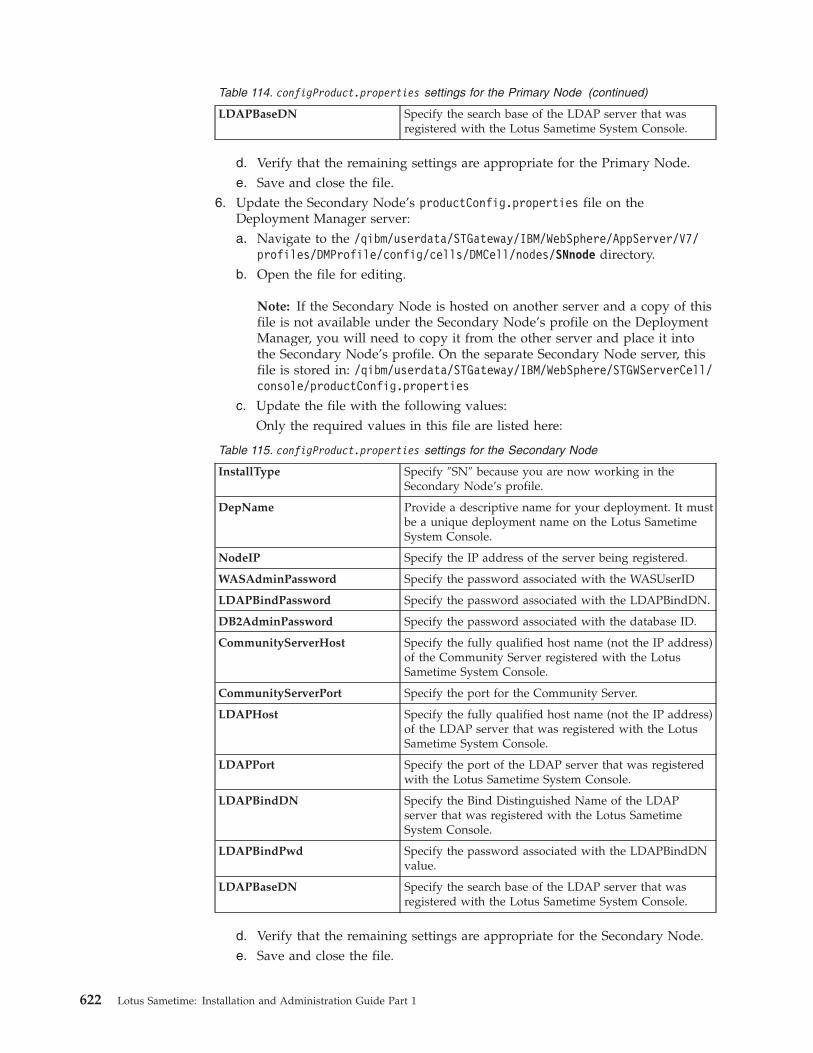
Table 114. configProduct.properties settings for the Primary Node (continued)
LDAPBaseDN Specify the search base of the LDAP server that wasregistered with the Lotus Sametime System Console.
d. Verify that the remaining settings are appropriate for the Primary Node.e. Save and close the file.
6. Update the Secondary Node’s productConfig.properties file on theDeployment Manager server:a. Navigate to the /qibm/userdata/STGateway/IBM/WebSphere/AppServer/V7/
profiles/DMProfile/config/cells/DMCell/nodes/SNnode directory.b. Open the file for editing.
Note: If the Secondary Node is hosted on another server and a copy of thisfile is not available under the Secondary Node’s profile on the DeploymentManager, you will need to copy it from the other server and place it intothe Secondary Node’s profile. On the separate Secondary Node server, thisfile is stored in: /qibm/userdata/STGateway/IBM/WebSphere/STGWServerCell/console/productConfig.properties
c. Update the file with the following values:Only the required values in this file are listed here:
Table 115. configProduct.properties settings for the Secondary Node
InstallType Specify ″SN″ because you are now working in theSecondary Node’s profile.
DepName Provide a descriptive name for your deployment. It mustbe a unique deployment name on the Lotus SametimeSystem Console.
NodeIP Specify the IP address of the server being registered.
WASAdminPassword Specify the password associated with the WASUserID
LDAPBindPassword Specify the password associated with the LDAPBindDN.
DB2AdminPassword Specify the password associated with the database ID.
CommunityServerHost Specify the fully qualified host name (not the IP address)of the Community Server registered with the LotusSametime System Console.
CommunityServerPort Specify the port for the Community Server.
LDAPHost Specify the fully qualified host name (not the IP address)of the LDAP server that was registered with the LotusSametime System Console.
LDAPPort Specify the port of the LDAP server that was registeredwith the Lotus Sametime System Console.
LDAPBindDN Specify the Bind Distinguished Name of the LDAPserver that was registered with the Lotus SametimeSystem Console.
LDAPBindPwd Specify the password associated with the LDAPBindDNvalue.
LDAPBaseDN Specify the search base of the LDAP server that wasregistered with the Lotus Sametime System Console.
d. Verify that the remaining settings are appropriate for the Secondary Node.e. Save and close the file.
622 Lotus Sametime: Installation and Administration Guide Part 1
7. Now run the registration utility:a. From an IBM i command line, run the following command to start the
QShell Interpreter: QSHb. Run the cd shell command, specifying the fully qualified path to the console
directory you used in Step 1.c. Run the shell script to register the server: registerProduct.shd. When prompted for the cluster’s name, type the name you assigned the
cluster when you created it, and press Enter.e. When the registration script completes, press F3 to exit QSH.
The utility registers the cluster, as well as each node, generating a log filecalled ConsoleUtility.log and storing it in the consoles/logs directory. Ifthe registration is successful, a console.pid will also be generated.
8. Start the Lotus Sametime Gateway cluster, if it is not already running.
Upgrading the SIP and XMPP proxy server:
If the SIP and XMPP proxy server is on an existing Primary Node or SecondaryNode in the IBM Lotus Sametime Gateway cluster, it will be upgradedautomatically when you upgrade the IBM WebSphere Application Server runningon that node. If your SIP and XMPP proxy server is installed on its own node, youmust upgrade WebSphere Application Server on that node.
About this task
The instructions for upgrading a SIP and XMPP proxy server are the same as forinstalling it. If you have a SIP proxy server but not an XMPP proxy server, you stilluse the same instructions for installation and upgrade.
Installing a SIP and XMPP proxy server on Windows:
The SIP and XMPP proxy servers are the first point of contact, after the firewall,for messages that flow into and out your enterprise. Install the proxy servers forboth standalone or network deployment installations of Sametime Gateway. IBMrecommends that you install a SIP and XMPP proxy server on its own node.
About this task
The XMPP and SIP proxy server node installation creates a WebSphere ApplicationServer node with two application servers installed. One server is a generic SIPproxy server provided by WebSphere Application Server, and the other is astandard application server onto which is installed the XMPP proxy application.The node does not function until it is federated into a Sametime Gateway cell.Information on downloading packages for Lotus Sametime Gateway is located inthe Lotus Sametime Download document.1. Create two temporary file folders: \TMP\WASCD and \TMP\SametimeGateway.2. From the installation media, copy the WebSphere Application Server
installation image part_number.exe to the folder \TMP\WASCD.3. Open a command window and navigate to the folder \TMP\WASCD.4. Extract all files to the temporary directory \TMP\WASCD. When you are done
extracting the files, you should have a \TMP\WASCD\ifpackage folder with WASand JDK folders inside the ifpackage folder.
5. From the installation media, copy the Sametime Gateway installation imagepart_number.exe to the \TMP folder.
Chapter 4. Migrating and upgrading 623
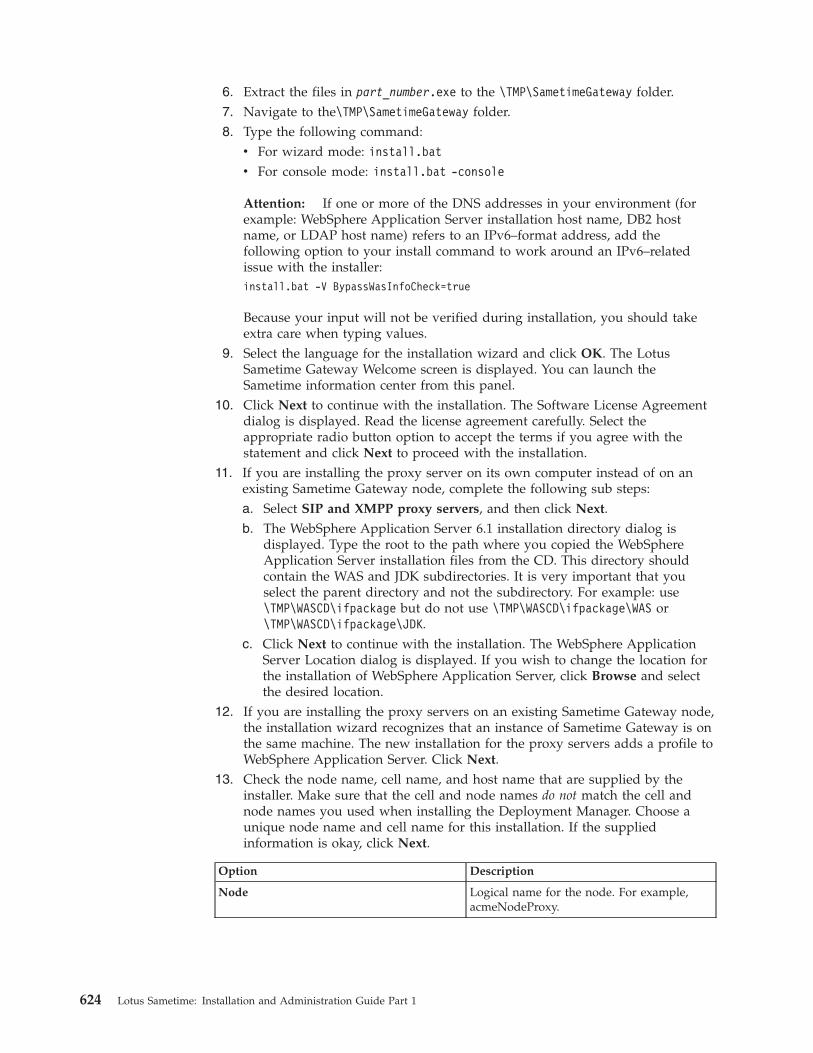
6. Extract the files in part_number.exe to the \TMP\SametimeGateway folder.7. Navigate to the\TMP\SametimeGateway folder.8. Type the following command:
v For wizard mode: install.batv For console mode: install.bat -console
Attention: If one or more of the DNS addresses in your environment (forexample: WebSphere Application Server installation host name, DB2 hostname, or LDAP host name) refers to an IPv6–format address, add thefollowing option to your install command to work around an IPv6–relatedissue with the installer:install.bat -V BypassWasInfoCheck=true
Because your input will not be verified during installation, you should takeextra care when typing values.
9. Select the language for the installation wizard and click OK. The LotusSametime Gateway Welcome screen is displayed. You can launch theSametime information center from this panel.
10. Click Next to continue with the installation. The Software License Agreementdialog is displayed. Read the license agreement carefully. Select theappropriate radio button option to accept the terms if you agree with thestatement and click Next to proceed with the installation.
11. If you are installing the proxy server on its own computer instead of on anexisting Sametime Gateway node, complete the following sub steps:a. Select SIP and XMPP proxy servers, and then click Next.b. The WebSphere Application Server 6.1 installation directory dialog is
displayed. Type the root to the path where you copied the WebSphereApplication Server installation files from the CD. This directory shouldcontain the WAS and JDK subdirectories. It is very important that youselect the parent directory and not the subdirectory. For example: use\TMP\WASCD\ifpackage but do not use \TMP\WASCD\ifpackage\WAS or\TMP\WASCD\ifpackage\JDK.
c. Click Next to continue with the installation. The WebSphere ApplicationServer Location dialog is displayed. If you wish to change the location forthe installation of WebSphere Application Server, click Browse and selectthe desired location.
12. If you are installing the proxy servers on an existing Sametime Gateway node,the installation wizard recognizes that an instance of Sametime Gateway is onthe same machine. The new installation for the proxy servers adds a profile toWebSphere Application Server. Click Next.
13. Check the node name, cell name, and host name that are supplied by theinstaller. Make sure that the cell and node names do not match the cell andnode names you used when installing the Deployment Manager. Choose aunique node name and cell name for this installation. If the suppliedinformation is okay, click Next.
Option Description
Node Logical name for the node. For example,acmeNodeProxy.
624 Lotus Sametime: Installation and Administration Guide Part 1
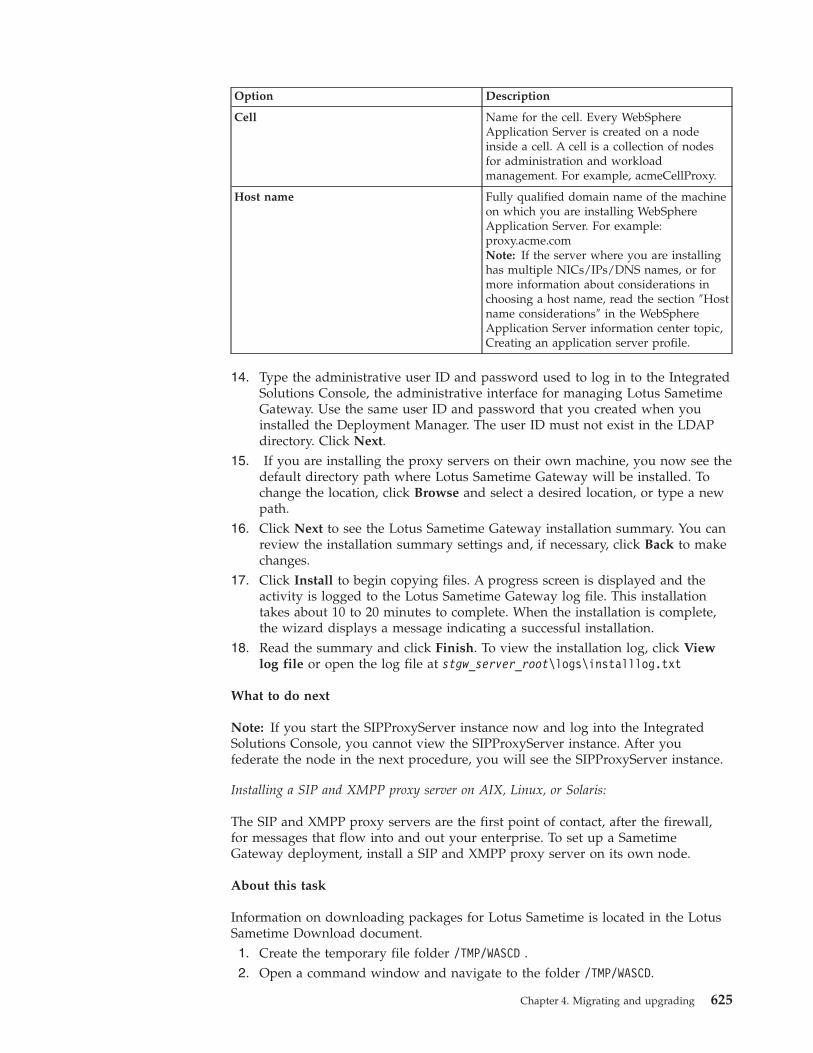
Option Description
Cell Name for the cell. Every WebSphereApplication Server is created on a nodeinside a cell. A cell is a collection of nodesfor administration and workloadmanagement. For example, acmeCellProxy.
Host name Fully qualified domain name of the machineon which you are installing WebSphereApplication Server. For example:proxy.acme.comNote: If the server where you are installinghas multiple NICs/IPs/DNS names, or formore information about considerations inchoosing a host name, read the section ″Hostname considerations″ in the WebSphereApplication Server information center topic,Creating an application server profile.
14. Type the administrative user ID and password used to log in to the IntegratedSolutions Console, the administrative interface for managing Lotus SametimeGateway. Use the same user ID and password that you created when youinstalled the Deployment Manager. The user ID must not exist in the LDAPdirectory. Click Next.
15. If you are installing the proxy servers on their own machine, you now see thedefault directory path where Lotus Sametime Gateway will be installed. Tochange the location, click Browse and select a desired location, or type a newpath.
16. Click Next to see the Lotus Sametime Gateway installation summary. You canreview the installation summary settings and, if necessary, click Back to makechanges.
17. Click Install to begin copying files. A progress screen is displayed and theactivity is logged to the Lotus Sametime Gateway log file. This installationtakes about 10 to 20 minutes to complete. When the installation is complete,the wizard displays a message indicating a successful installation.
18. Read the summary and click Finish. To view the installation log, click Viewlog file or open the log file at stgw_server_root\logs\installlog.txt
What to do next
Note: If you start the SIPProxyServer instance now and log into the IntegratedSolutions Console, you cannot view the SIPProxyServer instance. After youfederate the node in the next procedure, you will see the SIPProxyServer instance.
Installing a SIP and XMPP proxy server on AIX, Linux, or Solaris:
The SIP and XMPP proxy servers are the first point of contact, after the firewall,for messages that flow into and out your enterprise. To set up a SametimeGateway deployment, install a SIP and XMPP proxy server on its own node.
About this task
Information on downloading packages for Lotus Sametime is located in the LotusSametime Download document.1. Create the temporary file folder /TMP/WASCD .2. Open a command window and navigate to the folder /TMP/WASCD.
Chapter 4. Migrating and upgrading 625
3. Extract all files to the temporary directory /TMP/WASCD. When you are doneextracting the files, you should have a /TMP/WASCD/ifpackage folder with WASand JDK folders inside the ifpackage folder.
4. Run the following command to uncompress the files:gunzip -c part_number.tar.gz | tar -xvf -
When you are done extracting the files, you should have a/TMP/WASCD/ifpackage folder with WAS and JDK folders inside the ifpackagefolder.
5. From the installation media, copy the Lotus Sametime Gateway installationimage part_number.tar to the temporary directory /TMP.
6. Unzip the following file:unzip part_number.tar
This step creates the folder /TMP/SametimeGateway.7.
8. Navigate to the temporary directory /TMP/SametimeGateway and type one ofthe following commands:v For wizard mode: . /install.sh
v For console mode: . /install.sh -console
This command installs WebSphere Application Server 6.1 and Lotus SametimeGateway. The Language Selection dialog is displayed.
9. Select the language to be used for the installation and click OK. The LotusSametime Gateway Welcome screen is displayed.
10. Click Next to continue with the installation. The Software License Agreementdialog is displayed. Please make sure to read the license agreement carefully.
11. Select the appropriate radio button option to accept the license agreement ifyou agree with the statement and click Next to proceed with the installation.If you accepted the terms, the Installation Type dialog is displayed.
12. Select SIP and XMPP proxy servers, and then click Next.13. If you are installing the proxy servers on their own machine, complete the
following sub steps:a. The WebSphere Application Server installation directory dialog is
displayed. Type the root to the path where you copied the WebSphereApplication Server installation files from the CD. This directory shouldcontain the WAS and JDK subdirectories. It is very important that youselect the parent directory and not the subdirectory. For example: use/TMP/WASCD/ifpackage but do not use /TMP/WASCD/ifpackage/WAS or/TMP/WASCD/ifpackage/JDK.
b. Click Next to continue with the installation. The WebSphere ApplicationServer Location dialog is displayed. If you wish to change the location forthe installation of WebSphere Application Server, click Browse and selectthe desired location.
14. If you are not installing the proxy servers on their own machine, theinstallation wizard recognizes that an instance of Sametime Gateway is on thesame machine. The new installation for the SIP and XMPP proxy servers addsa profile to WebSphere Application Server. Click Next, and then click Nextagain.
15. Check the node name, cell name, and host name that are supplied by theinstaller. Make sure that the cell and node names do not match the cell andnode names you used when installing other Sametime Gateway servers.
626 Lotus Sametime: Installation and Administration Guide Part 1
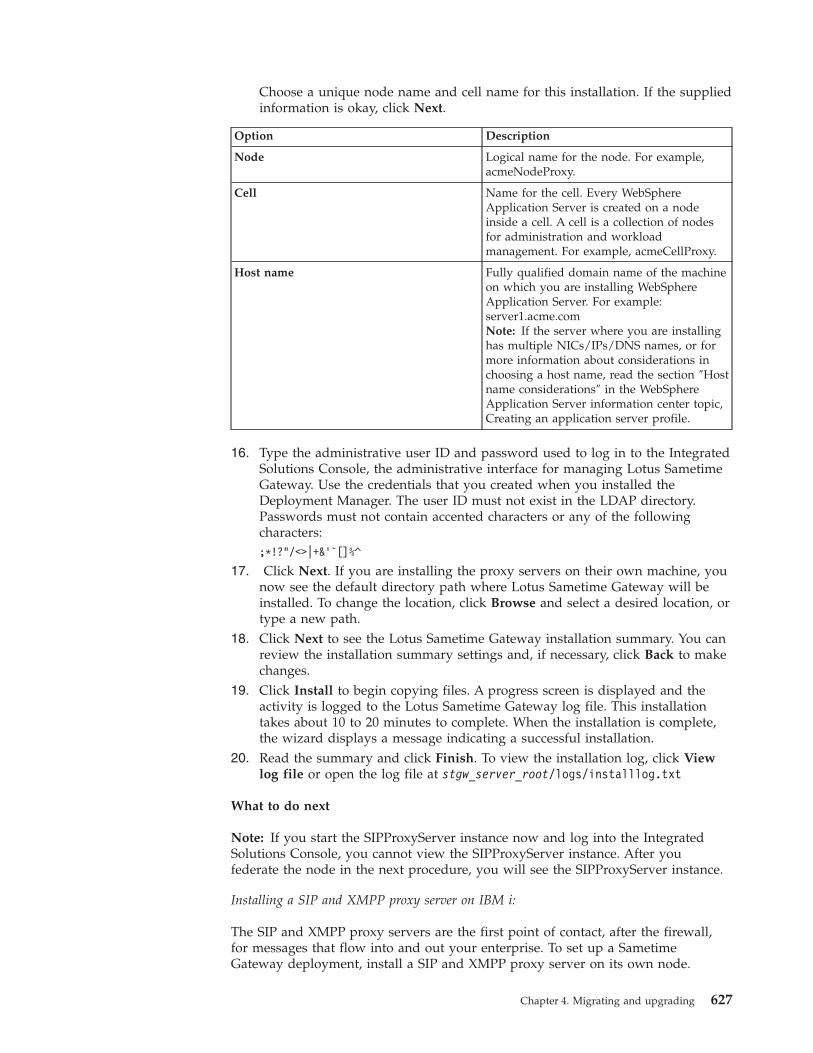
Choose a unique node name and cell name for this installation. If the suppliedinformation is okay, click Next.
Option Description
Node Logical name for the node. For example,acmeNodeProxy.
Cell Name for the cell. Every WebSphereApplication Server is created on a nodeinside a cell. A cell is a collection of nodesfor administration and workloadmanagement. For example, acmeCellProxy.
Host name Fully qualified domain name of the machineon which you are installing WebSphereApplication Server. For example:server1.acme.comNote: If the server where you are installinghas multiple NICs/IPs/DNS names, or formore information about considerations inchoosing a host name, read the section ″Hostname considerations″ in the WebSphereApplication Server information center topic,Creating an application server profile.
16. Type the administrative user ID and password used to log in to the IntegratedSolutions Console, the administrative interface for managing Lotus SametimeGateway. Use the credentials that you created when you installed theDeployment Manager. The user ID must not exist in the LDAP directory.Passwords must not contain accented characters or any of the followingcharacters:;*!?"/<>|+&'`[]%^
17. Click Next. If you are installing the proxy servers on their own machine, younow see the default directory path where Lotus Sametime Gateway will beinstalled. To change the location, click Browse and select a desired location, ortype a new path.
18. Click Next to see the Lotus Sametime Gateway installation summary. You canreview the installation summary settings and, if necessary, click Back to makechanges.
19. Click Install to begin copying files. A progress screen is displayed and theactivity is logged to the Lotus Sametime Gateway log file. This installationtakes about 10 to 20 minutes to complete. When the installation is complete,the wizard displays a message indicating a successful installation.
20. Read the summary and click Finish. To view the installation log, click Viewlog file or open the log file at stgw_server_root/logs/installlog.txt
What to do next
Note: If you start the SIPProxyServer instance now and log into the IntegratedSolutions Console, you cannot view the SIPProxyServer instance. After youfederate the node in the next procedure, you will see the SIPProxyServer instance.
Installing a SIP and XMPP proxy server on IBM i:
The SIP and XMPP proxy servers are the first point of contact, after the firewall,for messages that flow into and out your enterprise. To set up a SametimeGateway deployment, install a SIP and XMPP proxy server on its own node.
Chapter 4. Migrating and upgrading 627
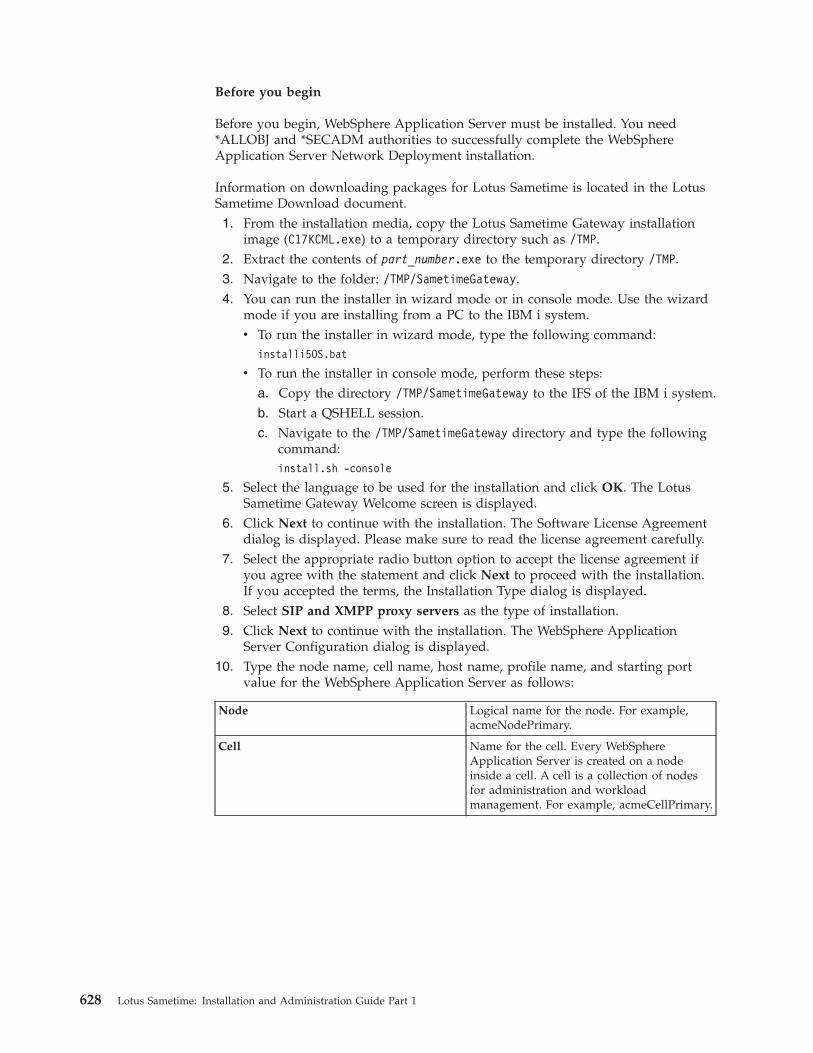
Before you begin
Before you begin, WebSphere Application Server must be installed. You need*ALLOBJ and *SECADM authorities to successfully complete the WebSphereApplication Server Network Deployment installation.
Information on downloading packages for Lotus Sametime is located in the LotusSametime Download document.1. From the installation media, copy the Lotus Sametime Gateway installation
image (C17KCML.exe) to a temporary directory such as /TMP.2. Extract the contents of part_number.exe to the temporary directory /TMP.3. Navigate to the folder: /TMP/SametimeGateway.4. You can run the installer in wizard mode or in console mode. Use the wizard
mode if you are installing from a PC to the IBM i system.v To run the installer in wizard mode, type the following command:
installi5OS.bat
v To run the installer in console mode, perform these steps:a. Copy the directory /TMP/SametimeGateway to the IFS of the IBM i system.b. Start a QSHELL session.c. Navigate to the /TMP/SametimeGateway directory and type the following
command:install.sh -console
5. Select the language to be used for the installation and click OK. The LotusSametime Gateway Welcome screen is displayed.
6. Click Next to continue with the installation. The Software License Agreementdialog is displayed. Please make sure to read the license agreement carefully.
7. Select the appropriate radio button option to accept the license agreement ifyou agree with the statement and click Next to proceed with the installation.If you accepted the terms, the Installation Type dialog is displayed.
8. Select SIP and XMPP proxy servers as the type of installation.9. Click Next to continue with the installation. The WebSphere Application
Server Configuration dialog is displayed.10. Type the node name, cell name, host name, profile name, and starting port
value for the WebSphere Application Server as follows:
Node Logical name for the node. For example,acmeNodePrimary.
Cell Name for the cell. Every WebSphereApplication Server is created on a nodeinside a cell. A cell is a collection of nodesfor administration and workloadmanagement. For example, acmeCellPrimary.
628 Lotus Sametime: Installation and Administration Guide Part 1

Host name Fully qualified domain name of the machineon which you are installing WebSphereApplication Server. For example:server1.acme.comNote: If the server where you are installinghas multiple NICs/IPs/DNS names, or formore information about considerations inchoosing a host name, read the section ″Hostname considerations″ in the WebSphereApplication Server information center topic,Creating an application server profile.
Profile name Name of the WebSphere Application Serverprofile that will be created and be installedwith the Lotus Sametime Gateway. Forexample: STGW_Proxy_Profile
Starting Port IBM i supports running multiple profilesand instances of WebSphere ApplicationServer at the same time; to avoid portconflicts the profile created will not use thedefault ports. Select a port range of 50consecutive unused ports on your system,and enter the first port number as yourstarting port. For example: 10000.
11. Type the administrative user ID and password used to log in to the IntegratedSolutions Console, the administrative interface for managing Lotus SametimeGateway. Use the same user ID and password that you created when youinstalled the Deployment Manager. The user ID must not exist in the LDAPdirectory. Click Next.
12. Click Next to see the installation summary. You can review the installationsummary settings and, if necessary, click Back to make changes.
13. Click Install to begin copying files. A progress screen is displayed and theactivity is logged to the Lotus Sametime Gateway log file. This installationtakes about 10 to 20 minutes to complete. When the installation is complete,the wizard displays a message indicating a successful installation.
14. Read the summary and click Finish to complete the installation. To view theinstallation log, click View log file or open the log file atstgw_server_root/logs/installlog.txt
What to do next
Note: If you start the SIPProxyServer instance now and log into the IntegratedSolutions Console, you cannot view the SIPProxyServer instance. After youfederate the node in the next procedure, you then see the SIPProxyServer instance.
Federating the proxy server node into the cell:
After you install the SIP and XMPP proxy server node, you must federate the nodeinto the Deployment Manager’s cell so that the proxy server becomes part of thecluster.
Before you begin
Expected state: The Deployment Manager is running.
Chapter 4. Migrating and upgrading 629
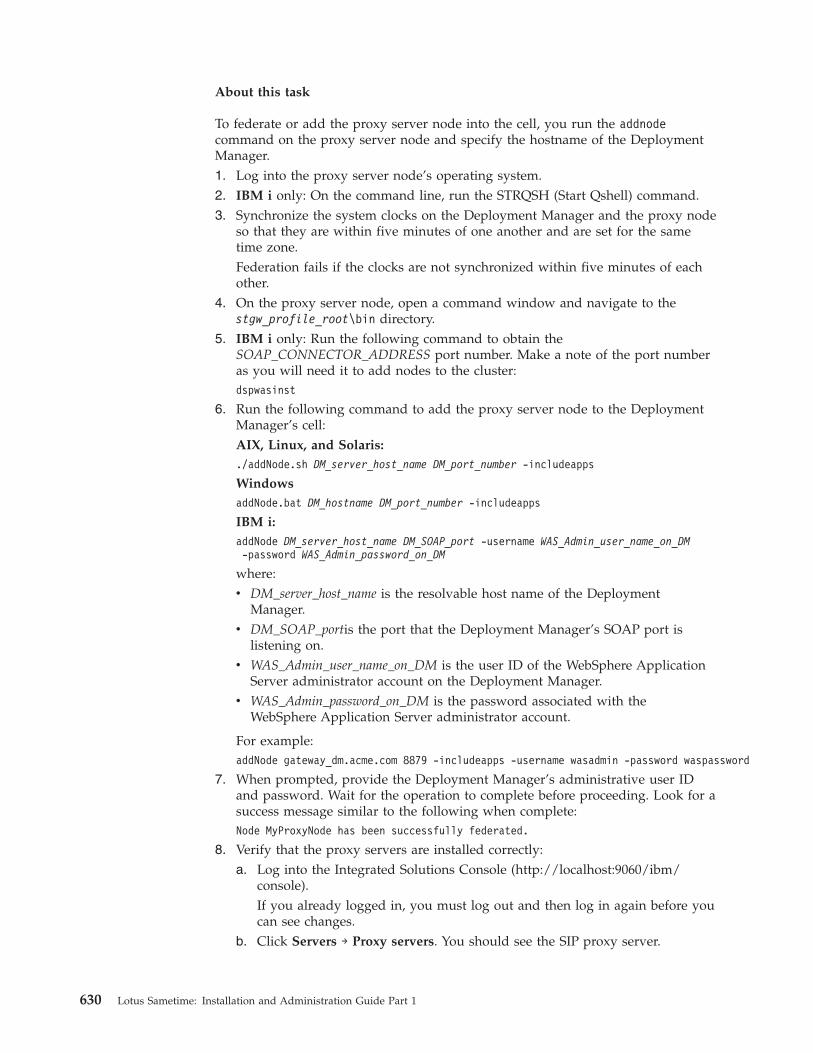
About this task
To federate or add the proxy server node into the cell, you run the addnodecommand on the proxy server node and specify the hostname of the DeploymentManager.1. Log into the proxy server node’s operating system.2. IBM i only: On the command line, run the STRQSH (Start Qshell) command.3. Synchronize the system clocks on the Deployment Manager and the proxy node
so that they are within five minutes of one another and are set for the sametime zone.Federation fails if the clocks are not synchronized within five minutes of eachother.
4. On the proxy server node, open a command window and navigate to thestgw_profile_root\bin directory.
5. IBM i only: Run the following command to obtain theSOAP_CONNECTOR_ADDRESS port number. Make a note of the port numberas you will need it to add nodes to the cluster:dspwasinst
6. Run the following command to add the proxy server node to the DeploymentManager’s cell:AIX, Linux, and Solaris:./addNode.sh DM_server_host_name DM_port_number -includeapps
WindowsaddNode.bat DM_hostname DM_port_number -includeapps
IBM i:addNode DM_server_host_name DM_SOAP_port -username WAS_Admin_user_name_on_DM-password WAS_Admin_password_on_DM
where:v DM_server_host_name is the resolvable host name of the Deployment
Manager.v DM_SOAP_portis the port that the Deployment Manager’s SOAP port is
listening on.v WAS_Admin_user_name_on_DM is the user ID of the WebSphere Application
Server administrator account on the Deployment Manager.v WAS_Admin_password_on_DM is the password associated with the
WebSphere Application Server administrator account.
For example:addNode gateway_dm.acme.com 8879 -includeapps -username wasadmin -password waspassword
7. When prompted, provide the Deployment Manager’s administrative user IDand password. Wait for the operation to complete before proceeding. Look for asuccess message similar to the following when complete:Node MyProxyNode has been successfully federated.
8. Verify that the proxy servers are installed correctly:a. Log into the Integrated Solutions Console (http://localhost:9060/ibm/
console).If you already logged in, you must log out and then log in again before youcan see changes.
b. Click Servers → Proxy servers. You should see the SIP proxy server.
630 Lotus Sametime: Installation and Administration Guide Part 1
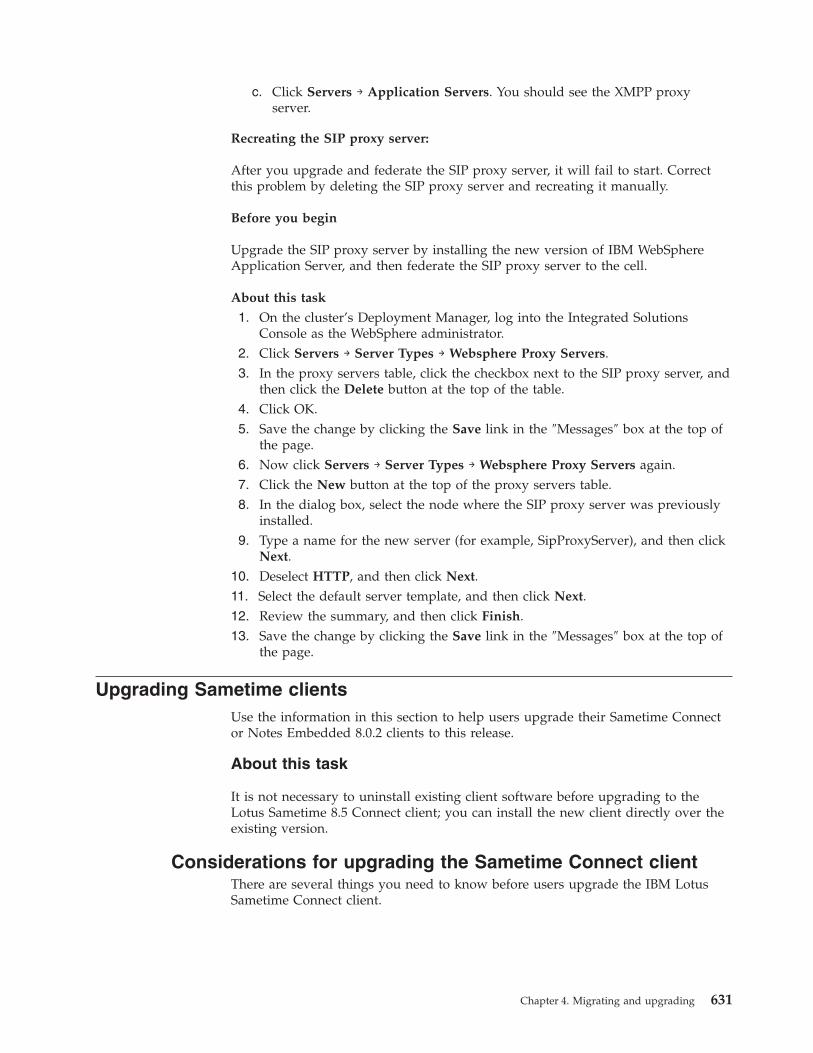
c. Click Servers → Application Servers. You should see the XMPP proxyserver.
Recreating the SIP proxy server:
After you upgrade and federate the SIP proxy server, it will fail to start. Correctthis problem by deleting the SIP proxy server and recreating it manually.
Before you begin
Upgrade the SIP proxy server by installing the new version of IBM WebSphereApplication Server, and then federate the SIP proxy server to the cell.
About this task
1. On the cluster’s Deployment Manager, log into the Integrated SolutionsConsole as the WebSphere administrator.
2. Click Servers → Server Types → Websphere Proxy Servers.3. In the proxy servers table, click the checkbox next to the SIP proxy server, and
then click the Delete button at the top of the table.4. Click OK.5. Save the change by clicking the Save link in the ″Messages″ box at the top of
the page.6. Now click Servers → Server Types → Websphere Proxy Servers again.7. Click the New button at the top of the proxy servers table.8. In the dialog box, select the node where the SIP proxy server was previously
installed.9. Type a name for the new server (for example, SipProxyServer), and then click
Next.10. Deselect HTTP, and then click Next.11. Select the default server template, and then click Next.12. Review the summary, and then click Finish.13. Save the change by clicking the Save link in the ″Messages″ box at the top of
the page.
Upgrading Sametime clientsUse the information in this section to help users upgrade their Sametime Connector Notes Embedded 8.0.2 clients to this release.
About this task
It is not necessary to uninstall existing client software before upgrading to theLotus Sametime 8.5 Connect client; you can install the new client directly over theexisting version.
Considerations for upgrading the Sametime Connect clientThere are several things you need to know before users upgrade the IBM LotusSametime Connect client.
Chapter 4. Migrating and upgrading 631
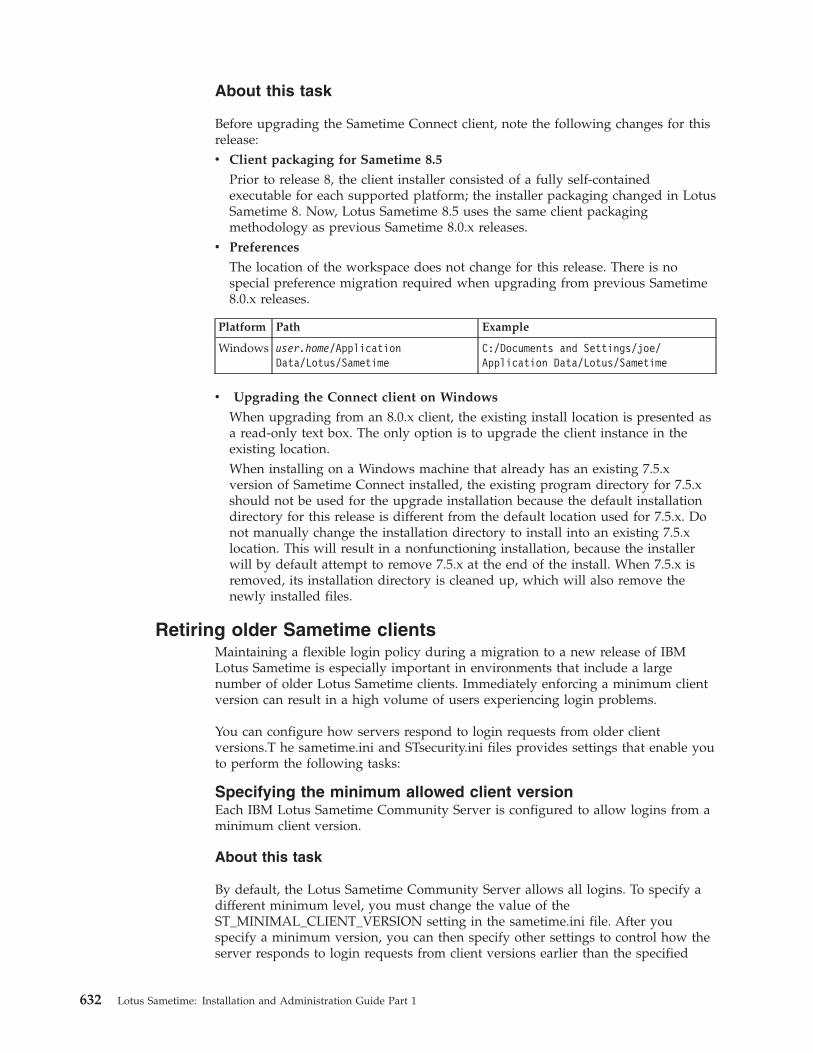
About this task
Before upgrading the Sametime Connect client, note the following changes for thisrelease:v Client packaging for Sametime 8.5
Prior to release 8, the client installer consisted of a fully self-containedexecutable for each supported platform; the installer packaging changed in LotusSametime 8. Now, Lotus Sametime 8.5 uses the same client packagingmethodology as previous Sametime 8.0.x releases.
v Preferences
The location of the workspace does not change for this release. There is nospecial preference migration required when upgrading from previous Sametime8.0.x releases.
Platform Path Example
Windows user.home/ApplicationData/Lotus/Sametime
C:/Documents and Settings/joe/Application Data/Lotus/Sametime
v Upgrading the Connect client on Windows
When upgrading from an 8.0.x client, the existing install location is presented asa read-only text box. The only option is to upgrade the client instance in theexisting location.When installing on a Windows machine that already has an existing 7.5.xversion of Sametime Connect installed, the existing program directory for 7.5.xshould not be used for the upgrade installation because the default installationdirectory for this release is different from the default location used for 7.5.x. Donot manually change the installation directory to install into an existing 7.5.xlocation. This will result in a nonfunctioning installation, because the installerwill by default attempt to remove 7.5.x at the end of the install. When 7.5.x isremoved, its installation directory is cleaned up, which will also remove thenewly installed files.
Retiring older Sametime clientsMaintaining a flexible login policy during a migration to a new release of IBMLotus Sametime is especially important in environments that include a largenumber of older Lotus Sametime clients. Immediately enforcing a minimum clientversion can result in a high volume of users experiencing login problems.
You can configure how servers respond to login requests from older clientversions.T he sametime.ini and STsecurity.ini files provides settings that enable youto perform the following tasks:
Specifying the minimum allowed client versionEach IBM Lotus Sametime Community Server is configured to allow logins from aminimum client version.
About this task
By default, the Lotus Sametime Community Server allows all logins. To specify adifferent minimum level, you must change the value of theST_MINIMAL_CLIENT_VERSION setting in the sametime.ini file. After youspecify a minimum version, you can then specify other settings to control how theserver responds to login requests from client versions earlier than the specified
632 Lotus Sametime: Installation and Administration Guide Part 1

minimum version. All servers in the community must have the sameST_MINIMAL_CLIENT_VERSION or they cannot communicate with one another.
For a list of client types, see Technote 1114318 on the IBM Lotus Support Web siteat http://www.ibm.com/support/docview.wss?uid=swg21114318.1. Open the sametime.ini file in a text editor. By default the file is located in the
Lotus Sametime Community Server installation folder, for example,C:\Lotus\Domino\Sametime.ini.
2. In the [Config] section of the sametime.ini file, specify the minimum LotusSametime client version that can log in to the server by providing one of thefollowing values for the ST_MINIMAL_CLIENT_VERSION setting:
Table 116. Client versions
Value Lotus Sametime client version
0 Allows logins for all clients regardless ofversion (Default)
7000 Lotus Sametime 7.0
7500 Lotus Sametime 7.5
7501 Lotus Sametime 7.5.01
7510 Lotus Sametime 7.5.1
8000 Lotus Sametime 8
8010 Lotus Sametime 8.0.1
8020 Lotus Sametime 8.0.2
8500 Lotus Sametime 8.5
The client version correlates to the version of the product, and the value islogged in stlog.nsf.
3. Save and close the file.
Allowing logins from clients that do not conform to the minimumlevelBy default, the IBM Lotus Sametime Community Server automatically logs outusers who attempt to connect from clients of versions earlier than the specifiedminimum. To allow users with earlier clients to continue to access the serverduring the transition to the new server version, you can configure the server toallow logins from client versions earlier than the specified minimum.
About this task
Maintaining a flexible login policy is especially important in environments thatinclude a large number of older Lotus Sametime clients. In such an environment,immediately enforcing a minimum client version can result in a high volume ofhelp desk calls. To avoid locking users out of Sametime, give users several weeksto upgrade and use the ST_FORCE_LOGOUT_OLD_CLIENT_VERSION setting toenable servers to continue to accept logins from earlier client versions. After thedeadline for upgrading passes, change the value of the setting to block logins fromclients that do not meet the minimum security level.
The ST_FORCE_LOGOUT_OLD_CLIENT_VERSION setting determines whether ornot users of old clients are allowed to stay logged in to the community. By default,
Chapter 4. Migrating and upgrading 633
when this setting is true (a value of 1), old client versions are disconnected. Whenthe setting is false (a value of 0), the users of old clients remain online an usually amessage is sent to them.
Note: The VP_SECURITY_ALLOW_USER setting was renamedST_FORCE_LOGOUT_OLD_CLIENT_VERSION in Lotus Sametime 8.5. In order tosmooth migration, ST_FORCE_LOGOUT_OLD_CLIENT_VERSION overridesVP_SECURITY_ALLOW_USER from prior versions. If it is not present, then itsdefault value will be 1 and VP_SECURITY_ALLOW_USER or its own default valuetakes affect.1. Open the sametime.ini file in a text editor. By default the file is located in the
Sametime installation folder, for example, C:\Lotus\Domino\Sametime.ini.2. In the [Config] section of the sametime.ini file, specify whether to allow logins
from clients earlier than the minimum allowed version by providing one of thefollowing values for the ST_FORCE_LOGOUT_OLD_CLIENT_VERSIONsetting:v 0 - Allows logins from all clients, regardless of version.v 1 - This default setting, rejects login attempts from clients of versions earlier
than allowed by the ST_MINIMAL_CLIENT_VERSION setting.3. Save and close the file.
Configuring the server to send announcements to clients that donot conform to the minimum versionYou can use the ST_OLD_CLIENT_VERSION_WARNING_MESSAGE setting in theSTSecurity.ini file to provide additional information to users who attempt to log into the server from Sametime clients running versions earlier than what is allowedby the specified version level.
About this task
The ST_OLD_CLIENT_VERSION_WARNING_MESSAGE setting configures theserver to automatically respond to login requests from clients that do not conformto the server’s minimum version level by sending an announcement containingspecified text. The message you specify functions as either a warning message or adisconnection notification, depending on whether the value of theST_MINIMAL_CLIENT_VERSION setting allows logins from earlier clients. If theST_MINIMAL_CLIENT_VERSION setting allows logins, use the text of themessage to warn users that they need to upgrade and to explain how to obtainand install the client upgrade. If the ST_MINIMAL_CLIENT_VERSION settingdoes not allows logins, use the text of the message to explain why login wasdenied.
Note the following before you configure the settings in the STSecurity.ini file:v All platforms - Double-byte characters are not allowed in the message text or
sender name.v All platforms - If you want to use accented characters (for example, Æ,é,ä,ñ) in
the message text or sender name, you should use Notepad on a Windows clientor server to edit the file. When you finish making your changes with Notepad,save the STSecurity.ini file as a UTF-8 file (select File-Save As And specify UTF-8as the Encoding option, then save the file).
v IBM i platform only - It is recommended that you map a network drive to makethe STSecurity.ini file on the server accessible from your workstation. Then youcan run Notepad from your workstation and update the file directly on your
634 Lotus Sametime: Installation and Administration Guide Part 1
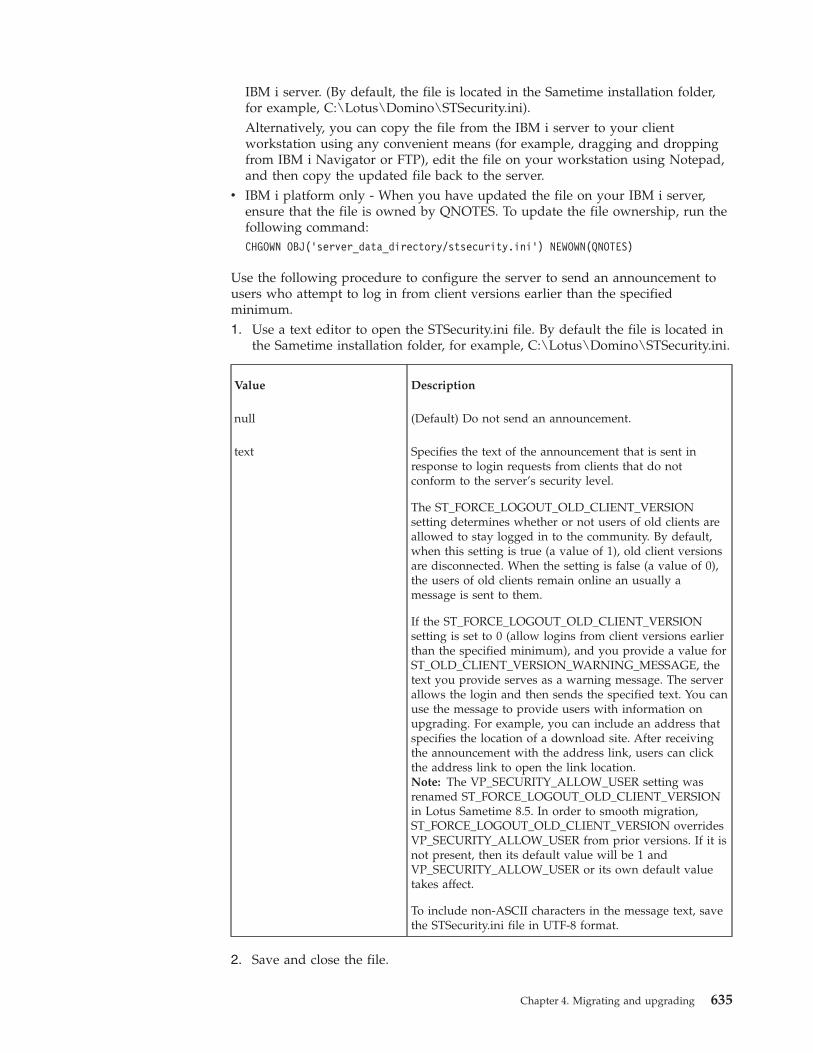
IBM i server. (By default, the file is located in the Sametime installation folder,for example, C:\Lotus\Domino\STSecurity.ini).Alternatively, you can copy the file from the IBM i server to your clientworkstation using any convenient means (for example, dragging and droppingfrom IBM i Navigator or FTP), edit the file on your workstation using Notepad,and then copy the updated file back to the server.
v IBM i platform only - When you have updated the file on your IBM i server,ensure that the file is owned by QNOTES. To update the file ownership, run thefollowing command:CHGOWN OBJ('server_data_directory/stsecurity.ini') NEWOWN(QNOTES)
Use the following procedure to configure the server to send an announcement tousers who attempt to log in from client versions earlier than the specifiedminimum.1. Use a text editor to open the STSecurity.ini file. By default the file is located in
the Sametime installation folder, for example, C:\Lotus\Domino\STSecurity.ini.
Value Description
null (Default) Do not send an announcement.
text Specifies the text of the announcement that is sent inresponse to login requests from clients that do notconform to the server’s security level.
The ST_FORCE_LOGOUT_OLD_CLIENT_VERSIONsetting determines whether or not users of old clients areallowed to stay logged in to the community. By default,when this setting is true (a value of 1), old client versionsare disconnected. When the setting is false (a value of 0),the users of old clients remain online an usually amessage is sent to them.
If the ST_FORCE_LOGOUT_OLD_CLIENT_VERSIONsetting is set to 0 (allow logins from client versions earlierthan the specified minimum), and you provide a value forST_OLD_CLIENT_VERSION_WARNING_MESSAGE, thetext you provide serves as a warning message. The serverallows the login and then sends the specified text. You canuse the message to provide users with information onupgrading. For example, you can include an address thatspecifies the location of a download site. After receivingthe announcement with the address link, users can clickthe address link to open the link location.Note: The VP_SECURITY_ALLOW_USER setting wasrenamed ST_FORCE_LOGOUT_OLD_CLIENT_VERSIONin Lotus Sametime 8.5. In order to smooth migration,ST_FORCE_LOGOUT_OLD_CLIENT_VERSION overridesVP_SECURITY_ALLOW_USER from prior versions. If it isnot present, then its default value will be 1 andVP_SECURITY_ALLOW_USER or its own default valuetakes affect.
To include non-ASCII characters in the message text, savethe STSecurity.ini file in UTF-8 format.
2. Save and close the file.
Chapter 4. Migrating and upgrading 635
Configuring the pause in the server before sending an announcement:
Follow these steps to configure the pause in the IBM Sametime Community Serverbefore sending announcement to clients that do not conform to the minimum clientversion level.
About this task
By default, the server waits one second before sending the announcement to userswho attempt to log in to the server from IBM Lotus Sametime clients runningversions earlier than what is allowed by the specified minimum version level. Thispause is needed since the full initialization time for some client versions is longerthan the others, and without the pause the announcement would reach the clientbefore it could handle it.
In case some users that should get the announcement do not receive it, the pausecan be extended to more than one second.1. Use a text editor to open the sametime.ini file. By default the file is located in
the Lotus Sametime installation folder, for example, C:\Lotus\Domino\sametime.ini.
2. In the [Config] section in sametime.ini specify the number of milliseconds thatthe sever waits before sending the announcement in theVP_SECURITY_PAUSE_INTERVAL setting.
3. Save and close the file.
Installing the new Lotus Sametime clientTo upgrade the IBM Lotus Sametime 8.5 Connect or Lotus Sametime 8.5 embeddedclient, you can install the newer version directly over the existing version.
About this task
For detailed instructions on installing the Lotus Sametime Connect or LotusSametime embedded client, see Deploying the Sametime client to users.
636 Lotus Sametime: Installation and Administration Guide Part 1

Notices
This information was developed for products and services offered in the U.S.A.
IBM may not offer the products, services, or features discussed in this document inother countries. Consult your local IBM representative for information on theproducts and services currently available in your area. Any reference to an IBMproduct, program, or service is not intended to state or imply that only that IBMproduct, program, or service may be used. Any functionally equivalent product,program, or service that does not infringe any IBM intellectual property right maybe used instead. However, it is the user’s responsibility to evaluate and verify theoperation of any non-IBM product, program, or service.
IBM may have patents or pending patent applications covering subject matterdescribed in this document. The furnishing of this document does not grant youany license to these patents. You can send license inquiries, in writing, to:
IBM Director of LicensingIBM CorporationNorth Castle DriveArmonk, NY 10504-1785U.S.A.
For license inquiries regarding double-byte (DBCS) information, contact the IBMIntellectual Property Department in your country or send inquiries, in writing, to:
Intellectual Property LicensingLegal and Intellectual Property LawIBM Japan Ltd.1623-14, Shimotsuruma, Yamato-shiKanagawa 242-8502 Japan
The following paragraph does not apply to the United Kingdom or any othercountry where such provisions are inconsistent with local law:INTERNATIONAL BUSINESS MACHINES CORPORATION PROVIDES THISPUBLICATION “AS IS” WITHOUT WARRANTY OF ANY KIND, EITHEREXPRESS OR IMPLIED, INCLUDING, BUT NOT LIMITED TO, THE IMPLIEDWARRANTIES OF NON-INFRINGEMENT, MERCHANTABILITY OR FITNESSFOR A PARTICULAR PURPOSE. Some states do not allow disclaimer of express orimplied warranties in certain transactions, therefore, this statement may not applyto you.
This information could include technical inaccuracies or typographical errors.Changes are periodically made to the information herein; these changes will beincorporated in new editions of the publication. IBM may make improvementsand/or changes in the product(s) and/or the program(s) described in thispublication at any time without notice.
Any references in this information to non-IBM Web sites are provided forconvenience only and do not in any manner serve as an endorsement of those Websites. The materials at those Web sites are not part of the materials for this IBMproduct and use of those Web sites is at your own risk.
© Copyright IBM Corp. 1996, 2009 637
IBM may use or distribute any of the information you supply in any way itbelieves appropriate without incurring any obligation to you.
Licensees of this program who wish to have information about it for the purposeof enabling: (i) the exchange of information between independently createdprograms and other programs (including this one) and (ii) the mutual use of theinformation which has been exchanged, should contact:
IBM CorporationSoftware Interoperability Coordinator, Department 49XA3605 Highway 52 NRochester, MN 55901U.S.A.
Such information may be available, subject to appropriate terms and conditions,including in some cases, payment of a fee.
The licensed program described in this information and all licensed materialavailable for it are provided by IBM under terms of the IBM Customer Agreement,IBM International Program License Agreement, or any equivalent agreementbetween us.
Any performance data contained herein was determined in a controlledenvironment. Therefore, the results obtained in other operating environments mayvary significantly. Some measurements may have been made on development-levelsystems and there is no guarantee that these measurements will be the same ongenerally available systems. Furthermore, some measurements may have beenestimated through extrapolation. Actual results may vary. Users of this documentshould verify the applicable data for their specific environment.
Information concerning non-IBM products was obtained from the suppliers ofthose products, their published announcements or other publicly available sources.IBM has not tested those products and cannot confirm the accuracy ofperformance, compatibility or any other claims related to non-IBM products.Questions on the capabilities of non-IBM products should be addressed to thesuppliers of those products.
All statements regarding IBM’s future direction or intent are subject to change orwithdrawal without notice, and represent goals and objectives only.
All IBM prices shown are IBM’s suggested retail prices, are current and are subjectto change without notice. Dealer prices may vary.
This information is for planning purposes only. The information herein is subject tochange before the products described become available.
This information contains examples of data and reports used in daily businessoperations. To illustrate them as completely as possible, the examples include thenames of individuals, companies, brands, and products. All of these names arefictitious and any similarity to the names and addresses used by an actual businessenterprise is entirely coincidental.
COPYRIGHT LICENSE:
This information contains sample application programs in source language, whichillustrate programming techniques on various operating platforms. You may copy,
638 Lotus Sametime: Installation and Administration Guide Part 1
modify, and distribute these sample programs in any form without payment toIBM, for the purposes of developing, using, marketing or distributing applicationprograms conforming to the application programming interface for the operatingplatform for which the sample programs are written. These examples have notbeen thoroughly tested under all conditions. IBM, therefore, cannot guarantee orimply reliability, serviceability, or function of these programs. The sampleprograms are provided ″AS IS″, without warranty of any kind. IBM shall not beliable for any damages arising out of your use of the sample programs.
Each copy or any portion of these sample programs or any derivative work, mustinclude a copyright notice as follows:
© (your company name) (year). Portions of this code are derived from IBM Corp.Sample Programs. © Copyright IBM Corp. _enter the year or years_. All rightsreserved.
If you are viewing this information softcopy, the photographs and colorillustrations may not appear.
TrademarksThese terms are trademarks of International Business Machines Corporation in theUnited States, other countries, or both:
IBMAIXDB2DB2 Universal Database DominoDominoDomino DesignerDomino Directoryi5/OSLotusLotus NotesNotesOS/400SametimeWebSphere
AOL is a registered trademark of AOL LLC in the United States, other countries, orboth.
AOL Instant Messenger is a trademark of AOL LLC in the United States, othercountries, or both.
Google Talk is a trademark of Google, Inc, in the United States, other countries, orboth.
Yahoo! is a registered trademark of Yahoo, Inc. in the United States, othercountries, or both.
Yahoo! Messenger is a trademark of Yahoo, Inc. in the United States, othercountries, or both.
Java and all Java-based trademarks are trademarks of Sun Microsystems, Inc. in theUnited States, other countries, or both.
Notices 639
Microsoft, and Windows are registered trademarks of Microsoft Corporation in theUnited States, other countries, or both.
Intel and Pentium are trademarks or registered trademarks of Intel Corporation orits subsidiaries in the United States, other countries, or both.
Linux is a trademark of Linus Torvalds in the United States, other countries, orboth.
Other company, product, or service names may be trademarks or service marks ofothers.
640 Lotus Sametime: Installation and Administration Guide Part 1


����
Printed in USA
SC23-5987-04