lesson 1 - university of akron
TRANSCRIPT

PeopleSoft Version 9.1: Requisitions
Ver. 2012.06.05 Page 1 [email protected] ©2008 These materials may not be reproduced in whole or in part without the express permission of
The University of Akron.
Table of Contents
COURSE OBJECTIVES .............................................................................................. 2
LESSON 1: CONTACT INFORMATION ...................................................................... 3
LESSON 2: REQUISITION OVERVIEW ..................................................................... 6
METHODS OF PURCHASING ............................................................................................ 6
REQUISITIONS DEFINED................................................................................................ 8
LIFE CYCLE OF A REQUISITION ........................................................................................ 9
LESSON 3: ADDING A NEW REQUISITION ............................................................ 10
DISCUSSION ........................................................................................................... 10
Starting Notes for Adding Requisitions .................................................................. 10
Information Needed for Completing a Requisition .................................................. 10
ENTERING A BASIC REQUISITION: ONE VENDOR, ONE SPEEDCHART ......................................... 11
ENTERING A REQUISITION WITH MULTIPLE SPEEDCHARTS PER LINE ITEM .................................... 27
ENDING NOTES FOR ADDING REQUISITIONS ...................................................................... 32
LESSON 4: PRINTING A REQUISITION ................................................................. 33
METHOD 1: PRINTING A REQUISITION FROM THE MAINTAIN REQUISITIONS PAGE ........................... 33
METHOD 2: PRINTING A REQUISITION USING THE REQUISITION PRINT PAGE ................................ 35
LESSON 5: RECALL A REQUISITION...................................................................... 46
Part A: Opening a Requisition Prior to Approval ..................................................... 46
Part B: Modifying a Requisition Prior to Approval ................................................... 48
Part C: Modifying a Requisition after Approval ....................................................... 49
Part D: Cancel a Requisition ................................................................................ 50
Part E: Processing a Requisition put on Hold ......................................................... 51
LESSON 6: REQUISITION INQUIRY ...................................................................... 56
REQUISITION INQUIRY PAGE ........................................................................................ 56
DOCUMENT STATUS INQUIRY PAGE ................................................................................. 62
LESSON 7: HOW TO HANDLE INVOICES ................................................................ 64
APPENDIX A: ALLOWING POP-UPS ....................................................................... 65
Configure Pop-up Blocker ................................................................................... 65
Configure Pop-up Blocker: Windows 7 Settings ...................................................... 67
APPENDIX B: ERROR MESSAGE WHEN SAVING A REQUISITION ........................... 69
APPENDIX C: WORKFLOW MESSAGES .................................................................. 70

PeopleSoft Version 9.1: Requisitions
Ver. 2012.06.05 Page 2 [email protected] ©2008 These materials may not be reproduced in whole or in part without the express permission of
The University of Akron.
Course Objectives
This is the PeopleSoft Version 9.1 Requisitions Manual. This manual is used in the
hands-on seminar that is required for security to PeopleSoft Requisitions at The
University of Akron. This manual will review the following topics:
Contact information for PeopleSoft and Purchasing related questions
High level review of the various methods of purchasing goods and services
Overview of the Life Cycle of a PeopleSoft Requisition
Creating PeopleSoft Requisitions
Printing PeopleSoft Requisitions
Recalling a PeopleSoft Requisition
Inquiring on a PeopleSoft Requisition
Working with Invoices
The Financials Intro New User seminar is a highly recommended pre-requisite for this
course. The PeopleSoft Requisition New User seminar does not cover the basics of
how to use the PeopleSoft Financials system. Also, if your job requires the running of
Budget Reports, Software Training Services also offers a hands-on seminar titled
Budget Reports and Inquiry: New User.
Security
To obtain security to PeopleSoft Requisitions, first you must attend training. Once
training has been complete, go to the online security form and complete as necessary.
This form can be accessed at:
https://footprints.uakron.edu/secure/ps/

PeopleSoft Version 9.1: Requisitions
Ver. 2012.06.05 Page 3 [email protected] ©2008 These materials may not be reproduced in whole or in part without the express permission of
The University of Akron.
Lesson 1: Contact Information
PeopleSoft Contacts
Office Contact Information Function
Support Desk [email protected] OR 330.972.6888
Answers general questions about PeopleSoft processes and non-PeopleSoft computer processes, opens work tickets for technicians, and assists with UANet password issues. Contact if you forget your PeopleSoft password.
Purchasing Questions
[email protected] OR See next page for listing of contacts in the Department of Purchasing.
Answers specific business process questions about purchasing goods or services.
Software Training Services
Answers “how to” questions about the PeopleSoft processes outlined in this manual.
PeopleSoft Web Sites
Office Web Site
Computer Help Desk http://www.uakron.edu/support-desk/
PeopleSoft Security Access Form https://footprints.uakron.edu/secure/ps/
Software Training Services Main Site: http://www.uakron.edu/training/ PeopleSoft Training: http://www.uakron.edu/training/PsoftFin.dot Seminar Site: https://www.uakron.edu/seminars/index.php
University of Akron’s Department of Purchasing
http://www.uakron.edu/purchasing/

PeopleSoft Version 9.1: Requisitions
Ver. 2012.06.05 Page 4 [email protected] ©2008 These materials may not be reproduced in whole or in part without the express permission of
The University of Akron.
Purchasing Contacts
Below is a contact list for The Department of Purchasing. This list also includes a
summary of the commodities that each buyer is associated with. This list is just a
summary and does not include every category available on campus. This list is meant to
be a guide to help direct you to the appropriate person.
Name Contact Information
Position/Commodity
Andy Roth Ext. 7340 Director, Purchasing PeopleSoft Functional Lead
Denise Cool Ext. 6270 Associate Director, Purchasing Appraisal Services, Audit Services, Automotive Parts & Supplies, Bearings, Belts, Power Transmission, Flowers, Lease/Purchase Other Equipment, Medical Expenses, Moving & Household Relocation, Musical Equipment over $5000, Office Space - Off Campus Rent, Purchase for Resale – Alcohol, Royalty Fees and Copyrights, Space, Exhibit Rental, Tents & Tarpaulins, Theatrical equip over $5000
Bill Jenkins Ext. 6469 Assistant Director, Purchasing Construction Services, Furniture
Buyers and Assistants
Matthew Beaven Ext. 6268 Risk Management, Insurance, Credit Card Administration
Vicki Collins Ext. 5420 Assistant Buyer
Luba Cramer Ext. 6272 Comp Hardware & Software Lease, Computer Components <$5000, Computer Hardware Maintenance, Computer Server/Equip- > $5000, Computer Software, Computer Software Maintenance, Computer-PC's >$5000, Copper Cable & Hardware-Matls, Data Commun & Internet Access, Data Processing, Disposal Services, Dry Cleaning and Laundry Svc, G3R Telecom Equip, Grant Equipment $1500-$4999, Laboratory Equip-over $5000, Lease/Purch Computer Equipment, Medical Equipment over $5000, Radio Equipment over $5000, Rental-Comp Hardware&Software, Service & Maintenance Contract, Telephone Station Equipment, UA Built Equipment, Uniforms
Barbara Fuller Ext. 6013 Credit Card Administration and Training
Barbara Hayes Ext. 2577 Advertising, Advertising Services, Athletic Goods, Books & Other Publication-Dept, Copying Svc (quick copying), Delivery Services, Freight, Fuel-Diesel, Inventory - Pin-Fed Forms, Letterhead, Business Cards, Mailing Services, Medical Supplies, Purchase for Resale – Books, TV/Radio Broadcasts

PeopleSoft Version 9.1: Requisitions
Ver. 2012.06.05 Page 5 [email protected] ©2008 These materials may not be reproduced in whole or in part without the express permission of
The University of Akron.
Name Contact Information
Position/Commodity
Valoree Lee Ext. 7340 Artists, Entertain/Performers, Catering & Event Services, Consulting Services, Envelopes, Office Supplies, Paper, Research Sub-contract, Security and traffic control, Traffic/Parking equip > $5000
Sue McPherson Ext. 5423 Hotel Accommodations, Advertising Specialties, Animals, Arms & Ammunition, Awards, Book Binding & binding Supplies, Chemicals, Copper Cable Installation, Fiber Cable & Hardware-Matls, Fiber Cable Installation, Film Rental, Food-Office Functions, Gases, Research & Maintenance, Hospitality-Devel Entertainmt, Hospitality-Tickets, Inventory - Chemical Stores, Laboratory Supplies, Laboratory Testing Services, Library equipment over $5000, Library Supplies, Lubricants and Penetrating Oil, Material Handling Equip >$5000, Memberships and Dues, Pharmacy, drugs, biological, Purchase for Resale – Food, Purchase for Resale – Misc, Purchase for Resale – Sundry, Radioactive Materials, Rental Equipment, Telephone Long Distance, Telephone, pager, etc., Training and Professional Educ, Travel, Video production services
Alan Parker Ext. 7643 Appliances-Over $5000, Appliances-Parts and Supplies, Art Class Supplies, Artwork < $5000, Audio Visual Equip->$5000, Audio Visual Supplies, Automobile Repair Service, Automobiles & other vehicles, Building Supplies, Cable TV access & svc, Child care equip over $5000, Child care supplies, Collectible Art Work & Archive, Custodial Supplies, Dining Services Supplies, Landscaping Services, Lawn Equipment over $5000, Lawn Maintenance Supplies, Lease/Purchase Copier Buyout, Lease/Purchase Copiers, Leased Vehicles, Locks & Security Devices/parts, Machinery over $5000, Moves on Campus, Cranes, etc., Musical Supplies, Office Equipment over $5000, Paint & wall covering, Print Design Services, Printing, Printing Supplies, Program printing, Purchase for Resale - Av/Film, Repair - Furniture & Equipment, Safety Supplies, Storage - Off Campus, Textiles & Yard Goods, Theatrical Supplies, Tools under$5000, Traffic/Parking Supplies, Upholstering, Water Treatment Chemicals

PeopleSoft Version 9.1: Requisitions
Ver. 2012.06.05 Page 6 [email protected] ©2008 These materials may not be reproduced in whole or in part without the express permission of
The University of Akron.
Lesson 2: Requisition Overview
Methods of Purchasing
The Department of Purchasing offers several different purchasing programs for use by
the individual departments on campus. The method you use will vary depending on
what you are trying to purchase. See the following table for details.
Method Description PeopleSoft Requisition Use PeopleSoft whenever you are ordering from external Vendors
(off-campus).
On-Campus Order Form
An online form that allows users to order items or services from on-campus “vendors.” For example: Computer Store, Physical Plant (PFOC), Telecommunications, Dining Services and Printing Services. You must obtain access to use the On-Campus Order Form. Please contact the Department of Purchasing for access at x7340 or [email protected] . To enter an On-Campus Order (after you obtain access) go to the following url: https://www.uakron.edu/forms/purchasing/OC/
Direct Payment Form A form, available on the Department of Purchasing web site, which can be used to order books, subscriptions, memberships, and pre-paid conference registrations. After the form is filled out, it can be mailed to Accounts Payable for payment. This process is also used for minor personal reimbursements. The form can be found at the following: https://www.uakron.edu/forms/purchasing/DP
Note: For reimbursements of $25.00 or less, complete the form and take directly to the Cashiers Window in Simmons Hall.

PeopleSoft Version 9.1: Requisitions
Ver. 2012.06.05 Page 7 [email protected] ©2008 These materials may not be reproduced in whole or in part without the express permission of
The University of Akron.
Method Description University Contract (for use by all Departments)
University Contracts are negotiated and awarded by the Department of Purchasing. All University departments are able to utilize these contracts to procure any item associated with the contract. Place your order directly with the contract vendor and have the invoice sent directly to you for approval. Once you receive the invoice, verify that you received the goods or services. If you received the desired goods or services mark the invoice “OK to Pay”, sign the invoice, write down the SpeedChart you wish to charge and forward the invoice to Accounts Payable for processing and payment. A list of Vendors the university has contracts with can be found on the Department of Purchasing web site.
Blanket Purchase Order (for use by specified Department)
A blanket purchase order is when an agreement is reached with a Vendor for a certain period of time, and for a certain amount of money (just encumbered). The department can utilize the blanket purchase order when working with the Vendor. Obtain an invoice for the goods or services provided. Verify the information on the invoice is correct, sign it and indicate that it is "ok to pay" and forward to Accounts Payable for payment processing.
Office Supplies
A web site to order office supplies and the url is http://www.guybrownproducts.com/ For more information visit: http://www.uakron.edu/purchasing/facultystaff/office-supplies.dot Contact Valoree Lee at extension 5965 if you have questions. Note: Paper ordering is done through Central Stores.
Procurement Card (Visa Card)
The Procurement Credit Card allows departments to purchase certain goods costing less than $1,500. The cardholder is required to know and follow the guidelines for using the credit card. For more information visit: http://www.uakron.edu/purchasing/facultystaff/procurement-card.dot
Contact Barb Fuller, Procurement Card Administrator at extension 6013.

PeopleSoft Version 9.1: Requisitions
Ver. 2012.06.05 Page 8 [email protected] ©2008 These materials may not be reproduced in whole or in part without the express permission of
The University of Akron.
Requisitions Defined
A requisition is a request for supplies, items, or services from one or several vendors.
As outlined on the previous pages there are several methods for requests of goods or
services, and PeopleSoft is used for off-campus purchases.
There are many guidelines involved when making purchases on behalf of the University.
The most important rule to remember is that all purchases (unless you are using
another Purchasing Program) should be initiated with a requisition and must be
approved by the authorized individual.
The Board of Trustees Guideline (3359-03-01) states the following:
“Contracts involving the expenditures of money within the limits fixed
by board appropriation may be made on behalf of the university by
the president, vice president for finance and administration and chief
financial officer, director of purchasing, or senior vice president and
provost and chief operating officer, within the scope of their authority,
as set forth in the bylaws and regulations of the board.”
Please contact the Department of Purchasing if you have any questions regarding this
guideline or if you have general questions about what purchasing program should be
used.

PeopleSoft Version 9.1: Requisitions
Ver. 2012.06.05 Page 9 [email protected] ©2008 These materials may not be reproduced in whole or in part without the express permission of
The University of Akron.
Life Cycle of a Requisition
Dispatched means the
order has been sent to the
Vendor by phone, mail, or
fax. Order is “official.”
NOTE: Each step
in the process is
contingent upon
the previous step.
STEP 5 The Purchase Order is
reviewed and IF
approved, dispatched by
Purchasing Department.
Prior to Budget Checking
(Commitment Control)
your requisition will have a
status of:
Not Chk’d: Has not been
Budget Checked yet.
Budget Checking
(Commitment Control)
creates the following
statuses:
Valid: Successful
Error: Failed Budget
Check.
An Approver can do
the following when
reviewing a
requisition:
Approve
Deny
Hold (Send back for
changes)
Common Statuses
for requisitions:
Approved
Denied
Hold
Pending Approval
Canceled
Complete
Voucher means “okay to pay.”
STEP 1
Requester Creates a
PeopleSoft Requisition.
STEP 2
Authorized Person
Approves the Order.
STEP 3
The Requisition is
Budget Checked
(Commitment Control).
STEP 4
Purchase Order is
Automatically Created.
STEP 6
Goods or Services
Received and Invoice is
Received.
STEP 7
Voucher Created and
Vendor is Paid.

PeopleSoft Version 9.1: Requisitions
Ver. 2012.06.05 Page 10 [email protected] ©2008 These materials may not be reproduced in whole or in part without the express permission of
The University of Akron.
Lesson 3: Adding a New Requisition
Discussion
Starting Notes for Adding Requisitions
Listed below are some general guidelines that you will want to follow when adding a
requisition in PeopleSoft.
◘ Training is required for new PeopleSoft Requisition Users. To access the Security Form, navigate to the following: https://footprints.uakron.edu/secure/ps/
◘ Do not use the Back button on the Internet Explorer Toolbar. Use the buttons
found on the PeopleSoft page to move from page to page.
◘ Requisitions should not be entered until they are ready to be processed. Do not add a requisition and then delay processing as this creates a problem for the Department of Purchasing.
Information Needed for Completing a Requisition
Listed below is information you will need in order to successfully complete a requisition
in PeopleSoft. The list is in the order in which you will enter information for your
PeopleSoft Requisitions.
1. What are you buying: Description, Quantity, Unit of Measure, Category, and Price
2. Vendor Name or Number 3. Due Date for the items 4. SpeedChart: 6-digit number (previously referred to in PeopleSoft as SpeedType) 5. Comments: The ReqDeli Standard Comment (contact and delivery information)
as well as anything you want to tell the Approver, Buyer, or Vendor.

PeopleSoft Version 9.1: Requisitions
Ver. 2012.06.05 Page 11 [email protected] ©2008 These materials may not be reproduced in whole or in part without the express permission of
The University of Akron.
Entering a Basic Requisition: One Vendor, One SpeedChart
Use this process to enter a PeopleSoft requisition when you are using one Vendor and
one SpeedChart for all line items.
Step by Step
1. From the Main Menu, choose: Purchasing, Requisitions, Add/Update Requisitions
2. On the Add a New Value tab, click on the Add button.

PeopleSoft Version 9.1: Requisitions
Ver. 2012.06.05 Page 12 [email protected] ©2008 These materials may not be reproduced in whole or in part without the express permission of
The University of Akron.
3. The Maintain Requisitions page displays:
Note: You can use the Tab key to move from field to field.
4. You will begin to enter information for the Requisition on this page. Requisition Name: You can create your own name for the requisition which will aid in the searching of this order at a later time. Enter a name for the requisition which can be a combination of letters and numbers that will give meaning to this order.

PeopleSoft Version 9.1: Requisitions
Ver. 2012.06.05 Page 13 [email protected] ©2008 These materials may not be reproduced in whole or in part without the express permission of
The University of Akron.
5. OPTIONAL STEP: (Adjusting the Routing for Multiple Approvers) To make a change from the default Approver, you change the Requester field. Note: The additional Approver(s) MUST have been specified when applying for your PeopleSoft Requisition Security in order for this set-up to be in place for use. Click on the Requester Lookup button.
Select from the list, the name of the person that you want to route this requisition to.
Click on the Yes button to return to the Requisition page.

PeopleSoft Version 9.1: Requisitions
Ver. 2012.06.05 Page 14 [email protected] ©2008 These materials may not be reproduced in whole or in part without the express permission of
The University of Akron.
6. Continue to enter information for the requisition. At the bottom of the page, in the Line frame, the following fields need to be completed, similar to the following:
a. Item: Leave blank
b. Description: Enter a specific description of the item such as an ID number, Page, SKU#, Catalog #, etc.
c. Quantity: Enter the requisition quantity.
d. UOM: Unit of Measure. Use the Look Up button to return a Unit of Measure list. Once you locate the measure, select it to return.

PeopleSoft Version 9.1: Requisitions
Ver. 2012.06.05 Page 15 [email protected] ©2008 These materials may not be reproduced in whole or in part without the express permission of
The University of Akron.
e. Category: Use the Look Up button to return a list of Categories. Locate the correct Category and click on any link of the Category to select it and return to the Requisition page. This field is linked to the Buyer and the Department’s Budget. In addition to searching by description you can search by Account.
f. Price: Price per Item. g. Amount: Will automatically calculate, you cannot enter anything in this field.
7. To enter additional items to this requisition, click on the Add button at the end of Line 1.
Enter the number of rows that you want added to the requisition and select OK. If needed, you can add additional rows later in the process.
8. To delete a line item, go to the end of the line you want to remove and click on the
Delete Row button. Click on the OK button to delete the selected row.
Note: Check the View Tools
to verify you are seeing all
search results.

PeopleSoft Version 9.1: Requisitions
Ver. 2012.06.05 Page 16 [email protected] ©2008 These materials may not be reproduced in whole or in part without the express permission of
The University of Akron.
9. After you have entered the line items, click on the Requisition Defaults link.

PeopleSoft Version 9.1: Requisitions
Ver. 2012.06.05 Page 17 [email protected] ©2008 These materials may not be reproduced in whole or in part without the express permission of
The University of Akron.
10. The Requisitions Defaults page displays. This is where you will enter the Vendor, Due Date and Speed Chart.
The only data that needs to be completed are the three items noted above, no other data should be entered on this page.

PeopleSoft Version 9.1: Requisitions
Ver. 2012.06.05 Page 18 [email protected] ©2008 These materials may not be reproduced in whole or in part without the express permission of
The University of Akron.
11. In the Vendor field, enter the Vendor ID number. Note: If the Vendor is unknown or if the Vendor is not contained within the PeopleSoft database, use 0000001342 (Department of Purchasing).
To search for a Vendor, click on the Look Up Vendor button.
In the Short Vendor Name field, enter the first few letters of the Vendor name and click on the Look Up button. The Short Vendor Name is typically the first 10 letters/characters of the company name. Locate the Vendor, and click on any of the fields (links) to select that Vendor.
12. The Requisition Defaults page returns again. In the Due Date field, enter a realistic due date for the order. You can click on the
Choose a Date button to return a calendar for easy date selection.

PeopleSoft Version 9.1: Requisitions
Ver. 2012.06.05 Page 19 [email protected] ©2008 These materials may not be reproduced in whole or in part without the express permission of
The University of Akron.
13. In the SpeedChart field, enter the department’s 6-digit SpeedChart (aka: SpeedType). Click on the Refresh button to populate the required Chartfield information in the Distributions frame at the bottom of the page.
Note: The SpeedChart will now be blank.
14. You do not need to enter any additional information on this page. If you enter information into the blank fields, your requisition may error and not move to the next step in the Requisition Life Cycle. The Requisition Defaults page should look similar to the following:
After you entered the default information (Vendor, Due Date and SpeedChart), click on the OK button.

PeopleSoft Version 9.1: Requisitions
Ver. 2012.06.05 Page 20 [email protected] ©2008 These materials may not be reproduced in whole or in part without the express permission of
The University of Akron.
15. Before you return to the Requisition Home Page, a page displays that requires action.
Click on the Mark All link to activate the checkboxes, in the Apply column, for all rows of data. NOTE: The result of clicking on the Mark All link will be a checkmark in all checkboxes in the Apply column. If you do not follow this step correctly, you will not be able to save the requisition. Once the boxes are all checked, in the Apply column, click on the OK button to continue.

PeopleSoft Version 9.1: Requisitions
Ver. 2012.06.05 Page 21 [email protected] ©2008 These materials may not be reproduced in whole or in part without the express permission of
The University of Akron.
16. The Requisition page displays again.
17. OPTIONAL STEP:
To add comments per individual line, click the Line Comment button next to the line item for which you wish to add the comment.
Note: Be sure to verify the line number so that the comment is associated with the correct line. The comment will print below the line item. Select the OK button to return.

PeopleSoft Version 9.1: Requisitions
Ver. 2012.06.05 Page 22 [email protected] ©2008 These materials may not be reproduced in whole or in part without the express permission of
The University of Akron.
18. It is a requirement, per The Department of Purchasing, to add comments to the requisition. Click on the Add Comments link.
ALL Requisitions should contain the following information in the Comments area:
Item Ordered For
Delivery Location (Building AND Room)
Zip +
Contact Name for Questions (Name AND Extension)

PeopleSoft Version 9.1: Requisitions
Ver. 2012.06.05 Page 23 [email protected] ©2008 These materials may not be reproduced in whole or in part without the express permission of
The University of Akron.
19. You can use the ReqDeli Standard Comment to add the needed information. This is a predefined entry that will provide you with a template for delivery and contact information. a. Click on the Use Standard Comments link.
b. In the Comment Type field, enter Req.
c. In the Comment ID field, enter Deli.
d. Click on the OK button to return.
20. The Header Comments page returns with the Standard Comment.
Read the template and fill in your information where applicable. You will have to scroll down to complete all template fields.

PeopleSoft Version 9.1: Requisitions
Ver. 2012.06.05 Page 24 [email protected] ©2008 These materials may not be reproduced in whole or in part without the express permission of
The University of Akron.
21. In order for the comment to print for the Vendor, on the receipt, and in order for Accounts Payable to view the comments, be sure to check the Send to Vendor, Shown at Receipt and Shown at Voucher checkbox(es).
22. There may be times, when you need to enter additional free-form comments. Some examples are:
What attachments are being sent to Purchasing.
Vendor information if not found in PeopleSoft.
Invoice number if entering an invoice.
23. OPTIONAL STEP: If you want to add additional comments in a new row, click on the Add a new row
button. You would add new rows if you want comments to be directed to different people. For example, row one comment (delivery and contact information) is intended to print for the Vendor and on the Receipt (Send to Vendor, Shown at Receipt checkboxes active) and row two’s comment is intended only for the Vendor (only the Send to Vendor checkbox is marked).
24. OPTIONAL (but encouraged) STEP: Adding Justification for Order You can add a reason for placing the order. This would be added as an Approval Justification Comment.
a. Add a new row for the comment by clicking on the Add a new row button.
b. Mark the checkbox for Approval Justification. c. Enter the justification in the large edit box.

PeopleSoft Version 9.1: Requisitions
Ver. 2012.06.05 Page 25 [email protected] ©2008 These materials may not be reproduced in whole or in part without the express permission of
The University of Akron.
25. OPTIONAL STEP: Adding Attachments If you have electronic documents that you want to submit with the requisition, you can attach them to the order. Click on the Attach button.
Click on the Browse button and locate the file you want to attach. Click on the Upload button to add the file to the requisition.
26. After adding comments, approval justifications, and attachments click on the OK button to return to the Requisition page.
27. The Requisition page displays again. To save the requisition, click on the Save button. The Requisition ID number will display in the top left corner of the Requisition.
Note: If you receive an error message, see Appendix B.

PeopleSoft Version 9.1: Requisitions
Ver. 2012.06.05 Page 26 [email protected] ©2008 These materials may not be reproduced in whole or in part without the express permission of
The University of Akron.
28. To print the requisition, click on the View Printable Version link above the Save button in the bottom left corner of the PeopleSoft window. A new window will open with the report. Note: It may take up to 30 seconds for this screen to appear – please be patient and do not click the View Printable Version link a second time.
Note: Think green and save money, consider saving the electronic PDF to your computer’s hard drive or a network drive rather than printining.
29. When the requistion is complete, you need to submit the requisition to your Approver (or to Budget Checking if you are a self-approver or a <$500 Requester).
In the top right quadrant of the page, click on the Submit for Approval button.
The Status will change to Pending. Your Approver will receive an e-mail notice that there is a requisition awaiting approval.

PeopleSoft Version 9.1: Requisitions
Ver. 2012.06.05 Page 27 [email protected] ©2008 These materials may not be reproduced in whole or in part without the express permission of
The University of Akron.
Entering a Requisition with Multiple SpeedCharts per Line
Item
Use this process to enter a PeopleSoft requisition when you need to enter one
PeopleSoft requisition and split the charges of one line to multiple SpeedCharts.
Step by Step
1. Follow the steps previously outlined for “Entering a Basic Requisition,” but stop before you save the requisition. Before you save the requisition, you will need to drill down on the line item that you need to make the adjustment to.
2. Click on the Schedule button for the line item that you need to split the charges for. This button is located on the far right, on the same line as the item you are adjusting.
3. The Schedule page displays.
Click on the Distribution button.

PeopleSoft Version 9.1: Requisitions
Ver. 2012.06.05 Page 28 [email protected] ©2008 These materials may not be reproduced in whole or in part without the express permission of
The University of Akron.
4. The Distribution page displays.
Verify that the correct line item is displayed by reviewing the information on this page. The default distribution method is by Quantity (Distribute By field). You can also change this value to Amount, if needed. This means you can divide the speedchart by Quantity or Dollar Amount.

PeopleSoft Version 9.1: Requisitions
Ver. 2012.06.05 Page 29 [email protected] ©2008 These materials may not be reproduced in whole or in part without the express permission of
The University of Akron.
5. Click on the Multi-Speed Chart link. The Multiple SpeedChart page displays.
In the SpeedChart field, reenter the default SpeedType that you previously entered on the Defaults page. In the Quantity (or Amount) to Distribute field, enter either the Quantity or Amount for this SpeedChart. You can use decimals for Quantity, for example, 2.5.
Click on the Add a New SpeedChart button to add another row. Add the additional SpeedChart information.
You can continue to add rows and additional SpeedCharts, if necessary. Click on the OK button. Note: The totals must add up to 100% of the order (by quantity or amount) or you cannot leave this page.

PeopleSoft Version 9.1: Requisitions
Ver. 2012.06.05 Page 30 [email protected] ©2008 These materials may not be reproduced in whole or in part without the express permission of
The University of Akron.
6. The Distribution page displays again.
Click on the OK button.
7. The Schedule page displays again.
Click on the Return to Main Page link.
8. The Maintain Requisitions page dispalys again.
9. To save the requisition, click on the Save button. The Requisition ID number will display in the top left corner of the Requisition.

PeopleSoft Version 9.1: Requisitions
Ver. 2012.06.05 Page 31 [email protected] ©2008 These materials may not be reproduced in whole or in part without the express permission of
The University of Akron.
10. When the requistion is complete, you need to submit the requisition to your Approver (or to Budget Checking if you are a self-approver or a <$500 Requester).
In the top right quadrant of the page, click on the Submit for Approval button.
The Status will change to Pending. Your Approver will receive an e-mail notice that there is a requisition waiting for approval.

PeopleSoft Version 9.1: Requisitions
Ver. 2012.06.05 Page 32 [email protected] ©2008 These materials may not be reproduced in whole or in part without the express permission of
The University of Akron.
Ending Notes for Adding Requisitions
After you save the requisition, an e-mail message will go to your Approver stating that
there is a requisition awaiting their approval in PeopleSoft.
Also, after you save the requisition, one of the following will occur:
If it is approved, you will receive an e-mail indicating that it was approved and forwarded to Purchasing for processing.
If it was denied, you will receive an e-mail indicating that it was denied.
If it was put on Hold for more information, you will receive an e-mail that additional information is needed.
If no action was taken on the requisition in three business days, the Approver will receive an e-mail notification that states, “Reminder – Req ID # is awaiting approval”.
Note: If you are both the Requester and the Approver you will not need to follow the
Approval Process Instructions. The requisition that you save will bypass the Approval
Process and move on to Budget Checking (Commitment Control) per the Requisition
Life Cycle.

PeopleSoft Version 9.1: Requisitions
Ver. 2012.06.05 Page 33 [email protected] ©2008 These materials may not be reproduced in whole or in part without the express permission of
The University of Akron.
Lesson 4: Printing a Requisition
Method 1: Printing a Requisition from the Maintain
Requisitions Page
You can print a requisition right after you save it by using the View Printable Version
link in the lower left corner of the Requisition page. You can print the requisition from
this page anytime before the requisition has been approved. After a requisition has
been approved, you will not be able to access this page and therefore you will need to
follow Method 2 to print the requisition.
Note: Think green and save money, consider saving the electronic PDF to your
computer’s hard drive or a network drive rather than printining.
Step by Step
1. Save the requisition that you are working on.
2. On the Maintain Requisitions page, click on the View Printable Version link.

PeopleSoft Version 9.1: Requisitions
Ver. 2012.06.05 Page 34 [email protected] ©2008 These materials may not be reproduced in whole or in part without the express permission of
The University of Akron.
3. A separate window will open - DO NOT close this window. Closing the window will cancel the report process.
Note: It may take up to 30 seconds for this screen to appear – please be patient and do not click the View Printable Version link a second time. Once the process is complete, the requisition will automatically open in a new window.
Note: If the requisition does not open in a new window, you will have to follow the instructions for allowing pop-ups from The University of Akron. See Appendix A for additional information.
4. Select from the browser’s menu File, Print. OR
Click on the Printer tool in the browser’s toolbar or in Adobe Acrobat’s toolbar.
5. You may opt to save the document (File, Save As) instead of printing if you wish to conserve paper or forward the requisition to someone else on campus electronically(File, Send, Page by Email).

PeopleSoft Version 9.1: Requisitions
Ver. 2012.06.05 Page 35 [email protected] ©2008 These materials may not be reproduced in whole or in part without the express permission of
The University of Akron.
Method 2: Printing a Requisition using the Requisition
Print Page
Creating a Run Control What is a Run Control ID?
A Run Control ID is an identification code that represents:
your PeopleSoft ID
the process you are running, such as printing a departmental budget report or printing a requisition
Each process that you run needs its own unique Run Control ID. If you print budget
reports and print requisitions, you will create one Run Control ID for printing budget
reports and one Run Control ID for printing requisitions.
When do you create a Run Control ID?
The first time that you run a process, you need to create a Run Control ID. Some
examples of processes are gathering the data to print a Departmental Budget Report or
gathering the data to print a requisition.
When you run the process in the future, you use the same Run Control ID as the first
time that you ran the process.
What are the characteristics of a Run Control ID?
A Run Control ID can be up to 16 characters in length. It cannot contain spaces. Some
examples of Run Control Ids are BudgetPrint or ReqPrint.

PeopleSoft Version 9.1: Requisitions
Ver. 2012.06.05 Page 36 [email protected] ©2008 These materials may not be reproduced in whole or in part without the express permission of
The University of Akron.
Step by Step: Printing a Requisition for the First Time
1. From the menu select: Purchasing, Requisitions, Reports, Print Requisition. OR Process Financial Information, UA Department Inquiries, Report, Requisition Print Click on the Add a New Value tab.
2. Type a RunControl ID with a maximum number of 16 characters and no spaces. For example, enter ReqPrint.
3. Click on the Add button.

PeopleSoft Version 9.1: Requisitions
Ver. 2012.06.05 Page 37 [email protected] ©2008 These materials may not be reproduced in whole or in part without the express permission of
The University of Akron.
4. The Print Requisition page displays. Enter or verify information as follows:
Business Unit: Akron
Requisition ID: Enter ID with lead zeros.
Statuses to Include Frame: Select All and select the option “On Hold AND Not On Hold” from the drop-down list.
Click on the Save button.
5. Click on the Run button. The Process Schedule Request Page displays.
Note/Select the following:
Server Name: PSNT
Run Date: (Do not change the system date that defaults.)
Run Time: (Do not change the system time that defaults.)
In the Process List grid at the bottom of the page, a checkmark needs to appear in the Select checkbox.
Type: Web
Format: PDF

PeopleSoft Version 9.1: Requisitions
Ver. 2012.06.05 Page 38 [email protected] ©2008 These materials may not be reproduced in whole or in part without the express permission of
The University of Akron.
6. Click on the OK button. The Print Requisition page displays again:
Note the Process Instance number.
7. Click on the Report Manager link.

PeopleSoft Version 9.1: Requisitions
Ver. 2012.06.05 Page 39 [email protected] ©2008 These materials may not be reproduced in whole or in part without the express permission of
The University of Akron.
8. Click on the Administration folder tab.
In the Report List grid, look in the Prcs Instance field to locate the Process Instance number for your report. You noted that number on the Requisition Print page. Click on the Refresh button, periodically, until the Status is Posted. After the report is Posted, the Description will become a hyperlink. Note: The Report Name will become a hyperlink once the status is Posted. Use this hyperlink to view the report

PeopleSoft Version 9.1: Requisitions
Ver. 2012.06.05 Page 40 [email protected] ©2008 These materials may not be reproduced in whole or in part without the express permission of
The University of Akron.
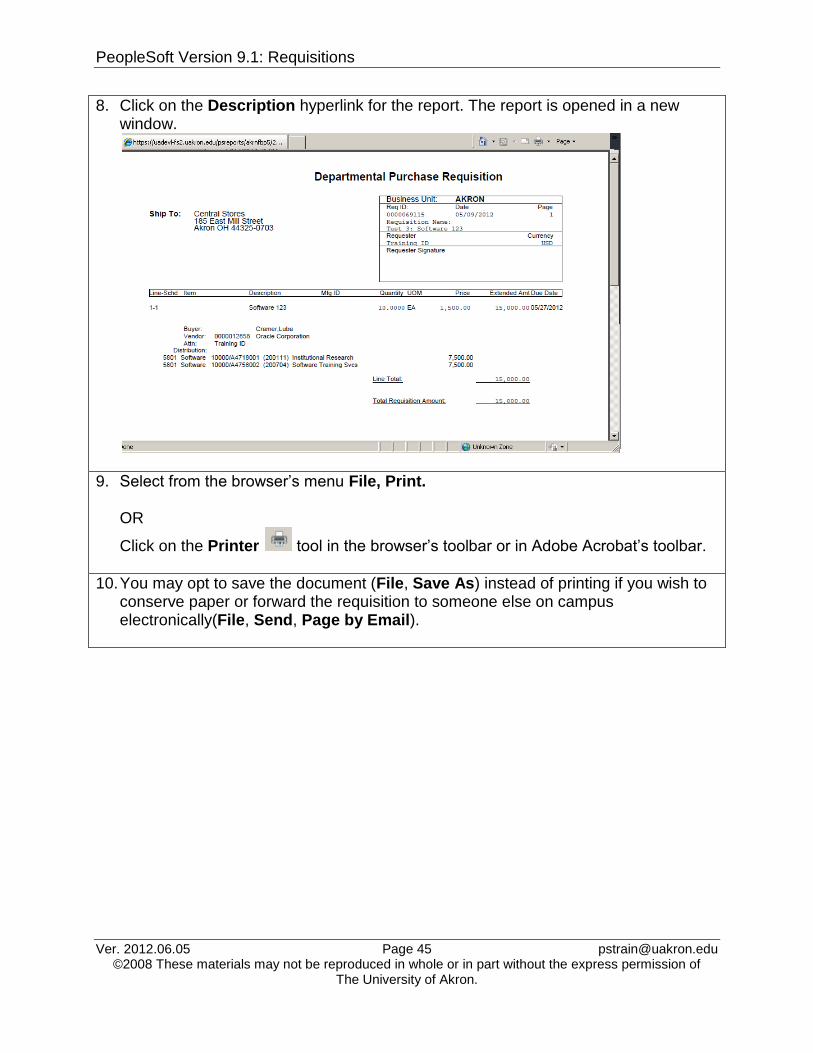
9. Click on the Description hyperlink for the report. The report is opened in a new window.
10. Select from the browser’s menu File, Print. OR
Click on the Printer tool in the browser’s toolbar or in Adobe Acrobat’s toolbar.
11. You may opt to save the document (File, Save As) instead of printing if you wish to conserve paper or forward the requisition to someone else on campus electronically(File, Send, Page by Email).

PeopleSoft Version 9.1: Requisitions
Ver. 2012.06.05 Page 41 [email protected] ©2008 These materials may not be reproduced in whole or in part without the express permission of
The University of Akron.
Printing a Requisition (after the initial set-up)
You should have already created a Run Control ID for printing a requisition. This would
have been done the first time you printed a requisition using the report method. If you
have not created a Run Control ID, please refer to the previous section in this chapter,
Printing a Requisition for the First Time.
1. From the menu select: Purchasing, Requisitions, Reports, Print Requisition. Click on the Find an Existing Value tab.
In the Run Control ID field, enter the ID that you created, i.e., ReqPrint. OR Click on the Search button. If you did not enter the complete Run Control ID or if you clicked on the Search button, you will be returned Search Results at the bottom of the page. Click on the correct Run Control ID to advance to the next step.

PeopleSoft Version 9.1: Requisitions
Ver. 2012.06.05 Page 42 [email protected] ©2008 These materials may not be reproduced in whole or in part without the express permission of
The University of Akron.
2. The Print Requisition page displays.
3. Data from the last requisition print will display. Modify the data for the current request and continue with the process. Click on the Save button.
4. Click on the Run button. The Process Schedule Request Page displays.
Note/Select the following:
Server Name: PSNT
Run Date: (Do not change the system date that defaults.)
Run Time: (Do not change the system time that defaults.)
In the Process List grid at the bottom of the page, a checkmark needs to appear in the Select checkbox.
Type: Web
Format: PDF

PeopleSoft Version 9.1: Requisitions
Ver. 2012.06.05 Page 43 [email protected] ©2008 These materials may not be reproduced in whole or in part without the express permission of
The University of Akron.
5. Click on the OK button. The Print Requisition page displays again:
Note the Process Instance number.
6. Click on the Report Manager link.

PeopleSoft Version 9.1: Requisitions
Ver. 2012.06.05 Page 44 [email protected] ©2008 These materials may not be reproduced in whole or in part without the express permission of
The University of Akron.
7. Click on the Administration folder tab.
In the Report List grid, look in the Prcs Instance field to locate the Process Instance number for your report. You noted that number on the Requisition Print page. Click on the Refresh button, periodically, until the Status is Posted. After the report is Posted, the Description will become a hyperlink. Note: The Report Name will become a hyperlink once the status is Posted. Use this hyperlink to view the report
PeopleSoft Version 9.1: Requisitions
Ver. 2012.06.05 Page 45 [email protected] ©2008 These materials may not be reproduced in whole or in part without the express permission of
The University of Akron.
8. Click on the Description hyperlink for the report. The report is opened in a new window.
9. Select from the browser’s menu File, Print. OR
Click on the Printer tool in the browser’s toolbar or in Adobe Acrobat’s toolbar.
10. You may opt to save the document (File, Save As) instead of printing if you wish to conserve paper or forward the requisition to someone else on campus electronically(File, Send, Page by Email).

PeopleSoft Version 9.1: Requisitions
Ver. 2012.06.05 Page 46 [email protected] ©2008 These materials may not be reproduced in whole or in part without the express permission of
The University of Akron.
Lesson 5: Recall a Requisition
This chapter will outline the process for opening the pages that you used to enter a
requisition. You would use this process for the following reasons:
To review or inquire on a previously saved requisition prior to Approval
To return to a non-approved requisition to make changes
This chapter will also outline the steps for making changes to a requisition before and
after approval, deleting or canceling a requisition, and working with a recycled
requisition.
Part A: Opening a Requisition Prior to Approval
1. From the Main Menu, choose: Purchasing, Requisitions, Add/Update Requisitions
2. Click on the Find an Existing Value tab.

PeopleSoft Version 9.1: Requisitions
Ver. 2012.06.05 Page 47 [email protected] ©2008 These materials may not be reproduced in whole or in part without the express permission of
The University of Akron.
3. Search for the requisition using one or both of the search fields below: Requisition ID: Use the operator of “=” or “begins with” if you are entering the full requisition ID. Use the operator of “contains” to enter just the last digits (minus the zeros). Requisition Name: Enter the name you gave to the requisition when entering it into the system. You can use the operator of “contains” if you only remember part of the name. Requester: The UserID of the requester must be used instead of the requester’s last name. This is the ID that you use to log into PeopleSoft. This is not case sensitive. Requester Name: Search for the requester by entering their name, or use the operator of “contains” to enter a portion of the Requester’s name. After you filled in the search criteria, click on the Search button. Note: If you changed the Requester field when entering the requisition for the purpose of a different approver you will need to enter that Approvers ID or name to recall that specific requisition.
4. Depending on the search criteria you entered, you may need to locate the requisition and click on any of the links for the requisition that you want to open.
5. Review or inquire by locating the desired data using the Maintain Requisitions page or by using the hyperlinks on the page.
Note: If you try to open a requisition after it has been approved using this instruction, you will be redirected to the Requisition Inquiry page. You cannot view a requisition via the Maintain Requisitions page after it has been approved.
PeopleSoft Version 9.1: Requisitions
Ver. 2012.06.05 Page 48 [email protected] ©2008 These materials may not be reproduced in whole or in part without the express permission of
The University of Akron.
Part B: Modifying a Requisition Prior to Approval
If you are a Requester/Approver (dual role) you cannot change a requisition after you
save and submit it. Please contact the Department of Purchasing if you need changes
made to the requisition.
If you are a Requester with the Limited Authority Class (automatic approval on
requisitions under $500) and you enter a requisition under $500, you cannot make
changes to a requisition after you save and submit it. Please contact the Department of
Purchasing if you need changes.
If you are only a PeopleSoft Requester (enter requisitions, but do not have Approval
Authority), follow the steps outlined below.
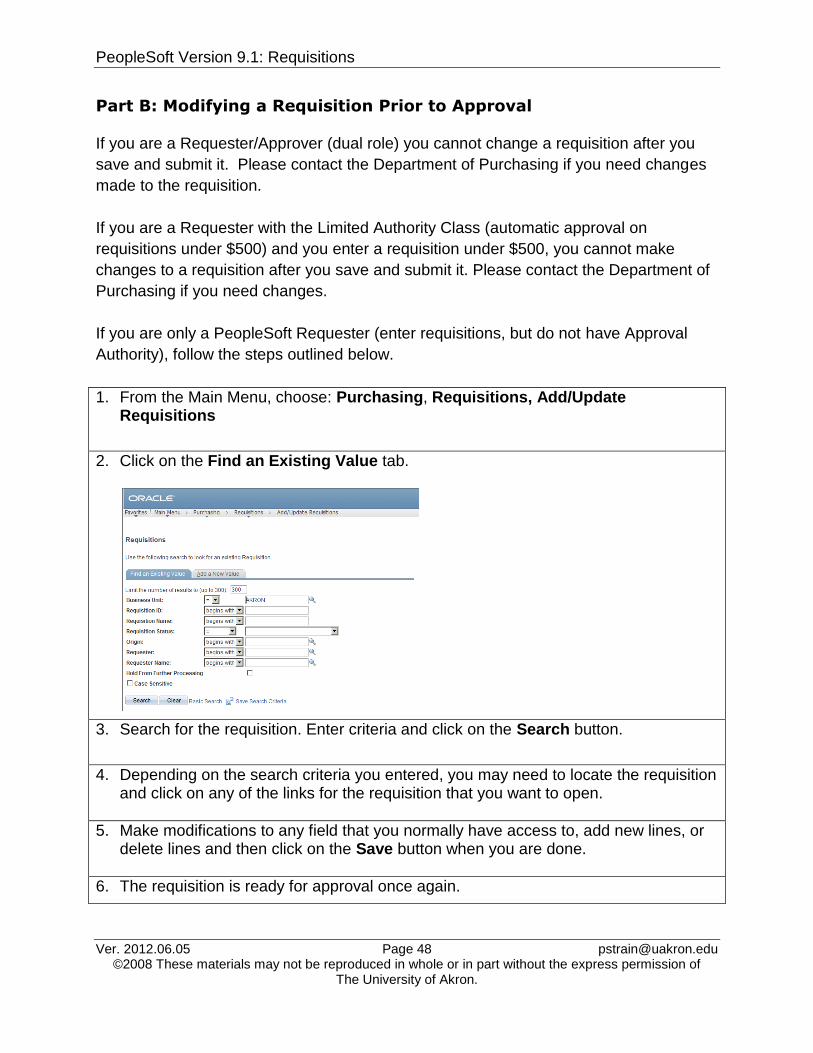
1. From the Main Menu, choose: Purchasing, Requisitions, Add/Update Requisitions
2. Click on the Find an Existing Value tab.
3. Search for the requisition. Enter criteria and click on the Search button.
4. Depending on the search criteria you entered, you may need to locate the requisition and click on any of the links for the requisition that you want to open.
5. Make modifications to any field that you normally have access to, add new lines, or delete lines and then click on the Save button when you are done.
6. The requisition is ready for approval once again.

PeopleSoft Version 9.1: Requisitions
Ver. 2012.06.05 Page 49 [email protected] ©2008 These materials may not be reproduced in whole or in part without the express permission of
The University of Akron.
Part C: Modifying a Requisition after Approval
Requisitions may not be changed by the Requester after approval. Contact the
Department of Purchasing (specifically the appropriate Buyer) if you need to make
changes to the requisition

PeopleSoft Version 9.1: Requisitions
Ver. 2012.06.05 Page 50 [email protected] ©2008 These materials may not be reproduced in whole or in part without the express permission of
The University of Akron.
Part D: Cancel a Requisition
Requisitions cannot be canceled by the Requester before or after approval. Contact the
Department of Purchasing if you need to cancel the requisition.

PeopleSoft Version 9.1: Requisitions
Ver. 2012.06.05 Page 51 [email protected] ©2008 These materials may not be reproduced in whole or in part without the express permission of
The University of Akron.
Part E: Processing a Requisition put on Hold
Once you process and save a requisition it will go to your Approver to Approve, Deny
or Hold. The status of Hold should be used if the Approver wants the Requester to
make adjustments (of any kind) to the requisition prior to Approval, Budget Checking
(Commitment Control) and then processing by the Department of Purchasing. If the
requisition is on Hold, you will need to return to the requisition and make the necessary
changes and save the updated requisition. Finally, it is recommended that you add a
comment to the Requisition Review page so that the Approver receives notification that
you took action and the requisition is again ready for their approval.
1. You will receive an e-mail message indicating that a requisition is awaiting action.
Note: This link will not take you directly to the requisition that needs modifications. You will be directed to the Requisition Review page which will only allow you see the Approver’s comments and the requisition basics (you will not be able to make changes on this page, nor will there be a link to advance to the requisition). This page will also allow you to add comments that will be routed to the Approver so they are aware the requested changes have been made and the requisition is ready for approval again.

PeopleSoft Version 9.1: Requisitions
Ver. 2012.06.05 Page 52 [email protected] ©2008 These materials may not be reproduced in whole or in part without the express permission of
The University of Akron.
2. To go to the Requisition Review page to see the comments, click on the link at the bottom of the message. The Requisition Review page displays:
3. Review the comments that the Approver added. You will have to navigate to the Requisitions pages to make the changes, but you are encouraged to return to the this page to add a comment once you have completed the changes so the Approver is notified that the requisition is ready for approval again.
4. From the Main Menu, choose: Purchasing, Requisitions, Add/Update Requisitions

PeopleSoft Version 9.1: Requisitions
Ver. 2012.06.05 Page 53 [email protected] ©2008 These materials may not be reproduced in whole or in part without the express permission of
The University of Akron.
5. Click on the Find an Existing Value tab.
6. Search for the requisition. Enter criteria and click on the Search button. Depending on the search criteria you entered, you may need to locate the requisition and click on any of the links for the requisition that you want to open.
7. Make modifications and then click on the Save button when you are done.
8. The requisition is now ready for approval once again.
9. Click on the Worklist link in the Navigation Header.
10. The Worklist displays:
Click on the link for the Requisition in the Link column to reopen the Requisition Review page.

PeopleSoft Version 9.1: Requisitions
Ver. 2012.06.05 Page 54 [email protected] ©2008 These materials may not be reproduced in whole or in part without the express permission of
The University of Akron.
11. The Requisition Review page displays:
12. In the Enter Comments edit box, add a comment that will go back to the Approver.
Click on the Save Comments button. The Approver will now receive an e-mail notification, “Requested Action Taken” and will provide a link for them to navigate back to the Approval pages once again for approval.

PeopleSoft Version 9.1: Requisitions
Ver. 2012.06.05 Page 55 [email protected] ©2008 These materials may not be reproduced in whole or in part without the express permission of
The University of Akron.
13. The Review/Edit frame will also update to show your comment:

PeopleSoft Version 9.1: Requisitions
Ver. 2012.06.05 Page 56 [email protected] ©2008 These materials may not be reproduced in whole or in part without the express permission of
The University of Akron.
Lesson 6: Requisition Inquiry
Requisition Inquiry Page
Use this page to locate the following information:
Status of the requisition
The Date the requisition was created
Total Amount of requisition
Items on a requisition
Approval History
If a Purchase Order has been created
If the items from the requisition have been received
If a Voucher has been created
If payment has been made and the check number
Step by Step
1. From the Main Menu, choose:
Purchasing, Requisitions, Review Requisition Information, Requisitions
The Requisition Inquiry search page is displayed.
Use this page to enter the criteria for the requisitions on which to check the status.

PeopleSoft Version 9.1: Requisitions
Ver. 2012.06.05 Page 57 [email protected] ©2008 These materials may not be reproduced in whole or in part without the express permission of
The University of Akron.
2. Fill in search criteria. The use of more criteria will return a smaller group of requisitions.
Business Unit AKRON
Requisition ID Enter Requisition ID, including any leading zeros. Example: 0000068609 To select a range of Requisition IDs, enter the beginning Req ID here and the ending Req ID in the To Req field. (Remember that search results are limited to 20 rows.)
Requisition Name Enter the name you gave the requisition during the requisition entry process. This is a field that is entered by the Requester and should relate to the requisition.
Requester This is the PeopleSoft ID for the person who entered the Requisition This is a case sensitive field. Enter the ID in all capital letters. . You can
use the Look Up button to locate IDs. For example:
Requester Name Search for the Requester by entering his/her name. The format for name is FirstName LastName. There is a space between the first name and last name. This is a case sensitive field. Use an initial capital letter for the first name and for the last name. Examples: Susan Instructor or Joseph Professor
Requisition Date Enter the date on which the Requisition was
entered. You can use the Choose a Date tool to display a calendar to select a date. To select a range of dates, enter the beginning date here and the ending date in the To field. (Remember that search results are limited to 20 rows.)
Vendor ID Enter the Vendor ID. To lookup the Vendor ID,
click on the link.

PeopleSoft Version 9.1: Requisitions
Ver. 2012.06.05 Page 58 [email protected] ©2008 These materials may not be reproduced in whole or in part without the express permission of
The University of Akron.
3. Locate the requisition you want to review. The Requisitions Inquiry Details page is displayed.
4. You can find the following information on the Requisitions Inquiry - Details page.
Requisition number
Status (Approved, Denied, Hold, Pending Approval, Canceled, or Complete)
Requester
Requisition Date
Total Amount
5. Click on the
Show All Columns tool .
All the columns from the two tabs, Details and Status, are displayed on the page. There are no tabs. Scroll to see all the data.
Click on the link for the Requisition ID to
display the Line Details page. Use the
button to return to the
Requisition Inquiry pages.
Case,Test
The Show All Columns tool Use this tool to download the data in the
grid to Excel.

PeopleSoft Version 9.1: Requisitions
Ver. 2012.06.05 Page 59 [email protected] ©2008 These materials may not be reproduced in whole or in part without the express permission of
The University of Akron.
6. Click on the Show tabs tool .
The two tabs, Details and Status, are displayed, again
7. Click on the Status tab to review additional information.
8. On the Status page, you can find the following information.
Use the button to go back to the Requisitions Inquiry page.
If a PO has been created: Click on the Y link in the On PO column to obtain the PO ID number.
If a Receipt has been created: Click on the Y link in the Received column to obtain the Receiver ID number.
This requisition does not have a receipt.
If a Voucher has been created: Click on the Y link in the On Voucher column to obtain the Voucher ID number. The Voucher ID link includes additional details including the Accounting (General Ledger) entries.
The Payment Information link opens a second PeopleSoft window to display the payment data such as check number (Payment Reference ID), date, total check amount and amount paid for this voucher. Close the window after your review.
Click on a Y link to obtain additional information.
Click on Search to enter new search criteria.

PeopleSoft Version 9.1: Requisitions
Ver. 2012.06.05 Page 60 [email protected] ©2008 These materials may not be reproduced in whole or in part without the express permission of
The University of Akron.
9. Return to the Requisition Inquiry page. Use OK, Return, or Cancel to move back a step.
10. Click on the link to return to the Requisition Inquiry Search page.
11. If the Requisition ID number is not known or you need to search for a group of requisitions, enter the approriate criteria.
In this example, criteria was entered to search for the requisitions created between 11/01/2004 and 11/30/2004 for a particular Requester.
The Requester field is case sensitive. Type the Requester ID in all capital letters.
12. Click on to begin the search.
The Requisitions Inquiry Details page is displayed with the search results.
Be sure to check the View Tools are in the grid’s header. Click on View All to display all the results if more than one requisition was returned.
In this example, after clicking on View All, all the requisitions display.

PeopleSoft Version 9.1: Requisitions
Ver. 2012.06.05 Page 61 [email protected] ©2008 These materials may not be reproduced in whole or in part without the express permission of
The University of Akron.
Note: If the search criteria entered returns more than 20 requisitions in the search results, this message displays.
Click on OK to proceed to the Requisitions Inquiry Details page. If you do not see the requisition(s) that you need in the search results, modify your search.

PeopleSoft Version 9.1: Requisitions
Ver. 2012.06.05 Page 62 [email protected] ©2008 These materials may not be reproduced in whole or in part without the express permission of
The University of Akron.
Document Status Inquiry Page
Use this page to locate the following information:
Requisition Status
Budget Status
Requester Name
Document ID’s for Purchase Order, Voucher and Payments
Step by Step
1. From the Main Menu, choose:
Purchasing, Requisitions, Review Requisition Information, Document Status
The Requisition Document Status search page is displayed.
Use this page to enter the criteria for the requisitions on which to check the status.
2. Fill in search criteria: Requisition ID: Enter Requisition ID, including any leading zeros. Example: 0000068609 Requisition Date: Date the requisition was entered. You can use the choose a date button. Requester: This is the PeopleSoft ID for the person who entered the Requisition This is a case sensitive field. Enter the ID in all capital letters. . You can use the
Look Up button to locate IDs.
For example: Click on the Search button.

PeopleSoft Version 9.1: Requisitions
Ver. 2012.06.05 Page 63 [email protected] ©2008 These materials may not be reproduced in whole or in part without the express permission of
The University of Akron.
3. Locate the requisition and click on any of the links for the requisition that you want to inquire about. The Requisition Document Status page display:
On this page you can find the following information:
Requisition Status (Approved, Denied, Recycled, Pending Approval, Canceled, Complete)
Budget Status (Valid, Not Chk’d, Error)
Requester
Document ID’s for Purchase Order, Receipt, Voucher, and Payment Click on the DOC ID link to view the Purchase Order, Receipt, Voucher or Payment. A new page will display with the requested document’s information. Remember: The Purchase Order must have a status of Dispatched to be considered a legal commitment by the University to purchase the requested goods or services.

PeopleSoft Version 9.1: Requisitions
Ver. 2012.06.05 Page 64 [email protected] ©2008 These materials may not be reproduced in whole or in part without the express permission of
The University of Akron.
Lesson 7: How to Handle Invoices
This chapter answers the question, “How do I get an invoice paid?” Under normal
circumstances you should have an accompanying Requisition /Purchase Order per the
Board of Trustees guideline 3359-20-53.
Step by Step
1. Complete a PeopleSoft requisition for the invoice. Be sure to put the invoice number on the Comments page so that Purchasing knows this is an invoice and not a new order. NOTE: There are exceptions to this process. There are “Contracts” set up in PeopleSoft for certain vendors. If you are working with one of these vendors, you can directly submit the invoice to Accounts Payable for payment. These exception invoices must have a SpeedChart written on it and it needs to be signed by the appropriate departmental person (“OK to Pay should accompany the signature.) You can obtain a current list of Contracts by visiting the Department of Purchasing web site.
Contract Examples:
Akron Beacon Journal
Chima Travel
Sheraton Suites (Cuyahoga Falls)
Roys (Stow) Travel Agency
Fed Ex
2. Send the printed requisition with invoice (with “OK to Pay and appropriate signature) to the Department of Purchasing (+9001).
3. The requisition for the invoice will move through the same steps as any requisition. If the PeopleSoft requisition is approved, it will then go to Budget Checking and then a Purchase Order is created.
4. A PO Voucher is created in Accounts Payable after receiving the invoice with the proper signature and “OK to Pay.”

PeopleSoft Version 9.1: Requisitions
Ver. 2012.06.05 Page 65 [email protected] ©2008 These materials may not be reproduced in whole or in part without the express permission of
The University of Akron.
Appendix A: Allowing Pop-Ups
Configure Pop-up Blocker
The following instructions are provided to enable pop-ups from The University of Akron
web sites. This is necessary so that PeopleSoft can open new windows to display
reports or to open Excel.
1. From within Internet Explorer, select the arrow to the right of the icon and select Pop-up Blocker > Pop-up Blocker Settings.
The Pop-up Blocker Settings dialog box displays.
2. In the box for Address of Web site to allow, enter uakron.edu .
uakron.edu

PeopleSoft Version 9.1: Requisitions
Ver. 2012.06.05 Page 66 [email protected] ©2008 These materials may not be reproduced in whole or in part without the express permission of
The University of Akron.
3. Click the Add button.
*.uakron.edu displays in the Allowed sites box,
4. Repeat steps 2 and 3 for uanet.edu.
5. Make sure there is a check in the box for Show Information Bar when a pop-up is blocked.
6. Click the Close button.
Note: Some browser plug-ins, such as the Yahoo search bar, Google search bar, and
MSN search bar may have built-in popup blockers. While in PeopleSoft, remove these
toolbars from the display at View > Toolbars.
Verify there is a
check in this
box.

PeopleSoft Version 9.1: Requisitions
Ver. 2012.06.05 Page 67 [email protected] ©2008 These materials may not be reproduced in whole or in part without the express permission of
The University of Akron.
Configure Pop-up Blocker: Windows 7 Settings
The following instructions are provided to enable pop-ups from The University of Akron
web sites. This is necessary so that PeopleSoft can open new windows to display
reports or to open Excel.
1. From within Internet Explorer, select the arrow to the right of the icon and select Pop-up Blocker > Pop-up Blocker Settings.
The Pop-up Blocker Settings dialog box displays.
2. In the box for Address of Web site to allow, enter uakron.edu .
uakron.edu

PeopleSoft Version 9.1: Requisitions
Ver. 2012.06.05 Page 68 [email protected] ©2008 These materials may not be reproduced in whole or in part without the express permission of
The University of Akron.
3. Click the Add button.
*.uakron.edu displays in the Allowed sites box,
4. Repeat steps 2 and 3 for uanet.edu.
5. Make sure there is a check in the box for Show Information Bar when a pop-up is blocked.
6. Click the Close button.
Note: Some browser plug-ins, such as the Yahoo search bar, Google search bar, and
MSN search bar may have built-in popup blockers. While in PeopleSoft, remove these
toolbars from the display at View > Toolbars.
Verify there is a
check in this
box.
*.uakron.edu

PeopleSoft Version 9.1: Requisitions
Ver. 2012.06.05 Page 69 [email protected] ©2008 These materials may not be reproduced in whole or in part without the express permission of
The University of Akron.
Appendix B: Error Message When Saving a Requisition
If you did not follow the steps outlined, specifically step X on page X, you will get an error message that will prevent you from saving the requisition. The error message is as follows:
To correct the requisition do the following:
1. Click on the OK button.
2. Click on the Requisition Defaults link.
3. Re-enter the SpeedChart in the SpeedChart field.
4. Click on the OK button
5. Click on the Mark All link. Note: The result of clicking on the Mark All link will be a checkmark in all checkboxes in the Apply column.
6. Click on the OK button.
7. Click on the Save button again

PeopleSoft Version 9.1: Requisitions
Ver. 2012.06.05 Page 70 [email protected] ©2008 These materials may not be reproduced in whole or in part without the express permission of
The University of Akron.
Appendix C: Workflow Messages
Requisition in Worklist waiting to be approved- goes to Approver
Requisition has been approved- goes to Requester
Requisition has been denied- goes to Requester
Requisition was put on Hold (requisition needs changes)- goes to Requester

PeopleSoft Version 9.1: Requisitions
Ver. 2012.06.05 Page 71 [email protected] ©2008 These materials may not be reproduced in whole or in part without the express permission of
The University of Akron.
Requested action taken- goes to Approver
Adding an additional Approver- goes to added (new) Approver
Additional Reviewer added - no approval required, FYI- goes to added Reviewer
Timeout /Escalation notice- goes to Approver

Software Training Services [email protected] The University of Akron
Appendix D: Approving a Requisition- Job Aid PeopleSoft Financials V9.1
Method 1:E-mail Notification
1. As the Approver, you will receive an e-mail message indicating that you have a requisition waiting approval in your PeopleSoft Worklist.
2. Click on the link at the bottom of the message.
3. You will be prompted to log into PeopleSoft, if you are not already logged in. Enter your User ID and Password.
4. The Requisition Approval page displays.
5. Once on the Requisition Approval page, see reverse side for step by step instructions.
Method 2: Manage Requisitions Approvals Page
1. In PeopleSoft, navigate using the menu to: Purchasing, Requisitions, Manage Requisition Approvals.
2. Click on the Search button to retrieve requisitions awaiting your review. You may have to adjust the search criteria at the top of the page prior to clicking on the Search button.
3. To approve a requisition, click on the link for the requisition in the Req ID column.
4. The Requisition Approval page displays.
5. Once on the Requisition Approval page, see reverse side for step by step instructions.
Method 3: PeopleSoft Worklist (This was the method used in the prior version of PeopleSoft Financials)
1. To open the Worklist, click on the Worklist link in the Navigation Header in the top right of the PeopleSoft window.
2. Your Worklist will open and will display requisitions awaiting your approval.
3. To review a requisition, click on the link for the requisition in the Link column.
4. The Requisition Approval page displays.
5. Once on the Requisition Approval page, see reverse side for step by step instructions.
There are three ways to initiate approving a requisition in
PeopleSoft.
1. From the e-mail notification you receive.
2. From the new Manage Requisition Approvals page.
3. From the PeopleSoft Worklist.
Note: Smartphones are NOT supported devices for
approving PeopleSoft requisitions.
As an Approver, you have three options available:
Approve: If you Approve a requisition, you are agreeing to all
of the contents of the document. You are also moving the
requisition to the next step in the Requisition Life Cycle, Budget
Checking.
Deny: If you Deny a requisition, you are stopping the
requisition from moving to the next step in the Requisition Life
Cycle. Denied requisitions will be closed.
Hold: If you Hold a requisition, you are sending it back to the
Requester for additional information or modification. Once the
Requester responds with information or changes, you will
again receive notification and be able to review and approve,
or deny, once again.

Software Training Services [email protected] The University of Akron
Appendix D: Approving a Requisition- Job Aid PeopleSoft Financials V9.1
Regardless of the method you choose to initiate the Approval
Process, you will end up at the Requisition Approval page.
Requisition Approval Page:
1. To view the requisition, click on the link for View printable version in the
top right quadrant of the window.
A separate window will open - DO NOT close this window. Closing the
window will cancel the report process. It may take up to 30 seconds for
this screen to appear – please be patient and do not click the View
Printable Version link a second time.
2. Add comments in the large edit box prior to selecting an action.
Note: Comments are required for Deny and Hold.
3. Click on the Approve, Deny or Hold button. The page will update and reflect the action just taken. For example, if the requisition was approved:
4. The Requester will now receive an e-mail message stating the requisition was Approved, Denied or put on Hold. For Holds and Denials, Requesters are directed to review the Approver’s comments on the Approval Page by clicking on the link provided.