leather - unevoc.unesco.org · leather shoes all of these work steps are also necessary for making...
TRANSCRIPT
Leather
Booklet 7.08
Global Action Programme on Education for All Youth Project

Learning and Working
Motivating for Skills Development: A Campaign Package Version February 2006 1 Campaign Package Overview
2 Campaign Flyer
3 Information for Stakeholders
4 Guide to being a Successful Facilitator
5 Activity Check List
6 Videos ‘Learning and Working’
7 Booklets for each of the Videos
8 CD-ROM with print files of above documents
Page 1 Leather Page 1
Booklet 7.08 - LEATHER This booklet complements the video clip on “Leather” on DVD 2. It gives a short summary of the content of the video and contains illustrations followed by technical texts, which will make it easier to understand and recall the activities shown in the video. The booklet can be copied and handed out to participants, so that they can make notes on them or use them as a reference for later. A transcript of the soundtrack of the video is included at the back of the booklet. Whenever the locally spoken language is different from the language used in the video, the facilitator may wish to use this text transcript as a basis for comments and explanations in the local language. Comment and Observations The video shows very specialised trades which require skills that are not easily learned. The facilitator should be able to provide information on where to obtain further training on the processing of leather. The facilitator has to attach importance to occupational health and safety topics. Occupational Health and Safety The process of tanning, especially mineral tanning, can be harmful to both the worker and the environment, if not carried out safely and correctly. The worker should wear protective clothing, protective gloves and shoes as well as a respirator to avoid breathing in dust and spray mists. The facilitator should point out that the working environment shown in the video, where the workers can be seen to work with bare hands, is not acceptable.
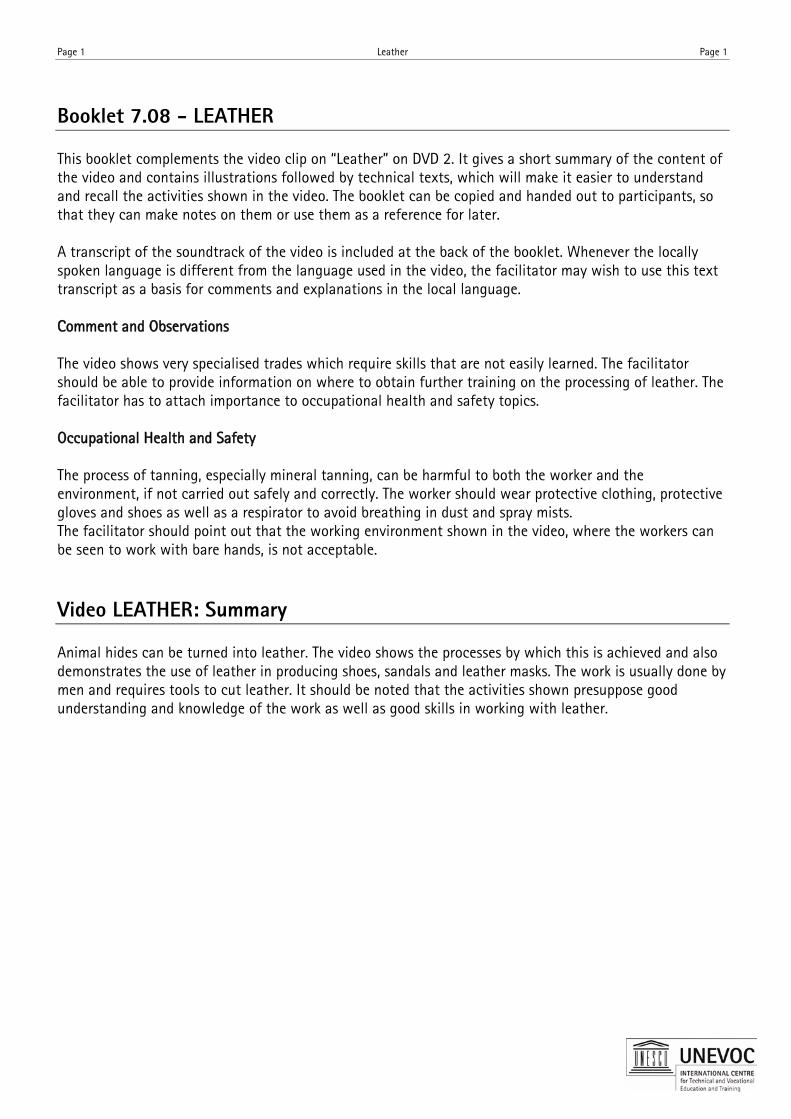
Video LEATHER: Summary Animal hides can be turned into leather. The video shows the processes by which this is achieved and also demonstrates the use of leather in producing shoes, sandals and leather masks. The work is usually done by men and requires tools to cut leather. It should be noted that the activities shown presuppose good understanding and knowledge of the work as well as good skills in working with leather.
Page 2 Leather Page 2
Notes:

Page 3 Leather Page 3
Notes:

Page 4 Leather Page 4
Notes:

Page 5 Leather Page 5
Notes:
Page 6 Leather Page 6
Notes:
Page 7 Leather Page 7
Notes:
Page 8 Leather Page 8
Notes:
Page 9 Leather Page 9
Notes:
Page 10 Leather Page 10
Notes:
Page 11 Leather Page 11
Notes:
Page 12 Leather Page 12
Notes:
Page 13 Leather Page 13
Notes:
Page 14 Leather Page 14
Video LEATHER: Technical Information
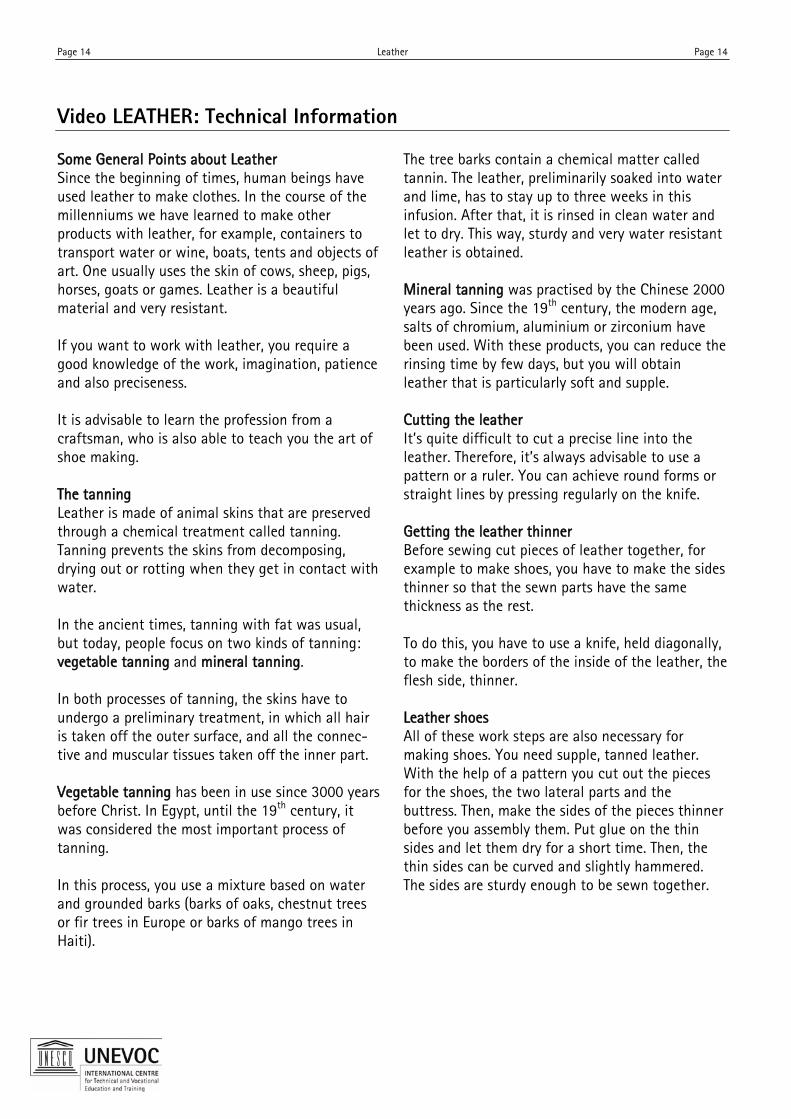
Some General Points about Leather Since the beginning of times, human beings have used leather to make clothes. In the course of the millenniums we have learned to make other products with leather, for example, containers to transport water or wine, boats, tents and objects of art. One usually uses the skin of cows, sheep, pigs, horses, goats or games. Leather is a beautiful material and very resistant. If you want to work with leather, you require a good knowledge of the work, imagination, patience and also preciseness. It is advisable to learn the profession from a craftsman, who is also able to teach you the art of shoe making. The tanning Leather is made of animal skins that are preserved through a chemical treatment called tanning. Tanning prevents the skins from decomposing, drying out or rotting when they get in contact with water. In the ancient times, tanning with fat was usual, but today, people focus on two kinds of tanning: vegetable tanning and mineral tanning. In both processes of tanning, the skins have to undergo a preliminary treatment, in which all hair is taken off the outer surface, and all the connec-tive and muscular tissues taken off the inner part. Vegetable tanning has been in use since 3000 years before Christ. In Egypt, until the 19th century, it was considered the most important process of tanning. In this process, you use a mixture based on water and grounded barks (barks of oaks, chestnut trees or fir trees in Europe or barks of mango trees in Haiti).
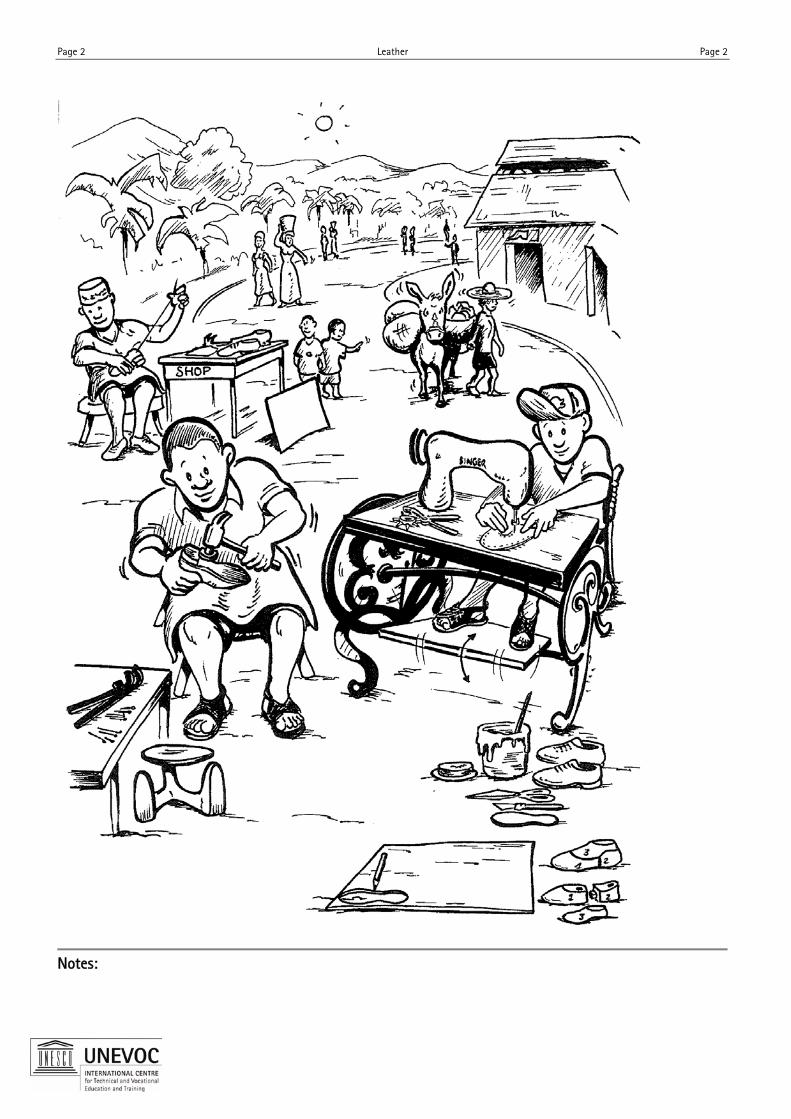
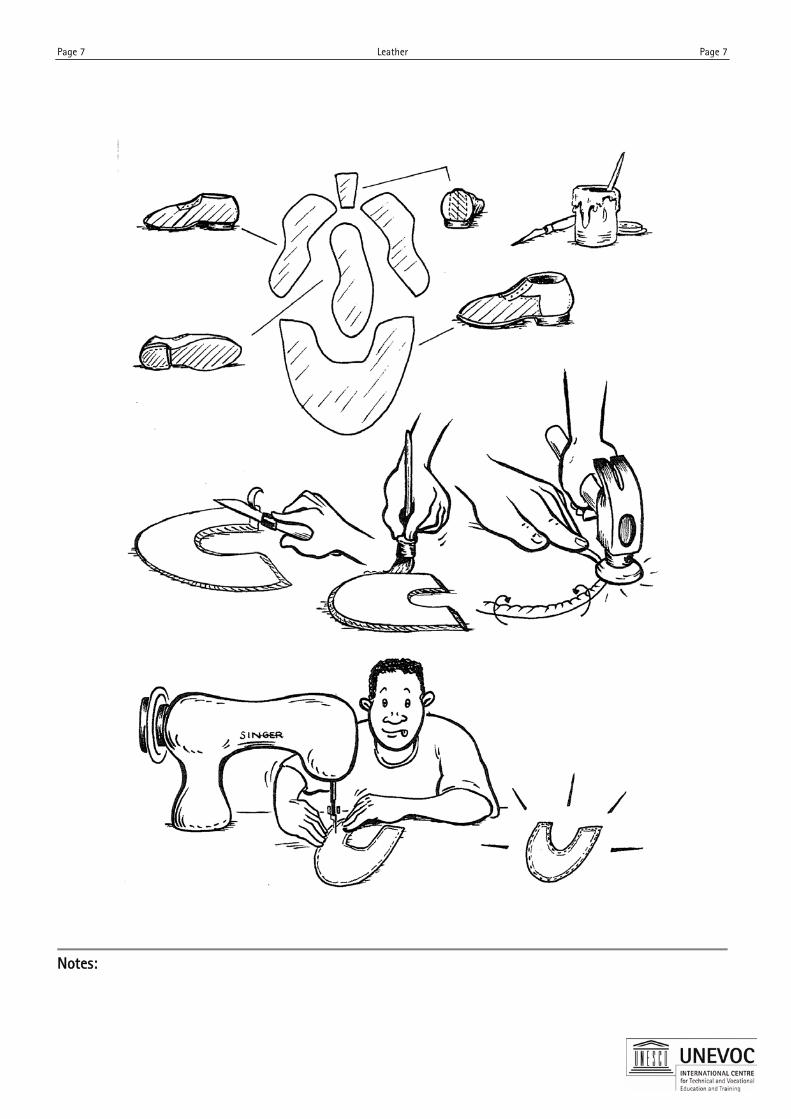
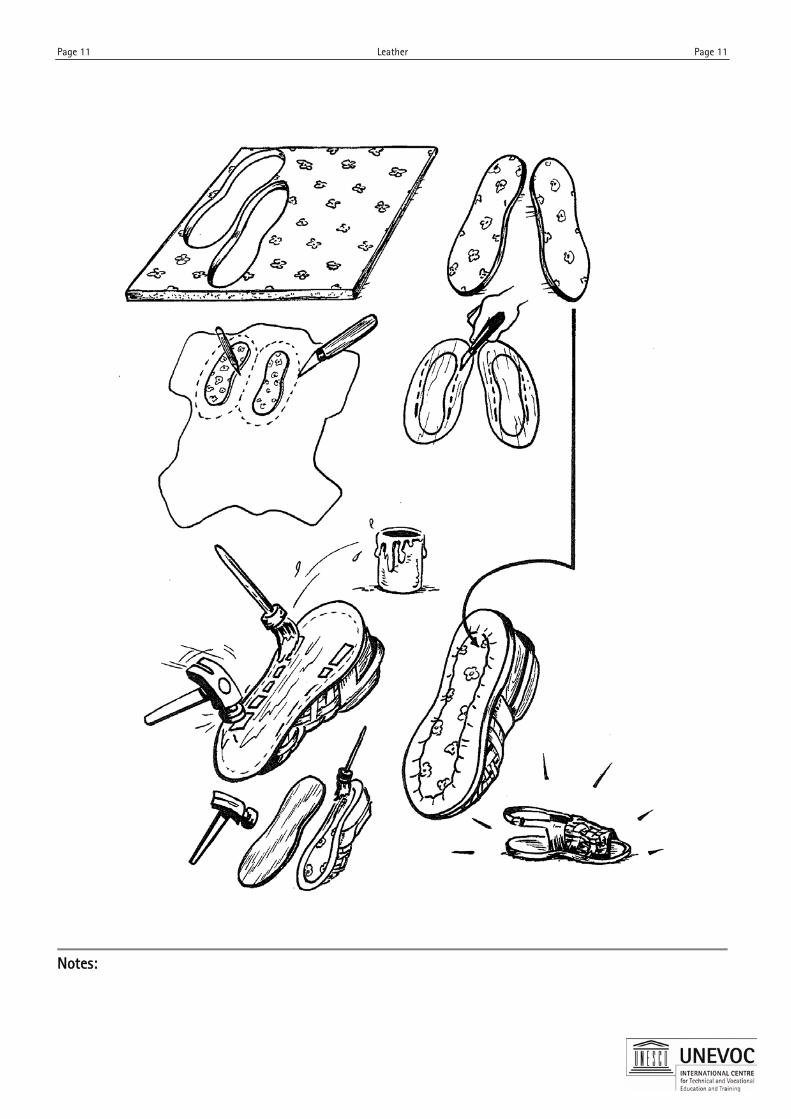
The tree barks contain a chemical matter called tannin. The leather, preliminarily soaked into water and lime, has to stay up to three weeks in this infusion. After that, it is rinsed in clean water and let to dry. This way, sturdy and very water resistant leather is obtained. Mineral tanning was practised by the Chinese 2000 years ago. Since the 19th century, the modern age, salts of chromium, aluminium or zirconium have been used. With these products, you can reduce the rinsing time by few days, but you will obtain leather that is particularly soft and supple. Cutting the leather It’s quite difficult to cut a precise line into the leather. Therefore, it’s always advisable to use a pattern or a ruler. You can achieve round forms or straight lines by pressing regularly on the knife. Getting the leather thinner Before sewing cut pieces of leather together, for example to make shoes, you have to make the sides thinner so that the sewn parts have the same thickness as the rest. To do this, you have to use a knife, held diagonally, to make the borders of the inside of the leather, the flesh side, thinner. Leather shoes All of these work steps are also necessary for making shoes. You need supple, tanned leather. With the help of a pattern you cut out the pieces for the shoes, the two lateral parts and the buttress. Then, make the sides of the pieces thinner before you assembly them. Put glue on the thin sides and let them dry for a short time. Then, the thin sides can be curved and slightly hammered. The sides are sturdy enough to be sewn together.

Page 15 Leather Page 15
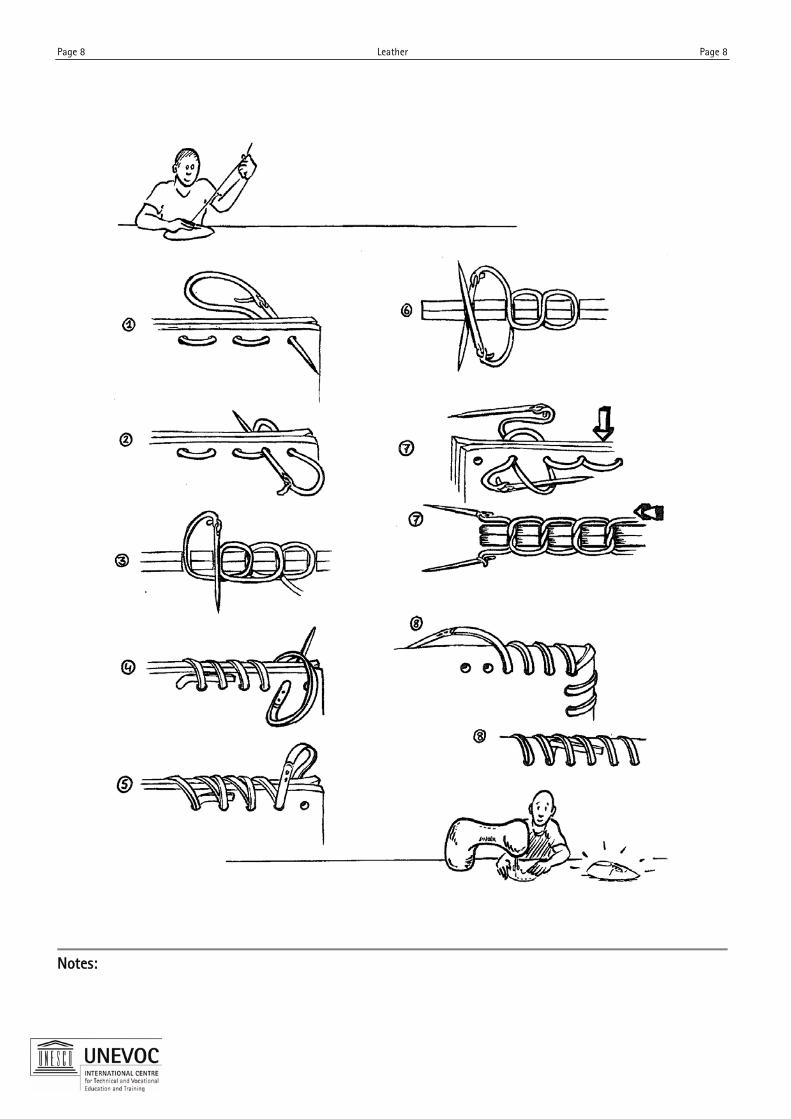
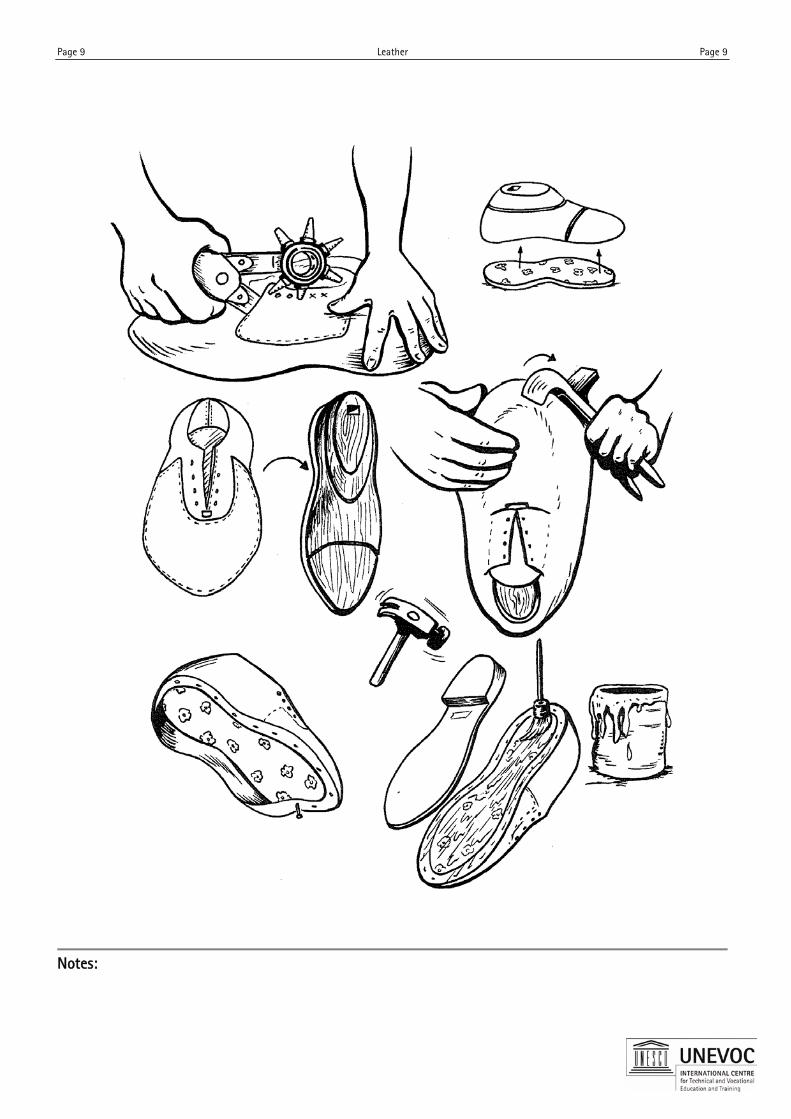
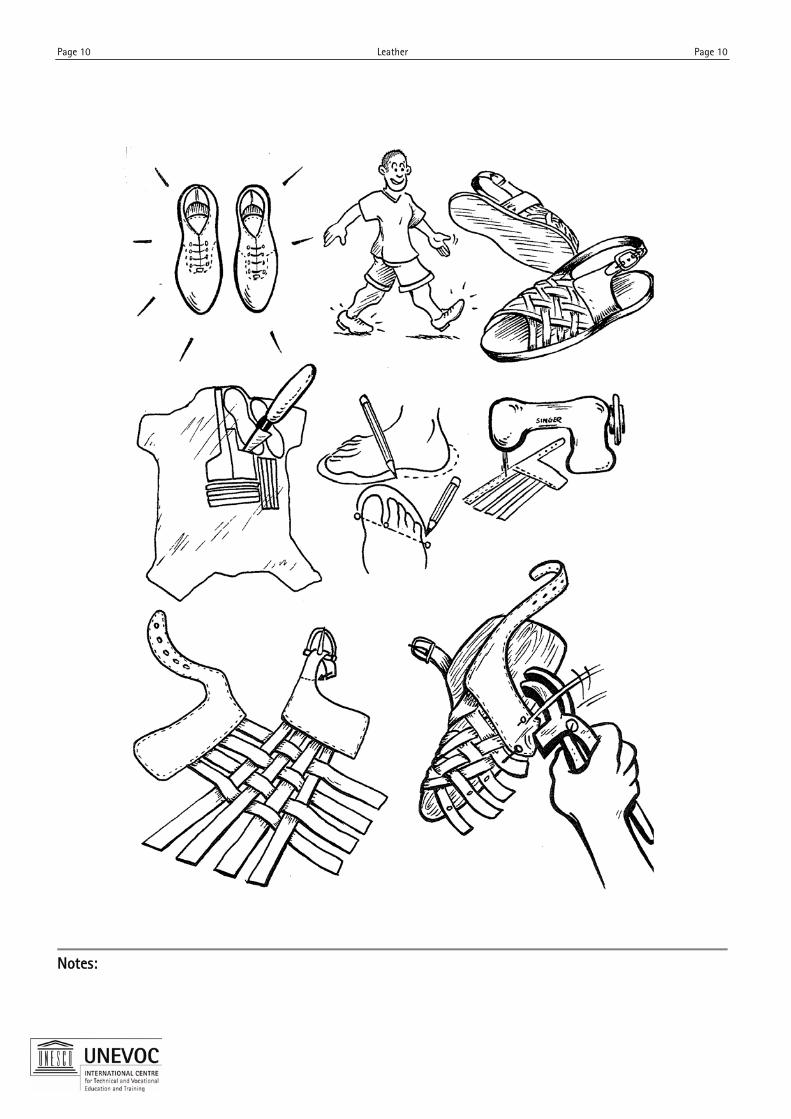
Folding and modelling leather You can fold or model any leather to form waves, for example. You can also cut them into strips and turn them to spirals; for that, you first have to slightly moisten the exterior side. You will fold it inside. Once folded to the desired form, let the work dry. This way, the leather will get hard and maintain its form. Punching leather You make holes for shoelaces or belts either with a nail or with a pair of professional pliers. This punching tool, specifically used to work with leather, has a wheel that has tubes of different diameters. These tubes make holes in the leather. Sewing the leather To sew the leather you can use a machine. But you can also do it manually. For that, you first have to
draw the planned seam, which should be around 3 to 5 cm from the side. Then, make the holes with the point of a pair of compasses, a nail or an awl. A special sewing needle for leather exists: it is very pointed. This needle allows sewing thin leather without preliminary piercing. The thread should be as thick as the needle. It is advisable to wax the thread so that it is more slippery. Moreover, you get more resistant seams. As you can see in the first part of this journal, many stitches exist which allow one to sew the leather in an accurate way. Care of the leather It is advisable to wax the finished product so that it stays supple, waterproof and shiny. Use animal fat or tallow.
Page 16 Leather Page 16
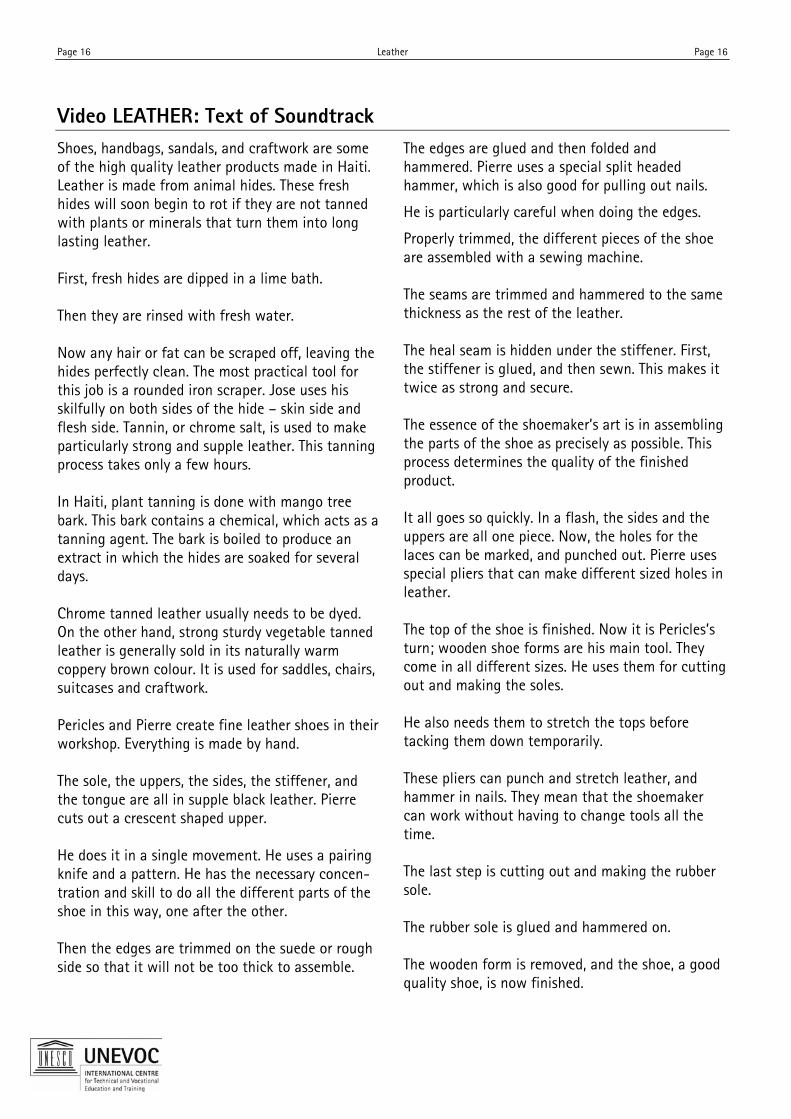
Video LEATHER: Text of Soundtrack Shoes, handbags, sandals, and craftwork are some of the high quality leather products made in Haiti. Leather is made from animal hides. These fresh hides will soon begin to rot if they are not tanned with plants or minerals that turn them into long lasting leather. First, fresh hides are dipped in a lime bath. Then they are rinsed with fresh water. Now any hair or fat can be scraped off, leaving the hides perfectly clean. The most practical tool for this job is a rounded iron scraper. Jose uses his skilfully on both sides of the hide – skin side and flesh side. Tannin, or chrome salt, is used to make particularly strong and supple leather. This tanning process takes only a few hours. In Haiti, plant tanning is done with mango tree bark. This bark contains a chemical, which acts as a tanning agent. The bark is boiled to produce an extract in which the hides are soaked for several days. Chrome tanned leather usually needs to be dyed. On the other hand, strong sturdy vegetable tanned leather is generally sold in its naturally warm coppery brown colour. It is used for saddles, chairs, suitcases and craftwork. Pericles and Pierre create fine leather shoes in their workshop. Everything is made by hand. The sole, the uppers, the sides, the stiffener, and the tongue are all in supple black leather. Pierre cuts out a crescent shaped upper. He does it in a single movement. He uses a pairing knife and a pattern. He has the necessary concen-tration and skill to do all the different parts of the shoe in this way, one after the other. Then the edges are trimmed on the suede or rough side so that it will not be too thick to assemble.
The edges are glued and then folded and hammered. Pierre uses a special split headed hammer, which is also good for pulling out nails.
He is particularly careful when doing the edges.
Properly trimmed, the different pieces of the shoe are assembled with a sewing machine. The seams are trimmed and hammered to the same thickness as the rest of the leather. The heal seam is hidden under the stiffener. First, the stiffener is glued, and then sewn. This makes it twice as strong and secure. The essence of the shoemaker’s art is in assembling the parts of the shoe as precisely as possible. This process determines the quality of the finished product. It all goes so quickly. In a flash, the sides and the uppers are all one piece. Now, the holes for the laces can be marked, and punched out. Pierre uses special pliers that can make different sized holes in leather. The top of the shoe is finished. Now it is Pericles’s turn; wooden shoe forms are his main tool. They come in all different sizes. He uses them for cutting out and making the soles. He also needs them to stretch the tops before tacking them down temporarily. These pliers can punch and stretch leather, and hammer in nails. They mean that the shoemaker can work without having to change tools all the time. The last step is cutting out and making the rubber sole. The rubber sole is glued and hammered on. The wooden form is removed, and the shoe, a good quality shoe, is now finished.
Page 17 Leather Page 17
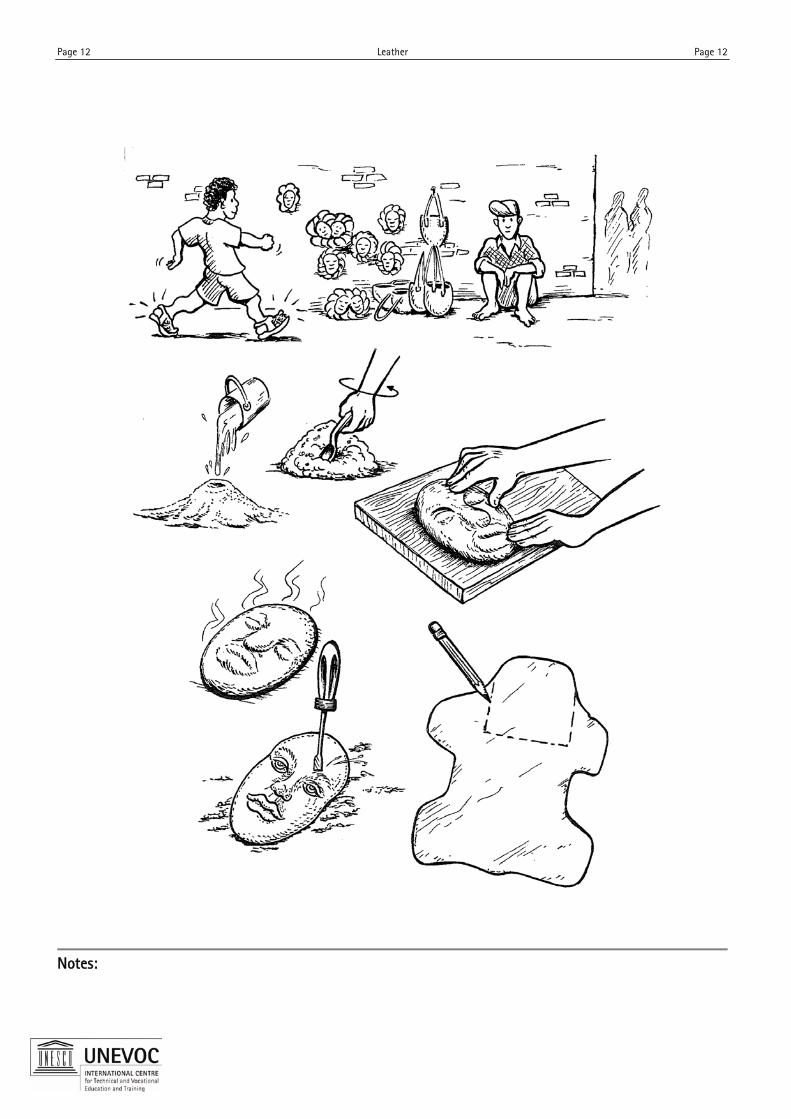
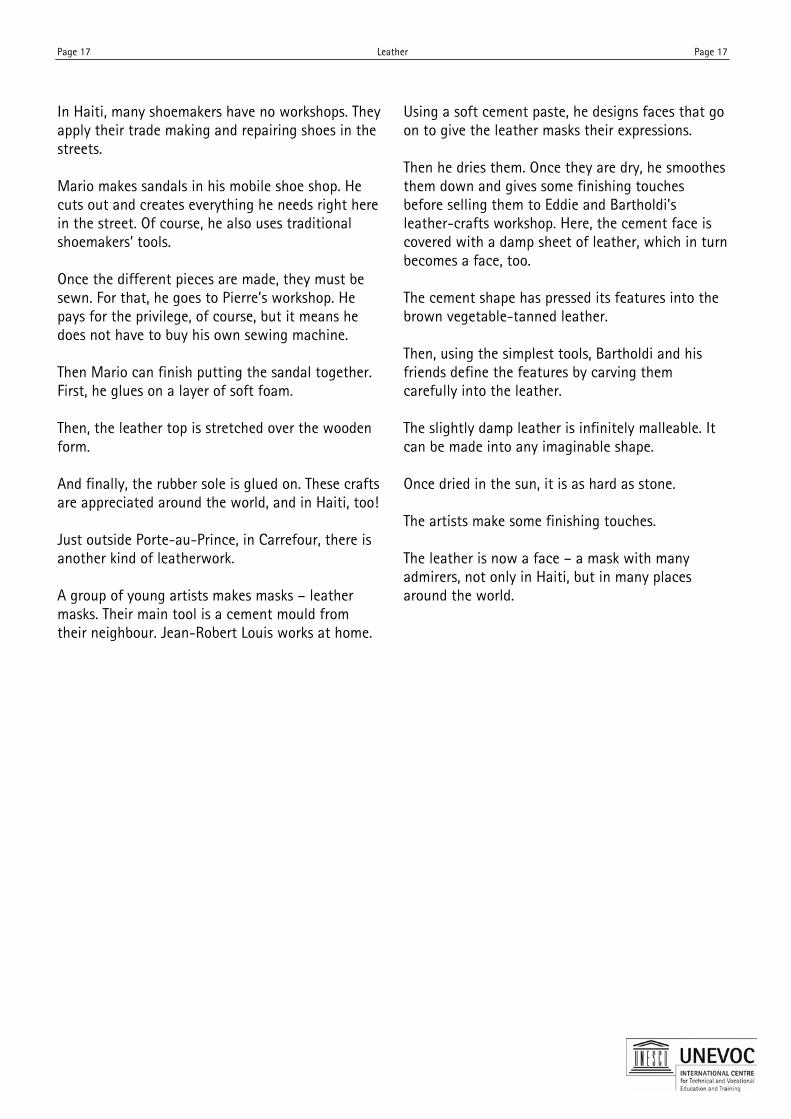
In Haiti, many shoemakers have no workshops. They apply their trade making and repairing shoes in the streets. Mario makes sandals in his mobile shoe shop. He cuts out and creates everything he needs right here in the street. Of course, he also uses traditional shoemakers’ tools. Once the different pieces are made, they must be sewn. For that, he goes to Pierre’s workshop. He pays for the privilege, of course, but it means he does not have to buy his own sewing machine. Then Mario can finish putting the sandal together. First, he glues on a layer of soft foam. Then, the leather top is stretched over the wooden form. And finally, the rubber sole is glued on. These crafts are appreciated around the world, and in Haiti, too! Just outside Porte-au-Prince, in Carrefour, there is another kind of leatherwork. A group of young artists makes masks – leather masks. Their main tool is a cement mould from their neighbour. Jean-Robert Louis works at home.
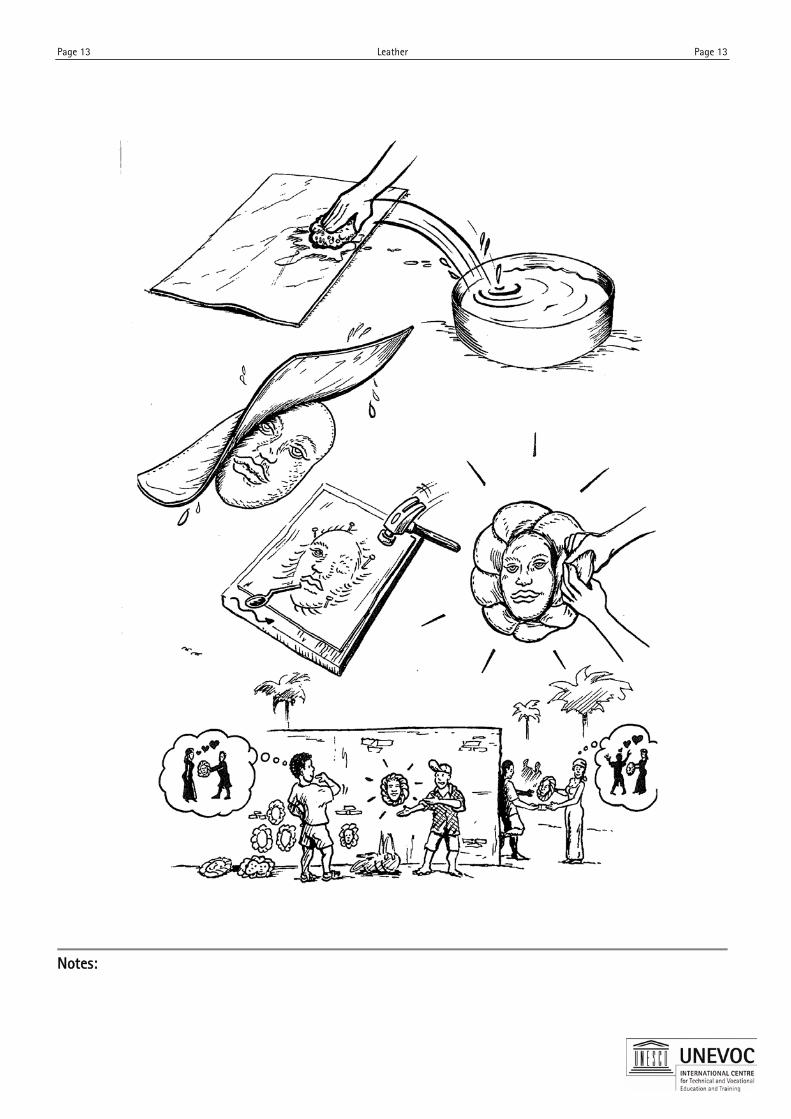
Using a soft cement paste, he designs faces that go on to give the leather masks their expressions. Then he dries them. Once they are dry, he smoothes them down and gives some finishing touches before selling them to Eddie and Bartholdi’s leather-crafts workshop. Here, the cement face is covered with a damp sheet of leather, which in turn becomes a face, too. The cement shape has pressed its features into the brown vegetable-tanned leather. Then, using the simplest tools, Bartholdi and his friends define the features by carving them carefully into the leather. The slightly damp leather is infinitely malleable. It can be made into any imaginable shape. Once dried in the sun, it is as hard as stone. The artists make some finishing touches. The leather is now a face – a mask with many admirers, not only in Haiti, but in many places around the world.

Further Notes

Further Notes

Further Notes

The Campaign Package
This Campaign Package has been developed and provided by the UNESCO-UNEVOC International Centre for Technical and Vocational Education and Training, Bonn, Germany. Its purpose is to facilitate the organisation of campaigns for mobilisation and motivation of young people, and for providing them with vocational orientation and guidance. The focus is on marginalised youth in the informal sector of least developed countries.
The package consists of eight components.
The current pilot version is being provided in English only. It will be evaluated in the field. Depending on the feedback that UNESCO-UNEVOC will receive, the package will be developed further.
The activities presented in this Campaign Package are not a guarantee of monetary success. The content is based on research, examples and advice from experts. Every attempt was made to ensure accuracy, and neither the authors nor the UNESCO-UNEVOC International Centre can be held responsible for incorrect information or changing circumstances.
UNESCO-UNEVOC International Centre Hermann-Ehlers-Str. 10 53113 Bonn Germany
[email protected] www.unesco.org/unevoc www.unevoc.unesco.org/learning+working
Authors:
Yael Eichner, Astrid Hollander, Sharon Kirabo-Steffens, Hans Krönner
Digitalisation of booklets:
Ian Ponce, Jordan Wolfe
ISBN 978-92-95071-21-6 (online)
© UNESCO 2006
Booklets accompanying the Video Series “Learning and Working”
The video series was filmed in Haiti. We would like to express our special gratitude to the people of Haiti.
Coordination: Martina and Jean-Claude Ramigé
Text: Martina Ramigé, UNESCO
Paintings: Edouard Michelet
Graphics: Stefan Nowak, Martin Warnke
Layout: Yael Eichner, Till Heeg, Astrid Hollander, Ramigé Film Production
