learning objectivesaucache.autodesk.com/au2012/sessionsfiles/2213/3976... · web viewwhy link dwg...
TRANSCRIPT
Why Doesn’t This Look Right?!: Working with AutoCAD® Drawings in Autodesk® Revit® MEP Trevor M. Uitvlugt P.Eng – Hemisphere Engineering Inc.
MP2213 With the growth of Autodesk® Revit® MEP software, many firms are transitioning from AutoCAD® software workflows to Revit® workflows. However, some design elements, such as schematics, details, site info, and other drawing elements, are still easier to assemble and manipulate in AutoCAD®. Although Revit® is able to import DWG™ files, there are many nuances which Revit® does not properly understand, which can lead to poor results when the file is imported and printed. In this class, you will learn about the limits of Revit® and how to develop AutoCAD® drafting standards specifically for Revit® import. You will produce much better drawings when considering these two factors.
Learning ObjectivesAt the end of this class, you will be able to:
Identify elements in a DWG™ file that Revit® does not properly understand
Modify AutoCAD® blocks to make them Revit® friendly
Develop layer-naming conventions and drafting standards that enable easier importation of DWG™ files into Revit®
Import DWG™ files and adjust the line weights and styles as required for proper printing
About the SpeakerTrevor Uitvlugt P.Eng is a Mechanical Engineer and CAD/BIM manager for Hemisphere Engineering Inc. with over 10 yrs experience. He has extensive experience with AutoCAD®, and Revit® MEP, and has developed intra-office standards for project organization. Recently he has led the charge in Hemisphere's transition to Revit®.
His work experience includes both renovation and new construction projects, spanning both the design and construction phases. His project experience includes many large scale projects with construction budgets in the hundreds of Millions. These projects span many years in design and construction, and require unparalleled organization and coordination to be successful.
Trevor brings a combination of organization expertise, software understanding, technical know-how, multi-disciplinary awareness and engineering experience.
eMail address: [email protected]
Twitter: @TrevorUitvlugt

Why Doesn’t This Look Right?!: Working with AutoCAD® Drawings in Autodesk® Revit® MEP
Part 1: Linking AutoCAD® Drawings into Revit®
Why Link DWG™ files? Even though many firms are transitioning from an AutoCAD® to a Revit® design process, there are many reasons that someone may still wish to link DWG™ files. This could include trying to make use of an existing detail library, or of schematic/P&ID drawing which was done in AutoCAD®. It could be that while the building design is done in Revit®, the site survey may only be available in DWG™ format.
It could be also that while your firm may be working in Revit®, other consultants or sub-consultants may not be on the same page. You may still be receiving floor plans or other drawings in DWG™ format.
It could be that not all of your staff has yet been Revit® trained. These staff members can still help out on the project if specific potions of the project are produced in AutoCAD®.
Why Not Just Use Revit®? Just as there are many different tools used in the construction of a building, there are many different tools that can be used in the design of the building. AutoCAD® still has a place in your tool box.
The realities of your firm may be that a full transition to Revit® is just not feasible. Working with both AutoCAD® and Revit® may help you to make the best use of your resources.
While Revit® continues to make improvements with every release, the reality is that Revit® is still not all things for all projects. It still has a few features which could be improved. These include a better content browser for the insertion of blocks and other standard content, and the ability to stretch elements similar to AutoCAD®.
Another reason to make use of Revit®, is that it may be easier to model the building elements if the modellers already know what to model. Doing some preliminary work in AutoCAD® may speed up the entire design process. However, during these early stage it may be desireable to link these drawing into Revit®.
Combining Revit® and AutoCAD®: Option 1 One common method for merging AutoCAD® and Revit® content is simply to keep them separate. This option usually comes up as “Plan-B”, late in the project when it is discovered that there are issues in making linked DWG™ files look right when plotted in Revit®. When the solution of how to correct this problem is not readily available, many users are tempted to abandon the unknown in favour of the known.
In this Case the title block from Revit® can be exported as a DWG™ file and then x-ref’d or inserted into AutoCAD®. This would allow the user to print the AutoCAD® drawings from
2

Why Doesn’t This Look Right?!: Working with AutoCAD® Drawings in Autodesk® Revit® MEP
AutoCAD®, and the Revit® drawings from Revit®. These two drawing sets could then be merged into one set.
Combining Revit® and AutoCAD®: Option 1 Pros The biggest Pro for this process is that it is understandable at a basic level. The users are working in a workflow that they have experience with and know how to handle.
Combining Revit® and AutoCAD®: Option 1 Cons There are also several Cons to this method:
1. The printing process is broken up into several steps. First print from Revit®, Then from AutoCAD®, then merge the pages or files.
2. The printing and merging process is Manual rather than Automatic. This allows one more opportunity for a mistake to be made.
3. The exported title block may not plot exactly as the title block plotted from Revit®.4. If the title block needs to be updated with the latest “issued for” or other such item, it
must be updated in two locations5. The AutoCAD® drawings will not automatically appear in the Revit® sheet lists6. The AutoCAD® drawing names and numbers cannot be modified in the Project
Browser
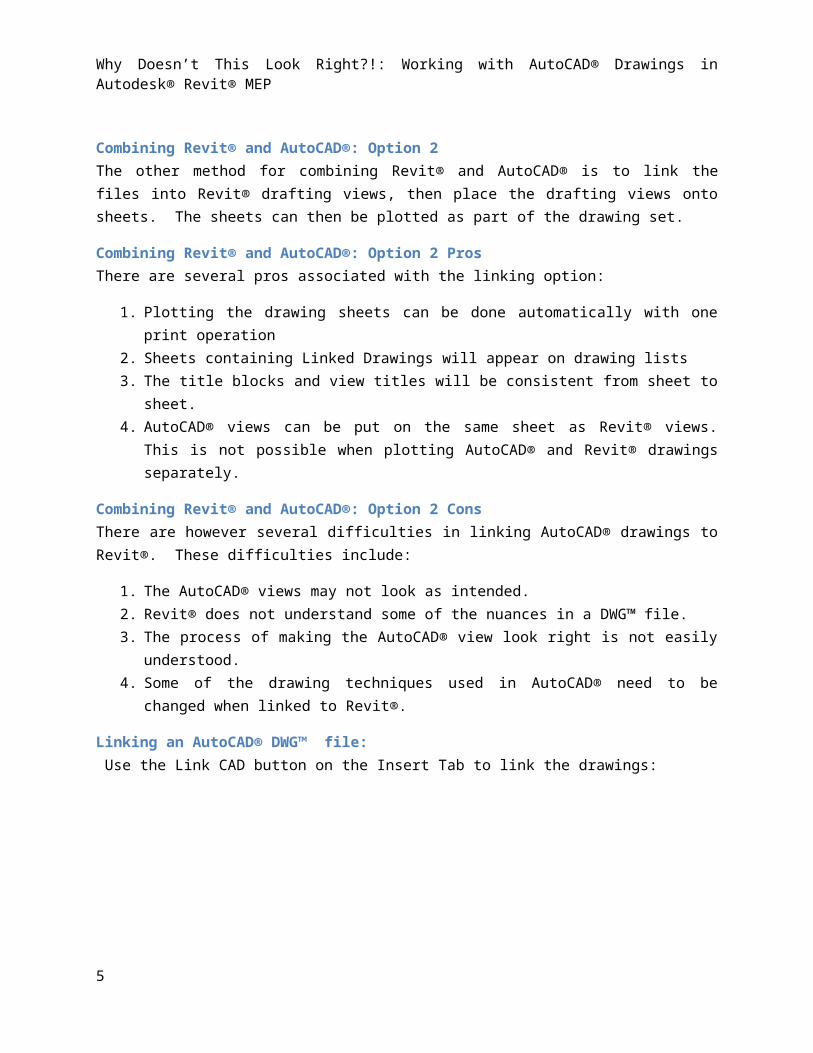
Combining Revit® and AutoCAD®: Option 2 The other method for combining Revit® and AutoCAD® is to link the files into Revit® drafting views, then place the drafting views onto sheets. The sheets can then be plotted as part of the drawing set.
Combining Revit® and AutoCAD®: Option 2 Pros There are several pros associated with the linking option:
1. Plotting the drawing sheets can be done automatically with one print operation2. Sheets containing Linked Drawings will appear on drawing lists3. The title blocks and view titles will be consistent from sheet to sheet.4. AutoCAD® views can be put on the same sheet as Revit® views. This is not possible
when plotting AutoCAD® and Revit® drawings separately.
Combining Revit® and AutoCAD®: Option 2 Cons There are however several difficulties in linking AutoCAD® drawings to Revit®. These difficulties include:
1. The AutoCAD® views may not look as intended.2. Revit® does not understand some of the nuances in a DWG™ file.3. The process of making the AutoCAD® view look right is not easily understood.4. Some of the drawing techniques used in AutoCAD® need to be changed when linked to
Revit®.
3

Why Doesn’t This Look Right?!: Working with AutoCAD® Drawings in Autodesk® Revit® MEP
Linking an AutoCAD® DWG™ file: Use the Link CAD button on the Insert Tab to link the drawings:
When Linking the drawings ensure that the correct options are selected on the “Link CAD Formats” dialog Box:
4
Why Doesn’t This Look Right?!: Working with AutoCAD® Drawings in Autodesk® Revit® MEP
Things To Note: If there is content in both Model Space and Paper Space, Revit® will only link the contets of the Model space. If the model space is empty, Revit® will then ask if you want to link the contents from paper space.
When linking an AutoCAD® file using the “origin to origin” positioning, Revit® automatically pins the file.
Revit® Drafting Views have no “Crop View” option. This means that all the drawing elements must be able to fit on the title block or within the area desired.
Revit® Drafting Views have no “Duplicate as Dependent” option. This means that you cannot break up a single model space into multiple paper spaces like you can in AutoCAD®. You must break up the drawing into multiple smaller drawings, with only section per view.
The area of the linked DWG™ (indicated as the rectangle around the link) will include “Off” or “Frozen” Layers, even if those layers are not visible.
Things to Think about: Before linking the .DWG™ , turn on and thaw all layers using the LAYON and LAYTHW commands. You can then if there are any see what the drawing extents are and delete any items not required. You can then use the Previous (LAYERP) command to return the layer states
You should also break up Multi-Sheet AutoCAD® drawings to one view per .DWG™ file
5

Why Doesn’t This Look Right?!: Working with AutoCAD® Drawings in Autodesk® Revit® MEP
Part 2: Line Weights
Plot Comparison: AutoCAD® vs Revit®: Line Weights
AutoCAD® Revit®
After linking the drawing you can compare how the two programs will plot the same information. By plotting to PDF with each program, the first thing we notice is that the line weights of the Revit® plot are significantly different then the AutoCAD®.
One reason for this is that AutoCAD® Uses CTB files to translate line or layer Colour into plotted line weights. This may not be as big of an issue if you are using STB files.
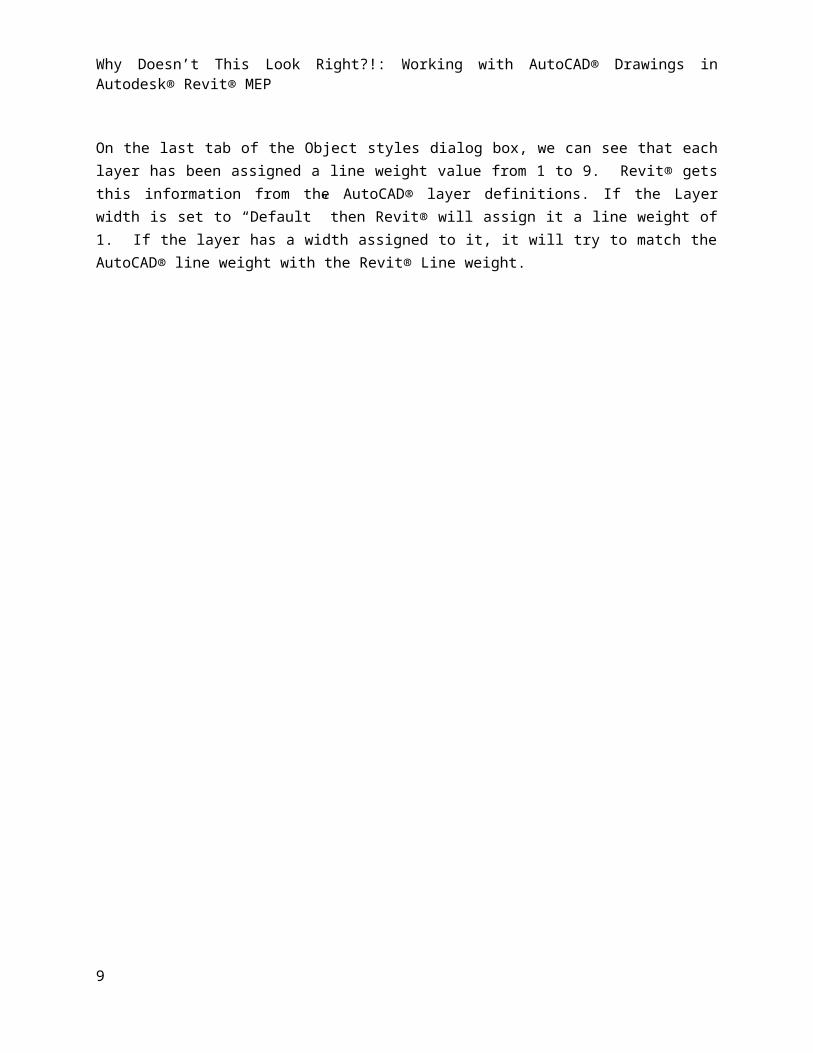
Revit® uses “Object Styles” to determine line weights.
On the last tab of the Object styles dialog box, we can see that each layer has been assigned a line weight value from 1 to 9. Revit® gets this information from the AutoCAD® layer definitions. If the Layer width is set to “Default” then Revit® will assign it a line weight of 1. If the layer has a width assigned to it, it will try to match the AutoCAD® line weight with the Revit® Line weight.
6

Why Doesn’t This Look Right?!: Working with AutoCAD® Drawings in Autodesk® Revit® MEP
Revit® Line Weights:
AutoCAD® Line Weights:
7

Why Doesn’t This Look Right?!: Working with AutoCAD® Drawings in Autodesk® Revit® MEP
Revit® translates layers with a specified with to the closest weight in the “Model Line Weights” table
Revit® Line Weights: Solutions There are two solutions to ensuring that Revit® will assign the correct line weights to each layer. Either set up the lineweights in AutoCAD® before linking, or adjust the line weights in Revit® after linking.
Note that in AutoCAD®, layers can be sorted by colour so making it easier to relate a colour to a line weight. This cannot be done in Revit®.
Also note that after linking the AutoCAD® to Revit®, changing the layer colour, linetype, or linewidth will not update the Revit® link. These definitions are determined at the time of linking.
Lastly, having a large number of Layers in AutoCAD® means having to adjust a large number of Layers in Revit®! Use fewer layers to save time and effort.
8
Why Doesn’t This Look Right?!: Working with AutoCAD® Drawings in Autodesk® Revit® MEP
Revit®: Imported Line Styles Similar to line weights, Revit® imports the line patterns of each layer when Linking .DWG™ files. However, the imported line patterns may not exactly match the patterns in Revit®. These imported Line patterns have a tendency to build up in Revit®
Change the “Import-[Linetype]” to a standard Revit® Line pattern
9

Why Doesn’t This Look Right?!: Working with AutoCAD® Drawings in Autodesk® Revit® MEP
You should also go into the Revit® Line Patterns list and delete all the “Import-[Linetype]” definitions from the list:
10

Why Doesn’t This Look Right?!: Working with AutoCAD® Drawings in Autodesk® Revit® MEP
Part 3: Blocks and Symbols Another area to look at is how Revit® understands blocks and symbols:
Wipeouts:
AutoCAD® Revit®
Revit® does not understand Wipeouts. In the example above, the symbol contains a wipeout so that the line below it does not need to be trimmed. However in Revit®, the wipeout does not block the line. This block needs to be revised to remove the wipeout.
Polylines:
AutoCAD® Revit®
11

Why Doesn’t This Look Right?!: Working with AutoCAD® Drawings in Autodesk® Revit® MEP
The solid fill area of the AutoCAD® symbol is made with a multi-width polyline, however Revit® does not understand Polyline Thickness. These blocks need to be revised to replace their Polyline with a solid fill hatch.
What does Revit® Understand? There are some things which Revit® does seem to understand. These include Blocks with embedded layers, Blocks with embedded linetypes, and Blocks with embedded Colours. However, having Linetypes and Colours not “By-layer” makes the linework non-adjustable via the Revit® “Object Styles” dialog Box
Part 4: Text and Leaders
MText – Background Masking: Similar to the wipeout feature, Revit® does not understand background masking of Mtext objects:
AutoCAD® Revit®
In AutoCAD®, Remove Background Masks and use the “Trim” command to trim linework behind text.
Leaders: Another item that Revit® does not understand is the Automatic Leader Tails generated by AutoCAD® Quick leaders.
12

Why Doesn’t This Look Right?!: Working with AutoCAD® Drawings in Autodesk® Revit® MEP
AutoCAD®:
Revit®:
To solve this, make leaders with at least two segments. If a standard tail length is required, a block can be used to ensure that the tail is the correct length:
13

Why Doesn’t This Look Right?!: Working with AutoCAD® Drawings in Autodesk® Revit® MEP
Block Tail Standard BlockStandardised tail length
The tail standardizer is created with elements on a non-plotting Layer (Defpoints). The one end is placed on the text insertion point. The leader tail is placed on the other.
Note that in AutoCAD®, the length of the tail is determined by the arrow size multiplied by the Dimscale.
14

Why Doesn’t This Look Right?!: Working with AutoCAD® Drawings in Autodesk® Revit® MEP
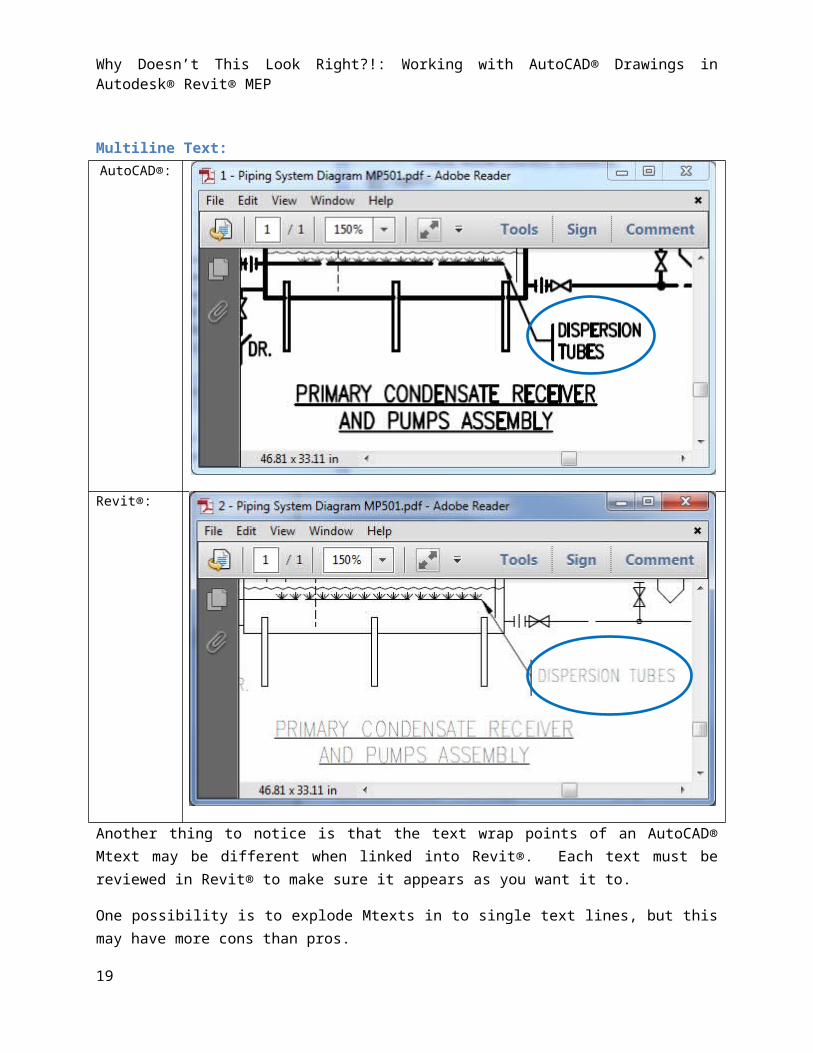
Multiline Text: AutoCAD®:
Revit®:
Another thing to notice is that the text wrap points of an AutoCAD® Mtext may be different when linked into Revit®. Each text must be reviewed in Revit® to make sure it appears as you want it to.
One possibility is to explode Mtexts in to single text lines, but this may have more cons than pros.
15

Why Doesn’t This Look Right?!: Working with AutoCAD® Drawings in Autodesk® Revit® MEP
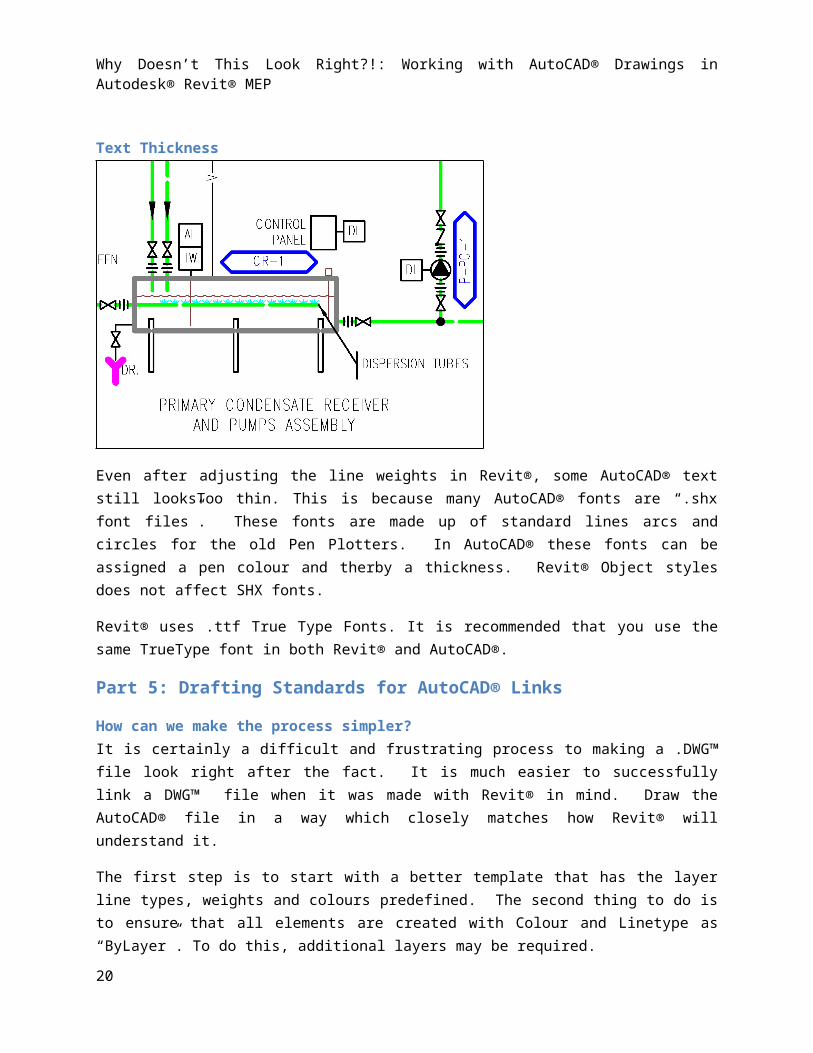
Text Thickness
Even after adjusting the line weights in Revit®, some AutoCAD® text still looksToo thin. This is because many AutoCAD® fonts are “.shx font files”. These fonts are made up of standard lines arcs and circles for the old Pen Plotters. In AutoCAD® these fonts can be assigned a pen colour and therby a thickness. Revit® Object styles does not affect SHX fonts.
Revit® uses .ttf True Type Fonts. It is recommended that you use the same TrueType font in both Revit® and AutoCAD®.
Part 5: Drafting Standards for AutoCAD® Links
How can we make the process simpler? It is certainly a difficult and frustrating process to making a .DWG™ file look right after the fact. It is much easier to successfully link a DWG™ file when it was made with Revit® in mind. Draw the AutoCAD® file in a way which closely matches how Revit® will understand it.
The first step is to start with a better template that has the layer line types, weights and colours predefined. The second thing to do is to ensure that all elements are created with Colour and Linetype as “ByLayer”. To do this, additional layers may be required.
The third thing to have in the template files are copies of modified block that have been made more “Revit® Friendly”. These blocks have any polylines replaced with solid fills, and wipeouts removed. It is also a good idea to remove any embedded layer content from blocks if possible.
Make sure you use True Type Fonts without masking.
16

Why Doesn’t This Look Right?!: Working with AutoCAD® Drawings in Autodesk® Revit® MEP
Layering:One simple way to simplify the process of inserting AutoCAD® drawings into Revit® is to limit the number of different layers used. Typically Details or schematics do not require extensive layers sets. Instead develop a layering standard which provides a separate layer for each Line Weight / Colour / Linetype Combination.
Examples:
“LINE 1” (Black Lines of weight 1)
“LINE 3 – CONTROL” (black Lines of Weight 3, Linetype “Control”)
“LINE 4 - BLUE – DCW” (Blue Lines of Weight 4, Linetype “DCW”)
This system does not conform to AIA / USNCS, but it is easy to understand.
AIA / USNCS Layering Standards: If it is required that your AutoCAD® files match the AIA/USNCS standards then a few things items must be considered: The first is that the AIA Ver 4.0 requires layers to be in the format:
DD-MAJR-MINR-MINR-P
Where:
DD – One or 2 letter Discipline Designator (Must be chosen from the list)
MAJR – 4 letter Major Group (User-defined Major Group field codes are not permitted)
MINR – 4 letter Minor Group (User-defined Minor Group field codes are permitted)
P – 1 letter Phase Designator (Optional)
Thus an AIA / USNCS Layering Alternitive could be established such that:
The Discipline Designator = “MP” (Mechanical Piping)
The Major Group = “ANNO”
The First Minor Group = LWT# (Line weight)
“LWT1”
“LWT2”
Etc.
The Second Minor Group = Linetype :
“HID2” (Hidden 2)
17

Why Doesn’t This Look Right?!: Working with AutoCAD® Drawings in Autodesk® Revit® MEP
“CNTR” (Center)
“CTR2” (Center2)
“DCW~” (Domestic Cold Water)
The biggest drawback to using a strict interpretation of the AIA / USNCS Layering Standards is that with only two minor groups to choose from, colour cannot be indicated as part of the layer name. This is fine for black and white prints, but it makes it difficult to do colour drawing sets.
Layer WeightsAnother thing to include in a template file are the lineweights for all the Layers. This will help Revit® to automatically determine the Layer pen weights. The following chart can be used:
Lineweight 1 = 0.09 mm (not USNCS compliant)
Lineweight 2 = 0.13 mm
Lineweight 3 = 0.25 mm
Lineweight 4 = 0.35 mm
Lineweight 5 = 0.50 mm
Lineweight 6 = 0.70 mm
Lineweight 7 = 1.00 mm
Lineweight 8 = 1.40 mm
Lineweight 9 = 2.00 mm
Other Tools Available: There are some other Lisp routine tools available to use in your AutoCAD® drawings to make them more compatable with Revit®. The first is NUKE.lsp. This tool redefines all the objects in any block in the drawing to layer 0, Colour = Bylayer. This tool is useful in removing embedded colour and layer information from blocks.
The second is BURST.lsp. This tool explodes a block into its components, but any elements that would normally convert to Layer 0, instead remains on the layer the block was on.
Part 5: Importing AutoCAD® into Revit® The alternate to linking AutoCAD® files, is to import them directly into Revit®. These could then be exploded into Revit® Elements. This procedure should be undertaken carefully.
18
Why Doesn’t This Look Right?!: Working with AutoCAD® Drawings in Autodesk® Revit® MEP
Why Insert CAD?Importing CAD files is useful if your are converting things like your detail library into Revit®, or if you need to create a “Detail Item” on a Revit® View.
Again the first step to successfully translating AutoCAD® into Revit® is to use the “AutoCAD® for Revit®” Tempate discussed above. The second step is to use an “AutoCAD® to Revit® Conversion” RFA Detail Item file to contain the converted objects
Things to Remember in AutoCAD®: The secret to successfully importing AutoCAD® files without problems, is to make the AutoCAD® file as “Clean” and simple as possible. To do this, take the following steps:
Ensure all elements are on the correct layers Delete all Extra, frozen, or off elements in the file. Consider deleting all Text elements. These may not convert nicely into Revit® objects.
Dimensions or Leader elements will convert into Lines. It is best to recreate these in Revit®.
Delete all Hatches, Solids, and Wipeouts from the AutoCAD®. Again it is best to recreate these in Revit®.
Put all objects as Colour Bylayer, and Linetype Bylayer “Burst” and “Nuke” your blocks as required to simplify the elements. Use the “Overkill” command to remove extra/overlapping elements, Use the “Purge Unused” command to remove any unused layers, block definitions, or
other elements. Check the units of your drawing useing the “Units” command.
Things to Remember in Revit®: Similarly, in Revit®, follow the following steps to create a clean “Detail Item” family which can be inserted into a Revit® Project. Keeping the old AutoCAD® elements in this family file, keeps them contained to a single location, and has less of chance of causing problems with your Revit® project:
Use a “Convert ACAD to Revit®” Detail Item family file which has all the object styles of the template layers predefined.
Import the clean AutoCAD® file. Locate the file where you want the insertion point to be. Partialy or Fully Explode the Drawing Purge Unused elements Delete Imported Linetypes “Save As” the new file
19
Why Doesn’t This Look Right?!: Working with AutoCAD® Drawings in Autodesk® Revit® MEP
Part 6: Conclusion There are many things to keep in mind when merging the AutoCAD® and Revit® tools. It is important to understand what some of the limitations of linking AutoCAD® DWG™ files into Revit®. These include:
Knowing what determines AutoCAD® Drawing Extents in Revit® Limiting the AutoCAD® file to one view per file Understanding how Revit® handles Line Weights, Patterns and Colour Understanding how to modify Revit® Object Styles Understanding what parts of an AutoCAD® file Revit® does not understand including:
o Polyline widthso Wipeouts and text maskingo Shx fontso Automatic Leader Tail
Develop and use a Simplified Layering standard, and template file. Understand how to easily import DWG™ files into Revit® with a conversion template.
20