ld-2500 - leak detector - jb industries hunter om.pdf · r134a, r404a, r410a: 2.0 oz/yr ... up to...
TRANSCRIPT

LD-2500 - LEAK DETECTOR
JB INDUSTRIES INC.

Declaration of Conformity
This is to certify that this equipment, designed by JB Industries 601 N. Farnsworth Ave., Aurora, IL 60505 USA meets the essential safety re-quirements of the European Union and is placed on the market according-ly. It has been constructed in accordance with good engineering practice in safety matters in force in the Community and does not endanger the safety of persons, domestic animals or property when properly installed and maintained and used in applications for which it was made.Equipment Description: LD-2500 HUNTER refrigerant leak detectorApplicable Directives: 73/23/EEC as amended by 93/68/EEC 89/336/EEC as amended by 93/68/EEC 2002/95/EC (RoHS)Applicable Standards: EN 61010-1: 1993 EN55011, Group 1, Class A: 1991 EN50082-1: 1992CE Implementation Date: March 1, 1997Authorized Representative: Dave Madden Director, Engineering JB Industries
Any questions relative to this declaration or to the safety of JB’s products should be directed, in writing to the quality assurance department at the above address.
WARNINGThis symbol is intended to alert the user to the presence of important operation and maintenance (servicing) instructions in the literature accompanying the instrument.
Specifi cations
Usage: Indoor and OutdoorMinimum. Sensitivity to R22, 0.25 oz/yr (high sensitivity)R134a, R404A, R410A: 2.0 oz/yr (low sensitivity)
Operating Temperature Range: +32° to 122° F (0° C to +50° C)*Storage Temperature Range: +14° F to +140° F (-10° C to +60° C)Humidity: 95% RH NC Max.Altitude: 6500’ (2000 m)Power Supply: Two “D” Cell Alkaline BatteriesBattery Life: Approximately 16 hoursPollution Degree: 2Overvoltage Category: 2Weight (with power cells): 1.28 lb. (0.58 kg)
*may be operated for a limited time in lower temperature environments.
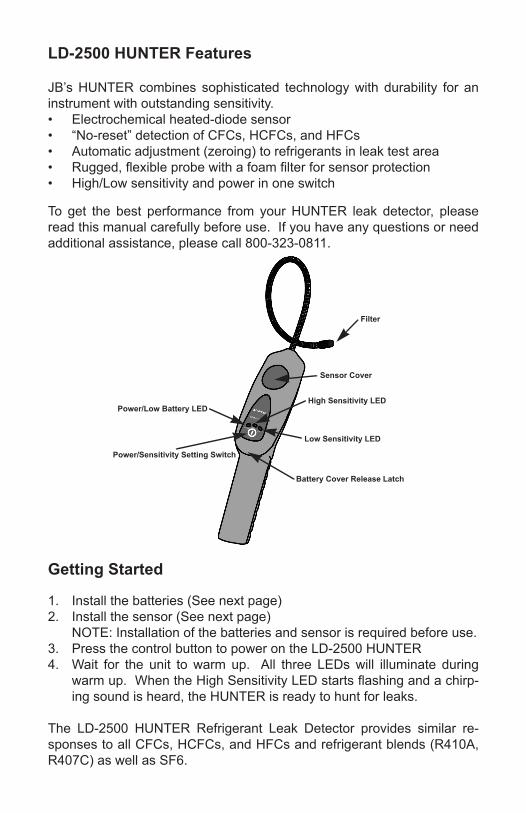
Sensor Cover
Battery Cover Release Latch
Power/Low Battery LEDHigh Sensitivity LED
Low Sensitivity LED
Power/Sensitivity Setting Switch
Filter
LD-2500 HUNTER Features
JB’s HUNTER combines sophisticated technology with durability for an instrument with outstanding sensitivity.• Electrochemical heated-diode sensor• “No-reset” detection of CFCs, HCFCs, and HFCs• Automatic adjustment (zeroing) to refrigerants in leak test area• Rugged, fl exible probe with a foam fi lter for sensor protection• High/Low sensitivity and power in one switch
To get the best performance from your HUNTER leak detector, please read this manual carefully before use. If you have any questions or need additional assistance, please call 800-323-0811.
Getting Started
1. Install the batteries (See next page)2. Install the sensor (See next page)
NOTE: Installation of the batteries and sensor is required before use.3. Press the control button to power on the LD-2500 HUNTER4. Wait for the unit to warm up. All three LEDs will illuminate during
warm up. When the High Sensitivity LED starts fl ashing and a chirp-ing sound is heard, the HUNTER is ready to hunt for leaks.
The LD-2500 HUNTER Refrigerant Leak Detector provides similar re-sponses to all CFCs, HCFCs, and HFCs and refrigerant blends (R410A, R407C) as well as SF6.
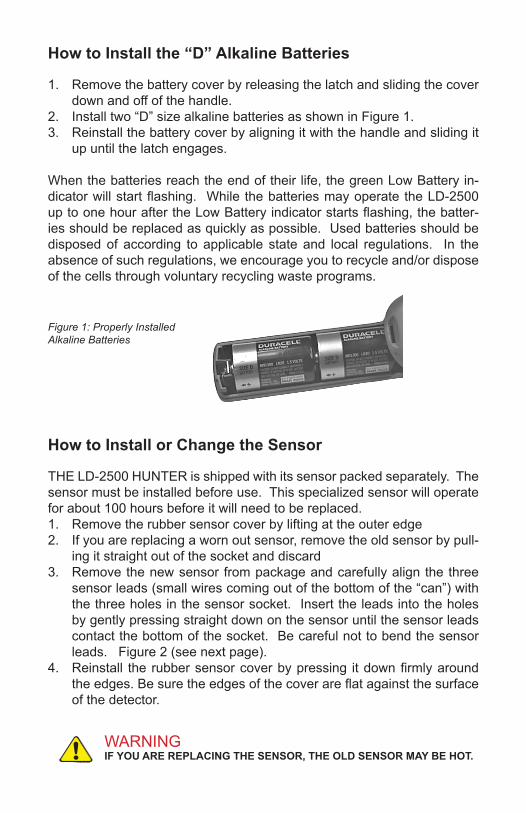
How to Install the “D” Alkaline Batteries
1. Remove the battery cover by releasing the latch and sliding the cover down and off of the handle.
2. Install two “D” size alkaline batteries as shown in Figure 1.3. Reinstall the battery cover by aligning it with the handle and sliding it
up until the latch engages.
When the batteries reach the end of their life, the green Low Battery in-dicator will start fl ashing. While the batteries may operate the LD-2500 up to one hour after the Low Battery indicator starts fl ashing, the batter-ies should be replaced as quickly as possible. Used batteries should be disposed of according to applicable state and local regulations. In the absence of such regulations, we encourage you to recycle and/or dispose of the cells through voluntary recycling waste programs.
Figure 1: Properly Installed Alkaline Batteries
How to Install or Change the Sensor
THE LD-2500 HUNTER is shipped with its sensor packed separately. The sensor must be installed before use. This specialized sensor will operate for about 100 hours before it will need to be replaced.1. Remove the rubber sensor cover by lifting at the outer edge2. If you are replacing a worn out sensor, remove the old sensor by pull-
ing it straight out of the socket and discard3. Remove the new sensor from package and carefully align the three
sensor leads (small wires coming out of the bottom of the “can”) with the three holes in the sensor socket. Insert the leads into the holes by gently pressing straight down on the sensor until the sensor leads contact the bottom of the socket. Be careful not to bend the sensor leads. Figure 2 (see next page).
4. Reinstall the rubber sensor cover by pressing it down fi rmly around the edges. Be sure the edges of the cover are fl at against the surface of the detector.
WARNINGIF YOU ARE REPLACING THE SENSOR, THE OLD SENSOR MAY BE HOT.

Figure 2: Installing the sensor
Using the LD-2500 HUNTER
HOW TO FIND LEAKSNOTE: A sudden whipping of the leak detector probe or blowing into the sensor tip will affect the air fl ow over the sensor and cause the instrument to alarm.1. Place tip of the leak detector probe as close as possible to the site of
the suspected leak. Try to position the probe within 1/4 inch (5 mm) of the possible leak source.
2. Slowly (approximately 1 to 2 inches per second (25 to 50 mm/sec)) move the probe past each possible leak point.
NOTE: It is important to move the tip of the probe past the leak. If held on a leak, the auto zero feature will gradually zero out the leak signal.3. When the unit detects a leak, it will emit a different tone and the LED
fl ash rate will increase to signal the leak. 4. When the LD-2500 HUNTER signals a leak, pull the probe away from
the leak for a moment, then bring it back to pinpoint the location. If the leak is large, set the sensitivity switch to LOW, by quickly pressing the main control button, to make it easier to fi nd the exact site of the leak.
5. Return sensitivity to HIGH before searching for additional leaks6. When you have fi nished leak-testing, turn OFF the instrument
WARNINGDO NOT OPERATE THIS INSTRUMENT IN THE PRESENCE OF GASOLINE, NATURAL GAS, PROPANE, OR IN ANY OTHER COMBUSTIBLE ATMO-SPHERES.
How to Change the Filter
The foam fi lter at the probe tip should be replaced if it becomes plugged with water or oil. To replace the fi lter, simply pull out the old fi lter (with a paper clip or similar device). Then push in the new fi lter.

Cleaning the HUNTER’s Housing
The JB LD-2500 HUNTER’s plastic housing can be cleaned with standard household detergent or isopropyl alcohol. Care should be taken to pre-vent the cleaner from entering the instrument. Since gasoline and other solvents may damage plastic, protect the unit from contact with these sub-stances.
Troubleshooting
Except for batteries and the sensor, the internal parts of the LD-2500 HUNTER refrigerant leak detector are not user serviceable. If you expe-rience a problem with your unit, see the Troubleshooting Table below to determine how to remedy the problem. If you cannot remedy the problem, take your LD-2500 HUNTER to your wholesaler for evaluation.
1. Poor sensitivity. The HUNTER does not fi nd leaks.
1a. Sensor has reached the end of its useful life.
1b. Sensitivity is set to LOW instead of HIGH.
1a. Replace the sensor. See page 4
1b. Set the Sensitivity to HIGH and scan again for leaks
2. HUNTER is slow to respond to leak.
2a. Filter is dirty or wet.
2b. Failure in the pump-ing system.
2c. The sensor cover is not sealing.
2a. Replace fi lter see page 5.
2b. Turn HUNTER on and listen for high-pitched motor sound. IF you do not hear the motor, return the unit to your wholesaler for evaluation.
2c. Make sure sensor cover is prop-erly installed. See step 4 on page 4.
3. Will not power up. 3a. Batteries are worn out.
3b. Batteries have been improperly installed.
3a. Install new set of batteries. See page 4.
3b. Check battery installation as shown in Figure 1 on page 4.
4. False alarms. The HUNTER alarms when the probe is moved or bumped.
4a. Sensor leads are bent.
4b. Moisture was absorbed by the sensor during a long period without use.
4a. Remove the sensor and inspect the leads. Straighten the leads with needle nose pliers, if necessary, and reinstall the sensor.
4b. Run the HUNTER for at least 20 minutes. The absorption of moisture does not affect the life or sensitivity of the sensor.
PROBLEM CAUSE REMEDY
JB warranties your LD-2500 HUNTER Refrigerant Leak Detector to be free from defects of materials or workmanship for two years from the date of purchase. JB does not warrant items that deteriorate under normal use, including power cells, sensors and fi lters. In addition, JB does not warrant any instrument that has been subjected to misuse, negligence, or accident, or has been repaired or altered by anyone other than JB.
JB’s liability is limited to instruments returned to JB, transportation pre-paid, not later than thirty (30) days after the warranty period expire, and which JB judges to have malfunctioned because of defective materials or workmanship. JB’s liability is limited to, at its opinion, repairing or replac-ing the defective instrument or part.
This warranty is in lieu of all other warranties, express or implied, whether of merchantability or of fi tness for a particular purpose or otherwise. All such other warranties are expressly disclaimed. JB shall have no liability in excess of the price paid to JB for the instrument plus return transporta-tion charges prepaid. JB shall have no liability for any incidental or conse-quential damages. All such liabilities are excluded.
Warranty and Liability
Special Information for Automotive TechniciansJB’s LD-2500 HUNTER Refrigerant Leak Detector is design certifi ed by MET Laboratories, Inc. to meet SAE J1627, “Rating Criteria for Electronic Refrigerant Leak Detectors” for R12, R22, R134a. The following SAE Rec-ommended Practice applies to this instrument and to the use of generally available electronic leak detection methods to service motor vehicle pas-senger compartment air conditioning systems.
1. The electronic leak detector shall be operated in accordance with the equipment manu-facturer’s operating instructions.
2. Leak test with the engine not in operation.3. The A/C system shall be charged with suffi cient refrigerant to have a gauge pressure of
at least 50 PSI (340 kPA) when not in operation. At temperatures below 59̊ F (15̊ C) leaks may not be measurable, since this pressure may not be reached.
4. Take care not to contaminate the detector probe tip if the part being tested is contami-nated. If the part is particularly dirty, it should be wiped off with a dry shop towel or blown off with shop air. No cleaners or solvents shall be used, since many electronic detectors are sensitive to their ingredients.
5. Visually trace the entire refrigerant system, and look for signs of air conditioning lu-bricant leakage, damage, and corrosion on all lines, hoses, and components. Each questionable areas shall be carefully checked with the detector probe as well as all fi ttings, hose-to-line couplings, refrigerant controls, service ports with caps in place, brazed or welded areas, and areas around attachment points and hold-downs on lines and components.
6. Always follow the refrigerant system around in a continuous path so that no areas of potential leaks are missed. If a leak is found, always continue to test the remainder of the system.

Special Information for Automotive Technicians Cont.
At each area checked, the probe shall be moved around the location, at a rate no more than 1 to 2 inches/second (25 to 50 mm/second) and no more than 1/4 inch (5 mm) from the surface completely around the position. Slower and closer movement of the probe greatly improves the likelihood of nding a leak.An apparent leak shall be veri ed at least once by blowing shop air into the area of the suspected leak, if necessary, and repeating the check of the area. In cases of very large leaks, blowing out the area with shop air often helps locate the exact position of the leak.Leak testing of the evaporator core while in the air conditioning module shall be accom-plished by turning the air conditioning blower on high for a period of 15 seconds mini-mum, shutting it off, then waiting for the refrigerant to accumulate in the case for time speci ed in step 10, then inserting the leak detector probe into the blower resistor-block or condensate drain-hole if no water is present, or into the closest opening in the HVAC case to the evaporator, such as the heater duct or a vent duct. If the detector alarms, a leak apparently has been found.The accumulation time for evaporator testing is 13 minutes.Following any service to the refrigerant system of the vehicle, and any other service which disturbs the refrigerant system, a leak test of the repair and of the service ports of the refrigerant system shall be done.
7.
8.
9.
10.11.
Return Authorization Procedure
All defective LD-2500 HUNTER units should be returned to your whole-saler for warranty evaluation. All warranty issues are sent in to JB for de-termination, this product is not an over-the-counter exchange item. If you have any questions, please contact JB at 800-323-0811.
NOTE: Do not return your item directly to the factory.
Replacement Parts and Accessories
Replacement parts and accessories for the LD-2500 HUNTER Refrigerant Leak Detector are available through the same wholesaler from whom you bought the instrument.
Replacement Storage CaseReplacement SensorTip �lters (package of 20)
JB INDUSTRIESAURORA, IL 60505 USAwww.jbind.com800-323-0811+1630-851-9444 outside the US
074-477-P37A