large scale 3d printer - northern arizona … the 3d printer is turned on and the home screen is...
TRANSCRIPT

NORTHERN ARIZONA UNIVERSITY MECHANICAL ENGINEERING CAPSTONE
LARGE SCALE 3D PRINTER “CONSUELA”
------ USER MANUAL ------

Page | 2
TABLE OF CONTENTS TABLE OF CONTENTS 2
POWER 3
FILAMENT 4
HEAT BED 5
SOFTWARE 6
REFERENCE 11
Specifications 11
Contact and Support 12

Page | 3
POWER (Figure 1) shows the back of the case that holds the control system (Aluminum Case). The
power supplies that power the control system should be plugged into the power strip that is attached
to the frame of the 3D printer. The power supply should then be plugged into the nearest 120V Power
outlet. To power on the control system, flip the switch on the back of the aluminum case to the upright
position. The red LED’s inside the case will turn on, indicating that the control system is now powered
on. No further action is needed for the control system.
Figure 1 – Control System
To power on the computer, make sure power cable of the computer is plugged into the computer’s
power supply and into the power outlet attached to the frame. From here, power on the computer
with the power button located on the front of the computer. (Figure 2) shows the location of the
power switch on the computer. The computer will then boot into the operating system. No further
action is needed in powering on the computer.
Figure 2 – Computer
Power Switch
Power Switch

Page | 4
FILAMENT To insert the 1.75mm filament, press the lever arm seen in (Figure 3) and then feed the filament
through the blue orifice on the top. To ensure the filament has engaged, heat the extruder to 210C for
PLA or 230C for ABS and then use the manual controls to feed ~10mm of filament.
Figure 3 – Print Head
Lever Arm

Page | 5
HEAT BED To operate the heat bed, plug the heat bed into a 220V power supply. Next set the thermostat
seen in (Figure 4) to the desired temperature. We recommend the print bed be heated to 70C (158F) for
prints with PLA and 100C (212F) for prints with ABS.\
Figure 4 – Heat Bed
Thermostat

Page | 6
SOFTWARE The control interface seen in (Figure 5) is where the 3D printer can be controlled.
Figure 5 – Control Interface
Once the 3D printer is turned on and the home screen is displayed, open Repetier located as seen
in (Figure 6)
Figure 6 – Home Screen
Repetier Software

Page | 7
The startup screen for Repetier can be seen in (Figure 7), from here the object can be
manipulated, the printer can be controlled manually, slicer can be configured, and the print can be
started.
Figure 7 – Repetier Software
In (Figure 8) the manual controls can be seen. This allows each axis to be moved, the hot end to
be turned on, and filament to be extruded. The home button illustrated in (Figure 8) is used to home the
print head. This will move the X, Y, and Z axes until they hit the end stop. It is good practice to home
the 3D printer before each print to ensure each axis is moving properly and that the end stops are being
engaged.
Figure 8 – Manual Control
Manual Control
Home Button
Add CAD File

Page | 8
To add a CAD file hit the button illustrated in (Figure 7), then select an STL file as seen in
(Figure 9).
Figure 9 – Import CAD File
With the CAD file imported, it can then be scaled to size, rotated, and manipulated using a
variety of built in functions as seen in (Figure 10)
Figure 10 – Manipulate Object
Once the CAD model is properly orientated, it is ready to be sliced using the software slicer.
This will effectively turn the CAD model into G-code that the 3D printer can understand.
Scale, Rotate
& Manipulate

Page | 9
Figure 11 – Slicer
There is a wide range of settings within slicer than can be used to optimize the printing process.
To access these settings hit the button illustrated in (Figure 11). From here print speed, infill settings,
filament settings, and much more can be changed.
Figure 12 – Slicer Configuration
With all the settings configured, go to the print preview section as seen in (Figure 13). Next hit
the print button to begin the printing process. The printer will first go to the home position and then
proceed to print the first layer. Be careful to ensure that the print head does not collide into the print bed
and watch the first layer print to make sure proper adhesion occurs. To help the first layer adhere, we
recommend that a layer of painters tape be placed on the print bed. This will also help with removing the
finished print.
Slicer configuration

Page | 10
Figure 13 – Print Preview
Print Button
Page | 11
REFERENCE
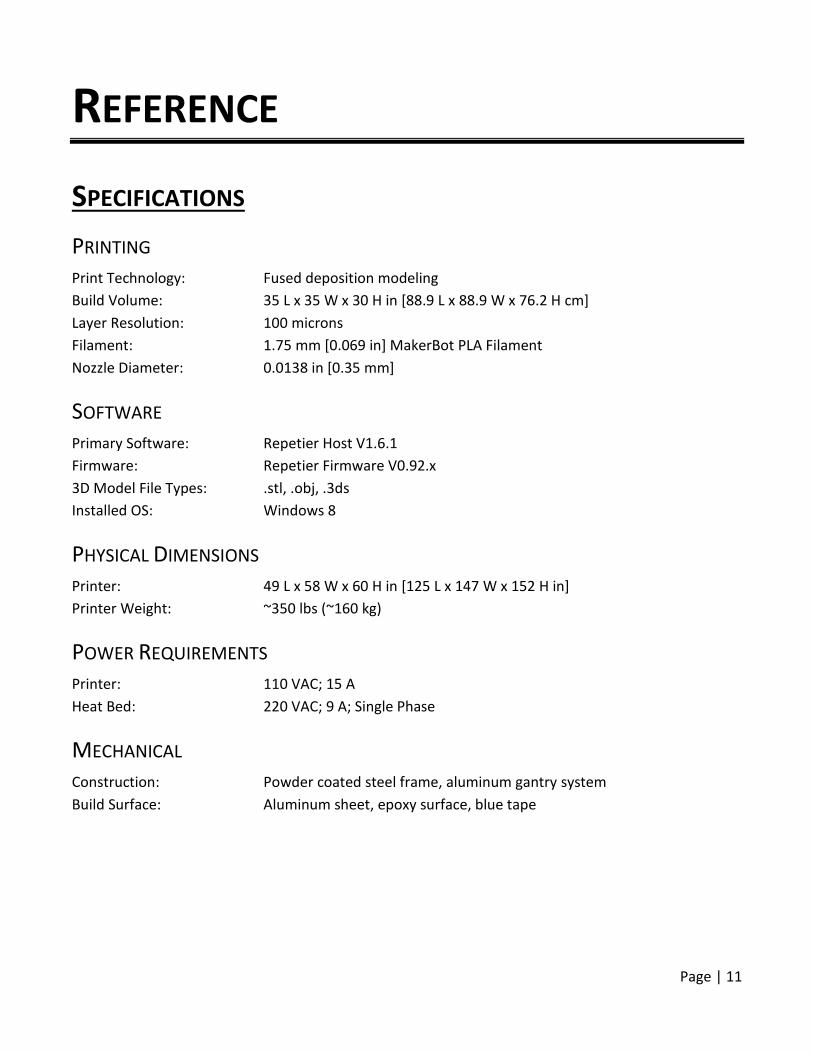
SPECIFICATIONS
PRINTING Print Technology: Fused deposition modeling
Build Volume: 35 L x 35 W x 30 H in [88.9 L x 88.9 W x 76.2 H cm]
Layer Resolution: 100 microns
Filament: 1.75 mm [0.069 in] MakerBot PLA Filament
Nozzle Diameter: 0.0138 in [0.35 mm]
SOFTWARE Primary Software: Repetier Host V1.6.1
Firmware: Repetier Firmware V0.92.x
3D Model File Types: .stl, .obj, .3ds
Installed OS: Windows 8
PHYSICAL DIMENSIONS Printer: 49 L x 58 W x 60 H in [125 L x 147 W x 152 H in]
Printer Weight: ~350 lbs (~160 kg)
POWER REQUIREMENTS Printer: 110 VAC; 15 A
Heat Bed: 220 VAC; 9 A; Single Phase
MECHANICAL Construction: Powder coated steel frame, aluminum gantry system
Build Surface: Aluminum sheet, epoxy surface, blue tape

Page | 12
CONTACT AND SUPPORT
THINGIVERSE For a thriving design community for discovering, making, and sharing 3D printable things, visit
Makerbot’s Thingiverse.com or one of the many other online databases for 3d printable files.
REPRAP WIKI For a comprehensive 3D printing community, visit RepRap.org or one of the many other online 3D
printing communities.
REPETIER For general inquiries regarding the use, operation, and troubleshooting of the Repetier software, visit
https://www.repetier.com/documentation/repetier-host/
THE TEAM For any other questions regarding this machine, feel free to contact the NAU ME Capstone team that
built it.
Fahad Alahmari – [email protected]
Sebastian Arevalo – [email protected] (assembly)
Brad Evans – [email protected] (XYZ movement)
Tomas Garcia – [email protected] (software and control system)
Benjamin Gouveia – [email protected] (construction and fabrication)
Jake Work – [email protected] (software and control system)