lab5 advanced software writing lab : microblaze. for edk 6.3i1 objectives utilize the opb timer....
Post on 22-Dec-2015
229 views
TRANSCRIPT
Lab5Advanced Software Writing Lab : MicroBlaze

for EDK 6.3i 2
Objectives Utilize the OPB timer. Assign an interrupt handler to the OBP
timer. Develop an interrupt handler function. View how the appropriate functions can
affect code size.
for EDK 6.3i 3
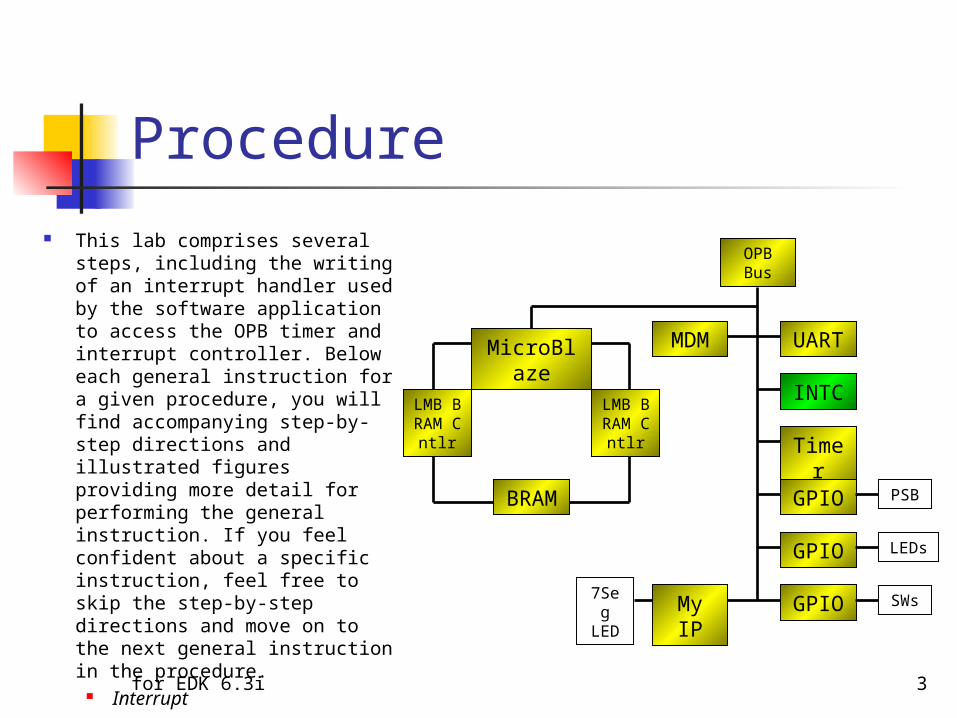
Procedure This lab comprises several
steps, including the writing of an interrupt handler used by the software application to access the OPB timer and interrupt controller. Below each general instruction for a given procedure, you will find accompanying step-by-step directions and illustrated figures providing more detail for performing the general instruction. If you feel confident about a specific instruction, feel free to skip the step-by-step directions and move on to the next general instruction in the procedure.
Interrupt
MicroBlaze
LMB BRAM C
ntlr
BRAM
LMB BRAM C
ntlr
MDM UART
INTC
Timer
GPIO
GPIO
GPIO
OPB Bus
My IP
PSB
LEDs
SWs7Seg
LED

for EDK 6.3i 4
Opening the Project Create a lab5 folder in the X:\EDKLab\ directory. If you wish t
o continue with your completed design from lab4 then copy the contents of the lab4 folder into the lab5 folder.
1. 2. 3. 4.

for EDK 6.3i 5
Opening the Project Open XPS, click File → Open Project and browse to the proje
ct which is in the directory: X:\EDKLab\lab5, then click system.xmp to open the project.
1.
2.
for EDK 6.3i 6
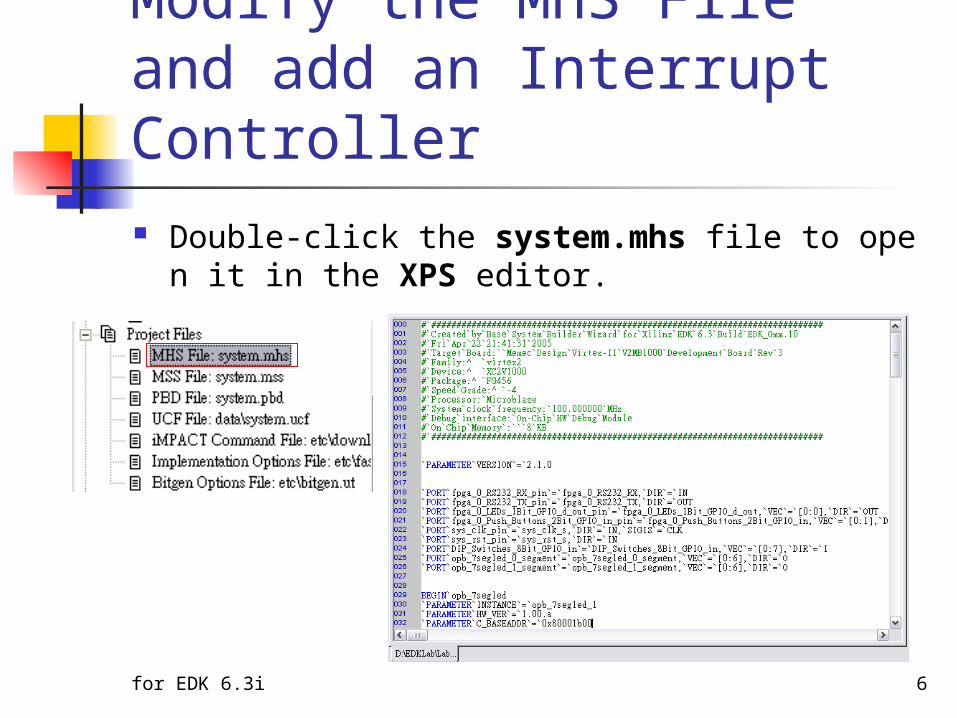
Modify the MHS File and add an Interrupt Controller Double-click the system.mhs file to open it in the
XPS editor.

for EDK 6.3i 7
Modify the MHS File and add an Interrupt Controller Add the following line at the end of the Delay
instance parameters (before the END keyword).
PORT Interrupt = timer1
Save and Close the MHS file.

for EDK 6.3i 8
Modify the MHS File and add an Interrupt Controller Click Project Add Cores (dialog).

for EDK 6.3i 9
Modify the MHS File and add an Interrupt Controller In the Peripherals tab, add the opb_intc pe
ripheral.
1.2
.
3.
for EDK 6.3i 10
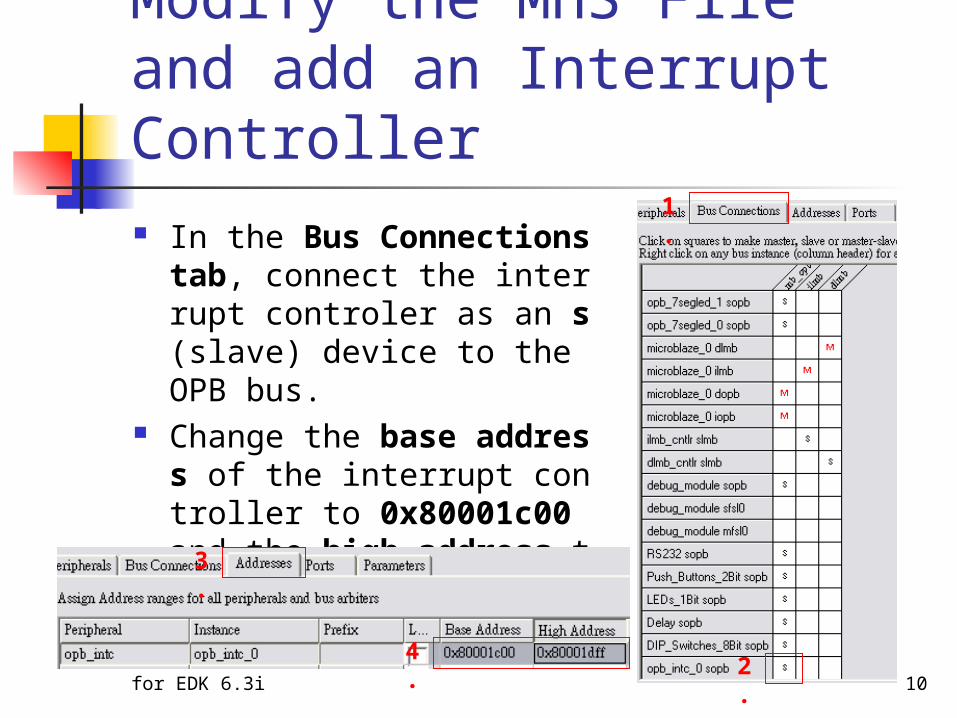
Modify the MHS File and add an Interrupt Controller In the Bus Connections tab,
connect the interrupt controler as an s (slave) device to the OPB bus.
Change the base address of the interrupt controller to 0x80001c00 and the high address to 0x80001dff.
1.
2.
3.
4.

for EDK 6.3i 11
Modify the MHS File and add an Interrupt Controller Using the Ports tab, add the OPB_Clk, Intr,
and Irq ports of the opb_intc_0 as internal.
1.2
.
3.

for EDK 6.3i 12
Modify the MHS File and add an Interrupt Controller Change the net names of the OPB_Clk and Irq port
s of the opb_intc_0 instance to sys_clk_s and interrupt, respectively.

for EDK 6.3i 13
Modify the MHS File and add an Interrupt Controller
Select the browse button under Net Name next for Intr to open the Connect and Prioritize Interrupts dialogue box.
Select timer1 from the High Priority list (right-side) and click the Add button to add the interrupt output of the delay instance to the input of the interrupt controller opb_intc.
Click <OK>.
1.
2.
3.
4.

for EDK 6.3i 14
Modify the MHS File and add an Interrupt Controller
Add the INTERRUPT (external interrupt request) port on the microblaze_0 to the design as an internal interrupt, and change its net name to interrupt.
Click the 確定 button to accept the changes and close the editor dialog.
1.
2.
3.
4.

for EDK 6.3i 15
Configure the BSP Using Project Software Platform
Settings … open the Software Platform Settings GUI.

for EDK 6.3i 16
Configure the BSP Click on the Processor, Driver Parameters and Interrupt Handler
s tab. Enter timer_int_handler in the Current Value field as a interrupt_h
andler function, as shown in following figure.
Click 確定 to accept the settings. Click Tools Generate Libraries to update the generated libraries
and xparameters.h file.
for EDK 6.3i 17
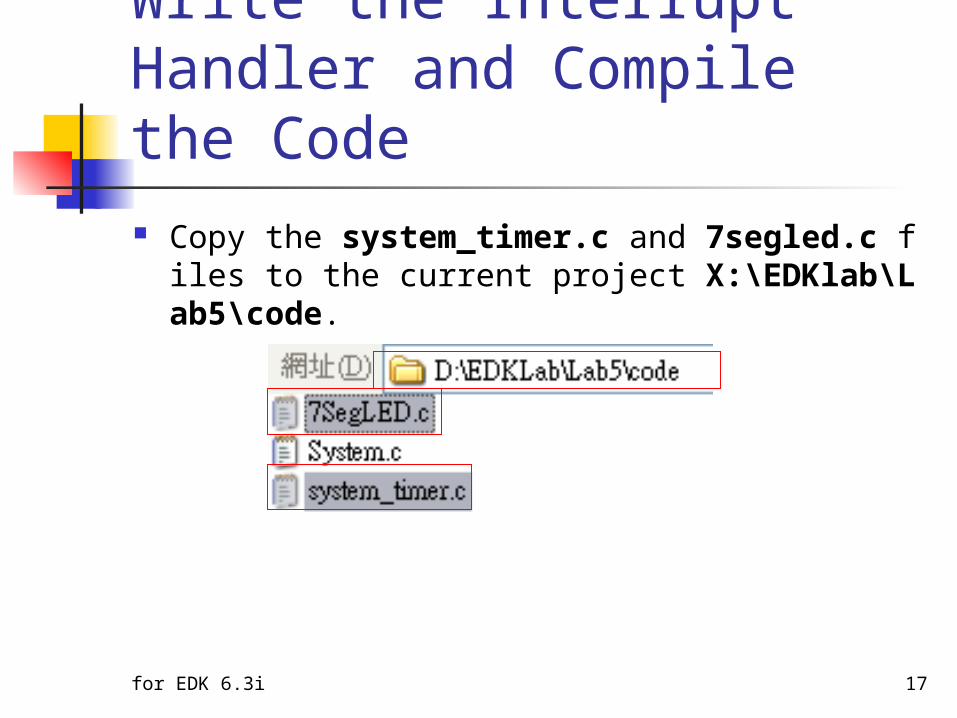
Write the Interrupt Handler and Compile the Code Copy the system_timer.c and 7segled.c files to th
e current project X:\EDKlab\Lab5\code.
for EDK 6.3i 18
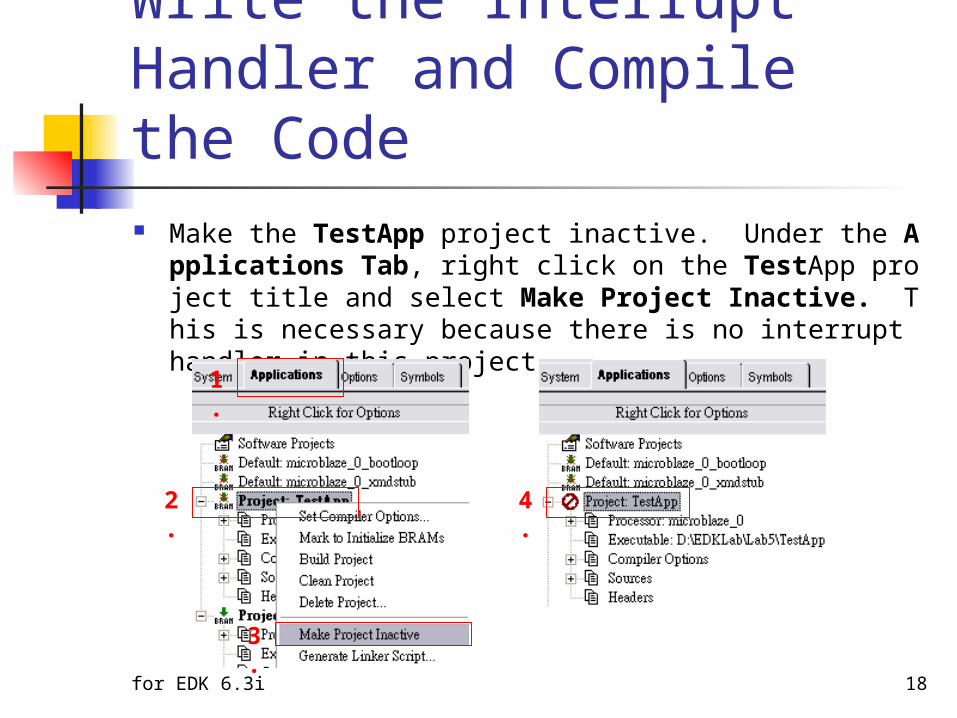
Write the Interrupt Handler and Compile the Code Make the TestApp project inactive. Under the Applications
Tab, right click on the TestApp project title and select Make Project Inactive. This is necessary because there is no interrupt handler in this project.
1.
2.
3.
4.

for EDK 6.3i 19
Write the Interrupt Handler and Compile the Code
Remove system.c from the Project: MyProj project by right clicking on it under Sources and deleting it.
Add the two new files system_timer.c and 7segled.c to the MyProj project by right clicking on Sources and selecting Add File… then navigate to the sources and add them.
1.
2.
3.
4.
5.

for EDK 6.3i 20
Write the Interrupt Handler and Compile the Code Double-click system_timer.c to open the C file in the XPS ed
itor. Examine the contents of the C file. Notice that the interrupt handler has not been completed. You will complete it.
for EDK 6.3i 21
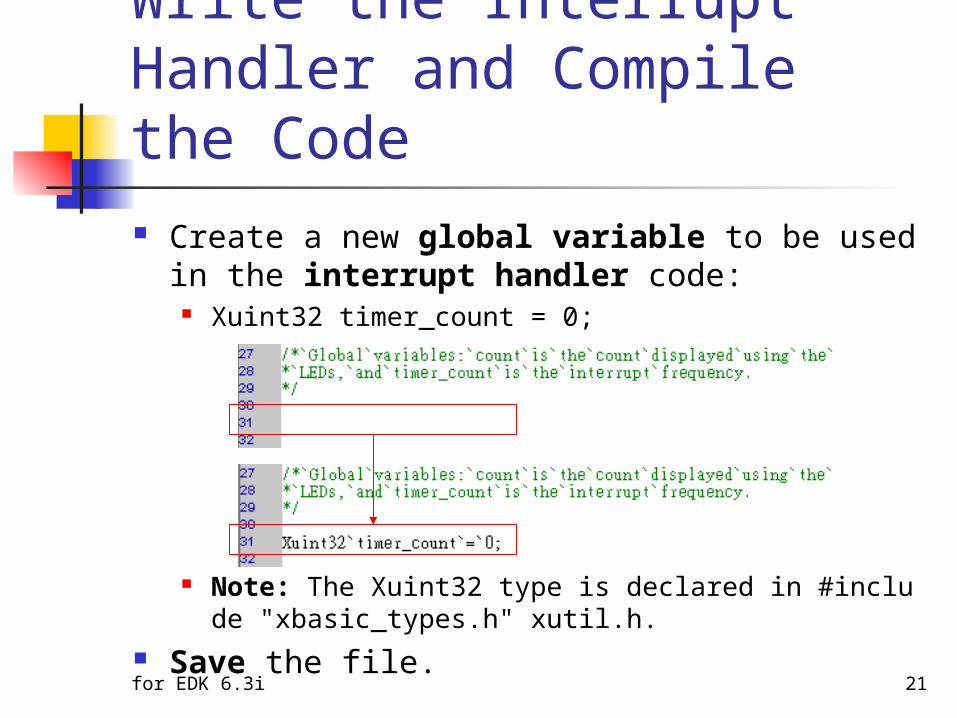
Write the Interrupt Handler and Compile the Code Create a new global variable to be used in the inte
rrupt handler code: Xuint32 timer_count = 0;
Note: The Xuint32 type is declared in #include "xbasic_types.h" xutil.h.
Save the file.
for EDK 6.3i 22
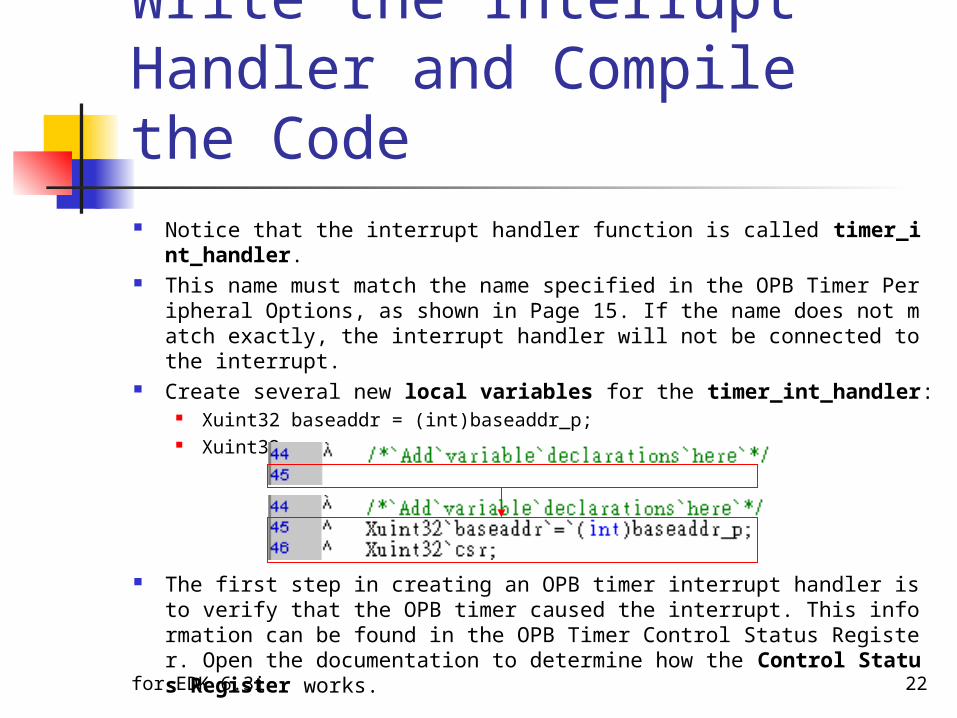
Write the Interrupt Handler and Compile the Code Notice that the interrupt handler function is called timer_int_handl
er. This name must match the name specified in the OPB Timer Periphe
ral Options, as shown in Page 15. If the name does not match exactly, the interrupt handler will not be connected to the interrupt.
Create several new local variables for the timer_int_handler: Xuint32 baseaddr = (int)baseaddr_p; Xuint32 csr;
The first step in creating an OPB timer interrupt handler is to verify that the OPB timer caused the interrupt. This information can be found in the OPB Timer Control Status Register. Open the documentation to determine how the Control Status Register works.
for EDK 6.3i 23
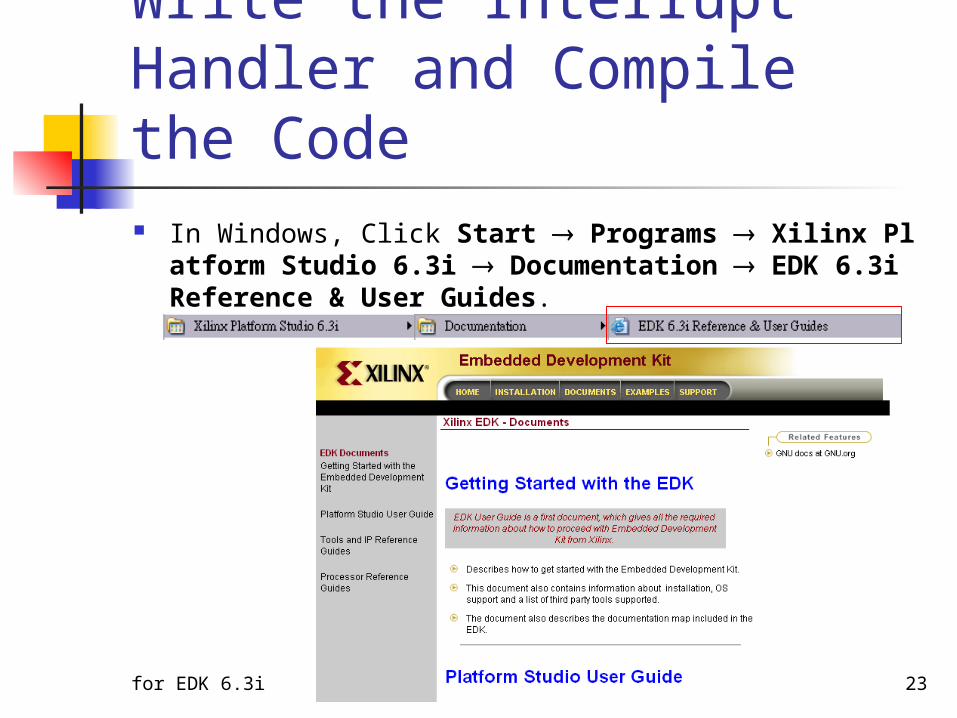
Write the Interrupt Handler and Compile the Code In Windows, Click Start Programs Xilinx Platform Studi
o 6.3i Documentation EDK 6.3i Reference & User Guides.

for EDK 6.3i 24
Write the Interrupt Handler and Compile the Code Scroll down to the bottom of the page and
click Processor IP Reference Guide.

for EDK 6.3i 25
Write the Interrupt Handler and Compile the Code In the Processor IP Reference Guide, click OPB
Timer/Counter under the peripheral cores section. Click View this data sheet to view the complete data sheet.
1.
2.
3.

for EDK 6.3i 26
Write the Interrupt Handler and Compile the Code Go to the Register Description section in the
data sheet and study TCSR0 Register. Notice that bit 23, T0INT, has the following description:

for EDK 6.3i 27
Write the Interrupt Handler and Compile the Code The level 0 driver for the OPB timer provides functions (macr
os) that read and write to the Control Status Register, which we will use to read and write TCSR0. We can use the following function to determine whether the interrupt has occured:
XTmrCtr_mGetControlStatusReg( ) The following is the documentation associated with the OPB
timer: XTmrCtr_mGetControlStatusReg ( BaseAddress, TmrCtrNum
ber ) Get the Control Status Register of a timer counter.
Parameters: BaseAddress is the base address of the device. TmrCtrNumber is the specific timer counter within the device, a zer
o-based number, 0 -> (XTC_DEVICE_TIMER_COUNT - 1). Returns:
The value read from the register, a 32-bit value.

for EDK 6.3i 28
Write the Interrupt Handler and Compile the Code Add this function call to the code with the associated parame
ters. The resulting 32-bit value should be stored in the variable csr.
csr = XTmrCtr_mGetControlStatusReg(baseaddr, 0); Using the value returned to csr, test to see if bit 23 is set by u
sing the XTC_CSR_INT_OCCURED_MASK parameter. if (csr & XTC_CSR_INT_OCCURED_MASK) { timer_count++; }

for EDK 6.3i 29
Write the Interrupt Handler and Compile the Code If the interrupt was taken, increment a counter. The count va
lue should then be displayed by using the 7SegLED peripheral. A subroutine to do the display is included in the 7SegLED.c file. The following call will display the value in timer_count on the display and light the decimal point in position 1.
dispLED(timer_count, 1); Clear the interrupt by using the following function call:
XTmrCtr_mSetControlStatusReg(baseaddr, 0, csr);

for EDK 6.3i 30
Write the Interrupt Handler and Compile the Code The interrupt handler has now been completed, and it
should look like following figure, with the exception of the counter. You can create any type of counter you like.
for EDK 6.3i 31
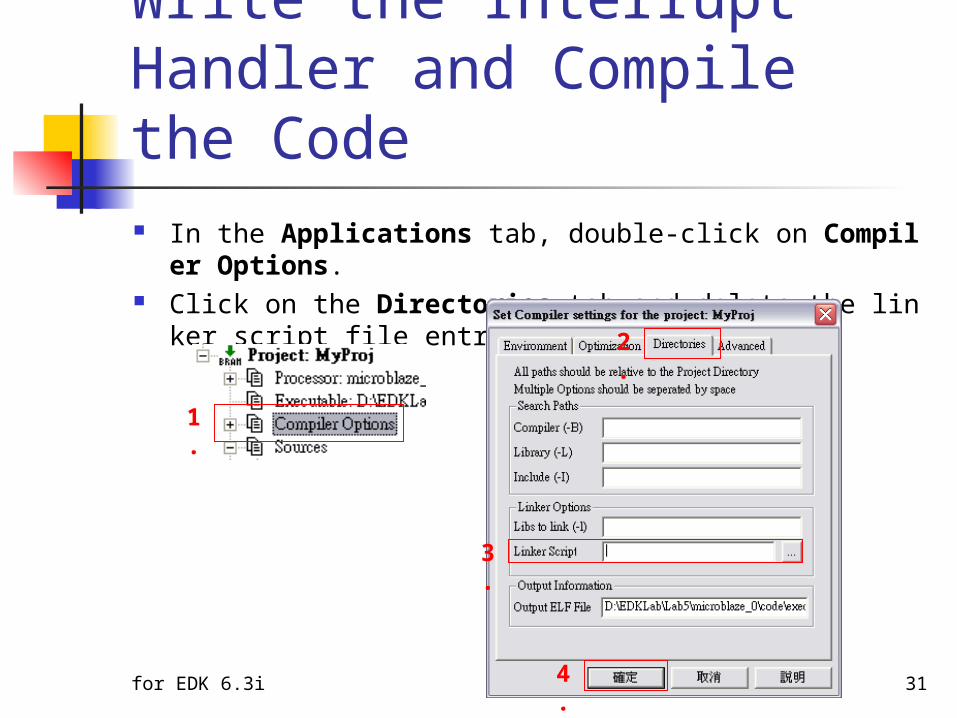
Write the Interrupt Handler and Compile the Code In the Applications tab, double-click on Compiler Options. Click on the Directories tab and delete the linker script file e
ntry and click 確定 .
1.
2.
3.
4.
for EDK 6.3i 32
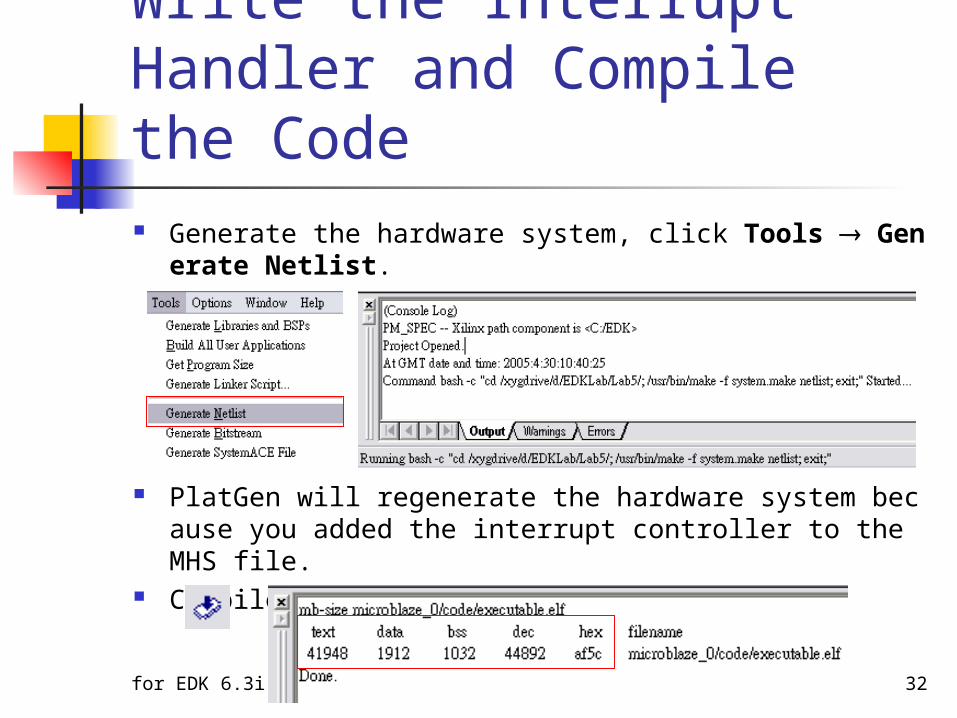
Write the Interrupt Handler and Compile the Code Generate the hardware system, click Tools Generate Netli
st.
PlatGen will regenerate the hardware system because you added the interrupt controller to the MHS file.
Compile the source file.

for EDK 6.3i 33
Write the Interrupt Handler and Compile the Code Why do you think the program is so big?
The printf function uses significant amount of code space. Change the printf to xil_printf.
This contains the same functionality as printf with the exception of the floating-point handling.
Recompile the code.
for EDK 6.3i 34
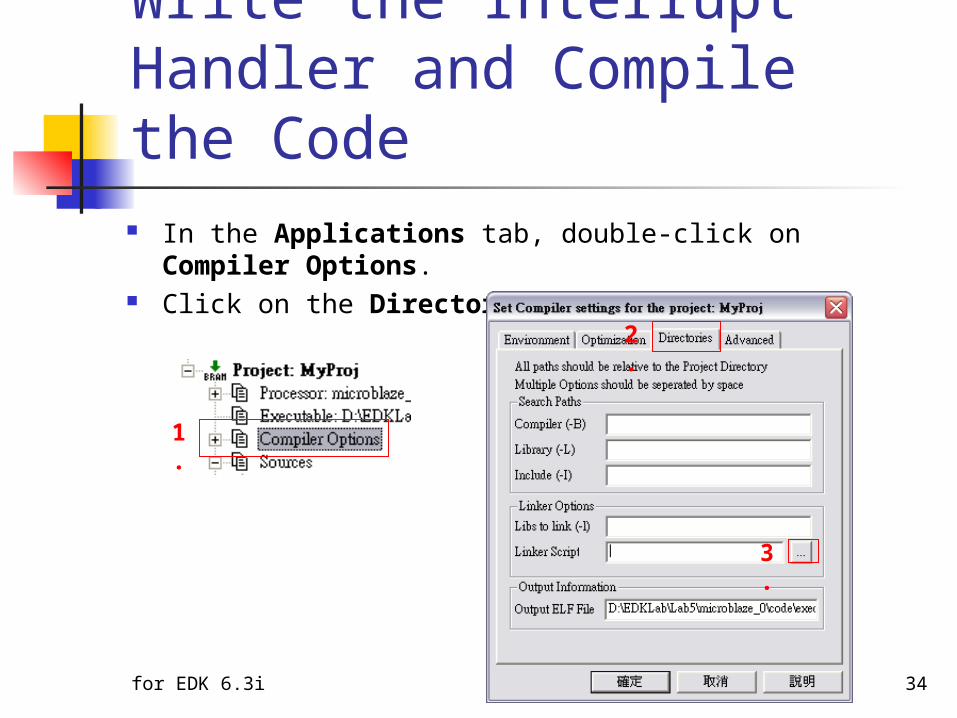
Write the Interrupt Handler and Compile the Code In the Applications tab, double-click on Compiler
Options. Click on the Directories tab.
1.
2.
3.

for EDK 6.3i 35
Write the Interrupt Handler and Compile the Code Click on the browse button of the linker script file entry, browse to t
he X:\EDKlab\Lab5\TestApp\src\ directory, and select TestAppLinkScr to add it to the project.
Click 確定 to accept the setting.
1.
2.
3.
4.
for EDK 6.3i 36
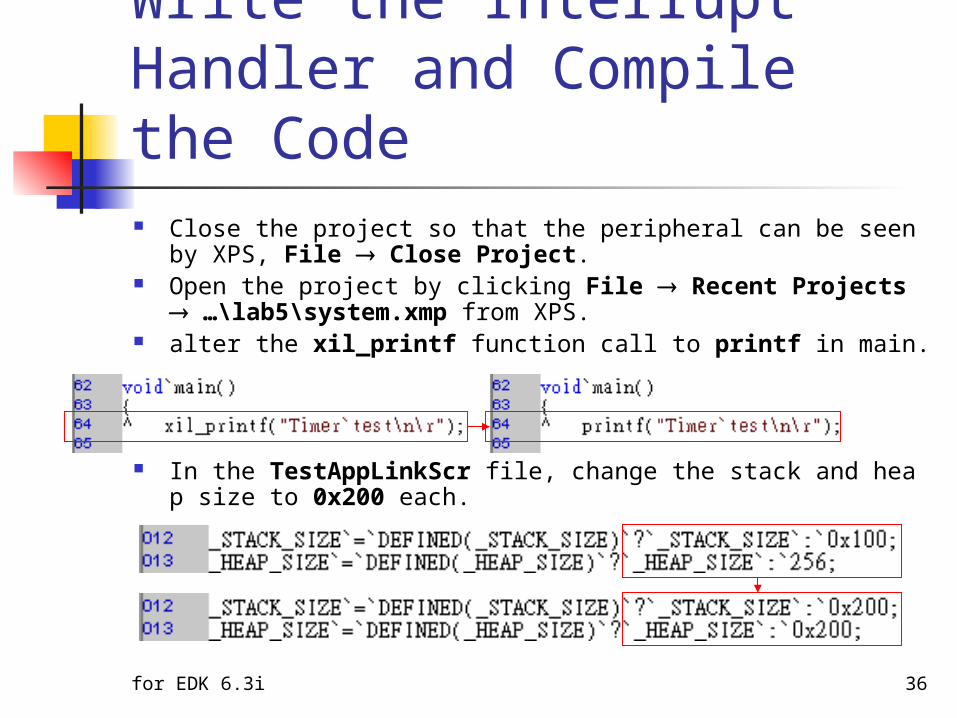
Write the Interrupt Handler and Compile the Code Close the project so that the peripheral can be seen by XPS, File C
lose Project. Open the project by clicking File Recent Projects …\lab5\syst
em.xmp from XPS. alter the xil_printf function call to printf in main.
In the TestAppLinkScr file, change the stack and heap size to 0x200 each.

for EDK 6.3i 37
Write the Interrupt Handler and Compile the Code Try to compile the code. A compilation error will occur due t
o memory being full. This occurred as now the linker script is in effect and the total memory requirement is 44432 which is much more than what we have (16K in lmb).
Change the printf function to xil_printf in main.
Save the changes.

for EDK 6.3i 38
Write the Interrupt Handler and Compile the Code Compile the code and you will see that it compiles
successfully.
Note: The amount of memory usage is different then the one being used without linker script as the linker script controls the heap and stack sizes and placement.
for EDK 6.3i 39
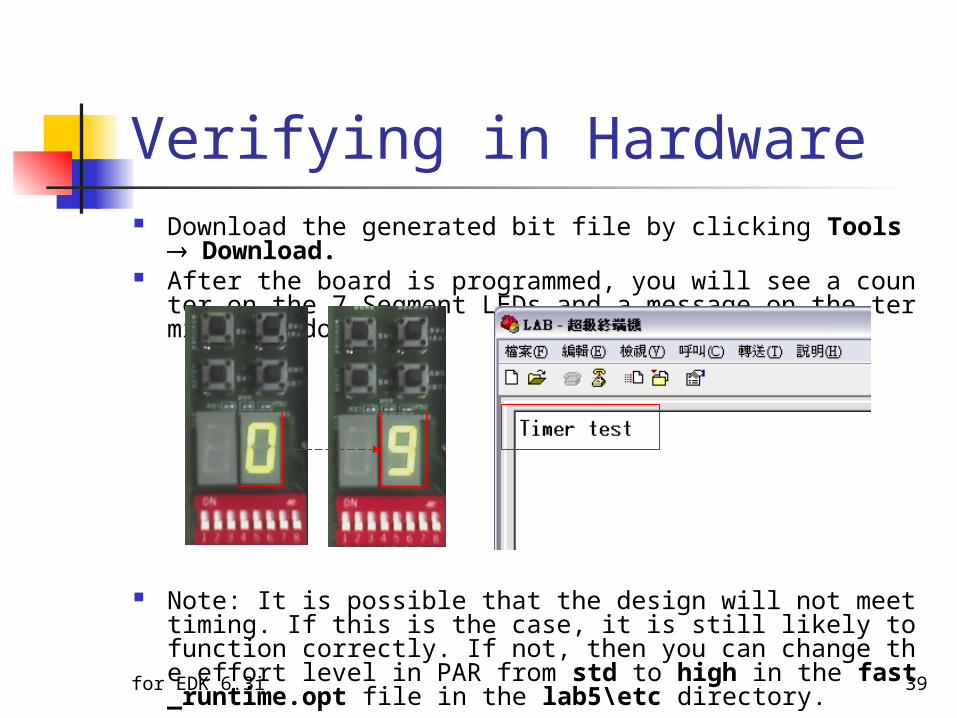
Verifying in Hardware Download the generated bit file by clicking Tools Downloa
d. After the board is programmed, you will see a counter on the
7 Segment LEDs and a message on the terminal window.
Note: It is possible that the design will not meet timing. If this is the case, it is still likely to function correctly. If not, then you can change the effort level in PAR from std to high in the fast_runtime.opt file in the lab5\etc directory.

for EDK 6.3i 40
Conclusion This lab led you through assigning an interrupt han
dler function to an interrupting device such as an OPB timer. An interrupt controller was added to the system.
The LibGen tool allowed you to update the parameters on the added and modified system.
You also developed an interrupt handler function and viewed how the appropriate function can reduce the code size, which can have a major impact on resource requirements.