lab 05: waves on a string - university of central … · lab 05: waves on a string introduction a...
TRANSCRIPT
Lab 05: Waves on a St r ing
INTRODUCTION
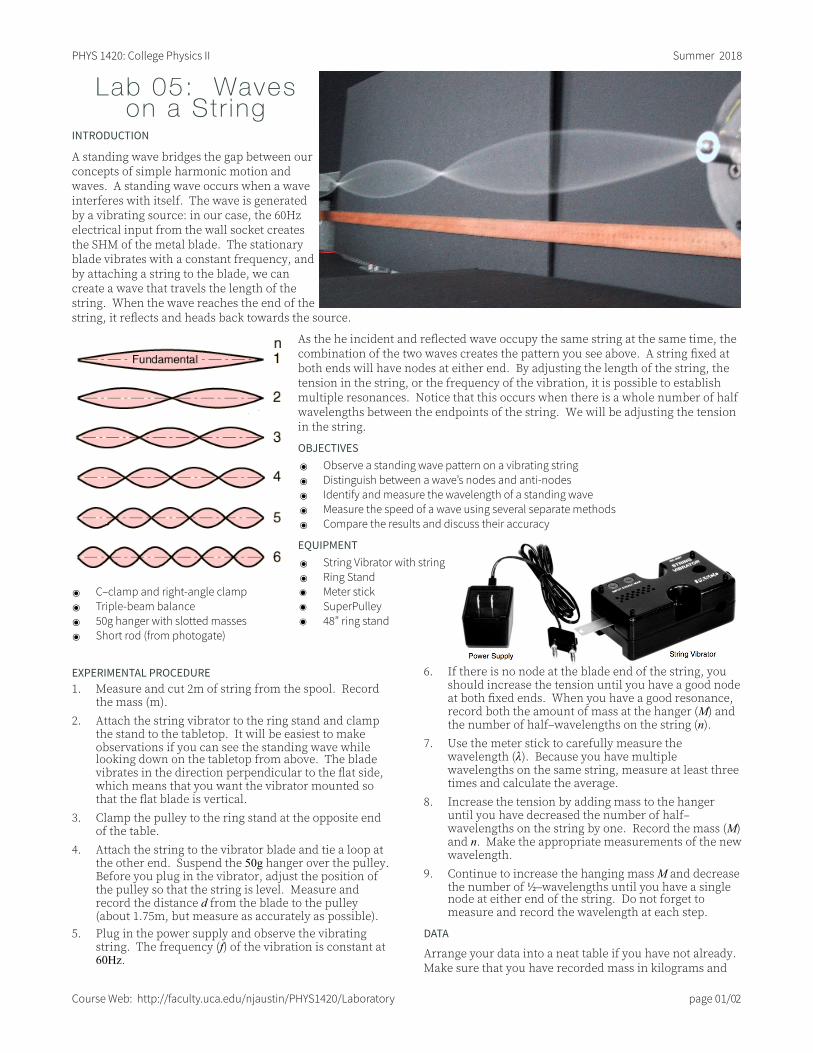
A standing wave bridges the gap between our concepts of simple harmonic motion and waves. A standing wave occurs when a wave interferes with itself. The wave is generated by a vibrating source: in our case, the 60Hz electrical input from the wall socket creates the SHM of the metal blade. The stationary blade vibrates with a constant frequency, and by attaching a string to the blade, we can create a wave that travels the length of the string. When the wave reaches the end of the string, it reflects and heads back towards the source.
As the he incident and reflected wave occupy the same string at the same time, the combination of the two waves creates the pattern you see above. A string fixed at both ends will have nodes at either end. By adjusting the length of the string, the tension in the string, or the frequency of the vibration, it is possible to establish multiple resonances. Notice that this occurs when there is a whole number of half wavelengths between the endpoints of the string. We will be adjusting the tension in the string.
OBJECTIVES๏ Observe a standing wave pattern on a vibrating string๏ Distinguish between a wave’s nodes and anti-nodes๏ Identify and measure the wavelength of a standing wave๏ Measure the speed of a wave using several separate methods๏ Compare the results and discuss their accuracy
EQUIPMENT๏ String Vibrator with string๏ Ring Stand
๏ C–clamp and right-angle clamp ◉ Meter stick๏ Triple-beam balance ◉ SuperPulley๏ 50g hanger with slotted masses ◉ 48” ring stand๏ Short rod (from photogate)
EXPERIMENTAL PROCEDURE1. Measure and cut 2m of string from the spool. Record
the mass (m).2. Attach the string vibrator to the ring stand and clamp
the stand to the tabletop. It will be easiest to make observations if you can see the standing wave while looking down on the tabletop from above. The blade vibrates in the direction perpendicular to the flat side, which means that you want the vibrator mounted so that the flat blade is vertical.
3. Clamp the pulley to the ring stand at the opposite end of the table.
4. Attach the string to the vibrator blade and tie a loop at the other end. Suspend the 50g hanger over the pulley. Before you plug in the vibrator, adjust the position of the pulley so that the string is level. Measure and record the distance d from the blade to the pulley (about 1.75m, but measure as accurately as possible).
5. Plug in the power supply and observe the vibrating string. The frequency (f) of the vibration is constant at 60Hz.
6. If there is no node at the blade end of the string, you should increase the tension until you have a good node at both fixed ends. When you have a good resonance, record both the amount of mass at the hanger (M) and the number of half–wavelengths on the string (n).
7. Use the meter stick to carefully measure the wavelength (λ). Because you have multiple wavelengths on the same string, measure at least three times and calculate the average.
8. Increase the tension by adding mass to the hanger until you have decreased the number of half–wavelengths on the string by one. Record the mass (M) and n. Make the appropriate measurements of the new wavelength.
9. Continue to increase the hanging mass M and decrease the number of ½–wavelengths until you have a single node at either end of the string. Do not forget to measure and record the wavelength at each step.
DATA
Arrange your data into a neat table if you have not already. Make sure that you have recorded mass in kilograms and
PHYS 1420: College Physics II Summer 2018
Course Web: http://faculty.uca.edu/njaustin/PHYS1420/Laboratory page 01/02
length in meters. You may want to use an Excel spreadsheet to perform your data reduction. If you create a spreadsheet, make sure to label your quantities adequately (and save the sheet frequently).
DATA REDUCTION AND ANALYSIS1. Calculate the linear
mass density of the string:
€
µ =ml
where m is the measured mass and l is the entire 2.0m length of string.2. Calculate the wave speed based on the tension in the
cord:
€
v =Tµ
=Mgµ
where T is the tension (equal to the weight of the hanger, Mg) and µ is the linear mass density. Calculate the speed for each resonance you established.
3. Calculate the wave speed based on the wavelength and frequency:
€
v = λfwhere λ is the average wavelength you measured, and f is a constant 60Hz for each resonance. Again, these calculations can be completed in a spreadsheet. Make sure that you label and save. The example sheet shown is not complete.
4. Compare the two wave speeds for each resonance. The speeds should be the same regardless of the method of determination. Calculate the percent difference between the values for each resonance:
€
%diff =v1 − v2
12 v1 + v2( )
⎛
⎝ ⎜
⎞
⎠ ⎟ •100
5. Which speed is more accurate? Yes, trick question. We don’t have a good basis (yet) for drawing any conclusions. Check the values for the wavelength–based speed by recalculating the wavelength based on the resonance:
€
λ =d12 n( )
where d is the length of string you measured from blade to pulley and ½n is the total number of wavelengths on the string. Recalculate the wave speed using this new wavelength.
6. Check the value of the linear mass density µ. Skipping
several steps of algebra, if you set
€
v = λf =Tµ
,
you will derive the equation of a line:
€
T = 4µf 2d2( ) 1n2⎛
⎝ ⎜
⎞
⎠ ⎟
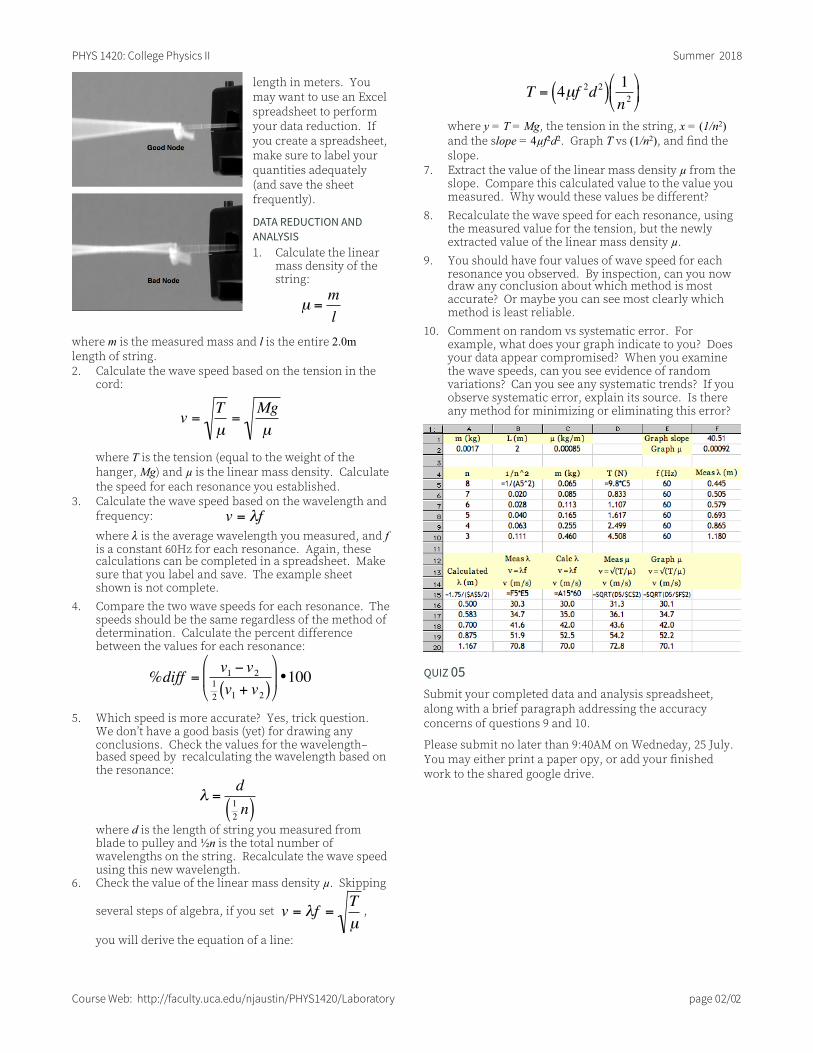
where y = T = Mg, the tension in the string, x = (1/n2) and the slope = 4µf2d2. Graph T vs (1/n2), and find the slope.
7. Extract the value of the linear mass density µ from the slope. Compare this calculated value to the value you measured. Why would these values be different?
8. Recalculate the wave speed for each resonance, using the measured value for the tension, but the newly extracted value of the linear mass density µ.
9. You should have four values of wave speed for each resonance you observed. By inspection, can you now draw any conclusion about which method is most accurate? Or maybe you can see most clearly which method is least reliable.
10. Comment on random vs systematic error. For example, what does your graph indicate to you? Does your data appear compromised? When you examine the wave speeds, can you see evidence of random variations? Can you see any systematic trends? If you observe systematic error, explain its source. Is there any method for minimizing or eliminating this error?
QUIZ 05Submit your completed data and analysis spreadsheet, along with a brief paragraph addressing the accuracy concerns of questions 9 and 10.
Please submit no later than 9:40AM on Wedneday, 25 July. You may either print a paper opy, or add your finished work to the shared google drive.
PHYS 1420: College Physics II Summer 2018
Course Web: http://faculty.uca.edu/njaustin/PHYS1420/Laboratory page 02/02