kuali financial system (kfs) overview and … overview and introduction page 1 of 64 7/22/2015 kuali...
TRANSCRIPT

KFS Overview and Introduction Page 1 of 64 7/22/2015
Kuali Financial System (KFS) Overview and Introduction
Contents
Introduction ..................................................................................................................................................................... 3 Organization and Conventions ...................................................................................................................................... 4
Icons and Symbols ................................................................................................................................................... 4 Screen Images and Test Data ................................................................................................................................... 4 Institutional Business Processes and KFS Implementation ........................................................................................ 4 Configurable Values ................................................................................................................................................ 4
Key Kuali Components .................................................................................................................................................... 5 Kuali Nervous System (KNS) ....................................................................................................................................... 5 Kuali Enterprise Workflow (KEW) .............................................................................................................................. 5 Kuali Financial System (KFS) ...................................................................................................................................... 6
KFS Architecture ............................................................................................................................................................. 6 E-Docs ......................................................................................................................................................................... 6 General Ledger (GL) .................................................................................................................................................... 6 Decision Support .......................................................................................................................................................... 6
KFS Modules ................................................................................................................................................................... 7 Chart of Accounts ........................................................................................................................................................ 7 Vendor ......................................................................................................................................................................... 7 Purchasing and Accounts Payable (PURAP) ................................................................................................................. 7 Pre-Disbursement Processor (PDP)............................................................................................................................... 7 Capital Asset Management (CAM) ............................................................................................................................... 8 Accounts Receivable (AR) ........................................................................................................................................... 8 Contracts and Grants (C&G) ........................................................................................................................................ 8 Effort Certification ....................................................................................................................................................... 8 Labor Distribution ........................................................................................................................................................ 8
Navigating through the KFS ............................................................................................................................................. 8 KFS Menus .................................................................................................................................................................. 8 KFS Modules ............................................................................................................................................................... 9 Reference and Maintenance .......................................................................................................................................... 9 Screen Elements ......................................................................................................................................................... 10
Standard Data Entry, Selection, Action, and Navigation Tools ........................................................................................ 11 Logging on to and out of KFS .................................................................................................................................... 11
KFS E-Doc Fundamentals .............................................................................................................................................. 11 E-Doc Screen Layout ................................................................................................................................................. 11
Document Header .................................................................................................................................................. 12 “Expand All”/“Collapse All” Buttons ..................................................................................................................... 12 “Show”/“Hide” Buttons ......................................................................................................................................... 13 Required Fields...................................................................................................................................................... 13 Date Fields ............................................................................................................................................................ 14 Standard Links and Icons ....................................................................................................................................... 14 Help Icon ............................................................................................................................................................... 15 Field Lookup ......................................................................................................................................................... 15 Multiple Value Lookup .......................................................................................................................................... 16 Export Options Links ............................................................................................................................................. 18 Drilldown .............................................................................................................................................................. 19
Standard Tabs ................................................................................................................................................................ 21 Document Overview Tab ........................................................................................................................................... 21

KFS Overview and Introduction Page 2 of 64 7/22/2015
Accounting Lines Tab ................................................................................................................................................ 21 Single-Sided Entry ................................................................................................................................................. 21 Double-Sided Entries ............................................................................................................................................. 22 Debit/Credit Entries ............................................................................................................................................... 23 Displaying Account Detail ..................................................................................................................................... 24 Accounting Lines Buttons ...................................................................................................................................... 24 Sales Tax ............................................................................................................................................................... 24 Import Lines .......................................................................................................................................................... 24 Restrictions............................................................................................................................................................ 25
Capital Asset Tabs ..................................................................................................................................................... 25 Accounting Lines for Capitalization ....................................................................................................................... 25 Create Asset Tab.................................................................................................................................................... 25 Modify Asset Tab .................................................................................................................................................. 25 System Control Amount ......................................................................................................................................... 25 System Control Remainder Amount ....................................................................................................................... 26 Redistribute Total Amount ..................................................................................................................................... 26 Update or Change Cost on Asset Information Tab .................................................................................................. 26 Known Issues ........................................................................................................................................................ 26 Business Rules ....................................................................................................................................................... 26
General Ledger Pending Entries Tab .......................................................................................................................... 28 Balancing Rules ..................................................................................................................................................... 28
Notes and Attachments Tab ........................................................................................................................................ 29 Ad Hoc Recipients Tab .............................................................................................................................................. 29 Route Log Tab ........................................................................................................................................................... 30
Basic E-Doc Operations ................................................................................................................................................. 30 Making a Balance Inquiry .......................................................................................................................................... 30 Initiating a Document ................................................................................................................................................. 31 Copying a Document .................................................................................................................................................. 31
Lookup and Copy Feature for Chart of Account Maintenance e-docs ...................................................................... 32 Saving a Document .................................................................................................................................................... 32 Canceling a Document ............................................................................................................................................... 32 Closing a Document ................................................................................................................................................... 32 Routing a Document .................................................................................................................................................. 32 Using the Action List ................................................................................................................................................. 32
Using Doc Search to Find a Document ................................................................................................................... 33 Using Wildcards (*) in the Search Criteria ............................................................................................................. 34
Performing Specialized Document Searches ............................................................................................................... 34 Common Features and Search Options ....................................................................................................................... 35 Data Entry Tips .......................................................................................................................................................... 36
Maintenance E-Doc Fundamentals ................................................................................................................................. 38 Common Tabs ............................................................................................................................................................ 38
Edit Tab ................................................................................................................................................................ 38 Non-Editable Documents ....................................................................................................................................... 39
Other Common Tabs .................................................................................................................................................. 39 Common Business Rules ............................................................................................................................................ 40 Performing Common Maintenance E-Doc Operations ................................................................................................. 40 Searching for a Document .......................................................................................................................................... 40 Initiating a Maintenance Document ............................................................................................................................ 40 Copying a Document (Initiating a Document Based on Another) ................................................................................. 41 Editing a Maintenance Document ............................................................................................................................... 42
Workflow: Overview and Key Concepts ......................................................................................................................... 43 KEW Overview ......................................................................................................................................................... 43 Route Levels and Workflow Routing .......................................................................................................................... 44 Typical Route Levels ................................................................................................................................................. 44
Account Level Routing (Fiscal Officer) .................................................................................................................. 44 Organization Review (Review Hierarchy) Routing ................................................................................................. 45 Special Conditions Routing .................................................................................................................................... 45

KFS Overview and Introduction Page 3 of 64 7/22/2015
Ad Hoc Routing ..................................................................................................................................................... 45 Viewing Route Nodes ................................................................................................................................................ 47 Route Log .................................................................................................................................................................. 48
Actions Taken Tab ................................................................................................................................................. 49 Pending Action Requests Tab ................................................................................................................................ 50 Viewing Pending Actions ...................................................................................................................................... 50 Future Action Requests Tab ................................................................................................................................... 51 Viewing Routing Details ........................................................................................................................................ 51
Route Status ............................................................................................................................................................... 52 Action List ................................................................................................................................................................. 52 Workflow Action Buttons .......................................................................................................................................... 53
Blanket Approving a Document ............................................................................................................................. 54 Disapproving a Document ...................................................................................................................................... 54 Acknowledging a Document .................................................................................................................................. 55 FYI........................................................................................................................................................................ 55 Correcting Errors after Approval ............................................................................................................................ 55
Workflow Preferences ................................................................................................................................................ 56 Action List Filter ................................................................................................................................................... 58 Clearing the Action List Filter ................................................................................................................................ 59
Advanced Document Searches ................................................................................................................................... 59 Detailed vs. Basic Searches .................................................................................................................................... 59 Superuser vs. Non-Superuser Searches ................................................................................................................... 60 Document-Specific Searches .................................................................................................................................. 61 Named Search ....................................................................................................................................................... 61 Clear Saved Searches ............................................................................................................................................. 61 Clearing Search ..................................................................................................................................................... 61 Superuser Functions ............................................................................................................................................... 61
Standard Reports ............................................................................................................................................................ 63
Introduction This guide provides an introduction to the Kuali Financial System (KFS) user documentation. It also provides an overview of
the KFS, including its components, the common characteristics of KFS screens, and instructions for performing common
operations.
This introductory guide is one of several guides on using the KFS. All guides are available as downloadable files and as
online help that is embedded in the KFS.
The Kuali Financial System (KFS) is a community-source software application system developed by and for higher education
institutions to serve their financial software needs. The purpose of KFS user documentation set is to provide high-quality
descriptions of how the software system interacts and performs with manual procedures in order to appropriately respond to
business events. It is aimed at not only providing user guides and online help for implementing institutions, but also
providing a basis for training new system users. The documentation contains detailed descriptions of the functionality of each
component of the application, so it may serve as a reference for users who are already quite familiar with financial business
rules and web-based software.
The audience is all users of KFS, but the focus is on standard end-users rather than those involved in configuration and
maintenance. Administrator and superuser functions are covered, but not in great detail. These user types, as well as
implementation specialists, and those seeking information about installation, customization, configuration, implementation,
workflow, system administration and maintenance should consult the KFS technical documentation resources that are
accessible from www.kuali.org. Additionally, these users may refer to technical documentation on the KFS wiki
(http://test.kuali.org/confluence) for more detailed information resources.
The term 'end user' is meant to differentiate software developers from the users of the programs they write, and similarly, for
information technology professionals to distinguish the system administrator from the users of computers for which the
administrator is responsible. The administration topics in this documentation cover only the maintenance documents used for
maintaining reference tables used in system administration.

KFS Overview and Introduction Page 4 of 64 7/22/2015
Organization and Conventions This help documentation is designed to help you use the system efficiently by providing information about:
Basic concepts
Screen navigation
Action options
Using the software to accomplish tasks
Electronic document and workflow routing
The entire documentation set is embedded in the KFS and is available to users via the help icon located to the right of the
title of each activity-specific screen. It is also available for download from the Kuali Financial System Learning Center.
The downloadable documentation consists of 13 related files. Depending on the KFS modules implemented at IU and the
division of responsibility and authority among users, different groups of users may need access to different documentation
files. A few of the files, however, are essential to every institution:
This volume—Kuali Financial System: Overview and Introduction to the User Interface—contains basic information that every
user needs in order to work efficiently in the KFS portal.
A companion volume, Kuali Financial System: Guide to Core Components and Functions, covers all functions of the General
Ledger, Chart of Accounts, Vendor, and Pre-Disbursement Processor modules. It also covers a number of system
reports and functions. Even the most basic KFS implementation relies on these modules and system functions.
The Kuali Financial System Guide to System Administration Functions covers system-wide functions that are usually maintained
by KFS system administrators.
The KFS Glossary defines terms used throughout the documentation set.
Nine additional volumes cover modules used at Indiana University:
Kuali Financial System: Guide to the Accounts Receivable Module
Kuali Financial System: Guide to the Budget Construction Module
Kuali Financial System: Guide to the Financial Processing Module
Kuali Financial System: Guide to the Capital Assets Modules
Kuali Financial System: Guide to the Effort Certification Module
Kuali Financial System: Guide to the Labor Distribution Module
Kuali Financial System: Guide to the Contracts and Grants Module
Kuali Financial System: Guide to the Purchasing/Accounts Payable Module
Users may download any or all volumes as needed from the Kuali Financial System Learning Center.
All KFS documentation, both downloadable and online, is meant to demonstrate how the system works and thus serves as a
helpful desk reference during day-to-day system usage. Once familiar with the basic functionality of the KFS, you may use
this material as a valuable guide to performing less common tasks and as a source of information should you experience any
difficulties.
Icons and Symbols “Warning” or “Important Note” will periodically appear in red in the documentation. This is an important note that to pay
attention to.
Screen Images and Test Data Screen images (and data displayed therein) may not be technically identical to what can be viewed in the actual application,
and are provided for demonstration purposes only.
Institutional Business Processes and KFS Implementation Various components of KFS modules contain functions that are configurable prior to implementation, based on individual
institutional business processes. KFS is delivered with a set of data elements; some of which come with pre-populated
(hard-coded) values, while others are configurable by institution. These may include, but are not limited to, administrative,
maintenance and control data such as restrictions, names, types, groups and codes that can be modified, removed or added to,
based on your institution's unique business rules.
Configurable Values Many values referenced in this user documentation are configurable, and an institution implementing KFS could choose to
customize them. Wherever possible an effort has been made to make key values configurable as parameters as opposed to
KFS Overview and Introduction Page 5 of 64 7/22/2015
'hard coding' values into the application. Therefore, some of the references in the user documentation to specific values for
fields or attributes may differ from those in use at IU, depending on the institution's configuration decisions.
Key Kuali Components 'Kuali' is an umbrella of applications development, under which smaller applications known as modules are developed to
support end-user tasks. Modules are portions of larger programs that carry out specific functions. They may be implemented
alone or combined with other modules.
The KFS's modular architecture allows institutions to implement only the functional elements they need. In this way, the KFS
can be scaled to meet the needs of institutions of any size.
Currently falling under the Kuali umbrella are the Kuali Nervous System (KNS), which encompasses infrastructure
components, and the Kuali Enterprise Workflow (KEW), which automates routing of electronic documents (e-docs) for
approval according to specified business rules. The core system is comprised of Rice (which includes KEW), Chart of
Accounts, Financial Processing, General Ledger, Pre-Disbursement Processing, and Vendor modules. These are considered
'core' modules because they depend on one another, while non-core modules and their components depend on the core
because these core modules are necessary for other functional modules to operate.
Specifications are available for institutions to develop their own interfaces to the core system modules. Any dependency of
one non-core component on another non-core component is flexible, which allows IU to implement unique combinations of
subsets via parameterization and service interface definition to meet institutional users' needs.
Now for a closer look at Kuali Nervous System (KNS), Kuali Enterprise Workflow (KEW), and Kuali Financial System
(KFS):
Kuali Nervous System (KNS) The KNS is the underlying infrastructure code that any KFS module may employ to perform its functions. The KNS is
functionality common to many modules. Examples include creating custom attributes, attaching electronic images, uploading
data from desktop applications, lookup/search routines, and database interaction. The KNS is a core technical module
composed of reusable code components that provide common pieces of functionality. The KNS is a technical framework that
enforces consistency in the applications that use it. It promotes adherence to the architectural principles and development
standards defined by the Kuali architects. The KNS also provides a stable core of development tools providing a more
efficient development paradigm.
Kuali Enterprise Workflow (KEW) The Kuali Enterprise Workflow (KEW) is a general purpose, content-based electronic routing infrastructure or workflow
engine. Client applications use the KEW to automate and regulate the routing and approval processes for the
transactions/documents they create. Workflow starts with an e-doc that users compose in a client application such as the KFS
or another Web application that requires routing and approval of documents. The KEW electronically routes the e-doc to
designated individuals and groups for approval in a prescribed sequence, according to established university or departmental
business rules and policies based on the e-doc's content.
The KEW streamlines mediated business processes across the enterprise. Via the KEW centralized routing system, users can
access and search for many types of e-docs from various client applications, such as HR, Purchasing, Travel, Research
Administration, Timekeeping, etc.
Accessing the appropriate documents is accomplished from a single location that provides both action list and doc search
buttons. The Route Log for each document allows users to follow its progress.

KFS Overview and Introduction Page 6 of 64 7/22/2015
Kuali Financial System (KFS) The Kuali Financial System (KFS) is a functional module (application) that interfaces with the core modules of KNS and
KEW. It is also an application that itself is comprised of many modules (sometimes
referred to as sub-modules). KFS includes a base system of these modules.
Chart of Accounts: controlling tables that define financial information.
General Ledger (GL): repository of all financial and budget information.
Financial Transactions Processing: allows account managers and organizations to
transact financial business through electronic means, rather than by using paper
forms.
Reporting/Decision Support: allows account managers and others to access
financial information and provide tools to assist in the analysis of the financial
information.
Additional modules may be implemented when institutions identify a need. These modules include: Accounts Receivable,
Budgeting, Capital Asset Management, Endowment, Enhanced Decision Support/Reporting, Labor Distribution,
Purchasing/Accounts Payable, and Post-Award (Contracts and Grants).
KFS Architecture The three main components of the KFS architecture are electronic documents (e-docs) in which users initiate and update
financial data; the General Ledger (GL), where financial data is stored; and decision support, which enables users to retrieve
data from the GL.
Here are definitions of how the three components shown in the diagram, at right, work and interact:
E-Docs In the KFS, department personnel initiate a transaction from their desktop Web browser. This transaction is called a
document (often called an e-doc or electronic document). The initiator receives immediate feedback on the validity of the
document both in light of the appropriateness of data and the compliance with business rules. The KEW routes a valid
document to one or more designated approvers based on the type and content of the transaction. Fully approved transactions
are sent to the General Ledger at a later time.
Anyone who initiates, reviews or approves financial transactions may be a user of an e-doc, including:
Departmental support staff, professional staff, and faculty
Fiscal officers and delegates
Contracts and Grants principal investigators
Deans, directors, and department chairs
Administrators
General Ledger (GL) The GL is the official repository of all the university's financial and budget information. It stores account balance and budget
information for multiple fiscal years as well as detailed records of all financial transactions. Whenever a financial transaction
in an e-doc is fully approved, it is recorded in the GL and affects balances.
Decision Support Decision support is a collection of online services that provide access to the data within the KFS. Decision support includes
inquiries and reports available in the KFS. You can use decision support to:
View account budgets, balances, and individual transactions.
Retrieve standard reports such as Account Status or Account Transaction Listing.
Generate pre-defined or custom reports from financial and system data.

KFS Overview and Introduction Page 7 of 64 7/22/2015
KFS Modules This section introduces the major software modules that constitute the KFS. These modules include Chart of Accounts
(COA), Vendor, Purchasing and Accounts Payable (PURAP), Pre-Disbursement Processor (PDP), Capital Asset
Management (CAM), Accounts Receivable (AR), Contracts and Grants (C&G), Effort Certification, and Labor Distribution.
Each module is explained as follows:
Chart of Accounts The Chart of Accounts (COA) is the set of tables that define the codes and coding structures within KFS, including attributes
such as accounts, organizations, and object codes. The COA exists primarily to support and validate entries into the General
Ledger (GL). For example, transactions cannot be applied to an account in the GL unless that account exists in the COA. The
account and other COA attributes are associated with additional attributes, such as the fund group or organization associated
with an account, or the object level that is associated with an object code. Defining these attributes and their various
relationships is how the financial structure of an institution is defined. By leveraging the COA, IU can organize its
information to support activities such as e-doc routing, management of internal controls, and internal and external reporting.
The KFS features a very flexible, multiple Chart of Accounts capability that can accommodate the needs of Carnegie Class
institutions, from small community colleges to large multi-campus research institutions.
Vendor The KFS Vendor module allows IU to maintain a table to track businesses or other entities that IU has done or plans to do
business with. The Vendor table includes all information pertinent to a vendor, including tax ID, addresses, contacts, and
other details required for the management of IU's procurement process.
This module also provides a lookup that allows Purchasing and Accounts Payable users to quickly identify vendor contracts
by description, by vendor, and even by payment terms.
Purchasing and Accounts Payable (PURAP) The Purchasing and Accounts Payable (PURAP) module allows users to request materials and services, generate and transmit
purchase orders, and process invoices and credit memos received from vendors. The requisition, purchase order, payment
request, purchase order amendment, and credit memo documents use the workflow Kuali Enterprise Workflow component
for document approval followed by encumbrance, expense and liability entries in the General Ledger as required.
The system tracks the status of POs throughout their life cycle and manages encumbrances and other G/L entries related to
the procurement process. PO numbers are stored in the reference document number of the G/L entry tables so you may track
the transactions easily from the G/L inquiry screens.
Pre-Disbursement Processor (PDP) The Pre-Disbursement Processor (or PDP) receives data from systems that need to make disbursements and outputs a data
file that can be sent to a check writer or formatted and sent to a bank for automated clearing house (ACH) direct deposits. It
can also generate ledger entries when appropriate, such as relieving liabilities when making a disbursement against a KFS
Payment Request document.
Files for processing may be created from KFS e-docs (such as the Disbursement Voucher or the Payment Request document)
or may be manually uploaded. The systems that provide these files are referred to as PDP 'customers’. Depending on the
specifications of these customers, checks and ACH deposits may be formatted in various ways before being outputted.
KFS Overview and Introduction Page 8 of 64 7/22/2015
Capital Asset Management (CAM) The KFS Capital Asset Management (CAM) module allows you to track assets purchased through IU's financial system,
assets received as gifts, and assets that have been transferred or even found. This module handles records for both capital and
non-capital assets.
CAM e-docs allow you to create, maintain, and retire asset records. Additionally, the system can create asset records from
data collected on financial transaction documents in other modules. The system also provides several documents to assist
your organization with inventory management and other aspects of managing assets.
In the KFS, the Capital Asset Builder (CAB) is the asset creation module for tracking movable capital additions. Information
from the General Ledger and the Purchasing module is pulled together in the CAB to create assets and add payments.
Accounts Receivable (AR) The Accounts Receivable module is used for billing non-student receivables. The module creates invoices, records payments,
issues credit memos, tracks outstanding receivables, and maintains historical data regarding customer charges and payments.
Contracts and Grants (C&G) The KFS supports all post-award financial requirements for contracts and grants, including indirect costs and cost share as
well as budgets and project to date balances.
Effort Certification The KFS Effort Certification module uses a batch process to automate the creation of effort certification reports (also referred
to as effort reports). These reports certify the percentage of effort an employee worked on a particular project. Each employee
identified as being funded by or cost-shared on a sponsored agreement has an effort certification report generated by a batch
process. Each report routes for approval and may be modified to correct the distribution of effort. After being fully approved,
an effort certification report generates Salary Expense Transfer documents to align the Labor Ledger and General Ledger
with the newly certified effort. The fully-approved effort certification report serves as a permanent record detailing the
distribution of effort for an employee for a given period.
This module allows IU to control the periods for which effort certification reports are created and the types of employees that
are included in a particular group of reports. You may also generate effort certification reports on an exception basis, view
effort certification reports still outstanding for approvals, inquire on the extracted Labor Ledger data used to build effort
certification reports, and more.
Labor Distribution The Labor Distribution module of the Kuali Financial System (KFS) manages the accounting aspects of compensation-
related expenses such as salaries and benefits. It includes salary transfer, benefit transfer, Labor Ledger correction process,
and Labor Ledger journal voucher e-docs. Labor distribution reports are accessed through balance inquiries.
Navigating through the KFS After you access the KFS by typing or pasting the URL for it into your browser's address bar, you need to know where to find
information and how to navigate. This section covers these topics: KFS Menus, Screen Elements (including Standard Data
Entry, Selection, Action, and Navigation Tools), and Logging on and off the KFS.
KFS Menus The KFS portal is organized into four menu tabs. The KFS Modules tab displays the list of transactions and functions that
regular users are permitted to initiate. This is the default tab when you login to KFS. The Resources tab displays links to
webpages and other materials that support KFS. The Reference and Maintenance menu tab is geared toward the central
administration staffs who maintain various reference tables to support field validation and lookups. The Technical Links
menu tab displays the list of functions that the only technical staff or super users in the functional area are likely to use.
KFS Overview and Introduction Page 9 of 64 7/22/2015
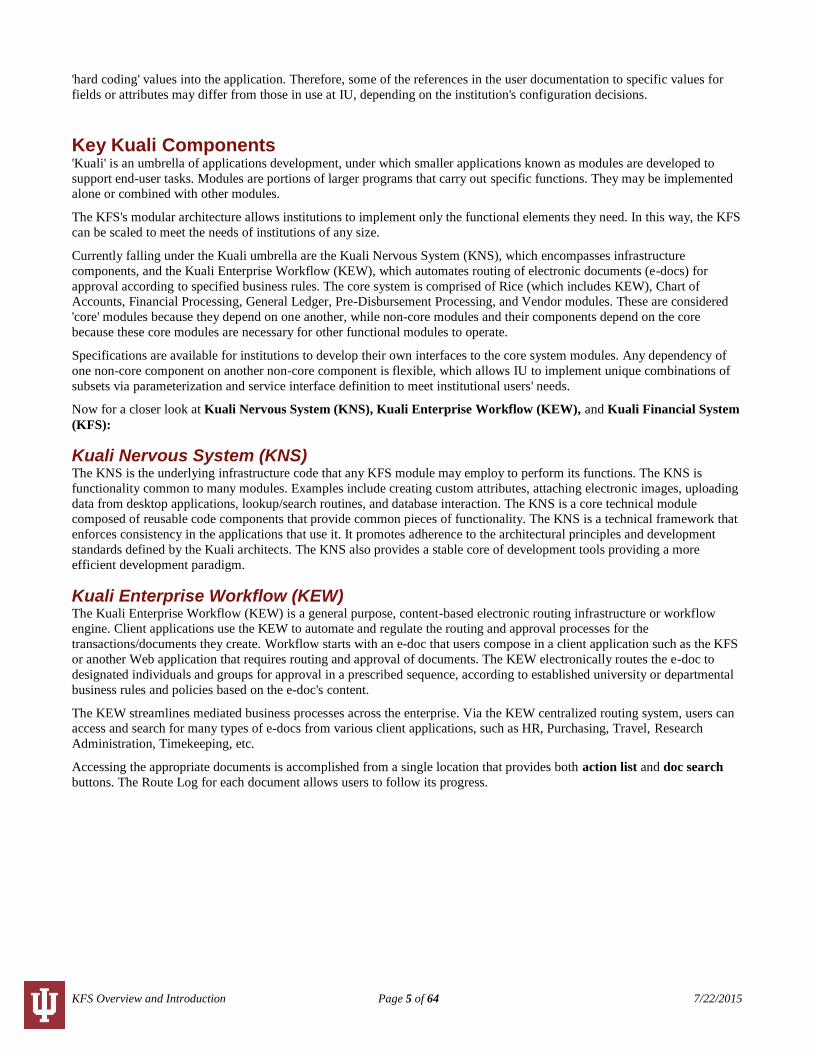
The portal also has 5 links to often used items or functions. Shop Catalogs launches the Purchasing online catalog
functionality. Balance Inquiries launches a list of GL and LL inquiries that users can run. Search for Documents launches a
document search for all KFS documents. View Action List opens a user’s KFS action list. Browse Policies directs the user to
the policy links for the various functions.
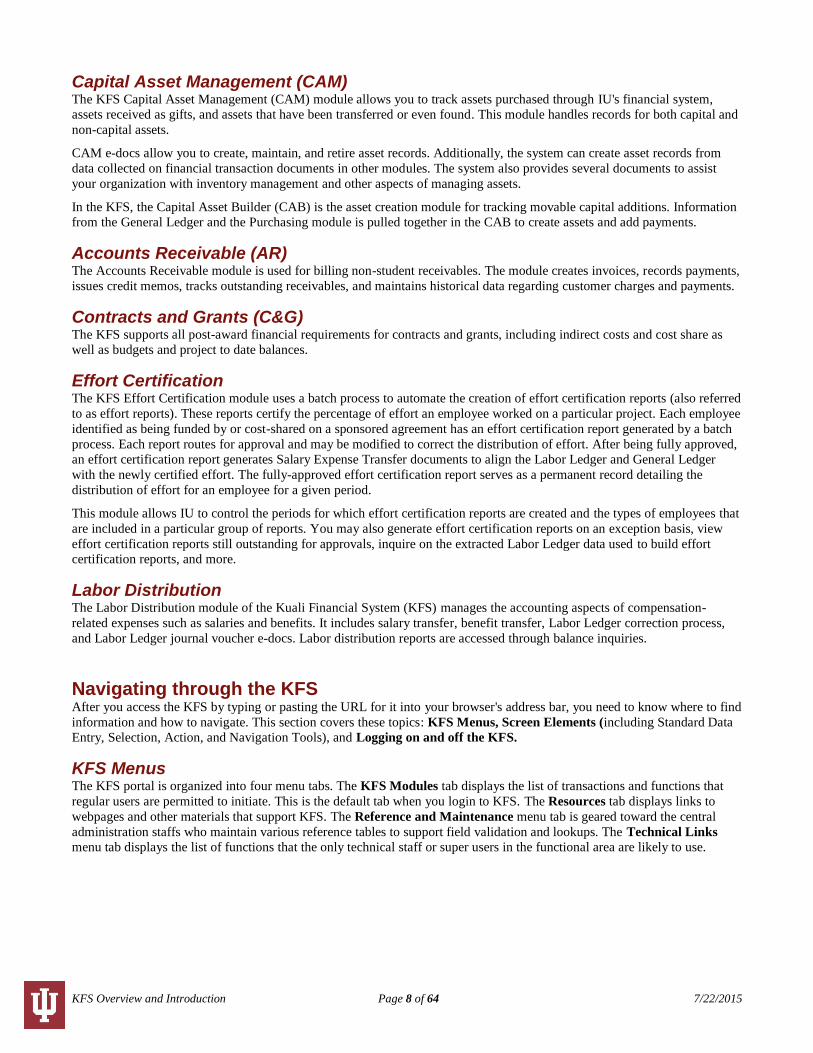
KFS Modules The KFS Modules tab lists electronic documents and functions that departmental users are usually allowed to initiate. They
are listed by the following categories. Each of these categories is further subdivided into the various documents that pertain to
that function.
For information on working with the various module functions, see the KFS guide to the specific module.
Reference and Maintenance The Maintenance menu provides access to a variety of user-defined reference tables that are essential to the KFS. These
tables define attributes the system uses to validate transactions and allow users to look up values as necessary. The tables also
control the often-complex relationship between elements for internal and external reporting. For example, the KFS relies on
maintenance tables for basic information such as the sub-fund groups to which new accounts may be assigned and the
calendar month that correlates to the first month of IU's fiscal year. This table-controlled flexibility is one of the features that
make the KFS a highly configurable application.

KFS Overview and Introduction Page 10 of 64 7/22/2015
These important reference tables are maintained by electronic documents called maintenance documents or e-docs. Each of
the KFS reference tables is maintained by a specific maintenance e-doc that is routed for approval before the table is updated.
All users can look up values in the KFS reference tables via the lookup screens on the maintenance menu, but only members
of the KFS-SYS Manager role may initiate most documents in the maintenance menu. They are listed by the following
categories:
Screen Elements Each menu tab is organized into multiple submenus that group similar types of functions. Each menu tab also has these
standard features:
Workflow functionality is accessible from View Action List and Search for Documents buttons at the top of the
screen.
The current user is displayed on the upper left corner of the screen.
A Provide Feedback link on the upper right corner of the screen allows anyone to report bugs, issues, and
suggestions.
Expand All or Collapse All enables the user to expand or collapse the portal tabs. This is not available on the
Resources tab.
Set Default Home enables the user to set the KFS portal page as their default home page.

KFS Overview and Introduction Page 11 of 64 7/22/2015
Standard Data Entry, Selection, Action, and Navigation Tools Online forms within this web-based software application allow you to enter and select information and to perform actions and
navigate, both within and outside the system. The following table briefly outlines the basic tools.
Basic KFS tools:
Element KFS Reference / Description
box (a.k.a. edit box, text box, or entry field): A rectangular box in which you can type text. If the box
already contains text, you can select that default text or delete it and type new text. Use a keyboard to type
or clipboard to paste text and numbers into the field.
check box (a.k.a. selection box): A square box that is selected or cleared to turn on or off an option. More
than one check box can be selected. Use a mouse to click within the box to place a check mark symbol to
indicate the option is selected.
option (a.k.a. radio button, option button): A round button used to select one of a group of mutually
exclusive options. Use a mouse to click within the circle. The dot symbol indicates that the option is
selected.
list (a.k.a. drop-down menu, combo box, or list box): A box with an arrow indicating a list that drops
(expands) downward for viewing (may expand upward to take advantage of available screen real estate).
Click the down arrow icon to list menu options, and then click the text to highlight and select an option.
button (a.k.a. command button, action button): A rectangular button with a text label that indicates the
action to be performed. Use a mouse to click the button to initiate the action.
http://ww
w.
kuali.org
Link (external file or Web page hyperlink): Use a mouse to click on the underlined text (usually blue in
color) to navigate to a different Web page or system within the same Web browser (may open a new pop-up
window).
Link: An internal hyperlink to a different place on the current page, a different screen within the current
application, or a related system. Use your mouse to click on the underlined text to cause the desired
information to appear.
Logging on to and out of KFS When you select an item on a menu tab for the first time in a session, the KFS asks for your user ID and password. The KFS
performs user authentication and authorization to restrict access to business transactions, according to IU's prevailing
practices.
To logout of KFS, close out of what you are working on by clicking the “X” in the upper right corner. Then logout of One.IU
by clicking on your name in the upper right of the One.IU search page. Choose the “Sign Out” option from the dropdown.
KFS E-Doc Fundamentals The following sections describe the page layout, common attributes of an e-doc, and basic functions.
E-Doc Screen Layout An e-doc consists of a document header and a document body. The document header in the upper right corner of the screen
contains system information about the document. The document body is organized in a stack of labeled tabs that are similar

KFS Overview and Introduction Page 12 of 64 7/22/2015
to file folders. Based on the type of document, the system displays different sets of tabs. To facilitate the document input
process, an initiated document opens with required tabs expanded and optional tabs collapsed. Workflow action buttons
appropriate to your role are displayed at the bottom of the screen.
Document Header
Basic information in the document header:
Title Description
Document Number
(Document Nbr)
The unique number used to identify each document. KFS assigns a sequential number to
each document when it is created, regardless of the type of document.
Status A code that identifies the status of a document within the Workflow process.
Initiator The user ID of the document initiator.
Created The time and date the document was created.
Optional information in the document header:
Title Description
Copied from Document
ID
KFS allows users to create new financial documents based on previous transactions by way
of a copy function. When one document is copied from another, the document number of the
copied document appears here.
Correct Document ID
The KFS gives you the option of reversing a fully approved financial transaction through the
use of an error correction function. When one document is a correction of another, the
document number of the document being corrected appears here. This information is
displayed only when the document was created using the error correction feature in an
existing document.
“Expand All”/“Collapse All” Buttons You may expand or collapse all tabs in a document by clicking expand all or collapse all.
Click expand all to expand all of the e-doc tabs.

KFS Overview and Introduction Page 13 of 64 7/22/2015
Click collapse all to collapse all of the tabs.
“Show”/“Hide” Buttons Click show or hide on the tabs to expand or collapse an individual tab.
Required Fields All required fields in an e-doc are denoted with an asterisk. You cannot submit the document until all required fields contain
data.

KFS Overview and Introduction Page 14 of 64 7/22/2015
Date Fields
Dates must be specified in mm/dd/yyyy format. Alternatively, you may select a date by clicking the calendar and
selecting from the calendar that is subsequently displayed.
Standard Links and Icons Since KFS is a web-based application, hyperlinks and icons are used for navigation. Clicking hyperlinks and icons allow you
to drill down into document detail and to obtain additional information.

KFS Overview and Introduction Page 15 of 64 7/22/2015
Help Icon When you click the icon by the title in the top left corner of an e-doc or other screen, the help system displays
information about and instructions for working with the screen.
Field Lookup
The round magnifying glass or 'lookup' icon allows you to look up reference table information so you avoid data entry
errors.
After you click the icon, the system displays a list of valid values for you to select from or connects you to a form that allows
you to search for the value you need.
To look up valid values in this form:

KFS Overview and Introduction Page 16 of 64 7/22/2015
Enter one or more search criteria or leave all search criteria fields blank to retrieve all. To specify search criteria:
Type data into any combination, all, or none of the listed search fields. (Most search fields change letters to
uppercase for the search.)
If desired, use wildcards at the end of or within a string of characters to represent any character or characters. The
symbols “*” (denotes any number of characters) and “%” (denotes a single character) may be used as wildcards.
If desired, to enter a range of numbers or dates, use any of these range operators: >, <, >=, <=, and ..
Note that the “..” operator may be used only between two date values. It may not be used with a single date. All
other operators are used before single dates.
Specify dates in the format mm/dd/yyyy.
Using logical operators “&” (AND) and “|” (OR) with multiple search parameters.
Specify whether to search for values that are active, not active, or both.
Click search . IUKFS displays the list of applicable values that you have requested. After the value list is
displayed, you may take one of the following actions by clicking the hyperlinks labeled a through c below.
Click return value to select the corresponding row’s value.
Click cancel to cancel the search and return to the original document or search returning no value.
Click the name of a column to sort the retrieved values by that column.
Multiple Value Lookup Multiple value lookup is used in global documents and labor e-docs. Documents requiring a list of values come with a special
multiple value lookup screen where you may select multiple values from the search list. The Look Up / Add Multiple xxx
Lines (where xxx is the name of the attributes you are updating) link is available in the applicable section of the tab
where this feature is available.
Clicking the Look Up / Add Multiple xxx Lines takes you to a special search screen where you are given an opportunity
to build a list of values from which you may choose one or more values by selecting the check boxes in the leftmost column.

KFS Overview and Introduction Page 17 of 64 7/22/2015
Click select all from all pages to select all values in the list
Click deselect all from all pages to clear the check boxes for all values in the list
Click select all from this page to select all values on the current page
Click deselect all from this page to clear the check boxes for only the values on the
current page
Click return selected to return the selected values

KFS Overview and Introduction Page 18 of 64 7/22/2015
Clicking cancel returns you to the document you came from without returning any values.
Export Options Links To export the result of the table lookup to your local computer in CSV, Excel, or XML format:
1. Click the export option link for the format you want.

KFS Overview and Introduction Page 19 of 64 7/22/2015
The system prompts you to click Open, Save, or Cancel:
Firefox Internet Explorer
2. Click one of the buttons and follow the standard prompts.
Drilldown After you perform a search, when the system displays a link or icon in the list of retrieved data, you can drill down into (that
is, display) details for any of the linked items. Standard drilldown features in the IU KFS include the following:
Document ID drilldown: Clicking the Document ID link retrieves the specified document so you can view or edit it.
User drilldown: Clicking a linked user ID takes you to a Person report.

KFS Overview and Introduction Page 20 of 64 7/22/2015
Route log lookup: Clicking the Route Log icon takes you to the KFS Route Log for the document in this row.
The Route Log contains two tabs summarizing routing activities. The “Action Taken tab logs prior events and the
“Pending Action Requests” tab logs known future events, from which you can see current Workflow action requests.

KFS Overview and Introduction Page 21 of 64 7/22/2015
Standard Tabs While the tabs contained in various e-docs may vary from one document type to another, a set of standard tabs is included in
every e-doc. All documents contain “Document Overview,” “Notes and Attachments,” “Ad Hoc Recipients,” and “Route
Log” tabs. Additionally, financial transactions e-docs contain the “Accounting Lines” tab and the “General Ledger Pending
Entries” tab. On financial documents that allow the usage of capital asset object codes within the “Accounting Lines” tab,
there may be three additional tabs; “Accounting Lines for Capitalization,” Create Capital Assets,” and/or “Modify Capital
Assets.”
Document Overview Tab The Document Overview tab identifies the document and includes fours fields: “Description,” “Explanation,” “Total
Amount,” and “Organization Document Number.” Other data fields may be available in the document overview of specific
documents.
Document Overview tab definitions:
Title Description
Description
Required. Enter the short description for the document. The description appears in the GL Inquiry,
standard reports, action list and document search as primary identification of the document. This
field is limited to 40 characters including spaces.
Explanation Optional. Enter a more detailed explanation than the information supplied in the description field.
This field provides justification for the transaction.
Total Amount Display-only. Displays the total amount of accounting lines when the document is submitted
successfully.
Organization
Document Number
Optional. Enter the value that may include departmental or organizational information. This
number is not the same as the Document Number assigned by the KFS.
Accounting Lines Tab Accounting information for a financial transaction is entered in the “Accounting Lines” tab. This is where the accounting
string data is entered. The required fields and the format of the tab vary slightly by document type. The “Amount” field may
also look different, depending on the type of document you are creating.
Single-Sided Entry A number of documents require you to enter information onto only one side of the transaction because the balancing side of
the transaction is automatically generated by the KFS based on pre-set business rules. An example of a single-sided entry is
the Cash Receipt (CR) document.

KFS Overview and Introduction Page 22 of 64 7/22/2015
Double-Sided Entries Several types of documents function by placing accounts, object codes, and amount combinations in separate sections of the
“Accounting Lines” tab. These sections may be entitled “From/To,” “Income/Expense,” “Decrease/Increase,” etc., depending
on the type of document.
In a document with “From/To” sections (such as the General Error Correction document), the “From” section of the
transaction represents a decrease in income, expense, or budget to an account. For example, when an account is entered in the
“From” section of a GEC document and the object code is an expense type; the transaction reduces (credits) the expense and
increases (debits) cash for that account.
The “To” section of this same type of transaction represents an increase in income, expense, or budget to an account. For
example, when an account is entered in the “To” section of a GEC document and the object code is an expense type, the
transaction increases (debits) the expense and decreases (credits) cash for this account.
KFS Overview and Introduction Page 23 of 64 7/22/2015
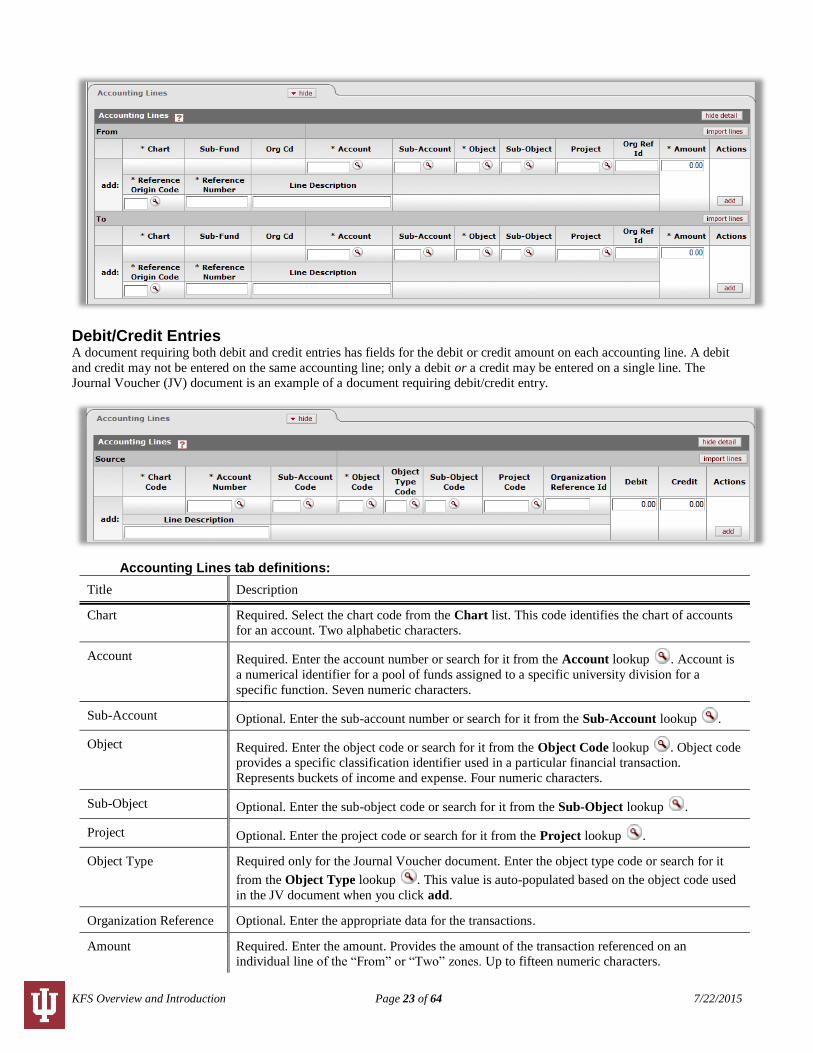
Debit/Credit Entries A document requiring both debit and credit entries has fields for the debit or credit amount on each accounting line. A debit
and credit may not be entered on the same accounting line; only a debit or a credit may be entered on a single line. The
Journal Voucher (JV) document is an example of a document requiring debit/credit entry.
Accounting Lines tab definitions:
Title Description
Chart Required. Select the chart code from the Chart list. This code identifies the chart of accounts
for an account. Two alphabetic characters.
Account Required. Enter the account number or search for it from the Account lookup . Account is
a numerical identifier for a pool of funds assigned to a specific university division for a
specific function. Seven numeric characters.
Sub-Account Optional. Enter the sub-account number or search for it from the Sub-Account lookup .
Object Required. Enter the object code or search for it from the Object Code lookup . Object code
provides a specific classification identifier used in a particular financial transaction.
Represents buckets of income and expense. Four numeric characters.
Sub-Object Optional. Enter the sub-object code or search for it from the Sub-Object lookup .
Project Optional. Enter the project code or search for it from the Project lookup .
Object Type Required only for the Journal Voucher document. Enter the object type code or search for it
from the Object Type lookup . This value is auto-populated based on the object code used
in the JV document when you click add.
Organization Reference Optional. Enter the appropriate data for the transactions.
Amount Required. Enter the amount. Provides the amount of the transaction referenced on an
individual line of the “From” or “Two” zones. Up to fifteen numeric characters.

KFS Overview and Introduction Page 24 of 64 7/22/2015
Ref Origin Code Required only for the General Error Correction document. Enter the ref origin code or search
for it from the Origination Code lookup .
Ref Number Required only for the General Error Correction document. Enter the ref number.
Line Desc Optional in most documents. Enter a description of the transaction line. This field is required
in a few documents and is noted as required in the help documentation for these types of
documents.
Some of the above fields are not included in all documents.
Specific requirements for each document type are noted in the section for the document type.
Displaying Account Detail
Descriptions for the accounting string data may be hidden or shown by clicking show detail and hide detail
. The default is to show detail.
The system displays the alternate option after you click the button.
Click hide detail hides the COA titles in the Accounting Lines tab:
Click show detail displays the COA titles in the Accounting Lines tab:
Accounting Lines Buttons The accounting lines buttons offer the following options.
To add an accounting line to the document, click add . The system validates the account number, expiration
status and business rules specific to the document type. If the account number is expired, you must check the
Expired Override box or enter a different account in order to add the line. If the account is "closed" you will not
receive a prompt to override.
To delete the accounting line, click delete .
To open the balance inquiry menu, click the Balance Inquiries at the top of the KFS portal. Then select one of the reports by
the name of the report which is a link to the report.
Sales Tax KFS can be configured to require sales tax information on the selected document types as well as the account and object code
combinations. The document types and account/object code combinations are stored in two separate business rules. When an
account and object combination in the account and object code parameter is used on a document in the document type
parameter, the systems displays the sales tax line after you add the accounting line.
Note: The system does not display the sales tax line until you enter the account and object code and click the add button.
Import Lines If you have a number of accounting lines to enter, you may create a .csv file containing the transactions and import it into the
document. Click the “import lines” button to upload a file.
For information about accessing and using the import templates, see Data Import Templates.

KFS Overview and Introduction Page 25 of 64 7/22/2015
Restrictions Each financial transaction document is governed by business rules for the document type and the accounting line data. Rules
may be derived from specific attributes associated with the account, object code, or other accounting string data. The
following is a partial list of account and object code attributes that may cause restrictions on various documents.
Attributes that may cause restrictions in entering accounting lines:
Attribute Cross Edits
Account Fund Group, Sub-Fund Group, Budget Recording Level, Effective/Expiration Date,
Account Sufficient Funds, Object Presence Control, Income Stream Account
Object Code Object Type, Object Sub-Type, Object Level, Consolidated Object Code
Capital Asset Tabs
Accounting Lines for Capitalization
After clicking generate , accounting lines with a capital object that collect asset information will be inserted into
the “Accounting Lines for Capitalization” tab. Not all financial documents have a “from” and “to”, but you can identify a
correlation between those lines and Source and Target as it is displayed on the Accounting Lines for Capitalization tab.
(Source is equivalent to the “From” line and Target is the “To” line.
If you need to make changes to the financial accounting lines you will need to click delete in the “Accounting Lines
for Capitalization” tab. This action will remove any create and/or modify asset information.
On the “Accounting Lines for Capitalization” tab, the document processor selects the line(s) they want to begin with for
creating or modifying their assets.
Note: If your financial document includes multiple transactions, you may need to process the accounting lines separately. The
document processor needs to select the accounting line or lines that pertain to the assets to be created or modified.
As line items are selected for processing, the amount is added to a “System Control Amount” and the “System Control
Remainder Amount.”
Distribution Method: Once the capital lines have been selected for processing the next step is to decide how the cost should
be distributed to the assets involved.
1. Distribute cost evenly: The selected accounting line amounts will be distributed evenly between the assets.
2. Distribute cost by amount: This option allows the document processor to enter the amount that should be
distributed to each asset.
Create Asset or Modify Asset Buttons: Once the distribution method has been determined you must select either the create
asset or modify asset buttons. This will forward information into the appropriate tab for the
line(s) selected.
Create Asset Tab
Click create asset when moving an amount from expense to capital and to populate data into the “Create
Asset” tab.
Modify Asset Tab
Click modify asset when you are moving amounts between accounts, sub accounts, object codes, or sub
object codes. The initial transaction created the asset, and the adjustment will modify the asset.
Note: When using the “Error Correction Option” you will always need to use the “modify asset” button. If “create asset”
information exits it will need to be deleted by clicking delete in the “Action” box on the “Create Asset” tab.
Once the asset information has been deleted you will need to re-select the accounting line for processing in the in the
“Accounting Line for Capitalization” tab and then click modify asset .
System Control Amount As line items are selected for processing, the amount is added to the system control amount. This amount field is used to
ensure asset amounts are not greater than the sum of the amounts selected for processing.

KFS Overview and Introduction Page 26 of 64 7/22/2015
System Control Remainder Amount As amounts are distributed to assets the remainder amount is reduced, this occurs when an action like clicking the redistribute
total amount button, or the save button is clicked. Once the system control remainder amount is zero the selected lines for
processing are grayed out. Deleting the asset information will uncheck the lines if changes need to be made.
Redistribute Total Amount The redistribute total amount button will distribute the cost to the asset(s) and update the Amt column in the Capital Asset for
Accounting Lines area. Click redistribute total amount button once you have created or modified
all the assets for the selected accounting lines. This will gray out the accounting lines and the “System Control Remainder
Amount” will be zero.
Update or Change Cost on Asset Information Tab To change the cost or change the accounting lines you can use the “delete” button to remove the asset information record,
which will unselect the accounting line in the “Accounting Line for Capitalization” tab and allow the processor to start over.
Known Issues 1. Rounding Error. If you receive an error message “Capital Asset Line Sequence#: 1 Asset Line#: Source Line
Type: $chart chart: $account account; $object object code {5} – Capital assets total amounts is more than Capital
Accounting Line’s Amount.” When all of the lines have been processed and the System Control Remainder Amount
is 0.00 you have encountered a rounding error in the “Capital Asset for Accounting Line” amounts. When you
receive this error you will need to issue a separate financial document for each asset.
Business Rules 1. The following documents collect asset information. Advance Deposit, Cash Receipt, Credit Card Receipt, General
Error Correction, Distribution of Income/Expense, Internal Billing, Procurement Card, Service Billing, Year End
General Error Correction, Year End Distribution of Income/Expense.
2. The Cash Receipt, Credit Card, and Advanced Depots Documents only Modify Asset is allowed.
3. Asset information Collection is required by financial object sub type codes in system parameter
FINANCIAL_PROCESSING_CAPITAL_OBJECT_SUB_TYPES.
4. Rules for insert into “Accounting Lines for Capitalization” tab:
a. Based on system parameter FINANCIAL_PROCESSING_CAPITAL_OBJECT_SUB_TYPES capital
accounting lines are inserted into the Accounting Lines for Capitalization tab. The insert will occurred when
generate is selected.
b. To make changes to financial accounting lines with moveable capital object codes the user must click the delete
button in the Accounting Lines for Capitalization tab. Action will be remove any create asset and or modify
asset information.
5. Rules for “Select Line”:
a. The “Select Line” check box allows the processor to select the accounting lines to be processed. Once the asset
information has been entered and the “redistribute total amount” selected the “select line” check box will be
grayed out signifying the processing for the accounting lines selected is complete. The check box is only grayed
out when more than one accounting line exits.
b. Upon submission, if all of the accounting lines have not been selected, an Error message: “Accounting Lines for
Capitalization” tab must be processed before the document can be submitted.
c. Each accounting line by sequence number, line type, chart, account, and object code must have asset
information. Error message: “Capital Accounting Lines with Sequence #: 1 Line Type: Source chart: 7000 does
not have any Capital Asset Information associated with it.
6. Confirm capital accounts/amounts match financial document accounts/amounts.
a. The account, sub account object code, sub-object code, project, org ref id and amount in the financial
accounting lines must be in agreement with the account, sub account object code, sub-code, project, org ref id
and amount in the Accounting Lines for Capitalization. When they are not in agreement the document initiator
will receive an Error message: “The Source Accounting line 1024700 amount does not match to the sum of
distributed accounting lines in all capital assets.” When they are not in agreement the document initiator can
save and reload the document to update the information in the “Accounting Lines for Capitalization” tab.
b. When submitting, the accounting lines in “Capital Asset for Accounting Line” for Create Assets and Modify
assets must be in agreement with the accounting lines in the “Accounting Lines for Capitalization” tab.
7. A warning is presented if the document processor selects multiple accounting lines for capitalization and the
accounting lines cross asset categories. The warning message reads “Accounting lines have been selected where the

KFS Overview and Introduction Page 27 of 64 7/22/2015
object codes cross asset categories per parameter OBJECT_SUB_TYPE_GROUPS (module: KFS-
CAM/component: Asset Global). Do you want to continue?
a. "Yes" will return the document initiator to the screen to continue processing.
b. "No" will de-select the accounting lines.
8. System control amount is set to sum of the account amounts selected.
9. System control remainder amount.
a. Is set to the sum of the account amounts selected.
b. The “redistribute total amount” button will reduce the amount of the “system control remainder amount” until
the “system control remainder amount is at zero.
c. When the “system control reminder amount” is at zero no more assets records can be inserted from the “create
asset” or “modify asset” buttons.
d. When the “system control reminder amount” is at zero the document can be submitted.
10. Distribution Method.
a. A distribution method is required.
b. The “Distribute cost evenly” option will divide the cost by the number of assets and system assign the amount.
c. The “Distribute cost by amount” allows the document initiator to enter the Amt. (amount) for the assets being
updated or created.
d. The distribution method is saved the asset record.
11. Redistribute Total Amount.
a. For distribution method “Distribute cost evenly” the redistribution button will set the “Amt” (asset amount) by
dividing the number of assets by the account amount. Each account amount is calculated as a proportion of the
total asset amount.
b. For distribution method “Distribute cost by amount” the redistribution button will calculate each account
amount as a proportion of the total asset amount.
c. If the document is submitted before “all” accounting lines have been distributed - Error message: “Capital
Accounting Lines total amount has not been completely distributed to Capital Assets.
12. Create asset button.
a. After the accounting line or lines are selected, clicking the “create asset” button will open the create capital
assets tab.
b. To add additional assets, click create asset as many times as necessary.
c. The accounting lines selected will be presented in the “Capital Asset for Accounting Lines.” The asset
information fields (asset quantity, asset type, vendor name, manufacturer, model, asset description, amt., and
action column) will be displayed.
d. If an accounting line has not been selected and the document initiator opens the “Create Capital Assets” tab the
following text will be displayed “There are currently no Create Capital Assets entries associated with this
Transaction Processing document.”
e. An accounting line must be selected before selecting create asset. Error message: “At least one accounting line
should be selected to create the capital asset.”
f. Clicking the create asset button sets the percent column in the accounting lines for capitalization tab. Percent is
based on the total of the selected lines.
13. Modify asset button.
a. An accounting line must be selected before selecting create asset. Error message: “At least one accounting line
should be selected to create the capital asset.”
b. Sets the percent column in the accounting lines for capitalization tab. Percent is based on total of selected lines.
c. If an accounting line(s) is/are selected the “modify asset” button will open the “Modify Capital Assets” tab. The
asset number field will be presented with the magnify icon that takes the user to the asset lookup screen. The
“Lookup/Add Multiple Capital Asset Lines” lookup will also be presented and allows the document initiator to
select multiple assets for the accounting lines to be applied to.
d. The distribution method is passed to the manual add payment document.
14. Business rules for create new assets.
a. Asset quantity must be numeric and is required. A quantity is required before the user can add tagging/location
information.
b. Asset type code is required and must be a valid value.
c. Manufacturer is required and is not validated.
d. Asset Description is required.
e. Action “add tag/location” will open a tab to collect location information.
f. Campus code is validated and required.
g. Building code is validated and required.
h. Room Number is validated and required.

KFS Overview and Introduction Page 28 of 64 7/22/2015
i. Duplicate tag edit checked to ensure the tag number does not exist on an active asset, and that the tag number
does not exist on another record with-in the document. Retired assets are excluded from this edit.
15. Create Asset, Action “Clear” button. Clicking the “clear” button
a. Clear the asset quantity, asset type, vendor, manufacturer, model, Amt. Dist. method, Amt., asset description,
and tag/location information. The asset information tab remains open.
b. Re-set the system control amount and the system control remainder amount.
c. Unchecks the selected accounting lines.
16. Create Asset, Action “Delete” button. Clicking delete will
a. Clear all asset information and close the Create Capital Assets tab.
b. Re-set the system control amount, and the system control remainder amount.
c. Unchecks the selected accounting lines.
17. Business rules for modify exiting.
a. Asset must be an active capital asset.
b. When using the “Add Multiple Capital Asset Lines” lookup to select assets numbers upon returning to the main
screen any blank capital asset modify lines will be automatically removed. If no assets numbers are returned the
blank lines will not be removed.
General Ledger Pending Entries Tab After a financial transaction document has been saved or submitted, the General Ledger Pending Entries tab displays the
actual entries that are to be posted to the GL when the document is fully approved and the GL batch process has run. In
addition to the entries the user created, the General Ledger Pending Entries tab may include system-generated offset
transactions. Before you submit the document, this tab contains the message 'There are currently no General Ledger Pending
Entries associated with the Transaction Processing document’.
When the document is submitted into routing for approval, the pending entries are displayed in the General Ledger Pending
Entries tab. If offset entries are generated by the KFS, they are also displayed in this tab.
After a transaction is fully approved, these entries are posted in a batch process to the General Ledger. After the batch process
has been run, the general ledger pending entries are moved from this tab of the document.
Balancing Rules Each e-doc is governed by a set of balancing rules, some of which are more complex than others. The balancing rules within
a document often enforce the basic rule that debits must equal credits. Whether or not an accounting line generates a debit or
credit relies on various factors, including which side of a double-sided document it is in and whether the object code used
represents income, expense, assets, or liabilities, etc.
The Accounting Lines total in some documents may balance to sections in the document or to entries in the tabs on the
document. For example, the Cash Receipt document's Accounting Lines tab balances to the Reconciliation section of the
document.

KFS Overview and Introduction Page 29 of 64 7/22/2015
Notes and Attachments Tab Size and File Type Restrictions for Attachments: The maximum size of attachments is 5 megabytes by default, but IU may
change that limit. The system imposes no restrictions on types of files that may be attached.
Important Note: Do not attach any document or include in the text of a note any data classified as “Restricted” or “Critical”
by the Office of the Vice President for Information Technology. Once added, notes cannot be removed by a typical
KFS user.
The Notes and Attachments tab displays user notes, attachments, or system-generated information about the document. The
number of notes and/or attachments is indicated on the tab.
Notes and Attachments tab definitions:
Title Description
Posted Timestamp Display-only. The time and date when the attachment or note was posted.
Author Display-only. The full name of the user who has added the notes or attachments.
Note Text Required. Enter comments.
Attached File Optional. Select the file to attach by clicking Browse and using the standard Choose File dialog box.
Click Cancel to clear the file name you have selected.
Click add to add a note.
Ad Hoc Recipients Tab The Ad Hoc Recipients tab allows you to interrupt the normal workflow routing of the document and include individuals or
groups in the routing path. Ad hoc routing does not supersede the normal workflow routing of the document but is in addition
to the normal routing.
The Ad Hoc Recipients tab has two sections: Person Requests and Ad Hoc Group Requests. Use one or both of the
sections to route the document to a person, group, or both.
Ad Hoc Recipients tab definition
Field Name Description
Action Requested Required. Select the desired action from the Action Requested list. The choices are
APPROVE, ACKNOWLEDGE, and FYI.
Person Required when routing the document to an individual. Enter a user ID or select it from the
lookup .
Ad Hoc Group Requested Required when routing the document to a group. Enter a group name or select it from the
lookup .
Click add in the Actions column to add the current line.
Click delete in the Actions column to delete the current line.

KFS Overview and Introduction Page 30 of 64 7/22/2015
Route Log Tab Most financial documents require one or more approvals before they impact the General Ledger. The process usually begins
with Workflow identifying all account numbers used on the document and requesting the approval of the fiscal officers
associated with these accounts. The applicable routing information for each e-doc can be found in its “Route Log” tab.
Basic E-Doc Operations This section describes basic e-doc operations that you perform on many different types of documents.
Making a Balance Inquiry
The Balance Inquiries button provides access to balances related to the General
Ledger and Labor Distribution.

KFS Overview and Introduction Page 31 of 64 7/22/2015
To access any of the balance inquiry screens and perform a search, follow these steps:
1. Select the desired inquiry from the Balance Inquiries button at the top of the KFS portal.
2. The system displays the requested lookup screen. This screen may display default values; these values may be
changed.
3. Enter values in all fields preceded by an asterisk. Narrow the search as desired by including additional criteria. If
desired, use % and * as wildcards at the end of or within a string of characters to represent any character (%) or
characters (*).
4. Click search when you have entered all necessary criteria and are ready to retrieve the balances.
For information about individual GL balance inquiries, see General Ledger Balance Inquiries in the KFS documentation
guides. For information about individual balance inquiries related to Labor Distribution and Endowment, see the KFS Guide
to the Labor Distribution Module.
Initiating a Document
1. Select the document link from the main menu. If you have not logged into KFS, the system prompts to enter your
user ID and password.
2. Click create under the “Create” column in the row of the document you need to create.
3. Complete required tabs for the document.
For information about the requirements for a particular type of e-doc, see the help documentation for the
specific document type.
4. Click submit to route the document for approval.
Copying a Document You may initiate a new document based on an existing document.
1. Retrieve the document from which you want to copy using the Search for Documents
button or the lookup icon next to the document type in the portal.
2. Click copy in the array of workflow action buttons at the bottom of the document.
The system creates a new document with a new document ID. The document ID information for the copied-from
document is displayed in the document header and also in the “Notes and Attachments” tab of the new document.
Clicking the Copied from Document Id takes you to the document you copied from.
A note stating that the document was copied from another document is attached to the copied-from document.
3. Complete required tabs for the document.
4. Click submit to route the document for approval.

KFS Overview and Introduction Page 32 of 64 7/22/2015
Lookup and Copy Feature for Chart of Account Maintenance e-docs To create a Chart of Accounts code that is similar to one of the existing codes, click the copy link. The system creates a
document with the same values, except for the values in the identifying fields. This copy feature is available directly on the
document lookup and is not available from the valid value lookup within the financial transaction documents.
Saving a Document
1. To save the document to work on later, click save in the array of workflow action buttons.
2. Verify that the document was successfully saved. The system displays a message in the upper left corner.
3. Retrieve the document at a later time to continue working.
Canceling a Document Documents in 'INITIATED' status that are canceled are removed from the database and cannot be retrieved or viewed.
1. To cancel a document, click cancel in the array of workflow action buttons.
2. When prompted, 'Are you sure you want to cancel?' click yes to proceed.
Closing a Document
1. To close a document and return to the main menu, click in the array of workflow action buttons.
2. When prompted 'Would you like to save this document before you close it?' click to proceed. Closing a
document in 'INITIATED' status has the same effect as canceling the document.
Routing a Document The e-doc process supports both pre-established workflow routing and ad hoc routing. In workflow routing, the KFS routes
the document to the proper users based on business rules established in Workflow. Ad hoc routing allows a user to route the
document to one or more individual users and/or groups for approval, acknowledgement, or FYI.
Unless you want to add an ad hoc routing, click submit to route the document in the predefined routing
hierarchy.
Using the Action List
The View Action List button is located in the upper left corner of the screen allows you to
view and act on documents that require your completion, acknowledgement, approval, and FYI.
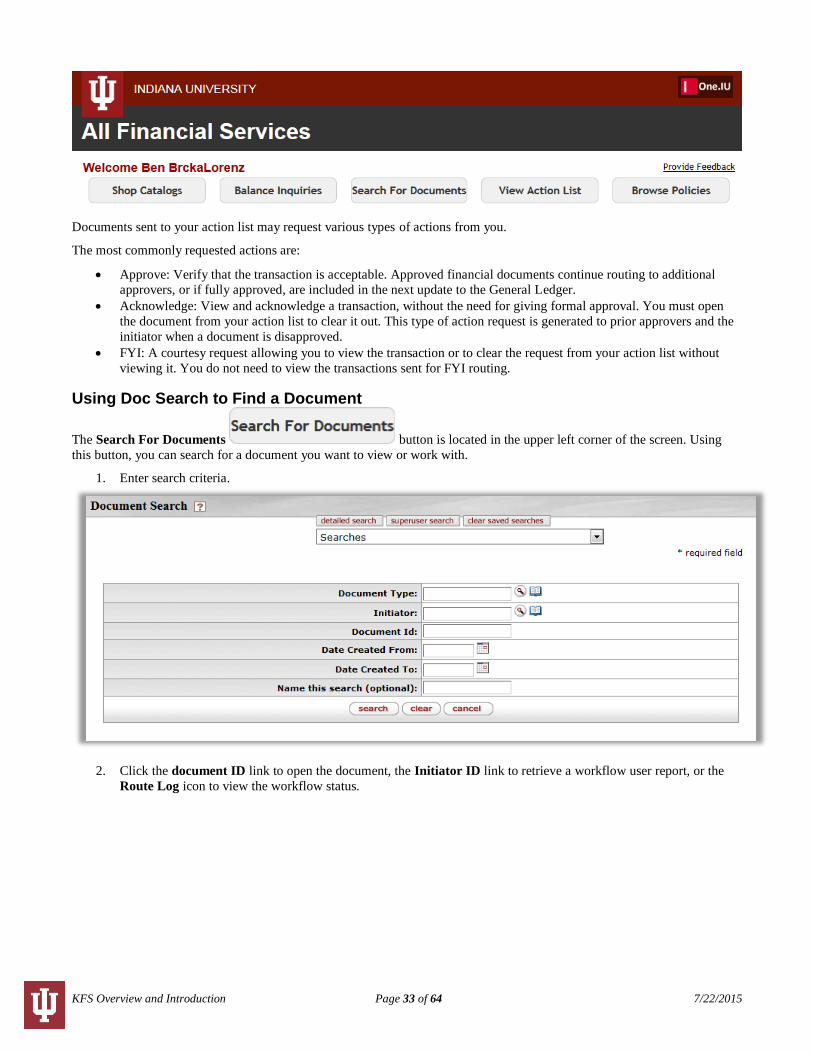
KFS Overview and Introduction Page 33 of 64 7/22/2015
Documents sent to your action list may request various types of actions from you.
The most commonly requested actions are:
Approve: Verify that the transaction is acceptable. Approved financial documents continue routing to additional
approvers, or if fully approved, are included in the next update to the General Ledger.
Acknowledge: View and acknowledge a transaction, without the need for giving formal approval. You must open
the document from your action list to clear it out. This type of action request is generated to prior approvers and the
initiator when a document is disapproved.
FYI: A courtesy request allowing you to view the transaction or to clear the request from your action list without
viewing it. You do not need to view the transactions sent for FYI routing.
Using Doc Search to Find a Document
The Search For Documents button is located in the upper left corner of the screen. Using
this button, you can search for a document you want to view or work with.
1. Enter search criteria.
2. Click the document ID link to open the document, the Initiator ID link to retrieve a workflow user report, or the
Route Log icon to view the workflow status.

KFS Overview and Introduction Page 34 of 64 7/22/2015
Document search criteria
Field Description
Type Document type. Enter the document type or select it from the Document Type
lookup .
Initiator User ID of the document initiator. Enter the user ID or select it from the Person
lookup .
Document/Notification ID Enter the numeric document ID assigned by the system.
Date Created from/to Enter or select from the calendar the range of document creation dates to search.
You may select the From date only, the To date only, or both.
Name this search (optional) To save the search criteria for future use, enter a name for the search. All saved search
are accessed via a list at the top of the document search screen.
Using Wildcards (*) in the Search Criteria The use of asterisks in the search criteria allows you to perform pattern matching. To search for documents containing a
string of characters in alphanumeric fields such as Document Title, you may enter a character string in the search criteria
accompanied by asterisks. For example, enter '*test' to search for a document title that ends with the word 'test’. Enter 'test*'
to search for a document title that begins with the word ‘test’. Enter '*test*' to search for a document title that has the word
'test' somewhere in the document title.
Performing Specialized Document Searches Choosing the document search icon from the Document Search column next to a document causes the system to display a
standard Document Lookup screen that contains a few slight changes to accommodate the type of search you have elected to
perform. After you retrieve documents, your role determines whether you have view-only permission or a variety of
maintenance permissions that allow you to change the documents.

KFS Overview and Introduction Page 35 of 64 7/22/2015
Custom Document Searches submenu:
Menu Group Description
Financial Transactions Provides search capabilities that help you easily locate financial transaction documents because it
includes additional fields such as account number and total amount.
Accounts Receivable Provides searches for customer invoices, customer credit memos, customer invoice write-offs,
cash controls, and payment applications.
Capital Asset
Management
Provides searches for asset maintenance documents.
Contracts & Grants Allows search for proposals within the Contracts & Grants module.
Effort Certification Allows search for effort certifications derived from salary and benefit data for use with Federal
grants.
Financial Processing Allows search for disbursement vouchers with additional data fields.
Purchasing/Accounts
Payable
Allows searches for a variety of Purchasing and AP documents using standard search fields along
with additional fields that are unique to each document type. Search documents include
Electronic Invoice Rejects, Payment Requests, Purchase Orders, Receiving, Requisitions, and
Vendor Credit Memos.
Common Features and Search Options The following example shows the document lookup screen for the Cash Receipt document.
This screen includes the document type CR pre-populated in the Type field. It also contains other fields you may want to use
as search criteria in your search for one or more cash receipts.
Each search screen gives you options for two search results types.
Document Specific Data: In the search results, display information specific to the document(s).
Workflow Data: In the search results, display information specific to the workflow status of the document(s).
To search for specific documents, follow these basic steps:
1. To restrict the search to documents that meet criteria of your choice, enter search data as appropriate.
2. If desired, save this set of search criteria for reuse later by entering a descriptive name in the Name this search field.
3. Click the “Search” button at the bottom of the screen.
4. The system retrieves a list of items that match your search criteria.
If you gave your search criteria a name, the system also displays the name of your saved search in the Searches
list at the top of the screen.
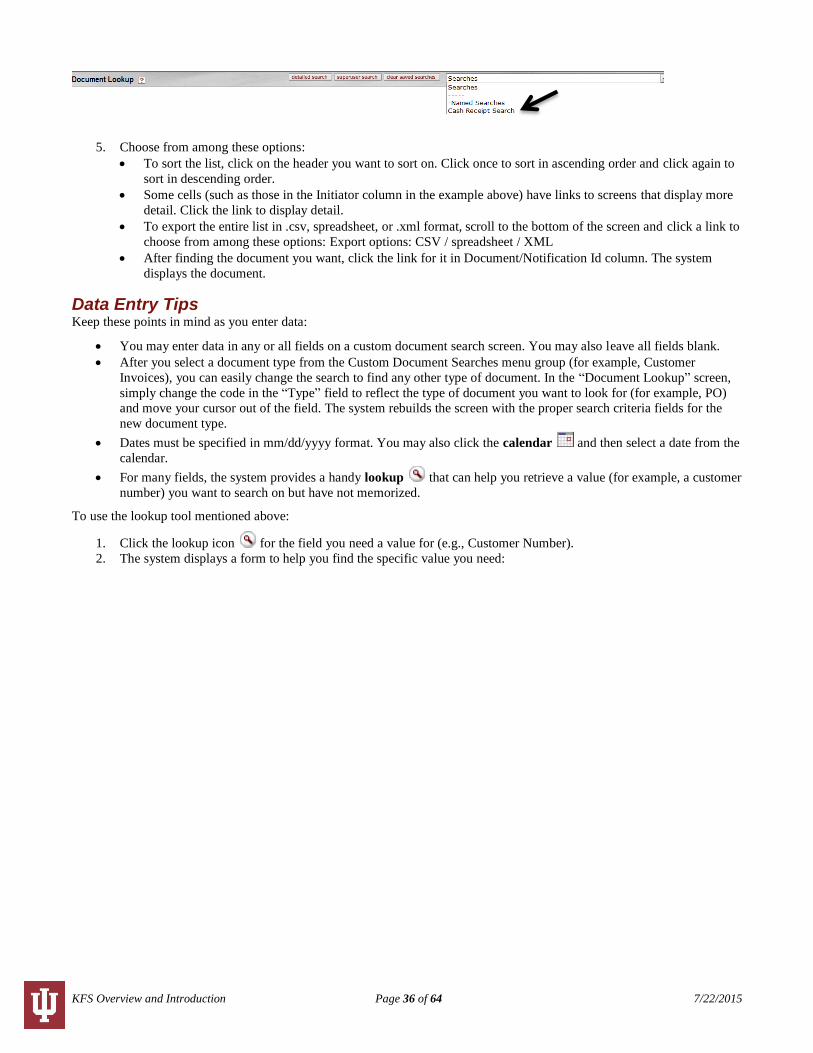
KFS Overview and Introduction Page 36 of 64 7/22/2015
5. Choose from among these options:
To sort the list, click on the header you want to sort on. Click once to sort in ascending order and click again to
sort in descending order.
Some cells (such as those in the Initiator column in the example above) have links to screens that display more
detail. Click the link to display detail.
To export the entire list in .csv, spreadsheet, or .xml format, scroll to the bottom of the screen and click a link to
choose from among these options: Export options: CSV / spreadsheet / XML
After finding the document you want, click the link for it in Document/Notification Id column. The system
displays the document.
Data Entry Tips Keep these points in mind as you enter data:
You may enter data in any or all fields on a custom document search screen. You may also leave all fields blank.
After you select a document type from the Custom Document Searches menu group (for example, Customer
Invoices), you can easily change the search to find any other type of document. In the “Document Lookup” screen,
simply change the code in the “Type” field to reflect the type of document you want to look for (for example, PO)
and move your cursor out of the field. The system rebuilds the screen with the proper search criteria fields for the
new document type.
Dates must be specified in mm/dd/yyyy format. You may also click the calendar and then select a date from the
calendar.
For many fields, the system provides a handy lookup that can help you retrieve a value (for example, a customer
number) you want to search on but have not memorized.
To use the lookup tool mentioned above:
1. Click the lookup icon for the field you need a value for (e.g., Customer Number).
2. The system displays a form to help you find the specific value you need:

KFS Overview and Introduction Page 37 of 64 7/22/2015
Enter identifying information (customer name, etc.) in any of the fields provided.
3. Click search to retrieve a list of records that match your entries.
4. When you find the record you need, click the link to copy the value (customer number in this example) into
your custom document search screen
The following table indicates how to use special characters to expand or limit your searches.
Using special characters in search
Character(s) Function Use with Example (Account Number field)
| Or All types of data 1111500|1123400
Matches on either of these two account numbers:
1111500
1123400
&& And All types of data 1111500&&1123400
Matches on records that contain both of these account numbers:
1111500
1123400
! Not equal to Alphanumeric
characters
!1031490
Matches on all account number except 1031490

KFS Overview and Introduction Page 38 of 64 7/22/2015
? Match on any
single character
Alphanumeric
characters
103?490
Matches on all seven-digit account numbers that start with 103
and end with 490 (1030490, 1031490, etc.)
* Match on any
character or
characters
Alphanumeric
characters
103*
Matches on all account numbers that start with 103 (1030000,
1039765, etc.)
> Greater than Alphanumeric
characters
>1031490
Matches on all account numbers greater than 1031490
< Less than Alphanumeric
characters, numbers,
dates
<1031490
Matches on all account numbers less than 1031490
>= Greater than or
equal to
Alphanumeric
characters, numbers,
dates
>=1031490
Matches on all account numbers greater than or equal to 1031490
<= Less than or
equal to
Alphanumeric
characters, numbers,
dates
<=1031490
Matches on all account numbers less than or equal to 1031490
.. Between
(inclusive
range)
Alphanumeric
characters, numbers,
dates
1031490..1111500
Matches on account numbers equal to or greater than 1031490
and on account numbers less than or equal to 1111500
Maintenance E-Doc Fundamentals All of the KFS documents accessible via the Maintenance Menu are updated in the same manner based on the Kuali Nervous
System (KNS) features running on the Kuali Enterprise Workflow engine. This section describes the common basic
document operations through which you create and update the values in the KFS reference tables.
Common Tabs The typical maintenance e-doc contains the “Document Overview,” “Notes and Attachments,” “Ad Hoc Recipients,” “Route
Log” tabs, and an additional tab called “Edit xxx” tab, where xxx is the name of the table. For example, the “Account Type”
document has the “Edit Account Type” tab below the “Document Overview” tab.
Edit Tab Each document has its own unique tab named “Edit xxx,” where “xxx” is the name of the table values that you want to
maintain. The layout and data fields within the “Edit” tab vary depending on the document type and whether you are creating,
editing or copying the document.
The “Edit” tab has one section when you are creating a new value. As shown below, the tab has two sections: “Old” and
“New” when you are editing the existing code.

KFS Overview and Introduction Page 39 of 64 7/22/2015
This display allows the document to serve as an audit trail for the maintenance table update history. In the New section, only
non-identifying fields are editable.
Non-Editable Documents There are some view-only documents which are not editable because all fields in the table are key identifying fields. The
tables in this category include the ICR Exclusion by Type, Travel Company, and Labor Object Code Benefits. When you
search for a document, you are not able to see the edit link in the lookup screen. These tables must be updated directly in the
database by the technical staff.
Other Common Tabs Maintenance e-docs contain additional tabs that are also common to other e-docs, and they function the same way. They are:
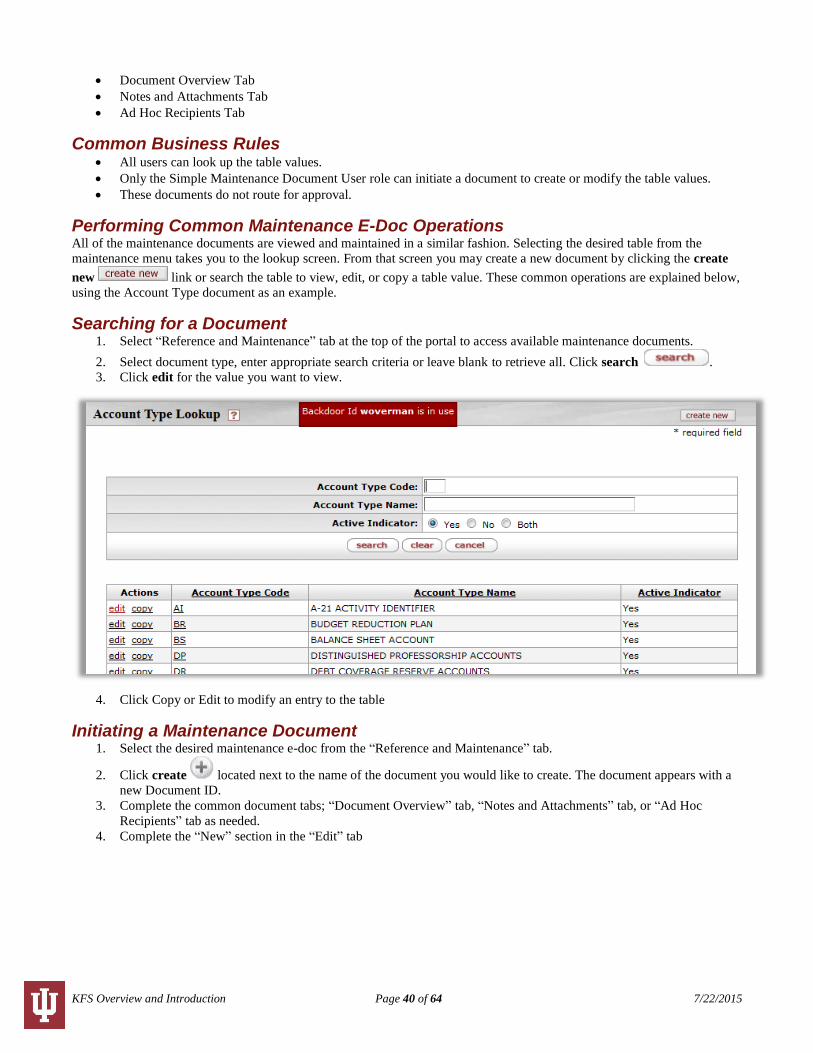
KFS Overview and Introduction Page 40 of 64 7/22/2015
Document Overview Tab
Notes and Attachments Tab
Ad Hoc Recipients Tab
Common Business Rules All users can look up the table values.
Only the Simple Maintenance Document User role can initiate a document to create or modify the table values.
These documents do not route for approval.
Performing Common Maintenance E-Doc Operations All of the maintenance documents are viewed and maintained in a similar fashion. Selecting the desired table from the
maintenance menu takes you to the lookup screen. From that screen you may create a new document by clicking the create
new link or search the table to view, edit, or copy a table value. These common operations are explained below,
using the Account Type document as an example.
Searching for a Document 1. Select “Reference and Maintenance” tab at the top of the portal to access available maintenance documents.
2. Select document type, enter appropriate search criteria or leave blank to retrieve all. Click search .
3. Click edit for the value you want to view.
4. Click Copy or Edit to modify an entry to the table
Initiating a Maintenance Document 1. Select the desired maintenance e-doc from the “Reference and Maintenance” tab.
2. Click create located next to the name of the document you would like to create. The document appears with a
new Document ID.
3. Complete the common document tabs; “Document Overview” tab, “Notes and Attachments” tab, or “Ad Hoc
Recipients” tab as needed.
4. Complete the “New” section in the “Edit” tab

KFS Overview and Introduction Page 41 of 64 7/22/2015
5. Click submit .
6. Review the “Route Log” tab.
Copying a Document (Initiating a Document Based on Another) 1. Select the desired maintenance e-doc from the Reference and Maintenance tab.
2. Click lookup in the Lookup column.
3. When the lookup screen appears, enter appropriate search criteria or leave blank to retrieve all. Click search
.
4. Click the copy link in the Actions column corresponding to the table value you want to copy from.
5. Complete the standard tabs; “Document Overview” tab, “Notes and Attachments” tab, or “Ad Hoc Recipients” tab
as needed.
6. Complete the “New Copy” section in the “Edit” tab.

KFS Overview and Introduction Page 42 of 64 7/22/2015
7. Click submit .
8. Review the “Route Log” tab.
Editing a Maintenance Document 1. Select the desired maintenance e-doc from the “Reference and Maintenance” tab.
2. Click lookup icon in the “Lookup” column.
3. When the lookup screen appears, enter appropriate search criteria or leave blank to retrieve all. Click search
.
4. Click the edit link in the “Actions” column corresponding to the table value you want to edit.
5. The document appears with a new Document ID.
6. Complete the common document tabs; “Document Overview,” “Notes and Attachments,” and “Ad Hoc Recipients”
tab as needed.
7. Complete the “New” section in the “Edit” tab.

KFS Overview and Introduction Page 43 of 64 7/22/2015
8. Click .
9. Review the Route Log tab.
You are allowed to edit non-identifying fields only. In edit mode, note that certain fields are not editable. You are only
allowed to change the non-identifying fields associated with the KFS code you are trying to edit. When the active/inactive
flags are available for the reference table, you can first make the existing code inactive and then create a new code to change
the identifying fields. If the active/inactive flags are not available, the changes must be made by the technical staff
Workflow: Overview and Key Concepts The Kuali Enterprise Workflow (KEW) is a general-purpose, content-based electronic routing infrastructure or workflow
engine. Its main purpose is to automate the routing of electronic documents (e-docs) to individuals and groups for approval,
yet the KEW can also be used to orchestrate complex processes between business components and applications. Approval
routing is based on institutional or departmental business rules and policies.
This section provides an overview of KEW as it relates to the KFS.
KEW Overview The KFS uses the KEW (also called Workflow) to handle the routing of electronic documents for actions such as approvals,
acknowledgements and FYI notifications. Although much KEW functionality works behind the scenes, the “View Action
List” and “Search for Document” buttons in the KFS portal are part of the KEW. These workflow options allow you access,
act on, and search for many types of e-docs from various functional areas from a single location. Additionally, the “Route
Log” tab on your KFS e-docs is a workflow feature that allows you to follow the progress of given documents through the
approval process.
Many facets of Workflow (such as the route nodes that define how a given document type routes) are stored in workflow
process definition files for the various document types. These files can be easily modified to alter the default routing of
documents in your KFS implementation, but doing so requires a technical resource and as such is beyond the scope of this
documentation.
KFS Workflow relies on Kuali Identity Management (KIM) to specify when workflow action requests are to be generated
and who should take action to fulfill them. Functional users employ the KIM interfaces to make changes that affect the
routing of documents.

KFS Overview and Introduction Page 44 of 64 7/22/2015
Route Levels and Workflow Routing Documents route by progressing through a series of route levels (also called 'route nodes'). All e-docs support both pre-
established workflow routing and ad hoc routing. Here is an example of the approval route nodes that a typical financial
processing document passes through:
In workflow routing, a document's type (General Error Correction, Transfer of Funds, etc.) determines the route levels it
passes through. Route nodes are defined by document type within the workflow process definition file.
A view for functional users is located in the “System” module in the “Reference and Maintenance” tab.
The KEW arranges KFS document types in a hierarchical fashion, with some document types being 'parent' to the document
types below them in the hierarchy. “Child” document types inherit attributes from their parents. The “Routing and Identity
Management Document Type Hierarchy” screen displays documents in their respective positions in this hierarchy and also
displays the route nodes associated with each document type. Nodes are listed in the order in which the document progresses
through them.
The following example shows route nodes associated with the Transfer of Funds document type viewed through the Routing
and Identity Management Document Type Hierarchy
Typical Route Levels Many, but not all, Kuali financial documents progress through three route levels: account level, organization hierarchy, and
special conditions.
Account Level Routing (Fiscal Officer) Each account in the KFS is assigned a designated approver called a fiscal officer. This individual is responsible for
maintaining the fiscal integrity of an account and is often one of the first approvers to review a document that impacts the
account. A fiscal officer can delegate this approval role. Most financial processing documents are routed to the fiscal officer
or their delegate for each of the accounts identified in the document. For example, Sue is the fiscal officer for account
1012300. All financial transactions involving this account are routed to Sue for approval.

KFS Overview and Introduction Page 45 of 64 7/22/2015
Organization Review (Review Hierarchy) Routing Every account belongs to an organization. The organization develops customized routing to appropriate roles based on
criteria such as document type, dollar amount and override code. This routing may take advantage of the Chart of Accounts
organization hierarchy, meaning that approvals are set up at different levels in the organization hierarchy. A document
proceeding through this hierarchy routing might route to someone at the department level, then route to someone else at this
department's school or college, and might even continue routing to someone up to a campus or university level.
Organization hierarchy routing (corresponding to the AccountingOrganizationHierarchy route node) is very flexible and may
be customized to be as simple or complex as needed. For example, it can be set up to accommodate appropriate routing when
the Dean of Biology wants to approve every Transfer of Funds document over $1,000 that involves an account reporting to
his organization.
Some documents without dollar amounts (such as account maintenance documents) also use organization hierarchy routing.
While technically distinct, this type of routing functions exactly as described above without regard to dollar amount or
override code.
Special Conditions Routing Special condition routing is a blanket term for additional route levels that might be triggered by various attributes of a
transaction. Special conditions often represent special administrative approvals that may be required. This routing may be
based on the type of document, attributes of the accounts being used, or other attributes of the transaction.
Note: Throughout the KFS help documentation, we refer to route levels that are not fiscal officer or organization review
routing as 'special conditions routing.' This term covers a variety of different types of routing that are explained in
the help documentation sections about the various document types that use these route levels.
For example, you may establish Contracts and Grant routing that requires that a document using a grant account be approved
by a central Contracts and Grants administration area.
Examples of special conditions routing:
Routing Type Description E-Docs
Content Routing If the document's content is incomplete, routes the document to
an appropriate individual for completion.
Requisition
Separation of Duties If the amount of the document exceeds an institutionally-
defined threshold and there have been no approvers other than
the document initiator, routes the document to a defined central
approver.
Requisition
Sub-Account
Routing
If the document uses a sub-account and the sub-account has a
routing rule established, routes the document to the person,
group or role for which the rule has been established.
Purchasing related e-docs
Sub-Fund Routing If a sub-fund derived from an account appearing on the
document has a routing rule established, the document routes to
the person, group or role for which the rule has been
established.
Financial transactions e-docs
Ad Hoc Routing Ad hoc routing allows a document initiator or approver to add additional individuals or groups to the routing of a specific
document. In most cases, ad hoc approvers inserted into the routing interrupt the regular routing process. For example, when
a user initiates a financial document and ad hoc routes it to another user for approval, the document routes to the ad hoc
approver before it routes to the fiscal officer.
Ad hoc acknowledge and FYI routing do not interrupt the regular routing process. Financial processing documents with these
types of ad hoc requests still pending post to the General Ledger as soon as all other approvals are obtained. The system does
not put them on hold while waiting for the acknowledgement to take place or for the FYI to be cleared.
The following steps describe how to add an ad hoc recipient in the “Ad Hoc Recipients” tab.
1. Select an action requested from the “Action Requested” list. To route the document to an individual, select this
option in the “Person Requests” section. To send the request to a group, select this option in the “Ad Hoc Group
Requests” section.

KFS Overview and Introduction Page 46 of 64 7/22/2015
2. To ad hoc route the document to another person, type the principal name in the “Person” box in the “Ad Hoc
Recipients” section or use the Person Lookup to search for the appropriate username.
3. To ad hoc route the document to a group, in the “Namespace Code” field in the “Ad Hoc Group Requests” section,
enter the group name or use the Group Lookup to search for the appropriate group name.
4. Click add . The system verifies that the person ID or group namespace code and name that you have entered
for routing is valid.
5. Click submit .
6. After you complete the “Ad Hoc Recipient” section and submit the document, the system changes the Node(s) value
to “Adhoc” and changes the “Status” value to “ENROUTE.”
The “Pending Action Requests” tab shows the requested action and the user ID.

KFS Overview and Introduction Page 47 of 64 7/22/2015
When a document is enroute, you may send ad hoc requests without taking a workflow action on the document. To do this
follow the steps listed above but use the send ad hoc request button instead of submit .
When you review the Route Log immediately after submitting a document, you may not see the “Pending Action Requests”
tab. This is because the KFS has not yet received the routing information from Workflow. In this case, wait for a few seconds
and click refresh button at the top of the “Route Log” to refresh the screen. You may need to repeat this process a
few times until the information appears in the “Pending Action Requests” tab.
Viewing Route Nodes To see the route nodes associated with a particular document type:
1. Navigate to the “Reference & Maintenance” tab in KFS.
2. At the bottom of the “System” module, select the Routing & Identity Management Document Type Hierarchy
link.
3. The system displays document types in the hierarchy.
4. Locate the desired document type route levels. For example, you might scroll down to Transfer of Funds to view the
rules of the Transfer of Funds document route levels.

KFS Overview and Introduction Page 48 of 64 7/22/2015
5. Beneath the document type, you see the nodes that the document routes through. The system lists these nodes in
order from first to last. To view more detail about the Kuali Identity Management (KIM) responsibilities associated
with these route nodes, click the View Document Configuration link.
6. Scroll down to the “Workflow / Responsibilities tab.”
7. In the Workflow / Responsibilities tab, the system displays the name of each route node along with the associated
role(s) and other information. The first entry in the list defines the exception routing for this document type. This
entry identifies the role that receives the document if Workflow encounters an error that prevents it from completing
the document's normal routing.
In some cases a document may have route nodes that the document passes through based on certain conditions. These split or
branching route nodes are indented to distinguish them from the route nodes through which all documents of this type pass.
Route Log The “Route Log” tab displayed on all KFS e-docs shows workflow status details. The route log is broken into four subtabs:
“Document ID,” “Actions Taken,” “Pending Action Requests,” and “Future Action Requests.”

KFS Overview and Introduction Page 49 of 64 7/22/2015
Route Log ID tab definitions:
Title Description
Title A combination of the document type, description, and the organization document number (if any).
Type The document type. The full name of the transaction used to identify this document type in Workflow.
Links to the document configuration of the document type listed.
Initiator The name of the person who created the document. Linked to that person’s KFS person document.
Status The route status for the document.
Node(s) The current route node of the document. That is, the current step that the document is on, on its route
path. Route nodes are also referred to as 'route levels’.
Created The time and date that the document was created.
Last Modified The time and date that the document was modified last.
Last Approved The time and date that the last action was taken on this document.
Finalized The time and date that the document reached' Final,' 'Canceled,' or 'Disapproved' status.
Actions Taken Tab The “Actions Taken” tab displays the history of workflow actions on the e-doc.
This tab lists each action taken, the name of the person who took this action, and the time and date the action was taken. The
“For Delegator” field shows the name of a delegate that took action on someone else's behalf. For example, for account
routing the fiscal officer's name is shown here if this person's delegate took action on the document.
To drill down into the details of each action, click show . The system displays the detail. Several layers of
information may be available for an action request.

KFS Overview and Introduction Page 50 of 64 7/22/2015
Pending Action Requests Tab The “Pending Action Requests” tab displays the next action to be taken and shows more detailed routing information about
this request. Only action requests at the current route node are displayed.
Viewing Pending Actions The following example shows a document that is awaiting approval by two fiscal officers.
The “Action” field indicates whether the document is in a user or group's action list or is pending their approval. An action of
“Pending Approve” means Workflow has identified other approval actions needed at this route node, but it has not actually
sent these requests yet. These pending approval actions may be determined by the Priority attribute on the appropriate
workflow responsibilities.
The “Requested Of” field displays the name of the user or group responsible for the pending action. The value in this field is
based on the responsibility at this current route level. In cases where a document routes to a role with more than five
members the name of the role will be displayed along with any qualifying values pertaining to the role assignees who
received the request.
Note that the “Pending Action Requests” tab shows pending requests only for the document at its current route node. The
system may add new requests when the document transitions to a new route level.
To identify members of a group whose ID is displayed in the “Requested Of” field, click the link for the group ID. The
system displays information about the group members.
If multiple users are identified as the recipients of a single action request, the first of the specified users to take the action will
cause the system to clear the action request for all other users with the same request.

KFS Overview and Introduction Page 51 of 64 7/22/2015
Future Action Requests Tab When a document's status is “saved” or “enroute,” the “Future Action Requests” tab on the “Route Log” shows the action
requests that Workflow will generate in the future based on the information currently on the document.
To open this section and view the future action requests, click show button. Future action requests are listed in the
order in which they are to occur.
As a document routes and users take action on it, the system updates the contents of the “Future Action Requests” tab to
show only those requests that have not yet been made by Workflow. When a document reaches “Final” or “Processed” status
in Workflow, this tab becomes empty because there are no future requests to display.
The “Annotation” entry is a message that is generated based on the KIM responsibilities being referenced by Workflow.
Viewing Routing Details To display more detailed routing information about the request, click show .
The resulting display contains additional information about the request.
Pending Action Requests detail definitions:
Title Description
Node The route node at which this request was generated.
Priority The priority assigned to this workflow request. If multiple requests are generated at the same workflow
node, the system generates requests with low priority numbers before requests with higher priority numbers.
Approval
Policy
A value indicating whether members of a role receiving this request must each take action to fulfill the
request or if only a single role member must take action.
Forced
Action
A true/false indicator specifying whether a user must take action on this document even if he or she has
acted on it previously. If 'True,' then the user must take another action. If 'False,' then the previous action
will automatically fulfill this request.

KFS Overview and Introduction Page 52 of 64 7/22/2015
Route Status Route status indicates where a document is in its routing process. For any given document, the system displays route status in
both the Route Log tab and the document header.
The following table summarizes the meaning of various route statuses in the KEW.
Route status:
Status Description
Approved The document has been approved. The document is now a valid business transaction in accordance with
institutional needs and policies. See note below.
Canceled The document is denoted as void and should be disregarded. This status is applied to a document when an
initiator creates a document and cancels it before submitting it for approval.
Committed The document has been committed to the database. See note below.
Disapproved The document has been disapproved by an approver.
Enroute The document has pending approval requests.
Exception The document has been routed to an exception queue because workflow has encountered an error when
trying to process its routing.
Final The document has been routed and has no pending approval or acknowledgement requests. Documents in
'Final' status are considered approved in that documents in this status affect the General Ledger or update
Chart of Accounts values.
Initialized The document has been created but has not yet been saved or submitted.
Processed The document has no pending approval requests but still has one or more pending acknowledgement
requests. Processed documents are considered approved, so they impact the General Ledger or update
Chart of Accounts values.
Saved The document has been started but not completed or routed yet. The save action allows the initiator of a
document to save his or her work and close the document. The document may be retrieved from the
initiator's action list for completion and routing at a later time.
A user does not ordinarily see a “Status” value of “Approved” or “Committed.” The system displays these statuses to users
only as a result of a system error or performance issue.
Action List In the KFS, you receive action requests for e-docs through your action list. This list provides summary information about
each document that requires your attention, such as document type, title, route status, the type of action requested of you,
who initiated the document, when it was created, and whether or not you've received this request because you are a delegate
or a member of a group.
1. Click “View Action List” button.
2. The Workflow system retrieves all documents that you have initiated and saved and any documents that are routed
to you to approve, acknowledge, or FYI.

KFS Overview and Introduction Page 53 of 64 7/22/2015
3. Click the document Id link to open the document.
4. The system displays a set of buttons at the bottom of the screen. The buttons you see depend on your role and the
requested action.
5. Click one of the workflow action buttons.
Workflow Action Buttons When you open a document, you see various workflow action buttons at the bottom of the page. The buttons vary depending
on the kind of action request you have received for the document and the KIM role(s) to which you belong.
Workflow action buttons:
Action Description
Signifies that you have responded to the acknowledgement action request. This button is available
only to users to whom a document has been routed for acknowledgement. See FYI below.
Signifies that in your judgment the document represents a valid business transaction in accordance
with institutional needs and policies. A single document may require approval from several users,
at multiple route levels, before it moves to 'Processed' status.
Bypasses all subsequent levels of approval and immediately moves a document to 'Processed' or
'Final' status. Anyone who would otherwise have received the document for approval receives an
acknowledge request instead. This action may be taken only by roles associated with blanket
approve document permission, such as the KFS-SYS Manager role.
Denotes that the document is void and should be disregarded. Canceled documents cannot be
modified in any way and do not route for approval.

KFS Overview and Introduction Page 54 of 64 7/22/2015
Allows you to exit the document. The system displays a message asking whether you want to save
the document before closing. No changes to action requests, route logs or document status occur
as a result of a close action. If you initiate a document and close it without saving, it is the same as
canceling that document.
Allows you to create a new document based on the existing document. Not all document types can
be copied.
Signifies that in your judgment the document does not represent a valid business transaction. A
disapprove action from any single approver prevents a document from posting to the GL or
updating a maintenance table.
Allows you to correct documents by creating a new document that reverses the original
transaction. This feature can be used only on documents that have completed the routing process
and have been fully approved. Not all document types are eligible for error correction.
Signifies that you have responded to the FYI action request. This action is available only to users
to whom a document has been routed for FYI. The difference between acknowledgement and FYI
is that FYI requests can be cleared directly from the action list without opening the document. FYI
requests also have a different effect on the document status than acknowledgements. Documents
with no pending approval requests but with pending acknowledge requests are in 'Processed'
status. A document with no pending approval requests but with pending FYI requests is in 'Final'
status.
Refreshes the screen and displays the most recently saved information. Changes that are made but
not saved prior to reloading a page are not maintained.
If you are the initiator of this document, allows you to save your work and close the document.
The document may be retrieved from your action list for completion and routing at a later time. If
your permissions allow you to edit enroute documents, you can also save changes to an enroute
document in your action list.
Moves the document (through workflow) to the next level of approval. After a document is
submitted, it remains in 'Enroute' status until all approvals have taken place.
Special attention should be paid when you select any of the workflow action buttons noted below.
Blanket Approving a Document If you are a member of a role with a blanket approve document permission (such as the KFS-SYS Manager role), you have
the option to blanket approve a document routed to you for your approval.
Note that you can only blanket approve a document you are initiating or a document for which you already have an approval
request.
Click blanket approve to approve the document bypassing all other approvals.
Disapproving a Document
1. Click disapprove .
2. Enter a reason for disapproval, and then click yes to confirm.

KFS Overview and Introduction Page 55 of 64 7/22/2015
After you complete the disapprove action, the system displays the reason in the Notes and Attachment tab.
Acknowledging a Document Acknowledgements do not interrupt the normal workflow routing of a document. They do not stop a document from routing
on to other individuals, groups, or roles who need to take approval actions. To acknowledge a document, click acknowledge
.
FYI FYIs do not interrupt the normal workflow routing of a document. To signify that you have responded to the FYI action, you
may take either of two actions:
Click FYI when you open the document
In the action list, select in the Actions column and click .
Correcting Errors after Approval The error correction action allows you to correct documents by creating a new document that reverses the original transaction
that has been fully approved. A document created with the error correction action must route and be approved in the same
manner as the e-doc it corrects.
Important Note: The error correction action should not be confused with the financial transaction document type General
Error Correction (GEC), which is described in “General Error Correction” module in the KFS Financial Processing
documentation.

KFS Overview and Introduction Page 56 of 64 7/22/2015
1. Click error correction . The system creates a new document with a new document ID. The
system also displays “Corrects Document ID” in both the document header and the “Notes and Attachment” tab of
the document.
2. Amounts are in negative to reverse the original transaction.
3. The new document has an annotation that is an error correction.
4. Click submit .
5. The header of the corrected document shows the corrected by document ID.
Workflow Preferences The system allows you to change the automatic refresh rate, action list page size, email notification, and row colors that
indicate the status of the document. You may also limit the list of documents in the action list by setting filters for delegators
or workflow status. To make any of these changes, click preferences in the action list.
The system displays the Workflow Preferences screen.

KFS Overview and Introduction Page 57 of 64 7/22/2015
Workflow Preferences field definitions:
Criteria Description
Automatic Refresh Rate Enter a number in whole minutes.
Action List Page Size Enter a number of rows to display per page in the action list.

KFS Overview and Introduction Page 58 of 64 7/22/2015
Email Notification Select one of the desired email frequencies from the list: 'None,' 'Daily,' 'Weekly' or
'Immediate’.
Receive Primary Delegate
Emails
Check this box to receive an email when a document arrives in your action list for which
you are the primary delegate.
Receive Secondary Delegate
Emails
Check this box to receive an email when a document arrives in your secondary delegate
action list.
Delegator Filter In the list, select 'Secondary Delegators on Action List' or 'Secondary Delegators only on
Filter Page' to specify when to show the secondary delegation entries in your action list.
Fields Displayed in Action List Check each box to include these items on the action list.
Document Route Status Colors
for Action List Entries
Click one of the color options for each document route status.
To save your preferences, click save .
To return to the default preferences, click reset .
Color changes do not take place until the next time you log onto the system. The row colors change the next time you log on.
Action List Filter Setting a filter allows you to display a subset of the action list.
1. To go to the “Action List Filter” dialog box, click filter .
2. Specify filtering criteria in the Action List Filter dialog box.
3. Click filter .

KFS Overview and Introduction Page 59 of 64 7/22/2015
Action List Filter definitions:
Criteria Description
Document Title Enter a partial or full character string that you are looking for in the document description. For
example, enter 'Test' to see all documents that contain 'Test' in the document description. This
field is case sensitive. Select the Exclude? check box to exclude documents with the specified
title from the list.
Document Route Status Select the route status you want. The choices are 'All,' 'Approved,' 'Disapproved,' 'Enroute,'
'Exception,' 'Processed and Saved’. Select the Exclude? check box to exclude documents with
the selected status from the list.
Action Requested Select an action from the list. The choices are 'Acknowledge,' 'Approve,' 'Complete,' and 'FYI’.
Select the Exclude? check box to exclude documents with the selected action from the list.
Action Requested Group Select the name of the group that is requested to take an action.
Document Type Select a document type from the lookup . Select the Exclude? check box to exclude
documents with the selected type from the list.
Date Created Enter a date range or select dates from the calendar to limit the documents based on the
date they were created. Select the Exclude? check box to exclude documents that were created
during this given time range.
Date Last Assigned Enter a date range or select dates from the calendar to limit the documents based on the
date that this action item was generated for you. Select the Exclude? check box to exclude
documents that entered your action list during this given time range. The acceptable format is
mm/dd/yyyy.
The system displays a message in the upper left corner to confirm your action list is being filtered by listing the filter field
that is being used. Below is an example of an action list being filtered by the “Document Route Status” field.
Clearing the Action List Filter The “Clear Filter” button is visible only when you have previously created the filter. To remove the filter and view the entire
list, click clear filter .
Advanced Document Searches We have introduced the basic search capabilities within the KEW. The system also provides more advanced and sophisticated
search capabilities.
Detailed vs. Basic Searches When you click “Search for Documents,” the system displays a search screen that initially defaults to a basic search.

KFS Overview and Introduction Page 60 of 64 7/22/2015
To switch between the basic search and detailed search, click the detailed search or basic search button near the top of the
screen. The detailed search screen gives you more options for specifying search criteria.
Superuser vs. Non-Superuser Searches The search screen initially defaults to a non-superuser search mode. If you are a member of a role (e.g., the KFS-SYS
Workflow Administrator role) that has the administer routing for document permission, you may switch between non-
superuser search and superuser search mode by clicking the superuser search or non-superuser search
link.

KFS Overview and Introduction Page 61 of 64 7/22/2015
The superuser search mode gives you more search options and allows you to access documents you wish to take superuser
actions on, such as bypassing an approval or sending a document to another route level.
Anyone can search for documents using superuser search, but only users with an appropriate role can actually take special
actions on the documents retrieved by the superuser search function.
Document-Specific Searches Document-specific searches allow you to specify additional criteria when you search specific document types or groups of
documents such as financial transactions or purchasing/accounts payable documents. In addition to the standard search
criteria available in the basic and advanced searches, document-specific searches allow you to specify fields such as dollar
amounts, status, and document-specific reference numbers.
You may also access these search options after you click the doc search button. To access document-specific search at this
point, either enter the document type name and tab out of the field or use the Document Type lookup . The system
displays the appropriate additional search fields.
Named Search When you name a set of search criteria, the system saves your search as a named search. When you later click search, the
system displays a list of all named searches you have created in the Searches list.
Clear Saved Searches
To clear all of your named searches, click clear saved searches . The KFS clears the “Searches” list.
Clearing Search
To clear your previous search criteria, click clear .
Superuser Functions If you are a user with 'Administer Routing for Document' permission (for example, if you are a member of the KFS-SYS
Workflow Administrator role), you may take special workflow actions on documents.
1. To access these options, click Search For Documents .
2. Select the superuser search link in the upper-right corner.
3. Perform a document search as usual and open the document. The top of the document is a copy of the document
itself. It has been cropped out of the picture below so the approval section can be highlighted. The approval section
is at the bottom of the document.
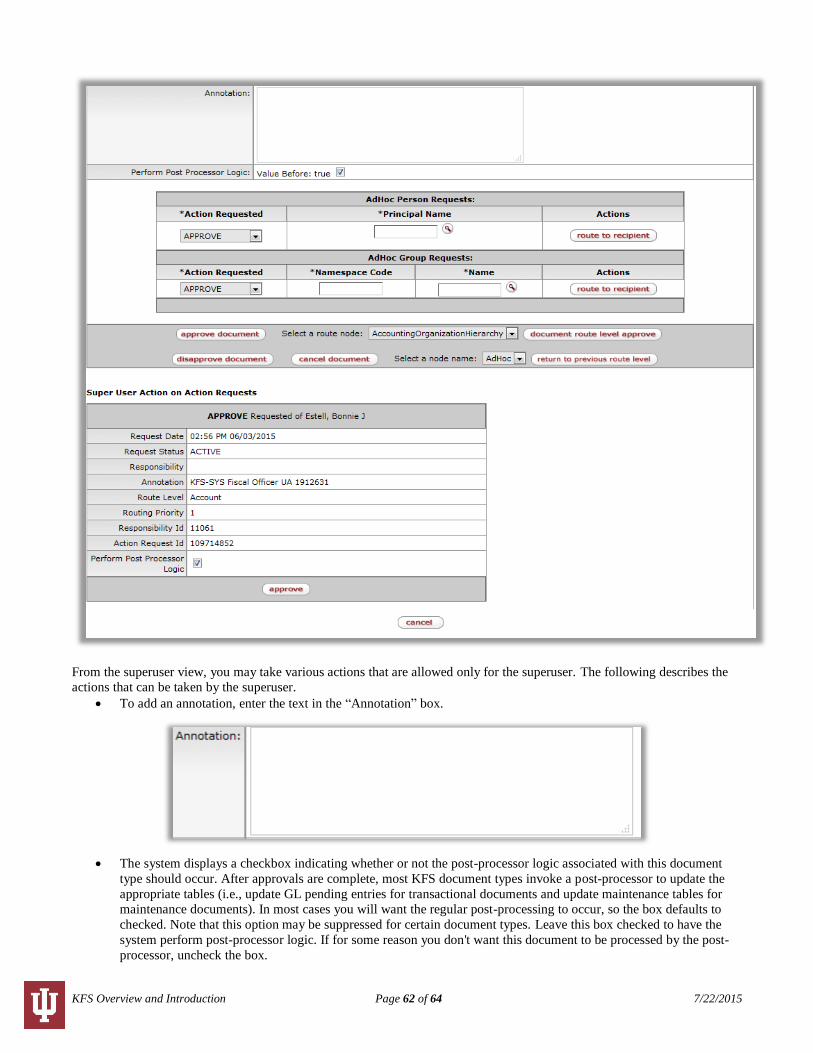
KFS Overview and Introduction Page 62 of 64 7/22/2015
From the superuser view, you may take various actions that are allowed only for the superuser. The following describes the
actions that can be taken by the superuser.
To add an annotation, enter the text in the “Annotation” box.
The system displays a checkbox indicating whether or not the post-processor logic associated with this document
type should occur. After approvals are complete, most KFS document types invoke a post-processor to update the
appropriate tables (i.e., update GL pending entries for transactional documents and update maintenance tables for
maintenance documents). In most cases you will want the regular post-processing to occur, so the box defaults to
checked. Note that this option may be suppressed for certain document types. Leave this box checked to have the
system perform post-processor logic. If for some reason you don't want this document to be processed by the post-
processor, uncheck the box.

KFS Overview and Introduction Page 63 of 64 7/22/2015
To ad hoc route the document, select the type of recipient you are routing to (person or group), then enter the
appropriate principal name or namespace code and group name, select the desired action request, and click route to
recipient .
To approve a document, click approve document .
To disapprove the document, click disapprove document .
To cancel the document, click cancel document .
To return the document to the previous route level, select a node name from the route level list and click return to
previous route level .
To complete any of the actions above, click the action button that the system displays along with the description of
this pending action request.
Important Note: Super approvers can also approve the document at specific “nodes” which represent different approval
levels. To approve for only one level, click the “Approve” button for that level.
Standard Reports As delivered, the KFS provides access to a number of standard AR and effort certification reports as well as several standard
system reports.
Reports submenu:
Menu Group Description
Accounts
Receivable
Allows for retrieval of standard reports for billing statement, customer aging, and customer invoices
derived from data within the KFS.
Effort
Certification
Allows for retrieval of standard effort certification reports including Duplicate Certification Report,
Effort Certification Extract Build, Outstanding Certification by Chart/Org/Report, and Outstanding
Certification by Report.
These reports may be used for monitoring account conditions throughout the year. It is up to each implementing institution to
determine the best method for scheduling, running, viewing, and distributing reports.
Standard reports are made up of these main sections:

KFS Overview and Introduction Page 64 of 64 7/22/2015
Header Information: The header contains information concerning the identification of the report and management of
the account (for example, the name of the fiscal officer, organization, responsibility, account number, and the fiscal
period of the report).
Report ID: The report ID is a unique ID assigned to each of the standard reports.
Column Headings: The column headings identify the contents of the columns directly below them.
Content: The report is separated into sections identifying the content (or data displayed therein) of each table (for
example, tables might include columns for revenues, expenditures, assets, liabilities, fund balances, and rows for
subtotals and totals).
Depending on the type of report, the report can be viewed, printed, and saved for your records and future reference. The
native format (indicated by corresponding file extension) of the report may be viewable with compatible software such MS
Excel (.AXLES) or Comma Separated Values (.CSV).