juma/forsete-ii series user guide - homeconnect.mehomeconnect.me/files/filer/support/0_797xx...
TRANSCRIPT

juma/forsete-ii series user guide

2
introduction This is the user guide for the DKTCOMEGA 7973x/794xx JUMA/Forsete-II Series CPE. The series include the following variants: - 79734 – 1x 10/100/1000Mbps RJ-45- 79741 – 4x 10/100/1000Mbps RJ-45, SNMP- 79742 – 4x 10/100/1000Mbps RJ-45, SNMP, CATV
The user guide includes explaination of features supported from firmware revision 05_02.Syntaxes for the individual features are listed in this document, please notice if the functionality is not implemented in the revision of the firmware yet - it is be marked as (feature will be supported in a future release)
indexThe boot process of the CPE node ..................................................................................... 3
DHCP Settings ............................................................................................................. 4
Custom configuration .................................................................................................... 5
Device script command .................................................................................................. 7
Reboot ...................................................................................................................... 8
Save configuration to flash .............................................................................................. 8
dhcp option 82 ............................................................................................................ 8
support for ssh ........................................................................................................... 10
configuration of snmp values .......................................................................................... 12
syslog ...................................................................................................................... 12

3
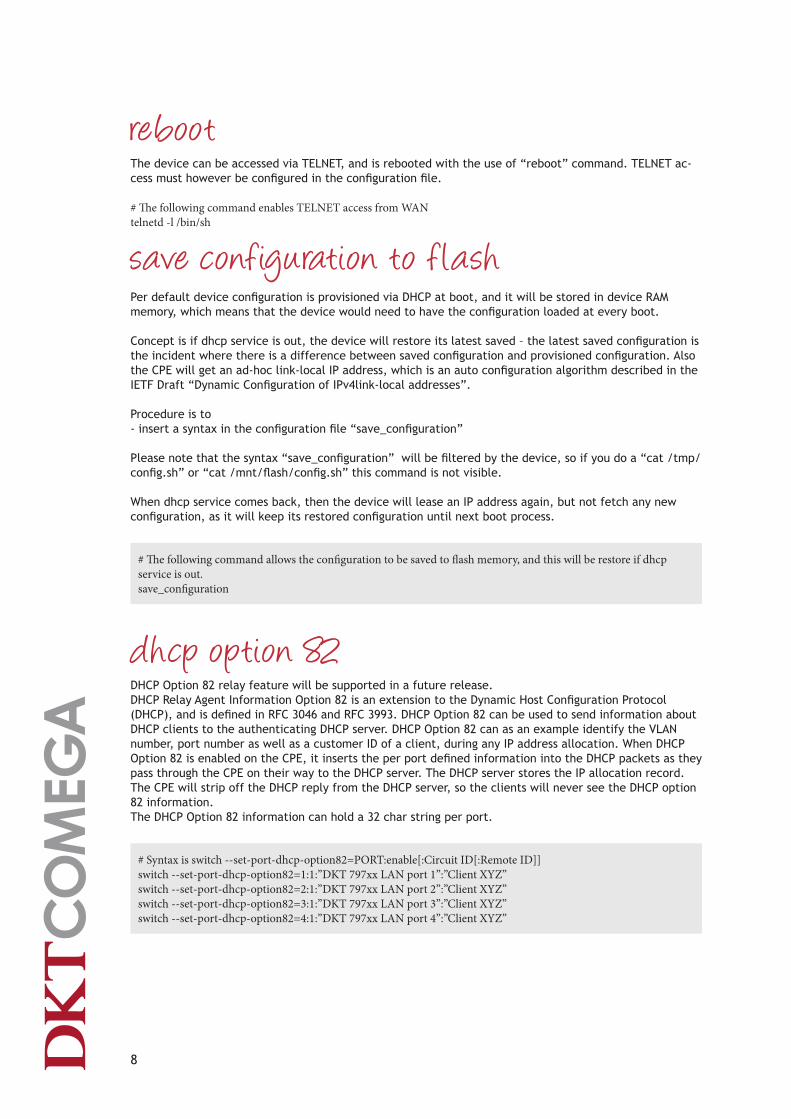
the boot process of the cpe nodeBoot start-up procedure:
• The first time that the device boots, it issues a DHCP Discover with dhcp option 60 set to DKT_F2_firstboot. The firmware can be downloaded to the unit.• Alternatively if firmware is present in the device, the device issues a dhcp request with dhcp option 60 set to DKT_F2_firmware_vXX_XX (where XX_XX is the version number of the firmware).
When a new node is unpacked from the factory, it doesn’t contain any firmware, and before it can be used in must be updated with the latest revision. This mean that when the node is installed at the customer premise, it will be required to remotely update with firmware, before it will be working. It is highly recommended to visit www.dktcomega.com -> support -> firmware for latest boot loader and firmware revision.The managed node depends on DHCP negotiation. Through this negotiation the firmware ID of the man-aged node is exchanged for a configuration file. The DHCP server hands out the configuration file depend-ing on the firmware ID.
Uboot.A device power-up it will start the uboot process. The purpose is to validate if the device has the correct firmware image (if any), and bring it onto the network using DHCP.
Linux (Device OS system).This is the main software with full network support and features to use the complete hardware platform. The network is configured using DHCP, and the system configuration is downloaded using TFTP.The first bootp/dhcp request from the device can be used to remote upgrade the firmware. If a bootfile and a bootserver is given in the bootp response then the file is downloaded via tftp and executed by the device.
The device is configured to not pass any traffic per default, so in order to pass traffic through the switch engine, the switch --enable-lan command must be provisioned to the device. Also telnet daemon must be started, with the use of telnetd -l /bin/sh command in the script
At device start-up configuration is provisioned automatically. Firmware is provisioned by request, either at first boot or when applicable
Ensures correct device settings and automatically firmware upgrade without user interaction
Firmware and configuration are provisioned by the operator
DHCP Discover, vendor class id = DKT_B2_firstboot
DHCP Offer, IP Address + firmware info, network info
DHCP Request, parameter list, network info + file name
DHCP ACK, respond parameter list, network info etc
TFTP Request – file name
TFTP Transfer – file name
DHCP Release – release IP address and boot
DHCP Discover, vendor class id = DKT_F2_firmware_vXX_XX, request configuration (option 66, 67)
DHCP Offer, IP Address + configuration info, network info
DHCP Request, parameter list, network info + conf file
DHCP ACK, respond parameter list, conf file, network info etc
TFTP Request – conf file
TFTP Transfer – conf file
If DHCP offer end with ”/” instead of specific file-name then CPE will try to make TFTP Request for:
<CFG_DIR>dkt_config_<MAC>.sh <CFG_DIR>dkt_config_<Hostname>.sh <CFG_DIR>dkt_config_<Model>.sh <CFG_DIR>dkt_config.sh
If DHCP offer doesn’t include any firmware file name, then the device will release the IP Address and continue to next step, Linux start-up
BO
OT
LOA
DE
RLI
NU
X
DHCP Server
DKT 797xx

4
dhcp settings The CPE requires a dhcp server connected to the fiber WAN port before power on. Please refer to Appendix 3 – DHCP Settings for example of DHCP settings
1) The device requests in its Uboot DHCP discoverer:Option: 1, 3
2) DHCP Server offers in its response:Option: 53, 54, 51, 1, 3

5
3) CPE requests in its LINUX Boot-up process, where configuration file is requested:Option: 1, 3, 6, 12, 43, 54, 66, 67 - Please make sure that DHCP Server responds to these option re-quests, as it will influence on the booting sequence, if these are not correctly answered, and may cause inproper booting of the device.
custom conf iguration When the OS issue a dhcp request a filename of a configuration file can be sent to the device. This configuration file is then downloaded by tftp during the boot process and issued instead of the default configuration. In this way it is possible to persist settings for each customer (by mapping the hardware address of the node and the customer number).
The server and the filename of the configuration file should be sent in respective tftp-server-name (op-tion 66) and bootfile-name (option 67) from the dhcp server. Notice these options are different from the bootfile/bootserver used in the bootp response.
If it is not feasible that the dhcp server distinguish the customer’s configurations base on the hardware address an alternative method can be used. The dhcp server sends out the name of a generic configura-tion. This configuration can then include instruction to the node of fetching a node specific configure by tftp where the requested filename is a combination of the node hardware address. In the generic configuration script, which is common for all devices and that will provisioned during boot up, the following instructions can be inserted:
source /etc/dhcp.varsexport WAN_MACADDR=$(ip addr show dev eth0 | grep “ether” | cut -d “ “ -f6 | tr -d :)tftp -g -r my_conf_$WAN_MACADDR -l /tmp/config.sh $TFTP_SERVERsave_configurationsource /tmp/config.sh
Alternatively, if DHCP offer in the response instead just end with ”/” instead of specific file-name then the device will try to make TFTP Request for:
<CFG_DIR>dkt_config_<MAC>.sh <CFG_DIR>dkt_config_<Hostname>.sh <CFG_DIR>dkt_config_<Model>.sh <CFG_DIR>dkt_config.sh

6
An example of a configuration file could be the following:
##################################################################### DKT configuration# Firmware version: XX_XX####################################################################switch --enable-lan # enable LAN ports# Example, how to create 4 VLANs, egress tagged on WAN and untagged on all LANs conf vlan init conf vlan create vlan-table vid 100 conf vlan create vlan-table vid 200conf vlan create vlan-table vid 300 conf vlan create vlan-table vid 400 conf vlan set vlan-table vid 100 member 0,4 conf vlan set vlan-table vid 200 member 1,4 conf vlan set vlan-table vid 300 member 2,4 conf vlan set vlan-table vid 400 member 3,4 conf vlan set pvid port 0 100 conf vlan set pvid port 1 200 conf vlan set pvid port 2 300 conf vlan set pvid port 3 400 conf vlan set pvid port 4 100 conf vlan set vlan-table vid 100 tag-member 4 conf vlan set vlan-table vid 100 untag-member 0 conf vlan set vlan-table vid 200 untag-member 1 conf vlan set vlan-table vid 300 untag-member 2 conf vlan set vlan-table vid 400 untag-member 3
# Example, how to enable double tagging on WAN, define SVID for each origin port conf svlan init conf svlan set service-port 4 conf svlan create svlan-table svid 500 conf svlan create svlan-table svid 600 conf svlan create svlan-table svid 700 conf svlan set svlan-table svid 500 member 0,4 conf svlan set svlan-table svid 600 member 1,4 conf svlan set svlan-table svid 700 member 2,4 conf svlan set port 0 svid 500 conf svlan set port 1 svid 600 conf svlan set port 2 svid 700 conf svlan set svlan-table svid 500 untag-member 0 conf svlan set svlan-table svid 600 untag-member 1 conf svlan set svlan-table svid 700 untag-member 2## The following command enables TELNET access from WANtelnetd -l /bin/sh # End of DKT configuration####################################################################

7
device script commands The following commands are supported in the script that will be downloaded to the CPE via TFTP during boot-up process.This command is used to configure the switch in the unit. The command takes one or more of the following parameters, with the syntax switch --nn or conf xx.
The 79741/742 models have 4 LAN ports, whereas 79734 model has 1 LAN port. The port outline and port mapping is as follows, shown from the front:
4 port (79741/742):
LAN1 1
LAN22
LAN33
LAN44
Please refer to syntax guide for Command Line Interface, to configure VLAN, QoS etc. parameters
8
reboot The device can be accessed via TELNET, and is rebooted with the use of “reboot” command. TELNET ac-cess must however be configured in the configuration file.
# The following command enables TELNET access from WANtelnetd -l /bin/sh
save conf iguration to f lashPer default device configuration is provisioned via DHCP at boot, and it will be stored in device RAM memory, which means that the device would need to have the configuration loaded at every boot.
Concept is if dhcp service is out, the device will restore its latest saved – the latest saved configuration is the incident where there is a difference between saved configuration and provisioned configuration. Also the CPE will get an ad-hoc link-local IP address, which is an auto configuration algorithm described in the IETF Draft “Dynamic Configuration of IPv4link-local addresses”.
Procedure is to - insert a syntax in the configuration file “save_configuration”
Please note that the syntax “save_configuration” will be filtered by the device, so if you do a “cat /tmp/config.sh” or “cat /mnt/flash/config.sh” this command is not visible.
When dhcp service comes back, then the device will lease an IP address again, but not fetch any new configuration, as it will keep its restored configuration until next boot process.
# The following command allows the configuration to be saved to flash memory, and this will be restore if dhcp service is out.save_configuration
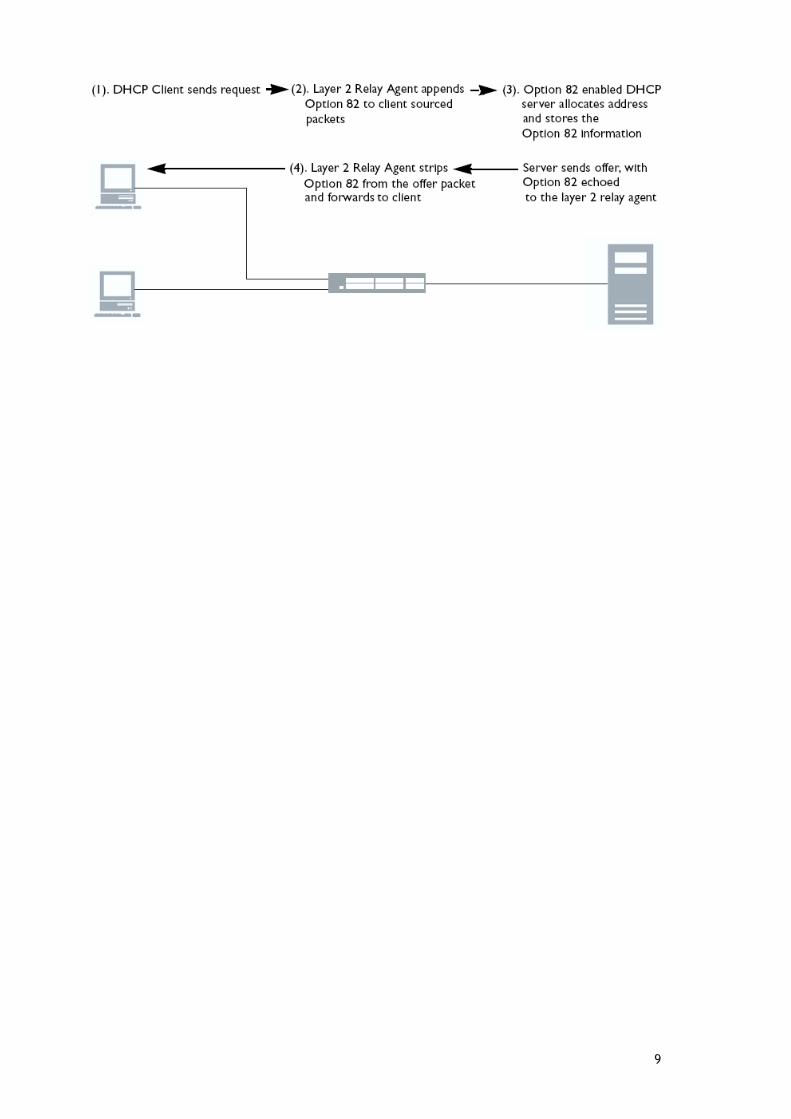
dhcp option 82DHCP Option 82 relay feature will be supported in a future release.DHCP Relay Agent Information Option 82 is an extension to the Dynamic Host Configuration Protocol (DHCP), and is defined in RFC 3046 and RFC 3993. DHCP Option 82 can be used to send information about DHCP clients to the authenticating DHCP server. DHCP Option 82 can as an example identify the VLAN number, port number as well as a customer ID of a client, during any IP address allocation. When DHCP Option 82 is enabled on the CPE, it inserts the per port defined information into the DHCP packets as they pass through the CPE on their way to the DHCP server. The DHCP server stores the IP allocation record. The CPE will strip off the DHCP reply from the DHCP server, so the clients will never see the DHCP option 82 information.The DHCP Option 82 information can hold a 32 char string per port.
# Syntax is switch --set-port-dhcp-option82=PORT:enable[:Circuit ID[:Remote ID]]switch --set-port-dhcp-option82=1:1:”DKT 797xx LAN port 1”:”Client XYZ”switch --set-port-dhcp-option82=2:1:”DKT 797xx LAN port 2”:”Client XYZ”switch --set-port-dhcp-option82=3:1:”DKT 797xx LAN port 3”:”Client XYZ”switch --set-port-dhcp-option82=4:1:”DKT 797xx LAN port 4”:”Client XYZ”
9

10
support for sshPlease note that support for SSH is available for all DKTCOMEGA CPE platforms except HW revision “FE1 0” or earlier. HW revision can found via SNMP OID -.1.3.6.1.4.1.27304.10.1.0
Alternatively with DKT-GENERIC-MIB::hwVersion.0HW with values of “ERROR” or “FE1 0” do not support SSH.
In order to have SSH support, please insert the following command in the configuration script:
# SSH daemon is started with the following command/etc/init.d/sshd start
The CPE is preconfigured with a login for SSH, please consult DKTCOMEGA for user name and password.
The first time the SSH daemon is started; two secret key files are generated.
Please note that it takes a while to generate the secret key files. The secret key files are not automati-cally stored to flash.
Save the SSH secret key files to flash using save_configuration in the configuration file:
# Save configuration to flash memory, same SSH key is used at every bootsave_configuration
Now it is possible to log into the CPE as the user ”Administrator” (case sensitive) through SSH.
ssh Administrator@<IP address>
or
ssh -l Administrator <IP address>
or using e.g. Putty application
When logged in as Administrator, it is not possible to make any changes, as you must switch user to root with this command:
su
Now it is possible to run all of the configuration commands, and it is possible to change the password of the user with the command
passwd <username>
If password is changed remember save to flash with the save_configuration command.
When finished, type exit to return to the Administrator user. To log out, type exit again.
The daemon is started by the normal configuration file by inserting the following commands (the lines should replace the telnetd command):
# Some configuration commands# Start SSH daemon/etc/init.d/sshd start# Save configuration and SSH secret files to flashsave_configuration

11
The sshd script automatically restores password- and SSH key files from flash before the SSH daemon is started.
Procedure for changing SSH password on all CPE units.If password for Administrator is to be changed for all CPE’s do the following:
1) Log into one CPE via ssh2) change user to root with command su3) cd /etc4) change password of the CPE5) Now copy the shadow file to a tftp server, typing “tftp -p -l shadow -r shadow <TFTP Server IP Address>”
This file has to be pushed to all CPE’s6) you can edit CPE’s configuration files by inserting the following commands:
tftp -g -r shadow -l /tmp/shadow <TFTP Server IP Address> # This will get the shadow file for Administrator from TFTP server and temporarily store this in /tmp directory
chown root /tmp/shadow # change owner of shadow
chmod 600 /tmp/shadow # change rights of shadow
mv /tmp/shadow /etc/ # move the shadow file to correct directory
save_configuration # save configuration to flash memory, now the password is saved locally on each CPE

12
conf iguration of snmp valu esSNMP feature will be supported in a future release. The following SNMP values can be set by the configuration file:
SysContact the administrate contact for the network echo “syscontact [email protected]” >> /etc/snmp/snmpd.local.conf
SysLocation for the location of the system echo “syslocation somewhere” >> /etc/snmp/snmpd.local.conf
SysName the name of the system e.g the customer identification echo “sysname customerXYZ” >> /etc/snmp/snmpd.local.conf
syslogSyslog feature will be supported in a future release. Support for remote logging via syslog (RFC 3164)To start syslog, enter the following line in your configuration file
syslogd [-l <log level>] -R <Remote server IP>
The syslog daemon sends logging information in UDP packets - port 514.
If all IP addresses are handled by the DHCP server, then there is also a way that the syslog daemon may be started by the DHCP client:
echo “-O logsrv” > /tmp/dhcp_requests.txt/etc/init.d/udhcpc restart
The daemon will be started by the DHCP client if the log server parameter (DHCP option 7) is received in the DHCP response.
You may control which extra DHCP options that are requested in DHCP option 55. It is done by creating a file /tmp/dhcp_requests.txt containing just one line with a list of request commands to the DHCP client.
The format of the line is:-O <option name> [-O <option name>] ...
The following values for <option name> are currently supported:
Name DHCP Option Description
dns 6 Domain name server IP
logsrv 7 Log server IP address
hostname 12 Hostname of the box
domain 15 Domain name
serverid 54 DHCP server identifier