iway installation and configuration version 5 release 5 · pdf fileiway installation and...
TRANSCRIPT

iWayiWay Installation and ConfigurationVersion 5 Release 5
Includes support for JCA 1.5
DN3501474.0305

EDA, EDA/SQL, FIDEL, FOCCALC, FOCUS, FOCUS Fusion, FOCUS Vision, Hospital-Trac, Information Builders, the Information Builders logo, Parlay, PC/FOCUS, SmartMart, SmartMode, SNAPpack, TableTalk, WALDO, Web390, WebFOCUS and WorldMART are registered trademarks, and iWay and iWay Software are trademarks of Information Builders, Inc.
Sun and Java are trademarks or registered trademarks of Sun Microsystems, Inc. in the U.S. and other countries.
Due to the nature of this material, this document refers to numerous hardware and software products by their trademarks. In most, if not all cases, these designations are claimed as trademarks or registered trademarks by their respective companies. It is not this publisher’s intent to use any of these names generically. The reader is therefore cautioned to investigate all claimed trademark rights before using any of these names other than to refer to the product described.
Copyright © 2005, by Information Builders, Inc and iWay Software. All rights reserved. Patent Pending. This manual, or parts thereof, may not be reproduced in any form without the written permission of Information Builders, Inc.
PrefaceThis documentation describes how to install and configure iWay Adapters, iWay Connector for JCA, iWay Business Services Engine (iBSE), and iWay Application Explorer for use with Sun Java System Application Server. It is intended for those with an administrator’s knowledge of the operating systems and target systems involved in their implementation.
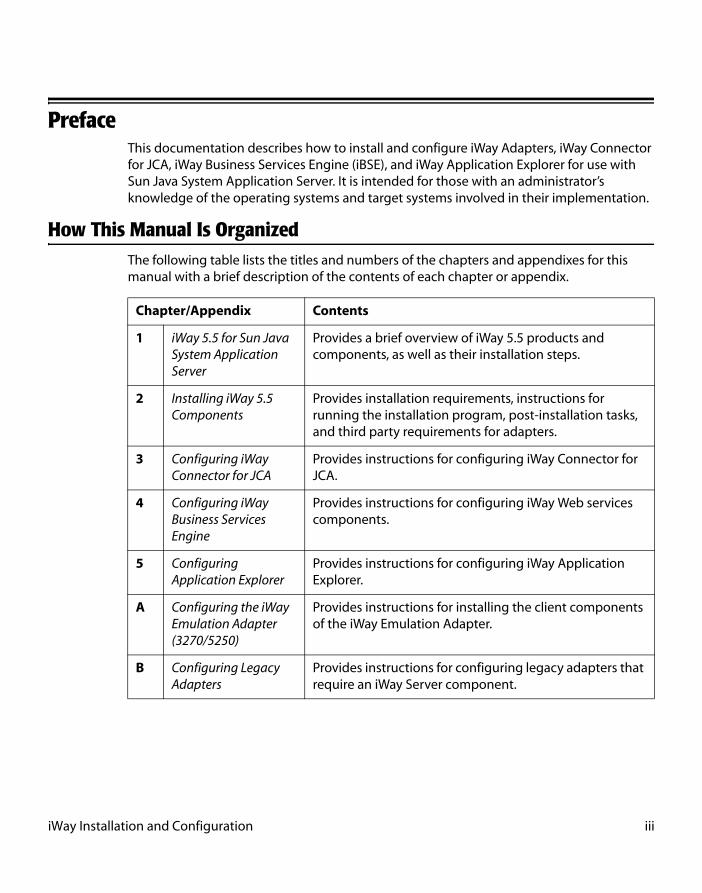
How This Manual Is OrganizedThe following table lists the titles and numbers of the chapters and appendixes for this manual with a brief description of the contents of each chapter or appendix.
Chapter/Appendix Contents
1 iWay 5.5 for Sun Java System Application Server
Provides a brief overview of iWay 5.5 products and components, as well as their installation steps.
2 Installing iWay 5.5 Components
Provides installation requirements, instructions for running the installation program, post-installation tasks, and third party requirements for adapters.
3 Configuring iWay Connector for JCA
Provides instructions for configuring iWay Connector for JCA.
4 Configuring iWay Business Services Engine
Provides instructions for configuring iWay Web services components.
5 Configuring Application Explorer
Provides instructions for configuring iWay Application Explorer.
A Configuring the iWay Emulation Adapter (3270/5250)
Provides instructions for installing the client components of the iWay Emulation Adapter.
B Configuring Legacy Adapters
Provides instructions for configuring legacy adapters that require an iWay Server component.
iWay Installation and Configuration iii
Preface
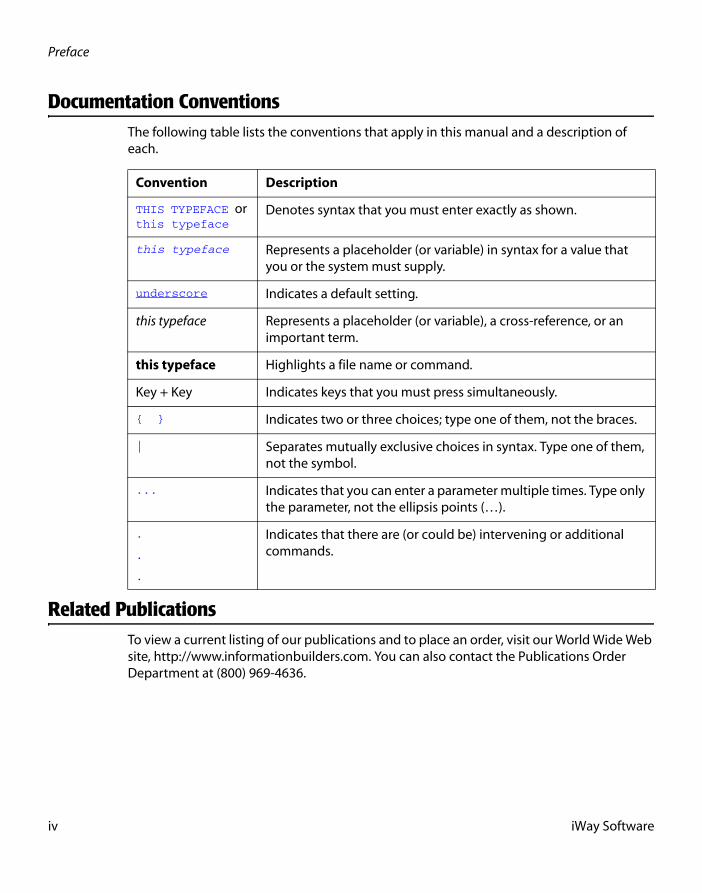
Documentation ConventionsThe following table lists the conventions that apply in this manual and a description of each.
Related PublicationsTo view a current listing of our publications and to place an order, visit our World Wide Web site, http://www.informationbuilders.com. You can also contact the Publications Order Department at (800) 969-4636.
Convention Description
THIS TYPEFACE or this typeface
Denotes syntax that you must enter exactly as shown.
this typeface Represents a placeholder (or variable) in syntax for a value that you or the system must supply.
underscore Indicates a default setting.
this typeface Represents a placeholder (or variable), a cross-reference, or an important term.
this typeface Highlights a file name or command.
Key + Key Indicates keys that you must press simultaneously.
{ } Indicates two or three choices; type one of them, not the braces.
| Separates mutually exclusive choices in syntax. Type one of them, not the symbol.
... Indicates that you can enter a parameter multiple times. Type only the parameter, not the ellipsis points (…).
.
.
.
Indicates that there are (or could be) intervening or additional commands.
iv iWay Software

Preface
Customer SupportDo you have questions about the software?
If you bought the product from a vendor other than iWay Software, contact your distributor.
If you bought the product directly from iWay Software, call Information Builders Customer Support Services (CSS) at (800) 736-6130 or (212) 736-6130.
Customer Support consultants are available Monday through Friday between 8:00 A.M. and 8:00 P.M. EST to address your iWay questions. Information Builders consultants also can give you general guidance regarding product capabilities and documentation. Please be prepared to provide your six-digit site code (xxxx.xx) when you call.
You also can access support services electronically, 24 hours a day, with InfoResponse Online. InfoResponse Online is accessible through our World Wide Web site, http://www.informationbuilders.com. You can connect to the tracking system and database of known problems at the Information Builders support center. Registered users can open, update, and view the status of cases in the tracking system and read descriptions of reported software issues. New users can register immediately for this service. The technical support section of www.informationbuilders.com also provides usage techniques, diagnostic tips, and answers to frequently asked questions.
To learn about the full range of available support services, ask your Information Builders representative about InfoResponse Online, or call (800) 969-INFO.
Help Us to Serve You BetterTo help our consultants answer your questions effectively, please be prepared to provide specifications and sample files and to answer questions about errors and problems.
The following tables list the specifications our consultants require.
Platform
Operating System
OS Version
Product List
Adapters
Adapter Deployment
For example, JCA, Business Services Engine, iWay Adapter Manager
Container Version
iWay Installation and Configuration v
Preface
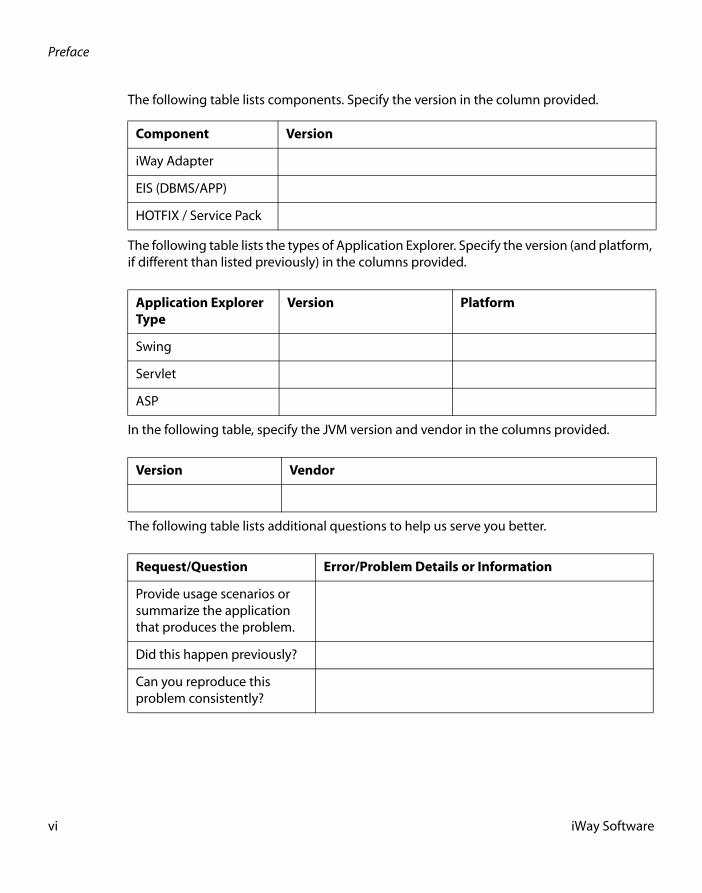
The following table lists components. Specify the version in the column provided.
The following table lists the types of Application Explorer. Specify the version (and platform, if different than listed previously) in the columns provided.
In the following table, specify the JVM version and vendor in the columns provided.
The following table lists additional questions to help us serve you better.
Component Version
iWay Adapter
EIS (DBMS/APP)
HOTFIX / Service Pack
Application Explorer Type
Version Platform
Swing
Servlet
ASP
Version Vendor
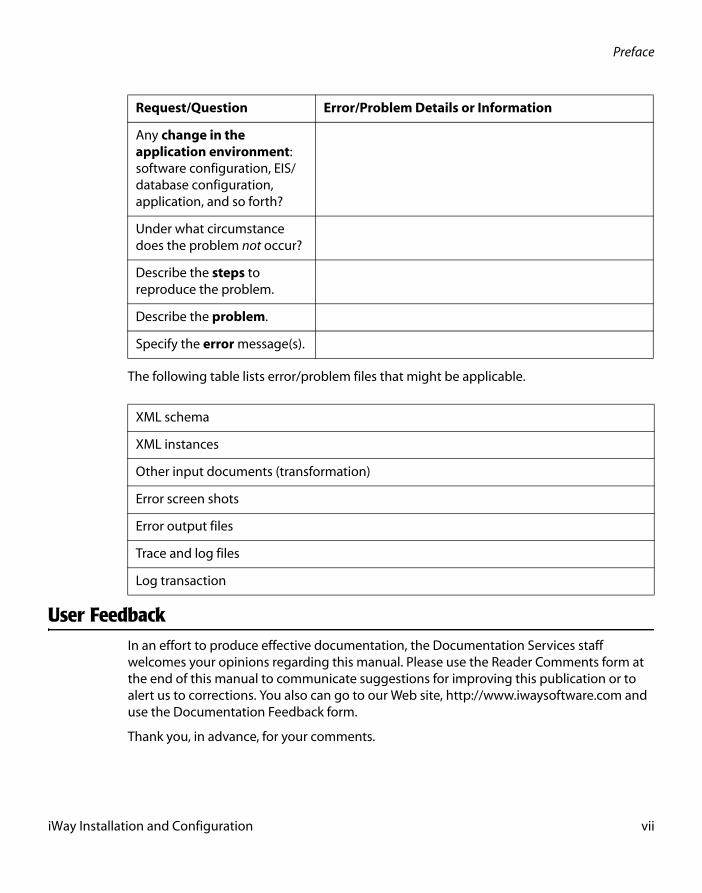
Request/Question Error/Problem Details or Information
Provide usage scenarios or summarize the application that produces the problem.
Did this happen previously?
Can you reproduce this problem consistently?
vi iWay Software
Preface
The following table lists error/problem files that might be applicable.
User FeedbackIn an effort to produce effective documentation, the Documentation Services staff welcomes your opinions regarding this manual. Please use the Reader Comments form at the end of this manual to communicate suggestions for improving this publication or to alert us to corrections. You also can go to our Web site, http://www.iwaysoftware.com and use the Documentation Feedback form.
Thank you, in advance, for your comments.
Any change in the application environment: software configuration, EIS/database configuration, application, and so forth?
Under what circumstance does the problem not occur?
Describe the steps to reproduce the problem.
Describe the problem.
Specify the error message(s).
XML schema
XML instances
Other input documents (transformation)
Error screen shots
Error output files
Trace and log files
Log transaction
Request/Question Error/Problem Details or Information
iWay Installation and Configuration vii
Preface
iWay Software Training and Professional ServicesInterested in training? Our Education Department offers a wide variety of training courses for iWay Software and other Information Builders products.
For information on course descriptions, locations, and dates, or to register for classes, visit our World Wide Web site, http://www.iwaysoftware.com or call (800) 969-INFO to speak to an Education Representative.
Interested in technical assistance for your implementation? Our Professional Services department provides expert design, systems architecture, implementation, and project management services for all your business integration projects. For information, visit our World Wide Web site, http://www.iwaysoftware.com.
viii iWay Software

Contents1. iWay 5.5 for Sun Java System Application Server . . . . . . . . . . . . . . . . . . . . . . . . . . . .1-1
iWay 5.5 Products and Components . . . . . . . . . . . . . . . . . . . . . . . . . . . . . . . . . . . . . . . . . . . . . . . . . . . . . . . . . . .1-2iWay Adapters . . . . . . . . . . . . . . . . . . . . . . . . . . . . . . . . . . . . . . . . . . . . . . . . . . . . . . . . . . . . . . . . . . . . . . . . . . .1-3iWay Connector for JCA . . . . . . . . . . . . . . . . . . . . . . . . . . . . . . . . . . . . . . . . . . . . . . . . . . . . . . . . . . . . . . . . . .1-4iWay Business Services Engine . . . . . . . . . . . . . . . . . . . . . . . . . . . . . . . . . . . . . . . . . . . . . . . . . . . . . . . . . . .1-4iWay Application Explorer . . . . . . . . . . . . . . . . . . . . . . . . . . . . . . . . . . . . . . . . . . . . . . . . . . . . . . . . . . . . . . .1-4
Installation and Configuration Overview . . . . . . . . . . . . . . . . . . . . . . . . . . . . . . . . . . . . . . . . . . . . . . . . . . . . . . .1-5
2. Installing iWay 5.5 Components . . . . . . . . . . . . . . . . . . . . . . . . . . . . . . . . . . . . . . . . . . . .2-1Installation Requirements . . . . . . . . . . . . . . . . . . . . . . . . . . . . . . . . . . . . . . . . . . . . . . . . . . . . . . . . . . . . . . . . . . . . .2-2
Sun Requirements . . . . . . . . . . . . . . . . . . . . . . . . . . . . . . . . . . . . . . . . . . . . . . . . . . . . . . . . . . . . . . . . . . . . . . .2-2Additional iWay Requirements . . . . . . . . . . . . . . . . . . . . . . . . . . . . . . . . . . . . . . . . . . . . . . . . . . . . . . . . . . .2-2Additional iWay Connector for JCA Requirements . . . . . . . . . . . . . . . . . . . . . . . . . . . . . . . . . . . . . . . .2-2Additional iBSE Requirements . . . . . . . . . . . . . . . . . . . . . . . . . . . . . . . . . . . . . . . . . . . . . . . . . . . . . . . . . . .2-3Adapter Requirements . . . . . . . . . . . . . . . . . . . . . . . . . . . . . . . . . . . . . . . . . . . . . . . . . . . . . . . . . . . . . . . . . .2-3Migration and Upgrading Requirements . . . . . . . . . . . . . . . . . . . . . . . . . . . . . . . . . . . . . . . . . . . . . . . . .2-3
Installing iWay 5.5 . . . . . . . . . . . . . . . . . . . . . . . . . . . . . . . . . . . . . . . . . . . . . . . . . . . . . . . . . . . . . . . . . . . . . . . . . . . .2-5iWay 5.5. Installation . . . . . . . . . . . . . . . . . . . . . . . . . . . . . . . . . . . . . . . . . . . . . . . . . . . . . . . . . . . . . . . . . . . . .2-5Post-Installation Tasks and Information . . . . . . . . . . . . . . . . . . . . . . . . . . . . . . . . . . . . . . . . . . . . . . . . . .2-7
Copying and Collecting Files for Adapters . . . . . . . . . . . . . . . . . . . . . . . . . . . . . . . . . . . . . . . . . . . . . . . . . . . 2-11Adjusting PATH for iWay Adapters . . . . . . . . . . . . . . . . . . . . . . . . . . . . . . . . . . . . . . . . . . . . . . . . . . . . . 2-19
Configuration Steps . . . . . . . . . . . . . . . . . . . . . . . . . . . . . . . . . . . . . . . . . . . . . . . . . . . . . . . . . . . . . . . . . . . . . . . . . 2-20Uninstalling iWay 5.5 . . . . . . . . . . . . . . . . . . . . . . . . . . . . . . . . . . . . . . . . . . . . . . . . . . . . . . . . . . . . . . . . . . . . . . . . 2-20
3. Configuring iWay Connector for JCA . . . . . . . . . . . . . . . . . . . . . . . . . . . . . . . . . . . . . . . .3-1Configuring and Deploying iWay Connector for JCA . . . . . . . . . . . . . . . . . . . . . . . . . . . . . . . . . . . . . . . . . . .3-2
Connector Configurations Overview . . . . . . . . . . . . . . . . . . . . . . . . . . . . . . . . . . . . . . . . . . . . . . . . . . . . .3-2Deploying iWay Connector for JCA . . . . . . . . . . . . . . . . . . . . . . . . . . . . . . . . . . . . . . . . . . . . . . . . . . . . . . .3-3Changing Default Connector Settings . . . . . . . . . . . . . . . . . . . . . . . . . . . . . . . . . . . . . . . . . . . . . . . . . . . .3-6
Deploying and Running the JCA Test Tool . . . . . . . . . . . . . . . . . . . . . . . . . . . . . . . . . . . . . . . . . . . . . . . . . . . . .3-8Deploying the JCA Test Tool . . . . . . . . . . . . . . . . . . . . . . . . . . . . . . . . . . . . . . . . . . . . . . . . . . . . . . . . . . . . .3-8Running the JCA Test Tool . . . . . . . . . . . . . . . . . . . . . . . . . . . . . . . . . . . . . . . . . . . . . . . . . . . . . . . . . . . . . . .3-9Configuring the iWay JCA 1.0 Test Tool . . . . . . . . . . . . . . . . . . . . . . . . . . . . . . . . . . . . . . . . . . . . . . . . . 3-11
4. Configuring iWay Business Services Engine . . . . . . . . . . . . . . . . . . . . . . . . . . . . . . . . .4-1Deploying, Configuring, and Verifying Servlet iBSE . . . . . . . . . . . . . . . . . . . . . . . . . . . . . . . . . . . . . . . . . . . . .4-2
Deploying Servlet iBSE . . . . . . . . . . . . . . . . . . . . . . . . . . . . . . . . . . . . . . . . . . . . . . . . . . . . . . . . . . . . . . . . . .4-2Configuring Servlet iBSE . . . . . . . . . . . . . . . . . . . . . . . . . . . . . . . . . . . . . . . . . . . . . . . . . . . . . . . . . . . . . . . . .4-3Verifying Servlet iBSE . . . . . . . . . . . . . . . . . . . . . . . . . . . . . . . . . . . . . . . . . . . . . . . . . . . . . . . . . . . . . . . . . . . .4-4Enabling Tracing for Servlet iBSE . . . . . . . . . . . . . . . . . . . . . . . . . . . . . . . . . . . . . . . . . . . . . . . . . . . . . . . . .4-5
Creating and Configuring the iBSE Repository . . . . . . . . . . . . . . . . . . . . . . . . . . . . . . . . . . . . . . . . . . . . . . . . .4-6
iWay Installation and Configuration ix

Contents
Creating the iBSE Repository . . . . . . . . . . . . . . . . . . . . . . . . . . . . . . . . . . . . . . . . . . . . . . . . . . . . . . . . . . . . .4-6Configuring iBSE to Use a Repository Database . . . . . . . . . . . . . . . . . . . . . . . . . . . . . . . . . . . . . . . . . . .4-9
5. Configuring Application Explorer . . . . . . . . . . . . . . . . . . . . . . . . . . . . . . . . . . . . . . . . . .5-1Configuring Servlet Application Explorer . . . . . . . . . . . . . . . . . . . . . . . . . . . . . . . . . . . . . . . . . . . . . . . . . . . . . .5-2
Configuring Servlet Application Explorer Communications . . . . . . . . . . . . . . . . . . . . . . . . . . . . . . .5-2Deploying Servlet Application Explorer . . . . . . . . . . . . . . . . . . . . . . . . . . . . . . . . . . . . . . . . . . . . . . . . . .5-5Accessing Servlet Application Explorer . . . . . . . . . . . . . . . . . . . . . . . . . . . . . . . . . . . . . . . . . . . . . . . . . . .5-6
A. Configuring the iWay Emulation Adapter (3270/5250) . . . . . . . . . . . . . . . . . . . . . . A-1Installing the iWay Emulation Adapter Client Components . . . . . . . . . . . . . . . . . . . . . . . . . . . . . . . . . . . . A-2
B. Configuring Legacy Adapters . . . . . . . . . . . . . . . . . . . . . . . . . . . . . . . . . . . . . . . . . . . . . .B-1Legacy Adapter Configuration . . . . . . . . . . . . . . . . . . . . . . . . . . . . . . . . . . . . . . . . . . . . . . . . . . . . . . . . . . . . . . . .B-2
x iWay Software

CHAPTER 1
iWay 5.5 for Sun Java System Application Server
Topics:
• iWay 5.5 Products and Components
• Installation and Configuration Overview
This section provides an overview of the installation and configuration of iWay 5.5 products and components for use with Sun Java System Application Server.
Note: Sun Java System Application Server was formerly known as Sun One Application Server.
iWay Installation and Configuration 1-1

iWay 5.5 Products and Components
iWay 5.5 Products and ComponentsThis manual explains how to install and configure the following products for use with Sun Java System Application Server:
• iWay Adapters
• iWay Connector for JCA (1.0 and 1.5)
• iWay Business Services Engine (iBSE)
• iWay Application Explorer
The following topics briefly summarize the iWay 5.5 components. This manual explains how to install all components. Most users require only a subset of the available components.
1-2 iWay Software

iWay 5.5 for Sun Java System Application Server
iWay AdaptersiWay adapter offerings consist of adapters for accessing and integrating information and systems across many different protocols and data sources. iWay Software provides over 200 types of adapters connecting everything from legacy systems and databases to the most recent advancements in information technology. Different iWay installation packages include different adapters, so the available adapters depend on which version of iWay you install. The following are some of the most common adapters installed with iWay 5.5:
By default, you can use any of the adapters installed with iWay 5.5 on a 90-day trial license. If you do not see your adapter in the previous list, contact your iWay Software representative for a complete list of available adapters.
Adapters can be deployed through an application server using iWay Connector for JCA or Servlet iBSE. In addition, adapters can be integrated directly into your own applications. For information on integrating adapters into your applications, contact an iWay Software representative.
• AS1
• AS2
• Baan
• BroadVision
• CICS Transaction Adapter (XML)
• ClarifyCRM (Amdoc ClarifyCRM)
• CORBA
• DB2 Net Driver
(iWay Adapter for RDBMS)
• Emulation (for 3270/5250)
• ESRI
• FIX
• HIPAA
• HL7
• IMS
• Informix (iWay Adapter for RDBMS)
• iWay/WebFOCUS (EDA) Server
(iWay Adapter for RDBMS)
• J.D. Edwards OneWorld
• J.D. Edwards WorldSoft
• JMS
• Lawson
• Lotus Notes
• Manugistics
• MFG/PRO
• Microsoft .NET
• Microsoft Message Queueing (MSMQ)
• MQ Series (IBM WebSphere MQ)
• Oracle (iWay Adapter for RDBMS)
• Oracle Applications (E-Business Suite)
• Oracle AQ
• PeopleSoft
• RDBMS
• SAP R/3
• Siebel
• SQL Server 2000
(iWay Adapter for RDBMS)
• SWIFT
• Sybase (iWay Adapter for RDBMS)
• TIBCO Rendezvous
• Transora
• Tuxedo (Transaction Adapter for BEA Tuxedo)
• UCCnet
• VSAM
iWay Installation and Configuration 1-3
iWay 5.5 Products and Components
iWay Connector for JCAiWay Connector for JCA runs in J2EE Connector Architecture (JCA) compliant application servers and uses the Common Client Interface (CCI) to provide fast integration services using iWay adapters. The connector provides an extremely quick way to deploy adapters to connect data, applications, systems, and protocols through an application server.
iWay Connector for JCA provides XML transformation, adapter hosting, and integration capabilities. After you deploy iWay Connector for JCA, you have access to adapters installed with iWay 5.5.
Two versions of iWay Connector for JCA are available:
• The JCA 1.5 Connector runs in JCA 1.5 compliant application servers such as Sun Java System Application Server 8.
• The JCA 1.0 Connector runs in JCA 1.0 or JCA 1.5 compliant application servers.
iWay Business Services EngineiWay Business Services Engine (iBSE) provides transformation and adapter hosting functionality as well as an environment for developing, running, and integrating Web services. It provides a transformation and integration engine for processing XML files and SOAP messages for exchanges with Web services applications. For use with application servers, iBSE is provided as a Web or Enterprise application and referred to as Servlet iBSE.
Servlet iBSE is deployed through a J2EE compliant application server. After you deploy Servlet iBSE, you have access to the adapters you installed. Although you can run both iBSE and iWay Connector for JCA, only one is required to host adapters.
Note: The term Servlet iBSE is used to distinguish the Web application version of iBSE from a version of iBSE that runs external to application servers in a standalone iWay Adapter Manager. iWay Adapter Manager is not required or provided for use with Sun Java System Application Server.
iWay Application ExploreriWay Application Explorer is a GUI tool that uses iWay adapters to create schemas and Web services for use with iWay Connector for JCA,iBSE, or other XML or Web services based programs. It enables you to quickly generate schemas and publish Web services from objects and procedures in production ERP systems, without requiring in-depth knowledge of the objects or systems.
For use with your application server, Application Explorer is available as a Web application. It is referred to as Servlet Application Explorer to distinguish it from other versions of Application Explorer available from iWay Software.
1-4 iWay Software

iWay 5.5 for Sun Java System Application Server
Note: iWay Software also offers a standalone Java Swing implementation of Application Explorer and an ASP.NET implementation of Application Explorer.
Installation and Configuration OverviewDepending on the components you wish to use, installation and configuration steps for iWay 5.5 may include the following:
1. Review the requirements and install any required third party components. (Chapter 2, Installing iWay 5.5 Components)
2. Run the installation program to install iWay 5.5 components. (Chapter 2, Installing iWay 5.5 Components)
3. Perform post-installation tasks to prepare your application server for iWay components. (Chapter 2, Installing iWay 5.5 Components)
4. Copy third party adapter-related files into the iWay 5.5 and application server directory structure. (Chapter 2, Installing iWay 5.5 Components)
5. To use iWay Connector for JCA, deploy iWay Connector for JCA and the JCA Test Tool on your application server. (Chapter 3, Configuring iWay Connector for JCA)
6. To use iWay Business Services Engine (iBSE), deploy Servlet iBSE on your application server and optionally set up a database repository. (Chapter 4, Configuring iWay Business Services Engine)
7. Configure Application Explorer. (Chapter 5, Configuring Application Explorer)
8. Perform any adapter-specific post-installation steps.
iWay Installation and Configuration 1-5

Installation and Configuration Overview
1-6 iWay Software
CHAPTER 2
Installing iWay 5.5 Components
Topics:
• Installation Requirements
• Installing iWay 5.5
• Copying and Collecting Files for Adapters
• Configuration Steps
• Uninstalling iWay 5.5
The following topics describe the requirements and initial installation procedures for iWay 5.5 components:
iWay Installation and Configuration 2-1
Installation Requirements
Installation RequirementsReview the following installation requirements to ensure your system supports iWay 5.5.
Sun RequirementsTo use iWay for Sun Java System Application Server, a Sun application server 7 or higher must be installed. You should ensure that you meet the hardware and software requirements needed for the application server. iWay will run as part of your application server. Therefore, iWay has the same operating system and Java software requirements.
Ensure that Sun Java System Application Server is installed and functioning properly before installing iWay. For more information, refer to the installation documentation for your application server.
Steps, paths, and examples in the document correspond to Sun Java System Application Server 8. If you use release 7, use the corresponding step, locations, and files.
Additional iWay Requirements• Approximately 75 MB of disk space.
• For end users, Internet Explorer 6 or higher.
The procedures, names, and paths in this manual use Windows conventions and default locations unless otherwise indicated. For other operating systems and non-default locations, substitute accordingly. Names and case may vary between operating systems.
Additional iWay Connector for JCA RequirementsRequirements for iWay Connector for JCA depend on whether you use the JCA 1.5 or JCA 1.0 Connector:
• The JCA 1.5 Connector requires Sun Java System Application Server 8 or higher.
• The JCA 1.0 Connector requires Sun Java System Application Server 7 or higher.
2-2 iWay Software
Installing iWay 5.5 Components
Additional iBSE RequirementsiBSE requires a repository in which to store transactions and metadata required for the delivery of Web services. iWay Software recommends using a JDBC™ compliant database. However, a file system repository is available and configured by default, so no initial database configuration is required to get started with iWay 5.5.
If you wish to use a database repository, the SQL required to create the repository tables is installed with iWay 5.5. The required steps are explained in Chapter 4, Configuring iWay Business Services Engine. The following are certified as iBSE repository databases:
• Microsoft SQL Server 2000 with SP1 or higher
• Oracle
Adapter RequirementsMany adapters require third party libraries or JDBC drivers provided by the vendor of the target data source, system, or protocol. You must copy these files into the iWay 5.5 and application server directory structure after you install iWay 5.5. For more information, see Copying and Collecting Files for Adapters on page 2-11.
Note: Some adapters for legacy data require that you install an iWay Server component on the mainframe containing the data you wish to access. For more information, see Appendix B, Configuring Legacy Adapters.
Migration and Upgrading RequirementsIf this is the first time you are installing iWay 5.5 proceed to Installing iWay 5.5 on page 2-5.
If you are upgrading a previous iWay 5.5 release and wish to preserve your repository, schemas, and other information, you must do the following:
1. Back up your existing iBSE or JCA repository as explained in How to Back Up iWay Repositories on page 2-4 .
2. Undeploy all iWay components from your Application Server.
3. Uninstall the older iWay release. Steps to uninstall iWay appear in How to Uninstall iWay on page 2-20.
4. Optionally reboot your system.
5. Install the new iWay release.
6. If necessary, copy the backed up iWay repositories into the new directory structure.
7. Redeploy iWay components using the steps in this manual.
Note: If you wish to migrate from a development to a production environment, see the user documentation for your adapter.
iWay Installation and Configuration 2-3
Installation Requirements
Procedure How to Back Up iWay Repositories
• For iWay Connector for JCA:
Copy your JCA configuration directory out of the iWay55 directory structure, for example:
C:\Program Files\iWay55\base
After reinstalling iWay 5.5, copy this directory back.
• For an iBSE file repository:
Copy the ibserepo.xml file out of the iWay55 directory structure. If it exists, also copy the ibsemrepo.xml file. These files are normally located in the base configuration directory, for example:
C:\Program Files\iWay55\base
However, they may be located in the directory where your application server expanded and runs the iBSE Web application.
After reinstalling iWay 5.5, copy the ibserepo.xml and ibsemrepo.xml files back into the base directory.
In addition, copy the wsdl directory from the iBSE Web application. This is located where your application server has expanded it, for example:
C:\Sun\AppServer\domains\domain1\applications\j2ee-apps\ibse\ibse_war\wsdl
You normally do not need to copy the wsdl directory back into the Web application after it is deployed. However, it is a good idea to preserve this directory when possible.
• For an iBSE database repository:
No back up is required when using a database repository. After reinstalling iWay 5.5, specify your old database when you access the Servlet iBSE Configuration page.
However, it is a good idea to copy the wsdl directory from the iBSE Web application. This is located where your application server has expanded it, for example:
C:\Sun\AppServer\domains\domain1\applications\j2ee-apps\ibse\ibse_war\wsdl
You normally do not need to copy the wsdl directory back into the Web application after it is deployed. However, it is a good idea to preserve this directory when possible.
2-4 iWay Software
Installing iWay 5.5 Components
Installing iWay 5.5The initial iWay installation procedure installs a set of adapters, iWay Connectors for JCA, iBSE, and Application Explorer. The set of adapters varies depending on which version of the iWay installation you install. After installation, iWay components and adapters are available for a 90-day trial. After the trial period, contact iWay Software to obtain a license for the components you wish to continue using.
On Windows, you must be an administrator for the local machine to run the installation.
On UNIX, since iWay components run as part of your application server, it is a good idea to install as the user ID under which your application server runs.
iWay 5.5. InstallationThe following procedure installs files for iWay 5.5. After installation, follow the procedures in this manual to activate features that require additional configuration.
If you are upgrading from a previous release, be sure to review Migration and Upgrading Requirements on page 2-3.
Procedure How to Install iWay 5.5
Warning: The iWay installation program does not currently support Java 1.5 in all environments. If you are using Java 1.5, change your environment to use Java 1.4 or 1.3 when you launch the installation.
1. Start the installation by executing the installation program for your platform and version of iWay 5.5. The name of the installation program may vary.
• On Windows, execute:
iwsun.win32.exe
• On UNIX platforms, there are two options:
If you have an X Windows environment, you can use a GUI based installation by executing the installation program with no options, for example:
./iwsun.solaris.bin
If you do not have an X Windows environment, use the text-based installation by executing the installation program with the -console option, for example:
./iwsun.solaris.bin -console
This procedure follows the GUI installation. The prompts for the text-based installation are almost identical.
The installation begins by temporarily copying files and analyzing your environment. This may take some time. When this completes, the Welcome window opens.
iWay Installation and Configuration 2-5
Installing iWay 5.5
2. Click Next at the Welcome window.
The Choose Destination Location window opens and lets you choose where to install iWay components.
Note: If an IWAY55 environment variable is already defined in your environment, this might not appear and the install will take place in the IWAY55 location.
3. Accept the default or specify a new location to install iWay. Then, click Next.
A window appears where you must enter the Base Url for your application server. This is the hostname, port, and protocol (http vs. https) for accessing your application server.
4. Enter the Base Url and click Next, for example:
http://hostname:8080
A summary window appears.
5. Click Next to start the installation.
Files are copied to your system in the directory you specified. On UNIX systems, you should log off and log back on to reapply your profile.
Note: If you backed up a previous JCA or iBSE file repository, copy the old base or other configuration directory into the new iWay directory structure.
2-6 iWay Software

Installing iWay 5.5 Components
Post-Installation Tasks and InformationAfter installation, an iWay55 directory is created. Review the information below for information on required tasks, directory structure, security settings, and environment variables.
Reference iWay 5.5 Directory Structure
After installation, an iWay55 directory is created and will contains the following subdirectories:
bin
Contains XML files required for iWay 5.5.
config
Contains configuration directories for the iWay components. By default, iWay Connector for JCA (and sometimes Servlet iBSE) are set to access the base configuration, and connector information is written to a base subdirectory. When additional connector configurations are created, their directories are placed here.
etc
Contains miscellaneous tools and files to configure additional components.
lib
Contains adapters, drivers, and other files used by iWay components.
All iWay components must access this directory. In most cases, after iWay components recognize this location, the adapters and other files are accessible. For some components, the lib directory is determined automatically after the iWay installation directory is known.
sun
Contains Web applications and connector modules to be deployed to Sun Java System Application Server.
On UNIX, ensure that the user ID your application server runs under has full permissions to the iway55 directory and subdirectories. If you installed under a different user ID than the user ID that runs the application server processes, you may need to use chmod, chown, and/or group ownership.
iWay Installation and Configuration 2-7

Installing iWay 5.5
Procedure How to Set Environment Variables
After installation, environment variables are required to use iWay adapters and components.
• On Windows, environment variables are automatically set by the installation program. No steps are necessary, but it is a good idea to be aware of them in case you need to troubleshoot.
• On UNIX, the installation program appends the PATH, IWAY55OEM, and IWAY55 environment variables to the end of the .profile (or .bash_profile) in your home directory. However, you may need to add the shared library path variable listed below. In addition, if you run iWay components under different user IDs, be sure to add these variables to those profiles as well. This includes user IDs that run any third party components such as your application server.
Ensure profiles are executed before attempting to run iWay adapters and components.
Note: If you plan to run multiple installations of iWay adapters and components, environment variables must have different values when running and installing each installation.
The following environment variable settings are required to use iWay adapters and components:
1. The following variable must be defined and set to the location of the iWay55 directory:
IWAY55
For example:
IWAY55=/opt/iWay55/export IWAY55
Note: Be sure to include the trailing slash.
2. The PATH variable must contain the iWay55/lib directory, for example:
PATH=$PATH:/opt/iWay55/libexport PATH
3. An IWAY55OEM variable must be defined and set as follows:
IWAY55OEM=SUN
For example:
export IWAY55OEM=SUN
2-8 iWay Software

Installing iWay 5.5 Components
4. On UNIX, the shared library variable must contain the iWay55/lib directory. This variable varies depending on your platform as defined in the following table which lists platforms and associated variables.
For example:
LD_LIBRARY_PATH=/opt/iWay55/lib:$LD_LIBRARY_PATHexport LD_LIBRARY_PATH
Procedure How to Configure Endorsed Files
iWay components rely on several files and classes that must be loaded before any of your application server’s default classes. To ensure classes load in the correct order, do the follow.
1. Determine your application server JAVA_HOME directory. If you installed a Java SDK/JDK with your application server, the default location on Windows is normally:
C:\SUN\AppServer\jdk
On other platforms, use the corresponding location.
If you specified a different Java installation, you can determine JAVA_HOME by looking at the asenv.bat or asenv.conf file for your applications server. For the default domain and server on Windows, this is:
C:\Sun\AppServer\config\asenv.bat
On other platforms, use the corresponding location.
2. If it does not exist, create an endorsed directory in the jre/lib or jdk/lib directory, for example:
C:\SUN\AppServer\jdk\lib\endorsed
or
C:\j2sdk1.4.2_03\jre\lib\endorsed
3. Copy the iwafjca.rar file installed with iWay to the endorsed directory. The default location for iwafjca.rar on Windows is:
C:\Program Files\iWay55\sun\iwafjca.rar
On other platforms, use the corresponding location.
AIX LIBPATH
HP-UX SHLIB_PATH
Other UNIX Platforms LD_LIBRARY_PATH
iWay Installation and Configuration 2-9

Installing iWay 5.5
4. Open a command or shell prompt and navigate to the endorsed directory.
5. Use the jar command to extract three files from iwafjca.rar.
jar xvf iwafjca.rar xalan.jar xercesImpl.jar xmlParserAPIs.jar
If you receive an error, then the jar command is probably not in your search path. You can add the jar command to your search path or execute it using its full path. The jar command is located in the Java SDK bin directory, which varies depending on your Java release, for example:
C:\j2sdk1.4.2_03\bin\jar xvf iwafjca.rar xalan.jar xercesImpl.jar xmlParserAPIs.jar
6. Confirm that the endorsed directory now contains the following three files:
xalan.jarxercesImpl.jarxmlParserAPIs.jar
7. Remove the iwafjca.rar file from the endorsed directory.
8. If your application server is running, restart it.
Procedure How to Configure Security Settings for iWay
You should disable server.policy as explained below before deploying iWay components.
1. Using a text editor, open the domain.xml file for your domain. For the default domain on Windows, this is:
C:\Sun\AppServer\domains\domain1\config\domain.xml
On other platforms, use the corresponding location. For other domains, use the corresponding location.
2. Remove the following line from server.xml where is corresponds to your server.
<jvm-options>-Djava.security.policy=${com.sun.aas.instanceRoot}/config/server.policy</jvm-options>
It may appear multiple times and you can remove each appearance of the line.
3. Save and exit domain.xml.
4. If your application server is running, restart it.
2-10 iWay Software
Installing iWay 5.5 Components
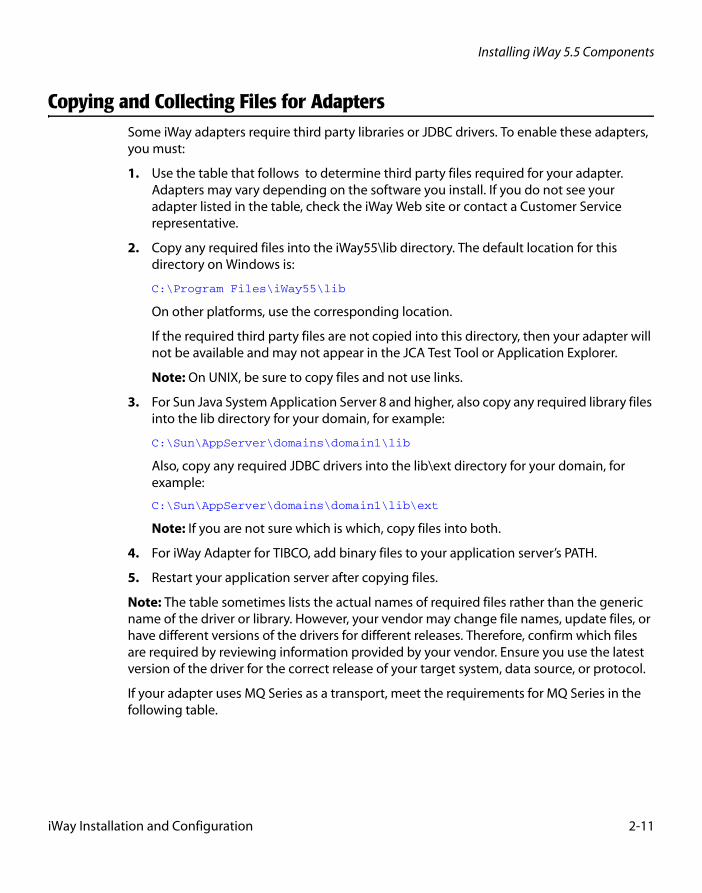
Copying and Collecting Files for AdaptersSome iWay adapters require third party libraries or JDBC drivers. To enable these adapters, you must:
1. Use the table that follows to determine third party files required for your adapter. Adapters may vary depending on the software you install. If you do not see your adapter listed in the table, check the iWay Web site or contact a Customer Service representative.
2. Copy any required files into the iWay55\lib directory. The default location for this directory on Windows is:
C:\Program Files\iWay55\lib
On other platforms, use the corresponding location.
If the required third party files are not copied into this directory, then your adapter will not be available and may not appear in the JCA Test Tool or Application Explorer.
Note: On UNIX, be sure to copy files and not use links.
3. For Sun Java System Application Server 8 and higher, also copy any required library files into the lib directory for your domain, for example:
C:\Sun\AppServer\domains\domain1\lib
Also, copy any required JDBC drivers into the lib\ext directory for your domain, for example:
C:\Sun\AppServer\domains\domain1\lib\ext
Note: If you are not sure which is which, copy files into both.
4. For iWay Adapter for TIBCO, add binary files to your application server’s PATH.
5. Restart your application server after copying files.
Note: The table sometimes lists the actual names of required files rather than the generic name of the driver or library. However, your vendor may change file names, update files, or have different versions of the drivers for different releases. Therefore, confirm which files are required by reviewing information provided by your vendor. Ensure you use the latest version of the driver for the correct release of your target system, data source, or protocol.
If your adapter uses MQ Series as a transport, meet the requirements for MQ Series in the following table.
iWay Installation and Configuration 2-11

Copying and Collecting Files for Adapters
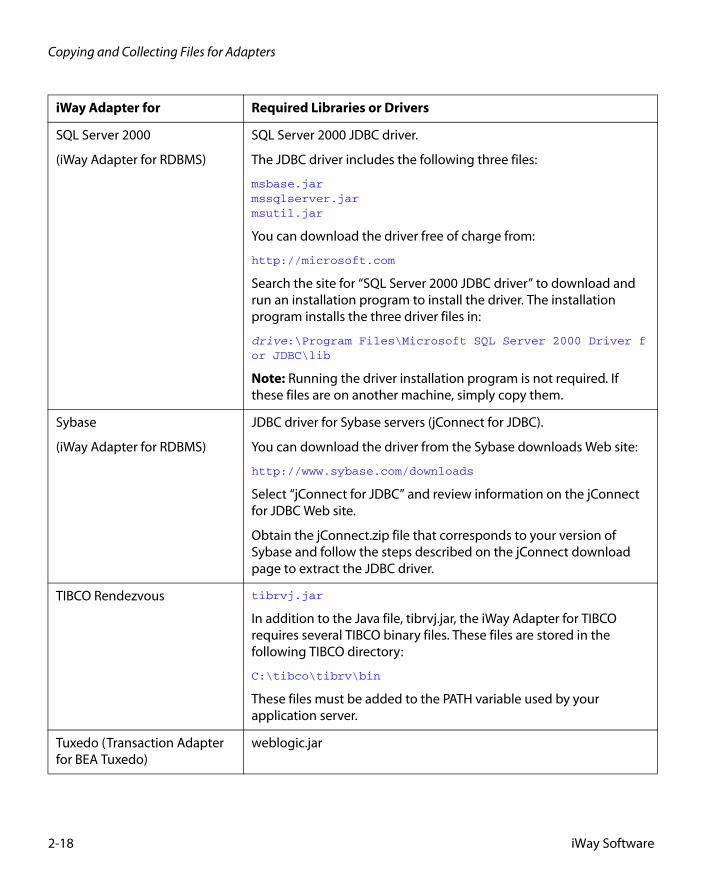
The following table lists the required libraries or drivers for your adapter.
iWay Adapter for Required Libraries or Drivers
CICS Transaction Adapter (XML)
None.
ClarifyCRM (Amdoc ClarifyCRM)
ClfyCbo.jar
And all .dll or .so files in the Clarify client bin directory, for example:
C:\ClarifyCRM12.0\eSupport\Clarify\bin.
You can also add this directory to the PATH variable used by your application server.
DB2 Net Driver
(iWay Adapter for RDBMS)
JDBC driver for DB2 (db2java.zip).
Installed as part of the DB2 server. The default location on Windows is one of the following:
C:\SQLLIB\java\db2java.zip
C:\Program Files\SQLLIB\java\db2java.zip
Because the iWay Adapter for RDBMS uses JDBC 2.0 features, you must run the usejdbc2.bat file supplied with DB2. Obtain the usejdbc2.bat from your DB2 server or download the current version from the DB2 JDBC driver download Web page.
This process builds the proper JDBC 2.0-compliant version of the db2java.zip file.
Note: To run the usejdbc2 procedure, you must stop the DB2 instance.
eMail None in the lib directory.
However, for Sun Java System Application Server, you may need to download the latest activation.jar file. This file is included in the jaf-1_0_2-upd.zip archive that you can download from the Sun Microsystems Web site. Extract activation.jar from the archive and replace the activation.jar files in the application server’s share\lib and imq\lib directories. See Release Notes for more information.
Emulation (3270/5250) (Telnet) None. However, additional information is available in Appendix A, Configuring the iWay Emulation Adapter (3270/5250)
Flat Files None.
2-12 iWay Software
Installing iWay 5.5 Components
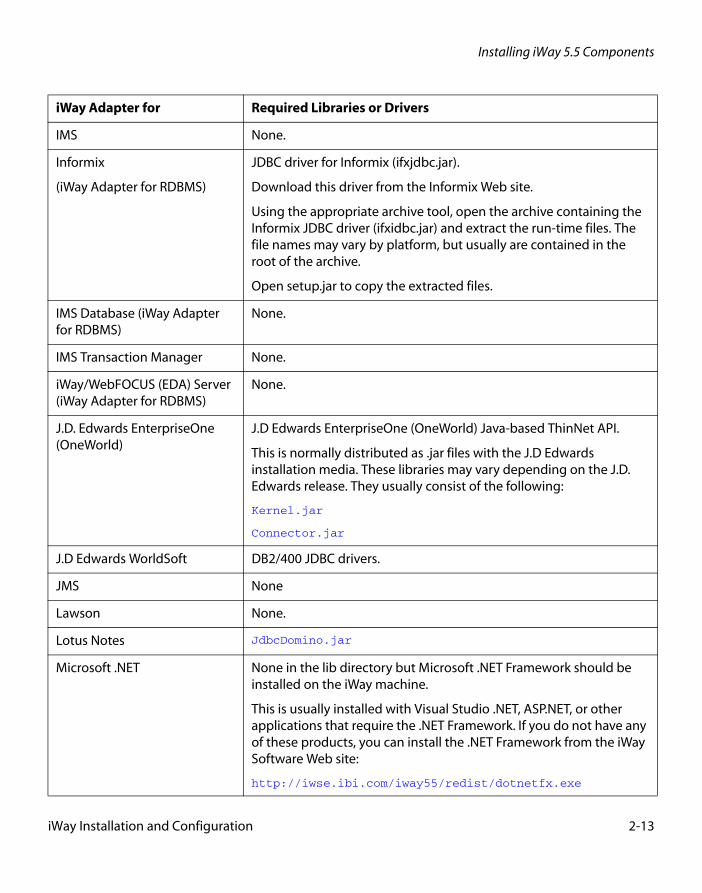
IMS None.
Informix
(iWay Adapter for RDBMS)
JDBC driver for Informix (ifxjdbc.jar).
Download this driver from the Informix Web site.
Using the appropriate archive tool, open the archive containing the Informix JDBC driver (ifxidbc.jar) and extract the run-time files. The file names may vary by platform, but usually are contained in the root of the archive.
Open setup.jar to copy the extracted files.
IMS Database (iWay Adapter for RDBMS)
None.
IMS Transaction Manager None.
iWay/WebFOCUS (EDA) Server (iWay Adapter for RDBMS)
None.
J.D. Edwards EnterpriseOne (OneWorld)
J.D Edwards EnterpriseOne (OneWorld) Java-based ThinNet API.
This is normally distributed as .jar files with the J.D Edwards installation media. These libraries may vary depending on the J.D. Edwards release. They usually consist of the following:
Kernel.jar
Connector.jar
J.D Edwards WorldSoft DB2/400 JDBC drivers.
JMS None
Lawson None.
Lotus Notes JdbcDomino.jar
Microsoft .NET None in the lib directory but Microsoft .NET Framework should be installed on the iWay machine.
This is usually installed with Visual Studio .NET, ASP.NET, or other applications that require the .NET Framework. If you do not have any of these products, you can install the .NET Framework from the iWay Software Web site:
http://iwse.ibi.com/iway55/redist/dotnetfx.exe
iWay Adapter for Required Libraries or Drivers
iWay Installation and Configuration 2-13

Copying and Collecting Files for Adapters
Microsoft Message Queueing (MSMQ)
None
MQ Series (IBM WebSphere MQ)
com.ibm.mq.jar
com.ibm.mqbind.jar
Also ensure that the following MQ Series directory is in PATH:
MQSeries\Java\lib
or
WebSphereMQ\Java\lib
For MQ Series 5.2, you need IBM Product Extension MA88 MQ Series classes.
Oracle Applications (E-Business Suite)
Oracle JDBC drivers (thin type4 or OCI type2) and/or Oracle Client NET8 or NET9.
All calls to Oracle E-Business Suite occur through these drivers. If you do not have the appropriate JDBC driver, Oracle Technology Network (OTN) provides a download site:
http://otn.oracle.com/software/tech/java/sqlj_jdbc/content.html
Note: You require a logon ID to download the drivers.
If you are using OCI drivers, you must install and configure Oracle Client on the machine with the iWay Adapter for Oracle.
To use iWay Concurrent Program request functionality, you must install and configure Oracle Client on the Oracle database that supports Oracle E-Business Suite.
Oracle
(iWay Adapter for RDBMS)
Oracle JDBC driver (classes12.zip or ojdbc14.jar)
You can download this driver from the Oracle Web site at:
http://otn.oracle.com/software/tech/java/sqlj_jdbc/content.html
Note: You require a logon ID to download the drivers.
For more information on Oracle JDBC issues, see the Oracle JDBC FAQ at:
http://otn.oracle.com/tech/java/sqlj_jdbc/htdocs/jdbc_faq.htm
iWay Adapter for Required Libraries or Drivers
2-14 iWay Software
Installing iWay 5.5 Components
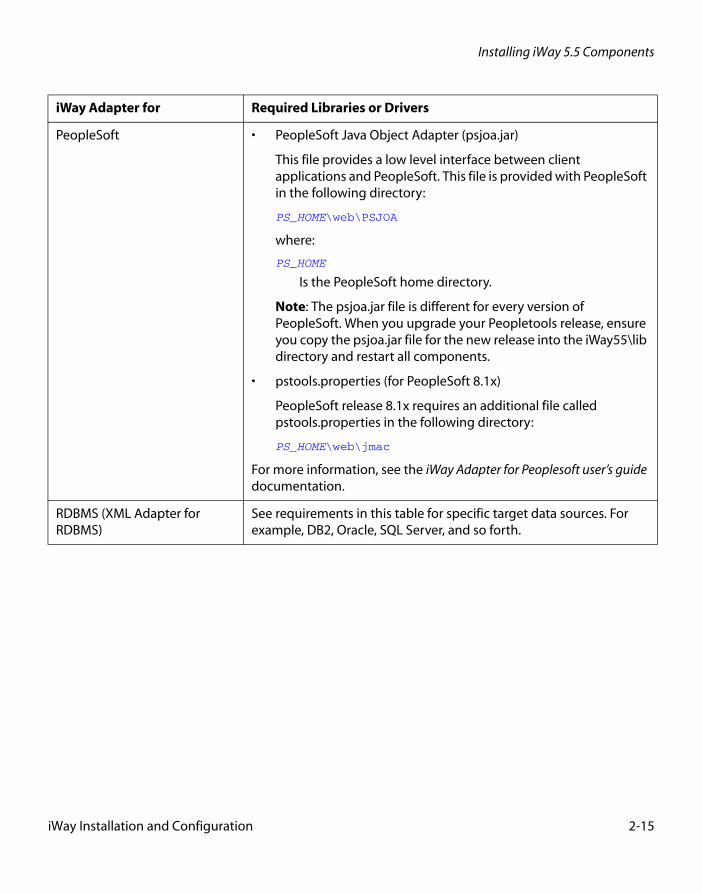
PeopleSoft • PeopleSoft Java Object Adapter (psjoa.jar)
This file provides a low level interface between client applications and PeopleSoft. This file is provided with PeopleSoft in the following directory:
PS_HOME\web\PSJOA
where:
PS_HOME
Is the PeopleSoft home directory.
Note: The psjoa.jar file is different for every version of PeopleSoft. When you upgrade your Peopletools release, ensure you copy the psjoa.jar file for the new release into the iWay55\lib directory and restart all components.
• pstools.properties (for PeopleSoft 8.1x)
PeopleSoft release 8.1x requires an additional file called pstools.properties in the following directory:
PS_HOME\web\jmac
For more information, see the iWay Adapter for Peoplesoft user’s guide documentation.
RDBMS (XML Adapter for RDBMS)
See requirements in this table for specific target data sources. For example, DB2, Oracle, SQL Server, and so forth.
iWay Adapter for Required Libraries or Drivers
iWay Installation and Configuration 2-15

Copying and Collecting Files for Adapters
SAP R/3 SAP Java connector (normally sapjco.jar).
Information on the current set of SAP connectors is available at:
http://service.sap.com/connectors
A valid SAP service ID is required to access this site. To download the current version, follow the information provided on the SAP Java Connector (SAP JCo) overview page. For more information, contact your SAP BASIS Administrator.
Using the appropriate archive tool, open the archive containing the SAP Java Connector (SAP JCo) and extract the run-time files. The file names may vary by platform but usually are contained in the root of the archive.
When using an application server, if you run into problems with the adapter for SAP, add sapjco.jar to your application server CLASSPATH.
iWay Adapter for Required Libraries or Drivers
2-16 iWay Software
Installing iWay 5.5 Components
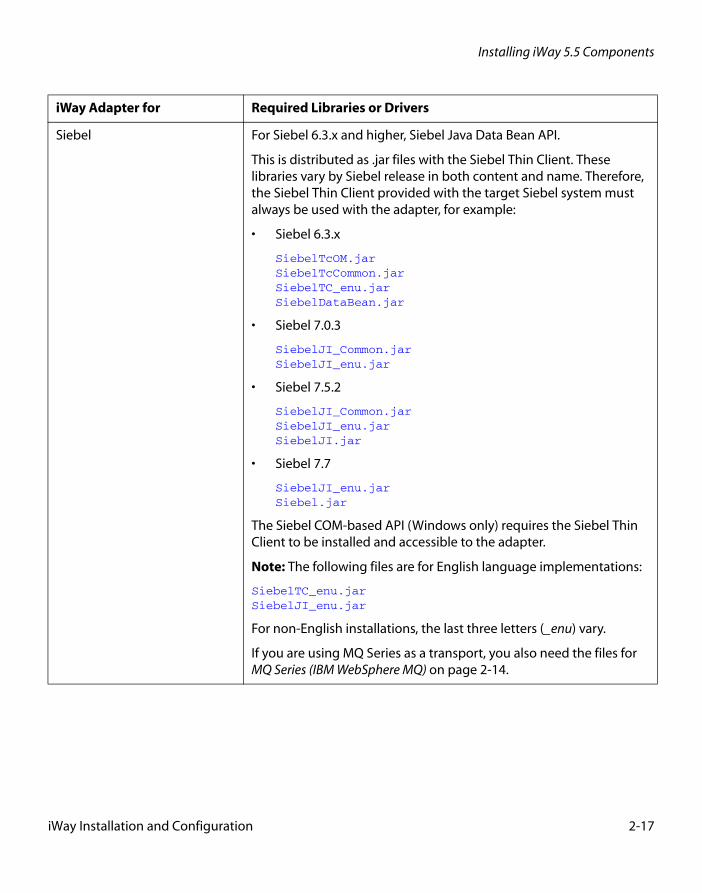
Siebel For Siebel 6.3.x and higher, Siebel Java Data Bean API.
This is distributed as .jar files with the Siebel Thin Client. These libraries vary by Siebel release in both content and name. Therefore, the Siebel Thin Client provided with the target Siebel system must always be used with the adapter, for example:
• Siebel 6.3.x
SiebelTcOM.jarSiebelTcCommon.jarSiebelTC_enu.jarSiebelDataBean.jar
• Siebel 7.0.3
SiebelJI_Common.jarSiebelJI_enu.jar
• Siebel 7.5.2
SiebelJI_Common.jarSiebelJI_enu.jarSiebelJI.jar
• Siebel 7.7
SiebelJI_enu.jarSiebel.jar
The Siebel COM-based API (Windows only) requires the Siebel Thin Client to be installed and accessible to the adapter.
Note: The following files are for English language implementations:
SiebelTC_enu.jarSiebelJI_enu.jar
For non-English installations, the last three letters (_enu) vary.
If you are using MQ Series as a transport, you also need the files for MQ Series (IBM WebSphere MQ) on page 2-14.
iWay Adapter for Required Libraries or Drivers
iWay Installation and Configuration 2-17
Copying and Collecting Files for Adapters
SQL Server 2000
(iWay Adapter for RDBMS)
SQL Server 2000 JDBC driver.
The JDBC driver includes the following three files:
msbase.jarmssqlserver.jarmsutil.jar
You can download the driver free of charge from:
http://microsoft.com
Search the site for “SQL Server 2000 JDBC driver” to download and run an installation program to install the driver. The installation program installs the three driver files in:
drive:\Program Files\Microsoft SQL Server 2000 Driver for JDBC\lib
Note: Running the driver installation program is not required. If these files are on another machine, simply copy them.
Sybase
(iWay Adapter for RDBMS)
JDBC driver for Sybase servers (jConnect for JDBC).
You can download the driver from the Sybase downloads Web site:
http://www.sybase.com/downloads
Select “jConnect for JDBC” and review information on the jConnect for JDBC Web site.
Obtain the jConnect.zip file that corresponds to your version of Sybase and follow the steps described on the jConnect download page to extract the JDBC driver.
TIBCO Rendezvous tibrvj.jar
In addition to the Java file, tibrvj.jar, the iWay Adapter for TIBCO requires several TIBCO binary files. These files are stored in the following TIBCO directory:
C:\tibco\tibrv\bin
These files must be added to the PATH variable used by your application server.
Tuxedo (Transaction Adapter for BEA Tuxedo)
weblogic.jar
iWay Adapter for Required Libraries or Drivers
2-18 iWay Software

Installing iWay 5.5 Components
Adjusting PATH for iWay AdaptersSome adapters require third party non-Java files or libraries, such as .dll files or .so files. These non-Java files must be in the PATH variable for your application server. You can ensure this by adding the iWay55\lib directory to the application server PATH through the console. In addition, when many files are involved, you can add their directories to the PATH variable as well as the iWay55\lib directory.
The iWay Adapter for TIBCO requires several TIBCO binary files, and you can add these to PATH as follows. These files are stored in the following TIBCO directory on Windows.
C:\tibco\tibrv\bin
On other platforms, use the corresponding location.
Procedure How to Add Files to PATH
1. If it is not started, start your application server.
2. Log on to the Sun Admin Console. If you kept the default port, you can use:
https://hostname:4849
where:
hostname
Is the hostname for your application server.
The Admin Console opens in your browser.
3. On the left, expand the Configurations and then expand the server instance you are using for iWay.
4. Under your sever on the left, select JVM Settings.
5. On the right, select Path Settings.
6. In the Native Library Path Prefix text box, enter the path where iWay is installed. This path cannot have spaces. On Windows, you can use the DOS name, for example:
C:\Progra~1\iWay55
Use the corresponding location on your system.
7. Click Save.
8. If you use iWay Adapter for TIBCO, in the Native Library Path Prefix field, enter the full path to the following TIBCO directory:
C:\tibco\tibrv\bin
Specify the full path on your system.
9. Click Save.
iWay Installation and Configuration 2-19
Configuration Steps
10. Restart the application server.
Configuration StepsAfter installation, the configuration steps depend on the components you wish to use.
1. For iWay Connector for JCA, deploy the connector and JCA Test Tool. (Chapter 3, Configuring iWay Connector for JCA)
2. For iBSE, configure Servlet iBSE and optionally set up a database repository. (Chapter 4, Configuring iWay Business Services Engine)
3. Configure Application Explorer. (Chapter 5, Configuring Application Explorer)
4. Review the appendixes for any adapter-specific post-installation steps.
Uninstalling iWay 5.5An uninstall utility is provided to remove iWay components from your machine. Be sure to use this if you wish to uninstall. If you manually remove directories, you may have problems installing a later release.
Procedure How to Uninstall iWay
1. Ensure all iWay components are undeployed from your application server.
2. Back up any files in the iWay55 directory structure that you wish to save.
3. Navigate to the directory containing the uninstall utility.
On Windows, the default location for this directory is:
C:\Program Files\iWay55\etc\uninstall\sun
On other platforms, use the corresponding directory.
4. Execute the uninstall utility.
• On Windows, execute:
uninstaller.exe
• On UNIX, issue:
java -jar uninstall.jar -silent
2-20 iWay Software

CHAPTER 3
Configuring iWay Connector for JCA
Topics:
• Configuring and Deploying iWay Connector for JCA
• Deploying and Running the JCA Test Tool
This section explains how to configure iWay Connector for JCA. If you are using Servlet iBSE, but do not plan to use iWay Connector for JCA, skip to Chapter 4, Configuring iWay Business Services Engine.
iWay Installation and Configuration 3-1

Configuring and Deploying iWay Connector for JCA
Configuring and Deploying iWay Connector for JCAiWay Connector for JCA runs in J2EE™ Connector Architecture (JCA) compliant application servers and uses the Common Client Interface (CCI) to provide fast integration services using iWay adapters. The connector provides a quick way to deploy adapters and connect data, applications, systems, and protocols. After you deploy the connector, you have access to adapters installed with iWay 5.5.
Two version of iWay Connector for JCA are provided:
• The JCA 1.5 Connector requires Sun Java System Application Server 8 or higher. The default location is on Windows is:
C:\Program Files\iWay55\sun\iwjca15.rar
• The JCA 1.0 Connector requires Sun Java System Application Server 7 or higher. The default location is on Windows is:
C:\Program Files\iWay55\sun\iwafjca.rar
For other platforms, see the corresponding locations.
Connector Configurations OverviewiWay Connector for JCA has configuration directories where repository, schemas, and other information are stored. By default, a configuration called base is used and files and information are written under the iWay55 directories to the following default location on Windows:
C:\Program Files\iway55\config\base
For other platforms, see the corresponding location.
The default file system repository for the base configuration on Windows is:
C:\Program Files\iway55\config\base\repository.xml
The repository.xml file is not created until you access the configuration using Application Explorer or the JCA Test Tool.
On UNIX, ensure the user ID under which your application server runs has full permissions to the iWay55/config directory and subdirectories. If you installed under a user ID other than the user ID that runs the application server processes, you may be required to use chmod, chown, and/or group ownership.
3-2 iWay Software
Configuring iWay Connector for JCA
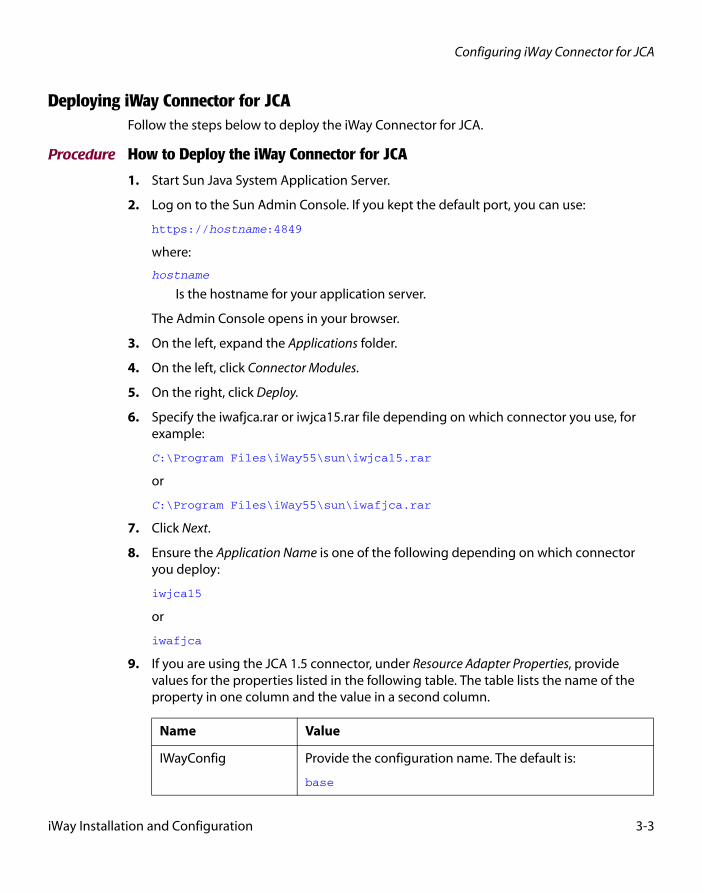
Deploying iWay Connector for JCAFollow the steps below to deploy the iWay Connector for JCA.
Procedure How to Deploy the iWay Connector for JCA
1. Start Sun Java System Application Server.
2. Log on to the Sun Admin Console. If you kept the default port, you can use:
https://hostname:4849
where:
hostname
Is the hostname for your application server.
The Admin Console opens in your browser.
3. On the left, expand the Applications folder.
4. On the left, click Connector Modules.
5. On the right, click Deploy.
6. Specify the iwafjca.rar or iwjca15.rar file depending on which connector you use, for example:
C:\Program Files\iWay55\sun\iwjca15.rar
or
C:\Program Files\iWay55\sun\iwafjca.rar
7. Click Next.
8. Ensure the Application Name is one of the following depending on which connector you deploy:
iwjca15
or
iwafjca
9. If you are using the JCA 1.5 connector, under Resource Adapter Properties, provide values for the properties listed in the following table. The table lists the name of the property in one column and the value in a second column.
Name Value
IWayConfig Provide the configuration name. The default is:
base
iWay Installation and Configuration 3-3

Configuring and Deploying iWay Connector for JCA
10. Specify which servers you are deploying into by moving them from the Available to Selected boxes.
11. Click OK.
When the connector is deployed, it is expanded to a directory under the application server, for example:
C:\Sun\AppServer\domains\domain1\applications\j2ee-modules\iwjca15
or
C:\Sun\AppServer\domains\domain1\applications\j2ee-modules\iwafjca
If you receive an error, stop the server instance and remove each appearance of the following line from domain.xml file for your domain (AppServer\domains\domain1\config\domain.xml):
<jvm-options>-Djava.security.policy=${com.sun.aas.instanceRoot}/config/server.policy</jvm-options>
Procedure How to Create Connection Pools for the iWay Connector for JCA 1.5
For JCA 1.5, create a connection pool for the connector:
1. On the left of the Admin Console, expand Resources.
2. Under Resources, expand Connectors.
3. Click Connector Connection Pools.
4. On the right, click New.
5. In the Name field enter:
eis/iWay
6. For the Resource Adapter menu, choose:
IWayRepoURL Clear this field so it has no value.
LogLevel Provide the LogLevel, for example:
DEBUG
IWayRepoPassword Clear this field so it has no value.
IWayRepoUser Clear this field so it has no value.
IWayHome Provide the directory where iWay is installed, for example:
C:\Program Files\iWay55
Name Value
3-4 iWay Software

Configuring iWay Connector for JCA
iwjca15
7. Click Next.
8. Click Next again.
9. For the Transaction Support drop down menu, choose one of the following:
NoTransaction
or
LocalTransaction
Note: Leave the Additional Properties as they appear.
10. Click Finish.
11. On the left, under Connectors, click Connector Resources.
12. On the right, click New.
13. In the JNDI Name field enter:
eis/iWay
14. For the Pool Name menu, choose:
eis/iWay
15. In the Targets area, select your sever or servers in the Available text box and click Add.
16. Click OK.
iWay Installation and Configuration 3-5

Configuring and Deploying iWay Connector for JCA
Changing Default Connector SettingsThe behavior of iWay Connector for JCA is controlled by the following file inside the iwafjca.rar or iwjca15.war archive:
META-INF/ra.xml
The following topic explains how to change the default settings for iWay Connector for JCA.
Reference How to Configure iWay Connector for JCA Settings
This is not a required configuration. It is provided for reference. If you wish, you can proceed to Deploying and Running the JCA Test Tool on page 3-8.
To change defaults, you must:
1. Find the META-INF/ra.xml file for iwafjca.rar or iwjca15.rar. You can edit the file included with the deployed connector or extract the META-INF/ra.xml file from an undeployed archive.
For an already deployed file, its location varies depending on your server, domain, and platform, for example:
C:\Sun\AppServer\domains\domain1\applications\j2ee-modules\iwafjca\META-INF
For an undeployed archive, extract ra.xml as follows:
a. Open a command prompt and navigate to the directory containing the connector, for example:
C:\Program Files\iWay55\sun
b. Issue the following command:
jar xvf iwafjca.rar META-INF/ra.xml
or
jar xvf iwjca15.rar META-INF/ra.xml
The jar command is located in the Java SDK bin directory which might not be in your search path. If you receive an error, execute the jar command using its full path. This path varies depending on which version of Java is installed, for example:
C:\j2sdk1.4.1_03\bin\jar xvf iwafjca.rar META-INF/ra.xml
Note: Be sure to use the jar command and not Winzip. Winzip does not properly extract Java related archives.
2. Open the ra.xml file in a text editor.
3. Modify the contents of the <param-value> tags to change defaults. Ensure the IWayHome variable specifies the iWay55 directory.
3-6 iWay Software

Configuring iWay Connector for JCA
The following settings can be changed:
• IWayHome. The installation directory where iWay 5.5. is installed.
<config-property-name>IWayHome</config-property-name><config-property-type>java.lang.String</config-property-type><config-property-value>c:\program files\iway55</config-property-value>
</config-property>
• IWayConfig. Configuration instance for the connector to use at run time. By default, a base configuration is available and defined in this file. A program can access this information via JNDI, or it can override these values.
<config-property> <config-property-name>IWayConfig</config-property-name> <config-property-type>java.lang.String</config-property-type> <config-property-value>base</config-property-value> </config-property>
Note: If you create a new configuration, you may need to manually create a directory with the same named under iWay55\config. You may also need to manual create a log directory under that new directory.
• LogLevel. Trace setting. This can be set to DEBUG, INFO, or ERROR.
<context-param><config-property> <config-property-name>LogLevel</config-property-name> <config-property-type>java.lang.String</config-property-type> <config-property-value></config-property-value></config-property>
For example:
<config-property-value>DEBUG</config-property-value>
A directory in the configuration directory contains the logs. Also, be sure to review logs generated by your application server.
Leave the remainder of this file unchanged.
4. Save the file and exit the editor.
5. If you edited the deployed file, stop and then restart the application server. If you edited an extracted file, use the jar command to return ra.xml file to the META-INF directory within the archive as follows:
a. Ensure that you are in the directory that contains the connector, for example:
C:\Program Files\iWay55\sun
b. Issue the following command:
jar uvf iwafjca.rar META-INF/ra.xml
iWay Installation and Configuration 3-7
Deploying and Running the JCA Test Tool
or
jar uvf iwjca15.rar META-INF/ra.xml
Deploying and Running the JCA Test TooliWay 5.5 includes a sample Web application called the JCA Test Tool. The JCA Test Tool includes sample code that enables you to test iWay Service and Event Adapters. You should deploy the iWay Connector for JCA before the JCA Test Tool.
Two version of iWay Connector for JCA Test Tool are provided:
• If you deployed the JCA 1.5 Connector, you must use 1.5 Test Tool. The default location is on Windows is:
C:\Program Files\iWay55\sun\iwjca15ivp.war
• If you deployed the JCA 1.0 Connector, you must use 1.0 Test Tool. The default location is on Windows is:
C:\Program Files\iWay55\sun\iwjcaivp.rar
For other platforms, see the corresponding locations.
Deploying the JCA Test ToolDeploy the JCA Test Tool to Sun Java System Application Server as explained below.
Procedure How to Deploy the JCA Test Tool
You can use the Sun Admin Console to deploy the JCA Test Tool.
1. Start Sun Java System Application Server if it is not started.
2. Log on to the Sun Admin Console. If you kept the default port and access it locally, you can use:
https://localhost:4849
The Admin Console opens in your browser.
3. On the left, expand the Applications folder.
4. On the left, click Web Applications.
5. On the right, click Deploy.
6. Specify the iwjcaivp.war or iwjca15ivp.war file depending on which connector you use, for example:
C:\Program Files\iWay55\sun\iwjca15ivp.war
or
3-8 iWay Software

Configuring iWay Connector for JCA
C:\Program Files\iWay55\sun\iwjcaivp.war
7. Click Next.
8. Ensure the Application Name is one of the following depending on which connector you deploy:
iwjca15ivp
or
iwjcaivp
9. Ensure the Context Root is one of the following depending on which connector you deploy:
/iwjca15ivp
or
/iwjcaivp
10. Click OK.
When the Test Tool is deployed, it is expanded to a directory under the application server, for example:
C:\Sun\AppServer\domains\domain1\applications\j2ee-modules\iwjca15ivp
C:\Sun\AppServer\domains\domain1\applications\j2ee-modules\iwjcaivp
Running the JCA Test ToolAfter deploying the JCA Test Tool, access it to test the deployment.
Procedure How to Run the JCA Test Tool
To run the JCA Test Tool:
1. Open a browser to:
http://hostname:port/iwjca15ivp
or
http://hostname:port/iwjcaivp
Depending on which JCA Test Tool and connector you deployed.
where:
hostname
Is the name of the machine where your application server is running.
port
Is the HTTP port for the application server.
iWay Installation and Configuration 3-9

Deploying and Running the JCA Test Tool
For example:
http://localhost:8080/iwjca15ivp
The iWay JCA Test Tool window opens and provides configuration information and options for viewing iWay Service or Event adapters.
2. To display the available adapters, click the Service adapters or Event adapters option.
3-10 iWay Software
Configuring iWay Connector for JCA
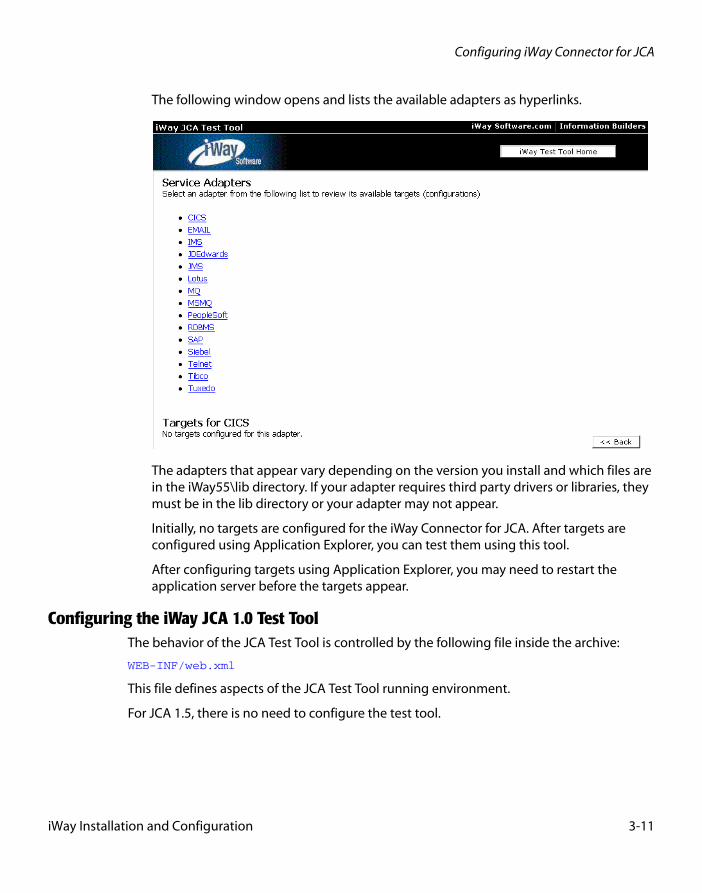
The following window opens and lists the available adapters as hyperlinks.
The adapters that appear vary depending on the version you install and which files are in the iWay55\lib directory. If your adapter requires third party drivers or libraries, they must be in the lib directory or your adapter may not appear.
Initially, no targets are configured for the iWay Connector for JCA. After targets are configured using Application Explorer, you can test them using this tool.
After configuring targets using Application Explorer, you may need to restart the application server before the targets appear.
Configuring the iWay JCA 1.0 Test ToolThe behavior of the JCA Test Tool is controlled by the following file inside the archive:
WEB-INF/web.xml
This file defines aspects of the JCA Test Tool running environment.
For JCA 1.5, there is no need to configure the test tool.
iWay Installation and Configuration 3-11

Deploying and Running the JCA Test Tool
Procedure How to Extract and Configure the JCA Test Tool
This is not a required configuration. It is provided for reference.
1. Extract the WEB-INF/web.xml file from the iwjcaivp.war or iwjca15ivp.war archive. To do this:
a. Open a command prompt and navigate to the directory containing the Test Tool, for example:
C:\Program Files\iWay55\sun
b. Issue the following command:
jar xvf iwjcaivp.war WEB-INF/web.xml
or
jar xvf iwjca15ivp.war WEB-INF/web.xml
The jar command is located in the Java SDK bin directory which might not be in your search path. If you receive an error, execute the jar command using its full path. This path varies depending on which version of Java is installed, for example:
C:\j2sdk1.4.1_03\bin\jar xvf iwjcaivp.war WEB-INF/web.xml
Note: Be sure to use the jar command and not Winzip. Winzip does not properly extract Java related archives.
2. Open the extracted web.xml file in a text editor.
3. Modify the contents of the <param-value> tags to change defaults. Ensure iway.home specifies the location of the iWay55 directory.
• Optionally, provide the connection factory name for iWay Connector for JCA. The connection factory is eis/IWAFConnectionFactory. The iWay JCA Test Tool attempts to connect to the adapter via JNDI if this is defined. If this is undefined iway.home and iway.config are used instead.
<context-param><param-name>iway.jndi</param-name><param-value></param-value><description>JNDI name for the IWAF JCA Resource Adapter. If notprovided, the application will create a new one basedon iway.home, iway.config and iway.loglevel. </description>
</context-param>
For example:
<param-value>eis/IWAFConnectionFactory</param-value>
3-12 iWay Software
Configuring iWay Connector for JCA
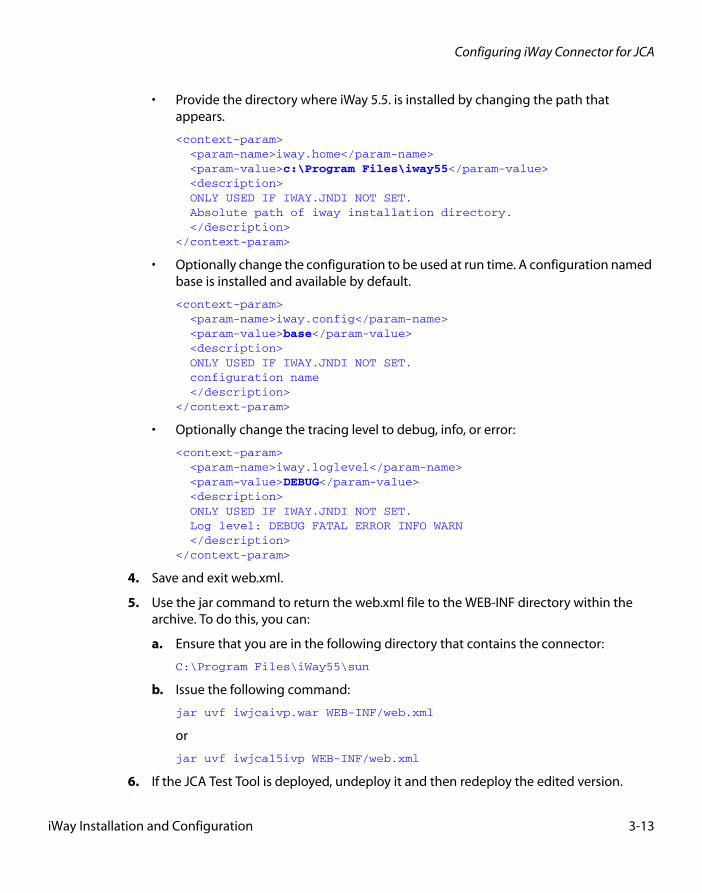
• Provide the directory where iWay 5.5. is installed by changing the path that appears.
<context-param><param-name>iway.home</param-name><param-value>c:\Program Files\iway55</param-value><description>ONLY USED IF IWAY.JNDI NOT SET. Absolute path of iway installation directory.</description>
</context-param>
• Optionally change the configuration to be used at run time. A configuration named base is installed and available by default.
<context-param><param-name>iway.config</param-name><param-value>base</param-value><description>ONLY USED IF IWAY.JNDI NOT SET. configuration name</description>
</context-param>
• Optionally change the tracing level to debug, info, or error:
<context-param><param-name>iway.loglevel</param-name><param-value>DEBUG</param-value><description>ONLY USED IF IWAY.JNDI NOT SET. Log level: DEBUG FATAL ERROR INFO WARN</description>
</context-param>
4. Save and exit web.xml.
5. Use the jar command to return the web.xml file to the WEB-INF directory within the archive. To do this, you can:
a. Ensure that you are in the following directory that contains the connector:
C:\Program Files\iWay55\sun
b. Issue the following command:
jar uvf iwjcaivp.war WEB-INF/web.xml
or
jar uvf iwjca15ivp WEB-INF/web.xml
6. If the JCA Test Tool is deployed, undeploy it and then redeploy the edited version.‘
iWay Installation and Configuration 3-13

Deploying and Running the JCA Test Tool
3-14 iWay Software
CHAPTER 4
Configuring iWay Business Services Engine
Topics:
• Deploying, Configuring, and Verifying Servlet iBSE
• Creating and Configuring the iBSE Repository
This section explains how to configure and install iWay Business Services Engine (iBSE) components. If you are not using Web services components, proceed to Chapter 5, Configuring Application Explorer.
iWay Installation and Configuration 4-1
Deploying, Configuring, and Verifying Servlet iBSE
Deploying, Configuring, and Verifying Servlet iBSEThe iWay Business Services Engine (iBSE) is a transformation and integration engine for processing XML files and SOAP messages for exchange with Web services applications and other systems. For use with Sun Java System Application Server, iBSE is available as a Web application and referred to as Servlet iBSE.
To use Servlet iBSE:
1. Deploy the iBSE Web application. (Deploying Servlet iBSE on page 4-2)
2. Configure Servlet iBSE. (Configuring Servlet iBSE on page 4-3)
3. Verify Servlet iBSE. (Verifying Servlet iBSE on page 4-4).
Deploying Servlet iBSEYou can use the Sun Admin Console to deploy Servlet iBSE packaged in ibse.ear. Its default location on Windows is:
C:\Program Files\iWay55\sun\ibse.ear
For other platforms, see the corresponding location.
Procedure How to Deploy Servlet iBSE
1. Start Sun Java System Application Server.
2. Log on to the Sun Admin Console. If you kept the default port and access it locally, you can use:
https://localhost:4849
The Admin Console opens in your browser.
3. On the left, expand the Applications folder.
4. On the left, click Enterprise Applications.
5. On the right, click Deploy.
6. Specify the ibse.ear file, for example:
C:\Program Files\iWay55\sun\ibse.ear
7. Click Next.
8. Ensure the Application Name is:
ibse
9. Click OK and Servlet iBSE is deployed.
The ibse application is expanded into a directory under your domain, for example:
4-2 iWay Software

Configuring iWay Business Services Engine
C:\Sun\AppServer\domains\domain1\applications\j2ee-apps\ibse
Some data generated by iBSE may be written to this directory and its subdirectories.
10. After iBSE is deployed, stop your application server, so you can modify some of its components.
11. Remove the jms.jar file from the WEB-INF/lib directory of Servlet iBSE, for example:
C:\Sun\AppServer\domains\domain1\applications\j2ee-apps\ibse\ibse_war\WEB-INF\lib\jms.jar
12. Replace the jms.jar file by copying the following file into the WEB-INF/lib directory of Servlet iBSE:
C:\Sun\AppServer\lib\j2ee.jar
Note: For Application Server 7, you need to download this file. It is available as part of the Sun Java J2EE SDK.
13. After replacing jms.jar with j2ee.jar, restart your application server.
Configuring Servlet iBSEAfter Servlet iBSE is deployed through your application server, you can configure it using its configuration Web page.
Procedure How to Configure Servlet iBSE
1. Open the following page in your browser:
http://hostname:port/ibse
where:
hostname
Is the hostname of the application server machine.
port
Is the HTTP port for the application server.
For example:
http://localhost:8080/ibse
Note: The first time you access this page, it may take some time to load.
2. Log on when prompted. When first installed, the user ID and the password are:
• User Name: iway
• Password: iway
iWay Installation and Configuration 4-3

Deploying, Configuring, and Verifying Servlet iBSE
The Servlet iBSE configuration page opens and provides fields for editing iBSE parameters.
3. Ensure the Adapter Lib Directory field specifies the path to the iWay55/lib directory, for example:
C:\Program Files\iWay55\lib
For some environments, this defaults, but for others, it does not.
After the path is specified, adapters in the lib directory are available to Servlet iBSE.
4. For security purposes, provide a new password in the Admin Password field.
Note: The Repository Url field specifies where the file system repository will be created. To use a database repository, you must enter the repository connection information. For now, use a file system repository for the initial verification. You can switch to a database repository as explained later in this section.
5. Click Save.
The file-based repository is created, and Servlet iBSE is ready for use. If you wish, you can change to a database repository after verifying Servlet iBSE.
Verifying Servlet iBSEWhen applications, such as Application Explorer, access Servlet iBSE, they can use one of the following URLs:
http://hostname:port/ibse/IBSEServlet/
http://hostname:port/ibse/IBSEServlet/XDSOAPAdapterFactory
Procedure How to Verify Servlet iBSE
You verify iBSE from the iBSE home page. This page should automatically open when you click Save on the configuration page.
1. If it is not open, open the following page in your browser:
http://hostname:port/ibse/IBSEServlet/
where:
hostname
Is the hostname of the application server machine.
port
Is the HTTP port for the application server.
For example:
http://localhost:8080/ibse/IBSEServlet/
4-4 iWay Software

Configuring iWay Business Services Engine
The iBSE home page opens.
This page enables you to test the sample Web service provided with iBSE.
When you create Web services using Application Explorer, you can also test them from this page.
2. Click IVP.
3. Click iwayivp.
4. Click ivp.
5. Click Invoke.
An XML response like the following appears in your browser:
<?xml version="1.0" encoding="UTF-8" ?> - <SOAP-ENV:Envelope xmlns:xsd="http://www.w3.org/2001/XMLSchema" xmlns:SOAP-ENV="http://schemas.xmlsoap.org/soap/envelope/" xmlns:xsi="http://www.w3.org/2001/XMLSchema-instance">- <SOAP-ENV:Body>- <ivpResponse xmlns="urn:iwaysoftware:ibse:jul2003:ivp:response"cid="A0328ED84ABFA055C4F64B8039C991AA"><CurrentTime>2004-01-05T19:15:48Z</CurrentTime> <Version>IWAY5.5</Version>
</ivpResponse></SOAP-ENV:Body></SOAP-ENV:Envelope>
Enabling Tracing for Servlet iBSEiBSE provides tracing functionality for troubleshooting problems with Web services. Only enable this for troubleshooting as it can affect performance.
Procedure How to Enable Tracing for Servlet iBSE
To enable tracing:
1. Open the Servlet iBSE configuration page:
http://hostname:port/ibse/IBSEConfig
where:
hostname
Is the hostname of the application server machine.
port
Is the HTTP port for the application server.
iWay Installation and Configuration 4-5
Creating and Configuring the iBSE Repository
For example:
http://localhost:8080/ibse/IBSEConfig
2. In the top System area, specify the level of tracing from the Debug drop-down list.
3. Click Save.
Tracing information is written to the ibselogs directory where your application server has expanded Servlet iBSE.
Creating and Configuring the iBSE RepositoryiBSE requires a repository in which to store transactions and metadata needed for the delivery of Web services. In addition, a second repository can be used for information needed to monitor services and events. iWay Software recommends using a JDBC-compliant database for repositories, but file system repositories are available and configured by default. To use database repositories, the SQL required to create the repository tables is installed with iWay 5.5.
To set up the repository, you must:
• Create the 5.5 repository and its tables as explained in Creating the iBSE Repository on page 4-6.
• Configure iBSE to access the repository as explained in Configuring iBSE to Use a Repository Database on page 4-9.
Creating the iBSE RepositoryFollow the steps for your type of repository:
• For a File System repository, see Configuring a File System Repository on page 4-6.
• For Microsoft SQL Server 2000, see How to Configure a Microsoft SQL Server 2000 Repository on page 4-7.
• For Oracle, see How to Configure an Oracle Repository on page 4-8.
Reference Configuring a File System Repository
If you do not have access to a database for the repository, you can store repository information in an XML file on your local machine. However, a file system repository is less secure and efficient than a database repository. When iBSE is first installed, it is automatically configured to use a file system repository.
For Servlet iBSE, the default location is either the root directory of the ibse Web application under the application server or a directory under iWay55, for example:
C:\Program Files\iWay55\config\base\ibserepo.xml
4-6 iWay Software
Configuring iWay Business Services Engine
On other platforms, use the corresponding location.
If you wish to use the iBSE monitoring information, a second repository is required. The default file for the monitoring repository on Windows is:
C:\Program Files\iWay55\config\base\ibsemrepo.xml
On other platforms, use the corresponding location.
For a file system repository, you are not required to configure additional iBSE components. You can proceed to Chapter 5, Configuring Application Explorer.
Procedure How to Configure a Microsoft SQL Server 2000 Repository
To configure a Microsoft SQL Server 2000 repository:
1. Create a SQL Server database to use as the iBSE repository.
2. Ensure that SQL Server authentication is supported.
You can do this from the SQL Server Enterprise Manager by right-clicking your SQL Server, choosing Properties, and clicking the Security tab. If Authentication is set to Windows only, change it to SQL Server and Windows, and then restart SQL Server.
Note: SQL Server has two authentication modes, Windows and SQL Server. Windows Authentication uses the same IDs as the Windows operating system. SQL Server Authentication uses IDs defined within SQL Server. iBSE uses the Microsoft SQL Server 2000 JDBC driver, and this driver requires SQL Server authentication.
3. Create a SQL Server ID and grant it db_owner rights to the iBSE repository database.
4. Open a command prompt and navigate to the iWay setup directory. The default location on Windows is:
C:\Program Files\iWay55\etc\setup
This directory contains SQL to create the repository tables in the following file:
iwse.sql
Once the database exists, you can use iwse.sql to create the database tables.
Note: If SQL Server is not on the same machine as iBSE, copy the iwse.sql file to the SQL Server machine. From a command prompt on the SQL Server machine, navigate to the directory containing the iwse.sql file.
iWay Installation and Configuration 4-7
Creating and Configuring the iBSE Repository
5. Issue the following command:
osql -S hostname -d databasename -U loginID -P password -i iwse.sql
where:
hostname
Is the name of the machine where SQL Server is running.
databasename
Is the database you created in step 1 on page 4-7.
loginID
Is the SQL Server ID with db_owner rights from step 3 on page 4-7.
password
Is the password for the SQL Server ID.
The tables should be created in your database.
If you wish to use the iBSE monitoring features, the SQL to create monitoring tables is in the following file:
C:\Program Files\iWay55\etc\setup\monitoring.sql
You can create these tables in the same database as the regular repository, or create a new database for the monitoring information. Creating a new database is recommended. Repeat the steps above, but submit monitoring.sql instead of iwse.sql when executing osql.
6. Proceed to Configuring iBSE to Use a Repository Database on page 4-9.
Procedure How to Configure an Oracle Repository
To configure an Oracle repository:
1. Contact your database administrator to obtain an Oracle user ID and password to create the iBSE repository.
This user ID should have rights to create and modify tables as well as the ability to create and execute stored procedures.
2. Open a command prompt and navigate to the iWay setup directory. Its default location on Windows is:
C:\Program Files\iWay55\etc\setup
For other platforms, see the corresponding location.
This directory contains SQL to create the repository tables in the following file:
iwse.ora
4-8 iWay Software

Configuring iWay Business Services Engine
Note: If Oracle is not on the same machine as iBSE copy iwse.ora to the Oracle machine. Then, from a command prompt on the Oracle machine, navigate to the directory containing the iwse.ora file.
3. Issue the following command depending on your Oracle release:
sqlplus userid/password @database @ iwse.ora
or
sqlplus userid/password @database @ iwse.ora9
If you wish to use the iBSE monitoring features, SQL to create monitoring tables is provided in:
monitoring.ora
The monitoring tables are separate from the other iBSE tables, so you can create them in a different instance or tablespaces if you wish. To create an iBSE monitoring repository, submit the monitoring.ora SQL.
Configuring iBSE to Use a Repository DatabaseAfter creating the repository database, you must provide the connection information that iBSE requires to access the repository.
Procedure How to Enter Connection Information for Servlet iBSE
To enter connection information for Servlet iBSE:
1. Copy the JDBC driver for your database into the lib directory for your domain, for example:
C:\Sun\AppServer\domains\domain1\lib
If you are not using the default domain1, substitute accordingly.
For Sun Java System Application Server 7, add these files to CLASSPATH.
The required driver files depend on your database and driver type, for example:
SQL Server 2000 (three files):
msbase.jarmssqlserver.jarmsutil.jar
iWay Installation and Configuration 4-9

Creating and Configuring the iBSE Repository
2. Log on to the Servlet iBSE Configuration page at:
http://hostname:port/ibse
Note: This page was introduced in Configuring Servlet iBSE on page 4-3.
3. At the bottom of the page, provide the repository connection information.
The following table lists and describes the fields.
The repository URLs have the forms listed in the following table.
Oracle:
classes12.zip
or
ojdbc14.jar (SDK 1.4.x and higher)
Field Description
Repository Type Specify the type of repository you are using.
Repository URL Provide a JDBC URL to connect to the database. Examples follow this table.
Repository Driver Provide the JDBC Class to connect to the database.
For SQL Server:
com.microsoft.jdbc.sqlserver.SQLServerDriver
For Oracle:
oracle.jdbc.driver.OracleDriver
Repository User Provide the user ID to access the repository database.
Repository Password
Provide the password to access the repository database.
SQL Server jdbc:microsoft:sqlserver://hostname:port;DatabaseName=dbname;SelectMethod=cursor
Oracle jdbc:oracle:thin:@hostname:port;SID
4-10 iWay Software

Configuring iWay Business Services Engine
where:
hostname
Is the name of the machine for the database server.
port
Is the port number for the database server. The SQL Server default is 1433. The Oracle default is 1521.
dbname
Is the database name.
SID
Is the ORACLE SID.
4. Click Save.
You should be redirected to the Servlet iBSE home page where you can test the sample Web service. However, until you redeploy or restart the server, your repository is not actually used.
5. Restart the application server.
After the server restarts or the application is redeployed, test it by going to the Servlet iBSE home page at:
http://hostname:port/ibse/IBSEServlet
If you receive an error, confirm the settings in:
http://hostname:port/ibse/IBSEConfig
6. If you wish to use the iBSE monitoring, return to the Servlet iBSE Configuration page:
http://hostname:port/ibse/IBSEConfig
7. At the bottom of the page, click More configuration....
8. Specify the information to connect to the monitoring repository. If it is the same database as the regular iBSE repository, enter the same information as you did for the regular repository. If you set up a different database, provide the information for the monitoring database.
9. Click Save Configuration.
10. Click Start Monitoring.
11. Restart the server or redeploy the iBSE Web application.
If you still receive errors, try adding the JDBC driver to your application server’s CLASSPATH and then restart the application server.
iWay Installation and Configuration 4-11

Creating and Configuring the iBSE Repository
4-12 iWay Software
CHAPTER 5
Configuring Application Explorer
Topic:
• Configuring Servlet Application Explorer
This section explains how to configure Application Explorer.
iWay Installation and Configuration 5-1
Configuring Servlet Application Explorer
Configuring Servlet Application ExploreriWay Application Explorer is a GUI tool that uses adapters to create schemas and business services for use with iWay Connector for JCA, iBSE, or other XML or Web services based programs. It enables you to quickly generate schemas and publish Web services from objects and procedures in production ERP systems, without requiring in-depth knowledge of the objects or systems.
Servlet Application Explorer is provided as the iwae.war file. The default location on Windows is:
C:\Program Files\iWay55\sun\iwae.war
For other platforms, see the corresponding location.
Configuring Servlet Application Explorer CommunicationsTo use Application Explorer, you must set up communications to iWay components or configurations. Communications are controlled by the following file inside the iwae.war archive:
WEB-INF/web.xml
To create business services or schemas for iBSE, Application Explorer connects to iBSE. Therefore, Application Explorer must know the correct URL to access it.
For iWay Connector for JCA, Application Explorer handles schema generation and target configuration itself. Application Explorer then writes information to the configuration directories from which iWay Connector for JCA will read. Therefore, Application Explorer must know the location of the configuration directories.
By default Application Explorer is set to connect to both Servlet iBSE and the iWay Connector for JCA base configuration. For Servlet iBSE, Application Explorer uses the Base URL you provided during the installation. If you are not using Servlet iBSE, you provided the wrong Base URL, or you wish to access a different connector configuration, you must edit web.xml as explained below. If you are confident that default settings are sufficient, proceed to Deploying Servlet Application Explorer on page 5-5.
Procedure: How to How to Configure Application Explorer Communications
To configure Application Explorer communications:
1. Open a command prompt and navigate to the directory containing the iwae.war file, for example:
C:\Program Files\iWay55\sun\iwae.war
2. Use the jar command to extract the web.xml file.
jar xvf iwae.war WEB-INF/web.xml
5-2 iWay Software
Configuring Application Explorer
If you receive an error, then the jar command is probably not in your search path. You can execute the command by specifying its exact location. The jar command is located in the Java SDK bin directory, which varies depending on your Java release, for example:
C:\j2sdk1.4.1_03\bin\jar xvf iwae.war WEB-INF/web.xml
Note: Be sure to use the jar command and not Winzip. Winzip may not properly extract Java related archives.
3. In a text editor, open the web.xml file for Servlet Application Explorer. This file is located in the WEB-INF directory that was created when you extracted web.xml from iwae.war, for example:
C:\Program Files\iWay55\sun\WEB-INF\web.xml
This file controls the behavior and communications of Application Explorer.
4. Find the "<service..." lines which define connections.
The default content of these lines may vary depending on which version of iWay you install, for example:
<explorer><service displayName="localhost" url="http://localhost:8080/ibse/IBSEServlet"/><service displayName="jca" provider="com.ibi.adapter.jspae.CustomJCAIWAEConnectio
n" url="C:\Program Files\iWay55#base" /></explorer>
A service line can have the following parameters:
displayName
Is the name that appears in Application Explorer. This is your choice. The displayNames appear when you access Application Explorer and you can toggle between them.
url
Is information Application Explorer needs to access an iWay component or configuration. This varies depending on whether you access iWay Connector for JCA or Servlet iBSE. The correct formats are described in the next steps.
provider
Is required for iWay Connector for JCA and should be com.ibi.adapter.jspae.CustomJCAIWAEConnection.
iWay Installation and Configuration 5-3
Configuring Servlet Application Explorer
You can define as many connections (service lines) as you wish. When you access Application Explorer in a browser, you choose the connections to access, and you can switch between them.
5. If you are not using both Servlet iBSE and Connector for JCA, remove the line for the component you are not using.
6. For Servlet iBSE, you need a service line with the following url:
url="http://hostname:port/ibse/IBSEServlet/"
where:
hostname
Is the hostname of your application server machine.
port
Is your application server HTTP port.
For example:
<service displayName="Sevlet ibse" url="http://localhost:8080/ibse/IBSEServlet"/>
7. For iWay Connector for JCA, edit the jca line so the url is the following. Make sure the correct directory where you installed iWay appears:
url="IWAY_HOME#IWAY_CONFIG"
where:
IWAY_HOME
Is the directory where iWay 5.5 is installed.
IWAY_CONFIG
Is the iWay Connector for JCA configuration instance. By default, a base configuration exists.
The provider parameter must appear as well.
provider="com.ibi.adapter.jspae.CustomJCAIWAEConnection"
For example:
<service displayName="jca" provider="com.ibi.adapter.jspae.CustomJCAIWAEConnection" url="c:\program files\iway55#base" />
Note: Technically this line enables Application Explorer to write to the configuration directory from which the Connector for JCA reads.
8. Save and exit the web.xml file.
9. In a command prompt, navigate to the directory containing the iwae.war file.
5-4 iWay Software

Configuring Application Explorer
10. From the directory containing the iwae.war file, use the jar command to add the new web.xml file.
jar uvf iwae.war WEB-INF/web.xml
Deploying Servlet Application ExplorerThe following procedure describes how to deploy Servlet Application Explorer.
Procedure: How to How to Configure Servlet Application Explorer for Sun Java System Application Server
You can use the Sun Admin Console to deploy Servlet Application Explorer.
1. Start Sun Java System Application Server if it is not started.
2. Log on to the Sun Admin Console. If you kept the default port and access it locally, you can use:
https://localhost:4849
The Admin Console opens in your browser.
3. On the left, expand the Applications folder.
4. On the left, click Web Applications.
5. On the right, click Deploy.
6. Specify the iwae.war file, for example:
C:\Program Files\iWay55\sun\iwae.war
7. Click Next.
8. Ensure the Application Name is:
iwae
9. Ensure the Context Root is:
/iwae
10. Click OK.
The application is expanded into a directory under your domain, for example:
C:\Sun\AppServer\domains\domain1\applications\j2ee-modules\iwae
iWay Installation and Configuration 5-5

Configuring Servlet Application Explorer
Accessing Servlet Application ExplorerAfter Servlet Application Explorer is deployed through your application server, you can access it.
Note: You may receive errors if you use Internet Explorer 5.5 or earlier. Before using Application Explorer, update to Internet Explorer 6 or higher.
Procedure: How to How to Access Servlet Application Explorer
After Servlet Application Explorer is deployed through your application server, you can access it as follows:
1. Go to the following URL in a browser:
http://hostname:port/iwae/index.html
where:
hostname
Is the hostname for the application server machine.
port
Is the HTTP port for the application server.
For example:
http://localhost:8080/iwae/index.html
5-6 iWay Software
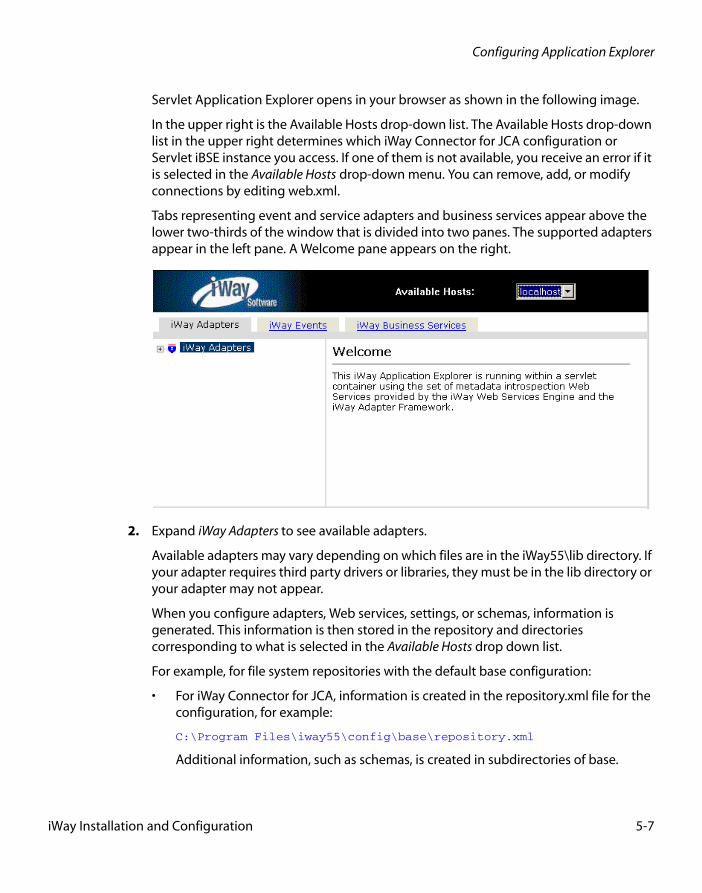
Configuring Application Explorer
Servlet Application Explorer opens in your browser as shown in the following image.
In the upper right is the Available Hosts drop-down list. The Available Hosts drop-down list in the upper right determines which iWay Connector for JCA configuration or Servlet iBSE instance you access. If one of them is not available, you receive an error if it is selected in the Available Hosts drop-down menu. You can remove, add, or modify connections by editing web.xml.
Tabs representing event and service adapters and business services appear above the lower two-thirds of the window that is divided into two panes. The supported adapters appear in the left pane. A Welcome pane appears on the right.
2. Expand iWay Adapters to see available adapters.
Available adapters may vary depending on which files are in the iWay55\lib directory. If your adapter requires third party drivers or libraries, they must be in the lib directory or your adapter may not appear.
When you configure adapters, Web services, settings, or schemas, information is generated. This information is then stored in the repository and directories corresponding to what is selected in the Available Hosts drop down list.
For example, for file system repositories with the default base configuration:
• For iWay Connector for JCA, information is created in the repository.xml file for the configuration, for example:
C:\Program Files\iway55\config\base\repository.xml
Additional information, such as schemas, is created in subdirectories of base.
iWay Installation and Configuration 5-7

Configuring Servlet Application Explorer
• For Servlet iBSE, information is created in ibserepo.xml under the ibse Web application’s root or in an iWay directory.
C:\Program Files\iWay55\config\base\ibserepo.xml
Additional information, such as schemas and wsdl, is created in subdirectories beneath the ibserepo.xml file or in subdirectories where your application server accesses Servlet iBSE files, for example:
C:\Sun\AppServer\domains\domain1\applications\j2ee-apps\ibse\ibse_war\wsdl
You should now review the appendixes to see if any information appears for your adapters. If your adapters are not discussed in the appendixes, see your adapter documentation.
5-8 iWay Software

APPENDIX A
Configuring the iWay Emulation Adapter (3270/5250)
Topic:
• Installing the iWay Emulation Adapter Client Components
This section provides post-installation steps for the iWay Emulation Adapter (3270/5250).
The iWay Emulation Adapter was formerly known as the iWay Adapter for Telnet.
iWay Installation and Configuration A-1

Installing the iWay Emulation Adapter Client Components
Installing the iWay Emulation Adapter Client ComponentsThe iWay Emulation Adapter (3270/5250) links new business applications to mainframe-based business logic through IBM 3270 and 5250 terminal screens and data streams. It enables you to transform your 3270 or 5250 mainframe screens into HTML pages or to create a remote procedure request (RPC) to transform the output of screens into an answer set. The adapter provides a simple, lightweight, and scalable way to reuse the business logic and data of terminal applications.
The iWay Emulation Adapter (3270/5250) requires client components that you must configure after installing iWay 5.5. The two client components are:
• The run-time component, which is supported on:
• Microsoft Windows 2000 with SP2 and Windows 2003.
• UNIX.
• OS/390 and z/OS (under UNIX System Services (USS)).
• The Telnet Designer, which is supported on:
• Microsoft Windows 2000 with SP2, Windows 2003, and Windows XP SP1.
UNIX note: if you plan to run the Emulation Adapter on a UNIX system, you must install iWay 5.5 and the Emulation Adapter client components on the UNIX system and also install the adapter’s client components on a Windows system. This enables you to use the Telnet Designer, which is supported on Windows only.
A-2 iWay Software
Configuring the iWay Emulation Adapter (3270/5250)
Procedure How to Install the iWay Emulation Adapter Client Components on Windows
The iWay Emulation Adapter requires client components, including the Telnet Designer, that must be configured after installing iWay 5.5.
To configure the client components on Windows:
1. Run the following utility installed with iWay 5.5.
C:\Program Files\iway55\etc\setup\iwtelnetwin32.exe
2. Follow the installation windows to install the adapter’s client components.
Procedure How to Install the iWay Emulation Adapter Client Components on UNIX
To configure the client components on Linux:
1. Navigate to the following directory:
$IWAY55/etc/setup
2. Use chmod to ensure the installation utility is executable. The name of the utility varies depending on your platform, for example:
chmod 555 iwtelnetlinux.bin
Note: If this file does not appear for you platform, download the current version from:
http://iwse.ibi.com/iway55/support/adapters/telnet/
3. Execute the installation utility, for example:
$IWAY55/etc/setup/iwtnlinux.bin -console
4. Respond to the prompts.
For information about using the adapter, including the Telnet Designer, see the iWay Emulation Adapter (3270/5250) User’s Guide.
iWay Installation and Configuration A-3

Installing the iWay Emulation Adapter Client Components
A-4 iWay Software
APPENDIX B
Configuring Legacy Adapters
Topic:
• Legacy Adapter Configuration
This section provides information on the steps and documentation required to configure legacy data adapters.
iWay Installation and Configuration B-1
Legacy Adapter Configuration
Legacy Adapter ConfigurationAccess to the following legacy mainframe data sources is provided through an iWay Server component that must be installed and configured on the mainframe.
• Adabas
• BULL GCOS
• Datacom
• Flat Files
• CA-IDMS/DB
• CA-IDMS/SQL
• Millennium
• MODEL 204
• Supra
• Teradata
• Total
• VSAM
Access to and from these data sources using iWay Connector for JCA, Servlet iBSE, or Application Explorer is accomplished by first connecting to the iWay Server.
Adapters for other legacy data sources do not require an iWay Server.
B-2 iWay Software
Configuring Legacy Adapters
Procedure How to Configure Legacy Data Adapters for use With iWay 5.5
To configure legacy data adapters for use with iWay 5.5:
1. Install an iWay Server on the mainframe containing the data sources you wish to access.
a. For Information on iWay Server installation and configuration, see the iWay Server Installation Manual.
b. Install the Server for OS/390 and z/OS, not the Server for MVS.
2. Configure the iWay Server to access the data source as explained in the following manuals:
• iWay Data Adapter Administrator User's Guide
• iWay Server Administration for UNIX, Windows NT OpenVMS, OS/400, OS/390 & z/OS
3. Install the iWay Data Management Administration Tools (DMAT) Suite on a Windows machine as explained in the iWay Data Management Administration Tools Suite Installation Guide.
4. Use the Catalog Administrator (installed with iWay DMAT) to add stored procedures to the iWay Server’s catalog so the procedures are accessible from Application Explorer.
For information on adding stored procedures, see the iWay Catalog Administrator manual.
iWay Installation and Configuration B-3

Legacy Adapter Configuration
B-4 iWay Software

Reader Comments
In an ongoing effort to produce effective documentation, the Documentation Services staff at Information Builders welcomes any opinion you can offer regarding this manual.Please use this form to relay suggestions for improving this publication or to alert us to corrections. Identify specific pages where applicable. You can contact us through the following methods:
Name:_________________________________________________________________________________
Company:______________________________________________________________________________
Address:_______________________________________________________________________________
Telephone:____________________________________Date:_____________________________________
E-mail:_________________________________________________________________________________
Comments:
Mail: Documentation Services - Customer SupportInformation Builders, Inc. Two Penn Plaza New York, NY 10121-2898
Fax: (212) 967-0460
E-mail: [email protected]
Web form: http://www.informationbuilders.com/bookstore/derf.html
Information Builders, Two Penn Plaza, New York, NY 10121-2898 (212) 736-4433
iWay Installation and Configuration DN3501474.0305Version 5 Release 5

Reader Comments
Information Builders, Two Penn Plaza, New York, NY 10121-2898 (212) 736-4433
iWay Installation and Configuration DN3501474.0305Version 5 Release 5