ivms4200 client software quick reference manual products/hikvision help... · hikvision ptz cameras...
TRANSCRIPT

1. Add DVR’s & IP cameras using the “Import camera” tab
2. Select “add Device” tab, the add device dialog boxwill then appear
3. add DVR information
Nickname = anything you want tocall the DVR Address = IP address of the DVR or IP camera
Port number = DVR port (usually 8000)
User name = admin (default)Password 12345 (default)
Multicast = do not enter anything here
Export to groupThis function must be done to allow the cameras to be visible in the Main(live) view screenYou can group the cameras under the DVR Nickname (most common group) You can also manually create additional groups, then individually highlight any camera thumbnail image,and export it to the group of your choice. This allows you to group cameras from more than oneDVR into a favourites group, This can be useful in the Live view screen as you can load all thefavourite cameras at once by clicking on the group name
Opens add device dialog box to allow editing of DVR infoDeletes the DVR/ip cam from IVMS4200 software
Refreshes or searches for the DVR/ip camera againExports the camera to group
Accesses DVR configuration settings and allows editingOpens or folds the thumbnail images of DVR,s cameras
IVMS4200 Client Software Quick reference manual
TIPWhen connected to the same local network as the DVRor IP camera, click on the “Show on line devices” buttonthis will open the show on-line devices dialog box anddisplay any Hikvision DVR or IP camera on the Network.Click on the required device and click the “Select Device”button.The information will automatically load into the add devicedialog boxThis method also proves the DVR/IPcam is present on the Network
Use the highlighted toolsto add any camera toany group
Easily import/export all the DVR,s and cameras on this software,making reloading or adding IVMS4200 to another PC very easy
Page 1

Main (live) view screenDrag & drop any camera into any window tostart video stream
Drag to swap camera positions
Page layout selector
Boarderless full screen(click Esc to return)
Stop all camerastreams
Capturestill image
Record streamto computer
Select nextcamera set
Start sequencingcameras
Start audiostream
Drag
Location of any backed up footage fromDVR or ip cameraLocation of any captured still images
Right click on DVR name to see toolsExpand & fold all reveal or hide camera list oronly show DVR name headings(useful when large volume of DVRs are connected)
Main and sub stream allow you to choose the resolution of the streamMain stream is ideal for local NetworkSub steam is ideal over the internet wherebandwidth is limited by the upload speed ofyour internet where DVR is installedYou can set the sub stream speed to matchyour internet speed in the “camera settings”menu under “video quality”
Open two way audio allows talkback to site whenamplifier and speakers attached at DVR end
Synchronize the DVR time with your PC time
Control steam type camera by camera
Right click on camera to see tools
Tool bar appears at the bottom of any camera youscroll over with mouse
Capturestill image
Recordstream
Talkback
to site
Digital zoomtool
PTZ controltool
Camera infotool
Camera/DVRsettings access
Stop videostream
instantplayback mode
Open audiolisten-in
DVR’s can be remotely monitored allowing automatic audio/video alarms to be generated and logged by the viewer software.Instant playback of any event is possible by clicking on the play button on the event line
Alarm event logging instant event playback button
TIP
Page 2
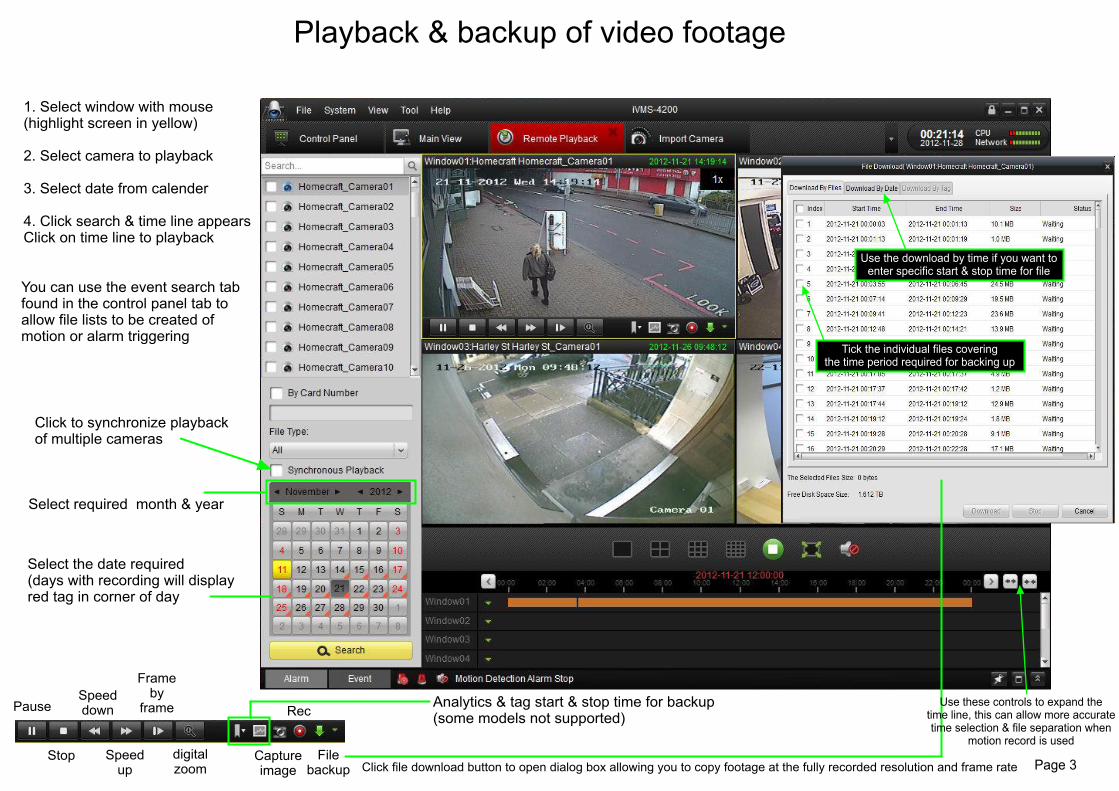
Playback & backup of video footage
1. Select window with mouse(highlight screen in yellow) 2. Select camera to playback 3. Select date from calender 4. Click search & time line appearsClick on time line to playback
Select required month & year
Select the date required(days with recording will displayred tag in corner of day
Click to synchronize playbackof multiple cameras
digitalzoom
Frameby
framePause
Speedup
Speeddown Analytics & tag start & stop time for backup
(some models not supported)
Filebackup
Stop
Rec
Captureimage Click file download button to open dialog box allowing you to copy footage at the fully recorded resolution and frame rate
Use these controls to expand thetime line, this can allow more accuratetime selection & file separation when
motion record is used
You can use the event search tabfound in the control panel tab toallow file lists to be created ofmotion or alarm triggering
Page 3
Tick the individual files coveringthe time period required for backing up
Use the download by time if you want toenter specific start & stop time for file

Playback of backed up files
Backup footage is found in this folder
Backup screen captures are found inthis folder
Search for you backed up files here
TIPRemember to set the date period tocover the date of backed up files(Default search is today’s date only)
Click on thumbnail tostart playback
To find file location highlightthumbnail image and clicksave iconDialog box opens showing files TIPDrag the file from this box onto yourdesktop or other folder to quicklymove the file or copy to USB stick etc
Shows file location where downloadis saved
File player can be downloaded as a separate download from our web site at any timeFile player can also be manually opened from the “file” tab at the top of the IVMS4200software
Capture still imagefor printing
Page 4

Click on Joy stick icon to open floatingPTZ control panel
You can drag this control panel toany position on screen
Drag mouse tomove camera
Scroll wheel to zoom
Advanced Pan Tilt & Zoom Control
Easy Preset position creation and call1.Click on a unused preset number2. Move the camera to the position you want it to remember3. Click pecil icon to open dialog box, enter a name for preset4. click on the required preset to call it at any time
TIPNot all 3rd party PTZ camerasfully support Patterns & PatrolsHikvision PTZ cameras arerecommended
3D PTZ controlActivate the 3D control button then draga box on the imageThe camera will move and zoomto the marked area
Setting Patterns and Patrols
Click here to run apattern or Patrol
TIPHikvision PTZ cameras arerecommended for 3D controlMost 3rd party Speed Domesdo not support 3D control
Page 5

Camera and DVR configuration and settings adjustments
Main Stream is the recording stream, whatever you set hereis the resolution the DVR is recording.
Sub Stream is a second stream used for viewing over theinternet ware bandwidth is limitedYou can select Sub Stream in the “Main view” Tab to make thevideo stream more fluid and to allow multiple cameras to beviewed without stalling the stream
When Configuring Sub Stream the settings shown here are oftenfound to be the optimum when upload speed of the site internetservice is between 500kb & 1 megabyte/second
“Stream Type” sets Video or use Audio/Video if you have Mic fitted
“Frame rate” adjusts the number of frames/secondif the stream stalls reduce this rate to make the stream more fluid
“Max Bitrate” adjusts the bandwidth allowance of each camera
Low Middle & High sets the bandwidth to preset valuesThis affects the quality of the recorded image whenadjusting Main Stream Advanced settings allow you to manually set the stream quality
Set the image size in pixels, this setting changes the qualityof the recorded images when adjusting Main stream
4CIF 704 x 575 pixels (PAL) is the max size for Standard Analogue SDI DVR,s
Higher resolutions can be achieved by usingHD-SDI & IP cameras & NVR,s
You can copy the settings changes to other cameras onthe same DVR here
You must save any changes before leaving this page orthey will not take effect
Choose a camera you want to edit settingsbefore commencing
Select the icon here to enter the menu you require edit
Additional DVR/NVR parameter setting
You can choose fixed or variable bit rate
Full Technical manual PDF is availableby clicking on help tab
TIP
Page 6

IVMS4200 easy navigation & additional features
Control Panel tab displays short-cuts to all IVMS functions
If you cannot see the tab you are looking forall tabs are visible in the View folder
Two level e-maps allow you to display systemlocations on main map, then click on systemlocation to display an e-map of the site withfloating images for each camera position
Page 7

Drag out tabs from the main page for multi window viewing
Support for 3 monitor display of Data makes software suitable for control rooms and security offices
IVMS4200 multi-window functions
Page 8