ir speed dome - cctv · pdf fileir speed dome installation manual v1.0.0 ud.6l0201a1032a02...
TRANSCRIPT
IR Speed Dome
Installation Manual
V1.0.0
UD.6L0201A1032A02
HIKVision IR Speed DOME PTZ Camera User Manual
DS-2DF7274-A DS-2DF7276-A DS-2DF5284-A DS-2DF5284-A0DS-2DF5286-A DS-2DF5286-A DS-2DF7284-A DS-2AF7264-A DS-2AF7268-A
Lo-Call 1890 866 900 www.cctvireland.ie [email protected]
IR Speed Dome Installation Manual 1
Thank you for purchasing our product. If there are any questions, or requests, please do not
hesitate to contact the dealer.
This manual applies to IR Speed Dome.
This manual may contain several technical or printing errors, and the content is subject to change
without notice. The updates will be added to the new version of this manual. We will readily
improve or update the products or procedures described in the manual.
DISCLAIMER STATEMENT
“Underwriters Laboratories Inc. (“UL”) has not tested the performance or reliability of the security
or signaling aspects of this product. UL has only tested for fire, shock or casualty hazards as outlined
in UL’s Standard(s) for Safety, UL60950-1. UL Certification does not cover the performance or
reliability of the security or signaling aspects of this product. UL MAKES NO REPRESENTATIONS,
WARRANTIES OR CERTIFICATIONS WHATSOEVER REGARDING THE PERFORMANCE OR RELIABILITY
OF ANY SECURITY OR SIGNALING RELATED FUNCTIONS OF THIS PRODUCT.
0203001030406
Lo-Call 1890 866 900 www.cctvireland.ie [email protected]

IR Speed Dome Installation Manual 2
Regulatory Information
FCC Information
FCC compliance: This equipment has been tested and found to comply with the limits for a digital
device, pursuant to part 15 of the FCC Rules. These limits are designed to provide reasonable
protection against harmful interference when the equipment is operated in a commercial
environment. This equipment generates, uses, and can radiate radio frequency energy and, if not
installed and used in accordance with the instruction manual, may cause harmful interference to
radio communications. Operation of this equipment in a residential area is likely to cause harmful
interference in which case the user will be required to correct the interference at his own expense.
FCC Conditions
This device complies with part 15 of the FCC Rules. Operation is subject to the following two
conditions:
1. This device may not cause harmful interference.
2. This device must accept any interference received, including interference that may cause
undesired operation.
EU Conformity Statement
This product and - if applicable - the supplied accessories too are marked with "CE"
and comply therefore with the applicable harmonized European standards listed
under the Low Voltage Directive 2006/95/EC, the EMC Directive 2004/108/EC, the
RoHS Directive 2011/65/EU.
2012/19/EU (WEEE directive): Products marked with this symbol cannot be disposed
of as unsorted municipal waste in the European Union. For proper recycling, return
this product to your local supplier upon the purchase of equivalent new equipment,
or dispose of it at designated collection points. For more information see:
www.recyclethis.info.
2006/66/EC (battery directive): This product contains a battery that cannot be
disposed of as unsorted municipal waste in the European Union. See the product
documentation for specific battery information. The battery is marked with this
symbol, which may include lettering to indicate cadmium (Cd), lead (Pb), or
mercury (Hg). For proper recycling, return the battery to your supplier or to a
designated collection point. For more information see: www.recyclethis.info.
Lo-Call 1890 866 900 www.cctvireland.ie [email protected]
IR Speed Dome Installation Manual 3
Safety Instruction These instructions are intended to ensure that the user can use the product correctly to avoid
danger or property loss.
The precaution measure is divided into ‘Warnings’ and ‘Cautions’:
Warnings: Serious injury or death may be caused if any of these warnings are neglected.
Cautions: Injury or equipment damage may be caused if any of these cautions are neglected.
Warnings Follow these safeguards to
prevent serious injury or death.
Cautions Follow these precautions to
prevent potential injury or material
damage.
Warnings
All the electronic operation should be strictly compliance with the electrical safety regulations,
fire prevention regulations and other related regulations in your local region.
Please use the power adapter, which is provided by normal company. The standard of the
power adapter is 24VAC10% or 12VDC10% (depending on models). The power consumption
cannot be less than the required value.
Do not connect several devices to one power adapter as adapter overload may cause over-heat
or fire hazard.
Please make sure that the power has been disconnected before you wire, install or dismantle
the speed dome.
When the product is installed on wall or ceiling, the device shall be firmly fixed.
If smoke, odors or noise rise from the device, turn off the power at once and unplug the power
cable, and then please contact the service center.
If the product does not work properly, please contact your dealer or the nearest service center.
Never attempt to disassemble the speed dome yourself. (We shall not assume any responsibility
for problems caused by unauthorized repair or maintenance.)
Cautions
Do not drop the dome or subject it to physical shock, and do not expose it to high
electromagnetism radiation. Avoid the equipment installation on vibrations surface or places
subject to shock (ignorance can cause equipment damage).
Do not place the dome in extremely hot, cold, dusty or damp locations, otherwise fire or
electrical shock will occur. The operating temperature should be -30°C ~ 65°C.
The dome cover for indoor use shall be kept from rain and moisture.
Exposing the equipment to direct sun light, low ventilation or heat source such as heater or
Lo-Call 1890 866 900 www.cctvireland.ie [email protected]
IR Speed Dome Installation Manual 4
radiator is forbidden (ignorance can cause fire danger).
Do not aim the speed dome at the sun or extra bright places. A blooming or smear may occur
otherwise (which is not a malfunction however), and affecting the endurance of sensor at the
same time.
Please use the provided glove when open up the dome cover, avoid direct contact with the
dome cover, because the acidic sweat of the fingers may erode the surface coating of the dome
cover.
Please use a soft and dry cloth when clean inside and outside surfaces of the dome cover, do
not use alkaline detergents.
Do not stare at infrared LED closely to avoid hurting your eyes when the infrared lights are on.
Please keep all wrappers after unpack them for future use. In case of any failure occurred, you
need to return the speed dome to the factory with the original wrapper. Transportation without
the original wrapper may result in damage on the speed dome and lead to additional costs.
Lo-Call 1890 866 900 www.cctvireland.ie [email protected]
IR Speed Dome Installation Manual 5
Table of Contents Chapter 1 Installation............................................................................................................................................ 6
1.1 Installing the IR Speed Dome ............................................................................................................................... 6
1.2 Connecting the Cables.......................................................................................................................................... 8
1.3 DIP Switch Settings ............................................................................................................................................... 8
1.3.1 Address Settings ............................................................................................................................................... 9
1.3.2 Baudrate Settings ........................................................................................................................................... 11
1.3.3 Protocol Settings ............................................................................................................................................ 12
1.3.4 Communication Mode Settings ...................................................................................................................... 12
1.3.5 Terminal Resistor Settings .............................................................................................................................. 12
1.4 Alarm Input and Output Connection .................................................................................................................. 13
1.5 Power Cable Requirement ................................................................................................................................. 13
Chapter 2 Mount Dimension ................................................................................................................................ 14
2.1 Wall Mount ........................................................................................................................................................ 14
2.2 Corner Adapter ................................................................................................................................................... 15
2.3 Pole Adapter ....................................................................................................................................................... 16
2.4 Pendant Mount .................................................................................................................................................. 17
Chapter 3 Mounting Applications ........................................................................................................................ 18
3.1 Wall Mounting Applications ............................................................................................................................... 18
3.1.1 Components ................................................................................................................................................... 18
3.1.2 Wall Mounting ............................................................................................................................................... 19
3.2 Corner Mounting Applications ........................................................................................................................... 20
3.2.1 Components ................................................................................................................................................... 20
3.2.2 Corner Mounting ............................................................................................................................................ 21
3.3 Pole Mounting Applications ............................................................................................................................... 22
3.3.1 Components ................................................................................................................................................... 22
3.3.2 Pole Mounting ................................................................................................................................................ 24
3.4 Pendant Mounting Applications ......................................................................................................................... 26
3.4.1 Components ................................................................................................................................................... 26
3.4.2 Pendant Mounting ......................................................................................................................................... 26
Appendix ..................................................................................................................................................................... 29
Appendix 1 Lightning & Surge Protection ....................................................................................................................... 29
Appendix 2 Waterproof .................................................................................................................................................. 33
Appendix 3 Bubble Maintenance ................................................................................................................................... 35
Appendix 4 RS485 Bus Connection ................................................................................................................................. 36
Appendix 5 24VAC Wire Gauge & Transmission Distance .............................................................................................. 39
Appendix 6 Wire Gauge Standards ................................................................................................................................. 40
Lo-Call 1890 866 900 www.cctvireland.ie [email protected]
IR Speed Dome Installation Manual 6
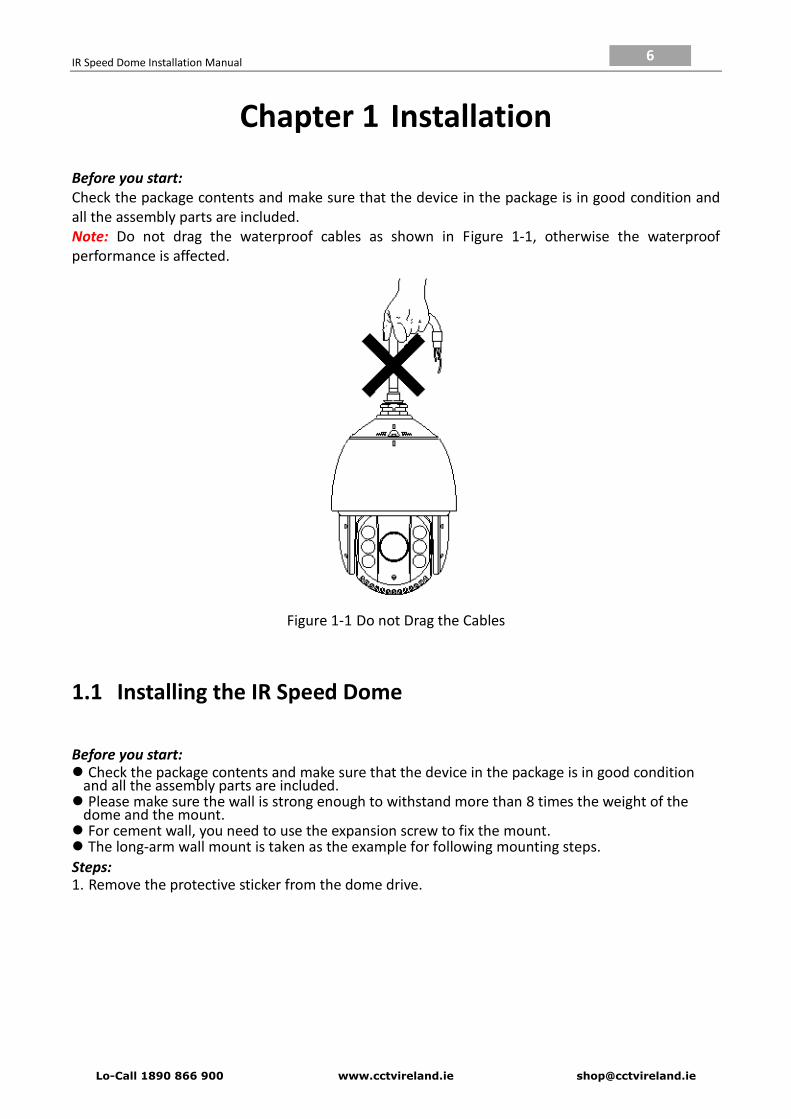
Chapter 1 Installation
Before you start: Check the package contents and make sure that the device in the package is in good condition and all the assembly parts are included. Note: Do not drag the waterproof cables as shown in Figure 1-1, otherwise the waterproof performance is affected.
Figure 1-1 Do not Drag the Cables
1.1 Installing the IR Speed Dome
Before you start: Check the package contents and make sure that the device in the package is in good condition
and all the assembly parts are included. Please make sure the wall is strong enough to withstand more than 8 times the weight of the
dome and the mount. For cement wall, you need to use the expansion screw to fix the mount. The long-arm wall mount is taken as the example for following mounting steps.
Steps: 1. Remove the protective sticker from the dome drive.
Lo-Call 1890 866 900 www.cctvireland.ie [email protected]
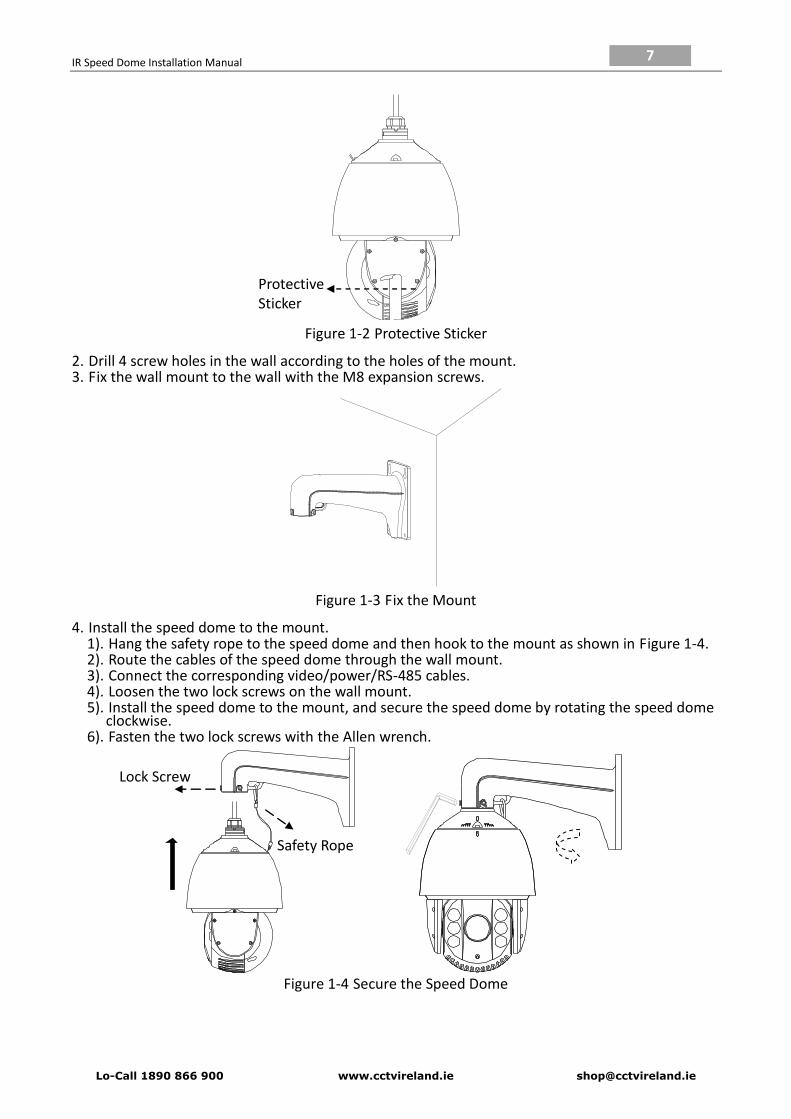
IR Speed Dome Installation Manual 7
Figure 1-2 Protective Sticker
2. Drill 4 screw holes in the wall according to the holes of the mount. 3. Fix the wall mount to the wall with the M8 expansion screws.
Figure 1-3 Fix the Mount
4. Install the speed dome to the mount. 1). Hang the safety rope to the speed dome and then hook to the mount as shown in Figure 1-4. 2). Route the cables of the speed dome through the wall mount. 3). Connect the corresponding video/power/RS-485 cables. 4). Loosen the two lock screws on the wall mount. 5). Install the speed dome to the mount, and secure the speed dome by rotating the speed dome
clockwise. 6). Fasten the two lock screws with the Allen wrench.
Figure 1-4 Secure the Speed Dome
Protective Sticker
Safety Rope
Lock Screw
Lo-Call 1890 866 900 www.cctvireland.ie [email protected]

IR Speed Dome Installation Manual 8
1.2 Connecting the Cables
Before you start:
Please make sure the power of the dome is off before connecting the cables.
Choose the video cable according to the transmission length. The video should meet the least
demands as: 75Ω resistance; 100% copper core conducting wire; 95% weaving copper shield.
RS485 communication cable, please refer to Appendix 4
24V AC power cable, please refer to Appendix 5
The cable interfaces of speed dome are shown in the following figures. Please refer to the following
figure for connecting the RS-485, power and video cables.
As shown in the following figures, the label instructs you to connect the power cables. The label
and instruct you to connect the RS-485 cables.
ORANGE RS485+YELLOW RS485-
Lable 1
Lable 2
Lable 1
Lable 2
BlackYellow Green
Red
YellowOrange
RED AC24VYELLOW/GREENBLACK AC24V
Figure 1-5 IR Speed Dome
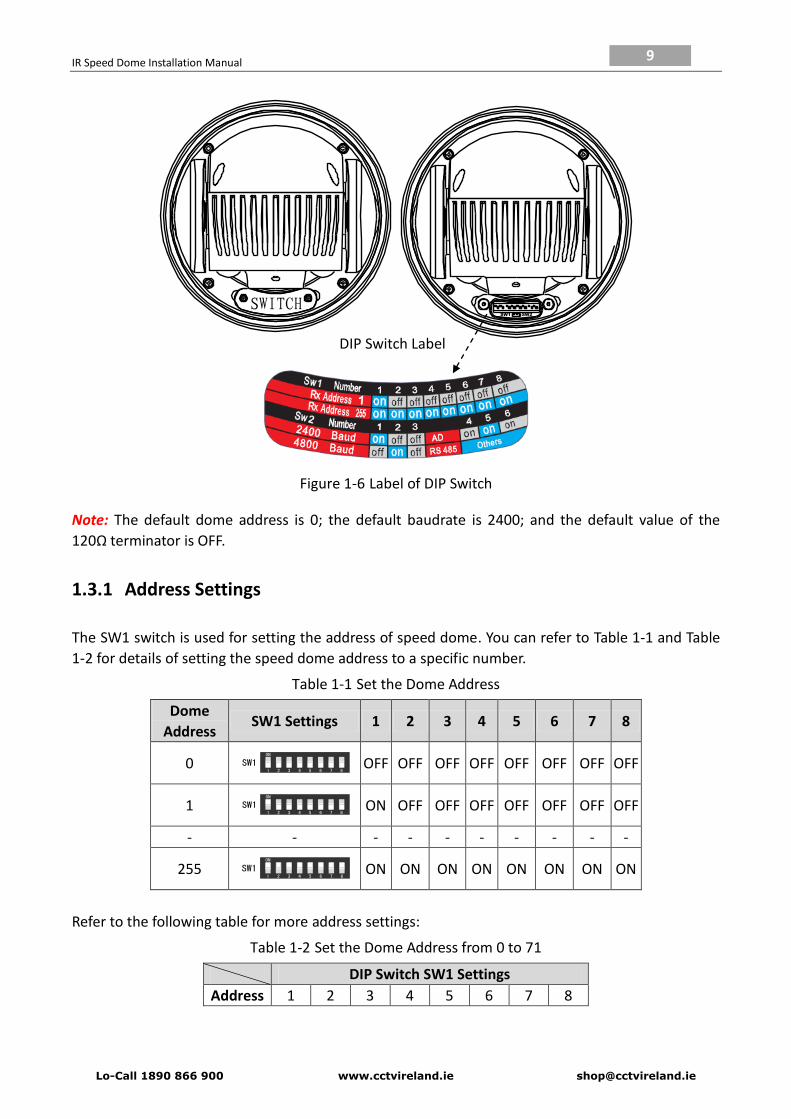
1.3 DIP Switch Settings
Two DIP switches SW1 and SW2 are for setting the speed dome address, baudrate, protocol, etc.,
with value ON=1 and OFF=0. The switch label is on the back of the SWITCH cover as shown in Figure
1-6.
Each number of the switch represents a DIP value, ranging from 1 to 8 for the lowest to highest.
Please refer to Section 1.3.1 to 1.3.2 for detailed settings.
Lo-Call 1890 866 900 www.cctvireland.ie [email protected]
IR Speed Dome Installation Manual 9
SW1 SW2
SWITCH
Figure 1-6 Label of DIP Switch
Note: The default dome address is 0; the default baudrate is 2400; and the default value of the
120Ω terminator is OFF.
1.3.1 Address Settings
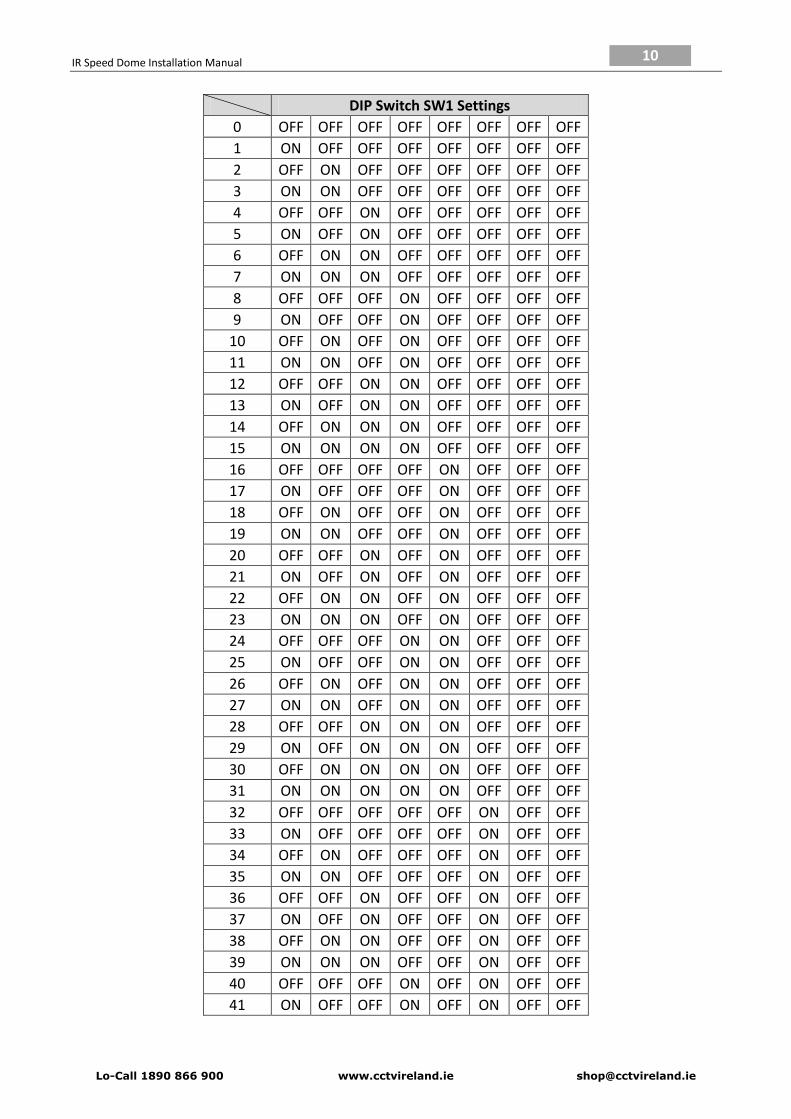
The SW1 switch is used for setting the address of speed dome. You can refer to Table 1-1 and Table
1-2 for details of setting the speed dome address to a specific number.
Table 1-1 Set the Dome Address
Dome
Address SW1 Settings 1 2 3 4 5 6 7 8
0 ON
1 2 3 4 5 6 7 8
SW1 OFF OFF OFF OFF OFF OFF OFF OFF
1 ON
1 2 3 4 5 6 7 8
SW1 ON OFF OFF OFF OFF OFF OFF OFF
- - - - - - - - - -
255 ON
1 2 3 4 5 6 7 8
SW1 ON ON ON ON ON ON ON ON
Refer to the following table for more address settings:
Table 1-2 Set the Dome Address from 0 to 71
DIP Switch SW1 Settings
Address 1 2 3 4 5 6 7 8
DIP Switch Label
Lo-Call 1890 866 900 www.cctvireland.ie [email protected]
IR Speed Dome Installation Manual 10
DIP Switch SW1 Settings
0 OFF OFF OFF OFF OFF OFF OFF OFF
1 ON OFF OFF OFF OFF OFF OFF OFF
2 OFF ON OFF OFF OFF OFF OFF OFF
3 ON ON OFF OFF OFF OFF OFF OFF
4 OFF OFF ON OFF OFF OFF OFF OFF
5 ON OFF ON OFF OFF OFF OFF OFF
6 OFF ON ON OFF OFF OFF OFF OFF
7 ON ON ON OFF OFF OFF OFF OFF
8 OFF OFF OFF ON OFF OFF OFF OFF
9 ON OFF OFF ON OFF OFF OFF OFF
10 OFF ON OFF ON OFF OFF OFF OFF
11 ON ON OFF ON OFF OFF OFF OFF
12 OFF OFF ON ON OFF OFF OFF OFF
13 ON OFF ON ON OFF OFF OFF OFF
14 OFF ON ON ON OFF OFF OFF OFF
15 ON ON ON ON OFF OFF OFF OFF
16 OFF OFF OFF OFF ON OFF OFF OFF
17 ON OFF OFF OFF ON OFF OFF OFF
18 OFF ON OFF OFF ON OFF OFF OFF
19 ON ON OFF OFF ON OFF OFF OFF
20 OFF OFF ON OFF ON OFF OFF OFF
21 ON OFF ON OFF ON OFF OFF OFF
22 OFF ON ON OFF ON OFF OFF OFF
23 ON ON ON OFF ON OFF OFF OFF
24 OFF OFF OFF ON ON OFF OFF OFF
25 ON OFF OFF ON ON OFF OFF OFF
26 OFF ON OFF ON ON OFF OFF OFF
27 ON ON OFF ON ON OFF OFF OFF
28 OFF OFF ON ON ON OFF OFF OFF
29 ON OFF ON ON ON OFF OFF OFF
30 OFF ON ON ON ON OFF OFF OFF
31 ON ON ON ON ON OFF OFF OFF
32 OFF OFF OFF OFF OFF ON OFF OFF
33 ON OFF OFF OFF OFF ON OFF OFF
34 OFF ON OFF OFF OFF ON OFF OFF
35 ON ON OFF OFF OFF ON OFF OFF
36 OFF OFF ON OFF OFF ON OFF OFF
37 ON OFF ON OFF OFF ON OFF OFF
38 OFF ON ON OFF OFF ON OFF OFF
39 ON ON ON OFF OFF ON OFF OFF
40 OFF OFF OFF ON OFF ON OFF OFF
41 ON OFF OFF ON OFF ON OFF OFF
Lo-Call 1890 866 900 www.cctvireland.ie [email protected]
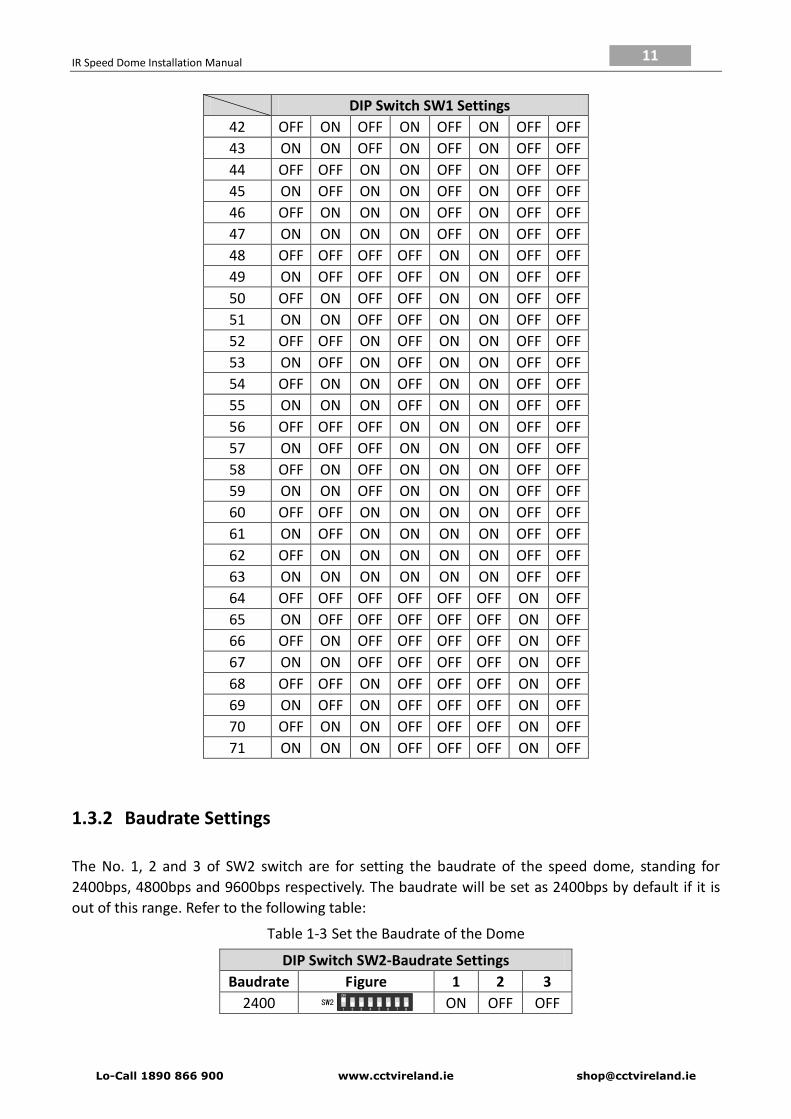
IR Speed Dome Installation Manual 11
DIP Switch SW1 Settings
42 OFF ON OFF ON OFF ON OFF OFF
43 ON ON OFF ON OFF ON OFF OFF
44 OFF OFF ON ON OFF ON OFF OFF
45 ON OFF ON ON OFF ON OFF OFF
46 OFF ON ON ON OFF ON OFF OFF
47 ON ON ON ON OFF ON OFF OFF
48 OFF OFF OFF OFF ON ON OFF OFF
49 ON OFF OFF OFF ON ON OFF OFF
50 OFF ON OFF OFF ON ON OFF OFF
51 ON ON OFF OFF ON ON OFF OFF
52 OFF OFF ON OFF ON ON OFF OFF
53 ON OFF ON OFF ON ON OFF OFF
54 OFF ON ON OFF ON ON OFF OFF
55 ON ON ON OFF ON ON OFF OFF
56 OFF OFF OFF ON ON ON OFF OFF
57 ON OFF OFF ON ON ON OFF OFF
58 OFF ON OFF ON ON ON OFF OFF
59 ON ON OFF ON ON ON OFF OFF
60 OFF OFF ON ON ON ON OFF OFF
61 ON OFF ON ON ON ON OFF OFF
62 OFF ON ON ON ON ON OFF OFF
63 ON ON ON ON ON ON OFF OFF
64 OFF OFF OFF OFF OFF OFF ON OFF
65 ON OFF OFF OFF OFF OFF ON OFF
66 OFF ON OFF OFF OFF OFF ON OFF
67 ON ON OFF OFF OFF OFF ON OFF
68 OFF OFF ON OFF OFF OFF ON OFF
69 ON OFF ON OFF OFF OFF ON OFF
70 OFF ON ON OFF OFF OFF ON OFF
71 ON ON ON OFF OFF OFF ON OFF
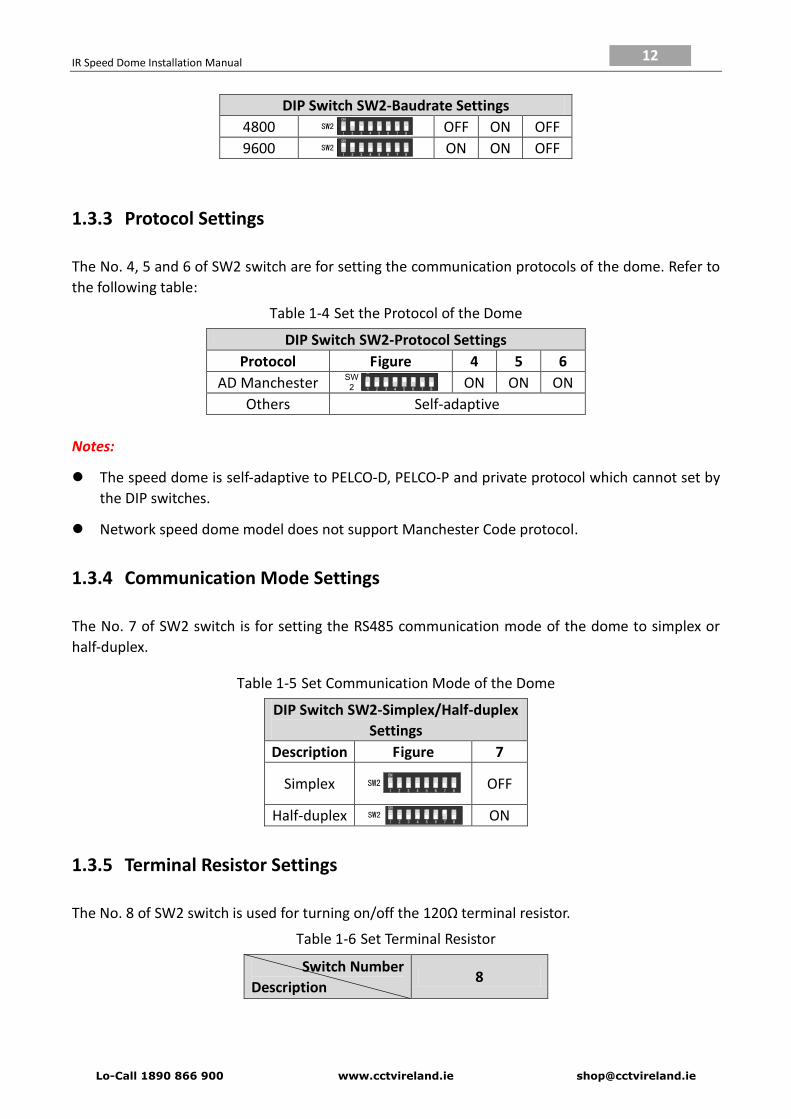
1.3.2 Baudrate Settings
The No. 1, 2 and 3 of SW2 switch are for setting the baudrate of the speed dome, standing for
2400bps, 4800bps and 9600bps respectively. The baudrate will be set as 2400bps by default if it is
out of this range. Refer to the following table:
Table 1-3 Set the Baudrate of the Dome
DIP Switch SW2-Baudrate Settings
Baudrate Figure 1 2 3
2400 ON
1 2 3 4 5 6 7 8
SW2 ON OFF OFF
Lo-Call 1890 866 900 www.cctvireland.ie [email protected]
IR Speed Dome Installation Manual 12
DIP Switch SW2-Baudrate Settings
4800 ON
1 2 3 4 5 6 7 8
SW2 OFF ON OFF
9600 ON
1 2 3 4 5 6 7 8
SW2 ON ON OFF
1.3.3 Protocol Settings
The No. 4, 5 and 6 of SW2 switch are for setting the communication protocols of the dome. Refer to
the following table:
Table 1-4 Set the Protocol of the Dome
DIP Switch SW2-Protocol Settings
Protocol Figure 4 5 6
AD Manchester O
N
1 2 3 4 5 6 7 8
SW
2 ON ON ON
Others Self-adaptive
Notes:
The speed dome is self-adaptive to PELCO-D, PELCO-P and private protocol which cannot set by
the DIP switches.
Network speed dome model does not support Manchester Code protocol.
1.3.4 Communication Mode Settings
The No. 7 of SW2 switch is for setting the RS485 communication mode of the dome to simplex or
half-duplex.
Table 1-5 Set Communication Mode of the Dome
DIP Switch SW2-Simplex/Half-duplex
Settings
Description Figure 7
Simplex ON
1 2 3 4 5 6 7 8
SW2 OFF
Half-duplex ON
1 2 3 4 5 6 7 8
SW2 ON
1.3.5 Terminal Resistor Settings
The No. 8 of SW2 switch is used for turning on/off the 120Ω terminal resistor.
Table 1-6 Set Terminal Resistor
Switch Number
Description 8
Lo-Call 1890 866 900 www.cctvireland.ie [email protected]
IR Speed Dome Installation Manual 13
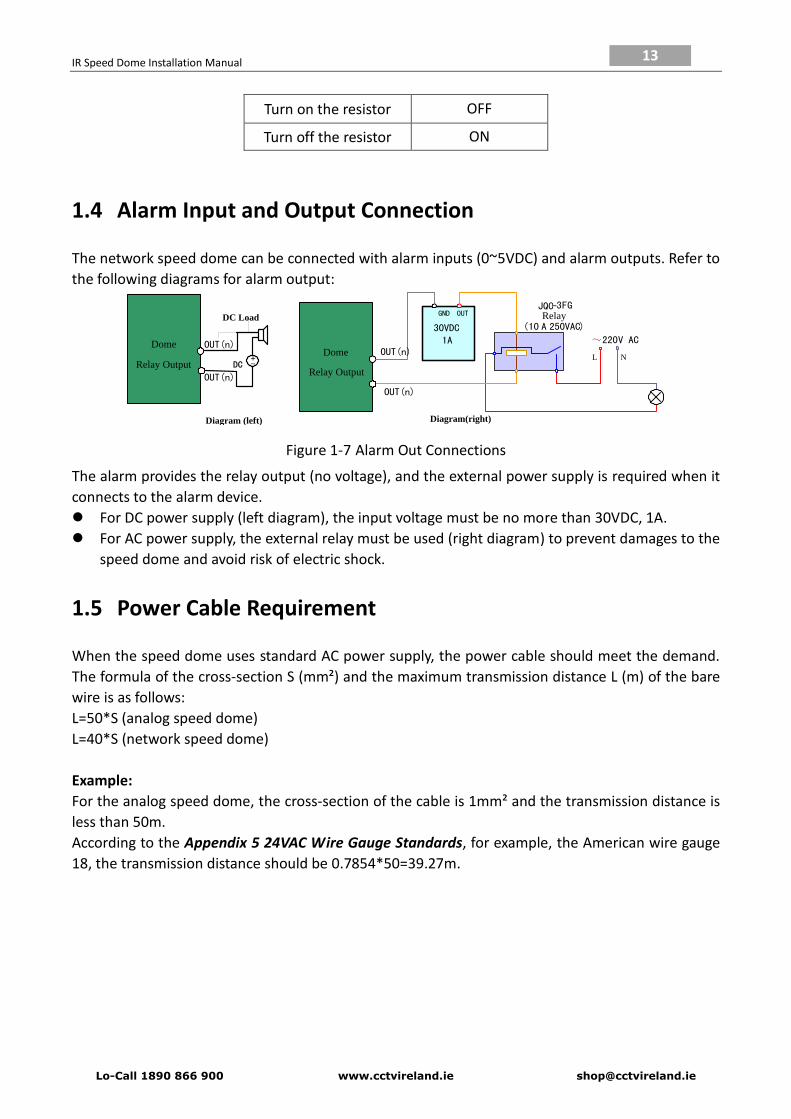
Turn on the resistor OFF
Turn off the resistor ON
1.4 Alarm Input and Output Connection
The network speed dome can be connected with alarm inputs (0~5VDC) and alarm outputs. Refer to
the following diagrams for alarm output:
JQC-3FGRelay
30VDC
GND OUT
L N
~220V AC
Relay Output
Dome
(10 A 250VAC)
Diagram (left) Diagram(right)
1A OUT(n)
OUT(n)
+-DC
DC Load
Relay Output
Dome OUT(n)
OUT(n)
Figure 1-7 Alarm Out Connections
The alarm provides the relay output (no voltage), and the external power supply is required when it
connects to the alarm device.
For DC power supply (left diagram), the input voltage must be no more than 30VDC, 1A.
For AC power supply, the external relay must be used (right diagram) to prevent damages to the
speed dome and avoid risk of electric shock.
1.5 Power Cable Requirement
When the speed dome uses standard AC power supply, the power cable should meet the demand.
The formula of the cross-section S (mm²) and the maximum transmission distance L (m) of the bare
wire is as follows:
L=50*S (analog speed dome)
L=40*S (network speed dome)
Example:
For the analog speed dome, the cross-section of the cable is 1mm² and the transmission distance is
less than 50m.
According to the Appendix 5 24VAC Wire Gauge Standards, for example, the American wire gauge
18, the transmission distance should be 0.7854*50=39.27m.
Lo-Call 1890 866 900 www.cctvireland.ie [email protected]

IR Speed Dome Installation Manual 14
Chapter 2 Mount Dimension
Note: Not all of the mounts are listed in this manual. Please refer to the specification manual.
2.1 Wall Mount
You can use the wall mount with corner adapter or pole adapter according to different installation
environments.
181.9
97
30575
160
φ 8.5
Figure 2-1 Wall Mount
Lo-Call 1890 866 900 www.cctvireland.ie [email protected]
IR Speed Dome Installation Manual 15
2.2 Corner Adapter
A corner adapter has to be used together with a wall mount for corner mounting applications.
Figure 2-2 Corner Adapter
Lo-Call 1890 866 900 www.cctvireland.ie [email protected]
IR Speed Dome Installation Manual 16
2.3 Pole Adapter
A pole adapter has to be used together with a wall mount for pole mounting applications.
Figure 2-3 Pole Adapter
Lo-Call 1890 866 900 www.cctvireland.ie [email protected]
IR Speed Dome Installation Manual 17
2.4 Pendant Mount
Figure 2-4 Pendant Mount
Lo-Call 1890 866 900 www.cctvireland.ie [email protected]
IR Speed Dome Installation Manual 18
Chapter 3 Mounting Applications
Before you start:
For cement wall, you need to use the expansion screw to fix the mount. The mounting hole of
the expansion pipe on the wall should align with the mounting hole on the mount.
For wooden wall, you can just use the self-tapping screw to fix the mount.
The wall must be thick enough to install the expansion screws.
Please make sure that the wall is strong enough to withstand more than 8 times the weight of
the dome and the mount.
3.1 Wall Mounting Applications
3.1.1 Components
Wall Mount
Figure 3-1 Wall Mount
Mounting Accessories
Figure 3-2 Nuts and Flat Washers
Lo-Call 1890 866 900 www.cctvireland.ie [email protected]
IR Speed Dome Installation Manual 19
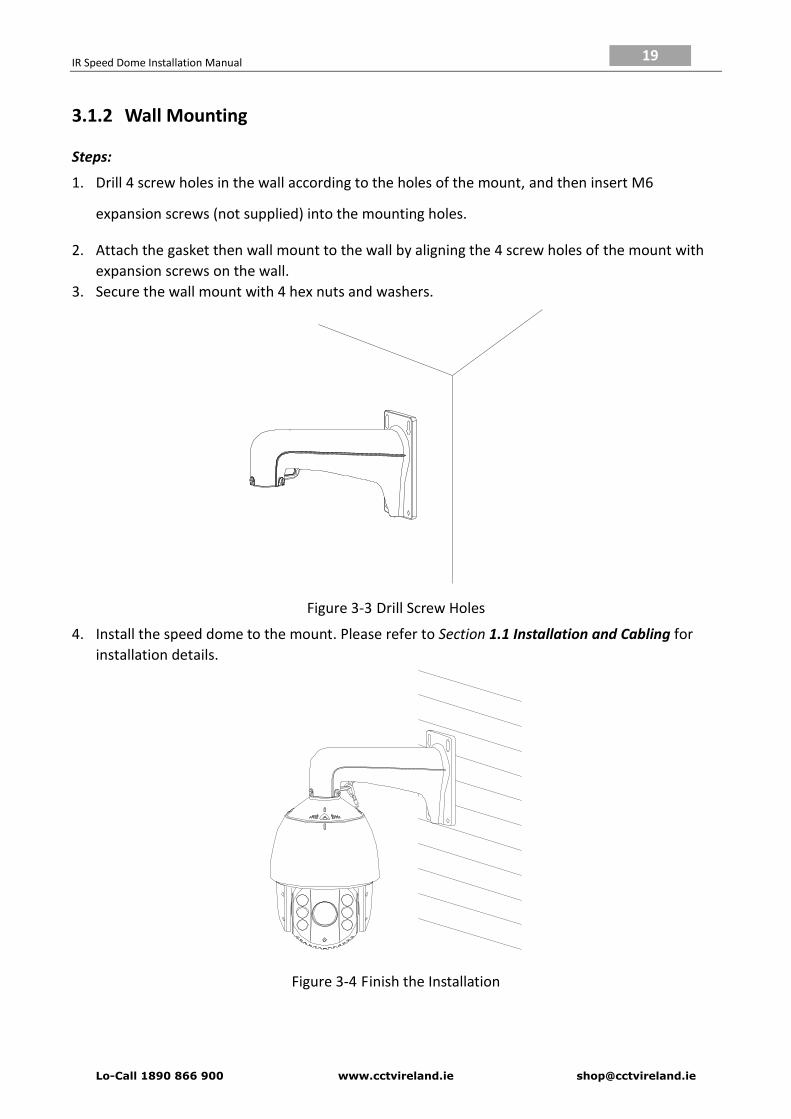
3.1.2 Wall Mounting
Steps:
1. Drill 4 screw holes in the wall according to the holes of the mount, and then insert M6
expansion screws (not supplied) into the mounting holes.
2. Attach the gasket then wall mount to the wall by aligning the 4 screw holes of the mount with
expansion screws on the wall.
3. Secure the wall mount with 4 hex nuts and washers.
Figure 3-3 Drill Screw Holes
4. Install the speed dome to the mount. Please refer to Section 1.1 Installation and Cabling for
installation details.
Figure 3-4 Finish the Installation
Lo-Call 1890 866 900 www.cctvireland.ie [email protected]
IR Speed Dome Installation Manual 20
3.2 Corner Mounting Applications
Before you start:
The corner mounting is applicable to the indoor/outdoor 90° solid corner construction.
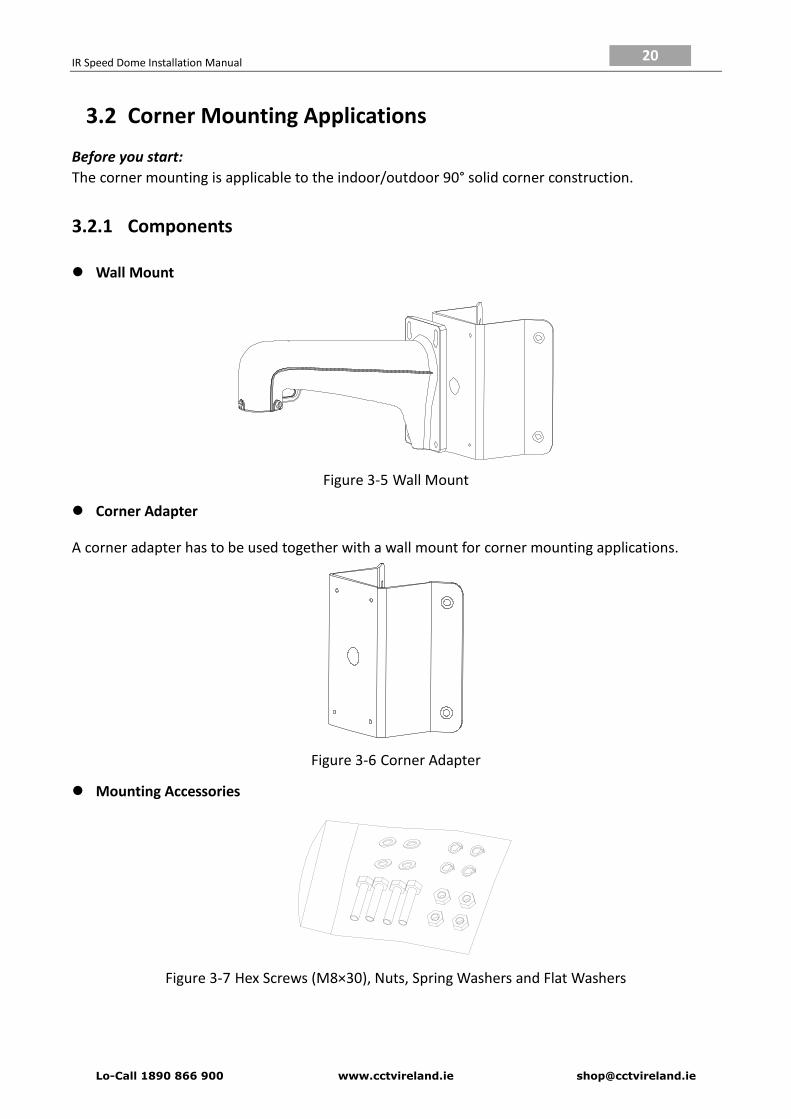
3.2.1 Components
Wall Mount
Figure 3-5 Wall Mount
Corner Adapter
A corner adapter has to be used together with a wall mount for corner mounting applications.
Figure 3-6 Corner Adapter
Mounting Accessories
Figure 3-7 Hex Screws (M8×30), Nuts, Spring Washers and Flat Washers
Lo-Call 1890 866 900 www.cctvireland.ie [email protected]
IR Speed Dome Installation Manual 21
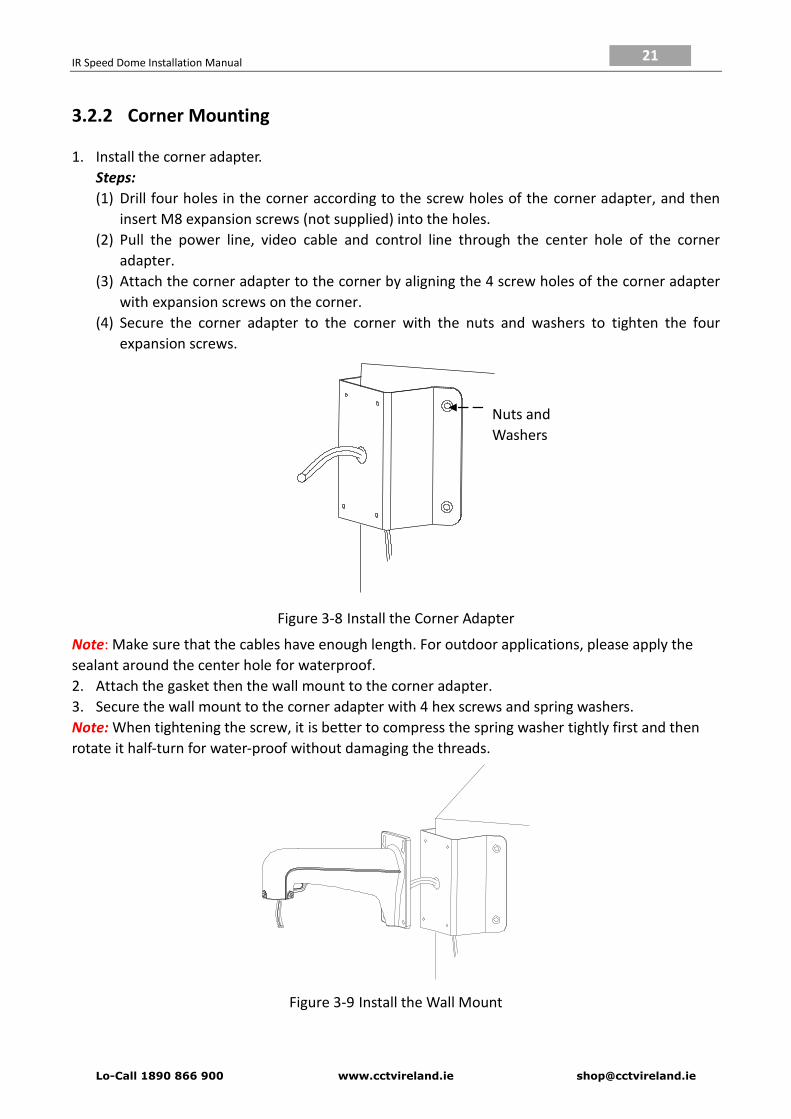
3.2.2 Corner Mounting
1. Install the corner adapter.
Steps:
(1) Drill four holes in the corner according to the screw holes of the corner adapter, and then
insert M8 expansion screws (not supplied) into the holes.
(2) Pull the power line, video cable and control line through the center hole of the corner
adapter.
(3) Attach the corner adapter to the corner by aligning the 4 screw holes of the corner adapter
with expansion screws on the corner.
(4) Secure the corner adapter to the corner with the nuts and washers to tighten the four
expansion screws.
Figure 3-8 Install the Corner Adapter
Note: Make sure that the cables have enough length. For outdoor applications, please apply the
sealant around the center hole for waterproof.
2. Attach the gasket then the wall mount to the corner adapter.
3. Secure the wall mount to the corner adapter with 4 hex screws and spring washers.
Note: When tightening the screw, it is better to compress the spring washer tightly first and then
rotate it half-turn for water-proof without damaging the threads.
Figure 3-9 Install the Wall Mount
Nuts and
Washers
Lo-Call 1890 866 900 www.cctvireland.ie [email protected]
IR Speed Dome Installation Manual 22
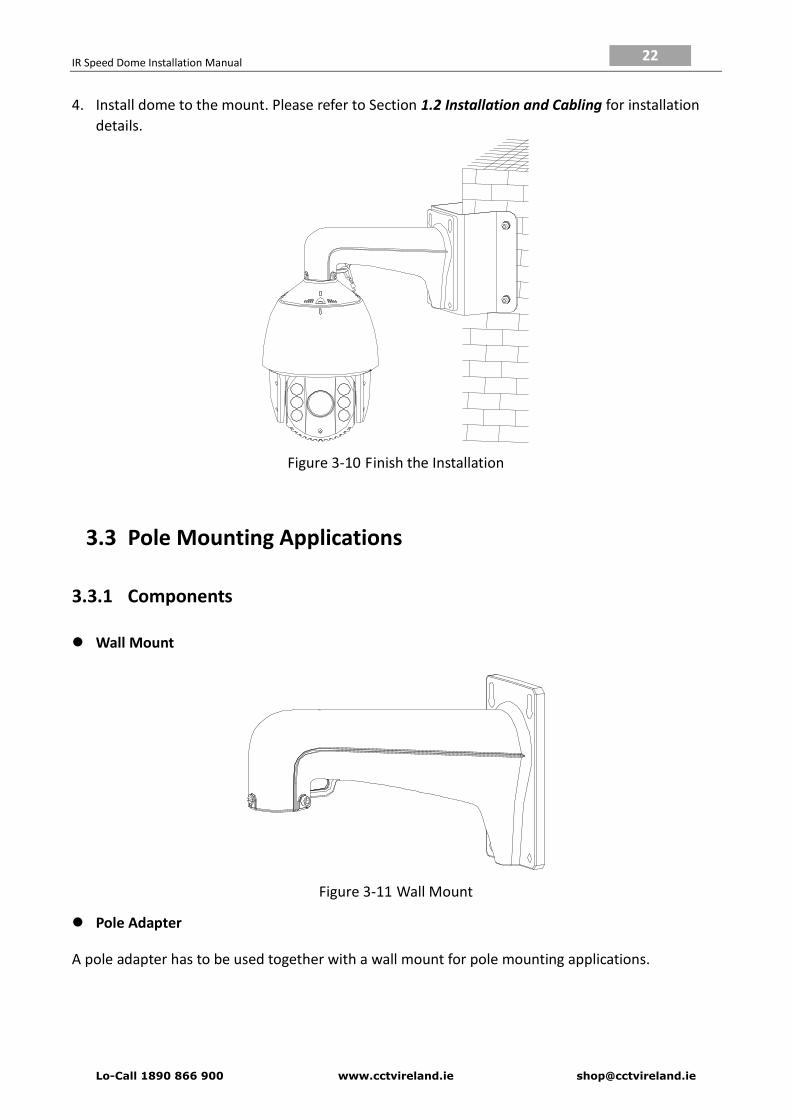
4. Install dome to the mount. Please refer to Section 1.2 Installation and Cabling for installation
details.
Figure 3-10 Finish the Installation
3.3 Pole Mounting Applications
3.3.1 Components
Wall Mount
Figure 3-11 Wall Mount
Pole Adapter
A pole adapter has to be used together with a wall mount for pole mounting applications.
Lo-Call 1890 866 900 www.cctvireland.ie [email protected]

IR Speed Dome Installation Manual 23
Figure 3-12 Pole Adapter
Pole Mounting Hoops
Pole mounting hoop is used for pole mounting with pole adapter and wall mount. There are
following dimensions selectable: φ59-82mm, φ84-108mm, φ103-127mm, φ130-152mm,
φ155-178mm, φ180-203mm and φ194-216mm. Dimensions can be customized according to your
demand.
Note: The dimensions of the pole mounting hoop must match with the diameter of the pole
adapter.
Figure 3-13 Pole Mounting Hoops
Mounting Accessories
Lo-Call 1890 866 900 www.cctvireland.ie [email protected]
IR Speed Dome Installation Manual 24
Figure 3-14 Hex Screws (M8×30) and Spring Washers
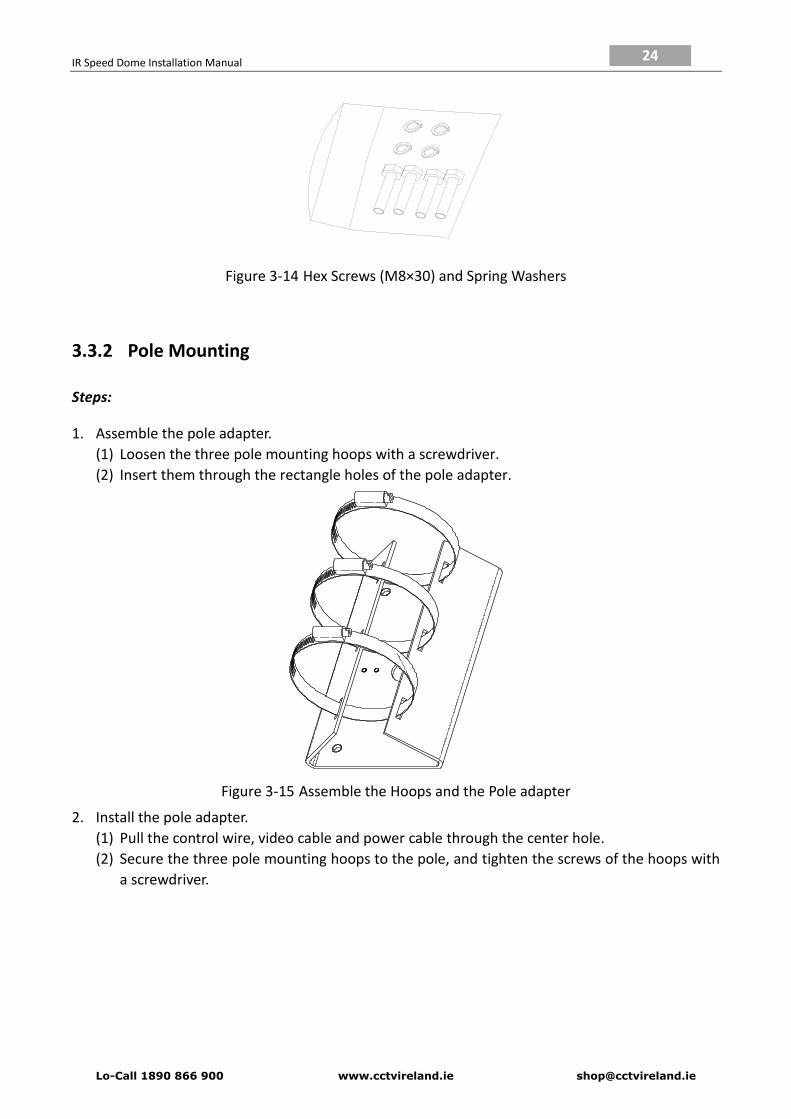
3.3.2 Pole Mounting
Steps:
1. Assemble the pole adapter.
(1) Loosen the three pole mounting hoops with a screwdriver.
(2) Insert them through the rectangle holes of the pole adapter.
Figure 3-15 Assemble the Hoops and the Pole adapter
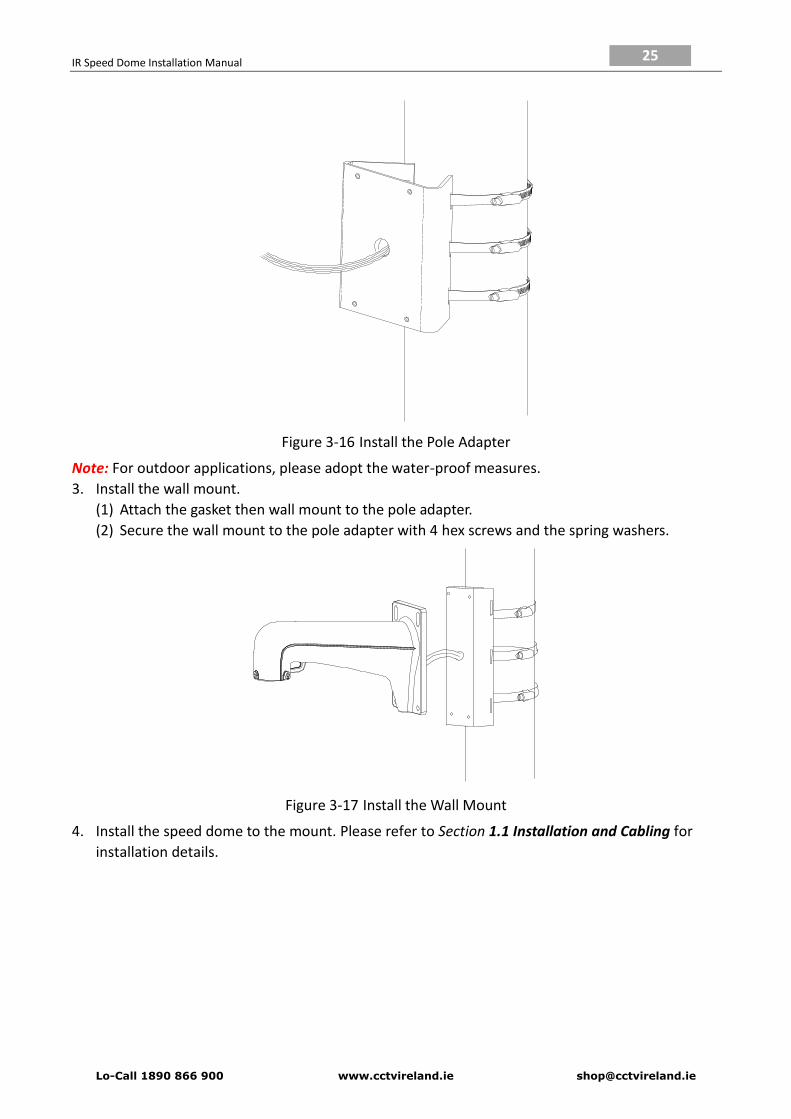
2. Install the pole adapter.
(1) Pull the control wire, video cable and power cable through the center hole.
(2) Secure the three pole mounting hoops to the pole, and tighten the screws of the hoops with
a screwdriver.
Lo-Call 1890 866 900 www.cctvireland.ie [email protected]
IR Speed Dome Installation Manual 25
Figure 3-16 Install the Pole Adapter
Note: For outdoor applications, please adopt the water-proof measures.
3. Install the wall mount.
(1) Attach the gasket then wall mount to the pole adapter.
(2) Secure the wall mount to the pole adapter with 4 hex screws and the spring washers.
Figure 3-17 Install the Wall Mount
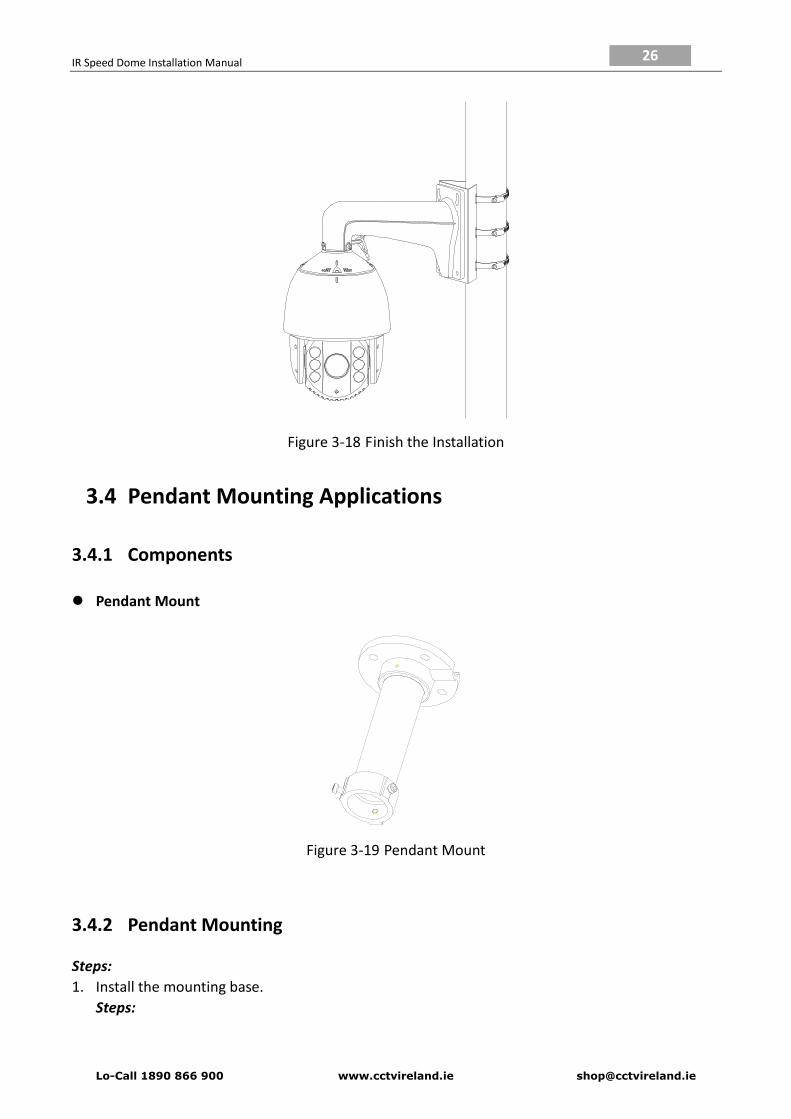
4. Install the speed dome to the mount. Please refer to Section 1.1 Installation and Cabling for
installation details.
Lo-Call 1890 866 900 www.cctvireland.ie [email protected]
IR Speed Dome Installation Manual 26
Figure 3-18 Finish the Installation
3.4 Pendant Mounting Applications
3.4.1 Components
Pendant Mount
Figure 3-19 Pendant Mount
3.4.2 Pendant Mounting
Steps:
1. Install the mounting base.
Steps:
Lo-Call 1890 866 900 www.cctvireland.ie [email protected]

IR Speed Dome Installation Manual 27
(1) Drill four φ8 holes in the ceiling according to the screw holes of the mounting base, and
then insert M8 expansion screws (not supplied) into the holes.
(2) Pull the power cable, video cable and control wire through the cable hole of the mounting
base.
(3) Attach the mounting base to the ceiling by aligning the screw holes of the mounting base
with the expansion screws on the ceiling.
(4) Secure the mounting base by using nuts and washers to tighten the four expansion screws.
Figure 3-20 Install the Mounting Base
Note: Make sure that the cables are long enough. For outdoor applications, please apply
waterproof measures between the ceiling surface and mounting base and around the cable hole.
The pendant mounting application is not recommended for places where the speed dome is easily
caught in the rain.
2. Install the pendant pole.
Steps:
(1) Pull out the cables through the pendant pole and screw the pendant pole into the mounting
base.
(2) Secure the pendant pole and mounting base with the set screws.
Note: For outdoor applications, please apply the water-proof thread compound to the threads.
Figure 3-21 Ceiling Mount
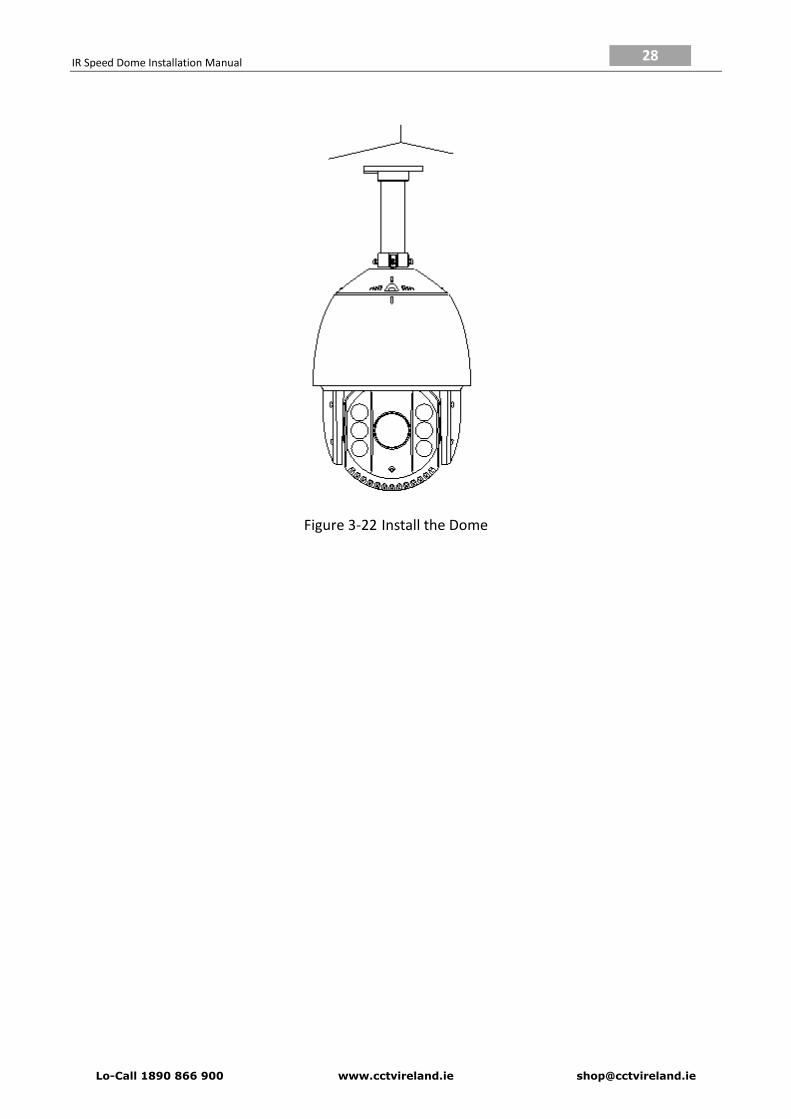
3. Install the speed dome to the mount. Please refer to Section 1.1 Installation and Cabling for
installation details.
Lo-Call 1890 866 900 www.cctvireland.ie [email protected]
IR Speed Dome Installation Manual 28
Figure 3-22 Install the Dome
Lo-Call 1890 866 900 www.cctvireland.ie [email protected]
IR Speed Dome Installation Manual 29
Appendix
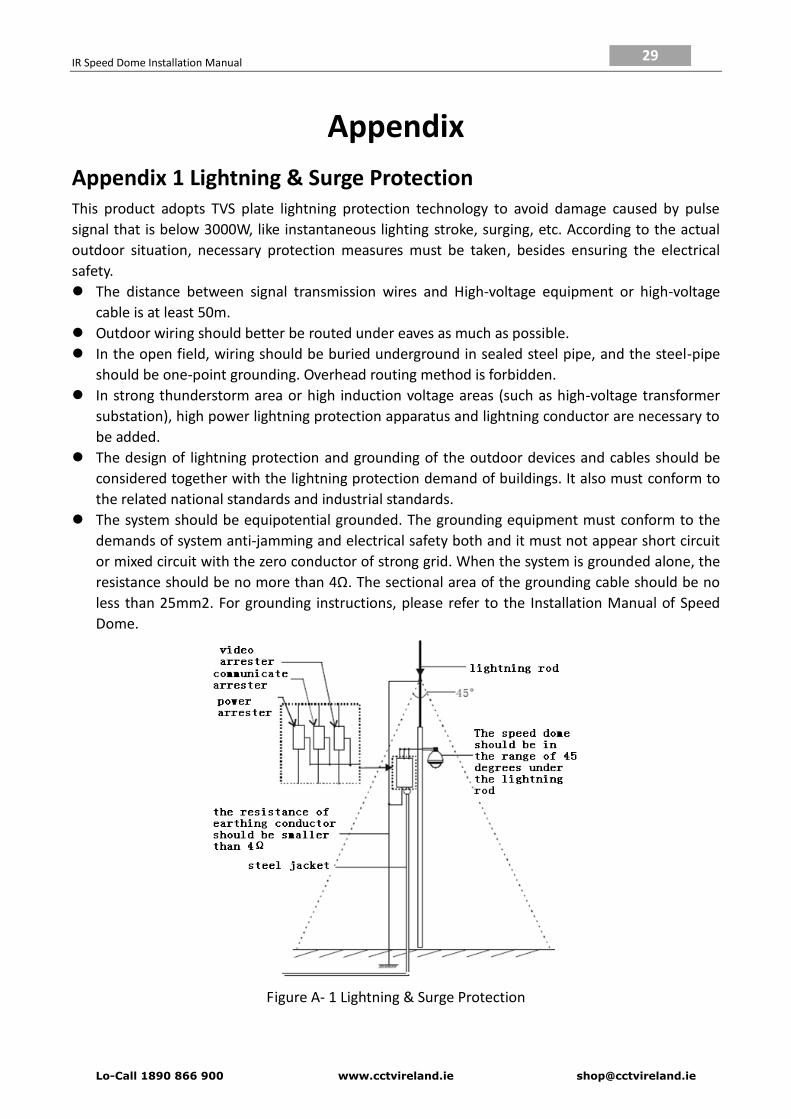
Appendix 1 Lightning & Surge Protection This product adopts TVS plate lightning protection technology to avoid damage caused by pulse
signal that is below 3000W, like instantaneous lighting stroke, surging, etc. According to the actual
outdoor situation, necessary protection measures must be taken, besides ensuring the electrical
safety.
The distance between signal transmission wires and High-voltage equipment or high-voltage
cable is at least 50m.
Outdoor wiring should better be routed under eaves as much as possible.
In the open field, wiring should be buried underground in sealed steel pipe, and the steel-pipe
should be one-point grounding. Overhead routing method is forbidden.
In strong thunderstorm area or high induction voltage areas (such as high-voltage transformer
substation), high power lightning protection apparatus and lightning conductor are necessary to
be added.
The design of lightning protection and grounding of the outdoor devices and cables should be
considered together with the lightning protection demand of buildings. It also must conform to
the related national standards and industrial standards.
The system should be equipotential grounded. The grounding equipment must conform to the
demands of system anti-jamming and electrical safety both and it must not appear short circuit
or mixed circuit with the zero conductor of strong grid. When the system is grounded alone, the
resistance should be no more than 4Ω. The sectional area of the grounding cable should be no
less than 25mm2. For grounding instructions, please refer to the Installation Manual of Speed
Dome.
Figure A- 1 Lightning & Surge Protection
Lo-Call 1890 866 900 www.cctvireland.ie [email protected]
IR Speed Dome Installation Manual 30
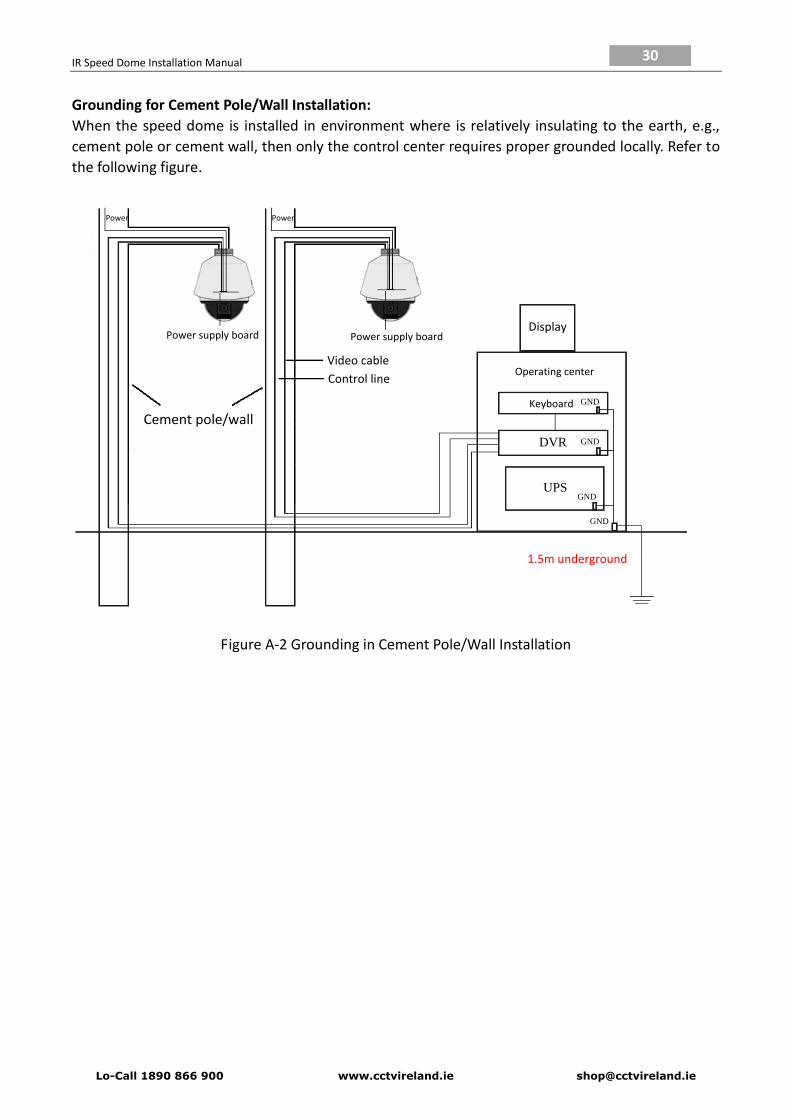
Grounding for Cement Pole/Wall Installation:
When the speed dome is installed in environment where is relatively insulating to the earth, e.g.,
cement pole or cement wall, then only the control center requires proper grounded locally. Refer to
the following figure.
PowerPower
Power supply board Power supply board
Video cable
Control line
Cement pole/wall
Display
Operating center
Keyboard
DVR
UPS
GND
GND
GND
GND
1.5m underground
Figure A-2 Grounding in Cement Pole/Wall Installation
Lo-Call 1890 866 900 www.cctvireland.ie [email protected]
IR Speed Dome Installation Manual 31
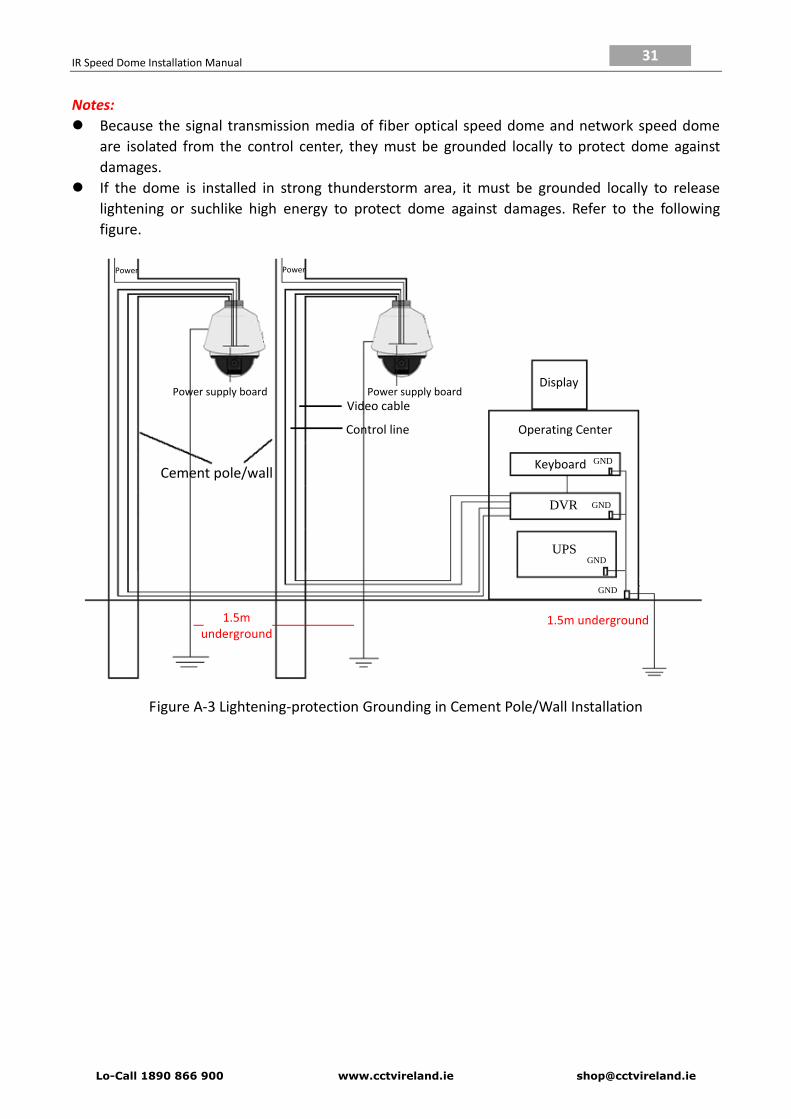
Notes:
Because the signal transmission media of fiber optical speed dome and network speed dome
are isolated from the control center, they must be grounded locally to protect dome against
damages.
If the dome is installed in strong thunderstorm area, it must be grounded locally to release
lightening or suchlike high energy to protect dome against damages. Refer to the following
figure.
PowerPower
Power supply board Power supply board
Video cable
Control line
Cement pole/wall
Display
Operating Center
Keyboard
DVR
UPS
GND
GND
GND
GND
1.5m underground1.5m underground
Figure A-3 Lightening-protection Grounding in Cement Pole/Wall Installation
Lo-Call 1890 866 900 www.cctvireland.ie [email protected]
IR Speed Dome Installation Manual 32
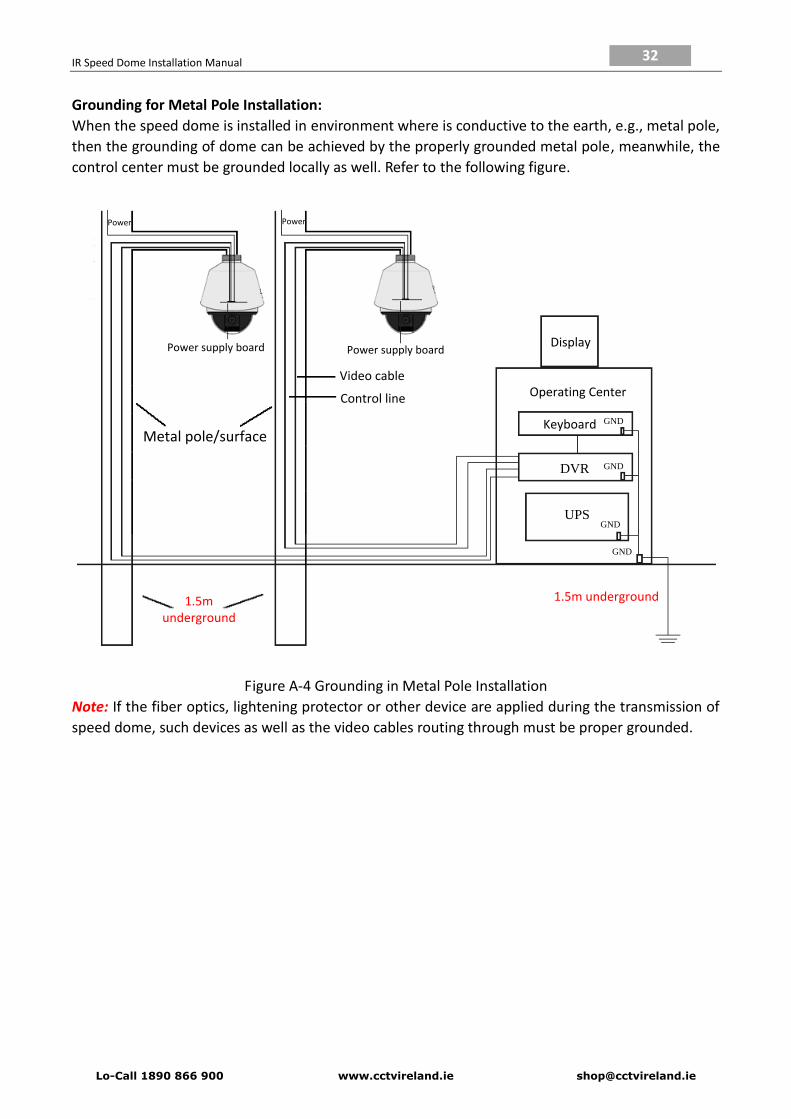
Grounding for Metal Pole Installation:
When the speed dome is installed in environment where is conductive to the earth, e.g., metal pole,
then the grounding of dome can be achieved by the properly grounded metal pole, meanwhile, the
control center must be grounded locally as well. Refer to the following figure.
PowerPower
Power supply board Power supply board
Video cable
Control line
Metal pole/surface
Display
Operating Center
Keyboard
DVR
UPS
GND
GND
GND
GND
1.5m underground1.5m underground
Figure A-4 Grounding in Metal Pole Installation
Note: If the fiber optics, lightening protector or other device are applied during the transmission of
speed dome, such devices as well as the video cables routing through must be proper grounded.
Lo-Call 1890 866 900 www.cctvireland.ie [email protected]
IR Speed Dome Installation Manual 33
Appendix 2 Waterproof Notes:
The long-arm wall mount is recommended for the outdoor application of speed dome.
You cannot use the short-arm wall mount or pendant mount for outdoor application, because it
is not water-proof.
It is recommended to use the mount with inner threaded interface and good waterproof
performance.
If you use a mount with outer threaded interface, please adopt waterproof measures to the
adapter applied between the mount and the dome.
Do not install indoor speed dome to the outdoor environment.
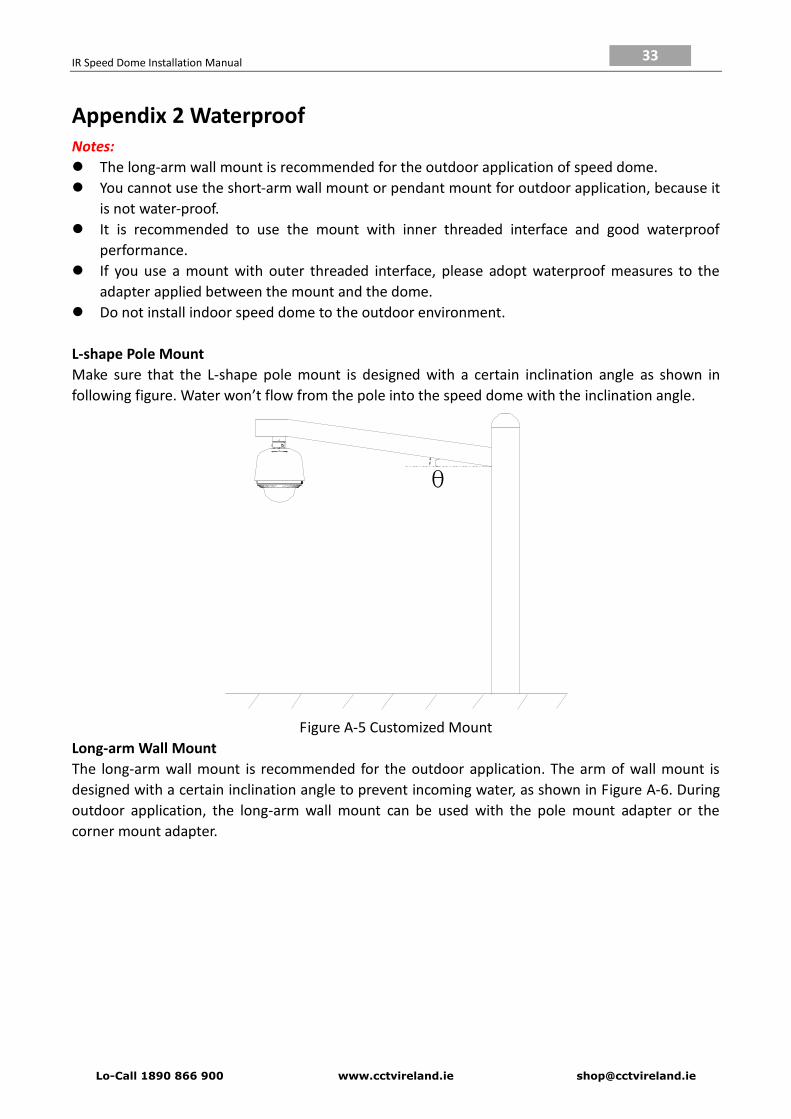
L-shape Pole Mount
Make sure that the L-shape pole mount is designed with a certain inclination angle as shown in
following figure. Water won’t flow from the pole into the speed dome with the inclination angle.
θ
Figure A-5 Customized Mount
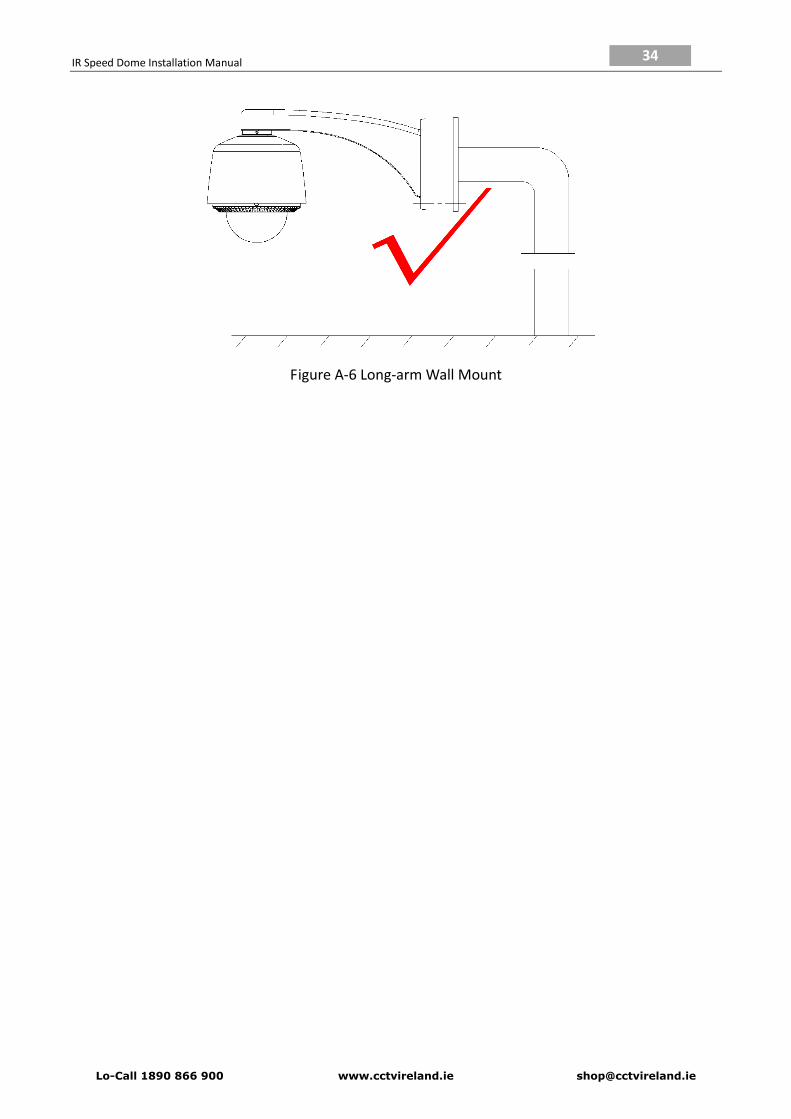
Long-arm Wall Mount
The long-arm wall mount is recommended for the outdoor application. The arm of wall mount is
designed with a certain inclination angle to prevent incoming water, as shown in Figure A-6. During
outdoor application, the long-arm wall mount can be used with the pole mount adapter or the
corner mount adapter.
Lo-Call 1890 866 900 www.cctvireland.ie [email protected]
IR Speed Dome Installation Manual 34
Figure A-6 Long-arm Wall Mount
Lo-Call 1890 866 900 www.cctvireland.ie [email protected]
IR Speed Dome Installation Manual 35
Appendix 3 Bubble Maintenance The bubble is a transparent plastic. The dust, oil and finger print, etc. will cause scratch or image
blur. Please refer to the following method to clean the bubble.
Handling dust
Use oil free soft brush or blowing dust ball to clean the dust.
Handling oil
Steps:
1. Wipe off the water-drop or oil by soft cloth and dry the bubble.
2. Use oil free cotton cloth to wipe the bubble with alcohol or detergent.
3. Change the cloth to wipe the bubble until the bubble is clean.
Lo-Call 1890 866 900 www.cctvireland.ie [email protected]
IR Speed Dome Installation Manual 36
Appendix 4 RS485 Bus Connection General Property of RS485 Bus
According to RS485 industry bus standard, RS485 is a half-duplex communication bus which has
120Ω characteristic impendence, the maximum load ability is 32 payloads (including controller
device and controlled device).
RS485 Bus Transmission Distance
When using 0.56mm (24AWG) twisted-pair line, according to different baudrate, the maximum
transmission distance theory table is shown as below:
Max. Distance of RS485 Transmission
Baudrate Max Distance
2400BPS 1800m
4800BPS 1200m
9600BPS 800m
The transmission distance will be decreased if we use the thinner cable, or use this product under
the strong electromagnetic interference situation, or there are lots of devices are added to the bus;
on the contrary, the transmission distance will be increased.
Connection Methods
RS485 industry bus standard require daisy-chain connection method between any devices, both
sides have to connect a 120Ω terminal resistance (show as Diagram 1), the simplified connection
method is shown as diagram 2, but the distance of “D” should not be too long.
120Ω 120Ω
1# 2# 3# 4# 32#
Figure A-2 RS485 Connection 1
D
主控器
A+
B-
A+ B-
1# 2# 3# 31#
Figure A-3 RS485 Connection 2
Problems in the Practical Application
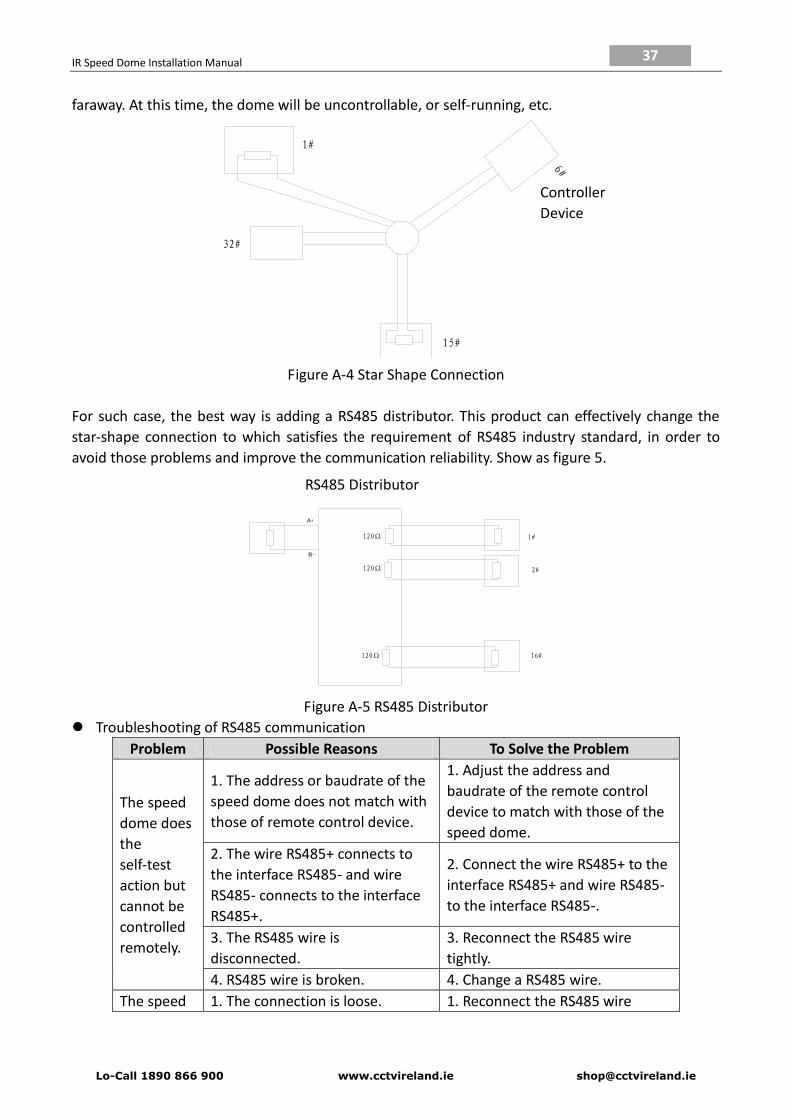
Normally, users adopt star-shape connection method in construction, under this situation, the
terminal resistors must be connected between two farthest devices (as Figure 4, 1# and 15#), but
this connection method is not satisfy the requirement of the RS485 industry standard so that it will
lead to some problems such as signal reflection, anti-jamming ability decline when the devices are
Controller
Lo-Call 1890 866 900 www.cctvireland.ie [email protected]
IR Speed Dome Installation Manual 37
faraway. At this time, the dome will be uncontrollable, or self-running, etc.
6#
主控设备
1#
32#
15#
Figure A-4 Star Shape Connection
For such case, the best way is adding a RS485 distributor. This product can effectively change the
star-shape connection to which satisfies the requirement of RS485 industry standard, in order to
avoid those problems and improve the communication reliability. Show as figure 5.
120Ω
120Ω
120Ω
1#
2#
16#
A+
B-
485分配器
Figure A-5 RS485 Distributor
Troubleshooting of RS485 communication
Problem Possible Reasons To Solve the Problem
The speed
dome does
the
self-test
action but
cannot be
controlled
remotely.
1. The address or baudrate of the
speed dome does not match with
those of remote control device.
1. Adjust the address and
baudrate of the remote control
device to match with those of the
speed dome.
2. The wire RS485+ connects to
the interface RS485- and wire
RS485- connects to the interface
RS485+.
2. Connect the wire RS485+ to the
interface RS485+ and wire RS485-
to the interface RS485-.
3. The RS485 wire is
disconnected.
3. Reconnect the RS485 wire
tightly.
4. RS485 wire is broken. 4. Change a RS485 wire.
The speed 1. The connection is loose. 1. Reconnect the RS485 wire
Controller
Device
RS485 Distributor
Lo-Call 1890 866 900 www.cctvireland.ie [email protected]

IR Speed Dome Installation Manual 38
Problem Possible Reasons To Solve the Problem
dome can
be
controlled
but not
smoothly.
tightly.
2. RS485+ or RS485-wire is
broken. 2. Change a RS485 wire.
3. The speed dome is too far away
from the remote control device. 3. Add a terminal resistor.
4. Too many speed domes are
connected. 4. Add a RS485 distributor.
Lo-Call 1890 866 900 www.cctvireland.ie [email protected]
IR Speed Dome Installation Manual 39
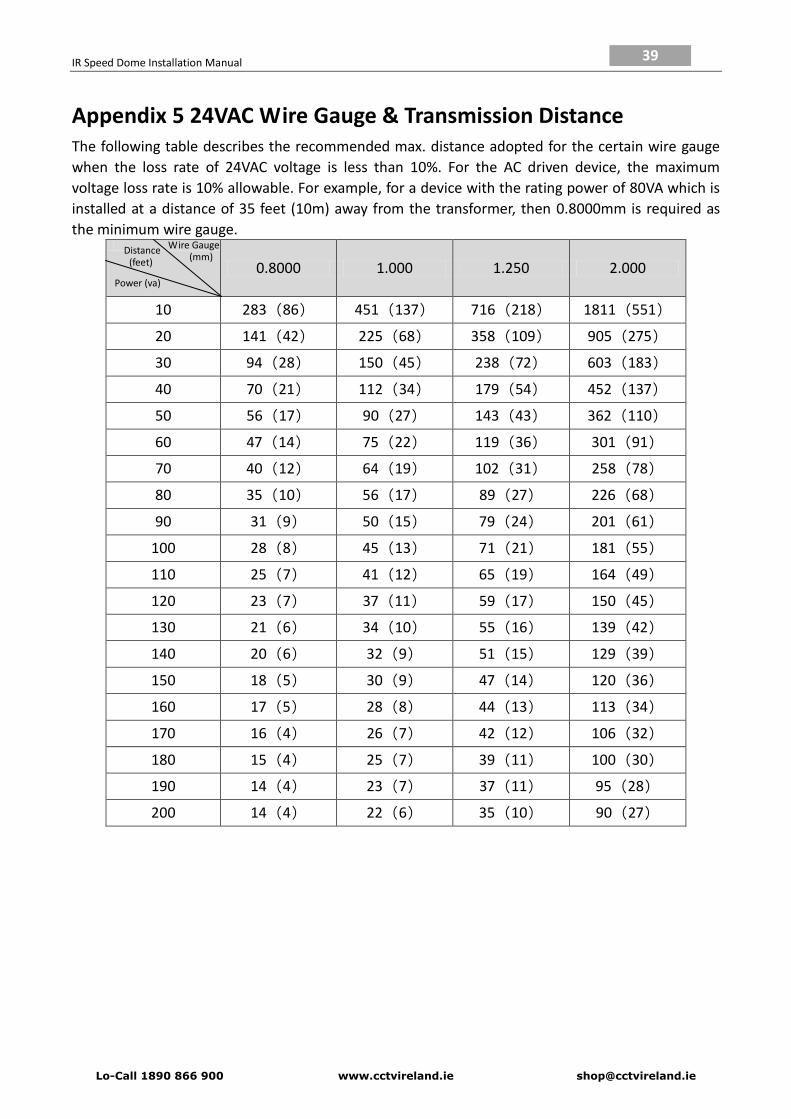
Appendix 5 24VAC Wire Gauge & Transmission Distance The following table describes the recommended max. distance adopted for the certain wire gauge
when the loss rate of 24VAC voltage is less than 10%. For the AC driven device, the maximum
voltage loss rate is 10% allowable. For example, for a device with the rating power of 80VA which is
installed at a distance of 35 feet (10m) away from the transformer, then 0.8000mm is required as
the minimum wire gauge.
0.8000 1.000 1.250 2.000
10 283(86) 451(137) 716(218) 1811(551)
20 141(42) 225(68) 358(109) 905(275)
30 94(28) 150(45) 238(72) 603(183)
40 70(21) 112(34) 179(54) 452(137)
50 56(17) 90(27) 143(43) 362(110)
60 47(14) 75(22) 119(36) 301(91)
70 40(12) 64(19) 102(31) 258(78)
80 35(10) 56(17) 89(27) 226(68)
90 31(9) 50(15) 79(24) 201(61)
100 28(8) 45(13) 71(21) 181(55)
110 25(7) 41(12) 65(19) 164(49)
120 23(7) 37(11) 59(17) 150(45)
130 21(6) 34(10) 55(16) 139(42)
140 20(6) 32(9) 51(15) 129(39)
150 18(5) 30(9) 47(14) 120(36)
160 17(5) 28(8) 44(13) 113(34)
170 16(4) 26(7) 42(12) 106(32)
180 15(4) 25(7) 39(11) 100(30)
190 14(4) 23(7) 37(11) 95(28)
200 14(4) 22(6) 35(10) 90(27)
Wire Gauge (mm)
Distance (feet)
Power (va)
Lo-Call 1890 866 900 www.cctvireland.ie [email protected]
IR Speed Dome Installation Manual 40
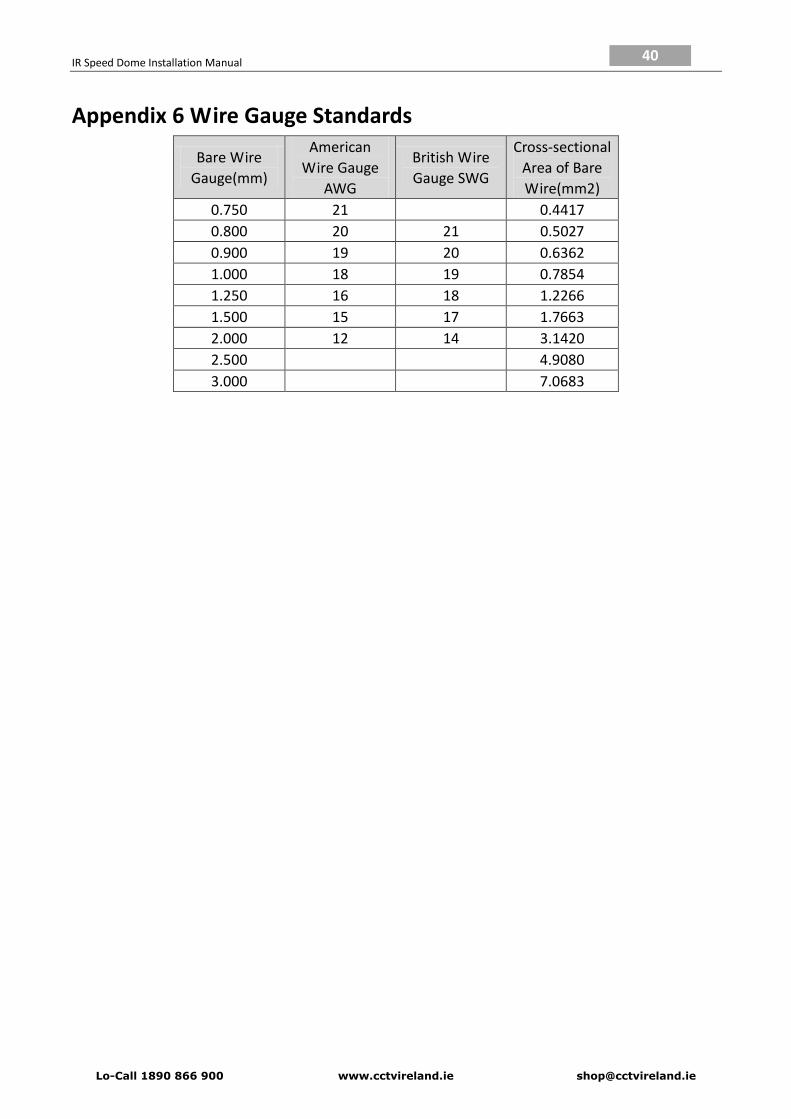
Appendix 6 Wire Gauge Standards
Bare Wire
Gauge(mm)
American
Wire Gauge
AWG
British Wire
Gauge SWG
Cross-sectional
Area of Bare
Wire(mm2)
0.750 21 0.4417
0.800 20 21 0.5027
0.900 19 20 0.6362
1.000 18 19 0.7854
1.250 16 18 1.2266
1.500 15 17 1.7663
2.000 12 14 3.1420
2.500 4.9080
3.000 7.0683
Lo-Call 1890 866 900 www.cctvireland.ie [email protected]