irmx command reference - tenasys.com · radisys corporation 5445 ne dawson creek drive hillsboro,...
TRANSCRIPT

RadiSys Corporation5445 NE Dawson Creek DriveHillsboro, OR 97124(503) 615-1100FAX: (503) 615-1150www.radisys.com
iRMX®
Command Reference
07-0574-01December 1999
ii
EPC, iRMX, INtime, Inside Advantage, and RadiSys are registered trademarks ofRadiSys Corporation. Spirit, DAI, DAQ, ASM, Brahma, and SAIB are trademarks ofRadiSys Corporation.
Microsoft and MS-DOS are registered trademarks of Microsoft Corporation and Windows 95is a trademark of Microsoft Corporation.
IBM and PC/AT are registered trademarks of International Business Machines Corporation.
Microsoft Windows and MS-DOS are registered trademarks of MicrosoftCorporation.
Intel is a registered trademark of Intel Corporation.
All other trademarks, registered trademarks, service marks, and trade names are property oftheir respective owners.
December 1999
Copyright 1999 by RadiSys Corporation
All rights reserved.
Command Reference iii
Quick Contents
Chapter 1. Using Commands
Chapter 2. Command Descriptions
Appendix A. Using Disk Mirroring
Appendix B. Using Diskverify in Interactive Mode
Appendix C. Structure of a Named Volume
Appendix D. Real-time Graphics Interface
Appendix E. Supplied Device Drivers and Physical DeviceNames
Appendix F. Partitioning PCI Hard Disk Drives
Index

iv
Notational ConventionsMost of the references to system calls in the text and graphics use C syntax instead ofPL/M (for example, the system call send_message instead of send$message). If youare working in C, you must use the C header files, rmx_c.h, udi_c.h, and rmx_err.h.If you are working in PL/M, you must use dollar signs ($) and use the rmxplm.ext anderror.lit header files.
This manual uses the following conventions:
• Syntax strings, data types, and data structures are provided for PL/M and Crespectively.
• All numbers are decimal unless otherwise stated. Hexadecimal numbers includethe H radix character (for example, 0FFH). Binary numbers include the B radixcharacter (for example, 11011000B).
• Bit 0 is the low-order bit. If a bit is set to 1, the associated description is trueunless otherwise stated.
• Data structures and syntax strings appear in this font.
• System call names and command names appear in this font.
• PL/M data types such as BYTE and SELECTOR, and iRMX data types such asSTRING and SOCKET are capitalized. All C data types are lower case exceptthose that represent data structures.
• The following OS layer abbreviations are used. The Nucleus layer isunabbreviated.
AL Application LoaderBIOS Basic I/O SystemEIOS Extended I/O SystemHI Human InterfaceUDI Universal Development Interface
• Whenever this manual describes I/O operations, it assumes that tasks use BIOScalls (such as rq_a_read, rq_a_write, and rq_a_special). Although notmentioned, tasks can also use the equivalent EIOS calls (such as rq_s_read,rq_s_write, and rq_s_special) or UDI calls (dq_read or dq_write) to do thesame operations.

Command Reference Contents v
Contents
1 Using CommandsHow to Use This Manual................................................................................. 1Commands Available on Your System............................................................ 3
The Human Interface (HI) ........................................................................ 4The Command Line Interpreter (CLI) ...................................................... 5Networking Software................................................................................ 5
Understanding the File Systems....................................................................... 6File Types................................................................................................. 7Named File Tree....................................................................................... 8File Access and User IDs ......................................................................... 9Using Pathnames ...................................................................................... 10Using the Copy Command with Multiple Pathnames............................... 11Using Wildcards in Filenames.................................................................. 11Specifying Hidden Files ........................................................................... 14
Entering Commands ........................................................................................ 14Command Syntax ..................................................................................... 15Using the To, Over, and After Parameters ............................................... 17Abbreviating Parameters .......................................................................... 17Abbreviating Command Names ............................................................... 18Recalling and Editing Commands ............................................................ 18Using Command Search Paths.................................................................. 19Creating Command Aliases ...................................................................... 20Redirecting I/O......................................................................................... 21
Using Commands on Directories ..................................................................... 22Displaying Files with the DIR Command................................................. 22Creating a New Directory......................................................................... 22Referring to a Directory............................................................................ 22Creating a Directory Within a Directory .................................................. 24Changing Your Working Directory .......................................................... 24Renaming Directories............................................................................... 25Deleting a Directory ................................................................................. 25
Using Commands on Volumes ........................................................................ 26Formatting a New Volume ....................................................................... 27
vi Contents
Using TCP/IP and NFS Commands................................................................. 29Executing TCP/IP Commands.................................................................. 29Case Sensitivity in TCP/IP and NFS Command Syntax........................... 29Executing OS Commands From a Posix Shell ......................................... 30
Creating and Using Logical Names................................................................. 30Creating Logical Names for Devices........................................................ 31Creating Logical Names for Files............................................................. 31Where Logical Names are Stored............................................................. 32Logical Names Created by the Operating System .................................... 33
Error Messages................................................................................................ 35General HI Error Messages ...................................................................... 35General iRMX-NET Error Messages ....................................................... 37
2 Command DescriptionsCommand Descriptions ................................................................................... 39
Command Summary................................................................................. 39! .............................................................................................................. 45accounting ................................................................................................ 47addloc ....................................................................................................... 50aedit.......................................................................................................... 54alias .......................................................................................................... 57arp ............................................................................................................ 63attachdevice.............................................................................................. 66attachfile................................................................................................... 72background............................................................................................... 76backup ...................................................................................................... 79bcl............................................................................................................. 87bootdos ..................................................................................................... 90bootrmx .................................................................................................... 91case........................................................................................................... 92changeid ................................................................................................... 93cli.............................................................................................................. 94connect ..................................................................................................... 95console ..................................................................................................... 97copy.......................................................................................................... 98copydir ..................................................................................................... 101createdir.................................................................................................... 105date........................................................................................................... 107dealias....................................................................................................... 110debug........................................................................................................ 111delete ........................................................................................................ 114deletedir.................................................................................................... 116
Command Reference Contents vii
deletename................................................................................................ 118detachdevice ............................................................................................. 119detachfile .................................................................................................. 121deviceinfo ................................................................................................. 123dir ............................................................................................................. 125disconnect................................................................................................. 133diskverify.................................................................................................. 134domain...................................................................................................... 141dump......................................................................................................... 142enetinfo..................................................................................................... 143esubmit ..................................................................................................... 144exit............................................................................................................ 169find ........................................................................................................... 170findname................................................................................................... 171format ....................................................................................................... 174ftp ............................................................................................................. 193getaddr...................................................................................................... 204getname .................................................................................................... 205grep........................................................................................................... 207help........................................................................................................... 209history....................................................................................................... 211ic .............................................................................................................. 213inamon...................................................................................................... 219initstatus ................................................................................................... 220jobdelete ................................................................................................... 222jobs ........................................................................................................... 224keyb .......................................................................................................... 225kill ............................................................................................................ 226killjob ....................................................................................................... 227lanstatus.................................................................................................... 228listname .................................................................................................... 229load........................................................................................................... 232loadname .................................................................................................. 233loadrmx .................................................................................................... 235locdata ...................................................................................................... 239lock........................................................................................................... 243logicalnames............................................................................................. 245logoff ........................................................................................................ 248make (mk) ................................................................................................ 249memory .................................................................................................... 263mirror ....................................................................................................... 264mkdep....................................................................................................... 268modcdf...................................................................................................... 270
viii Contents
modinfo .................................................................................................... 272netinfo ...................................................................................................... 273netstat ....................................................................................................... 274offer.......................................................................................................... 280paginate .................................................................................................... 282password................................................................................................... 284path........................................................................................................... 291pause......................................................................................................... 292pci............................................................................................................. 293pcnet ......................................................................................................... 295permit ....................................................................................................... 296physname.................................................................................................. 305ping........................................................................................................... 308publicdir ................................................................................................... 310rdisk.......................................................................................................... 311remini ....................................................................................................... 325remove...................................................................................................... 326rename...................................................................................................... 327restore....................................................................................................... 330retension ................................................................................................... 337rmextdbg .................................................................................................. 338rmxtsr ....................................................................................................... 339set ............................................................................................................. 341setconfig ................................................................................................... 345setname..................................................................................................... 346shutdown .................................................................................................. 349skim.......................................................................................................... 353sleep ......................................................................................................... 355sort............................................................................................................ 355submit....................................................................................................... 357super ......................................................................................................... 361sysinfo ...................................................................................................... 363sysload...................................................................................................... 366telnet......................................................................................................... 371term .......................................................................................................... 374time .......................................................................................................... 377timer ......................................................................................................... 380touch......................................................................................................... 381translate .................................................................................................... 383traverse ..................................................................................................... 384tree............................................................................................................ 385uniq........................................................................................................... 386unloadname .............................................................................................. 387

Command Reference Contents ix
unlock....................................................................................................... 389unxlate ...................................................................................................... 392version ...................................................................................................... 393whoami..................................................................................................... 395xlate .......................................................................................................... 396
A Using Disk MirroringIntroduction ..................................................................................................... 402Disk Mirroring Concepts ................................................................................. 402
Mirror Sets ............................................................................................... 403Failure Detection ...................................................................................... 404Rollover.................................................................................................... 404
Rollover on Different Hard Disk Controllers .................................... 405On-line and Off-line Repair...................................................................... 406
System Device Repair ....................................................................... 406On-line Resynchronization ....................................................................... 406Automatically Enabling Disk Mirroring................................................... 407Event Notification .................................................................................... 408
Disk Mirroring Configuration.......................................................................... 409Hardware Configuration........................................................................... 409
Mirror Set on One PCI Server ........................................................... 409Mirror Set Across SCSI Busses......................................................... 411Mirror Set Across Two PCI Servers.................................................. 412Mirror Set on Multiple Multibus II Systems ..................................... 413
Software Configuration ............................................................................ 414Setting the Maximum Outstanding Commands................................. 415
Using Disk Mirroring ...................................................................................... 415Summary of Disk Mirroring Operations................................................... 415Tutorial: Using the Mirror Command...................................................... 417Handling Events ....................................................................................... 419Handling Failures ..................................................................................... 420
Handling Secondary Hard Disk Failure............................................. 420Handling Primary Hard Disk Failure................................................. 422
Protecting Hard Disks............................................................................... 424Using A_special for Disk Mirroring......................................................... 424Mirror State Structure............................................................................... 424
B Using Diskverify in Interactive ModeIntroduction ..................................................................................................... 427Invoking Diskverify......................................................................................... 429
Invocation Error Messages ....................................................................... 430

x Contents
Using Diskverify Commands .......................................................................... 431Abbreviating Command Names ............................................................... 431Using Parameters ..................................................................................... 432Abbreviating Parameters .......................................................................... 432Specifying Input Radices.......................................................................... 432Aborting Diskverify Commands .............................................................. 433
Diskverify Error Messages .............................................................................. 434Tutorial: Backing Up and Restoring Fnodes................................................... 435
Structure of the Volume Label and Fnode File......................................... 435Creating the Backup Volume Label and Fnode File................................. 436
Example ............................................................................................ 437Maintaining the Backup Fnode File ......................................................... 438
Examples........................................................................................... 438Restoring Fnodes...................................................................................... 439
Examples........................................................................................... 439Restoring the Volume Label..................................................................... 440
Example ............................................................................................ 441Displaying R?save Fnodes........................................................................ 441
Example ............................................................................................ 442Diskverify Command Descriptions ................................................................. 443
Command Summary................................................................................. 443allocate ..................................................................................................... 445arithmetic commands ............................................................................... 447backupfnodes............................................................................................ 449conversion commands .............................................................................. 451disk........................................................................................................... 456displaybyte ............................................................................................... 459displayword .............................................................................................. 461displaydirectory........................................................................................ 463displayfnode ............................................................................................. 465displaysavefnode ...................................................................................... 470displaynextblock....................................................................................... 471displaypreviousblock................................................................................ 472editfnode................................................................................................... 473editsavefnode............................................................................................ 476exit............................................................................................................ 477fix ............................................................................................................. 478free ........................................................................................................... 480getbadtrackinfo......................................................................................... 482help........................................................................................................... 484listbadblocks............................................................................................. 485quit ........................................................................................................... 486read........................................................................................................... 487
Command Reference Contents xi
restorefnode.............................................................................................. 488restorevolumelabel ................................................................................... 491save........................................................................................................... 493substitutebyte............................................................................................ 495substituteword .......................................................................................... 497verify ........................................................................................................ 498
Named1 Output ................................................................................. 499Named2 Output ................................................................................. 501Physical Output ................................................................................. 501Named and All Output ...................................................................... 501Verify Command Error Messages ..................................................... 504Named1 Error Messages ................................................................... 504Named2 Error Messages ................................................................... 505Physical Error Messages ................................................................... 507Miscellaneous Error Messages .......................................................... 507
write ......................................................................................................... 508
C Structure of a Named VolumeIntroduction ..................................................................................................... 511Volume Structure............................................................................................. 512Volume Labels................................................................................................. 512
ISO Volume Label.................................................................................... 513iRMX Volume Label and Partition Table................................................. 515
Partition Table Structure ................................................................... 521Bootloader Location Table ....................................................................... 522
Initial Files....................................................................................................... 525Fnode File................................................................................................. 525Fnode 0: Fnode File................................................................................. 535Fnode 1: Volume Free Space Map File ................................................... 536Fnode 2: Free Fnodes Map File ............................................................... 536Fnode 3: Accounting File ........................................................................ 536Fnode 4: Bad Blocks Map File ................................................................ 537Fnode 5: Volume Label File .................................................................... 537Fnode 6: Root Directory .......................................................................... 537Fnodes 7 and 8: R?secondstage and R?save ............................................ 538
R?secondstage ................................................................................... 539R?save ............................................................................................... 539
Other Fnodes ............................................................................................ 540Short and Long Files........................................................................................ 541
Short Files ................................................................................................ 541Long Files................................................................................................. 542
Diskette Formats.............................................................................................. 546
xii Contents
D Real-Time Graphics InterfaceDescription ...................................................................................................... 549Using the Windows ......................................................................................... 549Using the Mouse.............................................................................................. 551Basic Menu...................................................................................................... 552Expanded Menu............................................................................................... 556
E Supplied Device Drivers and Physical Device NamesSupplied Device Drivers.................................................................................. 561
Preconfigured Drivers, DOSRMX and iRMX For PCs............................ 561ROM BIOS-based Hard Disk Driver ................................................ 561ROM BIOS-based Diskette Driver.................................................... 562Byte Bucket Driver ........................................................................... 563COM1 and COM2 Driver ................................................................. 563
Loadable Device Drivers.......................................................................... 564Loadable Device Driver Support Files .............................................. 564
ICU-configurable Drivers For iRMX III Systems.................................... 565Physical Device Names ................................................................................... 566DOSRMX and iRMX for PCs Systems........................................................... 567iRMX III Systems ........................................................................................... 569
iRMX III PC Systems .............................................................................. 569iRMX III Multibus I and Multibus II Systems ......................................... 570
F Partitioning PCI Hard Disk DrivesThe Partition Table.......................................................................................... 579Specifying iRMX Partitions ............................................................................ 580
Example DUIB Name .............................................................................. 581How to Use PCI Partitioning ........................................................................... 581
Partitioning and Formatting Tools............................................................ 581Partitioning Example for the iRMX III OS ..................................................... 582MSA Booting .................................................................................................. 583Partition Support for Multibus I Systems or PCs............................................. 584
Multibus I Systems................................................................................... 584PC Systems............................................................................................... 584
Index ......................................................................................................................... 585
Command Reference Contents xiii
TablesTable 1-1. Directory Search Paths for Commands........................................................ 19Table 2-1. Command Summary .................................................................................... 40Table 2-2. System Aliases in the :config:alias.csd File ................................................ 59Table 2-3. Default Aliases in the :prog:alias.csd File .................................................. 60Table 2-4. Property Types Used in Name Server Entries ............................................. 172Table 2-5. How Access Rights Apply to Files and Directories ..................................... 298Table 2-6. TSAP IDs Used in Transport Addresses...................................................... 347Table B-1. Diskverify Command Summary ................................................................. 443Table C-1. Characteristics of 5 1/4-Inch Non-SCSI Boot Diskettes ............................. 546Table C-2. Characteristics of 5 1/4-Inch SCSI Boot and Data Diskettes ...................... 546Table C-3. Characteristics of 3 1/2-Inch SCSI Boot and Data Diskettes ...................... 547Table E-1. Hard Disk Partition Names ......................................................................... 562Table E-2. Diskette Driver Device Names.................................................................... 563Table E-3. Supplied ICU-configurable Device Drivers ................................................ 565Table E-4. DOSRMX/PCs Default Device Names.......................................................... 567Table E-5. PC Terminal Device Names........................................................................ 567Table E-6. Device names for PC systems ..................................................................... 569Table E-7. Device Names for IDE Controllers ............................................................. 569Table E-8. Device Names for SBC 214, 221, and 215G/217C/218A Controllers......... 570Table E-9. Device Names for SBC 386/12S and 486/12S SCSI Controllers ................ 572Table E-10. Device Names for SBC 386/258(D) and 486/133SE Controllers .............. 573Table E-11. Multibus I Terminal Device Names .......................................................... 575Table E-12. Multibus II Terminal Device Names......................................................... 576Table E-13. Suggested Physical Device Names for Other Devices .............................. 577
xiv Contents
FiguresFigure 1-1. iRMX Operating System Layers that Provide Commands ......................... 3Figure 1-2. Example File Tree Structure ...................................................................... 9Figure A-1. Mirror Set Operations................................................................................ 403Figure A-2. Rollover, Repair, and Resynchronization .................................................. 405Figure A-3. Automatically Enabling Disk Mirroring.................................................... 407Figure A-4. Mirror Set on One PCI Server ................................................................... 410Figure A-5. Mirror Set Across a SCSI Bus................................................................... 411Figure A-6. Mirror Set Across Two PCI Servers.......................................................... 412Figure A-7. Mirror Set on Multiple Multibus II Systems ............................................. 413Figure C-1. General Structure of Named Volumes....................................................... 512Figure C-2. Short File Fnode ........................................................................................ 541Figure C-3. Long File Fnode ........................................................................................ 544Figure D-1. An Example of Windows Displayed on the System 520 ........................... 550Figure D-2. Basic Menu Selections .............................................................................. 552Figure D-3. Expanded Menu Selections ....................................................................... 556Figure F-1. Partition Table With iRMX and DOS Partitions ........................................ 580

Command Reference Chapter 1 1
Using Commands 1This manual describes the command interface to the iRMX Operating Systems(OS): the iRMX III OS, iRMX for PCs, and iRMX for Windows. It describes howto use the commands, and contains information about line-editing and terminalcontrol characters. In addition, this manual provides methods for verifying andcorrecting the data structures of iRMX named or physical volumes.
The introductory sections of this manual assume you are familiar with the terminalcharacteristics of your monitor and the keyboard from which you enter commands.Later sections, such as those on using diskverify in interactive mode, require anunderstanding of iRMX volume structure.
How to Use This ManualThe information in this manual applies to a variety of user levels, system types, andconfigurations. You will need to choose the information appropriate to your system.Some system types covered by this manual include:
• Installations running on PC bus, Multibus I, or Multibus II systems
• ICU-configurable iRMX systems, which may vary from the standard devicetypes and OS layers described in this manual
• iRMX for Windows and iRMX for PCs systems: descriptions of configurationissues don't apply to preconfigured iRMX for Windows, but discussions ofloading device drivers and user jobs, and modifying :config: files do apply
• Single-user systems, which need little or no file protection and user passwordprotection
• Multiple-user systems, including systems operating on a network, which mayneed to strictly enforce file and system access

2 Chapter 1 Using Commands
Use these guide to determine which parts of this manual you should read:
If you are: Refer to:
A new user Chapters 1 and 2 and Appendix E
An experienced user Chapter 2 and Appendices A-F
Responsible for managing thesystem
Appendices A, B, and C, in addition toother chapters
Using the SBX 279 Graphicsinterface
Appendix D, in addition to other chapters

Command Reference Chapter 1 3
Commands Available on Your SystemFigure 1-1 shows the layers of the iRMX OS that provide commands:
Command Line Interpreter (CLI)DOS/WindowsiRMX-NET networking softwareHuman Interface (HI)
The figure also shows the layers of the OS necessary to support these command-levellayers:
NucleusBasic I/O System (BIOS)Extended I/O System (EIOS)Application LoaderVM86 DispatcherRemote File Driver (RFD)
Command Line Interpreter(CLI)
DOS/WindowsCommand Line
iRMX-Netand
Remote FileDriver (RFD)
ApplicationLoader
(AL)
EIOS
BIOS VM86 Dispatcher
Nucleus
DOS/Windows
OM04425
Human Interface(HI)
NFS
TCP/IP
iNA 960Network Software
Figure 1-1. iRMX Operating System Layers that Provide Commands

4 Chapter 1 Using Commands
The commands in Chapter 2 are labeled according to their source or function: CLI,HI, DOS, NET (iRMX-NET), TCP/IP, and NFS commands. The commandsavailable to you depend on your type of system:
• If you use iRMX for Windows or iRMX on a PC, all the OS layers are part ofthe system. You may choose not to install the networking software; in this casethe NET and/or TCP/IP and NFS commands are not available, depending onwhat network you install. Some of the HI and NET commands in Chapter 2 arenot provided in iRMX for Windows. These commands are noted in that chapter.
• If you use an ICU-configurable system, the command-providing layers must beconfigured into the system to support the command-level layers. The iRMX-NET and TCP/IP subsystems are also optional in these systems.
• In any system, it is possible to replace the CLI with a user-written commandinterface program. In such a system, the CLI commands are not available.
• In any system you may selectively install individual HI and NET commands,which are simply HI commands provided by the iRMX-NET software. Eachcommand is a separate executable file. You may also write new commands.
Except where noted, this manual assumes that all commands provided by your typeof installation are available.
The Human Interface (HI)The HI provides single- or multi-user support for one or more terminals. When thesystem is booted, the HI initializes each terminal and begins running an initialprogram, which is an interactive HI job. The initial program can be your customcommand interface or the iRMX CLI.
The HI initializes terminals as either static or dynamic. A static terminal always hasa specific user associated with it. You do not log on or off such a terminal; yousimply begin entering commands. A dynamic terminal is one where you must log onand provide a user password. Each logon session begins a new HI interactive job.
HI commands are executable files loaded and run by the CLI (or other commandinterface). Each command is a separate file stored on disk.

Command Reference Chapter 1 5
You can use the dir command to display the names of the HI system commands,utilities, or development tools available on your system. Enter the commands shownbelow:
dir :system:
dir :utils:
dir :lang:
See also: Logging on, Installation and StartupCLI initial program, System Conceptsstatic and dynamic terminals, System Configuration and
Administrationdir command, Chapter 2
The Command Line Interpreter (CLI)The CLI is an application running under the HI. It enables operators to communicatewith the OS by entering commands. The CLI takes each HI command as it isentered, divides it into a program name and parameters, runs the program indicatedby the command name, and passes the parameters to the program. CLI commandsare internal to the CLI, not separate files on disk.
The CLI provides such features as type-ahead, command-line editing, and I/Oredirection: taking input from or sending output to a file or device on the commandline.
Three HI commands, logon, super, and submit, are similar to CLI commands by thesame name. The duplicate HI commands are for use with a custom commandinterface, but lack CLI features such as aliasing, line-editing, and backgroundprocessing.
Networking SoftwareThe iRMX-NET networking software provides connections across a network to othersystems that use OpenNET software. OpenNET is Intel's implementation of an ISO-TP4 network and is available for such diverse OSs as MS-DOS (through MS-Net),iRMX, UNIX, and VAX/VMS.
The iRMX-NET software also provides a set of HI commands that allow you toperform such operations as managing the network attributes of the system, locating asystem by name, restarting the network software on the network controller board, orloading a boot file to the network controller on a remote system. The networksoftware can perform many of these functions automatically during initialization.
6 Chapter 1 Using Commands
In addition to, or instead of, iRMX-NET, you may install TCP/IP software, whichincludes its own set of utilities. This manual includes the TCP/IP commands. If youdo install TCP/IP, you can also choose to install NFS software to get transparent fileaccess across the net.
See also: Network User's Guide and ReferenceTCP/IP and NFS for the iRMX Operating System
Understanding the File SystemsYou can use commands more effectively with an understanding of the basic filesystems. These terms are used in relation to file names, and are explained in moredetail in later sections:
Pathname The designation used by the OS to find or specify the locationof a file or directory in the file tree. The forward slash (/) isthe usual separator in iRMX pathnames.
Logical name A short identifier or symbolic name for a pathname, commandstring, device, etc. Logical names are usually surrounded bycolons, and are used to simplify command entry.
Volume A physical device for storing files. The volume might be ahard disk, a partition on a disk, a RAM disk, or a diskette ortape. The diskette is associated with the name of the diskdrive, and the tape is associated with the name of the tapedrive.
Prefix The beginning reference in a pathname, usually a volumename or a logical name.
Wildcards Characters (* and ?) used to replace some or all of thecharacters in a filename. Wildcards are most often used tospecify several files in a single reference within a command.
Command Reference Chapter 1 7
File TypesThe iRMX environment has five types of files: named, DOS, physical, stream, andremote. If you use NFS software, there is also an NFS file driver.
Named files Divide the data on storage devices into individually accessibleunits. Users and programs refer to these files by name whenthey want to access information stored in them. Whenoperating from the command line, you access named filesmore often than any other file type.
Physical files Enable the OS to deal with an entire I/O device as a single file.The HI accesses backup volumes and devices such as lineprinters and terminals in this manner. It also accessessecondary storage devices (such as disk drives) as physicaldevices when formatting them. When operators accessphysical files, it is usually in a manner that is transparent tothem (such as copying a named file to the line printer orformatting a disk).
Stream files Enables communication between programs. Two programscan use a stream file for communication if one program writesinformation to the stream file while another program reads theinformation.
Remote files Are the same as named files. However, remote files reside ona remote system connected to the network. No specialsemantics are needed to access remote files, but file accesspermissions may be different from local files. These are filesmade available through the iRMX-NET Remote File Driver.
DOS files Are named files in the DOS file system format. They areaccessed through the EDOS file driver on iRMX for Windowsand the DOS file driver on all other iRMX platforms. AlliRMX users have access to all DOS files.
NFS Any file available on a remote system that is made availablethrough the NFS File Driver. In a generic sense, these are alsoremote files.
8 Chapter 1 Using Commands
When you create files, use DOS conventions to name DOS and EDOS files: a prefixof up to eight characters, followed by a dot (.) and a three-character suffix. On otherfiles, use the iRMX convention of up to 14 characters and no suffix. The charactersin file and directory names must meet the rules of both the DOS and iRMX OSs.They can include letters (A through Z), numbers (0 through 9), and any of the thesecharacters:
. _ $ ~ ! # % & @ - { }
They cannot include spaces or any of these characters:
: / ^ * ? " ' | , = + < > ( ) [ ] ;
There are two uses for the term named files. One is the generic sense, where anyfiles in a file hierarchy are established with individual names. In this sense, remoteand DOS files and directories are named files. However, there is also a named filedriver, which only operates on iRMX named files, not remote or DOS files (these usetheir own file drivers). If a command parameter refers to files as named, as in theformat and attachdevice commands, the term refers to the named file driver.Otherwise, the term named files in this manual can encompass any file that is not aphysical file.
See also: File types, System Concepts
The OS treats both data files and directories as files. It also treats devices as files,after you use the attachdevice command to establish a logical name for the device.Thus, when a command parameter gives you the option to write to a file, you canwrite to a printer or terminal device by specifying the logical filename associatedwith the device.
See also: Logical names, in this chapter
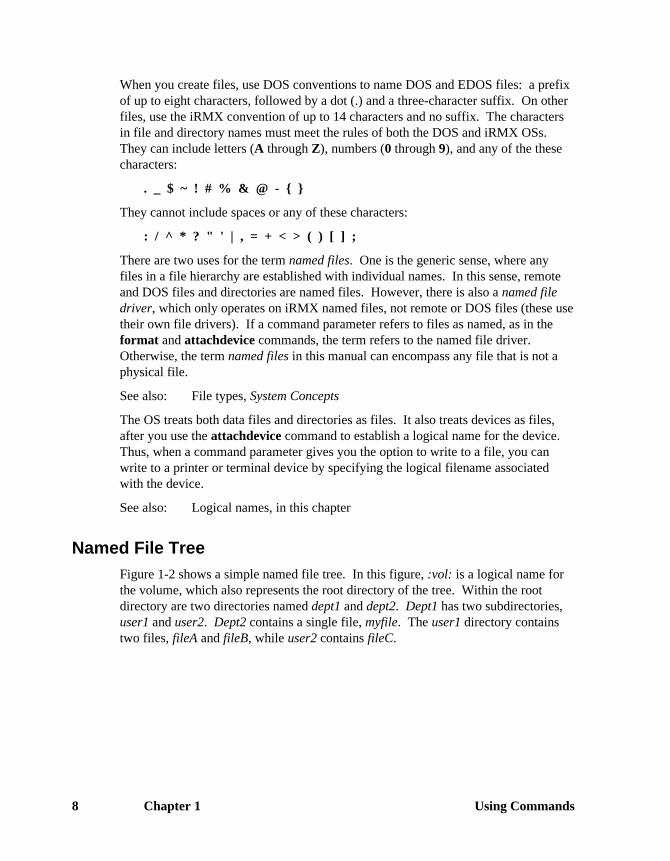
Named File TreeFigure 1-2 shows a simple named file tree. In this figure, :vol: is a logical name forthe volume, which also represents the root directory of the tree. Within the rootdirectory are two directories named dept1 and dept2. Dept1 has two subdirectories,user1 and user2. Dept2 contains a single file, myfile. The user1 directory containstwo files, fileA and fileB, while user2 contains fileC.
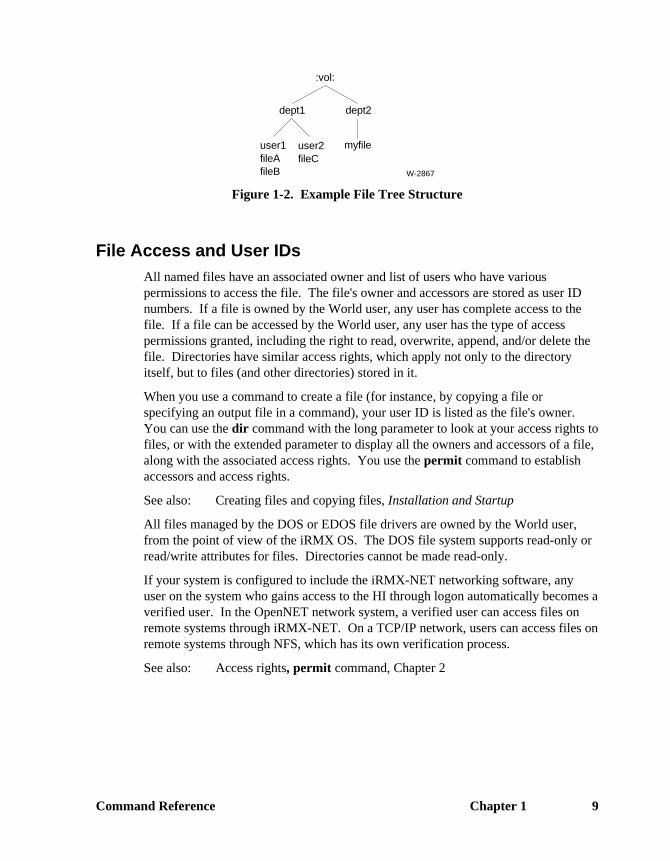
Command Reference Chapter 1 9
:vol:
dept1 dept2
user1fileAfileB
user2fileC
myfile
W-2867
Figure 1-2. Example File Tree Structure
File Access and User IDsAll named files have an associated owner and list of users who have variouspermissions to access the file. The file's owner and accessors are stored as user IDnumbers. If a file is owned by the World user, any user has complete access to thefile. If a file can be accessed by the World user, any user has the type of accesspermissions granted, including the right to read, overwrite, append, and/or delete thefile. Directories have similar access rights, which apply not only to the directoryitself, but to files (and other directories) stored in it.
When you use a command to create a file (for instance, by copying a file orspecifying an output file in a command), your user ID is listed as the file's owner.You can use the dir command with the long parameter to look at your access rights tofiles, or with the extended parameter to display all the owners and accessors of a file,along with the associated access rights. You use the permit command to establishaccessors and access rights.
See also: Creating files and copying files, Installation and Startup
All files managed by the DOS or EDOS file drivers are owned by the World user,from the point of view of the iRMX OS. The DOS file system supports read-only orread/write attributes for files. Directories cannot be made read-only.
If your system is configured to include the iRMX-NET networking software, anyuser on the system who gains access to the HI through logon automatically becomes averified user. In the OpenNET network system, a verified user can access files onremote systems through iRMX-NET. On a TCP/IP network, users can access files onremote systems through NFS, which has its own verification process.
See also: Access rights, permit command, Chapter 2
10 Chapter 1 Using Commands
Using PathnamesIf the directory where you are currently working is on another volume, you mustspecify the volume name to refer to a file. For example, to refer to myfile fromanother volume, you would specify the file as:
:vol:dept2/myfile
The forward slash (/) is the standard iRMX filename separator. When you specify alogical name at the beginning of the pathname, you cannot use a slash between thelogical name and the next component of the pathname.
However, if your current working directory is on :vol:, you do not need to specify:vol: as the root directory part of the pathname. You could refer to myfile fromanywhere on the volume with the pathname:
/dept2/myfile
The slash at the beginning of the pathname specifies the root directory of the currentvolume. Both :vol:dept2/myfile and /dept2/myfile are considered full pathnames tothe file, as long as the beginning logical name refers to the root directory of thevolume.
You can also specify a file with a pathname that is relative to your current workingdirectory. For example, if your current directory is user1, you can refer to fileAsimply as filea. In iRMX, to refer to fileC, you could use a circumflex (^) operator:
^user2/filec
In iRMX, each circumflex tells the OS that the next path component resides up onelevel in the file tree. When you use a circumflex in the pathname, you do not use the/ separator at that point in the pathname. For example, from the user1 directory, youcould refer to the myfile file with either of the these pathnames:
/dept2/myfile
^^dept2/myfile
The pathname does not need to end in the name of a data file. You use the same sortof pathnames to specify directories as to specify files.
In the DOS and EDOS file drivers, the dot-dot (..) operator works in a similarmanner.
The :$: logical name, discussed later in this chapter, determines the location of yourcurrent working directory.
See also: Logical names, in this chapterspecifying pathnames, in your DOS documentation

Command Reference Chapter 1 11
Using the Copy Command with Multiple PathnamesWhen specifying pathnames in a command's input and output lists, remember theserules:
• If you specify multiple input pathnames and a single output pathname for thecopy command, file concatenation takes place.
• If you specify multiple input pathnames and one output pathname that is adirectory rather than a file, the HI copies all the input files into the directory.Each file keeps its original name in the new directory.
• If you specify multiple output pathnames, you must specify the same number ofinput pathnames as output pathnames. Specifying more input pathnames thanoutput pathnames results in an error message. For example, these commandsreturn error messages:
-copy a,b,c to d,e <CR> (invalid)-copy a,b to c,d,e <CR> (invalid)
When the sequence of data in a concatenated file is important, remember that alloperations are performed in the sequence you specify in the command line.
Using Wildcards in FilenamesWildcards are characters used to specify several files in a single reference within acommand. Use wildcards in any position in a filename to replace some or all of thecharacters in the name.
You cannot use wildcards in the directory path part of a pathname, but if the lastcomponent of a pathname is a directory name you may use a wildcard in thatdirectory name. Thus the name system/app1/*file is valid, but system/app*/infileis not.
12 Chapter 1 Using Commands
The wildcard characters are * and ?:
? The question mark matches any single character. The HI selects every file thatmeets this requirement. For example, the name file? implies all of these files:
file1file2filea
* The asterisk matches any number of characters (including zero characters). TheHI selects every file that meets this requirement. For example, the name file*implies all of these files:
file1file.objfilefilechange
You can use multiple wildcards in a single name. For example, the name *if?.*matches every file containing the sequence if followed by any character and a period.This could include all of these files:
rmxifc.libifl.p28lnkifc.
The * character matches as close to the end of the pathname as possible. Forexample, suppose the directory contains the file abxcdefxgh, and you enter:
copy *x* to :prog:*2*
The first asterisk matches the characters abxcdef and the second asterisk matches thecharacters gh. The command creates a new file in the :prog: directory namedabxcdef2gh.

Command Reference Chapter 1 13
Many commands use input and output pathnames as parameters. You can usewildcards in both input and output pathnames. For example:
copy a* to b*
In this command, the a* represents the input pathname and b* represents the outputpathname. The HI searches the appropriate directory for all files that begin with A.It copies each file to a file of the same name, but beginning with B, as shown below:
Original Files Copied Filesalpha blphaa112 b112a b
In some commands you can specify lists of input and output pathnames, separated bycommas. For example:
copy a,b,c to d,e,f
This command copies a to d, b to e, and c to f. If you use wildcards in any one of theoutput pathnames, you must use the same wildcards in the same order in thecorresponding input pathname. This means that if you use both the * and the ?characters, their ordering must be the same in both the input and output pathnames.For example, this command is valid:
copy a*b?c*, x to *de?fgh*i, y
However, this command is invalid because the wildcards are out of order:
copy a*b?c* to *de*fgh?i
If you use wildcards in an input pathname, you can omit all wildcards from thecorresponding output pathname to concatenate files. For example, suppose adirectory contains files a1, b1, and c1. This command is valid:
copy *1 to x
It copies files in this manner:
a1 to x
b1 after x
c1 after x
However, if x is a directory, the HI does not concatenate files, but makes copies ofthe files in the x directory.
See also: copy command, Chapter 2
14 Chapter 1 Using Commands
Specifying Hidden FilesAn iRMX hidden file is any file whose name begins with r? or R?. Ordinarily, youcannot specify a hidden file in a pathname because the HI interprets the questionmark as a wildcard. To specify a hidden file, surround the pathname or the questionmark with single or double quotes. For instance:
copy 'r?logon.csd' to :co: orcopy r'?'logon.csd to :co:
The dir command has an invisible parameter that lets you list the hidden files in adirectory.
See also: dir command, Chapter 2specifying filenames, in your DOS documentation
Entering CommandsWhen you enter a command, line wraparound is not permitted. The maximum linelength is 76 characters, excluding the prompt, and no more than 79 charactersincluding the prompt. All characters exceeding the maximum line length are ignored.To enter a line that exceeds 79 characters, create a continuation line by using anampersand (&) as the last character in the line. If you continue a line, do not breakthe line in the middle of a command or a parameter. You may enter as manycontinuation lines as necessary.
The CLI does not recognize continuation marks, comment characters, or quotationmarks within its own commands. These characters, however, are recognized by HIcommands. If the result of a CLI command causes execution of an HI command, theHI command is governed by HI syntax. For example, background is a CLIcommand but copy is an HI command. You may use a semicolon as shown below toinclude a comment in the copy command. This command executes copy as abackground job:
background copy hi.txt to output.txt ;hi.txt contains tables
To execute a command, press <Esc> to execute the whole command line, or press<CR> to execute only the beginning part of the command, up to the letter under thecursor.
Command Reference Chapter 1 15
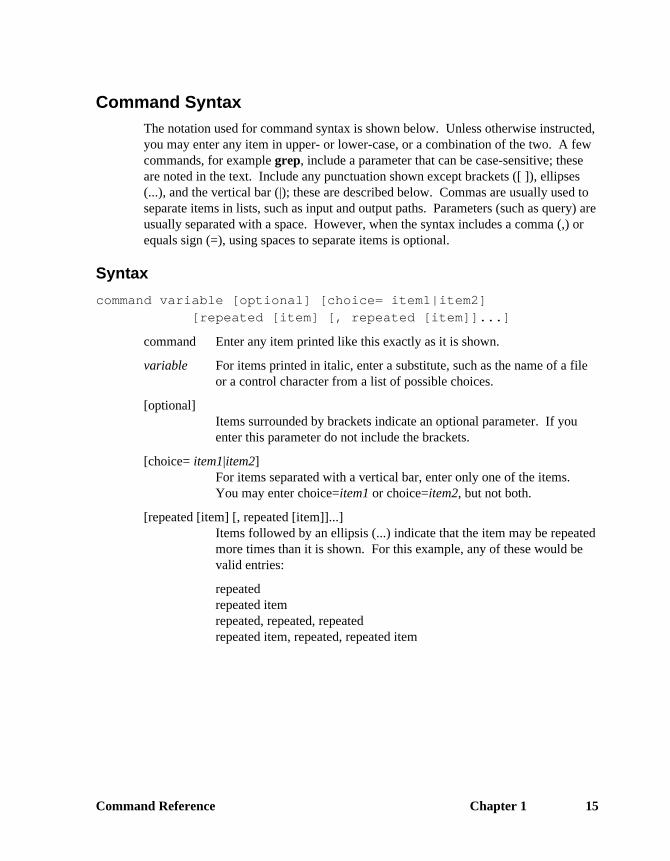
Command SyntaxThe notation used for command syntax is shown below. Unless otherwise instructed,you may enter any item in upper- or lower-case, or a combination of the two. A fewcommands, for example grep, include a parameter that can be case-sensitive; theseare noted in the text. Include any punctuation shown except brackets ([ ]), ellipses(...), and the vertical bar (|); these are described below. Commas are usually used toseparate items in lists, such as input and output paths. Parameters (such as query) areusually separated with a space. However, when the syntax includes a comma (,) orequals sign (=), using spaces to separate items is optional.
Syntax
command variable [optional] [choice= item1|item2][repeated [item] [, repeated [item]]...]
command Enter any item printed like this exactly as it is shown.
variable For items printed in italic, enter a substitute, such as the name of a fileor a control character from a list of possible choices.
[optional]Items surrounded by brackets indicate an optional parameter. If youenter this parameter do not include the brackets.
[choice= item1|item2]For items separated with a vertical bar, enter only one of the items.You may enter choice=item1 or choice=item2, but not both.
[repeated [item] [, repeated [item]]...]Items followed by an ellipsis (...) indicate that the item may be repeatedmore times than it is shown. For this example, any of these would bevalid entries:
repeatedrepeated itemrepeated, repeated, repeatedrepeated item, repeated, repeated item

16 Chapter 1 Using Commands
A few commands with many parameters have an additional syntax diagram. Theparameters are listed along a track, as shown below. Enter the track at the top leftand follow it through to the exit. Mandatory parameters are shown in line with thetrack. Optional parameters are shown below the track (you may follow the maintrack or follow the path through the option and return to the main track). Where youhave a choice of parameters, the track branches through them.
W-2627
(start) command A
B
CD
E
F
G
A vertical dotted line indicates that the following parameters may be entered in anyorder as long as they obey the rest of the syntax. Parameters preceding the dottedline must be entered in the order they appear. In this example:
• A is a required parameter and you must enter it immediately after the command.
• Either B or C is required. Whichever parameter you enter must follow A.
• D, E, and F are all optional but you may select only one. If you select one ofthese parameters, you may enter it before or after G.
Command Reference Chapter 1 17
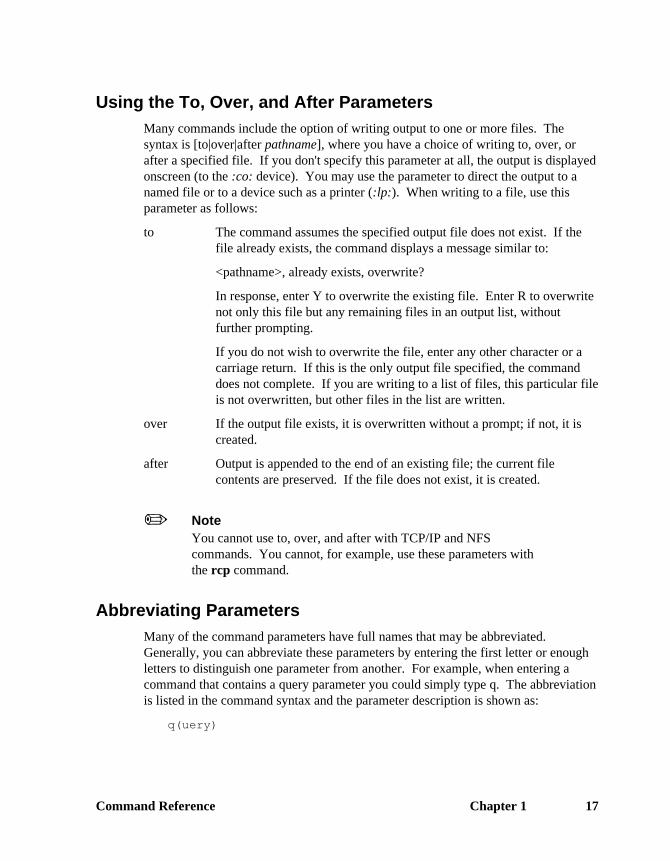
Using the To, Over, and After ParametersMany commands include the option of writing output to one or more files. Thesyntax is [to|over|after pathname], where you have a choice of writing to, over, orafter a specified file. If you don't specify this parameter at all, the output is displayedonscreen (to the :co: device). You may use the parameter to direct the output to anamed file or to a device such as a printer (:lp:). When writing to a file, use thisparameter as follows:
to The command assumes the specified output file does not exist. If thefile already exists, the command displays a message similar to:
<pathname>, already exists, overwrite?
In response, enter Y to overwrite the existing file. Enter R to overwritenot only this file but any remaining files in an output list, withoutfurther prompting.
If you do not wish to overwrite the file, enter any other character or acarriage return. If this is the only output file specified, the commanddoes not complete. If you are writing to a list of files, this particular fileis not overwritten, but other files in the list are written.
over If the output file exists, it is overwritten without a prompt; if not, it iscreated.
after Output is appended to the end of an existing file; the current filecontents are preserved. If the file does not exist, it is created.
✏ NoteYou cannot use to, over, and after with TCP/IP and NFScommands. You cannot, for example, use these parameters withthe rcp command.
Abbreviating ParametersMany of the command parameters have full names that may be abbreviated.Generally, you can abbreviate these parameters by entering the first letter or enoughletters to distinguish one parameter from another. For example, when entering acommand that contains a query parameter you could simply type q. The abbreviationis listed in the command syntax and the parameter description is shown as:
q(uery)

18 Chapter 1 Using Commands
Other parameter abbreviations may not be a simple truncation of the name. Forexample, the format command has a setbadtracks parameter; one possibleabbreviation is sbt. The parameter description shows this as:
s(etbadtracks) (or sbt)
This indicates that you could enter s, setbadtracks, or sbt.
Abbreviating Command NamesSome command names have abbreviations or aliases already provided. These arelisted in the Command Summary Table (in parentheses after the command name),and in the table of System Aliases. In addition, the syntax descriptions give theabbreviations along with the full name, as options. For example:
ad|attachdevice means that ad may be entered for attachdevice
Aliases must always be followed by a space, not a tab.
Recalling and Editing CommandsThe CLI allows you to continue typing commands as the current command is beingprocessed, and to edit commands on the command line. You may edit a commandyou are currently typing or recall a previous command and edit it. You may alsorecall a previous command and re-issue it without editing.
There are a several ways to recall a previous command. One method is to use the<Up-Arrow> and <Down-Arrow> keys to scroll through the command list stored in ahistory buffer. For each keystroke, the previous or next command is displayed on thecommand line, with the cursor at the end of the line. You can also use the ! andhistory commands.
See also: ! and history commands, Chapter 2
To edit a command, use <Left-Arrow> and <Right-Arrow> to move within the line.As you type new characters the following characters are advanced, not overwritten.
When the cursor is in the command, there are two ways to invoke it. If you press theenter key (<CR>), only the part of the command up to the cursor is invoked. If youpress <Esc>, the entire command line is invoked, regardless of the cursor position.
When you reinvoke a previous command, it becomes the current command at the endof the history buffer, and you are no longer scrolled upward in the command list.
Command Reference Chapter 1 19
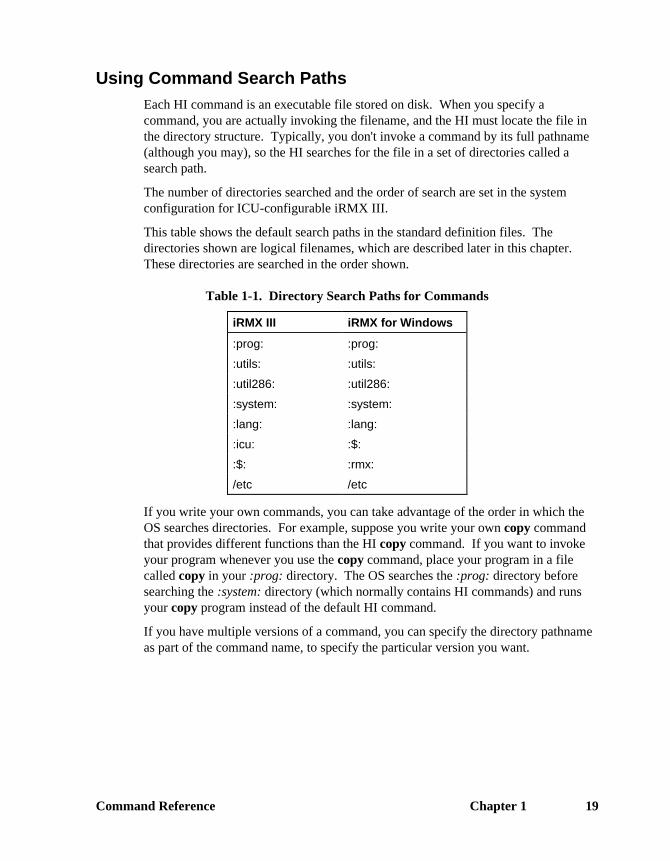
Using Command Search PathsEach HI command is an executable file stored on disk. When you specify acommand, you are actually invoking the filename, and the HI must locate the file inthe directory structure. Typically, you don't invoke a command by its full pathname(although you may), so the HI searches for the file in a set of directories called asearch path.
The number of directories searched and the order of search are set in the systemconfiguration for ICU-configurable iRMX III.
This table shows the default search paths in the standard definition files. Thedirectories shown are logical filenames, which are described later in this chapter.These directories are searched in the order shown.
Table 1-1. Directory Search Paths for Commands
iRMX III iRMX for Windows
:prog: :prog:
:utils: :utils:
:util286: :util286:
:system: :system:
:lang: :lang:
:icu: :$:
:$: :rmx:
/etc /etc
If you write your own commands, you can take advantage of the order in which theOS searches directories. For example, suppose you write your own copy commandthat provides different functions than the HI copy command. If you want to invokeyour program whenever you use the copy command, place your program in a filecalled copy in your :prog: directory. The OS searches the :prog: directory beforesearching the :system: directory (which normally contains HI commands) and runsyour copy program instead of the default HI command.
If you have multiple versions of a command, you can specify the directory pathnameas part of the command name, to specify the particular version you want.

20 Chapter 1 Using Commands
Creating Command AliasesYou may use the alias command to retrieve a command from one of the directories,as well as to create a shorter name for the command. For example, you might definethe attachfile command with an alias using this command:
alias af = :system:attachfile
In this case, every time you enter af, the OS replaces it with :system:attachfile andinvokes the attachfile command found in the :system: directory. The OS does notsearch for the command in the search path. (This particular alias is already thestandard alias for attachfile.)
If you are a DOS user, you can use this facility to make commands similar to theones you use in DOS. For instance, you could use the command above, but define:system:attachfile as cd, the DOS command to change the working directory.However, keep in mind that the commands are not an exact match; attachfile alsoperforms other functions, such as assigning a logical name to a file.
See also: Logical names, in this chapterQuick Reference to Commands for equivalent commands in DOS
and iRMX OStable of system aliases and alias command, Chapter 2
Aliases are useful to reduce the work of entering commands and command sequencesthat you use often. You can also use aliases in submit files, which are command filesused with the submit command, similar to DOS batch (.bat) files.
You can also use alias to assign parameters to commands. For instance, you candefine:
alias C = :util386:RUN86 :LANG:IC386
Then you can enter the alias C with a filename, such as myfile.C:
C myfile.C
The CLI executes:
:util386:RUN86 :LANG:IC386 myfile.C
You can nest aliases up to five levels. For instance, you can define:
alias C = :util386:RUN86 :LANG:IC386
alias CNL = C #0.PC nolist
Command Reference Chapter 1 21
Then you can enter:
CNL source
The CLI executes:
:util386:RUN86 :LANG:IC386 source.PC nolist
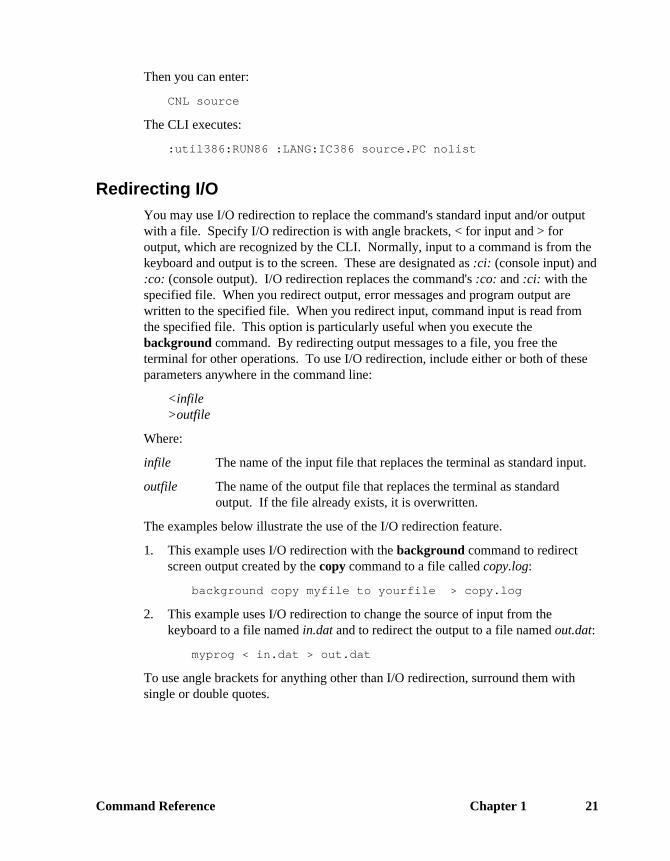
Redirecting I/OYou may use I/O redirection to replace the command's standard input and/or outputwith a file. Specify I/O redirection is with angle brackets, < for input and > foroutput, which are recognized by the CLI. Normally, input to a command is from thekeyboard and output is to the screen. These are designated as :ci: (console input) and:co: (console output). I/O redirection replaces the command's :co: and :ci: with thespecified file. When you redirect output, error messages and program output arewritten to the specified file. When you redirect input, command input is read fromthe specified file. This option is particularly useful when you execute thebackground command. By redirecting output messages to a file, you free theterminal for other operations. To use I/O redirection, include either or both of theseparameters anywhere in the command line:
<infile>outfile
Where:
infile The name of the input file that replaces the terminal as standard input.
outfile The name of the output file that replaces the terminal as standardoutput. If the file already exists, it is overwritten.
The examples below illustrate the use of the I/O redirection feature.
1. This example uses I/O redirection with the background command to redirectscreen output created by the copy command to a file called copy.log:
background copy myfile to yourfile > copy.log
2. This example uses I/O redirection to change the source of input from thekeyboard to a file named in.dat and to redirect the output to a file named out.dat:
myprog < in.dat > out.dat
To use angle brackets for anything other than I/O redirection, surround them withsingle or double quotes.
22 Chapter 1 Using Commands
Using Commands on DirectoriesA directory contains a list of all files assigned under its name. Display the contentsof a directory by using the dir command. Optional dir command parameters alsoallow you to access and display other pertinent information about each file, such asfile size and other file attributes.
Displaying Files with the DIR CommandThe iRMX dir command does not work exactly like the DOS dir command. In theiRMX OS, if you just type dir, it displays all files in the current directory (:$:), as inDOS. If, however, you include command line parameters, you must type $ to specifythe current directory.
For example, to display just the file myfile in the current directory, you cannot enterdir myfile. You must enter dir $ myfile. The dir command always interpretsthe first command line parameter as a directory, so when you type dir myfile, itattempts to display the contents of a subdirectory named myfile under the currentdirectory. Similarly, if you want to display all invisible files in the current directory,you cannot enter dir i (the “invisible” switch), you must enter dir $ i.
Creating a New DirectoryYou create new directories by using the createdir command. You must specifynames for the new directories. Directory names are limited to 14 characters.
To create two directories named mytest and NUTEST, enter:
-createdir mytest,NUTEST <CR>
The HI responds:
mytest, directory created
NUTEST, directory created
-
Once you create directories and data files, you can enter their pathnames in eitherlower-case or upper-case characters in subsequent commands; the HI commands arenot case-sensitive.
Referring to a DirectoryTo access any file or directory within the parent directory, you must specificallyidentify the path in your command, in the form of a pathname.
Command Reference Chapter 1 23
For example, assume your working directory has a directory named nutest underwhich you have another directory named samp. Samp, in turn, has a data file namedtest. Nutest is the parent directory for the samp directory and samp, in turn, is theparent for the test data file. In a command, the pathname for the samp directorywould be nutest/samp, where the slash characters separate the individual hierarchicalcomponents of the pathname. The pathname for the test data file would be:
nutest/samp/test
If the files are contained in your default directory, you can refer to them withoutspecifying a logical name as a prefix. When you enter this pathname, the HIautomatically appends the prefix :$: to the beginning:
nutest/samp/test
However, if the files are contained in a directory other than your working directory,you must enter the complete pathname for the file. For example, if the files reside ona device whose logical name is :AD3:, you must include this logical name as theprefix portion of the pathname, as follows:
:AD3:nutest/samp/test
If you omit the :AD3: portion, the HI assumes the files reside in your workingdirectory.
Do not use the :S: logical name as a parameter for a command unless the commanddescription says it is allowed; most commands will not work properly.
Once you have added files to a specific directory, every subsequent operationinvolving those files must specify a preceding directory name and the slash separatorunless you change your default directory.
See also: Logical names, in this chapter
24 Chapter 1 Using Commands
Creating a Directory Within a DirectoryTo create new directories in other directories, thereby expanding the file hierarchy,use the createdir command. For instance, if you have a directory named mytest, andyou want to create the subdirectory urtest, enter:
-createdir mytest/urtest <CR>
The HI responds:
mytest/urtest, directory created
-
If the directory resides on a device (for example, :f6:) other than your default device,you must also specify the logical device in the directory pathname.
Changing Your Working DirectoryIf there are many levels in your directory structure, the pathnames in your commandscan become inconveniently long. To avoid having to specify long pathnames, youcan use the attachfile command to change your working directory closer to the levelof the files you are using. For example, you could change your working directory tothe urtest directory, as follows:
-attachfile mytest/urtest <CR>
The HI responds:
mytest/urtest attached AS :$:
-
Now you can refer to files in the urtest directory without a preceding pathname. TheHI assumes the files reside in the urtest directory, because you have attached urtest asyour working directory.
You can use the attachfile command to change your working directory to anydirectory. To return to your original default directory, called the home directory,enter:
-attachfile <CR>
or
-af <CR>
The HI responds:
:HOME:, attached AS :$:
Command Reference Chapter 1 25
This command uses the default parameters and has the same effect as:
attachfile :HOME: as :$:
The :home: logical name represents your original default directory; therefore thecommand returns :$: to its original value.
If you use several directories at one time, you can also use the attachfile command toassign short logical names to these directories. By using the logical name in thepathname, you shorten the length of the pathname you enter each time you specify adirectory.
See also: Logical names, in this chapter
Renaming DirectoriesA directory can be renamed to a new pathname on the same volume, but not to anexisting pathname. To rename a directory whose pathname is alpha/beta to the newpathname alpha/bee, enter:
-rename alpha/beta to alpha/bee <CR>
The HI responds:
alpha/beta renamed to alpha/bee
Once you rename a directory, all files listed under that directory will also have theirpathnames changed. If your system has other programs that use data files listedunder the old directory name, those programs will never find the files. In such a case,you must either rename the directory to its original name or modify the programs.
Deleting a DirectoryYou can delete unused directories from secondary storage with the delete command.Enter:
-delete mytest <CR>
This command only works if there are no files or subdirectories in the mytestdirectory. If you previously created the mytest/urtest directory, the HI responds withan error message; the HI will not delete a directory that is not empty.
26 Chapter 1 Using Commands
However, there is a powerful command called deletedir that you can use to delete theentire contents of a directory, including all subdirectories, files, and the directoryitself. Deletedir should be used with caution, since this single command can havefar-reaching consequences.
See also: delete and deletedir commands, Chapter 2
Using Commands on VolumesYou can use all HI file-handling commands except rename to manipulate files acrossvolume boundaries. You can copy files or directories from one diskette or hard diskto another one mounted on a different drive.
You access a different volume by entering the logical name for the device (the driveon which the volume is mounted) as the first item in the pathname. To list the rootdirectory of a volume mounted on a drive whose logical name is :f1:, enter:
-dir :f1: <CR>
The HI might respond with:
01 JAN 90 00:00:00
directory OF :f1: ON VOLUME disk2
able baker chuck
To copy the able file from the volume mounted on :f1: to the mytest directory (if itresides in your working directory), enter:
-copy :f1:able to mytest <CR>
The HI responds:
:f1:able copied to mytest/able
To delete files able and baker from the :f1: volume, enter:
-delete :f1:able,:f1:baker <CR>
The HI responds:
:f1:able, deleted
:f1:baker, deleted
A volume prefix must be specified for each pathname in any command that crossesvolume boundaries.

Command Reference Chapter 1 27
Formatting a New VolumeTo use a new diskette or hard disk volume, you must format the volume before youcan write any information in it. The volume must be attached with attachdevice,using the physical parameter, and formatted. There are exceptions to this generalrule:
• You cannot format a remote volume (including volumes accessed through NFS).It must be formatted locally on the remote system.
• Typically, you do not use the format command to format a tape, nor do youaccess files on a tape with most commands. Use the backup and restorecommands to format, create files on, and retrieve files from a tape.
After a volume is formatted, you can attach it as a named, remote, or DOS volumeand create files and a directory structure on it.
See also: attachdevice, format, backup, and restore commands, Chapter 2
As an example of formatting, assume that you place a new diskette in a disk drive,and attach the drive with the logical name :f:, as a named device:
-attachdevice ah as :f: named <CR>
Enter:
-format :f: <CR>
The HI responds:
volume () will be formatted as a NAMED volume
granularity = 512 map start =301
interleave = 5 sides = 2
files = 200 density = double
extensionsize = 3 disk size = mini
save area reserved = no
bad track/sector information written = no
MSA bootstrap information written = no
System 120 bootstrap loader chosen = no
volume size = 318K
volume formatted
This formatting example exercised all the default options. It did not specify a volumename as a parameter of format. A volume name is not required; however, fordiskettes, a volume name gives you a method of identifying a volume in case thediskette label gets lost or destroyed.
28 Chapter 1 Using Commands
The granularity, interleave, extensionsize, mapstart, and files parameters tell theformat command how you want the physical space on the volume allocated andaccessed for maximum efficiency. Using the default parameters caused the exampleto be formatted with these attributes:
• Since the device is attached as a named device, the named parameter is thedefault with format. It specifies that you will be using the volume only tohandle named files and directories. If you specified the physical parameter (ineither attachdevice or format), the entire volume would be treated as a single,large physical file. Once you format the volume as named or physical, you canonly use it for that purpose. If you specified the DOS parameter, the entirevolume would be formatted with the DOS file system.
• The granularity parameter specifies the minimum number of bytes to beallocated for each increment of file size on the volume. The default granularityis the granularity of the physical device. Once the volume granularity is defined,it is applied to every file you create on the volume.
See also:Uniform and standard granularity diskettes,Installation and Startup
For example, assume the default volume granularity for your device is 1024bytes. Each time you create a new file on the volume, the I/O Systemautomatically allocates 1024 bytes of primary storage to that file, whether or notthe file requires the full 1024 bytes. If the size of your file exceeds 1024 bytes,the I/O System will increment your file size by still another block of 1024 bytes,and so on, until the end-of-file is reached.
• The interleave parameter default specifies that you want an interleave factor of 5.The interleave factor defines the number of physical sectors that occur betweensequential logical sectors. This value maximizes access speed for the files on agiven volume, depending upon the use for the volume and the deviceconfiguration of your system.
The interleave parameter is the only optional parameter that is meaningful forvolumes formatted for physical files; the files, extensionsize, and granularityoptions are ignored in format commands that specify a physical file format forthe volume.
• The files parameter default specifies that you wish to create a maximum of 200user files on the volume. Although the actual number of files you can specify is1 through 65,528, at a practical level one of your determining factors will be theincremental file size you specify in the granularity parameter.

Command Reference Chapter 1 29
• The extensionsize parameter default specifies that you wish to create three bytesof extension data for each file. The HI requires that at least three bytes ofextension data be available. Other system programs included in your systemmay require larger values.
• The mapstart parameter gives the volume block number where the fnode andmap files start. If you do not specify a number, the HI places the fnode and mapfiles in the center of the volume.
Using TCP/IP and NFS CommandsThe Posix, TCP/IP, and NFS commands do not necessarily have the same kind ofsyntax as iRMX commands or as TCP/IP commands when used on other OSs.
Executing TCP/IP CommandsThe syntax of TCP/IP commands in this manual assumes you have submitted the/etc/tcpalias.csd file, which sets up aliases for the commands. For example, the ftpcommand is an alias for psh ftp.
If you have not submitted this alias file, prefix each Posix-dependent command linewith psh and all other command lines with /etc/ when you invoke these commands.For example::
psh uname -S intel1 -N intel1
/etc/hostname intel1
Case Sensitivity in TCP/IP and NFS Command SyntaxUnlike other iRMX commands, the syntax for TCP/IP and NFS commands is case-sensitive. You can invoke the command names in upper- or lowercase since thecommands are utilities invoked by iRMX. However, you must enter the parametersand internal commands in the case shown, except for items such as iRMX filenames.
30 Chapter 1 Using Commands
Executing OS Commands From a Posix ShellYou can execute iRMX commands from a Posix program, such as psh, from a shellescape from ftp, or from your own Posix application. However, do not execute anyiRMX command that does
attachfile :$:
Entering this command does not work under Posix and creates unpredictablebehavior.
Creating and Using Logical NamesAlthough you can use pathnames to refer to files, you can also create symbolic namesthat correspond to files or devices. These symbolic names are called logical names.You use the attachdevice command to create logical names that represent devices.You use the attachfile command to create logical names that represent data files ordirectories. You may also create logical names when configuring the system. Aftercreating a logical name, you can refer to the entity it represents by specifying thelogical name. You can use the logicalnames command to view all the current logicalnames. The rules for logical names are:
• Each logical name must contain between 1 and 12 ASCII characters, excludingthe colons surrounding the name.
• The characters must be ASCII printable characters (hexadecimal values 021H to07EH, inclusive).
• The logical name cannot include a colon (:), slash (/), circumflex (^), asterisk(*), question mark (?), or any of these characters:
" ' | , = ( ) [ ] ;
• When you specify a logical name in a pathname, you must surround it withcolons. Some commands do not require that you specify the colons surroundinglogical names that represent devices.
See also: attachdevice, attachfile, and logicalnames commands, Chapter 2
Command Reference Chapter 1 31
Creating Logical Names for DevicesBy using device logical names as the prefix portion of your pathname specifications,you can refer to any file on any device. For example, suppose your system containstwo diskette drives and you use the attachdevice command to attach the devices as:f0: and :f1:. If you have a diskette containing the file /dept2/myfile in drive :f0:, youcould access the file with this pathname, using :f0: as the prefix of the pathname:
:f0:dept2/myfile
If the diskette were in drive :f1:, you would access the file as:
:f1:dept2/myfile
You can use the dir command to list the root directory of the :f1: device as follows:
dir :f1: <CR>
See also: Using devices, Installation and Startup
Creating Logical Names for FilesThe OS establishes a number of logical names for files during system initialization.These are listed later in this chapter. You may create additional logical names forfiles with the attachfile command.
A logical name for a file provides a shorthand way of accessing that file. Forexample, suppose you have a file that resides several levels down in the file tree, suchas:
:f1:dept1/tom/test-data/batch-2
In this command, :f1: is the logical name for the device that contains the file. Youcan establish a short logical name for this long pathname, such as :batch:, byattaching the file with the name :batch:. Whenever you want to refer to the file in acommand, you can specify the logical name instead of the pathname.
If a logical name refers to a directory instead of a data file, you can use the logicalname as a prefix of a pathname. For example, consider the same pathname:
:f1:dept1/tom/test-data/batch-2
32 Chapter 1 Using Commands
Suppose you attach the pathname :f1:dept1/tom/test-data as logical name :test:, so itis a logical name for the directory test-data. To refer to file batch-2, you could usethe pathname :
:test:batch-2
Where Logical Names are StoredWhen the OS creates logical names at initialization time, or as a result of theattachfile or attachdevice commands, it places the logical name into an objectdirectory, along with a token for a connection to the file or device.
See also: Connections, System Concepts
This process is referred to as cataloging the logical name. The object directory thatreceives this information determines the scope of the logical name (that is, who canuse the logical name). Object directories fall into three categories:
Localobjectdirectory
Some logical names are cataloged in the object directory of acommand's job. When you invoke a command (such as dir), the OScreates a job for that command and catalogs certain objects in its objectdirectory. A command that you create and invoke might also usesystem calls to catalog logical names in its own object directory.Logical names cataloged in a local job can only be used in the contextof that job. They remain valid only until the job exits or is deleted.
Globalobjectdirectory
Each interactive job (each user session's job) is called the global job forthat user session. This is the initial job for each user session created bythe HI. When you use attachfile to create logical names for files, theOS catalogs the logical names in your global job's object directory.Likewise, if you invoke any commands that issue attachfile commands(as in a file used by the submit command), the OS catalogs the logicalnames in your global job's object directory. You and the commands youinvoke can use the logical names cataloged in your interactive job.Other users have no access to these logical names. Logical names inyour interactive job remain valid for the life of your job or until they aredetached.
When you invoke the background command, the CLI creates a globaljob for commands invoked within the background environment. Alllogical names that were valid when the background command wasentered are also valid in the background environment.

Command Reference Chapter 1 33
Root objectdirectory
When you use attachdevice to create logical names for devices, the OScatalogs the logical names in the root directory. Logical namescataloged in the object directory of the root job can be accessed byevery user. Logical names in the root object directory remain valid untilthey are detached or the system is reinitialized.
When you use the system option of the attachfile command, thelogical name is cataloged in the root directory and is available to allusers.
See also: Cataloging, jobs, object directories, System Concepts
Whenever you (or commands you invoke) use a logical name, the OS searches for thelogical name in the local object directory. If the logical name is not defined there, itlooks in the parent job's (global) object directory and finally, if necessary, in the rootobject directory. It uses the first such logical name it finds.
Because of this order of search, you can override the system logical names (thosecataloged in the root object directory) by attaching the same logical name,representing a different file or device, during your interactive job. For example,suppose you use the attachfile command to attach a file with the logical name :utils:.Whenever you specify :utils:, the OS refers to your file and not the one representedby the same logical name in the root object directory.
Logical Names Created by the Operating SystemThe OS establishes logical names that you can use without first having to createthem. The HI catalogs system-wide logical names in the root object directory. Theselogical names are available to all users, and they represent the same file or device forall users. The number of logical names created and their identities depend on thesystem configuration.
These logical names are available on iRMX systems that use the standard softwaredefinition files:
:bb: A device treated as an infinite sink (byte bucket). Anything written to:bb: disappears, and anything read from :bb: returns an end-of-file. The:bb: device has the same effect as the DOS NUL device.
:config: A directory in which the HI expects to find user configuration files,named :sd:rmx386/config.
:lang: A directory used to store language products, such as assemblers,compilers, and linkers, named :sd:lang286.
:sd: The system device. You should never change the default logical namefor the system device.
34 Chapter 1 Using Commands
:stream: The stream file connection. To create a connection to a stream file, youmust use this logical name as the prefix portion of the pathname.
:system: The directory containing the HI commands, named :sd:sys386.
:utils: A directory used to store 32-bit utility programs , named :sd:util386.
:util286: A directory used only in iRMX III OS and iRMX for Windows to store16-bit utility programs, named :sd:util286.
:work: A directory that Intel language translators and utilities use to store theirtemporary and work files.
These logical names are available on iRMX III systems only:
:icu: The directory containing the Interactive Configuration Utility files (notused in iRMX for Windows), named :sd:rmx386/icu.
:lp: A logical name for the line printer.
:rmx: The directory containing the iRMX libraries, plus the configuration filesfor iRMX for Windows, named :sd:rmx386.
These logical names are cataloged in each user's global object directory, and are thesame for iRMX for Windows and iRMX III. These names represent different files ordevices for each user.
:$: This represents the path to your current working directory, and is alsocalled your default prefix. If you do not specify a logical name (aprefix) or a / at the beginning of a pathname, the OS automatically uses:$: as the prefix, assuming that the file resides in the directorycorresponding to :$:. You use the attachfile command to change thedirectory corresponding to :$:, and hence, your working directory.
:home: This is your default home directory, which you enter when you log onto the system. Initially, :home: and :$: represent the same directory.You can re-enter your home directory by issuing the attachfilecommand with no parameters; this sets :$: equal to :home:.
:prog: A directory in which to store your programs.
Command Reference Chapter 1 35
These logical names are cataloged in the local object directory of each user and eachcommand that a user invokes. These logical names can have different meanings foreach user and each command.
:ci: The terminal keyboard, or console input. Each user's :ci: refers to theterminal associated with that user.
:co: The terminal screen, or console output. Each user's :co: refers to theterminal associated with that user.
On initialization, the HI may create additional logical names, specified asconfiguration parameters. Contact your system manager for more information aboutthe logical names initially available to you.
See also: logicalnames command, Chapter 2
Error MessagesEach command can generate a number of error messages. The messages that applyto a specific command are listed with that command. This list includes general HIand iRMX-NET error messages that may appear with many of the commands. Inaddition to a displayed message, condition codes from system calls to parts of the OSmay be reported. Condition codes are typically displayed as a hexadecimal value anda mnemonic (for example, 0085:E_LIST).
See also: Condition codes, System Call Reference
General HI Error Messagescommand not found
There is no command file with the pathname you specified, and the HI cannot findthe file in any of the directories it automatically searches.
<pathname>, delete access requiredYou do not have delete access to the file. If this is a remote file, a user at the remotesystem has removed delete access. You cannot change the delete access locally; auser at the remote system must grant delete access before this command succeeds.
<logical name>, device does not belong to youThe specified device was originally attached by a user other than World or you.
<pathname>, file does not existThe specified pathname does not represent an existing file.
<pathname>, invalid file typeA data file was specified for an operation that required a directory, or vice versa.
36 Chapter 1 Using Commands
<logical name>, invalid logical nameThe specified logical name contains unmatched colons, is longer than 12 characters,or contains invalid characters.
<pathname>, invalid pathnameThe specified pathname contains invalid characters, or a path component of thepathname does not exist or does not represent a directory.
*, invalid wildcard specificationA pathname contains an invalid wildcard specification. For example, the parameterrequires one pathname only, but more than one file meets the wildcard specification.Wildcards cannot be used in the directory path part of the pathname.
<logical name>, is not a device connectionThe specified logical name does not represent a connection to a physical device.
<logical name>, logical name does not existThe specified logical name is not cataloged in a global object directory, either foryour interactive job or for the root job.
parameters requiredThe command cannot be entered without parameters.
program version incompatible with systemThe command cannot run successfully because it is incompatible with this version ofthe OS. The command expects to obtain information from internal tables that are notpresent.
<parameter>, unrecognized controlThe parameter you entered is not valid for the command.
<pathname>, update or add access requiredEither you cannot overwrite the file because you do not have update access to it (forremote files, update and append access is required), or you cannot create a new filebecause you do not have add-entry access to the parent directory.
<condition code:mnemonic>, while loading commandThe condition code and mnemonic indicate an error encountered when the OSattempted to load the command into memory from secondary storage.
<parameter>, <condition code:mnemonic>This condition code was encountered while processing the indicated parameter.
<condition code:mnemonic>This condition code was encountered while executing the command.
Command Reference Chapter 1 37
004BH : E_PASSWORD_MISMATCHYour current password and user ID are not valid for the remote access you areattempting. For example, on the remote system the user ID associated with your username has a different password.
02D0H : E_UDF_IOAn error occurred while accessing a remote User Definition File. The UDF musthave World read access.
General iRMX-NET Error MessagesCannot communicate with iRMX-NET File Server
The File Server does not respond. Either the server was not configured into thesystem or the iNA 960 transport software was not loaded successfully.
Communication resources are busyThe iNA 960 transport software is out of resources.
Fatal ErrorA fatal unrecoverable error has occurred in MIP. It may be because iNA transportsoftware is not responding or may be due to hardware failure.
Internal Software Error. Try command later.All internal tables are currently full; the command may succeed if tried again later.
iRMX-NET does not respondThe iRMX-NET software is not yet running. This error indicates an initializationproblem occurred that prevented the iRMX-NET job from starting. Reboot thesystem and look for error messages during initialization.
No user mailboxes are availableThe limit for the number of external mailboxes has been reached. The Number ofExternal Mailboxes option is a configuration parameter in the MIP configuration.The application could be changed to use fewer external mailboxes, or in configurablesystems the number of external mailboxes could be increased.
Unexpected iRMX error occurredMIP encountered an unexpected iRMX error; verify the OS configuration.
■■ ■■ ■■

38 Chapter 1 Using Commands

Command Reference Chapter 2 39
Command Descriptions 2Command Descriptions
This chapter provides a command summary table, in which the commands aredivided into functional groups. Then each command is described in detail, with thecommands arranged in alphabetical order.
Command SummaryTable 2-1 lists the commands described in this chapter. The table is divided intothese sections:
• CLI Commands
• HI Volume Management Commands
• HI File Management Commands
• HI General Utility Commands
• HI System Management Commands
• DOS Utility Commands
• iRMX-NET Commands
• TCP/IP and NFS Commands
See also: Equivalent DOS and iRMX Commands, Quick Reference to Commands

40 Chapter 2 Command Descriptions
Table 2-1. Command Summary
CLI Commands
! Recalls a specified command linealias Assigns an alias abbreviation to a command
background Executes a command as a background job
changeid Changes the Super user to a different user ID
dealias Deletes an alias
exit Leaves the Super user mode
history Displays the last 40 command lines
jobs Displays a list of background jobs by their job ID number
kill Cancels a background job
logoff Ends a user session
set Alters CLI environment values (terminal name, memory sizes, prompt)
submit Executes commands listed in a file
super Changes the operator to Super, the system manager
HI File Management Commands
attachfile (af) Associates a logical name with a file (changes the working directory)
case Converts the name of a file from upper- to lower-case
copy Displays or copies one or more files
copydir Copies one or more directory trees
createdir (crdir) Creates one or more new directories
delete Deletes one or more files or empty directories
deletedir Deletes one or more directory trees
detachfile (df) Removes the association of a logical name with a file
dir Lists a directory's filenames and, optionally, file attributes
find Searches for files with names that match a given pattern
grep Searches files for strings matching a pattern, displaying matching lines
permit Grants or rescinds user access to a file
rename Changes the names of files or directories
skim Displays text files one screenfull at a time
sort Displays or copies a file with lines sorted alphanumerically
touch Changes file time stamps
translate Displays or copies a file, converting upper- or lower-case characters
tree Displays a directory hierarchy
uniq Displays or copies a file with repeated lines removedcontinued
Command Reference Chapter 2 41
Table 2-1. Command Summary (continued)
HI General Utility Commands
addloc* Merges information from a located file with a bootloadable file
aedit Invokes the AEDIT text editor
console** Dynamically changes the SDM console device to redirect the I/Ostreams
date Displays or sets the system date
debug Transfers control to the SDM monitor to debug an iRMX application
esubmit Executes commands from a file based on conditional statements
help Displays a help file for commands or user-added utilities
keyb Configures the console keyboard for a specific country
locdata* Produces a located file for use with the addloc command
logicalnames Displays the logical names available to the user
memory Displays the memory available to the user
make Automates the creation of large programs
mkdep Assists the make command in creating makefiles or appendingdependencies to a given makefile
modinfo Displays or changes memory pool values in an OMF86 or OMF286module
path Displays the pathname for a file
pause Displays a message and waits for a carriage return
physname Displays system DUIB names and information
remini Translates an rmx.ini file into iNA 960 load file format
rmextdbg Improves binding efficiency by removing unneeded entries from objectmodules and producing a smaller version of the file
sleep Suspends execution for a given number of seconds
submit Executes commands from a file (for non-CLI users)
sysinfo Displays information about the boot system currently running
time Displays or sets the system time
timer Times the execution of a command and displays elapsed time
traverse Executes a command repetitively in a directory tree
version Displays the version numbers of commands
whoami Displays the current user ID*Either not available or not useful in DOSRMX and iRMX for PCs continued**For DOSRMX systems only
42 Chapter 2 Command Descriptions
Table 2-1. Command Summary (continued)
HI Volume Management Commands
attachdevice(ad)
Attaches a new physical device to the system under a logical name
backup Copies named or DOS files to a backup volume
detachdevice(dd)
Removes a physical device from system use and deletes its logicalname
deviceinfo Displays size and space information about a volume
diskverify Verifies the data structures of named and physical volumes
format Writes format information on an iRMX or DOS volume
mirror Provides disk mirroring operations for managing hard disk mirror sets
pci Sets a threshold at which I/O requests to a PCI server are buffered
rdisk Partitions a PCI hard disk
restore Copies files from a backup volume to a named or DOS volume
retension Retensions a tape
HI System Management Commands
accounting Tracks logon activities at dynamic terminals
bootdos Activates the primary DOS partition and resets systems
cli Invokes a loadable version of the Command Line Interpreter
connect Binds a locked terminal device to a logical name, making it accessible
disconnect Deletes a logical name for a locked terminal, making it inaccessible
ic Reads and modifies interconnect space registers in a Multibus II system
initstatus Displays initialization status of HI terminals
jobdelete Deletes a running interactive job
lock Prevents the HI from automatically creating an interactive job at aterminal
logoff Ends a user session (for non-CLI users)
password Changes user passwords or creates new users
pcnet A NetBIOS driver that provides the interface to iNA-based iRMX-NET
shutdown Shuts down the system in an orderly fashion
super Changes the operator to the Super user (for non-CLI users)
sysload Loads loadable device drivers or user jobs
term Displays or modifies terminal attributes
unlock Unlocks a terminal that was locked, and starts the HI logon sequencecontinued

Command Reference Chapter 2 43
Table 2-1. Command Summary (continued)
DOS Utility Commands
bootrmx Activates the primary iRMX partition and resets systems
loadrmx Loads the iRMX OSrdisk Partitions a DOS hard disk
rmxtsr Allows the iRMX OS to obtain DOS and AT ROM BIOS services
iRMX-NET Commands
bcl* Converts an ASCII file into a special binary file for remote booting
deletename Removes server names and addresses from the local Name Servertable
domain Sets the search domain of subnets the iRMX Name Server can access.
findname Finds the server name where a name or address object is cataloged
getaddr Returns the local system's Ethernet address
getname Returns the system name for a specified Ethernet address
inamon Reads and sets NMF objects, performs echo tests, or manages routing
lanstatus An alias for the netinfo command
listname Lists names and values of objects in the local Name Server table
load Downloads boot software and starts the network controller board
loadname Adds names and addresses from a file to the local Name Server table
modcdf Adds or deletes iRMX client systems in the Client Definition File
netinfo Displays the address, subnet ID, and iNA 960 information for networkcontrollers
offer Extends public directory access to remote users
pcnet A NetBIOS driver that provides the interface to iNA-based iRMX-NET
publicdir Displays pathnames of public directories on the server
remove Denies public directory access to remote users
setname Enters server names and addresses in the local Name Server table
unloadname Removes server names and addresses from the Name Server table
unxlate* Displays information about the format of a file translated with xlate
xlate* Produces a bootloadable image from an object module file*Either not available or not useful in DOSRMX or iRMX for PCs continued

44 Chapter 2 Command Descriptions
Table 2-1. Command Summary (continued)
TCP/IP and NFS Commands
arp Displays or modifies address resolution tables
enetinfo Displays Ethernet information
ftp User interface to File Transfer Protocol
netstat Shows network status
ping Tests communication between two hosts
route Manipulates network routing tables
rpcinfo Reports Remote Call Procedure (RPC) information (NFS command)
share Enables mounting of local NFS resources by remote clients
showmount Reports NFS-shared and mounted devices
telnet User interface to TELNET protocol
unshare Restricts mounting of local NFS resources by remote clients
✏ NoteThere is no mount command for NFS; use the attachdevicecommand instead.
CLI command !
Command Reference Chapter 2 45
!Recalls a previously-entered command line by either its number or the beginningletter(s) of the command. The CLI searches backward in the history buffer from themost recently entered command, and displays the first matching command on thecommand line. You may edit the line; the command is not executed until you press<CR> or <Esc>.
Syntax
!variable
Parametervariable
The command line number (0-999) or the beginning letter(s) of the command to berecalled. The variable must immediately follow the ! character without a separatingspace, unless you are recalling a command line that began with a space.
Additional Information
To display the line numbers associated with previous commands, use the historycommand before using !. To recall a command line by its number, for example line29, enter:
!29 <CR>
When recalling a command by letter rather than by number, enter enough letters tospecify the line uniquely. The CLI recalls the most recent command line that beginswith the letters you specify. For example, if your previous commands were:
format :d:
ftn286 myfile.f28
and you enter:
!F <CR>
the CLI displays:
ftn286 myfile.f28.
If you want to recall the format command line, enter:
!fo <CR>
! CLI command
46 Chapter 2 Command Descriptions
Error Messages<prefix>, history line not found
The command prefix you entered does not appear in the history buffer.
<number>, history number not foundThe number you entered cannot be found in the history buffer.
<number>, history number out of rangeThe number you entered is greater than 999.
<number>, illegal history numberYour entry is not a legal number. It may include non-numeric characters.

HI command accounting
Command Reference Chapter 2 47
accountingDisplays, creates, or truncates the :config:account.log file, which contains the logonand logoff history of dynamic terminals.
✏ NoteYou can use this command in an esubmit file orrq_c_send_command system call if the form of the commanddoes not require user input. If the command requires user input inan rq_c_send_command system call, it will fail. However, youcan use a form of the command that requires user input in anesubmit file if you use the eoresponse and coresponse
subcommands.
See also: esubmit command, in this chapter
Syntax
accounting [create] [save = num]
Parameters
create Creates a new accounting file to store the logon and logoff history. You must be thesystem manager to use this parameter.
save = numReduces the size of the accounting file by saving only the most recent num entries,where num is a decimal number. All earlier entries are deleted from the file. Youmust be the system manager.
Additional Information
For the accounting command to be effective, the system manager must first use thecreate parameter to create an empty :config:account.log accounting file. Thecreate parameter places special information in the file that is used by theaccounting command. You must use this command, not a text editor, to create the:config:account.log file. If you attempt to create the file and it already exists,accounting displays this message:
:config:account.log, already exists, overwrite?
Enter Y or R to delete the existing file and create a new, empty file. Enter any othercharacter to leave the existing file intact.
accounting HI command
48 Chapter 2 Command Descriptions
Once the file exists, the HI records all logon and logoff activities in the file. Anyuser may invoke the accounting command with no parameters to display the log,which begins with the most recent activity.
If the :config:account.log file becomes too large or contains unnecessary information,the system manager can use the save parameter to save only the most recentinformation. When invoked with the save parameter, accounting displays thismessage, indicating the decimal number of events saved and discarded. Thecommand then lists the events still recorded in the accounting file.
<n> events saved; <m> events deleted
To stop the OS from keeping track of logon and logoff activity, delete or rename the:config:account.log file.
The example below illustrates the format of the accounting display:
user user terminal
ID name device name date time event
0 bob .t2. 13 AUG 86 16:22:50 logoff
world newuser .t1. 13 AUG 86 14:45:00 logoff
world newuser .t1. 13 AUG 86 13:01:10 logon
0 bob .t2. 13 AUG 86 11:05:45 logon
0 bob .t2. 13 AUG 86 11:05:15 logon error 004B
The columns in the example above contain this information:
user ID ID of the user who logged on or off at a dynamic terminal
user name Logon name used
terminal device namePhysical name of the terminal, as defined during configuration of theBIOS and as attached by the HI. Periods surround each name.
date Date of the logon or logoff activity
time Time of the logon or logoff activity
HI command accounting
Command Reference Chapter 2 49
event One of these may be listed:
logon The user logged on the terminal.logon error The user unsuccessfully attempted to log on;
the resulting condition code is also listed.logoff The user logged off the terminal.logoff job deleted The user was logged off as a result of the
jobdelete command terminating a job or theshutdown command stopping the system.
logoff carrier lost A terminal connected to a modem lost thecarrier.
Error Messages<condition code:mnemonic>, account.log is not available
The :config:account.log file exists but is not currently available for reading orwriting. The accounting command terminates when this occurs.
:config:account.log, file does not existThe accounting file does not exist.
not a valid accounting log fileThe :config:account.log file exists, but it is corrupted, doesn't contain accountinginformation, or wasn't created with the create parameter. Use the accountingcommand with the create parameter to create a new file.
only the system manager may change the accounting log fileSomeone other than the system manager attempted to use the accounting commandwith the create or save parameters. Use the super command to become thesystem manager.
program version incompatible with accounting log fileThe :config:account.log file contains accounting information that is incompatiblewith this version of the accounting command.
<condition code:mnemonic>, while attaching accounting log fileThe accounting command encountered this condition code while attempting to attachthe existing accounting file.
<condition code:mnemonic>, while creating accounting log fileThe accounting command encountered this condition code while attempting to createa new accounting file.
addloc HI command
50 Chapter 2 Command Descriptions
addlocIntegrates a data file created by the locdata command with an existing bootloadableapplication file, to produce a new bootloadable file and a map file.
✏ NoteYou can use this command in an esubmit file orrq_c_send_command system call if the form of the commanddoes not require user input. If the command requires user input inan rq_c_send_command system call, it will fail. However, youcan use a form of the command that requires user input in anesubmit file if you use the eoresponse and coresponse
subcommands.
See also: esubmit command, in this chapter
Syntax
addloc datafile, sysfile to|over outpath
Parametersdatafile
Pathname of the located data file produced by the locdata command. Multiple orwildcard pathnames are not allowed.
sysfilePathname of a bootloadable application file in object module format (OMF286 orOMF386). This must be a file created by the Builder utility (BLD286 or BLD386,which is invoked by the iRMX ICU). Multiple or wildcard pathnames are notallowed.
to|overSpecify to create a new file or over to overwrite an existing file.
outpathThe pathname of the file that is to receive the combined information from datafileand sysfile. This is a new bootloadable file in object module format. Multiple orwildcard pathnames are not allowed. The base filename (not including a filenameextension) is limited to ten characters because the addloc command creates a printfile of the same name with the extension .mpa.
HI command addloc
Command Reference Chapter 2 51
Additional Information
You can use the locdata and addloc commands together to create an application thatautomatically loads part of itself into a RAM disk when the system boots.
Generally, to use a RAM disk you configure a system with an area of RAM dedicatedto the RAM disk. When the system boots, you attach the RAM disk memory to yoursystem, format it, and move data into and out of it just as you would with any othersecondary storage device.
If you want to use a RAM disk to store part of the application system (for instance,the HI commands), the stored data must be available in the RAM disk area when thesystem boots. This data cannot be copied into the RAM disk until you haveconfigured the application system into a bootable file, because the RAM disk areadoesn't exist until you define it through the configuration process. Therefore, youmust integrate a copy of a RAM disk data structure into an existing applicationsystem bootfile.
Addloc and locdata can create this new bootloadable version of the applicationsystem, which includes a copy of the RAM disk data structure. A map file is alsoproduced, giving information about the new bootloadable file and the process thatcreated it. When this new file is booted, the RAM disk data structure is loaded intomemory in the area defined for the RAM disk during configuration.
See also: locdata command, in this chapter
When you invoke addloc, if the first parameter is a file that has not been processedby locdata, or if the second parameter is a file that has not been created by theBuilder utility, addloc issues this error message and exits without processing thedata:
usage: addloc <located data file>, <system file> to/over
<outpath>
When processing is complete, addloc displays one of these messages:
<located data file> added to <system file> to <outpath>
<located data file> added to <system file> over <outpath>
Addloc also creates a print file with the filename extension .mpa. Thus if thebootloadable file produced by addloc is named newsys.386, the print file is namednewsys.mpa. The print file contains a header that includes the name of the input andoutput files, the address space used by the system file and the located data file, andthe base address of the located data file. Following the header is a list of any errormessages addloc may have generated.
addloc HI command
52 Chapter 2 Command Descriptions
Error Messagesaddloc, two input files only
Addloc requires two input files; you specified more or fewer.
addloc, one output file onlyAddloc requires one output file and you specified more.
addloc, missing parametersIn the invocation line you omitted one or more required parameters.
after, is an illegal preposition for addlocThe after preposition in your invocation line, is not a legal addloc preposition.
<string>, illegal prepositionThe preposition in the invocation line is not a legal addloc preposition.
<filename> file format is xxx
<filename> file format is yyyIf two input files are used, they must be of the same OMF type. The xxx and yyy
in the message give the OMF type.
<pathname>, output file same as input fileAddloc does not allow the input filename to be used as the output filename.
<pathname>, print file same as output fileThe output filename you specified has the same name as the print file with the .mpaextension.
<pathname>, output pathname too longThe name of the file you specified in the output pathname exceeded ten characters.
<pathname>, write errorA system error caused an incorrect number of bytes to be written to the output file.Retry the command.
<pathname>, read errorA system error caused an incorrect number of bytes to be read from the input file.Retry the command.
<pathname>, not a located data fileThe file was not processed by locdata.
<pathname>, not a bootloadable fileThe system file was not a system image file.
In addition to the error messages listed above, addloc produces the three warningmessages listed below. After each message, addloc lists the file that caused thewarning, the physical address, and the length of the section containing the faultyparameter.
OVERLAPPING AREAS IN MEMORYThe section read from the system file overlaps memory that was assigned to thelocated data stream. Although the process continues, the output is invalid.
HI command addloc
Command Reference Chapter 2 53
BAD SEQUENCEThe located data file contains a section that is not contiguous to the previous section.Although the process continues, the output is invalid.
BAD CHECKSUMOne of the input files you specified has a bad checksum. Output is invalid.

aedit HI command
54 Chapter 2 Command Descriptions
aeditInvokes the AEDIT text editor.
Syntax
aedit [first_input_file[,second_input_file]]
Parametersfirst_input_file
The file you want to edit. If you do not specify a file, AEDIT creates a new file, andprompts you for a name when you use the quit command.
,second_input_fileThe name of the second input file to edit. You can switch between the files with theother command.
Additional Information
AEDIT is an interactive, screen-oriented text editor. In addition to performing basicword-processing operations such as cursor movement and inserting, deleting, orovertyping text, you can use AEDIT to:
• Find any string of characters
• Substitute one string of characters for another string
• View and edit two files or two portions of the same file simultaneously
• Move or copy sections of text within a file or between files
• Create macros to execute several commands at once, thereby simplifyingrepetitive editing tasks
• Perform arithmetic functions
• View lines over 80 characters long
AEDIT also provides a set of commands that you can use in the invocation line tofurther control the editor's actions and output.
See also: AEDIT invocation and commands, Programming Techniques andAEDIT Text Editor
HI command aedit
Command Reference Chapter 2 55
When you invoke AEDIT, the editor displays this prompt at the bottom of the screen:-??- system-id AEDIT Vx.y Copyright yyyy Intel Corp.
Again Block Calc Delete Execute Find -find --more--
The question marks (-??-) at the beginning of the first line indicate that AEDIT iswaiting for input. Exclamation points (-!!-) in the same position indicate that AEDITis executing a command. A vertical bar (|) marks the end of the file; it is initially inthe upper left corner of the screen in a new file.
The --more-- at the end of the second line indicates that there are more commandsavailable. Use the <Tab> key to see additional commands.
These are the basic cursor movement keys:
Arrows The four keys labeled with directional arrows, <Left>, <Right>,<Up>, and <Down>, are the cursor control keys .
<Home> The <Home> key provides faster cursor movement. Press an arrowkey followed by <Home> to page backward or forward through afile, or to move rapidly to the beginning or end of a line. You canalso use <Home> to enter the re-edit mode for line-edit prompts.
<Return> The <Return> key moves the cursor to the beginning of the nextline in insert and xchange modes, and at the main command level.It also terminates the line-edit prompt.
These are basic AEDIT commands:
I or i Enters insert mode. You must enter insert mode to type text ontothe screen. To exit insert mode and return to the main commandlevel, press <Esc>.
<Backspace> Deletes the character to the left of the cursor, if you are at the maincommand level or in insert mode.
<Tab> Rotates the menu prompt line to display the next line of commands.In insert or xchange modes, <Tab> inserts the <Tab> character (oroptionally, replaces it with an equivalent number of blank spaces).
<Esc> The <Esc> (escape) key exits modes, terminates commands, andreturns the editor to the main command level.
aedit HI command
56 Chapter 2 Command Descriptions
To exit from the editor, press Q for quit. This prompt appears at the bottom of thescreen:
-??- no input file
Abort Init Write
W saves the file, and if this is a new file AEDIT will prompt you for an output filename. A aborts the session without saving.
See also: init command, Programming Techniques and Tools
Error messages
These are some of the more common error messages:
illegal invocationYou attempted to invoke AEDIT with an illegal invocation line, or used an illegalinvocation under quit init.
illegal commandYou entered an illegal and/or unknown command, which AEDIT ignores.
insufficient memoryAEDIT does not have enough RAM memory.
See also: Error messages in AEDIT manual, Programming Techniques andAEDIT Text Editor
▲▲! CAUTIONAEDIT converts filenames to uppercase. This may causeconfusion if you use AEDIT to edit and save a NFS file residing onan OS that has case sensitive filenames.
CLI command alias
Command Reference Chapter 2 57
aliasCreates an alias for a command string, or displays the definition of an existing alias.
Syntax
alias [abbreviation] [= command [#parameters]]
Parametersabbreviation
When defining an alias using the = command syntax, this is the short term thatbecomes an alias for the specified command. When displaying alias definitions, theabbreviation may contain a wildcard (*) as the final character.
= command
A command string that may contain command-line parameters as well as thecommand.
#parametersUp to ten formal parameters, specified as #0 to #9, that are replaced by actualparameters when you invoke the alias.
Additional Information
You may create an alias for any command or command string, including the aliascommand. Once the alias abbreviation has been assigned, the CLI recognizes theabbreviation as if it were the entire command. The alias stays in effect until youenter either a dealias or a logoff command.
You may define an alias that refers to another alias. Aliases can be nested in thisfashion up to five times. You may also change an existing alias. For example, if thealias m=mer is defined, you can change it to m=merrr by entering:
alias M = MERRR <CR>
The CLI changes the alias and issues this message:
<abbreviation>, former alias removed
The default size for the table that stores aliases is 2K bytes. If you need more or lessspace to store aliases, use the set command to modify the size of the table.
alias CLI command
58 Chapter 2 Command Descriptions
When you invoke an alias that contains formal parameters, each actual parameter onthe invocation line replaces a formal parameter, in order. You need not enter thesame number of actual parameters as there are formal parameters. For example, ifthere are three formal parameters and you enter two actual parameters, a null stringreplaces the third formal parameter. If you enter more actual parameters than thereare formal parameters, the extra parameters are considered another commandparameter.
To display all currently defined aliases, enter alias with no parameters. To displaythe definition of a single alias, specify the abbreviation on the command line. Forexample, to display the definition of the ad alias, enter:
alias ad
You may use the * wildcard character at the end of the abbreviation to display agroup of alias definitions. For example, to display all aliases that begin with theletter M, enter:
alias m*
If the list of displayed aliases requires more than one screen, the CLI displays onescreen followed by this message:
display more ? ([y] or n)
To see more alias definitions, enter Y or simply <CR>. Otherwise enter N.
Certain aliases are automatically defined for you by the OS. These aliases are insubmit files (refer to the submit command) that run when you log on to the system.System aliases are the same for all users and are required for all iRMXconfigurations. These are defined in the :config:alias.csd file, and should not bechanged. Other aliases are defined in your :prog:alias.csd file. Any alias that youenter on the command line is no longer defined the next time you log on. Topermanently store an alias, enter it in your :prog:alias.csd file. You may change anyof the default aliases in the :prog:alias.csd file.
Table 2-2 lists the system aliases in the :config:alias.csd file.

CLI command alias
Command Reference Chapter 2 59
Table 2-2. System Aliases in the :config:alias.csd File
Alias Command
ad attachdevice
af attachfile
cd attachfile
crdir createdir
dd detachdevice
del delete #0 q
df detachfile
install submit :config:cmd/instal(#0)
installrmx submit :config:cmd/rmxinstl(#0)
lf dir
tinstall submit :config:cmd/tinstall(#0)
md createdir
mkdir createdir
mksys submit :config:cmd/mksys(#0) (not for DOSRMX)
pwd path
Alias DOS-hosted tools iRMX-hosted tools
asm386 run86 /intel/bin/asm386.exe run86 :lang:asm386
bnd386 run86 /intel/bin/bnd386.exe run86 :lang:bnd386
bld386 run86 /intel/bin/bld386.exe run86 :lang:bld386
ic386 run86 /intel/bin/ic386.exe run86 :lang:ic386
lib386 run86 /intel/bin/lib386.exe run86 :lang:lib386
map386 run86 /intel/bin/map386.exe run86 :lang:map386
plm386 run86 -fixplm /intel/bin/plm386.exe run86 -fixplm :lang:plm386
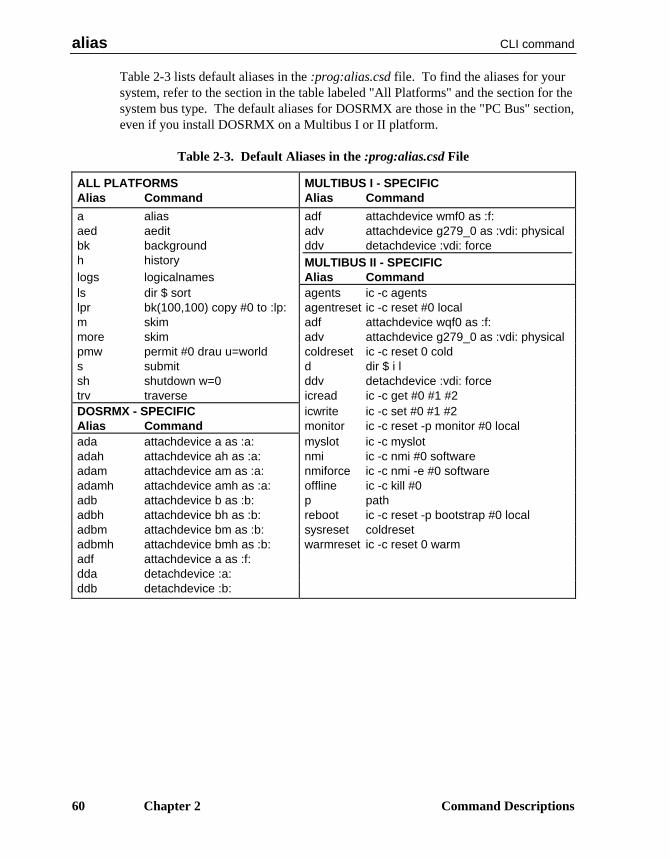
alias CLI command
60 Chapter 2 Command Descriptions
Table 2-3 lists default aliases in the :prog:alias.csd file. To find the aliases for yoursystem, refer to the section in the table labeled "All Platforms" and the section for thesystem bus type. The default aliases for DOSRMX are those in the "PC Bus" section,even if you install DOSRMX on a Multibus I or II platform.
Table 2-3. Default Aliases in the :prog:alias.csd File
ALL PLATFORMSAlias Command
MULTIBUS I - SPECIFICAlias Command
a alias adf attachdevice wmf0 as :f:aed aedit adv attachdevice g279_0 as :vdi: physicalbk background ddv detachdevice :vdi: forceh history MULTIBUS II - SPECIFIClogs logicalnames Alias Commandls dir $ sort agents ic -c agentslpr bk(100,100) copy #0 to :lp: agentreset ic -c reset #0 localm skim adf attachdevice wqf0 as :f:more skim adv attachdevice g279_0 as :vdi: physicalpmw permit #0 drau u=world coldreset ic -c reset 0 colds submit d dir $ i lsh shutdown w=0 ddv detachdevice :vdi: forcetrv traverse icread ic -c get #0 #1 #2DOSRMX - SPECIFIC icwrite ic -c set #0 #1 #2Alias Command monitor ic -c reset -p monitor #0 localada attachdevice a as :a: myslot ic -c myslotadah attachdevice ah as :a: nmi ic -c nmi #0 softwareadam attachdevice am as :a: nmiforce ic -c nmi -e #0 softwareadamh attachdevice amh as :a: offline ic -c kill #0adb attachdevice b as :b: p pathadbh attachdevice bh as :b: reboot ic -c reset -p bootstrap #0 localadbm attachdevice bm as :b: sysreset coldresetadbmh attachdevice bmh as :b: warmreset ic -c reset 0 warmadf attachdevice a as :f:dda detachdevice :a:ddb detachdevice :b:
CLI command alias
Command Reference Chapter 2 61
Examples
1. To assign an alias called PLM, with a formal parameter, enter:
alias PLM = :lang:plm386 #0.p38 nolist <CR>
Then, to compile a file called mine.p38 in the current directory, enter:
plm mine <CR>
The CLI replaces the formal parameter #0 with mine and executes the commandas if you had entered :lang:mine.plm386 p38 nolist.
If you enter:
plm mine pagewidth(132) <CR>
The CLI executes this, adding pagewidth(132) as an additional commandparameter. The CLI does not echo this command on the screen:
:lang:plm386 mine.p38 nolist pagewidth(132)
2. To use the nested alias feature, define these aliases:
alias PLM=:lang:PLM386
alias PNL=PLM #0.P38 nolist
Now when you enter:
PNL source <CR>
The alias command replaces PNL with PLM #0.P38 nolist, assigns sourceto #0, replaces PLM with :lang:PLM386, and executes:
:lang:source.plm386 p38 nolist
Error Messagesalias, wrong alias syntax
The command syntax is not correct.
<parameter>, alias not foundThe alias you entered is not in the list of declared aliases.
<parameter>, wildcard is allowed only in the last characterYou tried to list aliases with a wildcard character that was not the last character in thestring.
alias CLI command
62 Chapter 2 Command Descriptions
<parameter>, wildcard not allowed in alias abbreviationYou declared an alias with a wildcard. You can use wildcards only to display a list ofaliases, not to define them.
alias, no space in alias tableThe alias table is full. No more aliases can be assigned unless you increase the sizeof the alias table with the set command or delete some aliases.
TCP/IP command arp
Command Reference Chapter 2 63
arpDisplays and modifies the address resolution tables used by the Address ResolutionProtocol (ARP). These tables translate between the Ethernet addresses used at thehardware level and the Internet addresses used by TCP/IP software.
Syntax
arp -aarp –d inet-addrarp –s inet-addr phys-addr
Parameters
-a Displays the entire contents of the ARP table.
-d Deletes an entry from the ARP table.
inet-addr A host name or Internet address.
-s Modifies or adds an entry in the ARP table.
phys-addr The physical address of the network interface. Specify an Ethernetaddress in this hexadecimal form:
hh:hh:hh:hh:hh:hh
Additional Information
At network initialization, ARP places a complete and permanent entry in the ARPtable for every configured Ethernet interface. Because permanent entries cannot bedeleted, these entries remain in the table until the network is taken down. Once theinitialization is complete, arp dynamically adds and updates host entries based uponinformation received from arp modules on other network hosts. As the table fills,older entries are deleted and the space is reallocated for more recently usedaddresses.
You typically use arp to display the current contents of the table. You should addand delete entries only for hosts that do not implement the ARP protocol; modifyingthe contents of dynamically maintained entries has unpredictable effects.
The first form of the arp command, using the -a option, displays the entire contentsof the ARP table. For example:
- arp -a
host2.intel.com inet 128.215.12.21: Ethernet 00.aa.00.02.1c.2a
host1.intel.com inet 128.215.12.20: Ethernet 00.aa.00.02.13.38

arp TCP/IP command
64 Chapter 2 Command Descriptions
- ayers.intel.com inet 128.215.18.242: Ethernet 00.aa.00.02.29.bb
-
For each entry, the command displays the official host name, the Internet address(preceded by the word inet), the Ethernet address (preceded by the wordEthernet) and the status of the ARP table entry. The Ethernet address is a six-digithexadecimal value. The status is a comma-separated list of codes, with thesemeanings:
INCOMPLETE Incomplete: contains only an Internet address.
COM Complete: contains both Internet and Ethernet addresses.
PERM Permanent: cannot be deleted from table by arp.
PUBL Publishable: can be published in proxy for a non-ARP host; itcan be used to answer an ARP request from another host.
The second form of the arp command uses the –s option to create or modify anARP table entry. This example adds an entry for host name lee. The Internetaddress 128.215.18.185 could be substituted for the host name in the command.When you specify lee, arp gets the Internet address from the name lee in the/etc/hosts file. The screen display in response to the command indicates that theentry was successfully added to the table.
- arp –s lee 02:07:01:00:10:76
lee.intel.com inet 128.215.18.185: Ethernet 02.07.01.00.10.76 {COM,PERM,PUBL}
-
Entries added like this are always permanent.
If a host on the network does not implement ARP, choose one or more of the othernetwork hosts to act as proxy for the non-ARP host.
You can use arp at the command line any time after network initialization.However, you typically add entries by placing the command in the network startupscript tcpstart.csd. When you add an ARP entry in this way, also add the official hostname and its Internet address to the :config:hosts file, so the correct name-to-addresstranslation can be made during network initialization. Because the entry ispermanent, it cannot be deleted by the ARP module when the table is full. The entryremains in the ARP table until the network is taken down or until you explicitlyremove it with an arp -d command.
Diagnostics
Exit status is zero for normal termination or a positive number for error termination.
arp: cannot get arptab size: error messageThe size of the ARP table could not be retrieved for the given reason.
TCP/IP command arp
Command Reference Chapter 2 65
arp: can't get memory for arptabCould not allocate enough local memory to store the retrieved ARP table.
arp: error reading arptab: error messageThe given error occurred while reading the ARP table.
arp: invalid arptab size (size)The retrieved ARP table size was either less than 0 or greater than 1000.
arp: open failed for DEV_ARP: error messageAn arp minor device could not be opened for the given reason.
cmd: error messageThe given error occurred while trying to execute the command.
cmd: not in ARP tableThe command failed because the specified entry was not in the ARP table.
cmd: must have SYSPRVThe command failed because it requires superuser privileges.
cmd: no interface for internet addressThe command failed because the destination network was unreachable.
cmd: No room in ARP table, try laterThe ARP table is full; the entry was not added.
Default flags set to ATF_COM and ATF_PERMAn invalid flag was supplied to the set command, the default was used.
Only ethernet/ieee types supported.An invalid or unsupported type was supplied to the arp set command.
phys_addr: bad formatAn invalid physical address was supplied to the arp set command.
inet_addr: bad valueAn invalid Internet address was supplied to the arp set command.
attachdevice (ad) HI command
66 Chapter 2 Command Descriptions
attachdeviceAttaches a physical device to the OS and associates a logical name with the device.Attachdevice catalogs the logical name in the root object directory, making thelogical name accessible to all users. This command dynamically builds a table of allfile drivers in the system. Devices may be attached to the resident file drivers thatare configured into the system, or loadable file drivers that have been loaded with thesysload command.
Syntax
ad|attachdevice physical_name as logical_name[file_driver|n|p|r|nfs|e|d] [d(elay)] [w]
Parametersphysical_name
Physical device name of the device to be attached to the system, up to 14 characterslong. For file drivers that do not require DUIBs (Device Unit Information Blocks)such as NFS, this name may be up to 255 characters long. This name must be thename defined at system configuration time. With NFS, this name includes thehostname:/symbolic name as defined on the NFS server system.
as Preposition required for the command.
logical_nameA 1- to 12-character name (excluding colons) to be associated with the device.Colons surrounding the logical name are optional, but if used must be in pairs(:logical_name:).
file_driverA 1- to 14-character name of the attached file driver. The file driver may be eitherresident or loaded. File driver abbreviations are allowed for loadable file drivers.The file_driver parameter will match to the first file driver name that it eithermatches or is a substring of. The pre-defined abbreviations are:
n(amed)The volume mounted on the device is already formatted for the iRMX namedfile driver. Volumes that can contain named files are diskettes or hard disks. Ifnamed, physical, remote, nfs, edos, or dos is not specified, named is thedefault.
p(hysical)The volume mounted on the logical device is considered to be a single, large file.Examples include printers, terminals, and tape drives.

HI command attachdevice (ad)
Command Reference Chapter 2 67
r(emote)The volume mounted on the logical device is an iRMX-NET remote file server.If you specify remote with the physical name of a remote server, a logical nameis created for the virtual root directory of the server. The logical name is used totransparently access files residing at the server. The server, rather than theconsumer, associates the appropriate device drivers with the devices residing atthe server system. As a result, client systems do not require DUIBs attached forremote servers. The world switch is always supported for consumer-basedconnections and is supported for server-based connections if the remote serverhas defined a user named World with a carriage return password.
nfsSpecifies the NFS file driver job running on the client. Attaching devicesthrough this driver allows you to transparently access the remote logical deviceas if it were local to the client. The device you are attaching to must be definedas NFS-shared by the remote host.
e(dos)For DOSRMX only, specifies the encapsulated DOS (EDOS) file driver,enabling iRMX users to access shared DOS files. The edos parameter includesthe delay and world parameters. Physical device names used with this parameterinclude a_dos through z_dos, which are equivalent to DOS drives A: through Z:.
d(os)For all iRMX OS versions except DOSRMX, specifies the native DOS filedriver, enabling iRMX users to access DOS volumes. Physical device namesused with this parameter include c_dos through z_dos, which are equivalent toDOS drives C: through Z:.
d(elay)The device is attached logically, but not physically attached until the first access.
w(orld)The World user (ID 65535) is the owner of the device. Any user can detach thedevice. If you omit this parameter, your user ID is listed as the owner of the device.In this case, only you and the system manager can detach the device. In DOSRMX,access to all DOS volume is always done as World.
attachdevice (ad) HI command
68 Chapter 2 Command Descriptions
Additional Information
To use a device you must attach it, unless it is attached by the system duringinitialization. For example, before you use the format, backup, or restorecommands, you must attach the appropriate device. Likewise, any time you put adiskette in its drive, you must attach the drive device. For general access of a harddisk or diskette, such as reading or writing files, you may attach the device under ageneric physical device name. However, to format a hard disk or diskette, you mustattach it under a specific physical (DUIB) name that specifies the devicecharacteristics.
When you invoke attachdevice with no parameters, it displays a usage message andthe available file drivers. If no file driver is specified on the command line, thecommand will attempt to attach the device using in order the named, dos, and edos
file drivers (if available) until a successful attach occurs. It also prints the name ofthe file driver it has attached to. If an unformatted device is encountered, thecommand will default to the named file driver so that a named format command canoccur.
See also: physname command, in this chaptersupplied drivers and physical device names, Appendix Eformat command, in this chapter
Devices must have their characteristics listed as a BIOS DUIB before they can beattached with the attachdevice command. One frequent use of the attachdevicecommand is to attach a new device, such as a disk drive or a printer that wasconfigured into the boot system but was not attached. DUIBs can be specified duringconfiguration or with a loadable device driver.
See also: sysload command, in this chapterAppendix C, Using the ICU to Configure User-written Device Drivers,ICU User's Guide and Quick Reference
Unless you are the World user (ID 65535) or specify the world parameter, once youattach a device only you and the system manager can detach it. This prevents usersfrom detaching devices belonging to other users and prevents you from accidentallydetaching system volumes. However, if you are the World user or specify the worldparameter, any device that you attach can be detached by any other user.
To see what devices are currently attached, use the logicalnames command.
HI command attachdevice (ad)
Command Reference Chapter 2 69
The named parameter refers to the iRMX named file driver, which maintains thedirectory hierarchy of named files on an iRMX-format volume. A remote, edos,dos, or nfs volume also contains named files, but not maintained by the iRMXnamed file driver on the local system. Volumes maintained by the named file driveron remote systems must be attached as remote (if accessed through iRMX-NET) ornfs (if accessed through NFS) from this system.
If you try to attach a device maintained by the named file driver that has not beenshut down properly, you receive this message:
<logical_name>, device was not shut down properly
The number of retries to attach a device is set in the configuration. The commandrepeats the attempt to attach the device, and returns either when it has attached thedevice or has failed the configured number of attempts.
See also: detachdevice and logicalnames commands, in this chapter
NFS Support
Specifying nfs as the attached file driver allows you to attach a NFS-shared deviceon a remote host running NFS. The device will appear as local to your system. Thisallows you to access remote files either from the command line or programmatically.When the NFS client job initializes, many shared devices will be automaticallymounted (attached) through the startup files. To see which devices are alreadymounted, use the showmount command.
See also: showmount command, in this chapterAttaching NFS Devices, TCP/IP and NFS for the iRMX OperatingSystem
Attaching Diskette Devices
Each time you change a diskette in the drive, you must reattach the drive. Removinga diskette from the drive destroys any connections that may have existed to files onthat device, and logical names that represent files on the volume are no longer valid.Detach the files and detach the device before removing the diskette.
▲▲! CAUTIONOn volumes managed by the DOS and iRMX named file drivers,the file structure of the second diskette can be destroyed if youchange diskettes without detaching and reattaching the device.Avoid attaching remote diskette volumes; a user at the remotesystem might change diskettes without your knowledge.
See also: Switching diskettes, Installation and Startup
attachdevice (ad) HI command
70 Chapter 2 Command Descriptions
To transfer files between low-density and high-density 5.25" diskettes in Multibus Ior II systems, use the uniform granularity device name wdf0, rather than the standardgranularity device wmf0.
In DOSRMX, volumes attached with the named parameter are iRMX-format andmanaged by the iRMX named file driver. DOS users cannot access the diskette driveuntil it is detached.
Volumes attached with the edos parameter are DOS-format and managed by theDOS file system. After initially attaching the device, you can access DOS-formatdiskettes from either DOS or the iRMX OS. You need not detach and reattach thedevice when you change diskettes. You should, however, detach any files on thediskette that you have attached as logical names.
See also: attachfile and detachfile commands, in this chapter
Error Messages<physical_name>, cannot attach device
There is a hardware problem.
<physical_name>, cannot be attached as <type> deviceThe specified device cannot support the specified type of files (named, physical,remote, nfs, EDOS, or DOS). Attachdevice does not attach the device. Forexample, the named option is not valid for a device such as a line printer.
<physical_name>, device already attachedThe specified device has already been attached; attachdevice does not re-attach it.
<physical_name>, device is already attached as <logical name>The specified device has already been attached by the EIOS; attachdevice does notre-attach it.
<physical_name>, device does not existThe physical device name you specified does not correspond to a name the BIOSrecognizes. The current configuration does not specify the indicated physical nameas the name of a device-unit. Attachdevice does not attach the device.
<logical_name>, logical name already existsThe specified logical name is already cataloged in the root job's object directory.Attachdevice does not attach the device.
<logical_name>, logical name is already attached to physical device<physical_name>The specified logical name refers to an EIOS attached device that is alreadycataloged in the root job’s object directory. Attachdevice does not attach the device.
0085 : E_LIST, too many device namesYou tried to attach more than one physical device with a single attachdevicecommand. Attachdevice cannot attach more than one device per invocation.
HI command attachdevice (ad)
Command Reference Chapter 2 71
<logical_name>, device was not shut down properlyThe named volume device you attached was not previously shut down with ashutdown or detachdevice command.
<logical_name>, volume is not a named volumeAttachdevice attempted to attach a device as a named device and discovered that aphysical volume (for example, an unformatted diskette) was mounted. However,attachdevice does attach the device. You can use the device after formatting thevolume as a named volume or after inserting a named format diskette in the device.
<logical_name>, volume not formatted<logical_name>, <condition code:mnemonic>Attachdevice attempted to attach a device as a named device and encountered an I/Oerror while searching for the volume's root directory. This usually indicates that thevolume is not formatted. However, attachdevice does attach the device.
<logical_name>, volume not mountedThe specified device does not contain a volume. However, attachdevice does attachthe device.
<condition code:mnemonic>, while collecting device nameAttachdevice encountered this condition code while parsing the device name fromthe command line. Attachdevice does not attach the device.
<condition code:mnemonic>, while collecting logical nameAttachdevice encountered this condition code while parsing the logical name fromthe command line.
attachfile (af) HI command
72 Chapter 2 Command Descriptions
attachfileAssociates a logical name with an existing file or directory; one use is to change yourcurrent working directory. After making this association, you may use the logicalname to refer to the file, instead of the entire pathname.
Syntax
af|attachfile [pathname [as :logical_name: [system]]]
Parameterspathname
The file or directory with which the HI associates a logical name.
logical_nameThe 1- to 12-character name (excluding colons) to be associated with the file. Colonssurrounding the logical name are optional, but if used must be in pairs(:logical_name:). If you omit this parameter, the default logical name is :$:.
s(ystem)Creates the logical name and catalogs it in the root job as a system logical name.System logical names can be used by all users; they are permanent until they aredetached with the detachfile command. If the system logical name already exists, itis deleted and replaced by a connection to the new pathname. This option can onlybe executed by the Super user and is only valid with a logical name. The systemoption can be used in either the r?init or the loadinfo system initialization file toattach system logical names. Without the system option, attachfile catalogs thelogical name in your global object directory.
Additional Information
The uses for this command are to:
• Change your working directory. Attachfile does this by associating the defaultlogical name :$: with the directory. The syntax is either of these:
af directory_pathaf directory_path as $
• Restore your working directory to your home (logon) directory. Attachfile doesthis by associating the logical name :$: with the logical name :home:. Thesyntax is either of these:
af
af :home: as :$:

HI command attachfile (af)
Command Reference Chapter 2 73
• Create a short logical name that refers to a commonly-used directory or file. Ifyou use the system option, this logical name is available to all users and validuntil detached with the detachfile command.
• Change the :home: logical name. Each user has a :home: logical name thatpoints to the user’s home directory. This logical name can be changed with theattachfile command as shown below:
attachfile /user/world as home
:HOME:, overwrite existing logical name?
If you answer yes, the current path for :home: will be overwritten with the newone. This option can be used to restore your home directory for any reason; forexample, the home directory is accidentally deleted or the connection is deletedas a result of a diskverify operation.
• Recover from using the Disk Verification Utility on the system device (:sd:).The system option can be used to restore system logical names that were deletedwhen using the Disk Verification Utility on :sd:. You can accomplish this bycreating a submit file that attaches all of the system logical names.
Example submit file, lognames.csd:
:sd:sys386/attachfile :sd:util286 as util286 system
:sd:sys386/attachfile :sd:intel/include as include system
:sd:sys386/attachfile :sd:lang286 as lang system
:sd:sys386/attachfile :sd:work as work system
:sd:sys386/attachfile :sd:util386 as utils system
:sd:sys386/attachfile :sd:sys386 as system system
:sd:sys386/attachfile :sd:rmx386 as rmx system
:sd:sys386/attachfile :rmx:config as config system
:sd:sys386/attachfile :rmx:icu as icu system
After running the Disk Verification Utility, submit the file using a full pathnameto the file:submit :sd:user/super/lognames.csd
Normally (without the system option) attachfile associates a file with a logical nameby cataloging a connection to the file in your global object directory (this is usuallythe object directory of your interactive job). It catalogs the connection under thelogical name. If another connection is cataloged in the object directory under thesame name, attachfile uncatalogs and deletes the previous connection beforecataloging the new one. If an object other than a connection is cataloged under the
attachfile (af) HI command
74 Chapter 2 Command Descriptions
logical name, attachfile leaves the previous object as is, does not catalog the newconnection, and displays an error message.
Because the file connection is cataloged in your object directory, the logical name haseffect only within your interactive job. Therefore, several users can specify the samelogical name without affecting the others. Background jobs can also attach fileswithout affecting tasks being run in the foreground, since the background andforeground environments are independent.
See also: Logical names, Chapter 1
Logical names created with attachfile remain valid until one of these situationsoccurs:
• A detachfile command removes the association between file and logical name.
• The interactive session that specified the attachfile command terminatesprocessing, either because you log off or as a result of the jobdelete command.
• A background job exits or is killed. In this case, only logical names attached inthe background environment are removed.
• A task deletes the file connection with a BIOS or EIOS system call. In this case,the logical name remains cataloged in the global directory, but the connection towhich it refers does not exist.
• A user forcibly detaches the volume containing the file, using the detachdevicecommand.
• A user removes the (diskette) volume from the drive. In this case, the logicalname remains cataloged in the global directory, but the connection to which itrefers does not exist.
Logical names created with attachfile using the system option remain valid until oneof these situations occurs:
• A detachfile command removes the association between file and logical name.
• A task deletes the file connection with a BIOS or EIOS system call. In this case,the logical name remains cataloged in the global directory, but the connection towhich it refers does not exist.
• A user forcibly detaches the volume containing the file, using the detachdevicecommand.
• A user removes the (diskette) volume from the drive. In this case, the logicalname remains cataloged in the global directory, but the connection to which itrefers does not exist.
You cannot use attachfile to change the meaning of :term:, :ci:, and :co: (defaultconsole input and output).

HI command attachfile (af)
Command Reference Chapter 2 75
Error Messages<logical_name>, list of logical names not allowed
You entered more than one logical name as input to attachfile.
<pathname>, list of pathnames not allowedYou entered more than one pathname as input to attachfile.
<logical_name>, logical name not allowedYou attempted to attach a file using one of the logical names :term:, :ci:, or :co:.You cannot change the meaning of these logical names.
<logical_name>, not a file connectionThe logical name you specified is already cataloged in the object directory of thesession and does not represent a connection object.
<pathname>, not allowed as default prefixYou attempted to attach a physical or stream file as your working directory (:$:).Only named files (including DOS files) are valid.
<logical_name>, too many logical namesYour global object directory is full; therefore attachfile cannot catalog the logicalname. Delete some logical names you are no longer using.
Must be SUPER user to execute the SYSTEM optionOnly the Super user can use the system option.
background CLI command
76 Chapter 2 Command Descriptions
backgroundExecutes the specified command line as a background job, enabling you to continueentering commands while the job executes.
Syntax
background [([pool_min], pool_max)] command_line [> pathname]
Parameterspool_min
A decimal number of Kbytes specifying the minimum memory pool size to beallocated for the background job. If specified, this value overrides the defaultminimum value (either 6 Kbytes or as defined with the set command).
pool_maxA decimal number of Kbytes specifying the maximum memory pool size to beallocated for the background job. This value overrides the default maximum value(as defined with the set command or the smaller of 384 Kbytes and user_pool_max
- 200 Kbytes). If you specify pool_max less than 384 Kbytes, the CLI sets it to 0.
command_lineA user command to be executed in the background.
> pathnameA file where command output is written. If you do not specify this parameter, youare prompted for the name of a file; output from a background job cannot be writtento the screen.
Additional Information
▲▲! CAUTIONDo not put a background command in the r?logon file.
Background jobs are executed as they are submitted and are not queued. Eachbackground job is assigned a four-digit hexadecimal job ID that you can display byentering the jobs command. You can cancel background jobs by entering the killcommand.
CLI command background
Command Reference Chapter 2 77
When you invoke background, the active foreground environment is copied to thebackground job and becomes its initial environment. This means that the samelogical names and aliases used in the foreground are also available to the backgroundjob. However, after the background job begins, changes made to logical names andaliases in the background environment do not affect the foreground, and vice-versa.
You can control the amount of memory allocated for the background job by enteringthe pool-min and pool-max parameters. These modifiers are recommended forlarge programs such as compilers, ensuring the minimum memory pool to getacceptable performance for the application, but leaving enough memory forforeground jobs to also perform at an acceptable level.
Before the background job begins, the CLI checks that the minimum memory poolsize is less than the maximum; if not, the CLI issues this warning:
WARNING: maxbackpool < minbackpool,
use set command to set background memory pools
If pool-max is less than 384 Kbytes, the CLI assigns a value of 0 and issues thismessage:
maxbackpool attribute <384K, was set to 0
please set your maxbackpool attribute
Then the background job terminates.
If you don't specify the > pathname parameter, the background command promptsfor a log file to replace the terminal:
the log file is ?
If you enter :co: as the log file, the CLI displays the message:
:co:, not a valid log file
the log file is ?
A background job that tries to send a message to the :co: device causes this messageto appear on your screen:
***8085: E_ERROR_OUTPUT
However, if you have a system with multiple terminals, you can redirect :ci: and :co:to another terminal that acts as a background terminal.
When the background job begins running, the CLI displays this message:
Background job <job_id> "command" has been started

background CLI command
78 Chapter 2 Command Descriptions
When the background job is complete, the CLI displays:
Background job <job_id> "command" completed
The command given in the above messages is always enclosed in quotation marks (").Only the first 15 characters of the command are displayed.
Examples
1. This example illustrates using the background command and the I/O redirectionfeature to create a background job and send the output to a file named out.
background copy X.ASM to Y >OUT <CR>
Background job <0168> "copy x.asm to y" has
been started
When the background job is complete, this message is displayed:
Background job <0168> "copy x.asm to y" completed
The out output file contains all the output messages, such as:
x.asm copied to y
2. This example shows how the CLI prompts for an output file if you do notredirect the output:
background copy X.ASM to Y <CR>
the log file is ? OUT <CR>
Background job <0E78> "copy x.asm to y" has been started
3. This example changes the default pool sizes of a background job by entering thepool-min and pool-max parameters:
background (300,500) submit PLM >OUT <CR>
***CLI : background job <0C68> "submit plm" has been
started
Error Messages
Background job <job_id> "<command>" failed
<error message>The background command failed for the reason given in the error message.
background, parameter requiredYou entered the command without parameters.
HI command backup
Command Reference Chapter 2 79
backupArchives named files by copying them to a physical volume serving as a backupstorage device. The source volume may be a named, remote, or DOS volume. Inaddition to each file's name and contents, backup saves the file access list and owner,extension data, and file granularity.
✏ NoteDo not use this command in an esubmit file or anrq_c_send_command system call, because queries for user inputwill not be received.
Syntax
backup [pathname] to|over|after :logical_device:[date=mm/dd/yy] [time=hh:mm:ss] [name=name] [f] [q]
▲▲! CAUTIONWhile backup is executing, no other activity should be occurringon the volume you are backing up. If other users access the volumeduring a backup operation, the volume's data could becomecorrupted, possibly requiring the volume to be reformatted.

backup HI command
80 Chapter 2 Command Descriptions
Parameterspathname
Pathname of a file or directory on the source volume (either a local or remotedevice). If you specify a file, only that file is saved. If you specify a directory,backup saves all the files starting from that point on the file tree. If you don't specifythis parameter, backup saves all files in the current volume, beginning with the rootdirectory.
▲▲! CAUTIONBackup fails if you use it on a file named $ or a directorycontaining a file named $; for a directory, remove the file beforeusing the backup command.
to Output is sent to a new volume. If possible, backup reads the volume label on eachnewly mounted volume to determine the volume type. This ensures that the volumeis compatible with any previously mounted volumes in a backup set. If backup dataexists on the volume you are prompted to overwrite files of the same name as thosebeing backed up.
over Any previous files or directories on the backup volume are overwritten; backupbegins writing on each fresh volume without checking the label for compatibility.
after Backup searches the mounted volume for the end of a previous backup operation; thecurrent backup begins at that spot. There must be at least enough space left on thisvolume to write header information. If more volumes are needed to complete thebackup operation, backup behaves as if the to preposition had been specified forsubsequent volumes. If you specify format, backup formats any new volumesrequired to finish the backup operation.
:logical_device:The logical name of the device to which backup copies the files. The device must belocal, not remote.
date= Saves only files created or modified on or after the specified date.
mm/dd/yyNumeric designation for the month, day, and year. Specify only as many digits asneeded; for example, 1/1/91 indicates January 1, 1991. The year may be entered intwo or four digits, as follows:
Entry Specifies year00 through 77 2000 through 207778 through 99 1978 through 19991978 through 2099 1978 through 2099
HI command backup
Command Reference Chapter 2 81
time= When used with the date parameter, saves only files created or modified on or afterthe specified time and date. When used without the date parameter, the date is thecurrent system date. If time is omitted, the default is 00:00:00. If both date andtime are omitted, the date and time default to 1/1/78 and 00:00:00.
hh:mm:ssNumeric designation for the hour, minute, and second. Specify only as many digitsas needed: hours in the range 0-23, and minutes and seconds in the range 0-59.
name=nameSpecifies a 1- to 9-character name that backup applies to the backup set of data. Ifyou store multiple data sets on a single backup volume by specifying after, youmust specify a name to be able to restore an individual data set.
f(ormat)Formats each volume before writing to it. The interleave is set to one on diskettemedia. Use this parameter for new, unformatted media or to overwrite mediaformatted for a different OS. On a tape device, format also retensions the tape,ensuring the best conditions for archiving.
q(uery) Prompts for permission to save each file:
<pathname>, backup Data File? or<pathname>, backup Directory?
Respond as follows:
Y Save the fileE Exit from backupR Save remaining files without further queryN If a file, don't save it; if a directory, don't save the directory or any files
under it in the tree. Query for the next file.other Error message and reprompt.
Additional Information
Files can be backed up from a remote device, but not to a remote device. For backupto save files from either a local or remote named volume, you must have read accessto the files and to the directories that contain them.
Backup can save a large volume (a hard disk, for example) onto a number ofvolumes such as diskettes or tape cartridges. You do not have to separately formatthe backup volumes; use backup's format parameter.
Depending on the amount of data being backed up, a named data set may be a portionof a single backup volume or may span multiple volumes. If you store multiple datasets on a single backup volume, it is important to name each data set. Only bynaming the data sets can you restore them individually with the restore command.
backup HI command
82 Chapter 2 Command Descriptions
To restore a logical volume from a backup volume containing multiple data sets, youmust supply the name of the data sets in the restore command. There is no way toget a listing of these names from the volume itself. Label the backup volume withthe names of data sets on the volume.
After using the backup command to archive files, you should immediately invoke therestore command with the verify option to make sure the data has been recordedcorrectly. When you use verify, restore only verifies that backup produced arestorable backup volume; no files are actually restored. Enter:
restore backup-volume to :bb: verify
When you invoke backup, the command displays this sign-on message, where Vx.yis the version number of the utility:
iRMX Backup Utility, Vx.y
Copyright <year> Intel Corporation
All Rights Reserved
Once the command line has been scanned, one of these messages is displayed,depending on whether you specified the date and time:
All Files Modified After <date>, <time> Will Be SavedorAll Files Will Be Saved
Backup then prompts you to mount the backup volume. Whenever backup requiresa new backup volume, the command displays this message:
<device>, Mount Backup Volume (name) #<nn>, Enter Y to
Continue:
Where:
<device> The logical name of the backup device
(name) The name of the physical volume set
<nn> The identifying number of the requested volume.
When you see this message, place a volume in the backup device and respond with Y
or R to continue the backup process or E to exit the backup command. If youcontinue the backup process, backup displays this buffer summary message:
I/O Buffer Summary
Buffer Size <number>
Number of Buffers <number>
Backup continues prompting for a backup volume until you supply one that it canaccess.

HI command backup
Command Reference Chapter 2 83
Backup displays an error message if you insert a volume with one of these problems:
• The volume cannot be read
• The volume is a named volume and data would be overwritten
• The volume is a backup volume and data would be overwritten
• The volume is a physical volume containing data
If the situation is appropriate, the command may prompt you with a request to formator overwrite the mounted volume. Respond to this prompt as described for responsesto the query parameter:
<device>, Enter Y to Overwrite/Format:
When backup fills a backup volume, it prints this message and prompts foradditional volumes if it needs them:
Physical Volume (<name>), #<nn>, Complete
After backup finishes, it displays the number of data files and directories saved:
Summary For Logical Volume (<name>)
<nn> Data File[s] Saved
<nn> Director[y] [ies] Saved
Backup Complete
In some circumstances, when backed-up files are restored the original ownershiprights are not preserved, and restored files are owned by the user who performed therestore.
See also: restore command, in this chapter
Error Messages
If you encounter an error message that requires a response, enter Y or R to continuethe backup process or E to exit the backup command.
<backup device>, backup not completeYou specified an E to exit backup. This message reminds you the backup operationis not complete. The last file on the last backup volume may be incomplete.
backup HI command
84 Chapter 2 Command Descriptions
<backup device>, Backup Volume (<name>), #<nn>, <date>, <time>,
Mounted <backup device>, Enter Y to Overwrite:The backup volume you supplied already contains backup information. Backup liststhe logical name of the backup device, the volume number, and the date on which theoriginal backup occurred. It overwrites this volume if you enter Y or R.
<backup device>, Cannot Attach Volume
<backup device>, <condition code:mnemonic>
<backup device>, Mount Backup Volume #<nn>, Enter Y to Continue:Backup cannot access the backup volume. This could be because there is no volumein the backup device or because of a hardware problem with the device. The secondline of the message indicates the condition code encountered. Backup continues toissue this message until you supply a volume that can be accessed.
<pathname>, <condition code:mnemonic>, Cannot Back up FileBackup could not copy this file from the source volume, possibly because you do nothave read access to the file or because there is a faulty area on the volume. Themessage lists the condition code encountered. Backup copies as much of the file aspossible and continues with the next file.
<backup device>, Device in Use
<backup device>, <condition code:mnemonic>The device you specified for the backup device is being used by another job.Continuing would result in damage to existing files on the output volume.
<backup device>, Error Writing Volume Label
<backup device>, <condition code:mnemonic>
<backup device>, Mount Backup Volume #<nn>, Enter Y to Continue:When backup attempted to write a label on the backup volume, it encountered theindicated error condition, possibly because of a faulty area on the volume, or becausethe volume is write-protected. Backup reprompts for a different backup volume.
<backup device>, Input and Output are on Same DeviceThe device you specified for the backup device is the same device that contains yourinput pathname. Continuing would result in damage to the files on the input volume.
<backup device>, Invalid Input SpecificationThe logical name you specified for the backup device was not a logical name for adevice. Example invalid names are :ci:, :co:, and :home:.
<condition code:mnemonic>, Invalid Date or TimeYou entered a date or time parameter that is out of range (such as 31/02/86 or26:03:62). The message lists the condition code encountered as a result of this entry.
HI command backup
Command Reference Chapter 2 85
Invalid Output SpecificationYou did not supply the logical name of the backup device when you entered thebackup command.
<backup device>, Named Volume <volume name>, Enter Y to Overwrite:The backup volume you supplied is a named volume. Backup lists the logical devicename and the volume name; it overwrites this volume if you enter Y or R.
<backup device>, Not Correctly Formatted, Enter Y to Format:The backup volume was not correctly formatted.
Requested Date/Time Later Than System Date/TimeEither the date and time you specified in the backup command are in error or you didnot set the system date and time.
<pathname>, invalid wildcard specificationYou entered a list of pathnames or used a wildcard in the input pathname. You canenter only one input pathname per invocation of backup.
<pathname>, invalid output specificationYou entered a list of logical names for the backup device. You can enter only oneoutput logical name per invocation of backup.
<pathname>, Unable to Complete DirectoryBackup encountered an error when accessing a file in the indicated directory. Itskips the rest of the files in the directory and goes on to the next directory. This errorcould occur if you do not have list access to the directory.
<backup device>, Unrecognized Volume, Enter Y to Overwrite:The backup volume you supplied is a formatted volume, but it has a label that is notreadable. Backup will overwrite this volume if you enter Y or R.
<backup device>, Volume Not Formatted
<backup device>, Mount Backup Volume #<nn>, Enter Y to Continue:The backup volume you supplied was not formatted. Backup continues to issue thismessage until you supply a formatted backup volume.
<backup device>, Write Error On Backup Volume
<backup device>, <condition code:mnemonic>Backup encountered an error condition when writing information to the backupvolume. The second line of the message lists the condition code encountered. Thiserror is probably the result of a faulty area on the volume.
Name Required If After Is SelectedYou must use the name parameter when using the after preposition.
cannot attach VOLUMEThe destination device of the backup is a remote server.
backup HI command
86 Chapter 2 Command Descriptions
No Room for Append on Mounted VolumeYou specified the after parameter, but there is not enough room left on this volumeto write the header information to begin appending this data set. Use a new volume.
NET command bcl
Command Reference Chapter 2 87
bclConverts an ASCII file into a special binary file understood by the Remote BootServer program.
Syntax
bcl input_file output_file
Parametersinput_file
The pathname of an ASCII file containing language input statements, as specified inthe Boot Definition Language section below.
output_fileThe pathname of the resulting ccinfo file to be created.
Additional Information
The bcl command is the Boot Configuration Language utility, which produces aspecial binary file called the Class Code Information File, or ccinfo file. The RemoteBoot Server uses the ccinfo file to determine which bootable file(s) to send over thenetwork during a remote boot request. The remote boot request sends a class code tothe Boot Server. Entries in the ccinfo file map the class codes to bootable files. Abootable file is the kind of file produced by the xlate command.
See also: Remote Booting and ccinfo file, Network User's Guide and Referencexlate command, in this chapter
The Boot Definition Language
Each statement in the language has this form:
cc[,cc...] is fn[,fn...] [for na[,na..]];
Where:
cc One or more hexadecimal values of class codes, in the range 0 to0FFFFH.
fn One or more pathnames of files to be remotely loaded. The firstdirectory in the pathname must be a public directory on the Boot Serversystem. The string is not case-sensitive.

bcl NET command
88 Chapter 2 Command Descriptions
na One or more Ethernet addresses of Boot Clients.
; Ends each statement.
Each bcl statement defines one or more mappings between class codes and anordered list of filenames. When more than one class code is given in a statement,they act as synonyms to each other; any of the class codes result in exactly the sameimage being sent.
The filenames within a single statement can be thought of as being concatenated inthe order given, to form the image that will be sent. Bcl itself makes no restrictionson the characters used in the filenames, except that they cannot contain spacecharacters, commas, semicolons or end-of-line characters.
Statements that do not have an Ethernet address specified (no for clause) form thedefault mapping for all Boot Consumers not specifically mentioned in any otherstatement in the ccinfo file. The default mapping does not apply to Boot Consumerswhose Ethernet address appears in any statement. Ethernet addresses within astatement qualify the statement as pertaining to only those Boot Consumers. When aparticular Ethernet address appears in a bcl statement, that Ethernet address mustappear with every class code that is to service that Boot Consumer.
The standard command prepositions to, over, and after are not allowed. If used,incorrect results can be expected.
Examples
1. This command instructs the bcl utility to read the input statements in the fileccinfo.bdf. If there are no errors, bcl creates the file ccinfo.
bcl ccinfo.bdf ccinfo
2. These statements are examples of lines that might be in the ccinfo.bdf file.Together, these statements program the Remote Boot Server to send the/net/ina961.rem file when class code 1 is received, and the/rboot32/38612NET.386 file when class code 2 is received.
1 is /NET/INA961.32R;
2 is /RBOOT32/38612NET.386;
3. These lines state that class code 3BF maps to two files, but only for the twoEthernet addresses given. Unless specified by other statements, all otheraddresses are ignored. When more than one file is specified, as above, they aresent in the order specified.
3BF is /RBOOT32/rem3rd,/RBOOT32/boot2 for 00aa00010203,
00aa00020304;
NET command bcl
Command Reference Chapter 2 89
4. These are examples of other statements that might occur in an input file:
1,7 is /rboot86/boot1 for 00aa00030405, 00aa00020608;
99 is /sd/net/exec.rem for 00aa00030405, 00aa00020608;
abcd is /sd/tx/default;

bootdos HI command
90 Chapter 2 Command Descriptions
bootdosActivates the primary DOS partition and resets the systems.
Syntax
bootdos
Additional Information
The bootdos command is used primarily with the iRMX for PCs OS. It resets thesystem to boot DOS from the primary DOS partition rather than the iRMX OS froman iRMX partition.
See also: bootrmx command
DOS command bootrmx
Command Reference Chapter 2 91
bootrmxActivates the primary iRMX partition and resets the systems.
Syntax
bootrmx
Additional Information
The bootrmx command is used primarily with the iRMX for PCs OS. It resets thesystem to boot the iRMX OS from an iRMX partition rather than DOS from a DOSpartition.
See also: bootdos command

case HI command
92 Chapter 2 Command Descriptions
caseConverts the name of the specified file from upper- to lower-case.
Syntax
case pathname
Parameterspathname
The pathname of a file or directory whose name is to be converted to lower-case.The pathname may contain a wildcard (*) character.
Additional Information
This command is useful when working in a network environment, where some OSsmaintain case-sensitive filenames. The case command lets you convert the case ofiRMX filenames and access them from Unix or Xenix.
✏ NoteThe case command works only on local files managed by theiRMX named file driver. Do not use this command with DOS filesor remote files.
Examples
To convert the case of all files in a directory to lower-case, enter:
case directory_name/*
To convert a single filename to lower-case, enter either a full pathname or thepathname relative to your current working directory. For example:
case :config:terminals

CLI command changeid
Command Reference Chapter 2 93
changeidChanges the system manager's current user ID to any value from 0 to 65535. Youcan only use this command after invoking the super command, regardless of whetheryou logged on as the Super user.
Syntax
changeid [id|world]
Parameters
id A decimal value to which you want to change your user ID, in the range 0 to 65535.
world Changes you to the World user, with ID 65535.
Additional Information
If you omit an ID parameter, you are assigned ID 0, the system manager. If youchange your user ID to any value other than 0, the system prompt changes to this,indicating the current ID value:
super(id)-
The new user ID is not a verified user; you cannot access files available on theiRMX-NET network. You are not a verified user until you return to user ID 0.
Error Messages0084; E_INVALID_NUMERIC
The user ID you specified contained invalid characters or was not in the range 0 to65535.
changeid, allowed only in super modeYou invoked this command without previously invoking the super command.
<parameter>, unexpected parameterYou entered too many parameters.
<condition code:mnemonic>, while executing changeidAn internal system problem occurred which prevented the CLI from setting thedefault user.
cli HI command
94 Chapter 2 Command Descriptions
cliInvokes a loadable version of the Command Line Interpreter.
Syntax
cli
Additional Information
In a system that uses a different command interface than the CLI, you may invoke theCLI to take advantage of its interface. The CLI may also be started from a submitfile.

HI command connect
Command Reference Chapter 2 95
connectAssociates a locked terminal device with a logical name. The terminal can then beused as a physical device, in the same manner as any other terminal attached with theattachdevice command. The logical name is cataloged in the root job's objectdirectory.
Syntax
connect physical_name as :logical_name:
Parametersphysical_name
Physical device name of the locked terminal device to be connected. This name mustbe in the :config:terminals file, and must be defined as a BIOS DUIB, either in thesystem configuration or through a loadable device driver. You can obtain theterminal device names by invoking the initstatus command.
as Preposition required for the command.
logical_nameThe 1- to 12-character name (excluding colons) to be associated with the device.Colons surrounding the logical name are optional, but if used must be in pairs(:logical_name:).
Additional Information
When you connect a locked terminal device, the associated serial port can be used asa physical port, without an HI logon process. You may send data to or receive datafrom any physical device that uses a serial stream of data. The connect commandcannot be used for virtual terminals.
After connecting the device and cataloging its logical name in the root job's objectdirectory, the connect command displays this message:
<physical_name> connected as <logical_name>
If you change the terminal attributes while the terminal is connected, the changesremain in force after the terminal is disconnected. Note your terminal's attributesbefore connecting; you must restore them before the HI can use the terminal.
connect HI command
96 Chapter 2 Command Descriptions
Error Messages<logical_name>, logical name already in use
The logical name already exists in the root job's object directory.
<physical_name>, device name not foundThe physical name is not a terminal device that was defined at system configurationtime.
<physical_name>, has not been lockedThe specified terminal device must be locked using the lock command before it canbe connected.
not multi-access systemThe connect command does not function if the HI is configured as a single-usersystem.
<logical_name>, invalid logical nameThe logical name is too long.
<physical_name>, not connectedThe device could not be cataloged.
<condition code:mnemonic>, too many device namesThe parameters contain too many device names.
<physical_name>, already connectedThe specified device has already been connected.
*, invalid wildcard specificationWildcards are not supported.
no logical name givenYou did not specify a logical name.

HI command console
Command Reference Chapter 2 97
consoleDynamically changes the SDM (System Debug Monitor) console device to redirectthe I/O streams on DOSRMX systems.
Syntax
console device_name
Parametersdevice_name
The name of the device (CON, COM1, or COM2) to which you want to redirect the SDMI/O. CON is the normal screen and keyboard; COM1 and COM2 are the first two serialports. If this parameter is omitted, a usage message is displayed.
Additional Information
Use this command on DOSRMX systems, as a tool for debugging your OS andsoftware. SDM normally defaults to the console device (CON). The consolecommand redirects the SDM output stream, input stream, and error message streamto the specified device. If used, console should be set prior to entering SDM. Fromthe user's perspective, the redirection does not take effect until SDM starts.
Examples
This command redirects the streams to the COM1 console controller device:
console COM1
Error Messages<device_name>, device does not exist
The current configuration of the OS does not include the indicated device name.
copy HI command
98 Chapter 2 Command Descriptions
copyDisplays or makes a copy of the specified file(s) and synchronizes the time stamps.
✏ NoteYou can use this command in an esubmit file orrq_c_send_command system call if the form of the commanddoes not require user input. If the command requires user input inan rq_c_send_command system call, it will fail. However, youcan use a form of the command that requires user input in anesubmit file if you use the eoresponse and coresponse
subcommands.
See also: esubmit command, in this chapter
Syntax
copy inpath_list [to|over|after outpath_list] [q] [ns]
Parametersinpath_list
One or more pathnames of files to be copied. Multiple pathnames must be separatedby commas. Wildcards are permitted.
to|over|after outpath_listIf you omit this parameter, the input files are displayed on the screen (:co:). If youspecify this parameter, the input files are written to the specified output, such as aprinter (:lp:) or to new filenames. To copy files on a one-for-one basis, specify thesame number of output files as input files. If you specify multiple input files and asingle output file, copy appends the remaining input files to the end of the output file.If you specify a single output directory, the input files are copied to that directoryunder their current filenames.
q(uery)Prompts for permission to copy each file. Respond to the prompt with:
Y Copy the fileE Exit the commandR Copy remaining files without further queryN or other Do not copy this file; go to the next file in the inpath-list
ns (nosynchronize)Disables synchronization of the files' time stamps.
HI command copy
Command Reference Chapter 2 99
Additional Information
When copy copies files, it updates the new file's time stamp to match the original file(if this is supported on the target file driver). Copy can be aliased so thatnosynchronize is automatically specified.
See also: alias command
When copy creates new files, it sets the access rights and list of accessors as follows:
• The file has all access (delete, read, append, and change).
• The owner is the only accessor to the file.
The user ID of the person who invokes the copy command is considered the owner ofnew files created by copy. The user owns and has full access to remote files createdby copy. Only the owner or the system manager can change the access rightsassociated with the file.
See also: permit command, in this chapterfile access, Chapter 1
If you specify multiple output files, and there are more or fewer input files thanoutput files, copy returns an error message.
If you specify a wildcard character in an output pathname, you must specify the samewildcard character in the corresponding input pathname. Other combinations resultin error conditions.
See also: Using wildcards in file names, Chapter 1
A file listed under one directory can be copied to another directory. For example:
copy samp/test/A to :f1:alpha/beta
This would copy data file A to a different volume and directory. If beta is a filename,that is the new name of the copied file. If beta is a directory name, the copied fileretains the name A in the beta directory.
You cannot successfully use copy to copy a directory to a data file or to anotherdirectory. The directory attributes are lost and the copy can no longer be used as adirectory. Use the copydir command instead.
The copy command cannot be used with tape cartridges.

copy HI command
100 Chapter 2 Command Descriptions
To transfer files between low-density and high-density 5.25" diskettes in Multibus Ior II systems, attach the devices with the uniform granularity device name wdf0,rather than the standard granularity device wmf0.
Error Messages<pathname>, output file same as input file
You attempted to copy a file to itself.
HI command copydir
Command Reference Chapter 2 101
copydirCopies all files and subdirectories from one or more directory trees.
✏ NoteYou can use this command in an esubmit file orrq_c_send_command system call if the form of the commanddoes not require user input. If the command requires user input inan rq_c_send_command system call, it will fail. However, youcan use a form of the command that requires user input in anesubmit file if you use the eoresponse and coresponse
subcommands.
See also: esubmit command, in this chapter
Syntax
copydir inpath_list [to|over outpath_list ] [q][accessors|noaccessors] [world|noworld] [nodelete]
Parametersinpath_list
The pathnames of one or more directories to be copied. Use commas to separatemultiple directories.
to|over outpath_listEither one directory where the input directories are all copied, or the same number ofdirectories as specified in inpath_list. If you specify to, copydir prompts forpermission to overwrite existing files; a Y response overwrites the file and any otherresponse skips that file. If you specify over, existing files are overwritten.
copydir HI command
102 Chapter 2 Command Descriptions
q(uery)Prompts for permission to enter each directory and to copy each file in it. Respond tothe prompt with:
Y Enter the directory or copy the file.
E Exit from the copydir command.
R Continue copying without further query.
S Skip to the end of this (sub)directory and continue prompting fordirectories at this level or higher.
A Copy all remaining files and subdirectories in the currentdirectory without further query, then begin querying beforeentering the next (sub)directory.
N or other Do not enter this directory or copy this file.
accessorsCopies access information with the files; this is the default.
noaccessorsDoes not copy access information.
world Assigns World read access to all files copied; this is the default.
noworldDoes not assign World read access.
nodeleteDo not overwrite existing files.
Additional Information
If you specify multiple input directories and a single output directory, the outputdirectory has the combined structure of the input directory trees. For example, thiscommand copies the directory structures of both dir1 and dir2 into dir3:
copydir dir1, dir2 to dir3
If you specify multiple input and output directories (the number must be same), eachinput directory tree is copied to the corresponding output directory, in order. Forexample, this command copies dir1 to dir3, and dir2 to dir4:
copydir dir1, dir2 to dir3, dir4
Copydir can also copy individual files. Copydir handles access rights better thanthe copy command when copying remote files. From the local system, a remote fileappears to have its delete bit set to off, regardless of how the bit is set on the remotesystem. When copying access rights from a remote file to a local file, copydir setsthe delete bit to on if the file has write access. The same is true of the change bit fordirectories.
HI command copydir
Command Reference Chapter 2 103
Examples
These examples illustrate how copydir works when copying an entire directory tree.
1. The directory test1 that has this structure:
test1/dir1
test1/dir1/file1
test1/dir2
test1/dir2/file2
test1/file3
Test1 has this directory listing:
04 APR 89 20:14:52
directory OF $ ON VOLUME rmxll
test1
Enter:
copydir test1 to newdir
In response, this information is written to the screen:
test1/dir1/file1, copied
test1/dir1, directory copied
test1/dir2/file2, copied
test1/dir2, directory copied
test1/file3, copied
test1, directory copied
It creates an identical directory structure as test1 with the name newdir, asfollows:
newdir/dir1
newdir/dir1/file1
newdir/dir2
newdir/dir2/file2
newdir/file3
This is the new directory listing:
04 APR 89 20:14:52
directory OF $ ON VOLUME rmxll
test1 newdir
2. Given the same test1 directory structure as in example 1, enter:
copydir test1
It writes this information to the screen:
copydir HI command
104 Chapter 2 Command Descriptions
test1/dir1/file1, copied
test1/dir1, directory copied
test1/dir2/file2, copied
test1/dir2, directory copied
test1/file3, copied
test1, directory copied
It creates directories in your current directory with this structure:
dir1
dir1/file1
dir2
dir2/file2
The subdirectories and files of test1 are created and placed at the same directorylevel as test1. This is the new directory listing:
04 APR 89 20:17:59
directory OF $ ON VOLUME rmxll
test1 dir1 dir2 file3
Error Messages<pathname>, output file same as input file
You attempted to copy a file to itself.
HI command createdir (crdir)
Command Reference Chapter 2 105
createdirCreates one or more directories with all access rights available to you as the owner.You may delete, list, add, and change the contents of the new directory.
Syntax
crdir|createdir path_list [FILES=file_count]
Parameterspath_list
One or more pathnames of directories to be created. Multiple pathnames must beseparated by commas.
FILES=file_countReserves space for the specified number of files in the new directory. If this option isnot specified, the default is zero files. This parameter can be used to help controlfragmentation of large directories by allocating space when the directory is created.Some file systems (e.g., DOS) may always allocate some directory space when adirectory is created.
✏ NoteOn some file systems, reserving space for a large number of filesmay take a long time.
Additional Information
You can create new directories that are subordinate to other directories. For example,if the subdirectory ab/dc/ef exists in your current working directory, this commandcreates the directory gh under it:
createdir ab/dc/ef/gh
You own and have full access to any new remote directories that you create (list andadd-entry access permissions constitute full access for remote directories). No otherusers except the system manager have access to the directory unless you use thepermit command to change the access rights and list of accessors.
In a DOS file system, the directory is owned by the World user.
See also: permit command, in this chaptercreating a new directory, Chapter 1
createdir (crdir) HI command
106 Chapter 2 Command Descriptions
Error Messages<directory_name>, file already exists
The specified directory already exists.
<file_name>, file does not existOne of the directories specified in the pathname does not exist.
<directory_name>, invalid file typeOne of the directories specified in the pathname is not a valid directory.
<pathname>, 26H: E_FACCESSThe pathname is a remote directory and you do not have add-entry access to theparent directory of the directory to be created.
HI command date
Command Reference Chapter 2 107
dateDisplays the current date and time, or sets the local (OS) or global (battery-backed)time-of-day clock. Date optionally synchronizes the date of the local clock with theglobal system clock.
✏ NoteYou can use this command in an esubmit file orrq_c_send_command system call if the form of the commanddoes not require user input. If the command requires user input inan rq_c_send_command system call, it will fail. However, youcan use a form of the command that requires user input in anesubmit file if you use the eoresponse and coresponse
subcommands.
See also: esubmit command, in this chapter
Syntaxdate [date|q] [local|global]date synchronize
Parameters
date You may specify the day (month and year remain unchanged), the day and month(year remains unchanged), or the day, month, and year. Use one of these formats:
mm/dd/yyyy all numeralsdd month yyyy spell month using enough letters to distinguish it
Specify only the number of digits needed. For example, 12/1/91, 01 DE 91, and 1
December 1991 are equivalent. The year may be entered in two or four digits, asfollows:
Entry Specifies year00 through 77 2000 through 207778 through 99 1978 through 19991978 through 2099 1978 through 2099
q(uery)Displays the current date, time and clock type, and prompts for a new date. Inresponse, enter the date as shown above, or E to exit.
local Displays or sets the date portion of the local time-of-day clock maintained by the OS.This is the default if local or global is not specified. Any user may set the date.

date HI command
108 Chapter 2 Command Descriptions
global Applies only to systems with hardware clock/calendar components, typically backedup by battery power. Specifying global displays or sets the date portion of thisclock. Any user may display the date, but only the Super user can set it. If you setthe global clock, the local clock automatically takes on the same value.
synchronizeFor systems with a global clock/calendar, this sets the date portion of the local clockto the current date of the global clock. If you set the global clock, this parameter isunnecessary.
Additional Information
The date command displays an error message if you specify global orsynchronize and your system does not have a global clock/calendar.
If you set only one or two date parameters, the omitted parameters are replaced bytheir defaults. If you enter only one parameter, it is assumed to be the day. Twoparameters (in either format) represent the day and month. For example, assume thecurrent date in the system is 9 Sept 91. If you enter:
date 18 <CR>
date displays:
18 Sep 91, <current time>
If you omit the date parameters, date displays the current date and time as follows,showing only the first three characters of the month and the last two digits of theyear:
dd month yyyy, hh:mm:ss <local or global clock type>
If you have a system without a global clock/calendar (such as a System 310),whenever you start up or reset the OS, the date is automatically set to the date youlast accessed the :system: directory. You can reset the date to any acceptable value.
If your system has a global clock/calendar and the OS is configured to recognize it,the local clock is automatically set to the date maintained in the global clockwhenever you turn on or reset your system.
Error Messages<date>, invalid date
You entered an invalid date. This error could result from specifying a day that isinvalid for the month (such as 31 FEB 90), entering characters for the year that do notfall into a legitimate range, entering a month parameter that does not uniquelyidentify the month, or using an invalid format.

HI command date
Command Reference Chapter 2 109
<parameter>, invalid syntaxYou specified an illegal combination of parameters. For example, you may haveentered a date and also specified the query option.
only the system manager may set the global clockYou specified the global parameter, but you are not the system manager.
<condition code:mnemonic>, getting system timeYou specified the global or synchronize parameter, but there is no global clockin the system.
E_SHARE, global clock busyYou attempted to access the global clock while another job was accessing it. Try thecommand again.
E_INVALID_DATE, global date read was invalidThe date returned from the global clock was invalid. This condition usually occurswhen the global clock has never been initialized or when power to the clock has beeninterrupted. The BIOS system call get_global_time sets the date to 1 Jan 1978,which the date command then displays.
E_INVALID_TIME, global time read was invalidThe time returned from the global clock was invalid. This condition usually occurswhen the global clock has never been initialized or when power to the clock has beeninterrupted. The BIOS system call get_global_time sets the time to a valid time,which the date command then displays.
E_SUPPORT, attempted to access non-existent global clockThere is no global clock in the system.
dealias CLI command
110 Chapter 2 Command Descriptions
dealiasDeletes one or more aliases defined with the alias command.
Syntax
dealias abbreviation [q]
Parametersabbreviation
The alias to be deleted. You may delete all aliases with the * wildcard, or delete agroup of aliases by using * as the last character of the abbreviation.
q(uery)Prompts for permission before deleting an alias. Respond to the prompt with Y todelete the alias, or any other character to keep it.
Additional Information
If you specify a wildcard in the aliases to be deleted, you may use the query optionto choose which aliases to delete. Assume you have defined the two aliases s =
submit and su = super, and want to delete only the su alias. Enter:
dealias S* Q <CR>
At these prompts, respond as shown:
s = submit delete ? (y or [n]) <CR>
su = super delete ? (y or [n]) Y <CR>
Error Messages<parameter>, alias not found
You tried to delete an alias that was not defined in the alias table.
<parameter>, wildcard is allowed only in the last characterYou tried to delete a number of aliases with a wildcard, but the wildcard was not thelast character.

HI command debug
Command Reference Chapter 2 111
debugLoads an application program into memory, prints debug information to the screen orto an output file, and transfers control to the System Debug Monitor (SDM). Thedebug command cannot be used to debug CLI-level commands; only HI commandsand application programs.
Syntax
debug [to|over|after outpath] pathname [parameter_string]
Parametersto|over|after outpath
A pathname for the output file where debug information is to be written, rather thanto the screen.
pathnameThe file containing the application program to be debugged.
parameter_stringA string of required and/or optional parameters passed to the application programbeing debugged.
Additional Information
When you invoke the debug command with no output file, it displays this message,including the pathname of the application to be debugged:
debug file, <pathname>
Then it displays a segment map for the loaded program and breaks to the monitor.
If you specify an output file, debug loads the application job and writes the segmentmap to the output file. Then it displays a prompt and waits until you indicate thatyou're ready to enter SDM by pressing <CR>. This allows you to access the debugfile from a remote system (using iRMX-NET) to aid in the debug process. Thesystem breaks to SDM immediately after you press <CR>.
debug HI command
112 Chapter 2 Command Descriptions
Use SDM to single-step, display registers, and set breakpoints within the program.When debug executes, SDM disables interrupts. This causes the time-keepingfunction to stop when code is not executing. This slowing of the timing function hastwo consequences:
• It affects the ability of the Nucleus to execute time-out tasks that have providedtime limits to system calls, such as receive_units and receive_message.
• It affects the ability of the BIOS to keep track of the time-of-day and write itsdata structures to secondary storage.
This example shows the debug information that is displayed or written to a file. Thefirst line lists the token for the job that is created. The remaining lines list theselector portions of all segments (under the heading BASE) assigned by the bindapplication when the code was bound. The LDT(n) values are the same as those thatappear on the bind map. You can match the selector values shown in this displaywith the offset values shown in the bind map to determine the exact location of asymbol listed in the bind map.
SEGMENT MAP FOR job: 2250
NAME BASE NAME BASE NAME BASE NAME BASE
LDT(2) 2E40 LDT(3) 2E30 LDT(4) 2C08 LDT(5) 2CE0
LDT(7) 2220 LDT(8) 2158
Break at xxxx:yyyy
..
See also: Binder, map files, Intel386™ Family Utilities User's Guide
The debug command loads the application program into its own dynamic memory.As a result, the application program obtains dynamic memory from the memory poolof debug, not from the memory pool of the user session. Because debug uses adifferent set of default values than the CLI, it is possible that the program maybehave differently than when it is run independently.
See also: System Debugger Reference for more details and for commands youenter at the SDM prompt
If you use an SBX 279(A) graphics subsystem for a terminal, the monitor sessionoccurs on a different window than the HI window from which you invoke the debugcommand. Using two windows allows you to see more debugging context than witha single window. To return to the HI window, you may use either the mouse or apreviously mapped ALT/Function key.
The command to exit SDM and return to the CLI prompt is g <CR>.
HI command debug
Command Reference Chapter 2 113
Error Message<condition code:mnemonic> command aborted by EH
This condition code was encountered and the debug command was aborted by theexception handler.

delete HI command
114 Chapter 2 Command Descriptions
deleteDeletes one or more files and/or empty directories, or marks them for deletion if auser is currently accessing them.
✏ NoteYou can use this command in an esubmit file orrq_c_send_command system call if the form of the commanddoes not require user input. If the command requires user input inan rq_c_send_command system call, it will fail. However, youcan use a form of the command that requires user input in anesubmit file if you use the eoresponse and coresponse
subcommands.
See also: esubmit command, in this chapter
Syntax
delete pathname_list [q]
Parameterspathname_list
One or more pathnames of files or empty directories to be deleted. Multiplepathnames must be separated by commas. Wildcards are permitted.
q(uery)Prompts for permission to delete each file in the list. Respond to the prompt with:
Y Delete the file
E Exit the command
R Delete remaining files without further query
N or other Do not delete this file; query for the next
Additional Information
You don't need to be the owner of a file to delete it, but you must have delete access.If a user or program is accessing the file (has a connection to it) when you invokedelete, the file is marked for deletion, and deleted when all connections to the file aregone.
Directories must be empty to be deleted with this command.
See also: deletedir command, in this chapter
HI command delete
Command Reference Chapter 2 115
To delete a directory with delete, first delete all files and subdirectories contained init. For example, to delete a directory named alpha whose entire contents consist of adirectory beta containing a data file samp, you could enter:
delete alpha/beta/samp, alpha/beta, alpha
Delete displays this message as it deletes each file or marks the file for deletion:
<pathname>, deleted
▲▲! CAUTIONUse wildcards carefully with the delete command. For example,entering delete *,a (with a comma) instead of delete *.a
erases all files in your current directory, instead of just those filesending in .a.
The DOS file system does not support the delete access bit. DOS files are owned bythe World user and are either read-only (cannot be deleted) or read/write (can bedeleted by any user). DOS directories cannot be made read-only.
The delete access bit is not supported by iRMX-NET. Normally, append and updateaccess allow you to delete a remote file if you have add-entry access to the parentdirectory; and add-entry access allows you to delete an empty remote directory.However, if a user on the remote system has removed delete access to a file ordirectory, you cannot delete it, regardless of other access permissions.
See also: permit command, in this chapterdeleting files, Installation and Startupdeleting directories, Chapter 1
Error Messages<pathname>, delete access required
You do not have delete access to the file. If this is a remote file, a user at the remotesystem has removed delete access. You cannot change the delete access locally; auser at the remote system must grant delete access before this command succeeds.
<pathname>, 026H: add access requiredThe pathname to be deleted is a remote file and you do not have add-entry access tothe parent directory.

deletedir HI command
116 Chapter 2 Command Descriptions
deletedirDeletes one or more directories, including subsidiary files and subdirectories.
✏ NoteYou can use this command in an esubmit file orrq_c_send_command system call if the form of the commanddoes not require user input. If the command requires user input inan rq_c_send_command system call, it will fail. However, youcan use a form of the command that requires user input in anesubmit file if you use the eoresponse and coresponse
subcommands.
See also: esubmit command, in this chapter
Syntax
deletedir pathname_list [q]
Parameterspathname_list
Names of directories or files to be deleted. Multiple pathnames must be separated bycommas. Wildcards are permitted.
q(uery)Prompts for permission to enter each directory and to delete each file in it. Respondto the prompt with:
Y Enter the directory or delete the file.
E Exit from the deletedir command.
R Delete remaining directories without further query.
S Skip to the end of this (sub)directory and continue prompting fordirectories at this level or higher.
A Delete all remaining files and subdirectories in the currentdirectory without further query, then begin querying beforeentering the next (sub)directory.
N or other Do not enter this directory or delete this file. If given in responseto the original directory prompt, deletedir exits.
HI command deletedir
Command Reference Chapter 2 117
Additional Information
The deletedir command deletes an entire directory tree or trees. These are examplesof commands:
deletedir dirA
deletedir dirB, dirC
If you specify the query parameter, deletedir displays one of these prompts:
<pathname>, enter directory?
<pathname>, delete?
Deletedir can only delete empty directories; all files and subdirectories must bedeleted first. Thus, if you enter S to skip a queried file or directory, deletedir cannotdelete that directory or those above it on the same branch. For each of thesedirectories, this prompt is displayed:
<pathname> delete directory?
Any response other than N causes an exception code to be returned.
Error Messages<pathname>, delete access required
You do not have delete access to the file. If this is a remote file, a user at the remotesystem has removed delete access. You cannot change the delete access locally; auser at the remote system must grant delete access before this command succeeds.
<pathname>, 026H: add access requiredThe pathname is a remote file and you do not have add-entry access to the parentdirectory.
deletename NET command
118 Chapter 2 Command Descriptions
deletenameRemoves specified server names and addresses from the local network Name Serverobject table.
Syntax
deletename object_name_list
Parameterobject_name_list
Specifies one or more server names (or other object names) to be deleted. Multiplenames must be separated with commas.
Additional Information
A typical Name Server object is the name and transport address of a server system onthe network. Delete the object by specifying the server name. The deletenamecommand deletes objects from the table on the local system, but not from remotesystems. If the object table contains more than one entry with the same name butdifferent property types, all entries of that name are deleted by this command.
See also: Format of names and addresses, setname and loadname commands, inthis chapter
Error Messages<object_name>, name does not exist locally
The specified object name is not located in the local object table. However, the namemay exist on the network in the object table of another system.
illegal nameThe specified object name is more than 16 characters long. Verify the name of theobject being deleted, and invoke the command again.

HI command detachdevice (dd)
Command Reference Chapter 2 119
detachdeviceDetaches the specified devices and deletes their logical names from the root job'sobject directory.
Syntax
dd|detachdevice logical_name_list [f]
Parameterslogical_name_list
One or more logical names of physical devices to be detached. Colons surroundingthe logical names are optional, but if used must be in pairs (:logical_name:).Multiple names must be separated by commas.
f(orce) The device is to be detached even if connections to files on the device currently exist;the connections are deleted.
Additional Information
After a device is detached, no volume mounted on that device is accessible forsystem use until the device is reattached.
The Super user may detach any device. Other users can detach only these devices:
• Devices configured with your user ID as the owner ID
• Devices you originally attached using the attachdevice command
• Devices originally attached using the world parameter of attachdevice
• Devices originally attached by the World user
Detachdevice returns an error message if you attempt to detach devices originallyattached by other users. This prevents non-Super users from detaching devicesbelonging to other users and from accidentally detaching system volumes.
If other users are currently accessing a device, there are connections to it and you canonly detach it by specifying the force parameter.
▲▲! CAUTIONIf you detach the device containing HI commands, you cannot usethe commands until the system is restarted.
detachdevice (dd) HI command
120 Chapter 2 Command Descriptions
Error Messages
<logical_name>, can't detach device
<logical_name>, <condition code:mnemonic>The listed condition code shows an error condition that prevented detachdevice fromdetaching the device.
<logical_name>, device does not belong to youThe device was originally attached by a user other than you or World; you cannotdetach the device.
<logical_name>, device has outstanding file connectionsThere are existing connections to files on the device. You did not specify the forceparameter and detachdevice does not detach the device.
<logical_name>, device is in useAnother user or program is accessing the device (has a connection to a file). Youmust specify the force parameter in order to detach the device.
<logical_name>, outstanding connections to device have been deletedThere were outstanding connections to files on the volume. You specified the forceparameter and detachdevice deleted the connections. This is a warning messageonly; it does not prevent the device from being detached.
device is not a device connectionYou attempted to detach a remote server device. Remote devices attached by theBIOS, such as the system containing the Master UDF, cannot be detached by theEIOS through the detachdevice command.
HI command detachfile (df)
Command Reference Chapter 2 121
detachfileTerminates the association between one or more files and their logical namesestablished with attachfile.
Syntax
df|detachfile logical_name_list [system]
Parameterlogical_name_list
One or more logical names that represent the files to be detached. Colonssurrounding the logical names are optional, but if used must be in pairs(:logical_name:). Multiple names must be separated by commas.
s(ystem)This option indicates that the logical names in the list are system logical names.System logical names are cataloged in the root directory and are, therefore, availableto all users. The system option can only be executed by the Super user.
Additional Information
Detachfile also uncatalogs the detached files' logical names from your interactivejob's global object directory.
You cannot use detachfile to detach logical names that represent devices rather thanfiles. Detachfile returns an error message if you make such an attempt.
You cannot use detachfile to detach logical names originally created by other users.
If you do not specify the system option, detachfile searches for logical names only inthe global object directory of your interactive job. However, if you specify thesystem option, it searches only in the root job's object directory.
Error Messages<condition code:mnemonic> invalid global job
The HI encountered an internal system problem when it attempted to remove thelogical name from the global job's object directory. The message lists the resultingcondition code.
<logical_name>, logical name not allowedYou specified one of the logical names :$:, :term:, :ci:, or :co:. You cannot detachthe files associated with these logical names.

detachfile (df) HI command
122 Chapter 2 Command Descriptions
<logical_name>, not a file connectionThe logical name you specified is cataloged in the global object directory of yourinteractive job, but it is not the logical name of a file.
Must be SUPER user to execute the SYSTEM optionOnly the Super user can use the system option.
HI command deviceinfo
Command Reference Chapter 2 123
deviceinfoDisplays information about the size and available space on the specified volume(s).
Syntax
deviceinfo [logical_name_list] [to|over|after outpath]
Parameterslogical_name_list
One or more logical names of volume devices for which information is displayed.The names must be surrounded by colons (:logical_name:), and multiple namesmust be separated by commas. If no logical name is specified, :$: is the default.
to|over|after outpathWrites the output to the specified file rather than to the screen.
Additional Information
✏ NoteYou cannot use this command with a device that you accessthrough NFS.
This command supports resident file drivers and dynamic loadable file drivers. Thisexample shows the type of information produced by deviceinfo for a named filedriver:
deviceinfo :A: <CR>
:A:, volume (RMX) on device (AMH), NAMED file driver
block size = 512 bytes
total blocks = 2,880 (1.406 Mbytes)
free blocks = 2,832 (1.382 Mbytes)
free files = 200
total files = 207

deviceinfo HI command
124 Chapter 2 Command Descriptions
This example shows the type of information produced by deviceinfo for an EDOSfile driver:
deviceinfo :sd: <CR>
:SD:, volume (MS-DOS) on device (C_DOS), EDOS file driver
block size = 2,048 bytes
total blocks = 40,877 (79.83 Mbytes)
free blocks = 18,967 (37.04 Mbytes)
free files = unlimited
The total files field includes the internal system files. The number listed maybe up to seven higher than the number of user files that can be created. Ifinformation is not available, the command does not display any information.

HI command dir
Command Reference Chapter 2 125
dirLists the names (and optionally, attributes) of files and directories contained in agiven directory.
✏ NoteYou can use this command in an esubmit file orrq_c_send_command system call if the form of the commanddoes not require user input. If the command requires user input inan rq_c_send_command system call, it will fail. However, youcan use a form of the command that requires user input in anesubmit file if you use the eoresponse and coresponse
subcommands.
See also: esubmit command, in this chapter
Syntax
dir [inpath_list] [to|over|after outpath_list][f[ o]|s[ o]|l|e] [fr][so] [i] [p] [q] [for path_list]
dir HI command
126 Chapter 2 Command Descriptions
Parametersinpath_list
One or more pathnames of the directories to be listed. Multiple pathnames must beseparated by commas. If no parameters are specified, your current working directory(:$:) is listed. Wildcards are not permitted.
to|over|after outpath_listWrites the output to the specified file (or device) rather than to the screen. Multiplepathnames must be separated by commas and match the number specified ininpath_list.
f(ast) [one]
Lists only filenames and directory names. This is the default listing format. Theoutput is in five columns unless you specify one, for a single column.
s(hort) [one]
Lists names, file attributes, your access rights to the files, and sizes. The output is intwo columns unless you specify one.
l(ong) In addition to the information listed for short, lists the volume and file granularity, theowner, and the date last modified.
e(xtended)In addition to the information listed for long, lists the date and time of creation, lastaccess, and last modification; also lists the users who have access to the file and theiraccess rights.
HI command dir
Command Reference Chapter 2 127
fr(ee) Lists the amount of free space available on the volume containing the given directory,including the number of free files, free volume blocks, and free bytes. Thisinformation is automatically displayed for short, long, and extended listings.
so(rt) Sorts the list in alphanumeric order (except on DOS devices).
i(nvisible)Additionally lists invisible files: those beginning with the characters R? or r?. If youomit this parameter, invisible files are not listed.
p(arent)Displays an entry for the directory specified in inpath_list, in addition to the filescontained in the directory. In a list of directories you may specify a file if youinclude the parent parameter.
q(uery) Prompts for permission to list a directory. Respond with:
Y List the directory
E Exit the command
R List remaining directories without further query
N or other Do not list the directory; query for the next
for path_listIn the directories specified by inpath_list, lists only those files that match a namein path_list. Wildcards are permitted.
Additional Information
You do not need to be the owner of a directory to list its contents with dir; however,you must have list access to the directory. In DOSRMX and iRMX for PCs, you canlist any directory in the DOS file system.
See also: Accessors and access rights, permit command, in this chapter
To list your current working directory in fast format, enter dir without parameters.However, to use a listing format other than fast, you must specify the directoryname explicitly. The short, long, and extended listings display the amount of spaceused by the listed files and the amount of free space on the volume.
The iRMX dir command does not work exactly like the DOS dir command. In theiRMX OS, if you just type dir, it displays all files in the current directory (:$:), as inDOS. If, however, you include command line parameters, you must type $ to specifythe current directory.
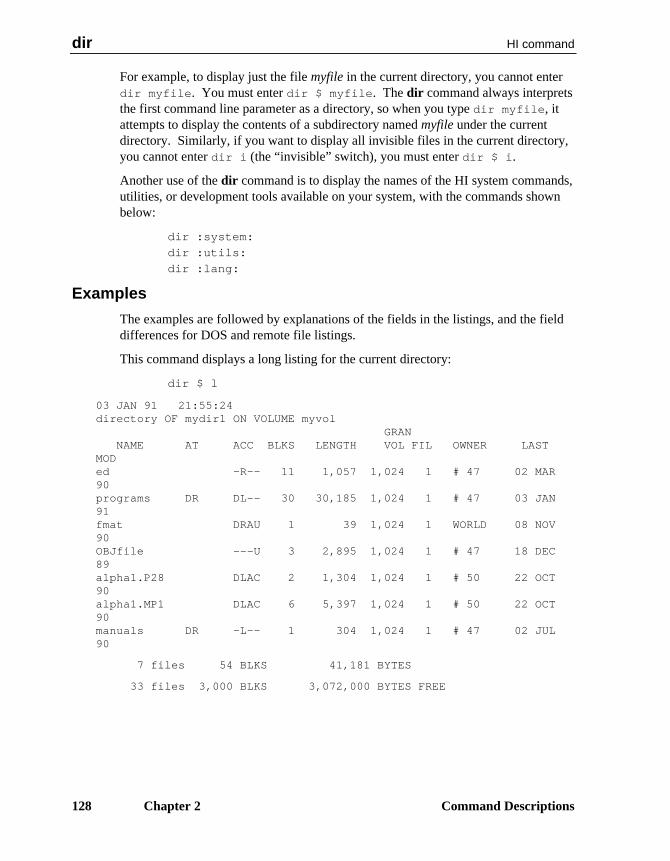
dir HI command
128 Chapter 2 Command Descriptions
For example, to display just the file myfile in the current directory, you cannot enterdir myfile. You must enter dir $ myfile. The dir command always interpretsthe first command line parameter as a directory, so when you type dir myfile, itattempts to display the contents of a subdirectory named myfile under the currentdirectory. Similarly, if you want to display all invisible files in the current directory,you cannot enter dir i (the “invisible” switch), you must enter dir $ i.
Another use of the dir command is to display the names of the HI system commands,utilities, or development tools available on your system, with the commands shownbelow:
dir :system:
dir :utils:
dir :lang:
Examples
The examples are followed by explanations of the fields in the listings, and the fielddifferences for DOS and remote file listings.
This command displays a long listing for the current directory:
dir $ l
03 JAN 91 21:55:24directory OF mydir1 ON VOLUME myvol
GRANNAME AT ACC BLKS LENGTH VOL FIL OWNER LAST
MODed -R-- 11 1,057 1,024 1 # 47 02 MAR90programs DR DL-- 30 30,185 1,024 1 # 47 03 JAN91fmat DRAU 1 39 1,024 1 WORLD 08 NOV90OBJfile ---U 3 2,895 1,024 1 # 47 18 DEC89alpha1.P28 DLAC 2 1,304 1,024 1 # 50 22 OCT90alpha1.MP1 DLAC 6 5,397 1,024 1 # 50 22 OCT90manuals DR -L-- 1 304 1,024 1 # 47 02 JUL90
7 files 54 BLKS 41,181 BYTES
33 files 3,000 BLKS 3,072,000 BYTES FREE
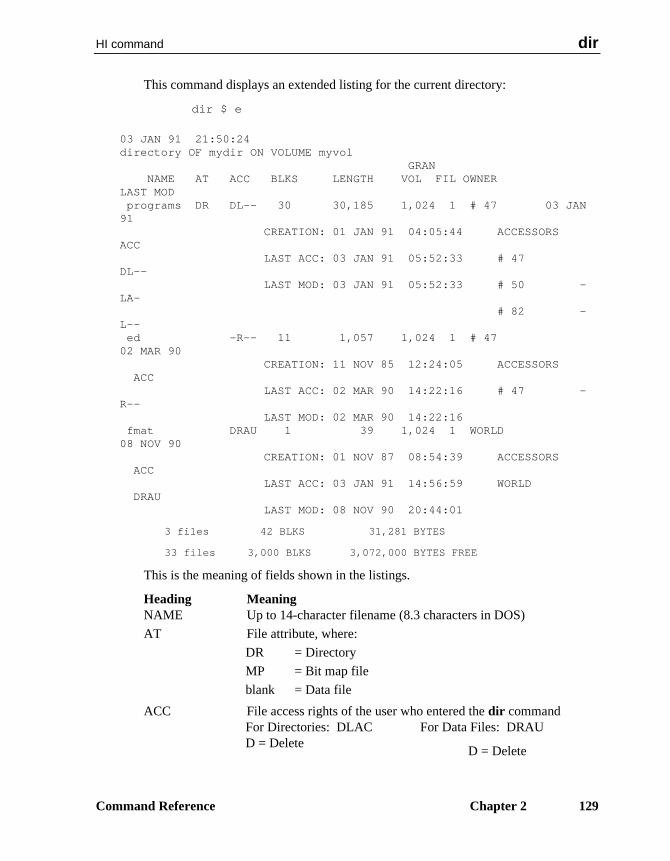
HI command dir
Command Reference Chapter 2 129
This command displays an extended listing for the current directory:
dir $ e
03 JAN 91 21:50:24directory OF mydir ON VOLUME myvol
GRANNAME AT ACC BLKS LENGTH VOL FIL OWNER
LAST MODprograms DR DL-- 30 30,185 1,024 1 # 47 03 JAN
91CREATION: 01 JAN 91 04:05:44 ACCESSORS
ACCLAST ACC: 03 JAN 91 05:52:33 # 47
DL--LAST MOD: 03 JAN 91 05:52:33 # 50 -
LA-# 82 -
L--ed -R-- 11 1,057 1,024 1 # 47
02 MAR 90CREATION: 11 NOV 85 12:24:05 ACCESSORS
ACCLAST ACC: 02 MAR 90 14:22:16 # 47 -
R--LAST MOD: 02 MAR 90 14:22:16
fmat DRAU 1 39 1,024 1 WORLD08 NOV 90
CREATION: 01 NOV 87 08:54:39 ACCESSORSACC
LAST ACC: 03 JAN 91 14:56:59 WORLDDRAU
LAST MOD: 08 NOV 90 20:44:01
3 files 42 BLKS 31,281 BYTES
33 files 3,000 BLKS 3,072,000 BYTES FREE
This is the meaning of fields shown in the listings.
Heading MeaningNAME Up to 14-character filename (8.3 characters in DOS)
AT File attribute, where:
DR = Directory
MP = Bit map file
blank = Data file
ACC File access rights of the user who entered the dir commandFor Directories: DLAC For Data Files: DRAUD = Delete
D = Delete
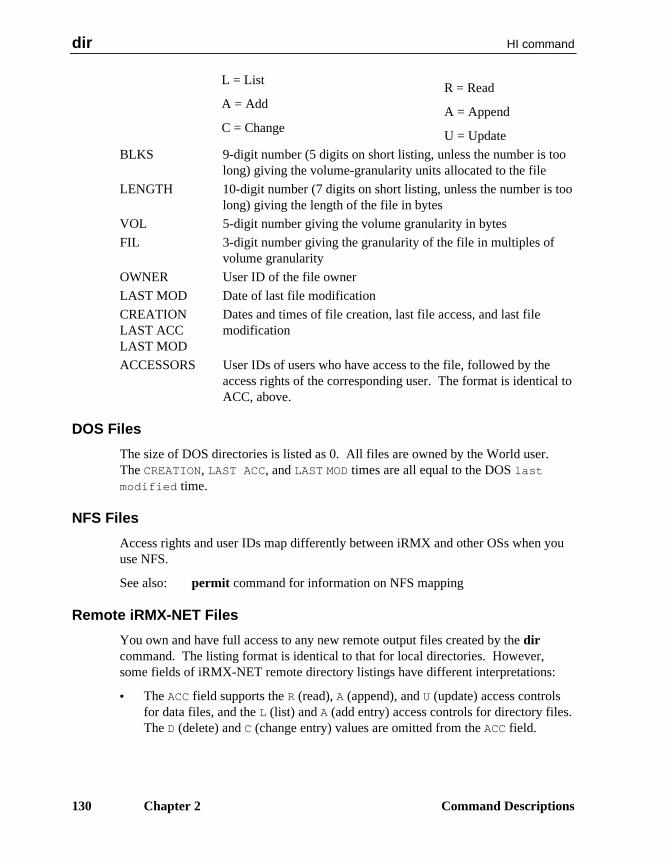
dir HI command
130 Chapter 2 Command Descriptions
L = ListR = Read
A = AddA = Append
C = ChangeU = Update
BLKS 9-digit number (5 digits on short listing, unless the number is toolong) giving the volume-granularity units allocated to the file
LENGTH 10-digit number (7 digits on short listing, unless the number is toolong) giving the length of the file in bytes
VOL 5-digit number giving the volume granularity in bytes
FIL 3-digit number giving the granularity of the file in multiples ofvolume granularity
OWNER User ID of the file owner
LAST MOD Date of last file modification
CREATIONLAST ACCLAST MOD
Dates and times of file creation, last file access, and last filemodification
ACCESSORS User IDs of users who have access to the file, followed by theaccess rights of the corresponding user. The format is identical toACC, above.
DOS Files
The size of DOS directories is listed as 0. All files are owned by the World user.The CREATION, LAST ACC, and LAST MOD times are all equal to the DOS last
modified time.
NFS Files
Access rights and user IDs map differently between iRMX and other OSs when youuse NFS.
See also: permit command for information on NFS mapping
Remote iRMX-NET Files
You own and have full access to any new remote output files created by the dircommand. The listing format is identical to that for local directories. However,some fields of iRMX-NET remote directory listings have different interpretations:
• The ACC field supports the R (read), A (append), and U (update) access controlsfor data files, and the L (list) and A (add entry) access controls for directory files.The D (delete) and C (change entry) values are omitted from the ACC field.
HI command dir
Command Reference Chapter 2 131
• Remote directory listings display the number of files, blocks, and bytes used bythe remote directory. The listings omit this information for the entire volume.

dir HI command
132 Chapter 2 Command Descriptions
• The user IDs in the OWNER and ACCESSORS fields may not be the same as alisting on the remote system. Your (client) system receives a user name from theserver for these fields. Your system obtains the user ID that corresponds to thatuser name from its own User Definition File (UDF). If your system and theremote system are in different Administrative Units (subnetworks), and if bothsystems contain a user by the same name, the user IDs are likely to be different.
• If the user name received from the server does not exist in the client UDF, theuser ID is displayed as 65534.
• The VOL granularity field is estimated by the Remote File Driver, using the valuereturned by a BIOS rq_get_file_status call.
• The BLKS field is calculated by dividing the LENGTH field by the estimated valueof the VOL granularity field.
• The FIL granularity is assigned a value of 1.
Error Messagesno directory files found
None of the files you specified were directories.
<pathname>, READ access requiredYou do not have read (list) access to the directory.

HI command disconnect
Command Reference Chapter 2 133
disconnectRemoves a terminal connection established with the connect command; cannot beused for virtual terminals.
Syntax
disconnect :logical_name:
Parameter
:logical_name:The logical name for the physical terminal device that is to be disconnected.
Additional Information
The specified logical name is deleted from the root job's object directory and theterminal returns to locked status, under HI control.
The Super user may disconnect any connected terminal. Other users can disconnectonly those terminals connected by themselves or by the World user. Disconnectreturns an error message if you attempt to disconnect a terminal originally connectedby another user.
If you change the terminal attributes while the terminal is connected, the changesremain in force after the terminal is disconnected. Note your terminals attributesbefore connecting; you must restore them before the HI can use the terminal.
Error Messages<logical_name>, is not a terminal connection
The specified name does not represent a terminal connection.
<logical_name>, has not been connectedThe specified name has not been connected using the connect command.
<logical_name>, not foundThe terminal connected as <logical name> cannot be found in the terminal table.
<logical_name>, device does not belong to youThe device was originally connected by a user other than you or World; you cannotdisconnect the device.
*, invalid wildcard specificationWildcards are not supported.
diskverify HI command
134 Chapter 2 Command Descriptions
diskverifyInvokes the Disk Verification Utility, which inspects, verifies, and corrects the datastructures of iRMX physical and named volumes. Operates as a single command(described here) or in interactive mode.
See also: Using diskverify in interactive mode, Appendix B
✏ NoteYou can use this command in an esubmit file orrq_c_send_command system call if the form of the commanddoes not require user input. If the command requires user input inan rq_c_send_command system call, it will fail. However, youcan use a form of the command that requires user input in anesubmit file if you use the eoresponse and coresponse
subcommands.
See also: esubmit command, in this chapter
Syntax
diskverify :logical_name: [to|over|after outpath][disk|gb|v[ options]|fix[ options]]
The options for the verify and fix parameters are shown in the diagram on thenext page.

HI command diskverify
Command Reference Chapter 2 135
Parameterslogical_name
Logical name of the secondary storage device containing the volume to be verified.The colons are not required.
to|over|after outpathPathname of the file to receive the output from diskverify. If you omit thisparameter, and/or no preposition is specified, the output goes to the console screen(:co:). You cannot direct the output to a file on the volume being verified; if you do,the utility returns an error message.
disk Displays attributes of the volume, such as the type of volume, device granularity,block size, number of blocks, interleave factor, extension size, volume size, the rootfnode number, and number of fnodes.
gb (or getbadtrackinfo)Reads and displays the bad track information from the volume. Output redirected toa file may be used as input to the format command by removing the headerinformation.
v(erify)Verifies the volume according to the specified option. If you omit the option, theutility performs named verification.
diskverify HI command
136 Chapter 2 Command Descriptions
fix Verifies and fixes the volume according to the specified option. After performing theverify functions, the utility tries to fix several types of inconsistencies on thevolume. Using the fix parameter may prove dangerous, since it changes data on thedisk. For example, during N1 verification, fix corrects the checksums on fnodeswith bad checksums. However, an fnode with a bad checksum may indicate anotherfnode problem which needs attention.
It is best to use fix in this manner:
1. Use diskverify with the verify option.
2. Examine the output and the problems on the volume to determine the type of fixneeded.
3. If the problems can be fixed using diskverify, invoke diskverify with the fixoption to correct the problem.
n(amed) Performs both the N1 and N2 options described below. If you omit an option toverify or fix, named is the default.
n1 (or named1)For named volumes only, checks the fnodes of the volume to ensure that they matchthe directories in terms of file type and file hierarchy. This option also checks theinformation in each fnode to ensure that it is consistent and displays a list of files inerror, with information about each file. When used with fix, the N1 option correctsbad checksums and attaches orphan fnodes to their parents.
See also: Fnodes, format command, in this chapter
all For named volumes, this option performs the N1, N2, and physical functions. Forphysical volumes, only the physical option is done.
list A control you may use with any option that activates N1 verification (named, N1, orall). When you use this control, the same file information generated by verify orfix is displayed for every file on the volume, even if the file contains no errors.
n2 (or named2)For named volumes only, checks the allocation of fnodes on the volume, checks theallocation of space on the volume, and verifies that the fnodes point to the correctlocations on the volume. When used with fix, the N2 option saves on the volume thecorrect bit maps constructed during verification. It also removes fnodes withmultiple references from illegal parent directories.
physicalApplies to both named and physical volumes. This option reads all blocks on thevolume and checks for I/O errors. It displays block numbers where errors are found.

HI command diskverify
Command Reference Chapter 2 137
Additional Information
Diskverify is most useful after such occurrences as power irregularities or accidentalreset. Diskverify can be used on only named and physical volumes; it cannot be usedon remote, NFS, EDOS, or DOS volumes. In DOSRMX and iRMX for PCs, use thiscommand only for an iRMX partition, not for a DOS drive or a partition containingthe DOS file system.
Diskverify can be used in two ways:
• As a single command that verifies the structures of a volume and returns controlto the Human Interface; this mode is covered here.
• In interactive mode, which you enter if you don't specify any parameters afteroutpath; interactive mode is covered later in this manual. Using diskverify ininteractive mode requires a more thorough understanding of iRMX volumestructures to avoid damaging the volumes.
See also: diskverify in interactive mode, Appendix BiRMX volume structures, Appendix C
When you invoke the diskverify command, the utility responds by displaying thismessage, where Vx.y is the version number of the utility:
iRMX Disk Verify Utility, Vx.y
Copyright <year> Intel Corporation
All Rights Reserved
In single-command mode, the results of your diskverify command followimmediately after the sign-on message. If you enter the interactive mode in error, thesign-on message is followed by a prompt (*). To exit diskverify at the * prompt,enter quit.
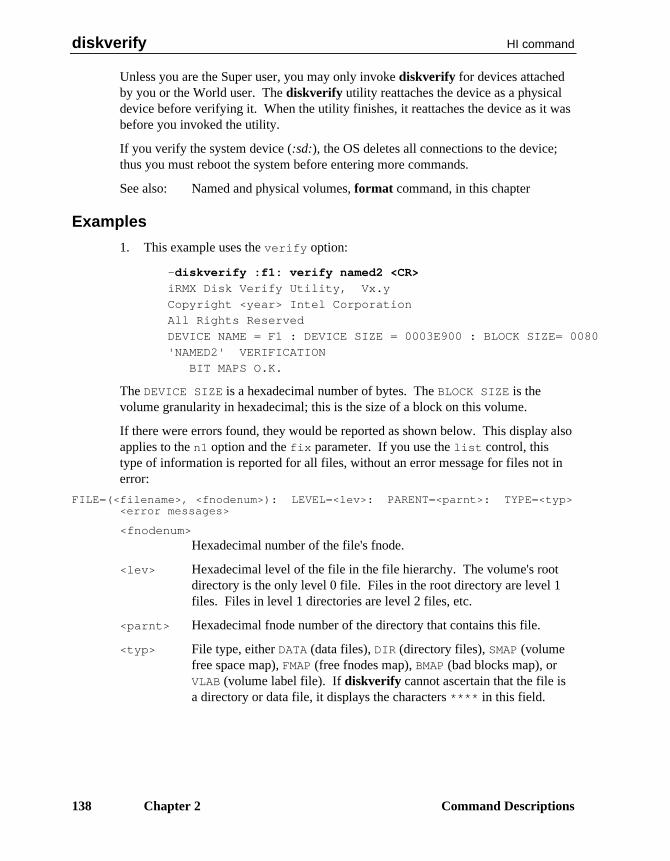
diskverify HI command
138 Chapter 2 Command Descriptions
Unless you are the Super user, you may only invoke diskverify for devices attachedby you or the World user. The diskverify utility reattaches the device as a physicaldevice before verifying it. When the utility finishes, it reattaches the device as it wasbefore you invoked the utility.
If you verify the system device (:sd:), the OS deletes all connections to the device;thus you must reboot the system before entering more commands.
See also: Named and physical volumes, format command, in this chapter
Examples
1. This example uses the verify option:
-diskverify :f1: verify named2 <CR>
iRMX Disk Verify Utility, Vx.y
Copyright <year> Intel Corporation
All Rights Reserved
DEVICE NAME = F1 : DEVICE SIZE = 0003E900 : BLOCK SIZE= 0080
'NAMED2' VERIFICATION
BIT MAPS O.K.
The DEVICE SIZE is a hexadecimal number of bytes. The BLOCK SIZE is thevolume granularity in hexadecimal; this is the size of a block on this volume.
If there were errors found, they would be reported as shown below. This display alsoapplies to the n1 option and the fix parameter. If you use the list control, thistype of information is reported for all files, without an error message for files not inerror:
FILE=(<filename>, <fnodenum>): LEVEL=<lev>: PARENT=<parnt>: TYPE=<typ><error messages>
<fnodenum>Hexadecimal number of the file's fnode.
<lev> Hexadecimal level of the file in the file hierarchy. The volume's rootdirectory is the only level 0 file. Files in the root directory are level 1files. Files in level 1 directories are level 2 files, etc.
<parnt> Hexadecimal fnode number of the directory that contains this file.
<typ> File type, either DATA (data files), DIR (directory files), SMAP (volumefree space map), FMAP (free fnodes map), BMAP (bad blocks map), orVLAB (volume label file). If diskverify cannot ascertain that the file isa directory or data file, it displays the characters **** in this field.
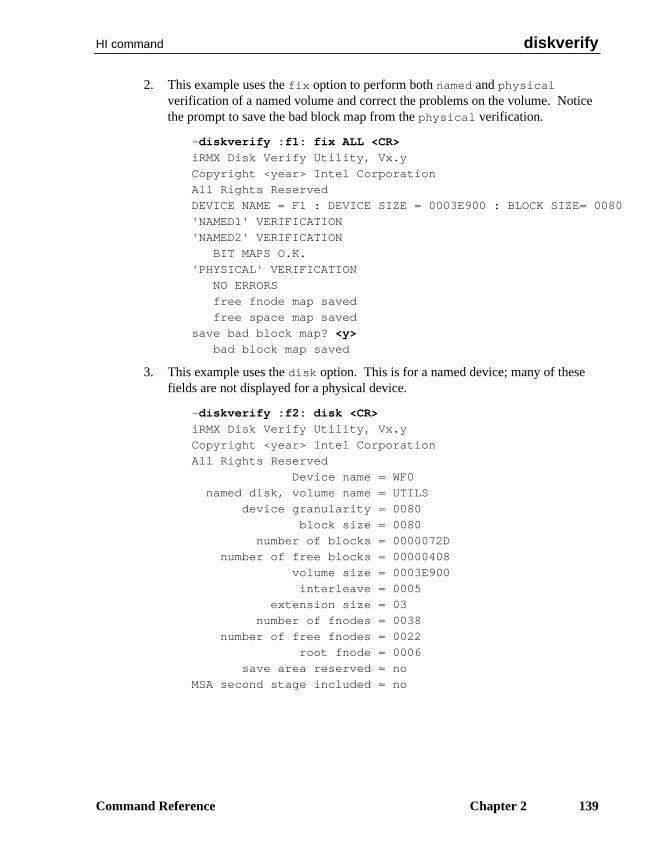
HI command diskverify
Command Reference Chapter 2 139
2. This example uses the fix option to perform both named and physical
verification of a named volume and correct the problems on the volume. Noticethe prompt to save the bad block map from the physical verification.
-diskverify :f1: fix ALL <CR>
iRMX Disk Verify Utility, Vx.y
Copyright <year> Intel Corporation
All Rights Reserved
DEVICE NAME = F1 : DEVICE SIZE = 0003E900 : BLOCK SIZE= 0080
'NAMED1' VERIFICATION
'NAMED2' VERIFICATION
BIT MAPS O.K.
'PHYSICAL' VERIFICATION
NO ERRORS
free fnode map saved
free space map saved
save bad block map? <y>
bad block map saved
3. This example uses the disk option. This is for a named device; many of thesefields are not displayed for a physical device.
-diskverify :f2: disk <CR>
iRMX Disk Verify Utility, Vx.y
Copyright <year> Intel Corporation
All Rights Reserved
Device name = WF0
named disk, volume name = UTILS
device granularity = 0080
block size = 0080
number of blocks = 0000072D
number of free blocks = 00000408
volume size = 0003E900
interleave = 0005
extension size = 03
number of fnodes = 0038
number of free fnodes = 0022
root fnode = 0006
save area reserved = no
MSA second stage included = no

diskverify HI command
140 Chapter 2 Command Descriptions
4. This example uses the getbadtrackinfo option. This option may be useful ona Multibus I system when migrating from a 215G controller to a 214 or 221controller.
-diskverify :sd: to :f1:WORK/BT GB <CR>
This information is written to the :f1:work/bt file:
Bad track information
cyl head sector
0034 03 00
0043 02 00
0316 00 00
Error Messages
In addition to the errors listed below, the verify and fix options produce errormessages.
See also: diskverify error messages, Appendix B
argument errorThe option you specified is not valid.
command syntax errorYou made a syntax error when entering the command.
device size inconsistent size in volume label = <value1> : computed
size = <value2>When diskverify computed the size of the volume based on the physical name usedfor attachment, the size it computed did not match the information recorded in thevolume label. It is likely that the volume label contains invalid or corruptedinformation. This is not a fatal error, but it indicates that further errors may occurduring verification. You may have to reformat the volume or use the diskverifyutility to modify or restore the volume label.
not a named diskYou tried to perform a named, named1, or named2 verification on a physicalvolume.
Can't attach deviceDiskverify's attachdevice system call failed or you specified the logical name of aremote server.
HI command domain
Command Reference Chapter 2 141
domainSets the search domain of all subnets the iRMX-NET Name Server can access. Usethis command when you have set up a network with any subnet IDs except 1, usingroutable iNA 960 jobs.
Syntax
domain [-a ID[-range]] [-d ID[-range]]
Parameters
-a Adds a single ID or a range of IDs to the search list.
-d Deletes a single ID or a range of IDs from the search list.
Additional Information
Without any parameters, domain displays the current search domain. With eitherparameter, domain displays the current search domain after the addition or deletion.
When adding or deleting IDs, specify either a single subnet ID or a range of IDsseparated with a dash (-) and no spaces. The ID must be a four-digit hexadecimalnumber followed by an H. For example, to add subnet 4 to the current searchdomain, enter:
domain -a 0004H
To enable searching of all subnets from 1 to 1AH, enter:
domain -a 0001H-001AH
The maximum number of subnets to be searched is 80. You can specify subnet IDsnot currently in use. However, adding more subnet IDs to the search domain slowsdown Name Server operations.
You can add the domain command to the loadinfo file following the sysloadcommand that loads the iRMX-NET job.
See also:Multibus II Subnet and Multiple Subnets, Network User’s Guideand Reference

dump HI command
142 Chapter 2 Command Descriptions
dumpDisplays one or more files in hexadecimal format.
Syntax
dump inpath_list [to|over|after outpath_list] [b|w] [q] [p=num]
Parametersinpath_list
One or more filenames separated with commas. Wildcards are permitted.
to|over|after outpath_listWrites the output to the specified file(s) rather than to the screen. If you specifymultiple input files and one output file, the output is appended.
b(yte) Displays the input files as 2-digit hexadecimal numbers, with the ASCII printablecharacters on the right. This is the default format.
w(ord) Displays the input files as 4-digit hexadecimal numbers.
q(uery) Prompts for permission to process each file. Respond to the prompt with:
Y Display the fileR Display remaining files without further queryE Exit the commandN or other Don't display the file; query for the next
p(agewidth)=numSpecifies the width of the output display in number of characters. By default thenumber is decimal, but you can specify octal or hexadecimal by appending an O orH. If this parameter is not entered, the default width for byte displays is 80characters, and for word displays is 55 characters.
Additional Information
All input files are considered one logical file. Therefore the offsets at the beginningof each line are not reset to 0 between each file. The default output is in columns ofeight bytes for byte format and columns of four words for word format.
TCP/IP command enetinfo
Command Reference Chapter 2 143
enetinfoDisplays the Ethernet addresses of the local system.
Syntax
enetinfo
Additional Information
The output of the enetinfo command is similar to:
Subsystem ID Ethernet Hardware Address
0x20 00:aa:00:02:fd:3a
0x2f a2:a4:a6:a8:aa:00
The Subsystem ID indicates the subsystem being used by iNA 960 network software.The Ethernet address is encoded on the network controller board. In a Multibus IIsystem you may have as many as three active network controller boards by usingMIX 560 boards. In this case the enetinfo command displays the subsystem ID andEthernet address for each board. iNA 960 assigns subsystem IDs according to theData Link subsystem on each board:
Subsystem ID Board20H first MIX 56021H SBX 586 board, EWENET module, or EtherExpress 1622H second MIX 56023H third MIX 56024H 82595TX component, EtherExpress PRO/10, SBC P5090 and
P5120 PC-compatible boards, all versions2FH Multibus II subnet
When configuring TCP/IP, you assign a particular stream to one of the boards in theinetinit.cf file.
See also: /dev/edlina2x and inetinit.cf, TCP/IP and NFS for the iRMX OperatingSystemSubsystem field in request blocks, Network User's Guide and Reference
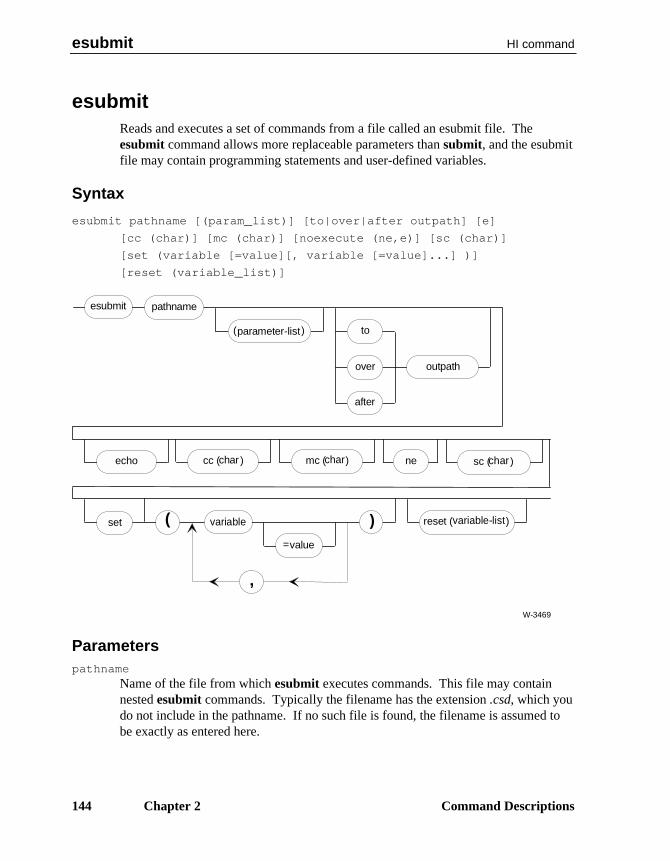
esubmit HI command
144 Chapter 2 Command Descriptions
esubmitReads and executes a set of commands from a file called an esubmit file. Theesubmit command allows more replaceable parameters than submit, and the esubmitfile may contain programming statements and user-defined variables.
Syntax
esubmit pathname [(param_list)] [to|over|after outpath] [e]
[cc (char)] [mc (char)] [noexecute (ne,e)] [sc (char)]
[set (variable [=value][, variable [=value]...] )]
[reset (variable_list)]
over
after
to
esubmit pathname
parameter-list
outpath
echo
set variable( )
,
value
char char char
=
W-3469
variable-list
mc ( )cc ( ) sc ( )
( )
reset ( )
ne
Parameterspathname
Name of the file from which esubmit executes commands. This file may containnested esubmit commands. Typically the filename has the extension .csd, which youdo not include in the pathname. If no such file is found, the filename is assumed tobe exactly as entered here.

HI command esubmit
Command Reference Chapter 2 145
param_listAs many as 36 actual parameters, separated by commas, that are to replace formalparameters in the esubmit file. You must surround this parameter list withparentheses. To omit a parameter in the middle of the list, reserve its position byentering a comma. If a parameter contains a comma, space, or parenthesis, enclosethe parameter in single or double quotes. The sum of all characters in the parameterlist must not exceed 1024 characters.
to|over|after outpathWrites the output from each command in the esubmit file to the specified file ratherthan to the screen. Commands in the esubmit file may redirect their own output; thatoutput is not written to this file.
e(cho) Data written to an output file is also echoed to the screen. Nested esubmitcommands do not have their contents echoed to the screen unless they are alsoinvoked with the echo parameter.
cc (or contchar or continuationchar)Specifies a character in parentheses to be used as a line continuation character inesubmit subcommands. By default, the continuation character is &.
mc (or metachar)Specifies a character in parentheses to be used by esubmit as a metacharacter. Bydefault, the metacharacter is $. The metacharacter at the beginning of a line in theesubmit file indicates the line contains an esubmit subcommand, rather than an OScommand.
ne (or noexecute)Displays the commands without actually sending them to the iRMX HumanInterface.
sc (or subchar or substitutionchar)Specifies a character in parentheses to be used by esubmit as a substitution character.By default, the substitution character is %. The substitution character is used toindicate substitution of formal parameters and esubmit variables.
set variable [=value]Sets one or more user-defined variable names to the specified numeric value. If thevalue is not specified, the default is one. The variable list must be within parenthesesand the variables must be separated with commas. The requirements for variablenames and values are described in a later section.
reset variable_listSets one or more user-defined variable names to zero. The variable list must bewithin parentheses and the variables must be separated with commas.
See also: Example 6 for this command
esubmit HI command
146 Chapter 2 Command Descriptions
Additional Information
✏ NoteDo not include the following commands in an esubmit file:
backup restorepause telnet
If you use a form of the following commands that requires userinput in an esubmit file, you must use the eoresponse andcoresponse subcommands with esubmit to access the userrepsonse. Without access to the required user input the commandswill fail.
accounting formataddloc ftpcopy helpcopydir locdatadate permitdelete reminideletedir renamedir timediskverify
The esubmit command has these characteristics in common with the submitcommand:
• Any program that reads its commands from the console input (:ci:) can beexecuted from within an esubmit file. With certain restrictions described at theend of this section, a submit file may be used with the esubmit command.
• The esubmit command can be nested in an esubmit file to any level, within thelimits of memory.
• If esubmit is operating in the foreground, you may enter a <Ctrl-C> to abortesubmit processing and return control to the command line.
• You own and have full access to any new files created by the esubmit command,including files created by the to, over, or after parameters.
HI command esubmit
Command Reference Chapter 2 147
To use the esubmit command, you must first create a text file that defines thecommand sequence. Esubmit supports aliases similar to the way in which the iRMXCLI does for iRMX commands (note that this does not include alias support foresubmit commands). The alias and dealias commands, and alias expansion aresupported. The difference between the alias support in esubmit and in the iRMXCLI is that esubmit treats the "?" (question mark) character as a single character wildcard. The iRMX CLI treats the "?" character as a supported ASCII character for thealias abbreviation and the alias expansion.
Other CLI commands, such as background, cannot be used in the file. Beforesubmitting commands in the file to the OS, esubmit processes these elements in thefile:
• formal parameters
• esubmit variables
• esubmit subcommands
In most cases, an error within an esubmit subcommand causes esubmit to terminate.When all commands in the esubmit file have been executed, esubmit displays:
END esubmit <pathname>
Formal Parameters
Formal parameters in the esubmit file are specified by the characters %n, where % isthe substitution character and n ranges from 0 through 9 and A through Z, in thatorder. Letters used as formal parameters are not case-sensitive. When esubmitexecutes the file, it replaces the formal parameters with the actual parameter list inthe esubmit command. The first actual parameter replaces all instances of %0, thesecond parameter replaces all instances of %1, and so forth. If the actual parameteris surrounded by quotes (to avoid command-line interpretation of a comma, space, orparenthesis in the parameter), esubmit removes the quotes before performing thesubstitution. If there is no actual parameter that corresponds to a formal parameter,esubmit replaces the formal parameter with a null string.
Within each line of the esubmit file, substitution of formal parameters occurs beforeprocessing of esubmit subcommands. Therefore, the metacharacter, a subcommand,or an expression within a subcommand may be passed as an input parameter.
See also: Example 1 for this command
Variables
Variables are names defined by the user and set to a numeric or string value on thecommand line or in an esubmit file. Numerical and string variable names can be 1 to32 characters and are not case-sensitive. String variables follow the same syntactic
esubmit HI command
148 Chapter 2 Command Descriptions
rules as numerical variables, except that all string variables start with an underscore(_) followed by either A through Z or a through z. The maximum length of the valueof each string variable is 128 bytes.
There are five new read-only esubmit variables.
• date is a numeric variable that contains the value yymmdd in decimal where yyis the last two digits of the year, mm is the month, and dd is the day of the currentdate.
• time is a numeric variable that contains the value hhmmss in decimal where hhis the hour, mm is the minute, and ss is the second of the current time.
• _date is a string variable that contains the value mm/dd/yy where yy is the lasttwo digits of the year, mm is the month, and dd is the day of the current date.
• _time is a string variable that contains the value hh:mm:ss where hh is the hour,mm is the minute, and ss is the second of the current time.
• _hostid is a string variable that contains the interconnect board id for thecurrent board.
Two variable names are reserved:
• Commandexcep always contains the condition code of the last commandexecuted. This read-only variable cannot be changed with the set or resetsubcommands.
• Inputparameters is a read-only variable that contains the value of the numberof input parameters (within parentheses) that were passed by the CLI to thecommand sequence definition file.
Variables can be set to any whole number value in the range 0-0FFFFFFFFH. Whenyou set a value, the default base is decimal, but you may specify the base byappending one of these letters to the value: B for binary, O or Q for octal, D or T fordecimal, H or X for hexadecimal, or E for enumerated. Enumerated numbers rangefrom 0 through 9 and A through Z, with equivalent decimal values of 0 through 9 and10 through 35. To distinguish between variable names and values, values must beginwith a numeral 0 through 9.
See also: Example 2 for this command
String variable values are assigned using the set and for subcommands. Set supportsconcatenation using the plus (+) character. For supports sets inside braces ({ and })delimited by commas. All values that are not other string variables must be enclosedwithin quotation marks. Both single and double quotation marks are supported, butthey must match within a single assignment statement. An example of a setcommand with a string variable is:
$SET _stringvar = "my string's value"

HI command esubmit
Command Reference Chapter 2 149
This assigns the value enclosed by the double quotes, including the single quote, tothe string variable _stringvar. An example of a set command with concatenationis:
$SET _stringvar = _stringvar + ' delimiter ' + _stringvar
An example of a for command with sets is:
$FOR _stringvar = {"one",'two',_stringvar+"three's",'four'}
String variables are maintained in an internal table separate from the one fornumerical variables, and, therefore, do not count against the limit of numericalvariables. The default maximum number of string variables is 32. This isconfigurable with the commands allocatestring, clearstring, and initstring, whichare equivalent to the allocate, clear, and init subcommands for numeric variables,respectively. The maximum allowable number of string variables is 128. Each entryin the table takes 162 bytes (1 byte for the variable name length, 32 bytes for thevariable name, 1 byte for the string value length, and 128 bytes for the string value).
Generally, a variable name within esubmit subcommands may be used to representthe value to which it is set. However, when writing information to a file or issuing anOS command, you need the actual value as an ASCII string rather than the variablename that represents the value. To accomplish this, format the variable name in theesubmit file as a variable substitution string. The esubmit command replaces thesubstitution string with an ASCII string corresponding to the current numeric value.This process is similar to replacing formal parameters.
The esubmit command substitutes the value string for variables preceded by thesubstitution character and metacharacter, and followed by the metacharacter. Youmay format the way the value string is displayed when substitution takes place byembedding optional control characters before the variable name. The syntax forvariable substitution is shown below; the characters cannot be separated with spaces.The closing metacharacter may be replaced with an end-of-line or end-of-file.
subchar metachar [base digits zerosupp] variable metachar
Base, digits, and zerosupp are format control characters that may occur in anyorder, but each may only be specified once for a given variable. Each controlcharacter is preceded with a backslash (\). Control characters are not case-sensitive.If no variable name is provided, the value 0 is substituted in the specified format.
base By default, the value is substituted in decimal. You may specify thebase with a two-character code: \B for binary, \O or \Q for octal, \D or\T for decimal, \H or \X for hexadecimal, or \E for enumerated.
digits This is a two-character code specifying the number of digits to use: \0through \9. If the specified number is smaller than the number ofsignificant digits, this code is ignored (the string %$\2var$ with
esubmit HI command
150 Chapter 2 Command Descriptions
var=1234 becomes 1234). If the specified number is greater than thenumber of significant digits, the display is padded with leading zeros(the string %$\4var$ with var=3 becomes 0003).
zerosupp If the value is 0, it is substituted in the number of digits indicated (oneby default), unless you specify 0 suppression with a \S or \Z. Zerosuppression takes precedence over the number of digits (the string%$\Z\2var$ with var=0 displays nothing). Zero suppression does notsuppress leading 0s in a non-zero value.
Examples of the string substituted for the variable myvar = 165 are shown below:
Variable String Substituted String%$myvar$ 165%$\Hmyvar$ A5%$\z\5myvar$ 00165
Part of a variable name may be formed by embedding a formal parameter or anothervariable substitution string. The form is %$variableX$ where variable is at leastone character and X is a formal parameter (%0 through %Z) or a second variablestring. For example, assume the variable myvar2 has the value 7, the first inputparameter (%0) is 2, and the variable index2 has the value 2. During substitution,the strings %$myvar%0$, %$myvar%$index2$$, and %$myvar%$index%0$$
become instances of %$myvar2$. Each is replaced with 7.
When an esubmit command is nested in an esubmit file, the nested esubmit sharesno variables with the parent esubmit. Each invocation of esubmit starts with abuffer large enough for 80 variables. Refer to the allocate, clear, and init
subcommands for information about manipulating the buffer size.
Using Esubmit Subcommands
Esubmit subcommands are commands in the esubmit file to control processing. Youindicate a subcommand with a metacharacter ($ by default) at the beginning of theline in the esubmit file. The metacharacter must be in the first column; if you indentsubcommands, do not indent the metacharacter. Subcommands are not case-sensitive. A subcommand may be continued on subsequent lines with thecontinuation character (& by default). Any text following the continuation characteron the same line is ignored. Subsequent continuation lines may optionally include ametacharacter in the first column.
Within a subcommand, the semicolon (;) is a comment character. Any text followinga semicolon on a subcommand line is ignored. However, variable substitution andinput parameter substitution occur in a comment.
Some subcommands define programming expression blocks that conditionallyexecute OS commands within the block. The subcommands to terminate a block

HI command esubmit
Command Reference Chapter 2 151
(endif, endwhile, enduntil, endcase, end, and next) are matched with themost recent corresponding subcommand (if, ifexist, ifnotexist, dowhile,dountil, case, do, and for). Programming expression blocks may be nested up to14 deep, in any order. Subcommands may contain mathematical or logicalexpressions as arguments. Elements in expressions are not case-sensitive.
Mathematical and Logical Expressions
Mathematical expressions are expressions evaluated to a whole number in the range0-0FFFFFFFFH. Mathematical expressions have the form:
operand [operator operand]...
An operand may be a numeric constant (optionally followed by a character indicatingthe base), a variable, or another mathematical expression enclosed in parentheses.
Operators are the characters % (modulus), * (multiplication), / (division), +(addition), and - (subtraction). When the substitution character is %, a space or tabmust follow the % modulus operator on a subcommand line. Otherwise, thesubstitution character takes precedence over the modulus operator. This is the orderof precedence for operators:
()
% Evaluated left to right* and / Evaluated left to right+ and - Evaluated left to right

esubmit HI command
152 Chapter 2 Command Descriptions
This is an example of a mathematical expression:
(36H / (17 + subtotal)) % 32
Logical expressions are expressions evaluated to TRUE or FALSE. TRUE is definedas the least significant bit on (all other bits are ignored) and FALSE is defined as theleast significant bit off (all other bits are ignored). Logical expressions have theform:
[not] variable [relation expression] [logical [not] variable ...]
Relation is one of <, <=, =, <>, >=, or >. Expression is a mathematicalexpression enclosed in parentheses, a variable, or a numeric constant (optionallyfollowed by a character indicating the base). Logical is one of the logical operatorsAND, OR, or XOR. This is the order of precedence for elements in a logicalexpression:
()
NOT
AND, OR, and XOR Evaluated left to right. (The current order of evaluationdoes not follow commonly accepted practice, which isAND evaluated left to right, then OR and XOR evaluatedleft to right.)
This is an example of a logical expression:
myvar = 32T OR NOT myvar = 10H

HI command esubmit
Command Reference Chapter 2 153
Subcommand Descriptions
allocate
clear
init
The allocate, clear, and init subcommands adjust the size of thevariable table buffer. This is a buffer that stores the variable namesand values; when esubmit is invoked the buffer has room for 80variables. Init and clear are equivalent, and reinitialize the bufferso no variables are currently stored in it. Allocate reinitializes thebuffer without losing the current contents, unless you specify a newbuffer size smaller than the existing number of variables. Thesesubcommands can be used to dynamically tune the esubmit memoryrequirements and resource availability. It takes 37 bytes to store eachvariable in the table: 1 byte for the variable name length, 32 bytes forthe name, and 4 bytes for the value. The form of the subcommand is
$keyword [mathematical expression]
where keyword is allocate, clear, or init, and mathematical
expression is the number of variables to be supported by the newtable. The maximum number of variables is 600H; if more than 600Hare requested, the number is reduced to 600H. If you specify 0, or ifno mathematical expression is provided, the default number is 80. Ifyou use allocate to make the buffer smaller than the current numberof variables, only the specified number of variables is preserved. Themost recently declared variables are lost.
See also: Example 3 for this command
If an error is encountered trying to change the buffer using one ofthese subcommands, esubmit continues and the previous variablebuffer is maintained.
break The break subcommand executes an Interrupt 3 to break to the debugmonitor. When this subcommand is executed, all processing in thesystem is halted. To allow pending I/O to complete before the INT 3,it is prudent to execute a delay subcommand immediately before thebreak. The subcommand has the form:
$BREAK
See also: Example 4 for this command

esubmit HI command
154 Chapter 2 Command Descriptions
case...
value...
default...
endcase
These subcommands conditionally execute lines of text between them,where the text may be other subcommands and/or OS commands.Case begins the conditional block and endcase terminates it. Value
and, optionally, default define blocks of text between the case andendcase.
Only one block of text is executed: the block following the firstvalue expression equivalent to the value in the case subcommand.If no value expression is equivalent to the case expression, the blockof text following the default subcommand is executed. (Includingvalue subcommands after the default subcommand is pointless,since the default or a previous value expression will have alreadyforced execution of a text block.)
The case...endcase block has the form:
$CASE mathematical expression
$VALUE mathematical expression
text
[$VALUE mathematical expression]
[text]
[$DEFAULT mathematical expression]
[text]
$ENDCASE
This is an example of a case...endcase block:
$CASE 5 - 200 % (myvar * 3)
$VALUE newvar - 1
text
$VALUE (newvar * 2) - 3
text
$DEFAULT
text
$ENDCASE
clear See the allocate, clear, init description.
HI command esubmit
Command Reference Chapter 2 155
coresponse
eoresponse
These commands execute the c_send_co_response andc_send_eo_response Human Interface calls. They use aprompt_string as the message parameter, which is sent to :CO: (forcoresponse) or to the operator's terminal (for eoresponse).Execution will be halted until input is received. An eoresponse
input must come from the operator's terminal. A coresponse inputwill come from whatever is attached as :CO: (possibly anotheresubmit file that is executing this one). The syntax is:
$CORESPONSE variable [prompt_string]
$EORESPONSE variable [prompt_string]
where variable is a numeric or string variable and the optionalparameter prompt_string is a string constant enclosed in quotes or astring variable expression.
Examples:
$CORESPONSE _input_string "Enter a string value: "
$CORESPONSE _opt “Enter dir opt: “
dir $ %$_opt$
$EORESPONSE input_var "Please enter a numeric value:
"
$EORESPONSE _opt “Enter dir opt: “
dir $ %$_opt$
continuationchar
contchar
These subcommands are equivalent. Contchar changes thecontinuation character from the point where this subcommand occurs.The continuation character (& by default) specifies that asubcommand continues on this line. For example, to make @ thecontinuation character, use the subcommand:
$CONTCHAR @
esubmit HI command
156 Chapter 2 Command Descriptions
copydependency The copydependency subcommand copies one file over anotherunder certain conditions. It has this syntax:
$COPYDEPENDENCY target | dependency [access]
where target is a single filename, dependency is a single filename,and access is an optional parameter listing the World access rights tobe granted to the target file if a copy is performed. (In the syntaxabove, you must enter the pipe symbol (|) as part of the command. Itmeans that the dependency file follows, as in the make command. Inthis case, the pipe symbol does not mean enter either target ordependency as part of the command.) If the target file does notexist, or if the dependency file has been modified later than the targetfile, then the dependency file is copied over the target file. Choicesfor access include any permutation of "DRAU" access. If you do notspecify access, the current user will have DRAU access, and allother non-Super users will have ---- access.
createdirdependency
mkdirdependency
These subcommands are equivalent. They create a directory unlessthe specified directory already exists. The syntax is:
$CREATEDIRDEPENDENCY target
$MKDIRDEPENDENCY target
where target is a single directory name. If the target directory doesnot exist it is created, with World DLAC access rights.
delay
pause
sleep
wait
These subcommands are equivalent. They delay execution of theesubmit file for a specified amount of time. The form of thesubcommand is
$keyword delaytime
where keyword is one of delay, pause, sleep, or wait, anddelaytime is a number, variable, or mathematical expression thatindicates the amount of time to delay, in hundredths of seconds. Thislist shows the amount of delay time for various commands:
Subcommand Seconds Delayed$DELAY 100 1$PAUSE 200 2$SLEEP 5 * 100 5$WAIT myvar 10, when myvar = 1000

HI command esubmit
Command Reference Chapter 2 157
dependency...
enddependency
The dependency subcommand conditionally executes anycommands until the enddependency subcommand, depending oncertain conditions. It has this syntax:
$DEPENDENCY target | dependency_list
<esubmit and iRMX commands>
$ENDDEPENDENCY
where target is a single filename and dependency_list is a list offilenames delimited by spaces or tabs. (In the syntax above, you mustenter the pipe symbol (|) as part of the command. It means that thedependency file follows, as in the make command. In this case, thepipe symbol does not mean enter either target or dependency aspart of the command.) If the target file does not exist, or if nodependency files are specified, or if any of the dependency files havebeen modified later than the target file, the commands inside thedependency/enddependency loop are executed. Otherwise, they willnot be executed.
do...end See the for...next description.
dowhile...
endwhile,
dountil...
enduntil
These subcommands conditionally execute the intermediate block oftext in a loop, based on logical expressions involving variables.Dowhile...endwhile executes the text as long as the conditionalexpression evaluates to TRUE. Dountil...enduntil executes thetext as long as the conditional expression evaluates to FALSE. Thesubcommands have the form:
$DOWHILE logical expression
text
$ENDWHILE
$DOUNTIL logical expression
text
$ENDUNTIL
These are examples of subcommands that cause infinite loops:
$DOWHILE 1
text
$ENDWHILE
$DOUNTIL 0
text
$ENDUNTIL
eoresponse See the coresponse, eoresponse description.
esubmit HI command
158 Chapter 2 Command Descriptions
exit
quit
The exit and quit subcommands end the current esubmitprocessing. If the current esubmit file was invoked with an include
command from another esubmit file, then processing of that parent fileis also ended. If the current esubmit file was invoked from anesubmit command in another esubmit file, then processing of thatparent file resumes. The subcommands are equivalent and have thefollowing syntax:
$EXIT exit_value
$QUIT exit_value
where exit_value is a mathematical expression whose value ispassed to the Human Interface as the command exception whenesubmit exits using the rq_exit_io_job system call.
HI command esubmit
Command Reference Chapter 2 159
for...next,
do...end
These subcommands execute a block of text a specified number ofiterations. Do...end is equivalent to for...next. Thesubcommands typically have the form:
$FOR variable = startvalue TO stopvalue [STEP
stepvalue]
text
$NEXT
$DO variable = startvalue TO stopvalue [BY
stepvalue]
text
$END
Startvalue, stopvalue, and stepvalue may be numericconstants, variables, or mathematical expressions enclosed inparentheses. Startvalue must be less than or equal to stopvalue
to enter the loop. Stepvalue is always interpreted to be greater thanor equal to 0. Text following the next subcommand on the same lineis ignored. Therefore, next always ends the loop begun by the lastfor subcommand. In nested loops, specifying $NEXT
variable_name does not necessarily end the loop begun with a $FORvariable_name = .... subcommand.
See also: Example 5 for this command
If the value of the loop variable is modified within the loop (using theset subcommand), the next iteration increments the modified value ofthe variable instead of the previous iterative value. The same variableshould not be used as a loop counter within nested loops.
The for and next and the do and end subcommands must occur aspairs. You can not have a for...end or a do...next block.However, the step and by keywords are interchangeable.
An alternate form of these subcommands is to iteratively assign thevariable to a set of values in a list. The loop executes once for eachvalue in the list, independently of whether the variable is modifiedwithin the loop. This form of the command is:
$FOR variable = {list}
text
$NEXT
esubmit HI command
160 Chapter 2 Command Descriptions
List is a series of numeric constants, variables, or mathematicalexpressions enclosed in parentheses. Surround the list with braces({ }) and separate each item in the list with commas.
This example would execute five times, once for each value in the list:
$DO loopvar = & {10,(4*9),myvar,(myvar*2),%$myvar$}
text
$END
gethostid Sets an environment variable to the value of the Multibus II slot ID ofthe host CPU board. If an error is encountered, such as not having theNucleus Communication System configured, the environment variableis set to 0FFH. This is the syntax:
$GETHOSTID variable
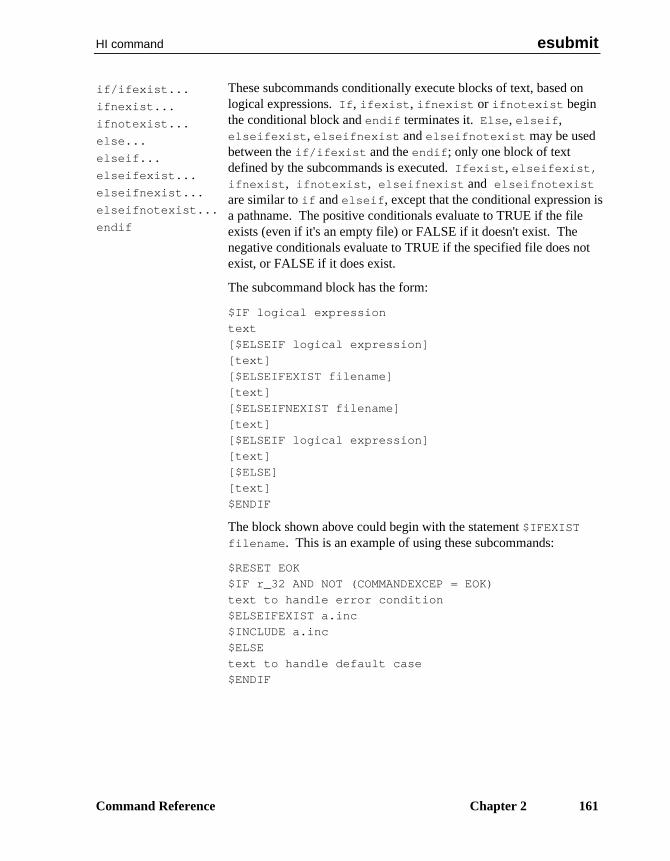
HI command esubmit
Command Reference Chapter 2 161
if/ifexist...
ifnexist...
ifnotexist...
else...
elseif...
elseifexist...
elseifnexist...
elseifnotexist...
endif
These subcommands conditionally execute blocks of text, based onlogical expressions. If, ifexist, ifnexist or ifnotexist beginthe conditional block and endif terminates it. Else, elseif,elseifexist, elseifnexist and elseifnotexist may be usedbetween the if/ifexist and the endif; only one block of textdefined by the subcommands is executed. Ifexist, elseifexist,ifnexist, ifnotexist, elseifnexist and elseifnotexist
are similar to if and elseif, except that the conditional expression isa pathname. The positive conditionals evaluate to TRUE if the fileexists (even if it's an empty file) or FALSE if it doesn't exist. Thenegative conditionals evaluate to TRUE if the specified file does notexist, or FALSE if it does exist.
The subcommand block has the form:
$IF logical expression
text
[$ELSEIF logical expression]
[text]
[$ELSEIFEXIST filename]
[text]
[$ELSEIFNEXIST filename]
[text]
[$ELSEIF logical expression]
[text]
[$ELSE]
[text]
$ENDIF
The block shown above could begin with the statement $IFEXISTfilename. This is an example of using these subcommands:
$RESET EOK
$IF r_32 AND NOT (COMMANDEXCEP = EOK)
text to handle error condition
$ELSEIFEXIST a.inc
$INCLUDE a.inc
$ELSE
text to handle default case
$ENDIF
esubmit HI command
162 Chapter 2 Command Descriptions
include This subcommand executes the contents of another file as if the textexisted in the current esubmit file. The scope of variables and inputparameters for the included file is the same as for the includingesubmit file. The nesting limit for include is 6.
The subcommand has the form:
$INCLUDE filename
where filename is either the full pathname of the file or thepathname relative to the current working directory. Include does notappend any extension to the specified filename. For example, toinclude the file test.inc in the csd subdirectory under your currentworking directory, the subcommand is:
$INCLUDE csd/test.inc.
init See the allocate, clear, init description.
HI command esubmit
Command Reference Chapter 2 163
log The log subcommand appends a log message to a file. Thesubcommand has the form:
$LOG filename [list]
where filename is any valid pathname and list is an optional list ofarguments to be written to the file. Arguments in the list must beseparated with spaces. Arguments can include text strings (quotes arenot required) and variables in substitution format. If the UniversalDevelopment Interface (UDI) is part of the current iRMX system, thedate and time are the first two arguments in the line written to the file.The arguments in list are appended to the line in order, separated inthe log file by two spaces. Arguments longer than 12 characters aretruncated; arguments shorter than 12 characters are padded in the logfile with trailing spaces.
If the file exists, the line is appended to the end of the file. If the filedoes not exist, it is created. If an error is encountered while trying toattach or create the file, an error message is displayed and the logsubcommand is aborted, but esubmit continues executing. Examplesof the log subcommand are:
$LOG
$LOG file.log
$LOG file.log Command_%$\3myvar$ Error_=
%$commandexcep$
If no parameters are provided in the log subcommand, as in the firstline above, esubmit writes the date and time to :co:. For the $LOGfile.log command, esubmit writes the date and time to the log file.For the third example above, esubmit writes the date, time, and"command_002=00" to the log file.
metachar Use this subcommand to change the metacharacter from within theesubmit file. For example, if the metacharacter has not been changedon the command line, the subcommand to make # the metacharacteris:
$METACHAR #
esubmit HI command
164 Chapter 2 Command Descriptions
min
max
The min and max subcommands assign to a variable the minimum ormaximum value from a list of values. The subcommand has the form:
$keyword variable {list}
where keyword is either min or max and list is a series of operandsseparated by commas. The operands may be mathematicalexpressions enclosed in parentheses. For example:
$MIN minvalue {10,30,99,%$myvar$,42}
$MAX maxvalue {10,30,99,(myvar% 20),42}
pause See the delay description.
random The random subcommand returns a pseudo-random value. It has thissyntax:
$RANDOM variable maximum_value
where variable is an esubmit numeric variable andmaximum_value is a mathematical expression as defined in the"Mathematical and Logical Expressions" section under this commanddescription. Random executes a call to get_time and returns the value(time MOD maximum_value). This is not a true random numberfunction because the variation of the value returned by consecutiverandom functions is dependent on the time elapsed between the calls.
set,
reset
Set sets a variable to a specified value. If no value is specified, thedefault is one. Reset sets a variable to 0. These subcommands havethe form:
$SET variable [= mathematical expression]
$RESET variable
Examples are:
$SET r_32
$SET iteration = iteration + 1
$SET execution_cnt = (iteration * loop ) / 10H
$RESET a
sleep See the delay description.
substitutionchar
subchar
These subcommands are equivalent. Subchar changes thesubstitution character (% by default) from the point in the esubmit filewhere this subcommand occurs. For example, this is the subcommandto make @ the substitution character:
$SUBCHAR @

HI command esubmit
Command Reference Chapter 2 165
wait See the delay description.
Compatibility with Submit Files
A file that works with the submit command may be used as an esubmit file, withthese restrictions:
• A line that begins with $ is assumed to be an esubmit subcommand. If thisoccurs in the submit file, change the metacharacter on the command line to acharacter that does not occur at the beginning of the line.
• If the two characters %$ occur in sequence, where % is the substitution characterand $ is the metacharacter, the text that follows until a closing metacharacter isassumed to be an esubmit variable. If this occurs in the submit file, change thesubstitution character and/or the metacharacter on the command line. If youchange the substitution character, you must also change the character used in thesubmit file for substitution of formal parameters.
• If the two characters %X occur in sequence, where % is the substitutioncharacter and X is any character from A to Z, upper- or lower-case, thecharacters are assumed to be a formal parameter. If this occurs in the submitfile, change the substitution character on the command line. You must alsochange the character used in the submit file for substitution of formalparameters.
• The file must use full command names rather than CLI-supported aliases. Forexample, use attachdevice instead of ad. CLI commands such as alias, dealias,and background may not be used in an esubmit file.
Examples
1. This is an esubmit invocation that calls the file test.csd and uses the setsubcommand:
esubmit test (:sd:testdir/test1, :sd: testdir/test2) &
set (decision=1)
esubmit HI command
166 Chapter 2 Command Descriptions
This code is the file test.csd; it uses the if, else, and endif subcommands:
$if decision = 1
%0
$else
%1
$endif
The esubmit invocation will be interpreted as:
$if decision = 1
:sd:testdir/test1
$else
:sd:testdir/test2
$endif
2. This examples use the set subcommand:
$set num = 255
$set bin_num = 11111111b
$set oct_num = 377Q
$set hex_num = 0FFh
3. These examples use the allocate, clear, and init subcommands:
$clear ;clears variable buffer of all variables
$init ;same as clear
$allocate 100 ;creates variable buffer capable &
of having 99 variables
$allocate %0 ;creates a variable buffer the &
size of the first parameter-1
4. This command sets a delay of 2 seconds before the break:
$delay 200
$break
5. This example references all of your input parameters sequentially using the forand next subcommands:
$for loopvar = 0 to (inputparameters-1)
%%$\Eloopvar$
$next
Loopvar would take on the values 0,1,...,9,A,...Z depending on how manyparameters you passed in. The substitution %%$\Eloopvar$ would give you%0, %1,...%9,%A... which in turn would give you your parameters.

HI command esubmit
Command Reference Chapter 2 167
6. These are esubmit invocations of the file test.csd:
esubmit :sd:testdir/test (:amh:,1)
esubmit test (:amh:,1) over log/test.log echo
esubmit test (:amh:,1) cc(\) mc(@) sc(#)&
set (dos_lvl=330,file_driver=1)
esubmit test (:amh:,1) reset (dos_lvl,file_driver)
Error Messages
The error messages listed under the submit command may be returned, as well as:
error creating variable bufferAn error was encountered creating the variable table buffer segment. If this error iscaused by invoking esubmit while trying to create the original variable table buffer,it is fatal and causes esubmit to exit. If the error is returned because of anallocate, clear, or init subcommand, it is not fatal. The original variable bufferis maintained.
illegal ASCII baseThe code used to indicate a numeric base is not a valid value.
illegal subcommandThe esubmit file contains a line with the metacharacter in the first column, but it isnot followed by a supported subcommand.
illegal invocation parameterThe esubmit invocation line contains an illegal parameter.
illegal operandThe subcommand did not find a valid operand (%, *, /, +, or -).
illegal relationThe subcommand did not find a valid relation (<, <=, =, <>, >=, or >)
illegal variable nameThe esubmit file contains a reference to an illegal variable name.
insufficient inputThe subcommand did not contain sufficient input to complete its function.
misplaced logicalThe subcommand found a logical keyword (NOT, AND, OR, or XOR) where one isnot allowed.
misplaced parenthesisThe subcommand found a parenthesis where one is not allowed.
missing environment commandThe esubmit file contains the metacharacter in the first column of a line, with eithernothing or only a comment character following (regardless of spaces and tabs).
esubmit HI command
168 Chapter 2 Command Descriptions
missing logicalThe subcommand did not find a valid logical keyword (NOT, AND, OR, or XOR)where one was expected.
missing operandThe subcommand did not find a valid operand (%, *, /, +, or -) where one wasexpected.
nesting limit exceededThe include nesting limit of six has been exceeded.
unmatched (An unmatched open-parenthesis was encountered.
unmatched )An unmatched close-parenthesis was encountered.
unmatched commandA subcommand was encountered that required a previous subcommand for it to bevalid. This could be caused by:
• An elseif, else, elseifexist, or endif without a preceding if orifexist
• A value, default, or endcase without a preceding case
• An endwhile or enduntil without a preceding dowhile or dountil,respectively
• A next or end without a preceding for or do, respectively.
variable limit exceededMore variables have been declared than can be supported in the current table. Referto the allocate, clear, and init subcommands.
CLI command exit
Command Reference Chapter 2 169
exitExits the system manager mode that was entered with a previous super command.
Syntax
exit
Additional Information
When you enter this command, the CLI changes your user ID back to the ID you hadbefore entering the last super command. It also changes the system prompt back tothe prompt in effect before the super command.
Error Messagesexit, allowed only in super mode
You invoked this command without previously invoking the super command.
<parameter>, unexpected parameterYou entered a parameter; the exit command does not take any parameters.
<condition code:mnemonic>, during exit executionAn internal system problem occurred which prevented the CLI from setting thedefault user.
find HI command
170 Chapter 2 Command Descriptions
findSearches a directory tree for files with names that match a given pattern. For eachmatching filename, the full pathname is displayed.
Syntax
find pattern [directory [to|over|after outpath]]
Parameterspattern
A pattern filename that may contain wildcards.
directoryThe pathname of the directory to search for matching filenames. All subdirectoriesare also searched.
to|over|after outpathWrites the output to the specified file rather than to the screen.
Additional Information
The find command recursively descends a directory hierarchy comparing the patternwith each data or directory file in the tree. If you do not specify a directory, findsearches the current working directory. However, you must specify a searchdirectory if you direct the output to a file using the to, over, or after parameter.
This command finds all files under the current directory that begin with term. Itwrites their pathnames to the findlog file in this directory:
find term* $ over findlog
This command displays the pathnames of all files on this volume that end in doc:
find *doc /

NET command findname
Command Reference Chapter 2 171
findnameFinds the spokesman system on the network that has cataloged a specified objectname in its Name Server table.
Syntax
findname object_name [P=property] [R=retries] [L]
Parametersobject_name
The name of the object to locate. This may be the name of a file server or virtualterminal server, or any other object in the Name Server object tables.
propertyThe property type of the object to be located; assumed to be a hexadecimal value.You need not specify an H after the value unless it contains the letters A-F. Anyletters in the hexadecimal value must be entered in upper-case (but the H need notbe). If a property type is not specified, 5H is the default.
retriesA decimal number of times the Name Server should try to find the spokesman using adifferent slot ID (necessary only for Multibus II spokesman systems). The maximumis 21. The default is 8.
L Additionally display the Ethernet address of the spokesman system.
Additional Information
Table 2-4 shows some of the property types defined by Intel. Types with values8000H and higher are available for user definition.

findname NET command
172 Chapter 2 Command Descriptions
Table 2-4. Property Types Used in Name Server Entries
Type Value Kind of Entry
0000H File server TSAP ID
0001H File client TSAP ID
0002H Name of client
0003H File server transport address
0004H Configuration objects
0005H Host unique ID
0000H-7FFFH Reserved by Intel
8000H-0FFFFH Available for user applications
The findname command provides information about the system whose Name Serverhas cataloged the specified object. The findname command returns the name of thesystem where the given object is entered. If an object by the same name is catalogedon multiple systems, only the first system found is listed. You may specify an objectby its name or by name and property type.
The findname command tries up to eight times to find the name of the system wherethe given object is entered. This is necessary because in Multibus II systems, the hostcan be located in any one of the slots, and the slot ID is used as part of the unique IDfor the object. If the Multibus II system contains more than eight slots, specify theretries option to increase the number of trials. Repeated trials are indicated by thismessage, where n stands for the number of trials:
finding iRMX System name - Trial n
In Multibus I and PC systems, the findname command finds the name of the host inthe first trial.
See also: Format of names and addresses, setname and loadname commands, inthis chapter
Error Messages<object_name>, illegal name
The name given in the command line is longer than 16 characters. Execute thefindname command again with a valid object name.
<object_name>, illegal propertyThe property type of the object specified in the command line is longer than fourcharacters. Execute the findname command again using a valid property type.

NET command findname
Command Reference Chapter 2 173
<object_name>, illegal optionThe switch specified in the command line is not correct. Execute the command againgiving the correct switch.
Spokesman name for object not foundThe name of the host with the property type 0005H is not entered in the object tableof the spokesman. The findname command could not find the name of thespokesman; it displays the Ethernet address of the spokesman system.
<name>, name does not existThe given object does not exist in the network.

format HI command
174 Chapter 2 Command Descriptions
formatFormats an iRMX or DOS volume on an attached device, such as a diskette or harddisk. The format command cannot format a device across a network.
✏ NoteYou can use this command in an esubmit file orrq_c_send_command system call if the form of the commanddoes not require user input. If the command requires user input inan rq_c_send_command system call, it will fail. However, youcan use a form of the command that requires user input in anesubmit file if you use the eoresponse and coresponse
subcommands.
See also: esubmit command, in this chapter
Syntax
format :logical_name:[volume_name] [named|DOS|physical[options]]
format :logical_name: getbadtracks [> pathname]
format :logical_name: bootstrap [msaboot|pcboot]
Use one of the three forms of the command shown above. The main optionalparameters for formatting named, DOS, and physical devices are shown below.The options for physical and DOS are a subset of the options for named.
HI command format
Command Reference Chapter 2 175
Options for Formatting Named Devices
Options for Formatting DOS Devices
format HI command
176 Chapter 2 Command Descriptions
Options for Formatting Physical Devices
Parameters
:logical_name:Logical name of the physical device-unit to be formatted. You must surround thename with colons.
volume_nameAn optional alphanumeric ASCII name, of up to 6 characters without embeddedspaces, to be assigned to a named volume. You must not leave spaces between thelogical name and the volume name.
na(med) The volume can store only named files; that is, it can hold many files that can beaccessed by individual pathnames. Diskettes and hard disks are typically formattedfor named files.
DOS The volume can store only DOS files.
p(hysical) (or pi)The volume can be used only as a single, physical file (the files, extensionsize,granularity, mapstart, and reserve parameters are not meaningful). If neithernamed nor physical is specified, the volume is formatted for the file type specifiedwhen the device was attached.
quickAn option for named and DOS devices that bypasses the normal low-level format andsimply writes the file system to the device.
HI command format
Command Reference Chapter 2 177
fi(les) = num
A decimal number, 1-65528, defining the maximum number of user files that can becreated on a named volume. (The maximum may be limited by differentcombinations of granularity and extensionsize.) The default number is 200.The reserve and msaboot parameters each require one of the files allocated.
force Forcibly deletes any existing connections to files on the volume before formatting thevolume. If connections exist and you do not specify force, you cannot format thevolume.
e(xtensionsize) (or es) = num
A decimal number, 3-255, specifying the number of bytes in the extension dataportion of each file. If not specified, the default extension size is 3 bytes.
g(ranularity) (or gu) = num
A decimal number, 1-65535, specifying the volume granularity. This is the minimumnumber of bytes to be allocated for each increment of file size on a named volume.The value you specify is rounded up to the next multiple of the device granularity,and becomes the default file granularity for every file created on the volume. If notspecified, the default granularity is the device granularity.
See also: Device tables, Appendix E
m(apstart) (or ms) = num
The block number on the volume where the fnodes file, bit map files, and rootdirectory should start. The size of the block is set by the granularity parameter.If no number is given, the OS puts the fnodes file in the center of the volume. If thenumber is too low, the OS places the map files at the lowest available space on thevolume.
i(nterleave) (or il) = num
A decimal number, 1-255, specifying the interleave factor for a named or physicalvolume. If not specified, the default value is 5. Track 0 is not affected by this value.
bt (or btfile or badtrackfile)Names a file containing bad track/sector information to be written to the volume.Unless you specify overwrite, the information from the file is merged with any badtrack/sector information existing on the disk, and is written to the disk before thevolume is formatted.
btonly Identical to badtrackfile, except that the rest of the volume is not formatted afterthe bad track/sector information is written.
s(etbadtracks) (or sbt)Invokes a user interface that allows you to enter bad track/sector information fromthe keyboard.

format HI command
178 Chapter 2 Command Descriptions
o(verwrite) (or ow)Bad track/sector information existing on the disk is overwritten by information youprovide. This parameter is only meaningful when used with the badtrackfile,btonly, or setbadtracks options. If you do not specify overwrite with one ofthese options, the default is to merge the bad track/sector data you supply with thebad track/sector information already on the device.
r(eserve)Creates the special file r?save at the end of a volume after formatting. The volumelabel file and the fnode file are copied to r?save. This file may be used inconjunction with the diskverify utility to back up the fnodes file on the volume. Ther?save file is not updated when files are altered; you update the file by usingdiskverify or by specifying backup in the shutdown command.
q(uery) Issues this prompt for permission to format the volume:<volume name>, format?
Enter Y or R to format the volume. Any other response is considered to be a no.
world Makes the World user the owner of the formatted disk's root fnode, regardless ofwhat user issues the format command.
msa(boot)Writes the Multibus II System Architecture (MSA) second stage bootloader in a filenamed r?secondstage and initializes the Bootloader Location Table (BOLT) in thevolume label to point to it. When this parameter is used with bootstrap, ther?secondstage file is written without formatting the rest of the volume.
pcbootWrites the second stage bootloader for PC platforms to track 0 of the volume. Whenthis parameter is used with bootstrap, the second stage is written withoutformatting the rest of the volume.
gbt (or getbadtracks)Existing bad track/sector information is read from the disk and displayed. Thisoption may be used only on a hard disk that is not the system device (:sd:). If thisoption is specified, all other options are ignored. However, you can redirect theoutput to a file (> pathname), and use the file when reformatting the disk.
bs (or bootstrap)Writes the second stage of the Bootstrap Loader onto track 0 without formatting thevolume. When this parameter is specified, the only options that apply are msabootor pcboot.

HI command format
Command Reference Chapter 2 179
Additional Information
✏ NoteYou cannot use this command with a device that you accessthrough NFS or through iRMX-NET.
Hard disks, diskettes, and RAM disks must be formatted as named or DOS volumesbefore you use them to store and access files. For example, you must format allpreviously unused diskettes before storing files on them. Formatting a volume asnamed or DOS also includes a physical format, or low-level format.
If you do not specify named, DOS, or physical, the volume is formatted asappropriate for the file driver attached to the connection specified when the devicewas attached. For example:
format :c_rmx3: /*formats a named disk*/
format :c_dos: /*formats a DOS disk*/
Although you could use the format command to format a tape, the proper headerinformation is not created on the tape for use with the backup and restorecommands. Instead, use the format option of the backup command.
Before formatting a volume, you must attach it with the attachdevice command.When formatting a diskette, you must attach it by its physical name. The physicalname you specify determines the device characteristics used when you invokeformat.
See also: attachdevice, in this manual
Low-Level Format for Partitioning
A named or DOS format of a complete (non-partitioned) volume includes a low-levelformat, unless you also specify the quick option. On a hard disk where you want tocreate partitions, you must first do a low-level format, then partition the volume, andfinally format each partition. To do the low-level format, specify named or DOS,without the quick option. (Do not specify a physical low-level format aspreparation for partitioning.) Then partition the disk with the rdisk command.
After partitioning, format each partition as a named or DOS volume. The formatcommand performs only a high-level (file system) format when you format apartition. You can specify the quick option, but it is not necessary to prevent a low-level format after partitioning.
Volume Name
Specifying a volume name makes a convenient volume reference (for example, itidentifies a diskette with a lost or destroyed label). The volume name is displayed

format HI command
180 Chapter 2 Command Descriptions
when you list any directory of the volume. Once the volume is formatted, you don'tneed to specify the volume name in commands; you only specify the logical name forthe device.
DOS Format Option
This option forces a DOS file system to be installed on the device. It overrides thefile driver that is attached to the logical device. A DOS file system can also beinstalled by attaching to the device using the DOS file driver.
These examples illustrate the DOS format option:
attachdevice d_dos as d_dos DOS
format :d_dos:
or
format :d_dos: DOS
This is the output message for DOS volumes:
volume (<volume name>) will be formatted as a DOS volume
device gran = 512 interleave = 5
root dir size = 512 volume size = 30,719 K
volume gran = 2,048 available bytes = 30,656 K
fat type = 16 number of clusters = 15,328
number of fats = 2 sectors/cluster = 4
sectors/fat = 60
Where:
device gran The low-level sector granularity of the device.
interleave The sector interleave factor.
root dir size The number of file slots available in the root directory.
volume size The total volume size.
volume gran The allocation granularity (size of a cluster).
available bytes The free space on the device (total space - file systemoverhead).
fat type Either a 12-bit or 16-bit FAT (file allocation table).
number of clustersTotal number of allocation units in the file system.
number of fats Is always 2.
sectors/cluster The number of disk sectors per each allocation cluster.
HI command format
Command Reference Chapter 2 181
sectors/fat The size of each fat, in sectors.
Quick Format Option (Named and DOS Only)
This option causes the format command to bypass the low-level format and simplywrite the file system to the device. It is useful for formatting devices that have beenpreviously formatted, either by the manufacturer, or by a previous use of either theDOS or iRMX format command. A file system can be quickly changed from onesupported file system to another by using this option. All data on the device is lost,just as in a full format. The quick option is ignored if you specify a physicalformat.
This is an example quick format command:
format :a_dos: QUICK
When performing a quick format, format displays this message:
volume (xyz) will be quick-formatted as a [DOS|NAMED] volume
Files and Fnodes (Named Only)
The number of fnodes on a volume defines the number of files that can exist on thevolume. Each fnode is a data structure that contains information about a file. Eachtime you create a file on the volume, the OS records information about the file in anunused fnode. Later, it uses the fnode to determine the location of the file on thevolume. You can enter the mapstart option to locate fnodes anywhere on a volume.If this option is not entered, the OS puts the fnodes in the center of the volume.
The number of fnodes created during formatting is the number you specify with thefiles parameter, plus 7. Six of the additional fnodes are for internal system filesand one is for the root directory. If you specify the reserve or msabootparameters, one fnode is used for each parameter. For example, if you use the defaultfiles value of 200, 207 fnodes are established and you may create 200 files on thevolume. If you specify reserve and msaboot, you may create 198 files.
Two of the internal system files created during formatting are not listed in adirectory. The other four files (five if you specify reserve) are listed in the rootdirectory as hidden files. The OS grants World read access to these files.
format HI command
182 Chapter 2 Command Descriptions
The files are listed below; the volume label file is a special file occupying the first3328 bytes of the volume:
File Descriptionr?spacemap Volume free space mapr?fnodemap Free fnodes mapr?badblockmap Bad blocks mapr?volumelabel Volume labelr?save Save area for fnodes and volume label (created by the
reserve parameter)
See also: Disk Verification, Appendix B
Owner of the Root Directory (Named Only)
The fnode for the root directory lists the user who formats the volume as the owner,giving that user all access rights. No other user has access to the root directory untilthe owner explicitly grants access. The owner can grant other users access to thevolume with the permit command. However, because the owner has all access rightsto the root directory, the owner can obtain exclusive access to the volume, and canobtain delete access to any file created on the volume, even files created by otherusers.
Extension Data (Named Only)
Each fnode contains a field that stores extension data for its associated file. An OSextension can access and modify this extension data by invoking thea_get_extension_data and a_set_extension_data system calls. You can use theextensionsize parameter to set the size of the extension data field in each fnode.Although you may specify any size from 0 to 255 bytes, the HI requires all fnodes tohave at least 3 bytes of extension data.
See also: a_get_extension_data and a_set_extension_data system calls, SystemCall Reference
Volume Granularity (Named Only)
The volume granularity is the minimum block assigned for files created on thevolume. For example, if the volume granularity is 128 bytes, the I/O Systemautomatically allocates permanent storage to each new file created on the volume inmultiples of 128 bytes, regardless of whether the file requires the full amount. Thedefault volume granularity is always the granularity of the physical device. Whenyou specify the granularity, the value is rounded to the next multiple of devicegranularity. That number is written in the header of the volume, where it becomesthe default file granularity when a file is created on the volume.
HI command format
Command Reference Chapter 2 183
Using a volume granularity larger than 1024 might cause users to exceed theirmemory limits when executing programs that reside on the volume. This error canoccur because the OS uses the volume granularity as a minimum buffer size whenreading and writing files.
Relationship Between Files, Extension Size, and Granularity (NamedOnly)
Although the files, extensionsize, and granularity parameters have themaximum values listed in the parameter descriptions, the combination of theseparameters must also satisfy this formula:
(87 + extensionsize) * (files + 7) / granularity < 65535
The format command displays an error message if the combination of values youspecify for these parameters exceeds this limit.
Map Files (Named Only)
If you have specified a map-files location (either implied or explicit) in an area whichhas a bad track or for which an alternate track was assigned, format allocates thesefiles to the nearest available area, and then asks for permission to move the files inone of these ways:
Map files located on a track assigned an alternate
Map files located on a bad track
A response of Y causes the files to be relocated and this message to be displayed:
map start relocated to <hex-location>
This means you do not have to compute the location of the maps.
Interleave Factor (Named and DOS Only)
The interleave factor applies to volumes formatted either for named or physical files.The interleave factor specifies the logical sector sequence. If the consecutively-accessed sectors of a disk are staggered (not physically consecutive), disk access timecan decrease considerably. The reason for this decrease is that although a controllercannot read a sector and issue another read command in the time it takes for the nextsector to be positioned under the head, the controller can perform this operation inless time than it takes for the disk to revolve once. Therefore, if consecutively-accessed sectors are correctly interleaved, the next sector accessed will be positionedunder the read head just as the controller becomes ready to read it. An interleavefactor of two means that as the disk rotates, the controller consecutively accessesevery second sector. An interleave factor of five means that the controllerconsecutively accesses every fifth sector.

format HI command
184 Chapter 2 Command Descriptions
The interleave factor also implies the number of disk rotations necessary to access allthe sectors on a given track in order. For example, with an interleave factor of twothe controller might access sectors 0, 2, and 4 on the first rotation and sectors 1, 3,and 5 on the second.
How to Select an Interleave Factor (Named and DOS Only)
The interleave factor is important when large transfers of consecutive data take placeat speeds that approach the maximum transfer rate of the disk. For hard disks, therevolution speed is high enough that the type of application does not affect the choiceof interleave factor. Format hard disks with an interleave factor optimized for theturn-around speed of the disk controller. Recommended values for hard disks areshown below.
System Controller Interleave Controller Interleave
DOSRMX SCSI 1 non-SCSI 2
Multibus II any 1
Multibus I SBC 221 1 SBC 215G, 5 1/4" 5
For diskettes with a slower revolution speed, the default value 5 is typically used.The ideal interleave factor depends on the turn-around time of software that controlsI/O operations. The turn-around time is the time between reading a sector andbecoming ready to read the next sector.
In the cases listed below, the turn-around time between sector accesses is different,indicating a different interleave factor:
• When you bootstrap load the OS, the Bootstrap Loader instructs the diskcontroller to read one sector at a time. The turn-around time depends on theexecution overhead of the Bootstrap Loader and is comparatively long. A largeinterleave factor is optimum for diskettes used with the Bootstrap Loader.
• When you load an application program, the Application Loader reads severalsectors at a time into its internal buffer, taking a relatively long time to processthe data. The ideal interleave factor for diskettes is somewhat smaller than forthe Bootstrap Loader.
• When you invoke programs that transfer large amounts of consecutive data (suchas the copy command), data transfers can involve many sequential sectors. Thecontroller accesses sectors on a given track as fast as possible. Optimize theinterleave factor for the turn-around speed of the disk controller.
If you do not know the optimum interleave factor, it is better to specify too large avalue rather than too small. An interleave factor slightly larger than optimum causesthe disk to move only an extra sector or two before reaching the correct sector.

HI command format
Command Reference Chapter 2 185
However, an interleave factor smaller than optimum causes the disk to make nearly acomplete revolution before reaching the sector.
Getting Bad Track Information (Named Only)
When you use the getbadtracks parameter, the bad track information is displayed(or written to a file) in this form:
cyl head sector
xxx xxx xxx
If you use I/O redirection (> pathname) to write this information to a file, you mayedit the file to remove the header information and add your own data. Then re-invoke format and specify this file with the badtrackfile or btonly parameter.
Writing Bad Track Information (Named Only)
The badtrackfile, btonly, and setbadtracks parameters allow you to enterthe manufacturer's bad track information before actually formatting the disk. Withthe badtrackfile and btonly parameters, bad track information in the file mustbe in this format, which constitutes a triplet:
cylinder_number head_number sector_number <CR><LF>
Where:
cylinder_numberThe cylinder number of the bad track or sector
head_numberHead number of the bad track or sector
sector_numberThe number of the bad sector on the track indicated by the cylinder andhead numbers. On devices that only support bad track information, thisvalue must be set to 0.
The triplets may be separated by spaces, commas, carriage returns, or line feeds.Each triplet is terminated with a carriage return-line feed combination.
If you use the setbadtracks parameter to enter bad track information, this messageis displayed:
Enter bad track information in <cylinder_number>, <head_number>,
<sector_number> triplets, one triplet per line. Numbers can
be in decimal or hexadecimal form. Entry of <sector_number>
is optional. An empty line terminates the entry process.
<cylinder>, <head>, <sector> =
format HI command
186 Chapter 2 Command Descriptions
The last line is the prompt line for the utility. Enter the cylinder, head, and sectornumber in that order on one line and then enter a <CR>. The prompt is againdisplayed; enter either more bad track information or <CR>. A <CR> with no entriesindicates that all the bad track information has been entered. The system thendisplays the entries you made, in this form:
n bad track triplets entered.
Entered bad track information:
entry cyl head sector
1 nnnn nnnn nnnn
2 nnnn nnnn nnnn and so on
If you want to change or add to your previous input, type the entry, cylinder, andhead numbers (sector number is optional) of the new or existing information andpress <CR>. Repeat this process until all changes have been made. When you finishentering information, press <CR> on a line by itself. A summary of the bad trackinformation is again displayed. If the bad track information is correct, press <CR>again to begin formatting the disk.
Bad track information you enter (in a file or interactively) is not checked for validity.Only the first 255 triplets are used when writing bad track information to a non-ESDIdrive configuration.
When writing to an ESDI drive on an SBC 221 controller board, the first 202 badtrack entries per head are used. If you have greater than 2048 defect entries, youmust invoke the format command with the btonly parameter and either thebadtrackfile or setbadtracks parameter. Do this multiple times in 2048 defectblocks, until all the bad track information is written to the disk. When writingmultiple defect blocks, use the overwrite parameter the first time you invoke theformat command. This overwrites any old bad track information. Omit thisparameter in subsequent executions of the format command.
Bootstrap Loader and the Format Command (Named Only)
The Bootstrap Loader operates in three stages on a Multibus I system, in two stageson a Multibus II system, and in three stages on a PC system. On all three buses, thefirst stage of the Bootstrap Loader resides in the system firmware and a real modesecond stage resides in a reserved area on Track 0 of the disk. On a Multibus IIsystem, an additional MSA second stage resides as a named file somewhere on thehard disk. This MSA second stage is pointed to by an entry in the BootloaderLocation Table (BOLT) located in a reserved area on Track 0 of the disk. The thirdstages on Multibus I and PC systems are named files located on the disk.

HI command format
Command Reference Chapter 2 187
To avoid forcing you to reformat entire disks when the second stage of the BootstrapLoader changes, you can specify the bootstrap parameter to write the second stageof the Bootstrap Loader onto track 0 without reformatting the rest of the volume.
▲▲! CAUTIONIf you fail to specify the bootstrap parameter, format willformat the entire volume.
You can also add the MSA second stage to an existing iRMX disk by using themsaboot parameter with the bootstrap parameter. In this case, both secondstages, (real mode and MSA) are added to the disk. The real mode second stageoverwrites the existing one on track 0, and the MSA second stage replaces anyexisting MSA second stage, in the /r?secondstage file.
You can replace the second stage for PC platforms on an existing iRMX disk byusing the pcboot parameter with the bootstrap parameter.
Any of these commands copy the second stage of the Bootstrap Loader onto track 0of a device that was attached using :f: as the logical name:
-format :f: BS <CR>
-format :f: bootstrap <CR>
-format :f: files= 300 granularity=200 force bootstrap <CR>
-format :f: BS MSA
The remainder of the files on the volume are unaffected. (In the third example, thefile, granularity, and force switches are ignored because the bootstrapparameter has precedence over any other format parameter.)
Output Display
The format command displays one of these messages while formatting. This is themessage for physical volumes:
volume (<volume name>) will be formatted as a physical volume
device gran = <number>
interleave = <number>
volume size = <k/m_number>
TTTTTTTTTTTTTTTTTTT...
volume formatted
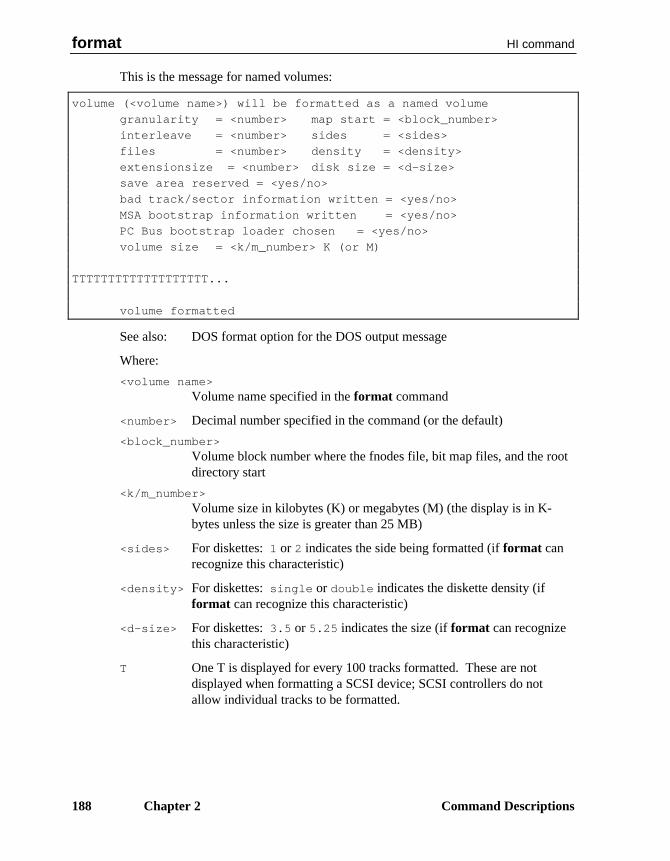
format HI command
188 Chapter 2 Command Descriptions
This is the message for named volumes:
volume (<volume name>) will be formatted as a named volume
granularity = <number> map start = <block_number>
interleave = <number> sides = <sides>
files = <number> density = <density>
extensionsize = <number> disk size = <d-size>
save area reserved = <yes/no>
bad track/sector information written = <yes/no>
MSA bootstrap information written = <yes/no>
PC Bus bootstrap loader chosen = <yes/no>
volume size = <k/m_number> K (or M)
TTTTTTTTTTTTTTTTTTT...
volume formatted
See also: DOS format option for the DOS output message
Where:
<volume name>Volume name specified in the format command
<number> Decimal number specified in the command (or the default)
<block_number>Volume block number where the fnodes file, bit map files, and the rootdirectory start
<k/m_number>Volume size in kilobytes (K) or megabytes (M) (the display is in K-bytes unless the size is greater than 25 MB)
<sides> For diskettes: 1 or 2 indicates the side being formatted (if format canrecognize this characteristic)
<density> For diskettes: single or double indicates the diskette density (ifformat can recognize this characteristic)
<d-size> For diskettes: 3.5 or 5.25 indicates the size (if format can recognizethis characteristic)
T One T is displayed for every 100 tracks formatted. These are notdisplayed when formatting a SCSI device; SCSI controllers do notallow individual tracks to be formatted.

HI command format
Command Reference Chapter 2 189
If you format a SCSI hard disk using the PCI driver, the volume size information isautomatically obtained by querying the SCSI device. If the capacity of the devicechanges as a result of the format, one of these messages is displayed. The firstmessage is for a physical format; the second for a named format:
formatted capacity = <size>
formatted capacity = <size> mapstart = <block_number>
If you specify the bootstrap or btonly parameter, one of these messages isdisplayed (instead of volume formatted):
Bootstrap Loader written
Bad Track/Sector Block written
If the error code E_IO_ALT_ASSIGNED is returned by a driver when formatting atrack, the track number is entered into a table and displayed when formatting iscomplete. There should be an entry in this table for every BTI track specified, exceptthose that reside in the alternate track area. The cylinder and head numbers are inhexadecimal.
The following tracks were assigned an alternate:
cyl hd cyl hd cyl hd cyl hd cyl hd
# # # # # # # # # #
If the E_IO_NO_SPARES error code is returned by a driver when formatting a track,the number of reserved alternate tracks is exhausted. The sectors of that track aremarked in the Bad Block Map File and entered in the Volume Space Map File as theywere assigned. The track is entered into a table and displayed as follows whenformatting is complete:
The following tracks were marked as bad:
cyl hd cyl hd cyl hd cyl hd cyl hd
# # # # # # # # # #
Formatting Uniform Versus Standard Granularity Diskettes
Previously, iRMX OSs supported iNDX-based development. This required a specialdiskette format to allow the various systems to read the same diskettes. Standardgranularity diskettes were attached using the wmf0 DUIB and formatted as follows:
format :f:disk extensionsize = 41 mapstart = 0
These switches provide an iNDX compatible, standard granularity format, which canbe read by SCSI controllers.
You should use uniform granularity format diskettes with newer Intel products suchas the System 520, and with newer boards. The SCSI interface in the newer Intel
format HI command
190 Chapter 2 Command Descriptions
boards reads uniform granularity diskettes using the wdf0 and wqf0 DUIBs. Withthese DUIBs, track 0 of a standard granularity diskette is unreadable.
Although the PCI device driver can read standard format diskettes if they wereformatted with the iNDX-compatibility switches, these are not the default values forthe format command. If it is necessary to transfer files to the System 520 from asystem which does not have a high density drive, use the wdf0 DUIB to ensurecreating a uniform format diskette, readable on all iRMX systems.
Error Messages
<logical_name>, can't attach device
<logical_name>, <condition code:mnemonic>Format cannot attach the device for formatting, or it cannot reattach the device (thatis, restore it to its original condition) after formatting takes place.
<logical_name>, can't detach device
<logical_name>, <condition code:mnemonic>Format cannot detach the device for formatting, which means that the volume doesnot exist, the volume is busy, or the device on which the volume is mounted is notcurrently attached to the system.
<logical_name>, device is in useYou cannot format the volume because there are outstanding connections to files onthe volume and you did not specify the force parameter.
<vol_name>, fnode file size exceeds 65535 volume blocksThe combination of values specified for files, granularity, andextensionsize is too great. See the formula described earlier.
<number>, invalid numberYou specified an out-of-range number for any of the files, granularity,extensionsize, or interleave parameters.
<logical_name>, map files do not fitThe volume is too small for the map files or the map start block is too high to allowroom for the map files.
map files do not fit with save areaEither the volume is too small for both the map files and the save area, or the mapstart block is too high in disk storage memory to allow for the map files and the savearea.
<logical_name>, outstanding connections to device have been deletedThere were outstanding connections to files on the volume. However, because youspecified the force parameter, format deleted those connections. This is a warningmessage that does not prevent formatting the volume.
HI command format
Command Reference Chapter 2 191
0023 : E_SUPPORT PCBOOT not supported for standard diskettesAn attempt was made to write the second stage of the bootstrap loader to a standardformat diskette.
0085 : E_LIST, too many valuesYou entered multiple logical_name/volume_name combinations separated bycommas; format can format only one volume per invocation.
<logical_name>: <condition code:mnemonic>
unit status <unit status code> while writing block numberAn I/O error occurred while writing the label, map files, or save area to a named file.
<logical_name>: <condition code:mnemonic>
unit status <unit status code> while formatting trackAn I/O error occurred while physically formatting the volume. If anE_IO_ALT_ASSIGNED error code is returned, you can consider this message awarning.
<volume_name>, volume name is too longThe volume name must not be longer than six characters.
Track zero bad, cannot writeThe volume label track (track 0) is marked in the Bad Block Map.
cannot relocateThis is a warning message displayed when the map files are located on one or moresectors which have been assigned an alternate, and a suitable location cannot befound on the disk.
cannot relocate...abortingThe map files are located on a sector or sectors which have been marked in the BadBlock Map and an alternate location cannot be found.
Save file located on a bad track, cannot writeThe save area is located on a sector or sectors which have been marked in the BadBlock Map.
<filename>, cannot open bad track/sector information file
<filename>, <condition code:mnemonic>The file containing the bad track/sector information cannot be opened for reading.
too many bad track/sector information entriesThe file containing the bad track/sector information has too many entries, or thecombination of file entries and information on the volume cannot be merged.
<filename>, illegal bad track/sector informationThe file containing the bad track/sector information has the wrong format.
format HI command
192 Chapter 2 Command Descriptions
badtrackfile option missing, cannot replace Bad Track/Sector
Information BlockYou entered the overwrite option without the badtrackfile parameter.

TCP/IP command ftp
Command Reference Chapter 2 193
ftpThe user interface to the File Transfer Protocol (FTP), which allows you to transferfiles to and from a remote network site.
✏ NoteYou can use this command in an esubmit file if the form of thecommand does not require user input. If the command requiresuser input, you must use the esubmit eoresponse andcoresponse subcommands to get the user input. In either case,errors from FTP will not percolate to the esubmit variablecommandexcep.
Do not use this command in an rq_c_send_command system call.
See also: esubmit command, in this chapter
Syntax
ftp [-d] [-g] [-i] [-n] [-t] [-v] [host [port]]
Parameters
-d Enables debugging (see debug).
-g Disables filename globbing (see glob).
-i Turns off interactive prompting during multiple file transfers (see prompt).
-n Disables autologin upon initial connection.
-t Enables packet tracing (see trace).
-v Enables verbose mode (see verbose).
host A host name or Internet address.
port A port number or a port name defined in the /etc/services file.
Most options correspond to an ftp command and are discussed in more detail in thedescription of the referenced command.
Additional Information
The ftp client includes a command interpreter which interactively executes filetransfer commands. The command interpreter prompt is ftp>.
ftp TCP/IP command
194 Chapter 2 Command Descriptions
If no host is specified on the command line, ftp enters its command interpreter andawaits further instructions from the user. If a host is specified, ftp immediatelyattempts to establish a connection to an FTP server on that host. If the host isfollowed by a port, ftp attempts to contact an FTP server at that port; otherwise ituses the default FTP port number.
If autologin is enabled (the default), ftp checks the netrc file in the user's homedirectory for an entry describing a login on the remote host. If such an entry exists,ftp automatically logs in to that account. If no entry is found, ftp uses the local username as the login on the remote host and prompts for a password (and account, ifappropriate) to complete the login. If autologin is disabled, ftp establishes the initialconnection to the remote host and returns to the command interpreter. The usercommand must then be invoked to log in to that host.
Filenames specified as arguments to ftp commands are processed according to theserules.
1. If the filename is -, stdin is used for reading and stdout is used for writing.
2. If the first character of the filename is a pipe symbol (|), the remainder of theargument is interpreted as a shell command. Ftp will fork a shell with thesupplied argument, and pipe the output of the ftp command to the shell. If theshell command includes spaces, the entire argument must be enclosed inquotation marks (for example, "|ls -lt"). There can be no space between thepipe symbol and the shell command.
3. If globbing is enabled, local filenames are expanded according to shellmetacharacters (see the glob command).
4. The transformations defined by case, ntrans, and nmap are applied whenever adestination filename is derived from a source filename. When you use mget orget with an unspecified local filename, case, ntrans, and nmap are applied.When you use mput or put with an unspecified remote filename, ntrans andnmap are applied. These transformations are of particular interest whenconnecting to a remote host with different file naming conventions or practices.
5. If runique or sunique is on, a unique local or remote destination filename iscreated by appending a unique numeric extension to the filename.
An FTP command works only if the remote FTP server supports it. Use rhelp to seewhich requests the remote server recognizes. Commands may be abbreviated, solong as they remain unique. Ftp will prompt for required arguments omitted from acommand. Command arguments that have embedded spaces should be enclosed indouble quotation marks.

TCP/IP command ftp
Command Reference Chapter 2 195
▲▲! CAUTIONUse the mget and mdelete commands with caution. You mayoverwrite or remove files you did not intend to.
Specifying a directory where a plain filename is expected couldproduce unexpected results. For example, the ftp commandls -l file will put a long directory listing of the current workingdirectory into file instead of returning a long listing of that file.
Commands
These commands are recognized by the ftp command interpreter.
account passedSpecify the supplemental password or account name required by somesystems for access to system resources. This command has no meaningon the iRMX and Unix OSs; they do not implement accountinformation.
allbinary Toggle the use of binary type for non-file transfer operations.Normally, these operations are done in ASCII mode regardless of thefile transfer type. If allbinary is on and the file transfer type is binary,non-file transfer operations will also be done in binary mode.
append local-file [remote-file]Append local-file to a file on the remote host. If remote-file is notspecified, the remote file will be named local-file. Ftp uses the currentsettings for file type, format, transmission mode, and structure.
ascii Set the data representation type to ASCII. This is the default type.
bell Toggle sounding of a bell after each file transfer command iscompleted. By default, the bell is turned off.
binary Set the data representation type to binary.
bye Terminate the FTP session with the remote server and exit the ftpprogram.
case Toggle case-mapping of remote filenames during a get or mgetcommand. When case-mapping is enabled, uppercase letters in theremote filename are changed to lowercase letters in the local filename.By default, case-mapping is turned off.
cd remote-directoryChange the working directory on the remote host to remote-directory.
ftp TCP/IP command
196 Chapter 2 Command Descriptions
cdup Change the working directory on the remote host to the parent of thecurrent working directory.
chmod mode remote-fileChange the permission mode on the remote file or directory to mode(interpreted by the remote server). An iRMX FTP server accepts only a3-digit octal value; for example, 777 grants all permissions.
See also: chmod( ) function, C Library Reference
close Terminate the FTP session with the remote server and return to theclient FTP command interpreter.
cr Toggle stripping of carriage returns during ASCII file retrieval. Whenenabled, the carriage return is stripped from each carriagereturn/linefeed pair encountered in the file, leaving the linefeed recorddelimiter recognized by Unix. By default, carriage return stripping isoff.
debug Toggle debug mode. When debug mode is on, each ftp protocolcommand sent to the remote server is displayed, preceded by the string-->. By default, debug mode is off.
delete remote-fileDelete the file remote-file on the remote host.
dir [remote-file [local-file]
dir [options [local-file]]List the current remote directory or a specified file or directory on aremote host. Specified options are supplied to the remote list command(for example, Unix ls or VMS dir). If a local file is specified, the list iswritten to that file. Note that if the first argument is options, the secondargument is assumed to be local-file.
disconnect A synonym for close.
form format Set the vertical format control for ASCII and EBCDIC file transfers toformat. Valid formats are carriage-control, non-print (thedefault), and telnet. Only the non-print format is supported.
get remote-file [local-file ]Retrieve the specified remote-file and store it on the local host. If local-file is not specified, the local file will be named remote-file. Ftp usesthe current settings for file type, format, transmission mode, andstructure.
glob Toggle local filename globbing. With globbing disabled, all local filesand pathnames are treated literally. With filename globbing enabled,

TCP/IP command ftp
Command Reference Chapter 2 197
each local file or pathname is processed for the shell metacharacters * ?[ ] and ~. An additional pair of metacharacters,{ and }, may enclose several comma-separated strings, for each ofwhich a match is sought. Globbing is always on with reference toremote files; it is on by default with reference to local files.
hash Toggle hash mark (#) printing for each data block transferred. The sizeof a data block is 4096 bytes. By default, hash mark printing is off.
help [command]Display a list of the ftp commands (no argument) or information aboutthe specified command.
idle [seconds]Display the current inactivity timer on the remote host or set it toseconds.
image Same as binary.
lcd [directory]Change the working directory on the local host to the user's homedirectory (no arguments) or to the specified directory.
ls [remote-file [local-file]]
ls [options [local-file]]Same as dir. Note that if the first argument is options, the secondargument is assumed to be local-file.
macdef mnameDefine a macro that will be invoked by using the name mname.Subsequent lines will be stored as the macro definition. A null line(consecutive newlines or carriage returns) ends the macro definition.Within the macro definition, a dollar sign specifies substitution ofarguments from the macro invocation line. The sequence $n, where n isa number, will be replaced by the n argument (for example, $1 is thefirst argument). The sequence $i will cause the macro to loopautomatically, executing once with each argument. Escape the dollarsign with a backslash (\$) to prevent this special treatment. Themaximum number of macros is 16. The maximum definition length is4096 characters. A macro definition is valid only for the duration of aconnection to a remote host; all macros are automatically deleted whenthe connection is closed.
macdel mnameDelete the macro mname.

ftp TCP/IP command
198 Chapter 2 Command Descriptions
macls [mname]List the names of defined macros or list the definition of the macromname.
mdelete remote-file ...Delete the specified files on the remote host. If globbing is enabled,each filename is first expanded.
mdir remote-file ... local-fileObtain an extended directory listing of multiple files on the remote hostand place the result in local-file. Globbing must be turned off whenusing this command. Note that the specification of local-file ismandatory.
mget remote-file ...Retrieve the specified files from the remote host and place them in thecurrent local directory. If globbing is enabled, the specification of eachremote file will first be expanded.
mkdir directory-nameMake a directory on the remote host.
mls remote-file ... local-fileObtain an abbreviated listing of multiple files on the remote host andplace the result in local-file. Globbing must be turned off when usingthis command. You must specify a local file.
mode [mode-name]Set the file transmission mode to mode-name. Valid modes are block,compressed, and stream (the default). Only the stream mode issupported.
modtime remote-fileDisplay the last modification time of the remote file.
mput local-file ...Transfer multiple files from the current local working directory to thecurrent working directory on the remote host.
newer remote-fileGet the specified remote file if a local file of that name does not exist orif the remote file has a later modification date than the local file of thesame name.
nlist [remote-file [local-file]]
nlist [options [local-file]]List name(s) of the current directory or a specified file or directory on aremote host. Specified options are supplied to the remote list command
TCP/IP command ftp
Command Reference Chapter 2 199
(for example, Unix ls or VMS dir). If a local file is specified, the list iswritten to that file. Note that if the first argument is options, the secondargument is assumed to be local-file.
nmap [inpattern outpattern]Remove (no arguments) or set the filename mapping mechanism.Filename mapping automatically derives a destination filename fromthe source filename during get, mget, put, and mput commands. Thisis of particular interest when connecting to a non-Unix remote host withdifferent file naming conventions or practices.
The input pattern consists of the variables $1 through $9 and literals.This pattern is matched against a source filename to extract the portionsof interest. The input pattern cannot contain spaces.
The output pattern specifies the manner in which the variables derivedby the input pattern are used to create the destination filename. Thevariables $1 through $9 are replaced by their derived values. Thevariable $0 is replaced by the original source filename. The pattern[str1,str2] is replaced by str1 if str1 is not a null string or by str2 if str1is a null string. All other spaces and characters are treated as literals.
For example, the command nmap $1;$2 $1.$2 can be used to create aUnix equivalent of the VMS version number extension by replacing thesemicolon with a period.
ntrans [inchars [outchars]]Remove (no arguments) or set the filename character translationmechanism. Character translation automatically derives a destinationfilename from the source filename during get, mget, put, and mputcommands. This is of particular interest when connecting to a remotehost with different file naming conventions or practices.
If a character in the source filename matches the n character in inchars,it is replaced by the corresponding character from outchars to create thedestination filename. If the inchars string is longer than the outcharsstring, the characters without a corresponding output character areignored in the source filename.
For example, the command ntrans ;$-% . will translate semicolons toperiods wherever they appear and ignore all dollar signs, hyphens, andpercent signs.
open host [port]Establish a connection to the FTP server on the specified remote host.Port is used to specify an alternate FTP server; it can be the actual port

ftp TCP/IP command
200 Chapter 2 Command Descriptions
number or the service name. If autologin is enabled (the default), ftpwill also attempt to automatically log the user in.
prompt Toggle interactive prompting, which is turned on by default. Interactiveprompts occur during multiple file transfers, to allow the user toselectively retrieve or store files. If prompting is turned off, mget andmput transfer all specified files.
proxy ftp-cmdExecute an FTP command on a secondary control connection. Thiscommand enables you to open simultaneous connections to two FTPservers and transfer files between them instead of between the localclient and a server. The original FTP connection is called the primarycontrol connection; the connection made through the proxy command iscalled the secondary control connection. The server on the secondaryconnection must support the FTP protocol command PASV.
The first proxy command should be open, to establish the secondaryconnection. The proxy command ? displays the list of commands thatcan be used on the secondary connection. These FTP commandsbehave differently when executed as proxy commands:
Command Differenceopen will not define new macros during autologinclose will not erase existing macro definitionsget, mget transfer files from the primary server to the secondary
server instead of to the local hostput, mput,append
transfer files to the primary server from the secondaryserver instead of from the local host
put local-file [remote-file]Copy the local file to the remote host. If remote-file is not specified, theremote file will be named local-file. Ftp uses the current settings forfile type, format, transmission mode, and structure.
pwd Display the pathname of the current remote working directory.
quit A synonym for bye.
TCP/IP command ftp
Command Reference Chapter 2 201
quote arg ... The specified arguments are sent, verbatim, to the remote FTP server.A single FTP reply code is expected in return. This command is used toavoid processing of a command by the local FTP client, and facilitatesthe sending of an explicit FTP protocol command to the remote serverwhen the client does not implement the related command.
recv remote-file [local-file]A synonym for get.
reget remote-file [local-file]Similar to get, but if local-file already exists and is smaller than remote-file, it is assumed to be a partially transferred copy of the file. Thetransfer is resumed from an offset into the remote file equal to the bytecount of the local file.
rename remote-file new-nameRename the remote file to new-name.
reset Clear the reply queue to resynchronize the command/reply mechanismbetween the FTP client and server.
restart markerRestart the file transfer immediately following get or put at theindicated marker, which is a byte offset into the file.
rhelp [command]Request a list of the FTP protocol commands implemented by theremote server (no arguments) or an explanation of the specifiedprotocol command.
rmdir directory-nameDelete a directory on the remote host.
rstatus [file] Show the status of the remote host or of the specified file on the remotehost.
runique (receive unique) Toggle the creation of unique local filenames whenusing get and mget; receive unique is turned off by default. If runiqueis on and the destination filename already exists, a numeric extension isadded to the name, incrementing the number sequentially until a uniquename is created. For example, if the target local filename is fortune andthat file already exists, the target name becomes fortune.1. If fortune.1already exists, the target name becomes fortune.2, and so on withextensions 1 through 99. If all versions of the file already exist, thetransfer fails. If the transfer succeeds, the unique filename will bedisplayed.
ftp TCP/IP command
202 Chapter 2 Command Descriptions
send local-file [remote-file ]A synonym for put.
sendport Toggle the use of the FTP protocol PORT command when establishinga data connection. When enabled (the default), ftp sends a PORTcommand to inform the server which local port the client uses to listenfor the data connection. The server will then connect to that port.When disabled, ftp listens for all data connections on the default port.This command is particularly useful when connecting to FTPimplementations that do not support the PORT command.
site arg ... Send the arguments, verbatim, to the remote server as a SITEcommand. These SITE commands are supported by the iRMX FTPserver; the CHMOD, ULIMIT, and UMASK commands operate likethe corresponding Unix commands:
CHMOD mode file Change the permission mode on the remote file.
HELP List the SITE commands supported by the server.
IDLE [secs] Display (no arguments) or set the current idletime limit.
ULIMIT [blocks] Display (no arguments) or set the current file sizelimit.
UMASK [mask] Display (no arguments) or set the current file-creation mode mask.
size remote-fileDisplay the size of the remote file.
status Show the current status of ftp.
struct [struct-name]Set the structure of the file to be transferred to struct-name. Validformats are file (the default), page, and record. Only the filestructure is supported.
sunique (send unique) Toggle the creation of unique remote filenames whenusing put and mput; send unique is turned off by default. This operatesthe same as runique.
system Display the type of OS running on the remote host.
tenex Set the data representation type to tenex, which corresponds to thelocal logical byte size. The only byte size supported is 8 bits, makingthis data type virtually the same as binary.
trace Toggle packet tracing. Packet tracing is turned off by default.

TCP/IP command ftp
Command Reference Chapter 2 203
type [type-name]Display the data representation type of the file to be transferred (noarguments), or set it to type-name. Valid types are ASCII (default),binary, EBCDIC, image, and tenex (local byte size). The binary andimage types are identical. The EBCDIC type is not supported. Thetenex type, in which the logical byte size is 8, is virtually the same asbinary.
umask [mask]Display (no arguments) or set the user file-creation mode mask on theremote host.
user login [password [account]]Log in to the remote FTP server as user login. Ftp will prompt for thepassword and account if they are required and not specified.
verbose Toggle verbose mode. When enabled, all responses from the FTPserver are displayed along with statistics regarding the efficiency ofeach file transfer. By default, verbose mode is enabled for aninteractive session and disabled for a background or batch session.
? [command]A synonym for help.
$ mname [arg ...]Invoke the macro mname with the specified arguments.
! [command] Invoke a shell on the local host. To return to ftp, exit from the shellwith an EOF (in the iRMX OS, a <Ctrl-Z>). If an argument isspecified, that command is executed and the shell exits automatically.Do not execute any iRMX command that does an attachfile :$:.
Diagnostics
Exit status is 0 for normal termination or a positive number for error termination.
getaddr NET command
204 Chapter 2 Command Descriptions
getaddrReturns the local system's Ethernet address.
Syntax
getaddr
Additional Information
The getaddr command displays the Ethernet address of the local system. Thecommand looks up the value for the local object named myhostid and returns it.iRMX-NET enters the myhostid object with the Name Server during initialization.The address is reported as shown below:
Ethernet address : 00 AA 00 02 5A 70
NET command getname
Command Reference Chapter 2 205
getnameReturns the network name of the local system or of any iRMX-NET system specifiedby its Ethernet address.
Syntax
getname [A=net_addr] [R=retries]
ParametersA=net_addr
A 12-digit ASCII string representing the hexadecimal Ethernet address of a system.Spaces are not allowed. If this parameter is omitted, the name of the local system isreturned. This is an example address:
00AA00025A70
R=retriesA decimal number of times the Name Server tries to find the system, using a differentMultibus II slot ID. The maximum is 21. The default is 8.
Additional Information
The getname command displays the name of the specified host, if the name iscataloged under property type 5H in any Name Server object table. If no object withthe specified Ethernet address is found cataloged under property type 5H, getnamedisplays an error message.
If an input parameter is not specified, the local host name is returned. This is the typeof name cataloged with the loadname command from the :sd:net/data file (assumingit is entered as property type 5H in that file). The name could also be cataloged witha setname command.
In Multibus I and PC systems, the getname command finds the name in the first trial.
In Multibus II systems, a host can be in any one of the Multibus II slots. To identifydifferent hosts in the system, the Name Server appends the slot ID with the Ethernetaddress for the host-unique ID (property type 5H). For example, if a host CPU is inslot 4 of a Multibus II system, the host-unique ID might be as follows, where 04 isappended to the Ethernet address:
Name Type ValueSLOT4SYS 0005H 00AA00025A7004
getname NET command
206 Chapter 2 Command Descriptions
To obtain the names of Multibus II hosts with getname, you may specify the slot IDas part of the address, as follows:
getname A=00AA00025A7004
If the slot ID is not known, it need not be specified. In this case, getname attempts tofind the host name up to 21 times (depending on the number of retries specified),each time with a different slot ID. For example, this command contains no slot ID:
getname A=00AA00025A70
The getname command tries five times with different appended slot numbers beforeit finds the name, as shown below:
Getting iRMX System name ... Trial 01 (slot0)Getting iRMX System name ... Trial 02 (slot1)Getting iRMX System name ... Trial 03 (slot2)Getting iRMX System name ... Trial 04 (slot3)Getting iRMX System name ... Trial 05 (slot4)
Host name is: SLOT4SYS
See also: findname command, in this chapter
Error Messages<net_addr>, illegal Ethernet address
The Ethernet address specified in the command line is invalid. Execute the getnamecommand again using the correct Ethernet address.
<net_addr>, name does not existAn object with the property type 0005H matching the given Ethernet address is notfound in the entire network.
<net_addr>, maximum responses receivedMore than one name is found to match the given Ethernet address. This happens ifthe setname command is executed more than once and different names are used. Inthis case, the number of such duplicate names found by the Name Server can be toolarge to handle. The maximum number of responses that can be handled by theName Server is a configurable option.

HI command grep
Command Reference Chapter 2 207
grepSearches the specified file(s) for a string matching the given pattern. For eachmatching string, grep displays the lines and/or filenames.
Syntax
grep pattern pathname [to|over|after outpath] [nofile][line] [exact] [unique] [plm]
Parameterspattern
The pattern for which a match is desired.
pathnameThe file to search. Wildcards are permitted.
to|over|after outpathWrites the output to the specified file instead of to the screen.
nofile Don't display the filename when a match is found. The default is to always displaythe filename.
line Display the line number when a match is found.
exact Searches for the pattern as entered with regard to upper- and lower-case. The defaultis to search without case-sensitivity.
unique When a match is found, displays only the filename, and only once for each file.
plm Ignores $ characters in the file when searching for a match.
Additional Information
Unless you specify the exact parameter, the search is caseless; all occurrences of thematching string, in any combination of case, are reported.
grep HI command
208 Chapter 2 Command Descriptions
Examples
To find all occurrences of rq$send$message in all files ending with p38, regardlessof PLM coding style, enter:
grep rqsendmessage *p38 plm
To find all occurrences of a distinctly spelled variable in the same files, enter:
grep SillyVar *p38 exact
HI command help
Command Reference Chapter 2 209
helpDisplays information about one or more commands. If no parameters are given,information about the help command is displayed.
✏ NoteYou can use this command in an esubmit file orrq_c_send_command system call if the form of the commanddoes not require user input. If the command requires user input inan rq_c_send_command system call, it will fail. However, youcan use a form of the command that requires user input in anesubmit file if you use the eoresponse and coresponse
subcommands.
See also: esubmit command, in this chapter
Syntax
help command_list [to|over|after outpath_list] [q] [p = num]
Parameterscommand_list
One or more command names for which you want help. Separate multiple nameswith commas. Wildcards are permitted. Only utilities added to the OS have helpscreens available.
to|over|after outpath_listWrites the output to the specified file(s) rather than to the screen. If you specifymultiple input files and one output file, the output is appended.
q(uery) Prompts for permission to display each help file. Respond to the prompt with:
Y Display the fileR Display remaining files without further queryE Exit the commandN or other Don't display the file; query for the next
p(agelength)=numThe maximum number of lines in the output page; the default is 66. A formfeed(0CH) is inserted in the output every n lines, where n = pagelength-3. If theoutput is not directed to a file, this parameter is ignored. The default value isdecimal, but you can specify octal or hexadecimal by appending an O or H.
help HI command
210 Chapter 2 Command Descriptions
Additional Information
If no output pathnames are given, the output is sent to the screen using the skimcommand. For help on commands used by skim, type H or ? at the more? prompt.
See also: skim command, in this chapter
The help command displays the contents of a help file with the same name as acommand. Each help file has the extension .hlp. If the filename becomes too longthe excess part of the .hlp extension is truncated.
Not all commands have help files. The help command is used primarily to giveinformation about utilities added by users; many of these utilities are now shippedwith the OS and described in this manual.
The help command determines the location of the help files by entries in a help.macfile, which is in the same directory as the help command. The help.mac file containsthe names of directories to search for help files. The directories should be onseparate lines or separated by commas. If you add directories, use these types ofentries; note the trailing slashes on the directory pathnames:
:prog:
:sd:helps/system/
:sd:helps/utils/
:sd:helps/uprocs/
:sd:util286/
:$:
If no help file for a command is found in any of the directories listed in help.mac, anerror message to that effect is displayed.
Indirect help files may be created by using an at sign (@) as the first character in thehelp file, followed by the indirect command name. To use this capability, there mustbe an actual help file referenced by the indirect command name. For example, ifthere is an actual skim.hlp file, and you want to provide help for an alias m=skim,create a file named m.hlp that contains only this line:
@skim

CLI command history
Command Reference Chapter 2 211
historyDisplays the last 40 command lines in chronological order. You can use theassociated number with the ! command to recall one of the displayed command lines.
Syntax
history
Additional Information
The command lines are displayed a screenful at a time, including the historycommand, and are numbered from 1 to 999. After 999, the numbers start over at 1.When displaying the command lines, the CLI lists the first page (20 lines) ofcommands followed by the query:
display more ? ([y] or n)
The default is Y. If you enter anything other than N, the CLI displays the next page ofcommand lines (assuming there are more command lines in the history buffer).
You can use the history command with the ! command to recall a specific linenumber or command line. For example, you might enter the history command to seethe last 20 command lines. To recall line 10 so you can modify and execute it, youwould enter:
!10 <CR>
This would display line 10 as the current line. You can then edit the line; however,the original line 10 remains unchanged in the history buffer. The edited line becomesthe last (newest) line in the history record.
If you have entered a command line that includes continuation lines, history displaysit as shown for command 2 below:
1 copy x to y
2 copy z &
** to &
** t.asm
3 dir
4 history

history CLI command
212 Chapter 2 Command Descriptions
Examples
Assume that you enter these commands:
- copy X to Y.PLM <CR>
- dir <CR>
- AEDIT Y.PLM <CR>
- history <CR>
The response to the history command would be:
1 copy X to Y.PLM
2 dir
3 AEDIT Y.PLM
4 history
To edit line 1, use the ! command. Line 1 is displayed with the cursor at the end:
- !1 <CR>
- copy X to Y.PLM
If you edit the line to read copy NEW.PLM to Y.PLM and execute the command,the line is entered into the history buffer as line 5. Now if you enter the historycommand you see:
1 copy X to Y.PLM
2 dir
3 AEDIT Y.PLM
4 history
5 copy NEW.PLM to Y.PLM
6 history
Error Messages<parameter>, unexpected parameter
You entered a parameter; history does not accept parameters. If you want to recall aspecific line, enter the ! command.
<condition code:mnemonic>, while history displayedAn error occurred when the CLI tried to write the history buffer to the screen.
HI command ic
Command Reference Chapter 2 213
icReads or writes interconnect space to perform one of several functions on aMultibus II system. The ic command must be invoked separately for eachsubcommand function.
Syntaxic -c agents [-s]ic -c fpi [-s] arm|disarmic -c get [-s] slot register countic -c helpic -c kill [-s] slotic -c myslot [-s]ic -c nmi [-s] [-e] slot nmitypeic -c record [-s] [-o occurrence] slot recordic -c reset [-s] [-p monitor|bootstrap|index] slot typeic -c set [-s] slot register value
Parameters
The parameters after -c are in alphabetical order, with hyphens ignored.
-c Specifies that one of the ic subcommands follows.
a(gents)Displays the slot ID and product code for each board (agent) in the system, includingadd-on (extension) boards. With the -s switch, the slot ID is repeated for extensions.
count A decimal number specifying the number of registers to display.
-e Enables the NMI source specified by nmitype. The -e is unnecessary if the NMIsource is already enabled.
f(pi) arm|disarmArms or disarms notification from the Front Panel Interrupt (FPI) server. This servernotifies when you turn the front panel keyswitch to Interrupt. By default, all boardsare disarmed when the system starts, and the interrupt switch has no effect. If youarm the server, the board where you issue the command is given a non-maskableinterrupt (NMI) when you turn the keyswitch.
g(et) Displays the contents of one or more interconnect registers on the board in thespecified slot.
h(elp) Displays ic syntax.
ic HI command
214 Chapter 2 Command Descriptions
k(ill) Disables the board in the specified slot by applying a local reset. To re-enable theboard it must be reset with the ic command or the reset switch.
m(yslot)Displays the slot ID of the board where ic is executing.
n(mi) Issues an NMI on the board in the specified slot.
nmitypeThe following; to specify the whole string, use underscores (_) not spaces:
diagnostics(_request)debugger(_entry)software(_nmi_source)
-o occurrenceA decimal number specifying which occurrence of the record to display, where thereare multiple occurrences. The default is 1, the first record.
-p monitor|bootstrap|indexFor a local or warm reset, specifies a program to run after the reset:
monitor invokes the firmware debug monitor
bootstrap invokes the firmware bootstrap loader
index is a number in the range 0-7, invoking a program in the Program TableIndex Register (PTIR)
rec(ord)Displays the contents of an interconnect space function record on the board in thespecified slot, or displays information about extension boards on it.
record A decimal number specifying the interconnect space record, or, to indicate extensionboards, the literal 20 or HW.
registerA decimal number specifying the (beginning) interconnect register.
res(et) Resets the board in the specified slot.
-s Shortens output to the value requested, not a message, except for error messages.
s(et) Writes a value into an interconnect register on the board in the specified slot. Thevalue written is verified and displayed.
type The type of reset: cold, recovery, warm, or local. Local causes a processorreset if the specified slot is where ic is executing.
slot A decimal slot number specifying which board to act upon.
value A one-byte hexadecimal value to write (don't specify the H).

HI command ic
Command Reference Chapter 2 215
Additional Information
Interconnect registers and the logical records that comprise a group of registers aredefined differently for different boards. Refer to the hardware reference manuals forthe boards you use.
See also: Records, reset, program table index register, NMI, Multibus IIInterconnect Interface Specification
The table below shows default aliases defined for the ic command in Multibus IIsystems. These are not defined for DOSRMX installed in a Multibus II system.
Subcommand Aliasesagents agents = ic -c agents
myslot myslot = ic -c myslot
reset agentreset = ic -c reset #0 local
coldreset = ic -c reset 0 coldsysreset = coldresetmonitor = ic -c reset -p monitor #0 localreboot = ic -c reset -p bootstrapwarmreset = ic -c reset 0 warm
nmi nmi = ic -c nmi #0 softwarenmiforce = ic -c nmi -e #0 software
get icread = ic -c get #0 #1 #2
set icwrite = ic -c set #0 #1 #2
kill offline = ic -c kill #0
Values written to a register with the set subcommand are hexadecimal. All othernumeric values you specify in the ic command are decimal. Values displayed by icfollow the same convention. If you enter an invalid command, ic displays the syntaxof ic commands.
ic HI command
216 Chapter 2 Command Descriptions
Examples
agents In this example the commands are for a system that includes an SBC 386/258 boardin slot 1, with a CSM/002 module attached.
ic -c agents <CR> or agents <CR>
AGENTS COMMAND -
SLOT:00 386/258
- CSM/002
SLOT:02 186/410
SLOT:03 386/116
SLOT:07 186/530
ic -c agents -s <CR> or agents -s <CR>
00
00
02
03
07
myslot In this example the command is issued from the board in slot 1.
ic -c myslot <CR> or myslot <CR>
MYSLOT COMMAND - SLOT:01
ic -c myslot -s <CR> or myslot -s <CR>
01
get This example returns the value from the board in slot 1, interconnect register 100,with the contents of two registers returned.
ic -c get 1 100 2 <CR> or icread 1 100 2 <CR>
GET COMMAND - SLOT:01
100 - 03H 101 - 00H
ic -c get -s 1 100 2 <CR> or icread -s 1 100 2 <CR>
03
00
set This example writes to the board in slot 2, interconnect register 0, value 1.
ic -c set 2 0 1 <CR> or icwrite 2 0 1 <CR>
SET COMMAND - SLOT:02, REGISTER: 0, VALUE:01H
ic -c set -s 2 0 1 <CR> or icwrite -s 2 0 1 <CR>
01
HI command ic
Command Reference Chapter 2 217
recordThis example returns information from the board in slot 1, record 1. Thecorresponding interconnect register numbers are shown in parentheses.
ic -c record 1 1 <CR>
RECORD COMMAND - SLOT:01, NAME:MEMORY, TYPE:001, LENGTH:05
2(038)-3fH 3(039)-00H 4(040)01H 5(041)-a1H
6(042)-f1H
ic -c record -s 1 1 <CR>
01
05
3f
00
01
a1
f1
recordThis example returns information about the hardware extension board attached to theboard in slot 0. The literals 20 or HW, used as a record number, specify hardwareextensions. Notice the prompts to display more information between each record.
-ic -c rec 0 20 <CR>
RECORD COMMAND - SLOT:00, NAME:HW_EXTENSION, LENGTH:20
02(103) - 00H 03(104) - 00H 04(105) - 01H 05(106) - 00H06(107) - 43H 07(108) - 53H 08(109) - 4dH 09(110) - 2fH10(111) - 30H 11(112) - 30H 12(113) - 32H 13(114) - 00H14(115) - 00H 15(116) - 00H 16(117) - 01H 17(118) - 00H18(119) - 00H 19(120) - 00H 20(121) - 00H
-MORE ([Y]/N) ? <CR>RECORD COMMAND - SLOT:00, NAME:CSM, TYPE:008, LENGTH:02
02(124) - 00H 03(125) - 23H
-MORE ([Y]/N) ? <CR>RECORD COMMAND - SLOT:00, NAME:TIME_DATE, TYPE:009, LENGTH:10
02(128) - 40H 03(129) - 10H 04(130) - 27H 05(131) - 16H06(132) - 15H 07(133) - 31H 08(134) - 01H 09(135) - 90H10(136) - 00H 11(137) - 03H
-MORE ([Y]/N) ? <CR>RECORD COMMAND - SLOT:00, NAME:ALARM, TYPE:032, LENGTH:07
02(140) - 00H 03(141) - 00H 04(142) - 00H 05(143) - 00H06(144) - 00H 07(145) - 00H 08(146) - 00H

ic HI command
218 Chapter 2 Command Descriptions
-MORE ([Y]/N) ? <CR>
RECORD COMMAND - SLOT:00, NAME:NVRAM, TYPE:033, LENGTH:28
02(149) - 00H 03(150) - 00H 04(151) - 00H 05(152) - 00H06(153) - 00H 07(154) - 00H 08(155) - 00H 09(156) - 00H10(157) - 00H 11(158) - 00H 12(159) - 00H 13(160) - 00H14(161) - 00H 15(162) - 00H 16(163) - 00H 17(164) - 00H18(165) - 00H 19(166) - 00H 20(167) - 00H 21(168) - 00H22(169) - 00H 23(170) - 00H 24(171) - 00H 25(172) - 00H26(173) - 00H 27(174) - 00H 28(175) - 00H 29(176) - 00H
-MORE ([Y]/N) ? <CR>RECORD COMMAND - SLOT:00, NAME:CHASSIS_ID, TYPE:034, LENGTH:02
02(179) - 00H 03(180) - 00H
Error MessagesGET COMMAND - Invalid count argument
The count value entered is invalid.
GET COMMAND - Invalid register argumentThe register offset is invalid.
SET COMMAND - Interconnect write errorThe value written to interconnect space could not be read back to validate it.
RECORD COMMAND - Invalid record typeThe record value entered is invalid.
<slot>: Invalid slot ID argumentThe slot value is not a valid Multibus II slot.
<slot>: Interconnect not initializedThe specified Multibus II host had not initialized its interconnect space.
<slot>: Invalid command argumentThe major option entered was not a valid ic subcommand.
E_NOT_CONFIGUREDThe system on which the ic command was invoked is not a Multibus II system.

NET command inamon
Command Reference Chapter 2 219
inamonPerforms several network functions chosen from a menu, including reading andsetting Network Management Facility (NMF) objects, performing echo tests, andmanaging network routing.
Syntax
inamon
Additional InformationInamon is a menu-driven utility that provides these functions:
• Determines and changes the iNA 960 configuration through NMF objects andmonitors Remote Boot Server activity. If the NMF is configured for remoteobject support, you can use inamon to monitor NMF objects on a remote system.Except for the ina961.31L download file, the default NMF configuration for iNA960 files shipped with iRMX-NET allows remote object manipulation.
• Performs echo tests of the Data Link Layer to determine if the physical linkbetween two systems is in place and if the iNA Data Link Layers arefunctioning. A remote system's Ethernet address and a Data Link Layer LSAPID of 08 are used to reach the remote Data Link Layer.
• Attaches to iNA 960 on a remote system to determine whether the iNATransport software is functional on the two systems. You must provide thetransport address for the remote system.
• Notifies the user of a local event.
• Provides routing management for both static IP and ES-IS dynamic routing.
See also: NMF objects, Network User's Guide and Reference
When you invoke inamon, this menu is displayed:
TYPE 0 FOR : READ/SET/CLEAR OBJECTS
TYPE 1 FOR : ECHO TESTING
TYPE 2 FOR : EVENT NOTIFICATION
TYPE 3 FOR : ROUTER MANAGEMENT
TYPE 4 FOR : ATTACH REMOTE AGENT
TYPE 5 FOR : DETACH REMOTE AGENT
Enter Option (TYPE H FOR HELP, E FOR EXIT) -->
At this menu, enter H for help information about the command. Once you enter thehelp screens, you must page through (using <CR>) to the end.
initstatus HI command
220 Chapter 2 Command Descriptions
initstatusDisplays the initialization status of all HI-managed terminals.
Syntax
initstatus
Additional Information
This is the format of the initstatus display:
terminal config device init term job user user user
device name excep excep excep state ID ID POOL name
.T0. 0000 0000 0000 D-E 1 0 1,400K rmx
.T1. 0000 0000 0000 SLE 2 65535 1,400K rmx
.T3. 0000 0002 D--
.T4. 0021 D--
Where
terminal
device
name
The physical name of the terminal, as defined during the configurationof the Basic I/O System and as attached by the HI. Periods surroundeach name.
config
excep
Hexadecimal condition code that the HI received when it attempted tointerpret the terminal definition and user definition files. A 0 valueindicates a normal condition. Nonzero values indicate exceptionalconditions.
device
excep
Hexadecimal condition code that the HI received when it originallyattached the terminal as a physical device.
init
excep
Hexadecimal condition code that the HI received when it created a jobfor the interactive session.

HI command initstatus
Command Reference Chapter 2 221
term
state
Three characters that indicate the current state of the terminal. Thefirst character can be either:
D a dynamic logon terminalS a static logon terminal
The second character can be either:L the terminal is locked- the terminal is unlocked
See also:lock and unlock commands, in this chapterdynamic and static terminals, SystemConfiguration and Administration
The third character can be either:E the HI interactive job associated with this terminal
exists- the interactive job does not exist
job
ID
A sequential number that the HI assigns to the interactive job duringinitialization. You specify this number as the parameter in thejobdelete command to delete the corresponding interactive job.
user
ID
The user ID that the HI associates with the interactive job when theuser begins a HI session.
user
POOL
The maximum size of the memory pool associated with the interactivejob.
user
name
The logon name of the user who is accessing this terminal.
See also: Logon names and terminals, System Configuration and Administration
Error Messagenot a multi-user system
The HI cannot return information about terminals because it is not configured as amulti-user system.
jobdelete HI command
222 Chapter 2 Command Descriptions
jobdeleteDeletes one or more running interactive jobs, which are the HI jobs that manage usersessions. The Super user can delete any interactive job. Other users can delete onlythose jobs with the same user ID as their own.
Syntax
jobdelete job_id_list
Parameterjob_id_list
One or more job ID numbers separated by commas, specifying the interactive jobs tobe deleted. Use the initstatus command to display the current job IDs.
Additional Information
Deleting an interactive job causes the HI to terminate the corresponding user session.The jobdelete command cannot be used to delete background jobs; for those, use thekill command.
When you invoke jobdelete, it first attempts to delete the interactive job's offspringjobs (for example, a submit file or a program invoked as a result of anrqe_create_io_job system call). It deletes multiple levels of offspring jobs.However, jobdelete cannot delete any interactive or offspring job that containsextension objects.
See also: Deleting offspring jobs, System Concepts
Normally, when a user's interactive job is deleted, the HI logs the user off the systemand issues a new logon prompt. If the job is on a static terminal, the HI automaticallyre-creates the interactive job, with no logon prompt. However, if the lock commandhas been invoked for the terminal, the HI does not reissue a prompt or re-createinteractive jobs after a jobdelete command. The system manager can use thecombination of lock and jobdelete to remove users from the system before a systemshutdown.
Unless you delete your own interactive job, jobdelete displays this message as itdeletes each job:
<job_ID>, deleted
If you delete your own interactive job, the logon prompt is displayed (for dynamicterminals) or your interactive job is restarted (for static terminals).
HI command jobdelete
Command Reference Chapter 2 223
Error Messages<job_ID>, does not exist
The interactive job associated with this job ID does not exist. It has already beendeleted or never existed.
<job_ID>, invalid job idThe specified job ID is not associated with any terminal managed by the HI.
<job_ID>, job does not belong to youYou do not have the same user ID as the interactive job, or you are not the systemmanager.
<job_ID>, not deleted
<job_ID>, <condition code:mnemonic>The indicated condition code was encountered, preventing jobdelete from deletingthe job.
jobs CLI command
224 Chapter 2 Command Descriptions
jobsDisplays the current background jobs and their job ID numbers, in last-in first-outorder.
Syntax
jobs
Additional Information
The job IDs are displayed in a list of four-digit hexadecimal ID numbers. These arethe job IDs assigned when the background command was invoked. To cancel abackground job, use the kill command.
This is the type of display produced by the jobs command, where <job> is atruncated copy of the command line running in the background:
Background Jobs:
9B08 "<job>"
1FF0 "<job>"
10A8 "<job>"
Error Message<parameter>, unexpected parameter
You entered a parameter; jobs does not accept any parameters.

HI command keyb
Command Reference Chapter 2 225
keybConfigures the console keyboard for a specific country, in iRMX for PCs andDOSRMX. The default keyboard setting is US.
Syntax
keyb [country-abbreviation]
Parameterscountry-abbreviation
Two-character abbreviation of the country indicating which keyboard is being used,as follows:
Abbreviation CountryFR FranceGR GermanyIT ItalyLA Latin AmericaSV Sweden/FinlandUK United KingdomUS United States
Additional Information
Without a country abbreviation, keyb displays the syntax and list of countriessupported.
For keyboards with keys that support three characters, you can type the thirdcharacter only by pressing the <Ctrl+Alt+key> combination.
Currently, <Alt+Shift+key> and the <Alt Gr> key are not supported by the keyboardcommand.
Error MessagesInvalid Language Abbreviation
You did not enter a correct country abbreviation as listed above.
Invalid Command TailYou entered a single letter instead of a two-letter country abbreviation.

kill CLI command
226 Chapter 2 Command Descriptions
killCancels the specified background job or all background jobs.
Syntax
kill [job_id|*]
Parameters
job_id The hexadecimal job ID number established when the background job was invoked.
* Cancels all background jobs.
Additional Information
The Super user can cancel any job. Other users can cancel only background jobsstarted by themselves or by the World user.
If you cancel several background jobs at once and then immediately issue the jobscommand, some of the canceled jobs may be listed. Even though these jobs aredisplayed, they have been canceled. Verify this with another jobs command.
When a job has been canceled, this message is displayed:
Background job <job_id> canceled
If you use the asterisk (*) parameter with the kill command, all background jobs arecanceled and this message is displayed:
All background jobs were canceled
Error Messageskill, the job parameter is not a valid background job of the caller
You tried to kill a background job that is not in your list of background jobs.
kill, a job parameter is requiredThe command you entered has a syntax error.
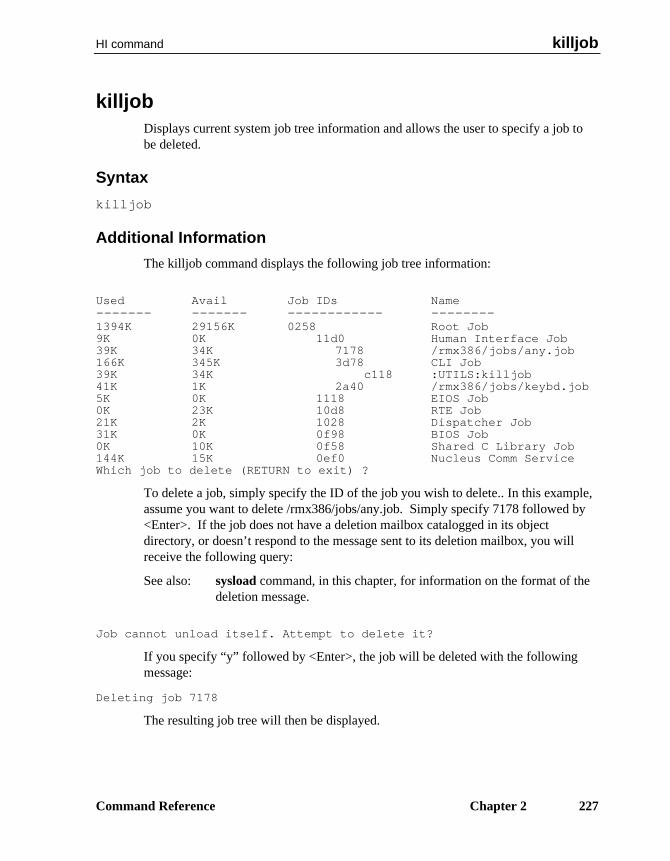
HI command killjob
Command Reference Chapter 2 227
killjobDisplays current system job tree information and allows the user to specify a job tobe deleted.
Syntax
killjob
Additional Information
The killjob command displays the following job tree information:
Used Avail Job IDs Name------- ------- ------------ --------1394K 29156K 0258 Root Job9K 0K 11d0 Human Interface Job39K 34K 7178 /rmx386/jobs/any.job166K 345K 3d78 CLI Job39K 34K c118 :UTILS:killjob41K 1K 2a40 /rmx386/jobs/keybd.job5K 0K 1118 EIOS Job0K 23K 10d8 RTE Job21K 2K 1028 Dispatcher Job31K 0K 0f98 BIOS Job0K 10K 0f58 Shared C Library Job144K 15K 0ef0 Nucleus Comm ServiceWhich job to delete (RETURN to exit) ?
To delete a job, simply specify the ID of the job you wish to delete.. In this example,assume you want to delete /rmx386/jobs/any.job. Simply specify 7178 followed by<Enter>. If the job does not have a deletion mailbox catalogged in its objectdirectory, or doesn’t respond to the message sent to its deletion mailbox, you willreceive the following query:
See also: sysload command, in this chapter, for information on the format of thedeletion message.
Job cannot unload itself. Attempt to delete it?
If you specify “y” followed by <Enter>, the job will be deleted with the followingmessage:
Deleting job 7178
The resulting job tree will then be displayed.

lanstatus NET command
228 Chapter 2 Command Descriptions
lanstatusAn alias for the netinfo command. The features of the former lanstatus commandare included in the netinfo command.
See also: netinfo command, in this chapter

NET command listname
Command Reference Chapter 2 229
listnameLists the names and values of objects in the local network Name Server object table.
Syntax
listname [to|over|after outpath]
Parametersto|over|after outpath
Writes the output to the specified file rather than to the screen.
Additional Information
This command lists only objects cataloged on the local system, not on remotesystems. The output can be directed to a terminal, a file, or a printer. The output hasthe form:
Name Property Unique PV_Type Value
FSTSAP 00000H NO SIMPLE 10 00H
FCTSAP 00001H NO SIMPLE 11 00H
INARELNUM 00004H NO SIMPLE 03H
INANLNUM 00004H NO SIMPLE 01H
NSCOMMENGINE 00004H NO SIMPLE FFH
TLCOMMENGINE 00004H NO SIMPLE 00H
The following entries depend on the number of subnets in the iNA 960 job. Forexample, there can be up to 4 MYHOSTID entries, 1 for each subnet, where xxvaries from 01 to 03.
MYHOSTID 00004H NO SIMPLE 00 AA 00 02 57 86H
MYHOSTIDxx 00004H NO SIMPLE 00 AA 00 02 57 86H
INASUBNET 00004H NO SIMPLE 00 01H
INASUBNETxx 00004H NO SIMPLE 00 01H
The following entries are added by file servers from the /net/data file. The BSMB2entry is for the server in slot 0 and the BSSLOT2 entry is needed by the client in slot2 (note that the last two digits of addresses in the Value column are the slot numberfor these entries).
listname NET command
230 Chapter 2 Command Descriptions
RNETSRV 00004H NO SIMPLE 52 4E 45 54 53 52 56 00 AA 00H
02 57 86H
BSMB2 00003H YES SIMPLE 0B 49 00 00 00 AA 00 02 57 86 FEH
00 02 10 00H
BSMB2 00005H YES SIMPLE 00 AA 00 02 57 86 00H
BSMB2 00006H YES SIMPLE 0B 49 00 00 00 AA 00 02 57 86 FEH
00 02 30 00H
BSSLOT2 00005H YES SIMPLE 00 01 00 AA 00 02 57 86 02H
NSDONE 00004H NO SIMPLE 52 4D 58 00 AA 00 02 57 86H
The following entry is for the client (file consumer), taken from the /net/data file.
MYNAME00 00002H NO SIMPLE 72 6D 78H
In the object table, Name means the name of the object, such as the server nameBSMB2 in this example.
The Property column lists the property type, a numeric code that tells what kind ofinformation is represented by the property value in the last column.
See also: Name Server property types, Network User’s and Reference Guide
Unique indicates whether this combination of object name and property type areunique on the network. The fixed entries are not unique; the object table on everynode in the network includes these objects. Other non-unique objects can be added tothe object table through the programmatic interface. Non-unique objects are, ineffect, local objects. Each computer can read the value of the object in its own objecttable, but it cannot access the object with that name on a remote node. The NameServer guarantees the uniqueness of any object entered through the Human Interface.Before it accepts a new object, it checks all the other object tables on the network forobjects with the same name and property type.
SIMPLE in the PV_Type column means that the property value in the last column isa simple string, rather than a complex structure in which each element is an object,such as a mail list made up of network users. Structured property types are notsupported in iNA 960/iRMX-NET.
The Value column is the property value, a field containing specific informationabout this object, usually based on the network address. For objects of property types3, 6 and 8, the Value column contains the server's transport address. For objects ofproperty type 5, that column contains the host-unique ID, combining the Ethernetaddress and a slot ID.
See also: findname and setname commands, in this chapter

NET command listname
Command Reference Chapter 2 231
Error Messagesillegal option
The option specified in the command must be to, over, or after.
<pathname>, illegal pathThe pathname specified in the command line is longer than 255 characters.
load NET command
232 Chapter 2 Command Descriptions
loadLoads iNA 960 network software into memory on the network controller board andstarts the controller running.
Syntax
load pathname
Parameterpathname
The name of the file containing iNA bootable network software.
Additional Information
The iRMX-NET software loads the iNA boot software onto the network controllerboard during initialization, so the load utility is generally not needed on iRMX IIIsystems. However, if iRMX-NET is unable to find the iNA file and cannot load thesoftware, iRMX-NET initialization stops. iRMX continues to initialize, and you maythen invoke the load command to load iNA and resume iRMX-NET operation.
The iNA file being loaded must be in a format as processed by the xlate utility. Inprevious releases of iNA 960, the load utility had the capability that xlate has; itcould be used for translating an OMF86 file to the iNA boot file format. However,the xlate utility should now be used to perform the translating function, and the loadutility should be used to load the LAN controller. Attempting to use the load utilityto perform the translation function produces unpredictable results.
See also: Remote Booting and ccinfo file, Network User's Guide and Reference
NET command loadname
Command Reference Chapter 2 233
loadnameAdds the names and addresses of network servers listed in a specified file to the localName Server object table.
Syntax
loadname [pathname]
Parameterpathname
The name of the file containing the list of network servers. The default file is:sd:net/data. If you specify another file, it must use the format defined for the/net/data file.
Additional Information
The loadname command reads the names and addresses of objects from a file andenters them into the Name Server object table. A template file, /net/data.ex, isprovided with the iRMX-NET software. Copy the template file to :sd:net/data andedit it. You may instead copy the /net/data file from a Unix or Xenix system that hasan edited file containing required servers. To do this, use the setname command tospecify the network address for the Unix system, then establish a connection to thesystem and copy the file.
See also: Chapter 11, Network User’s Guide and Reference, for the format andsyntax of the /net/data file
When you invoke loadname, a message is displayed indicating the success or failureof loading each object. If a failure occurs, the message indicates the name of theobject and the cause of the failure. After failing to enter an object, loadnamecontinues entering other objects from the file. File lines that are invalid are ignored.
A server object only needs to be entered in the object table of one iRMX system to beaccessible to the entire subnetwork. The system that contains the names andaddresses of other systems is called the spokesman for those systems. If the systemthat executed the loadname command is shut down, the command must bereinvoked. The number of objects that can be loaded into a single system’s NameServer object table is configurable; the default is 50.
loadname NET command
234 Chapter 2 Command Descriptions
Changes to the /net/data file are not reflected on the network until the file is reloadedusing the loadname command. If you intend to change a file loaded with loadname,you should first invoke the unloadname command to remove the objects from thename table. Then edit the file and reinvoke loadname. This ensures that only thecurrent entries in the file are cataloged with the Name Server.
To display the entries loaded after invoking loadname, use the listname command.
See also: setname command, in this chapter
Error Messages<pathname>, illegal input file format
The input format of the file is not correct. Check the contents of the input file andcorrect the format.
<object_name>, syntax error. TYPE not foundThe entry in the input file for this object does not contain the keyword TYPE=. Theentry is ignored and loadname processes the next entry.
<object_name>, property type too longThe property type or the system type field for this object is not in the correct format.
<object_name>, not valid property typeThe system type field for this object does not contain a valid value for the property orsystem type.
<object_name>, syntax error. ADDRESS not foundThe entry for this object does not contain the keyword ADDRESS.
<object_name>, value too longThe transport address specified for this object is too long.
<object_name>, illegal property valueThe transport address specified for this object contains invalid characters.
<object_name>, name already existsThe object name in the input file is already present on the network.
<object_name>, illegal nameThe object name specified in the input file is more than 16 characters long.
<object_name>, name table fullThe local object table is full. Each server specified in the input file occupies oneentry in the object table. You can delete some objects from the object table orreconfigure the Name Server to increase the size of the table.
DOS command loadrmx
Command Reference Chapter 2 235
loadrmxLoads the iRMX OS after DOS has booted. Use only with the DOSRMX OS.Invoke rmxtsr before loadrmx.
Syntax
loadrmx -n bootfile_name -s system_device [-f d|n|r][-i init_file_name] [-w]
Parameters-n Specifies the bootfile name; insert a space between -n and the name.
bootfile_nameName of the iRMX bootfile.
-s Specifies the iRMX system device; insert a space between -s and the name.
system_deviceName of the iRMX system device. The system device may be a DOS-formatteddrive (C_DOS, E_DOS, etc.), an iRMX-formatted drive (C_RMX or D_RMX), or aremote iRMX-NET file server. The device must have been set up correctly atinstallation time, with the correct iRMX OS directories and system files; otherwisethe iRMX OS will not initialize properly.
See also: Device names, Appendix E
-f Specifies the file system type. Values and corresponding file system types are:
d DOS partitions such as C_DOSn named iRMX partitions such as C_RMXr remote file systems using iRMX-NET
The r option invokes network remote load operations and requires theEtherExpress 16 or EWENET module. The bootfile name parameter thenspecifies the remote load class code (hexadecimal class code nnnn encoded asCC_nnnn). See examples.
Insert a space between -f and the value. If you do not specify a file system, EDOS isthe default.
-i Specifies the iRMX initialization file name; insert a space between -i and the name.If you do not specify -i, the default is \rmx386\config\rmx.ini.
init_file_nameName of the iRMX initialization file. If not specified, the default is :config:r?init.
-w Wait for iRMX initialization to complete.

loadrmx DOS command
236 Chapter 2 Command Descriptions
Additional InformationDuring the iRMX installation process, iRMX files are copied from the installationdiskettes to the hard disk. That hard disk is known to the iRMX OS as the SystemDevice and has the logical name :sd:. To load the iRMX OS, specify the physicaldevice name of the system device.
Loadrmx delays DOS execution until RMX is fully initialized.
Any DOS application that requires resetting the system (such as fdisk) orreconfiguring CMOS RAM must be run prior to loading DOSRMX. Even if youhave shut down DOSRMX, reset the system before running such software.
Load the iRMX OS before starting large applications, such as word processors, sothat memory allocation, which is done by the iRMX OS, is adequate for theapplication. If you load the iRMX OS from within an application, the encapsulatedDOS task will have only that amount of memory available at load time, even if youquit the DOS application.
Examples1. To load the iRMX bootfile located in the DOS subdirectory c:\dosrmx, and to
use the first iRMX partition on the first hard drive as the iRMX system device,enter:
loadrmx -n C:\DOSRMX\bootfile_name -s C_RMX -f n <CR>
2. To load the iRMX bootfile located in the DOS subdirectory c:\dosrmx, and touse the primary DOS partition on the first hard drive as the iRMX system device,enter:
loadrmx -n C:\DOSRMX\bootfile_name -s C_DOS -f DOS <CR>
The two batch files in the \dosrmx directory, rmx.bat and rmxnet.bat, use themechanism in this example. You can modify these batch files if you need to.
3. If you are in the \dosrmx directory, this command will default to loading the filedosrmx with the current DOS drive as the system device, and using the EDOSfile driver:
loadrmx <CR>
4. This command provides an example of a remote load invocation, where thename of the remote file system is filesrv and the remote load class code is4003H:
loadrmx -n CC_4003 -s FILESRV -f r <CR>
DOS command loadrmx
Command Reference Chapter 2 237
Error MessagesERROR -->Boot file is not OMF-386 type, loading aborted.
The Object Module Format (OMF) of the specified bootfile is not valid. The file'sOMF header is not present or not correct. You specified the wrong file or the file hasbecome corrupted.
ERROR -->Exception interrupt error, loading aborted!BIOS error.
ERROR -->file -n is emptyThe specified bootfile is empty (0 bytes). Use the DOS command chkdsk to scanyour disk, then reinstall your iRMX bootfile.
ERROR -->file -n is too short!!The specified bootfile must be greater than 75 bytes to be a valid OMF bootfile. Youspecified the wrong file or the file has become corrupted.
ERROR -->Gate Address A20 Failed, cannot run iRMX.Cannot access memory above 1 Megabyte, or BIOS error.
ERROR -->iRMX Interface TSR is not present.Invoke rmxtsr before using loadrmx.
ERROR -->iRMX Operating System is present in memory, cannot overload.The iRMX OS is already loaded. You cannot load more than one bootfile at any onetime. Reboot the system, then invoke rmxtsr before using loadrmx.
ERROR -->Memory configuration error; cannot load iRMX.The reported memory size was either less than 0 or greater than 640K.
ERROR -->No extended memory present; cannot load iRMX.Loadrmx loads the specified bootfile into extended memory and requires at least 1.5Megabytes. If insufficient extended memory is present, the iRMX OS cannot load.
ERROR -->Can't allow iRMX to load below 1MB, loading abortedThe specified bootfile does not contain code to load the iRMX OS in extendedmemory. The bootfile is probably a regular iRMX III bootfile without the DOSRMXenhancement.
ERROR -->Protected mode software already loaded.Loadrmx has detected that the microprocessor is running in Protected mode.Products that use Protected mode services cannot be used with DOSRMX.
Determine what DOS application program or utility is using Protected mode services,remove it from config.sys (or wherever it is being invoked), reboot the system, theninvoke loadrmx.
ERROR -->RAM parity error, loading aborted!BIOS reported a parity error.
ERROR -->Target file read error.The file may have been corrupted.
loadrmx DOS command
238 Chapter 2 Command Descriptions
ERROR -->Unable to open file: <filename>The specified bootfile is not in the specified directory. Invoke loadrmx again andspecify the correct drive, directory, filename, and extension of the bootfile.
ERROR -->Unknown error from BIOS, loading aborted!Run the system tests for your system.
***WARNING***Available Extended memory is less than 2 megabytes.There is less than 2 Mbytes of extended memory in your system. The requestedbootfile will load and the iRMX OS may run, depending upon how much memory isavailable. Some tools, application programs, compilers, etc. may not executebecause insufficient memory is available.
***WARNING***PC junior Not supported.The platform is a PC Junior. Loadrmx will attempt to load the bootfile but willreturn an error and abort.
***WARNING***PC Not supported.The platform is not a supported PC. Loadrmx will not attempt to load the bootfile.
***WARNING***PC/XT 8088 base Not supported.The platform is an 8088-based PC. Loadrmx will not attempt to load the bootfile.
***WARNING***PS/2 Model 30 Not supported.The platform is a PS/2 Model 30. Loadrmx will not attempt to load the bootfile.
***WARNING***Unknown PC Not supported.The platform is not an Intel386, Intel486™, or Pentium microprocessor-based PC.Loadrmx will not attempt to load the bootfile.
***WARNING***Unknown system type, loading aborted.The platform is not compatible. Loadrmx will not attempt to load the bootfile.
HI command locdata
Command Reference Chapter 2 239
locdataTransforms a data stream, such as a physically attached RAM disk, into a locateddata file (a file that identifies the absolute memory address where the BootstrapLoader loads the file). You then use the addloc command to integrate the locateddata into an existing application system.
✏ NoteYou can use this command in an esubmit file orrq_c_send_command system call if the form of the commanddoes not require user input. If the command requires user input inan rq_c_send_command system call, it will fail. However, youcan use a form of the command that requires user input in anesubmit file if you use the eoresponse and coresponse
subcommands.
See also: esubmit command, in this chapter
Syntax
locdata inpath to|over outpath address=value
Parametersinpath
The logical name of the physically attached RAM disk. Multiple or wildcardpathnames are not allowed.
to|over outpathPathname of the file to receive the output of locdata. Multiple or wildcardpathnames are not allowed. Specifying to guards against overwriting an existingfile. If you receive a message that the file exists, enter Y or R to overwrite the file, orN or E (exit) to exit the locdata command and preserve the existing file.
address=valueThe address at which the Bootstrap Loader is to load the data stream (for example,the address of a RAM disk). The address must specify a WORD boundary. Becareful not to assign an address that overlays any part of the system or the third stageof the Bootstrap Loader. By default, the value is decimal, but you may specify octalor hexadecimal by appending an O or H.
locdata HI command
240 Chapter 2 Command Descriptions
Additional Information
The locdata and addloc commands can be used together to create an application thatautomatically loads part of itself into a RAM disk when the system boots. Generally,to use a RAM disk you configure a system with an area of RAM dedicated to theRAM disk. When the system boots, you attach the RAM disk memory to yoursystem, format it, and move data into and out of it just as you would with any othersecondary storage device.
If you want to use a RAM disk to store part of the application system (for instance,the HI commands), the stored data must be available in the RAM disk area when thesystem boots. This data cannot be copied into the RAM disk until you haveconfigured the application system into a bootable file, because the RAM disk areadoesn't exist until you define it through the configuration process. Therefore, youmust integrate a copy of a RAM disk data structure into an existing applicationsystem boot file.
Using the address assigned to the RAM disk during the configuration process,locdata creates a located data file containing the image of the RAM disk. (A locatedfile is a file that specifies the starting address at which it is to be loaded by theBootstrap Loader.) Addloc integrates the located data file with an existingapplication boot file, creating a file that contains a new bootloadable version of theapplication system. When this new file is booted, the RAM disk data structure isloaded into memory in the area defined for the RAM disk during configuration.
You own and have full access to any remote files created by the locdata command.(Read, append, and update access permissions constitute full access for remote files.)
Example
To create an application system with a RAM disk that is initialized by the BootstrapLoader, perform these steps:
1. Configure a version of the OS that includes a RAM disk. Make a special note ofthe starting address you specify for the device.
See also: ICU User's Guide
2. Bootstrap load this new version of the OS.
3. Attach the RAM disk as a named device. For example:
attachdevice RAM AS :r: <CR>
4. Format the RAM disk as a named file. For example:
format :r: <CR>

HI command locdata
Command Reference Chapter 2 241
5. Create a directory structure on the RAM disk and copy the files that you need,such as the HI commands, to the appropriate directory. An error message isdisplayed if you run out of room on the RAM disk.
6. Detach the RAM disk. For example:
detachdevice :r: <CR>
7. Attach the RAM disk as a physical device. This allows you to access all the datain the device, including the formatting information. For example:
attachdevice RAM AS :r: physical <CR>
8. Use the locdata command to process the information from the RAM disk andplace the output in a file on the hard disk. Use the RAM disk starting address(specified during configuration) as the value for the address parameter. If youconfigured the RAM disk to have a base address of 0100000H, this exampleapplies:
locdata :r: to commands address = 0100000H <CR>
9. Use the addloc command to add the processed output (the commands file) to thefile that contains the bootstrap loadable version of the OS. For example:
addloc commands, RMX86.286 to /boot/RAMdisk.286 <CR>
The processed output file of the locdata command (the commands file) iscombined with a bootloadable file (RMX86.286 ) to produce a new bootloadablefile (RAMdisk.286). The addloc process generates a print file (RAMdisk.mpa).
10. Create a Bootstrap Loader third stage for the new bootable file. For example:
copy /system/RMX86 to /boot/RAMdisk <CR>
When you bootstrap load this new version of the OS, the RAM disk contains thecommands and files copied to it during Step 5.
locdata HI command
242 Chapter 2 Command Descriptions
Error Messages<pathname>, is a keyword not a file name
One of the pathnames you specified was a command keyword, not a file.
locdata, one input file onlyLocdata requires one input file; you specified more than one.
locdata, one output file onlyLocdata requires one output file; you specified more than one.
after, is an illegal preposition for locdataThe after preposition is not a legal locdata parameter.
<string>, illegal prepositionThe preposition you entered is not a legal locdata parameter.
locdata, address parameter is missingYou omitted the address parameter in the invocation line.
locdata address value is missingYou omitted the address value in the invocation line.
locdata, no more than one address valueYou entered more than one address value in the invocation line.
locdata, illegal address valueThe address value you specified is not within the range of 0 to 0FFFFFFH.
<pathname>, output file same as input fileLocdata does not allow the same name for both the input and output files.
<pathname>, write errorA system error caused an incorrect number of bytes to be written to the output file.Retry the command.
<pathname>, physical address exceeded 16M bytesThe base address added to the size of the input file you specified exceeds 16 Mbytes(this is for iRMX II systems only).
<pathname>, read errorA system error caused an incorrect number of bytes to be read from the input file.Retry the command.
HI command lock
Command Reference Chapter 2 243
lockLocks the terminal(s) after the current interactive job is deleted; cannot be used forvirtual terminals.
Syntax
lock [terminal_name_list|*]
Parametersterminal_name_list
One or more physical device names of the terminals to be locked. Multiple namesmust be separated with commas. To display the terminal device names, invoke theinitstatus command.
* Specifies that all configured terminals should be locked.
Additional Information
The lock takes effect as soon as there is no interactive job on the terminal. Lockprevents the HI from re-creating an interactive job or issuing a logon prompt once thecurrent interactive job is deleted. As a result, users cannot access the HI through thatterminal.
One use of the lock command (in conjunction with connect) is to take the terminaloff-line for use with a modem. Note your terminal's attributes before changing themfor modem use; you must restore them before the HI can use the terminal.
The Super user can lock any terminal; other users can lock only those terminalswhose interactive jobs have the same user ID as their own.
The system manager can use the lock command followed by a jobdelete commandeither to selectively delete users from the system or to shut down the entire system.Interactive jobs are deleted with the jobdelete or the logoff command.
This message is displayed on each locked terminal as the lock takes effect:
Terminal is now locked and unavailable for use
As each terminal is locked, this message is displayed at the terminal where lock wasinvoked:
locked
<terminal_name>, locked
See also: Terminals, System Configuration and Administration
lock HI command
244 Chapter 2 Command Descriptions
Error Messageslock not allowed
You attempted to lock your own terminal, which can only be done by the Super user.
<terminal_name>, not foundNo terminal with the indicated name is configured into your application system.
<terminal_name>, already lockedThe indicated terminal is already locked.
not a multi-user systemThe lock command does not function if the HI is configured as a single-user system.
HI command logicalnames
Command Reference Chapter 2 245
logicalnamesLists all the current logical names available to the user, including local and remotenames.
Syntax
logicalnames [to|over|after outpath] [f|s|l[ r]] [u|sy]
Parametersto|over|after outpath
Writes the output to the specified file rather than to the screen.
f(ast) Lists the logical names without any additional information. This is the default.
s(hort) Lists logical names along with their type, the physical device name, the currentconnections, and the owner.
l(ong) In addition to the information displayed by short, lists the complete pathnameassociated with each logical name.
r(oot) If specified with long, displays the pathname beginning at the root device.
u(ser) Lists only the logical names associated with the current user.
sy(stem)Lists only the logical names of system-defined files and devices.
Additional Information
You own and have full access to output files created by the logicalnames command,including any remote files.
When invoked with the long or short parameter, logicalnames displays theseabbreviations for the standard file driver names:
Named file driver: NAMDOS file driver DOSEDOS file driver EDOSPhysical file driver PHYSStream file driver STRiRMX-NET Remote file driver REMNFS file driver NFS
Logicalnames also displays the loadable file driver names.
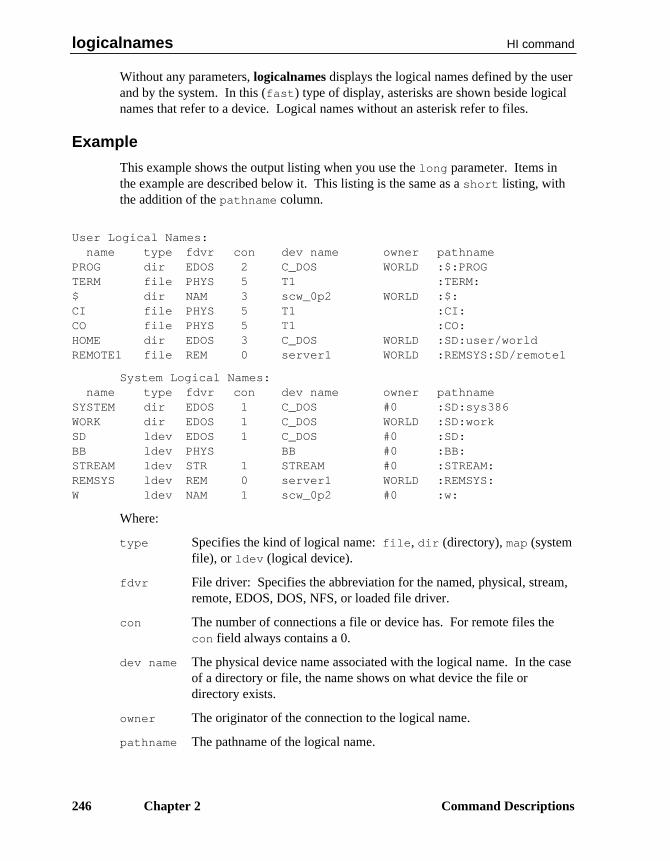
logicalnames HI command
246 Chapter 2 Command Descriptions
Without any parameters, logicalnames displays the logical names defined by the userand by the system. In this (fast) type of display, asterisks are shown beside logicalnames that refer to a device. Logical names without an asterisk refer to files.
Example
This example shows the output listing when you use the long parameter. Items inthe example are described below it. This listing is the same as a short listing, withthe addition of the pathname column.
User Logical Names:name type fdvr con dev name owner pathname
PROG dir EDOS 2 C_DOS WORLD :$:PROGTERM file PHYS 5 T1 :TERM:$ dir NAM 3 scw_0p2 WORLD :$:CI file PHYS 5 T1 :CI:CO file PHYS 5 T1 :CO:HOME dir EDOS 3 C_DOS WORLD :SD:user/worldREMOTE1 file REM 0 server1 WORLD :REMSYS:SD/remote1
System Logical Names:name type fdvr con dev name owner pathname
SYSTEM dir EDOS 1 C_DOS #0 :SD:sys386WORK dir EDOS 1 C_DOS WORLD :SD:workSD ldev EDOS 1 C_DOS #0 :SD:BB ldev PHYS BB #0 :BB:STREAM ldev STR 1 STREAM #0 :STREAM:REMSYS ldev REM 0 server1 WORLD :REMSYS:W ldev NAM 1 scw_0p2 #0 :w:
Where:
type Specifies the kind of logical name: file, dir (directory), map (systemfile), or ldev (logical device).
fdvr File driver: Specifies the abbreviation for the named, physical, stream,remote, EDOS, DOS, NFS, or loaded file driver.
con The number of connections a file or device has. For remote files thecon field always contains a 0.
dev name The physical device name associated with the logical name. In the caseof a directory or file, the name shows on what device the file ordirectory exists.
owner The originator of the connection to the logical name.
pathname The pathname of the logical name.
HI command logicalnames
Command Reference Chapter 2 247
When you specify the root parameter with the long parameter, the pathname isdisplayed beginning from the root device. If the displayed pathname has ellipsesbefore it (.../user/dir1/dir2/dir3/filename), logicalnames truncates the pathnamebecause it is too long to fit in its column; only the last elements are shown.
logoff CLI or HI command
248 Chapter 2 Command Descriptions
logoffLogs the user off of a dynamic terminal and frees the terminal for use by otheroperators.
Syntax
logoff
Additional Information
Logoff also deletes the user's interactive job, executes the :prog:r?logoff file, andissues a new logon prompt (if the terminal has not been locked). If there are anyactive background jobs when you invoke logoff, you receive the message:
background jobs are running, do you want to exit ?
([n] or y)
If you respond with Y, your background jobs are canceled and you are logged off.
If you use the CLI, this is an internal CLI command. It is also supplied as an HIcommand for systems that use a custom interface. Regardless of whether you use theCLI, invoking :system:logoff invokes the HI command. The HI version of thecommand does not check for the existence of background jobs.
On static terminals, logoff simply terminates the session and restarts a new sessionfor the same user, unless the terminal has been locked.
See also: Dynamic and Static Terminals, System Configuration andAdministration
Error Messages:prog:r?logoff, file does not exist
The CLI could not find the logoff file. This message is only a warning, not an error;logoff completes successfully.
<parameter>, unexpected parameterYou entered a parameter; logoff does not accept any parameters.
HI command make (mk)
Command Reference Chapter 2 249
make (mk)Automates the creation of large programs.
Syntax
make [option] [macdef] [target]
Parametersoption
One or more switches that modify program operation.
✏ NoteMany of these switches produce status codes, warnings, or errors:• Status codes provide useful information.• Warnings provide vital information that may affect
programming decisions. However, warnings will not stop thecreation of object files.
• Errors are fatal to the compilation process and stop the creationof object files.
-i Ignores iRMX errors.
-w System exits when it receives a warning from iRMX tools.
-n Displays commands but does not execute them.
-p Prints the complete set of macro definitions and dependency lines in amakefile.
-q Returns an iRMX status code based on the updated file.
-r Ignores the built-in rules.
-e Specifies that environment variables override makefile assignments.
-f filenameSpecifies the name of the makefile. For filenames, you must supply afull path name if the file is not in the current directory.
-s Executes makefile commands without displaying them.
-t Changes the modification date of each target file without recreating thefiles. This is similar to the touch command, where the date is madecurrent so that the object files are not unnecessarily created again.
-u Forces an update.
make (mk) HI command
250 Chapter 2 Command Descriptions
-? Requests help messages for various switches and version informationfor this command.
-d[dd] DEBUG makefile. Each d (up to three) provides more information.
See also: Additional Information section of this command for information onmacros, dependencies, built-in rules, environment variables, andcommands
macdefA macro definition that provides value or meaning to a macro.
See also: Using Macros section of this command
targetName of a file to be updated. Must correspond to one of the target names in themakefile. Make processes target names from the command line from left to right.
Additional Information
The make command helps you to quickly create makefiles and object files withoutleaving the iRMX OS. Make reads commands from a user-defined makefile thatlists the files to be created, the commands that create the files, and the files fromwhich they are created. This command is similar to the Unix make command.
When you use the make command to create a program, it ensures that each file onwhich the program depends is up-to-date. If necessary, it then creates the program byexecuting the given commands in the makefile. If a file is not up-to-date, makeupdates it before creating the program by executing explicitly given commands orone of the many built-in commands.
See also: Using Built-in Rules section of this command
Creating a Makefile
A makefile contains dependency lines, command lines, and comments. Adependency line shows how a given file depends on other files and what commandsare required to bring a file up-to-date. You can add comments as notes for theprogrammer or anyone reading the makefile.
Keep the makefile in the same directory as the given source files. The filenamemakefile is provided as the default filename if you do not give an explicit name atinvocation.
Dependencies
A dependency line lists the filename, its dependencies, and commands using thisform:
HI command make (mk)
Command Reference Chapter 2 251
target ... :[dependent ...]
[ command ...]
where target is the name of a file to be updated, dependent is the name of a fileon which the target depends, and command is the iRMX command needed to createthe target file. The command line(s) should be on a newline, and should begin at thefirst tab stop. If a dependency line is too long, you can continue it by typing abackslash (\) immediately followed by a newline.
You can give more than one target name or dependent name if desired. Separateeach name from the next by at least one space. Separate the target names from thedependent names by a colon (:). Filenames must follow iRMX naming conventions.
See also: iRMX file-naming conventions, in Chapter 1
✏ NoteNames are case-sensitive within a makefile.
Commands
You can give a sequence of commands on lines following the target by beginningeach line with a tab character. Specify commands exactly as they would appear onan iRMX command line. Use the ampersand character (&) in front of a command toprevent make from displaying the command before executing it.
Comments
You can add a comment to a makefile by starting the comment with a pound sign (#)and ending it with a newline. All characters after the pound sign are ignored.
Example
A program named test is made by linking three object files, x.obj, y.obj and z.obj.These object files are created by compiling the C language source files x.c, y.c, andz.c. Furthermore, the files x.c and y.c contain the line:
#include <defs>
This means test depends on the three object files, the object files depend on the Csource files, and two of the source files depend on the include file defs.

make (mk) HI command
252 Chapter 2 Command Descriptions
Here is a makefile representing these relationships:
test: x.obj y.obj z.obj
$(BND) $(CSTART), &
x.obj, y.obj, z.obj, &
$(SD)intel/lib/cifc32.lib, &
$(SD)RMX386/lib/rmxifc32.lib &
renameseg(code32 to code) &
segsize(stack(+8192)) rc(dm(10000,5000000)) &
object($@) $(DEBUG) $(TYPE)
x.obj: x.c defs
$(CC) $*.C $(CFLAGS)
y.obj: y.c defs
$(CC) $*.C $(CFLAGS)
z.obj: z.c
$(CC) $*.C $(CFLAGS)
In the first dependency line, test is the target file and x.obj, y.obj, and z.obj are itsdependents. This is the command sequence:
$(BND) $(CSTART), &
x.obj, y.obj, z.obj, &
$(SD)intel/lib/cifcf32.lib, &
$(SD)RMX386/lib/rmxifc32.lib &
renameseg(code32 to code) &
segsize(stack(+8192)) rc(dm(10000,5000000)) &
object($@) $(DEBUG) $(TYPE)
The next line tells how to create test if it is out-of-date. The program is out-of-date ifany one of its dependents has been modified since test was last created.
The second, third, and fourth dependency lines have the same form, with the x.obj,y.obj, and z.obj files as targets and x.c, y.c, z.c, and defs files as dependents. Eachdependency line has one command sequence that defines how to update the giventarget file.
Specifying a Makefile
This example make command reads the dependency lines of the makefile namedmaketest found in the current directory:
mk -f maketest
You can direct make to read dependency lines from the standard input by giving ahyphen (-) as the filename. Make will read the stdin until an end-of-file isencountered (Ctrl-Z if stdin is the console).
HI command make (mk)
Command Reference Chapter 2 253
If you specify only a target on the command line and no makefile is present, makewill attempt to create the target using only built-in rules. This is especially useful forsmall, single-module programs.
Updating Makefiles
When you invoke make, you can update and modify one or more target files in thedirectory. You can also direct make to update the first target file in the makefile bytyping just the command make. In this case, make searches for the makefile in thecurrent directory.
For example, assume that the current makefile contains the dependency lines given inthe last section. This command compares the modification dates of the test programand each of the object files x.obj, y.obj, and z.obj and recreates test if any changeshave been made to any object files since test was last created:
mk
It also compares the modified dates of the object files with those of the four sourcefiles, x.c, y.c, z.c, and defs, and recreates the object files if the source files havechanged. It does this before recreating test so that the recreated object files can beused to recreate test. If none of the source or object files has been altered since thelast time test was made, make stops and all files are unchanged.
You can direct make to update a given target file by giving the filename of thetarget. For example, this command causes make to recompile, creating the x.objfiles if the x.c or defs files have changed since the object file was last created:
mk x.obj
Similarly, this command causes make to recompile, creating x.obj and z.obj if thecorresponding dependents have been modified:
mk x.obj z.obj

make (mk) HI command
254 Chapter 2 Command Descriptions
Using Pseudo-target Names
You can include dependency lines that have pseudo-target names, i.e., names forwhich no files actually exist or are produced. Pseudo-target names allow make toperform tasks and execute iRMX commands not directly connected with the creationof a program, such as deleting old files or printing copies of source files. Forexample, this dependency line removes old copies of the given object files when thepseudo-target name cleanup is given in the invocation of make.
cleanup:
delete x.obj
delete y.obj
delete z.obj
Since no file exists for a given pseudo-target name, the target is always assumed to beout-of-date. Thus the associated series of commands are always executed.
This command causes the creation of makefile.new which will have a dynamicallycreated dependency section formed by the mkdep command:
depend:
copy makefile over makefile.new
mkdep -p -f makefile.new -i $(CDIR) \
mkdep.c $(SRC)
See also: mkdep command
Make also has built-in pseudo-target names that modify its operation.
The pseudo-target name .IGNORE causes make to ignore errors during execution ofcommands, allowing make to continue after an error. This is the same as the -ioption. Make also ignores errors for a given command if the command string beginswith a hyphen (-). To cause make to stop on warnings, the pseudo-target name.WARNING has the same effect as the -w option.
The pseudo-target name .PRECIOUS prevents dependents of the current target frombeing deleted when make is terminated by an error condition or user-input <Ctrl-C>.
The pseudo-target name .SILENT has the same effect as the -s option.
Using Macros
A makefile can contain macros. A macro is a short name that represents a filenameor command option. The macros can be defined when you invoke make or in themakefile itself.
HI command make (mk)
Command Reference Chapter 2 255
In a macro, the name (a string of letters and digits) to the left of the equal sign isassigned the string of characters following the equal sign. Except where noted underconcatenated macro definitions, leading blanks and tabs on both sides of the operatorare ignored (on both sides of the equal sign, leading blanks and tabs are stripped).
The macro definition templates shown differ only in the operator they contain (=,+=or :=). The operator distinguishes these three types of make macros:
NAME = [value] #standard macro definitionDefines a standard macro, where the value of the macro is the value string,which can contain other macros.
NAME += [value] #concatenated macro definitionDefines a concatenated macro, where the value of the macro is the concatenationof its current value and value. If you omit whitespace after the operator in thedefinition, make pastes the concatenated value immediately after the currentvalue; otherwise make converts any whitespace to a single space betweencurrent and concatenated values.
NAME := [value] #immediate macro definitionDefines an immediate macro, where all macros in value are expanded and theexpanded line is the value of the macro.
These examples are valid macro definitions:
CFLAGS = optimize(3) debug
LIBS =
The last definition assigns LIBS the null string. A macro that is never explicitlydefined has the null string as its value.
Invoking Macros
Invoke a macro by preceding the name with a dollar sign $ ; place macro nameslonger than one character in parentheses () or braces {}. The name of the macro iseither the single character after the dollar sign or a name inside parentheses or braces.These are valid macro invocations:
$(CFLAGS) $(xy) $Z ${Z}
The invocations $Z and ${Z} are identical.
make (mk) HI command
256 Chapter 2 Command Descriptions
Including a Standard Macro Definition in a Command Line
A macro definition argument has the same form as a macro definition in a makefile.Macros in a command line override corresponding definitions found in the makefile.For example, this command assigns the value internal to RELEASE:
mk RELEASE=internal
All environment variables are preloaded as macros before reading the makefile. Ifthe -e switch is set, the environment variables override the makefile.
Using Built-in Macros
Make has built-in macros that you can use when writing dependency lines:
$@ Contains the full pathname of the current target. It may be used independency lines with user-defined target names.
$* Contains the name of the current target with the suffix removed. Thusif the current target is test.obj, $* contains test. It may be used independency lines that redefine the built-in rules.
$? The value is the list of prerequisites newer than the target.
$- Contains the filename of the dependent that is more recent than thegiven target.
$(@D), $(@F), $(<D), $(<F), $(*D), $(*F), $(-D), $(-F)These macros get directory and file portions of the respective macrosabove.
$(MAKE) By default, the value of this macro is the name with which make wasinvoked, but you can change it. Using this macro on any operation lineoverrides the /n no execute control. This is useful in debuggingmakefiles that invoke make recursively.
$(MAKEVERSION)This macro is the version of make.
$(MFLAGS) $(MAKEFLAGS)This macro specifies the options that make starts with. Make fills thismacro with all options supplied, so you can use them to pass alongoptions when invoking make recursively.
$(STATUS) Make fills this macro with the return code of operation lines thatcontain the ignore prefix (-).
Make supports a macro substitution feature:
$(macro:old_suffix=new_suffix)
This is used as follows:
HI command make (mk)
Command Reference Chapter 2 257
SRC = x.c y.c z.cOBJS = $(SRC:.c=.obj) OBJS is now x.obj y.obj z.obj
OBJLIST = $(SRC:.c=.obj,) OBJLIST is now x.obj,y.obj,z.obj
vpath: Search Path for All Dependencies
The value of the make variable vpath specifies a list of directories that make shouldsearch. Dependency files are usually in the current directory, but if a file that is listedas a dependency does not exist in the current directory, make searches the directorieslisted in vpath for a file with that name. The first occurrence of that file is then usedas the dependency.
The vpath variable is a list of directory paths separated by colons. Because thepaths are colon-separated, iRMX logical names cannot be used.
For example, this command specifies two directory paths that make sequentiallysearches if it cannot find dependency files in the current directory:
vpath = intel/ic386/inc:/rmx386/demo/c/intro
Using Environment Variables
Make provides access to current values of the environment variables. Makeautomatically assigns the value of each environment variable to a macro of the samename. You can access a variable's value in the same way that you access the value ofexplicitly defined macros. For example, in this dependency line, $(SOURCE) willhave the same value as the user's SOURCE variable (assuming the user has definedthe variable SOURCE):
test:
$(CC) $(SOURCE)/x.c
Make assigns the environment variable before it assigns values to the user-specifiedmacros. Thus, you can override the value of an environment variable by explicitlyassigning a value to the corresponding macro. For example, this macro definitioncauses make to ignore the current value of the SOURCE variable and use /usr/pubinstead:
SOURCE=/usr/pub
For another example of changing environment variables, if you add this line to the:config:r?env file, make will break to an AEDIT window if an error occurs duringcompilation:
EDITOR = AEDIT
The precedence of make macros is determined by where they are defined. You canredefine an existing macro (i.e., change its value) if the redefinition has precedence at
make (mk) HI command
258 Chapter 2 Command Descriptions
least as high as the existing definition. This is the default precedence of macrodefinitions:
• Invocation command definition (highest)
• Description file definition
• Macros predefined by make
• Environment definition (lowest)
The -e environment control causes environment definitions to have higherprecedence than makefile definitions (but lower precedence than make invocationcommand definitions) for a particular invocation of make.
✏ NoteSome systems upper-case the name of an environment variablewhile the value of the variable retains its case as specified in thevariable's definition. It is therefore recommended that all macronames be in uppercase.
Using the Built-in Rules
Make provides a set of built-in dependency lines, called built-in rules, thatautomatically check the targets and dependents given in a makefile and create up-to-date versions of these files if necessary. The built-in rules are identical to user-defined dependency lines except that they use the suffix of the filename as the targetor dependent instead of the filename itself. For example, make can automaticallyassume that all files with the suffix .obj have dependent files with the suffix .c.
When no explicit dependency line is given in a makefile for a given file, makeautomatically checks the default dependents of the file, forming the name of thedependents by removing the suffix of the given file and appending the pre-defineddependent suffixes. If the given file is out-of-date with respect to these defaultdependents, make searches for a built-in rule that defines how to create an up-to-dateversion of the file and executes it.
HI command make (mk)
Command Reference Chapter 2 259
There are built-in rules for these files:
.obj Object file
.c C source file
.p38 PLM386 source file
.plm PLM386 source file
.a38 ASM386 source file
.asm ASM386 source file
For example, if the file x.obj is needed and there is an x.c in the description ordirectory, x.c is compiled.
The built-in rules are designed to reduce the size of your makefile. They provide therules for creating common files from typical dependents.
Reconsider the example given in Creating a Makefile. In this example, the programtest depended on three object files, x.obj, y.obj, and z.obj. The files x.c and y.c alsodepended on the include file defs. In the original example, each dependency andcorresponding command sequence was explicitly given. Many of these dependencyand command lines were unnecessary, since the built-in rules could have been usedinstead.
This is all that is needed to show the relationships between these files:
test: x.obj y.obj z.obj
$(BND) $(CSTART), $(@).obj, &
$(SD)intel/lib/cifc32.lib, &
$(SD)RMX386/lib/rmxifc32.lib &
renameseg(code32 to code) $(TYPE) &
segsize(stack(+8192))
rc(dm(10000,500000)) object($@) $(DEBUG)
x.obj y.obj: defs
In this makefile, test depends on three object files, and an explicit command is givenshowing how to update test. However, the second line merely shows that two objectfiles depend on the include file defs. No explicit command sequence is given on howto update these files if necessary. Instead, make uses the built-in rules to locate thedesired C source files, compile these files, and create the necessary object files.
Changing the Built-in Rules
You can change the built-in rules by redefining the macros used in these lines. Youcan display a complete list of the built-in rules and the macros used in the rules bytyping:

make (mk) HI command
260 Chapter 2 Command Descriptions
mk -p
The macros of the built-in dependency lines define the names and options of thecompilers, assemblers, and other programs invoked by the built-in commands. Makeautomatically assigns a default value to these macros when you start the program.You can change the values by redefining the macro in your makefile. For example,this built-in rule contains two macros, CC and CFLAGS.
.c.obj:
$(CC) $*.C $(CFLAGS)
You can redefine any of these macros by placing the appropriate macro definition atthe beginning of the makefile. You may create your own built-in rule in yourmakefile. A built-in rule has the form:
suffix-rule :
command
where suffix-rule is a combination of suffixes showing the relationships of theimplied target and dependent, and command is the iRMX command required to carryour the rule. If more than one command is needed, they are given on separate lines.
For a complete list of built-in rules, check:
:lang:builtins.mk
A pair of suffixes indicates a rule that makes one file from the other. For example,.c.obj is the rule that creates an object file (.obj) from a corresponding C source file(.c).
If necessary, you can create new suffix-rules by adding a list of new suffixes to amakefile with .SUFFIXES: this pseudo-target name defines the suffixes that may beused to make suffix-rules for the built-in rules. The line has the form:
.SUFFIXES: suffix ...
where suffix is usually a lower-case letter preceded by a dot (.). If more than onesuffix is given, you must use spaces to separate them.
HI command make (mk)
Command Reference Chapter 2 261
The order of the suffixes is significant. Each suffix is a dependent of the suffixespreceding it. For example, this suffix list causes test.c to be a dependent of test.obj,and test.plm to be a dependent of test.c:
.SUFFIXES: .obj .c .p38 .plm .a38 .asm
You can create new suffix-rules by combining dependent suffixes with the suffixof the intended target. The dependent suffix must appear first. If a SUFFIXES listappears more than once in a makefile, the suffixes are combined into a single list. IfSUFFIXES is given but has no list, all suffixes are ignored.
Troubleshooting
Most difficulties in using make arise from its specific meaning of dependency. If thefile x.c has the line:
#include <defs>
then the object file x.obj depends on defs; the source file x.c does not. If defs ischanged, it is not necessary to do anything to the file x.c, while it is necessary torecreate x.obj. To determine which commands make will execute, without actuallyexecuting them, use the -n option. For example, this command prints out thecommands make would normally execute without actually executing them:
mk -n
If a change to a file is absolutely certain to be benign (e.g., adding a new definition toan include file), the -t touch option can save a lot of time. Instead of issuing a largenumber of superfluous recompilations, make updates the modification times on theaffected file. Thus, this command, which stands for touch silently, causes therelevant files to appear up-to-date:
mk -ts
make (mk) HI command
262 Chapter 2 Command Descriptions
here Documents
Make understands Unix-style here documents. This enables you to include data inthe makefile that would normally need to be placed in a separate file, and makes thedata available as the standard input of the command. <<- (strip leading tabs) and<<\word (quoting) modes are both supported. If quoting is not specified, then thedata is subject to macro expansion, at the time of command execution.
date
EOF
/sys286/submit heredoc.000 to :bb: <<-\EOF
ed today.h
v/local/d
s/ local//
s/.*/static char xxxtime[] = "@(\#) Compiled: &";/
w
q
EOF
Error Messages
Make does not generate error messages. However, it does pass through any errormessages generated by the iRMX tools it invokes.
HI command memory
Command Reference Chapter 2 263
memoryDisplays the amount of memory currently allocated to the user, and the total systemmemory available to the user.
Syntax
memory [e]
Parameters
e Also displays the total amount of initial and currently available system memory.
Additional Information
This is an example of the listing produced when you use the e parameter:
-memory e <CR>
User Private Memory (pool minimum) : 300 k Bytes
Available Memory (Private + Shared): 1.545 M Bytes
Initial Available Shared System Memory: 13.99 M Bytes
Current Available Shared System Memory: 7.650 M Bytes
Where:
User Private MemoryThe amount of memory currently allocated to the user
Available MemoryThe amount of memory available for the user; that is, the privatememory and the amount of memory the user job can borrow fromparent jobs. For example, if the private memory is 300 Kbytes and thetotal memory is 1.545 Mbytes, as shown above, your interactive job canstill borrow 1.245 Mbytes.
Initial Available Shared System MemoryThe amount of memory initially assigned to the Free Space Managerafter the root job allocates its memory.
Current Available Shared System MemoryThe amount of memory currently available in the root job from the FreeSpace Manager.

mirror HI command
264 Chapter 2 Command Descriptions
mirrorManages disk mirroring on a pair of matched hard disks. The mirror commandprovides several distinct functions and must be invoked once for each functiondesired. This command is supported in:
• iRMX III systems using Multibus I and II• DOSRMX and iRMX for PCs systems using Multibus II• DOSRMX and iRMX for PCs systems using a PC bus with an
Adaptec 1542/1742 host adapter
Syntaxmirror create primary secondarymirror setopt primary read alt|prim|secmirror resync primary p2s|s2pmirror waitevent primarymirror getstat primarymirror attstat primarymirror disable primary
Parameterscreate
Creates a mirror set with a primary and secondary hard disk.
primaryPrimary hard disk's logical name (for example, :w:).
secondarySecondary hard disk's DUIB name (for example, M4380_3)
See also: physname command, in this chapterdevice names, Appendix E
setopt Sets special options for the mirror set.
read Sets the read policy for the mirror set to one of the following:
alt Reads are performed alternately from the primary and secondary harddisks. If setopt is not specified, this is the default.
prim Reads are performed only from the primary hard disk.
sec Reads are performed only from the secondary hard disk.
HI command mirror
Command Reference Chapter 2 265
resync Enables disk mirroring on a mirror set and resynchronizes the set's hard disks whileon-line. The direction of resynchronization is one of these:
p2s Primary to secondary.
s2p Secondary to primary.
waiteventWaits for a disk mirroring event and returns when an event occurs.
getstatReports the mirroring status of a mirror set.
attstatReports the attachment status of a hard disk.
disableDisables disk mirroring on a mirror set.
Additional Information
✏ NoteYou cannot use this command with a device that you accessthrough NFS.
Disk mirroring is a hard disk configuration that maintains identical copies (mirrors)of data on two disks for increased reliability. Disk mirroring requires you to create amirror set: a pair of hard disks configured to write the same data to both disks, readdata from alternate disks (by default), and perform error checking for read and writeoperations on the set.
A mirror set has a primary and secondary hard disk. The mirror set takes its namefrom the primary hard disk, and disk mirroring operations are directed at that disk.The primary hard disk must be already attached and is identified by a logical name,for example, :sd: or :m:. The secondary hard disk works together with the primaryhard disk to do disk mirroring operations. The secondary hard disk is identified by itsphysical (DUIB) name. The secondary hard disk should be formatted, but detached.
To create a mirror set, use the mirror command with the create parameter. Thiscreates a mirror set and specifies the primary and secondary hard disks in the set.
✏ NoteThe two hard disks must have the same formatted capacity, devicegranularity and should be the same model type to ensure the sameformatted disk capacity.

mirror HI command
266 Chapter 2 Command Descriptions
To set the read policy for a mirror set, use the mirror command with the setopt andread parameters. This determines whether data is read from one or both disks. Bydefault, data is read alternately from the primary and secondary disk; this gives thebest performance for multiple I/O requests.
To enable disk mirroring on a mirror set, use the mirror command with the resyncparameter. This enables disk mirroring and causes on-line resynchronization tooccur. The primary parameter specifies the mirror set name. Resynchronizing amirror set involves copying data from one hard disk of the set to the other. Theresynchronization direction is specified in the command. This command must beused only after a mirror set is created or after a rollover event (described later).During execution, the command ensures that the destination hard disk is a good harddisk. The resynchronization operation runs in the background and is done one trackat a time. I/O system read and write operations are allowed on the mirror set whileresynchronization is in progress. If an I/O system write is directed at the same diskaddress where the resynchronization is being performed, the driver delays the writeoperation. The write operation is resumed when the disk address no longer conflictswith the resynchronization address.
The mirror resync command returns with either a completion or abort status. Usethe mirror command with the waitevent parameter to get the resynchronizationstatus. Issue this command as a background job.
To get mirroring status for a mirror set, use the mirror command with the getstatparameter. The status information includes the state of the mirror set, the names ofdisks in the set, the name of the good hard disk after a rollover event, the error status,the error's address, whether resynchronization is in progress, and the percentage ofresynchronization completed. This example shows a display of disk mirroring status:
State = Mirroring Enabled
Primary Unit = M4380_2
Secondary Unit = M4380_3
Read Policy = Alternate Read
For a mirror set to be operational, the I/O system must successfully have attached thehard disk. To get the attachment status for a disk, use the mirror command with theattstat parameter. The status report contains such information as the name of themirror set and the state of the disk when it was last detached. The incarnationnumber is a unique 9-digit number assigned at shutdown. This example shows adisplay during a shutdown when you request attachment status:
Mirror Attach Status = Mirror Set Valid
Other Unit Name = M4380_3
Incarnation Number = XXXXXXXXX
Disk Status = Marked Good
HI command mirror
Command Reference Chapter 2 267
These events can occur for a mirror set: rollover, resynchronization complete, andresynchronization abort.
A rollover is an operation done by the device driver when a failure occurs on one diskin the set. All I/O is automatically directed to the surviving disk. After fixing theproblem that caused the rollover, you must resynchronize the disks.
To get notification of an event, invoke the mirror command with the waiteventparameter, as a background job. The command returns only when an event occurs.After the command returns, you must reissue the command to continue eventnotification. An example of the message returned by waitevent is:
Mirror Event Status = rollover
When the command returns, use the mirror command with the getstat parameterto get more information about the mirror event.
To disable a mirror set, use the mirror command with the disable parameter. Ifresynchronization is in progress on the set, the resynchronization is aborted. Allpending I/O operations on the mirror set are completed before mirroring is disabled.
See also: Disk mirroring, Appendix A, for more detailed information and atutorial
mkdep DOS command
268 Chapter 2 Command Descriptions
mkdepAssists the make command in creating makefiles or appending dependencies to agiven makefile.
Syntax
mkdep -?
mkdep [-s] [-i include_path] [-f filename] file ...
Parameters
-? Displays the correct format of the command.
-s Short form. Lists the dependencies from files in the current directory.
-i include_pathThe path to the include files.
-f filenameName of the output file (default is makefile).
file ... Files that contain dependencies.
Additional Information
This mkdep example:
mkdep -f mkfile x.c y.c
will either create a makefile named mkfile or it will append to a current filenamemkfile these dependencies:
#DO NOT DELETE THIS LINE
#These dependencies came from mkdep
#If you place information here, it will go away
x.obj: x.c
y.obj: y.c
If the name mkfile is used in another mkdep call, the dependencies below the threecomment lines will be deleted and replaced with the new dependency lines. To avoidthis condition and append further dependency lines, either delete the comment linesor move the dependencies above the comment lines.
DOS command mkdep
Command Reference Chapter 2 269
To use mkdep with a makefile, set up this structure in your makefile. If you callyour makefile anything other than the default name makefile, be sure to include the -f filename in the mkdep line.
depend:
mkdep -i $(INC)\
$(SRCDIR)check.c &
$(SRCDIR)error.c
Then, running make depend will append this to the makefile:
#DO NOT DELETE THIS LINE
#These dependencies came from mkdep
#If you place information here, it will go away
src/check.obj:\
src/check.c\
:INCLUDE:stdio.h\
:INCLUDE:reent.h\
:INCLUDE:locale.h\
:INCLUDE:stdlib.h\
# h.h
src/error.obj:\
src/error.c\
:INCLUDE:stdio.h\
:INCLUDE:reent.h\
:INCLUDE:locale.h\
:INCLUDE:stdlib.h\
:INCLUDE:stdlib.h\
:INCLUDE:rmxerr.h\

modcdf NET command
270 Chapter 2 Command Descriptions
modcdfA menu-driven utility that displays, adds, or deletes information about network clientsystems in the Client Definition File (CDF). Only the Super user can use modcdf.
Syntax
modcdf
Additional Information
The modcdf utility allows the system manager of an Administrative Unit (AU, orsubnetwork) to add and delete iRMX client systems from the Client Definition File(CDF) of a server. The name and password of an iRMX client are defined in theUser Administration configuration source file or the CDF screen of ICU. The clientname is limited to eight characters.
When you invoke modcdf, this message is displayed:
The following commands are available
A - Add a client
D - Delete a client
L - List the CDF
Q - Quit
E - Exit
Enter the command:
To add a client system, enter A. The utility prompts for the client's name andpassword. The name and password are both case-sensitive. The name of the clientmust be unique within the CDF; a client with the same name must not be alreadydefined. The password you enter is not echoed to the screen.
To delete a client system, enter D. The modcdf utility prompts for the name of theclient to be deleted from the CDF. The name is case-sensitive.
Enter L to display the contents of the CDF.
Enter Q to quit without updating the CDF. Any changes made during the currentsession are lost.
Enter E to exit the utility and save changes made during the current session.
Error Messagesinvalid command
The command is not recognized.

NET command modcdf
Command Reference Chapter 2 271
cannot add a client name to the CDF which exceeds 8 characters
in length.The specified client name exceeds the maximum length of eight characters.
invalid passwordThe second password entered while adding a client does not match the first.
client <name> is not defined in the CDFThe name specified for deletion does not exist in the CDF.
CDF is not in the proper format. Delete the CDF and start again.Improper format for the CDF file was used. This might be a line terminated by acarriage-return/line-feed rather than just with a line-feed.
The CDF is too big to add a new client.The CDF has a 5000-byte buffer maximum. Adding the specified new client wouldexceed the buffer maximum.
client <name> is already defined in the CDFThe client being added already exists in the CDF.
CDF is too big to handleThe CDF already contains 5000 bytes of information. The CDF buffer is full.
cannot attach :config:CDFAn error was encountered while attempting to access the CDF.
Only the System Manager can access the CDF.Access is only permitted to user ID 0. Enter the super command, then invokemodcdf again.

modinfo HI command
272 Chapter 2 Command Descriptions
modinfoDisplays or changes the sizes of memory pool values in OMF86 or OMF286 objectmodules.
Syntax
modinfo inpath_list [to|over|after outpath_list][mempool = min,max] [a] [q]
Parametersinpath_list
Pathname(s) of one or more OMF86 or OMF286 object modules, separated bycommas. Wildcards are permitted.
to|over|after outpath_listWrites the modifications in the output file(s) rather than in the original file(s). Ifmultiple pathnames with separating commas are specified in the inpath_list, usethe same number of pathnames in the outpath_list. If you do not specify thisparameter, but do specify changed values, the input files are modified.
mempoolNew minimum and maximum values to be established for the dynamic memory poolparameters in the object module. By default the values are decimal, but you mayspecify octal or hexadecimal by appending an O or H.
a(sk) After displaying current pool values, prompts for new values.
q(uery) Prompts for permission to process each file. Enter Y or R to process the file, E to exitthe command, or any other letter to indicate a no.
Additional Information
If ask or mempool is not specified, the current static and dynamic segment sizes ofthe given object module are displayed, rather than modified. If an output pathname isspecified, the values are changed in the output file, not in the input file. If no outputpathname is specified, the input file is changed.
▲▲! CAUTIONAvoid using wildcards to specify input files, especially if you don'tspecify corresponding output files. You might modify files you didnot intend to change.
NET command netinfo
Command Reference Chapter 2 273
netinfoDisplays the Ethernet address, subnet ID, and iNA 960 information for each networkcontroller in a system.
Syntax
netinfo
Additional Information
Netinfo does not indicate if iNA 960 software is running properly. Use the inamoncommand to get the status of iNA960. Netinfo displays a message similar to this foreach network controller board in the system:
iRMX II/III NIA Board NETINFO Utility Version x.x
Copyright Intel Corporation 1995
INA 960 OSI-Transport COMMputer Configuration
INA 960 OSI-Network Layer : NULL2
INA 960 Running On : Local Board - 486/166SE
Subnet (1)
ID : 0001
Name: SBx586
Address: 00 AA 00 06 A4 9E
iNA 960 OSI-TransportLists the type of hardware environment iNA 960 is running in. Thisentry is either COMMputer Configuration or COMMengineConfiguration.
iNA 960 OSI-Network LayerThe network layer addressing scheme. This entry is either NULL2 orES-IS.
See also: ES-IS and Null2 addressing, Network User’s Guide andReferencei*.job, ES-IS and Null2 jobs, System Configuration and Administration
iNA Running ONThe type of board iNA 960 is running on.
Subnet Lists the subnet ID and Ethernet address of each subnet. In the case theES-IS network layer, the subnet name also is listed.

netstat TCP/IP command
274 Chapter 2 Command Descriptions
netstatSymbolically displays the contents of TCP/IP network-related data structures. Thecommand can show the status of active connections (the default), configuredinterfaces, routing tables, network statistics, Streams buffer allocation failures, andpacket traffic.
Syntax
netstat [-A] [-a] [-n] [-p protocol]netstat -i [-n]netstat -r [-n]netstat -s [-r|-p protocol]netstat -S netstat interval
Parameters
-A Adds the associated protocol control block (PCB) to the connection display.
-a Includes the inactive connections (listening servers).
-n Disables the symbolic translation of local and remote addresses, causing both to bedisplayed in their Internet dot notation.
-p protocolLimits the display to the specified protocol.
-i Shows the status of configured network interfaces. The display includes the interfacename, the maximum transfer unit (MTU) in bytes, the network and interfaceaddresses, the number of packets received and sent, and the number of send andreceive errors.
-r Shows the status of the configured routes.
-s Displays network statistics for the ip, icmp, tcp, and udp protocols.
-S Shows the Streams display.
intervalDisplays packet traffic at given intervals, in units of seconds. Interrupt the displaywith a <Ctrl-C>.
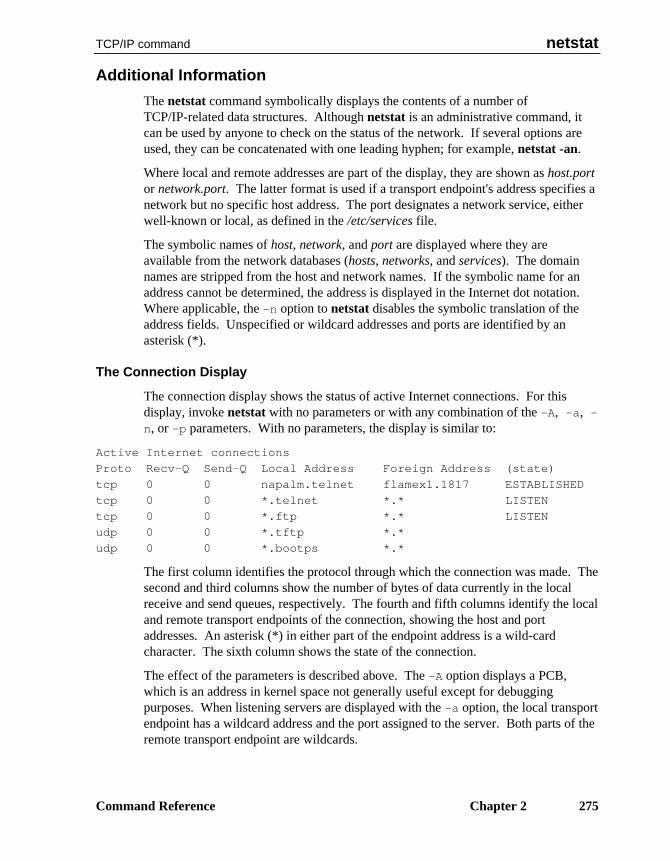
TCP/IP command netstat
Command Reference Chapter 2 275
Additional Information
The netstat command symbolically displays the contents of a number ofTCP/IP-related data structures. Although netstat is an administrative command, itcan be used by anyone to check on the status of the network. If several options areused, they can be concatenated with one leading hyphen; for example, netstat -an.
Where local and remote addresses are part of the display, they are shown as host.portor network.port. The latter format is used if a transport endpoint's address specifies anetwork but no specific host address. The port designates a network service, eitherwell-known or local, as defined in the /etc/services file.
The symbolic names of host, network, and port are displayed where they areavailable from the network databases (hosts, networks, and services). The domainnames are stripped from the host and network names. If the symbolic name for anaddress cannot be determined, the address is displayed in the Internet dot notation.Where applicable, the -n option to netstat disables the symbolic translation of theaddress fields. Unspecified or wildcard addresses and ports are identified by anasterisk (*).
The Connection Display
The connection display shows the status of active Internet connections. For thisdisplay, invoke netstat with no parameters or with any combination of the -A, -a, -
n, or -p parameters. With no parameters, the display is similar to:
Active Internet connections
Proto Recv-Q Send-Q Local Address Foreign Address (state)
tcp 0 0 napalm.telnet flamex1.1817 ESTABLISHED
tcp 0 0 *.telnet *.* LISTEN
tcp 0 0 *.ftp *.* LISTEN
udp 0 0 *.tftp *.*
udp 0 0 *.bootps *.*
The first column identifies the protocol through which the connection was made. Thesecond and third columns show the number of bytes of data currently in the localreceive and send queues, respectively. The fourth and fifth columns identify the localand remote transport endpoints of the connection, showing the host and portaddresses. An asterisk (*) in either part of the endpoint address is a wild-cardcharacter. The sixth column shows the state of the connection.
The effect of the parameters is described above. The -A option displays a PCB,which is an address in kernel space not generally useful except for debuggingpurposes. When listening servers are displayed with the -a option, the local transportendpoint has a wildcard address and the port assigned to the server. Both parts of theremote transport endpoint are wildcards.
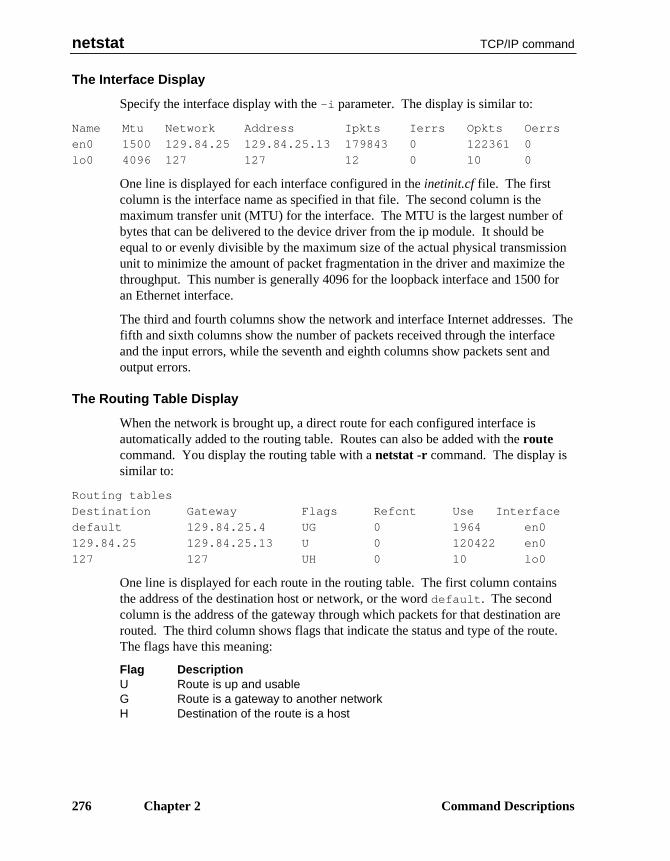
netstat TCP/IP command
276 Chapter 2 Command Descriptions
The Interface Display
Specify the interface display with the -i parameter. The display is similar to:
Name Mtu Network Address Ipkts Ierrs Opkts Oerrs
en0 1500 129.84.25 129.84.25.13 179843 0 122361 0
lo0 4096 127 127 12 0 10 0
One line is displayed for each interface configured in the inetinit.cf file. The firstcolumn is the interface name as specified in that file. The second column is themaximum transfer unit (MTU) for the interface. The MTU is the largest number ofbytes that can be delivered to the device driver from the ip module. It should beequal to or evenly divisible by the maximum size of the actual physical transmissionunit to minimize the amount of packet fragmentation in the driver and maximize thethroughput. This number is generally 4096 for the loopback interface and 1500 foran Ethernet interface.
The third and fourth columns show the network and interface Internet addresses. Thefifth and sixth columns show the number of packets received through the interfaceand the input errors, while the seventh and eighth columns show packets sent andoutput errors.
The Routing Table Display
When the network is brought up, a direct route for each configured interface isautomatically added to the routing table. Routes can also be added with the routecommand. You display the routing table with a netstat -r command. The display issimilar to:
Routing tables
Destination Gateway Flags Refcnt Use Interface
default 129.84.25.4 UG 0 1964 en0
129.84.25 129.84.25.13 U 0 120422 en0
127 127 UH 0 10 lo0
One line is displayed for each route in the routing table. The first column containsthe address of the destination host or network, or the word default. The secondcolumn is the address of the gateway through which packets for that destination arerouted. The third column shows flags that indicate the status and type of the route.The flags have this meaning:
Flag DescriptionU Route is up and usableG Route is a gateway to another networkH Destination of the route is a host

TCP/IP command netstat
Command Reference Chapter 2 277
The fourth and fifth columns are the number of active connections using the route(Refcnt) and the number of packets that have been sent (Use). The Refcnt value isalways shown as 0. The sixth column shows the name of the local interface throughwhich the packets are sent, as assigned in the inetinit.cf file.
See also: route command, in this chapter, for information about the default route
The Statistics Display
The network statistics display shows the current values of the statistics maintained bythe kernel for each protocol. Specify this display with the -s parameter. The defaultdisplay includes statistics for the ip, icmp, tcp, and udp protocols. The full displayscrolls off a typical monitor screen; redirect it to a file that you can view with theskim command. Use the -p protocol parameter to limit the display to statisticsfor a specified protocol.
This command displays statistics about the ip protocol:
- netstat -sp ip
ip:
0 bad header checksums
0 with size smaller than minimum
0 with data size < data length
0 with header length < data size
0 with data length < header length
The Streams Display
The Streams display shows the number of failed requests for Streams buffers. Thereis one line for each TCP/IP kernel Streams module or driver. Modules and driversthat are not configured into the TCP/IP kernel, such as the SLIP driver in theexample, are identified by messages like can't open /dev/slip. Such amessage does not necessarily indicate an error; it means that the indicated driver ormodule could not be accessed by netstat to retrieve the statistics.
The columns in the display represent the size in bytes of the requested buffers,rounded to the next higher power of two. A counter is incremented each time abuffer of a defined size is requested and cannot be obtained. For example, if the ipmodule requests a Streams buffer of 1500 bytes and that request is refused, the ipmodule counter for buffers of 2048 bytes is incremented.
The counters are reset only when the system is shut down and rebooted. They are notreset when you stop and restart the network jobs without rebooting.
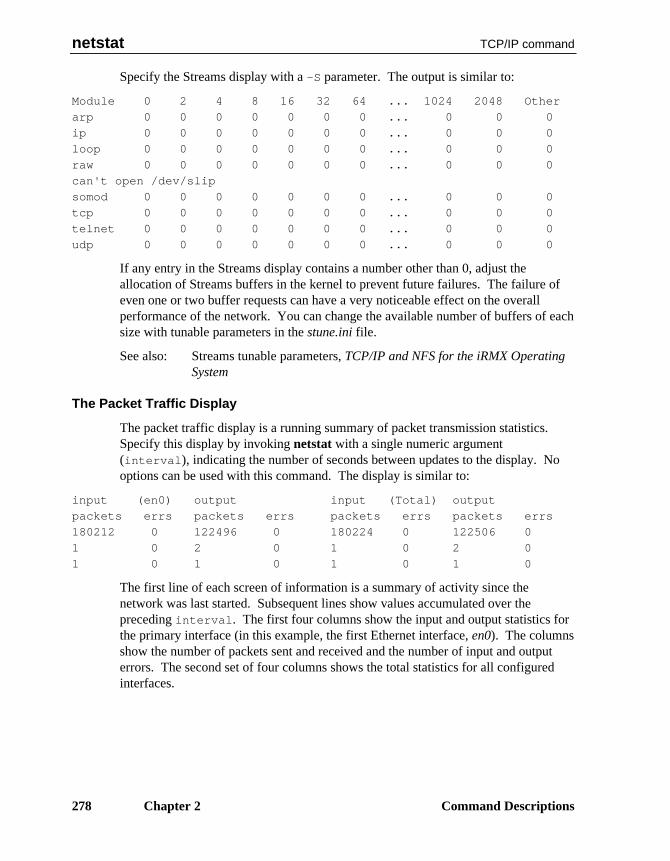
netstat TCP/IP command
278 Chapter 2 Command Descriptions
Specify the Streams display with a -S parameter. The output is similar to:
Module 0 2 4 8 16 32 64 ... 1024 2048 Other
arp 0 0 0 0 0 0 0 ... 0 0 0
ip 0 0 0 0 0 0 0 ... 0 0 0
loop 0 0 0 0 0 0 0 ... 0 0 0
raw 0 0 0 0 0 0 0 ... 0 0 0
can't open /dev/slip
somod 0 0 0 0 0 0 0 ... 0 0 0
tcp 0 0 0 0 0 0 0 ... 0 0 0
telnet 0 0 0 0 0 0 0 ... 0 0 0
udp 0 0 0 0 0 0 0 ... 0 0 0
If any entry in the Streams display contains a number other than 0, adjust theallocation of Streams buffers in the kernel to prevent future failures. The failure ofeven one or two buffer requests can have a very noticeable effect on the overallperformance of the network. You can change the available number of buffers of eachsize with tunable parameters in the stune.ini file.
See also: Streams tunable parameters, TCP/IP and NFS for the iRMX OperatingSystem
The Packet Traffic Display
The packet traffic display is a running summary of packet transmission statistics.Specify this display by invoking netstat with a single numeric argument(interval), indicating the number of seconds between updates to the display. Nooptions can be used with this command. The display is similar to:
input (en0) output input (Total) output
packets errs packets errs packets errs packets errs
180212 0 122496 0 180224 0 122506 0
1 0 2 0 1 0 2 0
1 0 1 0 1 0 1 0
The first line of each screen of information is a summary of activity since thenetwork was last started. Subsequent lines show values accumulated over thepreceding interval. The first four columns show the input and output statistics forthe primary interface (in this example, the first Ethernet interface, en0). The columnsshow the number of packets sent and received and the number of input and outputerrors. The second set of four columns shows the total statistics for all configuredinterfaces.
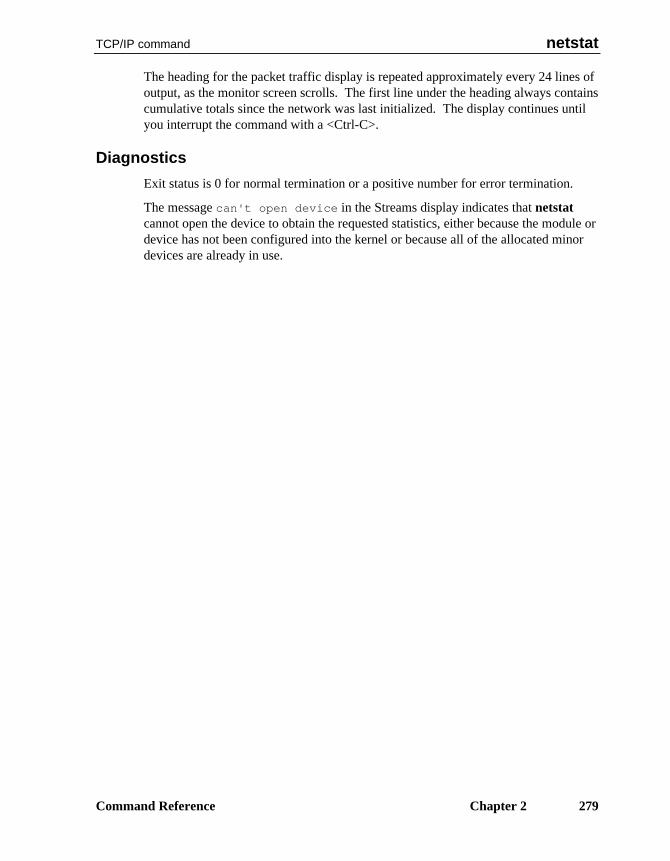
TCP/IP command netstat
Command Reference Chapter 2 279
The heading for the packet traffic display is repeated approximately every 24 lines ofoutput, as the monitor screen scrolls. The first line under the heading always containscumulative totals since the network was last initialized. The display continues untilyou interrupt the command with a <Ctrl-C>.
Diagnostics
Exit status is 0 for normal termination or a positive number for error termination.
The message can't open device in the Streams display indicates that netstatcannot open the device to obtain the requested statistics, either because the module ordevice has not been configured into the kernel or because all of the allocated minordevices are already in use.
offer NET command
280 Chapter 2 Command Descriptions
offerGives remote iRMX-NET users public network access to a local directory.
Syntax
offer pathname as public_name
Parameterspathname
The actual pathname of the local directory.
public_nameThe pathname assigned for use by remote users.
Additional Information
The number of public directories that may be offered at any one time is configurable,in the Public Directory Screen (PDIR) of the ICU.
See also: publicdir and remove commands, in this chapter
Example
These commands make available the :sd:utils directory, your :bb: device, and adiskette installed in your machine. Remote users can access these as files namedutilities, byte_bkt, and floppy.
offer :sd:utils as utilities
offer :bb: as byte_bkt
attachdevice a as :f:
offer :f: as floppy
Error Messagesmissing parameter
The actual-name or public-name parameter was omitted.
<name>, unrecognized controlThe keyword as in the command was omitted, or extra information was suppliedafter public-name.
illegal public nameColons are not permitted in the syntax when specifying the public name.

NET command offer
Command Reference Chapter 2 281
<name>, invalid pathnameThe specified pathname does not exist as given in the actual-name parameter.
<name>, cannot look up prefixThe prefix (logical name) part of the pathname is invalid.
cannot offer <actual_name> as <public_name>Select another public name.
cannot offer <actual_name> as <public_name> <condition code:mnemonic>A typical example of the condition code is E_LIMIT, which means the limit forpublic directories has been reached.
paginate HI command
282 Chapter 2 Command Descriptions
paginateDisplays or copies the input file(s) in page-sized parts, optionally putting a title, dateand time, and page number on each page.
Syntax
paginate inpath_list [to|over|after outpath_list] [q][n] [ti=text] [pw=num] [pl=num] [ta=num]
Parametersinpath_list
One or more pathnames of text files, separated with commas. Wildcards arepermitted.
to|over|after outpath_listWrites the output to the specified file(s) rather than to the screen. If you specifymultiple input files and one output file, the output is appended.
q(uery) Prompts for permission to process each file. Respond to the prompt with:
Y Display the fileR Display remaining files without further queryE Exit the commandN or other Don't display the file; query for the next
n(otitle)Do not display the title, date or page number.
ti(tle)=textSpecifies text to be used as the page heading. The default title is the filename.
pw (or pagewidth)=numMaximum number of characters in the output line, 132 by default.
pl (or pagelength)=numMaximum number of lines on the output page, 66 by default.
ta(bwidth) (or lg)=numNumber of spaces to print for a tab character, 4 by default.
HI command paginate
Command Reference Chapter 2 283
Additional Information
The command inserts formfeeds (0CH) into the output so it can be printed in pages.Several lines are added to each page as header information; adjust the pagelengthparameter accordingly. If the input file contains a formfeed, a new page is started.The values you specify for page width, page length, and tab width are decimal bydefault. You can specify an octal or hexadecimal number by appending an O or H.
password HI command
284 Chapter 2 Command Descriptions
passwordA menu-driven utility that only the Super user can invoke to add or delete users or tochange a logon password. Other users invoke password to change their ownpasswords, assuming the User Definition File (UDF) has World read access.
Syntax
password
Additional Information
If you are not the Super user, you can invoke the password command to change thepassword you enter when logging onto the HI from a dynamic terminal. However, ifyour system's UDF resides on a remote system, the Super user must change yourpassword for you, or allow you to do it while logged on as Super. When you invokethe command, these messages are displayed:
Enter your user name -
Enter the old password -
In response, enter your logon name and your current password. The password iscase-sensitive. For security reasons, the password you enter is not echoed on thescreen. The command then prompts you for the new password and asks you to repeatit:
Enter the new password -
Repeat the new password -
Enter your new password at each prompt. The password must be no longer than eightcharacters (more will be ignored). After confirming that both entries of the newpassword are identical, the command associates the new password with your logonname and displays the messages:
Password change successful
Updating the master UDF .......... Done
The next time you log on to the system, you must use the new password. Continueusing it until you change your password again with the password command.
If you are the Super user, the password command performs a variety of functions,including maintaining the User Definition File (UDF). The UDF contains the logonname, user ID, and password of all users who can access the HI using a dynamicterminal. Because this file is also used to validate user access to the network, the fileis a nonstandard format; do not use an ordinary text editor to maintain the file. Thepasswords listed in the UDF are encrypted to prevent unauthorized access. The
HI command password
Command Reference Chapter 2 285
password command is the sole mechanism for maintaining the UDF, and only theSuper user can access it. The password command maintains the format of the fileand automatically encrypts the passwords.
When you invoke the password command as Super, this menu is displayed. Enterthe letter corresponding to the operation you want to perform:
The following commands are available:
A - Add a user
D - Delete a user
L - List the UDF
C - Change password
Q - Quit
E - Exit
Enter the command:
Adding a User to the UDF
Choose the A option to add a new user; password prompts you to enter informationabout the new user. The prompts and valid answers are as follows:
Enter the user name -
Enter the logon name of the new user. This name must be three to eight characterslong, and is not case-sensitive. If you respond with more than eight characters, thecommand ignores the extra characters.
Enter the new password -
Enter the password for the new user. The password must be eight characters or less(additional characters are ignored), and it is case-sensitive. The password is notdisplayed. If you enter <CR> at the prompt, the new user's password is a carriagereturn. You may enter, in upper or lower case:
NO LOGIN
This entry prevents the user from logging onto the system using a dynamic terminal.This can be useful for restricting a user to a static logon terminal.
Repeat the new password -
Enter the password again. This validates the password and ensures that you spelled itcorrectly. Password returns an error message if the two passwords don't match andre-prompts for the new password. This continues until you enter the new passwordthe same way twice.
Enter the user ID -
password HI command
286 Chapter 2 Command Descriptions
Enter a decimal number in the range 0 to 65535 as an ID to associate with this user.If you enter <CR>, password assigns the next higher unassigned user ID andresponds with:
Assigned user ID of <ID>
Assigning a user ID that is not unique can cause problems in a network environment.If there are no unique user IDs available or the ID you enter is not unique, passworddisplays:
Warning - Not a unique user ID
Entering any other value causes the command to display an error message and repeatthe prompt. This continues until you enter a valid user ID, <CR>, or a Q (to abortthis session of adding a user).
Enter the group ID -
If your system is part of the OpenNET network and includes Unix workstations,assign a group ID consistent with the group access you want for this user (refer to theUnix documentation for more information). Otherwise, enter a second user ID whichwill be added to this user's iRMX user object. If neither user ID is 65535 (World),the HI automatically adds a third ID of 65535 to the user object when this user logson, providing World access.
Enter the comment -
Respond with <CR> unless your system is an OpenNET workstation. The iRMX OSdoes not use this field. It is typically used for a name or other information; refer tothe Unix documentation.
Enter the default UNIX directory -
For OpenNET workstations, enter the complete pathname of the user's homedirectory on Unix systems. Otherwise, respond with <CR>.
Enter the default UNIX shell -
For OpenNET workstations, supply the new user's default Unix shell (for example,/bin/sh; refer to the Unix documentation). Otherwise, respond with <CR>.
Once you have responded to all the prompts, password summarizes and displaysyour answers. At the bottom of the summary is this prompt:
Do you want to add this user to UDF?
If the summary is correct, respond with a Y to add the user. If you respond with anycharacter other than Y, password disregards your previous input and returns to theinitial menu.
HI command password
Command Reference Chapter 2 287
If you enter Y, password updates the copy of the UDF it maintains in memory (thepermanent copy will be updated when you invoke the Exit command), and displaysthis message:
Do you want to create the user directories?
A No response means you must manually create the user's home directories. In thiscase, password only creates the user configuration file :config:user/<username>(unless it already exists).
If you enter Y, password creates user directories, copies the alias.csd and r?logonfiles from the :config:default directory, and creates an empty r?logoff file in the newuser's prog directory. (You can modify the default files so that each time you create anew user, the user gets the initial configuration you want.) After the files are created,you are prompted for the pathname of the initial program:
Initial-program pathname =
Enter <CR> to give the new user the standard CLI interface. If you do not use thestandard CLI, enter the full pathname of the command interface you use. Afteradding the new user, password displays:
Default Initial Program is RMX HI CLI
Added user <user name>
Then the main menu is displayed. You may add another user or start anotheroperation, but the UDF is not updated until you enter the Exit (E) option.
Deleting a User from the UDF
Choose the D option to delete a user from the UDF. Password displays:
Enter the user name -
Enter the logon name of the user to be deleted. If the name you enter is currentlylisted in the UDF, password deletes the entry from the copy of the UDF it maintainsin memory and responds with this message:
Deleted user <logon name>
The permanent copy of the UDF will be updated when you invoke the Exit option.You must manually delete the user's logon directory and :config:user/<username>file.
password HI command
288 Chapter 2 Command Descriptions
Listing the Contents of the UDF
Choose the L option to list the contents of the UDF. Password displays a table ofentries containing this information:
<logon name>:<password>:<user id>:<group
id>:<comment>:<dir>:<shell>
Where:
<logon name>The name that the user enters to log on to the system.
<password>The encrypted password. No entry indicates that the user does notrequire a password to log onto the system. The characters NO LOGIN
indicate that the user is prohibited from logging on.
<user id> A decimal number representing the user ID. Value 0 is Super, thesystem manager, and value 65535 is the World user.
<group id>A second ID that can be implemented as a group convention, andcorresponds to Unix group file access in OpenNET systems.
<comment> The comment field, used only in OpenNET systems.
<dir> The Unix home directory, used only in OpenNET systems.
<shell> The Unix shell, used only in OpenNET systems.
Changing Passwords
Choose the C option to change the logon password for yourself or for another user.The instructions for changing the password are the same as shown at the beginning ofthis description. However, as Super you have the option of entering:
NO LOGIN
as the new password for another user. This prevents the user from logging onto thesystem.
Quitting the Password Command
To abort the password command without saving any of the changes you made duringthis session, choose the Q option. If you have made changes that will be lost,password displays:
Do you really want to quit without saving your changes?
If you want to abort the session and lose the changes you made, enter Y. Entering anyother character returns you to the main menu without discarding your changes. If you

HI command password
Command Reference Chapter 2 289
quit a session where you have added a user, you must manually delete the logondirectory and the :config:user <username> file (the logon directory is created if youanswer Yes to the create user directories? prompt).
Exiting the Password Command
To leave the password command and save all of the changes you made during thissession, choose the E option. Password writes the changes to the UDF.
Error MessagesCannot attach to the UDF
The OS encountered an error, either when attempting to read the password youentered or when attempting to access the UDF.
Illegal nameThe logon name you specified is invalid. The name must be between three and eightcharacters long, contain no embedded spaces, and contain no unprintable characters.
Invalid commandYou entered an invalid command at the password menu. The valid commands are A,D, L, C, Q, and E.
Invalid PasswordEither the password you entered was longer than eight characters, or you made atyping error when you confirmed the password by entering it again.
Invalid responseYour response to a prompt was invalid. For example, you might have enteredalphabetic characters when a numeric value was expected.
Maximum size of UDF reachedThe UDF can grow to a maximum of 32 Kbytes. It has reached this limit, and nomore new users can be added.
<Master/Local> UDF is not availableAn error occurred while password was attempting to attach the UDF. If your systemis part of an iRMX-NET environment, the error occurred while attaching the remotemaster UDF. Otherwise, the error occurred while attaching the local UDF. In eithercase, password does not change the UDF.
Old Password is incorrectThe password you entered did not match the password listed in the UDF.
UDF does not exist.Your system is not configured to support nonresident users; therefore, the UDF doesnot exist.
password HI command
290 Chapter 2 Command Descriptions
UDF does not exist. Creating new UDF.The UDF did not exist on your system before, because your system is not configuredto support nonresident users. As the system manager, you can add a UDF. Thepassword command creates a UDF to contain your additions.
UDF is corruptedThe UDF has an invalid format that must be fixed. This might have been caused byediting the file with a text editor. To correct this problem, the system manager mightneed to delete the UDF (with the delete command) and use the password commandto rebuild it. A copy of the original UDF is in the :config:default/udf file.
UDF is not availableThe UDF can be written by only one user at a time. Someone else is using thepassword command now and has exclusive write access to the UDF. Try again in afew seconds.
User <logon name> is already defined in the UDFThe user you attempted to add is already listed in the UDF.
User <logon name> is not defined in the UDFThe user you attempted to delete is not listed in the UDF.
HI command path
Command Reference Chapter 2 291
pathLists the full pathname of a data file or directory on local or remote systems.
Syntax
path [inpath_list] [to|over|after outpath_list] [r]
Parametersinpath_list
One or more filenames, separated by commas, whose pathnames you want to list.Wildcards are permitted.
to|over|after outpath_listWrites the output to the specified files rather than to the screen. If you specifymultiple input files and a single output file, path appends the remaining input filepathnames to the end of the output file.
r(oot) Specifies that the pathname should start from the root directory of whatever deviceholds the file or directory.
Additional Information
This command is useful for finding where you are located within the file structure.The output is similar to this when invoked with no input file list:
-path <CR>
:sd:user/world

pause HI command
292 Chapter 2 Command Descriptions
pauseDisplays an optional message and waits for you to enter a <CR>.
Syntax
pause [message]
Parametermessage
The text that appears on the console when the pause command is executed.
Additional Information
This command works ideally when executed from within a submit or esubmit file.You cannot use pause as part of a background job. Invoking pause without amessage causes the console to display a blank line before waiting for the carriagereturn.
The message is restricted to the length of the command line, but you may entercommand continuation lines, using the & character.

HI command pci
Command Reference Chapter 2 293
pciDisplays or sets a threshold size for disk I/O read and write requests to be madewithout Peripheral Controller Interface (PCI) server buffering, when the PCI clientand server are on the same host board.
Syntax
pci direct :logical_name: [threshold]
Parametersdirect
Specifies that this board will make direct I/O requests to the PCI server.
:logical_name:The logical name of the PCI device, surrounded by colons; for example, :sd:.
thresholdA number specifying the size in bytes of I/O read or write requests to be made asdirect requests. The value is decimal by default, but you may specify hexadecimalwith a 0x prefix or by appending an H. If threshold is not specified, the currentthreshold value is displayed. The default value is the maximum, 0FFFFFFFFH,which causes all read and write requests to use PCI buffering. A value of 0 causes allread and write requests to be direct.
Additional Information
A PCI client and server may be on the same host board or on separate hosts. Thedefault communication method between the client and server assumes they are onseparate hosts. This method uses a buffer on the server host to hold the read andwrite data associated with I/O requests. When a PCI client and server are on thesame host, it can be more efficient for the client to bypass the I/O request buffer andmake direct requests to the PCI server. Direct requests copy data directly betweenthe peripheral device and the user's buffer, and avoid buffering on the PCI server.
An I/O request for an equal or greater number of bytes than the threshold value ismade as a direct request. A request for fewer bytes than the threshold value isbuffered by the PCI server.
Direct requests can only be made to hard disk devices. The device cannot be part of amirrored disk drive set. If you specify direct I/O requests for a hard disk thatbecomes part of a mirrored set, the PCI server uses the default method for I/Orequests while the disk is part of the mirrored set.
pci HI command
294 Chapter 2 Command Descriptions
Generally, you should not do direct requests for all I/O requests. Bypassing thebuffers can be detrimental to performance for small I/O operations. It is better to setthe threshold value close to the size of a cache line in the PCI server; 16 Kbytes or18 Kbytes are reasonable threshold values.
See also: How to Use the Peripheral Controller Interface (PCI) Server

DOS command pcnet
Command Reference Chapter 2 295
pcnetA NetBIOS driver that provides the interface to iNA960-based iRMX-NET.
Syntax
pcnet [/s sessions][/c commands]
Parameters/s sessions
The number of NetBIOS sessions supported. The default is 6, and the maximumis 32.
/c commandsThe number of NetBIOS commands that can be queued to the NetBIOS driversimultaneously. The default is 12, and the maximum is 32.
Additional Information
When you set up network access from DOS, this command is used in the process ofredirecting the MS-NET server and client through iRMX-NET, usually as part of abatch file.
The option indicators, s and c, are not case-sensitive. If you enter invalid options, ausage message is displayed.
See also: pcnet command, Network User's Guide and Reference

permit HI command
296 Chapter 2 Command Descriptions
permitGrants or revokes user access to files that you own or files in directories for whichyou have change access.
✏ NoteYou can use this command in an esubmit file orrq_c_send_command system call if the form of the commanddoes not require user input. If the command requires user input inan rq_c_send_command system call, it will fail. However, youcan use a form of the command that requires user input in anesubmit file if you use the eoresponse and coresponse
subcommands.
See also: esubmit command, in this chapter
Syntax
permit pathname_list access[value][, ...] [u= id_list|world|*][data] [dir] [map] [q]
Parameterspathname_list
One or more pathnames, separated by commas, of files to have their access rights orlist of accessors changed. Wildcards are permitted.
access One or more access characters that grant or cancel the corresponding access to thefile(s), depending on a following value parameter. If specified with no value, eachaccess character grants the specified access. (The interpretation for DOS, NFS, andremote file access is somewhat different; these are described later.) From the listbelow, you may use L or R for data files and directories; likewise C and U.
Access MeaningD Delete
L or R List (for directories); Read (for data files)
A Add entry (for directories); Append (for data files)
C or U Change (for directories); Update (for data files)
N With no other characters, cancels all access. With other characters,cancels access not explicitly granted.
HI command permit
Command Reference Chapter 2 297
value A value that specifies whether to grant or revoke the associated access right.
Value Meaning0 Cancel the access right
1 (default) Grant the access right. Specifying an access character without avalue grants the corresponding access.
u(ser) = id_listA list of decimal or hexadecimal user IDs for which the access rights apply, separatedwith commas. Each file is limited to three user IDs in the access list. If you omit theuser parameter, the default is your user ID (the ID associated with your interactivejob).
= worldSpecifies user ID 65535, giving all users access to the file.
= * The access rights apply to all users currently in the file's access list.
data The access information applies to data files in the pathname list. If you omit both thedata and directory parameters, permit assumes both.
dir(ectory)The access information applies to directories in the list.
map The access information also applies to map files and volume label files in thepathname list. If you use the map parameter, you must specify the full pathname ofmap or volume label files in the list.
q(uery) Prompts for permission to modify the access rights associated with each file.Respond to the prompt with:
Y Change the access
R Change access for remaining files without further query
E Exit the command
N or other Don't change access; query for the next

permit HI command
298 Chapter 2 Command Descriptions
Additional Information
Table 2-5 shows the possible access rights for files and directories, and describes howthey relate to each other.
Table 2-5. How Access Rights Apply to Files and Directories
File Access Directory Access
Delete Delete or rename the file Delete Delete or rename the directory
Read Read the file (if the parentdirectory has list access)
List List the contents of the directoryand read files in it (if they haveread access)
Append Add information at the end of thefile, but no permission to overwriteexisting data
Add Add files or subdirectories to thedirectory, but no permission tochange existing files in it
Update Overwrite information in the file ortruncate it, but no permission toappend data to the file
Change Change the access rights oraccessors of files andsubdirectories in the directory, butnot of the directory itself; nopermission to add or delete filesin the directory
You can use permit to perform one or both of these functions:
• Add or subtract users from a file's list of accessors. This list determines whichusers have access to the file. Only three user IDs may be listed as accessors, butone of these can be the World ID, which grants access to all users.
• Set which access rights are granted or revoked for the users in the accessor list.
When you change the list of accessors for a file, specify the appropriate access for anadded user or N access for a user to be deleted. To change the access rights but notthe list of accessors, specify user=*.
The Super user can change accessors and access rights for any file. Other users canonly change access information for files owned by themselves or World, or for filesin directories where the user or World has change access. You can display the accessrights for files and directories with the dir command.
HI command permit
Command Reference Chapter 2 299
Specifying Access Rights
If specified without an accompanying value, each access character grants thespecified access. You can concatenate access characters and values together or youcan use commas to separate individual access/value specifications. For example, ifyou want to grant delete access and cancel add and update access, you could enterany of these combinations; the order in which you specify access characters is notimportant:
A0DU0
A0,D,U0
A0D1U0
A0,D1,U0
If there are multiple occurrences of an access character, permit uses the last suchcharacter to determine the access. For example, these specifications are equivalent;in the first list, D1 overrides D0:
D0,A1,R1,D1
A1,R1,D1
Specifying N by itself revokes all access for the specified users and removes the usersfrom the file's access list. However, the N character can also be useful whenchanging access rights, if you don't remember the user's current access rights. In thiscase, specify the N character first, to clear all access rights, and follow it with othercharacters to grant the desired access. For example, if you want to grant list accessonly, you could specify NL instead of D0A0C0L.
When changing access information for volume map files and volume label files,always specify the full pathnames. For example, this command changes the accessrights for all map files and volume label files on the volume, except for r?save, whichis unaffected by the map parameter. In this instance the HI does not interpret the ? asa wildcard character:
permit :f0:r?* DLAU map
See also: Map files and volume label files, format command, in this chapter

permit HI command
300 Chapter 2 Command Descriptions
Access to Remote iRMX-NET Files
File access rights for remote iRMX-NET files are treated somewhat differently thanfor local files. You may grant or revoke access by other users to remote files you orWorld own, but change access for directories does not apply. This list shows howaccess characters apply when you invoke permit for remote files.
Value For Directories For Files
D Delete: The value of the delete bitis always 0. Attempts to changethe value to 1 are ignored. Add-entry access is required to delete adirectory.
The value of the delete bit is always 0.Attempts to change the bit to 1 are ignored.Users must have both append and updateaccess to delete a file.
L or R List directories Read files (if the directory has list access)
A Add entry: if set to 1, the usermay add entries to the directory ordelete the directory
Append: must be set the same as Update
C or U Change: the value of the changebit is always 0. Attempts tochange the bit to 1 are ignored.
Update: when both Append and Updatebits are 1, the user can append, update, ordelete a file. If you attempt to set differentvalues for the append and update bits, anerror is returned.
N Cancels access not explicitlygranted by a value.
Cancels access not explicitly granted by avalue.
Accessor Fields in Remote iRMX-NET Files
When you access files on a remote system with iRMX-NET, your system obtainsfrom the remote system the user name associated with the accessor IDs for the files.Your system gets the user ID that matches the name it receives from its own UserDefinition File (UDF).
In one Administrative Unit (subnetwork), all the user names match the same userIDs. However, different subnetworks may associate different user IDs with the sameuser name. Therefore, the user ID displayed in the accessor fields of a remotepermit display may be different from the user ID that the server would displaylocally for the same file. If the user name that is received from the remote serverdoes not exist in the client UDF, the user ID is displayed as 65534.

HI command permit
Command Reference Chapter 2 301
The rules governing the N access character, multiple occurrences of the same accesscharacter, access value defaults, and the interchangeability of access characters applyto remote files in the same manner as local files.
See also: Remote files, Network User's Guide and Reference
Access to NFS Files
File access rights are mapped between different operating systems when accessingremote files through NFS. When you change access from an iRMX client, accessrights map as follows:
Setting any of these bitson an iRMX client
Results in all of these bits being set oniRMX, Unix, and DOS servers
iRMX iRMX Unix DOS
Files D-AU
-R--
D-AU
-R--
-w-
r-x
read/writeread-only
Directories D-AC
-L--
D-AC
-L--
-w-
r-x
read/writeread-only
For example, setting just the D access from an iRMX client results in D-AU access onthe iRMX server.
When you change access rights from another OS through NFS, the accesspermissions on an iRMX server are set as follows:
Setting any of these bits on Unix andDOS clients
Results in all of thesebits being set on aniRMX server
Unix DOS iRMX
Files -w-
r-x
read/writeread-only
D-AU
-R--
Directories -w-
r-x
read/writeread-only
D-AC
-L--
If, for example, you set the read (r) or the execute (x) bit from Unix, it results in afile with -R-- access on the iRMX server.
permit HI command
302 Chapter 2 Command Descriptions
File Ownership with NFS
File ownership mapping occurs between iRMX, DOS, and Unix files when usingNFS. The following list describes the mapping:
• When you use NFS between two iRMX systems, file owners are maintained on aone-to-one basis.
• When you use NFS between an iRMX system and a Unix system the followingmapping occurs regardless of which OS is the NFS client:
iRMX Unix
First owner in access list “owner”Second owner in access list “group”Third owner in access list (ignored)World owner is user ID 60000 and
group is user ID 1 (other)Super owner and group user IDs are 0 (root)
✏ NoteYou can modify iRMX to Unix file ownership mapping values forthe World user by setting parameters in the /etc/stune.ini file.
See also: Tunable Parameters, TCP/IP and NFS for the iRMX OperatingSystem
• When you use NFS between an iRMX system and a DOS system file ownershipmapping does not apply. This is because DOS has no concept of file owners.The NFS package you use on a DOS system may make certain assumptions. Forexample, a DOS-based NFS product might translate a file owned by user ID 0(Super) as read-only from the DOS side. See the documentation for your non-iRMX NFS product for such details.
User ID Translation with NFS
User IDs map one-to-one across NFS except as noted for the Super and World usersbetween iRMX and Unix systems described in the previous section.
When you use NFS between two machines that happen to have different user loginnames with the same user ID number, the file’s ownership is determined by theclient’s account. For example, assume that a file on an NFS server is owned by Samwith the login sam and user ID of 33. User Sarah on an NFS client also has a user IDof 33 but her login is sarah. If Sarah accesses the file on the NFS server throughNFS, the user IDs map one-to-one. However, Sarah’s access rights to the file will be

HI command permit
Command Reference Chapter 2 303
whatever rights Sam has for the file on the server machine. Also, if Sarah lists thedirectory that contains the file, the owner will appear as Sarah, not Sam.
This user ID mechanism works similarly between iRMX systems or between iRMXand Unix systems.
See also: Accessing NFS Files, File Ownership, and User ID Translation,System Concepts
DOSRMX Systems
The DOS file system does not support users other than World, and supports limitedaccess rights. For preconfigured DOSRMX systems, iRMX users and tasks canchange their DOS file access to correspond to the DOS read-only and read/writeattributes. DOS directories cannot be made read-only. Use these values with thepermit command (read and list access are not used):
Access Character Value Access Granted
D, A, or U (any) NOT 0 Read and Write (including permission to delete)
D, A, and U (all) 0 Read only
For example, these commands make a file read-only:
permit file1 d0a0c0
permit file2 nr
iRMX for PCs Systems
If you are using the DOS file driver, you can use DOS access rights only. If you areusing the iRMX named file driver, you can use all iRMX access rights.
Output
After changing the access information for a file, permit displays a list of changedfiles, containing this information:
<pathname>, accessor = <accessor ID>, <access>
Where:
<pathname>The name of the file.
<accessor ID>The user ID of one of the file's accessors.
permit HI command
304 Chapter 2 Command Descriptions
<access> That user's access rights, displayed as DLAC for directories and DRAUfor data files. If a particular access right is not allowed, the displayreplaces the corresponding character with a dash (-). For example, thedisplay -L-C indicates that the corresponding user has list and changeaccess, but not delete and add-entry access.
Error Messages<pathname>, accessor limit reached
The OS permits only three user IDs in the accessor list of a file. Before you can addanother accessor, you must remove one of the current accessors by setting its accessrights to N.
<pathname>, directory CHANGE access requiredEither you are not the owner of the specified file or you do not have change access tothe file's parent directory. You must satisfy one of these two conditions in order touse the permit command.
<user ID>, duplicate user controlYou must specify the keyword and parameter combination user=user-list onlyonce during the permit command. However, you can specify multiple user IDs byseparating them with commas in the user list. Permit exits without updating theaccess rights.
<character>, invalid access switchThe character you entered to indicate the access rights for the file was not a validaccess character; permit exits without updating the access rights.
<invalid id>, invalid user idThe user IDs you supply with the user parameter must consist of decimal orhexadecimal characters, the characters world, or the * character. Permit exits if yousupply other characters.
missing access switchesYou must specify one or more access characters with the permit command; permitexits without updating the access rights.
no files foundThere were no files of the type you specified (data, directory, or both) in thepathname list.
pathname, E_NAME_NEXISTThe pathname is a remote file. The accessor whose access is to be changed is notdefined either at the Administrative Unit containing the local client or at the AUcontaining the file server where the remote file resides.
HI command physname
Command Reference Chapter 2 305
physnameDisplays system DUIB names and information.
Syntax
physname *|target_device_name [-e]
Parameters
* Lists all of the DUIBs in the system.
target_device_nameDisplays DUIBs associated with the physical device name specified.
-e Displays extended information.
Additional Information
Use physname to obtain information about your system's available DUIBs.
If you specify a target_device_name that has more than one match in the systemphysname lists the DUIBs that include the specified name. Do not use a * within atarget_device_name parameter.
See also: Physical Device Names, Appendix E

physname HI command
306 Chapter 2 Command Descriptions
Examples
1. To view a list of the DUIBs in the system, enter:
physname *
The DUIBs are displayed as shown below. The names of loadable devices arelisted first, followed by the names of standard devices:
Dynamic DUIB Cluster 1
D_CONS
Intel's Standard DUIB Cluster
BB STREAM COM1 COM2 B
BH BM BMH A AH
AM AMH C_RMX C_RMX0 C_RMX1
C_RMX2 C_RMX3 C_RMX4 D_RMX D_RMX0
D_RMX1 D_RMX2 D_RMX3 D_RMX4 A_DOS
B_DOS C_DOS D_DOS E_DOS F_DOS
G_DOS H_DOS I_DOS J_DOS K_DOS
L_DOS M_DOS N_DOS O_DOS P_DOS
Q_DOS R_DOS S_DOS T_DOS U_DOS
V_DOS W_DOS X_DOS Y_DOS Z_DOS
2. If more than one DUIB name matches the name you specify, physname displaysa list of fully or partially matching DUIB names. For example:
physname c_rmx
This command displays:
Searching Dynamic DUIB Cluster 1
Searching Intel's Standard DUIB Cluster
C_RMX C_RMX0 C_RMX1 C_RMX2 C_RMX3 C_RMX4
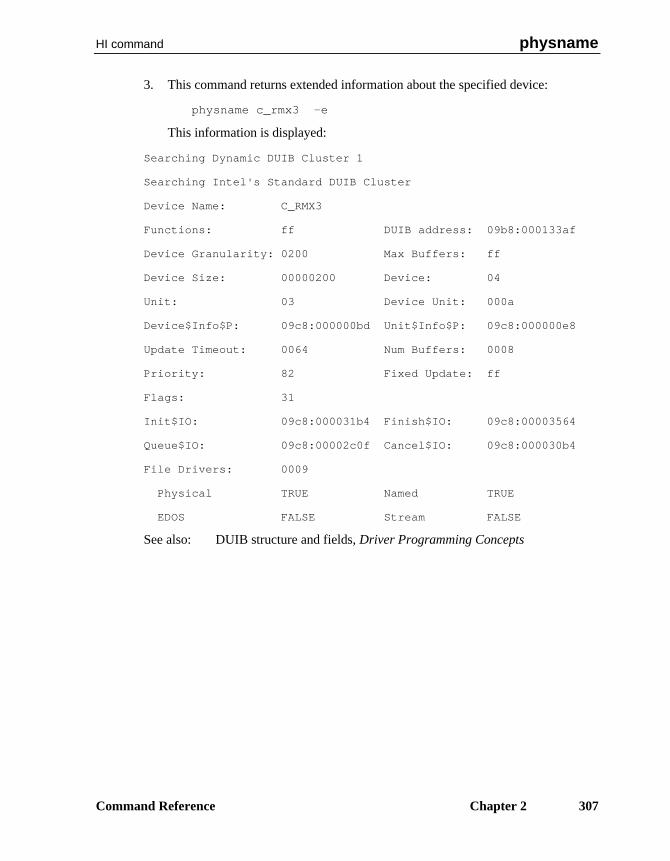
HI command physname
Command Reference Chapter 2 307
3. This command returns extended information about the specified device:
physname c_rmx3 -e
This information is displayed:
Searching Dynamic DUIB Cluster 1
Searching Intel's Standard DUIB Cluster
Device Name: C_RMX3
Functions: ff DUIB address: 09b8:000133af
Device Granularity: 0200 Max Buffers: ff
Device Size: 00000200 Device: 04
Unit: 03 Device Unit: 000a
Device$Info$P: 09c8:000000bd Unit$Info$P: 09c8:000000e8
Update Timeout: 0064 Num Buffers: 0008
Priority: 82 Fixed Update: ff
Flags: 31
Init$IO: 09c8:000031b4 Finish$IO: 09c8:00003564
Queue$IO: 09c8:00002c0f Cancel$IO: 09c8:000030b4
File Drivers: 0009
Physical TRUE Named TRUE
EDOS FALSE Stream FALSE
See also: DUIB structure and fields, Driver Programming Concepts
ping TCP/IP command
308 Chapter 2 Command Descriptions
pingTests communication between two hosts, at the lowest level of TCP/IPcommunications, to determine whether a connection can be made and to assess itsreliability. Used primarily to manually isolate faults.
Syntax
ping [-r] [-v] host [packetsize [count]]
Parameters
-r Bypass the normal routing tables and send datagrams directly to a host. An error isreturned if the host is not on a directly attached network. Use this option to ping alocal host through an interface that has no route.
-v Display a message any time an ICMP packet other than an ECHO_RESPONSE isreceived.
host Name or Internet address of a host or gateway.
packetsizeThe size in bytes of data for the packet; the default is 56 (for a 64-byte packet).
count Send the specified number of ECHO_REQUESTS and exit when all responses havebeen either received or assumed lost. If count is not specified, the command sendsdatagrams until it is interrupted. The value 0 is the same as no parameter.
Additional Information
The Internet is a large and complex group of network hardware connected bygateways. Tracking a single-point hardware or software failure can often be difficult.Ping uses the Internet Control Message Protocol (ICMP) mandatoryECHO_REQUEST datagram to elicit an ICMP ECHO_RESPONSE from a host orgateway. The command sends datagrams at one-second intervals until it isinterrupted or until it has sent and received count datagrams.
As each ECHO_RESPONSE is received from the target host, the packet number(icmp_seq) and round trip time is displayed. If ping cannot reach the target host,nothing is displayed. Similarly, a gap in the sequence numbers of the packet displayindicates the ECHO_REQUEST failed to reach the target or the ECHO_RESPONSEfailed to make it back to this host. When ping ends or is interrupted, it summarizesthe packet loss and round trip timing statistics for the session.
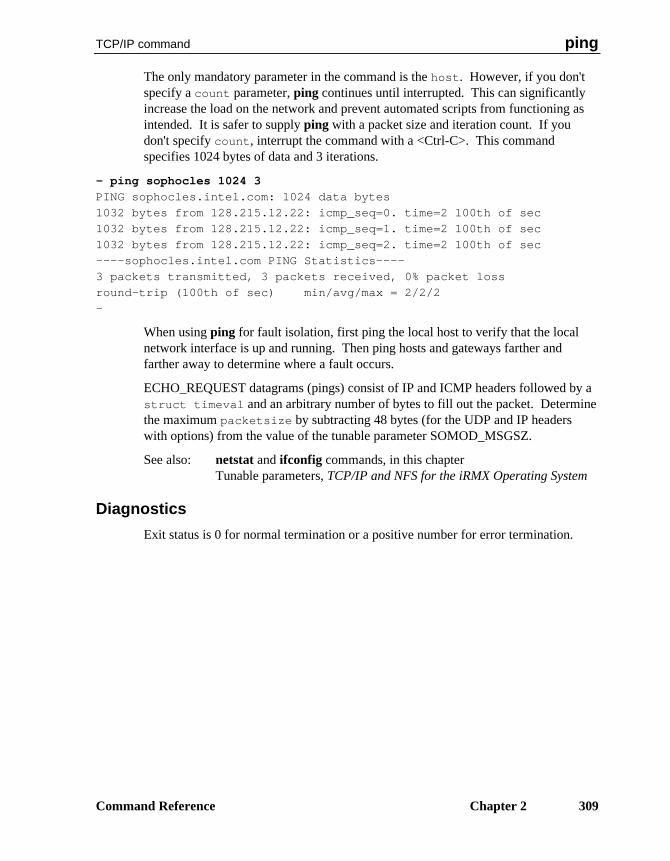
TCP/IP command ping
Command Reference Chapter 2 309
The only mandatory parameter in the command is the host. However, if you don'tspecify a count parameter, ping continues until interrupted. This can significantlyincrease the load on the network and prevent automated scripts from functioning asintended. It is safer to supply ping with a packet size and iteration count. If youdon't specify count, interrupt the command with a <Ctrl-C>. This commandspecifies 1024 bytes of data and 3 iterations.
- ping sophocles 1024 3
PING sophocles.intel.com: 1024 data bytes
1032 bytes from 128.215.12.22: icmp_seq=0. time=2 100th of sec
1032 bytes from 128.215.12.22: icmp_seq=1. time=2 100th of sec
1032 bytes from 128.215.12.22: icmp_seq=2. time=2 100th of sec
----sophocles.intel.com PING Statistics----
3 packets transmitted, 3 packets received, 0% packet loss
round-trip (100th of sec) min/avg/max = 2/2/2
-
When using ping for fault isolation, first ping the local host to verify that the localnetwork interface is up and running. Then ping hosts and gateways farther andfarther away to determine where a fault occurs.
ECHO_REQUEST datagrams (pings) consist of IP and ICMP headers followed by astruct timeval and an arbitrary number of bytes to fill out the packet. Determinethe maximum packetsize by subtracting 48 bytes (for the UDP and IP headerswith options) from the value of the tunable parameter SOMOD_MSGSZ.
See also: netstat and ifconfig commands, in this chapterTunable parameters, TCP/IP and NFS for the iRMX Operating System
Diagnostics
Exit status is 0 for normal termination or a positive number for error termination.
publicdir NET command
310 Chapter 2 Command Descriptions
publicdirDisplays pathnames of public iRMX-NET network directories on this system.
Syntax
publicdir [l]
Parameter
l(ong) Lists the directory including the full pathname and the device name where thedirectories reside.
Additional Information
Invoking publicdir without parameters lists the server's public directories, but doesnot list the pathnames and the device names. If you specify the long parameter, thedisplay is similar to:
PUBLIC DIRECTORIES OF THE SERVER
Offered Name Dev Name Pathname
WORK QMA0 /WORK
LANG QMA0 /LANG286
SYSTEM QMA0 /SYS386
WORLD QMA0 /USER/WORLD
SD QMA0 /
BB BB
F A /
See also: offer and remove commands, in this chapter
Error Messagescannot show public Directories
An I/O error occurred while executing the command.
not enough user memoryThe system does not have enough user memory to satisfy the request.

DOS or HI command rdisk
Command Reference Chapter 2 311
rdiskConfigures partitions on a DOS hard disk or an iRMX SCSI hard disk managed byPCI. The DOS version of rdisk uses ROM BIOS functions to access hard disks toretrieve disk configuration information and for reading and writing the partition table.
The DOS rdisk command runs on DOS Version 3.3 or later. In addition to standardROM BIOS-supported drives, you can set logical partition information for LogicalBlock Address (LBA) drives that use Enhanced IDE. The DOS rdisk command isused with the DOSRMX and iRMX for PCs OSs.
The iRMX rdisk command runs on iRMX Version 2.2 or later and can be used withthe iRMX III OS. Rdisk supports both primary and extended iRMX partitions. Youmust include the physical name (DUIB) of the hard disk drive being partitioned onthe command line with the iRMX rdisk command.
▲▲! CAUTIONIf a hard disk drive is partitioned with the DOS version of rdisk,use only the DOS version of rdisk to view or modify the partitiontable. The different OS versions of rdisk get the CHS (cylinder,head, sector) information in two different ways. The two ways arenot consistent and trying to use the two different versions of rdiskinterchangeably will corrupt the hard disk drive.
See also: Appendix F, Partitioning PCI Hard Disk Drives, in this manual
Syntax
rdisk (at the DOS prompt)
rdisk physical_name (at the iRMX prompt)
Parameterphysical_name
The DUIB name for the disk to be partitioned. The DUIB must be for the entire disk,not a partition. The DUIB name is required for the iRMX version of rdisk.
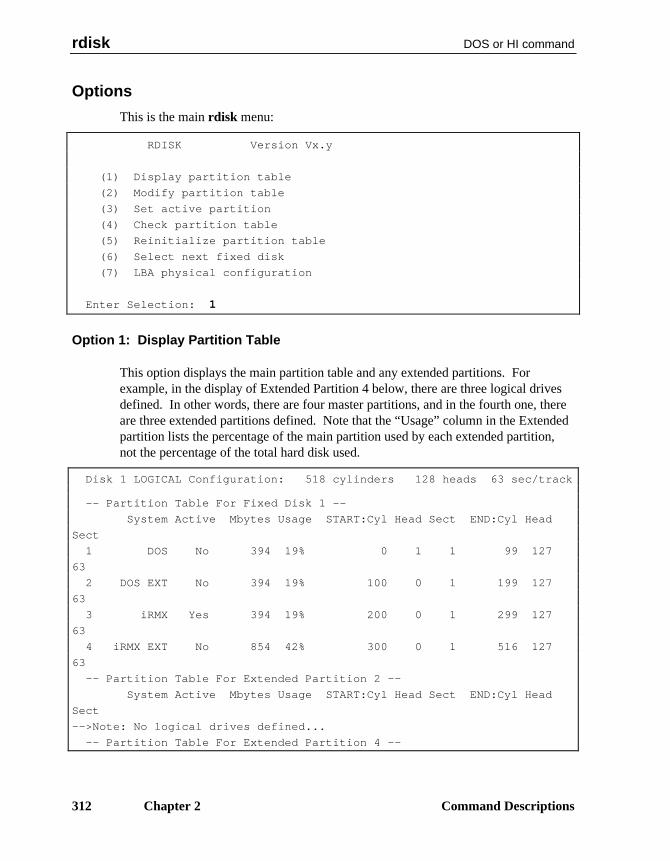
rdisk DOS or HI command
312 Chapter 2 Command Descriptions
Options
This is the main rdisk menu:
RDISK Version Vx.y
(1) Display partition table
(2) Modify partition table
(3) Set active partition
(4) Check partition table
(5) Reinitialize partition table
(6) Select next fixed disk
(7) LBA physical configuration
Enter Selection: 1
Option 1: Display Partition Table
This option displays the main partition table and any extended partitions. Forexample, in the display of Extended Partition 4 below, there are three logical drivesdefined. In other words, there are four master partitions, and in the fourth one, thereare three extended partitions defined. Note that the “Usage” column in the Extendedpartition lists the percentage of the main partition used by each extended partition,not the percentage of the total hard disk used.
Disk 1 LOGICAL Configuration: 518 cylinders 128 heads 63 sec/track
-- Partition Table For Fixed Disk 1 --
System Active Mbytes Usage START:Cyl Head Sect END:Cyl Head
Sect
1 DOS No 394 19% 0 1 1 99 127
63
2 DOS EXT No 394 19% 100 0 1 199 127
63
3 iRMX Yes 394 19% 200 0 1 299 127
63
4 iRMX EXT No 854 42% 300 0 1 516 127
63
-- Partition Table For Extended Partition 2 --
System Active Mbytes Usage START:Cyl Head Sect END:Cyl Head
Sect
-->Note: No logical drives defined...
-- Partition Table For Extended Partition 4 --

DOS or HI command rdisk
Command Reference Chapter 2 313
System Active Mbytes Usage START:Cyl Head Sect END:Cyl Head
Sect
1 DOS No 197 23% 300 1 1 349 127
63
2 iRMX No 197 23% 350 1 1 399 127
63
3 iRMX No 394 46% 400 1 1 499 127
63
Option 2: Modify Partition Table
▲▲! CAUTIONCreating or deleting a partition or logical drive will make existingfiles on the entire hard disk inaccessible.
When you choose option 2 from the main menu, you are presented with the menubelow. The “Display” choice is the same as Option 1 above.
Enter selection: 2
(1) Display partition table
(2) Create a partition
(3) Delete a partition
(4) Create or delete logical drives
<CR> Return to previous menu
Enter selection: 2
If you choose item 2 or 3 to create or delete a partition or logical drive, the currentpartition table is displayed and you choose the partition number to create or delete:
Disk 1 LOGICAL Configuration: 518 cylinders 128 heads 63
sec/track
-- Partition Table For Fixed Disk 1 --
System Active Mbytes Usage START:Cyl Head Sect END:Cyl Head
Sect
1 DOS No 394 19% 0 1 1 99 127
63
2 DOS EXT No 394 19% 100 0 1 199 127
63
3 None No 0 0% 0 0 0 0 0
0
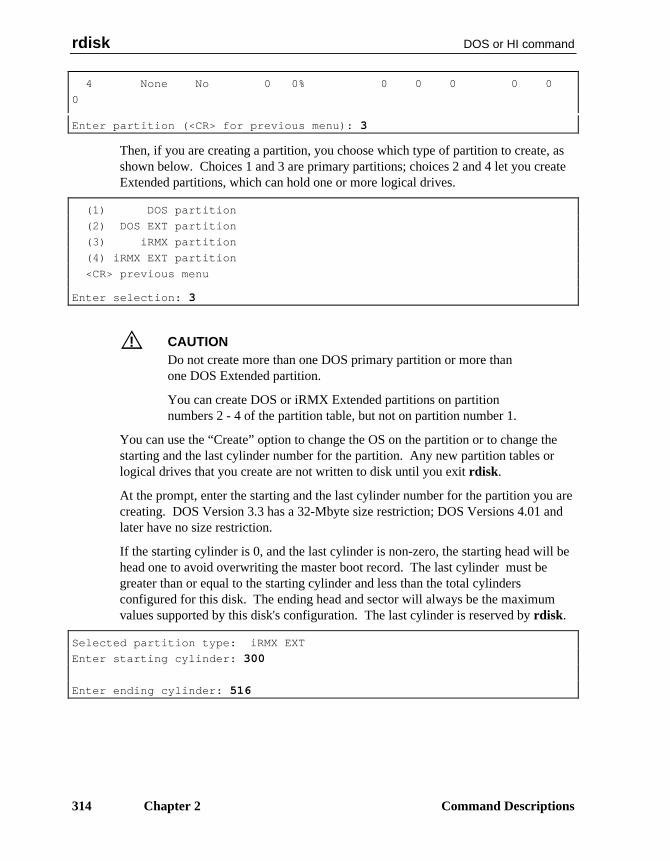
rdisk DOS or HI command
314 Chapter 2 Command Descriptions
4 None No 0 0% 0 0 0 0 0
0
Enter partition (<CR> for previous menu): 3
Then, if you are creating a partition, you choose which type of partition to create, asshown below. Choices 1 and 3 are primary partitions; choices 2 and 4 let you createExtended partitions, which can hold one or more logical drives.
(1) DOS partition
(2) DOS EXT partition
(3) iRMX partition
(4) iRMX EXT partition
<CR> previous menu
Enter selection: 3
▲▲! CAUTIONDo not create more than one DOS primary partition or more thanone DOS Extended partition.
You can create DOS or iRMX Extended partitions on partitionnumbers 2 - 4 of the partition table, but not on partition number 1.
You can use the “Create” option to change the OS on the partition or to change thestarting and the last cylinder number for the partition. Any new partition tables orlogical drives that you create are not written to disk until you exit rdisk.
At the prompt, enter the starting and the last cylinder number for the partition you arecreating. DOS Version 3.3 has a 32-Mbyte size restriction; DOS Versions 4.01 andlater have no size restriction.
If the starting cylinder is 0, and the last cylinder is non-zero, the starting head will behead one to avoid overwriting the master boot record. The last cylinder must begreater than or equal to the starting cylinder and less than the total cylindersconfigured for this disk. The ending head and sector will always be the maximumvalues supported by this disk's configuration. The last cylinder is reserved by rdisk.
Selected partition type: iRMX EXT
Enter starting cylinder: 300
Enter ending cylinder: 516

DOS or HI command rdisk
Command Reference Chapter 2 315
✏ NoteIf you define partitions with overlapping cylinder numbers, youwill be notified at either of these points:
• When you check the partition table (option 4 on the mainmenu)
• When you try to exit rdisk, before the partition information iswritten
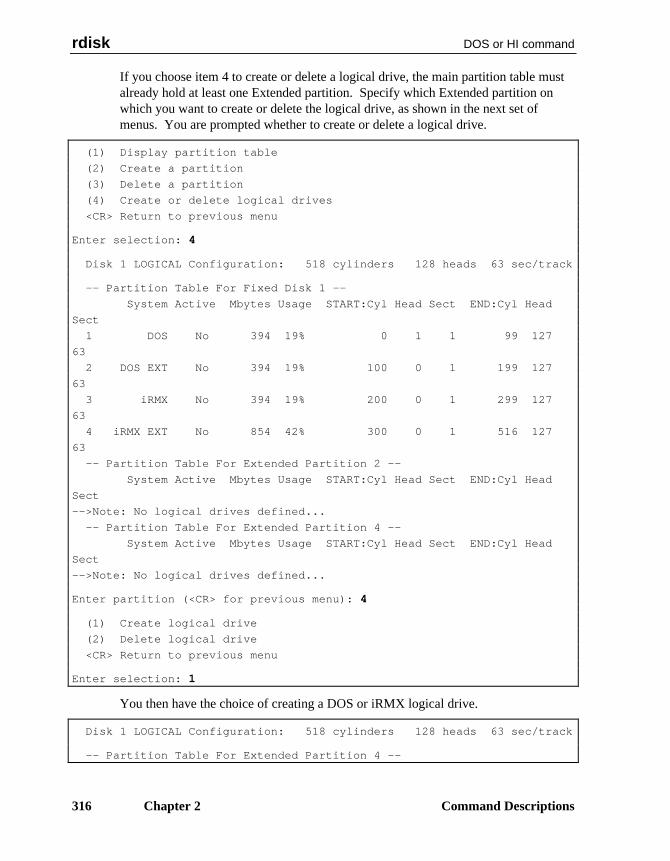
rdisk DOS or HI command
316 Chapter 2 Command Descriptions
If you choose item 4 to create or delete a logical drive, the main partition table mustalready hold at least one Extended partition. Specify which Extended partition onwhich you want to create or delete the logical drive, as shown in the next set ofmenus. You are prompted whether to create or delete a logical drive.
(1) Display partition table
(2) Create a partition
(3) Delete a partition
(4) Create or delete logical drives
<CR> Return to previous menu
Enter selection: 4
Disk 1 LOGICAL Configuration: 518 cylinders 128 heads 63 sec/track
-- Partition Table For Fixed Disk 1 --
System Active Mbytes Usage START:Cyl Head Sect END:Cyl Head
Sect
1 DOS No 394 19% 0 1 1 99 127
63
2 DOS EXT No 394 19% 100 0 1 199 127
63
3 iRMX No 394 19% 200 0 1 299 127
63
4 iRMX EXT No 854 42% 300 0 1 516 127
63
-- Partition Table For Extended Partition 2 --
System Active Mbytes Usage START:Cyl Head Sect END:Cyl Head
Sect
-->Note: No logical drives defined...
-- Partition Table For Extended Partition 4 --
System Active Mbytes Usage START:Cyl Head Sect END:Cyl Head
Sect
-->Note: No logical drives defined...
Enter partition (<CR> for previous menu): 4
(1) Create logical drive
(2) Delete logical drive
<CR> Return to previous menu
Enter selection: 1
You then have the choice of creating a DOS or iRMX logical drive.
Disk 1 LOGICAL Configuration: 518 cylinders 128 heads 63 sec/track
-- Partition Table For Extended Partition 4 --

DOS or HI command rdisk
Command Reference Chapter 2 317
System Active Mbytes Usage START:Cyl Head Sect END:Cyl Head
Sect
Extended Partition Table Empty
(1) DOS logical drive
<CR> RMX logical drive
Enter selection: 1
✏ NoteOn an iRMX Extended partition you can create either or both DOSand iRMX logical drives. However, on a DOS Extended partition,you can create only DOS logical drives.
A logical drive is simply another partition within an Extended partition. As whencreating a main partition, specify the starting and ending cylinders to define theextent of the logical drive:
Enter starting cylinder: 300
Enter ending cylinder: 349
Option 3: Set Active Partition
Select this option from the main menu to specify which partition number is activatedfor booting. Since only one partition can be active at a time, activating a newpartition automatically deactivates the last one. For DOSRMX, always make theDOS primary partition active. After you activate a partition, the partition table isdisplayed, similar to the display above for Option 1.
You can make a primary partition active. You cannot make an Extended partitionactive.
Option 4: Check Partition Table
Select this option to verify that the partition table is valid, including checks for:
• Overwriting the master boot record
• Partitions that have an ending address less than the starting address
• Overlapping partitions
• Partition addresses greater than disk size
rdisk DOS or HI command
318 Chapter 2 Command Descriptions
Option 5: Reinitialize Partition Table
Select this option to read the partition table contents from the selected hard disk. Ifthe current contents of the partition table have been modified, a query asks if themodifications should be saved.
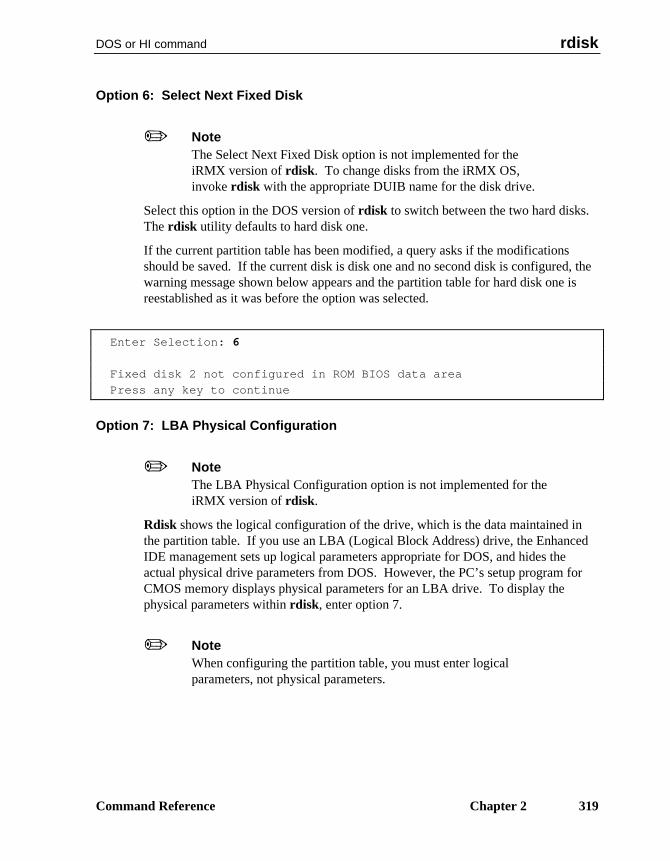
DOS or HI command rdisk
Command Reference Chapter 2 319
Option 6: Select Next Fixed Disk
✏ NoteThe Select Next Fixed Disk option is not implemented for theiRMX version of rdisk. To change disks from the iRMX OS,invoke rdisk with the appropriate DUIB name for the disk drive.
Select this option in the DOS version of rdisk to switch between the two hard disks.The rdisk utility defaults to hard disk one.
If the current partition table has been modified, a query asks if the modificationsshould be saved. If the current disk is disk one and no second disk is configured, thewarning message shown below appears and the partition table for hard disk one isreestablished as it was before the option was selected.
Enter Selection: 6
Fixed disk 2 not configured in ROM BIOS data area
Press any key to continue
Option 7: LBA Physical Configuration
✏ NoteThe LBA Physical Configuration option is not implemented for theiRMX version of rdisk.
Rdisk shows the logical configuration of the drive, which is the data maintained inthe partition table. If you use an LBA (Logical Block Address) drive, the EnhancedIDE management sets up logical parameters appropriate for DOS, and hides theactual physical drive parameters from DOS. However, the PC’s setup program forCMOS memory displays physical parameters for an LBA drive. To display thephysical parameters within rdisk, enter option 7.
✏ NoteWhen configuring the partition table, you must enter logicalparameters, not physical parameters.

rdisk DOS or HI command
320 Chapter 2 Command Descriptions
If the drive is an LBA drive, the display is similar to the following:
Enter Selection: 7
Disk 1 PHYSICAL Configuration: 1024 cylinders 32 heads 63 sec/track
NOTE: PARTITION TABLE ACCEPTS ONLY THE LOGICAL DRIVE CONFIGURATION
Press any key to continue
If the drive is not an LBA drive, this message is displayed:
Enter Selection: 7
Sorry, but disk 1 is NOT an LBA (Enhanced IDE) drive
Press any key to continue
Exit
Press <CR> at the main menu to exit rdisk. At this point, if you have madepartitioning changes, rdisk writes the partition table to the hard disk. The partitiontable is first validated. If any errors occur, a warning message appears, and thewrite/exit is aborted. If no errors occur, the partition table is written to the masterboot record on the hard disk and rdisk exits.
DOS or HI command rdisk
Command Reference Chapter 2 321
Additional Information
✏ NoteYou cannot use this command with a device that you accessthrough NFS.
DOS-based rdisk provides the full functionality of DOS-based fdisk for examiningand modifying a PC-based hard drive partition table.
See also: fdisk, in your DOS documentation
Rdisk uses the ROM BIOS is used to acquire the hard disk parameters. Since ROMBIOS supports only two hard disks, hard disk one and hard disk two are the onlydisks supported. These disks must be configured in the CMOS RAM data storagearea of the ROM BIOS prior to invoking rdisk. Use the ROM BIOS setup utility.
Use the fdisk utility to assign DOS logical drives.
If your version of DOS is older than Version 3.0, rdisk exits with a warning messagebefore executing any other functions.
Since the Version 3.3 or older DOS utility fdisk allows only two partitions, fdiskdisplays partition numbers 3 and 4 as partition number 2.
Setting up a Partition
DOS and the iRMX for PCs OS each require their own partitions.
Set up the partition table using the rdisk utility. Each OS to be installed requires apartition; no partition can share disk cylinders with another partition or overlap anyother partition. If you intend to install DOS, you must leave disk space for a DOSpartition when installing iRMX for PCs. See your DOS manual for information onthe size for this partition.
✏ NoteSystems with versions earlier than 2.2 of the iRMX OS contain anincompatible bootstrap loader. To install disks on these systems,you must invoke the rdisk utility and update the partition table,even if you do not make changes.
If you are installing your own hard disk drive, you must perform a low-level formatbefore partitioning.
To start the partitioning, invoke rdisk. When the rdisk screen appears, write downthe number of cylinders shown at the top of the screen; this number is the maximumnumber of cylinders in your system. For example, if rdisk displays 518 cylinders,
rdisk DOS or HI command
322 Chapter 2 Command Descriptions
they are numbered 0 through 517. Rdisk always reserves the last cylinder, so thehighest number you can specify during partitioning would be number 516.
Four partitions are available; their locations cannot overlap. Enter the next unusednumber for your partition number at the prompt. For example, if DOS is in partition1, partition 2 is the next available partition. Multiple iRMX partitions can exist on asingle hard disk.
The first track of cylinder 0 is reserved for the partition table and the master bootrecord. Rdisk reserves the last cylinder. To decide how many cylinders to give toeach OS partition, you can use an approximation:
Total Number of Cylinders/3 = one third of the disk for a given
partition
Or you can make a more exact determination using:
cylinders * heads * sectors * 512 = bytes in a given partition
If bad sectors are encountered at the start of a partition, rdisk decreases the size ofthat partition by mapping out the bad sectors. This may result in a partition that issmaller than you anticipated.
After you select the partition number, the system asks you to select the OS: enter 82to indicate that this new partition will run the iRMX OS. The system prompts youfor the starting cylinder. This prompt and the next prompt define the size of the newpartition. If your system runs only the iRMX OS, the starting cylinder is 0 and theending cylinder is (maximum cylinders - 1).
If you also have a partition for DOS, the Starting Cylinder Number for the iRMXpartition depends on the location of the DOS partition. Be certain that the cylindernumbers do not overlap.
✏ NoteIf your system contains both an iRMX partition and a DOSpartition, you should leave one track between the ending of onepartition and the beginning of the next.
At the Enter Last Cylinder prompt, enter the last cylinder in the iRMX partition. Ifthe iRMX partition fills the rest of the disk, this number is the number of cylindersdisplayed on the first line of the rdisk main menu screen.
This description assumes only one iRMX partition; to create more you must repeatthe process.

DOS or HI command rdisk
Command Reference Chapter 2 323
The main screen is displayed again and now contains the information that you justentered for the iRMX partition. You must now activate the iRMX partition. Select 3from the main menu to activate one of the partitions. This causes the system tobootstrap load the OS resident in that partition upon system reset.
Enter the number of your iRMX partition at the prompt. This marks the iRMXpartition as active. The main screen is displayed again. To complete the process, atthe main menu press <CR> to exit and write the information back to the table.
If any errors are displayed on the screen, the partition table information you enteredmay not be valid. Rdisk does not exit; reenter your information, making certain thatpartitions do not overlap.
Once the partition table has been successfully written, you are ready to format theiRMX partition.
See also: format, in this chapter
Error MessagesDisk X is NOT an LBA
This disk drive is not controlled by the LBA mechanism.
Duplicate DOS EXT partition;You can define only one DOS Extended partition.
Error during ROM BIOS function executionThe ROM BIOS returned the indicated error.
Extended Partition #X, Bad Partition Signature DetectedInvalid information was detected.
Extended partition X address greater than extended partition cylindersThe specified cylinder number for a logical drive is greater than the highest definedcylinder for the extended partition in which you are creating the logical drive.
Extended partition X contains logical device address greater than themaximum number of free disk cylinders
Partition x address greater than maximum number of disk cylindersThe starting and/or ending address for partition x is greater than the maximumaddress supported by this disk.
I/O error while reading disk drive parametersThe disk could not be read.
Illegal partition table read from fixed diskThe invalid table is displayed and you can choose to modify it to correct the partitiontable.
Illegal Partition: xThe starting address in partition x is greater than the ending address, or the endingaddress is greater than the disk size.
rdisk DOS or HI command
324 Chapter 2 Command Descriptions
Initialization FailedThe iRMX version of rdisk could not get the partition table from the device specifiedby this DUIB.
Invalid partition table, table not savedRdisk found an error in the changes you attempted to make and has not written thepartition table.
No logical drives to delete.You attempted to delete a logical drive, but there are none defined in this extendedpartition.
Not a bootable partitionYou attempted to make an extended partition active; you can only make a primarypartition active.
Not allowed to start at cylinder=0, head=0, sector=1 in extendedpartition x
Not allowed to start at cylinder=0, head=0, sector=1 in partition xThe specified partition address would overwrite the master boot record.
Not allowed to start at cylinder=0, head=0, sector=1 in partitionThe specified partition address would overwrite the master boot record.
Not an extended partition.You attempted to create a logical drive on a primary partition, not an extendedpartition.
Overlapping extended partitionsOverlapping partitions --> x : y
Partition number x overlaps with partition number y.
Partition existsYou attempted to create a partition that already exists. You must first delete theexisting partition.
Specified start_cylinder less than extended partition start cylinder.The specified start address for a logical drive is lower than the specified startingaddress for the extended partition.
HI command remini
Command Reference Chapter 2 325
reminiTranslates the rmx.ini file into the iNA 960 load file format (also known as remotefile format).
✏ NoteYou can use this command in an esubmit file orrq_c_send_command system call if the form of the commanddoes not require user input. If the command requires user input inan rq_c_send_command system call, it will fail. However, youcan use a form of the command that requires user input in anesubmit file if you use the eoresponse and coresponse
subcommands.
See also: esubmit command, in this chapter
Syntax
remini rmxinifile to|over remfile
Parametersrmxinifile
Name of the file to translate.
to|overSpecify to create a new file or over to overwrite an existing file.
remfileName for the file produced.
Additional Information
You can use this command to create an rmx.ini remote load file for use in the remotebooting of iRMX for PCs.
Example:
remini rmx.ini to rmxini.rem

remove NET command
326 Chapter 2 Command Descriptions
removeRevokes iRMX-NET public network access to one or more local directories.
Syntax
remove public_name_list
Parameterpublic_name_list
One or more public names, separated by commas, which were previously assigned tolocal directories for access by remote users.
Additional Information
The remove command revokes public access to a directory that was previouslydefined as public, either by configuration of the File Server or with the offercommand. Specify the public name, not the local directory name, if they aredifferent.
Error Messagesmissing parameters
The public name of the directory must be entered as part of the command syntax.
cannot remove <name>The first public directory configured in the File Server is used for a work file, andcannot be removed. The default for the first public directory is :sd:work.
HI command rename
Command Reference Chapter 2 327
renameChanges the pathname of one or more data files or directories. The renamecommand may be used to move a file to a different directory on the same volume.
✏ NoteYou can use this command in an esubmit file orrq_c_send_command system call if the form of the commanddoes not require user input. If the command requires user input inan rq_c_send_command system call, it will fail. However, youcan use a form of the command that requires user input in anesubmit file if you use the eoresponse and coresponse
subcommands.
See also: esubmit command, in this chapter
Syntax
rename inpath_list to|over outpath_list [q]
Parametersinpath_list
One or more pathnames, separated by commas, of files or directories that are to berenamed.
to|over outpath_listA list of new pathnames for the files, separated by commas. The number ofpathnames must be the same as in the inpath_list. If you specify to, you areprompted to overwrite existing files of the same name. If you specify over, existingfiles by these names are replaced by the input files. You cannot use over to renamea directory over an existing directory unless it is empty.
q(uery) Prompts for permission to rename each file in the list. Respond to the prompt with:
Y Rename the fileR Rename remaining files without further queryE Exit the commandN or other Don't rename this file; query for the next
rename HI command
328 Chapter 2 Command Descriptions
Additional Information
To use rename, you must have delete access to the current file and add-entry accessto the destination directory. If you rename a file over an existing file, you must alsohave delete access to the second file.
The rename command cannot be used across volume boundaries; that is, you cannotrename a file to move data from a volume located on one secondary storage device toa volume located on another device (for example, from one diskette to another).Attempting to do so causes an E_NOT_SAME_DEVICE error message. Use the copycommand or a combination of copy and delete commands to rename files or movedata across volume boundaries.
You can rename an existing directory pathname to a new, nonexistent pathnameanywhere in the directory tree. You cannot rename an existing directory over anotherexisting directory unless the destination directory is empty (an E_DIR_NOT_EMPTY
condition code is returned).
✏ NoteChanging the name of a directory also changes the pathnames of allfiles listed in that directory. All subsequent access to those filesmust specify the new pathnames for the files.
With the EDOS file driver, you can use rename to assign a different name to adirectory, but you cannot rename the directory to a different spot in the directoryhierarchy. If there is a directory structure /dir1/dir2/file_a, you cannot rename dir2as /dir3 to place it under the root directory.
You cannot rename a server's virtual root directory or public directories. Also, youcannot rename a file into a server's virtual root directory.
Error Messages<old pathname>, delete access required
You cannot rename a file unless you have delete access to that file.
<new pathname>, directory add ENTRY access requiredYou cannot rename a file unless you have add-entry access to the destinationdirectory.
<new pathname>, new pathname same as old pathnameYou specified the same name for the input pathname as you did for the outputpathname.
to or over preposition expectedEither you used the after preposition with the rename command or the number offiles in the inpath_list did not match the number in the outpath_list.

HI command rename
Command Reference Chapter 2 329
pathname, invalid access to remote file or directoryThe pathname is either a remote file to be renamed or a remote output filename. Oneof three conditions caused this error:
• You do not have add-entry access to the file's parent directory.
• You do not have append and update access to the file.
• A user at the server system has removed delete access to a file; you cannotchange delete access on a remote file. A user at the server system must grantdelete access before this command will succeed.
<pathname>, 0023:E_SUPPORTYou attempted to rename a DOS directory to a different spot in the directory tree,which is not supported by the EDOS file driver.
restore HI command
330 Chapter 2 Command Descriptions
restoreTransfers files from a backup volume to a named, remote, NFS, or DOS volume.
✏ NoteDo not use this command in an esubmit file or anrq_c_send_command system call, because queries for user inputwill not be received.
Syntax
restore :backup_device: to|over pathname [name=name] [verify][q] [select= (pathname_list)]
▲▲! CAUTIONWhile the restore command is executing, no other activity shouldbe occurring on the volume you are restoring. If other users accessthe volume during a restore operation, the volume's data couldbecome corrupted, possibly requiring the volume to be reformatted.
HI command restore
Command Reference Chapter 2 331
Parameters
:backup_device:Logical name of the backup device from which restore retrieves files. The backupdevice must always be a local device; it cannot be a remote device.
to|over pathnamePathname of a file to receive a single restored file, or of a directory to receivemultiple files. If you specify a logical name for a device, restore places the filesunder the root directory for that device. To restore files to the directory in which theyoriginated, specify the same pathname as you used with the backup command.Specify over to overwrite existing files on the volume. If you specify to, and filesbeing restored already exist on the volume, restore prompts:
<pathname>, already exists, overwrite?
Enter one of these in response:
Y or R Delete the file and replace it from the backup volume.E Exit from the restore command.N or other Do not restore the file; continue with the next file.
name=nameSpecifies a particular named data set from the backup device. If no name is given,only the first logical volume encountered is restored.
verifyNo files are restored; use this parameter to verify that backup has produced arestorable set of volumes. When you specify this parameter, use :bb: (byte bucket) asthe output pathname. The data on the volume is validated and restore displays:
<pathname>, Verified or<pathname>, Directory Verified
q(uery) Prompts for permission to restore each file or directory. Respond to the prompt with:
Y Restore the file
R Restore remaining files without further query
E Exit the command
N or other If a data file, do not restore the file; if a directory, do notrestore the directory or any file in that portion of the directorytree. Query for the next file, if any.
restore HI command
332 Chapter 2 Command Descriptions
select = (pathname_list)A list of pathnames, separated by commas, designating specific files or directories tobe restored. The complete list must be enclosed in parentheses. The pathnamescannot include the logical volume name and must be the exact pathnames used in thebackup command. If you don't know the pathnames, use restore with the verifyparameter to display them.
Additional Information
The restore utility copies files from backup volumes to target volumes in either localor remote directories. Restore copies the files to any directory you specify,maintaining the hierarchical relationships of the backed-up files. Restore allows thetransfer operation to begin at any named data set or at any physical volume in abackup volume set. By using the select parameter you can specify individual filesor directories to be restored.
Each backup volume used as input to the restore command must contain files placedthere by the backup command. If the backup operation required multiple backupvolumes, you must restore these volumes in the same order as they were backed up.
You must have sufficient access rights in the target volume to allow restore tooperate. To create new files, you must have add-entry access to the parentdirectories. To restore files over existing files, you must have add-entry and changeaccess to directories; and delete, append, and update access to data files. Normally,when restore copies files, it copies only those files to which you have access. Itestablishes your user ID as the owner ID, regardless of the file's previous owner ID.However, if you are the Super user, all files from the backup volume are restoredwith the owner ID and access rights intact.
When copying files, restore reconstructs the filename, access list, extension data, filegranularity, and the contents of the file. However, when the destination is a remoteor a DOS volume, the extension data is not copied and file ownership is notpreserved. Restored files will be owned by the user who performed the restore.
When you invoke the restore command, it displays this sign-on message, where Vx.yis the version number of the utility:
iRMX Restore Utility Vx.y
Copyright <years> Intel Corporation
All Rights Reserved
HI command restore
Command Reference Chapter 2 333
Then the command prompts you for a backup volume. Whenever restore requires anew backup volume, it issues this message:
<backup device>, Mount Backup Volume #<nn>, Enter Y to
Continue:
Where <nn> is the number of the requested volume. (In some cases restore displaysadditional information to indicate problems with the current volume.) In response tothis message, place the indicated backup volume in the backup device and enter oneof these:
Y or R Continue the restore process.E Exit from the restore command.N Reprompt for a new volume.any other Invalid entry; reprompt for entry.
If you supply the requested volume, restore starts restoring files from that volumeand, if necessary, requests additional backup volumes. Once you supply the firstbackup volume, you must supply all the other backup volumes in the data set, innumerical order, when restore requests them.
However, when restore requests the first backup volume, you can supply a higher-numbered backup volume, if you know that all the files you want to restore reside onhigher-numbered volumes. Restore starts copying files from the higher-numberedvolume and maintains the proper directory structure for the files it restores. Onceyou supply the first volume, you must supply all the remaining backup volumes innumerical order when restore requests them.
As it restores each file, restore displays one of these messages:
<pathname>, Restored/Verified
<pathname>, Directory Restored/Verified
If a not restored message is displayed, a more detailed error message isdisplayed.
restore HI command
334 Chapter 2 Command Descriptions
Error Messages<pathname>, access to directory or file denied
Restore could not restore a file; either you do not have add-entry access to the parentdirectory or you do not have update access to the file. Restore continues with thenext file.
<backup device>, Backup Volume #<nn>, <date>, Mounted
<backup device>, Backup Volume #<nn>, <date>, Required
<backup device>, Mount Backup Volume #<nn>, Enter Y to Continue:Restore cannot continue because the backup volume you supplied is not the one thatrestore expected. Either you supplied a volume out of order or you supplied avolume from a different backup session. Restore reprompts for the correct volume.
<backup device>, Cannot Attach Volume
<backup device>, <condition code:mnemonic>
<backup device>, Mount Backup Volume #<nn>, Enter Y to Continue:Restore cannot access the backup volume. This could be because there is no volumein the backup device or because of a hardware problem with the device. The secondline of the message indicates the condition code encountered. Restore continues toissue this message until you supply a volume that restore can access.
<pathname>, <condition code:mnemonic>, error during backup, file notrestoredThe backup utility encountered this condition code while attempting to save this file.Restore is unable to restore this file.
<pathname>, <condition code:mnemonic>, error during backup, restoreincompleteThe backup utility encountered this condition code while attempting to save this file.Restore restores as much of the file as possible to the target volume.
<backup device>, error reading backup volume
<backup device>, <condition code:mnemonic>Restore tried to read the backup volume but encountered an error condition, possiblybecause of a faulty area on the volume. The second line of the message indicates thecondition code encountered.
<pathname>, <condition code:mnemonic>, error writing output file,restore incompleteRestore encountered this condition code while writing a file to the named volume.Restore writes as much of the file as possible to the named volume.
HI command restore
Command Reference Chapter 2 335
<pathname>, extension data not restored, <nn> bytes requiredThe amount of space available on the named volume for extension data is notsufficient to contain all the extension data associated with the specified file. Thevalue <nn> indicates the number of bytes required to contain all the extension data.This message indicates that the target volume to which files are being restored isformatted differently than the source volume which originally contained the files. Toensure that you restore all the extension data from the backup volume, you shouldrestore the files to a volume formatted with an extension size set equal to the largestvalue reported in any message of this kind.
See also: Setting the extension size, format command, in this chapter
<backup device>, Invalid Input SpecificationThe logical name you specified for the backup device was not a logical name for adevice. Example invalid names are :ci:, :co:, and :home:.
<backup device>, logical name does not existThe logical name specified for the backup device does not exist.
<backup device>, Not a Backup Volume
<backup device>, Mount Backup Volume #<nn>, Enter Y to Continue:The volume you supplied on the backup device was not a backup volume. Restorecontinues to issue this message until you supply a backup volume.
<pathname>, E_IFDR Not RestoredFor some reason, restore was unable to restore a file from the backup volume; itcontinues with the next file. Another message usually precedes this message toindicate the reason for not restoring the file.
output specification missingYou did not specify a pathname to indicate the destination of the restored files.
<pathname>, READ access requiredYou do not have read access to a file on the backup volume; restore cannot restorethe file.
<pathname>, too many input pathnamesYou entered a list of logical names for backup devices. You can enter only one inputlogical name per invocation of restore.
Select List Too LongThe pathname list you supplied with the select parameter exceeded 255 bytes.Invoke restore again with a shorter list of pathnames.
Invalid Select : select = (filename [, filelist])The pathname supplied with the select parameter was not enclosed in parentheses.
select, unrecognized controlYou supplied a list of pathnames with the select parameter and the list was notenclosed in parentheses.
restore HI command
336 Chapter 2 Command Descriptions
cannot attach VOLUMEThe backup device is a remote device.
HI command retension
Command Reference Chapter 2 337
retensionRetensions a tape, which winds the tape evenly on the spool. This can eliminatepotential problems when reading or writing the tape.
Syntax
retension :logical_name:
Parameter
:logical_name:Logical name of a tape device.
Additional Information
✏ NoteYou cannot use this command with a remote devices such as thosethat you access through iRMX-NET or NFS.
Invoking this command does a fast-forward to the end of the tape, then rewinds thetape back to the load point. This winds the tape evenly. The command displays thismessage:
Starting retension operation
Error MessagesInvalid logical name
The logical name does not exist.
Device does not support retensionThe specified logical name refers to a file (condition code E_IFDR) or to a deviceother than a tape drive (condition code E_IDDR).

rmextdbg HI command
338 Chapter 2 Command Descriptions
rmextdbgImproves binding (linking) efficiency by removing SRCLINES entriesfrom OMF-386 linkable modules and producing a smaller version of thefile.
Syntax
rmextdbg filename.obj [filename.obj] [filename.obj]
Parametersfilename.obj
Object files to be processed.
Additional Information
SRCLINES are debug information segments in linkable modules (.obj files). Theycontain the full pathname to the source code file that the object code came from.Normally, there is one SRCLINES entry for every line of code, which uses a lot ofdisk space and is not needed by iRMX debugging tools.
Removing this unneeded information improves binding speed while leaving in allother debug information. Use this command on output from the PL/M compiler.
Rmextdbg processes the object files you enter on the command line, one at a time.Memory is reserved to load the entire file. If there isn't enough memory for the entireobject file to be loaded, the program exits with an error. Otherwise, rmextdbg scansfor SRCLINES debug segments, removes them, and thus shrinks the file.
When rmextdbg is finished, it writes the object file back out to disk.
See also: Example of a modified submit file using rmextdbg, in the PL/Mdirectory under /rmx386/demoFor C programs, use the nosourcelines compiler switch

DOS command rmxtsr
Command Reference Chapter 2 339
rmxtsrProvides the interface between DOS, ROM BIOS services, and the iRMX OS.
Syntax
rmxtsr
Additional InformationInvoke rmxtsr before using loadrmx. This utility performs all DOS and ROM BIOScalls on behalf of the iRMX OS.
✏ NoteRmxtsr runs at INT 85H; do not install other TSRs that chainthemselves to this interrupt level.
Rmxtsr is a DOS terminate and stay resident (TSR) program which runs in thebackground, allowing other DOS programs to run. When the iRMX OS invokesrmxtsr, the current DOS application program is halted and rmxtsr services theiRMX request.
Rmxtsr must load in conventional DOS memory, the first 640 Kbytes, so yoursystem must not use DOS extended memory managers. These memory managers putthe microprocessor into Protected Mode, which interferes with DOSRMX.
The rmxtsr program is divided into two parts:
Transient partExecutes when invoked. It reserves a portion of DOS conventionalmemory for the resident part of the utility, sets up software interruptvectors to allow the iRMX OS to invoke the resident part of the utility,and then terminates and removes itself from memory.
Resident partProvides the DOS and ROM BIOS extension to the iRMX OS byinterpreting iRMX requests, issuing DOS or ROM BIOS calls andsending the results back to the iRMX OS.

rmxtsr DOS command
340 Chapter 2 Command Descriptions
Rmxtsr handles requests as follows:
1. An application program makes an rqe_dos_request system call.
2. Rqe_dos_request sends the request to the TSR.
3. The TSR performs the appropriate DOS/ROM BIOS function and returns theresults to rqe_dos_request.
When rmxtsr runs, and no errors occurred, this message is generated:
iRMX Interface TSR Version x.x Installed
Error MessagesiRMX Interface TSR requires DOS V3.0 or later
Unknown DOS versionYou are running the wrong version of DOS: rmxtsr will not work on systemsrunning DOS earlier than Version 3.3. Use ver at the DOS prompt to determine theDOS version.
To reinstall a later version of DOS, first back up the DOS partition, and then reformatthe primary DOS partition. If you use the earlier version DOS backup utility to dothis, use the earlier version DOS restore utility; the later version of restore will notwork.
Alternatively, you can boot from a DOS System diskette and then run rmxtsr. Youmay have problems invoking some DOS utilities on your hard disk, as these utilitiesare an earlier version than the DOS utilities provided with the DOS version youbooted.
iRMX Interface TSR is already installedRmxtsr has already been invoked and cannot be invoked again. To reload the utility,reboot the system.
TCP/IP command route
Command Reference Chapter 2 341
setDisplays or changes CLI environment values. Only one value may be set at a time.
Syntax
set [terminal|minbackpool|maxbackpool|aliastable|prompt[= value|myslot]]
Parametersterminal
The terminal type for which CLI line-editing features are set.
minbackpoolThe minimum memory pool size for background jobs.
maxbackpoolThe maximum memory pool size for background jobs.
aliastableThe size of the table used to store aliases.
prompt The prompt displayed by the CLI.
= valueThe corresponding string or numeric value for each keyword. Values forminbackpool, maxbackpool, and aliastable are a decimal number of Kbytes.The prompt string can be up to 14 characters. If you omit the value parameter,values are displayed rather than set.
myslot An option only for the prompt that sets the prompt to the slot number of the board ina Multibus II system.
Additional Information
If you enter this command with no parameters, the CLI displays the current values,similar to:
CLI PARAMETERS are:
terminal = ANY
prompt = -
minbackpool = 6K
maxbackpool = 384K
alias table size = 2K
If you enter the command with a parameter name but no value, the current value forthat parameter is displayed.
set CLI command
342 Chapter 2 Command Descriptions
Options
Set terminal
Your initial terminal name is defined in the :config:terminals file. The set terminalcommand changes how the CLI supports line-editing by specifying a new terminaltype. The terminal command has the format:
set terminal=<terminal name>
In the command above, <terminal name> is the name of a terminal defined in the:config:termcap file. This file contains several default terminal definitions. If thename is not defined in this file, the CLI displays this error message and sets theterminal name to the default ANSI standard:
<terminal name> is not found in :config:termcap
default ANSI standard assumed
You can add terminal definitions to the :config:termcap file. This file also containsadditional configuration commands for AEDIT Version 2.2, Inamon Version 1.8, andthe Virtual Terminal Consumer V3.1 or later versions.
See also: termcap file, System Configuration and Administration
Assignments made with the set command are only valid for the current logon session.To change the terminal definition permanently, change the terminal name in the:config:terminals file.
See also: Terminal configuration files, System Configuration and Administration
Set minbackpool and set maxbackpool
The minbackpool and maxbackpool parameters establish new default values forthe minimum and maximum memory pool sizes used in background jobs. (Thedefault values can be overridden for a specific background job with an entry in thebackground command.) The initial minimum default is 6 Kbytes. The initialmaximum default is 384 Kbytes, unless you have a maximum memory partition lessthan 384 Kbytes; then the default is 0. The default values provide enough memoryfor most ordinary jobs. The commands have the format:
set minbackpool=<size>
set maxbackpool=<size>

CLI command set
Command Reference Chapter 2 343
Enter a decimal number of Kbytes (do not enter the K). Use a minimum value largeenough to accommodate the background stack and a maximum value less than(user_pool_max - 200 Kbytes). If the maximum value is greater than(user_pool_max - 200 Kbytes), you may not have enough memory to executeforeground jobs. The values are set as you entered them, but you may want to setdifferent values. If this occurs, the CLI displays this warning:
WARNING: maxbackpool attribute can avoid foreground
execution due to memory limits
If the maximum value you enter is less than the minimum value, this message isdisplayed:
WARNING: maxbackpool < minbackpool, value was assigned use
set command to set background memory pools
Set aliastable
The default size of the memory table used to store aliases is 2 Kbytes. Thealiastable parameter establishes a new size, either smaller or larger. The formatof the command is as follows, where <size> is a decimal number of Kbytes (do notenter the K).
set aliastable = <size>
Set prompt
The default CLI prompt is - (a hyphen). In DOSRMX it is RMX>. The promptparameter sets a new prompt string. The format of the command is as follows, where<string> is a string of up to 14 characters:
set prompt = <string>
On a Multibus II system or on a Multibus I system using the Multibus II Nucleuscommunication system, you may set the prompt to the string myslot. This causesthe CLI to include the Multibus II host ID in the prompt. If the Multibus II board isin slot 2, the new prompt would be:
[2]-
Multibus I and PC bus boards are considered to be in slot 0.
set CLI command
344 Chapter 2 Command Descriptions
Error Messages
terminal name is not found in :config:termcap:
default ANSI standard assumedThe terminal name you entered is not defined in the terminal definition file. Thedefault ANSI standard is assumed to be the terminal name until you redefine it usingthe set command.
<alias size>, new alias table is not enough to hold user aliasesThe new value you entered is too small to contain all the aliases you have assigned.The actual table size is not changed. This message does not appear if you reduce thesize of the alias table and the new size is still large enough for the current aliases youhave assigned.
set, wrong syntaxYou entered the command incorrectly.
set illegal parameter, parameters are:terminal prompt aliastableminbackpool maxbackpoolYou entered the command with an illegal parameter.
HI command setconfig
Command Reference Chapter 2 345
setconfigPlaces the contents of the specified configuration file into a system memory segmentso that it is available to subsequently loaded applications .
Syntax
setconfig file_name
Parametersfile_name Full pathname of a file containing configuration
information
Additional Information
The configuration information in the file passed to the setconfig command must be inthe same format as that of the RMX.INI file described in the System Configurationand Administration on-line manual.
✏ NoteIn DOSRMX and iRMX for PCs systems, the contents of the filepassed to the setconfig command overwrite the contents of thesystem configuration segment that initially was filled with thecontents of the RMX.INI file by the boot process. The setconfigcommand allows MSA booted Multibus II systems and standardMultibus I systems to have dynamic configuration capabilitiessimilar to those provided by the RMX.INI file in PC-bootedsystems.

setname NET command
346 Chapter 2 Command Descriptions
setnameEnters iRMX-NET server names and addresses in the local Name Server object table.
Syntax
setname server_name [SNIDx|network_address] [nfs|hid|rls] [r1]
Parametersserver_name
The name of a local or remote server system. The maximum length is 16 charactersand the name must be unique within the network. If the network address is omitted,the name is assigned to the local server.
SNIDx The configured subnet in the iNA 960 job. The number x can be in the range 1-4.The transport address is built using the xth subnet configured in the iNA 960 job.
network_addressA transport address that includes the Ethernet address of the system specified byserver_name. This is the same format as the 34-character transport address entriesin the :sd:net/data file.
See also: /net/data.ex file, Chapter 11, Network User’s Guide and Reference, forthe other addresses you can set
nfs The entry is to be made only under property type 3H, which specifies that this nameand address represent a file server. (This parameter has no relationship to theTCP/IP-based NFS.)
hid The entry is to be made only under property type 5H, which specifies that the addressis the host-unique ID. When you use this parameter, the Name Server catalogs theaddress for use by the getname command. Specify this parameter for systems actingonly as clients.
rls The entry is to be made only under property type 6H, which specifies that the addressis the iRMX load server.
If neither nfs, rls, nor hid is specified, the network_address is cataloged indifferent forms under property types 3H (file server), 6H (iRMX load server), and 5H(host-unique ID).
r1 The address is to be entered in iNA Release 1.0 format rather than the current format.This option is not available if a subnet ID is specified.

NET command setname
Command Reference Chapter 2 347
Additional Information
If a system is configured as an iRMX-NET server only, or as both a server and client,it must be given a server name before it can respond to client requests. If the name isnot set during system initialization, the system manager must invoke the setnamecommand at least once to catalog the local server name with the network NameServer.
The first command shown below catalogs the local system under the property typefile server; the second catalogs the host-unique ID, making the local system nameavailable to users who invoke the getname command. The third command catalogsboth entries.
setname server_name nfs
setname server_name hid
setname server_name
If the local name and address exists in the :sd:net/data file, the name is automaticallycataloged when the system initializes, or if network initialization fails you cancatalog the file's contents with the loadname command. In this case, you do not needto use setname to catalog the local name. However, you may want to catalog thename and address of a system that is not in the :sd:net/data file. To do this, specifythe remote system address in the setname command.
The format of the transport address is shown above, where you insert a TSAP ID andan Ethernet address. If you invoke setname from a Multibus II system and catalogthe address under property type 5H (using the hid parameter or using neither nfsnor hid), setname catalogs the Ethernet address and appends the slot number of theboard where it is invoked.
An example Ethernet address has the form 00AA00025A70. A TSAP ID indicatesthe type of system and its purpose. Table 2-6 shows TSAP IDs for various types ofsystems.
Table 2-6. TSAP IDs Used in Transport Addresses
TSAP ID Type of System
0001 Any MS-DOS system
1000 iRMX-NET file server
1100 iRMX-NET file consumer
8000 Unix (and other OS) file server
8100 Unix (and other OS) file consumer
setname NET command
348 Chapter 2 Command Descriptions
✏ NoteIn Multibus II systems, use the slot number of the host board in thelast two digits of the TSAP ID. This allows multiple hosts in onesystem to share a single network controller board.
You can invoke the setname command multiple times, giving different names forlocal and remote servers. Use the same name to catalog a server with the nfs andhid parameters. Use unique names to catalog different systems. The names arecataloged with the Name Server only as long as the local system is running; if youreboot the system, invoke setname to catalog them again.
See also: deletename, getname, and listname commands, in this chapter
The format of the transport address shown here is for iNA 960 Release 3.0 or later.The format is different if you specify the R1 parameter. This switch is used forcompatibility with systems running iNA Release 1.0 software.
See also: Network User's Guide and Reference
Error Messagesillegal option
The option specified for the command is not correct. Choose nfs, hid, or r1 as thecommand option.
<server>, name table fullThe local object table is full. Each server specified with setname occupies twoentries in the object table. You can increase the table size (it is configurable) ordelete some objects from the object table. Use the listname command to displayentries in the table.
<server>, name already existsThe specified server name is already defined on the network. Select a differentserver name.
illegal nameThe specified server name is more than 16 characters long. Select a shorter name.
illegal valueThe specified network address is in the wrong format. Re-enter the address.
NFS command share
Command Reference Chapter 2 349
shutdownShuts the system down in an orderly fashion; can only be invoked by the Super user.All HI users are warned at fixed intervals of an impending shutdown, until theshutdown takes place.
Syntax
shutdown [p] [w = num] [sd=:device_name:][b [d= list|all]]
Parameters
p(artial)Requests a partial shutdown. HI terminals are locked and all HI jobs except thisoperator's are aborted.
w(ait) = num
The delay period in minutes (0 to 30) before shutdown procedures begin. The defaultvalue is 10. A value of 0 indicates no delay.
sd = :device_name:A logical name for the system device containing the system directory and the volumemaster files. Colons are required. The device name must be a named volume that iscurrently attached. The default value is :sd:. Although the system device may bedifferent than the default, do not change it unless you have a specific reason to do so.
b(ackup)The shutdown utility creates a backup of the system device volume master files andany other devices specified in the devices parameter.
d(evices) = list|all
Backs up the fnode files on the specified devices and marks the devices as shut down.List is a list of logical device names surrounded by colons and separated bycommas. All specifies all attached EIOS logical named devices.
Additional Information
This command indicates a 10 minute wait, a backup of the fnode file, and themarking of :dev1: and :dev2: as shut down on the volumes.
shutdown W=10 B D=:dev1:,:dev2:,:sd: <CR>
You may use the partial option to delete only a limited number of HI users, suchas when backing up a disk. When the system is ready to return to general use, invokethe unlock command to reinitialize all users.
The logical operations defined in the shutdown utility are shown below:
shutdown HI command
350 Chapter 2 Command Descriptions
Operation FunctionTerminal locking Locks all HI terminals.Warnings Issues a warning every 5 minutes until 5 minutes before
shutdown, then issues a warning every minute.Job deletion Deletes all HI user jobs, excluding the caller's job.Time stamping Time-stamps the system directory.Backup Backs up all fnode files.Detaching Detaches all EIOS named and remote devices.Marking Marks the volume as shutdown.Delete job tree Deletes the caller's job tree.
All HI terminals are locked and the associated HI User Job Tree is deleted.
The default delay period of 10 minutes allows time to complete any cleanupprocedures; you may specify a different delay. When you invoke shutdown, thismessage is issued to all terminals except your own at 5 minute intervals. When lessthan 5 minutes remain, this message is issued at one minute intervals:
*** system WILL BE shutdown IN nn MINUTE(S)
All terminals remain active during the delay period, except the terminal from whichshutdown is invoked. This terminal becomes locked and cannot be used. If thepartial option is specified, the terminal used to invoke shutdown unlocks after thedelay period and can be used.
If shutdown is unable to delete one of the HI users for a period of five minutes, itdisplays this, specifying the user name as defined by the HI:
**** unable to delete user, <HI-user>
**** Continue? (Y/N)
The user has the choice of proceeding with the shutdown or aborting it.
During the shutdown process, shutdown catalogs the r?shutdown object in the rootdirectory to ensure that first-level jobs are able to close down and exit in an orderlyfashion. If shutdown is aborted the r?shutdown object is uncataloged.
The system directory on the system device volume is stamped, enabling HIinitialization to set the system clock the next time the system is booted. This ensuresthat the system clock, which is used to time-stamp files, moves forwardchronologically.
You can request that the system volume fnode file be copied to its duplicate filer?save, by specifying the backup parameter. If the devices parameter is alsospecified, the fnode files of those device are also backed up. When a successfulbackup has been made, the HI displays this, where the first message indicates anydevices specified with the devices parameter :
HI command shutdown
Command Reference Chapter 2 351
****backup OF VOLUME files ON <logical_device> COMPLETED
****backup OF VOLUME files ON (system-device> COMPLETED
Any errors detected while trying to back up the files are displayed immediately. Forinstance:
*** error in device fnode <number>
*** shutdown COMPLETED
Shutdown detaches all target devices, including the system device, that have beenlogically attached using the EIOS. This closes all file connections on the devices andflushes all EIOS and BIOS buffers associated with the devices.
Regardless of whether you specify a backup of specific devices, all EIOS logicalnamed and remote devices are marked as shut down. If an error is detected whiledetaching a device or while marking a volume as shut down, one of these messages isdisplayed:
*** error detaching device, <logical_name>
*** error marking shutdown device, <device>
When an error is detected during the backup and marking process of a logical nameddevice, as opposed to the system device, the processing continues. After namedvolumes are marked as properly shut down, this message is displayed and the systemmanager job tree is deleted:
:sd:, outstanding connections to device have been deleted
***shutdown COMPLETED
Any errors detected during the shutdown process cause the utility to abort anddisplay:
*** shutdown ABORTED
If a syntax error is encountered in the invocation of shutdown, the proper syntax isdisplayed. The utility then aborts and returns control to the system command level.
Shutdown cannot be called from a program because shutdown removes logicalnames, but cannot do so before the program terminates.
Aborting the Shutdown Utility
During operation of the shutdown utility, the system manager can enter <Ctrl-C> toabort the procedure. Shutdown can be aborted only at the completion of a logicaloperation; that is, only after all the terminals have been locked, but not during theterminal-locking process. If you use <Ctrl-C> to abort shutdown, you must invokeunlock to free each terminal.

shutdown HI command
352 Chapter 2 Command Descriptions
Failure to Issue Shutdown
If the system manager does not invoke shutdown before powering down or rebootingthe system, a warning message is displayed when the system is next powered on.This is the default warning message:
*** WARNING: The System Device was not shutdown properly.
You may establish a different message in a file named :config:shutdown.msg. Toeliminate any message, create a 0 length :config:shutdown.msg file.
✏ NoteIf you use iRMX-NET on a system with a local hard disk, anyprevious shutdown message is removed. Therefore, if there was aproblem with the previous shutdown procedure, the system cannotdetect it and notify the system manager.
Error Messages
This list contains only syntax errors not previously explained in the AdditionalInformation section.
<keyword>, unknown keyword or switchA keyword other than partial, wait, sd, backup or devices was encountered.
illegal keywordA switch was used as a keyword.
illegal valueA keyword was assigned an illegal value.
<system_device>, not a logical device nameThe name you entered is not cataloged as a logical device.
<system_device>, not a named deviceThe logical device name entered is not a named device.

HI command skim
Command Reference Chapter 2 353
skimDisplays one or more text files one screenful at a time, enabling you to page up anddown within the file.
Syntax
skim pathname [q] [tabwidth = num]
Parameterspathname
The path name of the file to display. Specify more than one file by using wildcards.
q(uery) Prompts for permission to display each file. Respond to the prompt with:
Y Display the fileR Display remaining files without further queryE Exit the commandN or other Don't display this file; query for the next
tabwidth = numThe number of spaces to display for each horizontal tab character.
Additional Information
As each page is displayed, this prompt appears at the bottom of the screen:
more?
To scroll the text one line, press <CR>. To display the next screen, press thespacebar. Press ? or H to see this display of other command characters used by skim:
A - repeat the last commandB - back one pageD - next half pagecr - display next lineE or Q - exitN - next fileP - current path nameT - top of fileW - windowZ - last page of file? or H - this displayspace - next page
When the end of the file is reached, skim displays:
skim HI command
354 Chapter 2 Command Descriptions
--(EOF)--more?
At this point, pressing <CR> or the spacebar terminates skim (unless you specifiedmultiple files), but other commands may be used to continue displaying the currentfile.
If terminal translation is not enabled, the screen commands for clear screen and clearline are simulated. Long lines are wrapped to subsequent lines and unprintablecharacters are displayed in hexadecimal.

HI command sleep
Command Reference Chapter 2 355
sleepSuspends execution for a given number of seconds.
Syntax
sleep seconds
Parameterseconds
The number of seconds to suspend execution.
Additional Information
The time needed to load the sleep command is not counted in the delay.
sortSorts lines alphanumerically in a text file and displays the output or writes it toanother file.
Syntax
sort inpath_list [to|over|after outpath_list] [q]
Parametersinpath_list
One or more pathnames, separated by commas, of text files to sort.
to|over|after outpath_listOne or more output files where sorted data is to be written rather than to the screen.Multiple pathnames must be separated with commas.
q(uery) Prompts for permission to sort each file in the list. Respond to the prompt with:
Y Sort the fileR Sort remaining files without further queryE Exit the commandN or other Don't sort this file; query for the next
Additional Information
If the input file contains these lines:
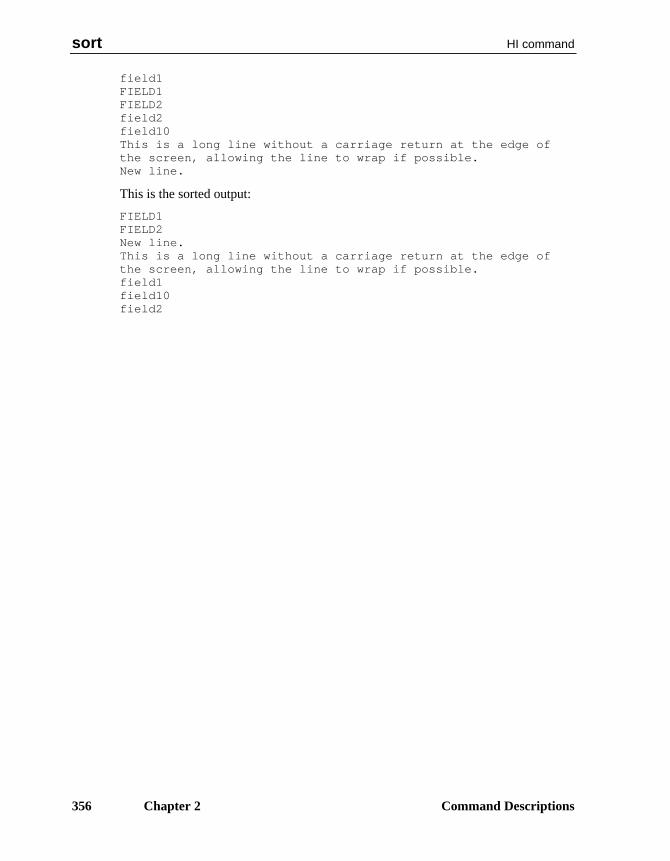
sort HI command
356 Chapter 2 Command Descriptions
field1FIELD1FIELD2field2field10This is a long line without a carriage return at the edge ofthe screen, allowing the line to wrap if possible.New line.
This is the sorted output:
FIELD1FIELD2New line.This is a long line without a carriage return at the edge ofthe screen, allowing the line to wrap if possible.field1field10field2
CLI or HI command submit
Command Reference Chapter 2 357
submitReads and executes a set of commands from a file rather than from the keyboard.
Syntax
submit pathname [(param_list)] [to|over|after outpath] [e]
Parameterspathname
Name of the file from which the commands are executed. This file may containnested submit commands. Typically the filename has the extension .csd, which youdo not include in the pathname. If no such file is found, the filename is assumed tobe exactly as entered here.
param_listOne to ten actual parameters, separated by commas, that are to replace formalparameters in the submit file. You must surround this parameter list withparentheses. To omit a parameter in the middle of the list, reserve its position byentering a comma. If a parameter contains a comma, space, or parenthesis, enclosethe parameter in single or double quotes. The sum of all characters in the parameterlist must not exceed 512 characters.
to|over|after outpathWrites the output from each command in the submit file to the specified file ratherthan to the screen. Commands in the submit file may redirect their own output, inwhich case the output is not written to this file.
e(cho) Data written to an output file is also echoed to the screen. Nested submit commandsdo not have their contents echoed to the screen unless they are also invoked with theecho parameter.
Additional Information
If you use the CLI, this is an internal CLI command. It is also supplied as an HIcommand for systems that use a custom interface. Invoke :system:submit for theHI version of the command. The HI command does not support CLI features; youcannot include such commands as alias and background in the submit file, nor canyou use an alias for a command.
To use the submit command, you must first create a data file that defines thecommand sequence and formal parameters (if any). Any program that reads itscommands from the console input (:ci:) can be executed from a submit file.
submit CLI or HI command
358 Chapter 2 Command Descriptions
If the submit file itself contains a submit command, another submit file is invoked.You can nest submit files to any level until memory is exhausted. When a nestedsubmit file completes execution, it returns control to the next higher level of submitfile.
Indicate formal parameters in the submit file by specifying the characters %n, wheren ranges from 0 through 9. When submit executes the file, it replaces the formalparameters with the actual parameters listed on the invocation line. The first actualparameter replaces all instances of %0, the second parameter replaces all instances of%1, and so forth. If the actual parameter is surrounded by quotes (to avoidcommand-line interpretation of a comma, space, or parenthesis in the parameter),submit removes the quotes before performing the substitution. If there is no actualparameter that corresponds to a formal parameter, submit replaces the formalparameter with a null string.
If you specify an output file and do not specify the echo parameter in the submitcommand, only your submit command entry is echoed on the console screen;command entries in the submit file are not displayed as they are loaded and executed.You own and have full access to output files created by the submit command and tonew files created by commands within the submit file.
If your command interface is the CLI, you may invoke the submit command as abackground job to execute large tasks while you continue entering data from theterminal. If you invoke submit as a foreground job and enter <Ctrl-C> to abortprocessing, all submit processing ends (including any nested submit commands),and control returns to you.
When all commands in the submit file have been executed, this message is displayed:
END submit <pathname>
Examples
Following are two examples showing the use of submit files. The first uses theBND386 utility; the second uses the MAP386 utility.
1. This example of the submit file invokes the BND386 utility. This utility createsa bound object module (the & characters are syntax required by the Binder). Theexample uses the file, bind.csd. It is located in the /intel/gen directory.
bnd386 &
/intel/lib/cstrmx3c.obj , & C startup module
%0.obj , & User module - include other
modules here

CLI or HI command submit
Command Reference Chapter 2 359
/intel/lib/crmx3c.lib , & iRMX III Floating-point
C-library
/intel/ndp387/cl387n.lib , & Floating point support
libraries
/intel/ndp387/80387n.lib , &
/rmx386/lib/rmxifc32.lib & iRMX III System Call
Interface library &
bind controls
renameseg (code32 to code) &
segsize (stack(2400h)) &
nodebug & Change to 'debug' if debug
info desired
object(%0) &
rc(dm(4000h,0FFFFFh))
;
Execute the submit file by issuing this command:
- submit /intel/gen/bind file.c echo
The file variable is the name of any C program which will be compiled underthe iC-386 compiler. The command executes as a foreground job. The submitcommand substitutes the actual parameter of the file name in place of the formalparameter %0 in the submit file. When the binding process starts, the CLIdisplays the bind.csd file as it processes each line.
This system message shows that processing has begun:
iRMX III 386(TM) BINDER, <version>
Intel Corporation Proprietary Software
When the job is complete, the CLI displays:
- END SUBMIT bind.CSD
See also: Using the 80386 Binder, Intel386 Family Utilities User's Guide
2. This example of the submit file, titled map.csd, invokes the MAP386 utility.This utility generates informational maps, such as table, segment, and cross-reference maps, about any input object module (the & characters are syntaxrequired by the Binder).
The map.csd submit file contains this command sequence:
map386 %0 printcontrols(tables) &
Execute the submit file by issuing this command:
- submit map (file.obj) printcontrols(tables)
submit CLI or HI command
360 Chapter 2 Command Descriptions
The file variable is the name of any object file created by a compatible 32-bitcompiler, such as the iC-386 compiler. The submit command substitutes theactual parameter of the file name in place of the formal parameter %0 in thesubmit file. The printcontrols option specifies Global Descriptor, LocalDescriptor, and Interrupt Descriptor tables.
This system message shows that the job has begun:
iRMX III 386(TM) MAPPER, <vers>
Copyright 1986,1989,1990 Intel Corporation
When the job is complete, the CLI displays:
- END SUBMIT map.CSD
See also: Using the 80386 Mapper, Intel386 Family Utilities User's Guide
Error Messages<pathname>, end of file reached before end of command
The last command in the input file was not specified completely. For example, thelast line might contain a continuation character.
<parameter>, incorrectly formed parameterYou separated parameters in the parameter list with a character other than a comma.
<pathname>, output file same as input fileYou attempted to place the output from submit into the input file.
<pathname>, too many input filesYou specified more than one pathname as input to submit; only one file can beprocessed per invocation.
<parameter>, too many parametersYou specified more than ten actual parameters in the parameter list.
<condition code:mnemonic>, during submit executionThe commands in the submit file produced the error indicated by this condition code.

CLI or HI command super
Command Reference Chapter 2 361
superMakes you the system manager (Super user), with user ID 0. You must know thepassword (the default is passme).
Syntax
super
Additional Information
If you use the CLI, this is an internal CLI command. It is also supplied as an HIcommand for systems that use a custom interface, in the :system:super file. The HIcommand does not recognize any of the CLI features such as line-editing andaliasing.
If you logged on as Super, you are already the system manager. You only need toinvoke super if you want to issue the changeid command to take on another user ID.In this case the super command doesn't require you to enter the password.
If you logged on as any user other than Super, invoke the super command to becomethe system manager; your user ID is changed to 0. In this case the super commandprompts you to enter the password. Although you have the privileges of the systemmanager, the Super user logon files are not executed. For example, if Super hasdifferent aliases defined than in your logon files, those aliases are not defined whenyou invoke the super command.
After invoking the command, your prompt changes to super-. You can enter anycommands and access any files available to the system manager. You become averified user, which allows you to access any files with iRMX-NET. If you createnew files, they are listed as owned by user ID 0, unless you previously invokechangeid to become another user.
The super command can be used only in the foreground. If you try to invoke it as abackground job, you receive a failure message. To return to your logon user ID afterinvoking super, use the exit command.
See also: changeid and exit commands, in this chapter
super CLI or HI command
362 Chapter 2 Command Descriptions
Error Messages<condition code:mnemonic> cannot set default user
A problem prevented the CLI from changing your user ID. The user definition file(UDF) may be corrupted.
<condition code:mnemonic>An internal system problem occurred. For example, the CLI could not find thedefault user.
<condition code:mnemonic>, super is unavailableThe CLI encountered an error while reading the password you entered or whileaccessing the UDF (to determine if the password is correct).
<parameter>, unexpected parameterYou entered a parameter; the super command does not accept any parameters.
HI command sysinfo
Command Reference Chapter 2 363
sysinfoDisplays information about the boot system that is currently running.
Syntax
sysinfo [l]
Parameter
l(ong) Displays an iRMX Job Tree which lists the jobs currently running and their memoryusage.
Additional Information
The displayed information varies, depending on the boot system and the associatedCPU board. The output has the general format:
The System Device DUIB Name is <duib_name>
The System Boot File Name is <boot_system>
The System Performance Index is <delay_constant>
The currently specified Time Zone is <time_zone>
The System Bus is <bus_type>
The CPU Type is <cpu_type> <cpu_model>
The System Board Type is <board_type>
The System Comments are:
<contents of ICU Comment Screen >
Where:
<duib_name>The DUIB name of the physical device that is currently attached as thesystem device (:SD:).
<boot_system>The name of the boot device and file which was booted and is currentlyexecuting.
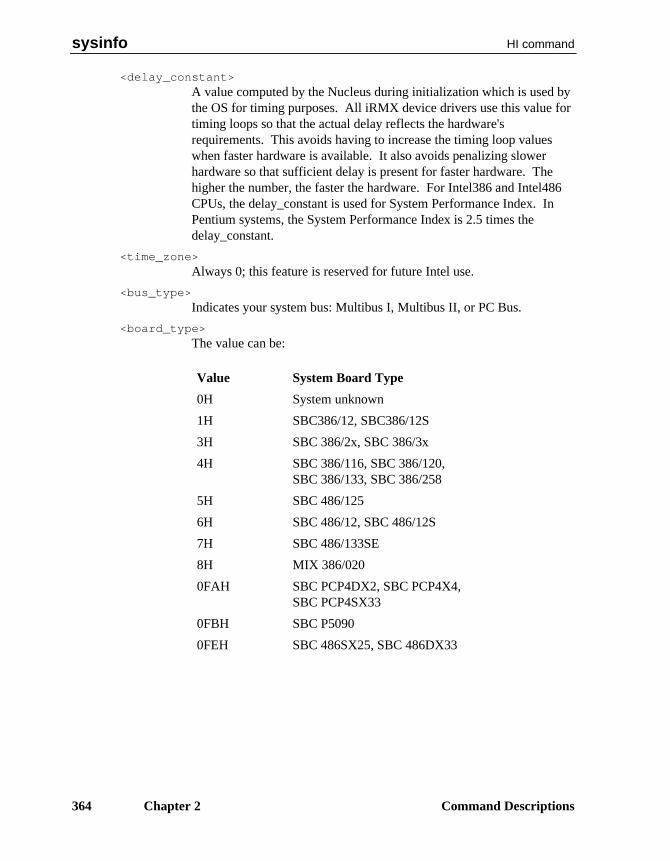
sysinfo HI command
364 Chapter 2 Command Descriptions
<delay_constant>A value computed by the Nucleus during initialization which is used bythe OS for timing purposes. All iRMX device drivers use this value fortiming loops so that the actual delay reflects the hardware'srequirements. This avoids having to increase the timing loop valueswhen faster hardware is available. It also avoids penalizing slowerhardware so that sufficient delay is present for faster hardware. Thehigher the number, the faster the hardware. For Intel386 and Intel486CPUs, the delay_constant is used for System Performance Index. InPentium systems, the System Performance Index is 2.5 times thedelay_constant.
<time_zone>Always 0; this feature is reserved for future Intel use.
<bus_type>Indicates your system bus: Multibus I, Multibus II, or PC Bus.
<board_type>The value can be:
Value System Board Type
0H System unknown
1H SBC386/12, SBC386/12S
3H SBC 386/2x, SBC 386/3x
4H SBC 386/116, SBC 386/120,SBC 386/133, SBC 386/258
5H SBC 486/125
6H SBC 486/12, SBC 486/12S
7H SBC 486/133SE
8H MIX 386/020
0FAH SBC PCP4DX2, SBC PCP4X4,SBC PCP4SX33
0FBH SBC P5090
0FEH SBC 486SX25, SBC 486DX33
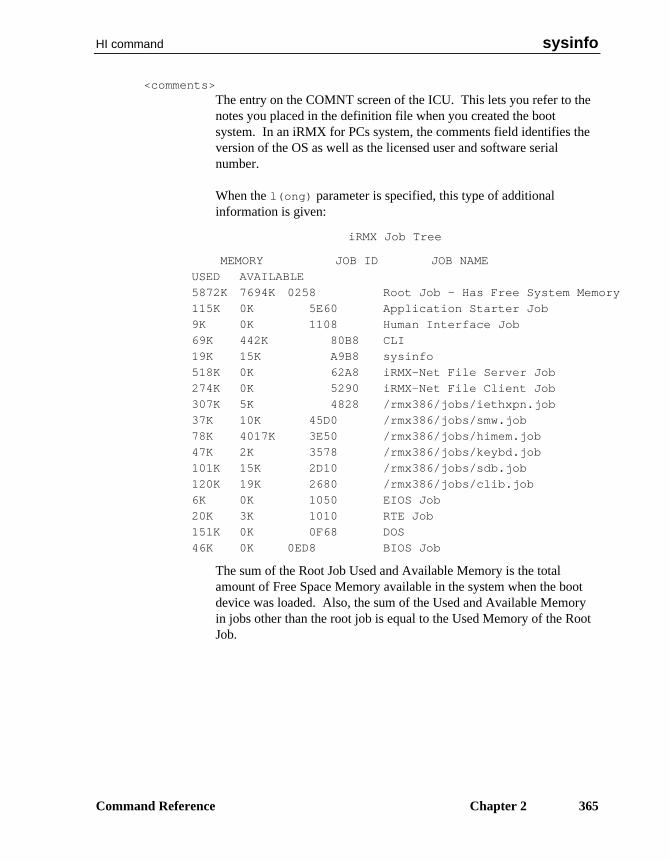
HI command sysinfo
Command Reference Chapter 2 365
<comments>The entry on the COMNT screen of the ICU. This lets you refer to thenotes you placed in the definition file when you created the bootsystem. In an iRMX for PCs system, the comments field identifies theversion of the OS as well as the licensed user and software serialnumber.
When the l(ong) parameter is specified, this type of additionalinformation is given:
iRMX Job Tree
MEMORY JOB ID JOB NAME
USED AVAILABLE
5872K 7694K 0258 Root Job - Has Free System Memory
115K 0K 5E60 Application Starter Job
9K 0K 1108 Human Interface Job
69K 442K 80B8 CLI
19K 15K A9B8 sysinfo
518K 0K 62A8 iRMX-Net File Server Job
274K 0K 5290 iRMX-Net File Client Job
307K 5K 4828 /rmx386/jobs/iethxpn.job
37K 10K 45D0 /rmx386/jobs/smw.job
78K 4017K 3E50 /rmx386/jobs/himem.job
47K 2K 3578 /rmx386/jobs/keybd.job
101K 15K 2D10 /rmx386/jobs/sdb.job
120K 19K 2680 /rmx386/jobs/clib.job
6K 0K 1050 EIOS Job
20K 3K 1010 RTE Job
151K 0K 0F68 DOS
46K 0K 0ED8 BIOS Job
The sum of the Root Job Used and Available Memory is the totalamount of Free Space Memory available in the system when the bootdevice was loaded. Also, the sum of the Used and Available Memoryin jobs other than the root job is equal to the Used Memory of the RootJob.

sysload HI command
366 Chapter 2 Command Descriptions
sysloadLoads a dynamically loadable device driver or user job as a child job of the HI. Thedriver or job remains resident in memory until the job is unloaded or the system isreset.
Syntax
sysload [-i name] [-o name] [-w] [-r] [poolmin, poolmax]pathname [target_params]
sysload -l
sysload -u job_name|job_token
Parameters-i name
Used to specify a file, logical name, or logical device as the :ci: for the loaded job.:CI: is the standard input for the job.
-o nameUsed to specify a file, logical name, or logical device as the :co: for the loaded job.:CO: is the standard output for the job.
-w Instructs the sysload command to wait until the loaded driver/job indicates that itsinitialization is complete before terminating.
-r Replaces an existing instance of the job to be loaded with the new job. If the job tobe loaded already exists, the previous job is deleted. This has the same effect asdeleting a job with sysload -u and then loading a new version of the same job.
poolminA decimal number specifying the minimum allowable memory pool size for the jobbeing loaded, in Kbytes. The default is 296 Kbytes. Do not follow the number withthe character K, and do not use hexadecimal or octal numbers.
poolmaxA decimal number specifying the maximum allowable memory pool size for the jobbeing loaded, in Kbytes. The default is 16 Mbytes (0FFFFFH). Do not follow thenumber with the character K, and do not use hexadecimal or octal numbers. For usewith himem, poolmax should be equal to poolmin.
See also: himem.job, System Configuration and Administration
pathnameThe pathname of the driver or job to be loaded.
HI command sysload
Command Reference Chapter 2 367
target_paramsParameters specific to the driver/job being loaded. These may be optional, dependingon the driver or job. The syntax of any parameters is defined by each driver and I/Ojob; sysload passes the parameters without interpreting them.
-l Used without parameters to display a list of current jobs and their job tokens loadedfrom a previous sysload command. For example:
sysload -l
Loaded Jobs: (6)c470 clib.jobdbf0 paging.job54a0 remotefd.job4ae8 netrdr.job36a0 netat.job2dc8 keybd.job
-u job_name|job_tokenUsed to unload a driver or a job. Use the job name or token returned by sysload -l.
▲▲! CAUTIONMost jobs and drivers provided with the OS are not unloadable.Attempting to unload such a job may cause unpredictable resultssuch as a General Protection fault.
See also:Reference to Loadable Jobs and Device Drivers,System Configuration and Administration, todetermine if a particular job or driver supportsunloading (-r and -u options)
Additional Information
If sysload is invoked without parameters, it displays a usage message and the list ofcurrently loaded jobs.
A loadable device driver is a device driver built as an HI command. Because youload the driver while the system is running, rather than configuring it with the ICU,you can dynamically change driver configuration. However, do not unload jobs withinterrupt handlers.
Loaded jobs are user applications that can be added to the OS in a semi-permanentfashion. Once the job is loaded with the sysload command, the job remains part ofthe OS until it explicitly exits or until the system is rebooted. Also, if the loaded jobsupports the -u option, the job can be deleted by specifying that option with thesysload command.
sysload HI command
368 Chapter 2 Command Descriptions
Typically, you only load a driver or job once each time the system is started. Theloaded driver is not deleted even after you log off, since sysload loads the driver as achild job of the HI rather than the CLI. You may use the sysload command in asubmit file, such as r?logon or loadinfo.
If a driver is already loaded and you reload it without resetting the system, a newinstance of the driver is loaded. For example, you may load a RAM disk driver,attach the device, and format it. If you then use sysload to reload the driver, andattach to the same device, the attachdevice command reports an unformattedvolume, since it is a new RAM disk.
The loaded driver has access to standard :ci: and :co:. The default :ci:/:co:connections are inherited from the user job that invoked the sysload command.These defaults can be overridden by using the -i and/or -o command line options.
The OS provides loadable drivers for most uses. These are some of the driversprovided:
• a RAM disk driver
• a terminal driver for Multibus I serial controller boards
• a driver for the system debug monitor, SDB
• a driver for the network redirector, Netrdr
• a driver for iRMX-NET
See also: Loadable device drivers, Loadable jobs, System Configuration andAdministration and Driver Programming Concepts
You may also write your own drivers or jobs to be loaded with sysload. OS driversfollow a standard convention for log files. The driver writes to a log file in the samedirectory as the driver. The log file has the same name as the driver file, with theextension .log. By convention, the load operation is successful if the log file containsonly the sign-on message from the driver. Otherwise, an appropriate error message iswritten to the log file.
By convention, a sysloadable job or driver should have the following components:
• Initialization section
Initializes application variables
Creates a deletion mailbox and catalogs it in the job’s object directory asR?EXIT_MBOX
Creates one or more worker tasks
Falls through to cleanup section
• Useful work section

HI command sysload
Command Reference Chapter 2 369
Includes one or more tasks that perform the functions and services provided bythe job. Error conditions are either handled locally with the tasks continuingtheir work, or by starting the termination process by signaling the cleanupsection.
Termination conditions that arise locally due to function completion or remotelyvia some sort of message cause the cleanup section to be signaled.
• Cleanup section
Waits at the exit mailbox for termination instructions. Termination message is abyte of 0xff.
Cleans up any resources that require special attention such as interrupt handlers,regions, or alarms.
Does the appropriate job exitting function based on job type (rq_delete_job orrq_exit_io_job).
You can also use sysload to add terminals defined by a loadable device driver to the:config:terminals file, enabling those DUIB names to automatically become part ofthe system during initialization.
See also: Loading and unlocking terminal devices, loading the PCX driver,System Configuration and Administration
sysload HI command
370 Chapter 2 Command Descriptions
Examples
This example loads the RAM disk driver. Poolmin and poolmax are not specified,so the default values are used:
sysload /rmx386/drivers/ramdrv (64)
This example loads the XMS server, specifying a poolmin of 500K, and a poolmaxof 500K:
sysload (500,500) /rmx386/jobs/himem.job
See also: himem.job and terminals, System Configuration and Administrationterminals, Driver Programming Concepts
Error Messages
Invalid PoolMin Value
Invalid PoolMax ValuePoolmin and poolmax must be decimal numbers without a suffix.
PoolMin larger than PoolMaxPoolmin must be equal to or smaller than poolmax.
Missing input parameterYou did not specify the driver's pathname.
Invalid Command TailYou used a delimiter other than a space preceding the pathname parameter.
E_FILE_NOT_EXISTYou must use a fully specified pathname.
Could not attach <name> as CI, using default CIYou specified <name> with the -i option, but an error occurred when an attempt wasmade to attach to it. The default :ci: will be used.
Could not attach <name> as CO, using default COYou specified <name> with the -o option, but an error occurred when an attempt wasmade to attach to it. The default :co: will be used.
TCP/IP command telnet
Command Reference Chapter 2 371
telnetCommunicates with another host using the TELNET protocol.
▲▲! CAUTIONDo not use this command in an esubmit file or anrq_c_send_command because queries for user input will not bereceived.
Syntax
telnet [-ec] [-8] [host[port]]
Parameters
-ec Changes the escape character to c for a telnet session.
-8 Enables the transmission of 8-bit data.
host The remote host name or its Internet address.
port The service number or its name.
Additional Information
Use telnet to connect to a remote host.
When invoked without the host and port arguments, telnet enters command mode,as indicated by its prompt, telnet>. In this mode, it accepts and executes thecommands discussed below.
When invoked with a host (and/or port), telnet performs an open command withthose arguments. If port is not specified, telnet attempts to contact the server at thedefault port. Once a connection has been opened, telnet enters input mode. In thismode, all text entered from the keyboard is sent to the remote host for processing.
See also: services file, TCP/IP and NFS for the iRMX Operating System
To enter command mode from input mode, enter the telnet escape character. Toreturn to input mode, enter a <CR> at the telnet> prompt. To execute a singleTELNET command from input mode, and return automatically to input mode, enterthe command preceded by the escape character (for example, ^]linemode). Thedefault escape character is ^] when TELNET is invoked with the telnet comm. Use
telnet TCP/IP command
372 Chapter 2 Command Descriptions
the -e command line option or the escape command to change the escape characterfor a telnet session.
The -8 option lets you communicate with hosts that use an 8-bit character set, suchas the Asian and European character sets. If this option is not used, parity bits arestripped from the data.
Logging out of the shell on the remote host terminates the telnet connection,returning you to the local shell if the connection was opened from the telnetcommand line or to the telnet> prompt if the connection was opened fromcommand mode. This can also be accomplished with the close command. The quitcommand terminates both the open connection and the telnet session, alwaysreturning you to the local shell.
Commands
These commands are recognized by the telnet command interpreter. They may beabbreviated, as long as they remain unique. The normal terminal editing conventionsare available in command mode.
close Close an open telnet connection, returning to the telnet> prompt(command mode) or to the local shell (input mode).
display Display the current operating parameters of telnet.
environ Change environment variables (type 'environ ?' for more environmentoptions).
logout Forcibly logout a remote user and close the connection, returning you tothe local shell.
mode Try to enter line or character mode (type 'mode ?' for more modeoptions.
open [-ec] [-8] host [port]Open a connection to the named host. The -e option specifies analternate escape character and -8 enables eight-bit mode. Theseoptions apply only to the session being opened. Host can be a hostname or Internet address. Port can be a service name or number; if notspecified, telnet attempts to contact the server at the default port.
quit Close the open TELNET connection, if there is one, and exit to thelocal shell.
send Transmit special characters to the remote host (type 'send ?' for moresend options).
set Set the operating parameters of the TELNET connection (type 'set ?' formore set options).

TCP/IP command telnet
Command Reference Chapter 2 373
slc Change the state of the TELNET connection’s special characters (type'slc ?' for more slc options).
status Show the current status of the TELNET connection, modes, andoptions.
telnet Open a connection to the named host
toggle Toggle the operating parameters of the TELNET connection (type‘toggle ?' for more toggle options).
unset Unset the operating parameters of the TELNET connection (type 'unset?' for more unset options).
? [command]Display a list of telnet commands (no arguments), or a description ofthe specified command.
! Invoke a new shell.
✏ NoteThe TELNET specifications specify defaults for line modetransmission with the local tty driver echoing. Thisimplementation, by default, provides character mode transmissionwith the local tty driver echoing.
Diagnostics
Exit status is 0 for normal termination or a positive number for error termination.
term HI command
374 Chapter 2 Command Descriptions
termDisplays attributes of a connection or terminal, or modifies terminal attributes.
Syntax
term [logical_name] [query] [display] [halfduplex|fullduplex][vdt|hardcopy] [modem|nomodem] [translate|notranslate][xy|yx] [inputrate=num] [outputrate=num] [width=num][height=num] [offset=num] [overflow=num] [scroll=num][rpc= zero|ignore|even|odd|num][wpc= zero|one|even|odd|pass|num][flowcontrol|noflowcontrol] [highwater=num][lowwater=num] [fcon=num] [fcoff=num][linkparity= noparity|even|odd] [linklength= 6|7|8][linkstop= 1|1.5|2] [spchighwater=num][nospecialcharacter|specialcharacter (num [,num...])]
Parameterslogical_name
The logical name of the terminal. Colons are not required.
query Prompts you whether the changes are correct before applying them.
displayAfter setting terminal attributes, displays the new settings.
halfduplex|fullduplexSets the terminal to full- or half-duplex transmission.
vdt|hardcopySpecifies whether the terminal is actually a video display terminal or a printer (hardcopy) device.
modem|nomodemSpecifies whether the terminal is connected to a modem.
translate|notranslateSpecifies whether the iRMX Terminal Support Code (TSC) should translate betweenANSI standard X3.64 escape sequences and unique terminal character sequences.
xy|yx Specifies whether horizontal (xy) or vertical (yx) screen coordinates are sent first.
inputrate=num outputrate=numA decimal input and output baud rate.

HI command term
Command Reference Chapter 2 375
width=num height=numThe number of characters in the screen width and the number of lines in the screenheight.
offset=num overflow=numThe cursor offset that starts the numbering sequence on X and Y axes, and theoverflow value that axis numbering falls back to after reaching 127.
scroll=numThe number of lines to send to the terminal when the operator enters the scrollingcontrol character (default: <Ctrl-W>).
rpc=zero|ignore|even|odd|num wpc=zero|one|even|odd|pass|numInput (rpc) and output (wpc) parity control settings that indicate how the TSC treatsthe high bit of each character. Input refers to data entered at the terminal; outputrefers to data sent to the terminal. Zero means the parity bit is always set to 0,yielding 128 8-bit characters; you may also set the value to 1, which has the sameeffect. Ignore means the parity bit is unchanged by the TSC, enabling 256 8-bitcharacters. Even or odd means the parity bit is used to validate the parity; thesemust be set the same, and yield 7-bit data.
flowcontrol|noflowcontrolFor buffered devices, enables or disables use of output flow control characters (<Ctrl-S> and <Ctrl-Q> by default, or as defined by fcon and fcoff).
highwater=num lowwater=numFor buffered devices, specifies the number of bytes in the buffer at which controllerboard firmware sends an off flow control character to stop receiving input data(highwater) or an on flow control character to begin receiving data (lowwater).
fcon=num fcoff=numFor buffered devices, the decimal value of the ASCII character to use for on and offflow control characters. The recommended value for fcon is 17 (<Ctrl-Q>) and forfcoff is 19 (<Ctrl-S>).
linkparity=noparity|even|odd linklength=6|7|8 linkstop=1|1.5|2For buffered devices, these specify how data is handled by the physical link betweenthe terminal and the controller device. Linklength is the number of bits percharacter and linkstop is the number of stop bits.
spchighwater=numFor buffered devices, if specialcharacter is set this is the number of bytes in theinput buffer above which Special Character Mode is enabled and below which thismode is disabled. Entering Special Character Mode means that the terminal driverand the TSC use special characters (defined below) as interrupts for signalingpurposes.
term HI command
376 Chapter 2 Command Descriptions
nospecialcharacter|specialcharacter (num [,num...])]For buffered devices, this specifies whether Special Character Mode can be enabledand defines up to four ASCII characters as special characters. Surround the valueswith parentheses and separate them with commas.
Additional Information
To display terminal attributes, enter only the logical name of the terminal orconnection. If the logical name is omitted, the attributes of the current terminal aredisplayed. When setting terminal attributes, the control names need not be typed incompletely. Enter only enough characters of the keyword to make it unique from theother parameters. All values are decimal by default.
Buffered devices are controllers that buffer input and output for the terminal. Theparameters that apply to buffered devices do not apply to the SBC 544A controller.
The term command cannot change connection attributes, since the changed attributeswould only be valid for the connection held by the term job and would disappearwhenever term exited. The command does not support translation specifications.
HI command time
Command Reference Chapter 2 377
timeDisplays the current time or sets the time of the local (OS) or global (battery-backed)time-of-day clock.
✏ NoteYou can use this command in an esubmit file orrq_c_send_command system call if the form of the commanddoes not require user input. If the command requires user input inan rq_c_send_command system call, it will fail. However, youcan use a form of the command that requires user input in anesubmit file if you use the eoresponse and coresponse
subcommands.
See also: esubmit command, in this chapter
Syntaxtime [hh:mm:ss|q] [local|global]time synchronize
Parameters
hh:mm:ssNumerical designation for the hour, minute, and second. Specify only as many digitsas needed: hours in the range 0-23 and minutes and seconds in the range 0-59. Youmay specify the hour only, the hour and minute, or all three. Any field not specifiedis assumed to be 0.
q(uery) Displays the current date, time and clock type, then prompts you to enter the newtime. Enter a valid time as described above or the letter E to exit.
local Displays or sets the time portion of the local time-of-day clock maintained by the OS.This is the default if local or global is not specified. Any user may set the time.
global Applies only to systems with hardware clock/calendar components, typically backedup by battery power. Specifying global displays or sets the time portion of thisclock. Any user may display the time, but only the Super user can set it. If you setthe global clock, the local clock automatically takes on the same value.
synchronizeFor systems with a global clock/calendar, this sets the time portion of the local clockto the current time of the global clock. If you set the global clock, this parameter isunnecessary.
time HI Command
378 Chapter 2 Command Descriptions
Additional Information
You must separate the individual time parameters with colons. If you omit the timeparameters, time displays the current date and time in this format:
dd mmm yyyy, hh:mm:ss <local or global clock type>
If you have a system without a global clock/calendar, whenever you start up or resetthe OS the time is automatically set to the time you last accessed the :system:directory plus the time that elapsed since the system was started. You can reset thetime to any acceptable value.
If your system has a global clock/calendar and the OS is configured to recognize it,the local clock is automatically set to the time maintained in the global clock whenyou turn on or reset your system.
Error Messages<time>, invalid time
You specified an invalid or out-of-range entry for one or more of the timeparameters.
<parameter>, invalid syntaxYou specified an illegal combination of parameters, such as both a time and thequery parameter.
only the system manager may set the global clockYou specified the global parameter, but you are not the system manager.
E_SHARE, global clock busyYou attempted to access the global clock while another job was accessing it. Try thecommand again.
<condition code:mnemonic>, while getting system timeThis condition code occurred while the time command was getting the time from theglobal clock. Possibly you specified the global or synchronize parameter, butthere is no global clock in the system.
E_INVALID_DATE, global date read was invalidThe date returned from the global clock was invalid. This condition usually occurswhen the global clock has never been initialized or when power to the clock has beeninterrupted. The BIOS system call get_global_time gets the date from the globalclock, which the time command then displays.
HI command time
Command Reference Chapter 2 379
E_INVALID_TIME, global time read was invalidThe time returned from the global clock was invalid. This condition usually occurswhen the global clock has never been initialized or when power to the clock has beeninterrupted. The BIOS system call get_global_time gets the time from the globalsystem clock, which the time command then displays.
E_SUPPORT, no global clockThere is no global clock in the system.
timer HI command
380 Chapter 2 Command Descriptions
timerTimes the execution of a given command and displays the elapsed time in seconds.
Syntax
timer command
Parametercommand
Any valid command line; continuation lines are allowed, using the & character.
Additional Information
The elapsed time cannot be measured in fractions of a second. The time needed toload the command is included in the result. The reported time is only as accurate asthe system time.
HI command touch
Command Reference Chapter 2 381
touchChanges file time stamps.
Syntax
touch inpath_list [date=date] [time=time][all|access|create|modify] [query]
Parametersinpath_list
One or more pathnames of files to be touched. Multiple pathnames must beseparated by commas. Wildcards are permitted.
date=dateA fully specified date of the form: mm/dd/yyyy. If you omit this parameter, thecurrent date is used.
time=timeTime in the form: hh:mm:ss. Both mm and ss are optional. If you omit thisparameter, the current time is used.
all Modifies all available time stamps. Some file systems support fullcreate/access/modify time stamps (named file driver) and others only support lastmodification time stamps (DOS file driver).
access (acc, a)This parameter modifies only the last accessed time stamp, if supported by the filesystem.
modify (modified, mod, m)This parameter modifies only the last modification time stamp, if supported by thefile system.
create (cr, c)This parameter modifies only the file creation time stamp, if supported by the filesystem.
query (q)Prompts for permission to touch each file. Respond to the prompt with:
Y Touch the file.E Exit the command.R Touch the remaining files without further query.N or other Do not touch this file; go on to the next file in the inpath-list.

touch HI command
382 Chapter 2 Command Descriptions
Additional Information
If you do not specify any time stamps, the default action of the touch command is tomodify the last accessed and last modified time stamps. If you invoke touch withoutany parameters, a help message listing the correct syntax and parameter descriptionsis displayed.
When you invoke touch, your user ID must have write permission for the files to bemodified by touch.
Error MessagesInvalid time specified
The time parameter was entered in an invalid format.
Invalid date specifiedThe date parameter was entered in an invalid format.
Missing parameter(s)Either the time or the date parameter was specified without a corresponding time
or date value.
Request is not supported by the file driverThe file driver associated with one of the files in the inpath-list does not support thes_set_file_status system call.
HI command translate
Command Reference Chapter 2 383
translateCopies a file to the screen or to another file, converting the case of upper- or lower-case characters as specified.
Syntax
translate inpath_list [to|over|after outpath_list] [q] [u] [l][n [=value]]
Parametersinpath_list
One or more pathnames, separated by commas, of files to be translated. Wildcardsare permitted.
to|over|after outpath_listWrites the output to the specified file(s) rather than to the screen.
q(uery)Prompts for permission to process each file. Respond to the prompt with:
Y Translate the fileR Translate remaining files without further queryE Exit the commandN or other Don't translate this file; query for the next
u(pper)All lower-case characters are forced to upper-case.
l(ower)All upper-case characters are forced to lower-case.
n(onprinting)If no value is specified, nonprinting characters are displayed as question marks. If avalue is specified, nonprinting characters are displayed as the ASCII characterrepresented by the numeric value. The value is decimal by default, but may bespecified in octal or hexadecimal by appending an O or H.
Additional Information
If no parameters are given, the translate command performs a slightly slower copyfunction. If you specify both upper and lower in the same invocation, all charactersare changed to the opposite case. You cannot specify what characters are considerednon-printable.
traverse HI command
384 Chapter 2 Command Descriptions
traverseRecursively travels a directory hierarchy, executing the specified command in eachdirectory in the tree. The command line may use the :$: logical file; :$: is set toindicate whatever directory is being traversed at the moment.
Syntax
traverse directory command
Parametersdirectory
Pathname of the topmost directory in the hierarchy to be traversed.
commandThe command, along with arguments and parameters, to be executed in eachdirectory.
Example
To change the access rights for all files under the /helps directory to have readpermission, and for all subdirectories to have list permission, enter:
traverse /helps permit * R U=world
Error Messages<file> is not a directory
The starting path is not a directory.
rq_c_send_command, exception 0021: E_FILE_NOT_EXISTThe HI rq_c_send_command system call cannot process the specified command.

HI command tree
Command Reference Chapter 2 385
treeDisplays the name (and optionally, size) of each data file and/or subdirectory in adirectory tree.
Syntax
tree pathname [to|over|after outpath] [s] [i] [noda|nodi]
Parameterspathname
The topmost directory of the tree to be displayed. Wildcards may be used to indicatemore than one directory. However, if a wildcard pattern matches a filename in thetree, the name is displayed regardless of a nodata or nodirectory parameter.
to|over|after outpathWrites the output to the specified file rather than to the screen.
s(ize) Displays sizes of files and directories.
i(ndent)Displays filenames using indentation.
noda(ta)Data files are not displayed.
nodi(rectory)Directory files are not displayed.
Additional Information
By default, the tree command lists all files and subdirectories. If you enter thecommand with no parameters, the tree begins in the current working directory. Ifyou specify the size parameter, the number of bytes and blocks is displayed forfiles, as well as the number of files in directories. When you use size, directoriesare denoted by an asterisk in the first column. The sizes of directories reflect the sumof all files contained in the directory.
To display the size of all directories beginning at the root directory, enter:
tree / s noda
The size displayed for the / directory (which is the final entry) is the size of the entirefile system.
uniq HI command
386 Chapter 2 Command Descriptions
uniqFinds duplicated lines in a file and displays either the duplicated lines or non-duplicated lines, or a combination. A line is only considered a duplicate if the secondline immediately follows the first.
Syntax
uniq pathname [to|over|after outpath] [s] [m] [d]
Parameterspathname
The text file to be processed. If a wildcard is used, uniq processes only the first filefound.
to|over|after outpathWrites the output to the specified file rather than to the screen.
s(ingle)Displays only lines with no duplicates.
m(ultiple)Displays only lines that are duplicated.
d(uplicate)Displays the extra line of lines that are duplicated.
Additional Information
The single, multiple, and duplicate parameters may be used in anycombination. If none of these is entered, the default is single and multiple,which causes uniq to display all lines that contain no adjacent duplicate lines. Thelines must be adjacent in order to be detected. Two otherwise identical lines with adifferent number of lines at the end are not considered to be duplicates by uniq.
NET command unloadname
Command Reference Chapter 2 387
unloadnameRemoves from the local Name Server object table the names and addresses of iRMX-NET servers listed in a specified file.
Syntax
unloadname [pathname]
Parameterpathname
The name of the file containing the list of network servers. The default file is:sd:net/data. If you specify another file, it must use the format defined for thenet/data file.
See also: :sd:net/data file, Chapter 11, Network User’s Guide and Reference
Additional Information
The unloadname command deletes names from the object table that were previouslyentered by the loadname command. The list of objects is read from a file and thenames are deleted from the object table. The format of the input file is the same asthat of the loadname command.
See also: listname and loadname commands, in this chapter
If an error message contains the name of one of the objects specified in the input file,the error occurred just for that name. Other entries in the file are processed.
Error Messages<name>, illegal input file format
The input format of the file is not correct.
<name>, syntax error. TYPE not foundThe entry in the input file for this object does not contain the keyword TYPE=. Thename is ignored and unloadname processes the next entry.
<name>, property type too longThe property type or the system type field for this object is not the correct format.
<name>, not valid property typeThe system type field for this object does not contain a valid value for the property orsystem type.
<name>, syntax error. ADDRESS not foundThe entry for this object does not contain the keyword ADDRESS.

unloadname NET command
388 Chapter 2 Command Descriptions
<name>, value too longThe transport address for this object is too long.
<name>, illegal property valueThe transport address for this object contains invalid characters.
<name>, name does not existThe object name in the input file is not present in the local object table. However, theobject may be present in another system.
<name>, illegal nameThe object name specified in the input file is more than 16 characters long.
HI command unlock
Command Reference Chapter 2 389
unlockEnables users whose terminals have been locked out of the system to log back on;cannot be used for virtual terminals.
Syntax
unlock [terminal_id_list|*]
Parametersterminal_id_list
One or more physical device names of the terminals to be unlocked. Multiple namesmust be separated with commas.
* All configured terminals are to be unlocked.
Additional Information
Only the Super user can invoke the unlock command. Unlock unlocks terminals thatwere locked out by either the lock or shutdown commands. When you invokeunlock, the HI initiates logon procedures for terminals where the user is logged off.
When a terminal is unlocked, this message is displayed on the terminal where unlockis invoked:
unlocked
<terminal_id>, unlocked
This message is displayed on the unlocked terminal:
Terminal is now unlocked and available for use.
See also: Loading and unlocking terminals, System Configuration andAdministration, for information about enabling terminals defined byloadable device drivers
Error Messagesnot multi-user system
You entered more than one terminal number in a system that is not configured as amulti-user system.
unlock not allowed to non-super usersYou are not the system manager and are not entitled to issue this command.
parameters requiredYou entered unlock with no parameters.
unlock HI command
390 Chapter 2 Command Descriptions
<terminal_id>, not foundThe terminal you specified is not configured into the system.
<terminal_id>, already unlockedThe terminal you specified is not locked.
<terminal_id>, terminal connectedThe terminal you specified has been connected with the connect command. Use thedisconnect command to disconnect the terminal before unlocking it.

NFS command unshare
Command Reference Chapter 2 391
unxlate Net command
392 Chapter 2 Command Descriptions
unxlateDisplays information about the format of a file that was translated with the xlatecommand. The xlate command translates OMF files into bootloadable (iNA 960)network files.
Syntax
unxlate pathname
Parameterpathname
A file produced with the xlate command
Additional Information
This utility can be used to determine the format of an xlate-translated file. Such afile consists of multiple modules that contain a command field, a length, a loadaddress, a starting address, and the actual data to be loaded. The output from unxlateshows information about each module. The information is listed in a table containingentries as shown below:
CMD=<cmd> LOADADDR=<base:offset> LENGTH=<len>
STARTADDR=<base:offset>
Where:
<cmd> One of these values:
0 For the last module on the LAN controller; execution waits for aGO command.
1 For modules that will reside on the LAN controller and are notthe last module.
2 For the last module on the LAN controller; execution startsimmediately.
C For the last module on the host.
D For modules that will reside on the host; not the last module.
<base:offset>Memory addresses in which to load the code. The base and offset forSTARTADDR is only used if the module is the last to load and executionstarts immediately afterward.
<len> The length of the module to load.
See also: xlate command, in this chapter
HI command version
Command Reference Chapter 2 393
versionDisplays the version number of one or more library files or object files, such as HIcommands.
Syntax
version pathname_list [l]
Parameterspathname_list
One or more pathnames, separated by commas, of files from which to display versionnumbers. Wildcards are permitted.
l(ong) Displays all the version numbers residing in the input file.
Additional Information
If there is a version number in the file, version displays it in this format:
<pathname>, <module_name> version is x.y
Where:
<pathname>The file containing the command
<module_name>Name of the specified command or library; Intel-supplied commandshave names as listed in this manual.
x.y Version number of the command.
You can use version to determine the version number of any HI command. You canalso use it to determine the version numbers of commands that you write. If the fileis a library, the command shows the current and previous version numbers.
For version to work on your commands, you must include a literal string in thecommand's source code to specify the name of the command and its version. Thestring contains this information:
'program_version_number=xxxx',
'program_name=yyyy...yyy',0

version HI command
394 Chapter 2 Command Descriptions
Where:
program_version_number=Specify this exactly as shown (lower-case, underscore separating thewords, no spaces).
xxxx Version number of the product; this can be any four characters, but itmust be exactly four characters long.
program_name=This is optional, but if you want version to recognize and display theprogram name, you must specify this exactly as shown.
yyyy...yyyName of the command; this can be any number of characters.
0 The literal string must be terminated with a byte of binary 0.
Example
This is an example of a literal string:
DECLARE version (*) BYTE
DATA('program_version_number=V8.5',
'program_name=MYPROG',0);
If your program included this declaration, version would display:
<pathname>, MYPROG version is V8.5
This is an example of a literal string that does not include the program name:
DECLARE vers2(*) BYTE
DATA('program_version_number=1986',0);
If your program included this declaration, version would display:
<pathname>, version is 1986
Error Messages<pathname>, does not contain a program version number.
The command you specified does not contain version number information.
<pathname>, is not an object module.The pathname you specified is not a file containing executable object code.
HI command whoami
Command Reference Chapter 2 395
whoamiLists your current user ID and access rights.
Syntax
whoami
Additional Information
The whoami command produces a display similar to:
User id: # 5
Access IDs: 5, WORLD
The access IDs are the IDs of other users who have granted you access to their files.
See also: permit command, in this chapter
HI command
396 Chapter 2 Command Descriptions
xlateProcesses files in Object Module Format (OMF86/286/386) to produce an iNA 960boot image file.
Syntax
xlate pathname to|over outpath [options]
Parameterspathname
The name of the input OMF file.
to|over outpathWrites the output to the specified file.
optionsA list of options separated by a single space. These options may be used to translateany OMF file:
Option DefinitionQ Quiet - Do not display information as translation is done
V Verbose - Print information as translation is done
N Not Last Module - Sets bit 0 of the command byte of the boot modulestructure to 1; other modules follow this one. If the complete boot modulecomprises more than one file, specify this option for all files except the lastone. If this option is not specified, the translation assumes that the moduleis the last one and sets bit 0 of the command byte of the boot modulestructure to 0.

HI command
Command Reference Chapter 2 397
These additional options may be specified to translate OMF286 and OMF386 files:
Option DefinitionI Information only - Do not translate, only display contents of file header.
T No task information - Do not load any task information data. If this optionis used, it must be the last option specified, because xlate assumes thatanything following the T is an address.
T address Load task information at the specified address (ahexadecimal number with the prefix 0x). Recognizedaddress suffixes are "k" for kilo and "M" for Mega. If thisoption is not specified, the translation assumes the no taskinformation option (T with no address).
O address Address offset - Add the specified address (a hexadecimalnumber with the prefix 0x) as an offset to all outputaddresses. Recognized address suffixes are "k" for kilo and"M" for Mega.
H size Output the result of the translation as hexadecimal records ofthe specified length (size).
These additional options may be specified to translate OMF86 files:
Option DefinitionG Go - Start execution upon loading. Sets bit 1 of the command byte of the
boot module structure to 1, and jumps to the execution address immediatelywhen loading is completed. If the boot module consists of more than onefile, specify this option only for the last file. If neither G nor W is specified,the translation assumes G.
W Wait - Sets bit 1 of the boot module structure to 0; when loading iscompleted, saves the execution address and waits for the start instruction. Ifthe boot module consists of more than one file, specify this option only forthe last file.
A Absolute addresses used in module - Sets bit 2 of the command byte of theboot module structure to 1. If this option is not specified, bit 2 is set to 0,which indicates that the load and execution addresses are pointers.
HI command
398 Chapter 2 Command Descriptions
Option DefinitionR Remote - File loaded into remote memory. Sets bit 3 of the command byte
of the boot module structure to 1: the module is to be loaded into remotehost memory (from the perspective of the NIA). If this option is notspecified, bit 3 is set to 0, which indicates that the module is to be loadedinto local memory. If this option is used with G, they must be specified inthe order R G. If this option is specified without a W or G, W is assumedfor the translation.
D Data - Include data segments in the output file. If this option is notspecified, only the code segments are translated and included in the outputfile.
Additional Information
After files are translated by xlate, they can be downloaded to a local networkcontroller board with the load utility. The files can be loaded on a remote networkcontroller by including their names in a ccinfo file produced with the bcl command.
See also: bcl and load commands, in this chapterboot file format, Network User's Guide and Reference
If processor-dependent options are not specified, the xlate utility applies thesedefaults to the translation:
• Normal translation information display mode.
• Last module - Sets bit 0 of the command byte of the boot module structure to 0.
• Go - If this is an OMF86 file translation, sets bit 1 of the command byte of theboot module structure to 1 and jumps to the execution address immediately whenloading is completed.
• Load in local memory - If this is an OMF86 file translation, sets bit 3 of thecommand byte of the boot module structure to 0; the module is to be loaded intolocal memory (from the perspective of the NIA).
• Pointer addresses used in module - If this is an OMF86 file translation, sets bit 2of the command byte of the boot module structure to 0.
• Code segments only in the output file - If this is an OMF86 file translation, onlythe code segments are translated; data segments are ignored.
• Load task information at address 1050H.
See also: unxlate command, in this chapter
HI command
Command Reference Chapter 2 399
Examples
1. This example translates an OMF86 file including the data segments, and displaystranslation information in verbose mode. This example is for local loading:
xlate file1.omf to file1.loc V D
Because no other options are specified, the translation makes these assumptions:
• Last module - Sets bit 0 of the command byte of the boot module structureto 0.
• Go - Sets bit 1 of the command byte of the boot module structure to 1 andjumps to the execution address immediately when loading is completed.
• Load in local memory - Sets bit 3 of the command byte of the boot modulestructure to 0; the module is to be loaded into local memory (from theperspective of the NIA).
• Pointer addresses used in module - Sets bit 2 of the command byte of theboot module structure to 0.
If the file1.loc file already exists, xlate halts without translating, leaving the fileundisturbed.
2. This example translates two OMF86 files for downloading with a remote bootrequest to a host:
xlate file1.omf over file1.loc N R A
xlate file2.omf over file2.loc R A
In this case, two files are created for loading into remote memory (option R).The files are to be loaded in this order: file1.rem (option N), then file2.rem. Theloading order must match that in the ccinfo file.
Because no other options are specified, these defaults are applied:
• Go - Sets bit 1 of the command byte of the boot module structure to 1 andjumps to the execution address immediately when loading is completed.
• Absolute pointer addresses (option A) used in module - Sets bit 2 of thecommand byte of both the boot module structures to 1.
Any existing files named file1.loc or file2.loc are overwritten.
HI command
400 Chapter 2 Command Descriptions
3. This example translates an OMF286 file, including data segments:
xlate appcode.omf to appcode.out
Because no options are specified, the translation makes these assumptions:
• Normal translation information display mode.
• Load task information data at address 1050H.
If the appcode.out file already exists, xlate halts without translating, leaving thefile undisturbed.
■■ ■■ ■■
Command Reference Appendix A 401
Using Disk Mirroring AiRMX disk mirroring is a hard disk configuration that maintains identical copies(mirrors) of data on two hard disks for increased reliability.
✏ NoteThe disks must have the same formatted capacity, granularity andshould be the same model type to ensure the same formatted diskcapacity.
Disk mirroring is implemented for the Peripheral Controller Interface (PCI) family ofcontrollers. Disk mirroring is available for:
• iRMX III systems using Multibus I and II• DOSRMX and iRMX for PCs systems using Multibus II• DOSRMX and iRMX for PCs systems using a PC bus with an
Adaptec 1542/1742 host adapter
This appendix is for operators who need to configure a system for disk mirroring andfor system developers who develop disk mirroring system applications.
This appendix contains this information about disk mirroring:
• Disk mirroring concepts
• Disk mirroring configurations
• Using disk mirroring, including a tutorial on using the mirror command andinformation about the a_special system call
See also: mirror command, in this manual, for syntax, parameters, and basicinformationa_special call, System Call Reference
402 Appendix A Using Disk Mirroring
IntroductionDisk mirroring provides these benefits:
• Prevents system crashes due to hard disk and peripheral controller failure
• Increases data integrity by replicating write operations
• Increases data reliability and availability by allowing your system to continueoperating after a hard disk or peripheral controller failure
• Improves read performance by providing data access from both hard disks of amirror set
• Reduces downtime by supporting on-line repair and resynchronization of harddisks
Disk Mirroring ConceptsThis section explains these concepts:
• Mirror sets
• Failure detection
• Rollover
• On-line and off-line repair
• On-line resynchronization
• Automatically enabling disk mirroring
• Event notification
• Disk mirroring operations
A mirror set consists of two hard disks that contain identical data: the primary andsecondary hard disks. Rollover occurs when the primary disk of a mirror set fails,and the secondary disk continues to perform I/O operations. On-line repair allows afailed hard disk to be reformatted and reused without shutting down the system. On-line resynchronization copies data from one hard disk to the other as a backgroundtask. Event notification reports events such as rollover and resynchronizationcompletion to the operator or a file.
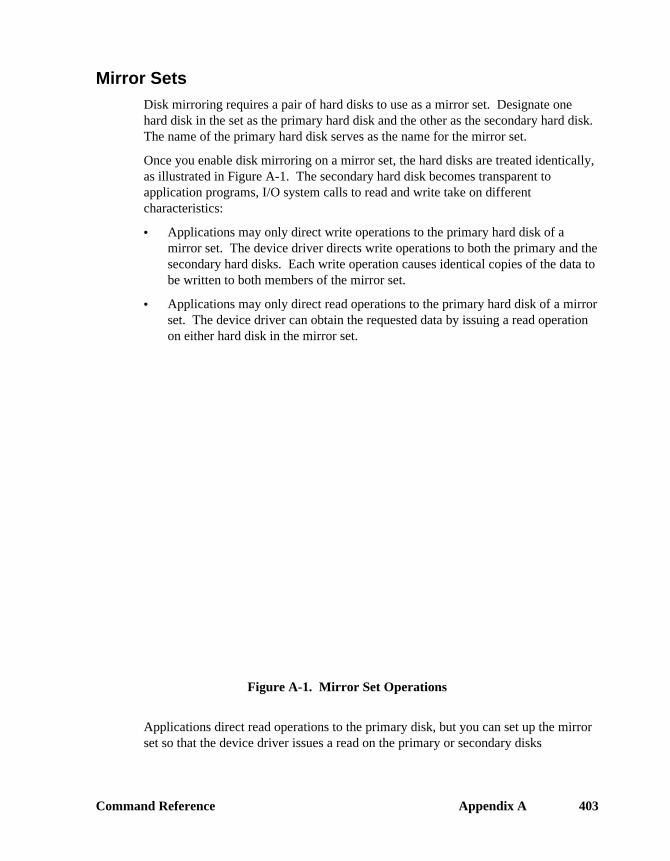
Command Reference Appendix A 403
Mirror SetsDisk mirroring requires a pair of hard disks to use as a mirror set. Designate onehard disk in the set as the primary hard disk and the other as the secondary hard disk.The name of the primary hard disk serves as the name for the mirror set.
Once you enable disk mirroring on a mirror set, the hard disks are treated identically,as illustrated in Figure A-1. The secondary hard disk becomes transparent toapplication programs, I/O system calls to read and write take on differentcharacteristics:
• Applications may only direct write operations to the primary hard disk of amirror set. The device driver directs write operations to both the primary and thesecondary hard disks. Each write operation causes identical copies of the data tobe written to both members of the mirror set.
• Applications may only direct read operations to the primary hard disk of a mirrorset. The device driver can obtain the requested data by issuing a read operationon either hard disk in the mirror set.
Figure A-1. Mirror Set Operations
Applications direct read operations to the primary disk, but you can set up the mirrorset so that the device driver issues a read on the primary or secondary disks
404 Appendix A Using Disk Mirroring
alternately. This operation is transparent to applications and improves readperformance by overlapping read operations.
Failure DetectionThe device driver detects a hard disk failure when a read or write operation returns afailed status or times out. The device driver keeps track of all transactions initiated tothe primary and secondary disks. If a transaction on a hard disk does not completewithin a fixed time period, the device driver marks that hard disk as failed. Thedevice driver frees up all the pending transactions on the failed hard disk and retriesthem on the other hard disk of the mirror set.
Once a mirror set has encountered an error on one hard disk, read and writeoperations are issued to only the good hard disk.
RolloverWith disk mirroring enabled, if either a read operation or a write operation results inan I/O error, the device driver initiates an automatic rollover. The rollover featureallows the device driver to detect a fault or a failure on a mirror set, determine whichhard disk failed, and direct I/O operations to the surviving hard disk of the mirror set.This allows system operations to continue. Rollover is transparent to the applicationrequesting the I/O operation.
If an I/O operation on one hard disk of a mirror set results in an unrecoverable error,the device driver retries the operation on the other disk. If the retry succeeds, the I/Ooperation returns with no error. The device driver then updates its state to reflect thatonly one hard disk of the mirror set is operational, and the device driver redirects allsucceeding read and write operations to the surviving hard disk. The disk that failedis marked failed and, if the application has requested notification, the operator orapplication is notified of the failure. Until a repair is performed, I/O operationscontinue on the surviving disk. In the absence of disk mirroring, a hard disk failurecauses a system crash.
Once an I/O error has occurred, the device driver redirects all I/O to the survivinghard disk. You can direct operations other than read and write (typically format) toeither hard disk, and they are performed on the hard disk to which they are directed.

Command Reference Appendix A 405
Figure A-2. Rollover, Repair, and Resynchronization
Rollover on Different Hard Disk Controllers
When mirrored hard disks are connected to two different hard disk controllers,applications can recover from peripheral server and controller failures. The devicedriver can detect a controller or a PCI server crash and automatically roll over to theremaining server.
The peripheral server can support command queueing at the controller. If so, theremight be commands pending at the hard disk which failed. After rollover, thesecommands can complete because the device driver will unconditionally retry all thequeued commands on the surviving hard disk when they are returned by the server.
Rollover on peripheral server and controller failures includes automatic rollover tosingle disk operation on I/O errors.
On-line and Off-line RepairWhen an I/O error occurs, the device driver redirects I/O operations to the survivingdisk. Diagnostic programs can then reformat or reassign alternates for bad blocks inan attempt at on-line repair of the failed disk.
Because the device driver allows you to format the failed hard disk when it is in therollover state, you can reformat a failed hard disk on-line, without ever powering

406 Appendix A Using Disk Mirroring
down the system. If you set up the system for disk mirroring with resynchronization,normal operations can continue after the repair is completed.
You must shut down the system to physically replace a disk or for off-line repair. Ifthe system crashes or is in rollover state at the time of shutdown, disk mirroring is notautomatically enabled when you restart the system. You must resynchronize the newor repaired hard disk with the surviving hard disk when the system is brought on-line.
See also: On-line resynchronization, in this appendix
System Device Repair
The procedure for mirroring a system device is identical to that of a non-systemdevice, but there are some issues that are unique to a system device in the event of afailure.
When the system device fails, you might need to reboot the system from thesecondary hard disk. You must set the boot parameters so that the OS can berebooted from either the standard system device or its secondary.
On-line ResynchronizationResynchronizing a mirror set involves copying data from one hard disk of the mirrorset to the other. You must explicitly resynchronize a mirror set; the device driverdoes not automatically perform this operation.
You need to resynchronize a mirror set any time you recreate it, such as after arollover, when a new hard disk is added to an existing mirror set, or after off-linerepair. You resynchronize a mirror set while it is on-line, as a background job. Thisminimizes system downtime after repair or on startup. I/O operations are allowed ona mirror set while resynchronization is in progress.
See also: Tutorial: Using the Mirror Command, in this appendix
If the device driver detects an error during resynchronization, the resynchronizationoperation is aborted and the surviving hard disk continues to respond to I/O requests.
Automatically Enabling Disk MirroringIf you set up disk mirroring on your system, disk mirroring is automatically enabledwhenever the I/O system attaches the mirror set's primary hard disk. The automaticenabling mechanism works as illustrated in Figure A-3.

Command Reference Appendix A 407
Figure A-3. Automatically Enabling Disk Mirroring
The process shown in Figure A-3 includes these steps:
1. When you attach the primary hard disk or initialize the system, the device driverreads the volume label on the primary and secondary units before any read orwrite operations are issued. The device driver determines whether the systemwas shut down normally with the mirror sets left intact, or whether the systemhad crashed, possibly leaving the elements of mirror sets holding different data.
If the state information indicates that the previous detach was not normal,mirroring is not enabled and I/O operations are performed only by the survivingdisk in the mirror set.
If the previous detach was normal, the mirror set is created and mirroring isenabled before any I/O operations occur. I/O operations are performed by bothdisks in the mirror set. As a precautionary measure, the device driver changesthe state information on the disks to indicate an improper shutdown. Thus if adisk fails while attached, disk mirroring will not be enabled on the nextreattachment.
2. When the primary hard disk is detached the device driver records, as stateinformation on the mirror set hard disks, that a normal detach occurred. Normaldetach information indicates that disk mirroring can be automatically enabledwhen the primary hard disk is attached next time.
408 Appendix A Using Disk Mirroring
In addition to the normal or improper detach information, the device driver recordsthe device unit information block (DUIB) name of the secondary hard disk on theprimary hard disk's volume label; it records the DUIB name of the primary hard diskon the secondary hard disk's volume label.
See also: Mirror state structure, in this appendix
The device driver also writes an incarnation signature pattern on both hard disks.This unique 32-bit number marks this particular instance of the mirror set. Thisprevents the device driver from accidentally enabling mirroring on the wronginstance of a hard disk.
Event NotificationYou can request event notification to monitor disk mirroring events. You can get thedisk mirroring status for these events:
• Rollover
• Resynchronization complete
• Resynchronization abort
When one of these events occurs, the device driver notifies the operator orapplication with a message. You can have the message sent to the screen or a file.Using the message, you can decide what actions to take in response to the event. Forexample, if rollover occurs, you can obtain detailed status on the error that caused therollover.
After you receive notification of an event, you must request event notification againto be notified of the next event.
Disk Mirroring ConfigurationThis section describes hardware and software configuration for disk mirroring.
Hardware ConfigurationDisk mirroring is implemented for the peripheral controller interface (PCI) family ofcontrollers. This product family includes these boards:
• The SBC 386/12S and SBC 486/12S for Multibus I systems
• The SBC 386/258 and SBC 486/133SE for Multibus II systems
For Multibus I systems, one board includes both the PCI server and the iRMX hostdevice driver.

Command Reference Appendix A 409
There are several configuration options for Multibus II systems. The configurationexamples shown in these illustrations use the SBC 386/258 board as the PCI server.The illustrations show:
• The primary and secondary hard disks can be on the same or on different SCSIbusses.
• The hard disks in a mirror set may reside on the same PCI server or on differentPCI servers.
• The iRMX device driver runs on one or more separate CPU boards or on thesame board that hosts the PCI server.
✏ NoteThe disks in a mirror set must have the same formatted capacityand granularity, and must be the same model type to ensure thesame formatted disk capacity.
Mirror Set on One PCI Server
In Figure A-4, the PCI Server runs on the SBC 386/258 board, which is connected toa single SCSI bus. The primary and the secondary hard disks are connected to thesame single-ended SCSI bus.
410 Appendix A Using Disk Mirroring
Figure A-4. Mirror Set on One PCI Server
This configuration has two advantages:
• A cost effective solution, since the mirror set resides on one SBC 386/258 board
• Recovery from a primary or a secondary disk failure, as long as that failure doesnot hang the SCSI bus
The major disadvantage in this configuration is that there is no recovery from either aSCSI bus failure or an SBC 386/258 board failure.

Command Reference Appendix A 411
Mirror Set Across SCSI Busses
In Figure A-5, the PCI Server runs on the SBC 386/258D (dual) board, which isconnected to two SCSI busses. The primary hard disk is connected to the differentialSCSI bus and the secondary hard disk is connected to the single-ended SCSI bus.
Figure A-5. Mirror Set Across a SCSI Bus
This configuration has two advantages:
• A cost effective solution using a single SBC 386/258D board
• Recovery from any single SCSI bus failure that does not cause the SBC386/258D board to fail
The major disadvantage to this configuration is that there is no recovery from an SBC386/258D board failure.

412 Appendix A Using Disk Mirroring
Mirror Set Across Two PCI Servers
In Figure A-6, the mirror set includes two SBC 386/258 boards. The PCI Server runson the SBC 386/258 boards, each of which is connected to a single-ended SCSI bus.The primary hard disk is connected to one SCSI bus on one of the SBC 386/258boards and the secondary hard disk is connected to a different SCSI bus on the otherSBC 386/258 board.
Figure A-6. Mirror Set Across Two PCI Servers
This configuration has two advantages:
• Recovery from
- A single hard disk failure on either board
- A SCSI bus failure on either board
- An SBC 386/258 board failure
• Better performance because there are two paths to the disks using the twoSBC 386/258 boards

Command Reference Appendix A 413
Mirror Set on Multiple Multibus II Systems
In Figure A-7, there are two individual Multibus II systems. Each system has its ownmirror set across the single-ended and differential SCSI busses of its SBC 386/258Dboard. A PCI Server runs on each SBC 386/258D board. The systems are connectedby a shared differential SCSI bus on the two SBC 386/258D boards.
Using two SBC 386/258D boards has two advantages:
• If either system fails, the primary hard disk of the failed system can still beaccessed from the surviving system because of the shared SCSI bus.
• Recovery is possible from any single SCSI bus failure that does not cause theSBC 386/258D board to fail.
This redundant system configuration also provides better performance.
Figure A-7. Mirror Set on Multiple Multibus II Systems
Software ConfigurationThere are two aspects of software configuration: setting up the mirror set with themirror command, and setting the number of maximum outstanding commands. Thetransaction timeout period is fixed in the device driver and is not set by the user.

414 Appendix A Using Disk Mirroring
See also: Disk mirroring tutorial, in this appendixmirror command, Chapter 2
Command Reference Appendix A 415
Setting the Maximum Outstanding Commands
You must equally divide the number of outstanding messages at each PCI serveramong all the PCI drivers in the system. For example, if a PCI server supports 100messages and there are 5 iRMX hosts with 2 PCI driver instances on each host, youmust configure each PCI driver to have at most 10 messages (100 / (5*2))outstanding.
Set the Maximum Outstanding Commands (MOC) option in the PCI Driver Screen.You do not need to change the defaults used in the standard definition files. This isthe formula for setting the MOC:
MOC = total outstanding messages / (number of hosts * number ofdevice driver instances on each host)
After you configure and regenerate the OS with the new driver, use the mirrorcommand to set up the mirror sets.
See also: Using the mirror command, in this appendixHow to Use the Peripheral Controller Interface (PCI) Server
Using Disk MirroringThese topics are described in this section:
• Summary of disk mirroring operations
• Tutorial on using the mirror command
• Handling events
• Handling failures
− Secondary hard disk failures
− Primary hard disk failures
• Protecting hard disks
• Using the a_special system call
Summary of Disk Mirroring OperationsYou perform disk mirroring operations using both a command interface and a systemcall subfunction. The mirror command lets you change and monitor disk operationsfrom the command line while the system is running. The disk mirroring subfunctionof the BIOS a_special system call lets you develop disk mirroring applications.
416 Appendix A Using Disk Mirroring
The mirror command and the disk mirroring subfunction of the BIOS a_specialsystem call provide these operations:
Create mirror set Requests the device driver to create a mirror set of two specifiedhard disks. You specify one hard disk as primary and the otherhard disk as secondary. The primary hard disk's name becomes themirror set's name.
Enable mirroringwithresynchronization
Enables disk mirroring by resynchronizing the primary andsecondary hard disks on-line. Resynchronizing a mirror setinvolves copying data from one hard disk of the mirror set to theother. You explicitly specify the source hard disk and destinationhard disk for the data copy.
Disable mirroring Requests the device driver to disable and discontinue mirroringoperations on a specified mirror set.
Request mirrorevent notification
Requests notification when certain events occur on a mirror set.These events include rollover, resynchronization completion, andresynchronization abort. You can have the status message sent tothe screen or to a file.
Get mirror status Reports disk mirroring status for a mirror set. For example, thestatus information includes whether a rollover has occurred andwhether resynchronization is in progress on a mirror set.
Get mirror attachstatus
Reports attach status for a hard disk after it is attached to thesystem. The status report contains such information as the name ofthe hard disk's mirror set and the state of the disk when it was lastdetached.
Set mirror options Sets or changes the read policy for a mirror set.
See also: mirror command, in this manuala_special system call, System Call Reference
Command Reference Appendix A 417
Tutorial: Using the Mirror CommandTo set up the mirror set, use the mirror command as illustrated in this example. ThePCI mirroring driver and the mirror command must be installed and the OS must berebuilt. Assume that the primary and the secondary disks are Maxtor 4380 with SCSIunits 2 and 3, and that the system was properly configured and generated with theICU. The DUIB names for the two disks are M4380_2 and M4380_3 respectively.
Follow these steps to set up a mirror set on a new system.
1. Attach and format the primary and secondary disks:
ad m4380_2 as :w:
ad m4380_3 as :w1:
format :w: <format command options>
format :w1: <format command options>
Formatting will take 15 to 30 minutes for each disk, depending on the disk.
2. Detach the secondary hard disk by entering:
dd :w1:
3. Create the mirror set by entering:
mirror create :w: m4380_3
4. Get the status of the mirror set by entering:
mirror getstat :w:
This information is displayed on the screen:
State = Mirror Set Created
Primary Unit = M4380_2
Secondary Unit = M4380_3
Read Policy = Alternate Read
5. Resynchronize the primary hard disk with the secondary hard disk by entering:
mirror resync :w: p2s
The resync function has started when the hard disk lights start flashing.Resynchronization takes 15 to 30 minutes, depending on the disk.
6. You can check on the progress of the resynchronization by entering:
mirror getstat :w:
418 Appendix A Using Disk Mirroring
This information is displayed on the screen:
State = Resync In Progress
Primary Unit = M4380_2
Secondary Unit = M4380_3
Resync Source Unit = M4380_2
Resync Percent Complete = xy%
Read Policy = Alternate Read
7. Obtain notification of the resynchronization completion by entering:
bk mirror waitevent :w: > :config:mirror.log
This causes a task to wait in the background for the resynchronization tocomplete. The status of the resynchronization is written into :config:mirror.log.
When the resynchronization is finished, the background job waiting for an eventwill complete, and send a message to the screen. Examine :config: mirror.log tosee if the resynchronization completed normally. The Mirror Set Event messageshould read Resync complete.
8. To verify that mirroring is now enabled, use the getstat parameter. All readcommands now alternate between both disks and all write commands areduplicated on both disks. This information is displayed on the screen:
State = Mirroring Enabled
Primary Unit = M4380_2
Secondary Unit = M4380_3
Read Policy = Alternate Read
9. To verify that mirroring gets automatically enabled after a normal detach, detachthe primary hard disk M4380_2:
dd :w:
10. Attach the primary hard disk again, then enter:
mirror attstat :w:
The mirror state information that was written on the disk during the detach willbe displayed on the screen. The incarnation number is a unique 9-digit numberassigned at shutdown time.
Mirror Attach Status = Mirror Set Valid
Other Unit Name = M4380_3
Incarnation Number = XXXXXXXXX
Disk Status = Marked Good
The attstat parameter is also useful for troubleshooting in certain situations.For instance, if you expect mirroring to be enabled automatically when a hard
Command Reference Appendix A 419
disk is attached, you can use the attstat parameter to check this. It might notbe enabled if the secondary hard disk is accidentally attached instead of theprimary.
11. To verify that mirroring has been automatically enabled, use the getstatparameter.
This information is displayed on the screen:
State = Mirroring Enabled
Primary Unit = M4380_2
Secondary Unit = M4380_3
Read Policy = Alternate Read
Now you can start normal operations.
If there are multiple mirror sets, the preceding steps must be repeated for each mirrorset.
Handling EventsTo receive notification of important events, such as rollover or resynchronizationcompletion, you must always keep a mirror command with the waiteventparameter operating in the background. When an event occurs, the command printsthe event that occurred. You can redirect the output to a log file. Once an event hasbeen reported, use the mirror command with the getstat parameter to get moredetails about the event. You can use a submit file for this purpose. This file has twolines:
mirror waitevent :w:
mirror getstat :w:
To wait for an event, type:
bk <submit file name> > :config:mirror.log
Once an event has been reported, you must again invoke the submit file to obtainfurther notification of events.
420 Appendix A Using Disk Mirroring
Handling FailuresThis section discusses options for handling primary and secondary failures. A failuremay be a hard disk failure, a SCSI bus failure, a disk controller failure, or a PCIServer failure.
When a failure occurs, two possibilities exist:
Off-linerepair
Keep the system running on the surviving disk until the next scheduledshutdown and fix the failure while the system is shut down. Re-introduce the fixed disk into the mirror set when the system is rebooted.
On-linerepair
Try to fix the failure and restart the failed entity without shutting thesystem down. A failed hard disk may be fixed by attempting to formatit. For example, the reboot command can be used to restart a failedSCSI controller, and the SCSI bus may be fixed by resetting it. (ThePCI server has an option to reset the SCSI bus on startup.)
The next two sections describe how to handle secondary and primary hard diskfailures.
Handling Secondary Hard Disk Failure
Assume the primary hard disk is M4380_2 and the secondary hard disk is M4380_3.Hard disk M4380_3 crashed and the system is running on its primary hard disk,M4380_2.
Off-line Repair of Secondary Hard Disk
To perform an off-line repair, take these steps.
1. Shut the system down and replace the secondary hard disk.
2. Attach the primary hard disk M4380_2 and get the system started whileformatting the new secondary hard disk:
ad m4380_2 as :w:
<perform normal operations on :w:>
ad m4380_3 as :w1:
format :w1: <format parameters>
Formatting will take 15 to 30 minutes, depending on the disk.
Command Reference Appendix A 421
3. When the format is finished, detach the new secondary hard disk:
dd :w1:
4. Create the mirror set and resynchronize the new secondary hard disk:
mirror create :w: m4380_3
mirror resync :w: p2s
Resynchronization takes 15 to 30 minutes, depending on the disk.
5. You can check on the progress of the resynchronization by entering:
mirror getstat :w:
6. Get the resynchronization notification by invoking the mirror command to waitfor an event in the background:
bk mirror waitevent :w: > :config:mirror.log
When the resynchronization is complete, you receive a notification. The twodisks are now identical.
On-line Repair of Secondary Hard Disk
To attempt to fix the secondary hard disk by formatting it on-line, take these steps.
1. Attach and format the secondary hard disk, M4380_3:
ad m4380_3 as :w1:
format :w1: <format options>
Formatting will take 15 to 30 minutes, depending on the disk.
If the format is not successful, the hard disk may have to be repaired off-line.
2. After the format is complete, detach the secondary hard disk:
dd :w1:
3. Resynchronize the primary hard disk with the secondary:
mirror resync :w: p2s
Resynchronization takes 15 to 30 minutes, depending on the disk.
422 Appendix A Using Disk Mirroring
4. You can check on the progress of the resynchronization by entering:
mirror getstat :w:
5. Wait for the resynchronization to complete:
bk mirror waitevent :w: > :config:mirror.log
When the resynchronization is complete, you receive a notification. The twodisks are now identical.
Handling Primary Hard Disk Failure
Assume that the hard disk M4380_2 crashed and the system is running on itssecondary, M4380_3.
Off-line Repair of Primary Hard Disk
When the primary hard disk fails, you have the option of either replacing the disk orattaching the secondary disk as the primary and trying to reformat the former primarydisk. Both options require shutting the system down.
To perform an off-line repair, take these steps.
1. Shut the system down and replace the primary hard disk if necessary.
2. Attach the secondary hard disk M4380_3 as the primary hard disk and get thesystem started while formatting the new (or former primary) hard disk:
ad m4380_3 as :w:
<Perform normal operations on :w:>
ad m4380_2 as :w1:
format :w1: <format parameters>
Formatting takes 15 to 30 minutes, depending on the disk.
3. When the format is finished, detach the new hard disk:
dd :w1:
4. Create the mirror set and resynchronize the new hard disk:
mirror create :w: m4380_2
mirror resync :w: p2s
Resynchronization takes 15 to 30 minutes, depending on the disk.

Command Reference Appendix A 423
5. You can check on the progress of the resynchronization by entering:
mirror getstat :w:
6. Wait for the resynchronization notification by invoking the mirror command towait for an event in the background:
bk mirror waitevent :w: > :config:mirror.log
When the resynchronization is complete, you receive a notification. The twodisks are now identical.
On-line Repair of Primary Hard Disk
On-line repair using the iRMX format command is not possible when the primarydisk has failed, since the OS does not allow a hard disk to be reformatted when it is inuse. Even though the device driver redirects all I/O to the secondary hard disk, theI/O System is not aware of this and assumes that all I/O is being performed on theprimary hard disk.
Utility programs that directly communicate with the PCI server may be used toformat the primary hard disk in an attempt to fix it. If these are available, take thesesteps:
1. Attempt to fix the primary disk by formatting it. If the format is not successful,you must repair the hard disk off-line.
2. If the format is successful, resynchronize the primary with the secondary. Theresynchronization direction is from secondary to primary:
mirror resync :w: s2p
Resynchronization takes 15 to 30 minutes, depending on the disk.
3. You can check on the progress of the resynchronization by entering:
mirror getstat :w:
4. Wait for the resynchronization to complete:
bk mirror waitevent :w: > :config:mirror.log
When the resynchronization is complete, you receive a notification. The twodisks are now identical.
See also: How to Use the Peripheral Controller Interface (PCI) Server, for moreinformation
424 Appendix A Using Disk Mirroring
Protecting Hard DisksThe PCI device driver reserves both the primary hard disk that is being attached andthe secondary hard disk in a mirror set. If a hard disk is reserved and an attempt ismade to reserve it again, the driver returns a Write Protect Error. This protects a harddisk from being used by two instances of the device driver at the same time. This canhappen when a hard disk is attached and another driver tries to use it as a secondaryhard disk of a mirror set.
Using A_special for Disk MirroringFunction code 19 of the a_special system call performs disk mirroring operations onthe primary hard disk of the mirror set and is valid for physical and named drivers.The iRMX PCI device driver implements the actual mirroring, error detection androllover, and on-line resynchronization. Refer to the mirror.lit and mirror.h files forthe literal definitions for the disk mirroring subfunction.
See also: Function 19 and error messages for a_special, System Call Reference
Mirror State Structure
Each mirrored disk contains a mirr_state_struct structure, located in theVolume Label at a byte offset of 896 decimal. When the first attach is performed ona hard disk, the device driver uses this structure to detect whether this hard disk waspart of a mirror set and, if it was, to identify the name of the secondary disk. Theformat of this structure in PL/M is:
DECLARE mirr_state_struct STRUCTURE(
other_name(14) BYTE,
valid_flg WORD32,
incarnation WORD32,
prim_flg BYTE,
good_flg BYTE);
The format of the structure in C is:
typedef struct {
UINT_8 other_name(14);
UINT_32 valid_flg;
UINT_32 incarnation;
UINT_8 prim_flg;
UINT_8 good_flg;
} MIRR_STATE_STRUCT;

Command Reference Appendix A 425
Where:
other_nameSpecifies the DUIB name of the other hard disk of the mirror set. TheDUIB name must be in capital letters, be null-terminated, and be amaximum of 14 characters not including the null.
valid_flg Specifies if the mirror set is valid. A valid set has the pattern600ddi5c (looks like gooddisc) on both disks; an invalid set has thepattern deadbeef. If the mirror set is valid, the device driverautomatically re-enables mirroring. The valid flag is set at the end of anormal detach if no I/O errors have occurred. The device driver clearsthe flag on each disk when it reads the disk so that mirroring is notautomatically enabled if the system crashes.
incarnationIs a pattern that is written on the disks to uniquely identify the correctinstance of a mirror set.
prim_flg Specifies if this hard disk is the primary or secondary unit of a mirrorset:1 primary unit2 secondary unit
good_flg Specifies whether this disk was good when it was detached:0AAH good055H not good
■■ ■■ ■■

426 Appendix A Using Disk Mirroring

Command Reference Appendix B 427
Using Diskverify in Interactive Mode BYou can use diskverify in one of two ways:
• In interactive mode, which requires an understanding of the iRMX filestructures. This appendix describes using diskverify in interactive mode.
• As a single Human Interface command, which does not require as muchunderstanding of the iRMX file structures
See also: diskverify as a single command, Chapter 2named volume structure, Appendix C
IntroductionThe Disk Verification Utility (DVU) inspects, verifies, and corrects the datastructures of iRMX named or physical volumes after such occurrences as powerirregularities or accidental reset. Diskverify can be used on named and physicalvolumes; it cannot be used on remote, NFS, or DOS volumes. In DOSRMX, use thiscommand only for an iRMX partition, not for a DOS drive or a partition containingthe DOS file system.
The DVU can reconstruct the file descriptor node (fnode) file, the volume label, thefnode map, the volume free space map, and the bad blocks map of the volume. Inaddition, with diskverify you can view bad track information, and manipulate fnodesand the actual data on the volumes. The DVU also supports auto-volume recognition,which means you can verify any iRMX named volume without detaching andreattaching the device with the correct DUIB. These processes usually involvereading a portion of the volume into a buffer, modifying that buffer, and writing theinformation back to the volume.
This appendix includes:
• Invocation instructions and invocation error messages• Information about using commands and parameters• Diskverify error messages• Instructions for using diskverify to back up and restore volume labels and fnodes• A command summary table• Descriptions of the 36 Disk Verification Utility commands

428 Appendix B Using Diskverify in Interactive Mode
You must be familiar with volume structure to use the full capabilities of the DiskVerification Utility. You should also understand the OS, and particularly the BIOSand Human Interface layers.
See also: Volume structure, Appendix CI/O Systems, Introducing the iRMX Operating Systems for generalinformationSystem Concepts for information on the BIOS and for information onthe HI
▲▲! CAUTIONDo not use the diskverify commands in an interactive programunless you understand the iRMX volume structure. Somecommands, if not used correctly, can render your volumesunusable.
It is recommended that you first try using diskverify on an expendable diskette.Format a spare diskette and create a simple file structure on it. Include some datafiles in the directories.
See also: format command, Chapter 2

Command Reference Appendix B 429
Invoking DiskverifyUnless you are the Super user, you may only invoke diskverify for devices attachedby you or the World user. The diskverify utility reattaches the device as a physicaldevice before verifying it. When the utility finishes, it reattaches the device as it wasbefore you invoked the utility.
If you verify the system device (:sd:), the OS deletes all connections to the device.You must either use the attachfile command with the system option or reboot thesystem to restore the system logical names before you can enter more commands.Attachfile can also be used to restore your :home: directory.
See also: attachfile in Chapter 2
To invoke diskverify in interactive mode, enter:
diskverify :logical_name: [to|over|after outpath]
Where:
:logical_name:Logical name of the secondary storage device containing the volume to be verified.The colons are not required.
to|over|afterTo writes the output of the DVU to the specified file, over copies the output over thespecified file, and after appends the output to the end of the specified file; if the filedoes not exist, it is created.
outpathPathname of the file to receive the output from the DVU. You cannot direct theoutput to a file on the volume being verified. If you attempt this, the utility returns anerror message.
If you omit the outpath parameter and/or the preposition, output is directed to theconsole screen (:co:) by default.
When you invoke diskverify, the utility displays a header message (where Vx.y is theversion number of the utility) and the utility prompt (*), as follows:
iRMX Disk Verify Utility, Vx.y
Copyright <year> Intel Corporation
All Rights Reserved
*
You can then enter any of the diskverify commands. If you enter anything else, theutility displays an error message.
430 Appendix B Using Diskverify in Interactive Mode
Invocation Error MessagesThese error messages can be generated when you invoke the DVU:
argument errorThe option specified is not valid.
<logical_name>, invalid logical nameThe logical name does not exist, was longer than 12 characters, contained invalidcharacters, or was missing a matching colon.
0045 : E_LOG_NAME_NEXIST or <logical_name>, logical name does not
existA nonexistent logical name was specified in either the :logical_name: oroutpath parameter.
<outpath>, 0038 : E_ALREADY_ATTACHEDThe output was directed to a file on the volume being verified.
command syntax errorYou made an error when entering the command.
<logical_name>, outstanding connections to the device have beendeleted.
This warning is not fatal, and will occur every time you try to verify the systemdevice or any other volume on which files have been attached.
<logical_name> or <outpath>, invalid wildcard specificationThe logical name or output pathname contained a wildcard character.
<logical_name>, can't attach deviceThe device cannot be attached and read.
device size inconsistent
size in volume label = <value1> : computed size = <value2>When the DVU computed the size of the volume, the size it computed did not matchthe information recorded in the iRMX volume label. The volume label may containinvalid or corrupted information. This is not a fatal error, but it is an indication thatfurther error conditions may result during the verification session. You may have toreformat the volume or use the DVU to restore the volume label.
<partial logical_name>, 0081: E_STRING_BUFFERThe logical name was longer than 12 characters, not including colons.
<logical_name>, device does not belong to youAn attempt was made to verify a device that was attached by another user. Forexample, the system device is :sd: and the user is not the Super user.
<logical_name>, device size is zeroThe logical name entered does not define a mass storage device. For example, youcannot perform diskverify on a line printer.
Command Reference Appendix B 431
Using Diskverify CommandsThis section provides information about:
• Abbreviating command names
• Using parameters
• Input radices
• Aborting diskverify commands
The notation used for diskverify command syntax is the same as for other commandsin this manual.
See also: Command Syntax, Chapter 2
Abbreviating Command NamesWhen you enter a diskverify command, you can enter the command name, itsabbreviation, or any unique portion of the command name. For example, whenspecifying the displayfnode command, you can enter any of these:
displayfnode fnodenumber
df fnodenumber
displayf fnodenumber
You can also enter any other partial form of the word displayfnode that contains atleast the characters displayf.
Command name abbreviations are provided in the Command Summary Table (inparentheses after the command name) and in the syntax description for eachcommand. The syntax descriptions give any standard abbreviations or substituteswith the full name as options. For example:
d|db|displaybytemeans that d or db may be used for displaybyte
>|<CR>|dnb|displaynextblockmeans that a right angle bracket (>), carriage return, or dnb may beused for displaynextblock
432 Appendix B Using Diskverify in Interactive Mode
Using ParametersSeveral diskverify commands have parameters in this form:
keyword = value
You can also enter these parameters in this form:
keyword (value)
For example, both of these specify a free command:
free fnode = 10
free fnode (10)
The use of the to, over, and after parameters is the same as for other commandsin this manual.
See also: Using the to, over, and after parameters, Chapter 1
Abbreviating ParametersThese parameters, used with the verify and fix commands, have standardabbreviations:Parameter Abbreviationnamed nnamed1 n1named2 n2
Both the full name and the abbreviation are listed in the individual commands'parameter descriptions.
Specifying Input RadicesDiskverify always produces numerical output in hexadecimal format. You canprovide input to diskverify in any one of these three radices by including a radixcharacter immediately after the number. The valid radix characters are:
Radix Character Examplehexadecimal h or H 16h, 7CHdecimal t or T 23t, 100Toctal o, O, q, or Q 27o, 33Q
If you omit the radix character, diskverify assumes the number is hexadecimal.
Command Reference Appendix B 433
Aborting Diskverify CommandsYou can abort some diskverify commands by typing <Ctrl-C>. This terminates thecommand and returns control to the DVU, not the HI command level. Thesecommands are:
diskdisplaybytedisplaydirectorydisplayfnodedisplaynextblockdisplaypreviousblockdisplaywordeditfnodeeditsavefnodefixgetbadtrackinfolistbadblockssubstitutebytesubstitutewordverify
434 Appendix B Using Diskverify in Interactive Mode
Diskverify Error MessagesEach diskverify command can generate a number of error messages, which indicateerrors in the way you specified the command, or problems with the volume itself.Individual command descriptions list the error messages generated by the particularcommand.
These messages can be generated by many of the commands:
block I/O errorThe utility attempted to read or write a block on the volume, found that the block wasphysically damaged, and therefore could not complete the requested command. Or,the utility tried to write a block to a disk volume that is write-protected. The errormessage states whether read or write was performed, and the number of the blockcausing the error.
command syntax errorA syntax error was made in a command.
illegal commandThe command specified is not a valid diskverify command.
fnode file/space map file inconsistentOne of the files, r?save (the fnode backup file) or r?fnodemap (the map of filedescriptor nodes), is damaged and diskverify cannot perform further verification.
argument errorThe command was missing a required argument, the argument was illegallyspecified, or an argument was entered for a command that does not accept one.
not a named diskEither the device is not a named volume, or the iRMX volume label, obtained whendiskverify begins processing, contains invalid information. The latter may cause theDVU to assume that a named volume is a physical volume. In this case, thecommands that apply to named volumes only (such as displayfnode,displaydirectory, and verify named) issue this message. If you are sure the volumeis a named volume, this message may indicate that the iRMX volume label iscorrupted.
If the file was formatted with the reserve option of the format command,diskverify issues this message only if both volume labels are corrupted. When onlythe volume label is invalid, the duplicate in the save area is used.
seek errorThe utility unsuccessfully attempted to seek to a location on the volume. This errornormally results from invalid information in the iRMX volume label or the fnodes,from inserting a new volume after diskverify is invoked, or from a defective disk.
Command Reference Appendix B 435
Tutorial: Backing Up and Restoring FnodesTo access data on a named volume (such as a disk), the iRMX OSs create andmaintain an index of pointers to the location of every file on the disk.
This index consists of the iRMX volume label and a file descriptor node (fnode) file.The volume label is the initial entry point into the device. The fnode file contains apointer and other vital information for each file on the disk. Since both containinformation essential to accessing and maintaining the volume and files, if either oneis damaged or destroyed it is very difficult to locate files and recover the data on thedisk.
The backup and restore fnodes feature enables some recovery of data lost as a resultof damage to the volume label or the fnode file. This feature is not intended toprovide comprehensive protection from the loss of data associated with damagediRMX volume labels or fnode files. Rather, it offers a tool that, when properlyapplied, can be useful in maintaining volume integrity in certain situations. Forcomprehensive protection against loss of data use the HI backup command.
See also: backup command, Chapter 2
To use this feature, you must create and maintain a backup version of the volumelabel and the fnode file, as detailed later in this section. You can then:
• Examine the contents of the backup file, r?save
• Restore damaged fnodes
• Restore the volume label
• Edit fnodes or save fnodes
This section provides a description of each operation, followed by one or moreexamples of a typical implementation.
Structure of the Volume Label and Fnode FileThe organization of the volume label and the fnode file reflects the hierarchical filestructure. The iRMX volume label contains a pointer to the fnode of the filestructure's root directory, the starting address for any file or directory on the volume.The fnode file begins with the root directory and continues down through thedirectory and file levels. Each file or directory is represented by an fnode. Thepointers and fnodes are adjusted each time a file is created, deleted, or changes size.
436 Appendix B Using Diskverify in Interactive Mode
The fnode, in addition to other data describing the file or directory, contains pointersto blocks on the volume. If the fnode describes a short file, these blocks contain theactual file data. If the fnode describes a long file, these blocks contain pointers toother blocks containing the actual data. If the fnode describes a directory, theseblocks contain entries which describe the contents of the directory. Each entry liststhe fnode number and name of the associated file or directory.
See also: Short and long files, Appendix C
The number of unallocated fnodes in the fnode file is controlled by the filesparameter of the format command. In addition to the unallocated fnodes, seven(with an option of nine) allocated fnodes are established when the fnode file iscreated. These allocated fnodes represent:
• The fnode file
• The volume label file, r?volumelabel
• The volume free space map file, r?spacemap
• The free fnodes map file, r?fnodemap
• The bad blocks file, r?badblockmap
• The root directory
• The space accounting file
• Optionally, the duplicate volume label file, r?save
See also: format command, Chapter 2
Creating the Backup Volume Label and Fnode FileUse the optional reserve parameter of the format command to create a file namedr?save. Format places a copy of the iRMX volume label in the front (that is, thephysical end) of the file, and copies the fnode file into r?save.
The r?save file is stored in one of the innermost tracks of the disk where the chanceof accidental loss of data is minimal. (In normal use, the disk heads do not extend tothe innermost tracks.)
▲▲! CAUTIONThe format command overwrites all of the data currently on thedisk. Therefore, before invoking format, use the HI backupcommand to make a backup copy of any files you wish to save.Or, use a blank disk to experiment with these procedures.
Command Reference Appendix B 437
Example
Assume that you have booted your system from a diskette to format the system disk.The command below uses the format command, specifying the reserve parameter.This will format the disk, create the r?save backup file, and copy the volume labeland initialized fnode file into r?save.
-attachdevice cmbo as :mydisk: <CR>
-format :mydisk: il = 4 files = 3000 reserve <CR>
The HI responds:
volume ( ) will be formatted as a named volume
granularity = 1,024 map start = 7,859
interleave = 4
files = 3000
extensionsize = 3
save area reserved = yes
bad track/sector information written = no
TTTTTTTTTTTTTTTTT
volume formatted
✏ NoteThe map start value may change if r?save is present.
The disk has now been formatted. If you use the DVU command displaydirectoryon the volume root fnode (fnode 6) or the HI dir command with the invisible (I)option on the volume root directory, you will find an fnode listed for r?save. R?savecontains a duplicate copy of the fnodes in the fnode file: eight allocated fnodes(r?save, r?spacemap, r?fnodemap, etc.) and 2,999 unallocated fnodes. (The r?savefnode is allocated out of the 3,000 fnodes specified through the files parameter.)

438 Appendix B Using Diskverify in Interactive Mode
Maintaining the Backup Fnode FileThe format command creates a backup of the fnode file in its initialized state.R?save is not automatically updated as files are created, written to, or deleted fromthe volume. Therefore, it is very important to back up the fnode file at regularintervals, such as once a day, or before each system shutdown. Otherwise the backupfnode file will contain incorrect information and be useless for data recovery.
There are two ways to back up the fnode file on a volume:
• Use the HI shutdown command with the backup option.
• Use the backupfnodes option of diskverify.
In both cases, you must reboot the system after backing up the fnodes on the volume.
Examples
1. This example uses shutdown with the backup option to copy the volume fnodefile to its duplicate file, r?save, on any attached volume:
super-shutdown B <CR>
***SYSTEM WILL BE SHUTDOWN IN 10 MINUTE(S)
:SD:, outstanding connections to device have been deleted
***SHUTDOWN COMPLETED ***
2. This example uses the diskverify command backupfnodes to copy all fnodes inthe system disk (:sd:, attached as a logical device) fnode file into the r?save file:
super- diskverify :sd: <CR>
iRMX Disk Verify Utility, Vx.x
Copyright <year> Intel Corporation
All Rights Reserved
:sd:, outstanding connections to device have been deleted
*backupfnodes <CR> or bf <CR>
fnode file backed up to save area
*

Command Reference Appendix B 439
Restoring FnodesIf the volume label or the fnode file become damaged, you can attempt to recoverfiles on the volume by using the DVU commands restorefnode andrestorevolumelabel to rebuild the index. To assist in this process, you can use thedisplaysavefnode DVU command to look at individual fnodes stored in the r?savefile.
▲▲! CAUTIONThe system changes the fnode file each time a volume is modified.If you do not back up the fnodes after each modification, somefnodes in r?save may not be associated with the same files as thecorresponding fnodes in the fnode file. Attempting to recoverfnodes under these conditions is dangerous because therestorefnode command could overwrite valid information withinvalid information.
Examples
1. This example uses the verify command to examine the fnode file on the volume:sd:(attached as a logical device):
super- diskverify :sd: <CR>
iRMX Disk Verify Utility, Vx.x
Copyright <year> Intel Corporation
All Rights Reserved
:sd:, outstanding connections to device have been
deleted
*verify
After examining the structure of the disk, you find that fnodes 09H through 0CHhave probably been destroyed. You then use the restorefnode command torecover these fnodes; the DVU prompts you to confirm each fnode:
*restorefnode 9, 0C <CR> or rf 9, 0C <CR>
restore fnode 9? Y <CR>
restored fnode number: 9
restore fnode 0A? Y <CR>
restored fnode number: 0A
restore fnode 0B? Y <CR>
restored fnode number: 0B
restore fnode 0C? Y <CR>
restored fnode number: 0C

440 Appendix B Using Diskverify in Interactive Mode
The DVU has now copied fnodes 09H through 0CH in the r?save file into fnode09H through 0CH in the fnode file. You should now be able to recover the dataon the disk.
2. Assume the same situation as in Example 1 except that two files, at fnodes 0AHand 0BH, have been modified since the last time the fnodes were backed up.You do not wish to restore them, since you might be replacing valid data withinvalid data.
To pass over the restoration of these two fnodes, respond to the confirmationprompt with some character other than Y, as shown. The DVU returns themessage: allocation bit not set for saved fnode.
*restorefnode 9, 0C <CR> or rf 9, 0C <CR>
restore fnode 9? Y <CR>
restored fnode number: 9
restore fnode 0A? <CR>
allocation bit not set for saved fnode
restore fnode 0B? <CR>
allocation bit not set for saved fnode
restore fnode 0C? Y <CR>
restored fnode number: 0C
The r?save fnodes 09H and 0CH have now been copied into the fnode file; 0AHand 0BH were not restored.
Restoring the Volume LabelSince the contents of the iRMX volume label do not change, the copy of the volumelabel in r?save does not need updating to remain valid.
When the DVU encounters a damaged volume label, it automatically uses the backupvolume label if the r?save file is present. However, it does not restore unlessexplicitly instructed to do so.
When the backup label is used, the DVU issues the message: duplicate volume
label used. If this message appears when the DVU is activated, then the volumelabel is damaged. It can be restored by being overwritten with the volume label copyfrom r?save.
Command Reference Appendix B 441
Example
When you attempt to access files on :sd: (the logical name of the current volume) thesystem returns an E_ILLEGAL_VOLUME message. Invoke the DVU to check thepossibility that the volume label is damaged:
super- diskverify :sd: <CR>
iRMX Disk Verify Utility, Vx.x
Copyright <year> Intel Corporation
All Rights Reserved
:sd:, outstanding connections to device have been deleted
duplicate volume label used
*
The message duplicate volume label used confirms that the volume label hasbeen damaged. Restore the volume label using the restorevolumelabel command:
*restorevolumelabel <CR> or rvl <CR>
The DVU responds:
volume label restored
*
The original volume label has been overwritten with the duplicate copy from ther?save file. Attempts to access files on volume :sd: should now be successful.
Displaying R?save FnodesIf you cannot access a file, it may be because the fnode file is damaged. You can usethe DVU to display the file's directory and identify the file's fnode, and then displaythe fnode.
Any fnode (both allocated and unallocated) in the r?save file can be examined byusing the DVU displaysavefnode command with the fnode's hexadecimal number.The DVU will display vital information about the fnode (total blocks, total size, blockpointers, parent node, etc.). The fnode is displayed in the same format used by thedisplayfnode command.

442 Appendix B Using Diskverify in Interactive Mode
Example
Assume that you cannot access a file at fnode 3C8H on a disk attached as :sd:. Youuse displayfnode to display fnode 3C8H, but you are not confident of the data yousee. Since the fnode for the file has been backed up since the file was last modified,you decide to compare the data in the r?save fnode. To do so, invoke diskverify,then enter this command to display the data for fnode 3C8H in r?save:
*displaysavefnode 3C8 <CR> or dsf 3C8 <CR>
The DVU responds:
Fnode number = 3C8 (saved)
path name: /USER/MYFILE
flags : 0025 => short file
type : 08 => data file
file gran/vol gran : 01
owner : 0001
create,access,mod times : 00000000, 00000000, 00000000
total size,total blocks : 00002D01, 0000000C
block pointer (1) : 000C, 004910
block pointer (2) : 0000, 000000
block pointer (3) : 0000, 000000
block pointer (4) : 0000, 000000
block pointer (5) : 0000, 000000
block pointer (6) : 0000, 000000
block pointer (7) : 0000, 000000
block pointer (8) : 0000, 000000
this size : 00003000
id count : 0001
accessor (1) : 0F, 0001
accessor (2) : 00, 0000
accessor (3) : 00, 0000
parent, checksum : 03C4, 56CA
aux (*) : 000000
*
You can modify the contents of the both the original fnode file and the saved fnodefile by using either the editfnode or editsavefnode commands.
Command Reference Appendix B 443
Diskverify Command DescriptionsThis section provides a command summary followed by a complete description ofeach command.
In the descriptions, the commands are presented in alphabetical order except whentwo commands are similar, such as displaybyte and displayword. In this case, thefirst command is in its alphabetical order, and the second command follows it withonly the differences described.
Command SummaryThe command summary below lists the name, name abbreviation, and a briefdescription of each diskverify command.
Table B-1. Diskverify Command Summary
Command Description
allocate Marks a particular fnode or volume block as allocated
arithmetic commands Perform arithmetic functions: add (+), sub (-), div (/), mul (*),and mod (finds the remainder of a division process)
backupfnodes (bf) Copies current fnode file into a backup file named r?save
conversion commands Perform conversion functions: address and block convertbetween block numbers and absolute addresses; dec and hexconvert between decimal and hexadecimal numbers
disk Displays the attributes of the volume being verified
displaybyte (db or d) Displays the working buffer in byte format
displayword (dw) Displays the working buffer in word format
displaydirectory (dd) Displays directory contents
displayfnode (df) Displays the specified fnode information
displaysavefnode (dsf) Displays the fields of a single fnode in the r?save file
displaynextblock(dnb or > or <CR>)
Displays the next volume block
continued
444 Appendix B Using Diskverify in Interactive Mode
Table B-1. Command Summary (continued)
Command Description
displaypreviousblock(dpb or <)
Displays the previous volume block
editfnode (ef) Edits the specified fnode
editsavefnode (esf) Edits the specified saved fnode
exit (e) Exits the Disk Verification Utility
fix Verifies the disk and fixes inconsistencies
free Marks a particular fnode or volume block as free
getbadtrackinfo (gb) Displays the bad track information
help (h) Lists the diskverify commands
listbadblocks (lbb) Displays all the bad blocks on the volume
quit (q) Exits the Disk Verification Utility
read (r) Reads a volume block into the working buffer
restorefnode (rf) Copies one fnode (or range of fnodes) from the r?save file to thefnode file
restorevolumelabel (rvl) Copies the duplicate volume label to the volume label offset ontrack 0
save Writes the updated fnode map, free space map, and bad blockmap to the volume
substitutebyte(sb or s)
Modifies the contents of the working buffer in byte format
substituteword (sw) Modifies the contents of the working buffer in word format
verify (v) Verifies the volume
write (w) Writes the working buffer to the volume

DVU command allocate
Command Reference Appendix B 445
allocateDesignates fnodes or volume blocks as allocated. You can also use this command todesignate one or a range of volume blocks as bad.
Syntax
allocate fnode=fnodenum[,fnodenum]|block=blocknum[,blocknum]|badblock=blocknum[,blocknum]
Parametersfnodenum
Number of the fnode to allocate. This number can range from 0 through (max fnodes- 1), where max fnodes is the number of fnodes defined when the volume wasoriginally formatted. Two fnode values separated by a comma signify a range offnodes.
blocknumNumber of the volume block to allocate. This number can range from 0 through(max blocks - 1), where max blocks is the number of volume blocks in the volume.Two block numbers separated by a comma signify a range of block numbers.
Output
Allocate returns one of these messages, depending on whether you specify fnodes,blocks, or badblocks:
<fnodenum>, fnode marked allocated
<blocknum>, block marked allocated
<blocknum>, block marked bad
Where:
<fnodenum>Is the number of the fnode that the utility designated as allocated.
<blocknum>Is the number of the volume block that the utility designated asallocated or bad.
If a block is not allocated before you designate it as bad, allocate also displays:
<blocknum>, block marked allocated

allocate DVU command
446 Appendix B Using Diskverify in Interactive Mode
Allocate checks the allocation status of fnodes or blocks before allocating them.Therefore, if you specify allocate for a block or fnode already allocated, allocatereturns one of these messages:
<fnodenum>, fnode already marked allocated
<blocknum>, block already marked allocated
<blocknum>, block already marked bad
Additional Information
When you discover an inconsistency between allocated fnodes or volume blocks andreferenced fnodes or volume blocks (most often as a result of using the verifycommand), you can use allocate and to help correct the errors.
Fnodes are data structures that describe the files on the volume. They are createdwhen the volume is formatted. An allocated fnode is one that represents an actualfile. Allocate designates fnodes as allocated by updating the flags field of thefnode and free fnodes map file.
An allocated volume block is a block of data storage that is part of a file; it is notavailable to be assigned to a new file. Allocate designates volume blocks asallocated by updating the volume free space map with this information.
When you use allocate to designate bad blocks, it updates the volume free space mapand marks an associated bit as bad in the bad blocks file.
Error Messagesargument error
A syntax error was made in the command, or a nonnumeric character was specifiedin the blocknum or fnodenum parameter.
<blocknum>, block out of rangeThe block number specified was larger than the largest block number in the volume.
<fnodenum>, fnode out of rangeThe fnode number specified was larger than the largest fnode number in the volume.
no badblocks fileThe volume does not have a bad blocks file. This message could appear if you usedan earlier version of the format command to format the disk.
DVU command arithmetic commands
Command Reference Appendix B 447
arithmetic commandsPerform arithmetic operations within the DVU: add adds two numbers together, subsubtracts one number from another, div divides one number by another, mulmultiples one number by another, and mod finds the remainder of one numberdivided by another.
Syntax
+|add arg1, arg2-|sub arg1, arg2/|div arg1, arg2*|mul arg1, arg2mod arg1, arg2
Where:
arg1 and arg2
Numbers on which the command operates. The value of each argument cannot begreater than 232-1. Sub subtracts arg2 from arg1; div divides arg1 by arg2; modperforms the operation arg1 modulo arg2.
Output
The commands perform their operations on unsigned numbers only and do not reportany overflow conditions. The number is displayed in hexadecimal format first,followed by the decimal number in parentheses. For example:
13 ( 19T)
arithmetic commands DVU command
448 Appendix B Using Diskverify in Interactive Mode
Examples
In all the examples below, the beginning asterisk is the DVU prompt. In the firstexample, the second asterisk is the multiply operator.
** 134T, 13T <CR> or *MUL 134T, 13T <CR>6CE ( 1742T)
*+ 8, 4 <CR>
0C ( 12T)
*SUB 8884, 256 <CR>
862E (34350T)
*MOD 1225, 256T <CR>
25 ( 37T)
Error Messages
This error message may be returned by any of the arithmetic commands:
argument errorA syntax error was made in the command, a nonnumeric value was specified for oneof the arguments, or a value was specified for a block number parameter that was nota valid block number.
DVU command backupfnodes (bf)
Command Reference Appendix B 449
backupfnodesCopies the current fnode file into a designated fnode backup file named r?save.
Syntax
bf|backupfnodes
Output
fnode file backed up to save area
Additional Information
The backupfnodes command ensures against data loss that occurs when the fnodefile is damaged or destroyed. Be sure that the current fnode file is valid beforeexecuting the backupfnode command (using named verification).
To use this command, you must have formatted the volume using the reserveoption in the format command (V1.1 or later) to create a special reserve area(r?save). If not, the backupfnodes command will be unable to copy the fnode file tor?save, and will return an error message.
The format command writes the initialized copy of the fnode file into r?save.Therefore, you do not have to use backupfnodes on a newly formatted volume.Subsequently, you can routinely (for example, once a day) back up fnodes to assurethat the data in r?save matches the data in the fnode file. You can do this by usingeither the backupfnodes command or the HI shutdown command with the backupoption.
See also: shutdown command, in this chapter
backupfnodes (bf) DVU command
450 Appendix B Using Diskverify in Interactive Mode
Error Messagesargument error
Backupfnodes does not accept an argument.
no save area was reserved when volume was formattedTo support fnode backup, use the backup command to save the data on the volume,reformat the volume using the reserve option of the format command, and thenrestore the volume data.
not a named diskThe volume specified when the DVU was invoked is a physical volume, not a namedvolume.
Example
super- diskverify :sd: <CR>
iRMX Disk Verify Utility, Vx.x
Copyright <year> Intel Corporation
All Rights Reserved
:sd:, outstanding connections to device have been deleted
*verify named <CR>
.
.
.
BIT MAPS O.K.
*backupfnodes <CR> or bf <CR>
fnode file backed up to save area
*
DVU command address
Command Reference Appendix B 451
conversion commandsPerform conversion operations within the Disk Verification Utility: address andblock convert between block numbers and absolute addresses; dec and hex convertbetween decimal and hexadecimal numbers.
addressConverts a block number into an absolute address on the volume; the inverse of theblock command.
Syntax
address blocknum
Where:
blocknumVolume block number that address converts into an absolute address in hexadecimal.This parameter can range from 0 through (max blocks - 1), where max blocks is thenumber of volume blocks in the volume.
Output
In response, address displays:
absolute address = <addr>
Where:
<addr> Absolute address in hexadecimal that corresponds to the specified blocknumber. This address represents the number of the byte that begins theblock and can range from 0 through (volume size - 1), where volumesize is the size, in bytes, of the volume.
Additional Information
All memory in a volume is divided into volume blocks, which are areas of memorythe same size as the volume granularity. Volume blocks are numbered sequentiallyin the volume, starting with the block containing the smallest addresses (block 0).
block DVU command
452 Appendix B Using Diskverify in Interactive Mode
blockConverts an absolute address into a volume block number; the inverse of the addresscommand.
Syntax
block address
Where:
address32-bit absolute address, in hexadecimal, that block converts into a block number.This parameter can range from 0 through (volume size - 1), where volume size is thesize, in bytes, of the volume.
Output
In response, block displays:
block number = <blocknum>
Where:
<blocknum>Number of the volume block that contains the specified absoluteaddress in hexadecimal. The block command determines this value bydividing the absolute address by the volume block size and truncatingthe result.

DVU command dec
Command Reference Appendix B 453
decFinds the decimal equivalent of a number.
Syntax
dec arg
Where:
arg Number for which dec finds the decimal equivalent. The value of the argumentcannot be greater than 232-1. The default base is in hexadecimal.
Output
Dec displays the decimal equivalent of the specified number.

hex DVU command
454 Appendix B Using Diskverify in Interactive Mode
hexFinds the hexadecimal equivalent of a number.
Syntax
hex arg
Where:
arg Number for which the command finds the hexadecimal equivalent. To specify adecimal number, follow it with a T. The value of the argument cannot be greaterthan 232-1.
Output
Hex displays the hexadecimal equivalent of the specified number.
Examples
*HEX 155T <CR>
9B
*ADDRESS 15 <CR>
absolute address = 0A80
*BLOCK 2236 <CR>
block number = 44
Error Messages
This error message may be returned by any of the conversion commands:
argument errorA syntax error was made in the command, a nonnumeric value was specified for oneof the arguments, or a value was specified for a block number parameter that was nota valid block number.

DVU command hex
Command Reference Appendix B 455
This error message may be returned by the address command:
<blocknum>, block out of rangeIf the command was an address command, the block number entered was greaterthan the number of blocks in the volume.
This error message may be returned by the block command:
<address>, address not on the diskIf the command was a block command, block converted the address to a volumeblock number, but the block number was greater than the number of blocks in thevolume.
disk DVU command
456 Appendix B Using Diskverify in Interactive Mode
diskDisplays the attributes of the volume being verified.
Syntax
disk
Output
The output of the disk command depends on whether the volume is formatted as aphysical or named volume. For a physical volume:
device name = <devname>
physical disk
device granularity = <devgran>
block size = <devgran>
number of blocks = <numblocks>
volume size = <size>
Where:
<devname> Physical name of the device containing the volume. This is the physicalname of the device, as specified in the attachdevice HI command.
<devgran> Granularity of the device, as defined in the Device Unit InformationBlock (DUIB). For physical devices, this is also the volume block size.
See also: DUIBs, Driver Programming Concepts
<numblocks>Number of volume blocks in the volume.
<size> Size of the volume, in bytes.

DVU command disk
Command Reference Appendix B 457
Output for a named volume:
device name = <devname>
named disk, volume name = <volname>
device granularity = <devgran>
block size = <volgran>
number of blocks = <numblocks>
number of free blocks = <numfreeblocks>
volume size = <size>
interleave = <inleave>
extension size = <xsize>
number of fnodes = <numfnodes>
number of free fnodes = <numfreefnodes>
root fnode = <rootfnode>
save area reserved = (yes/no)
The <devname>, <devgran>, <numblocks>, and <size> fields are the same as forphysical files. The remaining fields are:
<volname> Name of the volume, as specified when the volume was formatted.
<volgran> Volume granularity, as specified when the volume was formatted.
<numfreeblocks>Number of available volume blocks in the volume.
<inleave> The interleave factor for a named volume.
<xsize> Size, in bytes, of the extension data portion of each fnode.
<numfnodes>Number of fnodes in the volume. The fnodes were created when thevolume was formatted.
<numfreefnodes>Number of available fnodes in the named volume.
<rootfnode>The number of the fnode that contains the volume's root directory.
save area reservedIndicates whether the r?save file is reserved for volume label and fnodefile backups.
See also: Named disk fields, in this appendixformat command, Chapter 2

disk DVU command
458 Appendix B Using Diskverify in Interactive Mode
Additional Information
You can abort this command by typing <Ctrl-C>.
Example
This example shows the output of the disk command for a 5.25-inch diskette:
super- diskverify :f0: <CR>
iRMX Disk Verify Utility, Vx.x
Copyright <year> Intel Corporation
All Rights Reserved
*disk <CR>
device name =wmf0
named disk, volume name =rmx286
device granularity =0200
block size =0200
number of blocks =0000027C
number of free blocks =000001E9
volume size = 0004F800
interleave = 0005
extension size = 03
number of fnodes =00CF
number of free fnodes =00BE
root fnode =0006
save area reserved = no
DVU command displaybyte (d or db)
Command Reference Appendix B 459
displaybyteDisplays the specified portion of the working buffer in 16-byte rows.
Syntax
d|db|displaybyte [startoffset [,endoffset]]
Parametersstartoffset
Number of the byte at which you want the display to begin. With this parameter,displaybyte starts with the row containing the specified offset; if you omit thisparameter, displaybyte starts at the beginning of the working buffer.
endoffsetNumber of the byte, relative to the start of the buffer, at which you want the displayto begin. If you omit this parameter, displaybyte shows only the row indicated bystartoffset. However, if you omit both startoffset and endoffset,displaybyte displays the entire working buffer.
Output
Displaybyte begins by listing the block number where data resides in the workingbuffer. It then lists the specified portion of the buffer, providing the column numbersas a header and beginning each row with the relative address of the first byte in therow. It also includes, at the right of the listing, the ASCII equivalents of the bytes, ifthe ASCII equivalents are printable characters. If a byte is not a printable character,displaybyte displays a period in the corresponding position. For example:
*displaybyte 7,13 <CR>
BLOCK NUMBER = blocknum
offset 0 1 2 3 4 5 6 7 8 9 A B C D E F ASCII STRING
0000 00 01 02 03 04 05 06 07 08 09 0A 0B 0C 0D 0E 0F ............
0010 61 6E 20 65 78 61 6D 70 6C 65 20 20 20 20 20 20 an example

displaybyte (d or db) DVU command
460 Appendix B Using Diskverify in Interactive Mode
Additional Information
Diskverify maintains a working buffer for read and write commands. The size ofthe buffer is equal to the volume's granularity value. After you read a volume blockof memory into the working buffer with the read command, you can display part orall of that buffer, in BYTE format, by entering the displaybyte command.Displaybyte displays the hexadecimal value for each byte in the specified portion ofthe buffer. You can also use substitutebyte and substituteword to change the datain the block. Finally, you can use the write command to write the modified blockback out to the volume.
You can abort this command by typing <Ctrl-C>.
Error Messagesargument error
A syntax error was made in the command, or a nonnumeric character was specifiedin one of the offset parameters.
<offset>, invalid offsetEither a larger value was specified for startoffset than for endoffset, or anoffset value larger than the number of bytes in the block was specified.
DVU command displayword (dw)
Command Reference Appendix B 461
displaywordIs the same as the displaybyte command, except that it displays the working buffer ineight words per row.
Syntax
dw|displayword [startoffset [,endoffset]]
Examples
Assuming that the volume granularity is 128 bytes and that you have read block 20Hinto the working buffer with the read command, this command displays that block:
*displayword <CR>
BLOCK NUMBER = 20
offset 0 2 4 6 8 A C E
0000 0000 0000 0000 0000 0000 0000 0000 0000
0010 0000 0080 0000 0000 0000 0001 FF0F 00FF
0020 0000 0000 0500 0000 0000 0025 0108 FFFF
0030 1F25 0000 002E 0000 1F25 0000 002B 0000
0040 0001 0000 0001 0080 0000 0000 0000 0000
0050 0000 0000 0000 0000 0000 0000 0000 0000
0060 0000 0000 0000 0000 0000 0000 0080 0000
0070 0000 0000 0001 FF0F 00FF 0000 0000 0500
*
This command displays the portion of the block that contains the offsets 31H through45H (words beginning at odd addresses):
*dw 31, 45 <CR>
BLOCK NUMBER = 20
offset 0 2 4 6 8 A C E
0031 001F 2E00 0000 2500 001F 2B00 0000 0100
0041 0000 0100 8000 0000 0000 0000 0000 0000
*
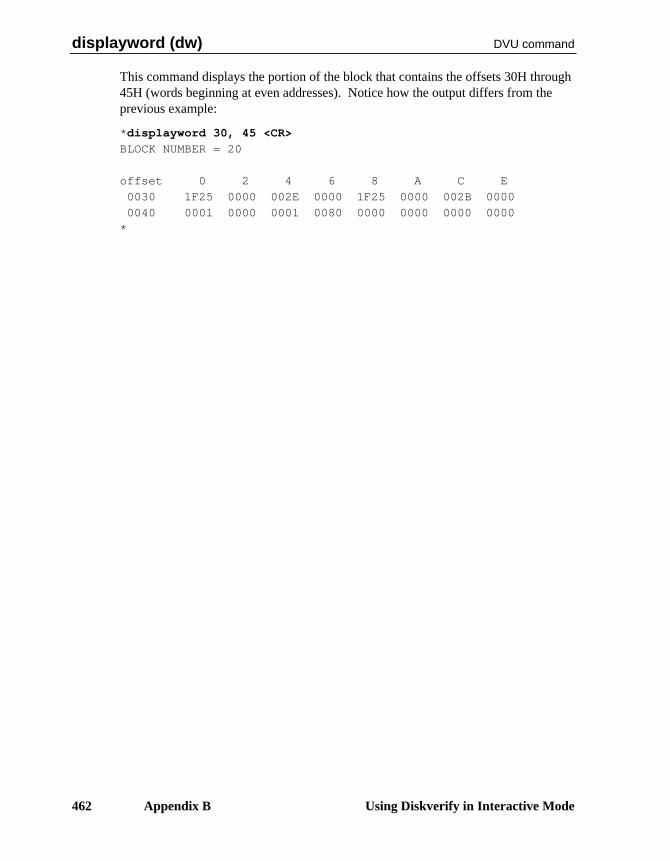
displayword (dw) DVU command
462 Appendix B Using Diskverify in Interactive Mode
This command displays the portion of the block that contains the offsets 30H through45H (words beginning at even addresses). Notice how the output differs from theprevious example:
*displayword 30, 45 <CR>
BLOCK NUMBER = 20
offset 0 2 4 6 8 A C E
0030 1F25 0000 002E 0000 1F25 0000 002B 0000
0040 0001 0000 0001 0080 0000 0000 0000 0000
*

DVU command displaydirectory (dd)
Command Reference Appendix B 463
displaydirectoryLists all the files contained in a directory, with their fnode numbers and types.
Syntax
dd|displaydirectory fnodenum
Parameterfnodenum
Number of the fnode that corresponds to a directory file. This number can rangefrom 0 through (max fnodes - 1), where max fnodes is the number of fnodes definedwhen the volume was originally formatted. Displaydirectory lists all files ordirectories contained in this directory.
Output
The format of the display is:
FILE NAME FNODE TYPE FILE NAME FNODE TYPE FILE NAME FNODE TYPE
<filenam> <fnode> <type> <filenam> <fnode> <type> <filenam> <fnode> <type>
<filenam> <fnode> <type> <filenam> <fnode> <type> <filenam> <fnode> <type>
. . .
. . .
. . .
Where:
<filename>Name of the file or directory contained in the directory.
<fnode> Number of the fnode that describes the file.
<type> Type of the file, as follows:
Type of file Descriptiondata data filesdir directory filessmap volume free space mapfmap free fnodes mapbmap bad blocks mapvlab volume label file**** indicates an illegal fnode type
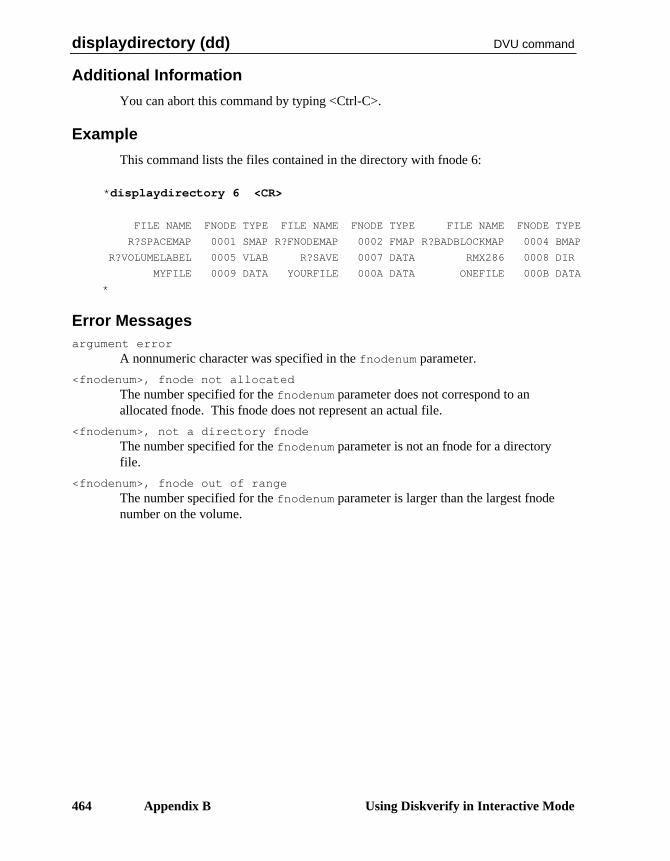
displaydirectory (dd) DVU command
464 Appendix B Using Diskverify in Interactive Mode
Additional Information
You can abort this command by typing <Ctrl-C>.
Example
This command lists the files contained in the directory with fnode 6:
*displaydirectory 6 <CR>
FILE NAME FNODE TYPE FILE NAME FNODE TYPE FILE NAME FNODE TYPE
R?SPACEMAP 0001 SMAP R?FNODEMAP 0002 FMAP R?BADBLOCKMAP 0004 BMAP
R?VOLUMELABEL 0005 VLAB R?SAVE 0007 DATA RMX286 0008 DIR
MYFILE 0009 DATA YOURFILE 000A DATA ONEFILE 000B DATA
*
Error Messagesargument error
A nonnumeric character was specified in the fnodenum parameter.
<fnodenum>, fnode not allocatedThe number specified for the fnodenum parameter does not correspond to anallocated fnode. This fnode does not represent an actual file.
<fnodenum>, not a directory fnodeThe number specified for the fnodenum parameter is not an fnode for a directoryfile.
<fnodenum>, fnode out of rangeThe number specified for the fnodenum parameter is larger than the largest fnodenumber on the volume.
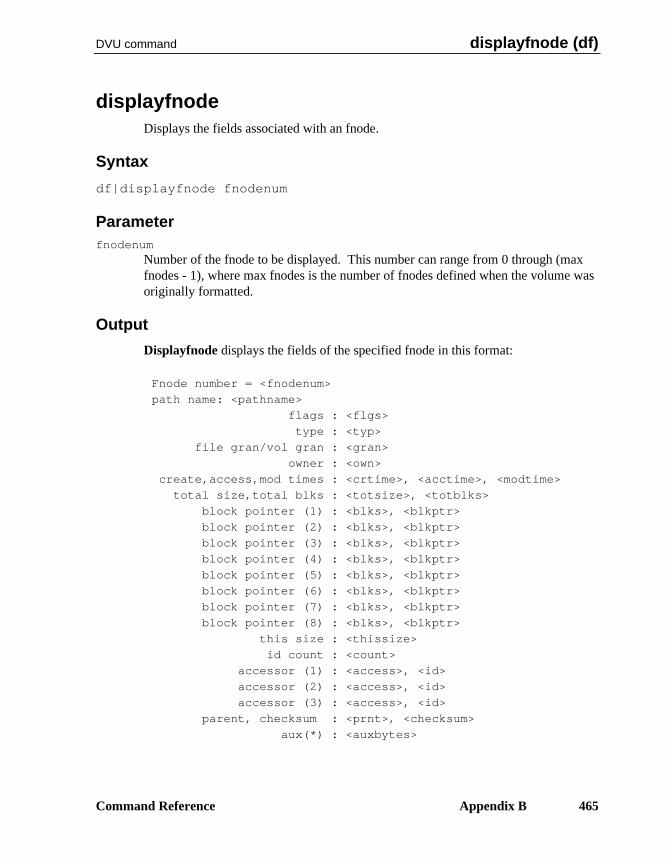
DVU command displayfnode (df)
Command Reference Appendix B 465
displayfnodeDisplays the fields associated with an fnode.
Syntax
df|displayfnode fnodenum
Parameterfnodenum
Number of the fnode to be displayed. This number can range from 0 through (maxfnodes - 1), where max fnodes is the number of fnodes defined when the volume wasoriginally formatted.
Output
Displayfnode displays the fields of the specified fnode in this format:
Fnode number = <fnodenum>
path name: <pathname>
flags : <flgs>
type : <typ>
file gran/vol gran : <gran>
owner : <own>
create,access,mod times : <crtime>, <acctime>, <modtime>
total size,total blks : <totsize>, <totblks>
block pointer (1) : <blks>, <blkptr>
block pointer (2) : <blks>, <blkptr>
block pointer (3) : <blks>, <blkptr>
block pointer (4) : <blks>, <blkptr>
block pointer (5) : <blks>, <blkptr>
block pointer (6) : <blks>, <blkptr>
block pointer (7) : <blks>, <blkptr>
block pointer (8) : <blks>, <blkptr>
this size : <thissize>
id count : <count>
accessor (1) : <access>, <id>
accessor (2) : <access>, <id>
accessor (3) : <access>, <id>
parent, checksum : <prnt>, <checksum>
aux(*) : <auxbytes>
displayfnode (df) DVU command
466 Appendix B Using Diskverify in Interactive Mode
Where:
<fnodenum>Number of the fnode being displayed. If the fnode does not describe anactual file (that is, if it is not allocated), this message appears next tothis field:
*** ALLOCATION STATUS BIT IN THIS FNODE NOT SET ***
In this case, the fnode fields are normally set to 0.
<pathname>Full pathname of the file described by the fnode. This field is notdisplayed if the fnode does not describe a file.
<flgs> A word defining the attributes of the file. Significant bits of this wordare:
Bit Attribute Setting6 deletion 1 to indicate a temporary file or a file to be
deleted5 modification 1 whenever a file is modified1 long or short file 1 for long files
0 for short files0 allocation status 1 for allocated fnodes
0 for free fnodes
The displayfnode command displays a message next to this field that indicateswhether the file is a long or short file.
<typ> Type of file. This field contains a value, and a description which isdisplayed next to the value. The possible values and descriptions are asfollows:
Value Descriptions00 fnode file01 volume map file02 fnode map file03 account file04 bad block file06 directory file08 data file09 volume label file
any other value illegal value
<gran> File granularity, specified as a multiple of the volume granularity.
<own> User ID of the owner of the file.
DVU command displayfnode (df)
Command Reference Appendix B 467
<crtime>
<acctime>
<modtime>
Time and date of file creation, last access, and last modification. Thesevalues are expressed as the time, in seconds, since midnight (00:00) onJanuary 1, 1978.
<totsize> Total size, in bytes, of the actual data in the file.
<totblks> Total number of volume blocks used by the file, including indirectblock overhead.
<blks>, <blkptr>Values that identify the data blocks of the file. For short files, each<blks> parameter indicates the number of volume blocks in the datablock, and each <blkptr> is the number of the first such volumeblock. For long files, each <blks> parameter indicates the number ofvolume blocks pointed to by an indirect block, and each <blkptr> isthe block number of the indirect block.
<thissize>Size in bytes of the total data space allocated to the file, minus anyspace used for indirect blocks.
<count> Number of user IDs associated with the file.
<access>, <id>Each pair of fields indicates the access rights for the file and the ID ofthe user who has that access ID. Bits in the <access> field are set toindicate these access rights:
Bit Data File Directory File3 update change entry2 append add entry1 read list0 delete delete
The first ID listed is the owner's ID.
<prnt> Fnode number of the directory that contains the file.
<checksum>Checksum of the fnode.
<auxbytes>Auxiliary bytes associated with the file.

displayfnode (df) DVU command
468 Appendix B Using Diskverify in Interactive Mode
Additional Information
Each time a file is created on the volume, the BIOS allocates an fnode for the file andfills in the fnode fields to describe the file. The displayfnode command enables youto examine these fnodes and determine where the data for each file resides.
You can abort this command by typing <Ctrl-C>.
Example
This example displays fnode 10 of a volume, which represents a directory:
*displayfnode 10 <CR>
Fnode number = 10
path name : /MYDIR
flags : 0025 =>short file
type : 06 =>directory file
file gran/vol gran : 01
owner : FFFF => world
create,access,mod times : 10219017, 10219E58, 10219E58
total size,total blocks : 00000360, 00000001
block pointer (1) : 0001, 000050
block pointer (2) : 0000, 000000
block pointer (3) : 0000, 000000
block pointer (4) : 0000, 000000
block pointer (5) : 0000, 000000
block pointer (6) : 0000, 000000
block pointer (7) : 0000, 000000
block pointer (8) : 0000, 000000
this size : 00000400
id count : 0001
accessor (1) : 0F, FFFF
accessor (2) : 00, 0000
accessor (3) : 00, 0000
parent, checksum : 0006, 796D
aux(*) : 000000
*

DVU command displayfnode (df)
Command Reference Appendix B 469
Error Messagesargument error
The value entered for the fnodenum parameter was not a legitimate fnode number.
<fnodenum>, fnode out of rangeThe number specified for the fnodenum parameter is larger than the largest fnodenumber on the volume.
Unable to get pathname - <reason>The pathname specified could not be retrieved. Possible causes of this error are seekerror, I/O error, invalid parent, or insufficient memory.
displaysavefnode (dsf) DVU command
470 Appendix B Using Diskverify in Interactive Mode
displaysavefnodeIs identical to displayfnode, except displaysavefnode takes the fnode informationfrom the r?save file, and displays the fnode as saved.
Syntax
dsf|displaysavefnode fnodenum
Output
The output is identical to displayfnode except for the first line, which indicates thatthe fnode is saved. The format of the first line is:
Fnode number = <fnodenum> (saved)
Error Messagesargument error
When the command was entered, no argument was supplied. Displaysavefnoderequires a designation of the fnode number.
<fnodenum>, fnode out of rangeThe number specified for the fnodenum parameter is larger than the largest fnodenumber on the volume.
no save area was reserved when volume was formattedTo support fnode backup, use the backup command to save the data on the volume,reformat the volume using the reserve option of the format command, and thenrestore the volume data.
Unable to get pathname - <reason>The pathname specified could not be retrieved. Possible causes of this error are seekerror, I/O error, invalid parent, or insufficient memory.
DVU command displaynextblock (dnb)
Command Reference Appendix B 471
displaynextblockDisplays the next volume block: the block immediately following the block currentlyin the working buffer. The display format can be either word or byte.
Syntax
dnb|>|<CR>|displaynextblock
Additional Information
Displaynextblock copies the next volume block from the volume to the workingbuffer and displays it at your terminal. If you specify displaynextblock at the end ofthe volume, the utility wraps around and displays the first block in the volume. Itdestroys any data currently in the working buffer.
The utility remembers the mode (word if you used displayword, or byte if you useddisplaybyte) in which you displayed the volume block currently in the workingbuffer, and it displays the next block in that format. Displaynextblock uses the byteformat as a default if you have not yet displayed a volume block.
Once the block is in the working buffer, you can use substitutebyte andsubstituteword to change the data in the block. Finally, you can use the write DVUcommand to write the modified block back out to the volume.
You can abort this command by typing <Ctrl-C>.

displaypreviousblock (dpb) DVU command
472 Appendix B Using Diskverify in Interactive Mode
displaypreviousblockIs identical to displaynextblock, except that it displays the volume block precedingthe current block in the working buffer.
Syntax
dpb|<|displaypreviousblock
DVU command editfnode (ef)
Command Reference Appendix B 473
editfnodeAllows you to edit values within a specified fnode.
Syntax
ef|editfnode fnodenum
Parameterfnodenum
Number of the fnode to edit. This number can be in the range of 0 through (maxfnodes - 1), where max fnodes is the number of fnodes defined when the volume wasoriginally formatted.
Output
Fnode number = nnnn
Where:
nnnn is the number of the fnode you want to edit.
The first field of the fnode, flags, is displayed with its current value:
flags(xxxx):
Where:
xxxx is the current value of the flags field.
From this point on, you can edit the fnode fields, one at a time. After you have editedthe last fnode field or entered a Q while in edit mode, this query appears on the screenand the modified fnode is displayed:
Write back?
A response of Yes causes the fnode with the modified values to be written on thevolume and this message to be displayed:
Fnode has been updated
Any other response causes the fnode to remain unchanged, and this message isdisplayed:
Fnode not changed
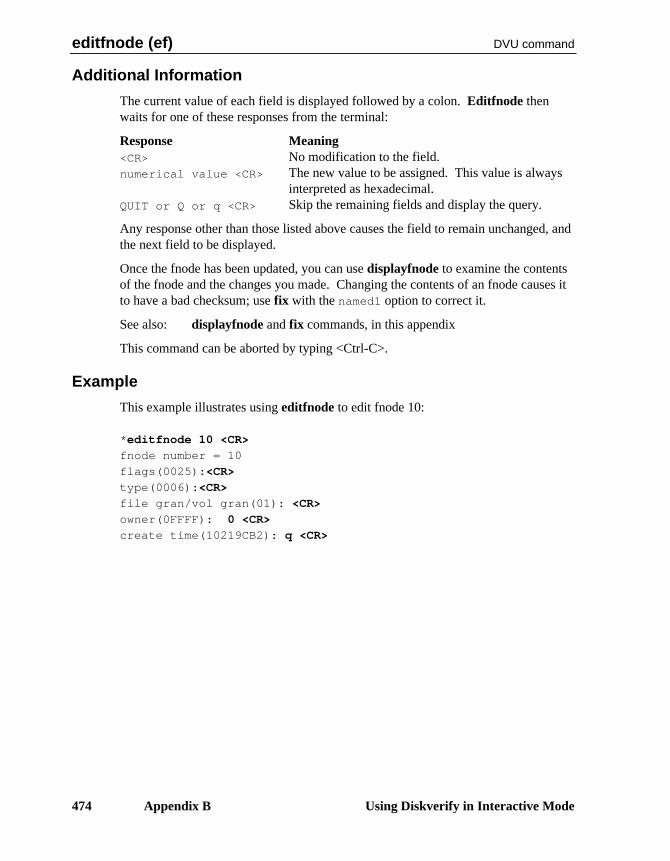
editfnode (ef) DVU command
474 Appendix B Using Diskverify in Interactive Mode
Additional Information
The current value of each field is displayed followed by a colon. Editfnode thenwaits for one of these responses from the terminal:
Response Meaning<CR> No modification to the field.numerical value <CR> The new value to be assigned. This value is always
interpreted as hexadecimal.QUIT or Q or q <CR> Skip the remaining fields and display the query.
Any response other than those listed above causes the field to remain unchanged, andthe next field to be displayed.
Once the fnode has been updated, you can use displayfnode to examine the contentsof the fnode and the changes you made. Changing the contents of an fnode causes itto have a bad checksum; use fix with the named1 option to correct it.
See also: displayfnode and fix commands, in this appendix
This command can be aborted by typing <Ctrl-C>.
Example
This example illustrates using editfnode to edit fnode 10:
*editfnode 10 <CR>
fnode number = 10
flags(0025):<CR>
type(0006):<CR>
file gran/vol gran(01): <CR>
owner(0FFFF): 0 <CR>
create time(10219CB2): q <CR>
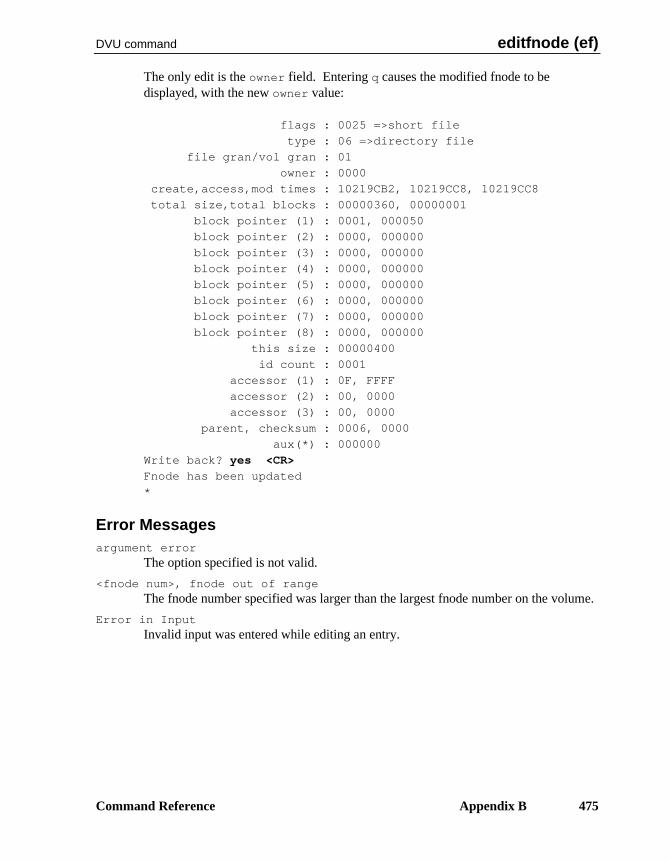
DVU command editfnode (ef)
Command Reference Appendix B 475
The only edit is the owner field. Entering q causes the modified fnode to bedisplayed, with the new owner value:
flags : 0025 =>short file
type : 06 =>directory file
file gran/vol gran : 01
owner : 0000
create,access,mod times : 10219CB2, 10219CC8, 10219CC8
total size,total blocks : 00000360, 00000001
block pointer (1) : 0001, 000050
block pointer (2) : 0000, 000000
block pointer (3) : 0000, 000000
block pointer (4) : 0000, 000000
block pointer (5) : 0000, 000000
block pointer (6) : 0000, 000000
block pointer (7) : 0000, 000000
block pointer (8) : 0000, 000000
this size : 00000400
id count : 0001
accessor (1) : 0F, FFFF
accessor (2) : 00, 0000
accessor (3) : 00, 0000
parent, checksum : 0006, 0000
aux(*) : 000000
Write back? yes <CR>
Fnode has been updated
*
Error Messagesargument error
The option specified is not valid.
<fnode num>, fnode out of rangeThe fnode number specified was larger than the largest fnode number on the volume.
Error in InputInvalid input was entered while editing an entry.
editsavefnode (esf) DVU command
476 Appendix B Using Diskverify in Interactive Mode
editsavefnodeIs identical to editfnode, except that you can edit an fnode from the r?save file. Inaddition, it designates the fnode as saved when displaying the fnode number.
Syntax
esf|editsavefnode fnodenum
Error Messages
The error messages are the same as in editfnode, with the addition of this message:
no save area was reserved when volume was formattedTo support fnode backup, use the backup command to save the data on the volume,reformat the volume using the reserve option of the format command, and thenrestore the volume data.
DVU command exit (e)
Command Reference Appendix B 477
exitExits the DVU and returns control to the HI command level; identical to the quitcommand.
Syntax
e|exit
Additional Information
Although you can use diskverify to verify the system device (:sd:), all connections tothis device are deleted by the OS. After exiting, you must reboot or warm start thesystem.
See also: Warm start feature, System Debugger
fix DVU command
478 Appendix B Using Diskverify in Interactive Mode
fixVerifies the volume in the same way as the verify command; also fixes various kindsof inconsistencies discovered during verification.
Syntax
fix [[all|named1|named] [,list]] [named2|physical]
Parameters
all Performs all operations appropriate to the volume. For named volumes, this optionperforms both the named and physical verification functions. For physicalvolumes, this option performs only the physical verification function. For bothnamed and physical volumes, all performs the fixes for the relevant verifications.
named1 or n1Performs named1 verification and fixes these inconsistencies:
• Fixes bad checksums
• Attaches orphan fnodes to their parents. An orphan fnode is an fnode containedwithin a directory, whose parent field does not point back to this directory. If theparent field of the specified fnode points to a second valid directory, and thesecond directory also points to the fnode, no fix is performed since the specifiedfnode belongs to an existing directory. This is a case of multiple references(discussed in named2 below).
• If the parent field does not point to a valid parent, the parent field is fixed topoint to the directory that contains this fnode in its file list.
named or nPerforms both the named1 and named2 verification functions on a named volumeand fixes the inconsistencies defined for these options.
list Lists the file information displayed in the verify command description later in thisappendix, for any verification that includes named1.
DVU command fix
Command Reference Appendix B 479
named2 or n2Performs named2 verification and fixes these inconsistencies:
• Removes fnodes from their illegal parents. If there is a multiple reference to anfnode, the fnode is removed from the directories that it does not point to (if fixwas performed with named1, the fnode should now point to one valid parent).
• Saves fnode and block bit maps on completion of named2.
physicalPerforms physical verification and saves the bad block bit map.
See also: verify command, in this appendix
Output
Fix produces the same output as the verify command (see examples there) withadditional messages displayed when an inconsistency is fixed. Named1 outputincludes these messages:
Checksum Fixed
fnode nnnn was attached to parent nnnn
The first message appears after a bad checksum is fixed. The second message isdisplayed when the parent field of an fnode is modified to point to a valid parent.
Named2 displays this message when an fnode with multiple references is removedfrom the directory:
fnode removed from this directory
If an fnode exists on a disk and is marked allocated, but has not been referenced, fixissues a warning message and asks if you want to save the bit maps. This preventssave from freeing this fnode and its blocks, possibly causing a file to be lost.
Additional Information
Because fix and verify perform the same verification functions and generate the sameerror messages, the command description given here describes only the additionalfunctions of fix.
See also: verify command, in this appendix
You can abort this command by typing <Ctrl-C>. <Ctrl-C> is ignored when fix iswriting to the volume in order to prevent inconsistencies on the volume.

free DVU command
480 Appendix B Using Diskverify in Interactive Mode
freeDesignates fnodes and volume blocks as free (unallocated); also removes volumeblocks from the bad blocks file.
Syntax
free fnode=fnodenum[,fnodenum]|block=blocknum[,blocknum]|badblock=blocknum[,blocknum]
Parametersfnodenum
Number of the fnode to free. This number can range from 0 through (max fnodes -1), where max fnodes is the number of fnodes defined when the volume wasoriginally formatted. Two fnode values separated by a comma signify a range offnodes.
blocknumNumber of the volume block to free. This number can range from 0 through(max blocks - 1), where max blocks is the number of volume blocks in the volume.Two block numbers separated by a comma signify a range of block numbers.
Output
Free returns one of these messages, depending on whether you specify fnodes,blocks, or badblocks:
<fnodenum>, fnode marked free
<blocknum>, block marked free
<blocknum>, block marked good
Where:
<fnodenum>is the number of the fnode that the utility designated as free.
<blocknum>is the number of the volume block that the utility designated as free orgood.
DVU command free
Command Reference Appendix B 481
Free checks the allocation status of fnodes or blocks before freeing them. Therefore,if you specify free for a block or fnode that is already unallocated, free returns one ofthese messages:
<fnodenum>, fnode already marked free
<blocknum>, block already marked free
<blocknum>, block already marked good
Additional Information
When you discover an inconsistency between allocated fnodes or volume blocks andreferenced fnodes or volume blocks (most often as a result of using the verifycommand), you can use free and to help correct the errors. You can also use free tocorrect inconsistencies in good block and bad block information.
Free fnodes are fnodes for which no actual files exist. Free designates fnodes as freeby updating both the flags field of the fnode and the free fnodes map file.
Free volume blocks are blocks that are not part of any file; they are available to beassigned to any new or current file. Free designates volume blocks as free byupdating the volume free space map.
When you use the free command to designate one or more bad blocks as good, itremoves the block number from the bad blocks file. However, free badblock doesnot designate the blocks as free. To update the volume free space map and designatethese blocks as free, use the free block command.
Error Messagesargument error
A syntax error was made in the command, or a nonnumeric character was specifiedin the blocknum or fnodenum parameter.
<blocknum>, block out of rangeThe block number specified was larger than the largest block number in the volume.
<fnodenum>, fnode out of rangeThe fnode number specified was larger than the largest fnode number in the volume.
no badblocks fileThe volume does not have a bad blocks file. This message could appear if you usedan earlier version of the format command to format the disk.
not a named diskFree was performed on a physical volume.
getbadtrackinfo (gb) DVU command
482 Appendix B Using Diskverify in Interactive Mode
getbadtrackinfoDisplays the volume's bad track information as written by the manufacturer or the HIformat command.
Syntax
gb|getbadtrackinfo
Output
Bad track information:
cyl head sector
cccc hh ss
cccc hh ss
. . .
. . .
Where:
cccc is the cylinder number
hh is the head number
ss is the sector number (always 0 for all devices supported in this releaseof the OS)
Additional Information
The output displayed by the getbadtrackinfo command is compatible with theformat required by the HI format command when writing bad track information onthe disk. To use the output as input to format, exit diskverify and reboot the system.Then edit :w:bad.lst and remove the header lines. The file can then be used asinput to the bad track information file created by the format command.
The example below shows how to use getbadtrackinfo this way:
-attachdevice wmf0 as :w: <CR>
-diskverify :sd: to :w:bad.list <CR>
*getbadtrackinfo <CR>
*exit <CR>
Getbadtrackinfo can be aborted by typing <Ctrl-C>.
DVU command getbadtrackinfo (gb)
Command Reference Appendix B 483
Error MessagesI/O error while trying to read bad track information
An I/O error occurred while reading the bad track information.
No valid bad track info foundBad track information is not valid and cannot be displayed.
No bad track info foundThe area designated for bad track information is empty.

help (h) DVU command
484 Appendix B Using Diskverify in Interactive Mode
helpLists all available Disk Verification Utility commands and provides a shortdescription of each command.
Syntax
h|help
Output
*help
allocate/free : allocate/free fnodes, space blocks, bad blocks
backup/restore fnodes (bf/rf) : backup/restore fnode file to/from save area
Control-C : abort the command in progress
disk : display disk attributes
display byte/word (d,db/dw) : display the buffer in (byte/word format)
display directory (dd) : display the directory contents
display fnode (df) : display fnode information
display next block (>,dnb) : read and display 'next' volume block
display previous block (<,dpb) : read and display 'previous' volume block
display save fnode (dsf) : display saved fnode information
exit,quit : quit disk verify
list bad blocks (lbb) : list bad blocks on the volume
read (r) : read a disk block into the buffer
restore volume label (rvl) : copy volume label from save area
save : save free fnodes, free space & bad block maps
substitute byte/word (s,sb/sw) : modify the buffer (byte/word format)
verify : verify the disk
write (w) : write to the disk block from the buffer
edit fnode (ef) : edit an fnode
edit save fnode (esf) : edit a saved fnode
fix : perform various fixes on the volume
get bad track info (gb) : get the bad track info on the volume
arithmetic and conversion commands-
address : convert block number to absolute address
block : convert absolute address to block number
hex/dec : display number as hexadecimal/decimal number
add,+,sub,-,mul,*,div,/,mod : arithmetic operations on unsigned numbers
DVU command listbadblocks (lbb)
Command Reference Appendix B 485
listbadblocksDisplays all the bad blocks on a named volume.
Syntax
lbb|listbadblocks
Output
Listbadblocks displays up to eight columns of block numbers from the bad blocksfile, in this format:
Badblocks on Volume: volumenum
<blocknum> <blocknum> <blocknum> <blocknum> <blocknum>
<blocknum>
<blocknum> <blocknum> <blocknum> <blocknum> <blocknum>
<blocknum>
. . . . . .
. . . . . .
. . . . . .
<blocknum> <blocknum> <blocknum> <blocknum> <blocknum>
<blocknum>
If no blocks have been marked as bad, listbadblocks displays this message:
no badblocks
Additional Information
You can abort this command by typing <Ctrl-C>.
Error Messagesno badblocks file
The volume does not have a bad blocks file. This message could appear because youused an earlier version of the HI format command when formatting the disk, orbecause the disk is a physical volume.
quit (q) DVU command
486 Appendix B Using Diskverify in Interactive Mode
quitExits the DVU and returns control to the HI command level; identical to exit.
Syntax
q|quit
Additional Information
Although you can use diskverify to verify the system device (:sd:), all connections tothis device are deleted by the OS. After exiting, you must reboot the system or usethe warm start feature.
See also: Warm start feature, System Debugger

DVU command read (r)
Command Reference Appendix B 487
readReads a volume block from the disk into the working buffer.
Syntax
r|read [blocknum]
Parameterblocknum
Number of the volume block to read. This number can range from 0 through(max blocks - 1), where max blocks is the number of volume blocks in the volume.If you omit this parameter, the read command reads the most recently accessedblock.
Output
Read reads the block into the working buffer and displays:
read block number: <blocknum>
Where:
<blocknum>is the number of the block.
Additional Information
Read destroys any data currently in the working buffer. Once the block is in theworking buffer, you can use displaybyte and displayword to display the block, andyou can use substitutebyte and substituteword to change the data in the block.Finally, you can use the write command to write the modified block back to thevolume and repair damaged volume data.
Error Messagesargument error
A nonnumeric character was specified in the blocknum parameter.
<blocknum>, block out of rangeThe block number specified was larger than the largest block number in the volume.
FFFFFFFF, block out of rangeNo block number was specified and no previous read request was executed on thisvolume.
restorefnode (rf) DVU command
488 Appendix B Using Diskverify in Interactive Mode
restorefnodeCopies an fnode or a range of fnodes from the r?save file to the fnode file.
Syntax
rf|restorefnode fnodenum[,fnodenum]
Parameterfnodenum
The hexadecimal number of the fnode to be restored. This number must be greaterthan or equal to 0 and less than the maximum number of fnodes defined when thevolume was formatted. Two fnode numbers specifies a range of fnodes to berestored. The second number must be greater than the first.
Output
Before changing the fnode file, restorefnode displays each fnode number to bechanged and prompts you to confirm (by entering a Y or y) that the fnode is to berestored:
restore fnode (fnodenum)? Y <CR>
When you respond Y or y, and the fnode is restored:
restored fnode number: (fnodenum)
*
If you do not respond with Y, the fnode is not restored, and the response is theasterisk (*) prompt:
restore fnode (fnodenum)? <CR>
*
Restorefnode passes on to the next fnode in the range.
Additional Information
The restorefnode command enables you to rebuild a damaged fnode file, thereby re-establishing links to data that would otherwise be lost.
Since restorefnode operates on the r?save file (the fnode backup file), you must havereserved this file with the reserve option of the format command when the volumewas formatted. Otherwise, restorefnode will return an error message.

DVU command restorefnode (rf)
Command Reference Appendix B 489
▲▲! CAUTIONWhen using this command, be sure that any fnode you restorerepresents a file that has not been modified since the last fnodebackup. Restorefnode overwrites the specified fnode in the fnodefile with the corresponding fnode in the r?save file. If that fnodehas not been backed up since the last file modification, a validfnode may be overwritten with invalid data. Thus, all links to theassociated file will be destroyed, and you will lose all of the data inthe file.
Example
super- diskverify :sd: <CR>
iRMX Disk Verify Utility, Vx.x
Copyright <year> Intel Corporation
All Rights Reserved
:sd:, outstanding connections to device have been deleted
*restorefnode 9,0B <CR> or rf 9,0B <CR>
restore fnode 9? Y <CR>
restored fnode number: 9
restore fnode 0A? Y <CR>
restored fnode number: 0A
restore fnode 0B? Y <CR>
restored fnode number: 0B
*
restorefnode (rf) DVU command
490 Appendix B Using Diskverify in Interactive Mode
Error Messagesargument error
The required argument was not supplied when the command was entered.
no save area was reserved when volume was formattedTo support fnode backup, use the backup command to save the data on the volume,reformat the volume using the reserve option of the format command, and thenrestore the volume data.
not a named diskThe volume specified when the DVU was invoked is a physical volume, not a namedvolume.
<fnode num>, fnode out of rangeThe fnode number specified is not in the range of 0 to (maximum fnodes - 1).
allocation bit not set for saved fnode
restore fnode <fnode num>?The fnode you specified has not been backed up in the r?save file. If you respond tothe query with a Y or y, the data in the file associated with the original fnode will belost.
See also: Caution, restorefnode command
DVU command restorevolumelabel (rvl)
Command Reference Appendix B 491
restorevolumelabelCopies the duplicate volume label to the volume label on track 0.
Syntax
rvl|restorevolumelabel
Output
Volume label restored
Additional Information
Use restorevolumelabel to rebuild a damaged volume label, thereby re-establishinglinks to data that would otherwise be lost.
The duplicate volume label must have been constructed when the volume wasformatted, by using the reserve option of the format command. The volume labelis automatically copied to the end of the r?save file at this time. Because the contentsof the volume label do not change, no other volume label backup is required.
If a duplicate volume label has been reserved on a volume, the DVU can access thatvolume as a named volume even if the volume label is damaged. When the originalvolume label is corrupted, the DVU attempts to use the duplicate volume label. If thebackup label is used, a DUPLICATE VOLUME LABEL USED message appears whenthe utility is invoked.
If the duplicate volume label was not reserved when the volume was formatted,restorevolumelabel will return an error message.
Example
super- diskverify :sd: <CR>
iRMX Disk Verify Utility, Vx.x
Copyright <year> Intel Corporation
All Rights Reserved
:sd:, outstanding connections to device have been deleted
DUPLICATE VOLUME LABEL USED
*restorevolumelabel <CR> or rvl <CR>
volume label restored
*
restorevolumelabel (rvl) DVU command
492 Appendix B Using Diskverify in Interactive Mode
Error Messagesargument error
This command does not accept an argument, but one was supplied when thecommand was entered.
no save area was reserved when volume was formattedTo support volume label backup, use the backup command to save the data on thevolume, reformat the volume using the reserve option of the format command, andthen restore the volume data.
not a named diskThe volume specified when the DVU was invoked is a physical volume, not a namedvolume.
DVU Command save
Command Reference Appendix B 493
saveWrites the reconstructed free fnodes bit map, volume free space bit map, and the badblocks bit map to the volume being verified.
Syntax
save
Output
save fnode map?
If you want to write the reconstructed free fnodes map to the volume, enter Y, y, orYES. Otherwise, enter any other character or a <CR>. If you enter Y, save writes thefnode map to the volume and displays:
free fnode map saved
In any case, save next displays this message:
save space map?
If you want to write the reconstructed free space map to the volume, enter Y.Otherwise, enter any other character or a <CR>. If you enter Y, save writes the spacemap to the volume and displays:
free space map saved
Save displays this message if the bad blocks map is reconstructed:
save bad block map?
If you want to write the reconstructed bad blocks map to the volume, enter Y.Otherwise, enter any other character or a <CR>. If you enter Y, save writes the badblocks map to the volume and displays:
bad block map saved
Additional Information
The save command takes the free fnodes map, the volume free space map, and thebad block map created during the verify operation and writes them to the volume,replacing the maps that currently exist. The maps were originally created with thenamed2 and physical options of the verify command.
See also: verify command, in this appendix
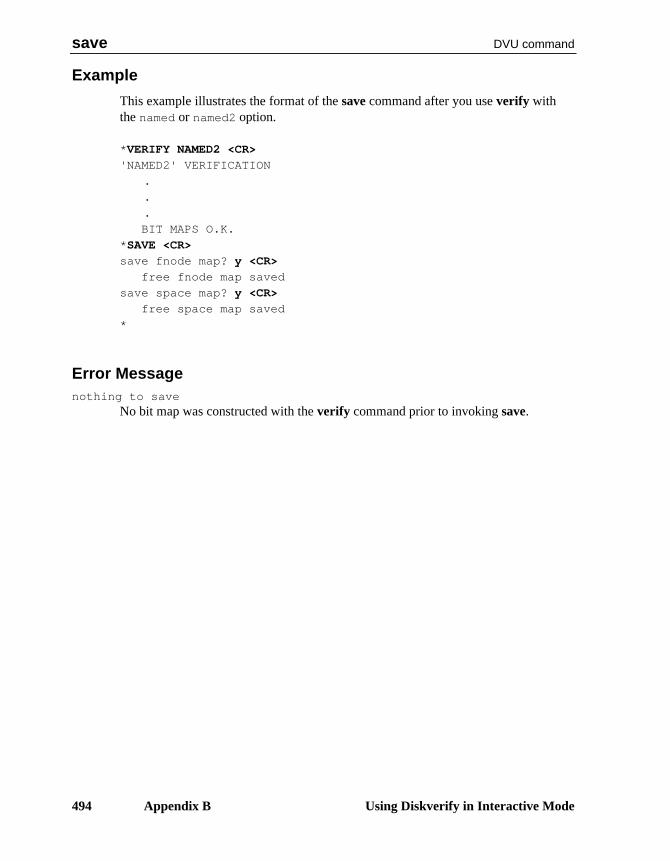
save DVU command
494 Appendix B Using Diskverify in Interactive Mode
Example
This example illustrates the format of the save command after you use verify withthe named or named2 option.
*VERIFY NAMED2 <CR>
'NAMED2' VERIFICATION
.
.
.
BIT MAPS O.K.
*SAVE <CR>
save fnode map? y <CR>
free fnode map saved
save space map? y <CR>
free space map saved
*
Error Messagenothing to save
No bit map was constructed with the verify command prior to invoking save.
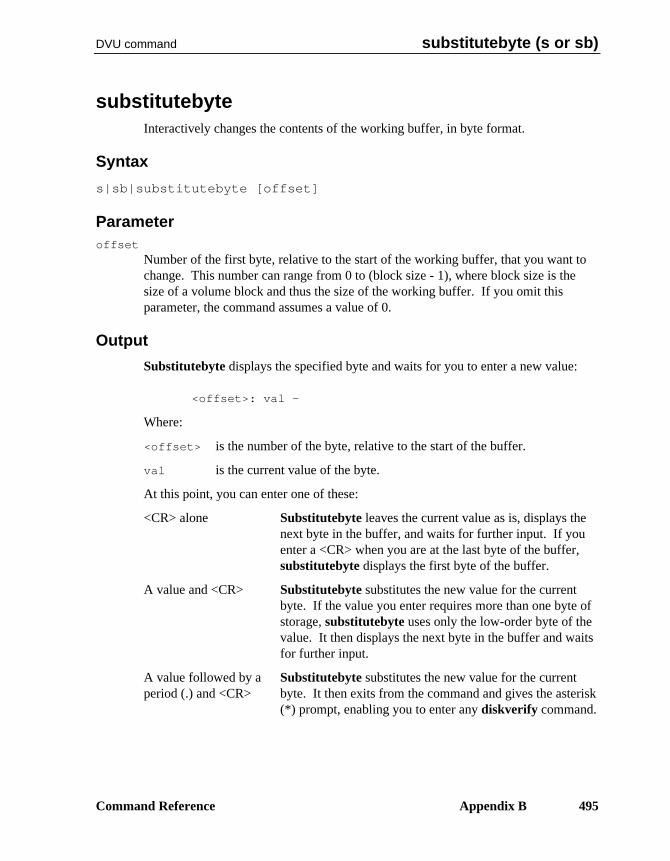
DVU command substitutebyte (s or sb)
Command Reference Appendix B 495
substitutebyteInteractively changes the contents of the working buffer, in byte format.
Syntax
s|sb|substitutebyte [offset]
Parameteroffset
Number of the first byte, relative to the start of the working buffer, that you want tochange. This number can range from 0 to (block size - 1), where block size is thesize of a volume block and thus the size of the working buffer. If you omit thisparameter, the command assumes a value of 0.
Output
Substitutebyte displays the specified byte and waits for you to enter a new value:
<offset>: val -
Where:
<offset> is the number of the byte, relative to the start of the buffer.
val is the current value of the byte.
At this point, you can enter one of these:
<CR> alone Substitutebyte leaves the current value as is, displays thenext byte in the buffer, and waits for further input. If youenter a <CR> when you are at the last byte of the buffer,substitutebyte displays the first byte of the buffer.
A value and <CR> Substitutebyte substitutes the new value for the currentbyte. If the value you enter requires more than one byte ofstorage, substitutebyte uses only the low-order byte of thevalue. It then displays the next byte in the buffer and waitsfor further input.
A value followed by aperiod (.) and <CR>
Substitutebyte substitutes the new value for the currentbyte. It then exits from the command and gives the asterisk(*) prompt, enabling you to enter any diskverify command.
substitutebyte (s or sb) DVU command
496 Appendix B Using Diskverify in Interactive Mode
A period (.) and <CR> This exits the substitutebyte command and gives theasterisk (*) prompt, enabling you to enter any diskverifycommand.
Additional Information
Use substitutebyte to consecutively step through the working buffer and changewhatever bytes are appropriate. When you finish changing the buffer, enter a period(.) followed by a <CR> to exit the command.
The substitutebyte command changes only the values in the working buffer. Tomake the changes in the volume, enter the write command to write the workingbuffer back to the volume.
You can abort this command by typing <Ctrl-C>.
Example
This example changes several bytes in two portions of the working buffer. Twosubstitutebyte commands are used.
*substitutebyte<CR>
0000: A0 - 00<CR>
0001: 80 - <CR>
0002: E5 - <CR>
0003: FF - 31<CR>
0004: FF - .<CR>
*substitutebyte 40<CR>
0040: 00 - E6<CR>
0041: 00 - E6.<CR>
*
Error Messagesargument error
A nonnumeric character was specified in the offset parameter.
<offsetnum>, invalid offsetAn offset value larger than the number of bytes in the block was specified.
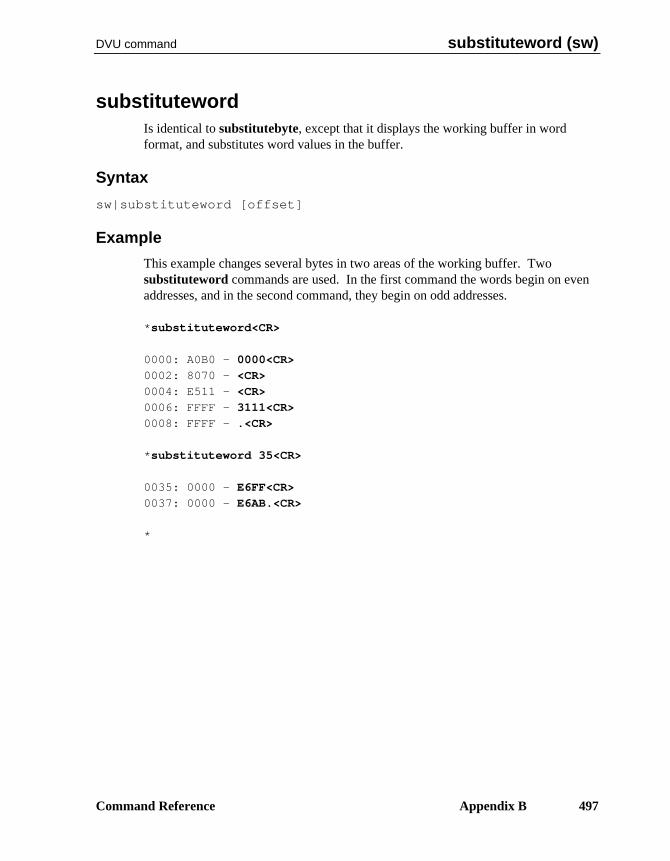
DVU command substituteword (sw)
Command Reference Appendix B 497
substitutewordIs identical to substitutebyte, except that it displays the working buffer in wordformat, and substitutes word values in the buffer.
Syntax
sw|substituteword [offset]
Example
This example changes several bytes in two areas of the working buffer. Twosubstituteword commands are used. In the first command the words begin on evenaddresses, and in the second command, they begin on odd addresses.
*substituteword<CR>
0000: A0B0 - 0000<CR>
0002: 8070 - <CR>
0004: E511 - <CR>
0006: FFFF - 3111<CR>
0008: FFFF - .<CR>
*substituteword 35<CR>
0035: 0000 - E6FF<CR>
0037: 0000 - E6AB.<CR>
*
verify (v) DVU command
498 Appendix B Using Diskverify in Interactive Mode
verifyChecks physical and named volumes to ensure that the volumes contain valid filestructures and data areas.
Syntax
v|verify [[named1|named|all] [,list]] [named2|physical]
Parameters
named1 or n1
Checks named volumes to ensure that the information recorded in the fnodes isconsistent and matches the information obtained from the directories themselves.Verify performs these operations during a named1 verification:
• Checks fnode numbers in the directories to see if they correspond to allocatedfnodes
• Checks the parent fnode numbers recorded in the fnodes to see if they match theinformation recorded in the directories
• Checks the fnodes against the files to determine if the fnodes specify the properfile type
• Checks the pointer(n) structures of long files to see if the indirect blocksaccurately reflect the number of blocks used by the file
• Checks each fnode to see if the total size, total blks, and this size
fields are consistent
• Checks the bad blocks file to see if the blocks in the file correspond to the blocksmarked as bad on the volume
• Checks the checksum of each fnode
named2 or n2Checks named volumes to ensure that the information recorded in the free fnodesmap and the volume free space map matches the actual files and fnodes. Verifyperforms these operations during a named2 verification:
• Creates a free fnodes map by examining every directory in the volume. It thencompares that free fnodes map with the one already on the volume.
• Creates a free space map by examining the information in the fnodes. It thencompares that free space map with the one already on the volume.
DVU command verify (v)
Command Reference Appendix B 499
• Checks to see if the block numbers recorded in the fnodes and the indirect blocksactually exist.
• Checks to see if two or more files use the same volume block. If so, it lists thefiles referring to each block.
• Checks the volume free space map for any bad blocks that are marked as free.
• Checks to see if two or more directories reference the same fnode. If so, it liststhe directories referring to each fnode.
named or nPerforms both the named1 and named2 operations on a named volume. If youspecify the verify command with no option, named is the default.
physicalReads all blocks on the volume and checks for I/O errors. This parameter applies toboth named and physical volumes. Verify also creates a bad blocks map byexamining every block on the volume.
all Performs all operations appropriate to the volume. For named volumes, performsboth the named and physical operations. For physical volumes, performs only thephysical operations.
list When you specify this option, the file information shown in Named1 Output below isdisplayed for every file on the volume, even if the file contains no errors. You canuse this option with all parameters that either explicitly or implicitly specify thenamed1 parameter.
Output
Verify produces a different kind of output for each of the named1, named2, andphysical options. The named and all options produce combinations of these threekinds of output.
Named1 Output
Named1 used without the list option:
DEVICE NAME = <devname> : DEVICE SIZE = <devsize> : BLOCK SIZE = <blksize>
'NAMED1' VERIFICATION
FILE=(<filename>, <fnodenum>): LEVEL=<lev>: PARENT=<parnt>:
TYPE=<typ>
<error messages>
verify (v) DVU command
500 Appendix B Using Diskverify in Interactive Mode
FILE=(<filename>, <fnodenum>): LEVEL=<lev>: PARENT=<parnt>: TYPE=<typ>
<error messages>
FILE=(<filename>, <fnodenum>): LEVEL=<lev>: PARENT=<parnt>:
TYPE=<typ>
<error messages>
Where:
<devname> Physical name of the device, as specified in the attachdevice command.
<devsize> Hexadecimal size of the volume, in bytes.
<blksize> Hexadecimal volume granularity. This number is the size of a volumeblock.
<filename>Name of the file (1 to 14 characters).
<fnodenum>Hexadecimal number of the file's fnode.
<lev> Hexadecimal level of the file in the file hierarchy. The root directory ofthe volume is the only level 0 file. Files contained in the root directoryare level 1 files. Files contained in level 1 directories are level 2 files.This numbering continues for all levels of files in the volume.
<parnt> Fnode number of the directory that contains this file, in hexadecimal.
<typ> Type of file:
Type MeaningDATA data filesDIR directory filesSMAP volume free space mapFMAP free fnodes mapBMAP bad blocks mapVLAB volume label file
If verify cannot ascertain that the file is a directory or data file, itdisplays the characters **** in this field.
<error messages>Messages that indicate the errors associated with the previously-listedfile. The possible error messages are listed later in this section.

DVU command verify (v)
Command Reference Appendix B 501
As shown above, the named1 option (without the list option) displays informationabout each file that is in error. If you use the list option with the named1 option,the file information above is displayed for every file, even if the file contains noerrors. The named1 display also contains error messages that immediately follow thelist of the affected files.
Named2 Output
If verify detects an error during named2 verification, it displays one or more errormessages in place of the BIT MAPS O.K. message.
DEVICE NAME = <devname> : DEVICE SIZE = <devsize> : BLK SIZE = <blksze>
'NAMED2' VERIFICATION
BIT MAPS O.K.
The fields in the named2 output are exactly the same as the corresponding fields innamed1 output.
Physical Output
DEVICE NAME = <devname> : DEVICE SIZE = <devsize> : BLOCK SIZE =
<blksize>
'PHYSICAL' VERIFICATION
NO ERRORS
The fields in physical output are exactly the same as the corresponding fields innamed1 output.
If verify detects an error during physical verification, it displays this message inplace of the NO ERRORS message:
<blocknum>, error
Named and All Output
If you specify named verification, verify displays both the named1 and named2
output. If you specify the all verification for a named volume, verify displays the

verify (v) DVU command
502 Appendix B Using Diskverify in Interactive Mode
named1, named2, and physical output. If you specify the all verification for aphysical volume, verify displays the physical output.
DVU command verify (v)
Command Reference Appendix B 503
Additional Information
Verify can perform three kinds of verification: named1, named2, and physical.Named1 and named2 verifications check the file structures of named volumes. Theydo not apply to physical volumes. A physical verification checks each data blockof the volume for I/O errors, and applies to both named and physical volumes.
As part of the named2 verification, verify creates a new free fnodes map and a newvolume free space map. To create the free fnodes map, it examines every directoryon the volume to determine which fnodes represent actual files. To create the volumefree space map, it examines the pointer(n) fields of the fnodes to determine whichvolume blocks the files use. It compares these with the corresponding maps on thevolume. You can use the save command to write the maps produced during named2
verification to the volume, overwriting the maps on the volume.
When you perform a physical verification on a named volume, if the volume has abad blocks file, verify also creates its own bad blocks map. It does this by examiningevery block on the volume, not by copying the maps that exist on the volume. Verifythen compares the newly created maps with the maps that exist on the volume. If adiscrepancy exists, verify displays a message indicating this. You can use the savecommand to write the bad blocks map produced during physical verification to thevolume; this destroys the bad blocks map already on the volume.
You can abort this command by typing <Ctrl-C>.
Example
This command performs both named and physical verification on a named volume:
*verify ALL <CR>
DEVICE NAME = F1 : DEVICE SIZE = 0003E900 : BLOCK SIZE = 0080
'named1' VERIFICATION
'named2' VERIFICATION
BIT MAPS O.K.
'physical' VERIFICATION
NO ERRORS
*
Error Messages
Four kinds of error messages can occur: as a result of entering the verify command,or from the named1, named2, or physical error messages.

verify (v) DVU command
504 Appendix B Using Diskverify in Interactive Mode
Verify Command Error Messages
argument errorThe parameter specified is not a valid verify parameter.
Named1 Error Messages
These messages can appear in a named1 display, immediately after the file to whichthey refer:
<blocknum 1 - blocknum n>, block badThe block numbers displayed in this message are marked as bad.
<blocknum 1 - blocknum n>, invalid block number recorded in thefnode/indirect blockOne of the pointer(n) fields in the fnode specifies block numbers larger than thelargest block number in the volume.
directory stack overflowA directory on the volume lists itself or one of the parent directories in its pathname.Thus when the utility searches through the directory tree it continually loops througha portion of the tree, overflowing an internal buffer area. Performing named2
verification may indicate the cause of this problem.
file size inconsistent
total_size = <totsize> :this_size = <thsize> :data blocks = <blks>The total size, this size, and total blks fields of the fnode areinconsistent.
<filetype>, illegal file typeThe file type of a user file, as recorded in the type field of the fnode, is not valid.The valid file types and their descriptions are:
File Type NumberDescriptionsmap 1 volume free space mapfmap 2 free fnodes mapbmap 4 bad blocks mapdir 6 directorydata 8 datavlab 9 volume label file
DVU command verify (v)
Command Reference Appendix B 505
<fnodenum>, allocation status bit in this fnode not setThe file is listed in a directory but the flags field of its fnode indicates that fnode isfree. The free fnodes map may or may not list the fnode as allocated.
<fnodenum>, fnode out of rangeThe fnode number is larger than the largest fnode number in the fnode file.
<fnodenum>, parent fnode number does not matchThe file represented by fnodenum is contained within a directory whose fnodenumber does not match the parent field of the file.
invalid blocknum recorded in the fnode/indirect blockOne of the pointers within the fnode or within the indirect block specifies a blocknumber that is larger than the largest block number in the volume.
insufficient memory to create directory stackThere is not enough dynamic memory available in the system for the utility toperform the verification.
sum of the blks in the indirect block does not match block in thefnodeThe file is a long file, and the number of blocks listed in a pointer(n) field of thefnode does not agree with the number of blocks listed in the indirect block.
total-blocks does not reflect the data-blocks correctlyThe total blks field of the fnode and the number of blocks recorded in thepointer(n) fields are inconsistent.
Bad Checksum, checksum is : <number>
Checksum should be : <number>The checksum recorded in the fnode does not match the checksum calculated bydiskverify.
Named2 Error Messages
These messages can appear in a named2 display:
<blocknum1 - blocknum2>, bad block not allocatedThe volume free space map indicates that the blocks are free, but they are marked asbad in the bad blocks file.
<blocknum>, block allocated but not referencedThe volume free space map lists the specified volume block as allocated, but nofnode specifies the block as part of a file.
<blocknum>, block referenced but not allocatedAn fnode indicates that the specified volume block is part of a file, but the volumefree space map lists the block as free.

verify (v) DVU command
506 Appendix B Using Diskverify in Interactive Mode
directory stack overflowA directory on the volume lists itself or one of the parent directories in its pathname.Thus when the utility searches through the directory tree it continually loops througha portion of the tree, overflowing an internal buffer area. In this case, performingnamed2 verification may indicate the cause of this problem. The Multiplereference message (explained below) may help you find the cause of this problem.
Fnodes map indicates fnodes > max_fnodeThe free fnodes map indicates that there are a greater number of unallocated fnodesthan the maximum number of fnodes in the volume.
<fnodenum>, fnode-map bit marked allocated but not referencedThe free fnodes map lists the specified fnode as allocated, but no directory contains afile with the fnode number.
<fnodenum>, fnode referenced but fnode-map bit marked freeThe specified fnode number is listed in a directory, but the free fnodes map lists thefnode as free.
Free space map indicates Volume block > max_volume_blockThe free space map indicates that there are a greater number of unallocated blocksthan the maximum number of blocks in the volume.
insufficient memory to create directory stackNot enough dynamic memory is available in the system for the utility to perform theverification.
insufficient memory to create fnode and space mapsDuring a named2 verification, the utility tried to create a free fnodes map and avolume free space map, but did not have enough dynamic memory available in thesystem.
Multiple reference to fnode <fnodenum>
Path name : <full path name>
referring fnodes:
<fnodenum> Path name: <full path name>
<fnodenum> Path name: <full path name>The directories on the volume list more than one file associated with this fnodenumber.
DVU command verify (v)
Command Reference Appendix B 507
Multiple reference to block <blocknum>
referring fnodes:
<fnodenum> Path name: <full path name>
<fnodenum> Path name: <full path name>More than one fnode specifies this block as part of a file.
Physical Error Messages
<blocknum>, errorAn I/O error occurred when verify tried to access the specified volume block. Thevolume probably has a physical defect.
insufficient memory to create bad blocks mapDuring a physical verification, the utility tried to create a bad blocks map, but didnot have enough dynamic memory available in the system.
Miscellaneous Error Messages
These messages indicate internal errors in the Disk Verification Utility. Undernormal conditions these messages should never appear. If these (or otherundocumented messages) do appear during a named1 or named2 verification, exit theDVU and re-enter the diskverify command:
directory stack empty
directory stack error
directory stack underflow
write (w) DVU command
508 Appendix B Using Diskverify in Interactive Mode
writeWrites the contents of the working buffer to the volume.
Syntax
w|write [blocknum]
Parameterblocknum
Number of the volume block to which the command writes the working buffer. Thisnumber can range from 0 through (max blocks-1), where max blocks is the maximumnumber of blocks in the volume. If you omit this parameter, write writes the bufferback to the block most recently accessed.
Output
write to block <blocknum>?
Where:
<blocknum>is the number of the volume block to which write intends to write theworking buffer.
If you respond by entering Y or any character string beginning with Y or y, writecopies the working buffer to the specified block on the volume and displays:
written to block number:<blocknum>
Any other response aborts the write process.
DVU command write (w)
Command Reference Appendix B 509
Additional Information
The write command is used in conjunction with the read, displaybyte, displayword,substitutebyte, and substituteword commands to modify information on thevolume. Initially you use read to copy a volume block from the volume to a workingbuffer. Then you can use displaybyte and displayword to view the buffer andsubstitutebyte and substituteword to change the buffer. Finally, you can use writeto write the modified buffer back to the volume. By default, write copies the bufferto the block most recently accessed by a read or write command.
A write command does not destroy the data in the working buffer. The data remainsthe same until the next substitutebyte, substituteword, or read command modifiesthe buffer.
Example
This command copies the working buffer to the block from which it was read:
*write <CR>
write 4B? y <CR>
write to block 4B? y
written to block number: 4B
*
Error Messagesargument error
A syntax error was made or nonnumeric characters were specified in the blocknumparameter.
<blocknum>, block out of rangeThe block number specified was larger than the largest block number in the volume.
FFFFFFFF, block out of rangeNo blocknum was specified and no previous read request was executed on thisvolume.
■■ ■■ ■■

write (w) DVU command
510 Appendix B Using Diskverify in Interactive Mode
Command Reference Appendix C 511
Structure of a Named Volume CIntroduction
This appendix describes the structure of an iRMX volume that contains named files.It is provided as reference information to help you interpret output from thecommands (especially diskverify, format, and restore) or to help you create yourown formatting utility programs. It covers the structure of directory files, theconcepts of long and short files, and also includes information on the:
• ISO Volume Label
• iRMX Volume Label, including partition table
• MSA Bootloader Location Table
• Fnode file
• Volume free space map file
• Free fnodes map file
• Bad blocks map file
• Root directory
The blocks reserved for the Bootstrap Loader (in Figure C-1) are not discussed.Bootstrap Loader blocks are automatically included on a new volume when youformat a volume with the format command.
See also: Bootstrap option, format command, Chapter 2
This appendix is for programmers with experience in reading and writing actualvolume information. It does not attempt to teach these functions.
512 Appendix C Structure of a Named Volume
Volume StructureFigure C-1 illustrates the general structure of a named file volume.
Figure C-1. General Structure of Named Volumes
Volume LabelsEach iRMX named volume contains ISO (International StandardizationOrganization) label information as well as iRMX label information and files. Thissection describes the structure of ISO volume labels and iRMX volume labels, bothof which must be present on a named volume.
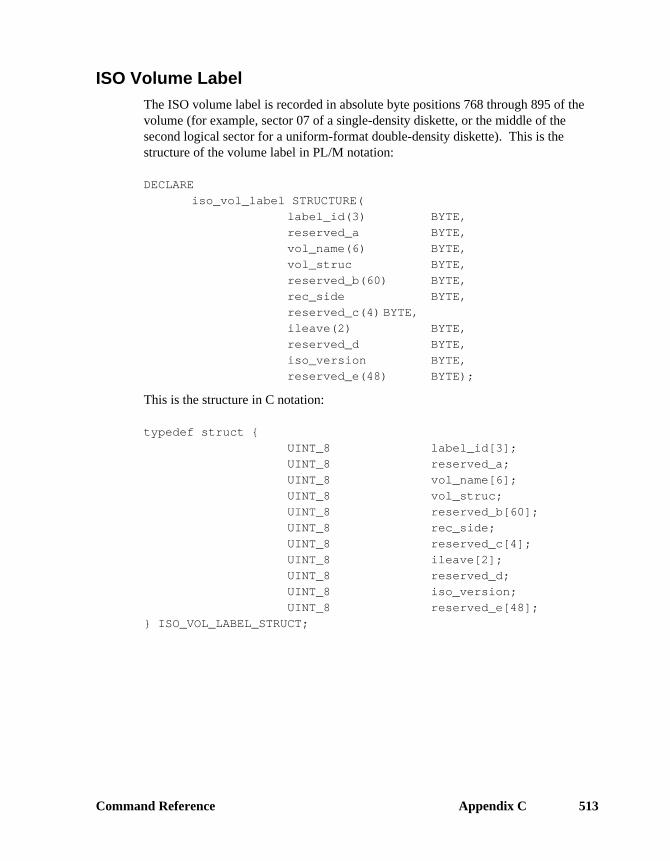
Command Reference Appendix C 513
ISO Volume LabelThe ISO volume label is recorded in absolute byte positions 768 through 895 of thevolume (for example, sector 07 of a single-density diskette, or the middle of thesecond logical sector for a uniform-format double-density diskette). This is thestructure of the volume label in PL/M notation:
DECLARE
iso_vol_label STRUCTURE(
label_id(3) BYTE,
reserved_a BYTE,
vol_name(6) BYTE,
vol_struc BYTE,
reserved_b(60) BYTE,
rec_side BYTE,
reserved_c(4) BYTE,
ileave(2) BYTE,
reserved_d BYTE,
iso_version BYTE,
reserved_e(48) BYTE);
This is the structure in C notation:
typedef struct {
UINT_8 label_id[3];
UINT_8 reserved_a;
UINT_8 vol_name[6];
UINT_8 vol_struc;
UINT_8 reserved_b[60];
UINT_8 rec_side;
UINT_8 reserved_c[4];
UINT_8 ileave[2];
UINT_8 reserved_d;
UINT_8 iso_version;
UINT_8 reserved_e[48];
} ISO_VOL_LABEL_STRUCT;

514 Appendix C Structure of a Named Volume
Where:
label_id(3)Label identifier. For named file volumes, this field contains the ASCIIcharacters VOL.
reserved_aReserved field containing the ASCII character 1.
vol_name(6)Volume name. This field can contain up to six printable ASCIIcharacters, left-justified and space-filled. A value of all spaces impliesthat the volume name is recorded in the iRMX volume label (absolutebyte positions 384-393).
vol_struc For named file volumes, this field contains the ASCII character N,indicating that this volume has a non-ISO file structure.
reserved_b(60)Reserved field containing 60 bytes of ASCII spaces.
rec_side For named file volumes, this field contains the ASCII character 1 toindicate that only one side of the volume is to be recorded.
reserved_c(4)Reserved field containing four bytes of ASCII spaces.
ileave(2) Two ASCII digits indicating the interleave factor for the volume, indecimal. ASCII digits consist of the numbers 0 through 9. Whenformatting named volumes, you should set this field to the sameinterleave factor that you use when physically formatting the volume.
reserved_dReserved field containing an ASCII space.
iso_versionFor named file volumes, this field contains the ASCII character 1,which indicates ISO version number one.
reserved_e(48)Reserved field containing 48 ASCII spaces.
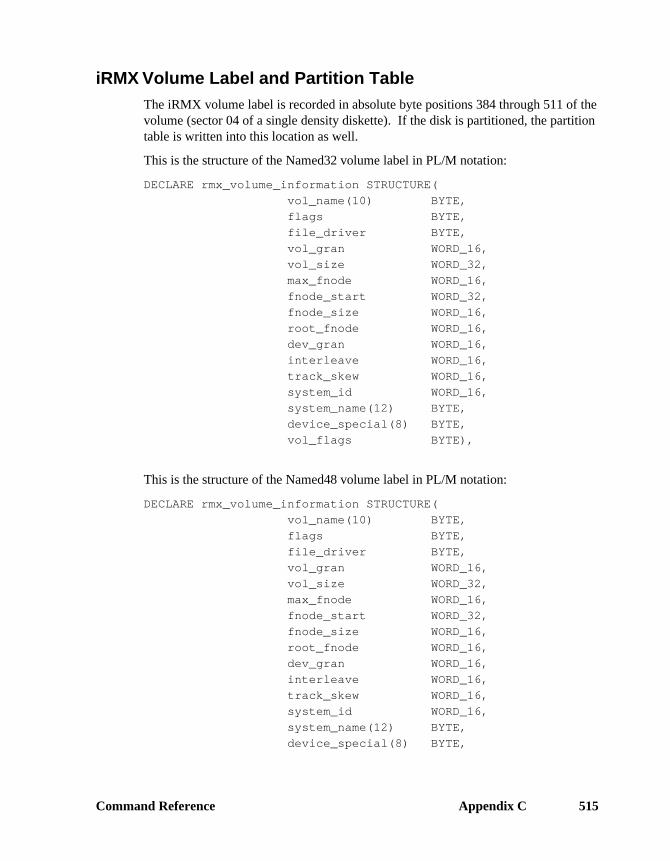
Command Reference Appendix C 515
iRMX Volume Label and Partition TableThe iRMX volume label is recorded in absolute byte positions 384 through 511 of thevolume (sector 04 of a single density diskette). If the disk is partitioned, the partitiontable is written into this location as well.
This is the structure of the Named32 volume label in PL/M notation:
DECLARE rmx_volume_information STRUCTURE(
vol_name(10) BYTE,
flags BYTE,
file_driver BYTE,
vol_gran WORD_16,
vol_size WORD_32,
max_fnode WORD_16,
fnode_start WORD_32,
fnode_size WORD_16,
root_fnode WORD_16,
dev_gran WORD_16,
interleave WORD_16,
track_skew WORD_16,
system_id WORD_16,
system_name(12) BYTE,
device_special(8) BYTE,
vol_flags BYTE),
This is the structure of the Named48 volume label in PL/M notation:
DECLARE rmx_volume_information STRUCTURE(
vol_name(10) BYTE,
flags BYTE,
file_driver BYTE,
vol_gran WORD_16,
vol_size WORD_32,
max_fnode WORD_16,
fnode_start WORD_32,
fnode_size WORD_16,
root_fnode WORD_16,
dev_gran WORD_16,
interleave WORD_16,
track_skew WORD_16,
system_id WORD_16,
system_name(12) BYTE,
device_special(8) BYTE,

516 Appendix C Structure of a Named Volume
vol_flags BYTE),
directory_type BYTE ,
firmware_flag BYTE,
fnode_ptr_count WORD_16,
dir_entry_size WORD_32,
vol_size_hi WORD_32,
fnode_ofst_hi WORD_32,
max_fnodes_mid WORD_16,
max_fnodes_hi WORD_16;
This is the structure of the Named32 volume label in C notation:
typedef struct {
UINT_8 vol_name[10];
UINT_8 flags;
UINT_8 file_driver;
UINT_16 vol_gran;
UINT_32 vol_size;
UINT_16 max_fnode;
UINT_32 fnode_start;
UINT_16 fnode_size;
UINT_16 root_fnode;
UINT_16 dev_gran;
UINT_16 interleave;
UINT_16 track_skew;
UINT_16 system_id;
UINT_8 system_name[12];
UINT_8 device_special[8];
UINT_8 vol_flags;
} RMX_VOLUME_INFORMATION_STRUCT;
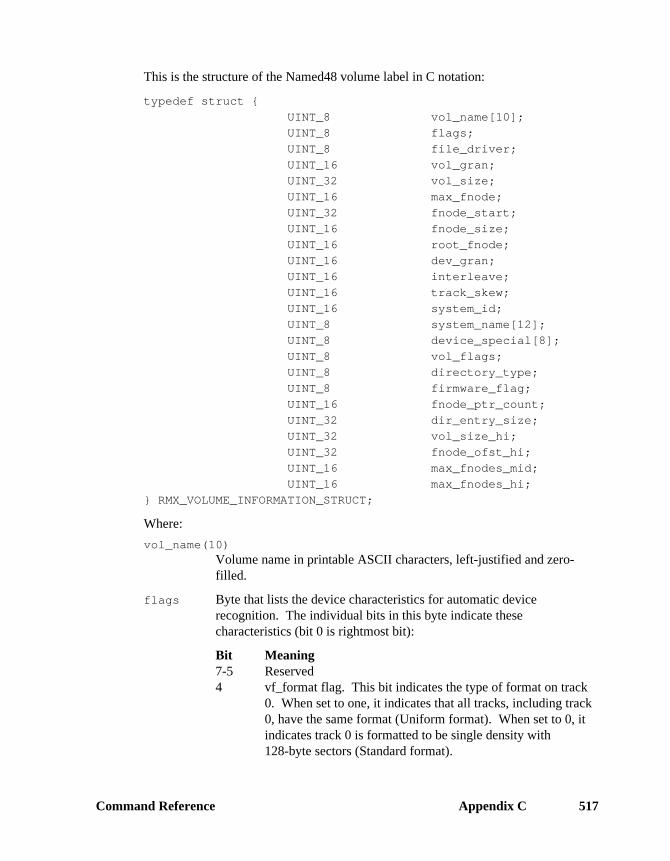
Command Reference Appendix C 517
This is the structure of the Named48 volume label in C notation:
typedef struct {
UINT_8 vol_name[10];
UINT_8 flags;
UINT_8 file_driver;
UINT_16 vol_gran;
UINT_32 vol_size;
UINT_16 max_fnode;
UINT_32 fnode_start;
UINT_16 fnode_size;
UINT_16 root_fnode;
UINT_16 dev_gran;
UINT_16 interleave;
UINT_16 track_skew;
UINT_16 system_id;
UINT_8 system_name[12];
UINT_8 device_special[8];
UINT_8 vol_flags;
UINT_8 directory_type;
UINT_8 firmware_flag;
UINT_16 fnode_ptr_count;
UINT_32 dir_entry_size;
UINT_32 vol_size_hi;
UINT_32 fnode_ofst_hi;
UINT_16 max_fnodes_mid;
UINT_16 max_fnodes_hi;
} RMX_VOLUME_INFORMATION_STRUCT;
Where:
vol_name(10)Volume name in printable ASCII characters, left-justified and zero-filled.
flags Byte that lists the device characteristics for automatic devicerecognition. The individual bits in this byte indicate thesecharacteristics (bit 0 is rightmost bit):
Bit Meaning7-5 Reserved4 vf_format flag. This bit indicates the type of format on track
0. When set to one, it indicates that all tracks, including track0, have the same format (Uniform format). When set to 0, itindicates track 0 is formatted to be single density with128-byte sectors (Standard format).

518 Appendix C Structure of a Named Volume
3 vf_mini flag. This bit indicates the size of the recordingmedia. When set to one, it indicates double density. When setto 0, it indicates either quad density or an 8-inch diskette.
2 vf_sides flag. This bit indicates the number of recording sideson the volume. When set to one, it indicates a double-sidedvolume. When set to 0, it indicates a single-sided volume.
1 vf_density flag. This bit indicates the recording density of thevolume. When set to one, it indicates modified frequencymodulation (MFM) or double-density recording. When set to0, it indicates frequency modulation (FM) or single-densityrecording.
0 vf_auto flag. When set to one, this bit indicates that the flagsbyte contains valid data for automatic device recognition.When set to 0, it indicates that the remaining flags containmeaningless data.
file_driverNumber of the file driver used with this volume. For named filevolumes, this field is set to four.
vol_gran Volume granularity, specified in bytes. This value must be a multipleof the device granularity. It sets the size of a logical device block, alsocalled a volume block.
vol_size Size of the entire volume, in bytes.
max_fnode Number of fnodes in the fnode file.
See also: Fnodes, in this appendix
fnode_startA 32-bit value that represents the number of the first byte in the fnodefile (byte 0 is the first byte of the volume).
fnode_sizeSize of an fnode, in bytes.
root_fnodeNumber of the fnode describing the root directory.
dev_gran Device granularity of all tracks except track 0 (which contains thevolume label). This field is important only when the system requiresautomatic device recognition.
interleaveBlock interleave factor for this volume. This value indicates thephysical distance, in blocks, between consecutively-numbered blocks onthe volume. A value of one indicates that consecutively-numbered

Command Reference Appendix C 519
blocks are adjacent. A value of 0 indicates an unknown or undefinedinterleave factor.
track_skewOffset, in bytes, between the first block on one track and the first blockon the next track. A value of 0 indicates that all tracks are identical.
system_id Numerical code identifying the OS that formatted the volume. Thesecodes are reserved for Intel OSs:
Operating System CodeiRMX 0–0FhiNDX 20h–2Fh
Currently, the OSs place a 0 in this field.
system_name(12)Several pieces of information are in this field:
The leftmost eight bytes of this field contain the name of the OS thatformatted the volume, in printable ASCII characters, left-justified andspace-filled. Zeros (ASCII nulls) indicate that the OS is unknown.
The next byte is an ASCII character that identifies the program thatformatted the volume, usually F for the Human Interface formatcommand. If the formatting program is unable to provide thisinformation, it places an ASCII space in this field.
The Human Interface format command places characters in the last 3bytes of this field based on the OS version. For iRMX III, thecharacters are 03.
device_special(8)Reserved for special device-specific information. When none exists,this field must contain 0s. For example, if the device is a hard disk withan SBC 214/215G controller, the iRMX OSs impose a structure on thisfield and supply this information (PL/M notation):
SPECIAL STRUCTURE(
cylinders WORD_16,
fixed BYTE,
removable BYTE,
sectors BYTE,
sector_size WORD_16,
alternates BYTE);
This is the structure in C notation:
typedef struct {
UINT_16 cylinders;

520 Appendix C Structure of a Named Volume
UINT_8 fixed;
UINT_8 removable;
UINT_8 sectors;
UINT_16 sector_size;
UINT_8 alternates;
} SPECIAL_STRUCT;
Where:
cylinders Total number of cylinders on the disk drive.
fixed Number of heads on the fixed disk or Winchester disk.
removable Number of heads on the removable disk cartridge.
sectors Number of sectors in a track.
sector sizeSector size, in bytes.
alternatesNumber of alternate cylinders or spare sectors on a track.
vol_flags Contains flags for general volume information, defined as:
Flag Bit Meaningvf_integrity 0 The volume has been properly shut down.
1 Possible disk corruption (the volume wasattached, but was not subsequently detached).
directory_typeSpecifies the directory type:
Linear TBD
Sorted TBD
firmware_flagReserved.
fnode_ptr_countSpecifies the number of pointers for each fnode.
dir_entry_sizeSpecifies the size of the directory.
vol_size_hiContains the upper 32 bits of the volume size.
fnode_ofst_hiContains the upper 32 bits of the location of the fnode file.
max_fnodes_midSpecifies bits 32–47 of the maximum fnode number.
Command Reference Appendix C 521
max_fnodes_hiSpecifies bits 48–63 of the maximum fnode number.
Partition Table Structure
For an unpartitioned disk the remainder of the iRMX volume label (bytes 441through 511) is reserved and must be set to 0.
A partitioned disk contains a partition table of 64 bytes beginning at byte 446 andending at byte 509. The partition table contains four contiguous 16-byte structures asshown below in C notation:
typedef struct {
UINT_8 boot;
UINT_8 start_head;
UINT_16 start_cylinder_sector;
UINT_8 system;
UINT_8 end_head;
UINT_16 end_cylinder_sector;
UINT_32 first_partition_sector;
UINT_32 number_of_sectors;
} PARTITION_TABLE_STRUCT;
Where:
boot Specifies whether this is the active boot partition.
start_headThe beginning head of this partition.
start_cylinder_sectorThe beginning cylinder of this partition.
system Specifies the OS type and whether this is a primary or extendedpartition.
end_head The last head of this partition
end_cylinder_sectorThe last cylinder of this partition.
first_partition_sectorThe beginning sector number of this partition.
number_of_sectorsNumber of sectors in this partition.
522 Appendix C Structure of a Named Volume
✏ NoteFor more information on the partition table structure, refer to aDOS technical reference; this is the same structure used for a DOSpartition table.
See also: Appendix F in this manual
Bootloader Location TableThe Bootloader Location Table (BOLT) describes the location of the Multibus IISystem Architecture (MSA) second stage bootstrap loader, which is normally in thefile r?secondstage. The MSA first stage bootstrap loader requires the BOLT to readand load the MSA second stage. The BOLT describes the location of ther?secondstage file as a set of data blocks on the disk by listing the number of datablocks and the byte offset and length of each block. The BOLT also contains otherinformation about the MSA second stage needed by the first stage.
The format command writes the BOLT structure to bytes 512 through 767 of anamed volume. This replaces the area marked uninitialized, reserved for future ISOstandardization in previous versions of the iRMX OSs.
The BOLT structure in PL/M is:
BOLT STRUCTURE(
reserved(4) WORD_32,
magic_word1 WORD_32,
magic_word2 WORD_32,
version WORD_16,
types WORD_16
data_size WORD_32,
num_entries WORD_32,
tbl_entry(num_entries) STRUCTURE(
byte_offset WORD_32,
length WORD_16));

Command Reference Appendix C 523
The BOLT structure in C:
typedef {
UINT_32 reserved[4];
UINT_32 magic_word1;
UINT_32 magic_word2;
UINT_16 version;
UINT_16 types;
UINT_32 data_size;
UINT_32 num_entries;
struct tbl_entry[num_entries]{
UINT_32 byte_offset;
UINT_16 length;
}}BOLT_ STRUCT
Where:
reserved(4)Reserved for future use. Set to 0.
magic_word1A value which defines a valid MSA second stage bootloader image.This value is 0B00F10ADH.
magic_word2Reserved for future use. Set to 0.
version The version of the BOLT structure. The BOLT structure listed here isversion 2.
types Defines the type of code and data segments used in the second stage fileto be bootloaded.
Bit Meaning1 Indicates the type of data segment:
0 = Use161 = Use32
0 Indicates the type of code segment:0 = Use161 = Use32
The format command sets these bits to 0 (Use16).
data_size The size of the data segment for the second stage bootstrap loader.
524 Appendix C Structure of a Named Volume
num_entriesThe number of entries in the table describing the second stage location.
tbl_entry(num_entries)A table containing byte_offset and length pairs which indicatewhere the second stage is located on the media.
On disks larger than 4 Gbytes, this 32-bit value requires that the MSAsecond stage be placed within the first 4 Gbytes of the volume. TheFormat HI Command has been changed so that it will place the MSASecond Stage immediately after the Volume Label on drives larger than4 Gbytes. On drives less than 4 Gbytes, the Format Command willcontinue to place the MSA Second Stage at the high (address) end ofthe volume.
byte_offset The offset, in bytes, from the beginning of the mediato this part of the second stage bootstrap loader.
length The length of this part of the second stage bootstraploader.

Command Reference Appendix C 525
Initial FilesAny mechanism that formats iRMX named volumes must place seven files, with theoption of an eighth and ninth file, on the volume during the format process. Thesefiles are:
File File Namefnode file not accessible as a filevolume label file r?volumelabelvolume free space map file r?spacemapfree fnodes map file r?fnodemapbad blocks file r?badblockmaproot directory not accessible as a filespace accounting file, not accessible as a fileOptionally, duplicate volume label file r?saveOptionally, MSA second stage file r?secondstage
The first of these files, the fnode file, contains information about all of the files onthe volume. The general structure of the fnode file is discussed first. Then all of thefiles are discussed in terms of their fnode entries and their functions.
Fnode FileA data structure called a file descriptor node (fnode) describes each file in a namedfile volume. All the fnodes for the entire volume are grouped together in a file calledthe fnode file. When the I/O System accesses a file on a named volume, it examinesthe iRMX volume label to determine the location of the fnode file, and then examinesthe appropriate fnode to determine the actual location of the file.
See also: iRMX volume label, in this appendix
When a volume is formatted, the fnode file contains seven allocated fnodes and anynumber of unallocated fnodes. The original number of unallocated fnodes dependson the files parameter of the format command. These allocated fnodes representthe fnode file, the volume label file, the volume free space map file, the free fnodesmap file, the bad blocks file, the root directory, and the space accounting file. Thesize of the fnode file is determined by the number of fnodes that it contains. Thenumber of fnodes in the fnode file also determines the number of files that can becreated on the volume. The number of files is set when you format the storagemedium.
See also: Fnode file, volume label file, volume free space map file, free fnodesmap file, bad blocks file, root directory, and space accounting file, inthis appendix.

526 Appendix C Structure of a Named Volume
This the structure of an individual fnode in a Named32 file volume in PL/M notation:
DECLAREfnode STRUCTURE (
flags WORD_16,type BYTE,gran BYTE,owner WORD_16,cr_time WORD_32,access_time WORD_32,mod_time WORD_32,total_size WORD_32,total_blks WORD_32,pointr(40) BYTE,this_size WORD_32,reserved_a WORD_16,chk_sum WORD_16,id_count WORD_16,acc(9) BYTE,parent WORD_16,aux(*) BYTE);
This the structure of an individual fnode in a Named48 file volume in PL/M notation:
DECLAREfnode STRUCTURE (
flags WORD_16,type BYTE,gran BYTE,owner WORD_16,cr_time WORD_32,access_time WORD_32,mod_time WORD_32,total_size WORD_32,total_size_hi WORD_32,total_blks WORD_32,total_blks_hi WORD_32,pointr(40) BYTE,pointr[72] BYTE,this_size WORD_32,this_size_hi WORD_32,reserved_a WORD_16,chk_sum WORD_16,id_count WORD_16,acc(9) BYTE,parent WORD_16,aux(*) BYTE);
Command Reference Appendix C 527
This is the structure of an individual fnode in a Named32 file volume, in C:
typedef struct {UINT_16 flags;UINT_8 type;UINT_8 gran;UINT_16 owner;UINT_32 cr_time;UINT_32 access_time;UINT_32 mod_time;UINT_32 total_size;UINT_32 total_blks;UINT_8 pointr[40];UINT_32 this_size;UINT_16 reserved_a;UINT_16 chk_sum;UINT_16 id_count;UINT_8 acc[9];UINT_16 parent;UINT_8 aux[2];/*adjust aux#
for application*/} FNODE_STRUCT
This is the structure of an individual fnode in a Named48 file volume, in C:
typedef struct {UINT_16 flags;UINT_8 type;UINT_8 gran;UINT_16 owner;UINT_32 cr_time;UINT_32 access_time;UINT_32 mod_time;UINT_32 total_size;UINT_32 total_size_hi;UINT_32 total_blks;UINT_32 total_blks_hi;UINT_8 pointr[40];UINT_8 pointr[72];UINT_32 this_size;UINT_32 this_size_hi;UINT_16 reserved_a;UINT_16 chk_sum;UINT_16 id_count;UINT_8 acc[9];UINT_16 parent;UINT_8 aux[2];/*adjust aux#
for application*/} FNODE_STRUCT
528 Appendix C Structure of a Named Volume
Where:
flags A word that defines a set of attributes for the file. The individual bits inthis word indicate these attributes (bit 0 is the rightmost bit):
Bit Meaning15-7 Reserved bits, always set to 0.6 Deletion attribute. This bit is set to one to indicate that the
file is a temporary file or that the file will be deleted (thedeletion may be postponed because additional connectionsexist to the file). Initially, when the volume is formatted,this bit is set to 0 in each fnode.
5 Modification attribute. Whenever a file is modified, thisbit is set to one. Initially, when a volume is formatted,this bit is set to 0 in each fnode.
3-4 Reserved bits, always set to 0.2 Reserved bit, always set to one.1 Long or short file attribute. This bit describes how the ptr
fields of the fnode are interpreted. If set to 0, indicating ashort file, the ptr fields identify the actual data blocks ofthe file. If set to one, indicating a long file, the ptr fieldsidentify indirect blocks. When formatting a volume, thisbit is always set to 0, since the initial files on the volumeare short files.See also: Indirect blocks, in this appendix
0 Allocation status. If set to one, this fnode describes anactual file. If set to 0, this fnode is available forallocation. When formatting a volume, this bit is set toone in the seven allocated fnodes. In other fnodes, it is setto 0.
Command Reference Appendix C 529
type Type of file. These are acceptable types:
Mnemonic Value Typeft_fnode 0 fnode fileft_volmap 1 volume free space mapft_fnodemap 2 free fnodes mapft_account 3 space accounting fileft_badblock 4 device bad blocks fileft_dir 6 directory fileft_data 8 data fileft_vlabel 9 volume label file
During system operation, only the I/O System can access file typesother than ft_data and ft_dir.
See also: File types, in this appendix
gran File granularity, specified in multiples of the volume granularity. Thedefault value is 1. This value can be set to any multiple of the volumegranularity.
owner User ID of the owner of the file. For the files initially present on thevolume, this parameter is important only for the root directory. For theroot directory, this parameter should specify the user World (FFFFH).The I/O System does not examine this parameter for the other files(fnode file, volume free space map file, free fnodes map file, bad blocksfile, volume label), so a value of 0 can be specified.
cr_time Time and date that the file was created, expressed as a 32-bit value.This value indicates the number of seconds since a fixed, user-determined point in time. By convention, this point in time is midnight(00:00), January 1, 1978. For the files initially present on the volume,this parameter is important only for the root directory. A 0 can bespecified for the other files (fnode file, volume free space map file, freefnodes map file, bad blocks file, volume label.)
access_timeTime and date of the last file access (read or write), expressed as a 32-bit value. For the files initially present on the volume, this parameter isimportant only for the root directory.
mod_time Time and date of the last file modification, expressed as a 32-bit value.For the files initially present on the volume, this parameter is importantonly for the root directory.
total_sizeIn Named32 file volumes, this field indicates the total size, in bytes, of
530 Appendix C Structure of a Named Volume
the actual data in the file. In Named48 file volumes, this field indicatesthe low 32 bits of total data.
total_size_hiAvailable only in Named48 file volumes, this field indicates the upper16 bits of total data.
total_blksIn Named32 file volumes, this field indicates the total number ofvolume blocks used by this file, including indirect block overhead. InNamed48 file volumes, this field indicates the low 32 bits of totalblocks used by the file.
A volume block is a block of data whose size is the same as the volumegranularity. All memory in the volume is divided into volume blocks,which are numbered sequentially, starting with the block containing thesmallest addresses (block 0).
See also: Indirect blocks, in this appendix
total_blks_hiAvailable only in Named48 file volumes, this field indicates the upper16 bits of total blocks used by the file.
pointr(40) A group of bytes on which this structure is imposed (in PL/M):
PTR(8) STRUCTURE(
NUM_BLOCKS WORD_16,
BLK_PTR(3) BYTE);
The same structure in C:
typedef struct {
UINT_16 num_blocks;
UINT_8 blk_ptr[3];
} ptr_struct[8];

Command Reference Appendix C 531
This structure identifies the data blocks of the file. These data blocksmay be scattered throughout the volume, but together they make up acomplete file. If the file is a short file (bit 1 of the flags field is set to0), each ptr structure identifies an actual data block. In this case, thefields of the ptr structure contain:
num_blocks Number of volume blocks in the data block.
blk_ptr(3) A 24-bit value specifying the number of the firstvolume block in the data block. Volume blocks arenumbered sequentially, starting with the block withthe smallest address (block 0). The bytes in theblk_ptr array range from least significant (blk_ptr(0))to most significant (blk_ptr(2)).
If the file is a long file (bit 1 of the flags field is set to one), each ptr
structure identifies an indirect block (possibly consisting of more thanone contiguous volume block), which in turn identifies the data blocksof the file. In this case, the fields of the ptr structure contain:
num_blocks Number of volume blocks pointed to by the indirectblock.
blk_ptr(3) A 24-bit volume block number of the indirect block.
See also: Indirect blocks, in this appendix.
pointr(72)A group of bytes on which this structure is imposed (in PL/M):
PTR(8) STRUCTURE(
num_blocks unsigned long,
blk_ptr[5] unsigned char;
The same structure in C:
typedef struct PTR_STRUCT {
unsigned long num_blocks;
unsigned char blk_ptr[5];
} ptr_struct[8];
532 Appendix C Structure of a Named Volume
This structure identifies the data blocks of the file. These data blocksmay be scattered throughout the volume, but together they make up acomplete file. If the file is a short file (bit 1 of the flags field is set to0), each ptr structure identifies an actual data block. In this case, thefields of the ptr structure contain:
num_blocks Number of volume blocks in the data block.
blk_ptr(5) A 24-bit value specifying the number of the firstvolume block in the data block. Volume blocks arenumbered sequentially, starting with the block withthe smallest address (block 0). The bytes in theblk_ptr array range from least significant (blk_ptr(0))to most significant (blk_ptr(2)).
Command Reference Appendix C 533
If the file is a long file (bit 1 of the flags field is set to one), each ptr
structure identifies an indirect block (possibly consisting of more thanone contiguous volume block), which in turn identifies the data blocksof the file. In this case, the fields of the ptr structure contain:
num_blocks Number of volume blocks pointed to by the indirectblock.
blk_ptr(5) A 24-bit volume block number of the indirect block.
See also: Indirect blocks, in this appendix.
this_size In Named32 file volumes, this field indicates the size, in bytes, of thetotal data space allocated to the file. In Named48 file volumes, this fieldindicates the low 32 bits of total data space used by this file.
This figure does not include space used for indirect blocks, but it doesinclude any data space allocated to the file, regardless of whether thefile fills that allocated space.
this_size_hiAvailable only in Named48 file volumes, this field indicates the upper16 bits of total data space used by this file.
reserved_aReserved field, unsigend long, set to 0.
chk_sum Contains a checksum value for the fnode.
Id_count Number of access-ID pairs declared in the acc(9) field.
acc(9) A group of bytes on which this structure is imposed (in PL/M):
ACCESSOR(3) STRUCTURE(
access BYTE,
id WORD_16);
The same structure in C:
typedef struct {
UINT_8 access;
UINT_16 id;
}ACCESSOR_STRUCT[3];

534 Appendix C Structure of a Named Volume
This structure contains the access-ID pairs that define the access rightsfor the users of the file. By convention, when a file is created, theowner's ID is inserted in accessor(0), along with the code for theaccess rights. The fields of the accessor structure contain:
access Encoded access rights for the file. The settings of theindividual bits in this field grant (if set to 1) or deny (if setto 0) permission for the corresponding operation. Bit 0 isthe rightmost bit.
Bit Data File Operation Directory Operation7-4 reserved (must be 0)3 update change entry2 append add entry1 read list0 delete delete
id ID of the user who gains the corresponding accesspermission.
parent Fnode number of directory file that lists this file. For files initiallypresent on the volume, this parameter is important only for the rootdirectory. For the root directory, this parameter should specify thenumber of the root directory's own fnode. For other files (fnode file,volume free space map file, free fnodes map file, bad blocks file,volume label) the I/O System does not examine this field.
aux(*) Auxiliary bytes associated with the file. The named file driver does notinterpret this field, but the user can access it by makingget_extension_data and set_extension_data system calls. The size ofthis field is determined by the size of the fnode, specified in the iRMXvolume label. If you use the format command or create your ownutility to format a volume, you can make this field as large as you wish;however, a larger aux field implies slower file access.
Certain fnodes designate special files that appear on the volume. These sectionsdiscuss these fnodes and the associated files.
Command Reference Appendix C 535
Fnode 0: Fnode FileThe first fnode structure in the fnode file describes the fnode file itself. This filecontains all the fnode structures for the entire volume. It must reside in contiguouslocations in the volume. The fields of fnode 0 must be set as:
• The bits in the flags field are set to (bit 0 is the rightmost bit):
Bit Value Description15-7 0 Reserved bits
6 0 File will not be deleted
5 0 Initial status is unmodified
3-4 0 Reserved bits
2 1 Primary fnode
1 0 Short file
0 1 Allocated file
• The type field is set to ft_fnode.
• The gran field is set to 1.
• The owner field is set to the ID of the user who formatted it.
• The cr_time, access_time, and mod_time fields are set to the time thesystem was formatted.
• Since the iRMX volume label specifies the size of an individual fnode structureand the number of fnodes in the fnode file, the value specified in thetotal_size field of fnode 0 must equal the product of the values in thefnode_size and max_fnode fields of the iRMX volume label.
• The total_blocks field specifies enough volume blocks to account for thememory listed in the total_size field. The product of the value in thetotal_blocks field and the volume granularity equals the value of thethis_size field, since the fnode file is a short file.
• Since the fnode file must reside in contiguous locations in the volume, only oneptr structure describes the location of the file. The value in the num_blocksfield of that ptr structure equals the value in the total_blocks field. Theblk_ptr field indicates the number of the first block of the fnode file.
• The id_count field is set to 1.

536 Appendix C Structure of a Named Volume
Fnode 1: Volume Free Space Map FileThe second fnode, fnode 1, describes the volume free space map file. The type fieldfor fnode 1 is set to ft_volmap to designate the file as such.
The volume free space map file keeps track of all the space on the volume. It is a bitmap of the volume, in which each bit represents one volume block (a block of spacewhose size is the same as the volume granularity). If a bit in the map is set to one,the corresponding volume block is free to be allocated to any file. If a bit in the mapis set to 0, the corresponding volume block is already allocated to a file. The bits ofthe map correspond to volume blocks such that bit n of byte m represents volumeblock (8 * m) + n. The bits in the remaining space allocated to the map file (thosethat do not correspond to actual blocks of memory) must be set to 0.
When the volume is formatted, the volume free space map file indicates that the first3328 bytes of the volume (the label and bootstrap information) plus any files initiallyplaced on the volume (fnode file, volume free space map file, free fnodes map file,bad blocks file) are allocated. Space is also reserved for the r?save andr?secondstage files if they are selected during formatting.
Fnode 2: Free Fnodes Map FileThe third fnode, fnode 2, describes the free fnodes map file. The type field of fnode2 is set to ft_fnodemap to designate the file as such.
The free fnodes map file keeps track of all the fnodes in the fnodes file. It is a bitmap in which each bit represents an fnode. If a bit in the map is set to one, thecorresponding fnode is not in use and does not represent an actual file. If a bit in themap is set to 0, the corresponding fnode already describes an existing file. The bits inthe map correspond to fnodes such that bit n of byte m represents fnode number (8 *
m) + n. The bits in the remaining space allocated to the map file (those that do notcorrespond to actual fnode structures) must be set to 0.
When the volume is formatted, the free fnodes map file indicates that fnodes 0, 1, 2,3, 4, 5, and 6 are in use. If the reserve option is selected when the volume isformatted, the map file also indicates fnode 7 is in use. If other files are initiallyplaced on the volume, the free fnodes map file must be set to indicate this as well.
Fnode 3: Accounting FileFnode 3 is a placeholder. When a volume is formatted, fnode 3 is set up representinga file of type ft_account. The fnode is set up as allocated, and of the indicatedtype, but it does not assign any actual space for the file.
Command Reference Appendix C 537
Fnode 4: Bad Blocks Map FileThe fifth fnode, fnode 4, describes a file containing a map of all the bad blocks on thevolume. The type field of fnode 4 is set to ft_badblock to indicate this.
The bad block map file keeps track of all the bad blocks on the volume. It is a bitmap of the volume, in which each bit represents one volume block (a block of spacewhose size is the same as the volume granularity). If a bit in the map is set to 0, thecorresponding volume block has no bad blocks and may be allocated to any file. If abit in the map is set to one, the corresponding volume block is bad. If a block ismarked bad, it must also be marked allocated in the volume free space file. The bitsof the map correspond to volume blocks such that bit n of byte m represents volumeblock (8 * m) + n.
Fnode 5: Volume Label FileThis fnode describes a file containing the first 3328 bytes of any volume. Theinformation in this file defines the volume as a whole. The type field of this fnodeis set to ft_vlabel. You cannot write to this fnode.
Fnode 6: Root DirectoryThe root directory is a special directory file. It is the root of the named file hierarchyfor the volume. The iRMX volume label specifies the fnode number of the rootdirectory. The root directory is its own parent; thus the parent field of its fnodespecifies its own fnode number.
The root directory (and all directory files) associates file names with fnode numbers.It consists of a number of entries that have this
This is the 16-byte structure in PL/M notation:
DECLARE
DIR_ENTRY STRUCTURE(
fnode WORD_16,
component(14) BYTE);
This is the 32-byte structure in PL/M notation:
DECLARE
DIR32_ENTRY STRUCTURE(
name[14] unsigned char,
reserved[5] unsigned short,
fnode_num_lo unsigned_long,
fnode_num_hi unsigned_long;
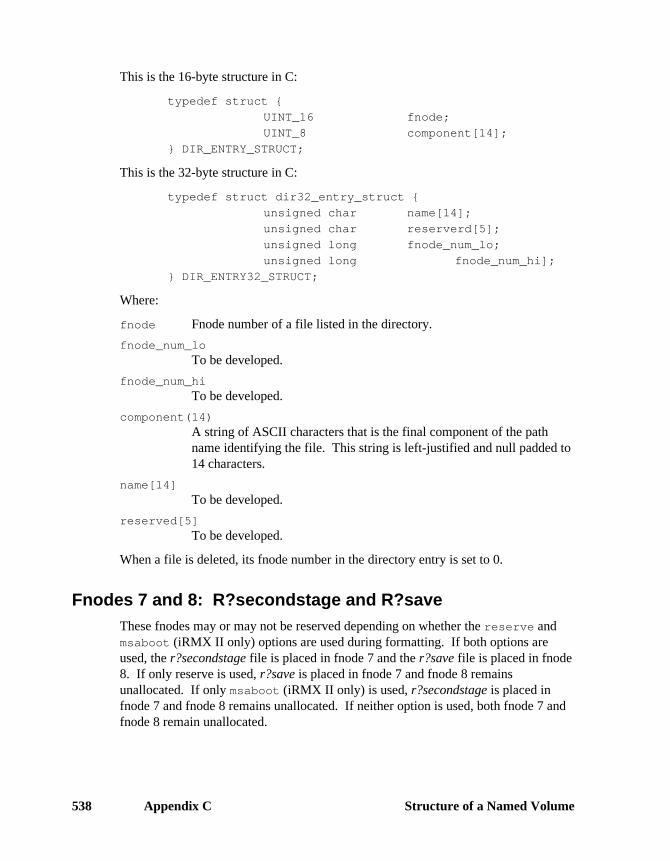
538 Appendix C Structure of a Named Volume
This is the 16-byte structure in C:
typedef struct {
UINT_16 fnode;
UINT_8 component[14];
} DIR_ENTRY_STRUCT;
This is the 32-byte structure in C:
typedef struct dir32_entry_struct {
unsigned char name[14];
unsigned char reserverd[5];
unsigned long fnode_num_lo;
unsigned long fnode_num_hi];
} DIR_ENTRY32_STRUCT;
Where:
fnode Fnode number of a file listed in the directory.
fnode_num_loTo be developed.
fnode_num_hiTo be developed.
component(14)A string of ASCII characters that is the final component of the pathname identifying the file. This string is left-justified and null padded to14 characters.
name[14]To be developed.
reserved[5]To be developed.
When a file is deleted, its fnode number in the directory entry is set to 0.
Fnodes 7 and 8: R?secondstage and R?saveThese fnodes may or may not be reserved depending on whether the reserve andmsaboot (iRMX II only) options are used during formatting. If both options areused, the r?secondstage file is placed in fnode 7 and the r?save file is placed in fnode8. If only reserve is used, r?save is placed in fnode 7 and fnode 8 remainsunallocated. If only msaboot (iRMX II only) is used, r?secondstage is placed infnode 7 and fnode 8 remains unallocated. If neither option is used, both fnode 7 andfnode 8 remain unallocated.

Command Reference Appendix C 539
R?secondstage
R?secondstage is a file which may be optionally created by the msaboot option ofthe format command. R?secondstage is the second stage bootloader for systems thatconform to the Multibus II System Architecture (MSA) specification. R?secondstageis created at the end of the volume. However, if the reserve option is alsospecified, r?secondstage will be placed in the volume blocks immediately precedingr?save. (The fnode for the r?secondstage file is allocated out of the fnodes reservedthrough the files parameter of the format command.)
R?save
R?save is a file which may be optionally created by the reserve option of theformat command. R?save contains the duplicate volume label, in the innermosttrack of the volume. A copy of the iRMX volume label is placed at the physical endof the file and an fnode is allocated for r?save in the fnode file, out of the fnodesreserved through the files parameter of the format command.

540 Appendix C Structure of a Named Volume
The format command creates a backup of the fnode file in its initialized state.R?save is not subsequently updated as files are written to or deleted from the volume.Therefore, you will have to use the backupfnodes command or the backup option ofthe Human Interface shutdown command to back up the fnode file at regularintervals.
Other FnodesWhen formatting a volume, no other fnodes in the fnode file represent actual files.The remaining fnodes must have bit 0 (allocation status) set to 0.
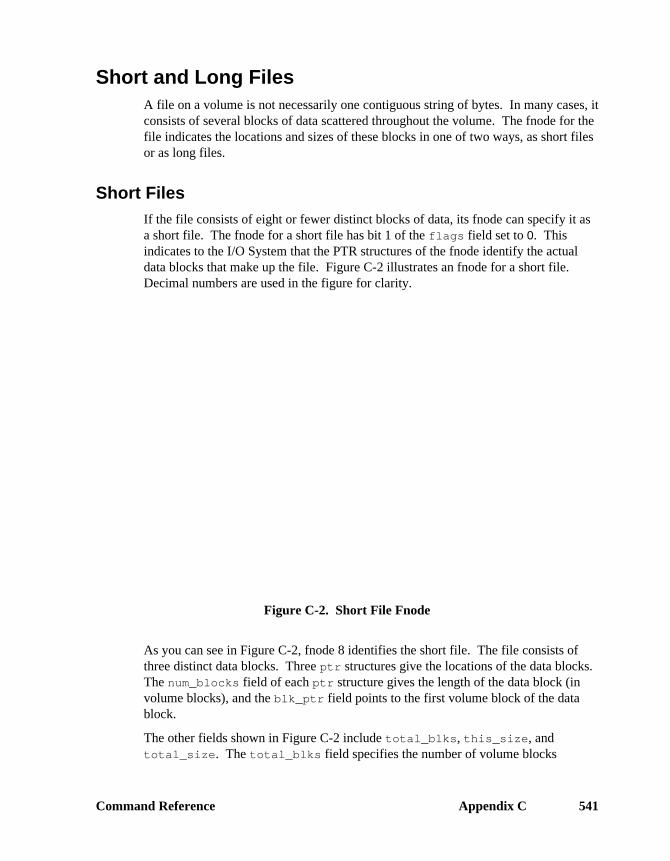
Command Reference Appendix C 541
Short and Long FilesA file on a volume is not necessarily one contiguous string of bytes. In many cases, itconsists of several blocks of data scattered throughout the volume. The fnode for thefile indicates the locations and sizes of these blocks in one of two ways, as short filesor as long files.
Short FilesIf the file consists of eight or fewer distinct blocks of data, its fnode can specify it asa short file. The fnode for a short file has bit 1 of the flags field set to 0. Thisindicates to the I/O System that the PTR structures of the fnode identify the actualdata blocks that make up the file. Figure C-2 illustrates an fnode for a short file.Decimal numbers are used in the figure for clarity.
Figure C-2. Short File Fnode
As you can see in Figure C-2, fnode 8 identifies the short file. The file consists ofthree distinct data blocks. Three ptr structures give the locations of the data blocks.The num_blocks field of each ptr structure gives the length of the data block (involume blocks), and the blk_ptr field points to the first volume block of the datablock.
The other fields shown in Figure C-2 include total_blks, this_size, andtotal_size. The total_blks field specifies the number of volume blocks
542 Appendix C Structure of a Named Volume
allocated to the file, which in this case is eight. This equals the sum of num_blocksvalues (3 + 2 + 3), since short files use all allocated space as data space.
The this_size field specifies the number of bytes of data space allocated to thefile. This is the sum of the num_blocks values (3 + 2 + 3) multiplied by the volumegranularity (1024) and equals 8192.
The total_size field specifies the number of bytes of data space that the fileoccupies (designated in Figure C-2 by the shaded area). As you can see, the file doesnot occupy all the space allocated for it, so the total_size value (8000) is not aslarge as the this_size value.
Long FilesIf the file consists of more than eight distinct blocks of data, its fnode must specify itas a long file. The fnode for a long file has bit 1 of the flags field set to one. Thistells the I/O System that the ptr structures of the fnode identify indirect blocks. Theindirect blocks identify the actual data blocks that make up the file.
Each indirect block contains a number of indirect pointers, which are structuressimilar to the ptr structures. However, an indirect block can contain more than eightstructures and thus can point to more than eight data blocks. In fact, an indirect blockcan consist of more than one volume block; however, all volume blocks of an indirectblock must be contiguous.
This is the 32-byte structure of each indirect pointer, in PL/M notation:
DECLARE
IND_PTR STRUCTURE(
nblocks BYTE,
blk_ptr(3) BYTE);
This is the 48-byte structure of each indirect pointer, in PL/M notation:
DECLARE
IND_PTR STRUCTURE(
num_blocks BYTE,
blk_ptr(5) BYTE);
This is the 32-byte structure in C:
typedef struct {
UINT_8 nblocks;
UINT_8 blk_ptr[3];
} IND_PTR_STRUCT;
This is the 48-byte structure in C:

Command Reference Appendix C 543
typedef struct indir48_ptr_struct{
unsigned short num_blocks;
unsigned char blk_ptr[5];
} INDIR48_PTR_STRUCT;
Where:
nblocks, num_blocksNumber of volume blocks in the data block.
blk_ptr A 24-bit volume block number of the first volume block in the datablock. Volume blocks are numbered sequentially throughout thevolume, starting with the block with the smallest address (block 0).
The OS determines how many indirect pointers there are in an indirect block bycomparing the nblocks fields of the indirect pointers with the num_blocks field ofthe fnode. It assumes that the indirect block contains as many pointers as necessaryfor the sum of the nblocks fields to equal the num_blocks field.
Because indirect blocks can span several volume blocks, any utility that uses indirectblocks must determine if an indirect block consists of more than one volume block.To do this:
1. Use the read DVU command to read the volume block pointed to by theblk_ptr field in the fnode's pointr structure. Blk_ptr points to thebeginning of a volume block containing all or the first part of an indirect block.
2. If the sum of all nblocks fields in the volume block is less than num_blocks,the indirect block continues into the next contiguous volume block. The utilitymust read and process the next volume block.
3. Add the nblocks values in the new volume block to the sum of all previousnblocks. When the sum of the nblock values equals num_blocks you havereached the end of the indirect block. If necessary, continue reading volumeblocks and summing nblocks values until the sum of the nblocks valuesequals num_blocks. The utility may have to read several volume blocks beforefinding the end of the indirect block.

544 Appendix C Structure of a Named Volume
Figure C-3 illustrates an fnode for a long file. Decimal numbers are used in thefigure for clarity.
Figure C-3. Long File Fnode

Command Reference Appendix C 545
As you can see in Figure C-3, fnode 9 identifies the long file. The actual file consistsof nine distinct data blocks. One ptr structure and an indirect block give thelocations of the data blocks. The num_blocks field of the ptr structure contains thenumber of volume blocks pointed to by the indirect block. The blk_ptr field pointsto the first volume block of the indirect block.
In the indirect block, each nblocks field gives the length of an individual data block,and each blk_ptr field points to the first volume block of a data block.
Figure C-3 also lists the total_blks, +this_size, and total_size values,which are more complex than for a short file. The total_blks field specifies thenumber of volume blocks allocated to the file, which in this case is 21. Of these 21and 20 are used for actual data storage and 1 is used for the indirect block.
The this_size field specifies the number of bytes of data space allocated to thefile, and does not include the size of the indirect block. This size is equal to thenum_blocks value (20) or the sum of nblocks values in the indirect block (2 + 1 +2 + 3 + 2 + 3 + 3 + 2 + 2 = 20) multiplied by the volume granularity (1024) andequals 20480.
The total_size field specifies the number of bytes of data space that the filecurrently occupies (designated in Figure C-3 by the shaded areas). As you can see,the file does not occupy all the space allocated for it, so the total_size value(20300) is not as large as the this_size value.
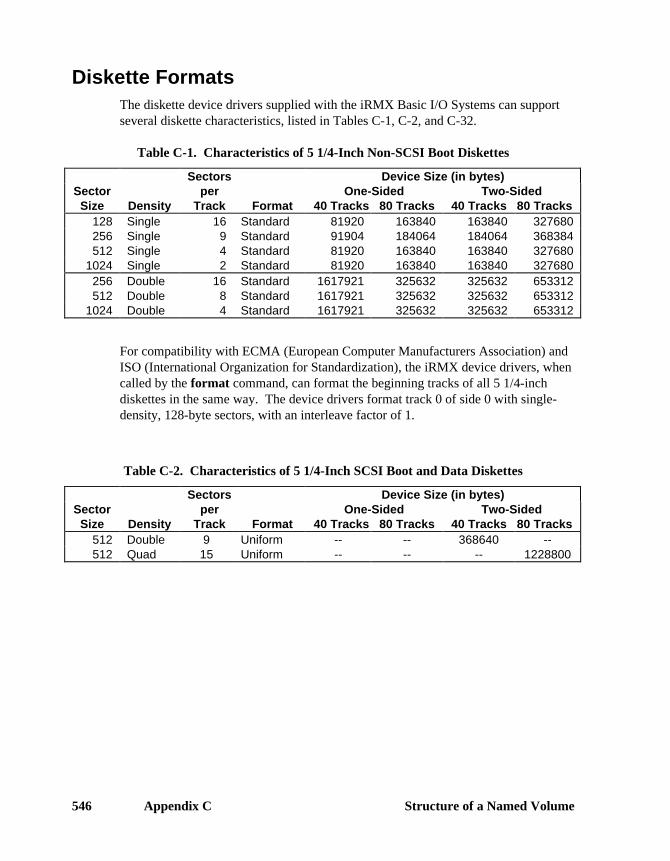
546 Appendix C Structure of a Named Volume
Diskette FormatsThe diskette device drivers supplied with the iRMX Basic I/O Systems can supportseveral diskette characteristics, listed in Tables C-1, C-2, and C-32.
Table C-1. Characteristics of 5 1/4-Inch Non-SCSI Boot Diskettes
Sectors Device Size (in bytes)Sector
Size Densityper
Track FormatOne-Sided
40 Tracks 80 TracksTwo-Sided
40 Tracks 80 Tracks128 Single 16 Standard 81920 163840 163840 327680256 Single 9 Standard 91904 184064 184064 368384512 Single 4 Standard 81920 163840 163840 327680
1024 Single 2 Standard 81920 163840 163840 327680256 Double 16 Standard 1617921 325632 325632 653312512 Double 8 Standard 1617921 325632 325632 653312
1024 Double 4 Standard 1617921 325632 325632 653312
For compatibility with ECMA (European Computer Manufacturers Association) andISO (International Organization for Standardization), the iRMX device drivers, whencalled by the format command, can format the beginning tracks of all 5 1/4-inchdiskettes in the same way. The device drivers format track 0 of side 0 with single-density, 128-byte sectors, with an interleave factor of 1.
Table C-2. Characteristics of 5 1/4-Inch SCSI Boot and Data Diskettes
Sectors Device Size (in bytes)Sector
Size Densityper
Track FormatOne-Sided
40 Tracks 80 TracksTwo-Sided
40 Tracks 80 Tracks512 Double 9 Uniform -- -- 368640 --512 Quad 15 Uniform -- -- -- 1228800

Command Reference Appendix C 547
Table C-3. Characteristics of 3 1/2-Inch SCSI Boot and Data Diskettes
Sectors Device Size (in bytes)Sector
Size Densityper
Track FormatOne-Sided80 Tracks
Two-Sided80 Tracks
512 Quad 18 Uniform -- 14745600
512 Double 9 Uniform 737280 --
The iRMX device drivers map the sectors on these beginning tracks into blocks ofdevice granularity size so that the BIOS and the Bootstrap Loader can treat diskettesas if they contained a contiguous string of blocks, all of the same size.
When the device driver tries to combine these leftover sectors of track 0, side 1 withthe first sectors of track 1, side 0, it finds that the sectors of track 1, side 0 are alreadyof device granularity size. Therefore, since the device driver cannot access partialsectors, it is left with one block (the leftover sectors of track 0, side 1) that is lessthan device granularity size. When the device granularity is 512, this small block isblock 19; when the device granularity is 1024, it is block 9.
If nothing is done to exclude this smaller-than-normal block from use, the devicedriver will treat this block as a normal block, assuming it is of device granularity size.Thus, if you try to write information to that block, the driver will attempt to write anentire device granularity block of information into a block that is much smaller,thereby losing data.
To prevent this situation, the format command automatically declares this smaller-than-normal block as allocated in the volume free space map when it formats thevolume. This prevents the BIOS from ever writing information into this block. Ifyou write your own formatting utility, you should also declare this block as allocated.
■■ ■■ ■■

548 Appendix C Structure of a Named Volume
Command Reference Appendix D 549
Real-Time Graphics Interface DDescription
The iRMX II and III OSs contain a driver that supports the SBX 279 and 279Agraphics interface modules. These modules attach to a Multibus CPU board andprovide users with a graphics interface, including:
• A windowed environment
• A mouse to use in manipulating windows
• A PC-style keyboard for entering data
These sections describe the windows and how to manipulate them with the mouse.
Using the WindowsThe windows provided by the SBX 279 or 279A board are ways of viewing manyoperations simultaneously on one screen. You can think of them as many terminalscontained in one, with each window representing a terminal. For example, theSystem 520 initializes with multiple windows. For each CPU board there are at leasttwo windows: one for the Monitor/Bootstrap loader/Debugger display and one forthe CPU HI screen.
At system start-up, the windows are layered on top of each other. You canmanipulate the windows with the mouse (move, resize, and relayer them) so that youcan view all or some of the windows at once. In the example screen in Figure D-1, Xis the OS (II for iRMX II, III for iRMX III) and y is the release level (1.0 for Release1, 4.0 for Release 4).

550 Appendix D Real-Time Graphics Interface
Figure D-1 is a simple display showing two windows for a single CPU.
MSA Bootstrap Loader
Booting from SCW_2
┌────────────────────────────────────────────────────Loading Bo│copied to :menu:
││4:46 global
Loading ta│onfig:R?INIT││-*-*-*-*-*-*-*-*-*-*-*-*-*-*-*-*-*-*-*-*-*-*-*-*-*-*││ iRMX* X.y operating system
││s a Registered Trademark of Intel Corporation
││-*-*-*-*-*-*-*-*-*-*-*-*-*-*-*-*-*-*-*-*-*-*-*-*-*-*│
└────────────────────────────────────────────────────
Figure D-1. An Example of Windows Displayed on the System 520
Command Reference Appendix D 551
Using the MouseYou can use the mouse to move, resize, and relayer the windows. All of theseactions are provided in one of two pop-up menus: basic or expanded.
The basic menu exists in EPROM on the SBX 279A Multimodule before the OS isinitialized. Once initialized, the OS can load the expanded menu when executing the:config:r?init file during the boot up procedure. The default system command file forthe System 520 contains several options that are commented out. Activate the optionthat is appropriate. The expanded menu offers more options and provides a fastermethod of selecting windows: just point at the desired window and press any of themouse buttons.
To select an option from either pop-up menu, do this:
1. Move the mouse so the pointer is outside any window.
2. Press and hold any one of the mouse buttons; the menu appears on the screen.
3. Move the mouse up or down the menu to select an option. Each option ishighlighted as the pointer passes over it.
4. To select an option, release the mouse button when the option is highlighted.The menu disappears and the pointer changes to an icon. The icons are shown tothe right of the menu in figures D-2 and D-3.
The mouse cannot be used to select anything inside a window (a file, for instance).
With the expanded menu map window function, you can also use the mouse toassociate an <Alt>-Function key combination with a specific window. This isespecially helpful when using numerous windows; for example, when there aremultiple CPU boards in a Multibus II system.
To load the expanded menu as part of your application, enter:
ad g279_0 as :vdi: physical
copy :config:<menu-name> to :vdi:
dd :vdi:
Where <menu-name> is one of these; both menus are initially installed in the:config:default directory:
menu.279 For the SBX 279 board
menu.279A For the SBX 279A board
If these commands are executed in a submit file, you cannot detach the :vdi: logicalname until about 2 seconds after copying the menu, due to buffer flushing in theBIOS. If the copying has not completed before the device is detached, the menu islost and the system must be restarted. To accomplish the 2 second delay, use thepause command or a status command such as date before the detach command.
552 Appendix D Real-Time Graphics Interface
Basic MenuThis section explains the selections provided by the basic menu, which is shown inFigure D-2. The icon for each menu selection is shown to the right of the menu item.This menu appears before the iRMX III OS is installed or initialized. Once installed,the OS invokes an expanded menu, which is described later.
Figure D-2. Basic Menu Selections
Command Reference Appendix D 553
The meaning of the basic menu selections is:
Pop This causes the selected window to appear on top of all other windows. Thekeyboard might not be attached to the window that has been popped. Use theKeyboard Focus selection to direct keyboard input to the popped window.
1. Select Pop from the menu with the mouse. The pointer changes to an up arrow.
2. Place the arrow within the desired window and press any of the mouse buttons.
3. The selected window is displayed on top of all other windows.
Push This causes the selected window to be placed behind all other windows.
1. Select Push from the menu with the mouse. The pointer changes to a downarrow.
2. Place the arrow within the desired window and press any of the mouse buttons.
3. The selected window is placed behind all other windows.
Pan This moves the contents of a window within the window. This selection is useful forviewing the contents of a window that has been reduced in size.
1. Select Pan from the menu with the mouse. The pointer changes to the iconshown in Figure D-2.
2. Place the icon within the desired window. Press and hold down any of themouse buttons.
3. Moving the mouse moves the contents of the window.
4. Release the mouse button when the desired contents are displayed.
Move This moves a window around the screen.
1. Select Move from the menu with the mouse. The pointer changes to the iconshown in Figure D-2.
2. Position the icon within the desired window. Press and hold down any of themouse buttons.
3. Moving the mouse moves the entire window.
4. Release the mouse button when the window is in the desired location.
554 Appendix D Real-Time Graphics Interface
Resize This selection changes the size of a window.
1. Select Resize from the menu with the mouse. The pointer changes to the iconshown in Figure D-2.
2. Position the icon within the desired window and near one of the four corners ofthe window. The selected corner will be the part of the window that moves.Press and hold down any of the mouse buttons.
3. Move the mouse to shrink or enlarge the window.
4. Release the mouse button when the window is at the desired size. Windowcontents are not rescaled when the window is resized. The maximum size of awindow is either the size of the bitmap in which it is drawn or the size of thescreen.
Keyboard FocusThis selection directs keyboard input to a window.
1. Select Keyboard Focus from the menu with the mouse. The pointer changes toa box icon.
2. Position the icon within the desired window and press any of the mouse buttons.
3. Keyboard input is now directed to the selected window.
Pop/FocusThis causes the selected window to appear on top of all the other windows, withkeyboard input directed to the selected window. This is the same as using Popfollowed by Keyboard Focus.
1. Select Pop/Focus from the menu with the mouse. The pointer changes to theicon shown in Figure D-3.
2. Position the icon within the desired window and press any of the mouse buttons.
3. The selected window is displayed on top of all other windows and keyboardinput is directed to it.
Command Reference Appendix D 555
Pop/Focus/ResizeThis causes the selected window to appear on top of the other windows withkeyboard input directed to it, and expands the window to full width andapproximately three-quarter height.
1. Select Pop/Focus/Resize from the menu with the mouse. The pointer changes tothe icon shown in Figure D-3.
2. Position the icon within the desired window and press any of the mouse buttons.
3. The selected window is displayed on top of other windows, expanded in size,with keyboard input directed to it.
Exit Use this selection to leave the menu list without affecting the windows.

556 Appendix D Real-Time Graphics Interface
Expanded MenuThis section explains the selections provided by the expanded menu, which is shownin Figure D-3. The icon for each menu selection is shown to the right of that menuitem. This menu is provided by the OS on the System 520.
Figure D-3. Expanded Menu Selections
Command Reference Appendix D 557
The meaning of the expanded menu selections is:
Pan This moves the contents of a window within the window. This selection is useful forviewing the contents of a window that has been reduced in size.
1. Select Pan from the menu with the mouse. The pointer changes to the iconshown in Figure D-3.
2. Place the icon within the desired window. Press and hold down any of themouse buttons.
3. Moving the mouse moves the contents of the window.
4. Release the mouse button when the desired contents are displayed.
Attach KeyboardThis selection directs keyboard input to a window.
1. Select Attach Keyboard from the menu with the mouse. The pointer changes toa box icon.
2. Position the icon within the desired window and press any of the mouse buttons.
3. Keyboard input is now directed to the selected window.
Pop to ForegroundThis causes the selected window to appear on top of all other windows. Thekeyboard might not be attached to the window that has been popped. Use the AttachKeyboard selection to direct keyboard input to the popped window.
1. Select Pop to Foreground from the menu with the mouse. The pointer changesto an up arrow.
2. Place the arrow within the desired window and press any of the mouse buttons.
3. The selected window is displayed on top of all other windows.
Push to BackgroundThis causes the selected window to be placed behind all other windows.
1. Select Push to Background from the menu with the mouse. The pointerchanges to a down arrow.
2. Place the arrow within the desired window and press any of the mouse buttons.
3. The selected window is placed behind all other windows.
558 Appendix D Real-Time Graphics Interface
Pop and Set FocusThis causes the selected window to appear on top of all other windows, withkeyboard input directed to the selected window.
1. Select Pop and Set Focus from the menu with the mouse. The pointer changesto a combination box and up arrow icon.
2. Place the icon within the desired window and press any of the mouse buttons.
3. The selected window is displayed on top of all other windows and keyboardinput is directed to it.
Move WindowThis moves a window around the screen.
1. Select Move Window from the menu with the mouse. The pointer changes tothe icon shown in Figure D-3.
2. Position the icon within the desired window. Press and hold down any of themouse buttons.
3. Move the mouse to move the entire window.
4. Release the mouse button when the window is in the desired location.
Resize WindowThis selection changes the size of a window.
1. Select Resize Window from the menu with the mouse.
2. Position the icon within the desired window and near one of the four corners ofthe window. The selected corner will be the part of the window that moves.Press and hold down any of the mouse buttons.
3. Move the mouse to shrink or enlarge the window.
4. Release the mouse button when the window is at the desired size. Windowcontents are not rescaled when the window is resized. The maximum size of awindow is either the size of the bitmap in which it is drawn or the size of thescreen.
Command Reference Appendix D 559
Expand WindowThis causes the selected window to appear on top of the other windows withkeyboard input directed to it, and expands the window to full width andapproximately three-quarter height.
1. Select Expand Window from the menu with the mouse.
2. Position the icon within the desired window and press any of the mouse buttons.
3. The selected window is displayed on top of other windows, expanded in size,with keyboard input directed to it.
Reduce WindowThis selection allows you to shrink the size of a window quickly and move it out ofthe way of other windows.
1. Select Reduce Window from the menu with the mouse.
2. Position the icon within the desired window next to one of the four corners.Press and hold down any one of the mouse buttons.
3. Move the mouse; the window shrinks rapidly.
4. Release the mouse when the window reaches the desired size and position on thescreen.
Map WindowThis selection assigns an <Alt>-Function key combination (F1-F10) to each window.When the <Alt>-Function key combination is pressed, the corresponding window isdisplayed on top of other windows and keyboard input is directed to that window.
1. Select Map Window from the menu with the mouse.
2. Position the icon within the desired window and press any one of the mousebuttons.
3. On the keyboard, hold down the <Alt> key and press the function key you wantassigned to the window.
4. To use the function keys to select a window, hold down the <Alt> key and pressthe corresponding function key. The window assigned to that key is displayed ontop of other windows and keyboard input is directed to it.
See also: SBX 279A Display Subsystem Hardware Reference Manual andProgrammer's Guide to the Real-Time Graphics Interface
■■ ■■ ■■

560 Appendix D Real-Time Graphics Interface
Command Reference Appendix E 561
Supplied Device Drivers andPhysical Device Names
Supplied Device Drivers
Preconfigured Drivers, DOSRMX and iRMX For PCsThese are the device drivers that are built into DOSRMX and iRMX for PCs:
• ROM BIOS-based Hard Disk Driver
• ROM BIOS-based Diskette Driver
• Byte Bucket Driver
• COM1 driver and COM2 driver
If you are using an iRMX driver to attach a flexible disk or hard disk partition, don'tattempt to attach it using the EDOS file driver.
ROM BIOS-based Hard Disk Driver
The ROM BIOS-based Hard Disk Driver is the link between iRMX and one or twoIBM PC-AT-compatible hard disk controllers. This is a random access driver. Thedriver supports one to four partitions on a single hard disk. Each partition is accessedas a logical device. The partitions can support different file structures, allowingmultiple operating systems to exist on a single drive. The Physical File driver canaccess all partitions created on a hard disk; the Named File driver can access onlyiRMX partitions.
A generic unit is associated with each physical drive. This unit automatically mapsto the first iRMX partition. The unit is part of the Automatic Device CharacteristicsRecognition (ADCR) feature of the OS.
Each disk drive can support up to six device-units, as shown in Table E-1.
E

562 Appendix E Physical Device Names
Table E-1. Hard Disk Partition Names
DUIB Name DescriptionC_RMX Generic name for C: driveC_RMX0 DUIB for entire drive (all partitions)C_RMX1 Partition 1C_RMX2 Partition 2C_RMX3 Partition 3C_RMX4 Partition 4D_RMX Generic DUIB name for D: driveD_RMX0 DUIB for entire driveD_RMX1 Partition 1D_RMX2 Partition 2D_RMX3 Partition 3D_RMX4 Partition 4
ROM BIOS-based Diskette Driver
The ROM BIOS-based diskette driver is the link between DOSRMX and one IBM PC-AT-compatible diskette controller. This random-access driver supports the diskcontroller as one device with two device-units. Table E-2 lists the device namesavailable for the diskette drives.
✏ NoteYou must use the drivers in Table E-2 for iRMX For PCs. Do notuse a_dos and b_dos.

Command Reference Appendix E 563
Table E-2. Diskette Driver Device Names
Device Name Disk CapacityDrive 0 (Unit 0)
Disk Format Drive CapacityA 360 Kbytes Uniform 360 Kbytes 48 TPIAH 1.2 Mbytes Uniform 1.2 Mbytes 96 TPIAM 720 Kbytes Uniform 135 TPIAMH 1.44 Mbytes Uniform 135 TPIAMO 2.88 Mbytes Uniform 135 TPI
Device Name Disk CapacityDrive 1 (Unit 1)
Disk Format Drive CapacityB 360 Kbytes Uniform 360 Kbytes 48 TPIBH 1.2 Mbytes Uniform 1.2 Mbytes 96 TPIBM 720 Kbytes Uniform 135 TPIBMH 1.44 Mbytes Uniform 135 TPIBMO 2.88 Mbytes Uniform 135 TPI
Byte Bucket Driver
This driver provides a pseudo device interface for operations that don't require deviceactivity. It is used for discarding output (byte bucket) and for direct communicationbetween tasks (stream files).
Driver characteristics are
• Returns EOF for read operations and write-completed for write operations
• Accepts all operations except special and seek, in the case of stream files, butdoes no operations for them
See also: Stream files, System Concepts
COM1 and COM2 Driver
See also: comdrv, System Configuration and Administration, for a description ofthe COM1 and COM2 drivers and how to set the I/O addresses andinterrupts to use them
564 Appendix E Physical Device Names
Loadable Device DriversYou add loadable drivers to the OS dynamically using the sysload command insteadof building the driver into the OS with the ICU.
See also: Loadable Jobs and Device Drivers, System Configuration andAdministration, for descriptions of each loadable driver
The OS includes source code for loadable driver initialization front-ends in thesedirectories: /rmx386/demo/c/ldd for C and /rmx386/demo/plm/ldd for PL/M. Thedefault drivers are found in /rmx386/drivers. Use the soource code examples whenwriting your own loadable drivers.
See also: Making a Driver Loadable, Driver Programming Conceptsloadable device drivers, System Configuration and Administration
Loadable Device Driver Support Files
The OS provides a number of include files, for both C and PL/M, and a library thatsupports loadable drivers. The files contain literal and data structure definitions,macros, and utilities required for custom, random access, and terminal drivers. Thesefiles are described below:
lddinfo.lit Contains the PL/M literal declarations that define the data structuresused by loadable drivers.
lddinfo.h Contains the C literal declarations that define the data structures used byloadable drivers.
lddinfo.mac Contains ASM literal declarations and macros that are used to produceloadable device driver configuration files.
lddupc.ext Contains PL/M external declarations for a number of driver utilitiesfound in the loadable device driver library ldd.lib.
lddupc.h Contains C external declarations for a number of driver utilityprocedures found in the loadable device driver library ldd.lib. Theprocedures are described in later chapters.
ldd.lib Contains the linkable utility procedure and driver modules provided inloadable and reconfigurable form. The library is found in the/rmx386/lib directory along with the standard iRMX interface libraries.
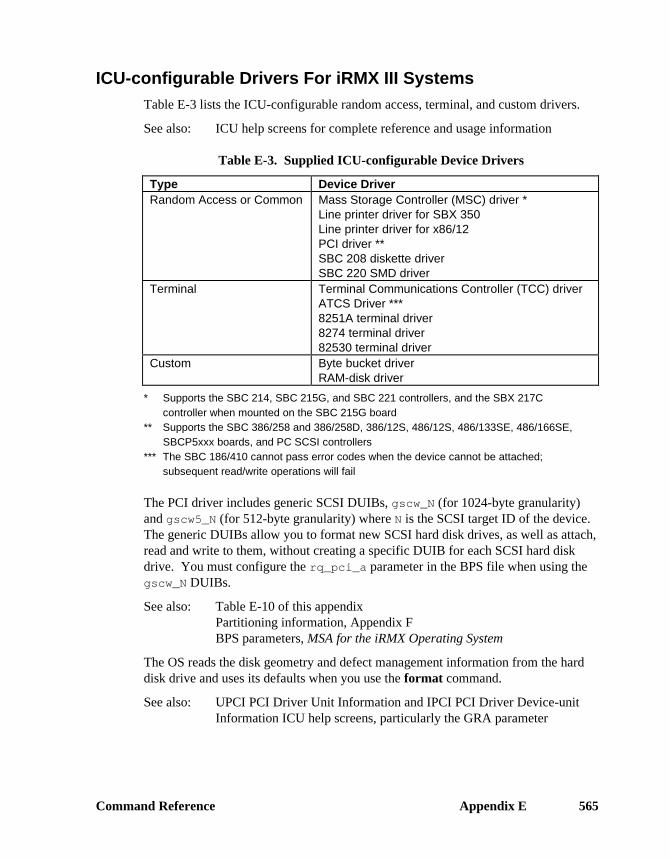
Command Reference Appendix E 565
ICU-configurable Drivers For iRMX III SystemsTable E-3 lists the ICU-configurable random access, terminal, and custom drivers.
See also: ICU help screens for complete reference and usage information
Table E-3. Supplied ICU-configurable Device Drivers
Type Device DriverRandom Access or Common Mass Storage Controller (MSC) driver *
Line printer driver for SBX 350Line printer driver for x86/12PCI driver **SBC 208 diskette driverSBC 220 SMD driver
Terminal Terminal Communications Controller (TCC) driverATCS Driver ***8251A terminal driver8274 terminal driver82530 terminal driver
Custom Byte bucket driverRAM-disk driver
* Supports the SBC 214, SBC 215G, and SBC 221 controllers, and the SBX 217Ccontroller when mounted on the SBC 215G board
** Supports the SBC 386/258 and 386/258D, 386/12S, 486/12S, 486/133SE, 486/166SE,SBCP5xxx boards, and PC SCSI controllers
*** The SBC 186/410 cannot pass error codes when the device cannot be attached;subsequent read/write operations will fail
The PCI driver includes generic SCSI DUIBs, gscw_N (for 1024-byte granularity)and gscw5_N (for 512-byte granularity) where N is the SCSI target ID of the device.The generic DUIBs allow you to format new SCSI hard disk drives, as well as attach,read and write to them, without creating a specific DUIB for each SCSI hard diskdrive. You must configure the rq_pci_a parameter in the BPS file when using thegscw_N DUIBs.
See also: Table E-10 of this appendixPartitioning information, Appendix FBPS parameters, MSA for the iRMX Operating System
The OS reads the disk geometry and defect management information from the harddisk drive and uses its defaults when you use the format command.
See also: UPCI PCI Driver Unit Information and IPCI PCI Driver Device-unitInformation ICU help screens, particularly the GRA parameter
566 Appendix E Physical Device Names
The PCI driver also includes SCSI DUIB, scw_N where N is the device-unit numberof the device. This DUIBs allow you to attach, read and write iRMX preformattedSCSI hard disk drives.
See also: Table E-10 of this appendix
Physical Device NamesThe tables in this section list the physical device names for disk drives, tape drives,and terminals, as supplied by default drivers in the operating system. You can makeother device names available by loading device drivers. Physical names identify aparticular Device Unit Information Block (DUIB) that specifies the physicalcharacteristics of the device.
See also: Loadable device drivers, System Configuration and Administrationphysname command, Chapter 2
You use the physical names for disk and tape devices in the attachdevice and mirrorcommands. The physical name you use to attach a device is also used by the formatand backup commands to properly format the device. Therefore, it is important touse the name that specifically describes the device characteristics, or use the gscw_NDUIBs provided. The non-generic DUIBs listed in the tables specify product names.If a device by a different manufacturer corresponds to the physical characteristics of adevice listed in the table (number of cylinders, heads, etc.), you may use the physicalname in the table.
If a device is already formatted and you are attaching it to read or write files (but notto back up files), you may attach it under a generic name (scw_N) listed in theappropriate table.
You use the physical names for terminals in the attachdevice, connect, lock, andunlock commands. You also specify terminal physical names in the:config:terminals file.
See also: attachdevice, mirror, format, backup, connect, lock, and unlockcommands, Chapter 2
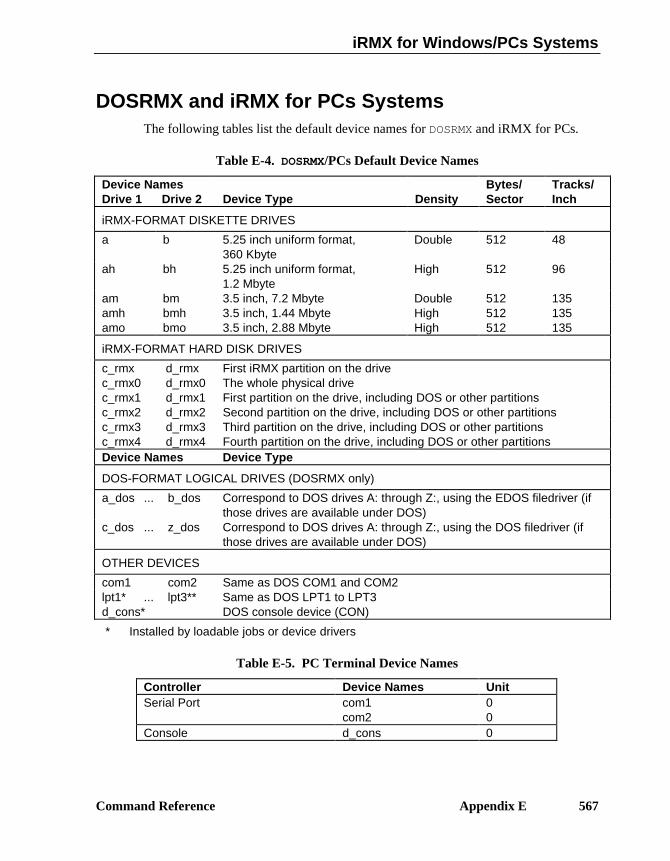
iRMX for Windows/PCs Systems
Command Reference Appendix E 567
DOSRMX and iRMX for PCs SystemsThe following tables list the default device names for DOSRMX and iRMX for PCs.
Table E-4. DOSRMX/PCs Default Device Names
Device NamesDrive 1 Drive 2 Device Type Density
Bytes/Sector
Tracks/Inch
iRMX-FORMAT DISKETTE DRIVES
a b 5.25 inch uniform format,360 Kbyte
Double 512 48
ah bh 5.25 inch uniform format,1.2 Mbyte
High 512 96
am bm 3.5 inch, 7.2 Mbyte Double 512 135amh bmh 3.5 inch, 1.44 Mbyte High 512 135amo bmo 3.5 inch, 2.88 Mbyte High 512 135
iRMX-FORMAT HARD DISK DRIVES
c_rmx d_rmx First iRMX partition on the drivec_rmx0 d_rmx0 The whole physical drivec_rmx1 d_rmx1 First partition on the drive, including DOS or other partitionsc_rmx2 d_rmx2 Second partition on the drive, including DOS or other partitionsc_rmx3 d_rmx3 Third partition on the drive, including DOS or other partitionsc_rmx4 d_rmx4 Fourth partition on the drive, including DOS or other partitionsDevice Names Device Type
DOS-FORMAT LOGICAL DRIVES (DOSRMX only)
a_dos ... b_dos Correspond to DOS drives A: through Z:, using the EDOS filedriver (ifthose drives are available under DOS)
c_dos ... z_dos Correspond to DOS drives A: through Z:, using the DOS filedriver (ifthose drives are available under DOS)
OTHER DEVICES
com1 com2 Same as DOS COM1 and COM2lpt1* ... lpt3** Same as DOS LPT1 to LPT3d_cons* DOS console device (CON)
* Installed by loadable jobs or device drivers
Table E-5. PC Terminal Device Names
Controller Device Names UnitSerial Port com1
com200
Console d_cons 0

iRMX for Windows/PCs Systems
568 Appendix E Physical Device Names
✏ NoteThe PCI driver makes available a set of DUIBs including genericDUIBS for SCSI devices and for partitioned SCSI devices.Partitioned SCSI hard disk drives have different DUIBs than non-partitioned drives. Refer to Appendix F for information on howpartitions are specified.
See also: Tables of DUIBs in pcidrv, System Configuration andAdministration
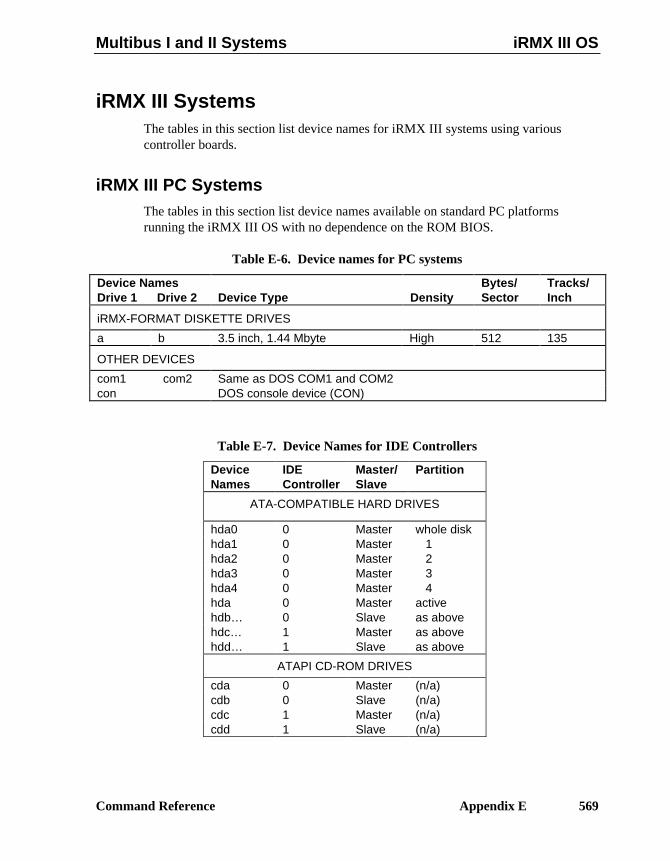
Multibus I and II Systems iRMX III OS
Command Reference Appendix E 569
iRMX III SystemsThe tables in this section list device names for iRMX III systems using variouscontroller boards.
iRMX III PC SystemsThe tables in this section list device names available on standard PC platformsrunning the iRMX III OS with no dependence on the ROM BIOS.
Table E-6. Device names for PC systems
Device NamesDrive 1 Drive 2 Device Type Density
Bytes/Sector
Tracks/Inch
iRMX-FORMAT DISKETTE DRIVES
a b 3.5 inch, 1.44 Mbyte High 512 135
OTHER DEVICES
com1 com2 Same as DOS COM1 and COM2con DOS console device (CON)
Table E-7. Device Names for IDE Controllers
DeviceNames
IDEController
Master/Slave
Partition
ATA-COMPATIBLE HARD DRIVES
hda0 0 Master whole diskhda1 0 Master 1hda2 0 Master 2hda3 0 Master 3hda4 0 Master 4hda 0 Master activehdb… 0 Slave as abovehdc… 1 Master as abovehdd… 1 Slave as above
ATAPI CD-ROM DRIVES
cda 0 Master (n/a)cdb 0 Slave (n/a)cdc 1 Master (n/a)cdd 1 Slave (n/a)
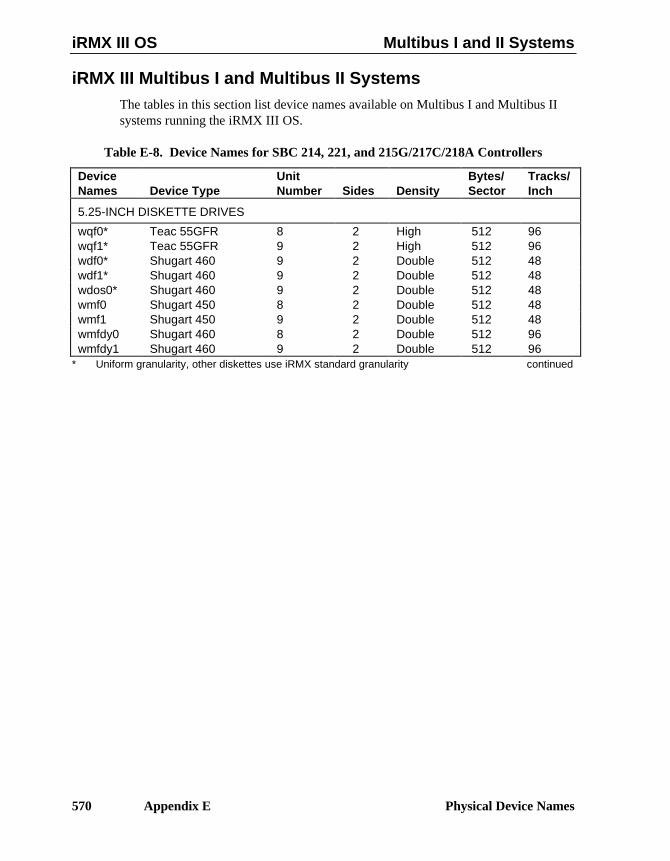
iRMX III OS Multibus I and II Systems
570 Appendix E Physical Device Names
iRMX III Multibus I and Multibus II SystemsThe tables in this section list device names available on Multibus I and Multibus IIsystems running the iRMX III OS.
Table E-8. Device Names for SBC 214, 221, and 215G/217C/218A Controllers
DeviceNames Device Type
UnitNumber Sides Density
Bytes/Sector
Tracks/Inch
5.25-INCH DISKETTE DRIVES
wqf0* Teac 55GFR 8 2 High 512 96wqf1* Teac 55GFR 9 2 High 512 96wdf0* Shugart 460 9 2 Double 512 48wdf1* Shugart 460 9 2 Double 512 48wdos0* Shugart 460 9 2 Double 512 48wmf0 Shugart 450 8 2 Double 512 48wmf1 Shugart 450 9 2 Double 512 48wmfdy0 Shugart 460 8 2 Double 512 96wmfdy1 Shugart 460 9 2 Double 512 96
* Uniform granularity, other diskettes use iRMX standard granularity continued
Multibus I and II Systems iRMX III OS
Command Reference Appendix E 571
Table E-8. Device Names for SBC 214, 221, and 215G/217C/218A Controllers(continued)
Device Names Device Type Unit Number Bytes/Sector
HARD DISK DRIVES
w0 generic drive 0 1024w1 generic drive 1 1024cm0 CMI 5412 0 1024cm1 CMI 5412 1 1024cmb0 CMI 5419 and Fujitsu M2235 0 1024cmb1 CMI 5419 and Fujitsu M2235 1 1024mma0 Maxtor XT-1140 0 1024mma1 Maxtor XT-1140 1 1024mmb0 Maxtor XT-1085 0 1024mmb1 Maxtor XT-1085 1 1024mmc0 Maxtor XT-4170E 0 1024mmc1 Maxtor XT-4170E 1 1024mmd0 Maxtor XT-4380E 0 1024mmd1 Maxtor XT-4380E 1 1024mme0 Maxtor XT-8760E 0 1024mme1 Maxtor XT-8760E 1 1024qma0 Quantum Q540 0 1024qma1 Quantum Q540 1 1024sma0 Seagate ST-225 0 1024sma1 Seagate ST-225 1 1024tma0 Toshiba MK56FB 0 1024tma1 Toshiba MK56FB 0 1024
5.25-INCH CARTRIDGE TAPE DRIVES
wta0 Archive 12 N/A
ADDITIONAL DEVICE NAMES FOR iSBC 221S CONTROLLER ONLY
GW500M_0 Generic 500 Mbyte drive 0 512GW500M_1 Generic 500 Mbyte drive 1 512GW700M_0 Generic 700 Mbyte drive 0 512GW700M_1 Generic 700 Mbyte drive 1 512GW1G_0 Generic 1 Gbyte drive 0 512GW1G_1 Generic 1 Gbyte drive 1 512GW2G_0 Generic 2 Gbyte drive 0 512GW2G_1 Generic 2 Gbyte drive 1 512GW4G_0 Generic 4 Gbyte drive 0 512GW4G_1 Generic 4 Gbyte drive 1 512

iRMX III OS Multibus I and II Systems
572 Appendix E Physical Device Names
Table E-9. Device Names for SBC 386/12S and 486/12S SCSI Controllers
Device NamesExampleDevice Type
SCSIAdapter
SCSI-IDNumber Density
Bytes/Sector
5.25-INCH DISKETTE DRIVES
sqf0* Teac 55GFR NCR ADP-20 0 high 512sqf1* Teac 55GFR NCR ADP-20 1 high 512sdf0* Teac 55GFR NCR ADP-20 0 double 512sdf1* Teac 55GFR NCR ADP-20 1 double 512smf0** Teac 55GFR NCR ADP-20 0 double 512smf1** Teac 55GFR NCR ADP-20 1 double 512t55_0* Teac 55GFR*** N/A 0 high 512t55_1* Teac 55GFR*** N/A 1 high 512t55D_0* Teac 55GFR*** N/A 0 double 512t55D_1* Teac 55GFR*** N/A 1 double 512Device Names Device Type SCSI-ID (N) Bytes/Sector
5.25-INCH CARTRIDGE TAPE DRIVES
sta0 Archive 2125S 6 N/A
OPTICAL DRIVES
OPT 1G1G_N Maxoptix Tahiti II 0, 1, 2, 3 1024OPT 1G1G5_N Maxoptix Tahiti II 0, 1, 2, 3 512OPT 650M_N Maxoptix Tahiti II 0, 1, 2, 3 1024OPT 650M5_N Maxoptix Tahiti II 0, 1, 2, 3 512* Uniform granularity** Using the SCSI interface, smf0/1 diskettes that have iRMX Standard granularity can be read only
if they are formatted on a Multibus I system with the parameters:format :F:disk ms=0 ext=41. They cannot be written to or formatted on a SCSI device.
*** The SCSI adapter is part of this drive. No separate SCSI adapter board (for example, an NCRADP-20) is required.
See also: Table E-10 for Hard Drive namesPCI Generic SCSI DUIB, Driver Programming ConceptsMSA for the iRMX Operating System Manual

Multibus I and II Systems iRMX III OS
Command Reference Appendix E 573
Table E-10. Device Names for SBC 386/258(D) and 486/133SE Controllers
Device NamesExampleDevice Type
SCSIAdapter
SCSI-IDNumber Density
Bytes/Sector
5.25-INCH DISKETTE DRIVES
wqf0* Teac 55GFR NCR ADP-20 0 high 512wqf1* Teac 55GFR NCR ADP-20 1 high 512wdf0* Teac 55GFR NCR ADP-20 0 double 512wdf1* Teac 55GFR NCR ADP-20 1 double 512wmf0** Teac 55GFR NCR ADP-20 0 double 512wmf1** Teac 55GFR NCR ADP-20 1 double 512t55_0* Teac 55GFR*** N/A 0 high 512t55_1* Teac 55GFR*** N/A 1 high 512t55D_0* Teac 55GFR*** N/A 0 double 512t55D_0* Teac 55GFR*** N/A 1 double 512
3.5-INCH DISKETTE DRIVES
t235_0* FD-235HF*** N/A 0 high 512t235_1* FD-235HF*** N/A 1 high 512Device Names Device Type SCSI-ID (N) Bytes/Sector
OPTICAL DRIVES
OPT 1G1G_N Maxoptix Tahiti II 0, 1, 2, 3 1024OPT 1G1G5_N Maxoptix Tahiti II 0, 1, 2, 3 512OPT 650M_N Maxoptix Tahiti II 0, 1, 2, 3 1024OPT 650M5_N Maxoptix Tahiti II 0, 1, 2, 3 512
* Uniform granularity continued** Using the SCSI interface, wmf0/1 diskettes that have iRMX Standard granularity can be read only if
they are formatted on a Multibus I system with the parameters:format :F:disk ms=0 ext=41. They cannot be written to or formatted on a SCSI device.
*** The SCSI adapter is part of this drive. No separate SCSI adapter board (for example, an NCR ADP-20) is required.
iRMX III OS Multibus I and II Systems
574 Appendix E Physical Device Names
✏ NoteThe DUIBs wmf0 and wmf1, which refer to standard format iNDX-compatible diskettes, are only present for backward compatibilityand are not recommended. Their use is strictly READ-ONLY.
Table E-10. Device Names for SBC 386/258(D) and 486/133SE Controllers (continued)
Device Names Device Type SCSI-ID (N) Bytes/Sector
HARD DISK DRIVES
scw_N* Generic SCSI 2, 3 1024gscw5_N Generic SCSI 2, 3 512gscw_N Generic SCSI 2, 3 1024gscw5_NMxEy Generic Partitioned SCSI 2, 3 512m4170_N Maxtor XT-4170S 2, 3 1024m4380_N Maxtor XT-4380S 2, 3 1024m8380_N Maxtor XT-8380S 2, 3 1024m8760_N Maxtor XT-8760S 2, 3 1024
CARTRIDGE TAPE DRIVES
wta0 wtab0 Tape drive 6 N/A
CD-ROM DRIVES
cd0 CDROM drive 5 2048cd1 CDROM drive 6 2048
* This DUIB can be used to access SCSI hard drives that have been formatted with the iRMXformat command, without creating a specific DUIB for each type of disk.
See also: PCI Generic SCSI DUIB, Driver Programming Concepts
✏ NotePartitioned SCSI hard disk drives have different DUIBs than non-partitioned drives. Refer to Appendix F for information on howpartitions are specified.
Multibus I and II Systems iRMX III OS
Command Reference Appendix E 575
Table E-11 lists standard physical device names of terminals. Where a board numberappears, the ICU definition file supports multiple instances of the controller board.
Table E-11. Multibus I Terminal Device Names
Controller CPU Boards Device Names Unit8251A SBC 386/2x/3x t0 08247 SBC 386/12(S) t1 0
SBC 486/12(S)SBC 544A SBC 386/12(S) t3 1
SBC 486/12(S) t4 2t5 3
SBC 188/56 SBC 386/12(S)SBC 486/12(S)SBC 386/2X/3X
SBC 548 SBC 386/12(S)SBC 486/12(S)
Controller CPU Boards Device Names Unit BoardSBC 547 SBC 386/2X/3X t547_0 ... t547_7 0-7 1
t547_8 ... t547_1 0-7 2t547_16 ... t547_23 0-7 3
iRMX III OS Multibus I and II Systems
576 Appendix E Physical Device Names
Table E-12 lists standard physical device names of Multibus II terminals. ATCSdevices refer to devices defined by the Asynchronous Terminal Controller Server.
See also: ATCS driver, ICU User’s Guide and Quick Referenceatcsdrv, System Configuration and Administration
Table E-12. Multibus II Terminal Device Names
Controller CPU Board Device Name Unit
82530 SBC 386/100 (with SBX 354) t82530_0 0SBC 386/116 (with SBX 354) t82530_1 1SBC 386/120 (with SBX 354)SBC 386/133SBC 386/258DSBC 486/125SBC 486/150SBC 486/133SESBC 486/166SE
82091AA P5090/120ISE COM1 0SBC P5090- COM2 0
ATCS DEVICE NAMES: All Multibus II definition files that include the ATCS device driverprovide the same ATCS device names
Controller Boards: CPU Boards:SBC 186/410 or 186/450MIXn86/020(A) with MIX/450 modulesMPI 450
Any Multibus II CPU or I/O Server Boardhosting the ATCS/450 Server Job
Board ID Device Names Unit Instance
186/410 t_atcs_a0 ... t_atcs_a11 0-11 1186/450 t_atcs_b0 ... t_atcs_b11 0-11 1MIXn86/020(A) (with MIX/450 modules) t_atcs_c0 ... t_atcs_c35 0-35 1486/125 (used for any CPU board) t_atcs_d0 ... t_atcs_d35 0-35 1486/133SE atcs_con_0 0 1(used for any I/O server board) t279_0 ... t279_4 0-4 1

Other Controller Boards iRMX III OS
Command Reference Appendix E 577
Table E-13 lists suggested physical device names for iRMX III systems using othercontroller boards.
Table E-13. Suggested Physical Device Names for Other Devices
DeviceNames
DeviceType
UnitNumber Sides Density
Bytes/Sector
Tracks/Inch
8-INCH DISKETTE DRIVES CONTROLLED BY THE SBC 208 BOARD
af0 Shugart SA800 0 1 Single 128 77af1 Shugart SA800 1 1 Single 128 77afd0 Shugart SA800 0 1 Double 256 77afd1 Shugart SA800 1 1 Double 256 77afdd0 Shugart SA850/SA851 0 2 Double 256 77afdd1 Shugart SA850/SA851 1 2 Double 256 77afdx0 Shugart SA850/SA851 0 2 Double 1024 77afdx1 Shugart SA850/SA851 1 2 Double 1024 77
5.25-INCH DISKETTE DRIVES CONTROLLED BY THE SBC 208 BOARD
amf0 Shugart 450 0 2 Double 512 48amf1 Shugart 450 1 2 Double 512 48amfdy0 Shugart 460 0 2 Double 512 96amfdy1 Shugart 460 1 2 Double 512 96
continued

iRMX III OS Other Controller Boards
578 Appendix E Physical Device Names
Table E-13. Suggested Physical Device Names For Other Devices (continued)
Device Names Device Type Unit Number Bytes/Sector
HARD DISK DRIVES CONTROLLED BY THE SBC 186/224A BOARD
w0 generic 0 1024w1 generic 1 1024cm0 CMI 5412 0 1024cm1 CMI 5412 1 1024cmb0 CMI 5419 and Fujitsu M2235 0 1024cmb1 CMI 5419 and Fujitsu M2235 1 1024qma0 Quantum Q540 0 1024qma1 Quantum Q540 1 1024mma0 Maxtor XT-1140 0 1024mma1 Maxtor XT-1140 1 1024mmb0 Maxtor XT-1085 0 1024mmb1 Maxtor XT-1085 1 1024
5.25-INCH CARTRIDGE TAPE DRIVES Controlled by the SBC 186/224A Board
wta0 QIC-02 12 N/A
STORAGE MODULE DISK DRIVES (SMD) Controlled by the SBC 220 Board
smd0 0 1024smd1 1 1024
■■ ■■ ■■
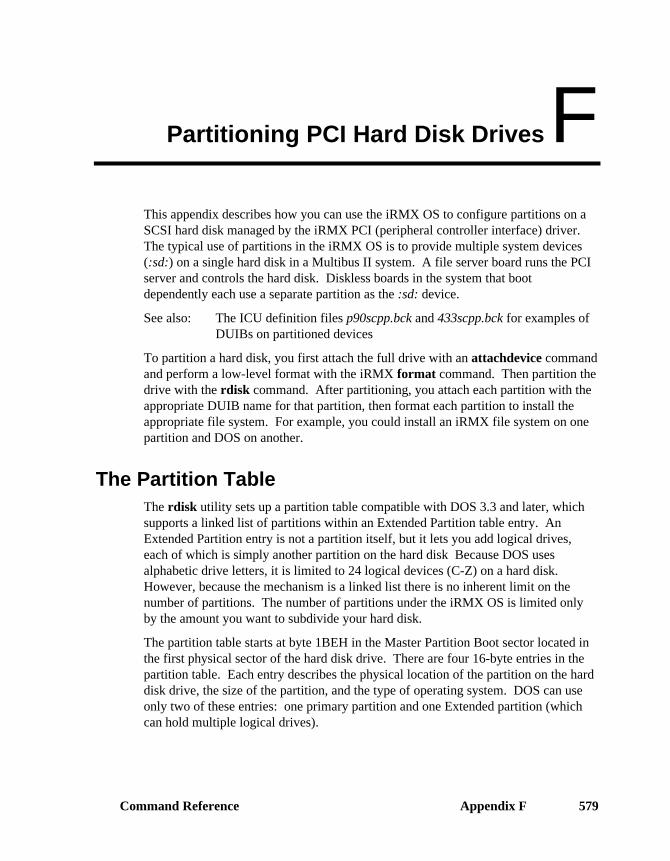
Command Reference Appendix F 579
Partitioning PCI Hard Disk DrivesFThis appendix describes how you can use the iRMX OS to configure partitions on aSCSI hard disk managed by the iRMX PCI (peripheral controller interface) driver.The typical use of partitions in the iRMX OS is to provide multiple system devices(:sd:) on a single hard disk in a Multibus II system. A file server board runs the PCIserver and controls the hard disk. Diskless boards in the system that bootdependently each use a separate partition as the :sd: device.
See also: The ICU definition files p90scpp.bck and 433scpp.bck for examples ofDUIBs on partitioned devices
To partition a hard disk, you first attach the full drive with an attachdevice commandand perform a low-level format with the iRMX format command. Then partition thedrive with the rdisk command. After partitioning, you attach each partition with theappropriate DUIB name for that partition, then format each partition to install theappropriate file system. For example, you could install an iRMX file system on onepartition and DOS on another.
The Partition TableThe rdisk utility sets up a partition table compatible with DOS 3.3 and later, whichsupports a linked list of partitions within an Extended Partition table entry. AnExtended Partition entry is not a partition itself, but it lets you add logical drives,each of which is simply another partition on the hard disk Because DOS usesalphabetic drive letters, it is limited to 24 logical devices (C-Z) on a hard disk.However, because the mechanism is a linked list there is no inherent limit on thenumber of partitions. The number of partitions under the iRMX OS is limited onlyby the amount you want to subdivide your hard disk.
The partition table starts at byte 1BEH in the Master Partition Boot sector located inthe first physical sector of the hard disk drive. There are four 16-byte entries in thepartition table. Each entry describes the physical location of the partition on the harddisk drive, the size of the partition, and the type of operating system. DOS can useonly two of these entries: one primary partition and one Extended partition (whichcan hold multiple logical drives).
Appendix F Partitioning PCI Hard Disk Drives580
Figure F-1 is an example of a partition table that has both DOS and iRMX partitions.The first two entries indicate the DOS primary partition and DOS extended partition.The extended partition is the beginning of a list pointing to two additional DOSpartitions. From this partition table, DOS finds three logical DOS drives: D:, E:, andF: (assuming that this is not a disk drive from which DOS boots, which would bedrive C:). The DOS primary partition is drive d: and the two logical drives in theExtended Partition are drives E: and F:.
Entries 3 and 4 in the partition table are an iRMX primary partition and an iRMXExtended Partition, which contains two logical drives The iRMX OS is not limited toone partition of each type. For example, you could have two iRMX primarypartitions and two iRMX extended partitions. Or you could have up to three iRMXextended partitions. Entry 1 of the partition table must be a primary partition, not anextended partition. There is no inherent limit on the number of logical drives you cancreate within an iRMX extended partition.
DOS Partition
DOS Extended Partition
Master Boot Partition
DOS Partition DOS Partition
Extended Logical Drive(s)
OM04458
iRMX Partition
iRMX Extended Partition iRMX Partition iRMX Partition
Figure F-1. Partition Table With iRMX and DOS Partitions
Specifying iRMX PartitionsA special DUIB name supports partitioned SCSI hard disk drives, gscw5_NMxEy.This name is formed by adding a Master Boot Partition (M) number and ExtendedLogical Drive (E) number to the generic SCSI disk drive DUIB. In this DUIB name,substitute SCSI ID 2 or 3 for N. The M and E are part of the name. For x and y,substitute:
x The number of the Master Boot Partition, in the range 1-4.
y The decimal number of the Extended Logical Drive. Only Master Bootpartitions 2-4 can have Extended Logical Drives.

Command Reference Appendix F 581
Example DUIB NameThe PCI DUIB gscw5_2 specifies a generic SCSI hard disk drive with 512-bytegranularity and a SCSI ID of 2. Using the example of Figure F-1, the DUIBgscw5_2M3 describes the first iRMX partition. The DUIB gscw5_2M4E2 specifiesthe second Extended Logical Drive of the iRMX extended partition.
How to Use PCI PartitioningTo prepare a hard disk drive for the installation of a new operating system, you mustperform three tasks:
1. Low-level format, with 512-byte granularity required for PCI support.2. Partitioning3. High-level format
If the hard disk drive is already formatted with the required granularity (512), alow-level format is unnecessary. If, however, the hard disk drive is not formattedwith 512 byte granularity, you must perform a low level format. Use the iRMXformat command and specify either the named or dos option without the quickoption to perform the low-level format. If you do a named format, specify the msaoption to install the second-stage bootstrap loader on the disk; this is required if youwant to boot the iRMX OS from this disk.
After the drive is low-level formatted, use the rdisk command to partition the harddisk and build the partition table. Typically, you also use the partitioning utility tospecify one of the primary partitions as the active boot partition.
After partitioning, use either the DOS or iRMX format command to perform a high-level format on each partition. A high-level format writes OS-dependent file systeminformation (volume label, FAT, root directory, etc.). Before using the iRMXformat command, you must attach each partition with the attachdevice command,specifying the DUIB name that identifies each partition.
Partitioning and Formatting ToolsThese tools are used for partitioning and formatting PCI hard disk drives:rdisk A DOS and iRMX command provided by the iRMX OS for
partitioning hard disk drivesformat An iRMX command that can perform a low level format (physical
sectoring) and high level format ( iRMX file system information)of hard drives and diskettes
format A DOS command that can perform a high level format (DOS filessystem information) of hard drives and diskettes
Appendix F Partitioning PCI Hard Disk Drives582
▲▲! CAUTIONIf a hard disk drive is partitioned with the DOS version of rdisk,use only the DOS version of rdisk to view or modify the partitiontable. The different OS versions of rdisk get the CHS (cylinder,head, sector) information in two different ways. The two ways arenot consistent and trying to use the two different versions of rdiskinterchangeably will corrupt the hard disk drive.
Partitioning Example for the iRMX III OSThis example includes a 20-slot Multibus II system with an I/O Server and six CPUboards. The I/O Server board contains a diskette drive, a tape drive, and a 1 Gbytehard disk drive. Assuming that each CPU board requires a system disk, partition thehard disk drive into six partitions of approximately equal size (165 Mbytes) to holdthe OS. The general procedure for partitioning the hard drive is:
1. Boot the iRMX OS from a diskette.
2. Attach the hard disk with the attachdevice command. Use a DUIB thatdescribes the entire hard disk, for example, gscw_2.
3. Low-level format: Use the iRMX format command to install the MSA secondstage on the hard disk by specifying the named and MSA switches on thecommand line. If the disk already has a low-level format with 512-bytegranularity, you can skip the low-level format by specifying the quick option.At this point you need not specify the files option.
4. Partitioning: Use rdisk to partition the drive into six parts. The Master BootPartition Table will have only two entries, an iRMX primary partition and aniRMX extended partition which is the header to a linked list of five partitions.
5. High-level format: Attach each partition with the appropriate DUIB name andformat the partition using the format command with the quick option to writethe file system information on the partition while skipping the low level format.If you forget to specify the quick option, the PCI device driver ignores a lowlevel format request on a partition. Specify the files option and any otheroptions you want for each partition.
6. Use the ICU to create an iRMX OS image for each board in the system, with therequired DUIBs to recognize the disk partition(s) that OS will use. Install theiRMX OS images and development tools on each formatted partition since eachpartition will serve as a different board’s system disk.
Command Reference Appendix F 583
✏ NoteIf you are installing the OS as described in the Installation andStartup manual, most of the steps listed above are performed bysubmit files during the installation. Steps 3 and 4 above arecovered by the partitioning instructions of Chapter 5, Step 4 in theInstallation manual. Steps 5 and 6 above are covered forinstallation on the first partition by the instructions in Chapter 5,Step 5 of the Installation manual.
After you install the OS on the first partition, you may choose toperform the installation in Step 6 above by attaching subsequentpartitions and copying files from the first partition.
MSA BootingThe Bootstrap Loader operates in two stages. The first stage loader resides in ROMand is independent of the OS. The first stage loads the second stage from the massstorage device. The second stage loads the OS. The second stage bootstrap processcan follow one of three methods: independent, dependent, or quasi-independent.
Boards that have a hard disk drive attached locally, such as the SBC 486/166SE orSBC P5120ISE, can boot independently. The disks attached to these boards must beformatted with the msa option. The msa option writes the MSA second stage at theend of the disk. The exact location of the second stage is written into an entry in theBootloader Location Table (BOLT), also written by format. As long as these tracksat the end of the disk space are not included in any partition, the second stage isavailable to boot from. Rdisk reserves the last cylinder of the disk for this purpose; itwill not allow you to include that cylinder in any partition you define.
The MSA second stage uses the bl_boot_master_part andbl_boot_logical_part BPS parameters to specify which partition to boot from.Use these parameters to override the default (active) boot partition. You mustspecify these BPS parameters at the Master Test Handler (MTH) prompt using themp command. If you don’t enter the master partition number at the MTH promptand the hard disk drive is partitioned, with the master partition marked active, thenthe second stage boots from that partition.
For example, to specify the primary iRMX partition from Figure F-1, you would setbl_boot_master_part=3 because it is the third entry in the master partition table.
To specify the last iRMX logical drive partition from Figure F-1, you would setbl_boot_master_part=4 and bl_boot_logical_part=2. This partition is thesecond logical drive entry in the fourth entry of the master partition table.
See also: BPS parameters, MSA for the iRMX Operating System

Appendix F Partitioning PCI Hard Disk Drives584
Partition Support for Multibus I Systems or PCsThe iRMX partitioning support is only provided for SCSI drives controlled by thePCI driver. Support is thus limited for systems other than the iRMX III OS in aMultibus II chassis.
Multibus I SystemsThese limitations apply in a Multibus I system:
• There is no boot support for partitioned drives
• Once booted, PCI can support a second disk drive that has been partitioned, butthis does not allow for booting diskless boards from individual partitions, as in aMultibus II system. Thus there is little point in partitioning the drive.
PC SystemsOn a PC or PC-compatible board in a Multibus system you can run DOSRMX oriRMX for PCs. These limitations apply to such systems:
• There is no boot support for partitioned drives
• The DUIBs to support partitioning are provided by the loadable PCI driver,pcidrv. However, these DUIBs are not available until the driver is loaded fromthe disk, so they can support only a second disk drive that has been partitioned,after booting.
■■ ■■ ■■

Command Reference Index 585
Index
! command, 18, 45& character
for continuing command lines, 14/ (slash) character
as pathname separator, 10; (semicolon) as comment character, 14? (question mark) character
as wildcard, 12in hidden files, 14
Aabbreviating
command names, 18command parameters, 17commands, 57
absolutely-located files, 338access rights, 9
changing, 99code definitions, 129displaying, 126, 393for backup, 81for deleting DOS files, 115for deleting iRMX files, 114for deleting remote files, 115for DOS files, 302meaning, 297remote directories, 105remote files, 130, 299root directory, 182setting, 297specifying, 298
accessingDOS files, 67iRMX files from Unix or Xenix, 92logical names, 66
accounting command, 47
accounting file, 538add DVU command examples, 450adding numbers, 449addloc command, 50address
Ethernet, 63Internet, 63translation, 63
address DVU command, 453examples, 456
aedit command, 54AEDIT text editor, 54after parameter, 17AL (Application Loader), 4alias command, 57
examples, 20, 61alias table, 57
setting size of, 343alias.csd file, 286aliases
creating, 20, 57default, 60defining, 57deleting, 110displaying, 58displaying definition, 57examples, 20for ic command, 215in background job, 77nesting, 20, 57permanent storage, 58system, 58table of, 58temporary storage, 58uses, 20
allocate DVU command, 447allocated fnodes, 438allocating
fnodes, 447
Index586
volume blocks, 447Application Loader, see ALarithmetic DVU commands examples, 450ARP tables, 63
displaying, 64modifying, 64permanent entries in, 63
arpbypass command, 63ASCII characters, 142, 148, 374, 381ASCII files, conversion to binary, 87ASCII name for volume, 176asterisk (*) character, 12ATCS (Asynchronous Terminal Controller
Server), 577devices, 577
attachdevice command, 30, 31, 32, 66device names in, 568examples, 27
attachfile command, 30, 31, 32, 72changing the working directory, 34creating and cataloging logical names, 32examples, 24limitations, 74using with Posix, 30
attachingdevices, 66diskette drives, 68diskettes, 69DOS-format diskettes, 70files, 72
AU (Administrative Unit), iRMX-NET, 269automatic device recognition, 519, 520
Bbackground command, 21, 76
examples, 14, 21, 78background jobs, 74
cancelling, 76deleting, 226displaying, 224memory pool sizes, 342output limitations, 76when logging off, 247
backup command, 79caution, 79with restore command, 82
with tapes, 27backup fnode file
creating, 438maintaining, 440
backup utility, DOS, 340backup volume label, creating, 438backup volumes, 81, 331backupfnodes DVU command, 451
examples, 440, 452bad blocks, 447
displaying, 487bad blocks file, 438, 448, 495, 500, 501bad blocks map file, 496, 505, 509, 539bad track information, 136, 185Basic I/O System, see BIOS:batch files, 356bcl command, 87
examples, 88bcl, definition, 87bf (backupfnodes) DVU command, 451binding, improving efficiency, 337BIOS (Basic I/O System), 4
and debug command, 112buffers, 350
BLD286, 50BLD386, 50block allocation, 447block DVU command, 454
examples, 456blocks
bad, map of, 539indirect, 533, 535, 544indirect, description, 544
BND386, example of submit command, 357BOLT (Bootloader Location Table), 524boot system, information about, 362bootdos command, 90bootfile, 51, 234bootloadable file, creating, 51Bootloader Location Table (BOLT), 524bootrmx command, 91bootstrap loader
MSA first stage, 524MSA second stage, 524
Bootstrap Loaderblocks, 513stages of, 186
Command Reference Index 587
third stage, 240byte bucket, 33Byte Bucket device driver, 565
Ccase command, 92
examples, 92case-sensitive items
client system name, 269converting filenames, 92grep parameter, 207password, 283translating file contents, 381
cataloginglogical names, 32
cataloging logical names, 32ccinfo file, 87, 88, 397CDF (Client Definition File), 269changeid command, 93characters
finding, 54in logical names, 30special, 10, 11, 21substituting, 54
checksums, 476, 480, 500chkdsk command, 236chmod command, 202circumflex (^) character in pathnames, 10CLI (Command Line Interpreter)
as initial program, 286description, 5environment values, 341loadable, 94prompt, 343
cli command, 94CLI commands
compared with HI commands, 14not allowed in esubmit file, 165summary table, 40
Client Definition File, see CDFcolon (:) character, 30
in logical names, 30COM1 and COM2 driver, 565command aliases
creating, 20entering, 18
examples, 20nesting, 20provided, 18uses, 20
command interfacecustom, 5user-written, 4
Command Line Interpreter, see CLIcommand lines
continuing, 14maximum length, 14
command parametersabbreviating, 17to, over, and after, 17
command usageabbreviating, 18, 57aliases for, 18case-sensitivity, 14, 29CLI, 40comment character ;, 14continuing lines, 14customizing, 19deleting aliases, 110DOS, 42editing, 18, 45entering, 18entering, 14executing throughout directory, 382HI (Human Interface), 40HI (Human Interface), 42in esubmit file, 144in makefile, 248in submit file, 356invoking, 18iRMX-NET, 43length of, 14multiple pathnames, 13, 19network, 43, 44NFS, 29on :$: logical name, 23recalling, 18, 45, 211search path, 19, 20selecting, 4summary table, 39syntax, 15, 16, 29table of, 39TCP/IP, 29, 44

Index588
timing execution of, 378using to/over/after parameters, 17writing, 19
comment character ;using, 14
comments in code, 14communicating
using stream files, 7configuration
and home directory, 34and iRMX for Windows, 1and logical names, 33, 35and number of mailboxes, 37and search paths, 19for RAM disk, 239
configuration files directory, 33configuring
for RAM disk, 51public directories, 279
connect command, 95terminal names in, 568
connectionsdisplaying, 274to files, 74
console command, 97examples, 97
console inputlogical name for, 35redirecting, 21
console input device, 35console output
logical name for, 35redirecting, 21
console output device, 35continuation character, 14
setting, 145continuing command lines, 14conversion DVU commands
address, 453block, 454dec, 455examples, 456hex, 456
convertingabsolute address into volume block number,
454block number into absolute address, 453
copy command, 11, 98as background job, 14, 21examples, 13, 14, 21, 26limitations, 99
copydir command, 101examples, 103
crdir (createdir) command, 105crdir command (createdir), 105createdir command, 105
examples, 22, 24creating
backup volume label, 438directories, 24files, 8large programs automatically, 248mirror set, 419r?save file, 438r?save file, example, 439
Ctrl-Q keys, 373Ctrl-S keys, 373current working directory, 34
Dd (displaybyte) DVU command, 461Data Link Layer, 219datagrams, 307date
default, 108format, 107
date command, 107db (displaybyte) DVU command, 461dd (detachdevice) command, 119dd (displaydirectory) DVU command, 465dd command (detachdevice), 119dealias command, 57, 110debug command, 111
interrupts disabled by, 112limitations, 111
debug monitor, 97dec DVU command, 455
examples, 456decimal equivalent of a number, finding, 455default aliases, 60default date, 108default directory, 24default prefix, 34

Command Reference Index 589
default route, 275default search path, 19delete command, 114
examples, 25, 26deletedir command, 116deletename command, 118deleting
directories, 25server names and addresses, 118
detachdevice command, 119detachfile command, 121detaching
devices, 119, 350diskettes, 69DOS-format diskettes, 70files, 121
detachingdevices, 68
device driversbuilt into DOSRMX, 563Byte Bucket, 565COM1 and COM2, 565flexible disk, 564hard disk, 563loadable, 365, 566loading, 1supplied, 567
device namesDOSRMX, 569, 570in pathnames, 24iRMX for PCs, 569, 570iRMX III, various controller boards, 578Multibus I, 571Multibus II, 571using, 568where used, 568
device recognition, automatic, 519, 520Device Unit Information Block, see DUIB
namesdeviceinfo command, 123devices
attaching, 66detaching, 68, 119, 350physical names, 568
df (detachfile) command, 121df (displayfnode) DVU command, 467df command (detachfile), 121
dir command, 9, 22, 125and hidden files, 14examples, 5, 26, 128
directoriesavailable to network, 279, 309, 325combining, 102command search path, 19copying, 102creating, 22, 24, 105default, 24deleting, 25displaying, 22, 127, 465fnodes, 438home, 24, 34naming, 8naming conventions, 22overwriting, 101renaming, 25root, 10
directory accessfor backup, 81remote, 105
directory tree, 8disconnect command, 133disk DVU command, 458
examples, 460disk mirroring
applications, 403, 405, 417automatic enabling, 409, 410benefits, 404creating the mirror set, 419disk protection, 426event notification, 410event notification, example, 421failure detection, 406hardware configuration, 411, 412, 413, 414,
415maximum outstanding commands, 417mirror set, definition, 404mirror state structure, 426operation, 405operations, summary, 417primary disk failure, 424repair, 408repair of system device, 408repair off-line, example, 422repair off-line, example, 424
Index590
repair on-line, example, 425repair on-line, example, 423repair options, 422resynchronization, 406, 408rollover, 406, 407secondary disk failure, 422setup, example, 419, 420software configuration, 416system device repair, 408terminology, 404using a_special, 426
Disk Verification Utility, see DVU. see DVUdiskette drives, attaching, 68diskettes
attaching and detaching, 69attaching and detaching, caution, 69characteristics of 3 1/2-inch, 549characteristics of 5 1/4-inch, 548formats, 548formatting, 27interleave factor, 184standard and uniform granularity, 189track 0 abnormalities, 548
disksbad track information, 185detecting failure, 406interleave factor, 184making bootable, 187mirroring, 263, 403verifying, 134
diskverify command, 134, 178examples, 138in interactive mode, see DVUinteractive mode, 429
diskverify commands, see DVU commandsdisplaybyte DVU command, 461
examples, 461displaydirectory DVU command, 465
examples, 466displayfnode DVU command, 467
examples, 470displaying
bad blocks, 487bad track information, 484DUIB names, 304fnode fields, 467fnodes from r?save file, 472
iRMX OS fixes, 399volume block, 473, 474working buffer, 461, 463
displaynextblock DVU command, 473displaypreviousblock DVU command, 474displaysavefnode DVU command, 472displayword DVU command, 463
examples, 463div DVU command examples, 450dividing numbers, 449dnb (displaynextblock) DVU command, 473domain command, 141DOS
interface, 339DOS commands
summary table, 42DOS directories
access rights, 302DOS file driver, 67DOS files, 7
access, 9, 67access rights, 302user, 302
DOS format option, 180DOS NUL device, 33DOS-format diskettes
attaching, 70detaching, 70
DOSRMXdebugging tools, 97device names, 569, 570
dpb (displaypreviousblock) DVU command, 474dsf (displaysavefnode) DVU command, 472DUIB names, 68, 95, 189, 263, 568
displaying, 304dump command, 142duplicate volume label file, 438, 541duplicated lines, finding in files, 384DVU (Disk Verification Utility)
aborting commands, 435as single command, 134caution, 430command names, abbreviating, 433command names, entering, 433command parameters, 434command radices, 434directing output, 431

Command Reference Index 591
error messages, 436exiting, 479, 488functions, 429interactive mode, 429invocation error messages, 432invoking, 431parameters, 434quitting, 488radices, 434
DVU commands< (displaypreviousblock), 474> (displaynextblock), 473aborting, 435address, 453, 454bf (backupfnodes), 451conversion, 453d (displaybyte), 461db (displaybyte), 461dd (displaydirectory), 465dec, 455df (displayfnode), 467disk, 458displaybyte, 461displaydirectory, 465displayfnode, 467displaynextblock, 473displaysavefnode, 472displayword, 463dnb (displaynextblock), 473dpb (displaypreviousblock), 474dsf (displaysavefnode), 472dw (displayword), 463e (exit), 479editfnode, 475editsavefnode, 478ef (editfnode), 475esf (editsavefnode), 478exit, 479fix, 480free, 482gb (getbadtrackinfo), 484getbadtrackinfo, 484h (help), 486help, 486hex, 456lbb (listbadblocks), 487listbadblocks, 487
q (quit), 488quit, 488r (read), 489read, 489restorefnode, 490restorevolumelabel, 493rf (restorefnode), 490rvl (restorevolumelabel), 493s (substitutebyte), 497save, 495sb (substitutebyte), 497substitutebyte, 497substituteword, 499summary table, 445sw (substituteword), 499v (verify), 500verify, 500w (write), 510write, 510
dw (displayword) DVU command, 463dynamic terminals, 4
restricting access to, 284
Ee (exit) DVU command, 479ECHO_REQUEST packets, 307ECHO_RESPONSE packets, 307editfnode DVU command, 475
examples, 476editing
fnodes, 475r?save fnodes, 478working xe "DVU
commands:substituteword"xe "DVUcommands:sw (substituteword)"xe"substituteword DVU command"xe "sw(substituteword) DVU command"buffer,499
working buffer, 497editsavefnode DVU command, 478EDOS (Encapsulated DOS) files, 7
access, 9EDOS file driver, 67EDOS volume, 27ef (editfnode) DVU command, 475EIOS (Extended I/O System), 4

Index592
attached devices, 350buffers, 350
enetinfo command, 143environment values, 341error messages
description, 35general HI, 35general iRMX-NET, 37
errorsdisplaying network, 273Streams, 276
esf (editsavefnode) DVU command, 478esubmit command, 144
examples, 165esubmit file, 144
using pause command, 291Ethernet address, 88, 173, 219
displaying local, 143format of, 205getting local, 204, 227mapping to Internet, 63of boot clients, 88of spokesman system, 171
examplesadd DVU command, 450address DVU command, 456alias command, 20, 61arithmetic DVU commands, 450attachdevice command, 27attachfile command, 24background command, 14, 21, 78backupfnodes DVU command, 440, 452bcl command, 88block DVU command, 456case command, 92command aliases, 20console command, 97conversion DVU commands, 456copy command, 13, 14, 21, 26copy command and wildcards, 12copydir command, 103createdir command, 22, 24creating r?save file, 439dec DVU command, 456delete command, 26dir command, 5, 26, 128disk DVU command, 460
disk mirroring event notification, 421disk mirroring setup, 419, 420disk mirroring, off-line repair of primary
disk, 424disk mirroring, off-line repair of secondary
disk, 422disk mirroring, on-line repair of primary
disk, 425disk mirroring, on-line repair of secondary
disk, 423diskverify command, 138displaybyte DVU command, 461displaydirectory DVU command, 466displayfnode DVU command, 470displaying r?save file, 444displaysavefnode DVU command, 444displayword DVU command, 463div DVU command, 450DVU command radices, 434editfnode DVU command, 476esubmit command, 165file tree, 8format command, 27, 439grep command, 208help DVU command, 486hex DVU command, 456history command, 212I/O redirection, 21ic command, 216listbadblocks DVU command, 487loadable device driver, 566loadrmx command, 235locdata command, 239logical names, 31logicalnames command, 245maintaining backup fnode file, 440mod DVU command, 450mul DVU command, 450offer command, 279pathname prefixes, 23pathnames, 23physname command, 305remini command, 324renaming directories, 25restorefnode DVU command, 491restorevolumelabel DVU command, 443,
493
Command Reference Index 593
restoring fnodes, 441restoring the volume label, 443save DVU command, 496shutdown command, 440specifying volume names, 10sub DVU command, 450submit command, 357substitutebyte DVU command, 498substituteword DVU command, 499sysload command, 368traverse command, 382verify DVU command, 441, 505version command, 392wildcards, 12wildcards in pathnames, 13write DVU command, 511xlate command, 397
exit command, 169exit DVU command, 479exiting the DVU, 479, 488Extended I/O System, see EIOSextended memory
limitations, 339requirements, 234
extension data, 182required by HI, 182
extension objects, 222
Ffdisk utility, 320file descriptor nodes, 527file drivers, 8file tree, 8filenames, permitted characters, 8files
access rights toDOS, 67
access rights to, 9changing, 99DOS, 302for backup, 81iRMX from Unix or Xenix, 92network, 9remote, 9
bad track, 185concatenating, 13
connections to, 74copying across directories, 99creating, 8denying network access to, 325detaching, 121displaying, 352displaying in hexadecimal, 142displaying in pages, 281displaying names of, 383DOS access to, 9editing, 54EDOS, 7finding, 170finding duplicate lines in, 384granularity of, 182hidden, 14included in esubmit file, 162initial, 527long, 500, 544map, 183moving between volumes, 26named, 7naming conventions, 8owner of, 9, 99physical, 7remote, 7remote access to, 279, 299searching for string in, 207short, 537, 543size of, 500, 544, 547sorting contents of, 354stream, 7system, 182types of, 7, 531
as specified in fnodes, 500user ID, 297viewing, 54
find command, 170findname command, 171fix DVU command, 480fixing
bad checksums, 480volumes, 480
flexible disk driver, 564fnode files, 437, 438, 537
backing up, 348, 451structure, 437

Index594
fnodes (file descriptor nodes), 136, 181access ID, 535allocated, 438allocating, 447auxiliary bytes, 536creation time, 531data block identification, 532, 533description, 181, 527displaying, 467editing, 475flags, 448, 530for long files, 438, 547for short files, 438, 543freeing, 482granularity, 531last file access, 531last modification, 531owner, 531parent, 500, 536restoring, 441, 490restoring, caution, 441size (bytes) actual data, 531size (bytes) data space, 535structure, 528type, 531
format command, 174, 583DOS option, 180examples, 27, 439quick option, 181
formattingremote volumes, 27volumes, 27, 28
formfeed in paginate command, 282FPI (Front Panel Interrupt) server, 213free DVU command, 482free fnodes map file, 438, 448, 483, 495, 496,
500, 505, 508, 538free space, 538
on volume, 124, 127, 182free space map file, 508freeing
fnodes, 482FTP
commands, 195get command, 196macros, 197, 200open command, 200
put command, 200ftp command, 193
Ggateway, 275gb (getbadtrackinfo) DVU command, 484getaddr command, 204getbadtrackinfo DVU command, 484getname command, 205global object directory, 32, 34, 72, 74, 121granularity, 28
device, 182volume, 182
graphics interface modulesand :config:r?init file, 553basic menu, 554expanded menu, 558for Multibus, 551multiple windows, 552
grep command, 207examples, 208
Hhandling
disk failures, 422hard disk driver, 563hard disks, protecting, 426headings used by the dir command, 129help command, 209help DVU command, 486help files, 210hex DVU command, 456
examples, 456hexadecimal equivalent of a number, finding,
456HI (Human Interface)
description, 4HI (Human Interface) commands, 42
summary table, 40, 42HI commands
compared with CLI commands, 14description, 4directory, 34
hidden files, 14, 182specifying, 14

Command Reference Index 595
history command, 18, 211examples, 212
home directory, 24, 34, 72UNIX, 285
host namedisplaying, 274
host-unique ID, 345
II/O redirection, examples, 21I/O requests
PCI buffering, 292I/O streams, redirecting, 97ic command, 213
examples, 216ICMP (Internet Control Message Protocol), 307ICU (Interactive Configuration Utility), 1, 4
and client definition file, 269directory, 34
iNA 960boot file, 231bootloadable files, 390, 394Remote Boot Server, 87software, 272starting locally, 231subsystem ID, 143transport address format, 347
inamon command, 219indirect block, 533, 535, 544
description, 544spanning more than one volume block, 545
iNDX-based development, 189init_file_name parameter, 234initial files, 527initial program, 4initstatus command, 220Interactive Configuration Utility, see ICUinteractive jobs, 4, 32
deleting, 222interconnect registers, 215interconnect space, 213interface between DOS, ROM BIOS, and iRMX
OS, 339interfaces
displaying, 275interleave factor, 28, 183
selecting, 184Internet address
mapping to Ethernet, 63iRMX for PCs
device names, 569, 570remote booting, 324
iRMX for Windows, 1layers, 4
iRMX layers, 3iRMX volume
labels, 517, 518, 519structure, 513
iRMX-NETas optional layer, 4description, 5
iRMX-NET commands, 6directory, 34summary table, 43
iSBX 279 board and graphics interface modules,551
iSBX 279(A) boardand debugging, 112and graphics interface modules, 551
ISO volume label, 515ISO-TP4, 5
Jjob ID
background jobs, 76, 226interactive jobs, 222
jobdelete command, 222jobs
background, 74, 224deleting background, 226deleting interactive, 222object directories, 32
jobs command, 224
Kkeyb command, 225kill command, 226
Llanguage products, directory, 33

Index596
lanstatus command, 227large programs, creating automatically, 248layers of iRMX OS, 3lbb (listbadblocks) DVU command, 487length of command lines, 14line printer
logical name for, 34line-editing keys, 18listbadblocks DVU command, 487listing
bad blocks, 487commands entered, 18current background jobs, 224files and fnodes, 465files in directory, 26hidden files, 14iRMX OS fixes, 399objects in Name Server, 228
listname command, 228, 347load command, 231loadable device drivers, 68, 365, 367, 566
code examples, 566include files, 566
loadname command, 205, 232loadrmx command, 234
examples, 235local object directory, 32, 35location of files, 543locdata command, 238
examples, 239lock command, 242
terminal names in, 568log file
accounting, 47produced by esubmit file, 163
logical names:$:, 34:bb:, 33:ci:, 35:co:, 35:config:, 33:home:, 34:icu:, 34:lang:, 33:lp:, 34:prog:, 34:rmx:, 34
:sd:, 33:stream:, 34:system:, 34:util286:, 34:utils:, 34:work:, 34access to, 32accessing, 66as prefixes, 31cataloging, 32creating, 30default, 33definition, 6deleting, 119, 121duration of validity, 74for devices, 31, 66for directories, 25, 31for files, 31, 72in background jobs, 32, 77in pathnames, 10listing, 244order of search, 33rules for, 30syntax, 30system-wide, 33user, 34with attachfile command, 72
logicalnames command, 30, 244examples, 245to view attached devices, 68
logoffrecording activity, 48
logoff command, 57, 247logon
home directory, 72recording activity, 48
logon command as HI command, 5long files, 500, 544
fnode, 547fnode, 438
loopbackMTU, 275
low-level format, 179
Mmacro
Command Reference Index 597
FTP, 197, 200macros, creating, 54make command, 248makefile, 248map files, 183
rmxloc command, 338MAP386
example, submit command, 358marking bad blocks, 447memory command, 262memory pools
allocated to user, 262changing values in modules, 271for background jobs, 342size for background job, 76when debugging, 112
memory requirements, 234Message Interprocess Protocol, see MIPmetacharacter
setting, 145MIP (Message Interprocess Protocol), 37mirror command, 263, 403
device names in, 568mirroring, see disk mirroringMIX 560 boards, 143mkdep command, 267mod DVU command examples, 450modcdf command, 269modinfo command, 271mouse and graphics interface modules, 553moving
files between volumes, 26MSA Bootstrap Loader, 186
first stage, 524second stage, 524
MSA, booting from a partitioned disk, 585msaboot, 541MTU
Ethernet, 275loopback, 275
mul DVU command examples, 450Multibus and graphics interface modules, 551Multibus I
Bootstrap Loader, 186device names, 571
Multibus IIBootstrap Loader, 186
device names, 571interconnect space, 213locating and controlling boards, 213network names, 205slot ID, 213slot ID in prompt, 343slot ID in TSAP ID, 347
multiple pathnames, 11multiplying numbers, 449
NName Server, 141
property types, 172Name Server object table, 118, 228, 232, 345,
385named file driver, 8, 66, 69named files, 7named volumes, 137, 179
structure, 513, 514verifying, 500
namingdirectories, 8, 22files, 6, 8using logical names, 30volumes, benefits, 27
netinfo command, 272netstat command, 273
-a option, 274-sp option, 276
network controller board, 227, 231network file access, 9Network Management Facility (NMF), 219network name, displaying, 274network names
cataloging, 232getting, 205
network routing, 219networking commands, 6networking software, 5NFS file driver, 67NMF (Network Management Facility), 219NMI (Non-Maskable Interrupt), 213Nucleus, 4
and debug command, 112
Index598
Oobject directories
cataloging logical names, 32global, 32, 34, 72, 74, 121local, 32, 35order of search through, 33root, 33, 66, 95, 119, 133
Object Module Format (OMF), 236offer command, 279
examples, 279OMF (Object Module Format), 236, 394OMF286, 271, 394OMF386, 394OMF-386
reducing module size, 337OMF86, 271, 394OpenNET, 285
description, 5optional parameters, 15orphan fnodes, 480over parameter, 17
Ppacket traffic, 277paginate command, 281parameters
assigning, 20optional, 15to, over, and after, 17with alias command, 58
Parametersentering, 16order of entry, 16
partition table, 313, 582DOS and iRMX, 582structure of, 523verifying, 316
partitionscaution, 313, 584PCI disks, 581
DUIB, 582example, 584
valid numbers, 313password
client system, 269
creating or changing, 283password command, 283path command, 290pathnames
circumflex (^) in, 10definition, 6entering, 22examples, 23full, 10input and output, 13listing, 290prefix in, 23, 31relative, 10shortening, 24, 25specifying, 10, 11using, 22using multiple, 11, 13using wildcards in, 11
pause command, 291PC, Bootstrap Loader, 186pci command, 292PCI driver, 190PCI requests, direct, 292PCI server, 292pcnet command, 294permit command, 9, 295physical device names, 568physical files, 7physical ports, 95physical volumes, 137
verifying, 500physname command, 304
examples, 305ping command, 307port, displaying names, 274Posix shell, 30prefix, 31
default, 34definition, 6in pathname, 23volume, 26
Program Table Index Register (PTIR), 214prompt
setting, 343telnet, 369, 370while transferring files, 200
property types, 172, 205, 345
Command Reference Index 599
protected mode, 236protocols
displaying, 274displaying statistics for, 276
PTIR (Program Table Index Register), 214public directories, 279, 309, 325publicdir command, 309
Qq (quit) DVU command, 488question mark (?) character, 12quick format option, 181quit DVU command, 488
Rr (read) DVU command, 489r?badblockmap file, 182r?fnodemap file, 182r?logoff file, 286r?logon file, 286r?save file, 178, 182, 349, 438, 443, 451, 541
creating, 438creating, example, 439displaying, 443displaying fnodes, 472
r?save file, 451, 490, 493r?save fnodes
editing, 478r?secondstage file, 524, 541r?shutdown object, 349r?spacemap file, 182r?volumelabel file, 182RAM disk, 51
loadable driver, 367rdisk command, 310, 583rdisk command, caution, 584read DVU command, 489reading
volume blocks, 489redirecting
I/O, example, 21remini command, 324
example, 324Remote Boot Server, 87remote booting
iRMX for PCs, 324remote device, backing up, 81remote files, 7
access, 9access rights, 130displaying, 130user ID, 299
remote serverin attachdevice command, 67
remote systems, 69remote volumes
formatting, 27remove command, 325rename command, 326
limitations, 26renaming
directories, 25repairing
primary disk of mirror set, 424secondary disk of mirror set, 422system device, 408
restore command, 329with backup command, 82with tapes, 27
restore utility, DOS, 340restorefnode DVU command, 490
examples, 491restorevolumelabel DVU command, 493
examples, 443, 493restoring
fnodes, 490volume label, 442, 443, 493
resynchronizing disks, 408retension command, 336rf (restorefnode) DVU command, 490rmextdbg command, 337rmxloc command, 338rmxtsr command, 339ROM BIOS
interface, 339root directory, 10, 539
owner and accessors, 182root object directory, 33, 66, 95, 119, 133route command, 275routing table
displaying, 275rpstsr command, see iRMX for PCs Installation
Index600
rvl (restorevolumelabel) DVU command, 493
Ss (substitutebyte) DVU command, 497save DVU command, 495
examples, 496sb (substitutebyte) DVU command, 497SCSI DUIB, generic, 567search path, 20
default, 19definition, 19using, 19
security, 283semicolon (;) as comment character, 14serial ports, 95server names, cataloging, 345service information inside back cover, 1set command, 341
with alias table, 57setname command, 345setting up disk mirroring, 419setup utility, 320short files, 543
fnode, 543fnode, 438
shutdown command, 348examples, 440
site commands, 202size of files, 500, 544, 547skim command, 352slash (/) character
as pathname separator, 10sleep command, 354sort command, 354space accounting file, 438spokesman system, 171standard granularity, 189
devices, 571, 573, 574static terminals, 4stream file connection
logical name for, 34stream files, 7Streams
displaying failed requests, 276message buffers, 276
structures
named volume, 513sub DVU command examples, 450submit command, 58, 356
and esubmit command, 146MAP386 example, 358
submit command as HI command, 5submit file, 20, 356
used with esubmit command, 165using pause command, 291
subnet IDs, searching, 141subnetwork, 269, 299substitutebyte DVU command, 497
examples, 498substituteword DVU command, 499
examples, 499substitution character
setting, 145subtracting numbers, 449super command, 360super command as HI command, 5super user
becoming another user, 93becoming the, 360exiting, 169
supplied device drivers, 567DOSRMX, 563
sw (substituteword) DVU command, 499symbolic names, see logical namessyntax of commands, 15
diagram, explanation, 16sysinfo command, 362sysload command, 365
examples, 368system
displaying information about, 362performance index, 362shutting down, 348
system 520multiple windows, 552
System 520and graphics interface modules, 551
system aliases, 58System Debug Monitor, 111system device, 234
logical name for, 33system files, 182
displaying ZAPs, 399

Command Reference Index 601
system manager, 360system types, 1, 362
Ttapes
formatting, 81, 179retensioning, 336
TCP/IP commands, summary, 44TELNET
close command, 370commands, 370help command, 371open command, 370quit command, 370
telnet command, 369term command, 372terminals
disconnecting, 133displaying or changing attributes, 372displaying status of, 220iRMX III PC device names, 569loadable drivers, 367locked, 95, 133, 242, 349, 387Multibus I device names, 576Multibus II device names, 577restricting access to, 284setting type of, 342static and dynamic, 4virtual, 133, 242, 387
textcopying, 54moving, 54
time command, 375timer command, 378tnrmx command, 369to parameter, 17tokens, 32touch command, 379track 0 abnormalities, diskettes, 548traffic display, 277translate command, 381traverse command, 382
examples, 382tree command, 383TSAP ID, 172
table, 346
turn-around time, 184
UUDF (User Definition File), 283, 299ulimit command, 202umask command, 202uniq command, 384UNIX shell, 285unloadname command, 233, 385unlock command, 387
terminal names in, 568unxlate command, 390user
adding, 284and logical names, 34changing password, 283, 287creating, 283displaying current ID, 393displaying information about, 287listing access rights, 126locking out, 242remote, 279removing, 286verified, 93
user ID, 297changing Super's, 93displaying, 393remote files, 299
utility programs, directory, 34
Vv (verify) DVU command, 500valid partition numbers, 313ver DOS command, 340verified user, 9, 93, 360verify DVU command, 500
examples, 441, 505functions, 500
verifyingpartition table, 316volumes, 500
version command, 391examples, 392
virtual terminals, 133, 242, 387volume blocks

Index602
displaying, 473, 474freeing, 482reading, 489
volume free space map file, 438, 448, 483, 495,496, 500, 505, 538
volume granularity, 182volume label file, 182, 437, 438, 493, 539volume labels, 514
creating backup, 438iRMX, 517, 518, 519ISO, 515restoring, 442, 493structure, 437structure, iRMX, 517, 518, 519structure, ISO, 515
volume map files, 183volume name, 179volumes
backup, 81, 331definition, 6displaying attributes, 458displaying attributes, 135displaying information about, 123fixing, 480formatting, 27, 28free space, 124, 127granularity, 28named, 179named and physical, 137naming, benefits, 27on remote systems, 69prefix, 26specifying, 26specifying names, 10structure, 513structure, named, 514verifying, 500
Ww (write) DVU command, 510whoami command, 393wildcards
characters, 11definition, 6in pathnames, 13order of use, 13to display aliases, 58using multiple, 12when copying files, 99when deleting aliases, 110
windows, multipleon system 520, 552
word processing, 54working buffer
changing contents, 498definition, 462displaying, 461editing, 497, 499writing, 510
working directory, 10, 34changing, 24, 72
write DVU command, 510examples, 511
Xxlate command, 231, 390, 394
examples, 397
ZZAPs, displaying, 399zscan command, 399

