ir intelligent speed dome camera - fullsec · hd intelligent speed dome camera user manual - 3 -...
TRANSCRIPT
IR Intelligent Speed
Dome Camera
User Manual

HD Intelligent Speed Dome Camera User Manual
- 1 -
Thank you for buying our company product, any question or request please
feel free to contact us.
The manual only use for our speed dome camera.
This manual maybe includes some inaccurate information on technology/product function/ operation or print error, we will update it in
the new versions manual in future.
Attentions:
Please read this manual carefully before you install and operate the dome camera.
● Transportation Security Heavy stress, violent vibration or water splash are not allowed during transportation, storage. Every unit should be transported in separated packing. In shipments of distributor and delivery of maintenance, any damages caused by integral packing are not covered by warranty.
● Installation Security
It has 2 installation ways: wall mounting and ceiling mounting, avoid mixing
installation!
The dome camera must be handle with care! Avoid heavy stress and violent vibration during installation. Don’t touch the dome cover directly by hand. When connecting the power source, please follow all electric safety standards and only use the power supply designed for this device. Keep the video and control signal in a decent distance with high voltage devices and cable. Don’t apply power to dome before
finishing the installation.
● Don’t remove Internal removing, assembly, repair and operations should be only performed by our
company or qualif ied service personnel.
●Electrical Safety
The video image would be interfered when the dome is installed from Television, radio transmitter, voltage changer and audio amplifier.
●Camera Protection
Avoid shooting very bright objects directly into the camera (such as the sun or light fittings) and avoid fixating the camera lens on bright static object for long time, as it will cause Irreparable damage to the camera.
●Cleaning Method
Avoid heavy stress and violent vibration! Please don’t use abrasive and violent detergent to clean the dome. Please choose dry fabric and neutral detergent. And
please use lens paper to clean the lens.
● Please use our product according the work environmental standards.

HD Intelligent Speed Dome Camera User Manual
- 2 -
CONTENTS
User Instructions ........................................................................................................... - 3 -
1. Product Feature ......................................................................................................... - 4 -
2. Main Technical Parameters .......................................................................................... - 5 -
3. Cable Definition ......................................................................................................... - 7 -
4. Address, Protocol, Baud Rate Setting ............................................................................ - 7 -
4.1 Dome Address Setup ......................................................................................... - 8 -
4.2 Baud Rate Setting .............................................................................................. - 8 -
4.3 Protocol Setting................................................................................................. - 9 -
5. Function Setting ......................................................................................................... - 9 -
5.1 Setup / Calling For Preset. .................................................................................. - 9 -
5.2 Calling For Cruising Function ..............................................................................- 10 -
5.3 limit positions on left and right(A to B) 、360 degree scan、setting and remove the
setup of scanning speed. ........................................................................................- 11 -
5.4 Factory Default.................................................................................................- 13 -
6.System OSD menu setup(for models with OSD menu) .....................................................- 13 -
6.1 Self Test Display................................................................................................- 14 -
6.2 Main Menu......................................................................................................- 14 -
6.3 Syetem Information ..........................................................................................- 15 -
6.4 System Setup ...................................................................................................- 15 -
6.5 Special Function ...............................................................................................- 16 -
6.5.1 Preset Func ...........................................................................................- 16 -
6.5.2 Idle Func ...............................................................................................- 17 -
6.5.3 Patrol Func ............................................................................................- 17 -
6.5.4 Timer Task .............................................................................................- 17 -
6.5.5 Trace Func .............................................................................................- 18 -
6.6 Display Information ..........................................................................................- 18 -
6.7 PTZ Camera System Setting. ...............................................................................- 18 -
6.8 Restore The Factory Value .................................................................................- 19 -
6.9 EXIT ................................................................................................................- 19 -
7.PTZ dome camera instruction list ..........................................................................- 20 -
8. Notice ......................................................................................................................- 22 -
After-Sales Service ........................................................................................................- 23 -
Appendix .....................................................................................................................- 25 -
Appendix I: Lightning and Surge Protection ...............................................................- 25 -
Appendix II: Basic Troubleshooting...........................................................................- 25 -
HD Intelligent Speed Dome Camera User Manual
- 3 -
User Instructions
Thank you for purchasing and using our company’s products.
According to our introduction of guarantee, Within the specified warranty period, our company will free to repair or replace parts that are damaged under normal use.User don’t
disassemble repair itself without Our Consent.
Within the specified warranty period, we will repair or replace parts (excludinghousing,bracket and cable) that are damaged under normal use (by judge of us) at
no additional charge.
Free services and repairs will not be covered under the following conditions:
1) Unauthorized repair or disassembly of the product;
2) Damage due to the bad shipping, or Move of discharging;
3) Damage due to the user not according to the user manual to operate,maintain, maintenance,
such as falling、extrusion、flooding water、be affected with damp、corrosion and Other
damage caused by human factor;
4) The product faulty caused by the overloaded or the working environment which is not
suitable for it, and surface damaged when your using it;
5) Any damage or ruin by force majeure.

HD Intelligent Speed Dome Camera User Manual
- 4 -
1. Product Feature
1) 7"elegant appearance, housing rotates follow the camera lens, IR light will not reflect by
the cover. You needn’t open the PTZ housing to set the Add Code & Baud Rate, more
convenient.
2) Drove by bearing and belt, more stable and smooth, long life performance.
3) Using import belt drive, Running more stable, more reliable and noiseless.
4) Using imported stepper motor, responsive, fixed position accurately.
5) Usingimported OSRAM Array IR LED, IR range is 120 m.
6) Different angles of infrared right according to the changes of the lens change times lead
to visual angle on or off in stages, make the IR light illuminate Angle and lens viewing
angles consistent, effectively solve the ordinary infrared machine due to the small Angle
change times high power IR light in the visual Angle when open comes to the lens
"flashlight" phenomenon, and make the irradiation Angle difference from the viewing
Angle of current camera for the IR light producing periodic rest, reduce the infrared lamp
panel working current, effectively control components of dark current and calorific value,
greatly improved the integration of cameras work environment. Really improve the
machine service life and stability.
7) Decoder board supply power to motor, camera and IR LED separately, machine can
works more stable.
8) Using conducting ring, realize continuously rotate for 360∑ and avoid the wires twist
together.
9) High precisionpreset positions, 255pcs presets; 4group routes, 4 group cruise; the default
stay time of preset is 6 seconds, 4 / 8 / 10 / 15 / 20 seconds adjustable;set limitation
positions on left and right; cruise / preset / route / limitation positions can delete to reset;
idle function.
Angle & speed;
IR high speed dome: horizontal 360°Rotation 200°/ sec, grade 5 horizontal scanning speed
are adjustable;vertical -90—-0° rotation150°/ sec
IR medium speed dome: horizontal 360°Rotation 80°/ sec, grade 5 horizontal scanning speed
are adjustable;vertical -90—-0° rotation30°/sec

HD Intelligent Speed Dome Camera User Manual
- 5 -
2. Main Technical Parameters
1) Electricity
Power supply; DC12V--(4A)
PTZ drive;DC12V--/0.5A
IR light power supply;DC12V--(1.8A)
lens Drive;DC12V/200mA
Camera power supply;DC12V/500mA
Retrofitting Temperature controlling device
Working temperature;-20℃-+65℃
Address range;0~255
Communication mode;RS485
Protocol;Pelco-D, Pelco-P
Baud rate;2400bps、4800bps、9600bps Adjustable
Controlling Equipment: Video Matrix、industrial control DVR、DVR、controlling
keyboard etc.
Preset: 255 presets
Patrol: 4 groups(16 presets per group)
stay time for each preset positions; 4、8、10、15、20 seconds adjustable
Patter: 4 groups (3 mins per pattern)
Scan: one group frame scan, one group 360 horizontal scan
Scan speed: 3、6、9、15、40 seconds adjustable
Timer task: support preste, patrol, pattern, auto scan, 360 degree horizontal scan
2) Mechanical Specifications
PTZ rotation angle: horizontal 360° unlimited rotation, vertical 90°—-0°
PTZ rotation speed;IR medium speed dome;horizontal 6°/sec~40°/sec(grade 4 adjustable)
IR high speed dome;horizontal 0.1°/sec~200°/sec

HD Intelligent Speed Dome Camera User Manual
- 6 -
Rotation limit;horizontal is adjustable in the range PTZ rotation angle of 360 °,software and
photoelectricity limit

HD Intelligent Speed Dome Camera User Manual
- 7 -
3. Cable Definition
Signal, power supply cable connection, please reference following chart:
4. Address, Protocol, Baud Rate Setting
The IR dome camera is built-in decoder board, through decoder to set the address, protocol, baud rate settings,realized PTZ and camera lens control of dome camera. This product designed the dial switch located on the sphere, given the set of convenient and stability, there is a piece of gusset plate under the ball cover which can open and close at any
time. Open the gusset plate can see one 8 dip switch and one 4 dip switch.
SW1-Dip switch for the dome address
SW2-Dip switch for the dome protocol

HD Intelligent Speed Dome Camera User Manual
- 8 -
4.1 Dome Address Setup
No.1~ No.8 of SW1 are used to set the dome address, you can set address codes within the range of 1~255. Every camera’s dome address should be same as the DVR or keyboard’s. Dip switch use binary, dial every number to be "ON" is means as 1, dial to be "OFF" is means
as 0, details please reference the sheet.
Address codes and dial codes switch sheet (Binary), calculate it according to this sheet;
Binary Add Binary Add Binary Add Binary Add
0000000 0 11110000 15 01111000 30 10110100 45
10000000 1 00001000 16 11111000 31 01110100 46
01000000 2 10001000 17 00000100 32 11110100 47
11000000 3 01001000 18 10000100 33 00001100 48
00100000 4 11001000 19 01000100 34 10001100 49
10100000 5 00101000 20 11000100 35 01001100 50
01100000 6 10101000 21 00100100 36 11001100 51
11100000 7 01101000 22 10100100 37 00101100 52
00010000 8 11101000 23 01100100 38 10101100 53
10010000 9 00011000 24 11100100 39 01101100 54
01010000 10 10011000 25 00010100 40 11101100 55
11010000 11 01011000 26 10010100 41 00011100 56
00110000 12 11011000 27 01010100 42 10011100 57
10110000 13 00111000 28 11010100 43 01011100 58
01110000 14 10111000 29 00110100 44 11011100 59
……………
00111100 60 10111100 61 01111100 62 11111100 63
……………
00011111 248 10011111 249 01011111 250 11011111 251
00111111 252 10111111 253 01111111 254 11111111 255
4.2 Baud Rate Setting
Set No. 1~2 dip switch of SW2 for the baud rate. It can set up the baud rate to 2400BPS、
4800BPS、9600BPS. Dial every number to be "ON" is means as 1, dial to be "OFF" is means
as 0,Baud rate and dial codes switch matching sheet reference sheet.
Dial Codes 2400 bps 4800 bps 9600 bps
No. 1 ON OFF ON
No. 2 OFF ON ON
No. 3 OFF OFF OFF

HD Intelligent Speed Dome Camera User Manual
- 9 -
No. 4 OFF OFF OFF
Please reference above table to finish the dip switch setting.
4.3 Protocol Setting
Decoder of Speed dome will automatically match protocol, no need to set;PELCO_D、
PELCO_P are support
5. Function Setting
5.1 Setup / Calling For Preset.
Preset function refers to through controlling equipment setting / call IR dome position parameters of the horizontal Angle and vertical Angle, by storing in digital form to the IR dome, when needs to call these parameters, adjust the IR dome to preset a set state. Operator can control it convenient and efficient through controlling keyboard and other devices to
set/call preset position. This IR dome camera supports 256 presets.
(1)Set preset position
Make the IR dome moved to the corresponding position by controlling keyboard, DVR
and other control equipments,You can refer to the Preset function of controlling keyboard
or DVR to process preset settings after using the zoom buttons of the controlling keyboard, DVR etc controlling devices to adjust Multiples of the lens to right angle, and enter the
corresponding number of preset position
Example: Using a type of controlling keyboard to set No.1 preset position
a、Move camera to the need position by joystick. Make the lens step to the angle in demand
by pressing the key “zoom”
b、 Enter“1”key;
c、Press “SHOT” key;
d、press and hold the “smart” key of the joystick.
e、Press “ON” key;
(2)Call preset position.
Refer to the calling preset function of controlling keyboard or DVR to process preset
calling, and according to the required preset position number to call
Example;Using a type of controlling keyboard to call No.1 preset position.
a、Enter“1” key;
b、Press “SHOT” key;

HD Intelligent Speed Dome Camera User Manual
- 10 -
c、Press “ACK” key;
5.2 Calling For Cruising Function
Auto cruise is to set the cruise routes arbitrarily ,only an external command can let the
dome camera according to the specified route to make a tour automatically,and staying in
the corresponding preset position. There are 4 auto cruise routes for the IR dome camera,
Each cruise lines can store up to 16 presets at most.
(1)Calling the auto cruising routes
By controlling keyboard or DVR to implement the commands to “call 71 preset position”,it can makes the speed dome camera auto cruise as your preset; As calling“72 preset”, it will
auto cruise the second cruise routes。Please see the quick operate sheet for the 4 cruises.
Example;Use one controlling keyboard to call the first cruise route.
a、Setting the presets you needed 1—16 preset;(see the operation 1)
b、Enter“71”
c、Press “SHOT” key;
d、Press “ACK” key;
(2)Stay time setting for preset position when auto cruising
It can set stay time for preset position as 4 /8 /10 /15 /20 Seconds when the IR dome camera auto cruising. Operation method by controlling keyboard, DVR to implement the
command “set No.75 preset position” the stay time is 4 sec;“set No.76 preset position”,the
stay time is 8 sec;Stay time setting command for auto cruising reference as below table;
Stay time Set commands Stay time Set commands
4s Call NO.75 preset 8s Call NO.76 preset
10s Call NO.77 preset 15s Call NO.78 preset
20s Call NO.79 preset
Example: using a type of controlling keyboard to set the stay time as 8 sec
a、Enter“76”
b、Press “SHOT” key;
c、Press “ACK” key;

HD Intelligent Speed Dome Camera User Manual
- 11 -
4 cruising routes of corresponding preset position number for cruise route and the relation
table of calling or delete command
Example;Use a keyboard to remove the preset position of the third automatically cruise routes.
a、Enter“73”
b、Press “SHOT” key;
c、Press “ACK” key;
Corresponding preset position number for cruise route and the relation table of calling
command
Cruise route Call command Presets in cruise route
NO.1 Call NO.71 preset 1—16 presets
NO.2 Call NO.72 preset 17—32 presets
NO.3 Call NO.73 preset 33—48 presets
NO.4 Call NO.74 preset 240—255 presets
5.3 limit positions on left and right(A to B) 、360 degree scan、setting and remove the
setup of scanning speed.
The IR dome uses the conductive ring and photo electricity to limit position,it can get
through the controlling keyboard and DVR to set the left and right rotation position of the dome. and automatically scan between the limit position of setting.
(1)A、B scan setting.
By controlling keyboard or DVR to implement the command “set No.91 preset position”
after moved the dome to the right for the required position ,Implementing the command “set
No.92 preset position” after make the dome rotating to the left to the position of left limit position, left and right limit position is setting done. Then calling No.93 preset position, the
dome just running between these two points only.
Example: use a type of controlling keyboard to set limit position on left and right
a、Press the key “set preset”, Then make the camera moved to the need position by shaking
joystick.
b、Enter“91”;
c、Press “SHOT” key;
d、Press “ACK” key;
HD Intelligent Speed Dome Camera User Manual
- 12 -
e、The dome camera will be moved to the left limit required by the position by shaking
joystick.
f、Enter“92”
g、Press “SHOT” key;
h、Press “ACK” key;
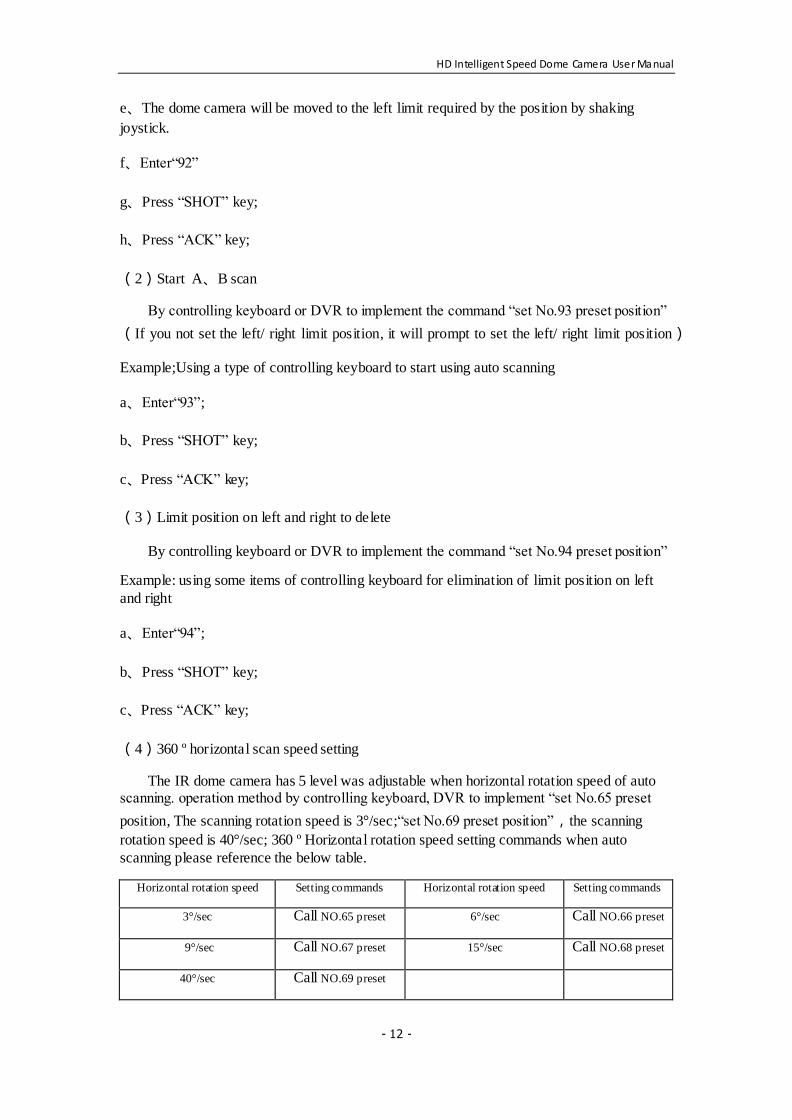
(2)Start A、B scan
By controlling keyboard or DVR to implement the command “set No.93 preset position”
(If you not set the left/ right limit position, it will prompt to set the left/ right limit position)
Example;Using a type of controlling keyboard to start using auto scanning
a、Enter“93”;
b、Press “SHOT” key;
c、Press “ACK” key;
(3)Limit position on left and right to delete
By controlling keyboard or DVR to implement the command “set No.94 preset position”
Example: using some items of controlling keyboard for elimination of limit position on left
and right
a、Enter“94”;
b、Press “SHOT” key;
c、Press “ACK” key;
(4)360 º horizontal scan speed setting
The IR dome camera has 5 level was adjustable when horizontal rotation speed of auto scanning. operation method by controlling keyboard, DVR to implement “set No.65 preset
position, The scanning rotation speed is 3°/sec;“set No.69 preset position”,the scanning
rotation speed is 40°/sec; 360 º Horizontal rotation speed setting commands when auto
scanning please reference the below table.
Horizontal rotation speed Setting commands Horizontal rotation speed Setting commands
3°/sec Call NO.65 preset 6°/sec Call NO.66 preset
9°/sec Call NO.67 preset 15°/sec Call NO.68 preset
40°/sec Call NO.69 preset

HD Intelligent Speed Dome Camera User Manual
- 13 -
Example: Using some items of controlling keyboard to set horizontal speed rotation be 9°/sec
when scanning
a、Ener“67”
b、Press “SHOT” key;
c、Press “ACK” key;
5.4 Factory Default
By controlling keyboard or DVR to implement the command “call No.96 preset position” then can make the dome camera settings back to factory default state. Has now set all preset position function will be cleared (limit position on left and right will not be cleared)
Example: Using a type of controlling keyboard to restore the factory default
a、Enter “96”;
b、Press “SHOT” key;
c、Press “ACK” key;
6.System OSD menu setup(for models with OSD menu)
Main Menu
System Information 、System Setup、Function
Setup、Display Setup 、Camera Menu Setup 、
Factory Default、Exit
System Information
Version:V5.0.4
Address:01
Protocol:Pelco-D
Self test:OK
back
System Setup
motion flip:on
Speed Matching:on
Motion speed:02
Time setup
IR setup
Communication Setup system
language:EN
返回
Function
Setup
preset setup
Idle task
setup
patrol setup
Timingtask setup track setup
back
Display Setup
Syetem time display:off
Orientation displayy:on
Bootinformation display:10 S
Back
Camera Menu
Setup
HD Intelligent Speed Dome Camera User Manual
- 14 -
6.1 Self Test Display
After powering on speed dome, the speed dome will pan and tilt automatically, and it will show the system information . After system information disappear, the self test over. The system information show as below
Address: 001
Protocol: Pelco-D
Baud rate: 2400
Note: different speed dome setup, will show different content
6.2 Main Menu
After powering on speed dome, and the speed dome can work normally, call preset 95,
enter to main menu, show as below
Main menu
1.system information
2.system setup
3.function setup
4.display setup
5.camera menu setup
6.factory default
preset setup
preset:01
Location setup delete current
preset
Delet all preset
back
Idle tak setup
Idle task:patrol 1
Idle time:60
(s)
back
Patrol
setup
Patrol:01
Patrol
setup
Call patrol
Delete
patrol
back
Timing task setup task
run:off
Task setup
Delete task
back
Track setup track
No.:01
Track setup call track
delete
track
back

HD Intelligent Speed Dome Camera User Manual
- 15 -
7.exit
keyboard button function explanation:
[RIGHT]pan right;Enter to sub menu or a setup
[LEFT]pan left;Return to previous menu or exit a setup
[UP]tilt up;During menu setup, move menu option up or modify parameter
[DOWN]tilt down;During menu setup, move menu option down or modify parameter
6.3 Syetem Information
Users can check the speed dome information by menu, the information include: speed dome address, baud rate, protocol, speed dome title, program version etc. The method as
below
Move the Cursor to 【system information】, press right to enter system information
menu
System information
1.version;V5.0.4
2.address;01
3.protocol;Pelco-D
4.baud rate;2400
5.self test;OK
6.back
6.4 System Setup
Users can setup the speed dome function by this menu. Move the cursor to 【system
setup】, press right to enter system setup menu
system setup
1、motion flip:off/on
2、speed matching;off/on
3、motion speed: 02
4、time setup:
5、IR setup:

HD Intelligent Speed Dome Camera User Manual
- 16 -
6、communication setup;
7.language:Chinese/English
Motion flip: open or close the flip function;
Speed matching: when speed dome is zooming, the control speed will change as well;
Motion speed: control speed adjustment;
Time setup:set the system time for the speed dome;
IR setup: set the IR mode and sensitivity ;
Communication setting ;the PTZ camera’s communication information setting.
System language: set the PTZ camera’s menu language
6.5 Special Function
Move the cursor to Special function,you can setting through this menu :Preset func / Idel
func/ Patrol func /Timer Task /Trace func .
Special Function
1.Preset func
2.Idle func
3Patrol func
4Timer Task
5Trace func
6Return
6.5.1 Preset Func
Through Preset func , you can perform on the PTZ camera preset setting,single
clearance and all preset clearance ,it’s convenient to call and add cruise group.
Preset function
1.Preset No.: 01
2. setting location
3 .clear the current preset
4 .clear all the presets
5 .Return

HD Intelligent Speed Dome Camera User Manual
- 17 -
6.5.2 Idle Func
Through Idel func ,you can set the PTZ camera Idle task and Idle waiting time,when the PTZ mil in the setting f time without any operation,the PTZ camera will perform to
automatically setting behavior.Idle task contains A cruise group,1 to 4 preset,1to 4 trajectory,
360 degree scanning path;A,B two scan and task.
Idle func
1.Idle task:cruise 1
2.Idle waiting: 60(s)
3.Return
6.5.3 Patrol Func
Through the Patrol func,you can set to cruise,running and clearing ,support a total of 16
cruise group setting.
Patrol func
1.Cruise NO.: 01
2.Set cruise
3.running cruise
4.clearing cruise
5.return
6.5.4 Timer Task
Through the Timer Task ,you can set the PTZ camera in set of execution of the set period
of action.
Timer Task
1.Task to run:off
2.set task

HD Intelligent Speed Dome Camera User Manual
- 18 -
3.clear task
4.return
6.5.5 Trace Func
Through the Trace func,you can track record,running,remove the PTZ camera,trajectory support 8,each support 3 minutes of recording.It will record the user’s operation in the process of the recording,when calling trajectory recorded,the PTZ camera can perform
operations.
Trace func
1.Trace NO.:01 2.Setting trace 3.Running trace 4.Clearing trace 5.Return
6.6 Display Information
Through the Display information,you can open and close the system time,system
position,setting the start information display time.
Display information
1.Sys time:off 2.Sys position:on 3.Start infor:on
4.Return
6.7 PTZ Camera System Setting.
Through the PTZ camera system setting,you can setting the PTZ camera module’s parameter,such as setting the brightness and the color effect.(The PTZ camera module must
be support set items,and different PTZ camera module,different MENU.)
Camera menu setup
(Different camera module is in a different setting, it is refference to the real object camera for the details)
HD Intelligent Speed Dome Camera User Manual
- 19 -
6.8 Restore The Factory Value
Chose 《Restore the factory value》, you can drop all of the PTZ camera’s
parameter ,such as
6.9 EXIT
Chose <exit> to exit the PTZ menu
HD Intelligent Speed Dome Camera User Manual
- 20 -
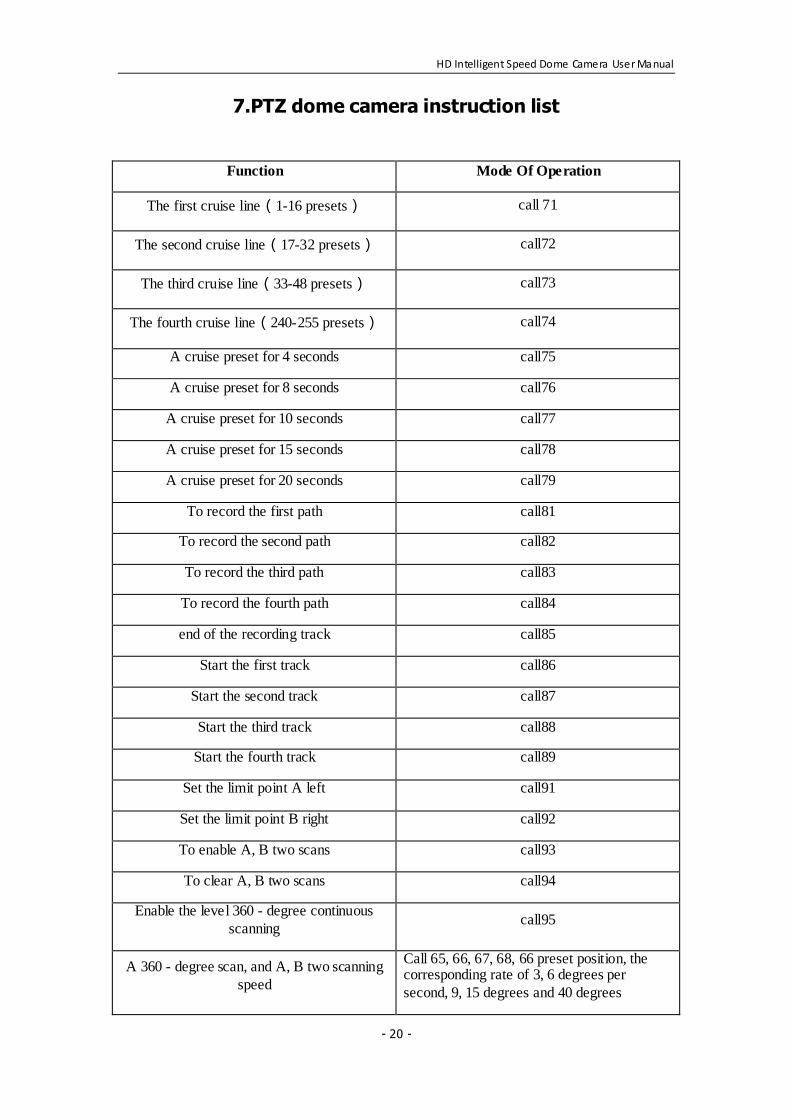
7.PTZ dome camera instruction list
Function Mode Of Operation
The first cruise line(1-16 presets) call 71
The second cruise line(17-32 presets) call72
The third cruise line(33-48 presets) call73
The fourth cruise line(240-255 presets) call74
A cruise preset for 4 seconds call75
A cruise preset for 8 seconds call76
A cruise preset for 10 seconds call77
A cruise preset for 15 seconds call78
A cruise preset for 20 seconds call79
To record the first path call81
To record the second path call82
To record the third path call83
To record the fourth path call84
end of the recording track call85
Start the first track call86
Start the second track call87
Start the third track call88
Start the fourth track call89
Set the limit point A left call91
Set the limit point B right call92
To enable A, B two scans call93
To clear A, B two scans call94
Enable the level 360 - degree continuous
scanning call95
A 360 - degree scan, and A, B two scanning
speed
Call 65, 66, 67, 68, 66 preset position, the corresponding rate of 3, 6 degrees per
second, 9, 15 degrees and 40 degrees

HD Intelligent Speed Dome Camera User Manual
- 21 -
Idle task setting
Preset level 1
trajectory 1
A/B scans
Call 64:360 degree scans
clear all of the presets call60
Open the camera menu Call70
Open the dome menu call95
Restore the factory call96

HD Intelligent Speed Dome Camera User Manual
- 22 -
8. Notice
1.The power supply of this product should be DC12V-14V, please use matched power from
our company to supply;
2.Forbid turning around by outside force whether power on or off
3.Dial switch is on the bottom of the ball cover. Open buckle, you can adjust the address code
and baud rate. Please don’t open without permission
4.The cruise stay time is 6s(default), user can set the other time,reference to the " setting of
cruise stay time.
5.If the preset has a deviation because of the long time operation, power down and external
force factors, it can be called the NO.96 preset postion to make a factory default.
6.In order to control the infrared light calorific value effectively and ordinary infrared machine “flashlight” phenomenon independent control, switch the lens at 11 times, so if there is one set of lamp off, are all normal phenomenon. Because the IR light off means they are under a state of rest when the irradiation angle and the current camera viewing angle are
not consistent.
7.The preset setting of this camera with lens preset position as the same as ordinary high-
speed dome camera. As for setup method, please refer to “preset position settings”
8.The camera outlet is directly high temperature conductive ring lines avoid interface, please
don’t pull output cable.

HD Intelligent Speed Dome Camera User Manual
- 23 -
After-Sales Service
Dear user, in order to get the high quality service for the speed dome camera, please read the
below service charters.
1. We can offer the service of limited warranty and life -long maintenance
(1)In the limited warranty (within 24 month from getting the camera), you can enjoy the maintenance free service. Note: improper operation, man-made fault and other irresistible
reasons are excluding of the limited warranty.
(2) If beyond 24 months from you getting the camera, our company promises that we will
provide a payment that if customer needs maintenance service for life.
2. Repair response time
(1) When the camera arrives at our company, the response service is within 24 hours.
(2) The customer need contact our company staff before sending camera back; if not, customer will be responsible for the risk of untimely repair.
In the warranty period, our company offer free repair; but it will pay for the material
cost when include any of below situation:
(1) It is damaged due to not follow the manual to operate.
(2) It is damaged due to lightning, fire disaster and other force majeure factors.
(3) It is damaged due to matching with other poor design products, which produced by other
manufacturer.
Statement:
Because of continuous new technology, so there is no further notice for change of
specifications.
Company has the authority to ultimate interpretation for the manual.
User Name:
__________________________________________
Address:
_____________________________________________
Tel:____________ Fax:____________ Post code:____
_________
E-
mail:_______________________________________________
Model:______________________________________________
_
Production date:________ Year_________ Month__________
Day
Purchase Date:_________ Year _________ Month __________

HD Intelligent Speed Dome Camera User Manual
- 24 -

HD Intelligent Speed Dome Camera User Manual
- 25 -
Appendix
Appendix I: Lightning and Surge Protection
This product is adopted the protection circuit which is composed of the gas discharge tube and TVS diode. It can effectively prevent the damage of equipment by transient lightning under 3.0 kV, surge and other kinds of pulse signal. But, for outdoor installation, we should do the necessary protective measure on the premise of guarantee the electrical safety
according to the actual situation.
1. Signal transmission lines must keep at least 50 meters with the high voltage equipment or
high voltage cable.
2. You shall choose to wire under the eave when you wire outside.
3. For empty area, you must wire through the way of sealing steel pipe buried, and also the steel pipe need to be earthed in one-point. Wiring overhead is absolutely forbidden. 4. In strong thunderstorms or high induction voltage region (e.g., high voltage transformer substation), It must be taken measures to add extra high power lightning protection equipment and install lightning rod or other measures
5.Lightning protection of outdoor installation and wiring and grounding design must be combined with the building lightning protection requirements into consideration, as well as conform to the requirements of relevant national standards and industry standards
6. The way of equipotential grounding is necessary for the system. Grounding device must meet requirements of the system anti-interference and electrical safety, and it cannot null line short or mixed wire with strong power grid. System separate grounding, grounding resistance
is not greater than 4Ω.
Appendix II: Basic Troubleshooting
Fault Phenomenon Possible Cause Solution
When connect to power supply, there is no self-check, no
image, and the indicator light
doesn’t light
Power cable wrong to connection Correct
Power supply was broken Change
Power supply mismatches change
Power cable poor contact change
There is a self check and has image, but
can’t control
Address code and bound rate is wrong Reset the address code
and bound rate Protocol is wrong correct
RS485 polarity reversed or open circuit
Check the connection cable of the RS-485
Pan can tilt can’t be
control
Control cable poor contact troubleshooting
Operation mistake Power down and restart

HD Intelligent Speed Dome Camera User Manual
- 26 -
over loading or the communication
distance is too far
1. Add a Resistor to the
farthest camera form
the controller, and turn
to “ON", the other
turn to off.
2. Add code distributor.
Image is unstable
Video cable poor contact Eliminate
Power shortage to the power supply Change
Video cable is disturbed Eliminate
Control delay or stop
to rotate
Power shortage to the camera power
supply
Change the better power supply, and best to put it
near the camera.
Checking that if there is a matched
resistor added to the fastest camera
added a matched resistor
to the fastest camera
485 signal attenuation,poor driving
force to 485 convertor Change a new convertor