inventory user’s guidetable of contents inventory user’s guide learning about this resource 10...
TRANSCRIPT

INVENTORYUSER’S GUIDE

Copyright Notification
At Cougar Mountain Software, Inc., we strive to produce high-quality software at reasonable prices. We can only do this, however, if our rights as developers are respected. Even though we provide excep-tional software at low prices, we do not consent to unlicensed use of our software or documentation.
Information contained in this document represents the current view of Cougar Mountain Software on the issues discussed as of the date of publication. Because Cougar Mountain Software must respond to changing market conditions, it should not be interpreted to be a commitment on the part of Cougar Mountain Software, and Cougar Mountain Software cannot guarantee the accuracy of any information presented after the date of publication.This documentation is for informational purposes only and is not a qualified accounting reference. COUGAR MOUNTAIN SOFTWARE MAKES NO WARRANTIES, EXPRESS OR IMPLIED, AS TO THE INFORMATION IN THIS DOCUMENT. It is the user’s responsibility to review the latest publication releases from Cougar Mountain Software. The demonstration companies, organizations, products, people, and events depicted herein are fictitious. No association with any real company, organization, product, person, or event is intended or should be inferred.
Complying with all applicable copyright laws is the responsibility of the user. Without limiting the rights under copyright, no part of this document may be reproduced, stored in or introduced into a retrieval system, or transmitted in any form or by any means (electronic, mechanical, photocopying, recording, or otherwise), or for any purpose, without the express written permission of Cougar Mountain Software.Cougar Mountain Software may have patents, patent applications, trademarks, copyrights, or other intellectual property rights covering subject matter in this document. Except as expressly provided in any written license agreement from Cougar Mountain Software, the furnishing of this document does not give you any license to these patents, trademarks, copyrights, or other intellectual property.Recognized Trademarks. Microsoft and all Windows products are registered trademarks of Microsoft Corporation. QuickBooks is a trademark of Intuit Inc., registered in the United States and other coun-tries. Other brands or products are the trademarks or registered trademarks of their respective holders and should be treated as such.
© 2020 Cougar Mountain SoftwareAll Rights Reserved
UGPDF00001 030920

Learning About this Resource 10
How to Use This Guide ........................................................................11
How This Guide Is Organized..............................................................11
Denali Help........................................................................................... 12Document Conventions........................................................................................................13
In-Program and Web Help ....................................................................................................13
Navigating the In-Program Help ..........................................................................................14
Navigating the Web Help ......................................................................................................15
Printing Help Topics .............................................................................................................17
User Guides ...........................................................................................................................17
Release Notes........................................................................................................................17
Customer Support............................................................................... 17Information to Gather before You Contact Customer Support .........................................18
Contacting Customer Support .............................................................................................18
Training ................................................................................................ 18Online Training ......................................................................................................................18
Classroom Training in Boise................................................................................................19
On-Site Training at Your Business ......................................................................................19
Telephone Training ...............................................................................................................19
Training Videos .....................................................................................................................19
Troubleshooting Options.................................................................... 19
Setting Up the Inventory Module 20
Module Preferences in Inventory....................................................... 21General Setup........................................................................................................................21
Setting Up Inventory Integration Settings ..........................................................................22
Tracking User-Defined Stock Item Information ..................................................................23
Establishing Inventory Printing Preferences .....................................................................23
Table of ContentsInventory User’s Guide
Overview of Codes in Inventory......................................................... 24Defining Inventory Codes.....................................................................................................24
Planning Inventory Transaction Codes...............................................................................26
Creating User-Defined Codes ..............................................................................................28
Changing or Deleting Codes................................................................................................29
Multi-Location Inventory..................................................................... 30
Troubleshooting: Setting Up the Inventory Module......................... 31
Setting Up Your Stock Items 32
Planning Your Stock Items ................................................................. 33Establishing a Naming/Numbering Scheme.......................................................................33
Adding Stock Item Records ............................................................... 33Enabling Lot Number Tracking for Stock Items .................................................................35
Using Serial Numbers for Stock Items................................................................................35
Allowing Stock Item Leases.................................................................................................36
Attaching Files to Stock Items.............................................................................................36
Using the User-Defined Fields After Setup.........................................................................37
Importing Stock Items from Another Software...................................................................37
Editing Inventory Stock Item Records .............................................. 37Renumbering Stock Items....................................................................................................38
Update Minimum and Maximum Stock Quantities .............................................................38
Copying Stock Items to Another Company ........................................................................39
Changing Stock Item Prices Globally .................................................................................40
Troubleshooting: Setting Up Your Stock Items................................ 42
Managing Stock Quantities 43
Working with Transaction Batches in Inventory .............................. 44
Adjusting Inventory............................................................................. 44
Table of ContentsInventory User’s Guide

Keeping Track of Quantities Available for Sale..................................................................45
Changing the Default Inventory Transaction Date.............................................................46
Increasing or Decreasing Stock Item Quantities.............................. 46Preparing to Enter Adjustment Transactions.....................................................................46
Adjusting Quantities by Specifying the Number to Add/Subtract....................................47
Adjusting Stock Quantities by Specifying the Quantity On Hand....................................48
Checking the Accuracy of Your Adjustment Transactions Before Posting ....................49
Importing Adjustment Transactions into Denali .............................. 51Using Hand-Held Scanners ..................................................................................................51
Working with External Text Files .........................................................................................53
Determining and Correcting Errors in Imported Transactions Before Posting ..............54
Posting Inventory Transactions......................................................... 55Printing the Posting Reports ...............................................................................................56
Seeing Results of the Adjustment Transactions................................................................56
Converting Quantities When Buying or Selling ............................... 57Buy Conversions...................................................................................................................57
Sell Conversions ...................................................................................................................58
Troubleshooting: Managing Stock Quantities.................................. 59
Establishing Prices for Your Stock Items 60
Introduction to Stock Item Pricing..................................................... 61
Overview of Stock Item Pricing Types............................................... 62
Setting Up Special Price Levels for Groups of Customers ............. 63
Pricing Determined By Discount Codes ........................................... 64Planning Your Discount Codes............................................................................................65
Setting Up Stock Items for Discount Codes.......................................................................66
Pricing Determined By Markup or Margin Codes............................. 66Planning Your Markup/Margin Codes .................................................................................67
Table of ContentsInventory User’s Guide

Setting Up Stock Items for Markup/Margin Codes.............................................................67
Pricing Determined by Promotional Codes ...................................... 68Adding Promotional Codes..................................................................................................68
Printing Promotional Shelf Signs ........................................................................................70
Troubleshooting: Establishing Prices for Your Stock Items ........... 71
Additional Options and Features 72
Additional Options When Selling Stock Items ................................. 73Setting Up Special Prompts When Ordering/Selling Items...............................................73
Attaching Non-Inventory Items (Services) to Stock Items ................................................74
Setting Up Additional Stock Item Identifiers .................................... 74
Working with Stock Item Images ....................................................... 75Adding Stock Item Images ...................................................................................................77
Editing Existing Stock Item Images ....................................................................................78
Replacing or Removing Stock Item Images .......................................................................78
Setting the Default View for Stock Item Images.................................................................79
Importing and Exporting in Inventory ............................................... 79Performing Common Inventory Import/Export Tasks........................................................80
Importing Inventory Data......................................................................................................81
Exporting Inventory Data .....................................................................................................82
Troubleshooting: Additional Options and Features ........................ 83
Managing Stock Items with Multi-Location Inventory 84
Planning to Use Multi-Location Inventory ........................................ 85
Setting Up Your Multiple Locations................................................... 85Creating Additional Locations for Stock Items Using Location Codes ...........................85
Table of ContentsInventory User’s Guide

Setting Up Your System to Enable Transfer Transactions................................................87
Setting the Primary Location of Your Inventory.................................................................87
Managing Multiple Locations of Inventory ....................................... 88Adding or Moving Inventory to Your Location ...................................................................88
Troubleshooting: Managing Stock Items with Multi-Location Inventory..................................................................... 92
Using Inventory with Specialty Shop 93
Preparing to Use Specialty Shop....................................................... 94
Setting Up Specialty Shop Pricing .................................................... 94Setting Up Multi-Pack Pricing ..............................................................................................94
Setting Up Promotional Sale Pricing...................................................................................95
Setting Up Buy Down Pricing ..............................................................................................98
Attaching Multi-Packs and Buy Downs to Stock Items .....................................................99
Printing a Report of Your Various Pricing Codes ............................................................100
Additional Stock Item Setup Options .............................................. 101Changing Pricing of Multi-Pack Stock Items....................................................................101
Setting Up Stock Items to Require Age Verification to Sell ............................................102
Tracking Stock Item Sales with Specialty Shop ............................. 103Stock Labels Report ...........................................................................................................104
Price Book Report...............................................................................................................104
Advanced Sales Information Report .................................................................................104
Inventory History Report ....................................................................................................104
Promotional Sales Report in Inventory.............................................................................104
Troubleshooting: Using Inventory with Specialty Shop................ 105
Working with Kits 106
Creating Kits ...................................................................................... 107
Table of ContentsInventory User’s Guide

Setting Up a Kit ...................................................................................................................107
Specifying Components for Bills of Materials..................................................................108
Editing Existing Component Lists.....................................................................................109
Building Kits from Components .......................................................110Assembling Kits .................................................................................................................. 110
Disassembling Kits Into Components............................................................................... 111
Using Kit Reports ...............................................................................112Kit Assembly Report........................................................................................................... 112
Master Kit Report ................................................................................................................ 113
Component Requirement Report....................................................................................... 114
Troubleshooting: Working With Kits ................................................115
Inventory Reports 116
Reporting Overview ...........................................................................117Denali Reports Available .................................................................................................... 117
Reporting Options in Denali............................................................................................... 118
Inventory Reports.............................................................................. 122Stock Quantity Reports ......................................................................................................123
Stock Value Reports............................................................................................................130
Transaction Reports ...........................................................................................................132
Lot Expiration Report .........................................................................................................135
Troubleshooting: Inventory Reports ............................................... 136
Inventory Period End and Maintenance 137
Performing Period End Procedures ................................................ 138Preparing for Period End....................................................................................................138
Clearing Variance Amounts ...............................................................................................138
Performing Inventory Maintenance ................................................. 139
Table of ContentsInventory User’s Guide

Viewing Inventory Table Information.................................................................................139
Recalculating Inventory Tables .........................................................................................140
Purging Inventory Transaction History.............................................................................140
Troubleshooting: Inventory Period End and Maintenance............ 142
Additional Resources 143
Formatting User-Defined Fields....................................................... 144
Format Requirements for Importing Transactions......................... 145File Formats Supported by Denali for Importing Transactions ......................................145
Inventory File Format Requirements.................................................................................147
Format Requirements for the Import/Export Feature..................... 148File Formats Supported by Denali for Importing Data.....................................................148
Use the Export Feature to View File Formats ...................................................................149
Inventory File Format Requirements for Importing Data.................................................150
Import Error Messages ..................................................................... 159
Glossary 162
Index 171
Table of ContentsInventory User’s Guide

1Chapter
Learning About thisResource
How to Use This Guide
How This Guide Is Organized
Denali Help
Customer Support
Training
Troubleshooting Options

Welcome to Denali by Cougar Mountain Software. This guide is designed to help you
effectively learn and use the Inventory module. This chapter presents an overview on
using this guide and where to find additional help, along with introductions to each
chapter of the guide.
How to Use This GuideWe wrote this documentation to accommodate a system that has all available modules and enhancements installed and integrated. If this is not the case, some windows and options might be different. After you review this guide, if you would like to expand your software package to get the most out of Denali, refer to our website or contact our Sales Department at (800) 388-3038 for more information.If you have not done so already, we highly recommend you review the information in the Getting Started guide before you continue. This guide provides valuable information on the commonalities between the Denali modules, customization options to ensure Denali meets your needs, and overviews of the different types of help and training available.
How This Guide Is OrganizedRefer to this section for a summary of what is covered in this user’s guide and how to get the most out of it.
Chapter 1: Learning About this ResourceThis chapter introduces you to the organization of this user’s guide. It provides an overall look at the information you can find and how it is designed.
Chapter 2: Setting Up the Inventory ModuleSetting up Inventory to meet the needs of your business is one of the best ways to ensure that you get the most from your software. This section covers general setup, integration with other modules, printing preferences, and Inventory codes.
Chapter 3: Setting Up Your Stock ItemsIn this section, we provide information on how to plan and work with your stock item records.
Chapter 4: Establishing Prices for Your Stock ItemsThis section explains how to establish stock item pricing methods. It provides information on special customer and group pricing, price break pricing, Discount, Markup, Margin, and Promotional Codes, and more.
Chapter 5: Managing Stock QuantitiesKeeping track of your stock item quantities is crucial to business. To accommodate this, Denali allows you to make adjustments to inventory and use transaction codes, both of which are discussed in this section. We also explain how to generate adjustments from external files, check the accuracy of your entries, and post adjustment transactions.
11Learning About this ResourceHow to Use This Guide

Chapter 6: Additional Options and FeaturesTracking information, prompting for additional information when ordering/selling an item, and working with aliases and images of stock items are all covered in this section. You will also find information on importing and exporting inventory data in Denali.
Chapter 7: Managing Stock Items with Multi-Location InventoryWith the installation of the Multi-Location Inventory (MLI) enhancement, you increase the flexibility in managing your stock items at your locations. This section covers the basic setup necessary before you begin to use MLI, as well as information on how MLI impacts other installed and integrated modules.
Chapter 8: Using Inventory with Specialty ShopSpecialty Shop is an enhancement that gives you more options for how you sell and discount your stock items. This section provides the basic setup requirements necessary before you use Specialty Shop and information on how it impacts other modules.
Chapter 9: Working with KitsIf you have a group of stock items that you would like to sell as a unit to your customers, you can set up stock item kits. Kits are set up so that the salesperson only enters one stock item code to include all items in the unit. This section describes how kits function and how to set them up.
Chapter 10: Inventory ReportsTo make smart business decisions, you need to be able to track and view inventory information. This section shows samples of the types of reports available in Inventory, as well as options that ensure you get only the information you want when you need it.
Chapter 11: Inventory Period End and MaintenanceMonth, period, and year end require you to perform certain accounting procedures. You might also need to complete data maintenance throughout the year to ensure your system is functioning to its fullest potential. Refer to this chapter for information to help you keep your system running smoothly.
Chapter 12: Additional ResourcesThis section provides information on format requirements you must use to import and export data in Inventory. You will also find information to help you format user-defined fields.
Denali Help Cougar Mountain Software is dedicated to providing as much help as you need to feel comfortable using our software. These topics describe the conventions we use in the documentation and the different types of help we offer.
12Learning About this ResourceDenali Help

Document ConventionsThe following conventions are used throughout the documentation:
In-Program and Web HelpCougar Mountain offers in-program help, which is part of the software, accessible from any Help button, and does not require an Internet connection. We also offer web help that you can access at https://cougarmtnservice.com/help/index.html. The web help includes features not available in the in-program help, such as the ability to comment on topics and share information on social networking platforms. The content is the same in the in-program and web help. When you access the help, you will find we offer both procedural and window-specific help. If you want to know the steps you need to take to complete a task, you should access the procedural help. If you want to know what an option or field in a window is used for, you should access the window-specific help.
Window-Specific HelpDenali offers window-specific help that explains each field and option available in every window. When you work in the software, you can access help specific to an active window or tab when you click the Help button or press F1 on the keyboard.
Convention Use
Bold Titles, names, and anything that appears on the screen will appear in bold, exactly as it appears.
•Select Change Session Date from the Common Tasks menu.•Click the New button.•Enter a name in the Name box.
Italic Italics are used for text that you should enter, or text that appears in a box or field within a window.
•Enter Hardwood in the Description box.•The default for this field is IN Code.
Uppercase Uppercase characters will be used to denote keyboard keys or hot key combinations. Some examples are:
•To delete an item in the detail grid, select the item and press the DELETE key.•To open the Enter Transaction Comments window,
simultaneously press SHIFT+C.
> This character is used to separate menus, submenus, and commands.
For example: Select Renumber / Merge Stock Items from the Inventory Items menu is written as: Select Inventory Items > Renumber / Merge Stock Items from the left navigation pane.
13Learning About this ResourceDenali Help

In many window-specific topics, you can access related task-based help topics when you select the See Also button at the bottom of the topic window. You can also access the task-based help from the Table of Contents in the left pane of the Help window.
Procedural HelpProcedural help gives you steps to complete a process from start to finish and general information about the software windows. You can access this help from the left navigation pane in the software when you click Resources and Tools > Access the Denali Help. You can also access the Help when you select the question mark on the right side of the toolbar. If you already have the Help window open, you can access all the help from the Table of Contents in the left pane of the window.
Reference HelpDenali includes topics that are designed to provide additional information for your reference. For example, format requirements to import transactions and purchase order calculations. Most of these topics can be found in the Appendix, which you can access from the Table of Contents in the in-program and web help.
Navigating the In-Program HelpWhen you access the Help in the software, you access the in-program help system. To help you find the information you’re looking for, we outline the different parts of the Help window.
Figure 1: Navigational points and features available in the in-program help window.
14Learning About this ResourceDenali Help

The reference numbers in the table correspond with the previous figure and are used to highlight the main navigational points and features.
Navigating the Web HelpTo help you find the information you’re looking for in the web help, we outline the different parts of the window.
Reference Number
Option Name Description
1 Contents tab This is the Table of Contents for the Help. Click on the books to show the related subtopics.
2 Breadcrumbs These are links that show you where you are in the Help. The first link reflects the main topic and following links are subtopics. You can click these links to navigate backwards.
3 Hide button This hides the Table of Contents and changes to read Show, which you can then click to see the Table of Contents.
4 Back button Clicking this button takes you back through the previously viewed topics one at a time.
5 Forward button Clicking this button takes you forward through the topics you have moved back through using the Back button, one topic at a time.
6 Home button This button returns you to the main topic window in the Help.
7 Print button If you want to print the current help topic, click this button.
8 Website button This button opens the Cougar Mountain corporate website through your browser.
9 Topic window This window displays the open or active topic.
10 Sublinks The links listed are subtopics of the open topic.
11 Email Us Your feedback on the documentation and Help systems is appreciated. Use this email address to send the Documentation Team your comments or suggestions.
15Learning About this ResourceDenali Help

Figure 2: Navigational points and features available in the web help window.
The reference numbers in the table correspond with the previous figure and are used to highlight the main navigational points and features.
Reference Number
Option Name Description
1 Contents This is the Table of Contents for the Help. Click on the folders to show the topics available.
2 Search Use the search field to quickly find the information you’re looking for. You can use the drop-down to filter the search to certain modules/guides.
3 Forward and Back
Click these arrows to navigate forward and back through the help topics, one topic at a time.
4 Home Click this button to go to the home page of the web help.
5 Translate Click this button to translate the help to another language.
6 Breadcrumbs These links show you where you are in the help. The first link reflects the main topic and the following links are subtopics. You can click these links to navigate backwards.
7 Social Click these buttons to post a topic on social media.
8 Print & Email Click these buttons to print the help topic or email the CMS Documentation team.
9 Sublinks The links listed are subtopics of the open topic.
10 Disqus Comment Use this feature to share public comment/questions with other users and the CMS Documentation team.
16Learning About this ResourceDenali Help

Printing Help TopicsYou can print out any help topic to keep for future reference. To print a single topic:
1 Select the Print button or right-click and select Print from the right-click menu.2 If the Print Topics window appears, select Print the selected topic and then select OK.3 When the Print window appears, make any desired adjustments and then select Print.
To print multiple topics in the in-program help:1 Verify the Contents tab is visible.2 Highlight the heading of the section you would like to print.3 Select the Print button.4 The Print Topics window will appear.5 Select Print the selected headings and all subtopics to print the entire section.
User GuidesDenali includes access to PDF (portable document format) versions of the procedural help that you can open with Acrobat® Reader®. This is the same procedural help content that appears in the in-program and web help. To access these user guides, click Start > Denali by Cougar Mountain > Denali User Guides. When the Customer Service Center site opens, choose the guide you want to view.
Release NotesThe Release Notes include last-minute changes and technical issues not covered in other documentation. You can review the Release Notes on the installation screen at the start of the installation process, from the Start menu, or through the web help. You need to have Acrobat® Reader® to view the PDF. To access them from the Start menu, click Start >Denali by Cougar Mountain > Release Notes.
Customer SupportIf you come across a problem or an error message you cannot resolve, call our Customer Support Department. Cougar Mountain Software maintains a full-time Customer Support staff at our Boise, Idaho office specially trained to solve problems.Our Customer Support staff has the expertise to answer your questions about installation and operation of the software. Call (800) 390-7053 to contact a Support Specialist. You can receive customer support over the phone from Cougar Mountain Software or you might be referred to a Cougar Mountain business partner in your area who can provide personalized, local support. Cougar Mountain Software offers support contract plans that allow you to get help when you need it. You can request a Customer Support Specialist to contact you through our online form or you can send an email to Customer Support. Visit our Customer Support Center online at: https://www.cougarmtn.com/support-request/.You can also visit the customer service site at https://service.cougarmtn.com to search for software updates you can download at your convenience.
17Learning About this ResourceCustomer Support

Information to Gather before You Contact Customer SupportWhen you contact Cougar Mountain Customer Support, please have your support number ready. This is typically your telephone number with the area code first. It will also be helpful to know your operating system, the Cougar Mountain product(s) you purchased and installed, and the version of the product. If you are not sure how or where to find this information, Customer Support can help.
Contacting Customer SupportRefer to the following table for options available to contact a Customer Support Specialist for answers to your questions. You can also use one of these options to purchase a support contract, which will ensure you get the help you need.
TrainingWhile Denali is a comprehensive business accounting solution, the information you can get from the software will only be as good as the information you put in. The more you know about the software, the more you will be able to take advantage of its features. For this reason, we consider training to be a critical part of the learning process. We offer several different types of training—one or more are sure to meet your educational needs, time constraints, and budget. Contact Cougar Mountain at (800) 388-3038 about your training needs.
Online TrainingTo ensure you get the most out of your accounting software, it is important that you understand all its capabilities. For this reason, as part of our Software Assurance program, we include the opportunity for you to participate in e-learning. This educational resource is offered online through the Cougar Mountain Customer Service Center (CSC) website (https://service.cougarmtn.com/). Depending on the subscription you purchase, you can access a wealth of short presentations on the features of Denali. Because these presentations are online, you can view a topic whenever it is convenient for you and/or your employees. For more information on this resource, contact your account executive at (800) 388-3038.
Support Type: Contact via:
Contact a Customer Support Specialist. (800) 390-7053
Purchase a Software Assurance plan. (800) 388-3038
Email questions to a Customer Support Specialist.
Complete the online Call Back Request form to have a Customer Support Specialist contact you.
https://www.cougarmtn.com/support-request/
18Learning About this ResourceTraining

Classroom Training in BoiseWe offer training classes on a regular basis at our corporate headquarters in beautiful Boise, Idaho. If you have a few people to train, this is a great way to learn about the software’s features and how you can use it to its full potential for your needs. One of the benefits of coming to our training classes is that you can hear from other users of the software, which can remind you of issues that are important to you. Another benefit is that it removes you from the day-to-day tasks at your own office and allows you to concentrate more fully on learning how to use the software. You can use this as a powerful tool to “train your trainer”—once the staff members who attended the training arrive back home, they can teach other staff members the aspects of the software they need to know.
On-Site Training at Your BusinessIf you have more than a few people to train, you might want to consider on-site training. In this scenario, one of our professional trainers travels to your site and works with your employees. One advantage to this type of training is that you can train as many people as necessary without incurring additional costs and you can have specific people participate for specific sessions depending on their job duties. For example, during the training for Purchase Order, only those associated with handling purchase orders need to be present. This will allow for less interruption in daily productivity. Another advantage of on-site training is that you can work with your own organization’s data and business practices while focusing on the specific needs of your business.
Telephone TrainingTraining can also be done over the telephone. Using network streaming technology via an internet connection between your computer and our trainer’s computer, you and your employees can work with one of our professional trainers to focus on the specific parts of the software you choose. The trainer will be able to see your computer screen and you can work with either your own data or the demonstration data to learn how to best use the software for your business. This is a great solution if you have one or two modules that are new to you and you want thorough training without traveling to our training facility or having a trainer come to you.
Training VideosCougar Mountain Software also offers training videos which can help you in specific areas of the software. They serve as a great orientation for people new to your company and/or the software. They also can be a refresher for people who have already used the software, but need help in a few areas or are changing their job responsibilities to include things they haven’t done before.
Troubleshooting OptionsOne goal of Cougar Mountain Software is to make your accounting software experience a positive and effective one. For this reason, we included Troubleshooting sections throughout this documentation to provide answers to problems that might occur. It is our intent to provide many possible solutions to your questions. If you have suggestions for additions to the Troubleshooting sections, please feel free to email us at [email protected].
19Learning About this ResourceTroubleshooting Options

2Chapter
Setting Up the InventoryModule
Module Preferences in Inventory
Overview of Codes in Inventory
Multi-Location Inventory
Troubleshooting: Setting Up the Inventory Module

You can set up the Inventory module to meet the needs of your business and assist
you in managing and maintaining your inventory records. This chapter introduces you
to the process of defining your inventory. It can help you decide what inventory
information to share with other installed modules and how to share it. The chapter also
includes information on printing, tracking, organizing, and maintaining your inventory.
Depending on the installed modules, some of the options and information you see here
may not be available.
Module Preferences in InventoryBefore you use Inventory, you should define how you want Inventory to share information with other installed modules (integration), how you want reports to print, and if you want to create fields to track miscellaneous information specific to your business. You can generally change these options at any time, but some options, such as integration, might affect the way information posts.To access these options, select Options > Set Up the Module Preferences from the Inventory navigation pane.
General SetupOn the General tab of the IN Module Preferences window, you’ll find options for serialized stock, transaction batches, viewing options for the Notes tab, and integration options. If you want the Notes tab to appear by default when you open the IN Stock window or the IN Adjust Stock Quantities window, select the Notes Always Visible check box. You can select the Allow copy of stock item information and sales information or the Allow copy of quantity and price information check box if you want a new stock item in the IN Stock window to use information from the last stock item you saved.If you have Multi-Location Inventory installed, this tab also shows the location the system uses as the default for stock items. This tab also contains the last posting and batch numbers for reference purposes.
21Setting Up the Inventory ModuleModule Preferences in Inventory

Figure 3: IN Module Preferences window, General tab
Determining If You Need a Serialized SystemIf any of the stock items you sell have serial numbers you need to track, you can select the Serialized System check box in the IN Module Preferences window to allow for serialized inventory. Once you select this check box, you can identify which stock items are serialized when you set them up.With the serialized inventory feature, you have the ability to track multiple serial numbers for a single stock item. It also allows you to:
• Assign unlimited serial numbers up to 20 characters per stock item.• Integrate serialized inventory with the Sales and Purchase Order modules.• Maintain serial numbers in sales and purchase order history.• Print serial numbers on labels and/or reports.
Setting Up Inventory Integration SettingsIntegration is how information is shared between installed modules. If you integrate, information can be automatically sent to General Ledger when you post. You can also look up General Ledger information from Inventory. See the Getting Started guide for more information.
Figure 4: Inventory posting to General Ledger
NOTE: If you receive an error that indicates integration failed, print the generated report, make the corrections listed, open Module Preferences again, and select the Fix <Module> Integration button on the General tab.
22Setting Up the Inventory ModuleModule Preferences in Inventory

If Inventory is integrated to General Ledger, you will be required to enter General Ledger accounts in the IN Inventory Codes and IN Transaction Codes windows. If you use Promotional Pricing, you will also need to enter GL Accounts in the IN Promotional Pricing window. You can set integration on the General tab of the IN Module Preferences window.
Tracking User-Defined Stock Item InformationIf you want to track specific stock item information for your business, you can set up User-Defined Fields (UDFs). For example, you might track the placement of your stock items in your warehouse. These UDFs appear in the IN Stock window where you can define them for each stock item. They can also be used to sort or filter many Inventory reports (see “Reporting Options in Denali” on page 118).
To set up user-defined fields:1 In the Inventory module, select Options > Establish User-Defined Tracking from the navigation
pane and select the User-Defined Fields tab.
Figure 5: IN Module Preferences window, User-Defined Fields tab
2 For each piece of information you want to track, select a field that corresponds with that type of information, and enter the field name you want to create. For example, Fields 1 and 2 are Code fields, Fields 5 and 6 are Date fields, etc.
3 Once you enter the UDFs you want to use, continue with your Module Preferences setup or click OK.For information on using these fields after setup, see “Using the User-Defined Fields After Setup” on page 37.
Establishing Inventory Printing PreferencesUse the Print Options tab of the IN Module Preferences window to specify your printing preferences for Inventory reports.
23Setting Up the Inventory ModuleModule Preferences in Inventory

Figure 6: IN Module Preferences window, Print Options tab
To set up printing preferences:1 Select the output type, number of copies, format, and printer/file name for each type of report. 2 If you choose to export reports to a file, select the format you want to use in the Export Format
column.3 Use the Edit check box to specify whether or not you want the ability to edit these preferences each
time you print a report. For example, if you sometimes want to preview a report on the screen before you print it, select the Edit check box. After you preview the report, you can then choose to print the report to a printer or file. To learn more about printing reports in Denali, see “Reporting Overview” on page 117.
Overview of Codes in InventoryInventory uses codes to track information, sort and filter reports, set temporary pricing, categorize stock items, direct posting, and establish promotions. You can select these codes from the Options menu in Inventory to open and edit them.
Defining Inventory CodesInventory Codes determine the GL accounts the stock item affects, the valuation method for the stock item (FIFO, LIFO, Weighted Average, or Standard Cost), and the sales tax that will be applied to this stock item. You must establish Inventory Codes before you set up your stock item records. Inventory Codes enable you to separate your inventory items into different categories you can then use to post or report separately for each group. You can also use these codes to set special pricing for a group (see “Setting Up Special Price Levels for Groups of Customers” on page 63). It’s important to understand how your company tracks inventory so you can plan and implement a useful Code system.
24Setting Up the Inventory ModuleOverview of Codes in Inventory

Planning Inventory CodesAs you plan and implement a useful Inventory Code system, there are some questions that might help you determine how many and what kind of codes you want to create. How many groups are represented by each account?Review your Chart of Accounts (see the General Ledger guide for additional information) and consider each Inventory Asset account. You need one Inventory Code for each group represented by each account. This could be one Inventory Code and one account, or you can set up additional codes based on your account structure.How do you assign costs to your stock items?Consider how you assign costs to your stock items. Inventory Codes determine the valuation method for your stock items and can handle instances in which the cost of a stock item determines the final price to customers.If you use the same valuation method for all items, you need one Inventory Code for each General Ledger Inventory Asset account. If you value items by different costing methods, then you need an Inventory Code for each different valuation method. Do you have stock items with different sales tax?You might want to create an IN Code if you have stock items with different sales tax. For example, if you have non-taxable items, you might attach a non-taxable IN Code to a stock item so when you create a sale, any item with this code is not included in the final Sales Tax calculation.Do you give special prices to customer groups?You might want to create multiple Inventory Codes to accommodate special pricing for customer groups. This type of pricing assigns stock item prices based on the combination of the AR Type Code for the customer purchasing the item and the Inventory Code of the stock item they are purchasing.If you want to use this pricing option, we recommend you review the complete information about special pricing for customer groups before you set up your Inventory Codes (see “Setting Up Special Price Levels for Groups of Customers” on page 63).Do you want to sort and filter Inventory reports by Inventory Code?You can sort and/or filter most Inventory reports by Inventory Codes, so you might want to create multiple codes even if you have only one Inventory account in your general ledger and you use the same valuation method for all your stock items.
Adding Inventory CodesYou can set up additional Inventory Codes at any time, but you must set up at least one code before you can enter stock items. Once you determine how many Inventory Codes you need, follow these instructions to create them.
To create your Inventory Codes:1 In Inventory, select Options > Establish Inventory Tracking from the navigation pane.
25Setting Up the Inventory ModuleOverview of Codes in Inventory
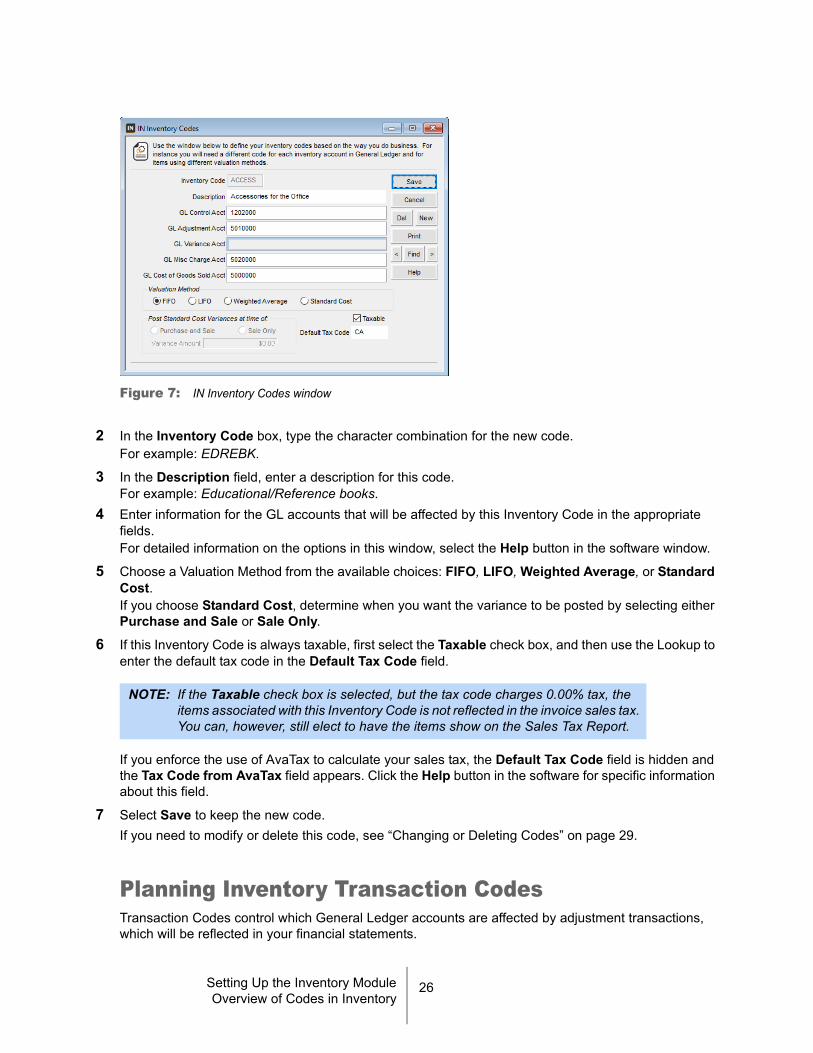
Figure 7: IN Inventory Codes window
2 In the Inventory Code box, type the character combination for the new code. For example: EDREBK.
3 In the Description field, enter a description for this code. For example: Educational/Reference books.
4 Enter information for the GL accounts that will be affected by this Inventory Code in the appropriate fields. For detailed information on the options in this window, select the Help button in the software window.
5 Choose a Valuation Method from the available choices: FIFO, LIFO, Weighted Average, or Standard Cost.If you choose Standard Cost, determine when you want the variance to be posted by selecting either Purchase and Sale or Sale Only.
6 If this Inventory Code is always taxable, first select the Taxable check box, and then use the Lookup to enter the default tax code in the Default Tax Code field.
If you enforce the use of AvaTax to calculate your sales tax, the Default Tax Code field is hidden and the Tax Code from AvaTax field appears. Click the Help button in the software for specific information about this field.
7 Select Save to keep the new code.If you need to modify or delete this code, see “Changing or Deleting Codes” on page 29.
Planning Inventory Transaction CodesTransaction Codes control which General Ledger accounts are affected by adjustment transactions, which will be reflected in your financial statements.
NOTE: If the Taxable check box is selected, but the tax code charges 0.00% tax, the items associated with this Inventory Code is not reflected in the invoice sales tax. You can, however, still elect to have the items show on the Sales Tax Report.
26Setting Up the Inventory ModuleOverview of Codes in Inventory

There are two basic adjustment transaction types: additions and subtractions. If you have Multi-Location Inventory installed, you will also have transfers. You need at least one Transaction Code for additions, one for subtractions, and one for transfers (if applicable).When you create Transaction Codes, use one of these prefix numbers to define how the system should handle the transaction:
• 1 = Add Inventory Quantity• 2 = Subtract Inventory Quantity• 3 = Transfer Inventory Quantity (MLI Only)
You can then add a suffix of up to five characters to create a more specific Transaction Code.To determine how many Transaction Codes to set up, consider how you want adjustments reflected in your general ledger and make a list of the different types of additions and subtractions you might enter. You should add additional Transaction Codes for different types of addition and subtraction adjustments.For example, let’s say you want to create different Codes for different types of subtraction transactions because you want to direct these adjustments to different General Ledger accounts. Here are a few examples of different types of subtractions:
• Breakage• Theft• Charitable Contributions• Floor Samples
Maybe you want breakage and theft adjustments to affect a different General Ledger account than an adjustment made for a charitable contribution. In this case, you could create a Transaction Code such as 2LOSS to use for adjustments made due to breakage and theft. You could create another Code, such as 2CHAR, for adjustments made because of charitable contributions.Build a Transaction Code for every combination of accounts for each transaction type.
Figure 8: Transaction Codes and General Ledger Posting
27Setting Up the Inventory ModuleOverview of Codes in Inventory

You can add additional codes at any time, but they will only affect future transactions and not previously posted transactions.
Setting Up Transaction CodesOnce you decide how many Transaction Codes you need, you are ready to create them. Remember, you need at least one code for additions to stock items and one for subtractions to stock items. If you have Multi-Location Inventory (MLI) installed, you need to enter a third code for transfers of stock items.
To create your Inventory Transaction Codes:1 In the Inventory module, select Options > Set Up Adjustment Types from the left navigation pane.
Figure 9: IN Transaction Codes window
2 Enter a Transaction Code of up to six characters. The first character of the code is determined by the transaction types as defined in the legend at the bottom of the window, for example: 1ADINV, 2BREAK, or 3TRFIN.
3 Enter a description that easily identifies the type of transaction represented by this code in the Description box.
4 Enter the General Ledger account affected by the opposing entry for this type of transaction in the Opp. Acct box. If Inventory is not integrated to General Ledger, you can leave this field blank. If integration to General Ledger is set to Report Only, the account here is listed on the report that is generated at posting.
5 Select Save to save the Transaction Code.
Creating User-Defined CodesIf you want to track specific stock item information for your business, you can create up to two code-type User-Defined Fields (UDFs) on the User-Defined Fields tab of the Module Preferences window. For example, you might want to track the row you store an item in the warehouse. You can type Row in one of the two Code fields (User-Defined Fields 1 and 2).You can select Options > <Code Name> from the menu bar to access this UDF and define specific Codes to enter or select in those fields, such as ROW3A, ROW4C, etc.
28Setting Up the Inventory ModuleOverview of Codes in Inventory

Figure 10: IN User-Defined Codes window
You will then be able to attach the specific codes to individual stock items on the User-Defined tab of the IN Stock window.
Changing or Deleting CodesOnce you create a code in Inventory, you can change some of the information you previously saved. It is important to consider how editing a code can affect other areas of the software. For example, if you edit a Promotional Pricing Code, the changes you make affect all of the items to which that code is attached.If you are no longer using a code, you might want to delete it. You can only delete Inventory or Transaction Codes if they are not attached to unposted transactions. Changes you make to codes will not affect previously-posted transactions.
To change or delete a code:1 In Inventory, select Options > <Code you want to modify> from the left navigation pane.2 Type or use the Lookup to select the code you wish to change or delete.3 Select Edit. This button then changes to read Del.4 If you are editing the code, make your changes and select Save.
-or-If you are deleting this code, select the Del button. If you try to delete a code that should not be deleted because it’s attached to records or transactions, you will receive an error message. You can then print out a report that indicates what the code is attached to.
NOTE: If you delete a code, be aware that you might need to add a new code to any transactions or records it was attached to before you can successfully post.
Code type To delete it
Inventory Codes You must detach Inventory Codes from stock items before you can delete the Codes. Inventory Codes can only be edited on existing stock items if the stock item has no cost/quantity information and there is no quantity on hand.
29Setting Up the Inventory ModuleOverview of Codes in Inventory

Multi-Location InventoryThe Multi-Location Inventory (MLI) enhancement allows you to track inventory at multiple locations. You can set up the system so that each location posts to a distinct General Ledger account, uses the account attached to the stock item, or posts according to the Sales Department Code. See “Setting Up Your Multiple Locations” on page 85 for more details.
Transaction You must detach Transaction Codes from unposted transactions before you can delete the Codes.
Location These are only available with MLI. Location Codes can only be deleted if they are not attached to any stock items. You must first transfer your stock items to new locations before you can delete or edit a Location Code attached to an existing stock item.
Multi-Pack and Promotional These codes can be deleted at any time.
Code type (Continued) To delete it (Continued)
30Setting Up the Inventory ModuleMulti-Location Inventory

Troubleshooting: Setting Up the Inventory ModuleAt times, problems or errors can occur that are simple to fix without contacting Customer Support. Here, we indicate some common problems and ways to correct them. If you do not find what you are looking for in this section, refer to the help options under the “Denali Help” section of this guide and/or check the FAQ topics of our Customer Service Center at http://cougarmtnservice.com before you contact Customer Support. If you would like to offer suggestions for additions to our Troubleshooting sections, please email us at [email protected].
To Fix This: Try This:
I cannot view vendor information from within the Inventory module.
Make sure that AP Lookup Enabled is selected in the Accounts Payable drop-down on the General tab of the IN Module Preferences window.
My inventory quantities aren’t being updated when I sell the stock items.
Check that Order Entry or Point of Sale is integrated to the Inventory module. See the Sales Administrator guide or online help for more information.
31Setting Up the Inventory ModuleMulti-Location Inventory

3Chapter
Setting Up Your Stock ItemsPlanning Your Stock Items
Adding Stock Item Records
Editing Inventory Stock Item Records
Troubleshooting: Setting Up Your Stock Items

Stock items are the foundation of Inventory. Everything else revolves around
managing the stock items in your inventory. Most setup and configuration can be
changed or updated at any time, but many of these changes may impact how
information is posted or stored. For this reason, we highly recommend reviewing all
your options before you create your stock items. This section covers the basic
elements you need to consider when creating your stock items to match the needs of
your business.
Planning Your Stock ItemsYou can use Inventory to track and manage your stock items according to your needs. We recommend you review all your options and determine what information your business needs and wants to track before you set up your stock items. Some questions you might ask yourself as you plan are:
• Do you want to keep track of your stock items using the same valuation method? • Do you have serialized or lot numbered stock items? • What pricing method(s) do you want to use? • Do you need to track the cost of goods sold in different ways for different groups of stock items?
You can make changes to your stock items at any time, but they will only affect future transactions and not previously posted transactions. Once you enter your stock items, you can sell them in the Sales module, include them in a job in Job Cost, and purchase or adjust them through Inventory, Accounts Payable, and Purchase Order.
Establishing a Naming/Numbering SchemeBefore you create your stock items, it is a good idea to decide on a naming/numbering scheme that will work best for you and your business. Stock numbers can be any combination of numbers and/or letters. In many cases, the manufacturer will provide a UPC for stock items. This is an easy and efficient way to track inventory stock items. Because different vendors of the same item might use different UPCs, you can use stock item aliases to reflect that items with multiple UPCs are the same item (see “Setting Up Additional Stock Item Identifiers” on page 74).
Adding Stock Item RecordsNow that you’ve planned how you want to manage and track your stock items and you have set up at least one Inventory Code, you are ready to add stock items.You can create a stock item with as little as a stock number and an Inventory Code. If you have Multi-Location Inventory installed, you also need to enter the Location information when you create a new stock item. You can add or edit the additional information in the window at any time, however if you want to delete a stock item, it must have an on-hand quantity of zero.
33Setting Up Your Stock ItemsPlanning Your Stock Items

If you selected the Allow copy of stock item information and sales information or the Allow copy of quantity and price information check box in Module Preferences, when you save a stock item certain fields will keep the information you saved in them. Click the help button in either the IN Stock or Module Preferences window to see which fields will keep information. To add an Inventory item:
1 In the Inventory module, select Inventory Items > Add / Change Stock Items from the left navigation pane.
Figure 11: IN Stock window
2 Enter a stock item number, description, and IN Code in the appropriate fields. For detailed information on the options in this window, select the Help button in the software window. If you plan to use special pricing for customer groups, you must have the same IN Code attached to items you will include in your price levels.
3 If this is not a serialized or lot numbered stock item, enter the beginning quantity in the On Hand box along with the last purchase price in the Last Cost box. If you checked the Hide Last Cost in IN Stock Window check box in Module Preferences, the Last Cost field won’t be available. If you enter a quantity, you must enter a last cost to save the stock item. If for any reason you do not want to enter a last cost, you must leave the quantity on-hand as zero. In this case, you can only add items to your inventory through adjustment transactions (see “Preparing to Enter Adjustment Transactions” on page 46 for more information on entering quantity through adjustment transactions).
4 Complete any other settings and options for the stock item according to your needs.5 Select the Save button to save the record.
For additional options on how to manage or price your stock items, see “Adjusting Inventory” on page 44, “Establishing Prices for Your Stock Items” on page 60, and “Additional Options and Features” on page 72.
34Setting Up Your Stock ItemsAdding Stock Item Records

Enabling Lot Number Tracking for Stock ItemsThe lot number tracking feature allows you to assign lot numbers of up to 50 characters to stock items so you can manage your inventory and generate reports for tracking purposes. For example, you might want to track items that have an expiration date and print a report to help you determine how to rotate your stock, or you might want to track items that are part of a specific production or series. When you sell a lot numbered item in Sales, you can indicate how many items from each lot you sold. To enable lot number tracking for a stock item, select the Lot Numbered check box in the IN Stock window when you set it up. Enter the rest of the information as you normally would. The stock item must have an on-hand quantity of zero to activate this feature.
If you use kits, you can only assign lot numbers to completed kits, not components of the kit. After you establish lot number tracking for a stock item, you can add lot numbers to it in two ways:
• perform an adjustment transaction in the IN Adjust Stock Quantities window• add lot numbers in the PO Assign Lot Numbers window when you receive the item in Purchase
OrderAfter you post the inventory adjustment or purchase order receiving transaction, you can view the lot numbers, quantity, item cost, received date, and lot number expiration (if applicable) on the Cost/Quantity tab of the IN Stock window.
Using Serial Numbers for Stock ItemsSerial numbers allow individual products to have unique numbers assigned to them and allow those products to be traced. You can assign serial numbers of up to 20 alphanumeric characters. To use serial numbers in Inventory, you must select the Serialized System check box in Module Preferences. When you create a stock item or edit a stock item that has an on-hand quantity of zero, you can select the Serialized check box in the IN Stock window.
Once you assign a serial number to a stock item, you’ll be required to enter a serial number when you sell or receive the item.If you use kits, you can only assign serial numbers to completed kits, not components of the kit. After you establish a serialized stock item, you can add serial numbers to it in two ways:
• perform an adjustment transaction in the IN Adjust Stock Quantities window• add serial numbers in the Received Serialized Numbers window when you receive the item in
Purchase Order.
NOTE: A stock item cannot be assigned both serial numbers and lot numbers. Once you activate lot number tracking in the IN Stock window, the Serialized check box is disabled. Also, you cannot use lot numbers if you use multi-pack pricing for the stock item.
NOTE: A stock item cannot be assigned both serial numbers and lot numbers. Once you activate lot number tracking in the IN Stock window, the Serialized check box is disabled. Also, you cannot use serial numbers if you use multi-pack pricing for the stock item.
35Setting Up Your Stock ItemsAdding Stock Item Records

Allowing Stock Item LeasesYou can set up stock items to be available for lease and for sale. All leased items must be serialized so you can track which items your customers leased. If you want the option to sell items marked for lease, you must include and allow entry to the For Lease check box in your Sales Entry window. This allows you to uncheck the box for items you want to sell. To set up stock items for lease:
1 In the IN Stock window, select the For Lease check box. The Serialized check box will be automatically checked and the Term field will appear.
2 Enter the term length for this lease and from the drop-down select if the term is days, months, or years. The term dates can be changed in the Sales Entry window (if you include the Term Start and Term Expiration fields) or on the Leased Items tab in the AR Customers window.
3 To set a price for a leased item, you must attach a Non-Inventory Code on the Sales Info tab. If you choose to sell this item, instead of lease, the price will be taken from the Qty/Price Info tab.
4 Enter the rest of the information for this stock item and save. Because this is a serialized item, you must add quantity in the IN Adjust Stock Quantities window. For detailed information on the options in the software window, select the Help button.Leased items will still appear as On Hand and be included in inventory valuation, but they will appear in the Leased Items count instead of the Available count. After you return a leased item, it will again become available for lease or sale.
Attaching Files to Stock ItemsUse the Attachments tab to attach files to your stock items. For example, you can attach additional information about a stock item, such as a special advertisement or a demonstration video. If you want to attach a file to multiple stock items or if you need to regularly update the file, you can create a custom menu instead of attaching the file to individual accounts.To attach a file to a stock item:
1 In Inventory, select Options > Add / Change Stock Items from the left navigation pane.
Figure 12: IN Stock window, Attachments tab
2 Make sure a stock item is selected and select the Edit button.3 Click the Attachments tab.4 Use the browse button in the Location field to select the file you want to attach.5 Enter a description of the attachment.
36Setting Up Your Stock ItemsAdding Stock Item Records

6 If you want to publish this file to the SQL server, select the Published check box. This will allow everyone that has access to the server to access the file. If you want to allow access only to users on the local machine, leave the check box unchecked. You can double-click on any row to open the attachment. Use the right-click menu to delete a row, open the attachment, or unpublish the file. When you back up your data through Denali or SQL, unpublished files will not be included.
Using the User-Defined Fields After SetupAfter you define any of the 10 user-defined fields on the User-Defined Fields tab of the IN Module Preferences window, the fields appear on the User-Defined tab of the IN Stock window. You will be able to use the Lookup in the User-Defined Fields 1 and 2 boxes to find the codes you created. For detailed information on the options in the software window, select the Help button.
Figure 13: IN Stock window, User-Defined tab
Importing Stock Items from Another SoftwareIf your stock item records are in an electronic format, you might be able to import them directly into Denali to save time. Keep in mind that there might be some information the existing electronic file doesn’t have that you will need to enter. Refer to “Importing and Exporting in Inventory” on page 79 or the Importing QuickBooks® Data guide for more information on this feature.
Editing Inventory Stock Item RecordsOnce you enter and save a stock item, you can view and edit certain information about that stock item at any time in the IN Stock window. Type the name of the stock item or use the Lookup to select it and then select the Edit button. Once you save a stock item, you can’t edit the stock item location (MLI only). To save your item in a different location, you must create a new stock item for that location. You cannot delete a stock item unless the on-hand quantity is zero. If you need to edit your stock item quantity, you must use the IN Adjust Stock Quantities or the IN Adjustment Transaction windows (see “Adjusting Quantities by Specifying the Number to Add/Subtract” on page 47 or “Adjusting Stock Quantities by Specifying the Quantity On Hand” on page 48 for more information).If you want to edit the IN Code or change a stock item to serialized or lot numbered, you must set your on-hand quantity to zero. If you want to change the stock number of a stock item, you must renumber it (see “Renumbering Stock Items” on page 38).
37Setting Up Your Stock ItemsEditing Inventory Stock Item Records

Renumbering Stock ItemsIn special circumstances, you might want to change the number of one or more stock items. The Renumber Stock Items option will renumber the item in Inventory, as well as in open transactions and the transaction history from other modules. Anywhere the stock number appears, the old number is changed to the new number.To renumber your stock items:
1 In the Inventory module, select Inventory Items > Renumber Stock Items from the left navigation pane.
Figure 14: IN Renumber Stock Items window
2 In the Old Stock Item box, select the stock item you want to renumber.3 In the New Stock Item box, type the new number you want to use from now on.4 Select OK to renumber.
Update Minimum and Maximum Stock QuantitiesOn the Qty/Price Info tab of the IN Stock window, you can define the minimum and maximum quantities you want to keep on hand for each stock item. If you want to update quantities for several stock items at once, use the IN Update Min/Max Quantities window.
To update minimum and maximum quantities:1 In the Inventory module, select Inventory Items > Update Min/Max Quantities from the left
navigation pane.
38Setting Up Your Stock ItemsEditing Inventory Stock Item Records

Figure 15: IN Update Min/Max Quantities window
2 In the Starting Stock Number and Ending Stock Number fields, use the Lookup or type the starting and ending stock numbers you want to update minimum and maximum quantities for.
3 In the Minimum Quantity and Maximum Quantity fields, enter the minimum and maximum quantities you want to keep on hand.
4 Select OK. A message will appear that indicates the number of stock item records that were updated.
Copying Stock Items to Another CompanyIt is possible to copy stock items from one company to another. You can do this for one stock item or all of your stock items and you can also select what items to copy based on Inventory Code, Product Type, or Vendor. When you copy stock items from one company to another, the User-Defined Fields (UDFs) are automatically copied to the destination company. See “Tracking User-Defined Stock Item Information” on page 23 for more information on UDFs.To copy inventory stock item records:
1 In the Inventory module, select Inventory Items > Copy Items to Another Company from the left navigation pane.
2 Select the company you want to copy the stock items to from the Destination Company drop-down. 3 If you have Multi-Location Inventory installed, you will need to enter the source and destination
locations of the stock items you will copy. You can use the IN Copy Stock Items window to copy items to another location (MLI only) or to another company.
39Setting Up Your Stock ItemsEditing Inventory Stock Item Records
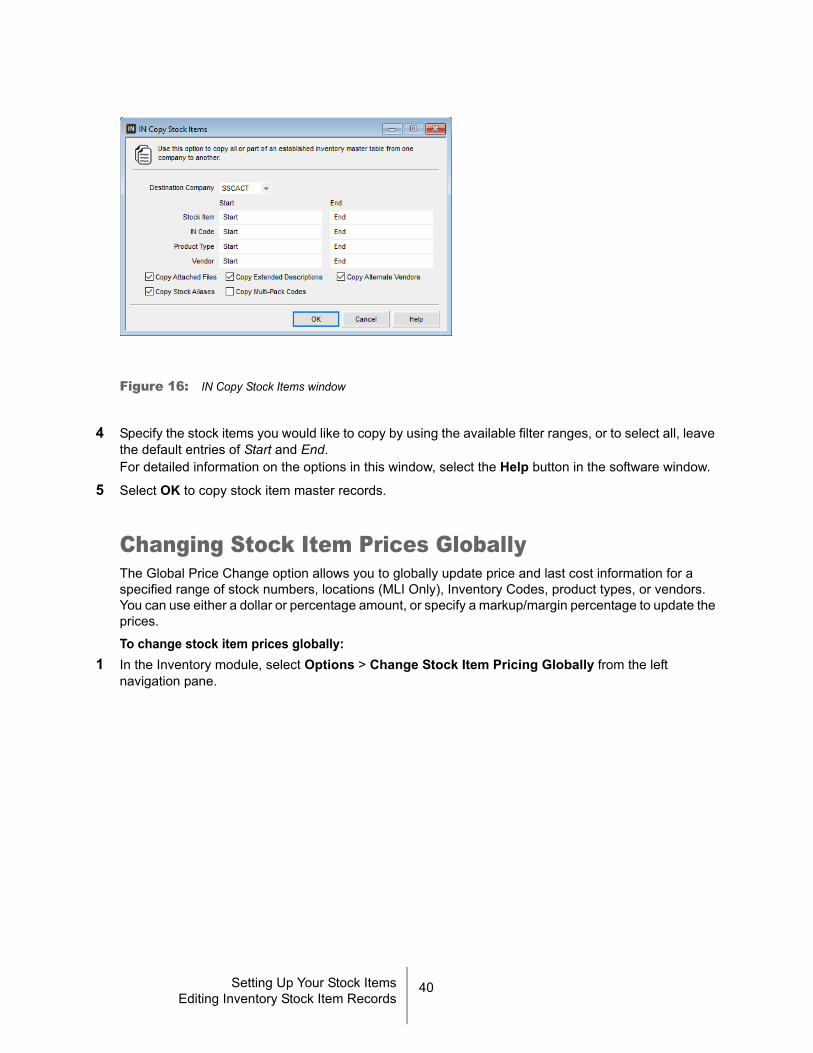
Figure 16: IN Copy Stock Items window
4 Specify the stock items you would like to copy by using the available filter ranges, or to select all, leave the default entries of Start and End.For detailed information on the options in this window, select the Help button in the software window.
5 Select OK to copy stock item master records.
Changing Stock Item Prices GloballyThe Global Price Change option allows you to globally update price and last cost information for a specified range of stock numbers, locations (MLI Only), Inventory Codes, product types, or vendors. You can use either a dollar or percentage amount, or specify a markup/margin percentage to update the prices.
To change stock item prices globally:1 In the Inventory module, select Options > Change Stock Item Pricing Globally from the left
navigation pane.
40Setting Up Your Stock ItemsEditing Inventory Stock Item Records

Figure 17: IN Global Price Change window
2 Enter the ranges of Stock Numbers, Locations, Inventory Codes, Product Types, and/or Vendor Numbers for which you want to change the price or last cost information. The default settings are Start and End and include the full range for each option.
3 In the Adjustment Type column, select either Dollar or Percent from the drop-down list.This column contains the options for Last Cost or Price Levels. The prices are the level breaks that are located on the Qty / Price Info tab of the IN Stock window.
4 Enter the amount (dollar or percent) in the Amount, Markup, or Margin column, depending on how you want the change calculated.For more information on Markup/Margin Pricing, see “Pricing Determined By Markup or Margin Codes” on page 66.
5 Select OK to change prices.
41Setting Up Your Stock ItemsEditing Inventory Stock Item Records

Troubleshooting: Setting Up Your Stock ItemsAt times, problems or errors can occur that are simple to fix without contacting Customer Support. Here, we indicate some common problems and ways to correct them. If you do not find what you are looking for in this section, refer to the help options under the “Denali Help” section of this guide and/or check the FAQ topics of our Customer Service Center at http://cougarmtnservice.com before you contact Customer Support. If you would like to offer suggestions for additions to our Troubleshooting sections, please email us at [email protected].
To Fix This: Try This:
My last cost for a stock item is incorrect and I’m not sure of the best way to change it.
One way to correct the cost is to adjust your quantity to zero and then use an adjustment transaction to enter the correct quantity and last cost. See “Editing Inventory Stock Item Records” on page 37 and “Increasing or Decreasing Stock Item Quantities” on page 46 for more information.
I want to change the stock item numbers for a few of my items, but I don’t want to re-enter all of the information.
The easiest way to change your stock item numbers is to use the renumber feature. See “Renumbering Stock Items” on page 38 for information on how to complete this task.
42Setting Up Your Stock ItemsEditing Inventory Stock Item Records

4Chapter
Managing Stock QuantitiesWorking with Transaction Batches in Inventory
Adjusting Inventory
Increasing or Decreasing Stock Item Quantities
Importing Adjustment Transactions into Denali
Posting Inventory Transactions
Converting Quantities When Buying or Selling
Troubleshooting: Managing Stock Quantities

Once you enter your stock items, one important aspect of any inventory system is
tracking quantities. If all the modules are integrated, Denali automatically adjusts
quantities in Inventory as you post transactions in other modules, such as when you
receive the stock items in Purchase Order and sell them in Sales.
You have a few other options you can use to manage your inventory and keep it
accurate, but one of the primary options is adjustment transactions. There are also
powerful conversions available that help you manage items you purchase and/or sell
in units other than the way you store them.
Working with Transaction Batches in InventoryTransaction batches allow you to group transactions that will post together. Batches are optional, and the guidelines below should help you decide whether or not this feature will be beneficial to you.If more than one person needs to enter transactions in the system at the same time, you should use multi-batch mode. You can also use this setting to enter and hold transactions in different batches so you can post them at different times. Enabling the batch control option allows you to set up and select different batches from the Adjustment Tasks menu. If you leave the Multi-batch mode check box empty in Module Preferences, you can only enter transactions on one network station at a time, and all transactions that you have entered but not posted are held together in one batch and will be posted together.For information about the benefits of multi-batch processing, refer to the Getting Started guide.
Adjusting InventoryInventory adjustments establish beginning inventory quantities and costs, and record subsequent adjustments for differences between the system’s on-hand quantities and the actual physical count.If you have Accounts Payable and/or Purchase Order and Sales integrated to Inventory, inventory quantities update automatically as the items are bought and sold. Inventory stock quantities are increased when stock items are purchased (through Accounts Payable and/or Purchase Order) and decreased when sold (through Sales). There might be times when you need to adjust the stock quantities in Inventory for other reasons—physical count discrepancies, breakage, or charitable contributions, for example. In this case, you can make an adjustment transaction to adjust your physical on-hand quantity. You can also import stock item data directly into your database tables. See “Importing and Exporting in Inventory” on page 79 to determine the best method for your business.If you run Inventory as a stand-alone module, you must use adjustment transactions to process all of your additions and subtractions. In addition, if you do not have Inventory integrated to General Ledger, you must manually update your ledger each time you post inventory adjustments.
44Managing Stock QuantitiesWorking with Transaction Batches in Inventory

Keeping Track of Quantities Available for SaleA challenge for any business that sells inventory is to keep the right amount of stock on-hand. Denali provides a number of features to address this challenge and provides a quick and easy way to check quantities to see what you need to reorder. The Qty / Price Info tab of the IN Stock window provides you with information about your stock item quantities. Depending on the way you set up your system, the number in the On Hand box might not always reflect an accurate count of the stock item quantities, and you might need to reference other fields in this window. The On Order, Back Order, Layaway, and Committed boxes will help you see the most common factors that influence your actual on-hand quantity. If the Sales and Purchase Order modules are installed and integrated with Inventory, the system automatically updates these fields for you. See the Sales Administrator guide and the Purchase Order guide for information about integration and other settings that can affect how inventory is adjusted.
Minimum, Maximum, and On Order Stock QuantitiesIf you want to maintain a specified quantity range for a stock item, you can use the minimum and maximum quantities. The Minimum box allows you to automatically create purchase orders and print reports for stock items that fall below the minimum number you set. In addition, the Maximum box can ensure you never order more than the quantity specified here.If you entered amounts here, you can print overstock and understock reports to see the status of your stock items. When orders for a stock item are placed, the On Order box displays the number of items that were ordered through Purchase Order.
Generate Purchase Orders from InventoryIf you have Purchase Order installed, you can generate purchase orders based on stock items that have fallen below the minimum quantity. The order is made to replenish the quantity up to the amount you entered in the Maximum box and based on other settings. See the Purchase Order guide for information on setting up this option.
Stock Quantities on Back OrderWhen you enter transactions in the Sales module, you might need to know when an order was placed and when it shipped. In the Sales module, after you indicate how many items were shipped, the Back Order box automatically reflects how many items were sold but not shipped.You can monitor the stock items on back order to find out how many items were sold, but are not available for shipping or viewing with the Back Order Tracking Report and Back Order Fulfillment Report. See the Sales Administrator guide for information on these reports.
Stock Quantities on LayawayWhen a salesperson places a sale on layaway in the Sales module, the Layaway box on the Qty/Price Info tab of the IN Stock window automatically reflects the number of items on layaway. This helps you to track the exact available quantities on the shelf.You can monitor these stock item quantities using the Layaway History Report and sort it by stock item. See the Sales Administrator guide for more information on running this report.
Committed and Available Stock ItemsWhen a salesperson is selling stock items in the Sales module, only posted transactions update a stock item’s on-hand quantity. However, the Committed box shows the number of stock items sold but not posted. The on-hand quantity minus the committed and layaway quantities equals the quantity available
45Managing Stock QuantitiesAdjusting Inventory

for sale. The total quantity still on the shelf is automatically reflected in the Available box on the Qty/Price Info tab of the IN Stock window and also in the Available Qty. column of the IN Available Inventory Lookup window.
Changing the Default Inventory Transaction DateThe IN Change Local Transaction Date window, accessed from Adjustment Tasks > Change the Session Date, allows you to set a new default transaction date for the Inventory module; this is not a global system change. If you need to enter multiple transactions for a date different than the current date, this is an easy way to do it.
Figure 18: IN Change Local Transaction Date window
You can set the date forward or backward from your system date to any date within the fiscal calendar. For example, this might be useful if you missed some adjustments a week ago. You can change the default adjustment date and enter as many adjustments as you want for that date. For more information on date and time or maintaining the fiscal calendar, refer to the Getting Started guide.
Increasing or Decreasing Stock Item QuantitiesThere are two ways to enter an adjustment transaction that will change the on-hand quantity of an item. The first is by specifying the quantity to add or subtract, and the second is by specifying the new physical quantity on hand. When you increase or decrease stock item quantities, you should:
• Enter the adjustments• Print and check the Edit Report• Make corrections, additions, and deletions as necessary• Post the adjustments
Preparing to Enter Adjustment TransactionsBefore you can adjust stock quantities, you must set up the stock items in the IN Stock window (see “Adding Stock Item Records” on page 33). If you did not enter a quantity on hand when you set up your stock items, you can use the adjust stock quantities option to enter your stock item quantities. There are other times when you might need to adjust your quantities. For example, if there is a discrepancy between quantities on the Control Report and your on-hand quantities (see “Control Report” on page 131). You might also find that you purchased the same stock item at different costs and need to enter them as separate adjustments. For instance, you carry an inventory item called a Widget, and you have 20 Widgets on hand. Of these 20 Widgets, you purchased 10 of them on July 7 for $25
46Managing Stock QuantitiesIncreasing or Decreasing Stock Item Quantities

and 10 on August 9 for $30. You should enter these items as two separate adjustment transactions. Later, when you sell the Widgets through the Sales module, their cost is based on the inventory valuation method set in the IN Inventory Codes window.
Adjusting Quantities by Specifying the Number to Add/SubtractYou can use the IN Adjust Stock Quantities window to specify a quantity of a stock item to add or subtract. This process works best for adjustment transactions for a small number of items.
To enter an adjustment for an item by specifying the quantity to add or subtract:1 In Inventory, select Adjustment Tasks > Increase / Decrease Stock Quantities from the left
navigation pane.2 If applicable, select a batch or create a new one (see “Transaction Batches” in the Getting Started
guide).
Figure 19: IN Adjust Stock Quantities window
3 Enter the appropriate information in the corresponding fields for the stock item.For additional information on the fields available in this window, select the Help button.
4 Click Save when your adjustment is complete.Keep the following in mind when you subtract items from inventory:
• You cannot enter a dollar amount for subtraction adjustments. The software will automatically subtract the quantity you enter based on the valuation method specified in the item’s Inventory Code.
• When you subtract serialized inventory, the serial number must already exist in the system. The adjustment quantity will always equal one for serialized inventory and the software looks for the specific serial number. If you don’t know the serial number, use the Lookup in the Serial Number box to search for it.
• When you subtract lot numbered inventory, the lot number must already exist in the system. Enter the lot number in the Lot Number field or use the Lookup to add it.
47Managing Stock QuantitiesIncreasing or Decreasing Stock Item Quantities

Adjusting Stock Quantities by Specifying the Quantity On HandWith this type of transaction, you enter the new quantity on hand instead of the quantity to add or subtract. This type of adjustment transaction is ideal when you first start to use Denali, or when you reconcile to a physical count of inventory.
To enter inventory adjustments by specifying the new quantity on hand:1 In the Inventory module, select Adjustment Tasks > Adjust Stock According to On-Hand Quantity. 2 If you are using batch processing, select an existing batch or set up a new one.
See “Transaction Batches” in the Getting Started guide for more information.
Figure 20: IN Adjustment Transaction window
3 Select the Transaction Codes you want to use to add and subtract the stock items and click Next.For additional information, see “Setting Up Transaction Codes” on page 28.
Figure 21: In Adjustment Transaction window
NOTE: You cannot use this option for serialized or lot numbered stock items. See “Adjusting Quantities by Specifying the Number to Add/Subtract” on page 47 for information on adjusting serialized or lot numbered item quantities.
NOTE: If you are doing a Bill of Materials adjustment, you must use a Transaction Code specifically of 1 or 2.
48Managing Stock QuantitiesIncreasing or Decreasing Stock Item Quantities

4 Select the Stock Number of the item for which you want to adjust the quantity.5 In the Quantity box, enter the (actual) quantity for the selected stock item.
For example, if you have a physical count of 12, but the quantity is listed in the system as 11, type 12 in the Quantity box. Do not enter 1 (the difference).You can refer to the message at the bottom of the window to verify you entered the information correctly.
6 Select Generate to generate the adjustment transaction.After the adjustment transaction has been generated, print the Edit Report. If you discover any errors on the Edit Report, use the IN Adjust Stock Quantities window to edit and correct the transactions before you post the transactions.
Checking the Accuracy of Your Adjustment Transactions Before PostingYou can print an Edit Report to ensure your entries are accurate before you post. This report will help you verify that your entries are correct and allow you the opportunity to correct or delete entries before you post (see “Correcting Adjustment Transaction Errors” on page 50). If you use batch processing, you need to run the Edit Report for each batch. For more information on using batches, see “Working with Transaction Batches in Inventory” on page 44.
Printing the Inventory Edit ReportThe Adjustment Edit Report can help you verify the accuracy of your data. This report shows every transaction in the adjustment file, which allows you to make any necessary changes before you post.Print the Adjustment Edit Report after every adjustment entry session, whether or not you use batches (see “Working with Transaction Batches in Inventory” on page 44). Check each adjustment for correct quantities, costs, dates, and more. Once you post adjustments, it is much more difficult to correct errors.
Figure 22: IN Adjustment Edit Report
49Managing Stock QuantitiesIncreasing or Decreasing Stock Item Quantities

Correcting Adjustment Transaction ErrorsIt is easy to correct transaction errors if you catch the errors before you post. If you find a mistake on your Adjustment Edit Report, follow these steps to correct the error before you post. If you prefer to delete the transaction(s) and/or batch, refer to “Deleting Adjustment Transactions” on page 50.To correct adjustment transaction errors:
1 In Inventory, select Adjustment Tasks > Increase / Decrease Stock Quantity.2 Click the Find button.3 When the adjustment is highlighted in the Lookup window, click Select.4 Select Edit to change the adjustment.5 Make the necessary corrections and click Save. 6 Complete the previous steps until you correct all errors, then you can select Cancel to exit this
window.7 Run the Edit Report to double-check that you corrected all errors.
For additional information on adjusting quantities, see “Increasing or Decreasing Stock Item Quantities” on page 46.
Deleting Adjustment TransactionsSometimes it might be necessary to delete an individual adjustment transaction or even an entire batch of transactions. If you want to correct the transaction instead of deleting it, refer to “Correcting Adjustment Transaction Errors” on page 50.
Deleting Individual Adjustment TransactionsIf you need to delete a single transaction, you can do so without deleting the entire batch. If you need to delete all of the transactions in the batch and/or the batch itself, refer to “Deleting an Entire Batch of Adjustment Transactions” on page 50 for instructions.To remove an adjustment that was entered in error:
1 In Inventory, select Adjustment Tasks > Increase / Decrease Stock Quantity from the menu.2 Click the Find button.3 Highlight the adjustment you want to delete in the Lookup and click Select.
This returns you to the Inventory IN Adjust Stock Quantities window with the adjustment transaction in view.
4 Select Edit. The Edit button changes to read Del.5 Select Del to delete the adjustment.6 A message asking “Are you sure you want to delete this record?” appears. Click Yes to delete.7 When you finish, select Cancel to exit.
Deleting an Entire Batch of Adjustment TransactionsThere might be a time when you want to remove a large number of erroneous adjustments. You could delete the adjustments individually; However, this can be a long process depending on how many adjustments exist. The easiest way to remove entries in this situation is to use the clear adjustments feature. If you need to delete an individual transaction(s) in the batch, refer to “Deleting Individual Adjustment Transactions” on page 50.
To clear an entire batch of adjustment transactions:1 In the Inventory module, select Adjustment Tasks > Clear Adjustments from a Batch from the left
navigation pane.
50Managing Stock QuantitiesIncreasing or Decreasing Stock Item Quantities

2 If you are using batch processing, select the batch from which you want to clear transactions.
Figure 23: IN Clear Adjustments window
3 Select the Remove Batch check box if you want to remove the adjustments and the batch. If you want to remove the adjustments but leave the batch accessible for new transactions, leave the check box unchecked.
4 Click Yes to clear pending adjustments. 5 In the message that appears, answer Yes to clear the batch and adjustments from the system, or No
to exit without deleting.
Importing Adjustment Transactions into DenaliYou can create adjustment transactions on a hand-held scanner or in another software application, and then import them into Denali. This adjustment transaction ability is available through a behind-the-scenes feature called the Universal Bridge and allows you to import adjustment transactions into several Denali modules.
Using Hand-Held ScannersGenerating adjustment transactions from a hand-held scanner provides a fast and efficient method to count, record, and adjust your inventory stock item quantities.
Format Requirements for the Scanner Text FileThe hand-held scanner hardware you choose must be able to output the data in the following file format:
• Each record in the file consists of two fields of data expressed in ASCII characters, with a maximum length of 50 characters per field. These two fields are the Stock Number and Quantity. The fields must be comma-delimited (fields are separated by a comma) and the transactions (records) must be separated by a CR/LF (carriage return/line feed) character. For example: PHILOSOPHY TEXT,30.
• If you have MLI installed, each record in the file consists of three fields of data expressed in ASCII characters, with a maximum length of 50 characters per field. These fields are Location, Stock Number, and Quantity. The fields must be comma-delimited (fields are separated by a comma) and the transactions (records) must be separated by a CR/LF (carriage return/line feed) character. For example: MAIN,PHILOSOPHY TEXT,30.
NOTE: You cannot import adjustment transactions for serialized or lot numbered stock items using a hand-held device. In this case, you must enter the adjustments individually. See “Adjusting Quantities by Specifying the Number to Add/Subtract” on page 47 for instructions on entering the adjustments individually.
51Managing Stock QuantitiesImporting Adjustment Transactions into Denali

The first step to generate adjustments from a hand-held scanner is to enter stock item numbers and quantities into the hand-held device. You can input the data with a wand, type it directly into the device, or use any other input device supported by your hardware. Refer to your hardware’s documentation for further data entry instructions. Once you gather and store the stock numbers in the device, save them to a comma-delimited file. Refer to the documentation that came with your hand-held device for instructions on connecting it to your computer.To purchase hardware designed to automatically create a file fully supported by Denali, contact our Sales Department at (800) 388-3038.
Importing Inventory Transactions from Hand-Held ScannerOnce you capture the data on the hand-held scanner you need to import it into Denali and generate the transactions to adjust the inventory quantities.
To import the ASCII inventory data and generate adjustment transactions:1 In the Inventory module, select Adjustment Tasks > Import Adjustments from a Hand-Held
Scanner.2 If you use batch processing, select an empty batch or create a new one (see “Working with
Transaction Batches in Inventory” on page 44).
Figure 24: IN Import Adjustments window
3 Select the Transaction Codes you want to use to add and subtract the adjustment quantities.For additional information, see “Setting Up Transaction Codes” on page 28.
4 In the File Name box, enter the path and file name of data file you want to import, or use the ellipsis button to browse for the file.
5 Select OK.During the import process, the system combines quantities for identical stock numbers to create one adjustment transaction for each stock number. The process continues until all of the transactions are imported.If the item number is an alias (see “Setting Up Additional Stock Item Identifiers” on page 74), the related stock number adjusts automatically. If neither the stock item nor the alias are found in the master table, an Import Error Report automatically generates. When the system imports transactions, it checks each piece of information to make sure it is in an acceptable format, required fields are not empty, and so on. If there are any errors, you will need to correct them before you post. Use the Import Error Report or Edit Report to determine and correct any
52Managing Stock QuantitiesImporting Adjustment Transactions into Denali

errors (see “Determining and Correcting Errors in Imported Transactions Before Posting” on page 54 or “Printing the Inventory Edit Report” on page 49).
Once all of the transactions are imported, verified, and any errors corrected, you can then post them. See “Posting Inventory Transactions” on page 55.
Working with External Text FilesIf you have adjustment transaction information in an external file, such as a spreadsheet, refer to this section for the requirements and procedure to import the transactions. This option allows you to import transactions from an external text file directly into the system. There are several ways you can obtain the text file you will import into Denali. Depending on the application you will export from, we recommend you refer to the documentation for that application to create a text file that meets the requirements for Denali.In some cases, you might need to make adjustments to the external file formats after you export the transactions to the text file. For example, you might need to shorten the length of a field, or change the date format. To view the file format requirements, see “Format Requirements for Importing Transactions” on page 145.
Importing Inventory TransactionsOnce you format the external file, you can import your transactions. See “Format Requirements for Importing Transactions” on page 145. You can only import or generate transactions into an empty batch. If you are not in batch mode, you must post or clear any unposted transactions that are currently open before you can import external transactions.To import external transactions:
1 In the Inventory module, select Adjustment Tasks > Import Adjustments from an External File from the left navigation pane.
2 If you use batch processing, create a new batch. When information is imported from the external file, it will be imported into one table in the batch. See “Working with Transaction Batches in Inventory” on page 44 for more information on batches. The IN Import Transactions window appears.
NOTE: Certain information is required to post, such as dates. However, the same information is not necessary to import transactions. Be sure to print an Edit Report and review it carefully before you post your imported transactions.
53Managing Stock QuantitiesImporting Adjustment Transactions into Denali

Figure 25: IN Import Transactions window
3 Select one of the file types that describes the file you want to import.4 Enter the path and file name of the data file you want to import. You can also use the ellipsis button to
browse for the file.5 Select Begin Import to import the transactions.
Determining and Correcting Errors in Imported Transactions Before PostingWhen the system imports transactions, it checks each piece of information to make sure it is in an acceptable format, required fields are not empty, and so on. If there are any errors, you need to correct them before you post. If the system detects errors during the import process, an error report automatically generates, and a message appears which shows exactly how many errors were found. You can use the Import Error Report and/or the Edit Report to determine and correct any errors. Follow the on-screen instructions to print the Import Error Report. This report shows you exactly which transactions contain errors and the type of errors that exist. Use this report as a reference to correct your errors before you post the transactions (see “Correcting Adjustment Transaction Errors” on page 50).
54Managing Stock QuantitiesImporting Adjustment Transactions into Denali

Figure 26: IN Import Error Report
While it might be possible to correct some of the errors on the Error Report in the transaction batch file,
we recommend that you clear the batch, correct the errors in the external file, and then import again.If you do want to correct errors in the transaction batch, you can edit the adjustment transactions in Denali. Refer to “Correcting Adjustment Transaction Errors” on page 50 for information on editing transactions or “Deleting Adjustment Transactions” on page 50 for information to help you delete transactions in a batch.Once you import, verify, and correct errors for all of the transactions, you can then post them. See “Posting Inventory Transactions” on page 55.
Posting Inventory TransactionsOnce you check the Edit Report and correct any errors, you are ready to post the adjustments. These adjustments can include any imported transactions, as well as individual transactions contained in a single batch. Also, the user ID and batch number for each transaction is included in the posting reports for tracking purposes.
To post adjustment transactions select Adjustment Tasks > Post Inventory Adjustments from the left navigation pane. If you use batch processing, select an existing batch, or create a new one (see “Working with Transaction Batches in Inventory” on page 44). Then select OK to post. When posting is complete, Posting Audit reports generate automatically. Use these reports to verify the accuracy of the entries. To correct a posted transaction, you must post a correcting entry.
NOTE: Certain information is required to post, such as dates. However, the same information is not necessary to import transactions. Be sure to print an Edit Report and review it carefully before you post your imported transactions.
NOTE: It might be beneficial if you have all users exit modules that are affected by posting before you post. This can help prevent data corruption.
55Managing Stock QuantitiesPosting Inventory Transactions

Printing the Posting ReportsWhen posting is complete, a Posting Audit report prints for each module affected by the adjustments. The Posting Audit reports show you exactly how each module was affected by posting. The location to which the report(s) prints depends on the preferences you specified on the Print Options tab of the IN Module Preferences window.For additional information on printing reports in Inventory, see the Getting Started guide.
Seeing Results of the Adjustment TransactionsAfter you post, you can check the quantities of the adjusted stock items in the affected modules. To view the new quantity in Inventory, select Inventory Items > Add / Change Stock Items from the left navigation pane.
Figure 27: IN Stock window, On Hand field
To view how the transaction affected General Ledger, in the General Ledger module, select Chart of Accounts > Add / Change Accounts from the navigation pane. Select the General Ledger account you want to view and then click the Detailed History tab.
Figure 28: GL Accounts window, Detailed History tab
56Managing Stock QuantitiesPosting Inventory Transactions

Converting Quantities When Buying or SellingBuy Conversions and Sell Conversions are used as multipliers when you purchase or sell stock items. Buy Conversions account for differences between the way you purchase items and the way you store or sell them. For example, you might buy soda by the case, but sell it by the can. Or, you might buy wire by the roll, but sell it by the foot. Buy Conversions appear on several reports, but only function when Accounts Payable or Purchase Order is integrated.Sell Conversions account for differences between the way you store items and the way you sell them. Sell Conversions also appear on several reports, but only function when Inventory is integrated to Sales.The settings for this feature are located on the Qty / Price Info tab of the IN Stock window.
Figure 29: IN Stock window, Qty/Price Info tab
Buy Conversions
To calculate a Buy Conversion, divide the unit by which you purchase the selected inventory item in Accounts Payable or Purchase Order by the unit by which you store the item in Inventory. This is the number to enter in the Buy Conv box on the Qty / Price Info tab of the IN Stock window.Buy Conversion = AP Unit / IN Unit or PO Unit / IN Unit
NOTE: The Buy Conversion and Sell Conversion formulas require that the values you enter must be positive numbers greater than 0.
57Managing Stock QuantitiesConverting Quantities When Buying or Selling
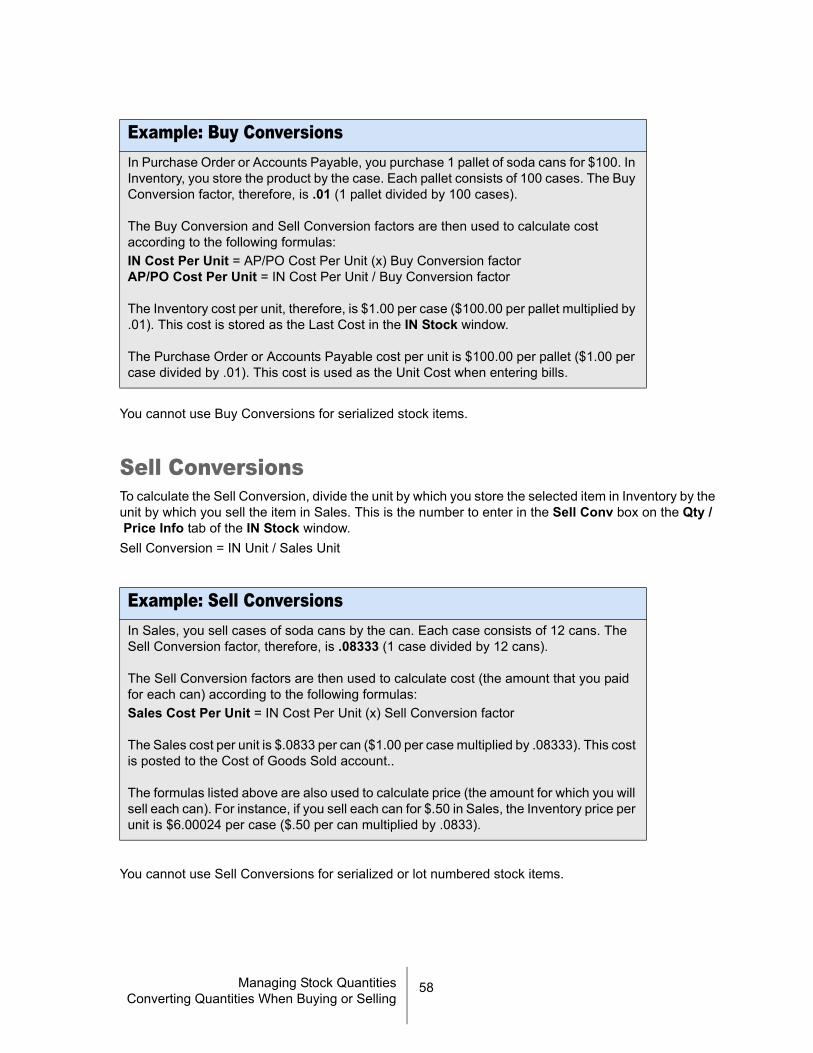
You cannot use Buy Conversions for serialized stock items.
Sell ConversionsTo calculate the Sell Conversion, divide the unit by which you store the selected item in Inventory by the unit by which you sell the item in Sales. This is the number to enter in the Sell Conv box on the Qty /Price Info tab of the IN Stock window.Sell Conversion = IN Unit / Sales Unit
You cannot use Sell Conversions for serialized or lot numbered stock items.
Example: Buy ConversionsIn Purchase Order or Accounts Payable, you purchase 1 pallet of soda cans for $100. In Inventory, you store the product by the case. Each pallet consists of 100 cases. The Buy Conversion factor, therefore, is .01 (1 pallet divided by 100 cases).
The Buy Conversion and Sell Conversion factors are then used to calculate cost according to the following formulas: IN Cost Per Unit = AP/PO Cost Per Unit (x) Buy Conversion factorAP/PO Cost Per Unit = IN Cost Per Unit / Buy Conversion factor
The Inventory cost per unit, therefore, is $1.00 per case ($100.00 per pallet multiplied by .01). This cost is stored as the Last Cost in the IN Stock window.
The Purchase Order or Accounts Payable cost per unit is $100.00 per pallet ($1.00 per case divided by .01). This cost is used as the Unit Cost when entering bills.
Example: Sell ConversionsIn Sales, you sell cases of soda cans by the can. Each case consists of 12 cans. The Sell Conversion factor, therefore, is .08333 (1 case divided by 12 cans).
The Sell Conversion factors are then used to calculate cost (the amount that you paid for each can) according to the following formulas:Sales Cost Per Unit = IN Cost Per Unit (x) Sell Conversion factor
The Sales cost per unit is $.0833 per can ($1.00 per case multiplied by .08333). This cost is posted to the Cost of Goods Sold account..
The formulas listed above are also used to calculate price (the amount for which you will sell each can). For instance, if you sell each can for $.50 in Sales, the Inventory price per unit is $6.00024 per case ($.50 per can multiplied by .0833).
58Managing Stock QuantitiesConverting Quantities When Buying or Selling
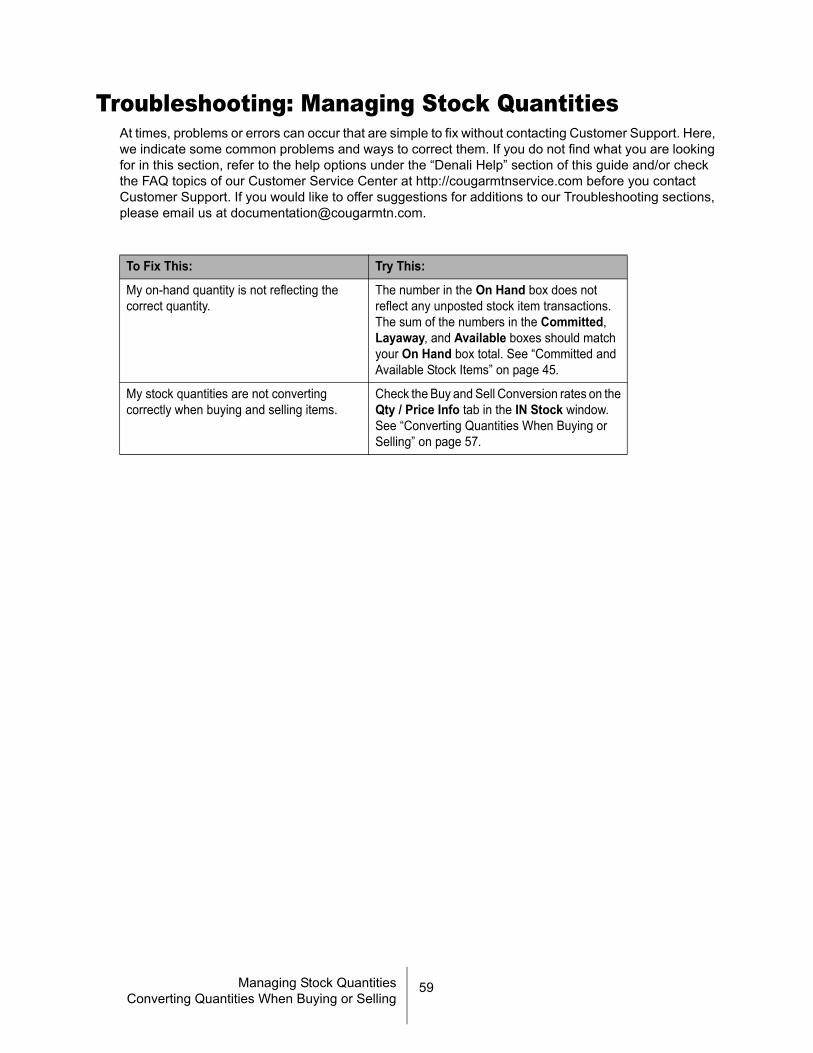
Troubleshooting: Managing Stock QuantitiesAt times, problems or errors can occur that are simple to fix without contacting Customer Support. Here, we indicate some common problems and ways to correct them. If you do not find what you are looking for in this section, refer to the help options under the “Denali Help” section of this guide and/or check the FAQ topics of our Customer Service Center at http://cougarmtnservice.com before you contact Customer Support. If you would like to offer suggestions for additions to our Troubleshooting sections, please email us at [email protected].
To Fix This: Try This:
My on-hand quantity is not reflecting the correct quantity.
The number in the On Hand box does not reflect any unposted stock item transactions. The sum of the numbers in the Committed, Layaway, and Available boxes should match your On Hand box total. See “Committed and Available Stock Items” on page 45.
My stock quantities are not converting correctly when buying and selling items.
Check the Buy and Sell Conversion rates on the Qty / Price Info tab in the IN Stock window. See “Converting Quantities When Buying or Selling” on page 57.
59Managing Stock QuantitiesConverting Quantities When Buying or Selling

5Chapter
Establishing Prices for YourStock Items
Introduction to Stock Item Pricing
Overview of Stock Item Pricing Types
Setting Up Special Price Levels for Groups of Customers
Pricing Determined By Discount Codes
Pricing Determined By Markup or Margin Codes
Pricing Determined by Promotional Codes
Troubleshooting: Establishing Prices for Your Stock Items

Before you set up your pricing options, (which include discounts, promotions, and
customer special pricing) you must determine which pricing schemes you want to use.
Some pricing schemes work in conjunction with the Accounts Receivable and Sales
modules to apply prices to stock items. Once you determine the scheme you want to
use, you can set up the various pieces necessary in the Inventory, Sales, and
Accounts Receivable modules. Review the different options and decide which work for
your business. You can set up basic codes and come back later to customize these
settings to meet your needs.
Introduction to Stock Item PricingYou can use Inventory to set up different methods of stock item pricing, from simple pricing to complex schemes. This gives you basic information about the different methods you can use.
Figure 30: Options that affect the final price of your stock items
These are some of the methods available to help you customize prices for inventory items:
• Special Customer Pricing - In Sales, you can assign a particular price for a selected stock item to a certain customer so the customer receives a special price for that stock item every time.
• Special Group Pricing - You can establish special price levels for items if you want to charge different prices for the same stock items to two or more categories of customers. For more information on setting up special price levels, see “Setting Up Special Price Levels for Groups of Customers” on page 63.
• Price Break Pricing - You can use the Qty / Price Info tab of the IN Stock window to give your customers price breaks when they purchase certain quantities of a stock item.
• Discount Codes - You can establish Discount Codes to automatically apply discounts to stock items at the time of sale. For information on discount codes, see “Pricing Determined By Discount Codes” on page 64.
• Markup and Margin Codes - You can establish markup or margin pricing to calculate the cost of an inventory item based on either a mark up of a percentage from cost or a specific profit margin. For information on Markup and Margin Codes, see “Pricing Determined By Markup or Margin Codes” on page 66.
61Establishing Prices for Your Stock ItemsIntroduction to Stock Item Pricing

• Promotional Codes - You can establish Promotional Codes if you want to change the price of a stock item for a sale or promotion for a certain time period. For more information on Promotional Codes, see “Pricing Determined by Promotional Codes” on page 68.
If you have Specialty Shop installed, you can also use the following options to customize prices for inventory items:
• Coupon/Buy Down Pricing - Allows you to set up coupon or buy down pricing for certain stock items to work in conjunction with the Sales module. Refer to the Sales Clerk guide for information on applying Coupon/Buy Down Codes during a sales transaction. For information on setting up this type of pricing, see “Setting Up Buy Down Pricing” on page 98.
• Multi-Pack Pricing - Allows you to set up a multi-pack pricing scheme for certain stock items. For information on setting up this type of pricing, see “Setting Up Multi-Pack Pricing” on page 94.
If you apply multiple pricing options to the same item, the system uses the pricing method that results in the lowest price.
Overview of Stock Item Pricing TypesYou can set the pricing type for a stock item as List, Margin, Markup, Level List, Level Margin, and Level Markup in the IN Stock window.
• List: the selling price is the amount you enter in the field.• Markup: the selling price is calculated using the following formula: $Price = Cost x (1+Markup).
This formula yields a price that is your specified percentage above cost.
• Margin: the selling price is calculated using the following formula: $Price = Cost / (1-Margin). This formula yields a price of which your specified percentage is profit.
• You can set up price breaks for List, Margin, and Markup pricing types.• Level pricing types are used only when you establish Price Level Codes. See the Sales guide
for more information. Price Level Codes allow you to set up different prices for groups of customers.
NOTE: Some pricing schemes require you to set up information and codes in the Inventory, Accounts Receivable, and Sales modules. If you do not have Accounts Receivable installed and integrated, only List, Markup, Margin, and Promotional Pricing are available in Inventory.
Example: Markup PricingYou buy a textbook for $100, select Markup as the pricing type, and choose 25% for the Markup amount. When the sale is made, your selling price will be $100 plus the markup of 25% on your cost ($100) for a total price of $125.
Example: Margin PricingYou buy a textbook for $100, select Margin as the pricing type, and choose 25% for the Margin amount. When the sale is made, your selling price will be $100 plus the margin of 25% (which is calculated on the selling price) for a total price of $133.33.
62Establishing Prices for Your Stock ItemsOverview of Stock Item Pricing Types

Setting Up Special Price Levels for Groups of Customers
If you want to charge different prices for the same stock items to different categories of customers and you have the Inventory, Accounts Receivable, and Sales modules installed and integrated, you can use a combination of codes in Denali to set up special price levels. To determine how many Price Level Codes you need to set up, we recommend you print a list of your customers and a list of your stock items to determine how many different customer groups and pricing categories you have. Once you determine this, you can set up the following codes to activate the special price levels. You must set up Price Level Codes in Sales after you establish AR Type Codes and Inventory Codes.
• Add the different AR Type Codes to the affected customer records in Accounts Receivable. • Apply the proper Inventory Codes and set up your Level List, Level Margin, or Level Markup
pricing on stock items in the IN Stock window in Inventory. • Create the Price Level Codes in the Sales module.
To use price levels, you must select the Level List, Level Margin, or Level Markup pricing types for the stock item and set the different price levels. The system combines the Type Code on the customer record with the Inventory Code on the stock item. It then compares this combination to the Price Level Codes in the Sales module. If it finds a match, it charges the price from the Price Level Code. For example, if the Price Level Code specifies Level 3, the system charges the Level 3 price for the stock item. Your Level 1 price should always be the highest price because if there is no Price Level Code match, the system automatically assigns the Level 1 price by default.
63Establishing Prices for Your Stock ItemsSetting Up Special Price Levels for Groups of
Customers

Pricing Determined By Discount CodesDiscount Codes let you automatically use unique pricing policies to promote certain markets or products. You can extend special prices on inventory items to targeted customers and implement strategic pricing plans.At the time of sale, the system identifies the customer and each inventory item, and then calculates the selling price for each stock item based on a discount percentage you specify for this particular customer and stock item. A Discount Code subtracts a percentage from the list price. You can also combine a
Example: Using Price Level Codes in a BookstoreA bookstore has four distinct types of customers and uses many different Inventory Codes.
First you will assign your customers Type Codes of no more than six characters in the Accounts Receivable module. This could be something like:
Customers who receive the student price – STUDNTCustomers who are members of the bookstore club – MEMBERCustomers who are employees of the bookstore – EMPLOYCustomers who are employees of the government – GOVNMT
Inventory Codes allow you to separate your stock items into different categories. This means you can set your pricing so customers receive the pricing level you specify on certain categories of stock items. Now, assume you create the following Inventory Codes:
Reference books – REFERTravel books – TRAVELFiction books – FCTIONChildren’s books – CHILDS
Then you set up price levels (up to five) for your stock items in the Inventory module. Level 1 is the highest price. You could make your levels something like this:
Dictionaries – $40, $35, $30, $25Travel books – $20, $17, $15Popular fiction books – $25, $20, $15
In the Sales Price Level Codes window, you will combine the Type Code and the Inventory Code and select a Price Level for the combination. For example, you could create the following Price Level Codes and assign different price levels to each:
STUDNT REFER; Price Level 4 – Student will receive the level 4 price on reference books. MEMBER FCTION; Price Level 3 – Members will receive the level 3 price on fiction books.GOVNMT REFER; Price Level 2 – Government employees will receive the level 2 price on reference books.
64Establishing Prices for Your Stock ItemsPricing Determined By Discount Codes

discount with markup or margin pricing (see the Sales Administrator guide).You should plan your Discount Codes before you set them up. To set up Discount Codes, you will need to:
• add the customer discount text to the affected customer records in Accounts Receivable.• and the stock item discount text to the affected stock item records in Inventory.• create the Discount Code in Sales.
You can perform these three tasks in any order, but the code will not take effect until you complete all three.
Planning Your Discount CodesYou should carefully plan your business needs before you set up your Discount Codes. To help you set up Discount Codes, set up a table of possible customer/stock item combinations and indicate weather the combination results in a discount. For Discount prices, you should also indicate the discount percentage. For example, come up with the different types of customers you have who might receive a discount. You would enter these in the Discount box of the AR Customers window.
• NONPRO= Customers who work for a nonprofit• MEMBER = Customers who are member of the store club• TEACHR = Customers who are teachers
Then come up with different product types that might receive a discount.You would enter these in the Discount box on the Sales Info tab of the IN Stock window. For example:
• FMRBST= Former bestsellers• BUSINS= Business books• REFERN= Reference books
If the combination results in a discount, then you will need to set up the Code in Accounts Receivable, Inventory, and Sales.
NOTE: If multiple price reductions exist for the same stock item (i.e., Price Level Codes, Discount Codes, and/or Promotional Pricing Code) the lowest price is automatically used.
Code Customer Group / Stock Item Group Pricing Type Percentage Discount
NONPRO FMRBST Nonprofit / Former bestsellers (List)
NONPRO BUSINS Nonprofit/ Business Discount 10%
NONPRO REFERN Nonprofit/ Reference (List)
MEMBER FMRBST Club Member / Former bestsellers Discount 25%
MEMBER BUSINS Club Member / Business (List)
MEMBER REFERN Club Member / Reference (List)
TEACHR FMRBST Teacher / Former bestsellers (List) 10%
65Establishing Prices for Your Stock ItemsPricing Determined By Discount Codes
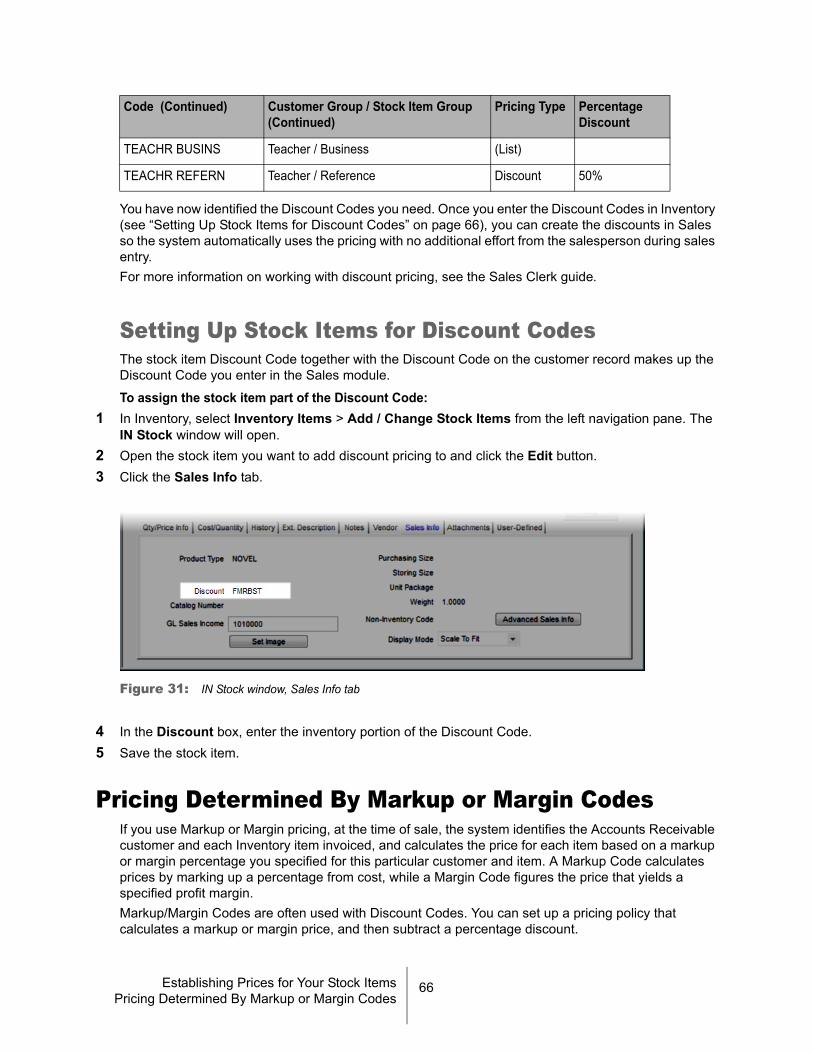
You have now identified the Discount Codes you need. Once you enter the Discount Codes in Inventory (see “Setting Up Stock Items for Discount Codes” on page 66), you can create the discounts in Sales so the system automatically uses the pricing with no additional effort from the salesperson during sales entry.For more information on working with discount pricing, see the Sales Clerk guide.
Setting Up Stock Items for Discount CodesThe stock item Discount Code together with the Discount Code on the customer record makes up the Discount Code you enter in the Sales module.To assign the stock item part of the Discount Code:
1 In Inventory, select Inventory Items > Add / Change Stock Items from the left navigation pane. The IN Stock window will open.
2 Open the stock item you want to add discount pricing to and click the Edit button.3 Click the Sales Info tab.
Figure 31: IN Stock window, Sales Info tab
4 In the Discount box, enter the inventory portion of the Discount Code.5 Save the stock item.
Pricing Determined By Markup or Margin CodesIf you use Markup or Margin pricing, at the time of sale, the system identifies the Accounts Receivable customer and each Inventory item invoiced, and calculates the price for each item based on a markup or margin percentage you specified for this particular customer and item. A Markup Code calculates prices by marking up a percentage from cost, while a Margin Code figures the price that yields a specified profit margin.Markup/Margin Codes are often used with Discount Codes. You can set up a pricing policy that calculates a markup or margin price, and then subtract a percentage discount.
TEACHR BUSINS Teacher / Business (List)
TEACHR REFERN Teacher / Reference Discount 50%
Code (Continued) Customer Group / Stock Item Group (Continued)
Pricing Type Percentage Discount
66Establishing Prices for Your Stock ItemsPricing Determined By Markup or Margin Codes

Keep in mind that if you use different pricing types, the lowest possible price will be applied at the time of sale.
Planning Your Markup/Margin CodesMarkup/Margin Codes allow you to vary the amount of margin/markup for combinations of customers and stock items. These codes are always based on last cost. To help you set up your Markup/Margin Codes, set up a table of possible customer/stock item combinations and indicate whether the price is List, Margin, or Markup.You would enter the customer portion of the Margin/Markup Code in the Discount box of the AR Customers window.
• NONPRO = Customers who work for a nonprofit• MEMBER = Customers who are members of the store club• TEACHR= Customers who are teachers
You would enter the stock item portion of the Margin/Markup Code in the Discount box on the Sales Info tab of the IN Stock window.
• FMRBST= Former bestsellers• BUSINS= Business books• REFERN= Reference books
. For Markup prices, a markup percentage will also be indicated.
You’ve now identified the Margin/Markup Codes you need. Once you create the Margin/Markup Codes (see the Sales Administrator guide), the system automatically administers the complex pricing policy with no additional effort from the salesperson.
Setting Up Stock Items for Markup/Margin CodesThe stock item Discount Code together with the Discount Code on the customer record makes up the Margin/Markup Code you enter in the Sales module.
Code Customer Group / Stock Item Group Pricing Type Markup/Margin Percent
NONPRO FMRBST Nonprofit/ Former bestsellers (List)
NONPRO BUSINS Nonprofit / Business (List) 15%
NONPRO REFERN Nonprofit / Reference (List)
MEMBER FMRBST Club Member / Former bestsellers Margin 20%
MEMBER BUSINS Club Member / Business (List)
MEMBER REFERN Club Member / Reference (List)
TEACHR FMRBST Teacher / Former bestsellers (List)
TEACHR BUSINS Teacher / Business Markup 10%
TEACHR REFERN Teacher / Reference Markup 15%
67Establishing Prices for Your Stock ItemsPricing Determined By Markup or Margin Codes

To assign the stock item part of the Margin/Markup Code:1 In Inventory, select Inventory Items > Add / Change Stock Items from the left navigation pane. The
IN Stock window will open. 2 Open the stock item you want to add discount pricing to and click the Edit button.3 Click the Sales Info tab.
Figure 32: IN Stock window, Sales Info tab
4 In the Discount box, enter the inventory portion of the Margin/Markup Code.5 Save the stock item.
Pricing Determined by Promotional CodesPromotional Pricing is used to assign, change, or delete pricing on sale or promotional items for a specified time period. The time period can be a date range, a time range, or a combination of the two. For example, you could assign stock item AAA-123, which regularly sells for $8.50, to sell for $6.75 between the dates of June 10 and June 17, but only during the hours of 8:00 A.M. to 2:00 P.M. This feature is useful for specials such as holiday sales, midnight madness sales, or clearance sales. With Denali, you can also quickly print promotional shelf signs and/or promotional item reports.
Adding Promotional CodesYou can quickly designate how and when your stock items will sell for special discounted prices. If you do not have Specialty Shop installed, some tabs, columns, or boxes might appear differently than illustrated here. For example, the Buy 1 Get 1 tab is not available unless Specialty Shop is installed. To establish the details of the Promotional Pricing Code and to include stock items in the promotion:
1 In the Inventory module, select Options > Set Up Promotional Pricing from the left navigation pane. The Promotional Pricing window will open.
68Establishing Prices for Your Stock ItemsPricing Determined by Promotional Codes

Figure 33: IN Promotional Pricing window
2 Enter a Promotional Pricing Code, up to 20 characters, in the Code box.3 Enter the description for this Promotional Pricing Code, up to 50 characters in length.4 Select the Import Description To Comment Line? check box to show the description for this
Promotional Pricing Code on invoices or receipts when it is used in a Sales transaction. Leave this check box unchecked if you do not want to show the description.
5 On the Promotional Period tab, select the type of discount to use for this Promotional Pricing Code. For detailed information on the options in this window, select the Help button in the software window.
6 If Inventory is integrated to General Ledger, enter the GL Discount account to use for posting promotional pricing discounts.
7 Enter the starting and ending date and time of the sale or promotion. You can enter times in 24-hour or standard time. Standard time automatically sets the A.M. or P.M. times (type A for A.M and P for P.M.). If you use a 24-hour clock, be sure to use a zero before numbers under 10 (e.g., 0900 for 9:00 A.M.).
8 On the Detail Entry tab, add a range of stock items and select the Add to Grid button. All stock numbers within the specified range are added to the grid. You can also add each stock item individually by entering the stock number in the Stock Item column. If you selected Fixed Price as the discount type on the Promotional Period tab, enter a fixed dollar amount for each stock item.
To print promotional shelf signs, see “Printing Promotional Shelf Signs” on page 70.
9 If Specialty Shop is installed, use the Buy 1 Get 1 tab to specify any Buy x Get x discounts and associated stock items to include in this promotion. Refer to “Promotional Pricing for Buy 1, Get 1 Sales” on page 96 for more information on setting up Buy 1 Get 1 discounts.
10 Click Save.If you want to edit or delete this code, see “Changing or Deleting Codes” on page 29.
69Establishing Prices for Your Stock ItemsPricing Determined by Promotional Codes

Printing Promotional Shelf SignsWhen you run a promotion, let your customers know about it by printing shelf signs that they’ll see next to the included items.To print promotional shelf signs:
1 In Inventory, select Options > Set Up Promotional Pricing. The Promotional Pricing window will open.
2 Enter the Promotional Code for which you want to print signs in the Code box or use the Lookup to select the Code.
3 Select the Detail Entry or Buy 1 Get 1 (if Specialty Shop is installed) tab.4 Click the Print Signs button. The window used to print promotional signs appears.
Figure 34: IN Print Codes - Print Promotional Signs window
5 Select the Print Current Code Only check box and enter the name of the Code to print, or specify a range of Codes to print by entering beginning and ending Codes.
6 From the drop-down, select how many signs you want to print per page.7 Click OK to print the signs.
Printing a Promotional Items ReportTo print a report that lists the promotions and the associated stock items, select the Print button in the IN Promotional Pricing window. You can choose to print the report for a single Promotional Code or a range of Codes.
70Establishing Prices for Your Stock Items

Troubleshooting: Establishing Prices for Your Stock Items
At times, problems or errors can occur that are simple to fix without contacting Customer Support. Here, we indicate some common problems and ways to correct them. If you do not find what you are looking for in this section, refer to the help options under the “Denali Help” section of this guide and/or check the FAQ topics of our Customer Service Center at http://cougarmtnservice.com before you contact Customer Support. If you would like to offer suggestions for additions to our Troubleshooting sections, please email us at [email protected].
To Fix This: Try This:
I set up Price Level Pricing but it still only uses the first level.
Make sure you completed all three steps required. See “Setting Up Special Price Levels for Groups of Customers” on page 63 for more information.
The Margin/Markup Codes I set up are not adjusting the final price to the customer for the specified stock items.
Make sure you have chosen the correct function for what you want the code to do. See “Pricing Determined By Markup or Margin Codes” on page 66 for instructions on completing these steps.
71Establishing Prices for Your Stock Items

6Chapter
Additional Options andFeatures
Additional Options When Selling Stock Items
Setting Up Additional Stock Item Identifiers
Working with Stock Item Images
Importing and Exporting in Inventory
Troubleshooting: Additional Options and Features

The Inventory module provides powerful options for tracking stock item prices,
quantities, and costs. Inventory also includes reporting features that allow you to view
reports with the specific information you need.
For example, if there is information you want to track that isn’t already tracked by the
software, you can use User-Defined Fields to accomplish this. You can also create
prompts you want to appear whenever a stock item is sold or attach a non-inventory
item to an inventory item so that it will automatically appear in the sales entry windows
when the stock item is sold. Additionally, you can set up aliases for your stock items.
Review all the information in this chapter to learn how these features can help you.
Additional Options When Selling Stock ItemsIn Denali, you can add safety information for the customer on a stock item they purchased, or automatically include a non-inventory item when a particular stock item is sold. This section explains how you can set this up.
Setting Up Special Prompts When Ordering/Selling ItemsYou can set up your stock items so the system will prompt your salespeople when certain items are sold, sometimes referred to as “cross-merchandising.” You can use these prompts for anything from reminders, such as reminding your sales staff to ask the customer if they need any batteries, to assembly instructions that the customer will use when they get the product home. To set up prompts for additional information:
1 In the Inventory module, select Inventory Items > Add / Change Stock Items from the left navigation pane.
2 Use the Lookup to find the item to which you want to add the prompt, and select the Edit button.3 Select the Ext. Description tab.
Figure 35: IN Stock window, Ext. Description tab
73Additional Options and FeaturesAdditional Options When Selling Stock Items

4 Enter a description of up to 50 characters for each of the four available description lines.5 Select the option to specify when the extended descriptions should print on purchase orders
(Purchase Order) and invoices (Sales). For additional information on the options available in this window, select the Help button in the software window.
Attaching Non-Inventory Items (Services) to Stock ItemsYou might want to include a Non-Inventory Item, such as a service or delivery charge, every time you sell a particular stock item. You can attach that service to your stock items on the Sales Info tab. Non-Inventory Codes are set up in the Sales module.
To include a Non-Inventory Item each time a stock item is sold:1 In Inventory, select Inventory Items > Add / Change Stock Items from the left navigation pane.2 Use the Lookup to find the stock item you want to include a Non-Inventory Item with and select the
Edit button.3 Select the Sales Info tab.
Figure 36: IN Stock window, Sales Info tab
4 Specify the Non-Inventory item you want to include when this stock item is sold in the Non-Inventory Code box.When the stock item is sold, the Non-Inventory Item will automatically appear on the next detail line. You can then edit it or remove it from the sale as necessary.
Setting Up Additional Stock Item IdentifiersAliases allow you to have several stock numbers and descriptions for any one item. This is handy if you purchase identical items from more than one supplier, or if you replace an item from one supplier with a similar item from another supplier.When you purchase or sell an item with an alias, you can enter or scan either your actual stock number or the alias, and the system will automatically recall the correct item. For this reason, aliases must be unique.There is no Lookup list associated with aliases. However, you can print a report that lists them, sorted in alphabetical order, by alias or stock number. When sorted by stock number, the alias is listed directly below the stock number.
74Additional Options and FeaturesSetting Up Additional Stock Item Identifiers

To set up aliases for your inventory:1 In Inventory, select Inventory Items > Set Up Stock Item Aliases from the left navigation pane.
Figure 37: IN Set Up Stock Alias window
2 Use the Lookup to select the stock item to which you want to assign an alias.If this item already has one or more aliases, select Edit to add an additional alias(es).
3 If desired, specify a Multi-Pack Code to which to assign this alias (Multi-Location Inventory only).If the stock item has been set up with multi-packs, and you do not assign a specific multi-pack to the alias, the clerk will be prompted to enter the Multi-Pack Code during sales entry.
4 Enter the Associated Alias(es) for the selected item.5 To print a Stock Alias Report, select the either Order by Stock or Order by Alias, and then select
Print.
6 Select Save to save the aliases.
Working with Stock Item ImagesDepending on your business, you might find it beneficial to include images of your stock items in the system. When you work with your stock items, you can select the Image button in the IN Stock window to view the stock item and verify it is correct.
NOTE: We recommend you print this report for reference purposes. Stock item aliases allow you to find the exact item you want, regardless of which number you are presented with. Aliases are not available in Lookups, so this report could be very useful when you enter sales.
75Additional Options and FeaturesWorking with Stock Item Images

Figure 38: IN Stock window, Image Viewer
Before you can add images of your stock items, the stock items records must exist in the system (see “Adding Stock Item Records” on page 33). To add images to your stock items, refer to “Adding Stock Item Images” on page 77.This feature can also help reduce errors during sales transactions or stock item returns from customers. If you have Sales installed and integrated with Inventory, this feature allows salespeople and customers to view the item to verify it is the correct item before they complete the sale.
Figure 39: Sales IN Image Viewer window
For more information on viewing images in Sales, refer to the Sales Clerk guide.
76Additional Options and FeaturesWorking with Stock Item Images

Adding Stock Item ImagesAfter you create your inventory records, you can add images of your stock items to your system. We recommend that you keep the image file size as small as possible to avoid storing or viewing issues.You can only add stock item images from the Inventory module.To add an image of a stock item:
1 In the Inventory module, select Inventory Items > Add / Change Stock Items from the left navigation pane. The IN Stock window opens.
2 Choose the stock item to which you want to add an image.3 Select the Sales Info tab.4 Select the Set Image button.
Figure 40: IN Stock window, Sales Info tab
5 In the IN Set Image - Publish Image to Server? window, type the file and path for the image location or use the ellipsis button to browse for the location of the image file. Image files must be in either .jpg, .bmp, or .gif format.
Figure 41: IN Set Image - Publish to Server? window
6 Click the Publish to Server button to add the image to this stock item.7 Select Close to return to the Sales Info tab of the IN Stock window.
77Additional Options and FeaturesWorking with Stock Item Images

Editing Existing Stock Item ImagesOnce you add images of stock items to your system, you can edit them at any time. To edit an image, you’ll need to use an image editing program outside of Denali. You will first need to export the image from Denali before you can edit it.To edit an existing image of a stock item:
1 In the Inventory module, select Inventory Items > Add / Change Stock Items from the left navigation pane.
2 Choose the stock item for which you want to edit an image.3 Select the Sales Info tab. 4 Select the Set Image button.
Figure 42: IN Stock window, Sales Info tab
5 In the IN Set Image - Publish Image to Server? window, type the file and path for the image location, or use the ellipsis button to browse for the image file you want to edit. Image files must be in .jpg, .bmp, or .gif format.
6 Select the Export Image for Editing button to save the image to the location of your choice.7 Open the image in your image editing program, make any changes, and save the modified image.8 Return to the IN Set Image - Publish Image to Server? window and type the file and path for the
image location, or use the ellipsis button to browse for the image file.9 Click the Publish to Server button and select Close to return to the IN Stock window.
Replacing or Removing Stock Item ImagesIf you want to update an image, or you find that you no longer want a certain stock item image, refer to the instructions in this section.
To replace or remove a stock item image:1 In the Inventory module, select Inventory Items > Add / Change Stock Items from the left navigation
pane.2 Choose the stock item you want to work with.3 Select the Sales Info tab.4 Click the Set Image button.
78Additional Options and FeaturesWorking with Stock Item Images

Figure 43: IN Stock window, Sales Info tab
5 If you want to replace the image for this stock item, type the file and path for the new image location or use the ellipsis button to browse for the image file.- or -If you want to completely remove the image from this stock item, select the Delete Image button.
6 Click the Publish to Server button.7 Select Close to return to the IN Stock window.
Setting the Default View for Stock Item ImagesOnce you add the image for the stock item, you can set the default display mode.To set the default view, use the Display Mode drop-down list on the Sales Info tab of the IN Stock window, which will determine how you want the image to display. Keep in mind that the default setting affects both the Inventory and Sales modules for viewing images. Refer to the Sales Clerk guide for more information on viewing images in the sales entry windows.For more information on Stock Items see “Adding Stock Item Records” on page 33.
Importing and Exporting in InventoryWith Denali, you can import or export data. There are a few different kinds of data you can add or modify with this feature. Here are a few of the common tasks you can accomplish:
• Add new stock items using an external file• Add stock items and quantities into a new company• Copy stock item data to an external file• Modify stock items using external data• Update stock item price lists
Refer to “Performing Common Inventory Import/Export Tasks” on page 80 to learn more about this beneficial feature and an example of how to use it.
79Additional Options and FeaturesImporting and Exporting in Inventory

Performing Common Inventory Import/Export TasksOne example of how the import/export feature could benefit your company is if you have seasonal prices for your stock items. You can use the Import/Export feature, accessed from Inventory Items > Import / Export Stock Information, to update your price lists, and then use the feature again when you need to update prices for the new season.If you have adjustment transactions you want to import from an external file, see “Importing Adjustment Transactions into Denali” on page 51.
Modifying or Adding Stock Items from an External FileYou can modify or add stock items from an external file through the Import feature by selecting Inventory Stock Item(s) in the File Definition field of the Import/Export window. This option adds information to fields, changes information in existing fields, or adds new items to your inventory. See “Importing Inventory Data” on page 81 for information on how to use this feature.
Importing Stock Items and Quantities into My New CompanyMany new customers have large inventory lists they need to transfer into Denali from another accounting program. The import feature handles the transaction workload for you to make this transition faster and easier. When you select the Inventory Stock Item(s) with Quantity option in the File Definition field of the Import/Export window, you can quickly add your stock item records and the quantity on hand for each item to your inventory. Refer to “Importing Inventory Data” on page 81 to begin this process.
Importing/Exporting a Price List for My Stock ItemsThere are times when you need to create a list of your stock item prices for reference purposes, or, you might have an external program you use to update price lists for your stock items. In either case, if you select the Inventory Price List option in the File Definition field of the Import/Export window, you can import or export only the prices of your stock items. See “Importing and Exporting in Inventory” on page 79 for an overview of available functions in Denali that can help you manage your stock item price list.
Exporting My Stock Item Information to Use with Another ProgramIt might sometimes be necessary to copy information from Denali or to import information that can be read and handled by Denali, for example, if you want to use another program to set up data for a report. See “Exporting Inventory Data” on page 82 to learn more about this process and how Denali can help meet your needs.
Updating My Stock Items and Quantities Using Data from Another ProgramYou can update your stock items and quantities using data from another program by selecting the Inventory Stock Item(s) with Quantity option in the File Definition field of the Import/Export window. This option adds information to fields, updates information in existing fields, or adds new items to your inventory. At the same time, it will also add or update the quantities of your stock items. See “Importing Inventory Data” on page 81 for information on how to use this feature.
80Additional Options and FeaturesImporting and Exporting in Inventory

Importing Inventory DataInventory allows you to import or export certain data between Denali and an external file. For instance, if you have an external spreadsheet that contains new stock items, quantities, and prices, you can import this information directly into Denali instead of individually creating each new stock item record. Depending on your choices, this feature will add or update specific information directly in your inventory tables, and you won’t need to post adjustment transactions. If you need to import adjustment transactions from an external file, see “Importing Adjustment Transactions into Denali” on page 51. Before you import data, make sure the text file is in the proper format and all required fields have entries.You can also use the export feature to see how the file should be formatted before you import it (see “Use the Export Feature to View File Formats” on page 149).To import stock item information:
1 In the Inventory module, select Inventory Items > Import / Export Stock Information from the left navigation pane. The IN Import/Export window appears.
Figure 44: IN Import/Export window, Import selected
2 From the Import/Export drop-down, select Import.3 Select the type of file, method, and format you will use for this import. For detailed information on the
options in this window, select the Help button.4 Once you enter all the information for this import, select the Begin Import button.
During the import process, data that is being imported to the fields will display in the Import/Export Log text box. This box will also show any errors that occur during the process as well as a message that indicates the transfer was successful.If an error occurs during the process, you can print this log for reference to correct the errors, and then retry the import process. Select the Print Log button, to print the error log. For information on correcting errors in an external file, see “Correcting Adjustment Transaction Errors” on page 50.
81Additional Options and FeaturesImporting and Exporting in Inventory

Exporting Inventory DataIf you need to copy stock item information from Denali to an external file, you can use the Import/Export feature. Exporting data from Denali allows you customize it to your needs. For example, you might need to integrate it with additional software packages, such as billing software.If you are exporting to 3dCart, you can view the file format requirements on page 157. To export stock item information:
1 In the Inventory module, select Inventory Items > Import / Export Stock Information from the left navigation pane. The IN Import/Export window appears.
Figure 45: Inventory Import/Export window, Export selected
2 From the Import/Export drop-down menu, select Export.3 Select the type of file, method, and format you will use for this export. If you select the Column Position
File type, column heads less than five characters will not appear because of the short field length.4 Once you enter the information for this export, select the Begin Export button. For detailed
information on the options in this window, select the Help button.During the transfer process, data that is being exported to the fields will display in the Import/Export Log box. This box will also show any errors that occur during the process as well as a message that indicates the transfer was successful.
If an error occurs during the process, you can print this log for reference to correct the errors, and then retry the export process. Select the Print Log button to print the error log.
82Additional Options and FeaturesImporting and Exporting in Inventory

Troubleshooting: Additional Options and FeaturesAt times, problems or errors can occur that are simple to fix without contacting Customer Support. Here, we indicate some common problems and ways to correct them. If you do not find what you are looking for in this section, refer to the help options under the “Denali Help” section of this guide and/or check the FAQ topics of our Customer Service Center at http://cougarmtnservice.com before you contact Customer Support. If you would like to offer suggestions for additions to our Troubleshooting sections, please email us at [email protected].
To Fix This: Try This:
When I try to import my updated stock price list from an external file, I receive an error.
This could be an error in the external file format. Make sure the text file is in the proper format and all required fields have entries. See “Format Requirements for the Import/Export Feature” on page 148.
You may also find our suggestion for file formats beneficial. See “Use the Export Feature to View File Formats” on page 149.
The image I added for one of my stock items is not showing in the sales entry windows.
You need to verify that the image was retained when you closed the IN Stock window. Refer to “Adding Stock Item Images” on page 77.
83Additional Options and FeaturesImporting and Exporting in Inventory

7Chapter
Managing Stock Items withMulti-Location Inventory
Planning to Use Multi-Location Inventory
Setting Up Your Multiple Locations
Managing Multiple Locations of Inventory
Troubleshooting: Managing Stock Items with Multi-LocationInventory

Along with all the standard features of Inventory that provide flexibility, Multi-Location
Inventory (MLI) goes a step further. The MLI enhancement allows you to manage your
inventory on one computer system while it is physically at more than one location. You
can also track your inventory and sales per location. We designed this chapter with the
assumption that all modules are installed and integrated with Inventory as well as the
enhancement, Multi-Location Inventory.
Planning to Use Multi-Location InventoryThere are a couple of things to consider before you use the Multi-Location Inventory (MLI) enhancement. Along with Inventory, installing MLI affects Accounts Payable, Sales, and Purchase Order. Because MLI works in conjunction with these other modules, it allows you the flexibility to manage your stock items in various locations and keep your business running smoothly.
Setting Up Your Multiple LocationsOnce you establish locations for your stock items, you can add the stock items to them, transfer stock from one location to another, edit or delete the locations, and even print reports for each location. This section provides the basics for working with multiple locations.If you will transfer inventory between locations, you need to create a special transaction type. To to do this, you’ll create a Transaction Code for transfers (see “Setting Up Your System to Enable Transfer Transactions” on page 87). The final piece of the setup, which is optional, is to specify a primary location. Depending on how you choose to set up a primary location, this setting might affect other integrated modules (see “Setting the Primary Location of Your Inventory” on page 87).
Creating Additional Locations for Stock Items Using Location CodesIf you store or sell inventory at multiple locations, you need to set up a Location Code for each location you want to track. You will use this code when you sort reports or specify which General Ledger Sales account you want to use when you post transactions. You will also have the option to use the Lookup to select any of these Location Codes in various windows throughout the software.To set up Location Codes for inventory items:
1 In the Inventory module, select Specialty Tasks > Set Up Inventory Locations from the left navigation pane.
85Managing Stock Items with Multi-Location InventoryPlanning to Use Multi-Location Inventory

Figure 46: IN Location Codes window
2 Enter a Location Code of up to 50 characters. Location is most commonly geographical (e.g., a city or warehouse), however, it can also be a shelf, bin area, color, or some other identifier.
3 Enter a Description that clearly identifies this location.4 Enter the GL Sales Account to use when you post Inventory sales from this location.
If you use the Interface Table, enter the GL Key.If you leave this box blank, the GL Sales Income account specified on the Sales Info tab of each item’s stock record is used for posting.However, if you specify a GL Account in the Sales Department Code window, it will take precedence over the sales account listed here and the sales account specified on the Sales Info tab of the individual stock item.
There might be a time when a location is no longer needed and you want to delete it from your system. Before you delete a location, you need to ensure that its code isn’t attached to a stock item with an available quantity and that it isn’t included in an open transaction. If the stock item still has quantity, you will need to change the Location Code for the associated item or change the transaction to reference a different location. See “Transfer Stock Items from One Location to Another” on page 90 for more information about updating stock item locations. If you need to update a transaction, you will need to go into that module and change the location for each individual, open transaction. See “Changing or Deleting Codes” on page 29 for more information on changing or deleting codes.
Printing a Report of Your LocationsAfter you create your Location Codes, we recommend you print them out for future reference.
To print this report:1 In Inventory, select Specialty Tasks > Set Up Inventory Locations from the left navigation pane.2 Select Print.
The Print Codes window displays.
86Managing Stock Items with Multi-Location InventorySetting Up Your Multiple Locations

Figure 47: IN Print Codes - Location Codes window
3 Select the Print Current Code Only check box and enter the name of a code to print, or enter starting and ending codes to specify a range of codes to print.
4 Select OK.
Setting Up Your System to Enable Transfer TransactionsTo provide additional inventory control, Multi-Location Inventory adds a third transaction type that allows you to transfer inventory between locations. Before you can transfer inventory items, you must set up a transfer type Transaction Code.For more information on Transaction Codes and how they function in Denali, see “Setting Up Transaction Codes” on page 28.
Setting the Primary Location of Your InventoryThe primary, or default, location is specified on the General tab of the Module Preferences window in Inventory, and how the system uses this default is specified in the Module Preferences windows in Sales. Even though you can override the default at times, try to choose a location that is a main site, such as a central warehouse or a headquarters store.
Primary Location for Stock Items in InventoryIn the conversion to Multi-Location Inventory (MLI) you first established a default location. At this point, you can set up other locations and add inventory to them. Refer to “Creating Additional Locations for Stock Items Using Location Codes” on page 85 and “Adding or Moving Inventory to Your Location” on page 88 for more information.
To set your default location:1 In Inventory, select Options > Set Up the Module Preferences from the left navigation pane.2 In the Default Location field, select the location you want to use from the Lookup.
87Managing Stock Items with Multi-Location InventorySetting Up Your Multiple Locations

Figure 48: IN Module Preferences window
For information on how to set your primary locations in Sales, refer to the help available in the Order Entry and Point of Sale Module Preferences windows.
Managing Multiple Locations of InventoryIf you have more than one location for your Inventory stock items, after you establish locations for your stock items, you can then add the stock items to them, edit or delete the items, and even print reports for each location. This section provides a basis for working with multiple locations.There are a few ways you can manage inventory in your different locations. You can add, sell, or move your stock items.Before you can enter certain adjustment transactions in Multi-Location Inventory, you need to create an additional Transaction Code (see “Setting Up Your System to Enable Transfer Transactions” on page 87). Once this is done, you can transfer inventory between locations or import transfer transactions from an external file.You can also use the Lookups in various windows to select any of the Location Codes you create (see “Creating Additional Locations for Stock Items Using Location Codes” on page 85).
Adding or Moving Inventory to Your LocationOnce you complete the necessary setup for using multiple locations, you are ready to add inventory to your location(s). There are a few ways to add stock items to a new location.
• Create a new location• Copy stock items from one location to a new location• Create stock items in a new location
88Managing Stock Items with Multi-Location InventoryManaging Multiple Locations of Inventory

• Import stock items from an external file• Purchase stock items from a vendor• Transfer stock items between locations
The information in this section provides details on these different ways to add inventory to your locations. Because not all of the options to add inventory to locations will include quantity information, we recommend you review all of your options before you begin.
Create Stock Items in Your New LocationOne way to add stock items to a location is to manually create them in the system. There are also other ways you can add stock items (see “Copy Stock Items from One Location to Another” on page 90, “Transfer Stock Items from One Location to Another” on page 90, or “Importing Stock Items from Another Software” on page 37). If you prefer to add them directly to the new location, follow the instructions in this section.
To create stock items in a new location:1 In Inventory, select Inventory Items > Add / Change Stock Items from the left navigation pane.
Figure 49: IN Stock window
2 Enter the stock number of an item you want to add to a new location. This might be a stock item already at the default location.
3 In the Location field, enter a stock location or use the Lookup to select from a list of available locations.
4 Select an Inventory Code to use with this stock item for this location.5 Complete the IN Stock window using the instructions found in “Adding Stock Item Records” on
page 33.The quantity at all locations is recorded automatically in the upper right corner of the window. At this point, you can specify different prices and Min/Max quantities for the stock item in this specific location.
6 Select Save to add the stock item to the new location.
89Managing Stock Items with Multi-Location InventoryManaging Multiple Locations of Inventory

Copy Stock Items from One Location to AnotherDenali makes it easy to set up inventory in multiple locations. You can copy the stock item records from one location to another in one step. This process does not transfer any quantities for those stock items you copy. If you want to decrease the quantity of your inventory in one location and add that quantity to the new location, you need to perform a transfer adjustment transaction (see “Transfer Stock Items from One Location to Another” on page 90).To set up stock items in a new location by copying from another location:
1 In Inventory, select Inventory Items > Copy Items to Another Company from the left navigation pane.
Figure 50: IN Copy Stock Items window
2 If you have more than one company, select the company to which you will be copying these stock items from the Destination Company drop-down.If you are copying stock items from one location to another in the same company, leave the default company selected.
3 Type or use the Lookup to select an existing location from which you will copy the stock items in the Source Location box.
4 Specify the location to which you will copy the stock items in the Destination Location box. Use the Start and End boxes to specify the range of stock items you want to copy. You can specify a range of stock items, Inventory Codes, Product Types, and/or vendors.
5 Use the check boxes to select additional information you want to copy. For detailed help on the options in this window, select the Help button in the software window.
6 Select OK to copy the stock items to the new location.
Transfer Stock Items from One Location to AnotherTransferring stock items from one location to another is different from copying stock items. When you copy stock items, you simply create the stock item in the second location, but do not add any quantity. To add quantity to the second location, you must move the stock items using a transfer adjustment.
90Managing Stock Items with Multi-Location InventoryManaging Multiple Locations of Inventory

To transfer items from one location to another:1 In Inventory, select Adjustment Tasks > Increase / Decrease Stock Quantity from the left navigation
pane.
Figure 51: IN Adjust Stock Quantities
2 If you use batch processing, select an existing batch.3 Enter the date, the stock item you want to transfer, and the locations that you are transferring from and
to. If the items you will transfer are serialized, the items must be marked as serialized in both locations.
4 Select a Transaction Code. Transaction Codes that are used to transfer inventory from one location to another must begin with “3”. For information on setting up Transaction Codes, see “Setting Up Transaction Codes” on page 28.
5 Enter the necessary information in the remaining fields. The cost of the item is determined by the valuation method specified on the Inventory Code of the item and is not editable in this window. For detailed help on the options in this window, select the Help button in the software window.
6 Click Save when your adjustment is complete.
\
NOTE: If you use LIFO or FIFO, any transferred items that are not entered into Denali are transferred at the last cost recorded for that item. For example, if you transfer five items of which three are “on hand” the remaining two (not entered) transfer at the last cost entered.
91Managing Stock Items with Multi-Location InventoryManaging Multiple Locations of Inventory

Troubleshooting: Managing Stock Items with Multi-Location Inventory
At times, problems or errors can occur that are simple to fix without contacting Customer Support. Here, we indicate some common problems and ways to correct them. If you do not find what you are looking for in this section, refer to the help options under the “Denali Help” section of this guide and/or check the FAQ topics of our Customer Service Center at http://cougarmtnservice.com before you contact Customer Support. If you would like to offer suggestions for additions to our Troubleshooting sections, please email us at [email protected].
To Fix This: Try This:
When I run a report in Inventory and select a specific location, one of the stock items at this location is not showing in the report.
You need to verify that this particular stock item is associated with the correct location. In the Location field of the IN Stock window, make sure that you have the correct location entered.
I cannot transfer a stock item to another location.
Make sure the Location and Transaction Codes are correctly set up. See “Transfer Stock Items from One Location to Another” on page 90 for more information.
92Managing Stock Items with Multi-Location InventoryManaging Multiple Locations of Inventory

8Chapter
Using Inventory withSpecialty ShopPreparing to Use Specialty Shop
Setting Up Specialty Shop Pricing
Additional Stock Item Setup Options
Tracking Stock Item Sales with Specialty Shop
Troubleshooting: Using Inventory with Specialty Shop

Along with all the standard features of Inventory, if you purchased Specialty Shop, you
will have additional setup requirements and available features. Specialty Shop
provides additional flexibility as to how you sell and discount your stock items. This
flexibility is accomplished by using Multi-Pack Codes and/or Coupon/Buy Down
Codes.
Preparing to Use Specialty ShopThe Specialty Shop enhancement is designed to assist businesses that sell alcohol and/or tobacco products with their accounting needs. Since this enhancement works in conjunction with other modules, it helps you keep your business running smoothly by allowing you additional flexibility for your stock items.Specialty Shop also gives you the option to prepare reports you can use to reconcile your buy down amounts with your payments received from tobacco manufacturers.
Setting Up Specialty Shop PricingIf you have Specialty Shop installed, you have additional pricing options for stock items that are sold in either the Sales Order Entry or Sales POS Register windows. This section contains information on some pricing methods available with Specialty Shop.
Setting Up Multi-Pack PricingMulti-Pack Codes allow you to establish pricing for the different types of packaging in which you sell an item: for example, a 6-pack of soda versus a 12-pack. We suggest that you establish a Multi-Pack Code for each type of packaging that you carry with the same stock number.To set up a Multi-Pack Code:
1 In the Inventory module, select Specialty Tasks > Set Up Multi-Pack Pricing from the left navigation pane.
Figure 52: IN Multi-Pack Codes window
94Using Inventory with Specialty ShopPreparing to Use Specialty Shop

2 Enter a code of up to ten alphanumeric characters and a description for this code.3 Once you complete the information in this window, select Save to keep the code. Repeat this process
until you have added all the codes you need.You can also add Multi-Pack Pricing on the fly using the Advanced Sales Info button on the Sales Info tab in the IN Stock window.
Setting Up Promotional Sale PricingWith the Specialty Shop enhancement installed, an additional promotional pricing option is available. This option is referred to as “Buy 1, Get 1” and means that if the customer purchases a specified stock item, they get another item at a discounted price.You can also set up promotional pricing for multi-pack items. See “Setting Up Multi-Pack Pricing” on page 94 for more information on setting up multi-packs.
Promotional Pricing for Multi-Pack SalesWith Specialty Shop, you can set up Promotional Pricing for multi-pack sales. The information in this section provides the necessary steps to set up this type of pricing.To set up Promotional Pricing for multi-packs:
1 In Inventory, select Specialty Tasks > Set Up Promotional Pricing from the left navigation pane.
Figure 53: IN Promotional Pricing window
2 Type or use the Lookup to enter a user-defined code of up to 20 characters in the Code box.3 Enter the description for this Promotional Code, up to 50 characters in length.4 Select the Import Description to Comment Line? check box to show the description for this
Promotional Code on invoices or receipts when it is used in a Sales transaction. 5 Select the Detail Entry tab.
95Using Inventory with Specialty ShopSetting Up Specialty Shop Pricing

Figure 54: IN Promotional Pricing window, Detail Entry tab
6 Enter the Start and End ranges for the stock items you want to include on this tab and select Add to Grid to include the items for this promotion.You can also enter stock items directly in the grid to include them individually. If you have Multi-Location Inventory installed, you need to enter the Location Code information.
7 When you complete the information on this tab, you can print shelf signs by selecting the Print Signs button. For detailed information about the options in this window, select the Help button.
8 Select Save to keep this code.For additional information on setting up pricing in Inventory, refer to “Establishing Prices for Your Stock Items” on page 60.
Promotional Pricing for Buy 1, Get 1 SalesYou can assign a percentage or amount discount for additional items when an item is purchased in a specified quantity. For example, you can specify that if a customer purchases stock item ANTIQUE PEN SET, they will receive stock item BRAIN TEASERS at a 5% discount.To set up a Buy 1, Get 1 Promotional Code:
1 In Inventory, select Specialty Tasks > Set Up Promotional Pricing from the left navigation pane.
96Using Inventory with Specialty ShopSetting Up Specialty Shop Pricing

Figure 55: IN Promotional Pricing window
2 Type a user-defined code or use the Lookup to select a user-defined code of up to 20 characters in the Code box.
3 Enter the description for this Promotional Code, up to 50 characters in length.4 Select the Import Description to Comment Line? check box to show the description for this
Promotional Code on invoices or receipts when it is used in a Sales transaction. 5 On the Promotional Period tab, enter the date and time range for this promotion, if applicable. For a
Buy 1, Get 1 promotion you will not use the Discount and Amount/Percent Off boxes.6 Select the Buy 1 Get 1 tab.
Figure 56: IN Promotional Pricing window, Buy 1 Get 1 tab
97Using Inventory with Specialty ShopSetting Up Specialty Shop Pricing

7 Enter the stock item information in the boxes on this tab and select Add to Grid to include the selected items, or you can enter stock items directly in the grid to add stock items individually.If you have Multi-Location Inventory installed, you need to enter the Location Code information. If you do not have this enhancement installed, this option is not available.
8 When you complete the information on the Buy 1 Get 1 tab, you can select the Print Signs button to print shelf signs. For detailed information about the options in this window, select the Help button.
9 Select Save to keep this code.For additional information on setting up pricing in Inventory, refer to “Establishing Prices for Your Stock Items” on page 60.
Setting Up Buy Down PricingCoupon/Buy Down Codes are special Non-Inventory Codes you can attach to stock items to indicate a coupon is being used to purchase all or part of the item. These codes might also be referred to as Buy Down Codes, a term used in the tobacco industry. Coupon/Buy Down Codes are used alone or in conjunction with Multi-Pack Codes to set pricing for certain stock items. The Coupon/Buy Down Codes are created in Sales and attached to the stock items in Inventory.See “Setting Up Multi-Pack Pricing” on page 94 for more information on Multi-Pack Codes.
To set up Coupon/Buy Down Codes:1 In Sales, select Options > Manage Non-Inventory Items > Define Coupon/Buy Downs from the left
navigation pane.
Figure 57: Sales Coupon/Buy Down Codes window
2 Complete the fields in this window for this Buy Down Code. For detailed information on the options in this window, select the Help button.
3 To determine whether to select the Taxable check box in the window, see “Taxability of Buy Downs” on page 99 for specific information on how to handle sales tax calculations when using buy downs.To attach Coupon Codes to stock items:
1 In Inventory, select Inventory Items > Add / Change Stock Items from the left navigation pane. 2 Enter the stock item number you want to attach a coupon to or use the Lookup to select one, and then
select Edit.
98Using Inventory with Specialty ShopSetting Up Specialty Shop Pricing

3 On the Sales Info tab, select the Advanced Sales Info button.4 In the IN Advanced Sales Information window, enter a Coupon Code or use the Lookup to select
one. For detailed information on the options in this window, select the Help button.See “Setting Up Multi-Pack Pricing” on page 94 for more information on Multi-Pack Codes.
Taxability of Buy DownsThe taxability of buy downs varies from state to state. Some states require the sales tax to be calculated on the total price of the item as if the Coupon or Buy Down were not applied, while others require the sales tax to be calculated on the net price of the item, after the discount has been taken. To address this issue and accommodate users in either situation, there is a check box in the window so you can specify whether the buy down is taxable. Review the descriptions of each setting carefully to determine which setting is appropriate for your particular situation.
• Calculate the Buy Down Before Taxes: In this situation, the sales tax is net of the buy down amount. This happens when the buy down is calculated before the sales tax is calculated. When considering state sales tax regulations, you would use this option if your state requires you to collect sales tax based on the net price of the item. To achieve this result, select the Taxable check box.
• Calculate the Buy Down After Taxes: In this situation, sales tax is calculated on the total price of the item before the buy down amount is subtracted. When considering state sales tax regulations, you would use this option if your state requires you to collect sales tax based on the original total price of the item. To achieve this result, leave the Taxable check box unchecked.
Attaching Multi-Packs and Buy Downs to Stock ItemsYou can use Coupon/Buy Down Codes to discount a stock item for a specific range of dates for which the coupon and/or buy down is in effect. Multi-Pack Codes allow you to assign a code to a stock item and specify a range of dates for which multi-pack pricing is in effect. You can also assign different codes to different multi-packs of a stock item. If the coupon and/or buy down is assigned to the stock item, it will automatically be included in the sale transaction.To set up stock items for coupon/buy down sales:
1 In Inventory, select Inventory Items > Add / Change Stock Items from the left navigation pane.2 Type the stock item or use the Lookup to select the stock item you want to use.3 Click the Sales Info tab > Advanced Sales Info button.
99Using Inventory with Specialty ShopSetting Up Specialty Shop Pricing

Figure 58: IN Advanced Sales Information window
4 If you want to use Multi-Pack Pricing with a Coupon/Buy Down Code, check the Allow Multi-Pack Pricing check box and complete the grid information.
5 Select Save to save the advanced sales information and return to the IN Stock window.6 To keep the code information for this stock item, select Save.
Printing a Report of Your Various Pricing CodesWe recommend you print a report of the pricing codes you have established. This can be helpful as a reference tool later so you don’t need to look them up in the system. To print a report of your pricing codes:
1 In Inventory, select Options > <code you want to print> from the navigation pane. 2 Click the Print button.
Figure 59: IN Print Codes - Multi Pact Codes window
3 In the Print Code window that appears, choose the range of codes to print.The title of this window varies depending on the code you choose.
100Using Inventory with Specialty ShopSetting Up Specialty Shop Pricing

4 Select OK to print.
Additional Stock Item Setup OptionsThere are a couple of things you might want to consider before you sell your stock items using multi-pack pricing and/or Coupon/Buy Down discounts. The information in this section covers the additional stock item setup options available to provide even more flexibility with Specialty Shop.
Changing Pricing of Multi-Pack Stock ItemsThe global price change feature in Inventory has an additional benefit when Specialty Shop is installed. You can choose to update the prices for all multi-packs when you update the prices for your stock items.To globally change multi-pack stock item pricing:
1 In Inventory, select Options > Change Stock Item Pricing Globally from the left navigation pane.
Figure 60: IN Global Price Change window
2 Select the Update Multi-Pack Pricing radio button. 3 Use the Lookup to select the Start and End range for the Multi-Pack Codes you want to include in this
global price change. For detailed information about the options in this window, select the Help button.
NOTE: You must run the global price change function twice to update multi-pack prices. Run it once with the Update Standard Stock Items radio button selected to update prices 1-5 in the IN Stock window and run it again with the Update Multi-Pack Pricing radio button selected to update multi-pack prices.
101Using Inventory with Specialty ShopAdditional Stock Item Setup Options

Setting Up Stock Items to Require Age Verification to SellIf you want to require the clerk to verify the age of the customer when certain stock items are purchased, you can do so through Inventory. You need to define each of your stock items that include this requirement and the information in this section provides steps to accomplish this task.To set up age verification for a stock item:
1 In Inventory, select Inventory Items > Add / Change Stock Items from the left navigation pane.2 Type the stock item or use the Lookup to select the stock item for which you want to require age
verification.3 Click the Sales Info tab > Advanced Sales Info button.
Figure 61: IN Advanced Sales Information window
4 Select the type of Age Verification you want to perform when this stock item is purchased.When an item specified as either Alcohol or Tobacco is purchased, the system will check the Sales module preferences to see how old the customer must be to purchase the item. During sales entry, the system will either prompt the clerk to check the customer’s age, or display the latest legal date of birth depending on the setup.
5 Click Save to keep this requirement and return to the IN Stock window.6 Select Save to keep the changes to this stock item.
For more information on using age verification requirements in the Sales module, refer to the Sales Clerk guide. If you need additional information on setting up age verification requirements in the Sales module, see “Prompt Clerk to Verify Age at Time of Sale” on page 102.
Prompt Clerk to Verify Age at Time of SaleWith Specialty Shop, you can set up the system to prompt your clerk for age verification for sales of tobacco and alcohol. In the Sales Order Entry Preferences and/or Sales Point of Sale Preferences windows, enter the minimum ages for sales of alcohol and tobacco, and indicate whether and how you want the clerk to verify the customer’s birth date.
102Using Inventory with Specialty ShopAdditional Stock Item Setup Options

To enter the age verification dates:1 In the Sales module, select Options > Set Up the Point of Sale Preferences
- or -Options > Set Up the Order Entry Preferences from the left navigation pane.
2 Select the Defaults tab.
Figure 62: Sales Point of Sale Preferences window, Defaults tab
3 In the Age Verification section of this window, select the ages and type of prompt you want to use. For information about the options in this window, select the Help button.
4 Select Save to keep this age verification information.
Tracking Stock Item Sales with Specialty ShopTwo additional reports are available when you install Specialty Shop. You can use these reports to view coupon/buy down transactions in Sales and advanced sales information in Inventory.There are also changes to the Inventory Price Book Report, Stock Labels, Inventory History Report, and the Sales History Report that allow you to print multi-pack information. The Promotional Pricing Report also includes additional information with Specialty Shop installed.
103Using Inventory with Specialty ShopTracking Stock Item Sales with Specialty Shop

Stock Labels ReportWith Specialty Shop installed, you can print multi-pack information on stock labels. For example, you have three Multi-Pack Codes associated with the stock item Kenser Cigarettes. If you choose to filter the stock labels by multi-pack and you enter 3 as the number of labels to print per multi-pack, then 9 labels would print for Kenser Cigarettes, or 3 for each Multi-Pack Code. If you are using the BarTender bar code generator, you can also print the Multi-Pack Code and multi-pack price on bar code labels. For more information on running this report or to view a sample of it, see “Stock Labels” on page 123.
Price Book ReportWith Specialty Shop installed, the Price Book Report allows you to break down the information by multi-pack. When you run this report, you also have an additional price level option of Multi-Pack Only. For more information on running this report or to view a sample of it, see “Price Book Report” on page 130.
Advanced Sales Information ReportThis report is only available in Inventory after you install Specialty Shop. The Advanced Sales Information Report shows your stock items that have Multi-Pack or Coupon Codes attached to them at the time of sale. This reporting flexibility allows you to break down your stock item sales according to these special codes, which helps you track the movement of your inventory.
Inventory History ReportAs with some of the other reports in Inventory, the History Report has the flexibility to include multi-pack information. You can further break down the report information and target multi-pack sales. For more information on running this report or to view a sample of it, see “History Report” on page 132.
Promotional Sales Report in InventoryThe Promotional Pricing Report includes specialized information for Specialty Shop users. For all users, this report shows sales history grouped by Promotional Pricing Code for a specified date range. However, for Specialty Shop users, this report provides useful information about how many items were sold at full price, and how many were free and/or discounted via “Buy 1, Get 1” promotions.
104Using Inventory with Specialty ShopTracking Stock Item Sales with Specialty Shop

Troubleshooting: Using Inventory with Specialty Shop
At times, problems or errors can occur that are simple to fix without contacting Customer Support. Here, we indicate some common problems and ways to correct them. If you do not find what you are looking for in this section, refer to the help options under the “Denali Help” section of this guide and/or check the FAQ topics of our Customer Service Center at http://cougarmtnservice.com before you contact Customer Support. If you would like to offer suggestions for additions to our Troubleshooting sections, please email us at [email protected].
To Fix This: Try This:
I set up a coupon discount for one of my stock items, but at the time of sale the discount is not being applied.
You may have the date set incorrectly. If the date range for the Coupon Code does not include the date at the time of sale, the discount will not be applied. See “Attaching Multi-Packs and Buy Downs to Stock Items” on page 99 for information on setting up stock items for coupon sales.
105Using Inventory with Specialty ShopTracking Stock Item Sales with Specialty Shop

9Chapter
Working with KitsCreating Kits
Building Kits from Components
Using Kit Reports
Troubleshooting: Working With Kits

Inventory Kits enable you to use inventory items as components for a single sellable
stock item that is made up of the other stock items. For example, a bookstore may
want to create a “back to school” package that is made up of required reading or
classic novels. This can be done using Kits. Review this chapter to see how to set up
and use Inventory Kits for your business.
Creating KitsYou can create a finished good (Kit assembly) inventory stock item from a list of inventory components. When you build a Kit (sometimes referred to as a “Bill of Materials”), the quantities of the component stock items are decreased, and the quantities of the finished good are increased.If you use lot numbers or serial numbers, you can only assign them to completed kits, not components of the kit.
Before you add components to your Kit, first create a stock item record for each of the items, including the finished good and all components, by following the steps in “Adding Stock Item Records” on page 33. Then you can set up your Kits (see “Setting Up a Kit” on page 107).
Setting Up a KitYou can think of a Bill of Materials table as a parts list for the assembly. It shows the quantity and part number of each component you use to build a finished product. Before you can set up a kit, you must create the stock item you’ll use as the finished product.
To create a Kit:1 In the Inventory module, select Inventory Items > Add / Change Kits from the left navigation pane.2 In the BOM Stock box, type the stock item or use the Lookup to select the stock item that will be the
finished product.
Example: Creating a Book BundleThe manager of a book store wants to sell a book bundle that includes several books from one author. The first step is to create a stock item for the finished good; for example, Brontë Book Bundle. The second step is to create the Kit by adding components to the Bill of Materials. These would be all items necessary to make the kit; for example, books by Brontë, such as Jane Eyre, Shirley, and The Green Dwarf. The final step is to assemble the Kit from the components; this step adjusts the stock quantities to show the new quantities of your components and Kits stock items.
107Working with KitsCreating Kits

Figure 63: IN Set Up Kits
3 Enter a description and select the costing method for this item. For detailed information about the options in this window, select the Help button in the software.
4 Select the Update at Posting check box to update the cost each time you post a Bill of Materials transaction for this item. This option only applies to stock items that use the Last Cost or Valuation Cost methods.If the Update at Posting check box is not checked, when you assemble the Kit, the cost of the Kit will be the sum total of the costs of the components as entered in the IN Set Up Kits window. See “Building Kits from Components” on page 110 for more information on assembling kits.
Specifying Components for Bills of MaterialsAfter you set up a Kit stock item, you can add the components to the list that make up the kit (finished good) in the detail grid at the bottom of the window. The components are any Inventory or Non-Inventory items that you will use in the kit. You cannot add lot numbered stock items as components of a kit, but you can assign lot numbers to completed kits.
Follow these steps to specify the components that make up this Kit:1 For stock item components, select the Inventory option from the drop-down in the Detail Type column.
For components that are not stock items, type the description of the service or other Non-Inventory item in the Component field. Non-Inventory items you enter here are not related to non-inventory items in the Sales module.
108Working with KitsCreating Kits

Figure 64: IN Set Up Kits detail grid
2 In the Component column, enter a stock number for the item that will be used to make the finished good, or select a stock number from the Lookup window.
3 Stock item descriptions will automatically appear in the Description column. You can change the description if necessary.
4 In the Quantity field, enter the quantity of this component required to make one finished Kit.
5 Select the Update Cost button to update the estimated cost with last cost information. If you chose Valuation Method as the costing method for the kit, the cost will be determined when it is produced. For detailed information about the costing methods, select the Help button in the software.
6 Select Save to save the Bill of Materials for this kit.
Editing Existing Component ListsOnce you enter a list of components, you can go back and edit it at any time.To edit an existing table (add, change, or delete components):
1 In the Inventory module, select Inventory Items > Add / Change Kits from the left navigation pane.
NOTE: You can use Non-Inventory detail types to include costs for items other than inventory items that go into the assembly. However, these Non-Inventory detail lines are not related to Sales Non-Inventory Codes.
NOTE: The Inquiry and Requirements reports use the new estimated production cost (last cost). This way, you can use last cost for estimates, but use the inventory valuation method to determine the accurate cost of production.
109Working with KitsCreating Kits

Figure 65: IN Set Up Kits, Edit option
2 Use the Lookup or the Find buttons to locate the kit you want to edit.3 Select the Edit button.
The only box that is not available for editing is the BOM Stock box.
You can use the search feature to locate components in large lists.
You can right-click in any editable field to delete the row, or copy, cut, paste, or delete the contents of the field.
4 Select Save after you finish making the edits.
Building Kits from ComponentsWhen you build a Kit, the system does the following:
• Subtracts the individual components from inventory quantities.• Adds assembled Kits to inventory quantities.
To list each individual stock item that comprises a Kit on invoices, picking lists, or packing lists whenever you sell an Inventory Kit item, check the List Kit Items on Invoices/Picking Lists/Packing Slips check box on the General tab of the Sales Order Entry Preferences window (refer to the Sales Administrator guide).
Assembling KitsIf you are “building” kits, use the Adjust Stock Quantities feature. Building Kits subtracts the component quantities and adds the Kit quantities.
110Working with KitsBuilding Kits from Components

To assemble Kits from components:1 In the Inventory module, select Adjustment Tasks > Increase / Decrease Stock Quantity from the
left navigation pane.2 If applicable, select an existing batch, or create a new one. See “Working with Transaction Batches in
Inventory” on page 44 for more information on batches.
Figure 66: IN Adjust Stock Quantities window
3 Select the Bill of Materials Type check box. For more on Bill of Materials, see “Specifying Components for Bills of Materials” on page 108.
4 Enter the stock number of the kit or use the Lookup to select a stock number. With the Bill of Materials Type check box selected, the Lookup will show only Kits.
5 Enter the number of Kits you want to assemble in the Quantity box.6 Fill in the remaining fields in the window. For detailed information about any of these fields, select the
Help button in the software window. 7 Click Save when your adjustment is complete.
For additional information on adjusting quantities, see “Increasing or Decreasing Stock Item Quantities” on page 46.
Disassembling Kits Into ComponentsYou might need to disassemble Kits into their individual components. For example, if you set up a Kit of school supplies to accommodate September purchases for the new school year, but you assembled more than you sold, you might want to disassemble these Kits to place the pencils, erasers, and other items back on the shelves individually.To disassemble Kits, use the IN Adjust Stock Quantities window in Inventory. When you disassemble a Kit in this way, the quantities of the finished good are reduced in Inventory, and the quantities of the component items are increased. To disassemble Kits into components:
1 In the Inventory module, select Adjustment Tasks > Increase / Decrease Stock Quantity from the left navigation pane.
111Working with KitsBuilding Kits from Components

2 If applicable, select an existing batch, or create a new one. See “Working with Transaction Batches in Inventory” on page 44 for more information.
Figure 67: IN Adjust Stock Quantities window
3 Select the Bill of Materials Type check box. For more on Bill of Materials, see “Specifying Components for Bills of Materials” on page 108.
4 Enter the stock number of the Kit being adjusted or use the Lookup to select a stock number. With the Bill of Materials Type check box selected, the Lookup will show only Kit items.
5 Enter the number of items to disassemble in the Quantity box. For subtractions, the Cost box will be unavailable. The cost for subtractions will calculate based on the valuation method of the stock item.
6 Fill in the remaining fields in the window. For detailed information about any of these fields, select the Help button in the software window.
7 Click Save when your adjustment is complete.For additional information on adjusting quantities, see “Increasing or Decreasing Stock Item Quantities” on page 46.
Using Kit ReportsYou can use the available kit reports to find out how many of each component is required to build a specified number of kits, how many kits can be assembled with the components on hand, and what each kit costs to assemble. You can select these reports from the Kits menu in the Inventory module.For additional information on report setup or Inventory reports, see “Reporting Overview” on page 117 or “Options for Report Type” on page 118.
Kit Assembly ReportYou can use the Kit Assembly report to help you monitor the costs and quantities of Bill of Materials items. You can find this report on the Reporting menu on the Inventory navigation pane. There are two variations to the Kit Assembly Report:
112Working with KitsUsing Kit Reports

• Inquiry Report (Default): This report shows the costs and quantities of the stock items necessary to produce the number of assembled items specified. You can only run this report for one finished good at a time.
Figure 68: IN Kit Assembly Report
• Understock Report: This report tells you if you have fewer than the required quantity of any of the stock items required to build the Bill of Materials assembly.If you choose this report type and have the Multi-Location Inventory module installed, you will see a Location drop-down to choose the location you want to include on the report.
Master Kit ReportThe Inventory Master Kit Report provides specific information about the components used to make up the assemblies. It lists each component individually and shows what components are used in the finished good, as well as the quantity and cost of each (see “Specifying Components for Bills of Materials” on page 108).If a component is used in more than one assembly, all assembly stock numbers are listed under the component stock number. You can access this report by selecting Reporting > Complete Kit Listing from the Inventory left navigation pane.
113Working with KitsUsing Kit Reports

Figure 69: IN Master Kit Report
Component Requirement ReportThe Component Requirement report is similar to the Kit Assembly report (see “Kit Assembly Report” on page 112), except you can print the report for all or a range of components instead of for a specific Kit. You can access this report by selecting Reporting > Component Requirement Report from the left navigation pane.
Figure 70: Inventory Component Requirement Report
114Working with KitsUsing Kit Reports

Troubleshooting: Working With KitsAt times, problems or errors can occur that are simple to fix without contacting Customer Support. Here, we indicate some common problems and ways to correct them. If you do not find what you are looking for in this section, refer to the help options under the “Denali Help” section of this guide and/or check the FAQ topics of our Customer Service Center at http://cougarmtnservice.com before you contact Customer Support. If you would like to offer suggestions for additions to our Troubleshooting sections, please email us at [email protected].
To Fix This: Try This:
When I try to assemble a kit and use the Lookup, all my stock items are listed.
If you select the Bill of Materials Type check box in the IN Adjust Stock Quantities window, when you access the Lookup window only your kits will show.
115Working with KitsUsing Kit Reports

10Chapter
Inventory ReportsReporting Overview
Inventory Reports
Troubleshooting: Inventory Reports

Stock items are the basis of the Inventory module. They are also an important factor
in keeping a business financially solvent. Keeping track of how stock items are moving
and what your on-hand quantities are is an integral part of making smart business
decisions and keeping your business running smoothly.
We designed this documentation with the assumption that you have all modules
installed. If this is not the case, some of the reports or options may not be available or
they may appear differently.
Reporting OverviewReports and financial statements are the lifeblood of any good accounting system because they provide a snapshot of your business. Reports throughout Denali provide specific business information to help you make the right decisions for your organization.Denali provides a wealth of reports applicable to the needs of any business. Yet any report is only as good as the information it is reporting. For this reason, it is very important to consider what kind of information you will need on your reports when you set up your accounting system. Once you enter the information into the database, you can retrieve and use the data in a variety of ways in the available reports. You can also sort or filter these reports to show only the information you want to see. You can use Crystal Reports to customize the look of your reports, and in some cases, the data it displays. This chapter contains samples of the reports and financial statements available in Denali.
Denali Reports AvailableWhen you need specific information on the status of your business, you will need reports and financial statements. All Denali reports fall under one of three categories: financial statements, history reports, and control reports. Each report type serves a specific purpose and understanding each purpose will help make it easier to sort through the report options and determine which reports you need. This section gives an overview of the types of reports and statements available throughout Denali as well as in each different module. Depending on the modules you purchased and installed, options might appear differently or not at all.
Financial StatementsThis type of report reflects the status of the business. These reports are used to view profits, losses, revenue/income, and expenses for the business. Two examples are the Trial Balance and Balance Sheet in the General Ledger module.
NOTE: Depending on how your print options were set up in the Module Preferences window, when you click OK, a message box might appear to notify you that the report is being processed. Do not close the window until the process is complete; doing so can cause problems in your system.
117Inventory ReportsReporting Overview

History ReportsThis type of report provides a quick view of all the information entered in a module for a certain period. In other words, it is a transaction log. For instance, in the Inventory module, the History Report reflects all additions and subtractions to each individual stock item for the specified range. The Audit Trail is an example of a General Ledger history report.
Control ReportsYou would use this type of report to verify the integrity of your data tables. These reports compare the master total to detail or period totals and show any discrepancies. For example, in the Accounts Payable module, the Control Report compares the total due for open invoices to the line detail for each vendor. If there is a discrepancy, an error report is automatically generated for you to use to correct the errors.
Reporting Options in DenaliDenali uses the information gathered in each module to create reports that can show you the information you need to make good business decisions. To increase the flexibility of these reports, Denali has a number of report options that allow you to fine tune your reports to meet your needs. The following options are available in most reports; some reports have additional options unique to them.
Options for Report TypeThese options describe the different levels of detail available within some reports. Some of these options will only appear depending on the type of report you choose and the modules you have installed.
• Detailed: Shows all activity for a specified range.• Condensed: Shows the group totals for a specified range.• Summary: Shows one total for a specified range.• Detailed with Notes: Shows all activity for a specified range along with any notes entered.• Classified: Sorts by account class subcategories (report groups).• Comparative Detailed: Lists all activity for both the selected year and the year prior to it. (Certain
reports will show two years prior to the selected year.)• Comparative Classified: Sorts by account class subcategories (report groups) for both the
selected year and the year prior to it. (Certain reports will show two years prior to the selected year.)
Standard Report Sort OptionsSome of the reports include a Sort By option, which offers choices of how the report information should be sorted. For example, in the Accounts Receivable module, you can sort by customer name or Salesperson Code.
Report Query OptionsTo enhance reporting capabilities, Denali includes querying functionality in several of the reports. This query ability allows you to report information based on specified search criteria. Keep in mind that depending on the integration settings for the module, some query options might appear differently or be unavailable. Refer to “Setting Up Inventory Integration Settings” on page 22 for more information on how your integration settings might affect the query ability for reports.
118Inventory ReportsReporting Overview
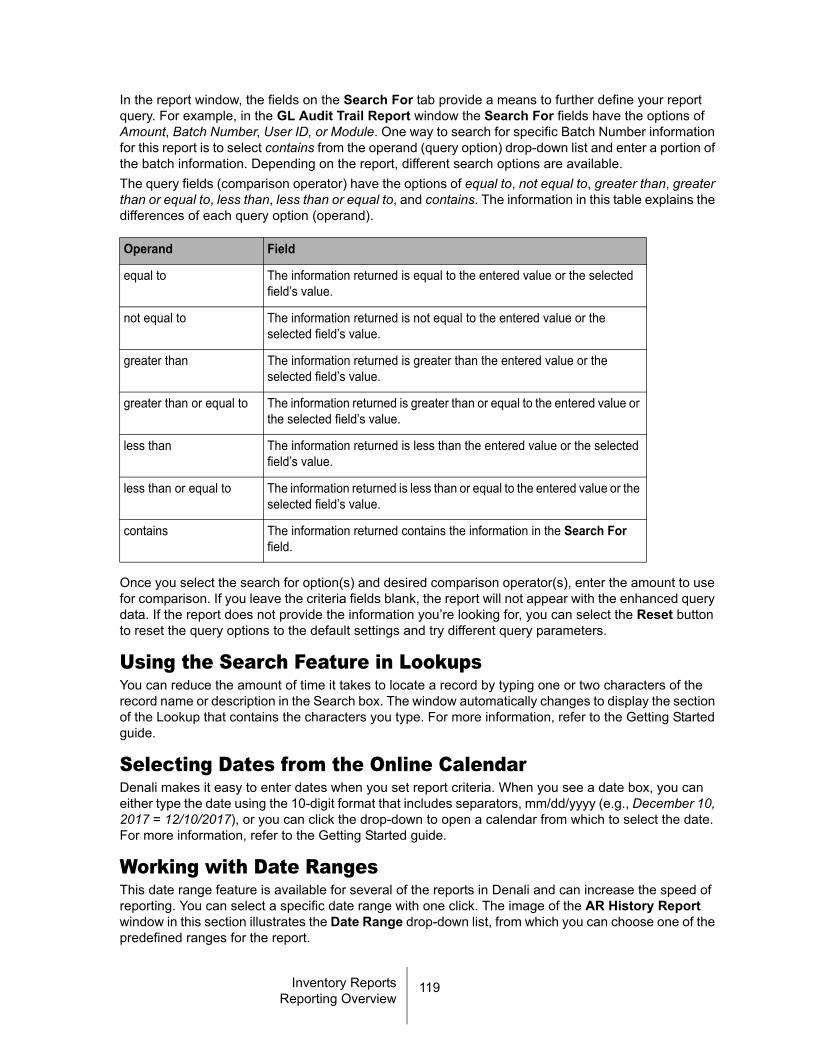
In the report window, the fields on the Search For tab provide a means to further define your report query. For example, in the GL Audit Trail Report window the Search For fields have the options of Amount, Batch Number, User ID, or Module. One way to search for specific Batch Number information for this report is to select contains from the operand (query option) drop-down list and enter a portion of the batch information. Depending on the report, different search options are available.The query fields (comparison operator) have the options of equal to, not equal to, greater than, greater than or equal to, less than, less than or equal to, and contains. The information in this table explains the differences of each query option (operand).
Once you select the search for option(s) and desired comparison operator(s), enter the amount to use for comparison. If you leave the criteria fields blank, the report will not appear with the enhanced query data. If the report does not provide the information you’re looking for, you can select the Reset button to reset the query options to the default settings and try different query parameters.
Using the Search Feature in LookupsYou can reduce the amount of time it takes to locate a record by typing one or two characters of the record name or description in the Search box. The window automatically changes to display the section of the Lookup that contains the characters you type. For more information, refer to the Getting Started guide.
Selecting Dates from the Online CalendarDenali makes it easy to enter dates when you set report criteria. When you see a date box, you can either type the date using the 10-digit format that includes separators, mm/dd/yyyy (e.g., December 10, 2017 = 12/10/2017), or you can click the drop-down to open a calendar from which to select the date. For more information, refer to the Getting Started guide.
Working with Date RangesThis date range feature is available for several of the reports in Denali and can increase the speed of reporting. You can select a specific date range with one click. The image of the AR History Report window in this section illustrates the Date Range drop-down list, from which you can choose one of the predefined ranges for the report.
Operand Field
equal to The information returned is equal to the entered value or the selected field’s value.
not equal to The information returned is not equal to the entered value or the selected field’s value.
greater than The information returned is greater than the entered value or the selected field’s value.
greater than or equal to The information returned is greater than or equal to the entered value or the selected field’s value.
less than The information returned is less than the entered value or the selected field’s value.
less than or equal to The information returned is less than or equal to the entered value or the selected field’s value.
contains The information returned contains the information in the Search For field.
119Inventory ReportsReporting Overview

Figure 71: AR History Report window, Date Range option
There are several predefined date ranges available and the table in this section provides an overview of each one.
Date Range Option Start Date for Report End Date for Report
All The start date of the Fiscal Calendar. The current Denali date.
Today The current Denali date. The current Denali date.
This Week The date of the Sunday immediately preceding or equal to the current Denali date.
The date of the Saturday immediately following or equal to the current Denali date.
This Week to date The date of the Sunday immediately preceding or equal to the current Denali date.
The current Denali date.
This Month The first day of the month containing the current Denali date.
The last day of the month containing the current Denali date.
This Month to date The first day of the month containing the current Denali date.
The current Denali date.
This Fiscal Quarter The first date of the fiscal quarter containing the current Denali date.
The last date of the fiscal quarter containing the current Denali date.
This Fiscal Quarter to date
The first date of the fiscal quarter containing the current Denali date.
The current Denali date.
This Fiscal Year The first date of the fiscal year containing the current Denali date.
The last date of the fiscal year containing the current Denali date.
This Fiscal Year to date The first date of the fiscal year containing the current Denali date.
The current Denali date.
120Inventory ReportsReporting Overview

Yesterday The date immediately preceding the current Denali date.
The date immediately preceding the current Denali date.
Last Week The date of the Sunday immediately preceding the week containing the current Denali date.
The date of the Saturday immediately preceding the week containing the current Denali date.
Last Week to date The date of the Sunday immediately preceding the week containing the current Denali date.
The current Denali date.
Last Month The first day of the month immediately preceding the month containing the current Denali date.
The last day of the month immediately preceding the month containing the current Denali date.
Last Month to date The first day of the month immediately preceding the month containing the current Denali date.
The current Denali date.
Last Fiscal Quarter The first day of the fiscal quarter immediately preceding the fiscal quarter containing the current Denali date.
The last day of the fiscal quarter immediately preceding the fiscal quarter containing the current Denali date.
Last Fiscal Quarter to date
The first day of the fiscal quarter immediately preceding the fiscal quarter containing the current Denali date.
The current Denali date.
Last Fiscal Year The first day of the fiscal year immediately preceding the fiscal year containing the current Denali date.
The last day of the fiscal year immediately preceding the fiscal year containing the current Denali date.
Last Fiscal Year to date The first day of the fiscal year immediately preceding the fiscal year containing the current Denali date.
The current Denali date.
Next Week The date of the Sunday immediately following the week containing the current Denali date.
The date of the Saturday immediately following the week containing the current Denali date.
Next 4 Weeks The date of the Sunday immediately following the week containing the current Denali date.
The date of the Saturday of the 4th week following the week containing the current Denali date.
Next Month The first day of the month immediately following the month containing the current Denali date.
The last day of the month immediately following the month containing the current Denali date.
Date Range Option Start Date for Report (Continued) End Date for Report
121Inventory ReportsReporting Overview

Filter Ranges and Filter MethodsFields are available to set beginning (Start) and ending (End) ranges to filter the information you will include in the reports or financial statements.Methods for defining filter ranges are as follows:
• Start/End: Start and End are the defaults for most of the filter boxes. If you accept the default of Start in the Start box and End in the End box, all values for that item are included in the report.You can also type the criteria in the Start and End boxes. When you enter a specific criterion in the Start box, the End box will auto-fill with the same criterion.
• In any box where your mouse pointer appears as a magnifying glass, you can double-click to open a Lookup from which you can select the entry. Highlight the desired item, then choose Select.
• You can also apply additional filters using the Additional Filter box. These filters include any User-Defined Fields you set up (see “Tracking User-Defined Stock Item Information” on page 23).
Another filtering method is based on the types of transactions available. For instance, you can choose to run a report that only includes invoices, receipts, or credit adjustments.
Inventory ReportsEach Inventory report provides management with a different view of the status of your stock items. These reports combine information from inventory master records with posted cost/quantity information to provide a powerful way to maintain control over your inventory.This section provides summaries and a sample of the different reports you can run in Inventory. You might need to try different options with the reports until you get the exact information you want. Depending on the report type and installed modules, you might not have some options shown here. As with the other modules, the Inventory Module Preferences allow you to define default settings for posting and other reports. See “Establishing Inventory Printing Preferences” on page 23 for information on defining your default print options. For additional information on printing reports, see the Getting Started guide.
Next Fiscal Quarter The first day of the fiscal quarter immediately following the fiscal quarter containing the current Denali date.
The last day of the fiscal quarter immediately following the fiscal quarter containing the current Denali date.
Next Fiscal Year The first day of the fiscal year immediately following the fiscal year containing the current Denali date.
The last day of the fiscal year immediately following the fiscal year containing the current Denali date.
Date Range Option Start Date for Report (Continued) End Date for Report
122Inventory ReportsInventory Reports

Stock Quantity ReportsThere are many reports you can run to show quantity for each stock item along with overstocked or understocked items. This section provides a description of each of these reports along with a sample based on default settings.
Quick Stock ListThe Quick Stock List report shows a complete list of all stock items in Inventory. You can sort this report by stock number, description, product type, or any of the defined User-Defined Fields. You can also tailor the report to include only one Inventory Code, but by default, it will include all Inventory Codes.
Figure 72: IN Quick Stock List
Stock LabelsWith this report, you can print stock labels directly on readily-available label stock for any or all of your Inventory items. This report allows you to choose the information you want to include on your labels and print them for a single stock number, a range of stock numbers, or all stock numbers. There are several options for the information you can include on each label, as well as the number of labels to print for each stock item.
123Inventory ReportsInventory Reports

Figure 73: IN Stock Labels
Printing Bar Code LabelsTo generate bar codes for your stock labels, select the Barcode On button on the IN Stock Labels window. You must have the BarTender Label Maker program installed to use this option. To order the BarTender program, call Cougar Mountain Sales at (800) 388-3038.Inventory sends the following fields to the BarTender program: Stock Number, Description, Location (if MLI is installed), Price, Unit Package, Product Type, Primary Vendor, and the ten User-Defined Fields. You can format your labels according to the BarTender functionality. For more information how to set up your bar code labels and how to use this program, see the BarTender documentation.
Master Stock ReportIf you want to see extensive information about your stock items, use the Master Stock Report. It shows all information from the Master table for the selected stock items, but you can sort and filter it to show only what you need. You can print this report for a single stock item, a range of stock items, or all stock items. You might also choose to include only one Inventory Code, or leave the default to include all. The first section of the report provides a legend for the information included in the report.
124Inventory ReportsInventory Reports

Figure 74: IN Master Stock Report
Physical Count WorksheetGenerate this report before you perform an inventory count. You can use the space on the report to note the actual physical count and note any discrepancies between physical and Denali counts for later adjustments. You can use the default setting to include all Inventory Codes, or choose only one. If you have a laser-scanning device and use a bar code system for your stock items, you can automate this count. See “Importing Adjustment Transactions into Denali” on page 51 for more information.You can also filter the report by any User-Defined Fields you have set up (see “Tracking User-Defined Stock Item Information” on page 23). To make quick adjustments to Inventory based on a physical count, refer to the tip for counting inventory on page 139.
Figure 75: IN Physical Count Worksheet
125Inventory ReportsInventory Reports

On Hand ReportThis report provides cost and quantity information about all inventory on hand. If you run this report in detail, the report includes each purchase of inventory on hand and the associated cost. The default option for this report is Print Detail (see “Options for Report Type” on page 118).This report is useful when you adjust inventory levels after you take a physical count. It is also useful when you reconcile to your General Ledger. The Condensed version of this report does not include the date-by-date quantity or serial number information. It only includes one record for each item. If you defined a custom report for this window in Controller, you can select the Use a custom report check box and then choose the custom report you want to run from the drop-down. See the Controller guide for more information on setting up custom reports.You can use Crystal Reports® to add fields to this report. Refer to your Crystal Reports documentation for instructions.
Figure 76: IN On Hand Report
Understock ReportThe Understock Report shows the minimum acceptable levels of inventory and the quantities you need to return inventory to the predetermined levels. The minimum is determined by your entry in the Minimum box on the Qty / Price Info tab of the IN Stock window.This report is often referred to as an “exceptions report” and indicates inventory items that are below desired levels. You can also elect to run the Advanced Understock report, which shows you which items are stocked at quantities below your desired minimums and how many have recently sold. For the advanced option, you can also view the total sold of each item over the last 15-, 30-, and 60-days.
126Inventory ReportsInventory Reports
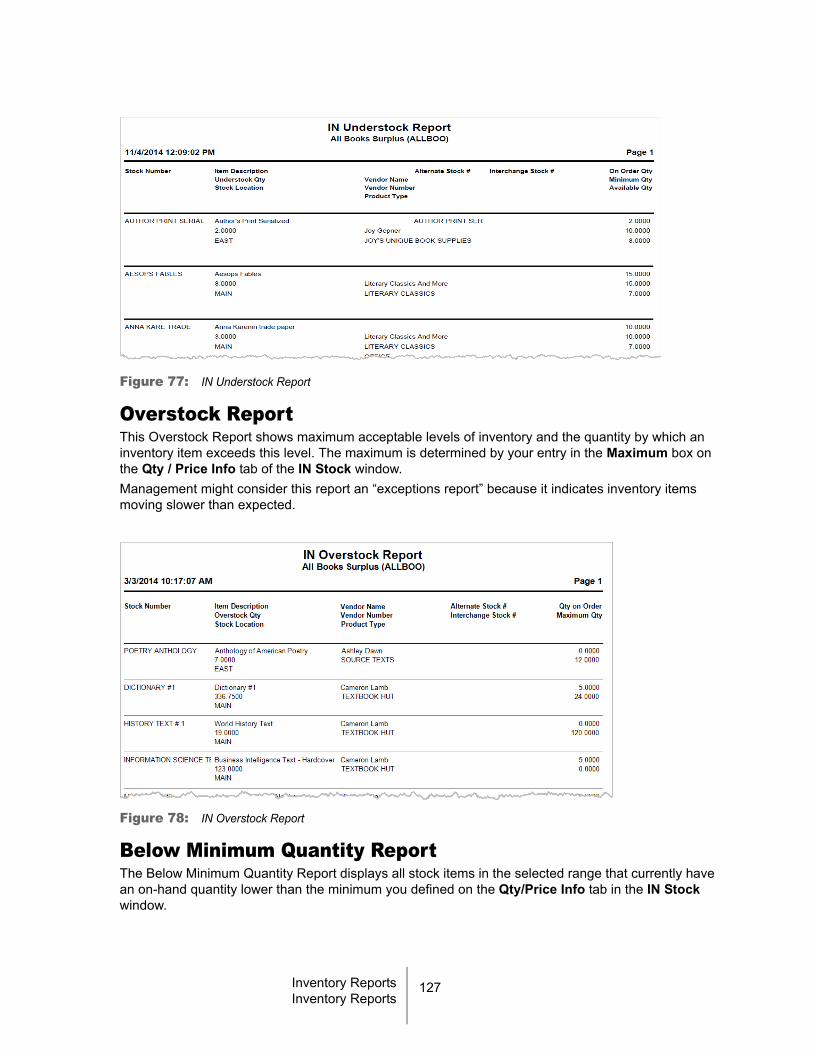
Figure 77: IN Understock Report
Overstock ReportThis Overstock Report shows maximum acceptable levels of inventory and the quantity by which an inventory item exceeds this level. The maximum is determined by your entry in the Maximum box on the Qty / Price Info tab of the IN Stock window.Management might consider this report an “exceptions report” because it indicates inventory items moving slower than expected.
Figure 78: IN Overstock Report
Below Minimum Quantity ReportThe Below Minimum Quantity Report displays all stock items in the selected range that currently have an on-hand quantity lower than the minimum you defined on the Qty/Price Info tab in the IN Stock window.
127Inventory ReportsInventory Reports

Figure 79: Below Minimum Quantity Report
On Order ReportThe On Order Report includes those items that have quantities in the On Order box of the IN Stock window. You can choose to include one stock item, a range of stock items, or all stock items. There is also the option to sort and filter by various fields. You might also apply an additional filter if a User-Defined Field has been set up. See “Tracking User-Defined Stock Item Information” on page 23 for additional information.If you defined a custom report for this window in Controller, you can select the Use a custom report check box and then choose the custom report you want to run from the drop-down. See the Controller guide for more information on setting up custom reports.
128Inventory ReportsInventory Reports
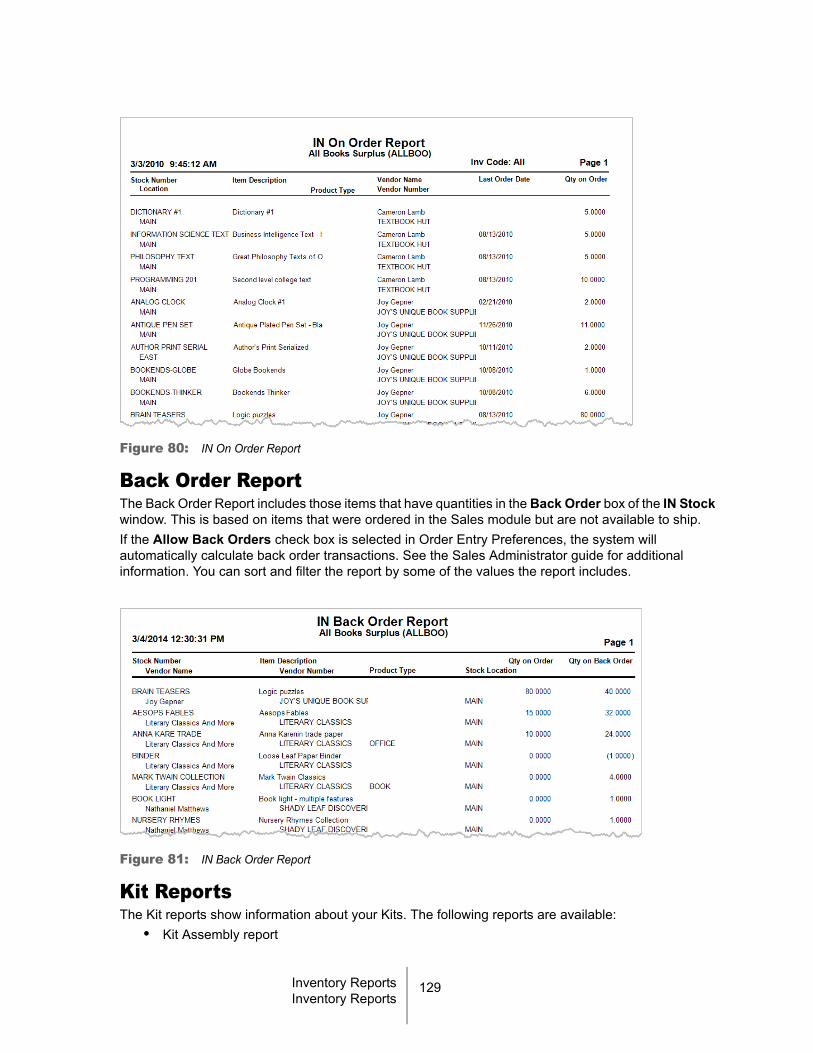
Figure 80: IN On Order Report
Back Order ReportThe Back Order Report includes those items that have quantities in the Back Order box of the IN Stock window. This is based on items that were ordered in the Sales module but are not available to ship.If the Allow Back Orders check box is selected in Order Entry Preferences, the system will automatically calculate back order transactions. See the Sales Administrator guide for additional information. You can sort and filter the report by some of the values the report includes.
Figure 81: IN Back Order Report
Kit ReportsThe Kit reports show information about your Kits. The following reports are available:
• Kit Assembly report
129Inventory ReportsInventory Reports

• Master Kit report • Component Requirement report
For more information on these reports or to view a sample of each, see “Using Kit Reports” on page 112.
Stock Value ReportsBesides quantity and transaction reports, there are reports you can run to show the value for each stock item. This section provides a description of each of these reports along with a sample of each based on default settings.
Price Book ReportThe Price Book Report shows both the quantity on hand and the various pricing breaks for each inventory stock item. You can sort and filter the information to meet the needs of your business. You can use Crystal Reports® to add fields to this report. Refer to your Crystal Reports documentation for instructions.
Figure 82: IN Price Book Report
Stock Value ReportThe Stock Value Report reads the cost and quantity information for each stock item and shows a total dollar value of inventory for the current period. The Condensed version of this report does not show the Date, Quantity On Hand, Cost, or Value of the stock items, it shows the totals for each item. The Detailed report contains a separate line for each purchase of a stock item, and details how many of each item are on hand at each cost. See “Options for Report Type” on page 118.
NOTE: The Value column on the report might not equal On Hand * Cost because of rounding. The column shows the amount stored in the Cost Quantity file.
130Inventory ReportsInventory Reports

Figure 83: IN Stock Value Report
Control ReportThe Control Report shows the following for a selected Inventory Code or all Inventory Codes:
• Total number of items on hand• The book value of each of those items
Report totals calculate for both values, and display at the bottom of the report. This report is useful if you want to show discrepancies between your Cost/Quantity detail table and the Inventory Master table. Both of these reflect your on-hand stock quantities and this report can ensure you keep them in balance with each other. You can filter the information to tailor this report to meet your needs.
Figure 84: IN Control Report
131Inventory ReportsInventory Reports

If you run the Control Report and it contains errors, the report will reflect a warning message that includes the number of errors found. This will help you correct error(s) in your data. For more information on correcting discrepancies in your data tables, see “Recalculating Inventory Tables” on page 140.
Transaction ReportsAlong with quantity and value reports, there are reports that you can run to show stock items affected by transactions. This section provides a description of each of these reports along with a sample of each based on the default settings.
History ReportThe History Report shows a brief history of each stock item you carry. You can include one stock item, a range of stock items, or all stock items. The report only includes the history since your last Purge History date. See “Performing Period End Procedures” on page 138 for more information on purging unwanted stock item history.You can sort and filter by various fields, and apply an Additional Filter of a User-Defined Field if you have any set up (see “Tracking User-Defined Stock Item Information” on page 23).If you defined a custom report for this window in Controller, you can select the Use a custom report check box and then choose the custom report you want to run from the drop-down. See the Controller guide for more information on setting up custom reports.
Figure 85: IN History Report
Movement ReportThe Inventory Movement Report indicates how fast inventory items are selling, and presents the movement as a percentage. This percentage calculates as the number of items sold over the sum of inventory on hand and purchased during the period. It shows the stock item, beginning quantity, and the quantities bought or sold for the ranges. The Qty Sold column reflects which items are selling and which are not. Use the drop-downs or Lookups for each field to choose what you want to include in the report.
132Inventory ReportsInventory Reports

Select the Group by IN Code check box to group the items by Inventory Code and print subtotals for the number of units sold and dollar amount sold for each code.You can use Crystal Reports® to add fields to this report. Refer to your Crystal Reports documentation for instructions.
Figure 86: IN Movement Report
Monthly Movement ReportIt’s important to any business that sells inventory to manage stock items. You can monitor your stock item movement for each month in your Fiscal Calendar. When you monitor your inventory movement on a monthly basis, you gain valuable insight into what is selling and not selling to help determine items you might need to reorder or discount. This report also allows you to track inventory over time to see what and if seasonal trends affect movement.You can sort and filter this report to tailor it to meet your needs. Because this is a robust report that provides valuable information about your inventory, you can only print it in Landscape format to a laser printer.
133Inventory ReportsInventory Reports

You can use Crystal Reports® to add fields to this report. Refer to your Crystal Reports documentation for instructions.
Figure 87: IN Monthly Movement Report
Promotional Sales ReportUse the Promotional Sales Report to evaluate your special sales promotions. This report tracks promotional sales data that is posted according to the Promotional Codes you set up.
Figure 88: IN Promotional Sales Report
134Inventory ReportsInventory Reports

Lot Expiration ReportUse the Lot Expiration Report to view information about lot numbered stock items in your inventory. This report tracks lot numbers, quantities, cost, valuation method, and expiration dates for lot numbered stock items. You might use this report to determine if you need to rotate your stock or to see how many items you have from each lot.To access this report, click Reports > Lot Expiration from the left navigation pane.
Figure 89: IN Lot Expiration Report
135Inventory ReportsInventory Reports

Troubleshooting: Inventory ReportsAt times, problems or errors can occur that are simple to fix without contacting Customer Support. Here, we indicate some common problems and ways to correct them. If you do not find what you are looking for in this section, refer to the help options under the “Denali Help” section of this guide and/or check the FAQ topics of our Customer Service Center at http://cougarmtnservice.com before you contact Customer Support. If you would like to offer suggestions for additions to our Troubleshooting sections, please email us at [email protected].
To Fix This: Try This:
My Inventory Control Report shows discrepancies in on-hand stock quantities.
You should first recalculate your data tables. Select Period End Tasks > Recalculate Inventory Tables. Be sure to read the warning information in “Recalculating Inventory Tables” on page 140 before you proceed.
When I run reports containing history they take a long time to run.
You might need to purge your data history. After you back up your data, in the Inventory module, select Period End Tasks > Purge History from the navigation pane (see “Purging Inventory Transaction History” on page 140) for additional information on this feature.
136Inventory ReportsInventory Reports

11Chapter
Inventory Period End andMaintenance
Performing Period End Procedures
Performing Inventory Maintenance
Troubleshooting: Inventory Period End and Maintenance

Year-end procedures may be necessary for your business. There are also tasks that
you may want to do periodically to keep your system functioning well.
Performing Period End ProceduresInventory period-end tasks allow you to print reports that analyze and disclose the results of operations in the period that just ended, and then wipe the slate clean and begin to gather information in the new period. See “Reporting Overview” on page 117 for an introduction to the reports in Inventory.
Preparing for Period EndIn normal business operations, depending on the time you need to complete the year-end processes, you can run a day or two into the next period before you actually close the period. This means that before you close the prior period, new entries might already be posted in the new period. Period End in Inventory serves two functions:
• If you use the Standard Cost valuation method, the Variance Amounts feature resets the Standard Cost variance accumulators to zero.
• The Purge History function purges Inventory transaction history through the date you specify.You do not need to stop operations at the end of a period to perform period-end processing. Continue to enter and post transactions in the new period, and make sure you use the correct transaction date. Your system automatically posts them to the correct period accumulator based on the transaction date.It is important that you print time-sensitive reports, such as the Control report, before you post to a new period. See “Reporting Overview” on page 117.
Clearing Variance AmountsIf you use the Standard Cost valuation method, variance accumulators associated with the Inventory Codes keep track of the variance between standard and actual costs. This amount then appears in the Variance Amount label at the bottom of the IN Inventory Codes window. This amount continues to accumulate until you clear it. You might want to clear your variance amounts for different reasons. One reason to purge these amounts is to keep only up-to-date variance amounts. For example, Company X uses the Standard Cost method to track the cost of their stock items. Once a year they look at the variance between the two and use this to determine if they need to adjust the standard cost they use for their stock items. After they review this number, they run the Variance Amounts function to purge this amount and start over for the new year.See “Adding Stock Item Records” on page 33 for valuation method information. To purge variance amounts, select Period End Tasks > Clear Variance Amounts from the left navigation pane. Select OK to clear variance accumulators.
CAUTION: Always back up your data tables before you begin any Period End procedures. Without a backup, you have no way to retrieve transaction data that was deleted. See the Controller guide for information on backing up or restoring data tables.
138Inventory Period End and MaintenancePerforming Period End Procedures

Figure 90: IN Variance Amounts window
Performing Inventory MaintenanceJust as your business maintains their stock items, you occasionally need to maintain the data. This section discusses a few maintenance tasks you might want to run to ensure the software runs smoothly.
Viewing Inventory Table InformationThe IN Display Table Information window allows you to view the Inventory data table information in the selected module. This includes the table name, number of records, and the date created. To view your data tables in the Inventory module, select Resources and Tools > View Table Information from the left navigation pane.
Figure 91: IN Display Table Information window
Tips & Tricks: Counting InventoryMany businesses delay proper inventory counts, or perform only one a year to avoid the large amount of time and effort it takes to complete properly.Denali has three features in the Inventory module to assist you with the timely completion of proper physical counts of inventory: the Physical Count Worksheet, Generating Adjustments from a Hand-Held Scanner device, and Adjustment Transaction entry.For more information on adjusting stock quantities, see “Increasing or Decreasing Stock Item Quantities” on page 46.
139Inventory Period End and MaintenancePerforming Inventory Maintenance

Recalculating Inventory TablesThis maintenance option corrects inconsistencies between Inventory tables due to corrupt or missing data. Data corruption can occur, for example, during power outages or system failures.
The Controller module must be closed before you recalculate.To recalculate your inventory data tables, select Period End Tasks > Recalculate Inventory Tables from the left navigation pane. Then, choose a rebuilding method from the drop-down.
Figure 92: IN Recalculate Inventory Tables window
Purging Inventory Transaction HistoryYou might want to purge transaction history to reduce the amount of hard drive space the Inventory data tables occupy, or to speed the process up when you sort or print Inventory history reports. The Purge History function removes unwanted transactions from the history table for transaction dates older than or including the date you specify. We strongly recommend you make a good backup before you purge so you can restore the purged information should you need it. Otherwise, all history information up to and including the purge date, except period balances, will be lost. For information on how to create a company specifically designated to hold old data, refer to the Controller guide.To purge Inventory history, select Period End Tasks > Purge History from the left navigation pane. Enter the date through which you want to purge transactions and select OK. All data prior to and including the date will be purged.
CAUTION: If you choose to recalculate your Inventory tables, always back up your data and print the Inventory Control report before you begin. See the Controller guide for information on backing up or restoring data tables.
140Inventory Period End and MaintenancePerforming Inventory Maintenance

Figure 93: IN Purge History window
141Inventory Period End and MaintenancePerforming Inventory Maintenance

Troubleshooting: Inventory Period End and Maintenance
At times, problems or errors can occur that are simple to fix without contacting Customer Support. Here, we indicate some common problems and ways to correct them. If you do not find what you are looking for in this section, refer to the help options under the “Denali Help” section of this guide and/or check the FAQ topics of our Customer Service Center at http://cougarmtnservice.com before you contact Customer Support. If you would like to offer suggestions for additions to our Troubleshooting sections, please email us at [email protected].
To Fix This: Try This:
I have discrepancies in stock quantities on my reports.
Recalculate your data tables in Inventory by selecting Period End Tasks > Recalculate Inventory Tables.
Be sure to read the warning information in “Recalculating Inventory Tables” on page 140 before you proceed.
142Inventory Period End and MaintenancePerforming Inventory Maintenance

12Chapter
Additional ResourcesFormatting User-Defined Fields
Format Requirements for Importing Transactions
Format Requirements for the Import/Export Feature
3dCart File Structures
Import Error Messages

This section is designed to provide you with additional information on some of the
more complex features in Inventory.
Formatting User-Defined FieldsTo change the default of how a user-defined field is going to appear in the entry screens, you need to format it. Numeric fields allow a maximum of 11 digits with 4 decimals. Text fields have a default of 50 characters (30 in Payroll), but can be modified by the number you enter in the Size field. Date fields allow caption entry only—the date format is already specified. The characters used to create user-defined formats are listed in the table provided here.
Formatting Character
Description Results
. (period) Decimal placeholder Determines how many digits are displayed to the left and right of the decimal separator. The actual character used is the one specified as the decimal placeholder in the international settings in the Control Panel. This character is treated as a literal for masking purposes.
, (comma) Thousand separator Separates thousands from hundreds within a number that has four or more places to the left of the decimal separator. The actual character used is the one specified as the thousands separator in the international settings in the Control Panel. This character is treated as a literal for masking purposes.
: (colon) Time separator Separates time elements, such as hour:minute:second. The actual character used is the one specified as the time separator in the international settings in the Control Panel. This character is treated as a literal for masking purposes.
/ (slash) Date separator Separates date elements such as day/month/year. The actual character used is the one specified as the date separator in the international settings in the Control Panel. This character is treated as a literal for masking purposes.
# Digit placeholder Displays a digit (0-9). For example, ####.## accepts 1234.12.
A Alphanumeric placeholder
Displays an alphanumeric character (a-Z and 0-9) and is required.
? Alphabetic placeholder
Displays an alphabetic character (a-Z) and is optional.
> Alphabetic placeholder, but forces uppercase characters (A-Z)
All characters are displayed in uppercase format.
144Additional ResourcesFormatting User-Defined Fields

Format Requirements for Importing TransactionsWhen you import transactions from an external file, the information in the file being imported must be in the proper format. For example, fields need to be a certain length. Make sure that your formatting is correct to avoid possible errors. Information on the various format requirements is contained in this section; be sure to review all the information to help ensure you successfully import your external file. Certain information, like dates, is required to post, but is not necessary to import transactions. Be sure to print an edit report and review it carefully before you post imported transactions (see “Printing the Inventory Edit Report” on page 49).If you are importing non-transaction data using the Import/Export window, see “Format Requirements for the Import/Export Feature” on page 148 for the file format requirements and other important information.
File Formats Supported by Denali for Importing TransactionsThe format requirements for a successful import are covered in this section. The file imported will contain multiple records, each having a CR/LF (carriage return/line feed) at the end. You can name the file anything you want, but the file extension must be .txt or the six character Denali company code, for example, GLXFER.TXT or Income.DMOACT.The external text file must be in one of the formats supported by Denali:
• Column Position File (fixed length): Each field in the text file starts at a specific position and contains a fixed number of characters. This file type is sometimes referred to as “fixed length”.
• Tab Delimited File: The fields in the file to be imported are separated by tabs.• Semi-Colon Delimited File: The fields in the file to be imported are separated by semi-colons.
The file format sample contained in this section is for reference purposes only and might not reflect the same type of information as your text file(s).
< Alphabetic placeholder, but forces lowercase characters (a-z)
All characters are displayed in lowercase format.
& Character placeholder Valid values are ANSI characters in the following ranges: 32-126 and 128-255 and is required.
\ Displays the next character in the format string
Many characters in the format expression have a special meaning and can’t be displayed as literal characters unless they are preceded by a backslash. The backslash itself is not displayed. Note that two backslashes must be used in string literals to accommodate for the fact that this is also treated as an escape character for ANSI/ISO string formatting.
Formatting Character
Description Results
145Additional ResourcesFormat Requirements for Importing Transactions

Refer to “Inventory File Format Requirements” on page 147 for a list of the required fields and the order of the fields.
Figure 94: Samples of External File Formats
Importing Quotation Marks in CSV FilesIf you import csv (comma-separated values) data files that contain quotation marks, it is important to understand how Denali handles quotation marks during the import process.
Quotation Mark Rule Example
Single quotation marks at the start of data in a field are removed. If you want Denali to keep quotation marks at the start of data, you need to add two more sets of quotation marks.
“““these quotation marks should remain””” = “these quotation marks should remain”
Quotation marks keep items that are separated by commas together as a group. If you have quotation marks at the start of a data field because information inside the quotes is separated by commas, but you want it to remain in one field, leave the quotes as is.
“quotation marks, keep, things, together” = quotation marks, keep, things, together
Quotation marks in the middle of a data string remain just as you typed them.
middle quotation marks “are not” affected = middle quotation marks “are not” affected
146Additional ResourcesFormat Requirements for Importing Transactions

Inventory File Format RequirementsBefore you begin the import process, you need to make sure the text file in is the proper format and that all required fields have entries. If the external file is properly formatted, it will help eliminate the possibility of errors.If errors occur, an Import Error Report generates and the errors on the report will indicate exactly which transactions have problems. See “Determining and Correcting Errors in Imported Transactions Before Posting” on page 54 for more information.The table in this section provides the requirements for the external file that is used to import Inventory adjustment transactions. After you import the transaction information from your external file, you can view the transactions in the IN Adjust Stock Quantities window.
Required fields are noted with an asterisk (*).
Table 1: Inventory External File Format Requirements Field Ordera
Field Description Maximum Field Lengthb
Character Position (Fixed-Length Format)c
Data Type
1 * Stock Numberd 50 1 Char-Caps
2 * Source Document 20 51 Char-Caps
3 * Transaction Date 10 71 YYMMDD__ or MM/DD/YYYY
4 Transaction Description 50 81 Numeric
5 Bill Of Materials Type(0=No, 1=Yes)
1 131 Boolean
6 Cost 15 132 Numeric
7 Quantity 15 147 Numeric
8 * Serial Number(serialized stock items only)
20 162 Char-Caps
9 * From Location (MLI only)e
50 182 Char-Caps
10 * To Location (MLI transfers only)e
50 232 Char-Caps
11 * Transaction Code 6 282 Char-Caps
147Additional ResourcesFormat Requirements for Importing Transactions

Format Requirements for the Import/Export FeatureWhen you import information from an external file, the information in the file being imported must be in the proper format. For example, fields might need to be a certain length. Make sure that your formatting is correct to avoid possible errors. This section contains information on the various format requirements; be sure to review all the information to help ensure you successfully import your external file. We provide tables in the following sections that indicate the file format requirements to use in the Import/Export window. Note that for fields that indicate “Char-Caps”, the import file can have lowercase characters; the system converts the characters to uppercase during the import process.This section covers only file format requirements when you import data using the Import/Export window. If you are importing transactions, refer to “Format Requirements for Importing Transactions” on page 145.
File Formats Supported by Denali for Importing DataYou can name the file to best meets your needs, but there are other requirements for the format which are covered in this section. The file you import will contain multiple records, each having a CR/LF (carriage return/line feed) at the end.
12 * Lot Number (lot numbered stock items only)
50 288 Char-Caps
13 * Expiration Date (lot numbered stock items only)
10 338 YYMMDD__ or MM/DD/YYYY
* End of Record 2 348
a. This number is for reference purposes only and will not appear in the actual text file.
b. If the file format is tab or semi-colon delimited, any characters over the specified length are cut off at the length limit. If the file format is fixed length (column position), each field must be the exact length shown in the Maximum Field Length column.
c. If the field doesn’t start in the character position specified it will create an error and potentially prohibit the transaction from being imported.
d. If his field is left blank, then the entire file will not import. To enable the import, the Stock Number and Transaction Code need to be set up in Denali prior to importing adjustment transactions.
e. This field is only used if you have Multi-Location Inventory installed. Whether you have this enhancement installed or not, when setting up your external text file you must account for this field.
Table 1: Inventory External File Format Requirements (Continued)Field Ordera
Field Description Maximum Field Lengthb
Character Position (Fixed-Length Format)c
Data Type
148Additional ResourcesFormat Requirements for the Import/Export Feature

The external text file must be in one of the formats supported by Denali:• Column Position File (fixed length): Each field in the text file starts at a specific position and
contains a fixed number of characters. This file type is sometimes referred to as “fixed length”.• Tab Delimited File: The fields in the file to be imported are separated by tabs.• Comma Delimited File: The fields in the file to be imported are separated by commas.• Semi-Colon Delimited File: The fields in the file to be imported are separated by semi-colons.
Any dates in the external file that you want to import must be in a specific format that uses a separator to distinguish the day, month, and year. With the exception of colons and semi-colons, you can use any symbol such as a forward slash or an asterisk as the separator. For example, if you want to import the date February 19, 2012, you could format it as 02/19/2012.The file format sample contained in this section is for reference purposes only and might not reflect the same type of information as your text file(s). Refer to “Inventory File Format Requirements for Importing Data” on page 150 for a list of the required fields and the order of the fields.
Figure 95: Samples of External File Formats
To view the requirements for your file format before importing transactions, refer to “Use the Export Feature to View File Formats” on page 149.
Use the Export Feature to View File FormatsOne way we suggest you verify the correct format you need to import an external file is to first export. This will allow you to see what is required for the type of file you will import. To verify the requirements for your external file format, you need to have at least one record (e.g., stock item, customer, or account) in your system, and then run the export feature.
149Additional ResourcesFormat Requirements for the Import/Export Feature
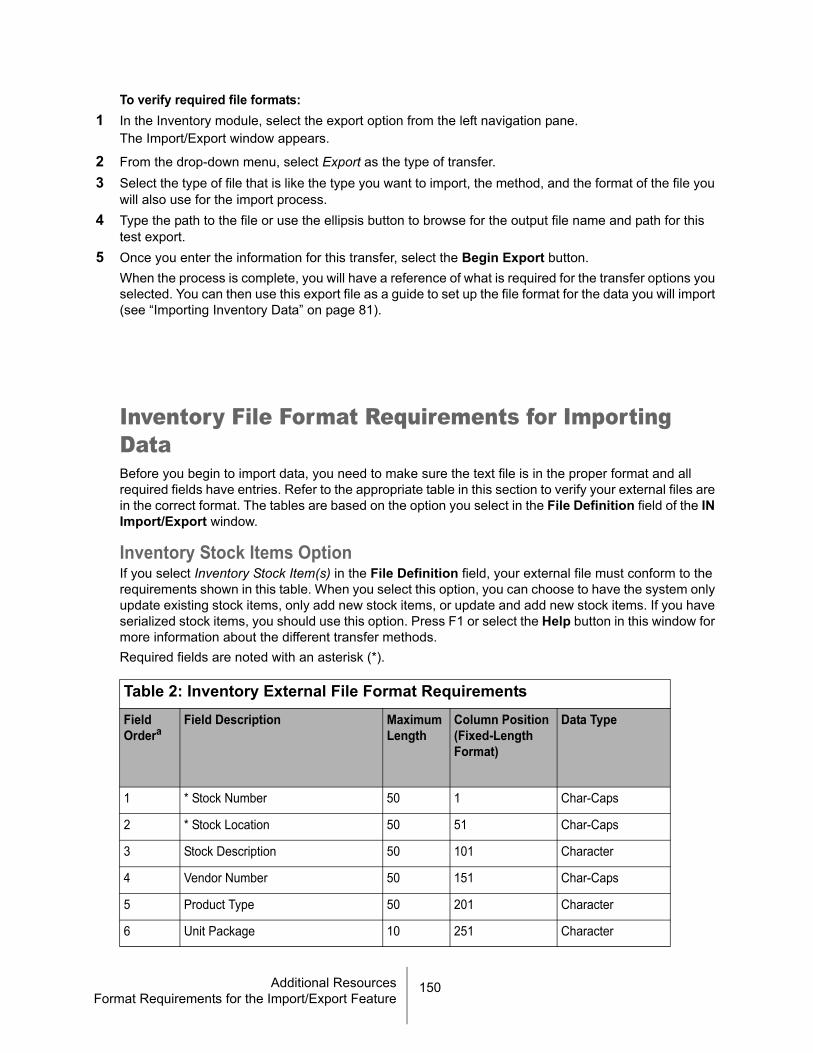
To verify required file formats:1 In the Inventory module, select the export option from the left navigation pane.
The Import/Export window appears.
2 From the drop-down menu, select Export as the type of transfer.3 Select the type of file that is like the type you want to import, the method, and the format of the file you
will also use for the import process. 4 Type the path to the file or use the ellipsis button to browse for the output file name and path for this
test export.5 Once you enter the information for this transfer, select the Begin Export button.
When the process is complete, you will have a reference of what is required for the transfer options you selected. You can then use this export file as a guide to set up the file format for the data you will import (see “Importing Inventory Data” on page 81).
Inventory File Format Requirements for Importing DataBefore you begin to import data, you need to make sure the text file is in the proper format and all required fields have entries. Refer to the appropriate table in this section to verify your external files are in the correct format. The tables are based on the option you select in the File Definition field of the IN Import/Export window.
Inventory Stock Items OptionIf you select Inventory Stock Item(s) in the File Definition field, your external file must conform to the requirements shown in this table. When you select this option, you can choose to have the system only update existing stock items, only add new stock items, or update and add new stock items. If you have serialized stock items, you should use this option. Press F1 or select the Help button in this window for more information about the different transfer methods.Required fields are noted with an asterisk (*).
Table 2: Inventory External File Format Requirements Field Ordera
Field Description Maximum Length
Column Position(Fixed-Length Format)
Data Type
1 * Stock Number 50 1 Char-Caps
2 * Stock Location 50 51 Char-Caps
3 Stock Description 50 101 Character
4 Vendor Number 50 151 Char-Caps
5 Product Type 50 201 Character
6 Unit Package 10 251 Character
150Additional ResourcesFormat Requirements for the Import/Export Feature

7 * Inventory Code 6 261 Char-Caps
8 GL Key 6 267 Char-Caps
9 Discount Code 6 273 Char-Caps
10 Pricing Flag
0=List1=Margin2=Markup3=Level List4=Level Margin5=Level Markup
1 279 Numeric
11 Price Break 2 14 280 Numeric
12 Price Break 3 14 294 Numeric
13 Price Break 4 14 308 Numeric
14 Price Break 5 14 322 Numeric
15 * Price 1 14 336 Numeric
16 Price 2 14 350 Numeric
17 Price 3 14 364 Numeric
18 Price 4 14 378 Numeric
19 Price 5 14 392 Numeric
20 Standard Cost 14 406 Numeric
21 Alternate Price/Cost 1 14 420 Numeric
22 Alternate Price/Cost 2 14 434 Numeric
23 Miscellaneous Charge 14 448 Numeric
24 Serialized Stock Item Flag0/1, F/T, f/t, N/Y, n/y
1 462 Logical
25 * Last Cost 14 463 Numeric
26 Buy Conversion Factor 15 477 Numeric
27 Sell Conversion Factor 15 492 Numeric
28 Superseded Stock Number 50 507 Char-Caps
29 Alternate Stock Number 50 557 Char-Caps
Table 2: Inventory External File Format Requirements (Continued)Field Ordera
Field Description Maximum Length
Column Position(Fixed-Length Format)
Data Type
151Additional ResourcesFormat Requirements for the Import/Export Feature

30 Interchangeable Stock Number 50 607 Char-Caps
31 Date Created 10 657 Date
32 Weighted Average Cost 14 667 Numeric
33 Catalog Number 50 681 Character
34 Purchase Size 10 731 Character
35 Storing Size 10 741 Character
36 User-Defined Field 1 6 751 Character
37 User-Defined Field 2 6 757 Character
38 User-Defined Field 3 10 763 Character
39 User-Defined Field 4 10 773 Character
40 User-Defined Field 5 10 783 Date
41 User-Defined Field 6 10 793 Date
42 User-Defined Field 7 15 803 Numeric
43 User-Defined Field 8 15 818 Numeric
44 User-Defined Field 9 50 833 Character
45 User-Defined Field 10 50 883 Character
46 Description Line 1 (converted) 50 933 Character
47 Description Line 2 (converted) 50 983 Character
48 Description Line 3 (converted) 50 1033 Character
49 Description Line 4 (converted) 50 1083 Character
50 PO Lines to Use (converted)
0/1 for each of the four fields; e.g. 0000 to 1111
4 1133 Character
51 SA Lines to Use (converted)
0/1 for each of the four fields; e.g. 0000 to 1111
4 1137 Character
Table 2: Inventory External File Format Requirements (Continued)Field Ordera
Field Description Maximum Length
Column Position(Fixed-Length Format)
Data Type
152Additional ResourcesFormat Requirements for the Import/Export Feature

Inventory Stock Items with Quantity OptionIf you select Inventory Stock Item(s) with Quantity in the File Definition field, your external file must conform to the requirements shown in this table. When you select this option, the system will only add new stock items. You cannot use this option with serialized stock items.Required fields are noted with an asterisk (*).
52 PO Use Flag (converted)
0=Never Use1=Always Use2=Prompt
1 1141 Numeric
53 SA Use Flag (converted)
0=Never Use1=Always Use2=Prompt
1 1142 Numeric
54 Non-Inventory Code 6 1143 Char-Caps
55 Non-MLI Location of Stock 50 1149 Character
56 GL Sales Income Account 50 1199 Character
57 Lot Numbered Stock Item Flag0/1, F/T, f/t, N/Y, n/y
1 1249 Logical
a. This number is for reference purposes only and will not appear in the actual text file.
Table 3: Inventory External File Format Requirements Field Ordera
Field Description Maximum Length
Column Position(Fixed-Length Format)
Data Type
1 * Stock Number 50 1 Char-Caps
2 Stock Location 50 51 Char-Caps
3 Stock Description 50 101 Character
4 Vendor Number 50 151 Char-Caps
5 Product Type 50 201 Character
6 Unit Package 10 251 Character
7 *Inventory Code 6 261 Char-Caps
Table 2: Inventory External File Format Requirements (Continued)Field Ordera
Field Description Maximum Length
Column Position(Fixed-Length Format)
Data Type
153Additional ResourcesFormat Requirements for the Import/Export Feature

8 GL Key 6 267 Char-Caps
9 Discount Code 6 273 Char-Caps
10 Pricing Flag
0=List 1=Margin2=Markup3=Level List4=Level Margin5=Level Markup
1 279 Numeric
11 Price Break 2 14 280 Numeric
12 Price Break 3 14 294 Numeric
13 Price Break 4 14 308 Numeric
14 Price Break 5 14 322 Numeric
15 * Price 1 14 336 Numeric
16 Price 2 14 350 Numeric
17 Price 3 14 364 Numeric
18 Price 4 14 378 Numeric
19 Price 5 14 392 Numeric
20 Standard Cost 14 406 Numeric
21 Alternate Price/Cost 1 14 420 Numeric
22 Alternate Price/Cost 2 14 434 Numeric
23 Miscellaneous Charge 14 448 Numeric
24 * Last Cost 14 462 Numeric
25 Buy Conversion Factor 15 476 Numeric
26 Sell Conversion Factor 15 491 Numeric
27 Minimum Quantity 15 506 Numeric
28 Maximum Quantity 15 521 Numeric
29 Quantity on Hand 12 536 Numeric
30 Quantity on Order 13 548 Numeric
31 Quantity on Back Order 13 561 Numeric
Table 3: Inventory External File Format Requirements (Continued)Field Ordera
Field Description Maximum Length
Column Position(Fixed-Length Format)
Data Type
154Additional ResourcesFormat Requirements for the Import/Export Feature

32 Quantity Committed 13 574 Numeric
33 Superseded Stock Number 50 587 Char-Caps
34 Alternate Stock Number 50 637 Char-Caps
35 Interchangeable Stock Number 50 687 Char-Caps
36 Date Created 10 737 Date
37 Weighted Average Cost 14 747 Numeric
38 Purchase Size 10 761 Character
39 Storing Size 10 771 Character
40 User-Defined Field 1 6 781 Character
41 User-Defined Field 2 6 787 Character
42 User-Defined Field 3 10 793 Character
43 User-Defined Field 4 10 803 Character
44 User-Defined Field 5 10 813 Date
45 User-Defined Field 6 10 823 Date
46 User-Defined Field 7 15 833 Numeric
47 User-Defined Field 8 15 848 Numeric
48 User-Defined Field 9 50 863 Character
49 User-Defined Field 10 50 913 Character
50 Description Line 1 (converted) 50 963 Character
51 Description Line 2 (converted) 50 1013 Character
52 Description Line 3 (converted) 50 1063 Character
53 Description Line 4 (converted) 50 1113 Character
54 PO Lines to Use (converted)
0/1 for each of the four fields; e.g. 0000 to 1111
4 1163 Character
55 SA Lines to Use (converted)
0/1 for each of the four fields; e.g. 0000 to 1111
4 1167 Character
Table 3: Inventory External File Format Requirements (Continued)Field Ordera
Field Description Maximum Length
Column Position(Fixed-Length Format)
Data Type
155Additional ResourcesFormat Requirements for the Import/Export Feature

Inventory Pricing List OptionIf you select Inventory Price List in the File Definition field, your external file must conform to the requirements shown in this table. When you select this option, the system will only update existing stock items.Required fields are noted with an asterisk (*).
56 PO Use Flag (converted)
0=Never Use1=Always Use2=Prompt
1 1171 Numeric
57 SA Use Flag (converted)
0=Never Use1=Always Use2=Prompt
1 1172 Numeric
58 Non-MLI Location of Stock 50 1173 Character
59 GL Sales Income Account 50 1223 Character
a. This number is for reference purposes only and will not appear in the actual text file.
Table 4: Inventory External File Format Requirements Field Ordera
Field Description Maximum Length
Column Position(Fixed-Length Format)
Data Type
1 * Stock Number 50 1 Char-Caps
2 * Stock Location 50 51 Char-Caps
3 Vendor Number 50 101 Char-Caps
4 Price Break 2 14 151 Numeric
5 Price Break 3 14 165 Numeric
6 Price Break 4 14 179 Numeric
7 Price Break 5 14 193 Numeric
8 * Price 1 14 207 Numeric
9 Price 2 14 221 Numeric
10 Price 3 14 235 Numeric
Table 3: Inventory External File Format Requirements (Continued)Field Ordera
Field Description Maximum Length
Column Position(Fixed-Length Format)
Data Type
156Additional ResourcesFormat Requirements for the Import/Export Feature

3dCart File StructuresIf you use 3dCart, you can export stock items from Denali and import them into 3dCart to help with your initial setup. If you select Inventory Stock Items to 3dCart in the File Definition drop-down in the IN Import/Export window, your export must conform to the requirements shown in this table. For more information, see the 3dCart documentation.
11 Price 4 14 249 Numeric
12 Price 5 14 263 Numeric
13 Non-MLI Location of Stock 50 277 Character
a. This number is for reference purposes only and will not appear in the actual text file.
Table 5: Inventory External File Format Requirements Field Ordera
3dCart Field Corresponding Denali Field
Field Description
1 idb Stock Number Unique product ID (SKU or part number) of the product.
2 mfgid Catalog Number Unique manufacturer ID that may be provided by the manufacturer of the product.
3 nameb Stock Description Name of the product.
4 manufacturer Vendor Number Name of the manufacturer this product is associated with.
5 categories Product Type The product’s assigned category.
6 cost Last Cost This is the base cost of your product for internal use and won't be displayed to the customer.
7 priceb Price 1 Customer price of the product.
8 price2 Price 2 MSRP or retail price of the product.
Table 4: Inventory External File Format Requirements (Continued)Field Ordera
Field Description Maximum Length
Column Position(Fixed-Length Format)
Data Type
157Additional ResourcesFormat Requirements for the Import/Export Feature

9 stock Quantity on hand.
10 weight Weight of the product.
11 free_shipping If free shipping is checked, Free Shipping will show during the checkout process as an option.
12 date_created DteCreated The system assigns this field once the product is added to the database.
13 description Description Line 1 Short description of the product.
14 extended_description Description Line 2 Description of the product. HTML is allowed.
15 keywords Additional keywords used by the internal search of the site.
16 hide This will hide the product from the website.
17 sorting The product's sorting inside the Categories.
18 thumbnail A path to your product's thumbnail image.
19 image1 A path to your product's main display image.
20 image2 A path to an alternate product image.
21 image3 A path to an alternate product image.
22 image4 A path to an alternate product image.
23 related Related products ids (separate by commas).
24 distributor Vendor Name Name of the distributor this product is associated with.
25 shipcost Any additional shipping fee for the product.
26 homespecial The product appears on your home page.
Table 5: Inventory External File Format Requirements (Continued)Field Ordera
3dCart Field Corresponding Denali Field
Field Description
158Additional ResourcesFormat Requirements for the Import/Export Feature

Import Error MessagesThis table provides a basic explanation of the various error messages you might receive during the import process and suggestions to correct any problems. If you perform the suggested fix and still receive the error, contact Customer Support at (800) 390-7053.
27 categoryspecial The product appears at the top of the Category it is a part of.
28 title This will define the title of this product in the web browser.
29 metatags Meta Tags.
a. This number is for reference purposes only and will not appear in the actual text file.b. These are required fields.
If this message appears It means Try this to fix it
“Maximum number of transactions reached. The import file is not allowed to have more than 9999 transactions, the remaining transactions will be skipped.”
This means that you have over 9999 transactions in the external file and have exceeded the maximum allowed by Denali.
You could break the external file into two files to decrease the number of transactions and retry the import again for those transactions that were skipped.
“Tran # xxxxx - Tran Date xx/xx/xxxx is not within fiscal calendar.”
This means that the indicated transaction you have tried to import is not within the fiscal calendar in which you are currently working.
You can change the transaction date in the external file to correspond with the fiscal calendar you are working in, or you might need to modify your organization’s fiscal calendar to accept the transaction.
To modify your fiscal calendar, refer to the Controller guide.
Table 5: Inventory External File Format Requirements (Continued)Field Ordera
3dCart Field Corresponding Denali Field
Field Description
159Additional Resources

“Tran # xxxxx - Tran Date xx/xx/xxxx is less than Block Date.”
This means that the indicated transaction date precedes the date you have determined as the Date Block Period for accepting transactions in the system.
You can either change the date in the external file to a date after the Date Block Period, or modify the Date Block Period in Denali.
To change the Date Block Period, refer to the Controller guide.
“Invalid date detected. xx/xx/xxxx is an invalid date.”
You will receive this error message when the date is outside of the allowable date range.
For instance, if the date is accidentally entered as 02/04/1007, you will receive this error message.
Check the transaction dates in your external file and retry the import process.
“Invalid date format. xxx is an invalid format length.”
This means that the date is not in the required format of MM/DD/YYYY.
Revise the date format in the external file to match the required format of MM/DD/YYYY.
For additional information, see “Inventory File Format Requirements” on page 147.
“Record xxx in the import file is the wrong length. Record skipped. The record is x characters too short (too long).”
The import file must be in the proper format to be imported. If a transaction contains too few, or too many characters, it cannot be imported.
You will need to adjust your external file to meet the file format requirements for importing into Denali.
Refer to “Inventory File Format Requirements” on page 147 for the specific requirements.
“Record xxxxx in the import file is not correctly delimited with tabs. Record skipped.”
There are specific requirements when you import a tab-delimited file, and this indicates that there is an error in the file format.
Refer to “File Formats Supported by Denali for Importing Transactions” on page 145 for the correct format and make necessary changes to your external file. Then you can retry the import process.
“Record xxx in the import file is not correctly delimited with semi-colons. Record skipped.”
There are specific requirements when you import a semi-colon delimited file, and this indicates that there is an error in the file format.
Refer to “File Formats Supported by Denali for Importing Transactions” on page 145 for the correct format and make necessary changes to your external file. Then you can retry the import process.
If this message appears It means Try this to fix it
160Additional ResourcesImport Error Messages

“The import file exceeds the maximum number of 32767 records. Please fix the file and try again.”
This means that you have exceeded the maximum allowance of records that can be imported at one time by Denali and the import process was cancelled and no transactions were imported.
You could break the external file into separate files to decrease the number of records and retry the import process.
“Unable to open the file xxx. Please make sure no program is using this file and try again.”
The file you are attempting to import is open by you or another user and Denali cannot open it.
You will need to close the file and/or program using the external file and retry the import process.
“An unexpected error has occurred. The error number is xxx at record xxxxx with message x.”
Due to the complexity of this error, we recommend contacting Customer Support for assistance at (800) 390-7053.
If this message appears It means Try this to fix it
161Additional ResourcesImport Error Messages

Glossary
Glossary
AAccounting Period The period of time covered by an income statement. One year is often the
accounting period for financial reporting, but financial statements are also pre-pared by most organizations for each quarter and each month.
Accrual Basis ofAccounting
The practice of recording revenue in the period in which it is earned and recording expenses in the period in which they are incurred. The effect on the business is recognized as goods or services are rendered or consumed, rather than when cash is received or paid.
Applied Credit In Accounts Receivable, a credit memo that reduces the amount remaining to be paid on a specific debit item, instead of merely reducing the total amount owed on the account.
Applied Debit In Accounts Payable, a debit memo that reduces the amount remaining to be paid on a specific credit item, instead of merely reducing the total amount owed on the account.
Applied Payment In Accounts Receivable or Sales modules, a payment that reduces the amount remaining to be paid on a specific debit item, instead of merely reducing the total amount owed on the account.
AP Code A six-character alphanumeric code attached to vendor master records that directs how transactions are posted to General Ledger accounts and also how they are aged.
AR Code A six-character alphanumeric code attached to customer master records and used to categorize customers. The AR Code is also used to specify a GL Accounts Receivable account.
Assets The economic resources owned by a business for the purpose of conducting busi-ness operations.
Audit Trail The documentation of transactions for use by consumers and auditors of financial statements to substantiate the authenticity and accuracy of the financial state-ments. Also, a report available in the General Ledger module that provides a chronological listing by account of the entries posted to each account.
BBackups Periodically updated copies of computer data that ensure against total loss of data
from a catastrophic event. Backups can be automatic or manual.
Balance Forward An AR customer type specified by the AR Code in which all open invoices are compacted into a single monthly balance at the end of each month. See also Open Item.
162GlossaryInventory User’s Guide
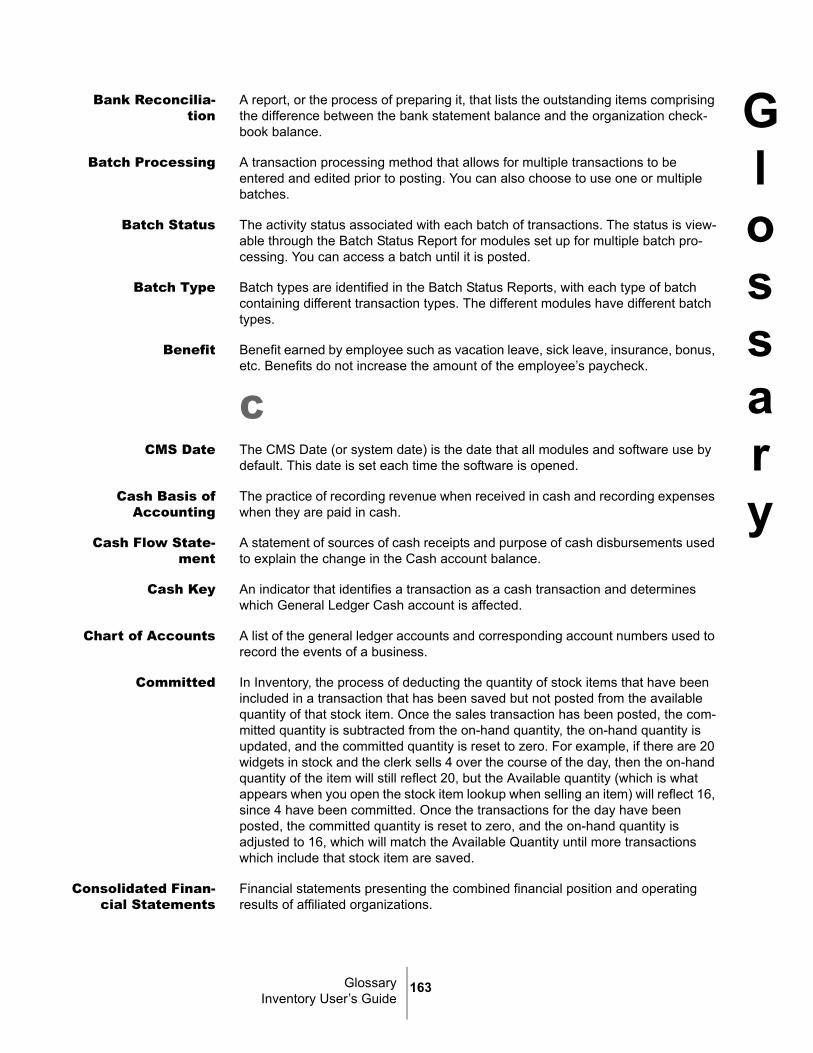
Glossary
Bank Reconcilia-tion
A report, or the process of preparing it, that lists the outstanding items comprising the difference between the bank statement balance and the organization check-book balance.
Batch Processing A transaction processing method that allows for multiple transactions to be entered and edited prior to posting. You can also choose to use one or multiple batches.
Batch Status The activity status associated with each batch of transactions. The status is view-able through the Batch Status Report for modules set up for multiple batch pro-cessing. You can access a batch until it is posted.
Batch Type Batch types are identified in the Batch Status Reports, with each type of batch containing different transaction types. The different modules have different batch types.
Benefit Benefit earned by employee such as vacation leave, sick leave, insurance, bonus, etc. Benefits do not increase the amount of the employee’s paycheck.
CCMS Date The CMS Date (or system date) is the date that all modules and software use by
default. This date is set each time the software is opened.
Cash Basis ofAccounting
The practice of recording revenue when received in cash and recording expenses when they are paid in cash.
Cash Flow State-ment
A statement of sources of cash receipts and purpose of cash disbursements used to explain the change in the Cash account balance.
Cash Key An indicator that identifies a transaction as a cash transaction and determines which General Ledger Cash account is affected.
Chart of Accounts A list of the general ledger accounts and corresponding account numbers used to record the events of a business.
Committed In Inventory, the process of deducting the quantity of stock items that have been included in a transaction that has been saved but not posted from the available quantity of that stock item. Once the sales transaction has been posted, the com-mitted quantity is subtracted from the on-hand quantity, the on-hand quantity is updated, and the committed quantity is reset to zero. For example, if there are 20 widgets in stock and the clerk sells 4 over the course of the day, then the on-hand quantity of the item will still reflect 20, but the Available quantity (which is what appears when you open the stock item lookup when selling an item) will reflect 16, since 4 have been committed. Once the transactions for the day have been posted, the committed quantity is reset to zero, and the on-hand quantity is adjusted to 16, which will match the Available Quantity until more transactions which include that stock item are saved.
Consolidated Finan-cial Statements
Financial statements presenting the combined financial position and operating results of affiliated organizations.
163GlossaryInventory User’s Guide

Glossary
Context-SensitiveHelp
Help that is relevant to the current active window. It includes information about all the options in the window. A Help button is available in some windows and the default Help key is F1. (See also the Task-based Help definition).
Contra Account A ledger account which is deducted from a related account.
Contra-AssetAccount
An account with a credit balance that offsets an asset account to reflect the appro-priate balance sheet value for the asset.
Contra-LiabilityAccount
An account with a debit balance that offsets a liability account to reflect the appro-priate balance sheet value for the asset.
Cost Activity In Job Cost, you enter cost activity to keep track of the progression of your jobs. Activity posts to all affected modules.
Cost Code In Job Cost, Cost Codes allow you to track activity and cost for specific parts of your jobs. They help you maintain accurate budgets, effective planning, and stay up-to-date on your projects.
Credit An amount entered in the right-hand column of a ledger account. A credit decreases an asset or expense account balance, and increases a liability, equity, or income account balance.
Credit Memo A document issued that reduces the amount of a receivable or increases the amount of a payable. These are used to record returned goods, defective goods or services, miscellaneous charges or credits, and error corrections.
DDatabase For Denali, the database refers to the SQL server that stores the software tables.
The tables store all of your organization data.
Debit A debit increases an asset or expense account balance, and decreases a liability, equity, or income account balance.
Deduction Amount deducted from pre-tax or after-tax wages.
Default A value automatically placed in a data entry field that is saved unless it’s overrid-den to a different value.
Department Code A Code that defines the departments within an organization. Department Codes determine which general ledger income accounts are affected by transactions.
Detail Line Type The type of transaction item entered on a particular line of a transaction docu-ment.
Discount Code A two-part code established in the Sales module which specifies a discount per-centage by inventory item and customer. One half of the code is entered on the customer master record and the other half is entered as part of each Inventory master record.
164GlossaryInventory User’s Guide

Glossary
Double-EntryAccounting System
A system in which the total dollar amount of debits must equal the total dollar amount of credits.
Due From An asset account that indicates the amount of deposits held in another account.
Due To A liability account that indicates the amount payable to another account.
EEarnings Wages, salary, or other compensation.
Edit Report A listing of entered but not posted transactions for checking the accuracy of the data entry work.
EFT Electronic Funds Transfer. The electronic transfer of funds from one bank account to another in an encrypted format. Charges are made automatically through the Federal Reserve’s automated Clearing House (ACH).
EFTPS Electronic Federal Tax Payment System; must be used to make electronic tax payments to the IRS.
EIN Employer Identification Number; This number is distributed by the IRS and is your business identity; also called Tax Identification Number.
Electronic Con-stants
Method of saving data in a report format to submit the report electronically, rather than on paper.
Encumber Setting aside an amount as a planned expense or obligation.
Equity See Owner’s Equity.
Expense The cost of goods or services used for the purpose of generating revenue.
Expense Allocation The process of allocating indirect expenses of a business among departments.
Extended Price The result when the quantity invoiced is multiplied by the price per unit. The total for a detail line on an invoice.
FFICA Federal Insurance Contributions Act. The tax paid equally by employee and
employer, commonly known as Social Security Tax.
FIFO Also known as “first in, first out”, this is an inventory valuation method based on the assumption that the first item acquired is the first item sold, and that the remaining items are the most recently acquired.
Finished Good A product that is created by combining other items. In Inventory, this is called a Kit. The Finished Good has completed the manufacturing and/or assembly pro-cess and is ready for sale.
165GlossaryInventory User’s Guide

Glossary
Form 940 Employer’s Annual Federal Unemployment (FUTA) Tax Return.
Form 941 Employer’s Quarterly Federal Tax Return.
FUTA Federal Unemployment Tax (See Form 940).
GGL Key Six-character alphanumeric entries found in various codes throughout the
accounting modules that are used in the Interface Table to specify an associated general ledger account.
HHold Invoice A sales invoice that is retained in the batch for further action. A hold transaction
remains in the hold batch and does not post until it is retrieved and changed to an invoice.
History Transactions that were posted in any module.
IIN Code A six-character alphanumeric code attached to IN Stock master records that
directs how transactions are posted to General Ledger accounts and the inventory valuation method.
Income Revenue resulting from the operations of a business.
Interface Code It specifies which general ledger accounts are affected by a transaction.
Interface Key Often used interchangeably with GL Key. See GL Key.
Interface Table A cumulative table of Interface Codes that directs posting of transactions from the Sales and Accounts Receivable modules to the appropriate general ledger accounts. It is similar to a Lookup table that contains every possible set of trans-action circumstances and the accounts affected by transactions conducted under each set of circumstances.
Integration Indicators set within the Module Preferences window of each module that speci-fies communication of posted information between modules.
Invoice Only Trans-action
A Purchase Order transaction that invoices items that were previously received into Inventory but not invoiced.
Invoice An itemized statement of goods or services sold that shows quantities, prices, total charges, payment terms, and sales tax. An invoice might also include many other items of information such as item description. The invoice serves as the original evidence of ownership transfer for both the buyer and seller.
166GlossaryInventory User’s Guide

Glossary
JJournal Entry This is a transaction created in General Ledger that adjusts particular accounts in
your chart of accounts.
KKits This refers to a method of selling a group of inventory items for one price. For
example you could create a pizza kit that might include the dough, sauce, and grated cheese. A kit is a group of stock items sold together as a single item.
LLanding Cost The costs of acquiring inventory besides the purchase cost. Sales tax and freight
charges can be landing costs. Discounts can also be considered landing costs depending on your business.
Liabilities The claims against the assets of a business. The debts or financial obligations of a business.
LIFO Also known as “last in, first out” and is an inventory valuation method based on the assumption that the last item acquired is the first item sold, and that the remaining items are the first acquired.
Line Item Types The different types of transactions that can be documented on a detail line of an invoice.
MMaster Tables The tables that hold the records containing general information about the partici-
pants or objects of transactions within a module. In General Ledger the master table contains the account names, numbers, and balances. In Accounts Receiv-able the master table contains the customer names, numbers, balances, and other general information. In Inventory the master table contains the inventory item descriptions, stock numbers, and cost and quantity information.
Module One of the functional applications of Denali. The modules are Controller, General Ledger, Accounts Receivable, Accounts Payable, Sales (Order Entry/Point of Sale), Inventory, Job Cost, Payroll, Purchase Order, and Bank Reconciliation.
NNested Tax Codes A set of Sales Tax Codes that are set up to charge tax on a sale for more than one
taxing agency. The total for all agencies is assessed on the sale, and the amounts for the individual agencies are recorded separately.
Non-Inventory Code A code that defines product categories that are not inventory items.
167GlossaryInventory User’s Guide

Glossary
OOpen Item A line item from a receivable or payable transaction that has an amount remaining
to be paid or applied.
Other Time In Payroll, units worked at other than the regular pay rate, such as overtime units.
OutstandingChecks
Checks issued on a bank account that have not been presented to the bank for payment.
Owner’s Equity The resources invested in a business by the owner plus profits retained in the business. The amount by which the assets of an organization exceed liabilities.
PPaid Out In Accounts Payable, an invoice paid to a vendor that does not have a vendor
record established in the AP module. In Purchase Order, an order made out to a vendor that does not have a vendor record established in the AP module. In the Sales module, a paid out transaction is one in which cash is removed from the drawer to fund a miscellaneous purchase.
Periodic Occurring at regular time intervals.
Phase In Job Cost, phases are groups of Cost Codes that make up different parts of your jobs. As you complete phases, you enter cost activity.
Posting The process of recording the effects of transactions to other integrated modules and General Ledger. Posting creates a history of your transactions.
Prepaid Expenses Expenses, such as rent and insurance, which are paid in advance. The unused portion of prepaid expenses are a balance sheet asset.
Profit The amount by which the revenue from business operations exceeds the cost of operations.
RRecurring Batch A transaction batch that holds template invoices that can be generated repeat-
edly. It is used for periodically recurring transactions without having to retype the information each time.
Retained Earnings The portion of owner or stockholder equity that is a result of profit earned by the business.
Revenue (Operat-ing Credit)
Income that a business receives from its business operations.
S
168GlossaryInventory User’s Guide

Glossary
SQL Structured Query Language. This is the type of database Denali uses.
Standard Cost An Inventory valuation method by which the cost assigned to an Inventory item at the time of sale is a predetermined estimate. When the actual cost is recognized, any variance between standard and actual costs is posted to an inventory vari-ance account and an expense adjustment account.
TTax Number Also known as Tax Identification Number or EIN, this is the number assigned to
your business by the IRS.
Terms Code A code in Accounts Receivable that outlines terms for early payment discounts and finance charges. When a Terms Code is attached to a transaction, the terms specified in the code apply to the transaction.
Transaction Batch A group of transactions that will be posted together.
Transactions Business events which can be measured in money.
UUnapplied Credit A credit in Accounts Receivable or the Sales module that reduces the total
amount owed by the customer, but does not reduce the amount remaining to be paid on a specific debit item. The unapplied item is an open item until the full amount is applied.
Unapplied Debit A debit in Accounts Payable that reduces the amount owed a vendor, but does not reduce the amount remaining to paid on a specific credit item. The unapplied item is an open item until the full amount is applied.
Unapplied Payment A payment in Accounts Receivable or the Sales module that reduces the total amount owed by the customer, but does not reduce the amount remaining to be paid on a specific debit item. The unapplied item is an open item until the full amount is applied.
Units The number by which the pay rate is multiplied to calculate gross pay. The most commonly used units in Payroll calculations are hours, but other measures of time or production can be used.
Universal Bridge The Denali feature that imports unposted transactions from an external file. Mod-ules that support this feature are General Ledger, Accounts Receivable, Accounts Payable, Inventory, Sales, Payroll, and Bank Reconciliation.
User Interface The means by which a computer user exchanges information with the computer. The menu and data entry screens are good examples of user interface.
V
169GlossaryInventory User’s Guide

Glossary
Valuation Method The practice used to assign costs to inventory items sold.
WW-2 Employee wage and tax statement, provided by the employer to the employee.
W-3 Transmittal of Wage and Tax Statements. Information filed with the Social Security Administration by the employer.
Weighted AverageCost Method
This method of inventory valuation divides the total cost of stock items available to sell by the number of units available.
Window-SpecificHelp
Help that is relevant to the current window. It includes information about all the options in the window. A Help button is available in some windows and the default Help key is F1.
170GlossaryInventory User’s Guide

Index
Index
Numerics3dCart export file structures 157
Aadd images 77adding
inventory codes 25promotional codes 68stock 47
adjusting stock quantities 46adjustment transactions 44
from external file 51from hand-held scanner 51posting, inventory 55
advanced sales 104age verification
prompt clerk 102set up stock items to require 102
aliases, stock item set up 74assembly
kits 110attaching
files 36automatically generate purchase orders 45available stock items, committed stock items 45
Bback order 45
report 129bar code labels 104bar codes 124batch
deleting 50transaction 44
below minimum quantity report 127bill of materials
components 108editing existing table 109report
master kit 113buy 1 get 1 96buy conversions 57buy down
calculateafter taxes 99before taxes 99
taxability 99buy down sales, setup stock items 99buy/sell conversions
example 58
Ccalculate buy downs 99change image 78changing
codes 29default date 46
codeinventory 24
adding 25planning 25
promotionaladding 68
promotional pricing 24transaction 24
planning 26setting up 28
user-defined 24fields 28
codeschanging 29deleting 29print report, specialty shop 100promotional 68
column position file 145, 149comma delimited file 149component requirement report 114context sensitive help 13control report 131converting quantities
buying/selling 57copy data
from inventory 79, 80into inventory 79, 80
copyingstock items 39
costtroubleshooting 71
counting inventory, tips 139coupon sales, set up stock items 99coupon/buy down 94, 98cross-merchandising 73customer support 17
contacting 18gathering information 18
Ddata exchange 79, 81, 82data sharing 22date
changing default 46selecting, online calendar 119
default view of images 79
171IndexInventory User’s Guide

Index
delete image 78deleting
adjustment transactions 50codes 29entire batch 50
delimited files 149display image 79document conventions 13
Eedit images 78editing
codes 29errors
import transactions 54examples
buy/sell conversion 58kits 107price level codes 64
export stock items 79, 82export to verify formats 149, 150ext. description tab 73external file
formatsinventory 147
import from 53test format 149, 150
external file format 145
Ffeatures
troubleshooting 83file format 145
test 149, 150file formats supported
import 148file structures
3dCart 157files
attaching 36fixed length file
see column position file 145, 149format requirements
external file 148hand-held scanner 51
format supported 145Format UDFs 144formats
supported file 148
Ggeneral setup 21
generateadjustment transactions, external file 51
global price changemulti-packs 101
Hhand-held scanner
format requirements 51import transactions 51, 52
helpcustomer support 17task-based 14troubleshooting options 19user’s guide 17window specific 13
historypurging, inventory 140
history report, specialty shop 104
Iimage
display, stock items 79replace/remove 78
imagesdefault view 79stock items, include 75, 77
importadjustment transactions 148
errors 54from external file 51, 53from hand-held scanner 51, 52requirements
hand-held scanner 51file format requirements
inventory 147from external file 53
import stock items 79, 81import/export 149, 150
stock items 37test file format 149, 150
import/export tasks 80importing
adjustment transactionexternal file 145requirement 145
integrationinventory with other modules 22
introduction to stock item pricing 61inventory
adding to locations 88adjustment transactions 44automatically generate purchase orders 45
172IndexInventory User’s Guide

Index
code 24adding 25planning 25
control report 131data maintenance
copy to/from external file 79, 80locations, troubleshooting 92maintenance
troubleshooting 142master stock report 124multiple locations for 30period end
troubleshooting 142posting transaction 55purging history 140recalculating tables 140reports
troubleshooting 136setup
troubleshooting 31Specialty Shop, troubleshooting 105
inventory codes 24inventory reports 122
Kkits
assembly 110component requirement report 114report 112
building 110disassembling 111example 107setting up 107troubleshooting 115
Llabels, stock 123layaway
stock quantities 45lease stock items 36location codes
printing 86locations
adding inventory to 88moving stock between 90
locations, troubleshooting 92lookup
list 119Lot Expiration
Report 135lot numbers
setting up 35
tracking 35
Mmaster
kit report 113stock report, inventory 124
maximumquantities 38
maximum quantitiesset up 38
maximum stock 45minimum
quantities 38minimum quantities
set up 38minimum quantity report 127minimum stock 45MLI
See multiple locations for inventory 30monthly movement report 133movement report 132multi-pack 95
global price change 101multi-pack pricing 94multiple locations
troubleshooting 92multiple locations for inventory 30
Nnon-inventory stock items 74
Oon hand
new quantity 48on order
report 128stock 45
onlinecalendar
selecting date from 119training 18
optionstroubleshooting 83
overstock report 127
Pphysical count worksheet 125planning
inventory codes 25price levels 63stock items 33transaction codes 26
173IndexInventory User’s Guide

Index
postingadjustments, preparing for 46
posting inventory transactions 55price
book report 130stock items
global change 40price book report, specialty shop 104price level
codesexample 64
planning 63pricing
set up 63pricing
buy 1 get 1 96coupon/buy down 94, 98multi-pack 94troubleshooting 71
pricing codesprint report of 100
pricing typesoverview 62
printedit report 49posting reports 56
printing inventory reports 122printing reports 122promotional
codesadding 68pricing 24
items report 70shelf signs 70
promotional codes 68promotional pricing
buy 1 get 1 96multi-packs 95specialty shop, set up 95
promotional salesreport, specialty shop 104, 134
promptadditional information at time of sale 73
prompt, age verification 102purchase orders
generate automatically, inventory 45purging
history, inventory 140
Qquantities
update 38
quick stock list report 123
Rrecalculating inventory tables 140records
adding stock items 33stock items
editing 37release notes 17remove image 78renumbering
stock items 38Report
Lot Expiration 135report
below minimum quantity 127component requirement, kits 114inventory 122kit assembly 112master kit 113print posting 56promotional items 70
report samplesback order 129control 131master stock report 124monthly movement 133movement 132on order 128overstock 127physical count worksheet 125price book 130quick stock list 123stock labels 123stock value 130understock 126
reportsadvanced sales transactions 104back order 129control 131history, specialty shop 104inventory
master stock 124monthly movement 133movement 132on order 128options
date 118filter 122lookup 119sort 118
overstock 127
174IndexInventory User’s Guide

Index
overview 117physical count worksheet 125price book 130price book, specialty shop 104pricing codes, specialty shop 100promotional, specialty shop 104, 134quick stock list 123stock labels 123stock value 130type 117
classified 118comparative classified 118comparative detailed 118condensed 118control 118detailed 118detailed with notes 118financial 117history 118options 118summary 118
understock 126require age verification 102requirements
external file 148
Ssale price 68sales
promotional report, specialty shop 104, 134sales transactions
advanced information 104selecting
date, online calendar 119sell conversions 58semi-colon delimited file 145serial numbers 35serialized
system, do I need 22set up
adding inventory to locations 88kits 107locations for stock items 85maximum quantities 38minimum quantities 38price level pricing 63promotional pricing, specialty shop 95transaction codes 28troubleshooting 31user-defined codes 28
setting uplot numbers 35
setting up sale pricing 68sort
methods 122Specialty Shop
troubleshooting, inventory 105specialty shop 94, 98
track sales 103stock item
recordsadding 33
stock item pricingintroduction 61
stock items 92adding/subtracting 47adjusting quantities 46aliases, set up 74available 45back order 45buy down sales, setup 99changing price
global 40committed 45converting quantities, buying/selling 57copy 39coupon sales, setup 99coupon/buy down pricing 98display image 79export data 79, 82history report, specialty shop 104identifying, tips 33image, replace/remove 78images
stock items, edit 78import data 79, 81import/export 37include images 75, 77leasing 36locations for 85moving between locations 90multi-pack pricing 94non-inventory 74planning 33price book, specialty shop 104pricing
global change, multi-packs 101quantities
maximum 45minimum 45on order 45
quantity tracking 45records
175IndexInventory User’s Guide

Index
editing 37renumbering 38require age verification 102serial numbers 35set up, specialty shop 101stock labels, specialty shop 104track sales, specialty shop 103tracking 35troubleshooting 42
stock labels 123stock labels report, specialty shop 104stock labels, specialty shop 104stock quantities
available 45back order 45committed 45layaway 45managing 45tracking 45troubleshooting 59
stock value report 130subtracting stock 47
Ttab
ext. description 73general 21
tab delimited file 145, 149table information, view 139taxability, buy down 99test file format 149, 150tips
counting inventory 139identifying stock items 33
trackinglot numbers 35stock items 35stock quantities 45
tracking custom information 23tracking sales with specialty shop 103training 18
classroom 19online 18on-site 19telephone 19
transactionsadjustment
adding 48deleting 50external 51
advanced sales, report 104batches 44
codes 24setting up 28
delete batch 50import
from external file 53from hand-held scanner 51from other software 51overview 44
inventoryadjustments 44
posting, inventory 55seeing the results 56view posting 56
transfer data 80transfer of data 79, 81, 82troubleshooting
cost and pricing 71inventory reports 136kits 115maintenance 142managing stock quantities 59module setup, inventory 31multi-location inventory 92options 19options and features 83period end 142setting up stock items 42Specialty Shop 105
Uunderstock report 126update
quantities 38user-defined
codes 24user-defined codes 28User-Defined Fields
formatting 144user-defined fields 23, 37user-defined tab 37using serial numbers 35using this guide 11
Vvaluation method 24variance amount 138verification of age 102verify file formats 149, 150view stock item image 79view table information 139
176IndexInventory User’s Guide

Index
Wwindow specific help 13
177IndexInventory User’s Guide

7180 Potomac Dr. Boise, Idaho 83704 Sales: (800) 388-3038 Customer Support: (800) 390-7053 Forms & Supplies: (800) 454-1660 www.cougarmtn.com