introduction to jeroo - georgia institute of...
TRANSCRIPT

Introduction to Jeroo
Version 2.4 (Java/C++/C# Style)
Dean Sanders and Brian Dorn Northwest Missouri State University

Introduction to Jeroo—Java/C++/C# Style i
Table of Contents
Chapter 1 – The Jeroos of Santong Island 1
Chapter 2 – Essential Concepts 3
Chapter 3 – Problem Solving and Algorithms 8
Chapter 4 – Simple Programs 15
Chapter 5 – Creating and Using Jeroo Methods 31
Chapter 6 – Control Structures 47
Appendix A – The Java/C++/C# Language Summary 59
Appendix B – A Brief History of Jeroo 68
Appendix C – Using Jeroo 70

Introduction to Jeroo—Java/C++/C# Style 1
Chapter 1 – The Jeroos of Santong Island 1.1 Jeroo’s World Santong island is an uninhabited speck of land in the South Pacific Ocean. In the late 1980’s, naturalist Jessica Tong discovered two previously unknown species that are unique to this island. One is the jeroo, a rare mammal similar to the wallabies of Australia. The other is the large winsum flower that is the jeroo’s primary food source. Like its distant Australian relative, the jeroo moves by hopping, but its movements are unique in all of nature. Each jeroo only moves in one of the four main compass directions, and only turns in 90o increments. This unusual behavior continues to mystify Jessica and the few other researchers who have observed jeroos in the wild. Some believe that this behavior is somehow related to geomagnetic forces, but others think that this is just a bizarre learned behavior. Every jeroo has a pouch, but the male’s pouch is somewhat smaller. While the female uses her pouch to protect and nurture her offspring, both sexes use their pouches to carry winsum flowers that they have picked. During the rainy season, January through December, sudden storms can create temporary lakes and rivers, or even alter the shape of the island, itself. Despite living on Santong island for uncounted millennia, the jeroos are extremely poor swimmers. While they are keenly aware of their immediate surroundings, jeroos can be careless. If one happens to hop into the ocean, its fur becomes waterlogged, and it must rest in the sun for a few hours before resuming its normal activity. In what can only be described as a telepathic connection, all other jeroos also cease their activities until the wet jeroo has recovered. Until recently, the jeroos were safe from human interference because they were only known to a handful of researchers and because Santong island is very small, very remote, and missing from most maps. The jeroos’ idyllic world was interrupted in 2001, when Brian arrived at the island. Brian is a renowned collector who was hired to capture a jeroo for the extreme animal exhibit at Missouri’s C. A. Baret zoo. Having studied the jeroos’ unique patterns of movement, Brian periodically sets nets in the locations that a jeroo is likely to visit. Fortunately, the sensitive jeroos can detect his nets, and have learned that tossing a winsum flower onto a net will disable the net and make that location safe for future travel. Brian can only catch a careless jeroo that leaps before it looks. 1.2 The Jeroo Simulator After returning from a recent trip to Santong Island, Jessica asked her colleague, Deanna, to develop a simulator that could be used to demonstrate the jeroos and their relationship with their island. The result of Deanna’s work is a computer program, named Jeroo, and a Jeroo programming language that work together to help Jessica with her research. The Jeroo language allows a programmer to direct the movements of up to four jeroos. The simulator contains a visual component that allows one to see the results of running a Jeroo program. When Deanna designed the simulator, she used the jeroos’ unique movements to model the island as a grid of rows and columns similar to a spreadsheet. There are 24 rows and 24 columns. The rows run East and West along lines of latitude, and the columns run North and South along lines of longitude. Each element (cell) of this model corresponds to a location where a jeroo might land when it hops.

Introduction to Jeroo—Java/C++/C# Style 2
Deanna chose to number both the rows and columns starting with zero at the northwest corner of the island. When asked why she started at zero, Deanna said that she was counting the number of safe hops from any location to the northwest corner. Deanna’s model is shown in figure 1.1. We will use the notation (r,c) to indicate a specific cell, where r represents the row number of the cell, and c represents its column number. For example, (4,5) indicates the cell in row number 4 and column number 5.
0 1 2 3 4 5 6 7 8 9 10 11 12 13 14 15 16 17 18 19 20 21 22 23 0 1 2 3 4 5 6 7 8 9
10 11 12 13 14 15 16 17 18 19 20 21 22 23
Figure 1.1 – The Model for Santong Island Appendix C contains a detailed description of the simulator and its use.
Cell (4,5)

Introduction to Jeroo—Java/C++/C# Style 3
Chapter 2 – Essential Concepts The Jeroo language is a small object-oriented programming language. We will use the Jeroo language to write programs that control up to four jeroos. This chapter describes several general concepts about object-oriented programs. As you read subsequent chapters, refer back to this chapter to review the meaning of important words and phrases. 2.1 Programs and Programming Languages It doesn’t matter whether we are sending email, surfing the net, listening to music, writing an essay, or playing a game, whenever we use a computer we are using one or more computer programs. Each program is simply a set of instructions for the computer.
Every program is written by one or more programmers. Programmers use a programming language such as Java, C++, Python, or Visual Basic to write a computer program. Programs exist in many forms. The form that a programmer writes is called the source code for the program. Unfortunately, a computer cannot use source code directly. Source code must be translated into machine language before it can be executed (run) by the computer. There are several kinds of translation. A compiler translates a program, as a whole, from one form into another, but not necessarily into machine language. An interpreter translates a program into machine language one statement at a time. Each statement is executed as soon as it has been translated. Both Java and Jeroo use a two-step approach to translating source code into machine language. First, a compiler translates the source code into an intermediate language. Second, an interpreter translates the intermediate language into executable instructions. In the case of Java, this intermediate language is called Java Byte Code, and the interpreter is called the Java Virtual Machine.
A computer program is a set of instructions for a computer.
A compiler translates a program, as a whole, from one form to another.
The source code for a program is written by a programmer in some programming language.
An interpreter translates a program into machine language one statement at a time.

Introduction to Jeroo—Java/C++/C# Style 4
2.2 Algorithms Every computer program starts with a plan. That plan is called an algorithm. There are many ways to write an algorithm. Some are very informal, some are quite formal and mathematical in nature, and some are quite graphical. The form is not particularly important as long as it provides a good way to describe and check the logic of the plan.
2.3 Case-Sensitive Language In Jeroo’s Java/C++/C#-style programming language, upper-case letters and lower-case letters are treated as being different from one another. For example, the words “jessica", “Jessica”, and “JESSICA” are treated as three different names. Other languages might treat these as being the same.
2.4 Syntax and Semantics Every language, whether it is a natural language such as English or a programming language such as Java, has a vocabulary, a syntax, and a semantic meaning.
Examples
One syntax rule is that the symbol “?” must appear at the end of a question in written English. The sentences “The balls bounce.” and “Bounce the balls.” use the same words and punctuation, but have different semantics (different meanings).
A language that treats upper-case and lower-case letters as being different from one another is said to be case-sensitive.
Syntax is a set of rules for writing or speaking that language.
The meaning associated with valid expressions is known as the semantics of the expression.
An algorithm is a plan for solving a problem.

Introduction to Jeroo—Java/C++/C# Style 5
2.5 Object It should come as no surprise to learn that an object-oriented programming language works with objects. But, what is an object? Unfortunately, this concept is difficult to define because an object is simultaneously something that only exists within a computer program and a logical representation of something else. A good approach is to define an object in terms of what it represents.
A typical program works with several different objects. Some of these may represent the same kind of thing. For example, suppose our problem were to manage the rental of books to students. We would likely have some objects that represent the books and others that represent the students. Now, if Kim were to rent “Haiku and You” and “Cooking with Mystery Meat”, we might have two objects, one for each of these books. The Jeroo programming language only supports one kind of object – the Jeroo, but a single program can work with as many as four Jeroo objects. These objects should work together to solve a problem. An object represents something, but we, as programmers, need to determine what characteristics of that thing are important to the problem we are trying to solve. There are two parts to an object, facts about the thing it represents and tasks that the object can perform. The facts are called attributes, and the tasks are called methods. 2.6 Attribute When designing an object to represent something, we must select facts about that thing that are relevant to the problem we are trying to solve. For example, the title of a book would be important to a bookstore, but not to the company that shipped the book from the publisher’s warehouse. On the other hand, the weight of the book would be important to the shipper, but not to the bookstore. Facts such as the title or weight of a book are called attributes.
The attributes of a Jeroo object include its location, the number of flowers in its pouch, and the direction it’s facing.
An attribute is a fact associated with a specific object.
An object represents a specific concept or item that is relevant to the problem we are trying to solve.

Introduction to Jeroo—Java/C++/C# Style 6
2.7 Methods and Behaviors When we design an object, we need to determine what tasks it should perform. In doing so, we tend to anthropomorphize the item that the object represents. (To anthropomorphize means to ascribe human characteristics to non-human things.) For example, we might want a book to tell us its price or to display a picture of its cover on the screen.
All Jeroo objects share the same set of behaviors. There is a set of predefined behaviors, but the language allows us to write methods that define additional behaviors. 2.8 Message (Invoking a Method) When we write an object-oriented program, we instantiate appropriate objects, and ask them to perform specific tasks. We use messages to make these requests.
A behavior is an action that an object can take or a task that it can perform in response to a request from an external source.
A method is a collection of statements that are written in some programming language to describe a specific behavior.
A message is a request for a specific object to perform a specific task.
When we ask an object to perform a task, we say that we are sending a message or invoking the method that describes the task.
A precondition for a method is something that is assumed to be true before the method is invoked.
A postcondition for a method is something that is assumed to be true after the method has been executed.

Introduction to Jeroo—Java/C++/C# Style 7
2.9 Classes and Instantiation A programmer must determine which objects are relevant to the problem being solved and the attributes and behaviors of those objects. These attributes and behaviors must be written in a programming language.
A class is similar to a recipe for a cake or a blueprint for a house. Many people view a class as being a template for creating an object. When we write an object-oriented program, we need to create specific objects as defined by the statements in the class. We “bake” to create a cake, we “build” to create a house, and we “instantiate” to create on object within a computer program.
All objects that have been instantiated from the same class have the same behaviors, but usually have different values for their attributes. For example, two different book objects usually have different ISBN numbers. Most object-oriented programs use two types of classes. Programmer-defined classes are ones that have been written by the programmer as part of the solution to a problem. Predefined classes have been purchased separately or are part of the programming language, itself. The Jeroo language only supports a single predefined class – the Jeroo class. We can instantiate up to four Jeroos from this class.
A class is a collection of statements that are written in some programming language to describe both the attributes and behaviors of an object.
The process of creating a specific object is called instantiation.

Introduction to Jeroo—Java/C++/C# Style 8
Chapter 3 – Problem Solving and Algorithms This chapter provides an introduction to a process for developing a solution to a problem. Nothing in this chapter is unique to using a computer to solve a problem. This process can be used to solve a wide variety of problems, including ones that have nothing to do with computers. 3.1 Problems, Solutions, and Tools I have a problem! I need to thank Aunt Kay for the birthday present she sent me. I could send a thank you note through the mail. I could call her on the telephone. I could send her an email message. I could drive to her house and thank her in person. In fact, there are many ways I could thank her, but that’s not the point. The point is that I must decide how I want to solve the problem, and use the appropriate tool to implement (carry out) my plan. The postal service, the telephone, the internet, and my automobile are tools that I can use, but none of these actually solves my problem. In a similar way, a computer does not solve problems, it’s just a tool that I can use to implement my plan for solving the problem. Knowing that Aunt Kay appreciates creative and unusual things, I have decided to hire a singing messenger to deliver my thanks. In this context, the messenger is a tool, but one that needs instructions from me. I have to tell the messenger where Aunt Kay lives, what time I would like the message to be delivered, and what lyrics I want sung. A computer program is similar to my instructions to the messenger. The story of Aunt Kay uses a familiar context to set the stage for a useful point of view concerning computers and computer programs. The following list summarizes the key aspects of this point of view.
A computer is a tool that can be used to implement a plan for solving a problem. A computer program is a set of instructions for a computer. These instructions
describe the steps that the computer must follow to implement a plan. An algorithm is a plan for solving a problem. A person must design an algorithm. A person must translate an algorithm into a computer program.
This point of view sets the stage for a process that we will use to develop solutions to Jeroo problems. The basic process is important because it can be used to solve a wide variety of problems, including ones where the solution will be written in some other programming language.

Introduction to Jeroo—Java/C++/C# Style 9
3.2 An Algorithm Development Process Every problem solution starts with a plan. That plan is called an algorithm. There are many ways to write an algorithm. Some are very informal, some are quite formal and mathematical in nature, and some are quite graphical. The instructions for connecting a DVD player to a television are an algorithm. A mathematical formula such as πR2 is a special case of an algorithm. The form is not particularly important as long as it provides a good way to describe and check the logic of the plan. The development of an algorithm (a plan) is a key step in solving a problem. Once we have an algorithm, we can translate it into a computer program in some programming language. Our algorithm development process consists of five major steps. Step 1: Obtain a description of the problem. Step 2: Analyze the problem. Step 3: Develop a high-level algorithm Step 4: Refine the algorithm by adding more detail. Step 5: Review the algorithm. Step 1: Obtain a description of the problem. This step is much more difficult than it appears. In the following discussion, the
word client refers to someone who wants to find a solution to a problem, and the word developer refers to someone who finds a way to solve the problem. The developer must create an algorithm that will solve the client’s problem.
The client is responsible for creating a description of the problem, but this is often the
weakest part of the process. It’s quite common for a problem description to suffer from one or more of the following types of defects: (1) the description relies on unstated assumptions, (2) the description is ambiguous, (3) the description is incomplete, or (4) the description has internal contradictions. These defects are seldom due to carelessness by the client. Instead, they are due to the fact that natural languages (English, French, Korean, etc.) are rather imprecise. Part of the developer’s responsibility is to identify defects in the description of a problem, and to work with the client to remedy those defects.
An algorithm is a plan for solving a problem.

Introduction to Jeroo—Java/C++/C# Style 10
Step 2: Analyze the problem. The purpose of this step is to determine both the starting and ending points for
solving the problem. This process is analogous to a mathematician determining what is given and what must be proven. A good problem description makes it easier to perform this step.
When determining the starting point, we should start by seeking answers to the
following questions. What data are available? Where is that data? What formulas pertain to the problem? What rules exist for working with the data? What relationships exist among the data values?
When determining the ending point, we need to describe the characteristics of a
solution. In other words, how will we know when we’re done? Asking the following questions often helps to determine the ending point.
What new facts will we have? What items will have changed? What changes will have been made to those items? What things will no longer exist?
Step 3: Develop a high-level algorithm. An algorithm is a plan for solving a problem, but plans come in several levels of
detail. It’s usually better to start with a high-level algorithm that includes the major part of a solution, but leaves the details until later. We can use an everyday example to demonstrate a high-level algorithm.
Problem: I need a send a birthday card to my brother, Mark. Analysis: I don’t have a card. I prefer to buy a card rather than make one myself. High-level algorithm: Go to a store that sells greeting cards Select a card Purchase a card Mail the card This algorithm is satisfactory for daily use, but it lacks details that would have to be
added were a computer to carry out the solution. These details include answers to questions such as the following.
“Which store will I visit?” “How will I get there: walk, drive, ride my bicycle, take the bus?” “What kind of card does Mark like: humorous, sentimental, risqué?” These kinds of details are considered in the next step of our process.

Introduction to Jeroo—Java/C++/C# Style 11
Step 4: Refine the algorithm by adding more detail A high-level algorithm shows the major steps that need to be followed to solve a
problem. Now we need to add details to these steps, but how much detail should we add? Unfortunately, the answer to this question depends on the situation. We have to consider who (or what) is going to implement the algorithm and how much that person (or thing) already knows how to do. If someone is going to purchase Mark’s birthday card on my behalf, my instructions have to be adapted to whether or not that person is familiar with the stores in the community and how well the purchaser known my brother’s taste in greeting cards.
When our goal is to develop algorithms that will lead to computer programs, we need
to consider the capabilities of the computer and provide enough detail so that someone else could use our algorithm to write a computer program that follows the steps in our algorithm. As with the birthday card problem, we need to adjust the level of detail to match the ability of the programmer. When in doubt, or when you are learning, it is better to have too much detail than to have too little.
Most of our examples will move from a high-level to a detailed algorithm in a single
step, but this is not always reasonable. For larger, more complex problems, it is common to go through this process several times, developing intermediate level algorithms as we go. Each time, we add more detail to the previous algorithm, stopping when we see no benefit to further refinement. This technique of gradually working from a high-level to a detailed algorithm is often called stepwise refinement.
Stepwise refinement is a process for developing a detailed algorithm by gradually adding detail to a high-level algorithm.
Introduction to Jeroo—Java/C++/C# Style 12
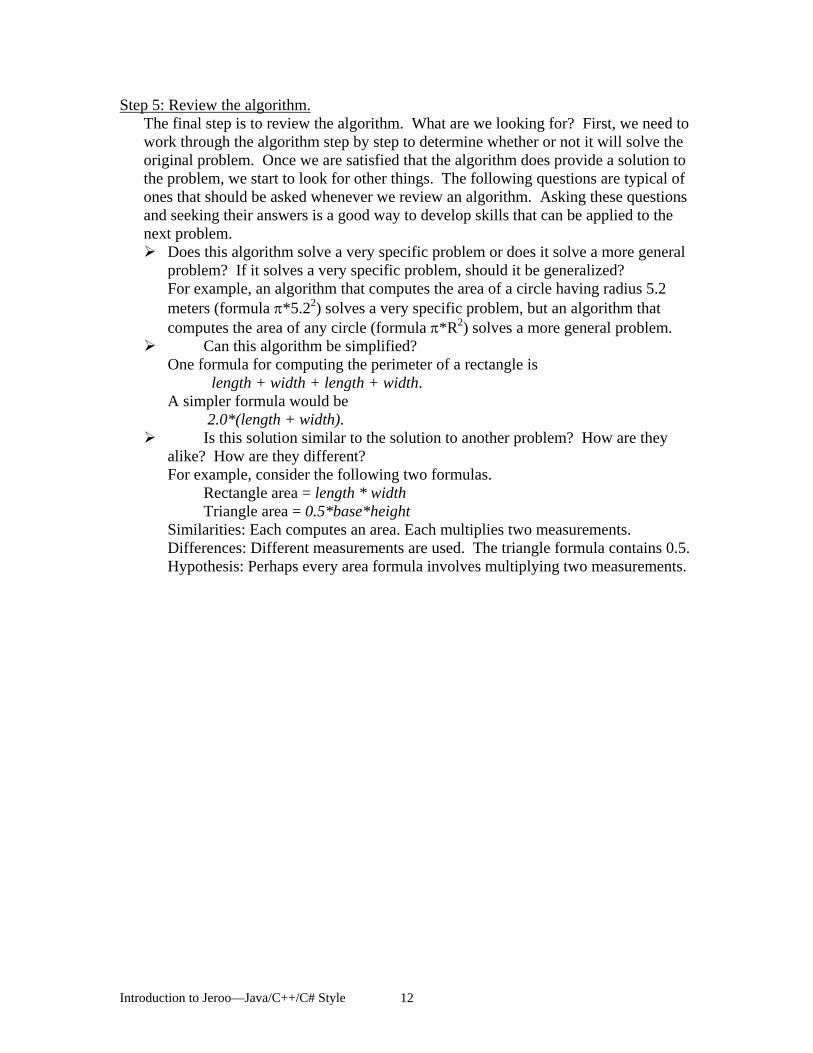
Step 5: Review the algorithm. The final step is to review the algorithm. What are we looking for? First, we need to
work through the algorithm step by step to determine whether or not it will solve the original problem. Once we are satisfied that the algorithm does provide a solution to the problem, we start to look for other things. The following questions are typical of ones that should be asked whenever we review an algorithm. Asking these questions and seeking their answers is a good way to develop skills that can be applied to the next problem.
Does this algorithm solve a very specific problem or does it solve a more general problem? If it solves a very specific problem, should it be generalized? For example, an algorithm that computes the area of a circle having radius 5.2 meters (formula π*5.22) solves a very specific problem, but an algorithm that computes the area of any circle (formula π*R2) solves a more general problem.
Can this algorithm be simplified? One formula for computing the perimeter of a rectangle is length + width + length + width. A simpler formula would be 2.0*(length + width).
Is this solution similar to the solution to another problem? How are they alike? How are they different? For example, consider the following two formulas. Rectangle area = length * width Triangle area = 0.5*base*height Similarities: Each computes an area. Each multiplies two measurements. Differences: Different measurements are used. The triangle formula contains 0.5. Hypothesis: Perhaps every area formula involves multiplying two measurements.

Introduction to Jeroo—Java/C++/C# Style 13
3.3 Example 3.1 – Pick and Plant This section contains an extended example that demonstrates the algorithm development process. To complete the algorithm, we need to know that every Jeroo can hop forward, turn left and right, pick a flower from its current location, and plant a flower at its current location. In chapter 4, we will use this algorithm to develop and test a Jeroo program. Problem Statement (Step 1) A Jeroo starts at (0,0) facing East with no flowers in its pouch. There is a flower at location (0,3). Write a program that directs the Jeroo to pick the flower and plant it at location (2,3). After planting the flower, the Jeroo should hop one space East and stop. There are no other nets, flowers, or Jeroos on the island. Jeroo Flower
0 1 2 3 4 0 1 2 3 4 0 0 1 1 2 2 3 3 4 4
Start Finish Analysis of the Problem (Step 2)
1. The flower is exactly three spaces ahead of the jeroo. 2. The flower is to be planted exactly two spaces South of its current location. 3. The Jeroo is to finish facing East one space East of the planted flower. 4. There are no nets to worry about.
High-level Algorithm (Step 3)
Let’s name the Jeroo Bobby. Bobby should do the following Get the flower Put the flower Hop East

Introduction to Jeroo—Java/C++/C# Style 14
Detailed Algorithm (Step 4) Let’s name the Jeroo Bobby. Bobby should do the following Get the flower Hop 3 times Pick the flower Put the flower Turn right Hop 2 times Plant a flower Hop East Turn left Hop once
Review the Algorithm (Step 5)
1. The high-level algorithm partitioned the problem into three rather easy subproblems. This seems like a good technique.
2. This algorithm solves a very specific problem because the Jeroo and the flower are in very specific locations.
3. This algorithm is actually a solution to a slightly more general problem in which the Jeroo starts anywhere, and the flower is 3 spaces directly ahead of the Jeroo.

Introduction to Jeroo—Java/C++/C# Style 15
Chapter 4 – Simple Programs This chapter provides an introduction to the process of writing a Jeroo program. We introduce the form of a program, the possible ways to instantiate (create) a Jeroo, and the basic actions that every Jeroo understands. 4.1 Basic Concepts At one level, a Jeroo program is just a text file, but one with identifiable parts. The largest parts are called methods (section 4.2 and chapter 5). The body of each method consists of comments, blank lines, action statements (section 4.4), and control structures (chapter 6). Jeroo’s Java/C++/C#-style programming language is case-sensitive. This means that upper-case and lower-case letters are considered to be different from one another. We need to be careful and consistent whenever we type the source code for a Jeroo program. It’s not enough to write a program that solves the intended problem. The program’s logic must be well designed, and it must be easy for someone to read and understand the program’s source code. Whitespace, comments, and descriptive identifiers all contribute to making a program easier to read. Whitespace consists of blank lines, spaces, tabs, and newline (end-of-line characters). Blank lines should be used to organize the parts of the source code into groups that correspond to the logic of the algorithm. Indentations using tabs or spaces should be used to show the extent of methods and control structures. Spaces should be used to help a reader see the important parts of a line of source code. A newline (press Enter or Return on the keyboard) should be used at the end of every statement, to break up long statements into smaller parts, and to help show the major parts of the code. The recommended way to use whitespace will be demonstrated in the examples, and discussed as necessary. Comments are phrases that a programmer inserts into a program to provide additional information for anyone who reads the program. Comments are ignored when the program is executed (run). A comment in Jeroo’s Java/C++/C#-style language begins with the digraph // and continues until the end of the line.

Introduction to Jeroo—Java/C++/C# Style 16
4.2 Form of a Jeroo Program Methods are the primary components of a Jeroo program. Every Jeroo program must have exactly one main method, and it may contain any number of programmer-defined Jeroo methods. Programmer-defined Jeroo methods are discussed in chapter 5. The main method describes how to use one or more Jeroos to solve a specific problem. The form of the main method is shown in figure 4.1. Everything that appears between the braces should be indented 2 or 3 spaces.
method main() { } //===== end of method main() =====
Figure 4.1 – Form of the main method
Body of the method
Declare one or more Jeroos.
Write a sequence of statements that describe how to use the Jeroos to solve a specific problem.
Braces mark the beginning and end of the body.
Empty parentheses are required

Introduction to Jeroo—Java/C++/C# Style 17
4.3 Declaring and Instantiating Jeroos Every Jeroo program uses from one to four Jeroo objects to solve a problem. The first part of the main method must be used to declare and instantiate all the Jeroos that will be used by the program. The syntax of this statement is shown in figure 4.2. There are two parts to the statement, the declaration and the instantiation.
Jeroo name = new Jeroo(...);
Figure 4.3 – Syntax for Declaring and Instantiating a Jeroo Declaration Portion The declaration portion indicates that the programmer plans to use a Jeroo to help solve the problem. The programmer must provide an identifier (or name) for the Jeroo object. The following box contains the rules for creating identifiers in Jeroo’s programming language.
The first character must be a letter, a dollar sign ($), or an underscore (_). The remaining characters can be letters, digits, dollar signs, or underscores. There is no limit on the length of an identifier.
Instantiation Portion The instantiation portion is a request that the Jeroo object be created. The crucial part of the instantiation is the constructor, which has the form Jeroo(...). The parentheses are to be filled in with initial values of the attributes for that Jeroo object. Every Jeroo object has three attributes: its location, its direction, and the number of flowers in its pouch. If we choose not to specify an initial value for one or more of the attributes, the constructor provides default values as shown in table 4.1.
Attribute Default Value Location (0,0) Direction EAST Flowers 0
Table 4.1 – Default Attributes
Declaration Instantiation

Introduction to Jeroo—Java/C++/C# Style 18
As a convenience, the Jeroo language contains six different constructors, all but one of which allows us to provide values for just some of the attributes. Default values will be provided for the others. The constructors are summarized in table 4.2. Example Attributes //---Accept all defaults --- Jeroo jessica = new Jeroo();
Name: jessica Location: (0,0) Direction: EAST Flowers: 0
//--- Specify just the flowers --- Jeroo jessica = new Jeroo(8);
Name: jessica Location: (0,0) Direction: EAST Flowers: 8
//--- Specify just the location --- Jeroo jessica = new Jeroo(3,4);
Name: jessica Location: (3,4) Direction: EAST Flowers: 0
//--- Specify location and direction --- Jeroo jessica = new Jeroo(3,4,WEST);
Name: jessica Location: (3,4) Direction: WEST Flowers: 0
//--- Specify location and flowers --- Jeroo jessica = new Jeroo(3,4,8);
Name: jessica Location: (3,4) Direction: EAST Flowers: 8
//--- Specify all attributes --- Jeroo jessica = new Jeroo(3,4,SOUTH,8);
Name: jessica Location: (3,4) Direction: SOUTH Flowers: 8
Table 4.2 – Declaration and Instantiation Examples
The equal sign between the declaration and instantiation portions indicates that the newly created Jeroo object is to be associated with the identifier in the declaration portion.

Introduction to Jeroo—Java/C++/C# Style 19
4.4 Action Statements An action statement is a request that a Jeroo perform a specific task. That task can be either one of the basic action methods that are part of the Jeroo language or a Jeroo method that has been written by the programmer. The syntax of an action statement is shown in figure 4.3.
jeroo_identifier.method_name(...);
Figure 4.3 – Syntax of an Action Statement The Jeroo language includes the seven action methods shown in table 4.3. Three of these, give, turn, and one version of hop require an argument value. Method Purpose Example hop() Hop one space ahead.
The program terminates with a logic error if the hopping Jeroo lands in the water, lands on another Jeroo, or hops onto a net. A Jeroo can hop onto a flower.
jessica.hop();
hop(number) Hop number times in a row, where number is a positive integer.
jessica.hop(3); jessica.hop(12);
pick() Pick a flower from the current location. Nothing happens if there is no flower at the current location.
jessica.pick();
plant() Plant a flower at the current location. Nothing happens if the jeroo does not have a flower to plant.
jessica.plant();
toss() Toss a flower one space ahead. The tossed flower is lost forever. If the flower lands on a net, the net is disabled.
jessica.toss();
turn(relativeDirection) Turn in the indicated direction [ turn(AHEAD) and turn(HERE) are meaningless ]
jessica.turn(LEFT); jessica.turn(RIGHT);
give(relativeDirection) Give a flower to a neighboring Jeroo in the indicated direction. Nothing happens if the giving Jeroo has no flowers, or if there is no neighboring Jeroo in the indicated direction. [ give(HERE) is meaningless ]
jessica.give(LEFT); jessica.give(RIGHT); jessica.give(AHEAD);
Table 4.3 – Basic Actions in the Jeroo Language
Which Jeroo? What task?
Period Parentheses and semicolon
Argument value
Introduction to Jeroo—Java/C++/C# Style 20
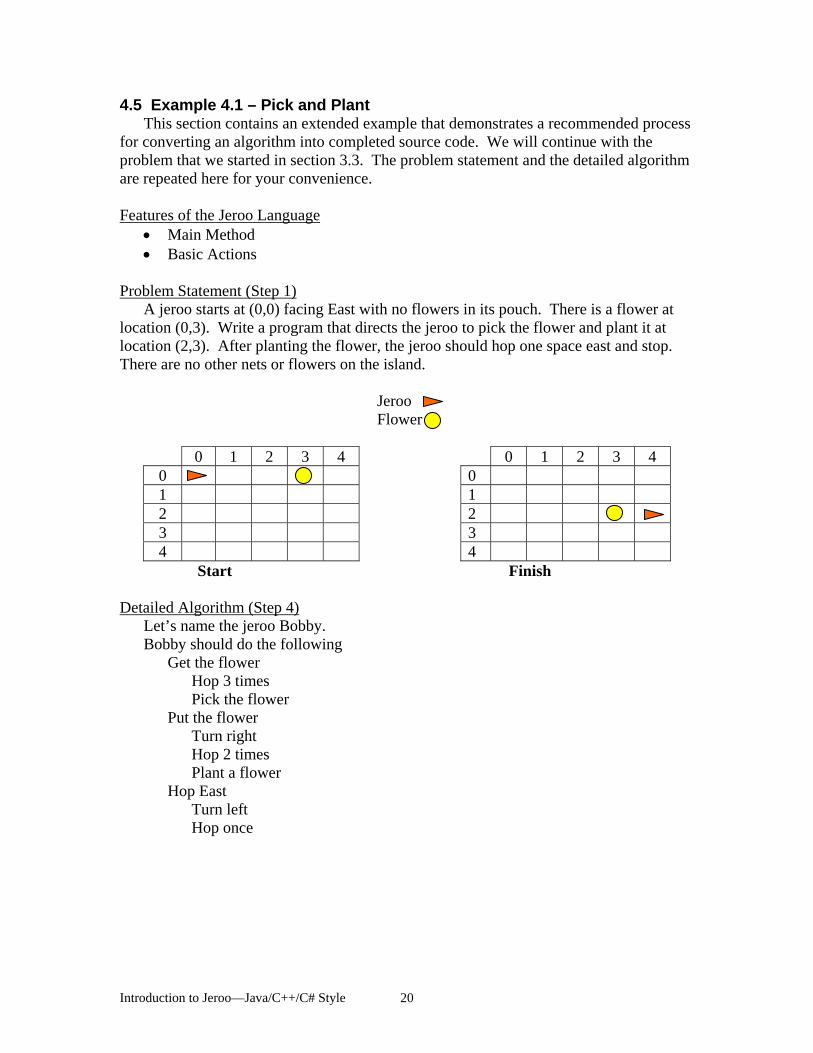
4.5 Example 4.1 – Pick and Plant This section contains an extended example that demonstrates a recommended process for converting an algorithm into completed source code. We will continue with the problem that we started in section 3.3. The problem statement and the detailed algorithm are repeated here for your convenience. Features of the Jeroo Language
• Main Method • Basic Actions
Problem Statement (Step 1) A jeroo starts at (0,0) facing East with no flowers in its pouch. There is a flower at location (0,3). Write a program that directs the jeroo to pick the flower and plant it at location (2,3). After planting the flower, the jeroo should hop one space east and stop. There are no other nets or flowers on the island. Jeroo Flower
0 1 2 3 4 0 1 2 3 4 0 0 1 1 2 2 3 3 4 4
Start Finish Detailed Algorithm (Step 4)
Let’s name the jeroo Bobby. Bobby should do the following Get the flower Hop 3 times Pick the flower Put the flower Turn right Hop 2 times Plant a flower Hop East Turn left Hop once

Introduction to Jeroo—Java/C++/C# Style 21
Jeroo Code for “Pick and Plant” A good programmer doesn’t write a program all at once. Instead, the programmer will write and test the program in a series of builds. Each build adds to the previous one. The high-level algorithm will guide us in this process.
FIRST BUILD
The recommended first build contains three things. 1. The main method 2. Declaration and instantiation of every Jeroo that will be used 3. The high-level algorithm in the form of comments. method main() { Jeroo Bobby = new Jeroo(); //--- Get the flower --- //--- Put the flower --- //--- Hop East --- } //===== end of method main() =====
Once the first build is working correctly, we can proceed to the others. In this case, each build will correspond to one step in the high-level algorithm. It may seem like a lot of work to use four builds for such a simple program, but doing so helps establish habits that will become invaluable as the programs become more complex.
This instantiation places Bobby at (0,0), facing East, with no flowers.

Introduction to Jeroo—Java/C++/C# Style 22
BUILD 2 This build adds the logic to “get the flower”. The blank lines help show the organization of the logic. The new code is shown in boldface type.
method main() { Jeroo Bobby = new Jeroo(); //--- Get the flower --- Bobby.hop(3); Bobby.pick(); //--- Put the flower --- //--- Hop East --- } //===== end of method main() =====
Hop 3 times
Pick the flower
Introduction to Jeroo—Java/C++/C# Style 23
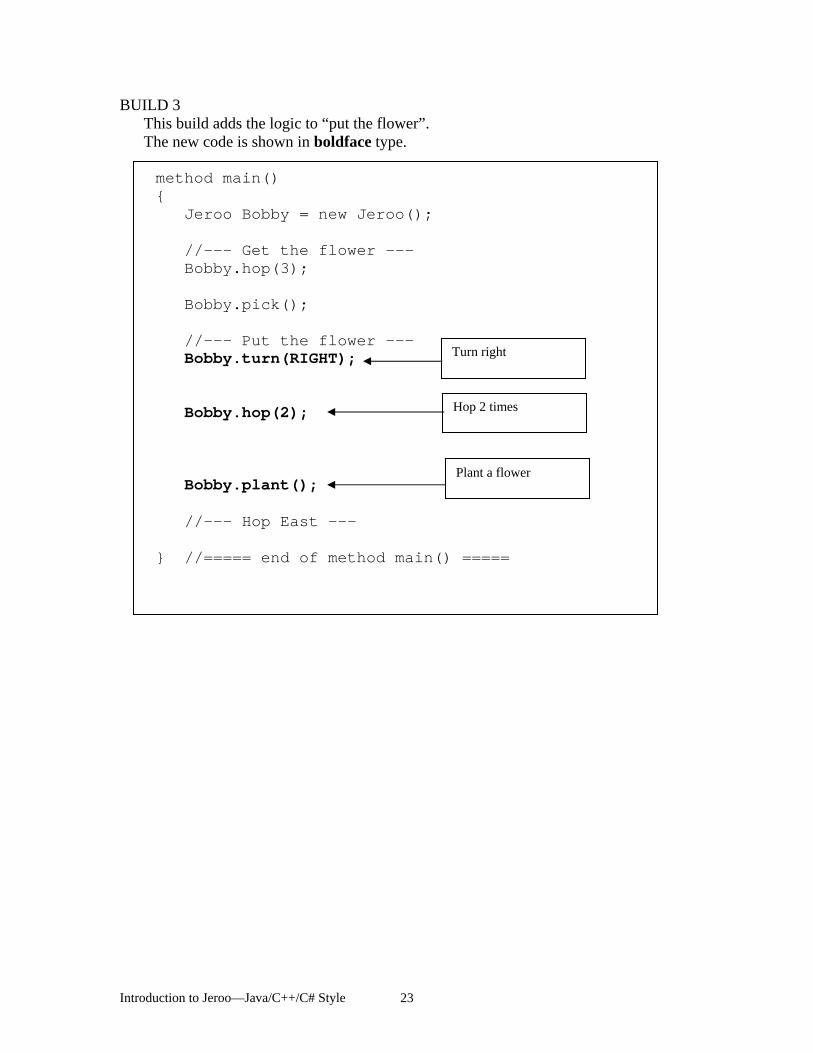
BUILD 3 This build adds the logic to “put the flower”. The new code is shown in boldface type.
method main() { Jeroo Bobby = new Jeroo(); //--- Get the flower --- Bobby.hop(3); Bobby.pick(); //--- Put the flower --- Bobby.turn(RIGHT); Bobby.hop(2); Bobby.plant(); //--- Hop East --- } //===== end of method main() =====
Turn right
Hop 2 times
Plant a flower

Introduction to Jeroo—Java/C++/C# Style 24
BUILD 4 (final) This build adds the logic to “hop East”. The new code is shown in boldface type.
method main() { Jeroo Bobby = new Jeroo(); //--- Get the flower --- Bobby.hop(3); Bobby.pick(); //--- Put the flower --- Bobby.turn(RIGHT); Bobby.hop(2); Bobby.plant(); //--- Hop East --- Bobby.turn(LEFT); Bobby.hop(); } //===== end of method main() =====
Hop 1 time Could use hop(1)
Introduction to Jeroo—Java/C++/C# Style 25
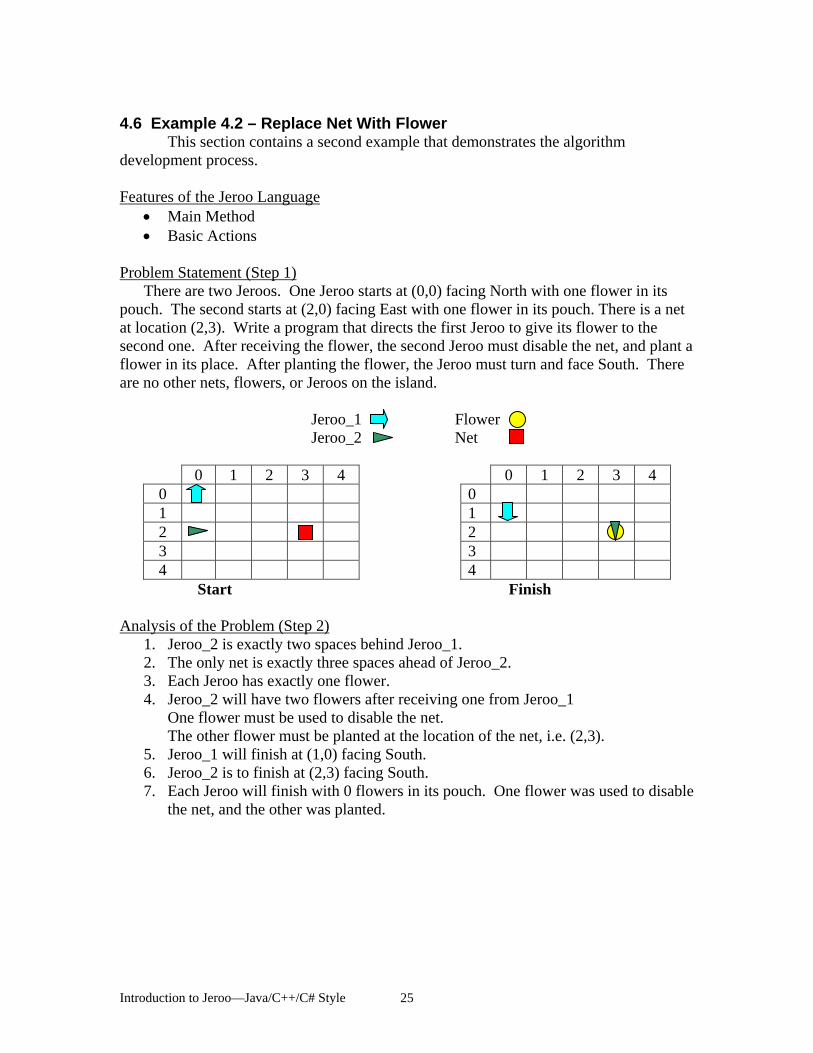
4.6 Example 4.2 – Replace Net With Flower This section contains a second example that demonstrates the algorithm development process. Features of the Jeroo Language
• Main Method • Basic Actions
Problem Statement (Step 1) There are two Jeroos. One Jeroo starts at (0,0) facing North with one flower in its pouch. The second starts at (2,0) facing East with one flower in its pouch. There is a net at location (2,3). Write a program that directs the first Jeroo to give its flower to the second one. After receiving the flower, the second Jeroo must disable the net, and plant a flower in its place. After planting the flower, the Jeroo must turn and face South. There are no other nets, flowers, or Jeroos on the island. Jeroo_1 Flower Jeroo_2 Net
0 1 2 3 4 0 1 2 3 4 0 0 1 1 2 2 3 3 4 4
Start Finish Analysis of the Problem (Step 2)
1. Jeroo_2 is exactly two spaces behind Jeroo_1. 2. The only net is exactly three spaces ahead of Jeroo_2. 3. Each Jeroo has exactly one flower. 4. Jeroo_2 will have two flowers after receiving one from Jeroo_1
One flower must be used to disable the net. The other flower must be planted at the location of the net, i.e. (2,3).
5. Jeroo_1 will finish at (1,0) facing South. 6. Jeroo_2 is to finish at (2,3) facing South. 7. Each Jeroo will finish with 0 flowers in its pouch. One flower was used to disable
the net, and the other was planted.

Introduction to Jeroo—Java/C++/C# Style 26
High-level Algorithm (Step 3) Let’s name the first Jeroo Ann, and the second one Andy. Ann should do the following Find Andy (but don’t collide with him) Give a flower to Andy (he will be straight ahead) After receiving the flower, Andy should do the following Find the net (but don’t hop onto it) Disable the net Plant a flower at the location of the net Face South
Detailed Algorithm (Step 4) Let’s name the first Jeroo Ann, and name the second one Andy. Ann should do the following Find Andy Turn around (either left or right twice) Hop (to location (1,0) Give a flower to Andy Give ahead Now Andy should do the following Find the net Hop twice (to location (2,2) Disable the net Toss Plant a flower at the location of the net Hop (to location(2,3)) Plant a flower Face South Turn right
Review the Algorithm (Step 5)
1. The high-level algorithm helps manage the details. 2. This algorithm solves a very specific problem, but the specific locations are not
important. The only thing that is important is the starting location of the Jeroos relative to one another and the location of the net relative to the second Jeroo’s location and direction.
Introduction to Jeroo—Java/C++/C# Style 27
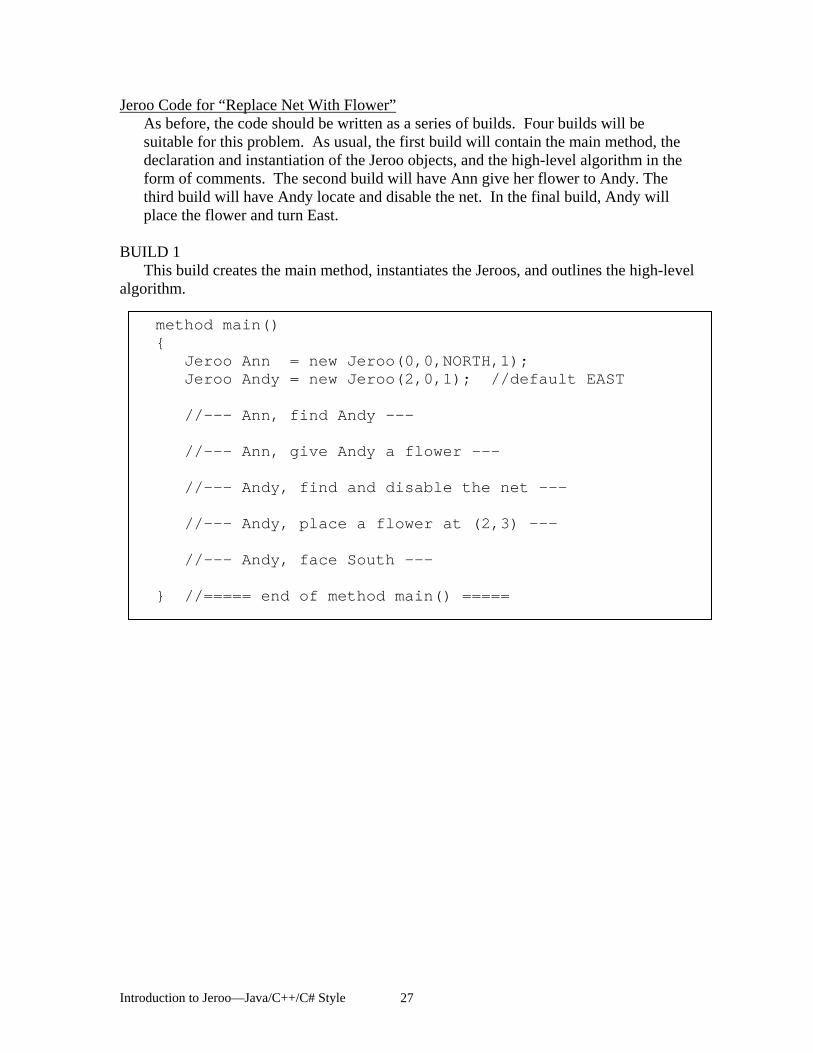
Jeroo Code for “Replace Net With Flower” As before, the code should be written as a series of builds. Four builds will be suitable for this problem. As usual, the first build will contain the main method, the declaration and instantiation of the Jeroo objects, and the high-level algorithm in the form of comments. The second build will have Ann give her flower to Andy. The third build will have Andy locate and disable the net. In the final build, Andy will place the flower and turn East.
BUILD 1 This build creates the main method, instantiates the Jeroos, and outlines the high-level algorithm.
method main() { Jeroo Ann = new Jeroo(0,0,NORTH,1); Jeroo Andy = new Jeroo(2,0,1); //default EAST //--- Ann, find Andy --- //--- Ann, give Andy a flower --- //--- Andy, find and disable the net --- //--- Andy, place a flower at (2,3) --- //--- Andy, face South --- } //===== end of method main() =====

Introduction to Jeroo—Java/C++/C# Style 28
BUILD 2 This build adds the logic for Ann to locate Andy and give him a flower. The new code is shown in boldface type.
method main() { Jeroo Ann = new Jeroo(0,0,NORTH,1); Jeroo Andy = new Jeroo(2,0,1); //-- default EAST //--- Ann, find Andy --- Ann.turn(LEFT); Ann.turn(LEFT); Ann.hop(); //-- Ann is at (1,0) facing South //-- Andy is directly ahead //--- Ann, give Andy a flower --- Ann.give(AHEAD); //-- Ann has 0 flowers, Andy has 2 //--- Andy, find and disable the net --- //--- Andy, place a flower at (2,3) --- //--- Andy, face South --- } //===== end of method main() =====

Introduction to Jeroo—Java/C++/C# Style 29
BUILD 3 This build adds the logic for Andy to locate and disable the net. The new code is shown in boldface type.
method main() { Jeroo Ann = new Jeroo(0,0,NORTH,1); Jeroo Andy = new Jeroo(2,0,1); //default EAST //--- Ann, find Andy --- Ann.turn(LEFT); Ann.turn(LEFT); Ann.hop(); //-- Ann is at (1,0) facing South //-- Andy is directly ahead //--- Ann, give Andy a flower --- Ann.give(AHEAD); //-- Ann has 0 flowers, Andy has 2 //--- Andy, find and disable the net --- Andy.hop(2); //-- Andy is at (2,2) facing the net Andy.toss(); //--- Andy, place a flower at (2,3) --- //--- Andy, face South --- } //===== end of method main() =====

Introduction to Jeroo—Java/C++/C# Style 30
BUILD 4 (Final) This build adds the logic for Andy to place a flower at (2,3) and turn South. The new code is shown in boldface type.
method main() { Jeroo Ann = new Jeroo(0,0,NORTH,1); Jeroo Andy = new Jeroo(2,0,1); //default EAST //--- Ann, find Andy --- Ann.turn(LEFT); Ann.turn(LEFT); Ann.hop(); //-- Ann is at (1,0) facing South //-- Andy is directly ahead //--- Ann, give Andy a flower --- Ann.give(AHEAD); //-- Ann has 0 flowers, Andy has 2 //--- Andy, find and disable the net --- Andy.hop(2); //-- Andy is at (2,2) facing the net Andy.toss(); //--- Andy, place a flower at (2,3) --- Andy.hop(); Andy.plant(); //--- Andy, face South --- Andy.turn(RIGHT); } //===== end of method main() =====
Introduction to Jeroo—Java/C++/C# Style 31
Chapter 5 – Creating and Using Jeroo Methods The Jeroo language contains a set of fundamental methods that define the basic behaviors of every Jeroo. These include the basic actions (table 4.3) and the sensor methods (table 6.3). Some problems are such that it would be convenient if we could extend the basic behaviors of the Jeroos. The Jeroo language allows us to write programmer-defined Jeroo methods that extend the behavior of every Jeroo. 5.1 Creating and Using a Jeroo Method The concepts of behavior and method were defined in section 2.7 and are repeated here. A behavior is an action that an object can take or a task that it can perform in response to a request from an external source. A method is a collection of statements that are written in some programming language to describe a specific behavior. These definitions imply that the creation of a method is a two-part process. First, we need to define and name the new behavior. Second, we need to write the source code for the method. Defining a Behavior The first question we must ask is “How do I decide on a good behavior?” There is no fixed answer to this question, but there are some guidelines to follow.
1. Examine the high-level algorithm. Any complex, but well-defined, step is a candidate for a new behavior, especially if two or more Jeroos need to perform that step.
2. Examine the detailed-algorithm. Any sequence of steps that occur several times is a candidate for a new behavior.
These guidelines serve as a starting point, but experience is a good teacher. Examine your own programs and those of others. A good behavior has a very clear definition and is used more than once in the program.

Introduction to Jeroo—Java/C++/C# Style 32
Writing a Jeroo Method A Jeroo method contains the source code that describes what an arbitrary Jeroo needs to do to carry out the corresponding behavior. The form of a Jeroo method is shown in figure 5.1 for Jeroo’s Java/C++/C#-style language. The method_identifier on the first line (the header line) is a name that the programmer chooses for the method. The name should indicate the corresponding behavior. The rules for creating an identifier for a method are the same as those given in section 4.3. As with the main method, we should indent every line between the opening and closing braces in every Jeroo method.
method method_identifier() { } //===== end of method method_identifier() =====
Figure 5.1 – Form of a Java-Style Jeroo Method
There is one important difference between a Jeroo method and the main method. Since a Jeroo method defines a behavior that applies to every Jeroo, we cannot send a message to a specific Jeroo. Instead, we simply write the name of the method. When the program is running, the messages are sent to the Jeroo that is performing the entire method.
EXAMPLE New Behavior: Turn around
//********************************************** // This method makes a Jeroo turn 180 degrees //********************************************** method turnAround() { turn(LEFT); turn(LEFT); } //===== end method turnAround() =====
Body of the method
Write a sequence of statements that describe how an arbitrary Jeroo can carry out the corresponding behavior.
Braces mark the beginning and end of the body.
Empty parentheses are required

Introduction to Jeroo—Java/C++/C# Style 33
It is possible for one Jeroo method to use another, or even itself.
EXAMPLE New Behaviors: Plant four flowers in a row Plant two adjacent rows with four flowers per row
//********************************************** // This method plants four flowers in a row. // starting at the current location //********************************************** method plantFour() { plant(); //-- one --- hop(); plant(); //-- two --- hop(); plant(); //-- three --- hop(); plant(); //-- four --- } //===== end method plantFour() ===== //************************************************** // This method plants two adjacent rows of flowers. //************************************************** method plantRowsOfFour() { //--- Plant first row --- plantFour(); //--- Move into position for next row --- turn(RIGHT); hop(); turn(RIGHT); //--- Plant second row (in opposite direction) --- plantFour(); } //===== end method plantRowsOfFour() =====
Introduction to Jeroo—Java/C++/C# Style 34
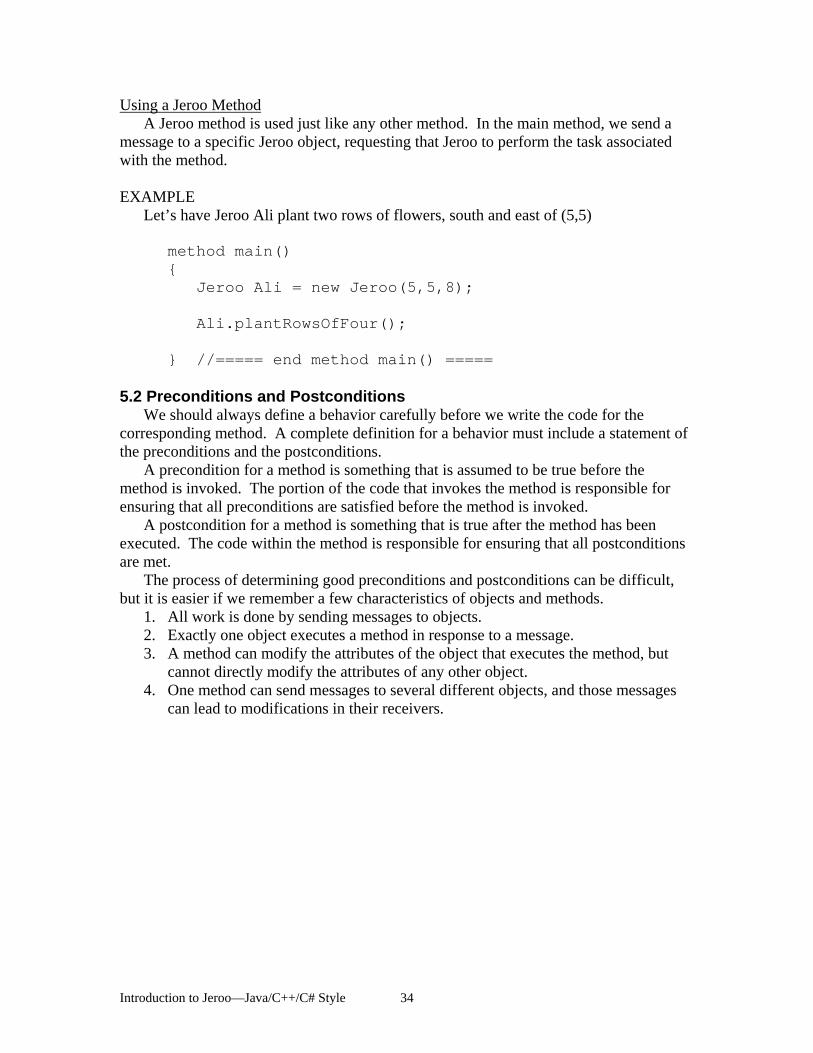
Using a Jeroo Method A Jeroo method is used just like any other method. In the main method, we send a message to a specific Jeroo object, requesting that Jeroo to perform the task associated with the method. EXAMPLE
Let’s have Jeroo Ali plant two rows of flowers, south and east of (5,5) method main() { Jeroo Ali = new Jeroo(5,5,8); Ali.plantRowsOfFour(); } //===== end method main() =====
5.2 Preconditions and Postconditions We should always define a behavior carefully before we write the code for the corresponding method. A complete definition for a behavior must include a statement of the preconditions and the postconditions. A precondition for a method is something that is assumed to be true before the method is invoked. The portion of the code that invokes the method is responsible for ensuring that all preconditions are satisfied before the method is invoked. A postcondition for a method is something that is true after the method has been executed. The code within the method is responsible for ensuring that all postconditions are met. The process of determining good preconditions and postconditions can be difficult, but it is easier if we remember a few characteristics of objects and methods.
1. All work is done by sending messages to objects. 2. Exactly one object executes a method in response to a message. 3. A method can modify the attributes of the object that executes the method, but
cannot directly modify the attributes of any other object. 4. One method can send messages to several different objects, and those messages
can lead to modifications in their receivers.

Introduction to Jeroo—Java/C++/C# Style 35
Using the previous list of characteristics as a guide, we can use the following questions as a basis for writing preconditions and postconditions. When we are working with the Jeroo language, we only have to consider two classes of objects, Jeroos and Island cells. We need to consider how a method can change the attributes of the Jeroo object that executes the method. The Island cells are less evident because we cannot send them messages, but the Jeroo actions pick, plant, and toss can change the contents of a cell. Behind the scenes, the pick, plant, and toss methods send appropriate messages to the island cells. Precondition Questions Postcondition Questions Do any of the attributes of the receiving object need to have specific values? Location Direction Flowers
How does this method affect the attributes of the receiving object? Location Direction Flowers
Are the contents of certain island cells important?
Have the contents of any island cells changed?
The preconditions and postconditions can be created rather informally, but the final versions should be stated in a comment block at the beginning of the source code for the method.
EXAMPLE New Behavior: Plant four flowers in a row
//********************************************** // This method plants four flowers in a row. // starting at the current location // //PRECONDITIONS // 1. The three spaces directly ahead of // the Jeroo are clear. // 2. The Jeroo has at least four flowers. //POSTCONDITIONS // 1. The Jeroo has planted four flowers, // starting at its current location and // proceeding straight ahead. // 2. The Jeroo is standing on the last flower, // and facing in its original direction. //**********************************************

Introduction to Jeroo—Java/C++/C# Style 36
5.3 Example 5.1 – Clear Nets and Pick The section contains an extended example that demonstrates the algorithm development process, and shows a recommended process for developing source code that contains Jeroo methods. Features of the Jeroo Language
• Main Method • Basic Actions • Jeroo Methods (programmer-defined methods)
Problem Statement (Step 1) A Jeroo starts at (1,4) facing North with 5 flowers in its pouch. There are two nets immediately South of the Jeroo at locations (2,4) and (3,4). There is a flower directly South of the second net. Write a program that directs the Jeroo to disable the nets and pick the flower. After picking the flower, the Jeroo should return to its starting location and face South. Jeroo Flower Net
0 1 2 3 4 0 1 2 3 4 0 0 1 1 2 2 3 3 4 4
Start Finish Analysis of the Problem (Step 2)
1. The Jeroo must turn around to locate the first net 2. Each net is directly South of the previous one 3. The first net is directly South of the Jeroo 4. The flower is at location (4,4) 5. The Jeroo must finish facing South at location (1,4) 6. The Jeroo should finish with 5 – 2 + 1 = 4 flowers

Introduction to Jeroo—Java/C++/C# Style 37
Detailed Algorithm (Steps 3 and 4) Let’s name the Jeroo kim. kim should do the following Turn around //now at (1,4) facing South Disable two nets in a row Toss Hop once // now at (2,4) facing South Toss Hop once // now at (3,4) facing South Get the flower Hop once // now on flower at (4,4) facing South Pick Go back to (1,4) and turn around Turn around // now at (4,4) facing North Hop 3 times // now at (1,4) facing North Turn around //now at (1,4) facing South
Review the Algorithm (Step 5) 1. The high-level algorithm helps manage the details. 2. We used a “turn around” step in example 4.2. We can use the same logic here. 3. The act of turning around appears as a step in the high-level algorithm and as part
of the “Go back to (1,4) and turn around” step. Interesting!

Introduction to Jeroo—Java/C++/C# Style 38
Possible Behaviors 1. “Turn around” is used three times 2. The sequence “Toss, Hop” is used two times in the Disable nets step. We will write a Jeroo method for each of these behaviors, but first, we need to define
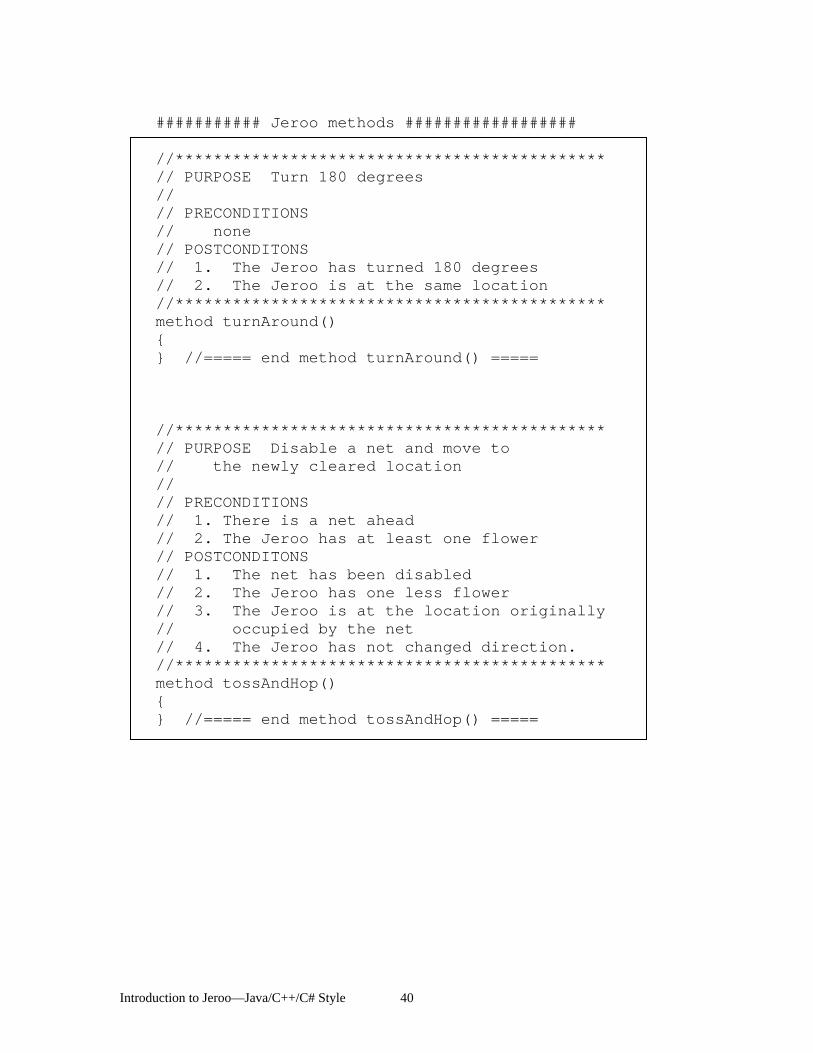
a purpose, preconditions, and postconditions for each method. This can be done informally, because we will write these things in a comment block at the beginning of each method. Method: turnAround() Purpose: Make the Jeroo turn 180 degrees Preconditons: none Postconditons: The Jeroo has turned 180 degrees The Jeroo is at the same location. Method: tossAndHop() Purpose: Disable a net and move to the newly cleared location Preconditons: There is a net ahead The Jeroo has at least one flower Postconditons: The net has been disabled The Jeroo has one less flower The Jeroo is at the location originally occupied by the net The Jeroo has not changed direction
The last postcondition of the tossAndHop method simply says that the Jeroo is facing the direction it was facing at the start of the method. It does not prohibit the Jeroo from changing direction during the course of the method as long as the Jeroo returns to its original direction at the end.

Introduction to Jeroo—Java/C++/C# Style 39
Jeroo Code for “Clear Nets and Pick” As before, we should develop the code as a series of builds.
FIRST BUILD
The recommended first build contains three things. 1. The main method 2. Declaration and instantiation of every Jeroo that will be used 3. The high-level algorithm in the form of comments. 4. Skeletons for each of the Jeroo methods. These skeletons are often called stubs. method main() { Jeroo kim = new Jeroo(1,4,NORTH,5); //--- Turn around --- //--- Disable nets --- //--- Get the flower --- //--- Go back to (1,4) and turn around --- } //===== end of method main() =====
Introduction to Jeroo—Java/C++/C# Style 40
########### Jeroo methods ################## //********************************************* // PURPOSE Turn 180 degrees // // PRECONDITIONS // none // POSTCONDITONS // 1. The Jeroo has turned 180 degrees // 2. The Jeroo is at the same location //********************************************* method turnAround() { } //===== end method turnAround() ===== //********************************************* // PURPOSE Disable a net and move to // the newly cleared location // // PRECONDITIONS // 1. There is a net ahead // 2. The Jeroo has at least one flower // POSTCONDITONS // 1. The net has been disabled // 2. The Jeroo has one less flower // 3. The Jeroo is at the location originally // occupied by the net // 4. The Jeroo has not changed direction. //********************************************* method tossAndHop() { } //===== end method tossAndHop() =====

Introduction to Jeroo—Java/C++/C# Style 41
BUILD 2 This build finishes the turnAround method and uses it in the main method. The new code is shown in boldface type. It would be wise to test this method four times, each time start with kim facing in a different direction. Once we are comfortable that this method works correctly, we can proceed with the next build. method main() { Jeroo kim = new Jeroo(1,4,NORTH,5); //--- Turn around --- kim.turnAround(); //--- Disable nets --- //--- Get the flower --- //--- Go back to (1,4) and turn around --- } //===== end of method main() =====
Send the turnAround message to invoke the turnAround method.

Introduction to Jeroo—Java/C++/C# Style 42
########### Jeroo methods ################## //********************************************* // PURPOSE Turn 180 degrees // // PRECONDITIONS // none // POSTCONDITONS // 1. The Jeroo has turned 180 degrees // 2. The Jeroo is at the same location //********************************************* method turnAround() { turn(LEFT); turn(LEFT); } //===== end method turnAround() ===== //********************************************* // PURPOSE Disable a net and move to // the newly cleared location // // PRECONDITIONS // 1. There is a net ahead // 2. The Jeroo has at least one flower // POSTCONDITONS // 1. The net has been disabled // 2. The Jeroo has one less flower // 3. The Jeroo is at the location originally // occupied by the net // 4. The Jeroo has not changed direction //********************************************* method tossAndHop() { } //===== end method tossAndHop() =====

Introduction to Jeroo—Java/C++/C# Style 43
BUILD 3 This build finishes the tossAndHop method and uses it in the main method. Our focus is on destroying the two nets. The new code is shown in boldface type. method main() { Jeroo kim = new Jeroo(1,4,NORTH,5); //--- Turn around --- kim.turnAround(); //--- Disable nets --- kim.tossAndHop(); kim.tossAndHop(); //--- Get the flower --- //--- Go back to (1,4) and turn around --- } //===== end of method main() =====
Send the tossAndHop message to invoke the tossAndHop method.

Introduction to Jeroo—Java/C++/C# Style 44
########### Jeroo methods ################## //********************************************* // PURPOSE Turn 180 degrees // // PRECONDITIONS // none // POSTCONDITONS // 1. The Jeroo has turned 180 degrees // 2. The Jeroo is at the same location //********************************************* method turnAround() { turn(LEFT); turn(LEFT); } //===== end method turnAround() ===== //********************************************* // PURPOSE Disable a net and move to // the newly cleared location // // PRECONDITIONS // 1. There is a net ahead // 2. The Jeroo has at least one flower // POSTCONDITONS // 1. The net has been disabled // 2. The Jeroo has one less flower // 3. The Jeroo is at the location originally // occupied by the net // 4. The Jeroo has not changed direction //********************************************* method tossAndHop() { toss(); hop(); } //===== end method tossAndHop() =====

Introduction to Jeroo—Java/C++/C# Style 45
BUILD 4 (final) This build finishes the program. The new code is shown in boldface type. We need to check to see that kim has the correct number of flowers at the end. method main() { Jeroo kim = new Jeroo(1,4,NORTH,5); //--- Turn around --- kim.turnAround(); //--- Disable nets --- kim.tossAndHop(); kim.tossAndHop(); //--- Get the flower --- kim.hop(); kim.pick(); //--- Go back to (1,4) and turn around --- kim.turnAround(); kim.hop(3); kim.turnAround(); } //===== end of method main() =====

Introduction to Jeroo—Java/C++/C# Style 46
########### Jeroo methods ################## //********************************************* // PURPOSE Turn 180 degrees // // PRECONDITIONS // none // POSTCONDITONS // 1. The Jeroo has turned 180 degrees // 2. The Jeroo is at the same location //********************************************* method turnAround() { turn(LEFT); turn(LEFT); } //===== end method turnAround() ===== //********************************************* // PURPOSE Disable a net and move to // the newly cleared location // // PRECONDITIONS // 1. There is a net ahead // 2. The Jeroo has at least one flower // POSTCONDITONS // 1. The net has been disabled // 2. The Jeroo has one less flower // 3. The Jeroo is at the location originally // occupied by the net // 4. The Jeroo has not changed direction //********************************************* method tossAndHop() { toss(); hop(); } //===== end method tossAndHop() =====

Introduction to Jeroo—Java/C++/C# Style 47
Chapter 6 – Control Structures The methods that we have written thus far have a common characteristic – sequential execution. Sequential execution means that the statements are executed one after another in the order that they appear in the source code. In this chapter, we will learn how to create a block of statements that can be executed several times in succession, how to create an optional block of statements, and how to create alternative blocks of statements. 6.1 Generic Control Structures A control structure is a feature of a programming language that determines the order in which statements will be executed. There are three categories of control structures: (1) sequential structure, (2) repetition structures (also called loops), and (3) selection structures. The sequential structure is the default structure that is used by all programming languages. Unless we indicate otherwise, the statements will be executed in the order that they appear in the source code, and each statement will be executed exactly once each time a method is called. Every program that we have seen thus far uses nothing but the sequential structure. A condition is a crucial part of the repetition structures and the selection structures. A condition is any expression that can be either true or false. Conditions in the Jeroo language are described in sections 6.2 and 6.5. Every repetition structure (or loop) allows a group of statements to be executed several times in succession. There are two important selection structures: a loop that is controlled by the state of the objects in the program, and a loop that is controlled by a counter. The Jeroo language supports just one kind of loop, one that is controlled by the state of the objects in the program. The Jeroo language does not support a counter-controlled loop because Jeroos can’t count. Every selection structure defines alternate paths through the source code. There are three important selection structures: an if structure, an if-else structure, and a multi-way branching structure. An if structure (sometimes called an if-then structure) defines an optional block of statements. An if-else structure (sometimes called an if-then-else structure) defines two different blocks of statements, only one of which will be executed. A multi-way branching structure defines several different blocks of statements, only one of which will be executed. Some programming languages have an explicit statement such as switch or case to create a multi-way branching structure. Jeroo’s Java/C++/C#-style language has both an if structure and an if-else structure, and it supports a common technique for building a multi-way branching structure.

Introduction to Jeroo—Java/C++/C# Style 48
6.1.1 Generic Repetition Structures There are two major parts to every repetition structure, the body and the controlling condition. These two parts provide a way to classify loops. The block of statements that can be executed repeatedly is called the body of the loop. Each time that the statements in the body are executed is called a trip (or iteration) through the loop, and the number of times the body is executed is called the trip count. The controlling condition is a condition that is checked to determine whether to make a trip through the body or terminate the loop. The controlling condition is rechecked after each trip through the body of the loop. One criterion for classifying loops is based on when the controlling condition is checked relative to the first trip through the body. In a pretest loop, the controlling condition is always checked before the body can be executed for the first time. In a posttest loop, the controlling condition is not checked until after the first trip through the body. In either case, the condition is checked after each trip through the body to determine whether or not to make another trip. A second criterion for classifying loops is based on whether a true condition or a false condition leads to a trip through the body. In a while loop, a true condition leads to a trip through the body, but a false condition terminates the loop. In an until loop, a true condition terminates the loop, but a false condition leads to a trip through the body. The difference between the while and until loops is summarized in table 6.1.
WHILE UNTIL Condition Action Condition Action true Make a trip through body true Terminate the loop false Terminate the loop false Make a trip through body
Table 6.1 – Comparison of While and Until Loops Combining these two criteria, we can define four broad categories of loops: pretest while, pretest until, posttest while, and posttest until. Table 6.2 shows the relationship between these categories and some popular programming languages. Pre/Post While/Until Jeroo Java Python VB.NET Other Languages Pretest While X X X X most Until COBOL but
few others Posttest While X many Until X PASCAL and
several others Table 6.2 – Loops and Languages

Introduction to Jeroo—Java/C++/C# Style 49
Since the Jeroo language only contains one repetition structure, we will take a closer look at the pretest while loop. Figure 6.1 shows a generic pretest while loop and uses arrows to show the order in which statements are executed and the condition is checked.
Figure 6.1 – Semantics of a Pretest while Loop 6.1.2 Generic Selection Structures An if structure (sometimes called an if-then structure) defines an optional block of statements. There are two parts to an if structure, the selection condition and the true branch. The true branch contains a block of statements that will only be executed whenever the selection condition is true. Figure 6.2 shows a generic if structure, and uses arrows to show the order in which statements will be executed. There are some similarities with the while loop, but there is one important difference. The if structure (NOT ”if loop”) defines optional code, and that code is either skipped or executed just once. There is no repetition.
Figure 6.2 – Semantics of an if Structure
//some statement while( condition ) { [false] [true] //statements in the body } //next statement
1. Execute “some statement” 2. Check the condition true – execute body recheck condition false – terminate loop execute “next statement?
//some statement if( condition ) { [false] [true] //true branch } //next statement
1. Execute “some statement” 2. Check the condition true – execute true branch false – skip true branch 3. execute “next statement?

Introduction to Jeroo—Java/C++/C# Style 50
An if-else structure (sometimes called an if-then-else structure) defines two different blocks of statements, only one of which will be executed. An if-else structure consists of three parts, the selection condition, the true branch, and the false branch. The true branch contains a block of statements that will be executed whenever the selection condition is true. The false branch contains a block of statements that will be executed whenever the selection condition is false.
Figure 6.3 – Semantics of an if-else Structure
//some statement if( condition ) { [false] [true] //true branch } else { //false branch } //next statement
1. Execute “some statement” 2. Check the condition true – execute true branch skip false branch false – skip true branch execute false branch 3. execute “next statement?

Introduction to Jeroo—Java/C++/C# Style 51
6.2 Conditions Using Sensor Methods The sensor methods are used to ask a Jeroo something about its immediate surroundings. Each sensor method has either a true or a false result. Any method that produces either true or false as a result is called a Boolean method. More generally, any expression that is either true or false is called a Boolean expression. This means that the conditions that are used in various control structures are, in fact, Boolean expressions. In the Jeroo language, the sensor methods are the basic building blocks for creating conditions. The simplest way to create a condition is to invoke a sensor method. Table 6.3 lists all of the sensor methods in the Jeroo language. These methods can only be used to construct conditions. Since they are methods, they are invoked by sending a message to a Jeroo object. Method Purpose Example hasFlower() Does this Jeroo have any
flowers? dean.hasFlower()
isClear( relativeDirection ) Is there a clear space in the indicated direction? A clear space contains no flower, no net, no water, and no Jeroo. [isClear(HERE) is meaningless]
dean.isClear(LEFT) dean.isClear(AHEAD) dean.isClear(RIGHT)
isFacing( compassDirection ) Is this Jeroo facing in the indicated direction?
dean.isFacing(NORTH) dean.isFacing(EAST) dean.isFacing(SOUTH) dean.isFacing(WEST)
isFlower( relativeDirection ) Is there a flower in the indicated direction?
dean.isFlower(HERE) dean.isFlower(LEFT) dean.isFlower(AHEAD) dean.isFlower(RIGHT)
isJeroo( relativeDirection ) Is there another Jeroo in the indicated direction? [isJeroo(HERE) is meaningless]
dean.isJeroo(LEFT) dean.isJeroo(RIGHT) dean.isJeroo(AHEAD)
isNet( relativeDirection ) Is there a net in the indicated direction? [isNet(HERE) is meaningless]
dean.isNet(LEFT) dean.isNet(AHEAD) dean.isNet(RIGHT)
isWater( relativeDirection ) Is there water in the indicated direction? [isWater(HERE) is meaningless]
dean.isWater(LEFT) dean.isWater(AHEAD) dean.isWater(RIGHT)
Table 6.3 – Jeroo’s Sensor Methods

Introduction to Jeroo—Java/C++/C# Style 52
6.3 Repetition Structures in Jeroo A pretest while loop is the only repetition structure in the Jeroo language. Figure 6.4 shows the syntax of the pretest while loop in Jeroo’s Java/C++/C#-style language. There are three important things to observe about the syntax.
1. The condition must be in parentheses. 2. There is no semicolon after the parentheses. 3. The while structure is not a method, which means that we do not send it as a
message to a Jeroo object. There are three important things to observe about the coding style.
1. Braces are used to define the beginning and end of the body. 2. The braces are aligned with the start of the word while. 3. The statements between the braces should be indented 2 or 3 spaces.
Figure 6.4 – Jeroo’s pretest while Structure
EXAMPLE (pretest while structure) Assume that a Jeroo named Kim is not standing on a flower, but there is a line of flowers ahead. Have Kim pick all of those flowers, and stop as soon as there is no flower directly ahead. After picking all of the flowers, Kim should turn to the left.
while( Kim.isFlower(AHEAD) ) { Kim.hop(); Kim.pick(); } Kim.turn(LEFT);
while( condition ) { //statements that comprise the body of the loop }
No semicolon

Introduction to Jeroo—Java/C++/C# Style 53
6.4 Selection Structures in Jeroo The Jeroo language supports both an if structure and an if-else structure, and supports a way to construct a multi-way branching structure. The syntax of each is shown below. An example of each follows its syntax. 6.4.1 Jeroo’s if structure Figure 6.5 shows the syntax of the if structure in Jeroo’s Java/C++/C#-style language. There are three important things to observe about the syntax.
1. The condition must be in parentheses. 2. There is no semicolon after the parentheses. 3. The if structure is not a method, which means that we do not send it as a message
to a Jeroo object. There are three important things to observe about the coding style.
1. Braces are used to define the beginning and end of the true branch. 2. The braces are aligned with the start of the word if. 3. The statements between the braces should be indented 2 or 3 spaces.
Figure 6.5 – Jeroo’s if Structure
EXAMPLE (if structure) Have the Jeroo named Jessica check for a net to her right. If there is one, have her disable it and return to her current state. Whether or not she disables a net, Jessica should hop one space ahead.
if( Jessica.isNet(RIGHT) ) { Jessica.turn(RIGHT); Jessica.toss(); Jessica.turn(LEFT); } Jessica.hop();
if( condition ) { //statements that comprise the true branch }
No semicolon

Introduction to Jeroo—Java/C++/C# Style 54
6.4.2 Jeroo’s if-else structure Figure 6.6 shows the syntax of the if-else structure in Jeroo’s Java/C++/C#-style language. There are four important things to observe about the syntax.
1. The condition must be in parentheses. 2. There is no semicolon after the parentheses. 3. There is no semicolon after the keyword else. 4. The if-else structure is not a method, which means that we do not send it as a
message to a Jeroo object. There are three important things to observe about the coding style.
1. Braces are used to define the beginning and end of both the true branch and the false branch.
2. The braces are aligned with the start of the words if and else. 3. The statements between the braces should be indented 2 or 3 spaces.
Figure 6.6 – Jeroo’s if-else Structure
EXAMPLE (if-else structure) Have the Jeroo named Timmy check for a net straight ahead. If there is one, have him disable it and turn around. If there is not a net straight ahead, Timmy should turn right. After he disables the net and turns around or simply turns right, Timmy must move one space forward.
if( condition ) { //statements that comprise the true branch } else { //statements that comprise the false branch }
No semicolon
if( Timmy.isNet(AHEAD) ) { Timmy.toss(); Timmy.turn(LEFT); Timmy.turn(LEFT); } else { Timmy.turn(RIGHT); } Timmy.hop();

Introduction to Jeroo—Java/C++/C# Style 55
6.4.3 Jeroo’s multi-way selection structure (a cascaded if) Figure 6.7 shows a common technique for writing a multi-way selection structure in Jeroo’s Java/C++/C#-style language. Technically, this structure consists of a series of nested if statements, but the coding style obscures this fact and makes the multi-way selection logic more evident. This particular structure is often called a cascaded if. There are five important things to observe about this structure
1. Each condition must be in parentheses. 2. There is no semicolon after the parentheses. 3. There is no limit on the number of else-if blocks. 4. The final else branch is optional. 5. This structure is not a method, which means that we do not send it as a message to
a Jeroo object. There are three important things to observe about the coding style.
1. Braces are used to define the beginning and end of each branch. 2. The braces are aligned with the start of the words if and else. 3. The statements between the braces should be indented 2 or 3 spaces.
Figure 6.7 – Jeroo’s Multi-Way Selection Structure
if( condition_1 ) { //statements to execute when condition_1 is true } else if ( condition_2 ) { //statements to execute when condition_2 is true } //more else if blocks as necessary else if ( last_condition ) { //statements to execute when last_condition is true } else { //statements to execute when all conditions are false }
The else branch is optional
else if is two words

Introduction to Jeroo—Java/C++/C# Style 56
EXAMPLE (cascaded if structure) Assume that a Jeroo named Louisa is carrying at least one flower. Have her check the cell ahead. If that cell contains a flower, pick it. If that cell contains a net, disable it. If that cell contains water, plant a flower at the current location. If that cell contains another Jeroo, give that Jeroo a flower. Finally, if there is nothing in that cell, have her hop once and turn left.
if( Louisa.isFlower(AHEAD) ) { Louisa.hop(); Louisa.pick(); } else if ( Louisa.isNet(AHEAD) ) { Louisa.toss(); } else if ( Louisa.isWater(AHEAD) ) { Louisa.plant(); } else if ( Louisa.isJeroo(AHEAD) ) { Louisa.give(AHEAD); } else { Louisa.hop(); Louisa.turn(LEFT); }
Introduction to Jeroo—Java/C++/C# Style 57
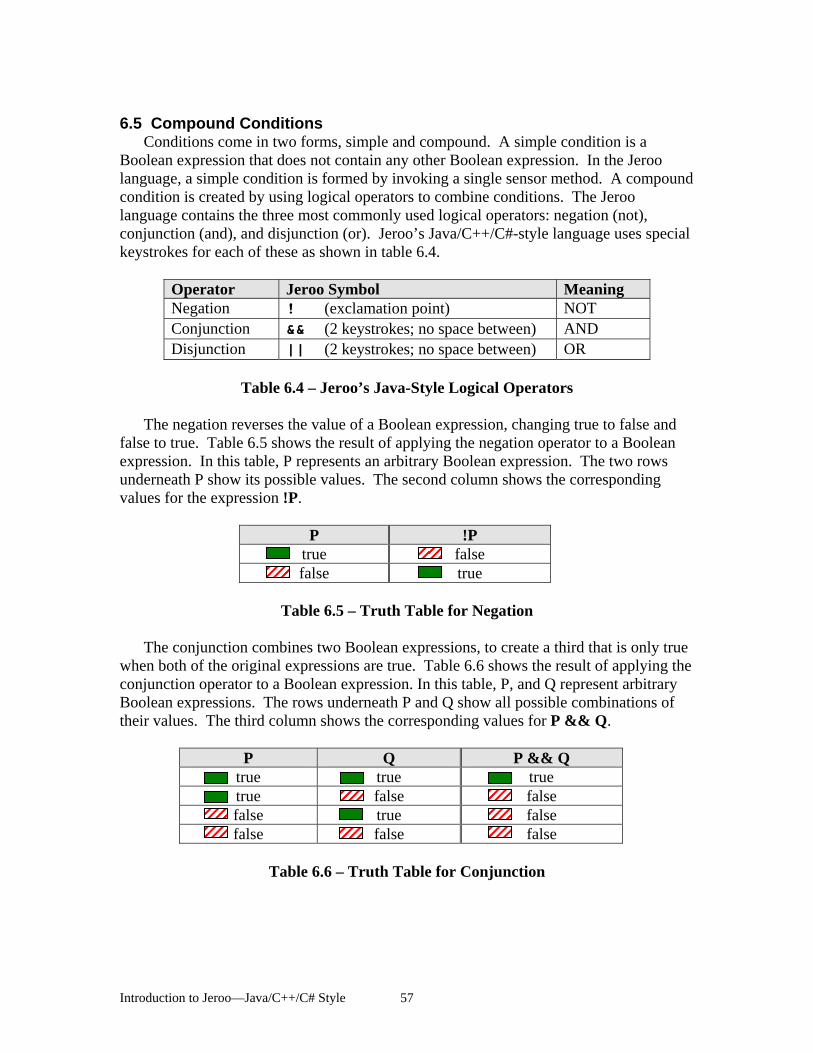
6.5 Compound Conditions Conditions come in two forms, simple and compound. A simple condition is a Boolean expression that does not contain any other Boolean expression. In the Jeroo language, a simple condition is formed by invoking a single sensor method. A compound condition is created by using logical operators to combine conditions. The Jeroo language contains the three most commonly used logical operators: negation (not), conjunction (and), and disjunction (or). Jeroo’s Java/C++/C#-style language uses special keystrokes for each of these as shown in table 6.4.
Operator Jeroo Symbol Meaning Negation ! (exclamation point) NOT Conjunction && (2 keystrokes; no space between) AND Disjunction || (2 keystrokes; no space between) OR
Table 6.4 – Jeroo’s Java-Style Logical Operators
The negation reverses the value of a Boolean expression, changing true to false and false to true. Table 6.5 shows the result of applying the negation operator to a Boolean expression. In this table, P represents an arbitrary Boolean expression. The two rows underneath P show its possible values. The second column shows the corresponding values for the expression !P.
P !P true false false true
Table 6.5 – Truth Table for Negation
The conjunction combines two Boolean expressions, to create a third that is only true when both of the original expressions are true. Table 6.6 shows the result of applying the conjunction operator to a Boolean expression. In this table, P, and Q represent arbitrary Boolean expressions. The rows underneath P and Q show all possible combinations of their values. The third column shows the corresponding values for P && Q.
P Q P && Q true true true true false false false true false false false false
Table 6.6 – Truth Table for Conjunction

Introduction to Jeroo—Java/C++/C# Style 58
The disjunction combines two Boolean expressions, to create a third that is only false when both of the original expressions are false. Table 6.7 shows the result of applying the disjunction operator to a Boolean expression. In this table, P, and Q represent arbitrary Boolean expressions. The rows underneath P and Q show all possible combinations of their values. The third column shows the corresponding values for the expression P || Q.
P Q P || Q true true true true false true false true true false false false
Table 6.7 – Truth Table for Disjunction
EXAMPLES (compound conditions) Remember that these are expressions that could be either true or false. They are not statements of fact.
Boolean Expression (Java-style) English Translation ! Bob.isNet(AHEAD) There is not a net ahead of Bob Bob.hasFlower() && Bob.isClear(LEFT) Bob has at least one flower and there is
nothing in the cell immediately to the left of Bob.
Bob.isWater(AHEAD) || Bob.isWater(RIGHT) There is water ahead of Bob or to the right of Bob, or both
Bob.isFacing(WEST) && ( ! Bob.isNet(AHEAD) )
Bob is facing west and there is no net ahead

Introduction to Jeroo—Java/C++/C# Style 59
Appendix A – The Java/C++/C# Language Summary A.1 General Principles
• The language is case-sensitive. • Every Jeroo program consists of comments, blank lines, and statements. • The rules for creating identifiers (names for Jeroos and methods) are the same as those
for creating identifiers in Java. • Each program must have exactly one main method. • All Jeroos must be declared and instantiated at the beginning of the main method. • A program can have zero or more programmer-defined Jeroo methods. • There is no limit to the number of programmer-defined Jeroo methods. • The Jeroo methods are written one after another. • Only comments and blank lines can appear between methods. • Jeroo methods can be recursive. This means that any method may invoke itself.
A.2 Comments and Blank Lines A comment in Jeroo begins with the digraph // and continues until the end of the line. Comments and blank lines can be inserted anywhere in a Jeroo program. A.3 Identifiers An identifier is a name that a programmer creates for a Jeroo or a method. The rules for creating an identifier in Jeroo’s Java-style language are the same as those used in Java.
1. The first character must be a letter, a dollar sign ($), or an underscore (_). 2. The remaining characters can be letters, digits, dollar signs, and underscores. 3. There is no limit on the length of an identifier.
A.4 Statements There are three types of statements in the Jeroo language: declaration/instantiation statements, method invocations, and control structures. These are described in subsequent sections of this appendix.

Introduction to Jeroo—Java/C++/C# Style 60
A.5 Declaring and Instantiating a Jeroo Table A.1 shows examples of the six possible ways to declare and instantiate a Jeroo. Each statement gives you control over the initial values for some of the Jeroo’s attributes. Use the version that most closely suits your needs, and replace the name, location, direction, and number of flowers with whatever values you desire.
Example Attributes Jeroo jessica = new Jeroo(); Name: jessica.
Location: (0,0) Direction: EAST Flowers: 0
Jeroo jessica = new Jeroo(8); Name: jessica. Location: (0,0) Direction: EAST Flowers: 8
Jeroo jessica = new Jeroo(3,4); Name: jessica. Location: (3,4) Direction: EAST Flowers: 0
Jeroo jessica = new Jeroo(3,4,WEST); Name: jessica. Location: (3,4) Direction: WEST Flowers: 0
Jeroo jessica = new Jeroo(3,4,8); Name: jessica. Location: (3,4) Direction: EAST Flowers: 8
Jeroo jessica = new Jeroo(3,4,SOUTH,8); Name: jessica. Location: (3,4) Direction: SOUTH Flowers: 8
Table A.1 – Jeroo’s Declaration and Instantiation Options

Introduction to Jeroo—Java/C++/C# Style 61
A.6 Basic Actions The Jeroo language contains six basic actions as shown in table A.2. Two different methods correspond to the hop action. Method Purpose Example hop() Hop one space ahead.
The program terminates with an error condition if the hopping Jeroo lands in the water, lands on another Jeroo, or hops onto a net. A Jeroo can hop onto a flower.
jessica.hop();
hop(number) Hop number times in a row, where number is a positive integer.
jessica.hop(3); jessica.hop(12);
pick() Pick a flower from the current location. Nothing happens if there is no flower at the current location.
jessica.pick();
plant() Plant a flower at the current location. Nothing happens if the Jeroo does not have a flower to plant.
jessica.plant();
toss() Toss a flower one space ahead. The tossed flower is lost forever. If the flower lands on a net, the net is disabled.
jessica.toss();
turn(relativeDirection) Turn in the indicated direction [ turn(AHEAD) and turn(HERE) are meaningless ]
jessica.turn(LEFT); jessica.turn(RIGHT);
give(relativeDirection) Give a flower to a Jeroo in a neighboring cell in the indicated direction. Nothing happens if the giving Jeroo has no flowers or if there is no Jeroo in the indicated direction. [give(HERE) is meaningless ]
jessica.give(LEFT); jessica.give(RIGHT);
Table A.2 – Jeroo’s Basic Actions
A.7 Direction Each Jeroo knows four relative directions and four compass directions as shown in table A.3. Each direction must be written in UPPER CASE. The relative direction HERE refers to the Jeroo’s current location. The HERE direction is only useful with the Boolean method isFlower.
Relative Directions Compass Directions LEFT RIGHT AHEAD HERE
NORTH EAST SOUTH WEST
Table A.3 – Jeroo’s Directions

Introduction to Jeroo—Java/C++/C# Style 62
A.8 Methods The Jeroo language supports two types of methods: a main method and programmer-defined Jeroo methods. The main method describes how to use one or more Jeroos to solve a specific problem. A programmer-defined Jeroo method describes a specific behavior that every Jeroo will be able to execute. A Jeroo program must contain exactly one main method, but it may contain any number of programmer-defined Jeroo methods. Format of the Main Method
The main method contains the logic for using one or more Jeroos to solve a specific problem. method main() { }
Example
method main() { Jeroo jessica = new Jeroo(2,1); Jeroo dean = new Jeroo(4,3,SOUTH,5); jessica.hop(); dean.turn(LEFT); dean.toss(); } //===== end method main() =====
Declare one or more Jeroos.
Write a sequence of statements that describe how to use the Jeroos to solve a specific problem.

Introduction to Jeroo—Java/C++/C# Style 63
A.9 Format of a Programmer-Defined Jeroo Method • A complete program can contain any number of Jeroo methods. • Each method describes a behavior that all Jeroos will be able to execute. • A Jeroo method can contain any number of control structures. • A method may invoke (use) another Jeroo method. • A Jeroo method cannot contain declaration/instantiation statements. • Since a Jeroo method can be executed by any Jeroo, all messages within a method must
be written without naming a specific Jeroo. For example, write hop(); instead of jessica.hop(); .
method method_name() { } //===== end method method_name() =====
Examples
method tripleStep() { hop(); hop(); hop(); } //===== end method tripleStep() ===== method pickLineAhead() { while( isFlower(AHEAD) ) { hop(); pick(); } } //===== end method pickLineAhead() =====
Write the logic for solving the problem

Introduction to Jeroo—Java/C++/C# Style 64
A.10 Sending a Message to a Jeroo The logic for solving a problem consists of sending messages to specific Jeroos. Each message is a request that a particular Jeroo either execute a method that is part of the basic Jeroo language, or execute a programmer-defined Jeroo method. A message consists of the name of a method followed by a pair of parentheses. The syntax of sending a message is shown below.
jeroo_name.method_name(…); Replace the values of jeroo_name and method_name with whatever names are appropriate for your program. Examples
mary.hop(); //tell mary to hop once john.pick(); //tell john to pick a flower
Required period Required parentheses Either empty or with an appropriate argument
l
Required semicolon
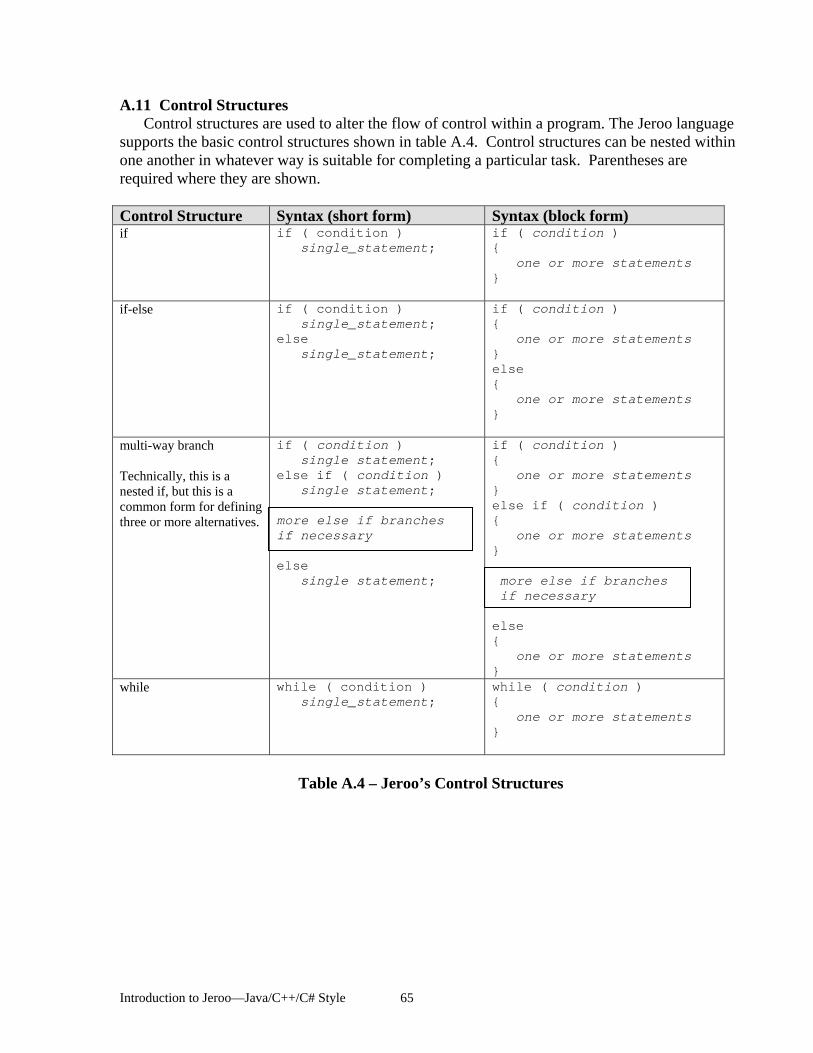
Introduction to Jeroo—Java/C++/C# Style 65
A.11 Control Structures Control structures are used to alter the flow of control within a program. The Jeroo language supports the basic control structures shown in table A.4. Control structures can be nested within one another in whatever way is suitable for completing a particular task. Parentheses are required where they are shown. Control Structure Syntax (short form) Syntax (block form) if if ( condition )
single_statement; if ( condition ) { one or more statements }
if-else if ( condition ) single_statement; else single_statement;
if ( condition ) { one or more statements } else { one or more statements }
multi-way branch Technically, this is a nested if, but this is a common form for defining three or more alternatives.
if ( condition ) single statement; else if ( condition ) single statement; more else if branches if necessary else single statement;
if ( condition ) { one or more statements } else if ( condition ) { one or more statements } more else if branches if necessary else { one or more statements }
while while ( condition ) single_statement;
while ( condition ) { one or more statements }
Table A.4 – Jeroo’s Control Structures

Introduction to Jeroo—Java/C++/C# Style 66
A.12 Boolean Methods Boolean methods are used to ask a Jeroo something about its immediate surroundings. Each Boolean method has either a true of a false result. Table A.5 shows all of the Boolean methods in the Jeroo language. Boolean methods can only be used to build conditions. Method Purpose Example hasFlower() Does this Jeroo have any
flowers? dean.hasFlower()
isClear( relativeDirection ) Is there a clear space in the indicated direction? A clear space contains no flower, no net, no water, and no Jeroo. [isClear(HERE) is meaningless]
dean.isClear(LEFT) dean.isClear(AHEAD) dean.isClear(RIGHT)
isFacing( compassDirection ) Is this Jeroo facing in the indicated direction?
dean.isFacing(NORTH) dean.isFacing(EAST) dean.isFacing(SOUTH) dean.isFacing(WEST)
isFlower( relativeDirection ) Is there a flower in the indicated direction?
dean.isFlower(HERE) dean.isFlower(LEFT) dean.isFlower(AHEAD) dean.isFlower(RIGHT)
isJeroo( relativeDirection ) Is there another Jeroo in the indicated direction? [isJeroo(HERE) is meaningless]
dean.isJeroo(LEFT) dean.isJeroo(RIGHT) dean.isJeroo(AHEAD)
isNet( relativeDirection ) Is there a net in the indicated direction? [isNet(HERE) is meaningless]
dean.isNet(LEFT) dean.isNet(AHEAD) dean.isNet(RIGHT)
isWater( relativeDirection ) Is there water in the indicated direction? [isWater(HERE) is meaningless]
dean.isWater(LEFT) dean.isWater(AHEAD) dean.isWater(RIGHT)
Table A.5 – Jeroo’s Boolean Methods

Introduction to Jeroo—Java/C++/C# Style 67
A.13 Conditions Conditions are used to build control structures (if, if-else, cascaded if, and while). There are two types of conditions in the Jeroo language.
Simple Condition A simple condition is formed by sending a Boolean message to a specific Jeroo. Example: jessica.isNet(AHEAD) Compound Condition A compound condition is constructed from simple conditions and the Boolean (or logical)
operators shown in table A.6.
Boolean Operator
Meaning
Name
! NOT Negation && AND Conjunction || OR Disjunction
Table A.6 – Jeroo’s Boolean Operators A negation is formed by placing an exclamation point in front of a simple or compound
condition. The effect is equivalent to saying: “The following is not true.” Example: ! jessica.isNet(AHEAD) This example means: “It is not true that there is a net ahead of jessica.” A conjunction is formed by placing the operator && between two conditions, each of
which is either simple or compound. There must be at least one space on either side of the && operator.
Example: jessica.isNet(RIGHT) && jessica.isNet(LEFT) This example means: “There are nets to the right and left of jessica”. A disjunction is formed by placing the operator || between two conditions, each of
which is either simple or compound. There must be at least one space on either side of the || operator.
Example: jessica.isWater(AHEAD) || jessica.isFlower(HERE) This example means: “There is water directly ahead of jessica, or jessica is standing on a
flower, or both”.

Introduction to Jeroo—Java/C++/C# Style 68
Appendix B – A Brief History of Jeroo Early 1970’s – LOGO Turtles Dr. Seymour Papert of The Massachusetts Institute of Technology conducted extensive
research into the design of programming languages. Part of his research involved teaching elementary school students to write programs that would move robotic turtles around the floor. One product of his work was the LOGO programming language.
Late 1970’s – Karel the Robot Dr. Richard Pattis developed Karel the Robot at Stanford University as a teaching/learning
tool. The design of Karel was inspired by Dr. Papert’s work with robotic turtles. Students would write programs in a Pascal-like language to move Karel (a virtual entity) and have him interact with walls and beepers that could be placed in his (virtual) world. Karel stripped away many of the complexities that are associated with developing even a simple program, and allowed students to focus on problem decomposition, control structures, and subprograms.
1990 – Jessica Lai Kuan Tong developed the Jessica program as her Master’s project at Illinois State
University under the direction of Dr. Dean Sanders. Jessica is a teaching/learning program that was inspired by Karel the Robot. While Ms Tong’s work was never published, the Jessica program was used successfully for several years at Illinois State University.
1999 – Analysis for Jessica’s successor A team of undergraduate students in Dr. Sanders’ software engineering class at Northwest
Missouri State University conducted a system analysis relative to the development of a Java-like successor to the Jessica program. Those students developed preliminary prototypes for the user interface and the design of the language that the students would use.

Introduction to Jeroo—Java/C++/C# Style 69
2001 – Snipe A second team of undergraduate students extended the work of the 1999 team. Working under the codename “Snipe”, these students refined the preliminary prototypes and implemented a basic version of the simulator. 2002-2003 – Jeroo Dr. Dean Sanders of Northwest Missouri State University and Dr. Brian Dorn of the University of Hartford developed Jeroo. Dr. Dorn earned his Bachelor’s degree at Northwest in 2002 and was a member of the 2001 Snipe team. Using the Snipe project as a prototype, Sanders and Dorn refined the user interface, extended the Jeroo programming language, made extensive revisions to the design of the simulator, and implemented a beta version. During the Fall semester of 2002, approximately 100 students at Northwest Missouri State University used the beta version of Jeroo in an introductory programming course. Jeroo was released for general use in the Spring of 2003. 2004 – Premier Award In 2004, Jeroo received the Premier Award for excellence in Engineering Education Software. Ongoing Since the original release, Drs. Sanders and Dorn have continued to revise, extend, and improve Jeroo. The most significant enhancements include the following.
• Support for three programming language styles: Python, VB.NET, and the original Java/C++/C#
• Enhancements to the source code editor • Improvements to the user interface
Comments from students and instructors continue to help shape Jeroo; send yours to [email protected].

Introduction to Jeroo—Java/C++/C# Style 70
Appendix C – Using Jeroo C.1 Installing Jeroo Jeroo has been tested under Linux, Solaris, Mac OS-X, and several versions of Windows.
• Make sure that Java 2 version 1.4.0_01 or later has been installed on your system. • Copy the file jeroo.jar into any convenient directory. This is an executable jar file.
We suggest C:\Jeroo under Windows. • Under Windows, create a desktop shortcut to the file jeroo.jar, and
use the icon jeroo.ico with the shortcut. C.2 Starting the Simulator There are two ways to start the Jeroo simulator.
• Make sure that your screen resolution is set to 800 by 600 or higher. • Under Windows double-click on the Jeroo icon on your desktop. • On a Unix system (or in a command window under Windows) type the command
java -jar jeroo.jar This example assumes that the directory containing jeroo.jar is already in your search path.
The first time you start Jeroo on a specific computer, you will see the preferences dialog shown in figure C.1.
Figure C.1 – Initial Preferences Dialog

Introduction to Jeroo—Java/C++/C# Style 71
After you complete the preferences dialog, you will see a login dialog similar to figure C.2, but all of the fields will be blank. Enter your name, course identification, and project name. Your name is required, but the other two items are optional. The information that you provide will be used to construct a header (or footer) on every page that you print from within Jeroo. The next time you start Jeroo on that computer, these fields will be filled automatically; you can modify the fields as necessary. Click the “Continue” button after you have entered or modified the requested information. Clicking on the “End Program” button will stop the simulator immediately.
Figure C.2 – The Login Dialog

Introduction to Jeroo—Java/C++/C# Style 72
C.3 The User Interface Figure C.3 shows the initial appearance of the main screen for the Jeroo simulator. This screen consists of nine main components: the title bar, the menu bar, the toolbar, the source code panes, the island view, the current language style panel, the cursor location panel, the message area, and the Jeroo status area. These areas are described in subsequent subsections.
Figure C.3 – The Main Screen
Title Bar
Toolbar Menu Bar
Island View Source Code Panes
Message Area Jeroo Status Area
Cursor Location Panel Current Language Style Panel

Introduction to Jeroo—Java/C++/C# Style 73
C.4 The Title Bar The title bar always shows the full path names for the current source code file and the current island file. The word “none” indicates that no file is currently associated with the source code or the layout of the island. Figure C.4 shows a typical title bar indicating that the path to the source file is “C:\JerooPrograms\PickAFlower.jsc”, and the path to the island file is “C:\JerooPrograms\PickAFlower.jev”.
Figure C.4 – A Typical Title Bar
C.5 The Menu Bar The menu bar provides access to menus that help you work with the Jeroo simulator. Each menu has a name with an underlined letter. That letter is called a mnemonic (a mnemonic is an aid to memory). It doesn’t matter whether you use an upper- or lower-case letter for the mnemonic. To open (display the contents of) a menu, you can click the left mouse button or hold down the <Alt> key and type the mnemonic letter.
Figure C.5 – The Menu Bar
C.6 The Toolbar The toolbar is a collection of buttons that parallel the menus. The buttons on the toolbar are arranged in groups that correspond to the various menus. Click on a button or choose the corresponding item from a menu to select a feature of the Jeroo simulator.
Figure C.6 – The Toolbar

Introduction to Jeroo—Java/C++/C# Style 74
C.7 The Source Code Panes You will use the source code panes to write your Jeroo programs. Use the pane labeled “main method” to write the logic for solving a problem. Use the pane labeled “Jeroo methods” to write methods that every Jeroo will be able to execute. Click on the tabs to select the desired pane. The smiley face will show you which pane is currently active. Figure C.7 shows the first part of a main method.
Figure C.7 – The Source Code Panes

Introduction to Jeroo—Java/C++/C# Style 75
C.8 The Island View The island view area shows the current layout of the island. Each flower is represented by the symbol Each net is represented by the symbol Water is represented by the blue symbol When a program is running, each active Jeroo is represented by an arrow that has a unique shape and color.
The arrow always points in the direction that the Jeroo is headed. Figure C.8 shows a typical island view.
Figure C.8 – The Island View
This Jeroo is standing on a flower

Introduction to Jeroo—Java/C++/C# Style 76
C.9 The Current Language Style Panel The current language style panel shows the programming language style that is being used with the current source code file. The programming language style is automatically saved with the source code file, and is reset whenever the file is opened. The user’s preferences are used to determine the style for each new file. This panel can be used to change the style for the current source code, without affecting the preferred style for new files. Figure C.9 indicates that the current source code is assumed to be “Java/C++/C#”.
Figure C.9 – The Current Language Style Panel
C.10 The Cursor Location Panel The cursor location panel shows the location of the cursor whenever it is over the island. Figure C.10 indicates that the cursor is currently pointing at the cell in row 10, column 13. The panel displays the phrase “off the island” when the cursor is not over the island.
Figure C.10 – The Cursor Location Panel
C.11 The Message Area The message area is used to display messages about the state of your Jeroo program. This area also displays messages associated with syntax and runtime errors. The messages in Figure C.11 indicate that a Jeroo program has been compiled successfully and is now being executed step-by-step.
Figure C.11 – The Message Area
C.12 The Jeroo Status Area The Jeroo status area is only active when a program is running. This area provides information about each active Jeroo. The information about a single jeroo shows the number of flowers the jeroo is carrying, the arrow that represents the jeroo, and the name of the jeroo. Figure C.12 shows the appearance of the status area with four active jeroos. Figure C.12 shows that a red arrow represents the jeroo named “bobby” who is facing east and carrying eight flowers. Figure C.12 also shows that the jeroo named “jessica” is represented by a blue arrow, is standing on a flower, is facing south, and has two flowers in her pouch.
Figure C.12 – The Jeroo Status Area

Introduction to Jeroo—Java/C++/C# Style 77
C.13 The Jeroo Controls The Jeroo controls make it easy for you to work with the simulator. Each control includes a menu item, a toolbar button, a keyboard shortcut, a mnemonic (a memory aid), and a tool tip. This combination allows you to work in whatever way feels comfortable. All of the controls are described in the next few sections. The first part of each section shows pictures of a single menu and the group of toolbar buttons that correspond to that menu. The second part of each section contains a table that describes each control in more detail. Let’s look at part of the “Source Edit” controls as an example. Menu Toolbar Group
Most menu item contains an icon that matches the one on the corresponding button, a descriptive name, and the keyboard shortcut. Each menu on the menu bar and most items in that menu have an underlined letter. This is the mnemonic letter. Each row of the descriptive tables contains the icon for that control followed by a description of the control. The first line of the description contains the menu-menuItem text, the keyboard shortcut, and the menmonic key sequence that will open the menu and select the menu item.
Source Edit – Paste <Ctrl-V> <Alt-E><Alt-P> Copy the contents of the system clipboard into the source code area at the current position of the cursor.
There are four ways to activate a control.
1. Left-click on a toolbar button. 2. Select a menu item. 3. Type the keyboard shortcut. In this example, hold down the Ctrl key and type the letter V to activate the
paste control. 4. Type the mnemonic key sequence. In this example, hold down the Alt key and type the letter E to open the
Source Edit menu, then hold down the Alt key and type the letter P to activate the paste control A tool tip will appear whenever you hold the mouse cursor over one of the controls. Each tip is a brief description of the purpose of that control.
will appear whenever you hold the mouse over the button. For example, the tip
For the Paste control The keyboard shortcut is <Ctrl-V> The mnemonic letter is ‘P’
Menu name Menu Item Keyboard Shortcut Mnemonic Key Sequence

Introduction to Jeroo—Java/C++/C# Style 78
C.13.1 Source File Controls These controls allow you to work with files that contain the source code for Jeroo programs. Menu Toolbar Group
Source File – New … <Ctrl-N> <Alt-F><Alt-N> Clear the source code area, and remove the reference to the current source file, if any. If the source code area contains unsaved code, you will be given the choice of saving the existing source code or discarding the changes. When you request a new file, the programming language style will be set according to your preferences.
Source File – Open … <Ctrl-O> <Alt-F><Alt-O> Open an existing source code file. This action will replace the contents of the source code area. If the source code area contains unsaved code, you will be given the choice of saving the existing source code or discarding the changes before the file is opened. When you open a source code file, the current language style will be set to that of the file.
Source File –Save <Ctrl-S> <Alt-F><Alt-S> Save the contents of the current source code area to the current source file. If there is no current source file, the action is the same as that of the “Save As …” control. When you save a source code file, the current programming language style will be saved along with the source code.
Source File – Save As … <Ctrl-A> <Alt-F><Alt-A> Save the contents of the current source code area in a file having a name and location that you will be asked to provide. If you specify a file that already exists, you will be given the option of replacing the contents of that file or specifying a different file name.
Source File – Print <Ctrl-P> <Alt-F><Alt-P> Print the contents of the current source code area. You will have the option of printing just the main method, just the Jeroo methods, or both. The printed pages will have a header that includes the identifying information you provided in the login dialog.
Source File – Exit <Ctrl-Q> <Alt-F><Alt-x> Exit the Jeroo simulator. You will be given the option of saving any unsaved changes to either the source code or the appearance of the island.
List of the five most recently accessed source code files. Click on one of these to open it.

Introduction to Jeroo—Java/C++/C# Style 79
C.13.2 Source Edit Controls These controls help you edit the source code for a Jeroo program. Menu Toolbar Group
Source Edit – Cut <Ctrl-X> <Alt-E><Alt-T> Delete the highlighted source code and save the deleted portion on the system clipboard.
Source Edit – Copy <Ctrl-C> <Alt-E><Alt-C> Copy the highlighted source code onto the system clipboard.
Source Edit – Paste <Ctrl-V> <Alt-E><Alt-P> Copy the contents of the system clipboard into the source code area at the current position of the cursor.
Source Edit – Undo last edit <Ctrl-Z> <Alt-E><Alt-N> Undo the last cut, paste, deletion, or block of typing.
Source Edit – Redo last undo <Ctrl-Y> <Alt-E><Alt-O> Redo the last action that was undone.
Comment Lines Source Edit – Comment Lines <F12> Convert the selected lines into comment lines. If no lines have been selected, this action applies to just the current line. The style of the comments corresponds to the current language style.
Uncomment Lines Source Edit – Uncomment Lines <Shift-F12> Remove comments from the selected lines. If no lines have been selected, this action applies to just the current line.
Indent Lines Source Edit – Indent Lines <Tab> Indent the selected lines. If no lines have been selected, the tab key works as usual, and this menu item is ignored. The size of the indentation is determined by the current tab size.
Unindent Lines Source Edit – Unindent Lines <Shift-Tab> Unindent the selected lines. If no lines have been selected, the <Shift-Tab> works as usual, and this menu item is ignored. Selected lines are moved to the left by an amount that is determined by the current tab size, or by the start of the line, whichever comes first.
Set Preferences for editing source code (see figure C.13) Modify the font in the source editor (see figure C.14)

Introduction to Jeroo—Java/C++/C# Style 80
Figure C.13 – The View/Change Preferences Dialog
Figure C.14 – The Font Selection Dialog

Introduction to Jeroo—Java/C++/C# Style 81
C.13.3 Run Controls These controls allow you to run a Jeroo program step-by-step or without pausing between steps. When you run a Jeroo program, lines in the source code will be highlighted just before they are to be executed. The effect of executing a statement can be seen in the island area. Menu Toolbar Group
Run – Reset < F2> <Alt-R><Alt-R> Clear all messages, highlighting, and status panels. Reset the island to the layout it had before the last time a program was run. This control also re-enables editing and some controls.
Run – Run Stepwise < F3> <Alt-R><Alt-S> Run the current Jeroo program one step at a time. The source code will be saved before running the Jeroo program. The program will be compiled and run based on the current programming language style.
Run – Run Continuously < F4> <Alt-R><Alt-C> Run the current Jeroo program without stopping between statements. The source code will be saved before running the Jeroo program. The speed control can be used to make the program run slower or faster. The program will be compiled and run based on the current programming language style.
Run – Pause < F5> <Alt-R><Alt-P> Pause a program that is running continuously. You can change the speed whenever the program is paused.
Run – Stop Run < F6> <Alt-R><Alt-T> Stop a program that is running continuously.

Introduction to Jeroo—Java/C++/C# Style 82
C.13.4 Run Speed Control This control allows you to increase or decrease the speed at which statements will be executed whenever a Jeroo program is executed continuously. The speed should be chosen before activating the “Run Continuously” control, but it can be changed whenever the program is paused. Menu Toolbar Group

Introduction to Jeroo—Java/C++/C# Style 83
C.13.5 Island File Controls These controls allow you to work with files that contain layout information for the island. Menu Toolbar Group
Island – New … < Ctrl-Shift-N> <Alt-I><Alt-N> Clear the island layout, and remove the reference to the current island file, if any. If the island contains any unsaved changes, you will be given the choice of saving the existing island or discarding the changes.
Island – Open … < Ctrl-Shift-O> <Alt-I><Alt-O> Open an existing island file. This action will replace the contents of the island area. If the island area contains unsaved changes, you will be given the choice of saving the existing layout of the island or discarding the changes before the file is opened.
Island – Save … < Ctrl-Shift-S> <Alt-I><Alt-S> Save the current layout of the island to the current island file. If there is no current island file, the action is the same as that of the “Save As …” control.
Island – Save As … < Ctrl-Shift-A> <Alt-I><Alt-A> Save the current layout of the island in a file having a name and location that you will be asked to provide. If you specify a file that already exists, you will be given the option of replacing the contents of that file or specifying a different file name.
Island – Print < Ctrl-Shift-P> <Alt-I><Alt-P> Print a picture of the island area on a single page. The printed page will have a footer that includes the identifying information you provided in the login dialog.
List of the five most recently accessed island files. Click on one of these to open it.

Introduction to Jeroo—Java/C++/C# Style 84
C.13.6 Island Edit Controls These controls allow you to modify the position of flowers and nets on the island.
If island editing is disabled, the cursor will change to whenever it is over the island. Menu Toolbar Group
Island Edit – Plant Flowers < Shift-F7> <Alt-D><Alt-P> Place flowers on the island.
The cursor will change to whenever it is over the island. Click the left mouse button to place a single flower. Click the right mouse button to remove a single flower. Hold the left mouse button down to place flowers while moving the mouse. Hold the right mouse button down to remove flowers while moving the mouse.
Island Edit – Set Nets < Shift-F8> <Alt-D><Alt-N> Place nets on the island.
The cursor will change to whenever it is over the island. Click the left mouse button to place a single net. Click the right mouse button to remove a single net. Hold the left mouse button down to place nets while moving the mouse. Hold the right mouse button down to remove nets while moving the mouse.
Island Edit – Add Water < Shift-F9> <Alt-D><Alt-W> Add water to the island.
The cursor will change to whenever it is over the island. Click the left mouse button to add water to a single cell. Click the right mouse button to remove water from a single cell. Hold the left mouse button down to add water while moving the mouse. Hold the right mouse button down to remove water while moving the mouse.
Island Edit – Clear Island < Shift-F10> <Alt-D><Alt-C> Remove everything from the island.

Introduction to Jeroo—Java/C++/C# Style 85
C.13.7 Help Menu This menu allows you to obtain a language summary, open a tutorial to help you get started, locate Jeroo’s homepage, and to learn some facts about Jeroo. Menu Toolbar Button
The Getting Started Tutorial provides an introduction to the process of writing a program, designing an island, and running a Jeroo program. The details of the tutorial are based on the current programming language style. The tutorial runs in a separate window that can be moved, resized, or minimized. The Jeroo Homepage menu item points you to Jeroo’s homepage and summarizes its contents.
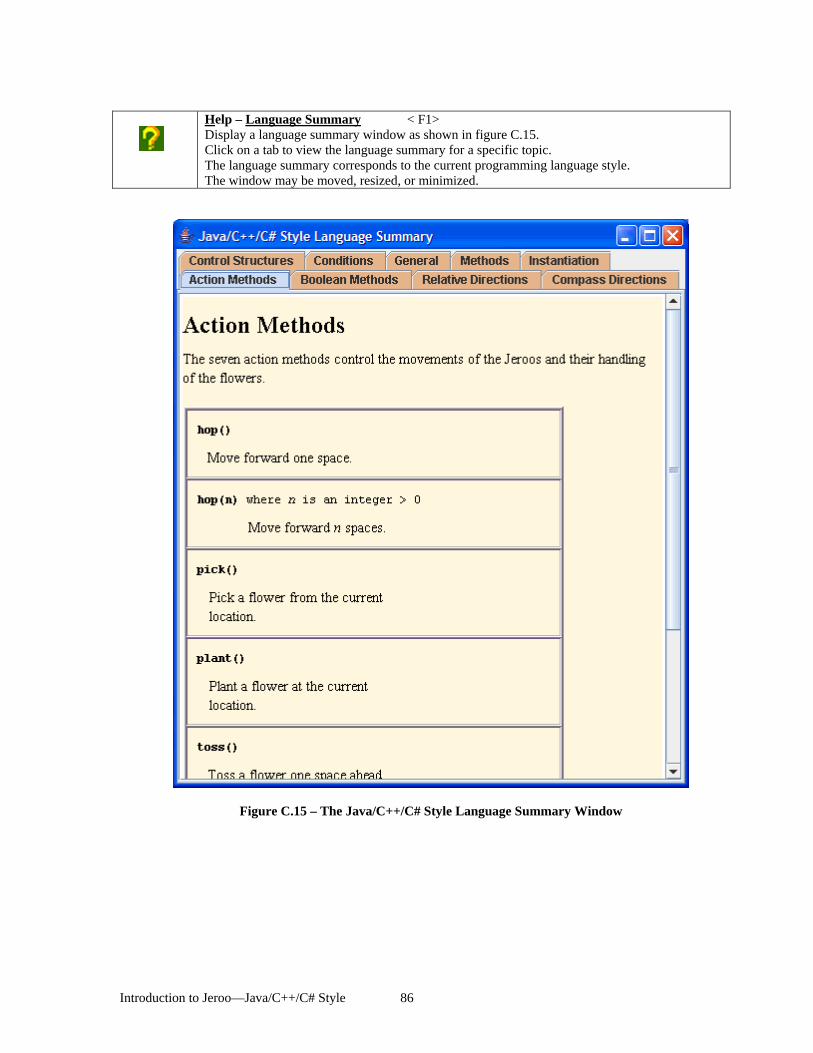
Introduction to Jeroo—Java/C++/C# Style 86
Help – Language Summary < F1> Display a language summary window as shown in figure C.15. Click on a tab to view the language summary for a specific topic. The language summary corresponds to the current programming language style. The window may be moved, resized, or minimized.
Figure C.15 – The Java/C++/C# Style Language Summary Window

Introduction to Jeroo—Java/C++/C# Style 87
C.13.8 Exit Control This control allows you to close the Jeroo simulator. Menu Toolbar Button
Source File – Exit <Ctrl-Q> <Alt-F><Alt-X> Exit the Jeroo simulator. You will be given the option of saving any unsaved changes to either the source code or the appearance of the island.
This menu option