introduction details reconciliation.pdfintroduction this article explains how the sage evolution...
TRANSCRIPT

Introduction This article explains how the Sage Evolution Bank Reconciliation utility works in order to ensure you’re
satisfied with your company’s bank accounts’ transactional content and balances, as compared against
the actual bank account statement’s balance.
This Utility allows you to compare and analyse your GL bank accounts in either the local or foreign currency values, to ensure the transactional integrity of your bank accounts’ history.
Details
Purpose The Bank Reconciliation utility allows you to match the entries as processed in your cashbook, per individual bank account, with the physically received bank statement, for the same General Ledger (GL) bank account. Generally this assists in verifying the correctness of these transactions. Note that any changes made and saved on the Bank Reconciliation screen does not affect any posted debit/credit values of the relevant GL bank account, neither are any additional debit/credit transactions posted by the Bank Recon. Performing routinely bank reconciliations should however be part of any accounting office’s monthly routines to ensure the accuracy of the company’s bank accounts’ transactions, as compared to, and relative to your bank statement.
Accessing and basic navigation of the Bank Reconciliation screen The following steps explain the basic navigation of the Bank Reconciliation screen. 1. From the Evolution System Tree, go to General Ledger | Transactions | Bank Reconciliation.
2. Entering/select the main fields’ values/filters.

Document Version: 2017.03.V01 Author: Bennie Pienaar
3. From the above screen, notice the explanations of the above fields
FIELD EXPLANATION
1. Account: Select the specific GL bank account that you want to reconcile
2. Reconcile up to Month: Select the option if you want to view and reconcile all previous periods (months) up and to the selected month in 3 below, in the results pane. Unselect the option if you only want to view and reconcile specific period selected in 3. below
3. Reconciled Period Select the specific period that needs to be reconciled.
4. Statement Balance Enter the specific closing balance as received on the official bank statement received (for the same period as selected in 3. above).
5. Bank Reference Enter the specific bank statement reference as stated on the bank statement
4. Configuring the Options menu.
5. From the above screen, notice the explanations of the above fields.
FIELD EXPLANATION
1. Show Reconciled Click this option if you want to view the already reconciled transactions in the results pane
2. Show Unreconciled Click this option if you want to view the currently unreconciled transactions in the results pane
3. Include Open Batches Click this option if you also want to view the (unprocessed) bank account transactions which are currently residing on unprocessed
4. Consolidate Reference Click this option to reconcile multiple transactional lines that shares the same period, transaction line Reference number. More details how this feature work explained below.
6. After the above screen filters have bene configured, the use rshoudl then click on the View button to display the
relevnat transactions in the results pane.
7. If at any time you want to reset or change any filter options after the View button has been clicked, simply click on
the Cancel button.

Document Version: 2017.03.V01 Author: Bennie Pienaar
Understanding the Consolidate Reference option 1. Notice the result pane’s values below on the Bank Reconciliation screen, after the View button at the top has
been clicked, and the other header field filters configured, as can be seen below.
2. Also note: before the View has been clicked, the Options menu | Consolidate reference option was not selected.
3. Also notice the same Reference number is shared by the following two transactions in the February 2017 period:
4. At this point, first click on the Cancel button on the top of the screen to remove the current result pane values

Document Version: 2017.03.V01 Author: Bennie Pienaar
5. On the Options menu, now click the Consolidate Reference option. If you then return to the Options menu you’ll
notice the Consolidate Reference options is selected as can be seen below. Don’t click again on it!
6. Click again on the View button.
7. Now notice there are less transactions displayed in the results pane.
This is because the two transactions in period February 2017, that shares transaction Reference number REF006,
have been consolidated into one line and their totals consolidated into one amount = R5500 (R2500 + R3000).
8. Also notice that only transactions in the same period that shares the same Reference number are consolidated.
That explains why the one transaction above of 01/2017, also with reference number REF006, is not also included
in the consolidated transaction line.
Document Version: 2017.03.V01 Author: Bennie Pienaar
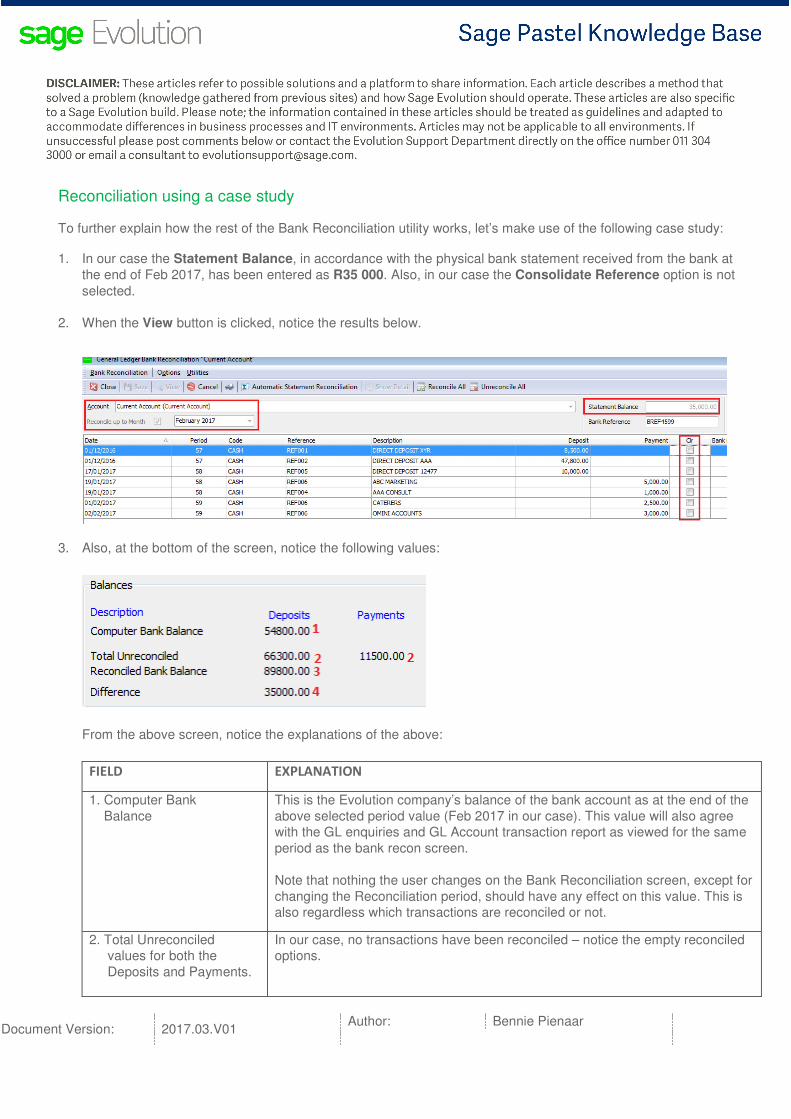
Reconciliation using a case study To further explain how the rest of the Bank Reconciliation utility works, let’s make use of the following case study: 1. In our case the Statement Balance, in accordance with the physical bank statement received from the bank at
the end of Feb 2017, has been entered as R35 000. Also, in our case the Consolidate Reference option is not
selected.
2. When the View button is clicked, notice the results below.
3. Also, at the bottom of the screen, notice the following values:
From the above screen, notice the explanations of the above:
FIELD EXPLANATION
1. Computer Bank
Balance
This is the Evolution company’s balance of the bank account as at the end of the
above selected period value (Feb 2017 in our case). This value will also agree
with the GL enquiries and GL Account transaction report as viewed for the same
period as the bank recon screen.
Note that nothing the user changes on the Bank Reconciliation screen, except for
changing the Reconciliation period, should have any effect on this value. This is
also regardless which transactions are reconciled or not.
2. Total Unreconciled
values for both the
Deposits and Payments.
In our case, no transactions have been reconciled – notice the empty reconciled
options.
Document Version: 2017.03.V01 Author: Bennie Pienaar
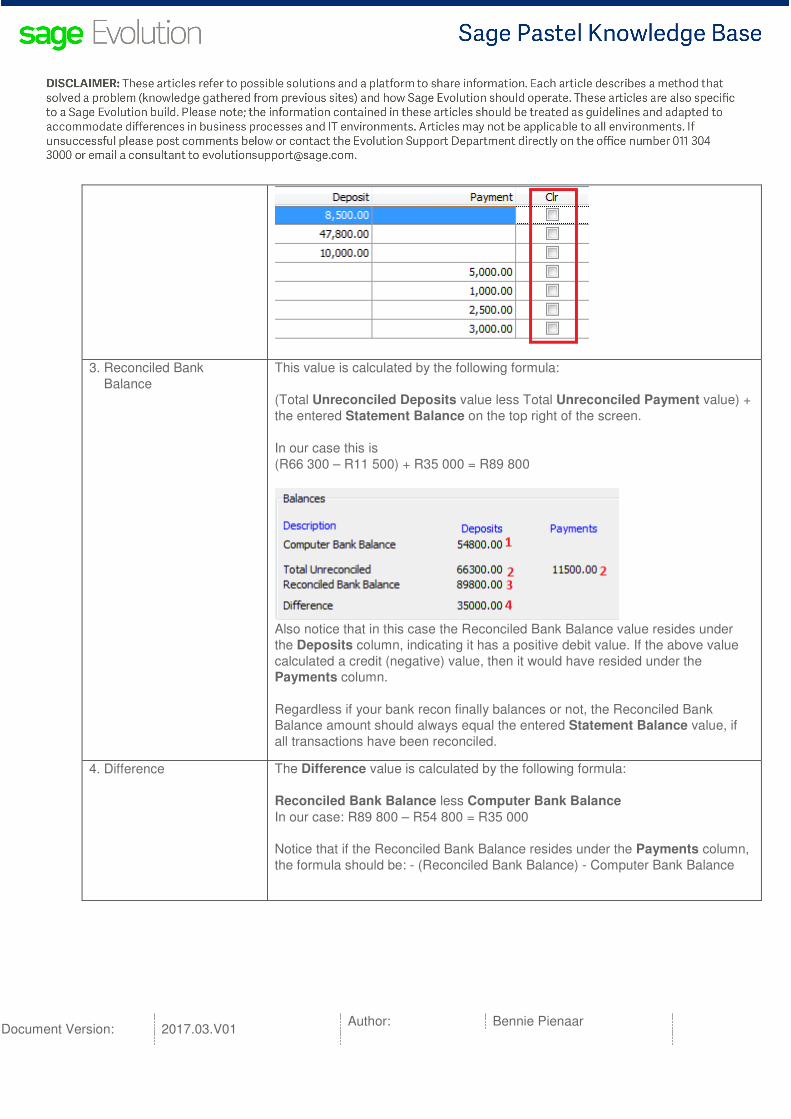
3. Reconciled Bank
Balance
This value is calculated by the following formula:
(Total Unreconciled Deposits value less Total Unreconciled Payment value) +
the entered Statement Balance on the top right of the screen.
In our case this is
(R66 300 – R11 500) + R35 000 = R89 800
Also notice that in this case the Reconciled Bank Balance value resides under
the Deposits column, indicating it has a positive debit value. If the above value
calculated a credit (negative) value, then it would have resided under the
Payments column.
Regardless if your bank recon finally balances or not, the Reconciled Bank
Balance amount should always equal the entered Statement Balance value, if
all transactions have been reconciled.
4. Difference The Difference value is calculated by the following formula:
Reconciled Bank Balance less Computer Bank Balance
In our case: R89 800 – R54 800 = R35 000
Notice that if the Reconciled Bank Balance resides under the Payments column,
the formula should be: - (Reconciled Bank Balance) - Computer Bank Balance

Document Version: 2017.03.V01 Author: Bennie Pienaar
4. Reconciliation of all transactions
As all the transactions processed in the company agrees with those found on the physical bank statement, we’ll select the Clr option for all transactions so that the results pane now appear as follow:
From the above, notice the Bank Reference column values that are automatically populated from the above entered header Bank Reference value.
Also notice you can either use the keyboard’s spacebar or left click in the Clr option box to individually tick the various transactions as they are individually reconciled.
5. Analysing the consolidated reconciliation totals:
As the reconciliation option box for each transaction in step 4 is clicked, so the totals at the bottom left of the results pane differ, according to the formulae discussed above. Let’s further qualify this case study with the following fact: There were no additional transactions found on the physical bank statement that were not processed in the Evolution company.
Document Version: 2017.03.V01 Author: Bennie Pienaar
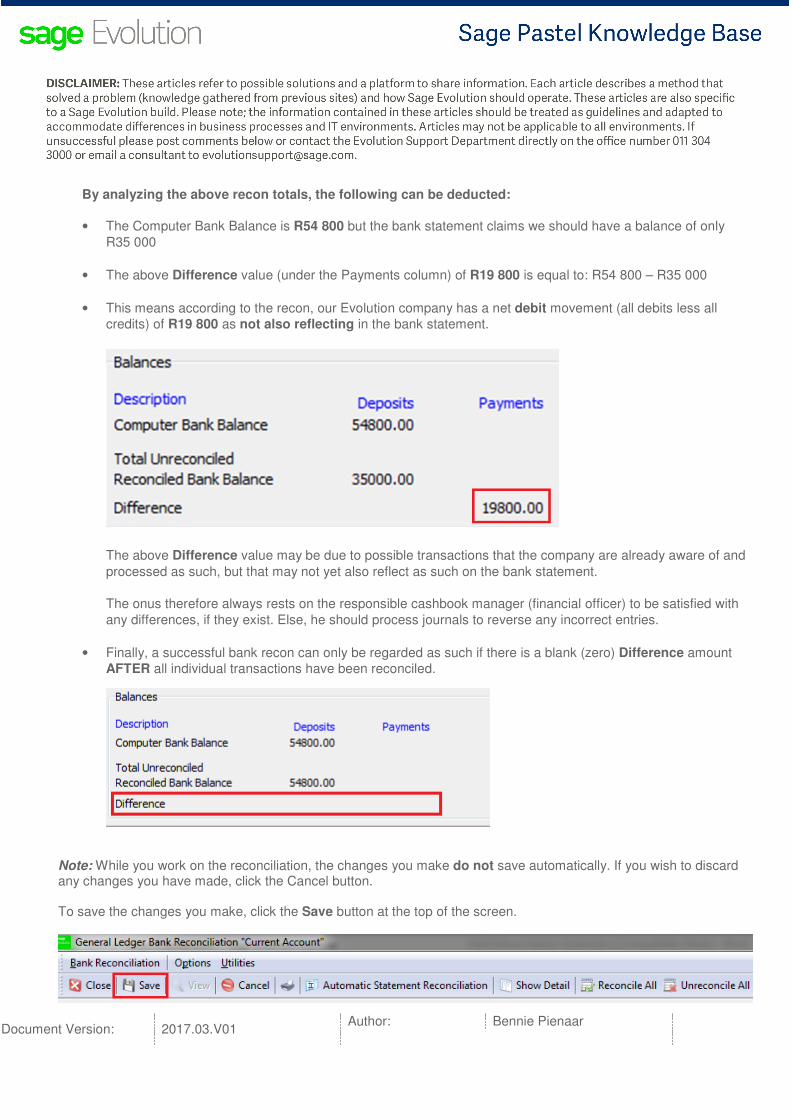
By analyzing the above recon totals, the following can be deducted:
• The Computer Bank Balance is R54 800 but the bank statement claims we should have a balance of only
R35 000
• The above Difference value (under the Payments column) of R19 800 is equal to: R54 800 – R35 000
• This means according to the recon, our Evolution company has a net debit movement (all debits less all
credits) of R19 800 as not also reflecting in the bank statement.
The above Difference value may be due to possible transactions that the company are already aware of and
processed as such, but that may not yet also reflect as such on the bank statement.
The onus therefore always rests on the responsible cashbook manager (financial officer) to be satisfied with
any differences, if they exist. Else, he should process journals to reverse any incorrect entries.
• Finally, a successful bank recon can only be regarded as such if there is a blank (zero) Difference amount
AFTER all individual transactions have been reconciled.
Note: While you work on the reconciliation, the changes you make do not save automatically. If you wish to discard any changes you have made, click the Cancel button. To save the changes you make, click the Save button at the top of the screen.
Document Version: 2017.03.V01 Author: Bennie Pienaar
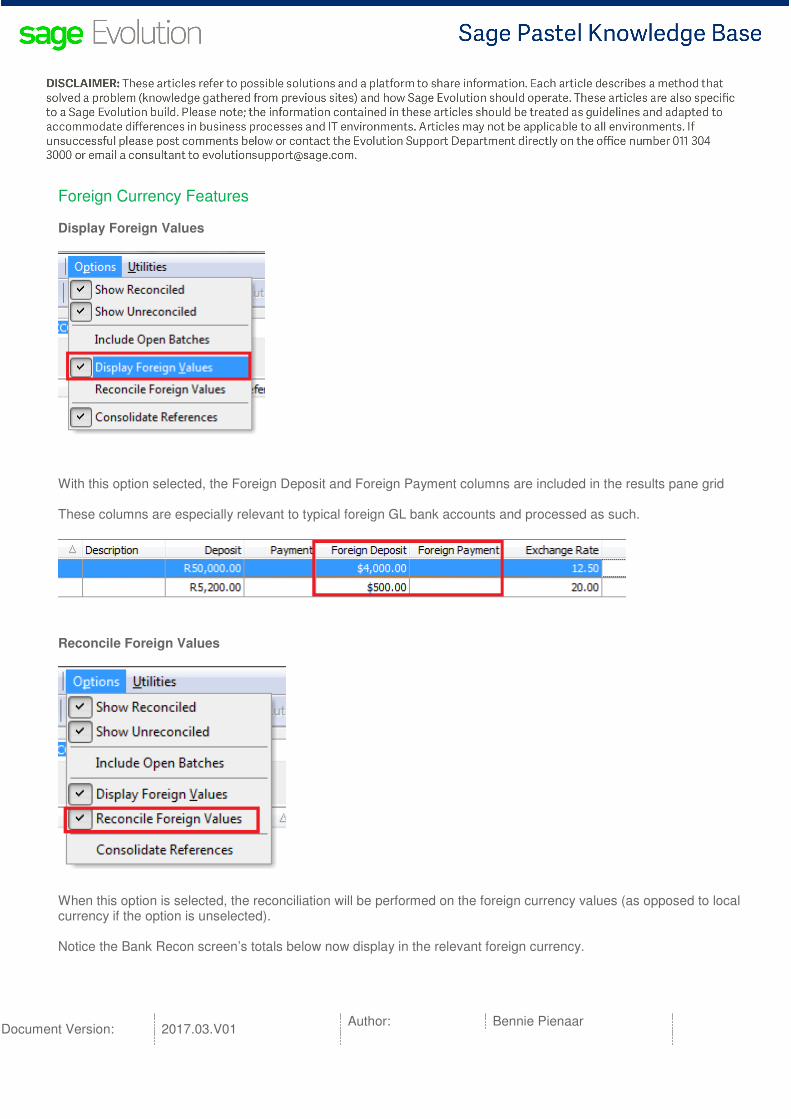
Foreign Currency Features Display Foreign Values
With this option selected, the Foreign Deposit and Foreign Payment columns are included in the results pane grid These columns are especially relevant to typical foreign GL bank accounts and processed as such.
Reconcile Foreign Values
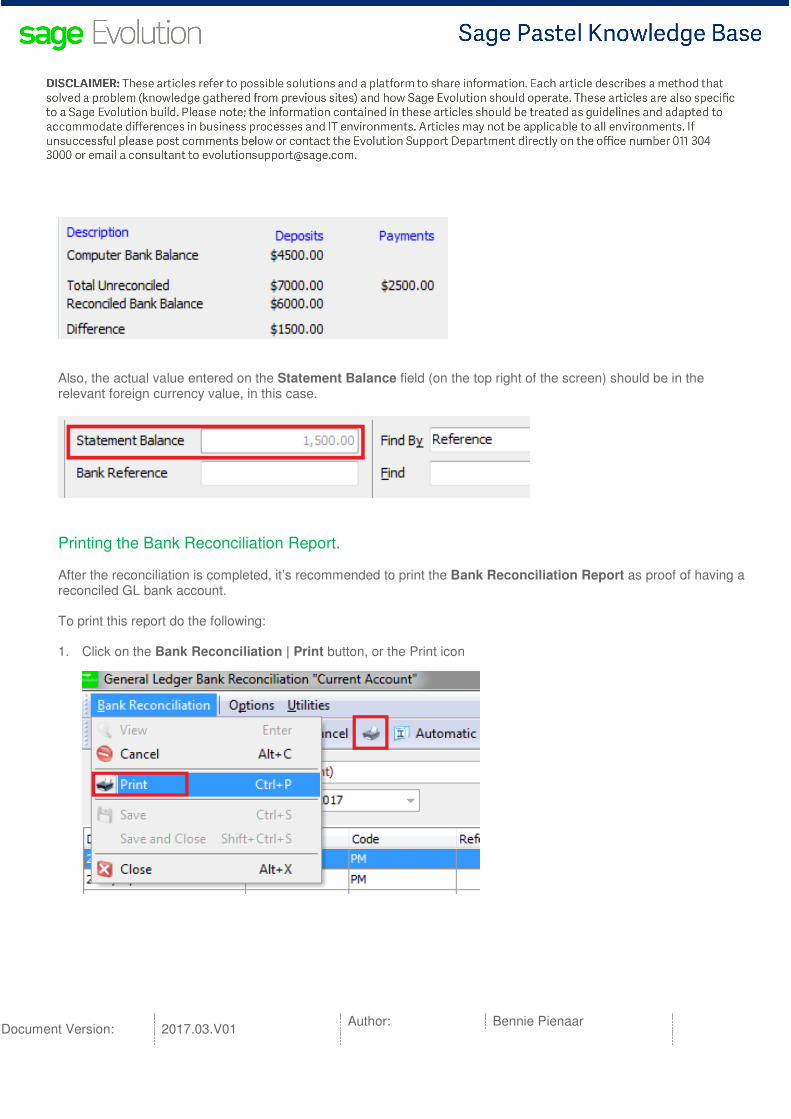
When this option is selected, the reconciliation will be performed on the foreign currency values (as opposed to local currency if the option is unselected). Notice the Bank Recon screen’s totals below now display in the relevant foreign currency.
Document Version: 2017.03.V01 Author: Bennie Pienaar
Also, the actual value entered on the Statement Balance field (on the top right of the screen) should be in the relevant foreign currency value, in this case.
Printing the Bank Reconciliation Report. After the reconciliation is completed, it’s recommended to print the Bank Reconciliation Report as proof of having a reconciled GL bank account. To print this report do the following: 1. Click on the Bank Reconciliation | Print button, or the Print icon

Document Version: 2017.03.V01 Author: Bennie Pienaar
2. Notice the various options on the report that should be correctly configured
Please note that the report printout doesn’t reflect any unsaved work you have done. You should therefore save your work and view the reconciled bank account again, before printing the report.
Document Version: 2017.03.V01 Author: Bennie Pienaar
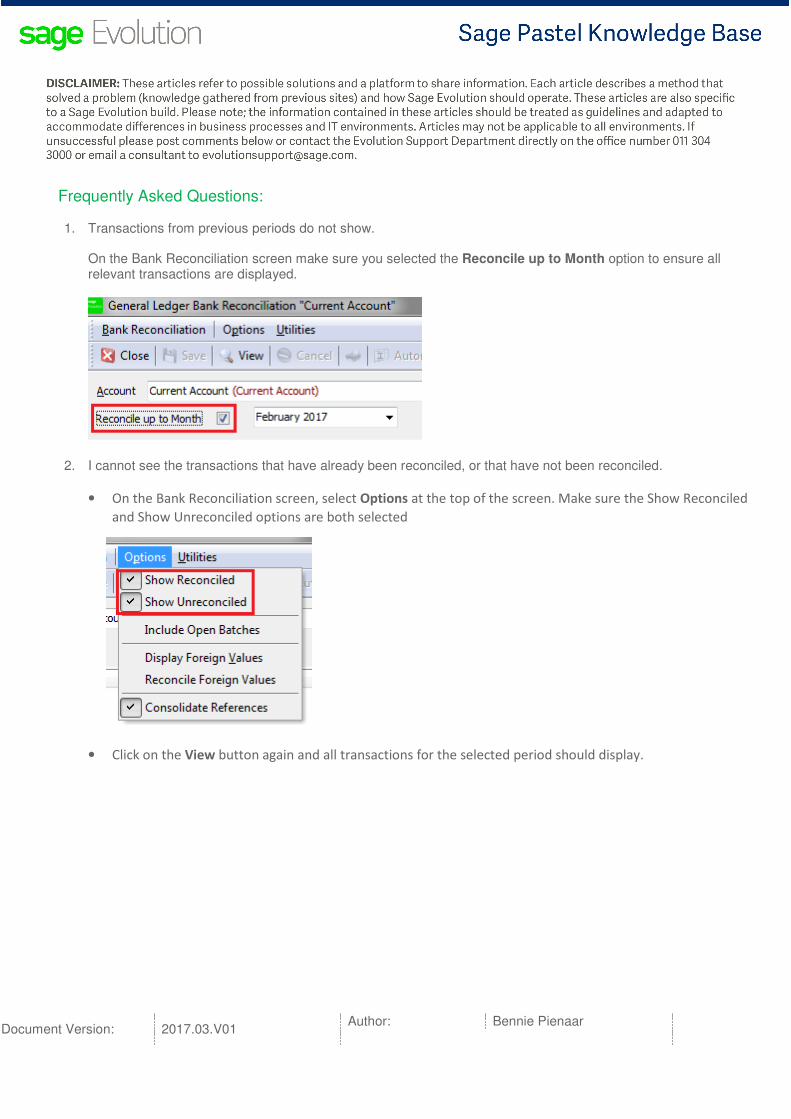
Frequently Asked Questions: 1. Transactions from previous periods do not show.
On the Bank Reconciliation screen make sure you selected the Reconcile up to Month option to ensure all relevant transactions are displayed.
2. I cannot see the transactions that have already been reconciled, or that have not been reconciled.
• On the Bank Reconciliation screen, select Options at the top of the screen. Make sure the Show Reconciled
and Show Unreconciled options are both selected
• Click on the View button again and all transactions for the selected period should display.