intro to teaching pilates reformer rev 3 -...
TRANSCRIPT

Intro to Teaching Reformer Pilates
How to Earn Your Home Study Course CEC’s
Included in this home study:
NETA Pilates Reformer Manual
Pilates Reformer Workbook
100 Question Multiple choice exam-70% correct to pass Criteria for successful completion of this course include:
Complete the activities in the workbook (does not need to be submitted to NETA)
Answer the 100 question test using the answer sheet (keep a copy for your files)
Exam may also be taken online at www.netafit.org To receive 15 NETA continuing education credits, do one of the following:
Return answer sheet to: NETA Attention: Home Study Coordinator 5955 Golden Valley Road, Suite 240 Minneapolis, MN 55422
Enter your answers online: Item #: 9168 Exam Code # 916891 Serial #: Refer to Home Study Answer Sheet
Your continuing education form will be sent to you within 30 days after we receive your completed answer sheet.

Intro Pilates Reformer HS Rev 3 ©NETA Learning and Development 2012 2

Intro Pilates Reformer HS Rev 3 ©NETA Learning and Development 2012 3
Contents
Section 1 Fill in the Blank #1 ..................................................................................................... 5
Section 1 Fill in the Blank #2 ..................................................................................................... 6
Section 1 Matching .................................................................................................................... 8
Section 2 Fill in the Blank .......................................................................................................... 9
Section 3 Fill in the Blank ........................................................................................................ 10
Workbook Answer Key ............................................................................................................ 13
Section 1 Fill in the Blank #1 ................................................................................................ 13
Section 1 Fill in the Blank #2 ................................................................................................ 13
Section 1 Matching ............................................................................................................... 13
Section 2 Fill in the Blank ..................................................................................................... 13
Section 3 Fill in the Blank ..................................................................................................... 13
Pilates Reformer Exam ............................................................................................................ 15
Pilates Reformer Home Study Answer Sheet .......................................................................... 29
Customer Evaluation ............................................................................................................... 31

Intro Pilates Reformer HS Rev 3 ©NETA Learning and Development 2012 4
Welcome to the NETA Pilates Reformer Home Study Certificate Course! This course is self guided and may be completed in 15 hours. Upon completion of the course, you will have earned 15 NETA continuing education credits.
How to get the most of out of this home study
The purpose of this study workbook is to help guide you through the book as you study the material. Several of the important points in each chapter have been highlighted. This workbook is not mean to be comprehensive, so if a concept has not been included it does not mean that it is not important. The answers for each question are printed in the back of the workbook.
To get the most benefit from this home study, please do the following:
1. Read through the NETA Pilates Reformer Manual to get a feel for the material
2. Complete the Reformer workbook
3. Answer the 100 question multiple choice exam
NETA Pilates Reformer Manual consists of 4 sections:
Section 1 introduces the origin, definition, benefits of Pilates, the Reformer, and starting positions
Section 2 describes the A, B, C, S.
Section 3 explains all exercises.
Section 4 includes biomechanics and anatomical references.
Each section has activity worksheets designed to help you work through the material. Keep these worksheets for your personal reference. The answers are listed at the end of the workbook.
In the back of the home study booklet, there is a 100 question multiple choice exam that you will need to complete and send in to NETA to obtain your 15 continuing education credits. Return only the answer sheet and the evaluation form.

Intro Pilates Reformer HS Rev 3 ©NETA Learning and Development 2012 5
Section 1 Fill in the Blank #1 Read pages 5-6. Fill in the blanks below.
1. Pilates exercise has been practiced since the early _______. The inventor, _________
______________ ____________, taught his method to a relatively small group of people in his
New York studio, located within the __________ ___________________. This original group of
people has come to be known as ___________ ____________, or the first generation of Pilates
teachers.
2. The focus of this course is on the education of the Pilates ______________ and __________
_______________ exercises. Because of the spinal emphasis placed on most exercises, it is
beneficial for Pilates’ instructor trainees to already have a basic knowledge of ____________
and _____________.
3. The ________________ principle is comprised mainly of postural assessment.
4. Joseph Pilates spoke of the ______________ numerous times in his published works with
insurmountable passion.
5. Getting “inside” the movement or being the participant during the exercise and not the observer
is attainable only with maximum ___________________.
6. His works regarded the abdominal area and the spinal muscles to be the center or the
powerhouse of the body. That powerful, efficient movement emanates from the ________.
7. The original title of his method was ______________________.
8. Modern science provides the concepts of ____________________for particular joints and body
parts prior to movement, namely; the head, neck, shoulders, spine, pelvis, and hips.
Intro Pilates Reformer HS Rev 3 ©NETA Learning and Development 2012 6
Section 1 Fill in the Blank #2 Read pages 7-10. Fill in the blanks below.
1. Define contrology:
____________________________________________________________________________
____________________________________________________________________________
__________________________________________________________
2. He created the forerunners of the exercise equipment used today. By removing
_________________ from a bed and attaching them to a __________, he created
__________________ exercises, which allowed his patients to exercise while lying down. The
patients were ___________ yet ______________. Pilates also used _____________, and later
designed other pieces of equipment such as the Pilates _______________.
3. The exercises are done in various positions on either a _______ or other _____________.
Some exercises are performed entirely in _____________, ____________ or side-lying
positions. Others start from a seated position. Still others start on the ___________ and
_____________. The various exercise positions help to promote a _________________
___________________ _____________. Every exercise is rooted in spinal _______________
or spinal __________________.
4. List 3 benefits of Pilates along with a description of how you would explain that benefit to a
friend or prospective client.
Benefit: _______________________________________________________________
Describe Benefit:
____________________________________________________________________________
________________________________________________________________
Benefit: _______________________________________________________________
Describe Benefit:
____________________________________________________________________________
________________________________________________________________
Benefit: _______________________________________________________________
Describe Benefit:
____________________________________________________________________________
________________________________________________________________

Intro Pilates Reformer HS Rev 3 ©NETA Learning and Development 2012 7
5. List the 3 categories of exercises this home study covers:
____________________________________________________________________________
________________________________________________________________
______________________________________________________________________
6. There are __________ _________________ of exercises that can be done on the Pilates
Reformer than those done exclusively on the mat. Additionally, the reformer can act as a
__________________ for certain body parts while others are worked. Exercises done on the
mat only are often considered more challenging, because the only __________________
____________ is the _____________. Exercising on the _______________ can
______________ the individual better in reaching new heights of _______________ that they
could not get to on their own with just the mat repertoire.
7. List the parts of the reformer described on page 10.
________________________________
________________________________
________________________________
________________________________
________________________________
________________________________
________________________________

Intro Pilates Reformer HS Rev 3 ©NETA Learning and Development 2012 8
Section 1 Matching Read page 11. Match the starting position to the correct definition.
1. Classic Pilates on Carriage A. Sit tall either on the carriage or short box. Neutral spine.
2. Classic Pilates on Carriage Feet in Straps
B. Lie supine on the carriage. Knees bent, hip distance apart, balls of feet on footbar. Arms alongside the body, palms down, elbows softly bent.
3. Sitting on Sit Bones C. Lie supine on the carriage. Feet in straps, legs extended either abducted or adducted. Arms alongside the body, palms down, elbows softly bent.
4. Hands and Knees D. Lie prone on the long box, head away from footbar. Legs extended either abducted or adducted. Elbows bent with hands to forehead, palms down. Head, neck and shoulders extend unsupported beyond the long box.
5. Prone E. Sit with posterior tilt of the pelvis. The abdominals are contracted to create full spinal flexion resulting in a low, middle, and upper back rounded formation creating the shape of a “C”.
6. C-Curve F. Kneel on the carriage with the head toward the footbar. Ankles dorsi-flexed with balls of feet against respective shoulder rests. Hands on footbar shoulder width apart. Neutral spine.

Intro Pilates Reformer HS Rev 3 ©NETA Learning and Development 2012 9
Section 2 Fill in the Blank Read pages 13-29. Fill in the blanks below.
1. List the A, B, C, S
________________________________
________________________________
________________________________
________________________________
________________________________
________________________________
2. ______________ _______________ refers to the curvature of the spine that is achieved by
balanced core strength and flexibility. It is characterized by slight ______________ curvatures
in the ________________ and _______________ vertebrae and a slight posterior curvature in
the thoracic vertebrae.
3. List the fundamental movements of the spine:
4. The __________ is the pivotal point of the body. All movements emanate from this center and
are transferred _____________. The core includes the deep _______________ muscles of the
spine and central region, as well as the ______________ muscles.
5. List the deep internal muscles:
Intro Pilates Reformer HS Rev 3 ©NETA Learning and Development 2012 10
6. List the large superficial muscles:
Section 3 Fill in the Blank The Footwork Series
1. Footwork is a ____________________ aspect in the Pilates Reformer workout. It is the first
series of exercises done on the Reformer in most any session. Even though it is called footwork,
it uses the ______________ muscles of the legs (Quadriceps, Hamstrings, and Glutes) to
warm-up the body. The muscles of the ______________ leg (Gastrocnemius, Soleus, and
Anterior Tibialis) work to move the ankle joint from plantar to dorsi-flexion, and the intrinsic
muscles of the feet gain _____________ and ____________________.
2. List the common foot positions used in footwork:
3. List the exercises performed in the footwork series:
4. Allowing each leg to work __________________, the Single Leg exercises strengthen potential
weakness on _________ side of the body and provide greater challenge on the core muscles to
keep the pelvis ___________.

Intro Pilates Reformer HS Rev 3 ©NETA Learning and Development 2012 11
5. List the exercises performed in the supine arm series:
6. List the prime movers for the abdominal series:
7. The purpose of the bridging series is to increase ___________________ ________________
while improving _______________________ _______________________.
8. List the exercises performed in the Feet in Straps series:
9. Levitation begins in _______________ Pilates on Carriage; _______________ pelvis,
_________ in straps, legs ________________ to 90 degree angle.
10. List the joint actions focused on in the Upper Back Series:
11. List the exercises performed in the Seated Upper Front Series:

Intro Pilates Reformer HS Rev 3 ©NETA Learning and Development 2012 12
12. List the stabilizing muscles for the Stomach Massage Series:
13. Knee stretches and elephant exercises involve two spinal positions: _______________ back
and ____________________ back.
14. The purpose of the Long Box Series is to increase __________________ in the
___________________ ___________________ muscles.
15. The purpose of the Short Box Series is to improve __________________, _________________
and ____________________ in the spine.
16. The joint actions needed to perform the Mermaid Series include:
17. List the exercises performed in the Lunging Series

Intro Pilates Reformer HS Rev 3 ©NETA Learning and Development 2012 13
Workbook Answer Key Section 1 Fill in the Blank #1
1. 1900’s , Joseph Humbertus Pilates, dance community, Pilates’ disciples 2. Principles, basic reformer, anatomy, kinesiology 3. Alignment 4. Breath 5. Concentration 6. Core 7. Contrology 8. Stabilization
Section 1 Fill in the Blank #2
1. a precise series of exercises designed to develop the body uniformly, correcting posture and revitalizing the body, mind and spirit.
2. Bedsprings, wall, resistance, mobile, stable, chairs, Reformer 3. Mat, apparatus, supine, prone, hands, knees, balanced musculoskeletal system, movement,
stabilization. 4. Refer to page 8 in the NETA Pilates Reformer Manual 5. Awareness, Warm Up, and Basic Reformer Workout 6. more variations, stabilizer, stabilizing force, floor, reformer, assist, strength 7. carriage, footbar, headrest, shoulder rests, springs or cords, gearbar, pulleys
Section 1 Matching
1. B 2. C 3. A 4. F 5. D 6. E
Section 2 Fill in the Blank
1. Alignment, Breath, Concentration, Core Strength, Control, Stability 2. Neutral spine, anterior, cervical, lumbar, 3. Flexion, Extension, Rotation, Lateral Flexion 4. Core, outward, internal, superficial 5. Transverse Abdominals, Internal Oblique, Multifidus, Pelvic Floor Muscles, Diaphragm,
Longissimus, Iliocostalis 6. Rectus Abdominis, External Oblique, Quadratus Lumborum
Section 3 Fill in the Blank
1. Fundamental, large, lower, strength, flexibility 2. Parallel, lateral, medial 3. Heels hip width, ball of foot, calf raises, running
Intro Pilates Reformer HS Rev 3 ©NETA Learning and Development 2012 14
4. Unilateral, one, stable 5. Tricep press, straight arm down, pull from side, arm circles 6. Latissiumus Dorsi, Pectorals, Rectus Abdominis 7. Spatial awareness, spinal articulation 8. Lower and lift, bend and stretch, inner thigh stretch, leg circles 9. Classic, neutral, feet, adducted 10. Shoulder flexion, shoulder extension, elbow flexion, elbow extension 11. Hug a tree, serve the platter, offering 12. Obliques, transverse abdominis, erector spinae 13. Flat, round 14. Strength, Erector Spinae 15. Strength, flexibility, mobility 16. Spinal flexion, spinal extension, spinal rotation, shoulder flexion, shoulder extension, elbow
flexion, elbow extension 17. Hip flexor stretch, scooter

Intro Pilates Reformer HS Rev 3 ©NETA Learning and Development 2012 15
Intro to Teaching Reformer Pilates Home Study Exam
Course # 9168 Exam Code # 916891
1. Which of the following is NOT true of Joseph Pilates: A. He was born in 1880 near Dusseldorf, Germany B. As a child he suffered from Tonsillitis C. He studied many subjects including Yoga D. Contrology was the name of his exercise discipline
2. The Pilates exercise discipline is all of the following except: A. A systematic approach to physical conditioning B. A workout that uses the limbs as weights C. Exercises that involve spinal movement or stabilization D. A quick fix to strengthening the core muscles
3. The benefits of Pilates include: A. Core strength B. Spatial awareness C. Disease prevention D. All of the above
4. Reformer exercises are done in which position(s) stated below? A. Lying supine B. Seated facing the footbar C. Both A and B D. Seated on your back
5. Which of the following is not a component on the Pilates Reformer? A. Head Bar B. Carriage C. Footbar D. Pulleys
6. The A, B, C’S are defined as: A. Airway, Breathing, Compressions B. Alignment, Breathing, Stabilization C. Concentration on Core Strength and Control D. Both B and C above
Intro Pilates Reformer HS Rev 3 ©NETA Learning and Development 2012 16
7. Which of the following is true regarding Alignment? A. The head is directly over the neck and shoulders B. The shoulders are under the ankles C. The pelvis is over the legs D. Both A and C
8. Which of the following postural alignment deviations results in a hunchback appearance? A. Lordosis B. Imprinted spine C. Kyphosis D. Scoliosis
9. The breathing pattern in Pilates exercises can NOT be changed. A. True B. False
10. The respiratory muscles include: A. Rectus Abdominis, Diaphragm and Obliques B. Diaphragm, Intercostals and Transverse Abdominis C. Nose, mouth and lungs D. None of the above
11. Concentration on Core Strength and Control: A. Must be applied to each exercise to perform them correctly B. Helps classify a participant’s fitness level C. Has nothing to do with Pilates exercise D. Teaches correct spinal and pelvic alignment
12. All of the following muscles are superficial except: A. Rectus Abdominis B. Transverse Abdominis C. Quadratus Lumborum D. External Obliques
13. Pilates exercises focus on the entire core, including the deep internal muscles and the superficial ones.
A. True B. False

Intro Pilates Reformer HS Rev 3 ©NETA Learning and Development 2012 17
14. Scapula stabilization requires a delicate balance of movements controlled by the muscles of the pelvis.
A. True B. False
15. Neutral pelvis refers to: A. The position that the pelvis is in when it is tilted neither anteriorly nor posteriorly B. Imprinted pelvis C. The curvature of the spine that is achieved by lack of core strength and flexibility D. All of the above
16. What is true regarding The Footwork Series? A. It is the last set of exercises performed in the workout B. There is no such thing as The Footwork Series C. The Footwork Series is a fundamental aspect in the reformer workout D. The only worthwhile position in The Footwork Series is lateral rotation
17. The joint action for footwork includes the hip, knee and ankle. A. True B. False
18. Which muscles are the prime movers for The Single Leg Series exercises? A. Rectus Abdominis and Hamstrings B. Quadriceps and Rectus Abdominis C. Quadriceps and Hamstrings D. Erector Spinae and Gastrocnemius
19. The Single Heel exercise in The Single Leg Series requires keeping one leg extended. A. True B. False
20. Which is NOT true regarding the purpose of The Supine Arms Series? A. Increase shoulder and arm strength B. Increases stress on the spine C. The carriage and shoulder rests provide feedback to the exerciser D. The weight of the legs in tabletop challenges core stabilization
21. It’s important to keep the scapulae elevated when performing Arm Circles. A. True B. False
Intro Pilates Reformer HS Rev 3 ©NETA Learning and Development 2012 18
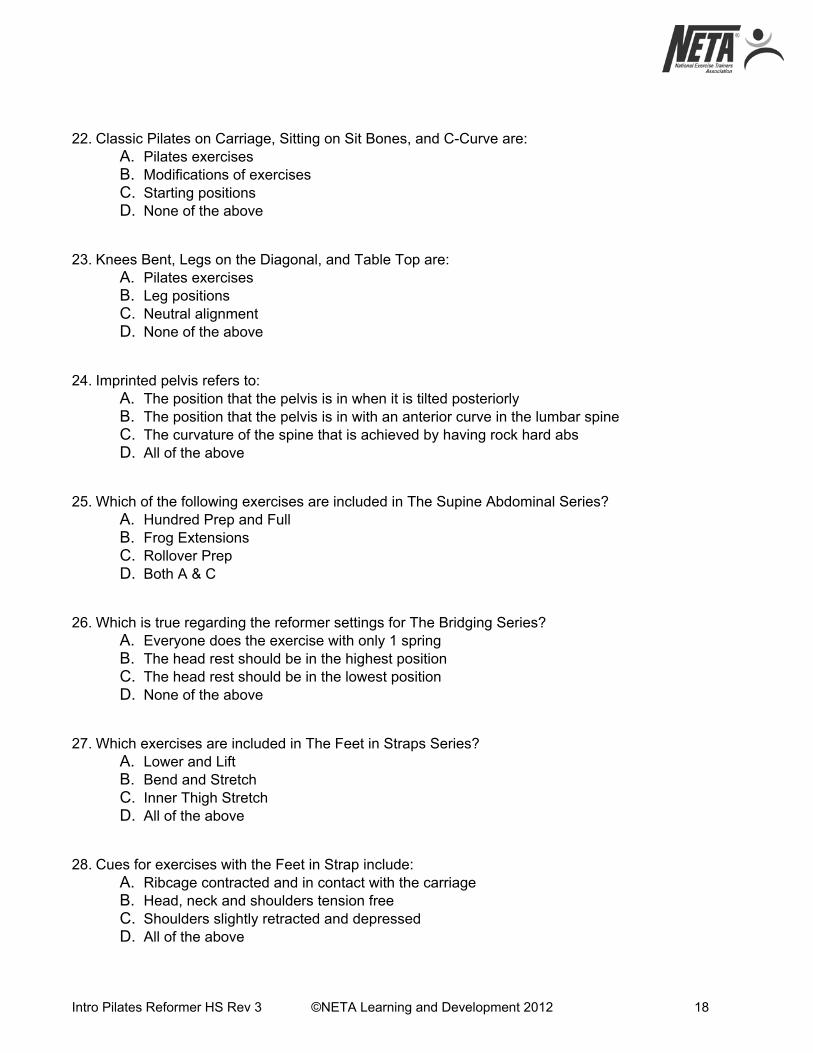
22. Classic Pilates on Carriage, Sitting on Sit Bones, and C-Curve are: A. Pilates exercises B. Modifications of exercises C. Starting positions D. None of the above
23. Knees Bent, Legs on the Diagonal, and Table Top are: A. Pilates exercises B. Leg positions C. Neutral alignment D. None of the above
24. Imprinted pelvis refers to: A. The position that the pelvis is in when it is tilted posteriorly B. The position that the pelvis is in with an anterior curve in the lumbar spine C. The curvature of the spine that is achieved by having rock hard abs D. All of the above
25. Which of the following exercises are included in The Supine Abdominal Series? A. Hundred Prep and Full B. Frog Extensions C. Rollover Prep D. Both A & C
26. Which is true regarding the reformer settings for The Bridging Series? A. Everyone does the exercise with only 1 spring B. The head rest should be in the highest position C. The head rest should be in the lowest position D. None of the above
27. Which exercises are included in The Feet in Straps Series? A. Lower and Lift B. Bend and Stretch C. Inner Thigh Stretch D. All of the above
28. Cues for exercises with the Feet in Strap include: A. Ribcage contracted and in contact with the carriage B. Head, neck and shoulders tension free C. Shoulders slightly retracted and depressed D. All of the above

Intro Pilates Reformer HS Rev 3 ©NETA Learning and Development 2012 19
29. Frog Extensions and Levitation are considered Short Spine Preps. A. True B. False
30. The footbar should be in the highest position in the Seated Upper Back Series. A. True B. False
31. Arms Pulling Straight Back is performed seated on the carriage. A. True B. False
32. The Seated Upper Front Series includes which exercise below? A. Bicep Curl B. Arms Pulling Straight Back C. Offering D. None of the above
33. Which muscles are the prime movers for The Seated Upper Front Series? A. Anterior Deltoid and Soleus B. Pectorals and Soleus C. Soleus and Gastrocnemius D. Pectorals and Anterior Deltoid
34. The Stomach Massage: A. Is performed kneeling on the carriage B. Can be done with either a c-curve or straight back C. Begins with the feet in the straps D. Both A and B
35. Which of the following joint actions are required for the Stomach Massage exercise? A. Knee B. Hip C. Spine D. All of the above
36. The arms cross the chest when performing the Stomach Massage exercise. A. True B. False

Intro Pilates Reformer HS Rev 3 ©NETA Learning and Development 2012 20
37. “Kneel on towel” is a modification for The Knee Stretches. A. True B. False
38. Exercises performed in a prone position are: A. Breast Stroke Prep and Swimming B. Stomach Massage and Elephant C. Stomach Massage and Swimming D. All of these are performed in a prone position
39. Standing on Carriage, Spinal C-Curve. Hands on footbar. A. Describes the starting position for Elephant Round Back B. Describes the variation for the Knee Stretch exercise C. Describes the starting position for Elephant Flat Back D. Is a cue for Pulling Ropes to Floor
40. A common error when performing any exercise is “moving without control”. A. True B. False
41. The Short Box Exercises: A. All start seated on the sit bones B. Can be done on the mat instead of the box C. Are for tall people D. Both A and B
42. The Basic Mermaid exercise is performed: A. Seated on the Carriage, facing the side B. Seated on the Carriage, facing the ropes C. Seated on the Carriage, facing the footbar D. Seated on the Carriage, facing the floor
43. Spinal movement for the Mermaid with Pushups includes: A. Flexion B. Extension C. Rotation D. All of the above
44. The Scooter exercise is part of the Mermaid Series. A. True B. False

Intro Pilates Reformer HS Rev 3 ©NETA Learning and Development 2012 21
45. Which exercise uses the Gluteals and Hamstrings as prime movers? A. Basic Mermaid B. Hip Flexor Stretch C. Spine Twist D. Hug a Tree
46. The name for the pictured exercise is: A. Seated Upper Front – Hug a Tree B. Supine Arms – Straight Arm Down C. Seated Upper Back – Tricep Press D. Hundred- Prep
47. The name for the pictured exercise is: A. Long Box – Breast Stroke B. Seated Upper Front – Offering C. Short Box – Round Back D. Mermaid
48. The name for the pictured exercise is: A. Footwork B. Leg Circles C. Rollover Prep D. Single Leg Stretch
49. The name for the pictured exercise is: A. Single Leg B. Supine Arms – Pull Straight Down C. Calf Raises D. Swimming

Intro Pilates Reformer HS Rev 3 ©NETA Learning and Development 2012 22
50. The name for the pictured exercise is: A. Hundred - Prep B. Hundred - Full C. Hip Flexor Stretch D. Stomach Massage
51. As a child, Joseph Pilates was the picture of perfect health A. True B. False
52. The Pilates discipline can be described as: a. A mindful way of exercise b. Exercises for elite athletes only c. A high intensity cardio workout d. Exercises that work the feet only
53. The benefits of Pilates include: a. Reduced stress b. Body awareness c. Improved posture d. All of the above
54. Reformer exercises are done in which position(s) stated below? a. Lying supine on the carriage b. Sitting on the footbar c. Sitting on the carriage d. Both A and C
55. Which of the following is NOT found on the Pilates Reformer? a. Foot Massager b. Head Rest c. Shoulder Rests d. Springs
56. The A, B, C’ S in this program refer to:
a. Fitness assessments b. Pilates principles c. Emergency procedures d. CPR guidelines

Intro Pilates Reformer HS Rev 3 ©NETA Learning and Development 2012 23
57. Which of the following is NOT true regarding Alignment? a. The head is upright and slightly retracted b. The shoulders are slightly depressed c. The hips are in line with the knee and ankle joints d. The legs are always laterally rotated
58. Which of the following postural alignment deviations is characterized by a lateral S curve of the spine? a. Scoliosis b. Lordosis c. Kyphosis d. Neutral pelvis
59. Pilates breath encourages inhaling through the nose and exhaling out the mouth. a. True b. False
60. Which muscle compresses the abdomen? a. Transverse Abdominis b. Quadratus Lumborum c. Trapezius d. Obliques
61. What is true regarding complementary breathing patterns for spinal movement? a. Extension is naturally accompanied with an exhale b. Forward flexion is naturally accompanied with an exhale c. Forward flexion is naturally accompanied with an inhale d. Extension is naturally accompanied with an inhale
62. All of the following muscles are superficial except: a. Triceps b. Multifidus c. Quadratus Lumborum d. Quadriceps
63. Pilates exercises can improve body awareness. a. True b. False
64. Traditional abdominal exercises, like the abdominal crunch, target the superficial muscles. a. True b. False

Intro Pilates Reformer HS Rev 3 ©NETA Learning and Development 2012 24
65. The two pelvis positions Pilates exercises focus on are: a. Neutral and imprint b. Neutral and anterior curve c. Pelvic clocks and imprint d. Pelvic clocks and anterior curve
66. What is true regarding The Supine Arm Series? a. The purpose is to increase strength in the legs b. The headrest should always be in the lowest position c. The purpose is to increase strength in the arms d. The footbar should always be in the lowest position.
67. The joint actions for the Supine Arm Series include shoulder and elbow flexion and extension a. True b. False
68. Which muscle(s) is/are considered stabilizers for The Supine Abdominals Series exercises? a. Obliques b. Triceps c. Erector Spinae d. All of the above
69. Short Box exercises are performed with the carriage in the away position. a. True b. False
70. Losing alignment, holding the breath, and moving without control are examples of: a. Pilates principles b. Common errors c. Starting positions d. Modifications
71. It’s important to keep the scapulae elevated when performing the Hundred. a. True b. False
72. Offering, Stomach Massage, and Elephant are examples of: a. Modifications b. Pilates reformer exercises c. Starting positions d. Common errors

Intro Pilates Reformer HS Rev 3 ©NETA Learning and Development 2012 25
73. Common leg positions include: a. Knees bent to 20 degrees b. Hips bent to 90 degrees c. Knees bent as much as possible d. Hips bent to 20 degrees
74. The Feet in Straps Series involves which muscle as a prime mover? a. Trapezius b. Hamstrings c. Soleus d. Rectus Abdominis
75. Which best describes the starting position for Bicep Curls? a. Seated on the carriage facing the footbar b. Kneeling on the carriage c. Seated on the carriage facing the pulleys d. Standing on the carriage
76. Which is true regarding the alignment for The Bridging Series? a. The hips move from flexion to extension b. Hold the breath during movement c. The chin is reaching up to the ceiling d. The legs are wider than hip distance apart
77. Try to keep the carriage steady while performing the Inner Thigh Stretch. a. True b. False
78. Cues for exercises for The Seated Upper Front Series: a. Imagine hugging something b. Check the length of a bath towel c. You are serving a platter d. All of the above
79. Frog Extensions and Levitation are considered part of The Footwork Series. a. True b. False
80. The springs should NOT be used in The Bridging Series.
a. True b. False

Intro Pilates Reformer HS Rev 3 ©NETA Learning and Development 2012 26
81. All Seated Upper Back exercises are performed prone on the carriage. a. True b. False
82. The pelvis should remain in imprint when performing the Scooter Exercise. a. True b. False
83. Which joint action takes place during all of The Feet in Straps Series? a. Knee flexion b. Ankle flexion c. Hip flexion and extension d. All of the above
84. The Stomach Massage: a. Maintains a lateral foot position b. Can be done with either a c-curve or straight back c. Is performed seated on the carriage d. All of the above
85. Which of the following joint actions are required for The Lunging Series? a. Knee flexion and extension b. Shoulder flexion and extension c. Spine flexion and extension d. All of the above
86. The starting position for Knee Stretches is seated on the carriage. a. True b. False
87. The Glutes and Hamstrings open the hip in the Elephant. a. True b. False
88. Which exercise is performed in a seated position: a. Knee Stretches b. Long box c. Stomach massage d. Supine abdominals

Intro Pilates Reformer HS Rev 3 ©NETA Learning and Development 2012 27
89. Kneeling on Carriage, neutral spine. Hands on footbar. a. Describes the starting position for Elephant Flat Back b. Describes the starting position for Elephant Round Back c. Are cues for Knee Stretches, Flat Back d. Are cues for Knee Stretches, Round Back
90. A common error when performing any exercise is “holding the breath”. a. True b. False
91. Which of the following is part of The Short Box Series? a. Running b. Knee Stretches c. Flat Back Hinge d. Mermaid
92. The purpose of the Mermaid exercises include: a. Improve flexibility in the spine, hips, and shoulders b. Stretch the hip flexors c. Improve Range of motion throughout the hips d. Train the core
93. The Long Box series: a. Strengthens the Erector Spinae b. Uses the Lats as prime movers c. Involves spinal flexion and extension d. All of the above
94. The Mermaid exercise is part of The Single Leg Series. a. True b. False
95. Which exercise uses the Glutes and Hamstrings as prime movers? a. Basic Mermaid b. Hip Flexor Stretch c. Spine Twist d. Hug a Tree
Please refer to the pictures for questions 96 – 100.

Intro Pilates Reformer HS Rev 3 ©NETA Learning and Development 2012 28
96. The name for the pictured exercise is: a. Seated Upper Front - Offering b. Supine Abdominals – Rollover Prep c. Supine Arms – Tricep Press d. Hundred- Prep
97. The name for the pictured exercise is: a. Short Box – Spine Twist b. Seated Upper Front – Hug a Tree c. Long Box – Push Up d. Mermaid
98. The name for the pictured exercise is: a. Footwork b. Leg Circles c. Rollover Prep d. Elephant
99. The name for the pictured exercise is: a. Single Leg b. Supine Arms – Pull Straight Down c. Hip Flexor Stretch d. Swimming
100. The name for the pictured exercise is: a. Hundred - Prep b. Inner Thigh Stretch c. Hip Flexor Stretch d. Stomach Massage
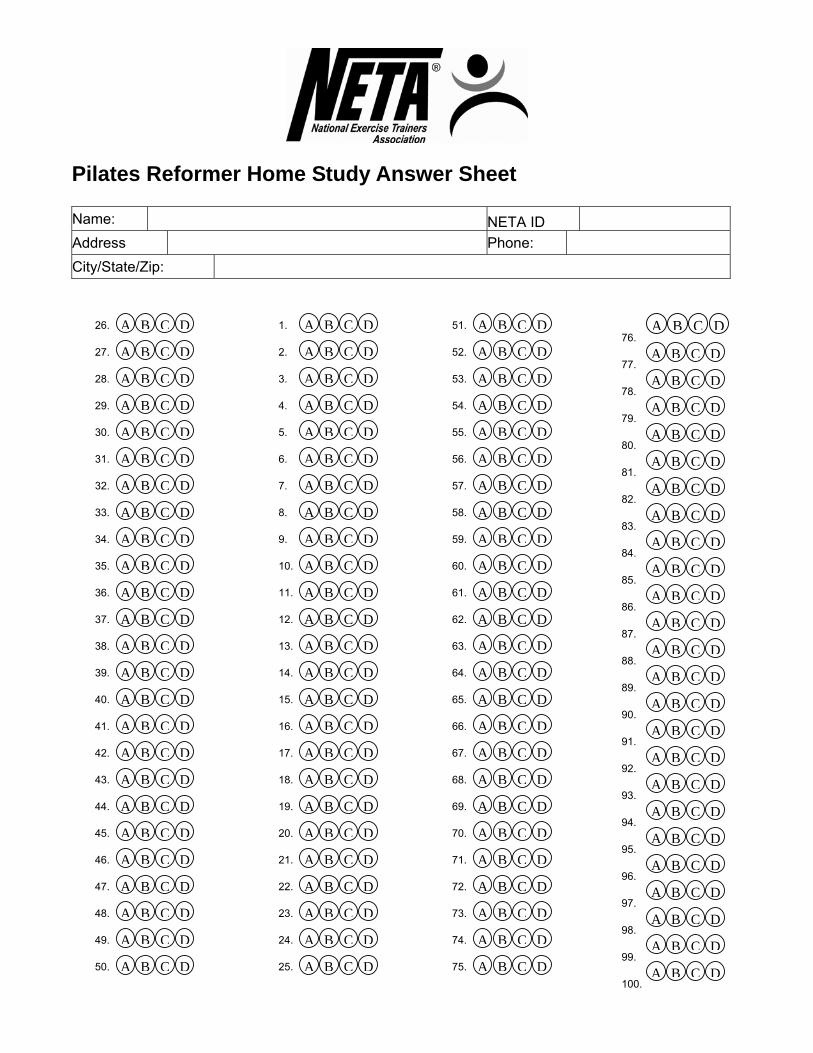
Pilates Reformer Home Study Answer Sheet
Name: NETA ID
Address Phone:
City/State/Zip:
1. A B C D 2. A B C D 3. A B C D 4. A B C D 5. A B C D 6. A B C D 7. A B C D 8. A B C D 9. A B C D 10. A B C D 11. A B C D 12. A B C D 13. A B C D 14. A B C D 15. A B C D 16. A B C D 17. A B C D 18. A B C D 19. A B C D 20. A B C D 21. A B C D 22. A B C D 23. A B C D 24. A B C D 25. A B C D
76.
A B C D
77. A B C D
78. A B C D
79. A B C D
80. A B C D
81. A B C D
82. A B C D
83. A B C D
84. A B C D
85. A B C D
86. A B C D
87. A B C D
88. A B C D
89. A B C D
90. A B C D
91. A B C D
92. A B C D
93. A B C D
94. A B C D
95. A B C D
96. A B C D
97. A B C D
98. A B C D
99. A B C D
100. A B C D
26. A B C D 27. A B C D 28. A B C D 29. A B C D 30. A B C D 31. A B C D 32. A B C D 33. A B C D 34. A B C D 35. A B C D 36. A B C D 37. A B C D 38. A B C D 39. A B C D 40. A B C D 41. A B C D 42. A B C D 43. A B C D 44. A B C D 45. A B C D 46. A B C D 47. A B C D 48. A B C D 49. A B C D 50. A B C D
51. A B C D 52. A B C D 53. A B C D 54. A B C D 55. A B C D 56. A B C D 57. A B C D 58. A B C D 59. A B C D 60. A B C D 61. A B C D 62. A B C D 63. A B C D 64. A B C D 65. A B C D 66. A B C D 67. A B C D 68. A B C D 69. A B C D 70. A B C D 71. A B C D 72. A B C D 73. A B C D 74. A B C D 75. A B C D

Intro Pilates Reformer HS Rev 3 ©NETA Learning and Development 2012 30
Intro to Teaching Pilates Reformer Home Study Answer Sheet page 2 Return for credit (choose one of the following): Mail to NETA 5955 Golden Valley Road, Suite 240 Minneapolis, MN 55422. Fax to: 763-545-2524. Complete online: home study tests, choose home study from drop down menu, enter online
code (listed at the top of this exam).
Item #: 9168
Serial # Exam Code #: 916891
Your Certificate of Completion will be mailed to you. Please allow 2-4 weeks for processing.
THANK YOU!
Intro Pilates Reformer HS Rev 3 ©NETA Learning and Development 2012 31
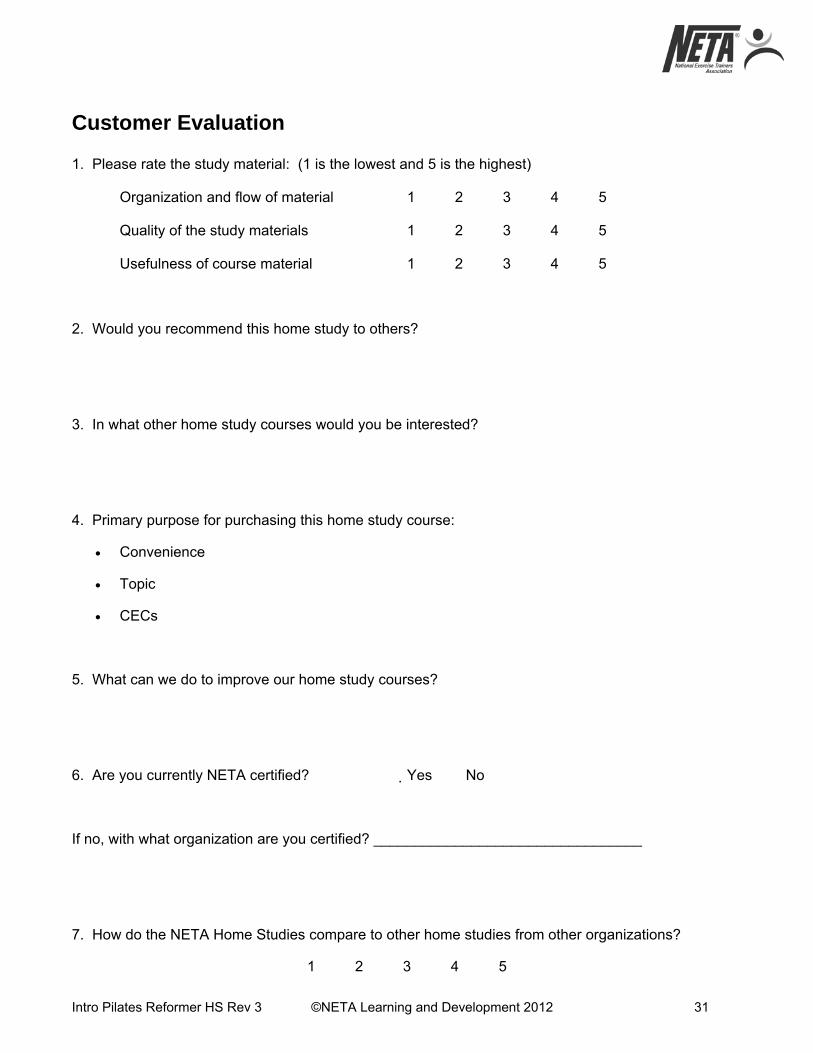
Customer Evaluation 1. Please rate the study material: (1 is the lowest and 5 is the highest)
Organization and flow of material 1 2 3 4 5
Quality of the study materials 1 2 3 4 5
Usefulness of course material 1 2 3 4 5
2. Would you recommend this home study to others?
3. In what other home study courses would you be interested?
4. Primary purpose for purchasing this home study course:
Convenience
Topic
CECs
5. What can we do to improve our home study courses?
6. Are you currently NETA certified? Yes �No
If no, with what organization are you certified? _________________________________
7. How do the NETA Home Studies compare to other home studies from other organizations?
1 2 3 4 5


1
Pilates
Reformer Manual
2008 NETA National Exercise Trainers Association. All rights reserved. This material may not be reproduced or duplicated in whole or part, by any means, without permission of:
NETA
5955 Golden Valley Road, Suite 240 Minneapolis, MN 55422
1-800-237-6242 (In MN 763-545-2505)
For additional copies of this workbook, call toll-free 1-800-AEROBIC (In MN call 1-763-545-2505) Rev: February 13, 2008

2
Table of Contents
Introduction ................................................................................................................................................. 5
Section 1...................................................................................................................................................... 7
Joseph Pilates .......................................................................................................................................... 7
What is Pilates? ....................................................................................................................................... 7
Benefits of Pilates ................................................................................................................................... 8
Pilates Reformer Exercises ..................................................................................................................... 8
Reformer versus Matwork ...................................................................................................................... 9
Reformer Setup & Safety ...................................................................................................................... 10
The Reformer ........................................................................................................................................ 11
Starting Positions .................................................................................................................................. 12
Section 2.................................................................................................................................................... 13
The A, B, C’ S....................................................................................................................................... 13
Alignment ............................................................................................................................................. 14
Posture Analysis Worksheet ............................................................................................................. 15
Posture Rating Chart ......................................................................................................................... 16
Postural Alignment Deviations ......................................................................................................... 17
Breath .................................................................................................................................................... 18
Breathing Techniques ....................................................................................................................... 20
Breathing Awareness Exercises ........................................................................................................ 20
Concentration on Core Strength and Control ........................................................................................ 22
Stabilization .......................................................................................................................................... 24
Cervical Spine ................................................................................................................................... 24
Head Nod Awareness Exercise ......................................................................................................... 24
Scapula Stabilization ......................................................................................................................... 25
Scapula Elevation and Depression Awareness Exercise .................................................................. 25
Scapula Protraction and Retraction Awareness Exercise ................................................................. 25
Rib Cage Stabilization ...................................................................................................................... 26
Pelvic Stabilization ........................................................................................................................... 27
Pelvic Placement Awareness Exercise .............................................................................................. 27
How to Kegel .................................................................................................................................... 29
Section 3.................................................................................................................................................... 30
Warm Up Exercises .............................................................................................................................. 30
The Footwork Series ......................................................................................................................... 30
Footwork – Heels Hip Width ............................................................................................................ 32
Footwork – Ball of Foot .................................................................................................................... 33
Footwork – Calf Raises ..................................................................................................................... 34
Footwork – Running ......................................................................................................................... 35
Work Out Exercises .............................................................................................................................. 36
The Single Leg Series ....................................................................................................................... 36
Single Leg – One Leg Bent ............................................................................................................... 37
Single Leg – One Leg Kick .............................................................................................................. 38
Single Leg – Single Heel .................................................................................................................. 39
Single Leg – One Leg Circles ........................................................................................................... 40

3
The Supine Arms Series.................................................................................................................... 41
Supine Arms – Tricep Press .............................................................................................................. 42
Supine Arms – Straight Arm Down .................................................................................................. 43
Supine Arms – Pull From Side ......................................................................................................... 44
Supine Arms – Arm Circles .............................................................................................................. 45
The Supine Abdominal Series .......................................................................................................... 46
Hundred – Prep ................................................................................................................................. 47
Hundred – Full .................................................................................................................................. 48
Single Leg Stretch ............................................................................................................................. 49
Rollover Prep .................................................................................................................................... 50
The Bridging Series .......................................................................................................................... 51
Bridging – Bottom Lift ..................................................................................................................... 52
Bridging – Rolling Bridge ................................................................................................................ 53
The Feet in Straps Series................................................................................................................... 54
Feet in Straps – Lower and Lift ........................................................................................................ 55
Feet in Straps – Bend and Stretch ..................................................................................................... 56
Feet in Straps – Inner Thigh Stretch ................................................................................................. 57
Feet in Straps – Leg Circles .............................................................................................................. 58
The Short Spine Prep Series ............................................................................................................. 59
Short Spine Preps – Frog Extensions ................................................................................................ 60
Short Spine Preps – Levitation ......................................................................................................... 61
The Seated Upper Back Series .......................................................................................................... 62
Seated Upper Back – Arms Pulling Straight Back ........................................................................... 63
Seated Upper Back – Tricep Press .................................................................................................... 64
Seated Upper Back – Bicep Curl ...................................................................................................... 65
The Seated Upper Front Series ......................................................................................................... 66
Seated Upper Front – Hug a Tree ..................................................................................................... 67
Seated Upper Front – Serve the Platter ............................................................................................. 68
Seated Upper Front – Offering ......................................................................................................... 69
The Stomach Massage Series............................................................................................................ 70
Stomach Massage – Round Back ...................................................................................................... 71
Stomach Massage – Flat Back .......................................................................................................... 72
The Knee Stretches and Elephant Exercises ..................................................................................... 73
Knee Stretches – Round Back ........................................................................................................... 74
Knee Stretches – Flat Back ............................................................................................................... 75
Elephant – Round Back .................................................................................................................... 76
Elephant – Flat Back ......................................................................................................................... 77
The Long Box Series ........................................................................................................................ 78
Long Box – Breast Stroke Prep ........................................................................................................ 79
Long Box – Swimming ..................................................................................................................... 80
Long Box – Pulling Ropes to Floor .................................................................................................. 81
The Short Box Exercises ................................................................................................................... 82
Short Box – Round Back .................................................................................................................. 83
Short Box – Flat Back Hinge ............................................................................................................ 84
Short Box – Spine Twist ................................................................................................................... 85
The Mermaid Series .......................................................................................................................... 86
4
Mermaids – Basic Mermaid .............................................................................................................. 87
Mermaids – Mermaid Pushups ......................................................................................................... 88
The Lunging Series ........................................................................................................................... 89
Lunges – Hip Flexor Stretch ............................................................................................................. 90
Lunges – Scooter............................................................................................................................... 91
Section 4.................................................................................................................................................... 92
Biomechanics ........................................................................................................................................ 92
Elbow ................................................................................................................................................ 92
Shoulder ............................................................................................................................................ 92
Spine ................................................................................................................................................. 93
Scapular / Shoulder Girdle ................................................................................................................ 93
Hip..................................................................................................................................................... 94
Knee .................................................................................................................................................. 95
Ankle ................................................................................................................................................. 95
Anatomical Terminology ...................................................................................................................... 96
Pilates Reformer Worksheet ................................................................................................................. 97
Prime Mover Pictures ........................................................................................................................... 98
Mission Statement ............................................................................................................................... 100
Acknowledgements ............................................................................................................................. 100
References ........................................................................................................................................... 101
5
Introduction Pilates exercise has been practiced since the early 1900’s. The inventor, Joseph Humbertus Pilates, taught his method to a relatively small group of people in his New York studio, located within the dance community. This original group of people has come to be known as Pilates’ disciples, or the first generation of Pilates teachers: Romana Kyranowska, Kathy Grant, Ron Fletcher, Eve Gentry, Carola Trier, Mary Bowen, and Bruce King. Fortunately, Pilates’ work has been passed on through the dedication of this first generation of Pilates teachers. Some of which have continued practicing, teaching students and/or developing other teachers. Originally a dancers’ workout, it has gained significant popularity over the last decade, as can be witnessed by hundreds of books, videos, DVD’s, and training programs being offered in mainstream society. It is being offered at large and small health clubs, community centers, park and recreational facilities, chiropractor offices, physical therapy clinics, and within sports training programs. The recent surge of interest in Pilates has placed a great demand on the fitness professional, as well as their certifying body. As fitness professionals, we want to deliver what is best for our participants. Pilates has helped a lot of people gain strength, flexibility, and mobility without pain. We’ve seen, heard or personally experienced dramatic results from following a well structured Pilates program. But, we have also seen, heard or personally experienced not so desirable results from doing too much too soon. The goal of this program is to develop Pilates instructors who focus on safety and realistic expectations when designing their classes. NETA’s formal Pilates training program is designed to educate fitness professionals on the specifics of Pilates exercise techniques. The focus of this course is on the education of the Pilates principles and basic reformer exercises. Because of the spinal emphasis placed on most exercises, it is beneficial for Pilates’ instructor trainees to already have a basic knowledge of anatomy and kinesiology. While some basic information is provided in the Pilates Reformer Manual, students may find it necessary to obtain further education on the human body in order to fully understand its methodology. Additionally, a well trained instructor has also practiced effective teaching techniques. This clinic teaches how to communicate all of the course material in ways that can be readily understood and utilized by the participant. Clinic attendees will walk away from the training with an understanding of what it takes to teach Pilates and a game plan of how to do it. The first section provides insight to Joseph Pilates, the man behind the method. His background and upbringing is of significance in his development as a pioneer of health. His passion is what made him excel at what he did. The many benefits of doing Pilates are discussed in this section as well as further descriptions of what Pilates exercises are. Section two explains the Pilates principles. They are defined with the A, B, C’ S: Alignment, Breath, Concentration on Core Strength, Control, and Stability. There are varying “principles” attested to by many different individuals, authors, and certifying bodies. Upon close inspection
6
of them all, the A, B, C’ S sum them up neatly. All of these descriptions are central and agreed upon by most:
� Joseph Pilates works were initially designed for those with injuries and those with postural issues. The Alignment principle is comprised mainly of postural assessment.
� Joseph Pilates spoke of the Breath numerous times in his published works with insurmountable passion.
� Getting “inside” the movement or being the participant during the exercise and not the observer is attainable only with maximum Concentration.
� His works regarded the abdominal area and the spinal muscles to be the center or the powerhouse of the body. That powerful, efficient movement emanates from the Core.
� The original self title of his method was “Contrology”. � Modern science provides the concepts of Stabilization for particular joints and body
parts prior to movement, namely; the head, neck, shoulders, spine, pelvis, and hips. The exercises are detailed in section three. Muscular reference is included for each exercise series. The last section provides greater detail of biomechanics of movement and references.

7
Section 1
Joseph Pilates Joseph Humbertus Pilates was born in 1880 near Düsseldorf, Germany. As a child he suffered from rickets, asthma, and rheumatic fever. Obsessed by his afflictions he became determined to overcome them. As a teenager he participated in gymnastics, skiing, and scuba-diving. He studied the musculature of the body. Later his studies included a variety of Eastern forms of exercise including Yoga and Karate. Merging his experience and his studies he created “The Method”. His name for it was “Contrology”, which is a precise series of exercises designed to develop the body uniformly, correcting posture and revitalizing the body, mind and spirit. He created the forerunners of the exercise equipment used today. By removing bedsprings from a bed and attaching them to a wall, he created resistance exercises, which allowed his patients to exercise while lying down. The patients were mobile yet stable. Pilates also used chairs, and later designed other pieces of equipment such as the Pilates Reformer. After moving to the United States in the mid 1920’s, Pilates opened a “physical fitness studio” located within the dance community of New York City. It was here that the Pilates method was used as a form of therapy rehabilitation for injured dancers. Pilates read constantly and used mathematics and the laws of physics in his exercises. He died in 1967. However, the basic principles of Joseph Pilates work have not changed. The aim of his method is awareness of movement, mental focus and control without excessive effort, thereby creating a body that is healthy inside and out. NETA is proud to bring Joseph Pilates work to fitness professionals. We recognize that extensive training and practice is necessary to become proficient at any highly specialized skill.
What is Pilates? Pilates is an exercise discipline that was developed by Joseph Pilates in the early 1900’s. It is a systematic approach to physical conditioning that incorporates physiological and biomechanical principles to ensure safe exercise that produces positive results. The exercises are done in various positions on either a mat or other apparatus. Some exercises are performed entirely in supine, prone or side-lying positions. Others start from a seated position. Still others start on the hands and knees. The various exercise positions help to promote a balanced musculoskeletal system. Every exercise is rooted in spinal movement or spinal stabilization. Spinal movement in this workout involves forward and lateral flexion, extension, and rotation of the spine. The limbs are often used as weights as well as tests of coordination, balance, and flexibility.
8
Pilates principles can be applied to all human movement. The exercises simulate daily life as well as athletic endeavor. They can be done on the floor (matwork) or on special Pilates equipment. This workbook covers Pilates Basic Reformer Exercises.
Benefits of Pilates Pilates trains all of the muscles of the body to gain strength in the manner they were designed to perform. It becomes a matter of efficiency and mind over muscle. As with any form of exercise, there are innumerable benefits. Proper breathing is essential throughout Pilates exercise. Controlled breathing purifies the body, reduces stress and builds endurance. Breathing is coordinated with each exercise, which oxygenates the muscles, eventually coming full circle to help the muscles responsible for breathing perform more effectively and efficiently. Core strength is one of the most important benefits of doing Pilates exercise, because all movement emanates from the core. If the core is strong, the appendages can move without undue stress on the spine. A strong core also helps to improve balance and coordination. Pilates exercise helps to strengthen opposing muscle groups. A stronger muscle is more effective at actively stretching its opposing muscle. This leads to overall improved flexibility. The whole body functions more efficiently. Pilates exercises also improve kinesthetic awareness, which helps a person to know where their body is in space. Spatial awareness and core control help to improve the performance of everyday activities, prevent injuries and facilitate rehabilitation. Mind over muscle is a very important concept in Pilates as it is for any mind body exercise. Joseph Pilates was convinced that his form of exercise was the best way to train the body and mind together to be able to perform the most amount of work with the least amount of effort. The application of mind over muscle has been shown to help decrease stress. Disease prevention is another benefit of training both mind and body. The mind that is trained to listen to the body is much more capable of identifying and dealing with stresses that may eventually cause disease.
Pilates Reformer Exercises Unlike Joseph H. Pilates’ 1945 publication detailing mat exercises, he did not publish one for the Pilates Reformer Exercises. The exercises have been handed down by the first generation of Pilates teachers. We know that those aforementioned shared the work demonstrated to them by Pilates. Some stay true to the exact method as it was taught them, while others have evolved Pilates’ teachings with the times. NETA sets out to maintain the essence of the discipline by finding commonality among the various schools of thought. Additionally, NETA stands by modern science as a deciding factor on the safety and efficacy of Pilates movement.

9
The reformer exercises in this manual have been selected for various reasons. In part, due to their popularity and relative ease of execution by the average exerciser. Secondly, we have tried to incorporate the different positions possible on the reformer: lying supine, seated facing the footbar, pulleys, and sides, arms in straps, legs in straps, kneeling, standing on the floor, lying prone on the long box and seated on the short box. They have also been chosen to provide a balanced workout should they be performed in their entirety. It should be kept in mind that the exercises address the body as a whole. Therefore, when one body part is performing an action, other parts are stabilizing. Not one muscle group is ever truly excluded from the workout. NETA’s Pilates Reformer repertoire breaks down the exercises into 5 categories: Awareness, Warm-Up, Basic Reformer Workout, Intermediate Reformer Workout, and Advanced Reformer Workout.
Awareness � With these exercises, the participant will realize where their body is in space.
They will observe their breath; discover the connection between every body part, and experience body control through thought.
Warm-up Exercises � These exercises prepare the body for more intense movement.
Basic Reformer Workout Exercises � These exercises are for those who are just learning the discipline. The primary
focus is on mastering the principles while learning control. Intermediate Reformer Workout Exercises
� Once the basic exercises can be performed effortlessly, intermediate exercises are introduced. They add further physical demand and coordination.
Advanced Reformer Workout Exercises � Advanced exercises provide an ultimate challenge to the body and mind.
This Pilates Reformer course covers Awareness, Warm Up, and Basic Reformer Workout exercises for apparently healthy populations. Each practice session should include each type of exercise. All of the exercises do not need to be performed in every session and they need not be performed in a specific order. However, it is highly recommended that awareness begins the session, followed by warm up, concluding with the workout exercises.
Reformer versus Matwork There are more variations of exercises that can be done on the Pilates Reformer than those done exclusively on the mat. Additionally, the reformer can act as a stabilizer for certain body parts while others are worked. Exercises done on the mat only are often considered more challenging, because the only stabilizing force is the floor. Exercising on the reformer can assist the individual better in reaching new heights of strength that they could not get to on their own with just the mat repertoire. Many people struggle with rolling up or rolling over on the mat. The reformer exercises offer assistance with the springs and pulleys that can fill in where the individual is weak until as such time they can perform those functions on their own.

10
Reformer Setup & Safety There are several different brands of Pilates Reformers on the market. Some offer more options than others, but all of them include the following components. Carriage – This is the moving part of the reformer. It is the main part that most exercises are performed on. The size of the carriage depends on the brand, but most are wide enough and long enough to support an average adult male. For safety, remember that the reformer carriage is a moveable object. Mindfulness when on or around the carriage should be kept to prevent injury. Footbar – This is a padded “bar” that is attached to one end of the reformer, near the “home” position. It is used as a stabilizing factor to move the carriage. Some reformers have adjustable footbars to accommodate for the exercisers’ needs. For safety, check to make sure that it is set up so that it does not move when in use. Headrest – This is a small padded ledge to rest the head weight on when lying supine on the carriage. Some reformers have adjustable headrests to accommodate for the exercisers’ needs. Shoulder Rests – These are small padded ledges to stabilize the shoulders against when lying supine on the carriage. Springs or Cords – Varying tensions of springs or cords are attached to the underside of the carriage to increase or decrease resistance of an exercise. For safety, check the wearing of the springs or cords every time before they are used. Gearbar – This is what the springs or cords attach to which produce more or less resistance. For safety, make sure the gearbar is securely in place. Pulleys – These are ropes with large padded handles (straps) on the ends that also attach to the underside of the carriage. The hands or feet are inserted into the straps depending on the exercise. For safety, check for excessive wearing regularly. Check the length every time before use to ensure they are set evenly.
Cleaning – The reformer parts including the carriage, head rest, footbar, and foot straps should be cleaned and or sanitized after every use. The mechanical parts of the machine should be checked and cleaned regularly.

11
The Reformer
Footbar Shoulder Rests
Springs Ropes
Head Rest
Straps Carriage

12
Starting Positions Classic Pilates on Carriage Lie supine on the carriage. Knees bent, hip distance apart, balls of feet on footbar. Arms alongside the body, palms down, elbows softly bent. Classic Pilates on Carriage Feet in Straps Lie supine on the carriage. Feet in straps, legs extended either abducted or adducted. Arms alongside the body, palms down, elbows softly bent. Prone Lie prone on the long box, head away from footbar. Legs extended either abducted or adducted. Elbows bent with hands to forehead, palms down. Head, neck and shoulders extend unsupported beyond the long box. Sitting on Sit Bones Sit tall either on the carriage or short box. Neutral spine. C-Curve Sit with posterior tilt of the pelvis. The abdominals are contracted to create full spinal flexion resulting in a low, middle, and upper back rounded formation creating the shape of a “C”. Hands and Knees Kneel on the carriage with the head toward the footbar. Ankles dorsi-flexed with balls of feet against respective shoulder rests. Hands on footbar shoulder width apart. Neutral spine. Neutral Pelvis Allow the lumbar spine to obtain its natural curve. The pelvis has neither an anterior nor posterior tilt. Keep the abdominals contracted and the gluteals relaxed. Imprinted Pelvis Pelvis has posterior tilt. Keep the abdominals contracted and the gluteals relaxed.
Leg Positions
Knees Bent: knees bent with feet on footbar.
Table Top: knees and hips flexed 90 degrees.
Legs on the Diagonal: legs are extended up to a 45 degree angle with knees straight.

13
Section 2
The A, B, C’ S These are key concepts that make Pilates exercise safe, effective, and functional. They include sound anatomical principles. A = Alignment Achieving and maintaining proper alignment before during and after each exercise is discussed and demonstrated. B = Breath The Breath is the most vital aspect necessary for life. Additionally, it enhances and promotes efficient movement through proper muscular usage. The importance of proper breathing technique is discussed and demonstrated. C = Concentration, Core Strength, Control The core muscles are central to Pilates exercises. Core Strength is necessary to allow effortless pain free movement as well as provide protection to the interior of the torso. Concentration ensures that each movement is done mindfully. Control over every movement reduces risk of injury. Concentration on and control of the core musculature is taught, demonstrated and practiced. S = Stabilization Stabilizing the joints of the body protect and strengthen them. The stabilization of the core, rib cage, scapula, pelvis and cervical spine is required to perform each exercise safely and effectively. Proper stabilization of the joints is taught, demonstrated and practiced.

14
Alignment Much of Pilates work is based on the identification and correction of postural alignment deviations. The first step in the process of accomplishing this task is to improve awareness of skeletal alignment, muscle imbalances and faulty movement patterns. Many people do not realize the inefficiencies in their posture or the impact their posture has on their health. Healthy posture involves a balance of the muscles, bones, ligaments, and joints. When observing someone’s profile we should be looking at how the body parts line up. Head Shoulders Rib Cage Pelvis Hips Knees
directly over the neck and shoulders over the rib cage over the pelvis over the legs over the knees over the ankles
Neutral Spine refers to the curvature of the spine that is achieved by balanced core strength and flexibility. It is characterized by slight anterior curvatures in the cervical and lumbar vertebrae and a slight posterior curvature in the thoracic vertebrae. The 12 vertebrae that are configured in the anterior curvature (7 cervical and 5 lumbar) are designed to balance the 12 vertebrae configured in the posterior curvature (thoracic). 7 Cervical
5 Lumbar
12 Thoracic

15
Posture Analysis Worksheet Goal: Assess posture to determine if there are any risk factors and / or musculoskeletal limitations to consider during fitness assessments and exercise programming. Protocol: Although there is no specific protocol to follow for postural analysis it would be beneficial for any fitness professional to observe a client from anterior, posterior and lateral perspectives while standing stationary and while walking towards and away from the tester. The following is a list of characteristics to look for: Head and Neck � Is the head upright? � Is the head tilted to one side or the other? � Is the chin / neck protracted? � Is the chin / neck retracted? Shoulders � Are the shoulders the same height? � Are the shoulders upright or rounded? � Do the scapulae protrude from the back? � Are both scapulae the same height? Chest and Upper Back � Is the chest lifted? � Is the upper back normally rounded? Spine and Trunk � Are the vertebrae in a vertical line, straight or curved? � Is the curve in the lower back normal, arched or inclined? � Is the abdomen protruding? Hips � Are the hips level? � Are both sides the same height from the floor? Knees � Are the kneecaps facing straight ahead like headlights? � Are the kneecaps at the same height? � Are the knees pushed backwards? Ankles and Feet � Are the feet straight-ahead or pointed out? � Where does the majority of the weight of the body lie? � On the outside, inside or midline of the feet?

16
Posture Rating Chart
Posture Rating Chart
Good Fair Poor* Head (anterior or posterior view)
Head is erect, gravity line passes directly though the center
Head is slightly twisted or turned to one side
Head is markedly twisted or turned to one side
Neck (lateral view)
Neck is erect, chin slightly retracted and head directly above shoulders
Neck and chin slightly protracted
Neck and chin markedly protracted
Shoulders (anterior or posterior view)
Both shoulders are level (horizontally)
One shoulder is slightly higher than the other
One shoulder is markedly higher than the other
Spine (posterior view)
Spine is in a straight line
Spine is slightly curved laterally (Scoliosis)
Spine is markedly curved laterally (Scoliosis)
Upper Back (lateral view)
Normal rounding consistent with upper thoracic curvature
Slightly more rounding than typical thoracic curvature
Marked rounding constant with Kyphosis
Spine / Trunk (lateral view)
Spine is erect and aligned directly over the pelvic girdle
Spine exhibits a slight posterior alignment
Spine exhibits a marked posterior alignment
Abdomen (lateral view)
Abdomen is flat or slightly rounded
Abdomen is protruding Abdomen is protruding and sagging
Lower Back (lateral view)
Lower back has a normal ‘S’ curvature consistent with the Lumbar vertebrae
Lower back appears slightly hollow. Slight exaggeration of the Lumbar curvature
Lower back is markedly curved causing a ‘sway back’ or Lordosis
Hips (anterior or posterior view)
Both hips are level (horizontally)
One hip is slightly higher than the other
One hip is markedly higher than the other
Ankles and Feet (anterior or posterior view)
Feet point straight forward with ankles directly above the heel
Slight Pronation Slight Supination
Pronated Supinated
*Any ratings of poor must be cleared by an orthopedic specialist (physical therapist, chiropractic physician or orthopedic surgeon)
17
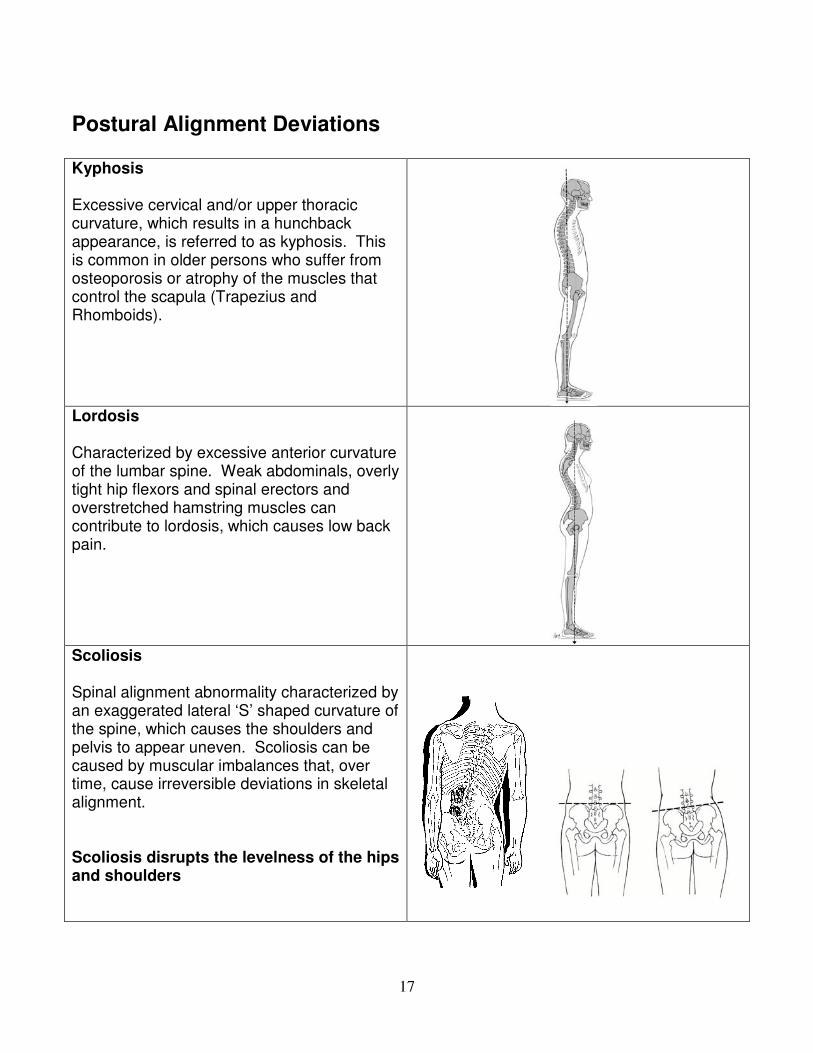
Postural Alignment Deviations
Kyphosis Excessive cervical and/or upper thoracic curvature, which results in a hunchback appearance, is referred to as kyphosis. This is common in older persons who suffer from osteoporosis or atrophy of the muscles that control the scapula (Trapezius and Rhomboids).
Lordosis Characterized by excessive anterior curvature of the lumbar spine. Weak abdominals, overly tight hip flexors and spinal erectors and overstretched hamstring muscles can contribute to lordosis, which causes low back pain.
Scoliosis Spinal alignment abnormality characterized by an exaggerated lateral ‘S’ shaped curvature of the spine, which causes the shoulders and pelvis to appear uneven. Scoliosis can be caused by muscular imbalances that, over time, cause irreversible deviations in skeletal alignment. Scoliosis disrupts the levelness of the hips and shoulders

18
Breath Correct breathing is defined as utilizing the full capacity of the thoracic and abdominal cavities to supply oxygen to the lungs to remove carbon dioxide, and other respiratory waste products. The respiratory system facilitates this exchange between trillions of cells in our bodies. Without that exchange, our bodies accumulate toxins to the point of toxic overload. This leads to fatigue, illness, and disease. The main respiratory muscles include the Diaphragm, the External Intercostals, the Internal Intercostals and the Transverse Abdominis.
Diaphragm
External Intercostals
Internal Intercostals
Transverse
Abdominis
Many of us underutilize these muscles, which cause the strength and elasticity of them to diminish. This in turn diminishes the depth of each breath taken. Breathing skills are taken for granted because we don’t have to think about them. But they are skills that become lost in the daily stresses of life. When stressed or anxious, the body responds by increasing the rate of respiration. We end up taking small, quick, shallow breaths - sometimes to the point of hyperventilation. Deep breathing helps rid the body of unnecessary tension as it oxygenates the tissues, mobilizes the rib cage, and massages the internal organs. How the Respiratory Muscles Work The Diaphragm is the main muscle involved in breathing. It is located between the abdominal and the thoracic cavities. The Internal and External Intercostals muscles are located in and around the ribcage. The Transverse Abdominis is located deep within the lower abdominal cavity. They all work together to expand and compress both cavities to allow oxygen to travel in and out. What Happens during Inhalation The External Intercostal muscles elevate the ribs and the Transverse Abdominis muscle relaxes. At the same time, the Diaphragm contracts and pushes down into the abdominal cavity, creating more space for the lungs to fully expand. What Happens during Exhalation The Internal Intercostal muscles depress the ribs and the Transverse Abdominis muscle contracts. At the same time, the Diaphragm relaxes. This creates pressure in the abdominal cavity to equalize, pushing the breath out.
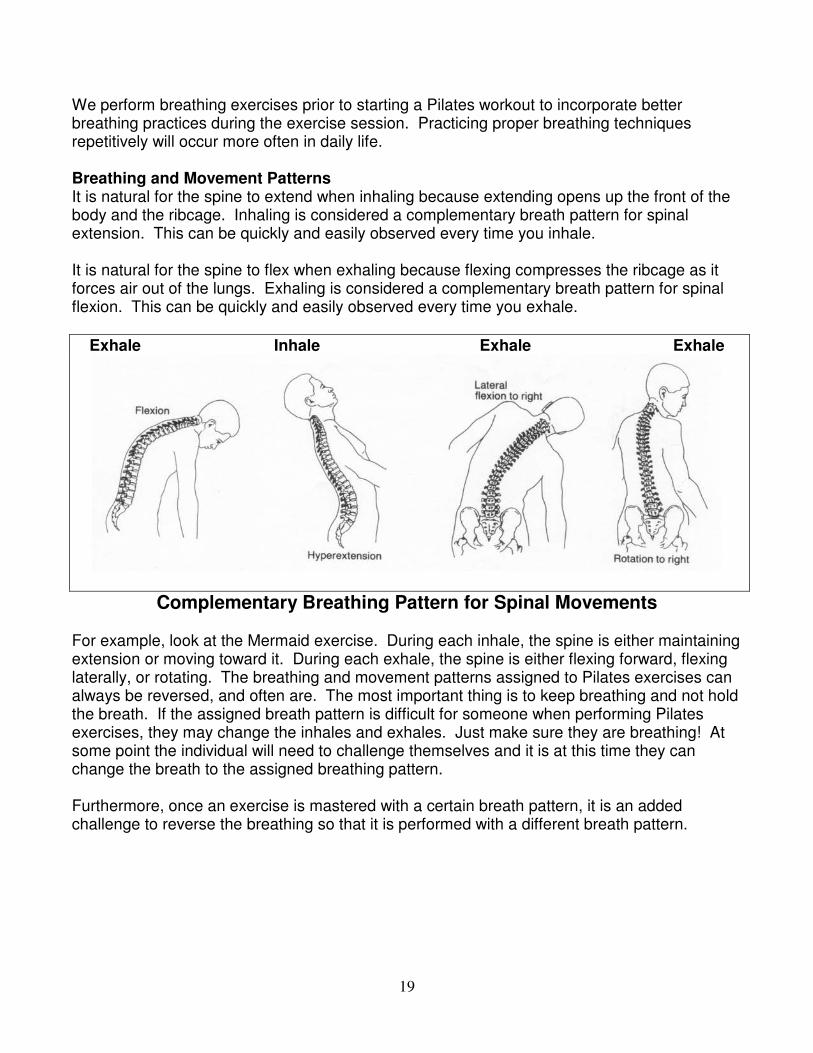
19
We perform breathing exercises prior to starting a Pilates workout to incorporate better breathing practices during the exercise session. Practicing proper breathing techniques repetitively will occur more often in daily life. Breathing and Movement Patterns It is natural for the spine to extend when inhaling because extending opens up the front of the body and the ribcage. Inhaling is considered a complementary breath pattern for spinal extension. This can be quickly and easily observed every time you inhale. It is natural for the spine to flex when exhaling because flexing compresses the ribcage as it forces air out of the lungs. Exhaling is considered a complementary breath pattern for spinal flexion. This can be quickly and easily observed every time you exhale.
Exhale Inhale Exhale Exhale
Complementary Breathing Pattern for Spinal Movements For example, look at the Mermaid exercise. During each inhale, the spine is either maintaining extension or moving toward it. During each exhale, the spine is either flexing forward, flexing laterally, or rotating. The breathing and movement patterns assigned to Pilates exercises can always be reversed, and often are. The most important thing is to keep breathing and not hold the breath. If the assigned breath pattern is difficult for someone when performing Pilates exercises, they may change the inhales and exhales. Just make sure they are breathing! At some point the individual will need to challenge themselves and it is at this time they can change the breath to the assigned breathing pattern. Furthermore, once an exercise is mastered with a certain breath pattern, it is an added challenge to reverse the breathing so that it is performed with a different breath pattern.
20
Breathing Techniques With the Pilates Breath, we inhale through the nose and exhale through the mouth. Inhale through the nose
• The nose is a filter for our respiratory system. It is the first attempt to reduce the amount of toxins in our body.
• Breathing through the nose warms the air slightly before it travels throughout our lungs. Exhale through the mouth
• Exhaling through the mouth provides a more effective forced exhalation.
• Forced exhalation engages the respiratory muscles, compresses the abdominal cavity, and assists abdominal muscle contraction.
• The abdominal muscles are the primary protectors of the spine. Any time the abdominals are not contracted, the spine is unprotected.
To quote Joseph Pilates: “squeeze every atom of impure air from your lungs in much the same manner that you would wring every drop of water out of a wet cloth”.
Breathing Awareness Exercises
Normal Breathing Purpose: Create greater awareness of normal breath pattern. Exercise Sequence: Observe normal breath pattern. Inhale as you normally do and observe
where the breath travels inside your body. Does the belly rise? Does the chest rise? Is it a full abdominal cavity breath? Do the abdominal muscles contract during the exhalation? Is all of the air being exhaled?
Deep Breathing Purpose: Increase awareness of how much inhalation is possible while strengthening
the breathing muscles. Exercise Sequence: Inhale through the nose slowly until you can’t inhale any more. Exhale
naturally.

21
Complete Exhalation Breathing Purpose: To practice full and complete exhalation and to become aware of how much
more air can be exhaled than normal. Exercise Sequence: Inhale through the nose slowly. Exhale through the mouth as if blowing a
pinwheel around in a circle. Continue exhaling until you can’t any longer. Breathe in naturally.
Back and Side Breathing Purpose: Controlling the breath as it travels into the body to create awareness of “back”
and “side rib” breathing. Starting Position: One hand placed on lower abdomen and the other on the chest. Exercise Sequence:
• Inhale; allow the chest to expand so that chest rises into hand. Do not let the belly rise.
• Exhale; naturally.
• Inhale; allow the belly to expand so the belly rises into hand. Do not let the chest rise.
• Exhale; naturally.
• Inhale; do not allow either the belly or the chest to rise. Focus on breathing into the side of ribs and the back.
Rib Cage Breathing Purpose: To feel the ribs expand laterally as you focus on compressing the abdomen
during both inhalation and exhalation. Starting Position: Hands on rib cage. Exercise Sequence:
• Inhale; contract the Rectus Abdominis and Transverse Abdominis. Try to expand to the side of your body. The fingertips will slide away from one another.
• Exhale; compress the Transverse Abdominis even more. The hands come closer together as the rib cage comes in and down.

22
Concentration on Core Strength and Control Concentration on Core Strength and Control must be applied to each exercise to perform them correctly. Concentration Concentration requires the realization that every movement of every body part is important and that all movements are integrated. Concentrate on each small movement and allow the movements to flow. Dismiss all activity around you and concentrate on your body as it responds to the minds direction. This meditative kind of concentration will bring clarity of thought, better mental focus, less mind wandering, increased mental energy and a calmer, positive frame of mind. Core Strength The core is the pivotal point of the body. All movements emanate from this center and are transferred outward. The core includes the deep internal muscles of the spine and central region, as well as the superficial muscles. The Deep Internal Muscles Include:
• Transverse Abdominis
• Internal Oblique
• Multifidus
• Pelvic Floor Muscles
• Diaphragm
• Longissimus
• Iliocostalis The Larger Superficial Muscles Include:
• Rectus Abdominis
• External Oblique
• Quadratus Lumborum Traditional abdominal exercises, like the abdominal crunch, target the superficial muscles. What has happened to the common exerciser is that their superficial muscles become very strong, but the deeper internal muscles remain weak. For most of the daily activities these individuals perform, their larger stronger muscles are employed to complete a given task. At some point, the larger muscles become fatigued and cannot complete a given task by themselves, so they call upon the deeper internal muscles for stabilization and support. It is often at this juncture that the individual experiences an injury because those internal muscles are not accustomed to being utilized and fail under the demand placed on them. Pilates exercises focus on the entire core, including the deep internal muscles and the superficial ones. The smaller deep internal muscles perform smaller movements. The larger superficial muscles perform larger movements. In order to isolate and use the deep muscles, the superficial muscles are used as little as possible. Therefore, some Pilates exercises do

23
not involve a lot of isotonic movement that is often witnessed by sight. Consequently if the individual is isolating the deep muscles they will feel the work instead of see the work. The common exerciser is more accustomed to believe they are “doing something” if they can see their bones moving. If their bones are not moving, they assume that they are not working. They are not accustomed to feeling the exercises and assessing the quality of the exercise based on their own intuition. It is often necessary to re-educate the participant’s mental perception of a quality workout as well as their physical perception of feeling the work instead of seeing it. Control Control over every movement is necessary to prevent injury. It begins with awareness of the smallest movements, allows mindful adjustments to maximize the effectiveness of the exercise, while minimizing the associated risks. By focusing on control, the body is able to utilize the internal and superficial muscles to achieve a balanced body. Movement that emanates from the core can occur at the head and neck, scapulae, spine, rib cage and pelvis. One must not only learn the following principles but also internalize the control required for each body part. These principles should be applied consistently to daily life as well as the Pilates exercises.

24
Stabilization
Cervical Spine (Head & Neck) Stabilization Neutral neck alignment: There should be a natural inward curvature of the cervical spine and while standing or sitting, the head should balance directly on top of the cervical spine.
Neutral Alignment ☺☺☺☺ Neck Flexion ���� Neck Extension ����
Head Nod Awareness Exercise Purpose: Increase awareness of neck position. Create length through the back of the neck by stretching the neck extensors. Starting Position: Seated or Classic Pilates on Carriage; neutral pelvis. Exercise Sequence:
• Inhale; nod the chin toward the chest.
• Exhale; return the head to starting position. It is a slight nod, not a jam into the chest. The chin does not touch the chest. Think of lengthening the back of the neck into the mat. Keep the distance between the chin and the chest approximately the size of a fist or small apple.
Number of Repetitions: 3-5.
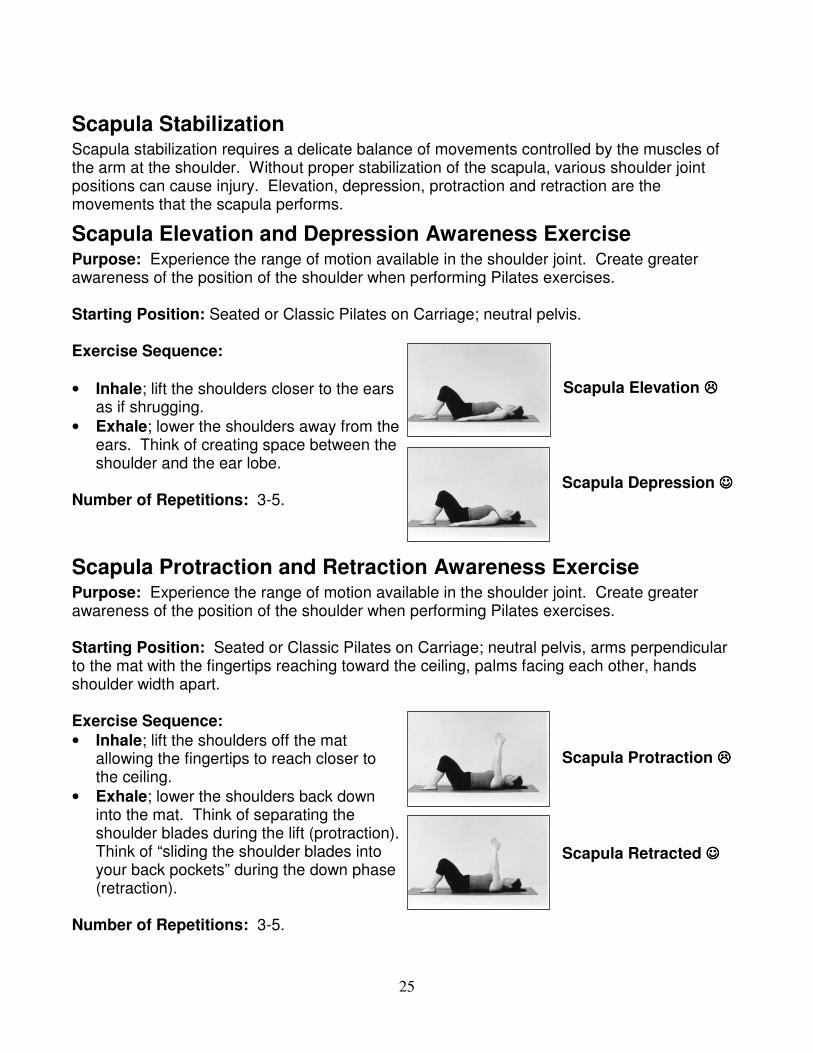
25
Scapula Stabilization Scapula stabilization requires a delicate balance of movements controlled by the muscles of the arm at the shoulder. Without proper stabilization of the scapula, various shoulder joint positions can cause injury. Elevation, depression, protraction and retraction are the movements that the scapula performs.
Scapula Elevation and Depression Awareness Exercise Purpose: Experience the range of motion available in the shoulder joint. Create greater awareness of the position of the shoulder when performing Pilates exercises. Starting Position: Seated or Classic Pilates on Carriage; neutral pelvis. Exercise Sequence:
• Inhale; lift the shoulders closer to the ears as if shrugging.
• Exhale; lower the shoulders away from the ears. Think of creating space between the shoulder and the ear lobe.
Number of Repetitions: 3-5.
Scapula Elevation ����
Scapula Depression ☺☺☺☺
Scapula Protraction and Retraction Awareness Exercise Purpose: Experience the range of motion available in the shoulder joint. Create greater awareness of the position of the shoulder when performing Pilates exercises. Starting Position: Seated or Classic Pilates on Carriage; neutral pelvis, arms perpendicular to the mat with the fingertips reaching toward the ceiling, palms facing each other, hands shoulder width apart. Exercise Sequence:
• Inhale; lift the shoulders off the mat allowing the fingertips to reach closer to the ceiling.
• Exhale; lower the shoulders back down into the mat. Think of separating the shoulder blades during the lift (protraction). Think of “sliding the shoulder blades into your back pockets” during the down phase (retraction).
Number of Repetitions: 3-5.
Scapula Protraction ����
Scapula Retracted ☺☺☺☺
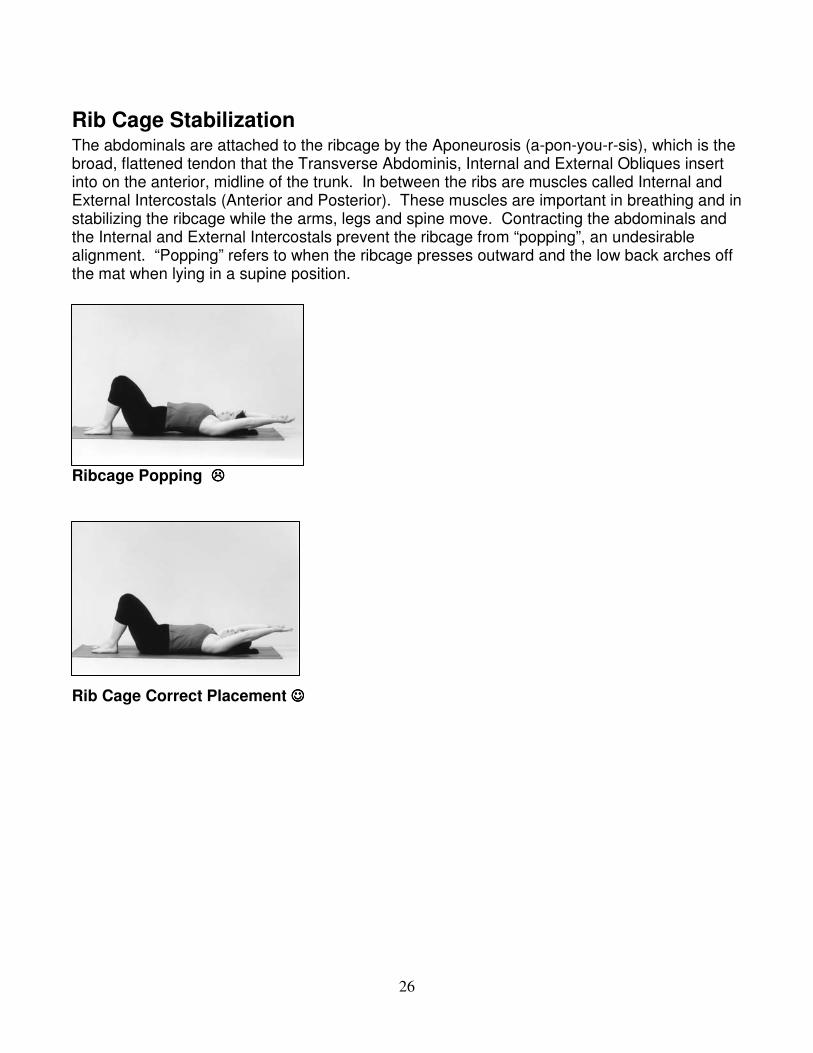
26
Rib Cage Stabilization The abdominals are attached to the ribcage by the Aponeurosis (a-pon-you-r-sis), which is the broad, flattened tendon that the Transverse Abdominis, Internal and External Obliques insert into on the anterior, midline of the trunk. In between the ribs are muscles called Internal and External Intercostals (Anterior and Posterior). These muscles are important in breathing and in stabilizing the ribcage while the arms, legs and spine move. Contracting the abdominals and the Internal and External Intercostals prevent the ribcage from “popping”, an undesirable alignment. “Popping” refers to when the ribcage presses outward and the low back arches off the mat when lying in a supine position.
Ribcage Popping ����
Rib Cage Correct Placement ☺☺☺☺

27
Pelvic Stabilization There are two positions the pelvis attains during Pilates exercise: neutral and imprint. Both positions are designed to maintain the stability of the pelvis while the arms, ribcage and legs move. Neutral pelvis refers to the position that the pelvis is in when it is neither tilted anteriorly nor posteriorly and the person’s natural lordotic curve is present. Many exercises are performed in neutral pelvis so that the muscles affecting it are worked in this desired natural state. It is important to keep the abdominals contracted even when the pelvis is neutral. Even though a natural low back curve is desired, neutral pelvis is not considered a rest position. Imprinted pelvis is used when neutral pelvic alignment cannot be effectively maintained during a particular exercise. Imprinted pelvis refers to the position that the pelvis is in when it has a posterior tilt. Ideally this position is achieved by contracting the abdominal muscles, not the Gluteal muscles. The more the Gluteal muscles work to secure an imprint, the less the abdominal muscles will need to work. Therefore, contracting the Gluteal muscles will not produce the most desirable results for strengthening the Transverse Abdominis.
Pelvic Placement Awareness Exercise Purpose: Learn the difference between neutral pelvis and imprinted pelvis. Starting Position: Classic Pilates on Carriage. Exercise Sequence 1: Begin Pilates breathing and place hands on lower abdomen. Notice the angle of hands as they rest between hip bones and pubic bone. When the hip bones and pubic bone are in the same plane, the hands will be parallel to the mat. This is considered neutral. Exercise Sequence 2: Continue Pilates breathing, and pull belly button in during the exhalation with enough muscle contraction to allow the pubic bone to elevate higher than the hip bones. Notice the angle of hands change as the pubic bone becomes higher than the hip bones. This is considered imprinted pelvis. The gluteal muscles are to remain inactive. The normal curve of the low back will be decreased as the low back descends toward the mat. Number of Repetitions: 3-5. Common Errors:
• Squeezing the gluteals to facilitate an imprint.
• Focusing on pressing the low back into the mat instead of using the abdominal muscles to create movement.
Muscles Targeted: Transverse Abdominis.

28
Supine View Standing View
Pelvic Floor Weak pelvic floor muscles may lead to incontinence (leaking of urine). The topic of incontinence may be uncomfortable, as is discussion of the pelvic floor. Many people do not frequently think of using their pelvic floor. Yet these muscles are used during daily urination. Discovering them is as simple as stopping the flow of urine. The flow should be broken off smoothly with no dribbling. The muscles used to do this are the pelvic floor muscles. Once the pelvic floor muscles have been identified, complete the urination. This exercise is good for identifying the muscles. It is not recommended to stop the flow of urine in this manner on a regular basis. It is recommended to contract these muscles daily for short periods of time to strengthen the pelvic floor muscles. It is also recommended that the pelvic floor muscles be exercised in moderation. Just like all of the muscles in the body, they can be overworked. Imagine the pelvic floor is an elevator and, as it ascends to each floor, pull up the pelvic floor muscles a little more each time, until they are completely tight. Then, the elevator can descend floor by floor, gradually relaxing the muscles in stages until fully relaxed. These are called “Kegel” (kā'gel) exercises. Kegel exercises were originally developed by Dr. Arnold Kegel in 1948 as a method of controlling incontinence in women following childbirth. The pelvic floor is contracted (Kegel’s) while performing Pilates exercises. Pelvic Floor, Abdominal Contraction and the Breath Proper breathing is essential to the correct execution of Pilates exercises. Concentration on the breath provides time to mentally prepare for movement. Another part of the mental preparation involves isometric contraction of the pelvic floor and the abdominals. They support and contribute to posture, breathing and circulation. The stronger the pelvic floor muscles, the better the functioning of the lower organs such as the uterus, bladder and bowels. The pelvic floor musculature is frequently forgotten as a necessary part of daily exercise. Yet it is evident that as we age, those muscles naturally lose strength if they are not used. Therefore, with each inhale, the pelvic floor muscles are “pulled up” (contracting the muscles used to stop the flow of urine). Additionally, the abdominals are “pulled in” (pulling the navel toward the spine as if trying to zip up tight jeans).
Posterior Tilt
Anterior Tilt
Neutral
Neutral Anterior Posterior

29
During exhalation, maintain the pelvic floor and the abdominal contractions. Additionally, the Transverse Abdominis contracts to compress the abdomen. When these three points (pelvic floor, Rectus Abdominis and Transverse Abdominis) are simultaneously contracted, it provides stability and a produces a feeling of connectedness within the entire pelvic region.
How to Kegel 1. Short (2 seconds). Contract (tighten) your pelvic muscle very hard for two seconds, and then immediately relax for two seconds. 2. Long (3, 5, or 10 seconds). Begin with the procedure outlined above, tightening for three seconds, and then relaxing for three seconds. Over time, increase the length of time you tighten or relax the pelvic muscle to five seconds, then ten seconds or even longer. Kegel exercises can be practiced anywhere and anytime. You should perform these exercises in several different positions: Sitting, Standing, Lying Down, and Exercising!

30
Section 3
Warm Up Exercises
The Footwork Series Footwork is a fundamental aspect in the Pilates Reformer workout. It is the first series of exercises done on the Reformer in most any session. Even though it is called footwork, it uses the large muscles of the legs (Quadriceps, Hamstrings, and Glutes) to warm-up the body. The muscles of the lower leg (Gastrocnemius, Soleus, and Anterior Tibialis) work to move the ankle joint from plantar to dorsi-flexion, and the intrinsic muscles of the feet gain strength and flexibility. There are several variations of footwork that can be added into a workout program to address the exercisers’ needs. For example:
1. Dancers who practice most of the time in lateral rotation of the hip can work on balancing the muscles of the legs by working in medial rotation on the reformer.
2. For someone who is pigeon toed (feet medially rotated), they can balance the muscles of the leg and feet by working in a lateral rotation on the reformer.
3. For people who do not have obvious variances one way or another, they can focus on working all three (parallel, lateral, medial) foot positions to promote balance.
Foot Positioning
Adducted Hip Distance Heels Together
Toes Apart Toes Together
Heels Apart
A l s o m e a n s A l s o m e a n s A l s o m e a n s A l s o m e a n s
Parallel Parallel Lateral Medial

31
Reformer Settings for all Footwork
Carriage Setting:
• While supine on carriage with feet on footbar, ninety degree flexion at the hip joint is preferred, but may adjust to greater than ninety degrees to accommodate the exerciser for comfort.
Headrest Setting:
• The headrest should be in the position that is the most comfortable for the exerciser. It is important that the neck and shoulders are free of tension.
Footbar Setting:
• The highest level is the default position, but the footbar should be lowered if this is not comfortable for the exerciser.
Spring Settings:
• 2-3 springs for beginners until proper alignment and muscle activation can be maintained.
• 2-3 springs for injured exercisers.
• 3-4 springs for those who can maintain proper alignment and muscle activation.
Cueing Footwork
Alignment:
• Head, neck and shoulders tension free.
• Shoulders slightly retracted and depressed.
• Ribcage contracted and in contact with carriage.
• Pelvis neutral. Imprint if needed.
• Abdominals and pelvic floor engaged.
• Hip, knee, and ankle aligned.
Common Errors:
• Losing alignment.
• Holding the breath.
• Moving without control.
Modifications:
• Press the carriage only half way out.
• Hold squishy ball between knees to keep muscle engagement and correct alignment.
Footwork Essentials
Purpose: Increase body temperature and to warm up the hip, knee, and ankle joints.
Joint Action: Hip, knee, ankle flexion and extension.
Prime Movers: Quadriceps to press carriage away, Hamstrings to return carriage home.
Assisters: Gluteals to keep external rotation, Adductors to keep internal rotation.
Stabilizing Muscles: Rectus Abdominis, Obliques, Transverse Abdominis, Erector Spinae.

32
Footwork – Heels Hip Width
Start End Exercise Sequence:
• Inhale; scan body for alignment, engage pelvic floor and abdominals.
• Exhale; push heels against footbar, extend knees and hips, moving the carriage away.
• Inhale; bend knees and hips to return to the starting position. Number of Repetitions: Up to 10 in each position (parallel, lateral, medial). Variations:
• Press carriage only halfway out to work a small range of motion.
• Press carriage only halfway back to home to work the end range of motion.
Remember:
• Keep the feet in the same position throughout. Imagine:
• You are performing a vertical squat so that your feet are flexed as if they were on the floor.
Notes:
SET UP Springs: 2 - 4 Footbar: Up Headrest: Up or Down
Parallel
heels on foot bar hip width apart, feet dorsi-flexed, toes aim to ceiling.
Lateral
heels on foot bar hip width apart, thighs externally rotated from the hip-socket, feet dorsi-flexed, up to approximate forty-five degree lateral angle.
Medial
heels on foot bar hip width apart, thighs internally rotated from the hip-socket, feet dorsi-flexed. Starting Position Classic Pilates on Carriage; neutral spine, arms resting on carriage, head resting on headrest. See foot position above.
Lateral Medial

33
Footwork – Ball of Foot
Start End Exercise Sequence:
• Inhale; scan body for alignment, engage pelvic floor and abdominals.
• Exhale; push heels against footbar, extend knees and hips, moving the carriage away.
• Inhale; bend knees and hips to return to the starting position. Number of Repetitions: Up to 10 in each position (parallel, lateral, medial). Variations:
• Press carriage only halfway out to work a small range of motion.
• Press carriage only halfway back to home to work the end range of motion.
Remember:
• Keep the feet in the same position throughout. Imagine:
• You are wearing high heeled shoes or walking on your tip toes.
Notes:
SET UP Springs: 2 - 4 Footbar: Up Headrest: Up or Down
Parallel
balls of feet on footbar hip width apart, feet plantar-flexed.
Lateral
balls of feet on footbar hip width apart, heels together, feet plantar-flexed.
Medial
balls of feet on footbar hip width apart, thighs internally rotated from the hip-socket, feet plantar-flexed. Starting Position Classic Pilates on Carriage; neutral spine, arms resting on carriage, head resting on headrest. See foot position above.
Squishy Ball Modification

34
Footwork – Calf Raises
Start Mid End Exercise Sequence:
• Inhale; scan body for alignment, engage pelvic floor and abdominals.
• Exhale; push feet against footbar, extend knees and hips, moving the carriage away.
• Inhale; keeping the knees and hips extended, lower the heels under the footbar.
• Exhale; lift heels up, bringing the ankle back to plantar-flexion.
• Inhale; bend knees and hips to return to the starting position. Number of Repetitions: Up to 10 in each position (parallel, lateral). Variations:
• Lower and lift the heels up to ten times in a row while carriage is away. Remember:
• Do not let the ankles roll out to the side. Imagine:
• You are wearing high heeled shoes or walking on your tip toes.
Notes:
SET UP Springs: 2 - 4 Footbar: Up Headrest: Up or Down
Parallel
balls of feet on footbar hip width apart, feet plantar-flexed.
Lateral
balls of feet on foot bar hip width apart, heels together, feet plantar-flexed. Starting Position Classic Pilates on Carriage; neutral spine, arms resting on carriage, head resting on headrest. See foot position above.

35
Footwork – Running
Start Mid End
Exercise Sequence:
• Inhale; scan body for alignment, engage pelvic floor and abdominals.
• Exhale; push feet against footbar, extend knees and hips, moving the carriage away.
• Inhale short staccato breath; keep the carriage away, lower one heel under the footbar, simultaneously lift the other heel to plantar-flexion.
• Inhale short staccato breath; keep the carriage away, switch the feet so the opposite heel is under the footbar.
• Exhale short staccato breath; keep the carriage away, switch the feet.
• Exhale short staccato breath; keep the carriage away, switch the feet. Continue through desired number of repetitions.
• Inhale; lift both heels to plantar-flexion.
• Exhale; bend knees and hips to return to the starting position. Number of Repetitions: Up to 100. Variation:
• Pick up the pace as long as the movement is controlled. Remember:
• To extend the knees all the way without locking them out. Imagine:
• You are prancing.
Notes:
SET UP Springs: 2 - 4 Footbar: Up Headrest: Up or Down
Parallel
balls of feet on footbar hip width apart, feet plantar-flexed. Starting Position Classic Pilates on Carriage; neutral spine, arms resting on carriage, head resting on headrest. See foot position above.

36
Work Out Exercises
The Single Leg Series
Reformer Settings for all Single Leg Series
Carriage Setting:
• While supine on carriage with feet on footbar, ninety degree flexion at the hip joint is preferred, but may adjust to greater than ninety degrees to accommodate the exerciser for comfort.
Headrest Setting:
• The headrest should be in the position that is the most comfortable for the exerciser. It is important that the neck and shoulders are free of tension.
Footbar Setting:
• The highest level is the default position, but the footbar should be lowered if this is not comfortable for the exerciser.
Spring Settings:
• 2 springs for beginners until proper alignment and muscle activation can be maintained.
• 2 springs for injured exercisers.
• 2-3 springs for those who can maintain proper alignment and muscle activation.
Cueing Single Leg Exercises
Alignment:
• Head, neck and shoulders tension free.
• Shoulders slightly retracted and depressed.
• Ribcage contracted and in contact with carriage.
• Pelvis neutral. Imprint if needed.
• Abdominals and pelvic floor engaged.
• Hip, knee, and ankle aligned.
Common Errors:
• Losing alignment.
• Holding the breath.
• Moving without control.
Modifications:
• Press the carriage only half way out.
Single Leg Essentials
Purpose: Allowing each leg to work unilaterally, the Single Leg exercises strengthen potential weakness on one side of the body and provide greater challenge on the core muscles to keep the pelvis stable.
Joint Action: Hip, knee, ankle flexion and extension.
Prime Movers: Quadriceps to press carriage away, Hamstrings to return carriage home.
Stabilizing Muscles: Rectus Abdominis, Obliques, Transverse Abdominis, Erector Spinae.

37
Single Leg – One Leg Bent
Start End Exercise Sequence:
• Inhale; scan body for alignment, engage pelvic floor and abdominals.
• Exhale; push the foot against the footbar to extend the knee and hip moving the carriage away. Keep the other leg in tabletop position, with the knee over the hip.
• Inhale; bend the extended knee and hip to return the carriage. Number of Repetitions: 10 each leg. Variation:
• Pick up the pace as long as the movement is controlled. Remember:
• To keep the hip bones in the same plane. Imagine:
• Your top leg is a statue and it is molded to represent a 90 degree angle.
Notes:
SET UP Springs: 2 - 3 Footbar: Up Headrest: Up or Down
Parallel
the ball of one foot on footbar, ankle plantar-flexed. The other leg in table top position with foot plantar-flexed. Starting Position Classic Pilates on Carriage; neutral spine, the ball of one foot on footbar, ankle plantar-flexed, arms resting on carriage, head resting on headrest. See above for foot position.
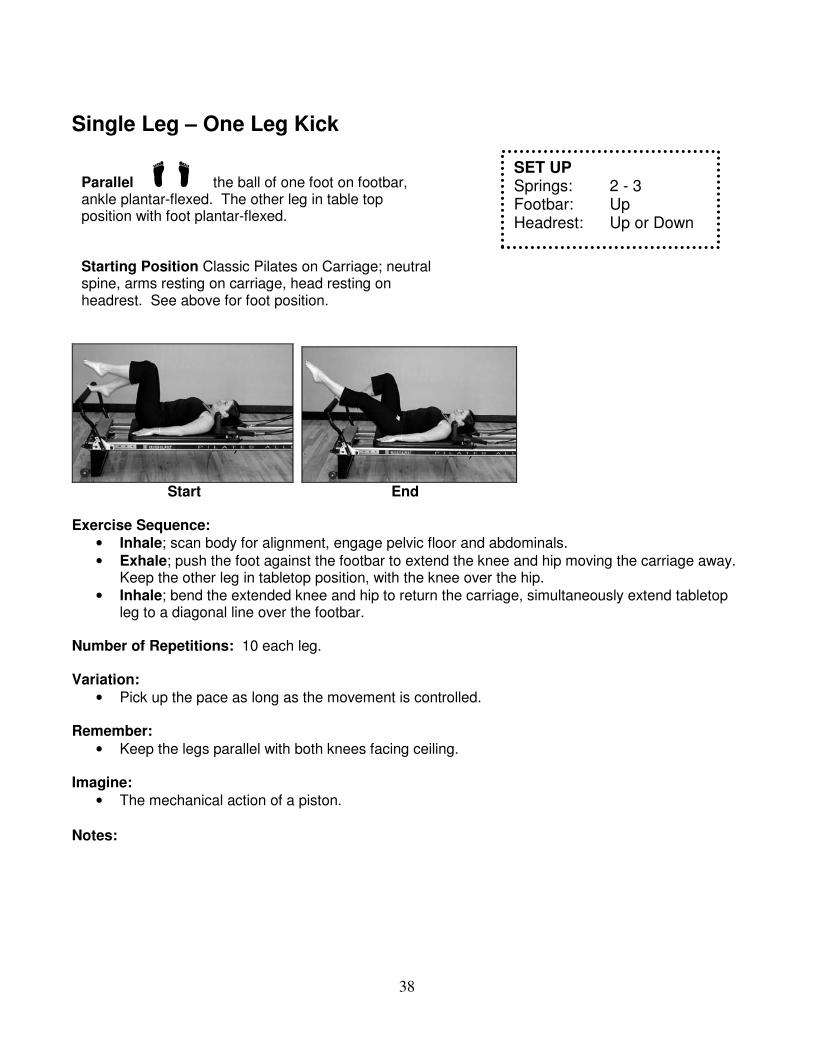
38
Single Leg – One Leg Kick
Start End Exercise Sequence:
• Inhale; scan body for alignment, engage pelvic floor and abdominals.
• Exhale; push the foot against the footbar to extend the knee and hip moving the carriage away. Keep the other leg in tabletop position, with the knee over the hip.
• Inhale; bend the extended knee and hip to return the carriage, simultaneously extend tabletop leg to a diagonal line over the footbar.
Number of Repetitions: 10 each leg. Variation:
• Pick up the pace as long as the movement is controlled. Remember:
• Keep the legs parallel with both knees facing ceiling. Imagine:
• The mechanical action of a piston.
Notes:
SET UP Springs: 2 - 3 Footbar: Up Headrest: Up or Down
Parallel
the ball of one foot on footbar, ankle plantar-flexed. The other leg in table top position with foot plantar-flexed. Starting Position Classic Pilates on Carriage; neutral spine, arms resting on carriage, head resting on headrest. See above for foot position.

39
Single Leg – Single Heel
Start End
Exercise Sequence:
• Inhale; scan body for alignment, engage pelvic floor and abdominals.
• Exhale; push heel against footbar, extend knee and hips, moving the carriage away.
• Inhale; bend knee and hip to return to the starting position. Number of Repetitions: 10 each leg. Variation:
• Bend top leg to table top position for comfort. Remember:
• Correct alignment should not be compromised at the expense of heavier workload. Imagine:
• Keep both feet dorsi-flexed as if standing on the floor.
Notes:
SET UP Springs: 2 - 3 Footbar: Up Headrest: Up or Down
Parallel
heel of one foot on footbar hip width apart, feet dorsi-flexed. The other leg extended at a diagonal over the footbar, with foot dorsi-flexed. Starting Position Classic Pilates on Carriage; neutral spine, arms resting on carriage, head resting on headrest. See above for foot position.

40
Single Leg – One Leg Circles
Start Mid 1 Mid 2
Mid 3 Mid 4 End
Exercise Sequence:
• Inhale; scan body for alignment, engage pelvic floor and abdominals.
• Exhale; push heel against footbar, extend knee and hips, moving the carriage away. Simultaneously extend top leg to ceiling. Hold the carriage in the away position.
• Inhale; start to circle the top leg across the midline of the body and down away from the face.
• Exhale; continue circling the top leg to return it to the start position. Repeat 5 times in each direction.
• Inhale; hold the carriage in the away position, continue lifting top leg to ceiling.
• Exhale; bend both knees and hips to bring the carriage home. Number of Repetitions: 10 each leg (5 circles in each direction). Variation:
• Bend top leg to table top position for comfort. Remember:
• Keep the pelvis neutral and steady. Imagine:
• Drawing a circle on the ceiling with your big toe. Notes:
SET UP Springs: 2 - 3 Footbar: Up Headrest: Up or Down
Parallel
the heel of one foot on footbar, ankle dorsi-flexed. The other leg in table top position, with foot plantar-flexed. Starting Position Classic Pilates on Carriage; neutral spine, arms resting on carriage, head resting on headrest. See above for foot position.
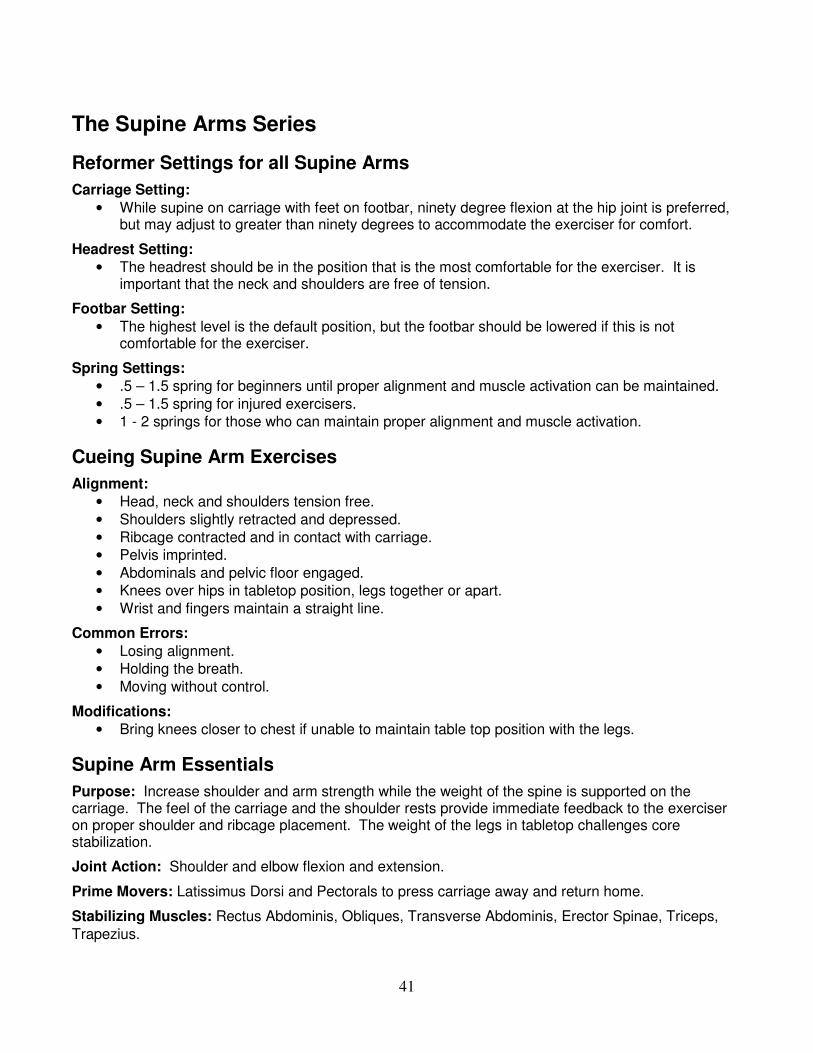
41
The Supine Arms Series
Reformer Settings for all Supine Arms
Carriage Setting:
• While supine on carriage with feet on footbar, ninety degree flexion at the hip joint is preferred, but may adjust to greater than ninety degrees to accommodate the exerciser for comfort.
Headrest Setting:
• The headrest should be in the position that is the most comfortable for the exerciser. It is important that the neck and shoulders are free of tension.
Footbar Setting:
• The highest level is the default position, but the footbar should be lowered if this is not comfortable for the exerciser.
Spring Settings:
• .5 – 1.5 spring for beginners until proper alignment and muscle activation can be maintained.
• .5 – 1.5 spring for injured exercisers.
• 1 - 2 springs for those who can maintain proper alignment and muscle activation.
Cueing Supine Arm Exercises
Alignment:
• Head, neck and shoulders tension free.
• Shoulders slightly retracted and depressed.
• Ribcage contracted and in contact with carriage.
• Pelvis imprinted.
• Abdominals and pelvic floor engaged.
• Knees over hips in tabletop position, legs together or apart.
• Wrist and fingers maintain a straight line.
Common Errors:
• Losing alignment.
• Holding the breath.
• Moving without control.
Modifications:
• Bring knees closer to chest if unable to maintain table top position with the legs.
Supine Arm Essentials
Purpose: Increase shoulder and arm strength while the weight of the spine is supported on the carriage. The feel of the carriage and the shoulder rests provide immediate feedback to the exerciser on proper shoulder and ribcage placement. The weight of the legs in tabletop challenges core stabilization.
Joint Action: Shoulder and elbow flexion and extension.
Prime Movers: Latissimus Dorsi and Pectorals to press carriage away and return home.
Stabilizing Muscles: Rectus Abdominis, Obliques, Transverse Abdominis, Erector Spinae, Triceps,
Trapezius.

42
Supine Arms – Tricep Press
Start End Exercise Sequence:
• Inhale; scan body for alignment, engage pelvic floor and abdominals.
• Exhale; press the hands into the straps to extend the elbows, bringing the arms parallel to the floor. The carriage will move away from home.
• Inhale; flex the elbow joint to bring the carriage toward home, but stop right before you get there to keep tension in the straps. Repeat appropriate repetitions.
Number of Repetitions: 10. Variation:
• Bring legs closer to chest for comfort. Remember:
• Move the carriage very smoothly. Imagine:
• That your forearm, wrist, and fingers move as a unit so that the fingers and wrists do not bend during the exercise.
Notes:
SET UP Springs: .5 - 2 Footbar: Up Headrest: Up or Down
Parallel
legs adducted in tabletop position. Starting Position Classic Pilates on Carriage; imprinted pelvis, legs in tabletop position, hands holding strap handles. Upper arms resting on carriage, head resting on headrest.
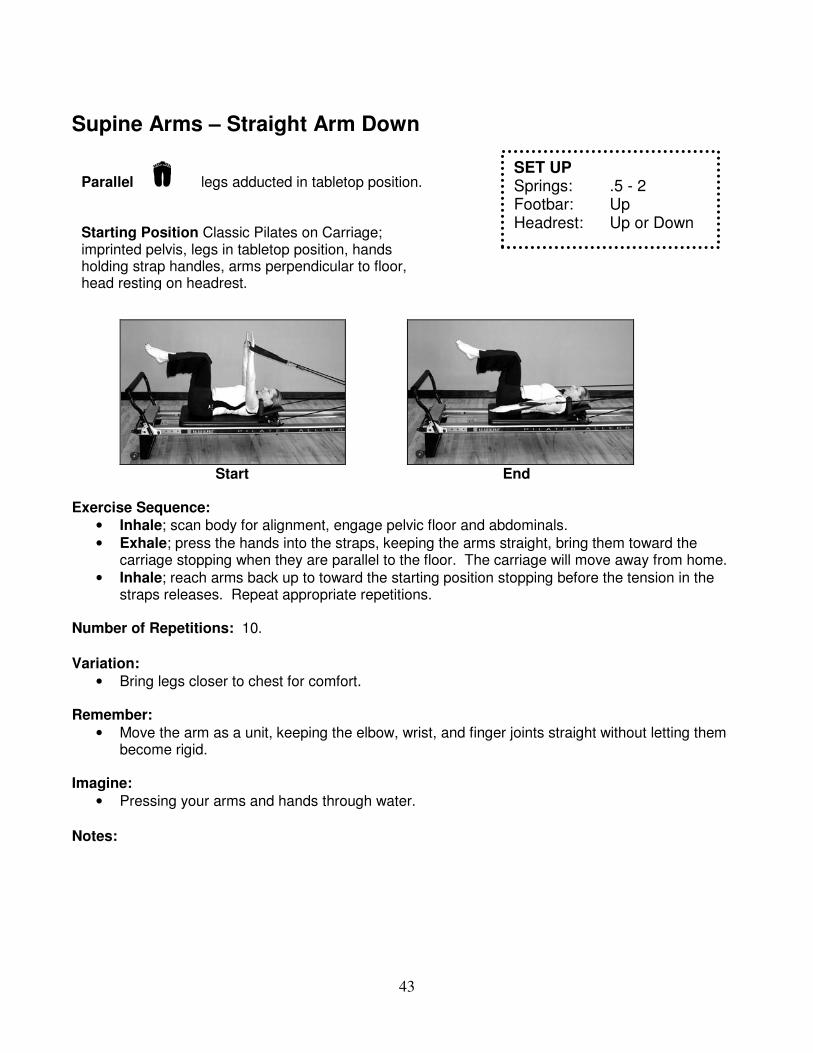
43
Supine Arms – Straight Arm Down
Start End Exercise Sequence:
• Inhale; scan body for alignment, engage pelvic floor and abdominals.
• Exhale; press the hands into the straps, keeping the arms straight, bring them toward the carriage stopping when they are parallel to the floor. The carriage will move away from home.
• Inhale; reach arms back up to toward the starting position stopping before the tension in the straps releases. Repeat appropriate repetitions.
Number of Repetitions: 10.
Variation:
• Bring legs closer to chest for comfort. Remember:
• Move the arm as a unit, keeping the elbow, wrist, and finger joints straight without letting them become rigid.
Imagine:
• Pressing your arms and hands through water.
Notes:
SET UP Springs: .5 - 2 Footbar: Up Headrest: Up or Down
Parallel
legs adducted in tabletop position. Starting Position Classic Pilates on Carriage; imprinted pelvis, legs in tabletop position, hands holding strap handles, arms perpendicular to floor, head resting on headrest.
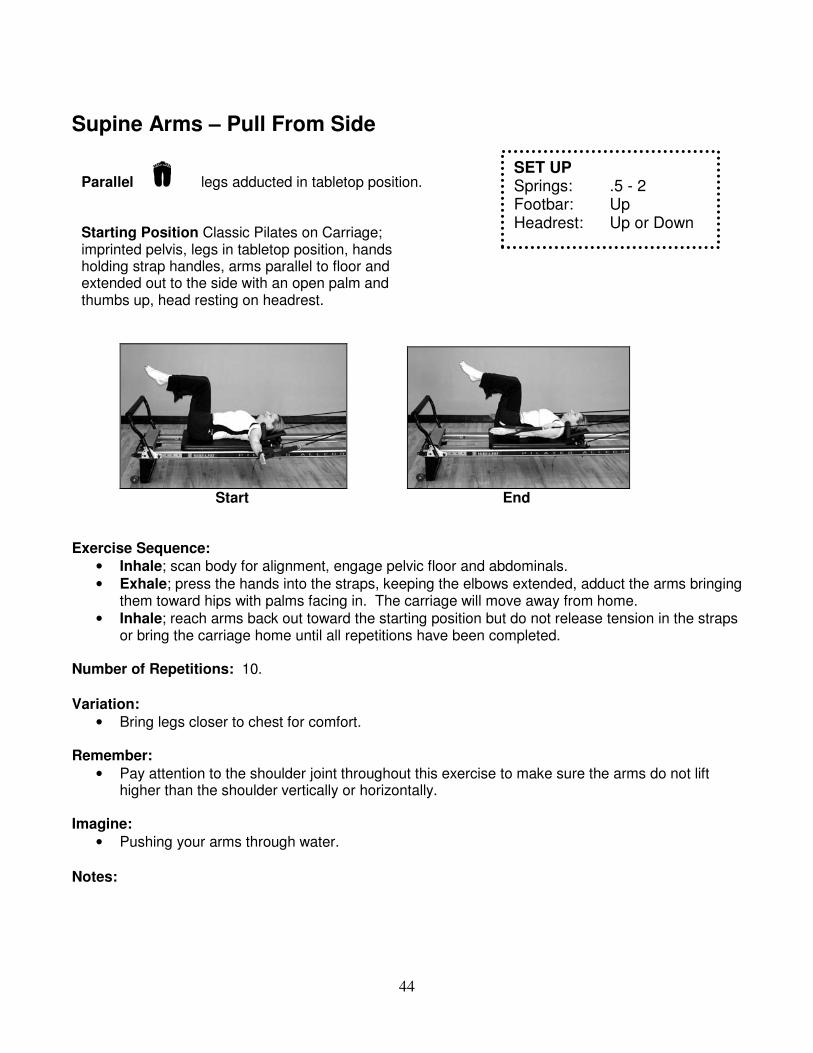
44
Supine Arms – Pull From Side
Start End Exercise Sequence:
• Inhale; scan body for alignment, engage pelvic floor and abdominals.
• Exhale; press the hands into the straps, keeping the elbows extended, adduct the arms bringing them toward hips with palms facing in. The carriage will move away from home.
• Inhale; reach arms back out toward the starting position but do not release tension in the straps or bring the carriage home until all repetitions have been completed.
Number of Repetitions: 10.
Variation:
• Bring legs closer to chest for comfort. Remember:
• Pay attention to the shoulder joint throughout this exercise to make sure the arms do not lift higher than the shoulder vertically or horizontally.
Imagine:
• Pushing your arms through water.
Notes:
SET UP Springs: .5 - 2 Footbar: Up Headrest: Up or Down
Parallel
legs adducted in tabletop position. Starting Position Classic Pilates on Carriage; imprinted pelvis, legs in tabletop position, hands holding strap handles, arms parallel to floor and extended out to the side with an open palm and thumbs up, head resting on headrest.
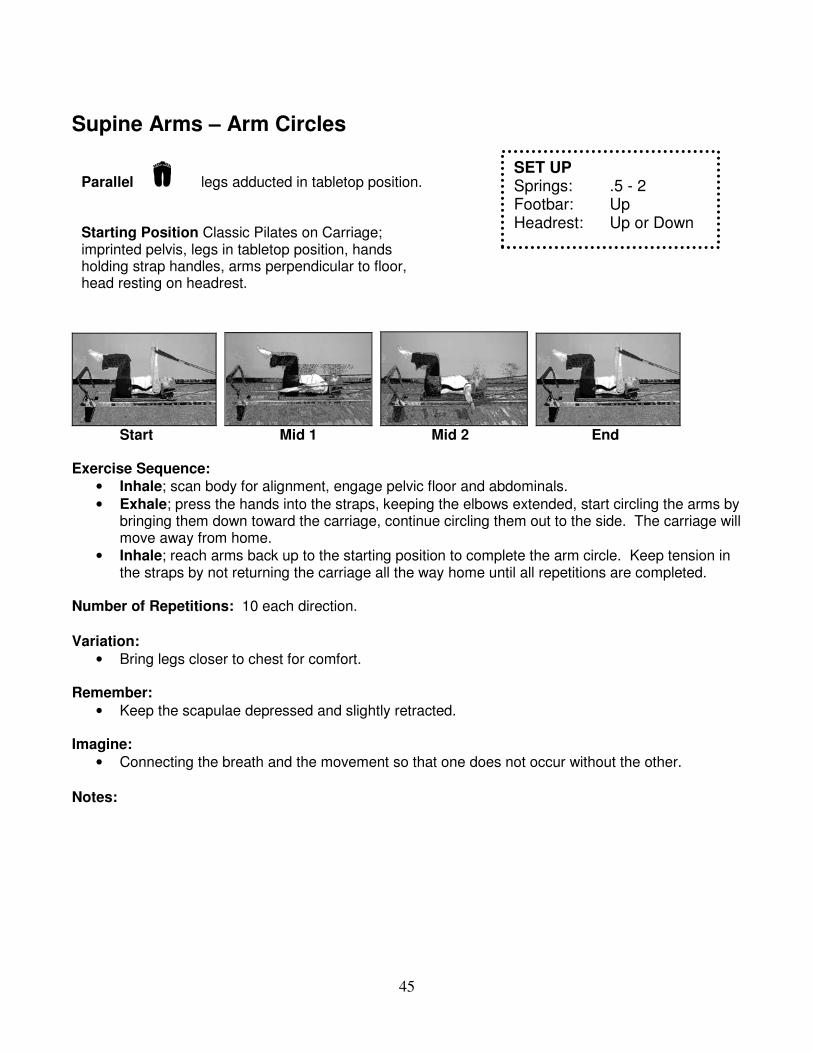
45
Supine Arms – Arm Circles
Start Mid 1 Mid 2 End Exercise Sequence:
• Inhale; scan body for alignment, engage pelvic floor and abdominals.
• Exhale; press the hands into the straps, keeping the elbows extended, start circling the arms by bringing them down toward the carriage, continue circling them out to the side. The carriage will move away from home.
• Inhale; reach arms back up to the starting position to complete the arm circle. Keep tension in the straps by not returning the carriage all the way home until all repetitions are completed.
Number of Repetitions: 10 each direction.
Variation:
• Bring legs closer to chest for comfort. Remember:
• Keep the scapulae depressed and slightly retracted. Imagine:
• Connecting the breath and the movement so that one does not occur without the other.
Notes:
SET UP Springs: .5 - 2 Footbar: Up Headrest: Up or Down
Parallel
legs adducted in tabletop position. Starting Position Classic Pilates on Carriage; imprinted pelvis, legs in tabletop position, hands holding strap handles, arms perpendicular to floor, head resting on headrest.
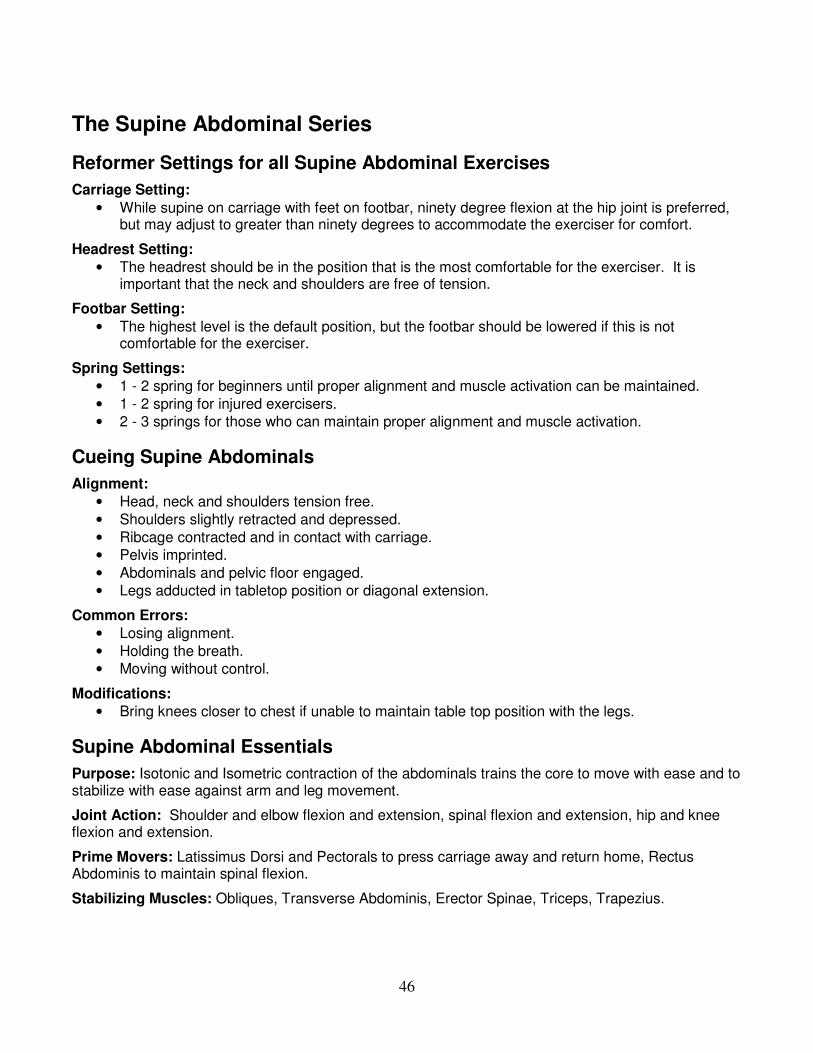
46
The Supine Abdominal Series
Reformer Settings for all Supine Abdominal Exercises
Carriage Setting:
• While supine on carriage with feet on footbar, ninety degree flexion at the hip joint is preferred, but may adjust to greater than ninety degrees to accommodate the exerciser for comfort.
Headrest Setting:
• The headrest should be in the position that is the most comfortable for the exerciser. It is important that the neck and shoulders are free of tension.
Footbar Setting:
• The highest level is the default position, but the footbar should be lowered if this is not comfortable for the exerciser.
Spring Settings:
• 1 - 2 spring for beginners until proper alignment and muscle activation can be maintained.
• 1 - 2 spring for injured exercisers.
• 2 - 3 springs for those who can maintain proper alignment and muscle activation.
Cueing Supine Abdominals
Alignment:
• Head, neck and shoulders tension free.
• Shoulders slightly retracted and depressed.
• Ribcage contracted and in contact with carriage.
• Pelvis imprinted.
• Abdominals and pelvic floor engaged.
• Legs adducted in tabletop position or diagonal extension.
Common Errors:
• Losing alignment.
• Holding the breath.
• Moving without control.
Modifications:
• Bring knees closer to chest if unable to maintain table top position with the legs.
Supine Abdominal Essentials
Purpose: Isotonic and Isometric contraction of the abdominals trains the core to move with ease and to stabilize with ease against arm and leg movement.
Joint Action: Shoulder and elbow flexion and extension, spinal flexion and extension, hip and knee flexion and extension.
Prime Movers: Latissimus Dorsi and Pectorals to press carriage away and return home, Rectus Abdominis to maintain spinal flexion.
Stabilizing Muscles: Obliques, Transverse Abdominis, Erector Spinae, Triceps, Trapezius.

47
Hundred – Prep
Start End Exercise Sequence:
• Inhale; scan body for alignment, engage pelvic floor and abdominals. Perform head nod.
• Exhale; press the hands into the straps to extend elbows bringing the arms parallel to floor. Simultaneously lift head, neck and shoulders off carriage. The carriage will move.
• Inhale; maintain lifted position.
• Exhale; return to starting position.
Number of Repetitions: 5. Variations:
• Hold squishy ball between knees.
• Do the exercise without using the straps.
• Bring knees closer to chest if unable to sustain tabletop.
Remember:
• Keep space between the chin and chest.
• Initiate every move with attention to the abdominal contraction. Imagine:
• Hollowing out the abdominals.
• Bringing the bottom rib closer to the hip bones. Notes:
SET UP Springs: 1 - 2 Footbar: Up Headrest: Up or Down
Parallel
legs adducted in tabletop position. Starting Position Classic Pilates on Carriage; imprinted pelvis, legs in tabletop position, hands holding strap handles, upper arms resting on carriage, head resting on headrest.

48
Hundred – Full
Start End Exercise Sequence:
• Inhale; scan body for alignment, engage pelvic floor and abdominals. Perform head nod.
• Exhale; press the hands into the straps to extend elbows bring the arms to parallel to floor. Simultaneously lift head, neck and shoulders off carriage. The carriage will move.
• Inhale; pulse arms up and down 5 times in tandem with 5 staccato breaths.
• Exhale; pulse arms up and down 5 times in tandem with 5 staccato breaths. Repeat 9 times for a total of 100 pulses of the arms. Try not to move the carriage.
• Inhale; maintain lifted position.
• Exhale; return to starting position. Number of Repetitions: 100.
Variations:
• Hold squishy ball between knees.
• Do the exercise without using the straps.
• Bring legs to tabletop if unable to sustain diagonal.
Remember:
• Keep the carriage as steady as possible during arm pulses.
• Keep pressing shoulders away from ears. Imagine:
• Hollowing out the abdominals.
• Bringing the bottom rib closer to the hip bones. Notes:
SET UP Springs: 1 - 3 Footbar: Up Headrest: Up or Down
Parallel
legs adducted in tabletop position. Starting Position Classic Pilates on Carriage; imprinted pelvis, legs in tabletop position, hands holding strap handles. Upper arms resting on carriage, head resting on headrest.
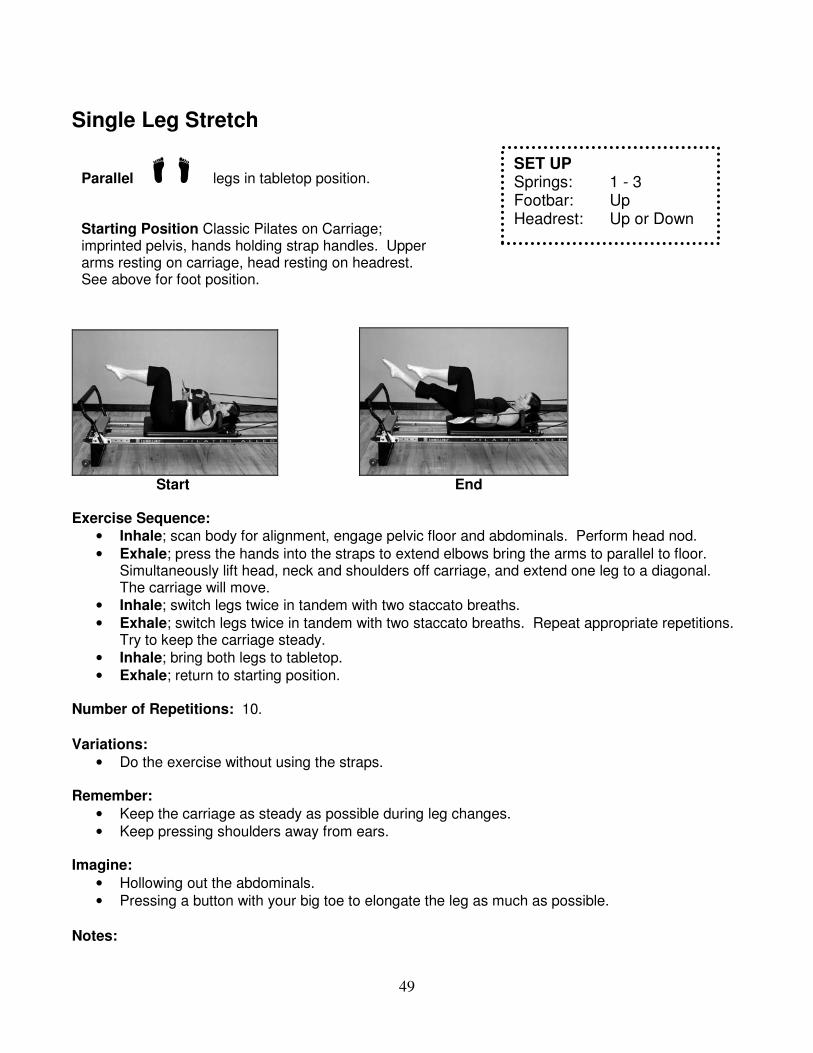
49
Single Leg Stretch
Start End Exercise Sequence:
• Inhale; scan body for alignment, engage pelvic floor and abdominals. Perform head nod.
• Exhale; press the hands into the straps to extend elbows bring the arms to parallel to floor. Simultaneously lift head, neck and shoulders off carriage, and extend one leg to a diagonal. The carriage will move.
• Inhale; switch legs twice in tandem with two staccato breaths.
• Exhale; switch legs twice in tandem with two staccato breaths. Repeat appropriate repetitions. Try to keep the carriage steady.
• Inhale; bring both legs to tabletop.
• Exhale; return to starting position. Number of Repetitions: 10.
Variations:
• Do the exercise without using the straps.
Remember:
• Keep the carriage as steady as possible during leg changes.
• Keep pressing shoulders away from ears. Imagine:
• Hollowing out the abdominals.
• Pressing a button with your big toe to elongate the leg as much as possible.
Notes:
SET UP Springs: 1 - 3 Footbar: Up Headrest: Up or Down
Parallel
legs in tabletop position. Starting Position Classic Pilates on Carriage; imprinted pelvis, hands holding strap handles. Upper arms resting on carriage, head resting on headrest. See above for foot position.

50
Rollover Prep
Start End Exercise Sequence:
• Inhale; scan body for alignment, engage pelvic floor and abdominals.
• Exhale; press the hands into the straps to extend elbows bring the hands to the carriage. Simultaneously tail bone away from carriage. Keep the head on the headrest. The carriage will move.
• Inhale; return to starting position. Repeat appropriate repetitions.
• Exhale; bring feet to footbar. Number of Repetitions: 10.
Variations:
• Do the exercise without using the straps.
Remember:
• Put the headrest in the lowest position.
• Keep shoulders on the carriage. Imagine:
• Hollowing out the abdominals.
• Your tailbone curling away from the carriage ever so gently.
Notes:
SET UP Springs: 1 - 3 Footbar: Up Headrest: Up or Down
Parallel
legs adducted in tabletop position. Starting Position Classic Pilates on Carriage; imprinted pelvis, hands holding strap handles. Upper arms resting on carriage, head resting on headrest. See above for foot position.

51
The Bridging Series
Reformer Settings for all Bridging Exercises
Carriage Setting:
• While supine on carriage with feet on footbar, ninety degree flexion at the hip joint is preferred, but may adjust to greater than ninety degrees to accommodate the exerciser for comfort.
Headrest Setting:
• The lowest position.
Footbar Setting:
• The highest level is the default position, but the footbar should be lowered if this is not comfortable for the exerciser.
Spring Settings:
• 3 - 4 spring for beginners until proper alignment and muscle activation can be maintained.
• 3 - 4 spring for injured exercisers.
• 2 - 3 springs for those who can maintain proper alignment and muscle activation.
Cueing Bridging Exercises
Alignment:
• Head, neck and shoulders tension free.
• Shoulders slightly retracted and depressed.
• Ribcage contracted and in contact with carriage.
• Abdominals and pelvic floor engaged.
• Legs hip distance apart with feet on footbar.
Common Errors:
• Losing alignment.
• Holding the breath.
• Moving without control.
Modifications:
• Use squishy ball between legs or knees to maintain parallel legs.
Bridging Exercise Essentials Purpose: Increase spatial awareness while improving spinal articulation.
Joint Action: Spine articulation, hip flexion and extension, knee and ankle flexion.
Prime Movers: Glutes and Hamstrings to open the hip and bend the knee.
Stabilizing Muscles: Rectus Abdominis, Obliques, Transverse Abdominis, Erector Spinae, Triceps, Trapezius

52
Bridging – Bottom Lift
Start End Exercise Sequence:
• Inhale; scan body for alignment, engage pelvic floor and abdominals.
• Exhale; press heels into footbar, imprint pelvis, contract Glutes and lift hips off carriage a couple inches without moving carriage.
• Inhale; maintain lifted position.
• Exhale; return to starting position. Number of Repetitions: 10.
Variations:
• Change the foot position to the most comfortable.
• Use a squishy ball between knees.
Remember:
• Put the headrest in the lowest position.
• Do not lift too high. Stop when you have a straight line between shoulders, hips, and heels. Imagine:
• You are lifting your hips just high enough to slide a blanket underneath.
Notes:
SET UP Springs: 2 - 4 Footbar: Up Headrest: Down
Parallel
heels on footbar, hip-width apart, feet dorsi-flexed. Starting Position Classic Pilates on Carriage; neutral pelvis, arms resting on carriage, head resting on headrest. See above for foot position.

53
Bridging – Rolling Bridge
Start End Exercise Sequence:
• Inhale; scan body for alignment, engage pelvic floor and abdominals.
• Exhale; press heels into footbar, imprint pelvis, contract Glutes and lift hips off carriage one vertebrae at a time until the hips, knees, and ankles from a straight line. Do not move carriage.
• Inhale; maintain lifted position.
• Exhale; roll down one vertebrae at a time to return to starting position. Number of Repetitions: 10.
Variations:
• Change the foot position to the most comfortable.
• Use a squishy ball between knees.
Remember:
• Put the headrest in the lowest position.
• Do not lift too high. Stop when you have a straight line between shoulders, hips, and heels. Imagine:
• Each vertebrae peeling away from the carriage one at a time.
Notes:
SET UP Springs: 2 - 4 Footbar: Up Headrest: Down
Parallel
heels on footbar, hip-width apart, feet dorsi-flexed. Starting Position Classic Pilates on Carriage; neutral pelvis, arms resting on carriage, head resting on headrest. See above for foot position.
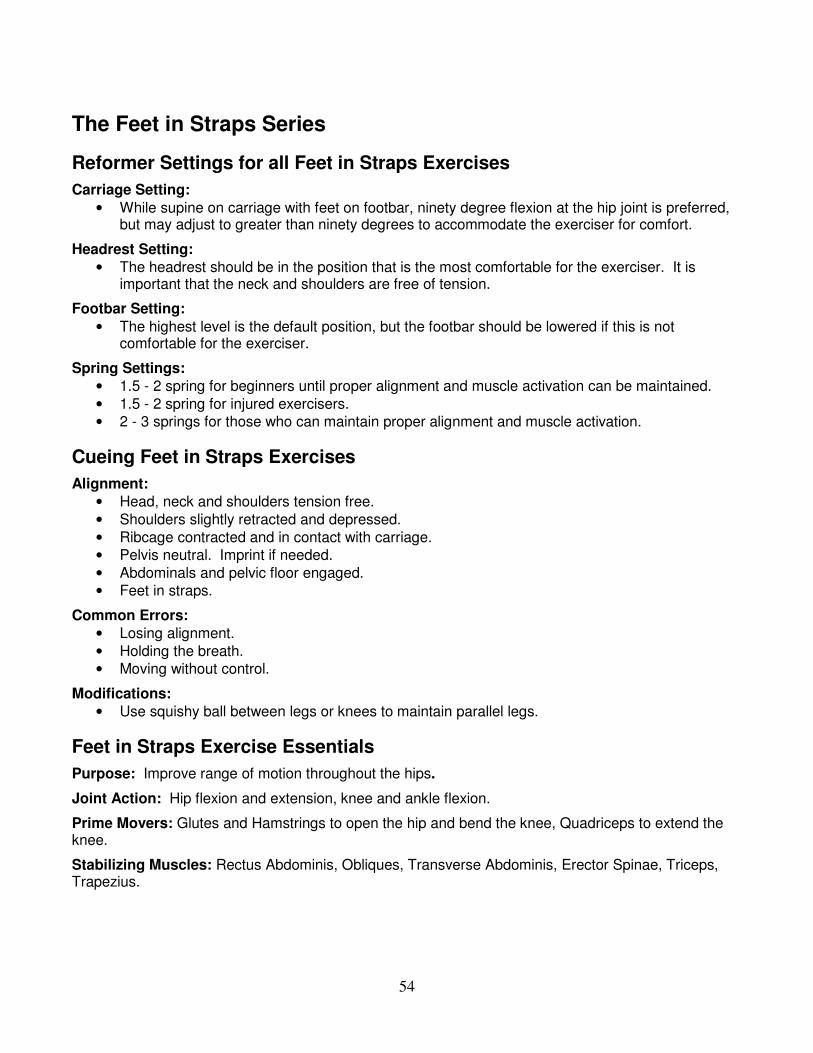
54
The Feet in Straps Series
Reformer Settings for all Feet in Straps Exercises
Carriage Setting:
• While supine on carriage with feet on footbar, ninety degree flexion at the hip joint is preferred, but may adjust to greater than ninety degrees to accommodate the exerciser for comfort.
Headrest Setting:
• The headrest should be in the position that is the most comfortable for the exerciser. It is important that the neck and shoulders are free of tension.
Footbar Setting:
• The highest level is the default position, but the footbar should be lowered if this is not comfortable for the exerciser.
Spring Settings:
• 1.5 - 2 spring for beginners until proper alignment and muscle activation can be maintained.
• 1.5 - 2 spring for injured exercisers.
• 2 - 3 springs for those who can maintain proper alignment and muscle activation.
Cueing Feet in Straps Exercises
Alignment:
• Head, neck and shoulders tension free.
• Shoulders slightly retracted and depressed.
• Ribcage contracted and in contact with carriage.
• Pelvis neutral. Imprint if needed.
• Abdominals and pelvic floor engaged.
• Feet in straps.
Common Errors:
• Losing alignment.
• Holding the breath.
• Moving without control.
Modifications:
• Use squishy ball between legs or knees to maintain parallel legs.
Feet in Straps Exercise Essentials
Purpose: Improve range of motion throughout the hips.
Joint Action: Hip flexion and extension, knee and ankle flexion.
Prime Movers: Glutes and Hamstrings to open the hip and bend the knee, Quadriceps to extend the knee.
Stabilizing Muscles: Rectus Abdominis, Obliques, Transverse Abdominis, Erector Spinae, Triceps, Trapezius.

55
Feet in Straps – Lower and Lift
Start Mid End
Exercise Sequence:
• Inhale; scan body for alignment, engage pelvic floor and abdominals. Lift legs up toward head as far as comfortable keeping the pelvis neutral. The carriage will move.
• Exhale; press feet into straps, and lower the legs to about a 45 degree angle. The carriage will move.
• Inhale; lift legs back up toward 90 degree angle, and allow them to move past 90 degrees as long as pelvis stays neutral.
• Exhale; lower legs to 45 degree angle keeping neutral pelvis. Repeat appropriate number of repetitions.
• Inhale; hold legs out at a 45 degree angle.
• Exhale; bend one knee to take foot out of strap. Bring that foot to footbar. Bend strapped leg if necessary. Then take 2nd foot out of strap and return it to the footbar.
Number of Repetitions: 10.
Variations:
• The legs may move past 90 degrees of flexion as long as the pelvis stays neutral.
Remember:
• To move with control. Imagine: Connect your inner thighs together as though your legs melted together to form one leg.
• Notes:
SET UP Springs: 1.5 - 3 Footbar: Up Headrest: Up or Down
Parallel
feet in straps, legs adducted up at a 45 degree angle.
Lateral
feet in straps, legs adducted up at a 45 degree angle. Starting Position Classic Pilates on Carriage; neutral spine, arms resting on carriage, head resting on headrest. See foot position above.
Getting your feet in the straps.

56
Feet in Straps – Bend and Stretch
Start Mid End Exercise Sequence:
• Inhale; scan body for alignment, engage pelvic floor and abdominals.
• Exhale; press feet into straps, and extend the knees to straighten the legs to about a 45 degree angle. The carriage will move.
• Inhale; bend knees toward chest. Keep neutral pelvis.
• Exhale; extend knees out to the 45 degree angle. Repeat desired number of repetitions.
• Inhale; hold legs out at a 45 degree angle.
• Exhale; bend one knee to take foot out of strap. Bring that foot to footbar. Bend strapped leg if necessary. Then take 2nd foot out of strap and return it to the footbar.
Number of Repetitions: 10.
Variations:
• The feet can be plantar-flexed or dorsi-flexed.
Remember:
• The knee bend goes only to 90 degrees. Imagine:
• You are pushing your feet onto a wall. Notes:
SET UP Springs: 1.5 - 3 Footbar: Up Headrest: Up or Down
Parallel
feet in straps, legs adducted up at a 45 degree angle, knees bent up to 90 degree angle.
Lateral
feet in straps, legs adducted up at a 45 degree angle, knees bent up to 90 degree angle. Starting Position Classic Pilates on Carriage; neutral spine, arms resting on carriage, head resting on headrest. See foot position above.
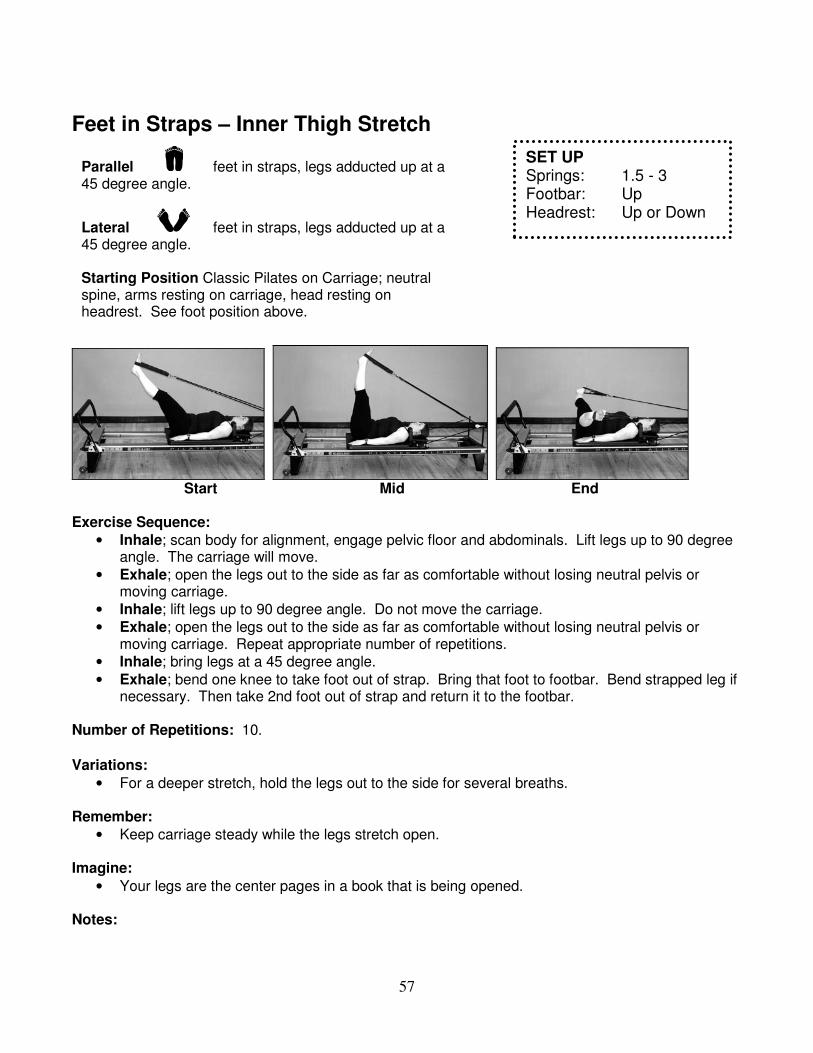
57
Feet in Straps – Inner Thigh Stretch
Start Mid End Exercise Sequence:
• Inhale; scan body for alignment, engage pelvic floor and abdominals. Lift legs up to 90 degree angle. The carriage will move.
• Exhale; open the legs out to the side as far as comfortable without losing neutral pelvis or moving carriage.
• Inhale; lift legs up to 90 degree angle. Do not move the carriage.
• Exhale; open the legs out to the side as far as comfortable without losing neutral pelvis or moving carriage. Repeat appropriate number of repetitions.
• Inhale; bring legs at a 45 degree angle.
• Exhale; bend one knee to take foot out of strap. Bring that foot to footbar. Bend strapped leg if necessary. Then take 2nd foot out of strap and return it to the footbar.
Number of Repetitions: 10.
Variations:
• For a deeper stretch, hold the legs out to the side for several breaths.
Remember:
• Keep carriage steady while the legs stretch open. Imagine:
• Your legs are the center pages in a book that is being opened. Notes:
SET UP Springs: 1.5 - 3 Footbar: Up Headrest: Up or Down
Parallel
feet in straps, legs adducted up at a 45 degree angle.
Lateral
feet in straps, legs adducted up at a 45 degree angle. Starting Position Classic Pilates on Carriage; neutral spine, arms resting on carriage, head resting on headrest. See foot position above.

58
Feet in Straps – Leg Circles
Start Mid Mid End Exercise Sequence:
• Inhale; scan body for alignment, engage pelvic floor and abdominals. Lift legs up to 90 degree angle. The carriage will move.
• Exhale; open the legs out to the side as far as comfortable without losing neutral pelvis. Continue circling legs toward footbar end of reformer, returning to the starting position. The carriage will move.
• Inhale; lift legs up to 90 degree angle.
• Exhale; open the legs out to the side as far as comfortable without losing neutral pelvis or moving carriage. Repeat appropriate number of repetitions. Reverse directions.
• Inhale; bring legs at a 45 degree angle.
• Exhale; bend one knee to take foot out of strap. Bring that foot to footbar. Bend strapped leg if necessary. Then take 2nd foot out of strap and return it to the footbar.
Number of Repetitions: 10 each direction.
Variations:
• Change the size of the circle from small to large or large to small.
Remember:
• It is very tempting to imprint the pelvis to make the circles bigger, but doing so will reduce the stretch of the hamstrings. Keep the pelvis neutral.
Imagine:
• Your big toes are big chunks of chalk and you are drawing circles on the walls and ceiling. Notes:
SET UP Springs: 1.5 - 3 Footbar: Up Headrest: Up or Down
Parallel
feet in straps, legs adducted up at a 45 degree angle.
Lateral
feet in straps, legs adducted up at a 45 degree angle. Starting Position Classic Pilates on Carriage; neutral spine, arms resting on carriage, head resting on headrest. See foot position above.

59
The Short Spine Prep Series
Reformer Settings for all Short Spine Prep Exercises
Carriage Setting:
• While supine on carriage with feet on footbar, ninety degree flexion at the hip joint is preferred, but may adjust to greater than ninety degrees to accommodate the exerciser for comfort.
Headrest Setting:
• The headrest should be in lowest position.
Footbar Setting:
• The highest level is the default position, but the footbar should be lowered if this is not comfortable for the exerciser.
Spring Settings:
• 1 - 2 spring for beginners until proper alignment and muscle activation can be maintained.
• 1 - 2 spring for injured exercisers.
• 2 springs for those who can maintain proper alignment and muscle activation.
Cueing Short Spine Prep Exercises
Alignment:
• Head, neck and shoulders tension free.
• Shoulders slightly retracted and depressed.
• Ribcage contracted and in contact with carriage.
• Pelvis neutral to imprint.
• Abdominals and pelvic floor engaged.
• Feet in straps.
Common Errors:
• Losing alignment.
• Holding the breath.
• Moving without control.
Short Spine Prep Exercise Essentials
Purpose: Challenge spinal articulation with the feet in the straps.
Joint Action: Hip flexion and extension, knee and ankle flexion, spinal articulation.
Prime Movers: Glutes and Hamstrings to open the hip and bend the knee, Quadriceps to extend the knee.
Stabilizing Muscles: Rectus Abdominis, Obliques, Transverse Abdominis, Erector Spinae, Triceps, Trapezius.

60
Short Spine Preps – Frog Extensions
Start
End Exercise Sequence:
• Inhale; scan body for alignment, engage pelvic floor and abdominals.
• Exhale; straighten the legs on a diagonal line up to a 45 degree angle from the carriage.
• Inhale; bend knees and return to the starting position. Repeat appropriate repetitions.
• Exhale; bend one knee to take foot out of strap. Bring that foot to footbar. Bend strapped leg if necessary. Then take 2nd foot out of strap and return it to the footbar.
Number of Repetitions: 10.
Variations:
• Alternate flexing the feet when the knees bend and pointing when they extend. Remember:
• To bend the knees just to a 90 degree angle. Do not let the knees splay apart wider than your hips.
Imagine:
• There is a wall on both sides of the carriage which prevents you from opening your knees too wide.
Notes:
SET UP Springs: 1 - 2 Footbar: Up Headrest: Up or Down
Lateral
feet in straps, legs adducted up at a 45 degree angle. Starting Position Classic Pilates on Carriage; neutral pelvis, feet in straps, knees in tabletop slightly wider than hip distance apart, heels together, feet dorsi-flexed, arms on carriage, head resting on headrest.

61
Short Spine Preps – Levitation
Start Mid End
Exercise Sequence:
• Inhale; scan body for alignment, engage pelvic floor and abdominals.
• Exhale; imprint pelvis, squeeze Glutes, then roll the low back up off the carriage. Do not move the carriage. Keep the legs perpendicular to floor.
• Inhale; return to carriage sequentially. Repeat appropriate repetitions.
• Exhale; bend one knee to take foot out of strap. Bring that foot to footbar. Bend strapped leg if necessary. Then take 2nd foot out of strap and return it to the footbar.
Number of Repetitions: 10.
Variations:
• Perform this with a four count breath. Inhale to prepare, exhale lift, inhale hold in lifted position, exhale return to the starting position.
Remember:
• Lift the spine off the carriage sequentially. Imagine:
• You are lifting your hips enough to put a pillow underneath your hips. Notes:
SET UP Springs: 1 - 2 Footbar: Up Headrest: Up or Down
Parallel
feet in straps, legs adducted up at a 45 degree angle.
Lateral
feet in straps, legs adducted up at a 45 degree angle. Starting Position Classic Pilates on Carriage; neutral pelvis, feet in straps, legs adducted to 90 degree angle, arms resting on carriage, head resting on headrest.

62
The Seated Upper Back Series
Reformer Settings for all Seated Upper Back Exercises
Carriage Setting:
• The carriage setting does not need to be specific for this series. If needed, the exerciser can hold onto the ropes instead of the straps.
Headrest Setting:
• The headrest should be in lowest position if the legs extend between shoulder rests.
Footbar Setting:
• The footbar is not used in this series.
Spring Settings:
• 1 - 2 spring for beginners until proper alignment and muscle activation can be maintained.
• 1 - 2 spring for injured exercisers.
• 2 springs for those who can maintain proper alignment and muscle activation.
Cueing Seated Upper Back Exercises
Alignment:
• Head, neck and shoulders tension free.
• Shoulders slightly retracted and depressed.
• Ribcage contracted and in contact with carriage.
• Spine neutral.
• Sitting on sit bones.
• Abdominals and pelvic floor engaged.
• Legs extended through head rests or crossed.
Common Errors:
• Losing alignment.
• Holding the breath.
• Moving without control.
Modifications:
• Sit on short box if hamstrings are too tight.
Seated Upper Back Exercise Essentials
Purpose: Improve strength, flexibility, and range of motion through arms while maintaining strong core stabilization.
Joint Action: Shoulder and elbow flexion and extension.
Prime Movers: Latissimus Dorsi, Triceps, Biceps.
Stabilizing Muscles: Rectus Abdominis, Obliques, Transverse Abdominis, Erector Spinae.

63
Seated Upper Back – Arms Pulling Straight Back
Start End
Exercise Sequence:
• Inhale; scan body for alignment, engage pelvic floor and abdominals.
• Exhale; press the hands into the straps, reach the arms downward toward the floor, keeping the elbows straight. The carriage will move away from home.
• Inhale; bring the arms forward, moving carriage toward home. Keep tension in ropes. Repeat appropriate repetitions.
• Exhale; return to starting position. Number of Repetitions: 10.
Variations:
• Bring the arms a little farther out to the side to a 45 degree angle instead of straight down.
Remember:
• To keep good posture throughout the exercise. Imagine:
• The movement coming from the shoulder joint. Notes:
SET UP Springs: 1 - 2 Footbar: N/A Headrest: Down
Starting Position Seated on carriage facing pulleys, legs either extended through shoulder rest or crossed, neutral spine, hands holding straps, arms long, palms facing back.
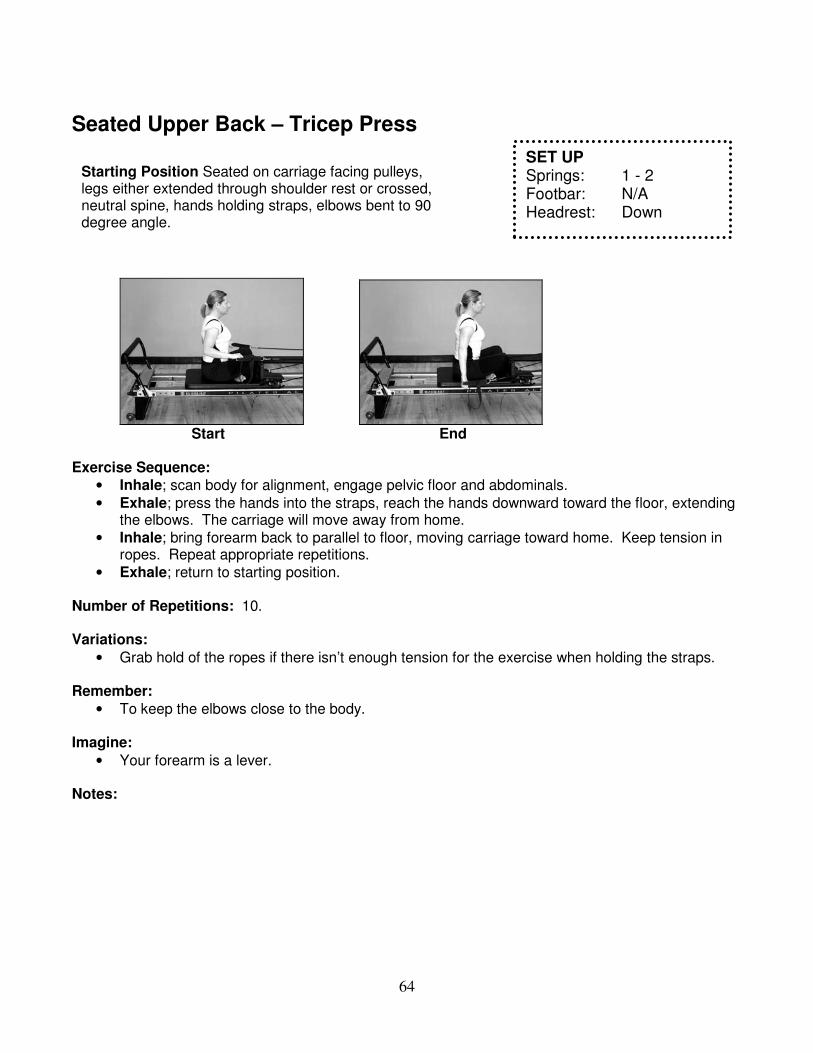
64
Seated Upper Back – Tricep Press
Start End Exercise Sequence:
• Inhale; scan body for alignment, engage pelvic floor and abdominals.
• Exhale; press the hands into the straps, reach the hands downward toward the floor, extending the elbows. The carriage will move away from home.
• Inhale; bring forearm back to parallel to floor, moving carriage toward home. Keep tension in ropes. Repeat appropriate repetitions.
• Exhale; return to starting position. Number of Repetitions: 10. Variations:
• Grab hold of the ropes if there isn’t enough tension for the exercise when holding the straps.
Remember:
• To keep the elbows close to the body. Imagine:
• Your forearm is a lever. Notes:
SET UP Springs: 1 - 2 Footbar: N/A Headrest: Down
Starting Position Seated on carriage facing pulleys, legs either extended through shoulder rest or crossed, neutral spine, hands holding straps, elbows bent to 90 degree angle.

65
Seated Upper Back – Bicep Curl
Start End
Exercise Sequence:
• Inhale; scan body for alignment, engage pelvic floor and abdominals.
• Exhale; press the hands into the straps, bending the elbow, reach the hands toward the shoulders. Keep the upper arm parallel to floor. The carriage will move away from home.
• Inhale; bring forearm back to parallel to floor, moving carriage toward home. Keep tension in ropes. Repeat appropriate repetitions.
• Exhale; return to starting position. Number of Repetitions: 10.
Variations:
• Hold onto the ropes instead of the straps.
Remember:
• To keep the wrist straight. Imagine:
• You are splashing water on your face. Notes:
SET UP Springs: 1 - 2 Footbar: N/A Headrest: Down
Starting Position Seated on carriage facing pulleys, legs either extended through shoulder rest or crossed, neutral spine, hands holding straps, arms parallel to floor in front of body, palms up.

66
The Seated Upper Front Series
Reformer Settings for all Seated Upper Front Exercises
Carriage Setting:
• The carriage setting does not need to be specific for this series. If needed, the exerciser can hold onto the ropes instead of the straps.
Headrest Setting:
• The headrest is not used in this exercise series.
Footbar Setting:
• The footbar is not used in this exercise series.
Spring Settings:
• 1 - 2 spring for beginners until proper alignment and muscle activation can be maintained.
• 1 - 2 spring for injured exercisers.
• 2 springs for those who can maintain proper alignment and muscle activation.
Cueing Seated Upper Front Exercises
Alignment:
• Head, neck and shoulders tension free.
• Shoulders slightly retracted and depressed.
• Ribcage contracted and in contact with carriage.
• Spine neutral.
• Sitting on sit bones.
• Abdominals and pelvic floor engaged.
Common Errors:
• Losing alignment.
• Holding the breath.
• Moving without control.
Modifications:
• Sit on short box if hamstrings are too tight.
Seated Upper Front Exercise Essentials
Purpose: Improve strength, flexibility, and range of motion through arms while maintaining strong core stabilization.
Joint Action: Shoulder and elbow flexion and extension.
Prime Movers: Pectorals and Anterior Deltoid.
Stabilizing Muscles: Rectus Abdominis, Obliques, Transverse Abdominis, Erector Spinae.

67
Seated Upper Front – Hug a Tree
Start End Exercise Sequence:
• Inhale; scan body for alignment, engage pelvic floor and abdominals.
• Exhale; press the hands into the straps, keeping the same bend in the elbow, reach the hands toward each other. Keep the arms parallel to floor. The carriage will move away from home.
• Inhale; open arms back to starting position, moving carriage toward home. Keep tension in ropes. Repeat appropriate repetitions.
• Exhale; return to starting position. Number of Repetitions: 10.
Variations:
• Reduce the range of motion.
Remember:
• Do not let the arms break the frontal plane by letting them open too wide. Imagine:
• You are hugging something. Notes:
SET UP Springs: 1 - 2 Footbar: N/A Headrest: N/A
Starting Position Seated on carriage facing footbar, legs either extended or crossed, neutral spine, hands holding straps, arms abducted and parallel to floor, elbows softly bent, palms facing in.

68
Seated Upper Front – Serve the Platter
Start End Exercise Sequence:
• Inhale; scan body for alignment, engage pelvic floor and abdominals.
• Exhale; press the hands into the straps, extend elbow, reach the arms forward as if serving a platter. The carriage will move away from home.
• Inhale; bend elbows back to starting position, moving carriage toward home. Keep tension in ropes. Repeat appropriate repetitions.
• Exhale; return to starting position. Number of Repetitions: 10.
Variations:
• Turn the palms to face in.
Remember:
• Do not let the elbows break the frontal plane. Imagine:
• You are serving a platter or delivering a pizza. Notes:
SET UP Springs: 1 - 2 Footbar: N/A Headrest: N/A
Starting Position Seated on carriage facing footbar, legs either extended or crossed, neutral spine, hands holding straps, elbows bent to 90 degrees, upper arm close to torso, palms facing up.

69
Seated Upper Front – Offering
Start Mid End
Exercise Sequence:
• Inhale; scan body for alignment, engage pelvic floor and abdominals.
• Exhale; press the hands into the straps, extend elbow, reach the arms forward as if serving a platter. The carriage will move away from home.
• Inhale; open arms wide to the side, arms parallel to floor, palms up. Do not let arms abduct past front of the body.
• Exhale; bring arms to front until they are parallel to each other.
• Inhale; bend elbows back to starting position, moving carriage toward home. Keep tension in ropes. Repeat appropriate repetitions.
• Exhale; return to starting position. Number of Repetitions: 10.
Variations:
• Turn the palms in to face one another so the thumbs are up toward the ceiling.
Remember:
• To keep the shoulders depressed and the head in line with the spine. Imagine:
• You are checking the length of a bath towel. Notes:
SET UP Springs: 1 - 2 Footbar: N/A Headrest: N/A
Starting Position Seated on carriage facing footbar, legs either extended or crossed, neutral spine, hands holding straps, elbows bent to 90 degrees, upper arm close to torso, palms facing up.
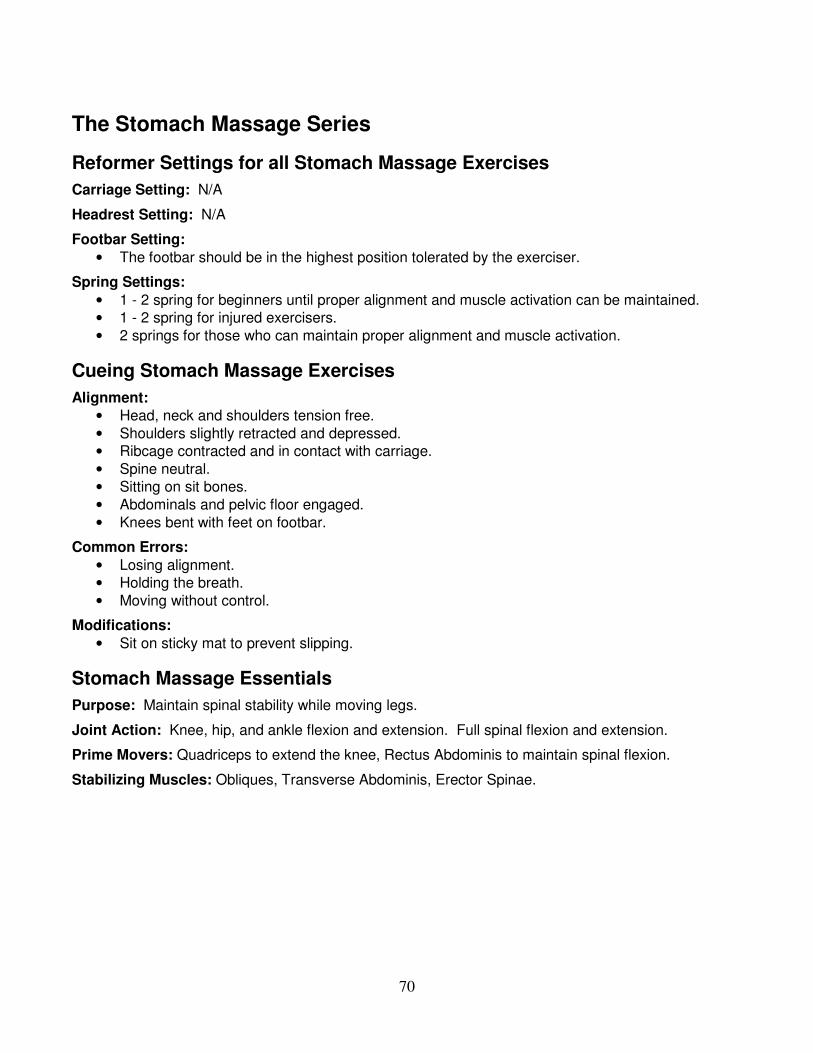
70
The Stomach Massage Series
Reformer Settings for all Stomach Massage Exercises
Carriage Setting: N/A
Headrest Setting: N/A
Footbar Setting:
• The footbar should be in the highest position tolerated by the exerciser.
Spring Settings:
• 1 - 2 spring for beginners until proper alignment and muscle activation can be maintained.
• 1 - 2 spring for injured exercisers.
• 2 springs for those who can maintain proper alignment and muscle activation.
Cueing Stomach Massage Exercises
Alignment:
• Head, neck and shoulders tension free.
• Shoulders slightly retracted and depressed.
• Ribcage contracted and in contact with carriage.
• Spine neutral.
• Sitting on sit bones.
• Abdominals and pelvic floor engaged.
• Knees bent with feet on footbar.
Common Errors:
• Losing alignment.
• Holding the breath.
• Moving without control.
Modifications:
• Sit on sticky mat to prevent slipping.
Stomach Massage Essentials
Purpose: Maintain spinal stability while moving legs.
Joint Action: Knee, hip, and ankle flexion and extension. Full spinal flexion and extension.
Prime Movers: Quadriceps to extend the knee, Rectus Abdominis to maintain spinal flexion.
Stabilizing Muscles: Obliques, Transverse Abdominis, Erector Spinae.

71
Stomach Massage – Round Back
Start End Exercise Sequence:
• Inhale; scan body for alignment, engage pelvic floor and abdominals.
• Exhale; press feet against footbar, extend knees to adduct legs. Keep c-curve in spine. The carriage will move away from home.
• Inhale; bend knees to return to starting position. Number of Repetitions: 10.
Variations:
• Sit on a sticky mat if the hips slip while pressing the feet into the footbar.
• Lower the heels under the footbar while the carriage is away from home.
Remember:
• Keep the spine in a c-curve. Imagine:
• Your torso is molded over a bowling ball on your lap. Notes:
SET UP Springs: 1 - 2 Footbar: Up Headrest: N/A
Lateral
balls of feet on footbar, heels together, toes apart, knees bent and slightly wider than hip width. Starting Position Sitting on Carriage facing footbar, Spinal C-Curve, off sit bones. See above for foot position.

72
Stomach Massage – Flat Back
Start End
Exercise Sequence:
• Inhale; scan body for alignment, engage pelvic floor and abdominals.
• Exhale; press feet against footbar, extend knees to adduct legs. Keep neutral spine. The carriage will move away from home.
• Inhale; bend knees to return to starting position. Number of Repetitions: 10.
Variations:
• Sit on a sticky mat if the hips start to slip when pressing the feet into the footbar.
• Lower the heels under the footbar while the carriage is away from home.
Remember:
• To keep the abdominals contracted while the spine maintains neutral alignment. Imagine:
• Your torso is fixed in the same position throughout the exercise. Notes:
SET UP Springs: 1 - 2 Footbar: Up Headrest: N/A
Lateral
balls of feet on footbar, heels together, toes apart, knees bent and slightly wider than hip width. Starting Position Sitting on Carriage facing footbar, neutral spine. See above for foot position.

73
The Knee Stretches and Elephant Exercises
Reformer Settings for all Knee Stretch and Elephant Exercises
Carriage Setting: N/A
Headrest Setting: N/A
Footbar Setting:
• The footbar should be in the highest position.
Spring Settings:
• 2 spring for beginners until proper alignment and muscle activation can be maintained.
• 2 spring for injured exercisers.
• 1 - 2 springs for those who can maintain proper alignment and muscle activation.
Cueing Knee Stretch and Elephant Exercises
Alignment:
• Head, neck and shoulders tension free.
• Shoulders slightly retracted and depressed.
• Ribcage contracted.
• Kneeling on carriage for Knee Stretches.
• Standing on carriage for Elephant.
• Abdominals and pelvic floor engaged.
• Knees bent with feet against headrest for Knee Stretches.
• Feet flat on carriage for Elephant.
Common Errors:
• Losing alignment.
• Holding the breath.
• Moving without control.
Modifications:
• Kneel on towel for comfort when doing Knee Stretches.
• Stand on sticky mat for stability when doing Elephant.
Knee Stretch and Elephant Essentials
Purpose: Maintain spinal stability while opening and closing the hips.
Joint Action: Knee and hip flexion and extension in Knee Stretch exercises. Hip flexion and extension in Elephant exercises. Full spinal flexion and extension for both.
Prime Movers: Gluteals and Hamstrings to open the hip.
Stabilizing Muscles: Rectus Abdominis, Obliques, Transverse Abdominis, Erector Spinae

74
Knee Stretches – Round Back
Start End
Exercise Sequence:
• Inhale; scan body for alignment, engage pelvic floor and abdominals.
• Exhale; press feet into headrests, keeping c-curve in spine, open the hip to bring knees away from footbar. The carriage will move away from home.
• Inhale; return to starting position. Repeat appropriate repetitions. Number of Repetitions: 10
Variations:
• Kneel on a sticky mat or towel if the knees become uncomfortable against the carriage.
Remember:
• To keep the spine in the same position as the hip opens and the carriages pushes away from home.
Imagine:
• You are trying to lift your abdomen as far away from the carriage as possible. Notes:
SET UP Springs: 1 - 2 Footbar: Up Headrest: N/A
Parallel
feet resting against respective shoulder rests, hip-width apart, dorsi-flexed. Starting Position Kneeling on Carriage, Spinal C-Curve. Hands on footbar, shoulder-width apart, elbows softly bent toward floor. See above for foot position.
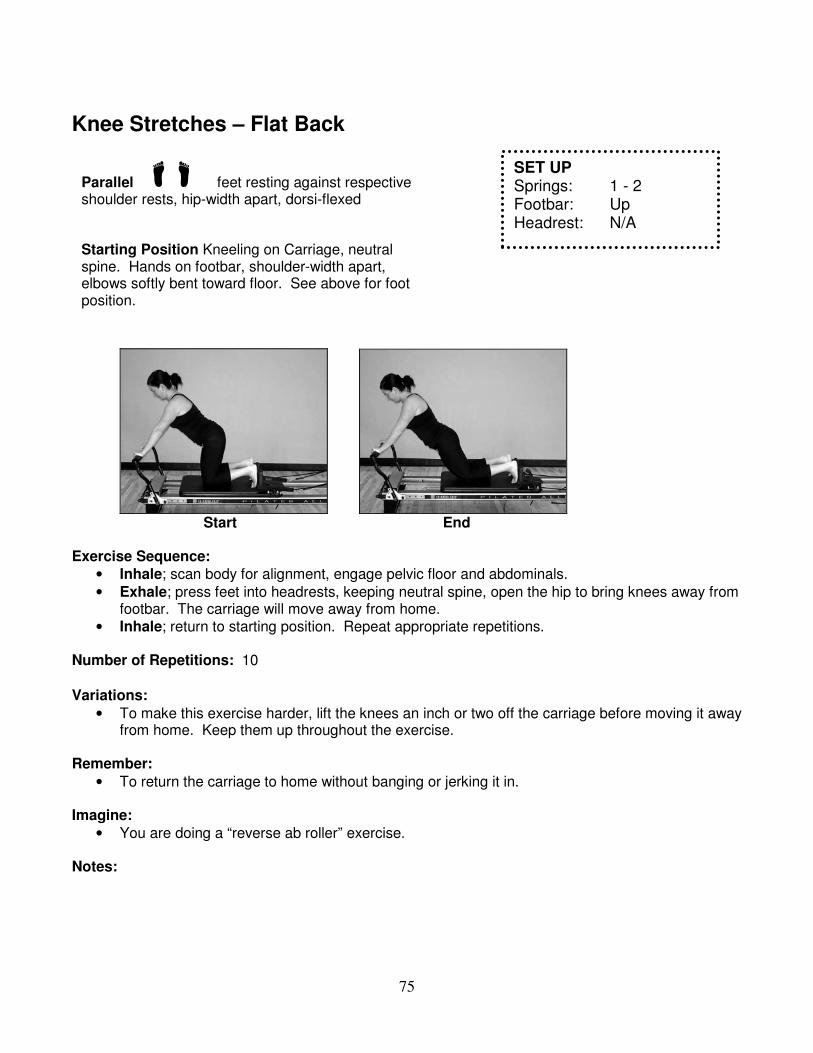
75
Knee Stretches – Flat Back
Start End Exercise Sequence:
• Inhale; scan body for alignment, engage pelvic floor and abdominals.
• Exhale; press feet into headrests, keeping neutral spine, open the hip to bring knees away from footbar. The carriage will move away from home.
• Inhale; return to starting position. Repeat appropriate repetitions. Number of Repetitions: 10
Variations:
• To make this exercise harder, lift the knees an inch or two off the carriage before moving it away from home. Keep them up throughout the exercise.
Remember:
• To return the carriage to home without banging or jerking it in. Imagine:
• You are doing a “reverse ab roller” exercise. Notes:
SET UP Springs: 1 - 2 Footbar: Up Headrest: N/A
Parallel
feet resting against respective shoulder rests, hip-width apart, dorsi-flexed Starting Position Kneeling on Carriage, neutral spine. Hands on footbar, shoulder-width apart, elbows softly bent toward floor. See above for foot position.
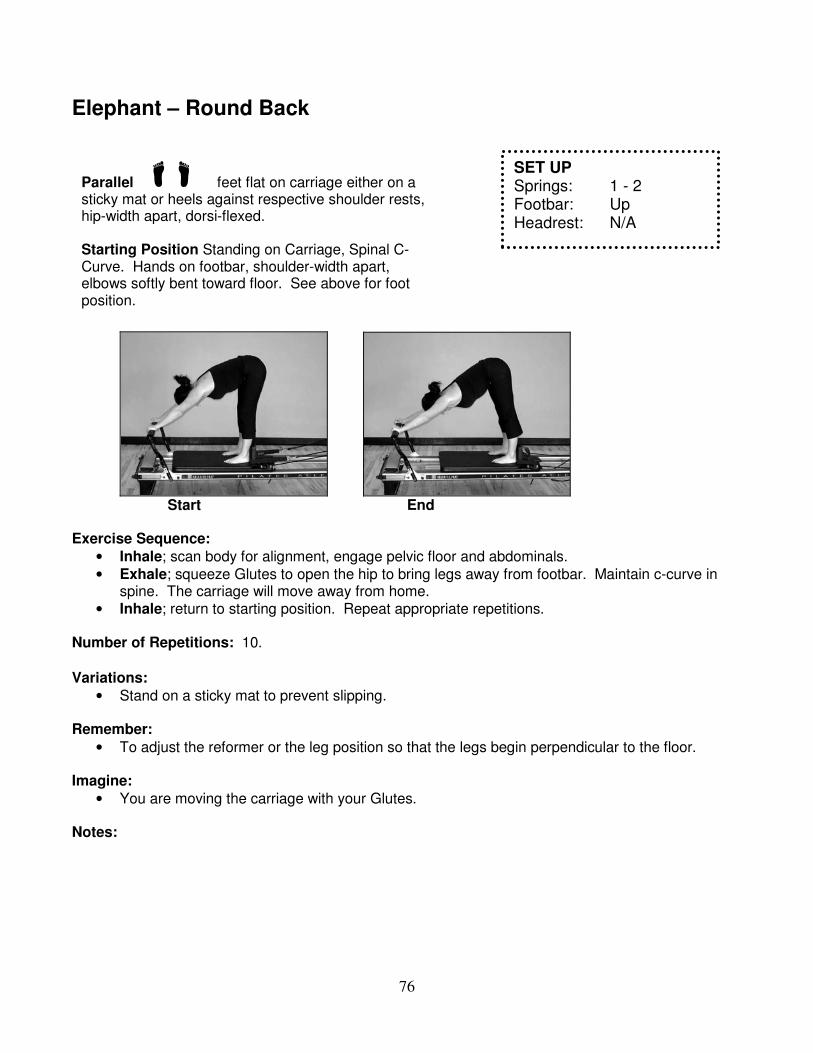
76
Elephant – Round Back
Start End Exercise Sequence:
• Inhale; scan body for alignment, engage pelvic floor and abdominals.
• Exhale; squeeze Glutes to open the hip to bring legs away from footbar. Maintain c-curve in spine. The carriage will move away from home.
• Inhale; return to starting position. Repeat appropriate repetitions. Number of Repetitions: 10.
Variations:
• Stand on a sticky mat to prevent slipping.
Remember:
• To adjust the reformer or the leg position so that the legs begin perpendicular to the floor. Imagine:
• You are moving the carriage with your Glutes. Notes:
SET UP Springs: 1 - 2 Footbar: Up Headrest: N/A
Parallel
feet flat on carriage either on a sticky mat or heels against respective shoulder rests, hip-width apart, dorsi-flexed. Starting Position Standing on Carriage, Spinal C-Curve. Hands on footbar, shoulder-width apart, elbows softly bent toward floor. See above for foot position.

77
Elephant – Flat Back
Start End Exercise Sequence:
• Inhale; scan body for alignment, engage pelvic floor and abdominals.
• Exhale; squeeze Glutes to open the hip to bring legs away from footbar. Maintain neutral spine. The carriage will move away from home.
• Inhale; return to starting position. Repeat appropriate repetitions. Number of Repetitions: 10.
Variations:
• Reducing the springs on this exercise makes it much harder!
Remember:
• To keep the shoulders depressed and the spine neutral. Imagine:
• You are doing a downward dog from yoga. Notes:
SET UP Springs: 1 - 2 Footbar: Up Headrest: N/A
Parallel
feet flat on carriage either on a sticky mat or heels against respective shoulder rests, hip-width apart, dorsi-flexed. Starting Position Standing on Carriage, neutral spine. Hands on footbar, shoulder-width apart, elbows softly bent toward floor. See above for foot position.

78
The Long Box Series
Reformer Settings for Long Box Exercises
Carriage Setting: N/A
Headrest Setting: N/A
Footbar Setting:
• The footbar should be in the highest position when used for Breast Stroke Prep. It will be in the lowest position for Swimming and Pulling Ropes to Floor.
Spring Settings:
• .5 - 1.5 spring for beginners until proper alignment and muscle activation can be maintained.
• .5 - 1.5 spring for injured exercisers.
• 2 springs for those who can maintain proper alignment and muscle activation.
Cueing Long Box Exercises
Alignment:
• Head, neck and shoulders tension free.
• Shoulders slightly retracted and depressed.
• Ribcage contracted.
• Lying prone on long box with head toward pulleys.
• Abdominals and pelvic floor engaged.
• Legs Adducted or hip distance apart.
• Spinal flexion and extension.
Common Errors:
• Losing alignment.
• Holding the breath.
• Moving without control.
Modifications:
• Place towel on top of box for comfort.
Long Box Exercise Essentials
Purpose: Increase strength in the erector spinae.
Joint Action: Spinal flexion and extension, shoulder flexion and extension.
Prime Movers: Lats to press carriage back.
Stabilizing Muscles: Rectus Abdominis, Obliques, Transverse Abdominis, Erector Spinae.

79
Long Box – Breast Stroke Prep
Start Mid End
Exercise Sequence:
• Inhale; Scan body for alignment, engage pelvic floor and abdominals.
• Exhale; Press the hands against the footbar to extend elbows. Keep the body long. The carriage will move away from home.
• Inhale; Bend elbows to return to the starting position. Repeat appropriate repetitions. Number of Repetitions: 5.
Variations:
• Open the legs if low back discomfort.
Remember:
• To keep the head in line with the spine during the hyper-extension of the spine. Imagine:
• You are pushing away from the edge of a swimming pool. Notes:
SET UP Springs: .5 - 2 Footbar: Up Headrest: N/A
Parallel
legs adducted extended over long box. Starting Position Prone on long box head toward pulleys, neutral pelvis, legs adducted, hands on footbar, shoulder width apart, elbows softly.
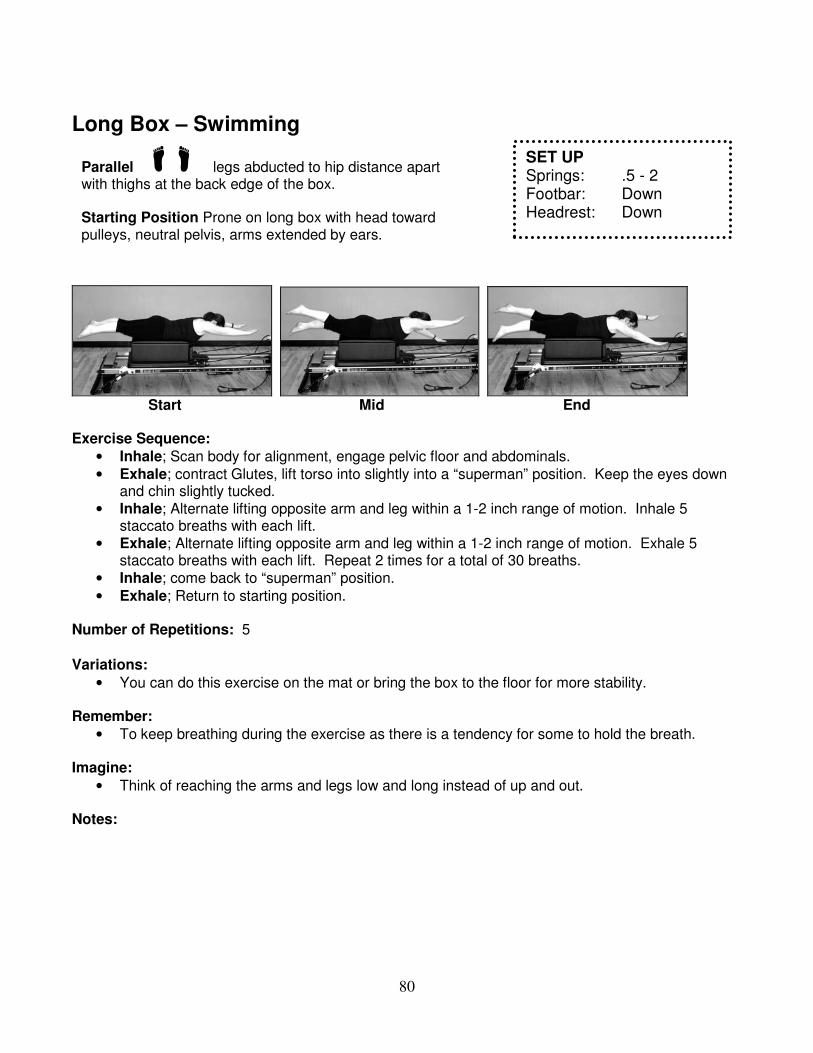
80
Long Box – Swimming
Start Mid End
Exercise Sequence:
• Inhale; Scan body for alignment, engage pelvic floor and abdominals.
• Exhale; contract Glutes, lift torso into slightly into a “superman” position. Keep the eyes down and chin slightly tucked.
• Inhale; Alternate lifting opposite arm and leg within a 1-2 inch range of motion. Inhale 5 staccato breaths with each lift.
• Exhale; Alternate lifting opposite arm and leg within a 1-2 inch range of motion. Exhale 5 staccato breaths with each lift. Repeat 2 times for a total of 30 breaths.
• Inhale; come back to “superman” position.
• Exhale; Return to starting position. Number of Repetitions: 5
Variations:
• You can do this exercise on the mat or bring the box to the floor for more stability.
Remember:
• To keep breathing during the exercise as there is a tendency for some to hold the breath. Imagine:
• Think of reaching the arms and legs low and long instead of up and out. Notes:
SET UP Springs: .5 - 2 Footbar: Down Headrest: Down
Parallel
legs abducted to hip distance apart with thighs at the back edge of the box. Starting Position Prone on long box with head toward pulleys, neutral pelvis, arms extended by ears.

81
Long Box – Pulling Ropes to Floor
Start Mid End
Exercise Sequence:
• Inhale; scan body for alignment, engage pelvic floor and abdominals.
• Exhale; depress shoulder blades, squeeze Glutes, pull hands to hips while lifting torso and head into slight hyperextension. The carriage will move away from home.
• Inhale; start to move hands toward floor while starting to lower the torso and head.
• Exhale; return to starting position. Number of Repetitions: 5
Variations:
• Bring the arms up to parallel to the floor in a T position before bring hands to hips.
Remember:
• To depress the scapula to initiate the movement to extension. Imagine:
• Reaching your toes as far away the crown of your head as possible. Notes:
SET UP Springs: .5 - 2 Footbar: Down Headrest: Down
Parallel
legs adducted. Starting Position Prone on long box with head toward pulleys, neutral pelvis, hands on ropes, upper body flexed over top edge of box.

82
The Short Box Exercises
Reformer Settings for Short Box Exercises
Carriage Setting: N/A
Headrest Setting: N/A
Footbar Setting: N/A
Spring Settings:
• Maximum setting for all levels
Cueing Short Box Exercises
Alignment:
• Head, neck and shoulders tension free.
• Shoulders slightly retracted and depressed.
• Ribcage contracted.
• Sitting on sit bones on top of box.
• Feet under footstrap or on carriage.
• Abdominals and pelvic floor engaged.
• Legs Adducted or hip distance apart.
• Spinal flexion and extension.
Common Errors:
• Losing alignment.
• Holding the breath.
• Moving without control.
Modifications:
• Place towel on top of box for comfort.
Short Box Exercise Essentials
Purpose: Improve strength, flexibility and mobility in the spine.
Joint Action: Spinal flexion, extension and rotation, shoulder and elbow flexion and extension.
Prime Movers: Abdominals and Erector Spinae.
Stabilizing Muscles: Hip Flexors.

83
Short Box – Round Back
Start Mid End
Exercise Sequence:
• Inhale; scan body for alignment, engage pelvic floor and abdominals.
• Exhale; roll off sit bones by imprinting pelvis, then round the entire spine into a c-curve.
• Inhale; maintain c-curve, and lift arms parallel to floor.
• Exhale; bring arms to abdomen, come back onto sit bones while maintaining c-curve.
• Inhale; stack the vertebrae sequentially beginning at the tailbone to the starting position. Number of Repetitions: 5.
Variations:
• This can be performed on the floor as in the half roll back mat exercise.
Remember:
• Not to collapse the torso during forward flexion. Imagine:
• You have a bowling ball on your lap and you are molding your body over it. Notes:
SET UP Springs: Maximum Footbar: N/A Headrest: N/A
Parallel
legs adducted. Starting Position Sitting on sit bones on short box, spine neutral, knees bent, feet securely under foot
strap, arms crossed in front of the body.
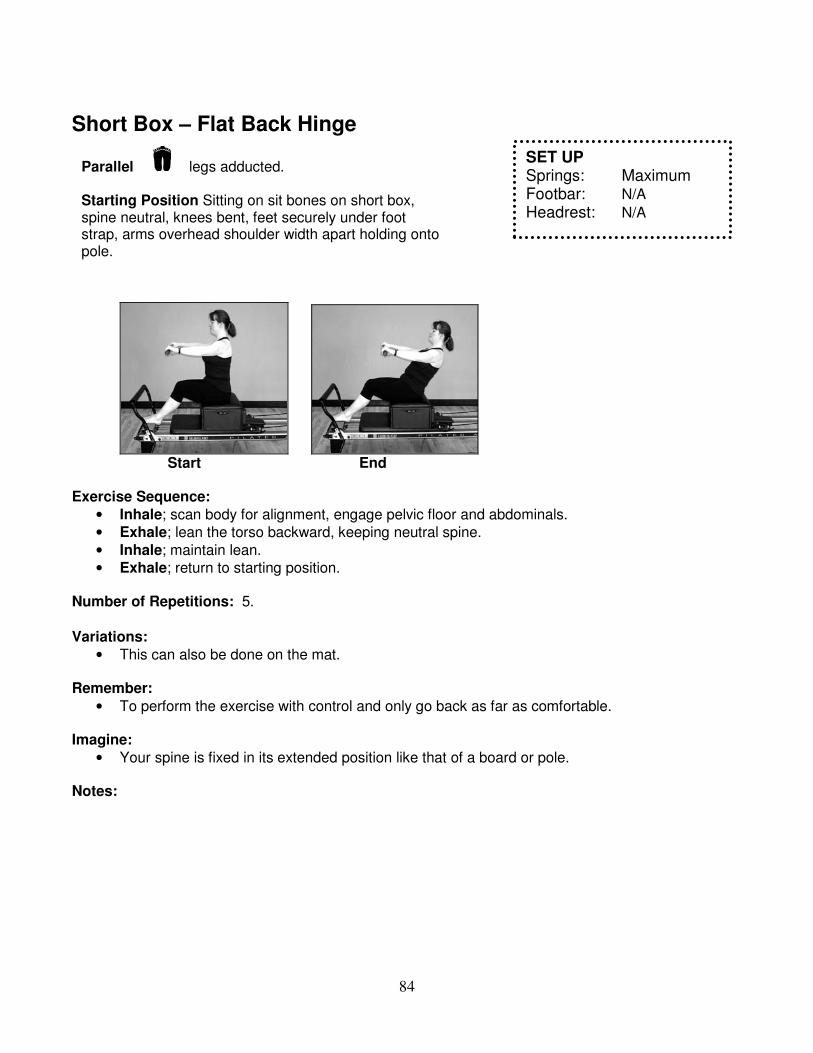
84
Short Box – Flat Back Hinge
Start End Exercise Sequence:
• Inhale; scan body for alignment, engage pelvic floor and abdominals.
• Exhale; lean the torso backward, keeping neutral spine.
• Inhale; maintain lean.
• Exhale; return to starting position. Number of Repetitions: 5.
Variations:
• This can also be done on the mat.
Remember:
• To perform the exercise with control and only go back as far as comfortable. Imagine:
• Your spine is fixed in its extended position like that of a board or pole. Notes:
SET UP Springs: Maximum Footbar: N/A Headrest: N/A
Parallel
legs adducted. Starting Position Sitting on sit bones on short box, spine neutral, knees bent, feet securely under foot strap, arms overhead shoulder width apart holding onto pole.

85
Short Box – Spine Twist
Start End Exercise Sequence:
• Inhale; scan body for alignment, engage pelvic floor and abdominals.
• Exhale; 3 staccato exhales in tandem with 3 staccato rotations of the spine in one direction, keeping hips fixed in same position.
• Inhale; keep spine neutral and long, return to starting position. Repeat to other side. Number of Repetitions: 5.
Variations:
• The arms and hands may be modified to adjust for individual and spatial needs.
Remember:
• To keep elongating the spine during the rotation. Imagine:
• You are a lawn sprinkler. Notes:
SET UP Springs: Maximum Footbar: N/A Headrest: N/A
Parallel
legs adducted. Starting Position Sitting on sit bones on short box, spine neutral, knees bent, feet resting on carriage, arms extended out to side parallel to floor.
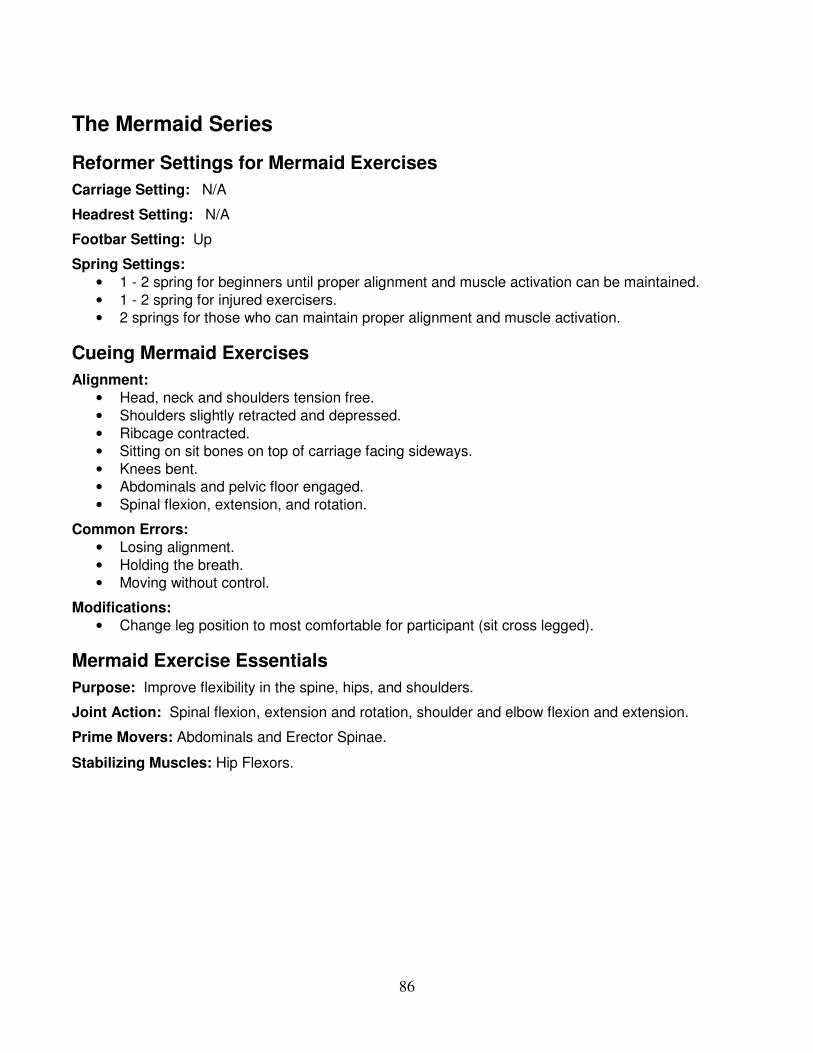
86
The Mermaid Series
Reformer Settings for Mermaid Exercises
Carriage Setting: N/A
Headrest Setting: N/A
Footbar Setting: Up
Spring Settings:
• 1 - 2 spring for beginners until proper alignment and muscle activation can be maintained.
• 1 - 2 spring for injured exercisers.
• 2 springs for those who can maintain proper alignment and muscle activation.
Cueing Mermaid Exercises
Alignment:
• Head, neck and shoulders tension free.
• Shoulders slightly retracted and depressed.
• Ribcage contracted.
• Sitting on sit bones on top of carriage facing sideways.
• Knees bent.
• Abdominals and pelvic floor engaged.
• Spinal flexion, extension, and rotation.
Common Errors:
• Losing alignment.
• Holding the breath.
• Moving without control.
Modifications:
• Change leg position to most comfortable for participant (sit cross legged).
Mermaid Exercise Essentials
Purpose: Improve flexibility in the spine, hips, and shoulders.
Joint Action: Spinal flexion, extension and rotation, shoulder and elbow flexion and extension.
Prime Movers: Abdominals and Erector Spinae.
Stabilizing Muscles: Hip Flexors.

87
Mermaids – Basic Mermaid
Exercise Sequence Part 1:
• Inhale; scan body for alignment, engage pelvic floor and abdominals. Raise the shoulder rest arm overhead while keeping scapulae depressed.
• Exhale; press the footbar hand against the footbar, and extend the elbow to move the carriage away from home. Simultaneously flex spine laterally. Try to keep the hips down and the lifted arm alongside the ear.
• Inhale; bend the elbow of the footbar arm to return the carriage. Simultaneously, straighten spine back to neutral.
• Exhale; return lifted arm back to shoulder rest. Exercise Sequence Part 2:
• Inhale; scan body for alignment, engage pelvic floor and abdominals. Raise the footbar arm overhead while keeping scapulae depressed.
• Exhale; flex spine laterally away from footbar. Try to keep the hips down and the lifted arm alongside the ear.
• Inhale; straighten spine back to neutral.
• Exhale; return lifted arm back to footbar. Number of Repetitions: 3 each side.
Variations:
• Sit with the legs crossed.
Remember:
• Try to keep the sit bones on the carriage. Imagine:
• There is a wall in front of you and behind you and as you bend laterally you do not touch either one of them.
Notes:
SET UP Springs: .5 - 2 Footbar: Up Headrest: N/A
Starting Position Sitting on carriage facing the side, legs bent with one shin pressing against shoulder rests, and the other foot against the knee, hips as level as possible, one hand on the footbar, and the other on the shoulder rest.

88
Mermaids – Mermaid Pushups
Exercise Sequence:
• Inhale; scan body for alignment, engage pelvic floor and abdominals. Raise the shoulder rest arm overhead while keeping scapulae depressed.
• Exhale; flex spine laterally toward footbar, rotate chest toward floor, and bring other hand to footbar. Try to keep the hips down.
• Inhale; scan body for alignment and proper muscle engagement.
• Exhale; extend elbows to move carriage away from home.
• Inhale; bend elbows to return carriage. Allow the head to extend beyond the footbar if necessary. Repeat appropriate repetitions.
• Exhale; to finish: extend elbows to move carriage away from home, take top hand off footbar and rotate spine back to center
• Inhale; bring spine back to neutral as the footbar arm bends to return carriage.
• Exhale; lower lifted arm back to shoulder rest. Number of Repetitions: 3 each side.
Variations:
• The head may go beyond the footbar above it or below it.
Remember:
• To keep the shoulders depressed especially when the arm raises to the ceiling. Imagine:
• Going to lay your chest on your front thigh. Notes:
SET UP Springs: .5 - 2 Footbar: Up Headrest: N/A
Starting Position Sitting on carriage facing the side, legs bent with one shin pressing against shoulder rests, and the other foot against the knee, hips as level as possible, one hand on the footbar, and the other on the shoulder rest.

89
The Lunging Series
Reformer Settings for Lunging Exercises
Carriage Setting: N/A
Headrest Setting: N/A
Footbar Setting: Up
Spring Settings:
• 2 spring for beginners until proper alignment and muscle activation can be maintained.
• 2 spring for injured exercisers.
• 2 - 3 springs for those who can maintain proper alignment and muscle activation.
Cueing Lunging Exercises
Alignment:
• Head, neck and shoulders tension free.
• Shoulders slightly retracted and depressed.
• Ribcage contracted.
• Abdominals and pelvic floor engaged.
Common Errors:
• Losing alignment.
• Holding the breath.
• Moving without control.
Modifications:
• Place towel under knee for comfort.
Lunging Exercise Essentials
Purpose: Stretching the hip flexors.
Joint Action: Hip and knee flexion and extension.
Prime Movers: Gluteal muscles, Hamstrings.
Stabilizing Muscles: Abdominals and Erector Spinae.

90
Lunges – Hip Flexor Stretch
Start End Exercise Sequence:
• Inhale; scan body for alignment, engage pelvic floor and abdominals.
• Exhale; press foot against shoulder rest to move the carriage away from home. Bend the knee of the standing leg to keep it above the ankle. The knee on the carriage will extend.
• Inhale; bend carriage leg and extend standing leg to return to the starting position. Number of Repetitions: 5.
Variations:
• Straighten the front leg as well as the back leg as in doing the splits.
Remember:
• To keep the pelvis neutral. Imagine:
• Your hips are moving toward the floor. Notes:
SET UP Springs: 2 - 3 Footbar: Up Headrest: N/A
Parallel
legs abducted to hip distance apart. Starting Position Place hands on footbar, stand alongside the reformer with the foot of outside leg in line with front edge, knee over ankle. Place inside leg on top of the carriage with the knee bent and the foot against the shoulder rest, neutral spine.

91
Lunges – Scooter
Start End Exercise Sequence:
• Inhale; scan body for alignment, engage pelvic floor and abdominals.
• Exhale; press foot against shoulder rest to move the carriage away from home. Keep standing leg the same. The knee on the carriage will extend.
• Inhale; bend carriage leg to return to the starting position Number of Repetitions: 5.
Variations:
• This exercise can be performed with a round back.
Remember:
• To keep the abdominals pulling in as there is a tendency to arch the low back in this exercise. Imagine:
• You are a runner preparing to push back into the starting block. Notes:
SET UP Springs: 2 - 3 Footbar: Up Headrest: N/A
Parallel
legs abducted to hip distance apart. Starting Position Place hands on footbar, stand alongside the reformer with the foot of outside leg in line with shoulder rests. Place inside leg on top of the carriage with the knee bent and the foot against the shoulder rest, neutral spine.

92
Section 4
Biomechanics
Joint Joint Action Muscles
Elbow
Flexion Biceps Brachii
Extension Triceps Brachii
Shoulder
Flexion Anterior Deltoid
Extension /
Hyperextension
Posterior Deltoid
& Latissimus
Dorsi
Abduction Deltoids
Adduction Latissimus Dorsi
Horizontal
Extension
Latissimus Dorsi
& Posterior
Deltoid
Rotation Rotator Cuff

93
Joint Joint Action Muscles
Spine
Flexion Rectus Abdominis
Extension /
Hyperextension Erector Spinae
Lateral Flexion
Rectus
Abdominis,
Erector Spinae
and Obliques
Rotation Obliques
Scapular / Shoulder
Girdle
Abduction /
Protraction Pectoralis Major
Adduction /
Retraction
Rhomboids and
Mid Trapezius
Elevation Upper Trapezius
Depression Lower Trapezius

94
Joint Joint Action Muscles
Hip
Flexion Iliopsoas and
Rectus Femoris
Extension Hamstrings and
Gluteus Maximus
Abduction Gluteus Medius
Adduction Adductors
Rotation
External / Lateral
= Gluteus
Maximus

95
Joint Joint Action Muscles
Knee
Flexion Hamstrings
(Gastrocnemius)
Extension Quadriceps
Ankle
Flexion
(Dorsiflexion) Tibialis Anterior
Extension
(Plantarflexion)
Gastrocnemius
and Soleus
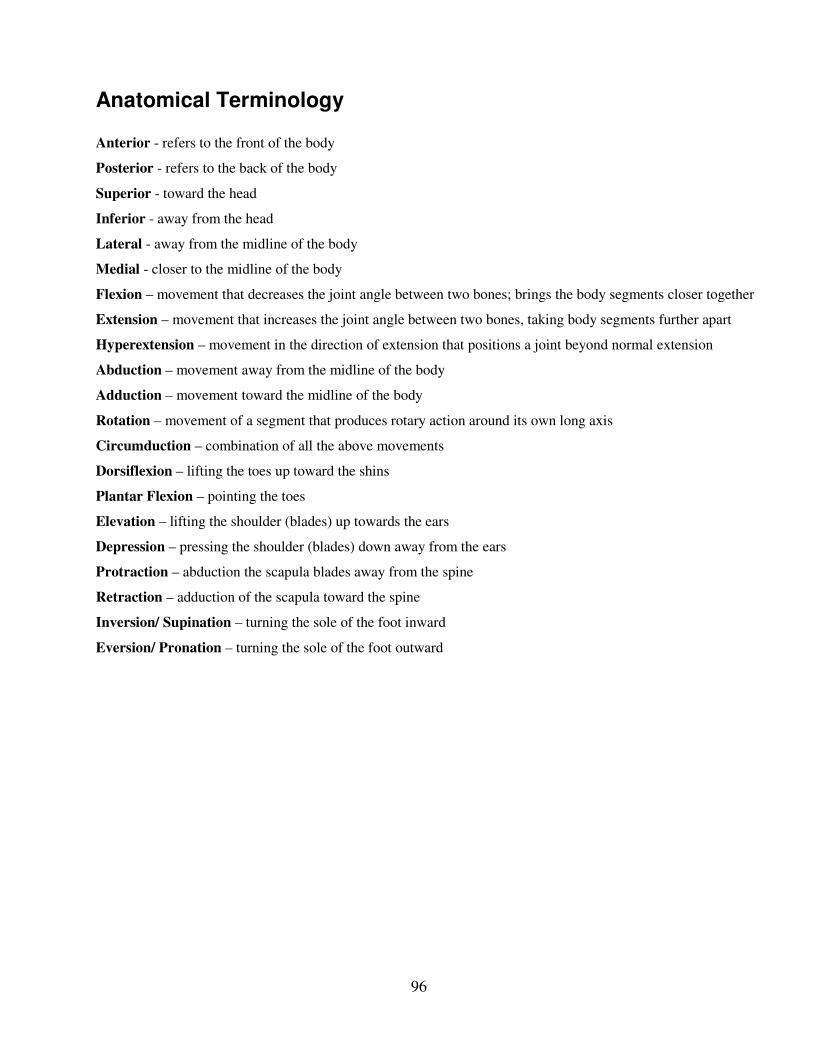
96
Anatomical Terminology Anterior - refers to the front of the body
Posterior - refers to the back of the body
Superior - toward the head
Inferior - away from the head
Lateral - away from the midline of the body
Medial - closer to the midline of the body
Flexion – movement that decreases the joint angle between two bones; brings the body segments closer together
Extension – movement that increases the joint angle between two bones, taking body segments further apart
Hyperextension – movement in the direction of extension that positions a joint beyond normal extension
Abduction – movement away from the midline of the body
Adduction – movement toward the midline of the body
Rotation – movement of a segment that produces rotary action around its own long axis
Circumduction – combination of all the above movements
Dorsiflexion – lifting the toes up toward the shins
Plantar Flexion – pointing the toes
Elevation – lifting the shoulder (blades) up towards the ears
Depression – pressing the shoulder (blades) down away from the ears
Protraction – abduction the scapula blades away from the spine
Retraction – adduction of the scapula toward the spine
Inversion/ Supination – turning the sole of the foot inward
Eversion/ Pronation – turning the sole of the foot outward

97
Pilates Reformer Worksheet
Footwork: 2 - 4 springs
• Heels Hip Width
• Ball of Foot
• Calf Raises, Adducted
• Running, Hip Width
# Reps: 10 Parallel,Lateral,Medial
Parallel,Lateral,Medial
Parallel
Parallel
Seated Upper Body Front (facing footbar): 1 - 2 springs
• Hug a Tree
• Serve the Platter
• Offering
# Reps: 10
Single Leg: 2 - 3 springs
• One Leg Bent
• One Leg Kick
• Single Heel
• One Leg Circles
# Reps: 10 R/L Parallel
Stomach Massage: 1 - 2 springs
• Round Back
• Flat Back
# Reps: 10
Supine Arms: .5 - 2 springs
• Tricep Press
• Arms Pulling Straight Down
• Arms Pulling from Side
• Arm Circles
# Reps: 5
Knee Stretches: 1 - 2 springs
• Round Back
• Flat Back
# Reps: 10
Supine Abdominals: 1 - 3
• Hundred Prep
• Hundred Full
• Single Leg Stretch
• Rollover Prep
# Reps: 5-10 Parallel
Elephant: 1 - 2 springs
• Round Back
• Flat Back
# Reps: 10
Bridging: 2 - 4 springs
• Bottom Lift
• Rolling Bridge
# Reps: 10 Parallel
Long Box: .5 - 2 springs
• Breast Stroke Prep
• Swimming
• Pulling Straps to Floor
# Reps: 5
Feet in Straps: 1.5 - 3 springs
• Lower and Lift
• Bend and Stretch
• Inner Thigh Stretch
• Leg Circles
# Reps: 10 Parallel Lateral
Short Box: Maximum
• Round Back
• Flat Back Hinge
• Spine Twist
# Reps: 5
Short Spine Preps: 1 - 2 springs
• Frog Extensions
• Levitation
# Reps: 10
Mermaids: 1 - 2 springs
• Mermaid
• Mermaid Pushups
Reps: 3 R/L
Seated Upper Body Back (facing pulleys): 1 - 2 springs
• Arms Pulling Straight Back
• Tricep Press
• Bicep Curl
# Reps:10
Lunges: 2 - 3 springs
• Hip Flexor Stretch
• Scooter
# Reps: 5 R/L

98
Prime Mover Pictures
Pectoralis Major and Minor Triceps Brachii Latissimus Dorsi & Rhomboids
Rectus Abdominis Obliques Obliques
Transverse Abdominis Biceps Brachii Gluteus Maximus and Medius
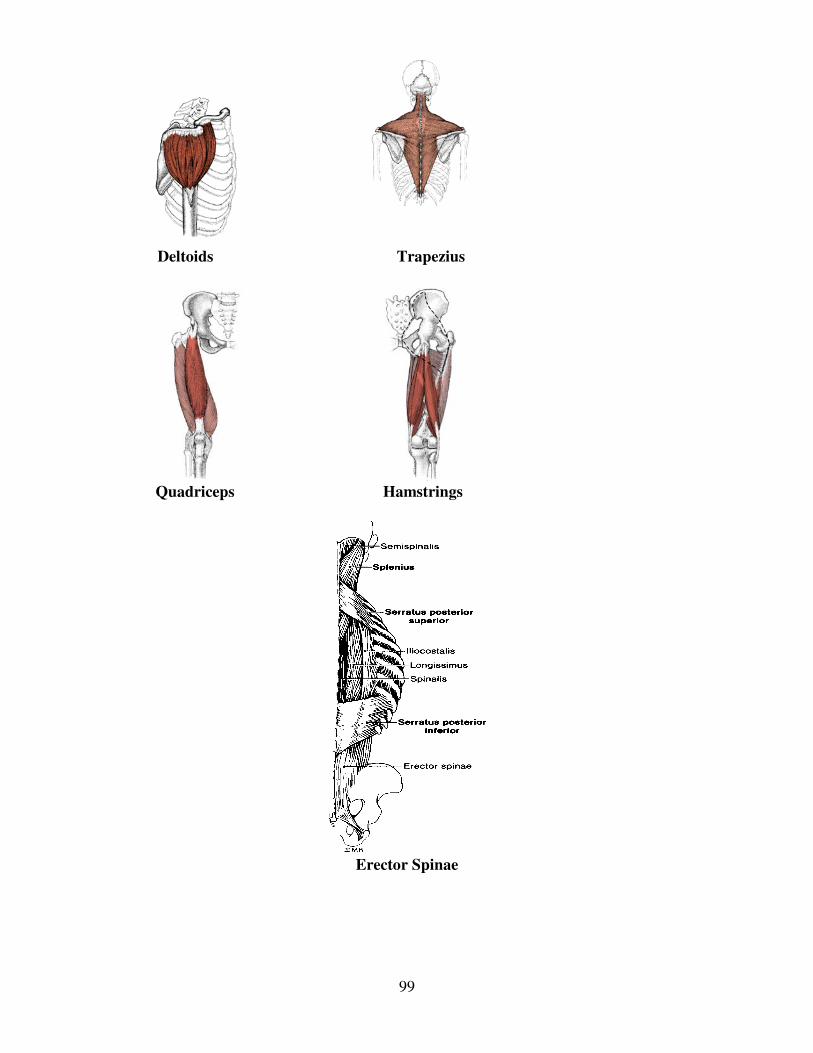
99
Deltoids Trapezius
Quadriceps Hamstrings
Erector Spinae

100
Mission Statement
NETA is an educational and training organization for fitness professionals. We are dedicated to offering certification programs and continuing education workshops that teach the concepts and theories of health and fitness. NETA emphasizes practical application of these concepts and theories as they relate to fitness leadership. We believe it is important to offer education and certification to all who are interested and, in this way, help improve the quality of fitness instruction to the public.
Our curriculum is based on the belief that fitness professionals need a thorough understanding of fitness concepts as well as current industry standards and research. We believe total well-being and overall health is the primary objective in learning how to teach safe and effective exercise.
Acknowledgements Contributing Authors:
Lu Herbeck, B.S.
Suzanne Kranitz, B.S.
Photography:
Glen Hagen
Suzanne Kranitz, B.S.
Illustrations:
Medi Clips
Exercise Models:
Suzanne Kranitz, Certified Pilates Instructor
Stephanie Maks, Certified Pilates Instructor
Susie Supper, Certified Pilates Instructor
2008 NETA National Exercise Trainers Association. All rights reserved. This material may not be reproduced or duplicated in whole or part, by any means, without permission of: NETA 5955 Golden Valley Road, Suite 240 Minneapolis, MN 55422 1-800-237-6242 (In MN 763-545-2505) For additional copies of this workbook, call toll-free 1-800-AEROBIC (In MN call 1-763-545-2505) Rev: February 13, 2008
101
References
Bender, Leslie. The Method of the Millennium – The Pilates Coach Reformer I
Crouch, James. Essential Human Anatomy - A Text Atlas. Philadelphia, PA: Lea & Febiger, 1982.
Gallagher, Sean P. and Kryzanowska, Romona. The Pilates Method of Body Conditioning. Philadelphia, PA: BainBridge Books, 1999.
Herman, Ellie. Pilates for Dummies. New York, NY: Hungry Minds, 2002.
Herman, Ellie. Pilates Reformer. San Francisco, CA: Ellie Herman Books, 2007.
Isacowitz, Rael. Total Pilates. Human Kinetics, 2006.
Kahn, June. Basic Pilates “Fitness” Reformer Training – Level 1. Broomfield, CO.
Karter, K. The Complete Idiot’s Guide to The Pilates Method. Indianapolis, IN: Alpha Books, 2001.
NETA. The Fitness Professional’s Manual. Minneapolis, MN: 2007.
Physical Mind Institute, The. The Method: fundamentals and Mat Exercises of Joseph Pilates.
Stott-Merrithew, Moira. The Contemporary Approach - Comprehensive Matwork Manual. Toronto, Canada. Merrithew Corp. 2001.
Stott-Merrithew, Moira. Stott Conditioning Essential Reformer Manual. Toronto, Canada. Stott 1999.
Pilates, Joseph, and William John Miller. Return to Life through Contrology. Nevada: Presentation Dynamics Inc., 1998.
Other References and Suggested Reading:
1. Chek, Paul. The Inner Unit. Personal Training on the Net. www.PTontheNET.com 2. Hall, Carrie M., & Brody, Lori Thein (1999). "Therapeutic Exercise: Moving Toward Function." Lippincott Williams & Wilkins. 3. Tecco, Armand (1999). Exercise and Pregnancy. Women’s Health Center [Online].
go.drkoop.com/resource/womens/pregnancy/exercise.asp.