core stability - a pilates workout - philip bayliss stability - a pilates... · core stability - a...
TRANSCRIPT
43 Thames Street, St Albans, Christchurch 8013 Phone: (03) 356 1353. Website: philip-bayliss.com
Core Stability - A Pilates Workout This Pilates workout is designed to strengthen your core stability muscles: the deep abdominal, back, and pelvic floor muscles. One of the best ways to challenge these muscles is to make them stabilize the trunk under unstable conditions. We do that by reducing stabilizing contact with the floor and by using the exercise ball. For the non-ball exercises you should use an exercise mat.
Points to keep in mind as you work with Pilates exercises for core stability: • This workout is designed for people free of pain. Increasing core stability should
help to prevent back pain. If you currently have back pain and you wish to do this workout, it is advised that you discus these exercises with your osteopath first. The download ‘Pilates Exercises For Back Pain’ may be more appropriate for you.
• Do these exercises mindfully. Go slow, be gentle, and stop any exercise if it hurts. Discuss it with your osteopath before repeating,
• Breathe! Deep breathing activates the supportive core muscles of your trunk.(among many other benefits, like keeping you alive)
• Your abdominal and back muscles are mutually supportive. You will want to support your back by engaging your abs during these exercises.
• Keep your neck long and your shoulders down away from your ears, like a giraffe. • Be attentive to symmetry and balance. In most cases you will want your shoulders
even and your hips to be even. • It is recommended that you go to a Pilates class if you want to go further.
1. Warm Up the Core - Diaphragmatic Breathing
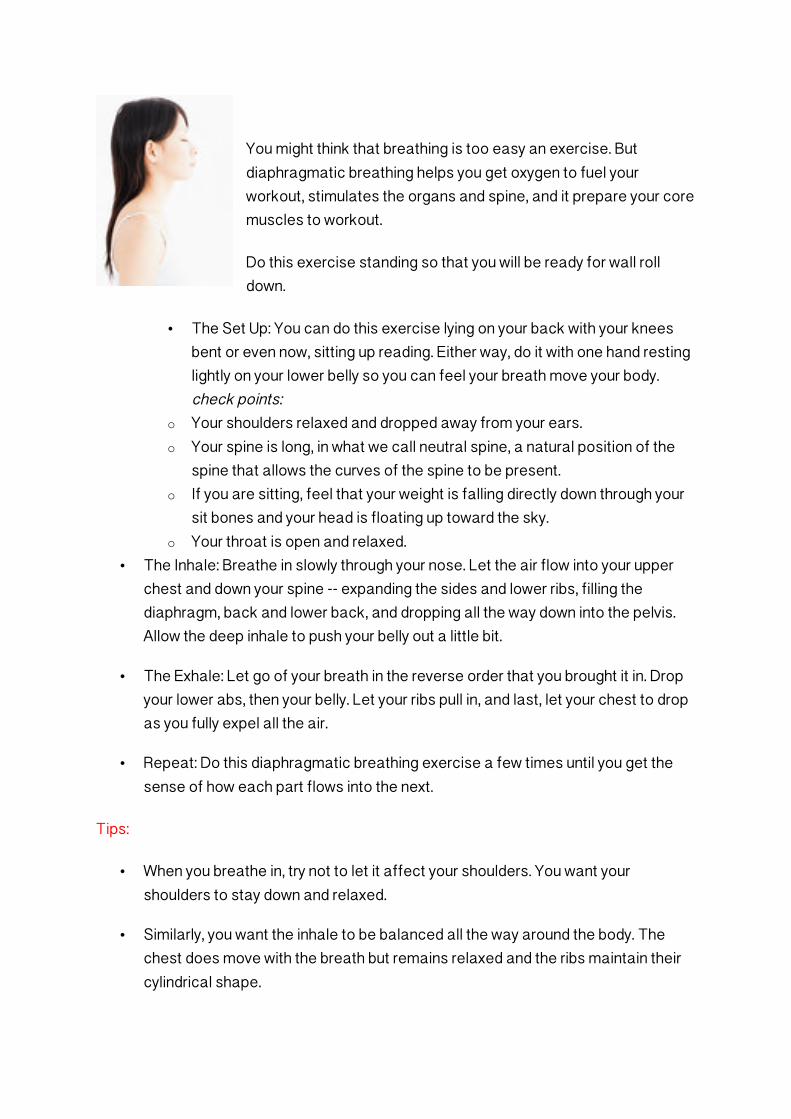
You might think that breathing is too easy an exercise. But diaphragmatic breathing helps you get oxygen to fuel your workout, stimulates the organs and spine, and it prepare your core muscles to workout.
Do this exercise standing so that you will be ready for wall roll down.
• The Set Up: You can do this exercise lying on your back with your knees bent or even now, sitting up reading. Either way, do it with one hand resting lightly on your lower belly so you can feel your breath move your body. check points:
o Your shoulders relaxed and dropped away from your ears. o Your spine is long, in what we call neutral spine, a natural position of the
spine that allows the curves of the spine to be present. o If you are sitting, feel that your weight is falling directly down through your
sit bones and your head is floating up toward the sky. o Your throat is open and relaxed.
• The Inhale: Breathe in slowly through your nose. Let the air flow into your upper chest and down your spine -- expanding the sides and lower ribs, filling the diaphragm, back and lower back, and dropping all the way down into the pelvis. Allow the deep inhale to push your belly out a little bit.
• The Exhale: Let go of your breath in the reverse order that you brought it in. Drop your lower abs, then your belly. Let your ribs pull in, and last, let your chest to drop as you fully expel all the air.
• Repeat: Do this diaphragmatic breathing exercise a few times until you get the sense of how each part flows into the next.
Tips:
• When you breathe in, try not to let it affect your shoulders. You want your shoulders to stay down and relaxed.
• Similarly, you want the inhale to be balanced all the way around the body. The chest does move with the breath but remains relaxed and the ribs maintain their cylindrical shape.
Take at least 5 deep, belly breaths.
2. Wall Roll Down
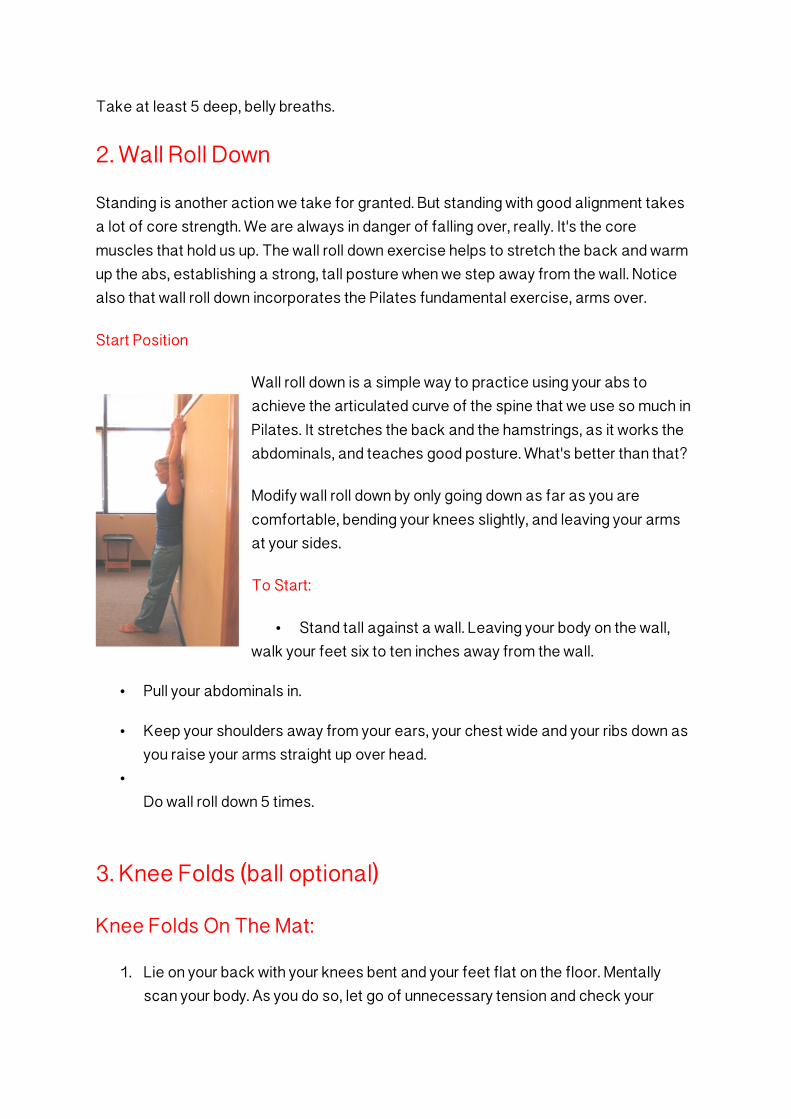
Standing is another action we take for granted. But standing with good alignment takes a lot of core strength. We are always in danger of falling over, really. It's the core muscles that hold us up. The wall roll down exercise helps to stretch the back and warm up the abs, establishing a strong, tall posture when we step away from the wall. Notice also that wall roll down incorporates the Pilates fundamental exercise, arms over.
Start Position
Wall roll down is a simple way to practice using your abs to achieve the articulated curve of the spine that we use so much in Pilates. It stretches the back and the hamstrings, as it works the abdominals, and teaches good posture. What's better than that?
Modify wall roll down by only going down as far as you are comfortable, bending your knees slightly, and leaving your arms at your sides.
To Start:
• Stand tall against a wall. Leaving your body on the wall, walk your feet six to ten inches away from the wall.
• Pull your abdominals in.
• Keep your shoulders away from your ears, your chest wide and your ribs down as you raise your arms straight up over head.
• Do wall roll down 5 times.
3. Knee Folds (ball optional)
Knee Folds On The Mat:
1. Lie on your back with your knees bent and your feet flat on the floor. Mentally scan your body. As you do so, let go of unnecessary tension and check your
alignment. Alignment Check:
o Your neck is long and relaxed o Your shoulders are dropped and your chest is open. o Your arms are by your sides. o Your ribcage is released onto the floor. o Your spine and pelvis are in neutral position -- not tucked and not arched. o Your legs are parallel, about hip distance apart. o Your feet are in line with your legs, toes pointing straight forward.
2. Breathe deeply. Allow the breath to expand the ribs evenly, and to travel down your spine and into your pelvis.
3. Engage your abdominal and pelvic floor muscles. They should feel active, and your belly will pull in and up as you engage. However, this is not an overly strong move and it does not change the position of the pelvis.
4. On an inhale, feel that you are using your abdominal muscles to lift one leg off the floor. Your thigh muscles will be part of this move, but the abdominals are more important. As you use your abs, keep your torso long. Feel a deepening of the crease at the hip joint. It is important not to let the hip to come up with the leg.
5. Exhale and return your foot to the floor. As you do so, be sure to use abdominal control. Don't let the thigh take over.
6. Repeat the knee folds 3 times on one side, then switch to the other leg.
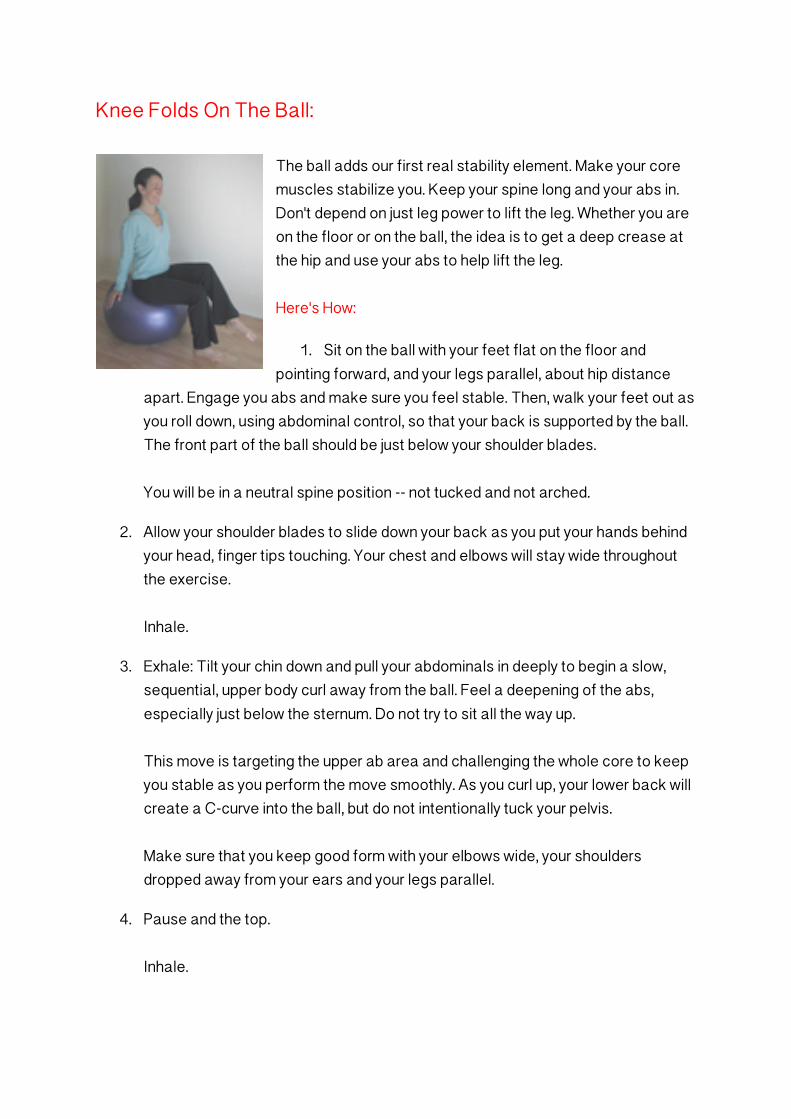
Knee Folds On The Ball:
The ball adds our first real stability element. Make your core muscles stabilize you. Keep your spine long and your abs in. Don't depend on just leg power to lift the leg. Whether you are on the floor or on the ball, the idea is to get a deep crease at the hip and use your abs to help lift the leg. Here's How:
1. Sit on the ball with your feet flat on the floor and pointing forward, and your legs parallel, about hip distance
apart. Engage you abs and make sure you feel stable. Then, walk your feet out as you roll down, using abdominal control, so that your back is supported by the ball. The front part of the ball should be just below your shoulder blades. You will be in a neutral spine position -- not tucked and not arched.
2. Allow your shoulder blades to slide down your back as you put your hands behind your head, finger tips touching. Your chest and elbows will stay wide throughout the exercise. Inhale.
3. Exhale: Tilt your chin down and pull your abdominals in deeply to begin a slow, sequential, upper body curl away from the ball. Feel a deepening of the abs, especially just below the sternum. Do not try to sit all the way up. This move is targeting the upper ab area and challenging the whole core to keep you stable as you perform the move smoothly. As you curl up, your lower back will create a C-curve into the ball, but do not intentionally tuck your pelvis. Make sure that you keep good form with your elbows wide, your shoulders dropped away from your ears and your legs parallel.
4. Pause and the top. Inhale.
5. Exhale: Keep the abdominals drawn in as you use them to slowly lower your upper body down to the support of the ball.
6. Inhale: Release the abdominals and return to neutral spine.
7. Repeat 6 to 8 times
Tips:
1. Remember, the work is in your abs, which are in a deep concave position. Your neck and shoulders stay relaxed, and the movement does not create tension in the legs.
2. Chest lift on the mat and supported roll back are both good prep. exercises for chest lift on the ball.
3. There is some extra focus on the upper ab area, but be sure that your lower abs are fully engaged.
4. Use your inner thighs to help keep your legs parallel to each other as you work.
Do at least 5 lifts on each leg, alternating. Then, stay on the ball (if you are using one) for chest lift.
1. Chest Lift (ball optional)
Chest Lift On The Mat
1. Lie on your back with your knees bent, feet flat on the floor. Make sure that your legs are parallel - lined up so that your hip, knee and ankle are in one line and the toes are pointing directly away from you. You are in neutral spine position with the natural curve of the lower spine creating a slight lift off the mat.
2. Keep your shoulders down as you bring your hands behind your head with the finger tips touching. Your hands will support the base of your skull. Your elbows will stay open throughout the exercise.
3. Take a few deep breaths. Use this time to make a little survey of your body. Be sure your body is balanced side to side. Check that your neck is relaxed and your
ribs are dropped. Exhale: Slowly pull your belly button down toward your spine and keep going, allowing your spine to lengthen out and the lower back to come down to the mat. Simultaneously, tilt you chin slightly down and from the top of the head, with a long neck, slowly lift the upper spine off the mat until the base of the scapula is just brushing the mat. There is a deepening feeling under the bottom ribs as you lift. *Remember, the work is in your abs, which are in a deep concave position. Your your neck and shoulders stay relaxed, and the movement does not create tension in the legs.
4. Pause at the top and inhale. Draw the abdominals in deeper.
5. Exhale: Keep the abdominals drawn in as you slowly lower back to the mat.
6. Inhale: Release the abdominals and return to neutral spine.
7. Repeat 6 - 8 times
8. Pelvic Curl would be a nice follow up for this exercise.
Tips:
1. Chest lift creates a deep curve of the abdominals down toward the mat. The result is flat abs. In most crunches, there is a shortening of the rectus abdominis (the long superficial muscle that runs down the front of the abdomen) that often causes the abs to pop up on the contraction. This will not create the flat abs people are looking for.
2. Chest Lift is done very slowly with the breath. There is no momentum being used.
3. The tail bone and hips do not start to curl up off the floor as is often seen in crunches.
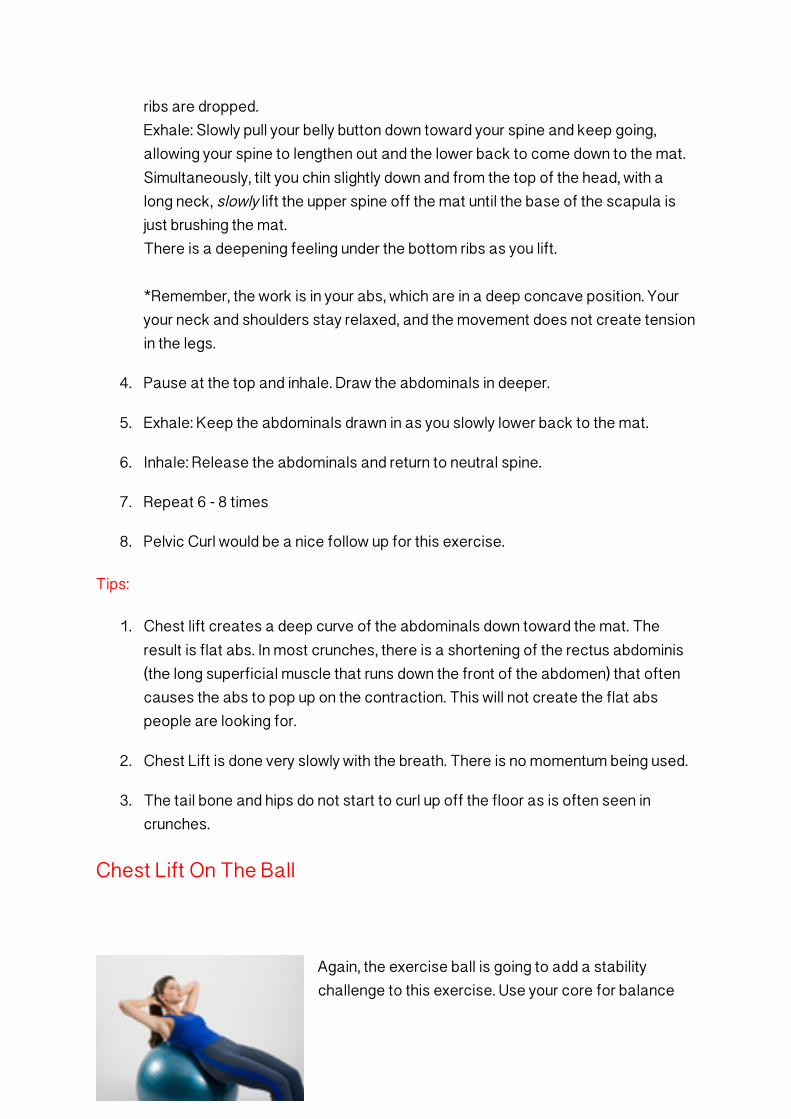
Chest Lift On The Ball
Again, the exercise ball is going to add a stability challenge to this exercise. Use your core for balance
and stay away from trying to steady yourself by over-gripping the ball with the legs. On the floor or on the ball, you might feel this more in your upper abs but pull in the lower abs in and up as well.
1. Sit on the ball with your feet flat on the floor and pointing forward, and your legs parallel, about hip distance apart. Engage you abs and make sure you feel stable. Then, walk your feet out as you roll down, using abdominal control, so that your back is supported by the ball. The front part of the ball should be just below your shoulder blades. You will be in a neutral spine position -- not tucked and not arched.
2. Allow your shoulder blades to slide down your back as you put your hands behind your head, finger tips touching. Your chest and elbows will stay wide throughout the exercise. Inhale.
3. Exhale: Tilt your chin down and pull your abdominals in deeply to begin a slow, sequential, upper body curl away from the ball. Feel a deepening of the abs, especially just below the sternum. Do not try to sit all the way up. This move is targeting the upper ab area and challenging the whole core to keep you stable as you perform the move smoothly. As you curl up, your lower back will create a C-curve into the ball, but do not intentionally tuck your pelvis. Make sure that you keep good form with your elbows wide, your shoulders dropped away from your ears and your legs parallel.
4. Pause and the top. Inhale.
5. Exhale: Keep the abdominals drawn in as you use them to slowly lower your upper body down to the support of the ball.
6. Inhale: Release the abdominals and return to neutral spine.
7. Repeat 6 to 8 times
Tips:
1. Remember, the work is in your abs, which are in a deep concave position. Your neck and shoulders stay relaxed, and the movement does not create tension in the legs.
2. There is some extra focus on the upper ab area, but be sure that your lower abs are fully engaged.
3. Use your inner thighs to help keep your legs parallel to each other as you work.
Do 5 -7 repetitions.
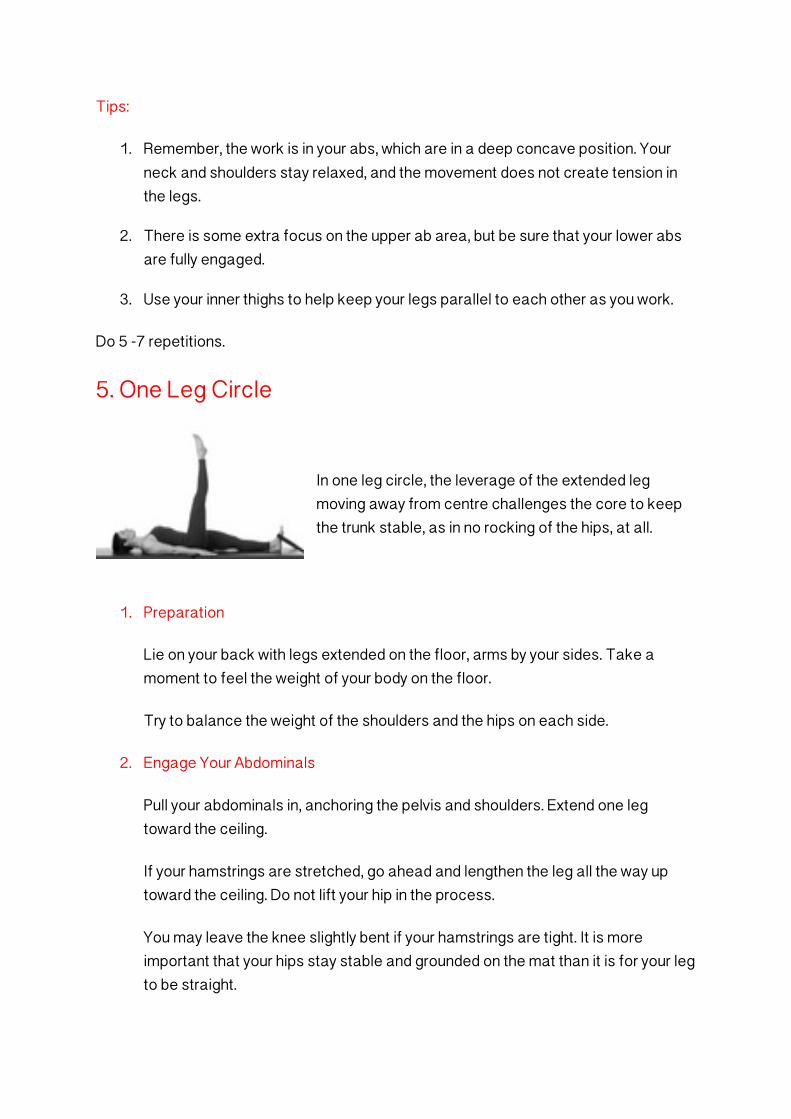
5. One Leg Circle
In one leg circle, the leverage of the extended leg moving away from centre challenges the core to keep the trunk stable, as in no rocking of the hips, at all.
1. Preparation
Lie on your back with legs extended on the floor, arms by your sides. Take a moment to feel the weight of your body on the floor.
Try to balance the weight of the shoulders and the hips on each side.
2. Engage Your Abdominals
Pull your abdominals in, anchoring the pelvis and shoulders. Extend one leg toward the ceiling.
If your hamstrings are stretched, go ahead and lengthen the leg all the way up toward the ceiling. Do not lift your hip in the process.
You may leave the knee slightly bent if your hamstrings are tight. It is more important that your hips stay stable and grounded on the mat than it is for your leg to be straight.
3. The Leg Circles
Inhale: Cross the extended leg over toward the opposite hip. Exhale: Drop the leg a few inches. Use control as you open the leg out and then sweep it around in a small circle back to centre.
Be sure to keep your shoulders and pelvis level. This is more important than extending the leg fully or making big circles. It is in keeping the pelvis stable that your abdominals get their workout. No Rockin' or Rollin'!
4. The Breath and Movement Pattern
Do five circles in each direction with each leg. First set of 5: Inhale to cross the body and circle down. Exhale to open the leg and circle up. Second set of 5: Exhale to open the leg and circle down. Inhale to cross the body and circle and up.
Tips:
1. Modify this exercise by keeping the non-working leg bent with the foot flat on the floor. This will provide more stability for the pelvis.
2. As your core strength increases, you will be able to increase the size of the circle you make with your leg. Start small and work up.
Do 5 circles each direction with each leg. Do small circles at first and build up to larger ones.
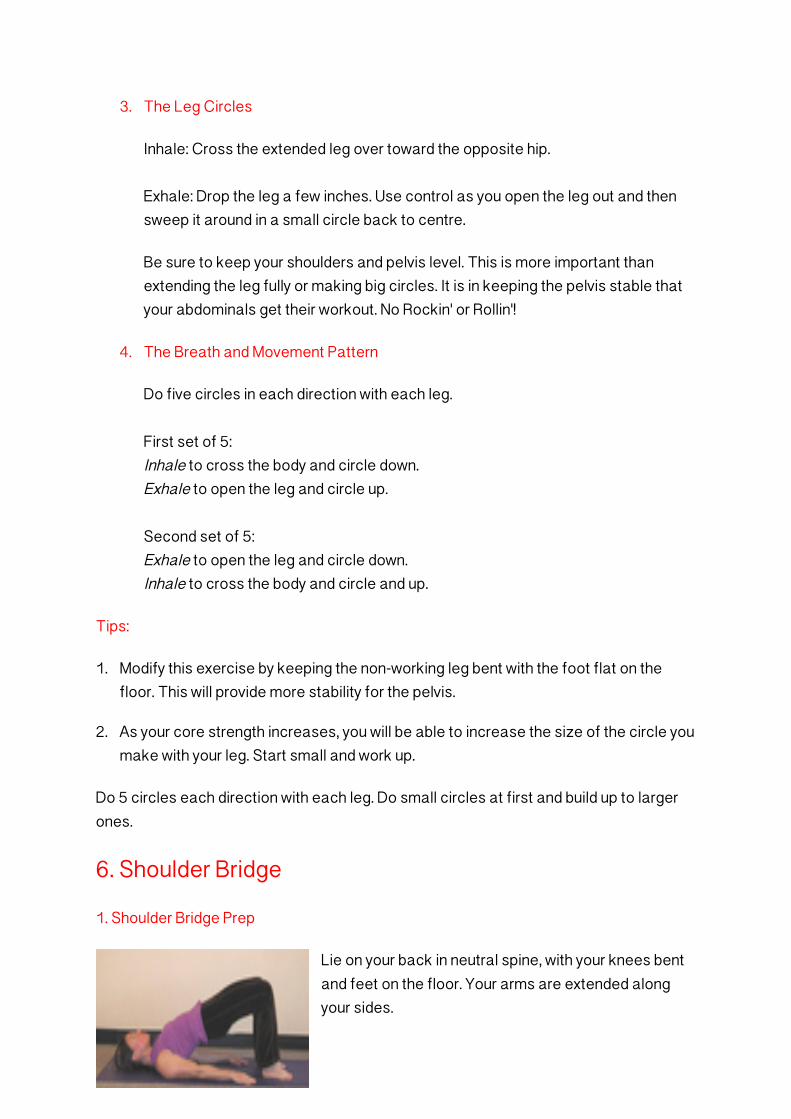
6. Shoulder Bridge
1. Shoulder Bridge Prep
Lie on your back in neutral spine, with your knees bent and feet on the floor. Your arms are extended along your sides.
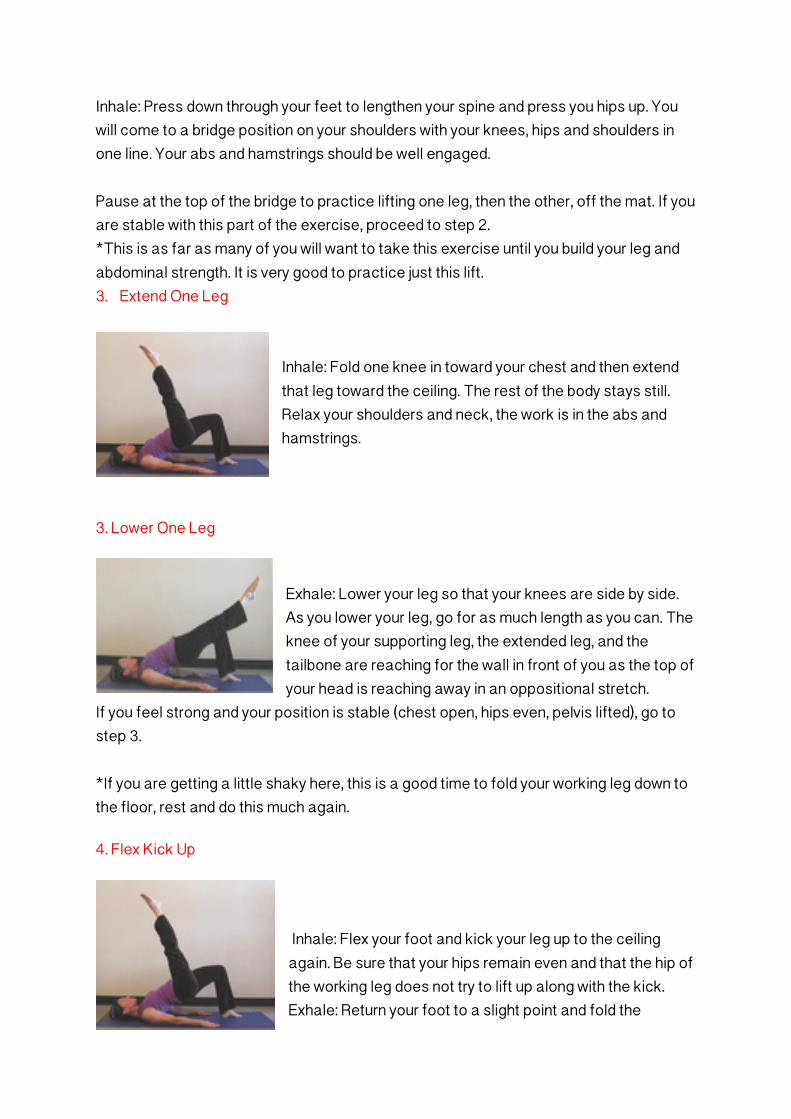
Inhale: Press down through your feet to lengthen your spine and press you hips up. You will come to a bridge position on your shoulders with your knees, hips and shoulders in one line. Your abs and hamstrings should be well engaged. Pause at the top of the bridge to practice lifting one leg, then the other, off the mat. If you are stable with this part of the exercise, proceed to step 2. *This is as far as many of you will want to take this exercise until you build your leg and abdominal strength. It is very good to practice just this lift. 3. Extend One Leg
Inhale: Fold one knee in toward your chest and then extend that leg toward the ceiling. The rest of the body stays still. Relax your shoulders and neck, the work is in the abs and hamstrings.
3. Lower One Leg
Exhale: Lower your leg so that your knees are side by side. As you lower your leg, go for as much length as you can. The knee of your supporting leg, the extended leg, and the tailbone are reaching for the wall in front of you as the top of your head is reaching away in an oppositional stretch.
If you feel strong and your position is stable (chest open, hips even, pelvis lifted), go to step 3. *If you are getting a little shaky here, this is a good time to fold your working leg down to the floor, rest and do this much again.
4. Flex Kick Up
Inhale: Flex your foot and kick your leg up to the ceiling again. Be sure that your hips remain even and that the hip of the working leg does not try to lift up along with the kick. Exhale: Return your foot to a slight point and fold the
working knee back to your chest and return your foot to the floor. Roll down through your spine to return to your starting position. Repeat this exercise two to three times on each side.
5. Shoulder Bridge Notes
Shoulder bridge should be controlled and flowing, with an easy coordination of movement and breath. This exercise begins with shoulder bridge prep, where both feet are on the floor and you lift the hips straight up (not rolled up) to
be in a diagonal line with the shoulders. Extending one leg gives you less of a base and a greater level of difficulty for the core to maintain stability. Alternate lifting each leg 5 times each. If you are only pressing up to bridge position without the leg lifts, press up 3 times. 7. Open Leg Balance and Rocker
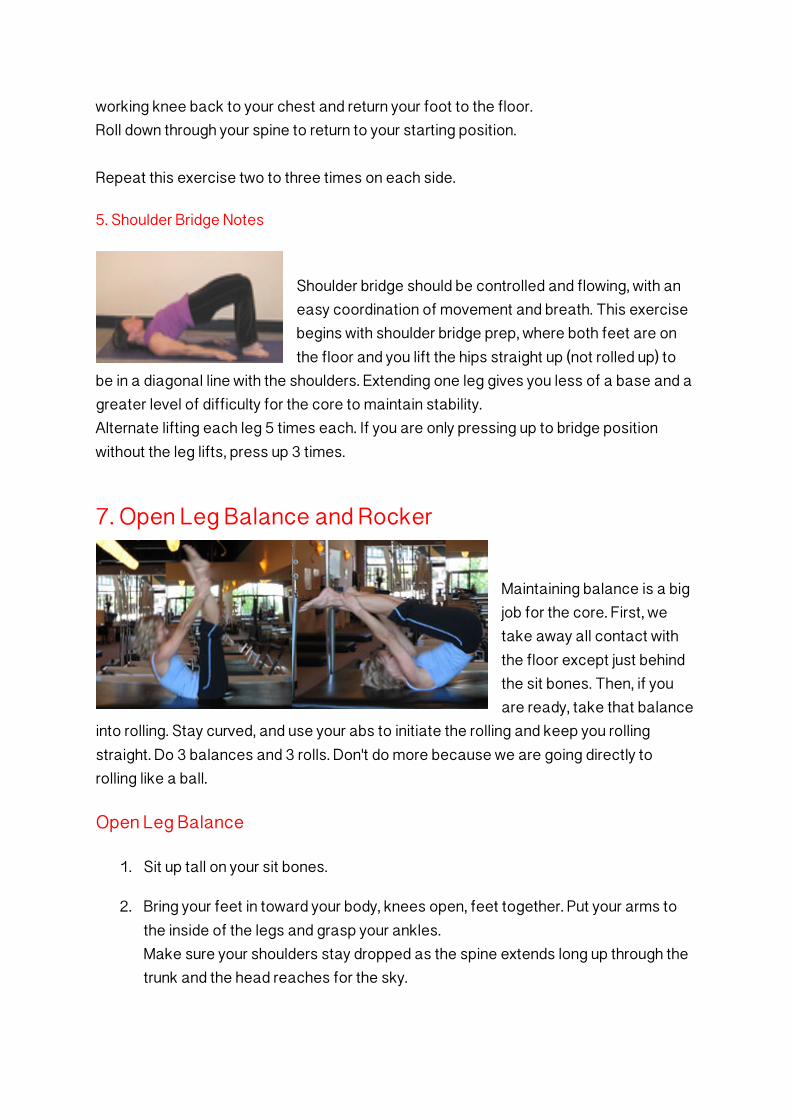
Maintaining balance is a big job for the core. First, we take away all contact with the floor except just behind the sit bones. Then, if you are ready, take that balance
into rolling. Stay curved, and use your abs to initiate the rolling and keep you rolling straight. Do 3 balances and 3 rolls. Don't do more because we are going directly to rolling like a ball.
Open Leg Balance
1. Sit up tall on your sit bones.
2. Bring your feet in toward your body, knees open, feet together. Put your arms to the inside of the legs and grasp your ankles. Make sure your shoulders stay dropped as the spine extends long up through the trunk and the head reaches for the sky.

3. Pull in the abdominals, paying special attention to lifting the lower abs.
4. Extend one leg, stabilize, extend the second leg. You may rock back behind your sit bones, but don't go so far that you settle onto your tail bone.
5. BALANCE and hold for a count of 5.
6. With control, fold one leg in, then the next.
7. Check you posture and repeat the exercise 3 - 4 times.
Tips:
1. Modify for tight hamstrings: The legs can be slightly bent with the hands behind the thighs.
2. Work your way up to the full balance by extending one leg, bringing it down, and then extending the other.
3. Be sure to keep the shoulders connected in the back the whole time. 4. Think of yourself as radiating out from a strong core. Your legs, spine and arms
extend infinitely in both directions. 5. Use Open Leg Balance as a preparation for Open Leg Rocker
Open Leg Rocker
Open Leg Rocker is a great abdominal workout. This exercise provides an opportunity to practice using sequential control between the upper and lower abdominals. You will need to keep your abdominals engaged in a deep scoop, and use the breath, to keep this rolling exercise flowing and controlled.
To Do Open Leg Rocker:
1. Prepare: Sit up tall on your sit bones with your knees bent so that you can grasp your ankles. As you balance between your sit bones and tailbone, keep your abdominals activated as you lift and extend one leg, then the other, to shoulder width apart. Balance.
2. Inhale and Roll: On an inhale, use a deepening scoop of the abdominals and the fullness of your inhale to propel your roll back onto your shoulders.
Stay in your C-curve as you roll, leaving your head and neck off the mat. Pause.
3. Exhale and Return: Remain in your C-curve and use your abdominal muscles, along with a strong exhale, to bring yourself back to an upright balance.
Tip: Rolling exercises are initiated and controlled by the deepening of the abdominals, the breath, and expansion of the back in relation to the breath. They are never accomplished by throwing oneself backward from the shoulders and head. Stay in the C-curve until you come up for your balance!
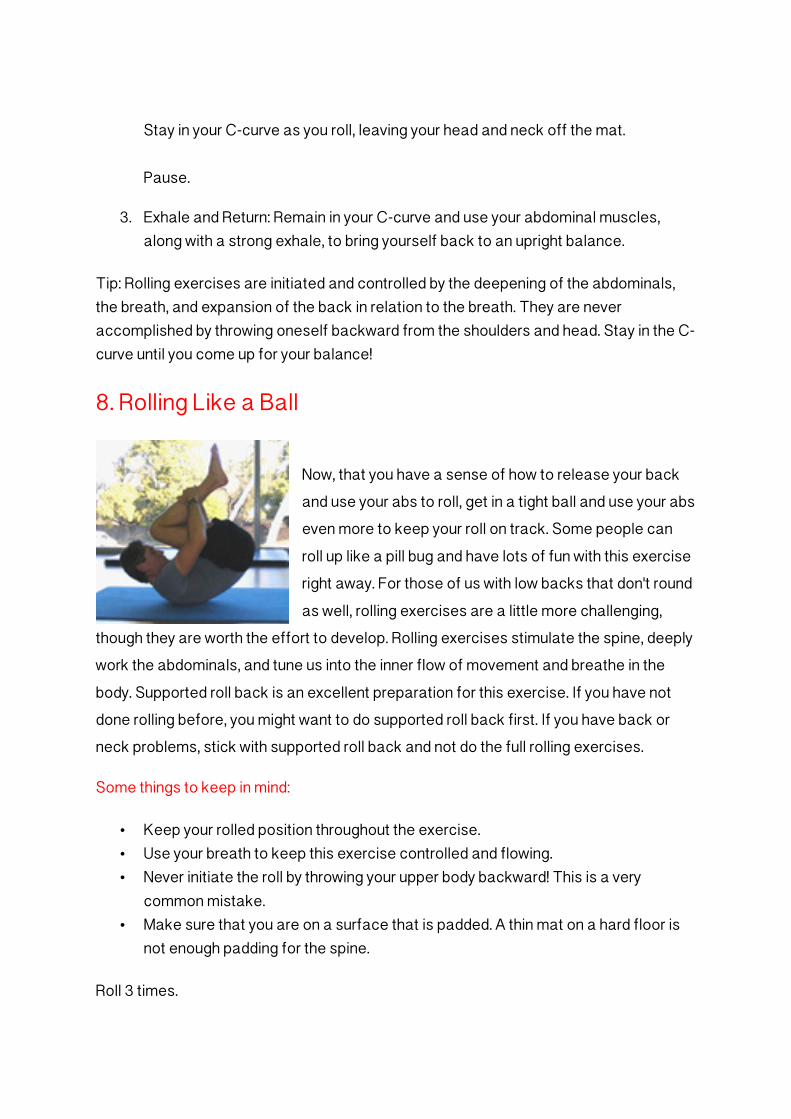
8. Rolling Like a Ball
Now, that you have a sense of how to release your back and use your abs to roll, get in a tight ball and use your abs even more to keep your roll on track. Some people can roll up like a pill bug and have lots of fun with this exercise right away. For those of us with low backs that don't round as well, rolling exercises are a little more challenging,
though they are worth the effort to develop. Rolling exercises stimulate the spine, deeply work the abdominals, and tune us into the inner flow of movement and breathe in the body. Supported roll back is an excellent preparation for this exercise. If you have not done rolling before, you might want to do supported roll back first. If you have back or neck problems, stick with supported roll back and not do the full rolling exercises.
Some things to keep in mind:
• Keep your rolled position throughout the exercise. • Use your breath to keep this exercise controlled and flowing. • Never initiate the roll by throwing your upper body backward! This is a very
common mistake. • Make sure that you are on a surface that is padded. A thin mat on a hard floor is
not enough padding for the spine.
Roll 3 times.
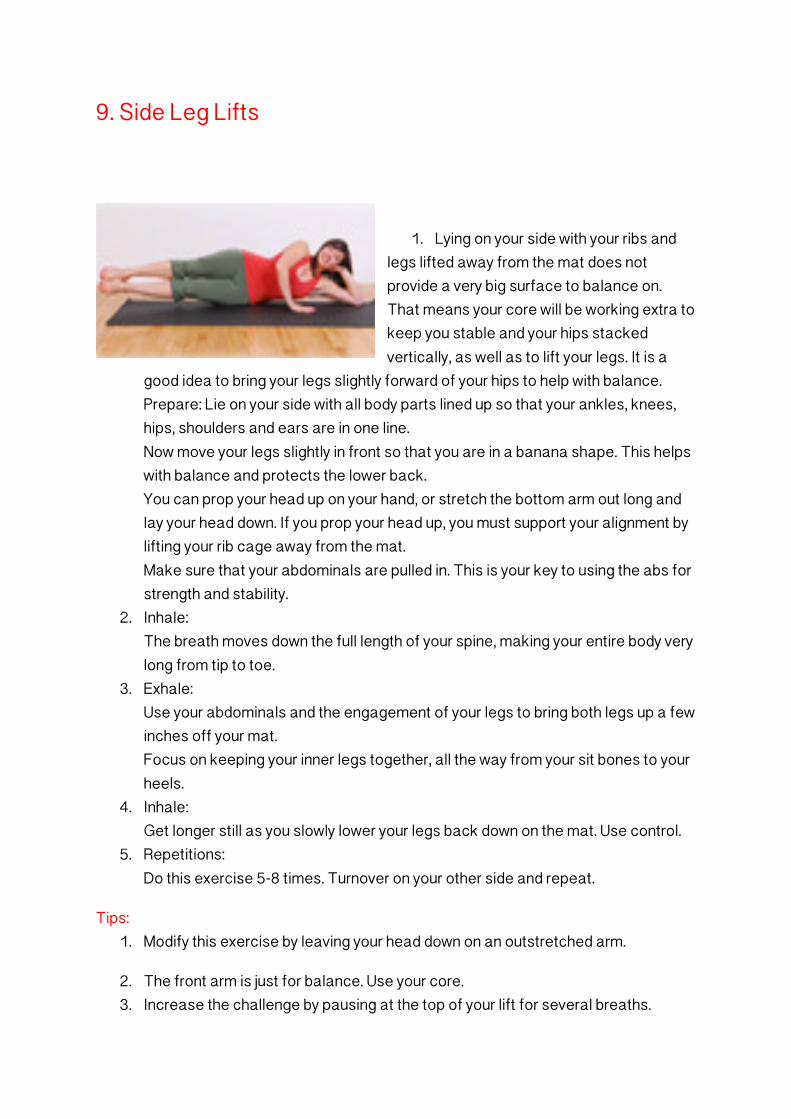
9. Side Leg Lifts
1. Lying on your side with your ribs and
legs lifted away from the mat does not provide a very big surface to balance on. That means your core will be working extra to keep you stable and your hips stacked vertically, as well as to lift your legs. It is a
good idea to bring your legs slightly forward of your hips to help with balance. Prepare: Lie on your side with all body parts lined up so that your ankles, knees, hips, shoulders and ears are in one line. Now move your legs slightly in front so that you are in a banana shape. This helps with balance and protects the lower back. You can prop your head up on your hand, or stretch the bottom arm out long and lay your head down. If you prop your head up, you must support your alignment by lifting your rib cage away from the mat. Make sure that your abdominals are pulled in. This is your key to using the abs for strength and stability.
2. Inhale: The breath moves down the full length of your spine, making your entire body very long from tip to toe.
3. Exhale: Use your abdominals and the engagement of your legs to bring both legs up a few inches off your mat. Focus on keeping your inner legs together, all the way from your sit bones to your heels.
4. Inhale: Get longer still as you slowly lower your legs back down on the mat. Use control.
5. Repetitions: Do this exercise 5-8 times. Turnover on your other side and repeat.
Tips: 1. Modify this exercise by leaving your head down on an outstretched arm.
2. The front arm is just for balance. Use your core. 3. Increase the challenge by pausing at the top of your lift for several breaths.

Do 5 lifts on each side.
9. Side Kick Front/Back with Kneeling
Side-lying and a leverage challenge from your moving leg will work your core muscles in side kick front/back. Moving up to kneeling side kick, with just one leg and one hand on the floor, makes it even
harder to maintain a stable trunk. Preparation
• Lie on your side and line up your ears, shoulders, hips, knees and ankles. Your shoulders should be stacked one on top of the other, as should your hips.
• Lightly support your head with your hand, making sure to lift your ribs away from the mat so that your back and neck stay in alignment. Modify this position by reaching your bottom arm straight out along the mat above your head and resting your head on it.
• The front hand rests firmly, palm down, on the mat in front of your chest. Use this hand for balance, but don't depend on it - depend on your abs.
• Now move your legs slightly in front of your hips. This will help stabilize your trunk and protect your lower back.
• Rotate your legs outward slightly from the hips, in Pilates stance.
• Lift your top leg a few inches. Flex your foot and send energy out through the heel.
• With your foot flexed, swing the top leg to the front. At the full length of your kick, do a small pulse kick.
There will be a slight adjustment of the pelvis as you move your leg forward, but there should be no real rocking of the pelvis or the shoulders. The intent is to develop core strength so that you can freely move the leg in the hip socket, independent of the rest of the body.
• Keeping length in your leg and through your whole body, point your toe and sweep your top leg to the back. Pause, but do not do a pulse kick.
Only reach as far back as you can go without crunching the low back or moving the pelvis. Again, a big part of the challenge of the exercise is to use the core muscles to keep the entire trunk of the body stable. No rocking of the pelvis or the shoulders!
• Flex your foot and kick to the front. Repeat this exercise 5 to 10 times.
To Develop the Exercise:
• Pick up the pace: As you get comfortable with the leg pattern, step up the pace and try to get a nice flowing rhythm going with the swing of the leg -- flex kick, little kick, swing back.
• Breathing: I have seen this exercise taught with natural breath (deep, of course). That is where you should start. When you are ready, try inhale to the front and exhale to the back. A little more challenging is to exhale to the front and inhale to the back.
• Increase the Challenge: Bring the front hand to the back of your head with the chest very wide, elbow pointing to the ceiling. Only do this if you have mastered moving the leg without losing the stability and alignment of the pelvis and shoulders.
Do 5 kicks on each side. Do 3 on each side if you are taking the exercise up to kneeling position as well.
11. Plank to Leg Pull Front
Plank is one of those wonderful exercises that engages everything. Part of the difficulty of plank is that your legs are close together so you are challenged to stay stable though you are in a long tripod position.
With leg pull front the challenge is increased by taking one foot off the floor.
Pilates Plank Preparation
Engage the Core to Prepare for Plank
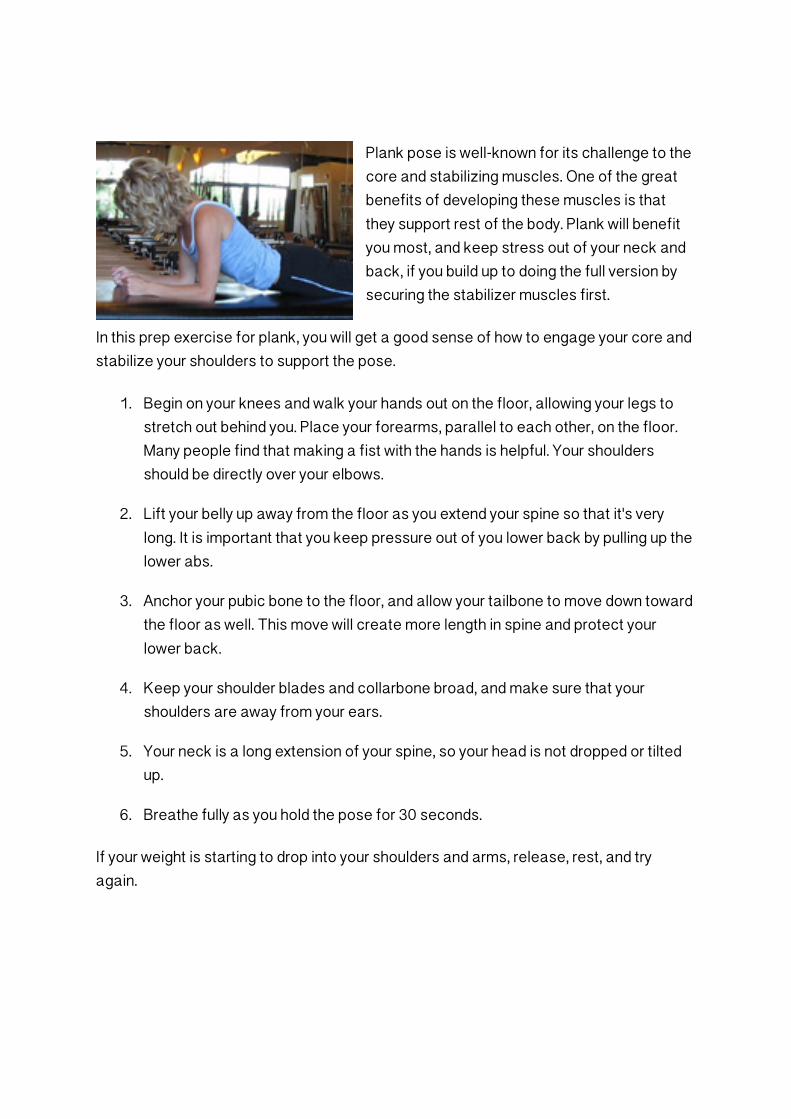
Plank pose is well-known for its challenge to the core and stabilizing muscles. One of the great benefits of developing these muscles is that they support rest of the body. Plank will benefit you most, and keep stress out of your neck and back, if you build up to doing the full version by securing the stabilizer muscles first.
In this prep exercise for plank, you will get a good sense of how to engage your core and stabilize your shoulders to support the pose.
1. Begin on your knees and walk your hands out on the floor, allowing your legs to stretch out behind you. Place your forearms, parallel to each other, on the floor. Many people find that making a fist with the hands is helpful. Your shoulders should be directly over your elbows.
2. Lift your belly up away from the floor as you extend your spine so that it's very long. It is important that you keep pressure out of you lower back by pulling up the lower abs.
3. Anchor your pubic bone to the floor, and allow your tailbone to move down toward the floor as well. This move will create more length in spine and protect your lower back.
4. Keep your shoulder blades and collarbone broad, and make sure that your shoulders are away from your ears.
5. Your neck is a long extension of your spine, so your head is not dropped or tilted up.
6. Breathe fully as you hold the pose for 30 seconds.
If your weight is starting to drop into your shoulders and arms, release, rest, and try again.
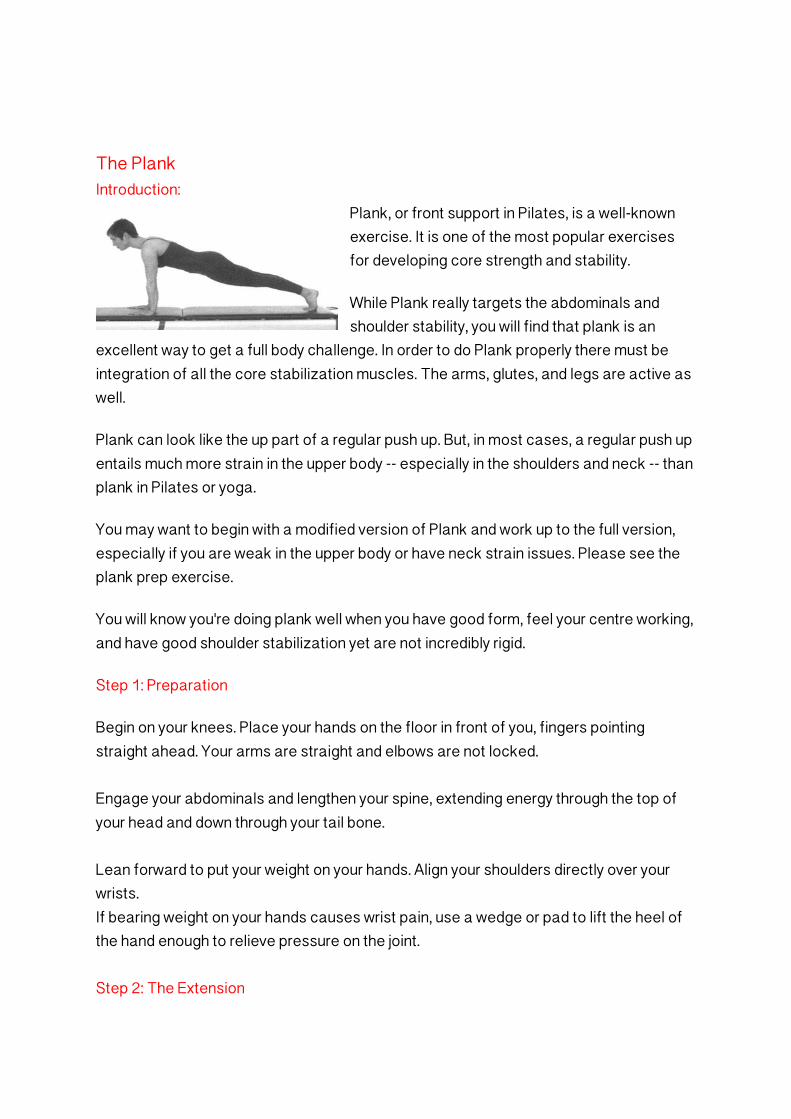
The Plank Introduction:
Plank, or front support in Pilates, is a well-known exercise. It is one of the most popular exercises for developing core strength and stability.
While Plank really targets the abdominals and shoulder stability, you will find that plank is an
excellent way to get a full body challenge. In order to do Plank properly there must be integration of all the core stabilization muscles. The arms, glutes, and legs are active as well.
Plank can look like the up part of a regular push up. But, in most cases, a regular push up entails much more strain in the upper body -- especially in the shoulders and neck -- than plank in Pilates or yoga.
You may want to begin with a modified version of Plank and work up to the full version, especially if you are weak in the upper body or have neck strain issues. Please see the plank prep exercise.
You will know you're doing plank well when you have good form, feel your centre working, and have good shoulder stabilization yet are not incredibly rigid.
Step 1: Preparation
Begin on your knees. Place your hands on the floor in front of you, fingers pointing straight ahead. Your arms are straight and elbows are not locked. Engage your abdominals and lengthen your spine, extending energy through the top of your head and down through your tail bone. Lean forward to put your weight on your hands. Align your shoulders directly over your wrists. If bearing weight on your hands causes wrist pain, use a wedge or pad to lift the heel of the hand enough to relieve pressure on the joint. Step 2: The Extension
With your abdominals lifted, extend your legs straight behind you. Keep them together and send energy through your heels. Your toes are curled under so that some weight is on the balls of your feet. Without over-tightening, activate your legs (especially your hamstrings) and bring them together, emphasizing the centre line. Similarly, activate but do not clench your glutes (butt muscles) -- think of pulling your sit bones together. Breathe deeply, allowing the breath to expand into your lower ribs and back. Hold your position for three to five breaths. Take a break and repeat up to five times. Reminders:
• Your body is in a straight line from the ears, through the shoulders and hips, and to the heels. Do not arch or sag.
• Keep the abdominals lifted throughout this exercise. You want to engage the muscles of the pelvic floor as well.
• Put some space between the base of your scull and your neck.
• If you start to shake, release the pose, breathe, and start again.
Hold and release plank 3 times. If you are stable, add leg pull front, 3 lifts for each leg.
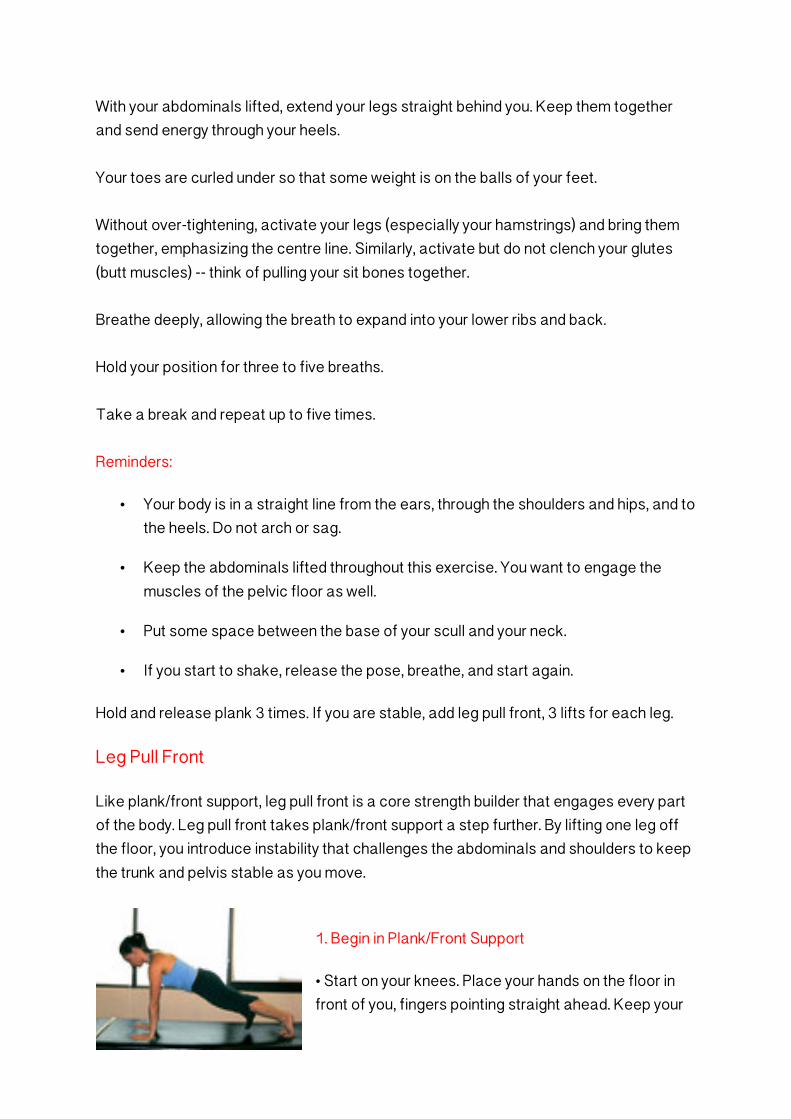
Leg Pull Front
Like plank/front support, leg pull front is a core strength builder that engages every part of the body. Leg pull front takes plank/front support a step further. By lifting one leg off the floor, you introduce instability that challenges the abdominals and shoulders to keep the trunk and pelvis stable as you move.
1. Begin in Plank/Front Support
• Start on your knees. Place your hands on the floor in front of you, fingers pointing straight ahead. Keep your
arms straight and your elbows unlocked. • Engage your abdominals and lengthen your spine, extending through the top of the head as you lean forward to put your weight on your hands. Your shoulders should be directly over your wrists and settled in your back. That means there is a lot of space between your shoulders and your ears. • With your abdominals lifted, extend your legs back so that they are straight and together. Your toes are curled under so that some weight is on the balls of your feet. Your ears, shoulders, hips and heels should be in one long line.
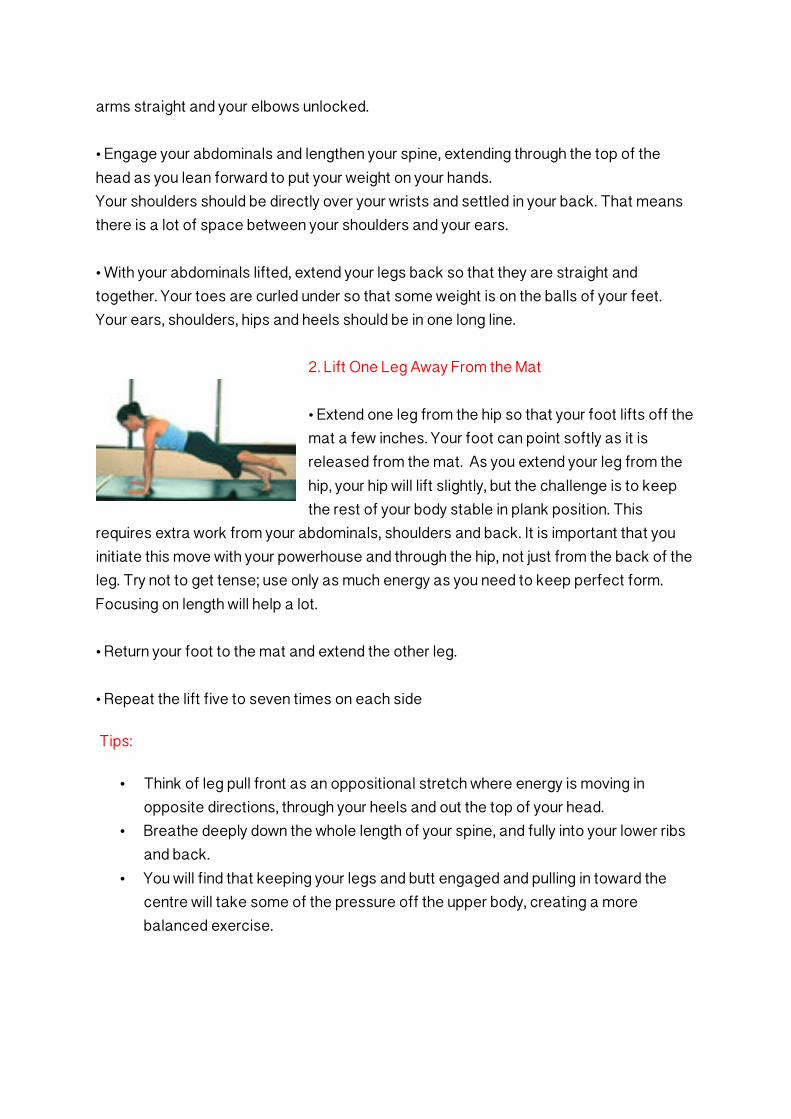
2. Lift One Leg Away From the Mat • Extend one leg from the hip so that your foot lifts off the mat a few inches. Your foot can point softly as it is released from the mat. As you extend your leg from the hip, your hip will lift slightly, but the challenge is to keep the rest of your body stable in plank position. This
requires extra work from your abdominals, shoulders and back. It is important that you initiate this move with your powerhouse and through the hip, not just from the back of the leg. Try not to get tense; use only as much energy as you need to keep perfect form. Focusing on length will help a lot. • Return your foot to the mat and extend the other leg. • Repeat the lift five to seven times on each side
Tips:
• Think of leg pull front as an oppositional stretch where energy is moving in opposite directions, through your heels and out the top of your head.
• Breathe deeply down the whole length of your spine, and fully into your lower ribs and back.
• You will find that keeping your legs and butt engaged and pulling in toward the centre will take some of the pressure off the upper body, creating a more balanced exercise.

12. Bicycle
As bicycle gets more advanced the angle of the body shifts so that the back position is closer to neutral spine. This is very hard to maintain. You will also notice that it is a lot of core work to keep your trunk lifting up, and not sinking into your hands.
1. Lie on your back and roll your hips up into shoulder stand position. make sure that you are not too far up on your neck. Check Points:
o Your weight should be supported by a nice tripod of your shoulders and upper arms.
o Hold yourself upright with your abdominals. Ideally, you will not have a lot of weight on your hands.
o Shoulders wide, away from the ears, and the neck is long and relaxed.
2. Bend the right knee and extend the right leg toward the wall behind you. At the same time, bring the straight left leg over your head, to almost parallel to the floor. Bicycle is a good torso stability challenge. You have to keep everything steady in the hips and torso - no extra movement - as you move your legs.
3. As each leg moves into its fullest extension, the left leg bends to come through toward the back wall, and the right leg makes a long arc up and overhead. Basically, this is like pedalling in reverse. It makes the exercise harder and it makes you think a bit more too.
4. Do up to 10 sets of "reverse pedals". Then bring the legs together and use abdominal control to roll back down.
Tips:
1. As you get more comfortable with the movement pattern, you can take the legs even further apart so that eventually they move into a wide split before one leg folds and threads past the other one as it arcs toward the ceiling.
2. At advanced levels, you do not bring the the hips and torso up to shoulder stand. Rather, you roll the hips up, support them with your hands, but leave hips and torso are position closer to neutral spine. This requires exceptional pelvic stabilization. Work with an instructor at this level.
Do the bicycle action 5 times with each leg.
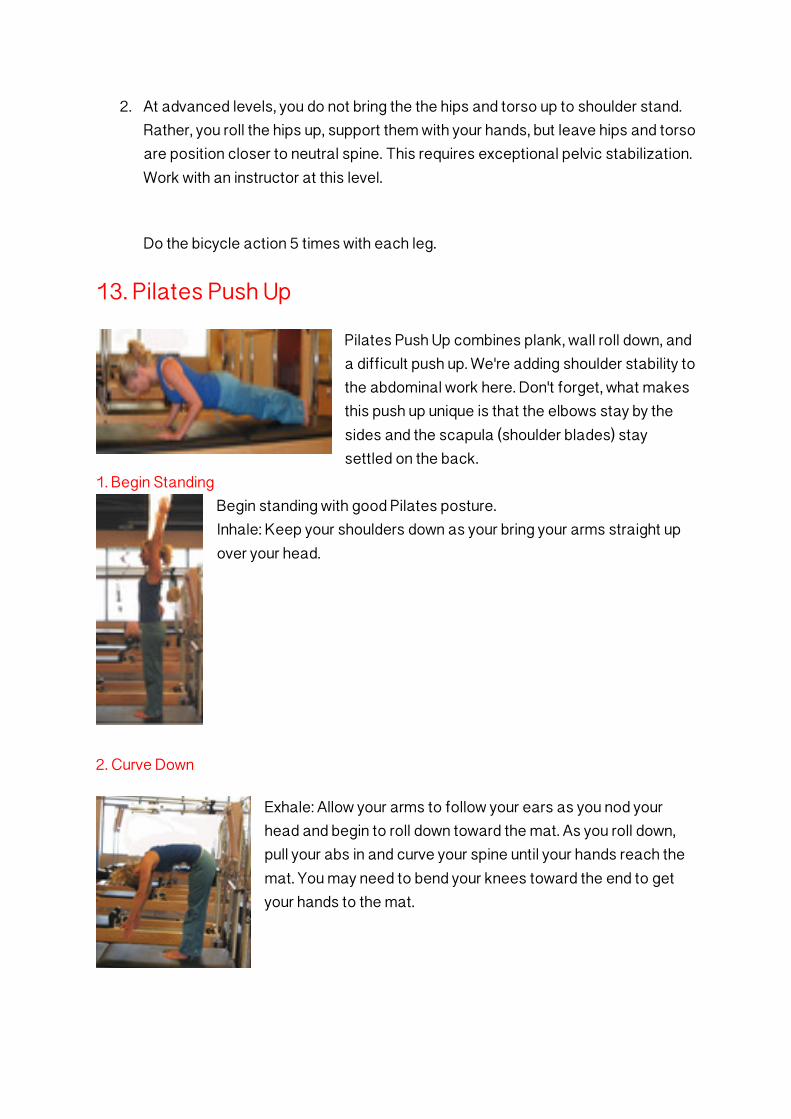
13. Pilates Push Up
Pilates Push Up combines plank, wall roll down, and a difficult push up. We're adding shoulder stability to the abdominal work here. Don't forget, what makes this push up unique is that the elbows stay by the sides and the scapula (shoulder blades) stay settled on the back.
1. Begin Standing Begin standing with good Pilates posture. Inhale: Keep your shoulders down as your bring your arms straight up over your head.
2. Curve Down
Exhale: Allow your arms to follow your ears as you nod your head and begin to roll down toward the mat. As you roll down, pull your abs in and curve your spine until your hands reach the mat. You may need to bend your knees toward the end to get your hands to the mat.
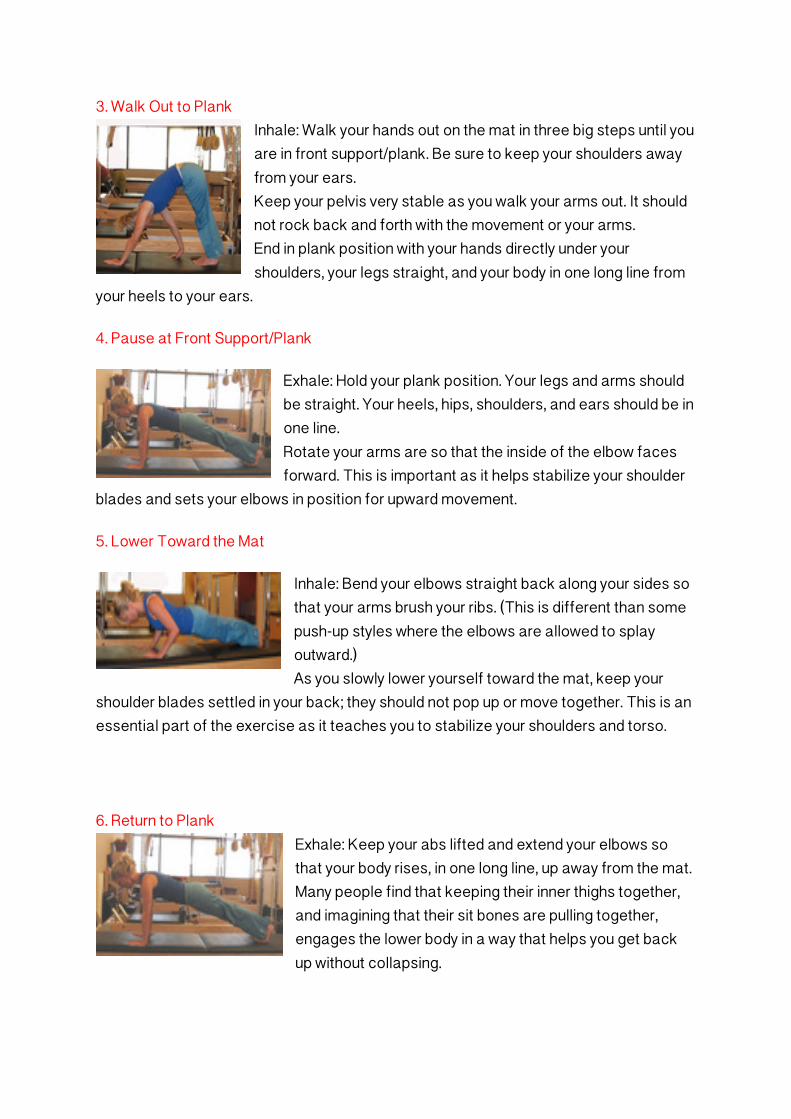
3. Walk Out to Plank Inhale: Walk your hands out on the mat in three big steps until you are in front support/plank. Be sure to keep your shoulders away from your ears. Keep your pelvis very stable as you walk your arms out. It should not rock back and forth with the movement or your arms. End in plank position with your hands directly under your shoulders, your legs straight, and your body in one long line from
your heels to your ears.
4. Pause at Front Support/Plank
Exhale: Hold your plank position. Your legs and arms should be straight. Your heels, hips, shoulders, and ears should be in one line. Rotate your arms are so that the inside of the elbow faces forward. This is important as it helps stabilize your shoulder
blades and sets your elbows in position for upward movement.
5. Lower Toward the Mat
Inhale: Bend your elbows straight back along your sides so that your arms brush your ribs. (This is different than some push-up styles where the elbows are allowed to splay outward.) As you slowly lower yourself toward the mat, keep your
shoulder blades settled in your back; they should not pop up or move together. This is an essential part of the exercise as it teaches you to stabilize your shoulders and torso. 6. Return to Plank
Exhale: Keep your abs lifted and extend your elbows so that your body rises, in one long line, up away from the mat. Many people find that keeping their inner thighs together, and imagining that their sit bones are pulling together, engages the lower body in a way that helps you get back up without collapsing.
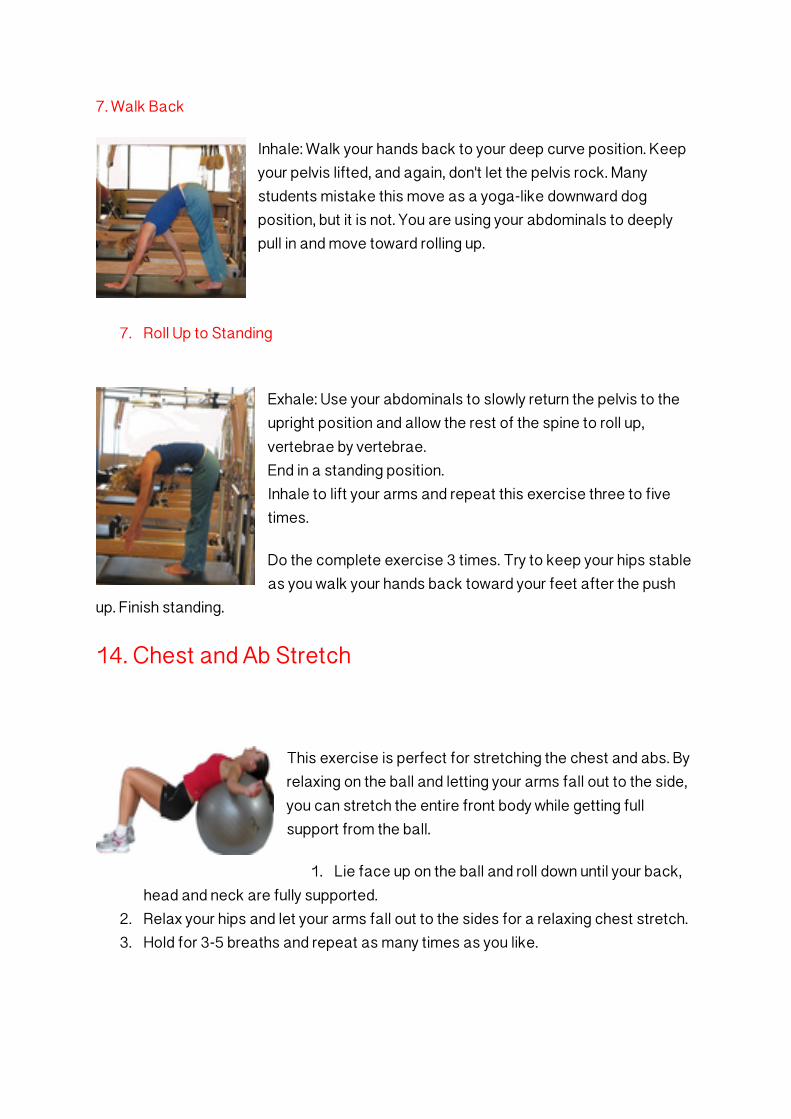
7. Walk Back
Inhale: Walk your hands back to your deep curve position. Keep your pelvis lifted, and again, don't let the pelvis rock. Many students mistake this move as a yoga-like downward dog position, but it is not. You are using your abdominals to deeply pull in and move toward rolling up.
7. Roll Up to Standing
Exhale: Use your abdominals to slowly return the pelvis to the upright position and allow the rest of the spine to roll up, vertebrae by vertebrae. End in a standing position. Inhale to lift your arms and repeat this exercise three to five times.
Do the complete exercise 3 times. Try to keep your hips stable as you walk your hands back toward your feet after the push
up. Finish standing.
14. Chest and Ab Stretch
This exercise is perfect for stretching the chest and abs. By relaxing on the ball and letting your arms fall out to the side, you can stretch the entire front body while getting full support from the ball.
1. Lie face up on the ball and roll down until your back, head and neck are fully supported.
2. Relax your hips and let your arms fall out to the sides for a relaxing chest stretch. 3. Hold for 3-5 breaths and repeat as many times as you like.