intel do-it-yourself challenge lab 3: a demo with led and ... · intel do-it-yourself challenge lab...
TRANSCRIPT

Intel Do-It-Yourself Challenge
Lab 3: A demo with LED and sensor
Nicolas Vaillietwww.Intel-Software-Academic-Program.com
Intel Software
2014-02-01

Prerequisites and objectives
We assume that:
- You are able to download an archive, to unzipped it and run a program under the OS you’re familiar to.
- You are able to read pieces of code and comments written in C language.
Our objective are:
- Given a Galileo board and a laptop connected on the same network, and the C library and corresponding Makefile, you will be able to compile and run the LedSensor project.
In general,
Our goal is to give you a tool to access to Galileo’s inputs and ouputsquickly and easily. All you need is to know a little bit of C to reuse the Arduino C library for Galileo.

Before you start

What do you need?
Desktop OS
We assume you’re under Microsoft Windows.Linux and Mac users should not have any problem to do the same.
Hardware
- An Intel Galileo Development Board.
- The box comes with power supply and cable.
- A Wi-Fi adaptor (N-2200 Mini-PCIe)
- A micro SD card (8GB with the full Linux image we provide)
Software
A SSH client like Putty for Windows. Mac and Linux users only need a terminal.
http://www.chiark.greenend.org.uk/~sgtatham/putty/download.html
The Arduino library is on the board in ~/labs/ledsensor/c

Demo with LED and sensor

A simple circuit
Resistor is connected
to digital port #8.
Bend sensor is
between 5V and A0
analog input.
Warning!
Check IOREF Jumper
is on 5V position!

How does it work?
Procedure
1) We blend the sensor.
2) We read the value on an analogic input.
3) When a specific value is reached, we turn on the LED.
4) We turn off the LED when the voltage is under the threshold.
Arduino code
The loop function basically reads a value on the analogic input and decide to turn the LED on or off.
Only 3 Arduino library functions to use:
- PinMode,
- DigitalWrite,
- AnalogRead

Arduino version
To copy and paste into your Arduino IDE
int sensorPin = A0; // select the input pin for the potentiometer
int ledPin = 8; // select the pin for the LED
int sensorValue = 0; // variable to store the value coming from the sensor
void setup() {
Serial.begin(9600); //serial communication at 9600 bits per second
pinMode(ledPin, OUTPUT);
}
void loop() {
sensorValue = analogRead(sensorPin);
Serial.println(sensorValue);
if(sensorValue > 600)
digitalWrite(ledPin,HIGH);
else
digitalWrite(ledPin,LOW);
delay(200);
}

Bash version (1/2)
Bash versionThe script is in ~/labs/ledsensor/bash/ledsensor.sh
It directly uses Linux file system.
#! /bin/bash
# Initializing digital output pin number 8
echo -n "26" > /sys/class/gpio/export
echo -n "out" > /sys/class/gpio/gpio26/direction
echo -n "strong" > /sys/class/gpio/gpio26/drive
echo -n "0" > /sys/class/gpio/gpio26/value
# Initializing analog input A0
echo -n "37" > /sys/class/gpio/export
echo -n "out" > /sys/class/gpio/gpio37/direction
echo -n "0" > /sys/class/gpio/gpio37/value
# Reads the value on A0
sensorvalue=`cat /sys/bus/iio/devices/iio\:device0/in_voltage0_raw`

Bash version (2/2)
Bash version
#Infinite loop
while true
do
#Print values
echo "sensorvalue $sensorvalue "
#if value > 2000 do LED on
if [ $sensorvalue -le 2000 ]
then echo -n "0" > /sys/class/gpio/gpio26/value
else echo -n "1" > /sys/class/gpio/gpio26/value
fi
sensorvalue=`cat /sys/bus/iio/devices/iio\:device0/in_voltage0_raw`
#Wait 200ms
usleep 200000
done
echo -n "26" > /sys/class/gpio/unexport
echo -n "37" > /sys/class/gpio/unexport
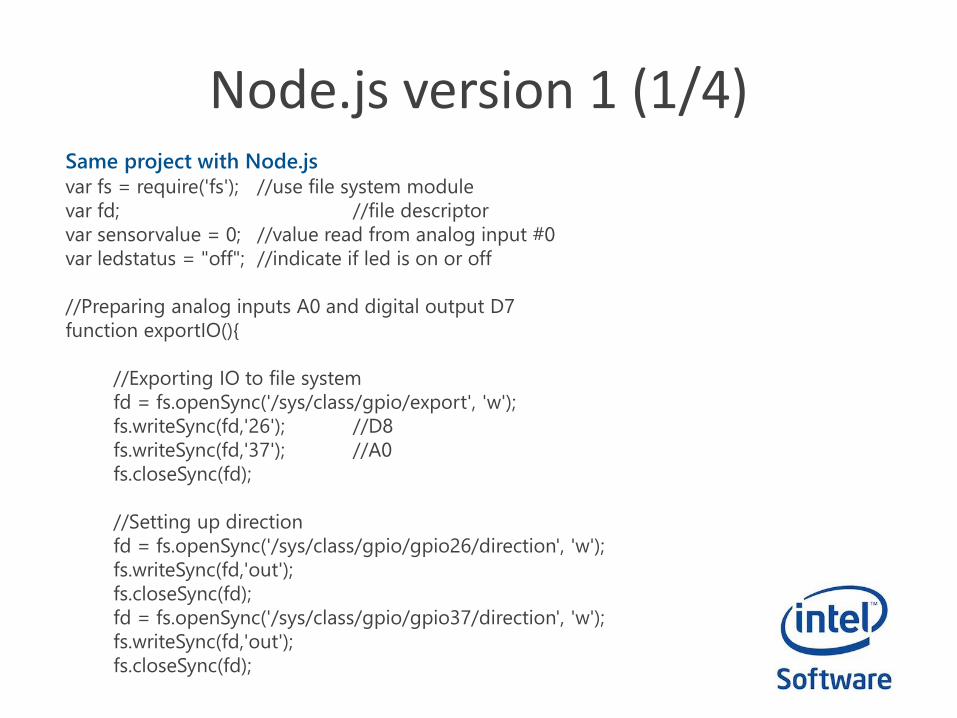
Node.js version 1 (1/4)Same project with Node.js
var fs = require('fs'); //use file system module
var fd; //file descriptor
var sensorvalue = 0; //value read from analog input #0
var ledstatus = "off"; //indicate if led is on or off
//Preparing analog inputs A0 and digital output D7
function exportIO(){
//Exporting IO to file system
fd = fs.openSync('/sys/class/gpio/export', 'w');
fs.writeSync(fd,'26'); //D8
fs.writeSync(fd,'37'); //A0
fs.closeSync(fd);
//Setting up direction
fd = fs.openSync('/sys/class/gpio/gpio26/direction', 'w');
fs.writeSync(fd,'out');
fs.closeSync(fd);
fd = fs.openSync('/sys/class/gpio/gpio37/direction', 'w');
fs.writeSync(fd,'out');
fs.closeSync(fd);

Node.js version 1 (2/4)fd = fs.openSync('/sys/class/gpio/gpio26/drive', 'w');
fs.writeSync(fd,'strong');
fs.closeSync(fd);
// Initializing value to 0
fd = fs.openSync('/sys/class/gpio/gpio26/value', 'w');
fs.writeSync(fd,'0');
fs.closeSync(fd);
fd = fs.openSync('/sys/class/gpio/gpio37/value', 'w');
fs.writeSync(fd,'0');
fs.closeSync(fd);
}
Writing a function to turn on the LED
function turnOnLed(){
fd = fs.openSync('/sys/class/gpio/gpio26/value', 'w');
fs.writeSync(fd,'1');
fs.closeSync(fd);
ledstatus = "on";
}
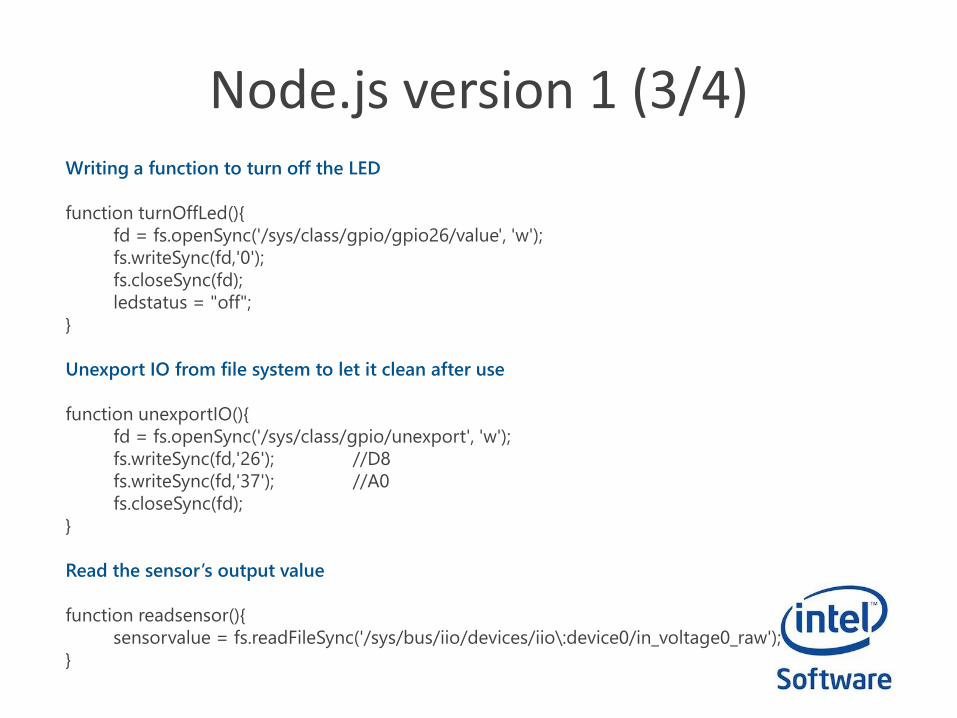
Node.js version 1 (3/4)Writing a function to turn off the LED
function turnOffLed(){
fd = fs.openSync('/sys/class/gpio/gpio26/value', 'w');
fs.writeSync(fd,'0');
fs.closeSync(fd);
ledstatus = "off";
}
Unexport IO from file system to let it clean after use
function unexportIO(){
fd = fs.openSync('/sys/class/gpio/unexport', 'w');
fs.writeSync(fd,'26'); //D8
fs.writeSync(fd,'37'); //A0
fs.closeSync(fd);
}
Read the sensor’s output value
function readsensor(){
sensorvalue = fs.readFileSync('/sys/bus/iio/devices/iio\:device0/in_voltage0_raw');
}

Node.js version 1 (4/4)Don’t forget to implement the demo itself…
function ledsensor()
{
exportIO();
for(var i=0 ; i < 1000 ; i++){
readsensor();
console.log('A0:'+sensorvalue.toString());
if(sensorvalue > 2000)
turnOnLed();
else
turnOffLed();
}
unexportIO();
}
Run the function
ledsensor();
GPIO must not be exported before doing exportIO() and vice-versa!

Node.js version 2 (1/3)Install galileo-io
Galileo-io is node.js module which simplify IO access from
Node.JS. With Galileo-io, you don’t need to manipulate directly the
file system (export and unexport stuff).
Install galileo-io with this command on your board:
# npm install galileo-io
Issue: Oops SSL certificate is not valid yet…
If you have an issue with certificates, it’s because your system’s
date is not set up properly. Run:
# date –s “01 APR 2014 12:00:00”

Node.js version 2 (2/3)We import galileo-io
var Galileo = require("galileo-io");
var board = new Galileo();
var sensorvalue = "0";
var ledstatus = "off";
A simple call to digitalWrite allows you to control the LED
function turnOnLed(){
board.digitalWrite(8, 1);
ledstatus = "on";
}
function turnOffLed(){
board.digitalWrite(8, 0);
ledstatus = "off";
}

Node.js version 2 (3/3)A function to activate a listener on analogRead.
NB: The callback function is called each time the value on A0 changes.
function readsensor(){
board.analogRead("A0",function(value){
sensorvalue = value.toString();
});
console.log('A0:'+sensorvalue.toString());
}
We start the demo when the board is ready
board.on("ready", function() {
console.log("Board is ready");
//Setting direction up is also easier with galileo-io
this.pinMode(8, this.MODES.OUTPUT);
ledsensor();
});

C version
C source code (don’t forget header file and optionnaly, the Arduino Serial logger)
#define sensorPin 0#define ledPin 8int sensorvalue = 0;
void setup(){pinInit();pinMode(ledPin, OUTPUT);
}
void loop(){for(;;){
sensorvalue = analogRead(sensorPin);printf("Value: %d\n",sensorvalue);
if(sensorvalue > 600)digitalWrite(ledPin,HIGH);
elsedigitalWrite(ledPin,LOW);
}}
int main( int argc, char ** argv ){
interrupt_init();init(argc, argv);setup();loop();
}

How to use the Arduino C library
Method
- Make a copy of the project
- Create your own myfilename.c in ‘src’ folder (copy ledsensor.c)
- Edit Makefile and specify myfilename on the second line. Here it was ‘ledsensor’.
- If it has not been done before, compile the lib with
# make
- Run with
# ./bin/myfilename
Our advice
- Instead of recompiling the library, generate your binary only, with:
# make myfilename

Web LED controller demo
Thanks to Node.JS, controlling Galileo from a web interface is easy!
Controlling servo motors
USB ports on Galileo are useful.
Let’s control servo motor!
Implement your own projects
Want a remote for Galileo? Do it under Android!
Another idea? Let’s make it!
Next steps


License Creative Commons – By 3.0
You are free:• to Share — to copy, distribute and transmit the work • to Remix — to adapt the work • to make commercial use of the work Under the following conditions:• Attribution — You must attribute the work in the manner specified by the author or licensor (but
not in any way that suggests that they endorse you or your use of the work).With the understanding that: • Waiver — Any of the above conditions can be waived if you get permission from the copyright
holder. • Public Domain — Where the work or any of its elements is in the public domain under applicable
law, that status is in no way affected by the license. • Other Rights — In no way are any of the following rights affected by the license:
– Your fair dealing or fair use rights, or other applicable copyright exceptions and limitations; – The author's moral rights; – Rights other persons may have either in the work itself or in how the work is used, such as publicity or
privacy rights.
• Notice — For any reuse or distribution, you must make clear to others the license terms of this work. The best way to do this is with a link to this web page.
http://creativecommons.org/licenses/by/3.0/