integrity software systems, inc. mini storage personal accountant
TRANSCRIPT

INTEGRITY SOFTWARE SYSTEMS, INC. Mini Storage Personal Accountant
User Manual
Integrity Software Systems, Inc. 4020 Copper View, Suite 111
Traverse City, MI 49684 Phone 800.They.Know • Fax 231.941.9544
www.integritysoftware.com


Table of Contents
Introduction i
C H A P T E R 1 - S E T U P Overview 1 System Requirements 2 Installation 3 Facility Configuration 4
C H A P T E R 2 - O P E R A T I O N S Main Window 9 Unit Inquiry 10 Unit Update 11 Comments 12 Rent Unit 13 Lease 14 Vacate Unit 15 Account Ledger 16 Account Inquiry 17 Account Ledger 18 Transfer 19 Posting 20 Invoices 23 Late Charges 24 Transactions 25 Activity 26
C H A P T E R 3 – M A I N T E N A N C E Unit Type Maintenance 27 Add/Delete Units 28 Configuration 29 Location Information 29 Billing Information 29 Directory Locations 30 Registration Information 31 Program Options 32 Gate Systems 34 Unlock System 35 Fonts 36 Edit Text Files 37 Lease Wording 37 Late Notice Wording 38 Purge History 39 Rebuild Database 41
C H A P T E R 4 – R E P O R T S Transaction Report 43 Transaction Analysis 45 Trial Balance 47 Vacancy Report 48 Sales Report 49 Summary Report 50 Tenant Query 51
C H A P T E R 5 – S A M P L E R E P O R T S Account Ledger 54 Invoice 55 Late Notice 56 Lease Agreement 57 Receipt 58 Deposit Ticket 59 Transaction Report 60 Transaction Analysis 61 Trial Balance 62 Vacancy Report 63 Sales Report 64 Unit Summary Report 65 Tenant Summary Report 66
C H A P T E R 6 – A D V A N C E D O P E R A T I O N S Microsoft Word Interface 67 Mail Merge 71 Digital Images 75 Gate System Interfaces 76 PTI Falcon 77 DigiGate


Intro
iI N T R O D U C T I O N
© Copyright This program is copyright © 1986-1998 by Integrity Software Systems. All rights reserved. Licensed users are granted a perpetual, non-exclusive, non-transferable license to use the system for their own internal use. No part of this system or its documentation may be copied or distributed, transmitted, transcribed, stored in a retrieval system, or translated into any human or computer language, in any form or by any means, electronic, mechanical, magnetic, manual, or otherwise, or disclosed to third parties without the express written permission of Integrity Software Systems, 4020 Copper View, Suite 111., Traverse City, Michigan 49684
Trademarks Mini-Storage Personal Accountant is a trademark of Integrity Software Systems. Microsoft Windows 95/98/NT/2000/ME/XP/Vista and Microsoft Word are trademarks of Microsoft Corporation. Pentium is a trademark of Intel Corporation.
Disclaimer Integrity Software Systems makes no warranties, express or implied, including, but not limited to, any implied warranty of fitness for a particular purpose or merchantability. In no event shall Integrity Software Systems be liable for loss of profits, indirect, special or consequential damages. Further, Integrity Software Systems reserves the right to revise this publication or system and to make changes from time to time in the content hereof without obligation of Integrity Software Systems to notify any person or organization of such revision or changes.
i


Chapter
1S E T U P
Overview
his system has been designed by experienced data processing professionals and certified public accountants who manage a large mini-storage warehouse. It is designed to run on PC based microcomputer running Windows 98 or later and greatly simplifies many of the day-to-day operational tasks. Although the system is simple to operate, it maintains very tight financial control over the
operations of mini-storage warehouses that are operated by non-owner management. Some of the features of the system include:
T Unit inquiry capability by tenant name, unit number, unit type, as well as vacancies or delinquencies allow for quick
access to facility and/or account information.
Rent proration is automatic when renting a unit. A complete lease agreement can be automatically printed. Each unit can be flagged for automatic invoice generation on a monthly, quarterly, or annual basis.
Rent proration is also automatic when vacating a unit. A statement summarizing past payment history and final balance due or refund due is printed at vacancy.
Tenants can be transferred from one unit to another with all of their payment history intact. No need to delete and reenter all the data.
Daily transaction posting includes debit memos, credit memos, cash on account, and miscellaneous sales with balancing procedures to insure the correct bank deposit. Bank deposit slips can be automatically printed.
Invoicing is run monthly and automatically updates tenants accounts and optionally prints an invoice.
Up to three late charge processing cycles will automatically charge the tenants account a late charge fee based on a percentage or fixed amount. A late notice letter can be automatically produced for accounts with a late charge.
Ability to store and display JPG pictures from many digital cameras for identifying tenants or tenant property.
An interface to many gate control systems provides access security for tenants with delinquent accounts.
Tenant information may also be automatically merged with Microsoft Word templates for customized letter or document printing.
Many reports can be run upon request and include:
Activity Summary showing all new rentals and terminations. Vacancy Report by unit number or unit type. Transaction Report showing all transactions by day. Transaction Analysis showing all transactions by type. Trial Balance showing all balances outstanding. Account Analysis showing all transactions by unit.
- 1 -

S E T U P
System Requirements
he system is a true Windows 32 bit application which means that your computer must have Windows 98, 2000, ME, NT, XP, or Vista (32 bit Not 64-bit) installed. In addition, you must have the following equipment:
T Adequate hard disk space to store historical transactions. This amount depends on the number
of units in the facility and the amount of history you will be retaining.
Super VGA monitor capable of 800 X 600 resolution in 256 colors. This resolution is recommended when storing and displaying JPG graphic images.
An inkjet or laser printer.
The system may or may not operate properly on all equipment. Every effort has been made to insure that the system will operate on every PC compatible computer, however we cannot guarantee that the system will operate on all systems.
- 2 -

S E T U P
Installation
nsert the MSPA CD into the CD-ROM drive. (If the CD does not start automatically, double-click SETUP.EXE on the CD) or on the Start Menu choose Run, enter D:\Setup.exe and click OK. If your CD Rom is a drive letter other than D replace D with your CD Rom drive letter. I
The installation program will guide you through the installation process. It is recommended that you accept the default installation options. The Installation Screen should look as follows:
- 3 -

S E T U P
Facilf you are not familiar with the software, it is recommended that you become familiar with the basic features by using the 30 unit demo facility which is initially installed. Once you have become familiar with the operation of the system, you can then run the Setup Wizard and configure your own facility. To access the Setup Wizard, select the
ity Configuration
I Utilities option on the Main Window.
The Setup Wizard will guide you through the steps required to remove the demo data and set up your own facility. The first step is to initialize the files and remove the demo data. Click Next to continue the setup.
When you initialize the files, you must enter a startup date. This date is the effective date for entering current tenant balances. Remember, it assumes that you have already charged that months rent for balances you will be entering.
- 4 -

S E T U P
After initializing the files, the next step is to Setup the Unit Type information. This information includes unit size, door size, monthly rent, annual rent, etc. Click on NEW and enter Unit information. Type codes should be assigned for each size and/or priced unit or parking space in your facility. This will allow you to generate rental statistics, change prices on all units of a specific type, and identify appropriate vacant unit types.
- 5 -

S E T U P
The next step is to add the UNIT NUMBERS in your facility. This can be done by a range of numbers if all units within the range are of the same Unit Type. Information regarding unit size, description, and rates are
automatically updated.
On the same screen, the beginning balances for all rented units are also entered. First you must check the rented box, if it is not checked all information is cleared when moving to the next row. Enter the Tenant Name, Entry Date, Deposit Amount, and Balance for each unit using the scroll bar on the right, your arrow keys, or mouse pointer to move to the next row. The Balance is entered as a positive number for tenants who owe rent and as a negative number for tenants that are prepaid.
- 6 -

S E T U P
After all balances are correct, simply click the Finish button. Please note that you cannot return to this option once you have finished the Setup Wizard. You must either restart the entire setup process or use the Rental and Vacate features and/or use either Debit Memos or Credit Memos to adjust tenant balances
You are now ready to use the system. All other tenant information is entered in the Unit Details screen.
Before using the system you should go into Configuration located on the Utilites Menu and choose the Program Options tab and change the settings to reflect your business procedures. For instance this is where you define Deposits, set up Late Notices, Termination charges, set Invoice Defaults (to Print or not, Print xMonths Detail, or Postcard size Invoices).
The QuickBooks tab is also located in Configuration if you plan on importing to QuickBooks. Tax options are located here as well.
This is where you will go to Backup and Restore data.
There is a lot of information located in this section so please be sure to access this area and understand how it will impact your program.
If you have any questions do not hesitate to call.
- 7 -

S E T U P
- 8 -

Chapter
2O P E R A T I O N S
Main Menu nce the system is started the Main Menu screen will be displayed. Most of the daily functions can be activated from the buttons on the Main Menu. Other functions can be activated from the drop down menus by either clicking on the item or by using the shortcut key. The shortcut key is always the underlined letter in the title. All the buttons in the system also have shortcut keys. To use the
shortcut, simply press the ALT key along with the shortcut key. The Main Menu looks as follows:
O
The calendar on the Main Menu controls the default date for the rest of the system. Simply click on the proper day. The system will only allow the selection of a day within the current month. In order to advance to the next month, the Month End option must be run. This will automatically advance the date to the next month. Once you run invoices for the month you are locked out of the current month and cannot return to make any changes.
- 9 -

O P E R A T I O N S
Unit Lookup
he Unit Lookup is used as a main access to the units. From this screen you can identify rented units, vacant units, or past due units. The table can be sorted by any column either ascending or descending simply by selecting the appropriate column and using the right mouse button, double right click the column. You can select a unit simply by clicking on the appropriate line in the table. Option buttons
in the lower right corner of the window allow you to select the different functions based upon your Selections in the lower left corner. The Unit Inquiry looks as follows:
T
Select the Unit Details button to edit tenant and unit information. Select the Rent button to rent a vacant unit. Select the Vacate button to vacate a rented unit. Select Acct History to view the Account Inquiry for the rented unit. Select Transfer to move a tenant from one unit to another. Select Posting to enter a transaction for selected tenant. Select Photo to view the photo image stored for the tenant.1 Select Letter to merge the tenant information with a Microsoft Word document. Select Gate to load gate information. Select Exit to exit Unit Inquiry.
1Photos should be stored as JPG files in the proper directory (see Configuration). The photo for unit #4 should be 4.jpg etc. If using Building letters it would be 4-b.jpg.
- 10 -

O P E R A T I O N S
Unit Details
his screen is used to make changes to the unit demographic information. Changes include unit type as well as tenant information. Several fields on the UNIT Details screen are for display only and cannot be changed. This maintains the accounting control of the system. The status of a unit cannot be changed on this screen for the same reason. The screen looks as follows:
Options exist for the following:
Rent – Rent vacant unit
Vacate – Vacate rented unit
Transfer – Transfer to new unit
Comments – Tenant comments
History – Account Inquiry
Letter – Word interface
Gate – Load gate
T
- 11 -

O P E R A T I O N S
Commhis screen is available for entering any information you might need regarding the tenant. This information is transferred to new units when the tenant moves to a new unit. This is different than the Unit Remarks field, which is a remark regarding the unit itself and does not transfer when a tenant transfers to a new unit
ents
T
- 12 -

O P E R A T I O N S
Rent Uhis screen is used to rent a vacant unit. After entering all pertinent information, options exist for printing the Lease, printing a Receipt, printing a Letter, or loading the Gate. These options should be selected before pressing the OK button and finishing the rental. The Sort Name must be filled out in order for this information to appear on reports.
nit
T
Options exist for the following:
Lease – Print Lease Receipt – Print Receipt Letter – Word interface Gate – Load gate
- 13 -

O P E R A T I O N S
Lease
his screen displays the merged information for the Lease. The printer and number of copies can be selected before printing. The Lease can also be zoomed into for review. T
The wording on the Lease can be modified from the Edit Text Files option under the Utilities Menu in the Main Window. It is also possible to created a completely custom Lease using Microsoft Word and using the Letter option.
See the Reports Chapter for a sample of the Lease.
- 14 -
O P E R A T I O N S
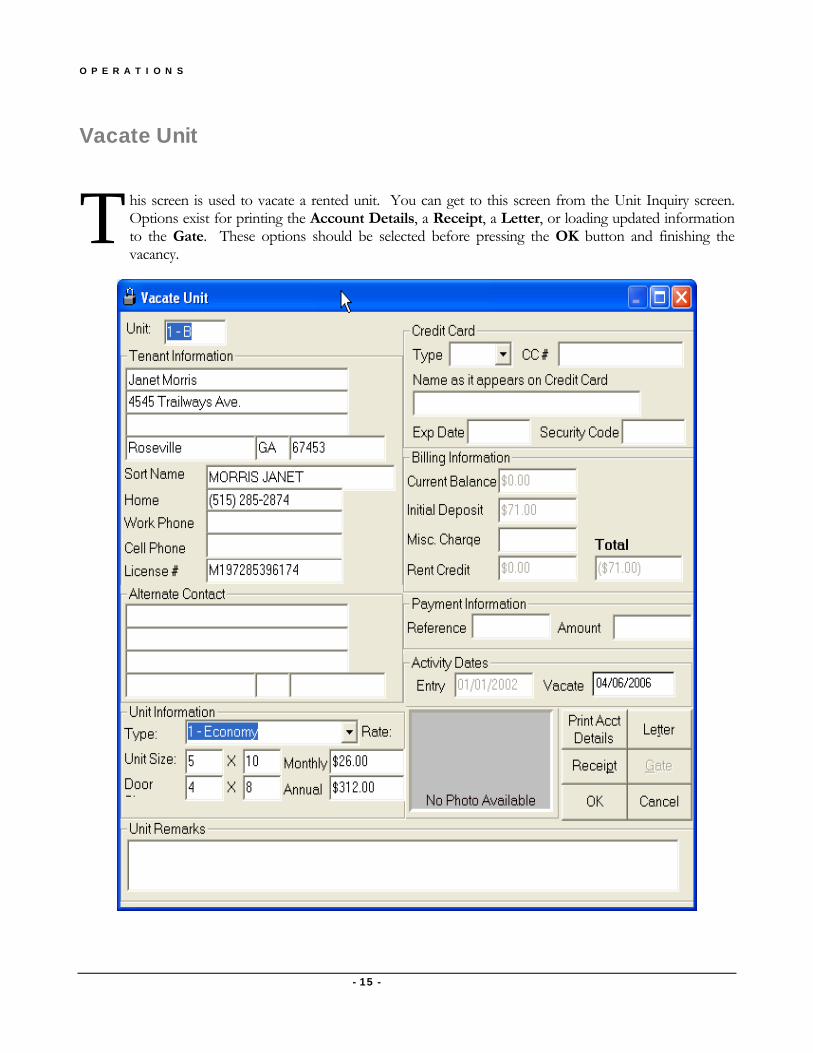
Vacate Unit
his screen is used to vacate a rented unit. You can get to this screen from the Unit Inquiry screen. Options exist for printing the Account Details, a Receipt, a Letter, or loading updated information to the Gate. These options should be selected before pressing the OK button and finishing the vacancy.
T
- 15 -

O P E R A T I O N S
- 16 -

O P E R A T I O N S
Account Ledger
he Print button on the Vacate screen will display the merged information for the Account Ledger. The printer and number of copies can be selected before printing. The Account Ledger can also be zoomed into for review by double clicking on the report or using the zoom menu. T
See the Reports Chapter for a sample of the Account Ledger.
- 17 -

O P E R A T I O N S
Account Inquiry
o view the detail transactions for a rented unit you may choose the Unit Lookup button from the Main Menu then select the unit and choose the Acct History button. Options are available for the Unit Details where you may update Unit information or to print the Account Ledger.
T
See the Reports Chapter for a sample of the Account Ledger.
- 18 -

O P E R A T I O N S
Transfer
his screen is used to move a tenant from one unit to any other vacant unit. During the transfer, all transaction history and comments are also transferred to the new unit. From the Unit Inquiry menu, select the unit and click the Transfer button. Next select a vacant unit from the table of vacant units in the bottom portion of the screen by double clicking with the left mouse button. The "To Unit" box
in the upper right hand corner of the screen will identify the unit that has been selected. Enter the amount of the deposit that should be held for the new unit. Adjustments will be automatically made to the tenants account for any prorated rent charges or credits. Click the Transfer button to finish the transaction.
T
Options exist for printing a Lease or Letter. These options should be selected before pressing the Transfer button and finishing the transfer.
- 19 -

O P E R A T I O N S
Posting
his screen is used to post all transaction to tenant accounts. Some transactions are automatically posted to tenant accounts. Invoices, Late Charges, and Deposits are automatic transactions and cannot be entered in the Posting screen. Transactions that can be posted are Cash on Account, Miscellaneous Sales, Debit Memos, Credit Memos, and Inactive Accounts. All transactions are
posted to a Batch. A Batch can be any number of transactions and represent a bank deposit. When a Batch is Released, the transactions can no longer be modified and a Deposit Ticket is generated to simplify the bank deposit and to insure financial integrity.
T
Current Transactions
New entry
Tenant’s last transactions
When the Posting screen is activated, the transactions that make up the current Batch are displayed in the table. The buttons on the bottom of the screen are the actions that can be taken. A new transaction is entered in the New entry area. After entering the unit number in the first box, tab over or with your mouse pointer click in the next entry area. The tenant name will be displayed and the last two transactions for that tenant will be displayed below. You may use the scroll bar to view previous transactions for this customer. The option buttons on the bottom of the window are explained below.
- 20 -

O P E R A T I O N S
Once completing the New entry area, press the Add button to add the transaction to the Batch Add
To identify the proper Unit number for the transaction, press the Lookup button to activate the Tenant Name Inquiry window.
Lookup
Once the proper unit has been identified, double click on the proper line in the table and then tab over.
To Change a transaction, simply double click in the Current Transaction Area to modify. Press the Change button once the transaction has been modified. System generated transactions cannot be modified. You must issue a Debit or Credit memo.
Change
To Delete a transaction, simply double click in the Current Transaction area to modify. Press the Delete button once the transaction has been selected. System generated transactions cannot be deleted. You must issue a Debit or Credit memo.
Delete
The Deposit button is used to print a Preliminary Deposit Ticket. This can be used to balance the batch with the cash before releasing the batch and printing the final Deposit Ticket. Deposit
The Release button is used to finish the Batch and print the Deposit Ticket. This should be done when ready to deposit the money in your account. Once released, transactions can no longer be modified. See the Reports Chapter for a sample of the Deposit Ticket.
Release
- 21 -

O P E R A T I O N S
The Receipt button is used to print a Receipt for the transaction. The Receipt should be printed before the transaction is Added. See the Reports Chapter for a sample of the Receipt.
The Cancel Button is used to cancel the transaction. It will clear the transaction you are currently working on.
Receipt
Cancel
The Exit Button is used to Exit the Posting Window.
Valid transactions types are as follows:
DEBITS CREDITS IN INVOICE CA CASH ON ACCOUNT DM DEBIT MEMO CM CREDIT MEMO
Exit
MS MISC. SALE IA INACTIVE ACCOUNTS LC LATE CHARGE ID INITIAL DEPOSIT
Shaded transactions are system generated and may not be entered manually.
- 22 -

O P E R A T I O N S
Month his section is used to create the next months invoice transactions and hardcopy invoices and Run Credit Card charges that you process manually. There are three options available for invoicing accounts. The first option is Print Invoices Only. This option will create the hardcopy invoices without charging the accounts. This allows for creation of invoices prior to the actual month end
processing or reprinting invoices for a range of units. The second option is Charge Accounts Only. This option will charge the accounts and advance the date to the next month but will not create hardcopy invoices. This option can be used if invoices have been printed earlier. The third option is Print and Charge Accounts. This option is a combination of the first two options.
End Processing
T For options that print Invoices, the Invoices are printed only for those units that have the Print Invoices option enabled. The frequency of printing invoices is controlled by the Invoice Frequency option. The frequency is Monthly, Quarterly, or Yearly. Regardless of this setting, the charges to the account are made each month. If a Print option was selected, the Invoices can be printed at the end of the process. The number of copies and the range of pages can be selected and printed or reprinted. One of three different Invoice formats can be selected. See the Reports chapter for samples of the formats and make the selection in the Configuration section. It is important to have a backup of the data files prior to running the Invoice process. Do not interrupt the process once it has been started.
Print and Run Credit Card Charges will enter payments into the Mini Storage program NOT actually run them, if you have selected this option in either the Rent screen or Unit Details screen. It will also print a list of those that you have selected with payment information that you will need to process these transactions manually.
- 23 -

O P E R A T I O N S
Late Charges
his section is used to create the Late Charge transaction and/or print the Late Notice. Up to three Late Charge processes can be run. Late Charge transactions are created for all rented units that have a Balance Due greater than the Minimum field. Those tenants whose balance is greater than the Minimum will also have a Late Notice printed if the Print Letter option is selected. Defaults for the
Print Letter option, the Percent or Amount, and Minimum can be set in the Configuration section. If the Print Letter option was selected, the Late Notice can be printed at the end of the process. The number of copies and the range of pages can be selected and printed or reprinted.
T It is wise to have a backup of the data files prior to running the late charge process. Do not interrupt the process once it has been started.
The Late Notice has two parts. The first part is the standard name and address and balance data and the second part is the actual letter text. Each of the three late notice letters can be customized by using the Edit Text Files option under Utilities.
- 24 -

O P E R A T I O N S
Historyhis screen is used to review historical transactions by Batch.
T
To display the transactions within the Batch, simply double click on the Batch row.
- 25 -

O P E R A T I O N S
A ctivityhis section is used to display the details on units that have been rented or vacated. It provides a chronological list of activity that should be reviewed periodically to maintain proper financial controls.
T
To review the detail on the rental or the vacancies, simply double click the Activity row.
The Payments you made to customers and Payments you received from customers after the unit has been vacated can be updated to maintain accurate records.
- 26 -

O P E R A T I O N S
- 27 -

Chapter
3M A I N T E N A N C E
Unit Type Maintenance his section is used to add, change or delete Unit Types. It is also used to change standard rates for existing Unit Types. After standard rates are changed, options exist for updating all or vacant units with the new standard rates. When a unit is vacated, it will always update with the standard rates from this table. You should never delete a Unit Type without using the UNIT UPDATE to modify the
individual unit’s type information first. Units that do not have a valid Unit Type in this table may not appear on some reports. This option can be found under the UNIT drop-down box on the MAIN WINDOW. To update a Unit Type, simply double click on the appropriate row in the table.
T
- 28 -

M A I N T E N A N C E
Add/Delete Units
his section is used to add or delete units from the system. Units must be vacant before they can be deleted. To add units, simply enter the range of units to be added in the Beginning Unit and Ending Unit fields, select the appropriate Unit Type in the drop-down box and select the Add or Delete button. Then simply press the Add or Delete button. This option can be found under the UNIT drop-down
box on the MAIN WINDOW.
T
- 29 -

M A I N T E N A N C E
Confighis section is used to customize the many options available within the system. These options include the format for some of the printouts as well as defaults for deposits, defaults for proration calculations as well as other features. This section can be found under the UTILITIES drop-down box on the MAIN WINDOW.
uration
T Facility Information This information is used to create the Lease. This address should be the physical facility address, not necessarily the mailing address. The Facility Name cannot be changed. If your facility name changes, please contact Integrity Software Systems for an update.
Billing Information This information is used in the header of the reports that would be mailed to customers. It should be the actual mailing address of the facility. This address may be different than the actual location address of the facility.
- 30 -

M A I N T E N A N C E
Directory Locations This information is used to identify where digital images and Microsoft Word templates are stored. To change directories, simply select the appropriate drive letter from the drop-down box. Then navigate using the directory box by double clicking on the appropriate directory. You can also type the directory location in the first line of the directory box. Refer to the Advanced Features section for information regarding storing digital images and using the Microsoft Word integration.
A digital image can be stored and displayed for each unit.
Digital images would normally come from a digital camera used by the facility to photograph the tenant or the unit contents for security or liability purposes. The digital images would be stored in the directory identified under Photo Directory and should be stored in a JPG format. To store the image for unit number 1 for instance, the file should be saved in the directory as 1.JPG or 1-A.JPG. The image for unit 2 would be stored as 2.JPG, etc. Please refer to the documentation regarding the scanner or camera software for information regarding how to store images as JPG format files.
- 31 -

M A I N T E N A N C E
Registration Information This information is used to register your system with Integrity Software Systems. If you have been using the demo version of the software, you must register the system. Once registering the system and paying the license fee, you will be issued a registration password, which will be used to unlock the system. Once filling in all the appropriate information, print the registration form and fax to Integrity Software Systems at 231-941-9544. You will be contacted regarding your payment options and arrangements will be made to unlock your system.
- 32 -

M A I N T E N A N C E
Program Options This section is used to set the various options within the system. Each option affects the operation of the system, and the options used should be chosen carefully.
Document Header: This option is used to determine where the Return Address will print on the documents which would potentially be mailed to the customer. It can be printed in the center of the document header or left justified for use with double windowed envelopes.
Invoice Format: These options are used to determine the format of the Invoice. With Print Current selected, only the current billing transaction will be printed on the invoice. The Invoice format will be the full-page format. With the Print Detail option selected, the Months field will determine the number of months detail that will print on the invoice. The Invoice format will be the full-page format. With the Postcard option selected, only the current billing transaction will be printed and the format will be the 1/3 page format.
- 33 -

M A I N T E N A N C E
Invoice Defaults: These options are used to set several Invoice option defaults. The Print Invoices checkbox is used to set the default option for the new Rentals. When checked, the option for printing invoices will be checked under the Rental option. When unchecked, the option for printing invoices will be unchecked under the Rental option. This can always be overridden during the Rental process however. The Letterhead checkbox is used to disable printing of the header on all invoices. This option assumes that you are printing the invoices on preprinted letterhead and do not want the return address to print at all. The Fee field is used to determine the default fee amount under the Rental option. This can always be overridden during the Rental process however.
Deposit Options: This option is used to determine the default deposit under the Rental option. With the Full Month option selected, the default deposit for the Rental process will be one months rent. With the Half Month option selected, the default deposit for the Rental process will be one half months rent. With the Fixed Amount option selected, the default deposit for the Rental process will be the Amount fields value. The deposit amount can always be overridden during the Rental process however.
Termination Options: This option is used to determine the proration used during the Vacate process. With the Cutoff Day set to zero, the Vacate process will use a daily proration. With a value selected in the Cutoff Day, the Vacate process will use the Before Cutoff percentage to give a refund to vacates that happen before the Cutoff Day and the After Cutoff percentage for vacates that happen on or after the Cutoff Day. You need to decide how much if any you will refund if they vacate early.
Late Notices: These options are used to control the number and type of Late Charge processing. Late Charge processing is not automatic. You must run the Late Charge process from the Main Window. Late charges will then be based on the tenant balances at that time. Up to Late Charge processes that can be performed each month. Each process can be customized as needed. With the Print Letter option selected, the Late Notice will be printed for units whose balance is greater than or equal to the value in the Minimum field. The Day field is used to notify when Late Charge processing should be run. A message will appear on the Main Window when the day reaches the value in the Day field. The Percent field is used for charging a percent of the balance for the Late Charge fee. The Amount field is used for charging a fixed amount for the Late Charge fee. The Amount field is the value of the fixed amount Late Charge fee. If both the Amount and the Percent fields are both entered, the system will charge the larger of the two amounts. The Minimum field is the minimum value the tenant balance must be before charging the Late Charge fee.
- 34 -

M A I N T E N A N C E
Gate System These options are used to configure the links to the gate systems supported by the system. The gate system interface will create a data file to pass the information to the gate system software. Demographic information as well as lockout status information is passes to the gate system. The defaults should be set as required by the gate system software. To activate a gate system, simply select the appropriate option and identify the proper gate system. Then identify the file name and directory where the interface file should be created. To change directories, simply select the appropriate drive letter from the drop-down box. Then navigate using the directory box by double clicking on the appropriate directory. You can also type the directory location in the first line of the directory box. Refer to the Advanced Features section for information regarding the gate system interfaces.
- 35 -

M A I N T E N A N C E
Unlock System This option is used to unlock the system. This option should only be used under direction of someone from Integrity Software Systems. Attempting to modify this information may result in your system no longer functioning! Please call 231-941-2322 for information about unlocking your system.
- 36 -

M A I N T E N A N C E
Fonts This option is used to change the fonts in the reports. Care should be taken when modifying these fonts. Information may not print properly when using some fonts. The default font is Times New Roman and should be available on most system. To change the font for the different sections of the reports, simply select the font from the list available on your system in each drop-down box.
- 37 -

M A I N T E N A N C E
Confighis section is used to customize the wording of the Lease and Late Notice. The wording can be modified any time. This section can be found under the UTILITIES drop-down box on the MAIN WINDOW.
uration
T Lease Wording This wording is printed between the header and footer of the standard Lease. The information is presented in a text box and can be edited similar to a word processor. Standard text inserting and deleting as well as pagination is provided. Once changes have been made, simply press OK to save the data.
- 38 -

M A I N T E N A N C E
Late Notice Wording This wording is printed below the header Late Notice. First select the appropriate Notice by clicking on the Notice button. The information is presented in a text box and can be edited similar to a word processor. Standard text inserting and deleting as well as pagination is provided. Once changes have been made, simply press OK to save the data.
- 39 -

M A I N T E N A N C E
Purgehe system will continue to collect transaction detail for all accounts, both active and terminated until this option is run. The system's capability to store transaction is limited only by your disk capacity. Even with this capability, it is unpractical and unnecessary to store this volume of information. As more transactions are entered, the time required to backup the system greatly increases and overall
performance of the system will deteriorate. For instance, continually having to review over two years worth of history on an Account Ledger becomes bothersome.
History
T It is recommended that once per year the old detail be purged from the system. This does not mean that the balance for existing tenants is lost, only that the individual transactions will no longer be shown.
Before purging old detail, you may wish to run the Print History option prior to the purge for your permanent records. This option will print an Account Ledger for those units which will have historical transactions purged for the Batches that have been selected.
The Print History option can be run prior to actually purging the transaction by selecting the same Batch range that will be purged. To select the range of Batches to be printed, simply select the Beginning Batch and Ending Batch from the drop-down boxes. Then select the Print History option and press the Begin button.
- 40 -

M A I N T E N A N C E
After the report is processed, the report is previewed and ready to send to the printer. . The printer and number of copies can be selected before printing. The Account Ledger can also be zoomed into for review either by selecting the zoom percentage from the Zoom drop-down box, or by double clicking on the Preview area. Also each page of a multiple page report can be previewed by selecting the slide bar on the right of reports that are more than one page. Select the Starting Page and Ending Page before clicking the Print button.
It is not necessary to purge all of the detail, only that which is perhaps one or two years old. To select the range of Batches to be printed or purged, simply select the Beginning Batch and Ending Batch from the drop-down boxes. Then select the Purge History and press the Begin button
After running the Purge History option, the Rebuild Database option should also be run. This will compress the database and reduce the size of the files that need to be backed up.
- 41 -

M A I N T E N A N C E
Rebuihis section should not be required except after running the Purge History option. BEFORE THIS OPTION IS RUN,
ld Database
BE SURE YOU HAVE A GOOD BACKUP AND AMPLE SPACE ON YOUR HARD DRIVE! This option requires as that as the computer have enough free disk space to make a copy of all data files (.DAT). This option will eliminate free space contained in the data files due
to the purging of transactions. If the Purge History has not been run, this option will completely re-index all data files but there will not be any noticeable decrease in space required for the data files. This option may also resolve some corrupt database situations.
T To run this option from the Utilities drop down menu, select Rebuild Database press the Begin button.
- 42 -

M A I N T E N A N C E
.
- 43 -

R E P O R T R E F E R E N C E
Reporhis section is used to run the reporting options within the system Many of the reports are created as a part of the other processes and are listed here for reference. Several of the reports can be run any time. Those reports are listed under the Reports drop-down box on the Main Window.
Chapter
4ts
T Transaction Report This report is used to print from history all transactions within a given range by Batch number.
- 44 -

R E P O R T R E F E R E N C E
Options for the report are
• Detail – Prints all transactions that make up the Batches selected. It also prints a summary by Batch of the Transaction Types within that Batch. It will also print a summary of the Transaction Types for all the Batches.
• Summary – Prints only the summary by Batch of the Transaction Types and the summary of the Transaction Types for all the Batches.
• Total – Prints only the summary of the Transaction Types for all the Batches.
To select the range of Batches to be printed, simply select the Beginning Batch and Ending Batch from the drop-down boxes. Then select the type of report desired and press the Begin button.
After the report is processed, the report is previewed and ready to send to the printer. . The printer and number of copies can be selected before printing. The Transaction Report can also be zoomed into for review either by selecting the zoom percentage from the Zoom drop-down box, or by double clicking on the Preview area. Also, selecting the slide bar on the right of the report can preview each page of a multiple page report. Select the Starting Page and Ending Page before clicking the Print button.
- 45 -

R E P O R T R E F E R E N C E
Transahis report is used to print from history all transactions within a given range by Transaction Type.
ction Analysis
T
The report can be printed for All Transaction Types, or individual Transaction Types by making the selection in the Transaction Type table. To select the range of Batches to be printed, simply select the Beginning Batch and Ending Batch from the drop-down boxes. Then select the type of report desired and press the Begin button.
- 46 -

R E P O R T R E F E R E N C E
After the report is processed, the report is previewed and ready to send to the printer. . The printer and number of copies can be selected before printing. The Transaction Report can also be zoomed into for review either by selecting the zoom percentage from the Zoom drop-down box, or by double clicking on the Preview area. Also each page of a multiple page report can be previewed by selecting the slide bar on the right of reports that are more than one page. Select the Starting Page and Ending Page before clicking the Print button.
- 47 -

R E P O R T R E F E R E N C E
Trial Bahis report will print a summary of the balance for the selected units. It is a very important report. It should be printed periodically as a hard copy record of the Account Balances. It would also be wise to keep a copy of this report at an off-site location. In case of major facility damage such as fire or flood, or in case of a major computer malfunction, this report can be used to rebuild your system
lance
T The report can be printed for All Unit Types or selected Unit Types by making the selections in the Unit Type table. To select the range of Units to be printed, simply select the Beginning Unit and Ending Unit from the drop-down boxes. Then press the Begin button.
After the report is processed, the report is previewed and ready to send to the printer. . The printer and number of copies can be selected before printing. The Trial Balance can also be zoomed into for review either by selecting the zoom percentage from the Zoom drop-down box, or by double clicking on the Preview area. Also each page of a multiple page report can be previewed by selecting the slide bar on the right of reports that are more than one page. Select the Starting Page and Ending Page before clicking the Print button.
- 48 -

R E P O R T R E F E R E N C E
Vacanchis report will print a list of the Vacant units. It can be used to conduct a facility review to verify accuracy and any repairs that may need to be performed prior to renting the units again.
Th
y Report
e report can be printed for All Unit Types or selected Unit Types by making the selections in the Unit Type table. To select the range of Units to be printed, simply select the Beginning Unit and Ending Unit from the drop-down boxes. Then press the Begin button. Also the sequence of the report can either be by Unit Number or Unit Type.
T After the report is processed, the report is previewed and ready to send to the printer. . The printer and number of copies can be selected before printing. The Vacancy Report can also be zoomed into for review either by selecting the zoom percentage from the Zoom drop-down box, or by double clicking on the Preview area. Also each page of a multiple page report can be previewed by selecting the slide bar on the right of reports that are more than one page. Select the Starting Page and Ending Page before clicking the Print button
- 49 -

R E P O R T R E F E R E N C E
Sales Rhis report is used to print from history all Sales transactions within a given range.
Options f
eport
T or the report are
• Detail – Prints all Sales transactions in the selected Batches. It also prints a summary by Reference of the Sales within the Batches.
• Summary – Prints only the summary of the Sales transactions for all the Batches.
To select the range of Batches to be printed, simply select the Beginning Batch and Ending Batch from the drop-down boxes. Also select the type of report desired, either Detail or Summary. Then select the type of report desired and press the Begin button.
After the report is processed, the report is previewed and ready to send to the printer. . The printer and number of copies can be selected before printing. The Sales Report can also be zoomed into for review either by selecting the zoom percentage from the Zoom drop-down box, or by double clicking on the Preview area. Also each page of a multiple page report can be previewed by selecting the slide bar on the right of reports that are more than one page. Select the Starting Page and Ending Page before clicking the Print button.
- 50 -

R E P O R T R E F E R E N C E
Summhis report will provide two different reports. One is the Unit Summary report that will summarize the unit configuration of the facility. It will summarize by Unit Type, the Vacant and Rented units. It will summarize the number of units, the square footage, and the monthly rent.
ary Report
The other report is the Tenant Summary that will summarize the Tenants by Tenant Type. It will count the number of Tenants of each Tenant Type and will total the number of Tenants and Monthly Rent for each of the Tenant Types.
T The report can be printed for a range of Units. To select the range of Units to be printed, simply select the Beginning Unit and Ending Unit from the drop-down boxes. Then press the Begin button. Then select the type of report desired, either Unit Summary or Tenant Summary, and press the Begin button.
After the report is processed, the report is previewed and ready to send to the printer. . The printer and number of copies can be selected before printing. The Summary Reports can also be zoomed into for review either by selecting the zoom percentage from the Zoom drop-down box, or by double clicking on the Preview area. Also each page of a multiple page report can be previewed by selecting the slide bar on the right of reports that are more than one page. Select the Starting Page and Ending Page before clicking the Print button.
- 51 -

R E P O R T R E F E R E N C E
Tenanthis option is used to search the database with very specific criteria to identify selected Tenants. Two standard reports can be produced by Unit or Name sequence. A Comma Delimited File can also be created. This file format can be used by other programs such as Microsoft Word. With this file and Microsoft Word, custom letters or labels can be created for all tenants that meet the selection criteria.
See the Advanced Features section for more information regarding this process.
Query
T The Name & Address report includes tenant demographic information while the Account Balance report includes tenant balance information. For instance, an Account Balance report can be generated for all tenants with a balance greater than two months rent. Or a Name & Address report can be generated for all tenants in a 5 X 10 unit. Criteria on Unit Numbers, Unit Status, Unit Type, Tenant Type, and Account Balance can be combined in a complex and/or logic to generate either of the reports.
After the report is processed, the report is previewed and ready to send to the printer. . The printer and number of copies can be selected before printing. The Summary Reports can also be zoomed into for review either by selecting the zoom percentage from the Zoom drop-down box, or by double clicking on the Preview area. Each page of a multiple page report can be previewed by selecting the slide bar on the right of reports that are more than one page. Select the Starting Page and Ending Page before clicking the Print button.
- 52 -

R E P O R T R E F E R E N C E
- 53 -

S A M P L E R E P O R T S Chapter
5
Sample Reports
- 54 -

S A M P L E R E P O R T S
Account Ledger
- 55 -

S A M P L E R E P O R T S
Invoice
- 56 -

S A M P L E R E P O R T S
Late Notice
- 57 -

S A M P L E R E P O R T S
Lease Agreement
- 58 -

S A M P L E R E P O R T S
- 59 -

S A M P L E R E P O R T S
Receipt
- 60 -

S A M P L E R E P O R T S
Deposit Ticket
- 61 -

S A M P L E R E P O R T S
Transaction Report
- 62 -

S A M P L E R E P O R T S
Transaction Analysis
- 63 -

S A M P L E R E P O R T S
Trial Balance
- 64 -

S A M P L E R E P O R T S
Vacancy Report
- 65 -

S A M P L E R E P O R T S
Sales Report
- 66 -

S A M P L E R E P O R T S
Unit Summary Report
- 67 -

S A M P L E R E P O R T S
Tenant Summary Report
- 68 -

S A M P L E R E P O R T S
- 69 -

6
Advanhis section will explain how to use the advanced features of the system. Advanced features include the interface to Microsoft Word, storing and viewing the digital images, and the gate system interfaces These features are accessed from different areas of the system and are integrated with other parts of the system. For instance, wherever the Letters button is displayed, the Word interface can be accessed.
Likewise, wherever the Gate button is displayed, the gate system interface can be accessed. The digital image retrieval can be accessed wherever the Photo button is displayed or the photo itself appears. Storing of the digital image happens outside of the system. The image could originate from a scanner, a digital camera, or even a Photo CD.
ced Options
T
Microsoft Word Interface This option is perhaps the most powerful features of the system. It allows for integration of most tenant data with a Word template. This could be used to generate special Late Notice or eviction notices, a completely custom Lease, or any other document that could be created with Microsoft Word. Some knowledge of Microsoft Word is required to successfully integrate the system with Word.
The integration is provided via the Bookmark feature of Microsoft Word. In general, the Word bookmarks are replaced with the data from the tenants record. Bookmarks are named in Word and the name of the bookmark is what determines which field is inserted in the document. For instance, a bookmark named Tenant Name would be replaced with the name of the tenant. Each bookmark must have a unique name, so if multiple instances of the tenant name are required, each bookmark must have a different name. To accommodate this, each bookmark must only contain the keyword that identifies the data field. Therefore, a bookmark named Tenant Name1 and First Tenant Name would both be replaced with the name of the tenant.
See the sample document UnitInfo.dot for a list of the available Bookmark Names. This file should be installed with the demo and should be available when using the Letters option. It is by default installed into the C:\Program Files\Persacct directory. It can be opened with Microsoft Word and printed or reviewed as a sample.
70

Before inserting the bookmarks, the option for Viewing bookmarks should be enabled. To view the bookmarks in the document, on the Tools menu, click Options, and then click the View tab. Select the Bookmarks check box. Bookmarks appear as a reverse brackets ( ][ ) on the screen.
71

Once the Template is created, the bookmarks are inserted into the Template via the Insert command.
Name the Bookmark using the appropriate keyword.
72

The original documents that are created in Word must be saved as a Word Template in order to be merged. Use the Save As option under the File menu and save the document as a Document Template in the Documents Directory. The Document Directory is set in the Directory Location section of the Configuration option.
After the document is saved, it will be available in the Letters option. To select the document, simply double click on the document name. Microsoft Word will be started and the tenant information will be merged in place of the bookmarks in the Template.
73

Microshis option is used for creating custom letters and labels using Microsoft Word or other software. The steps outlined here are specific to Microsoft Word, but the same functionality is provided by many other commercial packages. Once the Comma Delimited file is created using the Tenant Query, you can select the Mail Merge option under the Tools item in Microsoft Word.
oft Word Mail Merge
T
Once the Mail Merge tool is selected, create the Main Document from the Mail Merge Helper. Select the Form Letter or Mailing Label from the list of options.
74

Next select the Open Data Source option under Data Source.
From this option , browse to the directory which contains the Query.txt file created by the Tenant Query. The directory the data will be stored in can be changed under the Directory Locations tab of the Configuration utility. Be sure to select Text Files under Files of type: . This will allow you to view & select the Query.txt file.
75

After selecting the Query.txt file, it is time to setup the Main Document.. If you have chosen a Mailing Label document, a list of standard label formats will be available. Choose the proper format and press OK.
At this point, you are ready to Insert Merge Fields into the Sample Label. A list of Merge Fields will be displayed. Simply select the field you wish to place in the appropriate area of the Sample Label and press OK.
76

Press the Merge button and the data will be merged with the template and a new label document will be created.
Once the Merge is complete, the document template will be created which can be used in subsequent processes and the new document will be created that contains the tenant information. The process is similar for creating a Mail Merge Letter. The new label document should look similar to the following:
77

Digital his feature allows a digital image to be stored and displayed with each unit. It can be used to identify the tenant or contents of the unit. The images need to be stored in the Photo Directory. The Photo Directory is set in the Directory Location section of the Configuration option. The image files should be saved in a JPG format. The name of the file should be the same as the Unit Number it will
be associated with. For instance, the image for unit number 1 would be 1.JPG and the image for unit number 30 would be 30.JPG. If using the Building fields you would need to add the building letter with a dash (1-A.jpg) The method of saving the file will depend on the source of the data. For instance, most digital cameras allow files to be stored via software distributed with the camera. Scanners also have custom software which allow for files to be scanned and stored in different formats.
Images
T
Once the images are stored, they can be displayed via the Photo button in Unit Inquiry or by double clicking on the Photo thumbnail image in Unit Update and other windows. Clear image display requires high-resolution display modes in Windows.
78

Gatenterfaces are provided for the two major manufacturers of Gate Systems for the Mini-Storage industry. These two are the Preferred Technology PTI Falcon and the Doug West & Associates DigiGate 107.
Th
System Interface
e interface is provided via a data file that is extracted from the system and stored in a format which is compatible with the gate system software. It is the responsibility of the gate system software written by the gate manufacturer to actually load the information to the gate system. This data file is created for all units in the system via the Gate option of Utilities. Each gate system has different features so the information collected varies. See the gate system documentation for a description of each field.
I Once the appropriate Gate System is selected in the Gate System option of Configuration, the Gate button will be activated on several screens. From these screens the gate interface can be activated.
All information should be loaded from the system to the gate periodically. For instance, after processing Late Charges the entire system should be loaded to the gate. This will update the delinquency status of all units. Those unit with a balance greater than that allowed will be locked out. Likewise, after posting the daily receipts, the information should again be loaded. This will release any unit which no longer has a balance greater than the maximum allowed.
Specific unit information can also be loaded to the gate at the time of a new Rental or Vacancy. This will load the gate system with the access code of the new Rental or remove the access for a Vacated unit.
79

PTI Falach time the Gate Interface is activated, the interface file is deleted and new one is created. Once the Gate Interface is exited, the data should be loaded to the gate via the software provided by the gate manufacturer.
con
The Falcon interface has two options. The first tab allows a Manager Code to be entered. This code will allow access to the facility by the staff. The Maximum Balance field is the amount that the unit Balance must be greater than in order for the unit to be locked out. A Maximum Balance of zero assumes aMaximum Balance of one months rent. To modify the Manager Code or Maximum Balance simply change the field values and press Update. To load
E ALL units, simply press the Load button on the General
Info tab.
80

The Unit Info tab will update or load information for an individual unit. This option can be used to load a single unit after posting a payment, renting a new unit, or vacating an existing unit. Access Codes and other gate system specific information can be updated for each unit.
81