instrukcja obsługi user manual -...
TRANSCRIPT

Sander
Instrukcja obsługiUser manual
fotelik samochodowybaby car seat
Grupa wagowa 0+ półuniwersalny 0 - 9kg Suitable for Group 0+ / 0kg to 9kgGrupa wagowa I uniwersalny 9 - 18kg Suitable for Group I / 9kg to 15kgGrupa wagowa II półuniwersalny 15 - 25kg Suitable for Group II / 15kg to 25kgGrupa wagowa III półuniwersalny 25 - 36kg Suitable for Group III / 25kg to 36kg


PL InformacjaUrządzenie przytrzymujące dla dzieci należy do kategorii „uniwersalne” oraz „półuniwersalne”. Uzyskało homologację zgodnie z regulaminem nr 44, seria poprawek 04, do ogól-nego zastosowania w pojazdach i nadaje się do instalacji na większości miejsc siedzących w samochodzie.
Prawidłowa instalacja jest możliwa, jeśli producent pojazdu oświadczył w instrukcji obsługi pojazdu, że pojazd ten nada-je się do instalacji urządzenia przytrzymującego dla dzieci kategorii „uniwersalne dla grupy I” oraz „półuniwersalne” dla grupy 0+, II, III” dla tych grup wiekowych.
To urządzenie przytrzymujące dla dzieci zostało zaklasy-fikowane do kategorii „uniwersalne” i „półuniwersalne” w bardziej wymagających warunkach w odniesieniu do warun-ków stosujących się do wcześniejszych projektów, które nie są opatrzone tą informacją.
W przypadku wątpliwości należy skonsultować się z produ-centem lub sprzedawcą detalicznym urządzenia.
-

PLWprowadzenieDrogi Kliencie!
Dziękujemy za obdarzenie nas zaufaniem i wybranie fotelika samochodowego marki Lionelo.
Nasze foteliki wykonywane są z największą starannością, by zapewnić Twojemu dziecku komfortową podróż, a przede wszystkim, by zadbać o jego bezpieczeństwo. Dzięki wykorzy-staniu wysokiej jakości materiałów i nowoczesnych rozwiązań technologicznych zapewniamy użytkownikom produkt, który doskonale sprawdza się w codziennym użytkowaniu.
Przed pierwszym użyciem fotelika prosimy o uważne przeczytanie niniejszej instrukcji użytkowania. Niepra-widłowe używanie produktu może stanowić zagrożenie życia dziecka.
Jeśli masz jakiekolwiek uwagi lub pytania do zakupionego produktu, skontaktuj się z nami:
[email protected] Produkt jest dopuszczony do ECE R44/04 jako fotelik dla grup wiekowych 0 + I + II + III, od 0 do 36 kg. Fotelik samochodowy będzie maksymalnie chronić twoje dziecko tylko wtedy, gdy jest zamontowany zgodnie z instrukcją. Niestosowanie się do instrukcji może prowadzić do nieszczę-śliwego wypadku. Aby chronić swoje dziecko prawidłowo,

PLLO-Sander musi zawsze być używany i zainstalowany w sposób opisany w niniejszej instrukcji.
1. ZastosowanieNiniejszy fotelik przeznaczony jest dla kategorii (grup) wagowych 0-III, co oznacza, że mogą z niego korzystać dzieci o wadze od 0 do 36 kg (w wieku od urodzenia do 12 lat).0+ grupa wagowa: 0kg - 9kgI grupa wagowa: 9kg - 18kgII grupa wagowa: 15kg-25kgIII grupa wagowa: 22kg-36kgDzieci z 0+ I grupy wagowej korzystają z systemu dedyko-wanych pasów bezpieczeństwa (szelek) dołączonych do fotelika. Sam fotelik przymocowany jest do siedzenia pojaz-du za pomocą systemu ISOFIX wraz z górnym pasem TOP TETHER oraz 3-punktowego pasa samochodowego. W przypadku dzieci z grup wagowych II i III (15 - 36 kg) dedy-kowane pasy są odczepiane, a dziecko zabezpieczone jest 3-punktowym pasem samochodowym.
Uwaga: Proszę przeczytać tę instrukcję przed użyciem fotelika samochodowe-go. Instrukcję obsługi należy zachować na czas użyteczności produktu. Niepra-widłowy montaż może spowodować zagrożenie życia Twojego dziecka!
Jest to fotelik wyposażony w system ISOFIX, jest zatwierdzony przez ECE R44/04. Może być instalowany tylko w samochodach posiadających zaczepy ISOFIX. Produkt powinien być zainstalowany na ustalonych pozycjach w zależ-ności od kategorii fotelika i rodzajów zaczepów ISOFIX w samochodzie (zgod-nie z instrukcją obsługi pojazdu). Ten fotelik jest przeznaczony dla grup wago-wych 0+, I, II i III, zgodnie z rozmiarem ISOFIX i grupą wagową, czyli dla dzieci ważących pomiędzy 0kg a 36kg.

PL
2. Zastosowanie w aucie
Nie wolno montować fotelika na przednim siedzeniu pasa-żera z poduszką powietrzną, chyba że jest wyłączona. Poduszka powietrzna może spowodować śmierć lub poważne obrażenia. Proszę sprawdzić instrukcję dotyczą-cą korzystania z systemu mocowania fotelika w instrukcji obsługi pojazdu. Siedzenia z tyłu pojazdu są najbezpiecz-niejszym miejscem dla dzieci w wieku do 12 lat. Ten fotelik samochodowy musi być zamontowany przodem lub tyłem do kierunku jazdy. Jeśli masz wątpliwości co do montażu fotelika w twoim pojeździe, skontaktuj się z dostawcą pojaz-du.
Uwaga:Twarde elementy oraz plastikowe części urządzenia przy-trzymującego dla dzieci należy umieścić i zainstalować w taki sposób, by w normalnych warunkach eksploata-cji pojazdu nie mogły zostać uwięzione przez przesuwane siedzenie lub drzwi pojazdu.
Nie używaj fotelika w aucie wyposażonym w dwupunktowe pasy bezpieczeństwa.
Fotelik przeznaczony jest do instalacji wyłącznie w pojazdach wyposażonych w 3-punktowe pasy bezpieczeństwa (statyczne lub bezwładnościowe), spełniające warunki Regulaminu nr 16 EKG/ ONZ lub inne równoważne normy.

PLzła pozycja
Może być stosowany z trzypunktowym systemem pasów
nie może być zamontowany w pojeździe z akty-wną poduszką powietrzną
• Fotelik przeznaczony jest wyłącznie dla dzieci o wadze od 0 do 36 kg.• Fotelik musi być stosowany w pojazdach posiadających 3-punk-towy pas bezpieczeństwa oraz złącze ISOFIX z górnym zapięciem TOP TETHER.• Fotelik należy zainstalować zgodnie z naklejkami lub instrukcją
Ostrzeżenia
Prawidłowy i nieprawidłowy montaż fotelika:

PLobsługi.• Fotelik może być zainstalowany tyłem lub przodem do kierunku jazdy.• Przed każdą podróżą należy upewnić się, że fotelik jest prawidłowo i pewnie zamocowany. • Tylko prawidłowe korzystanie z pasów bezpieczeństwa zapewni dziecku maksymalną ochronę podczas wypadku.• Nie należy używać innych punktów instalacji, oprócz tych, które zostały zdefi niowane.• Zabrania się łączenia fotelika z innymi nieprzystosowanymi siedzi-skami.• Zabrania się montażu fotelika na składanym siedzeniu samochodo-wym bez zablokowania. Niezablokowane siedzenia lub kanapy mogą wpłynąć negatywnie na bezpieczeństwo dziecka podczas hamowa-nia lub wypadku.• Nie należy w żaden sposób modyfi kować niniejszego produktu. • Nie należy nigdy pozostawiać dziecka w foteliku bez opieki. • W nagłych wypadkach bardzo ważne jest, by dziecko mogło być szybko wyjęte z fotelika. Oznacza to, że klamra nie jest całkowicie odporna na manipulacje, dlatego też należy instruować dziecko, aby nigdy się nią nie bawiło. • Jeśli dziecko odepnie pas bezpieczeństwa, należy niezwłocznie się zatrzymać i zapiąć pas bezpieczeństwa.• Należy bezwzględnie unikać sytuacji, w których fotelik jest wysta-wiony na działanie bezpośrednich promieni słonecznych. W przeciw-nym razie może się on nagrzać do wysokich temperatur i w konse-kwencji doprowadzić do poparzeń dziecka. • Należy upewnić się, że wszystkie części fotelika są prawidłowo zamocowane do stałych, niepodlegających regulacjom elementów samochodu.• Należy zadbać o to, by bagaż oraz inne przedmioty mogące spowo-

PLdować obrażenia ciała w przypadku kolizji pojazdu, były odpowied-nio zabezpieczone. • Podczas jazdy, fotelik powinien być pewnie przymocowany do siedzenia pojazdu za pomocą systemu ISOFIX oraz pasa samo-chodowego, nawet wówczas, gdy nie znajduje się w nim dziecko.• Fotelik samochodowy nie może być używany bez pokrowca. Pokrowiec nie może być zastąpiony innymi niezalecanymi przez producenta, ponieważ jest integralną częścią urządzenia i ma wpływ ma bezpieczeństwo dziecka.• W przypadku konieczności jego wymiany, oryginalna tapicerka może być zastąpiona wyłącznie odpowiednikiem rekomendowanym przez producenta. • Należy okresowo sprawdzać pasy bezpieczeństwa zwracając szczególną uwagę na punkty mocowań, szwy oraz elementy regu-lacyjne. • Oparcie fotelika musi przylegać płasko do oparcia siedzenia pojaz-du. Jeśli to konieczne, należy poprawić ustawienie zagłówka fote-la pojazdu.• Nie zaleca się dalszego używania fotelika po wypadku, gdzie urzą-dzenie zostało poddane dużym siłom i naprężeniom. W takiej sytu-acji zaleca się wymianę fotelika.• Podczas groźnego wypadku bezpieczeństwo pasażerów zale-ży głównie od konstrukcji pojazdu. Fotelik sam nie uchroni dziecka przed wszelkimi obrażeniami. Jednak prawidłowy montaż i korzy-stanie z fotelika zapewnia większe szansę na przeżycia dziecka. Upewnij się, że wszyscy użytkownicy fotelika potrafi ą z niego prawi-dłowo korzystać.• Zaleca się instalację fotelika na tylnych siedzeniach samochodów.• Należy uczyć dzieci zasad bezpieczeństwa, zawsze zapinaj pasy jako dobry przykład. Nie naruszaj zasad bezpieczeństwa, kiedy dziecko płacze.

PLOparcie
Klamra pasów
Przycisk regulacji ISOFIX
Obudowa fotelika
Uchwyt ISOFIX
Obudowa ISOFIX
Przycisk regulacjiISOFIX
Pas górnyTop tether

PLSYSTEM MOCOWANIA ISOFIXISOFIX jest systemem mocowania fotelików dziecięcych na siedzeniach w samochodzie. System ISOFIX składa się z dwóch uchwytów, które znajdują się między siedzeniami a oparciem fotela. Uchwyty te są przymocowane bezpośred-nio do konstrukcji pojazdu. W stosunku do pasów ISOFIX zapewnia sztywniejsze zamocowanie, co przekłada się na wyższe bezpieczeństwo.
Fotelik jest wyposażony w system mocowania ISOFIX (w tym dwa złącza ISOFIX na dole i górny pas - TOP TETHER). Jest on używany w celu wzmocnienia połączenia między foteli-kiem dziecięcym a siedzeniem pojazdu, w zakresie instalacji dla grupy 0, I, II lub III. System ISOFIX powinien być stosowa-ny z 3-punktowym systemem pasów bezpieczeństwa.
Ustaw mocowania ISOFIX fotelika w odpowiednim miejscu (fotelik może być montowany tyłem lub przodem do kierun-ku jazdy). W tym celu pociągnij i przytrzymaj przycisk blokady uchwytów ISOFIX i ustaw je w odpowiednim kierunku prze-suwając cały uchwyt ruchem poziomym do zewnątrz fote-lika. Zablokuj złącze ISOFIX w uchwycie (rys. 1-3). Wysuń całkowicie prowadnice naciskając szary przycisk regulacji ISOFIX. Powtórz czynność z drugiej strony (rys. 4-5)
Jeżeli Twój pojazd nie jest standardowo wyposażony w prowadnice do kotwic systemu ISOFIX, użyj dwóch plasti-kowych prowadnic dołączonych do fotelika (rys. 6). Wsuń prowadnice w szczelinę między oparciem a siedziskiem i zahacz jej kocówkę o kotwicę ISOFIX (rys. 7).

PL
1 2 3
4 5 6
7
Dwa kliknięcia będą oznaczały poprawne zamocowanie fote-lika oraz znaczniki przy systemie ISOFIX zmienią kolor. z czerwonych na zielone.

PLUWAGA ! Jeśli wskaźniki na złączu ISOFIX będą czerwone, znaczy to że fotelik został źle zamocowany. Zainstaluj fotelik ponownie. Pociągnij mocno fotelik aby upewnić się, że został prawidłowo zamocowany
SYSTEM MOCOWANIA PASA GÓRNEGO TOP TETHER Korzystanie z górnego paska znacznie zwiększa siłę mocu-jącą, ale nie nadaje się do wszystkich pojazdów (w tym niektórych pojazdów wyposażonych w złącze ISOFIX). Pozy-cja mocowania będzie się różnić w zależności od pojazdu.
Mocowanie do tylnych siedzeń pojazdu.
Mocowanie tuż pod siedzeniami pojazdu, trzeba położyć siedzenia aby znaleźć zaczep.
Mocowanie do podłogi bagażnika, która znajduje się za tylnymi siedzeniami.
Mocowanie do podłogi bagażnika, która znajduje się za tylnymi siedzeniami.
Łączenie górnego paska do punktów mocowania

PL
Naciśnij przycisk regulacji na górnym zaczepie, wciągnij wystarczającą długość pasa TOP TETHER, tak by jego długość wystarczyła do zaczepienia z punktem mocowania w samochodzie.
Pociągnij końcówkę paska górnego, aby docisnąć fotelik do siedzenia
Upewnij się że złącza system mocowania ISOFIX zostały prawidłowo zainstalowane.
Upewnij się, że pas nie jest skręcony i jest dobrze ustawiony względem uchwytu znajdującego się w pojeździe
Na górnym regulatorze widnieje zielony znacznik – oznacza że instalacja górnego paska została zakończona pomyślnie.
Jeśli na górnym regulatorze nie widać zielonego znacznika lub jest przykryty oznacza to że fotelik jest za luźno lub źle zamocowany. Należy poprawić montaż

PLDEMONTAŻ ZACZEPÓW ISOFIX ORAZ PASA GÓRNEGO TOP TETHERNaciśnij przycisk regulacji górnego paska i poluzuj pasek. Naciśnij elastyczną końcówkę na haku paska górnego i odczep hak pasa górnego.
Trzymając podstawę fotelika z obu stron, pchaj fote-lik w stronę siedzenia. Naciśnij przycisk regulacji uchwytu ISOFIX, aby odłączyć mocowanie.
Pociągnij końcówkę paska górnego, aby docisnąć fotelik do siedzenia
Wysuń końcówkę paska górnego.

PLDOPASUJ FOTELIK DO DZIECKA
REGULACJA POŁOŻENIA OPARCIAFotelik posiada 4 stopniową regulację pochylenia oparcia. Użyj dźwigni zmiany położenia znajdującą się z przodu fote-lika, aby zmienić pozycje oparcia.

PLREGULACJA WYSOKOŚCI ZAGŁÓWKAWciśnij przycisk umiejscowiony w tylnej części oparcia i podnieś lub opuść zagłówek do żądanej pozycji. Pamiętaj, aby głowa dziecka zawsze była na środku zagłówka.
REGULACJA 5-PUNKTOWYCH PASÓW BEZPIECZEŃSTWAKońcówki prawidłowo ustawionych 5-punktowych pasów bezpieczeństwa powinny znajdować się tuż nad ramiona-mi dziecka. Aby dopasować ich wysokość odblokuj zapię-cie pasów bezpieczeństwa. Wyciągnij sprzączkę z pasów bezpieczeństwa (z tyłu fotelika). Wyciągnij pasy z fote-lika. Wybierz wysokość na jakiej chcesz zamontować pasy i wsuń je w odpowiednie otwory. Wsuń oba pasy ramiączek fotelika w złączkę, która znajduje się z tyłu fotelika. Zakończ regulację.

PL
JAK NACIĄGNĄĆ I POLUZOWAĆ PASY FOTELIKAIm ciaśniej pasy będą przylegały do ciała dziecka, tym lepszą ochronę zapewnią. Pomiędzy pasami a dzieckiem powinna być przestrzeń na dwa palce osoby dorosłej. Przed zapięciem dziecka w foteliku, najlepiej zdjąć grube ubrania (typu kurtki). Pasy nie powinny być wyregulowane za cias-no lub za luźno. Aby wyregulować napięcie pasów dziecko powinno znajdować się w zamontowanym foteliku. Zapnij 5-punktowe pasy bezpieczeństwa. Naciśnij przycisk regu-lacji pasów (znajdujący się z przodu fotelika) jedna ręką, drugą pociągnij pas regulacji, aby napiąć pasy naramienne. Upewnij się, że nakładki na pasy spoczywają na ramion-ach dziecka. Możesz zdemontować pasy jeśli waga dziecka przekracza 15kg lub wzrost sięga powyżej 1 metra.

PL
INSTALACJA DLA GRUPY 0+ (0-13kg)Ustaw położenie oparcia w pozycji największego pochylenia (4ta pozycja regulacji). W tym ułożeniu fotelika oparcie musi być maksymalnie pochylone. Fotelik powinien być zamon-towany tyłem do kierunku jazdy. W tym celu przesuń prow-adnice ISOFIX na przód fotelika (instrukcja powyżej, rys. 1-3). Zamontuj fotelik zgodnie z instrukcją montażu systemu ISOFIX opisaną powyżej. Zamontuj pas górny TOP TETHER zgodnie z instrukcją powyżej. Naciśnij czerwony przycisk na klamrze 5-punktowych pasów bezpieczeństwa aby odblo-kować pasy. Rozłóż pasy bezpieczeństwa fotelika na boki, następnie poprawnie umieścić dziecko

PLw foteliku. Złóż dwie metalowe klamry razem. Włóż dwie części metalowej klamry w uchwyt. Po usłyszeniu kliknię-cia, pas zostanie zablokowany. Upewnij się że pas został poprawnie zablokowany. Pociągnij regulację pasa, aby naciągnąć uprząż pasów bezpieczeństwa fotelika. Im ciaśniej pasy będą przylegały do ciała dziecka, tym lepszą ochronę zapewnią (rys 14-14d).
KLIK
3 2 14

PLInstalacja dla GRUPY I (9-18kg) za pomocą ISOFIXFotelik powinien być zamontowany przodem do kierunku jazdy. W tym celu przesuń prowadnice ISOFIX na tył foteli-ka (instrukcja powyżej, rys.1-3). Fotelik powinien być usta-wiony w pozycji siedzącej (rys. 8). Zamontuj fotelik zgod-nie z instrukcją montażu systemu ISOFIX opisaną powyżej. Zamontuj pas mocujący TOP TETHER zgodnie z instruk-cją opisaną powyżej. Upewnij się, że fotelik jest mocno doci-śnięty do oparcia fotela samochodowego. Pociągnij pas bezpieczeństwa. Przeciągnij pas bezpieczeństwa z tyłu oparcia korzystając z oznaczonych prowadnic (pomiędzy stelażem a pokrowcem fotelika), wyciągnij pas z drugiej strony fotelika i zablokuj go wpinając w klamrę pasów samochodowych. Naciągnij pas oraz sprawdź, czy fote-lik jest mocno zamontowany. Jeśli jest luźno, naciągnij pas ponownie (rys. 9-13). Rozłóż pasy bezpieczeństwa fotelika, następnie poprawnie umieść dziecko w foteliku. Złóż dwie części metalowej klamry razem. Włóż dwie części metalo-wej klamry w uchwyt. Po usłyszeniu kliknięcia, pas zostanie zablokowany. Upewnij się, że pas został poprawnie zablo-kowany. Pociągnij regulację pasa, aby naciągnąć uprząż pasów bezpieczeństwa fotelika. Im ciaśniej pasy będą przy-legały do ciała dziecka, tym lepszą ochronę zapewnią (rys. 14-14d).
Instalacja dla Grupy I (9-18kg) za pomocą pasów bezpieczeństwaFotelik powinien być zamontowany przodem do kierunku jazdy. Postaw fotelik na fotelu samochodowym, tak aby jego oparcie przylegało do oparcia kanapy. Pociągnij pas bezpie-czeństwa. Przeciągnij pas bezpieczeństwa z tyłu oparcia

PLkorzystając z oznaczonych prowadnic (pomiędzy stelażem a pokrowcem fotelika), wyciągnij pas z drugiej strony foteli-ka i zablokuj go wpinając w klamrę pasów samochodowych. Naciągnij pas oraz sprawdź, czy fotelik jest mocno zamon-towany. Jeśli jest luźno, naciągnij pas ponownie (rys. 9-13). Rozłóż pasy bezpieczeństwa fotelika, następnie popraw-nie umieść dziecko w foteliku. Złóż dwie części metalowej klamry razem. Włóż dwie części metalowej klamry w uchwyt. Po usłyszeniu kliknięcia, pas zostanie zablokowany. Upewnij się, że pas został poprawnie zablokowany. Pociągnij regulację pasa, aby naciągnąć uprząż pasów bezpieczeństwa fotelika. Im ciaśniej pasy będą przylegały do ciała dziecka, tym lepszą ochronę zapewnią (rys. 14-14d).
8 9 10
11 12 13
14 14a
14b

PL
Instalacja dla GRUPY II i III (15-36kg) za pomocą ISOFIXUsuń pasy bezpieczeństwa fotelika (instrukcję znaj-dziesz poniżej). W tej pozycji fotelik musi być ustawio-ny przodem do kierunku jazdy, ustaw odpowiednio uchwy-ty ISOFIX (zgodnie z opisem powyżej). Zamontuj fote-lik zgodnie z instrukcją montażu systemu ISOFIX opisaną powyżej. Zamontuj pas mocujący TOP TETHER zgonie z instrukcją opisaną powyżej. Umieść dziecko w fote-liku. Ustaw odpowiednią wysokość zagłówka (instruk-cja powyżej). Przeprowadź pas samochodowy z przo-du fotelika. Zapnij klamrę pasów w sprzączce i ułóż pas biodrowy w dolnych prowadnicach (na wysokości bioder dziecka).Przeciągnij górną część pasa piersiowego przez prowadnice w zagłówku od strony zwijacza pasa samochodowego. Upewnij się, że pas znajduje się w prowadnicy pasa i nie jest poskręcany. Napnij pas, pocią-
KLIK
14c
14d
3 2 14

PLgając jego piersiową część w kierunku zwijacza pasa. Upewnij się, że pas piersiowy przebiega przez środek obojczyka dziecka. Jeśli pas jest zbyt blisko szyi dziecka, należy dopasować ponownie wysokość zagłówka (rys. 15-15c).
Instalacja dla GRUPY II i III (15-36kg) za pomocą pasów bezpieczeństwa Usuń pasy bezpieczeństwa fotelika (instrukcję znajdziesz poniżej). W tej pozycji fotelik musi być ustawiony przodem do kierunku jazdy. Postaw fotelik na fotelu samochodowym, tak aby jego oparcie przylegało do oparcia kanapy. Umieść dziecko w foteliku. Ustaw odpowiednią wysokość zagłów-ka (instrukcja powyżej). Przeprowadź pas samochodowy z przodu fotelika. Zapnij klamrę pasów w sprzączce i ułóż pas biodrowy w dolnych prowadnicach (na wysokości bioder dziecka).Przeciągnij górną część pasa piersiowego przez prowadnice w zagłówku od strony zwijacza pasa samocho-dowego. Upewnij się, że pas znajduje się w prowadnicy pasa i nie jest poskręcany. Napnij pas, pociągając jego piersiową część w kierunku zwijacza pasa. Upewnij się, że pas piersio-wy przebiega przez środek obojczyka dziecka. Jeśli pas jest zbyt blisko szyi dziecka, należy dopasować ponownie wyso-kość zagłówka (rys. 15-15c).
15 15b 15c

PL
16
16b
16d16c 16e
16a
DEMONTAŻ 5-PUNKTOWYCH PASÓW BEZPIECZEŃSTWAP o l u z u j m a k s y m a l n i e p a s y i o t w ó r z k l a m r ę s ze l e k . W yc i ą g n i j s p r z ą c z kę z p a s ó w b e z p i e -czeństwa (z tyłu fotel ika) . Wyciągni j pasy nara-m i e n n e z f o t e l i k a . W y c i ą g n i j p a s k r o k o w y z metalowej sprzączki pod podstawą fotelika, pociągnij wyciągając cały pas krokowy wraz ze sprzączką z otworu (rys. 16- 16e). Aby zamontować pięciopunktowe pasy bezpieczeństwa w foteliku, wykonaj te same czynności w odwrotnej kolejności.
2 1

PLZDEJMOWANIE POKROWCAZdejmij 5-punktowe pasy bezpieczeństwa zgodnie z instruk-cją powyżej. Odepnij dodatkową poduszkę na zagłówku.Zdejmij pokrowiec zaczynając od doły fotelika, na zagłówku kończąc.
Czyszczenie
Używać naturalnych detergentów i c iepłe j wody (poniżej 30°C). Nie prać w pralce. Nie wirować i nie wyci-skać. Uwaga: Nadmierne szorowanie może zniszczyć powierzchnię pokrowca lub gąbki.Stelaż czyścić wilgotną szmatką z użyciem naturalnych detergentów.
Zdjęcia mają charakter poglądowy, rzeczywisty wygląd produktów może różnić się od prezentowanego na zdję-ciach.

EN
InfoThis is a “universal” and “semi-universal” child restraint.It is approved to Regulation No. 44.04 series of amendments, for general use in vehicles, and can be installed on most car seats.
Correct installation is possible if the vehicle manufacturer has declared in the vehicle’s manual that the vehicle is capa-ble of accepting a “universal” child restraint (for group I) and a “semi-universal” child restraint (for group 0+, II and III).
This child restraint has been classifi ed as “universal” and “semi-universal” under more stringent conditions than those applied to earlier designs, which do not carry this notice.
In case of any questions, please contact either the manufac-turer or the retailer of the device.
Only suitable if the approved vehicles are fi tted with 3-point retractor safety belts, approved to UN/ECE Regulation No.16 or other equivalent standards.
Only suitable if the approved vehicles are fi tted with 3-point retractor safety belts, approved to UN/ECE Regulation No.16 or other equivalent stan-dards.

EN
IntroductionDear Customer!Thank you for placing your trust in us and purchasing the Lionelo child safety seat.
Our child restraint systems are made with the utmost care to ensure comfortable journeys and, above all, maximum safety of your child. Implementation of high quality materials and modern technologies allows us to provide users with a product that is perfectly suited for everyday use.
Before you start using this seat, please read the user manual carefully. Improper use may lead to a serious threat to the life of your child.
In case of any questions or comments on the purchased product, please contact us:
The product is compliant with ECE R44/04 as a car safety seat suitable for 0 + I + II + III age groups, that is for children between 0 and 36 kg of weight. Only when used correct-ly can the safety seat protect your child the most effective-ly. Failure to comply with the provisions in the manual can result in an accident. In order to protect your child, always install and use LO-Sander as described in this manual.

EN
1. ApplicationThis safety seat is designed for 0-III weight groups (cate-gories), that is for children weighing: 0 - 36 kg (aged from 0 months to 12 years)0+ weight group: 0kg - 9kgI weight group: 9kg - 18kgII weight group: 15kg-25kgIII weight group: 22kg-36kgChildren from 0+ and I weight group must use dedicat-ed safety belts (harness) supplied with the safety seat. The safety seat itself is attached to the vehicle seat with a ISOFIX system along with a top belt TOP TETHER and a 3-point seatbelt. In case of children from groups II and III (15 - 36 kg), detachable belts are dedicated, and the child is secured with a 3-point seatbelt of the car
Note: Please read this manual carefully before using the car safety seat and keep it for future reference. Improper instal-lation may lead to a serious threat to the life of your child!
This is the ISOFIX car safety seat compliant with ECE R44/04. It can be mounted in the cars equipped with ISOFIX connectors only. The product must be installed in a car (according to the vehicle’s manual) in a place and position suitable for a given safety seat category and ISOFIX connec-tors type. This safety seat is designed for 0+, I, II and III ISOFIX age groups, that is for children weighing from 0 to 36 kg.

EN
Do not mount the safety seat in a front car seat with an airbag, unless it is inactive. Otherwise it can cause death or a serious injury of the child. Please check the manual of your vehicle to fi nd the information regarding the instal-lation of a child safety seat. As far as children aged 0- 12 are concerned, vehicle’s back seats are the safest place to mount the safety seat. This safety seat has to be installed in a forward-facing or rear-facing position. In case of any doubts regarding installation of the safety seat, please contact your vehicle dealer.
Note:Hard items and plastic parts of the child restraint must be placed and installed in a way that are not trapped by sliding seat or vehicle door in regular operation of the vehicle.
The seat can only be installed in vehicles equipped with 3-point safety-belts (static or inertia-reel ones) which satisfy Regulations no.
16 ECG/UN or other equivalent standards.
Do not use the safetyseat in a car equippedwith 2-point seat belts.

EN
Wrong position
May beused withthree point belt system
Proper and improper installation of the safety seat:
Warnings:• The safety seat is suitable for children weighing from0 to 36 kg only.• The safety seat can only be used in vehicles equipped with a 3-point safety belt and an ISOFIX connector with an upper TOP TETHER clasp.• Please install the safety seat according to the stickers and user manual.• This safety seat must only be installed in a rear-facing or forward-facing position.• Before you start travel, make sure the safety seat has been properly and securely mounted.
Can not be mount-ed on an active airbag

EN
• Only the correct use of the safety belts ensures maximum protection of the child during an accident• Do not use other installation points than specifi ed.• It is forbidden to combine the safety seat with other unsuit-able/unfi t seats.• It is forbidden to assemble the safety seat on a folding seat of your car without interlock. Unlocked seats may affect safety of your child when braking or during accident. • Do not modify this product in any way.• Never leave your child in the safety seat unattended.• In case of emergency, it is important that a child can be taken out of the safety seat smoothly. This means that the clamp is not utterly resistant to manipulations. For this reason, please tell your child not to play with this.• If your child unfastens the safety belt, stop immediately and fasten it again.• Make sure the safety seat is never exposed to direct sunlight. Otherwise it may reach high temperature and in effect burn your child.• Make sure all parts of the safety seat have been properly attached to fi xed, non-adjustable car components.• Make sure your luggage and other items which may lead to bodily injuries in case of car accident have been proper-ly secured.• When travelling, the safety seat must be properly attached to the vehicle seat by means of the ISOFIX system and car seatbelt, even if there is no child.• Do not use the safety seat without the cover. Do not replace the cover with the one that is not recommended by the manufacturer. It is an integral part of the product and it contributes to the safety of the child.• If the cover must be replaced, the original upholstery may

EN
be replaced by a substitute recommended by the manufac-turer only.• Please inspect safety belts periodically and pay special attention to fi xing points, seams and adjustment elements.• The backrest of the safety seat must adhere to the back-rest of the vehicle seat well. If necessary, correct the vehicle seat headrest position.• It is not advisable to use the safety seat if it has been subject to large forces and stress. This being the case, the safety seat replacement is recommended.• In the event of a serious accident, the safety of all passen-gers depends widely on the vehicle structure. The safe-ty seat cannot protect a child against all hazards. Howev-er, a suitable assembly and use of the safety seat reduces a risk of death. Make sure all users of the safety seat are able to use it properly. • It is advisable to mount the safety seat on rear seats of the car. • Please educate your children about safety principles, always fasten your seatbelt to show it is necessary. Do not violate safety principles when a child cries.

EN
Headrest
Backrest
Belt pad
Buckle
Safety belt
Adjustment strap
Position changing lever
ISOFIX adjustment button
Top tether strap
Five-point safety belt
Safety belt connector
ISOFIX handle
ISOFIX casing
ISOFIX adjustment
Safety seat casing

EN
ISOFIX FIXINGISOFIX is the system of connectors enabling the installation of safety seats in a vehicle. It is composed of two handles located between the seats and the backrest. These handles are attached directly to the structure of the vehicle. In rela-tion to belts, ISOFIX guarantees more rigid fixing, which translates into increased safety.
The safety seat is equipped with ISOFIX fixing system (including two bottom ISOFIX connectors and upper strap – TOP TETHER). It is used to strengthen connection between a child safety seat and vehicle seat in terms of installation for group 0, I, II or III. ISOXI system must be used together with a 3-point safety belt.
Position ISOFIX handles in a relevant place (the safety seat can also be mounted in a face-forward or rear-forward posi-tion). To do so, pull and hold the interlock button of ISOFIX handles and position them in a proper direction by slid-ing the entire handle horizontally outwards. Lock ISOFIX connector in the handle (fi g. 1-3). Pull out guides by press-ing a grey ISOFIX adjustment button. Repeat actions on the other side (fi g. 4-5).
If your vehicle is not equipped with ISOFIX anchor guides, use two plastic guides supplied with the safety seat (fi g. 6). Push the guide in the gap between the backrest and a seat, and hook its tip to ISOFIX anchor (fi g. 7).
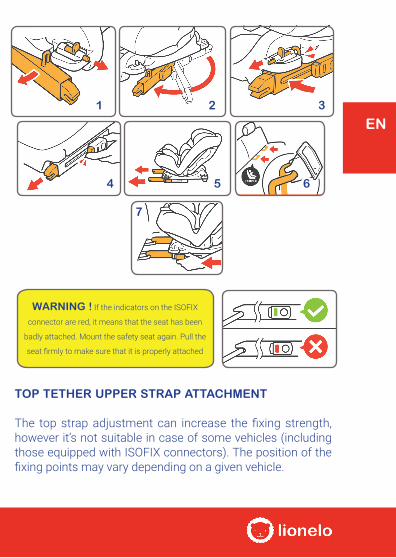
If you can hear two clicks, the safety seat has been mount-ed properly and ISOFIX markers will turn from red into green.
EN
TOP TETHER UPPER STRAP ATTACHMENT
The top strap adjustment can increase the fi xing strength, however it’s not suitable in case of some vehicles (including those equipped with ISOFIX connectors). The position of the fi xing points may vary depending on a given vehicle.
WARNING ! If the indicators on the ISOFIX
connector are red, it means that the seat has been
badly attached. Mount the safety seat again. Pull the
seat fi rmly to make sure that it is properly attached
1 2 3
4 5 6
7

EN
Make sure the connectors of ISOFIX fixing system have been installed properly
Press adjustment button on the upper hook, draw a suffi -cient amount of TOP TETHER strap so that its length is suffi cient to hook on the car fi xing point.
Make sure the belt has not been twisted and is well-posi-tioned in relation to the handle in the car.
Pull the end of the upper strap to press the safety seat against the car seat.
You can see a green marker on the upper adjustment – this means that the upper belt has been installed successfully.
Attaching to the rear vehicle seats.
Fixing just under the seat of the vehicle, you have to put the seat to fi nd the hook.
Attaching to the fl oor of the trunk behind the rear seats.
Attaching to the fl oor of the trunk behind the rear seats.
Connecting the top strap to fi xing points

EN
If you cannot see a green marker on the up-per adjustment or the marker is coverd, this means that the safety seat has not been mounted properly. Make improvements.

EN
DISASSEMBLING TOP TETHER UPPER STRAP AND ISOFIX CONNECTORS
Press upper strap adjustment button and slacken the strap. Press a flexible end on the hook of the upper strap and unfasten the hook of the upper strap.
Hold the base of the safety seat on both sides, press the safety seat against the car seat. Press ISOFIX handle adjust-ment button to unfasten fi xing.
Pull the end of the upper strap to press the safety seat against the car seat.
Pull out the end of the upper strap.

EN
ADJUST THE SAFETY SEAT
TO YOUR CHILD
ADJUSTMENT OF BACKREST POSITIONThe backrest of the safety seat can be tilted in a 4-degree mode. Use a lever located in the front of the safety seat to change the backrest position.

EN
ADJUSTMENT OF HEADREST HEIGHT Press a button located in the rear part of the backrest and lift or drop the headrest to a desired position. Remember that the child’s head must always be in the center of the headrest.
ADJUSTMENT OF 5-POINT SAFETY BELTSEnds of properly positioned 5-point safety belts must be just above the child’s arms. To adjust their height, unlock the safety belt fastening. Pull out a buckle (in the back of the safety seat). Pull out belts from the safety seat. Select height you wish to mount your belts and push them into relevant holes. Slide both straps of the safety seat arms into the connector located in the back of the safety seat. Finish adjustment.

EN
HOW TO TIGHTEN AND SLACKEN SAFETY SEAT BELTSIf belts fi t tight the body of your child, it is highly protected. Between the belts and your child should be space (two adult fi ngers). Before you fasten your child in the safety seat, it is advisable to take off warm clothes (such as jackets). Belts must not be too loose or too tight. To adjust the tension of belts, a child must be positioned in the ready safety seat. Fasten 5-point safety belts. Press belt adjustment button (in front the safety seat) with one hand, use another hand to pull adjustment strap to tighten arm belts. Make sure the belt pads remain on the child’s arms. You can disassemble the belts if your child weighs more than 15 kg or its height exceeds 1 meter.

EN
INSTALLATION FOR GROUP 0+ (0-13kg)Position the backrest at maximum tilting (4-th position of adjustment). In this position the backrest must be titled as much as possible. The safety seat must be in a rear-fac-ing position. To do so, slide ISOFIX guides to the front of the safety seat (see instructions above, fi g. 1-3). Mount the safety seat in accordance with ISOFIX assembly instruc-tions described above. Mount TOP TETHER upper strap as instructed above. Press a red button on the clamp of 5-point safety belts to unlock belts. Spread safety belts of the safety seat to sides, next place your child properly.

EN
Combine two metal clamps. Insert two parts of the metal clamp in the handle. If you can hear a click, the belt is locked. Make sure the belt has been locked properly. Push belt adjustment to tighten harness of the safety belts. If belts fi t a child tight, the protection is fully guaranteed (fi g. 14-14d).
The position of the safety seat must be 4
KLIK
3 2 14

EN
INSTALLATION FOR GROUP I (9-18KG) WITH ISOFIXThe safety seat must be in forward-facing position. To do so, slide ISOFIX guides to the back of the safety seat (see instructions above, fig. 1-3). The safety seat must be in sitting position (fi g. 8). Mount the safety seat in accordance with ISOFIX assembly instructions described above. Mount TOP TETHER fi xing strap in accordance with instructions described above. Make sure the safety seat is fi ts tight the backrest of the car seat. Pull the safety belt. Pull through the safety belt in the back of the backrest with marked guides (between a frame and car seat cover), pull out a belt from the other side of the safety seat and unlock it by inserting in the car belt clamp. Tighten the belt and see if the safety seat has been mounted properly. If it is still slackened, tight-en the belt again (fi g. 9-13). Spread safety belts of the safe-ty seat, next place the child in the safety seat well. Combine two parts of the metal clamp. Insert two parts of the metal clamp in the handle. If you can hear a click, the belt is locked. Make sure the belt has been locked properly. Pull belt adjustment to tighten hardness of the safety belt. If belts fi t your child tight, it is fully protected (fi g. 14-14d).
INSTALLATION FOR GROUP I (9-18KG) WITH SAFETY BELTSThe safety seat must be in a forward-facing position. Posi-tion the safety seat on the car seat so that its backrest fi ts the backrest of the seat tight. Pull the safety belt. Pull through the safety belt in the back of the backrest with marked guides (between a frame and the safety seat cover), pull out a belt on the other side of the safety seat and lock it by inserting in the car belt clamp. Tighten the belt and check

EN
if it is well mounted. If it is still slackened, tighten the belt again (fi g. 9-13). Spread safety belts of the safety seat, next position your child in the safety seat well. Combine two parts of the metal clamp. Insert two parts of the metal clamp in the handle. If you can hear a click, the belt is locked. Make sure the belt has been locked properly. Pull belt adjustment to tighten harness of the safety belts. If belts fi t your child tight, it is fully protected (fi g. 14-14d).
8 9 10
11 12 13
14 14a
14b
EN
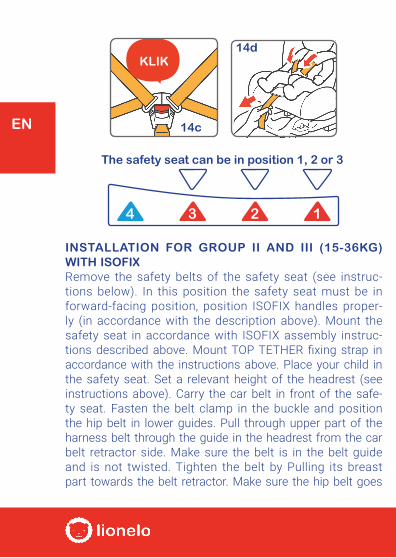
INSTALLATION FOR GROUP II AND III (15-36KG) WITH ISOFIXRemove the safety belts of the safety seat (see instruc-tions below). In this position the safety seat must be in forward-facing position, position ISOFIX handles proper-ly (in accordance with the description above). Mount the safety seat in accordance with ISOFIX assembly instruc-tions described above. Mount TOP TETHER fi xing strap in accordance with the instructions above. Place your child in the safety seat. Set a relevant height of the headrest (see instructions above). Carry the car belt in front of the safe-ty seat. Fasten the belt clamp in the buckle and position the hip belt in lower guides. Pull through upper part of the harness belt through the guide in the headrest from the car belt retractor side. Make sure the belt is in the belt guide and is not twisted. Tighten the belt by Pulling its breast part towards the belt retractor. Make sure the hip belt goes
KLIK
14c
14d
3 2 14
The safety seat can be in position 1, 2 or 3

EN
through the center of the child’s collarbone. If the belt is too close to the child’s neck, adapt it to the headrest again (fi g. 15-15c).
Installation for Group II and III (15-36kg) with safety beltsRemove safety belts of the safety seat (see instruc-tions below). In this position the safety seat must be in forward-facing position. Place the safety seat on the car seat so that its backrest fi ts the backrest of the car seat tight. Place the child in the safety seat. Set a relevant height of the headrest (see instructions above). Carry the car belt in front of the safety seat. Fasten the belt clamp in the buck-le and position the hip belt in the lower guides. Pull through the upper part of the harness belt through the guides in the headrest from the car belt retractor side. Make sure the belt is in the belt guide and is not twisted. Fasten the belt by pull-ing its breast part towards the belt retractor. Make sure the harness belt goes through the center of the child’s collar-bone. If the belt is too close to the child’s neck, adapt the headrest again (fi g. 15-15c).
The safety seat must be in position 1
15 15b 15c
2 1

EN
DISASSEMBLY OF 5-POINT SAFETY BELTSSlacken belts off and open the harness clamp. Pull out the buckle from the safety belts (in the back of the safety seat). Pull out arm belts from the safety seat. Pull out the crotch belt from the metal buckle under the base of the safety seat, and pull it by taking out the entire crotch belt along with the buckle from the hole (fi g. 16-16e). To mount fi ve-point safety belts in the safety seat, follow the same actions in reversed order.
REMOVING A COVERRemove 5-point safety belts in accordance with the instruc-tions above. Undo an additional headrest cushion. To remove a cover, start from the bottom of the safety seat and end up with its headrest.
16
16b
16d16c 16e
16a

EN
CLEANING
Use natural detergents and warm water (below 30°C). Do not wash in the washing machine. Do not swirl and squeeze. Note: Extensive scrubbing may damage the surface of the cover or sponge.Clean the frame with a wet cloth and natural detergents.
The pictures are for reference only. The real design of the products may differ from the pictures presented.

EN

BrandLine Group Sp. z o. o. ul.Dziadoszańska 10
61-248 Poznańwww.lionelo.com
WARRANTY CARDKARTA GWARANCYJNA
Model: …………………………..
SN: ………………………….......
May be sold in: BE CZ DK DE EE IE EL ES FR HR IT LV LT HU MT NL AT PL PT RO SI SK FI SE UK

Warunki gwarancji:
1. Marka Lionelo z siedzibą w Poznaniu (61-248) przy ul. Dziado-szańskiej 10 gwarantuje sprawne działanie produktu zgodnie z warunk-ami techniczno-eksploatacyjnymi opisanymi w instrukcji obsługi.2. Gwarancja jest udzielana na okres 60 miesięcy, licząc od daty sprzedaży. W przypadku zakupu produktu przez fi rmę (faktura VAT) gwarancja udzielana jest na okres 12 miesięcy.3. Gwarancja obowiązuje w kraju zakupu.4. Ujawnione wady będą usunięte bezpłatnie w okresie gwarancji przez Autoryzowany Serwis Producenta.5. W przypadku zakupu towaru przez Internet Klient (reklamujący) jest zobowiązany do zgłoszenia reklamacji przez stronę internetową www. Lionelo.com i dostarczenia uszkodzonego produktu do Autoryzowanego Serwisu Producenta na własny koszt. W innym przypadku dokonuje zgło-szenia i dostarcza produkt do punktu sprzedaży, w którym dokonał zakupu. Informacja na temat naprawy jest udzielana w miejscu złożenia reklamacji.6. Ewentualne wady lub uszkodzenia produktu ujawnione i zgłoszone w okresie gwarancji będą usunięte bezpłatnie w terminie 21 dni roboczych, lecz w uzasadnionych przypadkach (sprowadzenie części zamiennych z zagranicy) termin ten może ulec przedłużeniu o kolejne 30 dni.7. Wady lub uszkodzenia sprzętu powinny być zgłoszone i dostarczone do serwisu niezwłocznie po ujawnieniu się ich.8. Gwarancja dla akcesoriów jest udzielana na 3 miesiące od daty zakupu.9. W przypadku nieuzasadnionej reklamacji (reklamacja produktu sprawnego lub uszkodzonego w sposób mechaniczny) zgłaszający reklamację zostanie obciążony kosztami transportu.10. Klientowi przysługuje prawo do wymiany towaru na inny, posiadają-cy te same lub zbliżone parametry techniczne (również kolorystykę) w przypadku, gdy serwis uzna, że usunięcie wady nie jest możliwe.11. Serwis nie ponosi odpowiedzialności za utratę danych.

12. Gwarancja będzie respektowana jedynie w przypadku dołączenia do reklamowanego urządzenia opisu uszkodzenia, wszystkich akce-soriów, które klient otrzymał podczas kupna urządzenia oraz dowodu zakupu zawierającego datę sprzedaży.13. Gwarancją nie są objęte: naturalne zużycie związane z eksploatac-ją, uszkodzenia powstałe w wyniku niewłaściwego i niezgodnego z in-strukcją obsługi użytkowania, uszkodzenia lub rozdarcia wynikłe z winy nabywcy, płowienie tkanin spowodowane długotrwałym działaniem promieni słonecznych, pranie w nieodpowiedniej temperaturze, uszko-dzenia mechaniczne, elektryczne, termiczne, ingerencje cieczy lub ce-lowe uszkodzenia i wywołane nimi wady, samowolne przeróbki.14. Serwis może odmówić wykonania naprawy w przypadku śladów nieautoryzowanej naprawy.15. W przypadku gdy usterka nie jest objęta gwarancją producenta, ser-wis może zaproponować wykonanie usługi odpłatnej.16. Producent ani Autoryzowany Serwis nie odpowiada za szkody i straty pow-stałe w wyniku niemożności korzystania z produktu będącego w naprawie.17. Produkt nieodebrany z serwisu w ciągu 3 miesięcy może skutkować naliczeniem kosztów magazynowania urządzenia do czasu odbioru.18. Dostarczenie produktu w stanie niekompletnym, brak odpowied-niego opakowania jest równoznaczne z niewypełnieniem przez kupu-jącego warunków gwarancji i może stanowić podstawę do odmowy naprawienia produktu lub przedłużenia okresu naprawy.19. Jeśli w odesłanym do naprawy serwisowej produkcie nie stwierd-zono usterki, konsument będzie obciążony kosztem ekspertyzy (stawka godzinowa 70 zł netto).20. W sytuacji, gdy produkt odesłany do serwisu jest sprawny, a powo-dem złego działania urządzenia była np. rozładowana bateria, serwis obciąży konsumenta kosztem usługi ekspertyzy w kwocie 25 zł netto.21. Gwarancja na produkt nie wyłącza, nie ogranicza ani nie zawiesza uprawnień kupującego wynikających z rękojmi.22. Produkty do reklamacji przyjmowane są wyłącznie czyste i w kar-tonowym opakowaniu (oryginalnym lub zastępczym).

Warranty conditions:
1. The Lionelo brand with its registered offi ce at Dziadoszańska 10, 61-248 Poznań, Poland guarantees that the equipment is operational in accordance with the technical-operating conditions described in the manual.2. The warranty is granted for a 60 months period from the date of sale. If the Buyer is a company (VAT invoice), the warranty is granted for a 12-month period.3. The warranty is valid in the country of purchase.4. Revealed manufacturing defects shall be removed during the warran-ty period free of charge by the Authorised Manufacturer Service.5. Any defects or damages discovered and reported within the warranty period will be removed free of charge within 21 working days, but in jus-tifi able cases (for instance, spare parts must be brought from abroad) this period may be extended by another 30 days.6. Any defects or damages to the equipment should be reported and delivered to the service site immediately after being revealed.7. Accessories included with the devices are under 3-month warranty from the date of purchase.8. In case of an unjustifi ed complaint (a complaint of effi cient product or the mechanically damaged one), the person who reports a complaint shall be charged for transportation cost.9. The Customer is entitled to replacement of the product to another with the same or similar specifi cations (and) colours if the Service de-termines that the removal of defects is not possible.10. The service is not responsible for any loss of data.11. The warranty will be respected only if the customer attaches (to the faulty device) a damage description, all of the accessories received at the moment of the equipment purchase, and proof of purchase contain-ing the date of sale.

12. The warranty does not cover: natural wear of the product relat-ed to its normal operation, damage resulted from improper usage or non-compliance of the instructions described in the manual, tears or cracks caused by the Customer, fading of fabric resulting from pro-longed exposure to sunlight or washing the product or its parts in the wrong temperature, mechanical, electrical, thermal and intentional damages and defects caused by them, as well as damage caused by unauthorised modifi cations or repairs.13. The Service may refuse to repair products in case of any traces of unauthorised repair.14. If the fault is not covered by the manufacturer’s warranty, paid repair may be offered by the Service.15. Neither the Manufacturer nor the Authorised Service is responsible for any damages or losses arising from the inability to use the device that is being repaired.16. The product that has not been collected from the service site within 3 months can be charged with storage cost appropriate to the storage time.17. Delivery of the product which is incomplete or lack of proper pack-aging is equivalent to the failure of the warranty conditions by the Buyer, and it can provide a basis to refusal of the repair or extension of the repair period.18. In case of sending the product for repair, when no defect is found, the expenses for the expert assessment shall be fully borne by the consumer.19. If the product (sent for repair) works properly, and the reason of its invalid operation is, for instance, a low battery, the Consumer shall bear the cost of the expert assessment.20. The product warranty shall not exclude, limit or suspend the Cus-tomer rights resulting from the guarantee.21. Only clean products in original or replacement packagings can be reclaimed.

Lionelo Service – Support
List of Authorized Service Centers:Lista autoryzowanych centrów serwisowych:
lionelo.com/en/service
Dziękujemy za zakup urządzenia naszej marki!


WWW.LIONELO.COM