instructions for making an arrow with a … · instructions for making an arrow with a kyudo...
TRANSCRIPT

INSTRUCTIONS FOR MAKING AN ARROW WITH
A KYUDO FLETCHER
ASAHI ARCHERY INC.
⑨ ⑩
⑪
① ②
③
④
⑤
⑥
⑧
⑫
⑬
⑮ ⑭
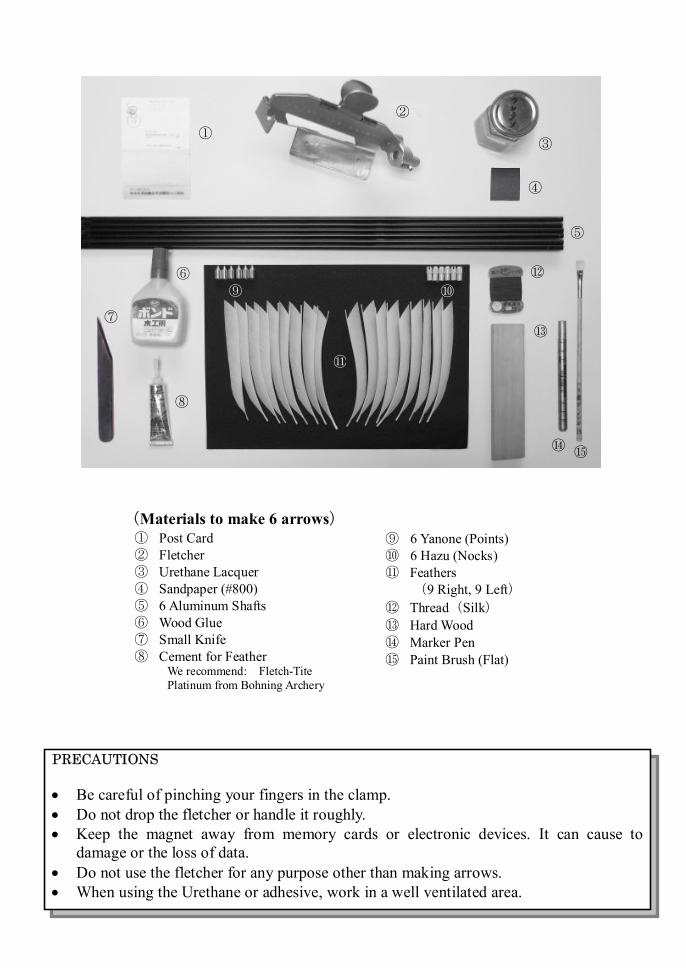
(Materials to make 6 arrows) ① Post Card ② Fletcher ③ Urethane Lacquer ④ Sandpaper (#800) ⑤ 6 Aluminum Shafts ⑥ Wood Glue ⑦ Small Knife ⑧ Cement for Feather
We recommend: Fletch-Tite Platinum from Bohning Archery
PRECAUTIONS · Be careful of pinching your fingers in the clamp. · Do not drop the fletcher or handle it roughly. · Keep the magnet away from memory cards or electronic devices. It can cause to
damage or the loss of data. · Do not use the fletcher for any purpose other than making arrows. · When using the Urethane or adhesive, work in a well ventilated area.
⑦
⑨ 6 Yanone (Points) ⑩ 6 Hazu (Nocks) ⑪ Feathers
(9 Right, 9 Left) ⑫ Thread(Silk) ⑬ Hard Wood ⑭ Marker Pen ⑮ Paint Brush (Flat)

1 Inserting the Nock
Apply a small amount of bond to the root of the nock.
3
Once the position has been determined, press straight down onto a piece of hard wood to push in the nock.
5 Preparing the Shaft
Rough the surface of the shaft a length of 9 inches below the nock with #800 sandpaper to ensure that the feathers are bonded firmly.
4
Wipe out the excessive bond.
6 Preparing the Feather
Hold the feather with the quill facing up. Place the knife blade on the back of the quill and use your index finger to press the quill against the blade and shave the soft part by sliding the knife to the end of the quill.
How to fletch a feather
2
Push the nock in a little and turn it around fully to spread the bond evenly on the root of the nock. Align the groove of the nock with the XX75 mark.

12
Apply a thin bead of the cement to the quill. Caution:If cement is excessive the feather will bond to the clamp.
9
Insert the nock deeply in the nock supporter and placed so that the XX75 mark is aligned with the mark on the knob.
10 Attaching the Feather
Clip the feather with the clamp. Set the base of the upper end of the feather (B) at the 1 mark on the scale.
11
Run your finger along the quill to ensure contact with the clamp.
8
Make sure that a mark (A) on the knob is aligned with the clamp.
7
Shave the soft part on both ends. Do this for all the feathers.
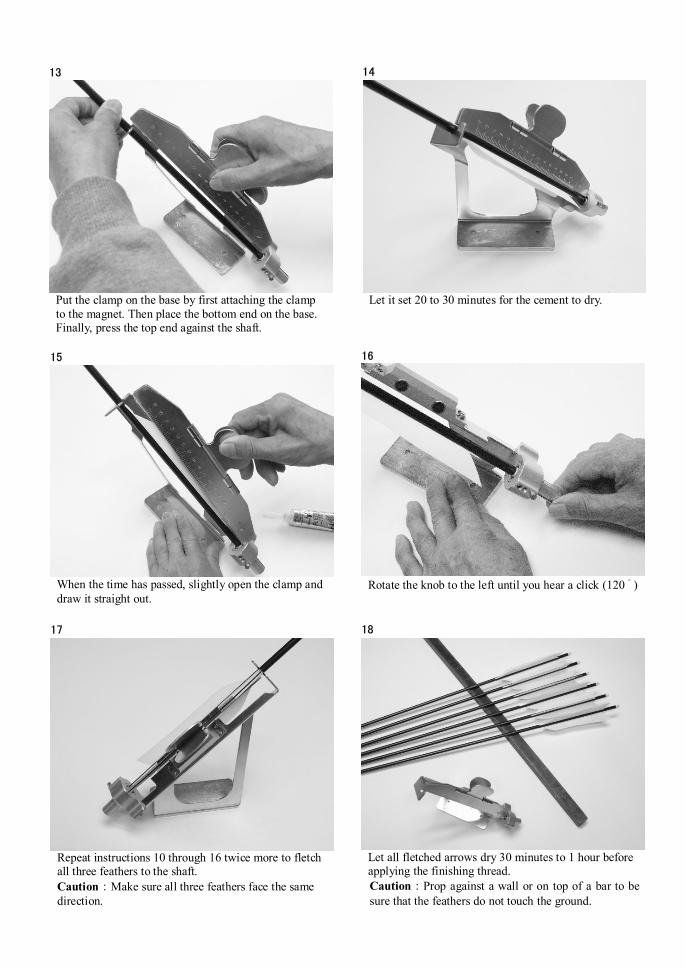
13
Put the clamp on the base by first attaching the clamp to the magnet. Then place the bottom end on the base. Finally, press the top end against the shaft.
14
Let it set 20 to 30 minutes for the cement to dry.
18
Let all fletched arrows dry 30 minutes to 1 hour before applying the finishing thread. Caution:Prop against a wall or on top of a bar to be sure that the feathers do not touch the ground.
17
Repeat instructions 10 through 16 twice more to fletch all three feathers to the shaft. Caution:Make sure all three feathers face the same direction.
15
When the time has passed, slightly open the clamp and draw it straight out.
16
Rotate the knob to the left until you hear a click (120 ゚)

――― The angle can be changed if needed ―――
Unscrew the upper and lower screws (C) with the wrench provided in the box.
With referring to the scale, tilt the magnet plate. When the position is decided, fix the screws firmly. Caution:If the angle is too great, it may cause to feathers to detach from the shaft.

How to wind the threads
1 Preparation
Cut a 3cm wide strip from a post card make a tube 1.5cm in diameter. Prepare tubes for 6 arrows.
6
In the same way, slice the top quill to make it thinner.
5
Slice the bottom quill to make it thinner.
4
Cut 1cm from the bottom of the quill in the same way.
3
Cut 5mm from the top of the quill at a diagonal.
2
Inset the tube over the nock and push feathers down. *Inset the tube until the feathers are clear of the area where you will wind the thread.

8
Secure the shaft under the belt.
7
Draw a line 1cm down from the nock, then at 2cm from the upper feather line, and at 2.6cm from the lower feather line. Caution:If available, use a sample arrow to copy the lines.
9 Winding the URAHAGI Thread
Wind the thread 2 to 3 times around the shaft at the tip of the quill and pull it down toward the feather line. (Tacking) * Wet thread makes it easier to stick to the shaft.
10
When the thread comes to 1mm above the hairline, wind 2 to 3 times as to press it down toward the nock.
11
Cut the thread that was temporarily holding the quill. Caution:Make sure the main thread stretches tight.
12
Wind the main thread toward the line drawn on figure #7. Leave no spaces.

13
When the thread reaches the line, wind 2-3 times more.
14
Hold the thread on the shaft with your middle finger and make a loop by winding the thread twice around your index finger and thumb.
15
Turn this loop over and slip it over the nock and pull the thread. Caution:Press the thread with the middle finger so it will not come loose.
18 Winding the HAZUITO Thread
From the bottom of the nock wind the thread without leaving spaces.
16
Rewind the thread until it meets the line.
17
Cut the leftover thread.

20
Put the spool through the loop twice.
21
Hold the thread so it does not uncoil and pull it until it meets the line. Cut the leftover thread.
22 Winding the MOTOHAGI Thread
Begin to wind the thread at the feather line and keep winding without leaving spaces until it meets the line drawn in figure #7. When the thread reaches the line, wind 2 to 3 times.
19
Cross the thread spool under the shaft and make a big loop while stretching the thread.
23
Again, cross the spool under the shaft and make a big loop and place the spool through the loop twice.
24
Hold the thread so it does not uncoil and pull it until it meets the line.

25
Cut the leftover thread.
26 Coating
Dilute wood glue with a small amount of water. Coat the threads equally while rotating the shaft. Coat the space between the threads. Apply a second coat once the glue dries well. Caution:Be careful not to coat on the feathers.
29
Remove the tube and rub feathers lightly to re-shape.
30
Apply steam to the feathers to put them back in shape. Remove all moisture on the shaft with a cloth. Caution:Keep feathers away from the fire or they will burn.
27
Apply Urethane twice in the same way.
28 Drawing the Finishing Lines
After the Urethane dries, draw finishing lines with a marker pen on the edges of the thread (shown by arrows).

33 Inserting the Point
Partially insert a point on the shaft (it must be straight).
34
Strike the arrow down onto a piece of hard wood to set the point. Caution:Lift straight up and strike down at a right angle to the wood.
31 Cutting the Shaft
Measure the length of the arrow from the root of the nock and mark 1cm shorter than the desired arrow length. *Once the point is inserted, the length will be correct.
32
Cut the shaft at the mark. * A Pipe Cutter is recommendable.
35
The completed set.