installation manual inmarsat-c mes model felcom18 - furuno … · all brand and ... installation...
TRANSCRIPT

Installation ManualINMARSAT-C MES
Model FELCOM18
SAFETY INSTRUCTIONS ................................................................................................ iSYSTEM CONFIGURATION ........................................................................................... iiEQUIPMENT LISTS........................................................................................................ iii
1. MOUNTING..............................................................................................................1-11.1 Antenna Unit ......................................................................................................................1-11.2 Terminal Unit......................................................................................................................1-21.3 Distress Alert/Received Call Unit IC-305/Alarm Unit IC-306..............................................1-51.4 Printer (option) ...................................................................................................................1-61.5 AC/DC Power Supply Unit PR-240 (option).......................................................................1-71.6 Junction Box IC-318...........................................................................................................1-8
2. WIRING....................................................................................................................2-12.1 Antenna Cable Connector at the Terminal Unit .................................................................2-22.2 Distress Alert/Received Call Unit IC-305 ...........................................................................2-52.3 Alarm Unit IC-306 ..............................................................................................................2-52.4 Junction Box IC-318...........................................................................................................2-6
3. INITIAL SETTINGS..................................................................................................3-13.1 How to Set the IMN (INMARSAT MOBILE NO.)................................................................3-13.2 How to Set External Equipment .........................................................................................3-23.3 How to Set the Alarm Contact............................................................................................3-33.4 How to Set up the AMS......................................................................................................3-33.5 How to Select Position-fixing Equipment ...........................................................................3-53.6 How to Set up for 2nd DTE................................................................................................3-5
4. HOW TO INSTALL OPTIONAL EQUIPMENT ........................................................4-14.1 GPS Board OP16-62 .........................................................................................................4-14.2 IPX2 Kit OP16-58/OP16-59 ...............................................................................................4-24.3 Waterproofing Kit OP16-60/OP16-67/OP16-68 .................................................................4-7
5. HOW TO CHANGE POWER SUPPLY SPECIFICATIONS.....................................5-1
APPENDIX 1 JIS CABLE GUIDE .............................................................................AP-1PACKING LISTS ......................................................................................................... A-1OUTLINE DRAWING................................................................................................... D-1INTERCONNECTION DIAGRAM ................................................................................ S-1
www.furuno.comAll brand and product names are trademarks, registered trademarks or service marks of their respective holders.

The paper used in this manual
is elemental chlorine free.
・FURUNO Authorized Distributor/Dealer
9-52 Ashihara-cho,
Nishinomiya, 662-8580, JAPAN
A : JUN 2012.Printed in JapanAll rights reserved.
C : JUN . 10, 2013
Pub. No. IME-56740-C
(AKMU ) FELCOM18
0 0 0 1 7 6 5 1 9 1 2

i
SAFETY INSTRUCTIONS
CAUTION
Standard Steering
Antenna Unit IC-118Terminal Unit IC-218Printer PP-510 or PP-520Junction Box IC-318Distress Alert/Received Call Unit IC-305Alarm Unit IC-306SSAS Alert Unit IC-307AC/DC Power Supply UnitPR-240Mini keyboard
Do not open the equipmentunless totally familiar withelectrical circuits andservice manual.
Only qualified personnelshould work inside theequipment.
WARNING
Turn off the power at the mains switchboard before beginning the installation. Post a sign near the switch to indicate it should not be turned on while the equip- ment is being installed.
Fire, electrical shock or serious injury can result if the power is left on or is applied while the eqiuipment is being installed.
ELECTRICALSHOCK
HAZARD
0.30 m 0.30 m0.65 m 0.40 m1.00 m 0.80 m0.90 m 0.60 m
Do not approach the ra-dome closer than 0.5 mwhen it is transmitting.
Microwave radiation cancause severe injury or illness.Radiation level:10 W/m at 0.5 m2
Ground the equipment to preventelectrical shock and mutualinterface.
0.30 m 0.30 m
Use the correct fuse.
0.50 m 0.30 m
0.50 m 0.30 m0.70 m 0.45 m
0.90 m 0.60 m
Confirm that the power supply voltage is compatible with the voltage rating of the equipment.
Connection to the wrong power supply can cause fire or equipment damage. The voltage rating appears on the label at the rear of the terminal unit.
Use of wrong fuse can result in damage to the equipment.
Keep the following compass safe distances.

ii
SYSTEM CONFIGURATION
Standard configuration is shown with solid line.
Printer** PP-510/PP-520
ANTENNA UNIT IC-118
TERMINAL UNIT IC-218
JUNCTION BOX IC-318
Navigator
POWER SUPPLY 100-115/200-230 VAC , 1φ 50/60 Hz
POWER SUPPLY 12/24 VDC
AC/DC Power Supply PR-240
For 12 VDC power supply, DC-DC converter is required to use PP-510 or PP-520.
Personal Computer (PC/AT compatible)
Shipboard LAN (Ethernet)
Mini Keyboard5139U
DGPS
CATEGORY OF UNITS
Unit Category
Terminal Unit Protected from weather
Antenna Unit Exposed to weather
Other Units Protected from weather
**: Mandatory for EGC operation as required by IMO RES. A.664(16).
Distress Alert/ Received Call Unit IC-305 or 350
Alarm Unit IC-306
SSAS Alert Unit* IC-307
SSAS Alert Unit* IC-307
(Max. 3 units)Standard supply for SSAS
*: At least two SSAS Alert Units are required.
Built inGPS Board OP16-62
POWER SUPPLY 24 VDC
POWER SUPPLY 24 VDC

EQUIPMENT LISTS
Standard supply
Optional supply
Name Type Code No. Qty RemarksAntenna Unit IC-118 - 1 w/FP16-02501Terminal Unit IC-218 - 1 w/CP16-05200, SP16-01301, FP16-02600Junction Box IC-318 - 1SSAS Alert Unit IC-307 - 2 For SSAS onlyInstallation Materials
CP16-05500 000-021-697 1 For IC-118, 30 m
Name Type Code No. Qty RemarksPrinter PP-520 - 1Distress Alert/ Re-ceived Call Unit IC-305 - 1
Alarm Unit IC-306 - 1AC/DC Power Supply Unit PR-240 - 1
SSAS Alert Unit IC-307 - 1PC Terminal Software OP16-57 001-180-050 1Cable Assy. COSPEVVSBC 5PX0.2LF 000-560-452-11 1 5P, 10 m
COSPEVVSBC 5PX0.2LF 000-103-868-11 1 5P, 20 mCOSPEVVSBC 5PX0.2LF 000-103-869-11 1 5P, 30mCOSPEVVSBC 5PX0.2LF 000-132-829-11 1 5P, 40 mCOSPEVVSBC 5PX0.2LF 000-132-828-11 1 5P, 50 m
Flush Mount Kit OP16-27 004-448-000 1 For IC-305/306OP16-28 004-448-010 1 For IC-307
Antenna Unit IC-118 - 1Antenna Mounting Kit CP16-05601 001-189-600 1 For IC-118Antenna Bracket CP16-05602 001-189-610 1Antenna Mounting Pipe CP16-05603 001-189-620 1
IPX2 Kit OP16-58 001-180-070 1 D-sub cablesWater Proof Kit OP16-59 001-180-080 1 For IC-218
OP16-60 001-180-090 1 For IC-318OP16-67 001-189-380 1 For IC-305OP16-68 001-189-400 1 For IC-307
GPS Board Kit OP16-62 001-180-100 1 For IC-218Bracket Kit OP16-65 001-182-900 1
iii

EQUIPMENT LISTS
Installation Materials CP16-05710 000-021-701 1 w/pipe, 30 mCP16-05750 000-021-704 w/o pipe, 30 mCP16-05780 000-021-712 w/pipe, 30 m,
for armored cableCP16-05790 000-021-715 w/o pipe, 30 m,
for armored cableCP16-05720 000-021-708 w/pipe, 40/50 m
for armored cable
CP16-05760 000-021-713 w/o pipe, 40/50 m, for armored cable
CP16-05730 000-021-711 w/pipe, 100 mCP16-05770 000-021-714 w/o pipe, 100 m,
for armored cable
Name Type Code No. Qty Remarks
iv

1. MOUNTING
1.1 Antenna Unit
1.1.1 Mounting locationRefer to IMO resolutions A663(16) and A.807(19), as amended.
• Mount the omnidirectional antenna unit high atop a mast clear of stays and the turn-ing diameter of a radar antenna. The ideal mounting location would be where no ob-stacle appears in the fore and aft directions down to -5° and down to 15° in the port and starboard directions. The concept is illustrated in the figure below. Shadow sec-tor of the antenna mast, whip antenna, etc. should be within two degrees at one meter from the antenna unit.
• When two FELCOMs are installed, the horizontal separation shall be at least 1.5 m and the vertical separation, 1 m or more.
• If Inmarsat ship earth stations other than C are installed, separate the Inmarsat an-tenna at least 8 m from the Inmarsat-C antenna.
NOTICEDo not apply paint, anti-corrosive sealant or contact spray to coating or plastic parts of the equipment.
Those items contain organic solvents that can damage coating and plastic parts, especially plastic connectors.
ANTENNA UNIT
55 1515
1-1

1. MOUNTING
• Separate the antenna unit from an S-band radar as follows:
• The allowable vibration level as specified by Inmarsat is as shown in the table be-low.
Allowable vibration level
• Avoid the location near tunnels and stacks; smoke and soot on the radome can low-er signal level (10 m or more in horizontal distance).
• Separate the antenna unit 5 m from HF, VHF of 27 MHz antenna.
1.1.2 MountingThe antenna cable is available in lengths of 30 m, 50 m and 100 m (see table below).
To mount the antenna unit, a dedicated mounting pipe is necessary.
For how to mount the antenna, see the outline drawing at the end of this manual and “Installation and Replacement of Antenna Unit”, included with the antenna unit.
1.2 Terminal UnitSelect a mounting location, considering the following points.
• The temperature and humidity should be moderate and stable.• For maintenance and checking purposes, leave sufficient space at the sides and
rear of the unit and leave slack in cables.
Frequency Level
2 to 10 Hz 2.54 mm Peak Amplitude
10 to 100 Hz 9.8 m/s2 Peak Acceleration
Cable length Type Remarks
30 m (no armor) TP5FBAW-5DFB TNC connector at both ends
30 m (w/armor) 5D-FB-CV-NP N connector on one end (antenna side)
50 m (w/armor) 8D-FB-CV
100 m (w/armor) 12D-SFA-LITE-CV
HORIZONTAL LINE
Install above this line
PROHIBITED ZONE1.5 m
5 m
15
2 m
S-band radar
INSTALLTION ZONE
2 m
1-2

1. MOUNTING
Mounting
Tabletop mount
1) Fix the hanger (option) to a table with four self-tapping screws (5x20, supplied), re-ferring to the outline drawing at the back of this manual.
2) Screw knobs and washers to terminal unit loosely.3) Set the terminal unit to the hanger and tighten knobs.
Terminal unit, tabletop mounting
Flush mount
Use locally supplied pan head screws (M4x20) when the thickness of the bulkhead is from 11 to 14 mm. For bulkhead which exceeds 14 mm in thickness the length of the pan head screws should be bulkhead thickness A +7.8±2 mm. Also the length of B should be max. 8 mm (B≤8 mm).
Bulkhead, sectional view
1. Prepare a cutout in the mounting location whose dimensions are as shown in the outline drawing at the back of this manual.
2. Fix the display unit with six pan head screws, inserting them from the inside of the bulkhead. Refer to the outline drawing at the end of this manual.
AB
1-3

1. MOUNTING
How to connect the LAN cable
Connect the LAN cable using the sponge and LAN cable support (supplied). This pro-cedure should be done even if the LAN cable is not used, to waterproof the unit.
1. Attach the sponge for LAN terminal to the LAN terminal.
2. Use the binding screw (pre-attached at the rear of the unit) to fix the LAN cable support.
3. Connect the LAN cable to the terminal unit. Fix the LAN cable to the LAN cable support with a cable tie (supplied).
Sponge for LAN terminal
LAN cable support
Fix the cable here with a cable tie.
Binding screw
1-4

1. MOUNTING
Keyboard
1. Attach the function key label (IMN-C18) to the keyboard as shown below.
2. Attach four fasteners (small, supplied) to the bottom of the keyboard.3. Attach four fasteners (large, supplied) to the small fasteners attached at step 2.4. Remove the paper from four fasteners.5. Fasten the keyboard to the mounting place.
1.3 Distress Alert/Received Call Unit IC-305/Alarm Unit IC-306
Bulkhead mounting1. Remove four screws from the unit to separate the bottom chassis from the top
cover.2. Fix the bottom chassis to the mounting location with four self-tapping screws (sup-
plied).3. Cable can be led in from the bottom or the rear panel. For rear panel entrance,
change the clamp orientation as follows.1) Unfasten two screws to remove the cable clamp.2) Turn the clamp 90 degrees.
Function key label (supplied)
Distress alert/received call unit IC-305 Alarm unit IC-306
ALARMACK
ALARMACK
1-5

1. MOUNTING
3) Refasten two screws removed at step 1) to fix the clamp.
4) Run the interconnection cable thorough a cable entrance and connect it to ter-minal board.
Flush mountThe optional flush mounting kit OP16-27 (Code No.: 004-448-000) is required.
1. Make a cutout in the mounting location, referring to the outline drawings at the back of this manual.
2. Fix the unit to the fixture with four pan head screws (supplied).3. Fasten four self-tapping screws (φ5, supplied) to fasten the fixture to the mounting
position.
1.4 Printer (option)Mount the printer (PP-510 or PP-520) on a tabletop with the fixtures sup-plied. Refer to the outline drawing at the end of this manual for the mount-ing dimensions. The right figure is for PP-520
1. Decide the location of the printer.2. Set the ink ribbon cartridge and
the roll paper to the printer.3. Set the fixtures (left/right) onto
the printer. Fasten them with four self-tapping screws (φ5x20).
Name Type Code No. Qty
Fixture 16-018-4201-1 100-317-841 1
Pan head screw M3x6 000-800-362 4
Self-tapping screw 4x16 000-162-605-10 4
Unfasten these screws.
Rotate.
Refasten screws.
405
200
1-6

1. MOUNTING
1.5 AC/DC Power Supply Unit PR-240 (option)Fix the unit on a table with four self-tapping screws.
AC/DC power supply unit PR-240
1-7

1. MOUNTING
1.6 Junction Box IC-318The junction box IC-318 is connected to the terminal unit by using the cable assy 16S0344 (2 m, attached to the junction box). Install the junction box within 2 m from the terminal unit.
1. Remove four screws from the unit to separate the bottom chassis from the top chassis.
2. Fix the bottom chassis to the mounting location with four self-tapping screws (4x16, supplied).
3. Connect the cables referring to Chapter 2.
Junction box IC-318
1-8

2. WIRING
Wiring of FELCOM 18
Power supply 24 VDC
Copper strap 1.2 m
Ground wire
Distress alert/ Received call unit IC-305or IC-350
TP5FBAW-5DFB,30 m (No armor) Connector at both ends
0.34 m
Mini keyboard (to USB terminal on the front panel)
5D-FB-CV-NP, 30 m 8D-FB-CV, 50 m 12D-SFA-CV, 100 m Connector at one end
For cable w/armor
IC-307 Navigator
CO-SPEVV-SB-C 0.2x5p (option) or TTYCS(LA)-4 (Japanese Industrial Standards)
LAN cable (10BaseT, local supply)
DGPS
Connector N-P-5DFB N-P-8DFB N-P-12DSFA
(Supplied, local arrangement)
24 VDC
VCTF-0.75x3C (5 m)
TNCP-NJ connector (Supplied)
16S0184, 3 m
Junction Box IC-318
Alarm unit IC-306
The terminal unit is shipped with a 15 A fuse in its power cable. This fuse is for use with a 12 VDC power supply.
For a 24 VDC power supply, replace the fuse with a 7A fuse (supplied). Attach the "7A" label to the fuse holder on the power cable. Use of a wrong fuse can damage the equipment.
MJ-A3SPF0018-050Z
Cable Assy. TPA5FB0.4NJ5FBA-5DFB
CAUTION
PrinterPP-510/PP-520
2-1

2. WIRING
2.1 Antenna Cable Connector at the Terminal Unit5D-FB-CV-NP (30 m)
How to fabricate antenna cable 5D-FB-CV-NP
30
Cover with heat-shrink tubing and heat.
Outer Sheath
Armor
15
Nut
GasketClamp
Inner SheathBraided Shield
5
Washer
50
Cut braided shield here.
3.5Insulator
Core
Center Pin
Solder here.
Ring
Insulator Ring
Shell
Nut
Remove the outer sheath, armor and inner-sheath by the dimensions shown.
Set the nut, washer, gasket, clamp onto cable as shown.
- Be careful not to damage the braided shield.
Fold back the braided shield onto the clamp and trim the shield as shown.
Make the length of insulator 3.5 mm and the length of the core 5 mm. - Be careful not to damage the core.
Set the center pin to the core and solder the pin from the hole in the pin.(Pull the pin with approx. 1 kg of force to check strength of solder joint.)- Be sure the solder is flush with surface of pin.- Be sure there is no gap between center pin and insulator. Do not push the center pin into the insulator.- Do the soldering as quickly as possible so as not to deform the insulator.
Set the ring and insulator ring onto the cable.
Set the shell to the cable then turn the nut to tighten. (Do not tighten by turning shell.) - Use a wrench or the like to tighten the nut securely.
2-2

2. WIRING
8D-FB-CV (50 m)
How to fabricate antenna cable 8D-FB-CV
Outer SheathArmor Shield
Dimensions in millimeters.
50 30
Cover with heat-shrink tubing and heat.
30 10
Clamp NutGasket (reddish brown)
Clamp
Trim shield here.
Aluminum Foil
Insulator
Trim aluminum tape foil here.
1
5
Pin
ShellClamp Nut
Solder through the hole.
Remove outer sheath and armor by the dimensions shown left. Expose inner sheath and shield by the dimensions shown left.
Remove insulator and core by 10 mm.
Twist shield end.
Slip on clamp nut, gasket and clamp as shown left.
Fold back shield over clamp and trim.
Cut aluminum foil at four places, 90 from one another.
Fold back aluminum tape foil onto shield and trim.
Expose the insulator by 1 mm.
Expose the insulator by 5 mm.
Slip the pin onto the conductor. Solder them together through the hole on the pin.
Insert the pin into the shell. Screw the clamp nut into the shell. (Tighten by turning the clamp nut. Do not tighten by turning the shell.)
Inner Sheath
2-3

2. WIRING
12D-SFA-LITE-CV (100 m)
How to fabricate antenna cable 12D-SFA-CV
Outer SheathArmor Inner Sheath Shield
Dimensions in millimeters.
80 12
NutWasher
Gasket Clamp
1.8
4.5
Clamp NutPin
Solder through the hole.
Remove outer sheath and armor by the dimensions shown left. Expose inner sheath and shield by the dimensions shown left.
Twist shield end.
Slip on clamp nut, gasket and clamp as shown left.
Expose the insulator by 1.8 mm.
Expose the core by 4.5 mm.
Slip the pin onto the conductor. Solder them together through the hole on the pin.
Insert the pin into the shell. Screw the clamp nut into the shell. (Tighten by turning the clamp nut. Do not tighten by turning the shell.)
30
Cover with heat-shrink tubing and heat.
2-4

2. WIRING
2.2 Distress Alert/Received Call Unit IC-305Use the installation materials CP16-02201 to connect the IC-305. The optional CO-SPEVV-SB-C 0.2x5P cable or JIS cable (Japan Industrial Standard) TTYCS(LA)-4 or equivalent are available to connect with the junction box IC-305. Select the cable clamp attached according to the diameter of cable, and fix the armor of the cable with the clamp.
Wiring of distress alert IC-305
2.3 Alarm Unit IC-306A maximum of three alarm units can be connected to the junction box IC-318, in par-allel. To distinguish the incoming indictors, set jumper wires for the second alarm unit as shown below. For connection, refer to 2.2 Distress Alert/Received Call Unit IC-305.”
Alarm unit IC-306
No.1 (default setting) No.2 No.3JP1 Open Open ShortJP2 Short Open Open
Distress alert IC-305
16P0213
1 2 3 4 5
15 mm 40 mm 10 mm
CO-SPEVV-SB-C 0.2X5P or TTYCS(LA)-4
Cut unused cables.
For TTYCS-4 (JIS) or equivalent
For CO-SPEVV-SB-C 0.2x5P
Twist the shield.(or drain wire)
JP2JP1
16P0213
2-5

2. WIRING
2.4 Junction Box IC-318Use the junction box IC-318 to connect the distress alert/received call unit IC-305 and other units (max. four units) to the terminal unit. Unfasten four screws to remove the units cover to connect cables.
For connection, use the optional 5 pair cable CO-SPEVV-SB-C 0.2x5P, JIS cable (Ja-pan Industrial Standard) TTYCS(LA)-4 or equivalent.
Junction Box IC-318
Input sentences
The following sentences can be input by a GPS navigator.
Input sentences
BWC, BWR, DBT, DTM, GGA, GLL, GNS, GSA, MTW, RMA, RMB, RMC, VDO, VDR, VTG, WPL, ZDA
Cover
Terminal board
Procedure1. Insert from direction 1 .
2. Tilt slightly toward 2 .
3. Insert cable core to 3 .
Core 7 mm
12
3
VccGNDTD/RD-ATD/RD-BNCALM-H
RD-A(NAV)RD-B(NAV)GNDSSAS OUT-HSSAS OUT-CSSAS IN-HSSAS IN-CSSAS CTR
IC-3
05/3
06123456789101112131415
Cable clamp
4. Pull out the screwdriver.
Note 1: Do not insert the wire deeply, to prevent pinching its sheath.
Note 2: Pull the wire slightly to confirm that it is in the slot correctly.
Sticker for connection of other equipment
ALM-C
For TTYCSLA cable, use the screws and crimp-on lugs shown below to connect the drain wire of that cable.
Screws and crimp-on lugs(supplied in the IC-318)
IC-318, inside viewFold back
15 mm 90 mm 7 mm
2-6

3. INITIAL SETTINGS
This chapter shows you how to setup the equipment. Some procedures require entry of job no. and password. Ask your dealer.
3.1 How to Set the IMN (INMARSAT MOBILE NO.)Set your IMN (Inmarsat Mobile No.) as shown below.
1. Turn the power on.2. Press the function key [F8] to show the [Setup] menu.
3. Press 1 key to display the [System Setup] menu.
4. Confirm that [IMN] is selected, and then press the Enter key.An input box appears.
5. Key in your IMN.6. Press the Enter key.
To clear the IMN, select [IMN], then press I, M, N while pressing the Alt key.7. Press the Esc key.8. Press the Enter key.
Setup
File Edit Transmit EGC Reports Logs Options Setup Distress StopAlarm
1. System Setup2. Editor Setup3. Terminal Setup4. EGC Setup5. Auto Mode Setup6. E-Mail Setup7. Directories8. Configuration
SetupSystem Setup
01:53 12-02-25 (YY-MM-DD)
INMARSAT-CEXTONINTINT
System Date & TimeIMNMES Operation ModeNav PortLAN PortMessage Output PortEGC Output PortNetwork SetupCommand Window
3-1

3. INITIAL SETTINGS
3.2 How to Set External EquipmentThe FELCOM 18 is set at the factory to accept the distress alert/received call unit IC-305, up to three alarm units IC-306 and the SSAS alert unit IC-307. If the configuration is different, change the setting to OFF as below.
1. Press the F8 key to show the [Setup] menu.2. Press the 1 key to show the [System Setup] menu.3. Press the ↓ key to select [Command Window], and then press Enter key to show
the [Command Window] screen.4. Enter the [Enter JOB No.:], and then press the Enter key.5. Enter the [PASSWORD:], and then press the Enter key.
[Main Menu] is highlighted.6. Press the 1 and Enter keys in order.
Command Window screen7. Press the number key for unit not connected.
Setting window for IC-3078. If the unit is not connected, press the 1 key, and the Enter key.
To return to the [Remote Box Setup] menu, press the E key (not any numeric key).9. Repeat step 7 to step 8 for other units not connected.10. Press the Esc key several times to close the menu.
SetupSystem Setup
01:53 02-02-25 (YY-MM-DD)
INMARSAT-C
System Date & TimeIMNMES Operation Mode Command Window
[ Main Menu ]1. Remote Box Setup2. External Alarm Setup
Enter JOB No.: 13. AMS Setup
[ Remote Box Setup ]1. SSAS OFF2. IC-305 ON3. IC-306 No.1 ON4. IC-306 No.2 OFF5. IC-306 No.3 OFFE: ExitEnter No.:
[ SSAS ]1. OFF2. IC-307 (Standard SSAS)3. IC-307 (Russia SSAS)4. SSAS(Momentary SW) E: Exit
3-2

3. INITIAL SETTINGS
3.3 How to Set the Alarm Contact1. Press the F8 and 1 keys to show the [System Setup] menu.2. Press ↓ to select [Command Window], and then press the Enter key.3. Enter the [Enter JOB No.:], then press the Enter key.4. Enter the [PASSWORD:], and then press the Enter key.
[Main Menu] is highlighted.5. Press the 2 key, and the Enter key.
6. Press a numeric key (1 to 4), then press the Enter key. To detect the error on a unit, press 4 and Enter in order.
7. Press the 1, and Enter keys.To return to the [External Alarm Setup] menu, press the E key.
8. Repeat steps 6 and 7 to set other alarm contacts.9. Press the Esc key several times to close the menu.
3.4 How to Set up the AMSDo the following to connect the AMS (Alert Management System).
1. Press the F8 and 1 keys to show the [System Setup] menu.2. Press ↓ to select [Command Window], and then press the Enter key.3. Enter the [Enter JOB No.:], then press the Enter key.4. Enter the [PASSWORD:], then press the Enter key.5. Press the 3 key, and the Enter key.
6. Press appropriate numeric key (1 to 4), then press the Enter key. To return to the [AMS Setup Menu], press the E key at the setting window.
[ External Alarm Setup ]
2. Distress EGC : ON3. Urgent EGC : ON4. Unit Fault : OFFE: Exit
Enter No.:
Command Window
1. Distress Message : ON
[ Unit Fault ]
2. OFF E: Exit1. ON
[ AMS Setup Menu ]
2. MY SFI Setup3. AMS SFI Setup4. Error LogE: Exit
Enter JOB No.:
Command Window
1. Mode Setup
3-3

3. INITIAL SETTINGS
1 key: [Mode Setup]
Set the AMS mode.[Legacy]: Select when no AMS is connect-ed.[AlertIF1]: Select when AMS is connected.
For [AlertIF1], an option window is shown. To return to the [AMS Setup Menu] from this window, press the E key twice.
[Distress Alarm Stop Enable]: The AMS can stop the alarm sound when the Dis-tress Priority message is received.[Distress Alarm Stop Disable]: The AMS can not stop the alarm sound when the Distress Priority message is received.
2 key: [MY SFI Setup]
Set the SFI of FELCOM18. Enter the four-digit number that follows “CS”.
3 key: [AMS SFI Setup]
Set the SFI of the AMS. Enter the two alpha-bet characters and four-digit number.
4 key: [Error Log]
The [Error Log] compiles AMS re-lated errors. To delete an error log entry, select the log then press the 1, Enter key.
The error log holds 4294967296 entries. When that count is reached, the message "LIMIT MAX" appears.
7. Press the Esc key several times to close the menu.
[ Mode Setup ]
2. AlertIF1E: ExitEnter AMS Mode No.:
Command Window
1. Legacy ON
[ Mode Setup ]
2. AlertIF1E: ExitEnter AMS Mode No.:
Command Window
1. Legacy ON[ AlertIF1 Option ]
2. Distress Alarm Stop Disable ONE: ExitEnter AlertIF1 Option No.:
Command Window
1. Distress Alarm Stop Enable
[ MY SFI Setup ]
0000 to 9998: SFI No.E: ExitEnter SFI No.:
Command Window
SFI CS0001
[ AMS SFI Setup ]
E: ExitEnter SFI:
Command Window
SFI II0001
[ Error Log ]
Command Window
Datagram header error xxxxxxxxxx*TAG block formatting error xxxxxxxxxxTAG checksum error xxxxxxxxxxTAG syntax error xxxxxxxxxxTAG framing error xxxxxxxxxxSentence syntax error xxxxxxxxxxTotal 4294967295 LIMIT MAX
1. Log ClearE: ExitEnter JOB No.:
*: xxxxxxxxxx: Error log count
3-4

3. INITIAL SETTINGS
3.5 How to Select Position-fixing EquipmentSelect the position-fixing equipment that is to feed navigation data to the FELCOM.
1. Press the F8 and 1 keys to show the [System Setup] menu.2. Select [NAV Port] then press the Enter key.3. Select the navigator to use, then press the Enter key.
OFF: No navigator connected.Auto: If two or more navigators are connected, the FELCOM automatically selects the position sensor in the order of GPS and Loran C.INT: Use the navigator that is built into the terminal unit.EXT: Use an external navigator.
4. Press the Esc key several times to close the menu. The [Update] window ap-pears.
5. Select [Yes] then press the Enter key.
3.6 How to Set up for 2nd DTEFor a 2nd DTE, do the procedure shown below.
1. Press the F8 and 3 keys to show the [Terminal Setup] menu.
Terminal Setup menu (for 2nd DTE)2. [Connection] shows the name of the terminals available for connection to the LAN
interface. Press the Enter key to show the [Connect List].
The No., Name, IMN, IP address and software version of each terminal are shown. The asterisk marks the terminal currently selected for communication.
3. To connect to a different terminal, select it then press the Enter key. The [Con-nect] window appears and [Yes] is selected. Press the Enter key to connect the terminal.
ConnectionDate Disp. Form YY-MM-DDScreen Saver OFFWindow Color
Terminal Setup
No. Name IMN IP Address Software Version*01 F18_123456 123432588 172.31.16.100/24 1650247-01 02 F18_133234 456789210 192.168.16.11/24 1650247-01 03 04 05 06 07 08 09 10
Connect List
3-5

3. INITIAL SETTINGS
This page is intentionally left blank.
3-6
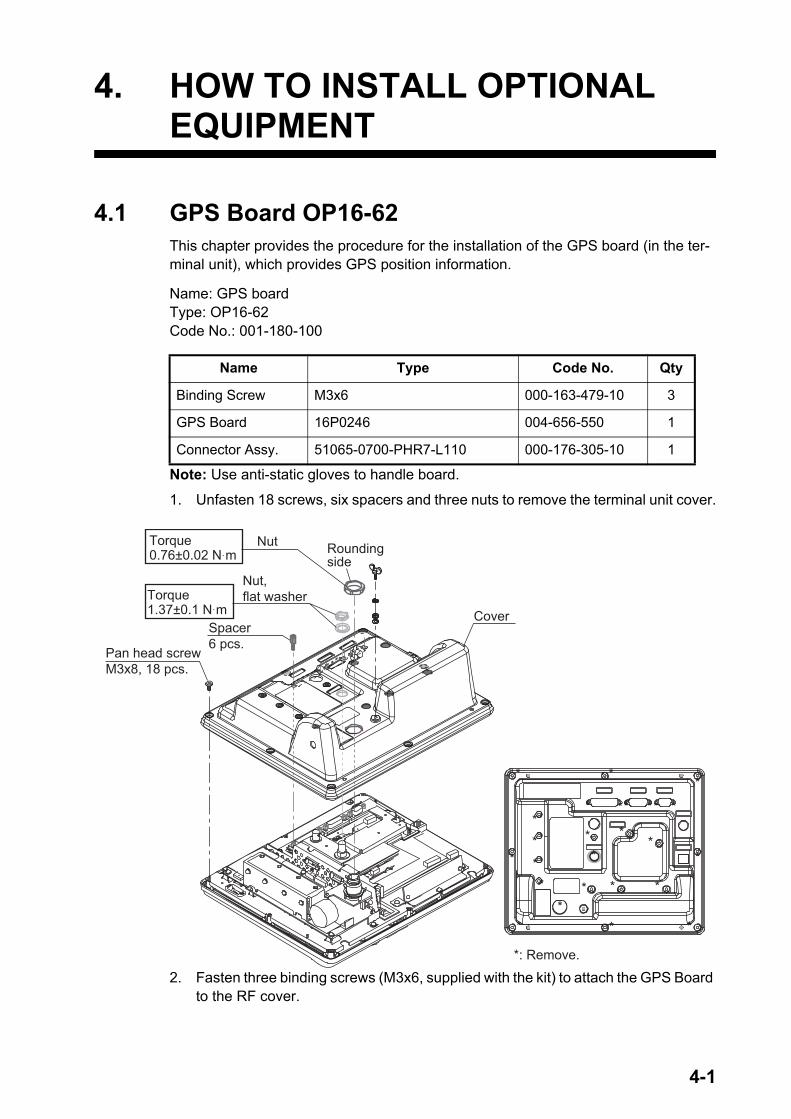
4. HOW TO INSTALL OPTIONAL EQUIPMENT
4.1 GPS Board OP16-62This chapter provides the procedure for the installation of the GPS board (in the ter-minal unit), which provides GPS position information.
Name: GPS boardType: OP16-62Code No.: 001-180-100
Note: Use anti-static gloves to handle board.
1. Unfasten 18 screws, six spacers and three nuts to remove the terminal unit cover.
2. Fasten three binding screws (M3x6, supplied with the kit) to attach the GPS Board to the RF cover.
Name Type Code No. Qty
Binding Screw M3x6 000-163-479-10 3
GPS Board 16P0246 004-656-550 1
Connector Assy. 51065-0700-PHR7-L110 000-176-305-10 1
CoverSpacer6 pcs.
Nut, flat washer
Pan head screwM3x8, 18 pcs.
Torque1.37±0.1 N m
Torque0.76±0.02 N m Rounding
side
*
*
* * *
*
**
* ** * ****
** * * *
***
*
*
*: Remove.
Nut
4-1

4. HOW TO INSTALL OPTIONAL EQUIPMENT
3. Attach the 51065-0700-PHR7-L110 connector assy. between J13 on the TERM-CPU Board and J1 on the GPS board.
4. Attach the cable from the GPS board to J6 on the RF COMMCPU Board.Use the clamp next to the connector to fix the cable.
5. Reassemble the terminal unit.
4.2 IPX2 Kit OP16-58/OP16-59The optional kits OP16-58 and OP16-59 are used to protect the connectors on the ter-minal unit from water splash. Note that these optional kits should be used as a pair.
4.2.1 OP16-58 (cables)Connect the waterproofed D-sub cables to the rear of the terminal unit, instead of the standard supply cable. For the connection at the IC-318, see section 4.3.
OP16-58 (Code No.: 001-180-070)
Name Type Code No. Qty
Cable Assy. H230817-1 001-176-552-10 1
H230817-2 000-176-553-10 1
XM-FD-361 000-176-551-10 1
GPS board
Binding screwM3x6, 3 pcs.
J13
J6
4-2

4. HOW TO INSTALL OPTIONAL EQUIPMENT
4.2.2 OP16-59 (for connector ports)
OP16-59 (001-180-080)
USB port
Name Type Code No. Qty
Sponge for Dsub 16-023-3531 100-369-600-10 1
Cover for BNC 16-023-3534 100-369-630-10 1
Cover for USB 16-023-3535 100-369-641-10 1
USB Support 16-023-3536 100-369-650-10 1
Sponge for BNCR 16-023-3541 100-369-690-10 1
Dummy Plate 9P 16-023-3542 100-368-190-10 1
Dummy Plate 15P 16-023-3543 100-369-700-10 1
Dummy Plate 25P 16-023-3544 100-369-710-10 1
Binding Screw #4-40UNCX3/16 000-176-619-10 6
Attach the cover for USB (16-023-3535) to the USB connector, then connect it to the terminal unit.
Cover for USB (triangle mark should be upward.)Cover for USB (triangle mark should be upward.)
Fasten two binding screws (pre-attached) to fix the USB support (16-023-3536) as shown right.
USB supportUSB support
1
2
4-3

4. HOW TO INSTALL OPTIONAL EQUIPMENT
D-sub ports
Peel the paper from the sponge for Dsub (16-023-3531), then attach the sponge to the D-sub connectors at the rear of the terminal unit.
Connect the cables supplied with OP16-58 to the appro-priate ports.
1
Sponge for DsubSponge for Dsub
2
Use the binding screws (#4-40UNCx3/16) to fix the dummy plates (for 9P, 15P and 25P) to the appropriate ports.
(Cables connected)
(No cables connected)
4-4

4. HOW TO INSTALL OPTIONAL EQUIPMENT
DGPS port
(Coaxial cable connected)
Pass the coaxial cable through the slit on the cover for BNC (16-023-3534).
Attach the connector* of the coaxial cable to the DGPS port.
USB supporUSB suppor
1
2
Cover for BNCCover for BNC
Slide the cover for BNC on the connector to cover the connector. Confirm that the triangle mark on the cover is upward.
3
Triangle markTriangle mark
*For waterproofing, use the connector assy. shown below:-BNCP-58U-BNCP L-200 (000-161-953-11)-BNCP-58U-BNCP L-290 (000-175-274-11)
4-5

4. HOW TO INSTALL OPTIONAL EQUIPMENT
(Coaxial cable not connected)
Remove the cap from the DGPS port, then atttach the sponge for BNCR (16-023-3541) around the port.
Re-attach the cap to the DGPS port.
1
2
CapCap
Sponge for BNCRSponge for BNCR
4-6

4. HOW TO INSTALL OPTIONAL EQUIPMENT
4.3 Waterproofing Kit OP16-60/OP16-67/OP16-68To mount the IC-318, IC-305 and IC-307 on a bulkhead, use the optional waterproof-ing kit to keep water splash out of the unit
OP16-60 (for IC-318)
OP16-60 (Code No.: 001-180-090)
When the OP16-58 (described in paragraph 4.2.1) is used, replace the cable from the IC-318 with the XM-FD-361 as shown below.
Name Type Code No. Qty
Cover gasket 16-023-5502 100-373-530-10 1
Grommet 16-023-5503 100-373-540-10 1
Attach the grommet to this notch.
Cable assy.XM-FD-361
Attach the cover gasket to here (reverse side).
Pan head screw(M4x8, 2 pcs.)
# Color 1 Blue 2 Brown 3 Purple 4 Gray 5 - 6 Green 7 Yellow 8 Orange 9 Pink 10 Light-green 11 White (w/black dots) 12 White (w/red dots) 13 Black 14 Red 15 Light-blue
4-7

4. HOW TO INSTALL OPTIONAL EQUIPMENT
OP16-67 (for IC-305), OP16-68 (for IC-307)
Note: These kits cannot be used if the IC-305/IC-307 is mounted face upward.
OP16-67 (Code No.: 001-189-380)
OP16-68 (Code No.: 001-189-400)
1. Unfasten four screws to remove cover of IC-305/IC-307.2. Attach supplied fixing tape to the underside of the cover as shown in the illustra-
tion below.
3. Attach the cover.4. For IC-307, remove the seal from the waterproofing cover and attach the cover as
shown in the illustration below.
Name Type Code No. Qty
Fixing Tape 24-009-1225 100-366-200-10 2
Name Type Code No. Qty
Waterproofing Cover 16-023-5501 100-374-950-10 1
Fixing Tape 24-009-1225 100-368-200-10 2
Fixing tape
(IC-305) (IC-307)
4-8

5. HOW TO CHANGE POWER SUP-PLY SPECIFICATIONS
The AC-DC power supply PR-240 is shipped ready for connection to a 200-230 VAC ship’s mains. If the ship’ mains is 100 VAC, change the tap connection and terminal board connection as below. Attach a label supplied as accessories to the front panel according to the ship’s mains.
Note: The DC output load must be less than 8 A.
Ship’s mains Tap connection Terminal board Label
200 to 230 VAC SEL 230 V Below (a) 200-230 VAC, 2.2-1.7 A, 1φ 50/60 Hz
100 to 115 VAC SEL 115 V Below (b) 100-115 VAC, 3.2-2.6 A, 1φ 50/60 Hz
Remove screw and cover.
Cover
12345678
SEL 115V
123
100-115 VAC
123
200-230 VAC(a)
(b)
Output Setting: Normal Close Set plug to 2 & 3 pins of J4 (Factory setting) Normal Open Set plug to 1 & 2 pins of J4
AC Power Switch(When connecting DC input, note that the DC power is supplied even though this switch is turned off.)
Heat sink
Tap connection (Pull out to disconnect.)
Front panel
Terminal board
GrayBlack
Gray
Black
Attach appropriate label.Front panel
CoilRelay
321
J4
AC FAIL: Connect to Alarm system.
SEL 230V
5-1

5. HOW TO CHANGE POWER SUPPLY SPECIFICATIONS
This page is intentionally left blank.
5-2

APPENDIX 1 JIS CABLE GUIDE
CoreType Area Diameter
The following reference table lists gives the measurements of JIS cables commonly used with Furuno products:
TTYCSLA-4
MPYC-4
TPYCY
DPYCY
Cable Diameter
DPYC-1.5 1.5mm2 1.56mm 11.7mmDPYC-2.5 2.5mm2 2.01mm 12.8mmDPYC-4 4.0mm2 2.55mm 13.9mmDPYC-6 6.0mm2 3.12mm 15.2mmDPYC-10 10.0mm2 4.05mm 17.1mmDPYCY-1.5 1.5mm2 1.56mm 13.7mmDPYCY-2.5 2.5mm2 2.01mm 14.8mmDPYCY-4 4.0mm2 2.55mm 15.9mmMPYC-2 1.0mm2 1.29mm 10.0mmMPYC-4 1.0mm2 1.29mm 11.2mmMPYC-7 1.0mm2 1.29mm 13.2mmMPYC-12 1.0mm2 1.29mm 16.8mmTPYC-1.5 1.5mm2 1.56mm 12.5mmTPYC-2.5 2.5mm2 2.01mm 13.5mmTPYC-4 4.0mm2 2.55mm 14.7mmTPYCY-1.5 1.5mm2 1.56mm 14.5mmTPYCY-2.5 2.5mm2 2.01mm 15.5mmTPYCY-4 4.0mm2 2.55mm 16.9mm
TTYCS-1 0.75mm2 1.11mm 10.1mmTTYCS-1T 0.75mm2 1.11mm 10.6mmTTYCS-1Q 0.75mm2 1.11mm 11.3mmTTYCS-4 0.75mm2 1.11mm 16.3mmTTYCSLA-1 0.75mm2 1.11mm 9.4mmTTYCSLA-1T 0.75mm2 1.11mm 10.1mmTTYCSLA-1Q 0.75mm2 1.11mm 10.8mmTTYCSLA-4 0.75mm2 1.11mm 15.7mmTTYCY-1 0.75mm2 1.11mm 11.0mmTTYCY-1T 0.75mm2 1.11mm 11.7mmTTYCY-1Q 0.75mm2 1.11mm 12.6mmTTYCY-4 0.75mm2 1.11mm 17.7mmTTYCY-4S 0.75mm2 1.11mm 21.1mmTTYCY-4SLA 0.75mm2 1.11mm 19.5mmTTYCYS-1 0.75mm2 1.11mm 12.1mmTTYCYS-4 0.75mm2 1.11mm 18.5mmTTYCYSLA-1 0.75mm2 1.11mm 11.2mmTTYCYSLA-4 0.75mm2 1.11mm 17.9mm
EX: TTYCYSLA - 4 MPYC - 4Designation type Core Area (mm2) Designation type # of cores
1 2 3 4 5 6 1 2 3 4
Cables listed in the manual are usually shown as Japanese Industrial Standard (JIS). Use the following guide to locate an equivalent cable locally.
JIS cable names may have up to 6 alphabetical characters, followed by a dash and a numerical value (example: DPYC-2.5).For core types D and T, the numerical designation indicates the cross-sectional Area (mm2) of the core wire(s) in the cable.For core types M and TT, the numerical designation indicates the number of core wires in the cable.
1. Core TypeD: Double core power lineT: Triple core power lineM: Multi coreTT: Twisted pair communications
(1Q=quad cable)
2. Insulation TypeP: Ethylene Propylene Rubber
3. Sheath TypeY: PVC (Vinyl)
4. Armor TypeC: Steel
5. Sheath TypeY: Anticorrosive vinyl
sheath
6. Shielding TypeS: All cores in one sheath-S: Indivisually sheathed coresSLA: All cores in one shield, plastic
tape w/aluminum tape-SLA: Individually shielded cores,
plastic tape w/aluminum tape
CoreType Area Diameter
Cable Diameter
AP-1

NAME
OUTLINE
Q'TY
DESCRIPTION/CODE №
PA
CK
IN
G
LI
ST
16AV-X-9862-2
FELCOM18-A-E-30, FELCOM18-A-E-30-HK, FELCOM18-A-G-E-30
1/1
NAME
OUTLINE
Q'TY
DESCRIPTION/CODE №
ユニ
ット
UNIT
アンテナユニツト
ANTE
NNA
UNIT
IC-118*
000-020-943-00
1
**
タ-ミナルユニツト
TERM
INA
L UNI
TIC-218-A*
000-020-961-00
1
**
接続箱
JUNC
TIO
N BOX
IC-318
000-020-971-00
1
予備
品SPARE PARTS
予備品
SPAR
E P
ARTS
SP16-01301
004-439-370-00
1
付属
品ACCESSORIES
ミニ キーボード
KEYB
OAR
D5139U
000-176-235-10
1
付属品
ACCE
SSO
RIES
FP16-02501
001-175-970-00
1
工事
材料
INSTALLATION MATERIALS
ケーブル組品
CABL
E A
SSY.
TP5FBAW-5DFB 30M
000-159-523-11
1
ケーブル組品MJ
CABL
E A
SSY.
MJ-A3SPF0018-050ZC
000-154-025-10
1
工事材料
INST
ALL
ATION
MATE
RIALS
CP16-05101
001-180-020-00
1
工事材料
INST
ALL
ATION
MATE
RIALS
CP16-05201
001-179-830-00
1
工事材料
INST
ALL
ATION
MATE
RIALS
CP16-05202
001-184-540-00
1
工事材料
INST
ALL
ATION
MATE
RIALS
CP16-05511
001-189-560-00
1
図書
DOCUMENT
アプリケーションフォ-ム
REGI
STR
ATION
FOR
SERVI
CE
ACTI
VAT
ION
J59-50010-* ワ/
エイ
000-807-330-1*
1
アンテナ交換方法
ANTE
NNA
INST
ALL/R
EPALC
ETIC-56351-*
000-173-370-1*
1
ヒューズ変更のお願い
NOTI
FIC
ATION
DOCU
MENT
C52-00206-* ワ/エイ
000-147-004-1*
1
機器引渡し前の注意
BEFO
RE
DELIV
ERING
TO O
WNER
C52-00201-* ワ/
エイ
000-809-353-1*
1
取扱説明書(英)
OPER
ATO
R'S M
ANUAL
(EN)
OME-56351-*
000-150-359-1*
1
取扱説明書(英)
OPER
ATO
R'S M
ANUAL
(EN)
OME-56740-*
000-176-509-1*
1
操作要領書(英)
OPER
ATO
R'S G
UIDE
(EN)
OSE-56740-*
000-176-510-1*
1
装備要領書(英)
INST
ALL
AION
MANUA
L (EN
)IME-56740-*
000-176-519-1*
1
遭難通信要領
DIST
RES
S COM
MUNIC
ATION
TIC-
56350-* ワ/
エイ
000-809-352-1*
1
コ-ド
番号
末尾
の[*
*]は
、選
択品
の代
表コー
ドを
表し
ます
。
CO
DE N
UM
BER
EN
DIN
G W
ITH
"**" IN
DIC
ATES T
HE C
OD
E N
UM
BER
OF R
EP
RESEN
TA
TIV
E M
ATER
IAL.
(略
図の寸
法は
、参考
値で
す。 DIMENSIONS IN DRAWING FOR REFERENCE ONLY.)
型式
/コー
ド番
号が
2段
の場
合、
下段
より
上段
に代
わる
過渡
期品
であ
り、
どち
らか
が入
って
いま
す。
な
お、
品質
は変
わり
ませ
ん。
TW
O T
YP
ES
AN
D C
OD
ES
MA
Y B
E L
ISTED
FO
R A
N ITEM
. T
HE L
OW
ER
PR
OD
UC
T M
AY B
E S
HIP
PED
IN
P
LA
CE O
F T
HE U
PP
ER
PR
OD
UC
T. Q
UA
LIT
Y IS
TH
E S
AM
E.
C5674-Z07-CA-1

NAME
OUTLINE
Q'TY
DESCRIPTION/CODE №
PA
CK
IN
G
LI
ST
16AV-X-9866-2
FELCOM18-A-E-30-SSAS,FELCOM18-A-G-E30SSAS
1/2
NAME
OUTLINE
Q'TY
DESCRIPTION/CODE №
ユニ
ット
UNIT
アンテナユニツト
ANTENNA UNIT
1
**
IC-118*
000-020-943-00
タ-ミナルユニツト
TERMINAL UNIT
1
**
IC-218-A*
000-020-961-00
接続箱
JUNCTION BOX
1IC-318
000-020-971-00
保安警
報発呼器
SSAS ALERT UNIT
2IC-307
000-043-474-00
予備
品SPARE PARTS
予備品
SPARE PARTS
1SP16-01301
004-439-370-00
付属
品ACCESSORIES
ミニ キーボード
KEYBOARD
15139U
000-176-235-10
付属品
ACCESSORIES
2FP16-00901
004-448-050-00
付属品
ACCESSORIES
1FP16-02501
001-175-970-00
工事
材料
INSTALLATION MATERIALS
ケーブル組品
CABLE ASSY.
1TP5FBAW-5DFB 30M
000-159-523-11
ケーブル組品MJ
CABLE ASSY.
1MJ-A3SPF0018-050ZC
000-154-025-10
工事材
料
INSTALLATION MATERIALS
2CP16-03101
004-448-040-00
工事材
料
INSTALLATION MATERIALS
1CP16-05101
001-180-020-00
工事材
料
INSTALLATION MATERIALS
1CP16-05201
001-179-830-00
工事材
料
INSTALLATION MATERIALS
1CP16-05202
001-184-540-00
工事材
料
INSTALLATION MATERIALS
1CP16-05511
001-189-560-00
コ-ド
番号
末尾
の[*
*]は
、選
択品
の代
表コー
ドを
表し
ます
。
CO
DE N
UM
BER
EN
DIN
G W
ITH
"**" IN
DIC
ATES T
HE C
OD
E N
UM
BER
OF R
EP
RESEN
TA
TIV
E M
ATER
IAL.
(略
図の
寸法
は、
参考
値で
す。
DIM
EN
SIO
NS IN
DR
AW
ING
FO
R R
EFER
EN
CE O
NLY.)
型式
/コー
ド番
号が
2段
の場
合、
下段
より
上段
に代
わる
過渡
期品
であ
り、
どち
らか
が入
って
いま
す。
な
お、
品質
は変
わり
ませ
ん。
TW
O T
YP
ES
AN
D C
OD
ES M
AY B
E L
ISTED
FO
R A
N ITEM
. T
HE L
OW
ER
PR
OD
UC
T M
AY B
E S
HIP
PED
IN
PLA
CE O
F
TH
E U
PP
ER
PR
OD
UC
T. Q
UA
LIT
Y IS
TH
E S
AM
E.
C5674-Z11-C(1)
A-2

NAME
OUTLINE
Q'TY
DESCRIPTION/CODE №
PA
CK
IN
G
LI
ST
16AV-X-9866-2
FELCOM18-A-E-30-SSAS,FELCOM18-A-G-E30SSAS
2/2
NAME
OUTLINE
Q'TY
DESCRIPTION/CODE №
図書
DOCUMENT
IC-30X引き渡し前の注意
BEFORE DELIVERING TO
OWNER
1C52-00202-*
000-809-354-1*
アプリケーションフォ-ム
REGISTRATION FOR
SERVICEACTIVATION
1J59-50010-* ワ/エイ
000-807-330-1*
アンテナ交
換方法
ANTENNA INSTALL/REPALCE
1TIC-56351-*
000-173-370-1*
カバー貼
付要領書
ATTACHMENT OF SWITCH
COVER
1C52-00403-*
000-150-849-1*
ヒューズ変更のお願い
NOTIFICATION DOCUMENT
1C52-00206-* ワ/エイ
000-147-004-1*
機器引
渡し前の注意
BEFORE DELIVERING TO
OWNER
1C52-00201-* ワ/エイ
000-809-353-1*
取扱説
明書(英
)
OPERATOR'S MANUAL (EN)
1OME-56351-*
000-150-359-1*
取扱説
明書(英
)
OPERATOR'S MANUAL (EN)
1OME-56740-*
000-176-509-1*
操作要
領書(英
)
OPERATOR'S GUIDE (EN)
1OSE-56740-*
000-176-510-1*
装備要
領書(英
)
INSTALLAION MANUAL (EN)
1IME-56740-*
000-176-519-1*
遭難通
信要領
DISTRESS COMMUNICATION
1TIC-56350-* ワ/エイ
000-809-352-1*
コ-ド
番号
末尾
の[*
*]は
、選
択品
の代
表コー
ドを
表し
ます
。
CO
DE N
UM
BER
EN
DIN
G W
ITH
"**" IN
DIC
ATES T
HE C
OD
E N
UM
BER
OF R
EP
RESEN
TA
TIV
E M
ATER
IAL.
(略
図の
寸法
は、
参考
値で
す。
DIM
EN
SIO
NS IN
DR
AW
ING
FO
R R
EFER
EN
CE O
NLY.)
型式
/コー
ド番
号が
2段
の場
合、
下段
より
上段
に代
わる
過渡
期品
であ
り、
どち
らか
が入
って
いま
す。
な
お、
品質
は変
わり
ませ
ん。
TW
O T
YP
ES
AN
D C
OD
ES M
AY B
E L
ISTED
FO
R A
N ITEM
. T
HE L
OW
ER
PR
OD
UC
T M
AY B
E S
HIP
PED
IN
PLA
CE O
F
TH
E U
PP
ER
PR
OD
UC
T. Q
UA
LIT
Y IS
TH
E S
AM
E.
C5674-Z11-C(2)
A-3

NAME
OUTLINE
Q'TY
DESCRIPTION/CODE №
PA
CK
IN
G
LI
ST
16AV-X-9852-1
IC-218-A-E,IC-218-A-G-E,IC-218-A-E-HK
1/1
NAME
OUTLINE
Q'TY
DESCRIPTION/CODE №
ユニ
ット
UNIT
タ-ミナルユニツト
TERMINAL UNIT
1
**
IC-218-A*
000-020-961-00
予備
品SPARE PARTS
予備品
SPARE PARTS
1SP16-01301
004-439-370-00
付属
品ACCESSORIES
FP16
-0260
0
ミニ キーボード
KEYBOARD
15139U
000-176-235-10
工事
材料
INSTALLATION MATERIALS
CP16
-0520
0
ケーブル組品MJ
CABLE ASSY.
1MJ-A3SPF0018-050ZC
000-154-025-10
工事材
料
INSTALLATION MATERIALS
1CP16-05201
001-179-830-00
工事材
料
INSTALLATION MATERIALS
1CP16-05202
001-184-540-00
図書
DOCUMENT
アプリケーションフォ-ム
REGISTRATION FOR
SERVICEACTIVATION
1J59-50010-* ワ/エイ
000-807-330-1*
ヒューズ変更のお願い
NOTIFICATION DOCUMENT
1C52-00206-* ワ/エイ
000-147-004-1*
機器引
渡し前の注意
BEFORE DELIVERING TO
OWNER
1C52-00201-* ワ/エイ
000-809-353-1*
取扱説
明書(英
)
OPERATOR'S MANUAL (EN)
1OME-56351-*
000-150-359-1*
取扱説
明書(英
)
OPERATOR'S MANUAL (EN)
1OME-56740-*
000-176-509-1*
操作要
領書(英
)
OPERATOR'S GUIDE (EN)
1OSE-56740-*
000-176-510-1*
装備要
領書(英
)
INSTALLAION MANUAL (EN)
1IME-56740-*
000-176-519-1*
遭難通
信要領
DISTRESS COMMUNICATION
1TIC-56350-* ワ/エイ
000-809-352-1*
コ-ド
番号
末尾
の[*
*]は
、選
択品
の代
表コー
ドを
表し
ます
。
CO
DE N
UM
BER
EN
DIN
G W
ITH
"**" IN
DIC
ATES T
HE C
OD
E N
UM
BER
OF R
EP
RESEN
TA
TIV
E M
ATER
IAL.
(*1)の
書類
は、
英文
仕様
専用
です
。
(*1)
MA
RKED
DO
CU
MEN
TS A
RE F
OR
EN
GLIS
H S
ET O
NLY.
(略
図の
寸法
は、
参考
値で
す。
DIM
EN
SIO
NS IN
DR
AW
ING
FO
R R
EFER
EN
CE O
NLY.)
型式
/コー
ド番
号が
2段
の場
合、
下段
より
上段
に代
わる
過渡
期品
であ
り、
どち
らか
が入
って
いま
す。
な
お、
品質
は変
わり
ませ
ん。
TW
O T
YP
ES
AN
D C
OD
ES M
AY B
E L
ISTED
FO
R A
N ITEM
. T
HE L
OW
ER
PR
OD
UC
T M
AY B
E S
HIP
PED
IN
PLA
CE O
F
TH
E U
PP
ER
PR
OD
UC
T. Q
UA
LIT
Y IS
TH
E S
AM
E.
C5674-Z03-BA-4

A-6
A-5

A-8
A-7

A-10
A-9

A-12
A-11

A-14
A-13

D-1

D-2

D-3

24/Jan/2012Y.NISHIYAMA
西山義浩 電子署名者 :西山義浩 DN : cn=西山義浩, o, ou=情技課, [email protected], c=JP - 日本 日付 : 2012.01.24 15:12:11 +09'00'
D-4

D-5

D-6

D-7

D-8

D-9

D-10

D-11

D-12

26/Oct/09 R.Esumi
D-13

D-14

D-15

1 2 4 5 63
B
A
D
C
NAME
名称
TITLE
kgMASS
DWG No.
SCALE
APPROVED
CHECKED
DRAWN
REF.No.INTERCONNECTION DIAGRAM
相互結線図
FELCOM 18T.YAMASAKI
CO-0.2x5P: CO-SPEVV-SB-C 0.2x5P,φ13.5
H.MAKI
CO-0.2x2P: CO-SPEVV-SB-C 0.2x2P,φ10.5
4
USB
PRINTER
25
キーボードKEYBOARD
321 DC+
DC-GND
MJ-A3SPFDC IN
シロクロ
WHTBLK
7A(24V)15A(12V)
5m,φ11MJ-A3SPF0018-050Z
ANT
アンテナユニットANTENNA UNITIC-118
5D-FB-CV,30m,φ10.7: N-P-5DFB
12D-SFA-CV,100m,φ20: N-P-12DSFAFBA-5DFB,0.4mTPA5FB0.4NJ5
TP5FBAW-5DFBB,30m,φ7.7
TNCP-NJ
DGPSBNC
321
456789
GND 101112131415
2mVcc(ALM)
GNDTD/RD-ATD/RD-B
NC
RD-ARD-B
JUNCTION
接続箱
IC-318
ターミナルユニットTERMINAL UNITIC-218
COAX. CABLE(50Ω)DGPS DECODER
DGPSデコーダー
JUNCTION BOX
321
456789101112131415
1.5m
17JE-23250-02(D8C)
16S01843m,φ8
DC/DCコンバータDC/DC CONVERTER
*1
12 VDC
36
57-30363
RH12BPG-3S
PRINTERプリンタ
PP-510
VCTF-0.75x3C,5m,φ7
*2アカクロシロ
BLKWHT
RED(+)(-)GND
24 VDC(16S0084)
A TYPE
-02(D8C)17JE-23150
ALM-HALM-C
W=30,1.2mCOPPER STRAP銅板
インマルサット-C 船舶地球局
INMARSAT-C MES*3: CHANGE SETTING OF JUMPER IN IC-307 TO TERMINATE.
NOTE
*2: OPTION.*1: SHIPYARD SUPPLY.
注記*1)造船所手配。*2)オプション。*3)終端のIC-307はジャンパー設定を変更する。
*4)SSAS仕様のとき標準構成。
*4: STANDARD CONFIGURATION FOR SSAS.16-023-3001-1
保安警報発呼器SSAS ALERT UNITIC-307
321
45
P
P
321
45
遭難警報器
P
P
DISTRESS ALERT/RECEIVED CALL UNIT
IC-305
321
456 GND
SSAS_CTRLSSAS_IN-CSSAS_CHECKNCSSAS_OUT-H
VCCGNDTD/RD-ATD/RD-BGND
VCCGNDTD/RD-ATD/RD-BGND
P
P
IC-307
321
456
(No.2)
P
P
IC-307(No.3)
選択SELECT
CONNECTION FOR IC-350 (DO NOT USE W/ IC-305)
IC-350を接続するとき(IC-305との共用不可)
P
P321
456
*2 *3
CO-0.2x5P(*2)TTYCSLA-4(*1) OR
合計 :最大200mTOTAL: UP TO 200m
MAX. 3 UNITS AVAILABLE.最大3台まで接続可能
IC-318
ALARM SYSTEMアラームシステム
航法装置NAV EQUIPMENT
アラームユニットALARM UNITIC-306
*2
*2
*2 *3 *4*2 *3 *4
SSAS_CTRLSSAS_IN-C
SSAS_CHECKSSAS_OUT-CSSAS_OUT-H
TTYCSLA-4(*1) OR CO-0.2x5P(*2)
TTYCSLA-4(*1) OR CO-0.2x5P(*2)
TTYCSLA-1(*1) OR
TTYCSLA-1(*1) OR
CO-0.2x2P(*2)
CO-0.2x2P(*2)
+-
24VDCINAC
OUT
*2SUPPLY UNITAC/DC POWER
AC/DC
PR-240
電源ユニット+-
E
INDC
100-115/200-230 VAC1φ,50/60Hz
24 VDC
DPYC-2.5
DPYC-4*1
*1
PE
保護アース
*1IV-2sq.
12-24VDC
123
アラームユニット
IC-350ALARM UNIT
INMARSAT No.1/2TR-ATR-BFG
TTYCSLA-1(*1) OR
43
CO-0.2x2P(*2)
接続箱
IC-318JUNCTION BOX
321
456789101112131415
アオチャムラサキハイ
ミドリキダイモモウスミドリシロ/クロシロ/アカクロアカミズ
BLUBRNPPLGRY
GRNYELORGPNKL-GRNWHT/BLKWHT/RED
REDL-BLU
BLK
XM-FD-361,2m*2
ORまたはH230817-1(*2)防水仕様ケーブルWATERPROOF CABLE
防水仕様ケーブルWATERPROOF CABLE
321
456789101112131415
JUNCTION
IC-218
IV-2sq.*1
RJ458
LAN
STP(CAT5)*1
PC OR HUBパソコン/HUB
8D-FB-CV,40/50m,φ14.3: N-P-8DFB
12/Dec/2012
12/Dec/2012
C5674-C01- D
18/Dec/2012 Y.NISHIYAMA
S-1