installation instructions for jmp clinical 5 · installation instructions for jmp clinical 5.0 ......
TRANSCRIPT

Installation Instructions for JMP Clinical 5.0
These instructions describe the process for downloading and installing JMP Clinical 5.0 on your Win-dows desktop machine. These instructions include two major sections:
1 Download the Software
JMP Clinical 5.0 is downloaded using a small utility program called the SAS Download Manager. You will first download and install the SAS Download Manager and then run the Download Man-ager to download the installation files for JMP Clinical 5.0 as described in “Step 1: Download and Run the SAS Download Manager Application,” p. 3.
The installation files are placed in a folder known as the SAS Software Depot. The SAS software Depot is large (almost 10 Gigabytes), and it might take several hours for the SAS Download Man-ager to complete the download process.
2 Install the SoftwareFollow the instructions detailed in “Step 2: Install JMP Clinical Software,” p. 13.
3 AppendixesAppendixes provide instructions and suggestions for managing atypical installations and situa-tions.Appendix 1: Installing JMP Clinical from DVDAppendix 2: Increasing the Memory Allocation for SAS Processes Run under JMP Clinical
Before installing JMP Clinical, you should note the following important items:
• A SAS software depot can be used by multiple users. If there are multiple JMP Clinical users at your site, either the site administrator or a designated user should download the software (either electronically or from the DVDs) to a single SAS software depot. This depot should be located on a network server that is accessible to every user. Registered users can then use that single depot to install the software on their local machines.
• You should keep at least one copy of your SAS software depot, in case you need to reinstall the software again in the future.
• If you plan on using the client/server option in JMP Clinical, you must have JAVA 6 (v1.6) or later installed on the client machine before installing JMP Clinical. Software can be down-loaded from the JAVA website (http://java.com/en/download/index.jsp).

2 Installation Instructions for JMP Clinical 5.0
Before You Install JMP Clinical 5.0 Terminate all non-essential applications.
If the SAS Job Spawner is running as a service, it must be disabled.
Disable any anti-virus software that might be running.
If you are upgrading a prior version of JMP Clinical to JMP Clinical 5.0, you must uninstall the prior version before installing the new software.
Launch the Uninstall Utility
• In Windows 7, click Start > Control Panel > Uninstall a program.
Use the utility to uninstall SAS 9.3.
You should also delete the SASHome directory located in the C:\Program Files directory)
Description of Your Package
Electronic Delivery
After you submit your signed paperwork for JMP Clinical 5.0, you will receive an e-mail listing your site’s order number, an installation key code specific to this order and contact information for SAS Technical support.

Insta
llatio
n In
stru
ctio
ns fo
r JM
P C
linic
al 5
.0 Installation Instructions for JMP Clinical 5.0 3
DVD Delivery
In some cases, you can elect to receive JMP Clinical on DVD. See “Appendix 1: Installing JMP Clinical from DVD,” p. 29 for specific instructions for installing JMP Clinical from DVD.
Step 1: Download and Run the SAS Download Manager Appli-cation
You will NOT need to install the SAS Download Manager if:
• Your IT administrator has already done so. You will need to know the location of the SAS software depot. You should skip Step 1 and proceed directly to “Step 2: Install JMP Clinical Software,” p. 13.

4 Installation Instructions for JMP Clinical 5.0
You will need to install the SAS Download Manager if:
• You are a single user of JMP Life Sciences software.
• You are an IT administrator managing the software for multiple users.
Install the SAS Download Manager as described below.
The e-mail listing your site’s order number, an installation key code will also contain a link (circled below) to the SAS Download Manager. The SAS Download Manager application must be down-loaded and used to generate a local SAS Software Depot before JMP Clinical 5.0 can be installed.
Click the link in step 1 of the e-mailed instructions (circled above) to open the download window in your web browser.
Click on the link to the SAS Download Manager.
Select your Windows platform.
In this example, we are installing 64-bit JMP Clinical 5.0 on a Windows 7 machine. Therefore, we chose Microsoft Windows for x64.

Insta
llatio
n In
stru
ctio
ns fo
r JM
P C
linic
al 5
.0 Installation Instructions for JMP Clinical 5.0 5
Click to request the download for the desired platform.
A window will open asking you how to log in to your SAS Profile.

6 Installation Instructions for JMP Clinical 5.0
Either login to your existing SAS Profile or create a new Profile.
You must read and accept the SAS License agreement to proceed further.
Click to proceed.

Insta
llatio
n In
stru
ctio
ns fo
r JM
P C
linic
al 5
.0 Installation Instructions for JMP Clinical 5.0 7
Click .
Click Run.
A window asking you to launch the SAS Download Manager will open.
Click Run.
A window asking you to specify the language of your installation will open.
Select English and click OK.
Enter your order number and installation key (from the e-mail) in the text fields.

8 Installation Instructions for JMP Clinical 5.0
Click Next.
Examine the order details.

Insta
llatio
n In
stru
ctio
ns fo
r JM
P C
linic
al 5
.0 Installation Instructions for JMP Clinical 5.0 9
Click Next.
Make sure that Include complete order contents is selected.

10 Installation Instructions for JMP Clinical 5.0
Click Next.
Specify where the software depot is to be installed.
By default, the software depot is installed to the C:\SAS Software Depot directory. If this directory does not exist, it is created for you. You should accept the default location unless there is a pressing need to place the software elsewhere.
Click Next.
Click Yes.
Review the install information.

Insta
llatio
n In
stru
ctio
ns fo
r JM
P C
linic
al 5
.0 Installation Instructions for JMP Clinical 5.0 11
Click Back if you need to make any changes. Otherwise, click Download.
The download process begins. You must wait for this process to complete.
Note: This process can take an extended time.
When the download process is complete, the Next button is surfaced.

12 Installation Instructions for JMP Clinical 5.0
Click Next.

Insta
llatio
n In
stru
ctio
ns fo
r JM
P C
linic
al 5
.0 Installation Instructions for JMP Clinical 5.0 13
Click Finish.
Click Finish.
Proceed to “Step 2: Install JMP Clinical Software,” p. 13.
Step 2: Install JMP Clinical Software
Step 2a: Determine the location of the SAS Software Depot containing the JMP Clinical software to be installed.
By default, the location of the depot is C:\SAS Software Depot.

14 Installation Instructions for JMP Clinical 5.0
Step 2b: Open the SAS Software Depot.
Double-click on the setup icon ( ) to open the application.
Proceed to Step 2c.
Step 2c: Installation
Select English as the language that you want to view the SAS Deployment Wizard to display and click OK.
Select Install SAS Software and click Next.

Insta
llatio
n In
stru
ctio
ns fo
r JM
P C
linic
al 5
.0 Installation Instructions for JMP Clinical 5.0 15
By default, the software will be installed in the SASHome directory within Program Files. If this direc-tory does not exist, it will be created. You should accept this location.
Click Next.
Specify the type of deployment that you want to perform.
In most cases, unless you are an IT administrator, you will be installing only the SAS Foundation and related software.

16 Installation Instructions for JMP Clinical 5.0
Select Install SAS Foundation and Related Software and click Next.
The list of software to be installed is shown.
Insta
llatio
n In
stru
ctio
ns fo
r JM
P C
linic
al 5
.0 Installation Instructions for JMP Clinical 5.0 17
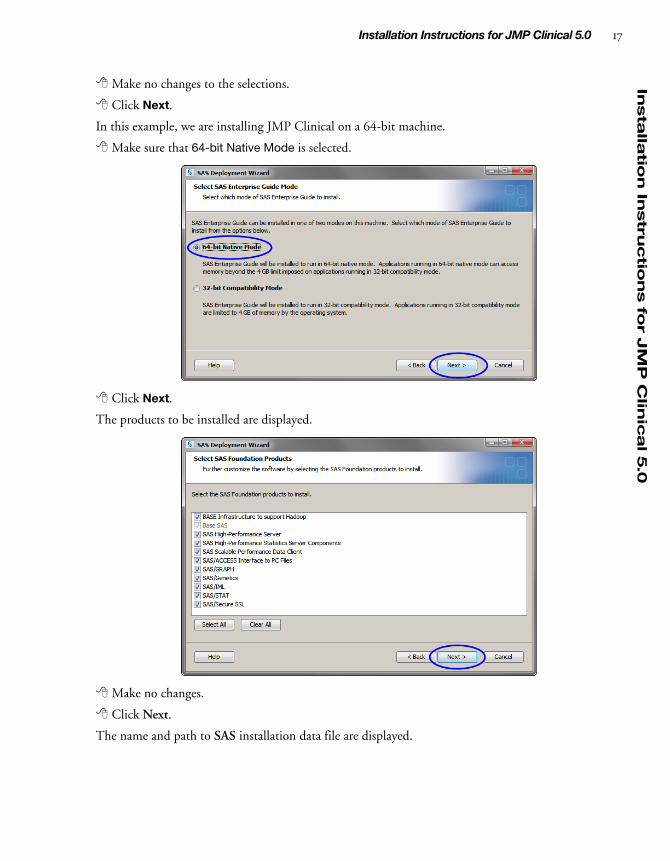
Make no changes to the selections.
Click Next.
In this example, we are installing JMP Clinical on a 64-bit machine.
Make sure that 64-bit Native Mode is selected.
Click Next.
The products to be installed are displayed.
Make no changes.
Click Next.
The name and path to SAS installation data file are displayed.

18 Installation Instructions for JMP Clinical 5.0
Make no changes.
Click Next.
The name and path to JMP installation data file are displayed.
Make no changes.
Click Next.
The list of language support files to be installed is shown.

Insta
llatio
n In
stru
ctio
ns fo
r JM
P C
linic
al 5
.0 Installation Instructions for JMP Clinical 5.0 19
Note: JMP Clinical is currently supported for English, Chinese, and Japanese. You can install Chinese and/or Japanese if needed. To save hard disk space, all other languages should be unchecked.
Click Clear All to deselect all languages except for English.
Check Chinese Simplified and/or Japanese, if desired.
Click Next.
By default, the regional settings default to United States English. This can be modified if needed.

20 Installation Instructions for JMP Clinical 5.0
Note: If you are installing JMP Clinical on a machine that supports a language other than English, and you plan to analyze data formated in English, you should check the Configure as Unicode Server check box to configure the software as a Unicode server. All data sets, catalogs, and text files are written in UTF-8 encoding. If you plan to analyze data in the language specified by the OS, you should not check the Configure as Unicode Server check box.
Click Next.
Select SAS Foundation (64-bit) as the default product to use when opening SAS files.
The Installer begins by checking your system for required components. You must wait for this process to complete.
Note: This process can take an extended time.

Insta
llatio
n In
stru
ctio
ns fo
r JM
P C
linic
al 5
.0 Installation Instructions for JMP Clinical 5.0 21
Click Next when the System Check is complete.
Examine the Deployment Summary.

22 Installation Instructions for JMP Clinical 5.0
Click Start to begin the installation.
You might be required to reboot your machine one or more times during the installation. You will need to restart the installation after each reboot.
As each component is successfully installed, a green checkmark appears.

Insta
llatio
n In
stru
ctio
ns fo
r JM
P C
linic
al 5
.0 Installation Instructions for JMP Clinical 5.0 23
The Next button becomes active when the installation is complete.

24 Installation Instructions for JMP Clinical 5.0
Click Next.
You will have the option of allowing your SAS software to send basic information about your installa-tion back to SAS. No personal information will be sent.

Insta
llatio
n In
stru
ctio
ns fo
r JM
P C
linic
al 5
.0 Installation Instructions for JMP Clinical 5.0 25
Click the desired radio button and click Next.

26 Installation Instructions for JMP Clinical 5.0
Click Finish to complete the installation and close the Deployment Wizard.
Step 2d: Verify that JMP Clinical has been successfully installed.
Click Start > All Programs > SAS > JMP Clinical 5 to open JMP Clinical.
The first time you open JMP Clinical, you might be asked to personalize your software.
Insta
llatio
n In
stru
ctio
ns fo
r JM
P C
linic
al 5
.0 Installation Instructions for JMP Clinical 5.0 27
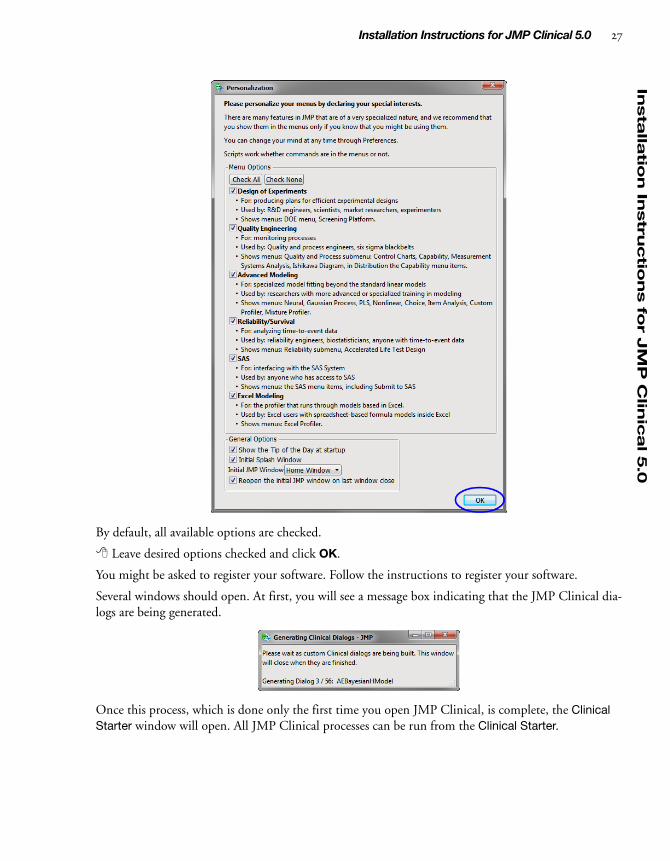
By default, all available options are checked.
Leave desired options checked and click OK.
You might be asked to register your software. Follow the instructions to register your software.
Several windows should open. At first, you will see a message box indicating that the JMP Clinical dia-logs are being generated.
Once this process, which is done only the first time you open JMP Clinical, is complete, the Clinical Starter window will open. All JMP Clinical processes can be run from the Clinical Starter.

28 Installation Instructions for JMP Clinical 5.0
If you are installing JMP Clinical on this machine for the first time, the Add Study process will run, generating a Nicardipine study using included data.
When this process is complete, you will see the following window.

Insta
llatio
n In
stru
ctio
ns fo
r JM
P C
linic
al 5
.0 Installation Instructions for JMP Clinical 5.0 29
If you are upgrading this machine from JMP Clinical 4.1 to JMP Clinical 5.0, your existing studies will be migrated to JMP Clinical 5.0.
You should run at least one process (Check Required Variables, for example) using one of the sample settings to verify successful installation.
Appendix 1: Installing JMP Clinical from DVDAfter you submit your signed paperwork for JMP Clinical 5.0, you will receive an installation package containing four DVDs. The DVDs contain both your software and the SAS Download Manager. The package also includes an information sheet listing your order number, an installation key code specific to your order and contact information for SAS Technical support.
Installing the Software
Insert the disk labeled SAS Software Disk 1.
Navigate into the disk’s directory (shown below).
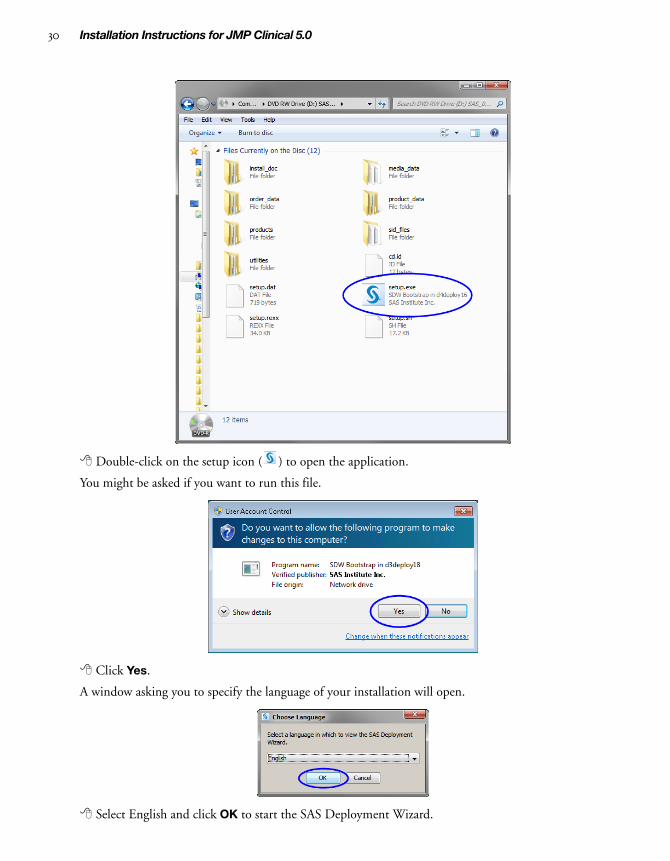
30 Installation Instructions for JMP Clinical 5.0
Double-click on the setup icon ( ) to open the application.
You might be asked if you want to run this file.
Click Yes.
A window asking you to specify the language of your installation will open.
Select English and click OK to start the SAS Deployment Wizard.

Insta
llatio
n In
stru
ctio
ns fo
r JM
P C
linic
al 5
.0 Installation Instructions for JMP Clinical 5.0 31
You will be asked to select a deployment task.
Select Create or Add to a SAS Software Depot and click Next.
Your order details should be specified automatically.

32 Installation Instructions for JMP Clinical 5.0
Click Next.
Make sure that Include complete order contents is selected.

Insta
llatio
n In
stru
ctio
ns fo
r JM
P C
linic
al 5
.0 Installation Instructions for JMP Clinical 5.0 33
Click Next.
Specify where the software depot is to be installed.
By default, the software depot is installed to the C:\SAS Software Depot directory. If this directory does not exist, it is created for you. You should accept the default location unless there is a pressing need to place the software elsewhere.
Click Next.
Click Yes.
Review the install information.

34 Installation Instructions for JMP Clinical 5.0
Click Back if you need to make any changes. Otherwise, click Start.
The install process begins. You must wait for this process to complete.
Note: This process can take an extended time.
Approximately mid-way through the installation, you will be prompted to change disks.
Remove SAS Software Disk 1 and insert the disk labeled SAS Software Disk 2.
Click OK to continue the installation.

Insta
llatio
n In
stru
ctio
ns fo
r JM
P C
linic
al 5
.0 Installation Instructions for JMP Clinical 5.0 35
As the installation continues, you will again be prompted to change disks several times. Repeat the pro-cess described above for disks 1 and 2, for the specified disks, as directed.
When the download process is complete, the Next button is surfaced.
Click Next.
Click Finish.
Proceed to “Step 2: Install JMP Clinical Software,” p. 13.
Appendix 2: Increasing the Memory Allocation for SAS Pro-cesses Run under JMP Clinical
While native JMP stores all data in memory, the SAS processes run by JMP Clinical use a combination of both memory and disk. The latter enables the system to handle very large data sets, but run times can sometimes be slow due to read and write speed to disk. If your computer has 4 gigabytes of mem-

36 Installation Instructions for JMP Clinical 5.0
ory or more and your data sets are 1 gigabyte or less, you can improve the performance of SAS runs by allocating more memory to SAS. Use the following steps:
Close all JMP and SAS sessions.
Navigate into the C:\Program Files\SASHome\SASFoundation\9.4\nls\en directory (or the direc-tory in which SAS is installed).
Create a backup copy of the SASV9.CFG file and save the backup to another directory.
Note: It is very important that you create this backup copy before making any modifications to the SASV9.CFG file. Changes to the SASV9.CFG file might prevent SAS from functioning properly. Hav-ing this backup will enable you to revert to the original configuration.
Open the SASV9.CFG file using a text editor such as Notepad or TextPad.
Scroll down through the file to the -MEMSIZE 2G line of code.
Delete the -MEMSIZE 2G line of code and replace it with the following 4 lines of code:
-MEMLIB-MEMSIZE 0-MEMMAXSZ *G-SORTSIZE *Gwhere * indicates the number of gigabits of RAM to allocate to SAS. A recommended amount for
both -MEMMAXSZ and -SORTSIZE is ¾ of your total RAM. For example, if you have 8G of RAM, specify 6G for both of these options.
Caution: Do not exceed your machine’s available RAM. You must leave sufficient memory available for other processes. If a SAS process does exceed the memory limits you specify, you will see an error message in the SAS log such as "Out of Memory" or "Unable to Allocate Sufficient Resources". In such cases, you should remove the options above and let SAS use disk space to store large working data sets.
Appendix 3: Reconfiguring JMP Clinical for Use with Multiple Languages
JMP Clinical can be run computers running either an English-language or Chinese-language operating system. Data consisting of words, symbols, or other elements from the same language as the specified OS only can be run without additional modifications. However, if the data contains elements from more than one language, you will need to configure your software to function as a Unicode server.
the data language is the same as OS language
Download and install the SAS Software Depot as described previously.
Install SAS as described previously, checking the Configure as Unicode Server check box. (See page 20.)
Alternatively, you can reconfigure an existing software installation by completing the following steps:
Navigate to C:\Program Files\SASHome\SASFoundation\9.4.

Insta
llatio
n In
stru
ctio
ns fo
r JM
P C
linic
al 5
.0 Installation Instructions for JMP Clinical 5.0 37
Note: This assumes you have installed SAS in the default location.
Open the SASV9.CFG file using a text editor such as Notepad or TextPad. This file should contain only the following line of code:
<-CONFIG "C:\Program Files\SASHome\SASFoundation\9.4\nls\**\SASV9.CFG">.
where ** is the two-letter language abbreviation.
Change the language abbreviation to U8.
Save the change and close the file.

38 Installation Instructions for JMP Clinical 5.0