installation instruction ips video analytics for axis acap ... · the procedure for installing the...
TRANSCRIPT

1 / 13 | 22/03/18 | V9.0 R01 A Business Unit of Securiton GmbH IPS
Installation Instruction
IPS Video Analytics for Axis ACAP Cameras and Encoders
Contents
1 Axis camera configuration .................................................................................................................. 1
1.1 IP configuration ............................................................................................................................... 1 1.2 Setting up date and time ................................................................................................................. 4 1.3 Enable Anonymous viewer login ..................................................................................................... 5
2 Installing an IPS Analytics Application .............................................................................................. 6
3 Licensing ............................................................................................................................................... 7
3.1 Manual licensing ............................................................................................................................. 7 3.1.1 Requesting a licence key file ................................................................................................... 7 3.1.2 Licensing the Analytics Application.......................................................................................... 9
3.2 Automatic licensing ....................................................................................................................... 11
4 Upgrading............................................................................................................................................ 13
5 Backup and Restore of an Analytics Configuration ....................................................................... 13
1 Axis camera configuration
1.1 IP configuration
The IP configuration procedure described below assigns a fixed IP address to the camera.
Note: There are two ways to access the TCP/IP Settings dialog. They are:
Setup | Basic Setup | TCP / IP
Setup | System Options | Network | TCP/IP | Basic
The second access option is used in the following description.
1. Open the camera’s website.
2. Select Setup | System Options | Network | TCP/IP | Basic.
3. Enter the IP address and the subnet mask.
4. Enter the address of your router in the Default router field.
5. Click the Save button.

2 / 13 | 22/03/18 | V9.0 R01 A Business Unit of Securiton GmbH IPS

3 / 13 | 22/03/18 | V9.0 R01 A Business Unit of Securiton GmbH IPS
6. Select Advanced.
7. Enter the address of a DNS server (e.g. 8.8.8.8) in the Primary DNS server field under Setup | System Options | Network | TCP/IP | Advanced.
8. Click the Save button.

4 / 13 | 22/03/18 | V9.0 R01 A Business Unit of Securiton GmbH IPS
1.2 Setting up date and time
1. Select Setup | System Options | Date & Time.
2. Select the appropriate Time zone.
3. Select the Time mode.
4. Click the Save button.

5 / 13 | 22/03/18 | V9.0 R01 A Business Unit of Securiton GmbH IPS
1.3 Enable Anonymous viewer login
When the WebViewer is started some browsers request the password for a second time. In other cases the warning message “MJPEG stream not accessible, falling back to frame polling” is displayed. To avoid both effects, make the following setting:
1. Select Setup | Basic Setup | Users.
2. Select the option Enable anonymous viewer login.
Notes:
In Internet Explorer the frame rate for the live image is 1 frame per second.
For Firefox and Safari the following is true:
If Anonymous viewer login in the camera is enabled, images are displayed with the full frame rate;
if Anonymous viewer login in the camera is disabled, the frame rate drops to 1 fps.

6 / 13 | 22/03/18 | V9.0 R01 A Business Unit of Securiton GmbH IPS
2 Installing an IPS Analytics Application
The procedure for installing the IPS AnalyticsManager (Axis) and for installing an IPS Analytics appli-cation is the same. In the following the term IPS Analytics Application denotes one of the two.
AnalyticsManager (Axis) and one Analytics application can simultaneously be installed on a camera which fulfils the requirements for the master camera (see the Compatibility list for details).
From IPS you receive a licence code and access data for downloading the application file from the IPS web site.
Download the application file. To be able to select the suitable application file you need to have the fol-lowing information: name of the Analytics application (e.g. IPS Intrusion Detection), camera chip type (e.g. ARTPEC-4), and the camera firmware version (e.g. 5.60). As you can see from the following exam-ple, the appropriate details can be found in the application file name.
Application file name example: IPS-Intrusion_V7.0r000_artpec45_fw540.eap
Use the following procedure to load the application file into the camera:
1. Connect the camera to the PC running the browser (Microsoft Internet Explorer or Mozilla Fire-fox) you intend to use to load the application file into the camera.
2. Launch the browser and open the camera’s website.
3. Click on Setup.
4. Select Applications.
5. Click the Browse… button.
6. Select the folder where you saved the application file and select the file.
7. Click the Upload Package button.
8. Wait until the application appears in the Installed Applications list.
Attention: Do not click Start until you have licensed the application.
Note: If you use a multi-channel encoder Analytics is available only on channel 1.

7 / 13 | 22/03/18 | V9.0 R01 A Business Unit of Securiton GmbH IPS
3 Licensing
Important note: Due to the Axis licensing procedure a licence generated using automatic licensing can-not be used any longer after an Analytics Application or firmware update. Therefore manual licensing is strongly recommended.
If your camera or encoder has Internet access and you nevertheless want to use automatic licensing, proceed as described in the “Automatic licensing” section.
3.1 Manual licensing
3.1.1 Requesting a licence key file
The Analytics Application must be licensed before you use (start) it.
Use the following procedure:
1. Locate the serial number of the device (camera or encoder) on its website (under Setup | Basic Setup | Instructions). The serial number equals the MAC address without the colons.
2. Open the Axis website (www.axis.com).
3. Select Products & solutions | Analytics & other applications.
4. Click on License key registration.
5. Enter the license code (you received from Securiton by e-mail) and the serial number, and click on Confirm.
8 / 13 | 22/03/18 | V9.0 R01 A Business Unit of Securiton GmbH IPS
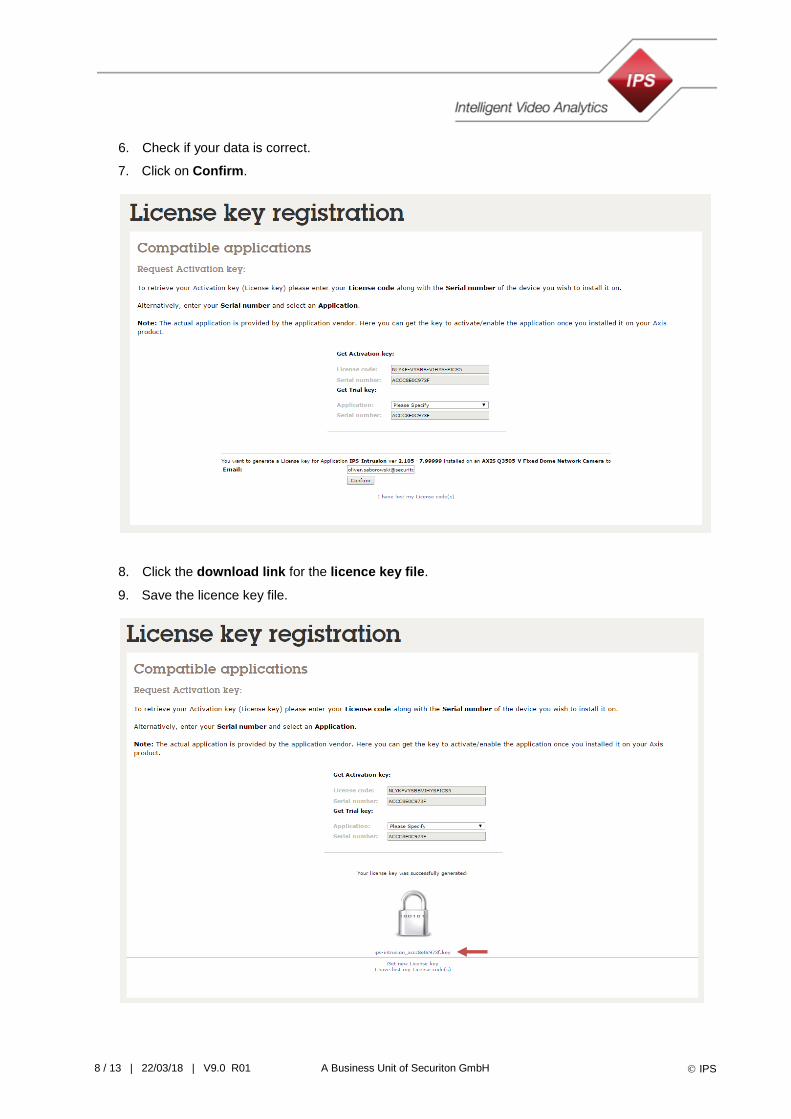
6. Check if your data is correct.
7. Click on Confirm.
8. Click the download link for the licence key file.
9. Save the licence key file.

9 / 13 | 22/03/18 | V9.0 R01 A Business Unit of Securiton GmbH IPS
3.1.2 Licensing the Analytics Application
Use the following procedure to license the application in the camera or encoder:
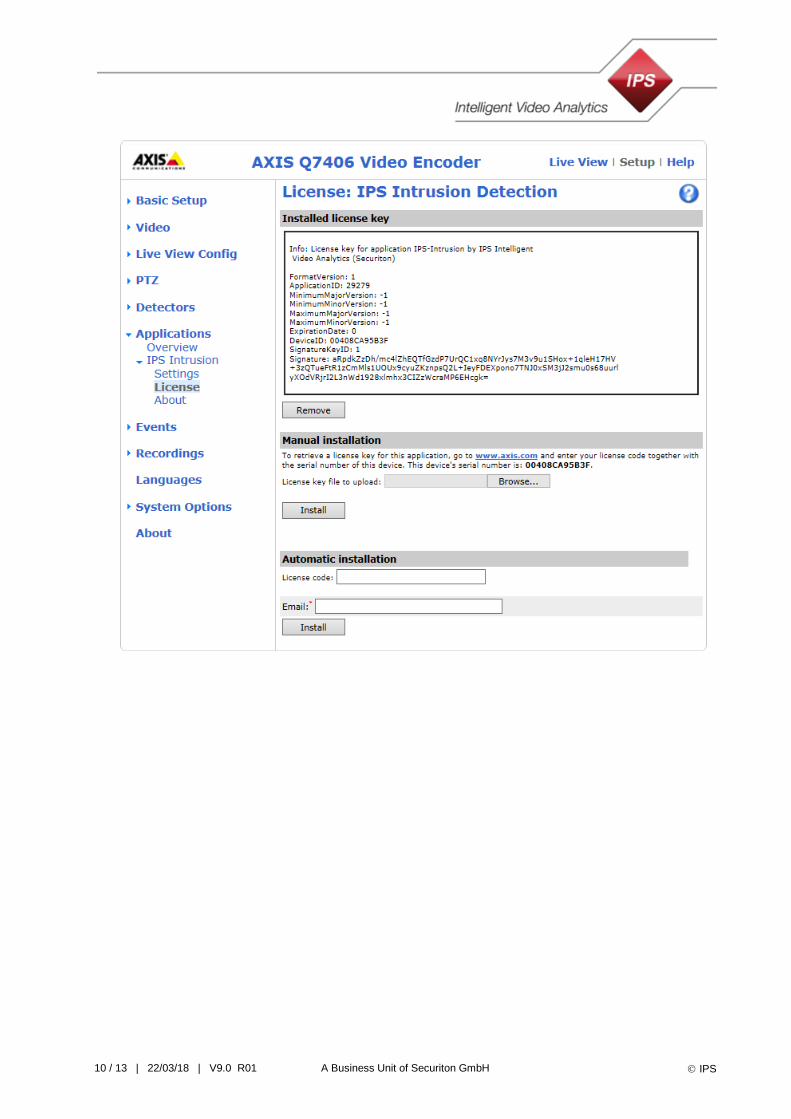
1. Open the camera’s website.
2. Select Setup | Applications | <application name> | License. Replace <application name> by the name of the analytics application installed on your camera or encoder.
3. Under Manual installation click the Browse… button.
4. Select the licence key file.
5. Click the Install button.
10 / 13 | 22/03/18 | V9.0 R01 A Business Unit of Securiton GmbH IPS

11 / 13 | 22/03/18 | V9.0 R01 A Business Unit of Securiton GmbH IPS
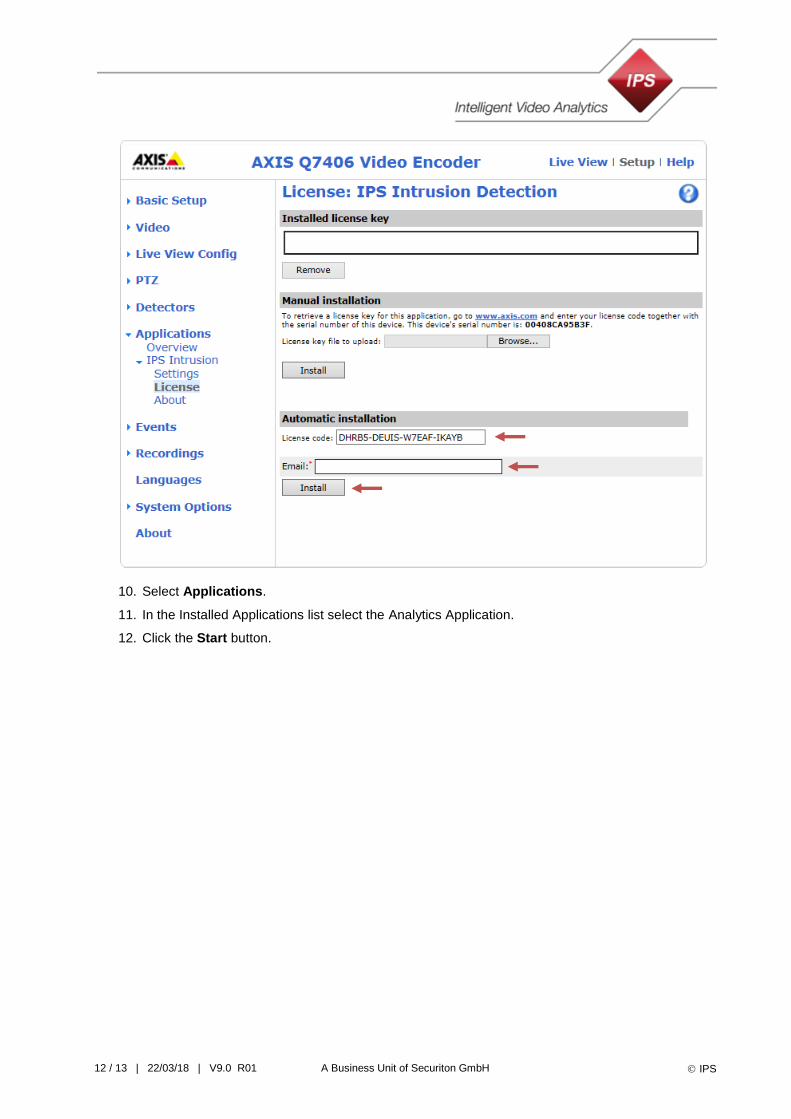
6. Select Applications.
7. Select the Analytics Application.
8. Click the Start button.
3.2 Automatic licensing
If the camera in which you wish to license the analytics application has Internet access, you can license it automatically. Use the following procedure:
1. Open the camera’s website.
2. Enter the address of your router in the Default router field under Setup | System Options | Network | TCP/IP | Basic.
3. Click the Save button.
4. Enter the address of the DNS server (e.g. 8.8.8.8) in the Primary DNS server field under Setup | System Options | Network | TCP/IP | Advanced.
5. Click the Save button.
6. Select Setup | Applications | <application name> | License. Replace <application name> by the name of the analytics application installed on your camera or encoder.
7. Enter the licence code (that you received from Securiton by e-mail) in the License code field of the Automatic installation pane.
8. Enter the customer information.
9. Click the Install button.
12 / 13 | 22/03/18 | V9.0 R01 A Business Unit of Securiton GmbH IPS
10. Select Applications.
11. In the Installed Applications list select the Analytics Application.
12. Click the Start button.

13 / 13 | 22/03/18 | V9.0 R01 A Business Unit of Securiton GmbH IPS
4 Upgrading
For upgrades of a Analytics Application the following rules apply:
An update is only possible if the licensing has been made using Manual licensing.
A new minor version may be licensed with the same licence key file as the previous version.
For a new major version a new licence must be purchased.
Important notes:
1. If you upgrade an analytics application, the configuration data is lost. If you want to maintain it, you have to save it before the upgrade and restore it afterwards.
For details on preserving the Analytics configuration refer to the section Saving and restoring an Analytics configuration.
2. If you upgrade the AnalyticsManager (Axis), the configuration data is also lost. To maintain it, save it in the download directory by clicking on Save in the AnalyticsManager System Configura-tion.
Use the following procedure to update an IPS Analytics Application:
1. Open the camera’s website.
2. Select Setup | Applications.
3. Under Installed Applications select the application.
4. Click the Stop button.
5. Click the Remove button.
6. Load the new version of the application as described under Installing an IPS Analytics Applica-tion.
7. License the new version as described under Licensing the Analytics Application in the Manual licensing section.
8. Configure the Analytics Application.
5 Backup and Restore of an Analytics Configuration
At the last step of an Analytics configuration you can save a copy of the settings on the hard disk of your PC. When you click on Backup, a file with the settings is stored to the download directory. The name of the file is generated automatically. It is structured as follows: ips-analytics-config_<camera UID>. The camera UID is a number which AnalyticsManager automatically creates when you add a camera.
At the first step of an Analytics configuration you can load previously saved settings by clicking on Re-store. The Web Analytics Configuration then opens a dialog, in which you can select the settings file. Click on Open to load the file.
Copyright 2018 Securiton GmbH. IPS and the IPS logo are registered trademarks of Securiton GmbH.
Securiton GmbH has included the information contained in this manual to the best of its knowledge. Content of this documentation exclusively serves information purposes and may be changed without prior notice. Securiton GmbH accepts no responsibility for damage or accidents, which occur as a consequence of information, which has been given regarding devices or components not manufactured by itself. Securiton GmbH accepts no responsibility for changes or modifications, which have not been explicitly au-thorised by Securiton GmbH.