um axis 70u 7000 - axis communications · 2 axis 70u/7000 user’s manual notices take some time to...
TRANSCRIPT

AXIS 70U/7000 User’s Manual 1
AXIS 70UAXIS 7000
Network Document Servers
User’s Manual
AXIS 70U/7000 User’s Manual2
Notices
Take some time to read through the safety notices before installing the Document Server. Please observe all safety markings and instructions when using this product.
Caution! - must be observed to avoid loss of data or damage to your equipment.
Important! - must be observed to avoid operational impairment.
Do not proceed beyond any of the above notices, until you have fully understood the implications.
Copyright Information. The unauthorized copying of materials that are covered by copyright and other international proprietary or intellectual property rights is prohibited in most countries. Axis Communications AB recommends that the users of this equipment seek the necessary authorizations for copying material. The instructions for use in the manual shall not be considered as an inducement to make illicit duplications of material. Any duplication will be made at the user’s own risk.
Electromagnetic Compatibility (EMC). USA - This equipment has been tested and found to comply with the limits for a Class B digital device, pursuant to Part 15 of the FCC Rules. These limits are designed to provide reasonable protection against harmful interference in a residential installation. This equipment generates, uses and can radiate radio frequency energy and, if not installed and used in accordance with the instructions, may cause harmful interference to radio communications. However, there isno guarantee that interference will not occur in a particular installation. If this equipment does cause harmful interference to radio or television reception, which can be determined by turning the equipment off and on, the user is encouraged to try to correct the interference by one or more of the following measures:- - Reorient or relocate the receiving antenna.- - Increase the separation between the equipment and receiver.- - Connect the equipment into an outlet on a circuit different from that to which the receiver is connected.- - Consult the dealer or an experienced radio/TV technician for help.Shielded (STP) network cables must be used with this unit to ensure compliance with the class B limits.
Europe - This digital equipment fulfils the requirements for radiated emission according to limit B of EN55022, and the requirements for immunity according to EN55024 residential, commercial, and light industry (Compliance is not valid for unshielded network cables).
Japan - This is a class B product based on the standard of the Voluntary Control Council for Interference from Information Technology Equipment (VCCI). If this is used near a radio or television receiver in a domestic environment, it may cause radio interference. Install and use the equipment according to the instruction manual
Australia - This electronic device meets the requirements of the Radio communications (Electromagnetic Compatibility) Standard 1998 AS/NZS 3548
Liability. Every care has been taken in the preparation of this manual; if you detect any inaccuracies or omissions, please inform your local Axis office. Axis Communications AB cannot be held responsible for any technical or typographical errors and reserves the right to make changes to the product and manuals without prior notice. Axis Communications AB makes no warranty of any kind with regard to the material contained within this document, including, but not limited to, the implied warranties of merchantability and fitness for a particular purpose. Axis Communications AB shall not be liable nor responsible for incidental or consequential damages in connection with the furnishing, performance or use of this material.
Trademark Acknowledgments. Acrobat, Adobe, AIX, DOS, Ethernet, IBM, Internet Explorer, Macintosh, Microsoft, Netscape Navigator, OS/2, UNIX and Windows are registered trademarks of the respective holders.
Software Trademark Acknowledgments. JPEG code (libjpeg) used courtesy of the Independent JPEG Group. LDAP code (libldap and libber) used courtesy of the University of Michigan at Ann Arbor. Copyright © 1991 Regents of the University of Michigan. All rights reserved. TIFF code (libtiff) used courtesy of Sam Leffler and Silicon Graphics, Inc. Copyright © 1988-1996 Sam Leffler. Copyright © 1991-1996 Silicon Graphics, Inc.
Maintenance. It is recommended that you use a moist cloth to clean the unit. Do not use petroleum based substances as this may cause damage.
Network Document Servers User’s Manual Revision: 3.0Copyright © Axis Communications AB, 2000 - 2005 Date: August 2005

AXIS 70U/7000 User’s Manual 3
Table of Contents
Preface . . . . . . . . . . . . . . . . . . . . . . . . . . . . . . . . . . . . . . . . . . . . . . . . . . . . . . . . . . . . . . . . . . . . . .5
Introduction . . . . . . . . . . . . . . . . . . . . . . . . . . . . . . . . . . . . . . . . . . . . . . . . . . . . . . . . . . . . . . . . .7Features and Benefits . . . . . . . . . . . . . . . . . . . . . . . . . . . . . . . . . . . . . . . . . . . . . . . . . .7
Physical Description . . . . . . . . . . . . . . . . . . . . . . . . . . . . . . . . . . . . . . . . . . . . . . . . . . . . . . . . . . .9Control Panel . . . . . . . . . . . . . . . . . . . . . . . . . . . . . . . . . . . . . . . . . . . . . . . . . . . . . . .11External Keyboard . . . . . . . . . . . . . . . . . . . . . . . . . . . . . . . . . . . . . . . . . . . . . . . . . . .12
Basic Installation . . . . . . . . . . . . . . . . . . . . . . . . . . . . . . . . . . . . . . . . . . . . . . . . . . . . . . . . . . . .15Checking the Hardware Inventory . . . . . . . . . . . . . . . . . . . . . . . . . . . . . . . . . . . . . . .15Connecting Scanners and Digital Copiers . . . . . . . . . . . . . . . . . . . . . . . . . . . . . . . . .17Connecting the Document Server to the Network . . . . . . . . . . . . . . . . . . . . . . . . . .18Mapping a Host Name to the IP Address . . . . . . . . . . . . . . . . . . . . . . . . . . . . . . . . .27Verifying your Installation . . . . . . . . . . . . . . . . . . . . . . . . . . . . . . . . . . . . . . . . . . . . .28
Configuring the Document Server . . . . . . . . . . . . . . . . . . . . . . . . . . . . . . . . . . . . . . . . . . . . . .29Overview of the Administration Tools . . . . . . . . . . . . . . . . . . . . . . . . . . . . . . . . . . . .30Specifying the System Settings . . . . . . . . . . . . . . . . . . . . . . . . . . . . . . . . . . . . . . . . .32Specifying Network Settings . . . . . . . . . . . . . . . . . . . . . . . . . . . . . . . . . . . . . . . . 37Specifying Authentication Settings . . . . . . . . . . . . . . . . . . . . . . . . . . . . . . . . . . . . . .50Specifying Destinations . . . . . . . . . . . . . . . . . . . . . . . . . . . . . . . . . . . . . . . . . . . . . . .53Specifying Profiles . . . . . . . . . . . . . . . . . . . . . . . . . . . . . . . . . . . . . . . . . . . . . . . . . . .65Specifying Paper Sizes . . . . . . . . . . . . . . . . . . . . . . . . . . . . . . . . . . . . . . . . . . . . . . . .75Configuring Using a Text Editor and FTP . . . . . . . . . . . . . . . . . . . . . . . . . . . . . . . . .77Scan Counter (AXIS 7000 only) . . . . . . . . . . . . . . . . . . . . . . . . . . . . . . . . . . . . . . . . .79
Using the Document Server . . . . . . . . . . . . . . . . . . . . . . . . . . . . . . . . . . . . . . . . . . . . . . . . . . .81Sending Methods . . . . . . . . . . . . . . . . . . . . . . . . . . . . . . . . . . . . . . . . . . . . . . . . . . . .81Authentication . . . . . . . . . . . . . . . . . . . . . . . . . . . . . . . . . . . . . . . . . . . . . . . . . . . . . .84Sending to Destinations . . . . . . . . . . . . . . . . . . . . . . . . . . . . . . . . . . . . . . . . . . . . . . .85Adding Temporary Destinations . . . . . . . . . . . . . . . . . . . . . . . . . . . . . . . . . . . . . . . .88Adding Temporary Profiles . . . . . . . . . . . . . . . . . . . . . . . . . . . . . . . . . . . . . . . . . . . .92Changing the Name of the Scanned Image Files . . . . . . . . . . . . . . . . . . . . . . . . . . .93Adding a Temporary E-mail Subject . . . . . . . . . . . . . . . . . . . . . . . . . . . . . . . . . . . . .94Scanning Parameters . . . . . . . . . . . . . . . . . . . . . . . . . . . . . . . . . . . . . . . . . . . . . . . . .94Sending to your Web Browser . . . . . . . . . . . . . . . . . . . . . . . . . . . . . . . . . . . . . . . . . .97Viewing Image Files . . . . . . . . . . . . . . . . . . . . . . . . . . . . . . . . . . . . . . . . . . . . . . . . . .99
Meta Data . . . . . . . . . . . . . . . . . . . . . . . . . . . . . . . . . . . . . . . . . . . . . . . . . . . . . . . . . . . . . . . . .101Example: Archiving . . . . . . . . . . . . . . . . . . . . . . . . . . . . . . . . . . . . . . . . . . . . . . . . .103Example: Invoice Handling . . . . . . . . . . . . . . . . . . . . . . . . . . . . . . . . . . . . . . . . . . .111

AXIS 70U/7000 User’s Manual4
Example: Job Applications . . . . . . . . . . . . . . . . . . . . . . . . . . . . . . . . . . . . . . . . . . . .114Retrieving the XML DD file . . . . . . . . . . . . . . . . . . . . . . . . . . . . . . . . . . . . . . . . . . .120
Troubleshooting . . . . . . . . . . . . . . . . . . . . . . . . . . . . . . . . . . . . . . . . . . . . . . . . . . . . . . . . . . . .127Restoring Factory Default Settings . . . . . . . . . . . . . . . . . . . . . . . . . . . . . . . . . . . . .127Front Panel Indicator Conditions . . . . . . . . . . . . . . . . . . . . . . . . . . . . . . . . . . . . . .129Error and Warning Messages . . . . . . . . . . . . . . . . . . . . . . . . . . . . . . . . . . . . . . . . . .131Displaying the Log File . . . . . . . . . . . . . . . . . . . . . . . . . . . . . . . . . . . . . . . . . . . . . .134
LDAP . . . . . . . . . . . . . . . . . . . . . . . . . . . . . . . . . . . . . . . . . . . . . . . . . . . . . . . . . . . . . . . . . . . . .135Common Attribute Types . . . . . . . . . . . . . . . . . . . . . . . . . . . . . . . . . . . . . . . . . . . . .135LDAP Test Tools . . . . . . . . . . . . . . . . . . . . . . . . . . . . . . . . . . . . . . . . . . . . . . . . . . . .138
Meta Data DTD . . . . . . . . . . . . . . . . . . . . . . . . . . . . . . . . . . . . . . . . . . . . . . . . . . . . . . . . . . . . .140
The Parameter List . . . . . . . . . . . . . . . . . . . . . . . . . . . . . . . . . . . . . . . . . . . . . . . . . . . . . . . . . .146
Updating the Firmware . . . . . . . . . . . . . . . . . . . . . . . . . . . . . . . . . . . . . . . . . . . . . . . . . . . . . .158
Technical Specifications . . . . . . . . . . . . . . . . . . . . . . . . . . . . . . . . . . . . . . . . . . . . . . . . . . . . . .160
Glossary . . . . . . . . . . . . . . . . . . . . . . . . . . . . . . . . . . . . . . . . . . . . . . . . . . . . . . . . . . . . . . . . . . .164
Index . . . . . . . . . . . . . . . . . . . . . . . . . . . . . . . . . . . . . . . . . . . . . . . . . . . . . . . . . . . . . . . . . . . . .168

AXIS 70U/7000 User’s Manual Preface 5
Preface
About This Manual The information in this manual applies to
• AXIS 70U with software release 1.06 and above• AXIS 7000 with software release 2.46 and above Where specified, certain information refers to the AXIS 70U or AXIS 7000 only.
This manual contains instructions on how to install and manage the Document Server in your networking environment. Some knowledge of networking environments would be beneficial to the reader.
Support Services Should you require any technical assistance, please contact your Axis reseller. If your questions cannot be answered immediately, your Axis reseller will forward your queries through the appropriate channels to ensure a rapid response.
If you are connected to the Internet, you can:
• Download user documentation and firmware updates• Find answers to previously resolved problems in the FAQ
database. Search by product, category or phrase• Report problems to Axis support staff by logging in to your
private support area• Visit the Axis support Web at www.axis.com/techsup

Preface AXIS 70U/7000 User’s Manual6
Product comparison
Features AXIS 70U AXIS 7000
Workgroup scanners x x
Departmental and production scanners, digital copiers x
Paper size Photo/A5/B5/A4/Letter/Legal x x
Paper size A3/11”x17” and larger x
PDF format x x
TIFF, JPEG, PCL format and duplex x x
Send-to-e-mail x x
Send-to-file, print and Web x x
XML support x x
User authentication x x
Corporate address book x x
SCSI-2 scanner device connection x
USB scanner device connection x
Scan counter x

AXIS 70U/7000 User’s Manual Introduction 7
Introduction
Features and Benefits
File ServerIndependence
The AXIS 70U/7000 is connected in Ethernet networks, enabling scanner devices to be accessed via standard Internet protocols. Communicating directly with the network client, the AXIS 70U/7000 can be used independently of file servers, which means reduced network licensing fees. The product affords high performance, reliability and operational independence from other equipment.
Simplicity The file-server-independent approach makes installation quick and convenient. No additional software is required on clients or file servers, except for viewing applications for displaying images in TIFF, JPEG and PDF format.
Flexibility From the AXIS 70U/7000 control panel, you can send or copy directly to e-mail addresses, FTP servers or desktop directories, and even to network printers. You can also use a standard Web browser to trigger and save scanned documents.
The diverse range of transfer methods and image formats available means that the AXIS 70U/7000 can easily be integrated into existing workflows and adapted to satisfy your specific requirements.
Web BasedManagement
The built-in Web server provides cross platform management from any standard Web browser. The dynamically generated Web pages provide menu-based configuration and management capabilities as well as context sensitive help and links or user documentation and on-line support.
Meta Data Data sent together with the scanned image in the Information file or as a separate document. This information is requested using an XML DD file and can be used in applications such as workflow systems, archiving systems etc. or for storing in a database server.

Introduction AXIS 70U/7000 User’s Manual8
Ease of Use The AXIS 70U/7000 is designed for quick and easy installation on your network and your scanner device. It has a number of interesting features that will help you to simplify the distribution of your paper-based information, including:
• Send-to-e-mail• Send-to-Web browser• Send-to-file• Send-to-print over Raw TCP or LPD• Web based (HTTP) management and configuration• Plug-and-play functionality for supported scanner devices• No additional or special software required• Integrated scanner drivers, image-file creation and network
transfer methods• Destinations and profiles saved for regular use• External e-mail addresses supported• Supports industry standards
Speed Axis Network Document Servers are designed for 10 Mbps or 100 Mbps Ethernet networks and connect to the network via a twisted pair RJ45 category 5 cable (10baseT and 100baseTX) or better. Auto-sense for automatically detecting the speed of the local network segment and varying the rate of data communication accordingly.
AXIS ETRAX 100LX hardware, comprising an integrated 32 bit RISC processor and associated network controllers. Provides high performance and reliability combined with low power consumption.
Security Password protection of Administration tools.User authentication:
• Windows NT4 authentication• SMTP authentication• LDAP authentication
Upgrading Firmware downloadable to Flash memory using FTP.
Connections AXIS 70U: a USB connector for connection to the scanner device.AXIS 7000: a SCSI-2 connector for connection to the scanner device.

AXIS 70U/7000 User’s Manual Physical Description 9
Physical Description
The Back Panel
Push Button The Push button is used for restoring the Document Server parameters. See “Restoring Factory Default Settings” on page 127.
Connector AXIS 70U: a USB connector for connection to the scanner device.AXIS 7000: a SCSI-2 connector for connection to the scanner device.
Network Connector The Document Server is designed for 10 Mbps and 100 Mbps Ethernet networks (10baseT and 100baseTX) and connects to the network via an RJ-45 connector, via twisted pair category 5 cable (or better).
Auto-sensing allows the Document Server to vary the speed of data communication from 10 Mbps to 100 Mbps according to the local network segment.
USB connector
Keyboard
Power supply Push button
ConnectorNetwork
ConnectorAXIS 70U
SCSI-2 connector
Keyboard
Power supply Push button
ConnectorNetwork
ConnectorAXIS 7000

Physical Description AXIS 70U/7000 User’s Manual10
Keyboard Connector A Mini-DIN connector for connection of a standard PC compatible keyboard.
Power Supply For use only with Axis power supply. See “Power Supply” on page 16.
The Front Panel
Status Indicator The Status indicator flashes during startup and remains lit when the Document Server is ready for use. If the status indicator turns off, this may indicate an error.
Busy Indicator The Busy indicator turns on when the Document Server is allocated for use and remains on during the scanning process.
Network Indicator The tri-colored network indicator displays:
Power Indicator The Power indicator is normally on while power is applied. If the indicator remains off or flashes, this indicates a problem with the Document Server or its power supply
Note:
Power
Network Indicator
Status
Busy
Flashing Yellow indicating network activity on a 10MB Ethernet network
Flashing Green indicating network activity on a 100MB Ethernet network
Red indicating that the unit is not correctly connected to the network
When the Document Server is idle: the Power indicator should be on, the Network indicator should flash randomly, the Busy indicator should be off and the Status indicator should be permanently lit.

AXIS 70U/7000 User’s Manual Physical Description 11
Control Panel
The Document Server Control panel has user keys (described below) and a message display that describes the selected menu options and current status of the unit.
The message display consists of 2 lines of 16 characters indicating status and menu options.
User Keys The function of each user key is described below:
Add page The Add page key scans the material in the scanner device. Use this key when scanning each page from bound materials, e.g. books and magazines.
Cancel The Cancel key cancels the sending process at any stage and clears any selections made from the menu. It also resets error messages on the display.
Menu The Menu key scrolls the menu.
Select The Select key selects multiple destinations and confirms changes.
AXIS 7000
ver. x.xx

Physical Description AXIS 70U/7000 User’s Manual12
Send The Send key sends the scanned material to the selected destination(s) and releases the Document Server for other users. For a single page/stack of sheets, use this key to scan the material and send the image in one step.
Up/Down The Up and Down keys scroll and select menu options.
User KeyCombinations
Advanced Settings
Menu Pressing and holding the Menu key while simultaneously pressing the Select key displays the Advanced menu.
Up/Down Use the Up and Down scroll keys to select:
• Event Log• Firmware version number• Network settings
Select Use the Select key to enter the sub menu.
External Keyboard
It is possible to connect a standard PC compatible keyboard to the Document Server. This allows you to easily search long e-mail listings and add any non-listed addresses as temporary additions to the resident address list.
Note:
Be sure to disconnect the Document Server’s power supply before connecting the keyboard.

AXIS 70U/7000 User’s Manual Physical Description 13
The Instruction label supplied with the Document Server can be attached to your keyboard for quick reference to the function of the main keys.
Keys The function of each key is described below:
F1 The F1 key scans the material in the scanner device. Use this key to scan each page of bound materials, for example, books and magazines.F1 corresponds to the Add page key on the control panel.
F2 The F2 key sends the scanned material to the selected destination and releases the Document Server for other users. For a single page or stack of sheets, use this key to scan the material and send the image in one step.F2 corresponds to the Send key on the control panel.
F3 Press the F3 key to change the profile. Scroll through the list of available profiles by repeatedly pressing F3.
F4 Press the F4 key to change the paper size. Scroll through the list of available paper sizes by repeatedly pressing F4.
F5 Press the F5 key to switch between Duplex (double-sided) and No duplex (single-sided).
F6 Press the F6 key to change between defined e-mail subjects. Scroll through the list of available e-mail subjects by repeatedly pressing F6.
F9 Press the F9 key to select the pre-defined Quick Destination, see “Specifying Destinations” on page 53 for more information.
Esc The Esc key cancels the sending process at any stage and clears any selections made from the menu. It also resets error messages.Esc corresponds to the Cancel key on the control panel.

Physical Description AXIS 70U/7000 User’s Manual14
Tab The Tab key scrolls the menu.Tab corresponds to the Menu key on the control panel.
Enter The Enter key selects multiple destinations and confirms changes.Enter corresponds to the Select key on the control panel.
Up/Down The Up and Down arrow keys scroll and select menu options.The Up and Down arrow keys correspond to the Up/Down keys on the Control Panel.
Note:
Insert Press the Insert key to add an address or subject. Press Enter to finish a new address or subject.
Delete Press Delete to remove a temporary address, a temporary subject or to delete characters when editing a subject.
Backspace Press Backspace to delete characters.
Left Press the Left arrow key to go backwards in the menu.
Page Up Press Page Up to go to the next entry with a different first character in the “Send to:” or “Sent by:” list.
Page Down Press Page Down to go to the previous entry with a different first character in the “Send to:” or “Sent by:” list.
Home/End Press Home to go to the first entry in the “Send to:” or “Sent by:” list. Press End to go to the last entry in a list.
Ctrl+A Press Ctrl+A to access the advanced menu. Use Page Up/Down to scroll and select menu options.
When sending your document, the product always uses the destination and scanning options most recently displayed, whether explicitly selected or not.

AXIS 70U/7000 User’s Manual Basic Installation 15
Basic InstallationThis section describes the various aspects of product installation and includes:
• A detailed hardware inventory• Instructions for installing the Document Server into your
networking environment • Instructions for setting the IP address using the Document
Server’s control panel, DHCP, RARP, BOOTP and AXIS IP Installer
• Instructions for setting a host name• Instructions on how to verify your installation
Checking the Hardware Inventory
Unpack and check all the items using the following list. Contact your dealer if anything is missing or damaged. All packing materials are recyclable.
Item Description
Product AXIS 70U Network Document ServerAXIS 7000 Network Document Server
Media AXIS 70U/7000 User’s GuideAXIS 70U/7000 Instruction LabelKeyboard Instruction Label
Power Supply See table below
Accessories Mounting bracket with plastic feet
Optional Accessories(AXIS 7000)
50-pin high-density shielded SCSI-2 connector (micro-D)
Part no. 14260
50-pin high-density shielded SCSI-2 connector (Centronics)
Part no. 14259
(AXIS 70U/7000) Mini Keyboard USMini Keyboard DEMini Keyboard UK
Part no. 17588Part no. 17883Part no. 17884

Basic Installation AXIS 70U/7000 User’s Manual16
Power Supply
Document Server
For Use in... Power Supply Type
Power SupplyPart no.
AXIS 70U0162-xxx-01
AXIS 70000094-xxx-030094-xxx-04
EuropeUKAustraliaUSA/JapanKorea
AXIS PS-H 1910819109191111911019112
AXIS 70000094-xxx-010094-xxx-02
EuropeUKAustraliaUSAJapan
AXIS PS-E 1550715509155101550815511

AXIS 70U/7000 User’s Manual Basic Installation 17
Connecting Scanners and Digital Copiers
Important!
ConnectingAXIS 7000
Connecting the AXIS 7000 to your scanner device or digital copier:
1. Switch off the scanner device and disconnect the Document Server’s external power supply.
2. Connect the SCSI cable to the SCSI connector on the Document Server.
3. Connect the SCSI cable to the scanner device. The Document Server uses a built-in SCSI terminator. Note that the scanner device must also be terminated properly. Refer to the documentation supplied with your scanner device.
ConnectingAXIS 70U
Connecting the AXIS 70U to your scanner device:
1. Switch off the scanner device and disconnect the Document Server’s external power supply.
2. Connect the USB cable to the USB connector on the Document Server.
3. Connect the USB cable to the scanner device.Notes:
• Check that the power supply provided with your Document Server is marked with the correct mains voltage.
• Make sure the scanner device is switched off and the Document Server power sup-ply is disconnected.
• AXIS 7000: The SCSI bus may become damaged if you connect or disconnect units when power is on.
The AXIS 70U does not support USB hubs or USB converters and can only be connected to one scanning device at a time.
The AXIS 70U supports USB 1.1 and USB 2.0 Full Speed.

Basic Installation AXIS 70U/7000 User’s Manual18
Connecting the Document Server to the Network
Important!
Follow the instructions below to connect the Document Server to your network:
1. Turn off the Document Server by disconnecting the power supply.
2. Connect your Document Server to the network.Note:
3. Switch on the scanner device.
4. Connect the external power supply to the Document Server. The network indicator will flash during power up and self test. The following message will appear on the display during self test:
where x.xx is the software version number, e.g. 2.46.Notes:
Always consult your Network Administrator before making changes to the network configuration.
The Document Server is designed for 10 Mbps and 100 Mbps Ethernet networks and connects to the network via a twisted pair category 5 (or better) cable (10baseT and 100baseTX).
AXIS 7000
Version: x.xx
The tri-colored Network indicator displays:
• flashing yellow - indicating network activity on a 10MB Ethernet net-work.
• flashing green - indicating network activity on a 100MB Ethernet net-work.
• red - if there is no network connection.
• Not lit - indicates that there is no network activity.
AXIS 70U/7000 User’s Manual Basic Installation 19
Assigning an IP Address
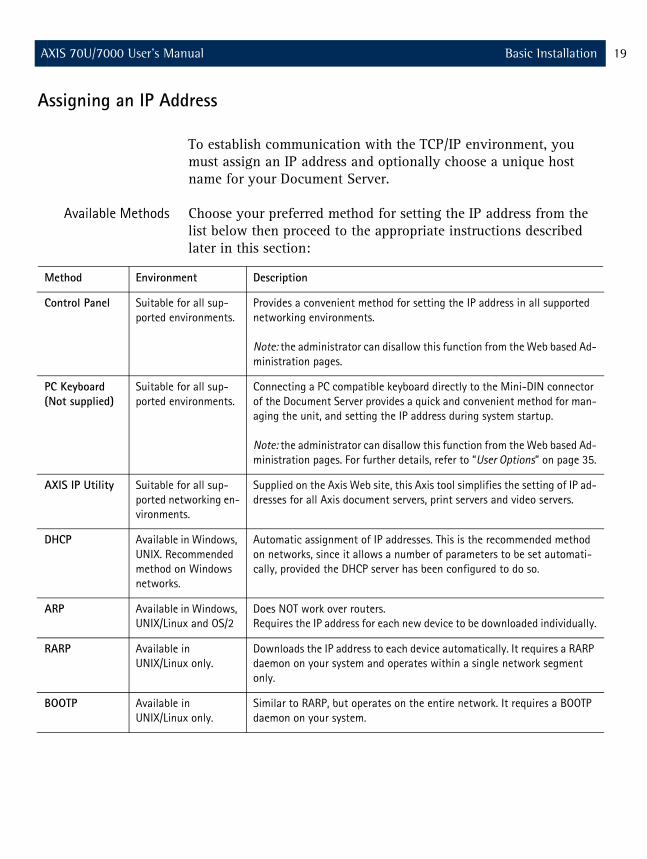
To establish communication with the TCP/IP environment, you must assign an IP address and optionally choose a unique host name for your Document Server.
Available Methods Choose your preferred method for setting the IP address from the list below then proceed to the appropriate instructions described later in this section:
Method Environment Description
Control Panel Suitable for all sup-ported environments.
Provides a convenient method for setting the IP address in all supported networking environments.
Note: the administrator can disallow this function from the Web based Ad-ministration pages.
PC Keyboard(Not supplied)
Suitable for all sup-ported environments.
Connecting a PC compatible keyboard directly to the Mini-DIN connector of the Document Server provides a quick and convenient method for man-aging the unit, and setting the IP address during system startup.
Note: the administrator can disallow this function from the Web based Ad-ministration pages. For further details, refer to “User Options” on page 35.
AXIS IP Utility Suitable for all sup-ported networking en-vironments.
Supplied on the Axis Web site, this Axis tool simplifies the setting of IP ad-dresses for all Axis document servers, print servers and video servers.
DHCP Available in Windows, UNIX. Recommended method on Windows networks.
Automatic assignment of IP addresses. This is the recommended method on networks, since it allows a number of parameters to be set automati-cally, provided the DHCP server has been configured to do so.
ARP Available in Windows, UNIX/Linux and OS/2
Does NOT work over routers.Requires the IP address for each new device to be downloaded individually.
RARP Available in UNIX/Linux only.
Downloads the IP address to each device automatically. It requires a RARP daemon on your system and operates within a single network segment only.
BOOTP Available in UNIX/Linux only.
Similar to RARP, but operates on the entire network. It requires a BOOTP daemon on your system.

Basic Installation AXIS 70U/7000 User’s Manual20
Control Panel Follow the instructions below to set the IP address from the control panel:Note:
1. Power up the Document Server. Press Menu when this display appears:
2. After a few seconds this display will be shown:
3. Press Select to edit the IP address:
4. Press Menu to move through the digits and highlight each digit, one at a time.
5. Use to increase or decrease each highlighted digit, as required.
6. Press Select to confirm the changes.
7. Press Menu to display the default router address setting:
8. Press Select to edit the default router address:
9. To change the value, repeat steps 4 - 6 above.
10. Press Menu to display the subnet mask setting:
The Administrator can disallow this function from the Web based Administration pages. For further details refer to “User Options” on page 35.
AXIS 7000
Version: x.xx
IP address:
000.000.000.000
Edit IP address:
000.000.000.000
Default router:
000.000.000.000
Edit router:
000.000.000.000
Net mask:
000.000.000.000

AXIS 70U/7000 User’s Manual Basic Installation 21
11. Press Select to edit the subnet mask:
12. To change the value, repeat steps 4 - 6 above.
13. Press Menu to display the node address. This address is not editable. The node address should equal the Document Server serial number found on the underside label of the unit.
14. Press Menu once more to display the final instructions:
15. Press Select to exit the IP settings. The Document Server then completes the startup sequence.
16. Write the name or IP address of the Document Server on the supplied Instructions label and attach it to the top cover.
The Document Server is ready for use when the Status indicator stops flashing and remains lit.
Note:
Verifying the NetworkSettings
Access the Advanced menu from the Document Server control panel to verify that the chosen network settings are correct, as described below:
1. Press and hold down the Menu key while simultaneously pressing the Select key . The Advanced menu is displayed.
2. Use to find the Network Settings option.
3. Press Select to enter the submenus.
4. Use to scroll through and check the parameter settings.
Edit net mask:
000.000.000.000
Press if you
are finished
If you make a mistake while editing the parameters, press the Cancel key on the control panel to cancel the operation.
Basic Installation AXIS 70U/7000 User’s Manual22
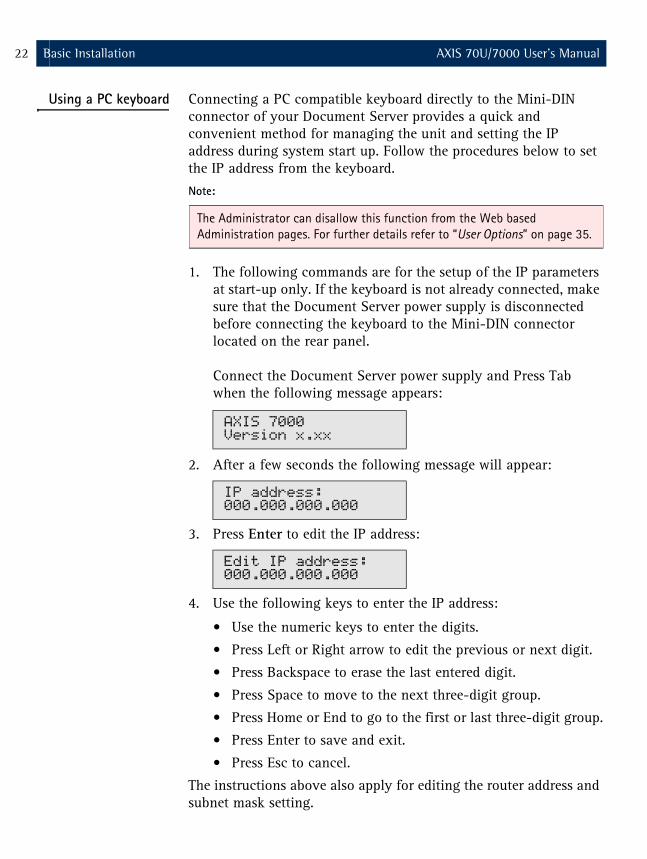
Using a PC keyboard Connecting a PC compatible keyboard directly to the Mini-DIN connector of your Document Server provides a quick and convenient method for managing the unit and setting the IP address during system start up. Follow the procedures below to set the IP address from the keyboard.Note:
1. The following commands are for the setup of the IP parameters at start-up only. If the keyboard is not already connected, make sure that the Document Server power supply is disconnected before connecting the keyboard to the Mini-DIN connector located on the rear panel.
Connect the Document Server power supply and Press Tab when the following message appears:
2. After a few seconds the following message will appear:
3. Press Enter to edit the IP address:
4. Use the following keys to enter the IP address:
• Use the numeric keys to enter the digits.
• Press Left or Right arrow to edit the previous or next digit.
• Press Backspace to erase the last entered digit.
• Press Space to move to the next three-digit group.
• Press Home or End to go to the first or last three-digit group.
• Press Enter to save and exit.
• Press Esc to cancel.
The instructions above also apply for editing the router address and subnet mask setting.
The Administrator can disallow this function from the Web based Administration pages. For further details refer to “User Options” on page 35.
AXIS 7000
Version x.xx
IP address:
000.000.000.000
Edit IP address:
000.000.000.000

AXIS 70U/7000 User’s Manual Basic Installation 23
Using DHCP, ARP,RARP and BOOTP
Use DHCP, ARP, RARP and BOOTP as an alternative to setting the IP address from the control panel or keyboard. Follow the appropriate instructions for the preferred method below.
Important!
Before you begin:
Using DHCP DHCP is enabled by default but can be disabled by an Administrator from the System Settings page.
Once connected, the IP address and all the other settings will be downloaded automatically to the document server if there is a DHCP server running on the network.
Using ARP in Windows Perform the following commands to download the IP address and verify the communication.
Important!
From the Command prompt, type the following:
The IP addresses given here are just examples.
• Power - make sure the document server is powered on and connected to the net-work.
• Ethernet Address - Depending on the method you are using, you will need to know the Ethernet address of your Document Server. The Ethernet address is based upon the Document Server serial number. You will find the number on the underside label.
Windows 95 only: If the ARP table is empty, you must first ping an existing unit on your network before setting the IP address of your Document Server. Type arp -a to display the ARP table.
arp -s <Internet address> <Ethernet address>ping <Internet address>

Basic Installation AXIS 70U/7000 User’s Manual24
The Ethernet address equals the serial number of the Document Server with each pair of digits separated by a hyphen.
Example:
The host will return Reply from 192.168.0.90... or a similar message. This indicates that the address has been set and that the communication is established.Notes:
Using ARP inUNIX/Linux and OS/2
In UNIX/Linux and OS/2, type the following commands to download the IP address and verify the communication:
The Ethernet address or node address equals the Document Server serial number with each pair of digits separated by a colon.
Example:
arp -s 192.168.0.90 00-40-8c-11-00-86ping 192.168.0.90
• ARP is enabled by default but can be disabled by an Administrator using the System Settings page.
• The ability to set the IP address with ARP and PING will only be enabled the first 10 minutes after restarting the print server.
• Once the Document Server has established communication using an appropriate IP address, the arp/ping commands cannot be used to change the address. The reason for this is to avoid accidental or unauthorized changes of the IP address. Restart the Document Server to make it accept the setting of the IP address. You can per-form a restart remotely via the Document Server Web interface. See “Specifying the System Settings” on page 32.
• When you execute the ping command for the first time, the response time may be significantly longer than usual.
arp -s <host name> <Ethernet or node address> tempping <host name>
arp -s spserv 00:40:8c:11:00:86 tempping spserv

AXIS 70U/7000 User’s Manual Basic Installation 25
The host will return spserv is alive or a similar message. This indicates that the address has been set and that communication is established.Notes:
Using RARPin UNIX/Linux
Follow these steps to download the IP address using the RARP method:
1. Append the following line to your Ethernet address table. This is typically performed by editing the file /etc/ethers.
Example:
2. If necessary, update your host table and alias name databases as required by your system.
3. Start the RARP daemon, if it is not already running. This is typically performed using the command rarpd -a
4. Restart the Document Server to download the IP address.
• ARP is enabled by default but can be disabled by an Administrator using the System Settings page.
• The ability to set the IP address with arp and ping will only be enabled the first 10 minutes after restarting the print server.
• The arp -s command may vary between different systems. Some BSD-type sys-tems expect the host name and Ethernet address in reverse order. IBM AIX systems require the additional argument ether for Ethernet networks, e.g. arp -s ether spserv 00:40:8c:11:00:86 temp
• Once the Document Server has established communication using an appropriate IP address, the arp/ping commands cannot be used to change the address. The reason is to avoid accidental or unauthorized change of the IP address. Restart the Docu-ment Server to make it accept the setting. You can perform a restart remotely via the Document Server Web interface. See “Specifying the System Settings” on page 32.
• When you execute the ping command for the first time, the response time may be significantly longer than usual.
<Ethernet address> <host name>
00:40:8c:24:c0:1c spserv
Basic Installation AXIS 70U/7000 User’s Manual26
Note:
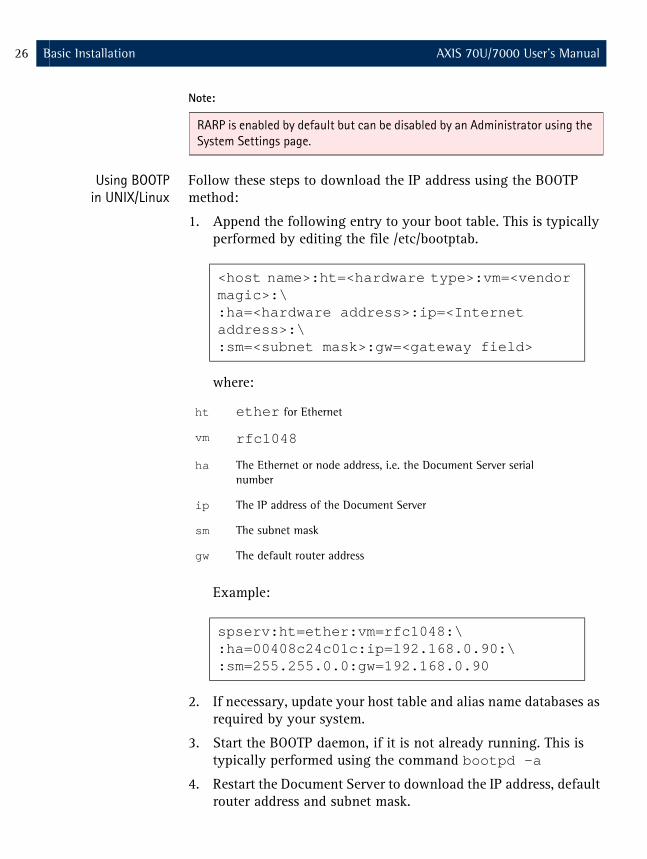
Using BOOTPin UNIX/Linux
Follow these steps to download the IP address using the BOOTP method:
1. Append the following entry to your boot table. This is typically performed by editing the file /etc/bootptab.
where:
Example:
2. If necessary, update your host table and alias name databases as required by your system.
3. Start the BOOTP daemon, if it is not already running. This is typically performed using the command bootpd -a
4. Restart the Document Server to download the IP address, default router address and subnet mask.
RARP is enabled by default but can be disabled by an Administrator using the System Settings page.
<host name>:ht=<hardware type>:vm=<vendor magic>:\:ha=<hardware address>:ip=<Internet address>:\:sm=<subnet mask>:gw=<gateway field>
ht ether for Ethernet
vm rfc1048
ha The Ethernet or node address, i.e. the Document Server serial number
ip The IP address of the Document Server
sm The subnet mask
gw The default router address
spserv:ht=ether:vm=rfc1048:\:ha=00408c24c01c:ip=192.168.0.90:\:sm=255.255.0.0:gw=192.168.0.90
AXIS 70U/7000 User’s Manual Basic Installation 27
Note:
Mapping a Host Name to the IP Address
If you are using host names, you can map a unique host name to the acquired IP address. Refer to your system manuals or to your Network Administrator for instructions on how to perform the name mapping on your particular system.Note:
Registering andResolving
Host Names
In order to register the host name of the Document Server in networks with dynamic IP address settings, WINS (Windows Internet Name Service) is supported. It is recommended that this method is used if you are setting the IP address of the Document Server using DHCP.
WINS Host NameRules
WINS only supports 15 character long host names. If your host name is longer than 15 characters, the Document Server truncates the host name to 15 characters when registering with a WINS server. Notes:
BOOTP is enabled by default but can be disabled by an Administrator using the System Settings page.
If the host name has not been included in the system host table, you can still perform the following instructions on how to download the IP address. In this case, simply replace the host name entry with the IP address wherever needed.
• The host name limitations conclude that the host name should be no longer than 15 characters and it should only contain the characters ‘A - Z’, ‘a-z’ and ‘-’.
• Refer to your system manuals or to your network administrator for instructions on how host name resolutions are performed on your system.

Basic Installation AXIS 70U/7000 User’s Manual28
Verifying your Installation
After successful installation, the Document Server will verify the attached scanner device and display the name of the detected device. If the scanner device is not supported, an error message will be displayed.
If no destinations have been specified, the Document Server will display:
If one or more destinations have already been specified, the Document Server will display:
where “xxxxxx” is the first destination in the destination list.
To verify the communication, you can access the Document Server using a standard Web browser:
1. Place a document in the scanner device.
2. Start your Web browser and enter the name or IP address of your Document Server in the location/address field, e.g. http://192.168.0.90
3. The Document Server Home Page is displayed (example from AXIS 70U).
4. Click Scan. Depending on the image format specified by the profile, the Web browser will display the scanned image in an associated image viewer, or ask you to save the file.
Connect using
Web browser
Send to:
xxxxxx
Document Server’s IP

AXIS 70U/7000 User’s Manual Configuring the Document Server 29
Configuring the Document ServerThis section is targeted specifically to users responsible for the administration of the Document Server. The Administrator is granted high-level privileges denied to the ordinary user.
Important!
Configure the Document Server from a standard Web browser.
Alternatively, edit the configuration file using a text editor and upload the file to the Document Server using FTP. See Configuring Using a Text Editor and FTP, on page 77.
The following settings must be specified by the Administrator before the Document Server can be used for distributing documents on your network:
• Network settings - define the parameters for TCP/IP and SMTP protocols.
• Destinations - specify the e-mail address, file server or printer to which you wish to send your document.
The Administrator can optionally modify:
• System settings - system information, administrator password, language, user privileges etc.
• Profiles• Paper sizes
To access the Document Server configuration file, you must first set the IP address as described in “Assigning an IP Address” on page 19.

Configuring the Document Server AXIS 70U/7000 User’s Manual30
Overview of the Administration Tools
The Web based Administration tools provide a convenient method for managing destinations, profiles, defining the network protocol settings, establishing user privileges, authentication etc. The tools are password protected and available to the Administrator only.
Accessing the Tools You can access the Document Server Home Page using a standard Web browser.
1. Start the Web browser.
2. Enter the name or IP address of the Document Server on the location/address line, e.g. http://192.168.0.90
3. This brings you to the Document Server Home Page.
Example from AXIS 70U
Online help is available on every page within the Document Server Web interface. This is of particular relevance when configuring the unit and should be used as a first point of reference for any administration queries. The help system is stored internally in the Document Server.
Document Server’s IP

AXIS 70U/7000 User’s Manual Configuring the Document Server 31
4. Click admin.
A prompt for a User Name and Password is displayed when entering these pages for the first time during a Web browser session. At the prompt, log on as root and use the default password pass.
Note:
5. The This Document Server page is displayed:
It is recommended that you change the password of your Document Server as soon as possible, since all Axis products are shipped with the same default password.

Configuring the Document Server AXIS 70U/7000 User’s Manual32
The Administrator can modify the system settings directly from this page. Access the other Administration tools using the control buttons to the left of the page.
Specifying the System Settings
Click This Document Server page to display software version, unit hardware address, memory size information and the current system settings.
Important!
Services overview The table below provides an overview of the information and services provided by each button on this page:
When installing the Document Server for the first time, it is recommended that the Administrator retains the default system settings, profiles and paper sizes. Optionally, customize these when you are familiar with the unit operation and functionality.
Button Description
Edit Allows editing of the General, Date & Time, User Options, Au-thentication, International and Meta Data settings.
View Settings Lists the current parameter settings in the configuration file.
Restart Server Restarts the Document Server. Removes all previously loaded temporary destinations and profiles from the memory.
Factory Defaults Restores the factory default settings and restarts the Docu-ment Server.

AXIS 70U/7000 User’s Manual Configuring the Document Server 33
The Edit Button Click the Edit button to display the This Document Server - Edit Page. Clicking the appropriate tab displays the General, Date & Time, User Options, Authentication, International and Meta Data settings for your Document Server as described below:
General Server Password and ConfirmThis is the Administrator password required for accessing the AXIS 70U/7000 for administration tools.
To change the password, simply enter your new password in the Server Password field. Repeat the new password in the Confirm field to confirm the spelling.
Notes:
• It is recommended that you change the password of your Document Server as soon as possible, since all Axis products are shipped with the same password as default.
• If you lose the Server password, you must restore the factory default set-tings. See “Restoring Factory Default Settings” on page 127.
• An asterisk * is displayed for each alphanumeric character that comprises the password in the Server password field of the This Document Server page.

Configuring the Document Server AXIS 70U/7000 User’s Manual34
Configuration file retrieval method Retrieving a Configuration file from an external source means that hundreds of document servers can be configured through one or more Configuration files. A Configuration file does not have to contain all parameters. Note that when this functionality is enabled, the retrieved parameter settings override any other settings made through e.g. the Web pages. Setting a parameter through the Web pages, also means that the Configuration file is immediately retrieved from it's external source.
• NoneSelect this option if you do not want to retrieve a configuration file from an external source.
• Configuration file via FTPSelect this option to read a configuration file from an FTP server.
• FTP Server - Specify the name or IP address of the FTP server.
• User - Specify the user name for logging on to the FTP server.
• Password - Specify the password for logging on to the FTPserver.
• Confirm - Confirm the password to make sure the spelling is correct.
• Directory - Specify the directory on the FTP server where the file is stored. If left blank, the root directory on the FTP server will be used.
• Filename - Specify the name of the configuration file. • Retrieval Interval - Specify how often the configuration file
is retrieved. The value is specified in whole hours. Note:
Date & Time If you are using time synchronization, specify the time zone in which the Document Server operates.
AXIS 7000 The AXIS 7000 has a built-in real time clock with a back-up battery which will keep the time when the power supply is disconnected.
The string %%SN%% anywhere in the Directory or Filename will be replaced with the six last digits of the Document Server’s serial number before contacting the FTP server.

AXIS 70U/7000 User’s Manual Configuring the Document Server 35
AXIS 70U/7000 Automatically using the Network Time Protocol (NTP)Click here to obtain date and time information from a time synchronization source. Time stamps are used in the event log.
NTP ServerSpecify the name or IP address of the NTP server used for time synchronization.
SMBClick here to obtain date and time information from Microsoft Windows NT Network (SMB) - a time synchronization source for NT domains.
Note:
Manually Click here to set date and time manually.
User Options The Allow Users to: field defines the privileges allowed to normal users by the Administrator(s). Check the corresponding check box for each task a user is allowed to perform, namely:
• Add temporary e-mail destinations• Add temporary profiles• Scan documents to Web browser• Specify the sender of scanned documents• Configure network settings on the control panel• Specify file name for e-mail and file destinations• Specify subject for e-mail destinationsNotes:
To use Microsoft Windows NT Network (SMB) properly WINS must be enabled and the Domain/GroupName parameter must be set to a valid name.
• All tasks, except specify the sender of scanned documents and Specify file name for e-mail and file destinations are enabled by default.
• Configuring the network settings on the control panel allows the user to change the IP Address using the control panel or the external keyboard.
• Specify file name for e-mail and file destinations allows the user to enter a new file name for an FTP destination or e-mail destination.

Configuring the Document Server AXIS 70U/7000 User’s Manual36
Authentication The authentication option makes it possible for the administrator to allow access to the Document Server to authenticated users only. For more information, please refer to “Specifying Authentication Settings” on page 50.
International Allows the Administrator(s) to select:
• The preferred language for messages displayed on the Document Server control panel display - English, French, German, Spanish, Italian, Swedish, Danish and Norwegian are supported.
• The keyboard layout which is compatible with the external keyboard.
• Keys to enable on startup (Num Lock, Caps Lock and/or Scroll Lock).
• The measurement unit to be used for displaying defined paper sizes (centimeters or inches).
Notes:
Meta Data Meta Data handling enables the administrator to request information from the user of the Document Server. The information requested is specified in an XML DD file. The user is prompted to enter the information at the moment of scanning, using the connected keyboard. For more information, please refer to “Meta Data” on page 101.
• The default language is set to English and the measurements to inches.• When a new language is selected you must go back to the Profiles page
and click Restore Predefined Profiles to change the language in the Profile Name list. This also applies to the language in the Paper Sizes list, i.e. you must go back to the Paper Sizes page and click Restore Predefined Paper Sizes.Note: All user-defined profiles and modifications to predefined profiles will be lost when you click Restore Predefined Profiles.
AXIS 70U/7000 User’s Manual Configuring the Document Server 37
Specifying Network Settings
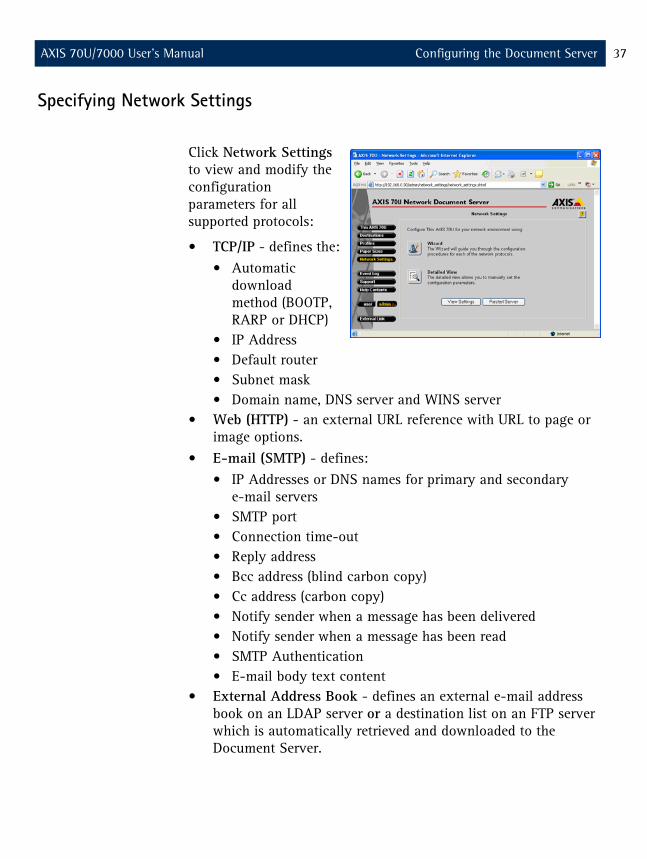
Click Network Settings to view and modify the configuration parameters for all supported protocols:
• TCP/IP - defines the:• Automatic
download method (BOOTP, RARP or DHCP)
• IP Address• Default router• Subnet mask• Domain name, DNS server and WINS server
• Web (HTTP) - an external URL reference with URL to page or image options.
• E-mail (SMTP) - defines:• IP Addresses or DNS names for primary and secondary
e-mail servers• SMTP port• Connection time-out• Reply address• Bcc address (blind carbon copy)• Cc address (carbon copy)• Notify sender when a message has been delivered• Notify sender when a message has been read• SMTP Authentication• E-mail body text content
• External Address Book - defines an external e-mail address book on an LDAP server or a destination list on an FTP server which is automatically retrieved and downloaded to the Document Server.

Configuring the Document Server AXIS 70U/7000 User’s Manual38
Note:
Services Overview The table below provides an overview of information and services available from this page
Using the Wizard The Wizard provides a convenient way to set up the Document Server in your networking environment. Follow the instructions below to configure the supported networking protocols:
The network settings are set automatically if you use RARP, DHCP or BOOTP for downloading the IP address. However, it is recommended that you verify the network settings using the Web browser interface, regardless of how the initial network setup was done.
Button Description
Wizard Guides the user through the setup procedures for the following protocols - TCP/IP, E-mail (SMTP) and the External Address book.
Note: You cannot set up all of the supported protocols with one pass of the Wizard. After completing one protocol, you then return to the Network Settings Wizard page where you can optionally proceed with another protocol.
Detailed View Displays the Protocols page that allows all of the supported pro-tocols to be set up within a single dialog.
Restart Server Restarts the Document Server. LED indicators flash during startup and self test. When they have stopped and the Network indicator starts flashing to indicate network activity, the unit is ready for use. New configuration settings will then become active.
Note: Clicking Restart deletes all temporary destination and pro-files and clears the Event Log.
View Settings Lists the current parameter settings in the configuration file.

AXIS 70U/7000 User’s Manual Configuring the Document Server 39
Important!
1. Click Network Settings.
2. Click Wizard and follow the on-screen instructions to have the Document Server guide you through the configuration procedures for each of the supported network protocols.
3. Click Close.
Detailed View Follow the instructions below to configure all of the supported networking protocols using Detailed View.
1. Click Network Settings.
2. Click Detailed View to display the Protocols dialog.
3. With reference to services overview below and the Online Help information, click the appropriate tab to view and modify the protocols to your choosing.
• Click Apply to save your changes. • Click OK to save your changes and close the dialog box.
• An SMTP server address must be specified by the Administrator before the Document Server can be used for scan-to-e-mail.
• In order to prevent conflicts with other network devices please be sure to acquire a unique and unused IP address from your Network Administra-tor.
• The Online help button provides instructions and general information on all system parameters and is your first point of reference for any administration queries.

Configuring the Document Server AXIS 70U/7000 User’s Manual40
Services Overview The table below provides an overview of the supported protocol settings describing both purpose and function:
Note:
Protocol setting
Purpose and function
TCP/IP Defines the IP Address, default router and subnet mask, automatic download method (BOOTP, RARP or DHCP), domain name, DNS server and WINS server.
Web (HTTP) An external URL reference with URL to page or image options.
E-mail (SMTP) Defines the:• IP Addresses or DNS names for primary and secondary e-mail
servers• SMTP port• Connection time-out• E-mail reply address• Bcc address• Cc address• E-mail notification• SMTP authentication method• E-mail body text contents
External Address Book
Defines an external e-mail address book on an LDAP server or desti-nations list on an FTP server.
The AXIS 70U/7000 configuration parameters are fully described in “The Parameter List” on page 146.

AXIS 70U/7000 User’s Manual Configuring the Document Server 41
Configuring the TCP/IPSettings
Follow the instructions below to configure the TCP/IP settings:
1. From the Protocols dialog, click the TCP/IP tab.
2. Check the appropriate checkbox to define your preferred method for setting the IP address automatically, i.e. DHCP, BOOTP or RARP. For further information on these methods, refer to “Assigning an IP Address ”on page 19.
Notes:
3. Enter the IP address of your Document Server, e.g. 192.168.0.90
Notes:
• If DHCP, BOOTP or RARP is enabled, your manual settings might be overridden when you restart the Document Server.
• Depending on how your network has been configured, other Inter-net-related parameters such as the default router, subnet mask, mail server, time server etc. might also be set automatically. How-ever, it is recommend that you verify the settings when the Docu-ment Server has been restarted and then enter any missing parameters manually.
• If the IP address is changed, you must re-establish the HTTP commu-nication using the new address.
• You can also set the IP address from the Document Server control panel. Refer to “Assigning an IP Address” on page 19.

Configuring the Document Server AXIS 70U/7000 User’s Manual42
4. Enter the IP address for the Default Router. All traffic directed outside the local network (according to the subnet mask) is sent to the default router. Any re-routing via other routers is done automatically. The setting 0.0.0.0 indicates that no default router is set.
5. Specify the Subnet Mask used for determining when the traffic should be sent via a router. This number combined with the IP address identifies on which network the Document Server is located. For example, the normal class C mask is 255.255.255.0. The setting 0.0.0.0 indicates that automatic router sensing is used.
6. Specify the Domain Name used by the Document Server for identification on the DNS server.
7. Specify the IP address of the Primary DNS Server. DNS (Domain Name System) servers are used for identifying computers with names instead of IP Addresses.
8. Specify the IP address of the Secondary DNS Server that will be used in case the primary DNS server is disconnected or unavailable.
9. Check this box to enable WINS (Windows Internet Name Service) over TCP/IP. WINS allows Windows-based clients to locate NetBIOS resources on TCP/IP networks. WINS is disabled by default.
10. Specify the IP address of the Primary WINS server.
11. Optionally specify the IP address of a Secondary WINS server. The secondary WINS server will be used in case the primary WINS server is disconnected or unavailable.

AXIS 70U/7000 User’s Manual Configuring the Document Server 43
Web (HTTP) Select Web (HTTP) to add a customized link to the Document Server Home Page:
• URL to Page: Useful for establishing guidelines and rules of usage for the Document Server. The full path must be specified, e.g. http://www.company.com
• URL to Image: Link to an image used as a customized link. Specify the full path; for example: http://www.company.com/images/a.gif, or the path relative to the URL of the page, e.g. images/a.gif
Note:
Note that the width of the image can not exceed 117 pixels. Leave blank to use a standard button.

Configuring the Document Server AXIS 70U/7000 User’s Manual44
E-mail (SMTP) An SMTP server address must be specified by the Administrator before the Document Server can be used for scan-to email.
Follow the instructions below to configure the e-mail (SMTP) protocol.
1. From the Protocols dialog, click the E-mail (SMTP) tab.
2. Specify the name or IP address of the Primary Mail Server that provides the e-mail facilities, e.g. mail or mail.domain.com or an IP address.
3. Optionally, specify the name or IP address of the Secondary Mail Server. The secondary mail server is only used if the primary mail server is disconnected or unavailable.
4. In the SMTP Port field, specify the number of the TCP/IP port.
5. Define the Connection Timout period, i.e. how long the Document Server is to wait before timing out when connecting to the e-mail (SMTP) server. This must be greater than 5 but no more than 65535 seconds.

AXIS 70U/7000 User’s Manual Configuring the Document Server 45
6. In the Reply Address field, specify the e-mail address that is to feature as the default sender when sending to e-mail destinations.
7. Check the Send copy to Bcc recipient checkbox to enable the option to send a blind carbon copy (Bcc) of an e-mail. Specify the default e-mail address of the recipient in the Bcc Address field.
8. Check the Send copy to Cc recipient checkbox to enable the option to send a copy (Cc) of an e-mail. Specify the default e-mail address of the recipient in the Cc Address field.
9. Check Notify sender when a message has been delivered to enable the option to send an e-mail to the default reply address to notify the sender that the message has been delivered.
10. Check Notify sender when a message has been read to enable the option to send an e-mail to the default reply address to notify the sender that the message has been opened/read.
Notes:
11. Check SMTP authentication to enable authentication for SMTP server access. Choose whether to retrieve user identification from an external account (LDAP or NT) or an internal account by entering a unique Username and Password in the Internal account fields. For more information on authentication, see “Specifying Authentication Settings” on page 50.
12. E-mail body text content - Select Built-in message to include the following message (in the selected control panel language) in each e-mail sent from the Document Server:“The attached document was sent to you using a Document Server. Please visit www.axis.com for more information”
13. Select Custom message and enter a customized message (200 characters maximum and no line breaks allowed) in the text field. This message will be included in each e-mail sent from the Document Server. Select None to disable this option.
• Notify sender when a message has been delivered requires that your mail server supports extended SMTP and DSN (Delivery Status Notifications).
• Notify sender when a message has been read requires that the recipient’s e-mail client supports MDN (Message Disposition Notifi-cations). Also, the recipient can discard the request without notify-ing the sender.

Configuring the Document Server AXIS 70U/7000 User’s Manual46
Notes:
• The user can specify another sender at the moment of scanning. This, however, does not apply if the administrator has enabled Authentication or if the Specify the sender of scanned documents option is not selected (see the admin > Edit > User Options tab)
• Make sure that your Document Server has a valid SMTP reply address to avoid rejection by spam filters.
• To be able to receive mail from the Document Server you may need to configure the IP address or host name of the Document Server in the mail server.

AXIS 70U/7000 User’s Manual Configuring the Document Server 47
External Address Book A Destination Address Book can be retrieved from an LDAP (Lightweight Directory Access Protocol) server or from a specified file on an FTP server. Alternatively, you can choose not to retrieve an address book.
Follow the instructions below to configure the External Address Book:
1. From the Protocols dialog, click the External Address Book tab.
Notes:
• The external e-mail addresses will appear in alphabetical order together with existing destinations in the destination list on the Document Server message display.
• The event log will show the amount of e-mail addresses retrieved using LDAP or FTP.
• For an example, create a destination with the selected transfer method and check the config.ini file.

Configuring the Document Server AXIS 70U/7000 User’s Manual48
Your options are:
Parameter Options Description
No External Address Book Select this option if you do not want to retrieve an External Address Book.
External Address Book via LDAP(e-mail destinations only)
Select this option to retrieve an external address book from an LDAP (Lightweight Directory Access Protocol) server. For more information, see “LDAP” on page 135.
LDAP Server Specify the name or IP Address of the LDAP server.
Port Number Specify the number of the TCP/IP port.
User Specify the name for logging on to the LDAP server, e.g. cn=name, o=companyname, c=countrycode. If left blank, no authorization will be attempted. If the contents in this field does not include a "=" or a comma, the string "cn=" is automatically added to the beginning of the contents.Password - Specify the password for logging on to the LDAP server. If the User field is left blank, this setting will be ignored.Confirm - Enter the password again to make sure it was spelled correctly.
Name Field Specify the name of the field that contains the destination name.
E-mail Field Specify the name of the field that contains the e-mail address.
Search Base Specify where to begin the search, e.g. o=companyname, c=countrycode. There may be other required settings depending on the LDAP server. Refer to the user documentation of the LDAP server for more information.
Filter Specify an LDAP filter in order to reduce the length of the destination list. The filter can be a real LDAP filter, e.g. (givenName=*). You can also specify a list of conditions, e.g. mail=adm*,telephoneNumber=+1 800*. In this case, the Document Server will generate a real LDAP filter.
Reload Interval Specify how often the external addresses are reloaded. The value is specified in whole hours, and the default is 12 hours.
External Address Book from a File(e-mail, printer and file destinations)
Select this option to read an external address book from a file on an FTP server.
FTP Server Specify the name or IP Address of the FTP server.
User Specify the user name for logging on to the FTP server. If left blank, the User and Password specified on the Destination Default page will be used.Password - Specify the password for logging on to the FTP server. If the User field is left blank, this setting will be ignored.Confirm - Enter the password again to make sure it was spelled correctly.
Directory Specify the directory on the FTP server where the file is stored. Example: /pub/axis7000/addressIf left blank, the root directory on the FTP server will be used.
File Name Specify the name of the file.

AXIS 70U/7000 User’s Manual Configuring the Document Server 49
The file containing the destination information must be a text file using the following syntax:
[Destination-<destination name>]
Description= <destination name>
Transfer method= Scan-to-e-mail (SMTP)/Scan-to-URL (SMTP & FTP)/Scan-to-file (FTP)/Scan-to-print (LPD)/Scan-to-print (TCP)
Destination= <e-mail address>/<directory>/<queue>/ <port>
Information level= Nothing/Basic/Complete
Profile= <profile>
Server= <FTP server>/<LPD server>/<printer>
User= <user name>
Password= <password>
File name= <file name>
Index file= Yes/No
Resolutions= <A subset of: 75 100 150 200 300 600 1200>
Paper sizes= <A subset of: Executive Letter LegalLedger A4 A3>
Duplex supported= Yes/No
Duplex selection= SingleSided/DoubleSided/AsScanned
LPD mode= SingleDataFile/SplitSourceFile/BufferDataFiles/MultipleDataFiles
Configuring the Document Server AXIS 70U/7000 User’s Manual50
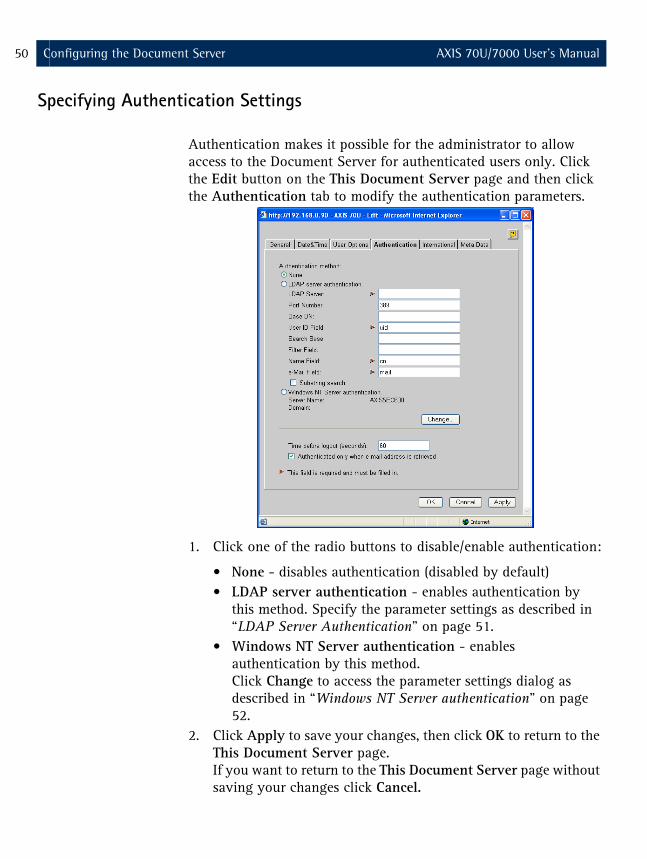
Specifying Authentication Settings
Authentication makes it possible for the administrator to allow access to the Document Server for authenticated users only. Click the Edit button on the This Document Server page and then click the Authentication tab to modify the authentication parameters.
1. Click one of the radio buttons to disable/enable authentication:
• None - disables authentication (disabled by default)• LDAP server authentication - enables authentication by
this method. Specify the parameter settings as described in “LDAP Server Authentication” on page 51.
• Windows NT Server authentication - enables authentication by this method. Click Change to access the parameter settings dialog as described in “Windows NT Server authentication” on page 52.
2. Click Apply to save your changes, then click OK to return to the This Document Server page.If you want to return to the This Document Server page without saving your changes click Cancel.

AXIS 70U/7000 User’s Manual Configuring the Document Server 51
Note:
LDAP ServerAuthentication
The SMTP authentication method is also available, refer to “Specifying Network Settings” on page 37 for information on how to configure the Document Server to use this method.
Parameter Description
LDAP Server Specify the name or IP Address of the LDAP server.
Port Number Specify the number of the TCP/IP port used by the LDAP server.
Base DN Specify the Base Descriptive Name to use when binding to the LDAP server, e.g. ou=people, o=company name.
User ID Field Specify the User ID field that contains the user ID / user name of the authenticated user, e.g. uid, userid=johnsmith.
Search Base Specify where to begin the search, e.g. ou=people, o=company name.
Filter Field Specify the name of the field against which the User ID will be matched. It is usually the same as the 'User ID Field'. However, LDAP servers like Microsoft Exchange confuses these two fields. If not specified this will be equal to the 'User ID Field'. e.g. uid .
Name Field Specify the name of the field that contains the destination name, e.g. cn, commonname=full name.
e-mail Field Specify the name of the field that contains the e-mail address, e.g. mail=email address.
Substring search Specify whether the Document Server is to search for the e-mail address and common name attribute using a ‘substring’ search or an ‘equal’ search. For more information on LDAP search options, see your LDAP server manual.

Configuring the Document Server AXIS 70U/7000 User’s Manual52
Windows NT Serverauthentication
Note:
Authenticated onlywhen e-mail address is
retrieved
When one of the authentication methods (LDAP or NT) is enabled, the reply address of e-mails is set to the e-mail address of the authenticated user and can not be changed.
• If the parameter Authenticated only when e-mail address is retrieved is set, the user may be authenticated only if his e-mail address is found in the Document Server’s list of e-mail destinations.
• If the parameter Authenticated only when e-mail address is retrieved is not set, and the user’s e-mail address is not found, he may still be authenticated, but the default reply e-mail address is used.
Parameter Description
Server Name Specify the name of the Document Server to be added in the Win-dows NT domain.
Domain Specify the name of the domain where the Document Server be-longs.
Create a Comput-er Account in the Domain
Add the Document Server to the domain. Check this box to create the account via this interface or use the Server Manager tool on a Windows NT server.
Username & Password
Specify the username and password of the NT administrator.
Treat the added computer name as a security element. Before your Document Server has joined the domain, it is possible for a user to add a different computer to your computer name and have it join the domain using the computer account you have just created for your Document Server.
For more Information see the Windows NT Help pages on creating a computer account.

AXIS 70U/7000 User’s Manual Configuring the Document Server 53
Specifying Destinations
A destination is used when sending scanned images from the Document Server control panel and is defined as one of the following:
Click Destinations from the admin page to display the Destinations page:
an e-mail address
a file on an FTP server referenced by a URL
a file on an FTP server
a printer

Configuring the Document Server AXIS 70U/7000 User’s Manual54
From the Destinations page you can:
• list currently available e-mail, file and printer destinations• edit and create new destinations• create copies of existing destinations• selectively delete destinations• set a Quick Destination which is a specific permanent
destination to be accessible through the F9 key on the keyboard

AXIS 70U/7000 User’s Manual Configuring the Document Server 55
Services Overview The table below provides an overview of the information and services provided by each button on this page
Creating and EditingE-mail Destinations
E-mail destinations allow the users to send scanned images to e-mail addresses using the SMTP protocol.
Follow the instructions below to create new or edit existing e-mail destinations:
Button Description
E-mail Destination New >> Creates a new e-mail destination.
File Destination New >> Creates a new file destination.
Printer Destination New >> Creates a new printer destination.
URL for e-mail >> Defines the storage location for images sent as hyper-links to e-mail destinations.
E-mail Subjects >> Specifies the text to be displayed in the subject field when sending to e-mail destinations.
Note: US ASCII characters only.
Destination Defaults >> Displays the default parameters for each destination, e.g. the associated profile for a particular destination, the transfer type, etc.
Note: Editing the default settings causes all destinations us-ing the default value to be changed automatically.
Quick Destination Enter specific permanent destinations to be accessible through the F9 key on the keyboard.
External Destinations Displays the external destinations. Destinations are dis-played using the same syntax as an external address book stored on an FTP server (see Network Settings > Detailed View).
Remove All Destinations Deletes all destinations from table.

Configuring the Document Server AXIS 70U/7000 User’s Manual56
1. Click Destinations.
2. Previously added e-mail, file and printer destinations are listed in the table. Click Detailed to view the detailed settings.
3. If you want to edit an existing destination in the displayed list, click the Destination Name link and proceed to step 5.
4. Click E-mail Destination New >> to add a new destination to the list.
5. Specify a descriptive name for the e-mail destination in the Destination Name field. This is the name that will appear in the destination list.
6. Specify the e-mail address of the recipient in the E-mail Address field. Multiple recipients must be separated by a comma (,) e.g. [email protected], [email protected]
7. From the drop-down Profile list, select the profile to be used as the default for this destination.
Note:
The user can specify another profile from the Document Server control panel at the moment of scanning. <Default-xx> is the default value specified on the Destination Defaults page.

AXIS 70U/7000 User’s Manual Configuring the Document Server 57
8. With reference to the table below, select the amount of information to be attached with the image:
9. The e-mail can include the scanned image as an e-mail attachment, or a hyperlink (URL) to the original file. Click the appropriate radio button to determine how the scanned image should be sent.
Important!
10. To complete this task, do one of the following:
• To enter a new destination, click Add to list. Once your destination additions are complete, click Done to return to the Destinations page.
• To save an edited destination click OKNotes:
Option Description
<Default-xx> Default value specified on the Destination Defaults page.
<Complete> Information about the connected scanner device, the parame-ter settings used when scanning etc.
<Basic> Includes the image-related profile settings.
<None> Does not include any information.
When selecting a URL that points to a scanned image, you must specify the location for storing the scanned images. Click URL for E-mail to specify the directory where all such images will be stored.
• You can enter more than one e-mail destination. Separate the dif-ferent entries with a comma (,) e.g. [email protected], [email protected]
• You can also define an external e-mail address book on an LDAP server or destinations list on an FTP server. See “External Address Book” on page 47.
• Fax Servers that have e-mail gateways can also be used as destina-tions. For more information, see the support Web page at http://www.axis.com

Configuring the Document Server AXIS 70U/7000 User’s Manual58
Adding PermanentDestinations
The Administrator can permit users to add temporary e-mail destinations using the New Destination button on the User > Destination page. If this privilege is enabled, the five most recently added temporary destinations will appear at the top of the table on the Destinations page.
The Administrator can make these temporary destinations permanent simply by clicking the Make Permanent button.
Creating and EditingFile Destinations
File destinations allows the user to store scanned images in a directory on a file server using the FTP protocol.
Follow the instructions below to edit, copy or create a new file destination:
1. Click Destinations.
• If you want to edit an existing destination in the displayed list, click the Destination Name link and proceed to step 2.
• If you want to copy an existing destination and modify it,
click and proceed to step 2.
• Click File Destination New >> to add a new destination to the list.

AXIS 70U/7000 User’s Manual Configuring the Document Server 59
2. Specify a descriptive name for the file destination in the Destination Name field. This is the name that will appear in the destination list.
3. From the drop-down Profile list, select the profile to be used as default for this destination.
Note:
4. With reference to the table below, select the amount of information to be included with the image:
5. Specify the name or IP address of the FTP server on which the scanned image will be stored in the FTP Server field.
6. Specify the user name for logging on to the FTP server in the User field.
Note:
7. If required, specify the password for logging on to the FTP server. Repeat the password in the Confirm field to check the spelling and syntax.
8. Specify the directory on the FTP server where the image will be stored.
9. Define the file name of the scanned image.
The user can specify another profile from the control panel at the moment of scanning. <Default-xx> is the default value specified on the Destination Defaults page.
Option Description
<Default-xx> Default value specified on the Destination Defaults page.
<Complete> Information about the Document Server, the connected scan-ner device, the parameter settings used when scanning etc.
<Basic> Includes the image-related profile settings.
<None> Does not include any information.
Leaving the User field blank causes the user and password defined in the Destination Defaults page to be used.

Configuring the Document Server AXIS 70U/7000 User’s Manual60
Note:
10. With reference to Filename Sequence Numbers and Extensions (see below), optionally combine the filename with a sequence number and/or a file extension, e.g.
11. Specify the extension of the information file. If you do not specify an extension the default value will be used.
12. To complete this task do one of the following:
• To save a new File Destination, click Add to list. Once your File Destination additions are complete, click Done to return to the Destinations page.
• To save an edited File Destination or to save a copy of a File Destination, click OK.
Filename SequenceNumbers and
Extensions
The filename defined within the New File Destination/Edit File Destination page can be appended with a sequence number and/or an extension. These numbers and extensions specify the file name and define which application is needed to automatically launch the appropriate image viewer, i.e. tif, jpg, or pdf.
Check the Append Sequence number to file name if you want to sequentially save a series of image files. This causes a new image file to be stored every time a user scans to the specified destination. For example, if you select 01 as the sequence number from the drop-down list, the first time you scan an image to the specified destination, the file will be saved as filename01. The next time the file will be saved as filename02,... etc.
For a directory with many files, performance increases if you store the sequence number on the FTP server. However, to do that, the FTP user must be permitted to overwrite/delete files in the specified directory.
The filename defined in the Destination Defaults page is used if the Filename field is left blank.
<filename><sequencenumber>.<fileextension>

AXIS 70U/7000 User’s Manual Configuring the Document Server 61
The table below summarizes the available sequence numbers and extensions:
Creating and EditingNew PrinterDestinations
Printer destinations allow users to send scanned or copied images to a PCL printer on the network, using either the Raw TCP or LPD printing method.
Raw TCP Printing Follow the instructions below to edit or create a new TCP/IP printer destination:
1. Click Destinations.
2. If you want to edit an existing destination in the displayed list, click the Destination Name link and proceed to step 4.
Option Description
Append sequence number to file name
Adds a unique sequence number to the file name.
Start sequence with: Selects the sequence number to be appended to the first image scanned to this destination. For example, if you choose 01, the first image will be called <filename>01, the second will be called <filename>02, etc.
Store sequence number on FTP server:
Check this box to store the sequence number on the FTP server. For a directory with many files, performance will increase. However, the specified user must have change and delete access rights to the specified directory on the FTP server.
Append file extension to file name:
Check this box to add the file extension to the file name, i.e. tif, jpg or pdf. The file extension will correspond to the profile used. It is needed for automatically launching the appropriate image viewer.
Information File Extension:
Specify an extension for the information file. Note: Do not use the same extension as the scanned document file format.

Configuring the Document Server AXIS 70U/7000 User’s Manual62
3. Click Printer Destination New >> to display the New Printer Destination Page.
4. Enter a descriptive Destination Name for the printer.
5. Check the Raw TCP radio button.
6. Type the IP Address or Host Name of the destination printer in the Printer field.
7. Specify the port number that the printer uses (normally 9100).
8. From the drop-down Profile list, select the profile to be used as the default for this destination.
Note:
9. Check the Include Page Header check box only if you want date, time, destination, sent by, and page number to appear on your printer output.
• The user can specify another profile from the control panel at the moment of scanning. <Default-xx> is the default value specified on the Destination Defaults page.
• Select the PCL image format as it is primarily for use with printer destinations.

AXIS 70U/7000 User’s Manual Configuring the Document Server 63
10. If the target printer supports double sided printing, check the My Printer Supports Double Sided Printing checkbox and define your printing preferences by clicking the associated radio buttons, namely: Only Print Single Sided, Only Print Double Sided or Print As Scanned.
11. Check the appropriate check boxes to define the supported resolutions and paper sizes for the target printer.
12. Select the PCL compression method for color and grayscale images. These compression methods are available: Unencoded, Run-length, TIFF and Delta row.
13. To complete this task do one of the following:
• If you have added a new printer destination, click Add to List. After adding all of your required printers, click Done.
• If you have edited or copied an existing printer destination, click OK.
LPD Printing Follow the instructions below to edit or create a new LPD printer destination:
1. Click Destinations.
2. If you want to edit an existing destination in the displayed list, click the Destination Name link and proceed to step 5.
3. Click Printer Destination New >> to display the New Printer Destination Page.
4. Enter a descriptive Destination Name for the printer.
5. Check the LPD radio button.
6. Type the IP Address or Host Name of the LPD server in the Server field.
7. In the Print Queue field, type the name of the target printer queue on the server. Optionally, enter a username to identify ownership of the print job.
8. Define the LPD Mode by clicking one of the adjacent radio buttons, namely, Axis Compatible Print Server, Windows Queue, Unix Queue or Other.

Configuring the Document Server AXIS 70U/7000 User’s Manual64
Notes:
9. From the drop-down Profile list, select the profile to be used as the default for this destination.
Note:
10. Check the Include Page Header checkbox only if you want date, time, destination, Sent By and Page Number to appear on your printer output.
11. If the target printer supports double sided printing, check the My printer supports double sided printing checkbox and define your printing preferences by clicking the associated radio buttons, namely, Only Print Single Sided, Only Print Double Sided or Print As Scanned.
12. Define the supported resolutions and paper sizes for the target printer by checking the appropriate check boxes.
13. Select the PCL compression method for color and grayscale images. These compression methods are available: Unencoded, Run-length, TIFF and Delta row.
14. To complete this task do one of the following:
• If you have added a new Printer Destination, click Add to List. After adding all of your required printers, click Done.
• If you have edited or copied an existing destination, click OK.
• Click Other if your destination printer server is not Axis compatible.• Click the Unix Queue button only if you wish to distribute the file to
a dedicated LPD server on your network.
The user can specify another profile from the control panel at the moment of scanning. <Default-xx> is the default value specified on the Destination Defaults page.

AXIS 70U/7000 User’s Manual Configuring the Document Server 65
Specifying Profiles
A profile defines the scanner device and image parameters to be used when scanning and is optionally part of the destination definition.
Note:
Click Profiles for:
• Viewing permanent and temporary profiles • Editing a profile• Making temporary profiles permanent • Creating copies of an existing profiles • Selectively deleting profiles• Setting Profile defaults
Although a profile is normally associated with a destination, the user can override that setting by choosing another profile from the control panel at the moment of scanning.

Configuring the Document Server AXIS 70U/7000 User’s Manual66
Services Overview The table below provides an overview of the information and services provided by each button on this page
Creating and EditingProfiles
Follow the instructions below to edit the existing profiles or create new profiles for specific document types such as invoices, mailings etc.
Click to create a copy of an existing profile. You can edit the settings to create a new profile based on existing settings.
Notes:
Button Description
Profile New>> Allows an administrator to create a new profile. See Creating new profiles below.
PDF Options>> Enables the user to insert the document in the same orienta-tion as when copying on a digital copier i.e. long-edge first.
Profile Defaults>> Allows the administrator to set the default paper size to be used for all profiles using the default.
Image enhancement>>
The image enhancement options will be available, if supported by the connected scanner device. Image enhancement is used to create a profile to capture text on poor quality originals or to capture text on a dark background.
Restore Predefined Profiles
The Document Server includes a number of predefined general purpose profiles. Clicking this button restores the predefined profiles. See Predefined Profiles below for details.
Note: All user-defined profiles are lost if you restore the pre-defined profiles. This does not apply to Default Paper SIze which must be set manually from admin > Profiles.
• When you have selected a new language you must go to the Profiles page and click Restore Predefined Profiles to change the language in the Pro-files list. It is recommended that you select your preferred language before defining and modifying paper sizes and profiles. Note: All user-defined profiles (except the set default paper size) and modifica-tions to predefined profiles will be lost when you click Restore Predefined Profiles.
• The Document Server will display an error message if the selected set-tings combination is not valid as some combinations of settings are incompatible.

AXIS 70U/7000 User’s Manual Configuring the Document Server 67
1. Click Profiles.
2. The previously added profiles are listed in the table. The Profile Name is the text that appears in the profile list on the Document Server interface. If you want to edit an existing profile, click the Profile Name link and proceed to step 4.
3. Click Profile New >> to add a new profile to the list.
4. In accordance with the information provided in the Profiles Parameters table (“Profiles Parameters” on page 68), define all of the parameters featured in the New Profile/Edit Profile page.
5. To complete this task do one of the following:
• If you have added a new profile, click Add To List. Once your profile additions are complete, click Done.
• Click Reset only if you wish to clear the current profile settings.
• If you have edited or copied an existing profile, click OK.6. Click Scan to scan the material currently placed in the scanner
device using the current profile settings. Depending on the image format used, the Web browser will either display the image or ask you to save the file.

Configuring the Document Server AXIS 70U/7000 User’s Manual68
Profiles Parameters
Parameter Options Instructions
Profile Name Specify a descriptive name for the profile. This is the name that will appear in the profile list.
Paper Size A3, A4, A5, B4, B4 (JIS), B5, B5 (JIS)Business cardExecutiveLedgerLegalLetter (default)Photo 3.5 x 5”Photo 4 x 6”
Select the paper size from the drop-down dialog box.Note: Change the default paper size on admin > Profile > Profile Defaults. If you perform Restore Predefined Profiles the set default Paper Size will not be changed back to Letter.
Duplex Scan-ning
Single sidedDouble sided
Click the appropriate radio button to spec-ify if the scanner device is to scan the doc-ument on both sides of the paper.
PaperOrientation
Portrait: top along the short edgeLandscape: top along the long edge
Click the appropriate radio button to spec-ify your chosen orientation.
Multipage Doc-uments
All pages in one fileSeparate file for each page
Click the appropriate radio button to select whether multipage documents should be saved in one or several files.
Resolution - Specify the resolution to be used for scan-ning for X and Y respectively, in dots per inch (DPI).
Intensity 0 - 100 (%) Enter the level of intensity as a percentage ratio.
Contrast 0 - 100 (%) Enter the level of contrast as a percentage ratio.
Data Type Black and WhiteGrayscaleColor
Select the appropriate data type

AXIS 70U/7000 User’s Manual Configuring the Document Server 69
Format - Compression
TIFF - No compressionTIFF - CCITT G.3 - one dimTIFF - CCITT G.3 - two dimTIFF - CCITT G.4 TIFF - PackbitsPDF - No compressionPDF - CCITT G.3 - one dimPDF - CCITT G.3 - two dimPDF - CCITT G.4 PDF - PackbitsPDF - JPEGPCL - PCL5JFIF - JPEG
Choose your combination of image format and compression from the methods dis-played in the drop-down dialog.
Note: The format compression choices within the drop down list will vary depen-dent upon the selected Data Type. See “Guidelines for Format and Compression” on page 71. for further information on each of the available techniques.
Dithering Method (b/w only)
Select the dithering method for black/white images from the drop-down dialog. None (recommended for text).Dithered (recommended for photos).Converts pixels with gray values above the middle gray level to white, and pixels with gray values below the middle gray level to black.Error diffusion(also recommended for photos) Evaluates the gray-level value of each pixel and converts it to either a black or a white value. The amount of error is transferred to surrounding pixels before they are converted. In this way, the error is diffused throughout the image.Both of the available dithering methods result in a grainy, film like tex-ture.
JPEG Quality Level
0 - 100 (%) Define the JPEG quality level for the JFIF - JPEG and PDF - JPEG formats as a percent-age
Color Dropout When scanning black/white, it is possible to exclude color information from the scanned image by selecting Red, Green or Blue from the Color Dropout drop-down list.
This is useful e.g. if the document contains black text enclosed by a green frame, the scanner can be set to 'ignore' Green color information.
If set to 'Default' the default settings of the scanner will apply. Please refer to the documentation of the connected scanner for information, as the default setting differs between manufacturers.
Note: If this functionality is not supported by the connected scanner, the drop-down list will not appear in the Profile Web page.
Parameter Options Instructions

Configuring the Document Server AXIS 70U/7000 User’s Manual70
Notes:
PredefinedProfiles
The Document Server is pre-installed with standard profiles to cover most needs.
Temporary Profiles If the Administrator allows users to add temporary profiles, the five most recently added profiles will appear in the profiles list. The Administrator can make temporary profiles permanent by clicking the Make Permanent button.
• High-resolution settings produce higher-quality scanning. However, your documents might take longer to scan. The resolutions used when scanning depend on your scanner's capabilities.
• Dithering - not all scanner devices support dithering.• Duplex scanning- not all scanner devices support duplex scanning.• TIFF viewers - not all TIFF viewers support multipage image files.• JPEG Quality Level - An image compressed using a higher quality will be
less compressed, thus taking up more disk space than an image com-pressed using a lower quality level. Using 75% JPEG quality level, you will not normally notice any difference from the original image.
• Contrast is the tonal gradation between the highlights, mid-tones and shadows in an image.
Name Resolution Type Image format
Color high 150 24-bit color JPEG
Color low 75 24-bit color JPEG
Color PDF 150 24-bit color JPEG
Gray high 150 4-bit grayscale TIFF/Packbits
Gray low 75 4-bit grayscale TIFF/Packbits
Text 300 black/white TIFF/CCITT G.4
Text high 600 black/white TIFF/CCITT G.4
Text low 200 black/white TIFF/CCITT G.4
Text PDF 300 black/white TIFF/CCITT G.4
Text/Photo 300 black/white TIFF/CCITT G.4

AXIS 70U/7000 User’s Manual Configuring the Document Server 71
Guidelines for Formatand Compression
In editing or creating a new profile it is necessary to specify the format and compression techniques that are to be employed. The table below highlights the significant benefits of each method.
Notes:
Format Comments
TIFF For color, black/white and grayscale images. Both single- and multipage images are supported
JFIF For color and grayscale images. Single page images only.
PDF For black/white, color and grayscale images. Both single- and multipage images are supported. Requires the Adobe Acrobat Reader.
PCL Profile used for print destinations - black and white only.
• Compression techniques are distinguished by whether they remove detail from the image or not. CCITT encoding is a family of lossless compression techniques for black/white images, of which CCIT G.4 is the most effi-cient compression method.
• JPEG is a compression technique that effectively reduces file size by iden-tifying and discarding extra data not essential to the display of the image.
• If you intend to manipulate a color image using an image editor, you are recommended to use uncompressed TIFF.
• Although the generated TIFF files do not contain searchable text, you can use an Optical Character Recognition (OCR) application to convert the bitmap to text that can be edited, indexed, searched or copied to other files.

Configuring the Document Server AXIS 70U/7000 User’s Manual72
Image Enhancement If supported by the connected scanner device, the image enhancement options will be available from the Profiles page. Image enhancement (IPC) is used to create a profile to capture text on poor quality originals or to capture text on a dark background.
1. Click Image Enhancement>>
2. The previously added image enhancement profiles are listed in the table. The Profile Name is the text that appears in the profile list on the Document Server interface. If you want to edit an existing profile, click the Profile Name link and proceed to step 4.
3. Click Profile New >> to add a new image enhancement profile to the list.
4. Profile Name - Specify a descriptive and unique name for the profile. This is the name that will appear in the profiles list.
5. Type - Select the image enhancement type that is compatible with your device driver. See the table “Image Enhancement Types” on page 73 for information on the available settings for each image enhancement type.
6. To complete this task do one of the following:
• If you have added a new profile, click Add To List. Once your profile additions are complete, click Done.
• Click Reset only if you wish to clear the current profile settings.
• If you have edited or copied an existing profile, click OK.

AXIS 70U/7000 User’s Manual Configuring the Document Server 73
Image EnhancementTypes
Select the image type that is compatible with your device driver. The available image enhancement types are Fujitsu DTC, Fujitsu IPC and Fujitsu Static Threshold. Each type has a specific set of optional settings. Refer to the table below for a list of the available options in each type:
Fujitsu DTC
Option Description
Gamma Pattern Gamma correction patterns are used to extend the availability of the built-in functions. See the manual of the scanner or device driver for more information.
White Level Follower
Used to scan a document with a colored background.
Density Defines the level of smoothing as follows:Scan for image - less smoothing but includes noise reduction.Scan for OCR - extensive smoothing without noise reduction.
Threshold curve Select Image lightest if the scanned image is too dark or Image darkest if the scanned image is too bright.
Gradation Select High Contrast for scanning documents with a dark background color.
Equal to White Click the checkbox to reduce the output of e.g. bold text.
Noise Removal Removes stray dots from the background to reduce unwanted ‘noise’ from the scanned image. Select 5*5 Matrix to remove all isolated dots.
Ball-point pen mode
Texts written in ball-point pen have two lines per stroke. This filter merges the two lines into one to make the text recognizable to OCR.
OCR smoothing If an image is scanned in low resolution, select OCR smoothing to reduce jagged edges.

Configuring the Document Server AXIS 70U/7000 User’s Manual74
Fujitsu IPC
Fujitsu StaticThreshold
Option Description
Gamma Pattern Gamma correction patterns are used to extend the availability of the built-in functions. See the manual of the scanner or device driver for more information.
White Level Follower
Used to scan a document with a colored background.
Emphasis Emphasizes image edges but also emphasizes background noise (low, medium, high).
Outline Extraction Extracts the edges from images and is used for image effects and image sensing.
Mirror Used to reverse the image.
Simplified DTC Effective for scanning images or text on colored backgrounds. Similar to emphasis but does not emphasize background noise.
Automatic Separation
Automatically dithers photos and digitizes texts in one scanning. Useful for scanning documents containing both text and photos.
Option Description
Gamma Pattern Gamma correction patterns are used to extend the availability of the built-in functions. See the manual of the scanner or device driver for more information.
White Level Follower
Used to scan a document with a colored background.
Emphasis Emphasizes image edges but also background noise (low, medium, high).
Outline Extraction Extracts the edges from images and is used for image effects and image sensing.
Mirror Used to reverse the image.
Automatic Separation
Automatically dithers photos and digitizes texts in one scanning. Useful for scanning documents containing both text and photos.

AXIS 70U/7000 User’s Manual Configuring the Document Server 75
Specifying Paper Sizes
The Paper Sizes parameter defines the size of the scanned image and is optionally part of the profile.
Note:
PredefinedPaper Sizes
The Document Server includes predefined standard paper sizes to cover most needs. These are the predefined paper sizes:
Note:
A user can override the Paper Size setting used by a profile by choosing another paper size from the Document Server control panel at the moment of scanning.
Name Width (cm) Length (cm) Width (inches) Length (inches)
A3 29.70 42.00 11.69” 16.54”
A4 21.00 29.70 8.27” 11.69”
A5 14.80 21.00 5.83” 8.27”
B4 25.00 35.30 9.84” 13.90”
B4 (JIS) 25.70 36.40 10.12” 14.33”
B5 17.60 25.00 6.93” 9.84”
B5 (JIS) 18.20 25.70 7.17” 10.12”
Business Card 5.50 9.50 2.17” 3.74”
Executive 18.41 26.67 7.25” 10.50”
Ledger 27.94 43.18 11.00” 17.00”
Legal 21.59 35.56 8.50” 14.00”
Letter 21.59 27.94 8.50” 11.00”
Photo 3.5” x 5” 8.89 12.70 3.50” 5.00”
Photo 4” x 6” 10.16 15.24 4.00” 6.00”
When a new language is selected you must go to the Paper Sizes page and click Restore Predefined Paper Sizes to change the language in the Paper sizes list. It is recommended that you select your preferred language before defining and modifying paper sizes and profiles.Note: All user-defined profiles and modifications to predefined paper sizes will be lost when you click Restore Predefined Paper Sizes.

Configuring the Document Server AXIS 70U/7000 User’s Manual76
Follow the instructions below to optionally edit any of the predefined paper sizes listed above, or create new ones to suit your specific needs:
1. Click Paper Sizes to specify paper sizes. To edit a paper size in the list, click the Paper Size Name link. To create a new paper size, click Paper Size New >>.
Click to create a copy of an existing paper size. You can edit the settings to create a new paper size based on existing settings.
Note:
2. From the New Paper Size page you can create a new paper size. Enter a descriptive name, width and length for the paper size.
3. If you need to restore the predefined paper sizes, click Restore Predefined Paper Sizes. Note that all your current paper sizes will be lost.
PDF Rotation The PDF rotation functionality allows you to scan a document and rotate it from portrait to landscape and vice versa. This option only affects the PDF output format on digital copiers. It cannot be changed at the moment of scanning.
Example:
Note:
Paper sizes longer than A3 can be set for some supported scanners. Check the documentation of your scanner for more information.
When using Legal sized paper in a digital copier, you have to feed the document short-edge first. The document will appear on the screen in the wrong page orientation. By enabling the PDF Rotation option, the document will be rotated and the document will appear on the screen in the correct orientation.
PDF rotation and TIFF rotation are automatic for scanners with an RADF (Reversing Automatic Document Feeder). However, the image viewer must also support rotated images. See the documentation supplied with your image viewer for more information.

AXIS 70U/7000 User’s Manual Configuring the Document Server 77
Configuring Using a Text Editor and FTP
The Document Server configuration file includes all the system parameter settings regarding network protocols, profiles, paper sizes and destinations.
As an alternative to Web based configuration, you can edit the configuration file directly using a text editor and upload the file to the Document Server using FTP.
Note:
Follow these instructions to edit the configuration file using FTP:
Caution
1. In a DOS or UNIX window, type ftp <Internet address>, where <Internet address> is the IP address or name of your Document Server.
2. Login using the user id root and the password pass
Note:
3. Type get config.ini to download the configuration file to your current directory.
4. Edit the file using your preferred text editor. In Windows environments, you can for example use Notepad.
5. Type put config.ini to download the file to the Document Server and save it permanently.
6. To exit FTP, type the command quit, bye or exit.
To access the Document Server configuration file, you must first set the IP address as described in “Assigning an IP Address ”on page 19.
Windows 95 has a directory called ‘config’ that contains important system files. It is important to change to another directory (using the cd command) before modifying your Document Server configuration file from within a Windows 95 environment. Failure to do this may result in some of your files being overwritten.
The password might have been changed. This is done by the Administrator from the admin > Edit > General page.

Configuring the Document Server AXIS 70U/7000 User’s Manual78
Notes:
• The configuration file can be used as a template when configuring multi-ple document servers.
• It is sufficient to download the configuration parameters that have changed. The other parameter settings will remain unchanged.
• All parameter settings apart from the IP address, Gateway and Subnet mask can be changed using FTP. Please refer to “The Parameter List” on page 146.
• If you upload the config.ini file the passwords will be represented by ‘*****’. These ***** must be changed to the actual password before down-loading the config.ini file to an Document Server. The passwords can also be changed via the Web interface after downloading the config.ini file.

AXIS 70U/7000 User’s Manual Configuring the Document Server 79
Scan Counter (AXIS 7000 only)
The Counter functionality enables the authorized administrator or service user to monitor the use of the scanner device. To access the Service pages, follow these instructions:
1. Type ‘service’ after the internet address of the AXIS 7000 in the location/address field of your Web browser and click Enter.
Example: http://192.168.0.90/service
2. You will be prompted to enter User Name and Password. At the prompt, log on as service and use the default password service
Note:
Service Page(AXIS 7000)
The Service page presents general information about the counter functionality.
Total number of pages - counts the total number of pages scanned and sent using the AXIS 7000. This counter cannot be reset.
Counter since last reset - counts the number of pages scanned since the counter was last reset.
Date of last reset - the date the counter was last reset.
1. Click Edit to access the pages where you can:
• Change the password.• Specify the e-mail address destination for the counter
statistics report.• Click the checkbox (default) if the counter is to be increased
only if the scanning is successful. If the check box is empty, all started scanning jobs will be counted.
Click Apply to save your changes without closing the dialog box or click OK to save your changes and close the dialog box.
We strongly recommend that the default password is changed by the Service user to prevent unauthorized access to the Service page and counter settings.
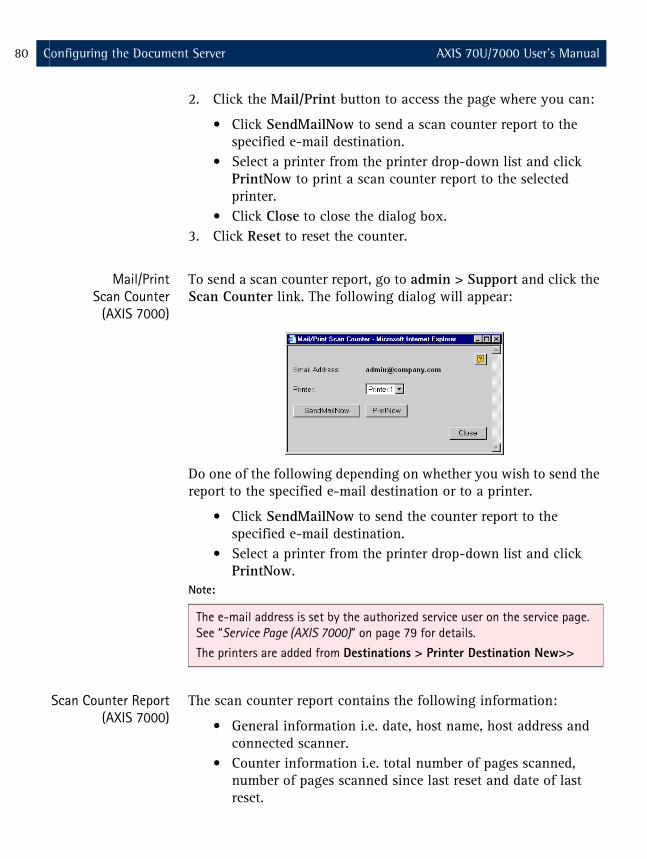
Configuring the Document Server AXIS 70U/7000 User’s Manual80
2. Click the Mail/Print button to access the page where you can:
• Click SendMailNow to send a scan counter report to the specified e-mail destination.
• Select a printer from the printer drop-down list and click PrintNow to print a scan counter report to the selected printer.
• Click Close to close the dialog box.3. Click Reset to reset the counter.
Mail/PrintScan Counter
(AXIS 7000)
To send a scan counter report, go to admin > Support and click the Scan Counter link. The following dialog will appear:
Do one of the following depending on whether you wish to send the report to the specified e-mail destination or to a printer.
• Click SendMailNow to send the counter report to the specified e-mail destination.
• Select a printer from the printer drop-down list and click PrintNow.
Note:
Scan Counter Report(AXIS 7000)
The scan counter report contains the following information:
• General information i.e. date, host name, host address and connected scanner.
• Counter information i.e. total number of pages scanned, number of pages scanned since last reset and date of last reset.
The e-mail address is set by the authorized service user on the service page. See “Service Page (AXIS 7000)” on page 79 for details.
The printers are added from Destinations > Printer Destination New>>

AXIS 70U/7000 User’s Manual Using the Document Server 81
Using the Document ServerThis section describes how to use the Document Server and includes the following information, given from the perspective of a user:
Note:
• Sending methods• Sending to destinations• Sending multiple pages• Adding temporary destinations and profiles• Sending to the Web browser• Viewing image filesNote:
Sending Methods
The Document Server supports the following basic methods for distributing scanned and copied documents over the network:
• Send-to-e-mail destinations• Send-to-file destinations• Send-to-printer destinations• Send-to-URL• Send-to-Web browser
The information in this manual applies to all Axis Document Server models unless otherwise stated.
“ - Configuring the Document Server” is targeted specifically to users responsible for the administration of the Document Server. Please refer to this section if you wish to access the Document Server as an Administrator.

Using the Document Server AXIS 70U/7000 User’s Manual82
AXIS 7000 The Document Server allows document information from network attached document distribution devices, such as scanners or digital copiers to be distributed to e-mail, file and printer destinations.
AXIS 70U The Document Server allows scanned documents to be distributed to e-mail, file and printer destinations.
AXIS 70U/7000 In addition to the resident profiles and destinations configured by the Administrator, users can also create both temporary e-mail destinations and profiles, using either the Web based user interface or user keyboard (if connected).
Destinations Documents are typically distributed using the Document Server’s control panel or a connected PC compatible keyboard, to selected e-mail, file or printer destinations.
Users can add temporary e-mail destinations using the Web interface or keyboard if the destination you wish to send your document to does not exist in the destination list.
If there is a keyboard connected to the Document Server, and if the option to Specify a file name for a file destination (admin > Edit > User Options) is enabled, the user can enter a new file name for the file destination or e-mail destination.

AXIS 70U/7000 User’s Manual Using the Document Server 83
Send-to-E-mail This allows document images to be distributed to any e-mail address defined in the destination list. This service is often referred to as Internet faxing.
E-mail transfer uses the Simple Mail Transfer Protocol (SMTP) whereby the document image is sent as a MIME-encoded e-mail attachment, or stored on a file server as an accessible hyperlink within an e-mail notification. Double-clicking the hyperlink or an e-mail attachment that is associated with an image viewer automatically starts the appropriate application.
Send-to-File This means that the document image is sent to and then stored on a networked storage device. This could be on a server, a client with a shared drive, a mainframe, or any chosen network device available to your filing system. Image files are distributed and archived using the File Transfer Protocol (FTP) that facilitates the storage of files over the Internet.
Typically a file is sent to a specific software management application, for example groupware, document management and workflow systems.
Note:
It is strongly recommended that you choose the send-to-print function for distributing documents to printer destinations. However, in some circumstances it may be desirable to send an image to a network printer using the send-to-file function instead. To do this, you must ensure that the destination printer supports FTP and PCL, or FTP and TIFF.
Send-to-URL Sending to URL (Uniform Resource Locator) is a combination of send-to-e-mail and send-to-file, where images/documents are stored on a file server. The recipient will receive an e-mail containing the URL (Web link) to the file, instead of an e-mail attachment. This off-loads the mail server from handling large attachments.
Users can arrange to have their own directories on an FTP server to which they can send document image information. In Windows operating systems, shortcuts to image directories can be placed directly on the user’s desktop. This gives easy access to the document image information.

Using the Document Server AXIS 70U/7000 User’s Manual84
Send-to-Web Browser This is a convenient method for users that do not have an e-mail address. It is also useful if you want to try a number of different profiles.
Simply place the document in your scanner device and access the AXIS 70U/7000 from a standard Web browser. Scanning is triggered directly from your Web browser and the image is saved within the Web browser dialog. The Web browser displays the image in an associated viewer or asks you to save the file, depending on the associated image format.
Send-to-Printer This allows document images to be distributed to any PCL printer defined in the AXIS 70U/7000 destination list.
Authentication
If the administrator has enabled authentication, the user must enter a user name and password to gain access to the Document Server. If the authentication process is not enabled, proceed to the next section “Sending to Destinations” on page 85.
1. When the following display appears, enter your user name and press Menu (on the control panel) or Tab (on the keyboard).
2. Enter your password and press Menu (on the control panel) orpress Tab (on the keyboard):
3. If NT Authentication is enabled, the following prompt will appear:
4. The following message will appear:
User Name:
Password:
Domain:
Default
Login in progress

AXIS 70U/7000 User’s Manual Using the Document Server 85
5. If the following message appears the authentication process has failed. Press Cancel (on the control panel) or press Esc (on the keyboard) to try again.
6. If the authentication process is successful the following message is displayed informing you that you can log out by pressing Cancel for two seconds (on the control panel) or Esc (on the keyboard).
7. To continue press any key or wait until the following message appears:
Note:
Sending to Destinations
Note:
Perform these instructions from the Document Server’s control panel:
Login failed!
To logout press
Cancel 2 sec.
Send to:
xxxxxx
If no destinations are set the display will show the Add Address: prompt.
Before sending to an e-mail address or a file, the Administrator must have set up the destinations as described in “Specifying Destinations” on page 53.

Using the Document Server AXIS 70U/7000 User’s Manual86
1. The Document Server display shows “Send to: xxxxxx” when it is ready for use. For example:
2. Use scrolling keys to find your required destination from the list. Press and hold the key to autorepeat scrolling. If you want to add a temporary E-mail destination, refer to “Adding Temporary Destinations” on page 88.
Note:
3. If you want to send the image to more than one destination, press Select to choose each destination:
Note:
4. Repeat steps 2 and 3, until all desired destinations are selected.
Note:
5. Optionally, press Menu to change the default settings for scanning parameters. You can select temporary settings for profile, paper size and double-sided. Use to select the desired value.
Note:
6. Insert a single page into the flatbed or a stack of paper into the sheet feeder of the attached scanner device.
Send to:
Accounting Dept
If a keyboard is connected you can easily search the list by pressing the first letter of the required destination.
Send to: +1
Accounting Dept
When sending to a printer, the image can not be sent to another destination type and is only sent to one printer at a time.
Be careful not to transmit images to an unwanted destination. The scanned image is always sent to the destination shown in the display, whether explicitly selected or not.
Press the Cancel button to reset all temporary settings to the default values.

AXIS 70U/7000 User’s Manual Using the Document Server 87
One single page or a stack of paper in the sheet feeder:
a. Press Send to scan and send the image to the destination in one step.
Several separate pages or stacks of paper:
a. Press Add to scan each page or stack.
b. Insert the next page or stack and press Add again. Repeat the procedure until all the pages have been scanned.
c. Press Send to transmit the image to the destination.
During the scanning this message appears on the display:
Note:
4. When you have pressed Send and the transfer of the document image is completed, the Document Server is released for other users to access.
Notes:
Multipage Image Files By scanning multiple pages, you can accumulate several pages into one image file. Multipage documents are by default, collated and output into a single PDF or TIFF image file.
Deselect the All pages in one file parameter only if you want the pages to appear separately in several PDF or TIFF files. This can be done by an Administrator from the admin > Profiles > Edit profile page.
Scanning #1
please wait
If you do not press Send within 60 seconds after scanning a page by pressing Add the scan job will automatically be finished and sent.
• If no operations are performed within five minutes of allocation, the Document Server will return to its default settings.
• The Document Server keeps all temporary settings in memory for 60 seconds from the last scan, and then resets all settings to the default settings.Note: If authentication is enabled, the time span before memory reset is set by the administrator.

Using the Document Server AXIS 70U/7000 User’s Manual88
Notes:
Job Separation Sheets The Document Server supports the job separation sheets that can be used with certain scanner devices. A job separation sheet inserted in a stack of paper will divide the scanning job into separate image files. Other separation pages will be ignored. Visit the Axis Web site at http://www.axis.com/techsup for a comprehensive list of supported scanner devices with this feature.
Paper Orientation onDigital Copiers
(AXIS 7000)
To receive an upright image, the setting should be “Portrait” and the paper should be placed with the short-edge in the ADF (Automatic Document Feeder) or in the A4-R position on the flatbed inside the digital copier. This is true for all the supported digital copiers except Sharp AR-series which always supports the same orientation as when copying, i.e. long-edge first.
Note:
Adding Temporary Destinations
The e-mail list resident within the Document Server is initially created by your administrator. If you want to send a scanned document to an e-mail destination that is not featured in the list, you can add a temporary e-mail destination using either:
• standard PC keyboard• standard Web browser
• The JFIF format sends each page as one separate image file.• The PCL format sends several pages in a single PCL file.• Web browsers not supporting multipage image files require that the Mul-
tipage Documents parameter is set to Separate file for each page. Alter-natively, scan each page using the Send button.
• Double-sided is only available if the scanner device supports duplexing.
The PDF rotation option can be used to enable the same feeder orientation as when copying, i.e long-edge first.

AXIS 70U/7000 User’s Manual Using the Document Server 89
Note:
Using a standard PCKeyboard
Connecting a standard keyboard to your Document Server will allow you to quickly search any destination within the resident list. You can do this by simply typing in the first couple of characters of the destination you wish to search for. The Document Server message display will automatically show the destination that best matches the keyboard input.
Note:
Follow the instructions below to add a new e-mail address to the list:
1. If the keyboard is not already connected, disconnect the Document Server power supply, connect the keyboard to the keyboard connector located on the rear panel, and then reconnect the power supply.
2. Press the Insert key on your keyboard. The following prompt will appear on the message display:
3. Enter the new e-mail address you want to add, then press Enter.
Note:
Please refer to the following table for information on additional keyboard functions:
The Administrator can disable the option for users to add temporary destinations in which case the New Destination button will not appear.
If the searched destination does not exist within the resident list the <Add Address> prompt will be displayed as shown below.
Add address:
Only the five most recently added temporary destinations will appear in the destination list. Contact your Network Administrator if you want to add a destination permanently.

Using the Document Server AXIS 70U/7000 User’s Manual90
Key Function
Tab and Right arrow
To scroll the menu
Enter To select multiple destinationsTo complete an address or subject entry
Up / Down arrows
To scroll and select menu options
Esc To cancel the scanning process at any stageTo clear any selection made from the menuTo reset error messagesNote: Press Esc for 2 seconds to log out if authentication is enabled
F1 To scan each page of bound materials, for example, magazines and books
F2 To send the scanned material to the selected destination and release the Document Server for other users. For a single page/stack of sheets, use this key to scan the material and send the image in one step
F3 To change the profile. Scroll through the list of profiles by repeatedly pressing F3
F4 To change the paper size. Scroll through the list of paper sizes by repeat-edly pressing F4
F5 To switch between Duplex (double-sided) and No-duplex (single-sided)
F6 To change between defined e-mail subjects. Scroll through the list of e-mail subjects by repeatedly pressing F6
F9 To select the pre-defined Quick Destination
Space To search the next word/name in an address (e.g. J<Space>S to find John Smith)
Insert To add an address or subject
Delete To remove a temporary addressTo delete characters when editingTo exit search mode
Backspace To remove characters
Left arrow To go backwards through the menu
Page Up To go alphabetically to the next entry with a different first character in the “Send to:” or “Sent by:” list
Page Down To go alphabetically to the previous entry with a different first character in the “Send to:” or “Sent by:” list
Home To go to the first entry in a list
End To go to the last entry in a list

AXIS 70U/7000 User’s Manual Using the Document Server 91
From a Web browser Follow the instructions below to remotely add temporary e-mail addresses to the address list:
1. Start the Web browser.
2. Enter the name or IP address of your Document Server on the location/address line.
Example:
This displays the Document Server Home Page
3. Click Destinations. The table lists the available destinations.
4. Click New Destination and specify the settings for the new destination.
5. Click OK to save the destination temporarily.
Notes:
http://192.168.0.90
• Only the five most recently added temporary destinations will appear in the destination list. Contact your Administrator if you want to add a des-tination permanently.
• All temporary destinations are erased when the Document Server is shut down or re-started.
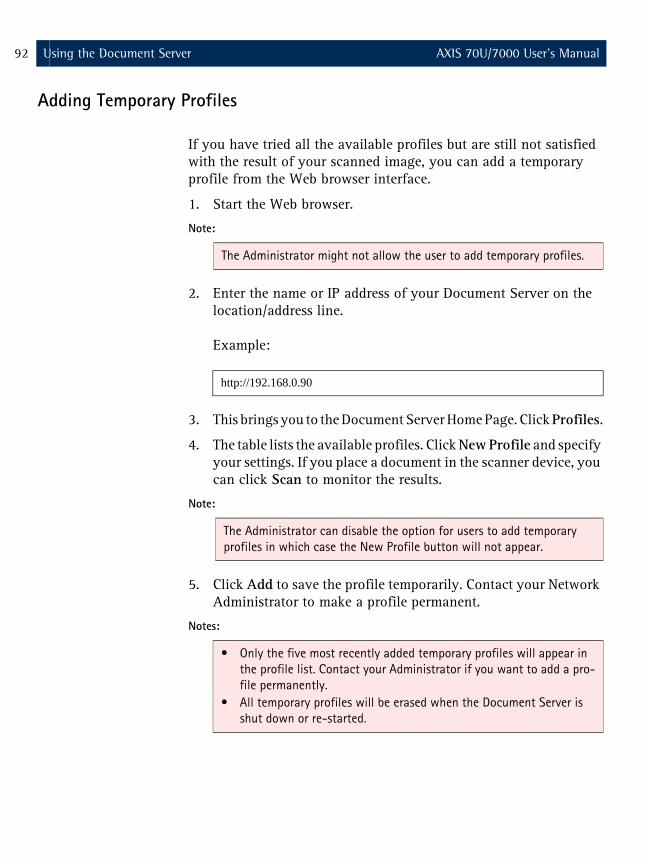
Using the Document Server AXIS 70U/7000 User’s Manual92
Adding Temporary Profiles
If you have tried all the available profiles but are still not satisfied with the result of your scanned image, you can add a temporary profile from the Web browser interface.
1. Start the Web browser.
Note:
2. Enter the name or IP address of your Document Server on the location/address line.
Example:
3. This brings you to the Document Server Home Page. Click Profiles.
4. The table lists the available profiles. Click New Profile and specify your settings. If you place a document in the scanner device, you can click Scan to monitor the results.
Note:
5. Click Add to save the profile temporarily. Contact your Network Administrator to make a profile permanent.
Notes:
The Administrator might not allow the user to add temporary profiles.
http://192.168.0.90
The Administrator can disable the option for users to add temporary profiles in which case the New Profile button will not appear.
• Only the five most recently added temporary profiles will appear in the profile list. Contact your Administrator if you want to add a pro-file permanently.
• All temporary profiles will be erased when the Document Server is shut down or re-started.

AXIS 70U/7000 User’s Manual Using the Document Server 93
Changing the Name of the Scanned Image Files
To change the name of the scanned image file perform these instructions from the Document Server control panel and keyboard:
1. Select one or more file destinations. Example:
2. Press Tab and use the Left and Right arrows on the keyboard to navigate in the menu list. The Document Server display will show the following message with the default name or the previously entered name for that specific file.
Note:
3. Edit the file name using the keyboard.
4. When you are finished press Enter and the Document Server will return to the previous state so that you can change other scanning properties and proceed as described in “Sending to Destinations” on page 85.
Note:
Send to: +1
Accounting Dept
Enter file name:
Default name
You can also use the keyboard shortcut Ctrl+s.
If the file name already exists a sequence number will be added to the file name if the Append sequence number to file name option under admin > Destinations > File Destination New>> has been selected. If this option has not been selected, the old file will be replaced.

Using the Document Server AXIS 70U/7000 User’s Manual94
Adding a Temporary E-mail Subject
There is a list of pre-defined e-mail subjects resident within the Document Server. If you want to send a scanned document with an alternative e-mail subject, you can add a temporary e-mail subject using either:
• standard PC keyboard• standard Web browserFollow the instructions below to add a temporary e-mail subject to the list:
1. If the keyboard is not already connected, disconnect the Document Server power supply, connect the keyboard to the keyboard connector located on the rear panel, and then reconnect the power supply.
2. When you have selected the e-mail destination and the sender of the e-mail, press the Menu key on your Document Server. The following prompt will appear on the message display:
3. Enter the new e-mail subject you want to add using the keyboard, then press Send.
Notes:
Scanning Parameters
From the Document Server control panel, press Menu to scroll through the scanning menu. Use to find the desired value. If a keyboard is connected, press Tab and use the UP/Down arrow keys to find the desired value or search the menu by typing the parameter name (or the first letters in the parameter name).
Subject:
• The e-mail subject will appear in the list of e-mail subjects and can be made permanent by the administrator. See “Specifying Destina-tions” on page 53 for details or contact the administrator.
• You can only add one temporary e-mail subject to the list. Any tem-porary e-mail subject will be overwritten.

AXIS 70U/7000 User’s Manual Using the Document Server 95
The table below describes the available parameters for each destination type:
Note:
Profile The Document Server comes pre-installed with 10 standard profiles designed to cover most needs. Refer to “Predefined Profiles ”on page 96 for details.
The profiles are maintained by the Administrator. If you have been granted permission by your administrator, you can define temporary profiles. For details, refer to “Adding Temporary Profiles” on page 92.
Select a profile appropriate to the document to be scanned. Documents typically use one of the Text profiles. Pictures could use one of the Text/Photo, Gray or Color profiles.
Scanning color images to JPEG/JFIF can be time consuming due to the amount of computation performed by the Document Server. You should therefore avoid using a higher resolution than is really needed. “Color low” (75 dpi) is normally sufficient for Web publishing of color images.
If you intend to manipulate a scanned color image using an image editor, it is recommended that you use uncompressed TIFF.
Note:
Parameter Destination Type Comment
E-mail/URL FTP Printer
Send to yes yes yes
Sent by yes no yes If enabled by the administrator.Note: Always disabled using Authentication.
Subject yes no no If enabled by the administrator
Enter file name yes yes no If enabled by the administrator
Number of copies no no yes
Profile yes yes yes
Paper size yes yes yes
Double-sided yes yes yes If supported by your scanner device
If you do not specify anything, the default settings will be used.
Uncompressed TIFF may generate very large files.

Using the Document Server AXIS 70U/7000 User’s Manual96
Predefined Profiles This table outlines when to use the predefined profiles:
Paper Sizes The Document Server comes with pre-installed paper sizes designed to cover most needs. The default paper size is Letter. The paper sizes are maintained by the Administrator. See also the table on “Predefined Paper Sizes ”on page 75.
Double-sided If supported by the attached scanner device, you can select Double-sided to scan both sides of a page in one operation. This option is also known as duplex and may be referred to by that term in the scanner device documentation.
Note:
Name Description
Color high Color pictures with high demand for precision. Suitable for photos, da-tabases, clip art in documents etc. Not suitable for Web publishing, since the image is larger than what the display will show. The JPEG/JFIF format cannot generate multipage files.
Color low Color pictures suitable for Web publishing, databases, clip art in docu-ments etc. The JPEG/JFIF format cannot generate multipage files.
Gray high Black/white pictures, diagrams etc. which require more detail. Generates 16 shades of gray.
Gray low Black/white pictures suitable for Web publishing. Generates 16 shades of gray.
Text(default)
Black/white documents intended for OCR, or documents containing small text. Suitable for most kind of document scanning. This is the de-fault profile.
Text high Black/white documents containing very small text. Excellent for OCR. If the scanner device does not support 600 dpi, its maximum resolution will be used instead.
Text low Black/white documents not intended for OCR, or documents containing large text, e.g. invoices. Suitable when maximum scanning speed and minimum file size is required.
Text/Photo Black/white documents with pictures. The pictures are dithered to create a rasterized effect. Especially good for faxing. Not suitable for OCR. As an alternative, try a grayscale profile.
Text PDF Creates a Black and white PDF document; suitable for printing or distri-bution as an e-mail attachment.
Color PDF Creates a 150 dpi PDF document; suitable for printing or distribution as an e-mail attachment.
By default the double-sided (Duplex) parameter is set to off.

AXIS 70U/7000 User’s Manual Using the Document Server 97
Sending to your Web Browser
Follow these steps to scan to your Web browser:
1. Place the material in your scanner device.
2. Start the Web browser.
3. Enter the name or IP address of the Document Server on the location/address line:
Example:
4. This brings you to the Document Server’s Home Page, the Scan Document page.
We recommend that you add the address as a bookmark, or as a link on the Department or Workgroup Web page.
5. Optionally change the default profile.
6. Click Scan and wait for the image to appear in your Web browser. Depending on the image format specified by the profile, the Web browser will display the image in an associated viewer or ask you to save the file. For further processing, you must save the image from within the viewer as the Web browser will normally use a temporary file name.
http://192.168.0.90

Using the Document Server AXIS 70U/7000 User’s Manual98
7. If you are not satisfied with the result, you can try one of the other available profiles or set up a new one by clicking Custom >>.
8. If you have additional documents to scan, click Reserve Scanner to lock the unit for your own use and then complete the scanning from the Document Server’s control panel.
9. Insert a single page on the flatbed or a stack of paper into the sheet-feeder of the attached scanner device.
10. At the control panel, continue as follows:One single page or a stack of paper in the sheet feeder:
a. Press Send to scan and transmit the image to your Web browser in one step.
Several separate pages or stacks of paper:
a. Press Add to scan each page or stack.
b. Insert the next page or stack and press Add again. Repeat the procedure until all your pages are scanned.
c. Press Send to transmit the image to your Web browser.
During the scanning this message appears on the display:
4. When you have pressed Send and the transfer of the scanned image is completed, the Document Server is released for other users to access.
Notes:
Scanning #1
please wait
• By scanning multiple pages, you can accumulate several pages into one image file. See “Multipage Image Files” on page 87.
• You must press the Add button or the Send button on the control panel within 5 minutes. Otherwise, the operation will be executed automatically.
• The Reserve Scanner function is not available when Authentication is enabled.
• When scanning to your Web browser (scan-to-Web) and using the Color Low or Color High profile, multipage documents in JPEG format are not supported, i.e. you can only scan one page at a time.

AXIS 70U/7000 User’s Manual Using the Document Server 99
Viewing Image Files
The Document Server generates standard TIFF, JPEG/JFIF and PDF formats that are supported by most image-related applications; and PCL format, that is supported by most printers.
Although the Document Server does not rely on any product-specific software installed on the client, tools for viewing and manipulating the images are required.
There are basically two different types of imaging tools:
• Tools optimized for image/picture editing • Tools optimized for handling scanned documents
Tools for Image/PictureEditing
Tools for image/picture editing normally support JPEG/JFIF and single-image uncompressed TIFF format. They are optimized for handling color and gray-scale images. Such tools are delivered with the desktop scanners. Most tools will work, as long as JPEG/JFIF and/or TIFF formats are supported.
Tools for Viewing, OCRand Archiving
Tools for viewing, OCR and archiving generally support multipage compressed TIFF, but often also JPEG/JFIF. Document viewers are optimized for presenting document data in a readable format on a screen. Suitable tools are often bundled with desktop scanners. Tools that combine viewing and simple archiving are becoming increasingly popular.
Notes:
Acrobat Reader The PDF format requires the Adobe Acrobat Reader. Acrobat Readers for Windows, Macintosh and UNIX can be downloaded free of charge from the Adobe Systems Web site http://www.adobe.com
• Although the generated TIFF image files do not contain searchable text, you can use an Optical Character Recognition (OCR) application to con-vert the bitmap to text that can be corrected, indexed, searched or copied to other files.
• The generated PDF image files do not contain searchable text. You can use Adobe Capture or the built-in capture function in Adobe Acrobat to make the text searchable.

Using the Document Server AXIS 70U/7000 User’s Manual100
Notes:
Associating ImageFormats withApplications
Applications are typically associated with a file format automatically during the installation procedure. If not, we recommend that you manually associate your image applications with the supported image file formats, so that double-clicking on an image icon launches the appropriate application.
• When using the “Text” profiles for scanning documents, make sure that the viewing tool supports multipage CCITT G.4-compressed TIFF; the TIFF format is the most common standard for imaging and archiving of scanned documents. If your application does not support multipage doc-uments, you can create a profile that generates single page documents, or scan each page as a separate job.
• When scanning pictures for Web publishing, create a JPEG/JFIF file using either the “Color low” or “Color high” profiles. The image files generated by these profiles are supported by almost all existing image editors and Web browsers.
• AXIS Document Servers are compatible with the majority of today’s pop-ular tools. However, if you find a tool that is not supported by the Docu-ment Server, we would like to know about it. For information on how to contact us see “Preface” on page 5.
• For further information, including recommendations for specific tools and sample images created by the Document Server, see the Axis Web site at http://www.axis.com

AXIS 70U/7000 User’s Manual Meta Data 101
Meta Data The Meta Data functionality allows the Developer, System Integrator, Administrator etc. of the Document Server to define a list of information to be requested (it can be required or optional information) from the user at the moment of scanning. The user will be prompted for this information before the document is scanned and sent over the network.
This section describes Meta Data from the perspective of the Developer/System Integrator/Administrator and the user.
The Meta Data will be sent together with the scanned image in the Information File or as a separate document to a different destination. The Meta Data file format is specified by the Developer/System Integrator/Administrator in XML, HTML or almost any other text format. The Developer can also choose to send information set by the Document Server itself, e.g. a time stamp or user identification.
This Meta Data can then be used by different applications such as accounting software, workflow systems, archiving systems, document management systems, imaging systems, knowledge management systems etc or for storing in a database server.
Notes:
Specifying theMeta Data
(XML DD File)
The administrator defines the list of requested information that the user is required to enter before scanning the document. The user is prompted to enter the information by messages on the Document Server’s control panel display.
The administrator specifies these messages by writing an XML DD (Document Description) file in a text editor. This file is then saved on an FTP server and the Document Server will be configured to retrieve the XML DD file from the specified FTP server. See “Retrieving the XML DD file” on page 120.
• If the XML data specifies user input, an external keyboard must be con-nected to the document server.
• XML (eXtensible Markup Language) is used as the language that defines the requested information.

Meta Data AXIS 70U/7000 User’s Manual102
Note:
XML DD file The XML DD (Document Description) file specifies what the user will be prompted for, and the format and contents of the output information file. The file is limited to a size of 50 000 bytes. The AXIS MetaData DTD defines the syntax of the XML DD file. For more information see “Meta Data DTD” on page 140.
The built in HTML-based XML parser can be used for validating an XML DD file. This enables the administrator to verify that the XML DD file used for Meta Data is correct before setting up the whole environment.
Note:
Application Examples This section contains three examples of the Meta Data functionality. The examples are complete with XML DD files. For more examples, please refer to the White papers in the Developer section at http://www.axis.com
Note:
You can write the XML DD file in any text editor although it is recommended that you download a Freeware XML writer with XML validation. There are several XML writers available in the Document Server Developer section at http://www.axis.com
This functionality is only for the validation of an XML DD file. Nothing of the parsed XML DD file will be used or stored in any way.
You cannot copy-and-paste the following examples into the XML parser. If you want to try out the examples you can find them in the correct format in the Developer section at http://www.axis.com

AXIS 70U/7000 User’s Manual Meta Data 103
Example:Archiving
You have an electronic archive (file server) for your scanned documents and you want to store certain information together with each document. The administrator can, for example, request the following information before scanning the document:
• Document Identification Number• Name of Document• Name of Issuer• Version Number• Classification• Level of Importance
Example:Invoice
You receive an invoice and you want to scan and send it over your network to the Accounts Department and to the Orderer with the following information:
• Invoice Number• Date of Payment• Name of Orderer
Example:Job applications
Your company receives a number of job applications and you want to store these applications for future reference. The user is prompted to enter the following information when scanning the document:
• Job Description• Arrival Date• Personal Details of Applicant• Job Type
Example: Archiving
Electronic Archive(File server)
The administrator wants to send the following information with the scanned image (as specified in the “Archiving” example above):
1. Document Identification Number
2. Name of Document
3. Name of Issuer
4. Version Number

Meta Data AXIS 70U/7000 User’s Manual104
5. Classification
6. Level of Importance
In this example the information is always asked and is not associated with any specific destination. The XML DD file generates the required messages (1 to 6) in this example.
XML DD file 1. Document Identification Number:(Required information)
Notes:
2. Name of Document:(Required information)
<?xml version="1.0"?><!DOCTYPE MetaDataFile SYSTEM "metadata.dtd"><MetaDataFile><AlwaysAsk><MetaData Required = "yes" Id = "DOC_ID" Prompt = "Doc Id No:" ErrorMessage = "Wrong Id!" DefaultValue = "00000" Pattern = "[0-9]{5}" />
• The value entered by the user must match the set pattern which, in this case, is 5 digits.
• Make sure that the DefaultValue matches the Pattern in the XML DD file. The Meta Data will be discarded if the DefaultValue and Pattern do not match.
• When the Required attribute of the Meta Data is set to yes the Administrator must specify a pattern.
• See “Regular Expressions” on page 122 for a list of the defined expressions.
<MetaData Required = "yes" Id = "DOC_NAME" Prompt = "Doc Name:" DefaultValue = "DEFAULT_NAME" Pattern = ".+" />
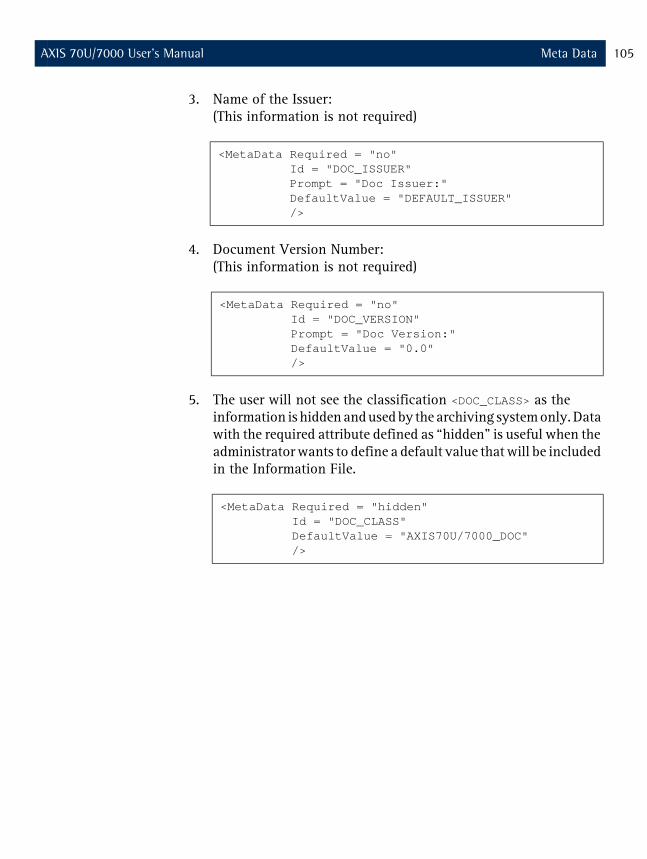
AXIS 70U/7000 User’s Manual Meta Data 105
3. Name of the Issuer: (This information is not required)
4. Document Version Number: (This information is not required)
5. The user will not see the classification <DOC_CLASS> as the information is hidden and used by the archiving system only. Data with the required attribute defined as “hidden” is useful when the administrator wants to define a default value that will be included in the Information File.
<MetaData Required = "no" Id = "DOC_ISSUER" Prompt = "Doc Issuer:" DefaultValue = "DEFAULT_ISSUER" />
<MetaData Required = "no" Id = "DOC_VERSION" Prompt = "Doc Version:" DefaultValue = "0.0" />
<MetaData Required = "hidden" Id = "DOC_CLASS" DefaultValue = "AXIS70U/7000_DOC" />

Meta Data AXIS 70U/7000 User’s Manual106
6. The user is prompted to choose from a list of values. The values in this example describe which level of importance the scanned document has. The values are not editable in this example, but if Editable is set to Yes the user can specify a value using an external keyboard.
The information file will be sent to the “Archiving System” destination with the entered value — in this case the archiving system would be set to archive the document corresponding to the specified level of importance.
<MetaData Required = "yes" Id = "DOC_IMPORTANCE" Prompt = "Doc Importance:" Editable = "no" DefaultValue = "Medium"> <Value>Very high</Value> <Value>High</Value> <Value>Low</Value> <Value>Very Low</Value></MetaData>
<Output FileName="$DOC_IMPORTANCE$"> <To><Destination Description="Archiving System"/></To>

AXIS 70U/7000 User’s Manual Meta Data 107
In this scenario, the archiving system understands the XML syntax. An XML information file is generated (through the CDATA section).
Information File The destination selected by the user will receive the image and the information file. The “Archiving System” destination will receive the following information file containing the information entered by the user.
The XML code is now complete. Save the file on an FTP server. For information on how to configure the Document Server to retrieve the XML DD file, see “Retrieving the XML DD file” on page 120.
<Format><!CDATA<?xml version="1.0"?><!DOCTYPE NewArchiveDocument SYSTEM
"newarchivedoc.dtd"><NewArchiveDocument><DOC_ID>$DOC_ID$</DOC_ID><DOC_IMPORTANCE>$DOC_IMPORTANCE$</DOC_IMPORTANCE><DOC_NAME>$DOC_NAME$</DOC_NAME><DOC_ISSUER>$DOC_ISSUER$</DOC_ISSUER><DOC_VERSION>$DOC_VERSION$</DOC_VERSION><DOC_CLASS>$DOC_CLASS$</DOC_CLASS><HOST>$INT_HOST_ADDRESS$</HOST></NewArchiveDocument>]]></Format></Output></AlwaysAsk></MetaDataFile>
<?xml version = ”1.0”?><!DOCTYPE NewArchiveDocument SYSTEM
“newarchivedoc.dtd”><NewArchiveDocument><DOC_ID>12345</DOC_ID><DOC_IMPORTANCE>Medium</DOC_IMPORTANCE><DOC_NAME>Document Server User’s Manual</DOC_NAME><DOC_ISSUER>AXIS</DOC_ISSUER><DOC_VERSION>0.0</DOC_VERSION><DOC_CLASS>AXIS70U/7000_DOC</DOC_CLASS><HOST>192.168.0.90</HOST></NewArchiveDocument>

Meta Data AXIS 70U/7000 User’s Manual108
Entering the RequiredMeta Data Archiving
When the user wants to scan and send a document a destination is selected from the list:
Note:
1. The following prompt will appear on the message display when the Add/Send key has been pressed. The user is prompted to enter the information and then press Enter. The star indicates that this is required Meta Data and that the user cannot scan without entering the requested information.
If the entered information is invalid the following display will be shown. The user must press Enter and try again to be able to scan.
2. The user is prompted to enter the name of the document and then press Enter. The star indicates that this is required Meta Data and that the user can not scan and send a document without entering the requested information.
3. The user is prompted to enter the name of the person who issued the document. This information is not required and can be ignored by pressing Menu.
Send to:
any_destination
This example describes a scenario where the user is prompted to add the information before scanning and sending a document, regardless of the destination.
Doc Id No:. *
Wrong Id!
abcdef
Doc Name: .*
Doc Issuer:

AXIS 70U/7000 User’s Manual Meta Data 109
Note:
4. The user is prompted to enter the version number of the document. This information is not required and can be ignored by pressing Menu.
5. The user is prompted to enter the level of importance by which the document is to be archived. The specified default value appears in the display. Using the UP/Down arrows the other values can be selected.
The Menu button scrolls through the list of Meta Data. The Enter button validates the entered information against the pattern defined in the XML DD file.
Doc Version:
Doc Importance:
Medium

Meta Data AXIS 70U/7000 User’s Manual110
Here is the same XML DD file in full:
<?xml version="1.0"?><!DOCTYPE MetaDataFile SYSTEM "metadata.dtd"><MetaDataFile><AlwaysAsk><MetaData Required = "yes" Id = "DOC_ID" Prompt = "Doc Id No:" ErrorMessage = "Wrong Id!" DefaultValue = "00000" Pattern = "0-9]{5}" /><MetaData Required = "yes" Id = "DOC_NAME" Prompt = "Doc Name:" DefaultValue = "DEFAULT_NAME" Pattern = ".+" /><MetaData Required = "no" Id = "DOC_ISSUER" Prompt = "Doc Issuer:" DefaultValue = "DEFAULT_ISSUER" /><MetaData Required = "no" Id = "DOC_VERSION" Prompt = "Doc Version:" DefaultValue = "0.0" /><MetaData Required = "hidden" Id = "DOC_CLASS" DefaultValue = "AXIS70U/7000_DOC" /><MetaData Required = "yes" Id = "DOC_IMPORTANCE" Prompt = "Doc Importance:" Editable = "no" DefaultValue = "Medium"> <Value>Really high</Value> <Value>High</Value> <Value>Low</Value> <Value>Really Low</Value></MetaData> <Output FileName="$DOC_IMPORTANCE$"> <To><Destination Description="Archiving System"/></To> <Format><!CDATA<?xml version="1.0"?><!DOCTYPE NewArchiveDocument SYSTEM "newarchivedoc.dtd"><NewArchiveDocument><DOC_ID>$DOC_ID$</DOC_ID><DOC_IMPORTANCE>$DOC_IMPORTANCE$</DOC_IMPORTANCE><DOC_NAME>$DOC_NAME$</DOC_NAME><DOC_ISSUER>$DOC_ISSUER$</DOC_ISSUER><DOC_VERSION>$DOC_VERSION$</DOC_VERSION><DOC_CLASS>$DOC_CLASS$</DOC_CLASS><HOST>$INT_HOST_ADDRESS$</HOST></NewArchiveDocument>]]></Format></Output></AlwaysAsk></MetaDataFile>

AXIS 70U/7000 User’s Manual Meta Data 111
Example: Invoice Handling
Invoice The administrator wants to send the following information with the scanned image (as specified in the “Invoice” example above):
The information is associated with the destination. When a destination with associated Meta Data is selected the user will be prompted to enter the requested information. The XML DD file generates the required messages (1 to 3) in this example.
1. Invoice Number
2. Date of Payment
3. Name of Orderer
In this example the information is associated with the “Accounts” or “Orderer” destination. The XML DD file generates the required display messages (1 to 5) in this example.
XML DD file 1. Invoice number: (Required Information)
2. Date of Payment: (Required Information)
<?xml version=”1.0”?><!DOCTYPE MetaDataFile SYSTEM “metadata.dtd”><MetaDataFile><Ask><When><Destination Description= “Accounts”/><Destination description=”Orderers”/></When><MetaData Required=”yes”Id=”INVOICE_NO”Prompt=”Invoice No:”ErrorMessage= “Wrong No!”DefaultValue= “00000”Pattern= “[0-9]{5}”/>
<MetaData Required=”yes”Id=”DUE_DATE”Prompt=”Due Date:”ErrorMessage= “Date: DD/MM/YYYY!”Pattern= “[0-9]{2}/[0-9]{2}/[0-9]{4}”/>

Meta Data AXIS 70U/7000 User’s Manual112
3. Name of Orderer:(Required Information) We want the user to enter a name so the pattern is created to match a non empty string.
4. Close the elements.
Information File The destination selected by the user will receive the image and the Information File. The Information File will contain the following Meta Data.
XML DD file Here is the same XML DD file in full:
<MetaData Required=”yes”Id=”ORDERER”Prompt=”Orderer name:”Pattern= “.+”/>
</Ask></MetaDataFile>
MetaData]INVOICE_NO = 12345DUE_DATE = 05/05/2005ORDERER = Name
<?xml version = “1.0”?><!DOCTYPE MetaDataFile SYSTEM “metadata.dtd”><MetaDataFile><Ask><When><Destination Description = “Accounts”/><Destination Description=”Orderers”/></When><MetaData Required = ”yes”Id = ”INVOICE_No”Prompt = ”Invoice No:”ErrorMessage = “Wrong No!”DefaultValue = “00000”Pattern = “0-9]{5}”/><MetaData Required = ”yes”Id = ”DUE_DATE”Prompt = ”Due Date:”ErrorMessage = “Date: DD/MM/YY!”Pattern = “0-9]{2}/0-9]{2}/0-9]{2}”/><MetaData Required = ”yes”Id = ”ORDERER”Prompt = ”Orderer name:”Pattern = “.+”/></Ask></MetaDataFile>

AXIS 70U/7000 User’s Manual Meta Data 113
Entering the RequiredMeta Data Invoice
Handling
The user selects the Orderer or Accounts destination:
The Meta Data in this example is associated with these destinations and the following messages will be displayed:
1. The user is requested to enter the number of the invoice and press Enter.
If the entered value is incorrect according to the pattern the following display will be shown for two seconds before returning to the previous prompt.
2. The user is requested to enter the date and then press Enter.
3. The user is requested to enter the name of the orderer, then press Enter.
Send to:
Accounts
Invoice No: *
Wrong No!
abcdef
Due Date: *
08/05/0000
Orderer name: *

Meta Data AXIS 70U/7000 User’s Manual114
Example: Job Applications
Job Applications The administrator wants to send the following information with the scanned image (as specified in the “Job Applications” example above):
1. Job Description
2. Arrival Date
3. Personal Details of Applicant
4. Job Type
The XML DD file generates the required messages (1 to 3) in this example.
XML DD file 1. Job Description:(Required information)
2. Arrival Date:(Required information)
<?xml version = "1.0"?><!DOCTYPE MetaDataFile SYSTEM "metadata.dtd"><MetaDataFile><Ask><When><Destination Description="Job Applications" /></When><MetaData Required = "yes" Id = "JOB_ID" Prompt = "Job Ref:" ErrorMessage = "Wrong Job Ref!" Pattern = "[0-9]{2}-[a-zA-Z]{2}-[0-9]{5}" DefaultValue = "00-aa-00000" />
<MetaData Required = "yes" Id = "ARRIVAL_DATE" Prompt = "Arrival date:" DefaultValue = "00/00/0000" ErrorMessage = "DD/MM/YYYY" Pattern = "[0-9]{2}/[0-9]{2}/[0-9]{4}" />

AXIS 70U/7000 User’s Manual Meta Data 115
3. Personal Details of Applicant - name:(Required information)
4. Personal Details of Applicant - date of birth: (This information is not required)
5. The user will be prompted to enter the type of job. There are listed options but the user can also enter a specific value, for example Manager.
<MetaData Required = "yes" Id = "PERSON_NAME" Prompt = "Name:" Pattern = ".+" />
<MetaData Required = "no" Id = "PERSON_BIRTH" Prompt = "Birth date:" DefaultValue = "00/00/0000" ErrorMessage = "DD/MM/YYYY" Pattern = "[0-9]{2}/[0-9]{2}/[0-9]{4}" />
<MetaData Required = "yes" Id = "JOB_TYPE" Prompt = "Applied Job Type:" Pattern = ".+" Editable = "yes"> <Value>Student</Value> <Value>Clerk</Value> <Value>Boss</Value></MetaData>

Meta Data AXIS 70U/7000 User’s Manual116
The information file will be sent to the “Job Applications” destination
Note:
Information File The destination selected by the user will receive the image and the information file. The “Job Applications” destination will receive the following information file containing the information entered by the user.
The XML code is now complete. Save the file on an FTP server. For information on how to configure the Document Server to retrieve the XML DD file, see “Retrieving the XML DD file” on page 120.
Note:
<Output><Format># Job Application FormJOB_ID = $JOB_ID$ARRIVAL_DATE = $INT_DATE$PERSON_NAME = $PERSON_NAME$PERSON_BIRTH = $PERSON_BIRTH$</Format></Output></Ask></MetaDataFile>
The administrator can choose to output information internally stored in the Document Server. For a list of these variables, see“Internally Defined Variables” on page 125.
# Job Application FormJOB_ID = 12-ab-12345ARRIVAL_DATE = 08/05/2005PERSON_NAME = John DoePERSON_BIRTH = 05/05/1965
The administrator has the option to specify the extension of the Information File when saving the file on the FTP server under admin > Destinations > new File Destination. If the extension is not specified the default value will be used.

AXIS 70U/7000 User’s Manual Meta Data 117
Entering the RequiredMeta Data
Job Applications
When the user wants to scan and send a document a destination is selected from the list:
Note:
1. The following prompt will appear on the message display. The user is prompted to enter the information and then press Enter. The star indicates that this is required Meta Data and that the user cannot proceed without entering the requested information.
If the entered information is invalid (i.e. does not match the pattern) the following display will be shown. The user must press Enter and try again to be able to proceed.
2. The user is prompted to enter the arrival date and then press Enter. The star indicates that this is required Meta Data and that the user can not proceed without entering the requested information
3. The user is prompted to enter the name of the applicant and then press Enter. The star indicates that this is required Meta Data and that the user can not proceed without entering the requested information.
Send to:
Job Applications
This example describes a scenario where the user is prompted to add the information on selecting the “Job Applications” destination.
Job Ref: *
Wrong Job Ref!
abcdef
Arrival Date: *
Name:. *

Meta Data AXIS 70U/7000 User’s Manual118
4. The user is prompted to enter the date of birth of the applicant. This information is not required and can be ignored by pressing Menu.
5. The user is prompted to enter the type of job the application is for. The values are editable meaning that the user can scroll among the listed values or enter a value using an external keyboard.
Note:
Birth Date:
Applied Job Type:
The Menu button scrolls through the list of Meta Data. The Enter button validates the entered information against the defined pattern.

AXIS 70U/7000 User’s Manual Meta Data 119
XML DD file Here is the same XML DD file in full:
<?xml version = "1.0"?><!DOCTYPE MetaDataFile SYSTEM "http://192.168.0.90/admin/support/xml_parser.shtml?GetDTD=yes"><MetaDataFile><Ask><When><Destination Description="Job Applications" /></When><MetaData Required = "yes" Id = "JOB_ID" Prompt = "Job Ref:" ErrorMessage = "Wrong Job Ref!" Pattern = "0-9]{2}-a-zA-Z]{2}-0-9]{5}" DefaultValue = "00-aa-00000" /><MetaData Required = "yes" Id = "ARRIVAL_DATE" Prompt = "Arrival date:" DefaultValue = "00/00/0000" ErrorMessage = "DD/MM/YYYY" Pattern = "0-9]{2}/0-9]{2}/0-9]{4}" /><MetaData Required = "yes" Id = "PERSON_NAME" Prompt = "Name:" Pattern = ".+" /><MetaData Required = "no" Id = "PERSON_BIRTH" Prompt = "Birth date:" DefaultValue = "00/00/0000" ErrorMessage = "DD/MM/YYYY" Pattern = "0-9]{2}/0-9]{2}/0-9]{4}" /><MetaData Required = "yes" Id = "JOB_TYPE" Prompt = "Applied Job type:" Pattern = ".+" Editable = "yes"> <Value>Student</Value> <Value>Clerk</Value> <Value>Boss</Value></MetaData><Output><Format># Job Application FormJOB_ID = $JOB_ID$ARRIVAL_DATE = $INT_DATE$PERSON_NAME = $PERSON_NAME$PERSON_BIRTH = $PERSON_BIRTH$</Format></Output></Ask></MetaDataFile>

Meta Data AXIS 70U/7000 User’s Manual120
Retrieving the XML DD file
To download the XML file to the Document Server, you must access the embedded Web pages using a standard Web browser e.g. Internet Explorer:
1. Start your Web browser.
2. Enter the name or IP address of your Document Server in the location/address field.:
3. This brings you to the Document Server’s Home Page. Click admin. Log on as described in “Accessing the Tools” on page 30.
4. Click the Edit button on the This AXIS 70U/7000 page and then click the Meta Data tab to display the page where you specify the Meta Data parameter settings.
http://192.168.0.90

AXIS 70U/7000 User’s Manual Meta Data 121
5. Click one of the radio buttons to disable/enable the Meta Data handling:
• Click None to disable Meta Data (disabled by default).• Click XML DD file via FTP to enable the Meta data
functionality. Specify the parameter settings as described in the table below.
6. Click Apply to save your changes, then click OK to return to the This AXIS 70U/7000 page.If you want to return to the This AXIS 70U/7000 page without saving your changes click Cancel.
Parameter Description
FTP Server Specify the name or IP Address of the FTP server where the file is stored.
User Specify the user name for logging on to the FTP server.
Password Specify the password for logging on to the FTP server. If the user field is left blank, this setting will be ignored.
Confirm Confirm the password to make sure the spelling is correct.
Directory Specify the directory on the FTP server where the file is stored. If left blank, the root directory on the FTP server will be used.
Note: Specifying the root as “/” will work in the majority of FTP servers.
File name Specify the name of the file.
Reload Interval Specify how often the XML DD file is reloaded. The value is specified in whole hours.
Allow scanning when no XML DD file retrieved
If enabled, the user is allowed to send a document without entering any Meta Data even though the Document Server has failed to retrieve the XML DD file from the FTP server.
Alert the Admin-istrator when no XML DD file re-trieved
If enabled, the Document Server will send an e-mail to the administrator indicating that it was unable to retrieve the XML DD file.
Use the Meta Data value for one scan only
If enabled, the Document Server will not reuse the values en-tered by the User for additional scanning.

Meta Data AXIS 70U/7000 User’s Manual122
Regular Expressions Each MetaData object is defined in the XML DD (Document Description) file. In this file the Administrator can set the pattern which is defined by a set of regular expressions used to check the lexical correctness of the value.
Example:
The format is enclosed into a string delimited by the quote (““) character, new lines are not accepted in the regular expression.
The regular expressions are described here:
• Prompt=”Due Date:”Pattern= “[0-9]{2}/[0-9]{2}/[0-9]{2}”
• Prompt=”Orderer name:”Pattern= “.+”
Character Description
"" empty string only
. matches any character except new line (this pattern will be the de-fault value of the Meta Data format field)
+ (postfix) matches the previous expression one or several times
* (postfix) matches the previous expression zero, one or several times
? (postfix) matches the previous expression once or not at all
..] character set; ranges are denoted with -, as in a-z]; an initial ^, as in ^0-9], complements the set
r{1,5} r could be repeated between 1 and 5 times *(upper limit: 48)
r{1} r must be repeated exactly once.
r{2,} r must be repeated at least twice.
r{,2} r could be repeated twice (i.e. 0, 1 or 2 times).
^ matches at beginning of line
$ matches at end of line
"a|b" "a" or "b"
| (infix) alternative between two expressions
(...) grouping and naming of the enclosed expression

AXIS 70U/7000 User’s Manual Meta Data 123
Notes:
\1 the text matched by the first (...) expression (\2 for the second expression, etc)
\b matches word boundaries
\ quotes special characters
“0-9]” "", "0", "14876328746", ...
"a-z]+" "a", "qwerty", ...
"abcd?" only "abc" and "abcd" correct
"A-Z]" only one letter between 'A' and 'Z" correct
"i{1,3}" only "i", "ii", "iii" correct
"i{5}" only "iiiii" correct
"i{2,}" only "ii", "iii", "iiii", ...
"i{,2}" only "" "i" and "ii"
"^qwerty" "qwerty" correct but not "aqwerty"
"qwerty$" "qwerty" correct but not "qwertyu"
• infix notation: Structure notation where the operator is located between the operands, e.g. (A+B).
• postfix notation: Structure notation where the operator follows the operands, e.g. (A,B)-.
• *The upper limit for repetitions is set to 48. (This limitation does not apply if the Editable attribute in the XML DTD is set to No)

Meta Data AXIS 70U/7000 User’s Manual124
Some more examples of regular expressions:
Example Description
"[0-9]{2}/[0-9]{2}/[0-9]{4}" Date: DD/MM/YYYY
"([a-zA-Z]+)|([a-zA-Z]+.[a-zA-Z]+)@[a-zA-Z]+.[a-z]{2,3}"
E-mail address:[email protected]@example.se
"(\([0-9]{3}\))?[0-9]{3}[-]{,1}[0-9]{4}"
Telephone number:"(123) 123-1234" "(123)1231234" "(123) 123 1234"
"[a-zA-Z ]+" Name:"John Doe" "John"
"[0-9]{2} ?[0-9]{3}" ZIP code:"12345" "12 345"
"(1|2|3|4|5|6|7|8|9|10|11|12):[0-9]{,2}(:[0-9]{0,2})?(AM|am|Am|PM|pm|Pm)"
Time: "1:05:59 AM" "1:05:59 am" "1:05:59 PM" "1:05:59 pm" "1:05 AM"
"^(http://|ftp://|https://|go-pher://)?([a-zA-Z0-9]+.)*[a-zA-Z0-9]+(/([a-zA-Z0-9]|-|.)+)*"
URL: "http://www.ax-is.com/prod/index.html""ftp://ftp.axis.com/pub/""www.axis.com" "http://www2.lemonde.fr/arti-cle/0,2320,seq-2039-53663-MIA,00.html"

AXIS 70U/7000 User’s Manual Meta Data 125
Internally DefinedVariables
There are several internal variables defined by the Document Server that can be output in the Information File. These internal variables are listed below.
Example:
This table contains a list of these internal variables:
<Format>The image is located at $INT_FILE_URL$The time at the moment of scanning was $INT_TIME$</Format>
Character Description
INT_FILE_URL Specifies the URL of the image file. For a file on an FTP server this URL will correspond to the complete URL of the file. For an e-mail to a pre-set destination it will correspond to the URL specified on the Web interface.
INT_FILE_NAME Specifies the file name of the image file only.
INT_FILE_SIZE Specifies the size of the image file.
INT_DATE Specifies the date of the image file.
INT_DATE_TIME Specifies the date and time of the image file.
INT_TIME Specifies the time of the image file.
INT_TIME_UTC Specifies the UTC time of the image file.
INT_HOST_NAME Specifies the host name of the Document Server that produced the file.
INT_HOST_ADDRESS Specifies the IP address of the Document Server that has produced the file.
INT_SCANNER Specifies the descriptive name of the scanner that produced the image file.
INT_PROFILE Specifies the profile used for the scanning.
INT_PAPER_SIZE Specifies the paper size used for the scanning.
INT_NUMBER_OF_PAGES Specifies the number of pages of the image file.
INT_WIDTH Specifies the width of the image file.
INT_HEIGHT Specifies the height of the image file.

Meta Data AXIS 70U/7000 User’s Manual126
More Information For more information on the Meta Data functionality and for more XML DD file examples, please refer to the White papers in the Document Server Developer section at http://www.axis.com
INT_X_RESOLUTION Specifies the horizontal resolution of the image file.
INT_Y_RESOLUTION Specifies the vertical resolution of the image file.
INT_BITS_PER_PIXEL Specifies the number of bits per pixel of the im-age file.
INT_DATA_TYPE Specifies the data type of the image file.
INT_PAPER_ORIENTATION Specifies the paper orientation of the image file.
INT_FORMAT Specifies the format of the image file.
INT_DOUBLE_SIDED Specifies the orientation of the image file.
INT_INTENSITY Specifies the intensity of the image file.
INT_CONTRAST Specifies the contrast of the image file.
INT_DESTINATION Specifies the destination description that origi-nated the image file.
INT_SUBJECT Specifies the selected subject.
INT_USER_MAIL Specifies the e-mail address of the user.
INT_USER_ID Specifies the description of the user.
INT_MAC_ADDRESS Specifies the MAC address of the Axis Network Document Server that produced the image file.
INT_LAST_RESET_DATE The date when the counter was last reset.
INT_COUNTER_LAST_RESET The counter at the time of the last reset.
INT_COUNTER_TOTAL The counter total (cannot be reset).

AXIS 70U/7000 User’s Manual Troubleshooting 127
TroubleshootingThis appendix helps you to:
• Restore factory default settings to the AXIS 70U/7000• Interpret the Document Server’s front panel indicators• Interpret the Document Server’s error messages• Display the log file
Restoring Factory Default Settings
The factory default settings can be restored using one of the following methods:
• Push button • Web browser• FTP
Important!
Push Button Follow these steps to restore the default settings using the Push button:
Important!
When you restore the factory default settings, all your current settings including the destinations and profiles will be lost. You will need to re-assign the IP address as described in “Assigning an IP Address ”on page 19.
If you have forgotten the previously installed server password, the push button provides the only method available for resetting the unit to factory default.

Troubleshooting AXIS 70U/7000 User’s Manual128
1. Turn off the Document Server by disconnecting the power supply.
2. Press and hold the Push button while you connect the Document Server. Keep the Push button pressed until the Status indicator flashes at regular two second intervals.
Example AXIS 7000
3. Release the Push button and wait at least two seconds (one flash of the indicators).
4. Press and hold the Push button for at least five seconds until the Status indicator remains constantly lit.
5. The Document Server is now reset to factory default settings.
6. Restart the Document Server by disconnecting and reconnecting the power supply.
Web Browser Follow these steps to reset to the defaults settings from a Web browser:
1. Start the Web browser.
2. Enter the name or the IP address of the Document Server in the location/address field. The Document Server Home Page is displayed.
3. Click admin.
4. Click Factory Defaults.The Document Server will now restart with the factory default settings.
Push button

AXIS 70U/7000 User’s Manual Troubleshooting 129
FTP Follow these steps to restore the default settings using FTP:
1. Log in to the Document Server with the command ftp <Internet address>, where <Internet address> is the name or IP address assigned to your Document Server.
2. You will be prompted for user id and password. Use the user id root, which has the default password pass
3. Issue the command get defaults to restore the default settings. The unit now restarts automatically.
4. Log out using the command quit, bye or exit depending on your FTP version.
The Document Server will now restart with the factory default settings.
Front Panel Indicator Conditions
The Power LED is hardware controlled and should always remain on when power is connected to the Document Server. The remaining LEDs are all software controlled.
Normal Conditions This table shows the front panel indicators during normal conditions:
Event StatusLED
BusyLED
NetworkLED
Remarks
Power up On On On Initial power to unit.
On Off Off Memory test.
Flash On Off Self test in progress.
On Off Flash Network LED flashes when network traffic is present.
Sending On On Flash
Idle On Off Flash Network LED flashes when network traffic is present.
Flash loading Blink Blink Blink During Flash loading, the Network LED blinks quickly.

Troubleshooting AXIS 70U/7000 User’s Manual130
Error Conditions This table lists a summary of error conditions:
Status Indicator Off The Status indicator remains off if a problem with the scanner device communication has occurred. The Document Server message display may additionally provide error status information.
Network Indicator Off The Network indicator flashes when there is network traffic. If it remains off and you know there is network activity, check the network connection.
Event StatusLED
BusyLED
NetworkLED
Remarks
Power up On Off Off Check SCSI cable to scanner device.
Off Off Off Check RJ45 cable to network.
Idle On Off Off Check RJ45 cable to network. If known network traffic, the Network LED should flash.
Error in FLASH PROM
Flash Off Flash Consult Network Administrator.
Error in SRAM Flash Flash Off Consult Network Administrator.
Error in DRAM/DIMM
Flash Off Off Consult Network Administrator.
DRAM/DIMMconfiguration error
Flash Flash Off Consult Network Administrator.
SW-HW combi-nation error
Flash Flash Flash Consult Network Administrator.
Illegal serial no. Flash Flash Flash Consult Network Administrator.
Flash load failed Flash Off Off Consult Network Administrator.

AXIS 70U/7000 User’s Manual Troubleshooting 131
Error and Warning Messages
This table lists the error and warning messages that might appear on the Document Server message display. Some error messages are applicable to the AXIS 7000 only:
Message DescriptionA timeout has occurred on the scan-ner, the job has been canceled
Please check the scanner device and try again.
A value specified for XML Meta Data XX ignored: the value has illegal for-mat
Check that the XML values correspond with the specified pattern.
Could not connect to LDAP server The DNS name or the IP address may be wrong. The server may be unreachable.
Could not connect to Windows NT domain controller
The name or the IP address may be incorrect or the server may be unreachable.
Device is busy Please try again later.Disconnected:<destination>
The connection to the destination specified in <destination> has been lost. The image transfer has been aborted.
Failed to retrieve userinformation
Check that the entered username has a corre-sponding name listed in the destinations list.
Illegal address <recipient>
Incorrect e-mail address specified for the e-mail destination.
Illegal command for (The printer may be busy):
Incorrect LPD Mode selected for the specified printer destination.
Illegal directory on:<server address>
The directory specified for the file destination does not exist.
Illegal LDAP filter specified Invalid LDAP filter. Please enter a new value.Illegal queue for: The specified LPD print queue does not exist;
check spelling and syntax.Incorrect Value The entered value does not match the pattern
specified by the administrator.Invalid field in SCSI CDB(AXIS 7000)
The SCSI command includes an invalid field. Con-tact your Document Server dealer.
Invalid field in SCSI parameter list (AXIS 7000)
The SCSI parameter block includes one or several invalid fields. Contact your Document Server deal-er.
Invalid LDAP credentials (e.g. invalid user or password)
The LDAP server did not recognize the user with the specified password.
Invalid SCSI command(AXIS 7000)
The scanner device does not support the given SCSI command. Contact your Document Server dealer.
Invalid Windows NTcredentials
Check the username and password and try again.

Troubleshooting AXIS 70U/7000 User’s Manual132
LDAP error! No/several e-mail ad-dress(es) were retrieved
The user could not be authenticated by the LDAP server. Change the LDAP settings and try again.
Login failed:<server address>
Incorrect FTP server password specified for the file destination.
MetaData Enabled. XML DD file re-quired
The Document Server failed to retrieve the XML DD file from the FTP server. Contact the adminis-trator.
Missing mandatory FTP parameter for external address book
Check the FTP settings for the external address book and try again.
No destinations were retrieved No destinations were retrieved. Change your LDAP settings and try again.
No info file on:<server address>
The information file could not be stored on the FTP server. Possible reasons are lack of memory or naming conflicts. The image file will be removed.
No paper in scanning device No paper in the sheet feeder. Applies to scanners and digital copiers without a flatbed.
No valid mail recipient found All the selected e-mail destinations were incor-rect.
Not available:<server address>
Cannot establish communication with the server specified in <server address>. Please try again lat-er.
Out of memory The document image contains too much data. Please try another profile.
Out of scanner image memory The document image contains too much data. Please contact your equipment supplier.
Paper jam Paper jam in the scanner device. Remove paper to continue sending.
Scanner compression unit failure The image compression unit in the scanner device did not work properly. Contact your equipment supplier.
Scanner firmware failure The scanner device reports a software failure. Contact your supplier.
Scanner fuse blown A fuse in the connected scanner device is blown. Refer to your suppliers user documentation for in-structions.
Scanner hardware failure The scanner device reports a hardware failure. Contact your equipment supplier.
Scanner lamp failure The lamp in the connected scanner device is blown. Refer to your suppliers user documenta-tion for instructions.
Scanner not connectedScanner disconnected
Please check the scanner device connection and try again.
Scanner not ready, please check scanner and retry
The scanner device is busy. Please try again. If the error occurs repeatedly, contact your equipment supplier.
Message Description

AXIS 70U/7000 User’s Manual Troubleshooting 133
Scanner not ready, please check scanner and restart the scan server
An error has occurred in the scanner device. Check the scanner device and restart the Document Server.
Scanner not supported The attached scanner device is not supported. Digital copying/scanning will not work properly.
Scanner warming up, please retry The scanner device lamp must reach the correct temperature and intensity.
Scanning failed An error occurred whilst sending. Please refer to earlier messages.
SCSI command sequence illegal (AXIS 7000)
The scanner device cannot receive the SCSI com-mands in the order they were sent. Contact your Document Server dealer.
SCSI parameter length illegal (AXIS 7000)
The length of the SCSI command is illegal. Contact your Document Server dealer.
SMTP Authentication is not sup-ported on xxx
Check xxx and make sure that SMTP authentica-tion is supported.
SMTP Authentication failed for user xxx
Invalid user name for SMTP authentication. Enter a correct user name.
xxx is an invalid SMTP Authentica-tion protocol
Check that the xxx file supports the SMTP Au-thentication protocol.
SMTP Authentication needs an au-thenticated user
The user must enter a valid username and pass-word in order to access the Document Server.
The ADF cover is open, please check and retry
Check that the ADF cover is properly closed and try again.
The user specified for LDAP is invalid Invalid user name for the LDAP server. Enter a cor-rect user name.
Unresolved name:<server name>
Cannot find the IP address mapped to <server name>.
USB Device not supported(AXIS 70U)
The connected device is not supported by the Doc-ument Server.
USB Hub not supported(AXIS 70U)
The Document Server cannot be connected to a USB Hub.
User and password are required to connect to this LDAP server
Please enter your username and password.
User and password can not be used to connect to this LDAP server
This LDAP server does not accept requests with the specified username and password.
Unable to open file on: Default file name is missing.Write error on:<server address>
Insufficient access rights to the directory speci-fied for the file destination.
Message Description

Troubleshooting AXIS 70U/7000 User’s Manual134
Displaying the Log File
The Document Server log file automatically logs all events and errors that have occurred since the last restart. You can access the log file using one of these methods:
• Control panel• Web browser
Control Panel Follow these steps to display the log file from the control panel:
1. Press Menu and Select simultaneously to display the Advanced menu.
2. Use to find the Server log option.
3. Press Select to enter the submenu.
4. Use to scroll through the messages.
Web Browser Follow these steps to display the log file from a Web browser:
1. Start the Web browser.
2. Enter the name or IP address of the Document Server in the location/address field:
Example
3. The Document Server Home Page is displayed. Click admin.
4. Click Event Log. The event log is displayed.
http://192.168.0.90

AXIS 70U/7000 User’s Manual LDAP 135
LDAP
Introduction LDAP (Lightweight Directory Access Protocol) is used to program directory-enabled applications. It is a directory service that allows people to locate other users, resources, services and information. LDAP allows resources and services to be selected with ease and accessed with location-independence.
Note:
Structure Example A structure can look like this:
Common Attribute Types
These are the most typical attribute types (the LDAP server implementation should understand these attribute types):
LDAP works differently depending on the organization and the structure of the system.

LDAP AXIS 70U/7000 User’s Manual136
The attribute types are used to create search filters. There are six types of basic search filters and the syntax of the filters is in the <attribute><operator><value> format. Complex search filters can easily be constructed by combining these basic search filters and other complex filters using the Boolean operations AND, OR and NOT. The six basic filter components are presented in the table below:
Attribute Type Matches
objectClass Describes the kind of object which the entry represents.
cn Contains the name of an object. If the object is a person, it is typically the person’s full name.
sn Contains the family name of a person.
c Contains a two-letter country code.
l Contains the name of a locality, such as a city, county or other geographic region.
st Contains the full name of a state or province.
street Contains the physical address of the object to which the entry corresponds, such as an address for package delivery.
o Contains the name of an organization.
ou Contains the name of an organization unit.
title This attribute contains the title, such as “Vice President”, of a person within an organization.
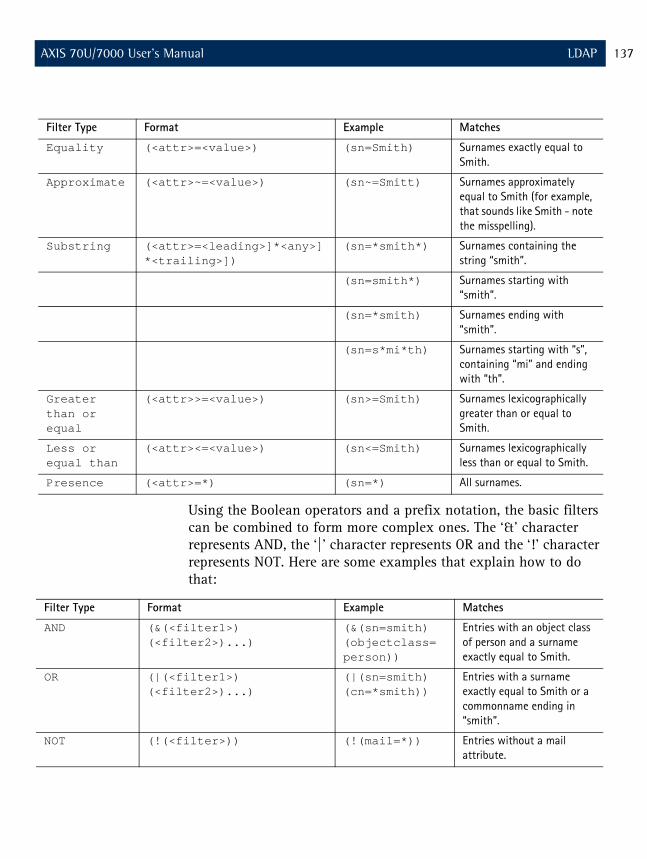
AXIS 70U/7000 User’s Manual LDAP 137
Using the Boolean operators and a prefix notation, the basic filters can be combined to form more complex ones. The ‘&’ character represents AND, the ‘|’ character represents OR and the ‘!’ character represents NOT. Here are some examples that explain how to do that:
Filter Type Format Example Matches
Equality (<attr>=<value>) (sn=Smith) Surnames exactly equal to Smith.
Approximate (<attr>~=<value>) (sn~=Smitt) Surnames approximately equal to Smith (for example, that sounds like Smith - note the misspelling).
Substring (<attr>=<leading>]*<any>]*<trailing>])
(sn=*smith*) Surnames containing the string “smith”.
(sn=smith*) Surnames starting with “smith”.
(sn=*smith) Surnames ending with “smith”.
(sn=s*mi*th) Surnames starting with “s”, containing “mi” and ending with “th”.
Greater than or equal
(<attr>>=<value>) (sn>=Smith) Surnames lexicographically greater than or equal to Smith.
Less or equal than
(<attr><=<value>) (sn<=Smith) Surnames lexicographically less than or equal to Smith.
Presence (<attr>=*) (sn=*) All surnames.
Filter Type Format Example Matches
AND (&(<filter1>)(<filter2>)...)
(&(sn=smith)(objectclass=person))
Entries with an object class of person and a surname exactly equal to Smith.
OR (|(<filter1>)(<filter2>)...)
(|(sn=smith)(cn=*smith))
Entries with a surname exactly equal to Smith or a commonname ending in “smith”.
NOT (!(<filter>)) (!(mail=*)) Entries without a mail attribute.

LDAP AXIS 70U/7000 User’s Manual138
Note:
Note:
Example Searches Here are some advanced search examples:
LDAP Test Tools
The built in, HTML-based LDAP Test Tools can be used for validating the settings. Using these tools, the administrator can verify that the Document Server’s LDAP settings are correct before setting up the whole environment.
Start the Web browser and enter the name or IP address of the Document Server on the location/address line. The test tools are available under admin > Support.
It is wise to create filters that sort out unwanted entries based on their object class. For example, in an address book, you might only want to retrieve entries of the “people” class, with the common name “John”, leaving out computers called John. This could be achieved with the following filter: (&(objectclass=person)(cn=john))
The way you construct your filter will have a large impact on how fast the search is conducted. If you create a filter involving structures that the directory server can not evaluate efficiently, performance is likely to suffer. Apart from being familiar with the administrator and/or the inner workings of the server itself, only trial and error can tell you whether your filter is working efficiently or not.
Searched Filter to use
All persons in Sweden. (&(objectclass=person)(c=SE))
All entries at Axis independent of country, except the ones called Smith.
(&(o=axis)(!(sn=smith)))
All persons at Axis Marketing in Sweden. (&(objectclass=person)(c=SE)(o=axis)(ou=marketing))
All persons with a common name contain-ing “bert” at Axis Marketing or Sales.
(&(objectclass=person)(cn=*bert*)(|(ou=marketing)(ou=sales)))
All Axis e-mail addresses in USA and Swe-den (but not e.g. France).
(o=AXIS,ou=USA)(o=AXIS,ou=Sweden)

AXIS 70U/7000 User’s Manual LDAP 139
LDAP Address BookTest Tool
To test your LDAP address book settings, click the addressbook link.
LDAP AuthenticationTest Tool
To test your LDAP authentication settings, click the authentication link.

Meta Data DTD AXIS 70U/7000 User’s Manual140
Meta Data DTDThe DTD (Document Type Definition) is a specific definition of the rules and syntax that the DD (Document Description) file must follow. It contains the definition of the element hierarchy and relation between these elements in the hierarchy. When your XML document is processed, it is compared to its associated DTD to be sure that it is structured correctly and that all tags are correctly used.
You can download the DTD file from the internal Web pages in the Troubleshooting section at admin > support.
Meta Data DTD Here follows the Meta Data DTD:
<!-- ==================================================FILE : metadata.dtdROOT : MetaDataFileDESCRIPTION : This file contains the DTD for the Meta Data functionality.This functionality allows the Administrator to define custom information that will be required from the User at the moment of scanning. This custom information can either be related to a particular destination (for instance an Invoice number when an invoice destination is selected) or it can be requested regardless of the destination.=================================================== --><!-- ==================================================ENTITY : MD_DTD_VERSIONDESCRIPTION : This entity contains the version number of this DTD.=================================================== --><!ENTITY MD_DTD_VERSION '1.00'><!- ===================================================ENTITY : MD_DOMAINDESCRIPTION : This entity contains the domain of this DTD.=================================================== --><!ENTITY MD_DOMAIN 'XML meta data'><!-- ==================================================ELEMENT : MetaDataFilePARENT : NoneCHILD : AlwaysAsk (optional)
Ask (zero or more)ATTRIBUTES : None

AXIS 70U/7000 User’s Manual Meta Data DTD 141
DESCRIPTION : This element is the root element. It allows the Administrator to define meta data that will always be requested (gathered in the 'AlwaysAsk' section) regardless of the destination, and meta data that will be requested only when a particular destination is selected (gathered in the 'Ask' section).=================================================== --><!ELEMENT MetaDataFile (AlwaysAsk?, Ask*) ><!ATTLIST MetaDataFile Version CDATA #FIXED '&MD_DTD_VERSION;' Domain CDATA #FIXED '&MD_DOMAIN;'><!-- ==================================================PARENT : MetaDataFileCHILD : MetaData (one or more)
Output (optional)ATTRIBUTES : NoneDESCRIPTION : This element gathers the meta data that is requested from the user regardless of the destination. This does not imply that the different meta data is required but just that it is not destination dependent as the meta data gathered in the 'Ask' section is. For instance, the Administrator can always ask the User to identify himself. This is not destination dependent.=================================================== --><!ELEMENT AlwaysAsk (MetaData+, Output?) ><!-- ==================================================ELEMENT : AskPARENT : MetaDataFileCHILD : When (one)
MetaData (one or more)Output (optional)
ATTRIBUTES : NoneDESCRIPTION : This element gathers the different meta data that is Destination dependent. The Administrator is able to specify the meta data which is to be requested from the User on selecting a specific destination (gathered in the 'When' element). This section also allows the Administrator to define the specific format of the output for this set of MetaData. For instance, the Administrator can ask for an invoice number when the User selects the invoice destination. He can also define a particular output format that can easily be processed (by a database for instance).=================================================== --><!ELEMENT Ask (When, MetaData+, Output?) ><!-- ==================================================ELEMENT : MetaDataPARENT : AlwaysAsk AskCHILD : Value (zero or more)

Meta Data DTD AXIS 70U/7000 User’s Manual142
ATTRIBUTES : Required:This attribute is an enumerated value that defines if
the User must enter the MetaData (='yes') or if it can be skipped (='no') or if it is hidden to the User (='hidden'). MetaData with the 'Required' attribute defined as 'yes', is mandatory and must be entered before the User can proceed with the scanning. MetaData with the 'Required' attribute defined as 'hidden', is useful when the administrator wants to define a default value that will help in processing the information entered by the User.
Id:This attribute indicates the system and name the
MetaData is known by. This identifier must be unique among all the MetaData elements.
Prompt:This attribute contains the string that will be
displayed on the LCD display when requesting this particular MetaData from the User. If the Administrator does not specify the text, the User will be prompted with the 'Id' attribute.
Label:This attribute contains the output string when the
Administrator has not defined an output format. If no labels are defined, the 'Id' attribute will be used instead.
ErrorMessage:This attribute contains the string that will be
displayed when the value entered by the User does not match the 'Pattern' attribute. If the Administrator does not specify this attribute, the default string 'Incorrect value!' will be displayed instead.
DefaultValue:This attribute contains the output string for when the
MetaData is not required and not entered by the User (attribute 'Required' equal 'no') or hidden (attribute 'Required' equal 'hidden'). The default value for this attribute is the empty string.
Pattern:This attribute contains the regular expressions that
describe the expected format in the value entered by the User. For more details on the Regular Expression syntax see the User's Manual. The default value for this attribute is the match-everything pattern ('.*').
Editable:

AXIS 70U/7000 User’s Manual Meta Data DTD 143
This attribute is an enumerated value that defines if the User is allowed to enter a value different from the one proposed in the list of value defined for this Meta Data. The User will be allowed if the attribute is set to 'yes' and will not be if the attribute is set to 'no'DESCRIPTION : This element contains the information specific to the meta data itself. See the attribute descriptions for more details.================================================== --><!ELEMENT MetaData (#PCDATA | Value)* ><!ATTLIST MetaData Required (yes | no | hidden) 'no' Id ID #REQUIRED Prompt CDATA #IMPLIED Label CDATA #IMPLIED ErrorMessage CDATA #IMPLIED DefaultValue CDATA #IMPLIED Pattern CDATA #IMPLIED Editable (yes | no) 'yes'><!-- =================================================ELEMENT : ValuePARENT : MetaDataCHILD : NoneATTRIBUTES : NoneDESCRIPTION : This element contains a specific value for a Meta Data. This allows the User to choose the value of a certain Meta Data among several values.================================================== --><!ELEMENT Value (#PCDATA)><!-- =================================================ELEMENT : WhenPARENT : AskCHILD : Destination (one or more)ATTRIBUTES : NoneDESCRIPTION : This element contains a list of the different destinations that trigger the request of the dependent MetaData elements from the User. When one or more of the specified destinations is selected by the User, the following MetaData will be requested.================================================== --><!ELEMENT When (Destination+) ><!-- =================================================ELEMENT : DestinationPARENT : When ToCHILD : NoneATTRIBUTES :Description:

Meta Data DTD AXIS 70U/7000 User’s Manual144
This is the Id of the Destination. One restriction is that the destination's description attribute must be a valid destination description. This means that the Administrator cannot define a new destination here.DESCRIPTION : This element contains the description of the defined destination================================================== --><!ELEMENT Destination (#PCDATA) ><!ATTLIST Destination Description CDATA #REQUIRED><!-- =================================================ELEMENT : OutputPARENT : AlwaysAsk AskCHILD : To (optional) Format (optional)ATTRIBUTES :
FileName :This attribute indicates to the Document Server which
template it should use in order to determine the remote file name. This template can contain references to Meta Data's Id, in order to create a file name that is created with the values entered by the User. This attribute overrides the value set for the Destination.
Description :This attribute indicates to the Document Server which
template it should use in order to determine the description of the Information File. This does actually matter only for Send-to-e-mail destinations. This will, then appear into the subject line of the e-mail. As for the attribute FileName it can contain references to Meta Data'Id. For other type destinations, this is discarded.DESCRIPTION : This element contains the specific information for when the Administrator wants to specify a format different from the traditional one. The Administrator can also specify a destination for the output file. ================================================== --><!ELEMENT Output (To | Format | (To, Format))? ><!ATTLIST Output FileName CDATA #IMPLIED Description CDATA #IMPLIED><!-- =================================================ELEMENT : ToPARENT : OutputCHILD : DestinationATTRIBUTES : NoneDESCRIPTION : This element contains the particular destination to which the output file should be sent.=================================================== -->

AXIS 70U/7000 User’s Manual Meta Data DTD 145
<!ELEMENT To (Destination)><!-- ==================================================ELEMENT : FormatPARENT : OutputCHILD : NoneATTRIBUTES : NoneDESCRIPTION : This element contains the custom declaration that defines the output format defined by the Administrator for this specific destination.=================================================== --><!ELEMENT Format (#PCDATA)>

The Parameter List AXIS 70U/7000 User’s Manual146
The Parameter ListThis table below displays the AXIS 70U/7000 parameter list. The middle column shows applicable default values, and the right-hand column a brief description of the parameter. Some parameters may not be applicable in the AXIS 70U.
Important! The parameters are case dependent and must be entered exactly as in the table below.
Parameter name Value Description
[Server]
HardwareAddress =00:40:8c:18:02:3c Specifies the Document Server hardware address which is equal to the serial number.
Date =yyyy-mm-dd Specifies the date in yyyy-mm-dd format.
Time =hh:mm:ss Automatically specifies the time zone in which the Document Server operates using the Network Time Protocol (NTP). Time can also be set manually in hh:mm:ss format using the 24 hour clock.Note: The AXIS 7000 contains a real time clock which means that the time will be kept even if the power is turned off.
FactoryDefaults =no Set this parameter to yes to reset to factory default settings. Note that all current settings will be lost.
Restart =no Set this parameter to yes to restart the Document Server.
TimeZone =UTC Specifies the time zone in which Document Server operates.
TimeSyncSource =NTP Specifies the time source for the Document Server. Valid values are NTP, Windows (SMB) or None.Note:To use Microsoft Windows NT Network (SMB) properly WINS must be enabled and the Domain/GroupName parameter must be set to a valid name.
ServerPassword =pass Specifies the Server password. The Supervisor/Administrator will be prompted for this password when trying to access the Document Server for administration tasks. The password is used in basically all protocols, i.e. HTTP, SNMP and FTP. Once written to the configuration file, the password will be replaced by *'s, representing each letter of the password.
DefaultProfile =Text Specifies the default profile.
DefaultPaperSize =letter Specifies the default paper size.
TemporaryDestinations =yes Specifies if users are allowed to add temporary e-mail destinations.
TemporaryProfiles =yes Specifies if users are allowed to add temporary profiles.

AXIS 70U/7000 User’s Manual The Parameter List 147
WebScanning =yes Specifies if users are allowed to use the Scan Document facility. Scan Document means that the user places a document in the scanner device, and then displays or saves the image via the Document Server Web browser interface.
SpecifySender =no Specifies if users are allowed to specify the sender when scanning from the Document Server control panel.
FrontPanelConfiguration =yes Specifies if user may configure network settings from the control panel.
PDFRotation =no If enabled, this option allows the user to place the document long-edge first in the document feeder regardless if you are scanning or copying.
SpecifyFileName =no If enabled, this option allows the user to change the file name for an FTP destination or e-mail destination.
SpecifySubject =yes If enabled, this option allows the user to enter a subject in the subject field.
QuickDestination Specifies an e-mail address to be associated with the F9 key on the external keyboard (if connected).
[IP]
InternetAddress =0.0.0.0 Specifies the IP address, which must be a unique and valid address to prevent conflicts with other network devices.
DefaultRouter =0.0.0.0 Specifies the IP address for the default router. All traffic directed outside the local network (according to the NetMask) is sent to the default router. Any re-routing via other routers is done automatically. The default 0.0.0.0 indicates that no default router is set.
NetMask =0.0.0.0 Specifies the subnet mask used for determining whether the traffic should stay within the network or be sent via a router. For example, the normal class C mask is 255.255.255.0. The default 0.0.0.0 indicates that automatic router sensing is used.
BOOTPEnable =yes Enables/Disables BOOTP for setting the IP address.
DHCPEnable =no Enables/Disables DHCP for setting the IP address.
RARPEnable =yes Enables/Disables RARP for setting the IP address.
DomainName =company.se Specifies the name of the domain to which the Document Server belongs. Domain refers to a set of computers on a network that have been assigned a group name.
PrimaryDNS =0.0.0.0 Specifies the IP address of the primary DNS server. DNS is required when setting up of destinations with names instead of IP addresses.
SecondaryDNS =0.0.0.0 Specifies the IP address of the secondary DNS server, should the primary be unavailable or disconnected.
Parameter name Value Description

The Parameter List AXIS 70U/7000 User’s Manual148
NTPServer =0.0.0.0 Specifies the name or IP address of the NTP server used for time synchronization.
EnableWINS =yes Specifies if WINS is enabled.
PrimaryWINSserver =0.0.0.0 Specifies the name or IP address of the server.
SecondaryWINSserver =0.0.0.0 Specifies the name or IP address of the server.
ProtectIP =Off If enabled, the IP address cannot be changed from the control panel using the Menu button.
[HTTP]
ExternalLink =www.company.name Specifies the URL to a customized link, e.g. to your company’s Web site. The link will be available from the Document Server Web browser interface.
ExternalImage = Specifies the URL to the image that will indicate the customized external link.
[SMB]
ServerName =AXISxxxxxx The server name in the SMB environment. Default is AXIS<nnnnnn> where nnnnnn are the last six digits of the serial number.
Domain/GroupName = Name of the Document Server workgroup in SMB. If not specified, the Document Server will appear in the workgroup that comes first in alphabetical order.
NTDomainInstallation =no Set to yes when you want to install the Document Server in an NT domain.
[SNMP]
GetCommunityName =public Specifies the community that has read only access to all supported SNMP objects except WriteCommunity, SupervisorPassword and ftpPassword. It corresponds to the ReadCommunity SNMP object.
TrapDestination =0.0.0.0 Specifies the IP Address which SNMP traps are sent to. It corresponds to the TrapAddress SNMP object. Default is 0.0.0.0, which means that all SNMP traps are disabled.
TrapCommunityName =public Specifies the community for all generated SNMP traps. It corresponds to the TrapCommunity SNMP object.
SystemContact = Optional entry which should be in plain text and may be used to show the name of the system contact person.
SystemName = Optional entry which should be in plain text and may be used to show the name of the system.
SystemLocation = Optional entry which should be in plain text and may be used to show the location of the system.
AuthenticationTrap =disabled Enables or disables the SNMP authentication failure traps. It corresponds to the snmpenableAuthenTraps (MIB-II) SNMP object.
Parameter name Value Description

AXIS 70U/7000 User’s Manual The Parameter List 149
[Clients]
InformationLevel =Basic Specifies the default amount of information to be transmitted with a scanned image. If not set for a destination, this setting will be used. Valid values are Nothing, Basic or Complete. Basic includes information about the Document Server, the connected scanner device, the parameter settings used when scanning etc. Complete also includes the image-related profile settings.
FTPDefaultUser =anonymous If not set for a destination, this username will be used.
FTPDefaultPassword [email protected] If not set for a destination, this password will be used. This field can also contain the identity of the user transmitting the scanned image. This is useful for administrative purposes.
FTPDefaultFileName =img%3i.%e If no file name has been assigned to the transmitted file, this name will be used. In the default file name, img%3i.%e, %3i means a 3-digit number and %e means the file extension, e.g. img001.tif
SMTPReplyAddress = Specifies the e-mail address of the person responsible for the administration of the Document Server.Note: Be sure to configure the Document Server with a valid SMTP reply address.
SMTPSubject =A scanned image Specifies the text that will appear on the Subject line of the e-mail containing the scanned image.
SMTPSendBcc =no Specifies the option to send a Bcc (blind carbon copy).
SMTPBccAddress [email protected] Specifies the e-mail address of the recipient of the Bcc (blind carbon copy).
URL FTP Server = Specifies the IP address of the FTP server on which the scanned image will be stored.
URL FTP User = Specifies the user name for logging on the FTP server.
URL FTP Password = Specifies the password for logging on to the FTP server.
URL Directory = Specifies the directory on the FTP server where the image will be stored.
URL = Specifies an external URL to the specified directory, e.g. http://www.company.com/documents/filename or ftp://ftp.company.com/documents/filename. This could be necessary when scanning to destinations outside your own company. If left blank, the URL will be constructed from the other fields.
Use URL as default =no Specifies the option to send the image as a hyperlink to the location where the image is stored.
FTPDefaultInfoFileExtension =txt Specifies the option to define the extension of the Information File.
Parameter name Value Description

The Parameter List AXIS 70U/7000 User’s Manual150
SMTPBodyTextLevel =nothing Specifies the selected e-mail body text (nothing, built-in or custom).
SMTPBodyText = Specifies the SMTP body text.
SMTPSendDeliveryNotification =no
SMTPSendMessageNotification =no
SMTPSendCc =no
SMTPCcAddress
SMTPAuthentication =no
SMTPAuthenticationAccount
SMTPAuthenticationUser
SMTPAuthenticationPassword
SMTPAuthenticationProtocol
[International]
Language =U.S. English Specifies the language used on the Document Server message display. Valid values are U.S. English, German, French, Italian, Swedish and Spanish.
Unit =inches Specifies the measurement units used, e.g. for paper sizes. Valid values are inches or cm.
Keyboard Layout =U.S. English Specifies the keyboard layout that is compatible with your external keyboard.
[Address Book]
Retrieve Method =None Specifies from where the address book will be retrieved. None, FTP or LDAP.
FTP Server = Specifies the name or IP address of the FTP server.
FTP User = Specifies the user name for logging on to the FTP server. If left blank, the FTPDefaultUser will be used.
FTP Password = Specifies the password for logging on to the FTP server. If left blank, the FTPDefaultPassword will be used.
FTP Directory = Specifies the directory on the FTP server where the file is stored.
FTP File Name = Specifies the name of the file on the FTP server.
LDAP Server = Specifies the name or IP address of the LDAP server.
LDAP Port =389 Specifies the number of the TCP/IP port.
LDAP User = Specify the name for logging on to the LDAP server, e.g. cn=name, o=company name, c=country code. If left blank no authorization will be attempted.
LDAP Password = Specify the password for logging on to the LDAP server. If the User Field is left blank, this setting will be ignored.
Parameter name Value Description

AXIS 70U/7000 User’s Manual The Parameter List 151
LDAP Search Base = Specifies where to begin the search, e.g. o=companyname, c=countrycode .
LDAP Name Field =cn Specifies the name of the field that contains the destination name.
LDAP Mail Field =mail Specifies the name of the field that contains the e-mail address.
LDAP Filter = Specifies an LDAP filter to reduce the length of the destination list, e.g. (givenName=*) .
LDAP Reload Interval =12 Specifies how often the external addresses are to be reloaded. The value is specified in whole hours and the default value is 12 hours.
[SMTP]
Primary Mail Server =mail Specifies the name or IP address of the SMTP mail server that provides the e-mail facilities for the Document Server. If you are using DNS, specify the name. Otherwise, specify the IP address. E.g. mail or mail.domain.com or 192.36.253.80.
Secondary Mail Server = Specifies the name or IP address of the secondary mail server, should the primary be unavailable or disconnected.
Connection Timeout =10 Specifies time before connection time-out.
SMTP Port =25 Specifies the SMTP Port number.
[Authentication]
Authentication Method =None Specifies which authentication method is enabled.
Authentication TimeOut =60 Specifies the time before automatic logout.
No mail fail =yes If enabled, the user will not be authenticated if the matching e-mail address is not found.
LDAP Server = Specifies the name or IP address of the LDAP server.
LDAP Port =389 Specifies the number of the TCP/IP port.
LDAP Base DN
LDAP User ID Field =uid Specifies the User ID field that contains the user ID / user name of the authenticated user, e.g. uid, userid=johnsmith.
LDAP Search Base =o=company name, c=country code
Specifies where to begin the search.
LDAP Filter Field
LDAP Name Field =cn Specifies the name of the field that contains the destination name.
LDAP Mail Field =mail Specifies the name of the field that contains the e-mail address.
Parameter name Value Description

The Parameter List AXIS 70U/7000 User’s Manual152
Use LDAP Substring Specifies whether the Document Server is to search for the e-mail address and common name attribute using a ‘sub-string’ search or an ‘equal’ search.
[MetaData]
Retrieve Method =None Indicates whether the Meta Data functionality is used or not.
FTP Server =myFTPserver.company.com
Specifies the name or IP address of the FTP server that holds the Meta Data file.
FTP User =anonymous Specifies the name used to log on to the server.
FTP Password =****** Specifies the password used to log on.
FTP Directory =metadata4axis7000 The directory where the Document Server will find the Meta Data file.
FTP File Name =axis7000.xml Specifies the file that contains the Meta Data.
FTP Reload Interval =12 Specifies the reload interval in hours.
AllowScanIfDownloadFail =no Specifies if the user is allowed to scan despite failing to retrieve the XML DD file from the FTP server.
SendMailIfDownloadFail =yes Specifies if the box is to send an e-mail to the Administrator if it fails to retrieve the XML DD file. The e-mail address is specified in Admin > Network Settings > Detailed View > E-mail (SMTP) > Reply Address.
UseMetaDataForOneScanOnly Specifies if the Document Server should reuse the values entered by the User for additional scannings.
[Destinations]
Clear List First =no
Destinations =x Specifies the number of destinations defined in the Document Server.
Destination0 =Destination name Specifies the name of the destination
[Destination-name(FTP)]
Description =Descriptive name Specifies the name of the file destination. This is the name that will appear in the destination list on the Document Server message display.
Transfer method =Scan-to-e-mail (SMTP), Scan-to-e-mail (URL), Scan-to-file (FTP), Scan-to-Print (TCP) and Scan-to-print (LPD)
Specifies how the scanned image should be sent; that is by which protocol.
Parameter name Value Description

AXIS 70U/7000 User’s Manual The Parameter List 153
Destination =Directory Dependent upon the transfer method specified (above), defines either: the E-mail address of the e-mail recipient (SMTP), the directory for Scan-to-file (FTP), port number for Scan-to-print (TCP), or the print queue for scan to print (LPD).
Profile =Text
Server =ftp.axis.se Specifies the name or IP address of the FTP server that holds the file.
User =name Specifies the name used to log on to the server.
Password =***** Specifies the password used to log on.
File name =FTPImage Specifies the name of the file.
Index file =no Defines the option to store the sequence number on the FTP server.
[Destination-name(URL)]
Description =name(URL) Specifies the name of the file destination. This is the name that will appear in the destination list on the Document Server message display.
Transfer method =Scan-to-URL (SMTP & FTP)
Specifies how the scanned image should be sent; that is by which protocol.
Destination [email protected] Defines the E-mail address of the e-mail recipient (SMTP).
[Destination-printer]
Description =printer Specifies the name of the printer. This is the name that will appear in the destination list on the Document Server message display.
Transfer method =Scan-to-print (LPD)Scan-to-print (TCP)
Specifies how the scanned image should be sent; that is by which protocol.
Destination =Printer Queue Defines the print queue for scan to print (LPD).
Information level =Nothing, Basic or Complete
Specifies the amount of image information to be included with the image. Prints Date, time information to the destination printer if the value is set to something other than None. See also [Clients] InformationLevel.
Server =IP address or DNS name
Dependent on the destination type, specifies the IP address of the FTP server on which the scanned image will be stored, or the printer destination.
Resolutions =75, 100, 150, 200, 300, 600, 1200
Specifies the resolution settings supported by the destination printer.
Paper sizes =Executive, Letter, Legal, Ledger, A4, A3
Specifies the different paper sizes supported by the destination printer.
Duplex supported =yes/no Defines if the printer destination has duplex support; that is, capable of printing on both sides of the paper.
Parameter name Value Description

The Parameter List AXIS 70U/7000 User’s Manual154
Duplex selection =SingleSided, DoubleSided, AsScanned
Defines the printing format for the printer destination.
LPD Mode =SingleDataFile, SplitSourceFile, BufferDataFiles, MultipleDataFiles
Specifies the LPD mode for the printer destination.
[Destination-name(SMTP)]
Description =Descriptive name Specifies the name of the file destination. This is the name that will appear in the destination list on the Document Server message display.
Transfer method =Scan-to-e-mail (SMTP)
Specifies how the scanned image should be sent; i.e. by which protocol.
Destination [email protected] Defines the E-mail address of the e-mail recipient (SMTP).
Profile =Text
[Subjects]
Clear List First =no
Subjects: =1
Subject0: Subject-A Scanned Image
[Subject-A Scanned Image]
Description A Scanned Image Specifies the text that will be used in the subject field when scanning to e-mail destinations.
[Profiles]
Clear List first =no
Profiles =10
Profile0 =Profile-Color high
Profile1 =Profile-Color low
Profile2 =Profile-Color PDF
Profile3 =Profile-Gray high
Profile4 =Profile-Gray low
Profile5 =Profile-Text
Profile6 =Profile-Text high
Profile7 =Profile-Text low
Profile8 =Profile-Text PDF
Profile9 =Profile-Text/Photo
[Profile-Text]
Parameter name Value Description

AXIS 70U/7000 User’s Manual The Parameter List 155
Description =Text Specifies the name of the profile. This is the name that will appear on the Document Server message display.
X-Resolution =300 Specifies the resolution to be used for scanning in dots per inch (dpi). Higher-resolution settings produce higher-quality scanning. However, your documents might take longer to scan. The resolutions available depend the capabilities of your scanner device.
Y-Resolution =300 Specifies the resolution to be used for scanning in dots per inch (dpi).
Data type =Black & White Specifies data type depending on the material you are scanning and the imaging application you intend to use.
Paper size =Executive, Letter, Legal, Ledger, A4, A3
Specifies the default paper size for this profile.
Paper orientation =Portrait Specifies how the document should be scanned.
Image compression =CCITT G.4 Specifies the image compression.
File format =JFIF Specifies the file format.
Double-sided =Off Specifies whether the scanner device should scan the document on both sides of the paper. This feature is only available for digital copiers/scanners that support duplex scanning.
Document mode =Multi page Specifies if several separate images can be scanned and sent in the same file.
Intensity =50 Specifies the level of intensity.
Contrast =50 Specifies the level of contrast. The contrast is the tonal gradation between the highlights, midtones and shadows in an image.
Image enhancement =none Specifies the type of image enhancement.
[Paper sizes]
Clear List First =no Deletes the list in the Document Server’s memory before entering the new values in the configuration file (config.ini).
PaperSizes =14 Specifies the number of paper sizes defined in the Document Server.
PaperSize0 =PaperSize-A3
PaperSize1 =PaperSize-A4
PaperSize2 =PaperSize-A5
PaperSize3 =PaperSize-B4
PaperSize4 =PaperSize-B4(JIS)
PaperSize5 =PaperSize-B5
PaperSize6 =PaperSize-B5(JIS)
Parameter name Value Description

The Parameter List AXIS 70U/7000 User’s Manual156
PaperSize7 =PaperSize-Business Card
PaperSize8 =PaperSize-Executive
PaperSize9 =PaperSize-Ledger
PaperSize10 =PaperSize-Legal
PaperSize11 =PaperSize-Letter
PaperSize12 =PaperSize-Photo 3.5”x 5”
PaperSize13 =PaperSize-Photo 4”x 6”
[PaperSize-A3]
Description =A3 Specifies the name of the paper size. This is the name that will appear on the Document Server message display.
Width =11.69 inches Specifies the width of the paper.
Length =16.54 inches Specifies the length of the paper.
PDF Rotation =No Enables/Disables PDF rotation.
[MetaData]
Retrieve Method =None Indicates whether the Meta Data functionality is used or not.
FTP Server =myFTPserver.company.com
Specifies the name or IP address of the FTP server that holds the Meta Data file.
FTP User =anonymous Specifies the name used to log on to the server.
FTP Password =****** Specifies the password used to log on.
FTP Directory =metadata4axis7000 The directory where the Document Server will find the Meta Data file.
FTP File Name =axis7000.xml Specifies the file that contains the Meta Data.
FTP Reload Interval =12 Specifies the reload interval in hours.
[ImageEnhancements]
Clear List First =No
ImageEnhancements =3 Specifies the number of image enhancement profiles defined in the Document Server.
ImageEnhancement0 =ImageEnhancement - DTC
ImageEnhancement1 =ImageEnhancement - IPC
ImageEnhancement2 =ImageEnhancement - Static Threshold
[ImageEnhancement - DTC]
Parameter name Value Description

AXIS 70U/7000 User’s Manual The Parameter List 157
Description =DTC Specifies the name of the image enhancement profile. This is the name that will appear on the Document Server message display.
Enhancement Type =Fujitsu DTC Specifies the type of image enhancement.
Gamma =Sharp Specify image processing parameters to improve image quality.See descriptions in manual or help files.
White Level Follower =Auto
DTC Scan Mode =Image
DTC Curve =Image Darkest
DTC Gradation =Ordinary
DTC Smoothing =Image
DTC Filtering =Ball-Point Pen
DTC Equal to =Black
DTC Noise Removal =Off
[ImageEnhancement - IPC]
Description =IPC Specifies the name of the image enhancement profile. This is the name that will appear on the Document Server message display.
Enhancement Type =Fujitsu IPC Specifies the type of image enhancement.
Gamma =Default Specify image processing parameters to improve image quality.See descriptions in manual or help files.
White Level Follower =Auto
Emphasis =No
Mirror =On
Threshold Variance =4
Automatic Separation =On
[ImageEnhancement - Static Threshold]
Description =Static Threshold Specifies the name of the image enhancement profile. This is the name that will appear on the Document Server message display.
Enhancement Type =Fujitsu Static Threshold
Specifies the type of image enhancement.
Gamma =Sharp Specify image processing parameters to improve image quality.See descriptions in manual or help files.
White Level Follower =Disable
Emphasis =Smoothing
Mirror =On
Outline Extraction =On
Automatic Separation =On
Parameter name Value Description

Updating the Firmware AXIS 70U/7000 User’s Manual158
Updating the FirmwareThe firmware (system software) for your Document Server is stored in a resident flash memory chip that keeps its contents even when the power is turned off.
This means that new system software can be easily loaded into your Document Server over the network using FTP as soon as it becomes available.
Obtaining theUpdated Firmware
Your Dealer Contact your dealer to check if there is a new version of the firmware available. You should have your current version numbers ready to compare against the latest firmware version from Axis.
Axis Web Site Check the support section on the Axis Web site at http://www.axis.com where you can download the latest versions of the firmware.
Upgrading theFirmware
To upgrade over the network you will need the following:
• The file with the new Document Server firmware, where the file name is in the form product_version.bin, e.g. 7000_246.bin for AXIS 7000 and software release 2.46.
• A computer on the network with TCP/IP and FTP.• It is recommended that you make a backup copy of your
current config.ini file before updating.Follow these steps to upgrade the Document Server firmware over FTP:
1. From a computer on your network, open a Command Prompt.
2. Log in to the Document Server with the command:
<Internet address> is the name or IP address of the Document Server.
ftp <Internet address>

AXIS 70U/7000 User’s Manual Updating the Firmware 159
3. You will be prompted for user id and password. Use the user id root which has the default password pass.
4. Enter the command bin to change to binary transfer mode.
5. Enter the command
<software name> is the name of the new firmware, e.g. 7000_246.bin.
6. During the flash load, the Document Server LCD will display the message Updating server and a progress bar. Wait for the flash load to finish. This normally takes 1 to 4 minutes. The unit will then automatically restart with the new Document Server software.
Caution
7. Depending on your FTP version, log out using one of the commands quit, bye or exit.
Note:
Downgrading theFirmware
To downgrade over the network, i.e. to flash the Document Server with an older version of the firmware, follow the procedure described above under Upgrading the Firmware. In step 5, use the command put <software name> FLASH (i.e. FLASH with capital letters) to permit downgrading.
Note:
put <software name> flash
Be careful not to interrupt the upgrade process. If the upgrade is interrupted, try again. If this is unsuccessful, the Document Server may have to be re-initialized by your dealer.
If you are using a window-based FTP client application such as Ws_ftp or Fetch, you must rename the new file <software file> to flash before downloading.
AXIS 7000 rev. 1 only: Downgrading to a software version lower than 2.22 is not possible if the current software version is 2.22 or above.

Technical Specifications AXIS 70U/7000 User’s Manual160
Technical Specifications
Supported Systems Systems supporting TCP/IP, Line Printer Daemon (LPD), Hypertext Transfer Protocol (HTTP) client (Web browser), and at least one of these protocols:
• Simple Mail Transfer Protocol (SMTP) server• File Transfer Protocol (FTP) server
SupportedWeb Browsers
• Netscape Navigator 4.0 or higher• Microsoft Internet Explorer 4.0 or higher• HTTP 1.0+ and HTML 3.0+ compatible Web browsers
Supported Protocols All models: HTTP, IP, FTP, SMTP, TCP, ARP, RARP, BOOTP, DHCP, ICMP, SNMP, UDP, LDAP, NTP, WINS, SMB
LPD, Reverse Telnet, SLP
Supported Devices If supported, the Document Server automatically senses the brand and model of the attached scanner device, without any user intervention. Scanner devices with built-in compression provide optimum performance.
For a detailed list of supported scanners and digital copiers, check the Document Server support pages at http://www.axis.com or contact your local dealer.
Device Connection AXIS 70U: USB 1.1 and USB 2.0
AXIS 7000: SCSI-2
Supported Printers TCP/IP with Raw TCP or LPD printing supported.

AXIS 70U/7000 User’s Manual Technical Specifications 161
Supported LDAPServer Software
• Microsoft Exchange 5.x, 2000, 2003 Server• Lotus cc: Mail 8.2, Domino• Novell GroupWise 5.2, 5.5• Netscape iPlanet• OpenLDAP
Supported ImageFormats
Document Server - Adobe PDF 1.2: The created PDF file contains compressed or uncompressed bit images in CCITT G.3/G.4 packbits or JPEG (24 bit) formats
TIFF 6.0: CCITT G.3 and G.4 for bilevel images, Packbits for grayscale images; both single- and multi-page images are supported
JPEG File Interchange Format (JFIF) for single-page color (24 bit) or grayscale (8 bit) images.
PCL 5, TIFF 4.0 and PackBits for grayscale images
Control Panel Alphanumeric LCD display with 2 rows by 16 characters, side-scrollable by 40 characters. English, German, French, Spanish, Italian and Swedish text available.
4 LED indicators signaling Status, Busy, Network, and Power.
7 keys for Menu, Up, Down, Select, Send, Add, and Cancel.
Menu for selecting Destination, Profile, Paper size, Subjects, Number of Copies, Double-sided, Sender, Meta Data and File name. Multiple selection of destinations is possible. Error log.
Installation IP address set from control panel, PC compatible keyboard (not supplied as standard), or using ARP, RARP, BOOTP or DHCP. E-mail and file destinations, the destinations established via Web browser, PC compatible keyboard, or downloaded via LDAP or from an FTP server.
Network Management Configuration and Administration via a Web browserAXIS ThinWizard (Software tool)Configuration over FTP

Technical Specifications AXIS 70U/7000 User’s Manual162
Security Administrator’s login for configuration and administration.
Administrator specifies which destinations should be accessible and whether users are allowed to add temporary e-mail destinations.
Possible to set a default destination (and optionally no other) for fixed application use.
• Windows NT4 authentication• SMTP authentication• LDAP authentication
Number ofDestinations
Depending on the length of the addresses, the Administrator can define approximately 1500 destinations within the Document Server; the maximum number is generally limited by the User Storage Area. LDAP destinations are limited only by available RAM memory.
Software Updates Flash memory allows central and remote updating of the Document Server software over the network using FTP.
Hardware CPU: 32 bit RISC Controller (AXIS ETRAX 100LX)Flash memory: 2 MbytesRAM: 16 Mbytes
Logical Connection IEEE 802.2, IEEE 802.3, SNAP and Ethernet II frame types simultaneously
Network Connectors 10baseT (twisted pair) and 100baseTX for Ethernet.
Optional Accessories AXIS 70U/7000:Mini Keyboard
AXIS 7000:SCSI cable: 50 pin high-density shielded (micro-D)SCSI cable: 50 pin high-density shielded to 50 pin shielded low-density (Centronics)
Power supply AXIS 70U: 5.1 V, 2A, via external power unit (PS-H)

AXIS 70U/7000 User’s Manual Technical Specifications 163
AXIS 7000 revision 3 and 4: 5.1 V, 2A, via external power unit (PS-H)
AXIS 7000 revision 1 and 2: 12V DC, 13.6 VA, via external power unit (PS-E)
Dimensions Height: 1.7 in (4.3 cm)Width: 5.9 in (14.9 cm)Depth: 8.8 in (22.4 cm)
Weight 1.5 lbs (0.7 kg)
Environmental Temperature: 40-105°F (5-40°C)Humidity: 20-80% RHG, noncondensing
Approvals
EMC: FCC:
Part 15 Subpart B, Class B
CE:
EN 55022 1998 Class B
EN 55024 1998
EN 61000-3-2 2000
EN 61000-3-3 1995+A1:2000
VCCI:
Class B
C-Tick
AS/NZS 3548
Safety: EN 60950
Warranty Warranty Sheet included in the package.
All specifications are subject to change without prior notice.

Glossary AXIS 70U/7000 User’s Manual164
Glossary
ADF Automatic Document Feeder.
AIX Advanced Interactive eXecutive. A version of the UNIX operating system from IBM that runs on various IBM computers including Mainframe systems.
ARP Address Resolution Protocol. A protocol within TCP/IP networks that allows a host to find the physical address of a node on the same network.
Bcc Blind Carbon Copy. Send a copy to the entered Bcc address but do not indicate to the recipient that you have sent this copy.
BOOTP Boot Protocol. A TCP/IP protocol, which allows an Internet node to discover certain startup information such as its IP address.
BSD Berkeley Software Distribution. The University of California, Berkeley additions to the UNIX operating system.
CCITT G.4 The most common format for compressed TIFF files. Used for viewing and archiving of scanned documents.
CMIP Common Management and Information Protocol.
DD Document Description.
DTC Dynamic Threshold Curve. Image enhancement type (see IPC).
DTD Document Type Definition. A specific definition of the rules and syntax that the DD (Document Description) file must follow.
DHCP Dynamic Host Configuration Protocol. A system based on network interface card addresses, which is used to allocate IP addresses and other configuration information for networked systems.
dither A method to obtain a rasterized effect for pictures, especially scanned photos.

AXIS 70U/7000 User’s Manual Glossary 165
DNS Domain Name System. A hierarchical naming system that uses a combination of text names separated by periods to create a unique name.
DSN Delivery Status Notifications. A method used to confirm the delivery of e-mails.
duplex A scanner/printer with the capability to scan/print both sides of a page in one operation.
FTP File Transfer Protocol. The TCP/IP protocol used for transferring files between computers on a network.
HTML Hypertext Markup Language. A standard hypertext language used to create Web pages and other hypertext documents.
HTTP Hypertext Transfer Protocol. The TCP/IP protocol for Web based communication, e.g. Web browsers.
IP Internet Protocol. The TCP/IP session-layer protocol that regulates packet forwarding by tracking IP addresses, routing outgoing messages, and recognizing incoming messages.
IPC Image Processing Circuit. Used to capture text on a colored background or from poor quality originals.
JFIF JPEG File Interchange Format. Format for storing bitmap images.
JPEG Joint Photographic Experts Group. Compression type for color and greyscale bitmap images.
LCD Liquid Crystal Display.
LDAP Lightweight Directory Access Protocol. A protocol for accessing on-line directory services.
LPD Line Printer Daemon. A protocol for network printing.
LED Light Emitting Diode.
Meta An underlying definition or description.

Glossary AXIS 70U/7000 User’s Manual166
MDN Message Disposition Notification. A method used to confirm the delivery of e-mails.
MIB Management Information Base. A database of network configuration information used by SNMP and CMIP to monitor or change network settings.
Mini-DINPS/2
Connector used on a PC to connect a keyboard. If your keyboard has a DIN connector, a DIN to Mini-Din adapter can be used.
MIME Multipurpose Internet Mail Extension. Enables transmission of e-mail containing non-English characters as well as attachments such as image files.
NIS Network Information Services. The security and file-access databases on UNIX systems, previously known as Yellow Pages.
NTP Network Time Protocol. A protocol to get time from a timeserver (NTP-server). To get a time when a message was stored in the event log, a NTP server must be specified.
OCR Optical Character Recognition. A technology that converts scanned documents into editable and searchable text.
PDF Portable Document Format. A format for cross-platform distribution of electronic documents. Can be viewed by anyone that has Acrobat Reader from Adobe installed.
RARP Reverse Address Resolution Protocol. A TCP/IP protocol governing the translation of a Data-Link Control (DLC) address to an IP address.
RISC Reduced Instruction Set Computing. A processor that recognizes only a limited number of assembly-language instructions.
SCSI Small Computer System Interface. A high-speed parallel interface, used to connect a computer to peripheral devices using just one port.
SMTP Simple Mail Transfer Protocol. The TCP/IP protocol for exchanging e-mail.

AXIS 70U/7000 User’s Manual Glossary 167
SNMP Simple Network Management Protocol. A TCP/IP protocol used to manage and monitor nodes on a network.
TCP Transmission Control Protocol. The connection-oriented, transport-level protocol used in the TCP/IP suite of protocols.
TIFF Tagged Image File Format. Format for storing bit-mapped images. Typically used for scanned documents and uncompressed images.
UNIX A 32-bit multitasking, multiuser operating system originally developed by AT&T.
URL Uniform Resource Locator. A way of specifying the location of publicly available information on the Internet.
USB Universal Serial Bus. A plug-and-play interface between a computer and peripheral devices (scanners, printers etc).
UTC Universal Time Coordinated.
WINS Windows Internet Name Service.
XML Extensible Markup Language. Describes how to define a collection of data. Sometimes referred to as metadata.
YP Yellow Pages. The security and file-access databases on UNIX systems. These databases are now known as Network Information Services.

AXIS 70U/7000 User’s Manual168
Index
A
ADF. . . . . . . . . . . . . . . . . . . . . . . . . 133, 164Administration tools . . . . . . . . . . . . . . . . 31Advanced menu . . . . . . . . . . . . . . . . . . . 134AIX systems . . . . . . . . . . . . . . . . . . . . . . . 25Archiving . . . . . . . . . . . . . . . . . . . . . . . . . 99ARP. . . . . . . . . . . . . . . . . . . . . . . . . . . . . . 19
OS/2 . . . . . . . . . . . . . . . . . . . . . . . . . . 24UNIX . . . . . . . . . . . . . . . . . . . . . . . . . 24Windows . . . . . . . . . . . . . . . . . . . . . . 23
Assigning an IP address . . . . . . . . . . . . . 19Associating image formats . . . . . . . . . . 100Attachments in e-mails . . . . . . . . . . . . . . 57Authentication . . . . . . . . . . 8, 30, 33, 84, 87Authentication methods . . . . . . . . . . . . . 52Authentication settings . . . . . . . . . . . . . . 50Axis WWW Home Page . . . . . . . . . . . . 158
B
Bcc Address . . . . . . . . . . . . . . . . . . . . 40, 45BOOTP . . . . . . . . . . . . . . . . . . . . . . . . 19, 26Built-in message . . . . . . . . . . . . . . . . . . . 45Busy indicator . . . . . . . . . . . . . . . . . . . . 129
C
Cc . . . . . . . . . . . . . . . . . . . . . . . . . . . . . . . 45Cc address . . . . . . . . . . . . . . . . . . . . . . . . 40CCIT G.4 . . . . . . . . . . . . . . . . . . . . . . . . . . 71CCITT G.4 . . . . . . . . . . . . . . . . . . 69, 70, 100Color . . . . . . . . . . . . . 68, 70, 71, 95, 99, 100Color PDF . . . . . . . . . . . . . . . . . . . . . . . . . 96Configuration . . . . . . . . . . . . . . . . . . . . . . 77
Administration . . . . . . . . . . . . . . . . . 31Destinations . . . . . . . . . . . 56, 58, 61, 63Profiles . . . . . . . . . . . . . . . . . . . . . 65, 75
Configuration file retrieval . . . . . . . . . . . 34
Connectors . . . . . . . . . . . . . . . . . . . . . . . . . 9keyboard . . . . . . . . . . . . . . . . . . . . . . 10
Control panel . . . . . . . . . . . . . . . . . . . . . . 11Counter . . . . . . . . . . . . . . . . . . . . . . . . . . 79
D
Default router address. . . . . . . . . . . . . . . 20Default settings . . . . . . . . . . . . . . . . . . . 127Destination settings . . . . . . . 56, 58, 61, 63Destinations . . . . . . . . . . . . . . . . . . . . . . . 29DHCP . . . . . . . . . . . . . . . . . . . . . . . . . 19, 23Double-sided . . . . . . . . . . . . . . . . . . . . . . 96Downgrading . . . . . . . . . . . . . . . . . . . . . 159DTD (Document Type Definition). . . . . 140Duplex . . . . . . . . . . . . . . . . . . . . . . . . . . . 96
E
E-mail . . . . . . . . . . . . . . . . . . . . . . . . . . . 85E-mail body text . . . . . . . . . . . . . . . . 40, 45E-mail notification . . . . . . . . . . . . . . . . . 40E-mail reply address . . . . . . . . . . . . . . . . 40Error conditions . . . . . . . . . . . . . . . . . . 130Error log. . . . . . . . . . . . . . . . . . . . . . . . . 134External Address Book . . . . . . . . . . . . . . 48
F
Factory default settings . . . . . . . . . . . . 127File destinations . . . . . . . . . . . . . . . . . . . 58File formats . . . . . . . . . . . . . . . . . . . . . . . 70Filter . . . . . . . . . . . . . . . . . . . . . . . . . . . . 136Firmware . . . . . . . . . . . . . . . . . . . . 158, 159
Downgrade . . . . . . . . . . . . . . . . . . . 159Upgrade . . . . . . . . . . . . . . . . . . . . . . 158
Flash. . . . . . . . . . . . . . . . . . . . . . . . . . . . 159Flash memory . . . . . . . . . . . . . . . . . . . . . . 8Front panel indicators. . . . . . . . . . . . . . 129

AXIS 70U/7000 User’s Manual 169
FTP server. . . . . . . . . . . . . . . . . . . . . . . . 121
G
Grayscale . . . . . . . . . . . . . . . . . . . . . . 70, 99
H
Host Name . . . . . . . . . . . . . . . . . . . . . . . . 27
I
Image editing . . . . . . . . . . . . . . . . . . . . . . 99Image Enhancement . . . . . . . . . . . . . . . . 72Image enhancement . . . . . . . . . . . . . . . . 66Image formats . . . . . . . . . . . . . . . . . . . . . 70Image viewers . . . . . . . . . . . . . . . . . . . . . 99Indicators
Busy . . . . . . . . . . . . . . . . . . . . . . . . . . 10Network . . . . . . . . . . . . . . . . . . . . 10, 18Power . . . . . . . . . . . . . . . . . . . . . . . . . 10Status . . . . . . . . . . . . . . . . . . . . . . . . . 10
IP address . . . . . . . . . . . . . . . . . . . . . . . . . 19ARP . . . . . . . . . . . . . . . . . . . . . . . 23, 24BOOTP . . . . . . . . . . . . . . . . . . . . . . . . 26control panel . . . . . . . . . . . . . . . . . . . 20DHCP . . . . . . . . . . . . . . . . . . . . . . . . . 23RARP . . . . . . . . . . . . . . . . . . . . . . . . . 25
IPC . . . . . . . . . . . . . . . . . . . . . . . . . . . 72, 73
J
Job separation sheets . . . . . . . . . . . . . . . 88JPEG . . . . . . . . . . . . . . . . . . . . . . . . . . . . . 70
L
LDAP server . . . . . . . . . . . . . . . . . . . 50, 161LDAP Test Tools. . . . . . . . . . . . . . . . . . . 138Log file . . . . . . . . . . . . . . . . . . . . . . . . . . 134
M
Mail/Print Scan Counter . . . . . . . . . . . . . 80Measurement units . . . . . . . . . . . . . . . . . 36Message display . . . . . . . . . . . . . . . . . . . 11MSN . . . . . . . . . . . . . . . . . . . . . . . . . . . . 166Multipage image files . . . . . . . . . . . . . . . 87
N
Net mask . . . . . . . . . . . . . . . . . . . . . . . . . 20Network Cconnectors . . . . . . . . . . . . . . . . 9Network settings . . . . . . . . . . . . . . . . . . . 29NTP Server . . . . . . . . . . . . . . . . . . . . . . . . 35
O
OCR . . . . . . . . . . . . . . . . . . . . . . . . . . . . . 99
P
Paper orientation. . . . . . . . . . . . . . . . . . . 88Paper sizes . . . . . . . . . . . . . . . . . . . . . . . . 96PC Keyboard . . . . . . . . . . . . . . . . . . . . . . 19PDF. . . . . . . . . . . . . . . . . . . . . . . . . . . . . . 99PDF Rotation . . . . . . . . . . . . . . . . . . . . . . 76Photo . . . . . . . . . . . . . . . . . . . . . . . . . 70, 75Picture editing . . . . . . . . . . . . . . . . . . . . . 99Power indicator . . . . . . . . . . . . . . . . . . . 129Power Supply . . . . . . . . . . . . . . . . . . 10, 16Predefined paper sizes . . . . . . . . . . . . . . 75Profile settings. . . . . . . . . . . . . . . . . . 65, 75Profiles . . . . . . . . . . . . . . . . . . . . . . . . 70, 95Push button . . . . . . . . . . . . . . . . . . . . 9, 127
R
RARP . . . . . . . . . . . . . . . . . . . . . . . . . 19, 25Resolution . . . . . . . . . . . . . . . . . . . . . . . . 70Restoring default settings . . . . . . . . . . . 127

AXIS 70U/7000 User’s Manual170
S
Scan Counter . . . . . . . . . . . . . . . . . . . . . . 80Scanning parameters . . . . . . . . . . . . . . . . 94Search filters . . . . . . . . . . . . . . . . . . . . . 136Sending to destinations. . . . . . . . . . . . . . 82Sending to e-mail . . . . . . . . . . . . . . . . . . 83Sending to file . . . . . . . . . . . . . . . . . . . . . 83Sending to Web browser . . . . . . . 83, 84, 97Send-to-e-mail. . . . . . . . . . . . . . . . . . . . . 83Server log . . . . . . . . . . . . . . . . . . . . . . . . 134Server password. . . . . . . . . . . . . . . . . . . . 31Service pages . . . . . . . . . . . . . . . . . . . . . . 79Setting IP address . . . . . . . . . . . . . . . . . . 19
ARP . . . . . . . . . . . . . . . . . . . . . . . 23, 24BOOTP . . . . . . . . . . . . . . . . . . . . . . . . 26control panel . . . . . . . . . . . . . . . . . . . 20DHCP . . . . . . . . . . . . . . . . . . . . . . . . . 23RARP . . . . . . . . . . . . . . . . . . . . . . . . . 25
Setting up destinations . . . . . 56, 58, 61, 63Setting up profiles . . . . . . . . . . . . . . . 65, 75SMB . . . . . . . . . . . . . . . . . . . . . . . . . . . . . 35SMTP . . . . . . . . . . . . . . . . . . . . . . . . . . . . 83SMTP authentication . . . . . . . . . . . . . . . . 40Specifying scanning parameters. . . . . . . 94Status indicator . . . . . . . . . . . . . . . . . . . 129Subnet mask. . . . . . . . . . . . . . . . . . . . . . . 20Support services. . . . . . . . . . . . . . . . . . . . . 5Supported scanners . . . . . . . . . . . . . . . . 160
T
Temporary Destinations . . . . . . . . . . . . . 94Temporary e-mail destinations. . . . . 35, 58Temporary profiles . . . . . . . . . . . . . . . . . 35Test Tools . . . . . . . . . . . . . . . . . . . . . . . . 138Text profile. . . . . . . . . . . . . . . . . . . . . . . . 70TIFF. . . . . . . . . . . . . . . . . . . . . . . . . . . . . . 70Time . . . . . . . . . . . . . . . . . . . . . . . . . . . . . 34
U
Updating the Firmware . . . . . . . . . . . . . 158
URL for e-mail. . . . . . . . . . . . . . . . . . . . . 57USB . . . . . . . . . . . . . . . . . . . . . . . . . . . . 167
V
Viewing image files . . . . . . . . . . . . . . . . 99
W
Windows NT Server authentication . . . . 52WINS . . . . . . . . . . . . . . . . . . . . . . . . . . . . 27Wizard . . . . . . . . . . . . . . . . . . . . . . . . . . . 39
X
XML . . . . . . . . . . . . . . . . . . . . . . . . . . . . 140XML parser . . . . . . . . . . . . . . . . . . . . . . 102