installation guide - merging technologiesmerging.com/uploads/assets/installers/ovation_6/ovation...
TRANSCRIPT
Installation GuideInstallation Guide

No part of this documentation may be reproduced in any
form whatsoever or be stored in any data retrieval system
without prior written permission of the copyright owners.
This documentation is supplied on an as-is basis. Informa-
tion contained within this documentation is subject to
change at any time without notice and must not be relied
upon.
All company and product names are ™ or Registered Trade-
marks ® of their respective owners. Windows 7, Windows
and Windows 8 are trademarks of Microsoft Corporation.
Merging Technologies makes no warranties express or
implied regarding this software, its quality, performance,
merchantability or fitness for a particular purpose. The soft-
ware is supplied “as is” you, the purchaser, are assuming the
entire risk of the results of using this Merging Technologies
software.
In no circumstances will Merging Technologies, its owners,
directors, officers, employees or agents be liable to you for
any consequential, incidental or indirect loss or damages
including loss of time, loss of business, loss of profits, loss of
data or similar resulting from the use of or inability to use
the Merging Technologies hardware and or software or for
any defect in the hardware software or documentation.
© Copyright Merging Technologies Inc. 2016. All rights
reserved
Merging TechnologiesLe Verney 4 1070 Puidoux Switzerland
Tel: +41 21 946 04 44 Fax: +41 21 946 04 45www.merging.com

Page 3

Installation Guide : Contents
1 Introduction 7
Thank you! 7
Scope 7
2 Ovation Overview 10
3 For Users Performing Upgrades 12
4 System Requirements 13
Ovation MassCore Systems 13
Ovation Native 13
MassCore and Networks 14
5 PC Setup 17
Motherboard Drivers and Utilities 17
BIOS Settings 17
Display Settings 17
Power Management 18
Aero graphics 18
Indexing 18
Other Applications 18
6 Ovation Software Installation 19
Installation Overview: 19
Driver Signing 20
Flux VS3/V3 plug-ins 20
VB VS3 plug-ins 20
Running the Installer 20
7 Ovation Software Registration 21
8 MassCore Installation 23
64 Bit MassCore Notes 25
Re-licencing MassCore 64 bit RTX 26
9 MassCore - Ravenna 27
Install the NET-MSC-GBEX1 Ethernet Card 27
Troubleshooting 30
10 Native - ASIO 32
11 First launch 33
12 Troubleshooting 35
13 Lost or Stolen Merging Technologies Security Keys 36
14 Contacting Merging 37
International Office: 37
UK: 37
USA: 37
Page 4


Installation Guide :
Installation Guide
Document: Ovation™ v6.x Installation Guide rev1Date: 13th February 2016

1 Introduction
Thank you!Congratulations on your purchase of the Ovation Media Server & Sequencer.
Ovation is a ground-breaking Media Server and Sequencer with the tools you need to produce and run
shows in many spheres of activity. For example:
• Theatres
• Theme Parks
• Museums
• TV Game Shows
• Trade Shows
• AV Presentations
• Radio stations
• Retail Outlets
• Film Festivals
are just a few of the possible applications for Ovation.
Note: IMPORTANT! - The first thing you need to do is register your software to acquire
your Ovation key(s) and to be included in our user support list.
http://www.merging.com/register/
Please also subscribe to the User Forum at:
http://www.merging.com/forum/
ScopeThis document is intended to get you up and running with Ovation and as quickly as possible. For more
detailed information about Ovation, Pyramix and VCube please see the PDF User Guides which are
installed with the software.
Important! If you are installing an upgrade to Ovation please read: For
Users Performing Upgrades on page 12 first.
If you have purchased Ovation as an integrated (Turnkey) system, the installation information in this
guide will be redundant, since these systems come with all hardware and software pre-installed. If you
are configuring your own system, please refer to the following instructions.
Installation Guide : Introduction 1 - 7

Ovation Versions - Compatibility and Installation Steps
Native (ASIO on 3rd party hardware):
Compatibility: Windows 7 32 bit and 64 bit
Installation Steps:
• Ovation Software Installation, See: Ovation Software Installation on page 19
• Entering Authorization Keys, See: Ovation Software Registration on page 21
• Select ASIO and the correct card/device in the VS3 Control Panel (Start Menu > Control Panel > VS3 Control
Panel)
Native with ASIO for Ravenna and Horus/Hapi:
Compatibility: Windows 7 64-bit and Windows 8.1 Professional 64-bit
Installation Steps:
• Install the Merging RAVENNA ASIO Driver provided with your Horus / Hapi or available from:
http://www.merging.com/download
• Select ASIO and the correct card/device in the VS3 Control Panel (Start Menu > Control Panel > VS3 Control
Panel)
• Optional: Pyramix Software Installation See: Pyramix Software Installation on page 17
• If Pyramix Software is installed: Entering Authorization Keys See: Pyramix Software Registration on page 19
• Select the desired network adapter in Merging Ravenna ASIO Panel (Start Menu > All Programs > Merging
Technologies > Merging Ravenna ASIO Driver > Merging Ravenna ASIO Panel) please see details in the Merging
Ravenna ASIO and CoreAudio Guide available in Start Menu > All Programs > Merging Technologies > Docu-
mentation > Merging Ravenna ASIO Driver > Merging Ravenna ASIO Panel
• Select ASIO/Ravenna in the VS3 Control Panel (Start Menu > Control Panel > VS3 Control Panel)
Mykerinos only:
Not supported on version 6.x
MassCore with Mykerinos:
Not supported on version 6.x
Installation Guide : Introduction 1 - 8

MassCore with Ravenna and Horus/Hapi:
Compatibility: Windows 7 64-bit
Installation Steps:
• NET-MSC-GBEX1 Installation See: Installing the Merging Technologies NET-MSC-GBEX1 PCIe Ethernet Controller
Card on page 23
• Ovation Software Installation, See: Ovation Software Installation on page 19
• Entering Authorization Keys, See: Ovation Software Registration on page 21
• MassCore Installation, See: MassCore Installation on page 21
• Select MassCore with Ravenna in the VS3 Control Panel (Start Menu > Control Panel > VS3 Control Panel)
Quick Setup Checklist For Systems with Horus/Hapi
1. MassCore users MUST uninstall the previous MassCore version from the Windows Control Panel (Interval
Zero RTX runtime).
2. MassCore users MUST configure their BIOs settings. Please see: BIOS Settings on page 17
3. Disable Windows Firewall in Windows Control Panel Security.
4. Increase Scheduling Priority. Please see: MassCore and Networks on page 14
5. Install Google Chrome.
6. Install Pyramix v10.x or Ovation v6.x.
7. Enter your new v10/v6 keys in MT Security Settings.
8. Also in MT Security Settings install MassCore from the MassCore Tab.
9. MassCore SMP users (recommended for i7 CPU configurations and above) should launch the VS3 Control
Panel and assign 2 cores to MassCore. (A reboot will be required.)
10. Shut down the system and install the MassCore NET-MSC-GBEX1 PCIe Ethernet controller card. (Card drivers
are included in the Pyramix and Ovation installers.)
11. In the VS3 Control Panel ensure that Ravenna is selected in the Hardware section.
12. Configure the Switch/Router Please refer to the Ravenna Network Guide.
13. Launch Ovation.
14. You can also launch the MTDiscovery application and open the Horus entry for remote access.
15. Ensure that the Horus is set to the same sampling rate as Pyramix or Ovation. A warning prompt will appear if
this is not the case.
16. Configure I/O as required in Pyramix/Ovation and Horus. Ravenna users should consult the Ravenna Easy
Connect Guide.
Installation Guide : Introduction 1 - 9

2 Ovation Overview
Ovation enables the user to run Cues of many Media and Command types, either manually like a spot
player / cartridge machine or automatically against Run-time, Time-of-day or external LTC or MIDI
TimeCode. The Ovation Sequencer can be controlled from a hardware controller, touch screens, GPIs,
Sony 9-pin (P2) Protocol commands and MIDI.
Ovation consists of three modules, the OVPlayer, OV Controller and the OVSequence Designer / Show
Controller. OVPlayer and OV Controller can be embedded into the main Ovation application, or run
stand-alone on the same machine or any machine accessible on the network. By default the embedded
player is enabled.
Ovation also includes the renowned Pyramix DAW.
For many applications the optional Ovation hardware controller will be highly desirable. VCube fully
supports the Merging Technologies Virtual Transport technology.
Ovation VersionsOvation is available in three main versions with a number of options.
Ovation Silver Designed for cut down systems where simple audio playback is needed.
Add the optional WebServer to be able to take control of your show from ANY web-connected device
(Desktop, Laptop, SmartPhone, TabletPC).
Includes:
• Audio playback with up to 48 matrix outputs (with proper hardware)
• VST support
• MIDI and GPI/O support
• Pyramix editing
• Designed for Broadcast Playout, Small theatres, and where connection to a larger system of control is
not necessary
• Optional WebServer
Ovation Gold Packaged for applications where the event also has show control requirements. Whether
being controlled by an external show controller, or running the show itself, Ovation Gold delivers all the
tools necessary to run a show, from pre-production to show-time.
Also, with a full Pyramix Virtual Studio Option set in the same box, the Ovation system becomes a true
dual-purpose device by turning it into a large track-count recorder/editor/mix system at the touch of a
button!
As with the Silver package, you can choose to add the Ovation WebServer option to the Gold package.
With the ability to load multiple access points for a single show, distributing information and control
has never been simpler.
Includes:
• All the Ovation Silver pack options
• Pyramix VS3 low-latency plugin support
• Support for all other control protocols (LTC, RS-422, MSC, Script/Batch files)
• Pyramix Music Pack
• Optional WebServer
Ovation Platinum The ultimate Ovation pack, Ovation Platinum features all the options available with
the Gold package and adds to it our vast knowledge and experience in delivering a mix engine of truly
astonishing size. In one Ovation Chassis, you can now harness the power of a 384-track mixer with
another 384 channels of bussing, configurable as any amount of mono/stereo/surround busses that
your show may need! Add to that a comprehensive Scene Snapshot and recall list with integrated glide
times and a virtual large-format mixing console is included “in the box.”
Installation Guide : Ovation Overview 2 - 10
The Ovation WebServer option is included in the cost.
Includes:
• All the Silver and Gold packages options
• Track count up to 384 I/O @1Fs
• Integration with SmartAV Tango controller
• Support for Oasis/Eucon/HUI protocols
• Scene Snapshots and recall with user programmable glide times for anything from a single band of EQ
gain all the way up to the entire mix-engine surface.
• Ovation WebServer option included
Items included with Ovation:• Installation Media with Ovation, Pyramix and VCube software. This Installation Guide.
• Sentinel USB security dongle. The security dongle authorizes both the Ovation application and any
optional features.
Complete turnkey systems are available.
If you have purchased Ovation as an integrated (Turnkey) system, the installation information in this
guide will be redundant, since these systems come with all hardware and software pre-installed. If you
are configuring your own system, please refer to the following instructions.
Installation Guide : Ovation Overview 2 - 11
3 For Users Performing Upgrades
Note: New v6 Keys have been issued for Ovation v6 users. Be aware that v5 keys will
only work with the Beta versions of Ovation 6.
OvationWe recommend uninstalling any previous version of Ovation before installing Ovation 6.
From the Windows Control Panel select Programs and features.
Remove the installed version of Ovation.
MasscoreMassCore users MUST remove the existing MassCore runtime. Once you have installed Pyramix v10.x
follow these steps:
1. Ensure that you are logged on to your system with the User Account which was used to install MassCore
in the first place. (This information can be retrieved with our MassCore Troubleshooting Guide - see
below.)
2. Launch MT Security Settings and select the MassCore tab.
3. Click on the Uninstall MassCore Runtime button.
4. When the uninstall completes reboot the system.
5. After the system reboot return to MT Security Settings and select the MassCore tab.
6. Click on the Install MassCore to install the new version of MassCore.
7. Reboot the machine.
Note: A second automatic reboot will occur after the first login.
Note: After the installation you should see two Interval Zero entries in Windows Con-
trolPanel > Programs and Features which are:
For 64 bit systems:
1. Interval Zero RTX64 2013 Runtime with Service Pack 1
If these entries are not present please refer to the troubleshooting advice document here:
http://www.merging.com/uploads/assets/Installers/Pyramix_8_1/
IntervalZeroRTX_Uninstall_Troubleshoot.pdf
Following the install of Ovation v6.0 you will then need to install the new MassCore Runtime from the
MT Security Settings : MassCore Tab.
Installation Guide : For Users Performing Upgrades 3 - 12

4 System Requirements
Wintel platforms tend to increase in number of cores, speed and performance at a tremendous rate.
New and faster processors are released almost on a monthly basis. Therefore we have not included sug-
gested Motherboard or Processor specifications here.
We maintain a list of up to date PC configurations in the Support Section of our website at:
http://www.merging.com/pages/pcconfig
Other Components• Graphics Card: In many situations the Intel Integrated Graphics (where supported by the motherboard
and CPU) are perfectly adequate. If a graphics card is desired or required Merging recommend the
ATI FIREPRO series of PCIe graphics cards.
• Sufficient HD space and speed for your audio media files. The speed and amount of disk space required
depends on sample rate, wordlength, number of tracks and length of program material.
• A typical 7200 RPM SATA drive is sufficient for 48 tracks at 48 kHz. Higher track-counts and/or higher
sampling rates will require an SSD drive and/or multiple drives configured in Raid 0, 1, 10 or 5.
• We recommend disks should be formatted as NTFS volumes with 64kB block sectors.
• BD/DVD/CD-ROM combo drive or better (optional).
• SXGA 17" monitor or better. Multiple 19” or larger monitors highly recommended.
Minimum resolution 1280x1024
• 3 button mouse
Note:
Ovation MassCore Systems Certified Operating Systems
• OS: We recommend and certify Ovation Version 6.0 and later under Windows 7 Professional 64-bit
ONLY
Ovation NativeCertified Operating Systems
• OS: We recommend and certify Ovation Version 6.x under Windows 7 Professional, 64-bit version
and Windows 8.1 Professional 64-bit.
Installation Guide : System Requirements 4 - 13

MassCore and NetworksIncrease Scheduling PriorityFor satisfactory operation over a network, you must add the User Group to which the User belongs to
“Increase Scheduling priority policy” with the help of gpedit.msc. If the Machine belongs to a domain
the Administrator of the domain must do this, if not then the Administrator of the system.
Procedure1. Open the Local Group Policy Editor.
Start > Accessories > Run and type or paste gpedit.msc).
2. Navigate to: Computer Configuration > Windows Settings > Security Settings > Local Policies >
User Rights Assignment
MassCore Windows GPO Editor Window
Installation Guide : System Requirements 4 - 14
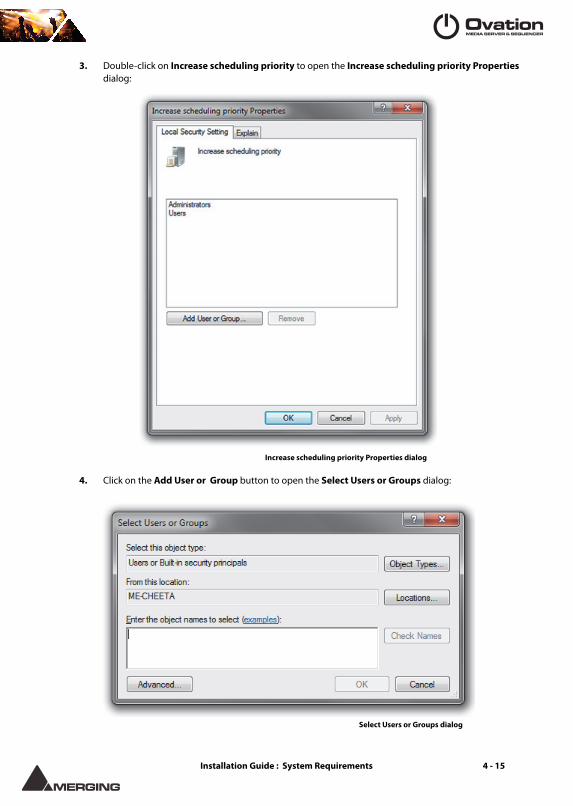
3. Double-click on Increase scheduling priority to open the Increase scheduling priority Properties
dialog:
4. Click on the Add User or Group button to open the Select Users or Groups dialog:
Increase scheduling priority Properties dialog
Select Users or Groups dialog
Installation Guide : System Requirements 4 - 15

5. Click on the Object Types button to open the Object Types dialog:
6. Ensure that Groups is ticked and click on OK to close the dialog.
7. In the Select Users or Groups dialog type the name of the User Group the user or users belong to (e.g.
Users) in the Enter the object names to select field and click on the OK button to close the dialog.
8. The Group name you typed in step 5.) should now appear in the increase scheduling priority Proper-
ties dialog list.
9. Click on the OK button to close the dialog.
Note: that the Groups selection in the Object Types dialog is temporary and must
be selected every time you wish to add or remove a Group.
Object Types dialog
Installation Guide : System Requirements 4 - 16

5 PC Setup
Motherboard Drivers and UtilitiesMotherboard drivers should be updated to current versions.
Motherboard Utilities should NOT be installed.
BIOS SettingsRecommended BIOS SettingsThe following features can create MassCore overloads (blinking red MSC).
Intel® Hyperthreading Technology is supported on 64 bit MassCore systems as of v5.x but NOT on 32
bit systems, this setting must be disabled for the relevant CPU(s). This setting is commonly found in
Main Bios page, or under CPU configuration. (see the motherboard manual for further details).
Intel® Speedstep Technology (also known as Enhanced Intel® SpeedStep), as well as CPU C State (or
Intel® C-State) features must be disabled in the BIOS.
Some Recent Intel boards have a global setting to disable those features known as Intel® Dynamic
Power Technology. If present this should be turned off. These settings are commonly found in BIOS
Power options or CPU Configuration.
Overclocking is not supported.
Display SettingsPyramix requires a minimum display resolution of 1280x1024 in 256 colors which MUST be set to small fonts mode.
Please use the following recommended Display settings:
Start by selecting the Windows 7 Basic Theme (Especially for MassCore users) from the Windows Con-
trol Panel > Personalization
Then make the following Advanced Settings.
Windows Control Panel > System > Advanced System Settings opens the System Properties win-
dow. Select the Advanced tab > Performance Settings to open the Performance Options window.
Choose the Visual Effects Tab:
Installation Guide : PC Setup 5 - 17

Disable the following settings by unticking the boxes to prevent MassCore peaks:
• Animate Windows when minimizing and maximizing - disable
• Animations in the taskbar and Start Menu - disable
• Aero Peek - disable
• Enable desktop composition - disable
• Enable transparent glass - disable
• Fade or slide menus into view - disable
• Fade or slide ToolTips into view - disable
• Save taskbar thumbnail previews - disable
• Show translucent selection rectangle - disable
• Show window content while dragging - disable
Slide open Combo boxes - disable
Power ManagementN.B. As with other Digital Audio Workstations and Non-Linear Editors, we recommend setting the PC to
an Always On Power management scheme. (In Windows XP: Start > Settings > Control Panel double-
click Power Options. Choose Always On from the Power Schemes drop down list.) This allows the
monitor to be turned off by the system but disables hard-disk spin down and Standby.
MassCore is not designed to support Standby modes.
Aero graphicsWindows 7 users should disable AERO themes for maximum performance.
IndexingIn the interests of better performance we recommend turning Indexing OFF for all Data drives in the
system.
Other ApplicationsLike all Digital Audio Workstations, Pyramix works best when there are no other unnecessary applica-
tions or services running.
Installation Guide : PC Setup 5 - 18

6 Ovation Software Installation
Note: You must have full Administrator Access to install Ovation.
Installation Overview:Note: If you have purchased hardware options such as Mykerinos cards, the NET-
MSC-GBEX1 PCIe Ethernet card, and or the Sync Board, please install these first fol-
lowing the instructions in the accompanying documentation.
InstallerThe Ovation software uses an automated installer wizard which will install all necessary prerequisites.
We use a unified installer package containing the current versions of Pyramix, VCube and Ovation. The
initial installer screen offers the choice of Pyramix, VCube and Ovation. Choosing Ovation will also
install Pyramix.
You may exclude the installation of any of the individual components in the wizard, if the device in
question is not present on your machine or if you do not intend to use an item, by un-ticking the tick
boxes next to the items listed in the wizard.
Note: Note: The security dongle must be in place and the security keys entered
before attempting to launch VCube.
Installation Guide : Ovation Software Installation 6 - 19

Driver SigningThere is no Driver Signing Options dialog in Windows 7.
Windows throws up a warning dialog when unsigned drivers are installed. To avoid the necessity of
clicking on OK several times you may wish to check the Always Trust Drivers from Merging Technol-
ogies box.
Flux VS3/V3 plug-insThe Flux plug-ins are not bundled in the installer, they must be installed separately. Two versions are
available, 32-bit and 64-bit. Download the appropriate installer and ensure you have valid Merging Flux
v3 Keys in order to run these Flux VS3 plug-ins.
https://www.fluxhome.com/download
Please download the Flux VS3 for Pyramix v10 installer.
VB VS3 plug-insVB VS3 plug-ins are installed by default with a complete Pyramix install. If you do not wish to have them
installed, e.g. in evaluation mode or if you do not have valid keys then select Custom during the Pyra-
mix install and remove them from the install by right-clicking on them.
Running the InstallerNote: If you have a SafeNet dongle please remove this before installing Ovation and
replace it after installation is complete.
Note: The HASP dongle is not supported on 64-bit systems. If you have a HASP don-
gle please contact your Merging Technologies Sales Partner to purchase a SafeNet
dongle and transfer your keys.Once the NET-MSC-GBEX1 Ethernet card and or Mykerinos card(s) have been properly installed, you
can now install the Ovation v6.x software.
To install the Ovation v6.x software insert the USB memory stick. The installation program will auto-
start on a PC where auto-start is configured on. Otherwise, double click on the USB memory stick icon.
Note: If the installation appears to freeze for a long period please check that the
Driver Signing warning dialogue is not hidden behind another Window. Installation
will not continue until you click OK in this dialog.WARNING: Certain computers do not properly shut down despite the reboot command issued by the
installer but only perform a log off. In this case, please activate a full shut down manually.
Installation Guide : Ovation Software Installation 6 - 20

7 Ovation Software Registration
The Ovation software and its various software options are protected by an authorization key mecha-
nism which uses a unique registration key number generated by Merging Technologies. Based on pur-
chased software components, this key is unique to your security dongle or Mykerinos board serial
number, your Company Name and your User name. Once you have registered your software you will be
provided with this Key or Keys (depending on the chosen options).
In a multi-board system only one key is required for all connected boards. The master board validates
the others.
If you did not receive this key, have lost it or would like to change the user and/or company name,
please contact your Merging Sales Partner with your Mykerinos serial #, your User Name, your Com-
pany Name and the list of purchased software components. Usually, a key can be issued within one
business day, after the verification of your personal data has been completed.
Entering your Key(s)After the Ovation installation process you will be prompted to enter your Authorization Key. If you
click Yes the MT Security Settings dialog will be launched automatically, allowing the Key or Keys to
be entered immediately. If you choose not to enter your Key at this point you can do so later by choos-
ing one of the following procedures:
1. Double-click the file YourPersonalKeyXXXXX.mtk. This is attached to the email containing your Key(s).
2. Open the MT Security Settings Control Panel
(Windows Task Bar Start > Control Panel > MT Security Settings),
click the Import Key button and browse for your Key file called
YourPersonalKeyXXXXX.mtk
3. Open the MT Security Settings Control Panel (as above), in the Registration section select the board
number corresponding to the serial number for your Keys or HASP/SafeNet Key for a dongle, click the
Enter Key button and type your User Name, Company Name and Key then click OK. Repeat this step
for each Keys listed in the email.
Changing or re-entering a KeyShould you need to subsequently change or re-enter a Key, follow the appropriate option above.
The key system is "smart". Only one key or set of keys is required regardless of the number of boards in
a system. Any card can hold this key set as the authorization is processed based on a "Logical OR" of all
keys present on any and all Mykerinos boards. Of course this Logical OR will only process keys with
identical User Name and Company Name to the one entered in the key enabling window.
Evaluation ModeIf started without a valid registration key, the software will recognize that no valid key is available and
will start in “evaluation” mode, which only allows for basic operation of the software as follows:
• Limited to 2 channels of I/O on host soundcard
• No Project > Save function
• Tone is added to new recordings
• All optional extra cost features are deactivated
All editing functions, playback, file type conversions etc. are fully functional.
Installation Guide : Ovation Software Registration 7 - 21

KeysAt any time you can check the serial number of your Security dongle or Mykerinos card(s) and the soft-
ware options enabled in your system in the MTSecurity application.
MT Security Settings - Keys tab
Installation Guide : Ovation Software Registration 7 - 22
8 MassCore Installation
System RequirementsA quad core Intel processor is the minimum requirement.
Conditions• You MUST be logged in as an Administrator to install MassCore
Note: You do not need to be logged in as an Administrator to RUN Pyramix with
MassCore™, just to install it.• You must have at least one Mykerinos board or a NET-MSC-GBEX1-Ethernet card in your system.
• You must have a MassCore 48 (Base) Key in order to proceed with the installation. Please contact your
Merging Technologies Sales Partner if you do not have this option but want to use MassCore.
MassCore Installation1. Install V6.x Ovation.exe
2. Restart your system after the Ovation install.
3. During the system restart select the non-MassCore boot line entry. (Typically Windows 7 (x64) ).
4. Open the VS3 Control Panel and choose the Uninstall MassCore RunTime option and reboot. There will
be two consecutive reboots.
Note: If you have booted your system and did not select the MassCore Boot line while it was available
and installed and had already entered your keys you will have an Install MassCore RunTime option
instead. You must proceed with the step 1 description.
5. Once MassCore had been removed, reboot selecting the NON-MassCore Windows Boot line. If you expe-
rience any problems please refer to the Troubleshooting document here:
http://www.merging.com/uploads/assets/Installers/Pyramix_8_1/IntervalZeroRTX_Uninstall_Troubleshoot.pdf
6. Enter Your Key(s) in MT Security Panel (make sure you have a valid MassCore key. The MassCore 64bit
and RTX64 keys are required for 64-bit systems.)
Note: RTX Dongle Users (SSK-HUD-RTX) MUST first install its driver manually :
http://sentinelcustomer.safenet-inc.com/sentineldownloads/?s=&c=End+User&p
=Sentinel+HASP+HL&o=all&t=all#
Select: Sentinel HASP/LDK - Windows GUI Run-time Installer
7. For automatic RTX licence validation on 64-bit systems ensure the system is connected to the Internet
during the MassCore installation.
8. In the MT Security Panel select the MassCore Tab
MassCore
Installation Guide : MassCore Installation 8 - 23

9. Press the Install MassCore RunTime button (will only be enabled if the MassCore Base Key is present)
Please note that the installation process can take some time to proceed.
10. A Windows Security RTX Driver approval dialog will appear:
11. Click Install in both dialogs or check the Always trust software from Interval Zero, Inc. box.
12. Restart System after the install.
Please note: After installation you should see an Interval Zero entry in Windows Control Panel > Pro-
grams and Features.This should read: Interval Zero RTX64 2014 Runtime with Service Pack 1
VS3 merging Technologies Security Settings dialog
Windows Security dialog
Installation Guide : MassCore Installation 8 - 24
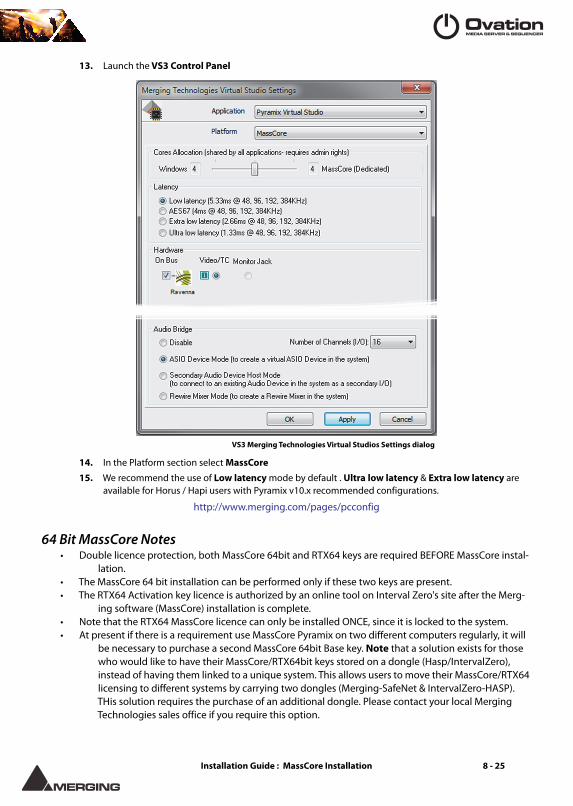
13. Launch the VS3 Control Panel
14. In the Platform section select MassCore
15. We recommend the use of Low latency mode by default . Ultra low latency & Extra low latency are
available for Horus / Hapi users with Pyramix v10.x recommended configurations.
http://www.merging.com/pages/pcconfig
64 Bit MassCore Notes• Double licence protection, both MassCore 64bit and RTX64 keys are required BEFORE MassCore instal-
lation.
• The MassCore 64 bit installation can be performed only if these two keys are present.
• The RTX64 Activation key licence is authorized by an online tool on Interval Zero's site after the Merg-
ing software (MassCore) installation is complete.
• Note that the RTX64 MassCore licence can only be installed ONCE, since it is locked to the system.
• At present if there is a requirement use MassCore Pyramix on two different computers regularly, it will
be necessary to purchase a second MassCore 64bit Base key. Note that a solution exists for those
who would like to have their MassCore/RTX64bit keys stored on a dongle (Hasp/IntervalZero),
instead of having them linked to a unique system. This allows users to move their MassCore/RTX64
licensing to different systems by carrying two dongles (Merging-SafeNet & IntervalZero-HASP).
THis solution requires the purchase of an additional dongle. Please contact your local Merging
Technologies sales office if you require this option.
VS3 Merging Technologies Virtual Studios Settings dialog
Installation Guide : MassCore Installation 8 - 25
Re-licencing MassCore 64 bit RTXIf a system needs to be re-licenced e.g after a Windows OS re-installation or if it is necessary to move
the licence to another system, then you should contact us at:
Please give the reason for your system migration or re-installation since the RTX64 key is not intended
to be renewed frequently.
If Merging cannot follow up with a timely response (in emergency or at weekends) please contact the
Interval Zero (RTX) sales team.
Please ensure that you have the RTX64 Authorization Key number (RTX64-XXX-XXXX-XXXX…) when
doing so.
Interval Zero Support team:
Installation Guide : MassCore Installation 8 - 26

9 MassCore - Ravenna
Certified Operating Systems (OS) for RavennaOvation Version 6.x MassCore in Ravenna mode is certified under Windows 7 Professional (64-bit ver-
sion) ONLY.
System RequirementsWe maintain a list of up to date PC configurations in the Support Section of our website at:
http://www.merging.com/pages/pcconfig
Please refer to the MassCore-Ravenna recommendations (Quad-Core is the minimum requirement)
Required HardwareThe Merging Technologies NET-MSC-GBEX1 PCIe Ethernet controller card is required for MassCore -
Ravenna.
Install the NET-MSC-GBEX1 Ethernet CardThe NET-MSC-GBEX1 PCIe card should be installed in your computer before installing Ovation v6.x.
Procedure
1. Power down your PC and switch it off at the wall. Remove the screws securing the top or side of the case
and carefully slide off the panel.
2. An anti-static wristband is sensible precaution whenever working with sensitive electrical equipment.
Keeping one hand on a metal part of the case will have the same effect, though you may need both
hands when installing certain items of hardware.
3. Locate an empty PCIe slot and remove the metal backing plate by removing the screw holding it in
place and carefully sliding it up and out. In some cases, there are no backing plates and you will need to
MassCore
Installation Guide : MassCore - Ravenna 9 - 27

remove a length of metal instead. Do this using a flat-blade screwdriver and/or pliers, taking care to
avoid any sharp edges left behind.
4. Remove the NET-MSC-GBEX1 card from its protective anti-static envelope and align it with the vacant
PCIe slot as shown below.
5. Push down, gently at first, ensuring you have the pins aligned correctly with the slot, and then apply
more pressure to slot the card fully home.
6. Use the screw which was used to retain the backing plate to secure the card in place and check that the
card sits comfortably.
7. Finally, replace the case cover(s) and switch the machine back on at the socket.
8. At the next power up and boot Windows will discover the Merging Ethernet PCIe card.
Ovation v5.x can now be installed.
Required SoftwareIn order to operate Ovation with Ravenna and Horus /Hapi, Ovation v6.x must be installed. The Ovation
v6.x installer includes; the MassCore-Ravenna Connect utility, MT Discovery tool along with Apple bon-
jour.
Note: Driver signing. Please tick Always trust “Merging Technologies” when the
first warning message about unsigned drivers appears.
Enter your Ovation keysLaunch MTSecurity settings and enter your Ovation v6.x keys. Please see Entering your Key(s) on
page 21
Install MassCorePlease see: MassCore Installation on page 23
Note: A valid MassCore (Base) key is mandatory.
The MassCore key is held on the Safenet dongle. Please make sure that you are in pos-
session of a dongle and valid keys in order to operate Ovation in MassCore-Ravenna
mode.
Note: The NET-MSC-GBEX1 Ethernet card requires MassCore in order to function.
Installation Guide : MassCore - Ravenna 9 - 28

Configure Ravenna in the VS3 Control Panel
1. Launch the VS3 Control Panel
2. Cores Allocation Leave on the default setting for now.
3. Latency Leave on the default setting Low Latency (only mode supported at present)
4. Select Platform : MassCore
5. Select Hardware : On Bus as Ravenna (box ticked)
6. Audio Bridge : Set as required.
7. Click on the OK button.
8. When the VS3 panel Do you want to save routing? dialog box appears, click on OK
9. the VS3 control panel will close.
VS3 Merging Technologies Virtual Studios Settings dialog
Installation Guide : MassCore - Ravenna 9 - 29

Before First LaunchBefore launching Ovation v6.x, you must ensure that a PTP Master* is present on your Ravenna net-
work. Merging Technologies recommends using its Horus converter as PTP Master.
* The Precision Time Protocol (PTP) is a protocol used to synchronize clocks throughout a computer
network.
Note: As of v6.x RAVENNA mode supports all three Latency modes. (VS3 Control
Panel).To enable RAVENNA I/O connections please refer to the separate RAVENNA
Easy Connect Guide.
Note: Horus users should refer to the Horus User Manual for configuration set-up
with Pyramix.
TroubleshootingRavenna: Horus / Hapi & Network configurationMerging recommend that the Ethernet MassCore card and Horus / Hapi are configured to obtain an IP
address automatically.
Setting Horus / Hapi and Network Card to Obtain IP Addresses AutomaticallyNetwork Card
1. Open Network Connections in the Windows Control Panel
2. Right-click on the MassCore Ethernet card NET-MSC-GBEX1 and open Properties.
3. Select Internet Protocol Version 4, TPC/IPv4 (which is the only one activated) and click on Properties.
4. Select the Obtain an IP address automatically option.
5. Click on OK in each dialog to accept the changes and close the dialogs.
Horus
1. Open the Horus / Hapi Setup >Advanced > Network page
2. In the IP address section select Auto
Setting Fixed IP addresses1. First, check the IP address of the Horus / Hapi device under Setup > Network
To be able to see each other, the Merging Technologies Network card and Horus / Hapi must be in the
same range of addresses. (for example 192.168.xxx.xx).
2. The Horus IP address can be checked (and changed if required in the Horus /Hapi Setup page> Net-
work)
3. The IP address of the MT Network card can be changed in Windows Control Panel > Change Adapter
Settings
4. Right click on the Merging Technologies NIC and select Properties.
5. Select Internet Protocol Version 4, TPC/IPv4 (which is the only one activated) and click on Properties.
6. Switch to Use the following IP address and enter an IP address that is in the same range as the Horus IP
address. The Subnet Mask should be added automatically.
7. Click on OK in each dialog to accept the changes and close the dialogs.
Windows Firewall and UACRecommendation
If not configured correctly, Windows Firewall can block communication between MassCore and Horus /
Hapi. User Account Control should also be set to Never Notify.
Firewall
• Open the Windows Control Panel. Open the System and Security section and under Windows Fire-
wall disable the Firewall for the Public Network.
Installation Guide : MassCore - Ravenna 9 - 30

• Go back to the Windows Control Panel and click on Windows Firewall. Click on Change notification
settings. Ensure Block all incoming connections, including those in the list of allowed pro-
grams is NOT ticked.
User Account Control
• Open the Windows Control Panel. Open the User Accounts section and under Change User Account
Control Settings move the slider down to Never Notify.
AntivirusRecommendation
Merging also recommends that any Antivirus software be disabled. Some Antivirus software such as
Avast have been known to block the Horus / Hapi discovery and Ravenna I/O connections.
Installation Guide : MassCore - Ravenna 9 - 31

10 Native - ASIO
Install Pyramix and the drivers for your ASIO device.
Configure ASIO in the VS3 Control Panel
1. Launch the VS3 Control Panel (Start: All Programs > Merging Technologies > VS3 Runtime > VS3 Control Panel
2. Select Platform : Native - ASIO
3. Select I/O Selection ; Driver name : Select your ASIO device from the drop-down list
4. Audio Bridge : Set as required.
5. Click on the OK button.
6. When the VS3 panel Do you want to save routing? dialog box appears, click on OK
7. The VS3 control panel will close.
8. The Inputs and Outputs present on the ASIO device will now be available in Pyramix.
VS3 Merging Technologies Virtual Studios Control Panel
Installation Guide : Native - ASIO 10 - 32
11 First launch
Important! After installation has been completed, please reboot the PC
before attempting to launch Ovation. Then open the VS3 control panel
application.
Start : All Programs > Merging Technologies > VS3 Runtime > VS3 control panel
For Systems with MassCore RAVENNAPlease see: Configure Ravenna in the VS3 Control Panel on page 29
For Native SystemsPlease see: Configure ASIO in the VS3 Control Panel on page 32
Launch PyramixDouble-click on the Pyramix Virtual Studio desktop icon to launch Pyramix.
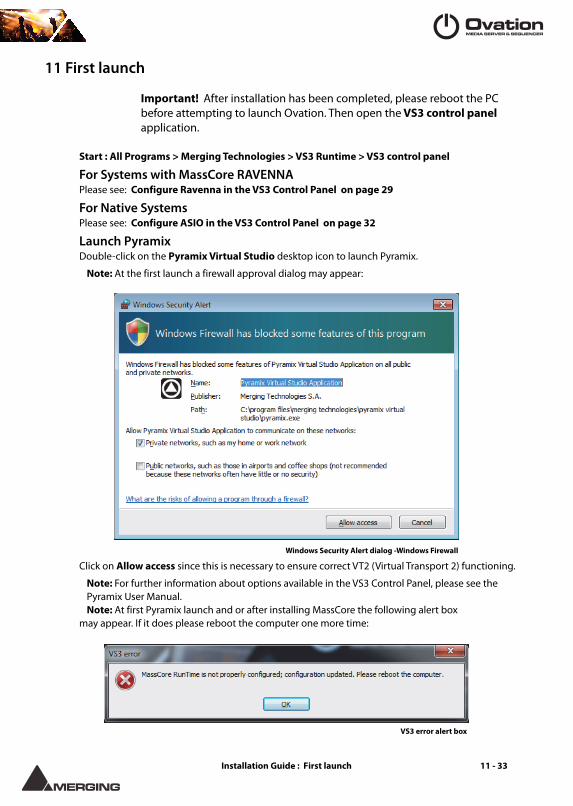
Note: At the first launch a firewall approval dialog may appear:
Click on Allow access since this is necessary to ensure correct VT2 (Virtual Transport 2) functioning.
Note: For further information about options available in the VS3 Control Panel, please see the
Pyramix User Manual.
Note: At first Pyramix launch and or after installing MassCore the following alert box
may appear. If it does please reboot the computer one more time:
Windows Security Alert dialog -Windows Firewall
VS3 error alert box
Installation Guide : First launch 11 - 33

Firewall Approval on First Launch
Note: At the first launch a Firewall approval dialog may appear:
In the Allow Pyramix Virtual Studio Application to communicate on these networks section
ensure the Private networks... box is ticked since this is necessary to ensure correct VT2 (Virtual Trans-
port 2) functioning and, for a MassCore system with RAVENNA and Horus, ensure the Public Net-
works... box is also ticked.
Note: For further information about options available in the VS3 Control Panel,
please see the Pyramix User Manual.
Note: At first Pyramix launch and or after installing MassCore the following alert boxmay appear. If it does please reboot the computer one more time:
Documentation
The User Manual and Quick Start Guide are available from within Pyramix and may be accessed via
the Help menu or by pressing F1, or online at:
http://www.merging.com/downloads
Windows Security Alert dialog -Windows Firewall
VS3 error alert box
Installation Guide : First launch 11 - 34

12 Troubleshooting
Please visit regularly:
www.merging.com
for the latest Troubleshooting Guide and FAQ sections.
Installation Guide : Troubleshooting 12 - 35

13 Lost or Stolen Merging Technologies Security Keys
(Sentinel / HASP USB Dongles)
The Merging USB Key carries all the value of your Merging software and the software licence authoriza-
tion to use it. Please ensure you do not lose the USB key as Merging Technologies cannot be held
responsible if this is lost or stolen.
If your USB key is lost or stolen then please make a claim on your insurance in the usual way just as you
would for any other item you own. Merging will be happy to confirm the details and value of the soft-
ware licence and USB key to your insurance company. If your USB key is lost or stolen and a different
user should attempt to register for this key, Merging will notify you and the authorities in your country
that an attempt has been made to register this stolen item.
If your USB key should become defective or is broken, please ensure this key is returned to merging
after requesting and RMA (Return Merchandise Authorization.) Only after the receipt of this key in the
Merging Offices will it be determined if it may be exchanged under warranty free-of-charge, or if the
damage is outside the warranty scope. in which case only a modest fee to replace it with a new key will
be charged (and not the entire value of the software.)
Installation Guide : Lost or Stolen Merging Technolo- 13 - 36

14 Contacting Merging
International Office: Merging Technologies S.A.
Le Verney 4
CH-1070 Puidoux
Switzerland
Phone: +41 21 946 0444
Fax: +41 21 946 0445
UK:Merging UK (Emerging Ltd)
23 Campbell Court
Campbell Road
Bramley
Hampshire
RG26 5EG
UK
Phone: +44 (0) 118 402 5090
Fax: +44 (0) 870 123 1747
Email: [email protected]
USA: Merging USA (Independent Audio)
43 Deerfield Road
Portland,
ME 04101-1805
United States of America
Phone: +1 (207) 773 2424
Fax: +1 (207) 773 2422
For all documentation inquiries or suggestions for improvement:
http://www.merging.com
Installation Guide : Contacting Merging 14 - 37
Page - 38
AAero graphics 18Antivirus 31BBIOS Settings 17CChanging or re-entering a Key 21Contacting Merging 37DDisplay Settings 17Do you want to save routing? 29Driver Signing 20EEntering Keys 21FFirewall 30First launch
Single board system 31, 33Flux VS3/V3 plug-ins 20IImport Key 21Increase Scheduling Priority 14Increase scheduling priority 15Indexing 18Introduction 7KKeys 22MMassCore
Ravenna 27MassCore and Networks 14MassCore Network Permissions 14MassCore Systems 13MT Security Settings 21Mykerinos Installation 19Mykerinos serial number 22NNative Install 20OOther Applications 18
PPC Setup 17Power Management 18Power Schemes 18RRavenna 27SSafeNet dongle 20small fonts 17Software Installation 19Software Registration 21System Requirements 13TThank you 7Troubleshooting 35UUAC 30User Account Control 31VVB VS3 plug-ins 20VS3 control panel 29WWindows Firewall 30YYourPersonalKey 21
Index

