industrialit system 800xa - abb ltd...pre-installation 6 3bse055053 g 5. close the opc server v1.0...
TRANSCRIPT
Industrial IT Extended Automation System 800xA
3BSE055053 G 1
IndustrialIT System 800xASystem Version 5.0 SP2 Rev E
Installation Instruction
IntroductionThis User Manual is only intended for use when manually installing an 800xA system Revision on an existing 800xA system. It is not intended for use when installing a new 800xA System, or when upgrading from the latest revision of a previous 800xA System Version to the latest revision of 800xA 5.0 SP2.
If a new manual installation is performed (a system without any 800xA software installed), proceed as described in the latest revision of Industrial IT, System - 800xA, Installation (3BSE034678R5021).
The preferred and recommended method for installing system revisions is to use the System Update Tool (SUT). Refer to Industrial IT, 800xA - System, System Update Tool User Instruction (2PAA106424) for instructions on installing the revision using the System Update Tool.
System Revisions can be installed in a running redundant system on a node-by-node basis without stopping the entire system. Read all installation instructions as outlined in this document before starting to plan and perform the installation.
Affected ProductsThis document covers the following products:
• 800xA Base.• 800xA Base Graphics Extension.• 800xA for AC 800M.• Structured Data Logger.• 800xA for Advant Master.
Related Documentation
2 3BSE055053 G
• 800xA for Safeguard.• 800xA for Safeguard Graphics Extension.• 800xA for DCI.• 800xA for MOD 300.• TRIO Integration.• 800xA for Harmony.• 800xA for Melody.• Softpoint Server.• PLC Connect.• Asset Optimization.• SMS and e-mail Messaging.• PC, Network and Software Monitoring.• Multisystem Integration.• SFC Viewer.• Engineering Studio.• Device Library Wizard.• Device Management FOUNDATION Fieldbus.• Device Management PROFIBUS & HART.• Batch Management.• Batch Management Graphics Extension.• Central Licensing System (CLS).• Process Engineering Tool Integration.• Information Management.• RNRP (only Domain Controller).• IEC 61850 Connect.• Process Graphics 2.• 800xA Documentation.• System Installer.
Related DocumentationRelated instructions to this document are as follows:
• Industrial IT, 800xA - System, System Version 5.0 SP2 Revision E, Release Notes (2PAA107984) - Describes the System Revision release notes.

New Installation
3BSE055053 G 3
• Industrial IT, 800xA - System, System Update Tool User Instruction (2PAA106424) - Describes installing the revision using the System Update Tool.
• Latest revision of Industrial IT, System - 800xA, Installation (3BSE034678R5021) - Provides instructions for installing 800xA Base System and Functional Area software.
• Latest revision of Industrial IT, 800xA - System, Upgrade (3BSE036342R5021) - Provides instructions for stopping services and applications.
• Latest revision of Industrial IT, 800xA - System, Process Graphics 2 Installation (3BUA001135R5022) - Provides instructions for installing Process Graphics 2 software.
• Latest revision of Industrial IT, 800xA - System, 800xA for Advant Master, RTA Unit PU410 Release Notes (3BSE055585) - Provides release notes and installation instructions for the PU410 RTA Unit.
• Latest revision of Third Party Software System 800xA (3BUA000500) - Provides information on the third party software that has been evaluated for use with System 800xA.
• Latest revision of Microsoft Security Updates Validation Status for IIT System 800xA (3BSE041902) - Provides information about security updates to Windows and other Microsoft software that has been evaluated for use with System 800xA.
• Latest revision of Industrial IT System 800xA SV 5.x System Software Versions (3BSE037782R5001) - Provides information on the released software versions for the installation packages that are part of System 800xA.
New InstallationIf a new manual installation is performed (a system without any 800xA software installed), proceed as described in the latest revision of Industrial IT, System - 800xA, Installation (3BSE034678R5021) instruction but note the following for the installation if rollups are available for any product:
• For products that require uninstall of the base version before installation of a rollup (refer to the Uninstallation on page 13 to check which products are

Process Graphics 2
4 3BSE055053 G
affected): Do not install the base version as described in Industrial IT, System - 800xA, Installation (3BSE034678R5021), instead install the latest available rollup.
Process Graphics 2Before starting to install the revision, considerations must be taken for Process Graphics 2. If Process Graphics 2 is already installed in the system, refer to Systems with Process Graphics 2 Installed on page 46 for more information. If Process Graphics 2 is not installed and installation is required, refer to Systems without Process Graphics 2 Installed on page 47 for more information.
Pre-InstallationThis topic describes actions that must be taken before installing the revision.
Batch Management
1. Verify that all scheduled batches are completed or terminated.
2. Archive batch history by selecting the Batch History Archive aspect (Library Structure > Batch Management > Overviews).
When using IEC61850 Connect it is recommended to perform the workaround mentioned in Release Note ID 800xAIEC-CN-5023-013 in Industrial IT, 800xA - System, System Version 5.0 SP2 Rev D Release Notes (3BUA001786).
It is recommended to back up the system before starting the installation. Refer to Industrial IT, 800xA - System, Maintenance (3BSE046784R5021) for more information.
Virus scanning must be disabled during installation of System 800xA software and updates.
Stop all third party and other non-800xA clients connected to the 800xA System (such as third party OPC DA, HDA, and AE clients that are accessing the 800xA System) as these will disturb the update.
Node Order
3BSE055053 G 5
During the course of each batch process run, the details about the batch are gathered and stored by the system in the Batch database until manually removed. Details that are archived can be retained in the Batch database. Once data associated with a batch has been archived and placed in a safe place, the data for that batch should be removed from the Batch database.
Archiving batch data has no effect on the uniqueness of the Batch ID. Even after data associated with a Batch ID has been removed from the system, a record of the Batch ID will be retained in the system. The Batch ID can not be reused.
Node Order
A system stop is not mandatory for a revision installation. Installation of the revision in a running system requires that node types be updated in the following order:
1. Application Server nodes.
2. Connectivity Server nodes.
3. Aspect Server nodes (Primary Aspect Server node last).
4. Client nodes.
5. Domain Controller (if the 800xA System is part of a domain environment).
Pre-Installation
This topic describes actions that must be taken before installing the revision.
1. Login as the 800xA Install account, or an account with Windows Administrative privileges.
Do not archive directly to or restore directly from CDs or DVDs. Archive to or restore from hard disk drives that can be backed up to CDs or DVDs using commercially available software.
Close the Plant Explorer Workplace and other applications.
Review and execute all pre-installation steps required by various products prior to executing the installation steps.

Pre-Installation
6 3BSE055053 G
2. For Information Management Servers and MOD 300 Connectivity Servers, start the pasgui.exe from the run prompt and select Stop All. The tool can also be accessed from:
Start > All Programs > Administrative Tools > PAS > Process Administration
3. Stop all processes associated with the 800xA System by using the Maintenance function in the Configuration Wizard (Answer Yes to the question about restart of Windows Explorers and Windows File browsers).
4. Close the Configuration Wizard.
5. Close the OPC Server V1.0 CET Tool if it is running on the IEC 61850 Connectivity Server node.
6. Copy the Revision Installation zip file:
9ARD115267-001_en_System_800xA_Rev_E_Updates_with_System_Update_Tool_Part_1_of_2.zip
9ARD115267-001_en_System_800xA_Rev_E_Updates_with_System_Update_Tool_Part_2_of_2.zip
to an arbitrary folder.
7. Unzip the file to an arbitrary folder (for example on a network device, on a memory stick, or directly on a storage device on every node where the revision has to be installed).
Avoid stopping server nodes when services are in the Initialize or Synchronizing state.
Manually stop the Batch_ShowRed.exe process (End Process) using the Windows Task Manager if the Batch Management component is installed.
The Revision Installation zip file contains all individual product rollups as well as the System Update Tool software. Refer to Table 2 for the paths to the individual rollup installation files. Refer to Industrial IT, 800xA - System, System Update Tool User Instruction (2PAA106424) to perform an automated installation.

Pre-Installation
3BSE055053 G 7
Updating Oracle 9 for Information Management
Oracle 9 Server software is required for the Information Management historical services. This upgrade procedure will upgrade Oracle if the latest patches are not installed. The upgrade procedure is as follows:
- Stop all 800xA software as described in the Pre-Installation on page 4.
- Open the ABB Oracle Installer to verify if the patch installation is required.
- If required, install the patch.
- Reboot after the patch installation is complete and continue the pre-installation procedure.
To verify that the most current Oracle 9 Patchset and/or CPU is installed, or to install the most current Patchset and/or CPU:
1. Verify whether the pre-installation procedure has been executed. At this instant, no 800xA software should be running on the node.
2. Use Windows Explorer to navigate to the directory where the downloaded files are located. The path to the ABB Oracle Installer is:
Information Management\IM
and the executable file is:
Oracle9CPUInstallerJuly2010.exe
3. To launch the ABB Oracle Installer (Figure 1) double-click the executable file.
4. Identify the status of the patch installation. If the patch is not installed, proceed to upgrade to the July 2010 oracle patch 9683644.
Use the appropriate procedure to install the patch based on the operating system.
Installing the Oracle CPU on Windows Server 2003 Nodes
Use the following procedure to complete the CPU installation on Windows Server 2003 nodes:
Perform the following steps only if the Information Management Server is installed on the node.
Pre-Installation
8 3BSE055053 G
1. Click Install Patch30 (Figure 1) to install the Oracle 9 CPU.
2. Click Install Perl.
3. Click OK to confirm the Perl installation.
4. Click Install OPatch.
5. Click OK to confirm the OPatch installation.

Pre-Installation
3BSE055053 G 9
6. Click Install Patch30.
7. Click OK to confirm the CPU installation. This will start the CPU installation in a command line window.
Figure 1. ABB Oracle Installer

Pre-Installation
10 3BSE055053 G
8. Respond with Y in the command line window to the prompt message displayed in Figure 2:
9. Click Post CPU 9 Install Step1.
10. Click OK to confirm the post CPU 9 installation.
11. Click Post CPU 9 Install Step2.
12. Click OK to confirm the post CPU 9 Step2 installation.
13. Click Close to exit.
14. Reboot the system. After reboot, let the system initialize and start up. After startup is complete, repeat the Pre-Installation on page 4 and proceed to Uninstallation on page 13.
Figure 2. Message for Shutdown of Oracle Applications
Should the patch install stop and identify some files that can not be moved, the proper response is to prevent the patch from installing. If the patch install continues, the Oracle instance may be corrupted.
• When a patch install error is seen, stop the patch installation by answering the question asking to stop the installation.
• Determine which processes are using the Oracle DLLs and stop them.
• Restart the Oracle Installer and the patch should install without error.

Pre-Installation
3BSE055053 G 11
Installing the Oracle CPU on Windows XP Nodes
Use the following procedure to install the oracle CPU on Windows XP nodes:
1. Set the ABB ServiceManager and ABB Process Administration in the Manual Startup type:
a. Select:
Start > Settings > Control Panel > Administrative Tools > Services
b. Right-click ABB ServiceManager and select Properties from the context menu to launch the ABB ServiceManager Properties dialog box.
c. Select the General tab (if not already selected).
d. Select Manual in the Startup Type drop-down list box.
e. Click Apply.
f. Click OK.
g. Repeat this procedure for ABB Process Administration.
2. Click Install Patch30 (Figure 1) to install the Oracle 9 CPU.
3. Click Install Perl.
4. Click OK to confirm Perl installation.
5. Click Install OPatch.
6. Click OK to confirm the OPatch installation.
7. Click Install Patch30 to launch the tool to change the startup mode of the system.
8. Select Diagnostic Startup - load basic devices and services only and then click OK.
9. Click Restart to continue. Windows will restart in Safe Mode.
10. After restart, login with the Windows user login that started the CPU installation.
11. Click OK to confirm the CPU installation. This will start the CPU installation in a command line window.

Pre-Installation
12 3BSE055053 G
12. Respond with Y in the command line window to the prompt message displayed in Figure 2.
When the update completes, a dialog box explaining how to switch to normal mode appears.
13. Click OK to continue.
14. Select Normal mode startup.
15. Click OK.
16. Click Restart to restart Windows in normal mode.
After restart, login with the Windows user login that started the CPU update.
17. Click Post CPU 9 Install Step1.
18. Click OK to confirm the post CPU 9 installation.
19. Click Post CPU 9 Install Step2.
20. Click OK to confirm the post CPU 9 Step2 installation.
21. Click Close to exit.
22. Set the ABB ServiceManager and ABB Process Administration in the Automatic Startup type:
a. Select:
Start > Settings > Control Panel > Administrative Tools > Services
b. Right-click ABB ServiceManager and select Properties from the context menu to launch the ABB ServiceManager Properties dialog box.
c. Select the General tab (if not already selected).
Figure 3. Message for Shutdown of Oracle Applications
Uninstallation
3BSE055053 G 13
d. Select Automatic in the Startup Type drop-down list box.
e. Click Apply and then OK.
f. Repeat this procedure for ABB Process Administration.
23. Reboot the system.
After reboot, let the system initialize and start up. After startup is complete, repeat the Pre-Installation on page 4 and proceed to Uninstallation on page 13.
Uninstallation
Uninstall the products in the order presented in Table 1. Any special instructions required when uninstalling a product are listed in Table 1. If there are no special instructions use Programs and Features from Windows Control Panel to uninstall the product.
Uninstall the following products listed in Table 1 only if they are part of the System Revision (the set of rollups) about to be installed. Refer to Industrial IT System 800xA SV 5.x System Software Versions (3BSE037782R5001), Rollups column, for more information on which rollups are included in the System Revision.
Allow one uninstallation to fully complete before starting the next one. Running the uninstallations in parallel may harm the System. It may take time (several seconds) between a mouse click and the corresponding user interface to appear. Make one click at a time and let the uninstallation software respond to the first click before making the next.
Do not restart the node after the uninstallation as this will damage the system.
Products that are not listed here will be uninstalled automatically (or a prompt may appear) when necessary during the installation.
It is imperative that the Special Instructions and the order listed in Table 1 be followed, otherwise the update will fail and leave the system inoperable.

Uninstallation
14 3BSE055053 G
Table 1. Uninstallation Order and Instructions
Product Special Instructions
800xA for MOD 300 Perform the uninstallation on the backup Connectivity Server node first. Once the backup Connectivity Server node is reinstalled and online, proceed with the uninstallation on the primary Connectivity Server node. Repeat this for all Connectivity Server node pairs in the system.
ABB PAS System Services for 800xA for
MOD 300
ABB PAS System Services exists on Information Management Servers and MOD 300 Connectivity servers. Uninstall PAS ABB PAS System Services only on the MOD 300 Connectivity servers. Do not uninstall ABB PAS System Services on the Information Management Servers.
PLC Connect and SoftPoint Server
Both PLC Connect and SoftPoint Server need to be uninstalled even if only one of them is going to be installed as part of the new System Revision.
Batch Management All actions performed on one Batch Server (stopping, uninstalling, and installing for example) must be performed on the other Batch Servers in the system at the same time.
The Batch Client applications must also be uninstalled.
Process Engineering Tool Integration
None
Asset Optimization Uninstall all previous versions of Asset Optimization. All previous versions must be uninstalled in the reverse order of installation. For example, if Rev B is installed, uninstall Asset Optimization 5.0 SP2 RU2, followed by Asset Optimization 5.0 SP2 RU1, and finally Asset Optimization 5.0 SP2 Base version.
SMS and e-mail Messaging
Make sure to uninstall any temporary corrections installed on the system.

Uninstallation
3BSE055053 G 15
IEC 61850 Connect Uninstall ABB IEC 61850 OPC Server from the IEC 61850 Connectivity Server node.
1. Clear the Uninstall MSDE (PCMSERVER) check box for the
Microsoft SQL Server Desktop Engine when uninstalling ABB IEC
61850 OPC Server.
2. Proceed with the uninstall.
CLS and CLS Extension Perform the following on the CLS Server:
1. Open Windows Control Panel.
2. Click Administrative Tools.
3. Click Services. The Services page appears.
4. Locate and right-click World Wide Web Publishing.
5. Select Stop from the context menu to stop the service.
Perform the following on the AO Server, where ECS software is installed:
1. Open Windows Control Panel.
2. Click Administrative Tools.
3. Click Services. The Services page appears.
4. Locate and right-click ABB cpmPlus Enterprise Connectivity.
5. Select Stop from the context menu to stop the service.
NOTE: After the maintenance shutdown on the CLS Server node, a CLS Communication Failure message appears on all CLS Client nodes. Click OK when the dialog appears.
Uninstall CLS and CLS extension using Programs and Features in Windows Control Panel.
After uninstalling CLS, make sure to uninstall any temporary corrections installed on the system.
Table 1. Uninstallation Order and Instructions
Product Special Instructions

Installation
16 3BSE055053 G
Installation
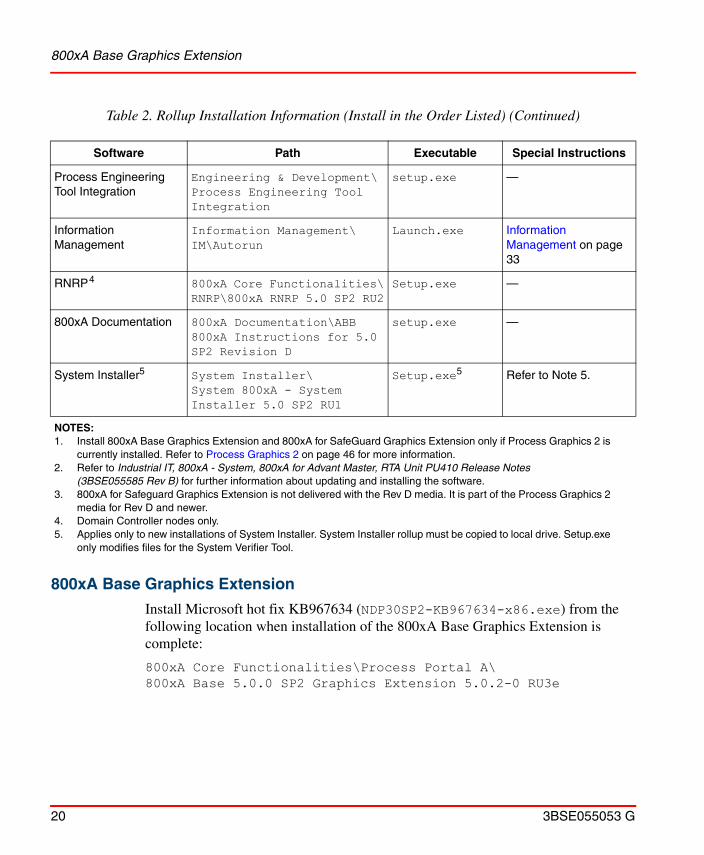
1. The revision consists of the rollups listed in the Software column in Table 2. Install them in the order listed in Table 2 if the base product is currently installed.
2. Double-click the executable files from the rollup folders to start each installation (the path to each executable file is shown the Path column in Table 2). Refer to the appropriate section for special information or instructions for the indicated product as indicated in the Special Instructions column in Table 2.
3. Continue to Post Installation on page 34.
Required uninstallations for any of the products should be complete prior to starting the installation. Refer to the Uninstallation on page 13 before installing.
Allow one installation to fully complete before starting the next one. Running the installations in parallel may harm the system. It may take time (several seconds) between a mouse click and the corresponding user interface to appear. Make one click at a time and let the installation software respond to the first click before making the next.
Do not restart at anytime during the installation even if prompted to do so. Wait to restart when instructed to in Post Installation on page 34.
Table 2. Rollup Installation Information (Install in the Order Listed)
Software Path Executable Special Instructions
800xA Base 800xA Core Functionalities\Process Portal A\800xA Base 5.0.0 SP2 RU4i
Setup.exe —
800xA Base Graphics Extension1
800xA Core Functionalities\Process Portal A\800xA Base 5.0.0 SP2 Graphics Extension 5.0.2-0 RU3e
Setup.exe 800xA Base Graphics Extension on page 20

Installation
3BSE055053 G 17
CLS 800xA Core Functionalities\Licensing\CLS
setup.exe —
CLS Extension 800xA Core Functionalities\Licensing\CLS Extension
setup.exe —
AC 800M Connect 800xA Connectivities\800xA for AC 800M\AC 800M Connect
Installer.exe 800xA for AC 800M on page 21
OPC Server forAC 800M
800xA Connectivities\800xA for AC 800M\OPC Server for AC 800M
Installer.exe
Control Builder M Engineering & Development\Control Builder M
Installer.exe
Base Software for Soft Control
Engineering & Development\Base Software for Soft Control
Installer.exe
Structured Data Logger Information Management\Structured Data Logger\System 800xA-Structured Data Logger 5.0.0 RU1
Setup.exe —
800xA for Advant Master
800xA Connectivities\800xA for Advant Master
Setup.exe —
800xA for Advant Master PU410 Support 5.0.2-22
800xA Connectivities\800xA for Advant Master PU410 Support 5.0.2-2
Setup.exe —
800xA for SafeGuard 800xA Connectivities\800xA for SafeGuard\800xA for Safeguard 5.0.0 SP2
Setup.exe —
800xA for SafeGuard Graphics Extension1
Process Graphics 2 media 3 — —
Table 2. Rollup Installation Information (Install in the Order Listed) (Continued)
Software Path Executable Special Instructions

Installation
18 3BSE055053 G
800xA for DCI 800xA Connectivities\800xA for DCI\800xA for DCI
setup.exe 800xA for DCI on page 23
800xA Batch for DCI 800xA Connectivities\800xA for DCI\800xA Batch for DCI
setup.exe
800xA for DCI Graphics Extension
800xA Connectivities\800xA for DCI\800xA for DCI Graphics Extension
setup.exe
ABB PAS - System Services
800xA Connectivities\800xA for MOD
ABB PAS - System Services.msi
800xA for MOD 300 on page 23
800xA for MOD 300 ABB MOD300 Connect.msi
ABB 800xA for MOD 300 Graphics Extension
ABB 800xA for MOD 300 Graphics Extension.msi
—
TRIO Integration Additional Products\TRIO setup.exe —
800xA for Harmony 800xA Connectivities\800xA for Harmony
setup.exe 800xA for Harmony on page 25
800xA for Melody 800xA Connectivities\800xA for Melody
setup.exe 800xA for Melody on page 27
SoftPoint Server Information Management\SoftPoint Server
setup.exe —
PLC Connect 800xA Connectivities\PLC Connect
setup.exe —
IEC 61850 Connect 800xA Connectivities\800xA for IEC 61850
setup.exe —
Table 2. Rollup Installation Information (Install in the Order Listed) (Continued)
Software Path Executable Special Instructions

Installation
3BSE055053 G 19
Asset Optimization Asset Optimization\Asset Optimization Server & Client
setup.exe Asset Optimization on page 27
SMS and e-mail Messaging
800xA Core Functionalities\SMS and e-mail Messaging\800xA, SMS and email Messaging 5.0 SP2 RU3
setup.exe —
PC, Network and Software Monitoring
Asset Optimization\PC, Network and Software Monitoring
setup.exe —
Multisystem Integration 800xA Core Functionalities\Multisystem Integration
Setup.exe —
SFC Viewer 800xA Core Functionalities\SFC Viewer\SFC Viewer 5.0 SP2 RU1
setup.exe —
Engineering Studio Engineering & Development\Engineering Studio
setup.exe Engineering Studio on page 31
Device Library Wizard Device Management & Fieldbuses\Device Library Wizard
setup.exe Device Library Wizard on page 31
Device Management FOUNDATION Fieldbus
Device Management & Fieldbuses\FOUNDATION Fieldbus
Setup.exe Device Management FOUNDATION Fieldbus on page 31
Device Management PROFIBUS & HART
Device Management & Fieldbuses\PROFIBUS & HART
setup.exe Device Management PROFIBUS & HART on page 31
Batch Management Production Management\Batch Management
Launch.exe Batch Management on page 31
800xA Batch Management Graphics Extension1
Production Management\ABB Batch Management Graphics Extension
setup.exe —
Table 2. Rollup Installation Information (Install in the Order Listed) (Continued)
Software Path Executable Special Instructions
800xA Base Graphics Extension
20 3BSE055053 G
800xA Base Graphics Extension
Install Microsoft hot fix KB967634 (NDP30SP2-KB967634-x86.exe) from the following location when installation of the 800xA Base Graphics Extension is complete:
800xA Core Functionalities\Process Portal A\800xA Base 5.0.0 SP2 Graphics Extension 5.0.2-0 RU3e
Process Engineering Tool Integration
Engineering & Development\Process Engineering Tool Integration
setup.exe —
Information Management
Information Management\IM\Autorun
Launch.exe Information Management on page 33
RNRP4 800xA Core Functionalities\RNRP\800xA RNRP 5.0 SP2 RU2
Setup.exe —
800xA Documentation 800xA Documentation\ABB 800xA Instructions for 5.0 SP2 Revision D
setup.exe —
System Installer5 System Installer\System 800xA - System Installer 5.0 SP2 RU1
Setup.exe5 Refer to Note 5.
NOTES:1. Install 800xA Base Graphics Extension and 800xA for SafeGuard Graphics Extension only if Process Graphics 2 is
currently installed. Refer to Process Graphics 2 on page 46 for more information.2. Refer to Industrial IT, 800xA - System, 800xA for Advant Master, RTA Unit PU410 Release Notes
(3BSE055585 Rev B) for further information about updating and installing the software.3. 800xA for Safeguard Graphics Extension is not delivered with the Rev D media. It is part of the Process Graphics 2
media for Rev D and newer.4. Domain Controller nodes only.5. Applies only to new installations of System Installer. System Installer rollup must be copied to local drive. Setup.exe
only modifies files for the System Verifier Tool.
Table 2. Rollup Installation Information (Install in the Order Listed) (Continued)
Software Path Executable Special Instructions

800xA for AC 800M
3BSE055053 G 21
800xA for AC 800M
AC 800M Connect
1. Use Windows Explorer to navigate to the path shown in Table 2.
2. Double-click Installer.exe to begin the installation. The Welcome dialog box appears.
3. Read the text in each dialog box for important information concerning steps to be taken during installation. For normal use, the suggested default settings are recommended.
4. Click Yes to use the previous product settings instead of the default settings. (This question only appears when an existing installation exists.)
5. Click Finish to exit out of the installation.
OPC Server for AC 800M
1. Record the service account settings in the OPC Server Setup Wizard.
2. Use Windows Explorer to navigate to the path shown in Table 2.
3. Double-click Installer.exe to begin the installation. The Welcome dialog box appears.
4. Read the text in each dialog box for important information concerning steps to be taken during installation. For normal use, the suggested default settings are recommended.
5. Click Yes to use the previous product settings instead of the default settings. (This question only appears when an existing installation exists.)
6. Click Finish to exit out of the installation.
7. Use the OPC Server Setup Wizard to re-enter the previously used service account settings.
If 800xA for Advant Master is the clock master in the system, the settings must be manually entered. Otherwise, the old settings will be lost. Use the Custom installation and deselect the Time Adapter.
800xA for AC 800M
22 3BSE055053 G
Control Builder M
1. Use Windows Explorer to navigate to the path shown in Table 2.
2. Double-click Installer.exe to begin the installation. The Welcome dialog box appears.
3. Read the text in each dialog box for important information concerning steps to be taken during installation. For normal use, the suggested default settings are recommended.
4. Click Yes to use the previous product settings instead of the default settings. (This question only appears when an existing installation exists.)
5. Click Finish to exit out of the installation.
Base Software for SoftControl
1. Use Windows Explorer to navigate to the path shown in Table 2.
2. Double-click Installer.exe to begin the installation. The Welcome dialog box appears.
3. Read the text in each dialog box for important information concerning steps to be taken during installation. For normal use, the suggested default settings are recommended.
4. Click Yes to use the previous product settings instead of the default settings. (This question only appears when an existing installation exists.)
5. Click Finish to exit out of the installation.
AC 800M High Integrity Controller Update
Firmware for PM865, SM810, and SM811 in AC 800M Connect that is labeled as NON-CERT is not TÜV certified for operational use in a High Integrity (HI) Controller. They are available for test and engineering purposes only.
NON-CERT labeled firmware for PM865, SM810, and SM811 must be replaced with the TÜV certified versions for operational use in a HI Controller. The list of certified software combinations is found in Annex 2 of the TÜV Certificate Report (3BSE054960).

800xA for DCI
3BSE055053 G 23
The installation files for the update are released when approved by TÜV and can be found on the AC 800M High Integrity Update CD and in the ABB Control Software for AC 800M High Integrity Update zip-archive.
Installation instructions for the update are described in Control Software for AC 800M HI Release Notes (3BSE057100Dxxxx) located on the AC 800M High Integrity Update CD and in the ABB Control Software for AC 800M High Integrity Update zip-archive.
800xA for DCI
1. Install 800xA for DCI software rollup.
a. Use Windows Explorer to navigate to the path shown in Table 2.
b. Double-click setup.exe to start the installation.
c. Follow instructions as shown in the dialog box to install the 800xA for DCI.
2. Install 800xA Batch for DCI software rollup.
a. Use Windows Explorer to navigate to the path shown in Table 2.
b. Double-click setup.exe to begin the installation.
c. Follow instructions as shown in the dialog box to install the 800xA Batch for DCI.
800xA for MOD 300
1. Install ABB PAS System Services on 800xA for MOD Connectivity Servers:
a. Open the Control Panel > System > Hardware > Driver Signing.
If required to update 800xA Batch for DCI along with 800xA for DCI, always install 800xA for DCI first followed by 800xA Batch for DCI. Do not install 800xA Batch for DCI first or it will be removed when 800xA for DCI is installed.
Perform Step d through Step h on the backup Connectivity Server node first and then on the primary Connectivity Server node for all Connectivity Server pairs if ABB PAS System Services was uninstalled as part of the System Revision. Otherwise, proceed to Step 2.
800xA for MOD 300
24 3BSE055053 G
b. Select Ignore in the Driver Signing dialog to avoid the need of confirming multiple warning messages.
c. Use Windows Explorer to navigate to the path shown in Table 2.
d. Double-click ABB PAS - System Services.msi to begin the installation.
e. Select MOD300 Connection for the required installation type.
f. Click Install Now.
g. Click Continue Anyway when the Hardware Installation dialog box appears.
h. Click Finish.
i. Change back to Warn in the Driver Signing dialog (refer Step a and Step b).
2. Install the 800xA for MOD 300 software with rollup:
a. Use Windows Explorer to navigate to the path shown in Table 2.
b. Double-click ABBMOD 300 Connect.msi to begin the installation.
c. The ABB MOD300 Setup dialog box appears. Choose required installation type (Client or Client/Connectivity Server).
d. Click Install Now. Client is preselected for all nodes types unless PAS System Services is installed. In that case the MOD 300 Client/Server install is the default.
e. When the MOD 300 Server Security Setup dialog box appears, enter the domain\user name and password of the service account (password is case sensitive) and click OK.
f. Click Finish.
3. Set the passwords for PAS.
a. Open the run prompt and type pasPwdAdmin.exe.
Perform Step b through Step f on the backup Connectivity Server first and then on the primary Connectivity Server for all Connectivity Server pairs.

800xA for Harmony
3BSE055053 G 25
b. Click OK.
c. Enter the domain\user id and password for the service account (password is case sensitive).
d. Click OK.
800xA for Harmony
Perform the installation on the backup 800xA for Harmony Connectivity Server node first followed by the primary 800xA for Harmony Connectivity Server node, and repeat for all 800xA for Harmony Connectivity Server node pairs. Finish by installing on the Aspect Server and 800xA Client nodes.
1. Stop the following 800xA for Harmony services on the Harmony Server nodes being updated:
a. Select:
Start > Control Panel > Administrative Tools > Services
b. Disable the following services:
– ABBDiagnosticService– EbDataSyncService– EbServerBroker– SoapSymTagAtomSrv– Time synchronization daemon
Perform the following steps to disable these services:
– Locate the service in the Services list.
– Double-click the service to open the Properties dialog box of the corresponding service.
– Change the Startup type to Disabled.
– Click Apply.
– Click OK.
Repeat these steps for each of the services mentioned in Step b.
2. Reboot the node.

800xA for Harmony
26 3BSE055053 G
3. Some 800xA System software requires preparatory steps before shutting down the 800xA System processes. Perform the applicable procedures in the Preparing the Node section in the latest revision of Industrial IT, System - 800xA, Upgrade (3BSE036342R5021).
4. Stop the 800xA System on the Primary Connectivity Server node and close any Plant Explorer Workplaces.
5. Use Windows Explorer to navigate to the path shown in Table 2.
6. Double-click setup.exe to begin the installation. The Welcome dialog box appears. Click Next to continue the installation.
7. Click Next in the following dialog box and then Finish when the installation is complete.
8. Reboot the node.
9. Repeat Step 1 through Step 8 for all Connectivity Server, Configuration Server, and Aspect Server nodes in the System.
10. Start the following 800xA for Harmony services on the Harmony Server nodes being updated:
a. Select:
Start > Control Panel > Administrative Tools > Services
b. Enable the following services:
– ABBDiagnosticService– EbDataSyncService– EbServerBroker– SoapSymTagAtomSrv– Time synchronization daemon
Perform the following steps to enable these services:
– Locate the service in the Services list.
– Double-click the service to open Properties dialog box of the corresponding service.
– Change the Startup type to Manual.
– Click Apply.

800xA for Melody
3BSE055053 G 27
– Click OK.
Repeat these steps for each of the services mentioned in Step b.
11. Import the following file into the system:
HarmonyUpdateFor50SP2RU2.afw
located in the following folder:
Program Files\ABB Industrial IT\OperateIT
800xA for Melody
1. Install the software on the 800xA nodes.
a. Use Windows Explorer to navigate to the path shown in Table 2.
b. Double-click startup.exe to begin the installation.
2. Shut down the Melody Tag Importer on the Configuration Server node (Config Server):
a. Right-click the Tag Importer icon (traffic light in the notification area on the far right side of the Taskbar).
b. Select Shutdown Melody Tag Importer.
c. Confirm the shutdown of the Melody Tag Importer by waiting for the dialog box to appear.
3. Install the software on the Configuration Server node (Config Server).
Asset Optimization
cpmPlus Enterprise Connectivity Version 4.0 (ECS 4.0)
The ECS 4.0 install package (ABB cpmPlus Enterprise Connectivity (ECS) 4.00.0003.exe) is in the following location:
Asset Optimization\Asset OptimizationServer & Client\ECS 4.0
Installation of cpmPlus Enterprise Connectivity Version 4.0 (ECS 4.0) and Web Service is required ONLY with CMMS integration to System 800xA when accessing Maximo Server Version 6.2 and SAP Server Version 4.7.

Asset Optimization
28 3BSE055053 G
Install ECS 4.0 on the node that is running the Asset Optimization Server.
Perform the following to install ECS 4.0:
1. Double-click ABB cpmPlus Enterprise Connectivity (ECS) 4.00.0003.exe to begin the installation.
2. Follow the Installation Wizard and accept the defaults to complete the installation.
a. When the Setup Settings dialog box is shown, install only the Execution Service, Process Definition Tool, and Documentation features (Figure 4). DO NOT install the Clients and 800xA Connectivity features. Although ECS 4.0 is a distributed system, it is recommended to install all the required features of ECS 4.0 on the Asset Optimization Server node.
Microsoft SQL Server 2005 Express is required for the ECS 4.0 installation. Both Microsoft SQL Server 2005 Standard and Express versions are supported.
Refer to cpmPlus Enterprise Connectivity Version 4.0, Installation and Maintenance Manual (3BSE045766) for more detailed information.
Figure 4. ECS 4.0 Setup Settings

Asset Optimization
3BSE055053 G 29
Web Service
Install the Web Service on the same node where ECS 4.0 is installed.
The Web Service install package (ABB cpmPlus Enterprise Connectivity (ECS) 4.00.0003 - Web Service Access.exe) is the following location:
Asset Optimization\Asset Optimization Server & Client\ECS 4.0\Web Service
1. Double-click ABB cpmPlus Enterprise Connectivity (ECS) 4.00.0003 - Web Service Access.exe to begin the installation.
2. Follow the Installation Wizard and accept the defaults to complete the installation.
Ensure that ECS 4.0 is installed before installing the Web Service.
It is recommended to change the ABB cpmPlus Enterprise Connectivity service startup type to Automatic in Windows services. To perform this:
1. Open Windows Control Panel.
2. Select Administrative Tools > Services to launch Windows Services.
3. Locate and right-click ABB cpmPlus Enterprise Connectivity Service.
4. Select Properties from the context menu.
5. Change the value in the Startup type drop-down list box from Manual to Automatic.
6. Click Apply.
7. Start/restart the ABB cpmPlus Enterprise Connectivity service using the icons in Windows Services.
Asset Optimization
30 3BSE055053 G
The following must be created and configured whenever Maximo Integration with ECS is used for the first time in the 800xA System.
• MROSenderID: External system identifier configured in the Maximo System.
• ECSWebAccessURL:
http://<ECSServer>/ECS/EcsIntegration.asmx (http://%3CECSServer%3E/ECS/EcsIntegration.asmx)
property with values for the Maximo Equipment ID aspect in the following location:
Aspect System Structure > Maximo Connectivity, Aspect System > Maximo Equipment ID, Aspect Type > Maximo Equipment ID, Aspect Category

Engineering Studio
3BSE055053 G 31
Engineering Studio
Device Library Wizard
In the Welcome dialog box, the ABB Device Library Wizard Client check box is selected by default:
• Leave the Install Device Library Wizard - Client check box selected on all 800xA System nodes.
• Select the Install Device Library Wizard - Server check box on all Aspect Server nodes only (including redundant Aspect Server nodes).
Device Management FOUNDATION Fieldbus
Device Management PROFIBUS & HART
When updating from any previous version:
• Select all products except ABB FDT Shared Components.
• Select ABB HART Multiplexer Connect only if it was installed in previous releases.
Batch Management
Use this procedure to install Batch Servers (primary and if applicable, secondary), and Batch Clients. Any differences in the procedures will be noted.
Do not select the Engineering Diagnostics Data check box, from the setup during the SP2 rollup installation, if the Engineering Studio DCT plugin is already installed in the node during the SP2 installation.
During installation, Microsoft Visual J# 2.0 is installed (silent). Do not uninstall Microsoft Visual J# 2.0 unless indicated.
Click Keep Blocked when the dialog box for the Firewall appears.
Batch Management
32 3BSE055053 G
The Batch Primary Server and Batch Secondary Server (if present) must be updated as a pair with the Batch Primary Server being installed first and then the Batch Secondary Server.
1. Use Windows Explorer to navigate to the path shown in Table 2.
2. Double-click Launch.exe to begin the installation.
3. Follow the Installation Wizard to complete the installation. Perform the following when the indicated dialog boxes appear:
a. Installation Products dialog box: Click the product type (Primary Server, Secondary Server, or Client) to be installed. Table 3 describes the options and where each should be used.
b. Installation Type dialog boxes (Batch Management Environment and Batch Management):
– Select the type of installation desired (Typical is the recommended type).
– Use Browse to select the installation location, or accept the default. Specify the same installation location for Batch Management and Batch Management Environment.
Install Batch Clients on all nodes in the 800xA System other than the primary and secondary Batch Server nodes as the Batch Servers already have the Batch Client installed (by default).
Do not initialize the Batch Runtime database when asked to do so.
The folder containing the Launch.exe file must have a path shorter than 115 characters.
Table 3. Setup Type Options
Option RequirementsPrimary Server Install on one node. This server manages the secondary server
and all batch options.Secondary Server (optional) Install on one node. This server will take over if the primary server
fails.Client Install on all other nodes in the 800xA System.

Information Management
3BSE055053 G 33
Information Management
Detailed instructions for installing the Information Management rollup are described as follows:
1. Use Windows Explorer to navigate to the path shown in Table 2.
2. Double-click Launch.exe to begin the installation.
3. Select the Upgrade option. This displays the list of Information Management components for the selected node type. Components that have checks in both columns will be removed and then reinstalled by the wizard.
4. Click Upgrade when ready to begin the rollup installation. The wizard will perform the entire update without requiring any operator input.
Installing on an Information Management Server with Profile Logs will take longer than normal because the installer runs a conversion script to upgrade the Profile Logs.
5. In the Set PAS Service Account dialog box, enter the Service account username and password (and confirm password) as specified in the Configuration Wizard System Software User Settings dialog box. Click OK.
6. Click Exit when the Install Complete message appears.
7. Click the Close Window button (X) in the top right hand corner of the Restart Windows dialog box.
8. Click Exit.
Version Verification
Use the Information Management Version Info tool to verify that the applicable components have been replaced.
1. To launch the Information Management Version Info tool, select:
Start > Programs > ABB Industrial IT 800xA > Information Mgmt > Version Info
DO NOT click Restart Now.

Post Installation
34 3BSE055053 G
2. Verify that the component versions shown in the Information Management Version Info tool for the following components are the same as those shown in Industrial IT System 800xA SV 5.x System Software Versions (3BSE037782R5001). If the version of any component does not match, continue to Step 3.
• Application Scheduler• Calculations• DataDirect• Desktop Trends• Desktop Trends/Client (and /Server)• Display Services• History• ODA Provider
3. Use Windows Explorer to navigate to:
C:\Program Files\IM 5.0 SP2\RUx\Autorun
and execute the installer Launch.exe.
4. Double-click Launch.exe to launch the Information Management Installation Wizard.
5. Click on the installation type that corresponds to the missing component(s) in this rollup.
6. Continue as necessary to install all components.
Post InstallationPerform the following after completing the installation of the System Revision.
1. Install Microsoft Security Bulletin MS08-069 (KB954430) to get the latest version of msxml4.dll (4.20.9870.0). MS08-069 is described in the ABB Product Bulletin 9ARD173153-051. Refer also to Microsoft Security Updates Validation Status for IIT System 800xA (3BSE041902) for more information.
2. Install Microsoft Security Bulletin MS08-070. Refer to ABB Product Bulletin 3BSE055000 and to Microsoft Security Updates Validation Status for IIT System 800xA (3BSE041902) for more information. The executable file for the

System Extension Maintenance
3BSE055053 G 35
Security Bulletin is included with the System Revision media. The setup.exe file is located in:
3rd_Party_SW\Microsoft\MS08-070 1.3 Installation for System 800xA
3. Restart the node.
4. Start a Plant Explorer Workplace and other applications.
5. Verify rollup Installations for all products.
System Extension Maintenance
Perform the following after all required updates are complete on all nodes.
Use System Extension Maintenance and System Extension Load in the Configuration Wizard to load system extension updates into the system (Figure 5). It
Before continuing with the next Server node, wait until all services on the previously installed Server node (except Information Management Server nodes) are in Service State or standby. Use the System Status Viewer and wait until all Services on the node show green.
Verify (by Start > Settings > Control Panel > Add or Remove Programs, Support Information) that each rollup was installed correctly by comparing this version information with the version information found in the latest revision of Industrial IT System 800xA SV 5.x System Software Versions (3BSE037782R5001).
To perform the following steps, the user has to log on as an 800xA Administrator member of the Industrial IT Admin group in Windows and the Administrators group in 800xA.

System Extension Maintenance
36 3BSE055053 G
is assumed that all required 800xA System software updates are installed on all 800xA System nodes.
To update the system extensions:
1. Start the configuration wizard on the primary Aspect Server node. Select:
Start > Programs > ABB Industrial IT 800xA > System > Configuration Wizard
2. Open the System Extension Maintenance dialog box by going to:
System Administration > Select System > System Extension Maintenance
3. A view appears with the available system extensions listed in the left pane. Select the system extension to update in the list in the left pane and move it to the list in the right pane by clicking >. To move all the system extensions from
Figure 5. Configuration Wizard

System Extension Maintenance
3BSE055053 G 37
the left pane to the right pane, click >> (Figure 5).
4. The red cross, green check mark, and warning icons indicate the status of the update/upgrade evaluation. System extensions are evaluated regarding; for example, dependencies to other system extensions and environment awareness. Each time a system extension entry is moved from the left pane to the right, all system entries in the right pane are evaluated.
– The green check mark icon indicates that the system extension can be updated.
– The Warning icon indicates that the system extension can be updated but that there is additional information available in the Description frame in the lower part of the dialog box.
– The red cross icon indicates that the system extension can not be updated. Information regarding why the evaluation failed is available in the Description frame in the lower part of the dialog box.
If a message box appears stating the following: There are reserved entities in the system that might cause the load to fail. Do you still want to continue loading?, click No. Do not load System Extensions in a system with reserved entities, instead release all reserved objects before loading the System Extensions. Refer to the latest revision of Industrial IT, 800xA - Post Installation (3BUA000156R5021) for information on releasing reserved objects.
800xA for DCI requires that the 800xA for DCI system extension maintenance load be performed before performing the 800xA Batch for DCI system extension maintenance load if 800xA Batch for DCI was installed. If the two extensions are loaded in the reverse order, an error occurs and the maintenance load aborts.
Manually move the extensions from the left column to the right column by selecting each extension and click >. Ensure that the 800xA for DCI system extension is selected before the 800xA Batch for DCI system extension is selected.
If all system extensions are moved from the left column to the right column by clicking >>, remove the 800xA Batch for DCI system extension by selecting it and clicking <. Finish the system extension maintenance operation for the selected extensions. Then, select the 800xA Batch for DCI extension and perform the system extension maintenance operation for it.

System Extension Maintenance
38 3BSE055053 G
5. If the list in the right pane contains more than one system extension, click Press header to autosort to sort the system extension load order with regard to dependencies.
All system extensions listed in the right pane should be marked with the green check mark or the warning icon.
6. Click Next and the Apply Settings dialog box appears.
7. Click Finish. The system extension updates will load into the system.
8. A progress dialog box is shown during the load. Click View Log to view log messages during load.
9. When the load operation has finished, click Finished and view the Configuration Wizard log to verify that no errors occurred during the load.
10. Close the Configuration Wizard.
Do not click more than once, otherwise the sorting order will be wrong, and the loading will fail.
The load is aborted if:
• The user clicks Abort.
• An error occurs; for example, if the Configuration Wizard fails to load a file into the system.
An aborted system extension load can be resumed from the System Extension Maintenance dialog box.
Close all Workplaces on all nodes and restart the Workplaces (node by node). This action is necessary to ensure that all changes are activated.

System Extension Maintenance
3BSE055053 G 39
800xA for MOD 300
1. If installing on a MOD 300 Connectivity Server, run the Process Administration tool.
2. From the Windows Taskbar select:
Start > Programs > Administrative Tools > PAS > Process Administration.
3. Click Yes and proceed to verify the communication settings.
4. Click OK to continue the initialization of the services.
Batch Management
Verify that Batch Client applications are in client mode (letter C displayed in the Windows Taskbar) and Batch Server applications are in primary (letter P) or secondary (letter S) mode.
Information Management
Perform the following steps only if Information Management Server is installed.
1. Launch the Configuration Assistant from the following path:
Start > Programs > ABB IndustrialIT 800xA > Information Management > Configuration Assistant
2. Follow the instructions in the Configuration Assistant to perform Post installation configuration steps of Information Management.
Enable PAS and Initialize the PAS Configuration Settings: Select item 3.0 and click Run Selected Configuration Tool and perform the following instructions.
a. Click Yes when prompted to revert back to saved settings.
b. Click OK in the Communication Settings dialog box.
Do not initialize the PAS configuration settings on the systems that contain nodes on which 800xA for MOD 300 software is installed.

System Extension Maintenance
40 3BSE055053 G
c. Click OK on ComStacksTool dialog, which may instruct to restart PAS or restart the Node.
3. Follow the instructions in the Configuration Assistant to complete the pending Post installation configuration steps of Information Management.
4. Close the Configuration Assistant.
Log Configurations. Place a log summary at the top of the Control Structure (and any other structure that has Log Configuration aspects). Verify that no logs have inconsistencies. If they do, use the aspect to correct them.
This is required on any system that may have copied Log Configuration aspects prior to SV 5.0 SP2 Revision C. The correction is part of Revision C for SV 5.0 SP2; however, copies of the inconsistent aspects can be reintroduced into a system if projects/imports are brought in from older configurations.
Update Archive Logs. Absolute names are now included as part of the archive storage. Archive links now use an absolute reference that is independent of the name of the log. Run the archive maintenance to update the _RST log references to use the absolute log reference.
1. Open a Plant Explorer Workplace.
2. Use the Object Browser to navigate to IM Node > Archive Service Provider.
3. Click Archive Service Aspect in the Aspect List Area.
4. Click Maintenance in the Preview Area to launch the Maintain Archive References dialog box.
5. Click Validate Archive Logs.
Neither Restart of PAS nor Reboot of Node is required during post installation.
This procedure is not necessary if archives are not being used.
This procedure only needs to be performed one time no matter how many Information Management nodes are in the system.

System Extension Maintenance
3BSE055053 G 41
Asset Optimization
Reload all existing instances of the Control Loop Asset Monitor Ex objects to their designated AO servers.
800xA for AC 800M
The controller firmware versions may be upgraded either manually or online.
Coexistence. A newer version of the OPC Server automatically connects to controllers of older versions. However, an upgraded version of Control Builder may initially not always be able to go online towards a controller of older version.
This occurs when error corrections have been made in any of the used standard libraries. A download of changes from Control Builder then has to be manually performed in order to download the changed library types to the controller. This will be seen as an ordinary download from the controllers point of view (the controller does not have to be stopped).
Online Upgrade. Redundant AC 800M controllers can usually be upgraded with new firmware versions online. Online upgrade is initiated from Control Builder by a nine-step wizard, that provides a guide through the complete upgrade process. Refer to Section 5 Maintenance and Trouble-Shooting in Industrial IT, 800xA - Control and I/O, Basic Control Software, Introduction and Configuration (3BSE035980R5021) for more information.
Refer to the current release notes for the possible upgrade paths.
Manual Upgrade. Perform the following for each AC 800M controller as Singular AC 800M controllers can only be upgraded with new firmware versions manually:
1. Start Control Builder.
2. Select:
Starting from version 5.0 and installing newer versions of Control Builder and/or OPC Server does not require a controller upgrade. Controllers with different firmware versions can coexist in the same network, and newer versions of Control Builder and OPC Server can connect to controllers of older versions. Refer to the release notes for the current version of the rollup.

System Extension Maintenance
42 3BSE055053 G
Tools > Maintenance > Remote System... > Show Firmware Information.
3. Update the firmware in the PM8xx(s), CI8xx(s) if applicable, and SM810(s) if applicable.
4. Select:
Tools > Maintenance > Remote System... > Show Firmware Information
and verify that all firmware has been properly upgraded.
TRIO Integration
Perform the following to complete the post installation:
1. Create a new Control Builder project.
2. In Control Builder, expand Libraries > Hardware.
3. Right-click on Hardware and select Insert Library.
4. Select CI862TRIOHwLib yyy.y-y (the version supplied with the rollup) and select Insert.
5. Expand Controllers > Controller_1 > Connected Libraries.
6. Right-click on the existing CI862TRIOHwLib xxx.x-x and select Replace Library.
7. From the drop-down list box, select CI862TRIOHwLib yyy.y-y (the version supplied with the rollup) and select OK.
IEC 61850 Connect
Perform the following to complete the post installation:
1. Launch the OPC Server V1.1 CET Tool.
2. Open the project and complete the migration.
3. Perform the Update/Reload action (clear the Reset check box).
Refer to the current release notes for the current firmware versions.

System Extension Maintenance
3BSE055053 G 43
Device Management FOUNDATION Fieldbus
Perform the following to complete the post installation:
1. Update Linking Device Firmware
a. If not already done, update all LD 800HSE linking devices to the latest firmware version released for this system environment following the update procedure described in the user guides for the particular device.
2. Check, Save, and Upload FF Libraries
a. Open a Plant Explorer Workplace.
b. Use the Structure Selector to open the Object Type Structure.
c. Use the Object Browser to navigate to:
FF Libraries Object Type Group
d. Select FF Upload in the Aspect List Area.
e. Click Open Library in Fieldbus Builder FF.
f. Open the library in Fieldbus Builder FF.
g. Check the libraries for plausibility.
h. Exit Fieldbus Builder FF and save changes if prompted to do so.
i. Return to the Plant Explorer Workplace and click the Library Upload tab in the Preview Area.
j. If the traffic light symbol shows red, click Upload FF Library.
k. The green traffic light symbol indicates that the FF libraries have been synchronized.
Refer to Field IT, Foundation Fieldbus Linking Device, LD 800HSE, Version Table (3BDS009910) for the latest linking device firmware released for this system environment.
From Downloads Explorer in myABB/My Control System, navigate to the following:
Control Products and Systems/800xA/Device Management Foundation Fieldbus/Foundation Fieldbus Linking Device LD800HSE

System Extension Maintenance
44 3BSE055053 G
3. Optional: Reconstruct User-made Changes to Library Objects representing FF Standard Blocks
During update, user-made changes to library objects representing FF standard blocks have been overwritten. Important substitutions have been logged.
a. If such changes were made, display the substitutions as follows:
– Open a Plant Explorer Workplace.
– Use the Structure Selector to open the Object Type Structure.
– Use the Object Browser to navigate to:
FF Libraries Object Type Group
– Select FF Upload in the Aspect List Area.
– Select the Warnings tab.
b. Reapply the changes to the library objects manually to reconstruct user-made changes,.
4. Update FF Libraries for HSE Subnet (Library Update)
a. Open a Plant Explorer Workplace.
b. Use the Structure Selector to open the Control Structure.
c. Use the Object Browser to navigate to:
HSE Subnet
d. Select FF Upload in the Aspect List Area.
e. Click the Library Update tab in the Preview Area.
f. If the traffic light symbol shows red, click Update Library.
This step is required only if changes were made to library objects representing FF standard blocks.
Perform the following procedure for each HSE Subnet.

System Extension Maintenance
3BSE055053 G 45
5. Check, Save, Commission, and Upload the HSE Subnet
a. Open a Plant Explorer Workplace.
b. Use the Structure Selector to open the Control Structure.
c. Use the Object Browser to navigate to:
HSE Subnet
d. Select FF Upload in the Aspect List Area.
e. Click the HSE Subnet Reference tab in the Preview Area.
f. Click Open Subnet in Fieldbus Builder FF.
g. Check whole project for plausibility.
h. Perform device assignment for all linking devices LD 800HSE.
i. Perform precommissioning/commissioning for all objects for which this is necessary (discernible from engineering status).
j. Exit Fieldbus Builder FF and save changes if prompted to do so.
k. Return to the Plant Explorer Workplace and click the HSE Subnet Upload tab in the Preview Area.
l. If the traffic light symbol shows red, click Upload HSE Subnet.
m. The green traffic light symbol indicates that the HSE Subnet has been synchronized.
Perform the following procedure for each HSE Subnet.

Process Graphics 2
46 3BSE055053 G
Process Graphics 2
Systems with Process Graphics 2 Installed
Figure 6 shows the flow for systems that have Process Graphics 2 and System Revision B installed and are updating to System Revision E.
Figure 7 shows the flow for systems that have Process Graphics 2 installed (but not System Revision B) and are updating to System Revision E.
Refer to the latest revision of Industrial IT, 800xA - System, Process Graphics 2 Installation (3BUA001135R5022) to uninstall or install any Graphics Extensions.
Figure 6. Installation Flow for Systems with Process Graphics 2 and System Revision B Installed
Figure 7. Installation Flow for Systems with Process Graphics 2 Installed (but not System Revision B)

Systems without Process Graphics 2 Installed
3BSE055053 G 47
Figure 7 shows the flow for systems that have Process Graphics 2 and System Revision C installed and are updating to System Revision E.
Systems without Process Graphics 2 Installed
Figure 9 shows the flow for systems without Process Graphics 2 installed and installation of Process Graphics 2 is required while updating to System Revision E.
Figure 8. Installation Flow for Systems with Process Graphics 2 and System Revision C Installed
Figure 9. Installation Flow for Systems without Process Graphics 2 Installed

3BSE055053 GCopyright © 2003-2011 by ABB. All Rights Reserved
ABB AB Control SystemsVästerås, SwedenPhone: +46 (0) 21 32 50 00Fax: +46 (0) 21 13 78 45E-Mail [email protected]/controlsystems
ABB Industry Pte LtdControl SystemsSingaporePhone: +65 6776 5711Fax: +65 6778 0222E-Mail: [email protected]/controlsystems
ABB Automation GmbHControl SystemsMannheim, GermanyPhone: +49 1805 26 67 76Fax: +49 1805 77 63 29E-Mail [email protected]/controlsystems
ABB Inc.Control SystemsWickliffe, Ohio, USAPhone: +1 440 585 8500Fax: +1 440 585 8756E-Mail [email protected]/controlsystems
Power and productivityfor a better worldTM